
MODEL N° 90143 OWNER’S MANUAL COPYKeep this Product ID Number and use when contacting Customer...
38
Keep this Product ID Number and use when contacting Customer Service: MODEL N° 90143 OWNER’S MANUAL COPY
Transcript of MODEL N° 90143 OWNER’S MANUAL COPYKeep this Product ID Number and use when contacting Customer...

1
Keep this Product ID Number and use when contacting Customer Service:
MODEL N° 90143
OWNER’S MANUAL
COPY
2INSTRUCTION #1079890 L 2/3/2015
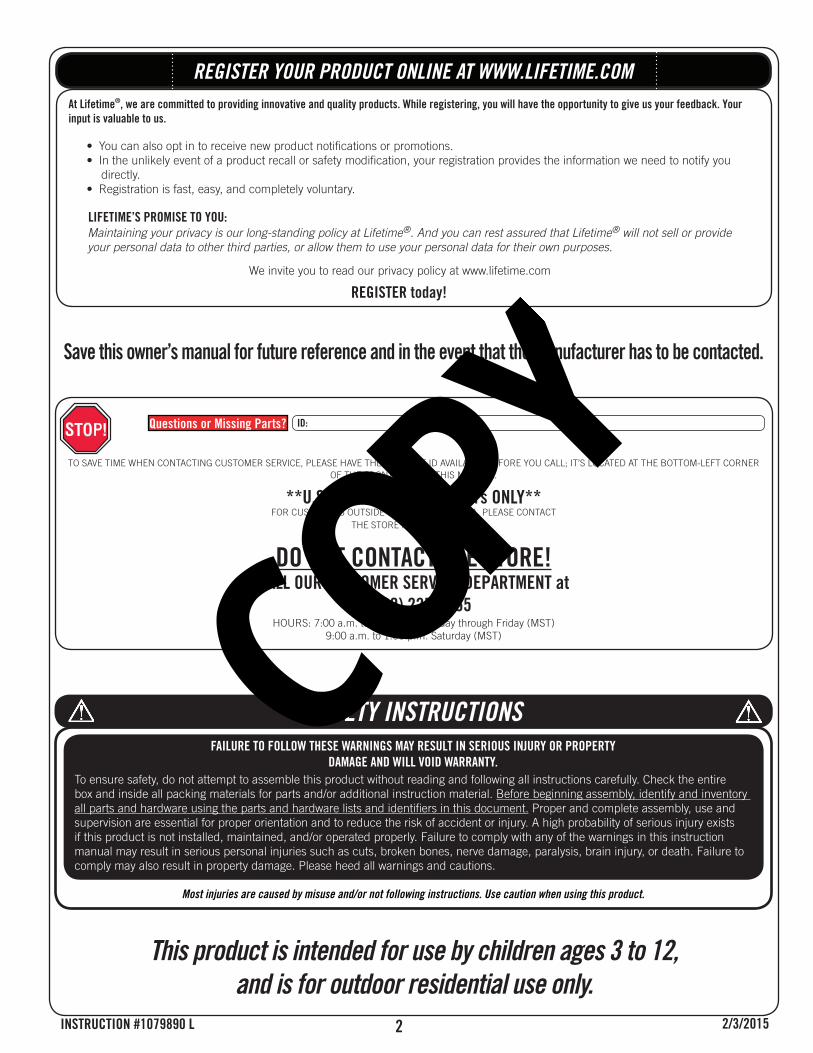
REGISTER YOUR PRODUCT ONLINE AT WWW.LIFETIME.COM
LIFETIME’S PROMISE TO YOU:
We invite you to read our privacy policy at www.lifetime.com
REGISTER today!
At Lifetime®, we are committed to providing innovative and quality products. While registering, you will have the opportunity to give us your feedback. Your
input is valuable to us.
directly.
Maintaining your privacy is our long-standing policy at Lifetime®. And you can rest assured that Lifetime® will not sell or provide your personal data to other third parties, or allow them to use your personal data for their own purposes.
Most injuries are caused by misuse and/or not following instructions. Use caution when using this product.
FAILURE TO FOLLOW THESE WARNINGS MAY RESULT IN SERIOUS INJURY OR PROPERTY
DAMAGE AND WILL VOID WARRANTY.
SAFETY INSTRUCTIONS
Save this owner’s manual for future reference and in the event that the manufacturer has to be contacted.
**U.S. and Canada customers ONLY**
DO NOT CONTACT THE STORE!CALL OUR CUSTOMER SERVICE DEPARTMENT at
1 (800) 225-3865
Questions or Missing Parts? ID:
This product is intended for use by children ages 3 to 12,
and is for outdoor residential use only.
COPY
3
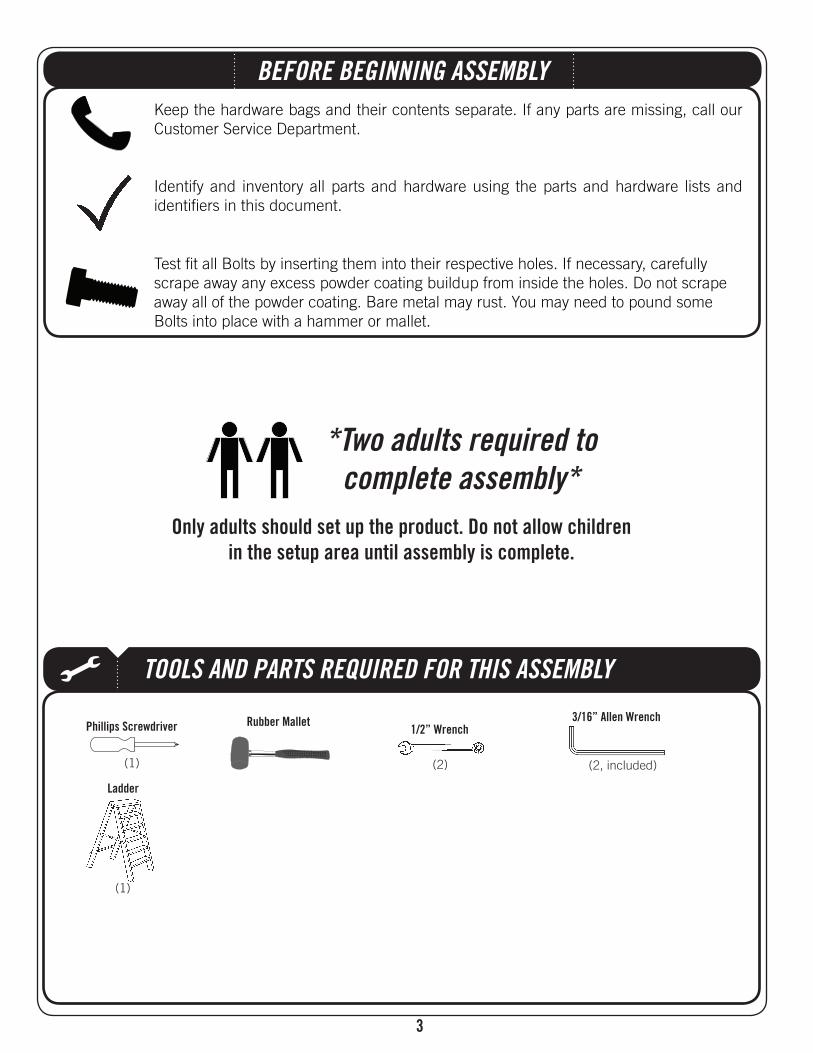
BEFORE BEGINNING ASSEMBLY
TOOLS AND PARTS REQUIRED FOR THIS ASSEMBLY
*Two adults required to
complete assembly*
Only adults should set up the product. Do not allow children
in the setup area until assembly is complete.
3/16” Allen Wrench1/2” WrenchPhillips Screwdriver
Ladder
Rubber Mallet
4
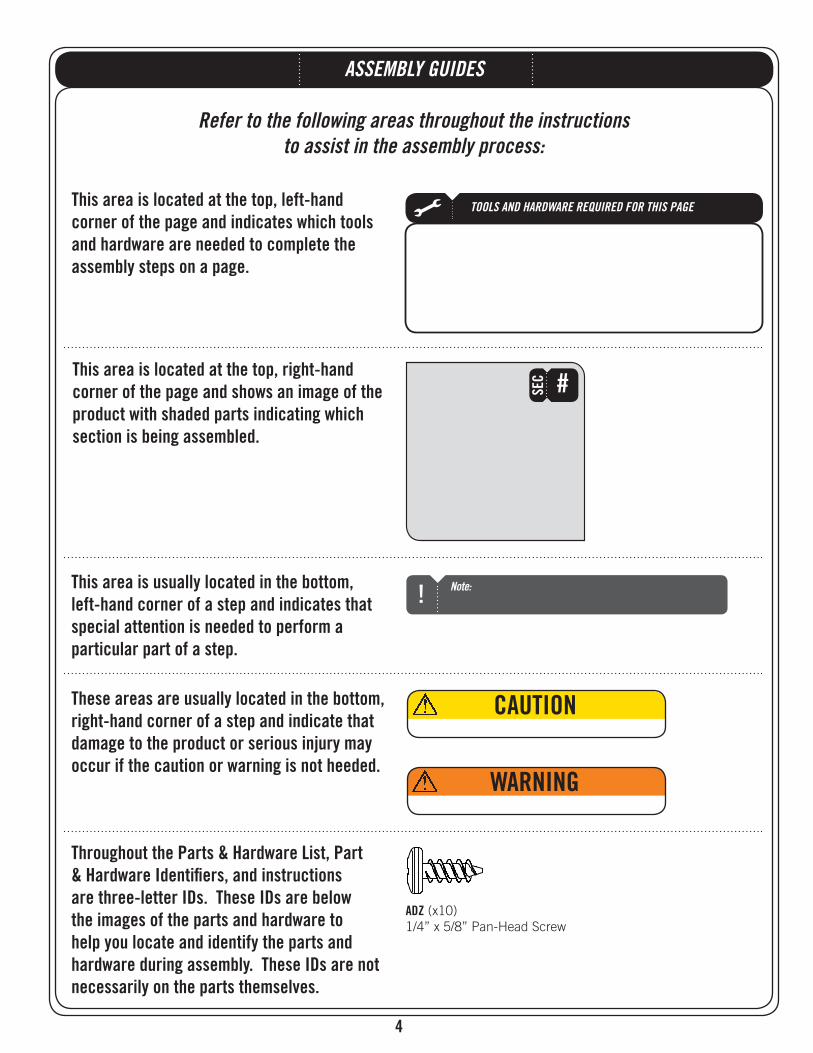
This area is located at the top, left-hand
corner of the page and indicates which tools
and hardware are needed to complete the
assembly steps on a page.
This area is located at the top, right-hand
corner of the page and shows an image of the
product with shaded parts indicating which
section is being assembled.
SEC
#
Note:!
Refer to the following areas throughout the instructions
to assist in the assembly process:
This area is usually located in the bottom,
left-hand corner of a step and indicates that
special attention is needed to perform a
particular part of a step.
These areas are usually located in the bottom,
right-hand corner of a step and indicate that
damage to the product or serious injury may
occur if the caution or warning is not heeded.
Throughout the Parts & Hardware List, Part
& Hardware Identifi ers, and instructions
are three-letter IDs. These IDs are below
the images of the parts and hardware to
help you locate and identify the parts and
hardware during assembly. These IDs are not
necessarily on the parts themselves.
WARNING
ASSEMBLY GUIDES
TOOLS AND HARDWARE REQUIRED FOR THIS PAGE
CAUTION
ADZ
5
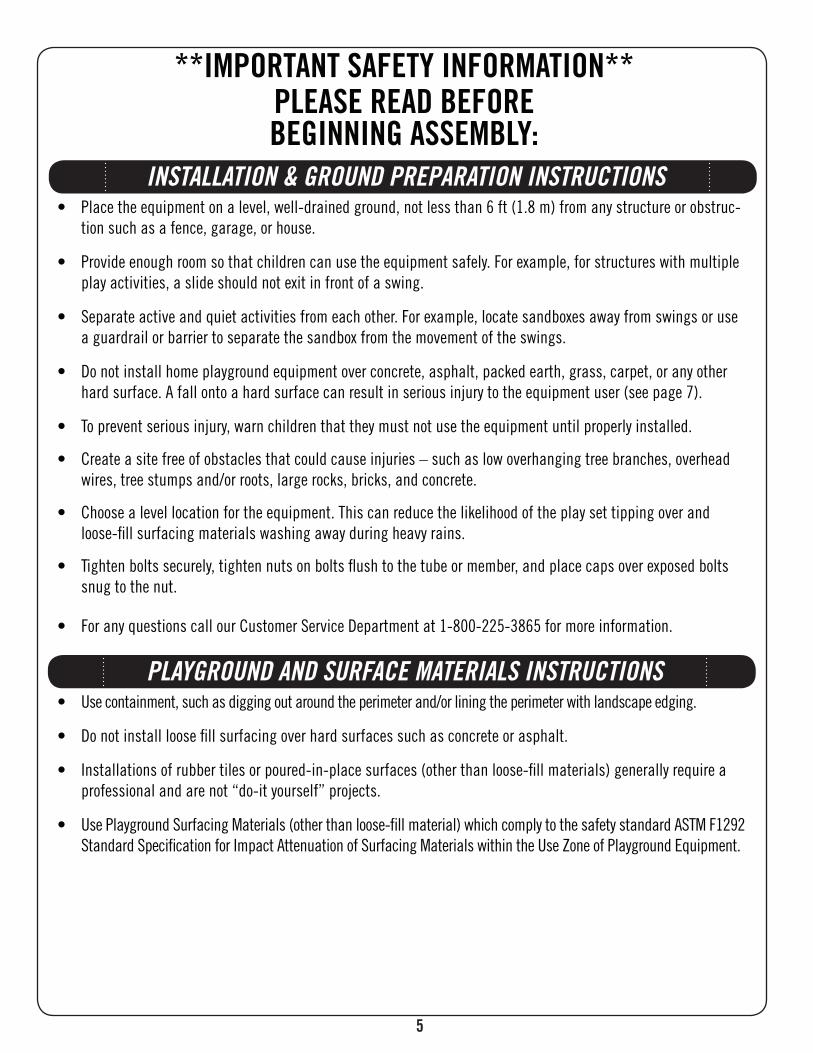
**IMPORTANT SAFETY INFORMATION**PLEASE READ BEFORE BEGINNING ASSEMBLY:
INSTALLATION & GROUND PREPARATION INSTRUCTIONS
PLAYGROUND AND SURFACE MATERIALS INSTRUCTIONS
6
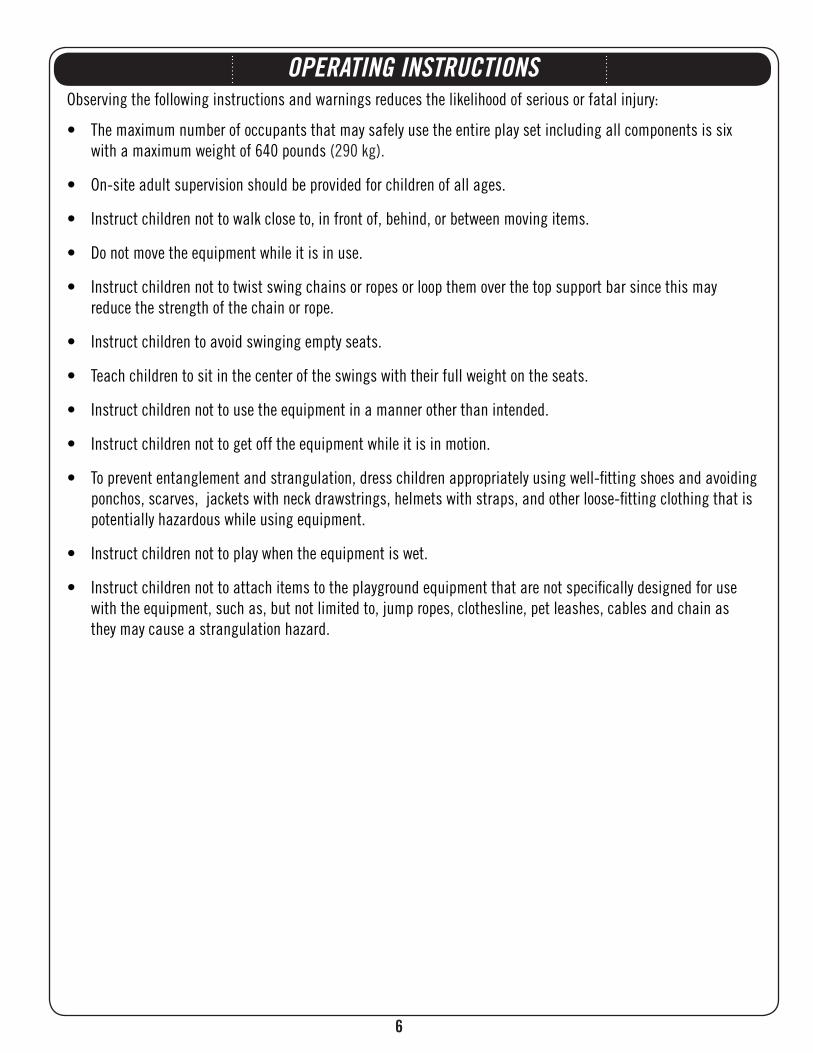
OPERATING INSTRUCTIONS

7
MAINTENANCE INSTRUCTIONS
At the beginning of each play season:
Twice a month during play season:
Once a month during play season:
At the end of each play season or when the temperature drops below 40oF (5oC):
Disposal Instructions:
8
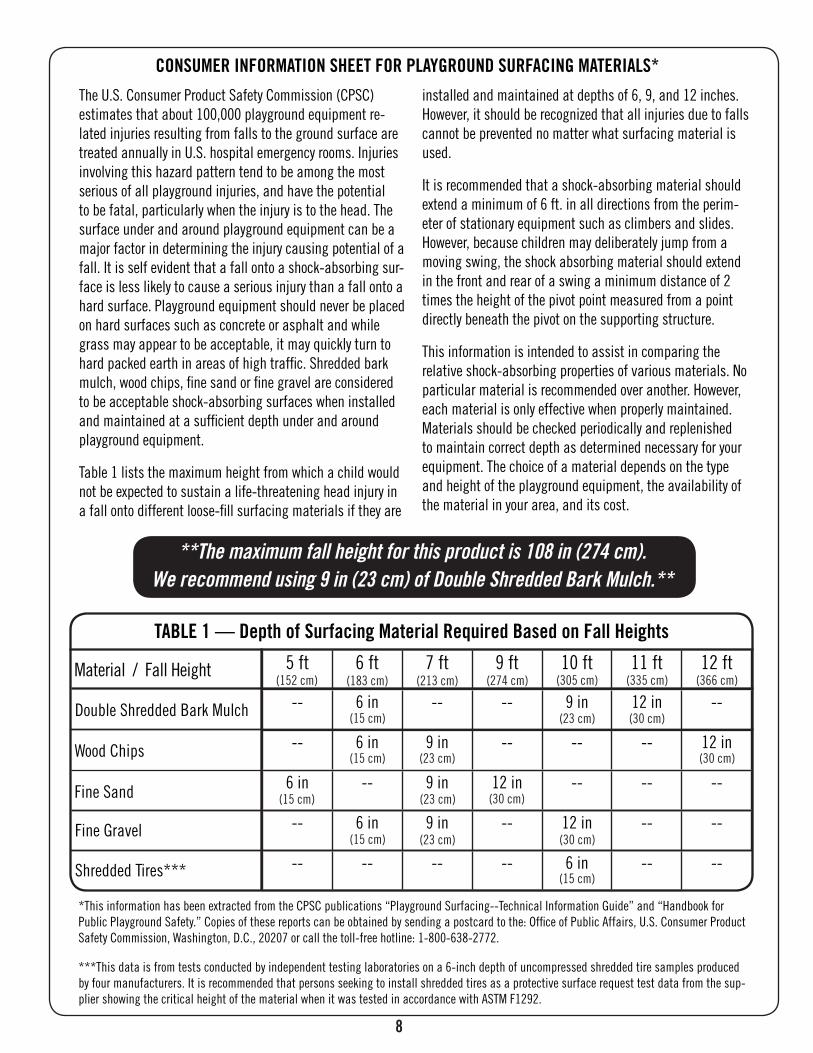
CONSUMER INFORMATION SHEET FOR PLAYGROUND SURFACING MATERIALS*
**The maximum fall height for this product is 108 in (274 cm).
We recommend using 9 in (23 cm) of Double Shredded Bark Mulch.**
TABLE 1 — Depth of Surfacing Material Required Based on Fall Heights
9
A cordless drill can be used for driving screws;
however, care should be taken not to over-tighten or strip screws.
USE AT YOUR OWN RISK!
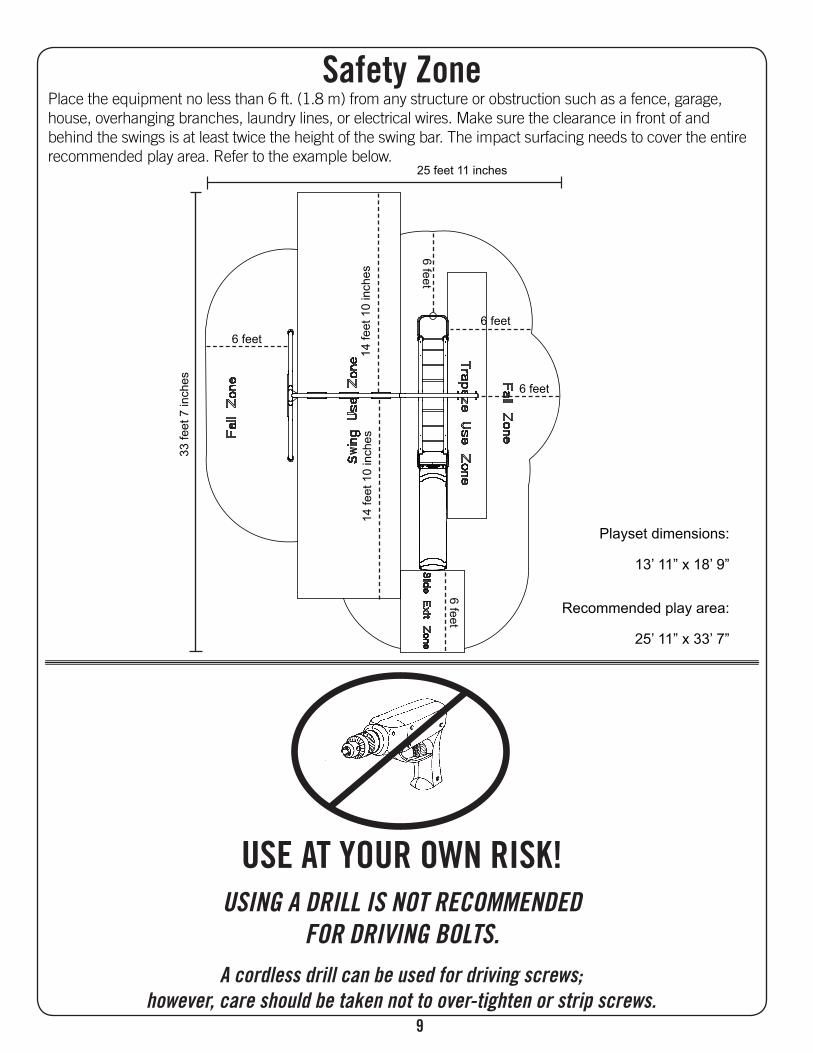
Safety Zone
USING A DRILL IS NOT RECOMMENDED
FOR DRIVING BOLTS.
Playset dimensions:
13’ 11” x 18’ 9”
Recommended play area:
25’ 11” x 33’ 7”
25 feet 11 inches33
feet
7 in
ches
6 feet
6 feet
6 feet14
feet
10
inch
es
14 fe
et 1
0 in
ches
6 feet
6 feet

10
HARDWARE LIST
PARTS LISTID Item Description Qty
PLAYGROUND PARTS
CVM ADVENTURE SET PARTS KIT 1 Turn Bar
ID Item Description Qty
CVN ADVENTURE SET PARTS KIT 2
CVO ADVENTURE SET PARTS KIT 3 BKT 3
ID Item Description Qty
CAM A-Frame Assembly Hardware
CVH Monkey Bars Assembly Hardware
CAH Slide Assembly Hardware
33
CVI Fire Pole Assembly Hardware3
EBX Pendulum HardwarePendulum
11
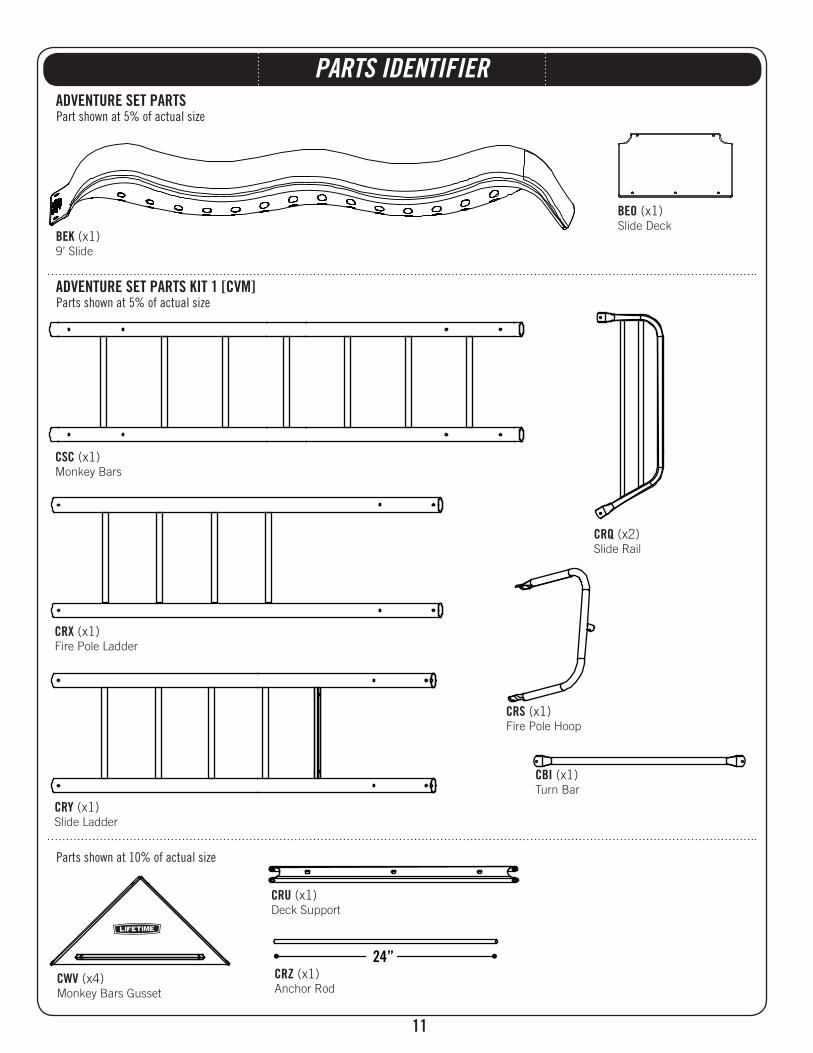
PARTS IDENTIFIER
ADVENTURE SET PARTS KIT 1 [CVM]
24”
CRQ
BEO
CRZ
CRU
CRS
CRX
CRY
CSC
CBITurn Bar
ADVENTURE SET PARTS
BEK
CWV

12
PARTS IDENTIFIER
ADVENTURE SET PARTS KIT 3 [CVO]
BKT BKU
BZJ CSB
CSA
CSD
ADVENTURE SET PARTS KIT 2 [CVN]
CBO
CBG
CRRCRT

13
HARDWARE IDENTIFIER
MONKEY BARS ASSEMBLY HARDWARE [CVH]
A-FRAME ASSEMBLY HARDWARE [CAM] PENDULUM HARDWARE [EBX]
DSA
BTS
BZK
DSA BTSBZK
CCL
DZQ
Pendulum
AAN
AAN
DZR
DZR

14
HARDWARE IDENTIFIER
SLIDE ASSEMBLY HARDWARE [CAH]
FIRE POLE AND SWING ASSEMBLY HARDWARE [CVI]
BTS
DSA
DXY
ARLARX
Bolt
ARM
DSA BTSDXY
CVZ

15
A-FRAME ASSEMBLY
HARDWARE REQUIRED
SEC
1
A-FRAME ASSEMBLY HARDWARE BAG [CAM]Hardware shown at actual size
PENDULUM HARDWARE BAG [EBX]Hardware shown at actual size
DSA
BTS
BZK
BZJ
TOOLS REQUIRED
PARTS REQUIRED
Parts shown at 5% of Actual Size
3/16” Allen Wrench
CBG
CB0
CBITurn Bar
1/2” Wrench
CCL
DZQ
Pendulum
AANDZR
TOOLS AND HARDWARE REQUIRED FOR THIS PAGE
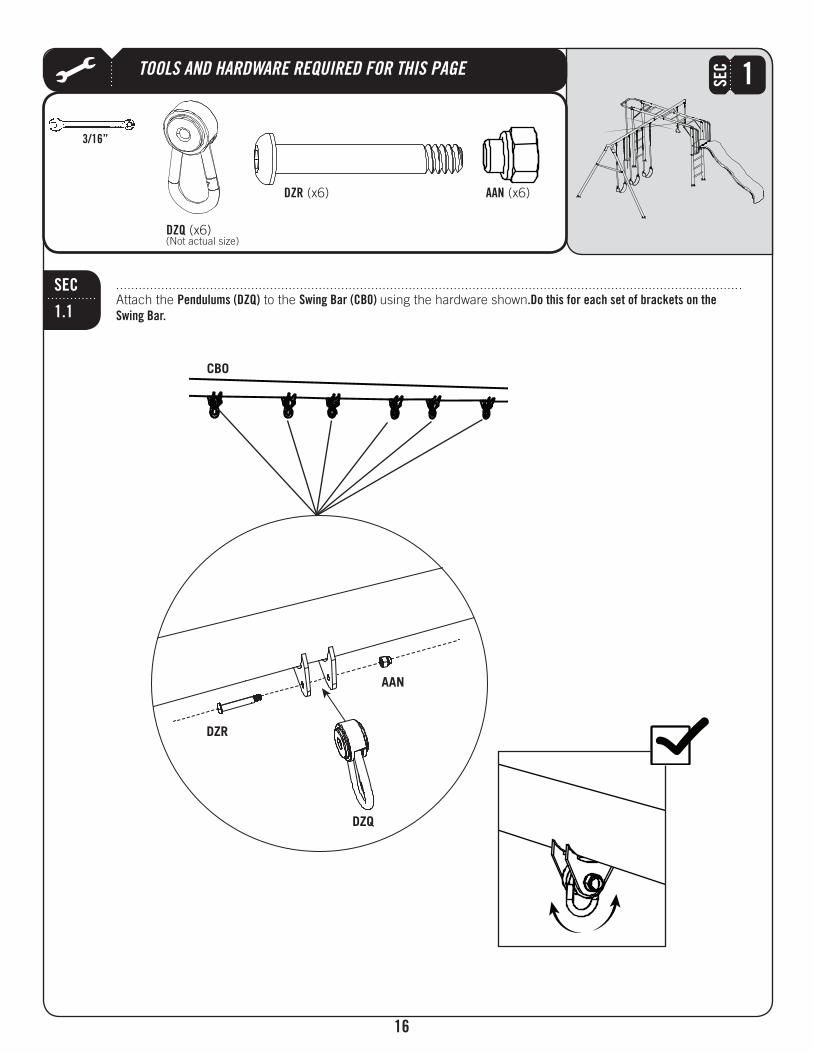
16
SEC
1
SEC
1.1Pendulums (DZQ) Swing Bar (CB0) .Do this for each set of brackets on the
Swing Bar.
3/16”
!
DZQ
AANDZR
AAN
DZR
DZQ
CBO
TOOLS AND HARDWARE REQUIRED FOR THIS PAGE
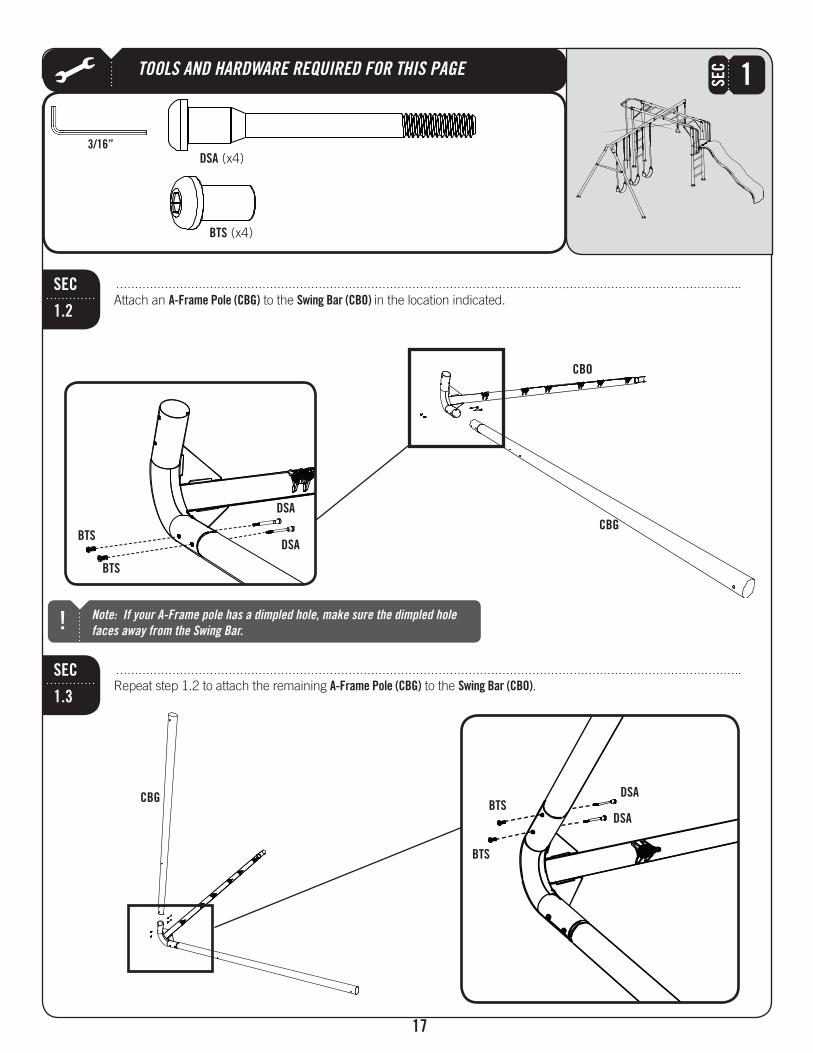
17
SEC
1
SEC
1.2A-Frame Pole (CBG) Swing Bar (CBO)
DSA
BTS
3/16”
BTSDSA
BTS
DSA
SEC
1.3A-Frame Pole (CBG) Swing Bar (CBO).
CBG
CBO
BTS
BTS
DSA
DSACBG
Note: If your A-Frame pole has a dimpled hole, make sure the dimpled hole
faces away from the Swing Bar.!
TOOLS AND HARDWARE REQUIRED FOR THIS PAGE
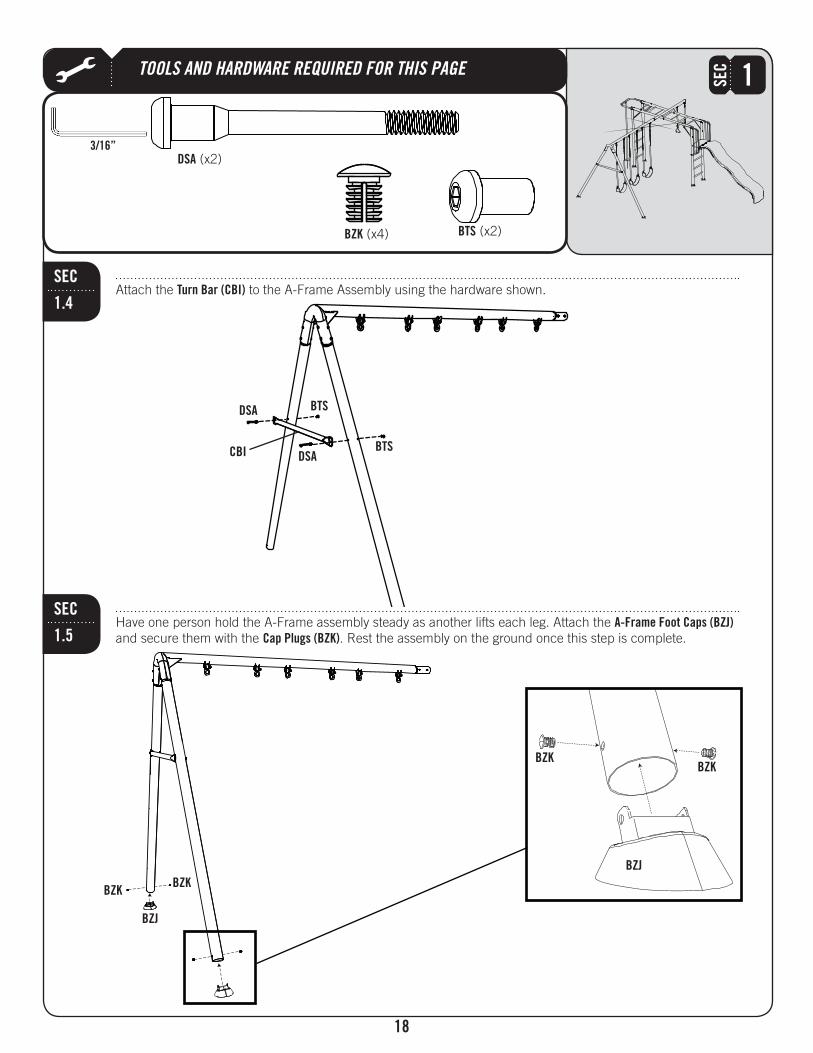
18
SEC
CBI
Turn Bar (CBI)SEC
1.4
A-Frame Foot Caps (BZJ) Cap Plugs (BZK)
SEC
1.5
1
BZK
BZKBZK
BZJ
DSA
BTS
3/16”
DSA
DSA BTS
BTS
BZKBZK
BZJ

19
MONKEY BARS ASSEMBLY
HARDWARE REQUIRED
SEC
2
MONKEY BARS ASSEMBLY HARDWARE BAG [CVH]
DSA
BTS BZK
CSB
CSA
CSD
PARTS REQUIRED
DZQ
Pendulum
AANDZR
PENDULUM HARDWARE BAG [EBX]Hardware shown at actual size

20
PARTS REQUIRED
TOOLS REQUIRED
3/16” Allen Wrench
CRR CRX
CRY
CSC
Ladder1/2” Wrench
CWV
TOOLS AND HARDWARE REQUIRED FOR THIS PAGE
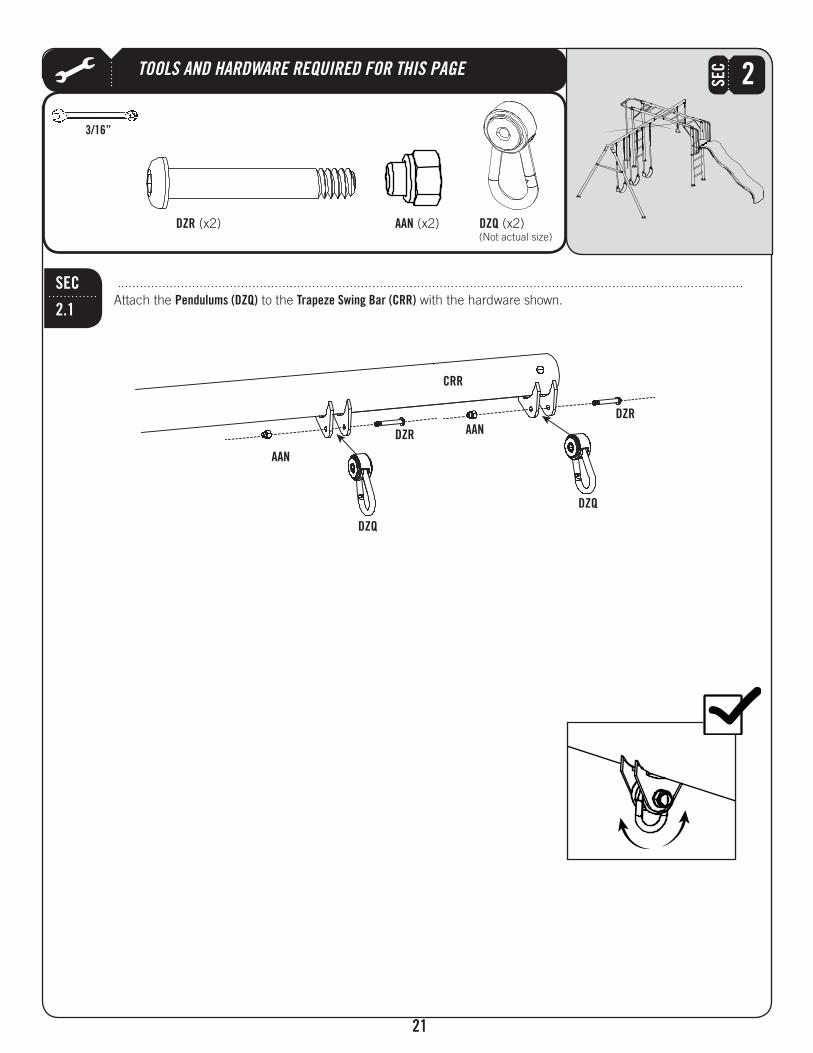
21
SEC
2
SEC
2.1Pendulums (DZQ) Trapeze Swing Bar (CRR)
DZQ
3/16”
AAN
AAN
DZQ
DZQ
DZR
DZR
CRR
AANDZR

TOOLS AND HARDWARE REQUIRED FOR THIS PAGE
22
SEC
2
SEC
2.2End Cap (CSD) Trapeze Swing Bar (CRR) .343 Cap Plugs (BZK).
3/16”
BZK
CSD
BZK
BZK
CRR
TOOLS AND HARDWARE REQUIRED FOR THIS PAGE
23
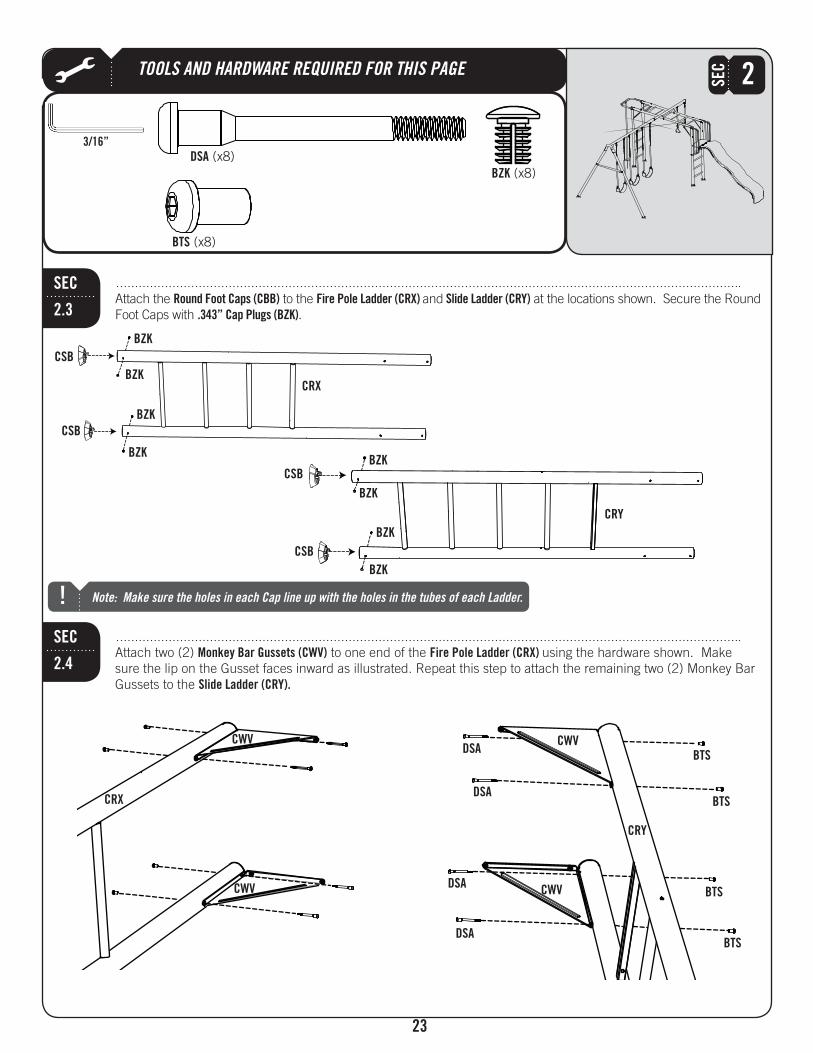
SEC
Note: Make sure the holes in each Cap line up with the holes in the tubes of each Ladder.!
2
SEC
2.3Round Foot Caps (CBB) Fire Pole Ladder (CRX) and Slide Ladder (CRY)
.343” Cap Plugs (BZK).
BTS
3/16”
DSA
SEC
2.4Monkey Bar Gussets (CWV) Fire Pole Ladder (CRX)
Slide Ladder (CRY).
BZK
CRX
CRY
CSB
CSB
CSB
CSB
BZK
BZK
BZK
BZKBZK
BZK
BZK
BZK
CRX
CRY
CWV
CWV
CWV
CWV
DSA
DSA
DSA
DSA
BTS
BTS
BTS
BTS
TOOLS AND HARDWARE REQUIRED FOR THIS PAGE
24
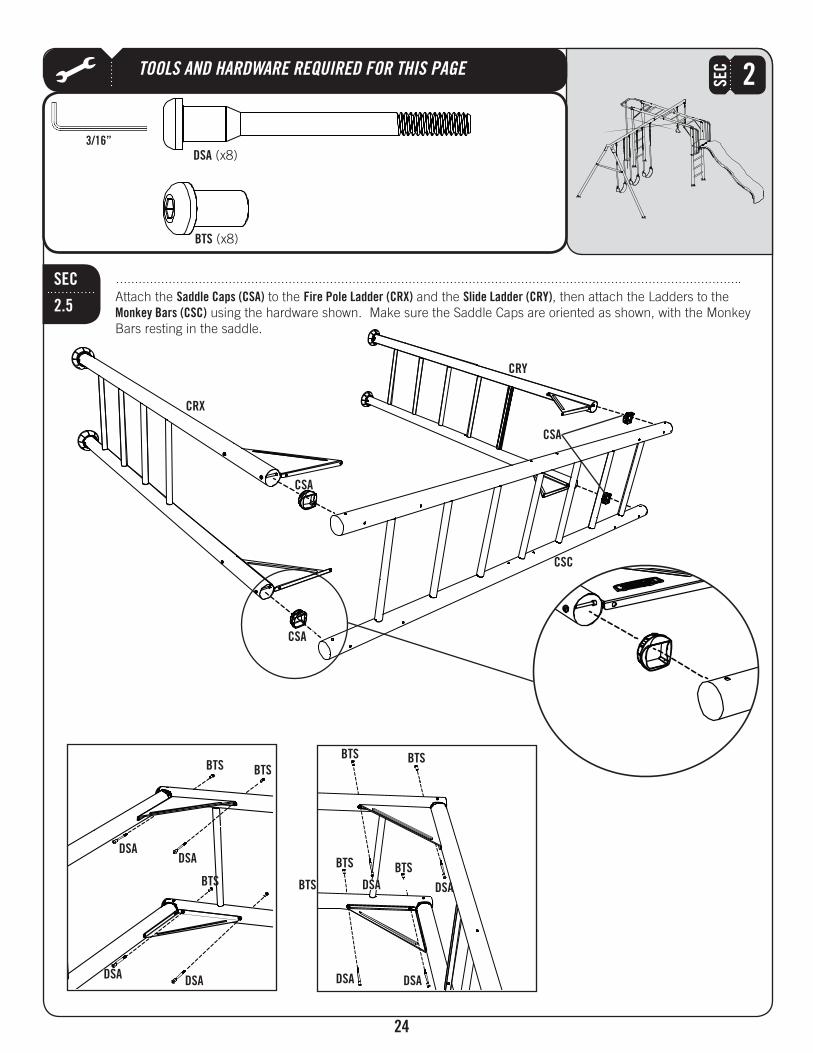
SEC
2
DSA
3/16”
SEC
2.5Saddle Caps (CSA) Fire Pole Ladder (CRX) Slide Ladder (CRY)
Monkey Bars (CSC)
BTS
CRX
DSADSA
DSADSA
BTSBTS
BTS BTS
CRY
DSA DSA
DSA DSA
BTS BTS
BTS BTS
CSA
CSA
CSA
CSC

TOOLS AND HARDWARE REQUIRED FOR THIS PAGE
25
SEC
SEC
2.6End Caps (CSD)
2
NO TOOLS OR HARDWARE REQUIRED FOR THIS PAGE
CSD
CSD
CSD
CSD
Note: Make sure the holes in each End Cap line up with the holes in the tubes of the Monkey Bars.!
TOOLS AND HARDWARE REQUIRED FOR THIS PAGE
26
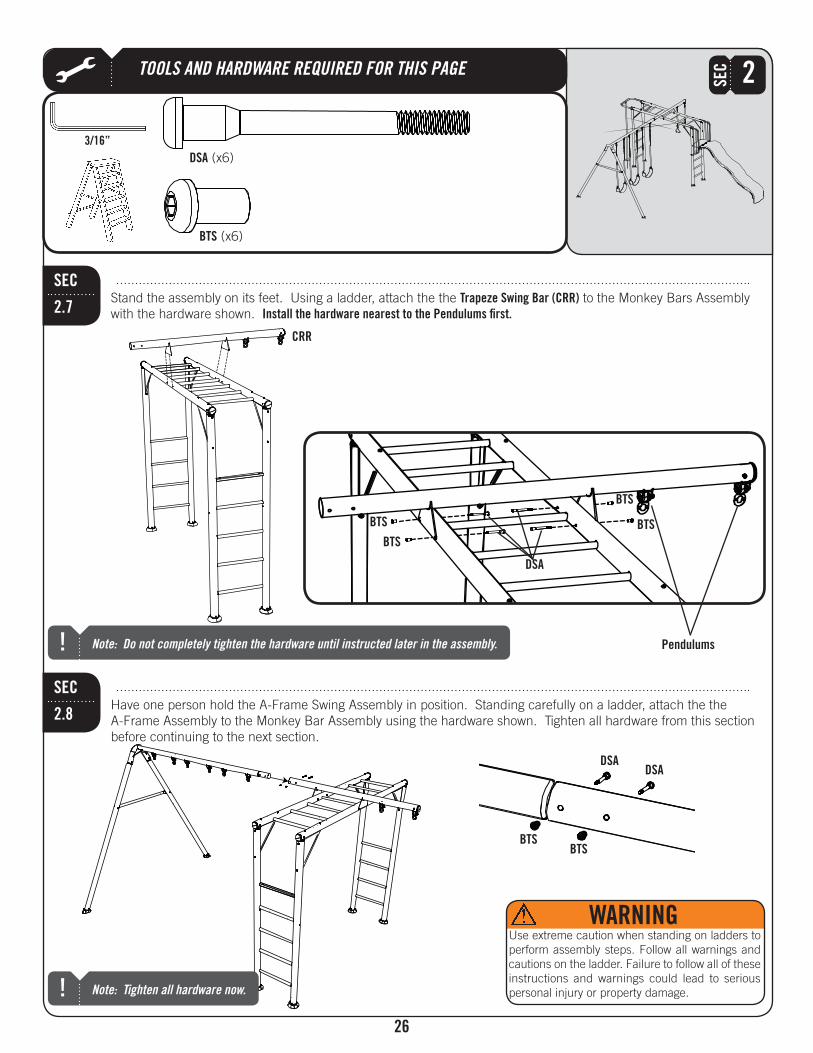
SEC
SEC
2.7Trapeze Swing Bar (CRR)
Install the hardware nearest to the Pendulums first.
2
CRR
Note: Do not completely tighten the hardware until instructed later in the assembly.!
DSA
BTS
DSA
BTS
BTS
BTS
BTS
3/16”
SEC
2.8
BTSBTS
DSADSA
WARNING
Note: Tighten all hardware now.!
Pendulums
27
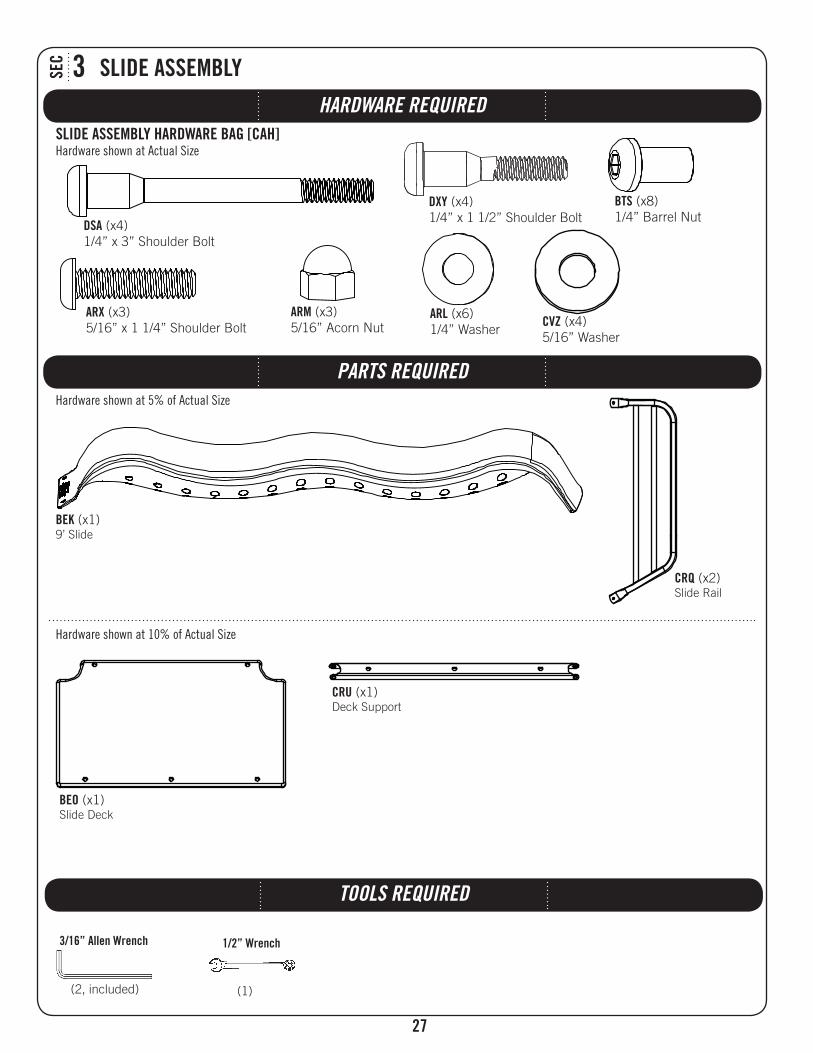
SLIDE ASSEMBLY
HARDWARE REQUIRED
SEC
3
SLIDE ASSEMBLY HARDWARE BAG [CAH]
TOOLS REQUIRED
3/16” Allen Wrench
PARTS REQUIRED
BEO
CRU
BEK
BTS
DSA
DXY
ARLARX ARM
CRQ
1/2” Wrench
CVZ
TOOLS AND HARDWARE REQUIRED FOR THIS PAGE
28
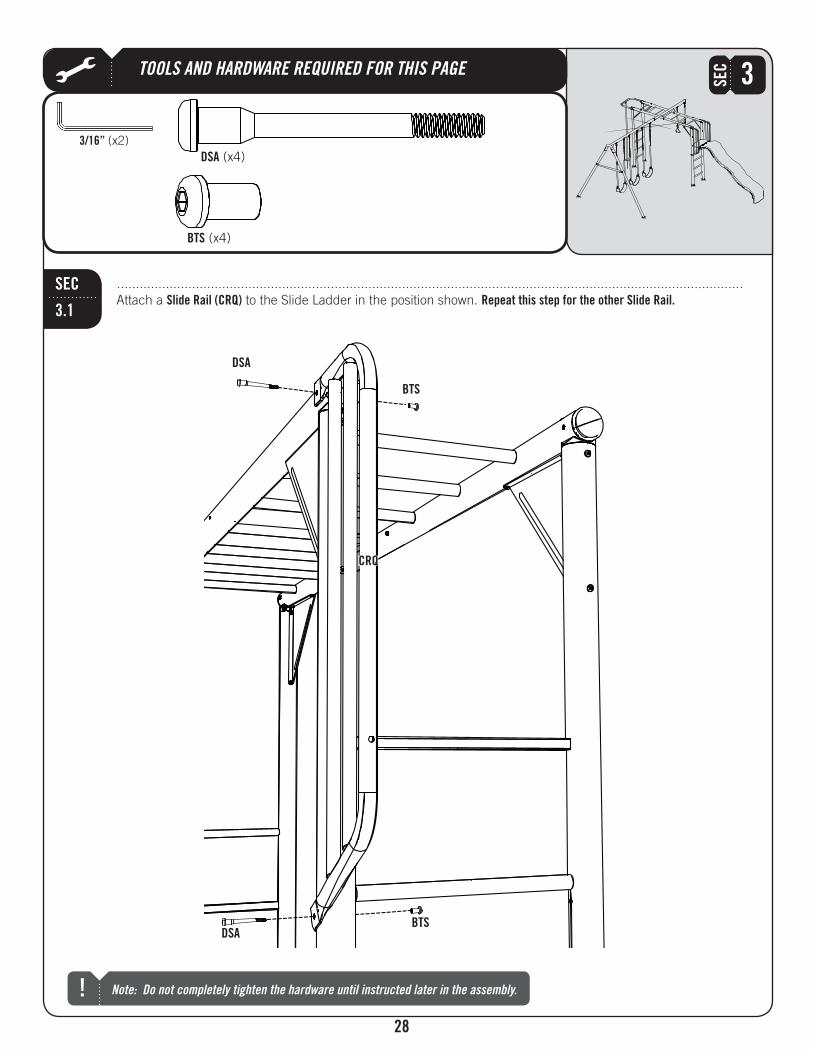
SEC
3
SEC
3.1
3/16”
Slide Rail (CRQ) Repeat this step for the other Slide Rail.
DSA
BTS
DSA
DSABTS
BTS
CRQ
Note: Do not completely tighten the hardware until instructed later in the assembly.!
TOOLS AND HARDWARE REQUIRED FOR THIS PAGE
29
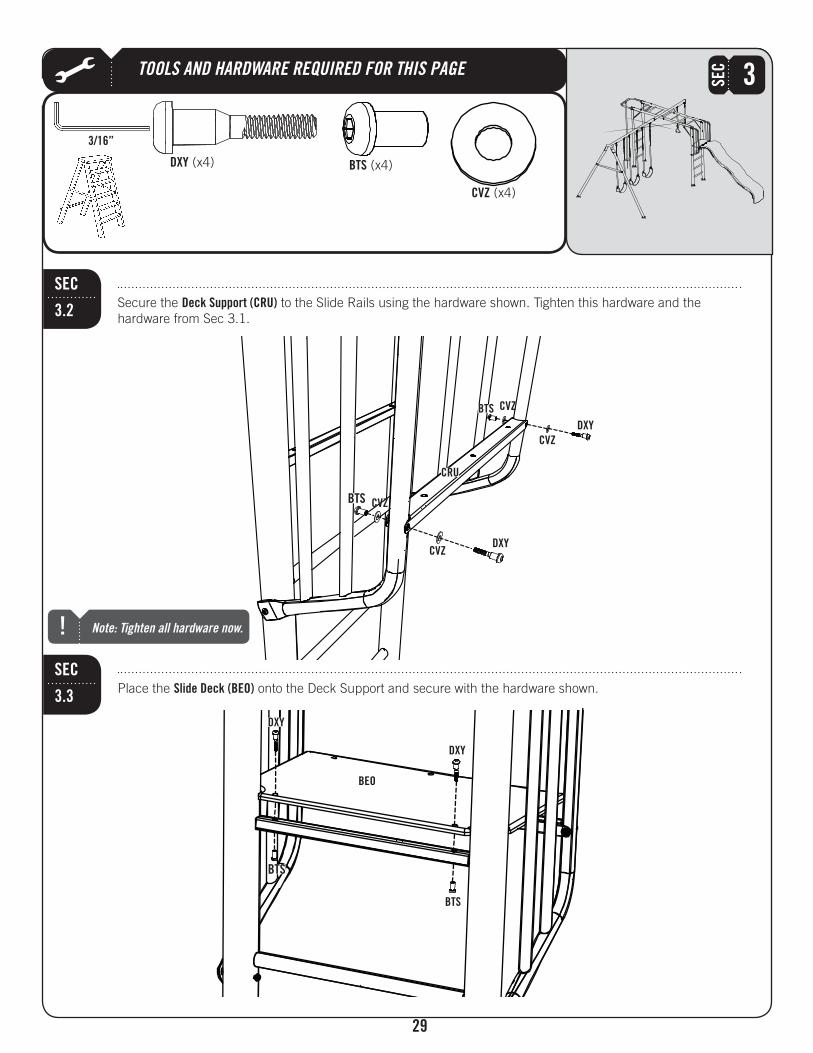
SEC
Slide Deck (BEO)
3
SEC
3.2Deck Support (CRU)
BTSDXY
3/16”
DXY
BTS
BEO
DXY
DXY
DXY
BTS
SEC
3.3
BTS
BTS
CRU
CVZ
CVZ
CVZ
CVZ
Note: Tighten all hardware now.!
CVZ
TOOLS AND HARDWARE REQUIRED FOR THIS PAGE
30
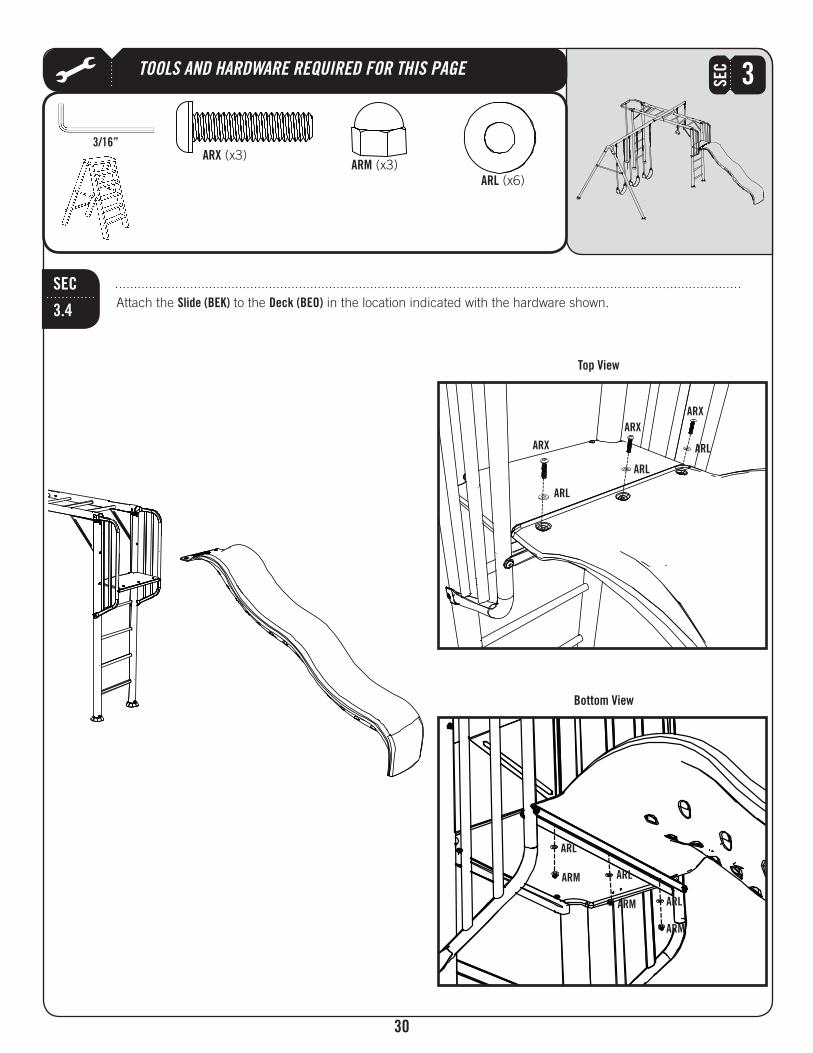
SEC
3
SEC
3.4Slide (BEK) Deck (BEO)
3/16”
Top View
ARL
ARXARM
Bottom View
ARX
ARX
ARX
ARL
ARL
ARL
ARL
ARL
ARL
ARM
ARM
ARM
31
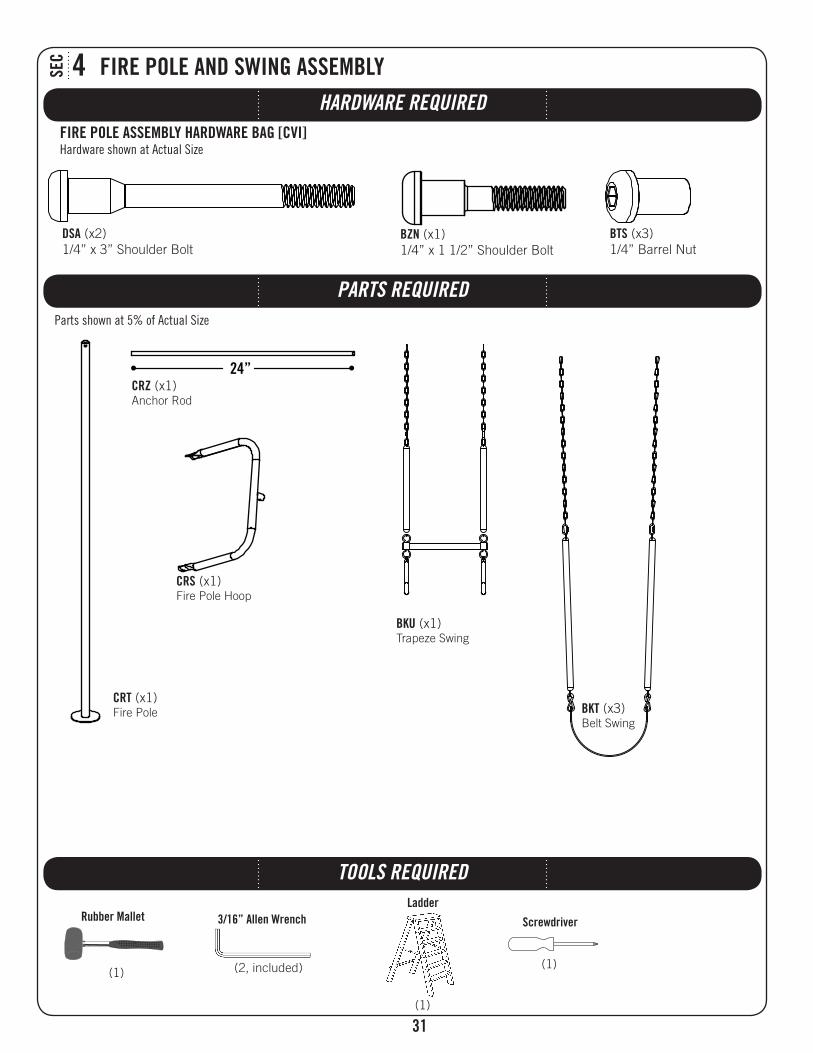
FIRE POLE AND SWING ASSEMBLY
HARDWARE REQUIRED
PARTS REQUIRED
TOOLS REQUIRED
SEC
4
3/16” Allen Wrench
Ladder
FIRE POLE ASSEMBLY HARDWARE BAG [CVI]
ScrewdriverRubber Mallet
BKT
BKU
24”CRZ
CRS
CRT
DSA BTSBZN
TOOLS AND HARDWARE REQUIRED FOR THIS PAGE
32
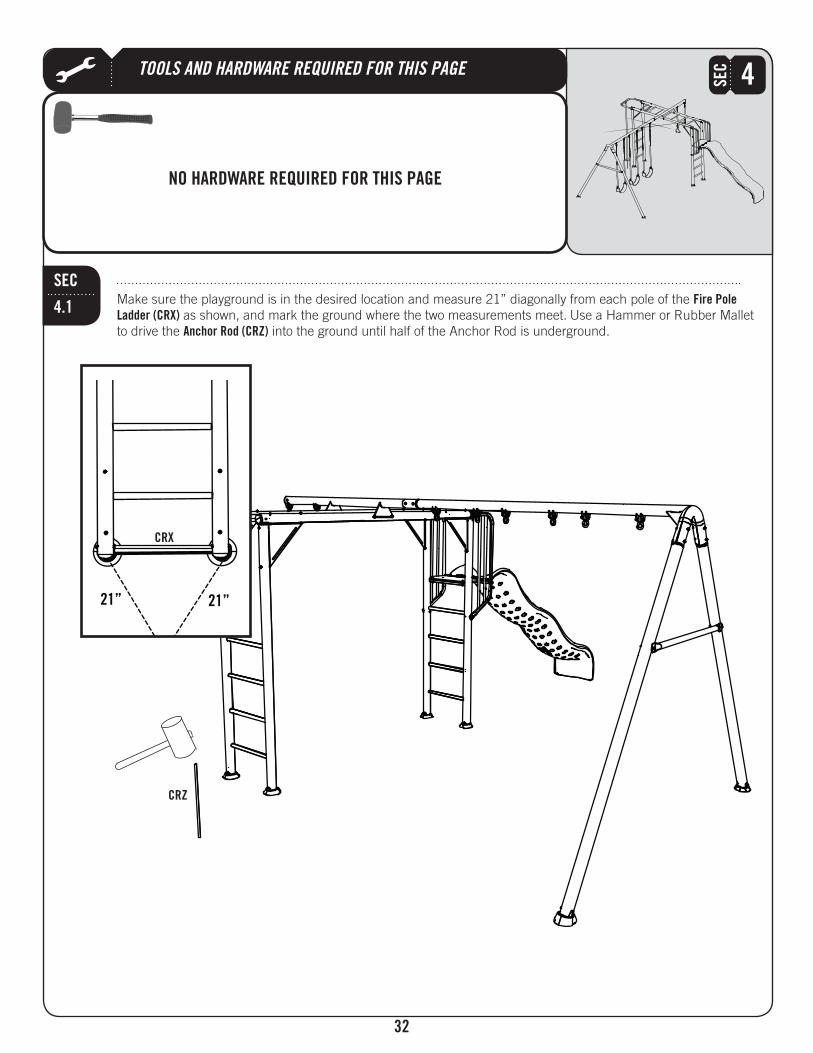
SEC
4
SEC
4.1Fire Pole
Ladder (CRX)
Anchor Rod (CRZ)
NO HARDWARE REQUIRED FOR THIS PAGE
21” 21”
CRX
CRZ

TOOLS AND HARDWARE REQUIRED FOR THIS PAGE
33
SEC
4
SEC
4.2Fire Pole (CRT)
Anchor Rod (CRZ).
Note: The Playground may need to be moved slightly
once the Fire Pole is positioned.!
DSA
BTS
3/16”
BTS BTS
DSA
DSA
CRT
CRZ
CRS
SEC
4.3Fire Pole Hoop (CRS)
Connecting Tube CRT
TOOLS AND HARDWARE REQUIRED FOR THIS PAGE
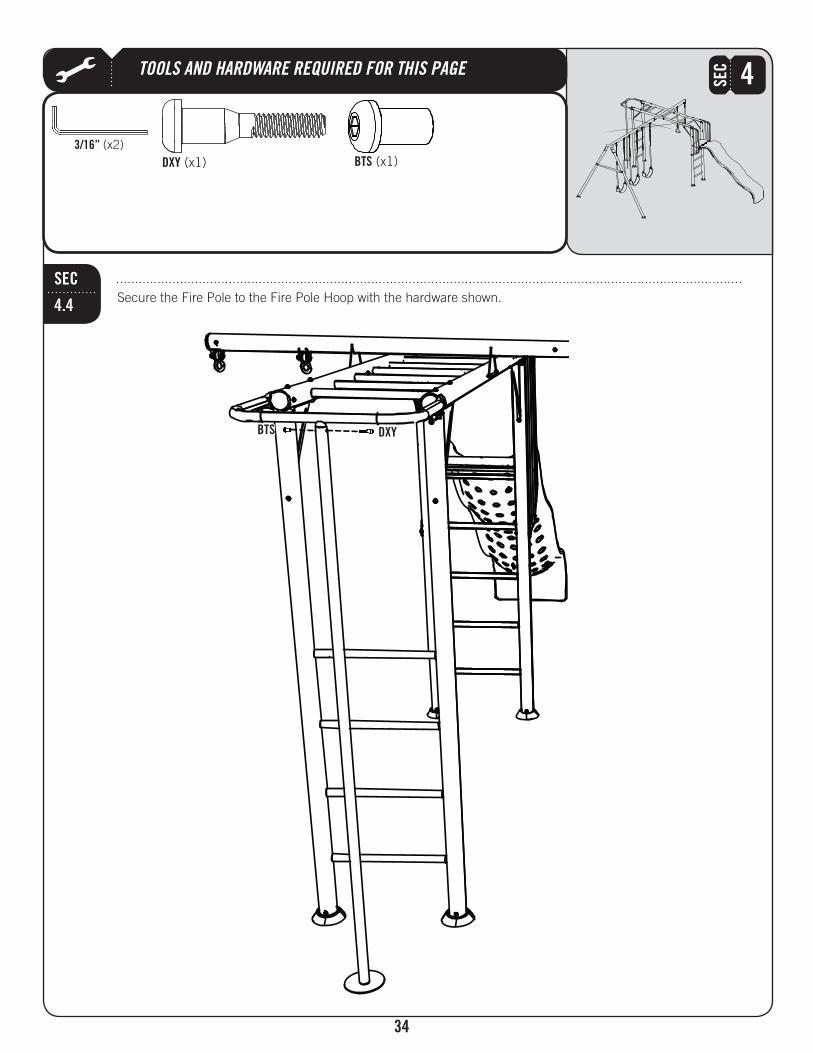
34
SEC
4
SEC
4.4
3/16”
BTSDXY
DXYBTS
TOOLS AND HARDWARE REQUIRED FOR THIS PAGE
35
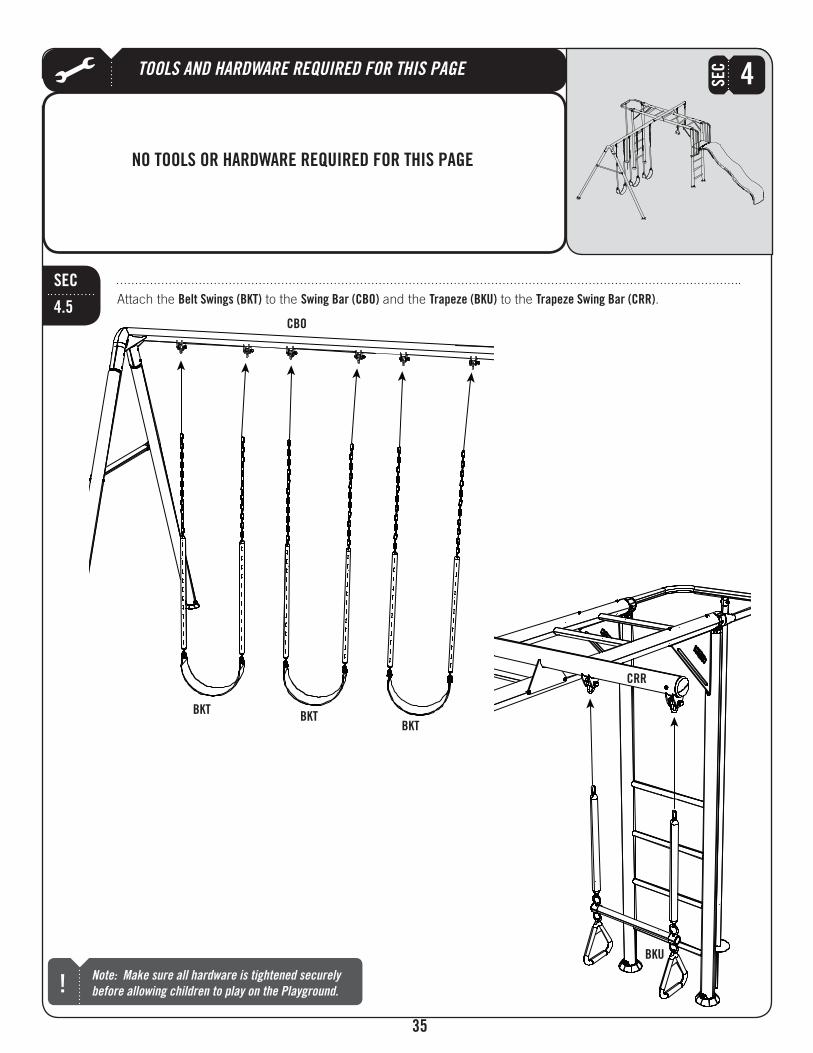
SEC
4
SEC
4.5Belt Swings (BKT) Swing Bar (CBO) Trapeze (BKU) Trapeze Swing Bar (CRR).
NO TOOLS OR HARDWARE REQUIRED FOR THIS PAGE
Note: Make sure all hardware is tightened securely
before allowing children to play on the Playground.!
BKTBKT
BKT
BKU
CBO
CRR
36
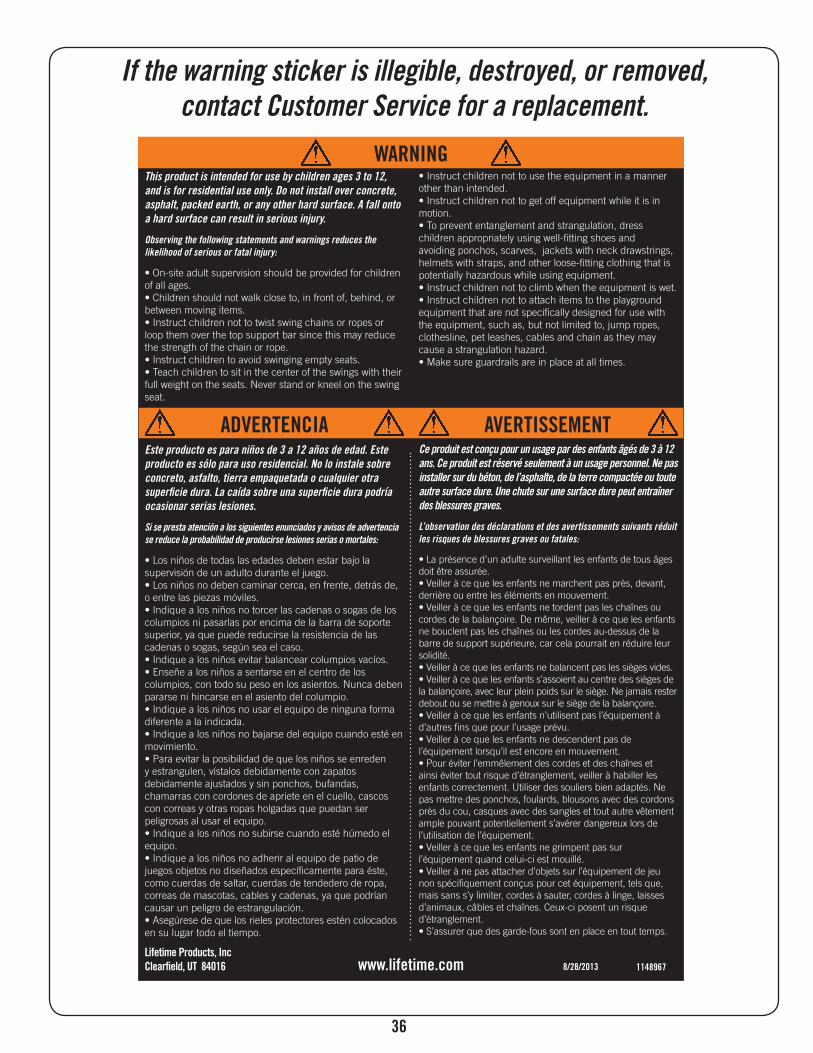
If the warning sticker is illegible, destroyed, or removed,
contact Customer Service for a replacement.
WARNING
Lifetime Products, Inc
Clearfield, UT 84016 11489678/28/2013www.lifetime.com
ADVERTENCIA AVERTISSEMENT
This product is intended for use by children ages 3 to 12,
and is for residential use only. Do not install over concrete,
asphalt, packed earth, or any other hard surface. A fall onto
a hard surface can result in serious injury.
Observing the following statements and warnings reduces the
likelihood of serious or fatal injury:
Este producto es para niños de 3 a 12 años de edad. Este
producto es sólo para uso residencial. No lo instale sobre
concreto, asfalto, tierra empaquetada o cualquier otra
superficie dura. La caída sobre una superficie dura podría
ocasionar serias lesiones.
Si se presta atención a los siguientes enunciados y avisos de advertencia
se reduce la probabilidad de producirse lesiones serias o mortales:
Ce produit est conçu pour un usage par des enfants âgés de 3 à 12
ans. Ce produit est réservé seulement à un usage personnel. Ne pas
installer sur du béton, de l’asphalte, de la terre compactée ou toute
autre surface dure. Une chute sur une surface dure peut entraîner
des blessures graves.
L’observation des déclarations et des avertissements suivants réduit
les risques de blessures graves ou fatales:
37
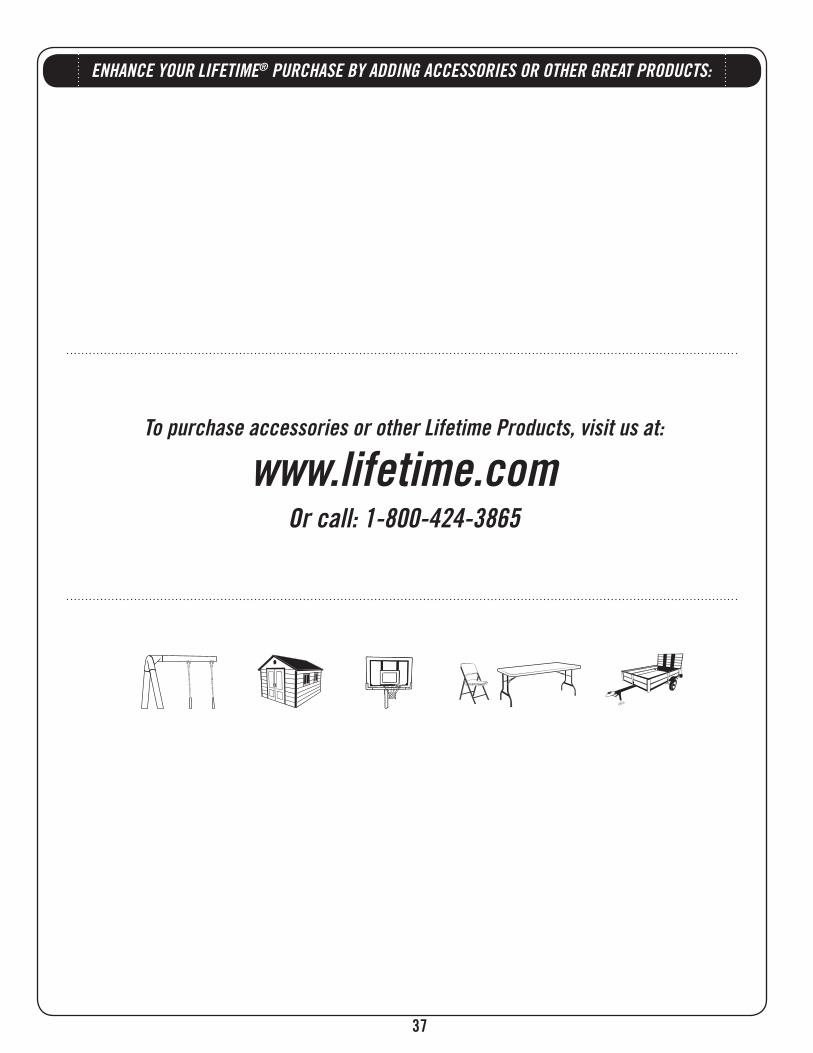
Or call: 1-800-424-3865
To purchase accessories or other Lifetime Products, visit us at:
www.lifetime.com
ENHANCE YOUR LIFETIME® PURCHASE BY ADDING ACCESSORIES OR OTHER GREAT PRODUCTS:

38
LIFETIME PLAYGROUND EQUIPMENT5-YEAR LIMITED FACTORY WARRANTY*
THE MANUFACTURER RESERVES THE RIGHT TO MAKE SUBSTITUTIONS TO WARRANTY CLAIMS IF PARTS ARE UNAVAILABLE OR OBSOLETE.
ALL WARRANTY CLAIMS MUST BE ACCOMPANIED BY A SALES RECEIPT.
REPORT PRODUCT DEFECTS IN WRITING TO:
Save this owner’s manual for future reference and in the event that the manufacturer has to be contacted.
To register the product, visit our Web site at www.lifetime.com
www.lifetime.com
WARRANTY INFORMATION