MODEL H8101 STIRLING ENGINE KIT 1 · h8101 stirling Engine Kit 1 -1-Introduction foreword We are...
35
MODEL H8101 STIRLING ENGINE KIT 1 OWNER'S MANUAL Copyright © MAy, 2007 By grizzly industriAl, inC., rEVisEd FEBruAry, 2012 (st) WARNING: NO PORTION OF THIS MANUAL MAY BE REPRODUCED IN ANY SHAPE OR FORM WITHOUT THE WRITTEN APPROVAL OF GRIZZLY INDUSTRIAL, INC. #ts9303 printEd in ChinA
Transcript of MODEL H8101 STIRLING ENGINE KIT 1 · h8101 stirling Engine Kit 1 -1-Introduction foreword We are...

MODEL H8101STIRLING ENGINE KIT 1
OWNER'S MaNuaL
Copyright © MAy, 2007 By grizzly industriAl, inC., rEVisEd FEBruAry, 2012 (st)WaRNING: NO pORTION Of THIS MaNuaL May bE REpRODucED IN aNy SHapE
OR fORM WITHOuT THE WRITTEN appROvaL Of GRIzzLy INDuSTRIaL, INc. #ts9303 printEd in ChinA


h8101 stirling Engine Kit 1 -C-
Introduction ..................................................................................................................................... 1Foreword .................................................................................................................................... 1Contact info ................................................................................................................................ 1the stirling Engine ..................................................................................................................... 1
Safety ................................................................................................................................................ 2safety instructions for Machinery ............................................................................................... 2safety instructions for Flammable liquids ................................................................................. 3
Setup & assembly ........................................................................................................................... 4overview .................................................................................................................................... 4recommended for setup ........................................................................................................... 4Metric sizing ............................................................................................................................... 4unpacking .................................................................................................................................. 4inventory ..................................................................................................................................... 5parts & inventory list ................................................................................................................. 7Machining parts.......................................................................................................................... 8Assembly diagram ..................................................................................................................... 9Additional Assembly instructions ............................................................................................. 10lubrication ................................................................................................................................ 12operation .................................................................................................................................. 12
WaRRaNTy aND RETuRNS ........................................................................................................ 31
Table of contents

h8101 stirling Engine Kit 1 -1-
Introduction
foreword
We are proud to offer the Model h8101 stirling Engine Kit 1. When used according to the guide-lines set forth in this manual, you can expect years of trouble-free, enjoyable operation and proof of grizzly’s commitment to customer satisfaction.
the specifications, drawings, and photographs illustrated in this manual represent the Model h8101 when the manual was prepared. however, owing to grizzly’s policy of continuous improve-ment, changes may be made at any time with no obligation on the part of grizzly.
For your convenience, we always keep current grizzly manuals available on our website at www.grizzly.com. Any updates to your machine will be reflected in these manuals as soon as they are complete. Visit our site often to check for the lat-est updates to this manual!
contact Info
if you have any comments regarding this manual, please write to us at the address below:
grizzly industrial, inc.C/o technical documentation Manager
p.o. Box 2069Bellingham, WA 98227-2069Email: [email protected]
We stand behind our machines. if you have any service questions or parts requests, please call or write us at the location listed below.
grizzly industrial, inc.1203 lycoming Mall Circle
Muncy, pA 17756phone: (570) 546-9663
Fax: (800) 438-5901E-Mail: [email protected] site: http://www.grizzly.com
The Stirling Engine
the stirling Engine was invented and developed by reverend dr. robert stirling and his brother, James, in the early 1800's.
in the conversion of heat into mechanical work, stirling engines can achieve the highest efficiency of any real heat engine, limited only by the proper-ties of the working gas, engine materials, and fric-tion. these engines can run on any heat source of sufficient quality, including solar, chemical, and nuclear.
Compared to an internal combustion engine of a given power rating, stirling engines have a higher initial cost and are usually larger and heavier. however, in recent years, the advantages of stirling engines have become increasingly signifi-cant due to the rising concerns over energy and environmental issues.
the stirling engine is a closed system and con-tains a fixed quantity of gas that, in this kit, is air. unlike other types of piston engines that require outside ventilation, the stirling engine is sealed, no gas enters or leaves the engine, and no valves are required. the stirling engine cycles through four main processes—cooling, compression, heating and expansion. this is accomplished by moving the enclosed air back and forth between hot and cold heat exchangers.
the round, horizontal heating exchanger in con-tact with the alcohol burner warms the working air and the finned cylinder on top cools it. A change in the enclosed air temperature will cause a cor-responding change in gas pressure, while the motion of the piston causes the enclosed air to be alternately expanded and compressed.
in summary, the stirling engine uses the energy difference between its hot and cold ends to create a cycle of alternately expanding and contracting a fixed amount of enclosed gas, and converting the temperature differences into mechanical power.
-2- h8101 stirling Engine Kit 1
for your Own Safety, Read Instruction Manual before Operating this Machine
The purpose of safety symbols is to attract your attention to possible hazardous conditions. This manual uses a series of symbols and signal words intended to convey the level of importance of the safety messages. The progression of symbols is described below. Remember that safety messages by themselves do not eliminate danger and are not a substitute for proper accident prevention measures.
Indicates a potentially hazardous situation which, if not avoided, May result in minor or moderate injury. It may also be used to alert against unsafe practices.
Indicates a potentially hazardous situation which, if not avoided, cOuLD result in death or serious injury.
Indicates an imminently hazardous situation which, if not avoided, WILL result in death or serious injury.
This symbol is used to alert the user to useful information about proper operation of the machine.NOTICE
4. aLWayS uSE HEaRING pROTEcTION WHEN OpERaTING MacHINERy. Machinery noise can cause permanent hearing loss.
5. WEaR pROpER appaREL. do not wear loose clothing, gloves, neckties, rings, or jewelry that can catch in moving parts. Wear protective hair covering to contain long hair and wear non-slip footwear.
6. NEvER OpERaTE MacHINERy WHEN TIRED OR uNDER THE INfLuENcE Of DRuGS OR aLcOHOL. Be mentally alert at all times when running machinery.
1. REaD THE ENTIRE MaNuaL bEfORE STaRTING MacHINERy. Machinery pres-ents serious injury hazards to untrained users.
2. aLWayS uSE aNSI appROvED SafETy GLaSSES WHEN OpERaTING MacHINERy. Everyday eyeglasses only have impact resistant lenses —they are not safety glasses.
3. aLWayS WEaR a NIOSH appROvED RESpIRaTOR WHEN OpERaTING MacHINERy THaT pRODucES DuST. Wood dust can cause severe respiratory illnesses.
Safety Instructions for Machinery
Safety

h8101 stirling Engine Kit 1 -3-
Safety Instructions for flammable Liquids1. aDEQuaTE vENTILaTION. A build-up of
alcohol fumes can present an explosion hazard. Always make sure there is enough ventilation around the stirling engine when it is in use.
2. ISOpROpyL aLcOHOL. use only com-mercially available isopropyl alcohol that is 99% pure. do not mix this alcohol with other chemicals or use any other flamma-ble substance or source to heat the stirling engine.
3. RESpONSIbLE uSE. using a stirling engine can present a fire hazard if not prop-erly operated. Make sure that the operator of the engine is capable of handling the alcohol fuel and the hot engine. do not let children operate this stirling engine.
4. KEEp aWay fROM ELEcTRIcaL SOuRcES. Any electrical device or source can produce a spark that may ignite the alcohol fuel as it is being handled—such as cell phones, electrical outlets, computers, etc. Make sure the alcohol fuel is stored in proper containers away from electrical sources. Keep the stirling engine safely away from electrical sources when in oper-ation.
5. REMOvE aLcOHOL afTER uSE. properly dispose or store any alcohol left in the stirling engine reservoir after use. the flammable liquid in the reservoir can spill during movement and become a fire hazard.
6. avOID HOT ENGINE paRTS. during the use of the stirling engine, many parts become hot enough to burn the skin. do not touch these parts until they are com-pletely cooled.
7. aLcOHOL fuEL DISpOSaL. Always check your local codes and standards for proper disposal of flammable substances.
8. cLEaN up aNy SpILLS. Although isopro-pyl alcohol will evaporate with time, a spill of this flammable liquid can present a fire hazard. if left for a period of time, isopropyl alcohol can damage other materials.
9. DO NOT DRINK aLcOHOL fuEL. ingesting any type of alcohol fuel can lead to blindness or death. Keep containers of alcohol fuel tightly sealed and away from children.
10. avOID EyE OR SKIN cONTacT WITH aLcOHOL fuEL. Alcohol fuel can dam-age eyes. prolonged exposure of the skin to alcohol fuels can result in skin irritations. Avoid any personal contact with alcohol fuels, including ingestion.
11. DO NOT LEavE uNaTTENDED. Always directly supervise the stirling engine when the alcohol fuel is lit or the engine parts are hot.
12. fIRE SafETy. Always keep a fire extin-guisher near when operating the stirling engine or servicing the fuel reservoir. do not have any other open flames or sourc-es of sparks near the alcohol fuel at any time. do not smoke during near the alco-hol fuel.
13. SafE aTTIRE. tie back long hair and loose clothing when operating the stirling engine or working with the alcohol fuel.
14. EXpERIENcING DIffIcuLTIES. if at any time you are experiencing difficulties per-forming the intended operation, stop using the engine! Contact our technical support at (570) 546-9663.
-4- h8101 stirling Engine Kit 1
Setup & assembly
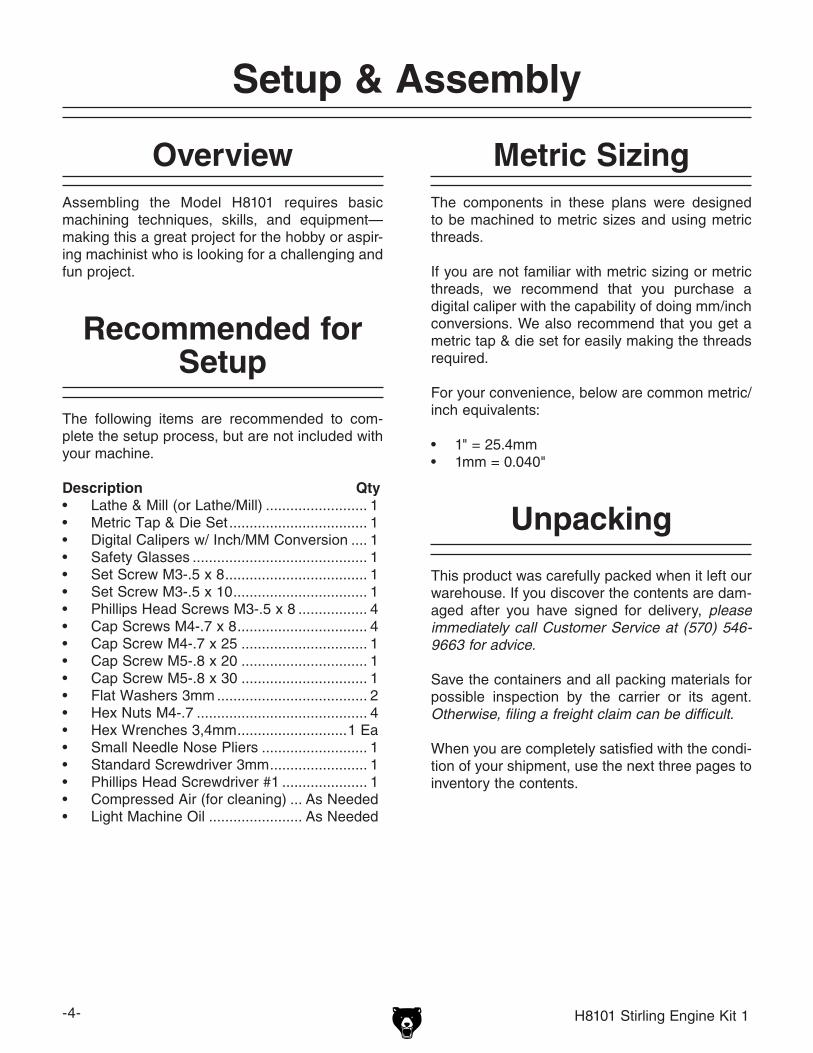
the following items are recommended to com-plete the setup process, but are not included with your machine.
Description Qty• lathe & Mill (or lathe/Mill) ......................... 1• Metric tap & die set .................................. 1• digital Calipers w/ inch/MM Conversion .... 1• safety glasses ........................................... 1• set screw M3-.5 x 8 ................................... 1• set screw M3-.5 x 10 ................................. 1• phillips head screws M3-.5 x 8 ................. 4• Cap screws M4-.7 x 8 ................................ 4• Cap screw M4-.7 x 25 ............................... 1• Cap screw M5-.8 x 20 ............................... 1• Cap screw M5-.8 x 30 ............................... 1• Flat Washers 3mm ..................................... 2• hex nuts M4-.7 .......................................... 4• hex Wrenches 3,4mm ...........................1 Ea• small needle nose pliers .......................... 1• standard screwdriver 3mm ........................ 1• phillips head screwdriver #1 ..................... 1• Compressed Air (for cleaning) ... As needed• light Machine oil ....................... As needed
Recommended for Setup
this product was carefully packed when it left our warehouse. if you discover the contents are dam-aged after you have signed for delivery, please immediately call Customer Service at (570) 546-9663 for advice.
save the containers and all packing materials for possible inspection by the carrier or its agent. Otherwise, filing a freight claim can be difficult.
When you are completely satisfied with the condi-tion of your shipment, use the next three pages to inventory the contents.
unpacking
Metric Sizingthe components in these plans were designed to be machined to metric sizes and using metric threads.
if you are not familiar with metric sizing or metric threads, we recommend that you purchase a digital caliper with the capability of doing mm/inch conversions. We also recommend that you get a metric tap & die set for easily making the threads required.
For your convenience, below are common metric/inch equivalents:
1" = 25.4mm• 1mm = 0.040"•
OverviewAssembling the Model h8101 requires basic machining techniques, skills, and equipment—making this a great project for the hobby or aspir-ing machinist who is looking for a challenging and fun project.

h8101 stirling Engine Kit 1 -5-
Inventory
44
32
33
= Brass = Aluminum or Steel
12
35
4734
46
30
9
6
1811
194
45
16
2125
7
39
29
31

-6- h8101 stirling Engine Kit 1
37
24
14
15
28
27
23
26
10
3
17
13
8
5
20
= Brass = Aluminum or Steel

h8101 stirling Engine Kit 1 -7-
Ref No. Part ID Part No. Description Quantity3 HAE0108 PH8101003 BRASS ROD BLANK 6 X 72MM 44 HAE0123 PH8101004 BRASS CYLINDER BLANK 8 X 15MM 15 HAE0124 PH8101005 BRASS ROD BLANK 3 X 40MM 16 HAE0103 PH8101006 BRASS CYLINDER BLANK 13 X 25MM 17 HAE0122 PH8101007 STEEL ROD BLANK 3 X 82MM 18 HAE0119 PH8101008 BRASS ROD BLANK 3 X 86MM 19 HAE0109 PH8101009 BRASS SQUARE BLANK 12 X 12 X 42MM 1
10 HAE0115 PH8101010 BRASS ROD BLANK 11 X 92MM 111 HAE0118 PH8101011 BRASS CYLINDER BLANK 10 X 20MM 112 HAE0117 PH8101012 BRASS PLATE BLANK 96 X 12 X 3MM 113 HAE0111 PH8101013 BRASS ROD BLANK 6 X 42MM 114 HAE0110 PH8101014 ALUMINUM CUBE BLANK 65 X 45MM 115 HAE0112 PH8101015 ALUMINUM CYLINDER BLANK 40 X 55MM 116 RB1 PH8101016 BRASS COOLING PISTON 13 X 22MM 117 HAE0125 PH8101017 BRASS ROD BLANK 8 X 58MM 118 HAE0126 PH8101018 BRASS CYLINDER BLANK 10 X 20MM 119 HAE0130 PH8101019 BRASS CYLINDER BLANK 8 X 20MM 120 HAE0131 PH8101020 BRASS ROD BLANK 3 X 13MM 121 RQ1-00 PH8101021 HEATING CYLINDER 123 HAE0114 PH8101023 ALUMINUM CYLINDER BLANK 62 X 20MM 124 HAE0116 PH8101024 ALUMINUM CYLINDER BLANK 45 X 40MM 125 P01 PH8101025 WICK HOLDER 126 HAE0120 PH8101026 ALUMINUM CYLINDER BLANK 48 X 15MM 127 HAE0121 PH8101027 ALUMINUM CYLINDER BLANK 45 X 25MM 128 HAE0127 PH8101028 ALUMINUM CYLINDER BLANK 42 X 20MM 129 HAE0105 PH8101029 STEEL ROD BLANK 3 X 35MM 130 HAE0102 PH8101030 BRASS SQUARE BLANK 6 X 6 X 25MM 131 HAE0104 PH8101031 STEEL ROD BLANK 3 X 25MM 132 HAE0106 PH8101032 BRASS PLATE BLANK 95 X 52 X 3MM 133 HAE0107 PH8101033 BRASS SQUARE BLANK 18 X 16 X 6MM 234 HAE0129 PH8101034 BRASS HEXAGON BLANK 5.5 X 30MM 135 HAE0128 PH8101035 BRASS HEXAGON BLANK 5.5 X 60MM 237 HAE0113 PH8101037 ALUMINUM CYLINDER BLANK 95 X 25MM 139 HAE0101 PH8101039 STEEL ROD BLANK 3 X 45MM 144 HAE0132 PH8101044 ALUMINUM PLATE BLANK 210 X 100 X 6MM 145 RQ1.04-01 PH8101045 ALUMINUM HEATING PISTON 15 X 40MM 146 HAE0134 PH8101046 BRASS HEXAGON BLANK 5.5 X 18MM 147 HAE0133 PH8101047 BRASS HEXAGON BLANK 5.5 X 25MM 1
parts & Inventory List

-8- h8101 stirling Engine Kit 1
Machining parts
the finished parts for your stirling engine require precise machining and the experience and equipment to do so.
use the specifications and illustrations beginning on page 13 to produce the parts required to assemble your stirling engine (all dimensions are in millimeters).
Note: Some parts have been pre-machined at the factory and are identified as such below. Also, there are some common fasteners and a wood base that are not required but are included with this kit.
After machining the parts, you should have the finished parts listed below. reference this information, the assembly Diagram on page 9, and additional assembly Instructions on page 10 to complete the assembly of your stirling engine.
RefNo. Qty
Specspage finished part Description
RefNo. Qty
Specspage finished part Description
3 4 13 threaded Connection rod 23 1 22 radiator4 1 14 slotted pivot Connector #2 24 1 22 Cooling Cylinder Base support5 1 14 Bent Connector rod 26 1 23 Fuel reservoir lid6 2 15 round Eccentric Connector 27 1 23 Fuel reservoir7 1 15 heating piston drive rod 28 1 24 pulley8 1 16 Bent drive rod 29 1 24 Axle 34mm9 1 16 rocker Arm shaft support 30 2 25 Connecting Arm10 1 17 rocker Arm shaft 31 1 25 Axle 20mm11 1 17 slotted pivot Connector #1 32 1 26 Bracket12 1 18 rocker Arm 33 2 26 Axle Bushing13 1 18 drive rod sleeve 34 3 27 Brass hex nut M3-.514 1 19 Cooling Cylinder Base 35 3 27 Brass hex Bolt M3-.5 x 1115 1 19 Cooling Cylinder 37 1 28 Fly Wheel17 1 20 Cooling piston drive rod 39 1 28 Axle 40mm18 1 20 slotted pivot Connector #4 44 1 29 Bottom plate19 1 21 slotted pivot Connector #3 46 1 29 Brass hex nut M2-.420 1 21 pin 47 1 30 Brass hex Bolt M2-.4 x 12
finished parts
pre-finished partsRefNo. Qty finished part Description
RefNo. Qty finished part Description
16 1 Cooling piston 25 1 Wick holder21 1 heating Cylinder 45 1 heating piston
Finished parts
common fasteners & Wood base (not provided)RefNo. Qty Description
RefNo. Qty Description
1 1 Wood Base 40 4 phillips head screw M3-.5 x 82 4 hex nut M4-.7 41 1 Cap screw M5-.8 x 3022 4 Cap screw M4-.7 x 8 42 1 Cap screw M5-.8 x 2036 2 Flat Washer 3mm 43 1 Cap screw M4-.7 x 2538 1 set screw M3-.5 x 10 48 1 set screw M3-.5 x 8

h8101 stirling Engine Kit 1 -9-
assembly Diagram
14
25
26
27
42
41
43
1
44
24
15
16
19
17
35 18
34
20
40
3 9
10 35
12
34 38
36
39
37
30
35 11
34
8 6 31
30
5 46
4
47
36
29
2
32
28
48
33
7
13
23
22
21 45
Assembly diagram

-10- h8101 stirling Engine Kit 1
additional assembly Instructions
As you enjoy assembling your Model h8101, take the opportunity to gain a better understanding of how your stirling engine works.
here are some general tips to help make your assembly process a successful experience:
• Establish a work area where the many small parts can be conveniently organized and stored.
• Make sure your hands and tools are clean and oil free when assembling the finished parts. dirt and grime will cause premature wear of the many moving parts.
• use an aerosol can of compressed air or a clean brush to remove any debris you may find on the parts. Make sure each part is clean and dry before assembly.
• take your time and be sure of the parts need-ed for each step—some of the parts appear very similar.
• do not overtighten the fasteners. Many of the parts can be damaged by using excessive force.
• A very small amount of silicon lubricant may assist in assembling sliding parts.
use the parts lists and assembly Diagram beginning on page 9, and the specific instructions in the following subsections to assemble your stirling engine.
Mounting the baseMake and finish a wood base to your taste that is at least 1" larger than the aluminum bottom plate on all sides (see figure 1).
the wood base needs two holes drilled for the cap screws that hold the metal bottom plate, the cooling cylinder assembly, and the rear bracket in place.
Note: In the following instructions, parts will be referenced with the term Ref and a number. Use this reference number and the Assembly Diagram on Page 9 to aid in part identification.
position the bottom plate (Ref 44) on the wood base (Ref 1), and mark the position of the two holes onto the base (see figure 1).
WoodBase
Bottom Plate
7/32"Center Hole
5/32" Rear Hole
figure 1. Bottom plate and wood base with location of holes to be drilled in the base.
drill a 7⁄32" hole through the wood base for the center hole, and a 5⁄32" hole near the end of the base, as shown in figure 1.
Additinal Assembly

h8101 stirling Engine Kit 1 -11-
CoolingCylinder
CylinderBase 3/16" (5mm)
Vent Holeat 30°
CircularIndent
figure 2. Cooling cylinder and base assembly showing location of 30° vent hole.
Drilling the vent HoleFor the internal air to move from the heating cyl-inder to the cooling cylinder, you must drill a 3⁄16" (5mm) vent hole at a 30° angle through the cool-ing cylinder base (Ref 14) and cooling cylinder (Ref 15) assembly.
Firmly seat the cooling cylinder into the top of the cooling cylinder base as shown in figure 2.
drill a 3⁄16" (5mm) hole at a 30° upward angle through the side of the cylinder base and into the bottom cavity of the cooling cylinder.
Note: Make sure the hole starts above the center hole in the circular indent as shown in Figure 2.
Clean out any metal debris after drilling.
positioning the pistonsone piston needs to draw the air into its cylinder as the other piston pushes the air out of its cylin-der. this cooperative process is a significant part of the stirling engine's efficiency.
in order for the pistons to work together, assemble the linkage so that operating cycle of the pistons are directly opposite of one another. see figure 3 for an illustration of this positioning.
CoolingPiston
HeatingPiston
figure 3. pistons positioned in opposing points and traveling in opposite directions.
positioning the connecting armsWhen assembling the connecting arms (Ref 30) with the axles and other linkage, be sure that both connecting arms are even and aligned with one another, as shown in figure 4.
ConnectingArms
(Ref 30)
figure 4. Connecting arms in correct alignment with one another.

-12- h8101 stirling Engine Kit 1
Isopropyl alcohol is an extremely flammable and volatile liquid. clean up any spills of alcohol and secure the fuel res-ervoir lid before lighting the wick. Keep all other flammable materials away from the engine during operation. failure to heed this warning could result in serious property dam-age and personal injury.
Operation
When all of the assembly is finished and lubrica-tion is complete, it is time to "fire up" your stirling engine!
To operate your Stirling engine:
1. Make sure you have read and complied with all of the safety warnings in this manual, and have prepared your operation environment appropriately.
2. Fill the reservoir about 3⁄4 full of 99% pure isopropyl alcohol and mount the reservoir lid with the wick showing only about 1⁄2".
3. Clean up any spills and remove the surplus fuel container away from the engine.
4. place the reservoir directly under the end of the heating cylinder.
5. When you are ready, carefully light the wick.
Note: It may be necessary to spin the large flywheel by hand to start the engine moving.
6. When you are finished using the engine, extinguish the wick and return the remaining alcohol safely back into the surplus contain-er.
Lubrication
After you have completed the assembly of your stirling engine, apply a drop or two of light machine oil at the metal-to-metal lubrication points shown in figures 5–7. re-lubricate as needed after use.
figure 5. Axle and connector lubrication points (shown from rear of engine).
figure 6. heating piston drive rod lubrication point.
figure 7. Cooling cylinder and piston lubrication point.

h8101 stirling Engine Kit 1 -13-
Machining Specifications
Ref No.:
Part No.:
Part ID.:
Material Blank Description:
Finished Part Description:
3 PH8101003 HAE0119
Brass Brass Rod Blank 6 x 72mm
Threaded Connection Rod 68mm Qty To Make
4
Not To Scale
Note: All dimensions are in millimeters.
3

-14- h8101 stirling Engine Kit 1
4-5
Ref No.:
Part No.:
Material Blank Description:
Finished Part Description:
4PH8101004 Brass
Brass Cylinder Blank 8 x 15mmSlotted Pivot Connector #2
Qty To Make
1
Not To Scale
Note: All dimensions are in millimeters.
Part ID.: HAE0124
Ref No.:
Part No.:
Material Blank Description:
Finished Part Description:
5PH8101005 Brass
Brass Rod Blank 3 x 40mmBent Connector Rod 38mm
Qty To Make
1
Not To Scale
Note: All dimensions are in millimeters.
Part ID.: HAE0124
h8101 stirling Engine Kit 1 -15-
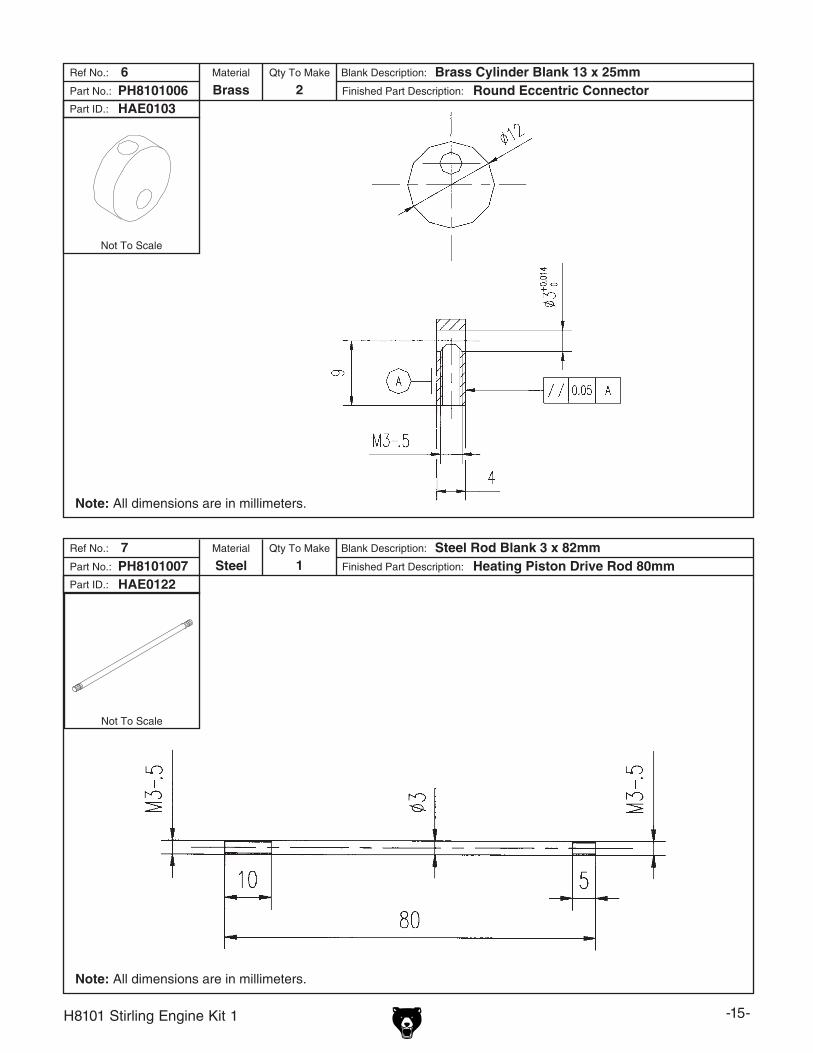
6-7
Ref No.:
Part No.:
Material Blank Description:
Finished Part Description:
6PH8101006 Brass
Brass Cylinder Blank 13 x 25mmRound Eccentric Connector
Qty To Make
2
Not To Scale
Note: All dimensions are in millimeters.
Part ID.: HAE0103
Ref No.:
Part No.:
Material Blank Description:
Finished Part Description:
7PH8101007 Steel
Steel Rod Blank 3 x 82mmHeating Piston Drive Rod 80mm
Qty To Make
1
Not To Scale
Note: All dimensions are in millimeters.
Part ID.: HAE0122

-16- h8101 stirling Engine Kit 1
8-9
Ref No.:
Part No.:
Material Blank Description:
Finished Part Description:
8PH8101008 Brass
Brass Rod Blank 3 x 86mmBent Drive Rod 85mm
Qty To Make
1
Not To Scale
Note: All dimensions are in millimeters.
Part ID.: HAE0119
Ref No.:
Part No.:
Material Blank Description:
Finished Part Description:
9PH8101009 Brass
Brass Square Blank 12 x 12 x 42mmRocker Arm Shaft Support
Qty To Make
1
Not To Scale
Note: All dimensions are in millimeters.
Part ID.: HAE0109

h8101 stirling Engine Kit 1 -17-
Ref No.:
Part No.:
Material Blank Description:
Finished Part Description:
10 PH8101010 Brass
Brass Rod Blank 11 x 92mm Rocker Arm Shaft
Qty To Make
1
Not To Scale
Note: All dimensions are in millimeters.
Part ID.: HAE011510-11
Ref No.:
Part No.:
Material Blank Description:
Finished Part Description:
10 PH8101010 Brass
Brass Rod Blank 11 x 92mm Rocker Arm Shaft
Qty To Make
1
Not To Scale
Note: All dimensions are in millimeters.
Part ID.: HAE0115
Ref No.:
Part No.:
Material Blank Description:
Finished Part Description:
11PH8101011 Brass
Brass Cylinder Blank 10 x 20mmSlotted Pivot Connector #1
Qty To Make
1
Not To Scale
Note: All dimensions are in millimeters.
Part ID.: HAE0118
-.8
(3)1 x 07 (3)1 x 07

-18- h8101 stirling Engine Kit 1
12-13
Ref No.:
Part No.:
Material Blank Description:
Finished Part Description:
12 PH8101012 Brass
Brass Plate Blank 96 x 12 x 3mm Rocker Arm
Qty To Make
1
Not To Scale
Note: All dimensions are in millimeters.
Part ID.: HAE0117
Ref No.:
Part No.:
Material Blank Description:
Finished Part Description:
13 PH8101013 Brass
Brass Rod Blank 6 x 42mm Drive Rod Sleeve
Qty To Make
1
Not To Scale
Note: All dimensions are in millimeters.
Part ID.: HAE0111

h8101 stirling Engine Kit 1 -19-
14-15
Ref No.:
Part No.:
Material Blank Description:
Finished Part Description:
14 PH8101014 Aluminum
Aluminum Cube Blank 65 x 45mmCooling Cylinder Base
Qty To Make
1
Not To Scale
Note: All dimensions are in millimeters.
Part ID.: HAE0110
Ref No.:
Part No.:
Material Blank Description:
Finished Part Description:
15 PH8101015 Aluminum
Aluminum Cylinder Blank 40 x 55mm Cooling Cylinder
Qty To Make
1
Not To Scale
Note: All dimensions are in millimeters.
Part ID.: HAE0112
(7)
3mm
(8)
2mm

-20- h8101 stirling Engine Kit 1
17-18
Ref No.:
Part No.:
Material Blank Description:
Finished Part Description:
17PH8101017 Brass
Brass Rod Blank 8 x 58mmCooling Piston Drive Rod 55mm
Qty To Make
1
Not To Scale
Note: All dimensions are in millimeters.
Part ID.: HAE0125
Ref No.:
Part No.:
Material Blank Description:
Finished Part Description:
18PH8101018 Brass
Brass Cylinder Blank 10 x 20mmSlotted Pivot Connector #4
Qty To Make
1
Not To Scale
Note: All dimensions are in millimeters.
Part ID.: HAE0126

h8101 stirling Engine Kit 1 -21-
19-20
Ref No.:
Part No.:
Material Blank Description:
Finished Part Description:
19PH8101019 Brass
Brass Cylinder Blank 8 x 20mmSlotted Pivot Connect #3
Qty To Make
1
Not To Scale
Note: All dimensions are in millimeters.
Part ID.: HAE0130
Ref No.:
Part No.:
Material Blank Description:
Finished Part Description:
20 PH8101020 Brass
Brass Rod Blank 3 x 13mm Pin 10mm
Qty To Make
1
Not To Scale
Note: All dimensions are in millimeters.
Part ID.: HAE0131

-22- h8101 stirling Engine Kit 1
23-24
Ref No.:
Part No.:
Material Blank Description:
Finished Part Description:
23 PH8101023 Aluminum
Aluminum Cylinder Blank 62 x 20mm Radiator
Qty To Make
1
Not To Scale
Note: All dimensions are in millimeters.
Part ID.: HAE0114
Ref No.:
Part No.:
Material Blank Description:
Finished Part Description:
24PH8101024 Aluminum
Aluminum Cylinder Blank 45 x 40mmCooling Cylinder Base Support
Qty To Make
1
Not To Scale
Note: All dimensions are in millimeters.
Part ID.: HAE0116
h8101 stirling Engine Kit 1 -23-
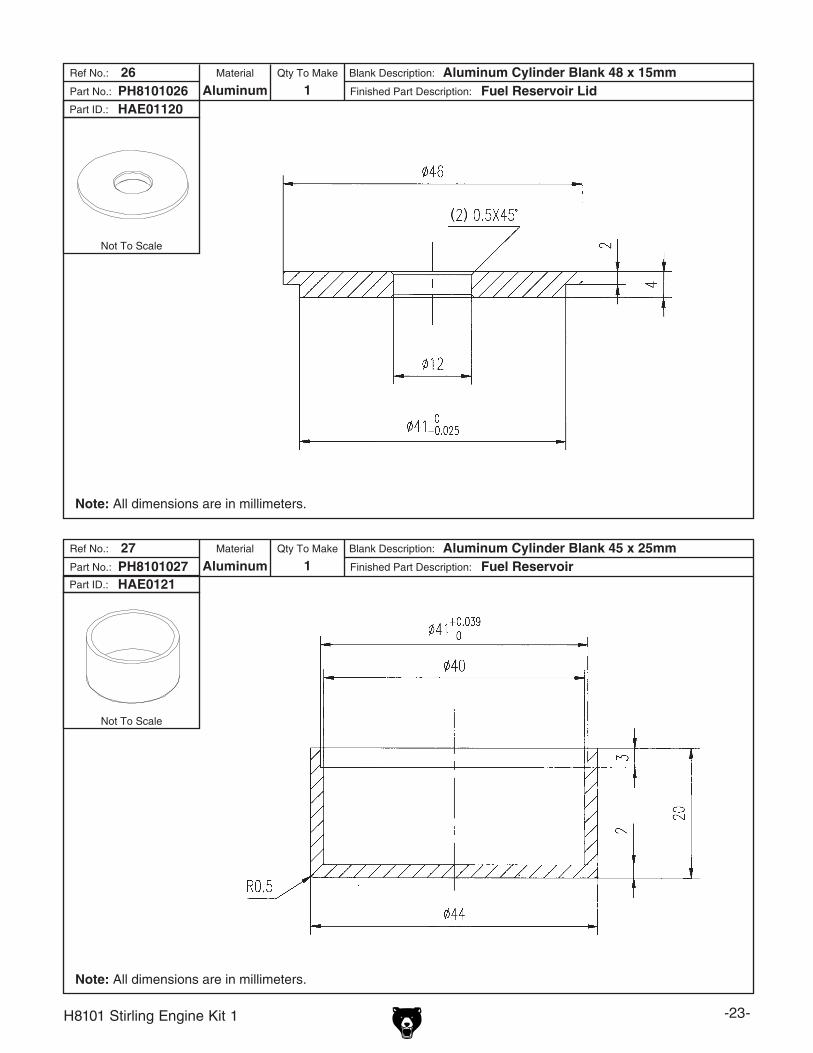
26-27
Ref No.:
Part No.:
Material Blank Description:
Finished Part Description:
26 PH8101026 Aluminum
Aluminum Cylinder Blank 48 x 15mm Fuel Reservoir Lid
Qty To Make
1
Not To Scale
Note: All dimensions are in millimeters.
Part ID.: HAE01120
Ref No.:
Part No.:
Material Blank Description:
Finished Part Description:
27 PH8101027 Aluminum
Aluminum Cylinder Blank 45 x 25mm Fuel Reservoir
Qty To Make
1
Not To Scale
Note: All dimensions are in millimeters.
Part ID.: HAE0121

-24- h8101 stirling Engine Kit 1
28-29
Ref No.:
Part No.:
Material Blank Description:
Finished Part Description:
28PH8101028 Aluminum
Aluminum Cylinder Blank 42 x 20mmPulley
Qty To Make
1
Not To Scale
Note: All dimensions are in millimeters.
Part ID.: HAE0127
Ref No.:
Part No.:
Material Blank Description:
Finished Part Description:
29 PH8101029 Steel
Steel Rod Blank 3 x 35mm Axle 34mm
Qty To Make
1
Not To Scale
Note: All dimensions are in millimeters.
Part ID.: HAE0105

h8101 stirling Engine Kit 1 -25-
30-31
Ref No.:
Part No.:
Material Blank Description:
Finished Part Description:
30 PH8101030 Brass
Brass Square Blank 6 x 6 x 25mm Connecting Arm
Qty To Make
2
Not To Scale
Note: All dimensions are in millimeters.
Part ID.: HAE0102
Ref No.:
Part No.:
Material Blank Description:
Finished Part Description:
31 PH8101031 Steel
Steel Rod Blank 3 x 25mm Axle 20mm
Qty To Make
1
Not To Scale
Note: All dimensions are in millimeters.
Part ID.: HAE0104

-26- h8101 stirling Engine Kit 1
32-33
Ref No.:
Part No.:
Material Blank Description:
Finished Part Description:
32PH8101032 Brass
Brass Plate Blank 95 x 52 x 3mmBracket
Qty To Make
1
Not To Scale
Note: All dimensions are in millimeters.
Part ID.: HAE0106
Ref No.:
Part No.:
Material Blank Description:
Finished Part Description:
33PH8101033 Brass
Brass Square Blank 18 x 18 x 6mmAxle Bushing
Qty To Make
2
Not To Scale
Note: All dimensions are in millimeters.
Part ID.: HAE0107
(4)R2
(4)04 through
(4)6
thr
ough
(4)4.5through

h8101 stirling Engine Kit 1 -27-
34-35
Ref No.:
Part No.:
Material Blank Description:
Finished Part Description:
34PH8101034 Brass
Brass Hexagon Blank 5.5 x 30mmBrass Hex Nut M3-.5
Qty To Make
3
Not To Scale
Note: All dimensions are in millimeters.
Part ID.: HAE0129
Ref No.:
Part No.:
Material Blank Description:
Finished Part Description:
35PH8101035 Brass
Brass Hexagon Blank 5.5 x 60mmBrass Hex Bolt M3-.5 x 11
Qty To Make
3
Not To Scale
Note: All dimensions are in millimeters.
Part ID.: HAE0128
-28- h8101 stirling Engine Kit 1
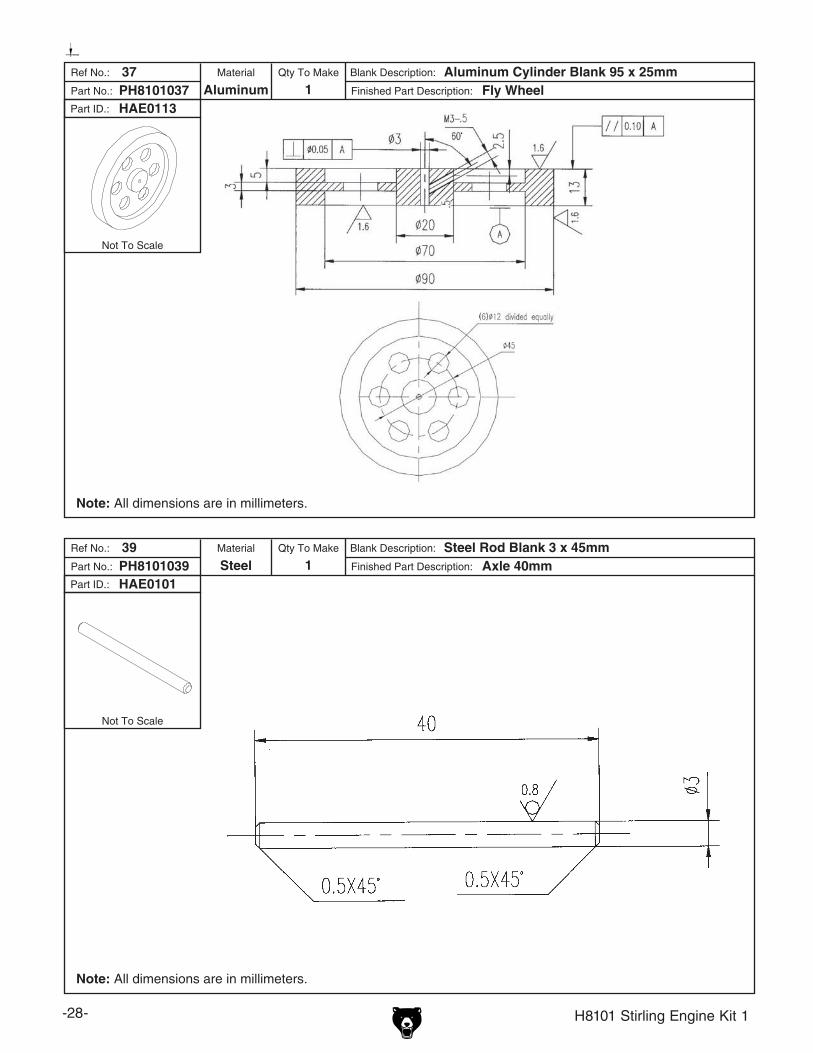
37-39
Ref No.:
Part No.:
Material Blank Description:
Finished Part Description:
37PH8101037 Aluminum
Aluminum Cylinder Blank 95 x 25mmFly Wheel
Qty To Make
1
Note: All dimensions are in millimeters.
Part ID.: HAE0113
Not To Scale
Ref No.:
Part No.:
Material Blank Description:
Finished Part Description:
39 PH8101039 Steel
Steel Rod Blank 3 x 45mm Axle 40mm
Qty To Make
1
Note: All dimensions are in millimeters.
Not To Scale
Part ID.: HAE0101
h8101 stirling Engine Kit 1 -29-
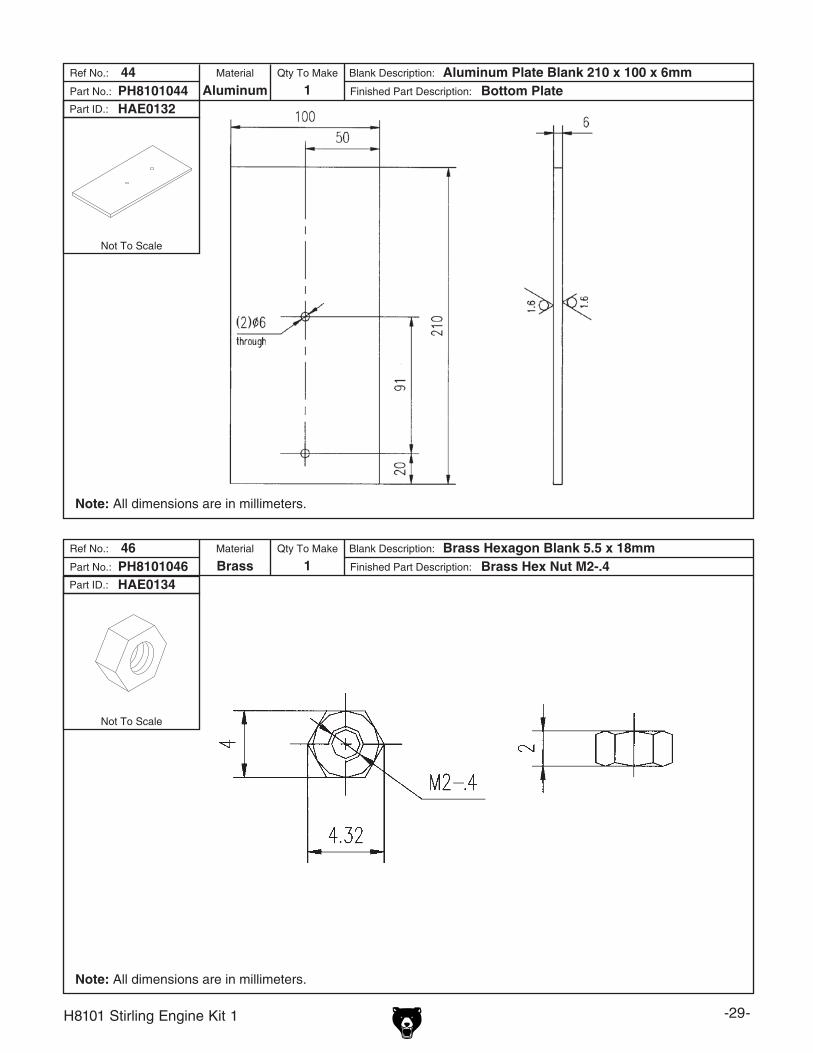
44-46
Ref No.:
Part No.:
Material Blank Description:
Finished Part Description:
44 PH8101044 Aluminum
Aluminum Plate Blank 210 x 100 x 6mm Bottom Plate
Qty To Make
1
Note: All dimensions are in millimeters.
Not To Scale
Part ID.: HAE0132
Ref No.:
Part No.:
Material Blank Description:
Finished Part Description:
46PH8101046 Brass
Brass Hexagon Blank 5.5 x 18mmBrass Hex Nut M2-.4
Qty To Make
1
Note: All dimensions are in millimeters.
Not To Scale
Part ID.: HAE0134

-30- h8101 stirling Engine Kit 1
47
Ref No.:
Part No.:
Material Blank Description:
Finished Part Description:
47PH8101047 Brass
Brass Hexagon Blank 5.5 x 25mmBrass Hex Bolt M2-.4 x 12
Qty To Make
1
Note: All dimensions are in millimeters.
Not To Scale
Part ID.: HAE0133

grizzly industrial, inc. warrants every product it sells for a period of 1 year to the original purchaser from the date of purchase. this warranty does not apply to defects due directly or indirectly to misuse, abuse, negligence, accidents, repairs or alterations or lack of maintenance. this is grizzly’s sole written warranty and any and all warranties that may be implied by law, including any merchantability or fitness, for any par-ticular purpose, are hereby limited to the duration of this written warranty. We do not warrant or represent that the merchandise complies with the provisions of any law or acts unless the manufacturer so warrants. in no event shall grizzly’s liability under this warranty exceed the purchase price paid for the product and any legal actions brought against grizzly shall be tried in the state of Washington, County of Whatcom.
We shall in no event be liable for death, injuries to persons or property or for incidental, contingent, special, or consequential damages arising from the use of our products.
to take advantage of this warranty, contact us by mail or phone and give us all the details. We will then issue you a “return number,’’ which must be clearly posted on the outside as well as the inside of the carton. We will not accept any item back without this number. proof of purchase must accompany the merchandise.
the manufacturers reserve the right to change specifications at any time because they constantly strive to achieve better quality equipment. We make every effort to ensure that our products meet high quality and durability standards and we hope you never need to use this warranty.
please feel free to write or call us if you have any questions about the machine or the manual.
thank you again for your business and continued support. We hope to serve you again soon.
WaRRaNTy aND RETuRNS

Buy Direct and Save with Grizzly® – Trusted, Proven and a Great Value!
~Since 1983~
ORDER24 HOURS A DAY!
1-800-523-4777
Visit Our Website Today For Current Specials!