Model Checking Tag Team: Revit vs Navisworks vs Solibri · 2.3 - Model Checking Tag Team: Revit vs...
36
BILT EUR 2018 GR – Ljubljana Exhibition and Convention Centre, Ljubljana 11 – 13 October 2018 Page 1 of 36 Session 2.3 Model Checking Tag Team: Revit vs Navisworks vs Solibri Owen Slootweg, Bimforce Class Description A key aspect of any BIM process it is how to keep your BIM in shape. Most project teams rely on a specific software tool to keep the BIM in shape. However, is a single software always the right solution? Or should the Model Checking part of a BIM project be filled in based on the actual project scope and workflow? This lecture will discuss three of the major software solutions used to perform Model Checks: Revit Model Checker, Navisworks Manage and Solibri Model Checker. Each of these tools has it’s pro’s and cons which will be discussed. Each tool also has it’s unique features that will be demonstrated. But more importantly: this lecture will discuss ways of choosing the right tool for the job. Attendees will learn how to assess a project setup and set up a Model Checking strategy that ultimately will span multiple levels of Model Checking, based on the project phase, desired results and parties involved in the project. Key Learning Outcomes: 1. Learn the major differences between different model checking software 2. Learn the unique features of each model checking software and how to leverage them 3. Learn to assess a project, it’s scope and choose the right software accordingly
Transcript of Model Checking Tag Team: Revit vs Navisworks vs Solibri · 2.3 - Model Checking Tag Team: Revit vs...

BILT EUR 2018
GR – Ljubljana Exhibition and Convention Centre, Ljubljana
11 – 13 October 2018
Page 1 of 36
Session 2.3
Model Checking Tag Team: Revit vs Navisworks vs
Solibri Owen Slootweg, Bimforce
Class Description
A key aspect of any BIM process it is how to keep your BIM in shape. Most project teams
rely on a specific software tool to keep the BIM in shape. However, is a single software
always the right solution? Or should the Model Checking part of a BIM project be filled
in based on the actual project scope and workflow? This lecture will discuss three of the
major software solutions used to perform Model Checks: Revit Model Checker,
Navisworks Manage and Solibri Model Checker. Each of these tools has it’s pro’s and
cons which will be discussed. Each tool also has it’s unique features that will be
demonstrated. But more importantly: this lecture will discuss ways of choosing the right
tool for the job. Attendees will learn how to assess a project setup and set up a Model
Checking strategy that ultimately will span multiple levels of Model Checking, based on
the project phase, desired results and parties involved in the project.
Key Learning Outcomes:
1. Learn the major differences between different model checking software
2. Learn the unique features of each model checking software and how to leverage
them
3. Learn to assess a project, it’s scope and choose the right software accordingly

2.3 - Model Checking Tag Team: Revit vs Navisworks vs Solibri
Owen Slootweg, Bimforce Bimforce
Page 2 of 36
About the Speaker:
Owen began his career as an architect at Oosterhuis Lenard
where he designed and engineered complex shapes. During
his studies, at TU Delft, he completed Virtual TU Delft. This was
an online interactive 3D model of the TU Delft campus. At the
department Hyperbody, faculty of architecture he did
research on real-time BIM. Also, he was a teacher of Msc
students at the faculty of architecture of Delft University of
Technology. From 2011 to 2016 he worked for cepezed as an
architect and BIM manager. Currently he is working as a BIM
consultant and Information specialist at Bimforce.

2.3 - Model Checking Tag Team: Revit vs Navisworks vs Solibri
Owen Slootweg, Bimforce Bimforce
Page 3 of 36
Contents 1. Model Checking Types ............................................................................................................. 4
2. Functionality ............................................................................................................................... 7
2. Introductions ............................................................................................................................. 11
2. File Formats ............................................................................................................................... 14
3. Templates .................................................................................................................................. 15
4. Making your own rules ............................................................................................................ 18
5. Reporting/Output .................................................................................................................... 22
6. Examples/Use cases ................................................................................................................ 25
Accessibility check for doors .................................................................................................. 25
Height check of sloped roofs ................................................................................................. 31
7. Pro’s and Con’s: conclusion .................................................................................................. 34
2.3 - Model Checking Tag Team: Revit vs Navisworks vs Solibri
Owen Slootweg, Bimforce Bimforce
Page 4 of 36
1. Model Checking Types
Model checking can be done in several different ways, serving several different
purposes. Before starting any kind of checking you will have to decide what the goal is
of your specific check. The three Model Checkers we are about to look at, are able to
answer questions about your model in the range of: Did I model properly? Are all the
necessary parameters filled out? Is my model ready for export? Is my model ready for its
weekly upload to the PIM environment? Will the design pass the building legislation?
Where, in general, your goal would of course be to get a positive answer to these
questions.. In order to be able to answer these questions they have to be disseminated
into a series of manually created or pre-set rules, which will then need to be passed by
all of your building elements or a filtered selection of them. In order to create a little bit
of structure for the reading and understanding of this handout we will establish a
differentiation in the following model checking types, which can be used separately or
combined, depending on your particular goal(s).
Geometry check
Perhaps the most elemental of all model checking types you can perform is the
Geometry check. This is all about the shape/form and presence of building elements
that have been modelled, disregarding any kind of data or information that has been
added to it. Examples of a geometry check can be:
• Clash detection: a check on whether or not the geometry of different building
elements intersect each other or near each other within a given margin
• Doubles checking: a check on duplicates in the same place (which is in essence
a 100% geometry clash)
• Presence/absence of certain building elements: a basic check on what has
been modelled or what is missing
• Distances between elements
Data consistency check
A second, almost equally important checking type is that of the data. In most cases, a
model will have parameters that are governed by its authoring software, in distinction
to the parameters that the user has to fill out manually. Since the software maintained
parameters are in essence always correct (or at least consistently given a value), they
will not likely need to be checked for consistency. For instance think about the length

2.3 - Model Checking Tag Team: Revit vs Navisworks vs Solibri
Owen Slootweg, Bimforce Bimforce
Page 5 of 36
and area of a wall, which are automatically controlled by Revit. These are always
consistent and could be used for a requirements check (see below), but checking
them to see if they are filled out properly is kind of pointless. So, this leaves us with the
user-defined parameters as well as the parameters which would be ready availably
from within your authoring software, yet not governed by it. The latter ones being for
instance: Revit’s Assembly Code, Description, Comments, Type Comments and such..
These user parameters are viable for a consistency check, since they are likely to
contain errors, or could have been left blank in cases where they should not have
been. The follow consistency checks can be done:
• Presence/absence parameters: have certain parameters been added to the
model that are needed for the project?
• Value check: are parameter values empty or filled in?
• Value correctness: is the value correct or within a given range/bandwidth/limit?
Naming conventions check
The naming conventions check may seem rather unimportant at first thought, however
without it the filtering and sorting done in other checks may become very tedious or
even impossible. Also, the naming conventions check may be an intrinsic part of one of
the possible requirements checks. Naming conventions checks may apply to building
elements or parameters. In naming conventions checks one would generally check for:
• Type-O’s: are spaces used when maybe forbidden, is text capitalized when
everything needs to be de-capitalized, have forbidden symbols been used, and
other general writing/textual issues..
• Standards, like DRS and COBie, have fixed names or syntax that needs to be
followed
• Project standards: perhaps some specific parameters are required to be used by
all modelling partners in the project
• By doing naming checks you can identify objects that are supposed to be similar
however are named somewhat differently. Take the example of a Revit Room
being named: toilet, Toilet, WC, water closet, water-closet, or bathroom.
Requirements check
The requirements checks are about checking if your building elements fulfil the
requirements that apply to your project. These can be requirements that are set by the
2.3 - Model Checking Tag Team: Revit vs Navisworks vs Solibri
Owen Slootweg, Bimforce Bimforce
Page 6 of 36
government or legislation (f.i. will the building design pass your country’s ruling Building
Code?), by the client (f.i. a program of demands) or by your own company or a project
partner (f.i. in a BIM protocol or BIM workplan). Another requirement could apply due to
the decision to follow a certain modelling standard, like f.i. the DRS (Dutch Revit
Standards) or COBie. Here are a few examples of what kind of requirements you could
encounter (or already have encountered):
• Building Code/legislation:
o Minimal ceiling heights for certain types of spaces
o Minimum amount of toilets and bathrooms (with showers)
o Minimal dimensions for accessibility of wheelchairs
o Minimal door widths and heights
o Minimal widths of stairs, maximum heights and correct step dimensions
• Design criteria
o Program of demands
o Minimal window sizes
o Floor areas matching with the room type?
• Standards:
o Correct syntax of all building elements?
o COBie parameters present and filled out?
o Assembly Codes all filled out and matching with the Revit Category?
o Technical descriptions correctly matched with the corresponding building
elements?

2.3 - Model Checking Tag Team: Revit vs Navisworks vs Solibri
Owen Slootweg, Bimforce Bimforce
Page 7 of 36
2. Functionality
While all our model checkers share a lot of the same functionality, each model checker
does have its own special features making it more powerful for certain types of checks
or more useful in certain situations. This is what we will go through per checker in the
following chapters. But first we will look into some of the general functionality that is
shared by each of our checkers, as to get an understanding of how model checking
works in general.
Filtering
Each of our checkers is similar in the sense that they all do their checks based on the
filtering of objects by a certain condition. Imagine you need to check if all your
windows have the correct Assembly Code. First off, you would have to filter out all the
elements in you model based on their Category. Secondly you would check if the
value of those elements’ Assembly Code matches with your desired value. Written in
pseudo code it could look somewhat like this:
Element Category = Window
Element Assembly Code = 31
In this above example the = sign is the condition. The text on its left is the Element
property and on the right is the desired value of that property. Conditions (also called
operators) come in various types: =, ≠, >, <, contains, does not contain, has value, is
empty, is defined, is undefined and so on. Some of these conditions apply to numbers
(like < and >) and others to text (contains, does not contain) and can be used to check
if the values you are looking at fall within a certain range, or a name or code contains
a certain string of text (like “Rob” is part of “Robert”). While not all conditions are
available in all of our Model Checkers, the same results can mostly be achieved in
checks regardless.
Stacking of filters
The options in the stacking of filters on top of each other gives you a way of controlling
which elements will be checked. The options are: AND, OR/Include, Exclude, Ignore,
Negate.

2.3 - Model Checking Tag Team: Revit vs Navisworks vs Solibri
Owen Slootweg, Bimforce Bimforce
Page 8 of 36
If we re-use the example of before we will see how these options work:
Element Category = Window
AND
Element Assembly Code = 31
This means we are filtering for Elements of which both the Category is “Window” and
the Assembly Code is “31”.
Element Category = Window
OR
Element Assembly Code = 31
This means we are filtering for Elements of which the Category is “Window” regardless of
what their Assembly Code is, and Elements of which the Assembly Code is “31”
regardless of what their Category is. Results will consequently also contain those
elements of which both the Category is “Window” and the Assembly Code is “31”.
Include
Element Category = Window
Exclude
Element Assembly Code = 31
This means we are filtering for Elements of which the Category is “Window”, except for
those of which the Assembly Code is “31”. Needless to say that the Exclude option is
only necessary for elements that are passed by a previous Include option. Using two
Include options here would result in the second Include option functioning as an OR
option.
Element Category = Window
Ignore
Element Assembly Code = 31
This means we are filtering for Elements of which the Category is “Window”, while
Elements of which the Assembly Code is “31” are not evaluated.
Negate
Element Category = Window
This means we are filtering for all Elements of which the Category is not “Window”. In
essence this is an inverted Include option, where it does not return the matched results,
but instead the results that did not match the condition.

2.3 - Model Checking Tag Team: Revit vs Navisworks vs Solibri
Owen Slootweg, Bimforce Bimforce
Page 9 of 36
RMC: AND, OR, Exclude
Revit Model Checker Configurator stacking options
SMC: Include(=OR), Exclude, Ignore
Solibri Model Checker (Ruleset Manager) stacking options
2.3 - Model Checking Tag Team: Revit vs Navisworks vs Solibri
Owen Slootweg, Bimforce Bimforce
Page 10 of 36
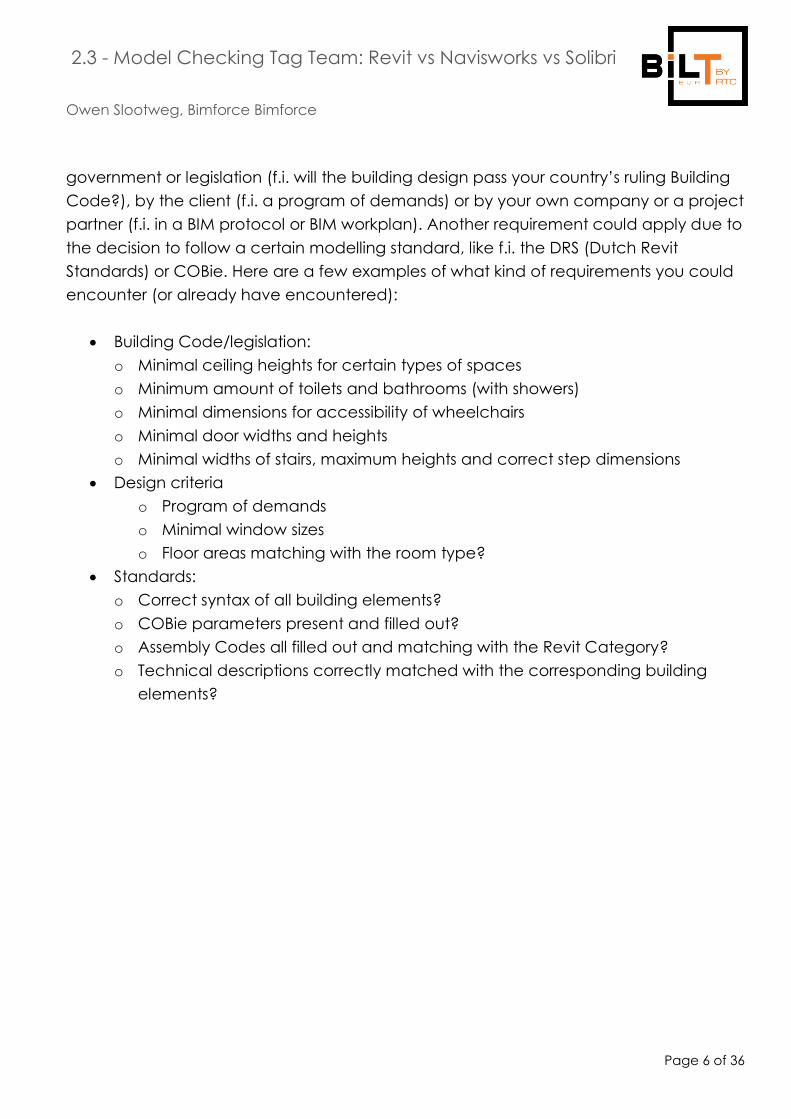
NWM: AND, OR(=Include), Negate
Navisworks Manage (Find Items menu) stacking options
As you may have noticed, not all stacking options are available in all checkers. But that
doesn’t mean that a check, done in one checker, is impossible to do in another.
For instance, making a check in RMC (which does not have a Negate stacking option)
that actually returns all of the non-matching Elements instead of the matching Elements
is not impossible. You just have to do it in a different way. For instance by smartly using
the condition. An = condition could be switched to an ≠ condition, inverting your
match, giving you the same result. So eventually these little differences can be
overcome quite easily, and are not what really separates one Checker from the other.
Furthermore, the Include option of SMC is the same as the OR option of RMC and NWM,
it’s just the name that is different.

2.3 - Model Checking Tag Team: Revit vs Navisworks vs Solibri
Owen Slootweg, Bimforce Bimforce
Page 11 of 36
2. Introductions
First let’s have a look at our checkers in a brief introduction.
Revit Model Checker (RMC)
RMC is a plug-in for Revit, which means you can only open it via Revit. In the add-ins
menu you have access to the Configure menu where you can open check
configurations and set which checks within that configuration you want to be
executed. Also, here you can define what unit format you want to use: Metric or
Imperial. When you have loaded and set your configuration you can start the model
check from the run check menu. Here links can be chosen to be included or excluded
in the check, or you can add models on the fly. These models can be existing links in
your open Revit file or external models (even if they’re not opened in Revit!).
The configurations you open from the Configure menu can be existing templates or
your own custom configurations. These can be made using a separate program outside
of Revit: RMCConfigurator. With the RMCConfigurator you can subdivide your
rules/checks into different chapters and sections, as well as configuring each individual
filtering.
After running a check a report menu pop up, with all the results of your check. A view
displaying the elements involved in an issue detected by your check, can be opened
automatically from within the report menu.
The RMC toolkit in Revit’s Add-ins tab

2.3 - Model Checking Tag Team: Revit vs Navisworks vs Solibri
Owen Slootweg, Bimforce Bimforce
Page 12 of 36
The Configure menu of RMC
RMCConfigurator is not run from within Revit and has its own interface
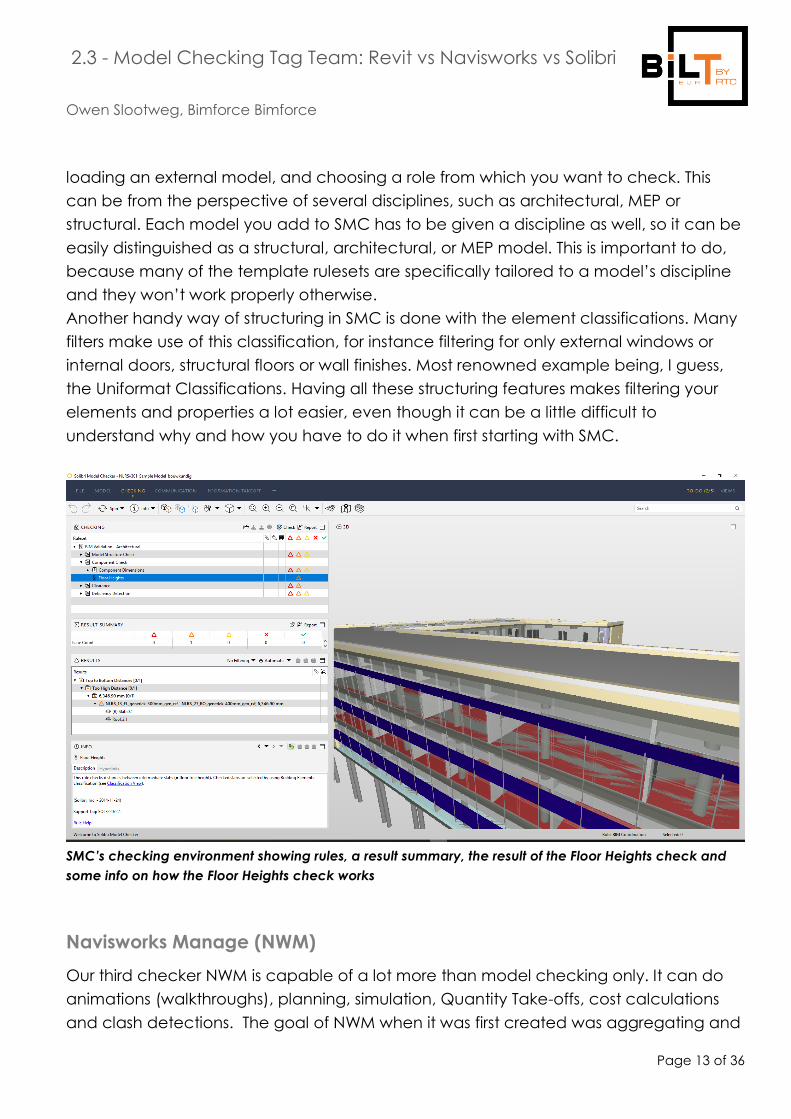
Solibri Model Checker (SMC)
SMC is a highly specialized model checker with a wide variety of checking possibilities,
classification options, issues management and quantity take-offs. In SMC you start off by
2.3 - Model Checking Tag Team: Revit vs Navisworks vs Solibri
Owen Slootweg, Bimforce Bimforce
Page 13 of 36
loading an external model, and choosing a role from which you want to check. This
can be from the perspective of several disciplines, such as architectural, MEP or
structural. Each model you add to SMC has to be given a discipline as well, so it can be
easily distinguished as a structural, architectural, or MEP model. This is important to do,
because many of the template rulesets are specifically tailored to a model’s discipline
and they won’t work properly otherwise.
Another handy way of structuring in SMC is done with the element classifications. Many
filters make use of this classification, for instance filtering for only external windows or
internal doors, structural floors or wall finishes. Most renowned example being, I guess,
the Uniformat Classifications. Having all these structuring features makes filtering your
elements and properties a lot easier, even though it can be a little difficult to
understand why and how you have to do it when first starting with SMC.
SMC’s checking environment showing rules, a result summary, the result of the Floor Heights check and
some info on how the Floor Heights check works
Navisworks Manage (NWM)
Our third checker NWM is capable of a lot more than model checking only. It can do
animations (walkthroughs), planning, simulation, Quantity Take-offs, cost calculations
and clash detections. The goal of NWM when it was first created was aggregating and
2.3 - Model Checking Tag Team: Revit vs Navisworks vs Solibri
Owen Slootweg, Bimforce Bimforce
Page 14 of 36
reviewing models, but as years past it gained a lot more functionality. To get started
with checking you open a model (NWM can virtually handle all file formats) and
append (aggregate) all other models to it that you need.
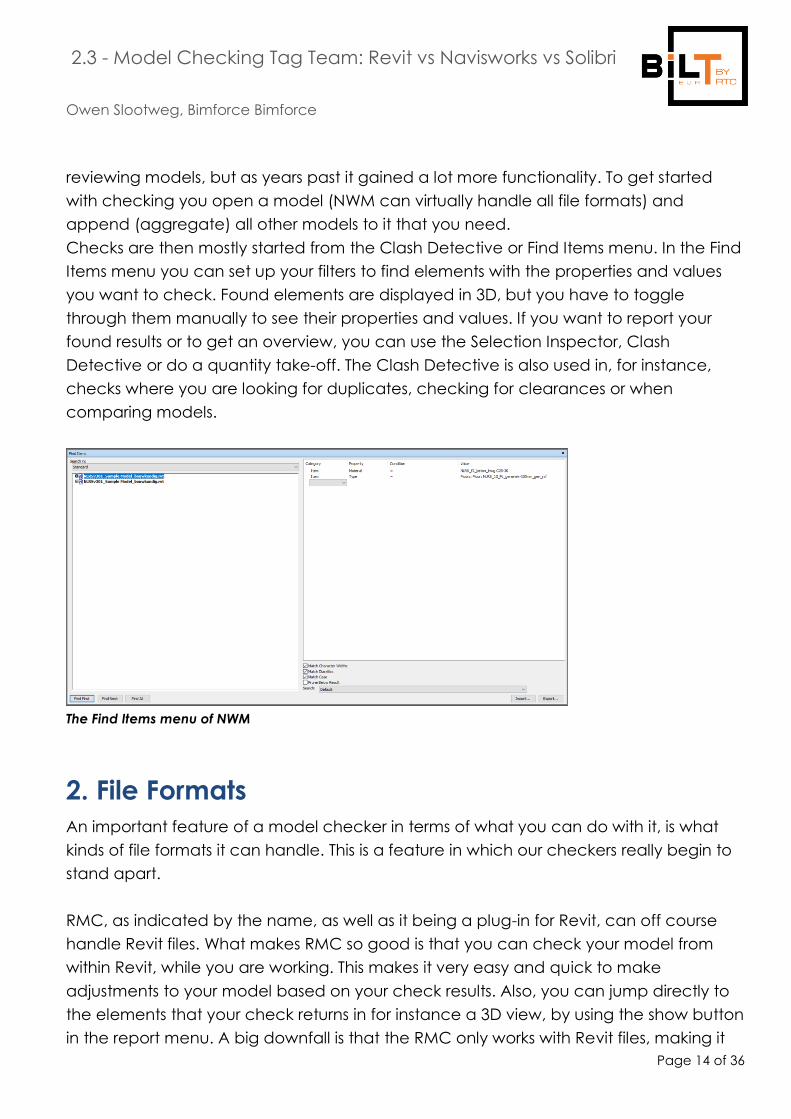
Checks are then mostly started from the Clash Detective or Find Items menu. In the Find
Items menu you can set up your filters to find elements with the properties and values
you want to check. Found elements are displayed in 3D, but you have to toggle
through them manually to see their properties and values. If you want to report your
found results or to get an overview, you can use the Selection Inspector, Clash
Detective or do a quantity take-off. The Clash Detective is also used in, for instance,
checks where you are looking for duplicates, checking for clearances or when
comparing models.
The Find Items menu of NWM
2. File Formats
An important feature of a model checker in terms of what you can do with it, is what
kinds of file formats it can handle. This is a feature in which our checkers really begin to
stand apart.
RMC, as indicated by the name, as well as it being a plug-in for Revit, can off course
handle Revit files. What makes RMC so good is that you can check your model from
within Revit, while you are working. This makes it very easy and quick to make
adjustments to your model based on your check results. Also, you can jump directly to
the elements that your check returns in for instance a 3D view, by using the show button
in the report menu. A big downfall is that the RMC only works with Revit files, making it
2.3 - Model Checking Tag Team: Revit vs Navisworks vs Solibri
Owen Slootweg, Bimforce Bimforce
Page 15 of 36
harder to review other BIM formats,. This can be done by workaround though, by linking
the file (e.g. an IFC) into an open Revit file, but checks may give a bit confusing results.
For instance, if you are linking an IFC model containing a space (IfcSpace), this space
will be considered a Generic Model by Revit (Architecture), where you would expect
perhaps that Revit would consider it a Room (as in; of the Revit Category ‘Rooms’). This
issue does not occur with SMC or NWM, giving those a bit more preference when using
IFC’s.
SMC is especially suitable to work with IFC file formats, but is in turn unable to work with
Revit native files. This means that if you wish to check your Revit model in Solibri, you
have to export it to IFC first. Having experience with (properly) making an IFC-export
would help a lot in this case, since a crummy IFC model will make doing a good check
quite the challenge. In IFC-exporting (from Revit) it is important to check and uncheck
the right boxes, ensuring all the parameters you need in your IFC will come across, while
keeping the unnecessary ones out. Knowing in advance what you are going to check
in Solibri would be the best first step.
NWM is the big star in handling file formats; it can nearly handle all relevant file formats,
like RVT, IFC, STEP, STL, 3DS, DWG, FBX and more. It even imports Revit files virtually
unaffected (lossless), keeping almost all of Revit’s parameters, constraints and host
information available for you to check. This is handy, because you can always find
anything back that you need for any kind of check, but at the same time it sometimes
makes looking for it a lot more tedious.
3. Templates
Another clear distinction between our checkers can be found in their template files. In
the templates we find a series of pre-set checks and combination of checks (Rules and
Rulesets). Templates are what you would go for when you want to do a quick check,
without having to concern yourself too much with how a Checker works or how you
would have to build your own rules/checks. Just quick and simple.. do a check.
2.3 - Model Checking Tag Team: Revit vs Navisworks vs Solibri
Owen Slootweg, Bimforce Bimforce
Page 16 of 36
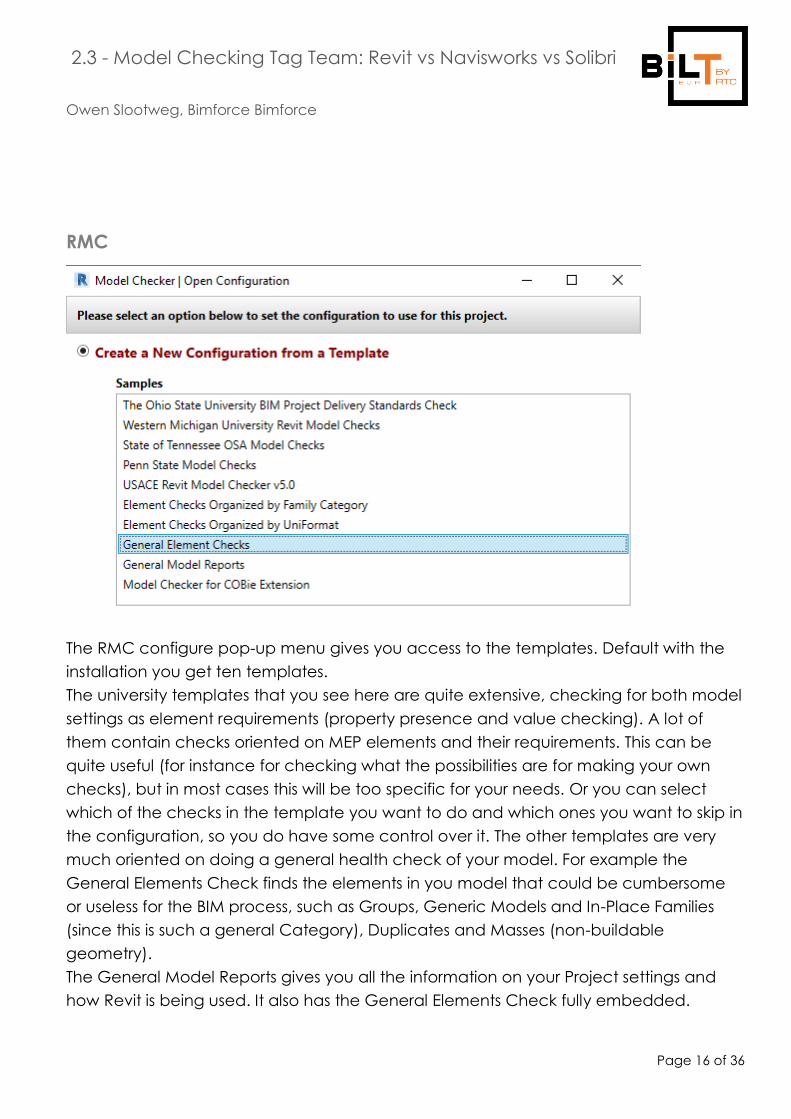
RMC
The RMC configure pop-up menu gives you access to the templates. Default with the
installation you get ten templates.
The university templates that you see here are quite extensive, checking for both model
settings as element requirements (property presence and value checking). A lot of
them contain checks oriented on MEP elements and their requirements. This can be
quite useful (for instance for checking what the possibilities are for making your own
checks), but in most cases this will be too specific for your needs. Or you can select
which of the checks in the template you want to do and which ones you want to skip in
the configuration, so you do have some control over it. The other templates are very
much oriented on doing a general health check of your model. For example the
General Elements Check finds the elements in you model that could be cumbersome
or useless for the BIM process, such as Groups, Generic Models and In-Place Families
(since this is such a general Category), Duplicates and Masses (non-buildable
geometry).
The General Model Reports gives you all the information on your Project settings and
how Revit is being used. It also has the General Elements Check fully embedded.

2.3 - Model Checking Tag Team: Revit vs Navisworks vs Solibri
Owen Slootweg, Bimforce Bimforce
Page 17 of 36
SMC
Wizard guiding you through the available rulesets
Rulesets with their accompanying sections and rules loaded in the
checking environment
One of the nice things about Solibri is that their standard library of rules is quite big,
which gives you a lot to choose from. As the above images illustrate, there are a whole
bunch of rulesets (e.g. Advance Space Check, BIM Validation - Architectural) to be

2.3 - Model Checking Tag Team: Revit vs Navisworks vs Solibri
Owen Slootweg, Bimforce Bimforce
Page 18 of 36
found containing a whole bunch of rules/checks (e.g. Model Hierarchy, Building Floors,
Doors and Windows…), all divided over several sections (Model Structure Check,
Component Check..). The rules are all preconfigured, leaving only the values for you to
fill out. If needed, you can adjust the values, as well as the filter’s condition/operator,
the elements, the stacking option (and order) or property on the fly, directly from the
checking environment by right-clicking the rule and selecting “rule parameters”. You
can even add entirely new filters. This will not affect the existing template you started
out with, unless you decide to specifically save it as such.
In a lot of cases, when working from the Solibri templates, you will get a lot more checks
than you might want to do. You can either ignore the results or simply disable the
checks you don’t need.
NWM
To put is short: Navisworks doesn’t have templates. All your filtering in NWM is done in
the Find Items menu. Here you can add and set all the filters you need, but this is all
manual work. There is an import option for external XML files with preset filters,
unfortunately they don’t come with Navisworks’s out-of-the-box installation. This
import/export function is used for storing and loading your own filters or filters shared by
others. The lack of templates makes NWM a little less convenient in cases where you just
need to do a quick check or if you are a first time user. Also, because of this, making
more complex searches is a lot more difficult compared to for instance SMC, where you
can just combine the different existing rules to suit your needs.
4. Making your own rules
Obviously you may at times need to do checks for which no template exists. In this case
you will have to create your own checks. All of our checkers have their own way of
doings so.
RMC
To create our own checks for RMC we have to open the Revit Model Checker
Configurator, which is a separate stand-alone piece of software and not included in
the Revit Model Checker plug-in. In the configurator we can build our custom rules with
the Check Builder, which we would later open in the RMC plug-in in order to run it.

2.3 - Model Checking Tag Team: Revit vs Navisworks vs Solibri
Owen Slootweg, Bimforce Bimforce
Page 19 of 36
The checks can be made with a wizard or the advanced menu. Though the advanced
menu is not overly difficult, in some cases you might just find it easier to use the wizard.
When you are finished with the wizard, you could always review and edit your check
through the advanced menu. Keeping the RMCConfigurator open next to Revit makes
it easy and quick to edit your checks and test-run it immediately in your model. You just
hit ‘save’ in RMCC and then hit ‘run’ in RMC.
RMC configurator showing an example of a Door dimensions check
Building checks to evaluate properties and their values are pretty straightforward, as
are presence checks for elements and properties. An easy trick to get started is to go
over the sample files provided by:
https://www.biminteroperabilitytools.com/modelcheckerconfigurator.php and see how
those checks and their filters are set up. In some cases it might even be sufficient to just
directly use one of the examples. RMCConfigurator uses Revt API code (programming
language) here and there which may be a bit off-putting to some people. However,
you will be very likely to understand what is meant in most situations (e.g. you might
have to fill out OST_Doors as a property, which is offcourse the Doors Category of Revit).
Sometimes programming language could be needed to complete a more difficult
check that you might not be able to come up with yourself. You would have to

2.3 - Model Checking Tag Team: Revit vs Navisworks vs Solibri
Owen Slootweg, Bimforce Bimforce
Page 20 of 36
consider one of the other checkers in that case. Nonetheless, RMC is to most easy way
to create your own checks in comparison to SMC and NWM.
Would you be able to come up with the above example of a duplicates check? The Value Code
dropdown gives no options to choose from!
SMC
In SMC you use the Ruleset Manager to create your own checks. Next to the templates
(in Ruleset Folders, see image below) for complete checks, Solibri also has a library of
separate rules (in Libraries, see image below), which you can use to create your own
checks. The templates can be used as an underlay or inspiration, or you can start from
scratch.

2.3 - Model Checking Tag Team: Revit vs Navisworks vs Solibri
Owen Slootweg, Bimforce Bimforce
Page 21 of 36
SMC hast a vast amount of rules to choose from and not all of them are as
straightforward to set up as we have seen in RMCConfigurator. SMC will therefore be a
little more difficult to learn, but you can do a lot more versatile checks than in RMC or
NWM. Besides, there are help files accessible directly from the Workspace (see image
above) for each rule individually, so learning how to use them is pretty easy.
If you create a new Ruleset under the “Rulesets Open in SMC” folder in the Ruleset
Manager any changes you make from there, are directly updated in the checking
environment. Once you have some rules in your Ruleset, it is possible to adjust their
elements, properties, values and stacking options (operators) from the checking
environment on the fly. This will also automatically be saved back into the Ruleset
Manager.
NWM
Creating rules in NWM is done with the Find Items menu or the Clash Detective or a
combination of both, depending on what you are trying to achieve. When you are
aiming to see if certain elements contain the right properties or if those have the right
values, the Find Items menu would suffice. If you want to list up all the found items you
can use the Selection Inspector (or do a quantity take-off). If you want to check for
duplicate elements or do a model comparison you would need the Clash Detective.
The Find Items menu is where you set up all you filters, in the same way as we have seen
for RMC and SMC. Since there are no templates in NWM, you might feel a little lost at
first, also considering there are a lot of categories and properties to choose from
(especially when you have loaded a Revit model). What is handy though, is the fact
that you can directly see the results of your check in the 3D view, to see if your check
functions as desired. You can save your search and the results in a Search Set for re-use,
or export it so you colleague or project partner can repeat the check in their own
models.
In the Clash Detective you can also set up some rules via the Rules tab, but these are
Ignore-rules only. You can use them to ignore elements that are found by the clashing

2.3 - Model Checking Tag Team: Revit vs Navisworks vs Solibri
Owen Slootweg, Bimforce Bimforce
Page 22 of 36
process. Some of them you can adjust by clicking on the blue underlined text, others
are fixed and just need to be selected/deselected in order for you to use them.
5. Reporting/Output
RMC: HTML, XLS
RMC check results are presented in a pop-up menu that automatically appears after a
check has been run. It gives you an overview of all checks performed and if it contains
passed or failed elements. In front of each failed element there is a ‘show’ button with
which you can display the failed element in Revit, allowing you to adjust it immediately.
The report menu will stay active as you do this, giving you a nice workflow to go through
all failed elements one by one. If someone else is supposed to do this you could either
export the report as an html file or send them your check configuration for them to
recreate you results. You can also copy the report to clipboard and then paste it into
excel or word.

2.3 - Model Checking Tag Team: Revit vs Navisworks vs Solibri
Owen Slootweg, Bimforce Bimforce
Page 23 of 36
Example of a check report in RMC (unexported)
SMC: SMC file itself, XLS, XLSX, PDF, RTF, BCF
The results of a check are reported in SMC in the checking environment. You get a
summary of the results just beneath the rules that have been executed by the check. By
clicking each individual rule, you get the elements involved listed in the Results menu.
Here you can click each result in order to highlight the involved elements in 3D.
You can save the reported results in SMC in principle by just saving your SMC file, but if
you need to communicate the results with people that do not have SMC there is an
option to save it as an excel file, a pdf or RTF (Rich Text Format), which f.i. opens neatly
in Word, containing layout and formatting.
SMC also has a way to communicate the results in BCF format, you then first have to
make a presentation of your results, and add a title, description, status etc. to the issues
you can create out of your check results. This can be exported as a BCF report.

2.3 - Model Checking Tag Team: Revit vs Navisworks vs Solibri
Owen Slootweg, Bimforce Bimforce
Page 24 of 36
Check results in SMC
NW: HTML, XML, BCF
Reporting in Navisworks can be done in a few different way: via the Selection Inspector,
the Clash Detective or a Quantity Take-Off.
In the Selection Inspector you just have to select the Search Sets with your check results,
and then you enter the properties you want to see in the Quick Property Definitions (this
is a button in the Selection Inspector menu). Unfortunately you would have to adjust this
(manually) for each different check.
If you have done a check using the Clash Detective you can export the results from the
Results tab as HTML, XML or plain text. If you use the path of the Quantity Take-Off, the
report can be exported to excel or XML. Navisworks also supports BCF, you can best use
additional plug-ins for that.
2.3 - Model Checking Tag Team: Revit vs Navisworks vs Solibri
Owen Slootweg, Bimforce Bimforce
Page 25 of 36
6. Examples/Use cases
Now that we have a good view on the capabilities of our checkers, let’s have a look at
some real-life examples of checks you would do.
Accessibility check for doors
A simple example of a Model check is a check to see if the dimensions of all doors in
your project fulfil certain minimum requirements, let’s say the width and height.
Depending on where the constraints are made in each door’s geometry, the values
may in some Families represent the clear width, while in others it represents the outer
width. In this sense, the interpretation of your Model Check would become vague or
unreliable. These kinds of issues can only be overcome by having good modelling
protocols or libraries with uniform Doors. Sadly, this cannot be dealt with automatically
by any of the model checkers. As goes for more things; good output relies on good
input.
RMC
In the RMC configurator we define two separate checks, one for the door width and
one for the door height. In RMC we need to first Filter the Category of interest, which is
Doors in this case. We want to check to see if we don’t have any Doors with a with
lower than 900mm, so the Parameter: Width is set to be equal to or lower than 900. To
2.3 - Model Checking Tag Team: Revit vs Navisworks vs Solibri
Owen Slootweg, Bimforce Bimforce
Page 26 of 36
finish this check we need to tell RMC that the parameter we are looking for belongs to
a Type, rather than an Instance. This is what I looked up in Revit before starting to set up
my check. Note the stacking options (called “operator” here) are set to “AND”. Same
procedure is repeated for the Height. By creating a separate check for the width and
the height, RMC will report the results of both checks with their corresponding failure
message.

2.3 - Model Checking Tag Team: Revit vs Navisworks vs Solibri
Owen Slootweg, Bimforce Bimforce
Page 27 of 36
RMC check report with corresponding failure messages
SMC
In SMC we go to the Ruleset Manager and in the libraries folder we look for the
‘Property Rule Template with Component Filters’-rule. After creating a new ruleset in the
Workspace, we can just drag&drop the rule into our new Ruleset. In the components to
check list we add one (minimum requirement) filter with the default settings. This
basically says we want to check all components in our model. In the Requirements list
we also add one filter, where we look for Doors with a Property: Width with a condition
of being larger than or equal to the Value: 900mm. In this rule the elements that do not
pass the requirement are reported. Interesting to notice is that RMC, instead, reported
back the elements that were found to fulfil the requirement. In SMC we can just
copy/paste this newly created rule and simply change the ‘width’ parameter to
‘height’ to create the second rule for our Door dimensions check. This is something we
can’t do in RMC or NWM. The failure messages are generated by SMC, so we don’t
have to manually set them. You can see this as either an advantage (less work) or a
downfall (less control).

2.3 - Model Checking Tag Team: Revit vs Navisworks vs Solibri
Owen Slootweg, Bimforce Bimforce
Page 28 of 36
In SMC we don’t have to specify whether our elements are Type or
Instance
The check results of each individual rule can be visualized separately
Solibri smart door check: takes into account the (wrongful)
placement of the door inside the adjacent wall

2.3 - Model Checking Tag Team: Revit vs Navisworks vs Solibri
Owen Slootweg, Bimforce Bimforce
Page 29 of 36
NWM
In the Find Items menu we create our filters on the property of Revit Type (since it is a
Type Parameter of which we want the value to be checked) in elements of the
Category Doors. This filter only finds the right items if you select a value from the
pulldown. Typing in your own value is possible, but this gives the wrong results! Also
when you import a saved filter, the results are incorrect. You first have to re-select the
right value from the pulldown menu. This makes NWM very unreliable for exchanging
checks with your colleagues or partners, because this re-selecting is easily forgotten.
To recreate the same results as in RMC and SMC, we have to first run a check for the
width, then save the results in a search set and run a check for the height and save it to
a new search set. You can use the Selection Inspector to get a list of the check results
by selection the search set(s) you want to see in a list view. This can then be exported
to .CSV. In the list it is not very clearly visible what the results are of each check and
there are no failure messages or notification or such, but you can collect all results in
one overview by selecting both search sets in one go.

2.3 - Model Checking Tag Team: Revit vs Navisworks vs Solibri
Owen Slootweg, Bimforce Bimforce
Page 30 of 36
Selection Inspector showing the check results of two Search Sets

2.3 - Model Checking Tag Team: Revit vs Navisworks vs Solibri
Owen Slootweg, Bimforce Bimforce
Page 31 of 36
Height check of sloped roofs
RMC
In the RMC it is not possible to do a distance check between different elements. RMC is
much more focused on checking data of the model itself or data belonging to the
element and maybe comparing that to the data of other elements. Since the distance
between one object and the other is not stored as data belonging to the objects, RMC
can not extract this data. Obtaining this information would require calcalution of the
objects’ positions and dimensions, and this is something that RMC unfortunately just
does not support.
SMC
In SMC you can use the Floor distance rule and simply add roofs and slabs to the
components to check and then enter the heights, top to bottom, that are required. This
rule will also return all floor to floor heights, which may be more than you want. You
could then add filters for the elements to check, to avoid this. Nice thing about SMC is
that you can choose from a wide variety of other rules which in this case gives you
another opportunity to check the roof height; the Component Distance rule. This is a bit
easier to set up and gives more specific results (only floor to roof distances), so in my
opinion this would be the best way to go in this case. Solibri will simply give you the
measured distance between the floor-tops and roof-bottoms. There is no real good
option to further specify this check for the slopes, f.i. in case you might want to know
more about the area’s under the slope that have a height above a certain threshold.

2.3 - Model Checking Tag Team: Revit vs Navisworks vs Solibri
Owen Slootweg, Bimforce Bimforce
Page 32 of 36
Solibri Component distance rule measures from top to bottom, for sloped roofs it simply uses the lowest
point of the slope
Component distance rule configuration

2.3 - Model Checking Tag Team: Revit vs Navisworks vs Solibri
Owen Slootweg, Bimforce Bimforce
Page 33 of 36
NWM
In Navisworks you will need the Clash Detective to do your height check. On the
selection A side you will select Elements of the Category Floors and on the B selection
side you will select the Roofs. You then need to run a clearance clash, where you fill out
the minimum height between Floor and Roof. Navisworks will the check for clearance
between the lowest point of the roof and the highest point of the floors beneath it. In
the process it will also check for the distance between floors that may be above the
roof or adjacent to it, so you will most likely get a lot of results you don’t need. You can
then further specify the elements that you want to have checked, for instance by
clashing the floors on the first floor with the roofs that are on the second floor.
Cobie check
Bouwbesluit/Building Code
Model comparison
Annotations check

2.3 - Model Checking Tag Team: Revit vs Navisworks vs Solibri
Owen Slootweg, Bimforce Bimforce
Page 34 of 36
7. Pro’s and Con’s: conclusion
Revit Model Checker (RMC)
Revit plugin, $FREE
File formats: Revit native, ‘some’ IFC
General health check
Annotation check
Project Settings & Info
Revit settings
No clash detection
No distance measurements between different elements
Stacking options: AND, OR, Exclude
Easy access to your elements for adding changes
Stacking of checks in one configuration
Easy checks can be done easily with simple to make rules
Difficult checks may be tedious or just not possible, there are limitations
Relevant Phases: Preliminary Design, Definitive Design
In-house checks, pre-export checks
Solibri Model Checker (SMC)
Individual software
File formats: IFC, IFCzip, Solibri native (SMC, SMV, SMCT), DWG.
Most versatile checker
Clashing is less insightful than NWM and more work to set up
Lots of templates and sample rules
Aggregate models
Difficult/Lot of work to set up a new project
2.3 - Model Checking Tag Team: Revit vs Navisworks vs Solibri
Owen Slootweg, Bimforce Bimforce
Page 35 of 36
Stacking of several checks in one ruleset
Stacking options: Include(=OR), Exclude, Ignore
Relevant Phases: Preliminary, Definitive Design, As Built, Maintenance
Post export checks, so you have to communicate issues outside of the authoring
software
Navisworks Manage (NWM)
Individual software, comes with BuildingSuite
File formats: IFC, RVT (as DWF, no data loss), 3DS, FBX, STEP, STL, Naviswork native (NWF,
NWC, NWD) and many more industry common 3D file formats
Object presence
Data checks
Easy and insightful Clash detection
Revit and IFC: model comparison
Loads of file formats possible
Messy interface, lots of different windows
Checking procedures sometimes in two steps: Find Items and then Clash
Stacking options: AND, OR(=Include), Negate
Relevant Phases: Preliminary, Definitive Design, As Built, Maintenance
Checks are outside of authoring software, so issues cannot be resolved directly

2.3 - Model Checking Tag Team: Revit vs Navisworks vs Solibri
Owen Slootweg, Bimforce Bimforce
Page 36 of 36
Geometry Checks Revit Model Checker Solibri Model Checker Navisworks Manage
Clashes and clearances
Presence/absence elements
Duplicates checking
Distances between elements
Data Checks Revit Model Checker Solibri Model Checker Navisworks Manage
Presence/absence of parameters
Values: empty or filled in?
Values correct?
Naming conventions Revit Model Checker Solibri Model Checker Navisworks Manage
Type-O’s
Project/company standards
External standards
Naming consistency
Requirements Checks Revit Model Checker Solibri Model Checker Navisworks Manage
Building Code/legislation
Design criteria
Standards and classifications


![Folleto 3 - NAVISWORKS [.LAB]](https://static.fdocuments.in/doc/165x107/62bac4625828452c5a0346f8/folleto-3-navisworks-lab.jpg)


