Model Bankable Project on Protected Cultivation; Gardening Guidebook for Haryana, India
69
-
Upload
school-vegetable-gardening-victory-gardens -
Category
Education
-
view
269 -
download
6
Transcript of Model Bankable Project on Protected Cultivation; Gardening Guidebook for Haryana, India


MODEL BANKABLE PROJECT ON
PROTECTED CULTIVATION IN HARYANA
BY
NATIONAL BANK FOR AGRICULTURE DEPARTMENT OF HORTICULTURE AND RURAL DEVELOPMENT GOVERNMENT OF HARYANA HARYANA REGIONAL OFFICE PANCHKULA CHANDIGARH

2
Model Bankable Project On
Protected Cultivation in Haryana
NATIONAL BANK FOR AGRICULTURE DEPARTMENT OF HORTICULTURE AND RURAL DEVELOPMENT Government of Haryana Haryana Regional Office Plot No. 3, Sector 34-A Udyan Bhawan, Sector-21, Chandigarh -160022 Panchkula-134112 Phone: 0172-5046703, 5046728 Phone: 0172-2582322, 2582589 Fax No: 0172-2604033 Fax: 0172-2582595 E-mail: [email protected] Email: [email protected] Wesite: www.nabard.org Email: [email protected]
2012

CONTENTS ______________________________________________________________________________________ Description Page No. ______________________________________________________________________________________
1. Protected Cultivation ………………………………………………………………………………………………….. 1-2
2. Aspects of Greenhouse Cultivation……………………………………………………………………………… 2 I. Classification of Greenhouse ……………………………………………………………………………. 2-3
II. Design and Orientation of Greenhouse / Polyhouse………………………………………….. 4-5 III. Components of Greenhouse……………………………………………………………………………… 5-6 IV. Plant Growing Structures/Containers in Greenhouse Production………………………. 6 V. Environmental Factors Influencing Greenhouse Cultivation………………………………. 7-8
VI. Fan and Pad System………………………………………………………………………………………….. 8 VII. Media Preparation and Fumigation………………………………………………………………….. 9-11
VIII. Drip Irrigation and Fertigation Systems ……………………………………………………………. 11-13 IX. Problem Management in Greenhouse Cultivation……………………………………………. 13-14 X. Linkages – Backward and Forward……………………………………………………………………. 14-15
3. Model Bankable Projects……………………………………………………………………………………………. 16 I. Model Bankable Project for Tomato /Cherry Tomato………………………………………. 16-25
II. Model Bankable Project for Capsicum……………………………………………………………… 26-35 III. Model Bankable Project for Cucumber…………………………………………………………….. 36-44 IV. Model Bankable Project for Rose……………………………………………………………………… 45-52 V. Model Bankable Project for Gerbera………………………………………………………………… 53-58
VI. Model Bankable Project for Carnation……………………………………………………………… 59-65

1
1. PROTECTED CULTIVATION
1.1 BACKGROUND Protected cultivation practices can be defined as a cropping technique wherein the micro climate surrounding the plant body is controlled partially or fully as per the requirement of crops grown during their period of growth. With the advancement in horticulture various types of protected cultivation practices suitable for a specific type of agro-climatic zone have emerged. Among these protective cultivation practices, poly green house, net house, shade house, plastic tunnel & mulching etc. are very useful for Haryana State. Protected cultivation under different types of structures save plants from winter and extends the cultivation session for off-season crop production. In Haryana state, commercially protected cultivation started after the launching of National Horticulture Mission and has taken a boost after the setting up of Centre of Excellence for Vegetables at Gharaunda in District Karnal under Indo-Israel Project during last year. In view of climate of Haryana State, naturally ventilated poly houses are very suitable and have good economics as compared to High-tech poly houses. Walk-in-Tunnels, a type of poly house with less height also proved effective technology particularly for the cultivation of capsicum crops. Low-tunnels have gained its popularity for the crops grown in winter season. The farmers have started adoption of mulching to eradicate the problem of weeds and to maintain the moisture of soil for prolonged period through minimization of evaporation losses. 1.2 Why Green house & Poly house Cultivation? After the advent of green revolution, more emphasis is laid on the quality of the agricultural product along with the quantity of production to meet the ever-growing food and nutritional requirements. Both these demands can be met when the environment for the plant growth is suitably controlled. The need to protect the crops against unfavourable environmental conditions led to the development of protected agriculture. Greenhouse is the most practical method of achieving the objectives of protected agriculture, where natural environment is modified by using sound engineering principles to achieve optimum plant growth and yield. Poly house cultivation has become an important policy of Indian Agriculture. Our country is self dependent on food grain production but to fulfill the nutritional security, the gap between increasing demand of horticultural produce has to be filled. This gap cannot be filled by the traditional horticulture which required large area under horticulture to increase the production for the ever growing population. Green house technology has potential to produce more produce per unit area with increased input use efficiency. Therefore, this problem can be coped up by adopting green /poly house technology for the horticultural production. For example if one lakh hectare area under vegetable cultivation is brought out under poly house cultivation the annual availability of vegetable will be increased by at least 100 lakh tons. Besides this it will also increase the significant jobs opportunity for the skilled rural men, youths and rural women. Total production of vegetables in India is next to China, but per capita availability of vegetables is much lower than required. The productions of vegetable crops are to be increased to meet the demand of the ever growing population otherwise per capita availability of vegetables will further go down. There is lot of pressure on cultivable land caused due to industrialization, urbanization and expansion of the rural villages. Therefore, it is utmost necessary to improve the productivity of crops including vegetables by adopting intensive cultivation, hydroponics and poly house cultivation. Adopting poly house cultivation the productivity of vegetable crops can be increased by 3-5 times as compared to open environment. Besides productivity, the better quality of produce is also obtained under poly house cultivation. This technology can be adopted by the rural youth for more income per unit of land. The improvement in economy of farmers

2
with the decreasing land holding is also possible through the protected cultivation by increasing production per unit area. The glut of vegetable during a short period of harvesting is also the problem in the country which can be minimized with the protected cultivation as harvesting period of crops under protected structures is longer.
2. ASPECTS OF GREENHOUSE CULTIVATION
The design and specification for poly house are based on the following aspects -
I. Classification of greenhouse II. Design and Orientation of Greenhouse / Polyhouse III. Components of green house IV. Plant growing structures/containers in green house production V. Environmental factors influencing greenhouse cultivation VI. Fan and Pad system VII. Media preparation and fumigation VIII. Drip irrigation and fertigation systems IX. Problem management in greenhouse cultivation X. Linkages – Backward and Forward
I. CLASSIFICATION OF GREENHOUSE/POLYHOUSE
Greenhouses are frames of inflated structure covered with a transparent material in which crops are grown under controlled environment conditions. Greenhouse cultivation as well as other modes of controlled environment cultivation has been evolved to create favourable micro-climates, which favours the crop production could be possible all through the year or part of the year as required. Greenhouses and other technologies for controlled environment plant production are associated with the offseason production of ornamentals and foods of high value in cold climate areas where outdoor production is not possible. The primary environmental parameter traditionally controlled is temperature, usually providing heat to overcome extreme cold conditions. However, environmental control can also include cooling to mitigate excessive temperatures, light control either shading or adding supplemental light, carbon dioxide levels, relative humidity, water, plant nutrients and pest control. A. Classification of greenhouse based on suitability
a. Low cost or low tech greenhouse: Low cost greenhouse is a simple structure constructed with locally available materials such as bamboo, timber etc. The ultra violet (UV) film is used as cladding materials. Unlike conventional or hi-tech greenhouses, no specific control devices for regulating environmental parameters inside the greenhouse are provided. Simple techniques are, however, adopted for increasing or decreasing the temperature and humidity. Even light intensity can be reduced by incorporating shading materials like nets. The temperature can be reduced during summer by opening the side walls. Such structure is used as rain shelter for crop cultivation. Otherwise, inside temperature is increased when all sidewalls are covered with plastic film. This type of greenhouse is mainly suitable for cold climatic zone.
b. Medium-tech greenhouse: Greenhouse users prefers to have manually or semiautomatic control arrangement owing to minimum investment. This type of greenhouse is constructed using galvanized iron (G.I) pipes. The canopy cover is attached with structure with the help of screws. Whole structure is firmly fixed with the ground to withstand the

3
disturbance against wind. Exhaust fans with thermostat are provided to control the temperature. Evaporative cooling pads and misting arrangements are also made to maintain a favourable humidity inside the greenhouse. As these systems are semi-automatic, hence, require a lot of attention and care, and it is very difficult and cumbersome to maintain uniform environment throughout the cropping period. These greenhouses are suitable for dry and composite climatic zones.
c. Hi-tech greenhouse: To overcome some of the difficulties in medium-tech greenhouse, a
hi-tech greenhouse where the entire device controlling environment parameters are supported to function automatically.
B. Classification based on Cost of polyhouses
a. Less expensive greenhouse without fan and pad Rs.300 to 600/m2 b. Medium cost greenhouse with natural ventilation without fan and pad system
Rs.800.00 to Rs.1100.00/m2 c. Expensive greenhouses with fully automatic Rs.1465 to Rs.4000/m2 control system
C. Other classifications The greenhouse can also be classified based on type of structures, type of glazing, number of spans, environmental control etc. The various types are as follows.
I. Classification as per type of structure a. Quonset type b. Curved roof type c. Gable roof type
II. Classification as per glazing a. Glass glazing b. Fiberglass reinforced plastic glazing i. Plain sheet ii. Corrugated sheet c. Plastic film i. Ultra violet stabilized low density poly ethylene ii. Silpaulin
III. Classification based on number of spans a. Free standing or single span b. Multispan or ridge and furrow or gutter connected
IV. Classification based on environmental control a. Naturally ventilated b. Passive ventilation
V. Classification based on types Poly house: The crops grown in open field are exposed to vivid environmental conditions, attack of insects and pests, whereas the polyhouse provides a more stable environment. Polyhouse can be divided in to three types -
a. Naturally ventilated polyhouse- These polyhouse do not have any environmental control system except for the provision of adequate ventilation and fogger system to prevent basically the damage from weather aberrations and other natural agents.
4
b. Environmental controlled polyhouse This type of polyhouse helps to extend the growing
season or permits off-season production by way of controlling light, temperature, humidity, carbon-dioxide level and nature of root medium.
c. Shade house- Shadehouses are used for the production of plants in warm climates or during
summer months. Nurserymen use these structures for the growth of hydrangeas and azaleas during the summer months. Apart from nursery, flowers and foliages which require shade can also be grown in shadehouses. E.g. Orchids, These shade structures make excellent holding areas for field-grown stock while it is being prepared for shipping to retail outlets. Shadehouses are most often constructed as a pole-supported structure and covered with either lath (lathhouses) or polypropylene shade fabric. Polypropylene shadenets with various percentages of ventilations are used. Black, green, and white coloured nets are used, while black colours are the most preferred as it retains heat outside.
II. DESIGN AND ORIENTATION OF GREENHOUSE/POLYHOUSE
The design of greenhouse should be based upon sound scientific principles which facilitates controlled environment for the plant growth. Controlled environment plant production systems are used widely throughout the world to produce plant materials and products at a time or place, or of a quality that cannot be obtained outdoors. Controlled environment agriculture requires far more capital investment per unit area than field agriculture and thus must essentially be correspondingly more intensive to justify investment costs. The greenhouse is a structure covered with a transparent material for admitting natural light for plant growth. The main components of greenhouse like structure, covering/glazing and temperature control systems need proper design for healthy growth of plants. Under Indian conditions, Quonset type, multispan greenhouse is most suitable, because of its low cost and eases of fabrication. Ultra violet resistant low density polyethylene (UVLDPE) single film cladding of 200 micron thickness is sufficient for Naturally Ventilated ( NV) greenhouse and fan and pad (FP) greenhouses. This should be fully tightened by stretching on the structure to avoid fluter and tearing. It should not be nailed or screwed to the structure as it gives the chance for tearing. The T-Lock and L-Lock should be used for fastening the sheet at structure, as this does not tear the sheet and sheet replacement is easy.
A. Design The structure has to carry the following loads and is to be designed accordingly.
a) Dead load: weight of all permanent construction, cladding, heating and cooling equipment, water pipes and all fixed service equipments to the frame.
b) Live load: weights superimposed by use (include hanging baskets, shelves and persons working on roof). The greenhouse has to be designed for a maximum of 15 kg per square meter live load. Each member of roof should be capable of supporting 45 kg of concentrated load when applied at its centre.
c) Wind load: The structure should be able to withstand winds of 110 Km/hr and at least 50 kg/m2 of wind pressure.
d) Snow load: These are to be taken as per the average snowfall of the location. The greenhouse should be able to take dead load plus live load or dead load plus wind load plus half the live load.

5
The greenhouses are to be fabricated out of Galvanized Iron Pipes. The foundation can be 60cmx60cmx60cm or 30 cm diameter and one meter depth in PCC of 1:4:8 ratio. The vertical poles should also be covered to the height of 60 cm by PCC with a thickness of 5cm. This avoids the rusting of the poles
B. Orientation
Orientation of the greenhouse is a compromise for wind direction, latitude of location and type of temperature control. Single greenhouses with latitude above 40°N should have ridge running east to west to allow low angle light to enter from side rather than ends. Below 40°N the ridge of single greenhouses should be oriented from north to south, since the angle of sun is much higher. This orientation permits the movement of shadow of the gutter across the green house. The location and orientation of the greenhouse should avoid falling of shadow on the adjacent greenhouses. To avoid the shading effect from one green house to another greenhouse these should be oriented East to West. However, the wind direction and latitude are also to be considered.
a. Wind effects:If the greenhouse is naturally ventilated, the advantage of natural wind direction has to be taken to the maximum possible. The maximum dimension (length) of greenhouse should be perpendicular to the wind direction especially in summer. For fan and pad greenhouse the natural wind direction should be same as the air blown by fan.
b. Size of the greenhouse:The dimension of NAV GH should not be more than 50m x 50m. Bigger the greenhouse more will be the temperature build up due to poor ventilation. The length of evaporative cooled greenhouse should not be more than 60m.
c. Spacing between greenhouses:The spacing between naturally ventilated green houses should be 10 to 15 m so that the exhaust from one greenhouse should not enter the adjacent greenhouse.
d. Height of greenhouse:The maximum height can be up to 5m for 50m x 50m green house and this can be reduced as per the reduced size of the green house. Higher is the greenhouse more is the wind load for structure and glazing. The side ventilation can be of 2 m width and roof ventilation is 1m in width.
e. Structural design:The greenhouses are to be designed for necessary safety, serviceability, general structural integrity and suitability. The structure should be able to take all the necessary dead, live, wind and snow loads. The foundation, columns and trusses are to be designed accordingly. The greenhouse structures are to be designed to take up the loads as per design loads prescribed by the National Greenhouse Manufactures Association (NGMA of USA) standards –1994.
III. COMPONENTS OF GREENHOUSE
i. Roof: transparent cover of a green house. ii. Gable: transparent wall of a green house iii. Cladding material: transparent material mounted on the walls and roof of a green house. iv. Rigid cladding material: cladding material with such a degree of rigidity that any
deformation of the structure may result in damage to it. Ex. Glass v. Flexible cladding material: cladding material with such a degree of flexibility that any
deformation of the structure will not result in damage to it. Ex. Plastic film vi. Gutter: collects and drains rain water and snow which is place at an elevated level
between two spans. vii. Column: vertical structure member carrying the green house structure viii. Purlin: a member who connects cladding supporting bars to the columns ix. Ridge: highest horizontal section in top of the roof x. Girder: horizontal structure member, connecting columns on gutter height

6
xi. Bracings: To support the structure against wind xii. Arches: Member supporting covering materials xiii. Foundation pipe: Connection between the structure and ground xiv. Span width: Center to center distance of the gutters in multispan houses xv. Green house length: dimension of the green house in the direction of gable xvi. Green house width: dimension of the green house in the direction of the gutter
Cladding material: Polythene proves to be an economical cladding material. Now long lasting, unbreakable and light roofing panels-UV stabilized clear fiber glass and polycarbonate panels are available. Plastics are used in tropical and sub-tropical areas compared to glass/fiberglass owing to their economical feasibility. Plastics create enclosed ecosystems for plant growth. LDPE (low density polyethylene) / LLDPE (linear low density polyethylene) will last for 3-4 years compared to polythene without UV stabilizers. Comparison of different kinds of covering materials:
Sr No.
Type Durability (year)
Transmission Maintenance
Light (%) Heat (%)
1 Polyethylene 01 90 70 Very high
2 Polyethylene UV resistant 02 90 70 High
3 Fiber glass 07 90 05 Low
4 Tedlar coated Fiber Glass 15 90 05 Low
5 Double strength glass 50 90 05 Low
6 Poly carbonate 50 90 05 Very Low
IV. PLANT GROWING STRUCTURES / CONTAINERS IN GREENHOUSE PRODUCTION
The duration of crop in greenhouse is the key to make the greenhouse technology profitable or the duration of production in greenhouses should be short. In this context, use of containers in greenhouse production assumes greater significance. The containers are used for the following activities in greenhouse production. Raising of seedlings in the nursery • Growing plants in greenhouses for hybrid seed production of flowers • Growing plants for cut flower production. • Growing potted ornamental plants. Advantages of containers in greenhouse production • Increase in production capacity by reducing crop time. • High quality of the greenhouse product • Uniformity in plant growth with good vigour. • Provide quick take off with little or no transplanting shock. • Easy maintenance of sanitation in greenhouse • Easy to handle, grade and shift or for transportation. • Better water drainage and aeration in pot media. • Easy to monitor chemical characteristics and plant nutrition with advanced irrigation systems
like drips. Selection of suitable containers depends upon the crop to be produced in greenhouse, plant characteristics like crop stage, duration, vigour, growth habit, root system, etc. Generally long duration, deep rooted and vigorous crop plants require bigger containers compared to short duration, shallow and less vigorous ones. The containers provide optimum condition for germination of seed and growth and development of transplants.

7
V. ENVIRONMENTAL FACTORS INFLUENCING POLYHOUSE CULTIVATION Plants need an optimum temperature for maximum yield and quality. The greenhouse in plain and coastal region of India needs cooling. The greenhouses in mild climates and coastal region can be naturally ventilated. The greenhouses for hot summer climates of northern plains have to evaporative cooled or with fan and pad (FP). The greenhouses for northern plains may require both cooling and heating depending on the crop. A. Natural ventilation: The greenhouse has to be thoroughly ventilated for control of
temperature. It should be noticed that the temperature built up in the greenhouse is not exceeding 2°C throughout the year. Further during hot months the temperature in the greenhouse was same as the ambient temperature.
B. Unconventional method of heating and cooling
a) Hot and cold water can be sprinkled on the greenhouse covered externally with the shadenet b) Use of earth tunnel for cooling in summer and heating in winter c) Construction of greenhouse in a trench for heating in winter cooling in summer d) Circulating the borewell water in pipes laid on the floor of the greenhouse
C. Heating of greenhouse: The heating of greenhouses in cold climates like winter in North India or Himalayan Region at high altitudes is advisable for getting better produce. Double covering of glazing with an air cushion of 2 cm to 10 cm reduces the heating load considerably.
D. Heating systems: These can be of the following types
a. Boiler: This system is used for very big greenhouses and is a centralized system of heating. The boiler of necessary capacity is provided in the greenhouse. The fuel for boiler can be coal or fuel oil. The heating of the greenhouse is generally done through hot water at 85°C or steam at 102°C. Water or steam pipes are installed above the beds of crop and along the side wall. The steam system is cheaper than hot water system. To reduce the length of pipe to be used a number of hot water or steam pipe coils can be used and green house air circulated over them by blower for heating.
b. Unit heaters: These are localized system of heating and a number of unit heaters are to be provided in the greenhouse at a height of about 3 meter to distribute heat evenly in the greenhouse. In a unit heater the fuel is combusted in the chamber at bottom. Hot fumes rise inside the heat exchanger tubes, giving heat to the walls of the tubes. Smoke exists at the top. A fan forces cool air of the greenhouse over the outside of heat exchange tubes, where it picks up heat.
c. Infra-red heaters: The fuel gas (LPG) is burnt and the fumes at a temperature of about 480°C are passed in 10 cm diameter pipes kept overhead at a height of 1.5m above plants. Reflectors are provided over the full length of pipe to radiate the infra red rays over the plants. The plants and soil only get heated without much heating of air. The infra red heating pipes can be provided at 6 to 10 meters interval all along the length of greenhouse. The temperature of fume gases at exist is about 65°C and exhaust fan is provided for maintaining the flow of fumes.
d. Solar heating: Flat plate solar heaters are used to heat the water during day time. The hot water is stored in the insulated tanks. The hot water is circulated in pipes provided along the length of the greenhouse during night. Supplementary or emergency heating systems are provided for heating the greenhouse during cloudy or rainy days.

8
E. Environmental control:
a. Temperature control: The thermostat can be coupled to water circulating pump or exhaust fan for controlling the temperature inside the greenhouse. However, the lowest achievable temperature in fan and pad greenhouse is not below the wet bulb temperature in any case.
b. Relative humidity control: The humidistat coupled to water circulating pump or exhaust fan to control the relative humidity inside the fan and pad greenhouse. The maximum achievable relative humidity is 90% only in fan regulated (FR) greenhouse. The RH in Non ventilated (NV) GH can be increased by providing foggers.
c. Light intensity control: In certain areas where natural illumination is absent or very low, illumination for plants may be provided by artificial sources. Incandescent bulbs generate excessive heat and are unsatisfactory in most instances. Fluorescent tubes are useful as the sole source of light for African violets, gloxinias and many foliage plants which grow satisfactorily at low light intensities. Excessive light intensity destroys chlorophyll even though the synthesis of this green pigment in many plants is dependent upon light. Chrysanthemum is a classic example for a short-day plant; however, flower buds will not form unless the night temperature is high enough. Chrysanthemum is flowered on a year-round basis as a cut flower or potted plant simply by controlling the length of day and temperature.
d. Quality of light: Quality of light refers to its wave-length composition. Light in the orange-red portion of the visible spectrum from either sunlight or artificial illumination is most effective in causing the long-day response in plants. Far-red radiation appears to have the opposite effect. It is probable that the wave lengths activate some hormonal mechanism within the plant which brings about the specific effect of light on growth or flowering.
VI. FAN AND PAD SYSTEM
A. Selection of fan: The fans should deliver the required air at 15mm static pressure. The maximum center to center spacing between the two fans should be of 7.5m. The height of the fans is to be determined based on the plant height which is proposed to be grown in the greenhouse. The fan blades and frame are to be made of non-corrosive materials like aluminium/stainless steel.
B. Design: The cross fluted cellulose pad is preferred. These are available mostly in 100mm thickness. One meter of pad height is given for every 20m of pad to fan distance. However, the fan to pad distance should not exceed 60m. The air flow rate should be of 75 cubic meter/minute/sq.m of pad. The water flow rate should be of 9 litres per minute/linear meter pad. The uniform distribution of water on pad is to be maintained.
C. Maintenance of pad: The algae will grow and salts will deposit on pads if these are not maintained properly. Good control of algae can be obtained without using chemicals by the following methods. i. By shading the pads and sumps ii. By drying the pads daily iii. By avoiding nutrient contamination iv. By draining and disinfecting the sump regularly v. By replenishing 20% of circulating water each time to avoid scaling of minerals.
D. Maintenance of fan i. The lubrication of bearings should be done regularly ii. The v belt should be tightened as per requirement iii. The levers should be properly lubricated.

9
VII. MEDIA PREPARATION AND FUMIGATION Soil mixes used for greenhouse production of potted plants and cut flowers are highly modified mixtures of soil, organic and inorganic materials. When top soil is included as a portion of the mixture, it is generally combined with other materials to improve the water holding capacity and aeration of the potting soil. Many greenhouses do not use topsoil as an additive to the soil mixes, but rather use a combination of these organic and inorganic components as an artificial soil mix. When managed properly as to watering and fertilization practices, these artificial mixes grow crops that are equal to those grown in top soil.
A. Media preparation for greenhouse production The media used in greenhouse generally have physical and chemical properties which are distinct from field soils.
i. A desirable medium should be a good balance between physical properties like water holding capacity and porosity.
ii. The medium should be well drained. iii. Medium which is too compact creates problems of drainage and aeration which will
lead to poor root growth and may harbour disease causing organisms. iv. Highly porous medium will have low water and nutrient holding capacity, affects the
plant growth and development. v. The media reaction (pH of 5.0 to 7.0 and the soluble salt (EC) level of 0.4 to 1.4 dS/m is
optimum for most of the greenhouse crops). vi. A low media pH (<5.0) leads to toxicity of micronutrients such as iron, zinc, manganese
and copper and deficiency of major and secondary nutrients while a high pH (>7.5) causes deficiency of micronutrients including boron.
vii. A low pH of the growth media can be raised to a desired level by using amendments like lime (calcium carbonate) and dolomite (Ca-Mg carbonate) and basic, fertilizers like calcium nitrate, calcium cyanamide, sodium nitrate and potassium nitrate.
viii. A high pH of the media can be reduced by amendments like sulphur, gypsum and Epsom salts, acidic fertilizers like urea, ammonium sulphate, ammonium nitrate, mono ammonium phosphate and aqua ammonia and acids like phosphoric and sulphuric acids.
ix. It is essential to maintain a temperature of the plug mix between 70 to 75ºF. Irrigation through mist is a must in plug growing. Misting for 12 seconds every 12minutes on cloudy days and 12 seconds every 6 minutes on sunny days is desirable.
x. The pH of water and mix should be monitored regularly.
B. Gravel culture: Gravel culture is a general term which applies to the growing of plants without soil in an inert medium into which nutrient solutions are usually pumped automatically at regular intervals. Haydite (shale and clay fused at high temperatures), soft- or hard-coal cinders, limestone chips, calcareous gravel, silica gravel, crushed granite and other inert and slowly decomposing materials are included in the term “gravel”. The more important greenhouse flowering crops include roses, carnations, chrysanthemums, gardenias, snapdragons, lilies, asters, pansies, annual chrysanthemums, dahlias, bachelor buttons and others.

10
C. Desirable nutrient level in greenhouse growth media
Sr. No.
Category Concentration (mg/l)
NO3 N P K
1 Transplants 75 125 10-15 250-300
2 Young plants & foliage plants
50 90 6-10 150-200
3 Plants in bed 125 225 10-15 200-300
D. Media ingredients and Mix: Commercially available materials like peat, sphagnum moss,
vermiculite, perlite and locally available materials like sand, red soil, common manure/ compost and rice husk can be used in different proportions to grow greenhouse crops. These ingredients should be of high quality to prepare a good mix. They should be free from undesirable toxic elements like nickel, chromium, cadmium, lead etc. Pasteurization of greenhouse plant growing media Greenhouse growing medium may contain harmful disease causing organisms, nematodes, insects and weed seeds, so it should be decontaminated by heat treatment or by treating with volatile chemicals like methyl bromide, chloropicrin etc.
E. Pasteurization of greenhouse plant growing media: Greenhouse growing medium may
contain harmful disease causing organisms, nematodes, insects and weed seeds, so it should be decontaminated by heat treatment or by treating with volatile chemicals like methyl bromide, chloropicrin etc.
Sr. No. Agent Method Recommendations
1 Heat Steam 30 min at 180° F
2 Methyl bromide
10 ml/cu. ft. of medium
Cover with gas proof cover for 24-48 hr. Aerate for 24-28 hr before use.
3 Chloropicrin (Tear gas)
3-5 ml/cu. ft. of medium
Cover for 1-3 days with gas proof cover after sprinkling with water. Aerate for 14 days or until no odour is detected before using.
4 Basamid
8.0 g/cu. ft. of medium
Cover for 7 days with gas proof cover and aerate for atleast a week before use.
5 Formalin
20 ml/l of water (37%)
Apply 2 l/cu.ft. cover for 14 to 36 hr and aerate for at least 14 days.
Disinfection of the growing media: It can also be achieved by fungicides or bactericides Fungicides and their effect on a few fungi – Fungicide Rate of application Effect against Captan 2 g/l of water Pythium, Fusarium, Rhizoctonia and Phytophthora. Some extent
to root and stem rot, white mold,black rot, crown rot and damping off.
Metalaxyl + Mancozeb (1 g/l of water) Pythium, Phytophthora, Fusarium and other soil borne pathogens

11
Temperature necessary to kill soil pests
115°F for water molds (Pythium and Phytophthora)
120°F for nematodes
135°F for worms, slugs and centipedes
140°F for most plant pathogenic bacteria
160°F for soil insects
180°F for most of weed seeds
200°F for few resistant weed seeds and plant viruses F. Fumigation in greenhouse: Physical propagation facilities such as the propagation room,
containers, flats, knives, working surface, benches etc. can be disinfected using one part of formalin in fifty parts of water or one part sodium hypochlorite in nine parts of water. An insecticide such as dichlorvos sprayed regularly will take care of the insects present if any. Care should be taken to disinfect the seed or the planting materials before they are moved into the greenhouse with a recommended seed treatment chemical for seeds and a fungicide – insecticide combination for cuttings and plugs respectively. Disinfectant solution such as trisodium phosphate or potassium permanganate placed at the entry of the greenhouse would help to get rid off the pathogens from the personnel entering the greenhouses.
VIII. DRIP IRRIGATION AND FERTIGATION SYSTEMS
The plant is required to take up very large amounts of water and nutrients, with a relatively small root system, and manufacture photosynthates for a large amount of flower per unit area with a foliar system relatively small in relation to required production.
A. Watering system: Micro irrigation system is the best for watering plants in a greenhouse. Micro sprinklers or drip irrigation equipments can be used. Basically the watering system should ensure that water does not fall on the leaves or flowers as it leads to disease and scorching problems. In micro sprinkler system, water under high pressure is forced through nozzles arranged on a supporting stand at about 1 feet height. This facilitates watering at the base level of the plants.
B. Equipments required for drip irrigation system include i. A pump unit to generate 2.8kg/cm2 pressure ii. Water filtration system – sand/silica/screen filters iii. PVC tubing with dripper or emitters
C. Drippers of different types are available i. Labyrinth drippers ii. Turbo dripper iii. Pressure compensating drippers – contain silicon membrane which assures
uniform flow rate for years iv. Button drippers- easy and simple to clean. These are good for pots, orchards and
are available with side outlet/top outlet or micro tube out let v. Pot drippers – cones with long tube
D. Water output in drippers i. 16mm dripper at 2.8kg/cm2 pressure gives 2.65 litres/hour ( LPH). ii. 15mm dripper at 1 kg/cm2 pressure gives 1 to 4 litres per hour
E. Filters: Depending upon the type of water, different kinds of filters can be used. i. Gravel filter: Used for filtration of water obtained for open canals and reservoirs
that are contaminated by organic impurities, algae etc. The filtering is done by beds of basalt or quartz.
ii. Hydrocyclone: Used to filter well or river water that carries sand particles.

12
iii. Disc flitersL: Used to remove fine particles suspended in water iv. Screen filters: Stainless steel screen of 120 mesh (0.13mm) sizes. This is used
for second stage filtration of irrigation water. F. Fertigation system: In fertigation system an automatic mixing and dispensing unit is
installed which consists of three systems pump and a supplying device. The fertilizers are dissolved separately in tanks and are mixed in a given ratio and supplied to the plants through drippers.
a. Fertilizer: Fertilizer dosage has to be dependent on growing media. Soilless mixes have lower nutrient holding capacity and therefore require more frequent fertilizer application. Essential elements are at their maximum availability in the pH range of 5.5 to 6.5. In general Micro elements are more readily available at lower pH ranges, while macro elements are more readily available at pH 6 and higher.
b. Forms of inorganic fertilizers: Dry fertilizers, slow release fertilizer and liquid fertilizer are commonly used in green houses.
c.Slow release fertilizer: They release the nutrient into the medium over a period of several months. These fertilizer granules are coated with porous plastic. When the granules become moistened the fertilizer inside is released slowly into the root medium. An important thing to be kept in mind regarding these fertilizers is that, they should never be added to the soil media before steaming or heating of media. Heating melts the plastic coating and releases all the fertilizer into the root medium at once. The high acidity would burn the root zone.
d. Liquid fertilizer: These are 100 per cent water soluble. These come in powdered form. This can be either single nutrient or complete fertilizer. They have to be dissolved in warm water.
e. Fertilizer Application Methods: i. Constant feed - Low concentration at every irrigation is much better. This provides
continuous supply of nutrient to plant growth and results in steady growth of the plant. Fertilization with each watering is referred as fertigation.
ii. Intermittent application -Liquid fertilizer is applied in regular intervals of weekly, biweekly or even monthly. The problem with this is wide variability in the availability of fertilizer in the root zone. At the time of application, high concentration of fertilizer will be available in the root zone and the plant immediately starts absorbing it. By the time next application is made there will be low or nonexistent. This fluctuation results in uneven plant growth rates, even stress and poor quality crop.
iii. Fertilizer injectors-This device inject small amount of concentrated liquid fertilizer directly into the water lines so that green house crops are fertilized with every watering.
iv. Multiple injectors-Multiple injectors are necessary when incompatible fertilizers are to be used for fertigation. Incompatible fertilizers when mixed together as concentrates form solid precipitates. This would change nutrient content of the stock solution and also would clog the siphon tube and injector. Multiple injectors would avoid this problem. These injectors can be of computer controlled H.E. ANDERSON is one of the popular multiple injector.
v. Fertilizer Injectors-Fertilizer injectors are of two basic types: Those that inject concentrated fertilizer into water lines on the basis of the venturi principle and those that inject using positive displacement.

13
vi. General problems of fertigation- Nitrogen - tends to accumulate at the peripherous of wetted soil volume. Hence, only roots at the periphery of the wetted zone alone will have enough access to Nitrogen. Nitrogen is lost by leaching and denitrification. Since downward movement results in permanent loss of NO3 –N, increased discharge rate results in lateral movement of N and reduces loss by leaching.
Phosphorous - It accumulates near emitter and P fixing capacity decides its efficiency. Low pH near the emitter results in high fixation.
Potassium- It moves both laterally and downward and does not accumulate near emitter. Its distribution is more uniform than N & P.
Micronutrients - Excepting boron, all micronutrients accumulates near the emitter if supplied by fertigation. Boron is lost by leaching in a sandy soil low in organic matter. But chelated micronutrients of Fe, Zn can move away from the emitter but not far away from the rooting zone.
IX. PROBLEM MANAGEMENT
The troubles which arise in the culture of crops in the greenhouse may be divided into several groups a) failure to supply the essential factors for optimum growth such as light, moisture, carbon dioxide and heat in amounts necessary for each individual crop b) fertilizer deficiencies c) fertilizer excesses d) toxic gases e) attacks by insects, animals, and allied pests and f) susceptibility to fungus, bacteria and virus troubles. A. Fertilizer deficiencies: Symptoms of deficiencies of various fertilizers have been studied over
a period of years with plants in greenhouses. i. Chlorosis - This is a term used to denote the loss of normal green colour from the foliage
whether it is on the older, more mature leaves or the younger foliage. The entire leaf may be affected or just areas between the veins, in which case the yellowing is most usually in irregular patches shading into the green colour. Sometimes only the margin of the leaf or leaflets may be yellow, while the centre of the foliage is almost a normal green.
ii. Necrosis - This refers to the death of the area severely affected by chlorosis. Necrotic spots or areas can also be caused by spray or aerosol damage, sunscald and other such factors which may have no relation of fertilizer.
iii. Nitrogen deficiency - Generally the entire plant becomes lighter green, but the effect will be most noticeable on the older foliage. Gradually the oldest leaves loose their green colour, and most plants become yellow. The flowers are smaller and may lack well-developed colour.
iv. Phosphorus deficiency - A purplish coloration developing first on the underside of the petiole, or leaf stem, which spreads to the main veins of the leaf is characteristic of this deficiency.
v. Calcium deficiency - In sand culture, a typical symptom is the development of short clubby roots followed in a matter of several weeks by their death. In many cases insufficient calcium is associated with a low pH of the soil.
vi. Iron deficiency - This is a rather common trouble although an actual lack of iron may not be the primary cause. As iron deficiency becomes more intense, necrotic areas appear on scattered portions of the yellow coloured leaves and the affected foliage may drop. Iron can become deficient in soil, but often the symptoms of this deficiency are induced by other causes from injury to the roots by over-watering or over fertilization. Nematodes or other soil pests interfering with root growth can also induce iron chlorosis symptoms.
vii. Boron deficiency - The number of cases where this is a limiting factor are few, and most of them are with certain rose and carnation varieties. The new foliage is thick or leathery

14
and quickly becomes chlorotic. The rose flowers are usually very malformed. The stem tip dies, giving rise to growth of shoots immediately below, which in turn die at the tip, and a ‘witches broom’ effect is observed. Because deficiency symptoms can sometimes be confused with the effects of some other environmental factor of cultural practice, a thorough review of fertilizer application, soil testing, soil type, watering practices, and other procedures is warranted before hasty conclusions are reached.
viii. Fertilizer excesses - An unfortunate belief among many growers is that when a plant does not grow under apparently favorable conditions, the trouble can be overcome by applications of fertilizer. This practice has resulted in untold damage or loss of crops, as more often than not the original trouble could have been too much fertilizer in the soil. If additional fertilizer is applied when no more is needed, the results can be very injurious. Sometimes the difference between a high but safe nutrient level and an injurious nutrient level is not very great and the margin of safety may be extremely small. The plants exhibit heavy, rank growth, with large, dark green leaves that are often crisp and break easily. Additional nitrogen may inhibit root action, causing typical symptoms of iron chlorosis. If the root system is killed, the plants wilt excessively and never recover. This yellowing of the top foliage is very common in chrysanthemums a reduced
X. LINKAGES – BACKWARD AND FORWARD
A. Procurement of Planting Material: The planting material (seedlings) can be procured from
Centre of Excellence for Vegetables, Gharonda, Panipat, Center for Protected Cultivation, IARI, New Delhi and HAU, Hisar. The seedlings can also be procured from the private nursery farms viz. Sabir Biotech, Noida, Agri Nouvas, Kharad, Punjab etc.
B. Transport: Normally, vegetables and flowers immediately after harvest is graded, packed,
and send to market. In context of Haryana, the distance from farm to market is maximum 250-275 Kms from any part of the Haryana which takes around 5-6 hrs to reach the market. Thus, as such there is no need of precooling or refrigerated van to transport the produce.
C. Marketing: Haryana being proximity to NCR have ample scope of marketing of fresh
vegetables as the requirement of fresh vegetables has increased manifold. Azadpur Mandi Market, Delhi a largest vegetable market in Asia which is in vicinity to Haryana. Further, as per information given by The Haryana State Agricultural Marketing Board (HSAMB), the specialised fruit and vegetable market having high-tech and ultra-modern infrastructure for longer preservation of perishable crops is being established at Ganaur in Sonepat distict of Haryana. Besides, the above Reliance Fresh, Mother Dairy and recently Wall Mart companies are directly purchase the fresh vegetables from the farmers.
The cut flowers like Rose, Gerbera, Carnation and others are used in preparation of bouquets, floral arrangements and social occasions. Hence there is huge demand for cut flowers in domestic as well as in international market.
Financing Aspects
a. Subsidy: The Dept of Horticulture, Govt of Haryana is providing subsidy of 65%, 90% and
50% on cost of polyhouse, irrigation system and planting material respectively. The back ended subsidy will be provided to financing bank in respect to the beneficiaries immediately after the release of first instalment of loan. The subsidy admissible to the borrower under the scheme will be kept in the Subsidy Reserve Fund A/c – borrower-wise in the books of the financing banks.

15
b. Refinance to Banks:The 90% of the amount financed to the borrower under the scheme
by banks will be eligible for the refinance from NABARD.
c. Bank Finance i. Term Loan: The banks may finance 90% of the project cost as term loan. The eligible
amount of subsidy would also be allowed as term loan.
ii. Margin Money: The entrepreneurs should normally meet 10% of the project cost out of their own resources.
iii. Interest Rate: Interest rate will be decided by financing banks from time to time. However, the repayment programme has been worked out at 14% rate of interest.
iv. Security: Banks may obtain security as per RBI norms.
v. Repayment: The principal and interest will be repayable in seven years, with moratorium of 01 year.

16
3 (i) MODEL BANKABLE PROJECTS
TOMATO/CHERRY TOMATO
A. INTRODUCTION Tomato (Lycopersicon esculentum) belongs to the genus Lycopersicon under Solanaceae family. Tomato is a herbaceous sprawling plant growing to 1-3 m in height with weak woody stem. The flowers are yellow in colour and the fruits of cultivated varieties vary in size from cherry tomatoes, about 1–2 cm in size to beefsteak tomatoes, about 10 cm or more in diameter. Most cultivars produce red fruits when ripe. Tomato is a native to Peruvian and Mexican region. Though there are no definite records of when and how it came to India, the Portuguese perhaps introduced it to India.
Tomato is one of the most important "protective foods" because of its special nutritive value. It is one of the most versatile vegetable with wide usage in Indian culinary tradition. Tomatoes are used for soup, salad, pickles, ketchup, puree, sauces and in many other ways It is also used as a salad vegetable. Tomato has very few competitors in the value addition chain of processing.
B. STATUS OF TOMATO IN HARYANA In Haryana, tomato is extensively cultivated in the districts like Yamunanagar, Ambala, Karnal, Sonepat, Jind, Gurgaon and Mewat. Tomato covers approximately 7.6% of the total area under vegetable (356769 ha) cultivation in Haryana. At present, the estimated area and production under tomato is 27070 ha and 417443 tonnes respectively.
C. CLIMATE It is a warm season crop and the moderate temperature ranging from 18oC to 30oC is best for its growth and flowering. This crop cannot tolerate low temperature and is very much susceptible to frost. However, it can be sown under polyhouse during December-January at slightly improved condition for raising early summer crop with better quality of fruits.
D. SOIL The tomato crop can be raised in a wide variety of soil ranging from light textured sandy or sandy loam to heavy clay soils. The soil should be rich in nutrients and organic matter. The ideal soil pH is 6.00 to 7.00 for its growth. High organic matter content in soil is highly essential for higher production and quality.
E. BED PREPARATION A raised bed is always preferred for plantation of Tomato Cultivation. After fumigation, the beds of following dimensions are prepared. 1. Top width - 90cm 2. Path width- 50 cm 3. Height - 40 cm F. PLANTING DISTANCE 1) 40 cm between two plants 2) 50 cm between two rows

17
G. PLANTING MATERIAL The seedlings of 05-06 weeks old are used for transplanting, depending on temperature and light conditions during propagation. Ideal seedling size is about 16 cm. H. VARIETIES/CULTIVARS The varieties which are preferred for cultivation under polyhouse are –
a. Tomato - By Syngenta - Him Sona, Him Shekha, Insona, 34774 etc. b. Cherry tomato – By Monsento -Olleh, Raisy etc.
Besides the varieties developed by HAU and IARI are also available for protected cultivation I. MANURES AND FERTILIZERS Application of nutrients should be based on analysis of soil and plant. However, for the better crop yield 4 to 5 tonnes of well rotten FYM per unit (1008 m2) should be mixed during soil preparation. The fertilizer doses of Nitrogen 40-45 kg, Phosphorus (P2O5) and 40-45 kg Potash (K2O5) may be applied per unit. The half of the dose of Nitrogen and potash and full dose of phosphorus are incorporated during soil preparation. J. CULTURAL PRACTICES Different cultural practices followed in tomatoes are as follows
1. Suckering Side shoots (suckers) will develop between each compound leaf and the stem. These suckers are removed as they develop, leaving only the main stem as a growing point. For this reason, side shoots are usually not pruned until they are a few cm long, and at which time they are easier to distinguish form the main stem.
2. Crop Support After transplanting as soon as possible, plant stems should be secured to nylon/plastic (high density) twine, quality of twine should be ensured. Twines are hung from horizontal wires at least 3m about the ground. Horizontal wires must be sturdy enough to support the weight of all plants in the row.
3. Training (Tying): Plants should be trained as single (main) stem. The plants can be supported with the help of plastic twine loosely anchored around the base of the plants (non slip loop) at one end. The same plastic twine is tied to overhead support wires (12 to 16 gauge) running along the length of the row. Overhead wires should be at least 3m above the surface of beds and should be firmly anchored to support structures. Tie the plant with the help of plastic twine in inclined position to the overhead support wires.
Twine should be wrapped clockwise around the plant as it develops, with complete swirl every three leaves. Plastic twine should not be wrapped around fruit clusters.
When plants reach the overhead supporting wires, unite the twine and lower the vines and twines at least three feet (once in two weeks). After lowering, vines should lean in one direction in one row, vines in adjacent row should lean in opposite direction. Be sure to leave at least 4-5 meters of extra twine for this purpose when initially tying wines.

18
4. Mulching Straw mulch is most common, if Straw mulches are used, apply to the soil when tomatoes are about two feet high. The mulch reduces evaporation of water from the soil and prevents compaction of the surface. White (reflective) plastic mulches are recommended to control weeds, conserve moisture, reduce humidity and improve light conditions also to avoid contact to soil and prevent diseases.
5. Topping Six weeks before the anticipated crop termination date, the growing point and small fruit clusters at the top of the plant are removed this operation is called Topping. Topping is carried out for fast fruit development and increase size of already-set fruit in the lower part of the plant. Some shoots at the top are left to grow as it helps to avoid risk of sunburn.
6. Pollination Tomatoes are self-pollinating under open field conditions. Pollen sheds and fertilization occur as a function of normal air movement leading to agitation of the plants and flowers. Under green house conditions, flowers need to be agitated mechanically. For pollination hand pollination method is used, in this method gently brush your hand on flower clusters. Timing is important in hand pollination for set fruit i.e. when humidity conditions are most favorable (50-70%). Pollination is done at least twice a week, inadequate pollination will lead to misshapen and lower yields.
7. De-leafing When vines are lowered, leaves touching the ground are removed to prevent disease development. The amount of de-leafing that occurs higher up the plant varies between growers. The purpose of de-leafing higher up the plant stem is to increase light penetration and air circulation. Typically, all leaves are removed below the lowest fruit cluster which has not been harvested Deleafing also helps to make more carbohydrates available to the fruit trusses, thereby increasing yield. This operation is carried out in all types of tomatoes.
8. Fruit Pruning Small, undersized fruit at the end of a cluster (distal fruit) are always removed, as these will generally not grow to marketable size and are thought to reduce the size of the other fruit on the cluster.
K. IRRIGATION Tomato needs to be irrigated at right time. In spring summer, the crop should be irrigated at the interval of 4-6 days depending upon the growth of plants. Under drip irrigation system measured quantity of water can be applied. It is best method to optimise plant nutrition without large fluctuation in the nutrient level in root zone. It minimises losses by fixation or leaching in the soil thus economically using fertilizers to result in higher yields and improved quality.
L. PLANT PROTECTION Major insect pest Tomato fruit worm Leaf miner Aphid
19
Major diseases Bacterial diseases Fungal diseases Viral diseases Physiological disorders Successful crop production requires that crop pests and diseases be managed so that their effects on the plants are minimized. The management of crop diseases is directed at preventing the establishment of diseases and minimizing the development and spread of any diseases that become established in the crop. Managing pest problems is directed at preventing pest populations from becoming too large and uncontrollable. The presence of pests and diseases are a fact of crop production and growers must use all available options and strategies to avoid serious pest and disease problems. Integrated pest management (IPM) where cultural, biological, and chemical controls are included in a holistic approach of pest and disease control may be adopted. Key components of effective pest and disease control programs include:
sanitation,
crop monitoring,
cultural control,
resistant cultivars,
biological control and chemical control
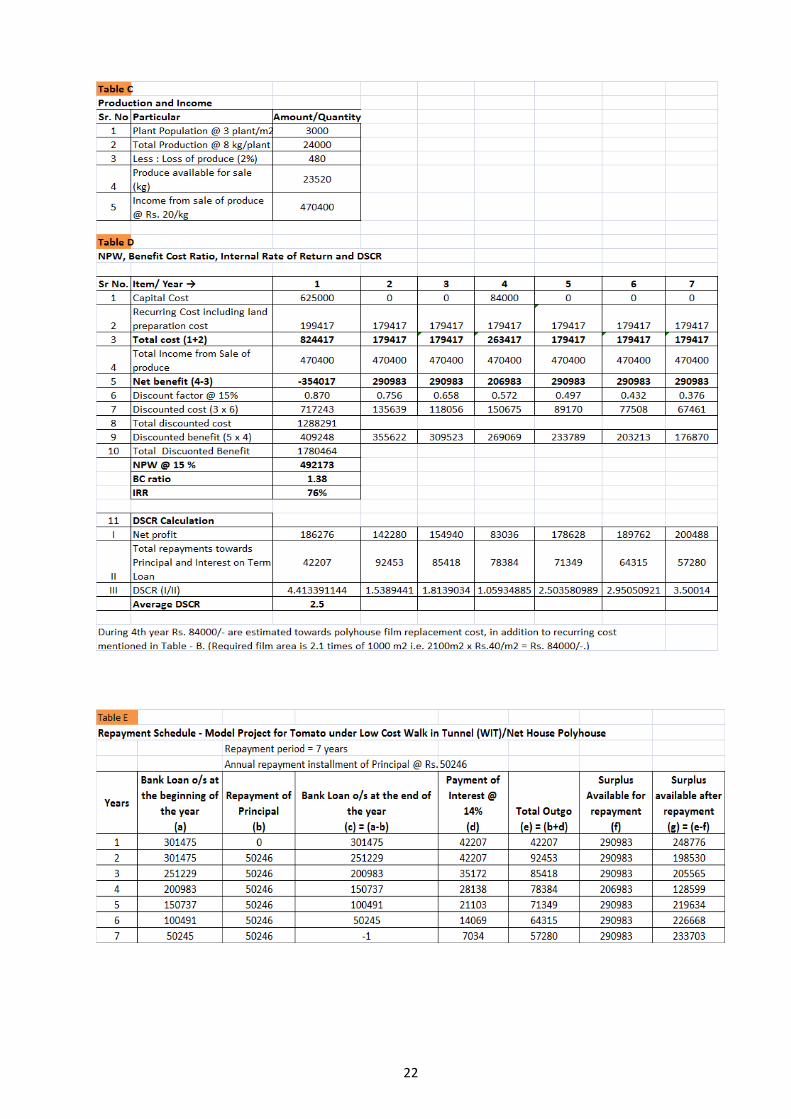
M. HARVESTING The harvesting of tomato fruits start from 90 days after transplanting. The total crop period for tomatoes is 8-9 month after planting. The harvesting is done daily or alternate day depending on market distance and customer choice. For long distance marketing, the fruits are picked at matured green or breaker stage. For processing the fully matured red ripe fruits are harvested in order to optimize the quality parameters. The optimum storage condition of 12oC temperature and 86 to 90 per cent relative humidity is required for tomatoes.
N. YIELD Under polyhouse condition from well maintained tomato crop average 30 kg/m2 or 10 kg/plant of marketable fruits are obtained.
O. GRADING Tomatoes should be graded to different classes according to their size and qualities. Grading is done manually by hand grading method.
P. PACKAGING After grading fruits are packed in crates/CFB which is best suited for tomato packing. Depending on the market, the box is either filled with one variety, one grade, or mixed colour one grade.
Q. ESTIMATED COST, MEANS OF FINANCE AND FINANCIAL ANALYSIS
The details of estimated cost, means of finance, economics and financial viability is worked out for Naturally Ventilated Polyhouse and Walk in Tunnel Polyhouse separately as follows.

20

21
22

23

24

25
26
3. (ii) CAPSICUM
A. INTRODUCTION Capsicum (Capsicum annum) belongs to the family Solanaceae and is an important member of chilli group. Green pepper is reported to be the native of tropical America. In India its introduction is believed to be through the Portuguese. In India it is cultivated commercially in Tamil Nadu, Karnataka, Himachal Pradesh and in some parts of Uttar Pradesh. In North India, it is known as "Simla Mirch" and is an important summer crop grown extensively in the mild hills of Himachal Pradesh to supply to the plains. It is variously called as capsicum, green pepper, sweet pepper, bell pepper, etc. In shape and pungency it is different from chilli. It is fleshy, blocky, of various shapes, more like a bell and hence named bell pepper. Almost all the varieties of green pepper are very mild in pungency and some of them are non-pungent, and as such they can be used as stuffed vegetable.
B. CLIMATE Capsicum grown under plolyhouse require following climatic conditions to get good quality and better yield round the year.
Name of crop Day (0C) Night (0C) Humidity (%) Light intensity (Lux)
Capsicum 21-28 18-20 60-65 50000-60000
Higher temperature is detrimental to fruit set. High temperature and low relative humidity at the time of flowering increases the transpiration pull resulting in abscission of buds, flowers and small fruits. Moreover, higher night temperatures are found to be responsible for the higher capsaicin (pungency) content in green pepper.
C. SOIL Although sweet pepper can be grown in almost all types of soils, well drained clay loam soil is considered ideal for its cultivation. It can withstand acidity to a certain extent. Levelled and raised beds have been found more suitable than sunken beds for its cultivation. On sandy loam soils, the crop can be successfully grown provided the manuring is done heavily and the crop is irrigated properly and timely. The most suitable pH range of soil for green pepper is 6 to 6.5.
D. BED PREPARATION A raised bed is always preferred for plantation of capsicum. Bed should be highly porous, well drained, providing adequate aeration for root development. The raised bed for capsicum plantation should have following dimensions. Top width - 100 cm Path width – 90 cm Height – 40 cm
E. PLANTING DISTANCE Plant to Plant distance: 40 cm Row to Row distance : 50 cm
F. PLANTING MATERIAL
The planting material should be healthy, resistant to diseases & pests.
Age of the seedling should be 35 to 40 days old.

27
Height of the seedling should be 16-20 cm.
Plant should possess good rooting system.
Seedling should have at least 4-6 leaves on the stem at the time of plantation. Other characteristics like fruit shape, fruit colour, production, fruit quality and vigour should also be considered while selecting plant material of good variety of capsicum.
G. VARIETIES/CULTIVARS There are a number of varieties of green pepper cultivated in India. The important ones are as under
California Wonder Chinese Giant World Beater Yolo Wonder Bharat There are some other varieties of capsicum such as Early Giant. Bullnose, King of North. Ruby King, Indra, Bombay, Orobelle etc. which are grown in India under polyhouse.
H. MANURES AND FERTILIZERS About 4 to 5 tonnes of farmyard manure, 30 to 55 kg of nitrogen in the form of ammonium sulphate or urea, 50 to 110 kg of phosphorus in the form of super phosphate and 75 to 100 kg of potash per hectare should be given depending upon the fertility status of the soil. The complete dose of farmyard manure should be applied in the soil at the time of soil preparation. Potassium and phosphate fertilizers should be mixed in the plant rows just before transplanting. The nitrogenous fertilizer is given two and half a month after transplanting.
I. CULTURAL PRACTICES Some varieties are very vigorous & plant can become as tall as 3.5 m and they produce about 4-5 kgs fruits on one plant in their life cycle. As stems are weak, they need support system. Plant stem after transplantation is tied by a high density plastic or nylon string. Twines are vertical ropes that are tied to horizontal wires on the ceiling at one end and to the crop at another end. Twines of good quality are used to hang from horizontal wires at least 3 m above the ground. Horizontal wire used should not have thickness less than 12 gauge, as it supports the weight of all plants in the row. If the wire is weak it will break and lead to losses. Three rows of over head horizontal wires are required for one bed and for each single plant four numbers of twines are required.
J. Topping The growing point at the top of the plant is removed. This operation is called topping. This technique is adopted for producing more branches. This is practiced after one month period from transplantation. After topping two or four main leaders are kept where as the lateral shoots is pinched first leaf (internodes) or second leaf (internodes). One or two fruits per side shoot are maintained.
K. Training Generally two system of training are practiced in capsicum cultivation. i. Two-leader system of training: In this system of training two main shoots are maintained as two leaders after topping. Side shoots are pinched after one or two pairs of leaves; generally one fruit is kept per side shoot.

28
ii. Four -leader system: In this system of training four main shoots are maintained as four leaders after topping. Side shoots are pinched after one or two pairs of leaves; generally one fruit is kept per side shoot.
L. Fruit thinning When there are too many fruits on the plant, it is necessary to remove some fruits, to promote the development of remaining fruits. This operation is called as fruit thinning. Fruit thinning is done when the fruit is of pea size. This practice is normally followed to increase the size of fruit thus by increasing the quality of production.
M. Pollination: Capsicum is self pollinating but there is high degree of cross pollination because of honey bees, thrips and other insects who transfer pollen from blossom to blossom. Pollination is not improved by using an "electric bees" or by spraying plant hormones but pollination is clearly better when honey bees or bumble bees fly in the green house. Bees increase the number of seeds in capsicum fruits.
N. IRRIGATION Capsicum needs to be irrigated at right time depending upon the growth of plants. Under drip irrigation system measured quantity of water can be applied. It is best method to optimise plant nutrition without large fluctuation in the nutrient level in root zone. It minimises losses by fixation or leaching in the soil thus economically using fertilizers to result in higher yields and improved quality.
O. INSECT and DISEASES a). The important insect pests attacking capsicum
i. Thrips ii. Aphids iii. Mites
b). Major Diseases of the capsicum i. Damping Off ii. Anthracnose iii. Powdery Mildew iv. Bacterial wilt v.
P. HARVESTING
Harvesting of capsicum is done at green, breaker and coloured (red/yellow etc.) stage. It depends upon the purpose for which it is grown and distance for the ultimate market. In India fruits are harvested at break stage for long distant markets. For local market, it is better to harvest coloured stage. Breaker stage is the one when 10% of the fruit surface is coloured and when more than 90% of the fruit surface is coloured it is considered as coloured stage. Harvesting starts after 60 to 75 days after transplanting & should be done with the help of sharp knife. Harvesting at the proper stage of maturity, careful and minimal handling of the produce will help in maintaining better fruit quality and reduce storage losses. Harvesting is generally done during morning and evening hours. Avoid harvesting immediately after fogging to check the disease and pest under control and to maintain better keeping quality of fruit. Generally,

29
Harvesting of capsicum is done by skilled worker in green house and kept in plastic containers an send to the packing hall.
Q. YIELD Average yield of capsicum is 6 to 8 kg/ plant.
R. POST HARVEST MANAGEMENT
i. Cleaning Grading: All damaged, malformed and bruised capsicums should be removed. Those with dirt adhering to their surface can be cleaned by wiping the surface with a moist soft cloth. The capsicum should be graded into same size and colour lots according to market requirements. Sorting is done on the basis of shape and weight of capsicum
ii. Packing: Capsicum is packed in cartons and should hold about 10 kg or 12 kg of capsicum.
Mostly farmers use apple boxes (used ones) for packing capsicum for local market. An ideal corrugated box carries following information.
On top side of the lid "Fresh vegetables" is printed. On width wise side of the lid "Variety, number of capsicum, gross and net
weight of box, box number is written on both sides. On length wise side of the lid" Fresh vegetable and handle with care is written
on both sides." Senders and buyers address with phone number.
iii. Storage
Capsicum can be stored in a cool room at a temperature of 7-10 oC for up to 3 weeks if required.
S. ESTIMATED COST, MEANS OF FINANCE AND FINANCIAL ANALYSIS
The details of estimated cost, means of finance, economics and financial viability is worked out for Naturally Ventilated Polyhouse and Walk in Tunnel Polyhouse separately as follows.

30

31

32

33

34

35

36
3. (iii) CUCUMBER
A. INTRODUCTION Cucumber (Cucumis sativus L.) known as Kihra in Hindi is an important summer vegetable commonly grown throughout India. The cucumber is used as salad, as pickle and also cooked vegetable. It has a cooling effect, prevents constipation, useful in jaundice and seed have number of ayurvedic uses.
B. CLIMATE The cucumber is a warm season crop and grows best at a temperature between 180C and 240C. It does not withstand even light frost.
C. SOIL Cucumber can be grown in all types of soil from sandy to heavy soils. Loam, silt loam and clay loam soils are considered best for getting higher yield. Soil pH between 5.5 and 6.7 is favorable for its cultivation.
D. BED PREPARATION
A raised bed is always preferred for plantation of Cucumber cultivation. After fumigation, the beds of following dimensions are prepared. 1. Top width- 90cm. 2. Path width- 50cm. 3. Height- 40cm.
E. PLANTING DISTANCE Plant to Plant distance: 45 cm Row to Row distance : 75 cm
F. PLANTING MATERIAL Seeds can be sown directly in the bed as cucumber has good germination % of seedling of five to six weeks age can be used for transplanting, depending on temperature and light conditions during propagation.
G. VARIETIES/CULTIVARS There are a number of varieties of cucumber cultivated in India. The important ones are -
Japnese Lon Green Poinsette Khira poona Balam Khira
H. MANURES AND FERTILIZERS About 4 to 5 tonnes of farmyard manure, nitrogen in the form of ammonium sulphate or urea, phosphorus in the form of super phosphate and potash in form of K2So4 should be given depending upon the fertility status of the soil. The complete dose of farmyard manure should be applied in the soil at the time of soil preparation. Potassium and phosphate fertilizers should be mixed in the plant rows just before transplanting. The nitrogenous fertilizer is given two and half a month after transplanting.

37
I. CULTURAL PRACTICES a. Training: The basic principle in developing a training system is to uniformly maximize the
leaf interception of sunlight throughout the green house. The selection of a system will largely depend on the greenhouse facility, the production system, and grower preference. A vertical cordon system trains plants vertically to an overhead wire. Once the plants reach the wire they are topped and then pruned using an umbrella system. A second popular training system is the V-cordon. Single rows are evenly spaced approximately 1.5m apart and plants are distanced approximately 30 cm apart within each row, and the 2 over head wires are spaced approximately 75cm apart from each other. Plants can be trained on plastic twine supported from horizontal support wires running along the length of the bed (3mt above top of the bed). The base of the string can be anchored loosely to the base of the plant with non-slip noose.
b. Pruning: The most common pruning system for either vertical cordon or V-cordon trained
plants is known as the umbrella system. The growing point of the main stem is removed when one or two leaves have developed above the wire. Two lateral branches near the top of the plant are allowed to grow and are trained over the overhead wire, in downward direction. The growing point of each lateral is removed when they are approaching to the ground.
c. Fruit thinning: Fruit pruning each plant is based on plant vigour and fruit load. Extensive
leaf growth is prevented to allow proper colouring of the fruits. The development of the fruit is dependent on the continuing production of leaf axils. If too many fruits are set at once, fruit thinning is necessary to avoid malformed and non-marketable small fruit. Such fruit, as they appear, should be removed.
J. IRRIGATION
Cucumber needs to be irrigated at right time depending upon the growth of plants. Under drip irrigation system measured quantity of water can be applied. It is best method to optimise plant nutrition without large fluctuation in the nutrient level in root zone. It minimises losses by fixation or leaching in the soil thus economically using fertilizers to result in higher yields and improved quality.
K. INSECT and DISEASES Cucumber is attacked by number of diseases and pests. The most important diseases are
i. Bacterial wilt ii. Anthracnose iii. Downy and Powdery Mildew iv. Angular Leaf Spot v. Cucumber Mosaic
Major insect pests of the cucumber are
i. Red Pumpkin Beetles ii. Aphid iii. Cut worm iv. Fruit Fly

38
L. HARVESTING Harvest may begin 50 to 65 days after planting. Cucumber is harvested both for fresh market and for processing. They should be picked at frequent intervals in order to avoid losses due to over sized or over mature fruits. Once harvesting starts the fruits are generally picked at 2-4 days intervals depending upon market information. For commercial purpose, cucumber is harvested at immature stage 5-7 days after pollination depending upon the cultivars.
M. YIELD Average yield of capsicum is 6 to 8 kg/ plant.
N. PACKAGING The harvested fruits are cleaned and packed in Corrugated Fibre Box or Bamboo Box or Gunny Bags according to the availability of market and transport facility.
O. ESTIMATED COST, MEANS OF FINANCE AND FINANCIAL ANALYSIS
The details of estimated cost, means of finance, economics and financial viability is worked out for Naturally Ventilated Polyhouse and Walk in Tunnel Polyhouse separately as follows.

39

40

41

42

43

44

45
3. (iv) ROSE A. INTRODUCTION
Depending on the species and varieties, roses have various uses. They may be used as cut flowers, and garden plants. They may also be used in making rose oil, rose water and gulkhand. Model project is on production of roses for use as cut flowers, which have an important place in preparation of bouquets, floral arrangements, worship, social occasions and presentation of gifts. Measured in terms of volume of trade in the international market cut roses rank first in popularity. Further, with the advancement in production and marketing of cut roses and also on account of recent economic liberalisation there has been an upsurge of interest in production of cut roses in plastic green houses in India.
B. CLIMATE Plenty of light, humid and moderate temperature ranging from 150C to 280C may be considered as ideal conditions for roses in the tropical and subtropical climate of India. At temperature below 150C roses can be grown, but the interval between flushes become longer. At higher temperature, say above 300C, roses can be grown provided high humidity is maintained and evaporation is slowed down.
C. SOIL Well drained soil rich in organic matter and oxygen is good for roses. Organic matter as high as 30 per cent in the top 30 cm of the growing beds is preferred by many growers. The pH of the soil should be around 6 to 6.5.
D. BED PREPARATION Top width – 90 cm Bottom width – 100 cm Height – 45 cm Path way – 50 cm
E. PLANTING DISTANCE Plant to Plant distance: 17 cm Row to Row distance : 45 cm
F. PLANTING MATERIAL Rose plant used for plantation should be 2-3 month old and have minimum two dark green colour leaves. Bud union of rose plant should not be covered with soil. It should be 2-3 cm above the ground level. The sprout coming out of the union should face towards the path at the time of plantation. Rose plants are planted in a zigzag method on the bed.
G. TYPES OF ROSES AND VARIETIES
The major types of roses which are commercially important are as under:-
Hybrid Tea Roses : These have large flowers (4 cm.) long stems (125 cm). Yield varies from 100-200 stems/sqm. Hybrid Teas fetch higher price than other types. A few well-known varieties of this group are SONIA, VIVALDI, TINEKE, MELODY, DARLING and ONLY LOVE.

46
Floribunda Roses : These have small flowers (2.5 cm) and shorter stems (less than 60 cm), but yield much higher than other types. Examples of this type are FRISCO, MERCEDES, JAGUAR, KISS and FLORENCE.
Spray Roses : A single stem of this type may carry 5-6 flowers, but stem yield per sqm is low. Important varieties belonging to the type are EVELIEN, JOY and NIKITA.
H. MANURES AND FERTILIZERS Organic manures are required to be added so that top 30 cm of the soil has 30% organic matter content. Application of nutrients should be based on analysis of soil and plant. In the present model the cost has been estimated based on 250 fertigation days and 1.2g dose of fertilizers per day per sq. meter.
I. CULTURAL PRACTICES For proper growth of rose plant and high production special cultural practices are to be carried out as follows:
i). Initial plant development / mother shoot bending: If the young plant is allowed to flower immediately after planting there is serious risk that the important structural frame work of the plant will be impaired. The various types of plants require different treatment. First flower is pinched after one month from the date of plantation so that 2 to 3 eyes bud will sprout on main branch to grow as branches and these branches in turn will form buds. When the plant attains this stage of growth, the mother shoot is to be bent towards the direction of path. This cultural operation in rose plants is done to initiate bottom break ground shoot. The maximum leaf area is required to build up a strong root system. The mother shoot is bent nearer to the bud joint.
ii). Plant structure development: To develop more growing points and plant structure development plays an important role. After planting ground shoot will start growing from crown of plant. The weak ground shoots should be bent at ground level, for forming a basic and strong frame work of plant structure for production throughout their life cycle. the strong ground shoots should be cut at 5th five pair of leaves after four and half months from the date of plantation. The medium ground shoots should be cut at 2nd or 3rd five of leaves. iii). Bending in roses: Bending helps in maintaining enough leaf area on the plants. The maximum leaf area is required to build up a strong root system. Leaves are important for producing carbohydrates. The mass of leaves is also known as the lungs of the plant. The growing suckers should be removed in order to check new growth on the bended stem. The buds should be removed from the bended stem in order to check the incidence of thrips and bud rot (botrytis). Only weak and blind shoots are selected for bending. Bending breaks apical dominance of the plant. It is continuous process and hence carried out throughout the life cycle. Bending should be such that the most of the stems lay below horizontal. In summer season it is generally advised not to go for bending as it provides favourable condition for mite’s incidence. Bending is done on 1st or 2nd five pair of leaves. One can also grow roses in green house without bending by keeping some blind shoots on plants in standing position for extra photosynthesis and uptake of water nutrients. While bending the stems, the care should be taken that the stem will not break and the leaves will not touch the soil on the bed. iv). Disbudding: Standard varieties are those with one flower on each stem. But as nearly all varieties produce some side buds below the center bud. these side buds have to be removed. The removal of these buds is known as disbudding. It should not be done too early or too late. If done too early it may harm leaves and if done too late then large wounds in the upper leaf axil

47
can take place. When bud attain pea-size and shows slight colour then it is right time to do disbudding.For most spray varieties, the center crown bud is to be removed. Disbudding is generally done on weak stem so that it can convert itself to thick stem and in future cuts can be taken. Thick stem produce strong sprouts whereas then stem gives out weak sprouts v). Pinching: Removal of unwanted vegetative growth from the axil of leaf below the terminal bud is called pinching. This helps to get good quality flowers and buds and avoids wastage of energy in the development of auxiliary bud if done at right stage and right time. It leads to apical dominance. vi). Wild shoot (root stock) removal: Wild shoots are the unwanted growth that takes place at the union on the root stock. They should be removed at the earliest as these will deplete nutrients and checks growth and development of plant. They should not be cut but removed from its union by pressing it with thumb in order to check its further sprouting. vii). Support of the plants The support system consists of bamboo / GI pipes / 'L' angles inserted on both sides of bed at the start and end of the bed. Post are placed at intervals of 3m on both sides of the bed, along the sides of bed, fastened at the posts at 30 cm – 40 cm intervals are 14 gauge GI wires or plastic string to support the plant. Between the wires across the bed, thin strings can be tied to keep the width of the bed constant. Support system makes intercultural operation easy and protects the buds from being damaged by not allowing the stems bend into the path. viii). Pruning: Stems are cut back leaving 4-5 nodes on the basic stock frame, removing all weak shoots and redirecting the wayward ones. This may be practised in a phased manner so that flowering takes place from September to March. Generally, flowering takes place 45 days after pruning.
J. IRRIGATION Rose plant require a lot of water, at least 6mm/day i.e. 60cum/ha/day. A drainage line may be laid below the beds for disposal of excess water.
K. PEST and DISEASES The principal diseases of rose are
i. Downy Mildew ii. Powdery Mildew iii. Botrytis iv. Pruning Dieback v. Black leaf Spot
Major insect pests of the rose are
i. Red Spider Mite ii. Leaf Roller iii. Aphids iv. Thrips v. White Fly
Control
The preventive spray programme with a volume of 1500 litres/spray at an average interval of once in a week is suggested. The chemicals could be as under.
Dithane M-45 0.6 gm/litre Metasystox 1.25 ml/litre Karathane 1.00 ml/litre

48
L. HARVESTING
Roses should attain the right stage for harvesting. If cut too early, flowers miss reserve food and therefore, may not develop into full flowers. If cut too late, longevity diminishes. As such, roses should be cut just as the buds are opening, after the sepals have almost fully curled up and the colour is fully visible. In small flowered varieties and Floribundas, the flowers are cut just when they begin to open the cluster. The cutting may be done in the evening or early morning with long stem. The lower end of cut stems are immediately placed in clean plastic buckets containing a clean solution of 500 ppm citric acid or in chrysal - RVB. Thereafter, the buckets containing cut roses are brought to the grading and packing Shed/Hall. Harvesting Stages
S.No Particulars Place of cutting Month from date of plantation
1 Ground shoot cutting At 5th five pair of leaves from bottom of plant
3 to 3.5
2 First harvesting 2nd or 3rd five pair of leaves from first cut
4.5 to 5
3 Second / Regular harvesting
2nd or 3rd five pair of leaves from first cut
6th month onwards daily harvesting
The rose should be cut with the help of sharp cut and hold secateurs. Ground shoot cutting should be done on 5th five pair of leaf then one or two eye buds sprout from lower leaves below the cut. These sprouts will grow into flowers in the period of 35 to 50 days. This varies from variety to variety. Later on the first harvest should be taken on 2nd or 3rd five pair of the leaves above the first cut. During summer season or when there is less leaf area on plant it is always advisable to take cut on 3rd five pair of leaves above the first cut. Always bend thin stems and take cut on 3rd five pair of leaves above the first cut. Always bend thin stems and take cut on thick stems to get strong shoots.
The regular harvesting is done on 2nd five pair of leaves. Sometimes under cutting is also practiced as it is an important technique to keep rose plants at reasonable height. Harvesting cut should be sharp and inclined direction for avoiding the deposition of water or spray solution. When the temperature is low in the green house harvesting is done only once i.e. during early morning hours. When there is high day temperature it is necessary to take second harvesting in later afternoon.
Cut stages of roses play an important role in harvesting. Cut stages of roses for export is stage 0 and 1 whereas cut stage is 2 and 3 for domestic market.
M. YIELD Average yield of roses is 30 to 35 stem/ plant per year.
N. GRADING Flowers should be graded into different classes according to their qualities. Grading is done on a mechanical grader or by hand grading tables or work stations.
49
O. PACKAGING Packing comprises three steps: bunching, wrapping and packing. The heads of roses are evened up and their stem tied with a rubber band into bunches in 10s, 20s, 25s, or 50s depending on the ultimate market. They are cut so that all the stems are of the same length. The bunches are placed in preservative solution and may be shifted to the cold store. They are brought back to the packing hall and the buds are wrapped and bunches are sleeved in transport polyethylene. The wrap is a 15-20 cm. wide plastic strip which acts as a cushion for the buds. Many different cardboard boxes are used for packing. For long term transport it is best to use telescopic style boxes made of corrugated fibreboard. The size could be 100 cm x 45 cm x 22 cm. There may be 400 to 1000 stems per box and weight may vary from 14 to 18 kg/box. Depending on the market, the box is either filled with one variety, one grade, or mixed colour one grade.
P. ESTIMATED COST, MEANS OF FINANCE AND FINANCIAL ANALYSIS
The details of estimated cost, means of finance, economics and financial viability is worked out for Naturally Ventilated Polyhouse as follows.

50
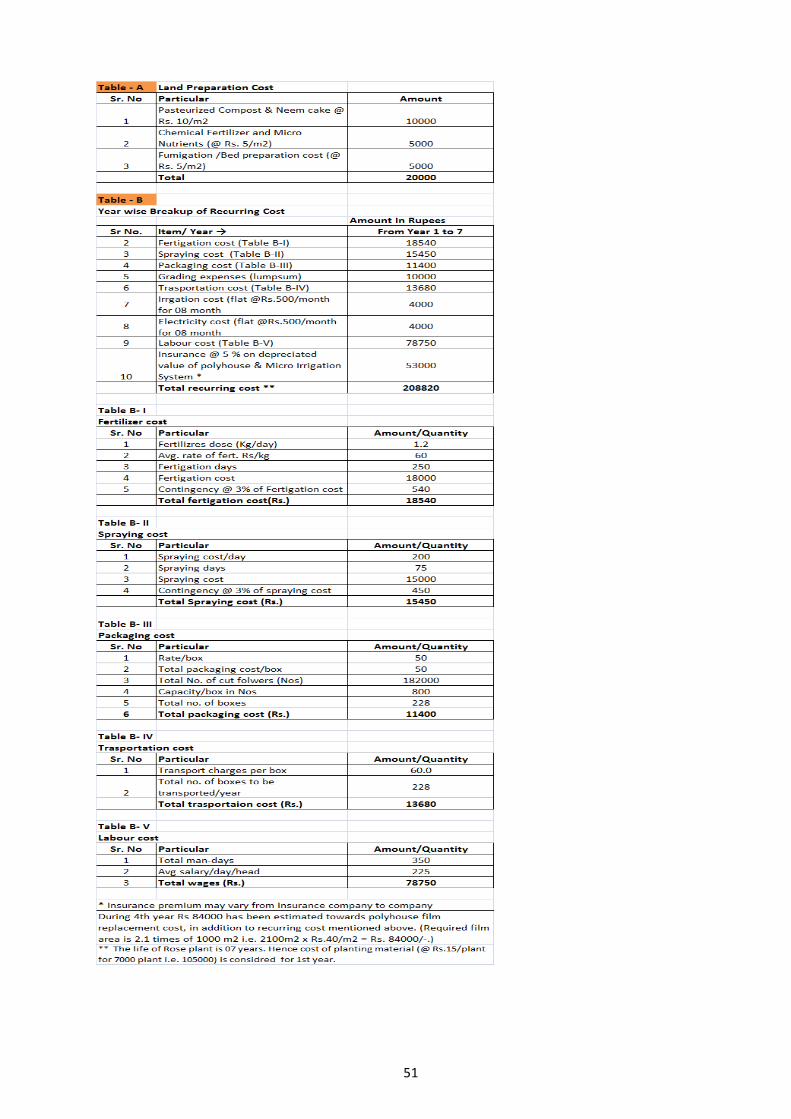
51

52

53
3. (v) GERBERA A. INTRODUCTION
Gerbera is a very attractive, commercial cut flower successfully grown under different conditions in several areas of the world as well as in India and meeting the requirements of various markets. This flower is originated in Asia and South Africa. Gerbera jamesonii has been developed through cross breeding program.
B. CLIMATE Bright sunshine accelerates the growth and quality of the flowers, however, in summer this flower needs diffused sunlight. Gerbera plants grown in locations with insufficient light will not bloom well.
C. SOIL Red lateritic soils are good for Gerbera cultivation as it is having all the essential qualities that an ideal soil should have. After fumigation with formaldehyde, the raised beds are prepared on which Gerbera plants are planted.
D. BED PREPARATION Top width – 60 cm Bottom width – 70 cm Height – 45 cm Path way - 40 cm
E. PLANTING DISTANCE Plant to Plant distance: 30 cm Row to Row distance : 40 cm
F. PLANTING MATERIAL Plant should not be less than three months old. At the time of planting the tissue culture, plant should have atleast 4 to 5 leaves. Gerberas are planted on raised bed in two rows formation. Zigzag plantation system is mostly preferred. While planting 65% portion of root ball should be kept below ground and rest of the portion i.e. 35% should be kept above the ground for better air circulation in the root zones.
G. VARIETIES There are many multi coloured varieties of Gerbera developed through tissue culture.
H. MANURES AND FERTILIZERS Organic manures are required to be added so that top 30 cm of the soil has 30% organic matter content. Application of nutrients should be based on analysis of soil and plant. In the present model the cost has been estimated based on 250 fertigation days and 1.2g dose of fertilizers per day per sq. meter.
I. CULTURAL PRACTICES
i). Weeding & raking of soil: Weeds take the nutrients of the plants and affect the production. Hence, they should be removed from the bed. Due to daily irrigation, the surface of the gerbera bed becomes hard hence raking of soil is done with the help of a raker. It increases soil aeration in the root zone of the plant. this operation should be done regularly, may be twice in a month.
54
ii). Disbudding: Removal of inferior quality flowers at the initial stage after plantation is called disbudding. The normal production of gerbera plants starts after 75-90 days from the date of plantation. Production of flowers starts 45 days after plantation but initial production is of inferior quality, hence these flowers should be removed from the base of the flowers stalk. this helps in making the plant strong and healthy. iii). Removal of old leaves: Sanitation helps in keeping the disease and pest infestation below the economic threshold level. The old, dry, infested leaves should be removed from the plant and burnt outside the green house or dumped in to a compost pit. This practice allows producing good, healthy new leaves and better aeration in the crop.
J. IRRIGATION Gerbera plant require a lot of water, at least 6mm/day i.e. 60cum/ha/day. A drainage line may be laid below the beds for disposal of excess water.
K. PEST and DISEASES The principal diseases of rose are
i. Pythium ii. Sclerotinia iii. White rust iv. Rhizoctonia v. Fusarium
Major insect pests of the rose are
i. Red Spider Mite ii. Aphids iii. Thrips iv. White Fly
Control: The preventive spray programme with a volume of 1500 litres/spray at an average interval of once in a week is suggested. The chemicals could be as under.
Dithane M-45 0.6 gm/litre Metasystox 1.25 ml/litre Karathane 1.00 ml/litre
M. HARVESTING The first flowers may be harvested after 75-90 days after planting. Flowers of most of the varieties (single types) are ready to be picked when 2-3 whirls of stamens have entirely been developed. Some varieties are picked little riper, especially the double types. Skilled labours are required for harvesting of gerbera cut flowers. After harvesting the flowers should be kept in bucket containing clean water. Flowers are very delicate hence they should be carefully handled otherwise can be damaged and their quality gets deteriorated. For harvesting gerbera no secateurs are required and are done by naked hands.
55
N. YIELD Average yield of roses is 30 to 35 stem/ plant per year. O. GRADING Flowers should be graded into different classes according to their qualities. Grading is done on a mechanical grader or by hand grading tables or work stations.
P. PACKAGING Packing comprises three steps: bunching, wrapping and packing. Many different cardboard boxes are used for packing. For long term transport it is best to use telescopic style boxes made of corrugated fibreboard. The size could be 100 cm x 45 cm x 22 cm. There may be 400 to 1000 stems per box and weight may vary from 14 to 18 kg/box.
Depending on the market, the box is either filled with one variety, one grade, or mixed colour one grade.
Q. ESTIMATED COST, MEANS OF FINANCE AND FINANCIAL ANALYSIS
The details of estimated cost, means of finance, economics and financial viability is worked out for Naturally Ventilated Polyhouse and Walk in Tunnel Polyhouse separately as follows.

56

57

58

59
3. (vi) CARNATION A. INTRODUCTION
Carnation is an important flower crop having great commercial value as a cut flower due to its excellent keeping quality, wide array of colour and forms. Carnation, apart from producing cut flowers can also become useful in gardening for bedding, edging, borders, pots, and rock gardens There are two basic groups of Carnations traded within the international markets.
S.No Types of Carnation Size and no. of flowers
1 Standard carnation Single big flower on stem
2 Spray carnation A bunch of flowers with smaller size
However, Standard carnation fetch better returns and hence most of the farmers prefer standard type carnation varieties in India.
B. CLIMATE Most of the varieties of carnation are photo-period insensitive. Ideal temperature requirement is about 10o C in the night and 23o C in the day. High light intensity with a 12 hour day length may produce top quality flowers.
C. SOIL
Carnation thrives best in well drained soil with soil reaction from neutral to slightly alkaline.
D. BED PREPARATION
Carnation may be grown in raised bed of soil. This would allow 72% utilisation of land.
Top width – 90 cm Bottom width – 100 cm Height – 45 cm Path way – 50 cm
E. PLANTING DISTANCE Plant to Plant distance: 15 cm Row to Row distance : 15 cm
F. PLANTING MATERIAL Carnations are multiplied vegetatively through cuttings. 10 to 15 cm with 3 to 4 nodes weighing around 10 gms. terminal cuttings give rise to good plants. Rooting hormone i.e. IBA 500 ppm is used for root initiation. Cuttings normally develop good root system within 3 weeks. Carnation plant used for plantation should be 1 to 1.5 month old.
G. VARIETIES Carnation is loved for its exquisite form, beauty and clove like fragrance and good vase life. Accordingly, there are number of varieties of Carnation are available for cultivation.
60
H. MANURES AND FERTILIZERS
Organic manures are required to be added so that top 30 cm of the soil has 30% organic matter content. Application of nutrients should be based on analysis of soil and plant. In the present model the cost has been estimated based on 250 fertigation days and 1.2g dose of fertilizers per day per sq. meter.
I. CULTURAL PRACTICES For proper growth of carnation plant and high production special cultural practices are to be carried out as follows:
i). Support system: Both spray and standard carnation produce weak and lanky stems hence must be supported with 4 to 5 layers of support netting. Lack of support system may cause lodging of stems. Nets of mild steel wire or nylon wires can be used. Nets of mild steel is expensive but last long. 4 to 5 layers of wire nets are required during the growth period of the plant. Spread the first support net i.e. 7.5 cm x 7.5 cm on top of the beds before planting. When the plants start to grow, the net should be lifted by 5 to 7 cm above ground. The wire should be support with iron poles. The poles should be placed at a distance of 3M along bed length.
S.No Dimension of Net Layering from bottom to top
* Height (ft)
1 7.5 cm x 7.5 cm 1st layer 0 – 0.5
2 12.5 cm x 12.5 cm 2nd layer 1 – 1.5
3 15 cm x 15 cm 3rd layer 2 – 2.5
4 15 cm x 15 cm 4th 3 – 3.5
5 15 cm x 15 cm 5th layer 4 – 4,5
*Height of the nets are raised time to time with the growth of the crop. II). Pinching: Removal of unwanted vegetative growth from the axil of leaf below the terminal bud is called pinching. this helps to get good quality flowers and buds and avoids wastage of energy in the development of auxillary bud if done at right stage and right time. It leads to apical dominance. There are generally two methods of pinching as follows:
1. Single pinch method 2. Pinch and half method
Single pinch method First pinching is done after 3 to 4 weeks from date of plantation, when the plants are well established. Apex shoot is pinched on the 5th to 6th pair of leaf (nodes). This method is adopted in order to produce maximum number of flowers during September to March when the demand for flowers in the market is high. Pinch and half method This method helps to get continuous production. After one month of 1st pinching, second pinching is done only on half of the lateral shoot by leaving three pairs of leaves on the shoots.
61
First the unpinched shoot will grow and produce flowers. Later on pinched shoots will grow and produce flowers. iii). Disbudding: Standard varieties are those with one flower on each stem. But as nearly all varieties produce some side buds below the center bud, those need to be removed. The removal of these buds is known as disbudding. It should not be done too early or too late. For most spray carnation varieties, the centre crown bud in many cases is also to be removed. iv). Weeding and loosening of the soil: This operation is done with the help of long handed weeding hook (khurpi). It is helpful for removal of weeds, breaking the top layer of algae and to facilitate better air circulation in soil. this is to be done very carefully to avoid damage of active roots.
J. IRRIGATION Rose plant require a lot of water, at least 6mm/day i.e. 60cum/ha/day. A drainage line may be laid below the beds for disposal of excess water.
K. PEST and DISEASES The principal diseases of rose are
i. Pythium ii. Pythopthora rot iii. Fusarium wilt iv. Fusarium stem rot v. Alternaria blight, Grey mold
Major insect pests of the rose are
i. Meanlybug ii. Spidermite iii. Thrips iv. White fly v. Aphid
Control:
1. Soil sterilisation - Chloropicrin 2. Dithane - 0.6 gm/litre 3. Metasystox - 1.25 ml/litre 4. Karathane - 1.00 ml/litre
Volume of preventive spray - 1500 litre/spray
L. HARVESTING The regular harvesting cuts are given at 2nd and 3rd nodes. Paint brush stage is the cut stage for standard carnation. Harvesting starts from 120 to 160 days from the date of plantation. It varies from variety to variety. Spray carnations are cut when two flowers are open and the remaining buds are showing colours.
Cut stages of carnation plan an important role in harvesting. Harvesting of carnation is a skilled job hence requires skilled worker. The yield of flowers not only depends on the variety and
62
pinching operation but also on the period, the crop is harvested. In general 70-80 carnation cut flowers should be kept in bucket (50 litres capacity) containing 5 to 7 litres of clean chlorinated water or clean water is containing preservatives like RVB chrysal or Florissant.
M. YIELD In tropical climate the standard carnation produces 200 cut stems (approx.) per square meter annually. Whereas spray carnation produce 250 cut stems (approx.) per square meter annually.
N. GRADING Flowers should be graded into different classes according to their qualities. Grading is done on a mechanical grader or by hand grading tables or work stations.
O. PACKAGING Packing comprises three steps : bunching, wrapping and packing. Depending on the market, the box is either filled with one variety, one grade, or mixed colour one grade.
P. ESTIMATED COST, MEANS OF FINANCE AND FINANCIAL ANALYSIS
The details of estimated cost, means of finance, economics and financial viability is worked out for Naturally Ventilated Polyhouse and Walk in Tunnel Polyhouse separately as follows.

63

64
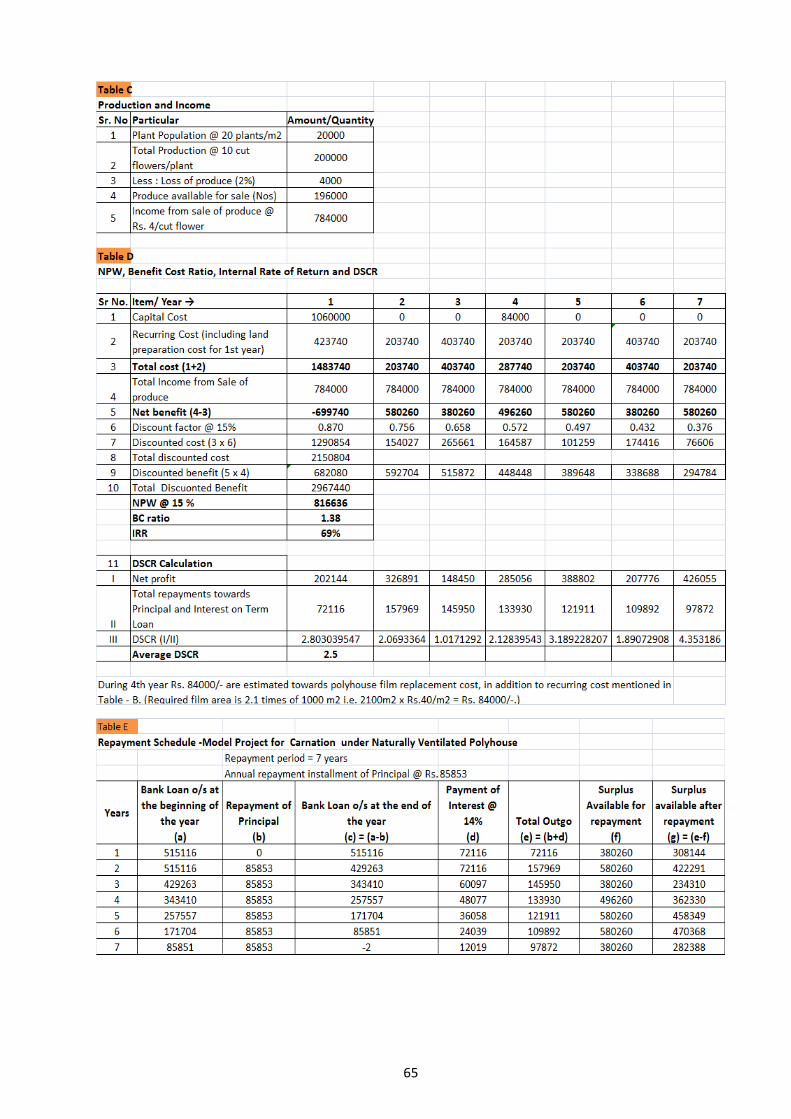
65