MODEL 1000-DX DELUXE DENT PULLING MACHINE - ai … Manual 2015 (2).pdf · MODEL 1000-DX DELUXE DENT...
15
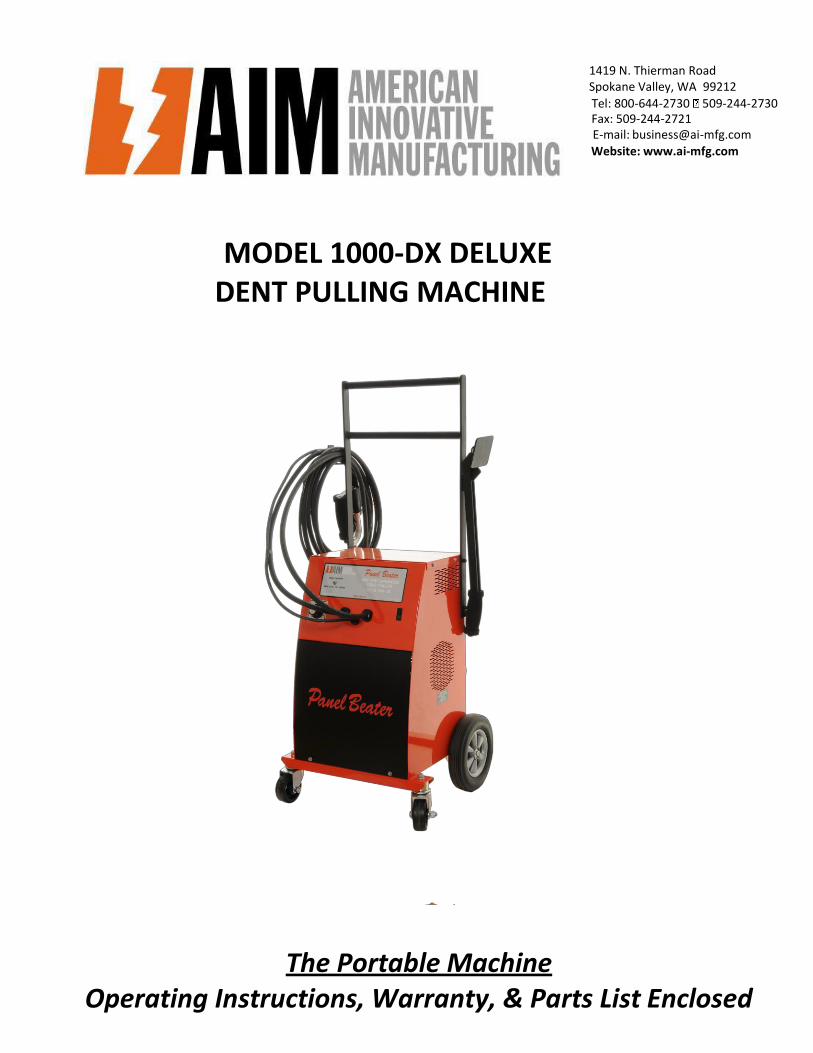
1419 N. Thierman Road Spokane Valley, WA 99212 Tel: 800-644-2730 509-244-2730 Fax: 509-244-2721 E-mail: [email protected] Website: www.ai-mfg.com MODEL 1000-DX DELUXE DENT PULLING MACHINE The Portable Machine Operating Instructions, Warranty, & Parts List Enclosed
Transcript of MODEL 1000-DX DELUXE DENT PULLING MACHINE - ai … Manual 2015 (2).pdf · MODEL 1000-DX DELUXE DENT...
1419 N. Thierman Road Spokane Valley, WA 99212
Tel: 800-644-2730 509-244-2730 Fax: 509-244-2721 E-mail: [email protected]
Website: www.ai-mfg.com
MODEL 1000-DX DELUXE DENT PULLING MACHINE
The Portable Machine Operating Instructions, Warranty, & Parts List Enclosed
A NOTE TO YOU
THANK YOU for purchasing an A.I.M. product. A.I.M designs and manufactures the highest quality tools for the Auto Body Industry. To ensure that you enjoy many years of trouble-free operation, we have developed this Operating Manual.
It contains valuable information concerning how to safely operate and maintain your new equipment properly and safely. Please read it carefully.
Always follow vehicle manufacturer’s recommendations for collision repairs.
Also, please complete and mail the enclosed warranty registration card. You must send in your warranty registration card within 30 days or your warranty may be void.
SERVICE: For assistance or service Inside the USA and Canada call toll free 1-800-644-2730
If you need assistance or service, first see the “Troubleshooting” section of this book. When calling – you will need your model and serial numbers. This information can be found on the back of the main unit.
Model: 1000DX
Serial Number:
Purchase Date:
A.I.M. MODEL 1000 DELUXE COMPONENTS Your AIM Model 1000 DX Dent Pulling Machine includes the following components:
A. Control handle and power lead F. Battery B. Power Switch G. Battery Charger C. Electrode Holder (on handle) H. Cabinet Console D. Magnetic ground & 10’ lead I. Pack of 5 Electrodes & Lock Nuts E. Puller Bar
Please check your package to make sure all parts listed above have been included with your machine. Call 1-800-644-2730 immediately upon receiving your 1000DX if you have any discrepancies.

IMPORTANT SAFETY INSTRUCTIONS WARNING – When operating this equipment, follow basic precautions, including the following:
Read all instructions before using this machine and its attachments. Use this equipment only for its intended use.
WARNING! All electrical connections must be made by a qualified electrician. Risk for electrical shock.
WARNING! All service and maintenance must be carried out by A.I.M qualified service personnel. Risk for electrical shock
IMPORTANT! The welder may only be used by qualified personnel.
Do not touch the copper connectors or electrodes during or immediately after use. WARNING! Make sure to use welding goggles when spot welding. The sparks might otherwise
injure the eyes. WARNING! Sparks from welding could start a fire. Risk for injuries.
Do not operate equipment unless all enclosure panels are properly in place. Always wear protective shield when working with batteries and equipment.
WARNING! Make sure to use welding goggles when spot welding. The sparks might otherwise injure the eyes.
Before using this equipment consult your physician if you have a pacemaker Failure to take basic safety precautions can result in serious injury or material
loss. IMPORTANT! The welder my only be used by qualified personnel. WARNING! Risk for damage to materials close to the weld.
Batteries improperly maintained may short out and explode. Contact Factory Authorized Service Personnel for all repairs or service to unit.
WARNING – Machine must remain in upright position at all times!
Shut down unit, and disconnect input power before inspecting, maintaining or servicing. WARNING! Unplug the welder from the wall outlet before servicing, cleaning, or maintenance.
Risk for electrical shock.
Cigarettes, Flames, or Sparks could cause battery to explode. Always shield eyes and face from battery. Do not charge or use booster cables or adjust post connections without proper instructions and training. Keep vent caps tight and level.
WARNING! Make sure to use welding goggles when spot welding. The sparks might otherwise injure the eyes.
IMPORTANT! The welder may only be used by qualified personnel. WARNING! Do not place the welder on unstable ground or uneven ground. The welder might tip
causing personal injuries or serious damage to the welder.
Do not operate this equipment unless user is fully trained in the safe use of welders and related accessories.
WARNING! The welder my only be used by qualified personnel.

1419 N. Thierman Road Spokane Valley, WA 99212
Tel: 800-644-2730 509-244-2730 Fax: 509-244-2721 E-mail: [email protected]
Website: www.ai-mfg.com
A.I.M. Parts List Model 1000 Deluxe – Page 1 of 3
PB-104 ELECTRODES PB-113 COPPER SHRINK (PACK OF 5) TOOL
(CONTROL HANDLE)
SA-140 WAVE WIRE TIP PB-201 ELECTRODE HOLDER

A.I.M Parts List Model 1000 Deluxe – Page 2 of 3
PB-224 SLIDE HAMMER PB-207 PULLER BAR
PB-251 ON/OFF ROCKER SWITCH PB- 226 Push Button

A.I.M Parts List Model 1000 Deluxe – Page 3 of 3
PB-200 CONTROL HANDLE SA-133 1LB WAVE WIRE
PB-205 Magnet Assembly
If the part you are looking for is not listed above please call
1-800-644-2730
HANDLING PROCEDURES
“The Panel Beater” A.I.M. Dent Pulling Machines
This sheet describes important tips for proper operation of the A.I.M. dent pulling machines.
1. Unpack your A.I.M. machine and then read your operating instructions. 2. Screw the electrode into the electrode holder protruding from the handle. 3. Grind off all paint in the area of the dent leaving enough room for the
magnetic ground to make contact on bare metal. 4. Put the ground on the clean area making sure you have a solid contact. If
the ground magnet sparks during operation you have a poor contact. 5. Firmly press the tip of the electrode against the dent and push the switch on
the handle briefly to get a “stick” or weld. 6. Adjust timer for metal thickness, always use low settings first. Start at “0”. 7. Pull straight out. Turn the handle clockwise to release the weld. Repeat as
needed. Use the puller bar where more force is required. 8. Cool the electrode often. Dip the electrode into a can of cool water to cool it. 9. Do not use the machine while charging the battery. Plug power cord into appropriate outlet.
Note: If battery is below 12.5 volts it must be recharged.
This machine contains lead-acid storage batteries. Each battery is liquid tight when kept in the upright position. However, in the event the battery is tipped over and some acid spillage does occur, neutralize the acid with baking soda.
WARNING! Should acid get on your skin, immediately flush the area with a large quantity of water. Report all injuries & seek appropriate medical attention!!
NOTE
OPERATING INSTRUCTION & WARRANTY ENCLOSED
CHARGING THE UNIT
Upon receiving you’re A.I.M. equipment, you must charge the unit before operating.
All A.I.M. battery operated equipment comes with a specially designed battery charger to ensure the power needed to operate the machine.
The A.I.M. charger is designed to automatically regulate the battery voltage
level. The battery must be fully charged before use.
INDICATOR LIGHTS
There is an indicator light displayed on the front panel of the machine.
A SOLID green light indicates the battery is being charged.
A FLASHING green light indicates the battery is fully charged.
The voltage required for your chargers power source is indicated on the back label of the charger.
Voltage Available:
110 / 120 Volt 60 HZ
Other Power options are available on special order. Please contact factory.
Note: Battery must be fully charged before using machine.

A.I.M. MODEL 1000 DELUXE COMPONENTS
Your A.I.M. Model 1000 Dent Pulling Machine includes the following components: A. Control handle and power lead F. Battery B. Power Switch G. Battery Charger C. Electrode Holder (on handle) H. Cabinet Console D. Magnetic ground & 10’ lead I. Pack of 5 Electrodes & Lock Nuts E. Puller Bar
ASSEMBLY OF COMPONENTS
Attach an electrode onto the electrode holder by first screwing a nut (provided) onto the electrode and then screwing the electrode into the end of the electrode holder. Tighten the nut against the electrode holder to prevent loosening.
Plug in the charger to a normal power outlet. NOTE: Panel Beaters are available for 110/120/volt 60 Hz power sources. The power requirement for your machine is indicated on the back of your machine.
A.I.M. CONTROL HANDLE
The key component of your A.I.M. Dent Puller is the Control Handle. In operating the machine you will weld the electrode to the dented metal and pull out the dent as described in the following instructions. You can also shrink bulges and dimples by using the shrink tool at the center of the Control Handle.
Control Handle Control Switch
Shrink Tool
Power Cable
Electrode Holder
Electrode
SPECIAL NOTE: Keep your electrodes sharpened to 1/8” flat tip for optimum operation. You can easily grind it or file it to its original shape. Keep electrode cool by dipping in water every 5-10 pulls. This will also prolong its use.

DENT PULLING
1. Sand paint from dent area. Place magnet (ground) on sanded area near dent to be repaired.
2. Screw an electrode PB-104, into the electrode holder.
Firmly push the electrode tip against the spot to be pulled, and push the thumb switch (on the electrode handle). Then release after 1-2 seconds. Pull straight out firmly on the handle being careful not to twist or tilt. It is useful to use a body hammer to work the metal. To release the electrode, give the handle a clockwise twist. Repeat as necessary.
3. Puller Bar: If the damage is severe, you may need to
Use the “Puller Bar” PB-207(provided) for additional leverage. Simply put the electrode through the slot in the puller bar and repeat the procedure. Most operators find it easier to use the puller bar for pulling dents. It requires less effort and gives better control while pulling.
4. Shrink Tool: You can use the shrink tool to shrink bulges
Created from dent pulling. Simply push the shrink tool (located at the center of the handle) very firmly against the panel, then activate the thumb switch. Repeat as necessary.
DO NOT MOVE THE TOOL WHILE SHRINKING!
Keep all foreign materials off of the surface of the electrode while shrinking. Keep a pail of water handy. Periodically dip the electrode in the water to cool.
A hole at the end of the shrink tool is provided for applying ‘nails” to a panel. Simply insert the “nail” or “draw pin” into the hole, against the metal and push the control switch momentarily. “Nails” applied in this way can be used to fill holes in a panel.
WARNING! Make sure to use welding goggles when spot welding. The sparks might otherwise injure the eyes.
IMPORTANT! The welder may only be used by qualified personnel. WARNING! Do not place the welder on unstable or uneven ground. The welder might tip causing
injury or damage to the welder.

WARNING! Sparks from welding could start a fire!
BATTERY
The A.I.M. battery is a commercial grade lead-acid rechargeable industrial battery. This machine is
equipped with maintenance-free batteries. If you need to replace your battery please replace it with a commercial battery with a minimum of 1000 Cold
Cranking Amps! Do not replace your battery with a marine or deep cycle battery. For warranty information on the battery please contact the manufacturer of the battery.
Should battery acid get on your skin flush with a large quantity of water. Report all injuries and seek appropriate medical attention.
BATTERY CHARGER
The Battery Charger incorporates a number of electronic features not normally found in chargers. It will not over charge the battery. The A.I.M. Battery Charger should not be operated at the same time the Panel Beater dent pulling machine is in operation. The FLASHING green light on your charger indicates a “full charge.” For best operation, maintain the battery at full charge as much as possible.
AUTOMATIC TIMER
The A.I.M. Panel Beater is equipped with an automatic timer which limits the actual welding time. Start by turning the timer knobs all the way counter clockwise to “0”. Then set the minimum timer setting that is appropriate for your project. Once the timer is set for the metal to be worked, the timer will automatically repeat the cycle each time the switch on the operating handle is pushed.
When shrinking set the timer to maximum (turn the knob all the way clockwise). Hold down the push button switch on the operating handle for as long as necessary to achieve the results desired.

RECOMMENDED MAINTENANCE
MONTHLY Inspect cables for cuts or damage. Use fine steel wool on copper connections. Clean magnet insert with fine sandpaper.
1 YEAR Remove dust from charger.
2 YEAR Inspect battery terminal connections. Clean if needed.
WARNING! Unplug the welder from the wall outlet before servicing, cleaning or maintenance. Risk for electrical shock!
HELPFUL HINTS
Not keeping your battery fully charged after use will decrease the life of your
battery. When welding, the limiting factor is heat, not battery power.
Gases from battery vent out of the machine.
Baking soda should be used to neutralize battery acid in the event of a spill.
Cool dent pulling electrodes every 10 to 20 welds. Keep tip tapered to a pencil like 1/8” flat tip.
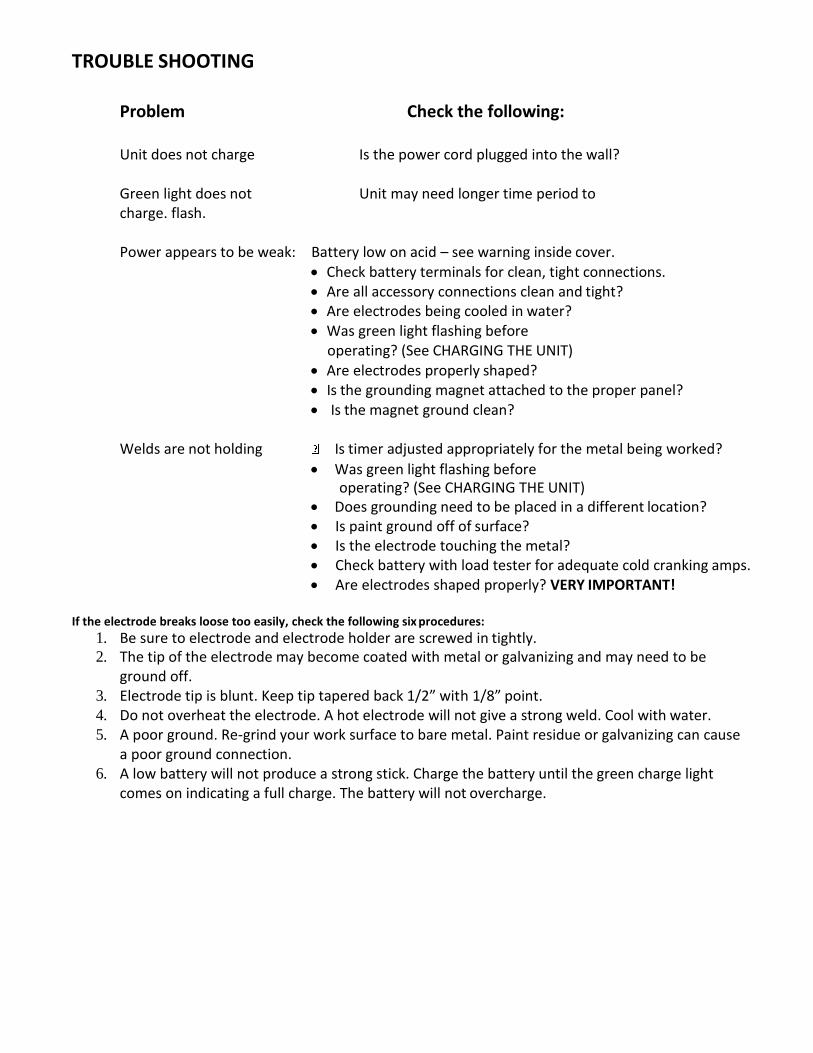
TROUBLE SHOOTING
Problem Check the following:
Unit does not charge Is the power cord plugged into the wall?
Green light does not Unit may need longer time period to charge. flash.
Power appears to be weak: Battery low on acid – see warning inside cover.
Check battery terminals for clean, tight connections. Are all accessory connections clean and tight? Are electrodes being cooled in water? Was green light flashing before
operating? (See CHARGING THE UNIT) Are electrodes properly shaped? Is the grounding magnet attached to the proper panel? Is the magnet ground clean?
Welds are not holding Is timer adjusted appropriately for the metal being worked?
Was green light flashing before operating? (See CHARGING THE UNIT)
Does grounding need to be placed in a different location? Is paint ground off of surface? Is the electrode touching the metal? Check battery with load tester for adequate cold cranking amps. Are electrodes shaped properly? VERY IMPORTANT!
If the electrode breaks loose too easily, check the following six procedures:
1. Be sure to electrode and electrode holder are screwed in tightly. 2. The tip of the electrode may become coated with metal or galvanizing and may need to be
ground off. 3. Electrode tip is blunt. Keep tip tapered back 1/2” with 1/8” point. 4. Do not overheat the electrode. A hot electrode will not give a strong weld. Cool with water. 5. A poor ground. Re-grind your work surface to bare metal. Paint residue or galvanizing can cause
a poor ground connection. 6. A low battery will not produce a strong stick. Charge the battery until the green charge light
comes on indicating a full charge. The battery will not overcharge.

LIMITED WARRANTY American Innovative Manufacturing LLC (AIM) of Spokane, WA, subject to the terms and conditions described below, warrants to its original retail purchaser that new AIM equipment sold after the effective date of this limited warranty is free of defects in material and workmanship at the time it is shipped by AIM. THIS WARRANTY IS EXPRESSLY IN LIEU OF ALL OTHER WARRANTIES, EXPRESS OR IMPLIED, INCLUDING THE WARRANTIES OF MERCHANTABILITY AND FITNESS. AIM PRODUCTS ARE INTENDED FOR PURCHASE AND USE BY COMMERCIAL/INDUSTRIAL USERS AND PERSONS TRAINED AND EXPERIENCED IN THE USE AND MAINTENANCE OF THE EQUIPMENT. AIM shall honor valid warranty claims on warranted equipment for a period of ONE YEAR in the event of such a failure within the warranty time period. All warranty time periods start on the delivery date of the equipment to the original end-user purchaser, and not to exceed one year after the equipment is shipped to a distributor or retail customer. Within the applicable warranty period AIM will repair or replace any warranted parts or components that fail due to such defects in material or workmanship. AIM must be notified in writing within thirty (30) days of such defect or failure, at which time AIM will provide instructions on the warranty claim procedures to be followed. AIM’s Limited Warranty shall NOT apply to:
1. Consumable components or parts that fail due to normal wear.
2. Items furnished by AIM, but manufactured by others. These items are covered by the manufacturer’s
warranty, if any.
3. Equipment that has been modified by any party other than AIM, or equipment that has been improperly
installed, improperly operated or misused based upon industry standards, or equipment which has not had
reasonable and necessary maintenance, or equipment which has been used for operation outside of the
specifications for the equipment.
In the event of a warranty claim covered by this warranty, the exclusive remedies shall be, at AIM’s option: 1. Repair,
2. Replacement,
3. The reasonable cost of repair or replacement by an authorized AIM service representative (where authorized
in writing by AIM in appropriate cases), or
4. Payment of or credit for the purchase price (less reasonable depreciation based upon actual use) upon return
of the goods at customer’s risk and expense. AIM’s option of repair or replacement will be F.O.B., Factory at
Spokane, WA, or F.O.B. at an AIM authorized service representative as determined by AIM. Therefore no
compensation or reimbursement for transportation costs of any kind will be allowed.
Some states in the U.S.A. do not allow limitations of how long an implied warranty lasts, or the exclusion of incidental, indirect, special or consequential damages, so the above limitation or exclusion may not apply to you. This warranty provides specific legal rights, and other rights may be available, but may vary from state to state. In Canada, legislation in some provinces provides for certain additional warranties or remedies other than as stated herein, and to the extent that they may not be waived, the limitations and exclusions set out above may not apply. This Limited Warranty provides specific legal rights, and other rights may be available, but may vary from province to province. TO THE EXTENT PERMITTED BY LAW, THE REMEDIES PROVIDED HEREIN ARE THE SOLE AND EXCLUSIVE REMEDIES. IN NO EVENT SHALL AIM BE LIABLE FOR DIRECT, INDIRECT, SPECIAL, INCIDENTAL OR CONSEQUENTIAL DAMAGES (INCLUDING LOSS OF PROFIT), WHETHER BASED ON CONTRACT, TORT OR ANY OTHER LEGAL THEORY. ANY EXPRESS WARRANTY NOT PROVIDED HEREIN AND ANY IMPLIED WARRANTY, GUARANTY OR REPRESENTATION AS TO PERFORMANCE, AND ANY REMEDY FOR BREACH OF CONTRACT TORT OR ANY OTHER LEGAL THEORY WHICH, BUT FOR THIS PROVISION, MIGHT ARISE BY IMPLICATION, OPERATION OF LAW, CUSTOM OF TRADE OR COURSE OF DEALING, INCLUDING ANY IMPLIED WARRANTY OF MERCHANTABILITY OR FITNESS FOR PARTICULAR PURPOSE, WITH RESPECT TO ANY AND ALL EQUIPMENT FURNISHED BY AIM IS EXCLUDED AND DISCLAIMED BY AIM.
WARRANTY QUESTIONS? Call Customer Service 1-800-644-2730 The Panel Beater is a Registered Trademark of American Innovative
Manufacturing US Patent Nos. 5,516,997 / 5,917,394 & Other Patents Pending