MOBILE STATION 2 MANUAL - MARKLIN
20
Mobile Station 60653 English Deutsch Instruction
-
Upload
thanasis-tsolis -
Category
Documents
-
view
884 -
download
55
description
MOBILE STATION 2 MANUAL - MARKLIN
Transcript of MOBILE STATION 2 MANUAL - MARKLIN

Mobile Station
60653
EnglishDeutsch
Instruction

Table of Contents PageMobile Station Mobile Station 3 Connections 3 Menu, Button Functions 4 Language Selection 4
Entering and Confguring a Lokomotive Running Locomotives, Button Functions 5 Entering a Locomotive with a Locomotive Card 5 An mfx Locomotive 6 Finding a Locomotive 6 Locomotive from the Database 7 Entering a Locomotive Manually 8 Configuring a Locomotive 13
Keyboard Controlling Accessories, Button Functions 11 Solenoid Accessory Protocol 11 Keyboard 12
Menu Information 18 Reset 18
Central Station Connections 19 Assuming Control of a Locomotive 20 When you find the following symbol in a section, the menu point described is only impor-tant for this digital protocol.
= only for Märklin Motorola/mfx
= only for DCC
The operating instructions are a component part of the product and must therefore be kept in a safe place as well as included with the product, if the latter is given to someone else.
�
���
2
124256/0210/HaEfÄnderungen vorbehalten
© Gebr. Märklin & Cie. GmbH
Gebr. Märklin & Cie. GmbH Stuttgarter Str. 55-57D-73033 Göppingen www.maerklin.com
www.maerklin.com/en/imprint.html

Mobile StationMobile Station Features:• Digital protocols: Märklin Motorola, mfx, DCC according to NMRA/NEM standards• Running locomotives ( � addresses 1 - 255, ��� 1 - 9999)• Running mfx locomotives (automatic registration)• Programming locomotives• Locomotive list for 10 active locomotives (direct selection) + 1 locomotive from a
locomotive card• Locomotive data base with 1,000 locomotives• Keyboard (addresses 1 - 320)
The Mobile Station is used to control a model railroad and can be used for H0/N/1 Gauge.The following is also required for operation:• 60113 Track Box for H0/N or 60112 Track Box for 1 Gauge• A transformer or power packor• Connections to a 60213 or 60214 Central Station• Connections to a 60125 Terminal by means of a 610 479 adapter cable
B
Connections to a Track BoxPreparations
!Only one Track Box may be connected to a layout.
1HON
Gauge
K Track C Track
B0
B0 0
3

Selection: Englisch (Enlish)
Locomotive control knob Reversing direction
Locomotive selection +Shift (configuring locomotives)
Solenoid accessories+ Shift (Menu)Shift
Stop
Menu
SelectionScroll
screen or selection
Active locomotive
Confirm
Back one step
Settings for the Mobile Station
Selection: Sprache
Language
4
����� then additionally press
Select: Scroll
Select: Scroll

Entering a Locomotive with a Locomotive Card
Insert the locomotive card; the loco-motive is immediately ready for use.
Entering a Locomotive The memory space in the locomotive list can be selected by pressing this button.
The next free memory space is used as long as no memory space in the locomotive list has been selected.
Note: If the locomotive list is full, a memory space must be deleted before a new locomoti-ve can be taken into the list (see page 17).
Control knobDirection reversing
Shift+control knob for fast locomotive selection
Lokomotive selction
Locomotive icon and locomotive name
Selection
ShiftStop
SelectionConnecting cable
Entering Lokomotives
Memory spaceLocomotive list; occupiedMemory spaceLocomotive list; open
5
Solonoid accessories
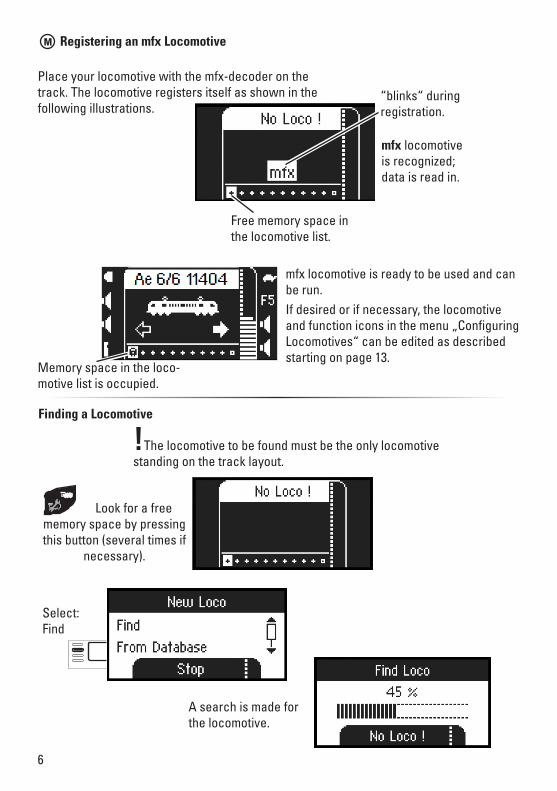
mfx locomotive is recognized; data is read in.
mfx locomotive is ready to be used and can be run.If desired or if necessary, the locomotive and function icons in the menu „Configuring Locomotives“ can be edited as described starting on page 13.
Registering an mfx Locomotive
“blinks“ during registration.
Memory space in the loco-motive list is occupied.
Free memory space in the locomotive list.
�
Finding a Locomotive
A search is made for the locomotive.
!The locomotive to be found must be the only locomotive standing on the track layout.
Select: Find
Look for a free memory space by pressing this button (several times if
necessary).
6
Place your locomotive with the mfx-decoder on the track. The locomotive registers itself as shown in the following illustrations.

Entering a Locomotive from the Database
Look for a free memory space by
pressing this button (several times if
necessary).
Select: From database
�
Locomotive has been found, taken into the locomotive list, and is ready to run.
Locomotive has been found. The address already exists and was not automatically taken into the locomotive list. Take into the list or reject as desired.
Locomotive was not found. Confirm and search again. Check the locomotive if necessary or program again, or if the address is known, enter manually.
or
or
7
����� then additionally press

Select one of your locomotives in the database.
!This only works if the address set at the factory for the locomotive has not been changed.
Locomotive is taken into the locomotive list and is ready to run.
or scroll
����� +
Select:
Entering a Locomotive Manually
Look for a free memory space by pressing this button (several times if neces-sary).
Select: Scroll
8
����� then additionally press

Address selected
Confirm selection
����� +
Select letter
The letters or digits can be selec-ted at this spot.
Cursor back Forward
Select: Scroll
The following steps are the same for all types of decoders. The selection of the decoder
controls editing of the locomotive later on. For example, with programmable decoders changing the address must also be sent to the locomotive to be stored in memory, but not for locomotives with coding switches.
Select: Enter manually
Select: Ex. MM2programmable
Address range:MM2 with coding switches 1- 80MM2 programmable 1 - 255DCC 1 - 9999
����� +
Select Address
or
9

Select: Scroll
Locomotive is taken into the locomotive list and is ready to run..
Confirm name
Decide on a selection
Now, the locomotives that have been entered can be controlled with the control knob and any functions that are present can be activated with the function buttons.
Control
Speed Control
Change direction by pressing on the
control knob.
Switch functions
�����
f0 - f3
f8 - f11+
f12 - f15 �����
f4 - f7
+
10

Keyboard
Select: Solenoid Accessory Protocol
Solenoid Accessory Protocol
Here, you can set which data protocol is to be used for controlling solenoid accessories. Independently of the locomotive protocol. Märklin Motorola is already set as a standard protocol.
Locomotive control knob Reversing direction
Shift + control knop for fast Keyboardn selection
Locomotive control mode
Shift + Setup
Keyboard address 1 - 320
Scroll addresses (–)
Shift
Stop
Scroll addresses (+)
Controlling accessories
Controlling accessories
Active locomotive
Change to Keyboard
11
Confirm selection
����� then additionally press

KeyboardAll 320 addresses for solenoid accessories will be displayed with the standard symbols available for use. If the Mobile Station is connected to a Central Station, the solenoid ac-cessories will be displayed with the symbols used on the Central Station. (Exceptions are turntables and color light signals. Color light signals are represented as semaphore/target signals and the turntable is represented with the standard symbols for solenoid accesso-ries).
The last locomotive used by you remains called up and can continue to be run with the control knob. You must go into the locomotive mode with this button to use the functions on this locomotive or to select another locomotive.
�����By holding this button you can search faster.
switchingswitching
One step back
One step forward
One Keybord
back
One Keyboard forward
����� +Fast search sor solenoid accessories
!Tip
12
Select: Scroll
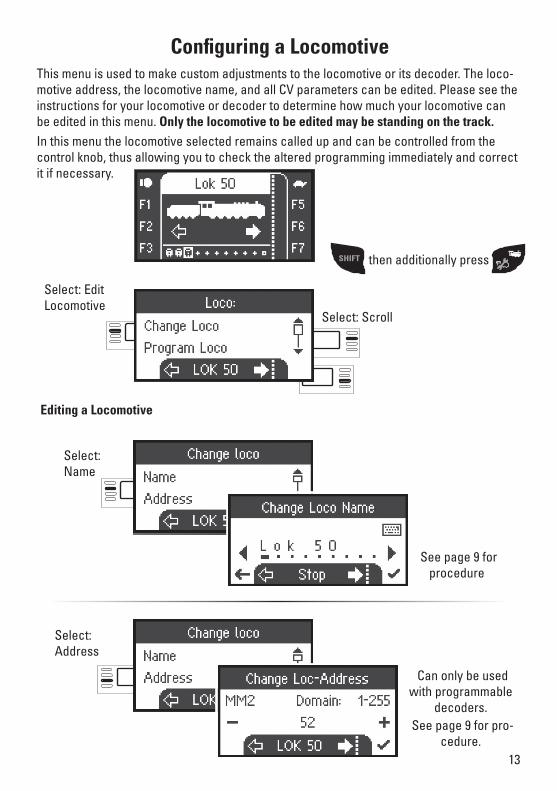
This menu is used to make custom adjustments to the locomotive or its decoder. The loco-motive address, the locomotive name, and all CV parameters can be edited. Please see the instructions for your locomotive or decoder to determine how much your locomotive can be edited in this menu. Only the locomotive to be edited may be standing on the track.In this menu the locomotive selected remains called up and can be controlled from the control knob, thus allowing you to check the altered programming immediately and correct it if necessary.
Select: Edit Locomotive
Editing a Locomotive
Select: Name
Can only be used with programmable
decoders.See page 9 for pro-
cedure.
Select: Address
Configuring a Locomotive
13
See page 9 for procedure
����� then additionally press

Confirm selection
Confirm selection
Select: Loco-motive Symbol
See page 10 for procedure.
Select: Locomotive
Function
Select: Function F1
����� +
Select: Symbol
Select: Mom. (mo-mentary function)
Select: Perm (function con-stantly on or off)
Select: Time
Select: Time
Confirm selection
FunctionsPlease check the instructions for your locomotive to see if these settings can be done.
14
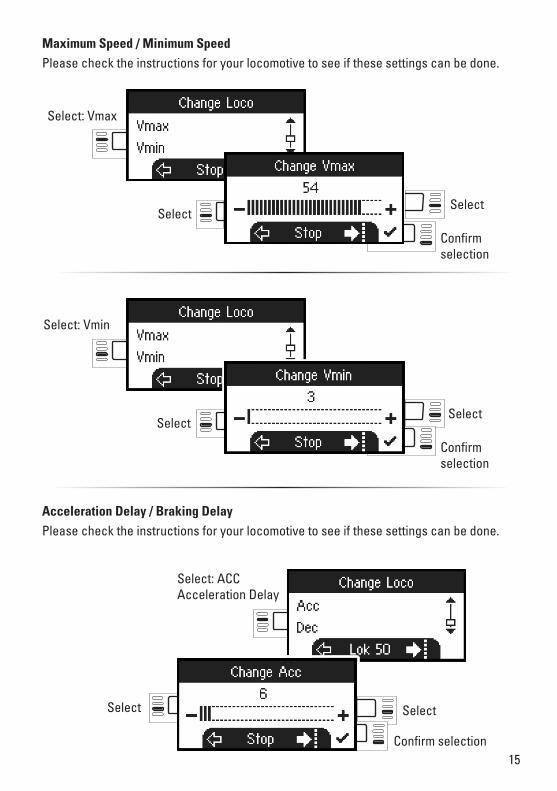
Confirm selection
Select: Vmax
SelectSelect
Confirm selection
Select: Vmin
SelectSelect
Confirm selection
Select: ACC Acceleration Delay
Select Select
Acceleration Delay / Braking DelayPlease check the instructions for your locomotive to see if these settings can be done.
Maximum Speed / Minimum SpeedPlease check the instructions for your locomotive to see if these settings can be done.
15

Confirm selection
Select: Dec Braking Delay
SelectSelect
VolumePlease check the instructions for your locomotive to see if these settings can be done..
Select: Vol
Confirm selection
SelectSelect
Select: Speed Levels
Select
The following selection is only for locomotives with DCC decoders. Please check the instructions for your locomotive to see if these settings can be done.���
16
Scroll to select

Confirm selection
Programming a Locomotive ���
Confirm selection
Select: Program Locomotive
SelectSelect
First, set the CV value to be edited (according to your decoder / locomotive instructions) and confirm the selection. First, the CV value being sought is read in; after that you can change the value in Step 2 and confirm. With this procedure you can change any permis-sible CV value.
Select: Write Locomotive Card
Select
Writing to a Locomotive Card
Select: Delete Loco-motive
Select Select
Insert locomotive card (see page 6)
Deleting a Locomotive
17

Select
Scroll for infor-mation
Information
Here, you can get information about the serial number, software version, hardware version, locomotive data status, and Can Bus status.
Reset
Select
! Important. When you do a Reset, all of the data and settings are deleted.
Menu
Factory Default Settings
18
Select: Information
����� then additionally press
Select: Factory default setting
Select:yes or no
Select: Reset loco
Reset Loco
This function triggers a reset of the locomotive decoder (see the instruc-tions of the locomotive decoder)

60213/60214 Central StationPossible connections to the Central Station
The 60124 adapter cable can be used in place of the Ter-minal for another Mobile Station.
���
� �
19
Terminal 60125
60124

Scroll to select
Assuming Control of a Locomotive from the Central Station
Select: From CS 2
Select: BR 363 159-5
The locomotive selected can now be run with the Mobile Station.
Configuring a Locomotive
When the Mobile Station is connected to the Central Station, configuring and editing a locomotive should only be done with the Central Station and its programming track.
20
Confirm
Confirm
����� then additionally press