Mobile for Android User Guide - NetSuite OpenAir 1 Mobile for Android User Guide Introduction...
34
Mobile for Android User Guide Version 2.0
Transcript of Mobile for Android User Guide - NetSuite OpenAir 1 Mobile for Android User Guide Introduction...

Mobile for Android User Guide
Version 2.0

Copyright © 2013, 2018, Oracle and/or its affiliates. All rights reserved.
This software and related documentation are provided under a license agreement containingrestrictions on use and disclosure and are protected by intellectual property laws. Except as expresslypermitted in your license agreement or allowed by law, you may not use, copy, reproduce, translate,broadcast, modify, license, transmit, distribute, exhibit, perform, publish, or display any part, in anyform, or by any means. Reverse engineering, disassembly, or decompilation of this software, unlessrequired by law for interoperability, is prohibited.
The information contained herein is subject to change without notice and is not warranted to be error-free. If you find any errors, please report them to us in writing.
If this is software or related documentation that is delivered to the U.S. Government or anyonelicensing it on behalf of the U.S. Government, then the following notice is applicable:
U.S. GOVERNMENT END USERS: Oracle programs, including any operating system, integrated software,any programs installed on the hardware, and/or documentation, delivered to U.S. Government endusers are "commercial computer software" pursuant to the applicable Federal Acquisition Regulationand agency-specific supplemental regulations. As such, use, duplication, disclosure, modification,and adaptation of the programs, including any operating system, integrated software, any programsinstalled on the hardware, and/or documentation, shall be subject to license terms and licenserestrictions applicable to the programs. No other rights are granted to the U.S. Government.
This software or hardware is developed for general use in a variety of information managementapplications. It is not developed or intended for use in any inherently dangerous applications, includingapplications that may create a risk of personal injury. If you use this software or hardware in dangerousapplications, then you shall be responsible to take all appropriate fail-safe, backup, redundancy, andother measures to ensure its safe use. Oracle Corporation and its affiliates disclaim any liability for anydamages caused by use of this software or hardware in dangerous applications.
Oracle and Java are registered trademarks of Oracle and/or its affiliates. Other names may betrademarks of their respective owners.
Intel and Intel Xeon are trademarks or registered trademarks of Intel Corporation. All SPARCtrademarks are used under license and are trademarks or registered trademarks of SPARCInternational, Inc. AMD, Opteron, the AMD logo, and the AMD Opteron logo are trademarks orregistered trademarks of Advanced Micro Devices. UNIX is a registered trademark of The Open Group.
This software or hardware and documentation may provide access to or information about content,products, and services from third parties. Oracle Corporation and its affiliates are not responsiblefor and expressly disclaim all warranties of any kind with respect to third-party content, products,and services unless otherwise set forth in an applicable agreement between you and Oracle. OracleCorporation and its affiliates will not be responsible for any loss, costs, or damages incurred due toyour access to or use of third-party content, products, or services, except as set forth in an applicableagreement between you and Oracle.

Table of ContentsIntroduction .......................................................................................................................... 1
Flow of Information ........................................................................................................... 1Getting Started .................................................................................................................. 1Synchronization ................................................................................................................. 3Common Features ............................................................................................................. 4
Changing Settings .................................................................................................................. 5Access Settings .................................................................................................................. 5Change Login Settings ........................................................................................................ 6Remember Me / Log Out When Inactive ............................................................................... 6Time Entry Units ............................................................................................................... 7Refresh All Data ................................................................................................................ 8
Working with Timesheets in OpenAir Mobile for Android ............................................................ 9Create a Timesheet and Add Time Entries ............................................................................ 9
Creating Linked Timesheets ........................................................................................... 11Edit a Time Entry ............................................................................................................. 12Copy a Timesheet ............................................................................................................ 13Delete a Time Entry from a Timesheet ................................................................................ 14Delete a Timesheet .......................................................................................................... 14Submit a Timesheet ......................................................................................................... 15
Working with Expenses in OpenAir Mobile for Android ............................................................. 17Create an Expense Report and Add Receipts ....................................................................... 17Edit an Expense Report .................................................................................................... 20Edit a Receipt .................................................................................................................. 21Delete a Receipt from an Expense Report ........................................................................... 22Delete an Expense Report ................................................................................................. 23Submit an Expense Report ................................................................................................ 23
Working with Approvals in OpenAir Mobile for Android ............................................................. 25References .......................................................................................................................... 28

Introduction 1
Mobile for Android User Guide
Introduction
OverviewOpenAir provides OpenAir Mobile for Android as an app for exchanging information between yourOpenAir account and your Android device. It allows you to keep your timesheets and expense reportsup-to-date anywhere and anytime.
When you are connected to the Internet, all of the information you've been working on in your Androiddevice is automatically uploaded to your OpenAir account in real time. Once a timesheet or expensereport is submitted, it transfers to OpenAir and follows the normal approval process. The app does notcurrently allow you to edit, submit, or create records when an Internet connection is not available
When you sync your OpenAir account to your Android device, it downloads current customer, project,and task information as well as your open timesheets and expense reports. Standard timesheetfunctionality is available such as the copy function and expenses functionality is available for creatingnew expense reports and receipts. Custom fields are supported in the app and appear in the Androidscreens, so you can enter information just as you do in your OpenAir account. See the following:
■ Flow of Information
■ Getting Started
■ Synchronization
■ Common Features
Flow of InformationNote the flow of information between your OpenAir account and Android device:
■ From Android to OpenAir - As you create timesheets and expense reports in Android your changesare sent to OpenAir. When you submit an expense report or timesheet, it is sent to OpenAir andfollows the normal approval process in OpenAir. See also Working with Approvals in OpenAir Mobilefor Android.
■ From OpenAir to Android - Open and rejected timesheets and expense reports created inOpenAir are download to your Android device when the accounts are synced, see Synchronization.Customization information is also sent from OpenAir to your Android device.
Note: The appearance of your app may differ from this guide. Terminology and fields canbe customized in OpenAir and your company settings will be used in the app.
Getting StartedOpenAir Mobile for Android employs intuitive procedures familiar to Android device users.

Getting Started 2
Mobile for Android User Guide
To get started:
1. Tap the OpenAir icon to launch the app.
2. Enter company and login information. See Synchronization. Tap SAVE for this initial setupprocess and you synchronize the Android app with your OpenAir account. Timesheets andExpenses account information downloads and everything is up-to-date. You can also use theSync button to sync with your OpenAir account at any time. It is available in the lower rightcorner of the app.
3. Once logged in, the app displays the Dashboard, where you can see a summary of Timesheetsand Expense Reports.

Getting Started 3
Mobile for Android User Guide
4. Tap a Timesheets category to enter, edit, or delete Timesheet information. You can submittimesheets using the Android app. Open and submitted timesheets automatically transfer toOpenAir when you are connected to the Internet. See Working with Timesheets in OpenAirMobile for Android.
5. Tap an Expenses category to enter, edit, or delete expenses and receipts. Add an image as anattachment to both expense reports and receipts. You can submit expense reports using theAndroid app. Open and submitted expense reports automatically transfer to OpenAir when youare connected to the Internet. See Working with Expenses in OpenAir Mobile for Android.
6. Approve or reject items from the To Approve lists. See Working with Approvals in OpenAirMobile for Android.
SynchronizationThe first time you use OpenAir Mobile for Android, perform the initial setup to synchronize theOpenAir Mobile for Android app with your OpenAir account. This downloads OpenAir customer, projectand task information as well as any open timesheets and expense reports. Keep in mind that initialsynchronization takes longer than it will in future use.
OpenAir Mobile for Android prompts you to sync after five minutes without syncing or when you startor resume using the app. The app will automatically sync after 7 days without syncing.
The OpenAir account information you enter for initial synchronization can be changed at a future timeif your OpenAir login information changes. See Changing Settings.
Refer to the following procedure for initial synchronization.
To Synchronize OpenAir Mobile for Android with Your OpenAir Account:
1. Tap the OpenAir icon to launch the application. The “Login” screen appears.

Synchronization 4
Mobile for Android User Guide
Important: If you enable the Remember Me option, your NetSuite Service passwordand/or session id will be stored on your device and encrypted using industry standardsecurity measures. Anyone with access to your unlocked device will be able to view,add or edit information in your Customer account on the NetSuite Service using thisdevice. You should always passcode lock your device as a precaution. If your device islost or stolen, you must change your NetSuite password immediately. By enabling thisRemember Me option, you accept full responsibility for any losses and/or damages thatmay result from that action and agree not to hold NetSuite liable for any losses and/ordamages resulting from saving the password and/or session information.
2. Enter your Server, Company, and Username.
Important: We recommend using a secure (https) connection. A secure connection willbe defaulted unless you explicitly specify an unsecure (http) connection. You will see awarning if you enter an unsecure connection. The Remember Me option is only availablefor secure connections.
3. Select the Use single sign-on option if your account has this feature enabled or enter yourpassword. If you select Use single sign-on, you won’t be able to enter a password. See To EnableSingle-Sign On:. for more details.
4. Click the Save button to save your settings.
5. Click the left arrow icon in the Settings header. The app will display Syncing progress messages.
Note: The initial synchronization may take a while since the app downloads all data.Subsequent synchronizations process much faster.
Common FeaturesThe following conventions are used:
■ Asterisk (*) — Identifies fields which must have a value before you can save the screen.
■ Save button — Used where data is synced to your OpenAir account.
■ Cancel button — Used where changes made can be abandoned.
■ Android Up button — Saves any changes made and closes the screen.

Changing Settings 5
Mobile for Android User Guide
Changing SettingsUse the “Settings” screen to change your login credentials, set your preferences, and force a refresh ofthe data held on your Android device. You can also see the version of the app and view the end userlicense agreement from this screen.
Note: You will need to change your Android app settings to match any login credentials andserver information changes made to your OpenAir account.
Refer to the following procedures:
■ Access Settings
■ Change Login Settings
■ Remember Me / Log Out When Inactive
■ Time Entry Units
■ Refresh All Data
Access SettingsThe “Settings” screen is accessible from the Settings icon in the upper right corner of the Dashboard.
To Access Settings:
1. Go to the Dashboard in the app.
2. Tap the Settings icon to display the “Settings” screen.
3. After you have made your changes, tap and the synchronization begins. The app performs afull sync and overwrites all information. A series of syncing messages appear:

Access Settings 6
Mobile for Android User Guide
Note: After syncing the Refresh All Data option is automatically toggled off.
Change Login SettingsTo Change Your Login Settings:
1. Go to the “Settings” screen. See Access Settings.
2. Tap Login and your current information appears.
3. Tap on the setting you would like to change and the keyboard will be displayed. Type in the newvalue.
Note: If you change the Server setting you will be required to confirm the Password.
4. Check the Use single sign-on option if your account has this feature enabled. If you select Usesingle sign-on, you will not be able to type a password into the Password field. See To EnableSingle-Sign On: for more details.
5. To remember your login information, tap the Remember Me toggle to enable it. Restrictionsapply to the use of the Remember Me option. See Synchronization.
6. When done, tap SAVE and the changes will be saved.
Remember Me / Log Out When InactiveThe Remember Me and Log out when inactive options work together.
Enabling the Remember Me option stores the login information internally and disables the Logoutwhen inactive option. Restrictions apply to the use of the Remember Me option. See Synchronization.
If the Remember Me option is not enabled, then the app will log out after the time period specified inthe “Log out when inactive” screen, and the app is running in the background.
Note: The app will only log out when inactive if the app is running in the background andinactive. If the app is active, it will not log out automatically.
To Change Remember Me / Log Out When Inactive:1. Navigate to the “Settings” screen. See Access Settings.
Remember Me / Log Out When Inactive 7
Mobile for Android User Guide
2. To remember the password, tap the Remember Me toggle to enable it.
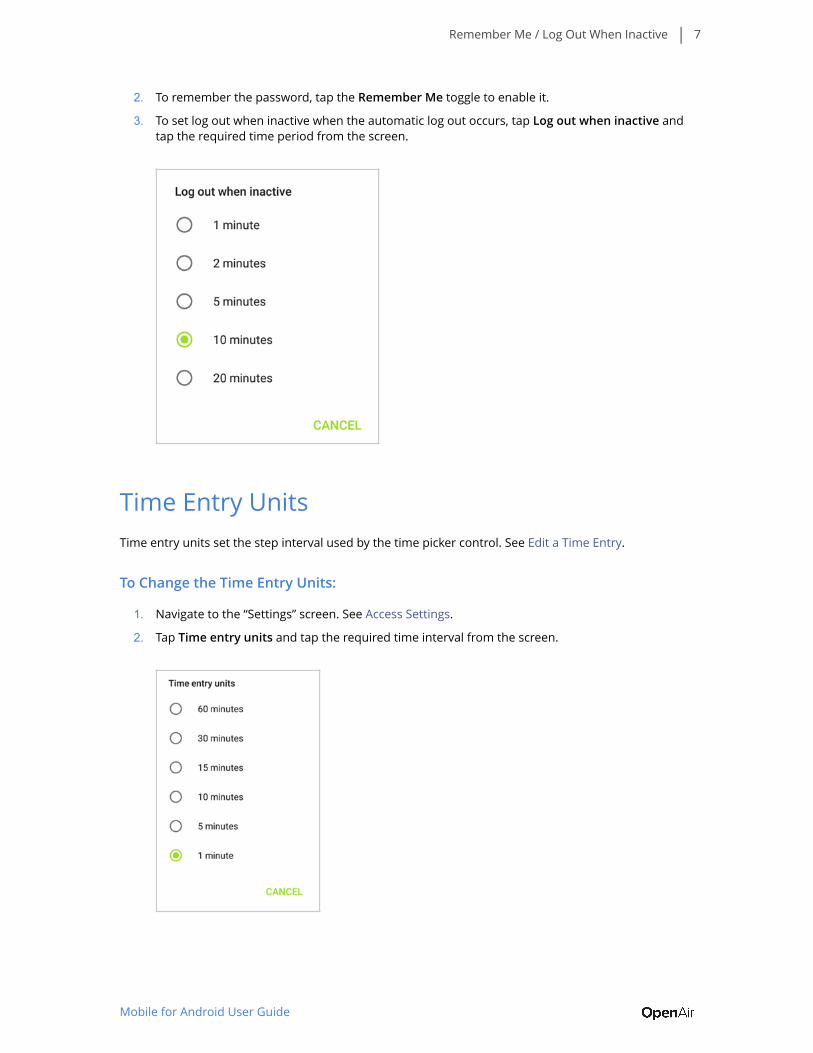
3. To set log out when inactive when the automatic log out occurs, tap Log out when inactive andtap the required time period from the screen.
Time Entry UnitsTime entry units set the step interval used by the time picker control. See Edit a Time Entry.
To Change the Time Entry Units:
1. Navigate to the “Settings” screen. See Access Settings.
2. Tap Time entry units and tap the required time interval from the screen.

Time Entry Units 8
Mobile for Android User Guide
Note: The available time intervals are determined by your OpenAir configuration.
Refresh All DataChecking the Refresh all data option causes the app to repeat the initial Synchronization. Once thesynchronization has been performed the option is automatically unchecked. Use this option if itemssuch as customers, projects, and tasks are missing from your list view.
To Refresh All Data:
1. Navigate to the “Settings” screen. See Access Settings.
2. To refresh all list data, tap the Refresh all data toggle to enable it.
3. Tap the icon and the app will repeat the initial synchronization.

Working with Timesheets in OpenAir Mobile for Android 9
Mobile for Android User Guide
Working with Timesheets in OpenAirMobile for AndroidThere are a number of timesheet-related tasks you can perform using OpenAir Mobile for Android,including creating timesheets, exchanging new and modified timesheets between the Android app andOpenAir, and submitting timesheets for approval.
Refer to the following procedures:
■ Create a Timesheet and Add Time Entries
■ Copy a Timesheet
■ Submit a Timesheet
■ Edit a Time Entry
■ Delete a Time Entry from a Timesheet
■ Delete a Timesheet
OpenAir Mobile for Android exchanges timesheet information with your OpenAir account continuouslyso that account information in both applications is current. OpenAir Mobile for Android updates itselfas soon as you start it as well as after you resume using it from the background. Record additions,modifications, and deletions are performed real time. However, ensure you are connected to theInternet if you want to modify, save, or delete data and exchange the information with your OpenAiraccount.
Create a Timesheet and Add Time EntriesUse OpenAir Mobile for Android to keep your timesheets current. You can create a timesheet and addtime entries to it. If circumstances change, you can easily modify the time entered before you submitthe timesheet for approval.
To Create a Timesheet and Add and Modify Time Entries:
1. Tap next to Timesheets in the Dashboard and a “New Timesheet” screen appears.
2. Tap the Date line to change the default date for the new timesheet. A “Set date” screen appears.Select a date and tap OK.
3. To copy a timesheet which already exists, tap Copy from. See Copy a Timesheet.

Create a Timesheet and Add Time Entries 10
Mobile for Android User Guide
4. Tap the Default Client pane to add customer and project information. The “Select Project andTask” screen appears.
5. Tap each line and available values appear. Find the desired value and tap it. The entry appears inthe screen and you can select another line to enter its value. When the values for Default Client,Default Project, and Default Task have been selected, tap SET.
Note: You can search for customers and projects available in your OpenAir accountusing dynamic search. Trigger this using the search/find button on your Android device orby selecting the search icon at the top of the available list of items.
6. Enter any other defaults which you want to set in the “New Timesheet” screen.
7. When complete, tap SAVE. A calendar displays the Timesheet interval. Below the calendar is the“Time Entry” screen, which contains a list of all time entries for the selected time period. Fromhere you can add time entries to the Timesheet.
8. To add time to this timesheet, tap the button. The “New Time Entry” screen appears.
Tap “Blank time entry” to create a new time entry with no information pre-populated. If you wantto pre-populate the timesheet with project, task, client, or other fields copied from previoustimesheets or unique time entries entered in the timesheet, tap one of the clients and projects inthe “Pre-populate data from” column.

Create a Timesheet and Add Time Entries 11
Mobile for Android User Guide
The “New Time Entry” screen will then allow you to enter details for the time entry.
9. Tap the Time line in the header to open the “Edit Time” screen. Select the number of hours andminutes worked. Tap SET when finished.
Note: Tap OFF next to “Negative?” to enable the ability to enter Negative time.
10. Tap the items on the “New Time Entry” screen to add or change information. When finished:
■ Tap SAVE in the upper right corner of the app, or
■ Tap and a menu opens with the Save and Create option. Use this option to save this timeentry and create another time entry to include in this timesheet.
Note: If displaying time by day, a small grey dot beneath each date indicates that thedate has a time entry.
Creating Linked TimesheetsBy default, you must manually create two timesheets for periods which include parts of two months.For example, if half of the week occurs in the end of January, and the second half of the week occurs

Create a Timesheet and Add Time Entries 12
Mobile for Android User Guide
in the beginning of February, you must create timesheets for the portion of the week which occurs inJanuary and the portion which occurs in February.
As of OpenAir Mobile for Android version 1.7, it is possible to create linked timesheets automaticallyby creating one timesheet for the period, irregardless of whether the period is split between twomonths. To enable this feature, please contact OpenAir Support and request the Auto-Create LinkedTimesheets for OpenAir Mobile for Android feature.
When this feature is enabled, OpenAir Mobile for Android creates timesheets for each period. Thetimesheet name indicates which month the partial timesheet belongs to.
Note: When the Auto-Create Linked Timesheets for OpenAir Mobile for Android feature isenabled, using the calendar navigation automatically displays the timesheet for the correct timeperiod (for example, the January portion or February portion of the timesheets above).
Edit a Time EntryUse OpenAir Mobile for Android to edit time entries in a timesheet.
To Edit a Time Entry:
1. In the Dashboard, tap the category of timesheets (for example, “Open” or ”Rejected”) which youwould like to edit.
2. Tap the timesheet with a time entry you would like to edit. The “Time Entries By Day” screenappears.

Edit a Time Entry 13
Mobile for Android User Guide
3. Tap the date with the time entry you would like to edit. The time entries for that date appear inthe list of time entries. Remember, you can display all timesheet entries or entries by day.
4. Tap the time entry you would like to edit. The “Edit Time Entry” screen appears.
5. Tap the line you would like to change, and the edit screen for that line appears. For example, ifyou tap “Time”, the “Edit Time” screen appears.
6. Make the changes and tap SET. The “Edit Time Entry” screen displays the changes.
7. Make additional changes as needed. When finished, tap SAVE. The Syncing message appears, aswell as a message indicating the record is saved. The “Time Entries By Day” screen appears.
Copy a TimesheetUse OpenAir Mobile for Android to copy a timesheet you created previously and add time entries to thenew timesheet. This procedure is similar to creating a new timesheet. If circumstances change, you caneasily modify the time entered before you submit the timesheet for approval.
To Copy a Timesheet and Add and Modify Time Entries:
1. Tap next to Timesheets in the Dashboard to open a new timesheet. The “New Timesheet”screen appears.

Copy a Timesheet 14
Mobile for Android User Guide
2. In the “Main” section of the “New Timesheet” screen, tap Copy From.
3. Tap Duplicate to open the “Source Timesheet” screen. Tap the radio button next to thetimesheet which you want to copy.
4. Tap Change hours to open the “Time Adjustment” screen. The options on this screen determinewhat hours will be populated in the new timesheet copy.
■ Leave the hours the same — the new timesheet copy uses the same number of hours foreach time period as the original timesheet
■ Clear the hours — the new timesheet copy will have no hours entered for any time period,but all other information will be the same as the original timesheet
■ Set each cell to 1 hour — the new timesheet copy will have 1 hour for each time period, butall other information will be the same as the original timesheet
■ Set each cell to 8 hours — the new timesheet copy will have 8 hours for each time period, butall other information will be the same as the original timesheet
5. Tap SET. The “New Timesheet” screen appears.
6. Make any additional changes desired. Tap SAVE. The Syncing message appears, as well as amessage indicating the record is saved. The new timesheet appears in the “Add Time Entry”screen with the specified hours from the timesheet you copied.
Delete a Time Entry from a TimesheetUse OpenAir Mobile for Android to delete a time entry from a timesheet which has not beensubmitted. When deleted, it is deleted from your Android app and is no longer available to transfer toyour OpenAir account.
To Delete a Time Entry from a Timesheet:
1. In the Dashboard, tap the category of timesheets (for example, “Open” or ”Rejected”) from whichyou would like to delete the time entry.
2. Tap the Timesheet with a time entry you would like to delete.
3. Tap the icon and tap Select. A radio button appears next to each time entry.
4. Tap the radio button next to the time entry or entries you want to delete.
5. Tap the icon which appears in the upper right corner of the app when a time entry is selected.The app prompts you to verify the delete action. Tap DELETE.
6. OpenAir Mobile for Android displays a syncing message as it deletes the time entries andupdates your OpenAir account. The timesheet no longer displays the deleted time entries.
Note: A quick way to delete a time entry is to long-press the time entry you want todelete. This causes the radio buttons next to time entries to appear.
Delete a TimesheetUse OpenAir Mobile for Android to delete a timesheet which has not been submitted. When deleted, itis deleted from your Android app and is no longer available to transfer to your OpenAir account.
To Delete a Timesheet:
1. In the Dashboard, tap the category of the timesheet (for example, “Open” or ”Rejected”) whichyou would like to delete. A list of timesheets appears.

Delete a Timesheet 15
Mobile for Android User Guide
2. Tap the icon and tap Select. A radio button appears next to each timesheet.
3. Tap the radio button next to each timesheet which you want to delete. When a timesheet isselected, the icon appears in the upper right corner of the app.
4. Tap the icon. The app prompts you to verify the delete action. Tap DELETE. The app displaysa syncing message as it deletes the timesheets and updates your OpenAir account. Thetimesheets no longer appear in the list of timesheets.
Note: A quick way to delete a timesheet is to long-press the timesheet which you wantto delete. This causes the radio buttons next to time entries to appear.
Deleting Linked TimesheetsBy default, you must manually create two timesheets for periods which include parts of two months.For example, if half of the week occurs in the end of January, and the second half of the week occursin the beginning of February, you must create timesheets for the portion of the week which occurs inJanuary and the portion which occurs in February.
For timesheets which include parts of two months (for example, part of the week is in the end ofJanuary, and part is in the beginning of February), you can delete either or both of the two timesheetscreated for the period. Using the above example, to completely delete the timesheets for the weekstarting at the end of January and finishing at the beginning of February, you would need to delete bothtimesheets for this period.
Note: If you delete a timesheet for one part of a linked period, and then use the calendarnavigation to go to the time period which was covered by that timesheet, you will receive thefollowing message:
“Associated timesheet is missing... Associated timesheet for previous month is no longeravailable, it was deleted earlier. Would you like to create new one?”
Tap Create to create a timesheet for the missing period which uses the same time codes as thepart of the period which still exists. Tap Cancel to not create a new timesheet for the missingperiod.
Submit a TimesheetOnce you have created a timesheet, use OpenAir Mobile for Android to submit the timesheet. Youcan transfer it to your OpenAir account for approval. When in OpenAir, it follows the normal approvalprocess.
To Submit a Timesheet:
1. Open a list of timesheets from the dashboard (for example, tap the “Open” category under“Timesheets”). Tap on the timesheet you would like to submit. The “Time Entries By Day” screenappears.
2. Tap the icon and the “Submit” screen appears. The “Submit” screen allows you to addadditional information.
3. If desired, enter information for Additional emails and Notes to approver.
As with OpenAir, timesheets can be submitted with a warning. Tap the “Submit on warning”toggle to allow timesheets to be submitted even if limitations on the server have been set.

Submit a Timesheet 16
Mobile for Android User Guide
For example, if the server has a rule that timesheets must have a minimum of 8 hours, and atimesheet with 4 hours is submitted, the “Submit on warning” feature still allows the timesheetwith 4 hours to be submitted.
4. Tap the icon. The Syncing message appears as OpenAir Mobile for Android syncs with yourOpenAir account. The timesheet follows the normal OpenAir approval process.

Working with Expenses in OpenAir Mobile for Android 17
Mobile for Android User Guide
Working with Expenses in OpenAir Mobilefor AndroidThere are a number of expense—related tasks you can perform using OpenAir Mobile for Android,including exchanging new and modified expense reports between the Android app and OpenAir andsubmitting expense reports for approval. You can also add an image attachment to expense reportsand receipts.
Note: Occasionally, the term “envelope” is used in place of “expense report”. Your app will usethe terminology set by your company’s administrator.
Refer to the following procedures:
■ Create an Expense Report and Add Receipts
■ Submit an Expense Report
■ Edit an Expense Report
■ Edit a Receipt
■ Delete a Receipt from an Expense Report
■ Delete an Expense Report
OpenAir Mobile for Android exchanges expenses information with your OpenAir account continuouslyso that account information in both applications is current. OpenAir Mobile for Android updates itselfas soon as you start it as well as after you resume using it from the background. Record additions,modifications, and deletions are performed in real time. However, ensure you are connected to theInternet if you want to modify, save, or delete data and exchange the information with your OpenAiraccount.
Create an Expense Report and Add ReceiptsUse OpenAir Mobile for Android to keep your expenses current. You can create an expense report andadd receipts to it. If circumstances change, you can easily modify those receipts before you submit theexpense report for approval.
To Create an Expense Report and Add and Modify Receipts:
1. Tap next to Expenses in the Dashboard to open a new expense report. A “New Envelopes”screen appears.

Create an Expense Report and Add Receipts 18
Mobile for Android User Guide
Note: If the One project per expense report switch is enabled for your account, you willalso see Client and Project lines.
2. Tap each entry line and enter information for the new expense report. When finished, tap SAVE.The “Receipts List” appears. If this is a new expense report, there will not be any receipts in thelist.
Note: The fields available in your Android app (for example, the “payment type” field)are set by your Administrator and correspond to the fields available in the web version ofOpenAir.
To Add Receipts to an Expense Report:
1. Open an expense report and tap the icon. The “New receipt” screen appears.
2. Tap each line to enter information into the “New receipt” screen. This screen includes the sameinformation as the receipt form in your OpenAir account. If custom fields are used there, theyalso appear in the OpenAir Mobile for Android app.

Create an Expense Report and Add Receipts 19
Mobile for Android User Guide
Note: The Customer and Project lines only appear and are taken from the expensereport if the One project per expense report switch is enabled for your account.
3. Tap the “Select Expense Item” line and tap to select the expense item.
4. Tap the “Date” and “Price” lines to change values. Accept the default displayed or change it. TapSET.
5. Tap the “Client” pane to add customer, project, and task information. The “Select Project andTask” screen appears.
Note: The Customer and Project lines only appear and are taken from the expensereport if the One project per expense report switch is enabled for your account.
6. Tap each line and available values appear. Find the desired values and tap them. The entryappears in the screen and you can select another line to enter its value. When each value hasbeen selected, tap SET.
Note: In fields where you can select from a number of possible values, for example,when selecting a client, tap the icon to search for customers and projects available inyour OpenAir account using dynamic search. You can also use the search/find button onyour Android device.
7. Swipe up to continue entering information in the “New receipt” or “Edit receipt” screen.
8. To indicate whether the receipt is billable, tap the Billable receipt toggle.
9. To attach a receipt, tap the Documents/folders line at the bottom of the app. The “Documents/folders” screen appears.
Note: The counter in the “Documents/folders” line shows how many files are attachedto this receipt. The attachment page requires run time permissions for your device’scamera, external storage, and GPS. Attachment activity is limited when these permissionshave not been granted.
10. Click the icon in the lower right corner. A “New attachment” screen appears.
■ If you tap From camera, the app opens your Android device’s camera, and you can take ascreenshot of the receipt. Tap OK or if the photo is correct, or RETRY or if you want to

Create an Expense Report and Add Receipts 20
Mobile for Android User Guide
retake the photo. The photo will be added to the receipt and to your Android device’s photogallery.
■ If you tap From gallery, the “Select a photo” screen appears, and you can select a photo touse from your Android device’s photo gallery.
■ If you tap From files, a list of recent files appears, and you can select a file to attach. Filesimported this way retain their original filename.
To change an attachment’s filename, tap SELECT and select an image or file to rename. Next,tap the icon, and enter the new name for the file. Please note that you cannot change a file’sextension.
Note: Photographs you take with the Android camera are automatically saved to yourphoto library. The size of the file attached via the Android is in Android's camera defaultresolution.
Files which are located on the OpenAir server but not locally on your Android device are representedin the “Attachments” screen by a “Tap to Download” message instead of a screenshot. Tap the “Tap toDownload” message to download these files to your Android device.
Edit an Expense ReportUse OpenAir Mobile for Android to edit expense report information.
To Edit an Expense Report:
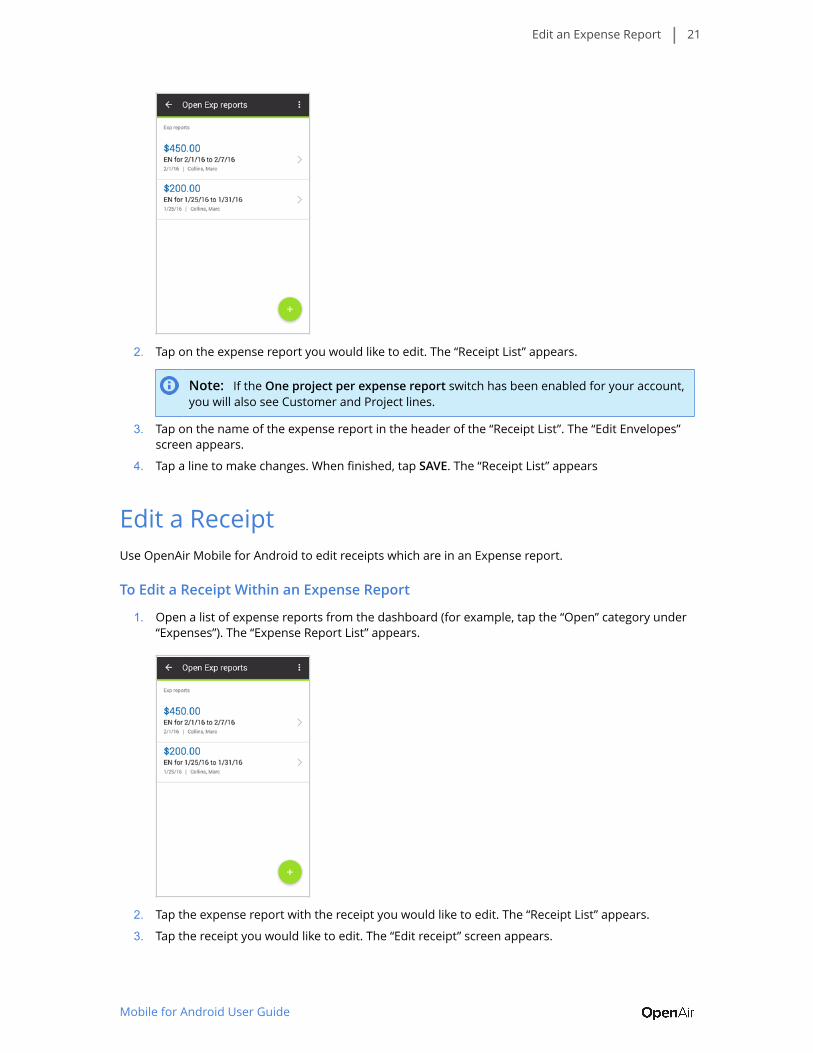
1. Open a list of expense reports from the dashboard (for example, tap the “Open” category under“Expenses”). The “Expense Report List” appears.
Edit an Expense Report 21
Mobile for Android User Guide
2. Tap on the expense report you would like to edit. The “Receipt List” appears.
Note: If the One project per expense report switch has been enabled for your account,you will also see Customer and Project lines.
3. Tap on the name of the expense report in the header of the “Receipt List”. The “Edit Envelopes”screen appears.
4. Tap a line to make changes. When finished, tap SAVE. The “Receipt List” appears
Edit a ReceiptUse OpenAir Mobile for Android to edit receipts which are in an Expense report.
To Edit a Receipt Within an Expense Report
1. Open a list of expense reports from the dashboard (for example, tap the “Open” category under“Expenses”). The “Expense Report List” appears.
2. Tap the expense report with the receipt you would like to edit. The “Receipt List” appears.
3. Tap the receipt you would like to edit. The “Edit receipt” screen appears.

Edit a Receipt 22
Mobile for Android User Guide
4. Tap a line on the receipt to make changes. When done, tap SAVE.
Delete a Receipt from an Expense ReportUse OpenAir Mobile for Android to delete a receipt from an expense report which has not beensubmitted. When deleted, it is deleted from your Android app as well as the online OpenAir account.
To Delete a Receipt from an Expense Report:
1. Open a list of expense reports from the dashboard (for example, tap the “Open” category under“Expenses”). The “Expense Report List” appears.
2. Tap the expense report with the receipt you would like to delete. The “Receipt List” appears.
3. Tap the icon and tap Select. A radio button appears next to each receipt.
4. Tap the radio button next to the receipts which you want to delete.
5. Tap the icon which appears in the upper right corner of the app when a time entry is selected.The app prompts you to verify the delete action. Tap DELETE.
6. OpenAir Mobile for Android displays a Syncing message as it deletes the receipts and updatesyour OpenAir account. The “Receipt List” no longer displays the deleted receipts.

Delete a Receipt from an Expense Report 23
Mobile for Android User Guide
Note: A quick way to delete a receipt is to long-press the receipt you want to delete. Thiscauses the radio buttons next to receipts to appear.
Delete an Expense ReportUse OpenAir Mobile for Android to delete an expense report which has not been submitted. Whendeleted, it is deleted from your Android app and cannot be uploaded to your OpenAir account.
To Delete an Expense Report
1. Open a list of expense reports from the dashboard (for example, tap the “Open” category under“Expenses”). The “Expense Report List” appears.
2. Tap the icon and tap Select. A radio button appears next to each expense report.
3. Tap the radio button next to each expense report which you want to delete. When an expensereport is selected, the icon appears in the upper right corner of the app.
4. Tap the icon. The app prompts you to verify the delete action. Tap DELETE. The app displays asyncing message as it deletes the selected expense reports and updates your OpenAir account.The expense reports no longer appear in the list of expense reports.
Note: A quick way to delete an expense report is to long-press the expense report youwant to delete. This causes the radio buttons next to the expense reports to appear.
Submit an Expense ReportOnce you have created an expense report and added one or more receipts, use OpenAir Mobile forAndroid to submit the expense report. When submitted to your OpenAir account, the expense reportfollows the normal approval process.
To Submit an Expense Report
1. Open a list of expense reports from the dashboard (for example, tap the “Open” category under“Expenses”). The “Expense Report List” appears. Tap on the expense report you would like tosubmit.
Submit an Expense Report 24
Mobile for Android User Guide
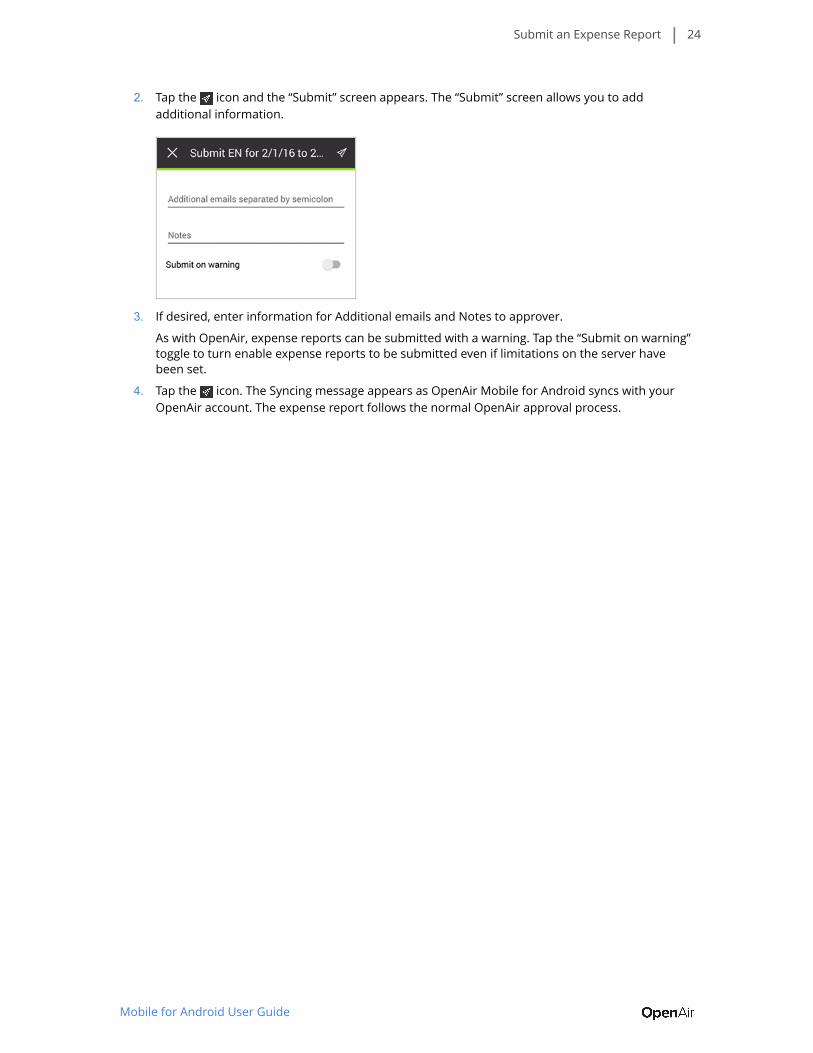
2. Tap the icon and the “Submit” screen appears. The “Submit” screen allows you to addadditional information.
3. If desired, enter information for Additional emails and Notes to approver.
As with OpenAir, expense reports can be submitted with a warning. Tap the “Submit on warning”toggle to turn enable expense reports to be submitted even if limitations on the server havebeen set.
4. Tap the icon. The Syncing message appears as OpenAir Mobile for Android syncs with yourOpenAir account. The expense report follows the normal OpenAir approval process.

Working with Approvals in OpenAir Mobile for Android 25
Mobile for Android User Guide
Working with Approvals in OpenAir Mobilefor AndroidYou can use OpenAir Mobile for Android to approve or reject Timesheets or Expense reports.
Important: The Approval feature is not available when the app is offline.
Note: You will only see the To Approve lines if you have the approval switches enabled in youraccount, see To provide users with permission to approve Timesheets or Expenses:.
To approve a Timesheet or Expense report in OpenAir Mobile for Android:
1. Tap the Timesheets or Expenses To Approve line from the Dashboard.
2. Tap the Timesheet or Expense report you want to approve.
3. Tap the icon to approve the Timesheet or Expense report.

Working with Approvals in OpenAir Mobile for Android 26
Mobile for Android User Guide
4. Type any additional email recipients who you want to notify of the approval, and add notes tothe approval (optional).
5. Tap Approve.
To reject a Timesheet or Expense report in OpenAir Mobile for Android:
1. Tap the Timesheets or Expenses To Approve line from the Dashboard.
2. Tap the Timesheet or Expense report you want to reject.

Working with Approvals in OpenAir Mobile for Android 27
Mobile for Android User Guide
3. Tap the icon and tap Reject.
4. Type any additional email recipients who you want to notify of the rejection, and add notes tothe rejection.
Note: You must enter a Note when rejecting a Timesheet or Expense report.
5. Tap Reject.
The Timesheet or Expense report will be returned to the sender for correction.

References 28
Mobile for Android User Guide
ReferencesReferences contain Administration, Troubleshooting, and Frequently Asked Questions.
AdministrationAdministrators provide users with permission to exchange information between the OpenAir Mobilefor Android app and an OpenAir account. Once you enable Exchange Access to OpenAir Mobilefor Android for a user and that user downloads the app, the user can communicate with OpenAirTimesheets and Expenses through the Android app.
Form permissions defined in a user's OpenAir account are downloaded and enforced on their Androiddevice.
Note: There are several limitations regarding the enforcement of permission rules in thisversion of the Android app. See the OpenAir Admin Guide for more details on form permissions.
■ Only permission rules for the main entity form are supported.
■ Form default values are not supported.
To Provide Users with Exchange Access:
1. Navigate to Administration > Global Settings > Employees and select an Employee ID.
2. Click Access control > Exchange Access. The “Exchange Access” form appears.
3. Select OpenAir Mobile (Android), click Add selected items, and click Save.
To Enable Single-Sign On:
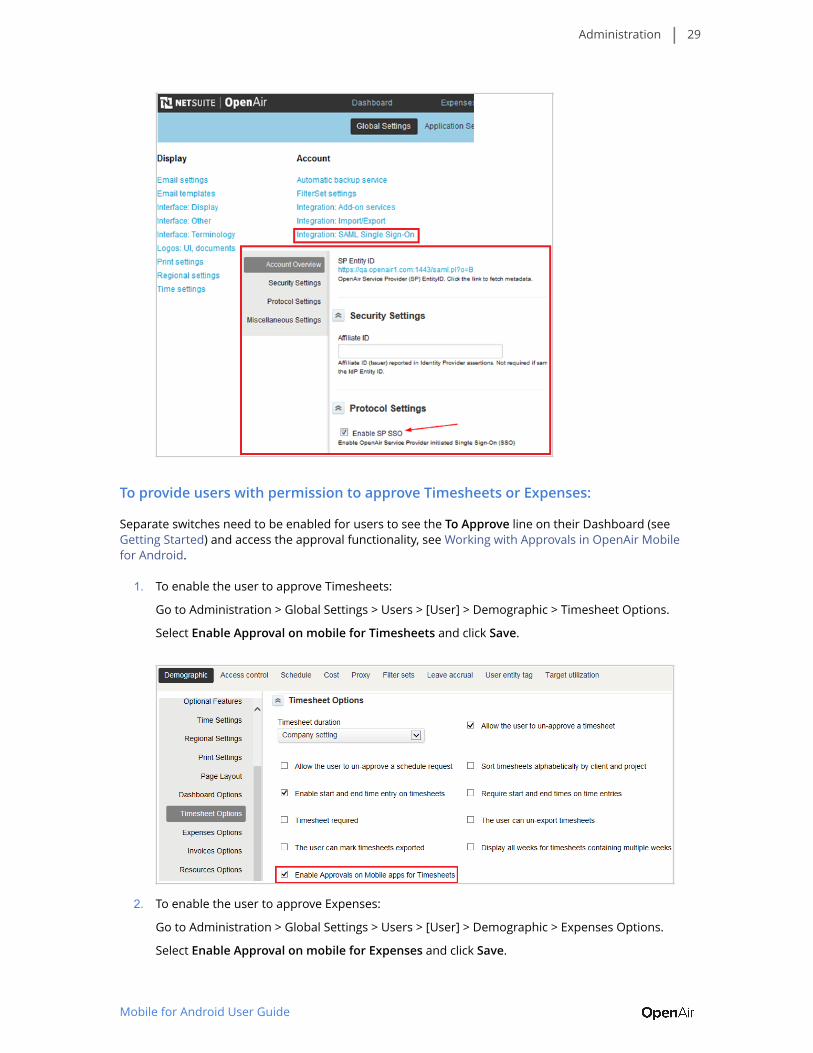
1. Navigate to Administration > Integration: SAML Single Sign-On
Note: To enable this feature, please contact OpenAir Support and request the EnableSAML integration switch.
2. You need to check the Enable SP SSO option to use single sign-on from your Android device.
Administration 29
Mobile for Android User Guide
To provide users with permission to approve Timesheets or Expenses:
Separate switches need to be enabled for users to see the To Approve line on their Dashboard (seeGetting Started) and access the approval functionality, see Working with Approvals in OpenAir Mobilefor Android.
1. To enable the user to approve Timesheets:
Go to Administration > Global Settings > Users > [User] > Demographic > Timesheet Options.
Select Enable Approval on mobile for Timesheets and click Save.
2. To enable the user to approve Expenses:
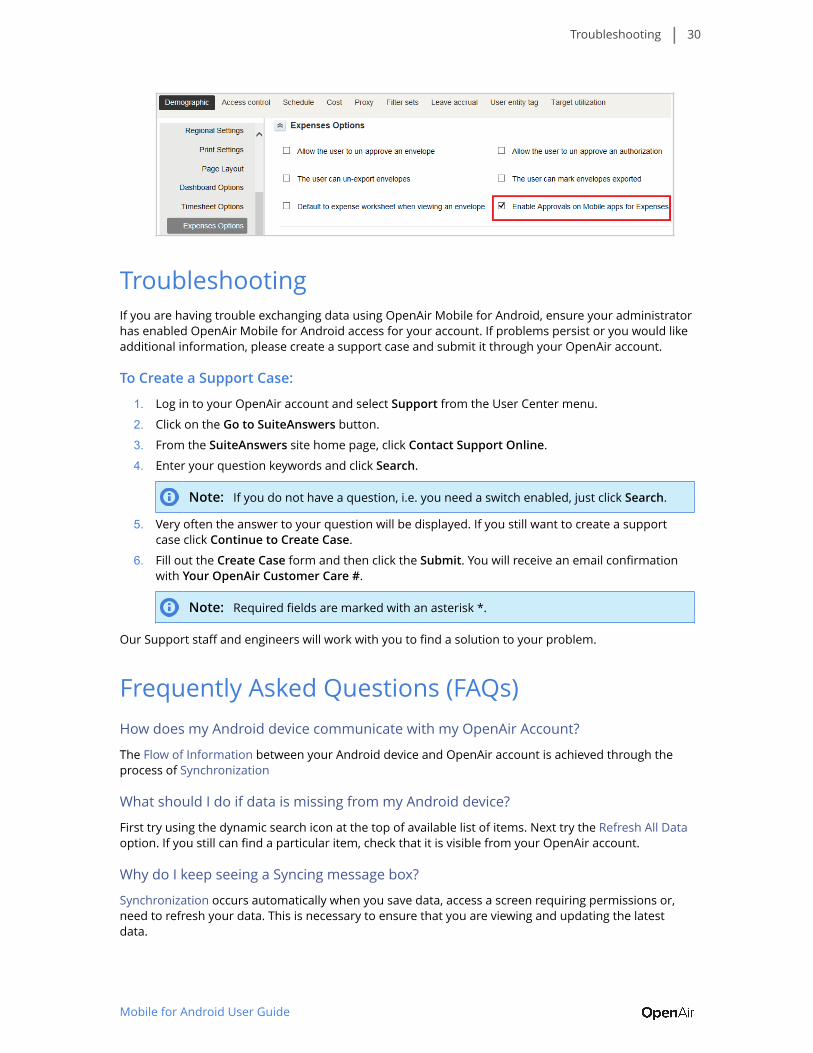
Go to Administration > Global Settings > Users > [User] > Demographic > Expenses Options.
Select Enable Approval on mobile for Expenses and click Save.
Troubleshooting 30
Mobile for Android User Guide
TroubleshootingIf you are having trouble exchanging data using OpenAir Mobile for Android, ensure your administratorhas enabled OpenAir Mobile for Android access for your account. If problems persist or you would likeadditional information, please create a support case and submit it through your OpenAir account.
To Create a Support Case:
1. Log in to your OpenAir account and select Support from the User Center menu.
2. Click on the Go to SuiteAnswers button.
3. From the SuiteAnswers site home page, click Contact Support Online.
4. Enter your question keywords and click Search.
Note: If you do not have a question, i.e. you need a switch enabled, just click Search.
5. Very often the answer to your question will be displayed. If you still want to create a supportcase click Continue to Create Case.
6. Fill out the Create Case form and then click the Submit. You will receive an email confirmationwith Your OpenAir Customer Care #.
Note: Required fields are marked with an asterisk *.
Our Support staff and engineers will work with you to find a solution to your problem.
Frequently Asked Questions (FAQs)How does my Android device communicate with my OpenAir Account?
The Flow of Information between your Android device and OpenAir account is achieved through theprocess of Synchronization
What should I do if data is missing from my Android device?
First try using the dynamic search icon at the top of available list of items. Next try the Refresh All Dataoption. If you still can find a particular item, check that it is visible from your OpenAir account.
Why do I keep seeing a Syncing message box?
Synchronization occurs automatically when you save data, access a screen requiring permissions or,need to refresh your data. This is necessary to ensure that you are viewing and updating the latestdata.

Frequently Asked Questions (FAQs) 31
Mobile for Android User Guide
I had to change my password in my OpenAir account. Do I need to change it in OpenAirMobile for Android?
Yes, the login credentials in Settings for the OpenAir Mobile for Android app need to be the same asyour OpenAir account. See Changing Settings for more information.
What do I do if I see an error message?
Read the message carefully. The most common errors result from your Android device losingits Internet connection. Check you have access to the Internet and are using the correct securitycredentials. See Troubleshooting.