Wasco Union High School Course: Physics 2012-2013 Pacing ...
Download the SageGlass Mobile App (search “sageglass” on Google Play or in Apple’s App Store). Then proceed to “Connecting to the SageGlass App Server” on page 3 to configure the SageGlass System.
The following definitions will be helpful background information as you use this guide. See the illustration on the next page for more information.
SageGlass Mobile App—used to control SageGlass windows from a mobile device.
SageGlass System—includes:a the SageGlass windows installed in your homeb the SageMesh Coordinatorc a web-enabled device (smartphone, tablet, laptop) connected to the SageMesh Coordinator
(usually via a router). The SageGlass system must be set up before using this guide (see the SageMesh Coordinator Quick Start Guide).
Location—a customized name that indicates the physical location(s) of the SageGlass windows. For residential installations, you should create just one location, the residence itself (e.g. “Our House“).
Zones—groups of SageGlass panes, usually near each other, that are controlled as one. For example, Zone 1 might be all windows in the Master Bedroom, while Zone 2 is the picture window in the Family Room, and Zone 3 is a Skylight. The Zone’s tint level (and other parameters) can be controlled using the Mobile App (e.g., command Zone 1 to fully tint all its windows).
Scenes—pre-set tint levels that can be applied to multiple zones. Scenes allow frequently used commands to be easily applied from the Mobile App.
Auto Mode—SageGlass windows tint based on outside light levels. Auto Mode can be overridden by the mobile app, but windows will return to Auto Mode after a specified length of time.
Setpoint—Sets the desired interior light level for a room during Auto Mode.
TECHNICAL SUPPORT1-800-388-0293
MOBILE APP SERVERSetup Guide for Wasco
Welcome to SageGlass! This guide explains how to configure the SageGlass System and use the mobile app to control your windows.
DOWNLOAD SAGEGLASS MOBILE APP

MOBILE APP SERVER 2
SAGEGLASS TERMSSee the image below for an explanation of what some of the SageGlass terms (location, zone, scene) mean in relation to your home.
LOCATION(OUR HOUSE)
ZONE 1(MASTER
BEDROOM)
ZONE 3 (SKYLIGHT)
ZONE 4(KITCHEN)
ZONE 2(FAMILY ROOM)
SCENE 1 (MOVIE NIGHT) MASTER BEDROOM SET TO AUTO FAMILY ROOM SET TO TINT 4 KITCHEN SET TO TINT 1
SCENE 2 (WINTER DAY) MASTER BEDROOM SET TO TINT 1, SETPOINT 1 FAMILY ROOM SET TO TINT 1, SETPOINT 1 SKYLIGHT SET TO TINT 1, SETPOINT 1 KITCHEN SET TO TINT 1, SETPOINT 1
This document explains how to fully customize your SageGlass system.
See “APPENDIX” on page 14 for an example of the steps necessary to set up your system so you can control it using the SageGlass mobile app.
3 MOBILE APP SERVER
CONNECTING TO THE MOBILE APP SERVERAfter having successfully setup your SageGlass System as described in the SageMesh Coordinator Quick Start Guide, follow these steps to configure your system.
LOG INTO THE SAGEGLASS SETUP SOFTWARE1 Be sure the mobile device you installed the SageGlass app on is connected to the same Wi-Fi network as the SageGlass
Coordinator (your home network or the router you installed with the SageMesh Coordinator).2 Open the SageGlass app.
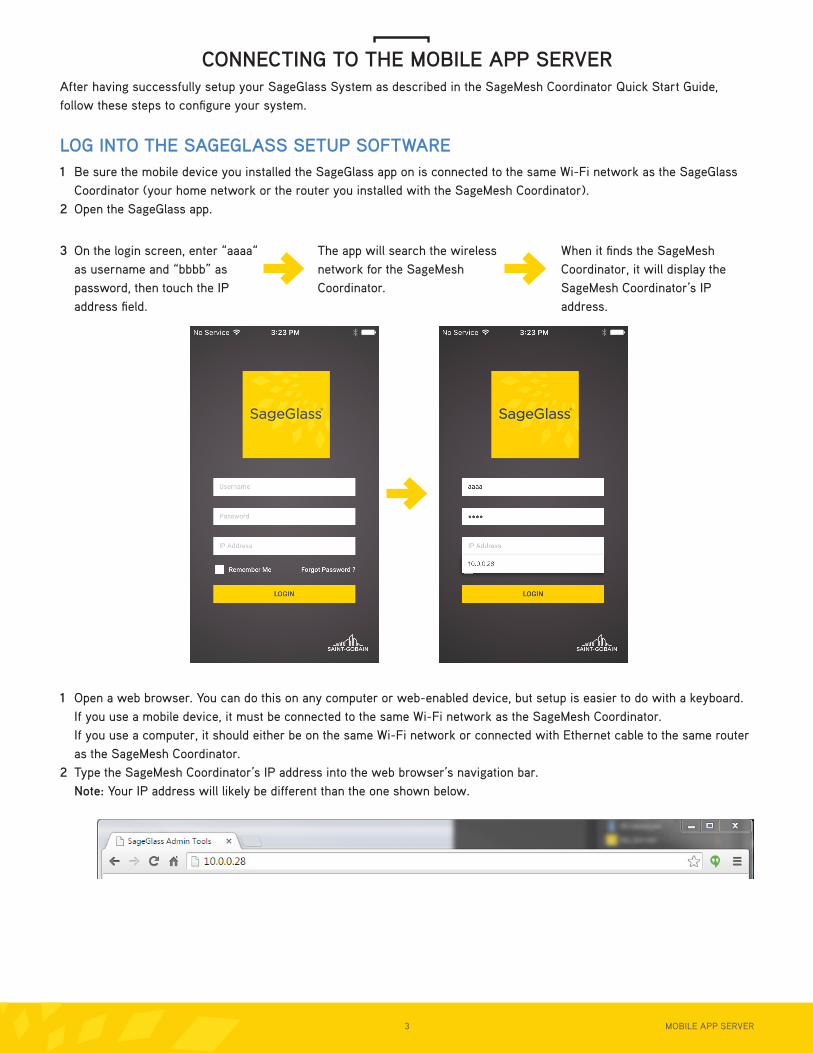
3 On the login screen, enter “aaaa“ as username and “bbbb” as password, then touch the IP address field.
The app will search the wireless network for the SageMesh Coordinator.
When it finds the SageMesh Coordinator, it will display the SageMesh Coordinator’s IP address.
1 Open a web browser. You can do this on any computer or web-enabled device, but setup is easier to do with a keyboard. If you use a mobile device, it must be connected to the same Wi-Fi network as the SageMesh Coordinator. If you use a computer, it should either be on the same Wi-Fi network or connected with Ethernet cable to the same router as the SageMesh Coordinator.
2 Type the SageMesh Coordinator’s IP address into the web browser’s navigation bar.Note: Your IP address will likely be different than the one shown below.
MOBILE APP SERVER 4
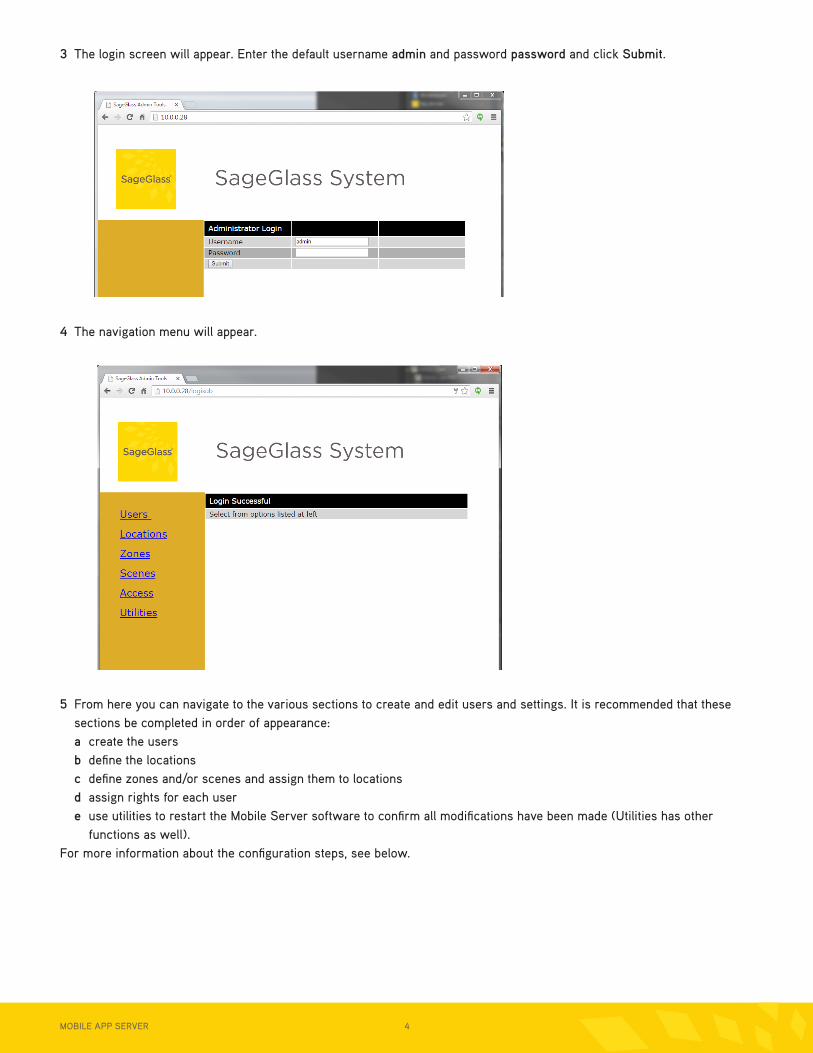
3 The login screen will appear. Enter the default username admin and password password and click Submit.
4 The navigation menu will appear.
5 From here you can navigate to the various sections to create and edit users and settings. It is recommended that these sections be completed in order of appearance:a create the usersb define the locationsc define zones and/or scenes and assign them to locationsd assign rights for each usere use utilities to restart the Mobile Server software to confirm all modifications have been made (Utilities has other
functions as well).For more information about the configuration steps, see below.
5 MOBILE APP SERVER
CUSTOMIZING THE SAGEGLASS SYSTEMIn this section you will create users, locations, zones, and scenes. This will allow you to custom control your SageGlass System.
USERSUsers are the people who have access to your SageGlass System.
Note: More than one person can use the same user name.
This section explains • adding new users• changing user passwords• deleting users
Note: For residential installations, it is recommended to define only one or very few users. One defined user can be used over multiple mobile devices, by multiple people.
Adding a new user
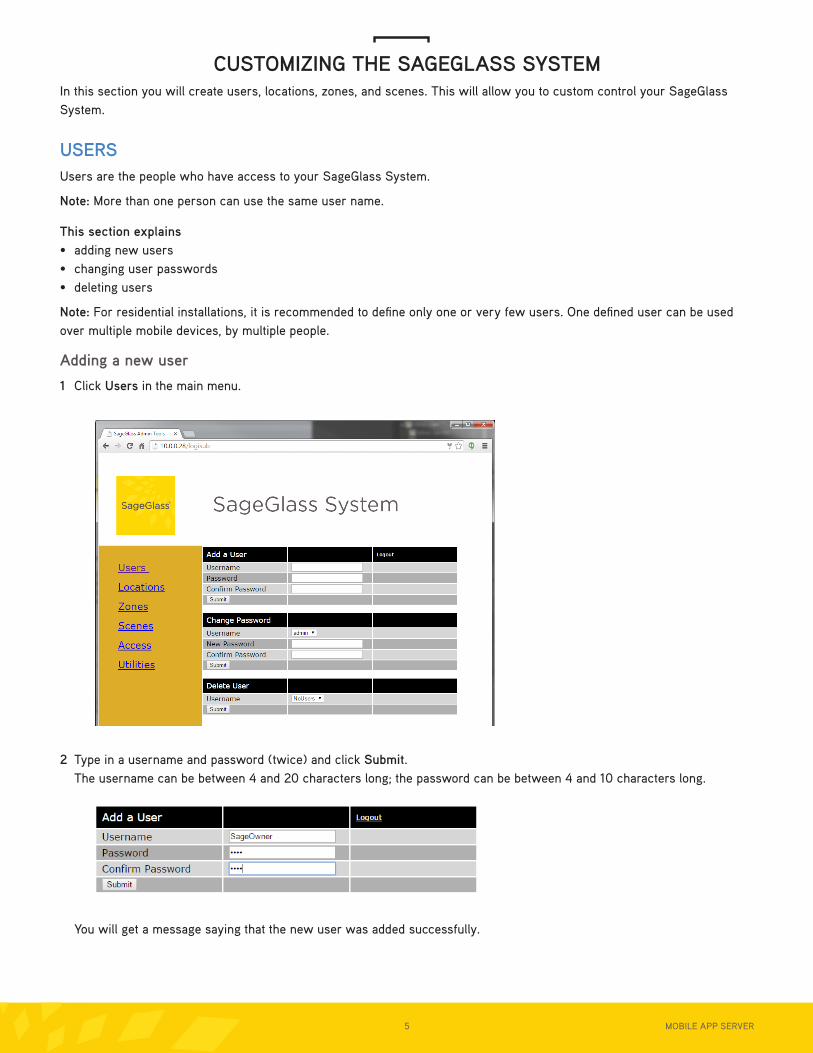
1 Click Users in the main menu.
2 Type in a username and password (twice) and click Submit. The username can be between 4 and 20 characters long; the password can be between 4 and 10 characters long.
You will get a message saying that the new user was added successfully.
MOBILE APP SERVER 6
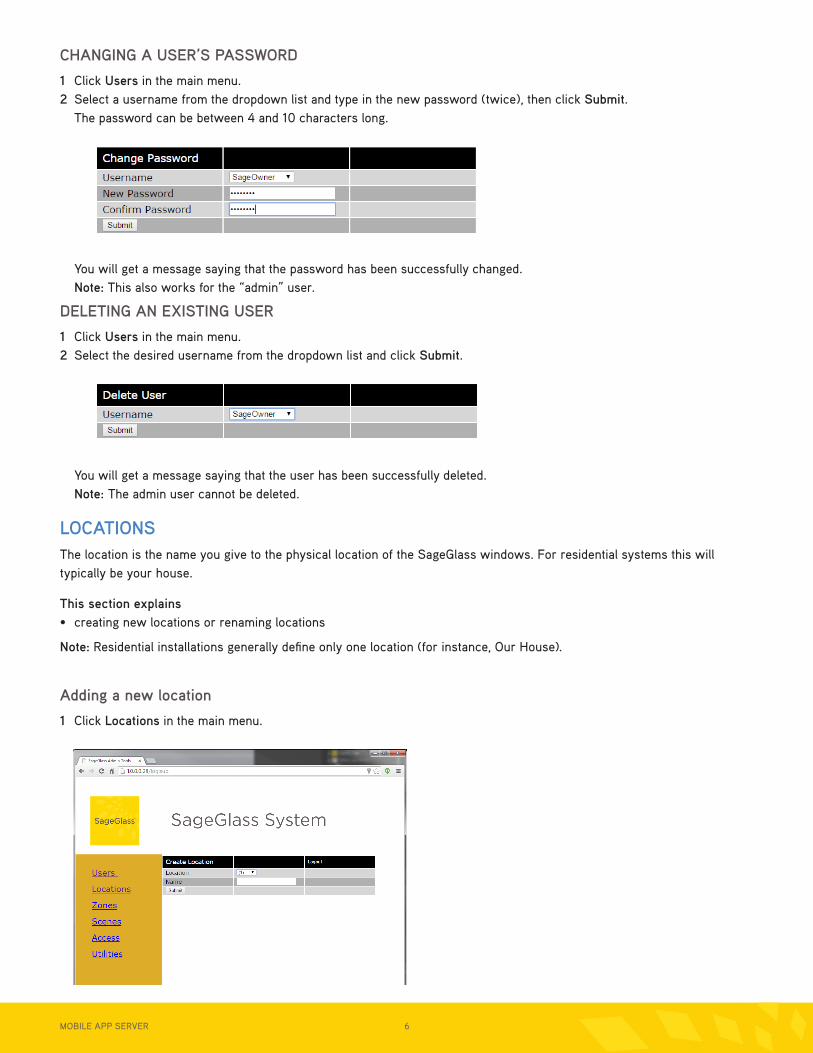
CHANGING A USER’S PASSWORD
1 Click Users in the main menu.2 Select a username from the dropdown list and type in the new password (twice), then click Submit.
The password can be between 4 and 10 characters long.
You will get a message saying that the password has been successfully changed.Note: This also works for the “admin” user.
DELETING AN EXISTING USER
1 Click Users in the main menu.2 Select the desired username from the dropdown list and click Submit.
You will get a message saying that the user has been successfully deleted.Note: The admin user cannot be deleted.
LOCATIONSThe location is the name you give to the physical location of the SageGlass windows. For residential systems this will typically be your house.
This section explains• creating new locations or renaming locations
Note: Residential installations generally define only one location (for instance, Our House).
Adding a new location
1 Click Locations in the main menu.
7 MOBILE APP SERVER
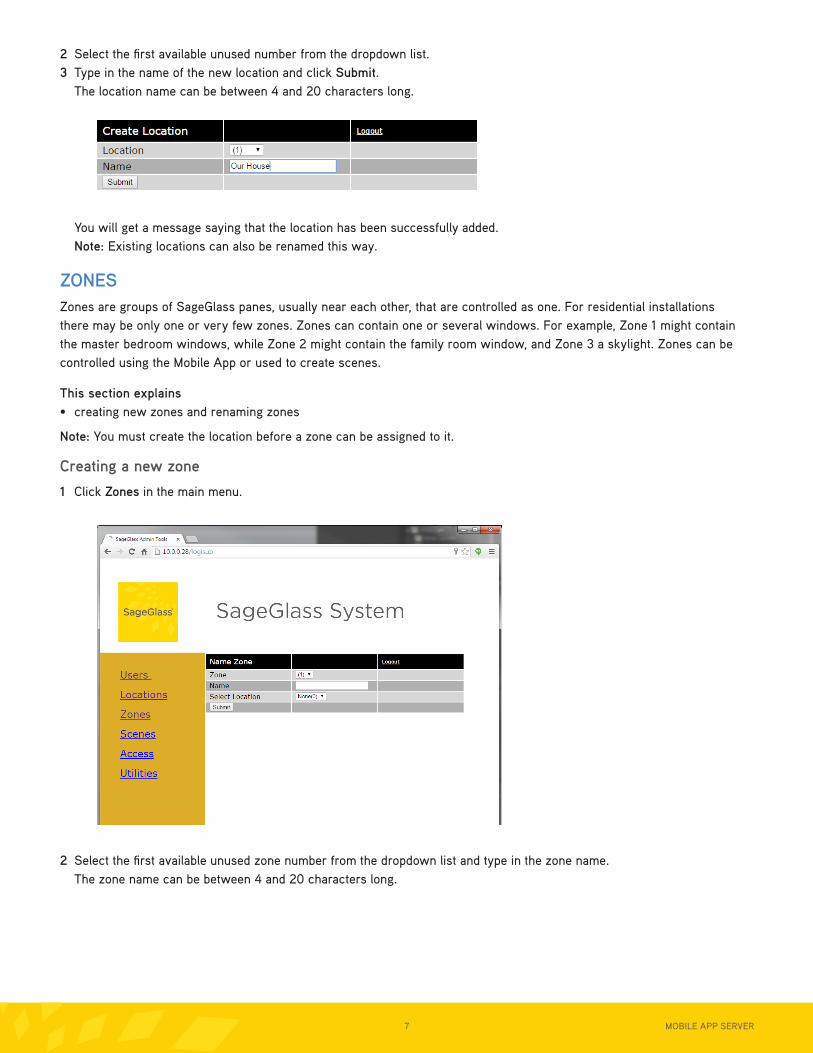
2 Select the first available unused number from the dropdown list.3 Type in the name of the new location and click Submit.
The location name can be between 4 and 20 characters long.
You will get a message saying that the location has been successfully added.Note: Existing locations can also be renamed this way.
ZONESZones are groups of SageGlass panes, usually near each other, that are controlled as one. For residential installations there may be only one or very few zones. Zones can contain one or several windows. For example, Zone 1 might contain the master bedroom windows, while Zone 2 might contain the family room window, and Zone 3 a skylight. Zones can be controlled using the Mobile App or used to create scenes.
This section explains• creating new zones and renaming zones
Note: You must create the location before a zone can be assigned to it.
Creating a new zone
1 Click Zones in the main menu.
2 Select the first available unused zone number from the dropdown list and type in the zone name. The zone name can be between 4 and 20 characters long.

MOBILE APP SERVER 8
3 Select a location for this zone, then click Submit.
You will get a message saying that the zone was successfully created.Note: Existing zones can also be renamed or reassigned to different locations this way.
SCENESA Scene is a preconfigured setting that can be applied manually to multiple zones. Scenes make it easy to apply frequently used multi-zone commands from the Mobile App. For example, one scene could change “Zone 1 plus Zone 2 to Full Tint,” another scene changes “All Windows to Full Tint,” or “Clear all Windows,” etc.
This section explains• creating, naming, and configuring new and existing scenes
Scene commands differ from zone commands in that they can send commands to multiple zones at once.
Adding a new scene
1 Click Scenes in the main menu.
2 Select the first available unused scene number from the dropdown list, type in a scene name, and select a location. The scene name can be between 1 and 20 characters long.Note: You must create the location before a scene can be assigned to it.
9 MOBILE APP SERVER
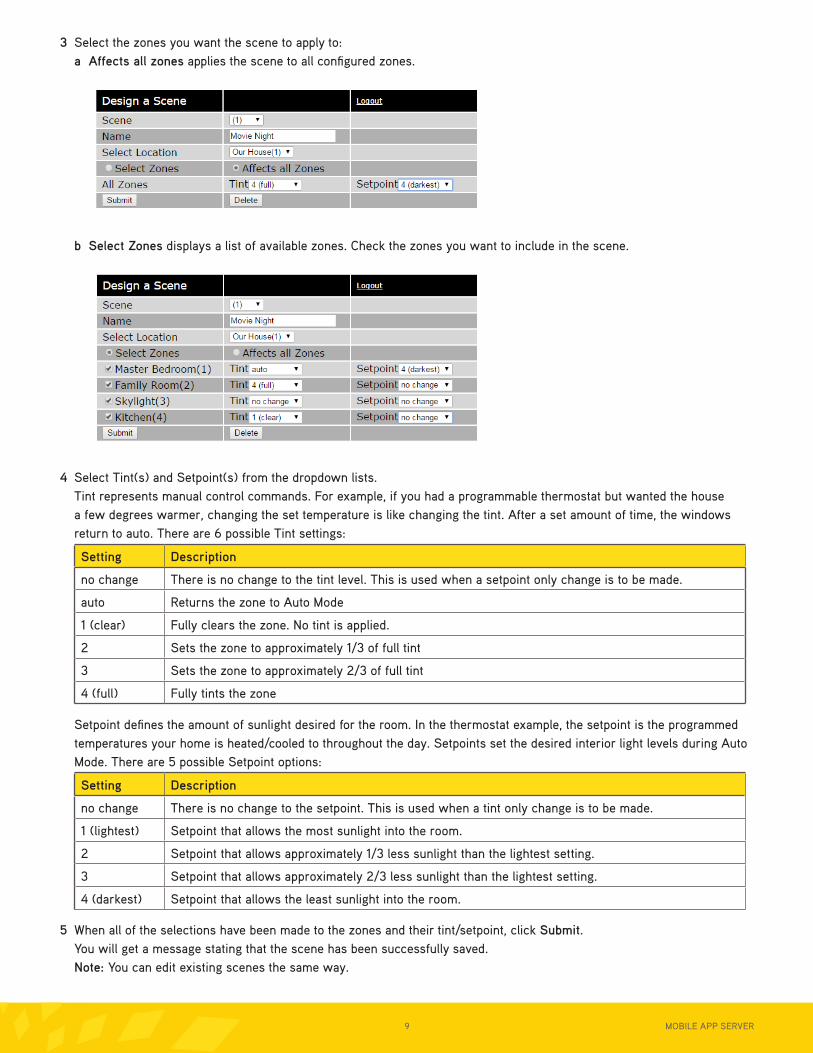
3 Select the zones you want the scene to apply to:a Affects all zones applies the scene to all configured zones.
b Select Zones displays a list of available zones. Check the zones you want to include in the scene.
4 Select Tint(s) and Setpoint(s) from the dropdown lists. Tint represents manual control commands. For example, if you had a programmable thermostat but wanted the house a few degrees warmer, changing the set temperature is like changing the tint. After a set amount of time, the windows return to auto. There are 6 possible Tint settings:
Setting Description
no change There is no change to the tint level. This is used when a setpoint only change is to be made.
auto Returns the zone to Auto Mode
1 (clear) Fully clears the zone. No tint is applied.
2 Sets the zone to approximately 1/3 of full tint
3 Sets the zone to approximately 2/3 of full tint
4 (full) Fully tints the zone
Setpoint defines the amount of sunlight desired for the room. In the thermostat example, the setpoint is the programmed temperatures your home is heated/cooled to throughout the day. Setpoints set the desired interior light levels during Auto Mode. There are 5 possible Setpoint options:
Setting Description
no change There is no change to the setpoint. This is used when a tint only change is to be made.
1 (lightest) Setpoint that allows the most sunlight into the room.
2 Setpoint that allows approximately 1/3 less sunlight than the lightest setting.
3 Setpoint that allows approximately 2/3 less sunlight than the lightest setting.
4 (darkest) Setpoint that allows the least sunlight into the room.
5 When all of the selections have been made to the zones and their tint/setpoint, click Submit.You will get a message stating that the scene has been successfully saved. Note: You can edit existing scenes the same way.
MOBILE APP SERVER 10
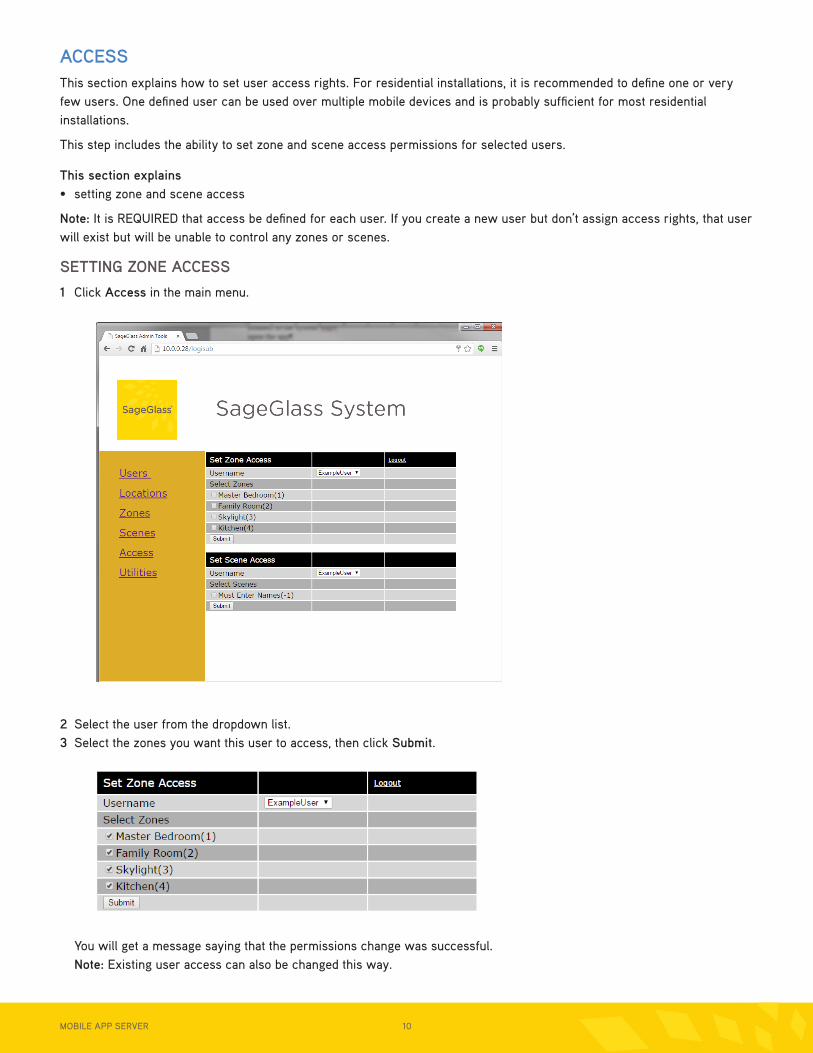
ACCESSThis section explains how to set user access rights. For residential installations, it is recommended to define one or very few users. One defined user can be used over multiple mobile devices and is probably sufficient for most residential installations.
This step includes the ability to set zone and scene access permissions for selected users.
This section explains• setting zone and scene access
Note: It is REQUIRED that access be defined for each user. If you create a new user but don’t assign access rights, that user will exist but will be unable to control any zones or scenes.
SETTING ZONE ACCESS
1 Click Access in the main menu.
2 Select the user from the dropdown list.3 Select the zones you want this user to access, then click Submit.
You will get a message saying that the permissions change was successful.Note: Existing user access can also be changed this way.
11 MOBILE APP SERVER
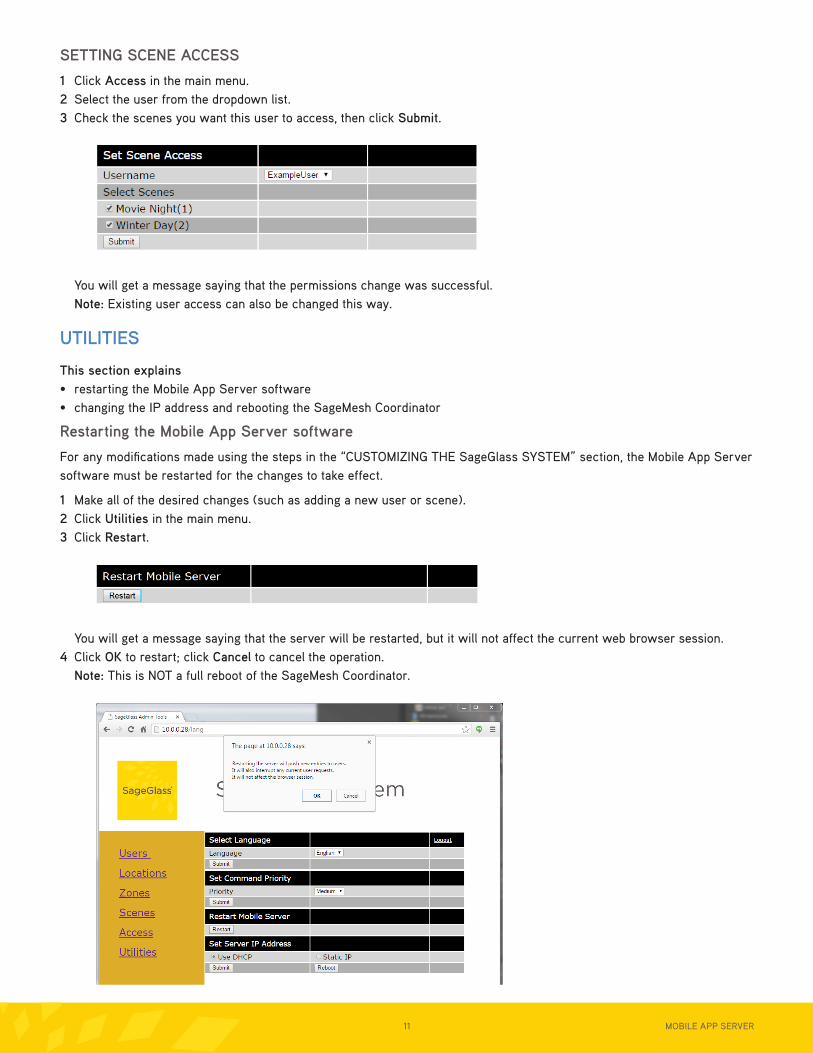
SETTING SCENE ACCESS
1 Click Access in the main menu.2 Select the user from the dropdown list.3 Check the scenes you want this user to access, then click Submit.
You will get a message saying that the permissions change was successful.Note: Existing user access can also be changed this way.
UTILITIES
This section explains• restarting the Mobile App Server software• changing the IP address and rebooting the SageMesh Coordinator
Restarting the Mobile App Server software
For any modifications made using the steps in the “CUSTOMIZING THE SageGlass SYSTEM” section, the Mobile App Server software must be restarted for the changes to take effect.
1 Make all of the desired changes (such as adding a new user or scene).2 Click Utilities in the main menu.3 Click Restart.
You will get a message saying that the server will be restarted, but it will not affect the current web browser session.4 Click OK to restart; click Cancel to cancel the operation.
Note: This is NOT a full reboot of the SageMesh Coordinator.
MOBILE APP SERVER 12
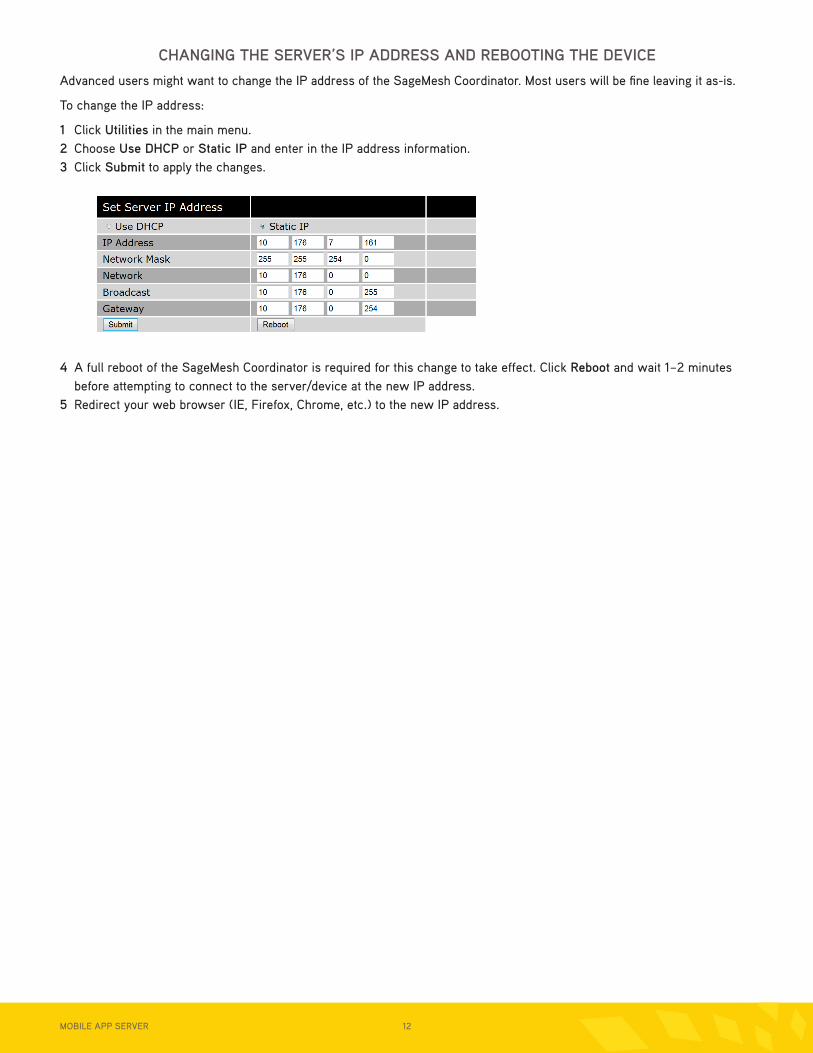
CHANGING THE SERVER’S IP ADDRESS AND REBOOTING THE DEVICE
Advanced users might want to change the IP address of the SageMesh Coordinator. Most users will be fine leaving it as-is.
To change the IP address:
1 Click Utilities in the main menu.2 Choose Use DHCP or Static IP and enter in the IP address information.3 Click Submit to apply the changes.
4 A full reboot of the SageMesh Coordinator is required for this change to take effect. Click Reboot and wait 1–2 minutes before attempting to connect to the server/device at the new IP address.
5 Redirect your web browser (IE, Firefox, Chrome, etc.) to the new IP address.
13 MOBILE APP SERVER
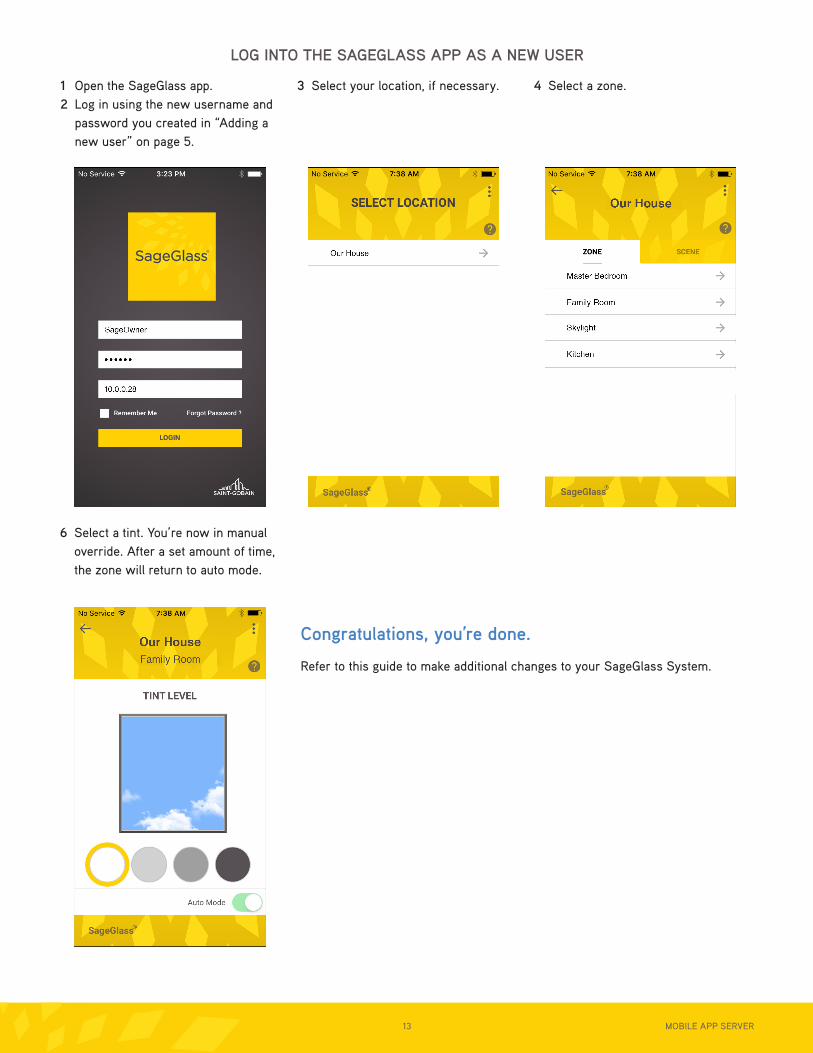
LOG INTO THE SAGEGLASS APP AS A NEW USER
1 Open the SageGlass app.2 Log in using the new username and
password you created in “Adding a new user” on page 5.
3 Select your location, if necessary. 4 Select a zone.
6 Select a tint. You’re now in manual override. After a set amount of time, the zone will return to auto mode.
Congratulations, you’re done.
Refer to this guide to make additional changes to your SageGlass System.
MOBILE APP SERVER 14
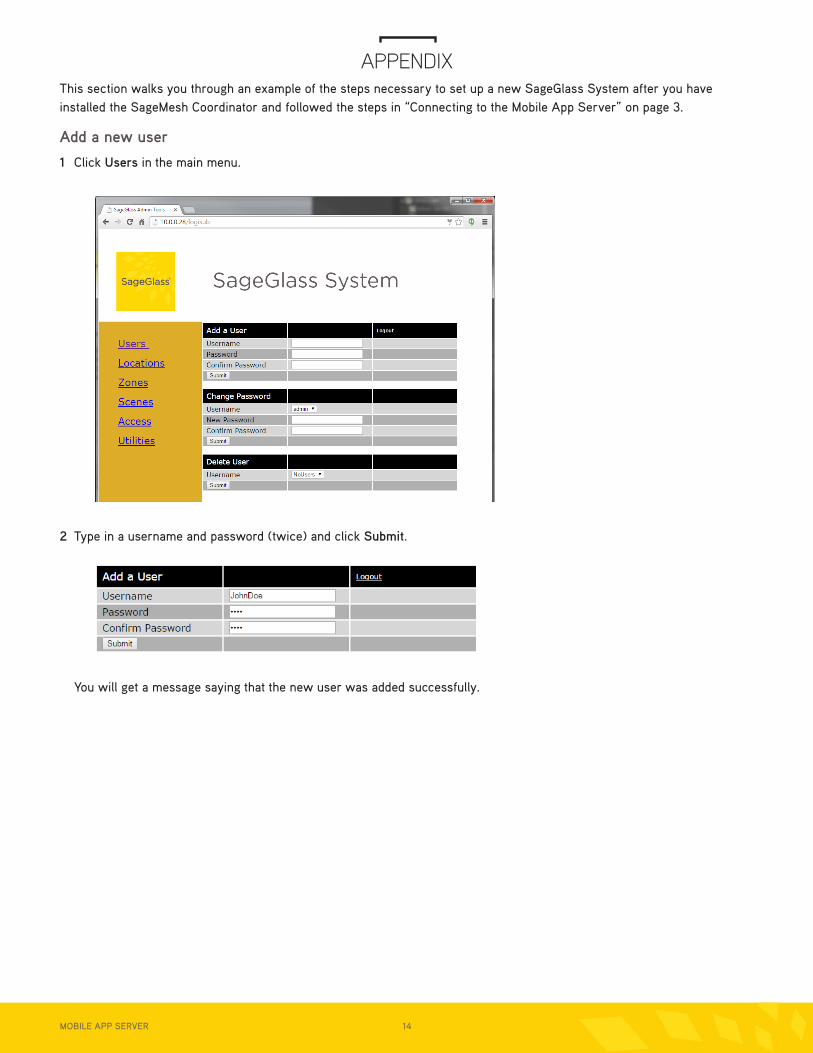
APPENDIXThis section walks you through an example of the steps necessary to set up a new SageGlass System after you have installed the SageMesh Coordinator and followed the steps in “Connecting to the Mobile App Server” on page 3.
Add a new user
1 Click Users in the main menu.
2 Type in a username and password (twice) and click Submit.
You will get a message saying that the new user was added successfully.
15 MOBILE APP SERVER
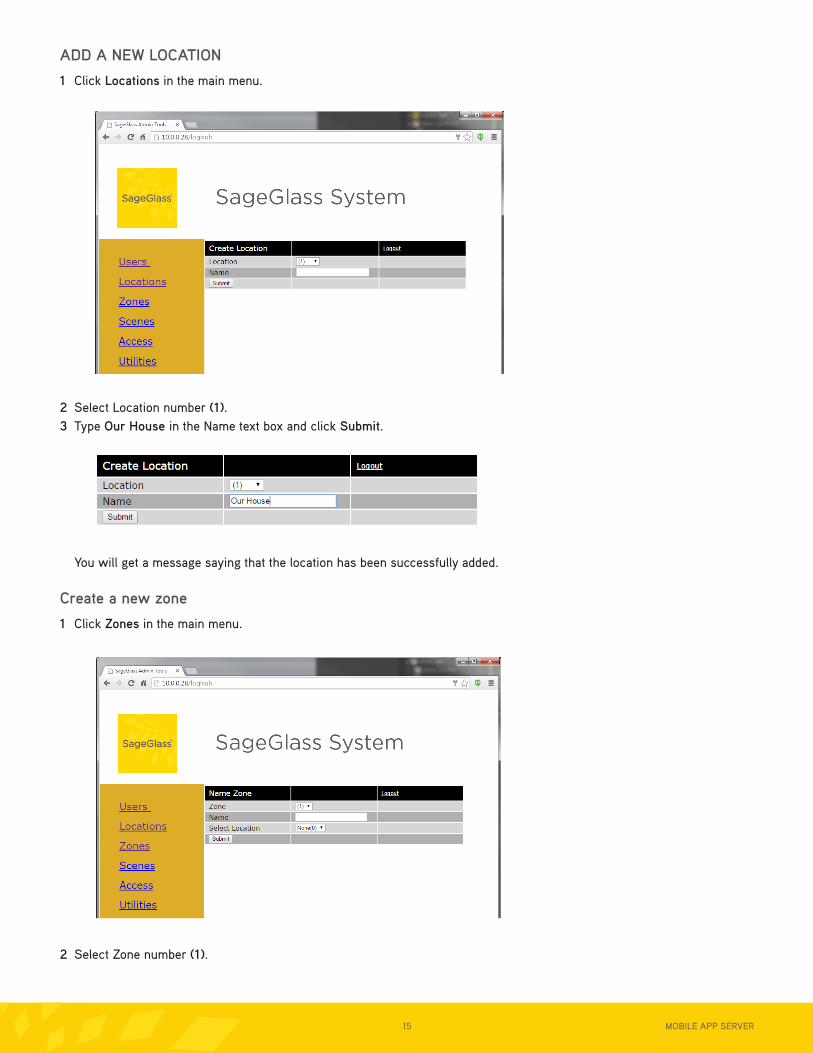
ADD A NEW LOCATION
1 Click Locations in the main menu.
2 Select Location number (1).3 Type Our House in the Name text box and click Submit.
You will get a message saying that the location has been successfully added.
Create a new zone
1 Click Zones in the main menu.
2 Select Zone number (1).
MOBILE APP SERVER 16
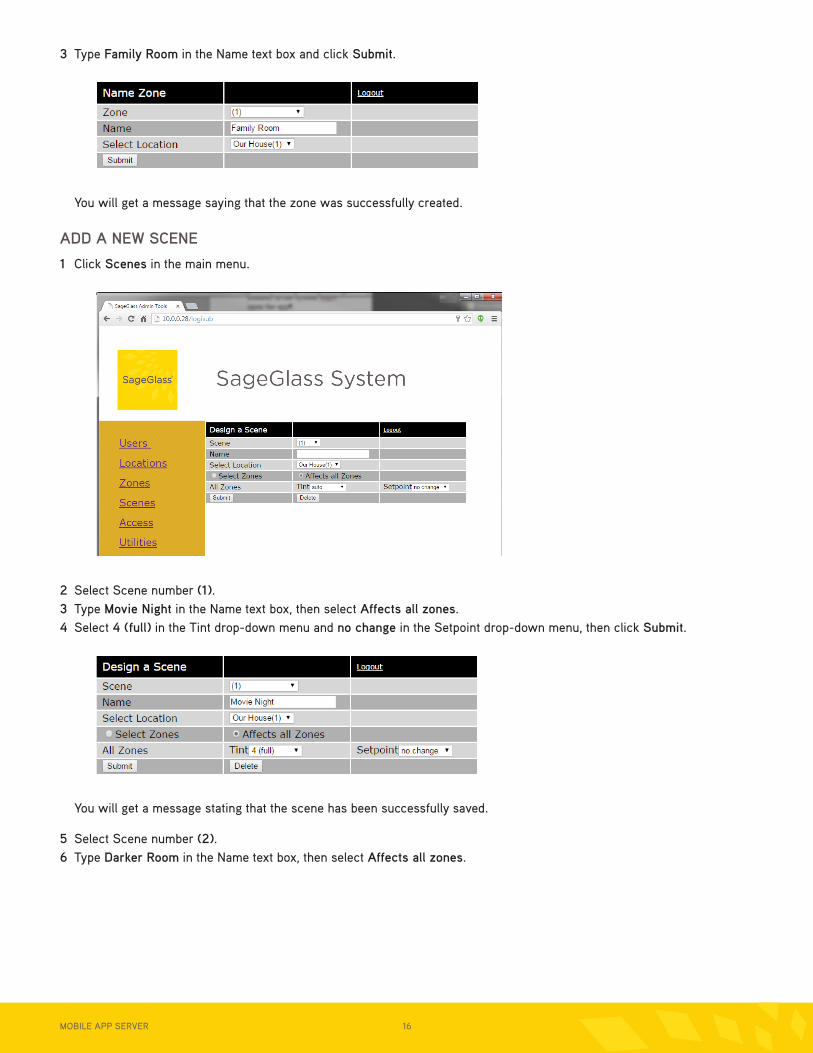
3 Type Family Room in the Name text box and click Submit.
You will get a message saying that the zone was successfully created.
ADD A NEW SCENE
1 Click Scenes in the main menu.
2 Select Scene number (1).3 Type Movie Night in the Name text box, then select Affects all zones.4 Select 4 (full) in the Tint drop-down menu and no change in the Setpoint drop-down menu, then click Submit.
You will get a message stating that the scene has been successfully saved.
5 Select Scene number (2).6 Type Darker Room in the Name text box, then select Affects all zones.
17 MOBILE APP SERVER
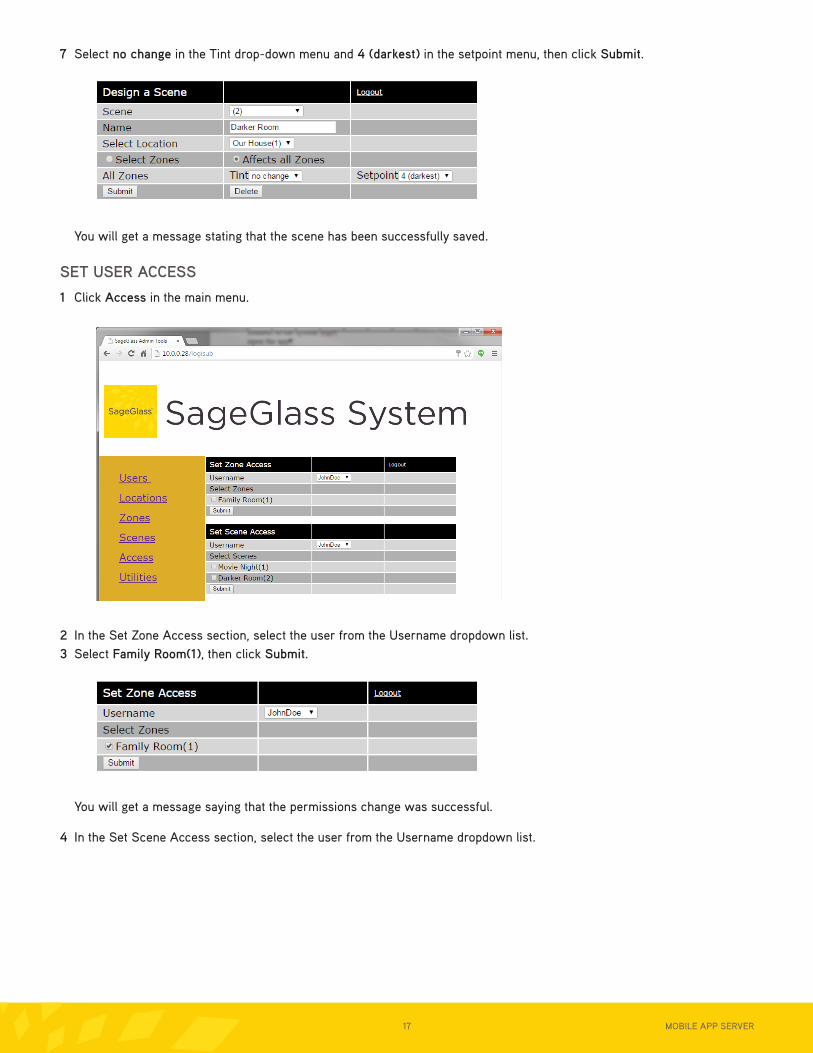
7 Select no change in the Tint drop-down menu and 4 (darkest) in the setpoint menu, then click Submit.
You will get a message stating that the scene has been successfully saved.
SET USER ACCESS
1 Click Access in the main menu.
2 In the Set Zone Access section, select the user from the Username dropdown list.3 Select Family Room(1), then click Submit.
You will get a message saying that the permissions change was successful.
4 In the Set Scene Access section, select the user from the Username dropdown list.
MOBILE APP SERVER 18
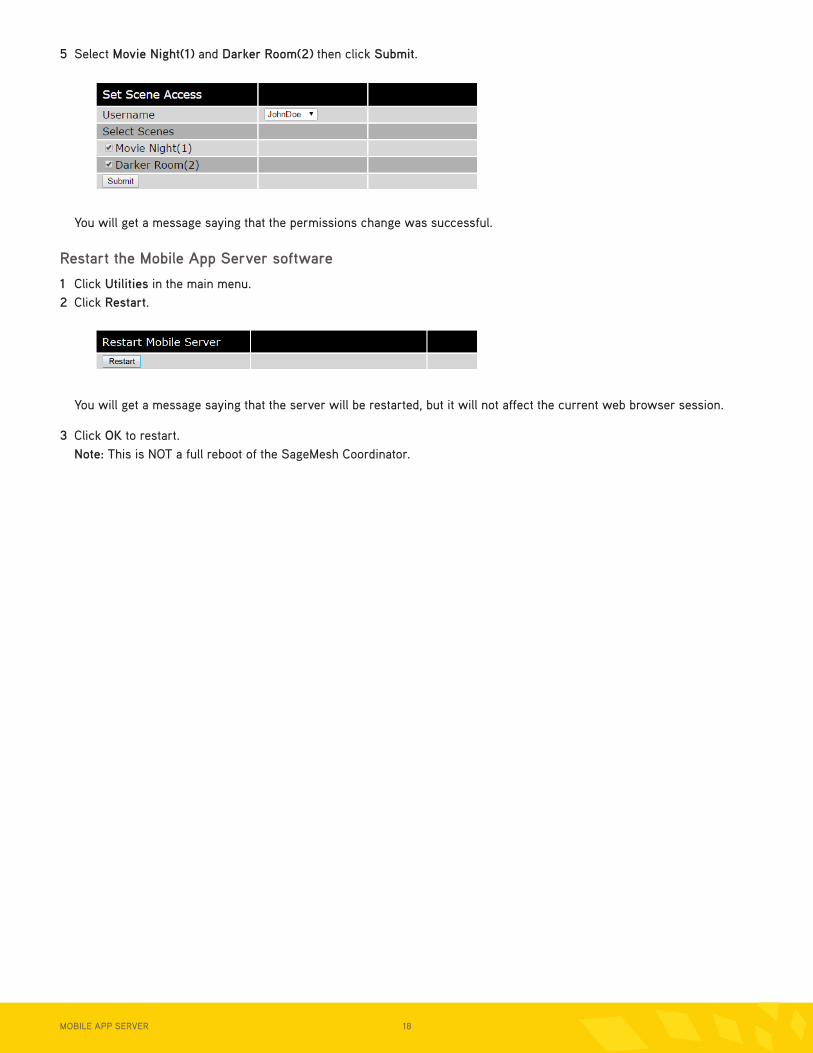
5 Select Movie Night(1) and Darker Room(2) then click Submit.
You will get a message saying that the permissions change was successful.
Restart the Mobile App Server software
1 Click Utilities in the main menu.2 Click Restart.
You will get a message saying that the server will be restarted, but it will not affect the current web browser session.
3 Click OK to restart.Note: This is NOT a full reboot of the SageMesh Coordinator.
19 MOBILE APP SERVER
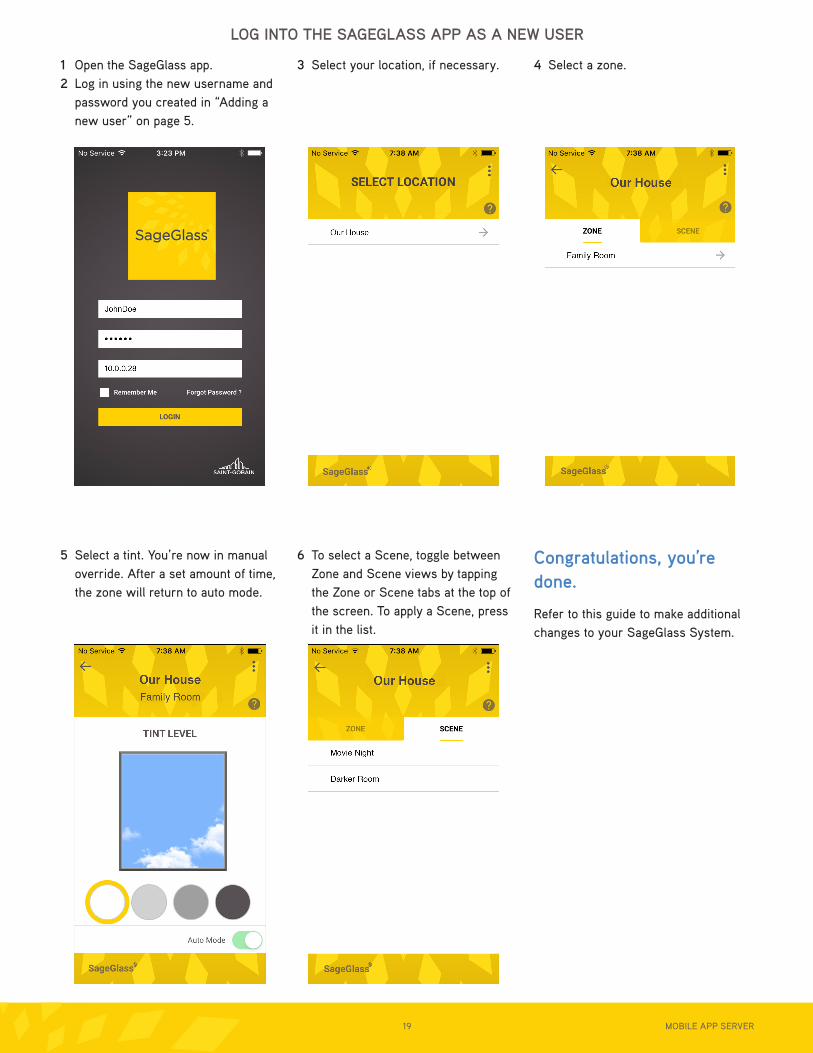
LOG INTO THE SAGEGLASS APP AS A NEW USER
1 Open the SageGlass app.2 Log in using the new username and
password you created in “Adding a new user” on page 5.
3 Select your location, if necessary. 4 Select a zone.
5 Select a tint. You’re now in manual override. After a set amount of time, the zone will return to auto mode.
6 To select a Scene, toggle between Zone and Scene views by tapping the Zone or Scene tabs at the top of the screen. To apply a Scene, press it in the list.
Congratulations, you’re done.
Refer to this guide to make additional changes to your SageGlass System.
SAGE Electrochromics, Inc. - 2 Sage Way • Faribault, MN 55021 USA
© SAGE Electrochromics, Inc. All rights reserved. SageGlass is a registered trademark of SAGE Electrochromics, Inc. SCS-018.1This document was printed on 10% post consumer recycled paper.
SageGlass® is the pioneer of the world’s smartest dynamic glass and is transforming the indoor experience for people by connecting the built and natural environments. Electronically tintable SageGlass tints or clears on demand to control sunlight and prevent heat and glare without the need for blinds or shades. SageGlass dramatically reduces energy demand and the need for HVAC by blocking up to 91 percent of solar heat. As part of Saint-Gobain, SageGlass is backed by more than 350 years of building science expertise that only the world leader in sustainable environments can provide.
TECHNICAL [email protected]
GET IN TOUCH