MixMate - Eppendorf · 2018. 11. 27. · Only use earth/grounded sockets with a protective earth...
42
Register your instrument! www.eppendorf.com/myeppendorf MixMate ® Operating manual
Transcript of MixMate - Eppendorf · 2018. 11. 27. · Only use earth/grounded sockets with a protective earth...
Register your instrument! www.eppendorf.com/myeppendorf
MixMate®
Operating manual
Copyright © 2018 Eppendorf AG, Germany. All rights reserved, including graphics and images. No part of this publication may be reproduced without the prior permission of the copyright owner.
Eppendorf® and the Eppendorf Brand Design are registered trademarks of Eppendorf AG, Germany.
MixMate® is a registered trademark of Eppendorf AG, Germany.
Registered trademarks and protected trademarks are not marked in all cases with ® or ™ in this manual.
U.S. Patents are listed on www.eppendorf.com/ip Operating manual MixMate®seeon p.Fig.Tab.p.English (EN)Operating manual
5353 900.058-00/092018
Table of contentsMixMate®
English (EN)3
Table of contents
1 Operating instructions. . . . . . . . . . . . . . . . . . . . . . . . . . . . . . . . . . . . . . . . . . . . . . . . 51.1 Using this manual . . . . . . . . . . . . . . . . . . . . . . . . . . . . . . . . . . . . . . . . . . . . . . 51.2 Danger symbols and danger levels . . . . . . . . . . . . . . . . . . . . . . . . . . . . . . . . . 5
1.2.1 Danger symbols . . . . . . . . . . . . . . . . . . . . . . . . . . . . . . . . . . . . . . . . 51.2.2 Danger levels . . . . . . . . . . . . . . . . . . . . . . . . . . . . . . . . . . . . . . . . . . 5
1.3 Symbols used . . . . . . . . . . . . . . . . . . . . . . . . . . . . . . . . . . . . . . . . . . . . . . . . . 51.4 Abbreviations used . . . . . . . . . . . . . . . . . . . . . . . . . . . . . . . . . . . . . . . . . . . . . 61.5 Glossary. . . . . . . . . . . . . . . . . . . . . . . . . . . . . . . . . . . . . . . . . . . . . . . . . . . . . . 7
2 Safety . . . . . . . . . . . . . . . . . . . . . . . . . . . . . . . . . . . . . . . . . . . . . . . . . . . . . . . . . . . . . 82.1 Intended use . . . . . . . . . . . . . . . . . . . . . . . . . . . . . . . . . . . . . . . . . . . . . . . . . . 82.2 User profile . . . . . . . . . . . . . . . . . . . . . . . . . . . . . . . . . . . . . . . . . . . . . . . . . . . 82.3 Information on product liability . . . . . . . . . . . . . . . . . . . . . . . . . . . . . . . . . . . 82.4 Warnings for intended use . . . . . . . . . . . . . . . . . . . . . . . . . . . . . . . . . . . . . . . 9
3 Product description . . . . . . . . . . . . . . . . . . . . . . . . . . . . . . . . . . . . . . . . . . . . . . . . . 123.1 Product overview. . . . . . . . . . . . . . . . . . . . . . . . . . . . . . . . . . . . . . . . . . . . . . 123.2 Delivery package . . . . . . . . . . . . . . . . . . . . . . . . . . . . . . . . . . . . . . . . . . . . . . 133.3 Features. . . . . . . . . . . . . . . . . . . . . . . . . . . . . . . . . . . . . . . . . . . . . . . . . . . . . 14
4 Installation . . . . . . . . . . . . . . . . . . . . . . . . . . . . . . . . . . . . . . . . . . . . . . . . . . . . . . . . 154.1 Preparing installation . . . . . . . . . . . . . . . . . . . . . . . . . . . . . . . . . . . . . . . . . . 154.2 Selecting the location . . . . . . . . . . . . . . . . . . . . . . . . . . . . . . . . . . . . . . . . . . 154.3 Installing the instrument . . . . . . . . . . . . . . . . . . . . . . . . . . . . . . . . . . . . . . . . 15
5 Operation . . . . . . . . . . . . . . . . . . . . . . . . . . . . . . . . . . . . . . . . . . . . . . . . . . . . . . . . . 165.1 Operating controls. . . . . . . . . . . . . . . . . . . . . . . . . . . . . . . . . . . . . . . . . . . . . 165.2 Inserting plates and tubes. . . . . . . . . . . . . . . . . . . . . . . . . . . . . . . . . . . . . . . 18
5.2.1 Inserting the plate in the plate holder . . . . . . . . . . . . . . . . . . . . . . 195.2.2 Inserting the tube holder in the plate holder . . . . . . . . . . . . . . . . 195.2.3 Removing the tube holder from the plate holder . . . . . . . . . . . . . 205.2.4 Inserting the plate in the PCR 96 tube holder . . . . . . . . . . . . . . . . 205.2.5 Inserting tubes in the tube holders . . . . . . . . . . . . . . . . . . . . . . . . 20
5.3 Mixing . . . . . . . . . . . . . . . . . . . . . . . . . . . . . . . . . . . . . . . . . . . . . . . . . . . . . . 205.3.1 Mixing with preset parameters . . . . . . . . . . . . . . . . . . . . . . . . . . . 215.3.2 Mixing with free parameters . . . . . . . . . . . . . . . . . . . . . . . . . . . . . 22
5.4 Vortexing. . . . . . . . . . . . . . . . . . . . . . . . . . . . . . . . . . . . . . . . . . . . . . . . . . . . 225.4.1 Touch Vortex mode at 3500 rpm. . . . . . . . . . . . . . . . . . . . . . . . . . 235.4.2 Vortexing with free parameters. . . . . . . . . . . . . . . . . . . . . . . . . . . 23
5.5 Device menu . . . . . . . . . . . . . . . . . . . . . . . . . . . . . . . . . . . . . . . . . . . . . . . . . 245.5.1 Menu structure . . . . . . . . . . . . . . . . . . . . . . . . . . . . . . . . . . . . . . . 245.5.2 Navigating in the menu . . . . . . . . . . . . . . . . . . . . . . . . . . . . . . . . . 245.5.3 Key lock (LOCK) activation/deactivation . . . . . . . . . . . . . . . . . . . . 255.5.4 Adjusting the signal tone-volume (VOL) . . . . . . . . . . . . . . . . . . . . 25
4Table of contentsMixMate®
English (EN)
6 Troubleshooting . . . . . . . . . . . . . . . . . . . . . . . . . . . . . . . . . . . . . . . . . . . . . . . . . . . . 266.1 General errors . . . . . . . . . . . . . . . . . . . . . . . . . . . . . . . . . . . . . . . . . . . . . . . . 26
7 Maintenance. . . . . . . . . . . . . . . . . . . . . . . . . . . . . . . . . . . . . . . . . . . . . . . . . . . . . . . 277.1 Cleaning . . . . . . . . . . . . . . . . . . . . . . . . . . . . . . . . . . . . . . . . . . . . . . . . . . . . 27
7.1.1 Cleaning the device and accessories. . . . . . . . . . . . . . . . . . . . . . . 277.1.2 Performing a function test . . . . . . . . . . . . . . . . . . . . . . . . . . . . . . . 28
7.2 Disinfection/decontamination . . . . . . . . . . . . . . . . . . . . . . . . . . . . . . . . . . . . 297.3 Decontamination before shipment . . . . . . . . . . . . . . . . . . . . . . . . . . . . . . . . 30
8 Transport, storage and disposal . . . . . . . . . . . . . . . . . . . . . . . . . . . . . . . . . . . . . . . 318.1 Transport . . . . . . . . . . . . . . . . . . . . . . . . . . . . . . . . . . . . . . . . . . . . . . . . . . . . 318.2 Storage . . . . . . . . . . . . . . . . . . . . . . . . . . . . . . . . . . . . . . . . . . . . . . . . . . . . . 318.3 Disposal. . . . . . . . . . . . . . . . . . . . . . . . . . . . . . . . . . . . . . . . . . . . . . . . . . . . . 31
9 Technical data . . . . . . . . . . . . . . . . . . . . . . . . . . . . . . . . . . . . . . . . . . . . . . . . . . . . . 329.1 Power supply. . . . . . . . . . . . . . . . . . . . . . . . . . . . . . . . . . . . . . . . . . . . . . . . . 329.2 Ambient conditions . . . . . . . . . . . . . . . . . . . . . . . . . . . . . . . . . . . . . . . . . . . . 329.3 Weight/dimensions . . . . . . . . . . . . . . . . . . . . . . . . . . . . . . . . . . . . . . . . . . . . 329.4 Application parameters . . . . . . . . . . . . . . . . . . . . . . . . . . . . . . . . . . . . . . . . . 32
Index . . . . . . . . . . . . . . . . . . . . . . . . . . . . . . . . . . . . . . . . . . . . . . . . . . . . . . . . . . . . . 33
Certificates . . . . . . . . . . . . . . . . . . . . . . . . . . . . . . . . . . . . . . . . . . . . . . . . . . . . . . . . 35
Operating instructionsMixMate®
English (EN)5
1 Operating instructions1.1 Using this manual
Read this operating manual completely before using the device for the first time. Observe the instructions for use of the accessories where applicable.
This operating manual is part of the product. Please keep it in a place that is easily accessible.
Enclose this operating manual when transferring the device to third parties.The current version of the operating manual for all available languages can be found
on our webpage www.eppendorf.com/manuals.
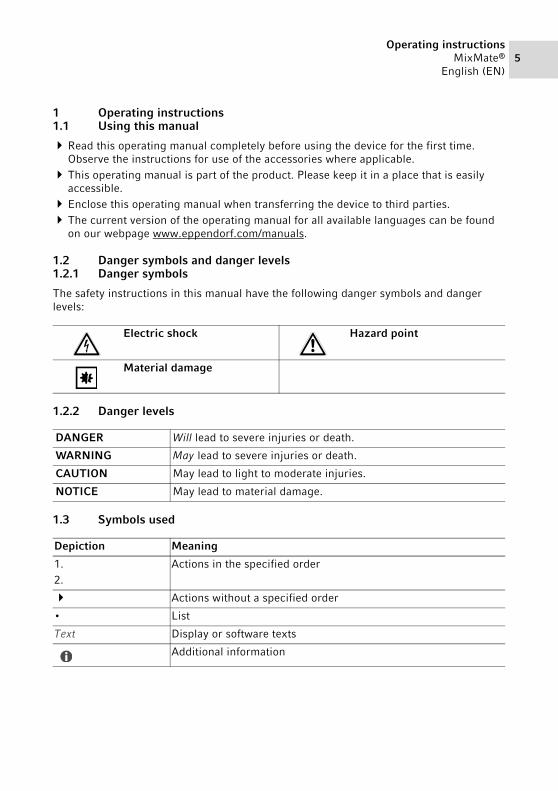
1.2 Danger symbols and danger levels1.2.1 Danger symbols
The safety instructions in this manual have the following danger symbols and danger levels:
1.2.2 Danger levels
1.3 Symbols used
Electric shock Hazard point
Material damage
DANGER Will lead to severe injuries or death.
WARNING May lead to severe injuries or death.
CAUTION May lead to light to moderate injuries.
NOTICE May lead to material damage.
Depiction Meaning
1.2.
Actions in the specified order
Actions without a specified order
• List
Text Display or software texts
Additional information
6Operating instructionsMixMate®
English (EN)
1.4 Abbreviations used
ANSIAmerican National Standards Institute
DNADeoxyribonucleic acid (DNA)
DWPDeepwell plate
MTPMicroplate
PCRPolymerase Chain Reaction
RNARibonucleic acid
rpmRevolutions per minute
SLASSociety for Laboratory Automation and Screening
Operating instructionsMixMate®
English (EN)7
1.5 Glossary
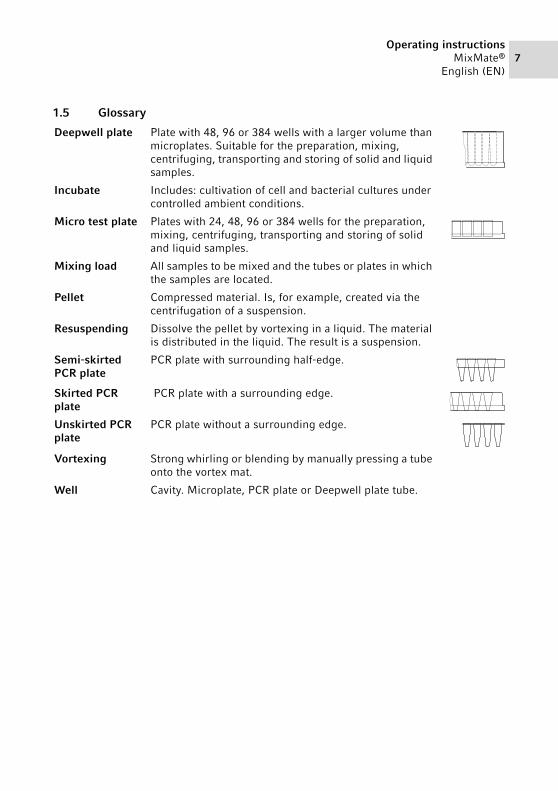
Deepwell plate Plate with 48, 96 or 384 wells with a larger volume than microplates. Suitable for the preparation, mixing, centrifuging, transporting and storing of solid and liquid samples.
Incubate Includes: cultivation of cell and bacterial cultures under controlled ambient conditions.
Micro test plate Plates with 24, 48, 96 or 384 wells for the preparation, mixing, centrifuging, transporting and storing of solid and liquid samples.
Mixing load All samples to be mixed and the tubes or plates in which the samples are located.
Pellet Compressed material. Is, for example, created via the centrifugation of a suspension.
Resuspending Dissolve the pellet by vortexing in a liquid. The material is distributed in the liquid. The result is a suspension.
Semi-skirted PCR plate
PCR plate with surrounding half-edge.
Skirted PCR plate
PCR plate with a surrounding edge.
Unskirted PCR plate
PCR plate without a surrounding edge.
Vortexing Strong whirling or blending by manually pressing a tube onto the vortex mat.
Well Cavity. Microplate, PCR plate or Deepwell plate tube.
8SafetyMixMate®
English (EN)
2 Safety2.1 Intended use
The Eppendorf MixMate is used to hold vessels and plates to mix samples. The Eppendorf MixMate is exclusively intended for indoor use.
All country-specific safety requirements for operating electrical equipment in laboratories must be observed.
Only use Eppendorf accessories or accessories recommended by Eppendorf.
The Eppendorf MixMate may only be operated by adequately trained and skilled personnel. The product can be used for training, routine and research laboratories in the areas of life sciences, industry or chemistry. This product is intended to be used for research purposes only. Eppendorf does not provide warranty for other applications. The product is not suitable for use in diagnostic or therapeutic applications.
2.2 User profile
The device and accessories may only be operated by trained and skilled personnel.
Before using the device, read the operating manual carefully and familiarize yourself with the device's mode of operation.
2.3 Information on product liability
In the following cases, the designated protection of the device may be affected. Liability for any resulting damage or personal injury is then transferred to the owner:
• The device is not used in accordance with the operating manual.• The device is used outside of its intended use.• The device is used with accessories or consumables that are not recommended by
Eppendorf.• The device is maintained or repaired by persons not authorized by Eppendorf AG.• The user makes unauthorized changes to the device.
SafetyMixMate®
English (EN)9
2.4 Warnings for intended use
Read the operating instructions and observe the following general safety information before using the MixMate.
WARNING! Electric shock due to damage to the device or mains/power cord.
Only switch on the device if the device and mains/power cord are undamaged.
Only operate devices which have been installed or repaired properly. In case of danger, disconnect the device from the mains/power supply
voltage. Disconnect the mains/power plug from the device or the earth/grounded socket. Use the isolating device intended for this purpose (e.g. the emergency switch in the laboratory).
WARNING! Lethal voltages inside the device.If you touch any parts which are under high voltage you may experience an electric shock. Electric shocks cause injuries to the heart and respiratory paralysis.
Ensure that the housing is closed and undamaged.Do not remove the housing.Ensure that no liquids can penetrate the device.Only authorized service staff may open the device.
WARNING! Risk of a device catching fire as a result of liquid ingress.Liquid ingress can cause a fire due to a short circuit in the device.
Do not allow any liquids to penetrate the inside of the housing.Only mix in sealed tubes and plates. If there was an ingress of liquid: switch off the device, pull the mains/power
plug, and have the device cleaned by service technicians who have been authorized by Eppendorf.
WARNING! Injury from flying tubes and plates.If the maximum permitted total weight of the mixing load is exceeded, plates or tubes may become detached from the device.
Always ensure that tubes, plates and tube holders are well-seated.Only use plates that conform to the Microplate standards ANSI/SLAS 1-2004
through ANSI/ SLAS 4-2004.
10SafetyMixMate®
English (EN)
WARNING! Injury from sample material being thrown out.Sample material can be thrown out of open, improperly sealed or unstable tubes and plates.
Only mix in closed tubes and closed plates.Observe the nationally prescribed safety environment when working with
hazardous, toxic and pathogenic samples. Pay particular attention to personal protective equipment (gloves, clothing, goggles, etc.), extraction, and the biosafety level of the lab.
WARNING! Injury from improper vortex action.Improper vortex action can destroy tubes or cause their content to be lost.
Only vortex intact and sealed tubes.Never vortex tubes made of glass or other fragile material.
WARNING! Danger due to incorrect voltage supply.
Only connect the device to voltage sources which correspond with the electrical requirements on the name plate.
Only use earth/grounded sockets with a protective earth (PE) conductor.Only use the mains/power cord supplied.
NOTICE! Damage to the display due to mechanical pressure.
Do not apply any mechanical pressure to the display.
NOTICE! Damage due to strong vibrations.When mixing at high speeds, items located near the device may be moved by the vibrations of the work surface and, e.g., fall off the work table.
Do not place easily movable items near the device or secure them adequately.
NOTICE! Damage to electronic components from spilled liquids.
Make sure that the vortex mat and the cover caps are fitted properly. If the vortex mat is not fitted properly, contact your Eppendorf partner or the authorized Technical Service.
If liquid has been spilled: Switch off the device, disconnect the mains/power plug and arrange for it to be cleaned by service personnel authorized by Eppendorf.
SafetyMixMate®
English (EN)11
NOTICE! Damage to electronic components due to condensation. Condensate may form in the device when it has been transported from a cool environment to a warmer environment.
After installing the device, wait for at least 3 h. Only then connect the device to the mains/power line.
NOTICE! Damage from the use of aggressive chemicals.
Do not use any aggressive chemicals on the device or its accessories, such as strong and weak bases, strong acids, acetone, formaldehyde, halogenated hydrocarbons or phenol.
If the device has been contaminated by aggressive chemicals, clean it immediately using a mild cleaning agent.
12Product descriptionMixMate®
English (EN)
3 Product description3.1 Product overviewAbb. 3-1:Front and rear view
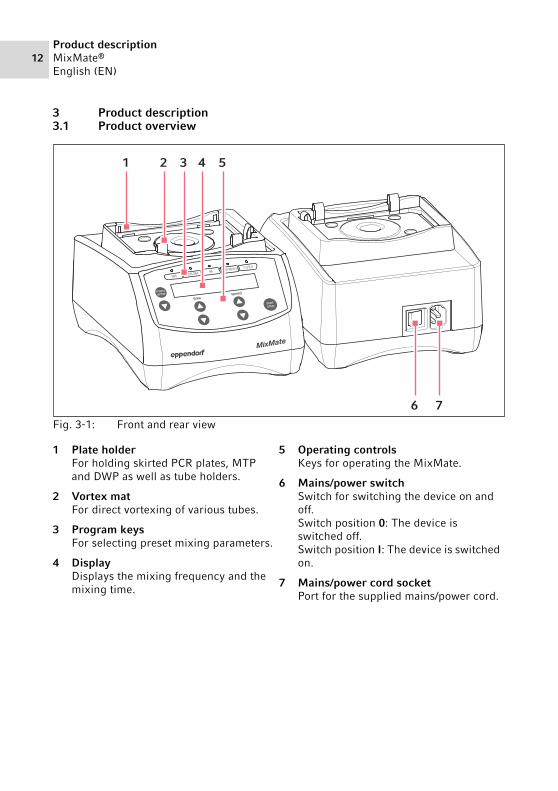
Fig. 3-1: Front and rear view
1 Plate holderFor holding skirted PCR plates, MTP and DWP as well as tube holders.
2 Vortex matFor direct vortexing of various tubes.
3 Program keysFor selecting preset mixing parameters.
4 DisplayDisplays the mixing frequency and the mixing time.
5 Operating controlsKeys for operating the MixMate.
6 Mains/power switchSwitch for switching the device on and off.Switch position 0: The device is switched off.Switch position I: The device is switched on.
7 Mains/power cord socketPort for the supplied mains/power cord.
1 2 3 4 5
6 7
Product descriptionMixMate®
English (EN)13
Abb. 3-2:Tube holders for the MixMate
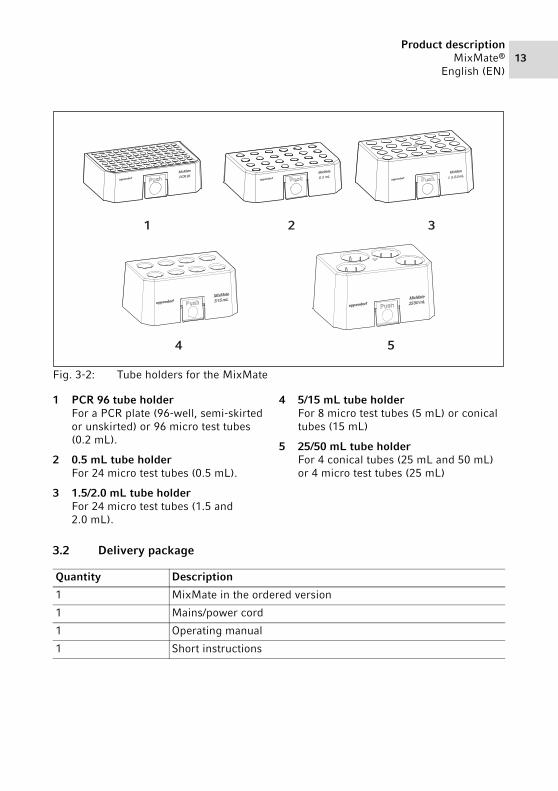
Fig. 3-2: Tube holders for the MixMate
3.2 Delivery package
1 PCR 96 tube holder For a PCR plate (96-well, semi-skirted or unskirted) or 96 micro test tubes (0.2 mL).
2 0.5 mL tube holderFor 24 micro test tubes (0.5 mL).
3 1.5/2.0 mL tube holderFor 24 micro test tubes (1.5 and 2.0 mL).
4 5/15 mL tube holderFor 8 micro test tubes (5 mL) or conical tubes (15 mL)
5 25/50 mL tube holderFor 4 conical tubes (25 mL and 50 mL) or 4 micro test tubes (25 mL)
Quantity Description
1 MixMate in the ordered version
1 Mains/power cord
1 Operating manual
1 Short instructions
1 2 3
4 5
14Product descriptionMixMate®
English (EN)
3.3 Features
The MixMate allows aqueous solutions and suspensions to be mixed and vortexed effectively in a wide range of micro test tubes or plates. The MixMate supports the following tube formats at a maximum mixing frequency of up to 3000 rpm:
• 0.2 mL PCR tubes up to 25 mL micro test tubes• MTP, DWP and PCR plates up to 384 wells• Conical tubes with 5 mL, 15 mL, 25 mL, 50 mL
The program keys facilitate rapid access to selected mixing parameters.
Potential applications include:
• Controlled mixing of PCR, restriction or other enzyme reactions.
• Controlled incubation of absorption, blocking or reaction batches.
• Resuspension of DNA, RNA, protein or cell pellets in tubes and plates.
• Vortexing in micro test tubes and in 15 mL and 50 mL screw-top tubes.
InstallationMixMate®
English (EN)15
4 Installation4.1 Preparing installation
Check the completeness of the delivery using the information on the delivery package.Check all parts for any transport damage.
4.2 Selecting the location
Select the device location according to the following criteria:
• Mains/power connection in accordance with the name plate• Minimum distance to other devices and walls: 10 cm• Resonance free table with horizontal even work surface• The design of table is suitable for operating the device.• Surrounding area must be well ventilated. • The location must be protected against direct sunlight.
4.3 Installing the instrument
1. Place the MixMate on a suitable work surface, so that the ventilation gaps on the bottom of the device are not blocked.
2. Connect the device to the mains/power line via the mains/power cord socket using the supplied mains/power cord.
3. Switch on the device, using the mains/power switch.4. Carry out a test run at maximum speed (3000 rpm) to ensure that the grip between the
device and the surface is sufficient.The MixMate must not move from its position.
Keep the transport carton and the packing material for subsequent safe transport or storage.
The mains/power switch and the disconnecting device of the mains/power line must be easily accessible during operation (e.g. a residual current circuit breaker).

16OperationMixMate®
English (EN)
5 Operation5.1 Operating controlsAbb. 5-1:Operating controls and display
Fig. 5-1: Operating controls and display
1 Program key for MTP (384-well)
2 Program key for PCR plates (384-well)
3 Program key for MTP (96-well)
4 Program key for PCR plates (96-well) and micro test tubes (0.2 mL and 0.5 mL)
5 Program key for micro test tubes (1.5 mL and 2.0 mL)
6 Control LED to display the selected program key
7 Display
8 Start/stop mixing run
9 Set the mixing frequency (speed)
10 Set the mixing duration (time)
11 Navigating in the menu
12 Call and select the menu parameters
speed
menuenter min
rpm
384 PCR 384 96 PCR 96/0.5 1.5/2.0
startstop
time
1 2 3 4 5
6
8
910
12
11
7

OperationMixMate®
English (EN)17
Abb. 5-2:Display
Fig. 5-2: Display
1 Mixing timeSetting: up to 19:45 min in 15 s increments20 min to 59 min: in 1 min increments1.0 h to 99.5 h: in 0.5 h increments'oo': unlimited mixing time
2 Symbol for key lock
3 Mixing frequencySetting: 300 rpm to 3000 rpm: in 50 rpm increments
4 Symbol for signal tone setting
After switching on, the display shows the values of the last run.
minrpm
1 32
4
18OperationMixMate®
English (EN)
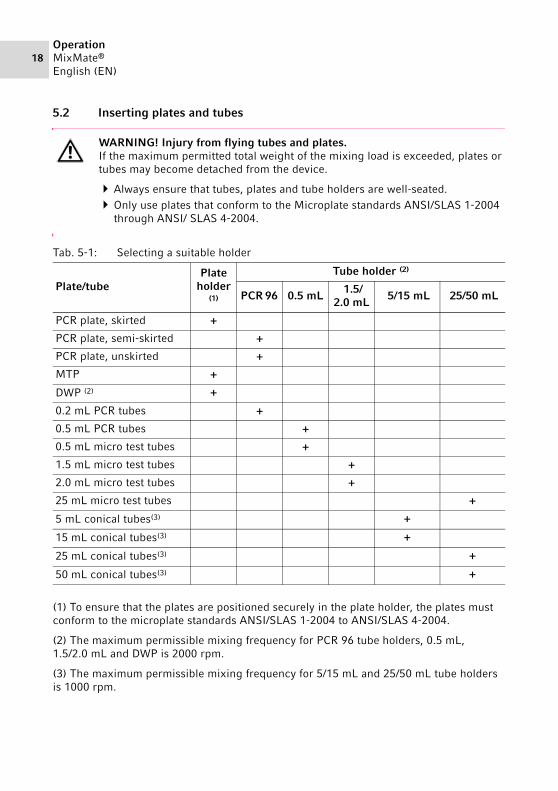
5.2 Inserting plates and tubes
Tab. 5-1: Selecting a suitable holder
(1) To ensure that the plates are positioned securely in the plate holder, the plates must conform to the microplate standards ANSI/SLAS 1-2004 to ANSI/SLAS 4-2004.
(2) The maximum permissible mixing frequency for PCR 96 tube holders, 0.5 mL, 1.5/2.0 mL and DWP is 2000 rpm.
(3) The maximum permissible mixing frequency for 5/15 mL and 25/50 mL tube holders is 1000 rpm.
WARNING! Injury from flying tubes and plates.If the maximum permitted total weight of the mixing load is exceeded, plates or tubes may become detached from the device.
Always ensure that tubes, plates and tube holders are well-seated.Only use plates that conform to the Microplate standards ANSI/SLAS 1-2004
through ANSI/ SLAS 4-2004.
Plate/tubePlate
holder (1)
Tube holder (2)
PCR 96 0.5 mL 1.5/2.0 mL
5/15 mL 25/50 mL
PCR plate, skirted +
PCR plate, semi-skirted +
PCR plate, unskirted +
MTP +
DWP (2) +
0.2 mL PCR tubes +
0.5 mL PCR tubes +
0.5 mL micro test tubes +
1.5 mL micro test tubes +
2.0 mL micro test tubes +
25 mL micro test tubes +
5 mL conical tubes(3) +
15 mL conical tubes(3) +
25 mL conical tubes(3) +
50 mL conical tubes(3) +
OperationMixMate®
English (EN)19
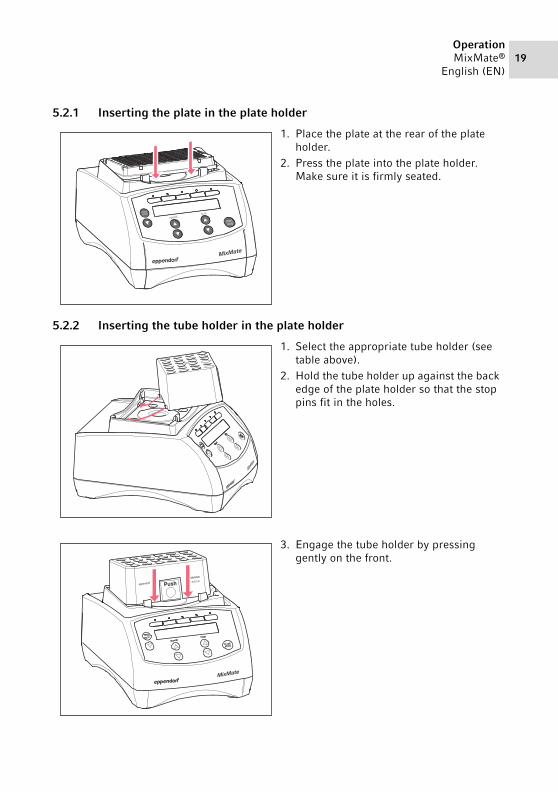
5.2.1 Inserting the plate in the plate holder
5.2.2 Inserting the tube holder in the plate holder
1. Place the plate at the rear of the plate holder.
2. Press the plate into the plate holder. Make sure it is firmly seated.
1. Select the appropriate tube holder (see table above).
2. Hold the tube holder up against the back edge of the plate holder so that the stop pins fit in the holes.
3. Engage the tube holder by pressing gently on the front.
startstop
menuenter
speedtime
Push
20OperationMixMate®
English (EN)
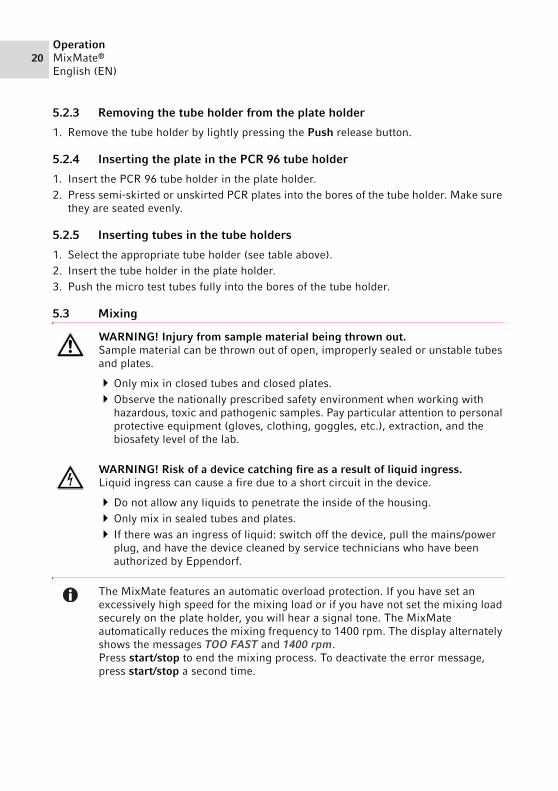
5.2.3 Removing the tube holder from the plate holder
1. Remove the tube holder by lightly pressing the Push release button.
5.2.4 Inserting the plate in the PCR 96 tube holder
1. Insert the PCR 96 tube holder in the plate holder.2. Press semi-skirted or unskirted PCR plates into the bores of the tube holder. Make sure
they are seated evenly.
5.2.5 Inserting tubes in the tube holders
1. Select the appropriate tube holder (see table above).2. Insert the tube holder in the plate holder.3. Push the micro test tubes fully into the bores of the tube holder.
5.3 Mixing
WARNING! Injury from sample material being thrown out.Sample material can be thrown out of open, improperly sealed or unstable tubes and plates.
Only mix in closed tubes and closed plates.Observe the nationally prescribed safety environment when working with
hazardous, toxic and pathogenic samples. Pay particular attention to personal protective equipment (gloves, clothing, goggles, etc.), extraction, and the biosafety level of the lab.
WARNING! Risk of a device catching fire as a result of liquid ingress.Liquid ingress can cause a fire due to a short circuit in the device.
Do not allow any liquids to penetrate the inside of the housing.Only mix in sealed tubes and plates. If there was an ingress of liquid: switch off the device, pull the mains/power
plug, and have the device cleaned by service technicians who have been authorized by Eppendorf.
The MixMate features an automatic overload protection. If you have set an excessively high speed for the mixing load or if you have not set the mixing load securely on the plate holder, you will hear a signal tone. The MixMate automatically reduces the mixing frequency to 1400 rpm. The display alternately shows the messages TOO FAST and 1400 rpm.Press start/stop to end the mixing process. To deactivate the error message, press start/stop a second time.
OperationMixMate®
English (EN)21
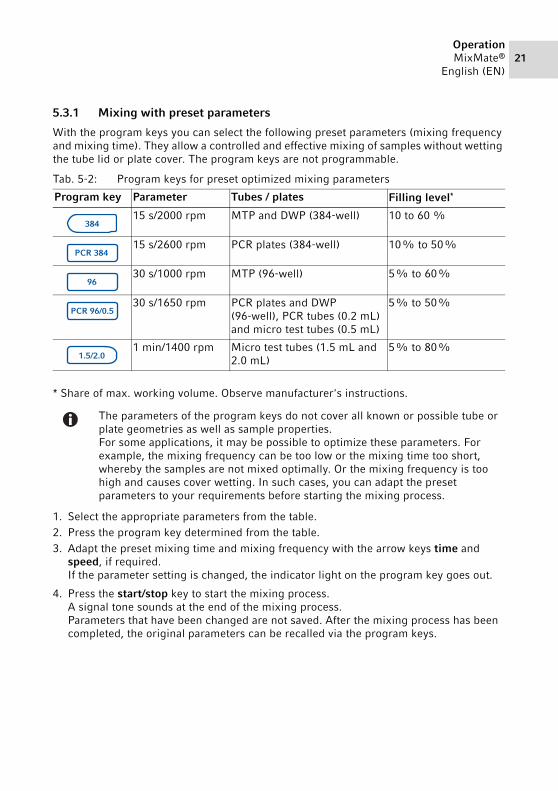
5.3.1 Mixing with preset parameters
With the program keys you can select the following preset parameters (mixing frequency and mixing time). They allow a controlled and effective mixing of samples without wetting the tube lid or plate cover. The program keys are not programmable.
Tab. 5-2: Program keys for preset optimized mixing parameters
* Share of max. working volume. Observe manufacturer's instructions.
1. Select the appropriate parameters from the table.2. Press the program key determined from the table.3. Adapt the preset mixing time and mixing frequency with the arrow keys time and
speed, if required.If the parameter setting is changed, the indicator light on the program key goes out.
4. Press the start/stop key to start the mixing process.A signal tone sounds at the end of the mixing process.Parameters that have been changed are not saved. After the mixing process has been completed, the original parameters can be recalled via the program keys.
Program key Parameter Tubes / plates Filling level*
15 s/2000 rpm MTP and DWP (384-well) 10 to 60 %
15 s/2600 rpm PCR plates (384-well) 10 % to 50 %
30 s/1000 rpm MTP (96-well) 5 % to 60 %
30 s/1650 rpm PCR plates and DWP (96-well), PCR tubes (0.2 mL) and micro test tubes (0.5 mL)
5 % to 50 %
1 min/1400 rpm Micro test tubes (1.5 mL and 2.0 mL)
5 % to 80 %
The parameters of the program keys do not cover all known or possible tube or plate geometries as well as sample properties.For some applications, it may be possible to optimize these parameters. For example, the mixing frequency can be too low or the mixing time too short, whereby the samples are not mixed optimally. Or the mixing frequency is too high and causes cover wetting. In such cases, you can adapt the preset parameters to your requirements before starting the mixing process.
384
PCR 384
96
PCR 96/0.5
1.5/2.0
22OperationMixMate®
English (EN)
5.3.2 Mixing with free parameters
1. Use the time arrow keys to set the mixing time.For continuous operation, select oo below 0:15 min or above 99.5 h.
2. Use the speed arrow keys to set the mixing frequency.3. To start the mixing process, press the start/stop key.
The remaining mixing time and the current mixing frequency are displayed. During continuous operation, the current mixing time appears alternating with oo, and after 99.5 h only oo appears.You can also change the parameters during a mixing process by pressing the time and speed arrow keys. To do so, the key lock must not be active. The mixing process is then continued with the changed parameters. The program keys are not available during the mixing process.A signal tone sounds at the end of the mixing process. The MixMate stops.
4. To end the mixing process prematurely, if necessary, press the start/stop key.
5.4 Vortexing
When vortexing different tubes (e.g. 1.5 mL micro test tubes or 50 mL screw cap tubes) press on the vortex mat of the MixMate to mix them inividually.
After switching on the device, the parameters for the last run appear on the display.
WARNING! Injury from improper vortex action.Improper vortex action can destroy tubes or cause their content to be lost.
Only vortex intact and sealed tubes.Never vortex tubes made of glass or other fragile material.
NOTICE! Damage to vortex mat caused by improper vortexing.
Only vortex tubes in the depression in the middle of the vortex mat.
OperationMixMate®
English (EN)23
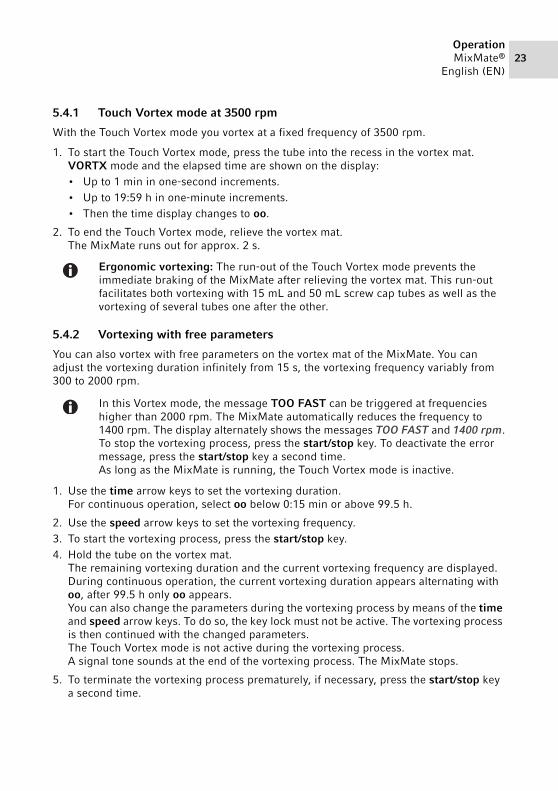
5.4.1 Touch Vortex mode at 3500 rpm
With the Touch Vortex mode you vortex at a fixed frequency of 3500 rpm.
1. To start the Touch Vortex mode, press the tube into the recess in the vortex mat.VORTX mode and the elapsed time are shown on the display:• Up to 1 min in one-second increments.• Up to 19:59 h in one-minute increments.• Then the time display changes to oo.
2. To end the Touch Vortex mode, relieve the vortex mat.The MixMate runs out for approx. 2 s.
5.4.2 Vortexing with free parameters
You can also vortex with free parameters on the vortex mat of the MixMate. You can adjust the vortexing duration infinitely from 15 s, the vortexing frequency variably from 300 to 2000 rpm.
1. Use the time arrow keys to set the vortexing duration.For continuous operation, select oo below 0:15 min or above 99.5 h.
2. Use the speed arrow keys to set the vortexing frequency.3. To start the vortexing process, press the start/stop key.4. Hold the tube on the vortex mat.
The remaining vortexing duration and the current vortexing frequency are displayed. During continuous operation, the current vortexing duration appears alternating with oo, after 99.5 h only oo appears.You can also change the parameters during the vortexing process by means of the time and speed arrow keys. To do so, the key lock must not be active. The vortexing process is then continued with the changed parameters. The Touch Vortex mode is not active during the vortexing process.A signal tone sounds at the end of the vortexing process. The MixMate stops.
5. To terminate the vortexing process prematurely, if necessary, press the start/stop key a second time.
Ergonomic vortexing: The run-out of the Touch Vortex mode prevents the immediate braking of the MixMate after relieving the vortex mat. This run-out facilitates both vortexing with 15 mL and 50 mL screw cap tubes as well as the vortexing of several tubes one after the other.
In this Vortex mode, the message TOO FAST can be triggered at frequencies higher than 2000 rpm. The MixMate automatically reduces the frequency to 1400 rpm. The display alternately shows the messages TOO FAST and 1400 rpm.To stop the vortexing process, press the start/stop key. To deactivate the error message, press the start/stop key a second time.As long as the MixMate is running, the Touch Vortex mode is inactive.
24OperationMixMate®
English (EN)
5.5 Device menu
In the MixMate menu, you can activate the key lock (LOCK) and set the volume of the signal tone (VOL).
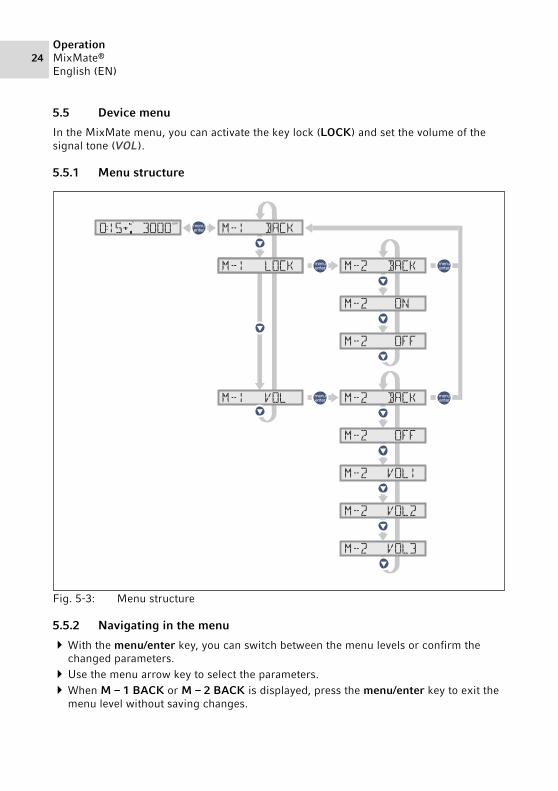
5.5.1 Menu structure Abb. 5-3:Menu structure
Fig. 5-3: Menu structure
5.5.2 Navigating in the menu
With the menu/enter key, you can switch between the menu levels or confirm the changed parameters.
Use the menu arrow key to select the parameters.When M – 1 BACK or M – 2 BACK is displayed, press the menu/enter key to exit the
menu level without saving changes.
OperationMixMate®
English (EN)25
5.5.3 Key lock (LOCK) activation/deactivation
The key lock prevents set parameters being modified inadvertently during a mixing process.
1. Press the menu/enter key to call up the menu.2. Press the menu arrow key once.3. Press the menu/enter key to open the key lock menu.4. Select sub-item M – 2 ON with the menu arrow key to activate the key lock, or
M – 2 OFF to deactivate the key lock.5. Press the menu/enter key to confirm the selected setting.
You will then exit menu level 2.Press the menu/enter key again to exit the menu completely.
With the key lock activated, all keys apart from menu/enter are inactive during the mixing process. When the mixer is at rest, all the keys are released.
You can tell from the symbol in the display that the key lock is active and from the symbol that the key lock is deactivated.
5.5.4 Adjusting the signal tone-volume (VOL)
The MixMate announces that a mixing process is complete by means of a signal tone. You can set the volume of this signal tone in the device menu as follows:
1. Press the menu/enter key to call up the menu.2. Press the menu arrow key twice.3. Press the menu/enter key to open the menu for the signal tone volume.4. Use the menu arrow key to select the desired setting from OFF, VOL1 to VOL3. With
OFF the signal tone is switched off, with VOL3 the signal tone sounds at maximum volume.The selected volume is played.
5. Press the menu/enter key to confirm the selected setting.You will then exit menu level 2.Press the menu/enter key again to exit the menu completely.
6. Press M – 2 BACK to leave this menu level.
26TroubleshootingMixMate®
English (EN)
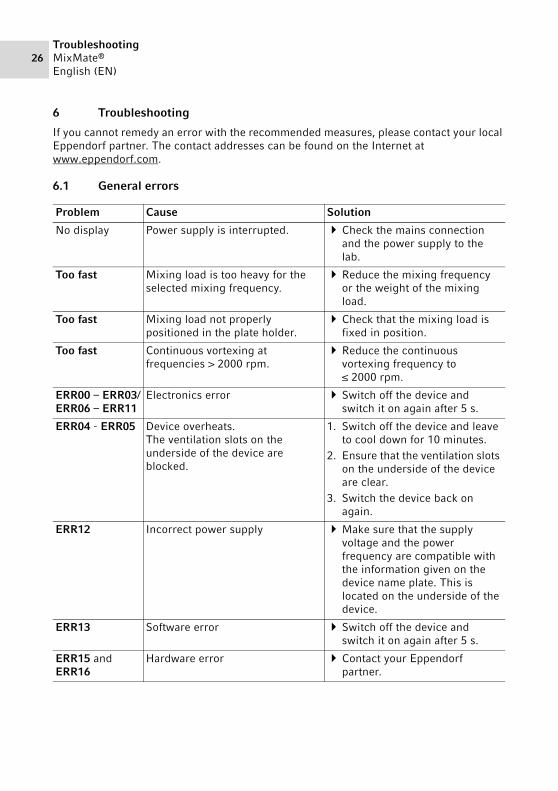
6 Troubleshooting
If you cannot remedy an error with the recommended measures, please contact your local Eppendorf partner. The contact addresses can be found on the Internet at www.eppendorf.com.
6.1 General errors
Problem Cause Solution
No display Power supply is interrupted. Check the mains connection and the power supply to the lab.
Too fast Mixing load is too heavy for the selected mixing frequency.
Reduce the mixing frequency or the weight of the mixing load.
Too fast Mixing load not properly positioned in the plate holder.
Check that the mixing load is fixed in position.
Too fast Continuous vortexing at frequencies > 2000 rpm.
Reduce the continuous vortexing frequency to ≤ 2000 rpm.
ERR00 – ERR03/ERR06 – ERR11
Electronics error Switch off the device and switch it on again after 5 s.
ERR04 - ERR05 Device overheats.The ventilation slots on the underside of the device are blocked.
1. Switch off the device and leave to cool down for 10 minutes.
2. Ensure that the ventilation slots on the underside of the device are clear.
3. Switch the device back on again.
ERR12 Incorrect power supply Make sure that the supply voltage and the power frequency are compatible with the information given on the device name plate. This is located on the underside of the device.
ERR13 Software error Switch off the device and switch it on again after 5 s.
ERR15 and ERR16
Hardware error Contact your Eppendorf partner.
MaintenanceMixMate®
English (EN)27
7 Maintenance7.1 Cleaning7.1.1 Cleaning the device and accessories
Clean the housing of the MixMate, the vortex mat, the plate holder and the tube holders regularly.
DANGER! Electric shock due to the ingress of liquid.
Switch off the device and disconnect it from the mains/power supply before starting cleaning or disinfecting.
Do not allow any liquids to penetrate the inside of the housing.Do not perform a spray clean/spray disinfection on the housing.Wait until the device is completely dry before reconnecting it to the mains/
power supply.
WARNING! Risk of a device catching fire as a result of liquid ingress.Liquid ingress can cause a fire due to a short circuit in the device.
Do not allow any liquids to penetrate the inside of the housing.Only mix in sealed tubes and plates. If there was an ingress of liquid: switch off the device, pull the mains/power
plug, and have the device cleaned by service technicians who have been authorized by Eppendorf.
NOTICE! Damage from the use of aggressive chemicals.
Do not use any aggressive chemicals on the device or its accessories, such as strong and weak bases, strong acids, acetone, formaldehyde, halogenated hydrocarbons or phenol.
If the device has been contaminated by aggressive chemicals, clean it immediately using a mild cleaning agent.
NOTICE! Corrosion due to aggressive cleaning agents and disinfectants.
Do not use any corrosive cleaning agents, aggressive solvents or abrasive polishes.
Do not incubate the accessories in aggressive cleaning agents or disinfectants for longer periods.
28MaintenanceMixMate®
English (EN)
Required equipment• Mild, soap-based household cleaning agent
1. Switch off the MixMate and isolate it from the mains/power supply.2. Clean the housing, plate holder, vortex mat and tube holder.
The housing may only be wiped with a damp cloth. Do not perform a spray clean/spray disinfection on the housing.
3. Dry all cleaned parts.4. Perform a function test.
7.1.2 Performing a function test
1. Use the mains/power cord to connect the MixMate to the mains/power supply.2. Switch on the device, using the mains/power switch.3. Check the Touch Vortex function using a suitable tube.
NOTICE! Damage to electronic components from spilled liquids.
Make sure that the vortex mat and the cover caps are fitted properly. If the vortex mat is not fitted properly, contact your Eppendorf partner or the authorized Technical Service.
If liquid has been spilled: Switch off the device, disconnect the mains/power plug and arrange for it to be cleaned by service personnel authorized by Eppendorf.
MaintenanceMixMate®
English (EN)29
7.2 Disinfection/decontamination
Required equipment• Alcohol (ethanol, isopropanol) or disinfectants containing alcohol• Mild, soap-based household cleaning agent
Proceed as follows:
1. Choose the disinfection method which corresponds to the legal regulations and guidelines in place for your range of application.
2. Switch off the device and disconnect it from the mains/power line.3. Wipe down all parts of the device and accessories, including the connecting cable,
with the disinfectant.4. Clean the device with a mild soap-based household cleaning agent.
DANGER! Electric shock due to the ingress of liquid.
Switch off the device and disconnect it from the mains/power line before starting cleaning or disinfection.
Do not allow any liquids to penetrate the inside of the housing.Do not perform a spray clean/spray disinfection on the housing.Only reconnect the device to the mains/power line when it is completely dry,
both inside and outside.
WARNING! Risk of a device catching fire as a result of liquid ingress.Liquid ingress can cause a fire due to a short circuit in the device.
Do not allow any liquids to penetrate the inside of the housing.Only mix in sealed tubes and plates. If there was an ingress of liquid: switch off the device, pull the mains/power
plug, and have the device cleaned by service technicians who have been authorized by Eppendorf.
NOTICE! Damage from UV and other high-energy radiation.
Do not use UV, beta, gamma, or any other high-energy radiation for disinfection.
Avoid storage in areas with strong UV radiation.
30MaintenanceMixMate®
English (EN)
7.3 Decontamination before shipment
If you are shipping the device to the authorized Technical Service for repairs or to your authorized dealer for disposal please note the following:
WARNING! Risk to health from contaminated device.
1. Observe the information in the decontamination certificate. It is available as a PDF document on our webpage (www.eppendorf.com/decontamination).
2. Decontaminate all the parts you are going to dispatch.3. Include the fully completed decontamination certificate in the shipment.
Transport, storage and disposalMixMate®
English (EN)31
8 Transport, storage and disposal8.1 Transport
Only transport the device in the original packaging.
8.2 Storage
8.3 Disposal
If the product needs to be disposed of, the relevant legal regulations must be observed.
Information on the disposal of electrical and electronic devices in the European Community:
Within the European Community, the disposal of electrical devices is regulated by national regulations based on EU Directive 2012/19/EU pertaining to waste electrical and electronic equipment (WEEE).
According to these regulations, any devices supplied after August 13, 2005, in the business-to-business sphere, to which this product is assigned, may no longer be disposed of in municipal or domestic waste. To document this, they have been marked with the following marking:
Because disposal regulations may differ from one country to another within the EU, please contact your supplier if necessary.
Air temperature Max. rel. humidity Air pressure
General transportation
-20 to 60 °C 10 to 95 % 30 to 106 kPa
Air freight -20 to 55 °C 10 to 95 % 30 to 106 kPa
Air temperature Max. rel. humidity Air pressure
in transport packaging
-20 to 55 °C 10 to 95 % 70 to 106 kPa
without transport packaging
-5 to 45 °C 10 to 95 % 70 to 106 kPa
32Technical dataMixMate®
English (EN)
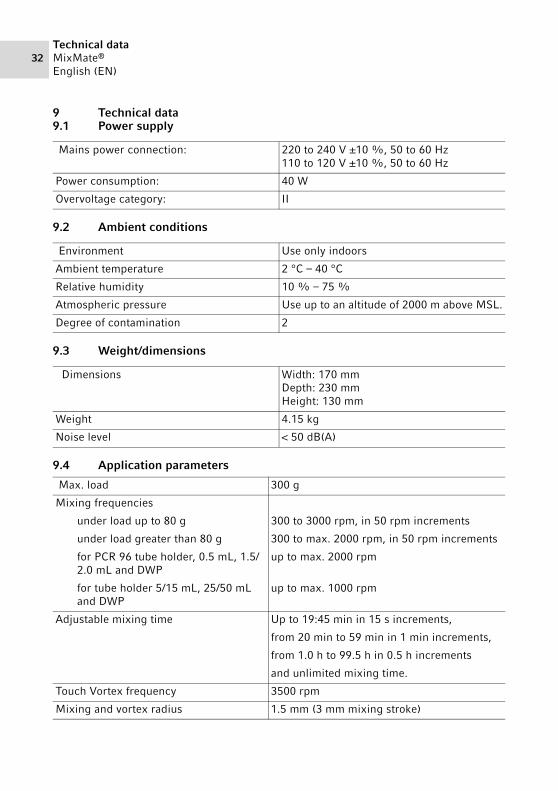
9 Technical data9.1 Power supply
9.2 Ambient conditions
9.3 Weight/dimensions
9.4 Application parameters
Mains power connection: 220 to 240 V ±10 %, 50 to 60 Hz110 to 120 V ±10 %, 50 to 60 Hz
Power consumption: 40 W
Overvoltage category: II
Environment Use only indoors
Ambient temperature 2 °C – 40 °C
Relative humidity 10 % – 75 %
Atmospheric pressure Use up to an altitude of 2000 m above MSL.
Degree of contamination 2
Dimensions Width: 170 mmDepth: 230 mmHeight: 130 mm
Weight 4.15 kg
Noise level < 50 dB(A)
Max. load 300 g
Mixing frequencies
under load up to 80 g 300 to 3000 rpm, in 50 rpm increments
under load greater than 80 g 300 to max. 2000 rpm, in 50 rpm increments
for PCR 96 tube holder, 0.5 mL, 1.5/2.0 mL and DWP
up to max. 2000 rpm
for tube holder 5/15 mL, 25/50 mL and DWP
up to max. 1000 rpm
Adjustable mixing time Up to 19:45 min in 15 s increments,
from 20 min to 59 min in 1 min increments,
from 1.0 h to 99.5 h in 0.5 h increments
and unlimited mixing time.
Touch Vortex frequency 3500 rpm
Mixing and vortex radius 1.5 mm (3 mm mixing stroke)
IndexMixMate®
English (EN)33
Index
AApplication fields.................................... 14Application parameters .......................... 32Applications............................................ 14
CChanging parameters
Mixing .............................................. 22Vortexing .......................................... 23
Cleaning ................................................. 27Continuous operation
mixing............................................... 22vortexing .......................................... 23
DDecontamination .................................... 30Deepwell plate .......................................... 7Dimensions............................................. 32Display.................................................... 17
LOCK ................................................ 24M – 2 BACK ...................................... 25M – 2 OFF......................................... 25M – 2 ON .......................................... 25VOL................................................... 24
Disposal .................................................. 31
EEnvironmental conditions....................... 32
FFeatures .................................................. 14Front view............................................... 12
GGlossary.................................................... 7
HHazards..................................................... 9
IIncubate ....................................................7Inserting
Plates and tubes ................................18Plates in the plate holder ..................19Plates in the tube holder ...................20Tube holder in the plate holder.........19Tubes in the tube holder ...................20
Inserting the plate.............................19, 20Inserting tubes ........................................20Installation
Device ...............................................15preparation........................................15Selecting the location........................15
Intended useHazards ...............................................9
KKey lock activation/deactivation..............25
LLOCK .......................................................24
MMains/power cord socket ........................12Mains/power switch ................................12Menu structure........................................24menu/enter..............................................25Micro test plate .........................................7Mixing .....................................................20
free parameters .................................22preset parameters .............................21starting ..............................................22
Mixing frequencyadjusting ...........................................22maximum permissible.......................18
Mixing load ...............................................7Mixing time
adjusting ...........................................22
IndexMixMate®
English (EN)34
OOFF......................................................... 25
PPCR plate
Semi-skirted ....................................... 7PCR-Platte
Skirted ................................................ 7Unskirted ............................................ 7
Pellet......................................................... 7Performing a function test...................... 28Plate holder ............................................ 12Power supply .......................................... 32Preset parameters .................................. 21Program keys.......................................... 21
RRear view................................................ 12Resuspending ........................................... 7
SSafety instructions.................................... 9Selecting the holder ............................... 18Selecting the location ............................. 15Semi-skirted ............................................. 7Setting the volume ................................. 25Signal tone.............................................. 25Skirted ...................................................... 7Software menu ....................................... 24speed
Mixing frequency ............................. 22Vortexing frequency ......................... 23
start/stopMixing .............................................. 22Vortexing .......................................... 23
Storage ................................................... 31
TTechnical data
Application parameters.....................32Dimensions .......................................32Environmental conditions .................32Power supply.....................................32
timeMixing time.......................................22Vortexing duration ............................23
Transport.................................................31Tube formats ...........................................14Tube holder
Inserting............................................19Tube holders ...........................................13Tubes
selecting............................................18
UUnskirted...................................................7
VVOL .........................................................24Vortex mat...............................................12Vortexing.............................................7, 22
free parameters .................................23Run-out .............................................23starting ..............................................23Touch Vortex mode...........................23
Vortexing durationsetting ...............................................23
Vortexing frequencysetting ...............................................23
WWeight
Device ...............................................32Mixing load .......................................18
Well ...........................................................7
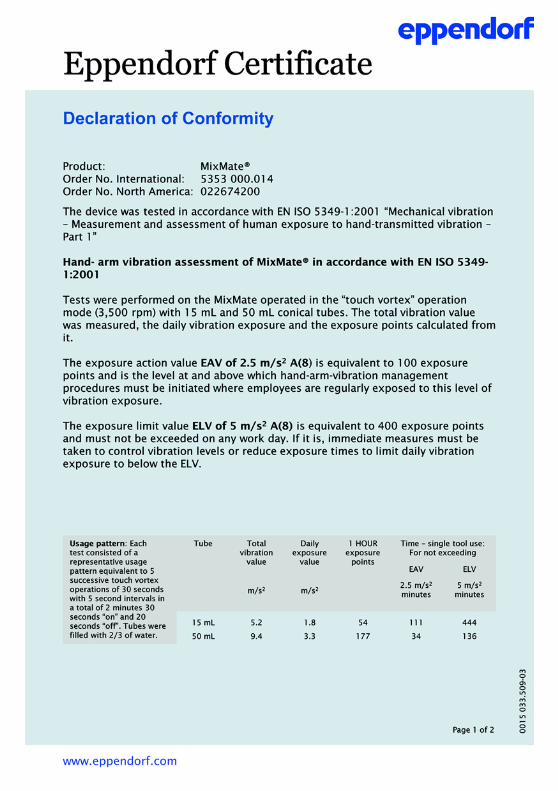
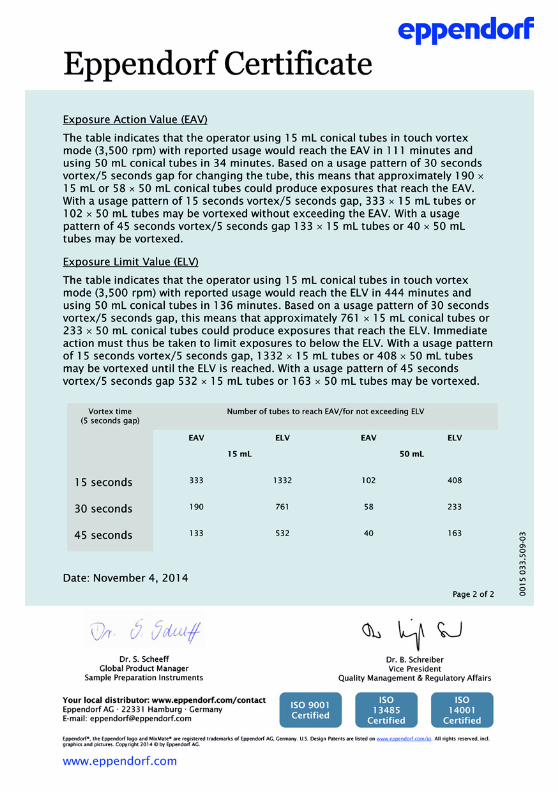
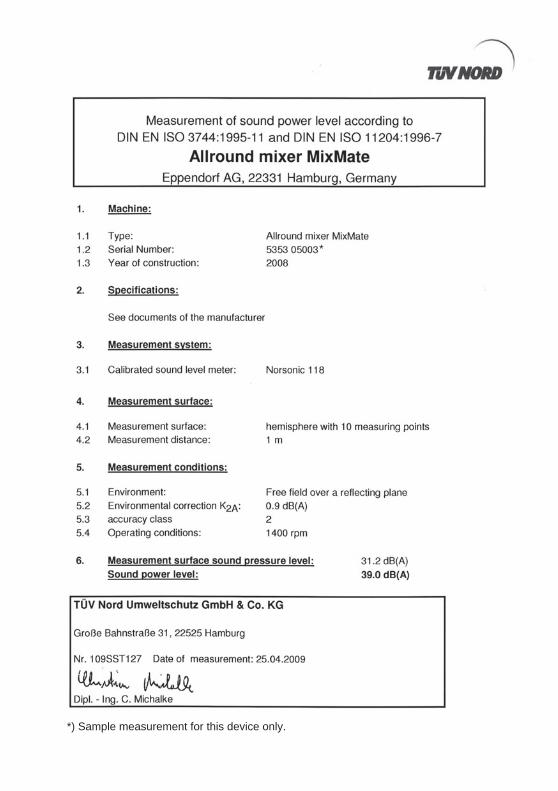
Certificates
*
*) Sample measurement for this device only.
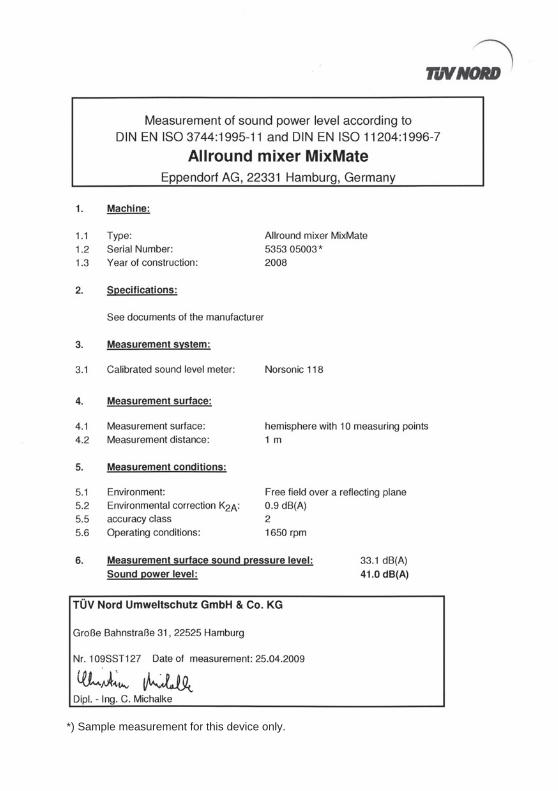
*) Sample measurement for this device only.
*

*) Sample measurement for this device only.
*

Evaluate Your Manual
Give us your feedback.www.eppendorf.com/manualfeedback
Your local distributor: www.eppendorf.com/contactEppendorf AG · Barkhausenweg 1 · 22339 Hamburg · [email protected] · www.eppendorf.com