MiVoice 6920 IP Phone User Guide for MiVoice Connect€¢ Mitel MiVoice 6920 IP Phone Quick...
79
MiVoice 6920 IP Phone User Guide for MiVoice Connect 58015959 REV00
Transcript of MiVoice 6920 IP Phone User Guide for MiVoice Connect€¢ Mitel MiVoice 6920 IP Phone Quick...

MiVoice 6920 IP PhoneUser Guide for MiVoice Connect 58015959 REV00
NOTICEThe information contained in this document is believed to be accurate in all respects but is not warranted by Mitel Networks Corporation (MITEL®). The information is subject to change without notice and should not be construed in any way as a commitment by Mitel or any of its affiliates or subsidiaries. Mitel and its affiliates and subsidiaries assume no responsibility for any errors or omissions in this document. Revisions of this document or new editions of it may be issued to incorporate such changes.
No part of this document can be reproduced or transmitted in any form or by any means - electronic or mechanical - for any purpose without written permission from Mitel Networks Corporation. Send an email to [email protected] for more details.
Trademarks
The trademarks, service marks, logos and graphics (collectively “Trademarks”) appearing on Mitel's Internet sites or in its publications are registered and unregistered trademarks of Mitel Networks Corporation (MNC) or its subsidiaries (collectively “Mitel”) or their respective owners. Use of the Trademarks is prohibited without the express consent from Mitel. Please contact our legal department at [email protected] for additional information. For a list of the worldwide Mitel Networks Corporation registered trademarks, please refer to the website: http://www.mitel.com/trademarks. Customer's use of this product and/or software shall be in accordance with the EULA and /or other accompanying licensing terms.
Mitel’s Power Over Ethernet (PoE) Powered Device (PD) products are covered by one or more of the U.S. patents (and any foreign patent counterparts thereto) identified at Mitel’s website: www.mitel.com/patents.
For more information about the PD patents that are licensed, please refer www.cmspatents.com.
Mitel MiVoice 6920 IP Phone Release 5.2.1User Guide for MiVoive Connect
58015959 REV00 - October 2019
®,™ Trademark of Mitel Networks Corporation© Copyright 2019, Mitel Networks Corporation
All rights reserved

Table of Contents
i
About This Guide . . . . . . . . . . . . . . . . . . . . . . . . . . . . . . . . . . . . . . . . . . . . . . . . . . . . . . . . . . . . . . . . . . . 1
Documentation. . . . . . . . . . . . . . . . . . . . . . . . . . . . . . . . . . . . . . . . . . . . . . . . . . . . . . . . . . . . . . . . . . . 1
Phone Features . . . . . . . . . . . . . . . . . . . . . . . . . . . . . . . . . . . . . . . . . . . . . . . . . . . . . . . . . . . . . . . . . . 1
Installation and Setup . . . . . . . . . . . . . . . . . . . . . . . . . . . . . . . . . . . . . . . . . . . . . . . . . . . . . . . . . . . . . 2
Tips for Your Comfort and Safety . . . . . . . . . . . . . . . . . . . . . . . . . . . . . . . . . . . . . . . . . . . . . . . . . . . . 2
Overview of the 6920 IP Phone. . . . . . . . . . . . . . . . . . . . . . . . . . . . . . . . . . . . . . . . . . . . . . . . . . . . . . . . 3
Keys Description . . . . . . . . . . . . . . . . . . . . . . . . . . . . . . . . . . . . . . . . . . . . . . . . . . . . . . . . . . . . . . . . . 4
Plugging In and Starting the Phone . . . . . . . . . . . . . . . . . . . . . . . . . . . . . . . . . . . . . . . . . . . . . . . . . . . 5
Your Phone’s Display . . . . . . . . . . . . . . . . . . . . . . . . . . . . . . . . . . . . . . . . . . . . . . . . . . . . . . . . . . . . . 8
Call Appearance Keys and Programmable Keys. . . . . . . . . . . . . . . . . . . . . . . . . . . . . . . . . . . . . . . . . 9
Setting Up Your Phone . . . . . . . . . . . . . . . . . . . . . . . . . . . . . . . . . . . . . . . . . . . . . . . . . . . . . . . . . . . . . . 9
Registering a Phone in a MiVoice Connect System . . . . . . . . . . . . . . . . . . . . . . . . . . . . . . . . . . . . . 10
Assigning Your Extension or Phone Number to the Phone . . . . . . . . . . . . . . . . . . . . . . . . . . . . . . . . 11
Logging In to the Voicemail System . . . . . . . . . . . . . . . . . . . . . . . . . . . . . . . . . . . . . . . . . . . . . . . . . 11
Operating Your Phone. . . . . . . . . . . . . . . . . . . . . . . . . . . . . . . . . . . . . . . . . . . . . . . . . . . . . . . . . . . . . . 11
Placing Calls . . . . . . . . . . . . . . . . . . . . . . . . . . . . . . . . . . . . . . . . . . . . . . . . . . . . . . . . . . . . . . . . . . . 11
Answering Calls . . . . . . . . . . . . . . . . . . . . . . . . . . . . . . . . . . . . . . . . . . . . . . . . . . . . . . . . . . . . . . . . . 12
Auto-Answer/Play Warning Tone. . . . . . . . . . . . . . . . . . . . . . . . . . . . . . . . . . . . . . . . . . . . . . . . . . . . 13
Adjusting the Ring and Listening Volume . . . . . . . . . . . . . . . . . . . . . . . . . . . . . . . . . . . . . . . . . . . . . 14
Muting a Call . . . . . . . . . . . . . . . . . . . . . . . . . . . . . . . . . . . . . . . . . . . . . . . . . . . . . . . . . . . . . . . . . . . 14
Guide to the Icons Displayed On Your Phone. . . . . . . . . . . . . . . . . . . . . . . . . . . . . . . . . . . . . . . . . . . . 15
Using Voicemail . . . . . . . . . . . . . . . . . . . . . . . . . . . . . . . . . . . . . . . . . . . . . . . . . . . . . . . . . . . . . . . . . . . 20
Using the Directory . . . . . . . . . . . . . . . . . . . . . . . . . . . . . . . . . . . . . . . . . . . . . . . . . . . . . . . . . . . . . . . . 20
Making a Call Using Directory . . . . . . . . . . . . . . . . . . . . . . . . . . . . . . . . . . . . . . . . . . . . . . . . . . . . . . 20
Finding Detailed Contact Information . . . . . . . . . . . . . . . . . . . . . . . . . . . . . . . . . . . . . . . . . . . . . . . . 21
Using the Intercom Through Directory. . . . . . . . . . . . . . . . . . . . . . . . . . . . . . . . . . . . . . . . . . . . . . . . 21
Dialing Voicemail from Directory . . . . . . . . . . . . . . . . . . . . . . . . . . . . . . . . . . . . . . . . . . . . . . . . . . . . 21
Help . . . . . . . . . . . . . . . . . . . . . . . . . . . . . . . . . . . . . . . . . . . . . . . . . . . . . . . . . . . . . . . . . . . . . . . . . . . . 22
Using the Call History . . . . . . . . . . . . . . . . . . . . . . . . . . . . . . . . . . . . . . . . . . . . . . . . . . . . . . . . . . . . . . 22
Viewing a List of All Calls Placed, Received, or Missed . . . . . . . . . . . . . . . . . . . . . . . . . . . . . . . . . . 23
Placing a Call Using the Call History . . . . . . . . . . . . . . . . . . . . . . . . . . . . . . . . . . . . . . . . . . . . . . . . . 23
Using the Intercom Through the Call History. . . . . . . . . . . . . . . . . . . . . . . . . . . . . . . . . . . . . . . . . . . 23
Deleting a Call from the Call History . . . . . . . . . . . . . . . . . . . . . . . . . . . . . . . . . . . . . . . . . . . . . . . . . 24
Interacting with Calls . . . . . . . . . . . . . . . . . . . . . . . . . . . . . . . . . . . . . . . . . . . . . . . . . . . . . . . . . . . . . . . 24
Table of Contents
ii
Placing a Call on Hold or Off Hold . . . . . . . . . . . . . . . . . . . . . . . . . . . . . . . . . . . . . . . . . . . . . . . . . . . 24
Diverting an Incoming Call to Voicemail . . . . . . . . . . . . . . . . . . . . . . . . . . . . . . . . . . . . . . . . . . . . . . 25
Transferring a Call . . . . . . . . . . . . . . . . . . . . . . . . . . . . . . . . . . . . . . . . . . . . . . . . . . . . . . . . . . . . . . . 25
Parking and Unparking Calls . . . . . . . . . . . . . . . . . . . . . . . . . . . . . . . . . . . . . . . . . . . . . . . . . . . . . . . 25
Picking Up an Incoming Call for Another Extension . . . . . . . . . . . . . . . . . . . . . . . . . . . . . . . . . . . . . 26
Customizing Your Phone . . . . . . . . . . . . . . . . . . . . . . . . . . . . . . . . . . . . . . . . . . . . . . . . . . . . . . . . . . . . 27
Phone Options Via IP Phone UI . . . . . . . . . . . . . . . . . . . . . . . . . . . . . . . . . . . . . . . . . . . . . . . . . . . . 27
Phone Options Via Connect Portal . . . . . . . . . . . . . . . . . . . . . . . . . . . . . . . . . . . . . . . . . . . . . . . . . . 29
Log Issue . . . . . . . . . . . . . . . . . . . . . . . . . . . . . . . . . . . . . . . . . . . . . . . . . . . . . . . . . . . . . . . . . . . . . . . . 29
Understanding Availability States . . . . . . . . . . . . . . . . . . . . . . . . . . . . . . . . . . . . . . . . . . . . . . . . . . . . . 29
Changing Your Active Availability State. . . . . . . . . . . . . . . . . . . . . . . . . . . . . . . . . . . . . . . . . . . . . . . 29
Specifying Settings for Availability States . . . . . . . . . . . . . . . . . . . . . . . . . . . . . . . . . . . . . . . . . . . . . 30
Time and Date . . . . . . . . . . . . . . . . . . . . . . . . . . . . . . . . . . . . . . . . . . . . . . . . . . . . . . . . . . . . . . . . . . . . 31
Settings . . . . . . . . . . . . . . . . . . . . . . . . . . . . . . . . . . . . . . . . . . . . . . . . . . . . . . . . . . . . . . . . . . . . . . . 31
Time Zone . . . . . . . . . . . . . . . . . . . . . . . . . . . . . . . . . . . . . . . . . . . . . . . . . . . . . . . . . . . . . . . . . . . . . 33
Directory . . . . . . . . . . . . . . . . . . . . . . . . . . . . . . . . . . . . . . . . . . . . . . . . . . . . . . . . . . . . . . . . . . . . . . . . 34
Settings . . . . . . . . . . . . . . . . . . . . . . . . . . . . . . . . . . . . . . . . . . . . . . . . . . . . . . . . . . . . . . . . . . . . . . . 34
Status. . . . . . . . . . . . . . . . . . . . . . . . . . . . . . . . . . . . . . . . . . . . . . . . . . . . . . . . . . . . . . . . . . . . . . . . . . . 35
Diagnostics . . . . . . . . . . . . . . . . . . . . . . . . . . . . . . . . . . . . . . . . . . . . . . . . . . . . . . . . . . . . . . . . . . . . . . 36
Ping . . . . . . . . . . . . . . . . . . . . . . . . . . . . . . . . . . . . . . . . . . . . . . . . . . . . . . . . . . . . . . . . . . . . . . . . . . 36
Traceroute . . . . . . . . . . . . . . . . . . . . . . . . . . . . . . . . . . . . . . . . . . . . . . . . . . . . . . . . . . . . . . . . . . . . . 37
Capture . . . . . . . . . . . . . . . . . . . . . . . . . . . . . . . . . . . . . . . . . . . . . . . . . . . . . . . . . . . . . . . . . . . . . . . 38
Log Upload . . . . . . . . . . . . . . . . . . . . . . . . . . . . . . . . . . . . . . . . . . . . . . . . . . . . . . . . . . . . . . . . . . . . 39
Audio Diagnostics . . . . . . . . . . . . . . . . . . . . . . . . . . . . . . . . . . . . . . . . . . . . . . . . . . . . . . . . . . . . . . . 39
Audio . . . . . . . . . . . . . . . . . . . . . . . . . . . . . . . . . . . . . . . . . . . . . . . . . . . . . . . . . . . . . . . . . . . . . . . . . . . 40
Configuring the Audio Mode . . . . . . . . . . . . . . . . . . . . . . . . . . . . . . . . . . . . . . . . . . . . . . . . . . . . . . . 41
Headset . . . . . . . . . . . . . . . . . . . . . . . . . . . . . . . . . . . . . . . . . . . . . . . . . . . . . . . . . . . . . . . . . . . . . . . 41
Changing the Ringtone . . . . . . . . . . . . . . . . . . . . . . . . . . . . . . . . . . . . . . . . . . . . . . . . . . . . . . . . . . . 43
Display . . . . . . . . . . . . . . . . . . . . . . . . . . . . . . . . . . . . . . . . . . . . . . . . . . . . . . . . . . . . . . . . . . . . . . . . . . 43
Home Screen Settings. . . . . . . . . . . . . . . . . . . . . . . . . . . . . . . . . . . . . . . . . . . . . . . . . . . . . . . . . . . . 43
Brightness Settings . . . . . . . . . . . . . . . . . . . . . . . . . . . . . . . . . . . . . . . . . . . . . . . . . . . . . . . . . . . . . . 44
Push Notifications . . . . . . . . . . . . . . . . . . . . . . . . . . . . . . . . . . . . . . . . . . . . . . . . . . . . . . . . . . . . . . . 45
Restart . . . . . . . . . . . . . . . . . . . . . . . . . . . . . . . . . . . . . . . . . . . . . . . . . . . . . . . . . . . . . . . . . . . . . . . . . . 45
Making a Conference Call . . . . . . . . . . . . . . . . . . . . . . . . . . . . . . . . . . . . . . . . . . . . . . . . . . . . . . . . . . . 47

Table of Contents
iii
Using the Merge Feature to Conference Active Calls . . . . . . . . . . . . . . . . . . . . . . . . . . . . . . . . . . . . . . 47
Using the Intercom. . . . . . . . . . . . . . . . . . . . . . . . . . . . . . . . . . . . . . . . . . . . . . . . . . . . . . . . . . . . . . . . . 48
Paging . . . . . . . . . . . . . . . . . . . . . . . . . . . . . . . . . . . . . . . . . . . . . . . . . . . . . . . . . . . . . . . . . . . . . . . . . . 48
Voice Services . . . . . . . . . . . . . . . . . . . . . . . . . . . . . . . . . . . . . . . . . . . . . . . . . . . . . . . . . . . . . . . . . . 48
Simultaneous Ringing . . . . . . . . . . . . . . . . . . . . . . . . . . . . . . . . . . . . . . . . . . . . . . . . . . . . . . . . . . . . . . 49
Other Advanced Features . . . . . . . . . . . . . . . . . . . . . . . . . . . . . . . . . . . . . . . . . . . . . . . . . . . . . . . . . . . 50
Voicemail Overview . . . . . . . . . . . . . . . . . . . . . . . . . . . . . . . . . . . . . . . . . . . . . . . . . . . . . . . . . . . . . . . . 53
Using Visual Voicemail . . . . . . . . . . . . . . . . . . . . . . . . . . . . . . . . . . . . . . . . . . . . . . . . . . . . . . . . . . . . . 53
Interacting with Messages in Visual Voicemail . . . . . . . . . . . . . . . . . . . . . . . . . . . . . . . . . . . . . . . . . 54
Replying to Messages in Visual Voicemail . . . . . . . . . . . . . . . . . . . . . . . . . . . . . . . . . . . . . . . . . . . . 55
Forwarding Messages in Visual Voicemail . . . . . . . . . . . . . . . . . . . . . . . . . . . . . . . . . . . . . . . . . . . . 56
Viewing Saved Messages in Visual Voicemail . . . . . . . . . . . . . . . . . . . . . . . . . . . . . . . . . . . . . . . . . 57
Deleting Messages in Visual Voicemail . . . . . . . . . . . . . . . . . . . . . . . . . . . . . . . . . . . . . . . . . . . . . . . 57
Using the Voicemail System . . . . . . . . . . . . . . . . . . . . . . . . . . . . . . . . . . . . . . . . . . . . . . . . . . . . . . . . . 58
Logging In to the Voicemail System . . . . . . . . . . . . . . . . . . . . . . . . . . . . . . . . . . . . . . . . . . . . . . . . . 58
Interacting with New Messages in the Voicemail System . . . . . . . . . . . . . . . . . . . . . . . . . . . . . . . . . 59
Listening to Saved Messages . . . . . . . . . . . . . . . . . . . . . . . . . . . . . . . . . . . . . . . . . . . . . . . . . . . . . . 60
Sending Messages from Voicemail . . . . . . . . . . . . . . . . . . . . . . . . . . . . . . . . . . . . . . . . . . . . . . . . . . 60
Leaving a Message and Using Message Options . . . . . . . . . . . . . . . . . . . . . . . . . . . . . . . . . . . . . . . 60
Using Mailbox Options. . . . . . . . . . . . . . . . . . . . . . . . . . . . . . . . . . . . . . . . . . . . . . . . . . . . . . . . . . . . 61
Accessory support . . . . . . . . . . . . . . . . . . . . . . . . . . . . . . . . . . . . . . . . . . . . . . . . . . . . . . . . . . . . . . . . . 66
Mitel Wireless LAN Adapter. . . . . . . . . . . . . . . . . . . . . . . . . . . . . . . . . . . . . . . . . . . . . . . . . . . . . . . . 66
Model M695 Expansion Module (Button Box) . . . . . . . . . . . . . . . . . . . . . . . . . . . . . . . . . . . . . . . . . 67
Analog, DHSG/EHS, and USB headsets. . . . . . . . . . . . . . . . . . . . . . . . . . . . . . . . . . . . . . . . . . . . . . 68
Mitel S720 Bluetooth Speakerphone . . . . . . . . . . . . . . . . . . . . . . . . . . . . . . . . . . . . . . . . . . . . . . . . . 69
Problems and Solutions. . . . . . . . . . . . . . . . . . . . . . . . . . . . . . . . . . . . . . . . . . . . . . . . . . . . . . . . . . . . . 72

MiVoice 6920 IP Phone User Guide for MiVoice Connect
iv

About This Guide
1
About This GuideThis guide explains how to use the basic features of your Mitel MiVoice 6920 IP Phone with MiVoice Connect.
Documentation• Mitel MiVoice 6920 IP Phone Quick Reference Guide – Contains call handling instructions, an
overview of the user interface (UI) and details on UI navigation, as well as information on other important features. The Quick Reference Guide can be downloaded from Mitel MiVoice 6920 IP Phone Quick Reference Guide.
• Mitel MiVoice 6920 IP Phone Installation Guide – Contains installation and set-up instructions, general features and functions, and basic options list customization. The Installation Guide can be downloaded from Mitel MiVoice 6920 IP Phone Installation Guide.
Supporting Documentation
To access phone and system-specific documentation:
1. Log on to Mitel MiAccess.
2. In left-hand menu, select Doc Center.
3. Select DEVICES AND ACCESSORIES > SIP PHONES AND PERIPHERALS > 6900 SERIES SIP PHONES FOR MIVOICE CONNECT> 6900 SIP PHONES.
Phone Features
Feature highlights include:
• 3.5” QVGA (320x240) color TFT LCD display with brightness controls
• Built-in-two-port, 10/100/1000 Gigabit Ethernet switch - lets you share a connection with your computer
• USB 2.0 port (100mA maximum)
• 6 top softkeys and 4 context-sensitive bottom softkeys
• Wideband handset
• Enhanced wideband, full-duplex speakerphone for handsfree calls
• Extensive support for peripherals and modules: USB, S720 Bluetooth Speaker, DHSG/EHS Handset, and wired analog headset, Mitel M695 Programmable Key (PKM) Module (button box), and Mitel Wireless LAN Adapter
• AC power adapter (sold separately)
*Availability of feature depends on your phone system or service provider.
MiVoice 6920 IP Phone User Guide for MiVoice Connect
2
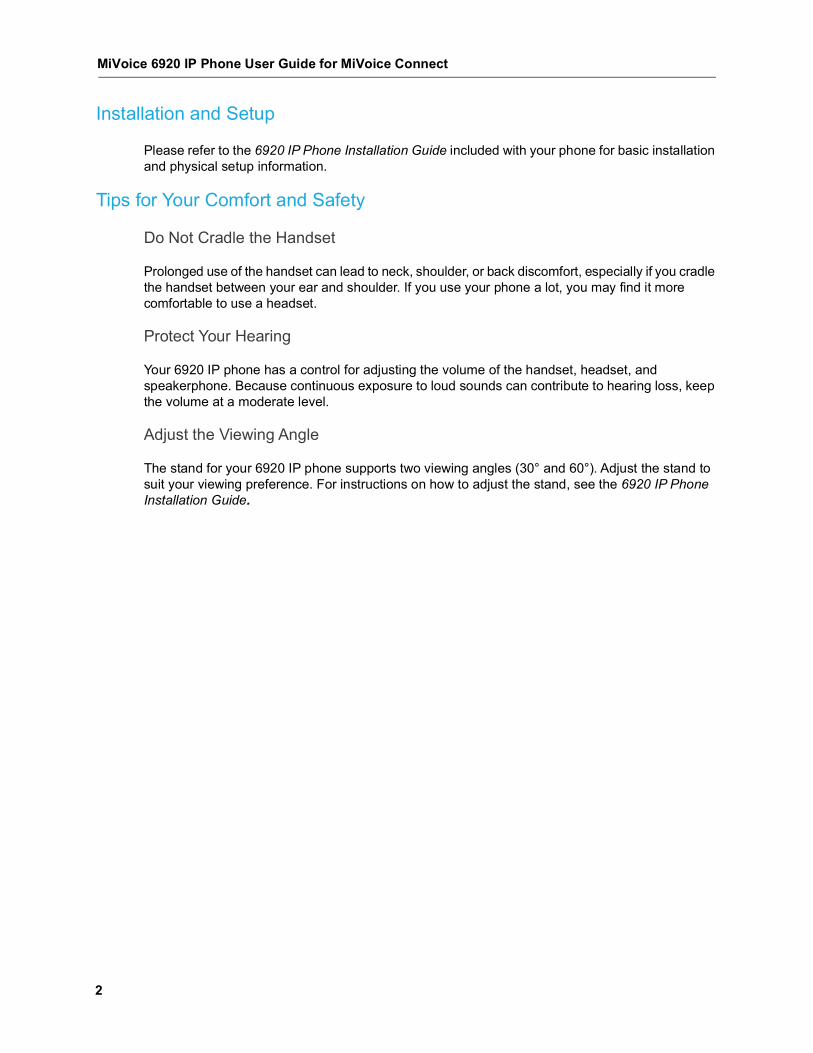
Installation and Setup
Please refer to the 6920 IP Phone Installation Guide included with your phone for basic installation and physical setup information.
Tips for Your Comfort and Safety
Do Not Cradle the Handset
Prolonged use of the handset can lead to neck, shoulder, or back discomfort, especially if you cradle the handset between your ear and shoulder. If you use your phone a lot, you may find it more comfortable to use a headset.
Protect Your Hearing
Your 6920 IP phone has a control for adjusting the volume of the handset, headset, and speakerphone. Because continuous exposure to loud sounds can contribute to hearing loss, keep the volume at a moderate level.
Adjust the Viewing Angle
The stand for your 6920 IP phone supports two viewing angles (30° and 60°). Adjust the stand to suit your viewing preference. For instructions on how to adjust the stand, see the 6920 IP Phone Installation Guide.

Overview of the 6920 IP Phone
3
Overview of the 6920 IP PhoneWelcome to your IP phone!
Figure 1 provides an overview of the Mitel MiVoice 6920 IP Phone components. Figure 2 on page 4 shows the ports on the back of the phone.
Figure 1: 6920 IP Phone Components
Handset
Speaker
function Keys
Function Keys
Dial Pad
Navigation key pad and select button
Microphone
Indicator LED
Display Area
Softkeys
Programmable call appearance Keys

MiVoice 6920 IP Phone User Guide for MiVoice Connect
4
Figure 2: Ports on the Back of the 6920 IP Phone
Keys Description
The following table describes the keys on the Mitel MiVoice 6920 IP Phone:.
Key Description
Directory key - Displays a list of your contacts.
History key - Displays a list of your missed, outgoing, and answered calls.
Voicemail key - Provides access to your voicemail service (if configured).
Settings key - Provides services and static settings that allow you to customize your phone.
Volume controls - Adjusts the volume for the ringer, handset, headset, and speakerphone.Press the volume control keys while the phone is ringing to adjust the ringer volume. Pressing these keys during an active call adjusts the volume of the audio device being used (handset, headset, or speaker).
Goodbye key - Ends an active call. The Goodbye key also exits an open list (such as Call History) and menus (such as the Static Settings menu) without saving changes.
Redial key - Displays a list of your previously dialed calls. Double-press the Redial key to call the last dialed number.
48V0.54A
Handset Jack ishearing-aid compatible (HAC)
Headset Jack USB Port
PC PortNetwork and Power Port
Power Adapter Port

Plugging In and Starting the Phone
5
Plugging In and Starting the Phone
The 6920 IP Phone automatically begins the startup sequence as soon as it is connected. The phone goes through this process the first time you plug in your phone and every time you restart your phone.
Hold key - Places an active call on hold. To retrieve a held call, press the applicable Line key.For more information, see Placing a Call on Hold or Off Hold on page 24.
Mute key - Mutes the microphone so that your caller cannot hear you. (The LED beside the key turns on when the microphone is on mute.)
Speaker/Headset key - Transfers the active call to the speaker or headset, allowing hands-free use of the phone.
Navigation keys and select button - Multi-directional navigation keys that allow you to navigate through the phone’s user interface (UI). Pressing the center Select button sets options as well as performs actions such as dialing out from the Contacts or Call History. On the Home screen, the left and right navigation keys can be used to switch between the home screen, the line manager, and active calls.
Softkeys - Four context-sensitive bottom softkeys that allow you to perform multiple functions during specific states (that is when the phone is an idle, connected, incoming, outgoing, or busy state).
Programmable call appearance Keys - Six programmable, multi-function keys that allow you to use up to 12 specific functions.
Key Description

MiVoice 6920 IP Phone User Guide for MiVoice Connect
6
The phone displays the following startup screens.
The 6920 IP Phone phone then checks the settings and looks for new configuration and firmware updates from a configuration server. It may take a few moments while the phone downloads the latest updates.
Note: Updates to your phone can be scheduled to be automatically installed from the server. The new updates are scheduled during non-business hours or slow call periods.
CAUTION: Do not unplug or remove power to the phone while the phone is checking or installing firmware and configuration information.

Plugging In and Starting the Phone
7
If language packs were loaded to your phone, the following screen displays during startup.
When the configuration update is complete, the phone displays the following screens before it displays the Home screen.
Network Connected/Network Disconnected
If your phone successfully connects to the network, the phone displays the Home screen.

MiVoice 6920 IP Phone User Guide for MiVoice Connect
8
If your phone did not successfully connect to the network, the Network Disconnected prompt is displayed and the status light turns on.
If this happens, check that the cables are firmly connected to the phone and to the wall jack. The phone automatically detects when it is reconnected successfully and the Network Disconnected prompt is removed from the screen. However, if changes have been made to your phone’s network settings, you may need to restart your phone. Check with your Mitel administrator or network administrator for assistance.
For more information about connecting your phone, see the Mitel 6920 IP Phone Installation Guide.
Your Phone’s Display
The display screen on your IP phone shows your name and extension, availability state, call appearance keys, workgroup agent status, programmed keys, and other information. Figure 3 shows the elements on the phone display screen.
Note: If the phone displays a No Service status message you can still use the phone but note that it is not registered with the system. For more information about registering your phone, contact your Mitel administrator.

Call Appearance Keys and Programmable Keys
9
Figure 3: Elements on the Display of the 6920 IP Phone
Call Appearance Keys and Programmable Keys
Your phone features 12 call appearance keys that show incoming, active, or held calls.
Your phone includes four softkeys, whose function change depending on the state of your phone. For example, if your phone is idle, the softkeys let you modify settings such as your availability state or phone Settings. If you have an active call, you can use the softkeys to do such things as hang up, park the call, or merge the call with another call to create a conference call. When the label on a softkey is underlined with a dotted line, you can press the select button on the navigation keypad to perform the function identified on that softkey.
Setting Up Your PhoneTo use all the functions of your IP phone, your phone needs to be assigned to you and you need to know your password for the voicemail system. You can determine whether your phone is already assigned to you as follows:
• If the phone displays your name and extension, your Mitel administrator has already assigned your phone to you, and you do not need to assign yourself to your phone. When your phone is
Voicemailmessageindicator
Missed callindicator
SoftkeysContext-sensitive keys let you perform actions based on the phone’s status and the call type.
Incoming Call

MiVoice 6920 IP Phone User Guide for MiVoice Connect
10
in this state, you can receive calls, make calls, and check for new messages using visual voicemail.
• If the phone displays “Available” and the date and time, use the procedure in Assigning Your Extension or Phone Number to the Phone on page 11 to assign your extension to your phone. Until the phone is assigned, you can place internal calls by dialing a number or using the Directory, but you cannot receive calls or use visual voicemail, and you might not be able to place external calls.
• If the phone displays “Anonymous” and the date and time, this extension is assigned as the primary phone for someone who is currently assigned to some other phone or endpoint. You can assign your extension to the phone by following the procedure in Assigning Your Extension or Phone Number to the Phone on page 11.
• If the phone displays “Voice Service”, use the procedure in Assigning Your Extension or Phone Number to the Phone on page 11 to assign your extension to your phone.
With the appropriate permissions (set by your Mitel administrator or authorized contact), you can log in to any Mitel 6900-Series IP phone in the system to assign your extension or phone number to that phone.
If you need to register a phone with a MiVoice Connect system, see Registering a Phone in a MiVoice Connect System on page 10.
Registering a Phone in a MiVoice Connect System
To register a phone in a MiVoice Connect system, perform the following steps:
1. Press .
2. Press the Advanced softkey.
3. Enter the Administration Password and press the Enter softkey.
4. Navigate to Voice Services > MiVoice Connect and press the select button or press the Select softkey.
5. In the Config. Server field, enter the MiVoice Connect Server IP addres.
6. Press the Save softkey.The IP phone automatically restarts and connects to the MiVoice Connect server.

Assigning Your Extension or Phone Number to the Phone
11
Assigning Your Extension or Phone Number to the Phone
The procedure that you use to assign your phone depends on whether the phone displays “Available”, or “Anonymous,” or “Voice Service”.
If Your Phone Displays “Available” or “Anonymous”
If your phone displays “Available” or “Anonymous,” use this procedure to assign your extension to your phone.
1. Press the Assign softkey.
2. Enter the extension number that your Mitel administrator provided, and then press the down navigation key.
3. Enter the password provided by your Mitel administrator.
4. Press the Enter softkey.Your extension is assigned to your phone and your name and extension is displayed.
Logging In to the Voicemail System
If you are a new user in the Mitel system, you need to log in to the voicemail system to record your name and personal greeting. For details, see Logging In to the Voicemail System on page 58.
Operating Your PhoneThis section provides an overview of the following basic phone tasks:
• Placing calls
• Answering calls
• Auto Answer
• Sending an incoming call to voicemail
• Adjusting the ring and listening volume
• Turning off the phone’s ringer
• Muting a call
Placing Calls
To place a call, you can use the handset, the speakerphone, or a headset.
Using the Handset to Place A Call1. To place a call, pick up the handset and dial a phone number.
2. To end the call, hang up the handset.
Note: The call timer on the 6920 IP phone starts after the call is answered.
MiVoice 6920 IP Phone User Guide for MiVoice Connect
12
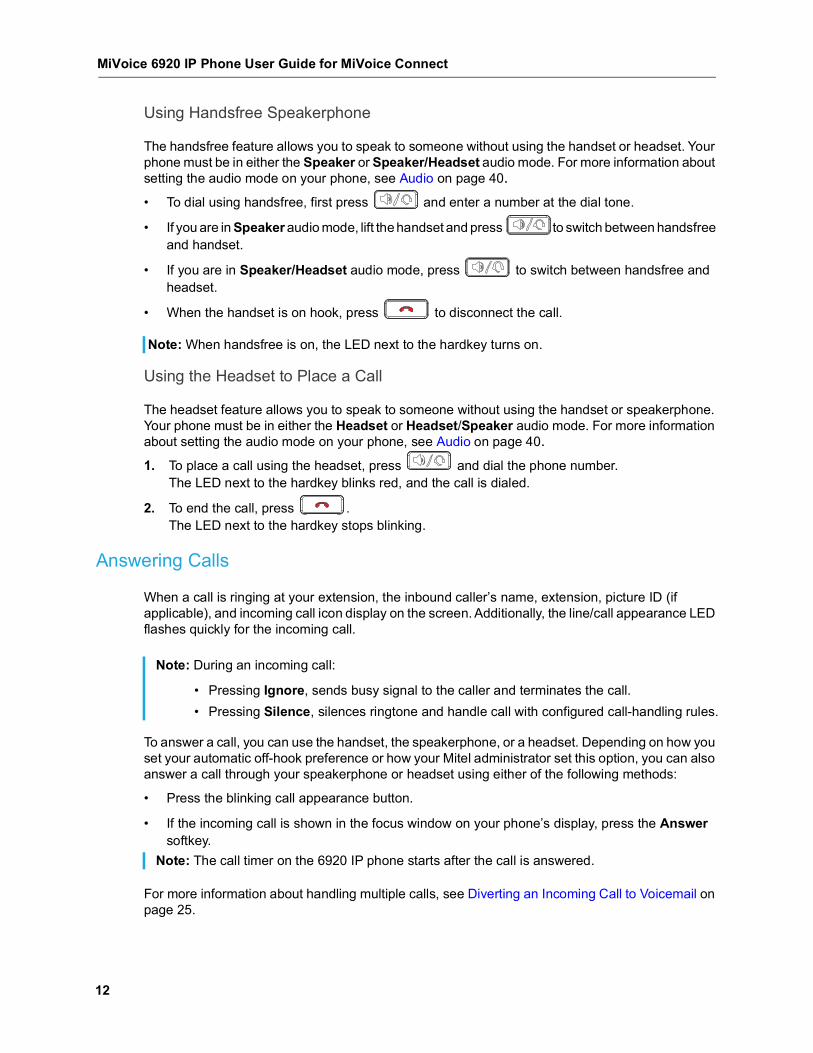
Using Handsfree Speakerphone
The handsfree feature allows you to speak to someone without using the handset or headset. Your phone must be in either the Speaker or Speaker/Headset audio mode. For more information about setting the audio mode on your phone, see Audio on page 40.• To dial using handsfree, first press and enter a number at the dial tone.
• If you are in Speaker audio mode, lift the handset and press to switch between handsfree and handset.
• If you are in Speaker/Headset audio mode, press to switch between handsfree and headset.
• When the handset is on hook, press to disconnect the call.
Using the Headset to Place a Call
The headset feature allows you to speak to someone without using the handset or speakerphone. Your phone must be in either the Headset or Headset/Speaker audio mode. For more information about setting the audio mode on your phone, see Audio on page 40.1. To place a call using the headset, press and dial the phone number.
The LED next to the hardkey blinks red, and the call is dialed.
2. To end the call, press .The LED next to the hardkey stops blinking.
Answering Calls
When a call is ringing at your extension, the inbound caller’s name, extension, picture ID (if applicable), and incoming call icon display on the screen. Additionally, the line/call appearance LED flashes quickly for the incoming call.
To answer a call, you can use the handset, the speakerphone, or a headset. Depending on how you set your automatic off-hook preference or how your Mitel administrator set this option, you can also answer a call through your speakerphone or headset using either of the following methods:
• Press the blinking call appearance button.
• If the incoming call is shown in the focus window on your phone’s display, press the Answer softkey.
For more information about handling multiple calls, see Diverting an Incoming Call to Voicemail on page 25.
Note: When handsfree is on, the LED next to the hardkey turns on.
Note: During an incoming call:
• Pressing Ignore, sends busy signal to the caller and terminates the call.• Pressing Silence, silences ringtone and handle call with configured call-handling rules.
Note: The call timer on the 6920 IP phone starts after the call is answered.

Auto-Answer/Play Warning Tone
13
Using the Handset to Answer a Call1. To answer a call, pick up the handset when the phone rings.
2. To end a call, hang up the handset.
Using the Speakerphone to Answer a Call
If you plan to use a Speakerphone to answer calls, see Audio on page 40 for instructions on how to designate Speaker or Speaker/Headset as your default auto off-hook preference.
1. To answer a call, press . If your automatic off-hook preference is configured to use the speaker, press the blinking call appearance button or press the Answer softkey. The LED next to the hardkey lights red.
2. To end the call, press the again.The LED next to the hardkey turns off.
Using a Headset to Answer a Call
If you plan to use a headset to answer calls, see Audio on page 40 to designate your wireless or wired headset as your default auto off-hook preference.
1. To answer a call using the headset, do one of the following:• If you use a wired headset, press . • If you use a wireless headset, go off-hook with your headset.• If your automatic off-hook preference is configured to use your headset, press the blinking
red call appearance button or press the Answer softkey. (If you use a wireless headset, the phone then displays a message prompting you to press the off-hook button on your headset.)The LED next to blinks red.
2. To end the call, do one of the following:• If you use a wired headset, press again.• If you use a wireless headset, put your headset in to the on-hook position.
The LED next to the hardkey stops blinking.
Auto-Answer/Play Warning Tone
The auto-answer feature on the IP phone allows you to enable or disable automatic answering for an Intercom call.
If Auto-Answer is enabled, the phone automatically answers an incoming intercom call. If Play Warning Tone is also enabled, the phone plays a tone to alert you before answering the intercom call.
Note: The audio mode setting you have selected in the Settings > Audio> Audio Mode menu on the IP phone determines if the call goes to speakerphone or headset operation. For more information, see Audio on page 40
Note: Your Mitel administrator can set a time period delay before the phone automatically answers. Contact your Mitel administrator for more information.
MiVoice 6920 IP Phone User Guide for MiVoice Connect
14
Adjusting the Ring and Listening Volume
To adjust the volume on your phone, use the keys. The volume settings for the ringer, handset, speakerphone, and headset are independent, and you can set them as follows:
• Adjust the volume of your phone’s ringer while the phone is on hook.
• Adjust the handset listening volume while the handset is off hook.
• Adjust the speakerphone volume when the LED next to is illuminated.
• Adjust the headset listening volume when the LED next to is blinking.
Muting a Call• To mute a call so that the caller does not hear you, press
The LED next to the hardkey blinks in red when the mute is active.
• To unmute a call so that the caller can hear you, again.The LED next to the hardkey does not blink when the mute is not active.
Note: When using a wireless headset, if you experience audio problems, ensure that your wireless headset is configured according to the manufacturer’s instructions. Problems that might result from improper configuration include the following:• You cannot hear a dial tone.• The volume for you or the other party is not loud enough.• You hear a buzzing or hissing sound.
Note: Mute does not work during number dial-out.

Guide to the Icons Displayed On Your Phone
15
Guide to the Icons Displayed On Your PhoneYour 6920 IP Phone displays icons for phone status and features. These icons are described in the following tables:2, "
• Table 1 describes the title bar icons on the main screen of the phone.
• Table 2 on page 16 describes the call appearance button icons on the main screen of the phone.
• Table 3 on page 18 describes the bridge call appearance button icons on the main screen of the phone
• Table 4 on page 18 describes the shared call appearance button icons on the main screen of the phone
• Table 5 on page 19 describes the history icons.
• Table 6 on page 20 describes the presence icons in the Directory.
• Table 8 on page 54 describes the voicemail icons.
Table 1: Title Bar Icons on the Main Screen Icon Description
Availability state: Available
Availability state: In a Meeting
Availability state: Do not disturb
Availability state: Out of office
Availability state: Vacation
Availability state: Custom
Missed call
Voicemail message indicator
MiVoice 6920 IP Phone User Guide for MiVoice Connect
16
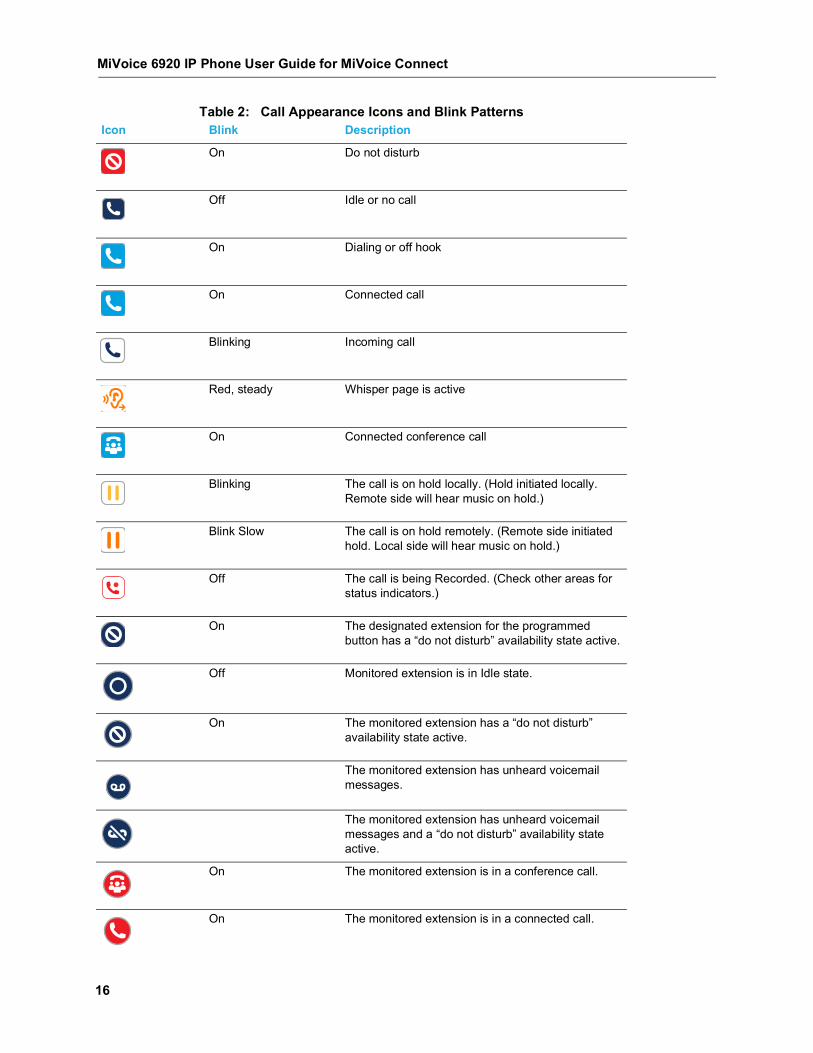
Table 2: Call Appearance Icons and Blink PatternsIcon Blink Description
On Do not disturb
Off Idle or no call
On Dialing or off hook
On Connected call
Blinking Incoming call
Red, steady Whisper page is active
On Connected conference call
Blinking The call is on hold locally. (Hold initiated locally. Remote side will hear music on hold.)
Blink Slow The call is on hold remotely. (Remote side initiated hold. Local side will hear music on hold.)
Off The call is being Recorded. (Check other areas for status indicators.)
On The designated extension for the programmed button has a “do not disturb” availability state active.
Off Monitored extension is in Idle state.
On The monitored extension has a “do not disturb” availability state active.
The monitored extension has unheard voicemail messages.
The monitored extension has unheard voicemail messages and a “do not disturb” availability state active.
On The monitored extension is in a conference call.
On The monitored extension is in a connected call.
Guide to the Icons Displayed On Your Phone
17
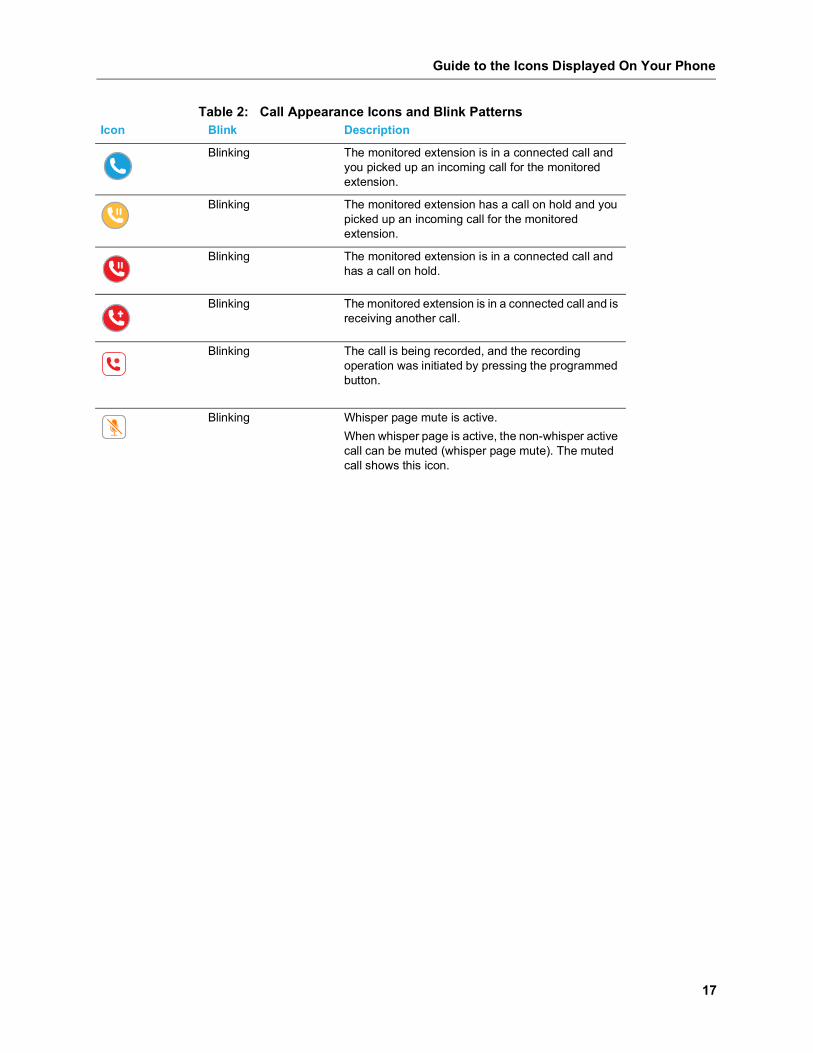
Blinking The monitored extension is in a connected call and you picked up an incoming call for the monitored extension.
Blinking The monitored extension has a call on hold and you picked up an incoming call for the monitored extension.
Blinking The monitored extension is in a connected call and has a call on hold.
Blinking The monitored extension is in a connected call and is receiving another call.
Blinking The call is being recorded, and the recording operation was initiated by pressing the programmed button.
Blinking Whisper page mute is active.When whisper page is active, the non-whisper active call can be muted (whisper page mute). The muted call shows this icon.
Table 2: Call Appearance Icons and Blink PatternsIcon Blink Description
MiVoice 6920 IP Phone User Guide for MiVoice Connect
18
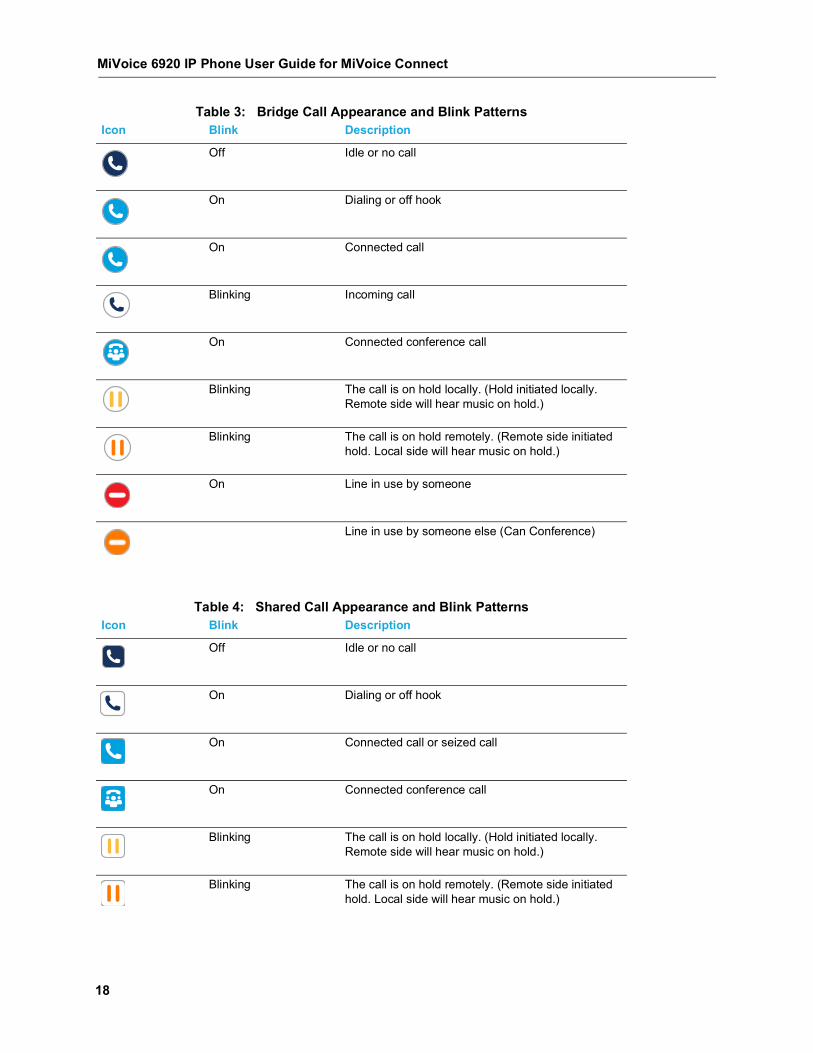
Table 3: Bridge Call Appearance and Blink PatternsIcon Blink Description
Off Idle or no call
On Dialing or off hook
On Connected call
Blinking Incoming call
On Connected conference call
Blinking The call is on hold locally. (Hold initiated locally. Remote side will hear music on hold.)
Blinking The call is on hold remotely. (Remote side initiated hold. Local side will hear music on hold.)
On Line in use by someone
Line in use by someone else (Can Conference)
Table 4: Shared Call Appearance and Blink PatternsIcon Blink Description
Off Idle or no call
On Dialing or off hook
On Connected call or seized call
On Connected conference call
Blinking The call is on hold locally. (Hold initiated locally. Remote side will hear music on hold.)
Blinking The call is on hold remotely. (Remote side initiated hold. Local side will hear music on hold.)

Guide to the Icons Displayed On Your Phone
19
Icons displayed in the Directory indicate the presence or status of the person you want to call. These presence icons are shown in Table 4. If the person or entity’s presence is unknown, no presence icon is shown. Presence icons are also not displayed for phones in the Available or Anonymous states. Figure 4 shows an example of the presence icons in the Directory.
Figure 4: Directory with Presence Icons
On Line in use by someone
Line in use by someone else (Can Conference)
Table 5: Call History IconsIcon Description
Inbound call
Outgoing calls
Missed calls
Redirected calls
All calls
Table 4: Shared Call Appearance and Blink PatternsIcon Blink Description

MiVoice 6920 IP Phone User Guide for MiVoice Connect
20
Using VoicemailTo access your voicemail messages, press the Voicemail hardkey.
For complete details about voicemail, see Using Visual Voicemail on page 53.
Using the DirectoryYou can use the Directory to quickly look up and dial a person’s extension. If you have the proper permissions, you can contact a person through the intercom or use the whisper page. In addition, if your Mitel administrator has added detailed contact information to the system, you can see information in the Directory such as a person’s email address, alternate phone numbers, and alternate contacts.
Making a Call Using Directory1. Press .
Table 6: Presence Icons in the DirectoryIcon Description
Available
In a meeting
Out of office
Extended absence
Anonymous
The user has set a custom availability state.
The user’s extension is on hold or has a call parked on it.
Do not disturb
On a call
Note: To close the directory, press or press the Quit softkey.

Finding Detailed Contact Information
21
2. Locate the name of the person you want to call using one of the following methods:• Use the up or down navigation key to scroll through the directory list until the name of the
person you want to call is highlighted. (To scroll quickly, press and hold a navigation key.)• Dial the numbers that correspond with the first few letters in the person’s first or last name,
pressing a number key once for any letter on that key. For example, to find the name Smith, dial the numbers 76484. You might need to press keys for only the first few letters of the person’s name before the name is recognized. If the filtered list contains more than one name, scroll through the list until the name of the person you want to call is highlighted.
3. With the contact’s name highlighted, press the right navigation key to navigate to the numbers selection column.
4. Press the Dial softkey, press the select button, press , or pick up the handset to dial the contact’s phone number.
Finding Detailed Contact Information 1. Press .
2. Use the up or down navigation key to scroll to the contact.
3. Press the Details softkey.The person’s contact details are displayed.
4. To return to the main Directory screen, press the Close softkey.
Using the Intercom Through Directory
If you have the proper permissions, you can use the Intercom for internal extensions.
1. Press .
2. Use the up and down navigation keys to scroll to the contact.
3. Press the Details softkey.The person’s contact details are displayed.
4. Press the Intercom softkey.The phone initiates an intercom connection.
Dialing Voicemail from Directory1. Press .
2. Use the up or down navigation key to scroll to the required contact.
3. Press the Details softkey.The person’s contact details are displayed.
Note: To delete characters in the filter, press the Backspace softkey. Delete all the characters in the filter to return to the full Directory list.
Note: If your Mitel administrator has enabled presence for the user, the presence icon in the Directory indicates the current status of the person you want to call. For details about the presence icons, see Table 6 on page 20.

MiVoice 6920 IP Phone User Guide for MiVoice Connect
22
4. Press the Dial Voicemail softkey.The phone calls the voice mailbox of the contact you selected.
HelpThe help option lets you immediately contact a member of the MiVoice Connect support team.
1. Press .
2. Press the Help softkey.A confirmation window is displayed.
3. Press the Yes softkey to confirm that you want to place a call.
Using the Call HistoryThe call history displays recent inbound, outbound, missed, and transferred calls, with the most recent call listed first. Each entry in the History list displays the caller’s name or number (if available) and the time or date of the call. If no caller ID information is available for a particular number, the phone displays “Caller ID Unknown.”
With the call history, you can view all calls, or you can filter to see only incoming (From), outgoing (To), or missed calls. You can also dial directly from the call history or delete calls from your call history.
Figure 5: Call History
Viewing a List of All Calls Placed, Received, or Missed
23
Viewing a List of All Calls Placed, Received, or Missed1. Press .
2. Use the up or down navigation key to scroll through the following list:• All• Missed • Outgoing• Received
3. Highlight the required option and press the right navigation key to move to entry column.
4. Use the up or down navigation key to scroll through and view the call list.
5. Press the Details softkey.
Placing a Call Using the Call History1. Press .
2. Use the up or down navigation key to scroll through the following list:• All• Missed • Outgoing• Received
3. Highlight the required option and then press the right navigation key to move to entry column.
4. Use the up or down navigation key to scroll through the History list to the required contact.
5. With the name of the contact you want to call highlighted, choose one of the following options to dial the call: • Press the Dial softkey.• Pick up the handset to take the phone off hook.• Press the speaker/headset button to take the phone off hook.
Using the Intercom Through the Call History
If you have the proper permissions, you can use the Intercom for internal extensions.
1. Press .
2. Use the up or down navigation key to scroll through the History list to the required contact.
3. Press the Intercom softkey.The phone initiates an intercom connection.
Note: To close the call history, press or the Quit softkey.
Note: To close the call history, press or the Quit softkey.
Note: To close the call history, press or the Quit softkey.
MiVoice 6920 IP Phone User Guide for MiVoice Connect
24
Deleting a Call from the Call History1. Press .
2. Use the up and down navigation keys to scroll through the History list and navigate to the contact to be deleted.
3. Press the Delete softkey.
4. When prompted press the Delete softkey.The call is removed from the call history.
Interacting with CallsThis section describes the following ways to interact with calls:
• Placing a call on hold or off hold
• Diverting an incoming call to voicemail
• Transferring a call
• Parking and unparking calls
• Picking up an incoming call for another extension
Placing a Call on Hold or Off Hold• To place an active call on hold, Press .
The screen displays the icon indicating the call is on hold. Additionally, the line/call appearance light begins to flash slowly and after a short time, the phone beeps softly to remind you that you still have a call on hold.
• To take a call off hold, do either of the following:- Press .- Press the Pickup softkey.
If your phone is on hook while a call is on hold, you hear a reminder ring in 10 seconds and then at one-minute intervals while any call remains on hold.
Note: To close the call history, press or press the Quit softkey.

Diverting an Incoming Call to Voicemail
25
Diverting an Incoming Call to Voicemail
Whether your phone is idle or you are engaged in a call, you can send an incoming call to your voice mailbox without answering it.
To send an incoming call to voicemail• While the phone rings, do one of the following:
- Press .- Press the To Vm softkey. - Press #.
The call is sent to your voice mailbox.
Transferring a Call
You can transfer a call in two ways:
• In a blind transfer, you transfer the call without the other party first answering your call.• In a consultative transfer, you talk to the other party before completing the transfer.
Both types of transfer use a similar procedure.
To Do a Blind Transfer1. While engaged in a call, press the Transfer softkey.
2. Dial the number you want to transfer the call to.
3. Press the Transfer softkey.The call is transferred to the designated number.
To Do a Consultative Transfer1. While engaged in a call, press the Transfer softkey.
2. Dial the number you want to transfer the call to.
3. After the other party answers the call, do one of the following:• To complete the transfer, press the Transfer softkey.• To cancel the transfer, press the Drop softkey.
Parking and Unparking Calls
With the appropriate permissions (set by your Mitel administrator), you can park a connected call on another extension and you can unpark that call and return it to your extension.
Note: If you want to cancel the transfer, press the Cancel softkey, take the original call off hold, or put the phone back on-hook, before the timeout is reached.
Note: If you want to cancel the transfer, press the Cancel softkey or take the original call off hold.
Note: To unpark a call, the call must be on hold on the other extension.

MiVoice 6920 IP Phone User Guide for MiVoice Connect
26
To Park a Call1. While the call is active, press the Park softkey.
2. Dial the extension number where you want to park the call.The call is parked on the designated extension.
To Unpark a Call and Return it to Your Extension1. Press the Unpark softkey.
2. Dial the extension number from which you want to unpark the call.The parked call is returned to your extension.
Picking Up an Incoming Call for Another Extension
With the appropriate permissions (set by your Mitel administrator), you can pick up a call that is ringing on another extension.
1. If you want to answer a call coming in to another phone, press the Pickup softkey.
2. Dial the extension number for which you want to pick up an incoming call.The call is now an active call on your extension.
Note: If the call is not answered on the parked phone within a certain amount of time (as configured by your Mitel administrator), the call returns to the original extension. The default is 60 seconds.
Customizing Your Phone
27
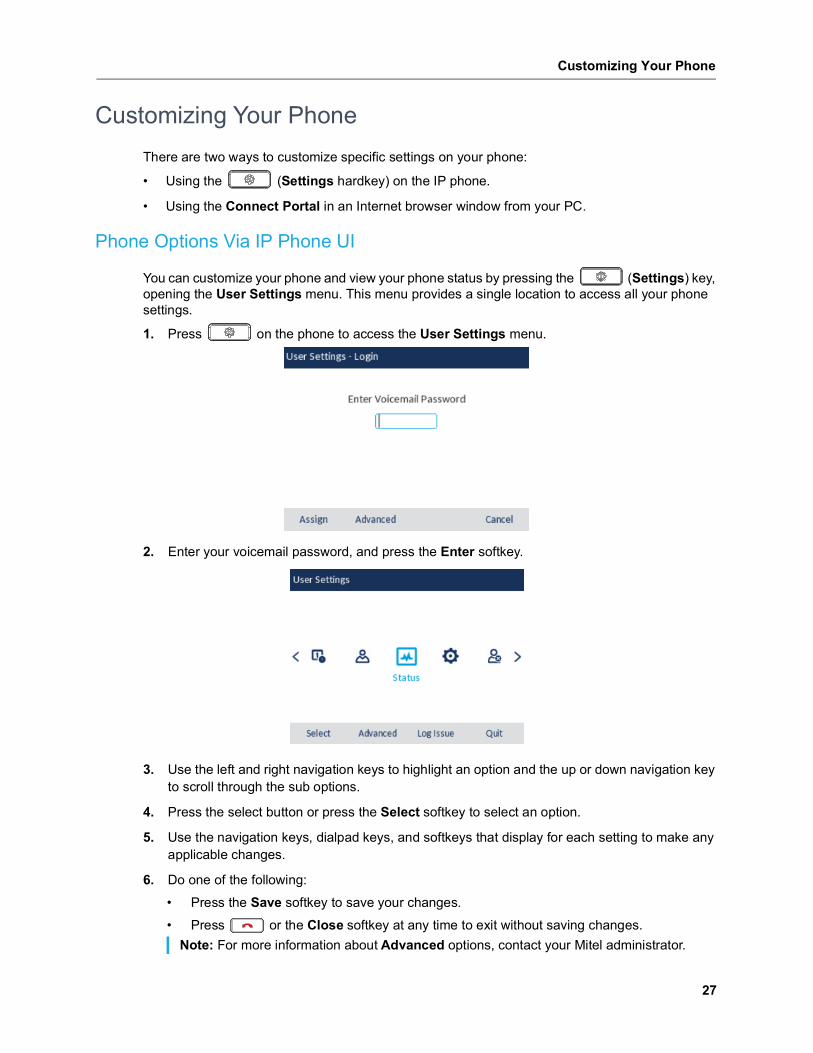
Customizing Your PhoneThere are two ways to customize specific settings on your phone:
• Using the (Settings hardkey) on the IP phone.
• Using the Connect Portal in an Internet browser window from your PC.
Phone Options Via IP Phone UI
You can customize your phone and view your phone status by pressing the (Settings) key, opening the User Settings menu. This menu provides a single location to access all your phone settings.
1. Press on the phone to access the User Settings menu.
2. Enter your voicemail password, and press the Enter softkey.
3. Use the left and right navigation keys to highlight an option and the up or down navigation key to scroll through the sub options.
4. Press the select button or press the Select softkey to select an option.
5. Use the navigation keys, dialpad keys, and softkeys that display for each setting to make any applicable changes.
6. Do one of the following:• Press the Save softkey to save your changes.• Press or the Close softkey at any time to exit without saving changes.
Note: For more information about Advanced options, contact your Mitel administrator.

MiVoice 6920 IP Phone User Guide for MiVoice Connect
28
The following phone settings can be configured through the Settings menu:Icon Option
Availability
Time and Date
Settings
Time Zone
Directory
Settings
Additional Phone
Diagnostics
Ping
Traceroute
Capture
Log upload
Audio Diagnostics
Audio
Audio Mode
Headset
Ring Tones
Display
Restart
Note: All Advanced settings are administrator-level functions, and are not accessible by the user. These settings should be set up and changed only by your Mitel administrator.

Phone Options Via Connect Portal
29
Phone Options Via Connect Portal
In addition to using your phone's interface to change options, you can customize settings on the IP phone using the Connect Portal.
For more information about the Connect Portal see https://oneview.mitel.com/s/article/Mitel-Connect-System-Administration-Guide.
Log IssueYou can collect the phone’s logs and upload them to a server.
1. Press .
2. Press the Log Issue softkey, and wait five minutes for log processing to occur.
Understanding Availability StatesYou can set six distinct availability states for your extension. These availability states can be configured with various options to forward incoming calls to another number or send them to voicemail. Using the voicemail system, you can also record a different personal greeting for each availability state.
By using your phone’s interface, you can configure options for each availability state, such as call forwarding destinations, number of rings, and simultaneous ring. (You can also configure these options in the Connect client.)
The availability states are as follows:
• Available (the default) allows you to answer all incoming calls.
• In a meeting
• Out of office
• Extended Absence
• Custom
• Do not disturb
If you select a “Do Not disturb” availability state, your phone displays the icon for all call appearance keys, and the call appearance LEDs light up orange. The “Do Not disturb” option is in effect when you specify that calls are always to be forwarded. For more information, see Specifying Settings for Availability States on page 30.
Changing Your Active Availability State1. Press the State softkey.
The active state is indicated.
2. Press the left or right navigation key to scroll to the desired Availability.
MiVoice 6920 IP Phone User Guide for MiVoice Connect
30
3. Press the Save softkey.The availability state for your phone changes to the selected state.
Specifying Settings for Availability States1. Press .
2. Enter your voicemail password, and press the Enter softkey.The User Settings menu opens.
3. Press the left or right navigation key to scroll to the Availability option.
4. With the Availability option highlighted, press the Select softkey.
5. Use left or right navigation key to select an Availability option.
6. Press down arrow key to specify when to forward calls by using the navigation keypad to scroll to and highlight one of the following values:• Always means that calls received when this availability state is active are always forwarded
to the specified destination number. When you select Always, you can also specify the Always destination, which is the number that you want calls forwarded to, or you can accept the default.
• No answer means that calls received when this availability state is active will be forwarded to the specified destination number only when you do not answer your phone or when your phone is unable to accept additional calls. You can also configure the following options or accept the defaults:- No answer destination. Specify the number you want calls forwarded to when you do
not answer them.- Number of rings Specify the number of times the phone rings before the call is
forwarded.- Busy destination Specify the number to forward the call to if your extension is busy.
• Never means that calls received when this availability state is active will never be forwarded.
7. For the Simulring option, select On or Off depending on whether you want the phones that you have configured through the Connect client to ring simultaneously with your extension. (However, if you choose to always forward calls to another number, your extension does not ring.)
8. After setting options, press the Save softkey.The changes are saved and the availability state is set.
9. Press the Quit softkey.
Time and Date
31
Time and DateOn the IP phones, the following time and date sub-options are available to be configured:
• Settings:- Time Format- Daylight Savings- Date Format
• Time Zone
Settings
Configuring the Time Format, Daylight Savings, and Date Format 1. Press .
2. Enter your voicemail password, and press the Enter softkey.The User Settings menu opens.
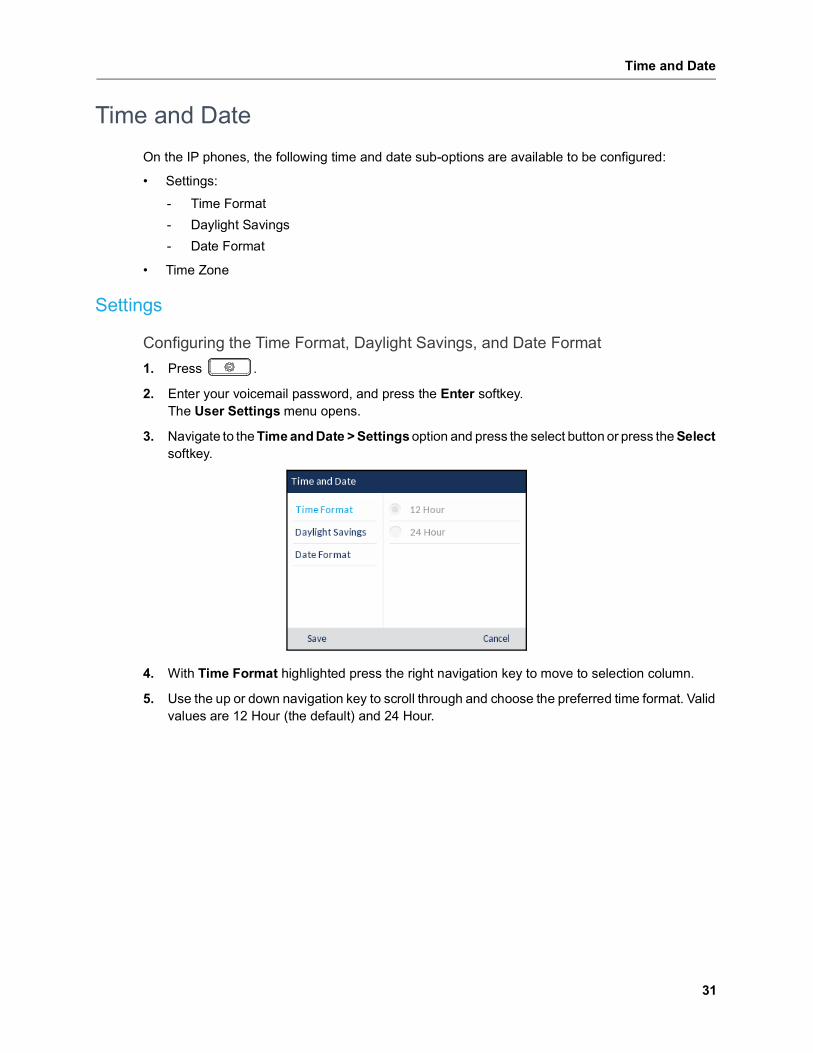
3. Navigate to the Time and Date > Settings option and press the select button or press the Select softkey.
4. With Time Format highlighted press the right navigation key to move to selection column.
5. Use the up or down navigation key to scroll through and choose the preferred time format. Valid values are 12 Hour (the default) and 24 Hour.

MiVoice 6920 IP Phone User Guide for MiVoice Connect
32
6. Press the left navigation key to move to back to the options column and press the down navi-gation key to highlight Daylight Savings.
7. With Daylight Savings highlighted press the right navigation key to move to selection column.
8. Use the up or down navigation key to scroll through and choose the preferred daylight savings setting. Valid values are:• Off• 30 min summertime• 1h summertime• Automatic (default)
9. Press the left navigation key to move to back to the options column and press the down navi-gation key to highlight Date Format.
10. With Date Format highlighted press the right navigation key to move to selection column.
11. Use the up or down navigation key to scroll through and choose the preferred date format. Valid values are:• WWW MMM DD (default)• DD-MMM-YY• YYYY-MM-DD• DD/MM/YYYY• DD/MM/YY• DD-MM-YY• MM/DD/YY

Time Zone
33
• MMM DD• DD MMM YYYY• WWW DD MMM• DD MMM• DD.MM.YYYY
12. Press the Save softkey to save your changes.
Time Zone
Configuring the Time Zone 1. Press .
2. Enter your voicemail password, and press the Enter softkey.The User Settings menu opens.
3. Navigate to the Time and Date > Time Zone option and press the select button or press the Select softkey.A list of time zones displays for different areas of the world.
4. Use the up or down navigation key to scroll through and highlight one of the following regions.• America• Asia• Atlantic• Australia• Europe• Pacific• Others
5. With the desired region highlighted, move to selection column.
6. Use the up or down navigation key to scroll through and choose the time zone that applies to your area. The default time zone is US-Eastern.
7. Press the Save softkey to save your changes.
Note: The time and date formats you configure are applicable to the Home screen as well as the Received Calls and Outgoing Redial Lists.

MiVoice 6920 IP Phone User Guide for MiVoice Connect
34
DirectoryYou can configure directory entries to display using the contact’s first name and then last name or vice versa. Moreover, the option to sort contacts using either their first name or last name is available through the Directory > Settings option in the User Settings menu.
Settings1. Press .
2. Enter your voicemail password, and press the Enter softkey.The User Settings menu opens.
3. Navigate to the Directory > Settings option and press the select button or press the Select softkey.
4. With Display Name Order highlighted press the right navigation key to move to selection column.
5. Use the up or down navigation key to choose the display name order.
6. Press the left navigation key to move to back to the options column and press the down navi-gation key to highlight Sorting Preferences.
7. With Sorting Preferences highlighted press the right navigation key to move to selection column.
8. Use the up or down navigation key to choose a sorting preference.
9. Press the Save softkey to save your changes.
Note: For more information about Directory functionality, see Using the Directory on page 20.

Status
35
StatusThe Status option in the Settings menu allows you to view the following information about your phone:
• Firmware Info: Information about the phone’s firmware version of phone, boot version, and platform.
• Network:General information regarding your phone’s network settings such as IP address, MAC address, and port information.
• Error Messages:Error messages for the phone. If there are no error messages, No Error Messages is displayed
• Notes:Pressing the Notes softkey provides link to the privacy policy information.
• Copyright:Pressing the Copyright softkey provides the copyright information of the IP phone.
To view the Status menu:
1. Press .
2. Enter your voicemail password, and press the Enter softkey.The User Settings menu opens.
3. Press the select button or the Select softkey to enter the Status menu.
4. Use the up or down navigation key to scroll the through the following status options:• Firmware Info

MiVoice 6920 IP Phone User Guide for MiVoice Connect
36
• Network
• Error Messages
To view more information about the selected status item, press the right navigation key and press the down navigation key to scroll through the information.
DiagnosticsThe Diagnostics menu allows you to access the following diagnostic tools:
• Ping
• Traceroute
• Capture
• Log upload
• Audio Diagnostics
Ping
The Ping sub-menu allows you to ping a host name or IP address directly from the 6920 IP Phone. This tool can be used to verify whether or not network connections between the phone and other network endpoints are intact.

Traceroute
37
Using the Ping Tool1. Press .
2. Enter your voicemail password, and press the Enter softkey.The User Settings menu opens.
3. Navigate to the Diagnostics > Ping using the navigation keys and press the Select button or Select softkey.
4. In the input field, enter the host name or IP address of the network endpoint you want to ping using the dialpad keys.
5. Press the Ping softkey to begin.The IP phone displays the number of packets sent, the number of packets received, and the Round-Trip Time (RTT) min/avg/max in milliseconds.
Traceroute
The Traceroute sub-menu allows you to perform a trace request. You can then review the parameters that the DHCP trace returns. After you have reviewed the trace information, the DHCP Lease is released.
Performing Traceroute1. Press .
2. Enter your voicemail password, and press the Enter softkey.The User Settings menu opens.
Note: The Backspace softkey can be used to delete the last digit/character entered, the dot (".") softkey can be used to enter a dot where applicable, and the abc/123 softkey can be used to switch the dialpad keys from alphabetic to numeric.
MiVoice 6920 IP Phone User Guide for MiVoice Connect
38
3. Navigate to the Diagnostics > Traceroute setting and press the Select button or press the Select softkey.
4. Enter an IP address.
5. Press the Traceroute softkey.
Capture
The Capture option allows you to capture TCP network packets for up to 1440 minutes (24 hours) as well as various logs that can in turn be used to help debug and troubleshoot various issues.
Capturing TCP Network Packets1. Press .
2. Enter your voicemail password, and press the Enter softkey.The User Settings menu opens.
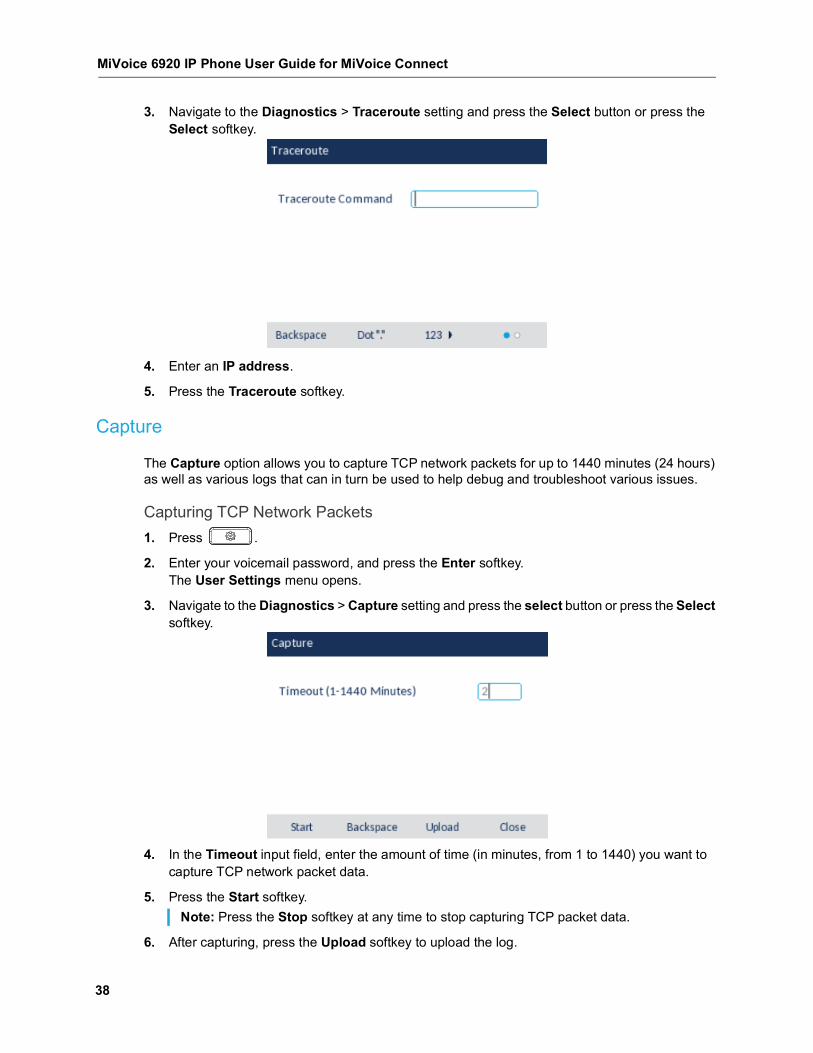
3. Navigate to the Diagnostics > Capture setting and press the select button or press the Select softkey.
4. In the Timeout input field, enter the amount of time (in minutes, from 1 to 1440) you want to capture TCP network packet data.
5. Press the Start softkey.
6. After capturing, press the Upload softkey to upload the log.
Note: Press the Stop softkey at any time to stop capturing TCP packet data.
Log Upload
39
7. Press the Close softkey to go back to the Diagnostics menu.
Log Upload
Log upload option allows you to collect the phone’s logs and upload them to a server.
Performing the Log Upload1. Press .
2. Enter your voicemail password, and press the Enter softkey.The User Settings menu opens.
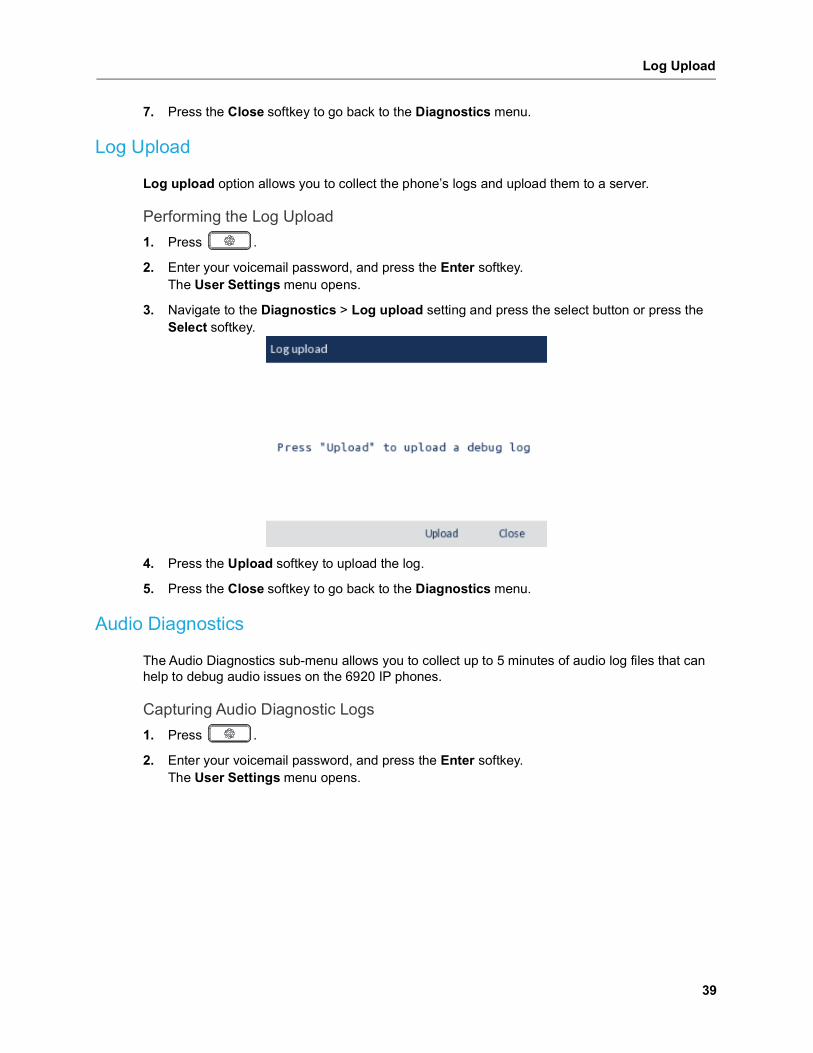
3. Navigate to the Diagnostics > Log upload setting and press the select button or press the Select softkey.
4. Press the Upload softkey to upload the log.
5. Press the Close softkey to go back to the Diagnostics menu.
Audio Diagnostics
The Audio Diagnostics sub-menu allows you to collect up to 5 minutes of audio log files that can help to debug audio issues on the 6920 IP phones.
Capturing Audio Diagnostic Logs1. Press .
2. Enter your voicemail password, and press the Enter softkey.The User Settings menu opens.

MiVoice 6920 IP Phone User Guide for MiVoice Connect
40
3. Navigate to the Diagnostics > Audio Diagnostics using the navigation keys and press the Select softkey.
4. In the Timeout input field, enter the amount of time (in minutes, from 1 to 5) you want to run the audio diagnostic tool for, using the dialpad keys.
5. Press Start softkey.The IP phone displays “Capturing” and when the timeout elapses, “Collecting Logs” is displayed. When all the logs have been collected, a “Complete” message is displayed.
6. Press the Close softkey to go back to the Diagnostics menu.
AudioThe 6920 IP phone allows you to use a handset, a headset, or handsfree mode to handle incoming and outgoing calls. The Audio Mode option provides different combinations of these three methods to provide maximum flexibility in handling calls. There are four audio mode options you can set:
Notes: • Press the Stop softkey at any time to stop capturing the audio diagnostic logs.• A “log issue” is issued only after the completion of an audio diagnostics run.
CAUTION: Do not change the audio device when you run the audio diagnostics tool.
Audio Mode Option Description
Speaker This is the default setting. Calls can be made or received using the handset or handsfree speakerphone. In handset audio mode, pressing on the phone switches to handsfree speakerphone. In Speaker audio mode, lift the handset to switch to the handset.
Headset Choose this setting if you want to make or receive all calls using a handset or headset. Calls can be switched from the handset to headset by pressing
on the phone. To switch from the headset to the handset, lift the handset.
Speaker/Headset Incoming calls are sent to the handsfree speakerphone first when is pressed. By pressing the hardkey again, you can switch back and forth between the handsfree speakerphone and the headset. At any time, lifting the handset switches back to the handset from either the handsfree speakerphone or the headset.

Configuring the Audio Mode
41
Configuring the Audio Mode1. Press .
2. Enter your voicemail password, and press the Enter softkey.The User Settings menu opens.
3. Navigate to the Audio > Audio Mode option and press the select button or press the Select softkey.
4. Use the up or down navigation key to scroll through and highlight the preferred audio mode. • Speaker (default)• Headset• Speaker/Headset• Headset/Speaker
5. Press the Save softkey to save your changes.
Headset
The Headset option allows you to set the volume level for the headset microphone and also allows you to enable/disable DHSG.
DHSG is a standard for telecommunication headsets. The 6920 IP Phones support the use of a DHSG headset.
Use of a non-verified DHSG headset solution is at the customer’s own discretion and the customer should be aware that some DHSG headsets require an optional cable in order to be electrically DHSG compliant. Mitel is not responsible for any damage to the IP phone or headset that may result from the use of non-verified headsets, or from incorrectly connecting headsets or cables.
Headset/Speaker Incoming calls are sent to the headset first when is pressed. By pressing the hardkey again, you can switch back and forth between the headset and the handsfree speakerphone. At any time, lifting the handset switches back to the handset from either the headset or the handsfree speakerphone.
Audio Mode Option Description

MiVoice 6920 IP Phone User Guide for MiVoice Connect
42
Configuring Headset Mic Volume and DHSG1. Press .
2. Enter your voicemail password, and press the Enter softkey.The User Settings menu opens.
3. Navigate to the Audio > Headset option and press the select button or press the Select softkey.
4. With Headset Mic Vol highlighted press the right navigation key to move to selection column.
5. Use the up or down navigation key to scroll through and choose the desired volume setting. Valid values are:• Low• Medium (default)• High
6. Press the left navigation key to move to back to the options column and press the down navi-gation key to highlight DHSG.
7. With DHSG highlighted press the right navigation key to move to selection column.
8. Use the up or down navigation key to scroll through and choose whether or not to enable DHSG. Valid values are:• DHSG is OFF (default)• DHSG is ON
9. Press the Save softkey to save your changes.

Changing the Ringtone
43
Changing the Ringtone1. Press .
2. Enter your voicemail password, and press the Enter softkey.The User Settings menu opens.
3. Navigate to the Audio > Ring Tones option and press the select button or press the Select softkey.
4. Use the up or down navigation key to scroll through and choose a ring tone (Tone 1 through Tone 15, Silent, or any custom ring tones installed).
5. Press the Save softkey to save your changes.The ring tone you select is immediately applied to the IP phone.
DisplayThe Display option allows you to set the following settings on your phone:
• Home Screen Settings:- Screen Saver Timer
• Brightness Settings:- Brightness Level- Brightness Timer
• Push Notifications:- Sound- Bluetooth- External
Home Screen Settings
The Screen Saver Timer option allows you to configure the amount of time (in seconds) the phone must be idle before the screen saver initiates. When the specified amount of time expires, a screen saver displaying the date and time and the number of missed calls (if applicable) is displayed on screen.

MiVoice 6920 IP Phone User Guide for MiVoice Connect
44
Configuring the Screen Saver Timer1. Press .
2. Enter your voicemail password, and press the Enter softkey.The User Settings menu opens.
3. Navigate to the Display option and press the select button or press the Select softkey.
4. Press the down navigation key to highlight Screen Saver Timer.
5. Enter a value, in seconds, using the dialpad keys. You can set the timer from 0 (disabled) to 7200 seconds. the default is 1800 (30 minutes).
6. Press the Save softkey to save your changes.
Brightness Settings
The Brightness Level option on the IP phone allows you to set the amount of light that illuminates the LCD display.
The Brightness Timer option allows you to set the amount of time you want the LCD display to stay illuminated before turning the backlight off during a period of inactivity. For example, if you set the brightness timer to 60, when the phone reaches 60 seconds of inactivity, the LCD backlight goes off.
Setting the Brightness Level and Timer1. Press .
2. Enter your voicemail password, and press the Enter softkey.The User Settings menu opens.
3. Navigate to the Display option and press the select button or press the Select softkey.
4. Press the down navigation key twice to highlight Brightness Level.
5. Use the left and right navigation buttons to increase or decrease the intensity of brightness on the LCD.
6. Press the down navigation key to highlight Brightness Timer.
7. Enter a value, in seconds, using the dialpad keys. You can set the timer from 1 to 36000 seconds. The default is 600 (10 minutes).

Push Notifications
45
8. Press the Save softkey to save your changes.
Push Notifications
A push notification is a message that pops up on the device. This ensures that the user gets notified even when the application is not running.
Setting the Push Notifications 1. Press .
2. Enter your voicemail password, and press the Enter softkey.The User Settings menu opens.
3. Navigate to the Display option and press the select button or press the Select softkey.
4. Press the down navigation key to highlight the desired option under Push Notification and press the select button or press the Select softkey.• Sound• Bluetooth• External
5. Press the Save softkey to save your changes.
RestartYou may want to restart your phone to check for updates on the server, or you may occasionally need to restart your phone for phone configuration changes or network settings to take effect. You may also need to restart your phone if you have been asked to do so by your Mitel administrator or should you experience any unexpected behavior.
Restarting Your Phone1. Press .
2. Enter your voicemail password, and press the Enter softkey.The User Settings menu opens.
3. Navigate to the Restart option and press the select button or press the Select softkey.

MiVoice 6920 IP Phone User Guide for MiVoice Connect
46
4. When the Restart Phone? prompt appears, navigate to Yes and press the select button. If you do not wish to restart your phone, press Cancel or No.
Note: Your phone goes out of service temporarily during the restart and reboot process.

Making a Conference Call
47
Making a Conference CallA conference call involves more than two parties connected in a call. The number of people you can conference together in a call using your Conference hardkey depends on your system configuration. Contact your Mitel administrator for the details about your system’s conference capabilities.
You can set up a conference call using either of the following approaches:
• In a blind conference call, you conference the people together without the other person first answering your call.
• In a consultative conference call, you talk to the person before adding that person to the conference call.
To make a conference call
1. Dial the extension of the first person you want to include in the conference call, and consult with that person.
2. Press the Conference softkey.The call is put on hold.
3. Dial the extension of the next person you want to add to the conference call.
4. Optionally, after dialing the extension, you can quickly do one of the following:• Press the Consult softkey or wait until the timeout ends to initiate a consultative conference.• If you have the necessary permissions, press the Intercom softkey to connect with the other
party through the intercom.
5. Do one of the following:• While the phone rings, proceed to the next step.• Wait for the person to answer, and consult with the person if necessary.
6. If you’ve initiated a consultative or Intercom conference, when prompted press the Conference softkey to proceed with the conference.A three-way conference call is established. Your phone displays the number of other participants included in the conference call.
7. Repeat steps 1-6 for each additional person you want to include in the conference call.
Using the Merge Feature to Conference Active CallsWhen you are engaged in an active call or a conference call, you can add another call to your active call through the Merge feature.
• To add the call to an existing call or conference call, press the Merge softkey.- If there is only one other call on the phone, the new call is automatically added to the held
call or conference call.- If more than one other call is on hold, the phone displays a list of calls you can merge the
active call to. Scroll to the call you want to merge, and press the Merge softkey.
Note: Press the Cancel softkey or press if you want to cancel the conference.

MiVoice 6920 IP Phone User Guide for MiVoice Connect
48
- If the call in focus is a held call, when you press the Merge softkey it merges the held call to the active call.
Using the IntercomThe Intercom function allows you to connect with another party without ringing the party through a call line. To use this feature, you and the other party must use Mitel IP phones and have the necessary permissions enabled by your Mitel administrator.
The intercom functionality is also available as a softkey through the directory, the call history, and the conferencing feature. Your Mitel administrator can also configure the Intercom as a programmed button.
To use the intercom to contact another party
1. Lift the handset.
2. Dial * 15 followed by the extension number of the person you want to contact.
PagingIf your phone and other phones at your site are configured for paging, you can speak a message to be heard on a connected speaker, usually overhead. Or you can use group paging to simultaneously page all of the phones included in a list of extensions.
To use either type of paging function, your Mitel administrator must give you access.
To send a page
1. Dial the number your Mitel administrator provided and wait for the confirmation tone, and then begin speaking in to the handset.
2. Hang up when you are finished.
Voice ServicesThe Voice Services option displays the fully qualified configuration server to which the phone is registered to obtain the provisioning data.
To View The Configuration Server1. Press .
2. Enter your voicemail password and press the Enter softkey.
Note: If you hear an error tone when you try to page, paging might not be configured at your site or you might not have the necessary permissions to use paging. Contact your Mitel administrator for assistance.

Simultaneous Ringing
49
3. Navigate to the Voice Services > MiVoice Connect and press the select button or press the Select softkey.
4. In the Config. Server field, enter the MiVoice Connect Server IP address.
Or, edit the existing MiVoice Connect Configuration Server address.
5. Press the Save softkey.
Simultaneous RingingThe simultaneous ringing feature allows users to configure up to two additional phones to ring in addition to their assigned phone. The Mitel administrator needs to configure the simultaneous ringing feature in the MiVoice Connect Director (Connect portal). When this feature configured for a user, the Additional Phone option (in the Settings) becomes available for the user.
A user can follow these steps to activate the simultaneous ringing feature:
1. Press .
2. Enter your voicemail password, and press the Enter softkey.
3. Navigate to the Additional Phone option and press the select button or press the Select softkey.
4. Select the Additional Phone check box and press the Save softkey to activate the simultaneous ringing feature.
To enable or disable additional ringing:
1. While your phone is ringing, press the AddOn softkey.The designated extension starts ringing.
2. Press the AddOff softkey to stop ringing on the additional phone. The call returns to the original extension.
Note: Mitel does not recommend changing the server configuration address after the phone is successfully registered.

MiVoice 6920 IP Phone User Guide for MiVoice Connect
50
Other Advanced FeaturesYour Mitel administrator can assign a variety of features and permissions to you that you can access through the programmable keys on your phone. Some of these features are also available through star codes.
Table 7 describes these advanced features. These features are available only if your Mitel administrator has configured your user profile with the necessary permissions.
Table 7: Advanced FeaturesFeature Name Star Code Description
Barge In Dial *16 plus the extension that is involved in the active call you want to join.
You can join an in-progress call (“barge in”) as a conferenced participant. This feature is useful for operators, executive assistants, trainers, and workgroup supervisors.Included in this feature are some visual cues such as simple icons that allow you to monitor the extension to a limited extent.
Bridged Call Appearance/Shared Call Appearance
None You can see call activity and interact with calls for another extension. This bridged information, which provides more detailed information than the Monitor Extension functionality, offers faster call handling between users. The call appearance button assigned to the targeted extension displays various icons and LED colors and blink patterns according to the type of call.Note: Two-key press is required for Admin to answer a BCA call. The first key press always displays the callerID screen.
Record Call None The Record Call button functionality depends on how Connect Call Recording is configured for the user.Record all calls (Always On Call Recording): Press the Record Call button to pause call recording; press the button a second time to resume call recording.Note: It is recommended that you configure a long and short label for this button which describes the pause/restart functionality; for example, Pause.User initiates recording (On-demand Call Recording): Press the Record Call button to start call recording; press the button a second time to stop call recording. Only external calls can be recorded.Call recordings are saved and can be accessed from the call recording portal.
Call Appearance None Represents a phone call on your extension.Note: Call Appearance is not supported on Button Box.
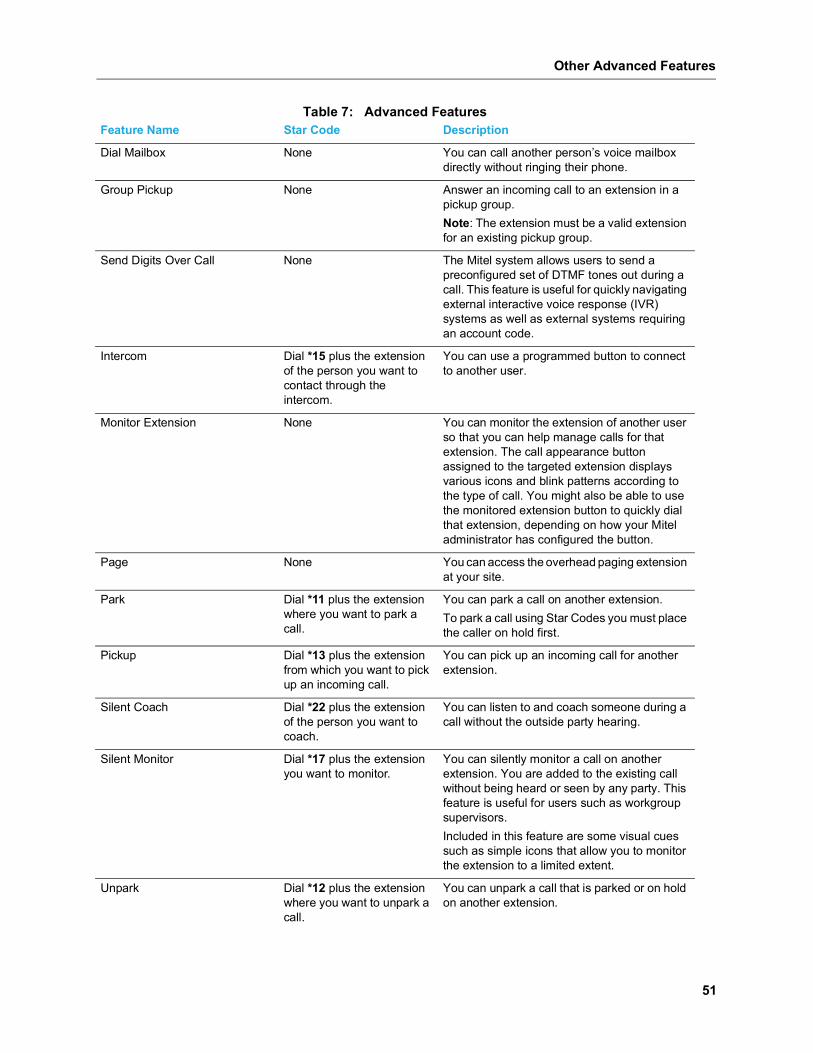
Other Advanced Features
51
Dial Mailbox None You can call another person’s voice mailbox directly without ringing their phone.
Group Pickup None Answer an incoming call to an extension in a pickup group.Note: The extension must be a valid extension for an existing pickup group.
Send Digits Over Call None The Mitel system allows users to send a preconfigured set of DTMF tones out during a call. This feature is useful for quickly navigating external interactive voice response (IVR) systems as well as external systems requiring an account code.
Intercom Dial *15 plus the extension of the person you want to contact through the intercom.
You can use a programmed button to connect to another user.
Monitor Extension None You can monitor the extension of another user so that you can help manage calls for that extension. The call appearance button assigned to the targeted extension displays various icons and blink patterns according to the type of call. You might also be able to use the monitored extension button to quickly dial that extension, depending on how your Mitel administrator has configured the button.
Page None You can access the overhead paging extension at your site.
Park Dial *11 plus the extension where you want to park a call.
You can park a call on another extension.To park a call using Star Codes you must place the caller on hold first.
Pickup Dial *13 plus the extension from which you want to pick up an incoming call.
You can pick up an incoming call for another extension.
Silent Coach Dial *22 plus the extension of the person you want to coach.
You can listen to and coach someone during a call without the outside party hearing.
Silent Monitor Dial *17 plus the extension you want to monitor.
You can silently monitor a call on another extension. You are added to the existing call without being heard or seen by any party. This feature is useful for users such as workgroup supervisors.Included in this feature are some visual cues such as simple icons that allow you to monitor the extension to a limited extent.
Unpark Dial *12 plus the extension where you want to unpark a call.
You can unpark a call that is parked or on hold on another extension.
Table 7: Advanced FeaturesFeature Name Star Code Description

MiVoice 6920 IP Phone User Guide for MiVoice Connect
52
Whisper Page Dial *19 plus the extension of the person you want to speak to.
You can enter a call on another extension and speak to the person without the other party hearing. The person can speak back to you privately through the whisper page mute feature.
Busyout Hunt Group Dial*18
Ring All - Call Move Dial *23
Unblock Caller ID for this call Dial *82
Block Caller ID for this call Dial *67
Whisper Page Mute None If you receive a whisper page, you can speak privately to the person who is speaking to you through the whisper page.
Send Digits Over Call None The Mitel system allows users to send a preconfigured set of DTMF tones out during a call. This feature is useful for quickly navigating external interactive voice response (IVR) systems as well as external systems requiring an account code.
Lock/Unlock None A user of the Shared Call Appearance feature can override the default privacy setting by toggling the Lock/Unlock softkey on the phone.The text above the softkey describes the action to be applied to the active call; the softkey text label toggles between Lock and Unlock.Lock makes the call private and unlock makes the call available for conferencing.
Picking up the Night Bell Dial *14 to answer the call when you hear the phone ring on the overhead speaker.
A night bell allows calls to route to an extension that rings on an overhead speaker. This feature can be convenient for off-hours when a caller needs to speak with anyone at a site. If you want to use the night bell function, the feature must be configured at your site and your Mitel administrator must authorize your access.Note: If you hear an error tone when you try to pick up the night bell, the night bell might not be configured at your site or you might not have the necessary permissions to answer it. Contact your system administrator for assistance.
Record Extension None Record an active external call on another person’s extension; only an extension involved in an external call can be recorded.Call recordings can be saved in the mailbox of the initiating client (by leaving the mailbox field blank) or can be routed to an alternate mailbox by entering a mailbox number in the field.
Table 7: Advanced FeaturesFeature Name Star Code Description

Voicemail Overview
53
Voicemail OverviewThe 6920 IP phone provides a hardkey to access voicemail.
When voicemail functionality is enabled, the LED on the 6920 flashes red and the (Voicemail) icon appears on the status bar indicating that voicemail messages are available. You can access your voicemail service by pressing (Voicemail hardkey).
Using Visual VoicemailWith visual voicemail, you can access and interact with messages through the display on your phone. At a glance, you can see the following information about the messages in your voice mailbox:
• The name and phone number of the person who left the message
• The date or time of the message
• Whether the message is a broadcast message and whether it is marked urgent, private, or return receipt requested
The most recent message is listed first.
The number at the top of your phone’s main display indicates the number of unheard messages. In your visual voicemail inbox, the number at the top indicates the number of messages in your inbox. Unheard messages are displayed in bold text. Messages that you have already listened to are displayed in regular text.
At any point, you can pause, skip back, or skip forward in the message.
You can also use the visual voicemail interface to record a new voicemail message and designate the recipients, include a subject label for the message, mark the message as urgent, mark the message as private, and request a return receipt.
Voicemail has the following folders:
Inbox: The voice mail messages you have received are listed in the inbox.
Saved: This folder contains the saved voicemail messages.
Deleted: This folder contains the deleted voicemail messages.
Note: Voicemail functionality must be configured by your Mitel administrator.
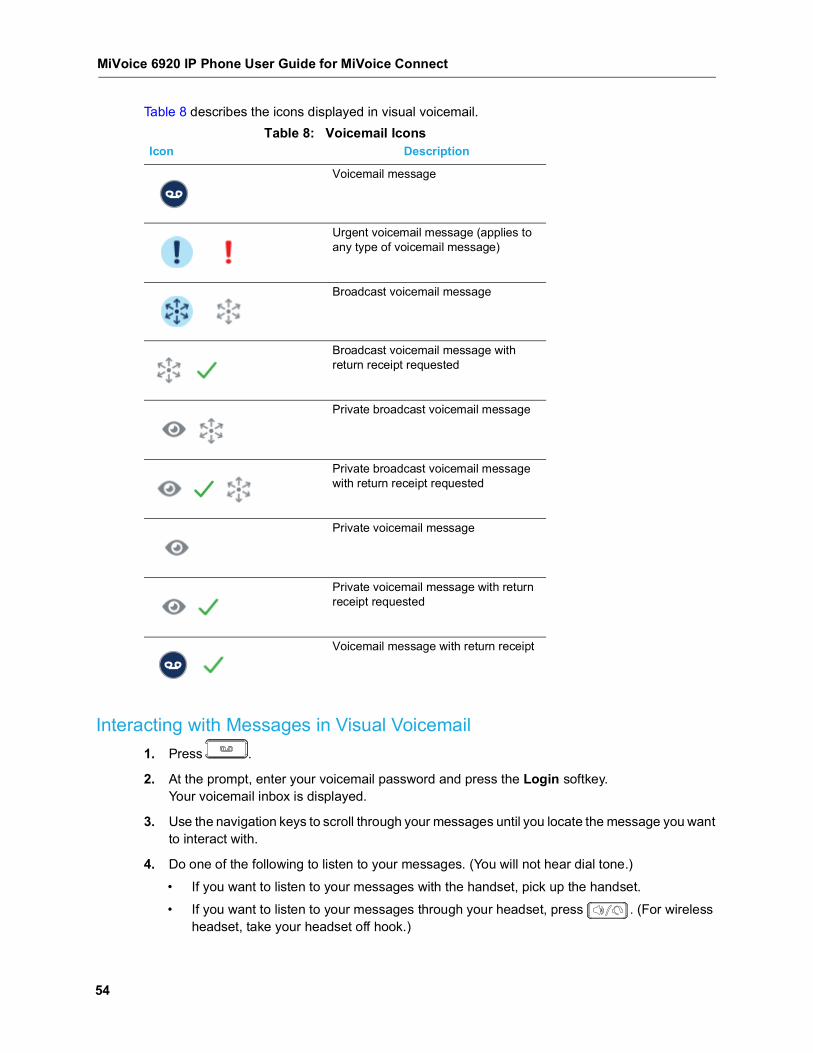
MiVoice 6920 IP Phone User Guide for MiVoice Connect
54
Table 8 describes the icons displayed in visual voicemail.
Interacting with Messages in Visual Voicemail1. Press .
2. At the prompt, enter your voicemail password and press the Login softkey.Your voicemail inbox is displayed.
3. Use the navigation keys to scroll through your messages until you locate the message you want to interact with.
4. Do one of the following to listen to your messages. (You will not hear dial tone.)• If you want to listen to your messages with the handset, pick up the handset. • If you want to listen to your messages through your headset, press . (For wireless
headset, take your headset off hook.)
Table 8: Voicemail IconsIcon Description
Voicemail message
Urgent voicemail message (applies to any type of voicemail message)
Broadcast voicemail message
Broadcast voicemail message with return receipt requested
Private broadcast voicemail message
Private broadcast voicemail message with return receipt requested
Private voicemail message
Private voicemail message with return receipt requested
Voicemail message with return receipt

Replying to Messages in Visual Voicemail
55
• If you want to listen to your messages through the speakerphone, you do not have to do anything. By default, messages are played over the speakerphone.
5. Choose one of the following actions:• To play the message, press the Play softkey. While the message is playing, you can do any
of the following: - To pause while listening to the message, press the Pause softkey.- To rewind the message a few seconds, press the Skip Back softkey.- To move a few seconds ahead in the message, press the Skip Forward softkey.- To stop playing the message, press the Stop softkey.
• To delete the message, press the Delete softkey.• To call the person who left the message, press the Call Back softkey.• To save the message, press the More softkey and then press the Save softkey.• To see more details about the message, such as the subject line or the sender’s email
address, press the More softkey and then press the Open softkey.
6. When you are done, press the Quit softkey.
Replying to Messages in Visual Voicemail1. Press .
2. At the prompt, enter your voicemail password and press the Login softkey.Your voicemail inbox is displayed.
3. Use the navigation keys to scroll through your messages until you locate the message you want to interact with.
4. Press the More softkey.
5. Press the Reply softkey.The Compose Voicemail page is displayed.
6. If you want to change the Subject label for the voicemail message, do the following: • Press the down navigation key to scroll to the Subject menu item, and press the Edit.. softkey.• Use the dialpad to enter the your text.• Press the Backspace softkey to delete some characters.• Press the ABC/abc/123 softkey to toggle through and select the preferred text-entry mode,
and then use the keypad to enter the text you want to use for the Subject line.
Note: If your system is configured to notify you that new or saved messages will be deleted after a certain number of days, you receive this type of notification as a message in your visual voicemail inbox. The notification appears as a message from yourself. When you select the message, the notification is displayed as a warning in a pop-up message on the phone rather than played as an file. After you view the pop-up message, you can delete the message by pressing the Delete softkey.
Note: To enter a space character, select either the uppercase or lowercase text-entry mode and press the * key until the space character is displayed.
MiVoice 6920 IP Phone User Guide for MiVoice Connect
56
• When you are done press the Back softkey.
7. If you want to mark the voicemail message as Urgent, press the down navigation key to scroll to the Urgent menu item, and press the select button on the navigation keypad.
8. If you want to mark the voicemail message as Private, press the down navigation key to scroll to the Private menu item, and press the select button on the navigation keypad.
9. If you want to receive a Return Receipt when the recipient listens to the message, press the down navigation key to scroll to the Return Receipt menu item, and press the select button on the navigation keypad.
10. If you want to include the original message with your reply, press the down navigation key to scroll to the Include Original menu item, and press the select button on the navigation keypad.
11. To record your reply to the voicemail message, press the Start softkey, record the message, and press the Stop softkey.
12. Press the Send softkey.The voicemail message is sent to the targeted recipients.
13. Press the Quit softkey.
Forwarding Messages in Visual Voicemail1. Press .
2. At the prompt, enter your voicemail password and press the Login softkey.Your voicemail inbox is displayed.
3. Use the navigation keys to scroll through your messages until you locate the message you want to interact with.
4. Press the More softkey.
5. Press the Forward softkey.The Compose Voicemail page is displayed.
6. Designate those to whom you want to forward the message as follows:
a. With To highlighted, press the Edit... softkey.
b. Enter the recipient phone number.
c. Press the Back softkey.
7. If you want to change the Subject label for the voicemail message, do the following: • Press the down navigation key to scroll to the Subject menu item, and press the Edit..
softkey.• Use the dialpad to enter your text.• Press the Backspace softkey to delete some characters.• Press the ABC/abc/123 softkey to toggle through and select the preferred text-entry mode,
and then use the keypad to enter the text you want to use for the Subject line.
Note: To enter a space character, select either the uppercase or lowercase text-entry mode and press the * key until the space character is displayed.

Viewing Saved Messages in Visual Voicemail
57
• When you are done, press the Back softkey.
8. If you want to mark the voicemail message as Urgent, press the down navigation key to scroll to the Urgent menu item, and press the select button on the navigation keypad.
9. If you want to mark the voicemail message as Private, press the down navigation key to scroll to the Private menu item, and press the select button on the navigation keypad.
10. If you want to receive a Return Receipt when the recipient listens to the message, press the down navigation key to scroll to the Return Receipt menu item, and press the select button on the navigation keypad.
11. If you want to include the original message with your reply, press the down navigation key to scroll to the Include Original menu item, and press the select button on the navigation keypad.
12. To start recording your reply to the voicemail message, press the Start softkey; to stop the recording, and press the Stop softkey.
13. Press the Send softkey.The voicemail message is sent to the targeted recipients.
14. Press the Quit softkey.
Viewing Saved Messages in Visual Voicemail1. Press .
2. At the prompt, enter your voicemail password and press the Login softkey.Your voicemail inbox is displayed.
3. Press down navigation to highlight Saved.
4. Press the right navigation key and then press down and up navigation keys to scroll through your saved messages until you locate the message you want to interact with.
5. With a saved message in focus, you can take one of the following actions:• To view details about the person who sent the message, press the Open softkey.• To delete the message, press the Delete softkey.• Press the Play softkey.• To call the person who left the message, press the More softkey, press the More softkey
again, and then press the Call Back softkey.
6. When you are done, press the Quit softkey.
Deleting Messages in Visual Voicemail1. Press .
2. At the prompt, enter your voicemail password and press the Login softkey.Your voicemail inbox is displayed.
3. Use navigation keypad to locate the message you’d like to delete.
4. With the message highlighted, press the Delete softkey.
5. At the prompt, press the Delete Softkey.The message is deleted.

MiVoice 6920 IP Phone User Guide for MiVoice Connect
58
6. For each message that you want to delete, repeat steps 3-5.
7. When you have completed deleting messages, press the Quit softkey.
Using the Voicemail SystemThe voicemail system provides a method to listen to and manage your voicemail messages by following prompts.
Logging In to the Voicemail System
A steadily flashing red light in the upper right corner of your phone indicates that you have unheard messages. To hear your messages using the voicemail system, you must first log in to the voicemail system.
You can also log in to the voicemail system from another extension or from an external phone.
Logging In to Voicemail from Your Phone1. Do one of the following:
• Press #.• Press , and then press the Call VM softkey.
Your phone dials the voicemail system.
2. At the prompt, enter your password, and then press #.
Logging In to Voicemail from Another Extension
You can log in to the voicemail system from another extension in your system, whether it is an IP phone or an analog phone.
1. Do one of the following:• Press # while the phone is on hook.• Press # while the phone is off hook with dial tone.• Press and press the Call VM softkey.
2. At the password prompt, press # and then enter your extension.
3. Enter your password, and then press #.
Logging In to Voicemail from An External Phone1. Dial the voicemail access number provided by your Mitel administrator.
2. At the prompt, press # and then dial your extension.
Note: To move the message to your voicemail inbox, press the To inbox softkey.
Note: The first time you log in to the voicemail system, you are prompted to record your name.
Note: If you are using a phone that is in an “Available” or “Anonymous” state, the initial prompt directs you to enter your extension rather than a password; therefore, so you do not have to press # before entering your extension.
Interacting with New Messages in the Voicemail System
59
3. Enter your password, and then press #.
Interacting with New Messages in the Voicemail System
This section describes shortcuts and common tasks for handling messages in the voicemail system.
Using Shortcut Keys
You can press the following keys while listening to messages:
• To hear envelope information (time and date sent, user’s name) for a message, press 6.
• To rewind to several seconds earlier in a message, press 7.
• To pause a message, press 8.
• To fast forward to several seconds later in a message, press 9.
• To continue to the next message, press #.
• To hear additional options, press 0.
Listening to, Replaying, Saving, and Deleting Messages1. Log in to voicemail.
2. To listen to new messages, press 1.
3. As you listen to each message, you can do one of the following:• To replay a message, press 1.• To save a message, press 2.• To delete a message, press 3.
Forwarding a Message1. Log in to voicemail.
2. To listen to new messages, press 1.
3. After listening to the message you want to forward, press 4.
4. Record a prefacing remark, and then do one of the following:• If you are satisfied with the prefacing remark, press #.• To review the prefacing remark, press 1.• To rerecord the prefacing remark, press 2.• To cancel the recording, press *.
Replying to a Message1. Log in to voicemail.
2. To listen to new messages, press 1.
3. After listening to the message you want to reply to, press 5.
Note: After addressing a message, you can press 1 to mark it urgent.

MiVoice 6920 IP Phone User Guide for MiVoice Connect
60
4. Choose one of the following options:• To reply with a voice message, press 1.• To reply with a call back, press 2.• To reply to all with a voice message, press 3.• To return to the previous menu, press *.
Listening to Saved Messages1. Log in to voicemail.
2. From the voicemail Main Menu, press 3.
To interact with saved messages, press any one of the options (except for option 2) described in Interacting with Messages in Visual Voicemail on page 54.
Sending Messages from Voicemail1. Log in to voicemail.
2. From the voicemail Main Menu, press 2.
3. Record the message and select one of the following options:• To cancel the message recording, press *.• To finish recording, press #.• To review the message, press 1.• To rerecord the message, press 2.
4. After you are satisfied with your recording, press # to finish recording.
5. At the prompt, enter the recipient’s extension.
6. To choose additional addressing options, press 0 and select any of the following options:• To look up a recipient by name in the directory, press 1.• To send a personal distribution list, press 2.• To broadcast to all extensions, press 3.• To cancel addressing options, press *.
7. After the message is addressed, select any of the following options:• To mark or unmark a message as urgent, press 1.• To request a return receipt, press 2.• To send the message, press #.
Leaving a Message and Using Message Options
When the recipient of your call does not answer and has not opted to automatically forward calls, you can leave a message when prompted.
1. Enter one of the following options while listening to the mailbox greeting:• To bypass the greeting and leave a message, press #.

Using Mailbox Options
61
• To transfer to an assistant, press 0.• To return to the auto-attendant, press 9.• To forward your call to the recipient’s Find Me destination (an optional number where calls
can be forwarded), press 1. If a Find Me destination is not enabled, you are prompted to record a message.
2. After recording the message, choose one of the following options:• To access message options, press # and select one of the following message options:
- To send the message, press #.- To cancel the message, press *.- To review the message, press 1.- To rerecord the message, press 2.- To mark or unmark the message as urgent, press 3.- To mark or unmark the message as private, press 4.- To transfer to the auto-attendant, press 9.- To transfer to the assistant, press 0.
• To rerecord the message, press *.• To send the message and transfer to an assistant, press 0.• To send the message and transfer to the auto-attendant, press 9.• To send the message and forward it to the recipient’s Find Me destination (if enabled), press
1.
3. Hang up to send the message.
Using Mailbox Options
The Mailbox Options sub-menu in the voicemail system lets you handle the following tasks:
• Record your name
• Record a personal greeting
• Set your password
• Assign your extension to a phone
• Change your availability state
• Enable or disable envelope information
• Listen to deleted messages
• Remove deleted messages
• Enable or disable Outlook-automated call handling
• Enable or disable email delivery
• Change the agent state
• Enable or disable Find Me forwarding

MiVoice 6920 IP Phone User Guide for MiVoice Connect
62
Recording Your Name1. Log in to voicemail.
2. From the voicemail Main Menu, press 7 to access mailbox options.
3. Press 6.
4. Record your name, and then press #.
5. Choose one of the following options: • To accept your name recording, press #.• To review your name recording, press 1.• To rerecord your name, press 2.• To delete this recording, press 3.• To cancel, press *.
Recording a Personal Greeting1. Log in to voicemail.
2. Press 7 to access mailbox options.
3. Press 1 to record a personal greeting.
4. Record your personal greeting for the currently active availability state at the tone and press #, then select from the following options:• To accept the personal greeting, press #.• To review the personal greeting, press 1.• To rerecord the personal greeting, press 2.• To cancel the recording, press *.
Setting Your Password 1. Log in to voicemail.
2. From the voicemail Main Menu, press 7 to access mailbox options.
3. Press 4.
4. Enter your new password, and press #.
5. Do one of the following:• To confirm your new password, enter your new password again, and then press #.• To cancel the new password, press *.
Assigning Your Extension to a Phone
With the appropriate permissions (set by your Mitel administrator), you can assign your extension to any system phone. This feature is helpful if you are using someone else’s office and phone temporarily.
Note: The personal greeting is linked to the active availability state.

Using Mailbox Options
63
Depending on how your phone was configured, you can also use your phone or the Connect client to assign or unassign an extension.
1. Log in to voicemail.
2. From the voicemail Main Menu, press 7 to access mailbox options.
3. Press 3.
4. Choose one of the following options:• Press 1 to assign the extension.• Press 2 to unassign the extension. (The phone reverts to the extension originally assigned
to it.)
Setting Your Availability State
Availability states let you specify your status and determine how inbound calls are handled. You can record distinct greetings and specify different call forwarding options for each state.
To change your availability state:
1. Log in to voicemail.
2. From the voicemail Main Menu, press 7 to access mailbox options.
3. Press 2 to set the availability state.
4. Choose one of the following availability states or other options:• For Available, press 1.• For In a Meeting, press 2.• For Out of Office, press 3.• For Vacation, press 4.• For Custom, press 5.• For Do Not Disturb, press 6.• For enabling calling additional phones (configured by your Mitel administrator), press 7.• To cancel, press *.
The availability state stays in effect until you change it. However, if Outlook automated call handling is active, Outlook modifies your availability state based on your status.
Enabling or Disabling Envelope Information
A message’s envelope information includes the date and time of your message’s delivery and your name. By default, envelope information is disabled.
1. Log in to voicemail.
2. From the voicemail Main Menu, press 7 to access mailbox options.
Note: If you assign your extension to a phone that is normally occupied by another user, calls to the original user’s extension are forwarded to the destination that user has defined for the active availability state.

MiVoice 6920 IP Phone User Guide for MiVoice Connect
64
3. Press 5 to toggle between disabling and enabling envelope information.
Listening to Your Deleted Messages
As a safeguard against accidental deletion of messages, the voicemail system retains deleted messages for a few hours.
1. Log in to voicemail.
2. From the voicemail Main Menu, press 7 to access mailbox options.
3. Press 7 to listen to deleted messages.
The voicemail system plays all deleted messages that are still available to the system. You can manage these messages as if they were new messages.
4. Press 2 to restore the deleted message and save it.
Removing Deleted Messages1. Log in to voicemail.
2. From the voicemail Main Menu, press 7 to access mailbox options.
3. Press 8 to remove deleted messages.
4. Press one of the following options:• To confirm removal of deleted messages, press 1.• To cancel removal of deleted messages, press *.
Enabling or Disabling Automated Call Handling in Outlook1. Log in to voicemail.
2. From the voicemail Main Menu, press 7 to access mailbox options.
3. Press 9.
4. To enable or disable Outlook automated call handling, press 1.
Enabling or Disabling a Notification Profile1. Log in to voicemail.
2. From the voicemail Main Menu, press 7 to access mailbox options.
3. Press 9.
4. Press 2.
5. Choose one of the following options:• Enter the number of the new notification profile.• To cancel, press #.
Enabling or Disabling Find Me Forwarding
When Find Me forwarding is enabled, calls sent to voicemail are routed to your Find Me forwarding destination if the caller presses 1 while listening to your voicemail greeting.
Using Mailbox Options
65
You can enable or disable the Find Me Forwarding option for the availability state that is currently active. However, you have the option to enable or disable Find Me forwarding only if it is configured in one of the following ways:
• Your Mitel administrator enabled the Find Me option for you, and you configured a Find Me destination in the Connect client.
• You used the Connect client to enable the Find Me option and to configure a Find Me destination.
To enable or disable find me forwarding:
1. Log in to voicemail.
2. From the voicemail Main Menu, press 7 to access mailbox options.
3. Press 9.
4. Press 5.
5. Choose one of the following options:• To enable Find Me forwarding, press 1.• To disable Find Me forwarding, press 2.

MiVoice 6920 IP Phone User Guide for MiVoice Connect
66
Accessory support
Mitel Wireless LAN Adapter
The Mitel Wireless LAN Adapter is a wireless bridge that can add wireless connectivity functionality to your 6920 IP phone. It allows your Ethernet-enabled phone to join a secure, high-speed network. It is software-transparent which means, that no changes to drivers, management tools, or applications are needed for using it.
Feature highlights include:
• Easily add robust, secure wireless capabilities to Ethernet devices:The Mitel Wireless LAN Adapter is a high-performance wireless network adapter that enables any Ethernet device to become an 802.11a/b/g/n dual band wireless network device, giving you freedom to place it anywhere in your facility.
• Dual band IEEE 802.11a/b/g/n support:The Mitel Wireless LAN Adapter is designed to communicate in the 2.4 GHz and the 5 GHz bands. Radio interference encountered in the commonly used 2.4 GHz band can be avoided by utilizing the 5 GHz band.
• Gigabit Ethernet support:The wired LAN port supports 10/100/1000 Ethernet.
• Simple to set up and use:The Mitel Wireless LAN Adapter is easy to set up using the enclosed network setup cable. No special drivers or software are required.
• Enterprise security:The Mitel Wireless LAN Adapter supports the following security functions:• WEP (64 Bit/128 Bit)• WPA-PSK (TKIP/AES)• WPA2-PSK (AES)• IEEE 802.1X EAP-PEAP, EAP-TLS, EAP-TTLS, EAP-FAST, EAP-LEAP
Note: For information about how to install and set up your Mitel Wireless LAN Adapter, see the Mitel Wireless LAN Adapter Setup Guide.
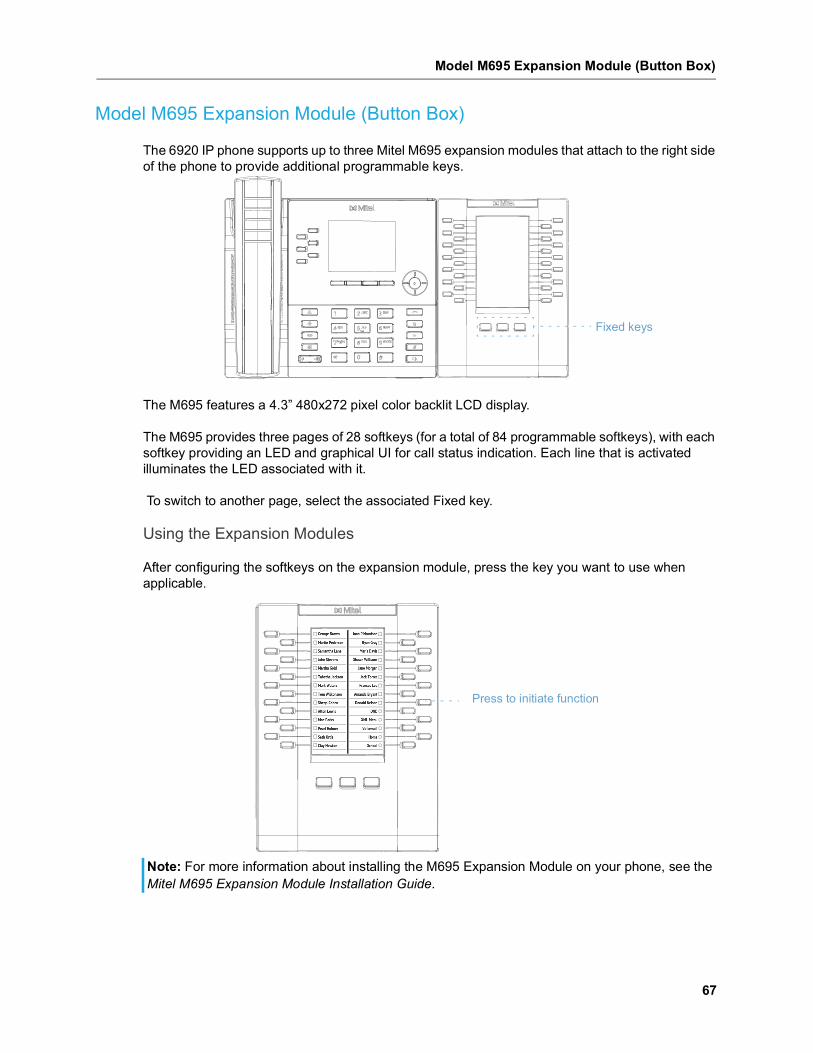
Model M695 Expansion Module (Button Box)
67
Model M695 Expansion Module (Button Box)
The 6920 IP phone supports up to three Mitel M695 expansion modules that attach to the right side of the phone to provide additional programmable keys.
The M695 features a 4.3” 480x272 pixel color backlit LCD display.
The M695 provides three pages of 28 softkeys (for a total of 84 programmable softkeys), with each softkey providing an LED and graphical UI for call status indication. Each line that is activated illuminates the LED associated with it.
To switch to another page, select the associated Fixed key.
Using the Expansion Modules
After configuring the softkeys on the expansion module, press the key you want to use when applicable.
Note: For more information about installing the M695 Expansion Module on your phone, see the Mitel M695 Expansion Module Installation Guide.
Fixed keys
Press to initiate function
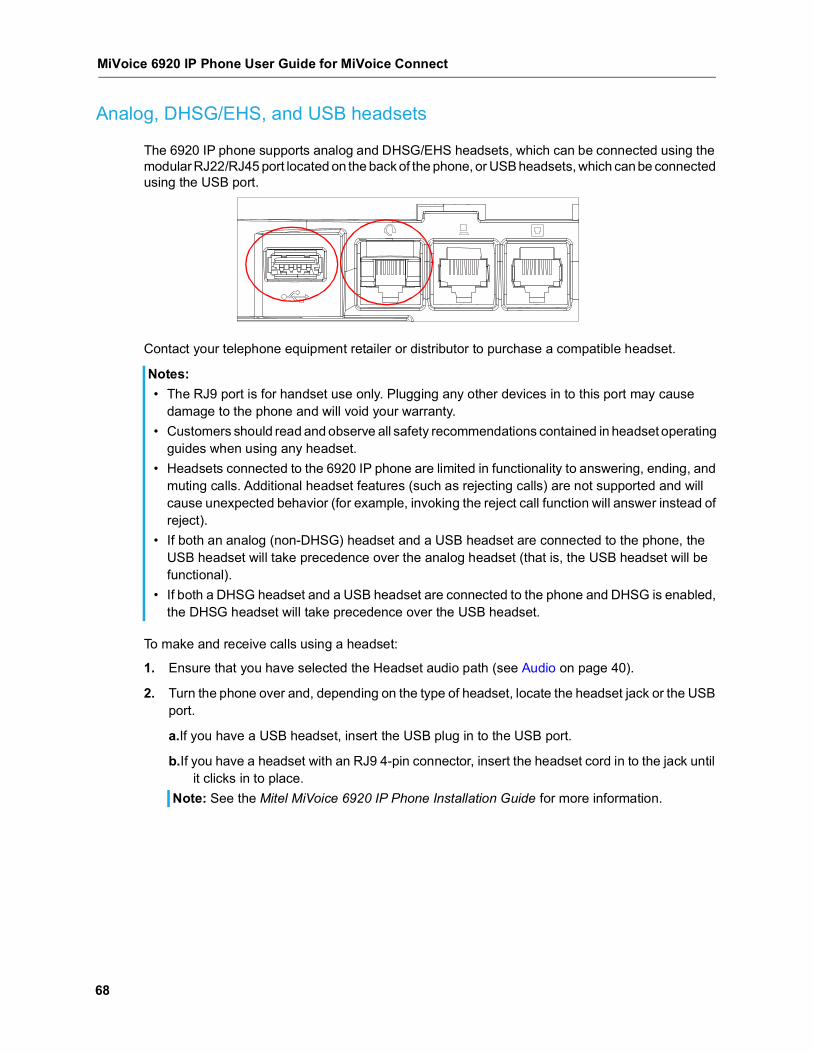
MiVoice 6920 IP Phone User Guide for MiVoice Connect
68
Analog, DHSG/EHS, and USB headsets
The 6920 IP phone supports analog and DHSG/EHS headsets, which can be connected using the modular RJ22/RJ45 port located on the back of the phone, or USB headsets, which can be connected using the USB port.
Contact your telephone equipment retailer or distributor to purchase a compatible headset.
To make and receive calls using a headset:
1. Ensure that you have selected the Headset audio path (see Audio on page 40).
2. Turn the phone over and, depending on the type of headset, locate the headset jack or the USB port.
a.If you have a USB headset, insert the USB plug in to the USB port.
b.If you have a headset with an RJ9 4-pin connector, insert the headset cord in to the jack until it clicks in to place.
Notes: • The RJ9 port is for handset use only. Plugging any other devices in to this port may cause
damage to the phone and will void your warranty. • Customers should read and observe all safety recommendations contained in headset operating
guides when using any headset.• Headsets connected to the 6920 IP phone are limited in functionality to answering, ending, and
muting calls. Additional headset features (such as rejecting calls) are not supported and will cause unexpected behavior (for example, invoking the reject call function will answer instead of reject).
• If both an analog (non-DHSG) headset and a USB headset are connected to the phone, the USB headset will take precedence over the analog headset (that is, the USB headset will be functional).
• If both a DHSG headset and a USB headset are connected to the phone and DHSG is enabled, the DHSG headset will take precedence over the USB headset.
Note: See the Mitel MiVoice 6920 IP Phone Installation Guide for more information.

Mitel S720 Bluetooth Speakerphone
69
Mitel S720 Bluetooth Speakerphone
The 6920 IP phone provides support for the optional Mitel S720 Bluetooth Speakerphone through a Bluetooth dongle. Plug the Bluetooth dongle in to the USB port of the 6920 IP phone. Once connected, you can receive calls on the Mitel S720 Bluetooth Speakerphone. The Mitel S720 Bluetooth Speakerphone can be placed (on its base or upright using a table stand) on your work desk or in a small-to-medium conference room.
When the BT dongle is plugged into the USB port on the 6920, it works as a USB headset. The headset icon will appear, the mute and volume sync does not work. No other headset is supported on the 6920 at the same time as the S720 via the BT dongle.
Feature highlights include:
• HD voice audio
• Omni-directional microphone
• Functionally integrated with desk phone -pulling call to / from conference phone
• Connect two speakerphones wirelessly to extend speakerphone range and for stereo music playback
• Portable design, protective travel pouch, and battery powered with USB charging (15 hours of talk time)
• Flexible and scalable for office side tables and small meeting rooms

MiVoice 6920 IP Phone User Guide for MiVoice Connect
70
Hardware features
Icon Button Description
Power On/Off Turns on or off.
Answer Call Answers a call.
End Call Ends or rejects a call.
Hold (8 seconds) to turn on or off voice guidance.
Battery Status Shows the battery status.
Bluetooth Connects to a Bluetooth device.
Link Links two speakerphones.
Smart Turns on or off the voice assistant application on your smartphone.
Battery Status
Smart Button
End CallPower On/OffAnswer Call
Link Button
Bluetooth Button

Mitel S720 Bluetooth Speakerphone
71
Notes: • To connect the Mitel S720 Bluetooth Speakerphone with the 6920 IP phone, power on the
speakerphone and pair it with the Bluetooth dongle. Plug the dongle in to the USB port of the IP phone.
• When the S720 speakerphone is successfully connected, a headset connected icon is displayed in the status bar on the Home screen.
• The (Speaker/Headset) key LED on the IP phone blinks when the call audio is presented on the speakerphone.
• For information about how to set up your Mitel S720 Bluetooth Speakerphone, see the Mitel S720 Bluetooth Speakerphone Quick Start Guide.
Headset Icon

MiVoice 6920 IP Phone User Guide for MiCloud Connect
72
Problems and SolutionsTable 9 shows common problems and solutions.
Table 9: TroubleshootingProblem Solution
When your callers try to leave a message, they are notified that your mailbox has exceeded its limit and is unable to accept new messages.
Your mailbox is full. You must delete messages you no longer need.
Your phone’s display shows “No Service.”
Your phone is temporarily inoperable. Contact your Mitel administrator or authorized contact.
You hear no dial tone when you take the handset off hook, but you hear a dial tone when using either the speaker or a headset.
The handset cable must be plugged firmly in to place on both the phone base and the handset. To ensure a tight connection, unplug and reconnect the cable at both points, clicking the jack firmly in to place. Take the handset off hook and listen for a dial tone.
The phone displays the message “Service unavailable at this time” when you try to dial a call from the keypad, visual voicemail, Directory, or History.
The phone goes out of service because of a switch issue or because an administrator has put it out of service. When a phone is in this state, you can access visual voicemail, Directory, and History, but you cannot make calls from the phone.
Note: The mailbox warning is triggered when there is space for only 10 additional messages in your voice mailbox. As your voice mailbox approaches its limit, a warning message is played indicating that there is enough space for only “n” number of messages, where “n” is a countdown from 10 to 0. This message is played each time you log in to the voicemail system until you delete enough messages to reduce the number of messages below the threshold.

© Copyright 2019, Mitel Networks Corporation. All Rights Reserved. The Mitel word and logo are trademarks of Mitel NetworksCorporation, including itself and subsidiaries and authorized entities. Any reference to third party trademarks are for reference only and Mitelmakes no representation of ownership of these marks.mitel.com