Miter Fold Dado Set Instructions -...
20
Miter Fold Dado Set Instructions Effective April 2017 THIS PRODUCT IS INTENDED FOR EXPERIENCED WOODWORKERS ONLY; review full manual instructions prior to use for important safety information. Always check Rockler.com to confirm that you are using the most recent manual version for your product.
Transcript of Miter Fold Dado Set Instructions -...

Miter Fold Dado Set Instructions Effective April 2017
THIS PRODUCT IS INTENDED FOR EXPERIENCED WOODWORKERS ONLY; review full manual instructions prior to use for important safety information. Always check Rockler.com to confirm that you are using the most recent manual version for your product.
2
> Always confirm that you are using the most recent version of the Instructions and safety warnings for your product. To find the most recent version, find the product page on Rockler.com and click on the link to the Instructions.
> For any tool used in conjunction with this product, always read, understand and follow the instructions and safety warnings in the owner’s manual for that tool. If you do not have the owner’s manual, obtain one from the tool’s manufacturer before using it with this product.
> Before using this product, review and verify that all tools to be used with it have safety equipment installed and are in proper working order as defined by the tools’ owner’s manuals.
> Do not use this product until you have read and are confident you understand: • Product Specific Safety Warnings (p. 3); • Cutting Workpiece to Size (pp. 4-5); • Determining Blade Configuration (pp. 5); • Installing the Blades (pp. 5-6); • Making a Dedicated Throat Plate Insert (pp. 6-7); • Rehearse Cutting Motion with Workpiece (pp. 8); • Setting Blade Height and Making Test Cuts (pp. 9); • Making Cuts in Fainal Workpiece (pp. 10-13); • Assembling the Box (pp. 14); • Using as a Standard Dado Stack (pp. 15); • Miter Fold Setup Chart (pp. 16-17); • Dado Setup Chart (pp. 18-19).
> Remain alert and use good judgment when using this tool. Do not use this tool if you are in any way impaired by medications, alcohol, drugs or fatigue.
> Dress appropriately and remove all jewelry, secure loose clothing and tie up long hair before using this tool.
> It is the sole responsibility of the purchaser of this product to ensure that any third party whom you allow to use this product reads and complies with all the instructions and safety precautions outlined in this manual prior to use.
> Maintain these instructions and warnings as long as you own the product. Keep this booklet in a place where it will be readily available for reference.
> The user assumes all risk and responsibility for the proper use of this product and for ensuring product suitability for intended application.
> Always wear safety glasses in compliance with ANSI safety standards and hearing protection and follow all standard shop safety practices, including: • Keep your work area well lit and clean; • Unplug all power tools before making any adjustments or changing accessories; • Use dust collection tools and dust face masks to reduce exposure to dust; • Use accessory safety equipment such as featherboards, push sticks and push blocks whenever appropriate; • Do not use power tools in explosive environments (e.g., in the presence of flammable liquids, fumes or dust); • Keep children and bystanders away from the tool operating area; • Maintain proper footing at all times and do not overreach; • Do not force the tool. > These warnings and instructions do not represent the total of all information available regarding tool safety, use and technique. Please read the full manual before using this product and always seek out opportunities to learn more and improve your skills and knowledge.
This product is designed for specific applications as defined in the instructions and should not be modified and/or used for any other applications. Before using the Miter Fold Dado Set, read, understand and follow all instructions and safety information provided. KEEP THESE INSTRUCTIONS FOR FUTURE REFERENCE.
GENERAL SAFETY WARNINGS
Drilling, sawing, sanding or machining wood products can expose you to wood dust, a substance known ot the State of California to cause cancer. Avoid inhaling wood dust or use a dust mask or other safeguards for personal protection. For more information go to www.P65Warnings.ca.gov/wood.

3
> The Miter Fold Dado Set is intended for use by advanced and experienced woodworkers who are comfortable using a table saw and have mastered the proper and safe mechanics of dado cuts. DO NOT ATTEMPT TO USE THIS PRODUCT BEFORE READING AND FULLY UNDERSTANDING THESE INSTRUCTIONS, regardless of your woodworking skill level or experience. Failure to do so may result in serious injury or death.
> Use only on contractor or cabinet saws with at least a 11⁄2 HP motor, a 5/8" diameter arbor and a maximum 5,500 RPM.
> Do NOT use on portable or jobsite table saws or radial-arm saws. Improper use of the Miter Fold Dado Set could result in serious personal injury and/or property damage.
> The Miter Fold Dado Set is NOT compatible with SawStop saws. The Miter Fold specialty blade will not fit on a SawStop saw, and because of the SawStop proprietary flesh-sensing technology, the dado stack should not be used. Improper use of the Miter Fold Dado Set could result in serious personal injury and/or property damage.
> Do not use blades, chippers or shims from other manufacturers’dadosetswithcomponentsoftheMiter Fold Dado Set. Sizing differences could result in instability, possibly leading to personal injury and/or property damage
> The Miter Fold specialty blade should be used only with solid wood and plywood. The dado stack can be used with standard wood products. Do not use to cut metal, masonry or concrete.
> The blades and chippers in the Miter Fold Dado Set feature carbide cutting teeth. Carbide is very hard and brittle; slight impacts can damage the teeth. Before each use, make sure the blades and chippers are sharp and free of cracks, loose teeth, missing teeth, broken teeth or other damage. Do not use the Miter Fold Dado Set if the cutters are dull or if any damage is detected or suspected.
> The maximum workpiece thickness and, correspondingly, the maximum-width configuration of the Miter Fold Dado Set depends on the length of the saw’s arbor. Always check the tablesaw’soperator’smanualforthemaximumallowable dado width. At a minimum, you MUST be able to install the arbor washer and fully thread on the arbor nut with the Miter Fold Dado Set installed. If the arbor nut cannot be fully threaded onto the arbor, the blades could come loose, causing serious personal injury and/or property damage.
> Chippers and shims must be installed between the left and right full dado blades or, for some cuts in 1/4" nominal material, between the Miter Fold specialty blade and the right full dado blade. (The left and right full dado blades are clearly marked.) NEVER USE CHIPPERS ALONE. Take care when installing the blades and chippers to stagger the carbide teeth so that they don’t contact each other. Also, distribute the shims throughout the stack to avoid gaps in the dado stack’s cutting area, and keep the shims from falling into the threads of the arbor.
> Push blocks must be used when making all cuts with the Miter Fold Dado Set. Because of possible variations in
thickness (even within the same workpiece) and because the Miter Fold specialty blade is set to cut within 1/32" of the material’s full thickness, there is a risk that the blade could cut all the way through the workpiece. Failure to use push blocks could result in serious personal injury.
> Use this set only with a zero-clearance throat plate insert. The openings on other inserts could be too small, and using the Miter Fold Dado Set with those inserts could result in personal injury and/or damage to the insert and blades.
> You MUST use infeed and outfeed support abutting the saw table for all cuts with the Miter Fold Dado Set. This will help support the workpiece before, during and after the cut and prevent any section from flopping or getting trapped, which could lead to dangerous kickback. Infeed and outfeed supports MUST NOT exceed the height of the saw table. Infeed and outfeed supports MUST NOT interfere with maintaining proper control of the workpiece.
> Table saw blade guards and splitters must be removed when using the Miter Fold Dado Set. Remember to reinstall these safety devices before using the table saw for regular cutting operations.
> Always follow common woodworking safety practices when working at a table saw. Never cut freehand. Failure to follow common woodworking safety practices could result in serious personal injury.
> Do NOT use the Miter Fold Dado Set to make cove moldings.
> For a solo woodworker, the maximum recommended workpiece size when working alone is 26" W x 26" L. Maximim side (box) height is 6". For workpieces longer than 26", it is strongly recommended that you find a helper to maintain proper control and avoid workpiece shifting that could lead to dangerous kickback. However, the safety benefit of having a helper depends on your ability to clearly explain what a helper should and should not do while assisting and the helper’s ability to follow your instructions. See WARNING on p. 4 for using a helper.
> DO NOT attempt to use the Miter Fold Dado Set on any workpiece that is too large for you to maintain control of or apply consistent downward pressure on (with push blocks). Loss of control may result in unexpected movement of the material and could cause you or the push blocks to fall into the blades, resulting in serious injury or death. Your ability to maintain proper control of the workpiece depends on many factors, including your height and body size, your arm length and strength, the type and size of material being cut, your table saw setup (e.g., presence of support wings, evenness of the table saw, etc.), the placement and technique used when moving the push blocks and the rate at which you feed material into the saw. Failure to understand these factors and the associated risks prior to using the product may result in injury or death.
> Professional sharpening is required. For specific guidelines to provide to the sharpening service, go to www.rockler.com.
PRODUCT SPECIFIC SAFETY WARNINGS

4
> Maximum recommended workpiece size when working alone is 26" W x 26" L. Fig. 1
> If you choose to use this product with a longer workpiece, it is essential that you have a helper to assist you in applying even pressure to keep the workpiece tight against the fence as you apply downward pressure and advance the workpiece across the blades. It is essential that you rehearse the cutting motion with the blades retracted and saw unplugged before trying to cut the workpiece. See p. 8. In no case should the workpiece exceed 26" W x 48" L. Final box height should not exceed 6". Fig. 1.
> DO NOT attempt to use the Miter Fold Dado Set on any workpiece that is too large for you to maintain control of or apply consistent downward pressure on (with push blocks) along the line of cut. Loss of control may result in unexpected movement of the material and could cause you or the push blocks to fall into the blades, resulting in serious injury or death. Your ability to maintain proper control of the workpiece depends on many factors, including your height and body size, your arm length and strength, the type and size of material being cut, your table saw setup (e.g., presence of support wings, evenness of the table saw, etc.), the placement and technique used when moving the push blocks and the rate at which you feed material into the saw. Failure to understand these factors and the associated risks prior to using the product may result in injury or death.
WARNING
Desired finished box dimension
Workpiece dimension
Fig. 1 - Maximum recommended workpiece size
Fig. 2
Cutting Workpiece to Size 1. To calculate the overall dimensions of your workpiece, you need to know the desired length, width and height of the finished box. To calculate overall workpiece length, add the finished box length to 2x the height of the sides. To calculate workpiece width, add the finished box width to 2x the height of the sides. Example: You want a finished box that measures 8"L x 16"W x 4" high. Your workpiece needs to be 16" long [8" + (4" x 2)] and 24" wide [16" + (4" x 2)]. Fig. 2.
2. Make sure that all corners of your workpiece are 90˚.
24"16"
4"
16"
8"
4"
16"
4"
4"
8"Desired finished box dimension
Workpiece dimension
Needs assitance to properly cut
(max 26" x 48")
26"
26"
48"
6"
6"
Maximum solo workpiece size:
26" x 26"

5
3. Cut several 18" long x 3" wide pieces from the same type and thickness of material you plan to use to make your box. You will use your saw’s miter gauge to make test crosscuts in these offcuts to verify the Miter Fold cutting height and dado stack width.
Determining Blade Configuration 1. Use a precise measuring device (such as calipers) to determine the actual thickness of your workpiece. This is crucial because the actual thickness of some materials can be different from the nominal (listed) thickness (e.g., 3/4" plywood can vary +/- 1/32").
2. Refer to the Miter Fold Setup Chart (pp. 16-17) to determine the appropriate number of dado blades, chippers and shims you will need for your workpiece thickness.
3. Gather the Miter Fold specialty blade, dado blades, chippers and shims required for your cuts. Take care when handling not to hit the carbide tips of the blades against anything hard that could damage the cutting edges.
Installing the Blades
1. Lower the saw blade fully and remove the throat plate. Raise the blade as high as it will go. Follow the instructions included with your saw to remove the arbor nut, arbor washer and blade from your saw.
All references to “left” and “right” assume that the user is facing the saw as if ready to make cuts.
All blades and chippers must be installed so that the cutting teeth face the user. Refer to markings on the blades to ensure the blades are installed correctly.
2. Install the required components of the Miter Fold Dado Set, as determined by reference to the Miter Fold Setup Chart, in the proper order on the saw’s arbor. A. The Miter Fold specialty blade must always be installed to the left of the dado stack. On saws with an arbor that extends from left to right, that means the specialty blade will go on first. On saws with an arbor that extends from right to left, the dado stack will go on first, and the specialty blade will go on last. Fig. 3.
B. Chippers and shims must be installed between the left and right full dado blades or, for some cuts in 1/4" nominal material, between the Miter Fold specialty blade and
> Switch off and unplug the table saw before removing the throat plate or saw blade and attempting to install the Miter Fold Dado Set. Failure to do so could allow the saw to start inadvertently, resulting in serious personal injury.
WARNING
Fig. 3
Left Dado Blade
Miter Fold Specialty Blade
Miter Fold Specialty Blade
Chipper(s)
Right Dado Blade
Shim(s)
Right Dado Blade
Shim(s)
Shim(s)
Shim(s)
Chipper(s)
Left Dado Blade
Right-to-Left Arbor Setup
Left-to-Right Arbor Setup
Arbor Nut
Arbor Washer
Arbor Washer
Arbor Nut

6
Fig. 4
Fig. 5
the right full dado blade. (The left and right full dado blades are clearly marked.) Take care when installing the blades and chippers to stagger the carbide teeth so that they don’t contact each other. Also, distribute the shims throughout the stack to avoid gaps in the dado stack’s cutting area, and keep the shims from falling into the threads of the arbor. Fig 4. Note: To make sure the shims aren’t in the threads of the arbor when you tighten the arbor nut, hold the arbor and slowly spin (by hand) the entire stack of blades as if threading it onto the arbor. Check for any wobble in the stacked blades; if there is none, the shims are out of the threads and the arbor nut can be tightened.
Failure to stagger the carbide tips on the blades and chippers could result in poor cutting results and damage to the cutters.
C. When all required components of the Miter Fold Dado Set are installed, reinstall the arbor washer and arbor nut on the saw’s arbor and tighten fully. The arbor nut must be fully threaded onto the arbor.
3. Fully retract the Miter Fold dado stack into the saw table.
Making a Dedicated Throat Plate Insert
> Use the Miter Fold Dado Set only with a dedicated zero-clearance throat plate insert installed in your table saw. The openings on other inserts might be too small, and using this set with such inserts could result in serious personal injury. Follow the steps below to make a dedicated throat plate insert.
WARNING
1. Place the throat plate that came with your table saw upside down on a piece of plywood that is at least 1/2" thick. Trace the outline.
2. Use a band saw, jigsaw or scroll saw to cut out the shape you traced, taking care to stay about 1/16" outside the line.
3. Use hot-melt glue or double-sided tape to adhere the original throat plate (still upside down) to the plywood piece, aligning it with your trace lines.
4. At a router table, with the router off and unplugged, install a flush-trim bit. Adjust the cutting height so the bearing will ride against the original throat plate and the cutters extend just a hair above the top of the plywood.
5. Using push blocks/pads to hold the piece and a starter pin installed in your router table to begin the cut, turn on the router and start with one of the long edges. Feed the piece from right to left, working all the way around to trim the piece to shape. Fig. 5.
6. Separate the original throat plate from the plywood blank and clean up any residue left on either.
7. Test fit the plywood blank in the throat plate opening in your saw. Sand or file to refine the shape as necessary until you achieve a good fit.
Miter Fold Specialty blade must be to the left of the dado stack
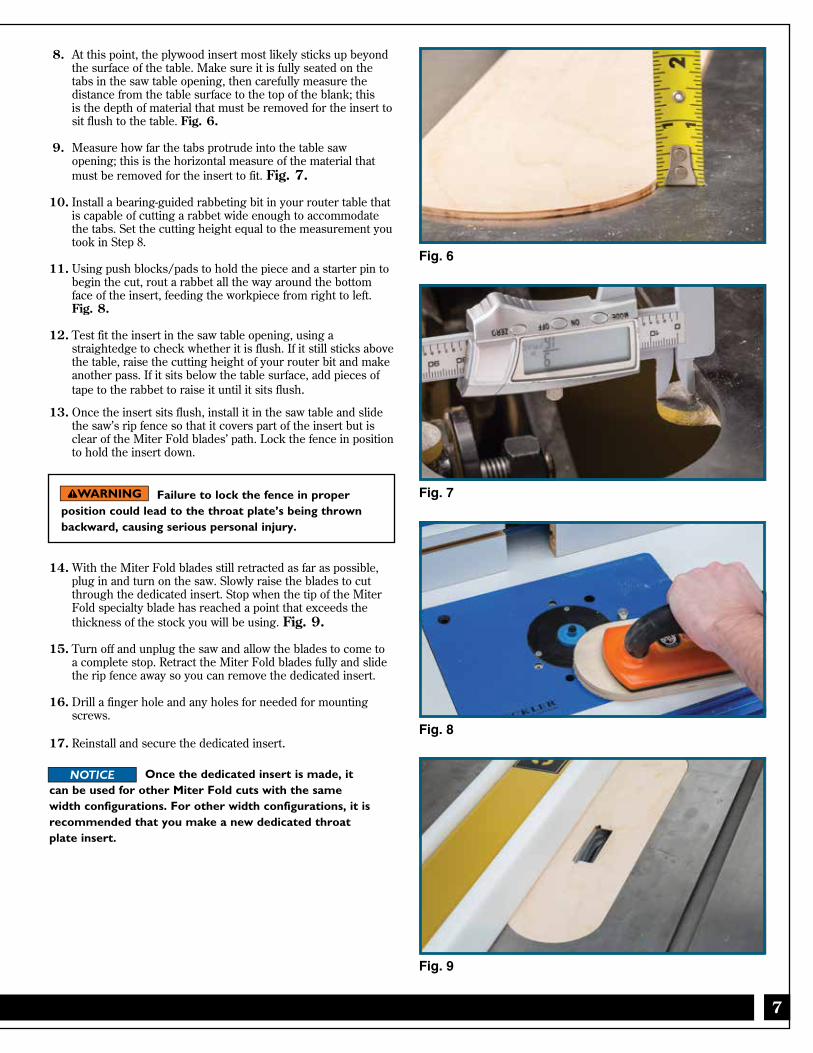
14. With the Miter Fold blades still retracted as far as possible, plug in and turn on the saw. Slowly raise the blades to cut through the dedicated insert. Stop when the tip of the Miter Fold specialty blade has reached a point that exceeds the thickness of the stock you will be using. Fig. 9.
15. Turn off and unplug the saw and allow the blades to come to a complete stop. Retract the Miter Fold blades fully and slide the rip fence away so you can remove the dedicated insert.
16. Drill a finger hole and any holes for needed for mounting screws.
17. Reinstall and secure the dedicated insert.
Once the dedicated insert is made, it can be used for other Miter Fold cuts with the same width configurations. For other width configurations, it is recommended that you make a new dedicated throat plate insert.
7
8. At this point, the plywood insert most likely sticks up beyond the surface of the table. Make sure it is fully seated on the tabs in the saw table opening, then carefully measure the distance from the table surface to the top of the blank; this is the depth of material that must be removed for the insert to sit flush to the table. Fig. 6.
9. Measure how far the tabs protrude into the table saw opening; this is the horizontal measure of the material that must be removed for the insert to fit. Fig. 7.
10. Install a bearing-guided rabbeting bit in your router table that is capable of cutting a rabbet wide enough to accommodate the tabs. Set the cutting height equal to the measurement you took in Step 8.
11. Using push blocks/pads to hold the piece and a starter pin to begin the cut, rout a rabbet all the way around the bottom face of the insert, feeding the workpiece from right to left. Fig. 8.
12. Test fit the insert in the saw table opening, using a straightedge to check whether it is flush. If it still sticks above the table, raise the cutting height of your router bit and make another pass. If it sits below the table surface, add pieces of tape to the rabbet to raise it until it sits flush.
13. Once the insert sits flush, install it in the saw table and slide the saw’s rip fence so that it covers part of the insert but is clear of the Miter Fold blades’ path. Lock the fence in position to hold the insert down.
Failure to lock the fence in proper position could lead to the throat plate’s being thrown backward, causing serious personal injury.
Fig. 9
Fig. 8
Fig. 7
Fig. 6

8
Fig. 12
Fig. 13
1/32"
Rehearse Cutting Motion with Workpiece Making a complete box with your Miter Fold Dado Set involves two sets of two parallel cuts: one set made with the rip fence on the right side of the blades and one set made with the rip fence on the left side of the blades. Before attempting any cuts, it is essential that you practice moving your workpiece across the table as you will during the cutting operation. This will familiarize you with the process, help you plan positioning of the push blocks and alert you to any potential issues that could affect your ability to feed the workpiece smoothly and safely.
1. On the top face of the workpiece, directly above where each of the four cuts will be made, run a piece of painter’s tape or similar tape lengthwise. Fig. 10.
2. Unplug the saw and fully retract the Miter Fold dado stack into the saw table. Fig. 11
3. Position the fence on the left side of the blades, at roughly the distance it will be for the cuts.
4. Using push blocks, slowly advance the piece across the saw table, taking care to maintain consistent downward pressure over the point of cut and to keep the piece tight against the fence throughout. If the piece drifts from the fence, determine why and make any necessary adjustments to your setup or to the positioning of the push block farthest from the fence.
5. Continue practicing until you are able to advance the stock without any drift away from the fence. If you are working with a helper, that person’s role should be to help prevent the far end of the workpiece from dragging on the table so that you can maintain consistent pressure downward and toward the fence while controlling the rate at which you advance the workpiece forward across the blades.
6. Repeat Steps 3-4 with the fence positioned on the right side of the blades.
Fig. 11Fig. 10
Be sure the way you plan to move the piece across the blades will ensure it maintains full contact with the fence at all times. Failure to do so could result in dangerous kickback and serious injury.
Painter’s tape marks blade location

9
Fig. 15
Fig. 14
Setting Blade Height & Making Test Cuts
Dado stack is too wide. Remove shims and make another test cut.
Dado stack is too narrow. Add shims and make another test cut.
1. Gather one of your offcut test pieces and the miter gauge for your saw.
2. With the dedicated insert installed, raise and rotate the blades so that one of the teeth on the Miter Fold specialty blade is positioned at the apex of the blade. Adjust the blade height until the tip of the cutter is 1/32" below the top of the test piece. Fig. 12.
3. Mark the leading and trailing edges of the saw blade on the fence. (A piece of painter’s tape affixed to the top of the fence works well.) This will help you gauge where downward pressure with a push block is needed when the workpiece is covering the blade. Fig. 13
4. Mark a line across the offcut piece several inches in from the end. Run a piece of painter’s tape or similar tape lengthwise along the center of the line. This can help hold the pieces together if the blade is set just a bit too high and cuts through the workpiece. Fig. 14.
5. Plug in and turn on the saw. Position the test piece, taped face up, so the cut will be roughly centered under the tape. Using the miter gauge to guide the test piece and a push block to apply downward pressure on the cut line, advance the piece slowly across the blades. Consistent pressure must be applied with the push block over the point of cut to ensure a uniform cut. Turn off the saw and allow the blade to fully stop. Fig. 15.
6. Test the joint and make any necessary adjustments to your setup.
A. An ideal cut height will leave just enough material (about 1/32") above the peak of the Miter Fold specialty blade that the joint does not fold with the force of gravity but easily folds when bent by hand.
B. The joint should fold together completely, without excessive gaps. If there is a gap, the dado stack is too wide; unplug the saw and remove shims, then make additional test cuts to check the fit. If the joint binds or won’t close, the dado stack is too narrow; unplug the saw and add shims, then make additional test cuts. Fig 16.
> When setting blade height, always use a test piece that is the same thickness as your final workpiece. This will ensure that the Miter Fold Specialty Blade is not set so high that it will cut through the material and into push blocks or hands.
> Push blocks must be used to maintain control of the material. Because of the nature of the cuts the Miter Fold Specialty Blade is designed to make and because of possible thickness variations even within a single workpiece, there is a risk that the blade could cut through the top of the material. To avoid serious injury, always use push blocks.
WARNING
Fig. 16

10
Making Cuts in Final Workpiece
These instructions assume a greater user familiarity with cutting operations with the rip fence on the right side of the blades; therefore, for safety reasons, it is recommended that the first set of cuts be made with the rip fence to the left of the blade (the less familiar side.) Note: If the user is more accustomed to working with the rip fence on the left side of the blade, it is recommended that the first set of cuts be made with the rip fence on the right side of the blades.
1. With the saw turned off and unplugged, move the rip fence to the left of the Miter Fold Dado Set.
2. Set the fence so that the distance from its face to the tip of the Miter Fold specialty blade is equal to the desired exterior height of the box sides. Fig. 17.
3. Decide which two parallel cuts you want to make first. If your workpiece is not a square, it is recommended that you make the cuts along the shortest sides first.
4. Position the workpiece at the front of the saw, clear of the blades. Plug in and turn on the saw.
5. Position one push block on the cut line toward the front of the workpiece. Position another push block toward the rear of the workpiece in a location that provides maximum control. Fig. 18.
> Push blocks must be used to maintain control of the material. Because of the nature of the cuts, the Miter Fold Specialty Blade is designed to make and because of possible thickness variations even within a single workpiece, there is a risk that the blade could cut through the top of the material. To avoid serious injury, always use push blocks.
> Cutting height must be reset every time there is a change in blade configuration or material thickness. Blade cutting height should be verified whenever switching workpieces, even if nominal thickness is the same.
> You MUST use infeed and outfeed support abutting the saw table for all cuts. This will help support the workpiece before, during and after the cut and prevent any section from flopping or getting trapped, which could lead to dangerous kickback. Infeed and outfeed supports MUST NOT exceed the height of the saw table. Infeed and outfeed supports MUST NOT interfere with maintaining proper control of the workpiece. Fig. 19.
> Maximum recommended workpiece size when working alone is 26" W x 26" L. If you choose to use this product with a longer workpiece, it is essential that you have a helper. In no case should the workpiece exceed 26" W x 48" L. Final box height should not exceed 6".
WARNING
Fig. 18
Fig. 17 - Adjust fence to desired side height
Cut 1
Cut 2

11
6. Applying pressure downward and toward the rip fence with the push blocks, slowly and carefully advance the workpiece over the Miter Fold blades to make Cut 1. Take your time; the feed rate should be slower than with a traditional dado stack, and consistent pressure must be applied with the push block over the point of cut to ensure a uniform cut. Fig. 19.
11. Move the workpiece back to the front of the saw and rotate it 180˚ to prepare for Cut 2, parallel to the first. Handle carefully in case the workpiece starts to fold at the cut.
12. As on Cut 1, position one push block on the cut line at the front of the workpiece and another toward the rear of the workpiece in a location that provides maximum control. Fig. 18.
13. Applying pressure downward and toward the rip fence with the push blocks, slowly and carefully advance the workpiece over the Miter Fold blades to make Cut 2. Fig. 19.
14. Once the workpiece is fully past the blades, turn off the saw and wait for the blades to come to a complete stop.
15. Move the workpiece back to the front of the saw. Handle carefully, in case the workpiece starts to fold at the cut.
16. Turn on the saw and repeat Cut 2, applying consistent pressure with the push block over the point of cut.
17. Once the workpiece is fully past the blades, turn off the saw and wait for the blades to come to a complete stop. Apply additional overlapping strips of painter’s or other tape on top of the original strip over Cut 2 to help ensure workpiece integrity for subsequent cuts.
18. Unplug the saw and move the rip fence to the right side of the blades.
Fig. 19
7. Once the workpiece is fully past the blades, turn off the saw and wait for the blades to come to a complete stop.
8. Move the workpiece back to the front of the saw. Handle carefully, in case the workpiece starts to fold at the cut.
9. Turn on the saw and repeat Cut 1, applying consistent pressure with the push block over the point of cut. The second pass will help ensure a consistent cut and clean joint.
10. Once the workpiece is fully past the blades, turn off the saw and wait for the blades to come to a complete stop. Apply additional overlapping strips of painter’s or other tape on top of the original strip over Cut 1 to help ensure workpiece integrity for subsequent cuts.
Be sure the way you plan to move the piece across the blades will ensure it maintains full contact with the fence at all times. Failure to do so could result in dangerous kickback and serious injury.
Infeed table
Outfeed table

12
19. Set the fence so that the distance from its face to the tip of the Miter Fold specialty blade is equal to the desired exterior height of the box sides (the same distance as in the first two cuts). Fig. 20.
20. Position the workpiece at the front of the saw, rotated 90˚ from the previous cut, to prepare for Cut 3. Plug in and turn on the saw.
21. Position one push block on the cut line toward the front of the workpiece. Position another push block toward the rear of the workpiece in a location that provides maximum control. Fig. 21.
When making Cuts 3 and 4, it is crucial that downward pressure with push blocks is applied within an inch of the front of the workpiece to keep the sides formed in Cuts 1 and 2 from lifting off the table or binding and potentially being thrown back. Fig. 21 Inset.
22. Applying pressure downward and toward the rip fence with the push blocks, slowly and carefully advance the workpiece over the Miter Fold blades to make Cut 3. Fig. 22.Fig. 20 - Adjust fence to desired side height
Fig. 21
1" max
Cut 3
Cut 4

13
23. Once the workpiece is fully past the blades, turn off the saw and wait for the blades to come to a complete stop.
24. Move the workpiece back to the front of the saw. Handle carefully, in case the workpiece starts to fold at the cuts.
25. Turn on the saw and repeat Cut 3, applying consistent pressure with the push block over the point of cut.
26. Once the workpiece is fully past the blades, turn off the saw and wait for the blades to come to a complete stop. Apply additional overlapping strips of painter’s or other tape on top of the original strip over Cut 3 to help ensure workpiece integrity for subsequent cuts.
27. Move the workpiece back to the front of the saw and rotate it 180˚ to prepare for the fourth and final cut, parallel to Cut 3. Handle carefully, in case the workpiece starts to fold at the cuts.
28. As on Cut 3, position one push block on the cut line at the front of the workpiece and another toward the rear of the workpiece in a location that provides maximum control. Fig. 21.
29. Applying pressure downward and toward the rip fence with the push blocks, slowly and carefully advance the workpiece over the Miter Fold blades to make Cut 4. Fig. 22.
30. Once the workpiece is fully past the blades, turn off the saw and wait for the blades to come to a complete stop.
31. Move the workpiece back to the front of the saw. Handle carefully, in case the workpiece starts to fold at the cuts.
32. Turn on the saw and repeat Cut 4, applying consistent pressure with the push block over the point of cut.
33. Once the workpiece is fully past the blades, turn off the saw and wait for the blades to come to a complete stop. Apply additional overlapping strips of painter’s or other tape on top of the original strip over Cut 4 to help ensure workpiece integrity.
Fig. 22
Infeed table
Outfeed table

14
Assembling the Box 1. Carefully place the workpiece on a smooth, flat surface, taped side down.
2. Using a sharp utility knife, make several light cuts to remove the squares at the edges of the four corners. Make sure to cut precisely in the center of the “V” made by the Miter Fold specialty blade. Fig. 23.
3. Fold all four edges of the workpiece inward to form the box and do a dry fit.
4. Allow the edges to lie flat again and apply glue to all mating surfaces.
5. Fold the edges back up and clamp in place with the clamping method of your choice. Make sure the corner joints come tightly together. Fig. 24.
6. After glue has cured, remove box from clamps and peel tape away.
7. Sand through 220 grit and apply finish of your choice.
Fig. 24
Fig. 23

15
> Switch off and unplug the table saw before removing the throat plate or saw blade and attempting to install the Miter Fold Dado Set. Failure to do so could allow the saw to start inadvertently, resulting in serious personal injury.
WARNING
Check Rockler.com for updates. If you have further questions, pleasecontact our Technical Support Department at 1-800-260-9663 or [email protected]
Using as a Standard Dado Stack
1. Use a precise measuring device (such as calipers) to determine the actual thickness of the stock that will fit into the dado or groove. This is crucial because the actual thickness of some materials can be different from the nominal (listed) thickness (e.g., 3/4" plywood can vary +/- 1/32").
2. Refer to the Dado Setup Chart (pp. 18-19) to determine the appropriate number of dado blades, chippers and shims you will need for your workpiece thickness.
All blades and chippers must be installed so that the cutting teeth face the user. Refer to markings on the blades to ensure the blades are installed correctly.
3. Install the required components of the Dado Set in the proper order on the saw’s arbor. The dado stack must be installed with the left and right full blades sandwiching the chippers and shims. (The left and right full blades are clearly marked.) Take care when installing the blades and chippers to stagger the carbide teeth so that they’re not contacting each other. Also, distribute any shims throughout the stack to avoid gaps in the dado stack’s cutting area, and keep the shims from falling into the threads of the arbor. Fig. 25. Note: To make sure the shims aren’t in the threads of the arbor when you tighten the arbor nut, hold the arbor and slowly spin (by hand) the entire stack of blades as if
threading it onto the arbor. Check for any wobble in the stacked blades; if there is none, the shims are out of the threads and the arbor nut can be tightened.
Failure to stagger the carbide tips on the blades and chippers could result in poor cutting results and damage to the cutters.
4. When all required components of the Miter Fold Dado Set are installed, reinstall the arbor washer and arbor nut and tighten.
5. Retract the dado stack fully into the saw table.
6. Install a dedicated throat plate insert with an opening that is wide enough to accommodate the dado stack. See pp. 6-7 for making a dedicated throat plate insert.
7. Set the blade to the desired cutting height, making sure that it will not cut all the way through your material.
To avoid serious injury, always use push blocks to advance the workpiece across the blades.
8. Make a test cut in scrap to verify your setup. Use push blocks to push the material across the dado stack, and keep your hands away from the blades.
9. Adjust the setup as required, removing or adding shims as indicated by your test cuts.
10. Make your final cut in your workpiece. Use push blocks to push the material across the dado stack, and keep your hands away from the blades. Fig. 26.
Fig. 25 Fig. 26

16
Miter Fold Setup Chart
> Maximum-width of blade stacking configuration depends your saw’s arbor length. Check table saw’s operator’s manual for maximum dado width. To avoid serious personal injury, make sure arbor washer is used and arbor nut is fully threaded onto arbor. > Chippers and/or shims must be installed between the left and right full dado blades or, for some cuts in 1/4" nominal material, between the Miter Fold specialty blade and the right full dado blade which is clearly marked. Never use chippers alone. > Do not use blades, chippers or shims from other manufacturers’ dado sets with components of the Miter Fold Dado Set. Sizing differences could lead to personal injury and/or property damage.
WARNING
Material Thickness Left Dado Right Dado 1/4"
Chipper1/8"
Chipper1/8"
Chipper1/16"
Chipper.008" Shims
.004" Shims
Miter Fold Blade
15/64" X 0 0 X
1/4" X 1 1 X
17/64" X 3 1 X
9/32" X 5 0 X
19/64" X 7 1 X
5/16" X X 2 0 X
21/64" X X 3 1 X
11/32" X X 1 1 X
23/64" X X 3 1 X
3/8" X X 5 1 X
25/64" X X 7 1 X
13/32" X X X 1 1 X
27/64" X X X 3 1 X
7/16" X X X 5 1 X
29/64" X X X 7 0 X
15/32" X X X 1 1 X
31/64" X X X 3 1 X
1/2" X X X 5 1 X
33/64" X X X 7 1 X
17/32" X X X X 1 1 X
35/64" X X X X 3 1 X

17
Material Thickness Left Dado Right Dado 1/4"
Chipper1/8"
Chipper1/8"
Chipper1/16"
Chipper.008" Shims
.004" Shims
Miter Fold Blade
9/16" X X X X 5 1 X
37/64" X X X X 7 0 X
19/32" X X X 1 1 X
39/64" X X X 3 1 X
5/8" X X X 5 1 X
41/64" X X X 7 1 X
21/32" X X X X 1 1 X
43/64" X X X X 3 1 X
11/16" X X X X 5 1 X
45/64" X X X X 7 0 X
23/32" X X X X 1 1 X
47/64" X X X X 3 1 X
3/4" X X X X 5 1 X
49/64" X X X X 7 1 X
25/32" X X X X X 1 1 X
51/64" X X X X X 3 1 X
13/16" X X X X X 5 1 X
53/64" X X X X X 7 0 X
27/32" X X X X X 1 1 X
55/64" X X X X X 3 1 X
7/8" X X X X X 5 1 X
Miter Fold Setup Chart (cont.)

Dado Setup ChartDado Cut Thickness Left Dado Right Dado 1/4"
Chipper1/8"
Chipper1/8"
Chipper1/16"
Chipper.008" Shims
.004" Shims
Miter Fold Blade
1/4" X X 0 0
17/64" X X 2 0
9/32" X X 4 0
19/64" X X 6 0
5/16" X X X 0 0
21/64" X X X 2 0
11/32" X X X 4 0
23/64" X X X 6 0
3/8" X X X 0 0
25/64" X X X 2 0
13/32" X X X 4 0
27/64" X X X 6 0
7/16" X X X X 0 0
29/64" X X X X 2 0
15/32" X X X X 4 0
31/64" X X X X 6 0
1/2" X X X 0 0
33/64" X X X 2 0
17/32" X X X 4 0
35/64" X X X 6 0
9/16" X X X X 0 0
18
> Maximum-width of blade stacking configuration depends your saw’s arbor length. Check table saw’s operator’s manual for maximum dado width. To avoid serious personal injury, make sure arbor washer is used and arbor nut is fully threaded onto arbor. > Chippers and/or shims must be installed between the left and right full dado blades or, for some cuts in 1/4" nominal material, between the Miter Fold specialty blade and the right full dado blade which is clearly marked. Never use chippers alone. > Do not use blades, chippers or shims from other manufacturers’ dado sets with components of the Miter Fold Dado Set. Sizing differences could lead to personal injury and/or property damage.
WARNING
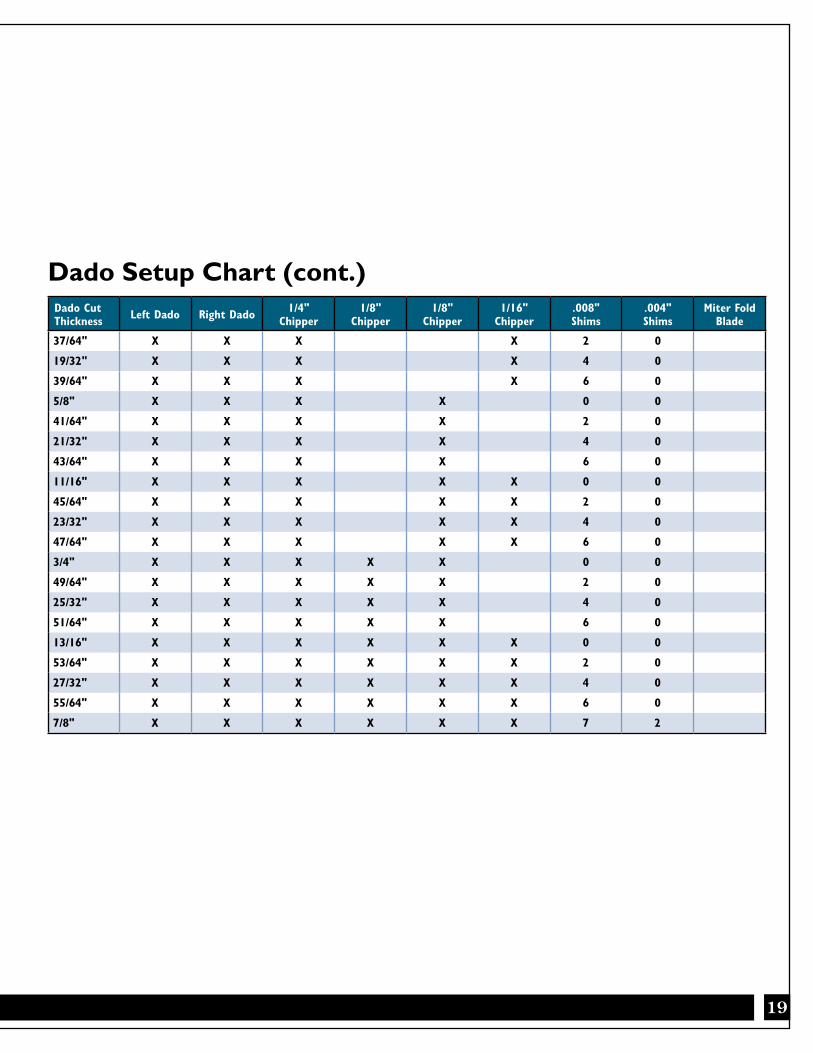
19
Dado Cut Thickness Left Dado Right Dado 1/4"
Chipper1/8"
Chipper1/8"
Chipper1/16"
Chipper.008" Shims
.004" Shims
Miter Fold Blade
37/64" X X X X 2 0
19/32" X X X X 4 0
39/64" X X X X 6 0
5/8" X X X X 0 0
41/64" X X X X 2 0
21/32" X X X X 4 0
43/64" X X X X 6 0
11/16" X X X X X 0 0
45/64" X X X X X 2 0
23/32" X X X X X 4 0
47/64" X X X X X 6 0
3/4" X X X X X 0 0
49/64" X X X X X 2 0
25/32" X X X X X 4 0
51/64" X X X X X 6 0
13/16" X X X X X X 0 0
53/64" X X X X X X 2 0
27/32" X X X X X X 4 0
55/64" X X X X X X 6 0
7/8" X X X X X X 7 2
Dado Setup Chart (cont.)

Distributed by Rockler Companies, Inc. ©2017 Rockler Woodworking and Hardware
54799Rev 05/17