MIRO City Hall WINLINK System information page 14 Operator Levels – Winlink Operator I V09 City...
17
V09 City Hall WINLINK Manual 1 MIRO City Hall WINLINK System [email protected] V09 11/11/17 IN CASE OF AN INCIDENT OR DRILL: • Change AUTOCONNECT TIME to 15 minutes: o Select WL2K Packet in the pulldown window o Left click Open Session o Left click Setup, autoconnect time, and select 15 min, Update and Exit o Remember to reset to 60 minutes when done. • In case of an incident, try using WL2k Telnet first. If successful it will be faster and avoid unnecessary radio traffic. For assistance contact: Michael Roessler, SYSOP [email protected] [email protected] 206-960-1936 Woody Howse [email protected] [email protected] 206-849-5370 David Giuliani [email protected] [email protected] 206-465-6852
Transcript of MIRO City Hall WINLINK System information page 14 Operator Levels – Winlink Operator I V09 City...

V09 CityHallWINLINKManual
1
MIRO City Hall WINLINK System [email protected]
V09 11/11/17
IN CASE OF AN INCIDENT OR DRILL: • Change AUTOCONNECT TIME to 15 minutes:
o Select WL2K Packet in the pulldown window o Left click Open Session o Left click Setup, autoconnect time, and select 15
min, Update and Exit o Remember to reset to 60 minutes when done.
• In case of an incident, try using WL2k Telnet first. If
successful it will be faster and avoid unnecessary radio traffic.
For assistance contact:
Michael Roessler, SYSOP [email protected] [email protected] 206-960-1936
Woody Howse [email protected] [email protected] 206-849-5370
David Giuliani [email protected] [email protected] 206-465-6852

V09 CityHallWINLINKManual
2
Overview This station can send and receive e-mail messages via WINLINK, using “RMS Express” software1. The system transmits messages in two possible ways:
• Conventional Internet – Try this first using “Telnet”
• Packet radio – we have 2 radio message servers (“RMS”) on Mercer Island, each with two frequencies. All use 1200 baud on-air data rates.
QTH Water Reservoir David WA6PXX near Luther Burbank Park
Internet 3 terrestrial providers + Hughes Satellite
Comcast
Operation 24x7 unattended 24x7 unattended
VHF W7MIR-10: 145.03 MHz
WA6PXX-10: 145.79 MHz
UHF W7MIR-11: 430.825 MHz
WA6PXX: 440.825 MHz
o If RMS has Internet access, messages will be sent via
Internet. o If no Internet available, message will be stored and will be
sent to the recipient who contacts the station by packet radio. Messages will be sent by Internet when restored.
o W7MIR and WA6PXX are not connected if local Internet goes down, and will not be able to deliver each other’s messages.
• Winmor – this is a HF messaging capability operating at 500 or 1600 baud. Current implementation requires an operator at the Winmor station. Two current Winmor stations are WA6PXX-10
1RMS stands for “Radio Messaging System”.

V09 CityHallWINLINKManual
3
(David Giuliani), and W7VXS-1 (Don Sandstrom). Messages can be transferred from the packet RMS system to the WINMOR HF system for long distance communication, using an attending operator at WA6PXX or W7VXS.
Chapters:
1. Starting system page 4
2. Preparing messages to send page 5
3. Sending & receiving messages page 10
4. Reading messages page 12
5. Advanced information page 14
Operator Levels – Winlink Operator I

V09 CityHallWINLINKManual
4
1. Starting System
Turn on the computer if it is not already on
Press: Power button
Log in with password: MIROPASS
RMS Express starts automatically. If it doesn’t, start it by double left clicking
the icon:
RMS Express starts with a Home Screen. From here you can send e-mails and receive e-mails. Note the most commonly used areas of the Home Screen.

V09 CityHallWINLINKManual
5
2. Preparing messages to send
Without a template
Left click the Message button on the top bar. This brings up the New Message window.
Select the Destinations by clicking on TO, which brings up a contact list. Select Destinations one at time, and left click Add to Message. Left click Complete when done. You can also type addresses into the address line directly, separated by a semi-colon.
Enter the Subject and body of the message. You can also attach small files (less than 5k bytes recommended; which will take about 5 minutes to send). Then click “Post to Outbox” to prepare to queue to send.

V09 CityHallWINLINKManual
6
With the ICS-213 template
ICS-213 is the standard message format used in the Incident Command System. WINLINK supports ICS-213 formatted messages. Left click the Message button on the top bar. This brings up the New Message window. If your installation shows the “ICS 213 initial”, then click to start.

V09 CityHallWINLINKManual
7
If this button isn’t available, look under “Select Template” and choose “ICS-213_Two_Way_Initial.” A browser will open with a preformatted message form, and complete all non-optional fields; the Date/Time is automatically filled.
Use “tab” to move down the message fields, and “Shift+Tab” to move back up. Click “Submit” when done, and then return to the RMS Express window, which will now show the formatted message:

V09 CityHallWINLINKManual
8
Complete the “To:” and if appropriate, the “Cc:” fields, pulling down the selectable contacts if helpful. Then “Post to Outbox.” If the receiving station has the IC-213 templates installed, the received message will be displaced in a format on the browser. If not, the message will be shown as in-line text. With templates other than ICS-213 Open a new message, click Select Template and choose one of these three templates offered:
EMERGENCY PRIORITY ROUTINE
Edit the template to produce the desired message.

V09 CityHallWINLINKManual
9
Select the Destinations by clicking on TO, which brings up a contact list. Select Destinations one at time, and left click Add to Message. Left click Complete when done. Edit the body of the message to suit your needs. Posting When ready to send, left click Post to Outbox. The message will be sent with the next autoconnect cycle. If you want to send it immediately, go to Sending and Receiving messages, and connect. Click Close and you are back to the Home Screen. You can manage the outgoing messages by clicking Outbox.
V09 CityHallWINLINKManual
10
Sending messages to a Winlink station from the Internet
Messages should be addressed to [email protected], e.g. [email protected]. The message line must also contain //WL2K to identify this as a Winlink message.
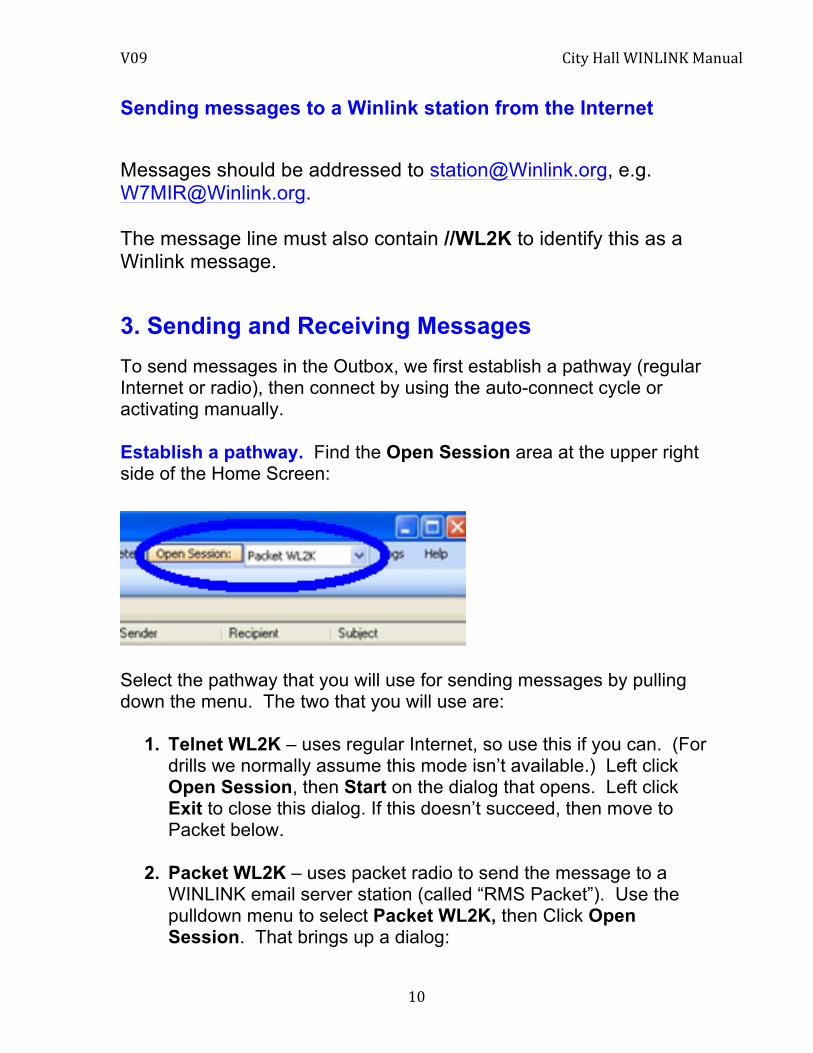
3. Sending and Receiving Messages To send messages in the Outbox, we first establish a pathway (regular Internet or radio), then connect by using the auto-connect cycle or activating manually. Establish a pathway. Find the Open Session area at the upper right side of the Home Screen:
Select the pathway that you will use for sending messages by pulling down the menu. The two that you will use are:
1. Telnet WL2K – uses regular Internet, so use this if you can. (For drills we normally assume this mode isn’t available.) Left click Open Session, then Start on the dialog that opens. Left click Exit to close this dialog. If this doesn’t succeed, then move to Packet below.
2. Packet WL2K – uses packet radio to send the message to a
WINLINK email server station (called “RMS Packet”). Use the pulldown menu to select Packet WL2K, then Click Open Session. That brings up a dialog:

V09 CityHallWINLINKManual
11
Check that the Call Sign in the white box and frequency shown on the right side of the IC-2720 radio match the frequency listed in the table below. Select the radio memory and enter a new Call sign if needed.
Radio memory
frequency Call sign
21 145.03 W7MIR-10
22 430.825 W7MIR-11
23 145.79 WA6PXX-10
24 440.825 WA6PXX-10
If there is a need to select the channel, then click Channel

V09 CityHallWINLINKManual
12
Selection. See “Advanced Information” for details on how to use this. Connect. Press Start to begin the radio connection. That brings up another box:
You can watch the system connect, then receive and send messages. Normal completion is shown with a “Disconnect reported.” Left click Exit to close the packet session, which returns to Home Screen.
4. Reading Messages Any new messages will have a header showing on the Home Screen:

V09 CityHallWINLINKManual
13
You can do several things to the selected message on this screen.
3. Reply, Reply All, Acknowledge Receipt, or Forward using the icons at the upper left. An appropriate dialog box will open.
• Save or print the message. Make sure the printer power is on.
4. Delete the message by clicking Delete on the top line, or using the Delete key on the keyboard.
• Move message, for example to the “Saved Messages” folder.

V09 CityHallWINLINKManual
14
You can also left click on a message to see its contents.
From here you can print, reply, or reply all.

V09 CityHallWINLINKManual
15
5. Advanced information Changing Packet frequency Use this information if you are unable to connect using the normal configuration Use Channel Selection to open a dialog which shows RMS Packet stations at the time of last update.
Click Select Channel, which returns to the message management screen. If W7MIR-10 & -11 and WA6PXX-10 aren’t working, select an alternative station. W7EFR-10 is located on Cougar Mountain and is a good choice.

V09 CityHallWINLINKManual
16
Make sure the squelch is full CCW on the right side
Normal configuration Computer – HP Stream 13 with Windows 10 Power setting: High performance, sleep disabled Laptop cover can be closed and computer remains active Radio – Icom IC-2720H Right band: 145.03 MHz, low power, no offset or tone Transmitted data rate: 1200 baud Squelch: fully off (counter clockwise) Volume: disabled Memory locations: see above TNC - TNC-X Computer port: 9600 baud Vtransmit = 2000 mVp-p RMS Express Setup Call sign for this station: W7MIR Grid location: CN87VN Autoconnect time:

V09 CityHallWINLINKManual
17
60 minutes when not in incident response or drill mode 15 minutes in incident response or drill mode Packet path: W7MIR-10, Message path: Library / Documents / My documents / Winlink Messages TeamViewer – allows other computers to view and control this computer when attached to Internet This computer: MIRO-EOC Contact System operators if you need to use this facility (page 1) Change history V03 6/17/14
• Changed QTH to CV87VN • Removed team viewer codes and replaced with sysop
contacts • Added channel select screen • Changed CCMV to MICEC • Added templates and note about formatting incoming Winlink
messages
V07 3/17/16 • Updated hardware configuration (Computer, TNC-X) • Updated to newest RMS Express software (1.3.10) • Updated channel configuration
V08 6/1/16
• Updated for Windows 10 conversion, new water tower call sign for UHF
V09 11/11/17 • Updated SYSOP and other minor changes