Mirantis OpenStack 6 - tmp.vpetkov.nettmp.vpetkov.net/VMware-NSX-Mirantis-6.0-Ref-Arch.pdf · US...
28
US HEADQUARTERS Mountain View, CA 615 National Ave., Suite 100 Mountain View, CA 94043 +1-650-963-9828 Phone +1-650-963-9723 Fax Mirantis OpenStack ® 6 with VMware vCenter and NSX Mirantis Reference Architecture 17 December 2014
Transcript of Mirantis OpenStack 6 - tmp.vpetkov.nettmp.vpetkov.net/VMware-NSX-Mirantis-6.0-Ref-Arch.pdf · US...
US HEADQUARTERS
Mountain View, CA
615 National Ave., Suite 100
Mountain View, CA 94043
+1-650-963-9828 Phone
+1-650-963-9723 Fax
Mirantis OpenStack® 6
with VMware vCenter
and NSX
Mirantis
Reference
Architecture
17 December 2014
© 2005–2014 All Rights Reserved 2 www.mirantis.com
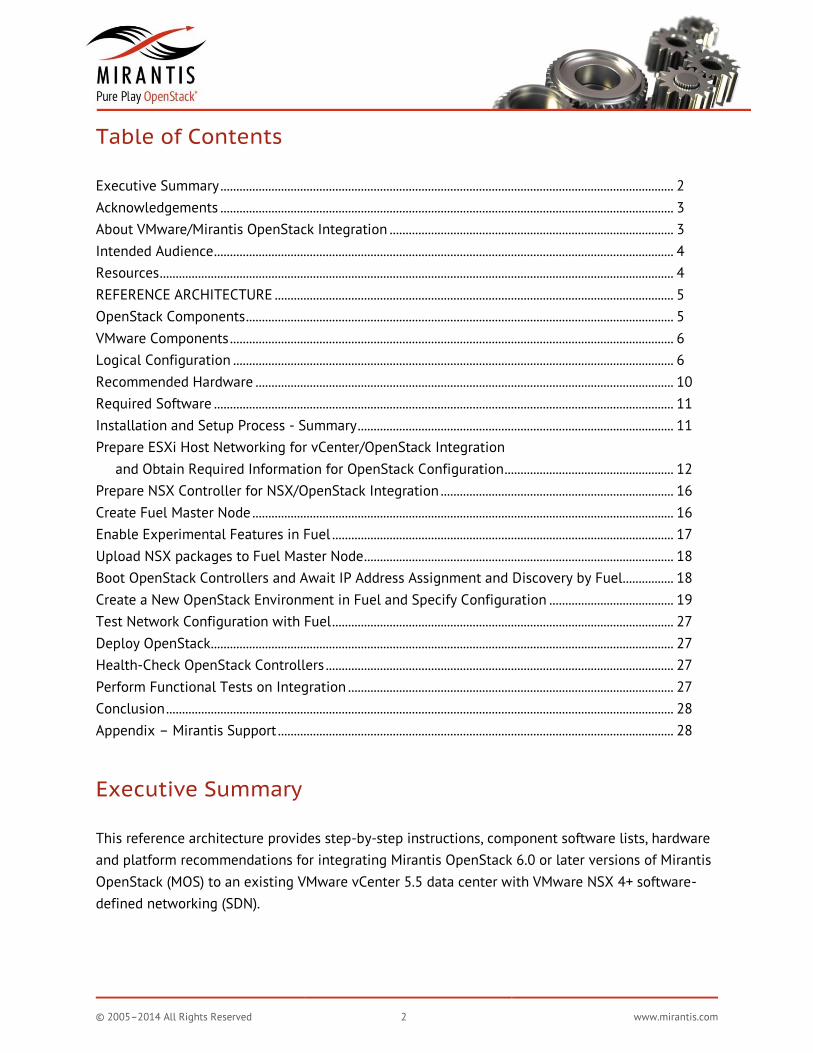
Table of Contents
Executive Summary .............................................................................................................................................. 2
Acknowledgements .............................................................................................................................................. 3
About VMware/Mirantis OpenStack Integration ......................................................................................... 3
Intended Audience ................................................................................................................................................ 4
Resources ................................................................................................................................................................. 4
REFERENCE ARCHITECTURE ............................................................................................................................. 5
OpenStack Components ...................................................................................................................................... 5
VMware Components ........................................................................................................................................... 6
Logical Configuration .......................................................................................................................................... 6
Recommended Hardware ................................................................................................................................... 10
Required Software ................................................................................................................................................ 11
Installation and Setup Process - Summary ................................................................................................... 11
Prepare ESXi Host Networking for vCenter/OpenStack Integration
and Obtain Required Information for OpenStack Configuration ..................................................... 12
Prepare NSX Controller for NSX/OpenStack Integration ......................................................................... 16
Create Fuel Master Node .................................................................................................................................... 16
Enable Experimental Features in Fuel ........................................................................................................... 17
Upload NSX packages to Fuel Master Node ................................................................................................. 18
Boot OpenStack Controllers and Await IP Address Assignment and Discovery by Fuel ................ 18
Create a New OpenStack Environment in Fuel and Specify Configuration ....................................... 19
Test Network Configuration with Fuel ........................................................................................................... 27
Deploy OpenStack ................................................................................................................................................. 27
Health-Check OpenStack Controllers ............................................................................................................. 27
Perform Functional Tests on Integration ...................................................................................................... 27
Conclusion ............................................................................................................................................................... 28
Appendix – Mirantis Support ............................................................................................................................ 28
Executive Summary
This reference architecture provides step-by-step instructions, component software lists, hardware
and platform recommendations for integrating Mirantis OpenStack 6.0 or later versions of Mirantis
OpenStack (MOS) to an existing VMware vCenter 5.5 data center with VMware NSX 4+ software-
defined networking (SDN).
© 2005–2014 All Rights Reserved 3 www.mirantis.com
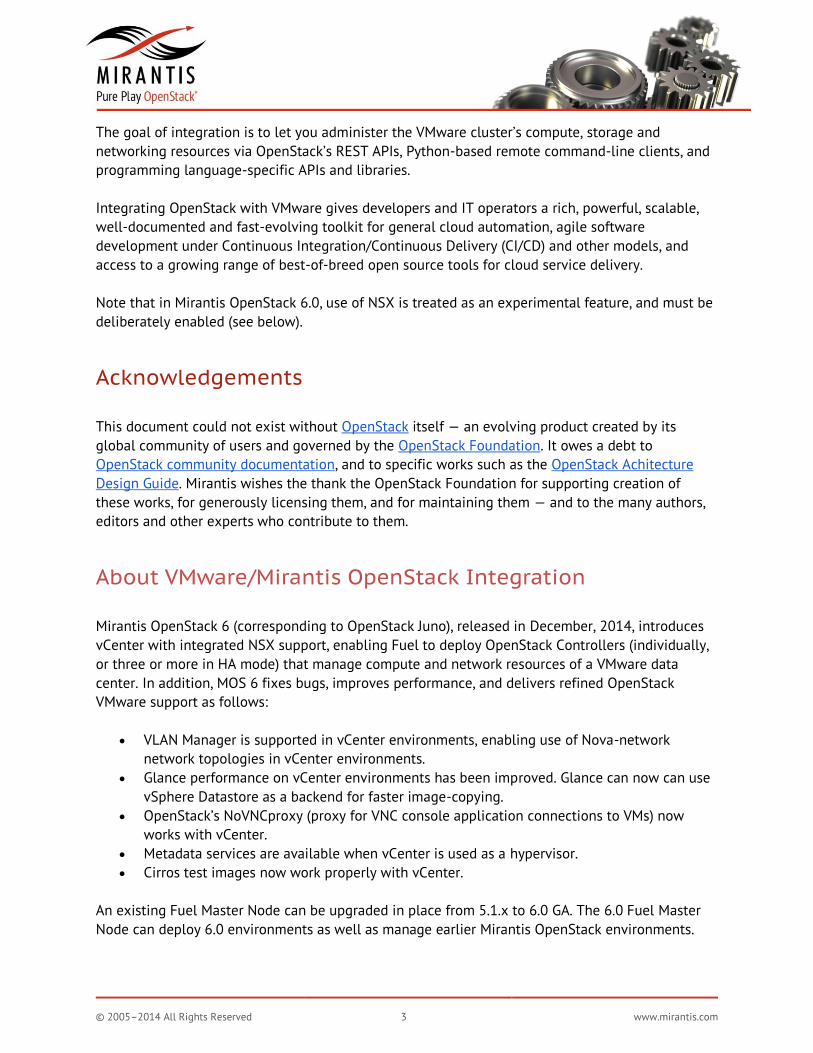
The goal of integration is to let you administer the VMware cluster’s compute, storage and
networking resources via OpenStack’s REST APIs, Python-based remote command-line clients, and
programming language-specific APIs and libraries.
Integrating OpenStack with VMware gives developers and IT operators a rich, powerful, scalable,
well-documented and fast-evolving toolkit for general cloud automation, agile software
development under Continuous Integration/Continuous Delivery (CI/CD) and other models, and
access to a growing range of best-of-breed open source tools for cloud service delivery.
Note that in Mirantis OpenStack 6.0, use of NSX is treated as an experimental feature, and must be
deliberately enabled (see below).
Acknowledgements
This document could not exist without OpenStack itself — an evolving product created by its
global community of users and governed by the OpenStack Foundation. It owes a debt to
OpenStack community documentation, and to specific works such as the OpenStack Achitecture
Design Guide. Mirantis wishes the thank the OpenStack Foundation for supporting creation of
these works, for generously licensing them, and for maintaining them — and to the many authors,
editors and other experts who contribute to them.
About VMware/Mirantis OpenStack Integration
Mirantis OpenStack 6 (corresponding to OpenStack Juno), released in December, 2014, introduces
vCenter with integrated NSX support, enabling Fuel to deploy OpenStack Controllers (individually,
or three or more in HA mode) that manage compute and network resources of a VMware data
center. In addition, MOS 6 fixes bugs, improves performance, and delivers refined OpenStack
VMware support as follows:
VLAN Manager is supported in vCenter environments, enabling use of Nova-network
network topologies in vCenter environments.
Glance performance on vCenter environments has been improved. Glance can now can use
vSphere Datastore as a backend for faster image-copying.
OpenStack’s NoVNCproxy (proxy for VNC console application connections to VMs) now
works with vCenter.
Metadata services are available when vCenter is used as a hypervisor.
Cirros test images now work properly with vCenter.
An existing Fuel Master Node can be upgraded in place from 5.1.x to 6.0 GA. The 6.0 Fuel Master
Node can deploy 6.0 environments as well as manage earlier Mirantis OpenStack environments.

© 2005–2014 All Rights Reserved 4 www.mirantis.com
Intended Audience
To be successful with this guide, we assume:
You are familiar with virtualization
You are knowledgeable about VMware, and are presently operating a data center using
VMware technologies, including vCenter Server, ESXi and NSX SDN.
You are comfortable following instructions to perform basic configuration and
administrative tasks with web-based system management tools and with vSphere Client on
Windows.
You have general knowledge of OpenStack and understand its components’ functions.
You are generally familiar with network architecture, concepts such as DHCP, VLANs, and
tunneling.
Resources
General Resources
o http://docs.openstack.org/
o Mirantis OpenStack Documentation (6.0)
o Mirantis Bill of Materials Calculator
o OpenStack community documentation
o OpenStack Architecture Design Guide
Specific Resources - This Reference Architecture
o See Mirantis OpenStack Documentation : Reference Architectures : VMware
vSphere Integration (5.1 / 6.0) for information about how vCenter support is
implemented in Mirantis OpenStack
o Mirantis OpenStack Documentation : User Guide : vSphere Deployment Notes (5.1 /
6.0) gives instructions for creating and deploying a Mirantis OpenStack environment
that is integrated with VMware vSphere
o For background information about VMware vSphere support in OpenStack, see
VMware vSphere - OpenStack Manuals
o vSphere Installation Guide: vSphere Installation and Setup
o VMware NSX Network Virtualization Design Guide:
http://www.vmware.com/files/pdf/products/nsx/vmw-nsx-network-virtualization-
design-guide.pdf
© 2005–2014 All Rights Reserved 5 www.mirantis.com
REFERENCE ARCHITECTURE
OpenStack Components
This reference architecture provides a method and specifies tools (primarily Mirantis OpenStack 6.0
or later versions of the Mirantis OpenStack distribution) and infrastructure for deploying an
OpenStack Controller (or HA controller cluster) and integrating it with an existing VMware vCenter
5.1 Server and vSphere data center with NSX 4 software-defined networking (SDN) (see below for
precise software component version compatibility notes).
Mirantis OpenStack components comprise:
Fuel Master Node: A discrete machine used to preconfigure, deploy, sanity-check, access
and manage the OpenStack Controller and its components.
OpenStack Controller: A single machine (or high-availability cluster of three or more
machines), with significant compute and storage capability, hosting the following
components:
o OpenStack Primary Components:
Keystone - OpenStack authentication service
Glance - OpenStack image-storage service
Cinder - OpenStack block-storage service
Neutron - OpenStack go-forward network service. The VMware NSX driver
translates between Neutron and NSX networking components.
SDN switching component - In this reference architecture, this is an
NSX vSwitch.
Nova components - Includes nova-scheduler and nova-compute, with which
the vCenter driver integrates.
o OpenStack Control Plane:
OpenStack REST API services.
OpenStack Horizon web dashboard (and web server).
OpenStack Python command-line clients (CLI).
o OpenStack Databases (MySQL):
o OpenStack Message Queues (RabbitMQ)
o High-Availability Components (HA configuration only):
Galera cluster manager (HA mode only, providing database high availability)
HAproxy (HA configuration only)
© 2005–2014 All Rights Reserved 6 www.mirantis.com
VMware Components
VMware components comprise:
VMware vSphere vCenter Server - Conceptually equivalent to the OpenStack Controller
VMware Control Center - Cluster management console
VMware vSphere ESXi hypervisor - Conceptually equivalent to an OpenStack nova compute
node with local storage
(4) NSX appliances:
o NSX Manager - Centralized network management component of NSX
o NSX Controller - Distributed state management system that controls virtual
networks and overlay transport tunnels.
o NSX Service Node - Assists with packet replication for broadcast network nodes,
and with management of similarly-tasked physical switches.
o NSX Gateway - Provides L2/L3 connectivity services for virtual machines.
(6+) NSX vSwitch - Virtual switch - provides distributed switching local to ESXi hosts and
OpenStack Controllers. One required in each OpenStack Controller, in each ESXi host, and
in NSX service nodes and gateways.
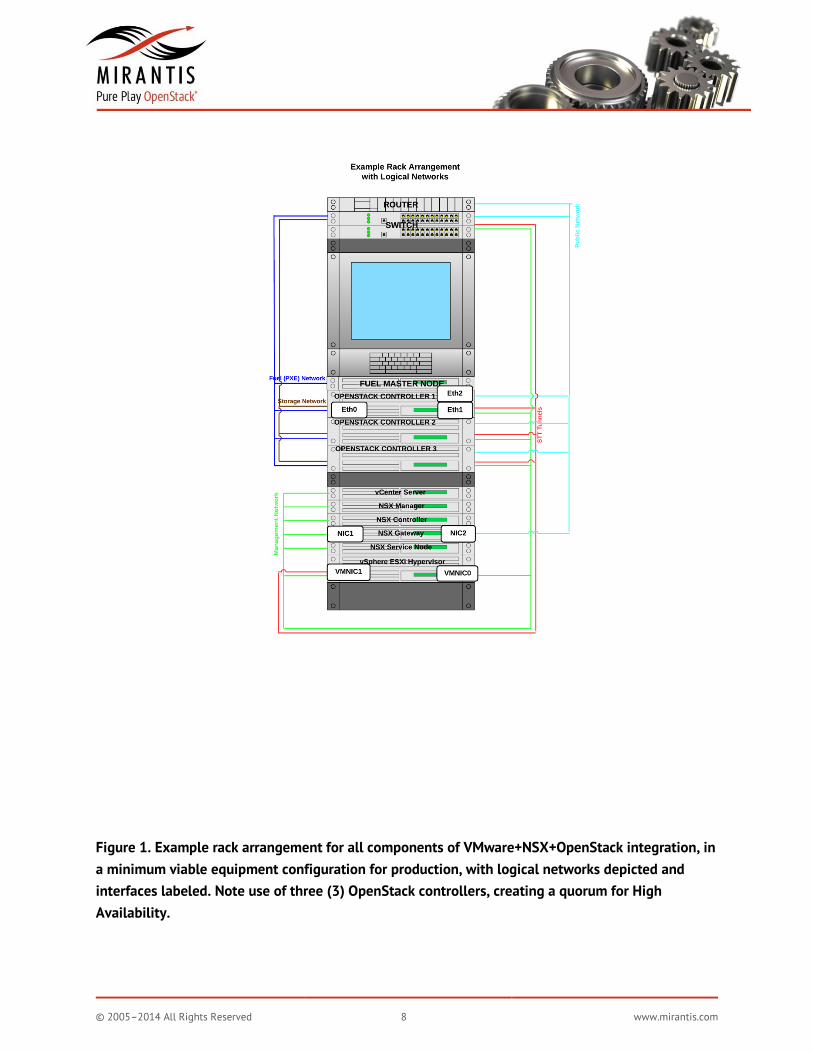
Logical Configuration
In the diagram below, required vCenter/vSphere, NSX and Mirantis OpenStack infrastructure is
shown in a minimal configuration with production elements. As illustrated, only a single OpenStack
Controller is present or required for a proof-of-concept (PoC) deployment, whereas a minimum of
three controllers (forming a quorum) is required for full HA functionality. As the integration
instructions make clear, we recommend using Mirantis OpenStack to deploy controllers (even a
single controller) in HA mode, which configuration will accomodate adding controllers (2+) later to
achieve full HA functionality.
Four equipment blocks are shown — from top to bottom, these are:
Connectivity - Comprising a router/gateway and 48-port switch
Mirantis OpenStack - Comprising:
o Fuel Master Node (not shown: Fuel management console - browser device)
o Three OpenStack Controller servers in HA configuration (each with NICs eth0 for
management and storage, eth1 for public network, eth2 for VM network). The
OpenStack Controllers host Neutron, OpenStack’s go-forward network management
module, the vCenter driver, and the NSX driver. Also residing on the controllers is
an NSX vSwitch component used to terminate and switch STT tunnels for VM
traffic.
VMware - Comprising:
o vCenter Server (not shown: vCenter Manager/vSphere Client)

© 2005–2014 All Rights Reserved 7 www.mirantis.com
o vSphere ESXi Hypervisors (compute nodes, x2) (each with NICs vmnic1, vmnic2).
Each Hypervisor node also hosts an NSX vSwitch component for VM traffic
switching on STT tunnels.
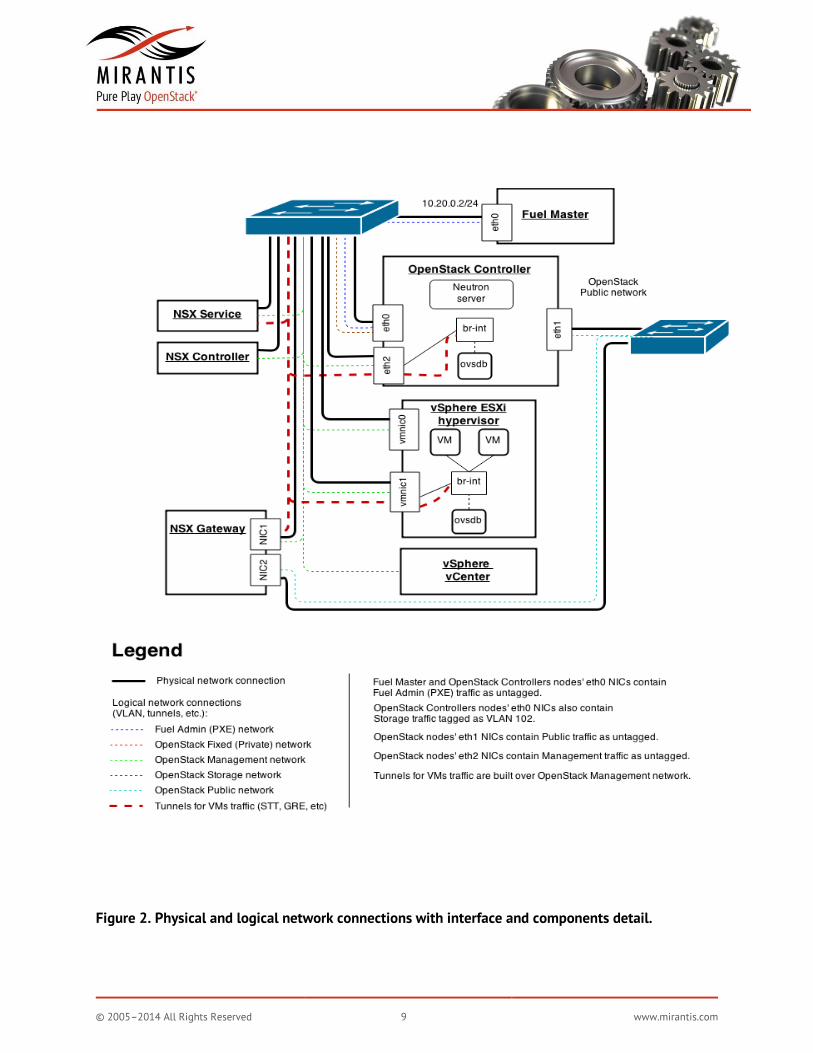
NSX Block - Comprising:
o NSX Manager
o NSX Controller
o NSX Gateway (two NICs, for VM and management, and for public network traffic)
o NSX Service Node
o NSX VIB for OpenVSwitch (see below)
Two physical networks conjoin these devices, referred to as:
Management Network, carrying logical networks:
o Management Network: Connects all devices except Fuel Master. OpenStack
Controllers connect on eth0, vSphere ESXi Hypervisor nodes connect on both
vmnic0 (for management of hypervisor) and vmnic1 (for management of VM
networking)
o OpenStack Networks (private to controllers):
Fuel Admin Network: Conveys untagged traffic between Fuel Master and
OpenStack Controller eth0 NICs as untagged traffic within CIDR
10.20.0.2/24, carried on the physical network designated for Management
traffic. Note: Since the Fuel Master Node will provide DHCP and PXE-boot
services to the OpenStack Controller machines, it is essential that no other
DHCP server be provisioned on this logical network.
OpenStack Storage Network: Connects OpenStack Controllers (tagged as
VLAN 102)
VM Fixed Network: Connects OpenStack Controllers (tagged as VLAN 103)
VM/Public Network, carrying logical networks:
o VM Traffic: As STT tunnels. Connects OpenStack Controllers (eth2), NSX Gateway,
NSX Service Node, and ESXi Hypervisor nodes (on vmnic1)
o OpenStack Public network and internet traffic, connecting NSX Gateway, eth1 of
OpenStack Controllers, and router.
© 2005–2014 All Rights Reserved 8 www.mirantis.com
Figure 1. Example rack arrangement for all components of VMware+NSX+OpenStack integration, in
a minimum viable equipment configuration for production, with logical networks depicted and
interfaces labeled. Note use of three (3) OpenStack controllers, creating a quorum for High
Availability.
© 2005–2014 All Rights Reserved 9 www.mirantis.com
Figure 2. Physical and logical network connections with interface and components detail.
© 2005–2014 All Rights Reserved 10 www.mirantis.com
Recommended Hardware
Required for this RA are:
1 Server to host Fuel Master:
Suggested minimum configuration for installation in production environment:
Quad-core CPU
4GB RAM
1 gigabit network port
128GB SAS Disk
IPMI access through independent management network
Suggested minimum configuration for installation in lab environment:
Dual-core CPU
2GB RAM
1 gigabit network port
50GB disk
Physical console access
1-3 servers to host OpenStack Controller services, each with three NICs
Example configuration. Additional configurations can be explored using the Mirantis Bill of
Materials Calculator at https://www.mirantis.com/openstack-services/bom-calculator/
Count: 3 server(s), 3 rack unit(s) total
CPU: 2 x Intel Xeon E5-2420 (6 cores total)
RAM: 6 x 4GB
NIC: Intel Ethernet X540 DP 10GBASE-T Server Adapter (20Gb)
Admin computer or laptop with browser to access Fuel Web UI and perform other
administrative functions
To access Fuel, you will need to use a browser pointed to the local IP address of the Fuel web UI
on the Fuel Master Node. This is most easily accomplished by attaching a laptop with a standard
browser (e.g., Chrome or Firefox) to the Fuel management network (10.20.0.2/24) via the switch.
© 2005–2014 All Rights Reserved 11 www.mirantis.com
Required Software
Mirantis OpenStack 6.x
VIB (vSphere Installation Bundle) files for integrating OpenStack with ESXi hosts. These are
obtainable from VMware for licensed users of NSX:nsx-ovs-2.0.0-build30176-rhel61_x86_64.tar.gz
nsx-ovs-2.0.0-build30176-ubuntu_precise_amd64.tar.gz
Browser (Firefox, Chrome)
VMware vSphere Client
This reference architecture was tested on:
vCenter 5.5
NSX 4.0.1 (Gateway, Manager, Controller, Service node)
NSX OVS 2.0.0-build30176 CentOS 6.5 as host OS on OpenStack Controller nodes (there is a kernel incompatibility
between OVS 2.0.0-build30176 and Ubuntu 12.04 (kernel 3.13))
We believe it should work on:
vCenter 5.5 (preferably Update 2)
NSX OVS 2.3
version of NSX Gateway, Manager, Controller, Service node compatible with NSX OVS 2.3.
NSX customers should consult VMware for compatibility recommendations.
Installation and Setup Process - Summary
Installation follows these major steps:
1. Prepare ESXi Host Networking for vCenter/OpenStack integration and obtain required
information for OpenStack configuration
2. Prepare NSX Controller for NSX/OpenStack integration
3. Download Mirantis OpenStack .iso from http://software.mirantis.com
4. Create Fuel Master Node
5. Log into Fuel Master Node, enable experimental features, restart required services
6. Upload NSX packages to Fuel Master Node
7. Boot OpenStack Controllers and await IP address assignment and discovery by Fuel
8. Create a New OpenStack environment in Fuel and specify configuration
9. Test Network configuration with Fuel
10. Deploy OpenStack
11. Sanity-check OpenStack Controllers
12. Perform functional tests on integration
© 2005–2014 All Rights Reserved 12 www.mirantis.com
Prepare ESXi Host Networking for vCenter/OpenStack Integration
and Obtain Required Information for OpenStack Configuration
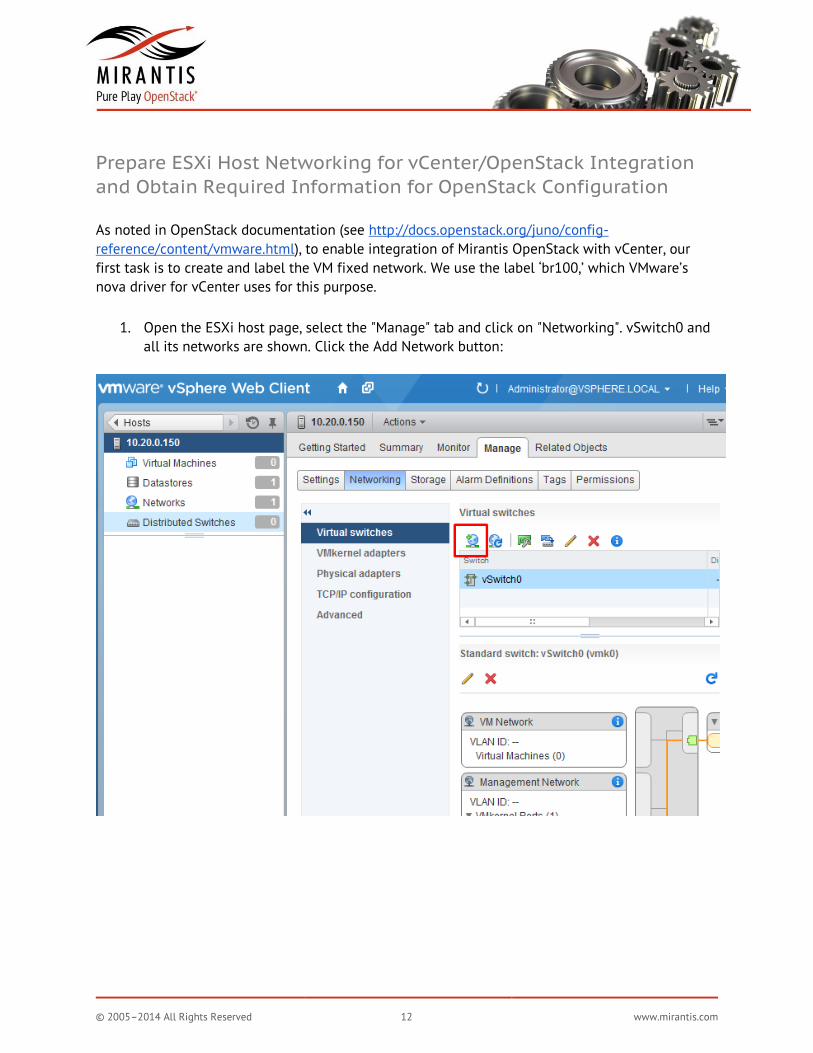
As noted in OpenStack documentation (see http://docs.openstack.org/juno/config-
reference/content/vmware.html), to enable integration of Mirantis OpenStack with vCenter, our
first task is to create and label the VM fixed network. We use the label ‘br100,’ which VMware’s
nova driver for vCenter uses for this purpose.
1. Open the ESXi host page, select the "Manage" tab and click on "Networking". vSwitch0 and
all its networks are shown. Click the Add Network button:
© 2005–2014 All Rights Reserved 13 www.mirantis.com
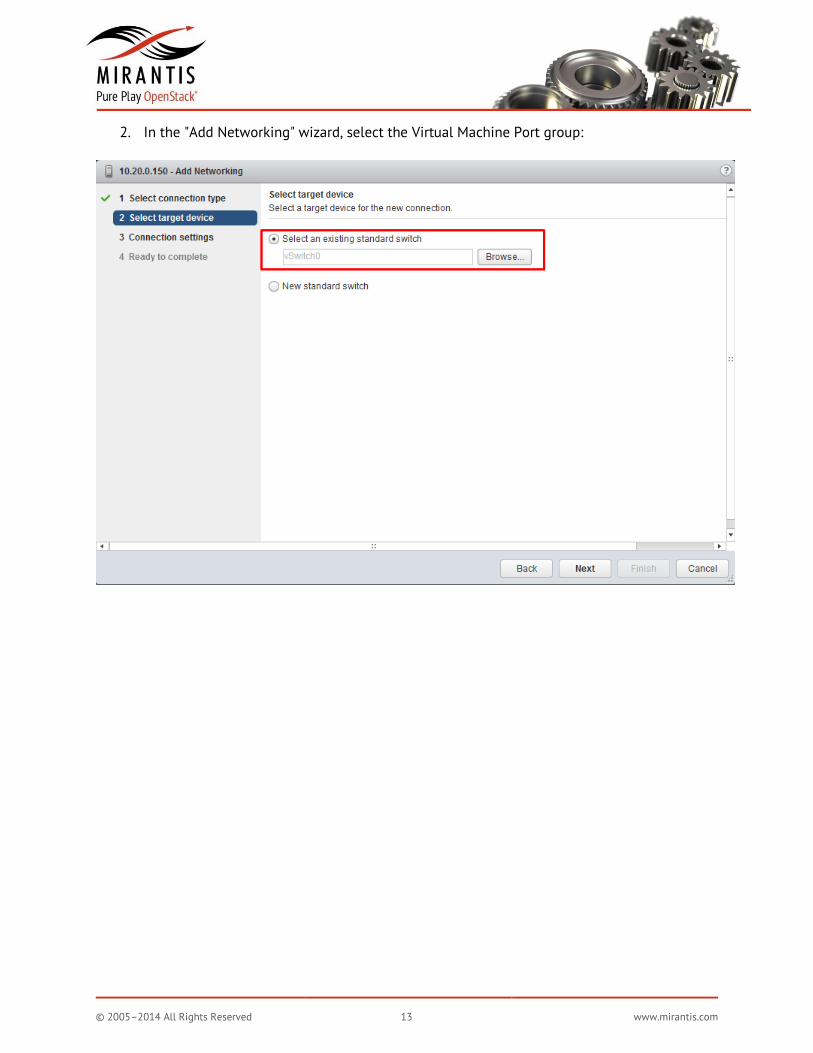
2. In the "Add Networking" wizard, select the Virtual Machine Port group:

© 2005–2014 All Rights Reserved 14 www.mirantis.com
3. On the next page, select the "Virtual Machine Port Group" option to ensure that the
network will be created in vSwitch0:
© 2005–2014 All Rights Reserved 15 www.mirantis.com
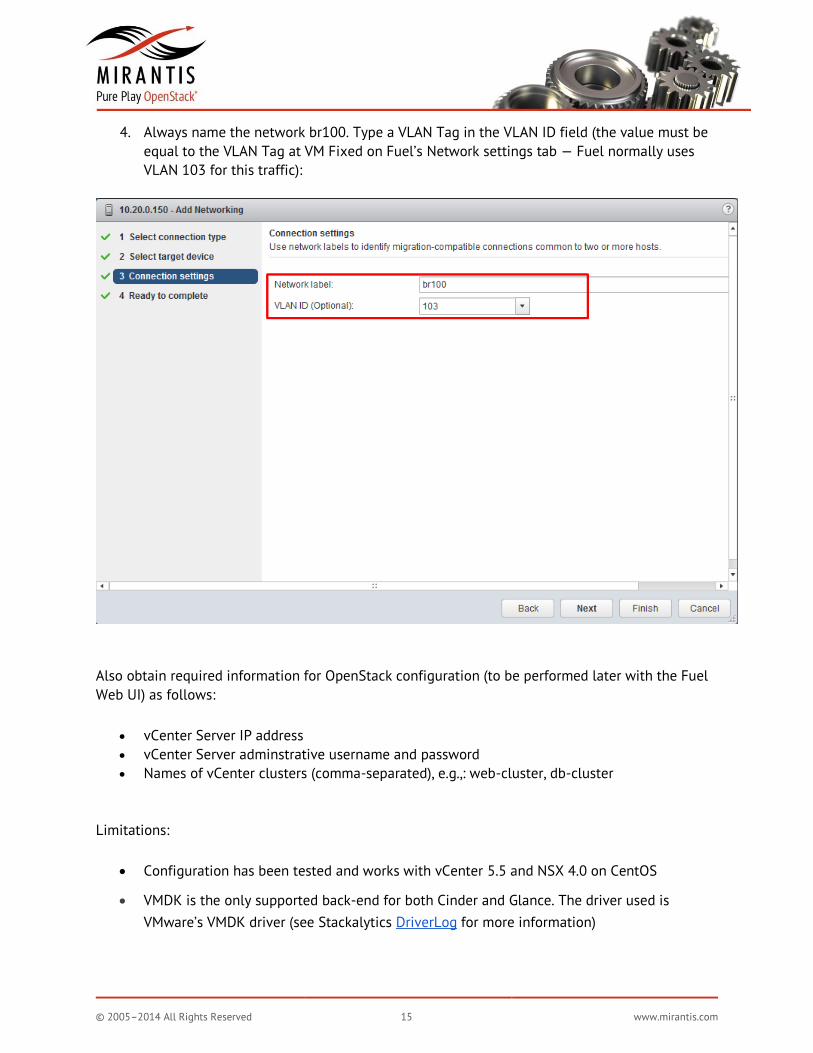
4. Always name the network br100. Type a VLAN Tag in the VLAN ID field (the value must be
equal to the VLAN Tag at VM Fixed on Fuel’s Network settings tab — Fuel normally uses
VLAN 103 for this traffic):
Also obtain required information for OpenStack configuration (to be performed later with the Fuel
Web UI) as follows:
vCenter Server IP address
vCenter Server adminstrative username and password
Names of vCenter clusters (comma-separated), e.g.,: web-cluster, db-cluster
Limitations:
Configuration has been tested and works with vCenter 5.5 and NSX 4.0 on CentOS
VMDK is the only supported back-end for both Cinder and Glance. The driver used is
VMware’s VMDK driver (see Stackalytics DriverLog for more information)
© 2005–2014 All Rights Reserved 16 www.mirantis.com
Prepare NSX Controller for NSX/OpenStack integration
Next, you will configure the NSX controller to communicate with OpenStack. Note that if the NSX
Controller’s IP address is on a network separate from NSX and vCenter you must insure L3
connectivity between the OpenStack Public network and the network where the NSX Controller
resides.
In NSX Manager, examine settings for the network used to provide VM networking in your vCenter
cluster. You will need to determine and provide several settings while configuring OpenStack using
the Fuel Web UI. The required values are:
UUID of the Transport Zone in the NSX cluster
Transport Type
UUID of the L3 Gateway Service
Instruct VMware NSX to export the OpenStack virtual machine virtual interface (vif) UUID as extra
information besides the VMware vSphere one. This is necessary as OpenStack uses a different UUID
than VMware vSphere does. Without this setting, OpenStack will not recognize a VM that it created
for further operations via the Neutron API. Instruct NSX to allow custom vifs with the nsxd --allow-
custom-vifs command. When asked for a username and password, enter the username and password
for the ESXi host.
Create Fuel Master Node
Procedure is as follows:
1. Connect hardware per the network diagram (Figure 2). Set the BIOS of all platforms
designated to host an OpenStack Controller to PXE-boot from network. Turn all Controller
machines off. Keep in mind that the Fuel Master works as a DHCP server for the Controller
nodes to which it will deploy OpenStack, so should be the only DHCP server active on this
L2 network.
2. Download the Mirantis OpenStack 6.0 .iso from http://software.mirantis.com.
3. Burn the .iso to disk or USB, and use it to boot the machine designated to host the Fuel
Master Node. Note: the Fuel Master software will take over an attached hard drive and
install itself for rapid restart — do not, therefore, perform this install on a personal laptop
or other machine whose hard drive contents or configuration must be retained.
4. If you need to change PXE network parameters or other default behavior, pressing <TAB>
during initial setup of the Fuel Master will let you modify the default command line for
installation. Change the value showmenu=no to showmenu=yes to enable access to Fuel
Setup, which makes a host of options customizable. Further instructions for customizing
PXE and other characteristics can be found in Mirantis Documentation: User Guide:
© 2005–2014 All Rights Reserved 17 www.mirantis.com
Changing PXE Network Parameters During Installation. Note that Fuel Setup can only be
used during initial boot of the Fuel Master Node — not post-installation. Setting new
network settings for an already-installed Master Node requires that all Docker containers
be rebuilt and possibly further manual reconfiguration.
5. Allow Fuel to complete self-installation.
Enable Experimental Features in Fuel
To enable configuration of an OpenStack Controller cluster with Neutron networking, integrated
with NSX, it is necessary to enable experimental features in Fuel. This is done by:
1. Logging into the Fuel Master as root (default password: r00tme)
2. Changing permissions on the file /etc/fuel/version.yaml to make it modifiable
# chmod 777 /etc/fuel/version.yaml
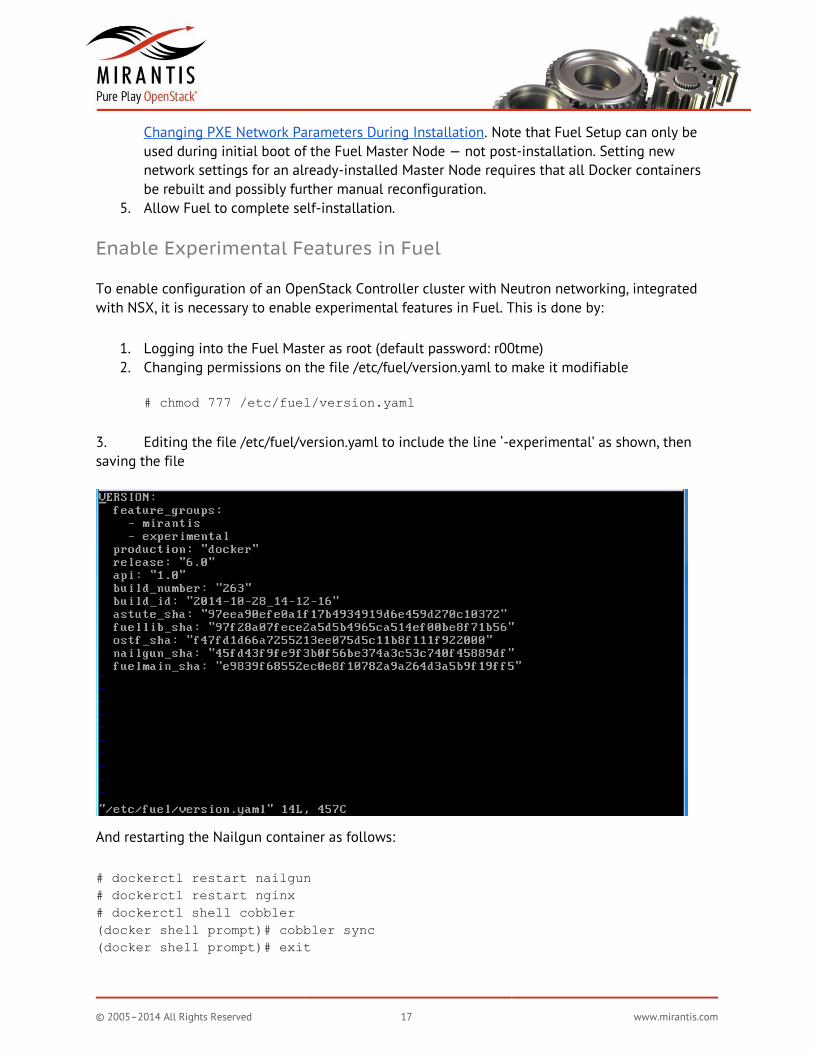
3. Editing the file /etc/fuel/version.yaml to include the line ‘-experimental’ as shown, then
saving the file
And restarting the Nailgun container as follows:
# dockerctl restart nailgun
# dockerctl restart nginx
# dockerctl shell cobbler
(docker shell prompt)# cobbler sync
(docker shell prompt)# exit
© 2005–2014 All Rights Reserved 18 www.mirantis.com
Upload NSX Packages to Fuel Master Node
Once the Fuel Master Node is installed, NSX packages must be copied onto it in preparation for
OpenStack configuration and deployment. The packages themselves must be obtained from
VMware directly — they are available free of charge to NSX license holders.
The Fuel Master Node is presumed to have IP address 10.20.0.2 in this example:
1. Copy packages to Fuel Master Node root directory:
$ scp nsx-ovs-2.0.0-build30176-rhel61_x86_64.tar.gz [email protected]:
$ scp nsx-ovs-2.0.0-build30176-ubuntu_precise_amd64.tar.gz [email protected]:
2. Place NSX packages in the /var/www/nailgun/ directory of the Fuel Master Node:
[root@fuel ~]# mkdir /var/www/nailgun/nsx
[root@fuel ~]# cd /var/www/nailgun/nsx
[root@fuel nsx]# tar -xf ~/nsx-ovs-2.0.0-build30176-rhel61_x86_64.tar.gz
[root@fuel nsx]# tar -xf ~/nsx-ovs-2.0.0-build30176-ubuntu_precise_amd64.tar.gz
3. Insure that the files are being served by the Fuel Master Node’s webserver. Open the URL
http://10.20.0.2:8080/nsx/ in a web browser and check that the web server successfully
lists the packages.
4. Record the URL http://10.20.0.2:8080/nsx/ for the "URL for NSX bits" setting on the
Settings tab in the Fuel web UI.
Boot OpenStack Controllers and Await IP Address Assignment and
Discovery by Fuel
The OpenStack Controller machines can then be switched on. They will PXE-boot from the Fuel
Master Node, installing a basic OS, and will be auto-discovered by Fuel and visible on the Fuel Web
UI, accessible via browser on the Fuel deployment network at the default URL:
http://10.20.0.2:8000, with default user/pass admin/admin.
Remaining configuration of your OpenStack Controller cluster will be done with the Fuel Web UI.
© 2005–2014 All Rights Reserved 19 www.mirantis.com
Create a New OpenStack environment in Fuel and Specify
Configuration
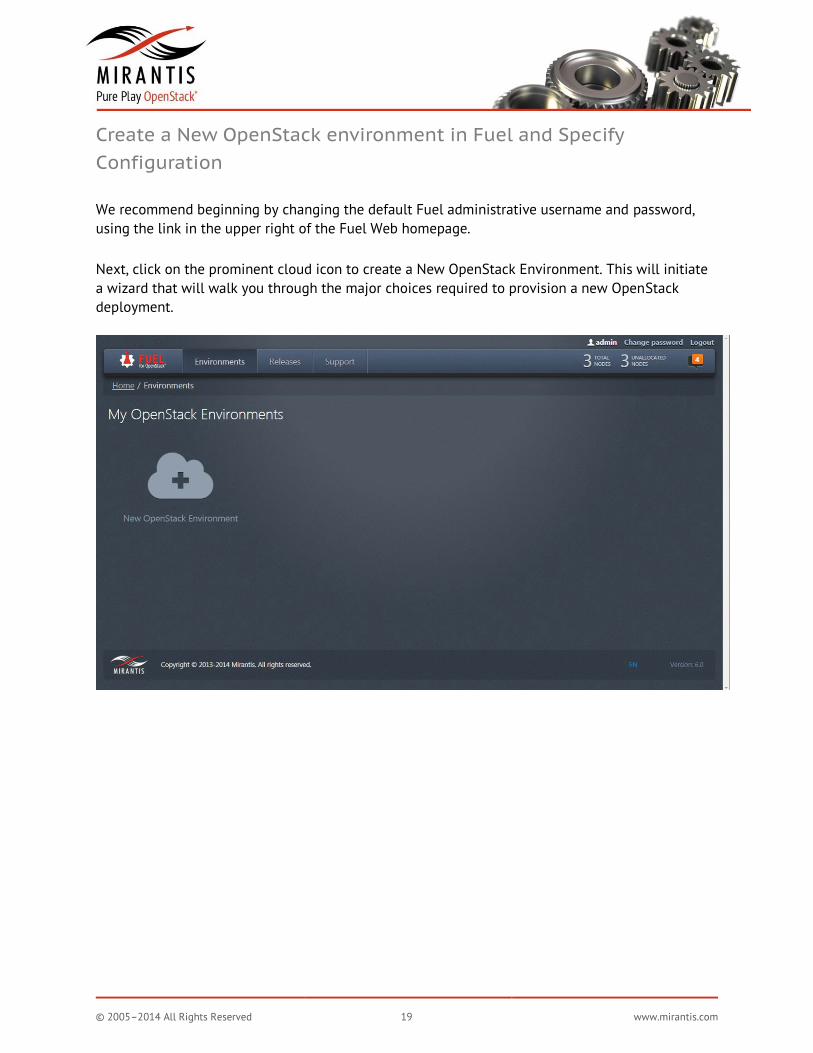
We recommend beginning by changing the default Fuel administrative username and password,
using the link in the upper right of the Fuel Web homepage.
Next, click on the prominent cloud icon to create a New OpenStack Environment. This will initiate
a wizard that will walk you through the major choices required to provision a new OpenStack
deployment.
© 2005–2014 All Rights Reserved 20 www.mirantis.com
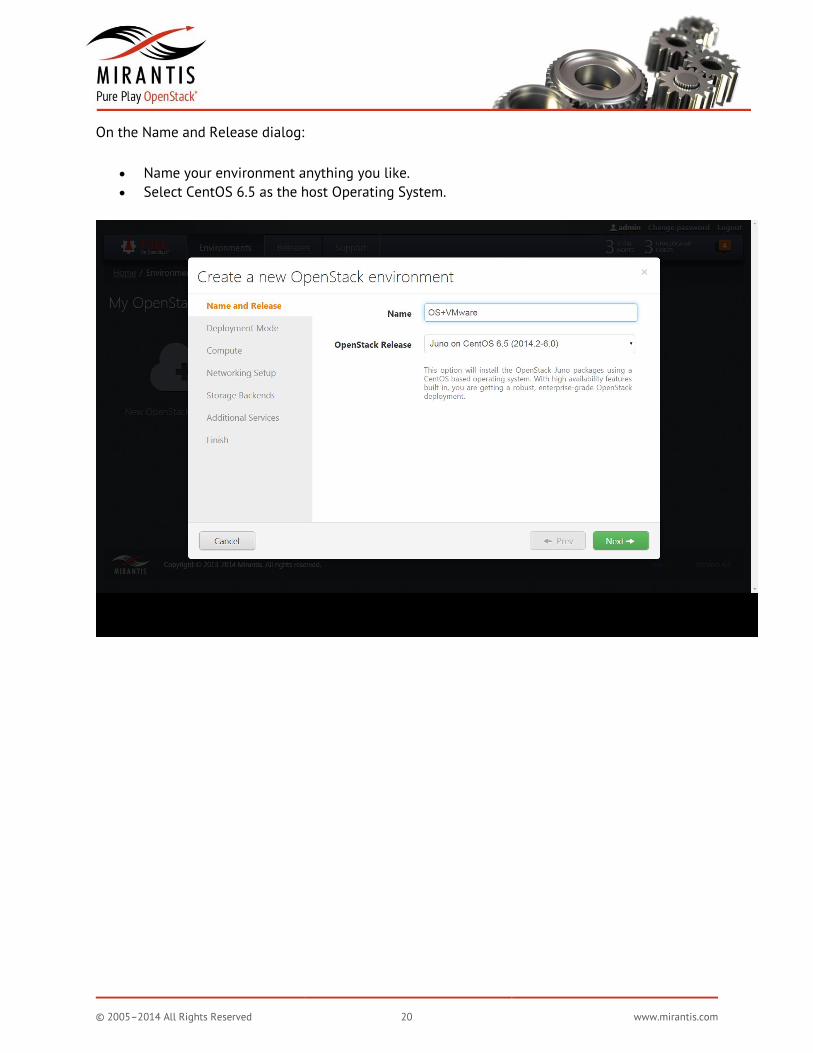
On the Name and Release dialog:
Name your environment anything you like.
Select CentOS 6.5 as the host Operating System.
© 2005–2014 All Rights Reserved 21 www.mirantis.com
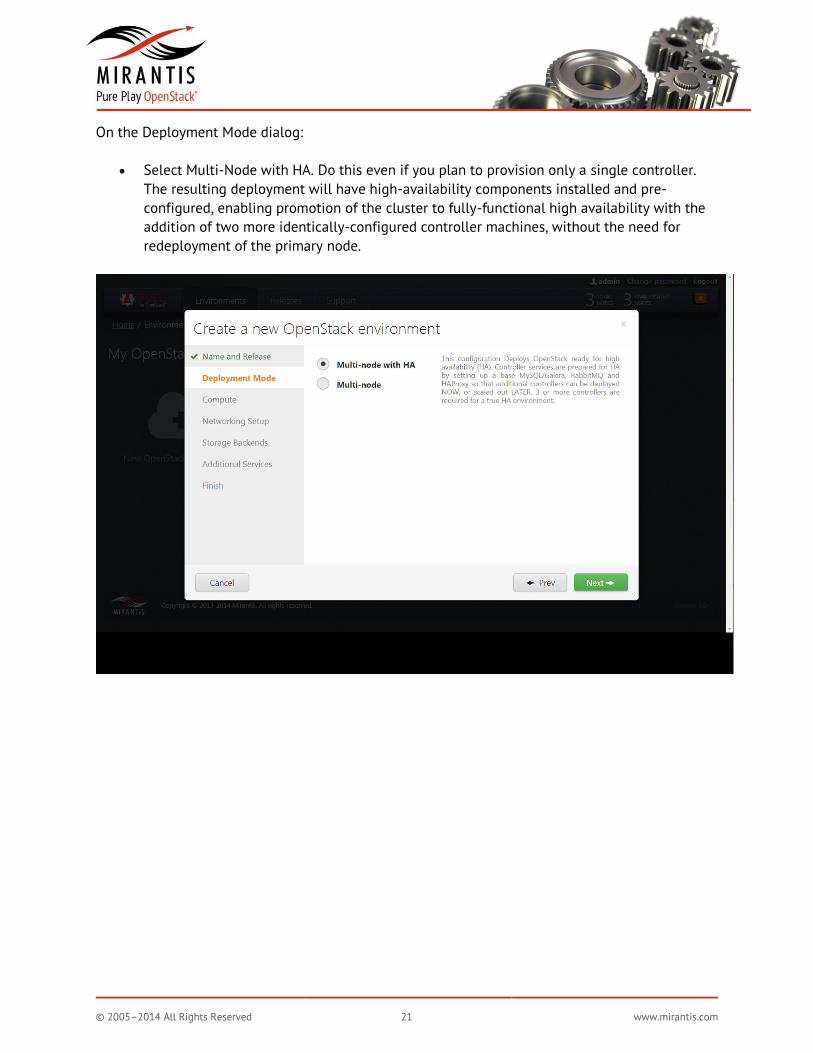
On the Deployment Mode dialog:
Select Multi-Node with HA. Do this even if you plan to provision only a single controller.
The resulting deployment will have high-availability components installed and pre-
configured, enabling promotion of the cluster to fully-functional high availability with the
addition of two more identically-configured controller machines, without the need for
redeployment of the primary node.
© 2005–2014 All Rights Reserved 22 www.mirantis.com
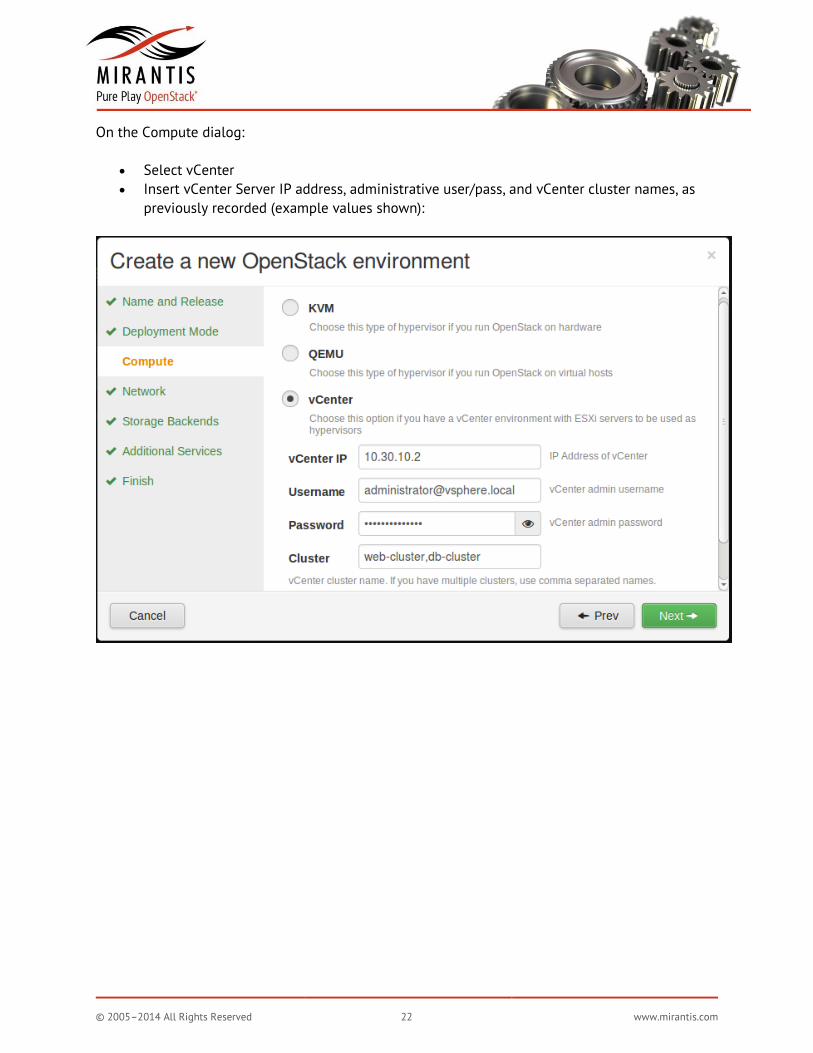
On the Compute dialog:
Select vCenter
Insert vCenter Server IP address, administrative user/pass, and vCenter cluster names, as
previously recorded (example values shown):

© 2005–2014 All Rights Reserved 23 www.mirantis.com
On the Network dialog:
Select Neutron with NSX Plugin. Note that you must have enabled MOS 6 experimental
features for this option to be available (see above). The prompt ‘Neutron is not available
with vCenter as a compute option’ is legacy, and does not appear in production MOS 6.0
Fuel.
© 2005–2014 All Rights Reserved 24 www.mirantis.com
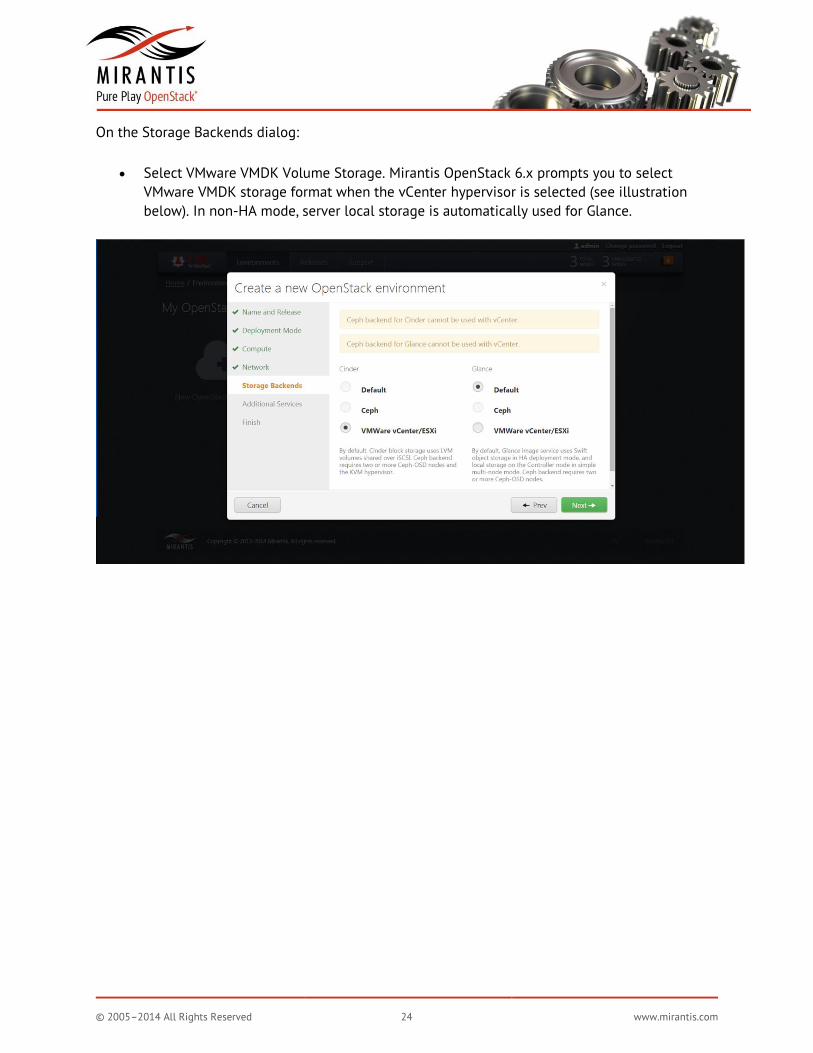
On the Storage Backends dialog:
Select VMware VMDK Volume Storage. Mirantis OpenStack 6.x prompts you to select
VMware VMDK storage format when the vCenter hypervisor is selected (see illustration
below). In non-HA mode, server local storage is automatically used for Glance.
© 2005–2014 All Rights Reserved 25 www.mirantis.com
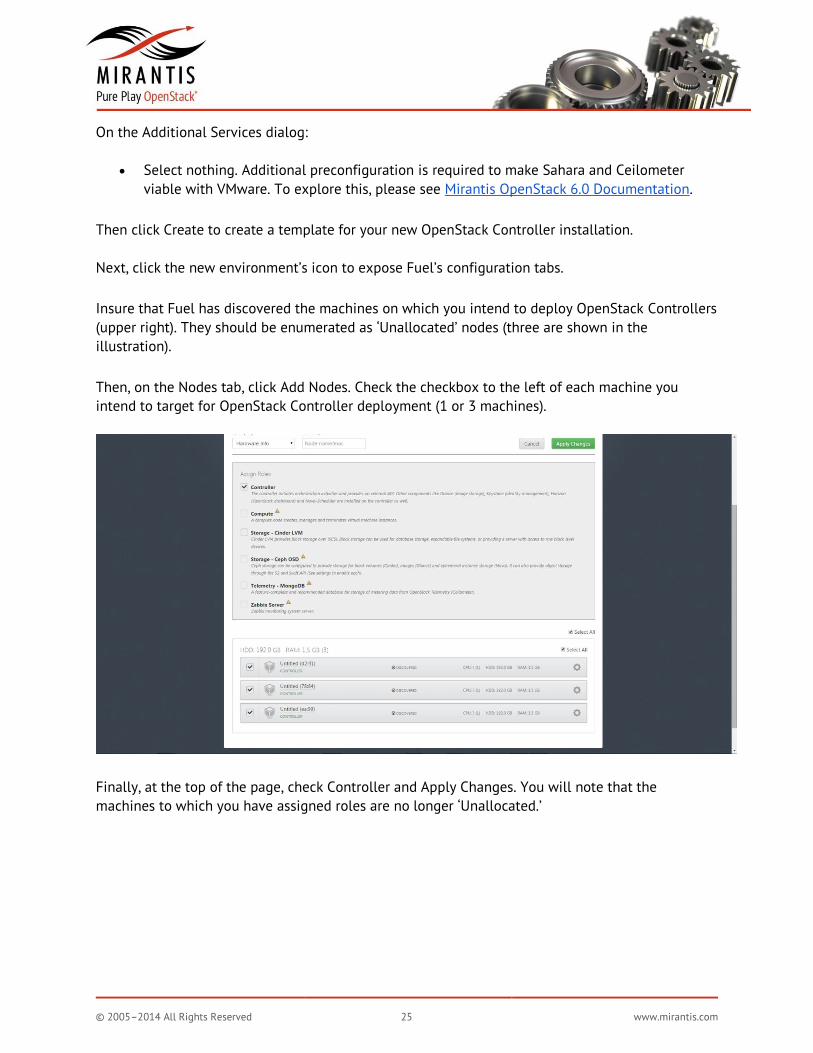
On the Additional Services dialog:
Select nothing. Additional preconfiguration is required to make Sahara and Ceilometer
viable with VMware. To explore this, please see Mirantis OpenStack 6.0 Documentation.
Then click Create to create a template for your new OpenStack Controller installation.
Next, click the new environment’s icon to expose Fuel’s configuration tabs.
Insure that Fuel has discovered the machines on which you intend to deploy OpenStack Controllers
(upper right). They should be enumerated as ‘Unallocated’ nodes (three are shown in the
illustration).
Then, on the Nodes tab, click Add Nodes. Check the checkbox to the left of each machine you
intend to target for OpenStack Controller deployment (1 or 3 machines).
Finally, at the top of the page, check Controller and Apply Changes. You will note that the
machines to which you have assigned roles are no longer ‘Unallocated.’
© 2005–2014 All Rights Reserved 26 www.mirantis.com
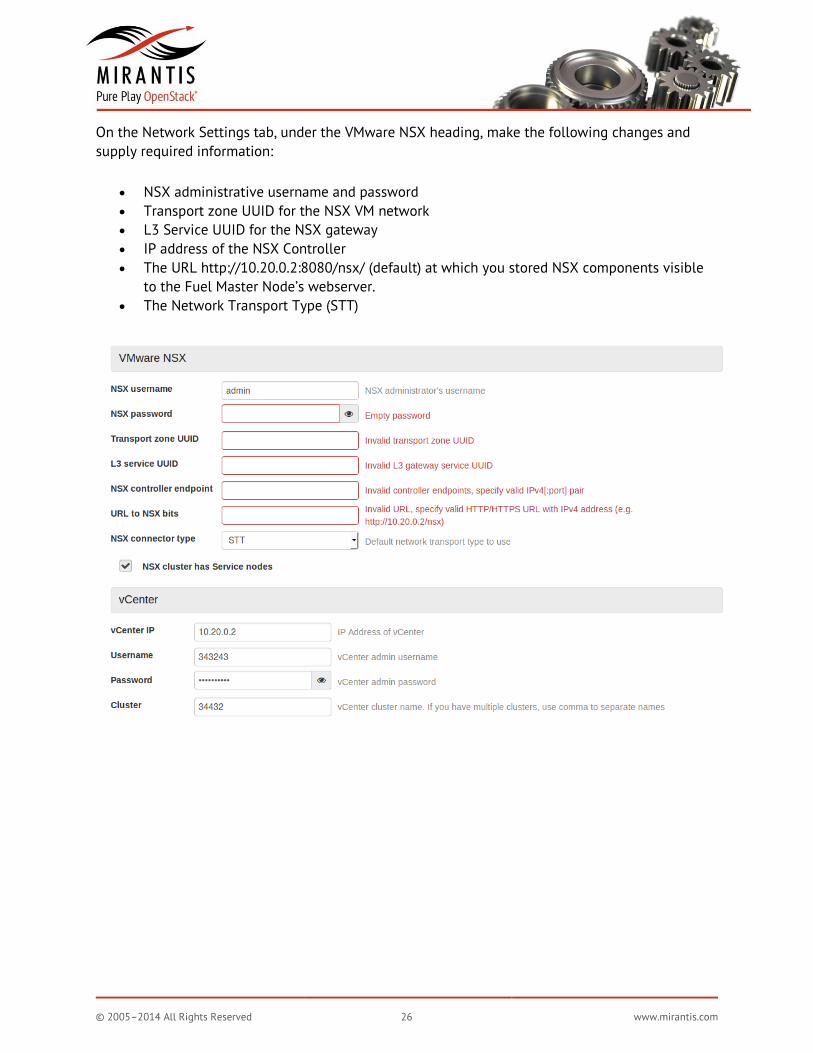
On the Network Settings tab, under the VMware NSX heading, make the following changes and
supply required information:
NSX administrative username and password
Transport zone UUID for the NSX VM network
L3 Service UUID for the NSX gateway
IP address of the NSX Controller
The URL http://10.20.0.2:8080/nsx/ (default) at which you stored NSX components visible
to the Fuel Master Node’s webserver.
The Network Transport Type (STT)
© 2005–2014 All Rights Reserved 27 www.mirantis.com
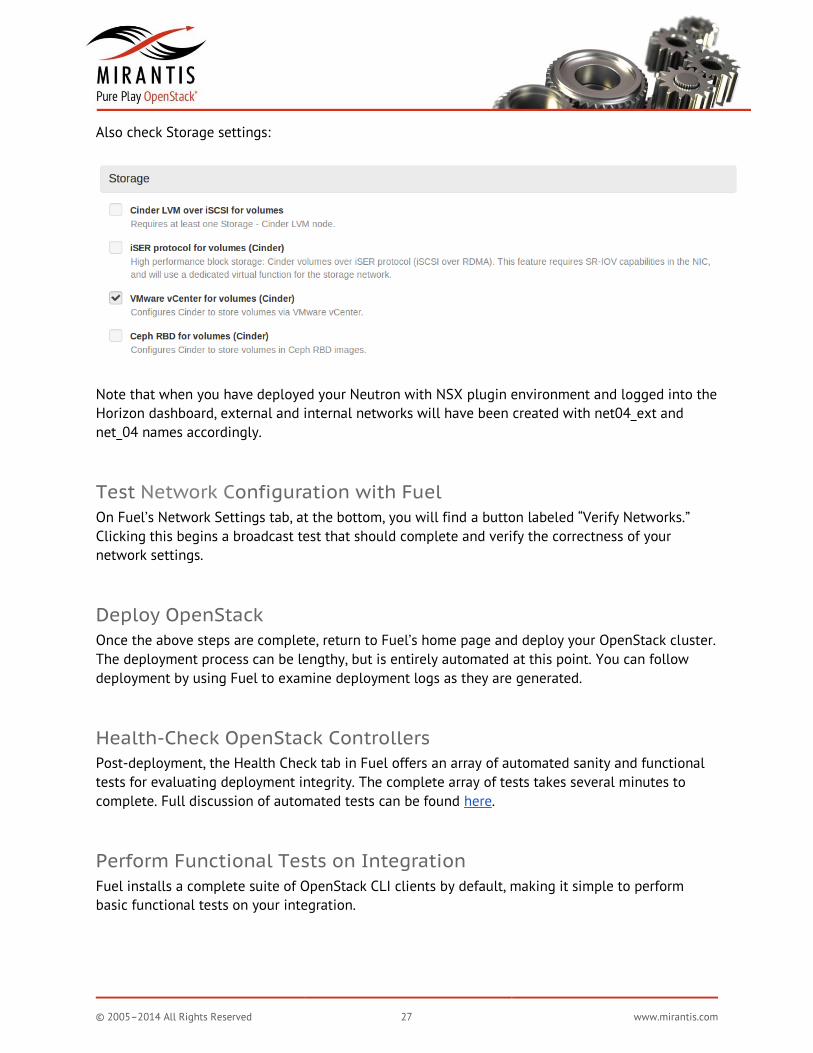
Also check Storage settings:
Note that when you have deployed your Neutron with NSX plugin environment and logged into the
Horizon dashboard, external and internal networks will have been created with net04_ext and
net_04 names accordingly.
Test Network Configuration with Fuel
On Fuel’s Network Settings tab, at the bottom, you will find a button labeled “Verify Networks.”
Clicking this begins a broadcast test that should complete and verify the correctness of your
network settings.
Deploy OpenStack
Once the above steps are complete, return to Fuel’s home page and deploy your OpenStack cluster.
The deployment process can be lengthy, but is entirely automated at this point. You can follow
deployment by using Fuel to examine deployment logs as they are generated.
Health-Check OpenStack Controllers
Post-deployment, the Health Check tab in Fuel offers an array of automated sanity and functional
tests for evaluating deployment integrity. The complete array of tests takes several minutes to
complete. Full discussion of automated tests can be found here.
Perform Functional Tests on Integration
Fuel installs a complete suite of OpenStack CLI clients by default, making it simple to perform
basic functional tests on your integration.
© 2005–2014 All Rights Reserved 28 www.mirantis.com
Clients can be accessed by SSH’ing to the Fuel Master Node as root (default password: r00tme).
Alternatively, remote clients can be installed on any machine according to this tutorial, and
accessed via the OpenStack public network/internet.
A good first test of the CLI interface is to try:
# nova image-list
… which returns a list of boot images available to you. Note the IDs.
# neutron net-list
Shows available networks. Note the ID of the private network.
Finally, let’s use the nova boot command to start a VM, swapping in the IDs for the image and
private network you derived from the values returned by the two prior commands:
# nova boot [vm-name] --flavor m1.small --image (image ID) --security-groups
default --nic net-id=(private net ID)
In a couple of seconds, your new VM should spawn. Check to see if it’s active, using:
# nova list
… which shows all your active VMs.
Conclusion
The reference architecture described above is inevitably going to evolve quickly as VMware,
Mirantis and the OpenStack community continue to expand the scope and utility of connections
between VMware virtualization and cloud software and OpenStack. For the moment, it is a practical
test-bed for evaluating some of the basic use-cases for VMware+OpenStack coexistence — benefits
that will no doubt expand radically over the next six to eighteen months.
Appendix – Mirantis Support
Mirantis offers 30 days of free support by email, to customers who download Mirantis OpenStack.