Minor Source Emissions Inventory SPARS Web Manual
97
Minor Source Emissions Inventory SPARS Web Manual Iowa Department of Natural Resources Air Quality Bureau Version 1.4 7900 Hickman Road, Suite 1 Windsor Heights, Iowa 50324 (515) 242-5100
Transcript of Minor Source Emissions Inventory SPARS Web Manual

Minor Source Emissions Inventory SPARS Web Manual
Iowa Department of Natural Resources Air Quality Bureau
Version 1.4
7900 Hickman Road, Suite 1 Windsor Heights, Iowa 50324
(515) 242-5100

Minor Source Emissions Inventory SPARS Web Manual | Version 1.4 September 2012
1
CONTENTS
Introduction 2 1.0 Definitions and Abbreviations 3 2.0 Getting to know SPARS Web 8 3.0 Accessing SPARS Web 16 4.0 Setting-Up your Computer to run SPARS Web 20 5.0 Querying in Site Management 31 6.0 Updating your Facility’s Site Management Information 36 7.0 Querying using the Application Query Tool 49 8.0 Creating your new Minor Source Emissions Inventory52 9.0 Completing your new Minor Source Emissions Inventory 58 10.0 Reviewing your newly created Minor Source Emissions Inventory 78 11.0 Submitting your Minor Source Emissions Inventory81 12.0 Correcting your Minor Source Emissions Inventory after Submittal 84 13.0 Working in SPARS Web: Workarounds86 14.0 Working in SPARS Web: Avoiding Common Errors92 15.0 Working in SPARS Web: Dos and Don’ts94 16.0 Contacts and On-line Resources95

Minor Source Emissions Inventory SPARS Web Manual | Version 1.4 September 2012
2
Introduction Facilities not subject to the Title V Operating Permit Program are known as minor sources. These sources are required to submit emissions inventories every three years by no later than May 15th following the Inventory Year. For the purpose of collecting emissions inventories from minor sources and portable plants, the State of Iowa is divided into thirds (eastern, central, and western).
The purpose of this manual is to explain how you can use the Iowa DNR’s State Permitting
and Air Reporting System (SPARS) to submit an electronic copy of your facility’s minor source emissions inventory. To this end, this manual thoroughly describes the five steps of the SPARS Web submittal process:
1. Updating the facility’s site information (Chapter 6); 2. Creating the inventory (Chapter 8); 3. Completing the inventory (Chapter 9); 4. Reviewing the inventory (Chapter 10); and 5. Submitting the inventory (Chapter 11)
It is important to remember, however, that preparing before working in SPARS Web is essential to facilitate a successful submittal process. This preparation includes, at a minimum, the gathering of the following materials:
1. A copy of the last inventory that your facility submitted; 2. Copies of your construction permits, especially those that you received after your
facility’s last inventory submittal; 3. Construction, installation, and start-operation dates for any emission points, emissions
units, control equipment, or monitoring equipment that started operation after the last inventory was submitted;
4. Cease-operation dates for any emission points, emissions units, control equipment, or monitoring equipment that discontinued operation after the last inventory was submitted;
5. Total amount of each raw material used by your facility’s emissions units/processes during the Inventory Year;
6. Emission factors to calculate potential and actual emissions for emission units/processes that were not included in your facility’s last inventory; and
7. Electronic documents to be attached to your new electronic inventory. Once your inventory has been submitted using SPARS Web, there is no need to send a hard copy to the Iowa DNR. It might be useful, however, to print a copy of your electronic inventory to keep it at your facility for easy access and to be used as a reference when completing your next inventory.

Minor Source Emissions Inventory SPARS Web Manual | Version 1.4 September 2012
3
1.0 Definitions and Abbreviations Actual Emissions – Air emissions calculated using the emission unit’s actual operating
hours, production rates, and quantities of materials processed, stored, or combusted for the calendar year
Ammonia (NH3) – NH3, also known as anhydrous ammonia, is a colorless, highly irritating
gas with a pungent, suffocating odor. About 80% of the ammonia produced by industry is used in agriculture as fertilizer. Ammonia is also used as a refrigerant gas, for purification of water supplies, and in the manufacture of plastics, explosives, textiles, pesticides, dyes, and other chemicals. Exposure to high concentrations of ammonia in air causes immediate burning of the nose, throat, and respiratory tract.
Appeon – A tool used to deploy entire PowerBuilder applications to the Web. Appeon consists
of three parts: a developer, a server, and a server web component.
Application Query Tool – A DataWindow which is used to access, view, create, edit, or
delete electronic documents found in SPARS.
AQB – Air Quality Bureau. This bureau administers DNR’s air quality program.
AQB plant number – A seven-digit identifier generated by the AQB Records Center for sources of air pollution.
Carbon Monoxide (CO) – CO is a colorless, odorless gas that is formed when carbon in fuel
is not burned completely. CO is poisonous even to healthy people at high levels in the air. It can affect the central nervous system and people with heart disease.
Client/server - A description for applications that have a local (client) user interface but
access data on a remote server. The application distributes the work between the local machine and the server, depending on the strengths of the front-end and back-end products.
Control Equipment (CE) – A CE is a device or system that collects or destroys one or more
air pollutants from a polluted gas and releases the cleaned gas to the atmosphere through one or more emission points.
Criteria Pollutants – These refer to six air pollutants commonly found all over the United States. They are particulate matter, ground-level ozone, carbon monoxide, sulfur oxides, nitrogen oxides, and lead. Data Acquisition System (DAS) – A DAS is a device designed to measure and log parameters such as temperature, humidity, pollutant concentration, volume, opacity, etc. DataWindow – A DataWindow is a custom object that is used to retrieve, present, and manipulate data from a database. The DataWindow object is unique to PowerBuilder.
DNR Phase – Indicates the status of a SPARS electronic document that is currently being
completed or modified by an AQB user.

Minor Source Emissions Inventory SPARS Web Manual | Version 1.4 September 2012
4
Emissions Inventory – A listing, by source, of the amounts of pollutants actually or
potentially discharged over a period of time – usually annually.
Emission Factor – The relationship between the amount of pollution produced and the
amount of raw material processed or number of product units produced.
Emissions Unit (EU) – An EU is the equipment or process that generates emissions of
regulated air pollutants. Emissions units may be grouped for reporting potential and actual emissions only if the emissions units are identical and they exhaust to the same emission point.
Emission Point (EP) – An EP is a stack or vent through which effluent gases along with any
air pollutants are discharged to the atmosphere.
Facility Administrator – An individual who receives access to SPARS in order to manage
SPARS user accounts for his/her company’s employees and consultants. A facility administrator may also be the responsible official for his/her company.
Facility User – An external SPARS user with the ability to create, delete, update, and review
SPARS electronic documents while in the INDUSTRY phase.
FINAL Phase – Indicates the status of a SPARS electronic document that has been reviewed
and approved in its entirety by the AQB.
Fugitive Emissions – Air emissions which are not released through stacks or vents, such as
unpaved plant roads, outdoor storage piles swept by the wind, surface mining, rock crushing, leaks in plant equipment such as valves, pump seals, flanges, sampling connections, etc. Ground-level Ozone – Ground-level or “bad” ozone is not emitted directly into the air, but is created by chemical reactions between oxides of nitrogen (NOx) and volatile organic compounds (VOC) in the presence of sunlight. Emissions from industrial facilities and electric utilities, motor vehicle exhaust, gasoline vapors, and chemical solvents are some of the major sources of NOx and VOC. Hazardous Air Pollutants (HAPs) – HAPs are those pollutants that are known or suspected to cause cancer or other serious health effects, such as birth defects or adverse environmental effects.
HTML – Hyper Text Markup Language. The authoring language used to create documents on
the World Wide Web.
INDUSTRY Phase – Indicates the status of a SPARS electronic document that is currently
being completed or modified by a facility user.
INITIAL Phase – Indicates the status of a SPARS electronic document that has been
submitted to the AQB and it is ready for review by AQB users.
Inventory Year – The year for which the actual air emissions from the entire facility are
calculated and reported.

Minor Source Emissions Inventory SPARS Web Manual | Version 1.4 September 2012
5
Iowa DNR – Iowa Department of Natural Resources. Government agency responsible for
maintaining state parks and forests, protecting the environment, and managing energy, fish, wildlife, land, and water resources in Iowa.
Lead (Pb)1 – Pb is a metal found naturally in the environment as well as in manufactured
products. Some sources of lead emissions are: iron foundries, aluminum foundries, coal-fired boilers, steel mills, cement kilns, lead-acid battery manufacturing, metal fabricators, etc. Depending on the level of exposure, lead can adversely affect the nervous system, kidney function, immune system, reproductive and developmental systems, and the cardiovascular system.
LEGAL Phase – Indicates the status of a SPARS electronic document that is currently being
reviewed by an Iowa DNR attorney to determine whether requests for data confidentiality meet legal requirements.
Nitrogen Oxides (NOx) – NOx is the generic term for a group of highly reactive gases, all of
which contain nitrogen and oxygen in varying amounts. Many of the nitrogen oxides are colorless and odorless. However, one common pollutant, nitrogen dioxide (NO2) along with particles in the air can often be seen as a reddish-brown layer over many urban areas. NOx is one of the main ingredients involved in the formation of ground-level ozone, which can trigger serious respiratory problems. Among several other concerns, NOx contributes to formation of acid rain and it reacts to form toxic chemicals.
North American Industry Classification System (NAICS) – The NAICS is a six-digit
code used by business and government to classify and measure economic activity in Canada, Mexico, and the United States. The first five digits are generally the same in all three countries. The last digit designates national industries. The first two digits designate the largest business sector, the third digit designates the subsector, the fourth digit designates the industry group, and the fifth digit designates particular industries.
Oracle Database – It is a relational database management system developed by Oracle
Corporation.
Particulate Matter (PM) – PM is a complex mixture of extremely small particles and liquid
droplets. Particle pollution is made up of a number of components, including acids (such as nitrates and sulfates), organic chemicals, metals, and soil or dust particles. The Environmental Protection Agency groups particle pollution into two categories:
“Inhalable coarse particles,” such as those found near roadways and dusty industries, are larger than 2.5 micrometers and smaller than 10 micrometers in diameter.
“Fine particles,” such as those found in smoke and haze, are 2.5 micrometers in diameter and smaller. These particles can be directly emitted from sources such as forest fires, or they can form when gases emitted from power plants, industries, and automobiles react in the air.
1 For more information on lead, please visit http://www.iowadnr.gov/InsideDNR/RegulatoryAir/EmissionsInventory.aspx and click “Lead Estimating Fact Sheet” under the Fact Sheets and FAQs subheading.

Minor Source Emissions Inventory SPARS Web Manual | Version 1.4 September 2012
6
PDF – Portable Document Format. A file format which captures formatting information from a
variety of desktop publishing applications.
Phase Codes – Codes used in SPARS Web to indicate the submittal and completion status of
all applications and inventories.
PIN – Personal Identification Number. This “number” consists of letters and numbers and it is
used to submit electronic documents to the AQB using SPARS Web.
Potential Emissions – Air emissions calculated assuming that the emissions unit is running
at maximum capacity while operating at the maximum hours of operation under its physical and operational design. Usually, maximum hours of operation are 8,760 hours per year, unless limitations on hours of operation have been incorporated within a construction permit or an enforcement order for that equipment.
PowerBuilder – A computer application development system that includes tools for drawing
the user interface and reports and accessing database content.
Responsible Official – An individual who receives an electronic signature device created by
the AQB and uses it to submit electronic documents through SPARS Web. A facility’s responsible official is legally accountable for the truth and accuracy of the information submitted under his/her name and for ensuring that his/her company meets any deadlines required by Iowa and federal codes.
REVIEW Phase – Indicates the status of a SPARS electronic document that is currently under
review by the AQB.
Site Management – A DataWindow used to access and edit the following facility’s
information: name, location, mailing address, air quality classification, plant number, equipment identification, equipment description, name and addresses for its contacts, latitude, longitude, UTM coordinates, etc.
Source Classification Codes (SCCs) – The Environmental Protection Agency uses SCCs
and area and mobile sources (AMS) codes to classify different type of anthropogenic emission activities. SCCs have 8 digits for point sources and use a hierarchical system in which the definition of the code gets increasingly more specific as you move from left to right.
SPARS – State Permitting and Air Reporting System. An Oracle database with a PowerBuilder
front-end used to receive and store air quality electronic documents.
SPARS Access Request Form for Facility Administrators – A form required by the
AQB to be completed and submitted by a facility’s employee who will be responsible for managing SPARS user accounts for said facility. Only facility employees may request a SPARS Facility Administrator account.
SPARS Access Request Form for Responsible Officials – A form required by the AQB
to be completed and submitted by a facility’s employee who will be responsible for submitting electronic documents using SPARS Web. Only the facility’s Responsible Official may request a SPARS Responsible Official account.

Minor Source Emissions Inventory SPARS Web Manual | Version 1.4 September 2012
7
SPARS Site ID – A twelve-digit number generated by SPARS.
SPARS Web – An application that gives external users the ability to access SPARS data and
submit electronic documents to the AQB using the internet.
Standard Industrial Classification (SIC) Code – The SIC code is a four-digit code used
to categorize industries in terms of the nature of their business.
Sulfur Dioxide (SO2) – SO2 belongs to the family of sulfur oxide gases. SO2 contributes to
respiratory illness and aggravates existing heart and lung diseases. It also contributes to the formation of acid rain.
TIFF – Tagged Image File Format. One of the most widely supported file formats for storing
bit-mapped images on personal computers.
UTM – Universal Transverse Mercator. The UTM coordinate system is a grid-based method of
specifying locations on the surface of the Earth.
Volatile Organic Compounds (VOCs) – VOCs are compounds that have a high vapor
pressure and low water solubility. Many VOCs are human-made chemicals that are used and produced in the manufacture of paints, pharmaceuticals, and refrigerants. VOCs have been found to be a major factor to ozone, a common air pollutant which has been proven to be a public health hazard.

Minor Source Emissions Inventory SPARS Web Manual | Version 1.4 September 2012
8
2.0 Getting to know SPARS Web As mentioned before, the main objective of this manual is to ensure that you acquire the necessary knowledge to submit your minor source emissions inventories using SPARS Web. The first step in accomplishing this objective is to learn what SPARS Web is, what it does, and how it communicates with you.
2.1 What is SPARS Web? SPARS (State Permitting and Air Reporting System) is composed of an Oracle database and a PowerBuilder interface to access the contents of this database. PowerBuilder has a native data-handling object called a DataWindow, which can be used to create, edit, and display data from a database. SPARS Web has two main DataWindows: Site Management and the Application Query Tool.
2.1.1 Site Management
The Site Management DataWindow (see Figure 2.1) allows the user to access information such as facility name, AQB plant number, SPARS site ID, location, address, responsible official contact information, equipment identification and description, latitude, longitude, UTM coordinates, etc. It also allows the user to edit certain information, such us description and specification for emission units, emission points, control equipment, and monitoring equipment.
Figure 2.1 – Site Management DataWindow

Minor Source Emissions Inventory SPARS Web Manual | Version 1.4 September 2012
9
2.1.2 Application Query Tool The Application Query Tool DataWindow (see Figure 2.2) allows the user to access, view, create, edit, review, and delete2 electronic applications and inventories. It also gives users the ability to submit these documents to the AQB when following the SPARS submittal process.
Figure 2.2 – Application Query Tool
2 Only applications and inventories in the INDUSTRY Phase may be deleted.

Minor Source Emissions Inventory SPARS Web Manual | Version 1.4 September 2012
10
Another useful SPARS DataWindow is the Report Interface (see Figure 2.3), which allows users the creation of several reports. One of these reports, “Facility-Wide Air Emission Summary,” lists the facility’s potential emissions reported in INV-3 and the actual emissions found in INV-4. At the top of each page, this report includes the Inventory Year for each emissions inventory stored in SPARS.
Figure 2.3 – Report Interface
2.2 What does SPARS Web do?
The State Permitting and Air Reporting System was first developed as a multi-user client/server database available only to AQB staff. The DNR also developed “SPARS Client” software to be downloaded to individual computers outside of AQB. In February 2006, the Appeon system was used to deploy the PowerBuilder interface to the Web, thus making SPARS web-enabled. As a result of the SPARS web-enablement, the “SPARS Client” software is no longer available to be downloaded onto external customers’ computers. As a web-enabled database, SPARS Web allows facilities to: 1. Access permit applications and emissions data electronically. 2. Create the following:
o Construction permit applications o Title V operating permit applications o Minor Source emissions inventories, and o Title V annual emissions inventories

Minor Source Emissions Inventory SPARS Web Manual | Version 1.4 September 2012
11
3. Submit these applications and inventories to the AQB via the web. 4. Reuse existing electronic information to create new applications or modify current applications. 5. Attach supporting documentation in Excel, PDF, Word, TIF, JPG, DWG, or HTML formats. 6. Receive prompt confirmation that applications and inventories have been received by the AQB.
2.3 How does SPARS Web communicate with its users? As you work with SPARS Web, you will find that sometimes the database will communicate with you through database errors or warning messages in response to what you have or have not done. (1) Database Errors. There are several reasons why SPARS will send you database errors and there are several ways in which these errors will be displayed. Figures 2.4 and 2.5 illustrate two of these database errors.
Figure 2.4 – Database Error Example 1

Minor Source Emissions Inventory SPARS Web Manual | Version 1.4 September 2012
12
Figure 2.5 – Database Error Example 2 Database errors are considered “terminal” errors. In other words, every time that they occur, the connection to the SPARS database is automatically terminated. If you click the “OK” button on the error window, you will be placed in a loop, because you are no longer connected to SPARS Web. At this point, the only course of action available to you is to use the Task Manager (see Figure 2.6) to get out of the loop and close the PowerBuilder interface. NOTE: In order to view the Task Manager window, press Ctrl-Alt-Delete.
Figure 2.6 – Getting out of the SPARS never-ending loop

Minor Source Emissions Inventory SPARS Web Manual | Version 1.4 September 2012
13
You can avoid receiving some of these database errors, but unfortunately, a few cannot be avoided. Out of the database errors that can be avoided, the most common one occurs when users try to access SPARS documents that have already been submitted to the DNR. For instance, if you open and try to navigate through the last inventory that your facility submitted, you will get a database error and your connection to the database will be terminated. SPARS Web does this to avoid accidental changes to the data already submitted to the DNR. To stop this from happening, you must use the print-preview to view the information contained in any of your facility’s SPARS documents that have been submitted to the DNR.3 In regards to database errors that cannot be avoided, the most common one occurs when users try to make changes to the information stored in SPARS for their facility contact, responsible official, or parent company contact. This error is a sign that the names associated with the facility must be cleaned up and consolidated. To illustrate this issue, let us say that your facility contact name has been entered into the SPARS database using different formats: (1) with middle initial; (2) without middle initial; (3) with a title; and (4) without a title. This time, you tried to enter a different title for the same name, but SPARS did not allow you to. Instead, it sent you a database error and disconnected you from the database. SPARS Web did this to notify us (through you) that data maintenance is required to preserve the integrity of the database. If and when you receive a database error while updating information regarding your facility contact, responsible official, or parent company contact, please let us know. We must maintain the database to ensure that the information stored in it continues to be reliable. (2) Warning Messages. Again, there are several reasons why SPARS will send you warning messages and there are several ways in which these messages will be displayed. Figures 2.7 and 2.8 illustrate two of these warning messages.
Figure 2.7 –Warning Error Example 1
3 To use the print-preview, open the Application Query Tool, query for your facility and for the document type
(inventories, applications, etc) that you are interested in. Highlight the document and double-click. Click on the print-preview icon. The appropriate list of forms is now ready for viewing and printing.

Minor Source Emissions Inventory SPARS Web Manual | Version 1.4 September 2012
14
Figure 2.8 –Warning Error Example 2
Unlike database errors, warning errors allow you to correct the problem and continue working without having to close SPARS Web (see Figure 2.9).
Figure 2.9 – After clicking “OK” SPARS Web allows you to correct the problem
In theory, all warning messages can be avoided. The key is to know what to do (or not to do) to avoid them. One of the most common warning messages is: “You are not authorized to perform this operation.” SPARS Web sends this message in Site Management when users:
1. Try to connect control equipment to a new emissions unit that has not yet been recognized by SPARS; or
2. Try to connect an emissions unit or control equipment to a new emission point that has not yet been recognized by SPARS.

Minor Source Emissions Inventory SPARS Web Manual | Version 1.4 September 2012
15
Figure 2.10 – Warning Message (Unrecognized Emission Unit) Course of action in both cases: 1. Click OK on the warning message window. 2. Save any changes. 3. Close the Emission Unit DataWindow or the Emission Point Data Window. 4. Open the Emission Unit DataWindow or the Emission Point Data Window. 5. Make connection.
Another common warning message is: “Duplicate record found.” The SPARS database does not allow duplicate information in certain fields. For instance, even though the description of emission points can be duplicated, the emission point ID, however, cannot. The third warning message that users commonly receive is: “No parent record found.” This message is received while working in the inventory, if the user tries to “write-in” a raw material that is not included in the SPARS pull-down list of raw materials.4
4 If there is a raw material that you would like to see in the pull-down list, please contact us.
User tried to connect control
equipment to a new emission unit not
yet recognized by SPARS. The Emissions Unit ID must appear here.

Minor Source Emissions Inventory SPARS Web Manual | Version 1.4 September 2012
16
3.0 Accessing SPARS Web 3.1 Step One – Request Access
1. Identify a Facility Administrator and a Responsible Official. The Facility Administrator is responsible for managing SPARS access for those working on the facility’s applications and inventories. The Responsible Official has the authority to submit applications and inventories to the AQB through SPARS. A Facility Administrator may also be the facility’s Responsible Official.
2. Complete and submit both the SPARS Access Request Form for Facility Administrators
and the SPARS Access Request Form for Responsible Officials. These forms are available at: http://www.iowadnr.gov/InsideDNR/RegulatoryAir/SPARS/HelpInfo.aspx
3. Once these accounts are created, the AQB sends via certified mail the respective SPARS access information to each Facility Administrator and each Responsible Official. Facilities can then create, review, and submit applications and inventories to the AQB.
3.2 Step Two – Download the Appeon plug-in
1. Open Internet Explorer. Disable any anti-popup software installed in your computer.
However, during the Appeon installation, be sure to choose “always accept popups from this site.” This will allow you to see all the screens used in SPARS Web without first having to disable your anti-popup software.
2. Open the SPARS website: http://spars.iowadnr.gov/spars.htm
3.3 Step Three – Log in
1. Use the Appeon log-in screen (see Figure 3.1) to enter the User Name and Password given to you by the AQB or by a Facility Administrator.
Figure 3.1 – Appeon Log-In Screen

Minor Source Emissions Inventory SPARS Web Manual | Version 1.4 September 2012
17
2. After logging in, the SPARS Welcome Window opens. Close this window by clicking on the X
on the top right. (See Figure 3.2).
Figure 3.2 – SPARS Welcome Window
NOTE: Some of the information displayed on the SPARS Welcome Window is outdated. For
instance, the following is no longer accurate:
“Getting started You will need to have a Site Identification Number unique for your facility before you can start entering data. If you do not have a Site Identification Number, you need to contact the IDNR to obtain this 12-digit number.”
You do not need to request this number to get started, because you do not need to know this number to access your facility’s information. This number will be accessible to you when you query for your facility in Site Management and in the Application Query Tool. In addition, the correct E-Mail address is: [email protected] and the correct SPARS Web Site is: http://www.iowadnr.gov/air/prof/SPARS/

Minor Source Emissions Inventory SPARS Web Manual | Version 1.4 September 2012
18
3. After closing the SPARS Welcome Window, you will only see the following menu:
Figure 3.3 – SPARS Web Menu
4. You are now ready to work in SPARS Web.
3.4 Working in SPARS Web
3.4.1 SPARS Web Speed
Obviously, SPARS Web speed will not be the same at every facility. The following factors influence the speed at which SPARS Web will work:
Connection type and speed (dial up, DSL, Cable, Network). Firewall and security protocols (blocking ports or IP addresses, scanning data packets,
restricting data download/upload speeds, either by Facility, Corporate, or Internet Service Provider).
Network issues including, but not limited to; o Traffic load at the Facility, ICN (state network), or IDNR o Routing of data between the Facility and Corporate headquarters in other
states/regions and IDNR Client workstation setup for computer processor speed, amount of memory, cache size,
programs running, virus scanning during use of SPARS application and other items which degrade computer performance.
Additionally, we have noticed that during the first two weeks of May, SPARS Web speed slows down even more, because most minor source users are working on their inventories. It would be best if you start working on your inventory well before May 15th to reduce some of the frustration caused by a slow SPARS Web connection.
3.4.2 SPARS Web Time-Out A SPARS Web session is timed-out at 2 hours from its start, regardless of being active or inactive for the entire 2 hours. Even though SPARS Web saves your work automatically, certain updates and changes do not take place unless you save them manually. Therefore, try to save your work regularly to avoid losing information. After being timed-out, you can log right back in to SPARS Web.

Minor Source Emissions Inventory SPARS Web Manual | Version 1.4 September 2012
19
3.4.3 Copying, Cutting, and Pasting Information
In most of the areas of SPARS Web that you will be working in, the traditional mouse right-click will not work when trying to copy (or cut) and paste. You can use the cut, copy, and paste icons in SPARS Web:
Cut Copy Paste Alternatively, you can do the following: 1. Highlight the text that you need to copy, cut, or paste. 2. Press “Ctrl C” to copy 3. Press “Ctrl X” to cut 4. Press “Ctrl V” to paste

Minor Source Emissions Inventory SPARS Web Manual | Version 1.4 September 2012
20
4.0 Setting-up Your Computer to Run SPARS Web Before running the SPARS Web application, please make sure that your computer system meets the following minimum hardware and software requirements:
◊ CPU: Pentium-class processor – 1 GHz or faster
◊ Memory: 128 MB
◊ Disk: 10 GB
◊ Network: 56k dial-up connection to Internet
◊ Operating System:
Windows 2000, or
Windows XP (any edition), or
Windows Server 2003 (any edition), or
Windows Vista (any edition), or
Windows Server 2008
◊ Software:
Microsoft Internet Explorer 6.0 SP1 or SP2, or
Internet Explorer 7.0, or
Internet Explorer 8.0, or
Internet Explorer 9.0,
Sybase Appeon Xcelerator (automatically downloaded to the client browser when running SPARS Web)
For the best possible experience working with SPARS Web, the Iowa DNR’s AQB recommends the following hardware and software for your computer system:
◊ CPU: Pentium-class processor – 1.8 GHz or faster
◊ Memory: 512 MB
◊ Disk: 20 GB
◊ Network: Broadband connection to Internet
◊ Operating System:
Windows 2000, or
Windows XP (any edition), or
Windows Server 2003 (any edition), or
Windows Vista (any edition), or
Windows Server 2008, or
Windows 7
◊ Software:
Microsoft Internet Explorer 6.0 SP1 or SP2, or
Internet Explorer 7.0, or
Internet Explorer 8.0, or
Internet Explorer 9.0,

Minor Source Emissions Inventory SPARS Web Manual | Version 1.4 September 2012
21
Sybase Appeon Xcelerator (automatically downloaded to the client browser when running SPARS Web),
Adobe Acrobat Reader 6.0 or later (for viewing printed PDF DataWindows and reports)
When you run an Appeon Web application, such as SPARS Web, for the first time, the Appeon Xcelerator plug-in must be downloaded to your computer. However, if you do not have administrator rights to your computer Windows system, the Xcelerator plug-in download will be blocked and the application will fail to run.
To avoid this and to allow SPARS Web to run in your computer, please follow the instructions described in this document.
Ask your administrator to assign the current login account to the Administrators group, so that it can successfully download and register the Xcelerator plug-in. In the case of Windows Vista and Windows Server 2008 users, you need to turn off the User Account Control feature, for the Appeon Server to start correctly. (See instructions below)
4.1Set account privilege for running Appeon Server
4.1.1 Windows System other than Windows Vista or Windows Server 2008
Ask your administrator to assign the current logging account to the Administrator group. This will allow the Xcelerator plug-in to be successfully downloaded and registered.
4.1.2 Windows Vista or Windows Server 2008
Go to Control Panel | User Accounts, click Turn User Account Control on or off.
De-select the option of Use User Account Control (UAC) to help protect your computer.
Click OK.
Restart your computer 4.2 Adjust Desktop Display Settings
Your desktop display should be set to 1024 X 768.
If your display is not set to 1024 X 768, follow these instructions:
1. Right-click inside the Windows desktop and select Properties (in Windows 7, select Screen resolution).
2. Select the Settings tab. 3. Note your current Screen resolution in case you need to reset it later. 4. Move the Screen resolution slide bar to 1024 X 768 (in Windows 7, select 1024 X 768
from the pull-down menu). 5. Click Apply. The screen will be reset. 6. Click Yes (in Windows 7, click Keep Changes). 7. Click OK.

Minor Source Emissions Inventory SPARS Web Manual | Version 1.4 September 2012
22
4.3 Adjust Temporary Internet Files and Caching Delete all temporary files stored in the Internet Explorer cache:
1. Open Internet Explorer. 2. Select Internet Options on the Tools menu. 3. Select the General tab. 4. Depending on the Internet Explorer that you have, do the following:
o Internet Explorer 6.0:
Click Delete Files… in the Temporary Internet Files section. o Internet Explorer 7.0:
Click Delete… in the Browsing History section.
Click Delete Files… in the Temporary Internet Files section. o Internet Explorer 8.0 and 9.0:
Click Delete… in the Browsing History section.
Click Delete.
5. Click OK.
Verify settings for temporary internet files within Internet Explorer and set up file caching:
1. Open Internet Explorer. 2. Select Internet Options on the Tools menu. 3. Select the Advanced tab. Scroll down to the Security section and make sure
that Empty Temporary Internet Files folder when browser is closed option is NOT checked.
4. Select the General tab. 5. Depending on the Internet Explorer version that you have, do the following:
o Internet Explorer 6.0:
Click Settings… in the Temporary Internet Files section.
Select the Automatically button to check for newer versions of stored pages.
o Internet Explorer 7.0, 8.0, and 9.0:
Click Settings… in the Browsing History section.
Select the Automatically button to check for newer versions of stored pages.
6. Verify that the Amount of Disk Space to Use is set to no less than 200MB.
7. Click OK.

Minor Source Emissions Inventory SPARS Web Manual | Version 1.4 September 2012
23
4.4 Adjust Compatibility Mode (Windows 7, IE9)
1. Open Internet Explorer. 2. Hit the F12 key or select F12 developer Tools on the Tools menu.
3. A window will open up at the bottom of the screen. Click Browser Mode: IE9 Compat View.
4. Click Internet Explorer 9.
4.5 Delete Java Cache/History (Windows 7, IE9)
1. Open the Control Panel and choose Java and a window will open up. 2. Select the General tab. 3. Under Temporary Internet Files, choose “Settings.”
Minor Source Emissions Inventory SPARS Web Manual | Version 1.4 September 2012
24
4. Under Disc Space, select “Delete Files.”
5. Click OK.
6.
4.6 If Running SPARS Web via a Proxy Server If you are running SPARS Web through a Proxy Server, you must ensure that the Advanced Setting HTTP 1.1 through proxy connections remains enabled. NOTE: These instructions are only necessary if a Proxy Server is used.
1. Open Internet Explorer. 2. Select Internet Options on the Tools menu. 3. Select the Advanced tab. 4. Scroll down to the HTTP 1.1 Settings section. 5. Select Use HTTP 1.1 if it is not currently selected. 6. Select Use HTTP 1.1 through proxy connections if it is not currently selected. 7. Click Apply and then OK.

Minor Source Emissions Inventory SPARS Web Manual | Version 1.4 September 2012
25
4.7 Adjust Internet Security Settings In order for SPARS Web to be set up on your machine, you must make sure that your internet security is set correctly. SPARS Web uses a version of Appeon (5.0 Xcelerator) and other functions that require specific security settings.
1. Open Internet Explorer. 2. Select Internet Options on the Tools menu. 3. Select the Security tab. 4. Select the Internet zone. 5. Click Custom Level… at the bottom of the box. 6. The following settings must be in place to set up SPARS Web. Your computer might
already have these selections in place, depending on the security level that you have set. Additionally, these options may or may not be available to you depending on the Internet Explorer version or Service Pack that you have:
o Download signed ActiveX controls – select Enable. o Download unsigned ActiveX controls – select Prompt. o Initialize and script ActiveX controls not marked as safe for scripting – select
Prompt. o Run ActiveX controls and plug-ins – select Enable. o Script ActiveX controls marked safe for scripting – select Enable. o File download – select Enable. o Active scripting – select Enable.
o Internet Explorer 6.0:
Allow paste operations via script – select Enable.
Allow active content to run in files on My Computer – select Enable. o Internet Explorer 7.0, 8.0 and 9.0:
Allow websites to prompt for information using scripted windows – select Enable.
o Windows 7, IE9:
Make sure that Enable Protected Mode is unchecked for Internet, Intranet, and Trusted Sites.
7. Click Apply. 8. Click OK. (For Windows 7, IE9, you might receive the warning: “The current security
settings will put your computer at risk.” This is temporary. Click OK)

Minor Source Emissions Inventory SPARS Web Manual | Version 1.4 September 2012
26
NOTE: After clicking OK, the following warning might appear:
Click Yes. You will re-adjust these settings immediately after Appeon is installed in your computer.
9. Click OK. 4.8 Adjust Trusted Sites Security Settings You must make sure that your “trusted sites” security is set correctly. SPARS Web uses a version of Appeon (5.0 Xcelerator) and other functions that require specific “trusted sites” security settings.
1. Open Internet Explorer. 2. Select Internet Options on the Tools menu. 3. Select the Security tab. 4. Select the Trusted Sites zone. 5. Click Custom Level… at the bottom of the box. 6. If available, make sure that the following settings are selected. Your computer might
already have these selections in place, depending on the security level that you have set. Additionally, these options may or may not be available to you depending on the Internet Explorer version or Service Pack that you have:
o Download signed ActiveX controls – select Enable. o Download unsigned ActiveX controls – select Prompt. o Initialize and script ActiveX controls not marked as safe for scripting – select
Prompt. o Run ActiveX controls and plug-ins – select Enable. o Script ActiveX controls marked safe for scripting – select Enable. o File download – select Enable. o Active scripting – select Enable. o Internet Explorer 6.0:
Allow paste operations via script – select Enable.
Allow active content to run in files on My Computer – select Enable.
o Internet Explorer 7.0, 8.0, and 9.0:
Allow websites to prompt for information using scripted windows – select Enable.

Minor Source Emissions Inventory SPARS Web Manual | Version 1.4 September 2012
27
7. Click OK when the new security settings have been selected.
NOTE: After clicking OK, the following warning might appear:
Click Yes. You will re-adjust these settings immediately after Appeon is installed in your computer.
8. Click OK. 4.9 Adjust Additional Trusted Sites Settings
1. Open Internet Explorer. 2. Select Internet Options on the Tools menu. 3. Select the Security tab. 4. Zone area, select the Trusted Sites zone. 5. Click the Sites button. 6. Make sure that Require server verification (https) for all sites in this zone is not
checked. Uncheck this field if necessary. 7. Add the following web addresses to your Websites box:
o http://spars.iowadnr.gov/spars.htm
8. To add these web addresses, do the following (one web address at a time).
o Type the web address in Add this website to the zone field. o Click the Add button.
9. When all the web addresses have added, click the Close button. 10. Click OK.
4.10 Check Version of Jscript.dll You must make sure that the version of jscript.dll on your PC is the correct version.
1. In Windows Explorer open the \WINNT\system 32 folder. 2. Scroll down and locate the jscript.dll file. 3. Right-click on this file name and select Properties. 4. Select the Version tab. The version must be at least 5.6.x.xxxx. If the version number
is older than 5.6.x.xxxx (a smaller number), download the newer version at:
Minor Source Emissions Inventory SPARS Web Manual | Version 1.4 September 2012
28
http://www.microsoft.com/downloads/details.aspx?FamilyID=c717d943-7e4b-4622-86eb-95a22b832caa&DisplayLang=en
4.11 Disable Internet Anti-popup/Anti-Virus Software In order to have Appeon correctly installed in your computer, anti-popup software must be disabled. After installation, the anti-popup software can be enabled. Additionally, it is recommended that your anti-virus software be temporarily disabled until you have completed the SPARS installation. Once you have completed the installation, the anti-virus software may be enabled.
4.12 Install Appeon
1. Open Internet Explorer.
2. On the web browser, type this address: http://spars.iowadnr.gov/spars.htm
3. If the download does not automatically start, you should be directed to a page to manually install the application. You may need administrator rights on your computer to install the Java applet needed to connect you to SPARS Web.
4. If prompted, choose the following: o Install ActiveX o Trust this site o Always allow popups from this site
5. When the installation is complete, close Internet Explorer.
4.13 Re-adjust Internet Security Settings
1. Open Internet Explorer. 2. Select Internet Options on the Tools menu. 3. Select the Security tab. 4. Select Internet. 5. Click Custom Level… at the bottom of the box. 6. Make the following security setting selections:
o Download signed ActiveX controls – select Prompt. o Download unsigned ActiveX controls – select Disable. o Initialize and script ActiveX controls not marked as safe for scripting– select
Disable. o Run ActiveX controls and plug-ins – select Enable. o Script ActiveX controls marked safe for scripting – select Enable. o File download – select Enable. o Active scripting – select Enable.
o Internet Explorer 6.0:
Allow paste operations via script – select Enable.
Allow active content to run in files on My Computer – select Enable.
o Internet Explorer 7.0, 8.0 and 9.0:
Allow websites to prompt for information using scripted windows – select Enable.

Minor Source Emissions Inventory SPARS Web Manual | Version 1.4 September 2012
29
7. Click OK when the new security settings have been selected.
NOTE: After clicking OK, the following warning might appear:
Click Yes. You will re-adjust these settings immediately after Appeon is installed in your computer.
8. Click OK. 4.14 Re-adjust Trusted Site Security Settings
1. Open Internet Explorer. 2. Select Internet Options on the Tools menu. 3. Select the Security tab. 4. Select the Trusted Sites zone. 5. Click Custom Level… at the bottom of the box. 6. Make the following security setting selections:
o Download signed ActiveX controls – select Prompt. o Download unsigned ActiveX controls – select Disable. o Initialize and script ActiveX controls not marked as safe for scripting – select
Disable. o Run ActiveX controls and plug-ins – select Enable. o Script ActiveX controls marked safe for scripting – select Enable. o File download – select Enable. o Active scripting – select Enable.
o Internet Explorer 6.0:
Allow paste operations via script – select Enable.
Allow active content to run in files on My Computer – select Enable. o Internet Explorer 7.0, 8.0, and 9.0:
Allow websites to prompt for information using scripted windows – select Enable.
7. Click OK when the new security settings have been selected. NOTE: After clicking OK, the following warning might appear:

Minor Source Emissions Inventory SPARS Web Manual | Version 1.4 September 2012
30
Click Yes. You will re-adjust these settings immediately after Appeon is installed in your computer.
8. Click OK.
9. Close Internet Explorer.
4.15 Create a SPARS Web shortcut Creating a SPARS Web shortcut using the correct URL will ensure your access to the Appeon logging screen regardless of any SPARS upgrades installed by the DNR.
1. Right-click inside the Windows desktop and select New. 2. Select Shorcut. 3. Inside the text box, type the following location:
http://spars.iowadnr.gov/spars.htm
4. Click Next. 5. Inside the text box, type: SPARS Web 6. Click Finish 7. Next time you need to access SPARS Web, place your cursor on this shortcut and
double-click the left side of your mouse.
Uninstalling Appeon To uninstall Appeon:
1. Access your hard drive to find the file named “EonUISpace Class” (or “ceondownloadcenter.dll” on Windows 7). This file is commonly found in C:\WINDOWS|Downloaded Program Files.
2. Delete the EonUISpace Class (or ceondownloadcenter.dll ) file. Once this file is deleted, you will no longer be able to access SPARS Web. To access SPARS Web, Appeon must be re-installed as instructed in this document.

Minor Source Emissions Inventory SPARS Web Manual | Version 1.4 September 2012
31
5.0 Querying in Site Management As mentioned before, Site Management is where information regarding your site, emission points, emissions units, control equipment, and monitoring equipment is kept. You may query for your facility’s Site Management information as follows:
5.1 Querying for site information: 1. From the Site Management menu, select Sites.
Figure 5.1 – Site Management Menu
2. Select one of your sites by using the Select Site Name pull down list OR by using the Select Site ID pull down list. The number of sites included in your pull-down list will depend on which sites you have been given access to by AQB or your Facility Administrator.
Figure 5.2 – Selecting your Site Name or Site ID
3. Once the site has been selected, click the Query Site Information button to display the site information as shown in Figure 5.3.

Minor Source Emissions Inventory SPARS Web Manual | Version 1.4 September 2012
32
Figure 5.3 –Site DataWindow
5.2 Querying for emission points, emissions units, control equipment, or monitoring equipment: There are two ways to query for information regarding emission points, emissions units, control equipment, or monitoring equipment. One way… 1. From the Site Management menu, select Emission Points, or Emission Units, or Control Equipment, or Monitoring Equipment.
Figure 5.4 – Querying for a facility’s emission point information

Minor Source Emissions Inventory SPARS Web Manual | Version 1.4 September 2012
33
2. Select one of your sites by using the Select Site Name pull down list OR by using the Select Site ID pull down list.
Figure 5.5 – Selecting the site for which the emission point information is needed. 3. Once the site has been selected, click the Query Site Information button to display the emission point as shown in Figure 5.6.
Figure 5.6 – Emission Point DataWindow

Minor Source Emissions Inventory SPARS Web Manual | Version 1.4 September 2012
34
The other way… 1. From the Site Management menu, select Sites.
Figure 5.7 – Site Management Menu
2. Select one of your sites by using the Select Site Name pull down list OR by using the Select Site ID pull down list. The number of sites included in your pull-down list will depend on which sites you have been given access to by AQB or your Facility Administrator.
Figure 5.8 – Selecting your Site Name or Site ID
3. Once the site has been selected, click the Query Site Information button to display the site information as shown in Figure 5.9.

Minor Source Emissions Inventory SPARS Web Manual | Version 1.4 September 2012
35
Figure 5.9 –Site DataWindow
4. Click on any of the four buttons in the lower left corner of the Site Management DataWindow. These buttons allow access to information about the facility’s emission points, emissions units, control equipment, and monitoring equipment.

Minor Source Emissions Inventory SPARS Web Manual | Version 1.4 September 2012
36
6.0 Updating your Facility’s Site Management Information Please make sure that you update your facility’s Site Management information prior to creating your Minor Source emissions inventory. Please call us if you need help with this. Updating the data in Site Management includes: Correcting or adding information such as business description, SIC code, NAICS code,
facility classification, number of employees, responsible official contact information, mailing address, and/or parent company address. Do not make any changes to the information displayed on the Site and Location tab (see Figure 5.9). If changes are needed to the information included under this tab, please contact the AQB, since this information affects other AQB/DNR databases.
Adding emission points, emissions units, control equipment, and/or monitoring equipment which started operation since the previous minor source inventory submittal.
Correcting existing information regarding any of your emission points, emissions units,
control equipment, and/or monitoring equipment. Modifying information for any of your existing emission points, emissions units, control
equipment, and/or monitoring equipment, based on most recent construction permits.
Entering the “Cease Operation Date” for all emission points, emissions units, control equipment, or monitoring equipment no longer operating at your facility.
Disconnecting all emission points, emissions unit, control equipment, or monitoring
equipment no longer operating at your facility.
When creating or updating emission points, emissions units, control equipment, or monitoring equipment, it is recommended that you follow this order: (1) monitoring equipment, (2) control equipment, (3) emissions unit, and (4) emissions point.
IMPORTANT: Site Management keeps an inventory of past and present units, points, control equipment, and monitoring equipment. Deleting or modifying these, will affect the validity of previously submitted applications and inventories. Therefore, never delete these from Site Management, even when one or more of them are no longer in operation at your facility. Instead, enter a cease operation date in the appropriate Site Management fields. If the equipment ID needs to be modified, please contact us.

Minor Source Emissions Inventory SPARS Web Manual | Version 1.4 September 2012
37
6.1 Updating Site Information: 1. Query the site information for the site that you will be working on (see Section 5.0). 2. Update the Other Information tab if needed.
Figure 6.1 – “Other Information” Tab
3. Under the Other Information tab, you may add or delete a Secondary and Tertiary SIC code and/or NAICS code. To do this, right-click underneath the field that says “PRIMARY” and choose “Add” or “Delete.”
Figure 6.2 – Adding or deleting SIC or NAICS codes
4. Update the Business Description and the Comments tabs if needed.

Minor Source Emissions Inventory SPARS Web Manual | Version 1.4 September 2012
38
5. Update the Responsible Official, the Mailing Address, and/or Parent Address tabs if needed: Click the appropriate button: Responsible Official, Mailing Address, or Parent
Address. A window opens. Enter the address information. If the address information is the same
as the location address, click the button at the bottom of the window to copy the location address.
Click the X on the top right corner. A box opens asking: “Do you want to save
changes?” Click “Yes” to save changes and close window; or click “No” to close window without saving changes; or click “Cancel” to keep the window open to make any additional changes or corrections.
6.2 Updating Monitoring Equipment Information: 1. Click the Monitor Equipment button in the lower left corner of the Site Management DataWindow. The Monitor Equipment DataWindow appears with the Equipment button information displayed.
Figure 6.3 – Monitoring Equipment DataWindow
Use any of these buttons to open Site, Points, Units, Control, or Monitor DataWindows.
The “Equipment” button is grayed out, because this information is being displayed

Minor Source Emissions Inventory SPARS Web Manual | Version 1.4 September 2012
39
2. Review existing information and make any necessary changes. Additional information regarding monitoring equipment may be found by clicking the buttons displayed on the right side of the Monitoring Equipment DataWindow (Type, Opacity, Gas, DAS, DAS Backup, or Comments). 3. Save the monitoring equipment that you updated by clicking on the Save button on the toolbar. 4. If the monitoring equipment no longer operates at the facility, enter the “Ceased Operation Date” under the Equipment button. In addition, make sure to disconnect the monitoring equipment from all appropriate control equipment, emissions units, and emission points. 5. If new monitoring equipment has been installed at your facility, right-click inside the Monitor Equipment box and select add. Type-in the new ID in the Monitor Equipment box. 6. Save the monitor equipment that you created by clicking the Save button on the toolbar. 7. Fill-in the applicable text boxes on the right-hand side, including the “Start Operation Date” under the Equipment button. Save this information. 8. Close the Monitor Equipment DataWindow by selecting File >Close on the toolbar, or by clicking the X on the upper right hand of the screen.

Minor Source Emissions Inventory SPARS Web Manual | Version 1.4 September 2012
40
6.3 Updating Control Equipment Information: 1. Click the Control Equipment button in the lower left corner of the Site Management DataWindow. The Control Equipment DataWindow appears with the Equipment button information displayed.
Figure 6.4 – Control Equipment DataWindow
2. Review existing information and make any necessary changes. Additional information regarding control equipment may be found by clicking the buttons displayed on the right side of the Control Equipment DataWindow (Efficiency or Specifications). 3. Save the control equipment that you updated by clicking the Save button on the toolbar. 4. If the control equipment no longer operates at the facility, enter the “Ceased Operation Date” under the Equipment button. I addition, make sure to disconnect the control equipment from all appropriate monitoring equipment, emissions units, and emission points.
5. If you are adding new control equipment, right-click inside the Control Equipment box and select Add. Type-in the new ID in the Control Equipment box.
The “Equipment” button is grayed out, because the equipment information is being displayed on this window.
Use any of these buttons to open Site, Points, Units, Control, or Monitor DataWindows.

Minor Source Emissions Inventory SPARS Web Manual | Version 1.4 September 2012
41
Figure 6.5 – Adding new control equipment 6. Enter a descriptive name in the Control Equipment Name text box located on the right side of the Control Equipment DataWindow. 7. Save the control equipment that you created by clicking the Save button on the toolbar. 8. Fill-in the applicable text boxes on the right-hand side, including the “Start Operation Date,” under the Equipment button. Save this information. 9. Close the Control Equipment DataWindow by selecting File >Close on the toolbar, or by clicking the X on the upper right hand of the screen.

Minor Source Emissions Inventory SPARS Web Manual | Version 1.4 September 2012
42
6.4 Updating Emission Unit Information: 1. Click the Emission Units button in the lower left corner of the Site Management DataWindow. The Emission Unit window appears, with the Units button information displayed.
Figure 6.6 – Emission Unit DataWindow 2. Review existing information and make any necessary changes. Additional information regarding emissions units may be found by clicking the buttons displayed on the right side of the Emission Unit DataWindow (Make/Model, Schedule, Flow, Construction Limits, Processes, Control Equipment, or Monitoring Equipment). 3. Save the emissions unit(s) that you updated by clicking the Save button on the toolbar. 4. If an emission unit no longer operates at the facility, enter the “Ceased Operation Date” under the Make/Model button. In addition, make sure to disconnect the emission unit from all appropriate monitoring equipment, control equipment, and emission points. 5. If you are adding a new emission unit, right click inside the Emission Unit ID box and select Add. Type-in the new ID in the Emission Unit ID box.
The “Units” button is grayed out, because the unit information is being displayed on this window.
Use any of these buttons to open Site, Points, Units, Control, or Monitor DataWindows.

Minor Source Emissions Inventory SPARS Web Manual | Version 1.4 September 2012
43
Figure 6.7 – Adding a new emission unit 6. Enter a descriptive name in the Emission Unit Name text box located on the right side of the Emission Unit DataWindow. 7. Save the emission unit(s) that you created by clicking the Save button on the toolbar. 8. Click the Make/Model button. Add manufacturer information for the emission unit. Be sure to fill out the construction, installation, and actual start operation dates for the new emissions unit. Save this information. 9. Click the Schedule button. Make any updates to the federally enforceable limit and enter the construction permit number on the Permit or Rule Limit box. Click the Construction Limits button to enter additional construction permit limits. Save this information. 10. Click the Processes button. The field above the Emission Unit ID box is filled in with the Unit ID that you selected. From the SCC NO drop down list, review or select the SCC number for the process. Provide a description of the process in the Description of Process field. Be

Minor Source Emissions Inventory SPARS Web Manual | Version 1.4 September 2012
44
sure to fill-in the following fields: Max Design Rate Amount, Max Design Rate Units, and Raw Material. Save this information.
NOTE: Do not leave empty the SCC NO and the Description of Process. If this
information is not entered, you will not be able to bring this process into the inventory. 11. If the new emissions unit uses two different raw materials, do not create two emission units. Instead, you must create two processes with their corresponding SCC NO under the same unit. Click inside each Description of Process field to enter the maximum design rate, raw material, etc. for each SCC NO. 12. If you find SCCs that were mistakenly entered for one or more emissions units, delete these incorrect SCCs. To do this, highlight the line containing the SCC to be deleted, then right click and choose “Delete.” A box opens asking:” Are you sure?” Click “Yes”. Save these changes. 13. Connect the new emissions unit to control equipment: Click on the Control Equipment button. This is located to the right of the Processes button. If there is control equipment associated with this emission unit, highlight the Unit ID in the Emission Unit ID box, and then select the correct Control Equipment ID in the right hand window. Use the left pointing arrow to link the control equipment to the emission unit. Save this information.
Figure 6.8 – Connecting control equipment to a new emission unit
When connecting control equipment to a new emission unit, make sure that the Unit ID appears here. If it does not, refresh this window, by closing the Emission Unit
DataWindow and opening it again.

Minor Source Emissions Inventory SPARS Web Manual | Version 1.4 September 2012
45
14. Close the Emission Unit DataWindow by selecting File >Close on the toolbar, or by clicking the X on the upper right hand of the screen.
6.5 Updating Emissions Point Information: 1. Click the Emission Points button in the lower left corner of the Site Management DataWindow. The Emission Point DataWindow appears, with the General button information displayed.
Figure 6.9 – Emission Point DataWindow 2. Review existing information and make any necessary changes. Additional information regarding emissions points may be found by clicking the buttons displayed on the right side of the Emission Point DataWindow (Flags and Types, Exhaust, Specifications, Emission Units, Control Equipment, or Monitoring Equipment). 3. Save the emissions point(s) that you updated by clicking the Save button on the toolbar. 4. If an emission point no longer operates at the facility, enter the “Ceased Operation Date” under the General button. In addition, make sure to disconnect this emission point from all appropriate monitoring equipment, control equipment, and emissions units.
The “General” button is grayed out, because general information about this emission point is being displayed on this window.
Use any of these buttons to open Site, Points, Units, Control, or Monitor DataWindows.

Minor Source Emissions Inventory SPARS Web Manual | Version 1.4 September 2012
46
5. If you are adding a new emission point, right click inside the Emission Point ID box and select Add. Type-in the new ID in the Emission Point ID box.
Figure 6.10 – Adding a new emission point 6. Enter a descriptive name in the Descriptive Name text box located on the right side of the Emission Point DataWindow. 7. Save the emission point(s) that you created by clicking the Save button on the toolbar. 8. Under the General tab, be sure to indicate the Emission Point Type: (Vertical Stack/Vent, Wall Vent, Fugitive, or Other). If the emission point type is Fugitive or Other, describe it in the text box provided. In addition, indicate the “Start Operation Date” for this emission point. 9. Click the Flags and Types button. Check the box for rain cap if the flow on this emission point is obstructed with a rain cap. Be sure to use the text box provided to describe any obstruction or if it is a horizontal discharge. Save this information. 10. Click the Exhaust button. Enter the exhaust flow rate, exhaust flow rate units and the exit temperature. Save this information.

Minor Source Emissions Inventory SPARS Web Manual | Version 1.4 September 2012
47
11. Click the Specifications button. Enter the stack opening dimensions and corresponding units. Enter the stack height from ground. Check the discharge style (V, VR, or D) that best describes the emission point. 12. Connect the new emission point to the appropriate emission unit(s): (1) Highlight the Point ID in the Emission Point ID box, and then click the Emission Units button. Highlight the Unit ID in the right hand window and use the left pointing arrow to connect the emission unit and emission point together. Save this information.
Figure 6.11 – Connecting an emission unit to a new emission point
When connecting an emission unit to a new emission point, make sure that the Point ID appears here. If it does not, refresh this window, by closing the Emission Point DataWindow and opening
it again.

Minor Source Emissions Inventory SPARS Web Manual | Version 1.4 September 2012
48
13. Connect the new emission point to the appropriate control equipment: (1) Highlight the Point ID in the Emission Point ID box, and then click the Control Equipment button. Highlight the Control Equipment ID in the right hand window and use the left pointing arrow to connect the control equipment and emission point together. Save this information.
Figure 6.12 – Connecting an emission unit to a new emission point
14. Close the Emission Point DataWindow by selecting File >Close on the toolbar, or by clicking the X on the upper right hand of the screen.

Minor Source Emissions Inventory SPARS Web Manual | Version 1.4 September 2012
49
7.0 Querying using the Application Query Tool
As mentioned before, the Application Query Tool is a SPARS Web DataWindow, which allows the user to access, view, create, edit, or delete5 applications and inventories. To access the Application Query Tool, do the following: 1. Access SPARS Web as indicated in Section 3.0 2. Click the Quick Navigation Tool button (the hand). See Figure 7.1 below.
Figure 7.1 – The Hand (Quick Navigation Tool Button)
3. The Application Query Tool opens:
Figure 7.2 – Application Query Tool Window
4. Select Site Name or Site ID to query for electronic documents stored in SPARS for your facility. A more detailed explanation regarding using the Application Query Tool is given later in this chapter. 5. Click the Minor Source Questionnaires button to see existing emission inventories for the selected facility. 5Only applications and inventories in the INDUSTRY Phase may be deleted
Step 4 - Select either the “Site Name” or “Site ID” when querying in the Application Query Tool. It is recommended to always use the “Site
ID” for querying purposes

Minor Source Emissions Inventory SPARS Web Manual | Version 1.4 September 2012
50
Figure 7.3 – Querying for minor source inventories
The “Minor Source Questionnaires” button is grayed out, because this information is being displayed on this window.
Since this inventory is in the INITIAL Phase, SPARS will not allow you to edit or delete it. If you open this inventory and attempt to see the information that it contains without using print-preview (see Chapter 10), a database error will occur and you will be disconnected from the database.

Minor Source Emissions Inventory SPARS Web Manual | Version 1.4 September 2012
51
6. Sometimes applications or inventories are not pulled by querying the Application Query Tool. There are three potential reasons for this: The facility has changed names and there were no applications or inventories submitted
under the new name. The Site ID and the Site Name both have been chosen, but the And/Or options have not
been used correctly. More than two searching parameters have been used.
The global solution to this issue is to use the Site ID as the only searching parameter.
Figure 7.4 – Site ID as the only searching parameter. The And option is automatically selected.
There are times when using a second searching parameter is appropriate. In this case, please select the Or option.
Figure 7.5 – Two searching parameters (Site ID and Site Name). The Or option must be selected.
Never use more than two searching parameters in the Application Query Tool. If this tip does not work, please call us.

Minor Source Emissions Inventory SPARS Web Manual | Version 1.4 September 2012
52
8.0 Creating your Minor Source Emissions Inventory
After updating the information in Site Management, you are now ready to create the minor source inventory. 1. Open the Application Query Tool and select the facility for which you will be creating the Minor Source emissions inventory. 2. Click the Create Minor Source EIQ button.
Figure 8.1 – Creating a minor source inventory
3. The Inventory/Application Date & Year window opens (see Figure 8.2).
Click this button to create a Minor Source Emissions Inventory.

Minor Source Emissions Inventory SPARS Web Manual | Version 1.4 September 2012
53
Figure 8.2 – Inventory/Application Date and Year DataWindow
4. Enter or select the correct year for your inventory in the Emission Inventory/Application Year field. The Year for inventories is usually the previous calendar year. If you are correcting an inventory submitted in a year other than the previous calendar year, enter the year for that inventory in the Emission Inventory/Application Year field. 5. Enter the correct date in the Application Date field. This date is the day that you begin working on the Inventory. You cannot enter a future date.
6. Choose how you would like to populate your inventory: (1) By copying data from Site Management or (2) By copying data from a previous inventory. If a previous inventory does not exist, the only choice available will be Copy Data From Site Management, since the Copy Data from Previous Document button will be grayed out. If a previous inventory exists, choose the most recent minor source inventory available.
NOTE: The default selection is Copy Data From Site Management as shown in Figure
8.2 above. Make sure that when you are creating your inventory, you select the appropriate button (see Figure 8.3).

Minor Source Emissions Inventory SPARS Web Manual | Version 1.4 September 2012
54
Figure 8.3 – Copying Data from Previous Document
7. Click OK. 8. The inventory forms will appear as depicted in Figure 8.4 (be patient; it takes a few minutes for the forms to appear). Except for the throughputs, all other information included in the emissions inventory that you selected is copied into the new inventory.
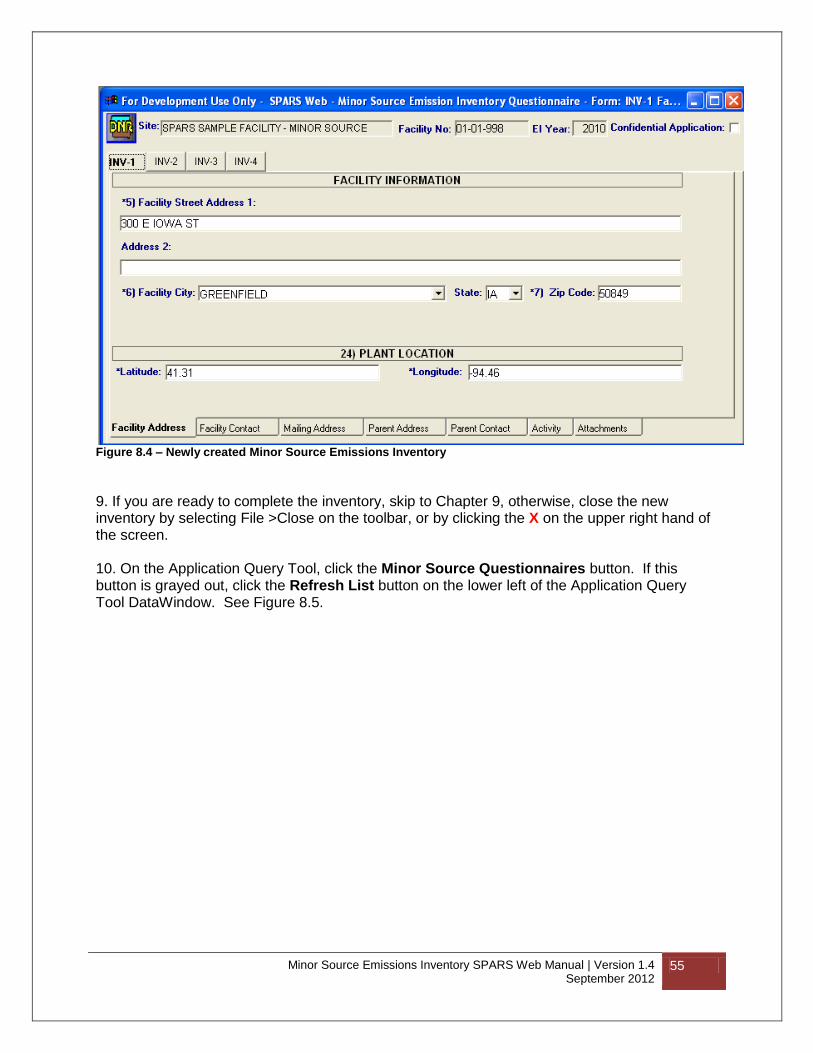
Minor Source Emissions Inventory SPARS Web Manual | Version 1.4 September 2012
55
Figure 8.4 – Newly created Minor Source Emissions Inventory 9. If you are ready to complete the inventory, skip to Chapter 9, otherwise, close the new inventory by selecting File >Close on the toolbar, or by clicking the X on the upper right hand of the screen. 10. On the Application Query Tool, click the Minor Source Questionnaires button. If this button is grayed out, click the Refresh List button on the lower left of the Application Query Tool DataWindow. See Figure 8.5.

Minor Source Emissions Inventory SPARS Web Manual | Version 1.4 September 2012
56
Figure 8.5 –Minor Source Emissions Inventory List
If the Minor Source Questionnaires button is grayed out, use the Refresh List button to obtain the list of inventories, including the newly created one.
The Inventory Type for your new inventory is INITIAL. If you delete this inventory and create another one with the same Inventory Year as the deleted one, the Type for this second inventory will be SUPP (supplemental) - See Figure 8.6. In this case, please contact us so that we can change the
Type back to INITIAL.
The newly created inventory is in the INDUSTRY Phase. This means that you are able to edit it or delete it, if needed.

Minor Source Emissions Inventory SPARS Web Manual | Version 1.4 September 2012
57
NOTE: If for some reason you decide to delete the INITIAL inventory, when you create a new one using the same Inventory Year as the one deleted, the inventory will no longer be an INITIAL one, but a SUPP inventory, instead (see Figure 8.6). Please call us and we will change the inventory type from SUPP back to INITIAL.
Figure 8.6 – This shows a Minor Source emissions inventory list after deleting an inventory and creating a new one with the same Inventory Year as the deleted one.
A new inventory was created with the same Inventory Year as the deleted inventory. Therefore, the Inventory Type for this new inventory is SUPP.

Minor Source Emissions Inventory SPARS Web Manual | Version 1.4 September 2012
58
9.0 Completing your new Minor Source Emissions Inventory
The Minor Source Emissions Inventory is comprised of five forms: INV-1, INV-2, INV-3, INV-4, and INV-5. Figure 8.4 shows the new inventory with buttons corresponding to INV-1, INV-2, INV-3, and INV-4. A button for INV-5 is not found in the SPARS inventory, because this form is automatically created if information is included in the Calculations sub tab of INV-3 and/or INV-4. The following information is expected to be submitted when completing a Minor Source Emissions Inventory: Form INV-1: Facility Identification
1. Facility address and location. 2. Facility contact name, title, and phone number. 3. Facility mailing address. 4. Parent Company name and address. 5. Parent Company contact name, title, and phone number. 6. SIC code. 7. NAICS code.
Form INV-2: Emission Point Description
1. Information for each emission point, such as ID, type, description, stack shape and dimensions, stack height, type of obstruction, if any, and composition of exhaust stream.
2. Identification of any emergency bypass stacks. 3. List of emission units associated with each emission point.
Form INV-3: Emission Unit Description – Potential Emissions
1. Emission unit and process description, such as date of construction, date of installation, date of modification, raw material, federally enforceable limits, permit or rule establishing limits, maximum hourly design rates and units.
2. List of emission points and control equipment associated with each unit/process. 3. Potential emissions for each process.
Form INV-4: Emission Unit Description – Actual Emissions
1. Throughput and operating schedule for each process during the Inventory Year. 2. List of emission points and control equipment associated with each unit/process. 3. Actual emissions that occurred due to the operation of each process during the
Inventory Year. Form INV-5: Calculations This form is a calculation worksheet to document how you calculated values on other individual forms throughout the inventory. Any assumptions used in making the calculations should also be included.

Minor Source Emissions Inventory SPARS Web Manual | Version 1.4 September 2012
59
How you complete your new inventory in SPARS Web depends on how you created it.6 There
are two ways to create your inventory: (1) By copying data from Site Management or (2) By copying data from a previous inventory. The two main reasons for creating your inventory by copying data from Site Management are: This is the first inventory submitted by your facility and therefore, there is no previous
inventory from which to copy.
Your facility has undergone so many changes from the last inventory submittal that the inventory in SPARS no longer represents the current operation and/or equipment at your facility.
When creating an inventory from Site Management, it will include all your updates to your facility’s Site Management information, as well as equipment connections. However, emergency bypass information will need to be updated for INV-2; emission factors, emission factor units, source of emission factor, etc. will need to be entered in both INV-3 and INV-4; potential emissions in INV-3; throughputs and actual emissions (if not auto-calculated by SPARS) in INV-4. Inventories are most commonly created by copying data from a previous inventory already stored in the SPARS database. By doing this, the new inventory includes all needed information, except for throughputs and updates that were made to Site Management after the last inventory was submitted. However, for both types of inventories, the following applies when dealing with equipment/process no longer in operation: Remove from the inventory any equipment/process that has been decommissioned and
any applicable permits have been rescinded.
Do not remove from the inventory any equipment/process no longer in operation if at least one of the following occurred:
o Equipment/process was used during the Inventory Year. o Equipment/process was not used during the Inventory Year, but it remains at the
facility and has the potential to be used again.
NOTE: If you are not able to complete the new emissions inventory during one session,
you may access the inventory at any time by doing the following:
a. Open the Application Query Tool.
b. Select the facility that you are interested in.
c. Click on the Minor Source Questionnaires button to see existing emission inventories for the selected facility.
d. Highlight the new inventory, which should be in INDUSTRY Phase, and double-click.
6 Refer to the previous section where the process of creating an emissions inventory is described.

Minor Source Emissions Inventory SPARS Web Manual | Version 1.4 September 2012
60
9.1 Completing an Inventory created from Site Management The process of completing an inventory created from Site Management is described below, but first, you must find the inventory you created. To do this, refer to Chapter 7.0 “Querying using the Application Query Tool.”
9.1.1 Form INV-1: Facility Identification 1. Update INV-1 with any new information regarding contacts, addresses, and other information that is not updated through Site Management screens. 7 When saving, if asked to use this information as default information when creating future forms, click YES (see Figure 9.1).
Figure 9.1 – Current Information to be used as Default
2. Attach any and all documents to the Attachments sub tab of Form 1.0. Enter a description, save, and view each document (to ensure it was actually attached to SPARS). To make changes to documents already attached to SPARS, you must:
a. Remove these documents from SPARS Web.
b. Make changes to original documents and save to your network or computer.
c. Re-attach modified documents to SPARS Web.
d. Enter a description, save, and view each modified document.
9.1.2 Form INV-2: Emission Point Description 1. Click the INV-2 tab. 2. INV-2 will show any emission points that were created in Site Management, so there is no need to bring them into the inventory. In addition, any new emission units associated with any new emission points will be displayed under the Emission Units sub tab of INV-2. See Figure 9.2. 3. Under the Emergency Bypass sub tab, for all emission points indicate if any of them is used as an emergency bypass stack or not (this information is not copied from Site Management). Save this update.
7 When an inventory is created from Site Management, all the updates that you just made to your facility’s Site
Management information will be copied to the new inventory. The only exceptions are the name, title, and phone number for the facility contact and the parent company contact, because you do not have access to this information in Site Management. As a result, the information that you will find in INV-1 for your facility contact and parent company contact might not be up-to-date.

Minor Source Emissions Inventory SPARS Web Manual | Version 1.4 September 2012
61
Figure 9.2 – New Emission Point EP-4 is found in the new inventory
4. Click the X on the top right corner to exit out of INV-2. 5. Remove from the inventory any equipment/processes that was dismantled and did not operate during the Inventory Year. To do this:
o Open INV-4. o On the left hand side, highlight the emission point connected to the process to be
removed. o On the right hand side, highlight the emission unit/process to be removed. o Click the Control Equipment sub tab and move from left to right any control equipment
associated with the process to be removed. Save this change. o Click the Emission Unit sub tab. The process to be deleted should be highlighted. o Right-click inside the box with the highlighted process and select “Delete.” o A box opens asking: “Are you sure?” Click Yes. o Save this change and click the X on the top right corner to exit out of INV-4. o Open INV-3 and follow the same steps as for INV-4. (The control equipment might be
already disconnected in INV-3). o Save this change and click the X on the top right corner to exit out of INV-3. o Open INV-2. o On the left hand side, highlight the emission point connected to the emission
unit/process to be removed. o Click the Emission Units sub tab. o Highlight the emission unit/process to be removed. o Right-click and select “Delete.” Save this change
There is no need to move EP-4 from right to left, because as the inventory was created from Site
Management, EP-4 would have to appear in the inventory.

Minor Source Emissions Inventory SPARS Web Manual | Version 1.4 September 2012
62
o Click the Emission Points sub tab. o If this emission point is to be removed because it is not connected to any other emission
units, then move it from left to right. Save this change. 6. Click the X on the top right corner to exit out of INV-2.
9.1.3 Form INV-3: Emission Unit Description – Potential Emissions 1. Click the INV-3 tab. 2. Remove from the inventory any processes that were mistakenly entered in INV-3. To do this:
o On the left hand side, highlight the emission point connected to the process to be removed.
o On the right hand side, highlight the emission unit/process to be removed. o Click the Control Equipment sub tab and move from left to right any control equipment
associated with the process to be removed. Save this change. o Click the Emission Unit sub tab. The process to be deleted should be highlighted. o Right-click inside the box with the highlighted process and select “Delete.” o A box opens asking: “Are you sure?” Click Yes. o Save these changes.
3. Click the Emission Unit sub tab. 4. Highlight an emission point on the left side. On the right side highlight the process associated with this emission point 5. Click the Emission Unit/Process Description sub tab and make any necessary changes. Save these changes. 6. Click the Control Equipment sub tab and make sure that the connection to the emission point and emission unit is correct. Save any changes. 7. Under the Potential Emissions sub tab, enter all the required information, such as emission factor, emission factor unit, source of emission factor, potential emissions, etc. for each applicable pollutant. Save these updates. 8. Use the Calculations sub tab to document how you calculated values associated with any applicable pollutant. This information will be included in INV-5. Save these updates. 9. Repeat Steps 3 through 8 for every emission point and every process. 10. Click the X on the top right corner to exit out of INV-3.

Minor Source Emissions Inventory SPARS Web Manual | Version 1.4 September 2012
63
9.1.4 Form INV-4: Emission Unit Description – Actual Emissions 1. Click the INV-4 tab. 2. Remove from the inventory any processes that were mistakenly entered in INV-4. To do this:
o On the left hand side, highlight the emission point connected to the process to be removed.
o On the right hand side, highlight the emission unit/process to be removed. o Click the Control Equipment sub tab and move from left to right any control equipment
associated with the process to be removed. Save this change. o Click the Emission Unit sub tab. The process to be deleted should be highlighted. o Right-click inside the box with the highlighted process and select “Delete.” o A box opens asking: “Are you sure?” Click Yes. o Save these changes.
3. Click the Emission Unit sub tab. 4. Highlight an emission point on the left side. On the right side highlight the process associated with this emission point. 5. Click the Throughput/Operating Schedule sub tab. 6. Enter the Raw Material Name, Yearly Total Amount, Yearly Total Unit Code, and the Actual Operating Rate/Schedule. Save these updates. 7. Click the Control Equipment sub tab and make sure that the connection to the emission point and emission unit is correct. 8. Under the Actual Emissions sub tab, enter all the required information, such as emission factor, emission factor unit, source of emission factor, actual emissions (if SPARS does not auto-calculate), etc. for each applicable pollutant. Save these updates.
NOTE: The auto-calculation tool will not work if:
1. The yearly throughput unit of measure is not comparable with the emission factor unit of measure. 2. The source of the emission factor was not entered. 3. The source of the emission factor was one of these: Permit, Other, or CEM.
9. Use the Calculations sub tab to document how you calculated values associated with any applicable pollutant. This information will be included in INV-5. Save these updates. 10. Repeat Steps 3 through 9 for every emission point and every process. 11. Click the X on the top right corner to exit out of INV-4.

Minor Source Emissions Inventory SPARS Web Manual | Version 1.4 September 2012
64
9.1.5 Form INV-5: Calculations This form is a calculation worksheet to document how you calculated values on other individual forms throughout the inventory. Any assumptions used in making the calculations should also be included. A button for INV-5 is not found in the SPARS inventory, because this form is automatically created if information is included in the Calculations sub tab of INV-3 and/or INV-4.
If you are ready to review the inventory by using the SPARS print-preview feature, go to Chapter 10. Otherwise, click the X on the top right corner to close the inventory.
9.2 Completing an Inventory created from a Previous Inventory The process of completing an inventory created from a previous inventory is described below, but first, you must find the inventory you created. To do this, refer to Chapter 7.0 “Querying using the Application Query Tool.”
9.2.1 Form INV-1: Facility Identification
1. Update INV-1 with any new information regarding contacts, addresses, and other information that is not updated through the Site Management screens. When saving, if asked to use this information as default information when creating future forms, click YES (see Figure 9.3).
Figure 9.3 – Current Information to be used as Default
2. Attach any and all documents to the Attachments sub tab of INV-1. To make changes to documents already attached to SPARS, you must:
a. Remove these documents from SPARS Web.
b. Make changes to original documents and save to your network or computer.
c. Re-attach modified documents to SPARS Web.
9.2.2 Form INV-2: Emission Point Description 1. Open INV-2. 2. Click the Emission Points sub tab. Figure 9.4 shows that the new Emission Point EP-4 is only on the right side of the window (Site Management) and not on the left hand side (inventory).

Minor Source Emissions Inventory SPARS Web Manual | Version 1.4 September 2012
65
Figure 9.4 – Form INV-2: New Emission Point EP-4 is not part of the new inventory yet.
3. To include the new emission point in the inventory, highlight the new emission point found on the right side of the window. Use the arrow pointing left to bring the new emission point into the inventory (see Figure 9.5).
Figure 9.5 – Form INV-2: New Emission Point EP-4 is now included in the new inventory.
4. Under the Emergency Bypass sub tab, indicate if the new emission point is used as an emergency bypass stack or not (this information is not brought in from Site Management). Save this information.
5. To add an emission unit to the new or any other emission point, click the Emission Unit sub tab.

Minor Source Emissions Inventory SPARS Web Manual | Version 1.4 September 2012
66
Figure 9.6 – Emission Unit Sub Tab: New Emission Point EP-4 is not connected to an emission unit in the inventory.
6. Click the long Select an EU and Create a Record for Each SCC AMS Code button. A popup window will appear with a list of emission units (see Figure 9.7).
Figure 9.7 – Emission unit list as it appears in Site Management

Minor Source Emissions Inventory SPARS Web Manual | Version 1.4 September 2012
67
7. Select one or more units connected to the emission point and click the OK button. The emission units will show up on the screen with SCC numbers and process descriptions. Save this change.
Figure 9.8 – Emission Unit Sub Tab: New Emission Point EP-4 is now connected to its emission unit in both the inventory and in Site Management.
8. Remove from the inventory any equipment/process that was dismantled and did not operate during the Inventory Year. To do this:
o Open INV-4. o On the left hand side, highlight the emission point connected to the process to be
removed. o On the right hand side, highlight the emission unit/process to be removed. o Click the Control Equipment sub tab and move from left to right any control equipment
associated with the process to be removed. Save this change. o Click the Emission Unit sub tab. The process to be deleted should be highlighted. o Right-click inside the box with the highlighted process and select “Delete.” o A box opens asking: “Are you sure?” Click Yes. o Save this change and click the X on the top right corner to exit out of INV-4. o Open INV-3 and follow the same steps as for INV-4. (The control equipment might be
already disconnected in INV-3 for the process to be deleted). o Save this change and click the X on the top right corner to exit out of INV-3. o Open INV-2. o On the left hand side, highlight the emission point connected to the emission
unit/process to be removed. o Click the Emission Units sub tab. o Highlight the emission unit/process to be removed. o Right-click and select “Delete.” Save this change o Click the Emission Points sub tab.

Minor Source Emissions Inventory SPARS Web Manual | Version 1.4 September 2012
68
o If this emission point is to be removed because it is not connected to any other emission units, then move it from left to right. Save this change.
9. Click the X on the top right corner to exit out of INV-2.
9.2.3 Form INV-3: Emission Unit Description – Potential Emissions 1. Click the INV-3 tab. You will find that all the information from the previous inventory is copied on each Form INV-3 of your new inventory.
NOTE: PM2.5 and ammonia emissions are required to be reported and will need to be added to INV-3 for each appropriate emission unit, since these pollutants have not been required to be reported in previous emissions inventories.
2. For each new emission point that you brought into INV-2, you will need to bring its corresponding emission unit/process into INV-3, as follows: 3. Inside the Emission Point ID box, highlight the emission point ID for the new emission point and click Add (see Figure 9.9).
Figure 9.9 – New Emission Point EP-4 was not included in the previous inventory, therefore, it is not included in INV-3 for the new inventory, either. 4. After clicking the “Add” button, the following window opens.

Minor Source Emissions Inventory SPARS Web Manual | Version 1.4 September 2012
69
Figure 9.10 – Finding the new emission unit/process associated with the new emission point 5. Highlight the emission unit/process and complete the applicable text boxes shown at the bottom of the window. Save this information. See Figure 9.11
Figure 9.11 – Entering all pertinent information regarding this new emission unit/process. 6. After saving the information just entered, click X on the top right corner to bring the emission unit/process to INV-3 (see Figure 9.12).

Minor Source Emissions Inventory SPARS Web Manual | Version 1.4 September 2012
70
Figure 9.12 – The new emission unit/process is now included in INV-3
7. With the new emission point highlighted, click the Emission Unit/Process Description sub tab and make any necessary changes. Save these changes. 8. Click the Control Equipment sub tab (see Figure 9.13).
Figure 9.13 – New Control equipment CE-2 which is connected to EP-4 and EU-4 in Site Management is not connected to these in INV-3 yet. 9. Connect any applicable control equipment to the new emission point and new emission unit. To do this, highlight the control equipment and use the arrow pointing left to bring it to INV-3. Save these changes.

Minor Source Emissions Inventory SPARS Web Manual | Version 1.4 September 2012
71
10. Under the Potential Emissions sub tab, enter all the required information, such as emission factor, emission factor unit, source of emission factor, potential emissions, etc. for each applicable pollutant. Save these updates. 11. Use the Calculations sub tab to document how you calculated values associated with any applicable pollutant. This information will be included in INV-5. Save these updates. 12. Remove from the inventory any processes that were mistakenly entered in INV-3. To do this:
o Click the Emission Unit sub tab. o On the left hand side, highlight the emission point connected to the process to be
removed. o On the right hand side, highlight the emission unit/process to be removed. o Click the Control Equipment sub tab and move from left to right any control equipment
associated with the process to be removed. Save this change. o Click the Emission Unit sub tab. The process to be deleted should be highlighted. o Right-click inside the box with the highlighted process and select “Delete.” o A box opens asking: “Are you sure?” Click Yes. o Save these changes.
13. Click the Emission Unit sub tab to update any necessary information for existing emission points and emission units. 14. Highlight an existing emission point on the left side. On the right side highlight the process associated with this emission point. 15. Click the Emission Unit/Process Description sub tab and make any necessary changes. Save these changes. 16. Click the Control Equipment sub tab and make sure that the connection to the emission point and emission unit is correct. Save any changes. 17. Click the Potential Emissions sub tab. You will find that the potential emission information for the existing emission point and emission unit was copied from the previous inventory. Review this information and make any necessary changes. Save these changes. 18. If needed, modify or add information to the Calculations sub tab. This information will be included in INV-5. Save any changes. 19. Repeat Steps 13 through 18 for every other existing emission point and existing emission unit/process. 20. Click the X on the top right corner to exit out of INV-3.

Minor Source Emissions Inventory SPARS Web Manual | Version 1.4 September 2012
72
9.2.4 Form INV-4: Emission Unit Description – Actual Emissions 1. Click the INV-4 tab. 2. For each new emission point that you brought into INV-2, you will need to bring its corresponding emission unit/process into INV-4, as follows: 3. Inside the Emission Point ID box, highlight the emission point ID for the new emission point and click Add (see Figure 9.14).
Figure 9.14 – New Emission Point EP-4 was not included in the previous inventory, therefore, it is not included in INV-4 for the new inventory, either. 4. After clicking the “Add” button, the following window opens. Note that the information regarding this new emission unit/process is already completed in INV-4. This is because it was entered in INV-3.

Minor Source Emissions Inventory SPARS Web Manual | Version 1.4 September 2012
73
Figure 9.15 – Finding the new emission unit/process associated with the new emission point 5. Highlight the emission unit/process and click the X on the top right corner to bring the emission unit/process into INV-4 (see Figure 9.16).
Figure 9.16 – The new emission unit/process is now included in INV-4 6. Click the Throughput/Operating Schedule sub tab. 7. Enter the Raw Material Name, Yearly Total Amount, Yearly Total Unit Code, and the Actual Operating Rate/Schedule. Save these updates.

Minor Source Emissions Inventory SPARS Web Manual | Version 1.4 September 2012
74
8. Click the Control Equipment sub tab and make sure that the connection to the emission point and emission unit is correct. 9. Under the Actual Emissions sub tab, enter all the required information, such as emission factor, emission factor unit, source of emission factor, actual emissions (if SPARS does not auto-calculate), etc. for each applicable pollutant. Save these updates.
NOTE: The auto-calculation tool will not work if:
1. The yearly throughput unit of measure is not compatible with the emission factor unit of measure. 2. The source of the emission factor was not entered. 3. The source of the emission factor was one of these: Permit, Other, or CEM.
10. Use the Calculations sub tab to document how you calculated values associated with any applicable pollutant. This information will be included in INV-5. Save these updates. 11. Remove from the inventory any processes that were mistakenly entered in INV-4. To do this:
o Click the Emission Unit sub tab. o On the left hand side, highlight the emission point connected to the process to be
removed. o On the right hand side, highlight the emission unit/process to be removed. o Click the Control Equipment sub tab and move from left to right any control equipment
associated with the process to be removed. Save this change. o Click the Emission Unit sub tab. The process to be deleted should be highlighted. o Right-click inside the box with the highlighted process and select “Delete.” o A box opens asking: “Are you sure?” Click Yes. o Save these changes.
12. Click the Emission Unit sub tab to update any necessary information for existing emission points and emission units. 13. Highlight an existing emission point on the left side. On the right side highlight the process associated with this emission point. 14. Click the Throughput/Operating Schedule sub tab. You will find that all the information for the existing emission unit was copied from the previous inventory. The only difference is that the Yearly Total Amount and Actual Emissions are set to 0 (zero). Enter the annual throughput for the existing unit. Save these changes.
NOTE: If the new inventory did not copy the raw material name, yearly total unit code,
and operating schedule from the previous inventory, it is very likely that you created the inventory by copying data from Site Management and not from the previous inventory. This is a very common mistake since the default selection is Copy Data From Site Management instead of Copy Data From Previous Document.
If you plan on deleting the inventory and creating a new one, please call us before you do this, since we need to delete the inventory from the database as well. Otherwise, when you create the inventory again, the database will consider it to be a Supplemental inventory, instead of an Initial one.

Minor Source Emissions Inventory SPARS Web Manual | Version 1.4 September 2012
75
15. Click the Control Equipment sub tab and make sure that the connection to the emission point and emission unit is correct. Save any changes. 16. Click the Actual Emissions sub tab. You will find that information such as emission factors, emission factor units, emission factor source, etc. are already included for the existing emission unit. Remember that PM2.5 and ammonia emissions will need to be added in INV-4 to the appropriate emission units. 17. Check the actual emissions to see if the SPARS auto-calculation worked. Emission totals are calculated in the far right column.
NOTE: The following window appears every time auto-calculation is performed. If you do not wish to see this window popping up after every auto-calculation, unclick the Show message for each auto calculation performed box.
Figure 9.17 – SPARS Auto-Calculation Disclaimer 18. If needed, modify or add information to the Calculations sub tab. This information will be included in INV-5. Save any changes.

Minor Source Emissions Inventory SPARS Web Manual | Version 1.4 September 2012
76
19. Repeat Steps 12 through 18 for every other existing emission point and existing emission unit/process. 20. When you have entered all the throughputs and have calculated the actual emissions for each applicable emission unit, click the X on the top right corner to exit out of Form INV-4.
9.2.5 Form INV-5: Calculations This form is a calculation worksheet to document how you calculated values on other individual forms throughout the inventory. Any assumptions used in making the calculations should also be included. A button for INV-5 is not found in the SPARS inventory, because this form is automatically created if information is included in the Calculations sub tab of INV-3 and/or INV-4. Sometimes you may find that INV-5 for your new inventory has information that you did not enter. This information came from the previous inventory. To delete this information do the following: 1. Click on the INV-3 tab and then on the Calculations tab. 2. Click on a pollutant on the left. 3. If there is any information on the right-hand side that needs to be deleted, highlight this information. 4. Right click and choose “Delete.” See Figure 9.18 below.
Figure 9.18 – Cleaning up Form INV-5

Minor Source Emissions Inventory SPARS Web Manual | Version 1.4 September 2012
77
5. Repeat Steps 2 – 4 for the other pollutants. 6. Click on INV-4 tab and click on the Calculations subtab and follow the same procedure indicated in Steps 2 – 5. Sometimes even after you follow Steps 1 – 6, your INV-5 form might still have some information that you did not enter. In this case, you are seeing information that was included in a previous inventory, but: It was deleted from the Potential Emissions tab of Form INV-3, before any comments or
calculations were deleted from the Calculations tab. AND/OR It was deleted from the Actual Emissions tab of Form INV-4, before any comments or
calculations were deleted from the Calculations tab. Solution: Add the pollutant(s) back to the Potential Emissions tab of Form INV-3 and follow the
procedure indicated in Steps 2-5. Add the pollutant(s) back to the Actual Emissions tab of Form INV-4 and follow the
procedure indicated in Steps 2-5.
If you are ready to review the inventory by using the SPARS print-preview feature, go to Chapter 10. Otherwise, click the X on the top right corner to close the inventory.

Minor Source Emissions Inventory SPARS Web Manual | Version 1.4 September 2012
78
10.0 Reviewing your newly created Minor Source Emissions Inventory
1. Open the Application Query Tool and select the facility for which you are completing the minor source emissions inventory. 2. Click on the Minor Source Questionnaires button to see all emission inventories for the selected facility. 3. Highlight your new Minor Source Inventory, which should be in INDUSTRY Phase.
Figure 10.1 – New Minor Source Emissions Inventory in INDUSTRY Phase
4. Click the Edit Application button. Alternatively, you may double-click to bring up the highlighted inventory.

Minor Source Emissions Inventory SPARS Web Manual | Version 1.4 September 2012
79
Figure 10.2 – New Minor Source Emissions Inventory
5. Click on the print-preview icon: (magnifying glass). The following window opens:

Minor Source Emissions Inventory SPARS Web Manual | Version 1.4 September 2012
80
Figure 10.3 – Print-Preview of the new Minor Source Emissions Inventory
6.0 You are now able to view or print the inventory by each form. In addition, you may print the entire inventory.
NOTE: Remember that in order to review information contained in inventories already
submitted to DNR, you must used the print-preview feature as described in this chapter.

Minor Source Emissions Inventory SPARS Web Manual | Version 1.4 September 2012
81
11.0 Submitting your Minor Source Emissions Inventory
Only Responsible Officials may submit applications and inventories to the AQB. To submit a completed application or inventory to the AQB: 1. After logging in as the Responsible Official, open the Application Query Tool and select the facility for which you will be submitting the Minor Source emissions inventory. 2. Click the Minor Source Questionnaires button. 3. Find the Minor Source Inventory in the INDUSTRY Phase and highlight it. IMPORTANT: Only applications and questionnaires on the INDUSTRY Phase can be submitted to the AQB.
Figure 11.1 – Minor Source Emissions Inventory in the INDUSTRY Phase
4. Click the Submit to AQB button. IMPORTANT: When the inventory on the INDUSTRY Phase is highlighted, the Submit to AQB button will be active; otherwise, the button will be inactive and the words grayed out.
5. A box will pop-up for the Responsible Official to enter the assigned PIN. Click OK to submit, or Cancel if you are not ready to submit.

Minor Source Emissions Inventory SPARS Web Manual | Version 1.4 September 2012
82
Figure 11.2 – Responsible Official’s PIN is required
6. If successfully submitted, a notice will appear: The application has been submitted to AQB. If not successfully submitted, an error message will appear, instead.
Figure 11.3 – The Minor Source Emissions Inventory has been submitted to the AQB. 7. As soon as the inventory is submitted, the Phase Code changes to INITIAL (see Figure 11.3).

Minor Source Emissions Inventory SPARS Web Manual | Version 1.4 September 2012
83
Figure 11.4 – When submitted, the inventory Phase Code changes from INDUSTRY to INITIAL.
8. Within 1 – 2 days, the Responsible Official and the Facility Administrator will be informed via E-mail that the inventory has been received by the AQB.
This inventory has an INITIAL Phase Code;
therefore, it is no longer available for modifications by facility users.

Minor Source Emissions Inventory SPARS Web Manual | Version 1.4 September 2012
84
12.0 Correcting your Minor Source Emissions Inventory after Submittal
If mistakes are discovered after submission to the AQB, you will need to create a supplement of the inventory that needs to be modified. To create a supplement: 1. Open the Application Query Tool and select the facility for which you will be creating the supplemental inventory. 2. Click on the Create Minor Source EIQ button. The Inventory/Application Date & Year window opens. 3. In the Emission Inventory/Application Year field, enter the same Inventory Year as the one for the inventory you are planning to correct. 4. Select the radio button for Copy Data from Previous Document. Select the inventory to be corrected.
Figure 12.1 – Creating a Minor Source Supplemental Inventory
5. A supplemental inventory in the INDUSTRY Phase will be created (see Figure 12.2).

Minor Source Emissions Inventory SPARS Web Manual | Version 1.4 September 2012
85
Figure 12.2 – Supplemental Minor Source Emissions Inventory in the INDUSTRY Phase
6. The supplemental inventory is an exact replica of the original inventory; therefore, you will only need to make modifications to those sections that need it. 7. After corrections are completed, the Responsible Official will have to submit the supplemental inventory to the AQB. NOTE: If you are not able to complete the supplemental emissions inventory during one session, you may access the inventory at any time by doing the following:
e. Open the Application Query Tool.
f. Select the facility that you are interested in.
g. Click on the Minor Source Questionnaires button to see existing emission inventories for the selected facility.
h. Highlight the supplemental inventory and double-click.

Minor Source Emissions Inventory SPARS Web Manual | Version 1.4 September 2012
86
13.0 Working in SPARS Web: Workarounds
Workaround #1 – Adding Transfer Efficiency for HAPs Problem Description:
Cell #23 found in INV-3 and INV-4 (see Figures 13.1 and 13.2) is used to enter spray booths transfer efficiency for PM2.5 and PM10.
Figure 13.1 – INV-3 Cell 23: Spray Booth Transfer Efficiency (PM2.5)
Figure 13.2 – INV-4 Cell 23: Spray Booth Transfer Efficiency (PM10)

Minor Source Emissions Inventory SPARS Web Manual | Version 1.4 September 2012
87
However, there is no cell for transfer efficiency for hazardous air pollutants (HAPs), even though it may be appropriate for a HAP that is a solid (see Figure 13.3).
Figure 13.3 – Spray Booth Transfer Efficiency Cell 23 is not available for this PM HAP (Cadmium Compounds) Workaround:
To enter a spray booth transfer efficiency for a HAP: 1. Complete the line for PM-10 (or PM-2.5) with the data that you want for the HAP, including the transfer efficiency (see Figure 13.4).
Figure 13.4 – Entering Spray Booth Transfer Efficiency for a PM HAP
Cell #23 is not available for
this PM HAP

Minor Source Emissions Inventory SPARS Web Manual | Version 1.4 September 2012
88
2. Using the pull-down menu, change the pollutant from PM10 (or PM2.5) to the desired HAP. SPARS will respond with a message that says that this pollutant cannot be changed (see Figure 13.5).
Figure 13.5 – Replacing PM10 with “Cadmium Compounds” (PM HAP)
2. Click OK. The transfer efficiency cell for the HAP will now be hidden, but the value you entered is still there and is used to calculate emissions (see Figure 13.6).
Figure 13.6 – PM10 and Cadmium Compounds

Minor Source Emissions Inventory SPARS Web Manual | Version 1.4 September 2012
89
3. Refresh by leaving the screen and returning. The PM-10 line will reappear but will be blank (see Figure 13.7).
Figure 13.7 – PM10 and Cadmium Compounds 4. Re-enter the correct data for PM-10. NOTE: This same procedure can be done for sulfur or ash content.

Minor Source Emissions Inventory SPARS Web Manual | Version 1.4 September 2012
90
Workaround #2 – Clearing Erroneous Information for PM2.5, PM10, Sulfur Dioxide, Nitrogen Oxides, Volatile Organic Compounds, Carbon Monoxide, Lead, and Ammonia Problem Description:
It may happen that data for potential or actual emissions for any of these eight pollutants is entered in error, as shown in Figure 13.8 for sulfur dioxide. The best correction resulted in 0.00 for some cells, (NONE) for emission factor units, and some arbitrary choice for emission factor source. It is possible to return the sulfur dioxide line to its pristine, blank state.
Figure 13.8 – This unit does not emit sulfur dioxide. The emission factor unit was entered in error. A Source of Emission Factor was also entered in error. Workaround:
To clear information entered in error for PM2.5, PM10, Sulfur Dioxide, Nitrogen Oxides, Volatile Organic Compounds, Carbon Monoxide, Lead, and Ammonia: 1. Change the pollutant for which the erroneous information has been entered to any other pollutant (cannot be any of the other seven pollutants). SPARS will respond with a message that says that this pollutant cannot be changed (see Figure 13.9).

Minor Source Emissions Inventory SPARS Web Manual | Version 1.4 September 2012
91
Figure 13.9 – Changing Sulfur Dioxide into Sulfur Oxides
2. Click OK. 3. Highlight the newly entered pollutant, right-click, and delete it. 4. Refresh by leaving the screen and returning. The Sulfur Dioxide line will reappear and will be blank. The Source of Emission Factor information is also gone (see Figure 13.10).
Figure 13.10 – The erroneous information for Sulfur Dioxide has been deleted

Minor Source Emissions Inventory SPARS Web Manual | Version 1.4 September 2012
92
14.0 Working in SPARS Web: Avoiding Common Errors Error #1: Listing “Single HAP” or “Combined HAP” as an air pollutant.
Solution: List the specific single HAP, such as “benzene” or list VOC HAP Total.
Error #2: Not listing HAPs and VOCs separately.
Solution: Many HAPs are also VOCs. List such pollutants as both an individual HAP and VOC.
Error #3: Entering the latitude and longitude in degrees, minutes, and seconds
(DMS Format). Solution: Enter the latitude and longitude in degrees only (decimal degree or DegDec Format).
Error #4: Entering the longitude as a positive number.
Solution: The longitude value should begin with a negative sign (-) to indicate the facility is located in the western hemisphere.
Error #5: Entering the latitude and longitude with two or three decimals.
Solution: The latitude and longitude should include at least six decimals.
Error #6: Leaving the parent company information blank.
Solution: If the facility does not have a parent company name, address, or contact number please use the facility name, address, and contact number.
Error #7: Leaving blank the fields for the SIC and NAICS codes.
Solution: Enter both codes and a brief description of what your facility does.
Error #8: Not including appropriate supporting materials.
Solution: Include all relevant MSDS and material usage logs as an attachment on INV-1.
Error #9: Not explaining why an emission point/unit was not included in the
inventory. Solution: Attach a cover letter as an attachment on INV-1indicating why an emission point/unit was not included in the inventory.
Error #10: Not including emission units that are still available, but did not
operate during the emission year. Solution: If an emission unit is still available for operation but did not operate during the emission year, include it in the inventory and fill the actual throughput in as “0.”

Minor Source Emissions Inventory SPARS Web Manual | Version 1.4 September 2012
93
Error #11: Entering the wrong emission point type for sources venting inside.
Solution: If an emission point vents inside, indicate the emission point type as “other.”
Error #12: Not entering dates of construction and installation of emission units.
Solution: Include dates of construction and installation of emission units.
Error #13: Using maximum hourly design rate units that do not cancel out with
the emission factor units. Solution: If possible, make sure that the maximum hourly design rate units and the emission factor units cancel out so the calculation results in lbs/hr (ex. MMBtu/hr multiplied by lbs/MMBtu = lbs/hr).
Error #14: Using a “lb/hr permit limit” as an emission factor.
Solution: If at all possible, use documented emission factors (from AP-42, FIRE, TANKS, and Engineering Evaluations) when calculating potential emissions. If you cannot find an emission factor from one of these sources you may use the permit limit as a last resort. The lb/hr permit limit should actually be placed in the potential hourly-controlled emissions box (#24). When calculating actual emissions the preferred emission factors should be obtained from stack tests, AP-42, FIRE, TANKS, or Engineering Evaluations. Again, the permit limit may be used, but only as a last resort.
Error #15: Using both a controlled emission factor and the combined control
efficiency. Solution: When using a controlled emission factor, do not enter a value for the combined control efficiency.
Error #16 Using actual throughput units that do not cancel out with the
emission factor units. Solution: If possible, make sure the actual throughput units and the emission factor units cancel out so the calculation results in tons/yr (ex. MMBtu multiplied by lbs/MMBtu multiplied by 1ton/2000lbs = tons).
Error #17: Not including actual operating schedules for the equipment.
Solution: Fill out the actual operating schedule; this schedule should be the hours the emission unit operated rather than the business hours the facility is open.

Minor Source Emissions Inventory SPARS Web Manual | Version 1.4 September 2012
94
15.0 Working in SPARS Web: Dos and Don’ts Dos and Don’ts of SPARS Web Work….
Do review a SPARS printout of your most recent Inventory.
Do gather all the necessary information before starting working in your new Inventory.
Do review and update Site Management before creating your new inventory in the
Application Query Tool.
Do add new Points, Units, Control, or Monitor equipment in Site Management
Do submit your inventory through SPARS Web if SPARS was used to create and
complete it.
Do call us when getting any database errors.
Don’t delete any Points, Units, Control, or Monitor equipment in Site Management.
Don’t delete or modify any Point IDs, Unit IDs, Control IDs, or Monitor IDs in Site
Management.
Don’t create new Points, Units, Control, or Monitor equipment in the inventory. (Do
this in Site Management.)
Don’t submit a hardcopy of your inventory if it was created and completed in SPARS
Web.
Don’t leave your inventory in the INDUSTRY Phase. Please submit it electronically.
Don’t delete an SCC number unless it was entered by mistake.

Minor Source Emissions Inventory SPARS Web Manual | Version 1.4 September 2012
95
16.0 Contacts and On-line Resources 16.1 DNR Air Quality Contacts
SPARS Questions Jason Dowie, 515-281-8568 [email protected]
SPARS Helpdesk
Phone: 515-281-8568, or 515-281-8983 Fax: 515-242-5094 [email protected]
Jason Marcel, 515-281-4873 [email protected]
Emissions Inventory Questions Nick Page, 515-281-8500 [email protected] Krysti Mostert, 515-281-5774
Seth Anderson, 515-281-5704 [email protected]
Greenhouse Gas Questions
Marnie Stein, 515-281-8468 [email protected]

Minor Source Emissions Inventory SPARS Web Manual | Version 1.4 September 2012
96
16.2 On-line Resources DNR Air Quality Bureau www.iowacleanair.com
DNR MSEI Forms www.iowacleanair.com Click on “Emissions Inventory,” then on “Minor Sources,” and then on “Forms and Instructions.”
EPA Emission Factors To access AP-42 and WebFIRE emission factors go to: www.epa.gov/ttn/chief/efpac/index.html
SIC Codes www.osha.gov/pls/imis/sicsearch.html
NAICS Codes and Conversion from SIC to NAICS http://www.naicscode.com
SCC Codes www.iowacleanair.com Click on “Emissions Inventory.” A list of links will open up under “Emissions Inventory.” Click on “Emissions Estimate Tools.” On the right side scroll down to find the Reference Material heading. Under “Classification Lists,” click on “Source Classification Code (SCC) List.” Ethanol and Biodiesel plants should click on “Ethanol and Biodiesel Source Classification Code (SCC) List.”
Calculation Spreadsheets and Tools To access calculation spreadsheets for painting operations, haul roads, asphalt, concrete and limestone processes go to: www.iowacleanair.com Click on “Emissions Inventory” then on “Emissions Estimate Tools.” The appropriate spreadsheet is located under “Emissions Inventory Worksheets.”
SPARS Web Download SPARS user’s guide at www.iowacleanair.com Click on “SPARS”
Iowa Administrative Code (IAC) http://www.legis.state.ia.us/IAC.html See section 567, Chapters 20-35