MINI SPLIT AIR CONDITIONER & HEATER - CR12000SACH Mini Split Air Conditioner and Heater LIMITED...
7
MINI SPLIT AIR CONDITIONER & HEATER IMPORTANT: READ CAREFULLY BEFORE ASSEMBLY AND USE Read and follow all safety rules and instructions before operating this equipment. THIS PRODUCT IS INTENDED FOR HOUSEHOLD USE ONLY. Please keep this manual for future reference. Air Conditioner & Heater ClimateRight ® USA Questions or concerns? For assistance, please call Customer Service 808 Rhoads Ave • Columbus, OH 43205 www.climaterightair.com Ph: 800-725-4628 INSTALLATION GUIDE CR12000SACH
Transcript of MINI SPLIT AIR CONDITIONER & HEATER - CR12000SACH Mini Split Air Conditioner and Heater LIMITED...

MINI SPLITAIR CONDITIONER & HEATER
IMPORTANT: READ CAREFULLY BEFORE ASSEMBLY AND USERead and follow all safety rules and instructionsbefore operating this equipment.
THIS PRODUCT IS INTENDED FOR HOUSEHOLD USE ONLY. Please keep this manual for future reference.
Air Conditioner & HeaterClimateRight® USAQuestions or concerns? For assistance, please call Customer Service
808 Rhoads Ave • Columbus, OH 43205www.climaterightair.comPh: 800-725-4628
INSTALLATION GUIDE
CR12000SACH

TABLE OF CONTENTS PRODUCT WARRANTY
PACKAGE CONTENTS
Model: CR12000SACHClimateRight® Mini Split Air Conditioner and Heater (Qty.1)Use & Care Guide (Qty.1)Remote Control (Qty.1)
CLIMATERIGHT® CR12000SACH Mini Split Air Conditioner and HeaterLIMITED WARRANTY
For details or to obtain service under this warranty, please visit our website: www.climaterightair.com.
If you need assistance:Visit our website at www.climaterightair.com or call 1-800-725-4628 to speak to a customer service representative; Mon - Fri 9am -5pm EST.
Product Warranty .......................................................
Package Contents .....................................................
Safety Instructions .....................................................
Pre Set-up Instructions .............................................
Installation of Indoor Unit ..........................................
Set-up Instructions ....................................................
Additional Instructions ...............................................
Whole Unit Instructions .............................................
Troubleshooting .........................................................
Notes ..........................................................................
2
2
3
5
6
7
8
9 -10
11-12
12
1 2
NEED TO DO

SAFETY INSTRUCTIONS
Thank you for purchasing a ClimateRight® CR12000-S Split Wall-Mounted Air Conditioner. Please read this manual carefully before using.
IMPORTANT SAFETY INSTRUCTIONS FOR USING YOUR Split Wall-Mounted Air Conditioner
WARNING: TO REDUCE THE RISK OF FIRE, ELECTRIC SHOCK OR INJURY:• Fully assemble before operating.• Do not repair or modify the unit unless
All other repairs should be completed by
• The plug for this unit is polarized with one blade wider than the other. Do not force the plug into an electrical outlet. Do not alter the plug in any way. If the plug dose not
to install a proper outlet.• Do not use if the power cord or plug is damaged or the connection to the wall outlet is loose.
lower back of the unit.• Do not damage, break, forcefully bend, pull, twist, bundle, coat, pinch, or place heavy objects on the power cord.• Periodically remove dust from the power plug. • If the power plug is damaged, it must be
technician• Remove the power plug from the outlet before cleaning the unit. When removing the power plug, grasp by holding the plug itself, never hold by the cord.• Remove the power plug from the outlet when not in use.• Do not handle the power plug with wet hands.• Do not operate the unit when using indoor smoke-generating insecticides.
• Do not clean unit with benzene or paint thinner. Do not spray insecticides on the unit.• Do not use the unit where it is humid or where the unit may become wet, such as in a bathroom.
into the air intake or outlet.
gases. Do not use near cigarettes, incense, or other spark-creating items.• Unit will not remove radon or carbon monoxide emitted from heating appliances or other sources.
WARNING:
• Do not block the air intake or air outlet
around the product.• Do not use near hot objects, such as
• Do not use where the unit may come into contact with steam.• Do not use the unit on its side.• Do not install where the air outlet will be
• Keep away from products that generate oily residue.• Keep children and pets away from the product.• Always unplug the unit before cleaning or servicing.
!!
To reduce risk of electrical shock, this appliance has a polarized plug (one blade is wider than the other). This plug
Do not change the plug in any way.
!!HIGH VOLTAGE
3 4
THANK YOU
Thank you for choosing a ClimateRight® product.Before using this machine, please take a look at
Hint: Attach your sales receipt to this owner’s
be required for warranty service.
Be sure to register your product online at www.climaterightair.com
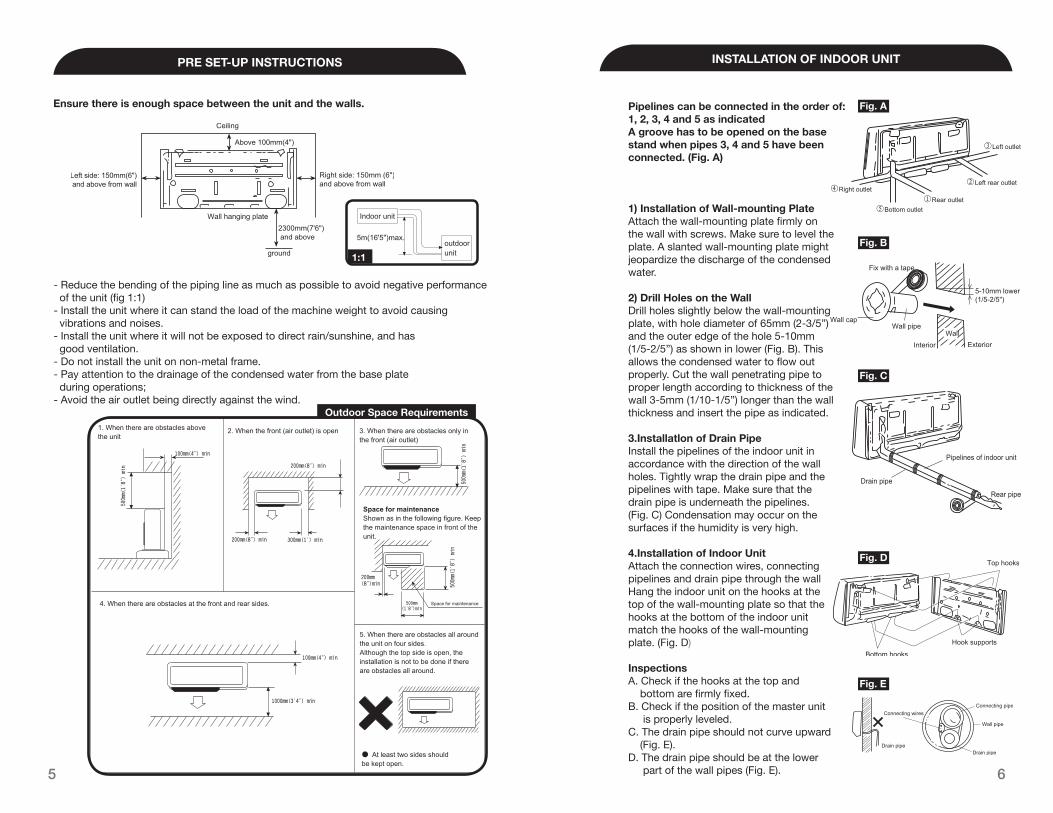
PRE SET-UP INSTRUCTIONS
Ensure there is enough space between the unit and the walls.
- Reduce the bending of the piping line as much as possible to avoid negative performance of the unit (fig 1:1)- Install the unit where it can stand the load of the machine weight to avoid causing vibrations and noises.- Install the unit where it will not be exposed to direct rain/sunshine, and has good ventilation.- Do not install the unit on non-metal frame.- Pay attention to the drainage of the condensed water from the base plate during operations;- Avoid the air outlet being directly against the wind.
INSTALLATION OF INDOOR UNIT
5 6
1:1
Outdoor Space Requirements
1) Installation of Wall-mounting Plate Attach the wall-mounting plate firmly on the wall with screws. Make sure to level the plate. A slanted wall-mounting plate might jeopardize the discharge of the condensed water.
2) Drill Holes on the Wall Drill holes slightly below the wall-mounting plate, with hole diameter of 65mm (2-3/5”) and the outer edge of the hole 5-10mm (1/5-2/5”) as shown in lower (Fig. B). This allows the condensed water to flow out properly. Cut the wall penetrating pipe to proper length according to thickness of the wall 3-5mm (1/10-1/5”) longer than the wall thickness and insert the pipe as indicated.
3.Installatlon of Drain PipeInstall the pipelines of the indoor unit in accordance with the direction of the wall holes. Tightly wrap the drain pipe and the pipelines with tape. Make sure that the drain pipe is underneath the pipelines.(Fig. C) Condensation may occur on the surfaces if the humidity is very high.
4.Installation of Indoor UnitAttach the connection wires, connecting pipelines and drain pipe through the wall Hang the indoor unit on the hooks at the top of the wall-mounting plate so that the hooks at the bottom of the indoor unit match the hooks of the wall-mounting plate. (Fig. D)
InspectionsA. Check if the hooks at the top and bottom are firmly fixed.B. Check if the position of the master unit is properly leveled.C. The drain pipe should not curve upward (Fig. E).D. The drain pipe should be at the lower part of the wall pipes (Fig. E).
Pipelines can be connected in the order of: 1, 2, 3, 4 and 5 as indicatedA groove has to be opened on the base stand when pipes 3, 4 and 5 have been connected. (Fig. A)
Fig. B
Fig. C
Fig. D
Fig. E
Fig. A

SET-UP INSTRUCTIONS
Dimensions for parallel units installations
- As the gravity center of the unit is not at the installation center, special caution should be taken when using hoisting cables to lift it up.- During shipping, do not slant the unit to over 45 degrees (Do not store the unit horizontalally).- Use expansion bolts to fix the mounting supports on the wall;- Use bolts and nuts to secure the outdoor unit firmly on the supports and keeping it level.- If the unit is installed on the wall or at the rooftop, the supports have to be firmly fixed to resist earthquakes or strong winds.
ADDITIONAL
7 8
Ordinary pipelines connection & air purgingThe following ordinary pipelines connection and air purging procedures are suitable for non-quick coupler model.
Lo Hi
Ordinary pipelines connectionDo not allow dust, foreign articles, air or moisture to enter the air conditioning system. Pay careful attention to pipeline connection for the outdoor unit. Try to avoid repeated curves as much as possible, otherwise hardening or cracks might occur to the pipes. Suitable wrenches should be used when the pipeline connection is done to ensure appropriate torque. Excessive torque might damage the joints while too little torque might lead to leakage.
Air purging with vacuum pump1. Check that the pipeline connections after they have been properly connected, remove the charging port cap, and connect the manifold gauge and the vacuum pump to the charging valve by service hoses as shown.
2. Open the valve of the low pressure side of the manifold gauge then run the vacuum pump. Vacuum the indoor unit and the connecting pipes until the pressure is below 1.5mmHG (vacuuming should take about ten minutes). When the desired vacuum is reached, close the low pressure manifold valve and stop the pump.
3. Disconnect the hoses and replace the cap.
4. Remove the blank caps and open the 2-way and 3-way valves using a wrench.
5. Re-tighten the blank caps.
Adding refrigerantRefrigerant must be added if the piping measures more than 5 meters (16’ 5”) in length. This operation can only be performed by a professional technician.
After connecting the plpellne, use a leakage inspection device or soap suds to carefully check if there is any leakage at the joints. This is an important step to ensure the quality of installation. If a leakage is detected, proper treatment should be taken immediately.
Gas leak inspection
If you have purchased the split-type quick coupler model, please use the following pipeline connection instructions.
1. Remove the dust caps from the indoor and outdoor units, and the connecting pipe. 2. Align the joint counter of connecting pipe with the proper indoor and outdoor joint conic surfaces, tighten the connecting nut manually, then secure it with a wrench.
3. Remove the two valve core caps from the outdoor unit.
4. Turn on the high and low pressure valve cores with a socket wrench, tighten the two valve core caps of the outdoor unit.
5. Finally ,wrap the hot insulating cotton around the joints of indoor and outdoor units.
Pipeline connection for Split-type quick coupler model

WHOLE-UNIT
Whole-Unit type quick coupler pipeline connections
WHOLE-UNIT
9 10
STEP 1- Remove two screws on the maintenance plate with a screwdriver and take off the plate, remove the dust caps on both indoor male coupler and outdoor female coupler.
STEP 2- Press the projecting section of outdoor female coupler backward with a little force by the thumb to make inner hooks open, and then you can easily take out the outdoor valve for gas leaking by the other hand.
STEP 3- In the same way,press the projecting section backward, connect the indoor male coupler to the outdoor female coupler.
STEP 4- Close the key lever of indoor male coupler to the horizontal postition. You can now hear the indoor and outdoor refrigerant will be clrculatlng.
STEP 5- Connect the outdoor quick cable coupler with the indoor quick cable coupler.
STEP 6- Finally, re-install the maintenance plate back into it’s place.
Keep the outdoor valve for gas leaking and the dust caps for future possible use on the removal of your air conditioner.
STEP 1
STEP 2
STEP 3
STEP 4
STEP 6 STEP 5
1. Remove the drawer of the outdoor unit.2. Non-quick coupler: connect the indoor power and control wires with the matched outdoor wires in accordance with the electric schematic diagram and make sure that the connection is firmly done. Quick coupler: Directly connect quick cable couplers with indoor and outdoor quick cable couplers after disassembly of the outdoor unit connecting box cover.
3. Use a press plate to fix the wires firmly, and re-install the drawer.4. 0ptional iBps: ln some cooling and heating models, you should connect the indoor wire connector with outdoor probe wire connector for defrosting.
Whole-Unit type quick coupler pipeline connections
Finishing touches- Wrap the pipelines tightly with ethylene tape.- Fix the wrapped pipelines on the exterior wall with clamps.- Fill in the gaps left over by the pipeline hole and wall hole to prevent rain-water from entering.
Teat running- Connect to the power source, check if the function selection keys on the remote controller are working properly.- Check if the room temperature adjustments and timer settings are working properly.- Check if the drain is works properly.- Check if there is any abnormal noises or vibrations during operation.- Check if there is any leakage of refrigerant.
Note: Do not connect the wires wrong,otherwise electric malfunctions can happen and damage to the unit will occur. The appliance should be installed in accordance with national wiring regulation. lf the supply cord is damaged, it must be replaced by the manufacturer, a service agent or a similarly qualified person in order to avoid a hazard. The plug shall be accessible after installing the appliance.

TROUBLESHOOTING WHOLE-UNIT
11 12
Ensure proper ventilation and avoid anything that may obstruct operation the front of the indoor unit.
Do not install the unit near the following places:• Inflammable gases• Hot flammable items such as a spark or hot oil• Poisonous or sultry gases are generated• Seaside district exposed to sea breezes• Air conditioner body and remote controller must be (39-3/4”) or more away from a TV or a radio • Drain the dehumidified water from the indoor unit
Do not install the unit near the following places:When installing the unit, choose a place which can stand the weight of the unit and does not increase the operation noise or vibration. Avoid areas where there may be vibration in the house, and affix the unit by inserting / attaching vibration-proof pads between the unit and fittings.• Avoid leaving items near the outlet and inlet of the outdoor unit. These can cause malfunction or increase operation noise. • Consult your ClimateRight® Customer Service Representative if you continue to hear irregular sounds during operation
Inspection and maintenance: - According to the service conditions and operating environment, the inside of the air conditioner will become dirty after several seasons (3 to 5 years) of service, resulting in decreased operating performance. Inspection and maintenance are recommended annually in addition to usual cleaning- We recommend performing inspection and maintenance during off-season
Self-Check Information Self-Check Codes Digital Self-Check Codes
Defrost indication Flicker 1time/1s Indicates “dF”or Heating icon flash
Anti-cold wind Flicker 1time/1s Fan motor not running
Room temp sensor fault Flicker 1time/8s E2
Cold temp sensor Flicker 2 times/8s E3
Over-heat protection Flicker 3 times/8s E8
Indoor fan fault Flicker 6 times/8s E5
External feedback fault Flicker 7 times/8s E7
Open the door fault Flicker 3 times/8s E0
Outdoor tube temp sensor fault
Flicker 4 times/8s E1
Communications fault Flicker 6 times/8s E6
Anti-cold wind Flicker 1 times/1s FF
If you need further assistance:To speak to a customer service representative, call 1-800-725-4628; Mon - Fri 9am - 5pm EST or visit www.climaterightair.com
POWER CORD CARE- Do not rest anything on the power cord- Do not place the Split Wall-Mounted Air Conditioner where people or pets may trip over the or walk on the power cord- Do not pick the unit up by the power cord- Inspect the power cord before use to ensure the cord and plug are in good condition
NOTES