Mini Bike OWNERS MANUAL - Motovox
23
Mini Bike Important Information. Read thoroughly before riding the first time. OWNERS MANUAL MOTOVOX.COM VISIT US ON THE WEB FOR MORE INFORMATION Attaching handlebars: See page 17. MINIMUM AGE 16 Younger riders require adult supervision.
Transcript of Mini Bike OWNERS MANUAL - Motovox
Mini Bike
Important Information. Read thoroughly before riding the first time.
OWNERS MANUAL
MOTOVOX.COMVISIT US ON THE WEB FOR MORE INFORMATION
Attaching handlebars:See page 17.
MINIMUM AGE 16Younger riders require adult supervision.

This operators manual contains important safety information and maintenance information. Read it carefully before using this vehicle. Failing to follow the warnings contained in this operators manual could result in INJURY or DEATH.
Keep this manual in a safe place. It is very important that this owners manual be reviewed by any rider and it should remain with the vehicle when transferred to a new owner.
All information, images and specifications contained in this manual are based on the latest product information available at the time of publication. Due to improvements or production changes, there could be discrepancies in this manual. Motovox reserves the right to make product changes at any time, without notice and without obligation to make the same or similar changes to any vehicle previously built or sold.
Avoid operating this vehicle on paved surfaces including, but not limited to highways, parking lots, sidewalks and driveways. Never operate this or any designated off-road vehicle on a public street, road or highway where it will be in violation of local traffic laws and restrictions.
No part of this owners manual may be reproduced or copied without express written permission from Motovox.
© Motovox, Inc. 2012
If you have any problems with this product
DO NOT RETURN TO THE STORE
contact us and we will make it right every time.
888-488-MOTO (6686)
or email [email protected]
WARNINGThe Engine Exhaust from this product contains chemicals known to the
State of California to cause cancer, birth defects or other reproductive harm.

PRODUCT WARRANTY INTRODUCTIONIMPORTANT SAFETY INFORMATIONOPERATING CONTROLSBEFORE RIDINGBASIC OPERATION AND RIDING TECHNIQUE Starting and Stopping the Engine
Braking Technique
MAINTENANCE OF YOUR MBx10 Maintenance Schedule
Component Locations
Attaching Handlebars
Fuel & Oil
Air Filter
Throttle Freeplay
Brake
Spark Plug
Wheels and Tires
Drive Chain
Clutch Lubrication
TROUBLESHOOTINGRESOLVING THE UNEXPECTED EMISSION CONTROL SYSTEM WARRANTYREGISTER YOUR MBx10
1
2
3 - 5
6 - 9
10 - 11
12
12 - 13
14
15
16
17
17
18 - 19
19
20
20
21
22 - 23
24
25
26 - 29
30 - 31
32 - 33
34 - 35
CONTENTS
PRODUCT WARRANTY Please see page 32 for emissions control warranty
Motovox warrants to the first buyer of the Product (“Buyer”) that on the date of purchase of the Product, as shown on Buyer’s sales receipt (“Purchase Date”), the Product shall be free from defects in material or workmanship subject to and in accordance with the terms and conditions set forth herein. The duration of this Limited Warranty is ninety (90) days from the Purchase Date (the “Warranty Period”). Motovox will correct, at its option, by repair or by furnishing replacement parts, any parts determined in Motovox’s sole discretion to have a defect in material or workmanship of the Product reported to Motovox during the Warranty Period, subject to the terms, conditions and limitations of this Limited Warranty. At its option, Motovox may require the Buyer to return to Motovox, at its address set forth below, at Buyer’s expense, the part claimed to be defective for Motovox’s inspection. Motovox’s sole obligation under this Limited Warranty is to repair and/or replace parts on the Product. If Motovox determines that any claimed defect or problem reported by Buyer is not covered by this Limited Warranty, Buyer shall pay Motovox its then existing charge for any repair or replacement made by Motovox.
TO QUALIFY FOR WARRANTY SERVICE:1. You must present a copy of the sales receipt.
2. This product can not be used for rental or commercial use.3. This product can not be used for competition.
LIMITATIONS OF LIABILITY• This Limited Warranty is non-transferable after the Product’s initial sale.• No unapproved modifications can be made to the Product, its performance or otherwise, in order for this Limited Warranty to remain in effect.• No reimbursement is provided for towing, loss of time, loss of use, inconvenience, incidental or consequential damages.• This Limited Warranty covers only parts and labor due to manufacturer defect. Damage due to misuse or neglect, use other than as specified in the Owner’s Manual, or use under abnormal conditions are is not covered by this Limited Warranty. • Motovox makes no warranty with respect to products or trade accessories not made by Motovox, including, but not limited to, engines, tires, wheels, batteries and transmissions, such products or trade accessories, such items being subject to the manufacturer’s warranty, if any.• This Limited Warranty does not cover minor surface blemishes, rips, tears, or other cosmetic damages due to normal use, or other intentional or unintentional damage to the Product.• This Limited Warranty will not cover any damage which results from the application of improper cleaners, solvents or chemicals to the Product, or from smoke or soot, or from exposure to saltwater, sea breeze or salt.• This Limited Warranty will not cover any damage which results from aging, such as fading of paint, deterioration of plated surfaces, deterioration of rubber or plastics, or rusting.• This Limited Warranty does not cover improper repair or misdiagnosis of problem.
OWNER’S WARRANTY RESPONSIBILITIESAs the vehicle owner, you are responsible for the performance of the required maintenance. You should maintain a record of all maintenance performed your vehicle and retail all receipts covering maintenance on yoru vehicle. You may not be denied a warranty claim solely because of your failure to ensure the performance of all scheduled maintenance or lack of maintenance records or receipts. As the vehicle owner, you should be aware that you may be denied your warranty coverage if your vehicle or a part has failed due to abuse, neglect, improper maintenance, or unapproved modifications.
For any issue regarding your Motovox product, call toll free 1-888-488-MOTO (6686)
1
TROUBLE? DO NOT RETURN TO STORE contact us! 888-488-MOTO (6686) or email [email protected]

Your personal safety and the safety of those around you is our primary concern. Operating this mini bike safely is an important responsibility and should not be taken lightly.
Motovox has provided you with safe operating procedures and warning labels on your mini bike and in this manual. This information will alert you to potential hazards that could harm you or others.
It is understood that it is not practical or possible to warn you about all possible hazards associated with off-road riding and maintaining your mini bike. You must always use your own best judgement.
Safety information is presented in a variety of forms, including:
• Safety labels and tags on the mini bike • Safety messages proceeded by a safety symbol and one of these three signal words: DANGER, WARNING and CAUTION.
Any of the above labels can indicate a danger where you or someone around you can be KILLED or SERIOUSLY INJURED if the instructions that it accompanies are not followed carefully.
• Safety Headings such as important safety reminders and/or precautions. • Safety Sections, such as Motorcycle Safety • Instructions, such as Riding Techniques or Braking Techniques
This manual is filled with important safety information, please read it carefully and be sure that you understand it.
INTRODUCTION IMPORTANT SAFETY INFORMATION
3SAFETY MESSAGES
Congratulations on choosing your Motovox MBx10 Mini Bike.
Your Motovox mini bike was designed as a recreational vehicle for off-road use only and by a single rider only. This mini bike is built for younger riders who are under 165 lbs. with basic experience.
Before riding, please take your time to get acquainted with your mini bike and how it works. To protect your investment we urge you to keep it well maintained. In addition to regular maintenance it is important to observe and perform all pre ride and periodic checks outlined in this manual. In this manual you will find helpful safety information, instructions and helpful tips. To make it easier to use, there is a table of contents at the beginning and an index at the end of the manual.
As you read through this manual you will find information that is noted with a NOTICE symbol. This is to point out key bits of information that will help you avoid damage to your mini bike and property around you. This manual covers basic maintenance procedures as well. For problems with your mini bike that are not covered in this manual, please refer to an authorized Motovox Service Center, which can be located at Motovox.com.
Read the warranty page careful so that you understand your rights and responsibilities.
Whenever you ride, tread lightly by staying on established trails and in approved areas. Protect the environment and keep off-road riding areas open for future use.
Please be sure to register your Motovox product and notify us of any address changes so we may contact you in the future with any important product information.
Enjoy your Motovox MBx10 mini bike!
2
TROUBLE? DO NOT RETURN TO STORE contact us! 888-488-MOTO (6686) or email [email protected]

A mini bike can provide many years of service and pleasure, provided you take responsibility for safety, proper maintenance and understand the challenges you may encounter while riding.
This minibike has been designed for younger riders. However, not all young riders meet the physical and emotional needs for safe riding. Before parents allow any children to ride this minibike, we strongly recommend that they read this entire manual to be fully informed before making deciding if their children are ready to ride. Listed below are some of the important safety measures one should ubderstand before and when riding. Never ride without a helmet. Helmets significantly reduce the number and severity of head injuries. An approved DOT motorcycle helmet is the most important part of your safety gear. Choose one that fits properly and is snug on your head. Motorcycle dealers can help in selecting a good quality helmet with proper fit. Never carry a passenger. This mini bike was designed for one rider at a time only. There are no passenger foot pegs, foot rests, handles or seat room for a passenger. Riding with a passenger can impair the driver’s ability to operate the mini bike which may result in serious injury or death. Ride off-road only. This mini bike has been designed and built for off-road riding only. It is not equipped with a headlight, signals, brake lights or horn which are all required for public road usage. The tires are not designed for pavement and could become unstable. If you have to cross a paved area or road, dismount and walk the bike across the pavement. Ride within your limits. Never attempt to operate this mini bike in a manner that is beyond your skill level. It takes time to learn off-road riding skills. Learn to ride step-by-step. Start by riding on safe terrain at slow speeds and gradually build your skills. Instruction from an experi-enced rider is strongly recommended. Be alert for hazards. Any area you ride can present many hazards. Always scan the terrain ahead of you continuously. Watch for unexpected turns, drop-offs, ditches, rocks, low-hanging limbs and other riders. Always maintain a low enough speed to stop under control and react to hazards. Never drink alcohol and ride. Even one drink can impair your ability to ride safely and each additional drink worsens your ability to do so. Remember, it is illegal to operate any motorized vehicle while intoxicated, including mini bikes.
As a parent, your child’s safety is your first priority. Riding a mini bike is very fun, but just like riding a bicycle, bad decisions can result in injury or death. As a parent you can prevent accidents by making informed decisions about if, when and how your child will ride. Always supervise your child when he/she is riding. Before you allow your child to ride you need to determine if he/she is ready. Riding readiness can vary from one person to another. Age and size are not the only factors that help to determine riding readiness. There are three other factors that you should consider before deciding if your child is ready to ride. First, consider your child’s physical ability. A rider must be able to hold the mini bike up, get on and sit comfortably with both feet on the ground. The rider must also be able to reach all handlebar controls and steer the mini bike accurately. Second, consider your child’s athletic ability. Your child should also be good at riding a bicycle before riding a mini bike, Determine if your child is a good judge of speed and distance while riding a bicycle and that they react with proper foot and hand actions. Any person who does not have good coordination, balance and agility should not attempt to ride this mini bike. Finally, determine your childs mental maturity. It is imperative that you are honest with yourself when you answer the following questions: Does your child think through problems and come to logical conclusions? Does your child obey the rules when they ride their bicycle? If your child makes bad judgements, takes unnecessary risks and ignores the rules, they should not ride this mini bike. If you have determined that your child is ready to ride please remember the following points: • Never let your child ride without a helmet. • Your child’s safety is your responsibility. Do not take it lightly. • Never push you child to try things before they are ready. • Always supervise your child when they are riding. • Proper maintenance and upkeep of the mini bike is key to safe riding. Any modifications or improper accessories added to the mini bike with parts that are not manufactured by Motovox can make it unsafe. Motovox strongly recommends that you do not remove any of the original equipment or make any modifications that alter the design and/or operation of the mini bike.
IMPORTANT SAFETY INFORMATION IMPORTANT SAFETY INFORMATION
54 SAFETY MESSAGES
TROUBLE? DO NOT RETURN TO STORE contact us! 888-488-MOTO (6686) or email [email protected]

When you operate a mini bike you need to be able to operate the throttle, brake and other controls without stopping to look at them. Please study the image below carefully to become familiar with the function and the location of each control.
Engine Kill Switch
Brake Lever
Foot Pegs
Chain Tensioner(on chain guard)
Throttle
Pull Start
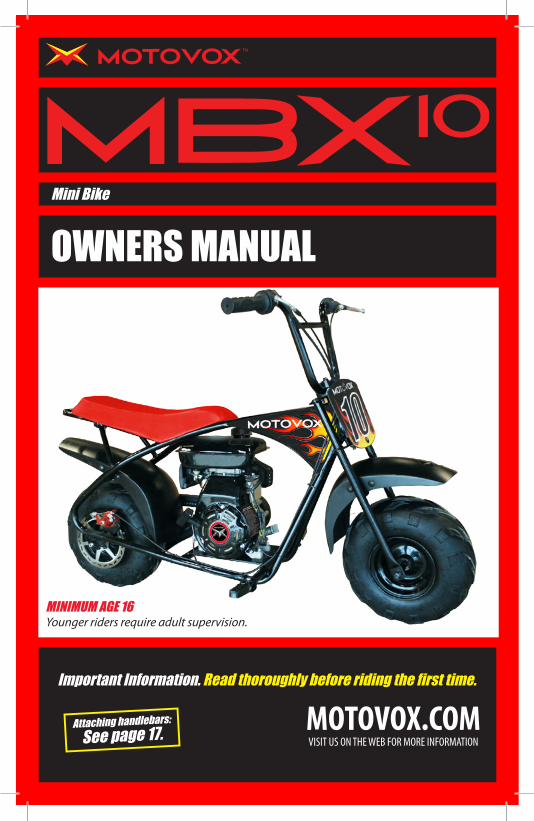
OPERATING CONTROLS
76 OPERATING CONTROLS
BEFORE STARTING
ENGINE KILL SWITCH
CHOKE LEVER
FUEL SHUTOFF VALVE
PULL STARTER
The Engine Kill Switch is used to stop the engine and must be in the RUN position for the engine to start. It is located next to the throttle twist grip on the right handlebar. To switch it to STOP, push the larger button at the bottom. To switch to RUN, push the smaller button at the top. The switch will stay in position after you push it.
Before starting your MBX10, you must be sure that the kill switch is in the ON position, the choke is in the START position and the fuel valve is in the ON position. The locations and operation information of each of these controls in shown below.
The Choke Lever is used to start the engine when it is cold and is located above the air filter. It is used to restrict the amount of air in the fuel mixture to start easier and warm up. Flip the lever up to the START position to start, and then as the engine warms up move the lever down to the RUN position.
The Fuel Shutoff Valve is used to stop the flow to the carburetor. It should be turned to the ON postion to run and to the OFF position for storage. The fuel shutoff valve is located under the fuel tank and to the rear of the motor on the right side of the mini bike.
The Pull Starter is used to start the engine. To start the engine after you have confirmed the readiness of the above three components, stand over the bike holding the left hand grip firmly. Using your right hand, pull up sharply on the pull start grip to spin the motor.
OPERATING CONTROLS
Engine Kill Switch
Choke Lever
Fuel Shutoff Valve
OFF ON
Pull Start
TROUBLE? DO NOT RETURN TO STORE contact us! 888-488-MOTO (6686) or email [email protected]
BRAKE LEVER KICKSTAND
THROTTLE CHAIN TENSIONER
BRAKE MECHANISM
FOLDING FOOT PEGS
OIL FILL CAP
The Brake Lever is used to apply braking to the rear wheel. When you pull the lever back, braking power is applied to the rear wheel. The harder it is pulled, the more braking power is applied to the wheel. To release the front brake, release the front brake lever.
The kickstand is used to keep the mini bike upright when not in use. It is located on the left side of the mini bike and can be swung down with your foot and then the bike leans on it for support. It is very important to remember to swing the kickstand up and out of the way when riding or accidents can occur.
When operating your MBx10 there are some key operating controls that allow you to operate your mini bike bike. Their location and operation information is shown below. 1. Brake Lever 2. Throttle 3. Folding Foot Pegs 4. Oil Fill Cap
When operating your MBx10 there are some key operating controls and components that allow you to operate your mini bike and perform routine maintenance. Their location and operation information is shown below. 1. Kick Stand 2. Chain Tensioner 3. Brake Mechanism
The Throttle controls the speed of the engine and is located in the right grip on the handlebars. To increase the engine speed, twist the throttle grip toward you, or downward. To decrease the engine speed, twist the grip away from you, or upward. The throttle grip is spring loaded so it will return to the lowest position as you release it.
The Chain Tensioner is used to keep the proper tension on the drive chain and is located on the frame, next to the chain guard. You should have about a half inch of play in the longest part of the chain, if not, loosen the set screw and turn the nut clockwise to tighten and the opposite direction to loosen. Then tighten the set screw back up to hold the tensioner in place. See page 24 for more details on chain maintenance.
Your MBx10 mini bike is equipped with a rear disc brake. The brake provides the stopping power to bring the mini bike safely to a stop and to hold it at a stop when the engine is running and the bike is trying to move forward. Refer to the Maintenance Procedures section for brake adjustment instructions.
The MBx10 is equipped with folding foot pegs which allows the footpegs to be folded out of the way to make the width of the mini bike narrower when it is being stored. To flip them ou of the way, swing them toward the rear of the mini bike.
The Oil Fill Cap is a very important component to know and understand. It is equipped with a dipstick and is used to check the oil level in the engine. If the oil level is not maintained properly, the engine can fail prema-turely and cause costly repairs.
OPERATING CONTROLS OPERATING CONTROLS
98 OPERATING CONTROLS
Brake Lever
Kickstand
ThrottleChain Tensioner
DiscBrake
Roller Axle Bolt
Folding Foot Peg
Oil Fill Cap
TROUBLE? DO NOT RETURN TO STORE contact us! 888-488-MOTO (6686) or email [email protected]

PRE-RIDE CHECKLIST PRE-RIDE INSPECTION
Before you ride you must be certain that you and your mini bike are ready to ride. Below is your pre-ride checklist. Be sure to review all the topics and determine your readiness to ride.
Before you ride you must be certain that you and your mini bike are ready to ride. Below is your pre-ride checklist. Be sure to review all the topics and determine your readiness to ride.
1. Have you completely read and do you thoroughly understand this owners manual?2. Have you found all the safety messages on your mini bike and do you understand them?3. Do you understand the location of, and how all the operating controls on your mini bike work?4. Are you in good mental and physical condition?5. Are you drug and alcohol free?6. Are you wearing a DOT-approved helmet that fits properly?7. Are you wearing eye protection?8. Are you wearing sturdy shoes and protective clothing?
Additional suggested protective clothing.1. Gloves to protect your hands.2. Sturdy riding boots that support your ankles.3. Riding pants with knee and hip pads.4. Riding jersey with elbow pads and chest/shoulder protection.
As a reminder: Never ride without a helmet. Helmets significantly reduce the number and severity of head injuries. An approved DOT motorcycle helmet is the most important part of your safety gear. Choose one that fits properly and is snug on your head. Motorcycle dealers can help in selecting a good quality helmet with proper fit.
1. Check tire pressure with a tire gauge. Recommended tire pressure is 10-15 psi for both tires.2. Check rims to make sure they are not bent or damaged.3. Inspect the engine for oil or fuel leaks.4. Check engine oil level and add if needed.5. Check the level of fuel in the gas tank. 6. Check the drive chain to see if it needs to be lubed or tightened.7. Check the brake to be sure it is working properly.8. Look over the entire bike for loose nuts and bolts.9. Check the throttle to be sure it rotates freely and returns to the low position on its own when released.10. Be sure that the handlebars turn freely.
Failure to properly maintain your mini bike can lead to a crash in which you can be seriously injured or killed. Always perform a pre-ride inspection on your mini bike and keep it in good condition to get the most out of your Motovox mini bike.
BEFORE RIDING BEFORE RIDING
1110 BEFORE RIDING
TROUBLE? DO NOT RETURN TO STORE contact us! 888-488-MOTO (6686) or email [email protected]

7. Once the engine starts to run, let it warm up by operating the throttle up and down for 10 to 15 seconds, then move the choke lever to the RUN position once it starts running smoothly.8. Be patient and let it warm up a little. Once the engine is warm, the idle will smooth out and it will be ready to ride.
NOTE: Extended running with the choke fully on will cause the engine to run poorly and can cause damage to the spark plug and cylinder wall.
If the engine fails to start after repeated attempts, it may mean that it is flooded with excess fuel. A common indication of a flooded engine is a strong smell of fuel around the mini bike. Follow the steps below to clear a flooded engine.
1. Move the engine kill switch to the OFF position.2. Switch the choke lever to the RUN position.3. Twist the throttle all the way down to the full open position. 4. Using the pull starter, crank the engine over 10 or 15 times.5. Move the kill switch back to the ON position.6. Start the mini bike using the pull starter and NO CHOKE.
To stop the engine, move the kill switch located on the right hand grip to the OFF position. The engine will stop.
NOTE: Be sure to close the Fuel Valve and lean the bike over onto the kickstand when done riding.
Before riding this mini bike, be sure that you have read and understand this entire owners manual up to this point, including the sections that are titled Important Safety Information and Before You Ride. Even if you have ridden other mini bikes in the past, take time to become familiar with how this mini bike runs and how it handles. Different bikes have different handling characteristics. Always practice in a safe area until you feel comfortable with how this mini bike runs.
For your safety, always avoid running the engine in an enclosed space with poor ventilation, such as a garage. The mini bike’s exhaust contains poisonous carbon monoxide which can collect rapidly and cause illness or death.
Not equipped with lights. Do not ride after dark.
1. Move the engine kill switch to the ON position.2. Turn the fuel valve to the ON position.3. If the engine is cold, flip the choke lever up into the START position. If the engine is warm, you may not need to use the choke at all.4. Stand over the mini bike and hold the handlebars.5. Twist the throttle down some, to give it a little gas. 6. Using your right hand, pull the pull start handle upward sharply. It may take a few tries to get it started. The pull starter will recoil automatically. Do not let go of the pull start handle in the extended position, but lower it back to the recoiled position gently.
SAFE RIDING PRECAUTIONS
STARTING THE ENGINE
A FLOODED ENGINE
STOPPING THE ENGINE
The following section of the manual provides some basic information on how to begin riding your mini bike. We will cover how to start and stop the engine, how to use the throttle and brake and what you should do when you finish riding.
BASIC OPERATION BASIC OPERATION
1312 BASIC OPERATION
TROUBLE? DO NOT RETURN TO STORE contact us! 888-488-MOTO (6686) or email [email protected]

This section will cover basic braking technique for your mini bike. To slow or stop the bike, squeeze the brake lever firmly and smoothly. Gradually increase your braking pressure as you feel it is needed. The more pressure you apply to the brake, the more braking power will be applied. When you come to a full stop, put your feet on the ground first to avoid tipping over.
Remember that your minibike has a rear brake only, which is more than adequate for a mini bike of this size. Always think ahead and allow yourself enough room to stop safely. Just be careful to apply braking carefully to avoid sending the bike into a skid which will cause you to lose control.
If you apply the brakes too quickly and start to skid, release the brake to regain control and then apply braking power carefully.
When riding on wet, or loose rocky conditions your braking power can be reduced greatly and it will be much easier to put the bike into a skid and lose control. If the surface is wet or loose, you must reduce your speed and allow more room to stop safely.
Avoid jamming on the brake suddenly or accelerating too quickly as either of these actions can cause you to lose control of the mini bike.
With the mini bike stopped, switch it off with the kill switch, flip down the kickstand and lean the bike over on it to park. Position and turn the fuel valve to OFF. Always park your mini bike on a flat surface to avoid tipping over.
If you are going to store the mini bike for an extended period of time, close the fuel valve with the engine still running until it stops. This will burn all the fuel out of the carburetor and reduce fuel system problems in the future.
Keeping your mini bike in perfect operating condition is absolutely essential to your safety. It is also the best way to protect your investment, get maximum performance, avoid breakdowns and have more fun. To help keep your mini bike well maintained, the maintenance schedule following will provide you valuable information that will help you keep your mini bike in excellent and safe operating condition and avoid injury.
The service intervals in this section are based on average riding conditions. More frequent service is needed if you subject your mini bike to severe use, such as competition or riding in unusually wet or dusty conditions.
Improper maintenance of this mini bike or failing to correct a problem before you ride can cause a crash in which you could be seriously injured or killed. Always follow the inspection and maintenance recommen-dations and schedules in this manual.
Remember, proper maintenance of your minibike is the responsibility of the owner and failure to do so can cause your warranty to be void.
Note to parents: As a parent it is up to you to make sure the mini bike is properly maintained and in safe operating condition. For youngsters, learning how to take care of a mini bike and perform basic maintenance can be an important part of their riding experience. However, if you allow a youngster to perform or assist in any maintenance task, such as filling the fuel tank, you need to provide close supervision to make sure the task is performed safely.
Make sure the engine is off before you begin any maintenance or repairs. This will help eliminate the following hazards:1. Carbon monoxide poisoning from engine exhaust. Be sure you have good ventilation whenever you have the mini bike running.2. Burns from hot engine parts. Let the engine and exhaust cool before you touch them.3. Injury from moving parts. Do not work on the engine while run-ning unless instructed by this manual to do so.
Be sure you have all the tools needed and understand the procedure before starting. Always be careful around gasoline. Keep flames and sparks away.
PARKING AND POST-RIDE INSPECTION
BRAKING TECHNIQUE
1514 BASIC OPERATION
IMPORTANT SAFETY PRECAUTIONS
MAINTAINING YOUR MBx10
TROUBLE? DO NOT RETURN TO STORE contact us! 888-488-MOTO (6686) or email [email protected]

MAINTENANCE SCHEDULE
1716 MAINTENANCE
To keep your mini bike safe and reliable when you ride, regular inspections and service is required. Below you will find a maintenance schedule that describes when components need to be inspected or serviced. This handy information lists items that can be performed with basic mechanical skills and hand tools. In addition, the maintenance schedule will list items that are more involved and could require taking it to your local Service Center.
Because your mini bike is not equipped with an odometer, service intervals are expressed in terms of riding days. We suggest that you keep a record of the amount of time you spend riding your minibike to avoid missing needed maintenance procedures. If you do not feel comfortable with performing any of these maintenance procedures, please contact Motovox for help by calling us toll free at 1-888-488-MOTO (6686). Note: Your mini bike may require more frequent service if you ride in particularly wet or dusty conditions.
COMPONENT LOCATIONSCarburetor
Brake
Fuel Tank Brake Lever Handlebar Clamps
Oil Fill / Dipstick Front Axle
Your MBx10 mini bike is shipped with the handlebars NOT clamped on the bike. To attach the handlebars follow these steps:1. After unpacking your mini bike, stand it on the kick stand on a level surface.2. Remove the screws from the handlebar clamps and set aside. Remove upper clamp.3. Sitting on the bike, place the handlebars in the lower clamp in a comfortable position, being careful to center in the clamps. 4. Replace upper clamps and bolts and tighten to 12 foot lbs with a torque wrench.
See the Maintenance Videos section of the MBx10 page on motovox.com for an easy to follow, step-by-step instructional video called “Initial Setup”.
ATTACHING AND ADJUSTING THE HANDLEBARS
Handlebar Clamps
* Can be performed by owner with proper tools and knowledge, otherwise consult with a service center.** Recommended to be performed by authorized service center.
Lube, check & adjust chain
Check engine oil*
Change engine oil*
Check air filter*
Clean air filter*
Change air filter*
Clean carburetor sediment cup*
Clean and adjust spark plug*
Replace spark plug*
Check/adjust idle speed*
Check/adjust valve clearance**
Clean fuel tank and filter*
Check fuel tube*
Clean and lube centrifugal clutch*
Tighten all nuts and bolts*
Check brakes*
Check throttle*
Every Use First Month(20 Hours)
After first2 hrs of riding
Every 3 Months
Every 6 Months
Every Year(200 Hours)
xxx x
x
xx
xxxxx
x
x
x
xxx
xx
SEE MOTOVOX.COM FOR SIMPLE HOW-TO VIDEOS FOR ALL MAINTENANCE PROCEDURES ABOVE.
TROUBLE? DO NOT RETURN TO STORE contact us! 888-488-MOTO (6686) or email [email protected]

Fuel recommendation: Any clean unleaded gasoline with a pump rat-ing of 86 octane or higher. Octane rating will be displayed on the gas pump where you purchase it. Motovox recommends the use of 92 octane or higher to get the maximum performance from your mini bike. This engine is not designed to use E-85 Ethonal Blended Fuels.
Use of lower octane gasoline can cause pre-detonation or “pinging” under heavy acceleration. A small amount of occassional pinging is nothing to be alarmed about, but severe pinging can cause engine damage. If you tend to experience pinging under normal loads, switch to a higher octane gasoline.
Never use stale or contaminated gasoline, or gasoline that has been mixed with oil. Avoid getting dust, dirt or moisture in your fuel tank.
1. Twist the fuel tank cap counter clockwise to remove from the tank.2. Using a funnel, add fuel to the tank until the level reaches about 2 inches from the top. Be careful not to over fill and spill fuel.3. Replace the cap by screwing on in a clockwise direction until you feel it seat firmly.
Gasoline is highly flammable and explosive. You can be burned and seriously injured when handling gasoline. Always stop the engine. Only handle gasoline outdoors. Clean up spills immediately.
IMPORTANT! The motor oil that comes in your MBx10 is break-in oil and should be changed after the first two hours of riding. Be sure to check the level before you start the engine for the first time to be sure it is correct.
Engine Oil Recommendation: SAE 10W-30 Motor Oil which is good for most climates. See your Motovox Service Center to inquire about oil recommendations for extreme temperatures and conditions.
Your mini bike does not need oil additives. Use only clean, fresh recommended weight oil. Do not use oils with graphite or molybdenum additives or oils that display the API circular logo that is labeled “energy conserving” as they may adversely affect the performance of your engine.
1. Park the mini bike on a firm level surface.2. Clean around the oil fill cap and surrounding surfaces.3. Unscrew the oil fill cap and wipe the dipstick portion clean.4. Reinsert the oil fill cap but DO NOT SCREW IT IN.5. Remove the oil fill cap check the oil level. If the level is at or near the high mark you do not need to add oil. If it is at or below the low mark you need to add enough oil to bring it up to the recommended level. NO NOT OVERFILL.
1. Park the mini bike on a firm level surface. 2. Clean around the oil fill cap, drain plug and surrounding surfaces. 3. Place an oil drain pan under the engine. 4. Unscrew and remove the oil drain plug to let the oil drain into the pan. 5. Once oil has drained, replace the drain plug and tighten to 140-160 inch/lbs. 6. Remove the oil fill cap. 7. Using a funnel, pour in the .31 (one third of a quart) of 10W-30 motor oil. 8. Reinsert the oil fill cap but DO NOT SCREW IT IN. 9. Remove the oil fill cap check the oil level. NO NOT OVERFILL.10. Check for any leaks.11. Dispose of used oil in approved manner.
Proper air filter care is extremely important for any engine, and your mini bike is no exception. The air filter keep impurities like dust and dirt out of the engine, and a clogged filter can seriously affect the performance and extend the life of your mini bike engine.
Your air filter is located on the back of the engine in a square, plastic case. To check and clean or replace your air filter, just unclip the clips that hold the air filter case to the housing, and remove the foam filter element. Wearing rubber gloves and eye protection, clean it with mineral spirits, taking care to not damage the element itself. Soak the element in motor oil and squeeze out the excess oil. Reinstall the element and replace the cover.
MAINTENANCE PROCEDURES MAINTENANCE PROCEDURES
1918 MAINTENANCE
FUEL
REFUELING PROCEDURE
CHECKING AND ADDING ENGINE OIL
CHANGING ENGINE OIL
AIR FILTER CHECKING AND REPLACING
ENGINE OIL RECOMMENDATION
TROUBLE? DO NOT RETURN TO STORE contact us! 888-488-MOTO (6686) or email [email protected]

MAINTENANCE PROCEDURES MAINTENANCE PROCEDURES
2120 MAINTENANCE
THROTTLE FREEPLAY
BRAKE ADJUSTMENTIf your brake seems “soft” or if you have to pull the lever too far to get proper braking power, you can adjust the brake to restore them.To adjust the brake and increase braking power:1. Place the mini bike on the kick stand with the engine off.2. Holding the brake mechanism, loosen the adjusting nut to let the cable slide free.3. Scoot the adjusting nut and mechanism toward the front of the bike, up the cable until it stops, then back off slightly.4. This will position the brake at just off of contact, so that it will activate quicker, but not drag when riding the mini bike causing extra wear.5. Tighten the adjusting nut on the cable.6. Check that the wheel spins freely when brake is not applied, but the brake should engage more quickly when riding.
Never ride the mini bike when the brake is not working properly. If you can not get the brake adjusted and repaired properly, you may need to replace the brake pads. Refer to your local Motovox Service Center for assistance.
Your throttle should have some free play to safely operate. The free play should range from 1/16” to 1/4”. To adjust the free play, follow these steps:
1. Loosen the lock nut on the throttle cable.2. Turn the adjuster nut in the direction needed to gain or reduce free play.3. Tighten the lock nut.4. After adjusting, check the throttle for smooth rotation from open to closed in all steering positions.
Adjusting Nut
Rear Disc Brake
A corroded spark plug can cause your engine to run rough, or in the case of a fowled plug, can cause your engine to not run at all. To check the spark plug it must be removed from the engine. The following steps will demonstrate this procedure.
Locate the spark plug boot on the top of the engine toward the front of the motor. Carefully remove the spark plug boot by pulling and twisting the boot housing. Do not pull on the plug wire.
Once you have the top of the plugexposed, use a 19mm wrench to unscrew the spark plug out of the engine by turning counter-clockwise.
Inspect the plug and check to make sure the gap is set to .030. Using the chart below, determine if the spark plug should be replaced. If replacing the spark plug, use an Autolite 255 or equivalent spark plug only.
To re-insert the spark plug or to install a new one, simply screw the plug back into the hole by hand, turning the plug clockwise. Tighten with the wrench.
Be very careful not to over-tighten and strip the threads.
TROUBLE? DO NOT RETURN TO STORE contact us! 888-488-MOTO (6686) or email [email protected]
MAINTENANCE PROCEDURES
22
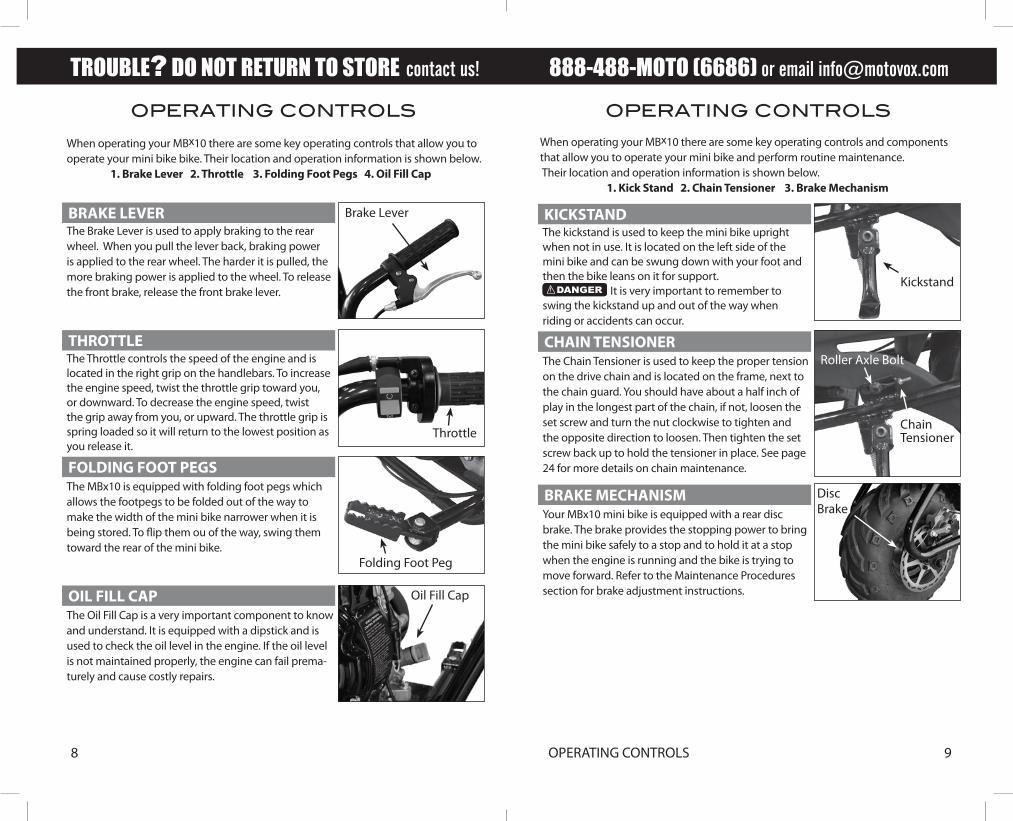
WHEEL RIMS
TIRE AIR PRESSURE
Your mini bike is equipped with steel rims. These rims are very durable, but can becomebent or dented when the tires are not inflatedproperly and large objects like rocks, roots orpavement edges are hit at speed. You shouldinspect the wheels before each ride to be surethe tires are properly inflated to 10-15 PSI so that they will roll properly and protect the rims.If you notice that a rim is bent or dented, pleaserefer to your local Motovox Service Center forassistance in replacing the rim.
Never ride the mini bike with a dented or bent rim. The tire may suddenly lose pressure causing an accident in which you could be seriously injured or killed. Refer to your local Service Center for assistance.
Properly inflated tires will provide you with the best combination of good handling, tread life and riding comfort. Under inflated tires will cause uneven tread wear and adversly affect handling. And they are more likely to cause wheel damage on rocky or rough terrain. Tires will lose air naturally over time and should be checked before each ride.
Over inflated tires will cause the mini bike to ride harshly and will not have as much traction as properly inflated tires.
Using tires that are excessively worn or improperly inflated can cause an accident in which you could be seriously injured or killed. Refer to the chart below for proper inflation and tire checking information.
Front or Rear Tire (cold) 10-15 PSI
Front Wheel
TROUBLE? DO NOT RETURN TO STORE contact us! 888-488-MOTO (6686) or email [email protected]
A tire blowout can lead to a dangerous situation, not to mention being very inconvenient. It is important to inspect your tires before each ride.
• Inspect both tires for bumps and bulges in the sidewall and tread.
• Look closely for cuts or other damage.
• Inspect both tires for embedded objects like glass, nails or sharp rocks that you may have picked up.
• Inspect the tread depth of your tires and replace them if the depth drops below a tenth of an inch, or if you notice a serious reduction in traction.
• Be sure that both tires are inflated to 10-15 PSI. If you use a high-powered air hose, like those found at a gas station or tire shop, inflate carefully as the small tires on the MBx11 will inflate very quickly and could explode if they are severely over inflated.
If a tire has been punctured it can be patched, but if it is torn or has a cut more than 1/2” long, the tire should be replaced. You may repair a punctured tire with a patch kit for a temporary fix but a patched tire may not be as reliable as a replacement. Always use replacement tires that are the same size as the original. Replacing the tire requires removal and disassembly of the wheel.The tires on your MBx11 were designed to provide a good combination of traction, handling, braking, durability and comfort across a wide range of riding conditions. If you replace a tire be sure to always use the proper type and size that is specified in the chart below.
Front and Rear Tire Size 145 x 70-6 Tire Type Bias-Ply, Tubeless Type
23MAINTENANCE
MAINTENANCE PROCEDURES
TIRE INSPECTION
TIRE REPLACEMENT

MAINTENANCE PROCEDURES
2524 MAINTENANCE
DRIVE CHAIN INSPECTION
DRIVE CHAIN ADJUSTMENTTo adjust the tension in the drive chain, you should use the chain tensioner which is located on the chain guard. To tightenor lossen the chain, follow these steps:1. Park the mini bike on a flat surface using the kick stand.2. Loosen the axle bolt on the chain tensioner.3. Adjust the chain tensioner nut, clockwise for tightening or counter clockwise for loosening.4. Check the tension to be sure that there is 3/8” to 1/2” of slack and tighten axle bolt.
Chain Tensioner
Roller Axle Bolt
MAINTENANCE PROCEDURES
CLUTCH LUBRICATIONThe life span of your drive chain will depend upon how well you take care of it. Proper drive chain maintenence will also extend the life of other parts on your MBx10, like the drive sprockets and the clutch.
IT IS CRITICAL THAT YOU CHECK THE DRIVE CHAIN TENSION AND LUBRICATE IT EACH TIME YOU RIDE.Excessive play in the drive chain can result in the chain coming off and damaging the engine cases, or excessive clutch noise. A chain that is too tight can cause excessive wear on drive train components and lead to premature failure. To check and adjust the chain to the proper tension, follow these steps.
With the engine turned off, check the slack in the lower part of the chain by pushing upward on it with your finger. The vertical movement should be between 3/8” and 1/2”. To adjust the tension of your drive chain, see below.
Always inspect your drive chain to be sure it is well lubricated and in good condition. Watch for damaged rollers or pins, dry or rusted links or any kink-ing of the chain.
If you are not able to adjust the tensioner enough to get proper tension on your drive chain, you need to replace your chain.
Your MBx10 mini bike uses a centrifugal clutch which requires periodic maintenance to operate properly. If you experience a noisy or “grabby” clutch, especially if it kills the engine at idle or low speeds, it is time to service your clutch. To do so, follow these steps:
1. Remove the chain tensioner wheel. 2. Remove the chain guard. 3. Remove the chain from the drive sprocket. 4. Remove the clutch retaining bolt in the center of the clutch and slide the clutch assembly off of the shaft. 5. Using a pair of snap ring pliers, remove the snap ring that is located around the sprocket. 6. Pull the assembly apart and wipe it down, inside and out with a clean cloth. 7. Then locate the thin shim around the shaft and remove it. Set it aside. 8. Using a high quality, high-temperature wheel bearing grease, coat the clutch shaft with a good layer of lube. 9. Replace the shim and re-assemble the clutch.10. Place the clutch mechanism back on to the drive shaft.11. Replace the bolt in the end of the shaft that holds the clutch in place with a new 6mm x 20 or 1/4”-28x3/4” socket head cap screw and hand tighten.12. Tighten the retaining bolt to 90 -120 in. lbs.
TROUBLE? DO NOT RETURN TO STORE contact us! 888-488-MOTO (6686) or email [email protected]
Snap Ring
Shim
Grease
Clutch Retainer Bolt

troubleshooting TROUBLESHOOTING
2726 TROUBLESHOOTING
ENGINE LACKS POWER
HANDLING ISSUES
FUEL LEAKING FROM CARBURETORENGINE STARTS BUT DIES QUICKLY
ENGINE DOES NOT START
TROUBLE? DO NOT RETURN TO STORE contact us! 888-488-MOTO (6686) or email [email protected]
Follow these steps in order to determine the cause:1. Is there fuel in the tank?2. Is the kill switch in the ON position?3. Is the choke lever in the proper position?a. ON for cold engine or OFF for warm engine.4. Is it flooded? If you smell gas fumes, this may be the problem. a. Follow the steps on page 13 in this book to remedy.5. Is fuel getting to the carburetor? Check for clogged fuel line.6. Remove and inspect spark plug. a. Is it fouled? Replace.b. Is it dirty or caked with residue? Clean or replace.7. Spark Test: a. Put the spark plug back into the boot without installing in the engine. b. Holding the rubber boot very carefully, place the open end of the plug onto a metal part of the engine and pull the starter while watching for a spark. If there is no spark or a very faint spark, replace the spark plug.
Be very careful not to touch the metal part of the spark plug as you can receive a painful shock.
Be sure there is no spilled fuel in the area of your spark test.
If none of the above steps work, please contact Motovox by calling us at: 888-488-MOTO (6686)
1. Examine the drive train. a. Raise the rear wheel off the ground and spin it by hand. Is the brake dragging? 2. Has the choke been turned off after the engine has warmed up?3. Check the tire pressure and be sure they are not under-inflated.4. Check the air filter and be sure it is not clogged.5. Check the fuel filter and be sure it is not clogged.6. Check the spark plug and replace if necessary.7. Make sure fuel is clean.8. Be sure exhaust is not restricted in some way.
If none of the above steps work, please contact Motovox by calling us at: 888-488-MOTO (6686)
1. Steering feels heavy and hard to turn a. Check torque on steering stem nut. b. Damaged or corroded steering head bearing. c. Under-inflated front tire.2. Wobble or bump while driving a. Bent rim – replace b. Damaged tire – replace3. Pulls to one side a. Bent or damaged fork – replace b. Bent frame – replace
A fuel leak on the back of the engine around the carburetor could be caused by a stuck float. To check to see if this is what is causing a fuel leak that youhave noticed, tap the float bowl (located under the carburetor) with a screwdriver a few times to dislodge the float. If this does not fix the problem,turn the fuel valve off and call Motovox.
1. Check for proper choke position. a. If the engine is warm, choke should be OFF.2. Clogged carburetor jet. a. Consult with your Motovox Service Center.3. Bad or contaminated gasoline. a. Drain fuel tank and refill with clean fuel from a clean container.
Float Bowl

2928
TROUBLE? DO NOT RETURN TO STORE contact us! 888-488-MOTO (6686) or email [email protected]
RESOLVING THE UNEXPECTED
RESOLVING THE UNEXPECTED
GENERAL GUIDELINES
RESOLVING THE UNEXPECTED
SPECIFIC PROBLEMSIf you encounter trouble during a ride, the first thing you should do is stop and turn off your mini bike as soon as it is safe to do so. Do not continue to ride if something feels wrong, or if you hear a strange noise until you know what the source of the problem is and you have determined that the situation is not dangerous. If you continue to ride, you may cause more damage to the mini bike and create a dangerous situation for yourself or for those around you.
After you stop and shut off your mini bike, take time to carefully inspect the entire bike and identify the problem. Always consider all your options since you may be able to fix the problem easily or you may be able to make a temporary repair that will get you home. Or it may be prudent to leave the mini bike where it is and walk to get help or you may be able to push it home if you are close enough.
Whatever the problem may be, always follow these three simple rules:1. Always put safety first.2. If you make a temporary fix to your mini bike, be sure to get a permanent fix done as soon as possible,3. Do not continue to ride if your mini bike is in an unsafe condition.
Following are some recommendations for specific problems that may arise.
IF YOU HAVE A FLAT TIREHow you handle a flat tire when you are out on the trail is determined by the severity of the tire damage and what tools and supplies you have with you. For example, if you carry an aerosol tire sealer you may be able to pump up and seal a small puncture. Or if you carry a patch kit, you may be able to repair the leak, but this will require removing the wheel from the mini bike and the tire from the rim, as well as a tire pump.
If you experience a torn tire, you will not be able to fix the problem on the trail and will have to send for help or walk the mini bike home. Never attempt to ride on a flat tire as it will be very hard to handle and if the tire comes off it can lock up the wheel and create a very dangerous situation.
IF YOU CRASHPersonal safety is the first priority after an accident. After a crash, you must fist determine if you or anyone around you is injured before inspecting the mini bike for damage. If you find that the mini bike has been damaged you must determine if it can safely be ridden before proceeding. Look carefully for cracked frame or fork tubes, loosened bolts or bent parts on your mini bike. Be sure that nothing is rubbing on a wheel as this can cause a sudden and dan-gerous flat tire. Make sure that all operating controls are in good working order and that the handlebars are not bent or broken.
Sometimes crash damage is not immediately apparent so be sure to inspect the mini bike very carefully after you get it home. And always have a Motovox Service Center inspect your mini bike after a crash to determine if it is safe to ride your mini bike.

RESOLVING THE UNEXPECTED
3130 RESOLVING THE UNEXPECTED
SPECIFIC PROBLEMS
TROUBLE? DO NOT RETURN TO STORE contact us! 888-488-MOTO (6686) or email [email protected]
DRIVE CHAIN PROBLEMSThe drive chain may come off when riding over bumpy ground. You may be able to work the chain back onto the sprockets but this probably means that the chain is getting worn in and needs to be adjusted to be tighter and stay on. If your chain comes off during a ride, you should always check the tension after you put it back on and adjust it if necessary. Follow the steps outlined on page 24 in this book to adjust the chain tension.
If the chain breaks when it comes off, chances are that you will not have a spare master link with you for the repair. But your chain may be able to be salvaged with a new master link. Consult your Motovox Service Center.
BRAKEIf you experience a problem with one of the brake system components and you lose your brake, do not ride this mini bike. Turn off the mini bike and push it home or send for help. A mini bike with a broken brake cable, brake lever or some other major brake system component is not safe to ride under any circumstances.
Likewise, if you damage any major component on your mini bike, it may not be safe to ride. Carefully assess the damage as well as you can and get help as needed. It is always best to put safety first and be conservative when making decisions to proceed.

33EMISSION CONTROL WARRANTY INFORMATION32
EMISSION CONTROL WARRANTY
YOUR WARRANTY RIGHTS AND OBLIGATIONSThe U.S. Environmental Protection Agency, APT Powersport & Utility Products, LLC (hereinafter “APT Powersport”) are pleased to explain the emission control system warranty on your 2011 Off-Road Motorcycle. APT Powersport must warrant the emission control system on your vehicle for 5,000 km, 500 hours of engine operation, or at least 30 months, whichever comes first, provided that there has been no abuse, neglect or improper maintenance of your vehicle. This OFMC was designed to meet the emission standards for 10,000 km, 1,000 hours of engine operation, or five years, whichever comes first. Your emission control system may include parts such as the carburetor or fuel injection system, the ignition system, catalytic converter and engine computer, if it is equipped. Also included may be hoses, belts,connectors and other emission-related assemblies. Where a warrantable condition exists, APT Powersport will repair your vehicle at no cost to you, including diagnosis, parts and labor.
If an emission-related part on your vehicle is defective, the part will be repaired or replaced by APTPowersport. This is your emission control system DEFECTS WARRANTY. NOTICE! Use of any Motovox brand vehicle in any type of competitive event completely and absolutely voids this and all other warranties offered by APT Powersport.
OWNER’S WARRANTY RESPONSIBILITIESAs the vehicle owner, you are responsible for the performance of the required maintenance listed in your owner’s manual. APT Powersport recommends that you retain all receipts covering maintenance on your vehicle, but APT Powersport cannot deny warranty solely for the lack of receipts or for your failure to ensure the performance of all scheduled maintenance. You are responsible for presenting your vehicle to the Motovox dealer as soon as a problem exists. The warranty repairs should be completed in a reasonable amount of time, not to exceed 30 days. As the vehicle owner, you should be aware that APT Powersport may deny your warranty coverage if your vehicle or a part has failed due to abuse, neglect, improper maintenance or unapproved modifications. If you use your vehicle in any type of competitive event, this warranty is immediately and completely void. If you have any questions regarding your warranty rights and responsibilities, you should contact:APT Powersport & Utility Products, LLC, 8844 Hillcrest Road, Kansas City, Missouri 64138, Phone: (816)767-8783, or the U.S. Environmental Protection Agency at 2000 Traverwood Avenue, Ann Arbor, MI 48105.
APT Powersport & Utility Products, LLCLimited Warranty on Emission Control SystemYOUR WARRANTY RIGHTS AND OBLIGATIONS
APT Powersport warrant that each new 2011 Motovox brand off-road vehicle:A. is designed, built and equipped so as to conform at the time of initial retail purchase with all applicable regulations of the United States Environmental Protection Agency; andB. is free from defects in material and workmanship which cause such vehicle to fail to conform to applicable regulations of the United States Environmental Protection Agency for the periods specified above.I. Coverage. Warranty defects shall be remedied during customary business hours at any authorized Motovox dealer located within the United States of America in compliance with the Clean Air Act and applicable regulations of the United States Environmental Protection Agency. Any part or parts replaced under this warranty shall become the property of APT Powersport.
II. Limitations. This Emission Control System Warranty shall not cover any of the following:A. Repair or replacement as a result of (1) accident, (2) misuse, (3) repairs improperly performed or replacements improperly installed, (4) use of replacement parts or accessories not conforming to specifications set forth by APT Powersport, which adversely affect performance and/or (5) use in competitive racing or related events.B. Inspections, replacement of parts and other services and adjustments required for required maintenance.C. Any vehicle equipped with an odometer or hour meter on which the odometer mileage or hour meter reading has been changed so that actual mileage cannot be readily determined.
III. Limited Liability.A. The liability of APT Powersport under this Emission Control System Warranty is limited solely to the remedying of defects in material or workmanship by an authorized Motovox dealer at its place of business during customary business hours. This warranty does not cover inconvenience or loss of use of the vehicle or transportation of the vehicle to or fromthe Motovox dealer. APT Powersport shall not be liable for any other expenses, loss or damage, whether direct, incidental, consequential or exemplary arising in connection with the sale or use of or inability to use the Motovox brand vehicle for any purpose. Some states do not allow the exclusion or limitation of any incidental or consequential damages, so the above limitations may not apply to you.
APT Powersport & Utility Products, LLCLimited Warranty on Emission Control System
B. No express emission control system warranty is given by APT Powersport, except as specifically set forth herein. Any emission control system warranty implied by law, including any warranty of mechanability or fitness for a particular purpose, is limited to the express emission control system warranty terms stated in this warranty. The foregoingstatements of warranty are exclusive and in lieu of all other remedies. Some states do not allow limitations on how long an implied warranty lasts, so the avove limitations may not apply to you.C. No dealer is authorized to modify this Limited Emission Control System Warranty issued by APT Powersport.
IV. LEGAL RIGHTS. This warranty gives you specific legal rights, and you may also have other rightswhich vary from state to state.
V. This warranty is in addition to the Motovox limited vehicle warranty.
VI. ADDITIONAL INFORMATION. Any replacement part that is equivalent in performance and durability may be used in the performance of any maintenance or repairs. However, APT Powersport are not liable for these parts. The owner is responsible for the performance of all required maintenance. Such maintenance may be performed at a service establishment or by any individual. The warranty period begins on the date the OFMC is delivered to an ultimate purchaser. If you have any questions regarding your warranty rights and responsibilities, you should contact APTPowersport & Utility Products, LLC, at the address and phone number listed below, or the U.S. Environmental Protection Agency at , 2000 Traverwood Avenue, Ann Arbor, MI 48105.
APT Powersport & Utility Products, LLC 8844 Hillcrest Road, Kansas City, MO 64138 Phone: 816-767-8783 Fax: 816-767-0605
TROUBLE? DO NOT RETURN TO STORE contact us! 888-488-MOTO (6686) or email [email protected]

Register your Motovox MBx10 Mini Bike so that we can provide you fast solutions to any problems you may have with
your product and so that we can keep in touch with you regarding any product updates.
Simply detach the regsitration form on the next page, fill it out and mail it to
Motovox8844 Hillcrest Road
Kansas City, Missouri 64138
Or go to motovox.com and click on ACTION to fill out your registration form online.
Motovox MBx10 Product RegistrationPlease complete and mail this card within 10 days of purchase.
Name Age
Address
City State Zip
Home Phone
Work Phone
Purchase Date Purchased from
VIN Number
Male Female Occupation
Is this your first Motovox product?
Other similar product owned before
How did you hear about the MBx10?
How do you plan to use your MBx10?
Just for fun Work Sport Commuting
Complete this form and mail it to:
8844 Hillcrest Road, Kansas City, Missouri 64138Attention: Product Registration
3534

For step-by-step maintenance videos and much more information about
your Motovox MBx10, visit
motovox.com
TROUBLE? DO NOT RETURN TO STORE contact us! 888-488-MOTO (6686) or email [email protected]
Motovox would sincerely like to thank you for choosing one of our fine products and we hope you will have many years of
safe, fun enjoyment with your new dirt bike!

Motovox Motorsports8844 Hillcrest Road, Kansas City, MO 64138-3759
Toll Free: 1-888-488-MOTO (6686)Motovox.com
email [email protected]
IF YOU HAVE TROUBLE
DO NOT RETURN TO STORECALL MOTOVOX AND WE WILL MAKE IT RIGHT.