migration best practices tb - JoR Systems Practices: Upgrading to FileMaker 8 Migrating pre-.fp7...
19
Technology Brief Upgrading to F i le Maker 8: Migrating pre-.fp7 solutions to FileMaker 8 and getting the most of out the new FileMaker 8 features Best Practices
Transcript of migration best practices tb - JoR Systems Practices: Upgrading to FileMaker 8 Migrating pre-.fp7...
Best Practices: Upgrading to FileMaker 8 Migrating pre-.fp7 solutions to FileMaker 8 and getting the most of out the new FileMaker 8 features page 1
Technology Brief
Upgrading to FileMaker 8:
Migrating pre-.fp7 solutions to FileMaker 8 and getting the most of out the new
FileMaker 8 features
Best Practices

Best Practices: Upgrading to FileMaker 8 Migrating pre-.fp7 solutions to FileMaker 8 and getting the most of out the new FileMaker 8 features page 2
About the AuthorBOB BOWERS is the CEO of Soliant Consulting, a Partner-level member of the FileMaker Solutions Alliance. With offi ces in Chicago and San Francisco, Soliant specializes in building database and Web solutions tailored to specifi c workgroup needs. Bob is the co-author of three books on FileMaker, including Special Edition Using FileMaker 7. He is an authorized trainer, a past recipient of the FileMaker Excellence Award, and a columnist for FileMaker Advisor magazine.
©2005 FileMaker, Inc. All rights reserved. FileMaker and the fi le folder logo are registered trademarks or trademarks of FileMaker, Inc., in the U.S. and other countries. All other trademarks are the property of their respective owners. Mention of third party products and companies is for informational purposes only and does not constitute an endorsement nor recommendation. Product specifi cations and availability subject to change without notice.
FileMaker documentation is copyrighted. By downloading from the FileMaker website you agree not to make additional copies or distribute this documentation without written permission from FileMaker.
THIS DOCUMENT IS PROVIDED “AS IS” WITHOUT WARRANTY OF ANY KIND, AND FILEMAKER EXPRESSLY DISCLAIMS ALL IMPLIED WARRANTIES, EITHER EXPRESS OR IMPLIED, INCLUDING BUT NOT LIMITED TO THE IMPLIED WARRANTIES OF MERCHANTABILITY AND FITNESS FOR A PARTICULAR PURPOSE OR THE WARRANTY OF NON-INFRINGEMENT. IN NO EVENT SHALL FILEMAKER, INC. OR ITS SUPPLIERS BE LIABLE FOR ANY DAMAGES WHATSOEVER INCLUDING DIRECT, INDIRECT, INCIDENTAL, CONSEQUENTIAL, LOSS OF BUSINESS PROFITS, PUNITIVE OR SPECIAL DAMAGES, EVEN IF FILEMAKER, INC. OR ITS SUPPLIERS HAVE BEEN ADVISED OF THE POSSIBILITY OF SUCH DAMAGES. SOME JURISDICTIONS DO NOT ALLOW THE EXCLUSION OF IMPLIED WARRANTIES OR LIMITATION OF LIABILITY. FILEMAKER MAY MAKE CHANGES TO THIS DOCUMENT AT ANY TIME WITHOUT NOTICE. THIS DOCUMENT MAY BE OUT OF DATE AND FILEMAKER MAKES NO COMMITMENT TO UPDATE THIS INFORMATION. (v1)
About This Technical BriefThere are signifi cant benefi ts to be gained from migrating solutions built using FileMaker® Pro 4/5/6 to FileMaker Pro 8. Both users and developers have many compelling reasons to choose for wanting to move their solutions to FileMaker Pro 8, ranging from new functionality like easily emailing reports as PDF attachments to better tools that result in quicker, more robust development.
A seemingly more contentious issue has been how to go about the migration itself. Since the introduction of FileMaker Pro 7 in March 2004, there has been much written on the subject of migration of solutions built using previous versions of FileMaker. The focus has typically been on what can happen during a conversion, rather than what’s likely to happen, which has contributed to a state of mind that might be called “conversion anxiety”. After all, if there are tools one needs to buy, white papers to read, and courses to take, then converting must be a diffi cult and time-consuming process, only to be attempted after rigorous planning and preparation, right?
In fact, the evidence gleaned from nearly two years of conversion experience strongly suggests otherwise. There are many conversion success stories that consist of little more than “we converted the fi les and everything just worked.” I argue in this technical brief that a typical business solution can generally be converted to FileMaker Pro 8 without any special effort at all.

Best Practices: Upgrading to FileMaker 8 Migrating pre-.fp7 solutions to FileMaker 8 and getting the most of out the new FileMaker 8 features page 3
There’s an apparent disconnect between my premise and much of the previous writing on migration. I believe there are a few reasons for this. First, much of what’s previously been written on conversion was created in the infancy of FileMaker 7, before the FileMaker community had established best practices and before there was much empirical evidence on real world conversion. Second, many of those writing on conversion, including myself, tended to focus on larger and more complex solutions. I strongly believe that conversion is a viable option for most large, mission critical systems, but it requires time, planning, and an in-depth knowledge of conversion issues.
Let me stress again from the outset that my focus here is on typical business solutions, defi ned as systems of under a dozen related fi les of low to mid-level complexity. If you are a developer or administrator of such a system, and you’re still using FileMaker Pro 6, then this document is intended for you. The premise stated above suggests that you shouldn’t even need to read this document to convert your solution to FileMaker Pro 8, and indeed I think that’s the case. That notwithstanding, there are two reasons I think you should:
• Even though you don’t need to read this document, there are tips and techniques presented that can save you time along the way.
• If you happen to have a solution that’s more complex in areas than the “typical” business solution, you might benefi t from some extra planning to have a smooth migration.
The organization of this tech brief is based on a typical sequence of conversion-related tasks. The fi rst section presents suggestions for how to plan and prepare for your conversion. A few simple, common sense tasks up front can save time and effort later in the conversion process. The second section discusses the actual conversion process itself, so that you know what to expect and what to be on the lookout for after converting. The third section covers topics related to the deployment of a converted solution, and the fourth section covers post-conversion strategies that you may be interested in pursuing.
I conclude this tech brief with three case studies of actual migration projects. The fi rst is of a system that epitomizes the “typical business solution” as I’ve defi ned it here. The second presents the detailed conversion experience of a 100-fi le system, which, while obviously larger than the systems focused on here, demonstrates that the same principles that obtain for small solutions often apply to larger systems as well. If a system as large as that converts so well, then imagine how easy it will be to convert your 10-fi le solution. The fi nal case study is meant to inspire you by showing not only how smoothly a migration project can go, but also how much you’ll benefi t from it in both the short and long term.
Best Practices: Upgrading to FileMaker 8 Migrating pre-.fp7 solutions to FileMaker 8 and getting the most of out the new FileMaker 8 features page 4
Preparing for migrationThere are two central theses of this technical brief:
1. The typical FileMaker Pro 4/5/6 solution can be converted to FileMaker Pro 8 with little risk and minimal effort.
2. While there’s no monolithic “right way” to go about a migration, the project will go more smoothly and quickly if you are well prepared and follow some basic rules.
From the outset, one of the most important things going into a migration project is to have rational expectations and an explicit set of goals. Your goals more than anything will drive the decisions you make during the migration process. Examples of goals for a migration project include staying current, reducing the number of fi les, being able to use particular features of FileMaker Pro 8, or remedying impending problems such as fi le size limits. Know what you are trying to accomplish and why.
As for rational expectations, for the migration of a typical business solution, you should expect to spend some time preparing for and performing a conversion, and you may have some post-conversion work to do as well. You should also expect that the entire process will take some time – usually anywhere from a day to a few weeks depending on the solution, your goals, and how much focus you can give to the project. Finally, expect that there will be a few wrinkles along the way that you hadn’t anticipated. It may simply be that some aspect of the migration takes longer than you planned for, or perhaps that you deleted something along the way that you later realize you shouldn’t have. Regardless of the specifi c issue, having realistic expectations about the time and effort involved will in and of itself facilitate the migration process.
How, then, does one prepare for migration, and what are the best practices to follow during the conversion process?
Listed below are tasks that you should consider doing early on in the migration process. It is presumed that you have a good understanding of the solution being converted, both from a technical standpoint (i.e., you understand how it was put together) and from a business standpoint (i.e., you understand what the system is supposed to do).
• Do a test conversion and see what happens. There’s no harm in doing a trial conversion at any stage of the migration process, and it can be a great source of information that will guide your future efforts. For instance, you should note how long it takes to do a conversion of the system. If it’s only a few minutes, you’ll know you can do a test conversion any time you want to. If your fi les have a lot of data and take hours to convert, you might consider making clones or copies with reduced data sets for future conversion tests. There are a few other things you should look for in your test conversion.
- Look at the File References in the converted fi les. If your solution was originally created in FileMaker Pro 3 or 4, then you might have a lot of absolute fi le references, most of which are probably obsolete and unnecessary and can be replaced with relative references. If you have a small number of fi le references, you’ll be able to clean these up by hand after conversion. If the fi le references seem to be in very bad shape, consider using a tool called File Reference Fixer, which is part of an analysis tool called Metadata Magic (www.nmci.com). As its name implies, File Reference Fixer can clean up and consolidate fi le references so that you don’t have to. One of the indicators that fi le references will be an issue that you need to address is if the converted fi les take a long time to open. This generally means that the fi les are attempting to resolve a lot of obsolete references.
Best Practices: Upgrading to FileMaker 8 Migrating pre-.fp7 solutions to FileMaker 8 and getting the most of out the new FileMaker 8 features page 5
- If you have problems getting access to some of the converted fi les but not others, it could mean that you have case-sensitivity issues with your passwords. Passwords weren’t case sensitive in previous versions of FileMaker, but they are in FileMaker Pro 7 and FileMaker Pro 8. It’s not a bad idea simply to check the Access Privileges in your existing fi les and make all passwords all lower case (or upper case, as you prefer) so that you don’t have to worry about this potential conversion issue.
• The cleaner your fi les are prior to conversion, the better your migration experience will be. This is because there’s less to test, less to organize, and less work to do after conversion. There are benefi ts for data migration as well. Spend some time getting your fi les ready for conversion by doing tasks such as the following:
- Remove any layouts, fi elds, and scripts that you know are no longer used. It’s certainly possible to clean up such detritus after migration, but there are more important things that you should be doing at that point. Get rid of it early on so that it doesn’t keep getting in your way.
- Organize fi elds, layouts, and scripts to make it easier to fi nd things. For instance, you might alphabetize your scripts or group them in functional blocks. Similarly, if you haven’t used consistent fi eld naming practices, take the time to rename your fi elds. As for layouts, consider grouping them by function (i.e., segregate the data entry layouts, the report layouts, and the developer layouts from one another) and renaming them with less generic names. Instead of having layouts called “Data Entry” and “List View”, for instance, you might want to use “Invoice Entry” and “Invoice List”. This will pay dividends later on if you decide to consolidate tables.
- If you have FileMaker Developer or FileMaker Pro 8 Advanced, run a Database Design Report (DDR) so that you have a reference for tracking down dependencies. There are third-party analysis tools available as well. While not required per se for migration, having some documentation of the structure of your database is certainly a best practice you should follow.
• Make a list of any special functionality that your system has so that you can be sure to test for it after conversion. For instance, note if you use any plug-ins or if your system interacts with any other systems, either directly or via import/export.
Your particular goals may dictate more, less, or different pre-conversion work; the list above represents common tasks that will be applicable to and have benefi ts for a wide range of goals. None of the tasks are mandatory, but all have the potential to save you time and effort.
Converting Files to FileMaker Pro 8The mechanics of actually converting your fi les to FileMaker Pro 8 are quite simple. The easiest way is to put all your fi les in a folder and then drag and drop that folder on top of the FileMaker application icon. The conversion process will produce new copies of your fi les; your original source fi les are not changed or modifi ed in any way during conversion, but it’s still a good idea to have a backup of them just in case you do something silly, like throw away a wrong folder somewhere along the line. During the conversion, you’ll be asked to specify a location to put the new fi les. The default location will be the same folder that contains the source fi les. To keep things well organized, I fi nd it best to create a subfolder within that for the converted fi les.
Immediately after performing a conversion, it’s a good practice to create a compressed archive of the converted fi les. That way, if you make any mistakes, such as deleting a fi le reference or table occurrence that you shouldn’t have, you can go back to the raw converted fi les rather than having to perform the conversion again. For the same reason, make frequent backups if and when you modify the converted solution.

Best Practices: Upgrading to FileMaker 8 Migrating pre-.fp7 solutions to FileMaker 8 and getting the most of out the new FileMaker 8 features page 6
You should also review the conversion log (which you’ll fi nd in the same folder as the converted fi les) to see if there are any particular issues you need to pay attention to. The majority of the log is simply information about the quantity of objects that were converted, but there may be important bits of information.
In order to know what sort of things you may be concerned about in the converted fi les, you need to understand what happens during the conversion process. An overview of the changes that take place, and what you need to pay attention to, is provided below.
SecurityAssuming you’ve cleaned up any case-sensitivity issues with your passwords during your pre-conversion work, there’s not much regarding security that can go wrong during conversion. Each password in the source fi le will be converted into an Account in the new fi le. The account name and password for each account will both be set to the old password. Because account names are shown as regular text in the login dialog, which is a security risk, be sure to change either the account names or the passwords prior to deploying the solution.
If you’re planning to consolidate tables later on, hold off on any other changes to security until then, as you’ll just need to redo them later. If you’re planning to run with the converted fi les as is, consider creating individual accounts for each user. If you have fewer than 10 fi les and 20 users, it shouldn’t be a big hassle to set up and maintain individual accounts. Over these numbers, consider using external authentication or doing some table consolidation.
The conversion process will create Privilege Sets in your new fi les based on the access privileges that were assigned to passwords and groups in the source fi les. You may want to rename the privilege sets or add some comments to them, but there aren’t any particular issues to watch out for here. If in addition to passwords, you had set up Groups in your old fi les (...chances are that you haven’t), then there are some added concerns that you have. If you ever used the Status (CurrentGroups) function to check someone’s group membership, that function turns into Get (CurrentPrivilegeSet) in the converted fi le. But, it’s possible and indeed likely that the new privilege set is named something other than the old Group name, so any formulas that reference Group names will need to reviewed and/or modifi ed.
File ReferencesFile references have typically been one of the greatest areas of confusion and concern in the conversion process. In exceptionally complex or old solutions, they can in fact cause some headaches during a migration project, but in a system of mild to moderate complexity, they shouldn’t be a problem provided you follow the rules discussed below.
There’s ample documentation that explains what fi le references are and why they might be messy in a converted solution. For our purposes here, it’s enough to know that fi le references are required any time one FileMaker fi le references an object in another FileMaker fi le. The three common reasons for fi le references are relationships (external table occurrences), performing external sub-scripts, and value lists constructed using the contents of data from another fi le.
After conversion, you may have two types of issues with your fi le references. First, there may be redundant references to a particular fi le. This happens when there are multiple links from one fi le to another. Note in Figure 1 that there are fi le references called Customer, Customer 2, and Customer 3, all of which seemingly refer to the same fi le.

Best Practices: Upgrading to FileMaker 8 Migrating pre-.fp7 solutions to FileMaker 8 and getting the most of out the new FileMaker 8 features page 7
Figure 1
In addition to redundant fi le references, you also may have individual fi le references that have multiple paths, incorrect paths, or other path issues. In Figure 1, for instance, the reference called Customer has three paths, the fi rst two of which are obsolete references.
If you’re going to be consolidating tables right away, then most of your fi le references will end up being unnecessary, so cleaning them up will be a waste of time. If not, then you’ll want to do some manual clean up after conversion. The general rules are as follows:
• Never delete a fi le reference, even if it’s redundant. There are things that are dependent on each fi le reference, such as scripts, relationships, or value lists, so deleting a fi le reference may break your solution in hard-to-troubleshoot ways. The redundancy may be annoying, but it’s not hurting anything. You can only delete fi le references if you’re absolutely sure that all the dependencies have been redirected to other fi le references.
• Make all of your fi le references simple relative references. Assuming that your solution fi les all reside in the same folder, then the only reference that’s needed is one that looks like “fi le: myFile”. Remove all other paths so that there’s just a single relative reference such as this; the fi le will therefore look only within the folder in which it lives for the specifi ed fi le. For the fi le shown in Figure 1, both the Customer and Main 10 references should have the absolute paths removed, leaving just the fi nal relative reference.
RelationshipsIf your goal is simply to convert and run with the resulting fi les, there’s nothing regarding relationships that will trouble you. During the conversion process, a table occurrence that’s named the same as the source table for that fi le will be created, and every relationship in the old fi le will turn into a table occurrence linked to that occurrence. So, if a fi le had 5 relationships in it, then the converted fi le will have 6 table occurrences: 1 representing the source table, and 5 representing the relationships. Those 5 table occurrences will be named the same as the old relationship name. Figure 2 shows an example of a post-conversion graph from one of the main fi les of a 10-table event management solution.

Best Practices: Upgrading to FileMaker 8 Migrating pre-.fp7 solutions to FileMaker 8 and getting the most of out the new FileMaker 8 features page 8
Figure 2
The potential issues with relationships will come up later, if and when you want to consolidate tables or extend the solution. It’s therefore recommended as a best practice that you do at least some organization of the graph, if for no other reason than to make it easier to fi nd things. The new FileMaker Pro 8 feature for adding notes to a Relationships Graph comes in handy here. Group table occurrences based on the same source table together, and put a note behind them that contains the table name. It’s easy in FileMaker Pro 8 to locate all of the tables based on the same source table: simply select a table occurrence on the graph and then use the selection tool shown in Figure 3 (or use the Ctrl/Cmd U keyboard shortcut). All of the occurrences based on the same source table will then be highlighted for you.
Figure 3

Best Practices: Upgrading to FileMaker 8 Migrating pre-.fp7 solutions to FileMaker 8 and getting the most of out the new FileMaker 8 features page 9
An example of what an organized post-conversion graph might look like is shown in Figure 4.
Figure 4
As you can see, simply arranging the table occurrences and adding notes to the graph helps bring order and meaning, which in turn will make it faster and easier to maintain or extend the system in the future.
Calcs and ScriptsDuring conversion, calculation formulas and scripts may be automatically modifi ed so as to preserve existing behavior. For instance, there’s a behavior change regarding sorting in FileMaker Pro 7/8. It used to be that when you sorted a set of records, the fi rst record in the set became the active record; in FileMaker Pro 7/8, the active record doesn’t change. For this reason, during conversion, a Go to Record/Request [First] step will be inserted into scripts after every instance of a Sort script step. Similarly, if your solution used the Today function—which isn’t supported in FileMaker Pro 7/8—in stored calculations, then during conversion a stored date fi eld called “Today” will be added to the fi le, along with a script that updates it when the fi le is opened.
There are a handful of other changes like this that are made automatically, so don’t be alarmed or surprised if your scripts and calculations look slightly different than they did before conversion. This is one of the reasons, by the way, that it’s helpful to have a DDR report from the original fi les.

Best Practices: Upgrading to FileMaker 8 Migrating pre-.fp7 solutions to FileMaker 8 and getting the most of out the new FileMaker 8 features page 10
Despite the changes made during conversion, there are a few things that you’ll still need to be on the lookout for in the converted fi les. The most common scripting issues that you’ll encounter in converted fi les are the following:
• Window activation issues. Some of the rules change in FileMaker Pro 7/8 regarding which window comes to the front when you call a subscript in another fi le. As an example, say that you have a script in File A that calls a script in File B. If there were no steps in the script in File A after the subscript call, then, in FileMaker Pro 6, File B would become the “active” fi le. That’s no longer the case in FileMaker Pro 7/8, where you need to use the Show Window script step to activate a window in File B.
To account for this change, all of your scripts that previously ended with an external subscript call will have a Show Window step added to them during conversion. The Show Window step is hard coded to activate a window named after the fi le where the subscript executes (here, File B). So long as such a window can be found, your script will run just fi ne. However, if, for some reason, File B doesn’t have a window named “File B”, then the Show Window script step won’t do anything and File A will remain active.
If this is a scenario that you encounter, the best solution is to have the subscript itself call the Show Window [Current Window] script step and to remove the Show Window from the calling script. There may be other window activation issues that you need to troubleshoot. Thankfully, these are easy issues to spot during testing. Adding or removing Show Window script steps is usually the solution you need.
• Records not being committed. Another set of rule changes in FileMaker Pro 7/8 involves opening and closing records. The particular one that can cause issues for you is that in FileMaker Pro 7/8, the Set Field script step opens a record but doesn’t commit the change. So, if you have a script that ends with a Set Field, the record is left in an open (locked), uncommitted state when it concludes. This can cause problems, especially if it occurs in subscripts that operate in background windows. As with window activation issues, this is usually an easy problem to spot, as you’ll either see record locking messages telling you another window has the record open or the script will fail in some other, usually obvious, way.
As a precaution, you may want to look through your scripts, and if any of them end with a Set Field (or have a Set Field that precedes a subscript call, which can also be an issue), simply add a Commit Records step after the Set Field step. This can be addressed as a pre-conversion issue as well by adding the Exit Record/Request step to your script. It will then turn into the Commit Records step during conversion.
• Print setup options may need to be re-specifi ed. Some Windows print setup options may be lost during the conversion process, so be prepared to edit scripts to reset the particular options you need. The Conversion Log will list all of the scripts that contain a Print Setup step, which saves you from having to hunt them down. This is another area where pre-conversion documentation may also come in handy. It’s usually only advanced settings, such as a custom paper size, that are lost, but it’s good practice to print all outputs from the new system during testing as a safeguard.
Deploying a Converted SolutionFor many migration projects, one of the goals will be to get the converted solution up and running as soon as possible, at the earliest point that it’s stable, even if other goals require future modifi cations of the fi les. In my opinion, there’s a lot to be said for getting the raw converted solution deployed as soon as possible:
Best Practices: Upgrading to FileMaker 8 Migrating pre-.fp7 solutions to FileMaker 8 and getting the most of out the new FileMaker 8 features page 11
• You’ll immediately have the use of many of the benefi ts of FileMaker Pro 8, such as the larger fi le size limit, live schema modifi cation, and greatly improved wide area network performance.
• With the converted solution up and running in FileMaker Pro 8, you’ll have an easier time moving data into future builds. It’s much more time consuming to move data if you have to do a fi le conversion fi rst.
The following suggestions are intended to help you quickly and effi ciently get your solution to the point of an initial deployment.
• Test the solution thoroughly. It sounds tedious, but consider setting up two computers side by side, one with the old solution, the other with the converted solution. Run test scenarios in each system to help determine if and where there are issues. In some more complex systems, we’ve even had testers click every button on every layout to make sure it produces proper results. More typically, you’ll be able to make some educated guesses about where to spend your testing time. The majority of scripting issues, for instance, involve navigation to/from other fi les.
Your level of testing may vary depending on the criticality of the system. For more critical systems, you’ll want more testing. For less critical systems, if there are issues that you don’t catch during the testing phase, you’ll be able to address them after deployment without much risk.
If you are going to deploy the solution using FileMaker Server, be sure to do at least some of your testing with that confi guration. It’s highly unlikely that you’ll get differences in functionality, but performance can fl uctuate, and there are some things, such as fi elds with global storage and some of the Get functions, that may behave differently when hosted.
Finally, if you have different security restrictions for different users, test the system from a variety of logins; things that work for you when logged in with the [full-access] privilege set may not work the same for users.
• Avoid the temptation to rework the code. As you look around the converted solution, there may be many opportunities for making the system more streamlined and effi cient. The more you give into the temptation to make modifi cations/optimizations, the longer it will take to deploy the system.
• Don’t alter the functionality of the system. Your goal should be that on day one, the new system has the same functionality that the old system did. This can be a tough pill to swallow if your organization sees migration to FileMaker Pro 8 as a means to an end. Realize, though, that this initial step of porting to FileMaker Pro 8 will lay the groundwork for the future goals.
In some cases, your old system will need to stay in use while you’re preparing and testing the converted solution. If that’s the case, then you’ll need to move fresh data from the old system into the new one prior to deployment. The best way to do this is to convert a copy of the production system and then import data into the new system. Make sure that users know they shouldn’t edit any data after that. If you think that you’ll need to do multiple test conversions, it’s often benefi cial to build scripts to automate the data import. Murphy’s Law in this case states that if you don’t automate the process, you’ll need to manually import data a bunch of times, so err on the side of automating unless there’s a good reason why not to.
After deploying the new system, be sure to allow for some time to fi nd and fi x any issues that didn’t get addressed during testing.

Best Practices: Upgrading to FileMaker 8 Migrating pre-.fp7 solutions to FileMaker 8 and getting the most of out the new FileMaker 8 features page 12
Post conversion strategiesThere are a variety of strategies you can employ for working with fi les once they’ve been converted. As stated previously, your project goals are the main driver for determining a post-conversion strategy. Examples of some post-conversion strategies include the following:
• Run with the basic conversion and maintain as necessary. If a basic conversion gets you where you need to be (e.g., it solves a fi le size limit issue), then deploy that version and just maintain the system as necessary. You’ll have a solution that operates in FileMaker Pro 8, but you may not be taking advantage of many of its features. That may be just fi ne, though.
• Replace old ways of doing things with new ways of doing things. Once the fi les are stable and deployed, you can begin to “rewire” the system to start using the new features that are available to you. For example, you might rewrite complex calculation formulas using the Let function to make them easier to read. Or, you’ll break down compound key relationships into multi-predicate relationships, thereby removing the need for several indexed calculations.
• Consolidate tables. Reducing the number of fi les is a goal for many migration projects, and FileMaker Pro 8 has many new tools to facilitate table consolidation.
For the fi rst and second of these options, all it takes is knowledge of FileMaker Pro 8 and some time. Consolidation, on the other hand, has some complexity and is worth discussing in depth here; it’s also an area where best practices have been slowly emerging.
Consolidation is defi ned here as merging what previously were two independent fi les into a single fi le that has two (or more) tables. The choice of which fi le is “acquired” depends mostly on size and complexity; a smaller, less complex fi le is generally acquired by a larger fi le.
Because a FileMaker fi le contains so much more than just data – it also has layouts, scripts, value lists, relationships, etc. – you need to make sure that you work through all the elements systematically or else you run the risk of missing something. My recommendation is that you fully consolidate two fi les before moving on to the next one. That is, don’t consolidate fi elds for 5 fi les, and then move on to scripts and layouts for 5 fi les, etc. That methodology can work, especially if there are only 3-5 fi les in a solution, but I fi nd it less confusing to follow one fi le through the whole process at a time.
As an example, say that you have an invoicing solution in FileMaker Pro 6 consisting of fi les called Customer, Invoice, Line Items and Product. After the basic conversion has been completed and the system is up and running, you decide you want to consolidate all of these four tables into a single fi le.
Your fi rst decision is whether to use one of the existing fi les as a consolidation “hub” or, perhaps, to build a new fi le with no tables, which would simply point at the data via external fi le references. In this case, it’s likely that the Invoice fi le and the Customer fi le are the ones with the most layouts and scripts and would therefore be good candidates as hubs. In many solutions such as this one, some fi les are natural hubs of activity while other fi les act as “spokes” that support the hub. You decide that you want to consolidate everything into the Invoice fi le, but the Customer fi le would work fi ne as well. From here, it will be benefi cial to walk through the process step by step:
Best Practices: Upgrading to FileMaker 8 Migrating pre-.fp7 solutions to FileMaker 8 and getting the most of out the new FileMaker 8 features page 13
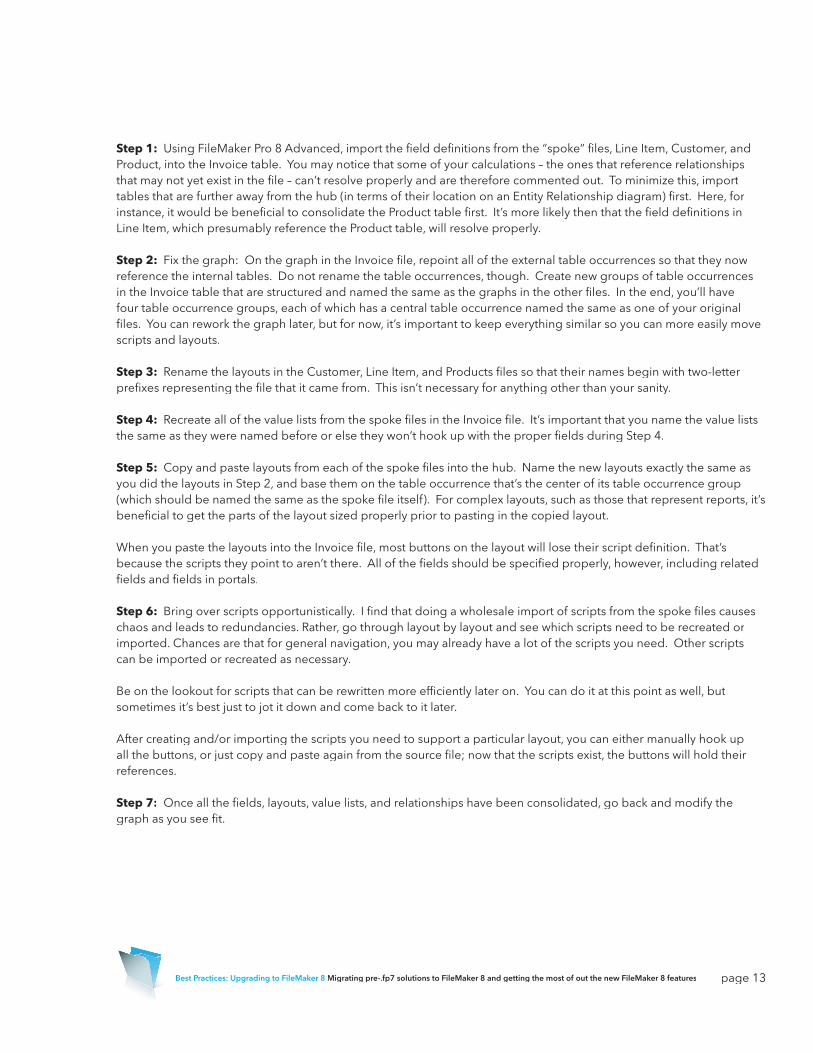
Step 1: Using FileMaker Pro 8 Advanced, import the fi eld defi nitions from the “spoke” fi les, Line Item, Customer, and Product, into the Invoice table. You may notice that some of your calculations – the ones that reference relationships that may not yet exist in the fi le – can’t resolve properly and are therefore commented out. To minimize this, import tables that are further away from the hub (in terms of their location on an Entity Relationship diagram) fi rst. Here, for instance, it would be benefi cial to consolidate the Product table fi rst. It’s more likely then that the fi eld defi nitions in Line Item, which presumably reference the Product table, will resolve properly.
Step 2: Fix the graph: On the graph in the Invoice fi le, repoint all of the external table occurrences so that they now reference the internal tables. Do not rename the table occurrences, though. Create new groups of table occurrences in the Invoice table that are structured and named the same as the graphs in the other fi les. In the end, you’ll have four table occurrence groups, each of which has a central table occurrence named the same as one of your original fi les. You can rework the graph later, but for now, it’s important to keep everything similar so you can more easily move scripts and layouts.
Step 3: Rename the layouts in the Customer, Line Item, and Products fi les so that their names begin with two-letter prefi xes representing the fi le that it came from. This isn’t necessary for anything other than your sanity.
Step 4: Recreate all of the value lists from the spoke fi les in the Invoice fi le. It’s important that you name the value lists the same as they were named before or else they won’t hook up with the proper fi elds during Step 4.
Step 5: Copy and paste layouts from each of the spoke fi les into the hub. Name the new layouts exactly the same as you did the layouts in Step 2, and base them on the table occurrence that’s the center of its table occurrence group (which should be named the same as the spoke fi le itself). For complex layouts, such as those that represent reports, it’s benefi cial to get the parts of the layout sized properly prior to pasting in the copied layout.
When you paste the layouts into the Invoice fi le, most buttons on the layout will lose their script defi nition. That’s because the scripts they point to aren’t there. All of the fi elds should be specifi ed properly, however, including related fi elds and fi elds in portals.
Step 6: Bring over scripts opportunistically. I fi nd that doing a wholesale import of scripts from the spoke fi les causes chaos and leads to redundancies. Rather, go through layout by layout and see which scripts need to be recreated or imported. Chances are that for general navigation, you may already have a lot of the scripts you need. Other scripts can be imported or recreated as necessary.
Be on the lookout for scripts that can be rewritten more effi ciently later on. You can do it at this point as well, but sometimes it’s best just to jot it down and come back to it later.
After creating and/or importing the scripts you need to support a particular layout, you can either manually hook up all the buttons, or just copy and paste again from the source fi le; now that the scripts exist, the buttons will hold their references.
Step 7: Once all the fi elds, layouts, value lists, and relationships have been consolidated, go back and modify the graph as you see fi t.

Best Practices: Upgrading to FileMaker 8 Migrating pre-.fp7 solutions to FileMaker 8 and getting the most of out the new FileMaker 8 features page 14
The preceding set of steps works well when consolidating any two tables. Be sure that in addition to testing newly created layouts and scripts that you also test the scripts in the hub fi le itself. Once you start bringing in new tables, all the scripts will have potential context issues. For instance, imagine you have a script called “Delete Invoice” that simply deletes the current record. If that script were accessible via the Scripts menu, then a user would be able to trigger it even when they were on a layout that displayed Customer or Product data, thereby deleting a record from the wrong table. Script context is determined by the current layout; as long as all of the layouts in a fi le are anchored to the same table occurrence (which is the case right after conversion), you don’t need to worry about context. You may need to add some Go to Layout [<layout name>] steps to certain scripts, particularly those that can be accessed from the Scripts menu, to make sure they operate in the correct context.
Case Study #1Many of the projects at Soliant Consulting over the past year have involved migration of older systems to FileMaker Pro 7. One in particular stands out as a good representative of the principles that have been discussed in this Tech Brief. The client is an advertising company looking for a system to manage their video-editing department. Their old system consisted of handwritten requests, manual tracking of costs and calculation of invoice amounts, and redundant entry into their accounting system. The new system was envisioned as something that would be used as necessary by a dozen requestors and frequently by the two video techs who processed the requests.
Our client’s parent company also had a video editing department, and they used a FileMaker 6 system to manage their workload. The system had most of the functionality our client was looking for, so we were asked to use a copy of that as the basis for the new system. After reviewing the existing system, we came up with a plan that included converting the existing system to FileMaker 7, consolidating everything to a single fi le, redoing the user interface, and then adding new functionality that our client needed.
The existing solution consisted of 12 fi les. These included a main menu fi le with no real functionality or purpose, several join tables that just resolved many-to-many relationships and which contained only a handful of fi elds, no user interface layouts, and minimal scripting, and a few code tables that were used to populate value lists. The fi les we were given were clones of the parent company’s system; it took less than a minute to do the initial test conversion.
We learned from the conversion log that there were a few places where the old Status(CurrentGroups) function was replaced with Get (PrivilegeSetName). One of our goals for the project was to replace the old group level security with individual usernames and passwords, so we noted these occurrences but decided that any issues would be fi xed as part of re-doing the accounts and privilege sets. No other potential conversion issues were discovered during the initial tests of the converted system. If we hadn’t had other functional changes to do, the converted system could have been installed and used the next day. Everything just worked, despite the homely interface and a few redundant fi le references.
The “hub” of the system was clearly the Job fi le, so we decided it made sense to consolidate all the other tables into it. And since none of the other fi les contained more than 20 fi elds, we just printed out the fi eld defi nitions and manually created the new tables and fi elds in the Job fi le. Value lists, layouts, and scripts were brought over in a similar manner as that described above. Because the fi elds were created in a different order than in the original fi les, we needed to re-specify a few after cutting and pasting layouts, but it was quick work. Using the table import feature of FileMaker Pro 8 would have made the consolidation task even easier.
All told, the conversion and consolidation took about a day’s work (and the majority of that was the consolidation). By the end of that day, we had a single fi le solution that had the same functionality as the old 12-fi le solution. The number
Best Practices: Upgrading to FileMaker 8 Migrating pre-.fp7 solutions to FileMaker 8 and getting the most of out the new FileMaker 8 features page 15
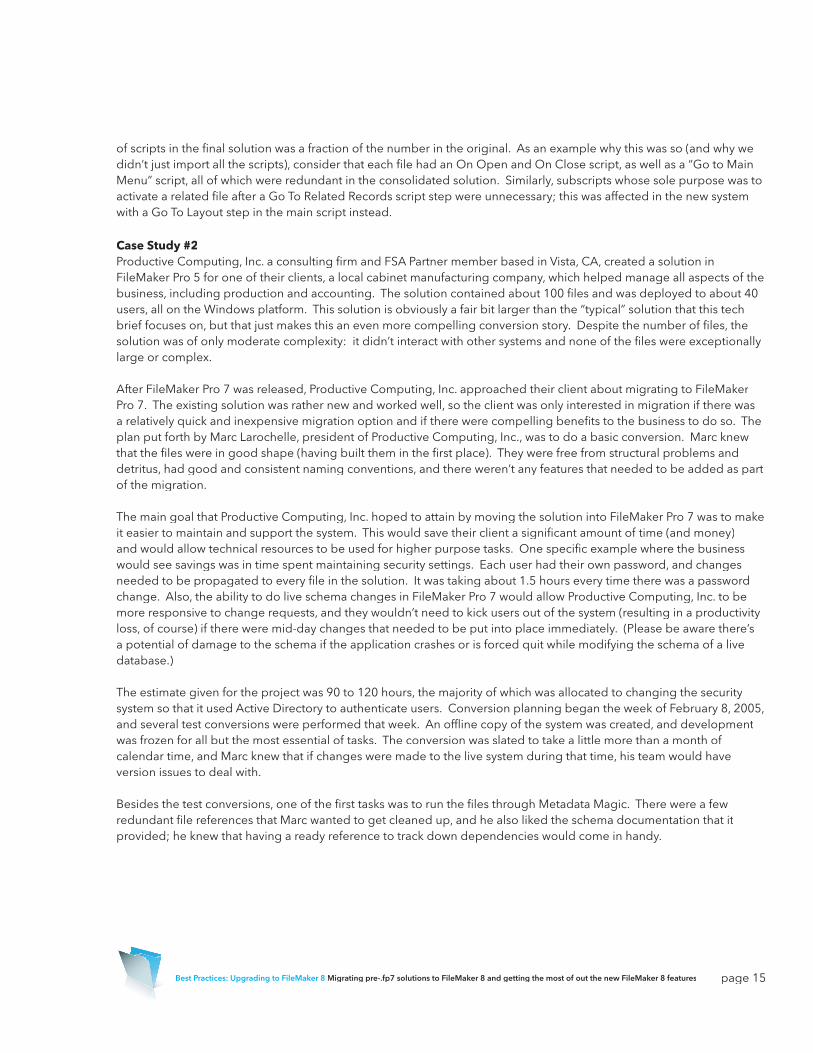
of scripts in the fi nal solution was a fraction of the number in the original. As an example why this was so (and why we didn’t just import all the scripts), consider that each fi le had an On Open and On Close script, as well as a “Go to Main Menu” script, all of which were redundant in the consolidated solution. Similarly, subscripts whose sole purpose was to activate a related fi le after a Go To Related Records script step were unnecessary; this was affected in the new system with a Go To Layout step in the main script instead.
Case Study #2Productive Computing, Inc. a consulting fi rm and FSA Partner member based in Vista, CA, created a solution in FileMaker Pro 5 for one of their clients, a local cabinet manufacturing company, which helped manage all aspects of the business, including production and accounting. The solution contained about 100 fi les and was deployed to about 40 users, all on the Windows platform. This solution is obviously a fair bit larger than the “typical” solution that this tech brief focuses on, but that just makes this an even more compelling conversion story. Despite the number of fi les, the solution was of only moderate complexity: it didn’t interact with other systems and none of the fi les were exceptionally large or complex.
After FileMaker Pro 7 was released, Productive Computing, Inc. approached their client about migrating to FileMaker Pro 7. The existing solution was rather new and worked well, so the client was only interested in migration if there was a relatively quick and inexpensive migration option and if there were compelling benefi ts to the business to do so. The plan put forth by Marc Larochelle, president of Productive Computing, Inc., was to do a basic conversion. Marc knew that the fi les were in good shape (having built them in the fi rst place). They were free from structural problems and detritus, had good and consistent naming conventions, and there weren’t any features that needed to be added as part of the migration.
The main goal that Productive Computing, Inc. hoped to attain by moving the solution into FileMaker Pro 7 was to make it easier to maintain and support the system. This would save their client a signifi cant amount of time (and money) and would allow technical resources to be used for higher purpose tasks. One specifi c example where the business would see savings was in time spent maintaining security settings. Each user had their own password, and changes needed to be propagated to every fi le in the solution. It was taking about 1.5 hours every time there was a password change. Also, the ability to do live schema changes in FileMaker Pro 7 would allow Productive Computing, Inc. to be more responsive to change requests, and they wouldn’t need to kick users out of the system (resulting in a productivity loss, of course) if there were mid-day changes that needed to be put into place immediately. (Please be aware there’s a potential of damage to the schema if the application crashes or is forced quit while modifying the schema of a live database.)
The estimate given for the project was 90 to 120 hours, the majority of which was allocated to changing the security system so that it used Active Directory to authenticate users. Conversion planning began the week of February 8, 2005, and several test conversions were performed that week. An offl ine copy of the system was created, and development was frozen for all but the most essential of tasks. The conversion was slated to take a little more than a month of calendar time, and Marc knew that if changes were made to the live system during that time, his team would have version issues to deal with.
Besides the test conversions, one of the fi rst tasks was to run the fi les through Metadata Magic. There were a few redundant fi le references that Marc wanted to get cleaned up, and he also liked the schema documentation that it provided; he knew that having a ready reference to track down dependencies would come in handy.

Best Practices: Upgrading to FileMaker 8 Migrating pre-.fp7 solutions to FileMaker 8 and getting the most of out the new FileMaker 8 features page 16
The fi les, even full of data, took less than an hour to convert. A few hours were spent right after conversion getting the fi les organized and making some minor changes. For instance, all of the fi les other than the Main fi le were set to not display in the Open Remote File dialog. The system also had two fi elds in each fi le that were set to auto enter the User name when records were created and modifi ed. These were changed to auto enter the Account Name, a new and more robust option in FileMaker Pro 7. Finally, the team streamlined the opening scripts to “cut out some fat” that was unnecessary.
On the security front, Marc and his team worked with their client to defi ne the privilege sets that would be needed going forward. Marc even created a database to help keep track of the options that were planned. In the end, they removed all of the accounts and privilege sets from the fi les, and then added back 7 new privilege sets and 7 accounts, which were authenticated via Active Directory. Setting up Active Directory and installing the new security options turned out to be one of the easiest parts of the project, requiring less than 20 hours of effort, the lion’s share of which was meeting time.
Post-conversion testing revealed several other minor issues that needed to be addressed. These mostly involved scripts that needed to be altered slightly to retain their intended behavior. Some scripts that ended with a Set Field needed to have a Commit Records step added to them. There were also some areas where navigation needed to be adjusted to avoid having windows activate in the wrong places. The old system contained a few instances of the Today function; this function isn’t supported in FileMaker Pro 7/8, so the conversion routine makes fi eld and script changes to retain the old behavior. Marc found that he needed to undo the work done by the conversion routine as it didn’t quite result in the intended behavior. Marc suggests that others planning a conversion project get rid of the Today function pre-conversion to avoid the issue altogether.
Since the goals of the migration could be achieved without consolidating tables, there was little work done on the Relationships Graph after conversion. In some high-use fi les, Marc organized the graph by rearranging objects and using colors to groups of table occurrences. For sanity, he also renamed some table occurrences where the old relationship name didn’t clarify its role.
Marc recognized that there were many areas where he could rework things using new FileMaker Pro 7 functions to make them more streamlined, and thereby reduce the number of fi elds, table occurrences, and scripts. But he also knew this was a potentially bottomless pit of tasks, and that most would in the end add little value to his client.
The new system, begun on February 8th, was ready to be deployed by the end of March. The cutover was planned over a weekend so that there would be time for a fi nal data import and testing. Marc took a fresh copy of the old system at end of day on Friday, converted it to FileMaker Pro 7, and then imported data into the new version. During the post-conversion work, no fi elds were renamed or deleted, so the import simply needed to match fi eld names. Marc cautions others to remember not to choose the option to perform lookups and auto-entry options on import, as that would likely alter the data. After the import, the auto-entered serial numbers in each table needed to be manually updated to the proper sequence number. This fi nal import took about 7 hours.
The system went live on Monday morning. FileMaker Pro 7 had previously been installed on all the user’s workstations, so over the weekend, the old desktop shortcuts were simply replaced with new ones that pointed to the new server. There were a few minor issues that cropped up the fi rst day, such as a fi nd routine that no longer worked properly and some page setups, which had to be fi xed on the fl y, but there were no major problems. The main reaction from users was glee over how much faster the new version opened up.
Best Practices: Upgrading to FileMaker 8 Migrating pre-.fp7 solutions to FileMaker 8 and getting the most of out the new FileMaker 8 features page 17
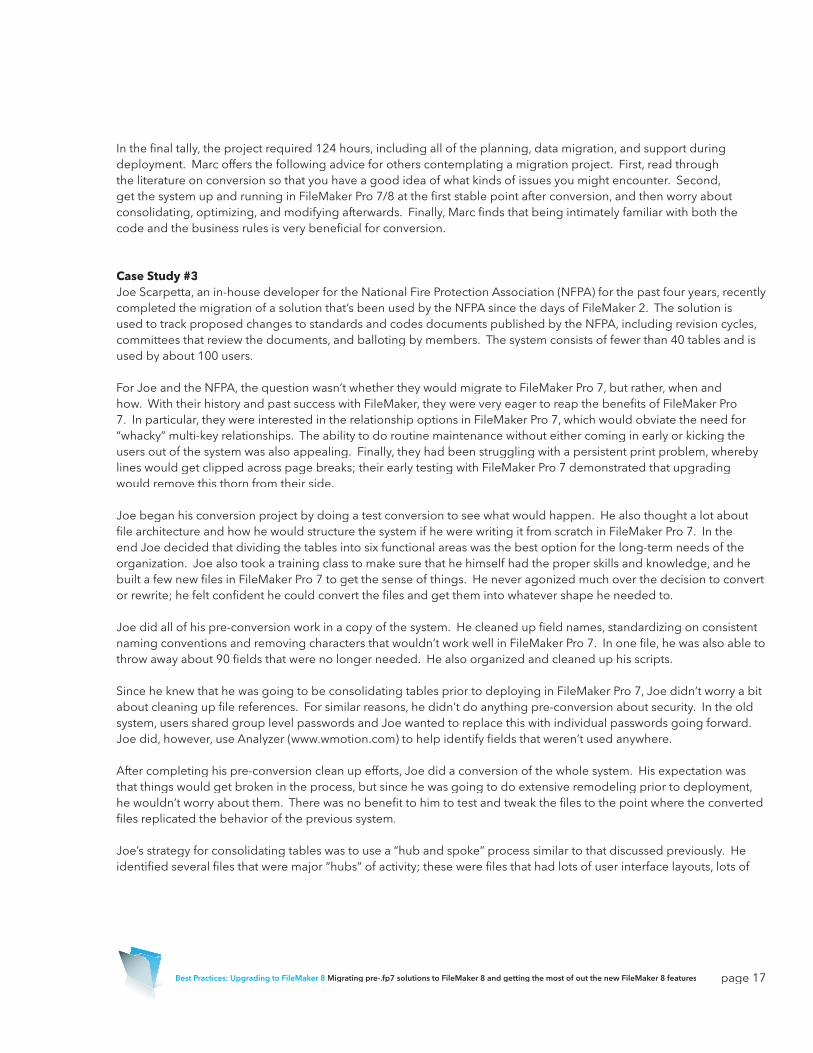
In the fi nal tally, the project required 124 hours, including all of the planning, data migration, and support during deployment. Marc offers the following advice for others contemplating a migration project. First, read through the literature on conversion so that you have a good idea of what kinds of issues you might encounter. Second, get the system up and running in FileMaker Pro 7/8 at the fi rst stable point after conversion, and then worry about consolidating, optimizing, and modifying afterwards. Finally, Marc fi nds that being intimately familiar with both the code and the business rules is very benefi cial for conversion.
Case Study #3Joe Scarpetta, an in-house developer for the National Fire Protection Association (NFPA) for the past four years, recently completed the migration of a solution that’s been used by the NFPA since the days of FileMaker 2. The solution is used to track proposed changes to standards and codes documents published by the NFPA, including revision cycles, committees that review the documents, and balloting by members. The system consists of fewer than 40 tables and is used by about 100 users.
For Joe and the NFPA, the question wasn’t whether they would migrate to FileMaker Pro 7, but rather, when and how. With their history and past success with FileMaker, they were very eager to reap the benefi ts of FileMaker Pro 7. In particular, they were interested in the relationship options in FileMaker Pro 7, which would obviate the need for “whacky” multi-key relationships. The ability to do routine maintenance without either coming in early or kicking the users out of the system was also appealing. Finally, they had been struggling with a persistent print problem, whereby lines would get clipped across page breaks; their early testing with FileMaker Pro 7 demonstrated that upgrading would remove this thorn from their side.
Joe began his conversion project by doing a test conversion to see what would happen. He also thought a lot about fi le architecture and how he would structure the system if he were writing it from scratch in FileMaker Pro 7. In the end Joe decided that dividing the tables into six functional areas was the best option for the long-term needs of the organization. Joe also took a training class to make sure that he himself had the proper skills and knowledge, and he built a few new fi les in FileMaker Pro 7 to get the sense of things. He never agonized much over the decision to convert or rewrite; he felt confi dent he could convert the fi les and get them into whatever shape he needed to.
Joe did all of his pre-conversion work in a copy of the system. He cleaned up fi eld names, standardizing on consistent naming conventions and removing characters that wouldn’t work well in FileMaker Pro 7. In one fi le, he was also able to throw away about 90 fi elds that were no longer needed. He also organized and cleaned up his scripts.
Since he knew that he was going to be consolidating tables prior to deploying in FileMaker Pro 7, Joe didn’t worry a bit about cleaning up fi le references. For similar reasons, he didn’t do anything pre-conversion about security. In the old system, users shared group level passwords and Joe wanted to replace this with individual passwords going forward. Joe did, however, use Analyzer (www.wmotion.com) to help identify fi elds that weren’t used anywhere.
After completing his pre-conversion clean up efforts, Joe did a conversion of the whole system. His expectation was that things would get broken in the process, but since he was going to do extensive remodeling prior to deployment, he wouldn’t worry about them. There was no benefi t to him to test and tweak the fi les to the point where the converted fi les replicated the behavior of the previous system.
Joe’s strategy for consolidating tables was to use a “hub and spoke” process similar to that discussed previously. He identifi ed several fi les that were major “hubs” of activity; these were fi les that had lots of user interface layouts, lots of

Best Practices: Upgrading to FileMaker 8 Migrating pre-.fp7 solutions to FileMaker 8 and getting the most of out the new FileMaker 8 features page 18
scripts, and lots of fi elds. Other fi les were clearly “spokes” whose purpose was to support or feed information to one or more hub fi les. The spokes characteristically didn’t have many user layouts or scripts.
To aid with the consolidation, Joe used a tool called FM Robot (www.newmillennium.com). He wishes, though, that he had had the new ability in FileMaker Pro 8 and FileMaker Pro 8 Advanced for copying and importing tables, as that would have simplifi ed and sped up his consolidation work. Joe’s fi rst hub was the Address Book. His approach was to bring in one table at a time, fi xing relationships, fi le references, layouts, scripts, and value lists before moving onto the next table. He’s on the fence about whether this fi le by fi le approach was better than working fi rst with all the tables, then the value lists, then the layouts, scripts, etc. He felt it gave him more control and made the process easier to manage. In the end, one of his “hubs”, the Committee fi le, now has 11 tables in it.
Joe defi nitely had a “while I’m at it” approach to the project. As long as he was going to be looking at all the layouts and scripts, he fi gured he might as well take advantage of new features and benefi ts of FileMaker Pro 7 rather than mechanically recreate what he had before. As an example, he used the new window management features to improve the workfl ow.
As he brought new tables into a hub, Joe would fi x the Relationships Graph to remove compound keys and constant relationships. He also found that he didn’t need many unstored calculations whose purpose was merely to display information in a portal. Many other fi elds became obsolete when Joe used the new Field Behavior function of only allowing access to a fi eld in a particular mode. Previously, Joe had to have “masking” calculation fi elds that sat on top of and protected the actual data fi elds. Joe also removed all previous security settings and instead created a system that authenticated users via Active Directory.
Another area where Joe took advantage of new features in FileMaker Pro 7 was scripting. He was able to use script parameters to reduce the number of scripts, and he found that the ability to defi ne multiple sorts, fi nds, and print set ups within a single script helped reduce this number even further. And because of the table consolidation, there was much less need for calling external sub-scripts. The numbers tell the story the best: the new system has 70% fewer scripts than the original (along with 30% fewer layouts and 25% fewer fi elds!)
Joe found that the new relationship possibilities in FileMaker Pro 7 meant that he could do without a plug-in that had been used for portal fi ltering. He also wants more control over menus and now with the ability of FileMaker Pro 8 Advanced to customize menus, Joe can take advantage of that feature as well.
Joe didn’t have an urgent need (such as fi le size issues) driving the move to FileMaker Pro 7, so he was able to take his time and do things the way he wanted. Development and testing spanned several months of occasional work, during which time Joe did frequent data migrations from FileMaker Pro 6 so that he knew how long it would take and so that he’d have good data for users to test against. His data migration plan was to take a copy of the production system, convert it, then manually import data into the new system. He was able to import matching names because of the pre-conversion work he had done to clean up fi eld names; he made it one of his “rules” while working on the converted system that he could add and delete fi elds, but not rename them. Another reason the data migration went smoothly was that the underlying data model didn’t change, despite all of the workfl ow and interface changes.
The new system underwent signifi cant testing prior to its fi nal deployment. Since there were no possible confl icts with the old system, users were able to have access to both systems simultaneously. Because of this, the actual deployment went very smoothly, and no major issues have been encountered to date with the new system.

Best Practices: Upgrading to FileMaker 8 Migrating pre-.fp7 solutions to FileMaker 8 and getting the most of out the new FileMaker 8 features page 19
If he had the opportunity to do another migration project in the future, there’s nothing signifi cant Joe would have done differently. He thinks that having FileMaker Pro 8 and FileMaker Pro 8 Advanced, however, would have made the job quicker and easier.
ConclusionsOver the past 18 months, many best practices regarding migration to FileMaker Pro 7/8 have emerged. The key elements of a successful migration are proper planning, explicit goals, rational expectations, and careful execution of post-conversion strategies. In truth, most typical business solutions can be converted with little risk and minimal effort. While operating within some suggested frameworks for converting fi les and working with converted fi les, the actual decision about migration strategies are, and need to be, driven by the goals of the project. Without explicit goals, it’s likely that time will be wasted on activities with little or no return.
New tools in FileMaker Pro 8 Advanced for working with the database schema, especially copying and pasting scripts and tables, will result in even more migration projects than have already taken place. Moreover, since many of the features of FileMaker Pro 8 can be realized through surface level changes (as opposed to many of the FileMaker Pro 7 features), it will be easy to take advantage of those new features, even in a solution that’s been deployed as a basic conversion.