microSTATION Easy Start Guide - Korg
75
Easy Start Guide Guide de démarrage Schnellstart Guía Rápida 1 S G F E
Transcript of microSTATION Easy Start Guide - Korg
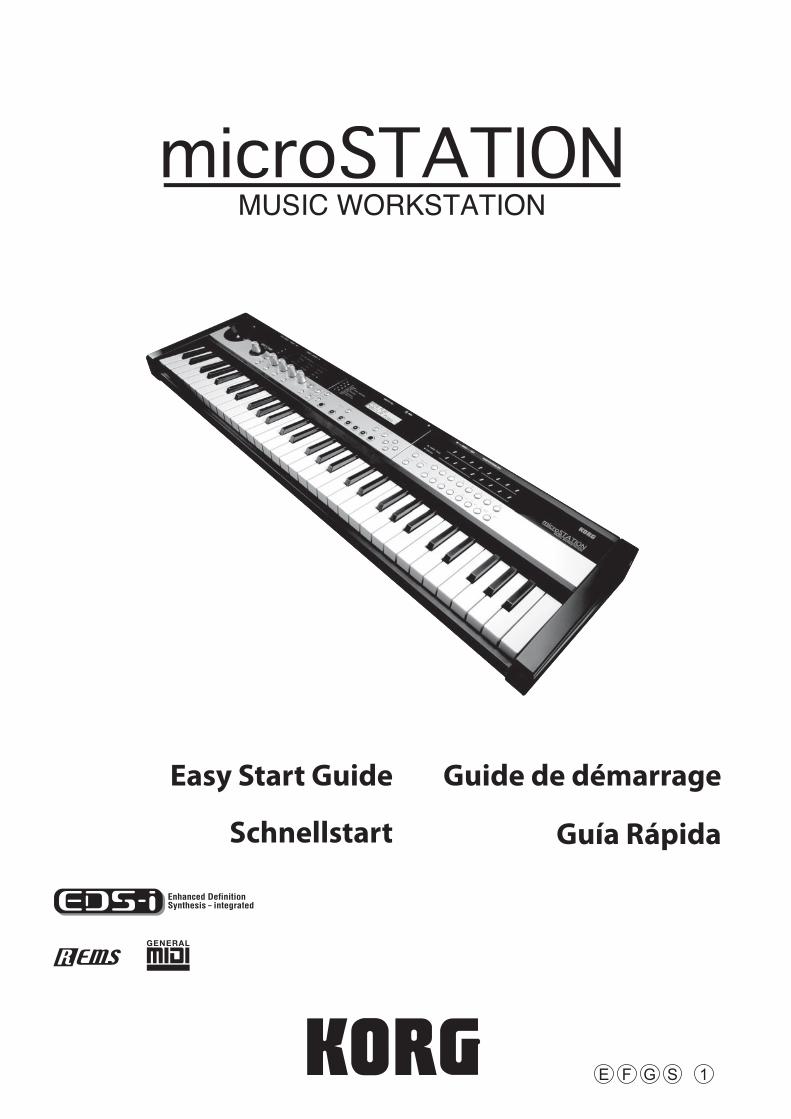
Easy Start Guide Guide de démarrage
Schnellstart Guía Rápida
1SGFE
Easy Start Guide . . . . . . . . . . . . . . . . . . . . . . . . . . . . . . . . . . . . . . . . . . .3
Guide de démarrage . . . . . . . . . . . . . . . . . . . . . . . . . . . . . . . . . . . . . 21
Blitzstart . . . . . . . . . . . . . . . . . . . . . . . . . . . . . . . . . . . . . . . . . . . . . . . . 39
Guía Rápida . . . . . . . . . . . . . . . . . . . . . . . . . . . . . . . . . . . . . . . . . . . . . 57
Easy Start Guide
4
Precautions
LocationUsing the unit in the following locations can result in a malfunction.
• In direct sunlight• Locations of extreme temperature or humidity• Excessively dusty or dirty locations• Locations of excessive vibration• Close to magnetic fields
Power supply Please connect the designated AC adapter to an AC outlet of the correct voltage. Do not connect it to an AC outlet of voltage other than that for which your unit is intended.
Interference with other electrical devicesRadios and televisions placed nearby may experience reception interference. Operate this unit at a suitable distance from radios and televisions.
HandlingTo avoid breakage, do not apply excessive force to the switches or controls.
CareIf the exterior becomes dirty, wipe it with a clean, dry cloth. Do not use liquid cleaners such as benzene or thinner, or cleaning compounds or flammable polishes.
Keep this manualAfter reading this manual, please keep it for later reference.
Keeping foreign matter out of your equipmentNever set any container with liquid in it near this equipment. If liquid gets into the equipment, it could cause a breakdown, fire, or electrical shock.Be careful not to let metal objects get into the equipment. If something does slip into the equipment, unplug the AC adapter from the wall outlet. Then contact your nearest Korg dealer or the store where the equipment was purchased.
Data handlingIncorrect operation or malfunction may cause the contents of memory to be lost, so we recommend that you save important data on media. Please be aware that Korg will accept no responsibility for any damages which may result from loss of data.
THE FCC REGULATION WARNING (for USA)
This equipment has been tested and found to comply with the lim-its for a Class B digital device, pursuant to Part 15 of the FCC Rules. These limits are designed to provide reasonable protection against harmful interference in a residential installation. This equipment generates, uses, and can radiate radio frequency energy and, if not installed and used in accordance with the instructions, may cause harmful interference to radio communications. How-ever, there is no guarantee that interference will not occur in a par-ticular installation. If this equipment does cause harmful interference to radio or television reception, which can be deter-mined by turning the equipment off and on, the user is encouraged to try to correct the interference by one or more of the following measures:• Reorient or relocate the receiving antenna.• Increase the separation between the equipment and receiver.• Connect the equipment into an outlet on a circuit different from that to
which the receiver is connected.• Consult the dealer or an experienced radio/TV technician for help.
Unauthorized changes or modification to this system can void the user’s authority to operate this equipment.
Notice regarding disposal (EU only)When this “crossed‐out wheeled bin” symbol is displayed on the product, owner’s manual, battery, or battery package, it signifies that when you wish to dispose of this product, manual, package or battery you must do so in an approved manner. Do not discard this product, manual, package or battery along with ordinary household waste. Disposing in
the correct manner will prevent harm to human health and potential damage to the environment. Since the correct method of disposal will depend on the applicable laws and regulations in your locality, please contact your local administrative body for details. If the battery contains heavy metals in excess of the regulated amount, a chemical symbol is displayed below the “crossed‐out wheeled bin” symbol on the battery or battery package.

Table of Contents
About this manual ................................................................................... 6
Main features ...........................................................................................7
Front and rear panels .............................................................................. 8
Front panel ................................................................................................................... 8
Rear panel ..................................................................................................................... 9
Connections and power ........................................................................10
Selecting modes ....................................................................................11
Selecting and playing sounds ..............................................................12
Selecting programs .................................................................................................12
Selecting combinations .........................................................................................13
Using controllers to modify the sound ................................................14
Using the arpeggiator ...........................................................................15
Saving (writing) a program or combination .......................................16
Loading and playing the demo songs .................................................17
Loading the demo songs ......................................................................................17
Playing the demo songs ........................................................................................18
Auto song setup ....................................................................................18
Saving to SD card ..................................................................................19
Specifications (abbreviated) ................................................................20
5
6
About this manualAbout the documentation and how to use itThe microSTATION is shipped with the following documentation.
• microSTATION Easy Start Guide
• microSTATION Operation Guide (PDF)
• microSTATION Parameter Guide (PDF)
• microSTATION USB‐MIDI Setup Guide (PDF)
• microSTATION Editor/Plug‐In Editor User’s Guide (PDF)
• microSTATION Voice Name List (PDF)
The PDF files listed above are in the “MANUALS” folder of the included disc. The manual for the KORG USB‐MIDI driver is located in the same folder as the driver.
microSTATION Easy Start GuideRead this first. It explains how to perform basic operations.
microSTATION Operation GuideThis explains what each part of the microSTATION does, how to connect the device and perform basic operations, as well as providing a summary of each mode, and explaining the basic knowledge you’ll need in each mode to edit sounds and record on the sequencer. This manual also explains the arpeggiator and effects.
In addition, it provides troubleshooting help, a list of error messages, and specifications.
microSTATION Parameter GuideThis provides a detailed explanation of the microSTATION’s parameters, organized by mode and page. Refer to this guide when you would like to learn more about an unfamiliar parameter.
microSTATION USB-MIDI Setup GuideThis explains how to install the Korg USB‐MIDI driver and set up the microSTATION.
microSTATION Editor/Plug-In Editor User’s GuideThis explains how to set up and use the microSTATION Editor/Plug‐In Editor and the microSTATION Editor/Plug‐In Editor.
microSTATION Voice Name ListThis lists the names of the multisamples, drum samples, and factory‐set combinations, programs, drum kits, user arpeggio patterns, and demo songs inside the microSTATION. Refer to this when you want to learn more about the preloaded content.
Conventions in this manual
Abbreviations for the manuals: OG, PGIn the documentation, references to the manuals are abbreviated as follows.
OG: Operation Guide
PG: Parameter Guide
Parameters in the LCD display screen “ “Parameters displayed in the LCD screen are enclosed in double quotation marks “ “.
Symbols , , Note, TipsThese symbols respectively indicate a caution, a MIDI‐related explanation, a supplementary note, or a tip.
Example screen displaysThe parameter values shown in the example screens of this manual are only for explanatory purposes, and may not necessary match the values that appear in the Display of your instrument.
MIDI-related explanationsCC# is an abbreviation for Control Change Number.
In explanations of MIDI messages, numbers in square brackets [ ] always indicate hexadecimal numbers.
Thank you for purchasing the Korg microSTATION Music Workstation. To help you get the most out of your new instrument, please read this manual carefully.
Main features
Easy Start Guide
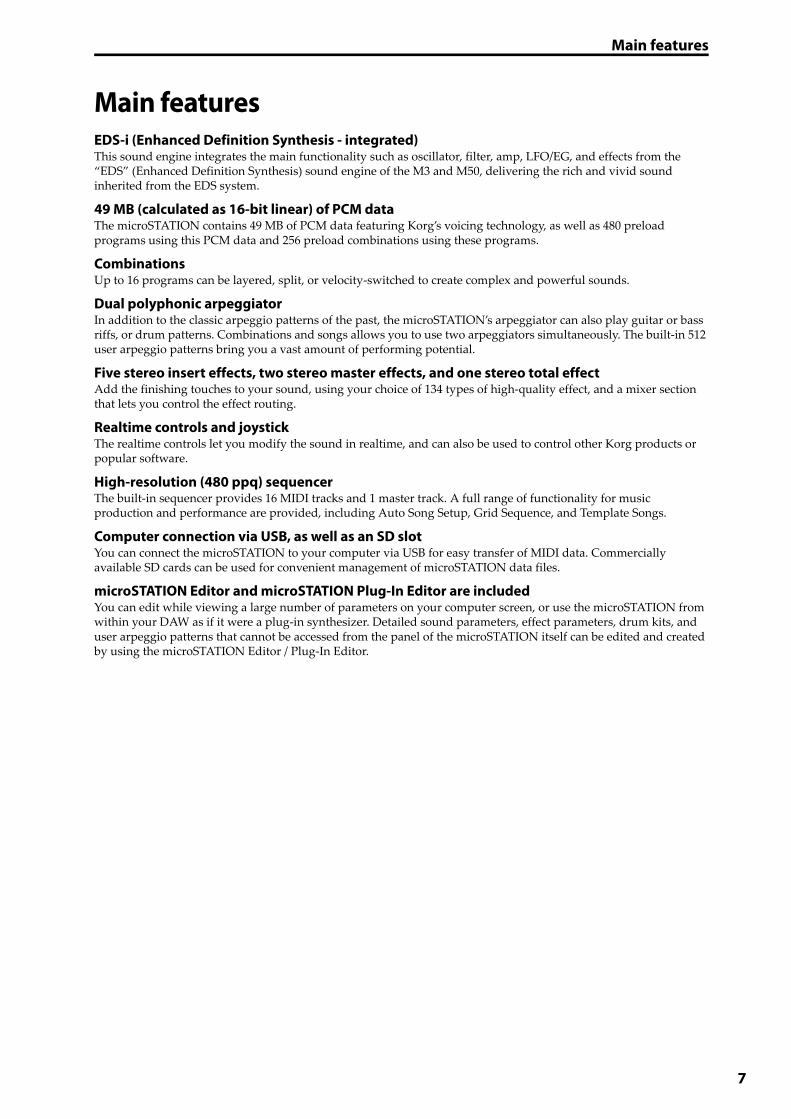
Main featuresEDS-i (Enhanced Definition Synthesis - integrated)This sound engine integrates the main functionality such as oscillator, filter, amp, LFO/EG, and effects from the “EDS” (Enhanced Definition Synthesis) sound engine of the M3 and M50, delivering the rich and vivid sound inherited from the EDS system.
49 MB (calculated as 16-bit linear) of PCM dataThe microSTATION contains 49 MB of PCM data featuring Korg’s voicing technology, as well as 480 preload programs using this PCM data and 256 preload combinations using these programs.
CombinationsUp to 16 programs can be layered, split, or velocity‐switched to create complex and powerful sounds.
Dual polyphonic arpeggiatorIn addition to the classic arpeggio patterns of the past, the microSTATION’s arpeggiator can also play guitar or bass riffs, or drum patterns. Combinations and songs allows you to use two arpeggiators simultaneously. The built‐in 512 user arpeggio patterns bring you a vast amount of performing potential.
Five stereo insert effects, two stereo master effects, and one stereo total effectAdd the finishing touches to your sound, using your choice of 134 types of high‐quality effect, and a mixer section that lets you control the effect routing.
Realtime controls and joystickThe realtime controls let you modify the sound in realtime, and can also be used to control other Korg products or popular software.
High-resolution (480 ppq) sequencerThe built‐in sequencer provides 16 MIDI tracks and 1 master track. A full range of functionality for music production and performance are provided, including Auto Song Setup, Grid Sequence, and Template Songs.
Computer connection via USB, as well as an SD slotYou can connect the microSTATION to your computer via USB for easy transfer of MIDI data. Commercially available SD cards can be used for convenient management of microSTATION data files.
microSTATION Editor and microSTATION Plug-In Editor are includedYou can edit while viewing a large number of parameters on your computer screen, or use the microSTATION from within your DAW as if it were a plug‐in synthesizer. Detailed sound parameters, effect parameters, drum kits, and user arpeggio patterns that cannot be accessed from the panel of the microSTATION itself can be edited and created by using the microSTATION Editor / Plug‐In Editor.
7
Easy Start Guide
8
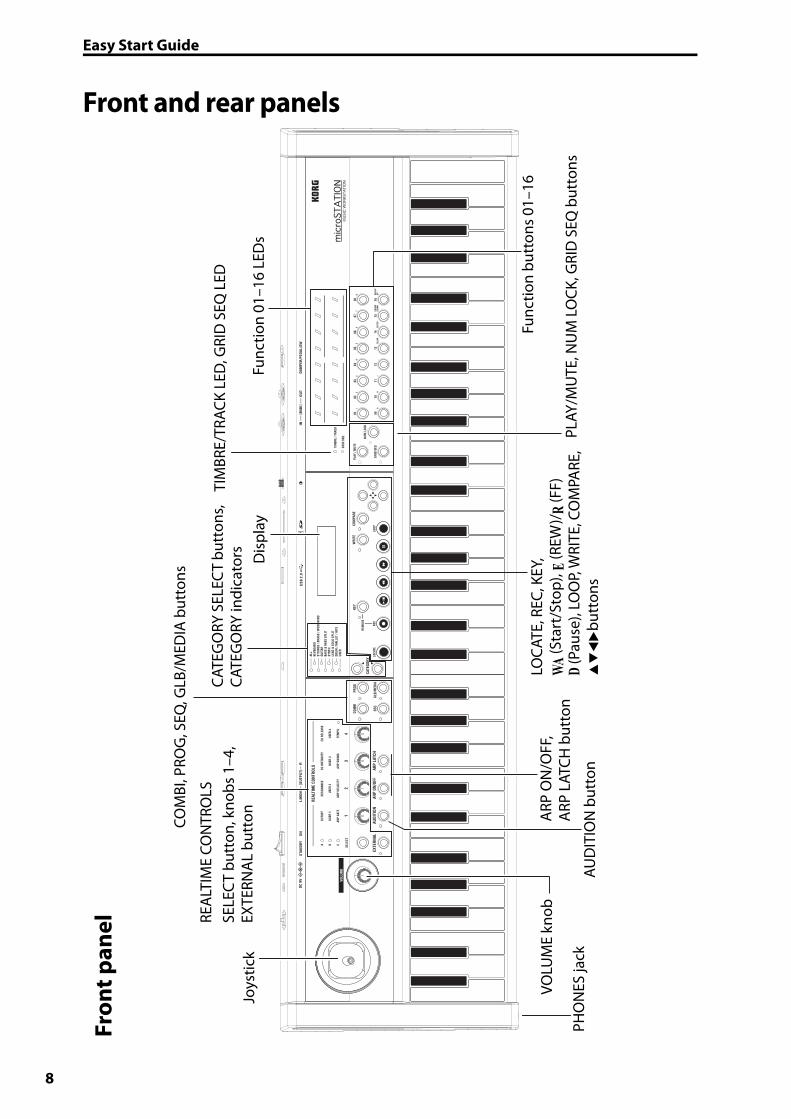
Front and rear panels
Joys
tick
REA
LTIM
E CO
NTR
OLS
SELE
CT
butt
on, k
nobs
1–4
, EX
TERN
AL
butt
onCOM
BI, P
ROG
, SEQ
, GLB
/MED
IA b
utto
ns
CATE
GO
RY S
ELEC
T bu
tton
s, CA
TEG
ORY
indi
cato
rs Dis
play
TIM
BRE/
TRAC
K LE
D, G
RID
SEQ
LED
Func
tion
01–1
6 LE
Ds
PHO
NES
jack
VOLU
ME
knob
AUD
ITIO
N b
utto
n
ARP
ON
/OFF
, A
RP L
ATCH
but
ton
LOCA
TE, R
EC, K
EY,
WA
(Sta
rt/S
top)
, E (R
EW)/R
(FF)
D (P
ause
), LO
OP,
WRI
TE, C
OM
PARE
,
butt
ons
PLAY
/MU
TE, N
UM
LO
CK, G
RID
SEQ
but
tons
Func
tion
butt
ons
01–1
6
Fron
t pan
el
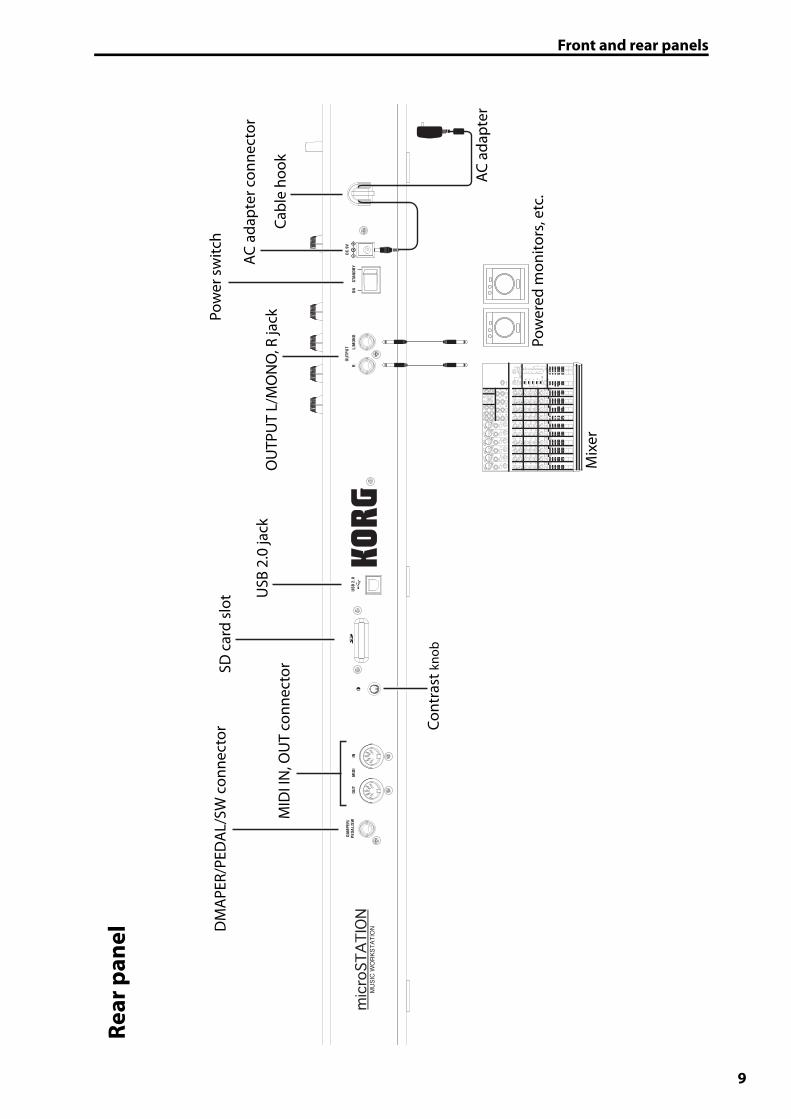
Front and rear panels
Cont
rast
kno
b
MID
I IN
, OU
T co
nnec
torSD
car
d sl
ot
USB
2.0
jack
Pow
ered
mon
itors
, etc
.
Mix
er
AC a
dapt
er
Pow
er s
witc
hD
MA
PER/
PED
AL/
SW c
onne
ctor
OU
TPU
T L/
MO
NO
, R ja
ckAC
ada
pter
con
nect
or
Cabl
e ho
ok
Rear
pan
el
9
Easy Start Guide
10
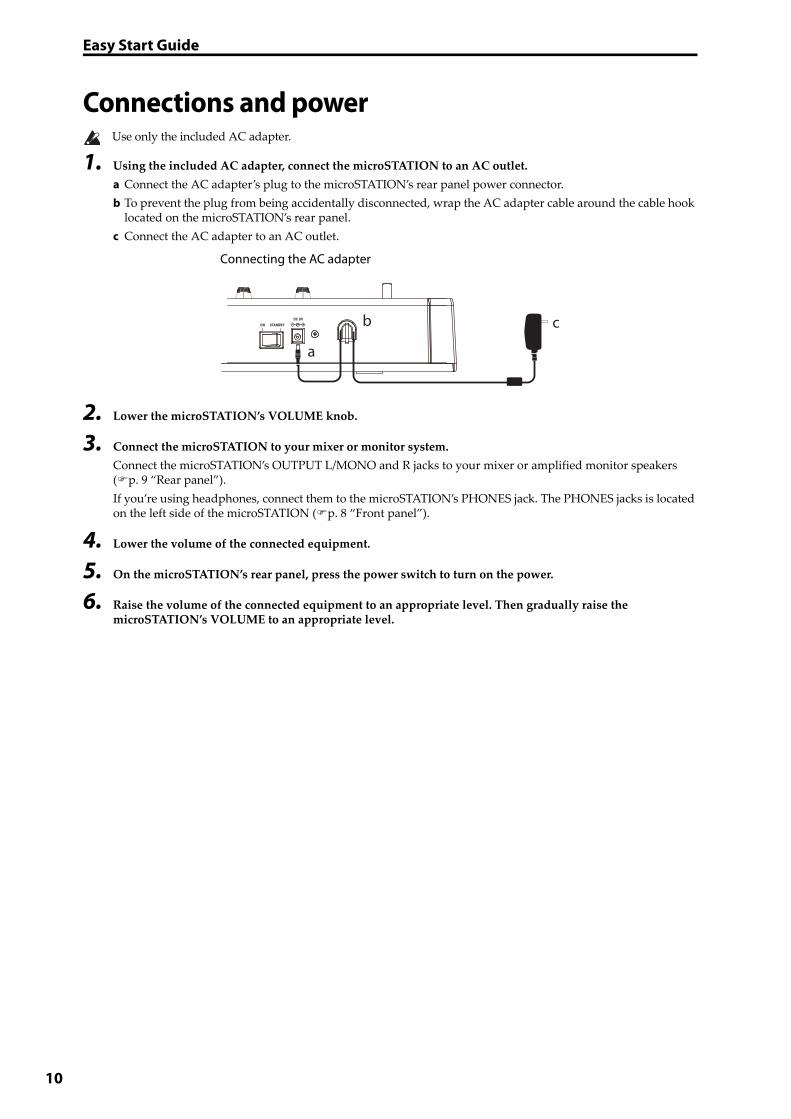
Connections and power Use only the included AC adapter.
1. Using the included AC adapter, connect the microSTATION to an AC outlet.
a Connect the AC adapter’s plug to the microSTATION’s rear panel power connector.
b To prevent the plug from being accidentally disconnected, wrap the AC adapter cable around the cable hook located on the microSTATION’s rear panel.
c Connect the AC adapter to an AC outlet.
2. Lower the microSTATION’s VOLUME knob.
3. Connect the microSTATION to your mixer or monitor system.
Connect the microSTATION’s OUTPUT L/MONO and R jacks to your mixer or amplified monitor speakers (p. 9 “Rear panel”).
If you’re using headphones, connect them to the microSTATION’s PHONES jack. The PHONES jacks is located on the left side of the microSTATION (p. 8 “Front panel”).
4. Lower the volume of the connected equipment.
5. On the microSTATION’s rear panel, press the power switch to turn on the power.
6. Raise the volume of the connected equipment to an appropriate level. Then gradually raise the microSTATION’s VOLUME to an appropriate level.
a
b c
Connecting the AC adapter
Selecting modes
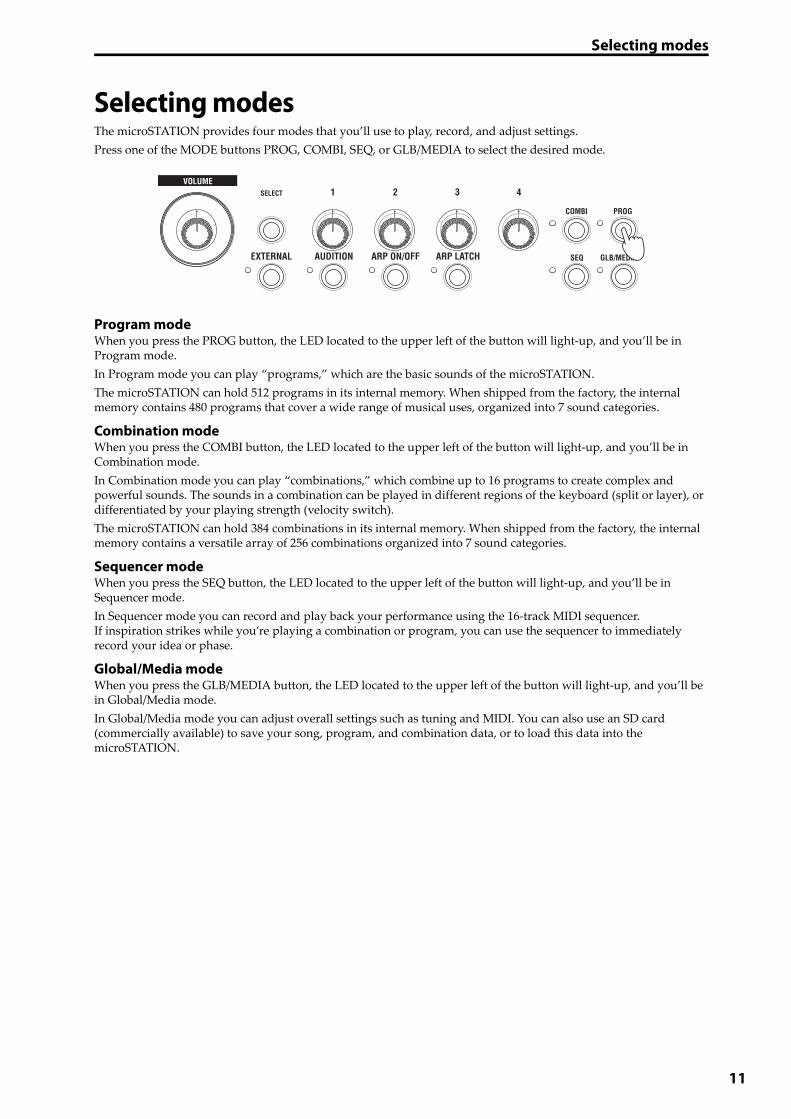
Selecting modesThe microSTATION provides four modes that you’ll use to play, record, and adjust settings.
Press one of the MODE buttons PROG, COMBI, SEQ, or GLB/MEDIA to select the desired mode.
Program modeWhen you press the PROG button, the LED located to the upper left of the button will light‐up, and you’ll be in Program mode.
In Program mode you can play “programs,” which are the basic sounds of the microSTATION.
The microSTATION can hold 512 programs in its internal memory. When shipped from the factory, the internal memory contains 480 programs that cover a wide range of musical uses, organized into 7 sound categories.
Combination modeWhen you press the COMBI button, the LED located to the upper left of the button will light‐up, and you’ll be in Combination mode.
In Combination mode you can play “combinations,” which combine up to 16 programs to create complex and powerful sounds. The sounds in a combination can be played in different regions of the keyboard (split or layer), or differentiated by your playing strength (velocity switch).
The microSTATION can hold 384 combinations in its internal memory. When shipped from the factory, the internal memory contains a versatile array of 256 combinations organized into 7 sound categories.
Sequencer modeWhen you press the SEQ button, the LED located to the upper left of the button will light‐up, and you’ll be in Sequencer mode.
In Sequencer mode you can record and play back your performance using the 16‐track MIDI sequencer. If inspiration strikes while you’re playing a combination or program, you can use the sequencer to immediately record your idea or phase.
Global/Media modeWhen you press the GLB/MEDIA button, the LED located to the upper left of the button will light‐up, and you’ll be in Global/Media mode.
In Global/Media mode you can adjust overall settings such as tuning and MIDI. You can also use an SD card (commercially available) to save your song, program, and combination data, or to load this data into the microSTATION.
11
Easy Start Guide
12
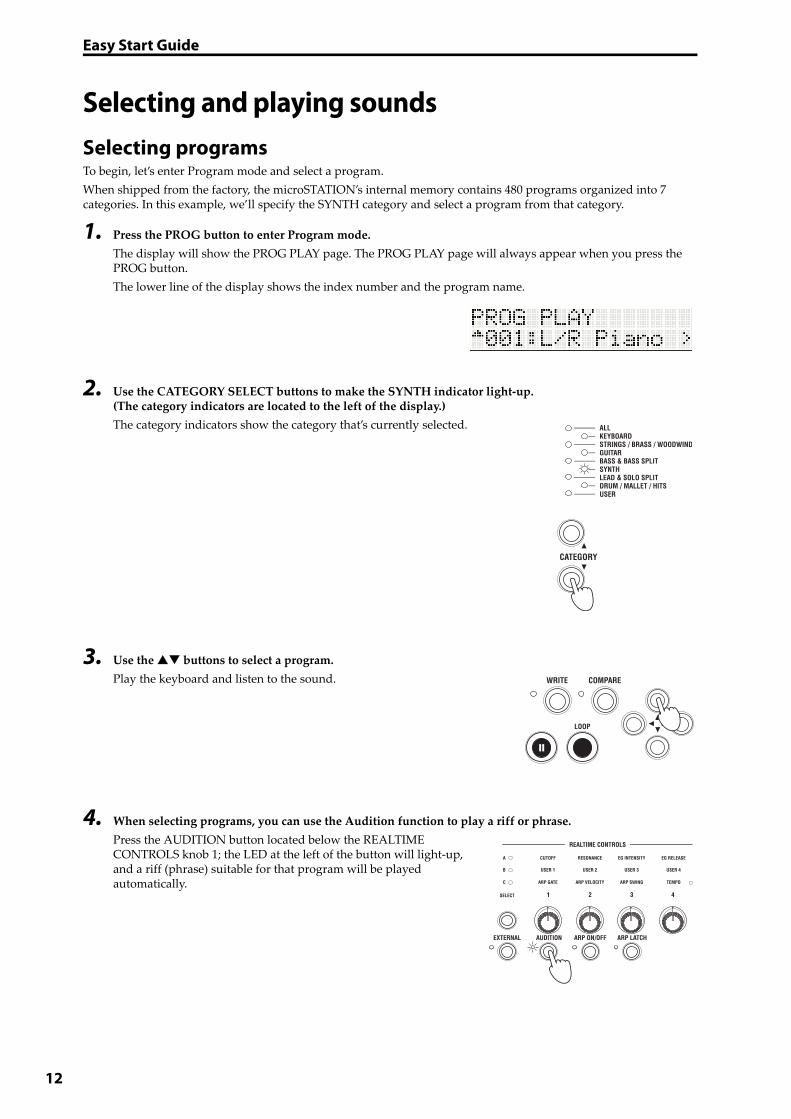
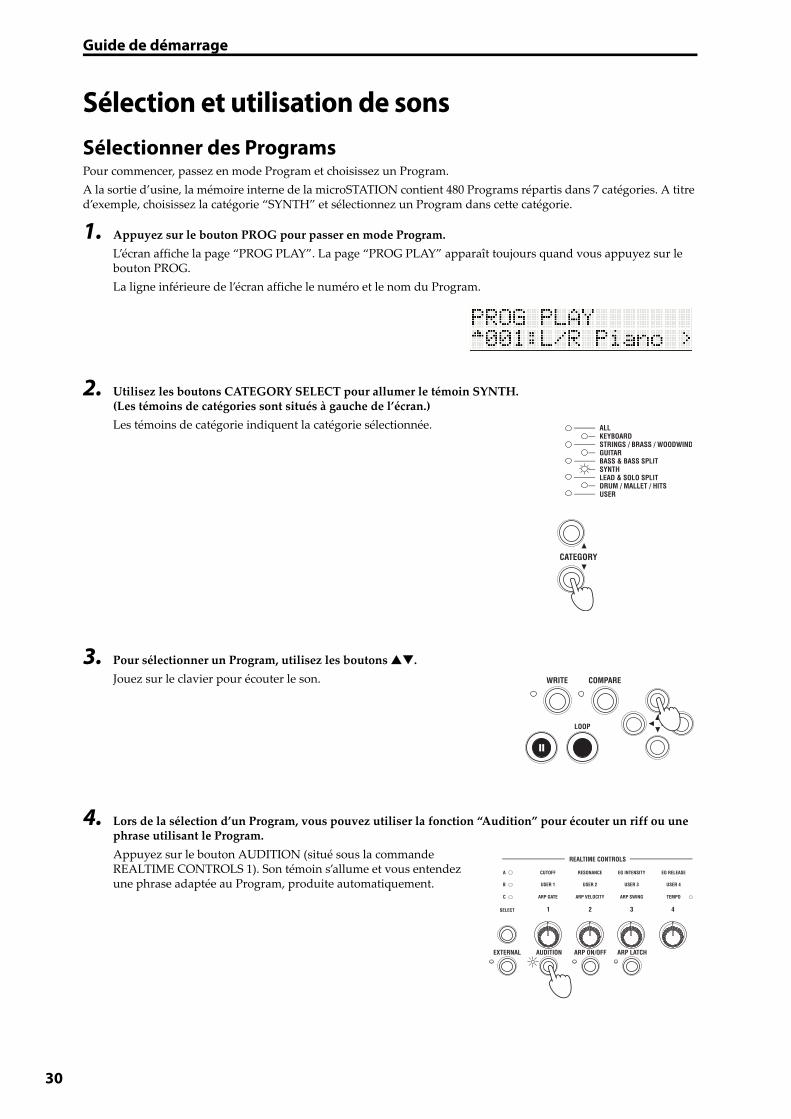
Selecting and playing soundsSelecting programsTo begin, let’s enter Program mode and select a program.
When shipped from the factory, the microSTATION’s internal memory contains 480 programs organized into 7 categories. In this example, we’ll specify the SYNTH category and select a program from that category.
1. Press the PROG button to enter Program mode.
The display will show the PROG PLAY page. The PROG PLAY page will always appear when you press the PROG button.
The lower line of the display shows the index number and the program name.
2. Use the CATEGORY SELECT buttons to make the SYNTH indicator light‐up. (The category indicators are located to the left of the display.)
The category indicators show the category that’s currently selected.
3. Use the buttons to select a program.
Play the keyboard and listen to the sound.
4. When selecting programs, you can use the Audition function to play a riff or phrase.
Press the AUDITION button located below the REALTIME CONTROLS knob 1; the LED at the left of the button will light‐up, and a riff (phrase) suitable for that program will be played automatically.
Selecting and playing sounds
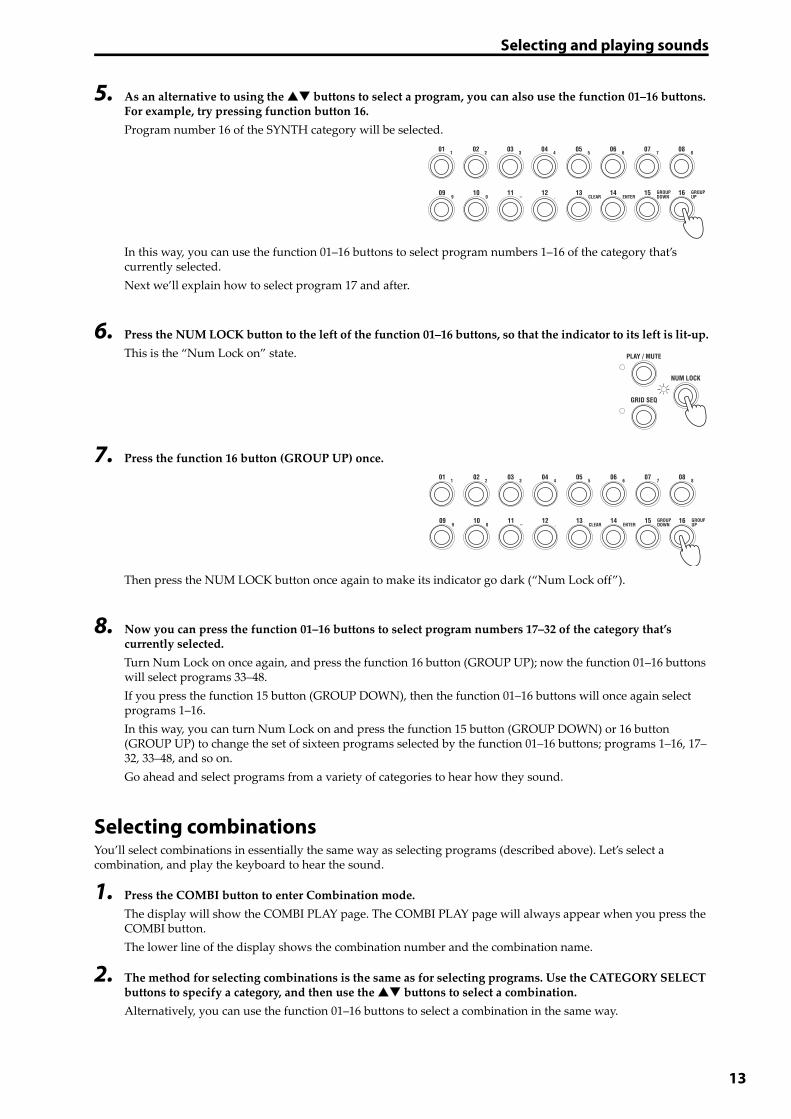
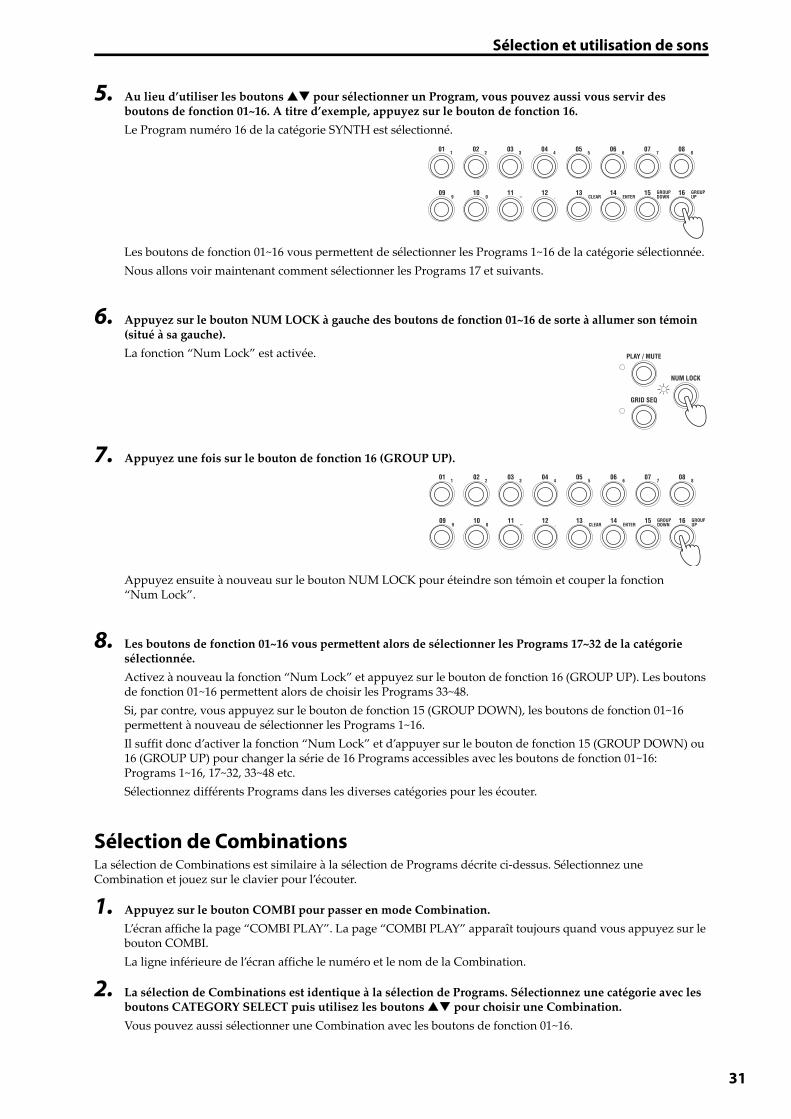
5. As an alternative to using the buttons to select a program, you can also use the function 01–16 buttons. For example, try pressing function button 16.
Program number 16 of the SYNTH category will be selected.
In this way, you can use the function 01–16 buttons to select program numbers 1–16 of the category that’s currently selected.
Next we’ll explain how to select program 17 and after.
6. Press the NUM LOCK button to the left of the function 01–16 buttons, so that the indicator to its left is lit‐up.
This is the “Num Lock on” state.
7. Press the function 16 button (GROUP UP) once.
Then press the NUM LOCK button once again to make its indicator go dark (“Num Lock off”).
8. Now you can press the function 01–16 buttons to select program numbers 17–32 of the category that’s currently selected.
Turn Num Lock on once again, and press the function 16 button (GROUP UP); now the function 01–16 buttons will select programs 33–48.
If you press the function 15 button (GROUP DOWN), then the function 01–16 buttons will once again select programs 1–16.
In this way, you can turn Num Lock on and press the function 15 button (GROUP DOWN) or 16 button (GROUP UP) to change the set of sixteen programs selected by the function 01–16 buttons; programs 1–16, 17–32, 33–48, and so on.
Go ahead and select programs from a variety of categories to hear how they sound.
Selecting combinationsYou’ll select combinations in essentially the same way as selecting programs (described above). Let’s select a combination, and play the keyboard to hear the sound.
1. Press the COMBI button to enter Combination mode.
The display will show the COMBI PLAY page. The COMBI PLAY page will always appear when you press the COMBI button.
The lower line of the display shows the combination number and the combination name.
2. The method for selecting combinations is the same as for selecting programs. Use the CATEGORY SELECT buttons to specify a category, and then use the buttons to select a combination.
Alternatively, you can use the function 01–16 buttons to select a combination in the same way.
13
Easy Start Guide
14
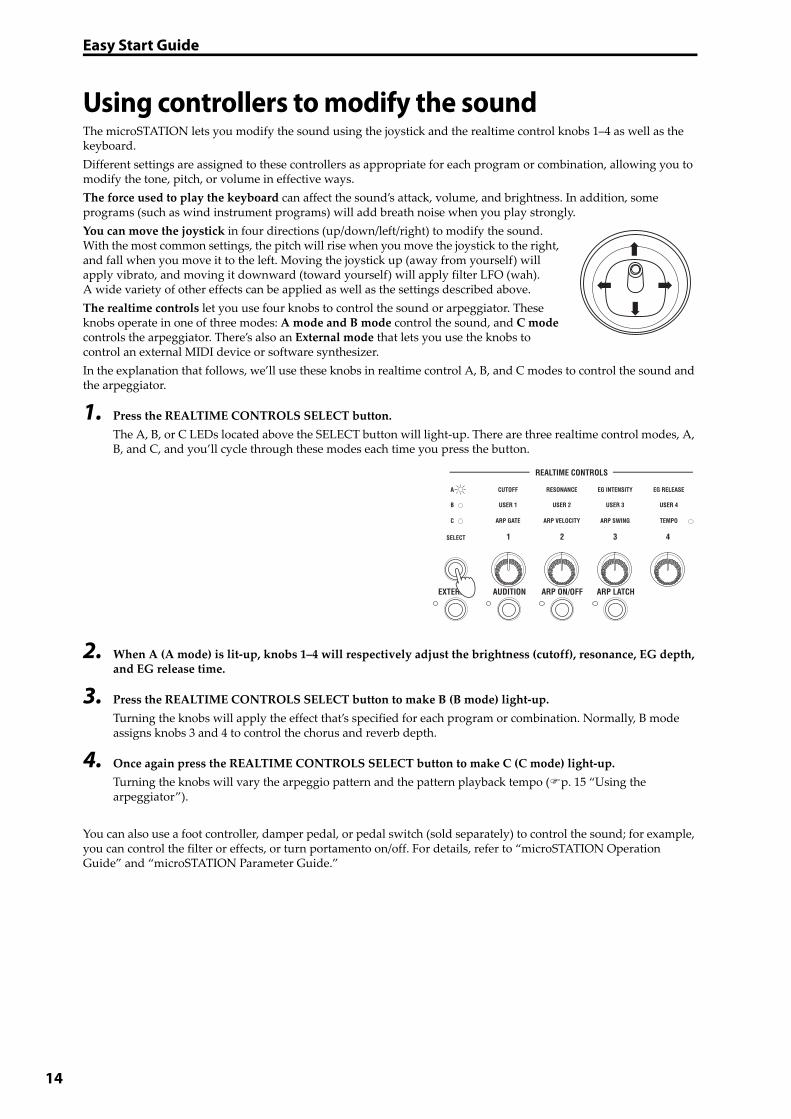
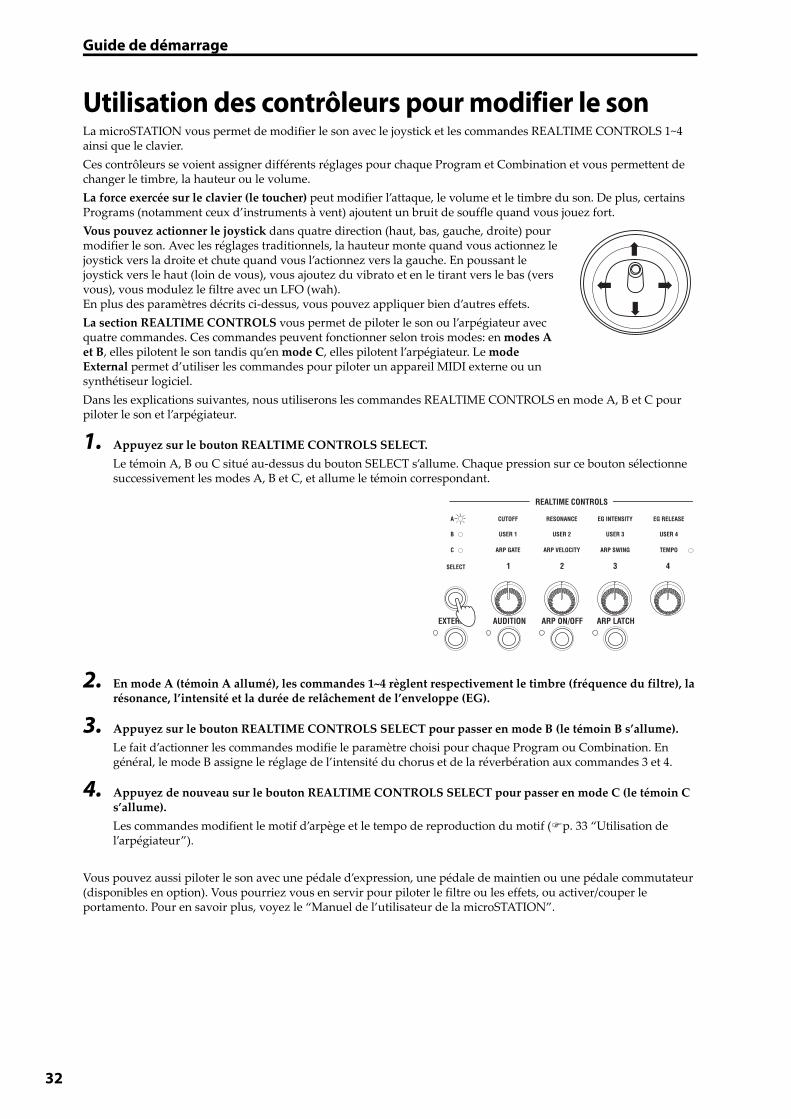
Using controllers to modify the soundThe microSTATION lets you modify the sound using the joystick and the realtime control knobs 1–4 as well as the keyboard.
Different settings are assigned to these controllers as appropriate for each program or combination, allowing you to modify the tone, pitch, or volume in effective ways.
The force used to play the keyboard can affect the sound’s attack, volume, and brightness. In addition, some programs (such as wind instrument programs) will add breath noise when you play strongly.
You can move the joystick in four directions (up/down/left/right) to modify the sound. With the most common settings, the pitch will rise when you move the joystick to the right, and fall when you move it to the left. Moving the joystick up (away from yourself) will apply vibrato, and moving it downward (toward yourself) will apply filter LFO (wah). A wide variety of other effects can be applied as well as the settings described above.
The realtime controls let you use four knobs to control the sound or arpeggiator. These knobs operate in one of three modes: A mode and B mode control the sound, and C mode controls the arpeggiator. There’s also an External mode that lets you use the knobs to control an external MIDI device or software synthesizer.
In the explanation that follows, we’ll use these knobs in realtime control A, B, and C modes to control the sound and the arpeggiator.
1. Press the REALTIME CONTROLS SELECT button.
The A, B, or C LEDs located above the SELECT button will light‐up. There are three realtime control modes, A, B, and C, and you’ll cycle through these modes each time you press the button.
2. When A (A mode) is lit‐up, knobs 1–4 will respectively adjust the brightness (cutoff), resonance, EG depth, and EG release time.
3. Press the REALTIME CONTROLS SELECT button to make B (B mode) light‐up.
Turning the knobs will apply the effect that’s specified for each program or combination. Normally, B mode assigns knobs 3 and 4 to control the chorus and reverb depth.
4. Once again press the REALTIME CONTROLS SELECT button to make C (C mode) light‐up.
Turning the knobs will vary the arpeggio pattern and the pattern playback tempo (p. 15 “Using the arpeggiator”).
You can also use a foot controller, damper pedal, or pedal switch (sold separately) to control the sound; for example, you can control the filter or effects, or turn portamento on/off. For details, refer to “microSTATION Operation Guide” and “microSTATION Parameter Guide.”
Using the arpeggiator
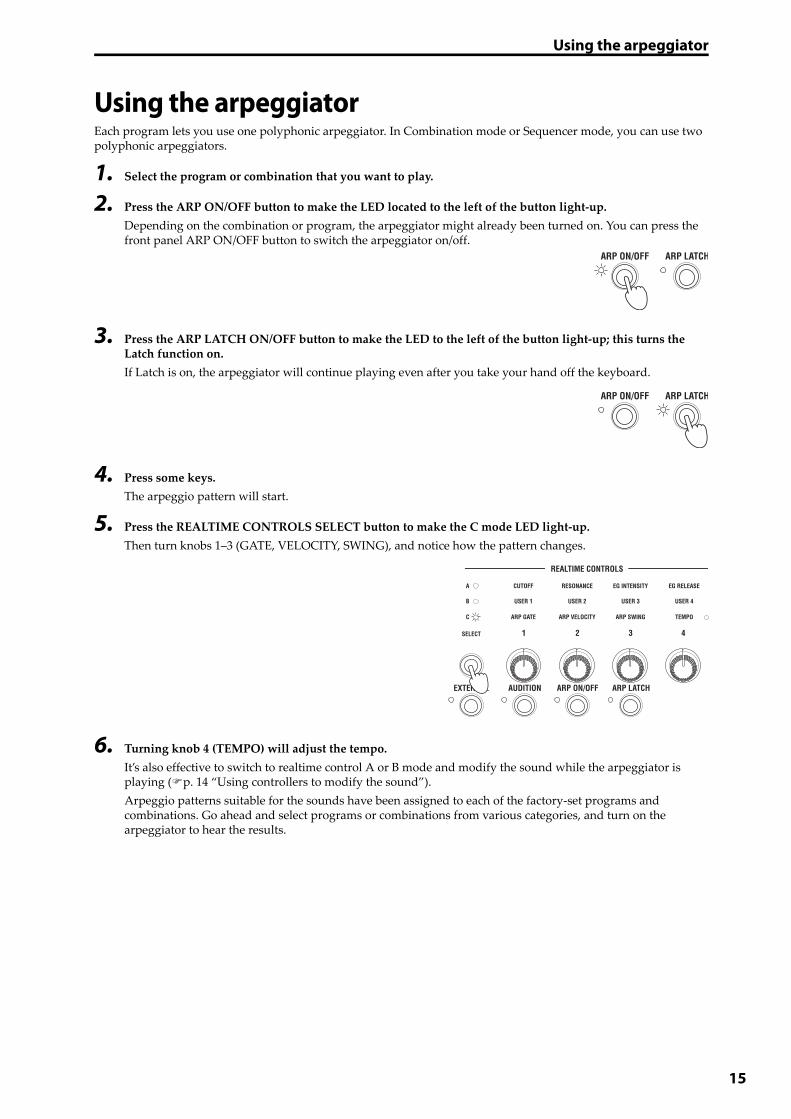
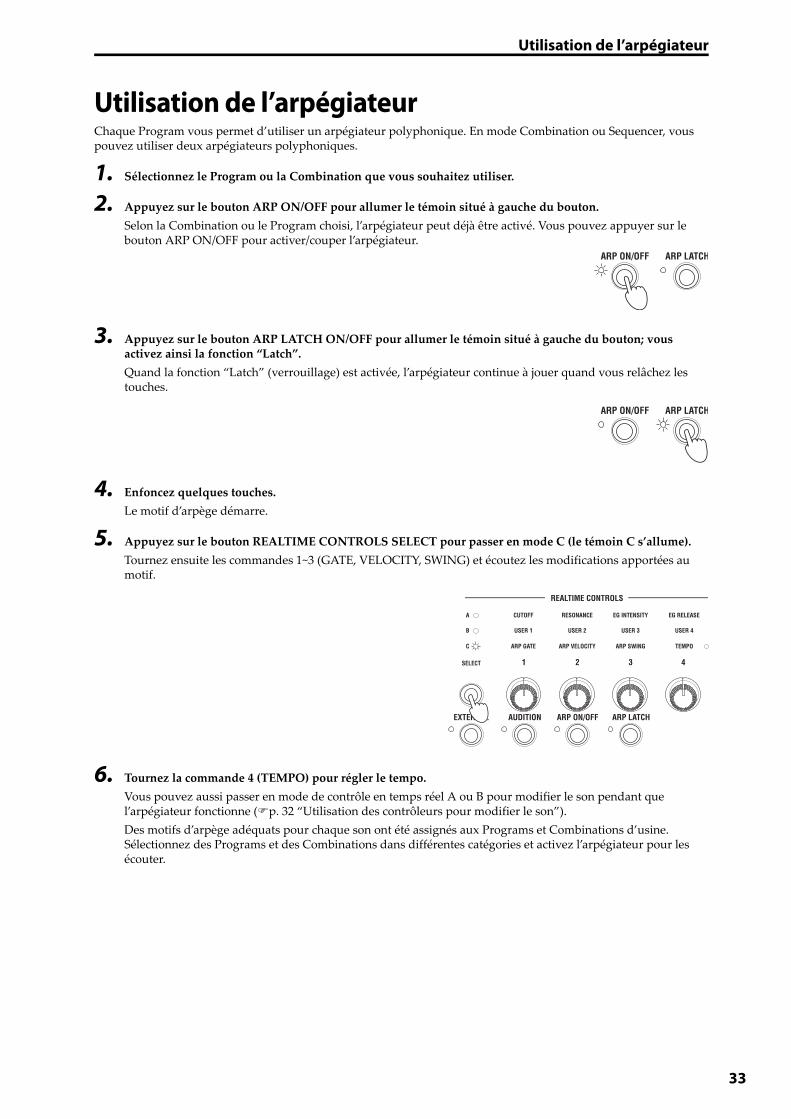
Using the arpeggiatorEach program lets you use one polyphonic arpeggiator. In Combination mode or Sequencer mode, you can use two polyphonic arpeggiators.
1. Select the program or combination that you want to play.
2. Press the ARP ON/OFF button to make the LED located to the left of the button light‐up.
Depending on the combination or program, the arpeggiator might already been turned on. You can press the front panel ARP ON/OFF button to switch the arpeggiator on/off.
3. Press the ARP LATCH ON/OFF button to make the LED to the left of the button light‐up; this turns the Latch function on.
If Latch is on, the arpeggiator will continue playing even after you take your hand off the keyboard.
4. Press some keys.
The arpeggio pattern will start.
5. Press the REALTIME CONTROLS SELECT button to make the C mode LED light‐up.
Then turn knobs 1–3 (GATE, VELOCITY, SWING), and notice how the pattern changes.
6. Turning knob 4 (TEMPO) will adjust the tempo.
It’s also effective to switch to realtime control A or B mode and modify the sound while the arpeggiator is playing (p. 14 “Using controllers to modify the sound”).
Arpeggio patterns suitable for the sounds have been assigned to each of the factory‐set programs and combinations. Go ahead and select programs or combinations from various categories, and turn on the arpeggiator to hear the results.
15
Easy Start Guide
16
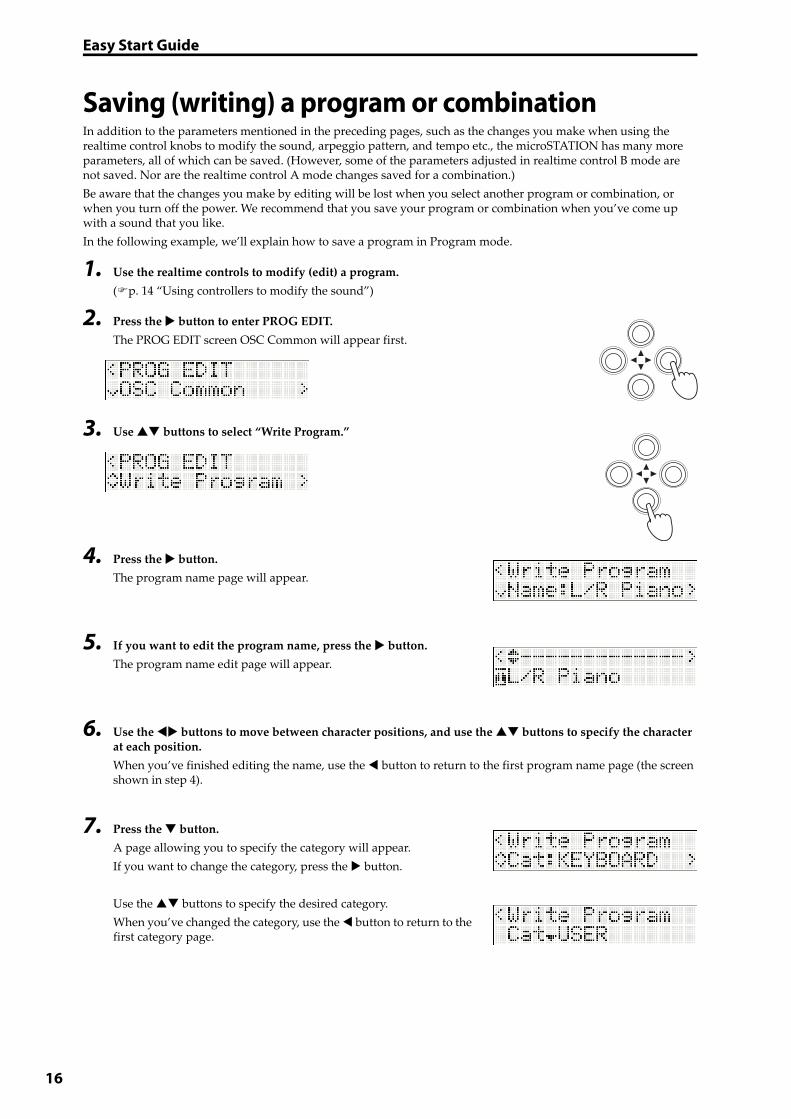
Saving (writing) a program or combinationIn addition to the parameters mentioned in the preceding pages, such as the changes you make when using the realtime control knobs to modify the sound, arpeggio pattern, and tempo etc., the microSTATION has many more parameters, all of which can be saved. (However, some of the parameters adjusted in realtime control B mode are not saved. Nor are the realtime control A mode changes saved for a combination.)
Be aware that the changes you make by editing will be lost when you select another program or combination, or when you turn off the power. We recommend that you save your program or combination when you’ve come up with a sound that you like.
In the following example, we’ll explain how to save a program in Program mode.
1. Use the realtime controls to modify (edit) a program.
(p. 14 “Using controllers to modify the sound”)
2. Press the button to enter PROG EDIT.
The PROG EDIT screen OSC Common will appear first.
3. Use buttons to select “Write Program.”
4. Press the button.
The program name page will appear.
5. If you want to edit the program name, press the button.
The program name edit page will appear.
6. Use the buttons to move between character positions, and use the buttons to specify the character at each position.
When you’ve finished editing the name, use the button to return to the first program name page (the screen shown in step 4).
7. Press the button.
A page allowing you to specify the category will appear.
If you want to change the category, press the button.
Use the buttons to specify the desired category.
When you’ve changed the category, use the button to return to the first category page.
Loading and playing the demo songs
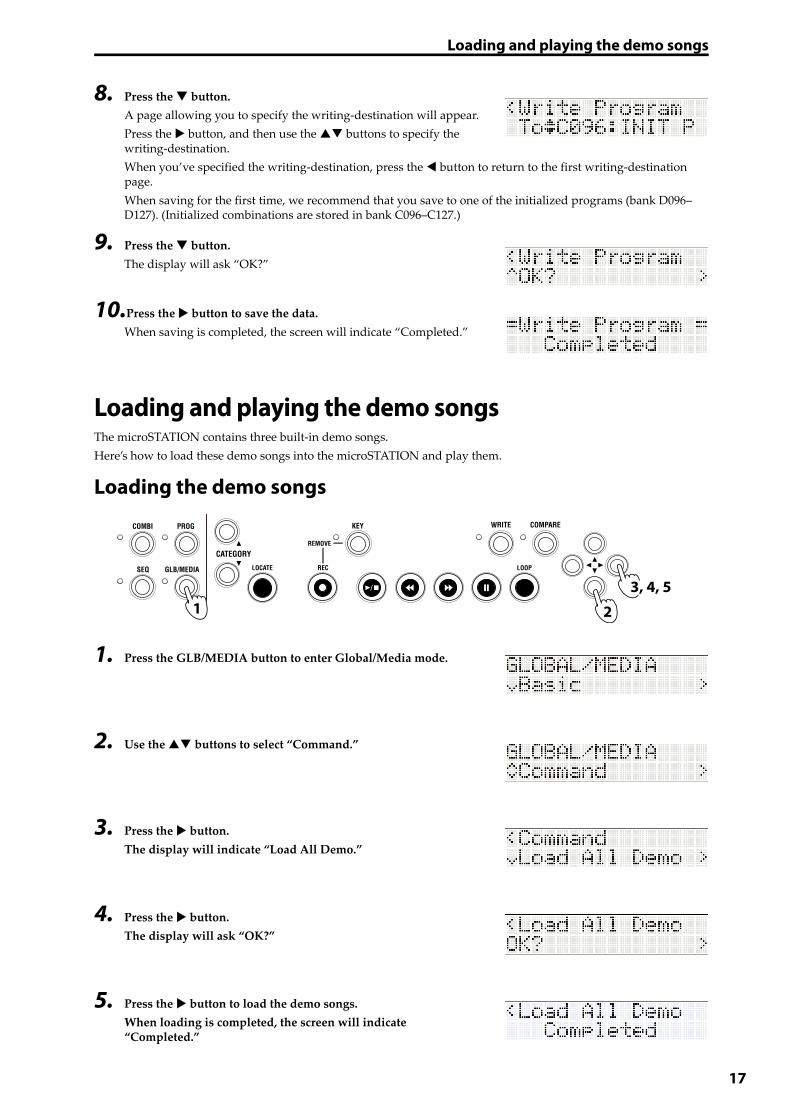
8. Press the button.
A page allowing you to specify the writing‐destination will appear.
Press the button, and then use the buttons to specify the writing‐destination.
When you’ve specified the writing‐destination, press the button to return to the first writing‐destination page.
When saving for the first time, we recommend that you save to one of the initialized programs (bank D096–D127). (Initialized combinations are stored in bank C096–C127.)
9. Press the button.
The display will ask “OK?”
10.Press the button to save the data.When saving is completed, the screen will indicate “Completed.”
Loading and playing the demo songsThe microSTATION contains three built‐in demo songs.
Here’s how to load these demo songs into the microSTATION and play them.
Loading the demo songs
1. Press the GLB/MEDIA button to enter Global/Media mode.
2. Use the buttons to select “Command.”
3. Press the button.
The display will indicate “Load All Demo.”
4. Press the button.
The display will ask “OK?”
5. Press the button to load the demo songs.
When loading is completed, the screen will indicate “Completed.”
1 2
3, 4, 5
17
Easy Start Guide
18
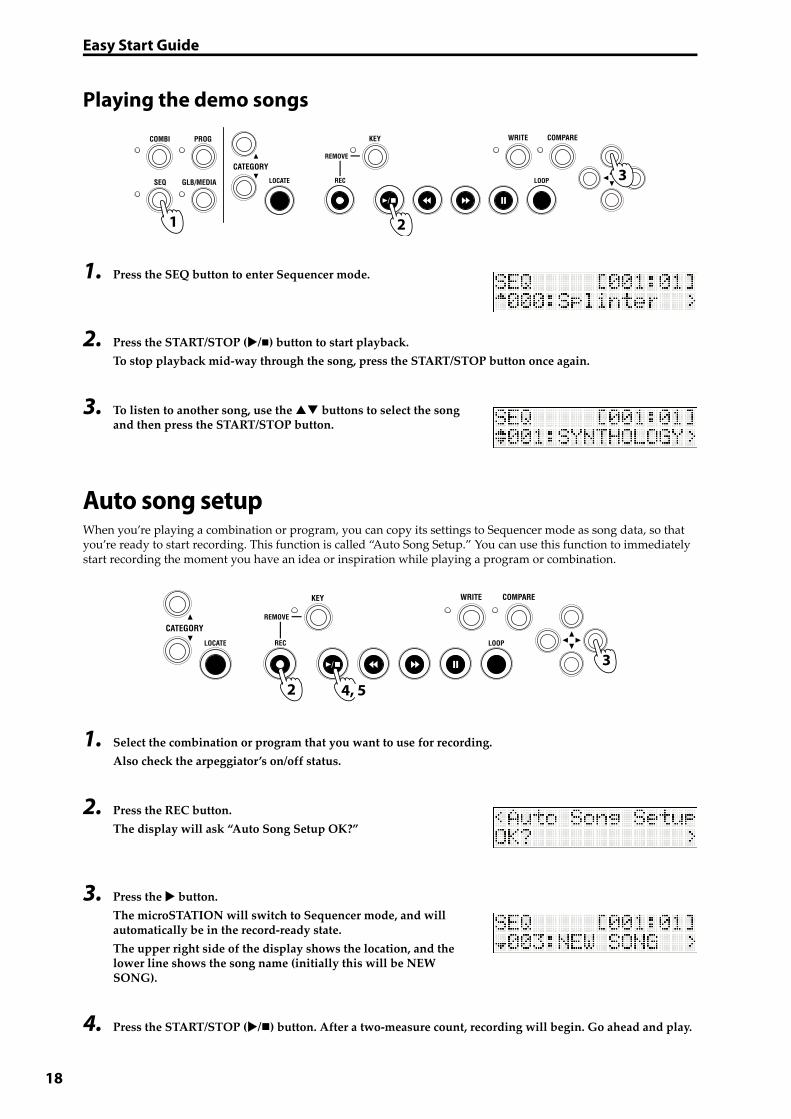
Playing the demo songs
1. Press the SEQ button to enter Sequencer mode.
2. Press the START/STOP (/) button to start playback.
To stop playback mid‐way through the song, press the START/STOP button once again.
3. To listen to another song, use the buttons to select the song and then press the START/STOP button.
Auto song setupWhen you’re playing a combination or program, you can copy its settings to Sequencer mode as song data, so that you’re ready to start recording. This function is called “Auto Song Setup.” You can use this function to immediately start recording the moment you have an idea or inspiration while playing a program or combination.
1. Select the combination or program that you want to use for recording.
Also check the arpeggiator’s on/off status.
2. Press the REC button.
The display will ask “Auto Song Setup OK?”
3. Press the button.
The microSTATION will switch to Sequencer mode, and will automatically be in the record‐ready state.
The upper right side of the display shows the location, and the lower line shows the song name (initially this will be NEW SONG).
4. Press the START/STOP (/) button. After a two‐measure count, recording will begin. Go ahead and play.
1 2
3
3
2 4, 5
Saving to an SD card
5. When you’ve finished recording, press the START/STOP button; recording will stop.
6. Play back the performance that you just recorded. Press the START/STOP button and playback will begin. Press the START/STOP button once again to stop playback.
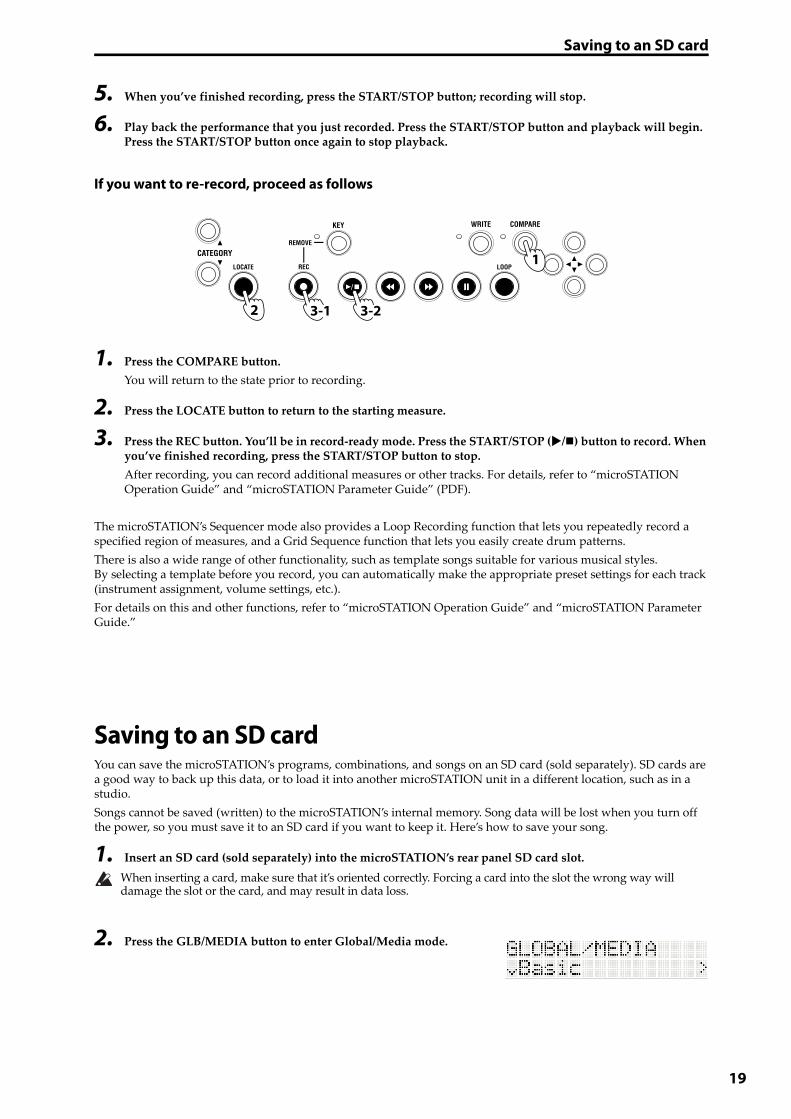
If you want to re-record, proceed as follows
1. Press the COMPARE button.
You will return to the state prior to recording.
2. Press the LOCATE button to return to the starting measure.
3. Press the REC button. You’ll be in record‐ready mode. Press the START/STOP (/) button to record. When you’ve finished recording, press the START/STOP button to stop.
After recording, you can record additional measures or other tracks. For details, refer to “microSTATION Operation Guide” and “microSTATION Parameter Guide” (PDF).
The microSTATION’s Sequencer mode also provides a Loop Recording function that lets you repeatedly record a specified region of measures, and a Grid Sequence function that lets you easily create drum patterns.
There is also a wide range of other functionality, such as template songs suitable for various musical styles. By selecting a template before you record, you can automatically make the appropriate preset settings for each track (instrument assignment, volume settings, etc.).
For details on this and other functions, refer to “microSTATION Operation Guide” and “microSTATION Parameter Guide.”
Saving to an SD cardYou can save the microSTATION’s programs, combinations, and songs on an SD card (sold separately). SD cards are a good way to back up this data, or to load it into another microSTATION unit in a different location, such as in a studio.
Songs cannot be saved (written) to the microSTATION’s internal memory. Song data will be lost when you turn off the power, so you must save it to an SD card if you want to keep it. Here’s how to save your song.
1. Insert an SD card (sold separately) into the microSTATION’s rear panel SD card slot.
When inserting a card, make sure that it’s oriented correctly. Forcing a card into the slot the wrong way will damage the slot or the card, and may result in data loss.
2. Press the GLB/MEDIA button to enter Global/Media mode.
1
2 3-1 3-2
19
Easy Start Guide
20
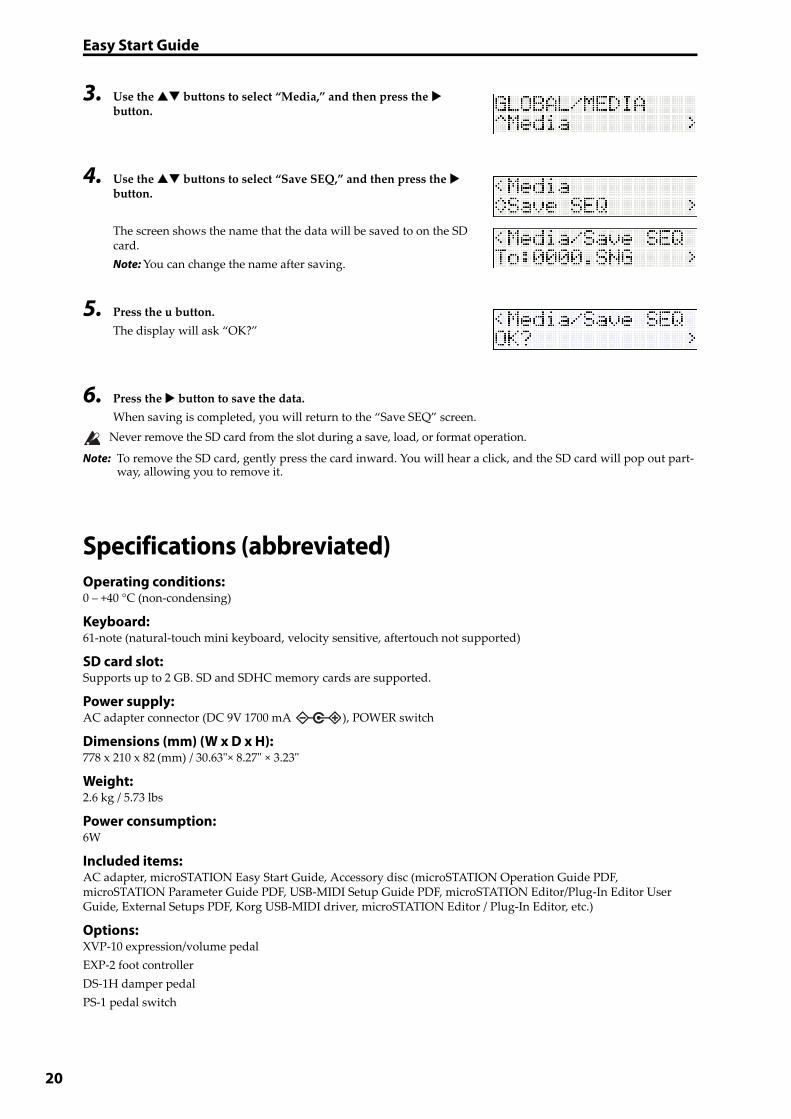
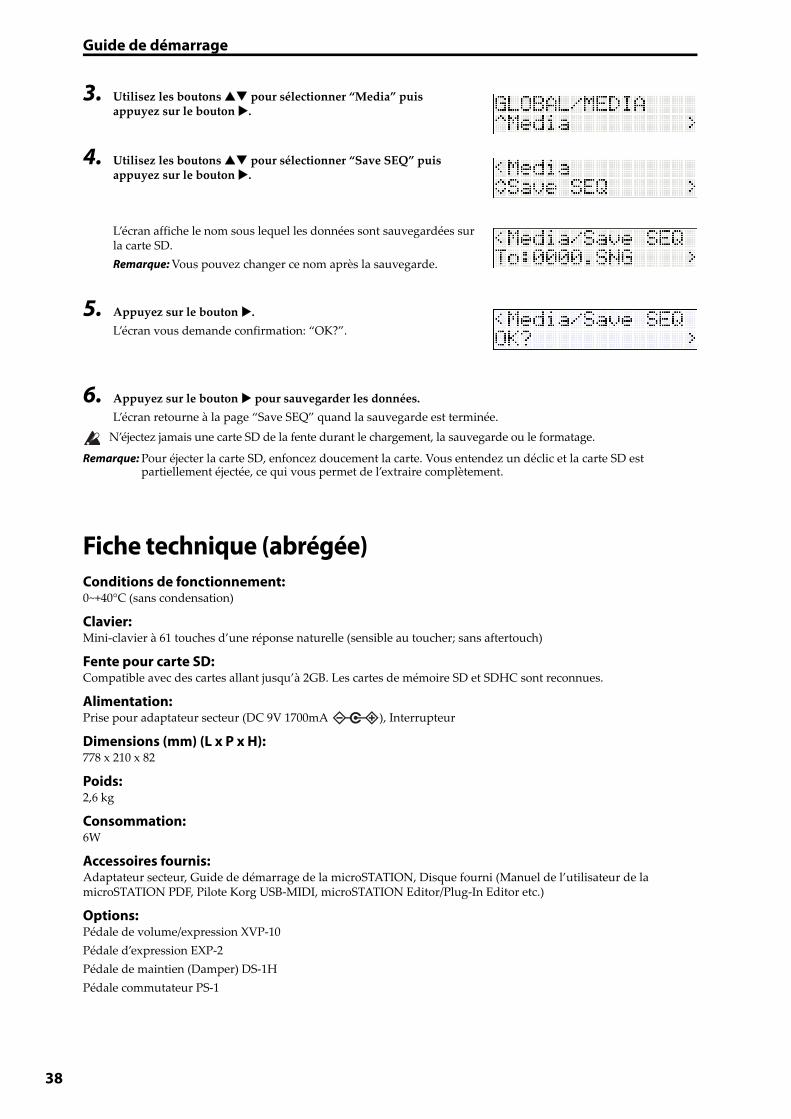
3. Use the buttons to select “Media,” and then press the button.
4. Use the buttons to select “Save SEQ,” and then press the button.
The screen shows the name that the data will be saved to on the SD card.
Note: You can change the name after saving.
5. Press the u button.
The display will ask “OK?”
6. Press the button to save the data.
When saving is completed, you will return to the “Save SEQ” screen.
Never remove the SD card from the slot during a save, load, or format operation.
Note: To remove the SD card, gently press the card inward. You will hear a click, and the SD card will pop out part‐way, allowing you to remove it.
Specifications (abbreviated)Operating conditions:0 – +40 °C (non‐condensing)
Keyboard:61‐note (natural‐touch mini keyboard, velocity sensitive, aftertouch not supported)
SD card slot:Supports up to 2 GB. SD and SDHC memory cards are supported.
Power supply:AC adapter connector (DC 9V 1700 mA ), POWER switch
Dimensions (mm) (W x D x H):778 x 210 x 82 (mm) / 30.63ʺ× 8.27ʺ × 3.23ʺ
Weight:2.6 kg / 5.73 lbs
Power consumption:6W
Included items:AC adapter, microSTATION Easy Start Guide, Accessory disc (microSTATION Operation Guide PDF, microSTATION Parameter Guide PDF, USB‐MIDI Setup Guide PDF, microSTATION Editor/Plug‐In Editor User Guide, External Setups PDF, Korg USB‐MIDI driver, microSTATION Editor / Plug‐In Editor, etc.)
Options:XVP‐10 expression/volume pedal
EXP‐2 foot controller
DS‐1H damper pedal
PS‐1 pedal switch
Guide de démarrage
22
Précautions
EmplacementL’utilisation de cet instrument dans les endroits suivants peut en entraîner le mauvais fonctionnement.
• En plein soleil• Endroits très chauds ou très humides• Endroits sales ou fort poussiéreux• Endroits soumis à de fortes vibrations• A proximité de champs magnétiques
Alimentation Branchez l’adaptateur secteur mentionné à une prise secteur de tension appropriée. Evitez de brancher l’adaptateur à une prise de courant dont la tension ne correspond pas à celle pour laquelle l’appareil est conçu.
Interférences avec d’autres appareils électriquesLes postes de radio et de télévision situés à proximité peuvent par conséquent souffrir d’interférences à la réception. Veuillez dès lors faire fonctionner cet appareil à une distance raisonnable de postes de radio et de télévision.
ManiementPour éviter de les endommager, manipulez les commandes et les boutons de cet instrument avec soin.
EntretienLorsque l’instrument se salit, nettoyez-le avec un chiffon propre et sec. Ne vous servez pas d’agents de nettoyage liquides tels que du benzène ou du diluant, voire des produits inflammables.
Conservez ce manuelAprès avoir lu ce manuel, veuillez le conserver soigneusement pour toute référence ultérieure.
Evitez toute intrusion d’objets ou de liquideNe placez jamais de récipient contenant du liquide près de l’instrument. Si le liquide se renverse ou coule, il risque de provoquer des dommages, un court-circuit ou une électrocution.Veillez à ne pas laisser tomber des objets métalliques dans le boîtier (trombones, par ex.). Si cela se produit, débranchez l’alimentation de la prise de courant et contactez votre revendeur korg le plus proche ou la surface où vous avez acheté l’instrument.
Gestion des donnéesUne procédure incorrecte ou un mauvais fonctionnement peut entraîner la perte du contenu de la mémoire, aussi nous vous recommandons d’archiver vos données importantes sur un support externe. Korg décline toute responsabilité pour tout dommage résultant de la perte de données.
Note concernant les dispositions (Seulement EU)Quand un symbole avec une poubelle barrée d’une croix apparait sur le produit, le mode d’emploi, les piles ou le pack de piles, cela signifie que ce produit, manuel ou piles doit être déposé chez un représentant compétent, et non pas dans une poubelle ou toute autre déchetterie conventionnelle.
Disposer de cette manière, de prévenir les dommages pour la santé humaine et les dommages potentiels pour l’environnement. La bonne méthode d’élimination dépendra des lois et règlements applicables dans votre localité, s’il vous plaît, contactez votre organisme administratif pour plus de détails. Si la pile contient des métaux lourds au‐delà du seuil réglementé, un symbole chimique est affiché en dessous du symbole de la poubelle barrée d’une croix sur la pile ou le pack de piles.
Sommaire
A propos de ce manuel ..........................................................................24
Caractéristiques principales .................................................................25
Panneaux avant et arrière ....................................................................26
Panneau avant ..........................................................................................................26
Panneau arrière ........................................................................................................27
Connexions et alimentation .................................................................28
Sélection des modes .............................................................................29
Sélection et utilisation de sons ............................................................30
Sélectionner des Programs ..................................................................................30
Sélection de Combinations ..................................................................................31
Utilisation des contrôleurs pour modifier le son ................................32
Utilisation de l’arpégiateur ..................................................................33
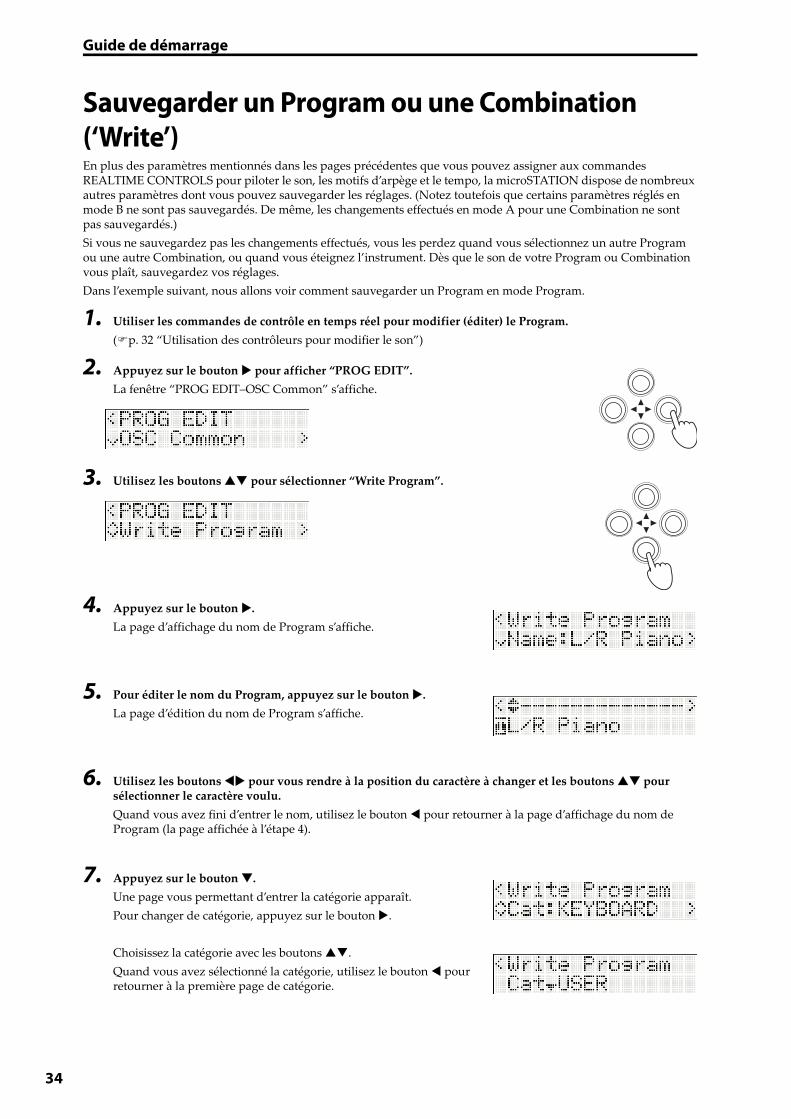
Sauvegarder un Program ou une Combination (‘Write’) ...................34
Charger et écouter les morceaux de démonstration ..........................35
Charger les morceaux de démonstration .......................................................35
Ecouter les morceaux de démonstration ........................................................36
Configuration automatique de morceau ............................................36
Sauvegarde sur carte SD .......................................................................37
Fiche technique (abrégée) ....................................................................38
23
24
A propos de ce manuelDocumentation fournieVotre microSTATION dispose de la documentation suivante.
• Guide de démarrage de la microSTATION
• Manuel de l’utilisateur de la microSTATION (PDF)
• microSTATION Voice Name List (PDF)
Vous trouverez les fichiers PDF mentionnés ci‐dessus dans le dossier “MANUALS” sur le disque fourni. Le mode d’emploi du pilote KORG USB‐MIDI se trouve également dans ce dossier.
Guide de démarrage de la microSTATIONCommencez par lire ce guide. Il explique comment effectuer les opérations élémentaires.
Manuel de l’utilisateur de la microSTATIONCe manuel décrit les noms et fonctions de chaque partie de votre microSTATION, il montre comment établir les connexions, il décrit le fonctionnement de base, il présente chaque mode de façon succincte et il explique comment modifier les sons et enregistrer avec le séquenceur. Ce manuel explique également comment utiliser l’arpégiateur et les effets.
Vous y trouverez en outre une section de dépannage, la liste des messages d’erreur et les caractéristiques techniques de l’instrument.
microSTATION Voice Name ListCette liste reprend le nom des multi‐échantillons et des échantillons de batterie ainsi que des Combinations, Programs, kits de batterie, motifs d’arpège utilisateur et morceaux de démonstration de votre microSTATION. Consultez‐la pour en savoir plus sur les données d’usine.
Conventions utilisées dans ce manuel
Abréviations désignant les manuels: MUDans la documentation, les différents manuels sont désignés par les abréviations suivantes:
MU: Manuel de l’utilisateur
Paramètres affichés à l’écran “ ”Les paramètres affichés à l’écran sont identifiés dans ce manuel par des guillemets “ ”.
Symboles , , Remarque, AstuceCes symboles signalent respectivement un avertissement, une explication relative au MIDI, une remarque supplémentaire ou une astuce.
Saisies d’écran données à titre d’exempleLes valeurs des paramètres représentés dans les saisies d’écran apparaissant dans ce manuel ne sont fournies que dans un but explicatif et ne correspondent pas nécessairement aux valeurs qui apparaissent à l’écran LCD de votre instrument.
Explications relatives au MIDICC est l’abréviation de “changement de commande”.
Dans les informations relatives au MIDI, les nombres entre crochets droits [ ] désignent toujours des nombres hexadécimaux.
Merci d’avoir choisi la Music Workstation Korg microSTATION. Afin de pouvoir exploiter au mieux toutes les possibilités offertes par l’instrument, veuillez lire attentivement ce manuel.
Caractéristiques principales
Guide de démarrage
Caractéristiques principalesEDS-i (Enhanced Definition Synthesis - integrated)Ce générateur de sons reprend les caractéristiques principales du générateur de sons EDS (“Enhanced Definition Synthesis”) des fameux M3 et M50 comprenant les oscillateurs, les filtres, l’amplification, les LFO et générateurs d’enveloppe (EG) ainsi que les effets permettant de délivrer les sonorités riches et vivantes propres au système EDS.
49Mo de données PCM (équivalent en format linéaire 16 bits)La microSTATION contient 49Mo de données PCM issues de la technologie de génération sonore Korg ainsi que 480 Programs d’usine exploitant ces données PCM et 256 Combinations d’usine exploitant ces Programs.
CombinationsVous pouvez combiner jusqu’à 16 Programs en les superposant, en leur assignant une partie du clavier ou une plage de dynamique afin de créer des sons complexes et impressionnants.
Double arpégiateur polyphoniqueEn plus des traditionnels motifs d’arpège, l’arpégiateur de la microSTATION peut aussi jouer des riffs de guitare ou de basse, ou des motifs rythmiques. Les Combinations et les morceaux vous permettent d’utiliser deux arpégiateurs simultanément. Les 512 motifs d’arpège utilisateur élargissent considérablement vos horizons.
5 effets d’insertion stéréo, 2 effets master stéréo et 1 effet total stéréoPeaufinez votre son en exploitant les effets de votre choix parmi les 134 types d’effet de qualité disponibles et déterminez l’acheminement des signaux avec la section Mixer.
Contrôleurs en temps réel et joystickLes contrôleurs en temps réel (REALTIME CONTROLS) vous permettent de modifier le son directement et de piloter d’autres produits Korg ou des logiciels populaires.
Séquenceur haute résolution (480 pas/noire)Le séquenceur intégré propose 16 pistes MIDI + 1 piste Master. Il dispose d’une palette complète de fonctions pour la production musicale et le jeu comme la configuration automatique de morceau, la programmation pas par pas de données de séquence et les modèles de morceaux.
Connexion à un ordinateur via USB et connecteur pour carte SDVous pouvez brancher la microSTATION à un ordinateur et échanger des données MIDI via USB. Des cartes SD disponibles dans le commerce facilitent la gestion des fichiers de données de la microSTATION.
Logiciels ‘microSTATION Editor’ et ‘microSTATION Plug-In Editor’ fournisCes logiciels vous permettent d’éditer un grand nombre de paramètres sur grand écran ou d’utiliser la microSTATION au sein de votre station de travail audio numérique comme si elle était un synthétiseur plug‐in. Les paramètres de sons, d’effets, de kits de batterie et de motifs d’arpège utilisateur les plus fins, inaccessibles à partir de la microSTATION même peuvent être modifiés avec le logiciel “microSTATION Editor/Plug‐In Editor”.
25
Guide de démarrage
26
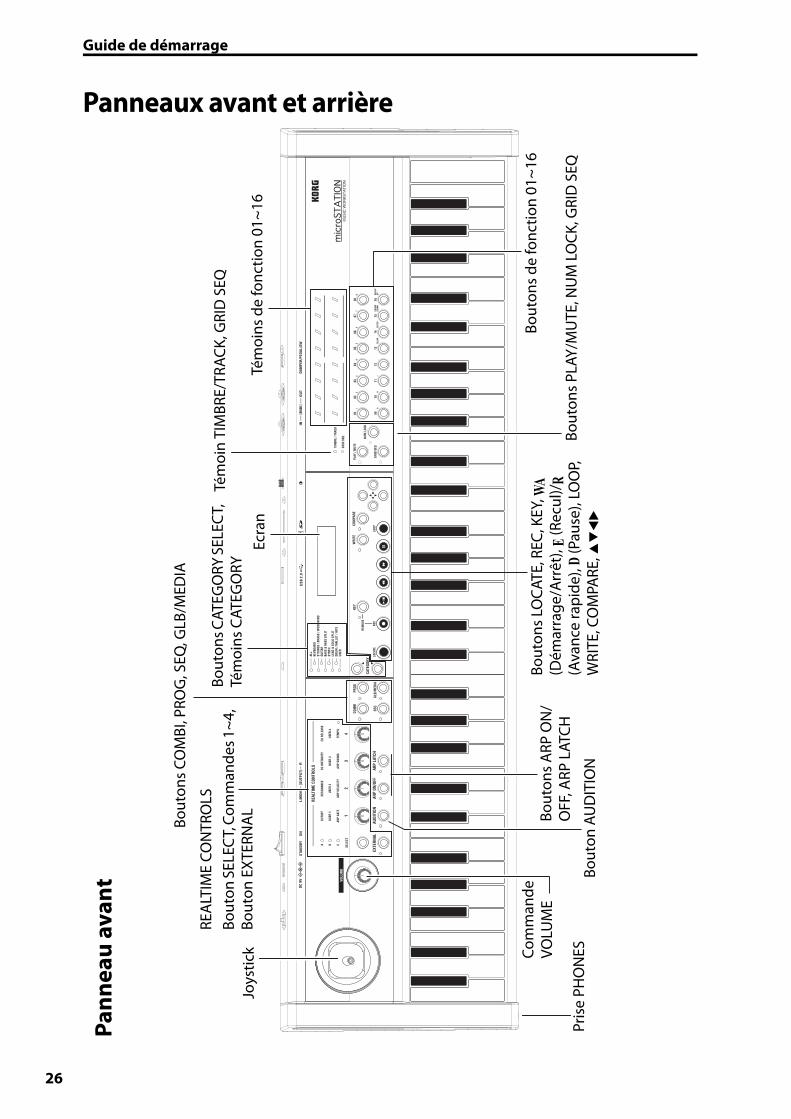
Panneaux avant et arrière
Joys
tick
REA
LTIM
E CO
NTR
OLS
Bout
on S
ELEC
T, C
omm
ande
s 1~4
, Bo
uton
EXT
ERN
AL
Bout
ons
COM
BI, P
ROG
, SEQ
, GLB
/MED
IA
Bout
ons C
ATEG
ORY
SEL
ECT,
Té
moi
ns C
ATEG
ORY
Ecra
n
Tém
oin
TIM
BRE/
TRAC
K, G
RID
SEQ
Tém
oins
de
fonc
tion
01~1
6
Pris
e PH
ON
ESCom
man
de
VOLU
ME
Bout
on A
UD
ITIO
N
Bout
ons
ARP
ON
/O
FF, A
RP L
ATCH
Bout
ons
LOCA
TE, R
EC, K
EY, WA
(Dém
arra
ge/A
rrêt
), E
(Rec
ul)/R
(Ava
nce
rapi
de), D
(Pau
se),
LOO
P, W
RITE
, CO
MPA
RE,
Bout
ons
PLAY
/MU
TE, N
UM
LO
CK, G
RID
SEQ
Bout
ons
de fo
nctio
n 01
~16
Pann
eau
avan
t
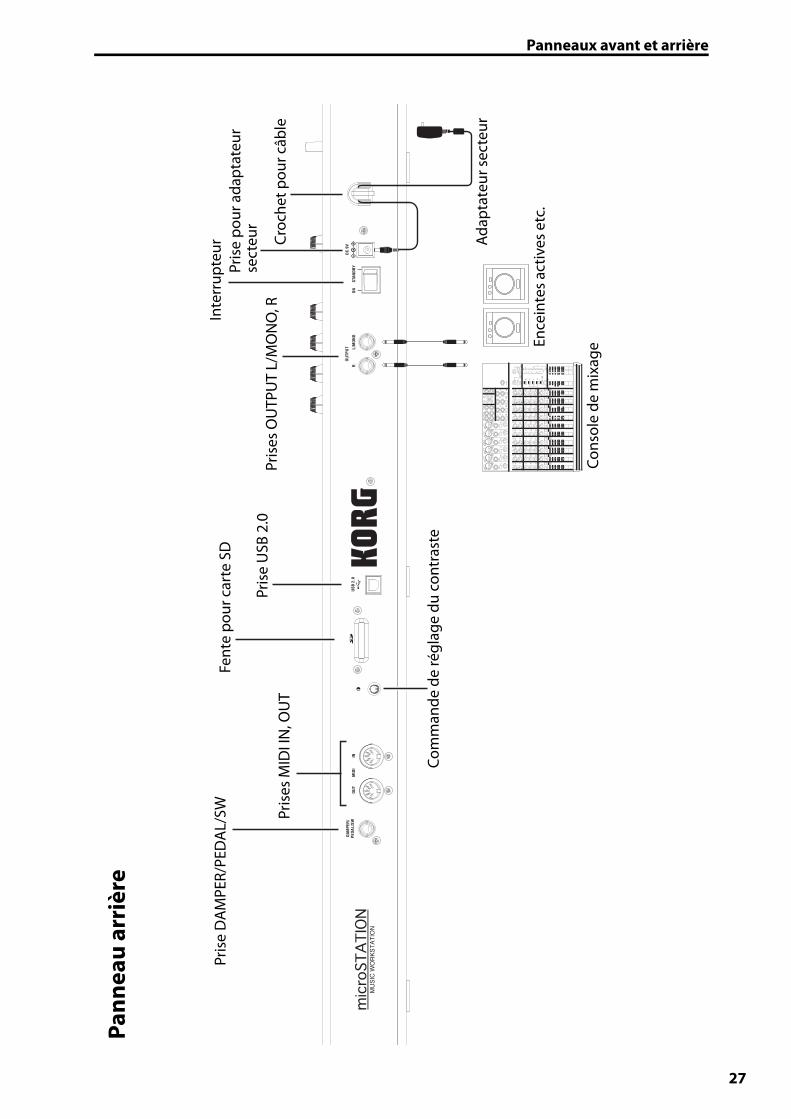
Panneaux avant et arrière
Com
man
de d
e ré
glag
e du
con
tras
te
Pris
es M
IDI I
N, O
UT
Fent
e po
ur c
arte
SD
Pris
e U
SB 2
.0
Ence
inte
s ac
tives
etc
.
Cons
ole
de m
ixag
e
Adap
tate
ur s
ecte
ur
Inte
rrup
teur
Pris
e D
AM
PER/
PED
AL/
SW
Pris
es O
UTP
UT
L/M
ON
O, R
Pris
e po
ur a
dapt
ateu
r se
cteu
r
Croc
het p
our c
âble
Pann
eau
arri
ère
27
Guide de démarrage
28
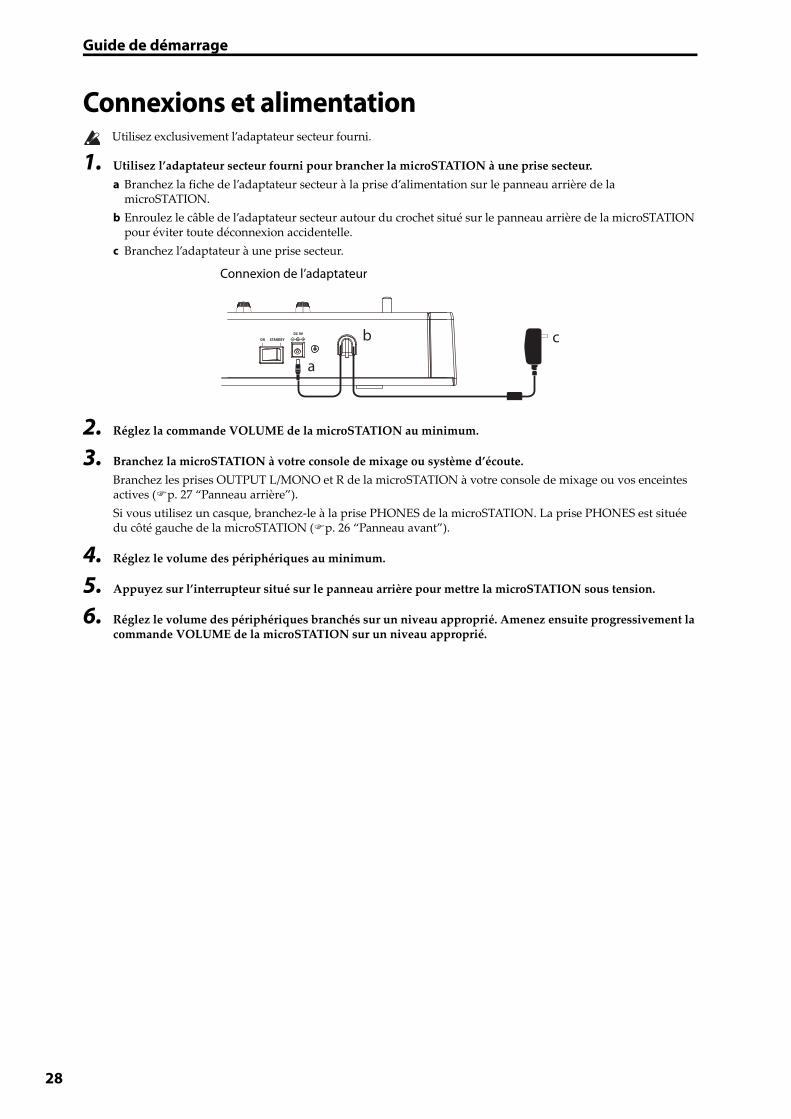
Connexions et alimentation Utilisez exclusivement l’adaptateur secteur fourni.
1. Utilisez l’adaptateur secteur fourni pour brancher la microSTATION à une prise secteur.
a Branchez la fiche de l’adaptateur secteur à la prise d’alimentation sur le panneau arrière de la microSTATION.
b Enroulez le câble de l’adaptateur secteur autour du crochet situé sur le panneau arrière de la microSTATION pour éviter toute déconnexion accidentelle.
c Branchez l’adaptateur à une prise secteur.
2. Réglez la commande VOLUME de la microSTATION au minimum.
3. Branchez la microSTATION à votre console de mixage ou système d’écoute.
Branchez les prises OUTPUT L/MONO et R de la microSTATION à votre console de mixage ou vos enceintes actives (p. 27 “Panneau arrière”).
Si vous utilisez un casque, branchez‐le à la prise PHONES de la microSTATION. La prise PHONES est située du côté gauche de la microSTATION (p. 26 “Panneau avant”).
4. Réglez le volume des périphériques au minimum.
5. Appuyez sur l’interrupteur situé sur le panneau arrière pour mettre la microSTATION sous tension.
6. Réglez le volume des périphériques branchés sur un niveau approprié. Amenez ensuite progressivement la commande VOLUME de la microSTATION sur un niveau approprié.
a
b c
Connexion de l’adaptateur
Sélection des modes
Sélection des modesLa microSTATION dispose de quatre modes vous permettant de jouer, d’enregistrer et d’effectuer des réglages.
Appuyez sur un des boutons de mode PROG, COMBI, SEQ ou GLB/MEDIA pour choisir un mode.
Mode ProgramQuand vous appuyez sur le bouton PROG, le témoin situé à gauche du bouton s’allume pour indiquer que vous êtes en mode Program.
En mode Program, vous pouvez jouer avec des “Programs”, les sons de base de la microSTATION.
La microSTATION peut contenir 512 Programs dans sa mémoire interne. A la sortie d’usine, la mémoire interne contient 480 Programs couvrant une vaste palette de styles musicaux et répartis dans 7 catégories de sons.
Mode CombinationQuand vous appuyez sur le bouton COMBI, le témoin situé à gauche du bouton s’allume pour indiquer que vous êtes en mode Combination.
En mode Combination, vous pouvez jouer avec des “Combinations”, un ensemble pouvant compter jusqu’à 16 Programs permettant de créer des sons complexes et puissants. Les sons d’une Combination peuvent être assignés à différentes parties du clavier (partage du clavier “Split” ou superposition “Layer”), ou sélectionnés en fonction de la force exercée sur le clavier (“Velocity”).
La microSTATION peut contenir 384 Combinations dans sa mémoire interne. A la sortie d’usine, la mémoire interne contient 256 Combinations offrant une grande flexibilité, réparties dans 7 catégories de sons.
Mode SequencerQuand vous appuyez sur le bouton SEQ, le témoin situé à gauche du bouton s’allume pour indiquer que vous êtes en mode Sequencer.
En mode Sequencer, vous pouvez enregistrer et reproduire ce que vous jouez à l’aide du séquenceur MIDI à 16 pistes.Si l’inspiration vous vient alors que vous jouez avec une Combination ou un Program, vous pouvez utiliser le séquenceur pour enregistrer votre idée sur le champ.
Mode Global/MediaQuand vous appuyez sur le bouton GLB/MEDIA, le témoin situé à gauche du bouton s’allume pour indiquer que vous êtes en mode Global/Media.
En mode Global/Media, vous pouvez effectuer des réglages globaux MIDI ou concernant l’accord de l’instrument, par exemple. Vous pouvez aussi utiliser une carte SD (disponible dans le commerce) pour archiver vos données de morceaux, de Programs et de Combinations ou pour charger ces données dans la microSTATION.
29
Guide de démarrage
30
Sélection et utilisation de sonsSélectionner des ProgramsPour commencer, passez en mode Program et choisissez un Program.
A la sortie d’usine, la mémoire interne de la microSTATION contient 480 Programs répartis dans 7 catégories. A titre d’exemple, choisissez la catégorie “SYNTH” et sélectionnez un Program dans cette catégorie.
1. Appuyez sur le bouton PROG pour passer en mode Program.
L’écran affiche la page “PROG PLAY”. La page “PROG PLAY” apparaît toujours quand vous appuyez sur le bouton PROG.
La ligne inférieure de l’écran affiche le numéro et le nom du Program.
2. Utilisez les boutons CATEGORY SELECT pour allumer le témoin SYNTH. (Les témoins de catégories sont situés à gauche de l’écran.)
Les témoins de catégorie indiquent la catégorie sélectionnée.
3. Pour sélectionner un Program, utilisez les boutons .
Jouez sur le clavier pour écouter le son.
4. Lors de la sélection d’un Program, vous pouvez utiliser la fonction “Audition” pour écouter un riff ou une phrase utilisant le Program.
Appuyez sur le bouton AUDITION (situé sous la commande REALTIME CONTROLS 1). Son témoin s’allume et vous entendez une phrase adaptée au Program, produite automatiquement.
Sélection et utilisation de sons
5. Au lieu d’utiliser les boutons pour sélectionner un Program, vous pouvez aussi vous servir des boutons de fonction 01~16. A titre d’exemple, appuyez sur le bouton de fonction 16.
Le Program numéro 16 de la catégorie SYNTH est sélectionné.
Les boutons de fonction 01~16 vous permettent de sélectionner les Programs 1~16 de la catégorie sélectionnée.
Nous allons voir maintenant comment sélectionner les Programs 17 et suivants.
6. Appuyez sur le bouton NUM LOCK à gauche des boutons de fonction 01~16 de sorte à allumer son témoin (situé à sa gauche).
La fonction “Num Lock” est activée.
7. Appuyez une fois sur le bouton de fonction 16 (GROUP UP).
Appuyez ensuite à nouveau sur le bouton NUM LOCK pour éteindre son témoin et couper la fonction “Num Lock”.
8. Les boutons de fonction 01~16 vous permettent alors de sélectionner les Programs 17~32 de la catégorie sélectionnée.
Activez à nouveau la fonction “Num Lock” et appuyez sur le bouton de fonction 16 (GROUP UP). Les boutons de fonction 01~16 permettent alors de choisir les Programs 33~48.
Si, par contre, vous appuyez sur le bouton de fonction 15 (GROUP DOWN), les boutons de fonction 01~16 permettent à nouveau de sélectionner les Programs 1~16.
Il suffit donc d’activer la fonction “Num Lock” et d’appuyer sur le bouton de fonction 15 (GROUP DOWN) ou 16 (GROUP UP) pour changer la série de 16 Programs accessibles avec les boutons de fonction 01~16: Programs 1~16, 17~32, 33~48 etc.
Sélectionnez différents Programs dans les diverses catégories pour les écouter.
Sélection de CombinationsLa sélection de Combinations est similaire à la sélection de Programs décrite ci‐dessus. Sélectionnez une Combination et jouez sur le clavier pour l’écouter.
1. Appuyez sur le bouton COMBI pour passer en mode Combination.
L’écran affiche la page “COMBI PLAY”. La page “COMBI PLAY” apparaît toujours quand vous appuyez sur le bouton COMBI.
La ligne inférieure de l’écran affiche le numéro et le nom de la Combination.
2. La sélection de Combinations est identique à la sélection de Programs. Sélectionnez une catégorie avec les boutons CATEGORY SELECT puis utilisez les boutons pour choisir une Combination.
Vous pouvez aussi sélectionner une Combination avec les boutons de fonction 01~16.
31
Guide de démarrage
32
Utilisation des contrôleurs pour modifier le sonLa microSTATION vous permet de modifier le son avec le joystick et les commandes REALTIME CONTROLS 1~4 ainsi que le clavier.
Ces contrôleurs se voient assigner différents réglages pour chaque Program et Combination et vous permettent de changer le timbre, la hauteur ou le volume.
La force exercée sur le clavier (le toucher) peut modifier l’attaque, le volume et le timbre du son. De plus, certains Programs (notamment ceux d’instruments à vent) ajoutent un bruit de souffle quand vous jouez fort.
Vous pouvez actionner le joystick dans quatre direction (haut, bas, gauche, droite) pour modifier le son. Avec les réglages traditionnels, la hauteur monte quand vous actionnez le joystick vers la droite et chute quand vous l’actionnez vers la gauche. En poussant le joystick vers le haut (loin de vous), vous ajoutez du vibrato et en le tirant vers le bas (vers vous), vous modulez le filtre avec un LFO (wah).En plus des paramètres décrits ci‐dessus, vous pouvez appliquer bien d’autres effets.
La section REALTIME CONTROLS vous permet de piloter le son ou l’arpégiateur avec quatre commandes. Ces commandes peuvent fonctionner selon trois modes: en modes A et B, elles pilotent le son tandis qu’en mode C, elles pilotent l’arpégiateur. Le mode External permet d’utiliser les commandes pour piloter un appareil MIDI externe ou un synthétiseur logiciel.
Dans les explications suivantes, nous utiliserons les commandes REALTIME CONTROLS en mode A, B et C pour piloter le son et l’arpégiateur.
1. Appuyez sur le bouton REALTIME CONTROLS SELECT.
Le témoin A, B ou C situé au‐dessus du bouton SELECT s’allume. Chaque pression sur ce bouton sélectionne successivement les modes A, B et C, et allume le témoin correspondant.
2. En mode A (témoin A allumé), les commandes 1~4 règlent respectivement le timbre (fréquence du filtre), la résonance, l’intensité et la durée de relâchement de l’enveloppe (EG).
3. Appuyez sur le bouton REALTIME CONTROLS SELECT pour passer en mode B (le témoin B s’allume).
Le fait d’actionner les commandes modifie le paramètre choisi pour chaque Program ou Combination. En général, le mode B assigne le réglage de l’intensité du chorus et de la réverbération aux commandes 3 et 4.
4. Appuyez de nouveau sur le bouton REALTIME CONTROLS SELECT pour passer en mode C (le témoin C s’allume).
Les commandes modifient le motif d’arpège et le tempo de reproduction du motif (p. 33 “Utilisation de l’arpégiateur”).
Vous pouvez aussi piloter le son avec une pédale d’expression, une pédale de maintien ou une pédale commutateur (disponibles en option). Vous pourriez vous en servir pour piloter le filtre ou les effets, ou activer/couper le portamento. Pour en savoir plus, voyez le “Manuel de l’utilisateur de la microSTATION”.
Utilisation de l’arpégiateur
Utilisation de l’arpégiateurChaque Program vous permet d’utiliser un arpégiateur polyphonique. En mode Combination ou Sequencer, vous pouvez utiliser deux arpégiateurs polyphoniques.
1. Sélectionnez le Program ou la Combination que vous souhaitez utiliser.
2. Appuyez sur le bouton ARP ON/OFF pour allumer le témoin situé à gauche du bouton.
Selon la Combination ou le Program choisi, l’arpégiateur peut déjà être activé. Vous pouvez appuyer sur le bouton ARP ON/OFF pour activer/couper l’arpégiateur.
3. Appuyez sur le bouton ARP LATCH ON/OFF pour allumer le témoin situé à gauche du bouton; vous activez ainsi la fonction “Latch”.
Quand la fonction “Latch” (verrouillage) est activée, l’arpégiateur continue à jouer quand vous relâchez les touches.
4. Enfoncez quelques touches.
Le motif d’arpège démarre.
5. Appuyez sur le bouton REALTIME CONTROLS SELECT pour passer en mode C (le témoin C s’allume).
Tournez ensuite les commandes 1~3 (GATE, VELOCITY, SWING) et écoutez les modifications apportées au motif.
6. Tournez la commande 4 (TEMPO) pour régler le tempo.
Vous pouvez aussi passer en mode de contrôle en temps réel A ou B pour modifier le son pendant que l’arpégiateur fonctionne (p. 32 “Utilisation des contrôleurs pour modifier le son”).
Des motifs d’arpège adéquats pour chaque son ont été assignés aux Programs et Combinations d’usine. Sélectionnez des Programs et des Combinations dans différentes catégories et activez l’arpégiateur pour les écouter.
33
Guide de démarrage
34
Sauvegarder un Program ou une Combination (‘Write’)En plus des paramètres mentionnés dans les pages précédentes que vous pouvez assigner aux commandes REALTIME CONTROLS pour piloter le son, les motifs d’arpège et le tempo, la microSTATION dispose de nombreux autres paramètres dont vous pouvez sauvegarder les réglages. (Notez toutefois que certains paramètres réglés en mode B ne sont pas sauvegardés. De même, les changements effectués en mode A pour une Combination ne sont pas sauvegardés.)
Si vous ne sauvegardez pas les changements effectués, vous les perdez quand vous sélectionnez un autre Program ou une autre Combination, ou quand vous éteignez l’instrument. Dès que le son de votre Program ou Combination vous plaît, sauvegardez vos réglages.
Dans l’exemple suivant, nous allons voir comment sauvegarder un Program en mode Program.
1. Utiliser les commandes de contrôle en temps réel pour modifier (éditer) le Program.
(p. 32 “Utilisation des contrôleurs pour modifier le son”)
2. Appuyez sur le bouton pour afficher “PROG EDIT”.
La fenêtre “PROG EDIT–OSC Common” s’affiche.
3. Utilisez les boutons pour sélectionner “Write Program”.
4. Appuyez sur le bouton .
La page d’affichage du nom de Program s’affiche.
5. Pour éditer le nom du Program, appuyez sur le bouton .
La page d’édition du nom de Program s’affiche.
6. Utilisez les boutons pour vous rendre à la position du caractère à changer et les boutons pour sélectionner le caractère voulu.
Quand vous avez fini d’entrer le nom, utilisez le bouton pour retourner à la page d’affichage du nom de Program (la page affichée à l’étape 4).
7. Appuyez sur le bouton .
Une page vous permettant d’entrer la catégorie apparaît.
Pour changer de catégorie, appuyez sur le bouton .
Choisissez la catégorie avec les boutons .
Quand vous avez sélectionné la catégorie, utilisez le bouton pour retourner à la première page de catégorie.
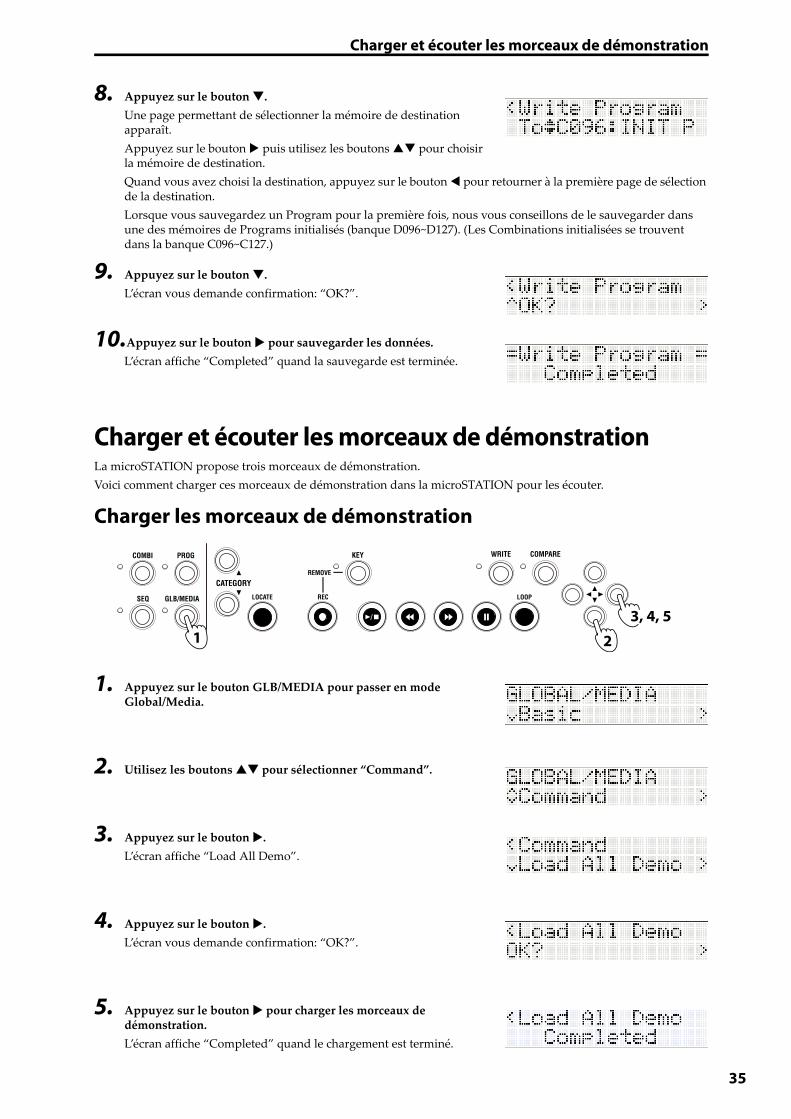
Charger et écouter les morceaux de démonstration
8. Appuyez sur le bouton .
Une page permettant de sélectionner la mémoire de destination apparaît.
Appuyez sur le bouton puis utilisez les boutons pour choisir la mémoire de destination.
Quand vous avez choisi la destination, appuyez sur le bouton pour retourner à la première page de sélection de la destination.
Lorsque vous sauvegardez un Program pour la première fois, nous vous conseillons de le sauvegarder dans une des mémoires de Programs initialisés (banque D096~D127). (Les Combinations initialisées se trouvent dans la banque C096~C127.)
9. Appuyez sur le bouton .
L’écran vous demande confirmation: “OK?”.
10.Appuyez sur le bouton pour sauvegarder les données.L’écran affiche “Completed” quand la sauvegarde est terminée.
Charger et écouter les morceaux de démonstrationLa microSTATION propose trois morceaux de démonstration.
Voici comment charger ces morceaux de démonstration dans la microSTATION pour les écouter.
Charger les morceaux de démonstration
1. Appuyez sur le bouton GLB/MEDIA pour passer en mode Global/Media.
2. Utilisez les boutons pour sélectionner “Command”.
3. Appuyez sur le bouton .
L’écran affiche “Load All Demo”.
4. Appuyez sur le bouton .
L’écran vous demande confirmation: “OK?”.
5. Appuyez sur le bouton pour charger les morceaux de démonstration.
L’écran affiche “Completed” quand le chargement est terminé.
1 2
3, 4, 5
35
Guide de démarrage
36
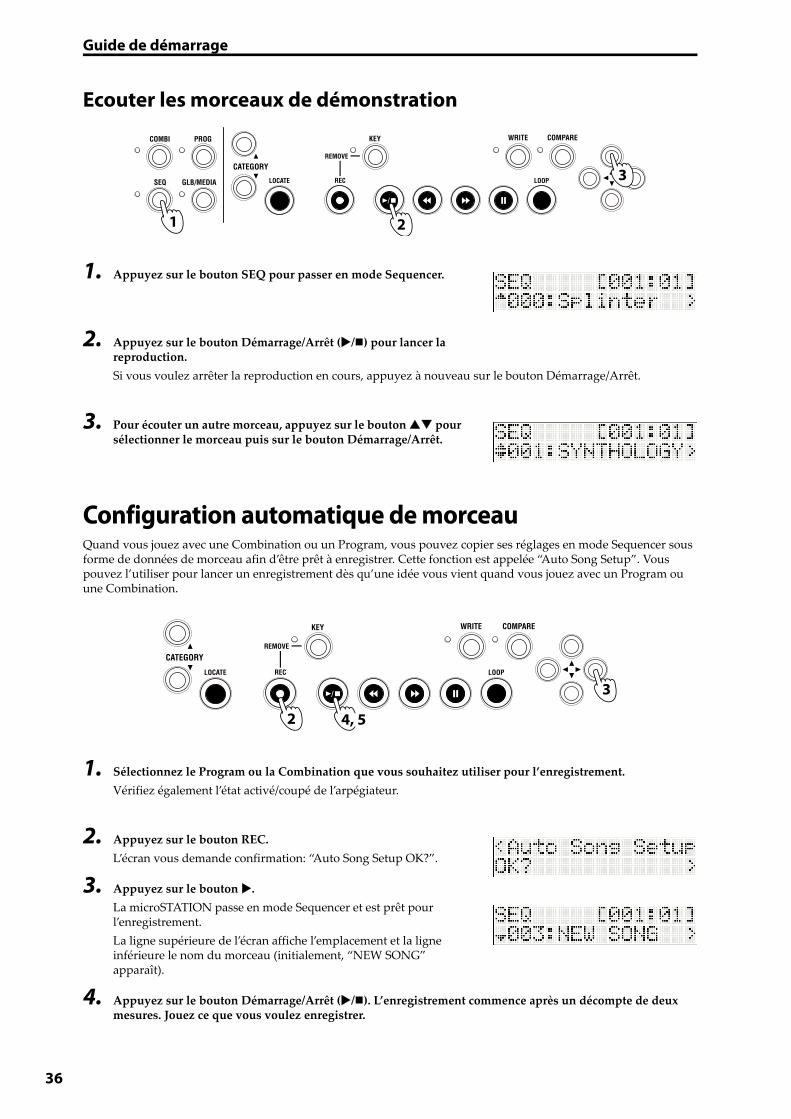
Ecouter les morceaux de démonstration
1. Appuyez sur le bouton SEQ pour passer en mode Sequencer.
2. Appuyez sur le bouton Démarrage/Arrêt (/) pour lancer la reproduction.
Si vous voulez arrêter la reproduction en cours, appuyez à nouveau sur le bouton Démarrage/Arrêt.
3. Pour écouter un autre morceau, appuyez sur le bouton pour sélectionner le morceau puis sur le bouton Démarrage/Arrêt.
Configuration automatique de morceauQuand vous jouez avec une Combination ou un Program, vous pouvez copier ses réglages en mode Sequencer sous forme de données de morceau afin d’être prêt à enregistrer. Cette fonction est appelée “Auto Song Setup”. Vous pouvez l’utiliser pour lancer un enregistrement dès qu’une idée vous vient quand vous jouez avec un Program ou une Combination.
1. Sélectionnez le Program ou la Combination que vous souhaitez utiliser pour l’enregistrement.
Vérifiez également l’état activé/coupé de l’arpégiateur.
2. Appuyez sur le bouton REC.
L’écran vous demande confirmation: “Auto Song Setup OK?”.
3. Appuyez sur le bouton .
La microSTATION passe en mode Sequencer et est prêt pour l’enregistrement.
La ligne supérieure de l’écran affiche l’emplacement et la ligne inférieure le nom du morceau (initialement, “NEW SONG” apparaît).
4. Appuyez sur le bouton Démarrage/Arrêt (/). L’enregistrement commence après un décompte de deux mesures. Jouez ce que vous voulez enregistrer.
1 2
3
3
2 4, 5
Sauvegarde sur carte SD
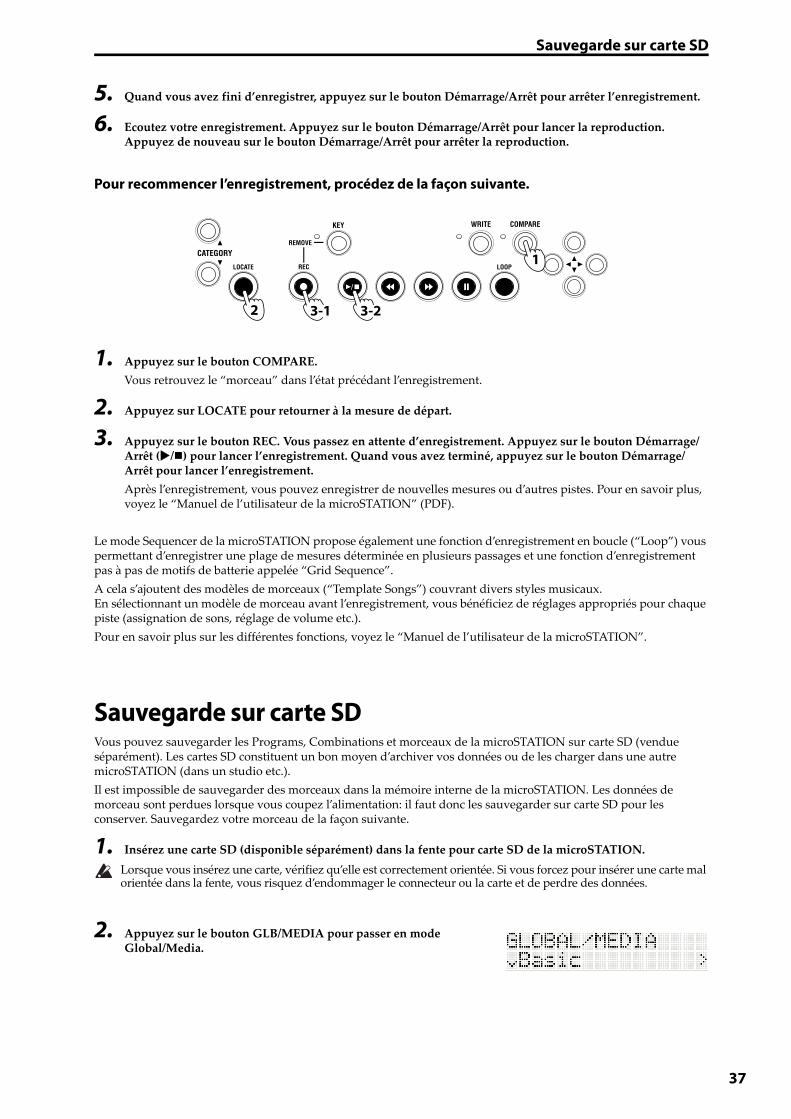
5. Quand vous avez fini d’enregistrer, appuyez sur le bouton Démarrage/Arrêt pour arrêter l’enregistrement.
6. Ecoutez votre enregistrement. Appuyez sur le bouton Démarrage/Arrêt pour lancer la reproduction. Appuyez de nouveau sur le bouton Démarrage/Arrêt pour arrêter la reproduction.
Pour recommencer l’enregistrement, procédez de la façon suivante.
1. Appuyez sur le bouton COMPARE.
Vous retrouvez le “morceau” dans l’état précédant l’enregistrement.
2. Appuyez sur LOCATE pour retourner à la mesure de départ.
3. Appuyez sur le bouton REC. Vous passez en attente d’enregistrement. Appuyez sur le bouton Démarrage/Arrêt (/) pour lancer l’enregistrement. Quand vous avez terminé, appuyez sur le bouton Démarrage/Arrêt pour lancer l’enregistrement.
Après l’enregistrement, vous pouvez enregistrer de nouvelles mesures ou d’autres pistes. Pour en savoir plus, voyez le “Manuel de l’utilisateur de la microSTATION” (PDF).
Le mode Sequencer de la microSTATION propose également une fonction d’enregistrement en boucle (“Loop”) vous permettant d’enregistrer une plage de mesures déterminée en plusieurs passages et une fonction d’enregistrement pas à pas de motifs de batterie appelée “Grid Sequence”.
A cela s’ajoutent des modèles de morceaux (“Template Songs”) couvrant divers styles musicaux.En sélectionnant un modèle de morceau avant l’enregistrement, vous bénéficiez de réglages appropriés pour chaque piste (assignation de sons, réglage de volume etc.).
Pour en savoir plus sur les différentes fonctions, voyez le “Manuel de l’utilisateur de la microSTATION”.
Sauvegarde sur carte SDVous pouvez sauvegarder les Programs, Combinations et morceaux de la microSTATION sur carte SD (vendue séparément). Les cartes SD constituent un bon moyen d’archiver vos données ou de les charger dans une autre microSTATION (dans un studio etc.).
Il est impossible de sauvegarder des morceaux dans la mémoire interne de la microSTATION. Les données de morceau sont perdues lorsque vous coupez l’alimentation: il faut donc les sauvegarder sur carte SD pour les conserver. Sauvegardez votre morceau de la façon suivante.
1. Insérez une carte SD (disponible séparément) dans la fente pour carte SD de la microSTATION.
Lorsque vous insérez une carte, vérifiez qu’elle est correctement orientée. Si vous forcez pour insérer une carte mal orientée dans la fente, vous risquez d’endommager le connecteur ou la carte et de perdre des données.
2. Appuyez sur le bouton GLB/MEDIA pour passer en mode Global/Media.
1
2 3-1 3-2
37
Guide de démarrage
38
3. Utilisez les boutons pour sélectionner “Media” puis appuyez sur le bouton .
4. Utilisez les boutons pour sélectionner “Save SEQ” puis appuyez sur le bouton .
L’écran affiche le nom sous lequel les données sont sauvegardées sur la carte SD.
Remarque: Vous pouvez changer ce nom après la sauvegarde.
5. Appuyez sur le bouton .
L’écran vous demande confirmation: “OK?”.
6. Appuyez sur le bouton pour sauvegarder les données.
L’écran retourne à la page “Save SEQ” quand la sauvegarde est terminée.
N’éjectez jamais une carte SD de la fente durant le chargement, la sauvegarde ou le formatage.
Remarque:Pour éjecter la carte SD, enfoncez doucement la carte. Vous entendez un déclic et la carte SD est partiellement éjectée, ce qui vous permet de l’extraire complètement.
Fiche technique (abrégée)Conditions de fonctionnement:0~+40°C (sans condensation)
Clavier:Mini‐clavier à 61 touches d’une réponse naturelle (sensible au toucher; sans aftertouch)
Fente pour carte SD:Compatible avec des cartes allant jusqu’à 2GB. Les cartes de mémoire SD et SDHC sont reconnues.
Alimentation:Prise pour adaptateur secteur (DC 9V 1700mA ), Interrupteur
Dimensions (mm) (L x P x H):778 x 210 x 82
Poids:2,6 kg
Consommation:6W
Accessoires fournis:Adaptateur secteur, Guide de démarrage de la microSTATION, Disque fourni (Manuel de l’utilisateur de la microSTATION PDF, Pilote Korg USB‐MIDI, microSTATION Editor/Plug‐In Editor etc.)
Options:Pédale de volume/expression XVP‐10
Pédale d’expression EXP‐2
Pédale de maintien (Damper) DS‐1H
Pédale commutateur PS‐1
Blitzstart
40
Vorsichtsmaßnahmen
AufstellungsortVermeiden Sie das Aufstellen des Geräts an Orten, an denen
• es direkter Sonneneinstrahlung ausgesetzt ist;• hohe Feuchtigkeit oder Extremtemperaturen auftreten
können;• Staub oder Schmutz in großen Mengen vorhanden
sind;• das Gerät Erschütterungen ausgesetzt sein kann.• in der Nähe eines Magnetfeldes.
Stromversorgung Schließen Sie das optionale Netzteil nur an eine geeignete Steckdose an. Verbinden Sie es niemals mit einer Steckdose einer anderen Spannung.
Störeinflüsse auf andere ElektrogeräteDieser kann bei in der Nähe aufgestellten Rund-funkempfängern oder Fernsehgeräten Empfangsstörungen hervorrufen. Betreiben Sie solche Geräte nur in einem geeigneten Abstand von diesem Erzeugnis.
BedienungVermeiden Sie bei der Bedienung von Schaltern und Reglern unangemessenen Kraftaufwand.
ReinigungBei auftretender Verschmutzung können Sie das Gehäuse mit einem trockenen, sauberen Tuch abwischen. Verwenden Sie keinerlei Flüssigreiniger wie beispielsweise Reinigungsbenzin, Verdünnungs- oder Spülmittel. Verwenden Sie niemals brennbare Reiniger.
BedienungsanleitungBewahren Sie diese Bedienungsanleitung gut auf, falls Sie sie später noch einmal benötigen.
Flüssigkeiten und FremdkörperStellen Sie niemals Behältnisse mit Flüssigkeiten in der Nähe des Geräts auf. Wenn Flüssigkeit in das Gerät gelangt, können Beschädigung des Geräts, Feuer oder ein elek-trischer Schlag die Folge sein.Beachten Sie, daß keinerlei Fremdkörper in das Gerät gelangen. Sollte ein Fremdkörper in das Gerät gelangt sein, so trennen Sie es sofort vom Netz. Wenden Sie sich dann an Ihren KORG-Fachhändler.
Konventionen in diesem Handbuch
Abkürzungen der Anleitungen: BAAb und zu verwenden wir folgende Abkürzungen für Verweise auf andere Anleitungen:BA: microSTATION Bedienungsanleitung
Symbole , Anmerkung, TippMit diesen Symbolen sind Vorsichtshinweise, generelle Anmerkungen und Tipps gekennzeichnet.
Beispielhafte Display‐AnzeigenDie in den Abbildungen gezeigten Display-Seiten und Parameter haben lediglich Beispielcharakter und stimmen also nicht immer mit den bei Ihnen angezeigten Werten überein.
Handhabung von DatenBei falschen oder unsachgemäßen Bedienvorgängen könnte der interne Speicherinhalt gelöscht werden. Daher raten wir, wichtige Daten auf einem externen Datenträger zu archivieren. Korg haftet nicht für Schäden, die sich aus dem Verlust irgendwelcher Daten ergeben.
Hinweis zur Entsorgung (Nur EU)Wenn Sie das Symbol mit der „durchgekreuzten Mülltonne“ auf Ihrem Produkt, der dazugehörigen Bedienungsanleitung, der Batterie oder dem Batteriefach sehen, müssen Sie das Produkt in der vorgeschriebenen Art und Weise entsorgen. Dies bedeutet, dass dieses Produkt mit elektrischen und elektronischen Komponenten nicht mit dem
normalen Hausmüll entsorgt werden darf. Für Produkte dieser Art existiert ein separates, gesetzlich festgelegtes Entsorgungssystem. Gebrauchte elektrische und elektronische Geräte müssen separat entsorgt werden, um ein umweltgerechtes Recycling sicherzustellen. Diese Produkte müssen bei benannten Sammelstellen abgegeben werden. Die Entsorgung ist für den Endverbraucher kostenfrei! Bitte erkundigen sie sich bei ihrer zuständigen Behörde, wo sie diese Produkte zur fachgerechten Entsorgung abgeben können.
Falls ihr Produkt mit Batterien oder Akkumulatoren ausgerüstet ist, müssen sie diese vor Abgabe des Produktes entfernen und separat entsorgen (siehe oben). Die Abgabe dieses Produktes bei einer zuständigen Stelle hilft ihnen, dass das Produkt umweltgerecht entsorgt wird. Damit leisten sie persönlich einen nicht unerheblichen Beitrag zum Schutz der Umwelt und der menschlichen Gesundheit vor möglichen negativen Effekten durch unsachgemäße Entsorgung von Müll. Batterien oder Akkus, die Schadstoffe enthalten, sind auch mit dem Symbol einer durchgekreuzten Mülltonne gekennzeichnet. In der Nähe zum Mülltonnensymbol befindet sich die chemische Bezeichnung des Schadstoffes.
Cd oder NiCd steht für Cadmium, Pb für Blei und Hg für Quecksilber.

Inhaltsübersicht
Über diese Anleitung ............................................................................42
Die wichtigsten Funktionen .................................................................43
Bedienelemente und Anschlüsse .........................................................44
Bedienfeld ..................................................................................................................44
Rückseite .....................................................................................................................45
Anschlüsse und Stromversorgung .......................................................46
Modusanwahl ........................................................................................47
Anwahl und Spielen von Klängen ........................................................48
Anwahl von Programs ............................................................................................48
Anwahl von Combinations ...................................................................................49
Verwendung der Spielhilfen ................................................................50
Arbeiten mit dem Arpeggiator .............................................................51
Speichern eines Programs/einer Combination ...................................52
Laden und Abspielen der Demosongs .................................................53
Laden der Demosongs ...........................................................................................53
Abspielen der Demosongs ...................................................................................54
Auto Song Setup ....................................................................................54
Datensicherung auf einer SD-Karte .....................................................55
Technische Daten (Auszug) ..................................................................56
41
42
Über diese AnleitungDie Dokumentation und ihre VerwendungZum Lieferumfang der microSTATION gehört die folgende Dokumentation.
• microSTATION Blitzstart
• microSTATION Bedienungshandbuch (PDF)
• microSTATION Voice Name List (PDF)
Die oben erwähnten PDF‐Dateien finden Sie im „MANUALS“‐Ordner auf der beiliegenden Disc. Die Anleitung für den KORG USB–MIDI‐Treiber befindet sich im selben Ordner wie der Treiber selbst.
microSTATION BlitzstartBitte zuerst durchlesen. Hier erfahren Sie nämlich, wie man die wichtigsten Funktionen verwendet.
microSTATION BedienungshandbuchHier werden die Bedienelemente und Funktionen der microSTATION vorgestellt. Außerdem erfahren Sie, wie man sie anschließt, welche Modi es gibt, wie diese strukturiert sind, wie man Klänge editiert und mit dem Sequenzer arbeitet. Auch der Arpeggiator und die Effekte werden hier vorgestellt.
Schließlich finden Sie hier Tipps für die Fehlerbehebung, eine Übersicht der Fehlermeldungen und die technischen Daten.
microSTATION Voice Name ListHier finden Sie die Namen der Multisamples, Drumsamples sowie der vorprogrammierten Combinations, Programs, Drumkits, User Arpeggio‐Pattern und Demosongs der microSTATION. Damit sparen Sie viel Zeit bei der gezielten Suche nach Sounds.
Konventionen in diesem Handbuch
Abkürzungen der Anleitungen: BHAb und zu verwenden wir folgende Abkürzungen für Verweise auf andere Anleitungen:
BH: Bedienungshandbuch
Parameter im LC-Display: „ “Parameter, die im Display angezeigt werden, sind in Anführungszeichen („ “) gesetzt.
Symbole , , Anmerkung, TippsMit diesen Symbolen sind Vorsichtshinweise, Hinweise für den MIDI‐Einsatz, generelle Anmerkungen und Tipps gekennzeichnet.
Beispielhafte Display-AnzeigenDie in den Abbildungen gezeigten Display‐Seiten und Parameter haben lediglich Beispielcharakter und stimmen also nicht immer mit den bei Ihnen angezeigten Werten überein.
Abkürzungen von MIDI-Parametern„CC“ (oder „CC#“) verweist auf MIDI‐Steuerbefehle (Controller).
Bei Erklärungen zum Thema MIDI sind Werte in eckigen Klammern [ ] immer Hexadezimalzahlen.
Vielen Dank für Ihre Entscheidung zu einer Korg microSTATION Music Workstation. Bitte lesen Sie sich diese Anleitung vollständig durch, um bei der Bedienung alles richtig zu machen.
Die wichtigsten Funktionen
Blitzstart
Die wichtigsten FunktionenEDS-i (Enhanced Definition Synthesis - integrated)Dies Klangerzeugung beruht auf dem „Enhanced Definition Synthesis“‐Verfahren (EDS), das im M3 und M50 zum Einsatz kommt, darunter die Oszillatoren, Filter, Verstärker, LFOs/Hüllkurven und Effekte.
49MB (umgerechnet in das 16-Bit-Linearformat) an PCM-DatenDie microSTATION enthält 49MB an PCM‐Wellenformen im speziellen Korg‐Format sowie 480 Werks‐Programs, die diese PCM‐Daten ansprechen und 256 Werks‐Combinations, die auf den Programs beruhen.
CombinationsBis zu 16 Programs können in „Layer“‐, „Split“‐ und/oder „Velocity Switch“‐Kombinationen angesteuert werden.
Zwei polyphone ArpeggiatorsAußer den herkömmlichen Arpeggien können die Arpeggiators der microSTATION auch Gitarren‐ und Bassriffs sowie Schlagzeugrhythmen spielen. Für Combinations und Songs stehen jeweils zwei Arpeggiators zur Verfügung. Die 512 User‐Arpeggien decken bereits eine Vielzahl Anwendungen ab.
Es stehen 5 Insert-, 2 Master-Effekte und 1 Total-Effekt zur Verfügung (alle Prozessoren sind stereo).Mit den 134 hochwertigen Effekttypen und der Mixer‐Sektion zum Steuern des Effekt‐Routings lassen sich so gut wie alle Sound‐Wünsche erfüllen.
Echtzeitsektion und JoystickDie Bedienelemente der Echtzeitsektion erlauben nicht nur Echtzeiteingriffe in das Sound‐Geschehen, sondern können auch zum Ansteuern anderer Korg‐Produkte und zahlreicher Software‐Programme genutzt werden.
Hoch auflösender Sequenzer (480 Schritte/Viertelnote)Der interne Sequenzer bietet 16 MIDI‐Spuren + 1 Master‐Spur. Hierfür stehen zahlreiche praktische Funktionen zur Verfügung, so z.B. „Auto Song Setup“, eine „Grid“‐Funktion und Song‐Vorlagen.
USB-Port für die Computeranbindung und SD-KartenschachtDie microSTATION kann an einen USB‐Port Ihres Computers angeschlossen werden und erlaubt dann den Austausch von MIDI‐Daten. Mit handelsüblichen SD‐Karten lassen sich die Daten der microSTATION außerdem bequem verwalten.
Geliefert mit ‘microSTATION Editor’ und ‘microSTATION Plug-In Editor’Hiermit haben Sie einerseits Zugriff auf alle Parameter der microSTATION und können sie andererseits wie einen Soft‐Synthesizer in Ihre DAW einbinden. Zahlreiche Klang‐ und Effektparameter sowie Drumkits und User‐Arpeggien können mit den Bedienelementen der microSTATION nicht editiert werden. Dafür muss man „microSTATION Editor/Plug‐In Editor“ verwenden.
43
Blitzstart
44
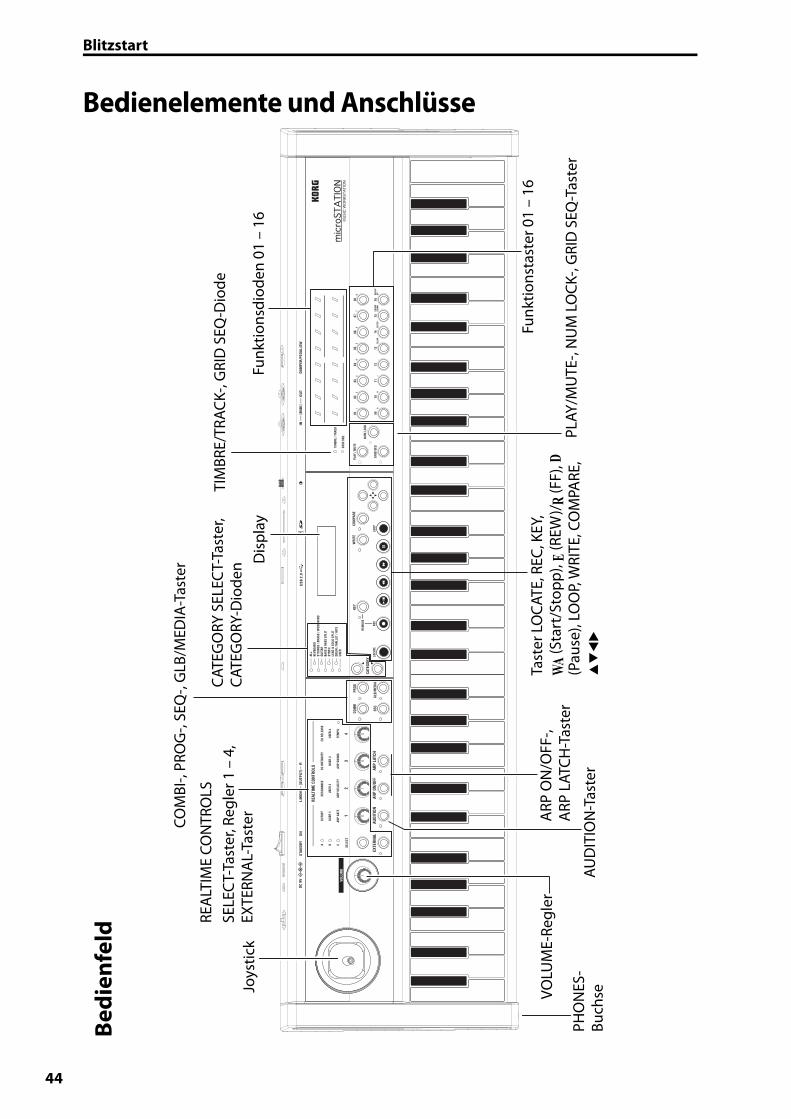
Bedienelemente und Anschlüsse
Joys
tick
REA
LTIM
E CO
NTR
OLS
SELE
CT-
Tast
er, R
egle
r 1 –
4,
EXTE
RNA
L-Ta
sterCO
MBI
-, PR
OG
-, SE
Q-,
GLB
/MED
IA-T
aste
r
CATE
GO
RY S
ELEC
T-Ta
ster
, CA
TEG
ORY
-Dio
den D
ispl
ay
TIM
BRE/
TRAC
K-, G
RID
SEQ
-Dio
de
Funk
tions
diod
en 0
1 –
16
PHO
NES
-Bu
chseVO
LUM
E-Re
gler
AUD
ITIO
N-T
aste
r
ARP
ON
/OFF
-, A
RP L
ATCH
-Tas
ter
Tast
er L
OCA
TE, R
EC, K
EY,
WA
(Sta
rt/S
topp
), E
(REW
)/R
(FF)
, D
(Pau
se),
LOO
P, W
RITE
, CO
MPA
RE,
PLAY
/MU
TE-,
NU
M L
OCK
-, G
RID
SEQ
-Tas
ter
Funk
tions
tast
er 0
1 –
16
Bedi
enfe
ld
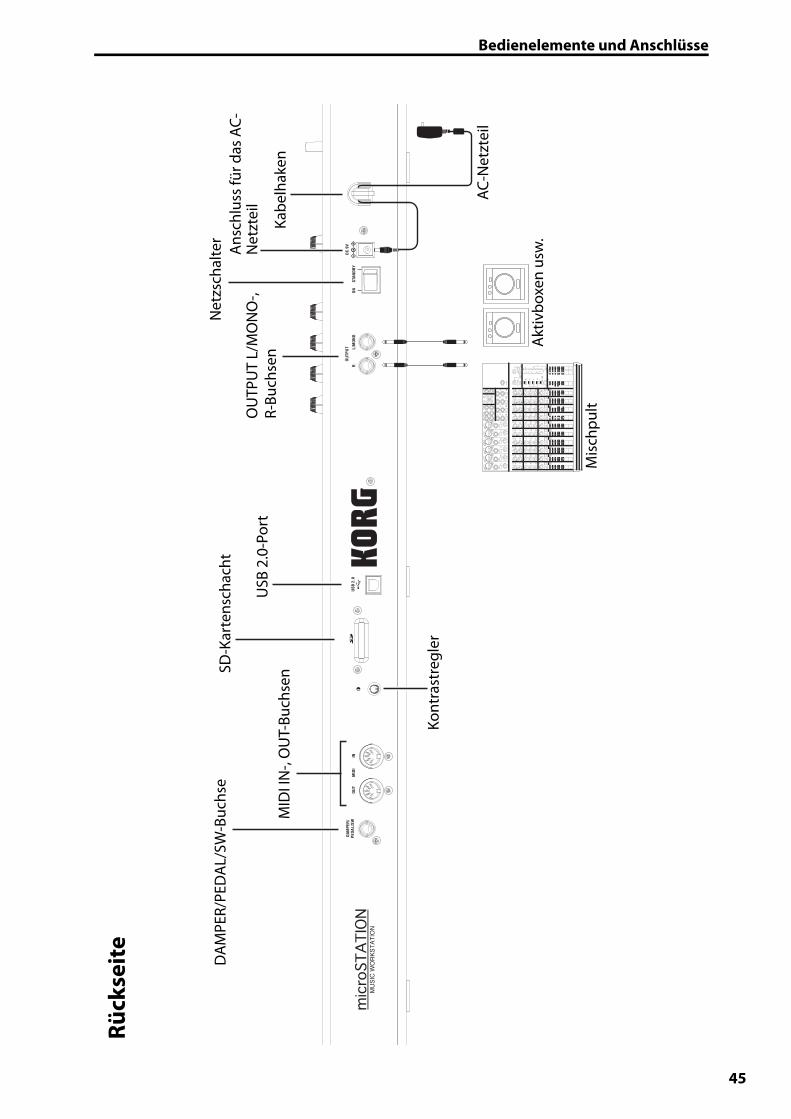
Bedienelemente und Anschlüsse
Kont
rast
regl
er
MID
I IN
-, O
UT-
Buch
senSD
-Kar
tens
chac
ht
USB
2.0
-Por
t
Akt
ivbo
xen
usw
.
Mis
chpu
lt
AC-N
etzt
eil
Net
zsch
alte
rD
AM
PER/
PED
AL/
SW-B
uchs
e
OU
TPU
T L/
MO
NO
-, R-
Buch
sen
Ans
chlu
ss fü
r das
AC-
Net
ztei
l
Kabe
lhak
en
Rück
seit
e
45
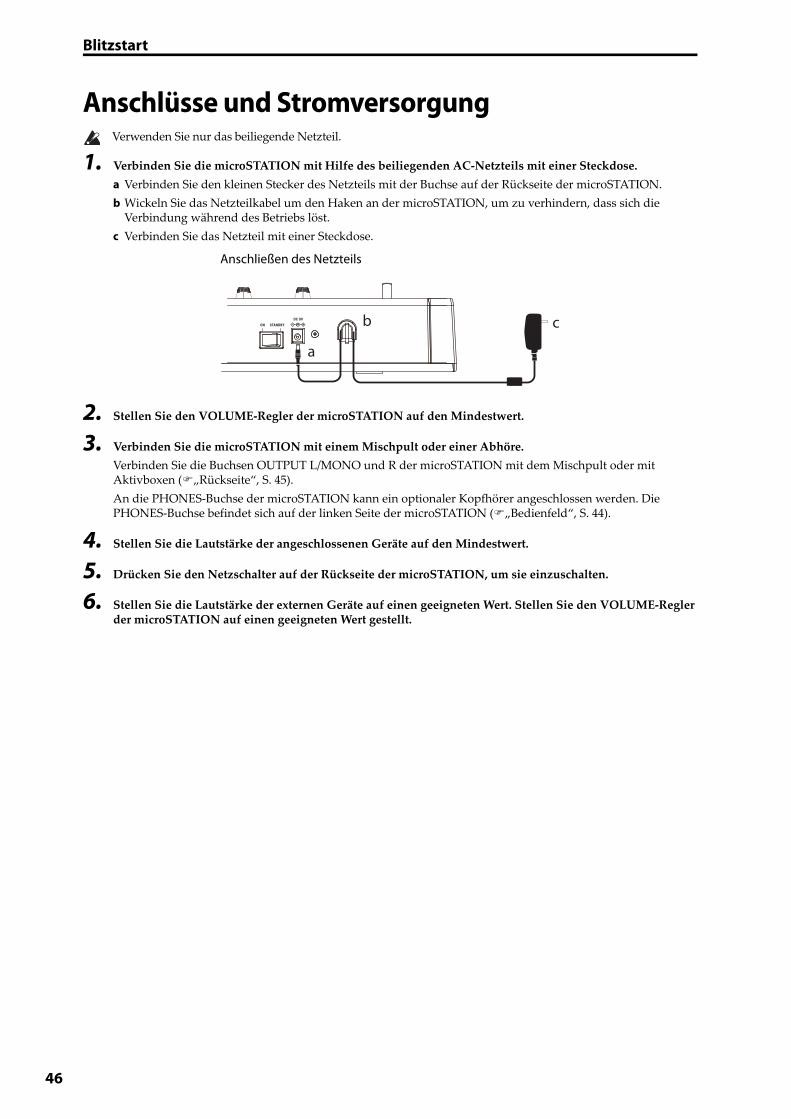
Blitzstart
46
Anschlüsse und Stromversorgung Verwenden Sie nur das beiliegende Netzteil.
1. Verbinden Sie die microSTATION mit Hilfe des beiliegenden AC‐Netzteils mit einer Steckdose.
a Verbinden Sie den kleinen Stecker des Netzteils mit der Buchse auf der Rückseite der microSTATION.
b Wickeln Sie das Netzteilkabel um den Haken an der microSTATION, um zu verhindern, dass sich die Verbindung während des Betriebs löst.
c Verbinden Sie das Netzteil mit einer Steckdose.
2. Stellen Sie den VOLUME‐Regler der microSTATION auf den Mindestwert.
3. Verbinden Sie die microSTATION mit einem Mischpult oder einer Abhöre.
Verbinden Sie die Buchsen OUTPUT L/MONO und R der microSTATION mit dem Mischpult oder mit Aktivboxen („Rückseite“, S. 45).
An die PHONES‐Buchse der microSTATION kann ein optionaler Kopfhörer angeschlossen werden. Die PHONES‐Buchse befindet sich auf der linken Seite der microSTATION („Bedienfeld“, S. 44).
4. Stellen Sie die Lautstärke der angeschlossenen Geräte auf den Mindestwert.
5. Drücken Sie den Netzschalter auf der Rückseite der microSTATION, um sie einzuschalten.
6. Stellen Sie die Lautstärke der externen Geräte auf einen geeigneten Wert. Stellen Sie den VOLUME‐Regler der microSTATION auf einen geeigneten Wert gestellt.
a
b c
Anschließen des Netzteils
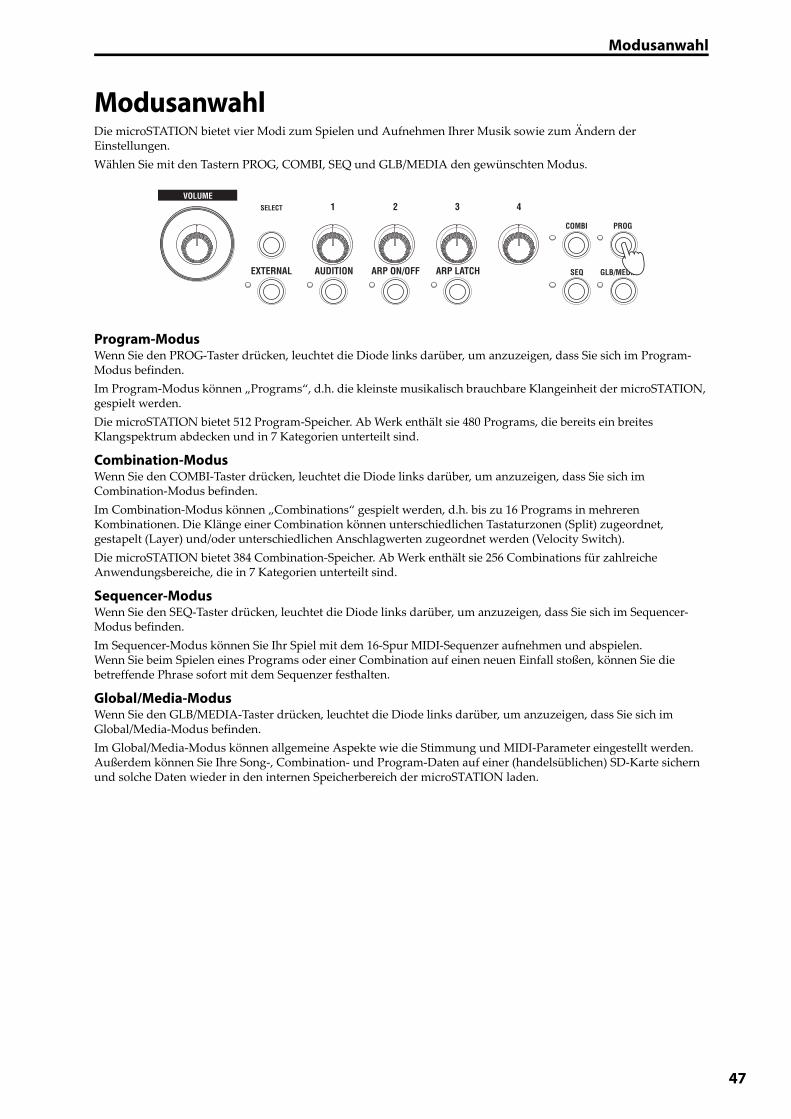
Modusanwahl
ModusanwahlDie microSTATION bietet vier Modi zum Spielen und Aufnehmen Ihrer Musik sowie zum Ändern der Einstellungen.
Wählen Sie mit den Tastern PROG, COMBI, SEQ und GLB/MEDIA den gewünschten Modus.
Program-ModusWenn Sie den PROG‐Taster drücken, leuchtet die Diode links darüber, um anzuzeigen, dass Sie sich im Program‐Modus befinden.
Im Program‐Modus können „Programs“, d.h. die kleinste musikalisch brauchbare Klangeinheit der microSTATION, gespielt werden.
Die microSTATION bietet 512 Program‐Speicher. Ab Werk enthält sie 480 Programs, die bereits ein breites Klangspektrum abdecken und in 7 Kategorien unterteilt sind.
Combination-ModusWenn Sie den COMBI‐Taster drücken, leuchtet die Diode links darüber, um anzuzeigen, dass Sie sich im Combination‐Modus befinden.
Im Combination‐Modus können „Combinations“ gespielt werden, d.h. bis zu 16 Programs in mehreren Kombinationen. Die Klänge einer Combination können unterschiedlichen Tastaturzonen (Split) zugeordnet, gestapelt (Layer) und/oder unterschiedlichen Anschlagwerten zugeordnet werden (Velocity Switch).
Die microSTATION bietet 384 Combination‐Speicher. Ab Werk enthält sie 256 Combinations für zahlreiche Anwendungsbereiche, die in 7 Kategorien unterteilt sind.
Sequencer-ModusWenn Sie den SEQ‐Taster drücken, leuchtet die Diode links darüber, um anzuzeigen, dass Sie sich im Sequencer‐Modus befinden.
Im Sequencer‐Modus können Sie Ihr Spiel mit dem 16‐Spur MIDI‐Sequenzer aufnehmen und abspielen.Wenn Sie beim Spielen eines Programs oder einer Combination auf einen neuen Einfall stoßen, können Sie die betreffende Phrase sofort mit dem Sequenzer festhalten.
Global/Media-ModusWenn Sie den GLB/MEDIA‐Taster drücken, leuchtet die Diode links darüber, um anzuzeigen, dass Sie sich im Global/Media‐Modus befinden.
Im Global/Media‐Modus können allgemeine Aspekte wie die Stimmung und MIDI‐Parameter eingestellt werden. Außerdem können Sie Ihre Song‐, Combination‐ und Program‐Daten auf einer (handelsüblichen) SD‐Karte sichern und solche Daten wieder in den internen Speicherbereich der microSTATION laden.
47
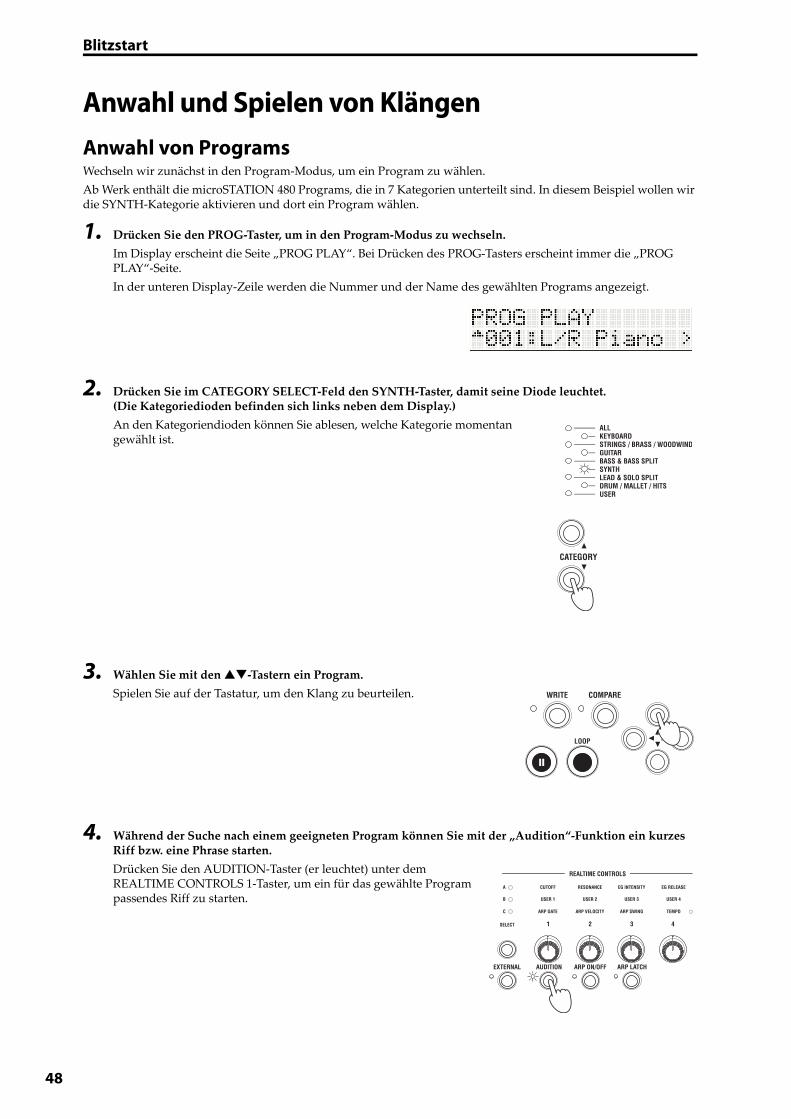
Blitzstart
48
Anwahl und Spielen von KlängenAnwahl von ProgramsWechseln wir zunächst in den Program‐Modus, um ein Program zu wählen.
Ab Werk enthält die microSTATION 480 Programs, die in 7 Kategorien unterteilt sind. In diesem Beispiel wollen wir die SYNTH‐Kategorie aktivieren und dort ein Program wählen.
1. Drücken Sie den PROG‐Taster, um in den Program‐Modus zu wechseln.
Im Display erscheint die Seite „PROG PLAY“. Bei Drücken des PROG‐Tasters erscheint immer die „PROG PLAY“‐Seite.
In der unteren Display‐Zeile werden die Nummer und der Name des gewählten Programs angezeigt.
2. Drücken Sie im CATEGORY SELECT‐Feld den SYNTH‐Taster, damit seine Diode leuchtet. (Die Kategoriedioden befinden sich links neben dem Display.)
An den Kategoriendioden können Sie ablesen, welche Kategorie momentan gewählt ist.
3. Wählen Sie mit den ‐Tastern ein Program.
Spielen Sie auf der Tastatur, um den Klang zu beurteilen.
4. Während der Suche nach einem geeigneten Program können Sie mit der „Audition“‐Funktion ein kurzes Riff bzw. eine Phrase starten.
Drücken Sie den AUDITION‐Taster (er leuchtet) unter dem REALTIME CONTROLS 1‐Taster, um ein für das gewählte Program passendes Riff zu starten.
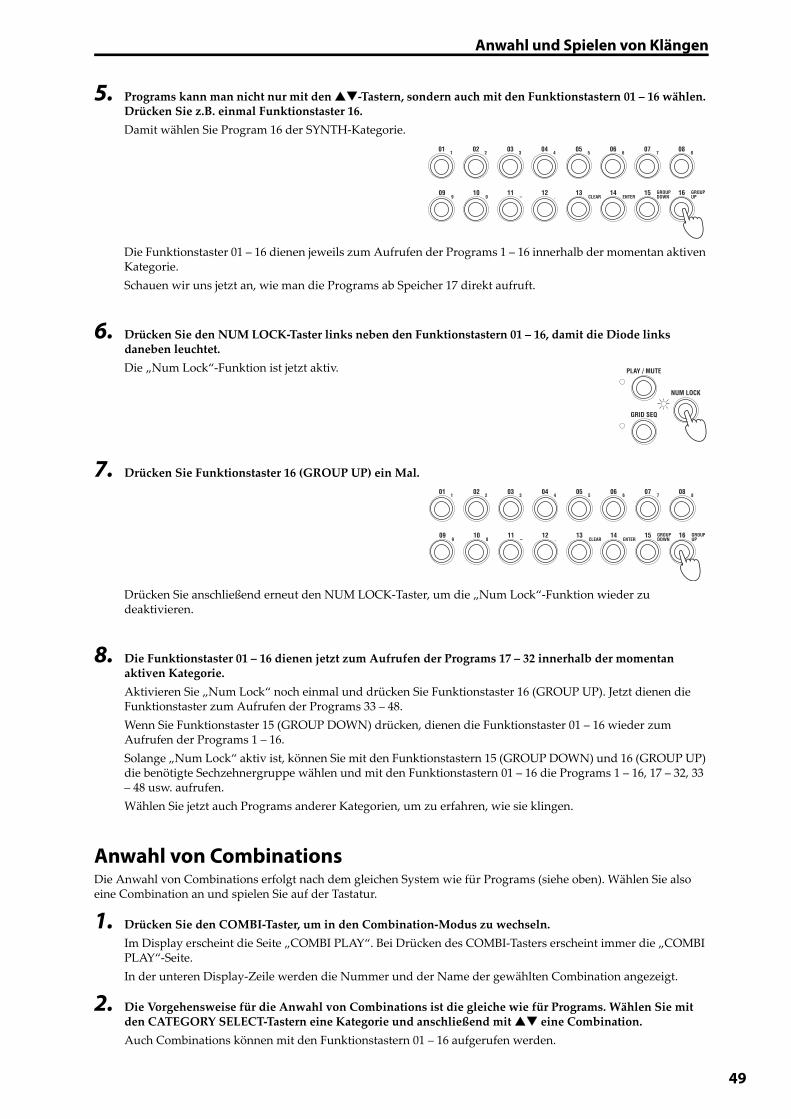
Anwahl und Spielen von Klängen
5. Programs kann man nicht nur mit den ‐Tastern, sondern auch mit den Funktionstastern 01 – 16 wählen. Drücken Sie z.B. einmal Funktionstaster 16.
Damit wählen Sie Program 16 der SYNTH‐Kategorie.
Die Funktionstaster 01 – 16 dienen jeweils zum Aufrufen der Programs 1 – 16 innerhalb der momentan aktiven Kategorie.
Schauen wir uns jetzt an, wie man die Programs ab Speicher 17 direkt aufruft.
6. Drücken Sie den NUM LOCK‐Taster links neben den Funktionstastern 01 – 16, damit die Diode links daneben leuchtet.
Die „Num Lock“‐Funktion ist jetzt aktiv.
7. Drücken Sie Funktionstaster 16 (GROUP UP) ein Mal.
Drücken Sie anschließend erneut den NUM LOCK‐Taster, um die „Num Lock“‐Funktion wieder zu deaktivieren.
8. Die Funktionstaster 01 – 16 dienen jetzt zum Aufrufen der Programs 17 – 32 innerhalb der momentan aktiven Kategorie.
Aktivieren Sie „Num Lock“ noch einmal und drücken Sie Funktionstaster 16 (GROUP UP). Jetzt dienen die Funktionstaster zum Aufrufen der Programs 33 – 48.
Wenn Sie Funktionstaster 15 (GROUP DOWN) drücken, dienen die Funktionstaster 01 – 16 wieder zum Aufrufen der Programs 1 – 16.
Solange „Num Lock“ aktiv ist, können Sie mit den Funktionstastern 15 (GROUP DOWN) und 16 (GROUP UP) die benötigte Sechzehnergruppe wählen und mit den Funktionstastern 01 – 16 die Programs 1 – 16, 17 – 32, 33 – 48 usw. aufrufen.
Wählen Sie jetzt auch Programs anderer Kategorien, um zu erfahren, wie sie klingen.
Anwahl von CombinationsDie Anwahl von Combinations erfolgt nach dem gleichen System wie für Programs (siehe oben). Wählen Sie also eine Combination an und spielen Sie auf der Tastatur.
1. Drücken Sie den COMBI‐Taster, um in den Combination‐Modus zu wechseln.
Im Display erscheint die Seite „COMBI PLAY“. Bei Drücken des COMBI‐Tasters erscheint immer die „COMBI PLAY“‐Seite.
In der unteren Display‐Zeile werden die Nummer und der Name der gewählten Combination angezeigt.
2. Die Vorgehensweise für die Anwahl von Combinations ist die gleiche wie für Programs. Wählen Sie mit den CATEGORY SELECT‐Tastern eine Kategorie und anschließend mit eine Combination.
Auch Combinations können mit den Funktionstastern 01 – 16 aufgerufen werden.
49
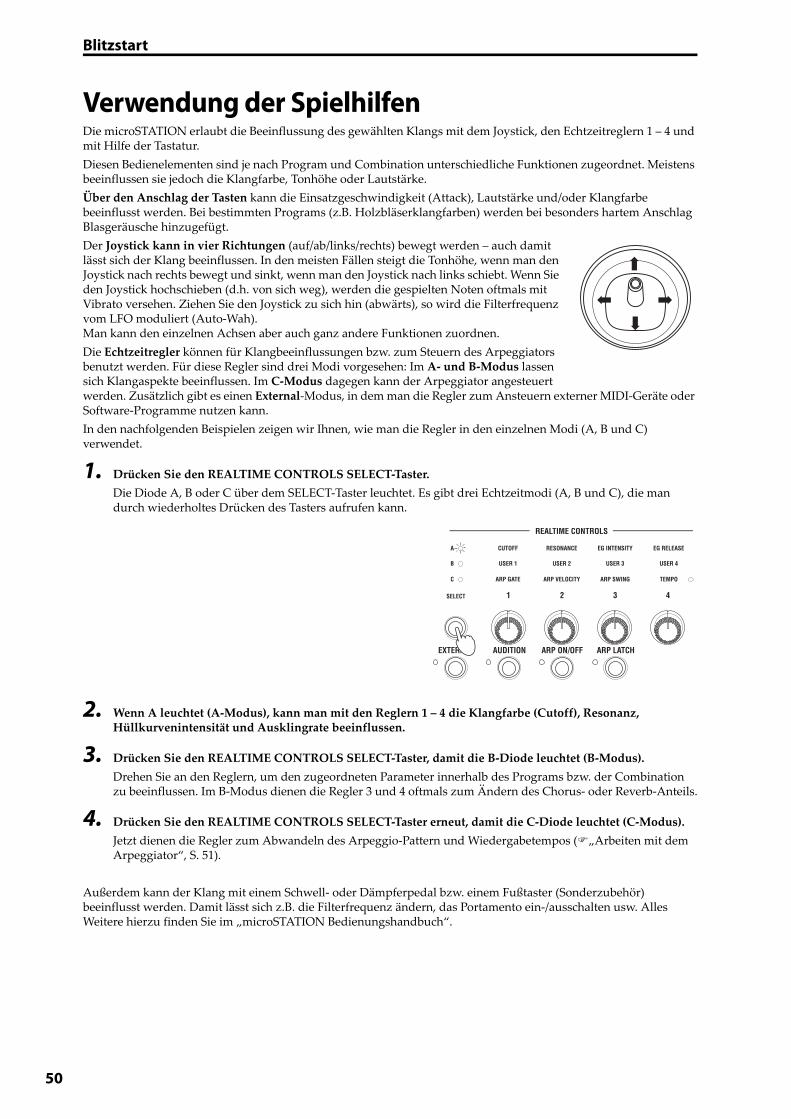
Blitzstart
50
Verwendung der SpielhilfenDie microSTATION erlaubt die Beeinflussung des gewählten Klangs mit dem Joystick, den Echtzeitreglern 1 – 4 und mit Hilfe der Tastatur.
Diesen Bedienelementen sind je nach Program und Combination unterschiedliche Funktionen zugeordnet. Meistens beeinflussen sie jedoch die Klangfarbe, Tonhöhe oder Lautstärke.
Über den Anschlag der Tasten kann die Einsatzgeschwindigkeit (Attack), Lautstärke und/oder Klangfarbe beeinflusst werden. Bei bestimmten Programs (z.B. Holzbläserklangfarben) werden bei besonders hartem Anschlag Blasgeräusche hinzugefügt.
Der Joystick kann in vier Richtungen (auf/ab/links/rechts) bewegt werden – auch damit lässt sich der Klang beeinflussen. In den meisten Fällen steigt die Tonhöhe, wenn man den Joystick nach rechts bewegt und sinkt, wenn man den Joystick nach links schiebt. Wenn Sie den Joystick hochschieben (d.h. von sich weg), werden die gespielten Noten oftmals mit Vibrato versehen. Ziehen Sie den Joystick zu sich hin (abwärts), so wird die Filterfrequenz vom LFO moduliert (Auto‐Wah).Man kann den einzelnen Achsen aber auch ganz andere Funktionen zuordnen.
Die Echtzeitregler können für Klangbeeinflussungen bzw. zum Steuern des Arpeggiators benutzt werden. Für diese Regler sind drei Modi vorgesehen: Im A‐ und B‐Modus lassen sich Klangaspekte beeinflussen. Im C‐Modus dagegen kann der Arpeggiator angesteuert werden. Zusätzlich gibt es einen External‐Modus, in dem man die Regler zum Ansteuern externer MIDI‐Geräte oder Software‐Programme nutzen kann.
In den nachfolgenden Beispielen zeigen wir Ihnen, wie man die Regler in den einzelnen Modi (A, B und C) verwendet.
1. Drücken Sie den REALTIME CONTROLS SELECT‐Taster.
Die Diode A, B oder C über dem SELECT‐Taster leuchtet. Es gibt drei Echtzeitmodi (A, B und C), die man durch wiederholtes Drücken des Tasters aufrufen kann.
2. Wenn A leuchtet (A‐Modus), kann man mit den Reglern 1 – 4 die Klangfarbe (Cutoff), Resonanz, Hüllkurvenintensität und Ausklingrate beeinflussen.
3. Drücken Sie den REALTIME CONTROLS SELECT‐Taster, damit die B‐Diode leuchtet (B‐Modus).
Drehen Sie an den Reglern, um den zugeordneten Parameter innerhalb des Programs bzw. der Combination zu beeinflussen. Im B‐Modus dienen die Regler 3 und 4 oftmals zum Ändern des Chorus‐ oder Reverb‐Anteils.
4. Drücken Sie den REALTIME CONTROLS SELECT‐Taster erneut, damit die C‐Diode leuchtet (C‐Modus).
Jetzt dienen die Regler zum Abwandeln des Arpeggio‐Pattern und Wiedergabetempos („Arbeiten mit dem Arpeggiator“, S. 51).
Außerdem kann der Klang mit einem Schwell‐ oder Dämpferpedal bzw. einem Fußtaster (Sonderzubehör) beeinflusst werden. Damit lässt sich z.B. die Filterfrequenz ändern, das Portamento ein‐/ausschalten usw. Alles Weitere hierzu finden Sie im „microSTATION Bedienungshandbuch“.

Arbeiten mit dem Arpeggiator
Arbeiten mit dem ArpeggiatorPro Program steht ein polyphoner Arpeggiator zur Verfügung. Im Combination‐ und Sequencer‐Modus können dagegen zwei polyphone Arpeggiators verwendet werden.
1. Wählen Sie das Program bzw. die Combination, das/die Sie spielen möchten.
2. Drücken Sie den ARP ON/OFF‐Taster, damit die Diode links daneben leuchtet.
Bei bestimmten Combinations und Programs wird der Arpeggiator automatisch aktiviert. Drücken Sie den ARP ON/OFF‐Taster, um den Arpeggiator ein‐ oder auszuschalten.
3. Drücken Sie den ARP LATCH ON/OFF‐Taster (die Diode links darüber leuchtet), um die „Latch“‐Funktion zu aktivieren.
Wenn Sie „Latch“ aktivieren, werden die Noten des zuletzt gespielten Akkords selbst nach der Freigabe aller Tasten noch verwendet.
4. Drücken Sie mehrere Klaviaturtasten.
Das Arpeggio‐Pattern wird gestartet.
5. Wählen Sie mit dem REALTIME CONTROLS SELECT‐Taster den C‐Modus (die Diode leuchtet).
Drehen Sie jetzt an den Reglern 1 – 3 (GATE, VELOCITY, SWING) und achten Sie darauf, wie sich das Pattern ändert.
6. Mit Regler 4 (TEMPO) kann das Tempo geändert werden.
Selbstverständlich kann man bei laufender Arpeggio‐Wiedergabe Modus A oder B aufrufen und den Klang „verbiegen“ („Verwendung der Spielhilfen“, S. 50).
Den Werks‐Programs und ‐Combinations sind bereits passende Arpeggio‐Pattern zugeordnet. Wählen Sie also einfach andere Programs und Combinations und aktivieren Sie den Arpeggiator, um zu erfahren, was dann passiert.
51

Blitzstart
52
Speichern eines Programs/einer CombinationAußer den bisher erwähnten Parametern, d.h. den Echtzeitreglern für Klangänderungen und zum Einstellen des Arpeggiators bietet die microSTATION noch zahlreiche andere Parameter, die ebenfalls editiert und gespeichert werden können. (Bestimmte Parameter des B‐Echtzeitmodus’ können nicht gespeichert werden. Auch die im A‐Modus vorgenommenen Einstellungen lassen sich im Falle einer Combination nicht speichern.)
Wenn Sie z.B. die Änderungen eines Programs bzw. einer Combination nicht sichern, gehen sie verloren, sobald Sie einen anderen Speicher wählen oder das Instrument ausschalten. Deshalb empfehlen wir, das Program bzw. die Combination sofort zu speichern, wenn Ihnen der Sound gefällt.
In diesem Beispiel wollen wir Ihnen zeigen, wie man im Program‐Modus ein Program speichert.
1. Ändern Sie die Program‐Einstellungen mit den Echtzeitreglern.
(„Verwendung der Spielhilfen“, S. 50)
2. Drücken Sie den ‐Taster, um „PROG EDIT“ aufzurufen.
Jetzt erscheint zunächst die „PROG EDIT–OSC Common“‐Seite.
3. Wählen Sie mit den ‐Tastern „Write Program“.
4. Drücken Sie den ‐Taster.
Jetzt erscheint die Seite, auf welcher der Program‐Name angezeigt wird.
5. Wenn Sie den Namen ändern möchten, müssen Sie drücken.
Es erscheint die Seite, auf der man das Program benennen kann.
6. Wählen Sie mit den ‐Tastern die änderungsbedürftige Zeichenposition und ordnen Sie ihr mit das gewünschte Zeichen zu.
Wenn Sie mit dem Namen zufrieden sind, können Sie mit dem ‐Taster zur ersten Seite mit dem Program‐Namen (siehe Schritt 4) zurückkehren.
7. Drücken Sie den ‐Taster.
Es erscheint die Seite, auf der Sie eine andere Kategorie wählen können.
Wenn Sie tatsächlich eine andere Kategorie wählen möchten, müssen Sie den ‐Taster drücken.
Wählen Sie mit den ‐Tastern die gewünschte Kategorie.
Drücken Sie nach Anwahl der Kategorie den ‐Taster, um zur ersten Kategorieseite zurückzukehren.
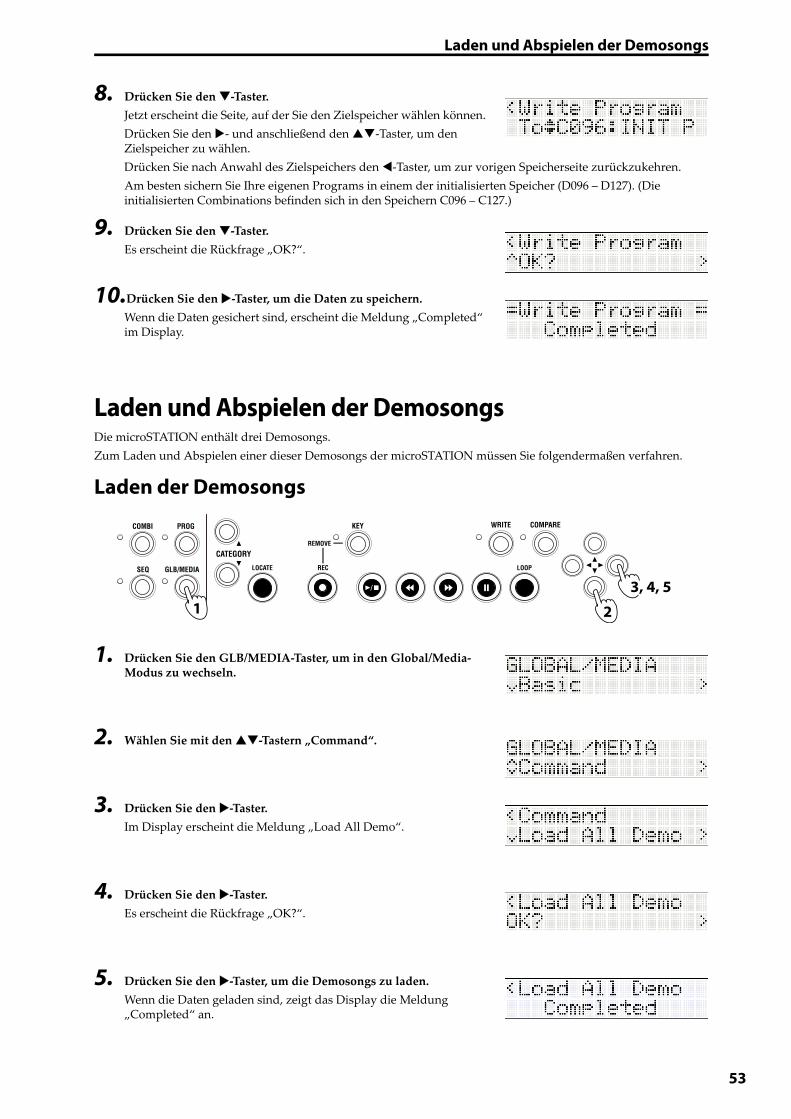
Laden und Abspielen der Demosongs
8. Drücken Sie den ‐Taster.
Jetzt erscheint die Seite, auf der Sie den Zielspeicher wählen können.
Drücken Sie den ‐ und anschließend den ‐Taster, um den Zielspeicher zu wählen.
Drücken Sie nach Anwahl des Zielspeichers den ‐Taster, um zur vorigen Speicherseite zurückzukehren.
Am besten sichern Sie Ihre eigenen Programs in einem der initialisierten Speicher (D096 – D127). (Die initialisierten Combinations befinden sich in den Speichern C096 – C127.)
9. Drücken Sie den ‐Taster.
Es erscheint die Rückfrage „OK?“.
10.Drücken Sie den ‐Taster, um die Daten zu speichern.Wenn die Daten gesichert sind, erscheint die Meldung „Completed“ im Display.
Laden und Abspielen der DemosongsDie microSTATION enthält drei Demosongs.
Zum Laden und Abspielen einer dieser Demosongs der microSTATION müssen Sie folgendermaßen verfahren.
Laden der Demosongs
1. Drücken Sie den GLB/MEDIA‐Taster, um in den Global/Media‐Modus zu wechseln.
2. Wählen Sie mit den ‐Tastern „Command“.
3. Drücken Sie den ‐Taster.
Im Display erscheint die Meldung „Load All Demo“.
4. Drücken Sie den ‐Taster.
Es erscheint die Rückfrage „OK?“.
5. Drücken Sie den ‐Taster, um die Demosongs zu laden.
Wenn die Daten geladen sind, zeigt das Display die Meldung „Completed“ an.
1 2
3, 4, 5
53
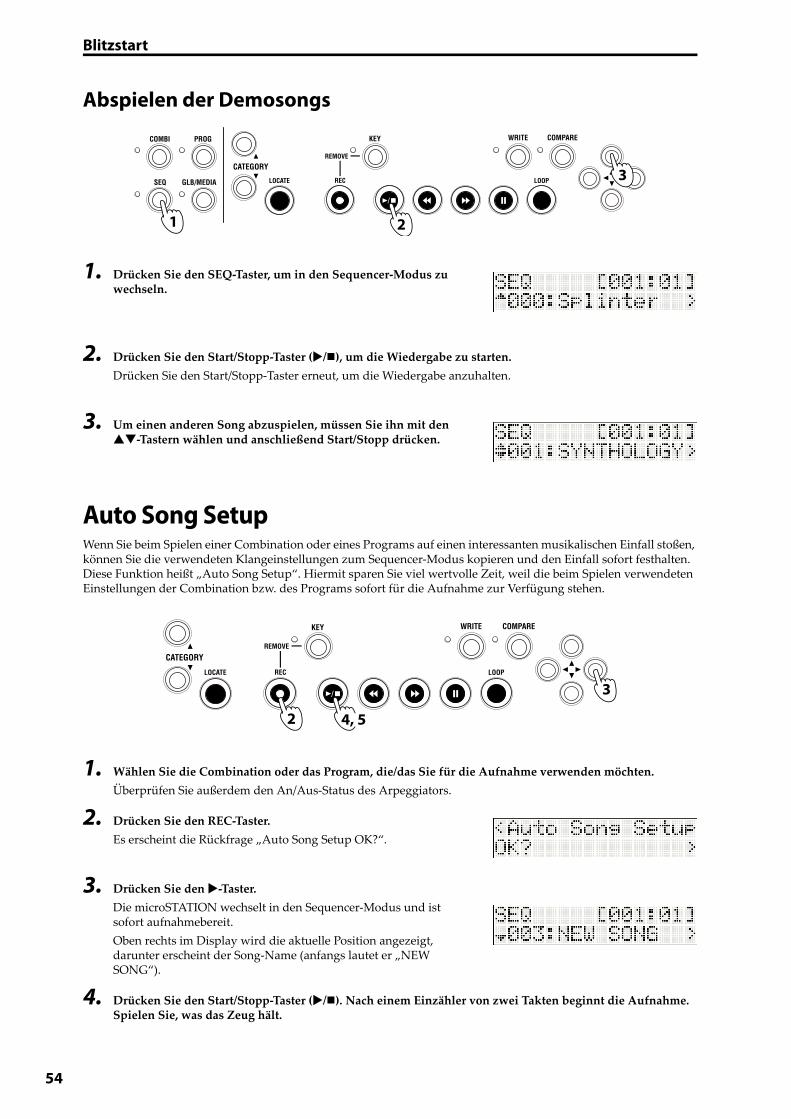
Blitzstart
54
Abspielen der Demosongs
1. Drücken Sie den SEQ‐Taster, um in den Sequencer‐Modus zu wechseln.
2. Drücken Sie den Start/Stopp‐Taster (/), um die Wiedergabe zu starten.
Drücken Sie den Start/Stopp‐Taster erneut, um die Wiedergabe anzuhalten.
3. Um einen anderen Song abzuspielen, müssen Sie ihn mit den ‐Tastern wählen und anschließend Start/Stopp drücken.
Auto Song SetupWenn Sie beim Spielen einer Combination oder eines Programs auf einen interessanten musikalischen Einfall stoßen, können Sie die verwendeten Klangeinstellungen zum Sequencer‐Modus kopieren und den Einfall sofort festhalten. Diese Funktion heißt „Auto Song Setup“. Hiermit sparen Sie viel wertvolle Zeit, weil die beim Spielen verwendeten Einstellungen der Combination bzw. des Programs sofort für die Aufnahme zur Verfügung stehen.
1. Wählen Sie die Combination oder das Program, die/das Sie für die Aufnahme verwenden möchten.
Überprüfen Sie außerdem den An/Aus‐Status des Arpeggiators.
2. Drücken Sie den REC‐Taster.
Es erscheint die Rückfrage „Auto Song Setup OK?“.
3. Drücken Sie den ‐Taster.
Die microSTATION wechselt in den Sequencer‐Modus und ist sofort aufnahmebereit.
Oben rechts im Display wird die aktuelle Position angezeigt, darunter erscheint der Song‐Name (anfangs lautet er „NEW SONG“).
4. Drücken Sie den Start/Stopp‐Taster (/). Nach einem Einzähler von zwei Takten beginnt die Aufnahme. Spielen Sie, was das Zeug hält.
1 2
3
3
2 4, 5
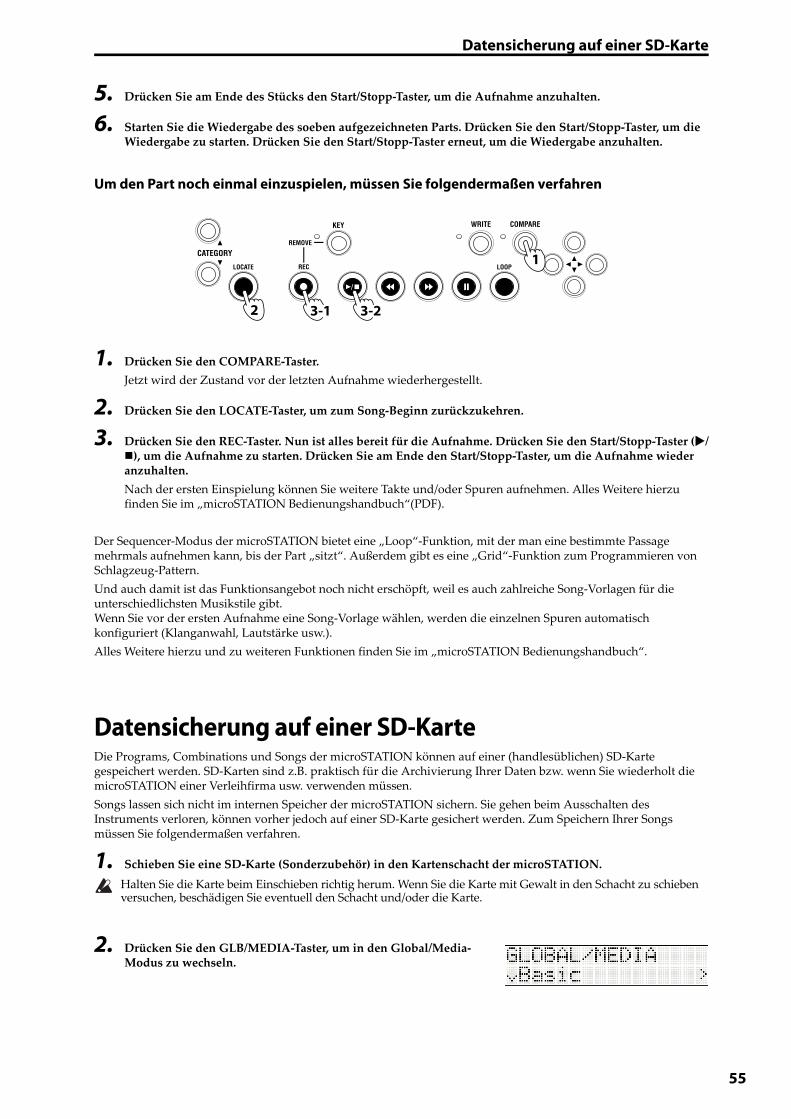
Datensicherung auf einer SD-Karte
5. Drücken Sie am Ende des Stücks den Start/Stopp‐Taster, um die Aufnahme anzuhalten.
6. Starten Sie die Wiedergabe des soeben aufgezeichneten Parts. Drücken Sie den Start/Stopp‐Taster, um die Wiedergabe zu starten. Drücken Sie den Start/Stopp‐Taster erneut, um die Wiedergabe anzuhalten.
Um den Part noch einmal einzuspielen, müssen Sie folgendermaßen verfahren
1. Drücken Sie den COMPARE‐Taster.
Jetzt wird der Zustand vor der letzten Aufnahme wiederhergestellt.
2. Drücken Sie den LOCATE‐Taster, um zum Song‐Beginn zurückzukehren.
3. Drücken Sie den REC‐Taster. Nun ist alles bereit für die Aufnahme. Drücken Sie den Start/Stopp‐Taster (/), um die Aufnahme zu starten. Drücken Sie am Ende den Start/Stopp‐Taster, um die Aufnahme wieder anzuhalten.
Nach der ersten Einspielung können Sie weitere Takte und/oder Spuren aufnehmen. Alles Weitere hierzu finden Sie im „microSTATION Bedienungshandbuch“(PDF).
Der Sequencer‐Modus der microSTATION bietet eine „Loop“‐Funktion, mit der man eine bestimmte Passage mehrmals aufnehmen kann, bis der Part „sitzt“. Außerdem gibt es eine „Grid“‐Funktion zum Programmieren von Schlagzeug‐Pattern.
Und auch damit ist das Funktionsangebot noch nicht erschöpft, weil es auch zahlreiche Song‐Vorlagen für die unterschiedlichsten Musikstile gibt.Wenn Sie vor der ersten Aufnahme eine Song‐Vorlage wählen, werden die einzelnen Spuren automatisch konfiguriert (Klanganwahl, Lautstärke usw.).
Alles Weitere hierzu und zu weiteren Funktionen finden Sie im „microSTATION Bedienungshandbuch“.
Datensicherung auf einer SD-KarteDie Programs, Combinations und Songs der microSTATION können auf einer (handlesüblichen) SD‐Karte gespeichert werden. SD‐Karten sind z.B. praktisch für die Archivierung Ihrer Daten bzw. wenn Sie wiederholt die microSTATION einer Verleihfirma usw. verwenden müssen.
Songs lassen sich nicht im internen Speicher der microSTATION sichern. Sie gehen beim Ausschalten des Instruments verloren, können vorher jedoch auf einer SD‐Karte gesichert werden. Zum Speichern Ihrer Songs müssen Sie folgendermaßen verfahren.
1. Schieben Sie eine SD‐Karte (Sonderzubehör) in den Kartenschacht der microSTATION.
Halten Sie die Karte beim Einschieben richtig herum. Wenn Sie die Karte mit Gewalt in den Schacht zu schieben versuchen, beschädigen Sie eventuell den Schacht und/oder die Karte.
2. Drücken Sie den GLB/MEDIA‐Taster, um in den Global/Media‐Modus zu wechseln.
1
2 3-1 3-2
55

Blitzstart
56
3. Wählen Sie mit den ‐Tastern „Media“ und drücken Sie den ‐Taster.
4. Wählen Sie mit den ‐Tastern „Save SEQ“ und drücken Sie den ‐Taster.
Im Display erscheint jetzt der Name, unter dem die Daten auf der SD‐Kate gespeichert werden.
Anmerkung: Der Name kann nach der Speicherung noch geändert werden.
5. Drücken Sie den ‐Taster.
Es erscheint die Rückfrage „OK?“.
6. Drücken Sie den ‐Taster, um die Daten zu speichern.
Sobald die Daten gespeichert sind, erscheint wieder die „Save SEQ“‐Seite.
Entnehmen Sie die SD‐Karte niemals, solange noch Daten darauf gespeichert bzw. von ihr geladen werden oder während sie formatiert wird.
Anmerkung: Um die SD‐Karte entnehmen zu können, müssen Sie sie vorsichtig weiter in den Schacht drücken. Dann hören Sie ein Klicken und die SD‐Karte springt halb aus dem Schacht, so dass Sie sie entnehmen können.
Technische Daten (Auszug)Betriebsbedingungen:0 – +40°C (ohne Kondensbildung)
Tastatur:61 Noten (Mini‐Tastatur mit natürlicher Ansprache, anschlagdynamisch, aber ohne Aftertouch)
SD-Kartenschacht:Kapazität bis zu 2GB. Unterstützt SD‐ und SDHC‐Karten.
Stromversorgung:Anschluss für das AC‐Netzteil (DC 9V 1700mA ), Netzschalter
Abmessungen (mm) (B x T x H):778 x 210 x 82
Gewicht:2,6 kg
Leistungsaufnahme:6W
Lieferumfang:AC‐Netzteil, microSTATION Blitzstart, ‘Accessory Disc’ (microSTATION Bedienungshandbuch PDF, Korg USB–MIDI‐Treiber, microSTATION Editor/Plug‐In Editor usw.)
Sonderzubehör:XVP‐10 Schwell‐/Volumenpedal
EXP‐2 Schwellpedal
DS‐1H Dämpferpedal
PS‐1 Fußtaster
Guía Rápida
58
Precauciones
UbicaciónEl uso de la unidad en las siguientes ubicaciones puede dar como resultado un mal funcionamiento:
• Expuesto a la luz directa del sol• Zonas de extremada temperatura o humedad• Zonas con exceso de suciedad o polvo• Zonas con excesiva vibración• Cercano a campos magnéticos
Fuente de alimentaciónPor favor, conecte el adaptador de corriente designado a una toma de corriente con el voltaje adecuado. No lo conecte a una toma de corriente con voltaje diferente al indicado.
Interferencias con otros aparatosLas radios y televisores situados cerca pueden experimentar interferencias en la recepción. Opere este dispositivo a una distancia prudencial de radios y televisores
ManejoPara evitar una rotura, no aplique excesiva fuerza a los conmutadores o controles.
CuidadoSi exterior se ensucia, límpiese con un trapo seco. No use líquidos limpiadores como disolvente, ni compuestos inflamables.
Guarde este manualDespués de leer este manual, guárdelo para futuras consultas.
Mantenga los elementos externos alejados del equipoNunca coloque ningún recipiente con líquido cerca de este equipo, podría causar un cortocircuito, fuero o descarga eléctrica. Cuide de que no caiga ningún objeto metálico dentro del equipo.
Gestión de datosSi utiliza el equipo de forma incorrecta o se produce un funcionamiento anómalo, el contenido de la memoria se podría perder, por lo que se recomienda guardar los datos importantes en algún soporte. Tenga en cuenta que Korg no acepta ningún tipo de responsabilidad por cualquier daño que pueda producirse por la pérdida de datos.
Nota respecto a residuos y deshechos (solo UE)Cuando aparezca el símbolo del cubo de basura tachado sobre un producto, su manual de usuario, la batería, o el embalaje de cualquiera de éstos, significa que cuando quiere tire dichos artículos a la basura, ha de hacerlo en acuerdo con la normativa vigente de la Unión Europea. No debe verter dichos artículos junto con la basura de casa. Verter este
producto de manera adecuada ayudará a evitar daños a su salud pública y posibles daños al medioambiente. Cada país tiene una normativa específica acerca de cómo verter productos potencialmente tóxicos, por tanto le rogamos que se ponga en contacto con su oficina o ministerio de medioambiente para más detalles. Si la batería contiene metales pesados por encima del límite permitido, habrá un símbolo de un material químico, debajo del símbolo del cubo de basura tachado.
Tabla de contenido
Acerca de este manual ..........................................................................60
Características principales ....................................................................61
Paneles frontal y posterior ...................................................................62
Panel frontal ...............................................................................................................62
Panel posterior ..........................................................................................................63
Conectar y activar ..................................................................................64
Seleccionar modos ................................................................................65
Seleccionar y reproducir sonidos .........................................................66
Seleccionar Programas ..........................................................................................66
Seleccionar Combinaciones .................................................................................67
Utilizar controladores para modificar el sonido .................................68
Utilizar el arpegiador ............................................................................69
Guardar (escribir) un Programa o una Combinación .........................70
Cargar y reproducir las canciones de demostración ..........................71
Cargar las canciones de demostración ............................................................71
Reproducir las canciones de demostración ...................................................72
Configuración automática de la canción .............................................72
Guardar en una tarjeta SD ....................................................................73
Especificaciones (abreviado) ................................................................74
59
60
Acerca de este manualAcerca de la documentación y cómo utilizarlaLa microSTATION se entrega con la siguiente documentación.
• microSTATION Guía Rápida
• microSTATION Guía de Funcionamiento (PDF)
• microSTATION Voice Name List (PDF)
Los archivos PDF listados arriba se encuentran en la carpeta “MANUALS” del disco incluido. El manual del controlador KORG USB‐MIDI se encuentra en la misma carpeta que el controlador.
microSTATION Guía RápidaLéala en primer lugar. Explica cómo realizar operaciones básicas.
microSTATION Guía de FuncionamientoExplica la función de cada parte de la microSTATION, cómo conectar el equipo y realizar operaciones básicas, y también proporciona un resumen de cada modo con la explicación de los conocimientos básicos necesarios en cada modo para editar sonidos y grabar en el secuenciador. Este manual también explica el arpegiador y los efectos.
Además, incluye ayuda para solucionar problemas, una lista de mensajes de error y las especeficaciones.
microSTATION Voice Name ListIncluye una lista de los nombres de las multimuestras, muestras de percusión y combinaciones de ajustes predeterminados, programas, kits de percusión, patrones de arpegio de usuario y canciones de demostración de la microSTATION. Consúltela cuando desee aprender más sobre el contenido precargado.
Convenciones de este manual
Abreviaciones para los manuales: GFEn la documentación, las referencias a los manuales se abrevian de la forma siguiente.
GF: Guía de Funcionamiento
Parámetros de la pantalla LCD “ ”Los parámetros visualizados en la pantalla LCD se muestran entre comillas “ ”.
Símbolos , , Nota, ConsejosEstos símbolos indican respectivamente una precaución, una explicación relacionada con MIDI, una nota adicional o un consejo.
Ejemplos de visualización en pantallaLos valores de los parámetros mostrados en las pantallas de ejemplo de este manual se incluyen a modo explicativo, y pueden no coincidir con los valores que aparecen en la pantalla del instrumento.
Explicaciones relacionadas con MIDICC# es la abreviatura para Número de Cambio de Control.
En las explicaciones de los mensajes MIDI, los números entre corchetes [ ] siempre indican números hexadecimales.
Gracias por adquirir la Music Workstation Korg microSTATION. Para ayudarle a sacar el máximo partido de su nuevo instrumento, lea detenidamente este manual.
Características principales
Guía Rápida
Características principalesEDS-i (Enhanced Definition Synthesis - integrated)Esta fuente de sonido integra las principales funciones de oscilador, filtro, amplificador, LFO/EG y los efectos de la fuente de sonido “EDS” (Enhanced Definition Synthesis) de los M3 y M50, para ofrecer el característico e intenso sonido heredado del sistema EDS.
49MB (calculados como 16 bits lineales) de datos PCMLa microSTATION contiene 49MB de datos PCM que incorporan la tecnología de voz de Korg, así como 480 Programas precargados que utilizan estos datos PCM y 256 Combinaciones precargadas que utilizan estos Programas.
CombinacionesSe pueden superponer, dividir o cambiar la velocidad de 16 Programas para crear sonidos complejos y potentes.
Arpegiador polifónico dualAdemás de los patrones clásicos de arpegio del pasado, el arpegiador de la microSTATION también puede reproducir riffs de guitarra o bajo, o patrones de percusión. Las Combinaciones y las canciones permiten utilizar dos arpegiadores simultáneamente. Los 512 patrones de arpegio de usuario integrados le acercan a un extenso potencial de interpretación.
Cinco efectos de inserción estéreo, dos efectos maestros estéreo y un efecto estéreo en totalAñada el toque final al sonido, utilizando una selección de 134 tipos de efectos de gran calidad y una sección del mezclador que permite controlar el direccionamiento del efecto.
Controles a tiempo real y joystickLos controles a tiempo real permiten modificar el sonido a tiempo real y también se pueden utilizar para controlar otros conocidos programas o productos de Korg.
Secuenciador de alta resolución (480 ppq)El secuenciador integrado proporciona 16 pistas MIDI y 1 pista maestra. Se incluye una amplia gama de funciones para la producción de música y la interpretación, incluyendo la configuración automática de la canción, la secuencia de cuadrícula y canciones de plantilla.
Conexión a ordenador mediante USB, y ranura SDPuede conectar la microSTATION al ordenador mediante USB para una rápida transferencia de datos MIDI. También puede usar tarjetas SD disponibles en comercios para una práctica gestión de los archivos de datos de la microSTATION.
microSTATION Editor y microSTATION Plug-In Editor incluidosPuede editar mientras visualiza un gran número de parámetros en la pantalla del ordenador o utilizar la microSTATION desde la DAW, como si fuera un sintetizador tipo plug‐in. Utilizando el microSTATION Editor/Plug‐In Editor, puede editar y crear parámetros de sonido detallados, parámetros de efectos, kits de batería y patrones de arpegio de usuario, a los que no se puede acceder desde el panel de la propia microSTATION.
61
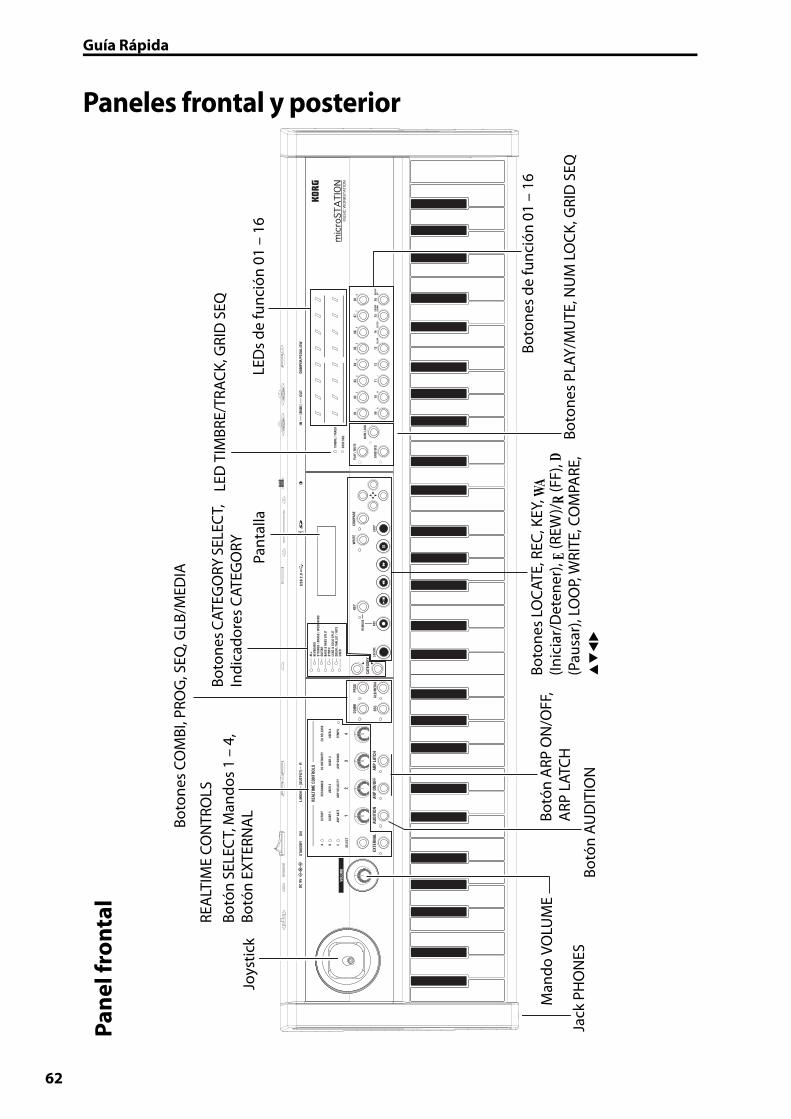
Guía Rápida
62
Paneles frontal y posterior
Joys
tick
REA
LTIM
E CO
NTR
OLS
Botó
n SE
LEC
T, M
ando
s 1
– 4,
Bo
tón
EXTE
RNA
L
Boto
nes
COM
BI, P
ROG
, SEQ
, GLB
/MED
IA
Boto
nes C
ATEG
ORY
SEL
ECT,
In
dica
dore
s CA
TEG
ORY
Pant
alla
LED
TIM
BRE/
TRAC
K, G
RID
SEQ
LED
s de
func
ión
01 –
16
Jack
PH
ON
ES
Man
do V
OLU
ME
Botó
n AU
DIT
ION
Botó
n A
RP O
N/O
FF,
ARP
LAT
CH
Boto
nes
LOCA
TE, R
EC, K
EY, WA
(Inic
iar/
Det
ener
), E
(REW
)/R
(FF)
, D
(Pau
sar)
, LO
OP,
WRI
TE, C
OM
PARE
,
Boto
nes
PLAY
/MU
TE, N
UM
LO
CK, G
RID
SEQ
Boto
nes
de fu
nció
n 01
– 1
6
Pane
l fro
ntal
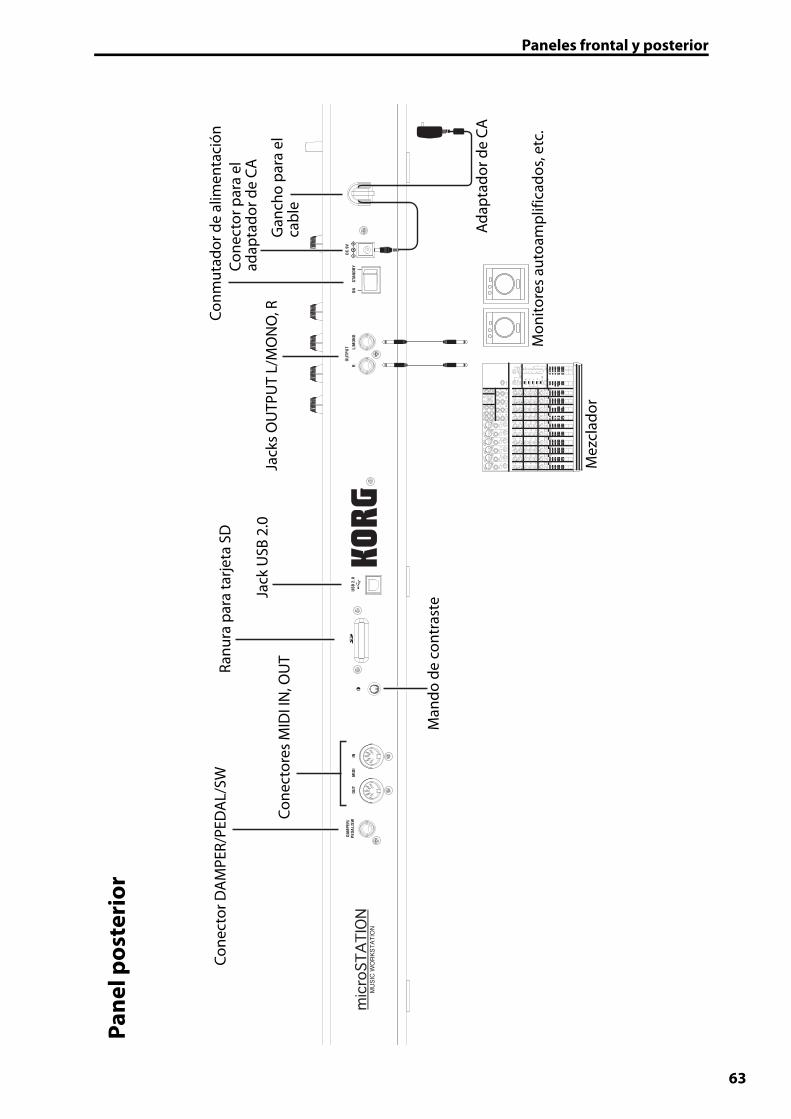
Paneles frontal y posterior
Man
do d
e co
ntra
ste
Cone
ctor
es M
IDI I
N, O
UTRa
nura
par
a ta
rjeta
SD
Jack
USB
2.0
Mon
itore
s au
toam
plifi
cado
s, et
c.
Mez
clad
or
Adap
tado
r de
CA
Conm
utad
or d
e al
imen
taci
ónCo
nect
or D
AM
PER/
PED
AL/
SW
Jack
s O
UTP
UT
L/M
ON
O, R
Cone
ctor
par
a el
ad
apta
dor d
e CA
Gan
cho
para
el
cabl
e
Pane
l pos
teri
or
63
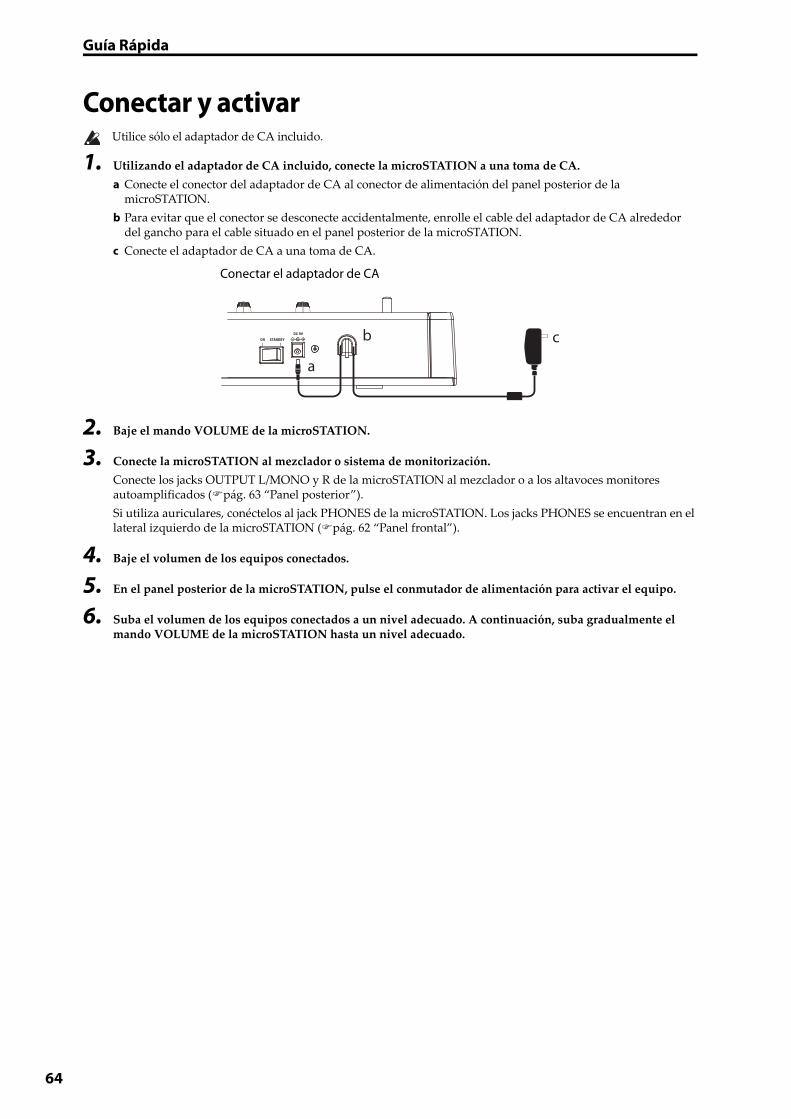
Guía Rápida
64
Conectar y activar Utilice sólo el adaptador de CA incluido.
1. Utilizando el adaptador de CA incluido, conecte la microSTATION a una toma de CA.
a Conecte el conector del adaptador de CA al conector de alimentación del panel posterior de la microSTATION.
b Para evitar que el conector se desconecte accidentalmente, enrolle el cable del adaptador de CA alrededor del gancho para el cable situado en el panel posterior de la microSTATION.
c Conecte el adaptador de CA a una toma de CA.
2. Baje el mando VOLUME de la microSTATION.
3. Conecte la microSTATION al mezclador o sistema de monitorización.
Conecte los jacks OUTPUT L/MONO y R de la microSTATION al mezclador o a los altavoces monitores autoamplificados (pág. 63 “Panel posterior”).
Si utiliza auriculares, conéctelos al jack PHONES de la microSTATION. Los jacks PHONES se encuentran en el lateral izquierdo de la microSTATION (pág. 62 “Panel frontal”).
4. Baje el volumen de los equipos conectados.
5. En el panel posterior de la microSTATION, pulse el conmutador de alimentación para activar el equipo.
6. Suba el volumen de los equipos conectados a un nivel adecuado. A continuación, suba gradualmente el mando VOLUME de la microSTATION hasta un nivel adecuado.
a
b c
Conectar el adaptador de CA
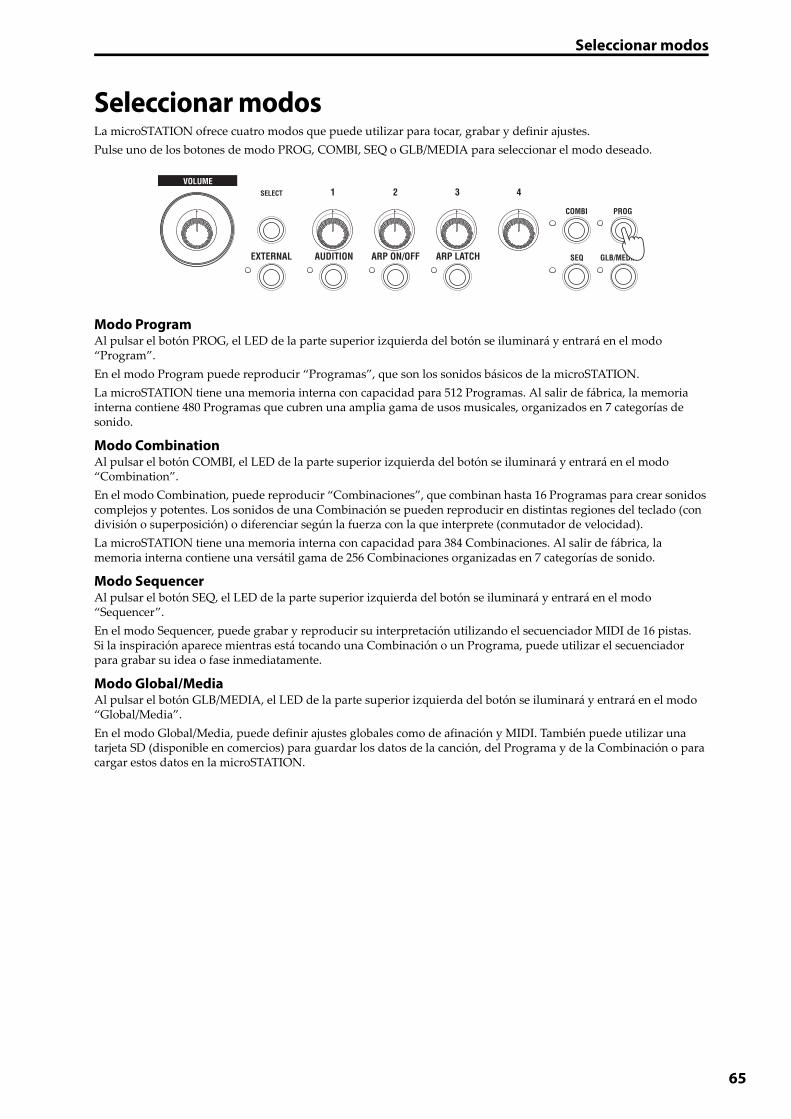
Seleccionar modos
Seleccionar modosLa microSTATION ofrece cuatro modos que puede utilizar para tocar, grabar y definir ajustes.
Pulse uno de los botones de modo PROG, COMBI, SEQ o GLB/MEDIA para seleccionar el modo deseado.
Modo ProgramAl pulsar el botón PROG, el LED de la parte superior izquierda del botón se iluminará y entrará en el modo “Program”.
En el modo Program puede reproducir “Programas”, que son los sonidos básicos de la microSTATION.
La microSTATION tiene una memoria interna con capacidad para 512 Programas. Al salir de fábrica, la memoria interna contiene 480 Programas que cubren una amplia gama de usos musicales, organizados en 7 categorías de sonido.
Modo CombinationAl pulsar el botón COMBI, el LED de la parte superior izquierda del botón se iluminará y entrará en el modo “Combination”.
En el modo Combination, puede reproducir “Combinaciones”, que combinan hasta 16 Programas para crear sonidos complejos y potentes. Los sonidos de una Combinación se pueden reproducir en distintas regiones del teclado (con división o superposición) o diferenciar según la fuerza con la que interprete (conmutador de velocidad).
La microSTATION tiene una memoria interna con capacidad para 384 Combinaciones. Al salir de fábrica, la memoria interna contiene una versátil gama de 256 Combinaciones organizadas en 7 categorías de sonido.
Modo SequencerAl pulsar el botón SEQ, el LED de la parte superior izquierda del botón se iluminará y entrará en el modo “Sequencer”.
En el modo Sequencer, puede grabar y reproducir su interpretación utilizando el secuenciador MIDI de 16 pistas.Si la inspiración aparece mientras está tocando una Combinación o un Programa, puede utilizar el secuenciador para grabar su idea o fase inmediatamente.
Modo Global/MediaAl pulsar el botón GLB/MEDIA, el LED de la parte superior izquierda del botón se iluminará y entrará en el modo “Global/Media”.
En el modo Global/Media, puede definir ajustes globales como de afinación y MIDI. También puede utilizar una tarjeta SD (disponible en comercios) para guardar los datos de la canción, del Programa y de la Combinación o para cargar estos datos en la microSTATION.
65
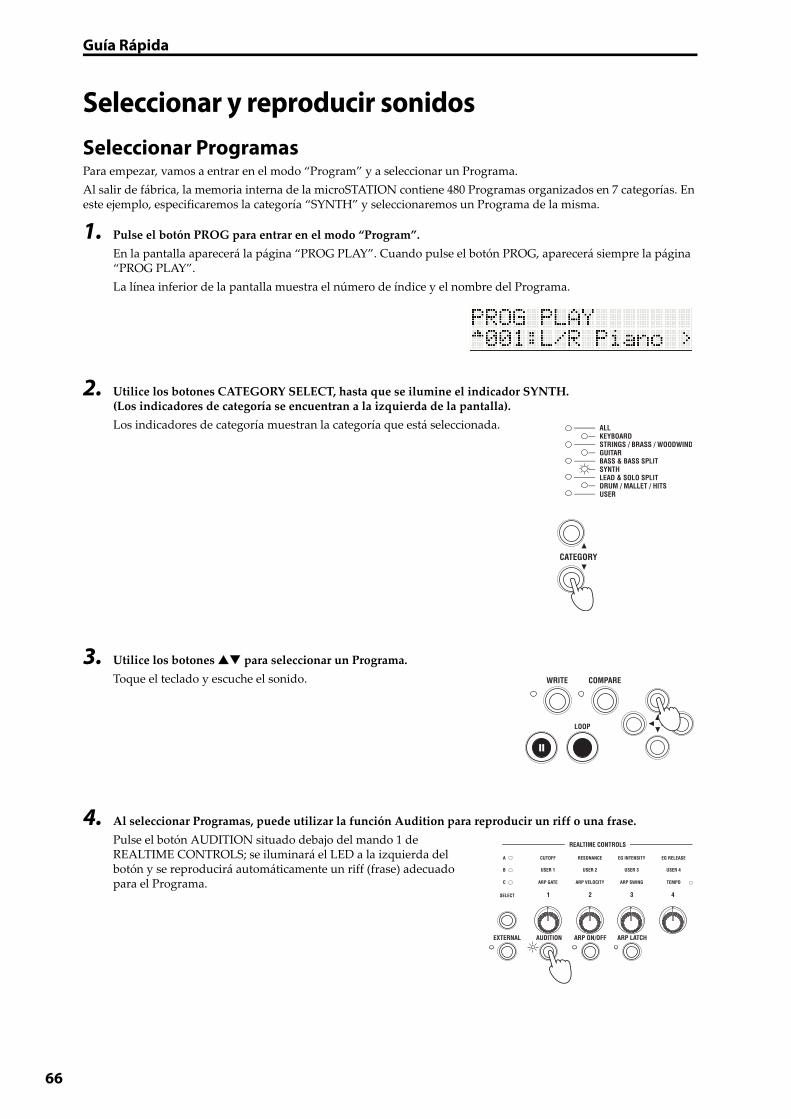
Guía Rápida
66
Seleccionar y reproducir sonidosSeleccionar ProgramasPara empezar, vamos a entrar en el modo “Program” y a seleccionar un Programa.
Al salir de fábrica, la memoria interna de la microSTATION contiene 480 Programas organizados en 7 categorías. En este ejemplo, especificaremos la categoría “SYNTH” y seleccionaremos un Programa de la misma.
1. Pulse el botón PROG para entrar en el modo “Program”.
En la pantalla aparecerá la página “PROG PLAY”. Cuando pulse el botón PROG, aparecerá siempre la página “PROG PLAY”.
La línea inferior de la pantalla muestra el número de índice y el nombre del Programa.
2. Utilice los botones CATEGORY SELECT, hasta que se ilumine el indicador SYNTH. (Los indicadores de categoría se encuentran a la izquierda de la pantalla).
Los indicadores de categoría muestran la categoría que está seleccionada.
3. Utilice los botones para seleccionar un Programa.
Toque el teclado y escuche el sonido.
4. Al seleccionar Programas, puede utilizar la función Audition para reproducir un riff o una frase.
Pulse el botón AUDITION situado debajo del mando 1 de REALTIME CONTROLS; se iluminará el LED a la izquierda del botón y se reproducirá automáticamente un riff (frase) adecuado para el Programa.
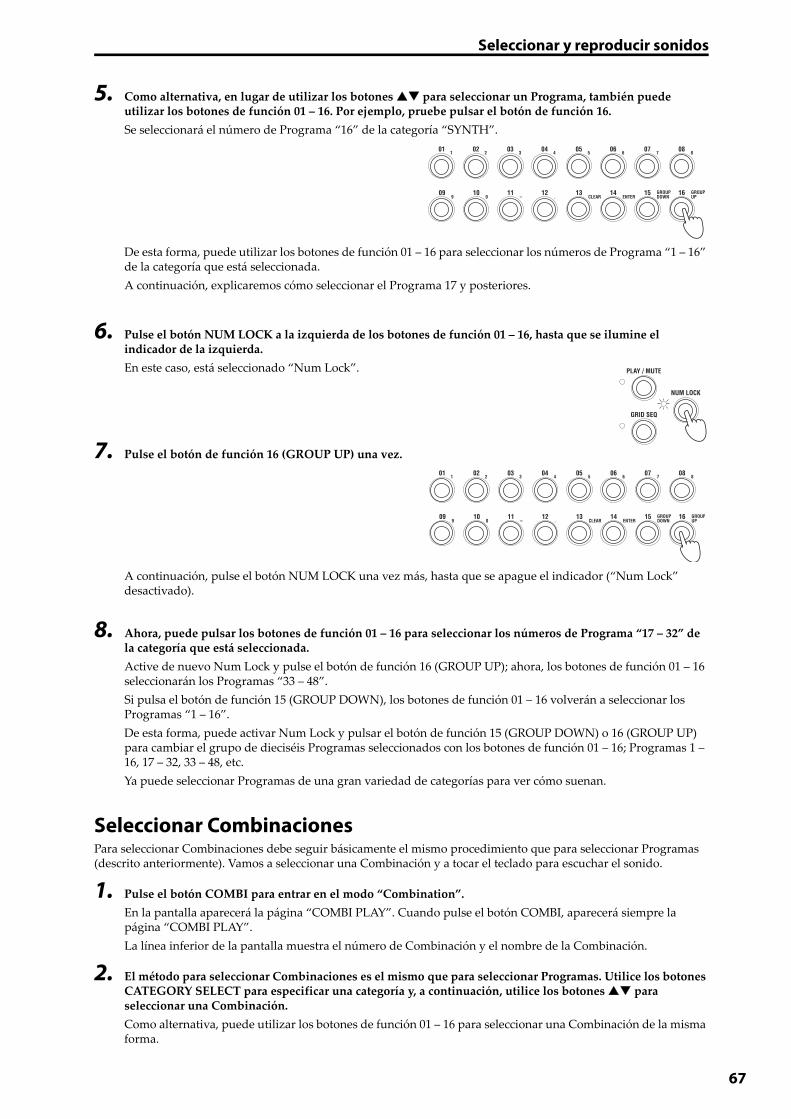
Seleccionar y reproducir sonidos
5. Como alternativa, en lugar de utilizar los botones para seleccionar un Programa, también puede utilizar los botones de función 01 – 16. Por ejemplo, pruebe pulsar el botón de función 16.
Se seleccionará el número de Programa “16” de la categoría “SYNTH”.
De esta forma, puede utilizar los botones de función 01 – 16 para seleccionar los números de Programa “1 – 16” de la categoría que está seleccionada.
A continuación, explicaremos cómo seleccionar el Programa 17 y posteriores.
6. Pulse el botón NUM LOCK a la izquierda de los botones de función 01 – 16, hasta que se ilumine el indicador de la izquierda.
En este caso, está seleccionado “Num Lock”.
7. Pulse el botón de función 16 (GROUP UP) una vez.
A continuación, pulse el botón NUM LOCK una vez más, hasta que se apague el indicador (“Num Lock” desactivado).
8. Ahora, puede pulsar los botones de función 01 – 16 para seleccionar los números de Programa “17 – 32” de la categoría que está seleccionada.
Active de nuevo Num Lock y pulse el botón de función 16 (GROUP UP); ahora, los botones de función 01 – 16 seleccionarán los Programas “33 – 48”.
Si pulsa el botón de función 15 (GROUP DOWN), los botones de función 01 – 16 volverán a seleccionar los Programas “1 – 16”.
De esta forma, puede activar Num Lock y pulsar el botón de función 15 (GROUP DOWN) o 16 (GROUP UP) para cambiar el grupo de dieciséis Programas seleccionados con los botones de función 01 – 16; Programas 1 – 16, 17 – 32, 33 – 48, etc.
Ya puede seleccionar Programas de una gran variedad de categorías para ver cómo suenan.
Seleccionar CombinacionesPara seleccionar Combinaciones debe seguir básicamente el mismo procedimiento que para seleccionar Programas (descrito anteriormente). Vamos a seleccionar una Combinación y a tocar el teclado para escuchar el sonido.
1. Pulse el botón COMBI para entrar en el modo “Combination”.
En la pantalla aparecerá la página “COMBI PLAY”. Cuando pulse el botón COMBI, aparecerá siempre la página “COMBI PLAY”.
La línea inferior de la pantalla muestra el número de Combinación y el nombre de la Combinación.
2. El método para seleccionar Combinaciones es el mismo que para seleccionar Programas. Utilice los botones CATEGORY SELECT para especificar una categoría y, a continuación, utilice los botones para seleccionar una Combinación.
Como alternativa, puede utilizar los botones de función 01 – 16 para seleccionar una Combinación de la misma forma.
67

Guía Rápida
68
Utilizar controladores para modificar el sonidoLa microSTATION le permite modificar el sonido utilizando el joystick y los mandos de control a tiempo real 1 – 4, así como el teclado.
Se asignan ajustes diferentes a estos controladores, de la forma apropiada para cada Programa o Combinación, lo que permite modificar el tono, la afinación o el volumen de forma eficaz.
La fuerza utilizada para tocar el teclado puede afectar al ataque, volumen y brillo del sonido. Además, algunos Programas (como los Programas de instrumentos de viento) añadirán ruido de respiración al tocar fuerte.
Puede mover el joystick en cuatro direcciones (arriba/abajo/izquierda/derecha) para modificar el sonido. Con los ajustes más comunes, el tono aumentará al mover el joystick hacia la derecha y caerá al moverlo hacia la izquierda. Al mover el joystick hacia arriba (alejándoselo) aplicará vibrato y al moverlo hacia abajo (acercándoselo) aplicará filtro LFO (wah).Puede aplicar muchos otros efectos, así como los ajustes descritos anteriormente.
Los controles a tiempo real permiten utilizar cuatro mandos para controlar el sonido o el arpegiador. Estos mandos funcionan en uno de los tres modos: Los modos A y B controlan el sonido y el modo C controla el arpegiador. También existe un modo External que permite utilizar los mandos para controlar un dispositivo MIDI externo o un sintetizador tipo software.
En la siguiente explicación, utilizaremos estos mandos en los modos de control a tiempo real A, B y C para controlar el sonido y el arpegiador.
1. Pulse el botón REALTIME CONTROLS SELECT.
Se iluminarán los LEDs A, B o C situados encima del botón SELECT. Existen tres modos de control a tiempo real A, B y C, y cada vez que pulse el botón pasará del uno al otro.
2. Cuando esté iluminado A (modo A), los mandos 1 – 4 ajustarán respectivamente el brillo (corte), la resonancia, la profundidad EG y el tiempo de desvanecimiento EG.
3. Pulse el botón REALTIME CONTROLS SELECT, hasta que se ilumine B (modo B).
Al girar los mandos, se aplicará el efecto especificado para cada Programa o Combinación. Normalmente, el modo B asigna los mandos 3 y 4 para que controlen el chorus y la profundidad de reverberación.
4. Pulse de nuevo el botón REALTIME CONTROLS SELECT, hasta que se ilumine C (modo C).
Al girar los mandos, cambiará el patrón de arpegio y el tempo de reproducción del patrón (pág. 69 “Utilizar el arpegiador”).
También puede utilizar un controlador de pedal, un pedal damper o un conmutador de pedal (se adquieren por separado) para controlar el sonido; por ejemplo, puede controlar el filtro o los efectos o activar/desactivar el portamento. Para más detalles, consulte el “Guía de Funcionamiento de la microSTATION”.
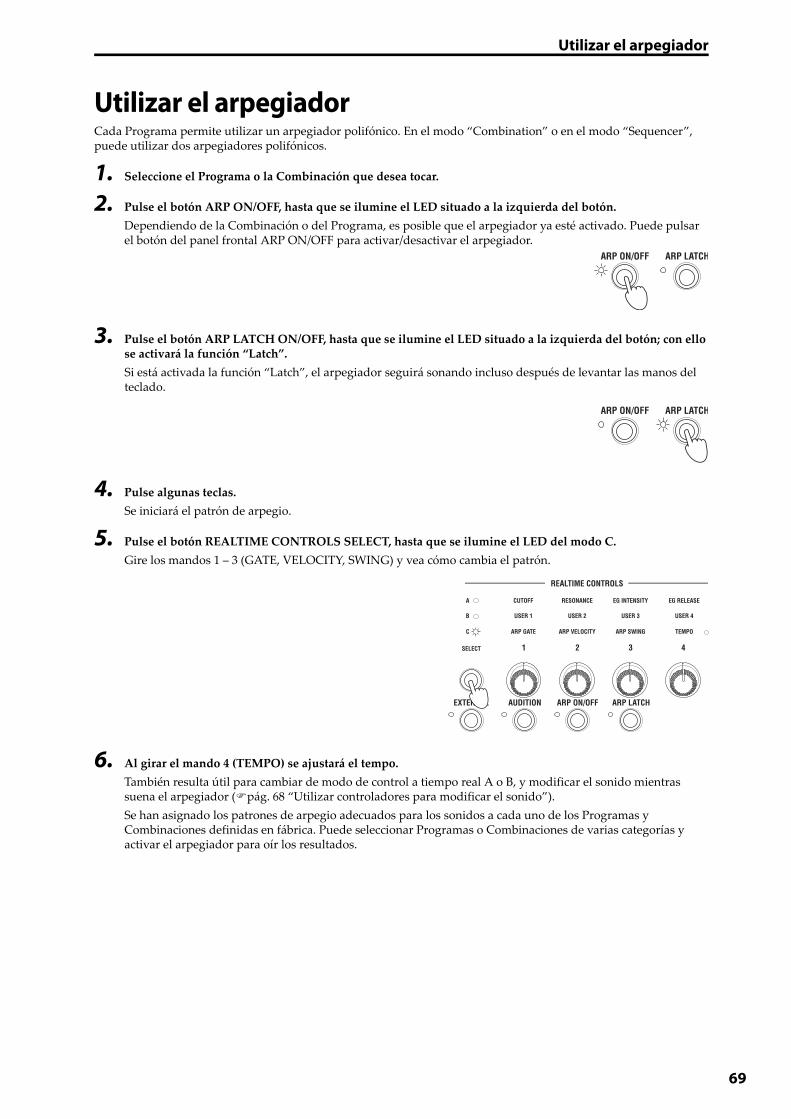
Utilizar el arpegiador
Utilizar el arpegiadorCada Programa permite utilizar un arpegiador polifónico. En el modo “Combination” o en el modo “Sequencer”, puede utilizar dos arpegiadores polifónicos.
1. Seleccione el Programa o la Combinación que desea tocar.
2. Pulse el botón ARP ON/OFF, hasta que se ilumine el LED situado a la izquierda del botón.
Dependiendo de la Combinación o del Programa, es posible que el arpegiador ya esté activado. Puede pulsar el botón del panel frontal ARP ON/OFF para activar/desactivar el arpegiador.
3. Pulse el botón ARP LATCH ON/OFF, hasta que se ilumine el LED situado a la izquierda del botón; con ello se activará la función “Latch”.
Si está activada la función “Latch”, el arpegiador seguirá sonando incluso después de levantar las manos del teclado.
4. Pulse algunas teclas.
Se iniciará el patrón de arpegio.
5. Pulse el botón REALTIME CONTROLS SELECT, hasta que se ilumine el LED del modo C.
Gire los mandos 1 – 3 (GATE, VELOCITY, SWING) y vea cómo cambia el patrón.
6. Al girar el mando 4 (TEMPO) se ajustará el tempo.
También resulta útil para cambiar de modo de control a tiempo real A o B, y modificar el sonido mientras suena el arpegiador (pág. 68 “Utilizar controladores para modificar el sonido”).
Se han asignado los patrones de arpegio adecuados para los sonidos a cada uno de los Programas y Combinaciones definidas en fábrica. Puede seleccionar Programas o Combinaciones de varias categorías y activar el arpegiador para oír los resultados.
69
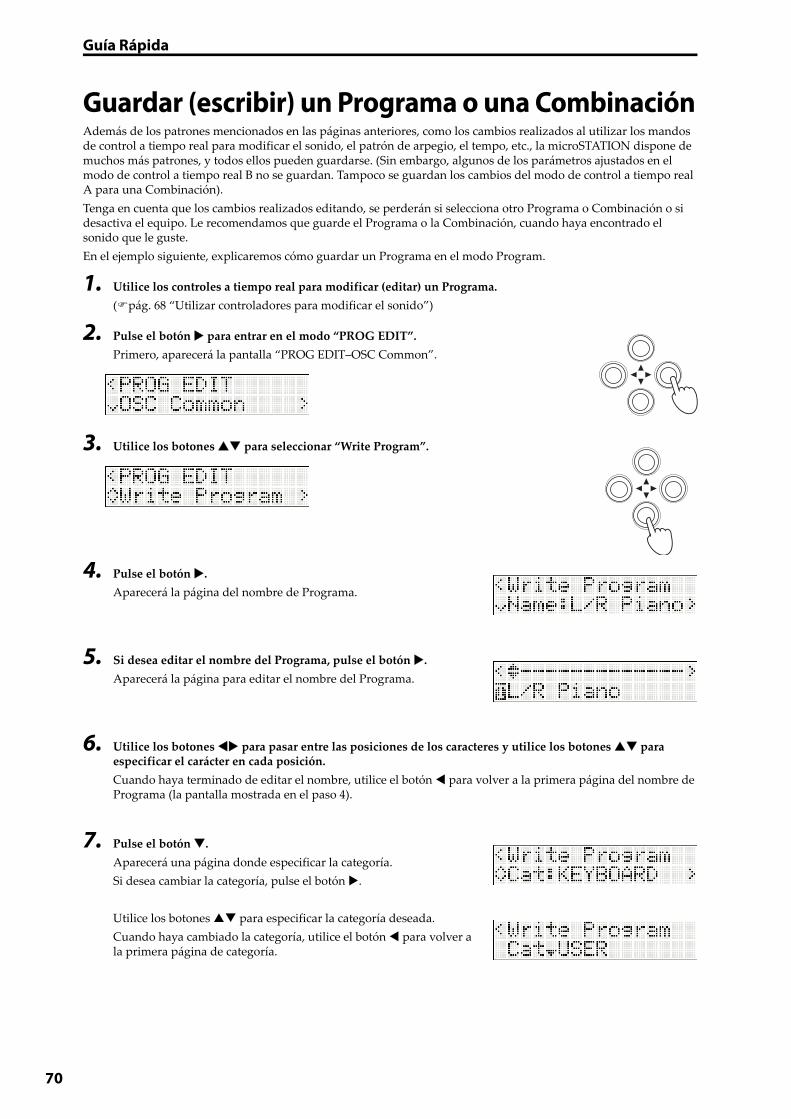
Guía Rápida
70
Guardar (escribir) un Programa o una CombinaciónAdemás de los patrones mencionados en las páginas anteriores, como los cambios realizados al utilizar los mandos de control a tiempo real para modificar el sonido, el patrón de arpegio, el tempo, etc., la microSTATION dispone de muchos más patrones, y todos ellos pueden guardarse. (Sin embargo, algunos de los parámetros ajustados en el modo de control a tiempo real B no se guardan. Tampoco se guardan los cambios del modo de control a tiempo real A para una Combinación).
Tenga en cuenta que los cambios realizados editando, se perderán si selecciona otro Programa o Combinación o si desactiva el equipo. Le recomendamos que guarde el Programa o la Combinación, cuando haya encontrado el sonido que le guste.
En el ejemplo siguiente, explicaremos cómo guardar un Programa en el modo Program.
1. Utilice los controles a tiempo real para modificar (editar) un Programa.
(pág. 68 “Utilizar controladores para modificar el sonido”)
2. Pulse el botón para entrar en el modo “PROG EDIT”.
Primero, aparecerá la pantalla “PROG EDIT–OSC Common”.
3. Utilice los botones para seleccionar “Write Program”.
4. Pulse el botón .
Aparecerá la página del nombre de Programa.
5. Si desea editar el nombre del Programa, pulse el botón .
Aparecerá la página para editar el nombre del Programa.
6. Utilice los botones para pasar entre las posiciones de los caracteres y utilice los botones para especificar el carácter en cada posición.
Cuando haya terminado de editar el nombre, utilice el botón para volver a la primera página del nombre de Programa (la pantalla mostrada en el paso 4).
7. Pulse el botón .
Aparecerá una página donde especificar la categoría.
Si desea cambiar la categoría, pulse el botón .
Utilice los botones para especificar la categoría deseada.
Cuando haya cambiado la categoría, utilice el botón para volver a la primera página de categoría.
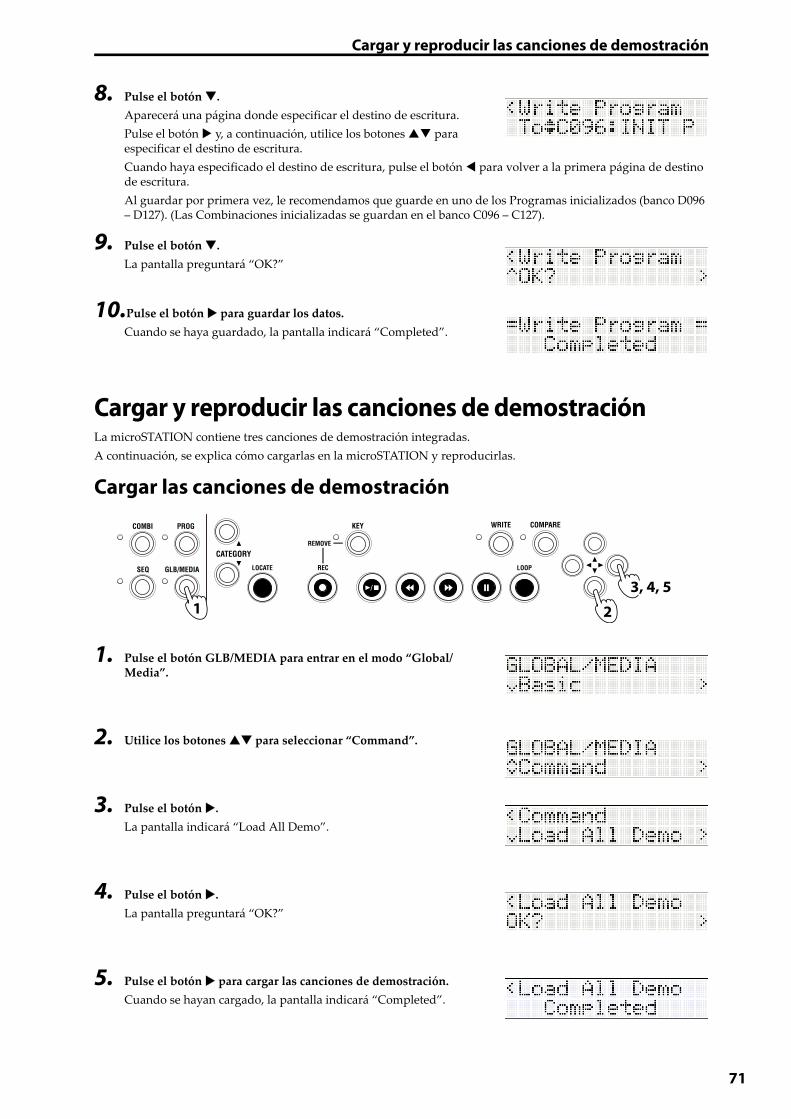
Cargar y reproducir las canciones de demostración
8. Pulse el botón .
Aparecerá una página donde especificar el destino de escritura.
Pulse el botón y, a continuación, utilice los botones para especificar el destino de escritura.
Cuando haya especificado el destino de escritura, pulse el botón para volver a la primera página de destino de escritura.
Al guardar por primera vez, le recomendamos que guarde en uno de los Programas inicializados (banco D096 – D127). (Las Combinaciones inicializadas se guardan en el banco C096 – C127).
9. Pulse el botón .
La pantalla preguntará “OK?”
10.Pulse el botón para guardar los datos.Cuando se haya guardado, la pantalla indicará “Completed”.
Cargar y reproducir las canciones de demostraciónLa microSTATION contiene tres canciones de demostración integradas.
A continuación, se explica cómo cargarlas en la microSTATION y reproducirlas.
Cargar las canciones de demostración
1. Pulse el botón GLB/MEDIA para entrar en el modo “Global/Media”.
2. Utilice los botones para seleccionar “Command”.
3. Pulse el botón .
La pantalla indicará “Load All Demo”.
4. Pulse el botón .
La pantalla preguntará “OK?”
5. Pulse el botón para cargar las canciones de demostración.
Cuando se hayan cargado, la pantalla indicará “Completed”.
1 2
3, 4, 5
71
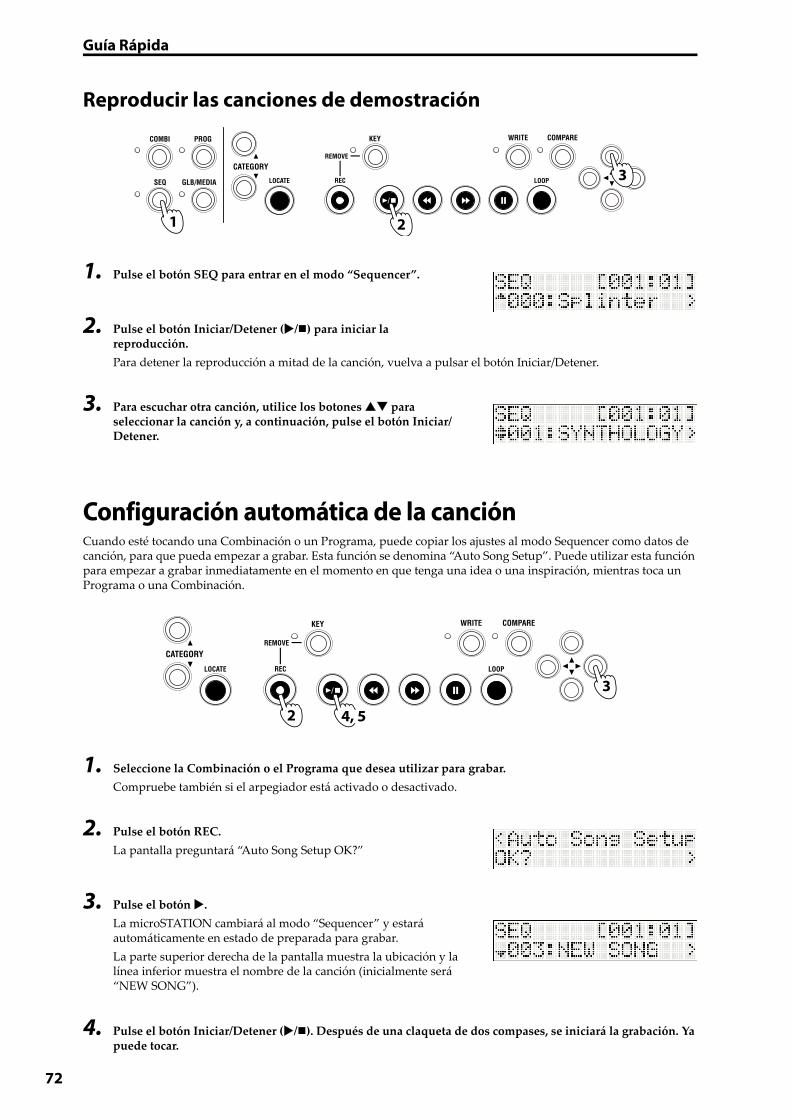
Guía Rápida
72
Reproducir las canciones de demostración
1. Pulse el botón SEQ para entrar en el modo “Sequencer”.
2. Pulse el botón Iniciar/Detener (/) para iniciar la reproducción.
Para detener la reproducción a mitad de la canción, vuelva a pulsar el botón Iniciar/Detener.
3. Para escuchar otra canción, utilice los botones para seleccionar la canción y, a continuación, pulse el botón Iniciar/Detener.
Configuración automática de la canciónCuando esté tocando una Combinación o un Programa, puede copiar los ajustes al modo Sequencer como datos de canción, para que pueda empezar a grabar. Esta función se denomina “Auto Song Setup”. Puede utilizar esta función para empezar a grabar inmediatamente en el momento en que tenga una idea o una inspiración, mientras toca un Programa o una Combinación.
1. Seleccione la Combinación o el Programa que desea utilizar para grabar.
Compruebe también si el arpegiador está activado o desactivado.
2. Pulse el botón REC.
La pantalla preguntará “Auto Song Setup OK?”
3. Pulse el botón .
La microSTATION cambiará al modo “Sequencer” y estará automáticamente en estado de preparada para grabar.
La parte superior derecha de la pantalla muestra la ubicación y la línea inferior muestra el nombre de la canción (inicialmente será “NEW SONG”).
4. Pulse el botón Iniciar/Detener (/). Después de una claqueta de dos compases, se iniciará la grabación. Ya puede tocar.
1 2
3
3
2 4, 5
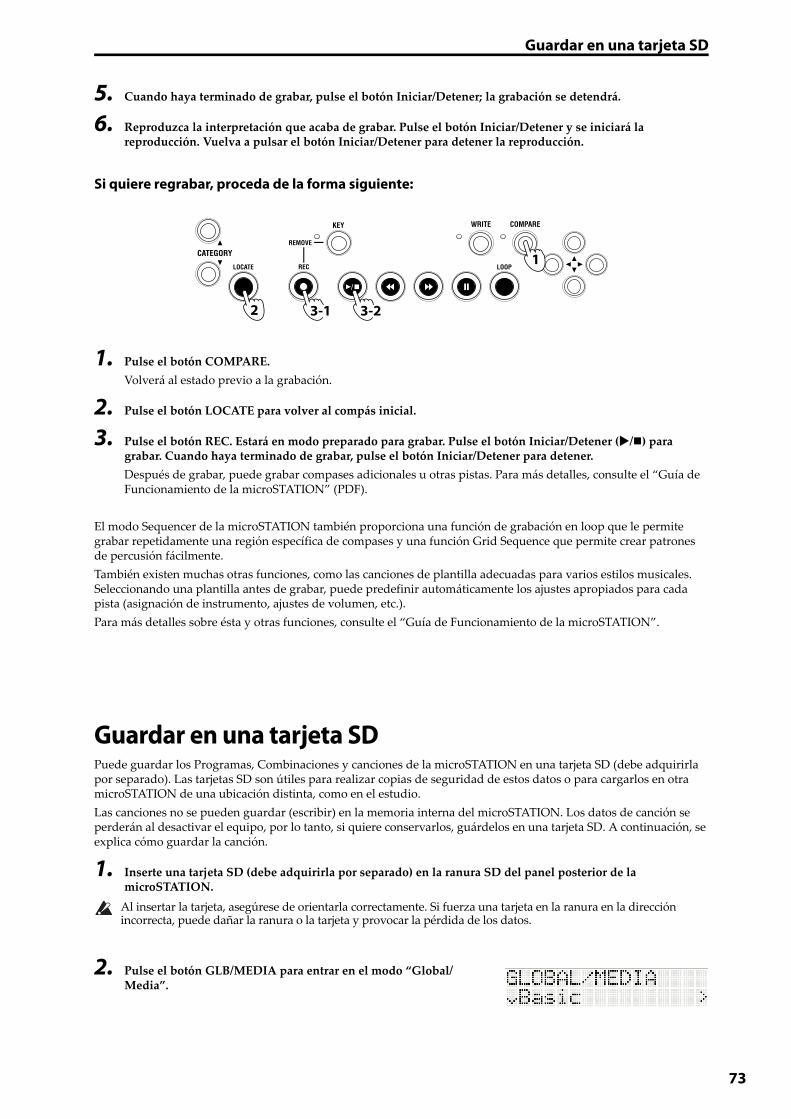
Guardar en una tarjeta SD
5. Cuando haya terminado de grabar, pulse el botón Iniciar/Detener; la grabación se detendrá.
6. Reproduzca la interpretación que acaba de grabar. Pulse el botón Iniciar/Detener y se iniciará la reproducción. Vuelva a pulsar el botón Iniciar/Detener para detener la reproducción.
Si quiere regrabar, proceda de la forma siguiente:
1. Pulse el botón COMPARE.
Volverá al estado previo a la grabación.
2. Pulse el botón LOCATE para volver al compás inicial.
3. Pulse el botón REC. Estará en modo preparado para grabar. Pulse el botón Iniciar/Detener (/) para grabar. Cuando haya terminado de grabar, pulse el botón Iniciar/Detener para detener.
Después de grabar, puede grabar compases adicionales u otras pistas. Para más detalles, consulte el “Guía de Funcionamiento de la microSTATION” (PDF).
El modo Sequencer de la microSTATION también proporciona una función de grabación en loop que le permite grabar repetidamente una región específica de compases y una función Grid Sequence que permite crear patrones de percusión fácilmente.
También existen muchas otras funciones, como las canciones de plantilla adecuadas para varios estilos musicales.Seleccionando una plantilla antes de grabar, puede predefinir automáticamente los ajustes apropiados para cada pista (asignación de instrumento, ajustes de volumen, etc.).
Para más detalles sobre ésta y otras funciones, consulte el “Guía de Funcionamiento de la microSTATION”.
Guardar en una tarjeta SDPuede guardar los Programas, Combinaciones y canciones de la microSTATION en una tarjeta SD (debe adquirirla por separado). Las tarjetas SD son útiles para realizar copias de seguridad de estos datos o para cargarlos en otra microSTATION de una ubicación distinta, como en el estudio.
Las canciones no se pueden guardar (escribir) en la memoria interna del microSTATION. Los datos de canción se perderán al desactivar el equipo, por lo tanto, si quiere conservarlos, guárdelos en una tarjeta SD. A continuación, se explica cómo guardar la canción.
1. Inserte una tarjeta SD (debe adquirirla por separado) en la ranura SD del panel posterior de la microSTATION.
Al insertar la tarjeta, asegúrese de orientarla correctamente. Si fuerza una tarjeta en la ranura en la dirección incorrecta, puede dañar la ranura o la tarjeta y provocar la pérdida de los datos.
2. Pulse el botón GLB/MEDIA para entrar en el modo “Global/Media”.
1
2 3-1 3-2
73
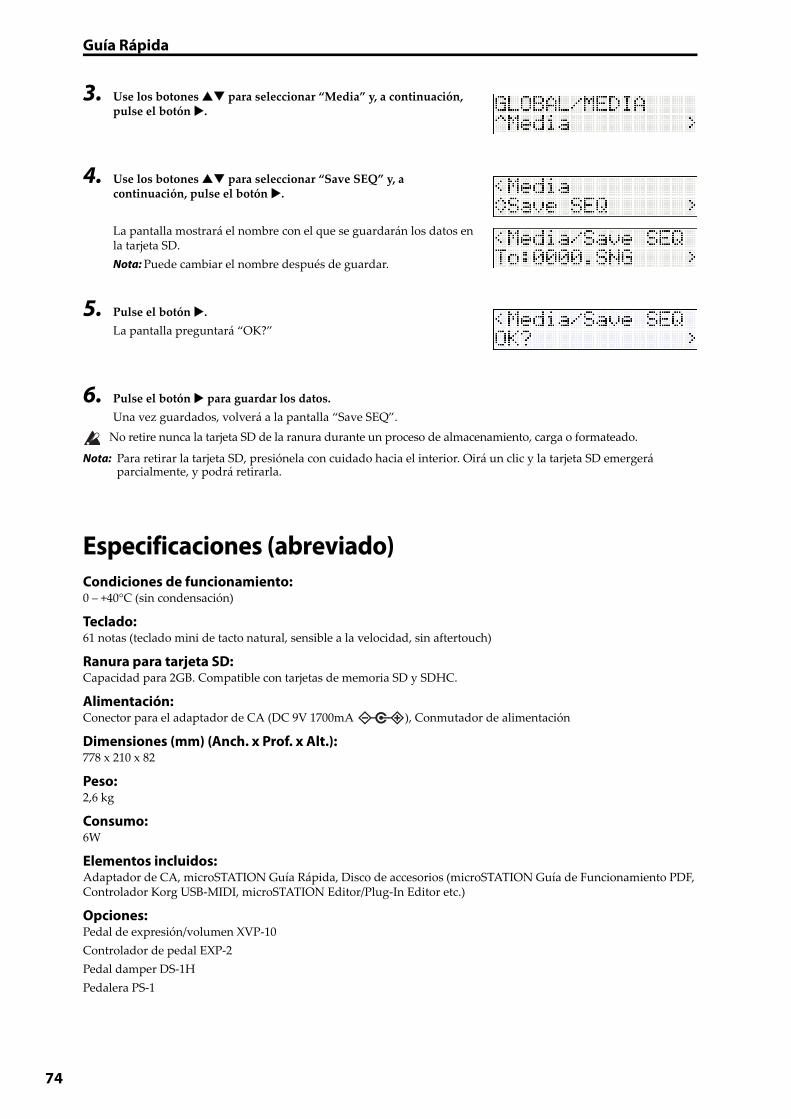
Guía Rápida
74
3. Use los botones para seleccionar “Media” y, a continuación, pulse el botón .
4. Use los botones para seleccionar “Save SEQ” y, a continuación, pulse el botón .
La pantalla mostrará el nombre con el que se guardarán los datos en la tarjeta SD.
Nota: Puede cambiar el nombre después de guardar.
5. Pulse el botón .
La pantalla preguntará “OK?”
6. Pulse el botón para guardar los datos.
Una vez guardados, volverá a la pantalla “Save SEQ”.
No retire nunca la tarjeta SD de la ranura durante un proceso de almacenamiento, carga o formateado.
Nota: Para retirar la tarjeta SD, presiónela con cuidado hacia el interior. Oirá un clic y la tarjeta SD emergerá parcialmente, y podrá retirarla.
Especificaciones (abreviado)Condiciones de funcionamiento:0 – +40°C (sin condensación)
Teclado:61 notas (teclado mini de tacto natural, sensible a la velocidad, sin aftertouch)
Ranura para tarjeta SD:Capacidad para 2GB. Compatible con tarjetas de memoria SD y SDHC.
Alimentación:Conector para el adaptador de CA (DC 9V 1700mA ), Conmutador de alimentación
Dimensiones (mm) (Anch. x Prof. x Alt.):778 x 210 x 82
Peso:2,6 kg
Consumo:6W
Elementos incluidos:Adaptador de CA, microSTATION Guía Rápida, Disco de accesorios (microSTATION Guía de Funcionamiento PDF, Controlador Korg USB‐MIDI, microSTATION Editor/Plug‐In Editor etc.)
Opciones:Pedal de expresión/volumen XVP‐10
Controlador de pedal EXP‐2
Pedal damper DS‐1H
Pedalera PS‐1
4015-2 Yanokuchi, Inagi-city, Tokyo 206-0812 Japan
© 2010 KORG INC.
IMPORTANT NOTICE TO CONSUMERS This product has been manufactured according to strict specifications and voltage requirements that are applicable in the country in which it is intended that this product should be used. If you have purchased this product via the internet, through mail order, and/or via a telephone sale, you must verify that this product is intended to be used in the country in which you reside.WARNING: Use of this product in any country other than that for which it is intended could be dangerous and could invalidate the manufacturer’s or distributor’s warranty.Please also retain your receipt as proof of purchase otherwise your product may be disqualified from the manufacturer’s or distributor’s warranty.
REMARQUE IMPORTANTE POUR LES CLIENTSCe produit a été fabriqué suivant des spécifications sévères et des besoins en tension applicables dans le pays où ce produit doit être utilisé. Si vous avez acheté ce produit via l’internet, par vente par correspondance ou/et vente par téléphone, vous devez vérifier que ce produit est bien utili‐sable dans le pays où vous résidez.ATTENTION: L’utilisation de ce produit dans un pays autre que celui pour lequel il a été conçu peut être dangereuse et annulera la garantie du fabricant ou du distributeur. Conservez bien votre récépissé qui est la preuve de votre achat, faute de quoi votre produit ne risque de ne plus être couvert par la garantie du fabricant ou du distributeur.
WICHTIGER HINWEIS FÜR KUNDENDieses Produkt wurde unter strenger Beachtung von Spezifikationen und Spannungsanforderungen hergestellt, die im Bestimmungsland gelten. Wenn Sie dieses Produkt über das Internet, per Postversand und/oder mit telefonischer Bestellung gekauft haben, müssen Sie bestätigen, dass dieses Produkt für Ihr Wohngebiet ausgelegt ist.WARNUNG: Verwendung dieses Produkts in einem anderen Land als dem, für das es bestimmt ist, verwendet wird, kann gefährlich sein und die Garantie des Herstellers oder Importeurs hinfällig lassen werden. Bitte bewahren Sie diese Quittung als Kaufbeleg auf, da andernfalls das Produkt von der Garantie des Herstellers oder Importeurs ausgeschlossen werden kann.
NOTA IMPORTANTE PARA EL CONSUMIDOREste producto ha sido fabricado de acuerdo a estrictas especificaciones y requerimientos de voltaje aplicables en el país para el cual está destinado. Si ha comprado este producto por internet, a través de correo, y/o venta telefónica, debe usted verificar que el uso de este producto está destinado al país en el cual reside.AVISO: El uso de este producto en un país distinto al cual está destinado podría resultar peligroso y podría invalidar la garantía del fabricante o distribuidor.Por favor guarde su recibo como prueba de compra ya que de otro modo el producto puede verse privado de la garantía del fabricante o distribuidor.