Microsoft Zune 80 Screen Replacement - ifixit-guide-pdfs ... · Microsoft Zune 80 Screen...
11
Microsoft Zune 80 Screen Replacement Written By: nwiswell Microsoft Zune 80 Screen Replacement © iFixit — CC BY-NC-SA www.iFixit.com Page 1 of 11
Transcript of Microsoft Zune 80 Screen Replacement - ifixit-guide-pdfs ... · Microsoft Zune 80 Screen...

Microsoft Zune 80 Screen ReplacementWritten By: nwiswell
Microsoft Zune 80 Screen Replacement
© iFixit — CC BY-NC-SA www.iFixit.com Page 1 of 11

INTRODUCTION
This guide can be used to remove and replace the LCD screen of the Zune 80GB.
TOOLS:Metal Spudger (1)
Microsoft Zune 80 Screen Replacement
© iFixit — CC BY-NC-SA www.iFixit.com Page 2 of 11

Step 1 — Case
Use a metal spudger or Zuneopening tool to remove the smallsilver plastic cap on top of thedevice.
Step 2
There are two T4 screws under thecap. Remove both with a T4screwdriver.
Be careful removing the screws; thescrew heads can break very easily.
Microsoft Zune 80 Screen Replacement
© iFixit — CC BY-NC-SA www.iFixit.com Page 3 of 11

Step 3
Using a metal spudger or Zune opening tool, remove the aluminum backing starting from the top.There are 5 clips on each side and two on the bottom.
Be careful not to press the tools in too far; there are exposed cables right inside the edge of thedevice.
Step 4 — Hard Drive
Remove the silver tape from the bottom center and the top right. This allows access to the harddrive and the battery.
Microsoft Zune 80 Screen Replacement
© iFixit — CC BY-NC-SA www.iFixit.com Page 4 of 11
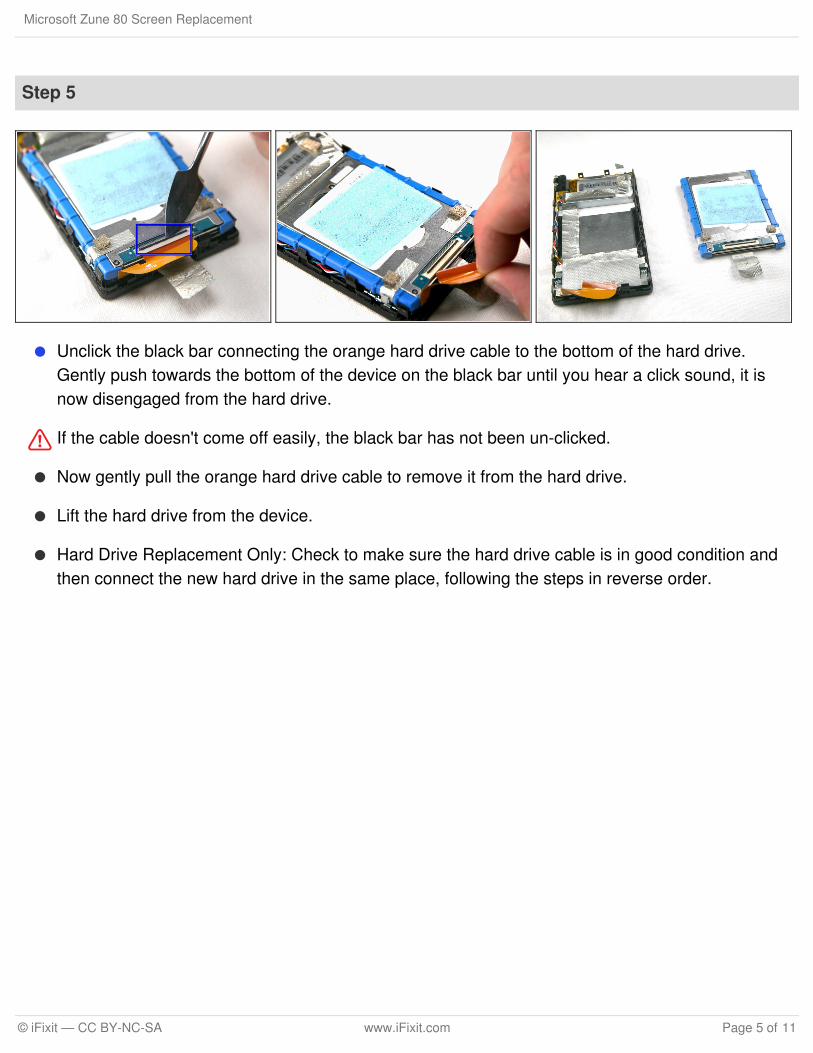
Step 5
Unclick the black bar connecting the orange hard drive cable to the bottom of the hard drive.Gently push towards the bottom of the device on the black bar until you hear a click sound, it isnow disengaged from the hard drive.
If the cable doesn't come off easily, the black bar has not been un-clicked.
Now gently pull the orange hard drive cable to remove it from the hard drive.
Lift the hard drive from the device.
Hard Drive Replacement Only: Check to make sure the hard drive cable is in good condition andthen connect the new hard drive in the same place, following the steps in reverse order.
Microsoft Zune 80 Screen Replacement
© iFixit — CC BY-NC-SA www.iFixit.com Page 5 of 11

Step 6 — Battery
Remove two more pieces of silver tape from the bottom of the device. One of these pieces isbelow the other.
Step 7
Remove the two T4 screws holdingthe headphone jack receiver on thetop left corner of the device.
Microsoft Zune 80 Screen Replacement
© iFixit — CC BY-NC-SA www.iFixit.com Page 6 of 11

Step 8
Remove the two T4 screws holding the metal brackets on both sides of the bottom of the device.
Remove the screws, brackets, and clips from the device. These are small pieces, so put them in asafe place.
Microsoft Zune 80 Screen Replacement
© iFixit — CC BY-NC-SA www.iFixit.com Page 7 of 11

Step 9
The orange audio board cable isclipped in with a small black bar,same as the hard drive cable. Un-clip the bar by pushing upwards onthe edge of the black bar towardsthe orange cable. You will hear itclick when is disengages.
WARNING: If the cable doesn'tcome off easily, the black bar hasnot been un-clicked.
Step 10
Flip the black bar to unclip the leftside of the hard drive cable. You cannow remove the hard drive cable.
WARNING: If the cable doesn'tcome off easily, the black bar hasnot been un-clicked.
Microsoft Zune 80 Screen Replacement
© iFixit — CC BY-NC-SA www.iFixit.com Page 8 of 11

Step 11
Remove the two T4 screws that hold the charging port on the bottom of the device.
Remove the charging port.
Step 12
Remove the battery from the device with the cables still connected.
Carefully lift up the mother board located at the base of the Zune. Unclip the orange ribbon cablein the same manner as in the previous steps.
Remove the mother board from the Zune, leaving the black wire connected.
Microsoft Zune 80 Screen Replacement
© iFixit — CC BY-NC-SA www.iFixit.com Page 9 of 11

Step 13 — Screen
Carefully remove the wireless assembly that runs along the top and upper left edges of the Zune.
The assembly is lightly glued to the device. Use caution, as some force will be needed, but toomuch force will damage the board.
Remove the assembly and the battery together as a unit.
Microsoft Zune 80 Screen Replacement
© iFixit — CC BY-NC-SA www.iFixit.com Page 10 of 11

To reassemble your device, follow these instructions in reverse order.
This document was last generated on 2018-01-27 01:47:28 AM.
Step 14
Gently pry the screen unit from the black, plastic front frame.
Screen Replacement Only: After fixing the original screen or purchasing a new one, simply placethe screen back into black frame and re-install the cables in the reverse order of this guide.
Microsoft Zune 80 Screen Replacement
© iFixit — CC BY-NC-SA www.iFixit.com Page 11 of 11