
Microsoft Word
18
The Zenith Institute of Computer Science Shikarpur Notes for Microsoft Office Presents By Nasir Ali Shah Quality Honesty & MOTIVE Thezics-
Transcript of Microsoft Word

The Zenith Institute of Computer Science Shikarpur
Notes for
Microsoft Office
Presents
By
Nasir Ali ShahVice Principal
QualityHonesty
&
Morality
MOTIVE
Thezics-shp.blogspot.com
The Zenith Institute of Computer Science ShikarpurMicrosoft Office - 2 - [email protected]
Windows XPWindows XP is an operating system, used to control all internal and external operations of computer system. Windows XP is developed by Microsoft. It has Graphical User Interface, which is the mean to access anything easily and quickly.
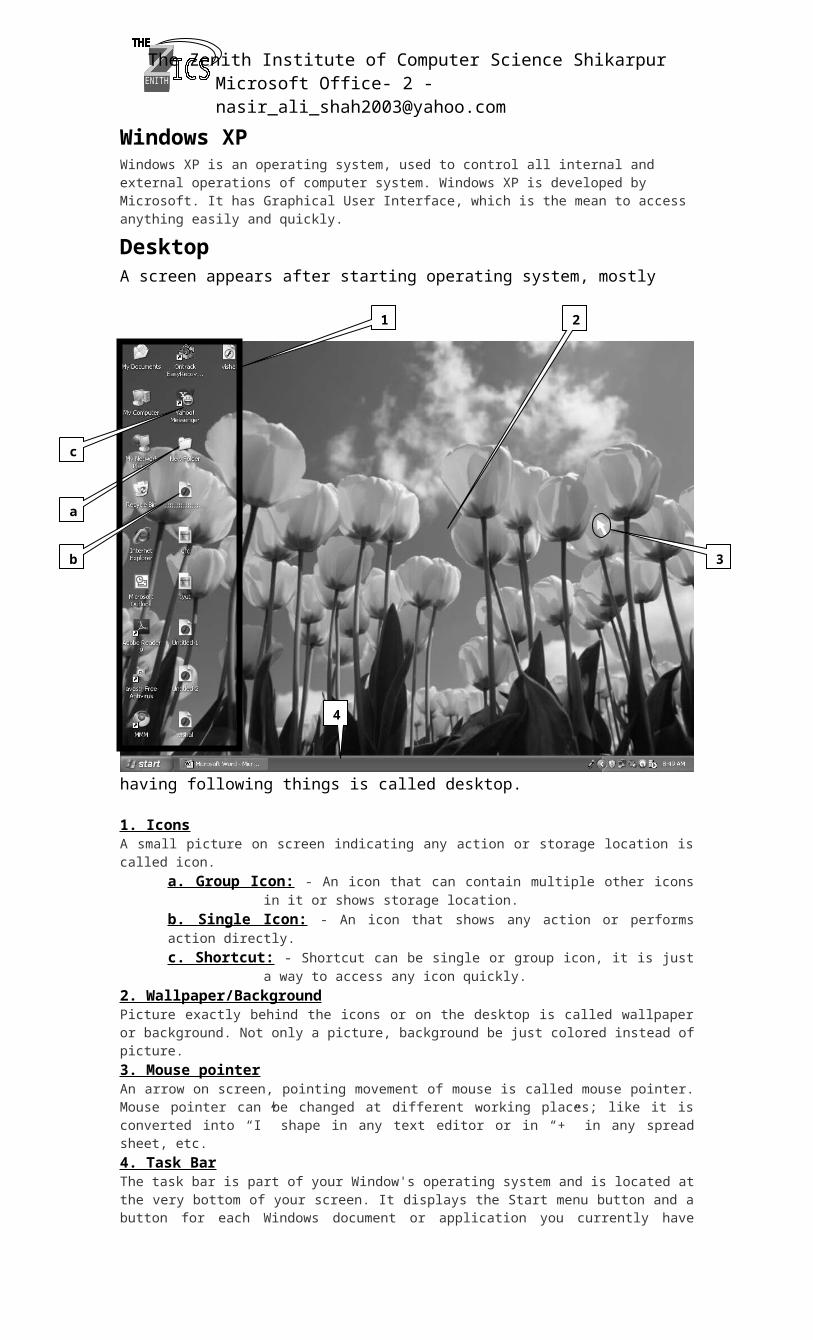
DesktopA screen appears after starting operating system, mostly having following things is called desktop.
1. IconsA small picture on screen indicating any action or storage location is called icon.
a. Group Icon: - An icon that can contain multiple other icons in it or shows storage location.
b. Single Icon: - An icon that shows any action or performs action directly.c. Shortcut: - Shortcut can be single or group icon, it is just a way to access
any icon quickly.
2. Wallpaper/BackgroundPicture exactly behind the icons or on the desktop is called wallpaper or background. Not only a picture, background be just colored instead of picture.3. Mouse pointerAn arrow on screen, pointing movement of mouse is called mouse pointer. Mouse pointer can be changed at different working places; like it is converted into “I” shape in any text editor or in “+” in any spread sheet, etc.
4. Task BarThe task bar is part of your Window's operating system and is located at the very bottom of your screen. It displays the Start menu button and a button for each Windows document or application you currently have running. It also may display the quick launch toolbar. On the far right is the system tray which displays icons for programs that launch when you start up your computer.
FolderFolder is a group icon, indicate any storage location, there are two types of folder.
1. System folderA folder, which is created by computer system, like my computer, recycle bin
etc.2. User folder
A folder, which created by user, like group “a” shown in figure above.
a
1
4
2
b
c
3
1 32
4
6
7
5
78 9
10
711
1213
14 15
16
The Zenith Institute of Computer Science ShikarpurMicrosoft Office - 3 - [email protected]
MS-OfficeMS stands for Microsoft, a software developer corporation in USA being owned by Bill Gates. Microsoft has introduced lots of application and system software. MS-Office is one of them, it is a software package used to complete different kinds of office work. It consists of different software tools. Some are:
1. Microsoft Word: - A word processor, used to create text based documents.2. Microsoft Excel: - A spreadsheet, used for calculation and creating worksheets.3. Microsoft Power point: - A presentation software, used to create presentations.4. Microsoft Access: - A database software, used to manage database.5. Microsoft Outlook: - A personal information manager, used to manage e-mail account.
Microsoft Word – the definitionMicrosoft Word is a word processor designed by Microsoft. It was first released in 1983 under the name Multi-Tool Word for Xenix systems. It is a component of the Microsoft Office system; however, it is also sold as a standalone product and included in Microsoft Works Suite. Beginning with the 2003 version, the branding was revised to emphasize Word's identity as a component within the Office suite on PC versions; Microsoft began calling it Microsoft Office Word instead of merely Microsoft Word.Microsoft Word is most commonly used word processor; it is used to create text-based documents. This is not the limit for creating documents in Microsoft Word; there is also facility to work with charts, tables, picture and graphs.
Opening Microsoft WordFollow the stepsMethod # 1:
1. Click Start button on the task bar2. Go to All Programs/Programs3. Go to Microsoft Word1 and Click it
Method # 2:1. Click Start button2. Go to Run2 and Click it3. Write keyword (Winword) for Microsoft Word and press OK.
Desktop Look of Microsoft Word
1 If you not find Microsoft Word exactly after going to programs or all programs, so there would be a folder named Microsoft Office, go on it and then you will see Microsoft Word.2 Shorkey for opening Run is Winkey+R.
The Zenith Institute of Computer Science ShikarpurMicrosoft Office - 4 - [email protected]
Elements of the MS Word Desktop1. MS Word Desktop - Title Bar The title bar is found at the top of the application window. It identifies the name of the active document (Document1 or file name)and the name of the application (Microsoft Word). Also found on the title bar is the Control Menu Icon on the far left of the Title Bar and the Program and Document Controls on the far right side of the title bar.
2. MS Word Desktop - Control Menu IconThe Control Menu Icon is located on the far left side of the Title Bar. You control the size and position of the window using its menu choices.
3. MS Word Desktop - Window Control ButtonsThe Window Control buttons are located on the far right hand side of the Title bar. The three controls are Minimize, Maximize/Restore Down, and Close. The Document Close button is located just below the Window Controls on the Application Menu bar.
Minimize ButtonThe minimize button is the first control button and it is visually represented by a minus sign. When you click on it, the application window will be reduced to an icon on the task bar. To redisplay the window, click on the taskbar button.
Maximize/Restore ButtonThe Maximize/Restore button is the middle control button and is visually represented by a Window icon. When you click on it, it controls the size of the window display. Restore down reduces the window to a smaller size on the desk top. Maximize resizes the window display fill the entire desktop.
Application Close ButtonThe Application close button is the third control button and is visually represented by a X. When you click on it, it closes the application window. In MS Word, if you have not saved your most recent edits, the system will prompt you to save when you click on the Application Close Button.
Document Close ButtonThe Document Close Button is visually represented by a X. When you click on it, it closes the current document window. If you have not saved your most recent edits, Word will prompt you to save prior to closing the document.
4. MS Word Desktop - Menu BarMS Word’s Menu bar gives you access to all of the Word’s commands. When you click on a menu selection it displays the commands from which you can select. On the left side of the cascading menu, you will see some menu choices with icon displays. These icons tell you that the menu command is also represented on one of the Tool Bars. Commands that have equivalent keyboard activation will show the keystroke combination on the right of the menu command. Menu choices with a small right pointing arrow heard have sub-menus that will display when you hover your mouse pointer over the main menu choice. Commands that are light grey are ones that currently are not active based on your selection.
There is certain logic in the menu structure with which you will become familiar with experience. For example, if you wanted to change the appearance of your text, you want to format it. Commands for formatting characters and paragraphs will naturally be found on the Format menu. Look at the menu choice and reason out what types of commands might be found within their selection. Don’t try to memorize command locations, but rather try to logically think about where it might be located within the menu choices.
5. MS Word Desktop - Ask A Question BoxNew in MS Word XP (2002) is the Ask a Question box located on the far right hand side of the menu bar. Since the MS Office Assistant does not display by default, the Ask a Question box gives quick access to the help journals. It works similarly to the MS Office Assistant. Type in a key term or question and then, press enter. A list of possible topics will be displayed in a drop down below the Ask a Question box. Generally, you will see about 8 – 10 topics that best fit your question. The first 4 or 5 will be displayed with a “See More” selection at the bottom to display the next 4 or 5. The last choice is most likely to be None of the Above Search the Web. Choosing this selection will launch your browser and take you to the MS Knowledge base with possible choices. Click on the option that most closely matches the topic with which you need help. Word will launch the help feature and take you directly to the topic you selected.
6. MS Word Desktop - Standard Toolbar

The Zenith Institute of Computer Science ShikarpurMicrosoft Office - 5 - [email protected]
Directly below the Menu bar, you will find the Standard Tool bar. Toolbars provide one click access to frequently used commands. The standard toolbar displays commands that are generally associated with file and data manipulation such as opening, saving, and closing documents; Copy, Cut, and Paste commands etc.
7. MS Word Desktop - Formatting ToolbarThe Formatting Toolbar may be located aside and to the right of the Standard Toolbar (depending on which version of Word you are using) or directly below the Standard Toolbar. The Formatting toolbar provides one click access to frequently used format commands. You can use it to quickly change the font, text size, attributes, paragraph alignment etc.
8. MS Word Desktop – RulersJust above the text area and below the Formatting Toolbar is the horizontal alignment ruler. This ruler shows width of the page and provides a visual measurement for your left and right margins and tabs. It also is used to manipulate your margins and insert tabs and indents to suit your document style. At the left of text area is the vertical alignment ruler. This ruler shows height of the page and provides visual measurement of top and bottom margins.
9. MS Word Desktop - Text AreaThis is the white space below the ruler in which you construct your document.
10. MS Word Desktop - Insertion Point/CursorYou will see a blinking vertical bar located in the text area that is commonly know as the insertion point and also as a cursor. Text that you type will be inserted directly in front of the cursor. You can readily move the cursor within your document by positioning your mouse pointer where you want to move it to, and then click the mouse button. You can also use your keyboard arrows to move your insertion a single character at a time to the left or right as determined by the arrow direction. The up and down arrows will move the cursor up or down a line of text in alignment with its starting point.
11. MS Word Desktop - Scroll BarsScroll bars are navigation tools found along the right side (Vertical Scrollbar) and bottom (Horizontal Scrollbar) of the application widow. Use the scroll bars to view different parts of your document. Keep in mind that when you use the scroll bars to navigate, your insertion point does NOT move with the scroll action. If you want to add text to the area of the document to which you have scrolled you must move your insertion point by clicking where you want to insert.
12. MS Word Desktop - View ButtonsAt the bottom of the document area and to the right of the horizontal scroll bar you will find four view buttons. These buttons are used to change the appearance (view) of your document. Changing the view does not affect the format of the document but rather how you see the document on the screen. Chose from the Normal View, Web View, Print Layout View and Outline View in Word XP. Prior versions of word do not include the Web view but do have another outline type view. Which view you chose will depend on your objectives and preferences. Experiment with each to determine which suits your work habits best.
13. MS Word Desktop - Select Browse ObjectThe Select Browse Object button is located below the vertical scroll bar on the right. It is used to move quickly between objects in your document. You can browse by page, section, comments, footnote, endnote, field, table, graphic, headings or edits. You can also access the GoTo and Find commands from this button. Use the previous and next button above and below the Select Browse Object to move from the object to object based on the type you selected. For example, suppose you want to review the graphic objects in your lengthy document. Place your insertion point at the top of your document, click on the Select Browse Object button and select Graphics, Click on the next button (downward pointing arrows) to move to the first graphic in your document. Keep clicking Next until you have review all graphics.
14. MS Word Desktop - Drawing ToolbarThe Drawing toolbar exactly below the horizontal scrollbar. It has most common options used in drawing any object, like rectangle, oval, line. Picture tools are also available for inserting any new picture from file as well as from clip art. Color options for any line or abject are also available on this bar.
The Zenith Institute of Computer Science ShikarpurMicrosoft Office - 6 - [email protected]
15. MS Word Desktop - Status BarThe Status bar at the bottom of MS Word's application window is a powerful tool. It gives you an orientation as to where you are in your documents. Reading across the line it indicates the following information about where you are in your document:
page displayed on the screen section displayed on the screen what page the insertion point is located on and how many pages are in the
document inches from the top of the document (keep in mind this includes the top
margin) the line number of the page the insertion point is on the character position of the insertion point on the current line
16. MS Word Desktop - Task PaneThe task pane is a new feature of the MS Office suite. The task panes are intended to give you easy access to commands related to what you are working on in your document. Task panes include:
New Document – for opening a document, creating a new document, creating a new document from an existing document (i.e., copy of the existing), selecting a template
Clipboard – the clipboard accumulates and displays the last 24 items you copied or cut within your document or from another applications giving you the ability to reuse the item multiple times as needed.
Search – provides you with the ability to search the current document for your system for files or key words
Insert Clip Art – provides easy access to the clip art files located on your computer as well as those offered by Microsoft's Online Design Gallery.
Styles – helps you to organize and manage styles within your document Reveal Format – provides you with formatting information about your current
selection. Mail Merge – use this tool to merge source information with a "form" letter or
address labels and envelopes. Translate – Word's first attempt at providing a utility to translate your
document to other languages.
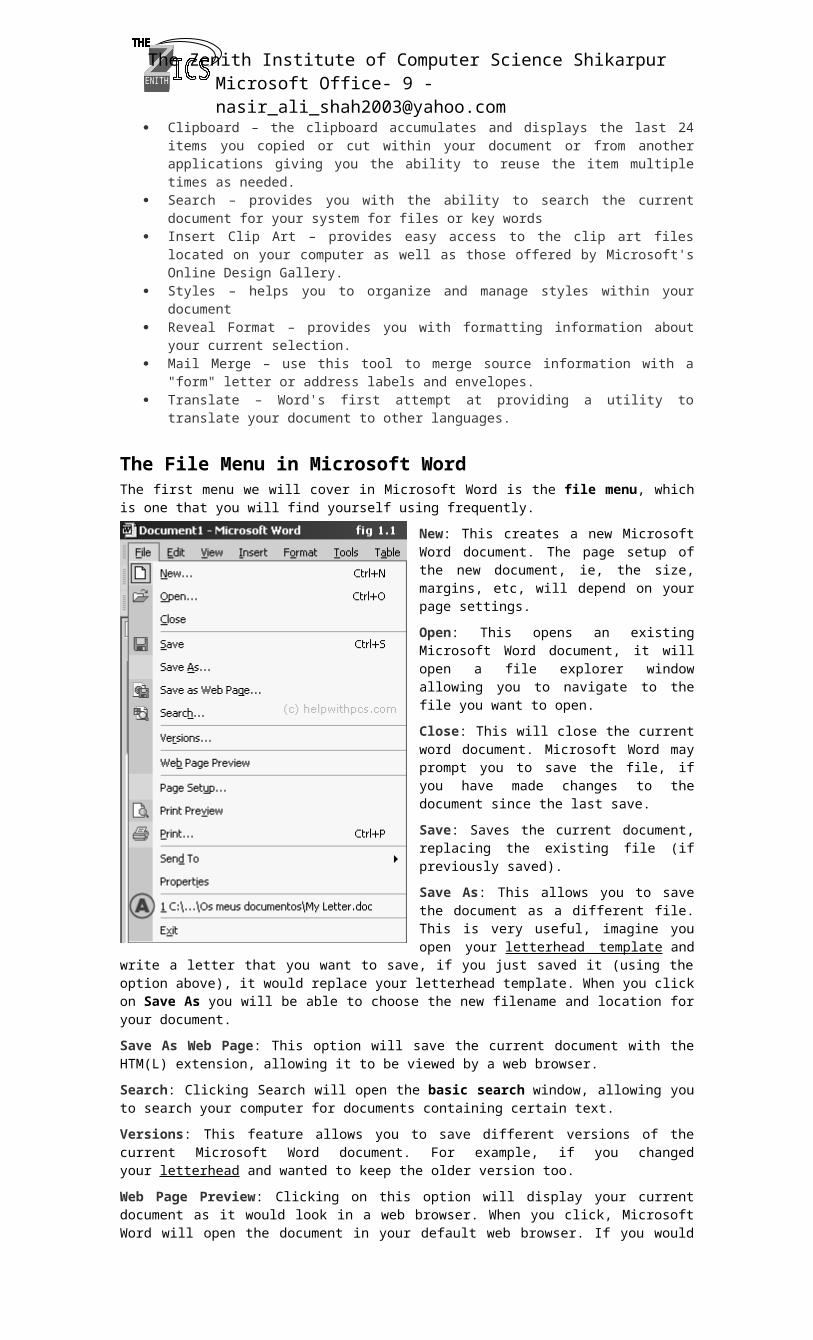
The File Menu in Microsoft WordThe first menu we will cover in Microsoft Word is the file menu, which is one that you will find yourself using frequently.
New: This creates a new Microsoft Word document. The page setup of the new document, ie, the size, margins, etc, will depend on your page settings.
Open: This opens an existing Microsoft Word document, it will open a file explorer window allowing you to navigate to the file you want to open.
Close: This will close the current word document. Microsoft Word may prompt you to save the file, if you have made changes to the document since the last save.
Save: Saves the current document, replacing the existing file (if previously saved).
Save As: This allows you to save the document as a different file. This is very useful, imagine you open your letterhead template and write a letter that you want to save, if you just saved it (using the option above), it would replace your letterhead template. When you click on Save As you will be able to choose the new filename and location for your document.
Save As Web Page: This option will save the current document with the HTM(L) extension, allowing it to be viewed by a web browser.

The Zenith Institute of Computer Science ShikarpurMicrosoft Office - 7 - [email protected]
Search: Clicking Search will open the basic search window, allowing you to search your computer for documents containing certain text.
Versions: This feature allows you to save different versions of the current Microsoft Word document. For example, if you changed your letterhead and wanted to keep the older version too.
Web Page Preview: Clicking on this option will display your current document as it would look in a web browser. When you click, Microsoft Word will open the document in your default web browser. If you would like to know more about making web pages, see our guide to creating a website.
Page Setup: This opens the page setup options dialogue box. It allows you to set the properties (dimensions, margins, etc) of the current document and change the default for new Microsoft Word documents.
Print Preview: Selecting this option opens the print preview window, allowing you to preview how your document will look when printed.
Print: Opens the print dialogue box allowing you to print the current document.
Send To: Hovering your mouse over this option will allow you to send your document via email, or export it to Microsoft Powerpoint (if installed).
Properties: This will open the Microsoft Word document properties dialogue box, allowing you to view/edit various properties of the document. Including author information, statistics, type, location and filesize of the document.
The A symbol in fig 1.1 above shows where a list of recently opened documents are listed. This is a very handy feature of Microsoft Word, it saves using the normal opening procedure.
Exit: Clicking this will exit Microsoft Word, it may prompt you to save any unsaved documents.
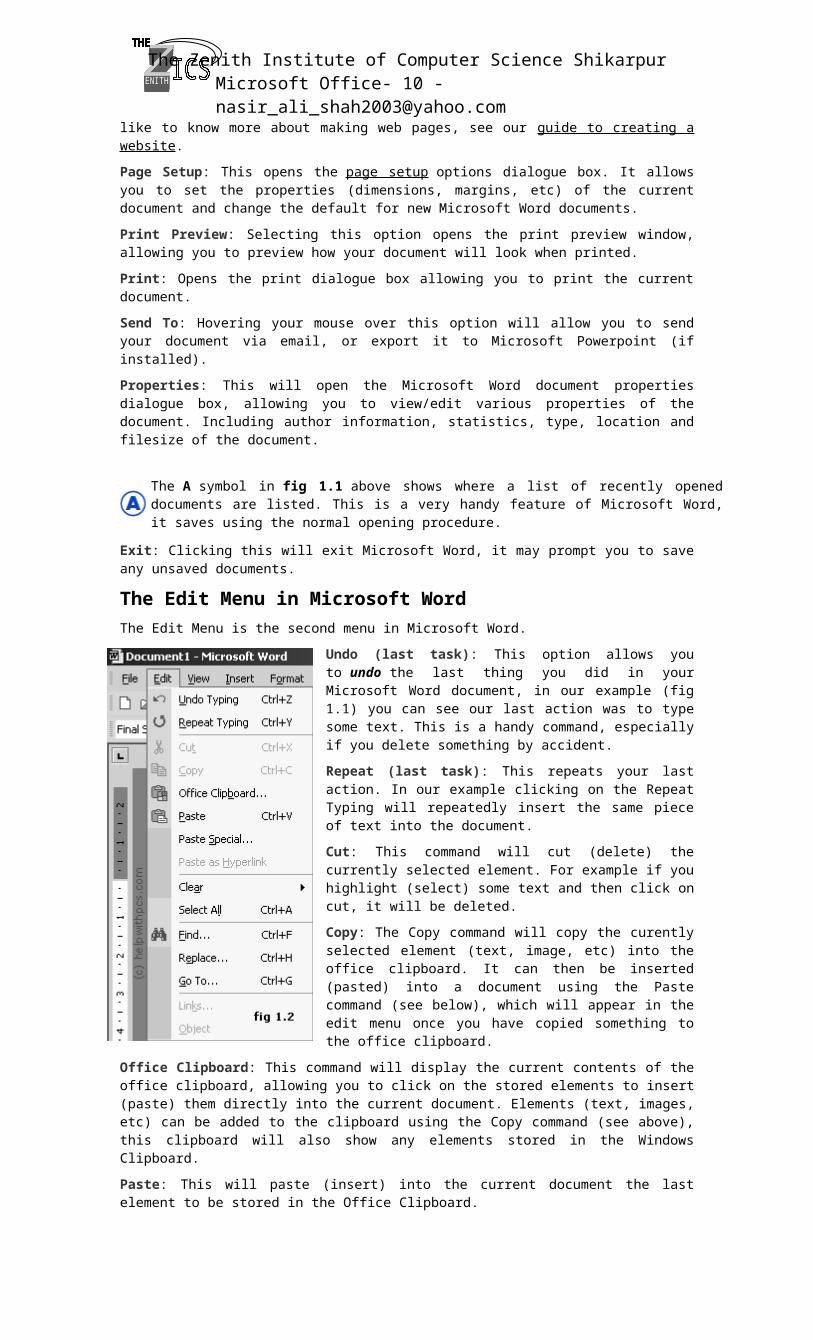
The Edit Menu in Microsoft WordThe Edit Menu is the second menu in Microsoft Word.
Undo (last task): This option allows you to undo the last thing you did in your Microsoft Word document, in our example (fig 1.1) you can see our last action was to type some text. This is a handy command, especially if you delete something by accident.
Repeat (last task): This repeats your last action. In our example clicking on the Repeat Typing will repeatedly insert the same piece of text into the document.
Cut: This command will cut (delete) the currently selected element. For example if you highlight (select) some text and then click on cut, it will be deleted.
Copy: The Copy command will copy the curently selected element (text, image, etc) into the office clipboard. It can then be inserted (pasted) into a document using the Paste command (see below), which will appear in the edit menu once you have copied something to the office clipboard.
Office Clipboard: This command will display the current contents of the office clipboard, allowing you to click on the stored elements to insert (paste) them directly into the current document. Elements (text, images, etc) can be added to the clipboard using the Copy command (see above), this clipboard will also
show any elements stored in the Windows Clipboard.
Paste: This will paste (insert) into the current document the last element to be stored in the Office Clipboard.
Paste Special: Clicking on this command will bring up the Microsoft Word Paste Special dialogue box, it allows you to control the format of the text that will be inserted (pasted) from the Office/Windows clipboard.
Paste as Hyperlink: This command allows you to link (create a hyperlink) to a certain place in another Microsoft Word document, Excel worksheet, PowerPoint slide, or Access database. To achieve this, first copy the element that you want to link to into the clipboard, and then select the Paste as Hyperlink command.
The Zenith Institute of Computer Science ShikarpurMicrosoft Office - 8 - [email protected]
note: The target file must have been saved previously, likewise if you are linking to an element in the current document, it must be saved first.
Clear: This command allows you to remove any formatting from the currently selected (highlighted) element (text/image). It also allows you to delete the selected element.
Select All: This will select (highlight) every element in the current document.
Find: Find allows you to search the current document for a certain word or phrase.
Replace: Replace allows you to replace a given text with a substitute of your choice.
Goto: Goto allows you to go directly to a certain page, section, line, bookmark, comment, footnote, endnote, field, table, graphic, equation, object, or heading.
Links: This allows you to manage any linked objects in the current document. A linked object is information (data) that is stored in another file, for example a Microsoft Excel spreadsheet, Microsoft Access database, or other compatible source.
Objects: This command allows you to manage any embedded objects within the current document.
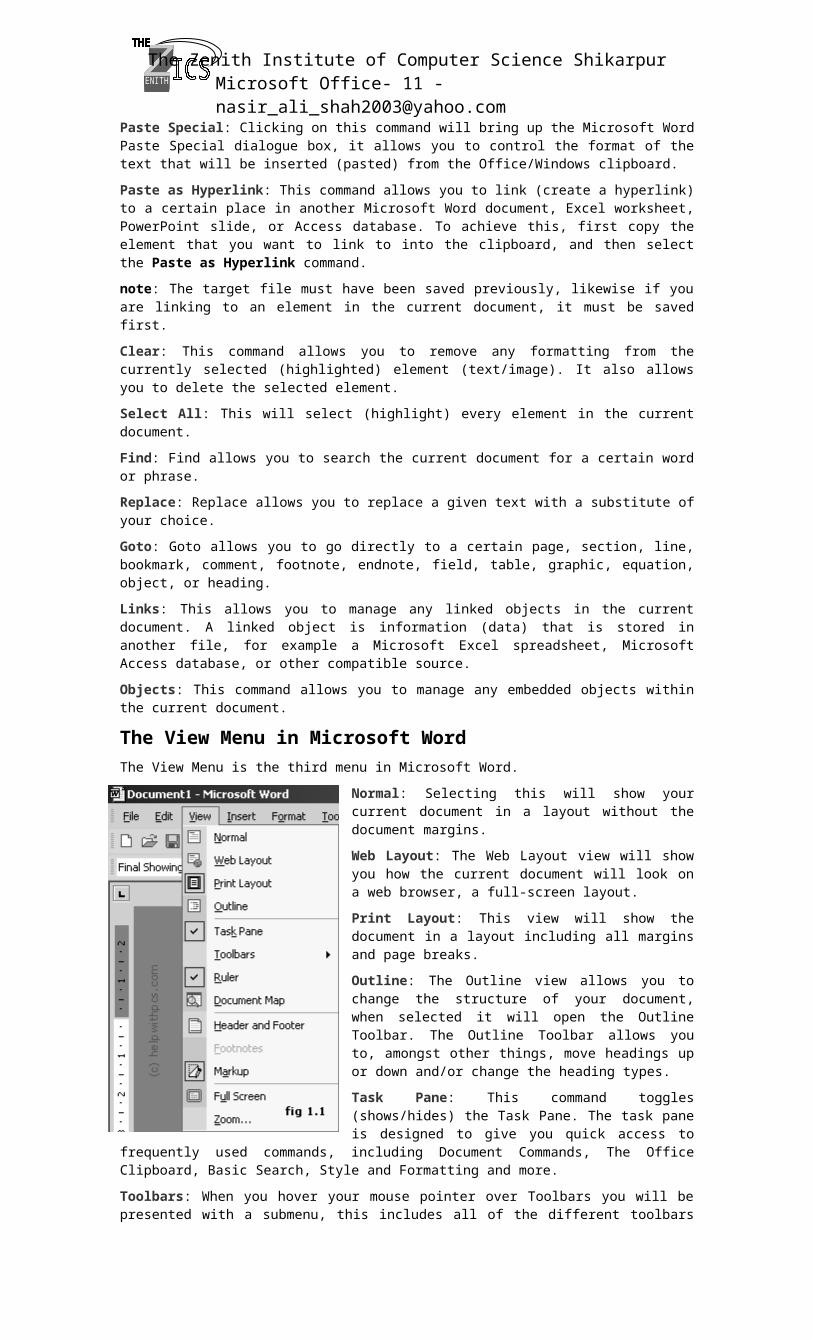
The View Menu in Microsoft WordThe View Menu is the third menu in Microsoft Word.
Normal: Selecting this will show your current document in a layout without the document margins.
Web Layout: The Web Layout view will show you how the current document will look on a web browser, a full-screen layout.
Print Layout: This view will show the document in a layout including all margins and page breaks.
Outline: The Outline view allows you to change the structure of your document, when selected it will open the Outline Toolbar. The Outline Toolbar allows you to, amongst other things, move headings up or down and/or change the heading types.
Task Pane: This command toggles (shows/hides) the Task Pane. The task pane is designed to give you quick access to frequently used commands, including Document Commands, The Office Clipboard, Basic Search, Style and Formatting and more.
Toolbars: When you hover your mouse pointer over Toolbars you will be presented with a submenu, this includes all of the different toolbars that are available. You can toggle (hide/show) the different toolbars by simply clicking on them within the submenu.
Ruler: Clicking on this will toggle (hide/show) the document ruler which appears across the top and down the side of the Microsoft Word document.
Document Map: The document map is a handy feature which allows you to navigate the current document, it will list the headings (heading 1, heading 2, etc) in the current document. To go directly to a certain paragraph heading, simply click on it in the left hand pane that opens.
Header and Footer: This allows you to edit the header and footer of the current document.
Footnotes: This command will show all footnotes and endnotes (you will be promoted for which) within the current document.
Markup: This will toggle (hide/show) any Markup (comments and tracked alterations/additions) in the current document.
Full Screen: This will show the current Microsoft Word document in full screen mode.
Zoom: This will open the zoom dialogue box, enabling you to change the percentage of zoom for the current view.
The Zenith Institute of Computer Science ShikarpurMicrosoft Office - 9 - [email protected]
The Insert Menu in Microsoft WordThe Insert Menu is the fourth menu in Microsoft Word.
Break: This command opens the Break dialogue box, allowing you to insert page breaks and section breaks into the current document.
Page Numbers: Clicking on Page Numbers will open a dialogue box, which allows you to insert page numbers into the document using various options.
Date and Time: This command will open the Date and Time dialogue box. You can choose from many different date and time formats, you may also have different languages to choose from.
Autotext: Choosing this option will open the Microsoft Word Autotext dialogue box. We will cover Autotext in a future tutorial.
Field: This command allows you to enter specified fields into your document. The available fields include Date & Time, Document Automation, Document Information, Equations and Formulas, Index and Tables, Links and References, Mail Merge, Numbering and User Information.
Symbol: This allows you to insert symbols and special characters into your document. For example, if you wanted to include a copyright symbol or a trademark symbol, then you would use this feature. Other symbols (special characters) include currency symbols, mathematical symbols and foreign language alphabet characters.
Comment: This command will place a comment into the document at the location of the cursor. You will be able to type your comment into the comment box, once done, simply click anywhere outside of the comment box.
Reference: The Reference command will allow you to insert a footnote, caption, cross-reference, index, and tables.
Web Component: This command is used to insert any web components into your Microsoft Word document.
Picture: Allows you to insert a picture into your document. You will be offered various locations to locate the image, including clip art, the file system on your computer, and a digital camera or scanner.
Diagram: The Diagram command will open the diagram gallery dialogue box. You can choose from a selection of diagrams to insert into your document, including an organization chart, cycle diagram, radial diagram, pyramid diagram, venn diagram and a target diagram. You may have less or more diagrams available to insert, depending on your Microsoft Word installation.
Text Box: This allows you to insert text box, as you can move text at any corner.
File: Enables you to insert part or all of a file into the current document.
Object: This command will insert an object of your choice, including media clips, Microsoft Excel charts and worksheets, Microsoft Powerpoint slides and presentations.
Bookmark: This handy feature allows you to bookmark a certain element (text, image, etc). You can name the bookmark and then return to it at any time by using the goto command in the edit menu and also by this command.
Hyperlink: The Insert Hyperlink dialogue box allows you to add a hyperlink to an existing file, web page, certain place in the current document, a new document, or an email address.
The Zenith Institute of Computer Science ShikarpurMicrosoft Office - 10 - [email protected]
The Format Menu in Microsoft WordThe Format Menu is the fifth menu in Microsoft Word.
Font: This will change the font attributes of either the currently selected text, or any subsequent text, using the font dialogue box.
Paragraph: This command will open the Paragraph dialogue box, allowing you to make changes to either existing text or subsequent text. To change an existing paragraph, select the text you wish to change and then use this command to make the alterations, such as alignment, indentation, and spacing.
Bullets and Numbering: This is a handy command, it creates indented lists with various formats. You can either click the command and then start typing your list (pressing enter for the next line), or you can select some existing text to convert to a list. The listing format options include bulleted,
numbered, outline numbered, and other styles.
Borders and Shading: This command allows you to create borders and shading on elements within your Microsoft Word document. The borders and shading can be applied to text, paragraphs, pictures, and more.
Columns: The Columns command will split the current document into the number of columns you specify. You can either split the whole page, or just from that point onwards.
Tabs: This command allows you to manage tabs, including the alignment, spacing, and whether the tab has a leader or not.
Drop Cap: A drop cap is a letter at the start of a paragraph of text that spans 2 or more rows of text, you will often see a drop cap in a book at the start of a chapter. This tool allows you to either add a drop cap character to your document or change an existing letter (at the start of a sentence) to a drop cap.
Text Direction: This allows you to change the text direction of a text object, for example a text box.
Change Case: The Change case tool allows you to alter the case of existing text. Options include sentence case, lowercase, uppercase, title case, and toggle case.
Background: This changes the background colour (color) of your Microsoft Word document. It also allows you to add watermarks and use different gradient effects.
Theme: The themes command will open the theme dialogue box, allowing you to change the theme of your document, including heading style, hyperlinks and background colour (color).
AutoFormat: The AutoFormat feature will format a whole document with preset attributes.
Styles and Formatting: This will open the Styles and Formatting toolbar, allowing you create headings, lists and more.
Reveal Formatting: Clicking on this will show a dialogue box detailing the format attributes of the selected element.
Object: Allows you to make changes to any existing objects within the current document.
The Zenith Institute of Computer Science ShikarpurMicrosoft Office - 11 - [email protected]
The Tools Menu in Microsoft WordThe Tools Menu is the sixth menu in Microsoft Word.
Spelling and Grammar: This command will check the spelling and grammar of the current Microsoft Word document. It also allows you to add words to the dictionary, as well as changing the dictionary language (if available).
Language: The language tool has various options, including setting the language of the document, translating text, open the thesaurus and manage hyphenation.
Word Count: This will open the Word Count dialogue box, enabling you to count the amount of words in the whole document, or the currently selected text.
AutoSummarize: This can be a handy feature of Microsoft Word, depending on the type and format of your document. It will summarize a document using the attributes you give it, for example, you can choose the percentage of the
document to be used for the summary, as well as the format of the summary.
Speech: This will open the Speech Recognition feature of Microsoft Word (if installed/available).
Track Changes: Clicking on this command will cause Microsoft Word to track any subsequent changes to the document. These changes can then be viewed by turning on the Markup option on the Edit menu.
Compare and Merge Documents: This feature enables you to easily compare and/or merge 2 documents.
Protect Document: This command allows you to control the protection of the document, including tracked changes, comments and forms.
Online Collaboration: Enables NetMeeting allowing you to communicate with others inreal time via the internet or local network.
Letters and Mailing: Gives you access to various features, including the Mail Merge Wizard, the Letter Wizard, the Envelopes and Labels tool, and the Mail Merge Toolbar.
Macro: This opens the Macro Dialogue box, allowing you to manage subsequent and existing macros. We will be covering Microsoft Word macros in a future tutorial.
Templates and Add-Ins: Opens the Templates and Add-Ins Dialogue box, allowing you to add, remove or update styles and template.
AutoCorrect Options: Opens the AutoCorrect dialogue box, enabling you to manage capitalisation, and also the replace text as you type settings.
Customize: Allows you to customize the Microsoft Word toolbars, commands, and other options.
Options: This opens the main options dialogue box in Microsoft Word. It allows you to change many aspects of the current document and Microsoft Word environment.

The Zenith Institute of Computer Science ShikarpurMicrosoft Office - 12 - [email protected]
The Table Menu in Microsoft WordThe Table Menu is the seventh menu in Microsoft Word.
Draw Table: This command opens the Tables and Borders dialogue box with thedraw table tool active. First you draw the outline of your table, then using the same tool, you can create cells by vertical or horizontal movements within the table.
Insert: Allows you to insert a whole table or just columns, rows and cells into the current document.
Delete: Delete complete tables, columns, rows and selected cells.
Select: This command allows you to select the current table, column, row or cell.
Merge Cells: This tool will merge the currently selected cells into one.
Split Cells: This will split the selected cell/s into your chosen amount of columns and rows, it will also offer (if more than one cell
selected) to merge the selected cells before the split.
Split Table: This command will split the current table, making the split at the currently selected cells.
Convert: This command will convert existing text into a table format. The text will have to have a common separator to indicate the different columns, it will also needs new paragraphs where you would like each row.
Sort: This opens the Sort Table dialogue box. You can choose which column you would like to sort and by what order.
Formula: This tool allows you to apply a formula to the selected cell. For example, if you wanted to add up the contents of several rows in a specific column, you could use the SUM formula in the Formla dialogue box.
Hide Gridlines: This simply hides the gridlines of the selected table.
Table Properties: This will display the various properties of the selected table.


![Introduction - interoperability.blob.core.windows.netMS-OFFDI]-160914.docx · Web view, by using Microsoft Word 2013, Microsoft Word 2010, Microsoft Office Word 2007, Microsoft](https://static.fdocuments.in/doc/165x107/5d51318488c993b0478b9899/introduction-ms-offdi-160914docx-web-view-by-using-microsoft-word-2013-microsoft.jpg)

![[MS-OFFDI]: Microsoft Office File Format Documentation … · 2017-09-19 · Microsoft Word 97 Microsoft Word 2000 Microsoft Word 2002 Microsoft Office Word 2003 Microsoft Office](https://static.fdocuments.in/doc/165x107/5edde022ad6a402d66691993/ms-offdi-microsoft-office-file-format-documentation-2017-09-19-microsoft-word.jpg)


![[MS-OFFDI]: Microsoft Office File Format Documentation ...MS... · Microsoft PowerPoint 2010 Microsoft PowerPoint 2013 Microsoft Word 97 Microsoft Word 2000 Microsoft Word 2002 Microsoft](https://static.fdocuments.in/doc/165x107/5ea61160271e716b297d501f/ms-offdi-microsoft-office-file-format-documentation-ms-microsoft-powerpoint.jpg)