Microsoft RMS Integration Installation guide · 2015-08-07 · Microsoft RMS Integration...
27
Microsoft RMS Integration Installation guide October 2013 Mercury ® integrates with Microsoft RMS for high-speed authorization of credit, debit, and gift card transactions. Processing is fully integrated into Microsoft RMS tender screens. Credit and debit make use of the built-in interface. Gift card processing requires a small, easy to install software component that interacts seamlessly with RMS.
Transcript of Microsoft RMS Integration Installation guide · 2015-08-07 · Microsoft RMS Integration...
Microsoft RMS Integration
Installation guide
October 2013
Mercury® integrates with Microsoft RMS for high-speed authorization of
credit, debit, and gift card transactions.
Processing is fully integrated into Microsoft RMS tender screens. Credit and debit make
use of the built-in interface. Gift card processing requires a small, easy to install software
component that interacts seamlessly with RMS.

1 mercurypay.com | 800.846.4472
Contents Quick Facts ................................................................................................................................................... 2
Mercury’s Enhanced Processing Features................................................................................................ 2
Why Mercury IP? ....................................................................................................................................... 2
Value Added .............................................................................................................................................. 2
Pre-Installation Requirements ....................................................................................................................... 3
One ............................................................................................................................................................ 3
Two ............................................................................................................................................................ 3
Three ......................................................................................................................................................... 3
Installation Options .................................................................................................................................... 3
Mercury RMS Integrated Install Options ....................................................................................................... 4
Option 1. Manual Installation for Credit/Debit............................................................................................ 4
Option 2. Automated Installation for Credit, Gift and Receipt Generation ................................................ 6
Adding Custom Buttons .............................................................................................................................. 10
Gift Card Balances .................................................................................................................................. 10
Web Reporting Login guide ..................................................................................................................... 10
Receipt Generation Tool .......................................................................................................................... 11
Adding an Inventory Item ............................................................................................................................ 12
Add Gift Cards as a Standard Item ......................................................................................................... 12
Add Gift Card Reload as a Non-inventory Item ....................................................................................... 13
Adding Tender Types .................................................................................................................................. 14
Set Up Tender Types .............................................................................................................................. 14
Credit Card ........................................................................................................................................... 14
Debit Cards .......................................................................................................................................... 15
Gift Cards ............................................................................................................................................. 16
Installing Gift on Windows 64 Bit Computers .............................................................................................. 17
Changing MPS Setup .................................................................................................................................. 21
Receipt Generation Application .................................................................................................................. 22
Using the Receipt Generation Application from within Microsoft RMS ................................................... 22
Using the Receipt Generation Tool from outside of Microsoft RMS POS ............................................... 25

2 mercurypay.com | 800.846.4472
Quick Facts
Mercury’s Enhanced Processing Features
Free MercuryGift® card processing for single and multi-store locations
Credit and debit transactions are fully integrated and supported
Electronic signature capture
Asynchronous PIN pad support - cardholder can swipe the card at any time during the sale
Address verification service
Check verification and guarantee
Free MercuryView™ web reporting on all transactions
MercuryStand-In™ authorization guarantees continuous processing if there is an outage within the authorization network
IP/Dial Bridge™ for Mercury® guarantees continuous payment processing during internet outages
Why Mercury IP?
Economical
Easy application and enrollment
Competitive rates
Free 24/7 MercuryLive™ specialized technical and customer support
Five-minute merchant application
24-48 hour enrollment
Automatic, time-initiated batch close
Value Added
Mercury is certified by Visa’s Cardholder Information Security Program (CISP)
Mercury uses Global Payments (NYSE:GPN) as its backend processor
Mercury is a registered merchant service provider of HSBC Bank, a leading financial group with assets of $85.4 billion
Mercury works with over 200 retail and restaurant POS and ECR systems and supports thousands of retail and restaurant customers in the U.S. and Canada
Next day funding for merchants banking with HSBC
NitroSell e-commerce solution
Advance funding for immediate merchant access to working capital

3 mercurypay.com | 800.846.4472
Pre-Installation Requirements
One
Version 1.2 with Service Pack 3, Version 1.3, or Version 2 for RMS Store Operations must be installed prior to performing the Mercury setup.
Two
You need the Merchant ID provided on the merchant’s set-up letter.
Three
For PIN debit processing: you need a PIN pad supported by the version of RMS installed, injected with the Mercury key.
Installation Options
1. Manual installation for credit. 2. Automated installation for credit, gift and receipt generation.

4 mercurypay.com | 800.846.4472
Mercury RMS Integrated Install Options
Option 1. Manual Installation for Credit/Debit
1. Go to the RMS Store Operations Administrator. Go to File > Configuration and select the EDC tab.Select “Use electronic draft capture software to verify credit card transactions.” 2. Select “Preferred Acquirer Credit/Debit Card Processing” in the EDC software drop down list.
3. Click on the Advanced Options button and fill out the Acquirer Bank Identification Number, Agent Bank Number, Agent Chain Number and Sharing Group. These fields are not used by Mercury, but are required by RMS. You can use filler values, such as “111111.”

5 mercurypay.com | 800.846.4472
4. Click on the Merchant Tab and fill out your Name (company name), Merchant Number (precede your Mercury Payment Systems Merchant ID with leading zeroes), Store Number, Category Code, City, State, Zip Code, Location Number, V Number, and Terminal Number. Only the Merchant Number field is used by Mercury, but RMS requires they all be completed. For those fields for which you do not have a value, such as V Number, you can use filler values, such as “11111111.”
5. Click on the Advanced button in the lower left corner of the EDC Preferred Acquirer Configuration.
1) Click the Edit button to the right of the Credit Gateway URL. Enter “v1.mercurypay.com/index.aspx.” 2) Click the Edit button to the right of the Debit Gateway URL. Enter “v1.MercuryPay.com.” 3) Click the OK button and then click the OK button again on the next two forms to save the settings. Go to page 12 for further instructions.
6 mercurypay.com | 800.846.4472
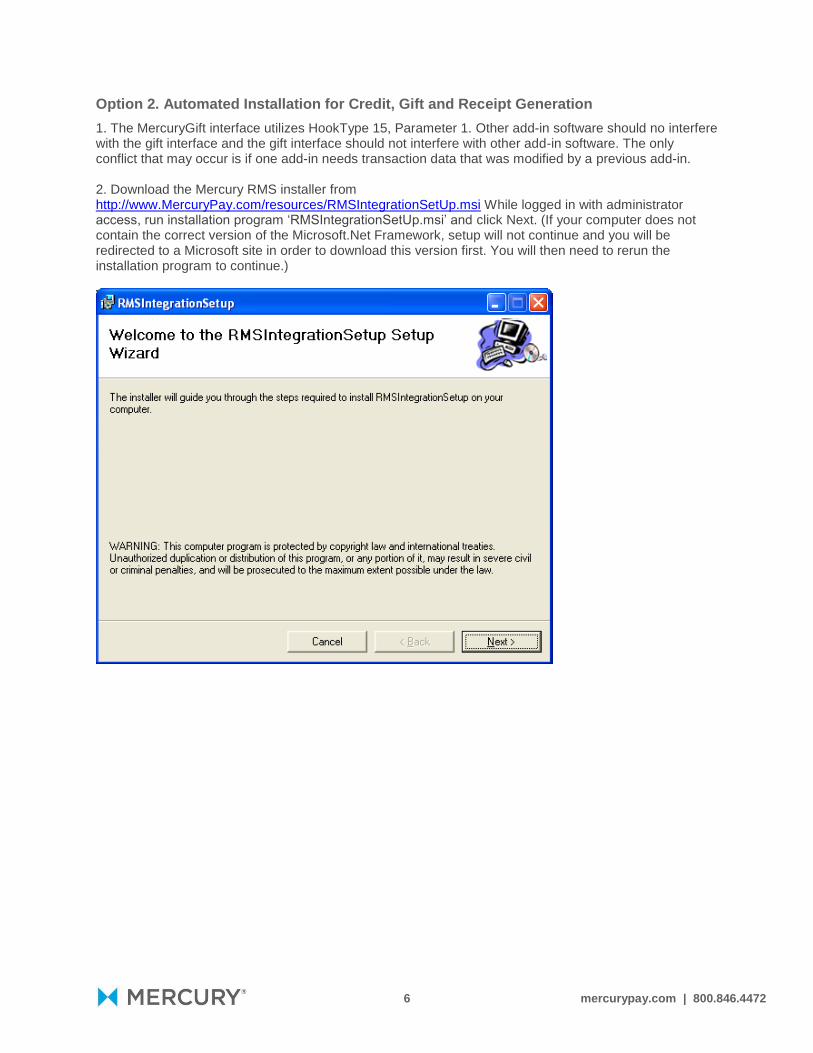
Option 2. Automated Installation for Credit, Gift and Receipt Generation
1. The MercuryGift interface utilizes HookType 15, Parameter 1. Other add-in software should no interfere with the gift interface and the gift interface should not interfere with other add-in software. The only conflict that may occur is if one add-in needs transaction data that was modified by a previous add-in. 2. Download the Mercury RMS installer from http://www.MercuryPay.com/resources/RMSIntegrationSetUp.msi While logged in with administrator access, run installation program ‘RMSIntegrationSetUp.msi’ and click Next. (If your computer does not contain the correct version of the Microsoft.Net Framework, setup will not continue and you will be redirected to a Microsoft site in order to download this version first. You will then need to rerun the installation program to continue.)

7 mercurypay.com | 800.846.4472
3. Please read the Software License Agreement and, if you agree, select the “I Agree” option, then continue by pressing Next.
4. This form allows you to choose the installation location of the RMS components. In most cases the default values will be fine. Press the Next button to continue.
8 mercurypay.com | 800.846.4472
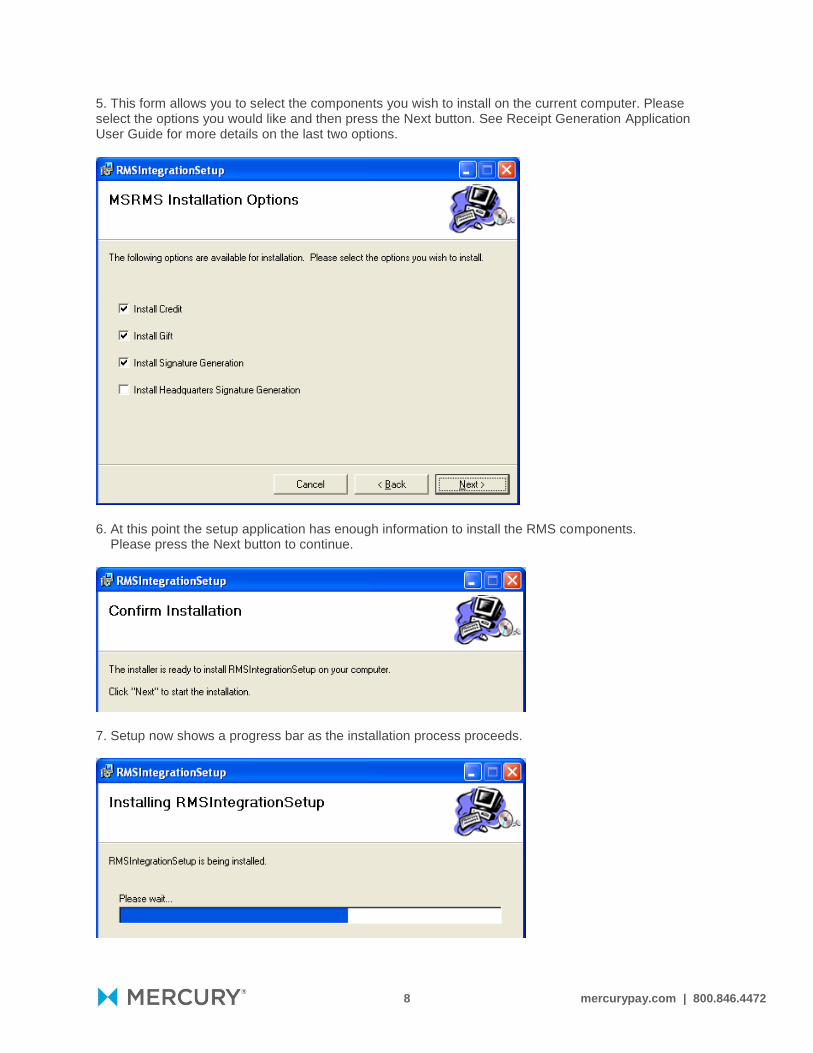
5. This form allows you to select the components you wish to install on the current computer. Please select the options you would like and then press the Next button. See Receipt Generation Application User Guide for more details on the last two options.
6. At this point the setup application has enough information to install the RMS components. Please press the Next button to continue.
7. Setup now shows a progress bar as the installation process proceeds.

9 mercurypay.com | 800.846.4472
8. A box will display for you to enter your Mercury Payment Systems provided variables. You should have been given a Merchant ID. Enter the Merchant ID number into the first field provided. This field is required, but a leading 0 is not. DSI Client servers should be entered as g1.mercurypay.com;g2.backuppay.com. The next three fields allow you to customize your Gift Card Item description. The default values, if left blank are shown on the frame. These values must correlate with the Item Descriptions set up within your Microsoft RMS Store Operations Manager. There should be a line item for your Gift Card purchases and the description must match this entry exactly (case sensitive). Same applies for your Gift Card Reload line item and your Gift Card Tender Type description. You can always change these values later if desired, for now leave blank to default to pre-set values. Leave the checkbox checked for First Time Install as this allows for full installation. This option is explained under “Changing MPS Setup.” You can also click on the question mark in the upper right corner and click the box you want more information on to display a detailed message.
9. Setup has completed successfully. Please press the Close button.

10 mercurypay.com | 800.846.4472
Adding Custom Buttons
Gift Card Balances
This is an optional button that will allow for retrieving Gift Card balances by swiping a Gift Card. Start the Store Operations Manager. Go to Database > Registers > Custom POS Buttons. Click New to add a new button.
Fill in the following values: 1) Style: COM Object (Session Object) 2) Caption: {blank} 3) Command: RMSGiftInterface.clsGiftBalance 4) Click Load. Select “GiftCard.gif” and click Open. 5) Click OK.
Web Reporting Login guide
This is an optional button that will allow for opening Mercury Payment Systems Web Reporting directly to the Login Page. Click New a second time.

11 mercurypay.com | 800.846.4472
Fill in the following values: 1) Style: External Program (Wait) 2) Caption: {blank} 3) Command: Path to Internet Explorer and Mercury’s Website. Default: “C:\Program Files\Internet Explorer\iexplore.exe” “http://www.mercurypay.com/mps_custportal” 4) Click Load. Select “WebRep.gif” and click open. 5) Click OK.
Receipt Generation Tool
This is an optional button that will allow for opening the Mercury Payment Systems’ Receipt Generation Tool. Click New to add a new button.
Fill in the following values: 1) Style: COM Object(Session Object) 2) Caption: {blank} 3) Command: MercurySigPOS.MercurySigPOS 4) Click Load. Select “receipt.gif” and click Open. 5) Click OK. For additional information on the use of the Receipt Generation Tool, please see the Receipt Generation Application User Guide on page 18.
12 mercurypay.com | 800.846.4472
Adding an Inventory Item
Add Gift Cards as a Standard Item
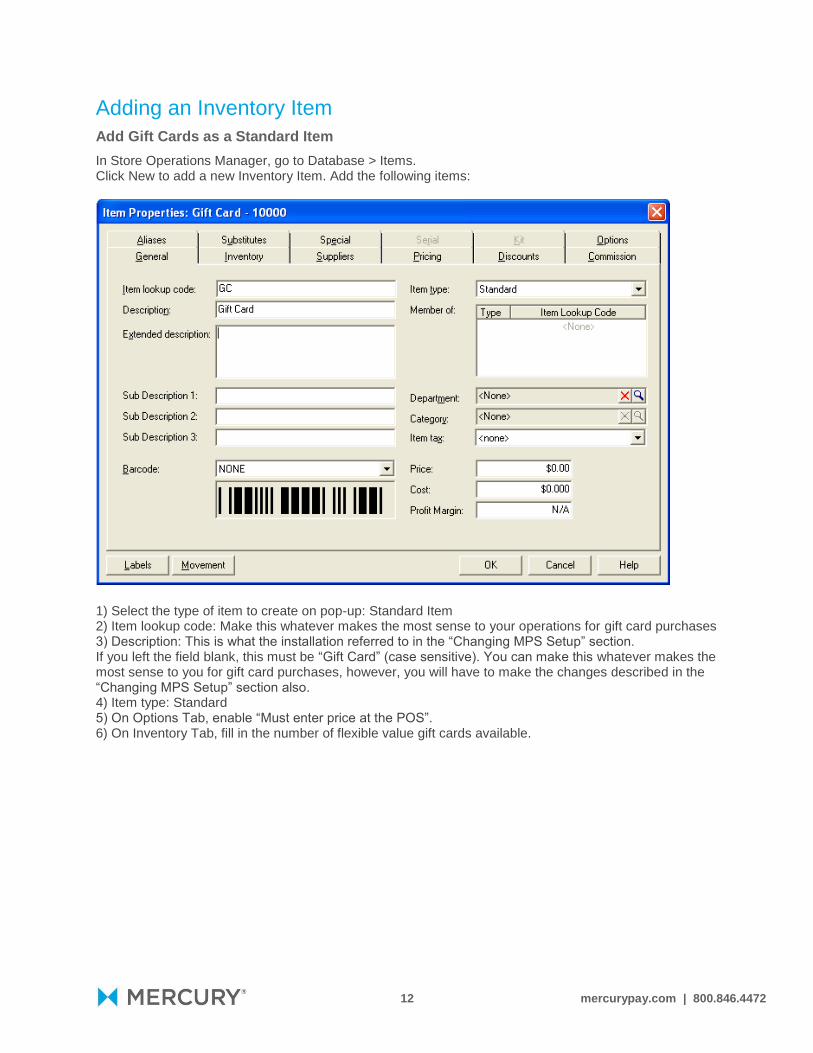
In Store Operations Manager, go to Database > Items. Click New to add a new Inventory Item. Add the following items:
1) Select the type of item to create on pop-up: Standard Item 2) Item lookup code: Make this whatever makes the most sense to your operations for gift card purchases 3) Description: This is what the installation referred to in the “Changing MPS Setup” section. If you left the field blank, this must be “Gift Card” (case sensitive). You can make this whatever makes the most sense to you for gift card purchases, however, you will have to make the changes described in the “Changing MPS Setup” section also. 4) Item type: Standard 5) On Options Tab, enable “Must enter price at the POS”. 6) On Inventory Tab, fill in the number of flexible value gift cards available.

13 mercurypay.com | 800.846.4472
Add Gift Card Reload as a Non-inventory Item
In Store Operations Manager, go to Database > Items. Click New to add a new Inventory Item. Add the following items:
1) Select the type of item to create on pop-up: Standard Item 2) Item lookup code: Make this whatever makes the most sense to your operations for gift card reloads 3) Description: This is what the installation referred to in the “Changing MPS Setup” section. If you left the field blank, this must be “Gift Card Reload” (case sensitive). You can make this whatever makes the most sense to you for gift card reloads, however, you will have to make the changes described in the “Changing MPS Setup” section also. 4) Item type: Non-Inventory 5) On Options Tab, enable “Must enter price at the POS.”

14 mercurypay.com | 800.846.4472
Adding Tender Types
Set Up Tender Types
Credit Card In Store Operations Manager, go to Database > Tender Types > Click New to add a new Tender Type for credit cards (or select the existing credit card tender type and click on the Properties button). Add the following items:
1) Description: Make this whatever makes the most sense to you for payments received with credit cards. 2) Tender Code: Make this whatever makes the most sense to your operations for payments by credit cards. 3) Tender Type: Credit Card. 4) Select the Verification tab: Check the box “Perform verification via EDC.”

15 mercurypay.com | 800.846.4472
Debit Cards Click New to add a new Tender Type for debit cards (or select the existing Debit Card tender type and click on the Properties button). Add the following items:
1) Description: Make this whatever makes the most sense to you for payments received with debit cards. 2) Tender Code: Make this whatever makes the most sense to your operations for payments by debit cards. 3) Tender Type: Debit Card. 4) Select the Verification tab: you will notice that the “Perform verification via EDC” is already checked for this tender type.

16 mercurypay.com | 800.846.4472
Gift Cards In Store Operations Manager, go to Database > Tender Types. Click New to add a new Tender Type for Gift Cards. Add the following items:
1) Description: This is what the installation referred to in the “Changing MPS Setup”. If you left the field blank, this must be “Gift Card” (case sensitive). You can make this whatever makes the most sense to you for payments received with gift cards, however, you will have to make the changes described in the “Changing MPS Setup” section also. 2) Tender Code: Make this whatever makes the most sense to your operations for gift card payments. 3) Tender Type: Credit Card. 4) Select the Verification tab: Check the box “Perform verification via EDC.”

17 mercurypay.com | 800.846.4472
Installing Gift on Windows 64 Bit Computers
You will receive the following error message once the install is complete: Microsoft.net Framework: “Unhandled Exception has occurred in your application, object reference not set to an instance of an object". Just enter through it and make sure to add the hooks as described below.
18 mercurypay.com | 800.846.4472
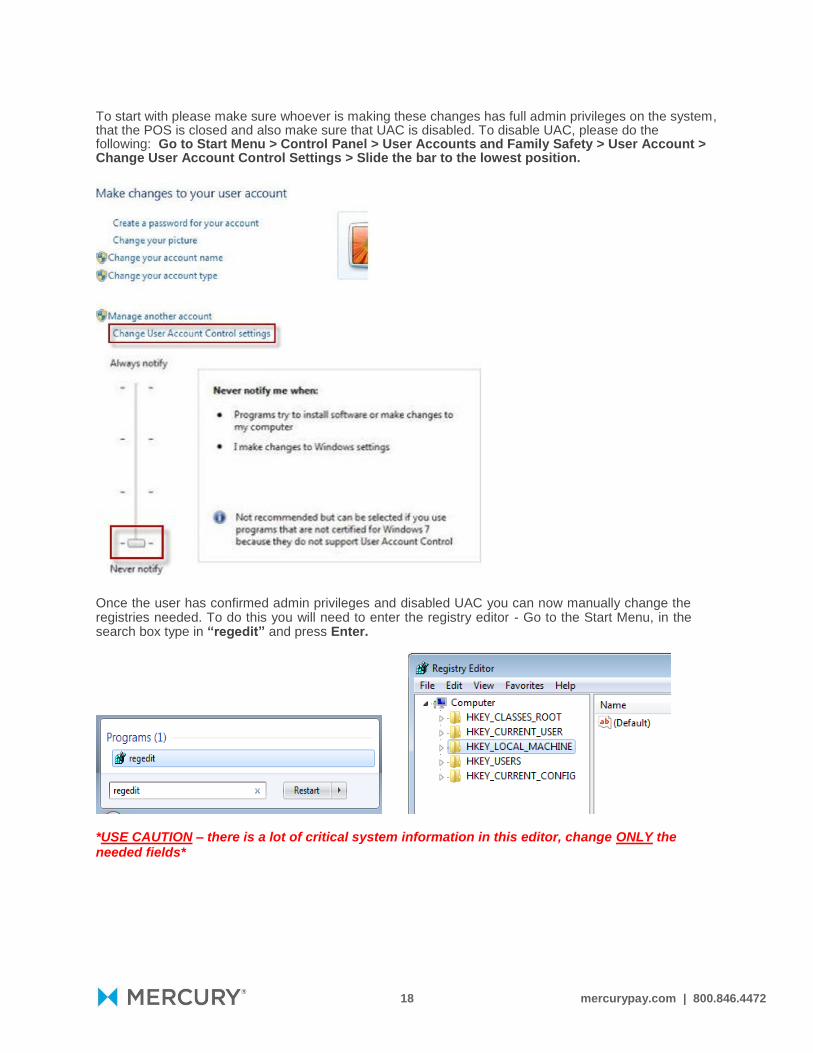
To start with please make sure whoever is making these changes has full admin privileges on the system, that the POS is closed and also make sure that UAC is disabled. To disable UAC, please do the following: Go to Start Menu > Control Panel > User Accounts and Family Safety > User Account > Change User Account Control Settings > Slide the bar to the lowest position. Once the user has confirmed admin privileges and disabled UAC you can now manually change the registries needed. To do this you will need to enter the registry editor - Go to the Start Menu, in the search box type in “regedit” and press Enter.
*USE CAUTION – there is a lot of critical system information in this editor, change ONLY the needed fields*

19 mercurypay.com | 800.846.4472
Once you are in the Registry Editor expand the folders in the following order: HKEY_LOCAL_MACHINE\SOFTWARE\Wow6432Node\Microsoft\Retail Management System\Store Operations\Hooks Once here you will need to manually create the hooks. Each hook should look like this:
000:
001:
To edit the values in each hook, you can highlight a value then right click on it. A menu should appear, click on “Modify”. You will want to change the “Value data” to match our hooks information.
Do this for each hook (there should only be 2). Each value must look like the hooks listed above labeled “000” and “001”. Please make sure you spelling and case sensitivity is accurate.

20 mercurypay.com | 800.846.4472
You will also need to update the hook count. To do this, go to: HKEY_LOCAL_MACHINE\SOFTWARE\Wow6432Node\Microsoft\Retail Management System\Store Operations\Hooks Click on the Hooks folder, then right click on the folder that says count and enter count 2 if they are only using our GC module.
IMPORTANT Go to the Mercury folder which is usually located at: HKEY_LOCAL_MACHINE\SOFTWARE\Wow6432Node\Mercury Payment Systems Make sure to update the data for MerchantID from Mercury’s Test Account number of 494901 to the correct merchant id for the location.

21 mercurypay.com | 800.846.4472
Changing MPS Setup
A program has been installed under C:\Program Files\Mercury PaymentSystems\ RMSIntegrationSetup called “RMSMPSReg.exe.” Execute this program and you will get the configuration form that you used during installation. IMPORTANT NOTE: If simply changing some of your description titles, uncheck the “First Time Install” checkbox so that it will not attempt to do a full install. This will prevent the application from adding more hooks into the RMS Registry.

22 mercurypay.com | 800.846.4472
Receipt Generation Application
User Guide The receipt generation application was developed by Mercury
® to generate receipts that print store
identifying information, transaction identifying information, and the customer’s signature. This application generates a receipt that can be used in the chargeback/retrieval process. The receipt generation application can be executed from within the RMS POS or as a standalone application designed to use in conjunction with Microsoft Headquarters
® multi-store business operations
utility. The options include: 1. Install “Signature Generation” application that executes using the local data base connected to the RMS POS. 2. Install Headquarters “Signature Generation” application that executes by requesting a specific store database.
Using the Receipt Generation Application from within Microsoft RMS
From Store Operations POS, launch the Receipt Generation Application by pressing the “Receipt Generation” button in the button menu. Note: If the Receipt Generation application tool was not selected in the original install, run the RMSIntegrationSetUp.msi installer again and select “remove” in order to uninstall the application and then reinstall with the receipt generation options you will be using. Follow the steps described in the “Adding Custom Buttons” section of the install guide to add the Receipt Generation custom button.
23 mercurypay.com | 800.846.4472
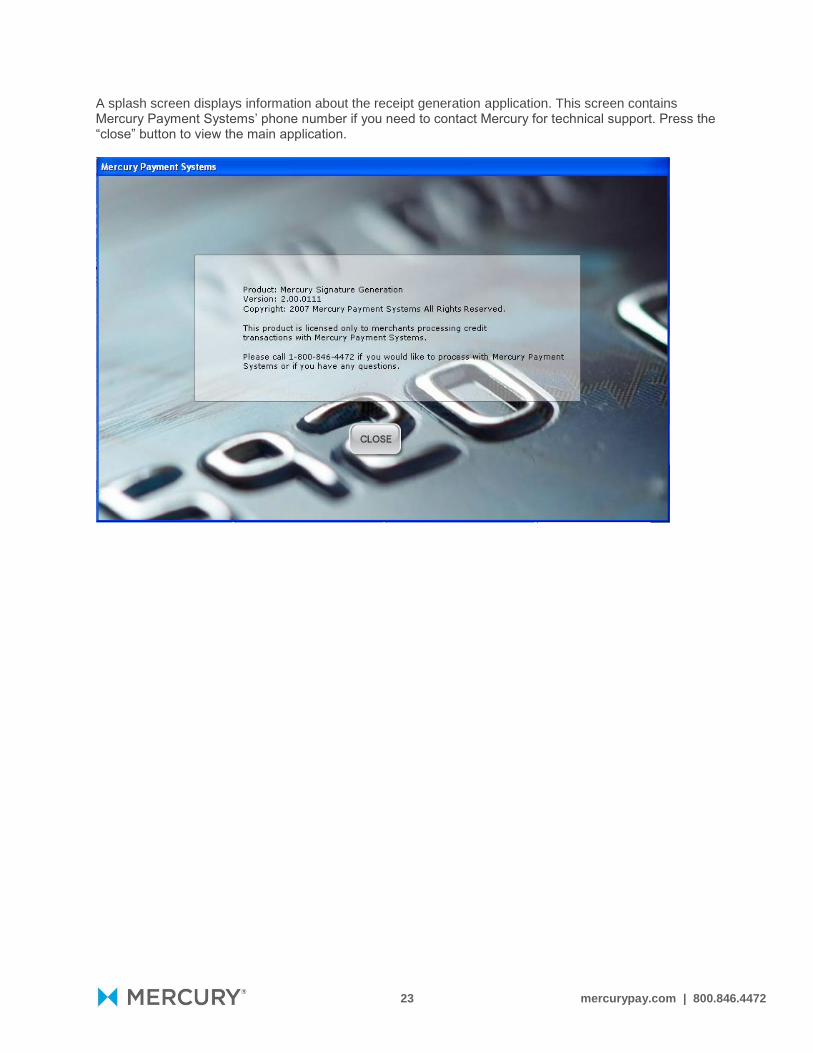
A splash screen displays information about the receipt generation application. This screen contains Mercury Payment Systems’ phone number if you need to contact Mercury for technical support. Press the “close” button to view the main application.

24 mercurypay.com | 800.846.4472
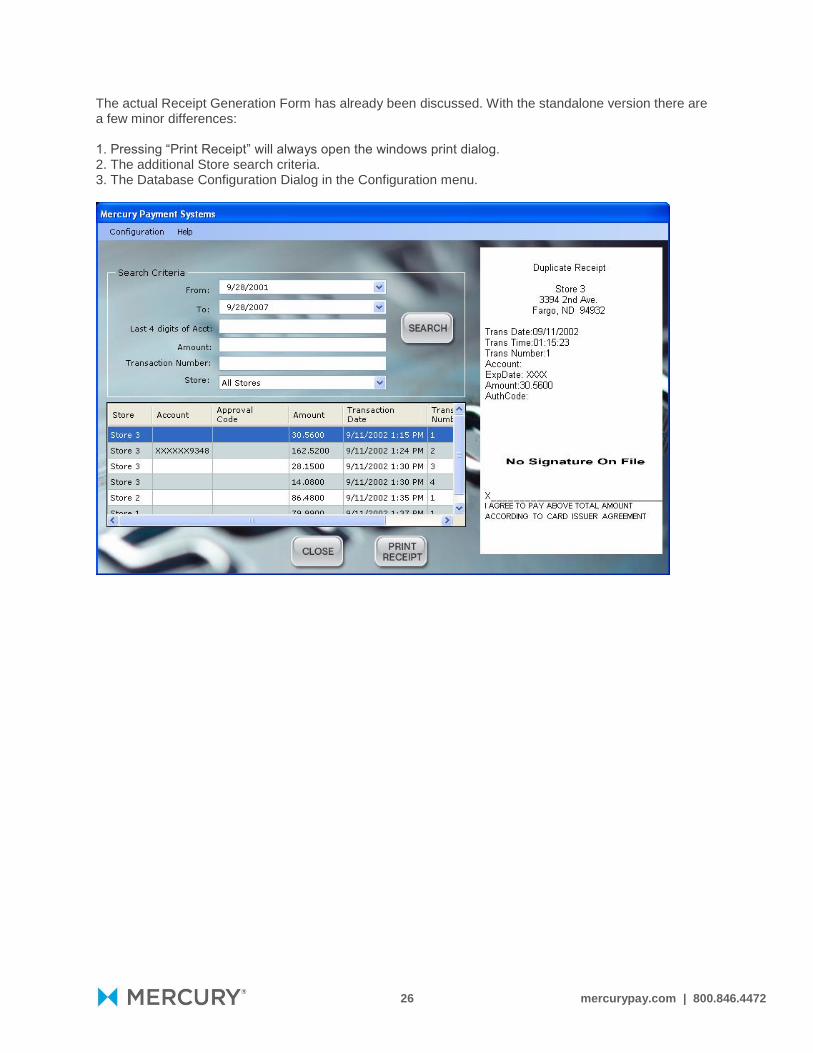
The main application provides the user with the following features: 1. Search Criteria – use these fields to narrow down the number of transactions returned when searching for a specific transaction. The available fields are: a. From Date – search from this date forward. b. To Date – search from this date backward. c. Last 4 digits of Account Number – search for the last 4 digits of a credit card number. d. Amount – search for the amount of the transaction. e. Transaction Number – search for the number assigned to this transaction by RMS. 2. The Configuration Menu a. Use OPOS Printer – when checked, this toggle option will print to the currently configured RMS OPOS printer. When this option is not checked, the user will be able to print the receipt to a configured windows printer. b. Show All Transactions – when this option is selected, and the user presses the “search” button, all transactions meeting the selected criteria will be displayed in the transaction grid. If this option is not selected only those transactions captured with a customer signature will be displayed in the transaction grid. 3. Help a. About – information about this application, version info, copyright notice, and Mercury Payment Systems’ phone number for technical support. 4. Search Button – press this button to search for transactions. 5. Transaction Grid – lists the transactions that met the criteria when the “search” button was pressed. 6. Close Button – closes the application. 7. Print Receipt Button – prints the receipt image to the currently active RMS printer or a windows printer. 8. Receipt Image – the image of the currently selected transaction displays in the transaction grid. a. If you select a transaction in the transaction grid that does not have a corresponding signature, the receipt image will display “No Signature On File.”

25 mercurypay.com | 800.846.4472
Using the Receipt Generation Tool from outside of Microsoft RMS POS
If the Headquarters Receipt Generation option has been selected the receipt generation tool can also be used outside of the RMS POS. The actual use of the application is the same with the added feature of being able to search by Store. This search criteria was added to make it easier to use the application from a RMS Headquarters installation. The following information will need to be configured by your network administrator or POS reseller. Open the Configuration menu and select “Database Configuration.”
1. Enter the name of the database server you wish to access. In an established networked Headquarters environment, this would be the main HQ server. In a non-Headquarter’s environment, this would the server where the database is located. 2. Select whether or not to use windows authentication or sql server based on the original administrative set up and password protection of the system. 3. Enter the username that will connect to the database. 4. Enter the password needed to connect to the database if you selected sql server authentication. 5. Finally enter the database name. 6. Press “Test Connection” and if the test is successful press the “OK” button. If the connection failed check the configuration data entered until the test is successful. 7. Pressing the “OK” button will close the configuration form and save the configuration information. 8. Pressing the “Cancel” button will close the configuration form without saving information.
26 mercurypay.com | 800.846.4472
The actual Receipt Generation Form has already been discussed. With the standalone version there are a few minor differences: 1. Pressing “Print Receipt” will always open the windows print dialog. 2. The additional Store search criteria. 3. The Database Configuration Dialog in the Configuration menu.