Microsoft PowerPoint 2002 - University of...
25
Microsoft PowerPoint 2002 Reference Manual This class is designed to introduce you to basic PowerPoint terminology and tools, as well as intermediate and advanced tasks. In this class, you will: • Understand basic PowerPoint 2002 terminology and features • Open, close, create, and save a presentation • Insert slides from other PowerPoint and Word files • Format fonts and objects • Modify the slide layout, design, background, and masters • Insert audio-visual elements, such as WordArt, pictures, and Sound Files • Insert and format charts and tables • Apply slide transitions and animations • Rehearse and deliver a presentation • Print slides and handouts
Transcript of Microsoft PowerPoint 2002 - University of...

Microsoft PowerPoint 2002
Reference Manual
This class is designed to introduce you to basic PowerPoint terminology and tools, as well as intermediate and advanced tasks. In this class, you will:
• Understand basic PowerPoint 2002 terminology and features • Open, close, create, and save a presentation • Insert slides from other PowerPoint and Word files • Format fonts and objects • Modify the slide layout, design, background, and masters • Insert audio-visual elements, such as WordArt, pictures, and Sound Files • Insert and format charts and tables • Apply slide transitions and animations • Rehearse and deliver a presentation • Print slides and handouts

Prepared by: Angela Sanderson Computer Training Coordinator Information & Telecommunications Services Prepared on: March 11, 2003

Table of Contents Getting Started ............................................................................................................................................1
PowerPoint Views ............................................................................................................................1 Customizing PowerPoint ..................................................................................................................2 Getting Help .....................................................................................................................................2
Creating a Presentation..............................................................................................................................3
Using the AutoContent Wizard.........................................................................................................3 Starting with a Blank Presentation ...................................................................................................3 Inserting Slides.................................................................................................................................3 Adding Text ......................................................................................................................................4 Importing Text ..................................................................................................................................4 Saving a Presentation......................................................................................................................5
Working with Text & Bullets ................................................................................................................................. 6
Selecting, Formatting, and Editing Text ...........................................................................................6 Copying and Moving Text ................................................................................................................7 Working with Bulleted Lists ..............................................................................................................7 Reordering and Deleting Slides .......................................................................................................8 Checking Spelling ............................................................................................................................9 Checking for Consistency and Style ................................................................................................9
Changing Slide Design and Layout .................................................................................................................. 10
Using Design Templates................................................................................................................10 Changing the Color Scheme..........................................................................................................10 Changing the Slide Background ....................................................................................................11 Modifying the Slide and Title Masters ............................................................................................11 Modifying Slide Layout ...................................................................................................................12
Using Charts and Tables ..................................................................................................................................... 10
Adding Tables ................................................................................................................................13 Adding Numeric Charts ..................................................................................................................13 Adding Organization Charts...........................................................................................................14
Adding & Working with Visual Elements......................................................................................................... 14
Inserting Pictures and Clip Art .......................................................................................................15 Adding AutoShape Objects and Text Boxes..................................................................................16 Adding WordArt..............................................................................................................................17 Inserting Media Clips......................................................................................................................17
Animations & Transitions .................................................................................................................................... 17 Printing a Presentation......................................................................................................................................... 19
Creating Speaker Notes.................................................................................................................19 Inserting Headers and Footers ......................................................................................................19 Previewing a Presentation .............................................................................................................19 Printing a Presentation...................................................................................................................19
Delivering a Presentation .................................................................................................................................... 20
Packaging a Presentation ..............................................................................................................20 Running a Presentation as a Slide Show.......................................................................................20 Hiding a Slide .................................................................................................................................21 Carnegie Tips for Presenters .........................................................................................................21

Microsoft PowerPoint 2002 Page 1
Getting Started Whether you're trying to communicate ideas to a co-worker or an audience of 200 people, you can probably convey your message more effectively with visual elements. With Microsoft PowerPoint 2002, you can combine text, graphics, audio, and video to create presentations that express ideas clearly and professionally.
Starting PowerPoint 2002 To start the program, double-click the Microsoft PowerPoint 2002 icon on your desktop. If an icon is not on your desktop, you can click the Start button, point to Programs, and then click Microsoft PowerPoint.
File Name and Title PowerPoint presentations are stored in a PPT file. When you create a new presentation, you assign a name to this file. The name of the presentation is displayed on the title bar of the application window.
Task Panes New to PowerPoint 2002, task panes are small vertical panes on the right side of the program window that adjusts to show several common functions. The New Presentation task pane is displayed by default when you start PowerPoint.
PowerPoint Views PowerPoint comes with different views to help you while you are creating a presentation. The two main views you use in PowerPoint are normal view and slide sorter view. To easily switch between views, click the buttons at the lower left of the PowerPoint window. Views Description Normal View In normal view, you can work with 1 or all slides in your presentation.
This view displays a large image of an individual slide. It also includes the Outline tab, the Slides tab, and the Notes pane. This will be your primary view to work in.
Slide Sorter view Displays thumbnail images of all slides in a presentation. In slide sorter view, you can add, delete, and move slides; add transitions and animation effects; and set the timings for electronic slide shows.
Slide Show Runs your slide show, beginning with the current slide if you're in slide view or the selected slide if you're in slide sorter view.
Notes Page Displays the notes page for the selected slide, where you can create speaker notes for the slide.

Microsoft PowerPoint 2002 Page 2
Customizing PowerPoint When PowerPoint is installed, your default working folder is C:\My Documents. You are always taking a chance of losing your work when you save your work on your hard drive instead of on the network. When you change this default location to a network folder, PowerPoint will use this folder when you open or save a file. To change the default working folder for PowerPoint: 1. Click the Tools menu and click Options. 2. Click the Save tab. 3. In the Default file location box, type the path for a folder on the network. 4. Click OK. Toolbars are a fast way to perform basic tasks. By default, though, the Standard and Formatting toolbars share one row. When you use a toolbar button, it is displayed on the row, and a button you haven’t recently used is hidden. This is called personalized toolbars. To make all buttons more accessible, turn off personalized toolbars. To turn off personalized toolbars: 1. Click Tools > Customize. 2. Click the Options tab. 3. Select the Show Standard &
Formatting toolbars on two rows check box.
NOTE: While you’re at it, select the Always show full menus check box to ensure that all menu commands are visible. This turns off personalized menus.
Getting Help PowerPoint provides you with several ways to find answers to your questions. Help Method Explanation Ask a Question Help Box You can type a search phrase or question and press
ENTER to display topics related to your search criteria Access Help Window Contains 3 tabs: Contents – displays the contents of the
help files in chapter form; Answer Wizard – allows you to enter a search phrase to find help topics; Index – displays an alphabetic index of the keywords in the help files
Office Assistant Uses an animated Help character to display topics related to your search phrase or question
“What’s This?” Command Displays information about different elements on the screen using What’s This? by pressing SHIFT+F1
Screen Tips Displays the name of a toolbar button when pointing to it

Microsoft PowerPoint 2002 Page 3
Creating a Presentation Creating a presentation in Microsoft PowerPoint involves starting with a basic design, adding new slides and content, choosing layouts, modifying slide design, and creating effects such as animated slide transitions. Whether you have a design in mind or need guidance on creating a presentation, PowerPoint enables you to get started in a variety of ways. In the New Presentation task pane, you can select from the following options available to create a presentation. Ways to Create a Presentation
Description
Blank presentation Creates a blank presentation using the default settings AutoContent Wizard Guides you through the design process and suggest content for
common types of presentations Design Template Includes preset colors, fonts, and arrangements of text and
graphics New from existing presentation
Creates a new presentation based on an existing presentation, which you can then edit and save with a new name
New from template Creates a new presentation based on a template that you have created or that you downloaded from the Internet
Using the AutoContent Wizard Use the AutoContent Wizard to apply a design template that includes suggestions for text on your slides. You then type the text that you want. This is a good way to create a presentation if you don’t know what to say or how to organize your presentation. To create a presentation using the AutoContent Wizard: 1. In the task pane, under New, click From AutoContent Wizard. 2. In the wizard, click Next. 3. Select a presentation type, and click Next. 4. Specify how the presentation will be used, and click Next. 5. Provide a title and footer for the presentation, click Next, and then click Finish.
Starting With a Blank Presentation When you run PowerPoint, it opens with a new blank presentation so you can begin working right away. You can add text, charts, pictures, and other visual elements in reserved spaces called placeholders. By default, placeholders for a title and subtitle are included in the first slide of a blank presentation. After you create your title page, you’ll then need to add new slides and content. Inserting Slides: 1. To insert a new slide, click the Insert Slide button on the Formatting toolbar. 2. The Slide Layout task pane appears. Click on a layout you want for your slides.

Microsoft PowerPoint 2002 Page 4
Adding Text in Normal View: To add text to the Slide, click in a text placeholder on the slide and start typing. If you have a few extra lines of text that do not fit in the placeholder, PowerPoint automatically tries to fit the text within the placeholder. NOTES: • Bullets appear automatically. • Press TAB to increase and SHIFT+TAB to decrease the indent of an item. • To start a new line in the same paragraph, press SHIFT+ENTER. To turn text AutoFit off permanently: 1. On the Tools menu, click AutoCorrect Options. 2. Click the AutoFormat As You Type tab. 3. Under Apply as you type, clear the AutoFit title text to placeholder and AutoFit
body text to placeholder check boxes. Adding Text in Outline View: If you prefer to work with the overall text of a presentation in view, you can work in outline format. This format is most useful when adding text to a slide. 1. To add text using the Outline tab, click the Outline tab. 2. Click next to the slide icon for the new slide, and type the slide’s title. 3. Press ENTER. A new slide is inserted rather than creating a bulleted list on the
previous slide. To correct this, press the TAB key. This demotes the new slide to the first bulleted item on the previous slide. Now you can continue adding text to the slide as you did to the previous slide.
4. To create a new slide, you can press ENTER.
Importing Text from an Existing Presentation You can also insert slides from an existing presentation. This is especially useful if you need to create a presentation by merging together several previously created presentations. You can even keep the source formatting of each slide you insert. To import slides from an existing presentation: 1. Click the Insert menu, and click Slides from Files. 2. On the Find Presentation tab of the Slide Finder dialog box, click Browse. 3. Locate the presentation from where you want to copy the slides, and click Open. 4. The slides in the presentation are displayed. You can:
a. Select just the slides you want to insert, and click Insert. b. To insert them all, click Insert All.
5. Click Close. NOTE: You can keep the same design template of the slides by selecting the Keep source formatting check box before inserting the slides. Otherwise, the slides’ design will be changed to match the presentation they are inserted into.
Microsoft PowerPoint 2002 Page 5
Importing Text from an Existing Outline You can repeat the above steps for each new slide you want, or you can insert text based on an outline saved as a Microsoft Word (.doc), Rich Text (.rtf), or plain text (.txt) document. When you insert a Word or Rich Text Format document, PowerPoint creates an outline structure based on heading styles in the document. A Heading 1 in your source document becomes a slide title in PowerPoint; a Heading 2 becomes the first level of body text on the slide, a Heading 3 the second level of text on the slide, and so on. If the original document contains no heading styles, PowerPoint creates an outline based on paragraphs. When you insert text from a plain text document, tabs at the beginning of paragraphs define the outline structure. So, text with no tab becomes a slide title; text with one tab indent becomes first-level body text on your slide; text with two tabs becomes second-level body text, and so on. To import text from an existing outline: 1. Click the Insert menu, and click Slides from Outline. 2. Browse to locate your outline document, and click Insert. 3. If the text from the outline doesn’t fit on the slides: click on the text placeholder, click
the AutoFit Options smart tag, and click AutoFit Text to Placeholder. 4. Repeat for each slide that doesn’t fit the text to the slide.
Saving a Presentation Remember to save your presentation often to avoid the potential loss of data should the power go out or your computer fail. Remember, also, that you should save your presentation to a network drive to ensure a back-up is regularly made. To save the presentation: 1. Click the File menu, and click Save. 2. Give the presentation a unique name and specify a file location. Click OK. Embedding fonts: When you create a presentation on a computer that uses one set of fonts, it might not look the same on another computer that has different fonts. To solve this problem, you can save the fonts, or embed them, in the presentation. To do that: 1. Click File / Save As. 2. In the Save As box, click Tools / Save Options / Embed TrueType Fonts. NOTE: saving a presentation with embedded fonts increases the file size of your presentation.

Microsoft PowerPoint 2002 Page 6
Working with Text & Bullets
About Placeholders Text and objects on slides are located in placeholders. Placeholders are boxes with dotted or hatch-marked borders that are part of most slide layouts. These boxes hold title and body text or objects such as charts, tables, and pictures. You can format, move, and resize the placeholders as needed.
Selecting Text Text that you want to copy, move, or modify (or bullets that you want to change) must first be selected. Use the following guide in selecting text: To Select Action A word Double-click a word A phrase or part of a paragraph Drag to select the text A paragraph and subordinate text Click once on a bullet OR triple-click the paragraph All text on a single slide Click the slide icon in the Outline pane All text in a presentation Press Ctrl+A in the Outline pane
Formatting & Editing Text An effective presentation must be both accurate and visually engaging. Using Microsoft PowerPoint 2002, you can enhance a presentation’s appearance by modifying the text formatting. You can also find and replace fonts, change capitalization, and check for spelling errors, helping to ensure your presentation is accurate down to the details. Tips for Using Fonts: • When designing for online or on-screen viewing, use standard fonts, such as Arial,
Verdana, Tahoma, or Times New Roman. • Limit fonts to ≤4 different types in a presentation to present a consistent message. • Contrast font colors sharply with the background to ensure readability. • Use bold and italic for emphasis only — heavy use diminishes their effectiveness. To format all text within a placeholder – OR – for selected text: 1. Click the placeholder – OR – select the text that you want to change. 2. Do one of the following:
a. Click the Format menu, click Font, make your changes, and then click OK. b. Select formatting options on the Formatting toolbar.
Replacing fonts throughout a presentation: 1. Click the Format menu, and then click Replace Fonts. 2. In the Replace box, select the font you want to replace. 3. In the With box, select the font you want to use as the replacement. 4. Click Replace, and then click Close.

Microsoft PowerPoint 2002 Page 7
Change capitalization: 1. Select the text you want to change. 2. Click the Format menu, and then click Change Case. 3. Click the option you want, and click OK. To change line spacing: 1. Click the placeholder with the text you want to change. 2. Click the Format menu, and click Line Spacing. 3. Specify your options for the spacing between lines, and before/after paragraphs. 4. Click OK.
Copying & Moving Text When creating or modifying a presentation, you can save time and reduce errors by moving and copying information instead of retyping it. You can copy and move text from within the same presentation, between different presentations, and from other files – enabling you to reuse and adapt information for a presentation. NOTE: The Office Clipboard can hold up to 24 text and graphic items, which you can paste individually or all at once. To change the position of a placeholder: 1. Click the placeholder. 2. Point to the border of the placeholder until you see a four-headed arrow. 3. Drag the placeholder where you want it. To copy and paste text: 1. If you're copying text between presentations or from other applications, such as
Microsoft Word, open both files. 2. On the source file, select the text you want to copy, and press CTRL+C. 3. Display the destination slide, click where you want to paste, and press CTRL+V. 4. If the text you pasted has a different style than text on the slide you pasted to, the
Paste Options smart tag appears. You can apply different formatting by clicking an option on the Paste Options smart tag.
NOTE: If you want to move an item instead of copy it, use the Cut command (CTRL+X) rather than the Copy command (CTRL+C).
Working with Bulleted Lists Whether you are creating a bulleted or a numbered list, the steps are the same as below – just substitute “bullets” for “numbering” in the steps. To add bullets to text: 1. Click the placeholder with the bullets you want to change. 2. Click the Format menu, and then click Bullets and Numbering. 3. Click the Bulleted tab, and then click the style you want.

Microsoft PowerPoint 2002 Page 8
To change the size, color, and appearance of bullets: Bullets appear automatically when you choose many of the layouts. You may also change or remove them. To do that: 1. Click the placeholder with the bullets you want to change. 2. Click the Format menu, and then click Bullets and Numbering. 3. Click the Bulleted tab, and then click the style you want. 4. Specify other options:
a. To change the size of bullets or numbers, enter a percentage in the Size box. b. To change the color of bullets or numbers, click the arrow next to Color and
select a color (or select More Colors to choose from a larger selection). c. To choose a different bullet style, click either Picture or Character, then
choose the bullet style you want. 5. Click OK. To remove bullets from text: 1. Click the placeholder with the bullets you want to change. 2. Click the Format menu, and then click Bullets and Numbering. 3. Click None, and then click OK.
Reordering & Deleting Slides If you need to refine or update a presentation, you can reorder or delete slides at any time. Remember, too, that you can add slides as discussed earlier in this manual. To reorder slides, do one of the following: • On the Outline tab in normal view, select one or more slide icons, and then drag the
selection to a new location. • On the Slides tab in normal view, select one or more slide thumbnails, and then
drag the selection to a new location. • In slide sorter view, select one or more slide thumbnails, and then drag the
thumbnails to a new location. To delete slides: • Select the slides to be deleted, and press DELETE on the keyboard. NOTE: You can select multiple slides in a row by pressing SHIFT while clicking the slide icon. You can also select slides that are not next to each other by pressing CTRL while clicking. You can then reorder, cut, copy, or delete the selected slides simultaneously.
This is an image of modified bullets in a slide presentation. You can assign each bullet a different picture.
Microsoft PowerPoint 2002 Page 9
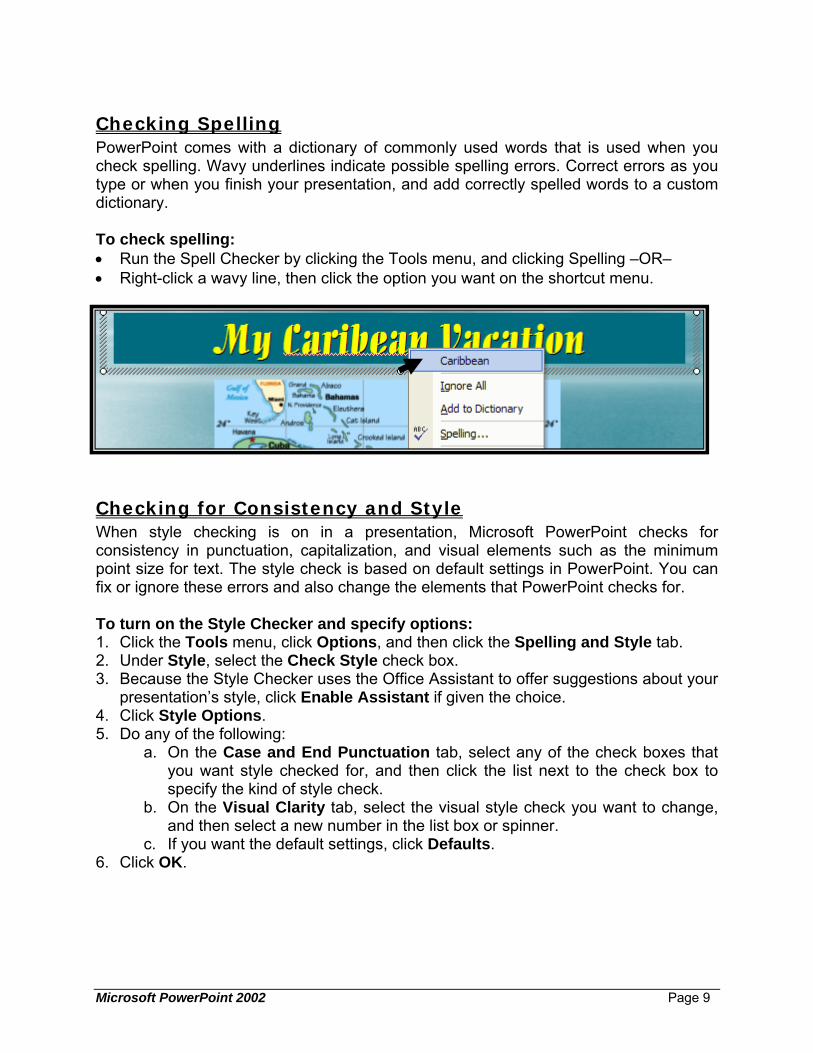
Checking Spelling PowerPoint comes with a dictionary of commonly used words that is used when you check spelling. Wavy underlines indicate possible spelling errors. Correct errors as you type or when you finish your presentation, and add correctly spelled words to a custom dictionary. To check spelling: • Run the Spell Checker by clicking the Tools menu, and clicking Spelling –OR– • Right-click a wavy line, then click the option you want on the shortcut menu.
Checking for Consistency and Style When style checking is on in a presentation, Microsoft PowerPoint checks for consistency in punctuation, capitalization, and visual elements such as the minimum point size for text. The style check is based on default settings in PowerPoint. You can fix or ignore these errors and also change the elements that PowerPoint checks for. To turn on the Style Checker and specify options: 1. Click the Tools menu, click Options, and then click the Spelling and Style tab. 2. Under Style, select the Check Style check box. 3. Because the Style Checker uses the Office Assistant to offer suggestions about your
presentation’s style, click Enable Assistant if given the choice. 4. Click Style Options. 5. Do any of the following:
a. On the Case and End Punctuation tab, select any of the check boxes that you want style checked for, and then click the list next to the check box to specify the kind of style check.
b. On the Visual Clarity tab, select the visual style check you want to change, and then select a new number in the list box or spinner.
c. If you want the default settings, click Defaults. 6. Click OK.

Microsoft PowerPoint 2002 Page 10
Changing Slide Design and Layout Once you’ve finished the basic content of your slide show, you can begin to further enhance your presentation by choosing a design and layout. You can give your presentation a consistent appearance using the many built-in tools in PowerPoint.
Using Design Templates PowerPoint comes with a wide variety of professionally designed templates which contain color schemes, slide and title masters with custom formatting and fonts. When you apply a design template to your presentation, the masters and color scheme of the new template replace those of the original presentation. After you apply a design template, each slide you add has the same custom look. To apply a professional design template to an existing presentation: 1. Open the presentation to which you want to apply a design. 2. Click the Design button on the Formatting toolbar. 3. On the Slide Design task pane, select the design you want to use. NOTE: To apply the new design to only the selected slide(s), point to the design, click the arrow beside the design, and then click Apply to Selected Slides.
Changing the Color Scheme Although most design templates specify the colors for text, bullets, and other elements, you can change the color scheme. This makes it easy to change color for a slide and know that the new color scheme will harmonize with the rest of the slides in your presentation. To change the color scheme of a single slide or all slides: 1. Click the Design button on the Formatting toolbar. 2. On the Slide Design task pane, click Color Schemes. 3. Select the standard color scheme you want to use. 4. For customized color schemes:
a. Click Edit Color Schemes. b. Click in the box by the item you want changed, and click Change Color. c. Select the color you want to change to, and then click OK. d. Repeat the process for each item that you want to change. e. To save your changes as a color scheme, click Add as Standard Scheme. f. Click Apply to apply the color scheme to all slides.
NOTE: To apply the color scheme to only the selected slide(s), point to the design, click the arrow beside the design, and then click Apply to Selected Slides.

Microsoft PowerPoint 2002 Page 11
Changing the Slide Background You can change the background color or background design on slides, notes, and handouts. Changing the background is useful if you just want a simple shade or texture for a slide background and not all the other design elements in a design template. Or, you might want to change the background to emphasize sections of a presentation. Besides changing the color, you can add shading, a pattern, a texture, or a picture. Change the slide background color: 1. Select the slides that you want to modify. Otherwise, the change applies to all slides
that follow the design template of the active slide. 2. Click the Format menu, and then click Background. 3. Under Background fill, click the arrow on the right of the box, and then do one of
the following: a. To use the background fill from the slide master: Click Automatic. b. To choose a design color: Click one of the eight colors below Automatic. c. To choose a custom color: Click More Colors. Select the color you want on
the Standard tab or create your own color on the Custom tab. Click OK. 4. Click Apply to apply the background color to the current slide only, OR Apply to All
to apply the background color to all slides
Modifying the Slide & Title Masters The slide master controls the format and placement of the titles and text you type on slides. The title master controls the format of the title slide. Any change you make to a slide master is reflected on every slide in the presentation. If you want an individual slide to look different from the master, you can make changes to that slide without changing the master. To view and modify a master: 1. Click the View menu, point to Master, and then click Slide Master. 2. To change font type, style, size, or color:
a. Select the text in the placeholders and make your formatting changes. b. Any text you add or delete in the placeholder text will appear on all slides.
3. To delete a placeholder: Select the placeholder, and then press delete. 4. To add an object:
a. Click the Insert menu, and click Object. b. Choose an object type. c. Locate the object, and then click OK.
5. To add text: a. Click the Text Box button on the Drawing toolbar b. Click where you want the text to appear c. Type your text — do not type in the text placeholders. The look of text you’ve
added with the Text Box button is not governed by the master. 6. To return to your slide, click Close on the Master View toolbar

Microsoft PowerPoint 2002 Page 12
Modifying Slide Layout You can give a presentation a consistent look by applying layouts that arrange text and visual elements in similar locations from slide to slide. You can also use different layouts to more effectively present specific types of information. Change the layout of a single slide: 1. Click the slide you want to change. 2. Click the Format menu, and click Slide Layout. 3. Use the scroll bar to view all layouts, and then click the one you want. 4. If necessary, rearrange objects to fit the new layout.

Microsoft PowerPoint 2002 Page 13
Using Charts and Tables When preparing a presentation, you can help the audience better understand your message by using tables, charts, and graphs to illustrate and organize your data. With PowerPoint, you can enter or import data as you create a variety of graphical elements that will help viewers follow along.
Adding Tables When presenting numerical data to an audience, often you can better organize the information by inserting a table. You can create a simple table from within PowerPoint. To add a table to a presentation: 1. Display the slide you want to add a chart to, and select a Content slide layout. 2. Click the Insert Table button on the slide. 3. Specify the number of columns and rows needed, and then click OK. 4. Add text to the table, and then format it. You can format text in a table as you would
text anywhere else in the presentation. 5. You can make changes to the format the table using the Table Formatting toolbar. NOTE: When working in a table, you can move between cells using the TAB and ARROW keys, and by clicking in a cell.
Adding Numeric Charts When you click the Insert Chart button to create a new chart, Microsoft Graph starts with special menus and toolbar buttons, which you can use to work with the chart. Also, PowerPoint displays a sample chart and datasheet, which is a table that contains the information expressed graphically in the chart. You can also import data from another program such as Microsoft Excel 2002. To insert a new chart: 1. Display the slide you want to add a chart to, and select a Content slide layout. 2. Click the Insert Chart button on the slide. 3. Change the information in the sample datasheet to suit your needs, and then close
the datasheet. 4. Click outside the chart when you are finished. To add a chart created in another program: 1. Display the slide you want to add a chart to, and select a Content slide layout. 2. Click the Insert menu, and then click Object. 3. Click Create from File, and then click Browse to locate the file you want. 4. Click OK.
Microsoft PowerPoint 2002 Page 14
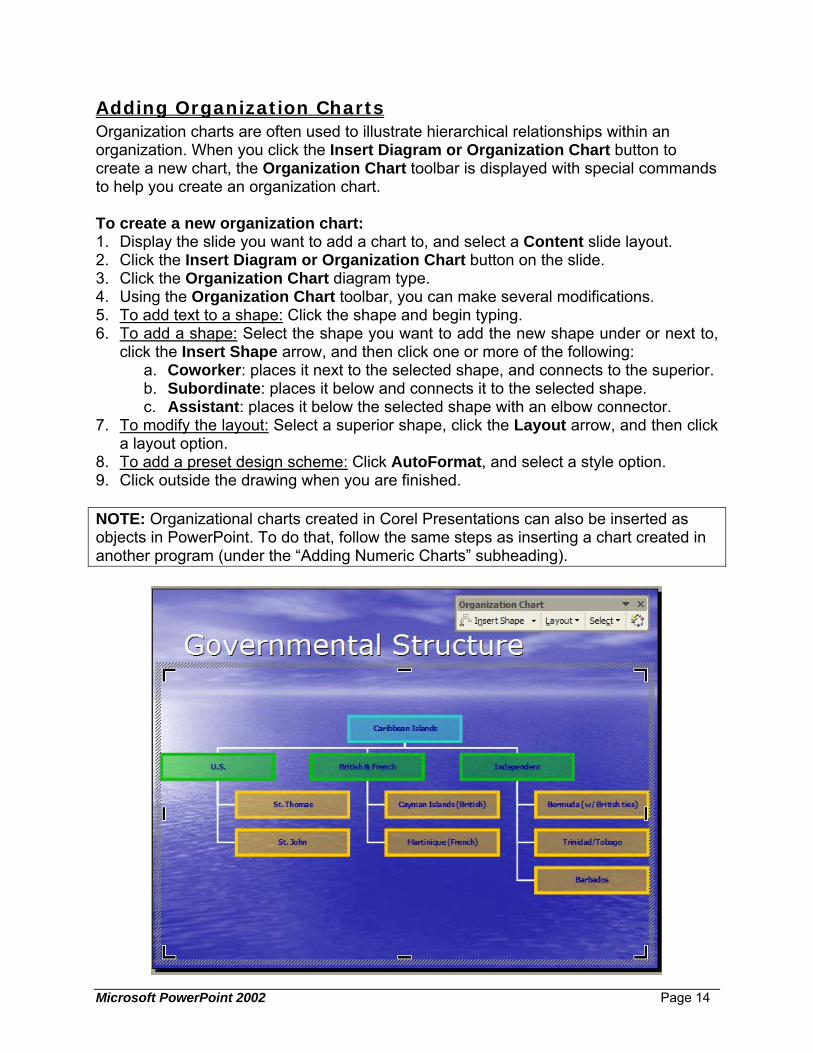
Adding Organization Charts Organization charts are often used to illustrate hierarchical relationships within an organization. When you click the Insert Diagram or Organization Chart button to create a new chart, the Organization Chart toolbar is displayed with special commands to help you create an organization chart. To create a new organization chart: 1. Display the slide you want to add a chart to, and select a Content slide layout. 2. Click the Insert Diagram or Organization Chart button on the slide. 3. Click the Organization Chart diagram type. 4. Using the Organization Chart toolbar, you can make several modifications. 5. To add text to a shape: Click the shape and begin typing. 6. To add a shape: Select the shape you want to add the new shape under or next to,
click the Insert Shape arrow, and then click one or more of the following: a. Coworker: places it next to the selected shape, and connects to the superior. b. Subordinate: places it below and connects it to the selected shape. c. Assistant: places it below the selected shape with an elbow connector.
7. To modify the layout: Select a superior shape, click the Layout arrow, and then click a layout option.
8. To add a preset design scheme: Click AutoFormat, and select a style option. 9. Click outside the drawing when you are finished. NOTE: Organizational charts created in Corel Presentations can also be inserted as objects in PowerPoint. To do that, follow the same steps as inserting a chart created in another program (under the “Adding Numeric Charts” subheading).

Microsoft PowerPoint 2002 Page 15
Adding & Working with Visual Elements Like a well-designed magazine advertisement, a presentation will more easily grab an audience’s attention if it includes visually appealing elements to illustrate concepts. Using PowerPoint, you can add a variety of images and stylized text that you can customize to fit your needs. NOTES: • To move visual elements, drag it with your mouse to its new location. • To quickly resize a visual element, hold down SHIFT while dragging a sizing handle.
Inserting Pictures & Clip Art When you create a presentation, consider adding pictures to improve its appearance and effectiveness. You can use any pictures that you’ve saved on your computer in the .JPG or .GIF file format, as well as locate images in the Clip Art Gallery or found online. To insert a picture: 1. Do one of the following:
a. Click the Insert menu, point to Picture, and then click From File. b. Change the slide layout to a Content slide layout, and then click the Insert
Picture button on the slide. c. Click the Insert Picture button on the Drawing toolbar.
2. Browse to locate the picture you want, and then click Insert. To insert clip art: 1. Do one of the following:
a. Click the Insert menu, point to Picture, and then click Clip Art. b. Change the slide layout to a Content slide layout, and then click the Insert
Clip Art button on the slide. c. Click the Insert ClipArt button on the Drawing toolbar.
2. In the Insert Clip Art task pane, in the Search text box, type a word or phrase that describes the clip you want or type in all or some of the file name of the clip.
3. Click Search. 4. In the search results, locate the clip art you want and click it. 5. On the slide, move the clip art to the location you want. To format pictures and clip art: 1. Right-click the image, and click Format Picture on the shortcut menu. 2. Specify options on the following tabs:
a. Colors and Lines: to modify fill, line, and arrow settings. b. Size: to resize, rotate, and scale the image. c. Position: to specify a position on the slide. d. Picture: to crop or specify color controls (such as watermarks/washout).
3. When finished, click OK.

Microsoft PowerPoint 2002 Page 16
Adding AutoShape Objects When you need to illustrate information in a presentation, you can do so efficiently by using the ready-made shapes available in PowerPoint. AutoShapes are organized by types, such as lines, arrows, and flowchart elements. You can insert, format, and arrange the shapes to suit your needs. To insert an AutoShape: 1. On the Drawing toolbar, click AutoShapes, point to a category, and then click the
shape you want. 2. Click the place where you want to insert the AutoShape. To format an AutoShape: 1. Select the AutoShape that you want to format. 2. To resize the AutoShape:
a. Position the mouse pointer over any white resizing handle. b. Hold down the mouse button and drag the handle to change the size.
3. To reshape the AutoShape: c. If the shape has a yellow adjustment handle, it can be reshaped. d. Position the mouse pointer over the yellow adjustment handle. e. Hold down the mouse button and drag the handle to change the shape.
4. To rotate the AutoShape: f. Position the mouse pointer over the green rotate handle. g. Hold down the mouse button and drag the handle to rotate the shape.
5. To select a different AutoShape: h. On the Drawing toolbar, click Draw. i. Point to AutoShapes, point to a category, and then click the shape you want.
Adding Text Boxes If you want to add text to a slide in a location that doesn’t have a placeholder, you can add a text box. A text box is a moveable, resizable container that you create for text or graphics. You can use text boxes to add text exactly where you want. To insert a text box: 1. Click the Insert menu, and click Text Box. 2. Click where you want the text to begin, and then drag the pointer to specify the size
of the text box. 3. Type your text inside the text box. NOTE: You can rotate a text box by dragging its rotate handle.

Microsoft PowerPoint 2002 Page 17
Adding WordArt If you want to enhance a presentation with text that captures the audience's attention, you can insert stylized text objects called WordArt. To insert WordArt: 1. On the Drawing toolbar, click Insert WordArt. 2. Click the WordArt effect you want, and then click OK. 3. In the Edit WordArt Text dialog box, type the text you want and format it. Click OK. 4. After the WordArt is inserted, move it to the location you want, and then resize it, etc.
Inserting Media Clips You can add music and sounds from files on your computer, a network, the Internet, or Microsoft Clip Organizer. You can also record your own sounds to add to a presentation, or use music from a CD. When you insert music or sounds on a slide, a sound icon ( ) that represents the sound file appears. To play the music or sound, you can set it to start automatically when the slide displays, start on a mouse-click, start automatically but with a time delay, or play as part of an animation sequence. To insert a sound file: 1. Display the slide in which you want to insert a sound. 2. Click the Insert menu, point to Movies and Sounds, and then choose an option:
a. Sound from Clip Organizer: you can insert any of the files available with the Clip Organizer that comes with Microsoft Office.
b. Sound from File: you’ll need to browse to locate the file and then decide if you want it to begin playing.
c. Play CD Audio Track: you’ll need to ensure the CD is in the CD-Rom drive, and you must specify which track to play.

Microsoft PowerPoint 2002 Page 18
Animations & Transitions Moderation is the key when adding special effects to your presentation. You want the effects you use — such as animations and transitions — to emphasize your points, not draw the audience’s attention to the effects themselves.
Adding Slide Transitions Transitions are special effects between slides in a slide show. You can choose from a variety of transitions, vary their speed, and change the transition effect to indicate a new section of a presentation or to emphasize a certain slide. Add transitions to slides: 1. On the Slides tab in Normal view, select the slides you want to add a transition to. 2. Click the Slide Show menu, and click Slide Transition. 3. In the list, click the transition effect you want and specify option. 4. If you want to apply the transition to all slides, click the Apply to All button;
otherwise just close the task pane.
Animating Text and Objects Animations are special visual effects that you can add to text or other objects on a slide, such as bullets, a chart, or a picture. You can apply an animation scheme to all slides in a presentation, or create custom animation. To apply an animation scheme: 1. On the Slides tab in Normal view, select the slides you want to add a animation to. 2. Display the slide that has the text or objects you want to animate. 3. Click the Slide Show menu, and click Animation Schemes. 4. In the list, click the animation effect you want and specify option. 5. If you want to apply the animation to all slides, click the Apply to All button;
otherwise just close the task pane. To create custom animation: 1. Display a slide and select the text or object that you want to animate. 2. Click the Slide Show menu, and click Custom Animation. 3. On the task pane, click the Add Effect button, point to either Entrance or Exit, and
then select an animation. 4. Modify start, direction, and speed options in the task pane. 5. To set the timing, click the object in the Custom Animation list, click the arrow that
appears next to the object, and then click either Start on click, Start with Previous, or Start After Previous.
6. To change the order of animation, select the object in the Custom Animation list, and click one of the Re-Order arrows to move the object up or down.
7. To preview animations, click Play. NOTE: Animated items are noted on a slide by numbered tags correlating to the effects.

Microsoft PowerPoint 2002 Page 19
Printing a Presentation Providing handouts to your audience is a good way to ensure the information you want them to understand is available to them even after the presentation is over. You can also print slides for you to use during your presentation, or even as transparencies to display using an overhead projector.
Creating Speaker Notes You can create speaker notes for each slide in the Notes pane while in Normal view. When you are done, you can preview how your notes pages will print by clicking the View menu, and clicking Notes Page.
Inserting Headers and Footers 1. Click the View menu, and click Header and Footer. 2. Select either the Slide tab or the Notes and
Handouts tab. 3. Type the text you want for the available options. 4. Click Apply to All.
Previewing a Presentation 1. Click the File menu, and click Print Preview. 2. In Print Preview, you can specify color and print
options, edit the header/footer, and specify what you want to print (slides, handouts, notes, outline, etc.).
You can print your entire presentation in color, grayscale, or pure black and white. • Grayscale optimizes the look of color slides for printing on a black and white printer. • Print in pure black and white prints the entire presentation in only black and
white. This option changes all shades of gray to either black or white.
Printing a Presentation 1. Click the File menu, and click Print. 2. In the Print Range area, you can specify which slides to print. 3. In the Print what box, click the item you want to print. If you select Handouts, you
can then select the number of slides per page, and specify the print order. 4. Select any other options you want, and then click OK.

Microsoft PowerPoint 2002 Page 20
Delivering a Presentation Microsoft PowerPoint gives you many ways to deliver your presentation, including on-screen, online, overhead transparencies, paper printouts, and 35mm slides.
Packaging a Presentation When you want to run a presentation on another computer, use the Pack and Go Wizard to put all the required files into one file and copy the file to a disk or network location. You then unpackage the file onto the destination computer or network and run the presentation. To begin the Pack and Go Wizard: 1. Open the presentation you want to package. 2. If you want to copy your packaged presentation to a floppy disk, insert the disk. 3. On the File menu, click Pack and Go, and then follow the steps in the wizard.
Running a Presentation as a Slide Show Before your actual presentation, be sure to practice your presentation many times. You can see how your slide show will look by clicking the Slide Show View button at the lower left of the PowerPoint window. Use the following controls while running your slide show. SLIDE SHOW CONTROLS TO PRESS Advance to the next slide, or Perform the next animation
Spacebar, N, Enter, PageDown, right arrow, down arrow, or click the mouse
Return to the previous slide or perform the previous animation
PageUp, Backspace, P, left arrow, up arrow
Go to slide <number> <number>, then press Enter Display a black screen, or Return to the slide show from a black screen
B or period
Display a white screen, or Return to the slide show from a white screen
W or comma
Stop or restart an automatic slide show S or Plus Sign End a slide show Esc Return to the first slide Both mouse buttons for 2 seconds Change the pointer to a pen Ctrl+P Change the pointer to an arrow Esc Note: You can also right-click while viewing your slide show to navigate between slides,exit the slide show, and other options.

Microsoft PowerPoint 2002 Page 21
Hiding a Slide You can hide slides you choose not to show using either of the following methods: • In Normal View, Outline View, or Slide View, select the slide you want to hide, then
click Slide Show / Hide Slide • In Slide Sorter view, select the slide you want to hide, then click the Hide Slide
button (a "null" sign will appear over the slide number) • To unhide the slide: repeat either method.
Carnegie Tips for Presenters Delivering your presentation effectively involves using the proven “4P” process: Plan, Prepare, Practice, and Present. The following is a summary of presentation guidelines from Dale Carnegie Training Center. Plan Describe your audience and define the purpose of your talk. Is your intention to inform? Persuade? Motivate? Teach? When you clarify your purpose, you will more easily hit your target. Prepare • Establish a positive mindset • Structure your presentation by centering it on a message with key points that you
can back up with evidence. • Prepare a close that relates back to your opening. Practice Practice your presentation in front of a small audience or a colleague, and ask for feedback on the content and style of your presentation. Things to consider: • Is your message clear? • Does your evidence support your key points? • Are your graphics and illustrations clear, appealing, and relevant to the topic? • In your close, did you summarize or restate the message? • Consider videotaping yourself rehearsing, and then review the videotape for
distracting mannerisms and other signs of nervousness. Remember that the best cure for nervousness is confidence, and that confidence comes with practice.
• Rehearse the timing of your presentation to be sure that it falls within your time limits.
Present When speaking, be natural. Speak in a heightened conversational tone. Slow down and emphasize important points, and pause before and after key points to set them apart.
FINAL NOTE: Remember to always check your equipment and presentation file at least one day before giving a presentation to ensure everything is functioning properly.

Microsoft PowerPoint 2002 Page 22
Your task is to create a PowerPoint presentation detailing your favorite vacation. This could be a business trip, a family vacation, or even a vacation you hope to take one day. Be sure your presentation consists of, at least: • 1 title slide • 5 content slides • Notes on all slides • A table, chart, and/or organization chart • A picture, ClipArt, text boxes, and/or WordArt • Inserted sounds (from a file or the Clip Organizer) • Animations and/or transitions • Header or footer information on printed handouts • A design template and color scheme Run the Pack and Go Wizard: When you have completed your presentation, and are satisfied with it, run the Pack and Go Wizard. Be sure to embed your fonts and other files used (if not from the Clip Organizer). DO NOT INCLUDE THE VIEWER. Save the packaged presentation to your computer, named: PptHW_YourLastName. E-Mail the Presentation to Angela: Attach the packaged presentation to an e-mail, and send it to Angela Sanderson in GroupWise (or type in the email address: [email protected]).