MICROSOFT OFFICE ACCESS 2003 CREATING A DATABASE · PDF fileAC2-2 Microsoft Office Access...
54
CHAPTER 2 MICROSOFT ® OFFICE ACCESS ® 2003 CREATING A DATABASE CHAPTER OUTLINE 2.1 Designing Your First Database 2.2 Creating a Simple Table 2.3 Using the Table Design View 2.4 Modifying a Table Chapter Summary Chapter Quiz Hands-On Exercises Case Study PREREQUISITES To successfully complete this chapter, you must know how to open database objects appearing in the Database window. Most importantly, you must be able to display and navigate a table’s datasheet using the mouse and keyboard. You should also be able to perform basic editing in a datasheet, including adding and deleting records. LEARNING OBJECTIVES After completing this chapter, you will be able to: • Create a new database from scratch • Create a new database using a wizard • Define table objects for storing data • Specify a primary key and indexes • Rename, delete, and move fields • Print a table's structure
Transcript of MICROSOFT OFFICE ACCESS 2003 CREATING A DATABASE · PDF fileAC2-2 Microsoft Office Access...

CHAPTER 2
MICROSOFT® OFFICE ACCESS® 2003
CREATING A DATABASE
CHAPTER OUTLINE 2.1 Designing Your First Database 2.2 Creating a Simple Table 2.3 Using the Table Design View 2.4 Modifying a Table Chapter Summary Chapter Quiz Hands-On Exercises Case Study
PREREQUISITES To successfully complete this chapter, you must know how to open database objects appearing in the Database window. Most importantly, you must be able to display and navigate a table’s datasheet using the mouse and keyboard. You should also be able to perform basic editing in a datasheet, including adding and deleting records.
LEARNING OBJECTIVES After completing this chapter, you will be able to: • Create a new database from scratch • Create a new database using a wizard • Define table objects for storing data • Specify a primary key and indexes • Rename, delete, and move fields • Print a table's structure

AC2-2 Microsoft Office Access 2003: Creating a Database
2.1 DESIGNING YOUR FIRST DATABASE
Desktop database software has existed since the first personal computer was introduced by IBM in the early 1980s. Since that time, many database programs and applications have been developed for both personal and business use. Whatever your particular data management needs, rarely will you require a truly unique application. Refining or customizing an existing database application is a more common practice. Microsoft Office Access 2003 allows you to take advantage of what others before you have learned and accomplished. Using the Access 2003 wizards, you can develop an entire database application in less time than it takes to read this module. 2.1.1 PLANNING A DATABASE
Feature Many people who have worked with computer databases can attest to the 90/10 rule of database design: place 90 percent of your effort into properly designing a database in order to spend only 10 percent of your time maintaining or changing it. As you can probably infer from this rule, many problems arising in database management are traceable to a faulty design. In this lesson, you will learn some strategies for planning a well-designed database.
Method Here are five steps to designing a better database:
1. Determine your output requirements. State your expectations in terms of the queries and reports desired from the application. It is often helpful to write out questions, such as “How many customers live in Kansas City?” and to sketch out reports on a blank piece of paper.
2. Determine your input requirements. From the output requirements, identify the data that must be collected, stored, and calculated. You should also review any existing paper-based forms used for data collection in order to get a better idea of what data are available.
3. Determine your table structures. Divide and group data into separate tables and fields for flexibility in searching, sorting, and manipulating data. Review the following example to see what fields can be separated out of a simple address:
Mr. Joe Black ABC Realty Ltd. 1001 Main Street Orinda, CA 94563
ZipStreet Address
Last Name
First Name
StateCity
CompanyTitle/Prefix

Chapter 2 AC2-3
Ensure that each record can be identified using a unique code or field, such as Order Number or Customer ID. This code need not contain information related to the subject—a numeric field that is automatically incremented works fine.
4. Determine your table relationships. Rather than entering or storing the same information repeatedly, strive to separate data into multiple tables and then relate the tables using a common field. For example, in a table containing book information (Books), an AuthorID field would contain a unique code that could be used to look up the author's personal data in a separate table (Authors). Without such a design, you would need to type an author's name and address each time you added one of his or her works to the Books table.
By incorporating common fields into your table structures, you can establish relationships among the tables for sharing data. This process, called normalizing your data, enhances your efficiency and reduces potential data redundancy and entry errors.
5. Test your database application. Add sample records to the table using both datasheets and forms and then run queries and produce reports to test whether the application is robust and accurate. In addition to ensuring the validity and integrity of data, you want the information to be readily accessible.
2.1.2 STARTING A NEW DATABASE
Feature Access provides two main options for creating a new database. First, you can choose to create a blank structure and then add the database objects appropriate for your specific application. The creation of an empty database structure is the focus of this lesson. The second option, discussed in the next lesson, is to select a starting point from a group of professionally designed database templates. Unlike Word and Excel, which allow you to work with multiple documents and workbooks simultaneously, Access restricts you to opening one database at a time. Therefore, before starting a new database, you must ensure that there is no

AC2-4 Microsoft Office Access 2003: Creating a Database
active database displayed in the application window's work area.
Method To create an empty database structure: 1. CLICK: New button ( )
or CHOOSE: File New
2. CLICK: “Blank database” option under the New area in the New File task pane
Practice In this lesson, you will create a new database file for storing table objects.
1. Ensure that you have turned on your computer and that the Windows
desktop appears. Load Microsoft Office Access 2003 using the Windows Start menu.
2. To create a new database application, start by ensuring that the New File task pane (shown in Figure 2.1) is displayed: CLICK: New button ( ) on the toolbar
Figure 2.1 New File task pane
3. Using the hand mouse pointer ( ): CLICK: Blank database, located under the New heading
4. You use the File New Database dialog box (Figure 2.2) to select a storage location and filename for permanently saving the database structure. Using the Places bar or the Save in drop-down dialog box, select your personal storage location.
Create a new database file using templates and the Database Wizard.
Create a new database file by copying the structure and data from an existing file.
Create a new database file, data access page, or project.

Chapter 2 AC2-5 Figure 2.2 File New Database dialog box
5. On your own, select the existing filename (by default, “db1”) that appears in the File name text box using the mouse. (Hint: Double-click or drag over the filename using the I-beam mouse pointer.)
6. To create the new database file: TYPE: My Phone Book to replace the existing filename CLICK: Create command button A new Database window appears in the work area, as shown in Figure 2.3. Notice that the Title bar reads “My Phone Book : Database (Access 2002 - 2003 file format).” Nothing more than an empty shell at this point, the Database window contains no objects except the default New Object shortcuts. (Note: To facilitate information sharing among users of legacy applications, Access 2003 also allows you to create database files using the Access 2000 file format.)
Select a storage location for the new database using the Save in drop-down list box or the Places bar.
Type a filename for the new database.
Places bar

AC2-6 Microsoft Office Access 2003: Creating a Database
Figure 2.3 Creating a blank database named “My Phone Book”
7. You learn how to add table objects to an empty database in the next module. For now, close the Database window and proceed to the next lesson: CLICK: its Close button ( )
2.1.3 EMPLOYING THE DATABASE WIZARD
Feature Besides creating an empty database structure and then populating it with objects, Access 2003 can lead you in the step-by-step generation of a new database using the Database Wizard. This wizard provides access to professionally designed templates for creating complete database applications. Each template contains tables, queries, forms, and reports, as well as a main menu called a switchboard that makes the application's features easier to access.
Method 1. CLICK: New button ( ) or CHOOSE: File New
2. CLICK: “On my computer” option under the Templates area in the New File task pane
3. CLICK: Databases tab in the Templates dialog box 4. DOUBLE-CLICK: a database wizard ( )

Chapter 2 AC2-7
Practice Using the Access 2003 Database Wizard, you will now create an inventory control application from scratch. Ensure that Access is loaded and that no Database window is displayed. 1. Let’s begin by ensuring that the New File task pane is displayed:
CLICK: New button ( ) on the toolbar
2. Using the hand pointer ( ) of the mouse: CLICK: On my computer, located under the Templates heading
3. The “Blank Database” template icon appears selected on the General tab of the Templates dialog box. This is the template used by Access when you click the “Blank database” option under the New heading. To list the Database Wizard templates that are available on your computer, do the following: CLICK: Databases tab Your screen should now appear similar to Figure 2.4. (Note: Depending on how Access 2003 was installed and configured on your system, different template options may appear in your dialog box. If you haven't installed any database templates, you cannot perform the steps in this lesson.)
Figure 2.4 Templates dialog box: Databases tab
4. Using the appropriate Database Wizard template, let's create an inventory database application: DOUBLE-CLICK: Inventory Control wizard ( )
5. In the File New Database dialog box that appears, use the Places bar or the Save in drop-down list box to select your personal storage location.
By default, Access 2003 provides the General
and Databases tabs for organizing database
templates.
You may also search for database templates on
the Microsoft Office Online Web site.

AC2-8 Microsoft Office Access 2003: Creating a Database
Then, select the name that appears in the File name text box using the mouse.
6. Now select the name (usually “Inventory Control” with the number “1” appended) that appears in the File name text box and do the following: TYPE: My Inventory to replace the existing filename CLICK: Create command button Wait patiently as Access 2003 displays your new Database window and prepares the Database Wizard dialog box, shown in Figure 2.5.
Figure 2.5 Database Wizard dialog box for creating an Inventory Control database
7. The opening screen of the Database Wizard dialog box provides information about the Inventory Control wizard. After reading its contents, proceed to the next step: CLICK:
8. Your first task in the Database Wizard, as shown in Figure 2.6, is to select fields for collecting and storing information in the database. Optional fields appear in italic type. On your own, click on the names listed in the Tables in the database list box. The field names for the selected table appear in the Fields in the table list box. To proceed: CLICK:

Chapter 2 AC2-9 Figure 2.6 Inventory Control Database Wizard: select fields
9. To select a screen appearance for your forms, click on each option in the dialog box to see a preview and then: SELECT: Sumi Painting, as shown in Figure 2.7 CLICK:
Figure 2.7 Inventory Control Database Wizard: select screen appearance
10. To select a page layout for your printed reports, click on each option in the dialog box to see a preview and then: SELECT: Soft Gray, as shown in Figure 2.8 CLICK:

AC2-10 Microsoft Office Access 2003: Creating a Database
Figure 2.8 Inventory Control Database Wizard: select report appearance
11. You can also specify the title of the database and whether to include a logo or picture. To accept the defaults (“Inventory Control”): CLICK:
12. At the finish line, you tell Access 2003 to create and display the database. Ensure that the Yes, start the database check box is selected and then do the following: CLICK: The Database Wizard creates the database based on your selections. Depending on the power of your system, this process can take a few minutes.
13. In this particular wizard, Access 2003 displays a dialog box asking you to furnish some company data. Do the following: CLICK: OK command button to continue
14. Using the key to move forward through the text boxes in the My Company Information window, type the information shown in Figure 2.9. When you are ready to proceed: CLICK: its Close button ( )

Chapter 2 AC2-11 Figure 2.9 Furnishing the wizard with company information
15. The Main Switchboard (Figure 2.10) for the Inventory Control application is displayed. On your own, click on the menu buttons to access and display the forms and reports created by the Database Wizard. (Note: If you move into a submenu, click the “Return to Main Switchboard” menu button to move back to the main window.)
Figure 2.10 Main Switchboard for the Inventory Control application
16. Before proceeding, close any display or preview windows that appear for a form or a report by clicking their Close buttons ( ).
Click here when you are finished entering data into the form window.
Menu buttons on the Main Switchboard

AC2-12 Microsoft Office Access 2003: Creating a Database
17. Let's examine the database objects that were created by the Database Wizard for this application. From the Menu bar: CHOOSE: Window My Inventory : Database (Access 2002 – 2003 file format)
18. In the Database window, click on the various buttons in the Objects bar to view the table, query, form, and report objects. You may need to scroll the list area or adjust the size of the Database window to see all of the object names. When you are finished, close the application: CLICK: the Close button ( ) for the Database window Notice that the Main Switchboard, which appears as a form object, also disappears when you close the Database window.
In Addition Accessing Other Database Templates
Besides the templates that ship with Microsoft Office System 2003, additional templates are available free on the Internet. For example, in the New File task pane, clicking the Templates on Office Online option launches a Microsoft Web page in your default browser. Before creating a new database from scratch, you can peruse these templates to search for a possible starting point and save yourself some time.
Self Check 2.1 What two objects are most closely associated with the output of a database application?
2.2 CREATING A SIMPLE TABLE
An Access 2003 database file is simply a container for storing database objects. After creating an empty database structure, the next step is to define the table objects for storing data. Each table in your database should contain information about a single topic or subject. In an automobile industry database, for example, one table may contain a list of car dealerships while another table contains a list of manufacturers. Although these tables deal with different subjects, they are both related to the automobile industry. In this module, you will learn two methods for quickly populating a database structure with table objects. What these methods may lack in power and flexibility, they make up for in speed and ease of use. 2.2.1 CREATING A TABLE USING THE TABLE WIZARD
Feature Access 2003 provides the Table Wizard to help you create a table structure, in much the same way that you created a complete application

Chapter 2 AC2-13
using the Database Wizard. Rather than defining a new table from scratch, you build it by picking and choosing fields from existing personal and business tables. This method lets you quickly populate an empty database structure with reliable and usable table objects.
Method In the Database window, select the Tables button and then: • DOUBLE-CLICK: Create table by using wizard
or • CLICK: New button ( ) on the Database window toolbar • DOUBLE-CLICK: Table Wizard in the New Table dialog box
Practice After opening a new database, you will create a table object using the Table Wizard. Before continuing, ensure that no Database window is displayed. 1. To create a new database using the New File task pane:
CLICK: New button ( ) on the toolbar CLICK: Blank database, under the New heading in the task pane
2. In the File New Database dialog box that appears, use the Places bar or the Save in drop-down list box to select your personal storage location. Then, select the name that appears in the File name text box using the mouse.
3. TYPE: My Business into the File name text box to replace the existing filename CLICK: Create command button The My Business Database window will appear.
4. Your next step is to add table objects to the empty database structure. To use the Table Wizard, ensure that the Tables button is selected in the Objects bar and then do the following: DOUBLE-CLICK: Create table by using wizard The Table Wizard dialog box appears, as shown in Figure 2.11.

AC2-14 Microsoft Office Access 2003: Creating a Database
Figure 2.11 Table Wizard dialog box
5. By default, the Business option button is chosen in the Table Wizard dialog box. As a result, only business-related table structures appear in the Sample Tables list box. To view the Personal tables: CLICK: Personal option button
6. On your own, scroll the Sample Tables list box to view the available table structures.
7. Let's create a new table in which to store the company's product information: CLICK: Business option button SELECT: Products in the Sample Tables list box Notice that the fields for this table structure now appear in the Sample Fields list box, as shown here.
8. To specify fields for your new table, select individual field names in the Sample Fields list box and then click to move them to the Fields in my new table list box. You can also select all fields by clicking . For this step, let's include all of the suggested fields: CLICK: Include All button ( )
9. To proceed to the next step: CLICK: Your screen should now appear similar to Figure 2.12.
Select a category in order to display tables
appropriate for your application.
Select one of the prebuilt tables to
display the fields that are available.
Select the fields you want included in the new table object.
The “My Business” Database window

Chapter 2 AC2-15 Figure 2.12 Specifying a table name in the Table Wizard dialog box
10. Let’s accept the default selections in this dialog box and proceed to the next step: CLICK:
11. Ensure that the Enter data directly into the table option button is selected in the final dialog box and then do the following: CLICK: The new table, called “Products,” appears in a Datasheet window ready to accept data, as shown in Figure 2.13.
Figure 2.13 Products Datasheet window
The new Products table is displayed in
Datasheet view so that you can begin
entering data.

AC2-16 Microsoft Office Access 2003: Creating a Database
12. Close the Products Datasheet window. You should now see the Products table object in the Database window.
2.2.2 CREATING A TABLE IN DATASHEET VIEW
Feature Using Datasheet view, you create a table by typing information into a blank datasheet, just as you would when entering data into an Excel worksheet. When you save the table, Access 2003 creates the table structure and assigns the proper data types to each field based on the information you have entered. This method lets novice users create tables without an in-depth understanding of table structures and data types.
Method In the Database window, select the Tables button and then: • DOUBLE-CLICK: Create table by entering data
or • CLICK: New button ( ) on the Database window toolbar • DOUBLE-CLICK: Datasheet View in the New Table dialog box
Practice In this lesson, you will create a new table in Datasheet view for storing supplier information. Ensure that you have completed the previous lesson and that the My Business Database window is displayed. 1. To create a table using Datasheet view, ensure that the Tables button is
selected in the Objects bar and then do the following: DOUBLE-CLICK: Create table by entering data A blank Datasheet window appears with several field columns and blank records.
2. Let's begin by renaming the column headings in the field header area. Using the column select pointer ( ) of the mouse: DOUBLE-CLICK: Field1 The field or column name appears selected in the field header row, as shown here.
3. Now type the new field name: TYPE: SupplierID PRESS: The new field name, SupplierID, appears in the field header area.

Chapter 2 AC2-17
4. To continue renaming fields in the Datasheet window: DOUBLE-CLICK: Field2 TYPE: Company DOUBLE-CLICK: Field3 TYPE: Contact DOUBLE-CLICK: Field4 TYPE: Phone PRESS: The cursor should now appear in the first field of the first record.
5. On your own, enter the two records appearing in Figure 2.14.
Figure 2.14 Entering records in Datasheet view
6. To save and name the new table structure: CLICK: Save button ( ) on the toolbar TYPE: Suppliers into the Save As dialog box PRESS: or CLICK: OK An Alert dialog box appears, as shown in Figure 2.15.
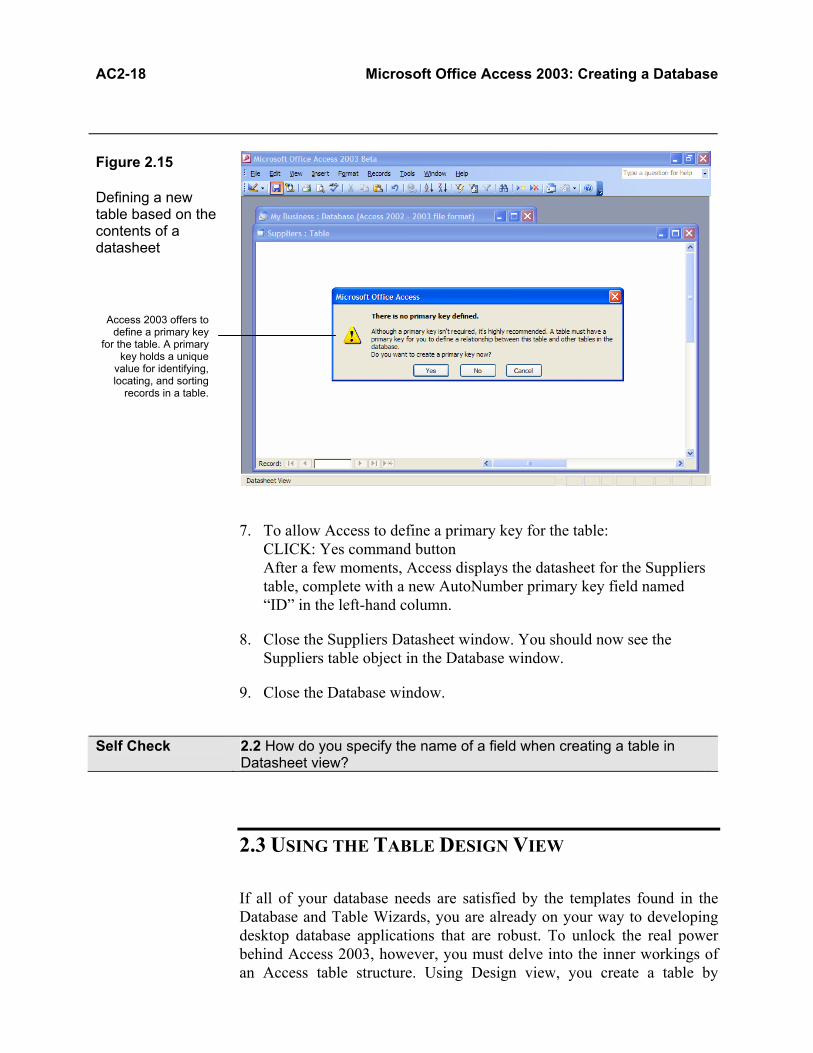
AC2-18 Microsoft Office Access 2003: Creating a Database
Figure 2.15 Defining a new table based on the contents of a datasheet
7. To allow Access to define a primary key for the table: CLICK: Yes command button After a few moments, Access displays the datasheet for the Suppliers table, complete with a new AutoNumber primary key field named “ID” in the left-hand column.
8. Close the Suppliers Datasheet window. You should now see the Suppliers table object in the Database window.
9. Close the Database window.
Self Check 2.2 How do you specify the name of a field when creating a table in
Datasheet view?
2.3 USING THE TABLE DESIGN VIEW
If all of your database needs are satisfied by the templates found in the Database and Table Wizards, you are already on your way to developing desktop database applications that are robust. To unlock the real power behind Access 2003, however, you must delve into the inner workings of an Access table structure. Using Design view, you create a table by
Access 2003 offers to define a primary key
for the table. A primary key holds a unique
value for identifying, locating, and sorting
records in a table.

Chapter 2 AC2-19
specifying its properties, characteristics, and behaviors down to the field level. Although this method requires the greatest understanding of database design, it is well worth the effort in terms of creating efficient custom table structures. 2.3.1 CREATING A TABLE IN DESIGN VIEW
Feature Table Design view allows you to get down to the nuts and bolts of designing and constructing a table. In Design view, you create the table structure manually, specifying the field names, data types, and indexes. After some practice, you will find that this method affords the greatest power and flexibility in designing and modifying table objects.
Method In the Database window, select the Tables button and then: • DOUBLE-CLICK: Create table in Design view
or • CLICK: New button ( ) on the Database window toolbar • DOUBLE-CLICK: Design View in the New Table dialog box
Practice You will now create a new table structure in Design view. Ensure that no Database window is displayed in the work area. 1. To create a new database using the New File task pane:
CLICK: New button ( ) on the toolbar CLICK: Blank database, under the New heading in the task pane
2. In the File New Database dialog box that appears, use the Places bar or the Save in drop-down list box to select your personal storage location. Then, select the name that appears in the File name text box using the mouse.
3. TYPE: My Library into the File name text box to replace the existing filename CLICK: Create command button The My Library Database window will appear.
4. Because tables are the foundation for all your queries, forms, and reports, you need to create at least one table before creating any other database object. To add a new table to the database: CLICK: New button ( ) on the Database window toolbar The New Table dialog box (Figure 2.16) offers an alternative to selecting a New Object shortcut in the list area of the Database window.

AC2-20 Microsoft Office Access 2003: Creating a Database
Figure 2.16 New Table dialog box
5. CLICK: Design View in the list area to select it CLICK: OK command button The table Design window (Figure 2.17), which is divided into a Field Grid pane and a Field Properties pane, appears in Design view. This window is used to add, delete, and rename fields for the table structure; set a field's data type; specify a field's properties or characteristics; and choose a primary key for organizing and sorting a table.
6. To define the first field in the table, ensure that the insertion point appears in the Field Name column and then do the following: TYPE: BookID PRESS: to move to the Data Type column Your screen should now appear similar to Figure 2.17. (Note: Access provides specific rules for naming fields in a table. First, names cannot exceed 64 characters in length. Second, names should not contain special symbols or punctuation, such as a period or exclamation point. Third, names cannot begin with a space and, in our opinion, should not contain spaces. Descriptive single-word names are best.)
Select a method for creating a new table.
Click the New button on the Database window toolbar to display the
New Table dialog box.

Chapter 2 AC2-21 Figure 2.17 Table Design window
7. By default, Access inserts “Text” as the data type for the BookID field. The data type you select determines the kind of values that you will be able to enter into the field. To view the other data type options, described further in Table 2.1, do the following: CLICK: down arrow attached to the field The drop-down list shown here is displayed.
Table 2.1 Data Types
Type Text
Description Alphanumeric data, up to 255 characters; used for entering text and numbers that are not required for calculation, such as zip codes and phone numbers
Memo Alphanumeric data, up to 65,535 characters; used to store notes, comments, or lengthy descriptions
Number Numeric data that are used to perform mathematical calculations
Date/Time Dates and times Currency Numeric data with a leading dollar sign; used to store and
calculate monetary values up to four decimal places AutoNumber Numeric value that increments automatically; used for
assigning a unique value to a record, which makes it a perfect primary key field
Yes/No Logical or Boolean values for toggling (turning on and off) yes/no or true/false results
When a field is selected in the Field Grid pane, the Field Properties pane is
used to display and set its characteristics, such as size and display format.
Use the Field Grid pane to define the fields that
you want in the table.

AC2-22 Microsoft Office Access 2003: Creating a Database
OLE Object Object linking and embedding (OLE) field for storing objects (Excel worksheets and Word documents), graphics, or other binary data up to one gigabyte (GB) in size
Hyperlink Text or numbers stored as a hyperlink address; used to store Web site addresses, also called URLs, such as http://www.advantageseries.com/
Lookup Wizard A link to another table or to a static list of values for inserting data into the current table; selecting this option launches the Lookup Wizard
8. For the BookID field's data type: SELECT: AutoNumber PRESS:
9. The Description column allows you to store a helpful comment describing the contents of the field. This comment will also appear in the Status bar when you select the field in Datasheet view. To proceed: TYPE: Unique code generated by Access PRESS: to move to the next row
10. On your own, complete the Field Grid pane as displayed in Figure 2.18. Notice that the longer field names, such as AuthorSurname, contain mixed case letters to enhance their readability. When finished, keep the table Design window displayed and proceed to the next lesson.
Figure 2.18 Completing the Field Grid pane
Row selection area of the Field Grid pane

Chapter 2 AC2-23 In Addition Field Naming Conventions
Besides the Access rules for naming fields, some naming conventions are used by programmers to convey specific information about fields and database objects. For example, the prefix “str” is often used to denote a text or string data type (such as strName) and the prefix “bln” is used to name a Boolean Yes/No field (such as blnMailingList). Furthermore, a group of database objects may be named tblBooks (table), qryBooks (query), frmBooks (form), and rptBooks (report) to describe the different types of objects related to a single subject. The important concept here is to remain consistent in whatever naming scheme you select. 2.3.2 ASSIGNING A PRIMARY KEY
Feature In creating a table structure, you need to specify a field (or fields) that will uniquely identify each and every record in the table. This field, called the primary key, is used by Access in searching for data and in establishing relationships between tables. Once a field is defined as the primary key, its datasheet is automatically indexed, or sorted, into order by that field. Access also prevents you from entering a duplicate value or a null value (nothing) into a primary key field. An AutoNumber data type automatically increments sequentially as each new record is added to a table, making this data type one of the best choices for a primary key.
Method In table Design view: 1. SELECT: the desired field using the row selection area 2. CLICK: Primary Key button ( ) on the toolbar
or CHOOSE: Edit Primary Key
Practice You will now assign a primary key field for the table created in the last
lesson. Ensure that you've completed the previous lesson and that the table Design window is displayed. 1. To select a field for the primary key:
CLICK: row selector button for BookID (Hint: Position the mouse pointer in the row selection area of the Field Grid pane and click the row selector button next to the BookID field.)
2. To assign a primary key: CLICK: Primary Key button ( ) Your screen should now appear similar to Figure 2.19.

AC2-24 Microsoft Office Access 2003: Creating a Database
Figure 2.19 Setting the primary key
3. Now that you've assigned the primary key, you can save the table structure. Do the following: CLICK: Save button ( )
4. In the Save As dialog box that appears: TYPE: Books PRESS: or CLICK: OK Notice that the Title bar for the table Design window displays the table’s name. Keep the window displayed for use in the next lesson.
2.3.3 DEFINING AND REMOVING INDEXES
Feature An index, like the primary key, is a special mechanism for dynamically organizing and ordering the data stored in a table. By defining indexes, you can speed up the search and sort operations for running queries and reports. However, you do not want to create indexes for all fields, as this would slow down the common activities of adding and editing records. As a rule, index only the fields that you use frequently in searching for and sorting data, such as a Surname or Company Name field.
Method To define an index in table Design view: 1. SELECT: the desired field using the row selection area 2. SELECT: Indexed text box in the Field Properties pane
Selecting a field in the Field Grid pane and then making it
the primary key field for the table.
Notice that the field is indexed (sorted) and
does not allow duplicate entries.
The Primary Key toolbar button now appears selected.

Chapter 2 AC2-25
3. CLICK: down arrow attached to the Indexed text box 4. SELECT: an indexing option To remove an index in table Design view: 1. CLICK: Indexes button ( ) on the toolbar 2. RIGHT-CLICK: the desired field's row selector button 3. CHOOSE: Delete Rows
Practice In this lesson, you will create two indexes to complement the primary key and remove an existing index that was created by Access. Ensure that you've completed the previous lessons and that the Design window for the Books table is displayed. 1. Most people search for a book based on its title or author. Therefore,
let’s create indexes for these fields in the Books table. To begin: SELECT: Title row selector button in the Field Grid pane
2. Using the I-beam mouse pointer: CLICK: in the Indexed text box in the Field Properties pane You should now see a drop-down arrow attached to the text box.
3. With the flashing insertion point in the Indexed text box, you may select an indexing option from the drop-down list box. To proceed: CLICK: down arrow attached to the Indexed text box Your screen should now appear similar to Figure 2.20.
Figure 2.20 Setting an index
Display the indexing options by clicking the attached down arrow.
Select a field by clicking its row selector button.

AC2-26 Microsoft Office Access 2003: Creating a Database
4. Because you do not want to limit the possibility of duplicate entries (different authors may have written books with the same title): SELECT: Yes (Duplicates OK)
5. Let's define another index for the table: SELECT: AuthorSurname in the Field Grid pane CLICK: in the Indexed text box in the Field Properties pane
6. From the drop-down list attached to the Indexed text box: SELECT: Yes (Duplicates OK)
7. Save the table structure: CLICK: Save button ( ) (Note: It is a good habit to save the table after each major change.)
8. To display the associated indexes for the Books table: CLICK: Indexes button ( ) The Indexes window appears as shown in Figure 2.21.
Figure 2.21 Indexes window for the Books table
9. As illustrated in Figure 2.21, Access automatically creates indexes for
fields that contain the letters “ID” in their names. The BookID field, for example, is the primary key but also the name of an index. To remove the BookID index using the row select mouse pointer ( ): RIGHT-CLICK: BookID row selector button
10. In the right-click menu that appears: CHOOSE: Delete Rows The BookID index is removed but the BookID primary key remains.
11. Close the Indexes window.
12. To clean up the Access 2003 work area, save and then close the table Design window. Finally, close the My Library Database window.
Index properties for selected index
List of available indexes
Sort order (ascending or descending) for the contents of the specified field name

Chapter 2 AC2-27 In Addition Setting Field Properties
Every field in a table has a set of properties. A field property is a specific characteristic of a field or data type that enables you to provide greater control over how your data is entered, stored, displayed, and printed. Some common properties include Field Size, Format, Decimal Places, Input Mask, Default Value, Required, and Indexed. You set a field's properties using the Field Properties pane in the table Design window.
Self Check 2.3 What is an AutoNumber field? Why is it useful as a primary key?
2.4 MODIFYING A TABLE
A database is a dynamic entity. It is not uncommon for the initial design requirements to change once a database is set in front of users. Fortunately Access enables you to modify a table's structure quickly and efficiently. Adding, deleting, and changing field specifications in table Design view are similar to editing records in a datasheet. Nonetheless, you should not perform structural changes hastily. When you modify a table's structure, you also affect the forms and reports that are based on the table. 2.4.1 INSERTING AND DELETING FIELDS
Feature After displaying a table structure in Design view, you can easily add and remove fields. Adding a field is as simple as entering a field name and data type on a blank row in the Field Grid pane. Removing a field deletes the field from the Field Grid pane but also deletes all the data stored in the field. Be extra careful when deleting existing fields!
Method To insert a field in table Design view: 1. SELECT: an empty row in the Field Grid pane 2. Type a field name, select a data type, and enter a description. To delete a field in table Design view: 1. RIGHT-CLICK: row selector of the field you want to remove 2. CHOOSE: Delete Rows
Practice In this lesson, you will insert and remove fields in an existing table structure. Ensure that no Database window is displayed. 1. Open the database named AC0240, located in your Advantage student
data files location.

AC2-28 Microsoft Office Access 2003: Creating a Database
2. This database contains a single table object, named Books, that is based on the table structure you created in the last module. To display the table in Datasheet view: DOUBLE-CLICK: Books Your screen should now appear similar to Figure 2.22.
Figure 2.22 Displaying the Books datasheet
3. With the Datasheet window displayed: CLICK: View - Design button ( ) on the toolbar (Note: Although the toolbar button is named View, we include the mode name “- Design” for clarity.)
4. Let's add a new field to the table structure that will store a reviewer's synopsis for each book. In the Field Grid pane: CLICK: in the Field Name column of the next empty row, so that the insertion point appears as shown here
5. Now enter the new field name: TYPE: Synopsis PRESS:
6. Because the contents of the field will be entered mostly in paragraph form, select Memo as the field's data type: CLICK: down arrow attached to the Data Type cell
Chapter 2 AC2-29
SELECT: Memo PRESS:
7. In the Description column: TYPE: Reviewer's synopsis or abstract PRESS: The field information should appear as shown below.
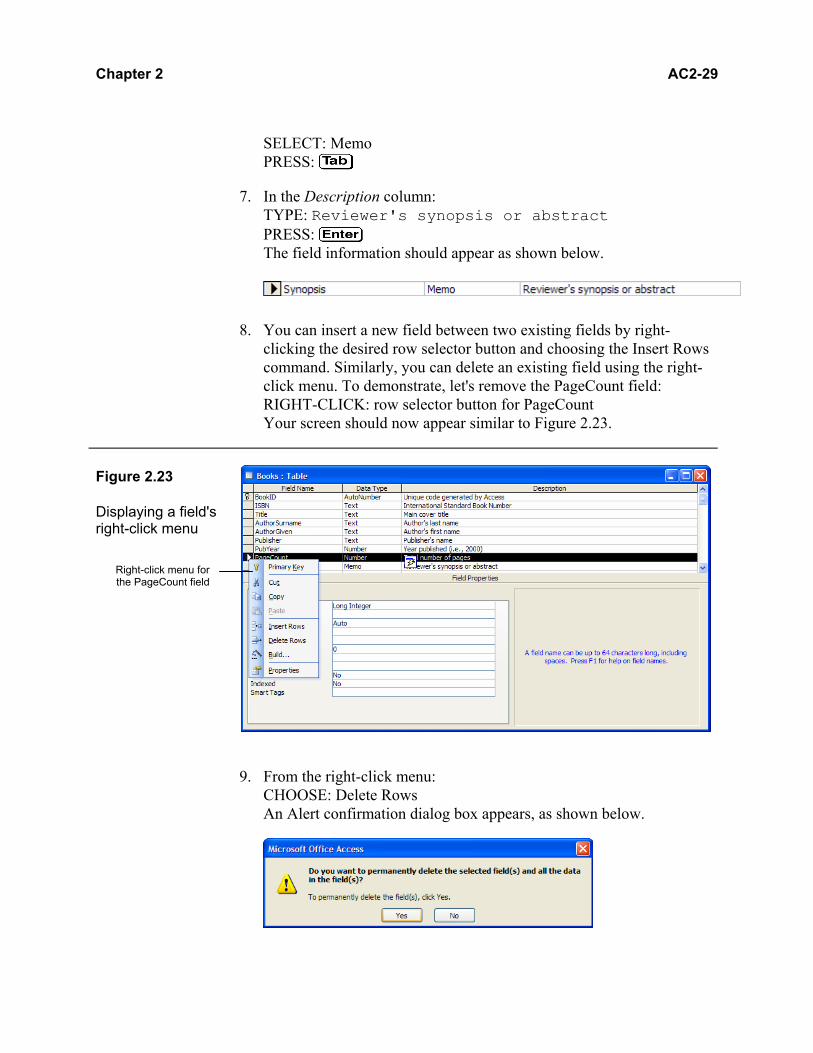
8. You can insert a new field between two existing fields by right-clicking the desired row selector button and choosing the Insert Rows command. Similarly, you can delete an existing field using the right-click menu. To demonstrate, let's remove the PageCount field: RIGHT-CLICK: row selector button for PageCount Your screen should now appear similar to Figure 2.23.
Figure 2.23 Displaying a field's right-click menu
9. From the right-click menu: CHOOSE: Delete Rows An Alert confirmation dialog box appears, as shown below.
Right-click menu for the PageCount field

AC2-30 Microsoft Office Access 2003: Creating a Database
10. To confirm that the deletion will also remove all the data in the field: CLICK: Yes command button
11. Let's save the table before proceeding: CLICK: Save button ( )
12. Now switch back to the Datasheet window: CLICK: View - Datasheet button ( )
13. To enter a brief synopsis for the first record: PRESS: to move to the last field column PRESS: + to zoom the window Your screen should now appear similar to Figure 2.24.
Figure 2.24 Using the Zoom window to enter data into a memo field
14. TYPE: Another thrilling novel about Soviet and American attempts to develop a Strategic Defense Initiative (SDI). A CIA undercover confidant named the Cardinal provides a steady stream of Soviet secrets. Once compromised, however, the Cardinal must be pulled to safety, a task assigned to Jack Ryan and John Clark, an ex-Navy SEAL.
Entering a memo using the Zoom window,
accessed by pressing + .

Chapter 2 AC2-31
15. To complete the entry and save the record: CLICK: OK command button PRESS: to move to the next record
16. Close the Datasheet window.
2.4.2 RENAMING AND MOVING FIELDS
Feature In addition to modifying a table's structure, renaming and moving fields in Design view affect the display of a datasheet. You may have noticed that the columns in Datasheet view follow the field names and display order appearing in Design view. More importantly, however, you can speed up most database operations by moving frequently used fields (those used as primary keys or in indexes) to the top of a table structure.
Method • To rename a field, edit the contents of the Field Name column as you would modify a cell entry in a datasheet.
• To move a field, click the field's row selector button and then drag it to the target location.
Practice You will now practice renaming and moving fields in table Design view.
Ensure that the AC0240 Database window is displayed. 1. To display the Books table object in Design view:
SELECT: Books in the list area, if it is not already selected CLICK: Design button ( ) on the Database window toolbar
2. Let's rename the Author fields. Using the I-beam mouse pointer: CLICK: to the right of “AuthorSurname” in the Field Name column The flashing insertion point should appear to the right of the name.
3. To remove the “Surname” portion of the cell entry: PRESS: seven times
4. TYPE: Last The cell entry should now read “AuthorLast,” as shown here with the insertion point.
5. To complete the entry: PRESS:
6. To remove the “Given” portion of the “AuthorGiven” field name: PRESS: (Edit mode) PRESS: five times

AC2-32 Microsoft Office Access 2003: Creating a Database
TYPE: First The cell entry now reads “AuthorFirst.”
7. To complete the entry: PRESS: Your screen should now appear similar to Figure 2.25.
Figure 2.25 Renaming fields in the Field Grid pane
8. Let's move the ISBN field below the AuthorFirst field. To begin: CLICK: row selector button for ISBN
9. Using the arrow mouse pointer: DRAG: row selector button for ISBN downward until a bold gridline appears below the AuthorFirst field
10. Release the mouse button. Your screen should now appear similar to Figure 2.26.

Chapter 2 AC2-33 Figure 2.26 Moving the ISBN field in the Field Grid pane
11. To save and then view the changes in Datasheet view: CLICK: Save button ( ) CLICK: View - Datasheet button ( ) Notice that the field header area displays the new field names in the modified field order.
12. Close the Datasheet window.
2.4.3 PRINTING A TABLE'S DESIGN STRUCTURE
Feature Access provides a special tool called the Documenter that allows you to preview and print various design characteristics of your database objects, including a table's structure and field properties. This tool is especially useful when you are planning or revising a table's field specification.
Method 1. CHOOSE: Tools Analyze Documenter 2. CLICK: Tables tab 3. SELECT: the desired object or objects 4. CLICK: Options command button 5. SELECT: the desired options 6. CLICK: OK command button to preview the report 7. CLICK: Print button ( ) to print the report
Practice In this lesson, you will prepare a documentation printout of the Books table. Ensure that the AC0240 Database window is displayed. (Note: If you have not already done so, this lesson requires that you install the Documenter feature from the Office System 2003 installation media.)

AC2-34 Microsoft Office Access 2003: Creating a Database
1. Before launching the Access Documenter, ensure that the Books table
appears selected in the Database window. Then, do the following: CHOOSE: Tools Analyze Documenter The Documenter window appears as shown in Figure 2.27. (CAUTION: If you have not yet installed the Documenter feature, a warning dialog box is displayed.)
Figure 2.27 Documenter window
2. To print the design structure for the Books table object, ensure that the Tables tab is selected and then: SELECT: Books check box so that a appears
3. To specify the report options for the Documenter: CLICK: Options command button The Print Table Definition dialog box appears, as shown in Figure 2.28.
Click the check box to include an object in the
Documenter’s report.

Chapter 2 AC2-35 Figure 2.28 Print Table Definition dialog box
4. For this example, let's specify that only the table structure is printed. In the Include for Table area, remove all the selections so that no appears in any of the check boxes.
5. In the Include for Fields area: SELECT: Names, Data Types, and Sizes option button
6. In the Include for Indexes area: SELECT: Names and Fields option button CLICK: OK command button
7. To preview the report printout: CLICK: OK command button
8. To maximize the report’s Object Definition window: CLICK: its Maximize button ( )
9. On your own, zoom in on the report by clicking the mouse pointer over the page. Then, move, size, and scroll the Object Definition window to make it appear similar to Figure 2.29.
These items will be selected in the next
few steps.

AC2-36 Microsoft Office Access 2003: Creating a Database
Figure 2.29 The maximized Object Definition window
10. To print the documentation report: CLICK: Print button ( ) on the toolbar
11. To restore the Object Definition window to the smaller size: CLICK: its Restore button ( )
12. Close the Object Definition window. Then, close the AC0240 Database window. Exit Microsoft Office Access 2003.
Self Check 2.4 What happens to your table's data if you delete a field in table
Design view?
CHAPTER SUMMARY
Microsoft Office Access 2003 provides several tools to help novice users create new database applications. The Database Wizard offers a variety of professionally designed template solutions for common database problems. After guiding you through a few simple steps in the wizard, Access creates a comprehensive set of database objects, including tables, forms, and reports, that you can put to use immediately. If you prefer

Chapter 2 AC2-37
having more control, you can opt to create an empty database and then populate it with standard tables using the Table Wizard. Another straightforward method involves designing a table simply by entering data into a Datasheet window. You can also use Design view in order to develop a custom table object. In the table Design window, you add, delete, rename, move, and manipulate fields and indexes individually, in addition to specifying each field's properties and characteristics. The Documenter helps you quickly document the design of database objects. COMMAND SUMMARY
Many of the commands and procedures appearing in this chapter are summarized in the following table.
Skill Set To Perform This Task… Do the Following… Creating and Using Databases
Create a new empty database
CLICK: New button ( ) CLICK: Blank database option,
under the New heading in the New File task pane
Create a comprehensive application
using the Database Wizard
CLICK: New button ( ) CLICK: On my computer option,
under the Templates heading in the New File task pane
CLICK: Databases tab in the Templates dialog box
DOUBLE-CLICK: a database wizard ( )
Switch from Datasheet view to
Design view
CLICK: View – Design button ( )
Switch from Design view to
Datasheet view
CLICK: View – Datasheet button ( )
Launch the Documenter utility
CHOOSE: Tools Analyze
Documenter
Creating and Modifying Tables
Create a table using the Table Wizard
SELECT: Tables object button DOUBLE-CLICK: Create table
by using wizard

AC2-38 Microsoft Office Access 2003: Creating a Database
Create a table in Datasheet view
SELECT: Tables object button DOUBLE-CLICK: Create table
by entering data
Create a table in Design view
SELECT: Tables object button DOUBLE-CLICK: Create table in
Design view
Save the table structure in Design view
CLICK: Save button ( )
Assign a primary key in Design view
SELECT: the desired field CLICK: Primary Key button ( )
Add a new field in Design view
SELECT: an empty row in the Field Grid pane
TYPE: field name
Remove a field in Design view
RIGHT-CLICK: row selector for the desired field
CHOOSE: Delete Rows
Move a field in Design view
DRAG: a field's row selector button to its new location
Define an index in Design view
SELECT: the desired field SELECT: an indexing option in
the Indexed property text box
Display the Indexes window
CLICK: Indexes button ( )
Remove an index displayed in the Indexes window
RIGHT-CLICK: row selector for the desired Index field
CHOOSE: Delete Rows KEY TERMS
This section specifies page references for the key terms identified in this chapter. For a complete list of definitions, refer to the Glossary at the end of this learning guide. AutoNumber, p. #
Database Wizard, p. #
Design view, p. #
Documenter, p. #
Field Properties pane, p. #
index, p. #
null value, p. #
primary key, p. #

Chapter 2 AC2-39
Field Grid pane, p. # Table Wizard, p. #
CHAPTER QUIZ
SHORT ANSWER
1. Name four Database Wizard templates that are available on your computer.
2. What is a switchboard? 3. Name the five steps to designing a better database. 4. Name three methods for creating a table in an Access database. 5. What are the two categories of Table Wizards? 6. What data storage types can be defined in a table structure? 7. What is the difference between the Text and Memo data types? 8. How does a primary key differ from an index? 9. When would you want to insert a row in a table structure? 10. Why must you be careful when changing a field's data type? TRUE/FALSE
1. ___ In creating a new database using a template, you select either the General or Wizards tab in the Templates dialog box.
2. ___ In the Database Wizard, the optional fields that you may select for inclusion appear in italic.
3. ___ The process of dividing related data into separate tables in order to reduce data redundancy is called normalizing your data.
4. ___ Like Word and Excel, you can open multiple Database windows in the Access 2003 work area.
5. ___ After selecting a sample table in the Table Wizard, you can specify only the fields that you want included in your new table.
6. ___ In table Design view, you define the names of fields in the Field Grid pane and select data types in the Field Properties pane.
7. ___ Field names cannot exceed 64 characters in length. 8. ___ What you type into the Description column of the Field Grid pane
appears in the Title bar of a table's Datasheet window. 9. ___ Access prevents you from entering duplicate values into a primary
key field. 10. ___ You can print a table's structure using the Documenter tool.

AC2-40 Microsoft Office Access 2003: Creating a Database
MULTIPLE CHOICE
1. In an application created using the Database Wizard, the main menu is presented as which of the following?
a. a form, called a switchboard b. a report, called a menu c. a table, called a switchboard d. a query, called a menu 2. Which of the following is not a step presented in this chapter for
designing a better database? a. Determine your input requirements b. Test your database application c. Create your tables using wizards d. Determine your table structures 3. You have the choice of either creating a table structure from scratch or
using the following to lead you through the process. a. Assistant b. Coach c. Relation d. Wizard 4. Which data type would you use to store the price of an item within an
inventory table? a. AutoNumber b. Currency c. Number d. Text 5. Which data type would you use to store a phone number? a. Currency b. Memo c. Number d. Text 6. What determines a table's default sort order in a datasheet? a. AutoNumber field b. Field order c. Index field d. Primary key 7. To display a window showing the table's primary key and indexes: a. CLICK: Indexes button ( ) b. CLICK: Primary Key button ( )

Chapter 2 AC2-41
c. CLICK: View – Datasheet button ( ) d. CLICK: View – Design button ( ) 8. To delete a field in Design view, right-click the field's selector button
and choose the following command: a. Delete Field b. Delete Rows c. Remove Field d. Remove Rows 9. You use this tool to generate a printout of a table's structure. a. Analyzer b. Designator c. Documenter d. Generator
10. When printing a table's structure, you use this dialog box to specify the desired options. a. Print Object Definition b. Print Table Definition c. Print Table Setup d. Print Setup Definition
HANDS-ON EXERCISES
1. STEP-BY-STEP: CREATING A NEW DATABASE
In this exercise, you will practice creating a new database file and adding a table object using the Table Wizard. 1. Load Microsoft Office Access 2003 using the Windows Start menu.
2. Display the New File task pane and then click the “Blank database” option under the New heading to begin creating a new database.
3. In the File New Database dialog box: TYPE: Acme Payroll into the File name text box
4. Using the Places bar or the Save in drop-down dialog box, select your personal storage location. Then, do the following: CLICK: Create command button

AC2-42 Microsoft Office Access 2003: Creating a Database
5. To use the Table Wizard, ensure that the Tables button is selected in the Objects bar and then do the following: DOUBLE-CLICK: Create table by using wizard
6. You will now create a new table to store Acme’s employee records. In the Table Wizard dialog box, select the Business option and then select “Employees” as the sample table on which to base your new table.
7. Include all of the suggested fields from the “Employees” table in your new table. Your screen should appear similar to Figure 2.30.
Figure 2.30 Creating a new table using the Table Wizard
8. Now let’s remove an unnecessary field. First scroll to the end of the Fields in my new table list. Then, do the following: SELECT: Photograph CLICK: Remove button ( )
9. On your own, remove the Notes and OfficeLocation fields.
10. Complete the wizard so that the “Employees” table opens in Datasheet view, ready to accept data.
11. Close the Datasheet window.
12. Close the Database window.

Chapter 2 AC2-43
2. STEP-BY-STEP: CREATING TABLE OBJECTS
In this exercise, you will practice creating two new table objects in an existing database. 1. Open the database file named AC02HE. Ensure that the Tables button
in the Objects bar is selected. Your screen should appear similar to Figure 2.31.
Figure 2.31 Opening the AC02HE database
2. To create a new table in Datasheet view: DOUBLE-CLICK: Create table by entering data
3. To start, rename the column headings in the field header area: DOUBLE-CLICK: Field1 TYPE: City DOUBLE-CLICK: Field2 TYPE: AreaCode DOUBLE-CLICK: Field3 TYPE: DialUp PRESS:
4. Now let’s enter one record before saving the table: TYPE: Arjuna PRESS: TYPE: 555 PRESS: TYPE: 533-1525

AC2-44 Microsoft Office Access 2003: Creating a Database
5. PRESS: + to save the record Your screen should now appear similar to Figure 2.32.
Figure 2.32 Creating a table by entering data
6. Save the new table structure as “Cities.”
7. When prompted, let Access define a primary key for the new table.
8. Close the Datasheet window.
9. Create a second table in Design view for storing information about a company’s personnel.
10. Define the table fields in the Design window’s Field Grid area: TYPE: SupportID PRESS: to move to the Data Type column SELECT: AutoNumber PRESS: TYPE: Code to identify Tech Support personnel PRESS: to move to the next row
11. Add two more fields to the table, as shown in Figure 2.33. First, add a Name field with a Text data type and the description “First and last name.” Then, add a Local field with a Number data type and the description “4-digit phone local.”
Figure 2.33 Creating a table in table Design view

Chapter 2 AC2-45
12. Save the table structure as “TechSupport.”
13. When prompted, let Access define a primary key for the new table.
14. Close the Datasheet window.
3. STEP-BY-STEP: CREATING PRIMARY KEYS AND INDEXES
In this exercise, you will add a primary key to an existing table object and then modify its indexes. 1. Ensure that the AC02HE Database window is displayed and that the
Tables button in the Objects bar is selected.
2. Open the “3 Orders” table for display in Datasheet view. Your screen should appear similar to Figure 2.34.
Figure 2.34 Displaying the 3 Orders datasheet
3. Change the display mode to Design view for the table object.
4. In Design view, assign the OrderNumber field as the primary key for the table. When completed, a key icon appears in the field’s row selector button.
5. To speed up operations for finding a particular salesperson, create an index for the SalesRep field that allows for duplicate values. Your screen should now appear similar to Figure 2.35.

AC2-46 Microsoft Office Access 2003: Creating a Database
Figure 2.35 Setting a primary key and creating an index
6. To display all the indexes for the table: CLICK: Indexes button ( )
7. In the Indexes window, remove the OrderDate index so that three entries are displayed only, as shown in Figure 2.36.
Figure 2.36 Viewing the indexes for a table
8. Close the Indexes window.
9. Save the table structure and then close the table Design window.
4. ON YOUR OWN: MODIFYING A TABLE’S STRUCTURE
The majority of database design work involves editing the structure of existing databases. In this exercise, you practice modifying the table structure of the 4 Contacts table in the AC02HE database. To begin, open

Chapter 2 AC2-47
the 4 Contacts table in Design view so that all of the fields and their data types are displayed. Perform the following changes to the table structure:
• Change the field name for “Contact” to “ContactPerson” • Add a new field named “Email” for storing e-mail addresses • Delete the field named “Phone 2,” including the data stored therein • Move the “Phone 1” field to appear below the “Email” field
Your table Design window should now appear similar to Figure 2.37.
Figure 2.37 Editing, deleting, and adding fields to the Field Grid pane
When you are satisfied with your work, save the changes and view the datasheet. Your screen should appear similar to Figure 2.38. Before proceeding, close the 4 Contacts Datasheet window.

AC2-48 Microsoft Office Access 2003: Creating a Database
Figure 2.38 Viewing the changes made to a table in Datasheet view
5. ON YOUR OWN: MODIFYING A TABLE’S INDEXES
To practice making changes to a table’s indexes, open the 5 Inventory table in the AC02HE database. After changing to Design view, add a new field named Category between the existing Description and OnHand fields. Assign a data type of Number to the new field. Next, move the Reorder field so that it appears immediately after the OnHand field and then remove the SuggestedRetail field. To speed up your table search and sort operations, create an index for the Buyer field that allows duplicate entries. Finally, in the Indexes window, remove the extraneous index on ProductID. Make sure that you do not remove the primary key for this field. Your screen should now appear similar to Figure 2.39. When you are finished, close the Indexes window. Then, save the table changes and close the table Design window.

Chapter 2 AC2-49 Figure 2.39 Adding, moving, deleting, and indexing fields
6. ON YOUR OWN: CREATING A TABLE IN DESIGN VIEW
In this exercise, use the table Design view to create a new table in the AC02HE database. If the Database window does not appear in the work area, open it now. Your new table should contain the following fields, complete with data types and descriptions. • PackageID: This field, which automatically increments by one each
time a new record is added, contains a unique code that identifies each promotional package.
• Description: This text field stores the name of each package. • Price: This field stores the suggested price in dollars for each package. • Nights: This field stores the number of nights for accommodations. Save the table as “Valley Packages” to the database and let Access create a primary key. Now use the Documenter tool to preview (Figure 2.40) and print out the table’s design structure. Then, close all of the open windows, including the Database window.
Setting and removing indexes using the Field Properties pane and the Indexes window
Compare your work to the field names and
order shown here.

AC2-50 Microsoft Office Access 2003: Creating a Database
Figure 2.40 Previewing the Documenter’s design report
CASE STUDY: MCGAVIN TRUCKING, LTD.
McGavin Trucking, Ltd. operates a fleet of trucks in the Pacific Northwest. Last week, McGavin’s management team asked the company’s controller, Mike Lambert, to locate and summarize a variety of information about the business. After spending three days reviewing reports and searching through filing cabinets, Mike came to the realization that he needs a better information management system and decides to use Microsoft Access. Mike starts the process by laying out his design ideas on paper. He wants to ensure that all of McGavin’s relevant business information is collected, stored, and readied for processing. In order to reduce data redundancies, Mike splits the company information into three tables. The first table stores operational data for each truck in the fleet. The second table stores personnel data for each driver. The third and final table stores a detailed log of each delivery. Now Mike must launch Access, create a database structure, and initialize these tables. In the following case problems, assume the role of Mike and perform the same steps that he identifies.

Chapter 2 AC2-51
1. To begin, Mike creates a new blank database named “McGavin Trucking” and saves it to his personal storage location. Once the Database window appears, he proceeds to create the first table using the Table Wizard. After launching the wizard, Mike ensures that the Business option button is selected. He then scrolls the list of sample tables to find a suitable structure. From the list, Mike selects a table named “Assets” and then includes all of the fields for his new table. After proceeding to the next screen in the wizard’s dialog box, he names the new table “Trucks” and lets Access set the primary key. In the final step, Mike opens the table in Design view in order to rename three of the fields. As shown in Figure 2.41, he changes “AssetID” to “TruckID,” “AssetDescription” to “TruckDescription,” and “AssetCategoryID” to “TruckCategoryID.” He saves the changes to the table structure and closes the Trucks table.
Figure 2.41 Creating and then modifying the Trucks table
2. Mike decides to create the second table in Datasheet view. After double-clicking the appropriate New Object shortcut, he renames the column headings in the empty datasheet to create the following fields:
• Name • Address • Phone • Classification

AC2-52 Microsoft Office Access 2003: Creating a Database
Mike saves the new table object as “Drivers” and lets Access define a primary key. Looking at the results shown in Figure 2.42, Mike decides to switch to Design view and rename the ID field “DriverID.” He then saves the table structure and closes the table Design window.
Figure 2.42 Creating the Drivers table structure in Datasheet view
3. For the third table, Mike uses Design view to create the structure
displayed in Figure 2.43. As shown in the screen graphic, Mike makes the TripID field the primary key. He then saves the table as “Trips” and closes the table Design window. Using the Access Documenter tool, he prints out the Trips table structure for later review.
Figure 2.43 Creating the Trips table structure in Design view
4. Later the same day, Mike realizes he needs to make a few structural changes to some of the tables. He begins by opening the Trips table in Design view and creating an index for the Destination field. Using the Indexes window, he removes the extra index on the TripID field that Access automatically created and then closes the window. In the Field Grid pane, Mike adds a new text field named “Pickup” between the Date and Destination fields. He then moves the DriverID field to appear immediately below the TruckID field, as shown in Figure 2.44. He saves the changes and closes the table Design window.

Chapter 2 AC2-53 Figure 2.44 Modifying the Trips table structure
For the Trucks table, Mike opens the table in Design view and deletes the DepartmentID and BarcodeNumber fields. He then moves the Make and Model fields to be the third and fourth fields respectively. Satisfied with the progress he has made in setting up McGavin’s new database, Mike saves his changes and exits Microsoft Office Access 2003.
ANSWERS TO SELF-CHECK QUESTIONS
Self Check 2.1 What two objects are most closely associated with the output of a database application? Query objects (the questions you ask of a database) and Report objects (the structured printed output from a database).
Self Check 2.2 How do you specify the name of a field when creating a table in Datasheet view? You double-click the column name in the field header area and then type the desired field name.
Self Check 2.3 What is an AutoNumber field? Why is it useful as a primary key? An AutoNumber field is a data type that automatically increments a numeric value each time a new record is added to a table. It is useful as a primary key because it already supplies a unique field value for identifying each record in a table.

AC2-54 Microsoft Office Access 2003: Creating a Database
Self Check 2.4 What happens to your table's data if you delete a field in table
Design view? The table data that is stored in the field is removed along with the field definition in Design view.


![เรียน-เล่น-เป็นง่าย Access 2007 · Microsoft Access Microsoft Office Professional Access "adî... Access Access Access "îl]î" muùouañoo:ls Access](https://static.fdocuments.in/doc/165x107/5f5793511c90a77e406f5980/aaaaa-aaaa-aaaaaaaa-access-2007-microsoft-access.jpg)