Microsoft Office 2007 (Brief Concepts and … Office 2007 ppoint.pdfMicrosoft Office 2007 (Brief...
15
Microsoft Office 2007 (Brief Concepts and Techniques) Windows XP Edition I. Creating and Editing a Presentation a. Objectives i. Start and quit PowerPoint ii. Describe the PowerPoint window iii. Select a document theme iv. Create a title slide and text slides with single and multi-bulleted lists v. Save a presentation vi. Copy elements from one slide to another vii. View presentation in slide view viii. Open a presentation ix. Display and print a presentation in grayscale x. Check spelling xi. Use PowerPoint Help xii. II. What Is Microsoft Office PowerPoint 2007? Microsoft Office PowerPoint 2007 is a complete presentation graphics program that allows you to produce professional-looking presentations. A PowerPoint presentation is also called a slide show. PowerPoint contains several features to simplify creating a slide show. For example the results- oriented user interface can boost productivity by making tasks and options readily accessible. Professionally designed standard layouts help you save time by formatting and creating content. You then can modify these layouts to create custom slides to fit your specific needs. To make your presentation more impressive you can add diagrams, tables, pictures, video, sound, and animation effects. Additional PowerPoint features include the following: Word processing – Create bulleted lists, combine words and images, find and replace text, and use multiple fonts and type sizes. Outlining – Develop your presentation using an outline format. You also can import outlines from Microsoft Word or other word processing programs. Charting – Create and insert charts into your presentations and then add effects and chart elements. Drawing – Form and modify diagrams using shapes such as arcs, arrows, cubes, rectangles, stars, and triangles. Then apply Quick Styles to customize and add effects. Arrange these objects by sizing, scaling, and rotating Inserting multimedia – Insert artwork and multimedia effects into your slide show. The Microsoft Clip Organizer contains hundreds of media files, including pictures, photos, sounds, and movies. Saving to the Web – Save presentations or parts of a presentation in HTML format so they can be viewed and manipulated using a browser. You can publish your slide show to the Internet or to an intranet. E-mailing – Send your entire slide show as an attachment to an e-mail message. Collaborating – Share your presentation with friends and coworkers. Ask them to review the slides and then insert comments that offer suggestions to enhance the presentation. Preparing delivery – Rehearse integrating PowerPoint slides into your speech by setting timings, using presentation tools, showing only selected slides in a presentation, and packaging the presentation for a CD. The latest version of PowerPoint has many new features to increase your productivity. Graphics and other shapes effects allow you to add glow, shading, 3D-effects, and other appealing visuals. Typography effects enhance the design’s impact. PowerPoint themes apply a consistent look to each graphic, font, and table color in an entire presentation. Digital signatures enable you to verify that no one has altered your presentation since you create, and the Document Inspector removes private data, such as comments and hidden text.
Transcript of Microsoft Office 2007 (Brief Concepts and … Office 2007 ppoint.pdfMicrosoft Office 2007 (Brief...

Microsoft Office 2007 (Brief Concepts and Techniques) Windows XP Edition
I. Creating and Editing a Presentation
a. Objectives i. Start and quit PowerPoint
ii. Describe the PowerPoint window iii. Select a document theme iv. Create a title slide and text slides with single and multi-bulleted lists v. Save a presentation
vi. Copy elements from one slide to another vii. View presentation in slide view
viii. Open a presentation ix. Display and print a presentation in grayscale x. Check spelling
xi. Use PowerPoint Help xii.
II. What Is Microsoft Office PowerPoint 2007? Microsoft Office PowerPoint 2007 is a complete presentation graphics program that allows you to produce professional-looking presentations. A PowerPoint presentation is also called a slide show. PowerPoint contains several features to simplify creating a slide show. For example the results-oriented user interface can boost productivity by making tasks and options readily accessible. Professionally designed standard layouts help you save time by formatting and creating content. You then can modify these layouts to create custom slides to fit your specific needs. To make your presentation more impressive you can add diagrams, tables, pictures, video, sound, and animation effects. Additional PowerPoint features include the following:
Word processing – Create bulleted lists, combine words and images, find and replace text, and use multiple fonts and type sizes.
Outlining – Develop your presentation using an outline format. You also can import outlines from Microsoft Word or other word processing programs.
Charting – Create and insert charts into your presentations and then add effects and chart elements.
Drawing – Form and modify diagrams using shapes such as arcs, arrows, cubes, rectangles, stars, and triangles. Then apply Quick Styles to customize and add effects. Arrange these objects by sizing, scaling, and rotating
Inserting multimedia – Insert artwork and multimedia effects into your slide show. The Microsoft Clip Organizer contains hundreds of media files, including pictures, photos, sounds, and movies.
Saving to the Web – Save presentations or parts of a presentation in HTML format so they can be viewed and manipulated using a browser. You can publish your slide show to the Internet or to an intranet.
E-mailing – Send your entire slide show as an attachment to an e-mail message.
Collaborating – Share your presentation with friends and coworkers. Ask them to review the slides and then insert comments that offer suggestions to enhance the presentation.
Preparing delivery – Rehearse integrating PowerPoint slides into your speech by setting timings, using presentation tools, showing only selected slides in a presentation, and packaging the presentation for a CD.
The latest version of PowerPoint has many new features to increase your productivity. Graphics and other shapes effects allow you to add glow, shading, 3D-effects, and other appealing visuals. Typography effects enhance the design’s impact. PowerPoint themes apply a consistent look to each graphic, font, and table color in an entire presentation. Digital signatures enable you to verify that no one has altered your presentation since you create, and the Document Inspector removes private data, such as comments and hidden text.

PowerPoint gives you the ability to make presentations using a projection device attached to a personal computer or using overhead transparencies. In addition, you can take advantage to the World Wide Web and run virtual presentations on the Internet. PowerPoint also can create paper printouts of the individual slides, outlines, and speaker notes. The process of developing a presentation that communicates specific information requires careful analysis and planning. As a starting point, establish why the presentation is needed. Next, analyze the intended audience for the presentation and their unique needs. Then, gather information about the topic and decide what to include in the presentation. Finally, determine the presentation design and style that will be most successful at delivering the message. PowerPoint allows you to produce slides to use in an academic, business, or other environment. One of the more common uses of these slides is to enhance an oral presentation. A speaker may desire to convey information, such as urging students to participate in a food drive, explaining first aide, or describing the changes in an employee benefit package. The PowerPoint slides should reinforce the speaker’s message and help the audience member retain the information presented. An accompanying handout gives audience members reference notes and review material after the presentation’s conclusion. P L A N A H E A D When creating a PowerPoint document, the actions you perform and decisions you make will affect the appearance and characteristics of the finished document. As you create a presentation, you should follow these general guidelines.
1. Find the appropriate theme. The overall appearance of a presentation significantly affects is capability to communicate information clearly. The slides’ graphical appearance should support the presentation ‘s overall message. Colors, fonts, and layouts affect how audience members perceive and react to the slide content.
2. Choose words for each slide. Use the less is more principle. The less text, the more likely the slides will enhance your speech. Use the fewest words possible to make a point.
3. Format specific elements of the text. Examples of how you can modify the appearance or format, of text include changing its shape, size color, and position on the slide.
4. Determine where to save the presentation. You can store a document permanently, or save it, on a variety of storage media including a hard disk, USB flash drive, or CD. You also can indicate a specific location on the storage media for saving the document.
III. Starting PowerPoint
The following steps, which assume Windows is running, start PowerPoint based on a typical installation.
1
2 3

1. Click the Start button on the Windows taskbar to display the Start menu. 2. Point to All Programs on the Start menu to display the All Programs submenu. 3. Point to Microsoft Office on the All Programs submenu to display the Microsoft submenu.
IV. The PowerPoint Window
The PowerPoint window consists of a variety of components to make your work more efficient and documents more professional. These include the document window, Ribbon, Mini toolbar an shortcut menus, Quick Access Toolbar, and Office Button. Some of these components are common to other Microsoft Office 2007 programs; others are unique to PowerPoint.
a. PowerPoint Window The basic unit of a PowerPoint Presentation is a slide. A slide may contain text and objects, such as graphics, tables, charts, and drawings. Layouts are used to position this content on the slide. When you open a new presentation, the default Title Slide layout appears.
Quiz 11
The purpose of this layout is to introduce the presentation to the audience. PowerPoint includes eight other built-in standard layouts. The default (preset) slide layouts are set up in landscape orientation, where the slide width is greater than its height. In landscape orientation, the slide size is preset to 10 inches wide and 7.5 inches high when printed on a standard sheet of paper measuring 11inches wide and 8.5 inches high.
Document theme
identifier
Total number of
slides
Status bar
Text
placeholder
Note pane
Mouse pointer Normal view is
default view Next slide
button
Previous
slide button
Scroll arrow
Scroll Box
Scroll Bar
Slide pane
Splitter bar
Title slide
layout
Slides tab Outlines tab

PLACEHOLODERS Placeholders are boxes with dotted or hatch-marked borders that are displayed when you create a new slide. All layouts except the Blank slide layout contain placeholder. Depending on the particular slide layout selected, title and subtitle placeholders are displayed for the slide title and subtitle; a content text placeholder is displayed for text, art, or a table, chart, picture, graphic, or movie. The title slide in the figure above has two text placeholders where you will type the main heading, or title, of a new slide and the subtitle. MOUSE POINTER The mouse pointer becomes different shapes depending on the task you are performing in PowerPoint and the pointer’s location on the screen. The mouse pointer in the figure above is the shape of a block arrow. SCROLL BAR You use the vertical scroll bar to display different slides in the document window. When you add a second slide to a presentation, this vertical scroll bar appears on the rigt side of the Slide pane. On the scroll bar, the position of the scroll box reflects the location of the slide in the presentation that is displayed in the document window. A scroll arrow is located at each end of a scroll bar. To scroll through, or display different portions of the document in the document window, you can click a scroll arrow or drag the scroll box to move forward or backward through the presentation. The Previous Slide button and the Next Slide button appear at the bottom of the vertical scroll bar. Click one of these buttons to advance through the slides backwards or forwards The horizontal scroll bar also may appear. It is located on the bottom of the Slide pane and allows you to display a portion of the slide when the entire slide does not fit on the screen. STATUS BAR The status bar, located at the bottom of the document window above the Window taskbar, presents information about the document, the progress of current tasks, and the status of certain commands and keys; it also provides controls for reviewing the document. As you type text or perform certain commands, various indicators may appear on the status bar. The left edge of the status bar in the above figure shows the current slide number followed by the total number of slides in the document and the document theme identifier. A document theme provides consistency in design and color throughout the entire presentation by setting the color scheme, font and font size, and layout of the presentation. Toward the right edge are buttons and controls you can use to change the view of the slide and adjust the size of the displayed document. Some commands on the Ribbon display an image to help you remember their function. When you point to a command on the Ribbon, all or part of the command glows in shades of yellow and orange, and an Enhanced Screen Tip appears on the screen. An Enhanced Screen Tip is an on-screen not that provides the name of the command.
The lower-right corner of some groups on the Ribbon has a small arrow, called a Dialog Box Launcher, that when clicked displays a dialog box or a task pane with additional options for

the group. A task pane, by contrast, is a window that can remain open and visible while you work in the document.
b. Mini Toolbar and Shortcut Menus The Mini toolbar, which appears automatically based on tasks you perform, contains commands related to changing the appearance of text in the slide. All commands on the Mini toolbar also exist on the Ribbon. The purpose of the Mini toolbar is to minimize mouse movement.
A shortcut men, which appears when you right-click an object, is a list of frequently used commands that relate to the right-clicked object. When you right-click a scroll bar, for example, a shortcut menu appears with command related to the scroll bar. If you right-click an item in the document window, PowerPoint displays both the Mini toolbar and a shortcut menu.
Dialog Box
Launcher
Results from
clicking the Dialog
Box Launcher
Mini
Toolbar
Results from
clicking the Dialog
Box Launcher
c. Quick Access Toolbar The Quick Access Toolbar, located by above the Ribbon, provides easy access to frequently used commands. The commands on the Quick Access Toolbar contain the Save, Undo, and Redo commands. If you click Customize Quick Access Toolbar button, PowerPoint provides a list of commands you quickly can add to and remove from the Quick Access Toolbar.
d. Office Button While the Ribbon is a control center for creating documents, the Office Button is a central location for managing and sharing documents. When you click the Office button, located in the upper-corner of the window, PowerPoint displays the Office Button menu. A menu contains a list of commands. When you click the New, Open Save As, and Print commands on the Office Button menu, PowerPoint displays a dialog box with additional options. The Save As, Print Prepare, Send, and Publish commands have an arrow to their right. If you point to the arrow, PowerPoint displays a submenu, which is a list of additional commands associated with the selected command.
V. Choosing a Document Theme
You easily can give a presentation a professional and consistent appearance by using a document theme. This collection of formatting choices includes a set of colors (the color theme), a set of heading and content text fonts (the font theme), and a set of lines and fill effects (the effect theme). These themes allow you to choose and change the appearance of all the slides or individual slides in your presentation. P L A N A H E A D Find the appropriate theme. In the initial steps of a project, you should select a document theme by locating a particular built-in theme in the Themes group. You could, however, apply a theme at any time while creating the presentation. Some PowerPoint slides show designers create presentations
Quick Access
Toolbar positioned
above Ribbon
Office
Button
Office
Button
Menu
submenu
Arrows causing
a submenu to
be displayed

using the default Office Theme. This blank design allows them to concentrate on the words being used to convey the message and does not distract them with colors and various text attributes. Once the text is entered, the designers then select an appropriate document theme.
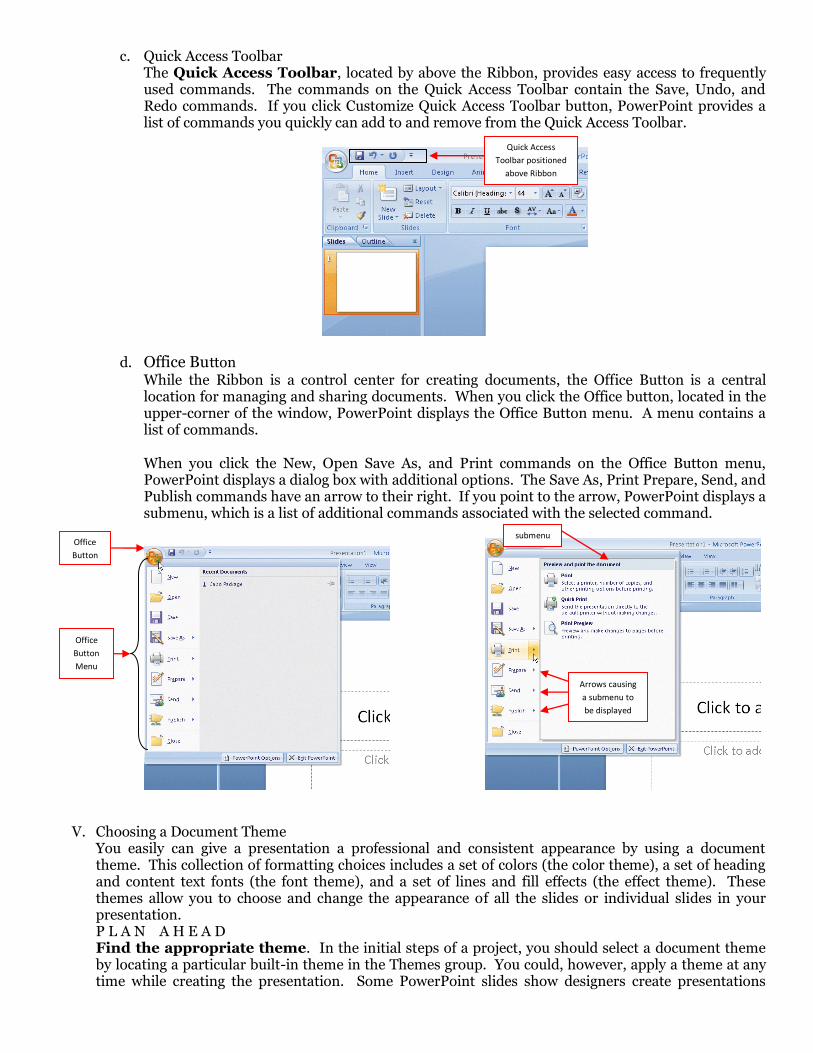
a. To Choose a Document Theme The document theme identifier shows the theme currently used in the slide show. PowerPoint initially uses the Office Theme until you select a different theme. The following steps change the theme from the Office Theme to the Flow document theme.
1. Click Design on the Ribbon to display the Design tab. 2. Click the More button in the Themes gallery to expand the gallery, which shows more
Built-in theme gallery options.
VI. Creating a Title Slide With the exception of a blank slide and a slide with a picture and caption, PowerPoint assumes every new slide has a title. Many of PowerPoint’s layouts has both a title text placeholder and at least one content placeholder. To make creating a presentation easier, any text you type after a new slide appears becomes title text in the title text placeholder.
a. To Enter the Presentation Title As you begin typing text in the title text placeholder, the title text also is displayed in the Slide 1 thumbnail in the Slides tab. PowerPoint line wraps text that exceeds the width of the placeholder. The steps for adding a slide title includes:
1. Click the label Click to add title, located inside the title text placeholder to select the placeholder.
2. Type the desired title in the title text placeholder. Do not press the ENTER key. This will create a new blank line inside of the placeholder
Theme in
Ribbon gallery
Design Tab
Groups on Ribbon change to
show commands related to
design because Design tab
now is the active tab.
Flow theme
Office theme is
default theme

b. Correcting a Mistake When Typing If you type the wrong letter, press the BACKSPACE key to erase all the characters back to and including the one that is incorrect. If you mistakenly press the ENTER key after typing the title and the insertion point is on the new line, simply press the BACKSPACE key to return the insertion point to the right of the last letter of the last word typed.
c. Paragraphs
Subtitle text in the subtitle text placeholder supports the title text. It can appear on one or more lines in the placeholder. To create more than one subtitle line, you press the ENTER key after typing some words. PowerPoint creates a new line, which is the second paragraph in the placeholder. A paragraph is a segment of text with the same format that begins when you press the ENTER key and ends when you press the ENTER key again. This new paragraph is the same level as the previous paragraph. A level is a position within a structure, such as an outline, that indicates the magnitude of importance. PowerPoint allows for five paragraph levels.
VII. Formatting Characters in a Presentation Recall that each document theme determines the color scheme, font and font size, and layout of a presentation. You can use a specific document theme and then change the characters’ formats any time before, during, or after you type the text.
a. Fonts and Font Styles
Characters that appear on the screen are a specific shape and size. Examples of how you can modify the appearance, or format, of these typed characters on the screen and in print include changing the font, style, size, and color. The Font, or typeface, defines the appearance and shape of the letters, numbers, punctuation marks, and symbols. Style indicates how the characters are formatted. PowerPoint’s text font styles include regular, italic, bold, and bold italic. Size specifies the height of the characters and is gauged by a measurement system that uses points. A point is 1/72 of each inch in height. Thus, a character with a point size of 36 is 36/72 (or ½) of an inch in height. Color defines the hue of the character. To select a word, double click on that word. To select a paragraph of text, simply triple click within that paragraph.
VIII. Saving the Project
While you are building a presentation, the computer stores it in memory. When you save a presentation, the computer places it on a storage medium such as a USB flash drive, CD, or hard disk. A saved presentation is referred to as a file. A file name is the name assigned to a file when it is saved. It is important to save the presentation frequently for the following reasons
The presentation in memory will be lost if the computer is turned off or you lose electrical power while PowerPoint is open.
If you run out of time before completing your project, you may finish your presentation at a future time without starting over.
When saving a document, you must decide which storage medium to use.
If you always work on the same computer and have no need to transport your projects to a different location, then your computer’s hard drive will suffice as a storage location. It is a good idea, however, to save a backup copy of your projects on a separate medium in case the file becomes corrupted or the computer’ hard drive fails.
If you plan to work on your projects in various locations or on multiple computers, then you should save your projects on a portable medium, such as a USB flash drive or CD. Saving to a USB flash drive is quicker and more reliable and allows you to reuse it for other projects. CD’s are easily portable and serve as good backups for the final versions of projects because type generally can salve files only one time. (CD-R)
a. To Save a Presentation

The following steps save a presentation on a USB flash drive using the file name, Cabo Package.
Save button
Save As
dialog box
My Documents is default
folder (your default
folder may differ
Words in title text placeholder on title
slide are displayed as default file name
and are selected in File name text box
Default file type is
PowerPoint Presentation
Selected words in default file
name automatically are replaced
when you type the new file name Clicking Cancel
button will close
the Save As dialog
box
Save in box
arrow
List of available
drives and folders is
displayed in Save in
list
Project to be
saved on UASB
flash drive My Places bar allows
you to change save
location
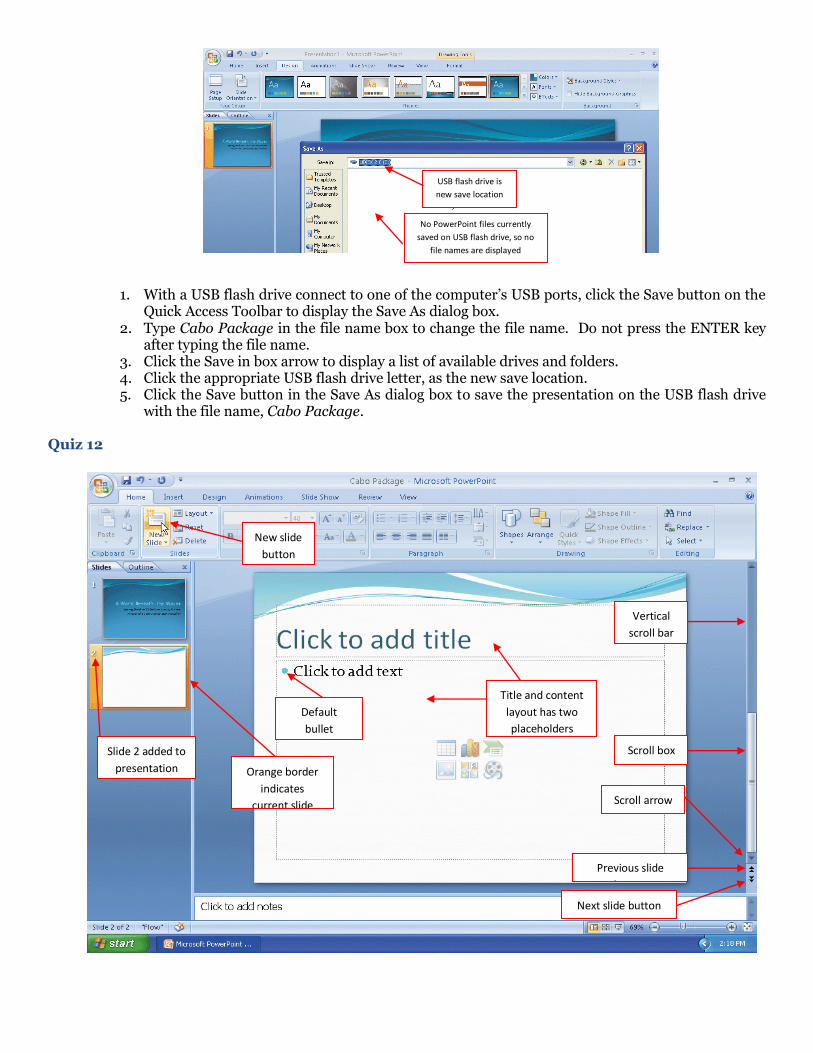
1. With a USB flash drive connect to one of the computer’s USB ports, click the Save button on the Quick Access Toolbar to display the Save As dialog box.
2. Type Cabo Package in the file name box to change the file name. Do not press the ENTER key after typing the file name.
3. Click the Save in box arrow to display a list of available drives and folders. 4. Click the appropriate USB flash drive letter, as the new save location. 5. Click the Save button in the Save As dialog box to save the presentation on the USB flash drive
with the file name, Cabo Package.
Quiz 12
USB flash drive is
new save location
No PowerPoint files currently
saved on USB flash drive, so no
file names are displayed
New slide
button
Slide 2 added to
presentation
Default
bullet
character
Title and content
layout has two
placeholders
Vertical
scroll bar
Scroll box
Scroll arrow
Previous slide
button
Next slide button
Orange border
indicates
current slide

IX. Adding a New Slide to a Presentation With the title slide for the presentation created, the next step is to add the first text slide immediately after the title slide. Usually, when you create a presentation, you add slides with text, graphics, or charts. Some placeholders allow you to double-click the placeholder and then access other objects, such as media clips, charts, diagrams, and organization charts. You can change the layout for a slide at any time during the creation of a presentation.
a. To Add a New Text Slide with Bulleted List When you add a new slide, PowerPoint uses the Title and Content slide layout. This layout provides a title placeholder and a content area for text, art, charts, and other graphics. A vertical scroll bar appears in the Slide pane when you add the second slide so that you can move from slide to slide easily. A thumbnail of this slide also appears in the Slide tab.
b. To Duplicate a Slide When two slides contain similar information and have the same format, duplicating one slide and then making minor modifications to the new slide saves time and increases consistency. The most expedient method of creating a duplicate slide is to copy the slide, then make minor modifications to the new slide.
c. To Arrange a Slide Changing slide order is an easy process and is best performed in the Tabs pane. When you click the slide thumbnail and begin to drag it to a new location, a line indicates the new location of the selected slide. When you release the mouse button, the slide drops into the desired location. Hence, this process of dragging and then dropping the thumbnail in a new location is called drag and drop. You can use the drag-and-drop method to move any selected item, including text and graphics.
X. Changing Document Properties and Saving Again PowerPoint helps you organize and identify your files by using document properties, which are the details about a file. Document properties, also known as metadata, can include such information as the project author, title, or subject. Keywords are words or phrases that further describe the document. For example, a class name or document topic can describe the file’s purpose or content. Document properties are valuable for a variety of reasons:
Users can save time locating a particular file because they can view a document’s properties without opening the document.
By creating consistent properties for files having similar content, users can better organize their documents.
Some organizations require PowerPoint users to add document properties so that other employees can view details about these files.
Five different types of document properties exist, but the more common ones used in this boo are standard and automatically updated properties. Standard properties are associated with all Microsoft Office documents and include author, title, and subject. Automatically updated properties include file system properties, such as the date you created or change a file, and statistics, such as the file size.
a. To Change Document Properties The Document Information Panel contains areas where you can view and enter document properties. You can view and change information in this panel at any time while you are creating a document. Before saving the presentation again, you want to add your name and class name as document properties.
1. Click the Office Button to display the Office Button menu. Point to Prepare on the Office Button menu to display the Prepare submenu.
2. Click Properties on the Prepare submenu to display the Document Information Panel.

3. Click Author text box, if necessary, and then type your name as the Author property. If a name already is displayed in the author text box, delete it before typing your name.
4. Click the Close the Document Information Panel button so that the Document Information Panel no longer is displayed.
b. To Save an Existing Presentation with the Same File Name Saving frequently cannot be overemphasized. When you first saved the document, you clicked the Save button on the Quick Access Toolbar, the Save As dialog box appeared, and you entered the file name. If you want to use the same file name to save the changes made to the document, you again click the Save button on the Quick Access Toolbar.
XI. Moving to Another Slice in Normal View
When creating or editing presentations in Normal view, you often want to display a slide other than the current one. You can move to another slide using several methods.
Office Button
Office Button
menu
Clicking Properties command
will open the Document
Information Panel
Prepare submenu
displays a list of tasks
that can be used to set
up files for distribution
Student name will
be typed in
Author text box
Document Information
Panel is displayed at
top of document Course number and
section will be typed in
Subject text box
Drag the scroll box on the vertical scroll bar up or down to move through the slides in the presentation.
Click the Next Slide or Previous Slide button on the vertical scroll bar. Clicking the Nextg Slide button advances to the next slide in the presentation. Clicking the Previous Slide button backs up to the slide preceding the current slide.
On the Slides tab, click a particular slide to display that slide in the Slide pane.
a. To use the Scroll Box on the Slide Pane to Move to Another Slide While developing a project, you may want to display a slide by clicking the scroll box on the vertical scroll bar. When you drag the scroll box, the slide indicator shows the number and title of the slide you are about to display. Releasing the mouse button shows the slide.
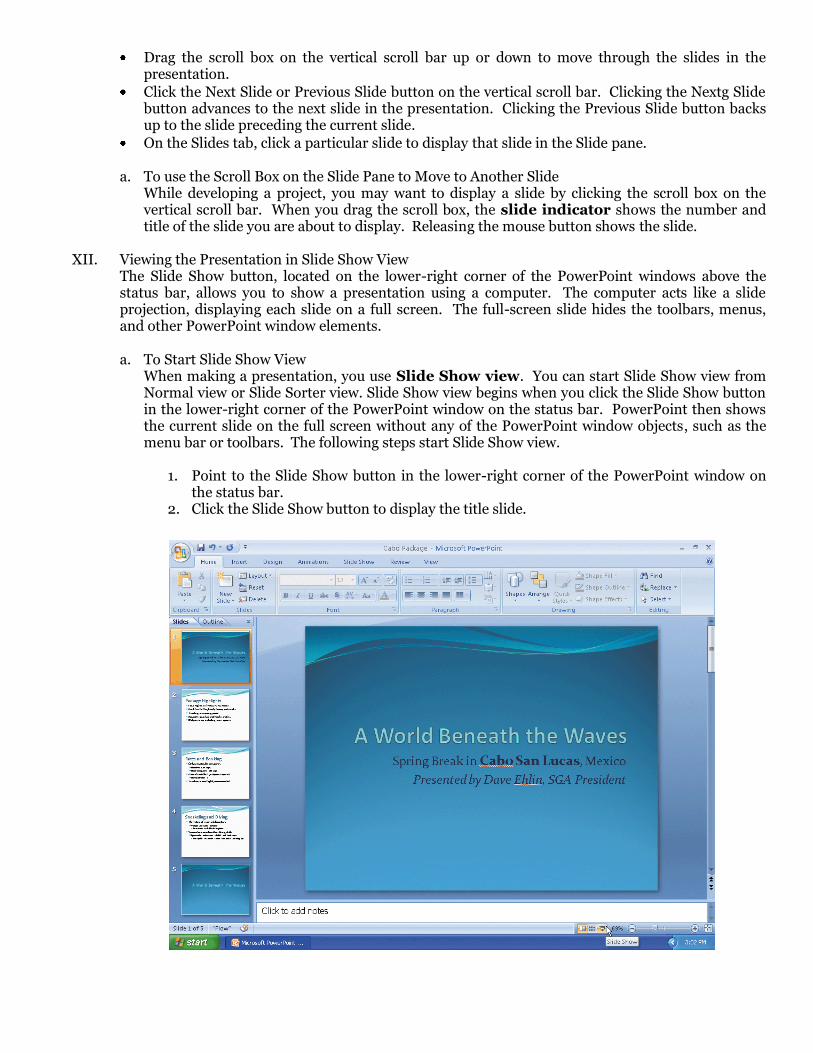
XII. Viewing the Presentation in Slide Show View
The Slide Show button, located on the lower-right corner of the PowerPoint windows above the status bar, allows you to show a presentation using a computer. The computer acts like a slide projection, displaying each slide on a full screen. The full-screen slide hides the toolbars, menus, and other PowerPoint window elements. a. To Start Slide Show View
When making a presentation, you use Slide Show view. You can start Slide Show view from Normal view or Slide Sorter view. Slide Show view begins when you click the Slide Show button in the lower-right corner of the PowerPoint window on the status bar. PowerPoint then shows the current slide on the full screen without any of the PowerPoint window objects, such as the menu bar or toolbars. The following steps start Slide Show view.
1. Point to the Slide Show button in the lower-right corner of the PowerPoint window on the status bar.
2. Click the Slide Show button to display the title slide.
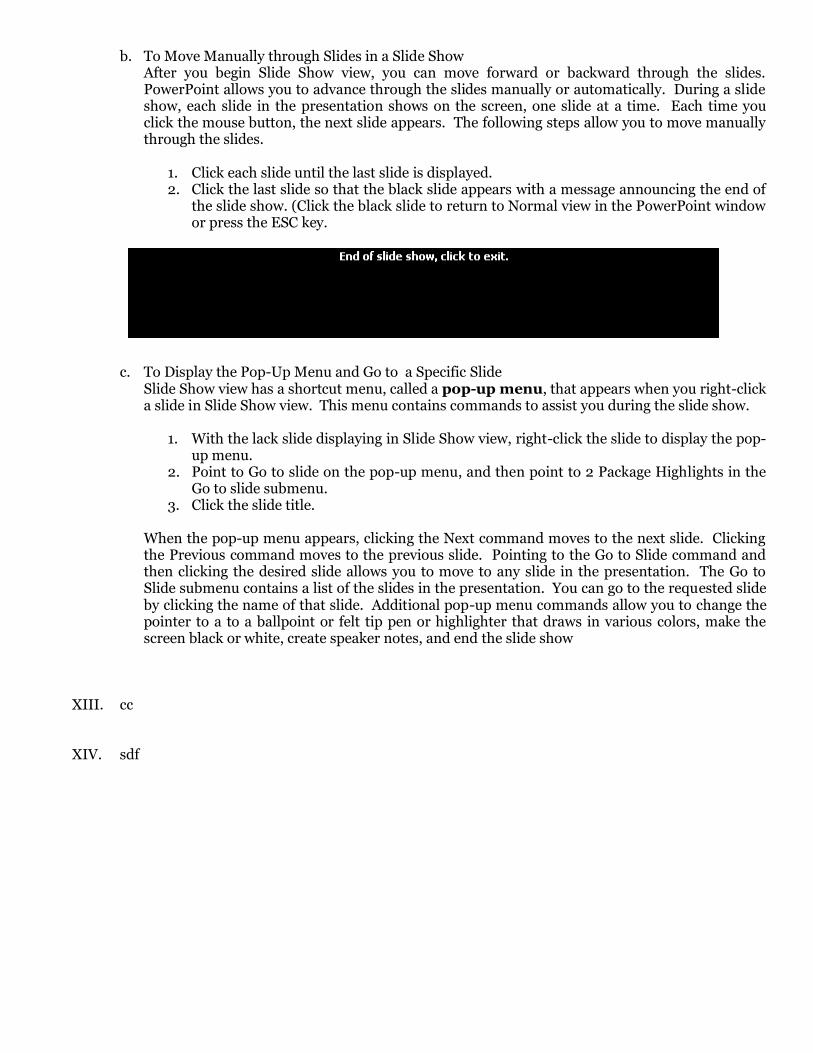
b. To Move Manually through Slides in a Slide Show After you begin Slide Show view, you can move forward or backward through the slides. PowerPoint allows you to advance through the slides manually or automatically. During a slide show, each slide in the presentation shows on the screen, one slide at a time. Each time you click the mouse button, the next slide appears. The following steps allow you to move manually through the slides.
1. Click each slide until the last slide is displayed. 2. Click the last slide so that the black slide appears with a message announcing the end of
the slide show. (Click the black slide to return to Normal view in the PowerPoint window or press the ESC key.
c. To Display the Pop-Up Menu and Go to a Specific Slide
Slide Show view has a shortcut menu, called a pop-up menu, that appears when you right-click a slide in Slide Show view. This menu contains commands to assist you during the slide show.
1. With the lack slide displaying in Slide Show view, right-click the slide to display the pop-up menu.
2. Point to Go to slide on the pop-up menu, and then point to 2 Package Highlights in the Go to slide submenu.
3. Click the slide title. When the pop-up menu appears, clicking the Next command moves to the next slide. Clicking the Previous command moves to the previous slide. Pointing to the Go to Slide command and then clicking the desired slide allows you to move to any slide in the presentation. The Go to Slide submenu contains a list of the slides in the presentation. You can go to the requested slide by clicking the name of that slide. Additional pop-up menu commands allow you to change the pointer to a to a ballpoint or felt tip pen or highlighter that draws in various colors, make the screen black or white, create speaker notes, and end the slide show
XIII. cc
XIV. sdf

Previous slide button