Microsoft Dynamics CRM - TWBS0101
135
DYNAMICS CRM - TWBS101
-
Upload
trioworxbusinesssolutions -
Category
Software
-
view
113 -
download
2
Transcript of Microsoft Dynamics CRM - TWBS0101

DYNAMICS CRM - TWBS101
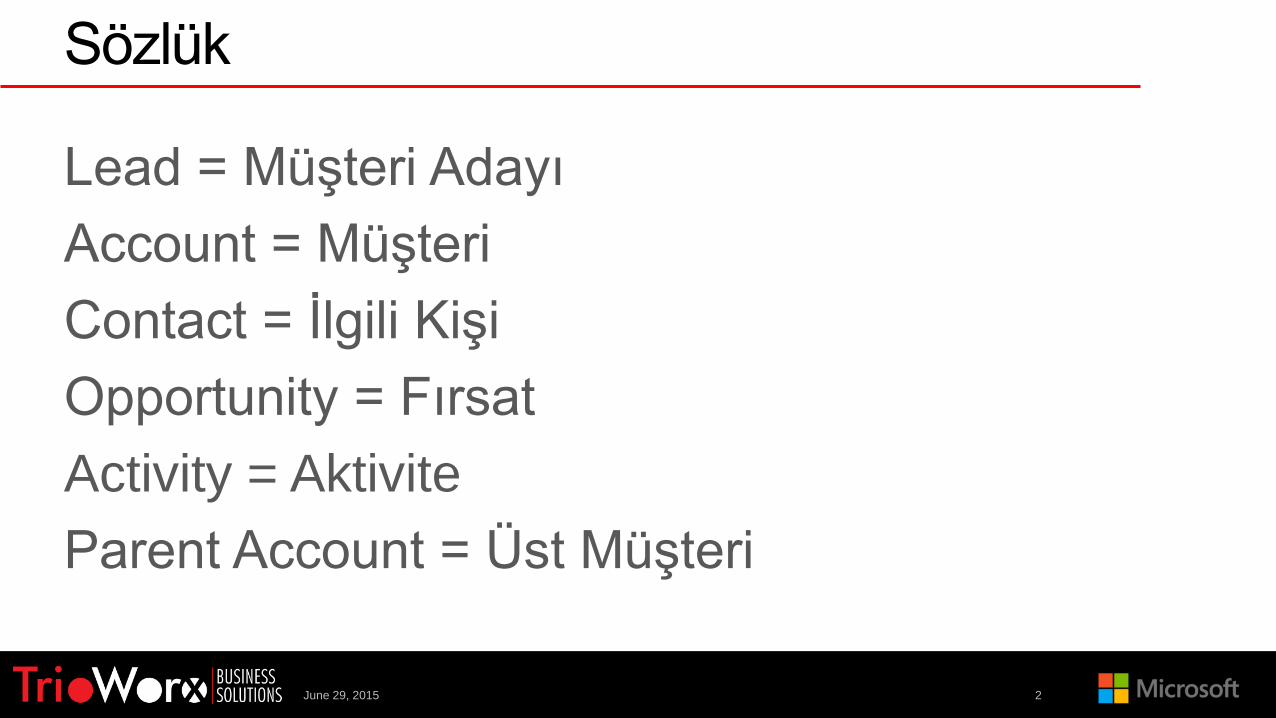
Sözlük
Lead = Müşteri Adayı
Account = Müşteri
Contact = İlgili Kişi
Opportunity = Fırsat
Activity = Aktivite
Parent Account = Üst Müşteri
June 29, 2015 2

Temel CRM İlişkileriLead – Account – Contact – Opportunity
June 29, 2015 3

June 29, 2015 4
Account-Contact Structure
CRM – Single Account, Single Contact Structure
Activities
1.Convert Lead into
Account and
Contact
2. This will create a link between the Account
and the Contact

June 29, 2015 5
CRM – Single Account, Multiple Contact Structure
Activities
1.Convert Lead into
Account and Contact
2.Each new Contact should be linked to
an Account
2
3
3.Individual Opportunities & Activities can
be linked to Contacts
Account-Contact Structure

June 29, 2015 6
CRM – Multiple Account, Multiple Contact Structure
1.Convert Lead into
Account and
Contact
2.Each sub Account should be
linked to the parent Account
2
3 3
43. Each sub Contact should be
linked to the sub Account
4. Individual Opportunities &
Activities can be linked to Contacts
Account-Contact Structure

June 29, 2015 7
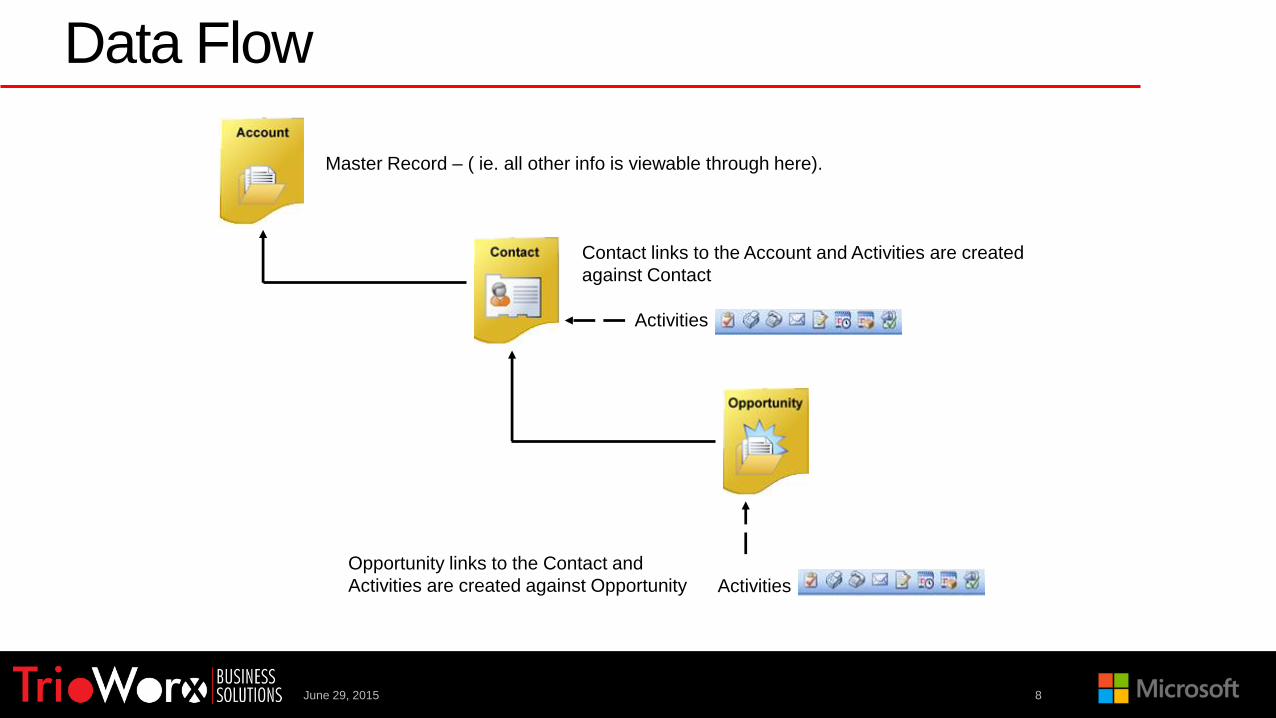
Data Flow
June 29, 2015 8
Data Flow
Master Record – ( ie. all other info is viewable through here).
Activities
Activities
Contact links to the Account and Activities are created
against Contact
Opportunity links to the Contact and
Activities are created against Opportunity

Temel Kayıt TipleriACCOUNT
June 29, 2015 9
June 29, 2015 10
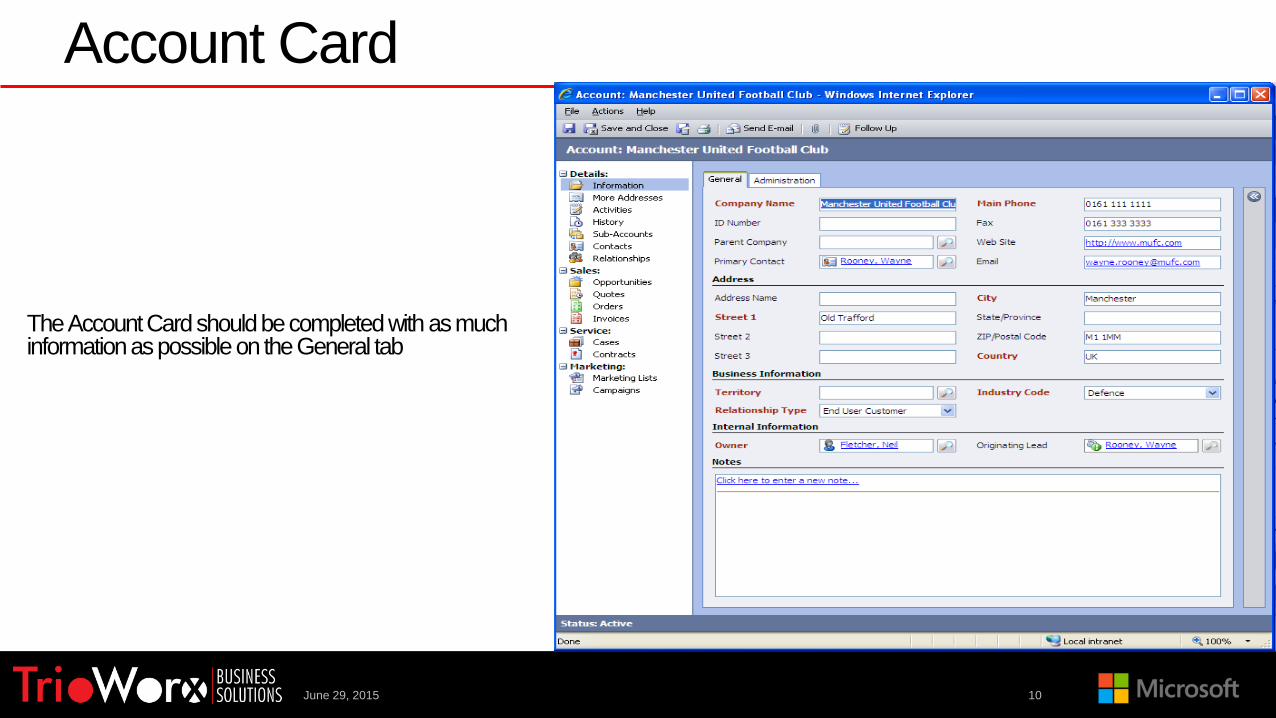
The Account Card should be completed with as much information as possible on the General tab
Account Card

June 29, 2015 11
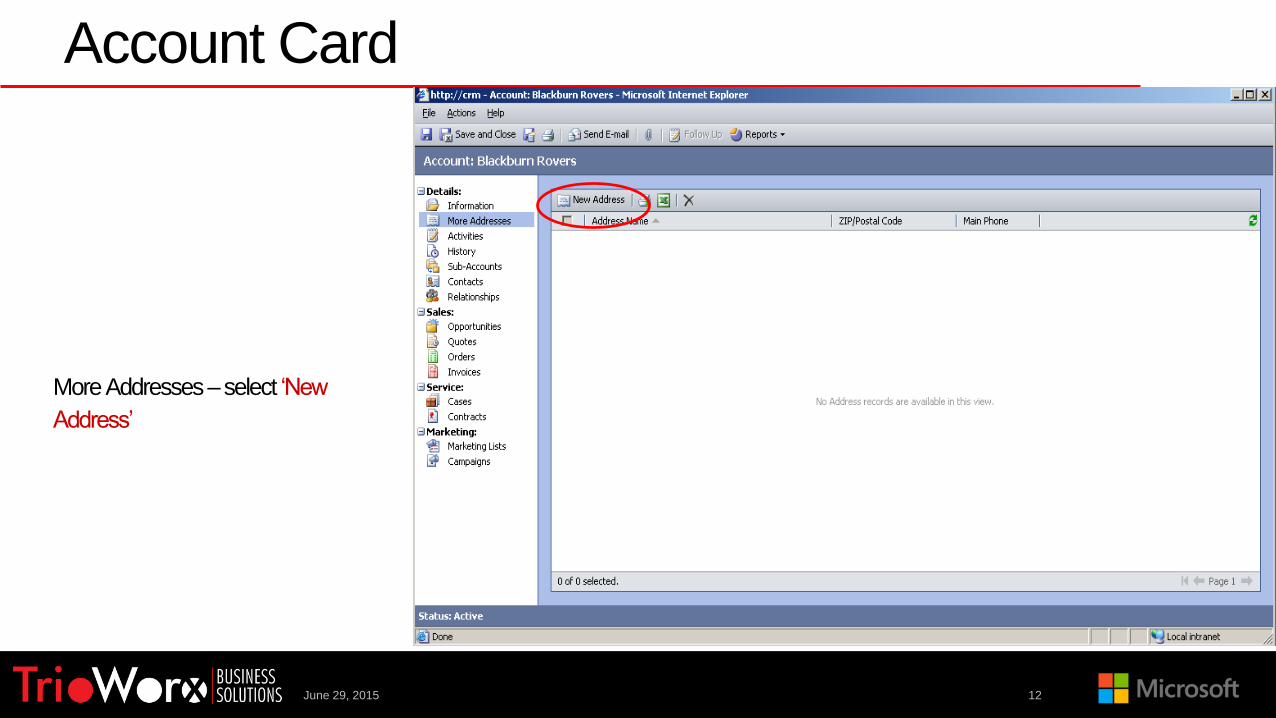
Account Card
More Addresses
June 29, 2015 12
Account Card
More Addresses –select ‘New
Address’

June 29, 2015 13
Account Card
Additional addresses –can be added, for example, if the Account has a separate production or warehouse facility
June 29, 2015 14
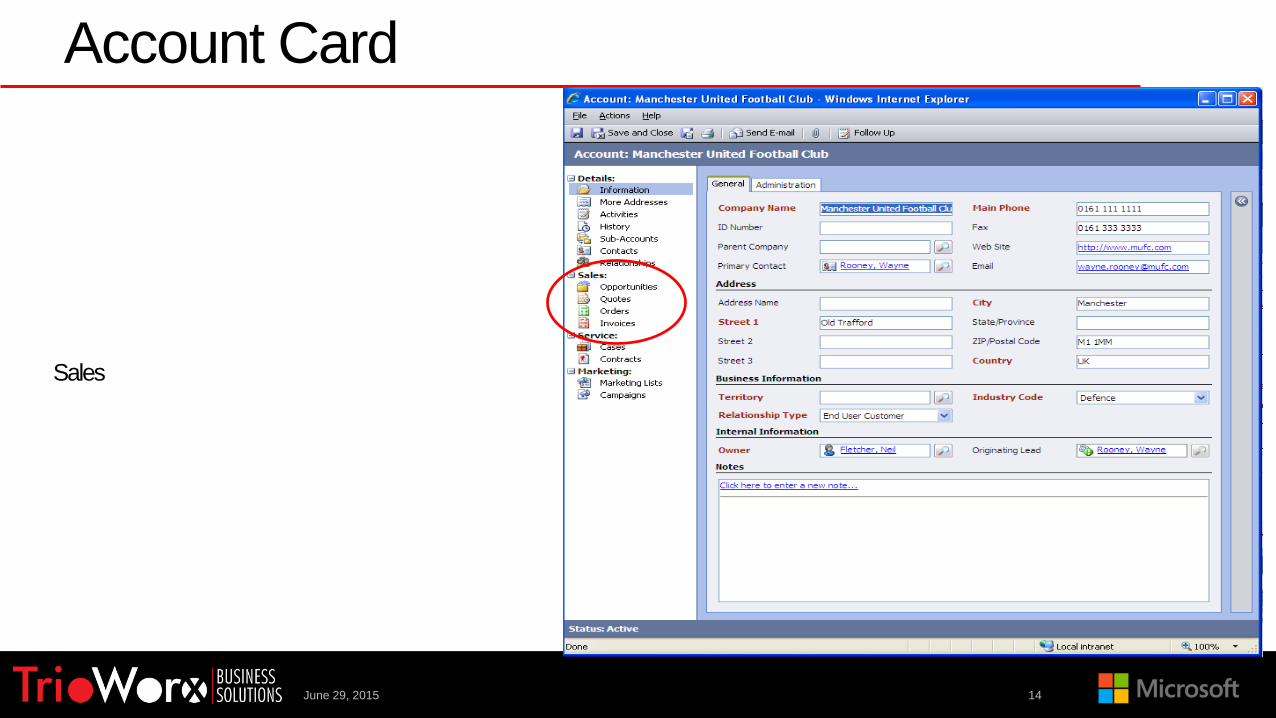
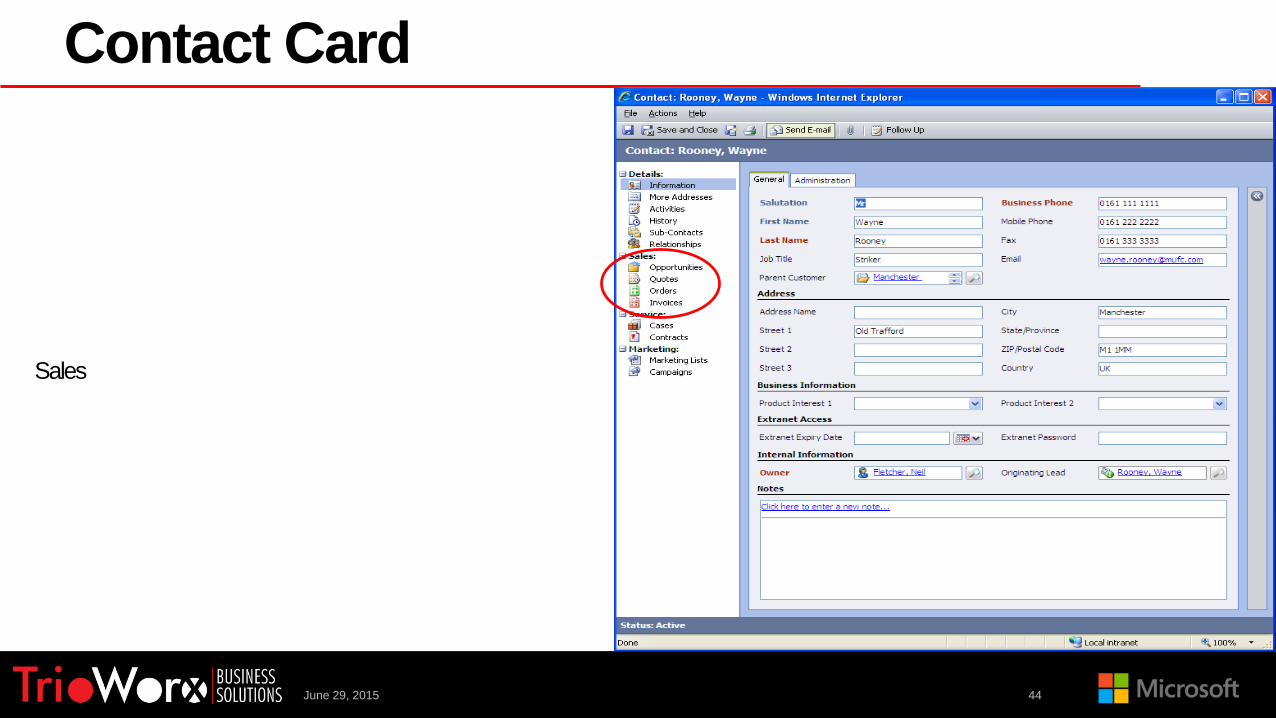
Account Card
Sales
June 29, 2015 15
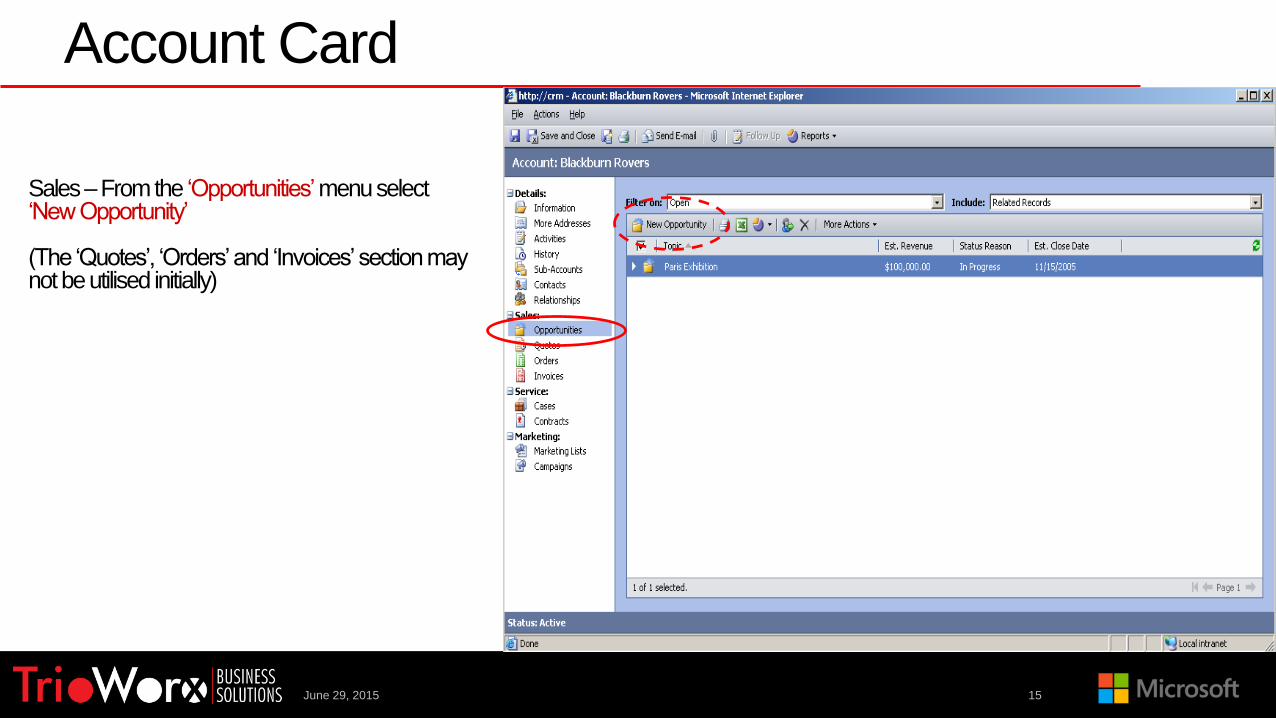
Account Card
Sales –From the ‘Opportunities’menu select ‘New Opportunity’
(The ‘Quotes’, ‘Orders’ and ‘Invoices’ section may not be utilised initially)

June 29, 2015 16
Account Card
New Opportunities can be created relating to quotations and pricing situations

June 29, 2015 17
Account Card
Activities
June 29, 2015 18
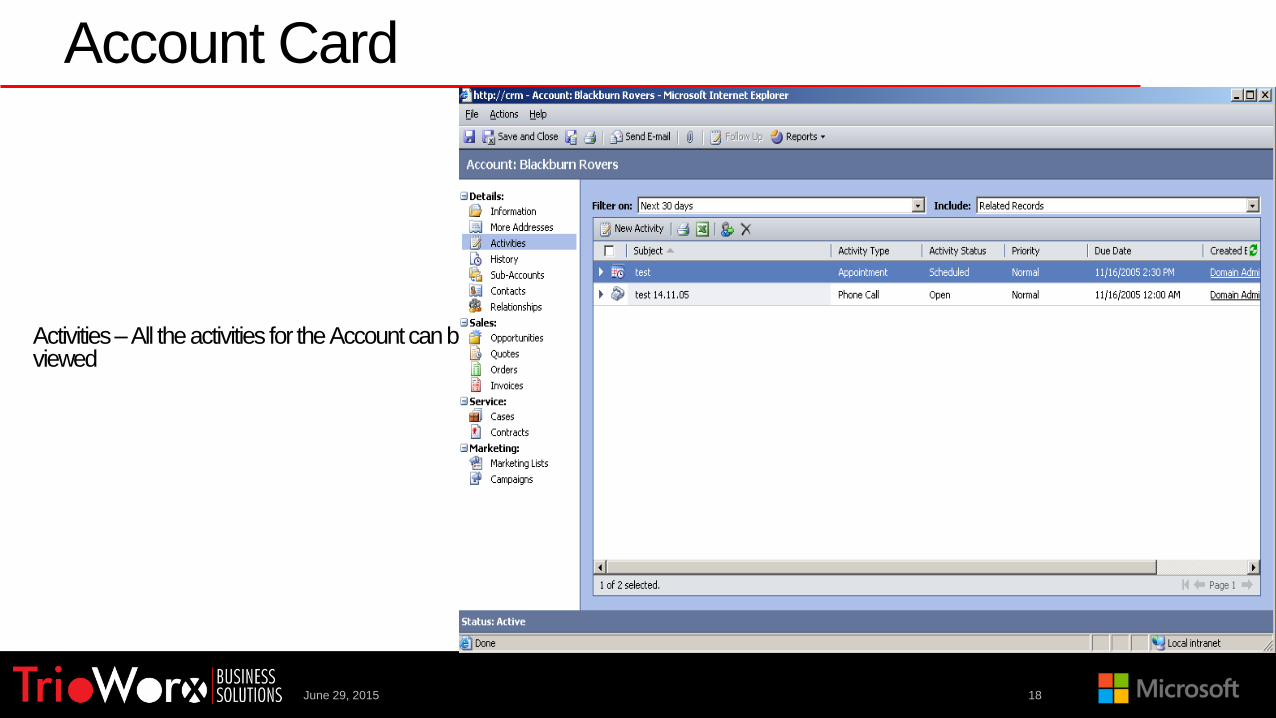
Account Card
Activities –All the activities for the Account can be viewed
June 29, 2015 19
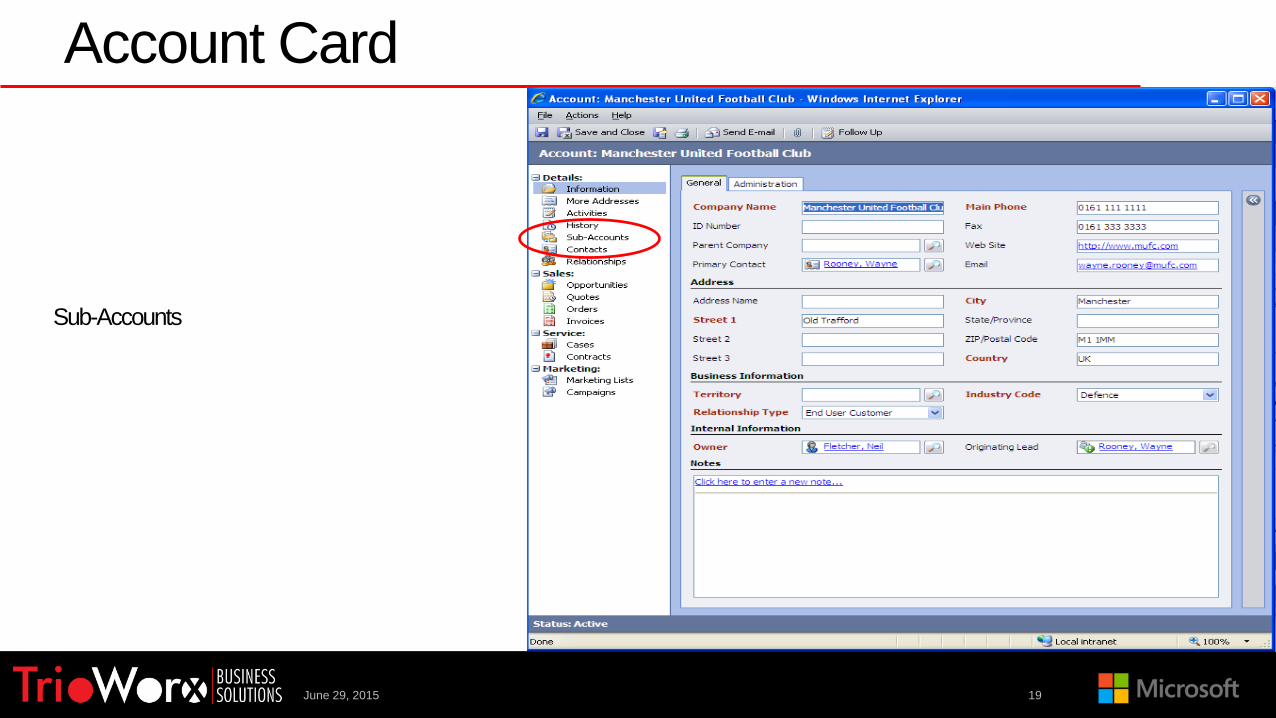
Account Card
Sub-Accounts

June 29, 2015 20
Account Card
Sub-Accounts –Select ‘New Account’
June 29, 2015 21
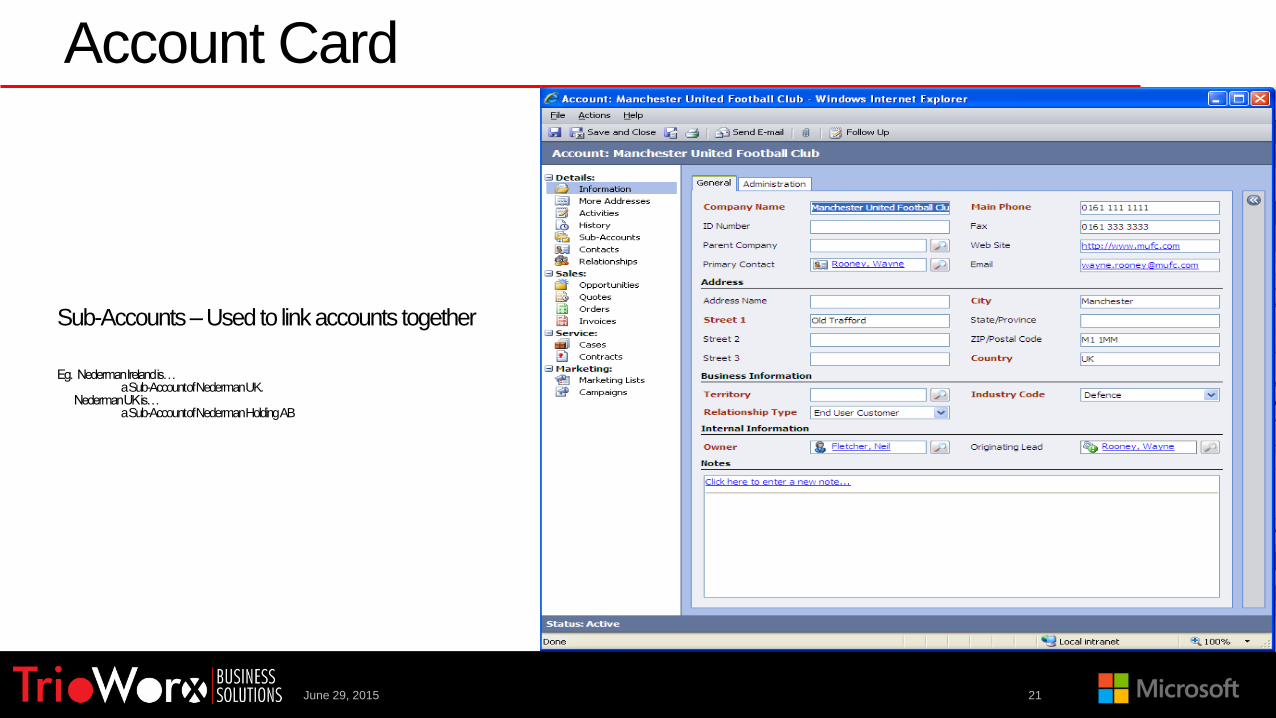
Account Card
Sub-Accounts –Used to link accounts together
Eg. Nederman Ireland is…a Sub-Account of Nederman UK.
Nederman UK is… a Sub-Account of Nederman Holding AB

June 29, 2015 22
Account Card
Contacts –Select ‘New Contact’
June 29, 2015 23
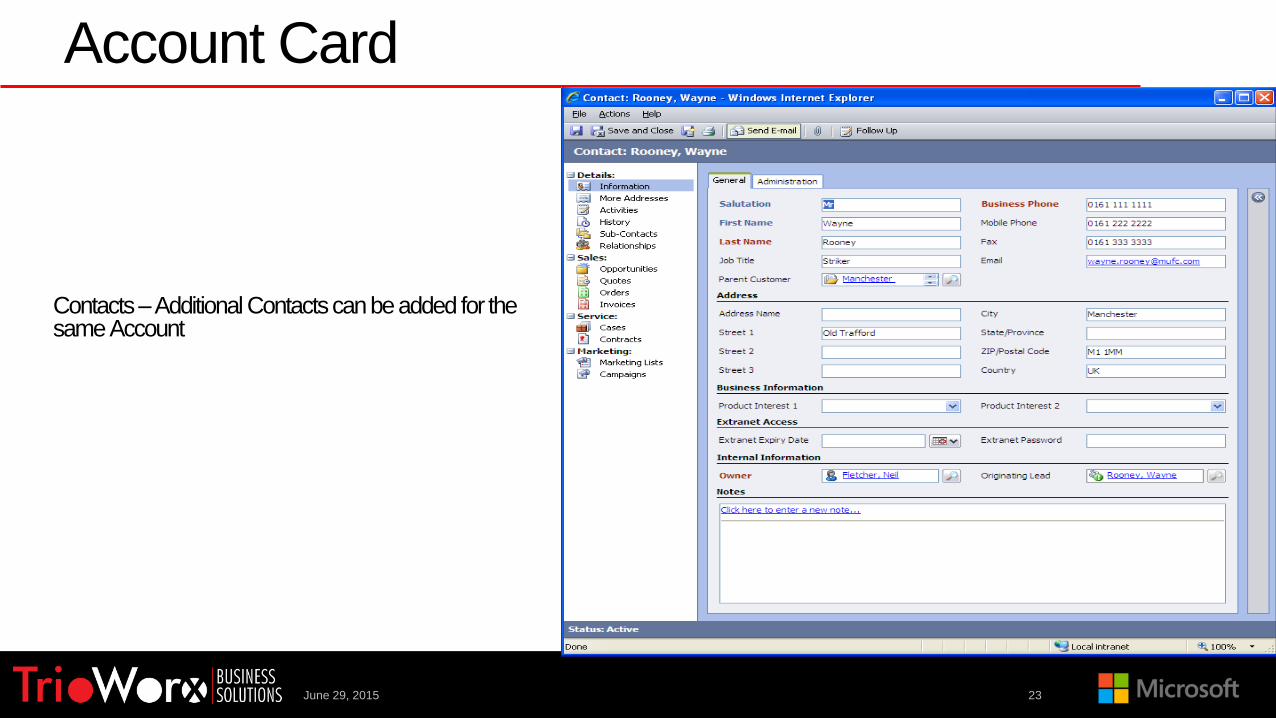
Account Card
Contacts –Additional Contacts can be added for the same Account

June 29, 2015 24
Account Card
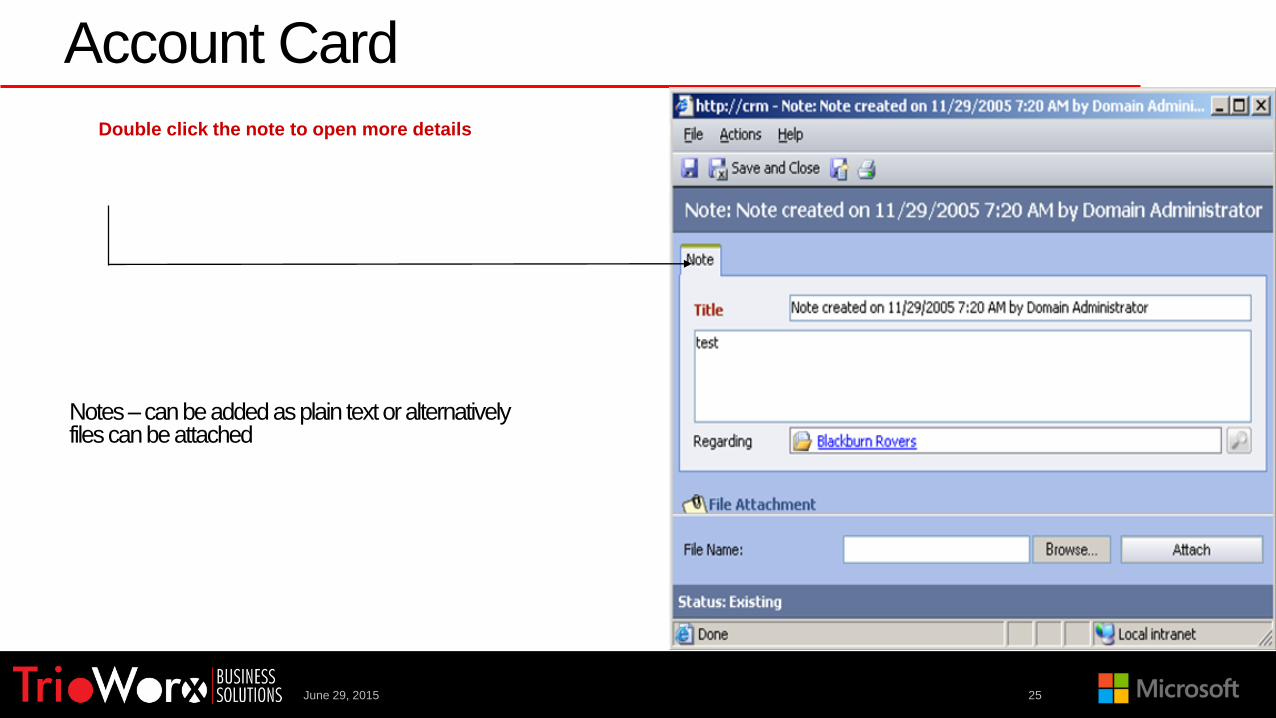
Notes
Notes–Select ‘New Note’Then type the title of the note –save your work
June 29, 2015 25
Account Card
Notes –can be added as plain text or alternatively files can be attached
Double click the note to open more details

June 29, 2015 26
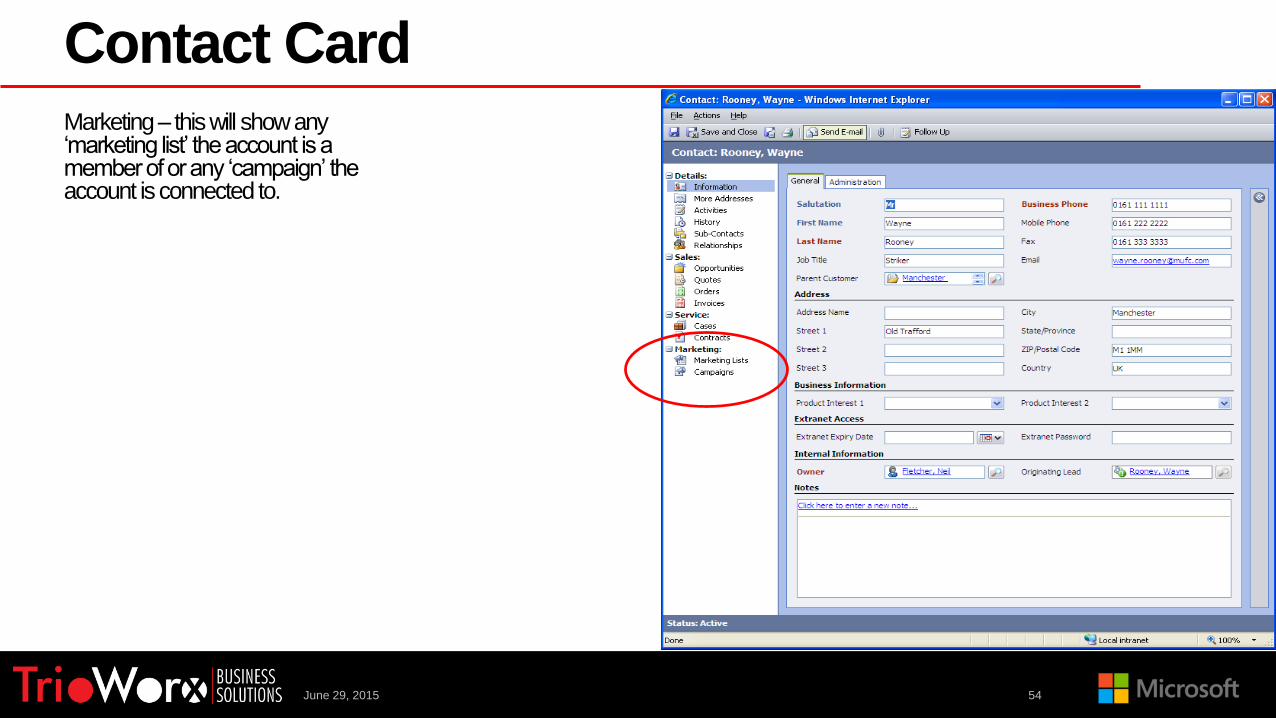
Account Card
Marketing – this will show any ‘marketing list’ the account is a member of or any ‘campaign’ the account is connected to.

June 29, 2015 27
Account Card
Relationships

June 29, 2015 28
Account Card
Relationships –eg. An end-user customer may always purchase through a distributor

June 29, 2015 29
Account CardRelationships –complete relevant fields

June 29, 2015 30
Creating an Activity
Activities can be created from Leads, Opportunities, Accounts, Contacts etc dependant upon how you want to link the activity.Select ‘Activities’Then ‘New Activity’
June 29, 2015 31
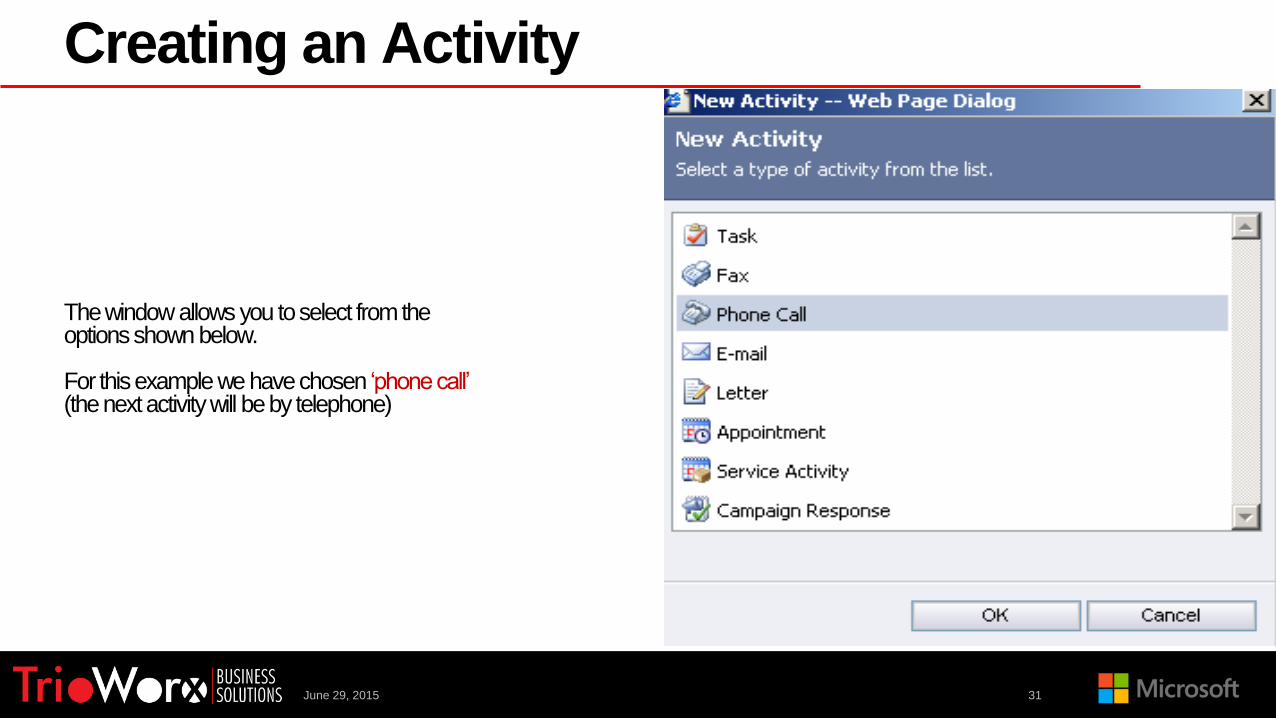
Creating an Activity
The window allows you to select from the options shown below.
For this example we have chosen ‘phone call’ (the next activity will be by telephone)
June 29, 2015 32
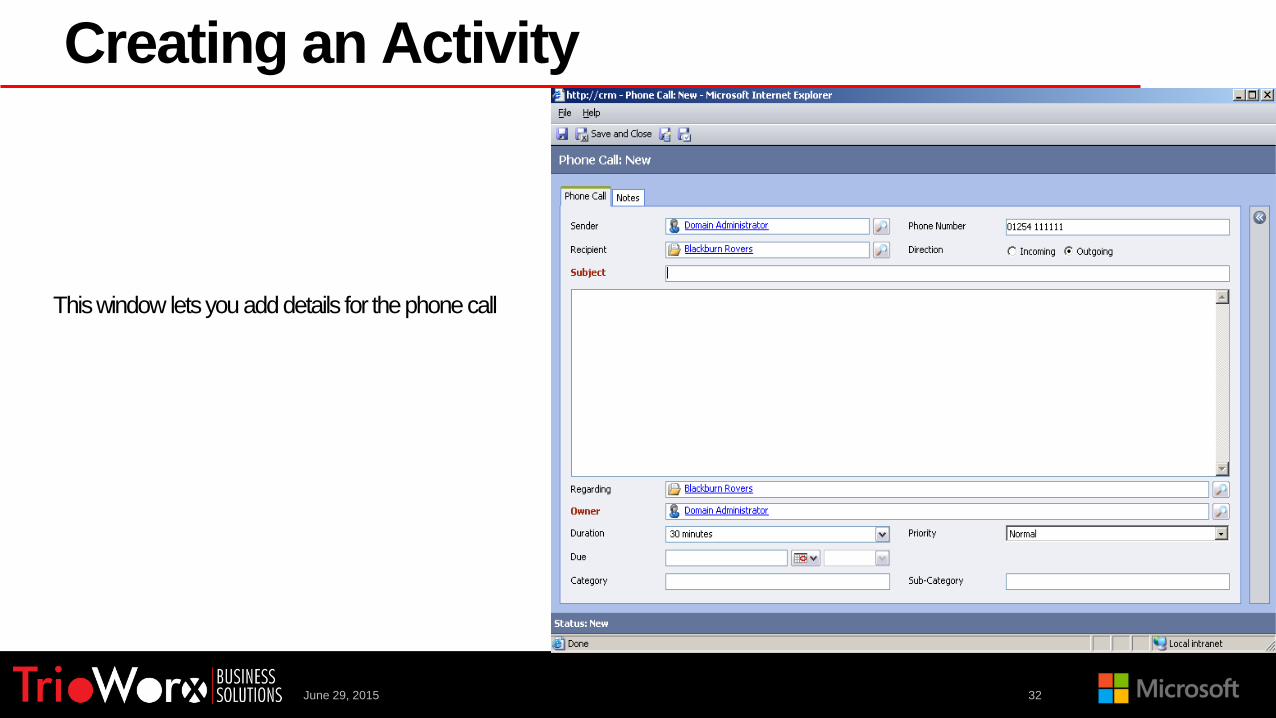
Creating an Activity
This window lets you add details for the phone call
June 29, 2015 33
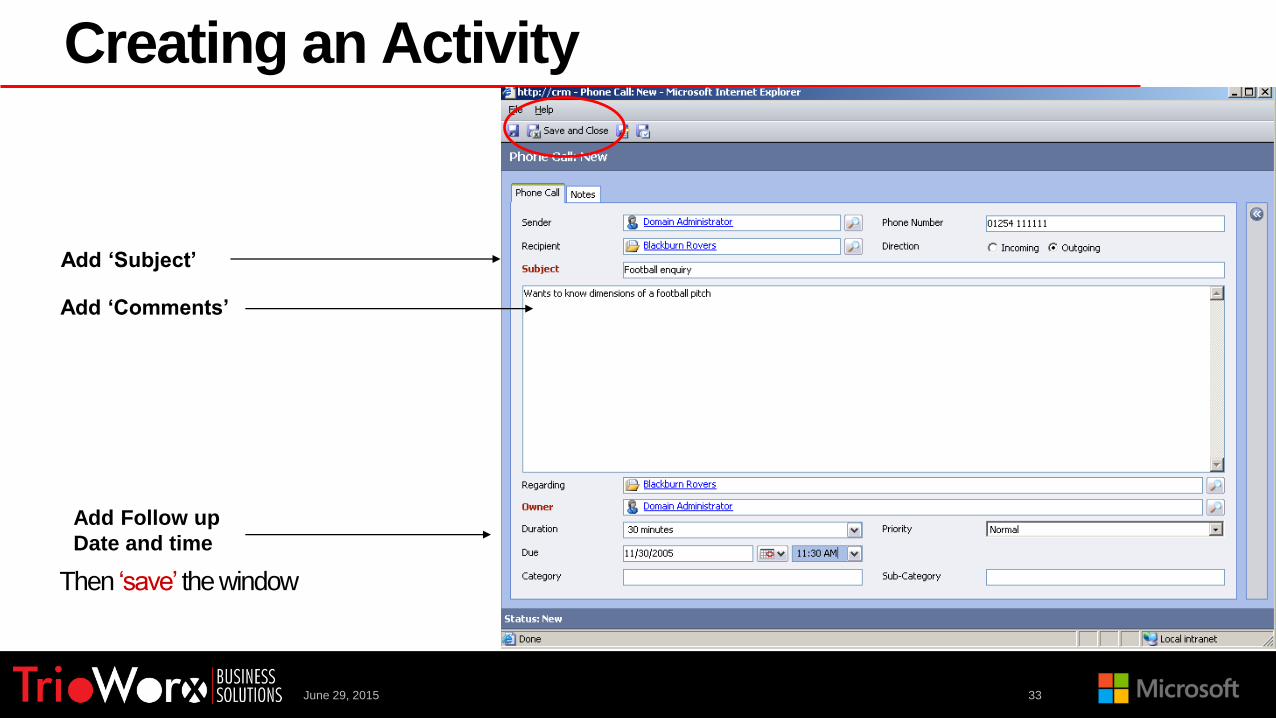
Creating an Activity
Add ‘Subject’
Add ‘Comments’
Add Follow up
Date and time
Then ‘save’ the window

June 29, 2015 34
Creating an Activity
The Window changes slightly, adding an ‘Actions’option and additional functions
June 29, 2015 35
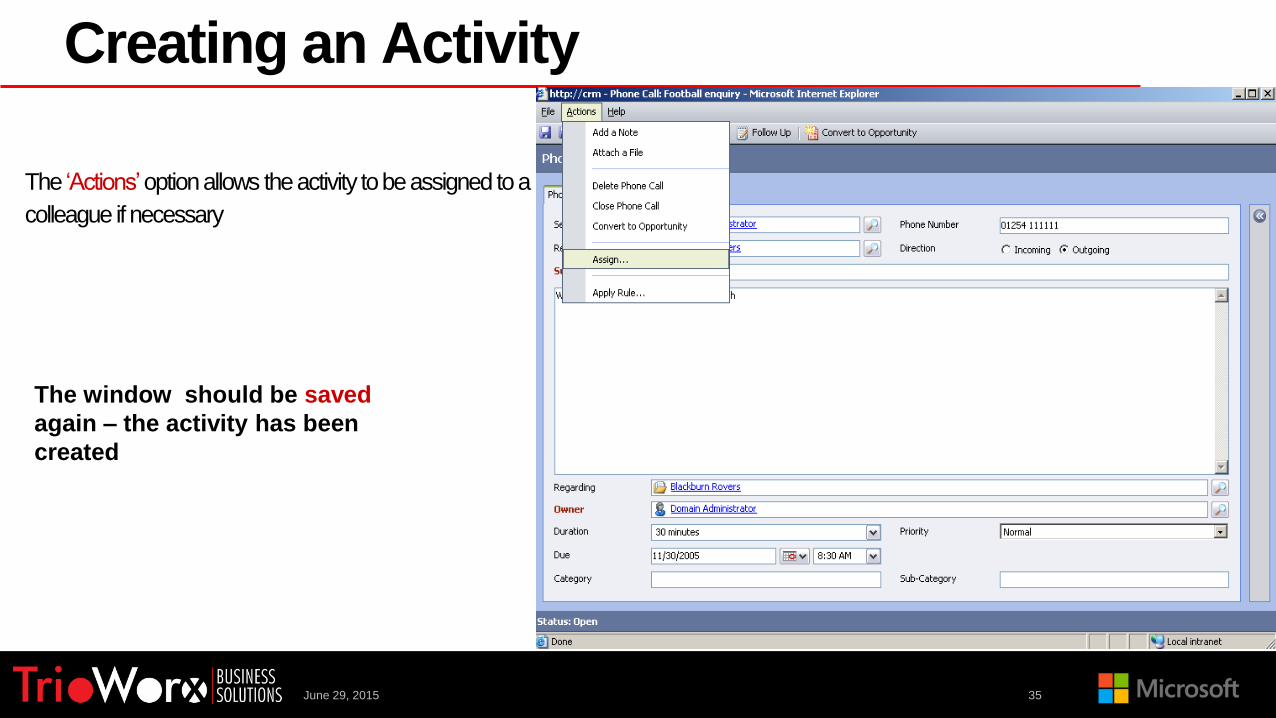
Creating an Activity
The ‘Actions’option allows the activity to be assigned to a
colleague if necessary
The window should be saved
again – the activity has been
created
June 29, 2015 36
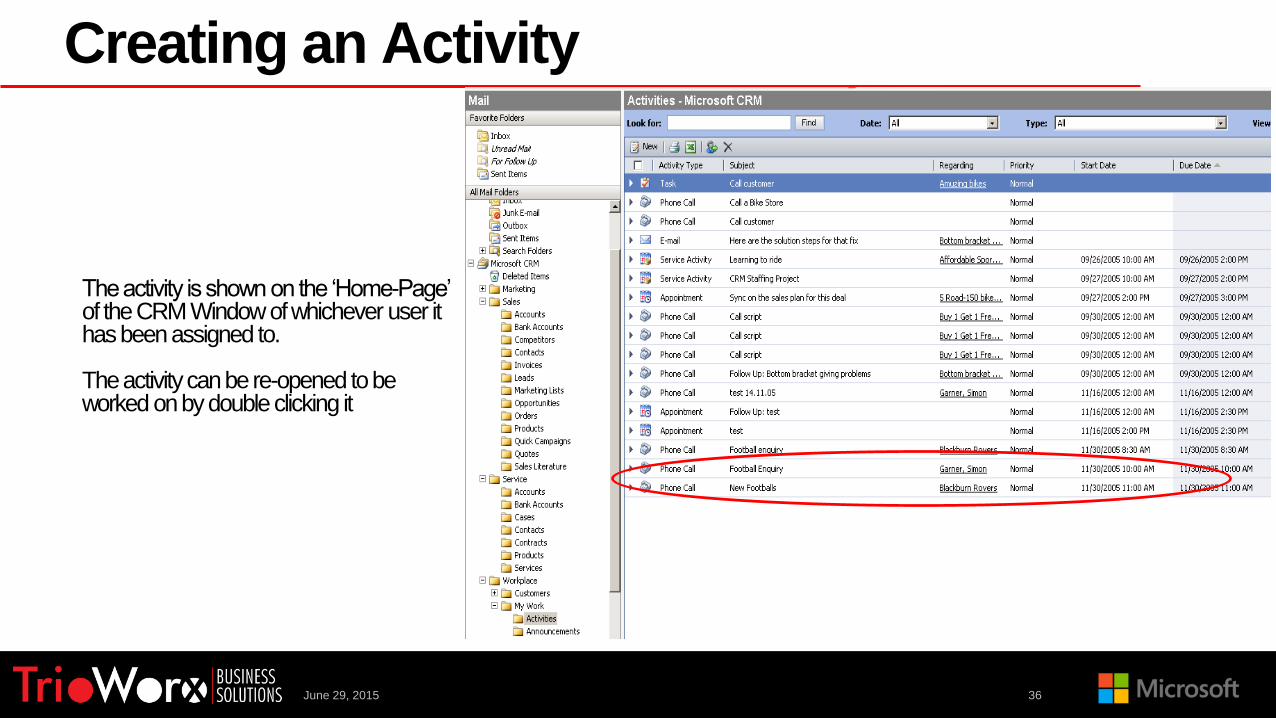
Creating an Activity
The activity is shown on the ‘Home-Page’ of the CRM Window of whichever user it has been assigned to.
The activity can be re-opened to be worked on by double clicking it

June 29, 2015 37
Creating an Activity
Any additional notes or comments should be added.
The activity must either be closed or alternatively can be forward dated for further
follow up
June 29, 2015 38
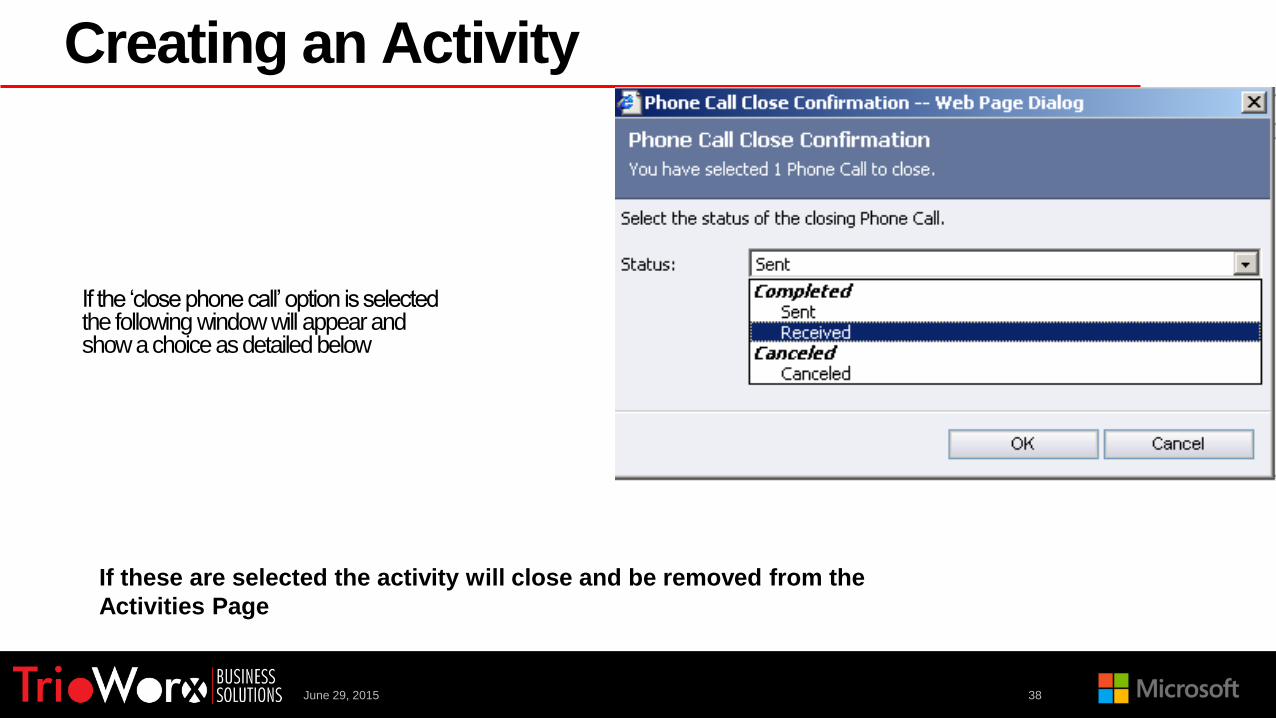
Creating an Activity
If the ‘close phone call’ option is selected the following window will appear and show a choice as detailed below
If these are selected the activity will close and be removed from the
Activities Page

Temel Kayıt TipleriCONTACT
June 29, 2015 39
June 29, 2015 40
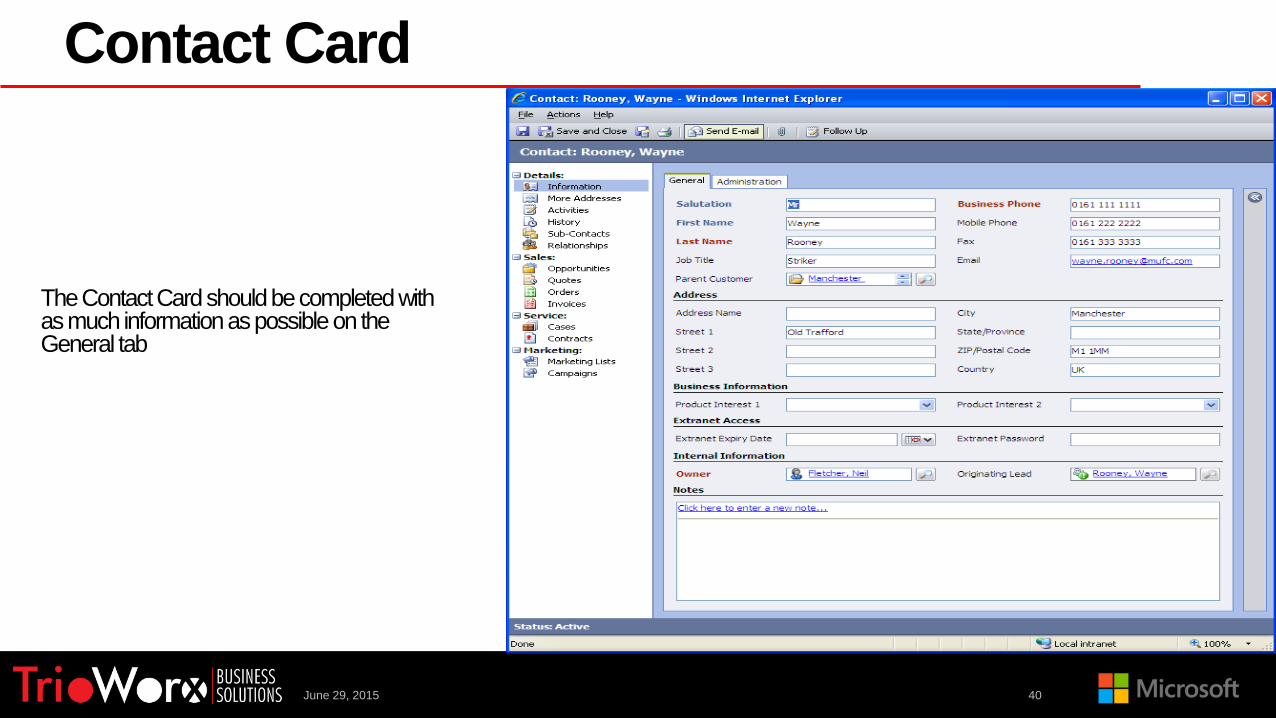
Contact Card
The Contact Card should be completed with as much information as possible on the General tab

June 29, 2015 41
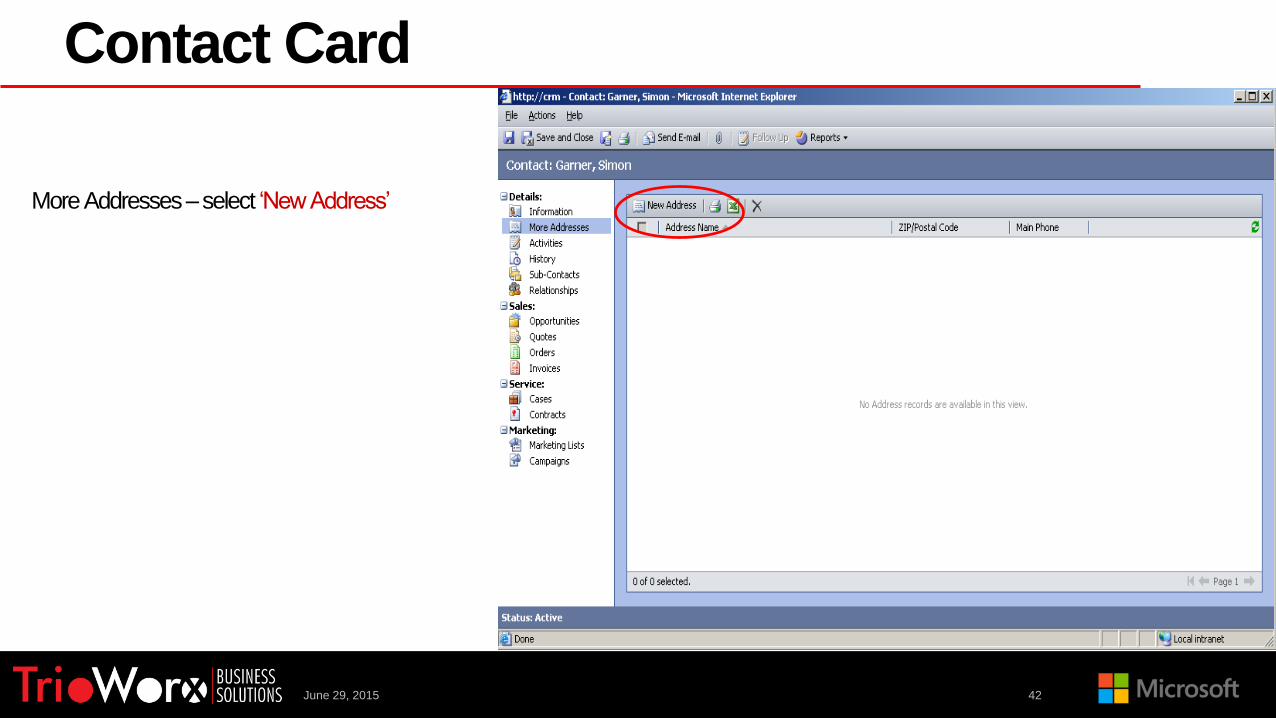
Contact Card
More Addresses
June 29, 2015 42
Contact Card
More Addresses –select ‘New Address’

June 29, 2015 43
Contact Card
Additional addresses –can be added, for example, if the Contact has a second office
June 29, 2015 44
Contact Card
Sales
June 29, 2015 45
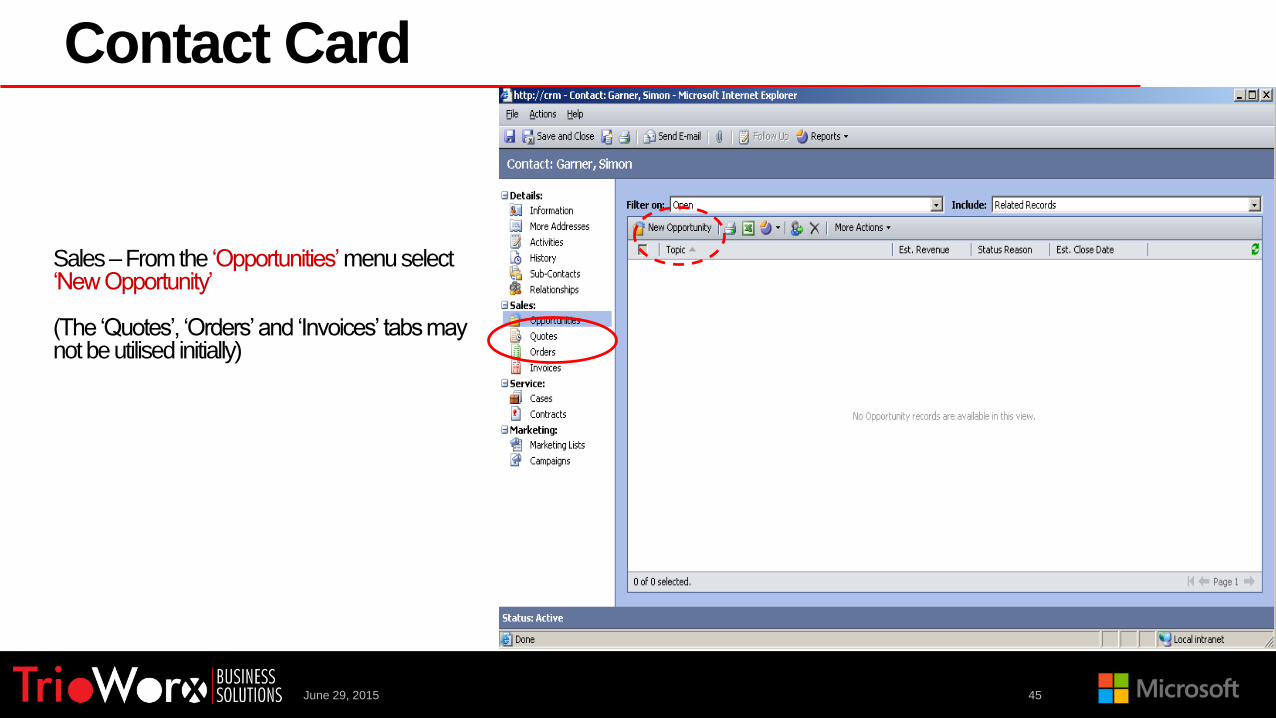
Contact Card
Sales –From the ‘Opportunities’menu select ‘New Opportunity’
(The ‘Quotes’, ‘Orders’ and ‘Invoices’ tabs may not be utilised initially)
June 29, 2015 46
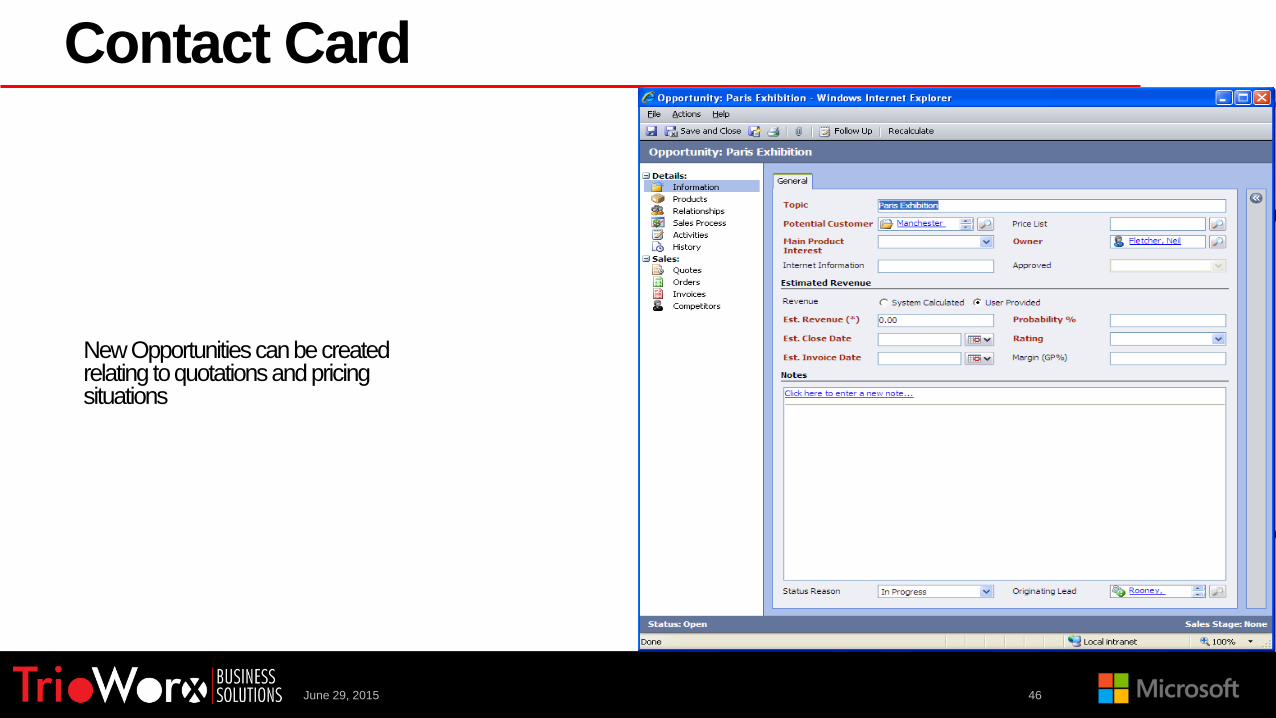
Contact Card
New Opportunities can be created relating to quotations and pricing situations

June 29, 2015 47
Contact Card
Cases – this section is not relevant at the moment
June 29, 2015 48
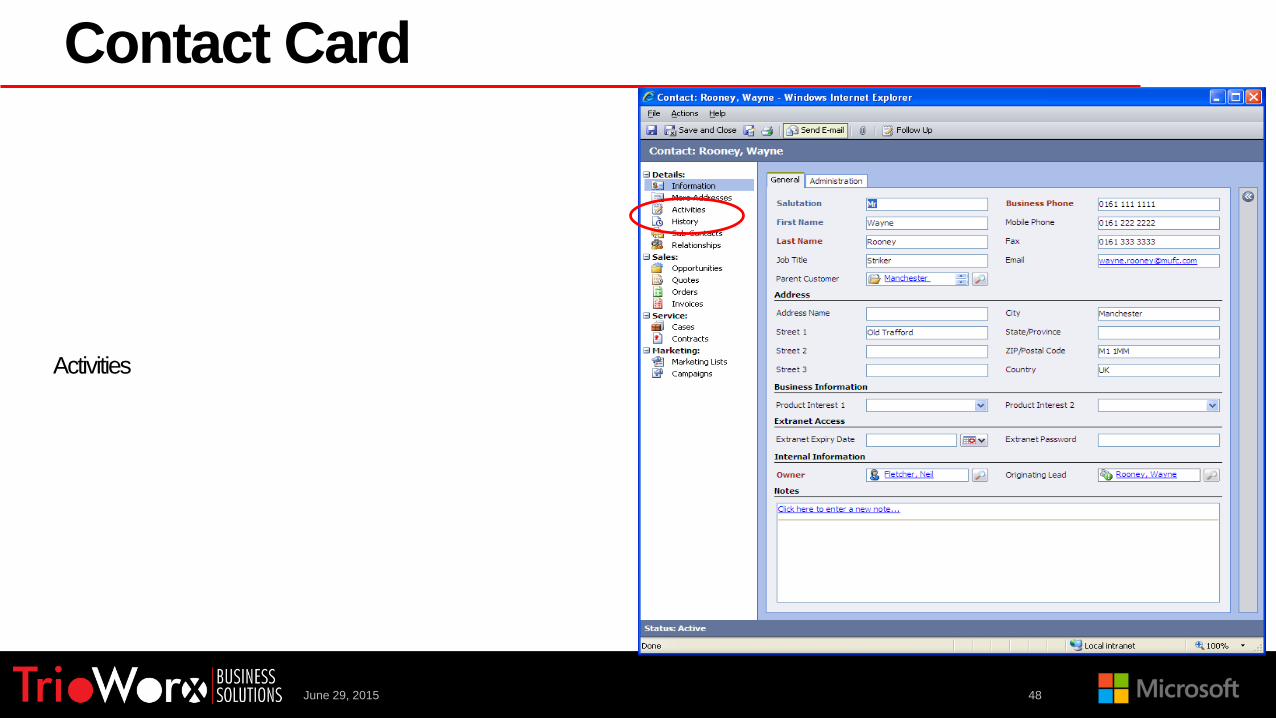
Contact Card
Activities
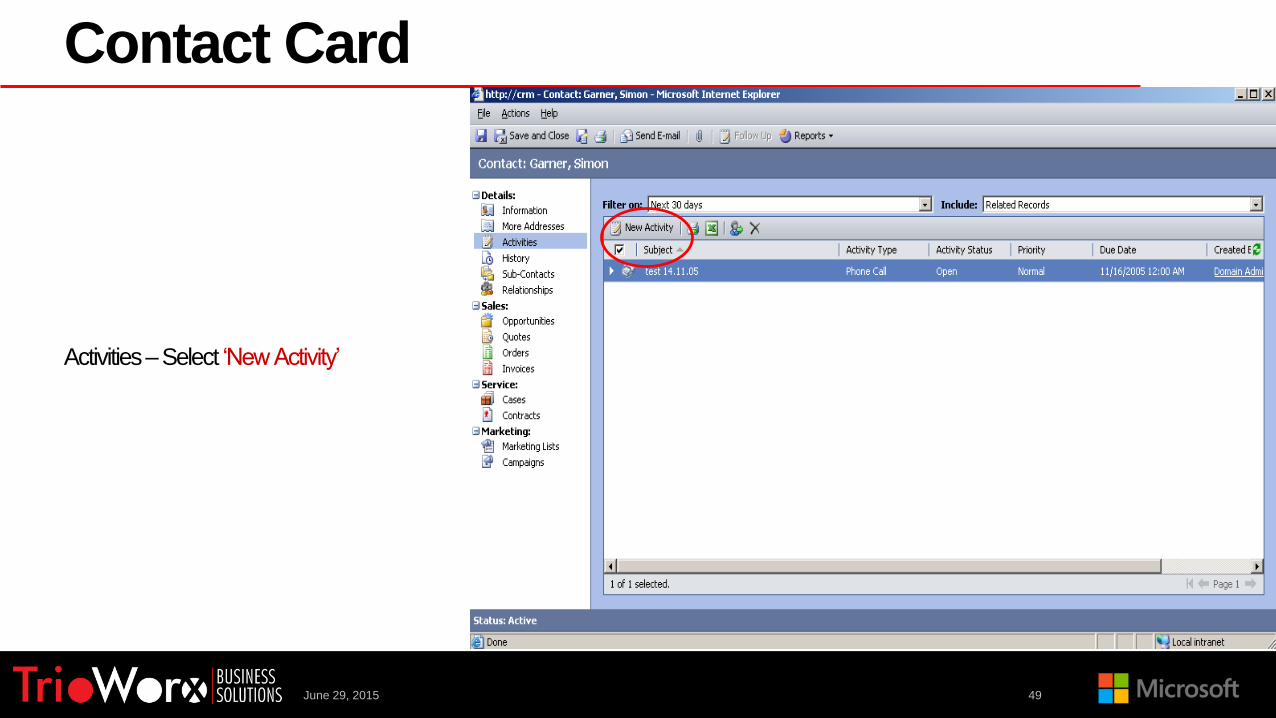
June 29, 2015 49
Contact Card
Activities –Select ‘New Activity’
June 29, 2015 50
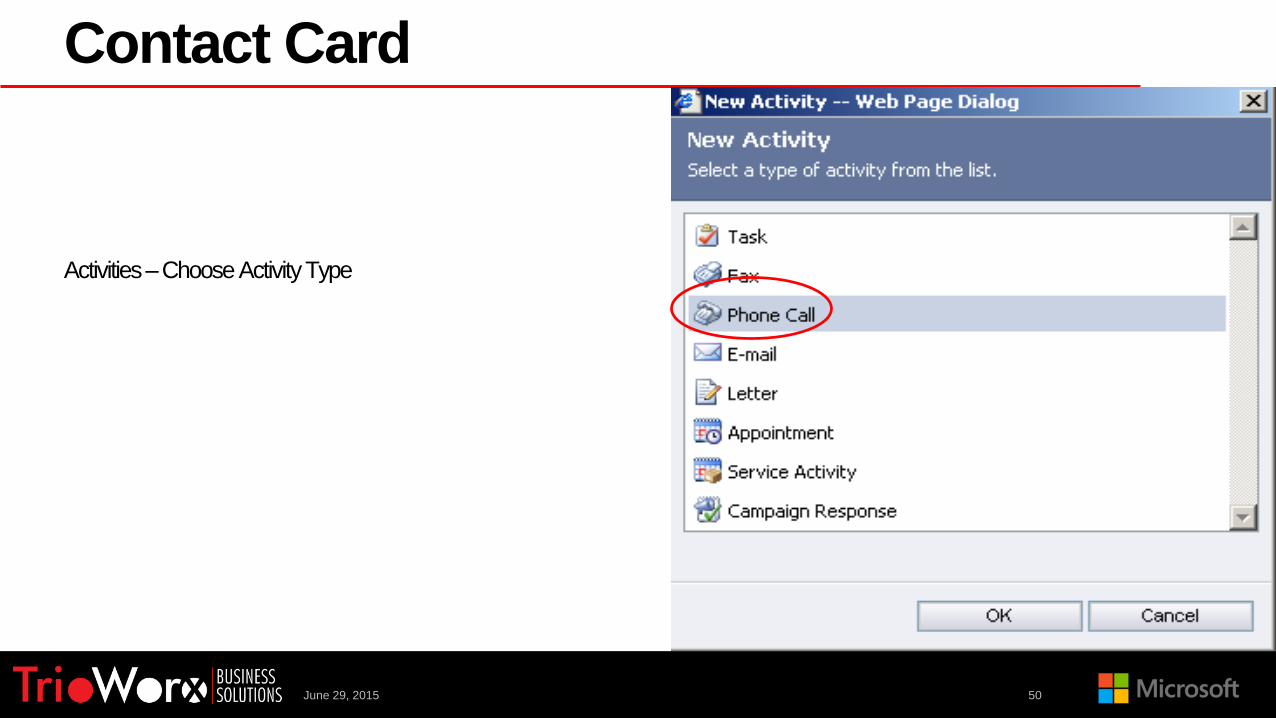
Contact Card
Activities –Choose Activity Type
June 29, 2015 51
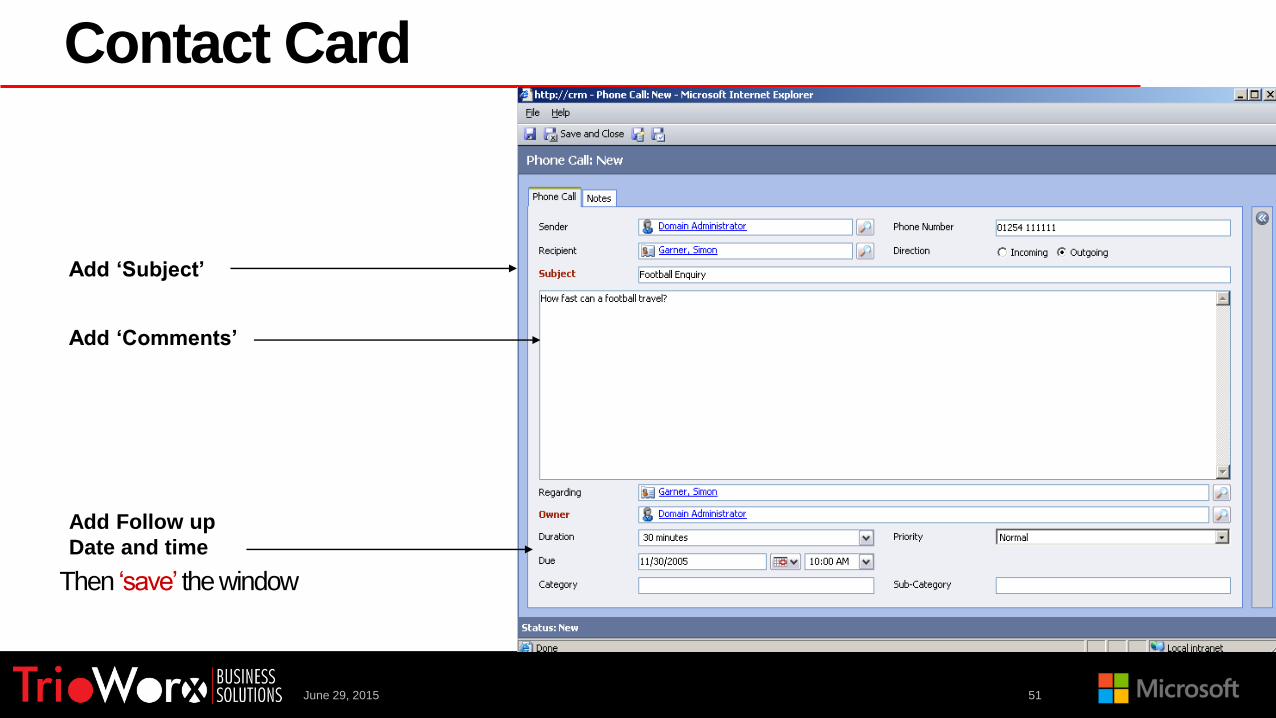
Contact Card
Add ‘Subject’
Add ‘Comments’
Add Follow up
Date and time
Then ‘save’ the window
June 29, 2015 52
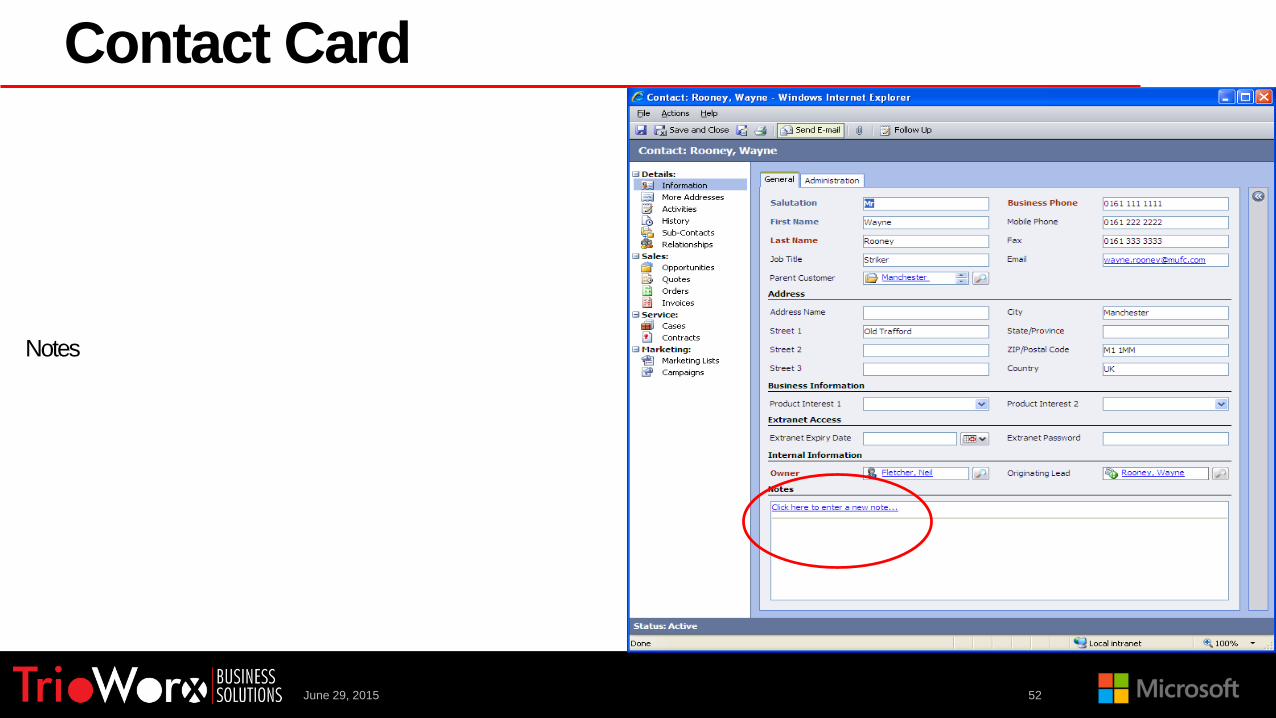
Contact Card
Notes

June 29, 2015 53
Contact Card
Notes –can be added as plain text or alternatively files can be attached
Double click the note to open more details
June 29, 2015 54
Contact CardMarketing – this will show any ‘marketing list’ the account is a member of or any ‘campaign’ the account is connected to.

June 29, 2015 55
Contact Card
Relationships
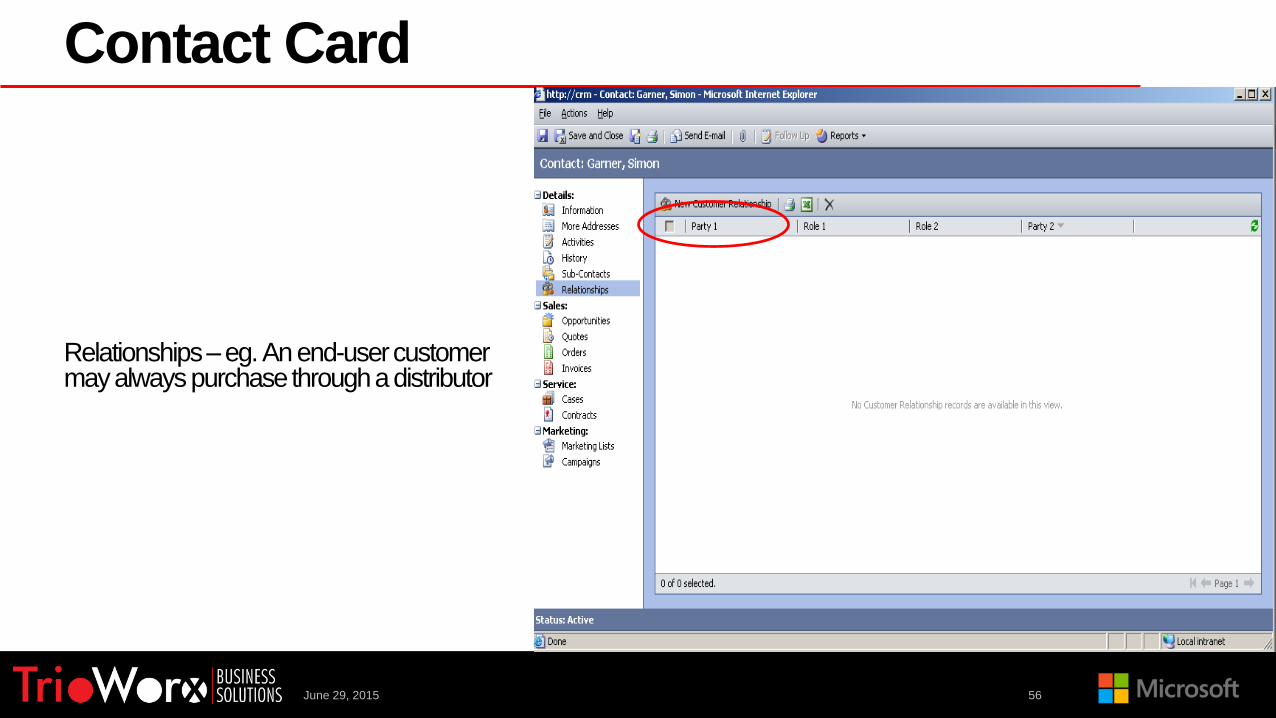
June 29, 2015 56
Contact Card
Relationships –eg. An end-user customer may always purchase through a distributor

June 29, 2015 57
Contact Card
Relationships –complete relevant fields

Temel Kayıt TipleriLEAD
June 29, 2015 58

June 29, 2015 59
Creating a Lead
From the Outlook menu bar choose “CRM” - “New Record” – “Lead”

June 29, 2015 60
Creating a Lead
A new LEAD window appears.
Red Bold text = Information must be includedBlue Bold Text = Information is recommendedBlack Text = Information
Then, “Save”the window
It is beneficial to ‘capture’ as much
information as possible

June 29, 2015 61
Creating a LeadWhen the information is saved the screen changes showing the following details…Extra fields/information have been added
‒ The lead is now created
June 29, 2015 62
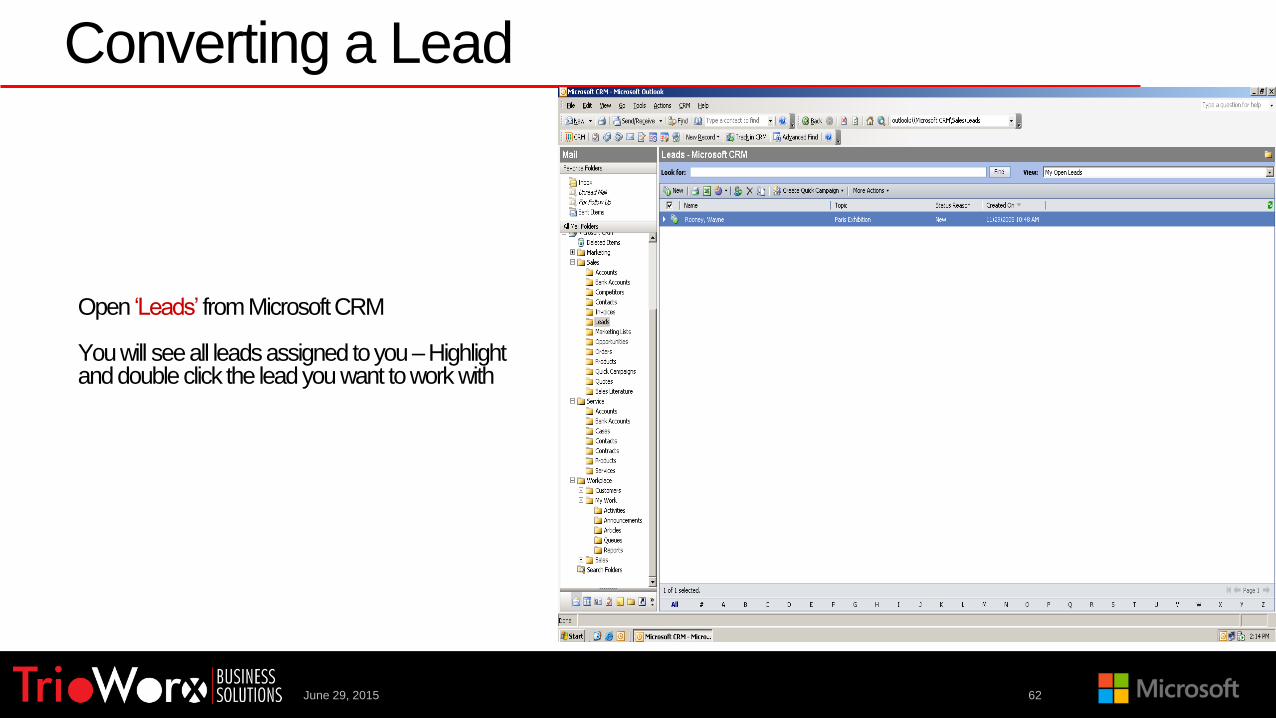
Converting a Lead
Open ‘Leads’ from Microsoft CRM
You will see all leads assigned to you –Highlight and double click the lead you want to work with

June 29, 2015 63
Converting a Lead
A separate window will open showing the lead – there is an option to ‘convert lead’
June 29, 2015 64
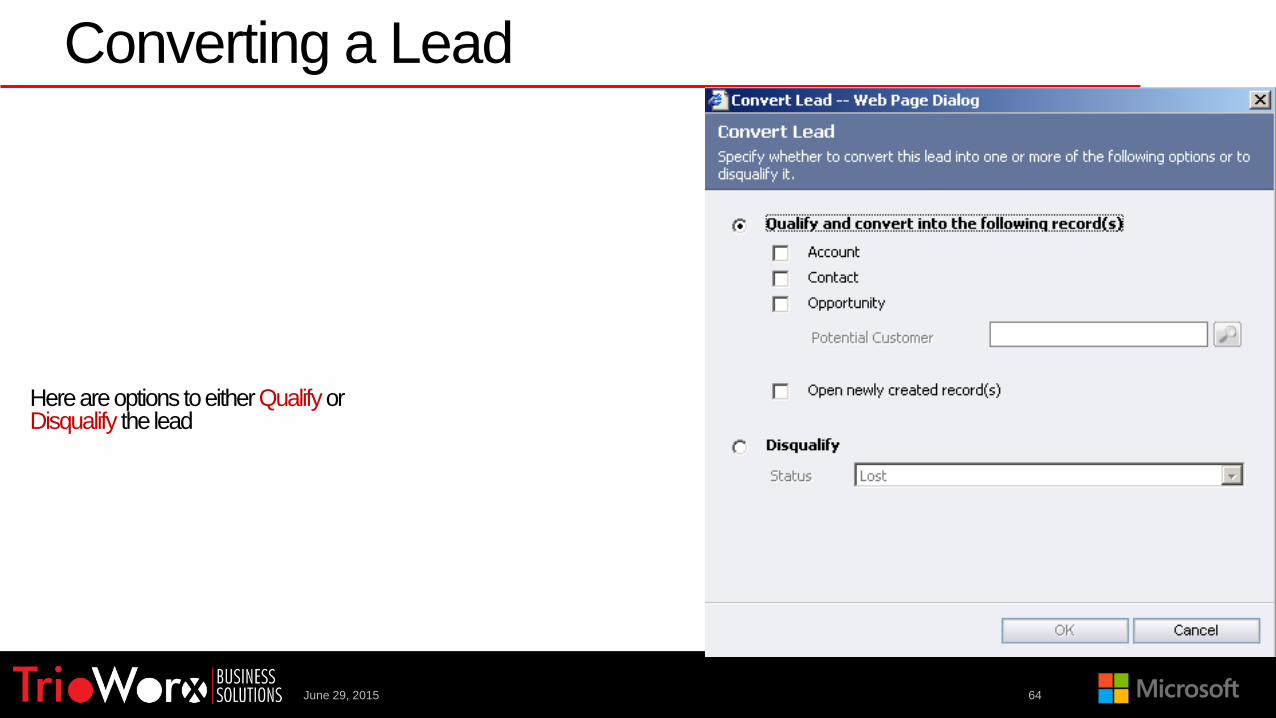
Converting a Lead
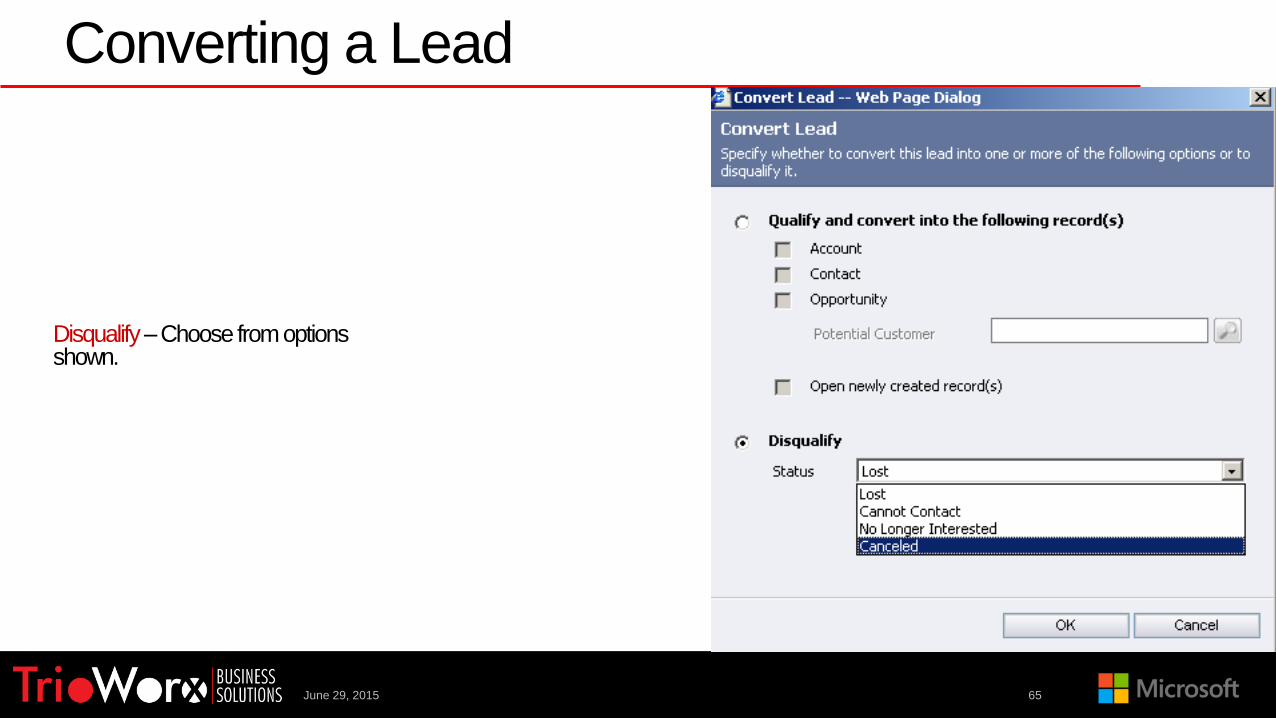
Here are options to either Qualifyor Disqualify the lead
June 29, 2015 65
Converting a Lead
Disqualify–Choose from options shown.

June 29, 2015 66
Converting a Lead
Qualify–Choose from options shown (Account, Contact, Opportunity)
June 29, 2015 67
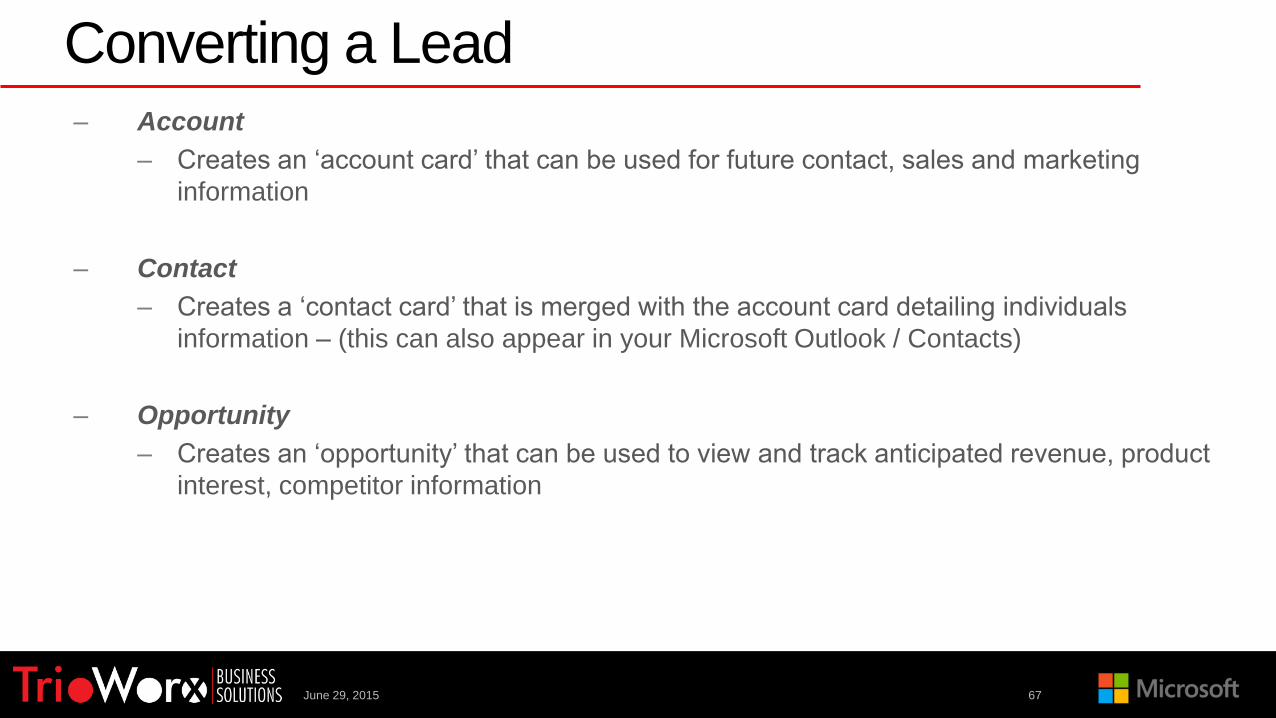
Converting a Lead‒ Account
‒ Creates an ‘account card’ that can be used for future contact, sales and marketing
information
‒ Contact
‒ Creates a ‘contact card’ that is merged with the account card detailing individuals
information – (this can also appear in your Microsoft Outlook / Contacts)
‒ Opportunity
‒ Creates an ‘opportunity’ that can be used to view and track anticipated revenue, product
interest, competitor information
June 29, 2015 68
Converting a Lead
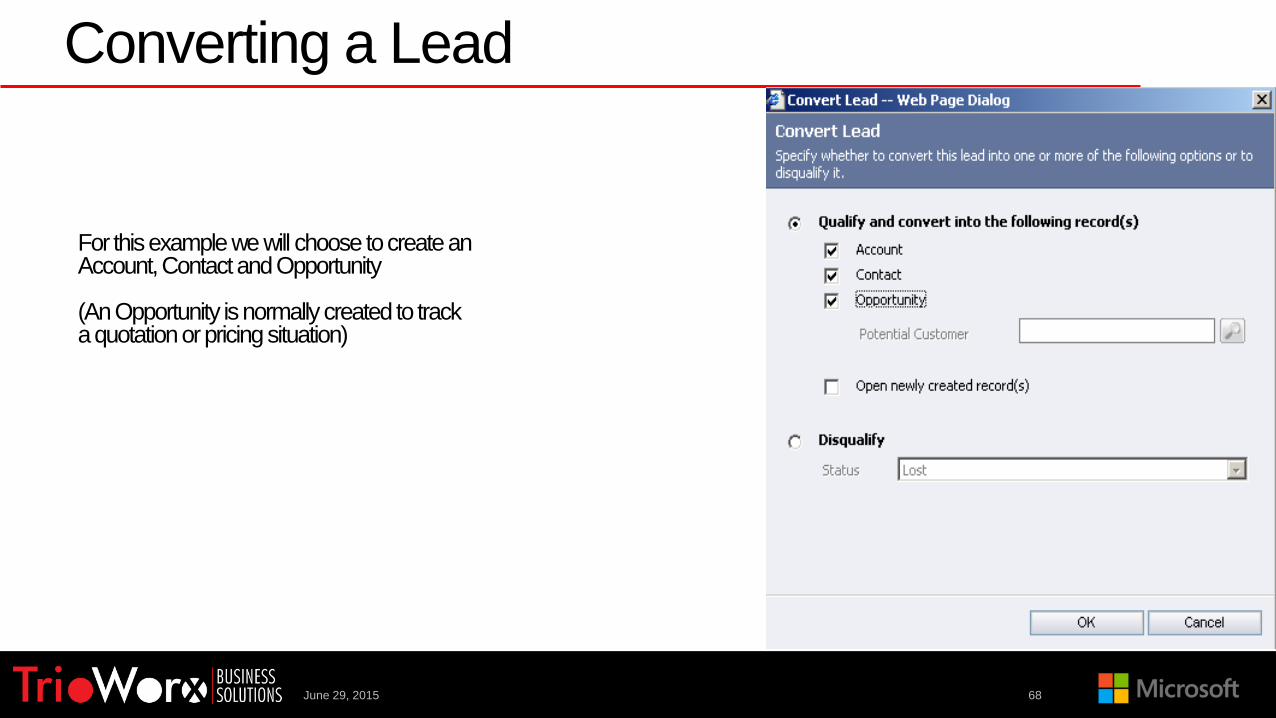
For this example we will choose to create an Account, Contact and Opportunity
(An Opportunity is normally created to track a quotation or pricing situation)
June 29, 2015 69
Account Card
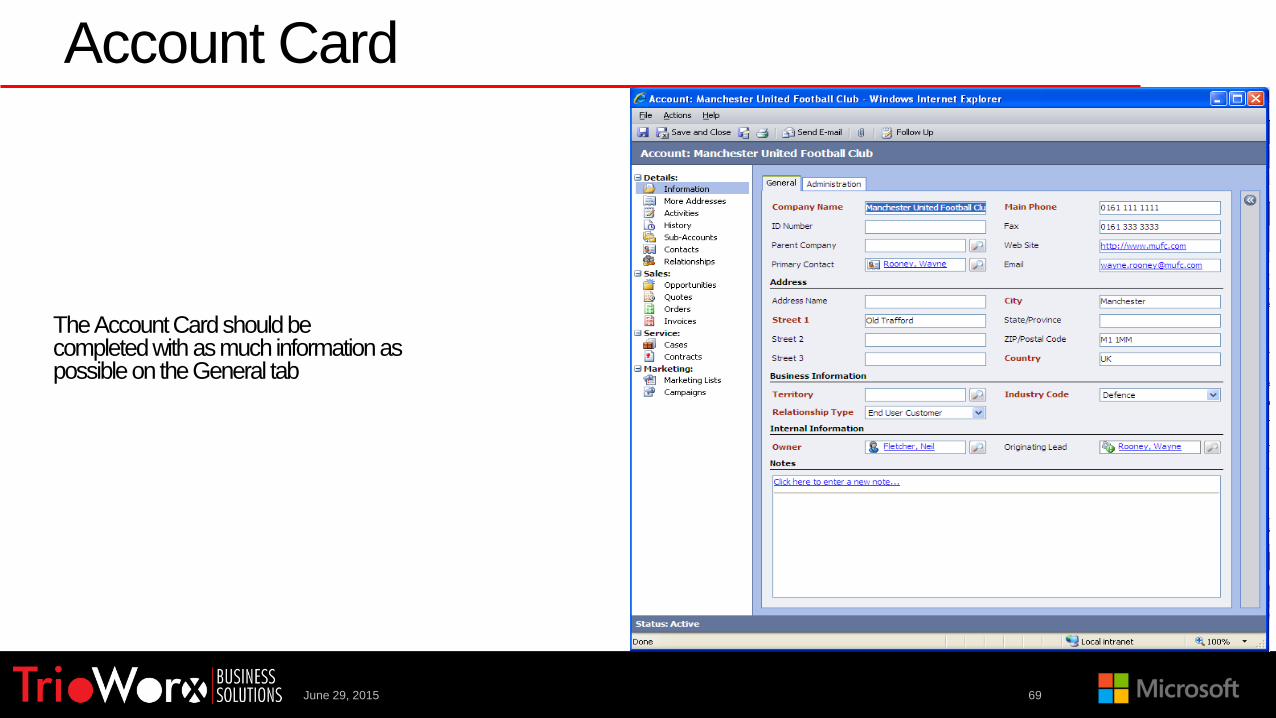
The Account Card should be completed with as much information as possible on the General tab
June 29, 2015 70
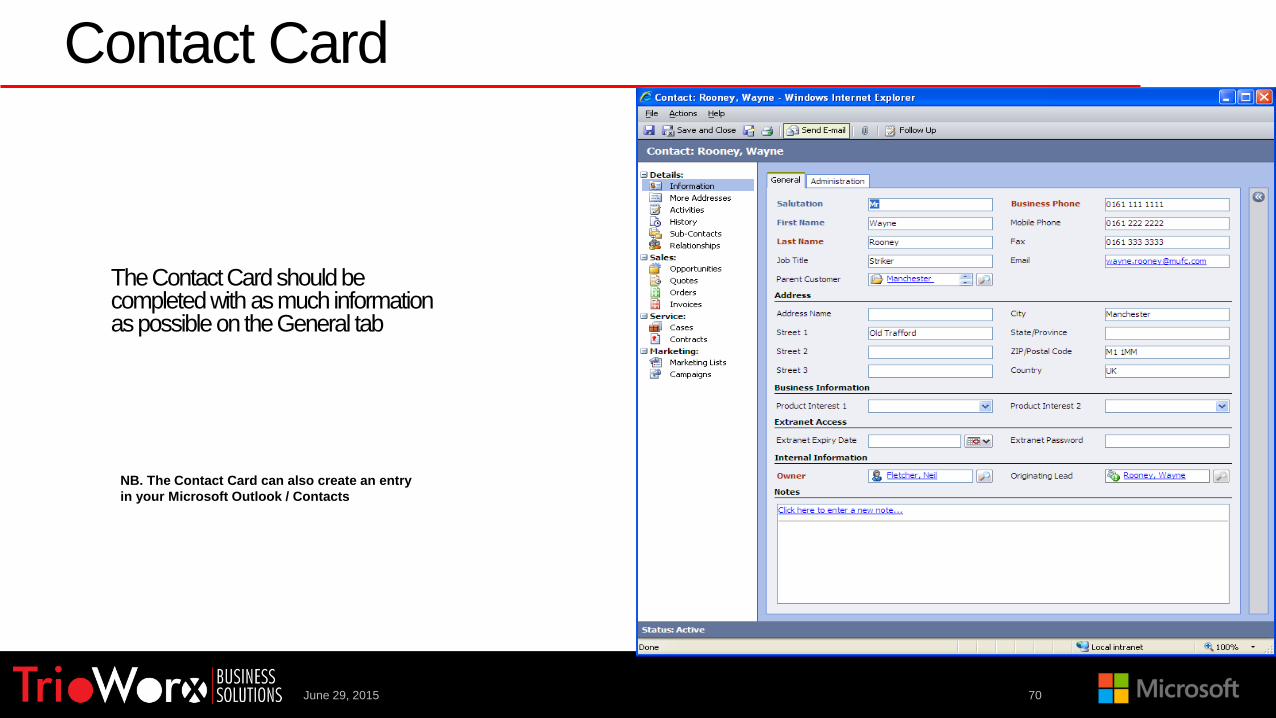
Contact Card
The Contact Card should be completed with as much information as possible on the General tab
NB. The Contact Card can also create an entry
in your Microsoft Outlook / Contacts
June 29, 2015 71
Opportunity Card
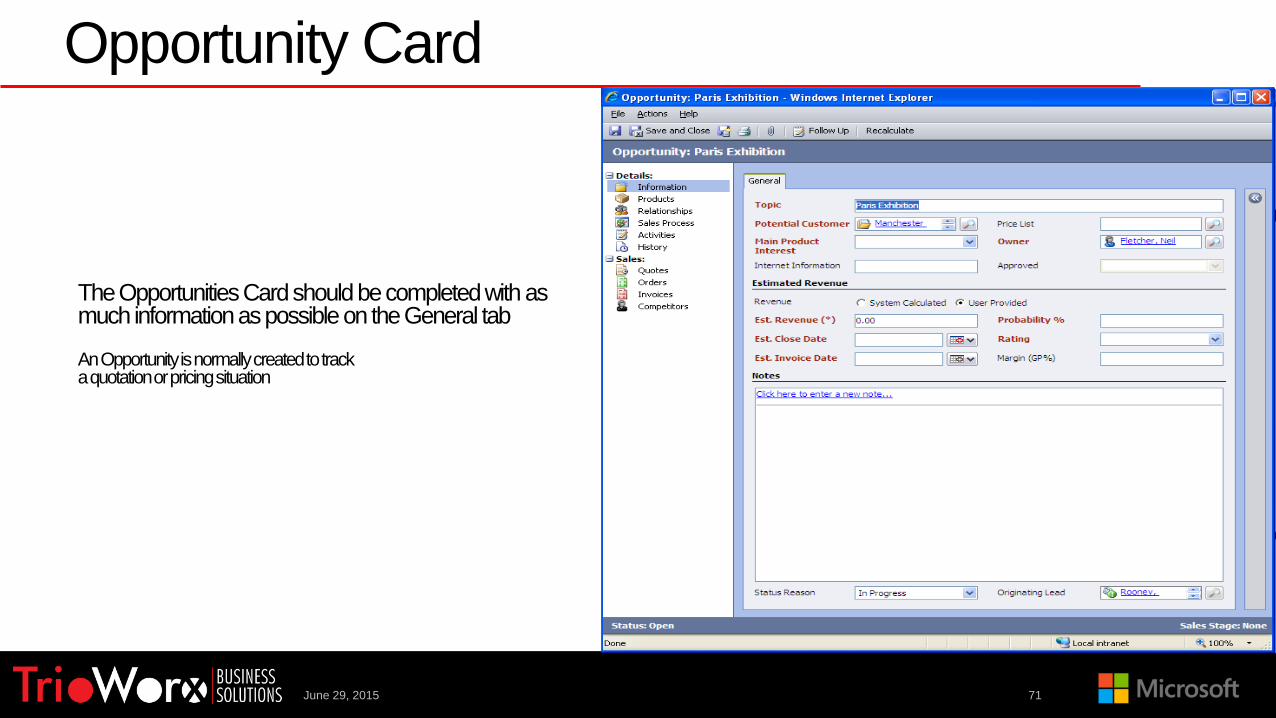
The Opportunities Card should be completed with as much information as possible on the General tab
An Opportunity is normally created to track a quotation or pricing situation

Temel Kayıt TipleriOPPORTUNITY
June 29, 2015 72
June 29, 2015 73
Opportunity Card
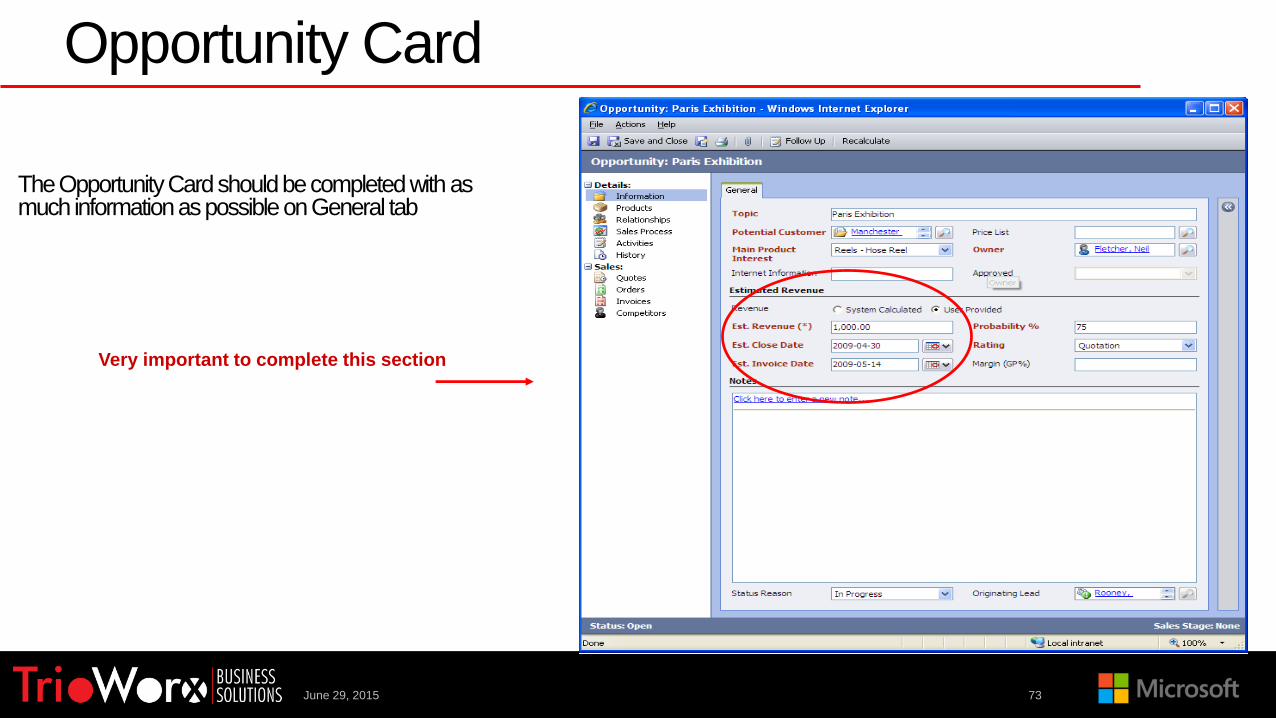
The Opportunity Card should be completed with as much information as possible on General tab
Very important to complete this section

June 29, 2015 74
Opportunity Card
Products – this section is not relevant at the moment

June 29, 2015 75
Relationships –an opportunity can be linked to more than one customer
Opportunity Card

June 29, 2015 76
Sales Process – this section is not relevant at the moment
Opportunity Card
June 29, 2015 77
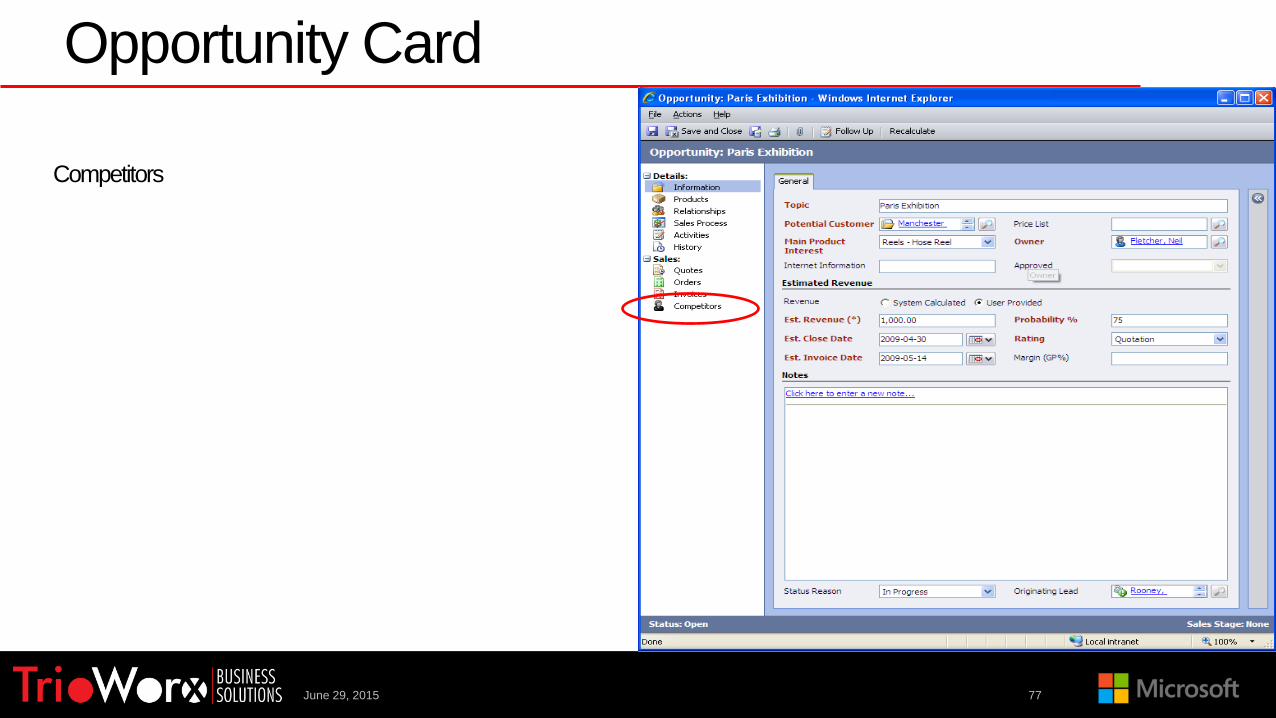
Competitors
Opportunity Card
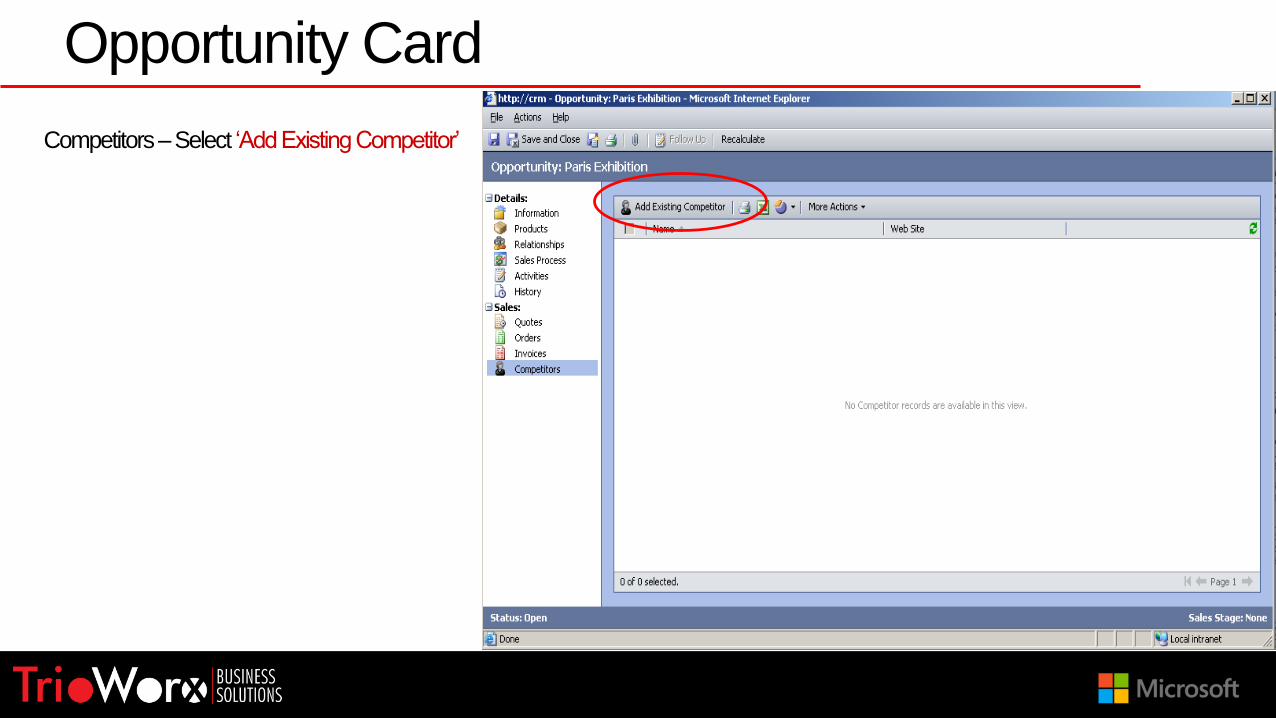
Competitors –Select ‘Add Existing Competitor’
Opportunity Card

Relevant Competitors to this Opportunity can be added using the ‘find’ function
Then highlight the
Contact
and add them to the
record
Opportunity Card

Activities
Opportunity Card

Activities –Select ‘New Activity’
Opportunity Card

Activities –Choose Activity Type
Opportunity Card

Then ‘save’ the window
Add ‘Subject’
Add ‘Comments’
Add Follow up
Date and time
Opportunity Card
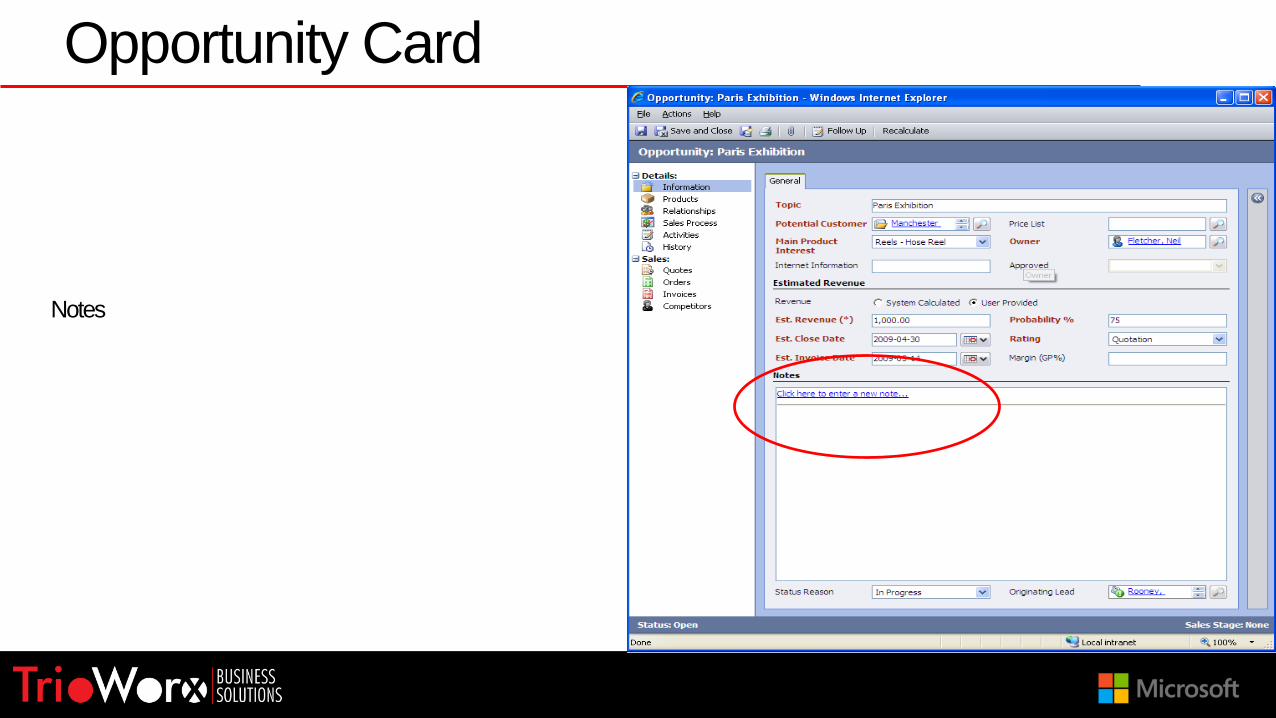
Notes
Opportunity Card

Notes –can be added as plain text or alternatively files can be attachedeg. A copy of the quotation
Opportunity Card
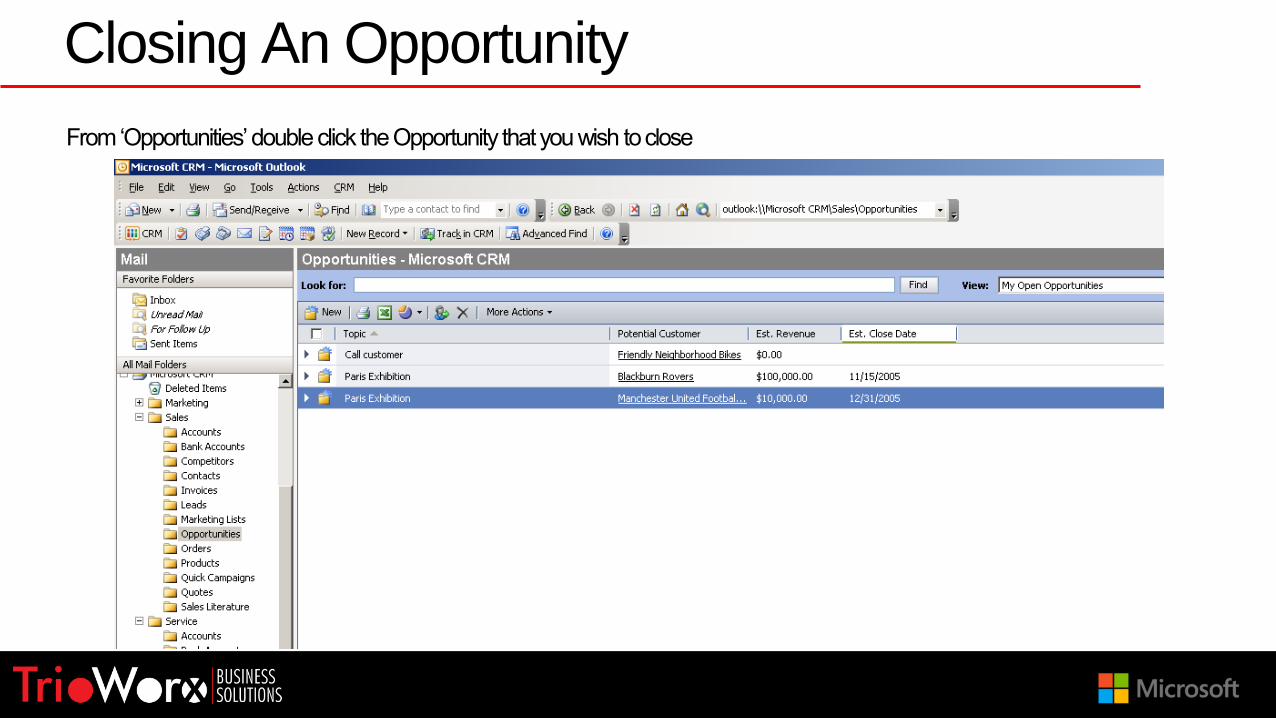
From ‘Opportunities’ double click the Opportunity that you wish to close
Closing An Opportunity
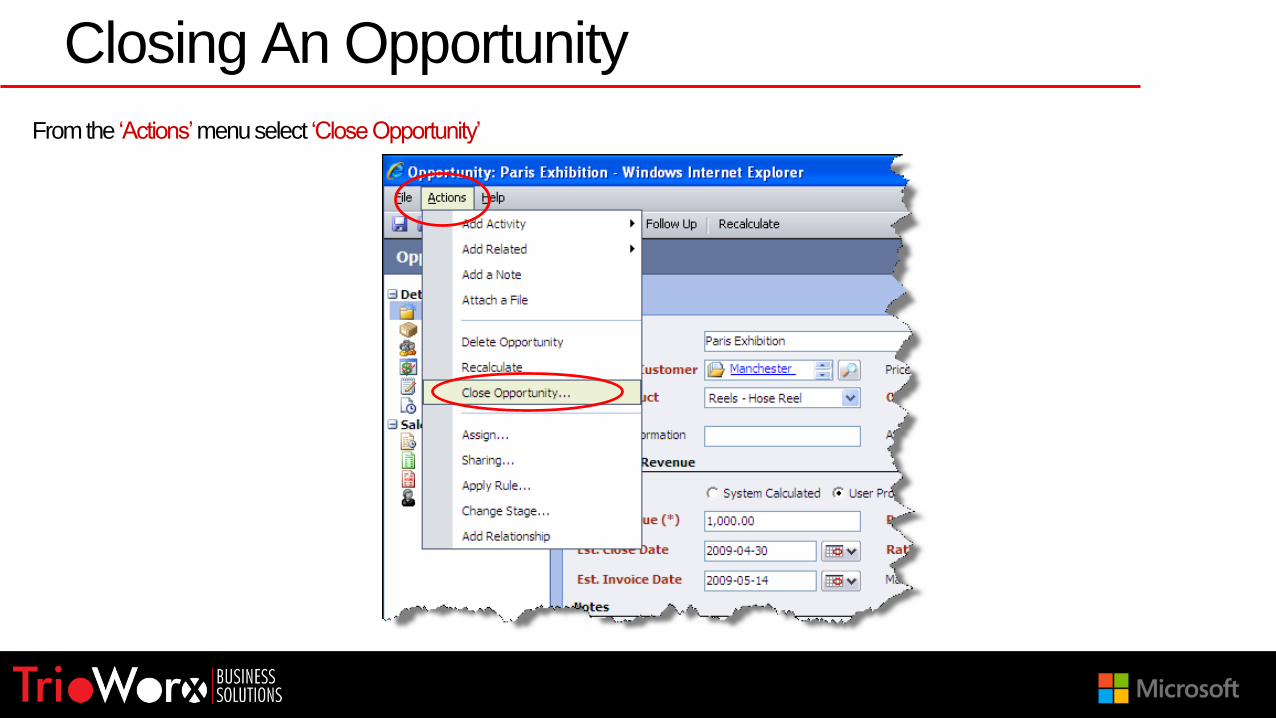
From the ‘Actions’menu select ‘Close Opportunity’
Closing An Opportunity

We can choose either ‘Won’or ‘Lost’and complete the respective information
Closing An Opportunity

PazarlamaMARKETING LIST
June 29, 2015 89

June 29, 2015 90
Marketing List
Marketing List –A function used to group ‘Accounts’, ‘Contacts’ or ‘Leads’ for marketing purposes
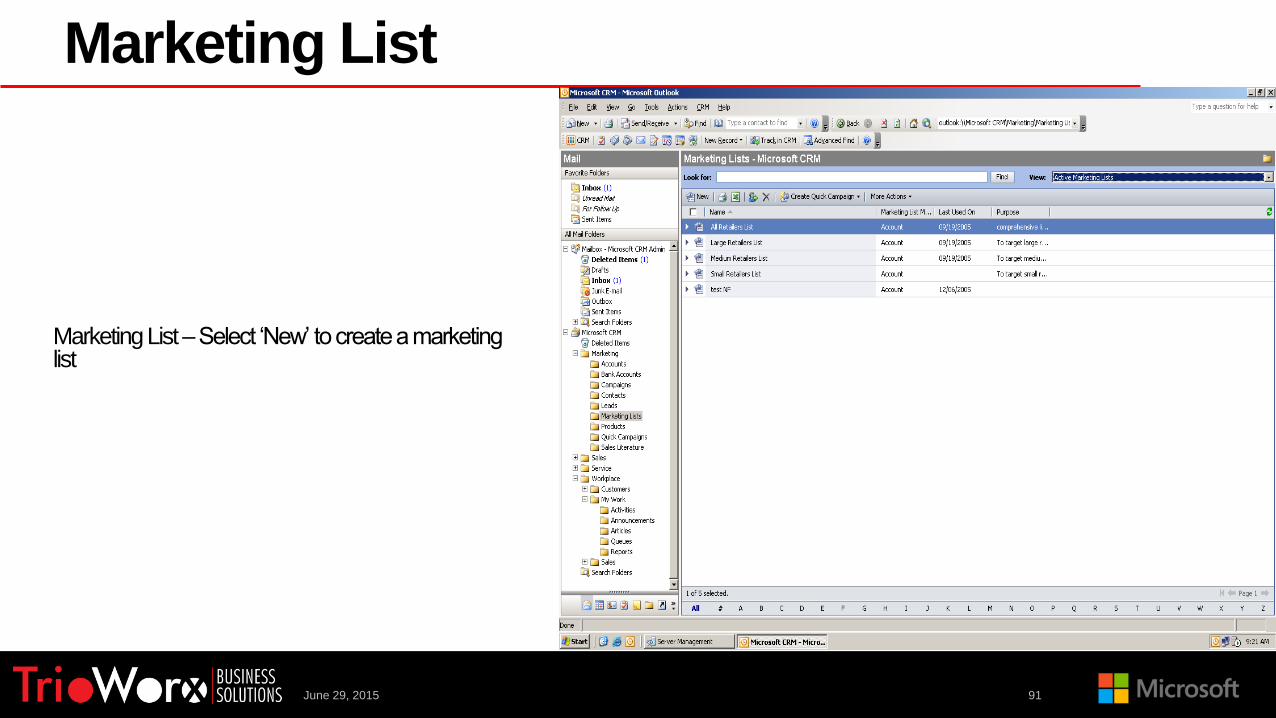
June 29, 2015 91
Marketing List
Marketing List –Select ‘New’ to create a marketing list

June 29, 2015 92
Marketing List
Marketing List –Complete necessary information
When you SAVE the
form these options
become available

June 29, 2015 93
Marketing List
Marketing List –To add members to the list select ‘Members’ and choose ‘Manage Members’

June 29, 2015 94
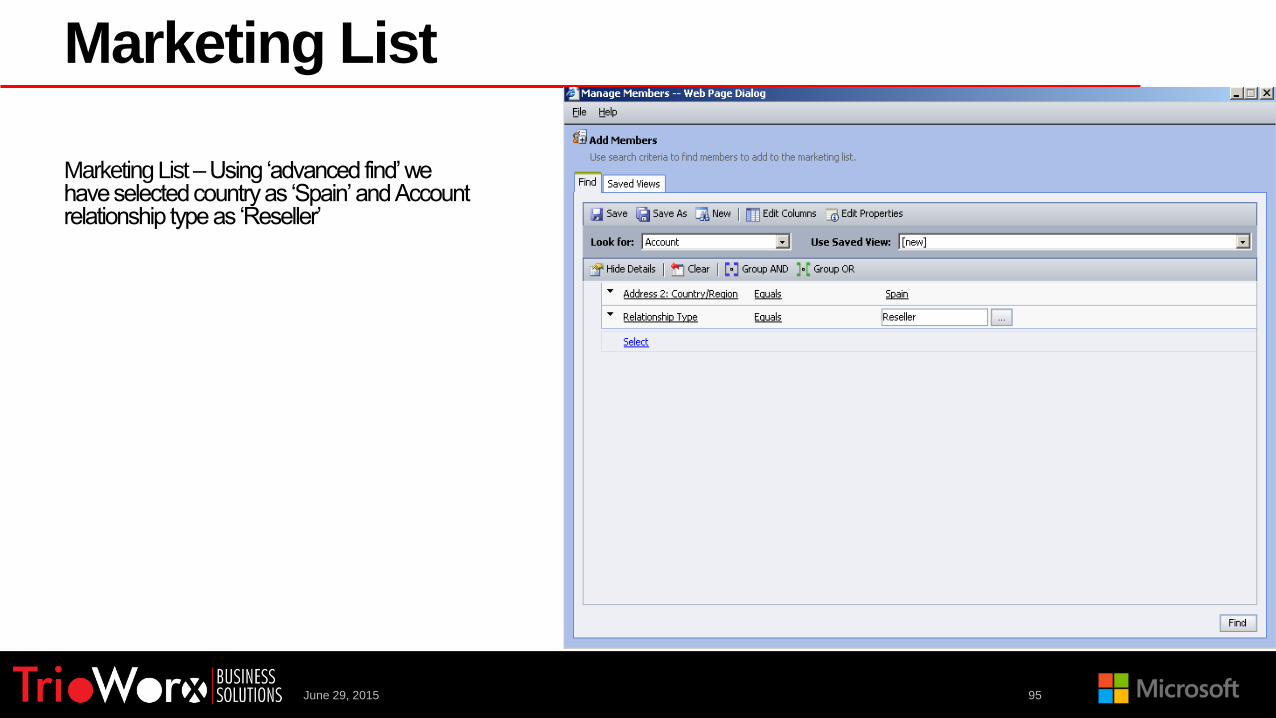
Marketing List
Marketing List –Members can be added using ‘lookup’ or ‘advanced find’
Members can also be removed from a
marketing list or the list can be updated
June 29, 2015 95
Marketing List
Marketing List –Using ‘advanced find’ we have selected country as ‘Spain’ and Account relationship type as ‘Reseller’
June 29, 2015 96
Marketing List
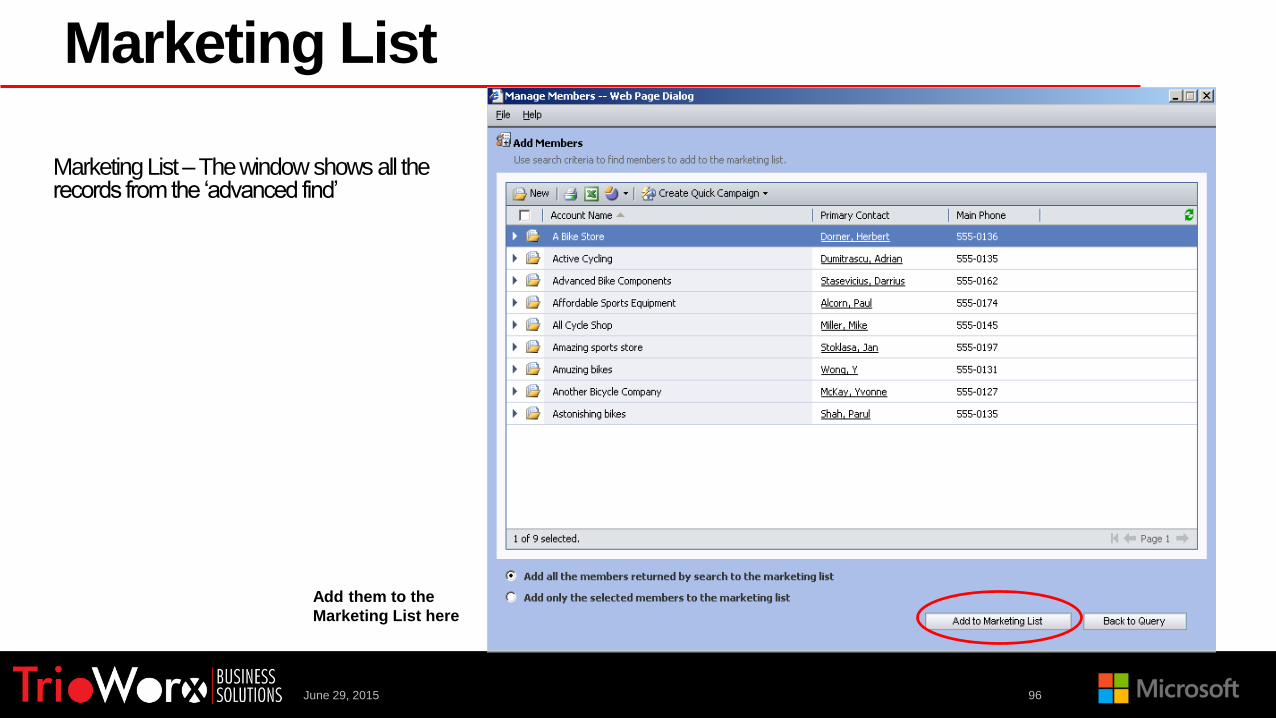
Marketing List –The window shows all the records from the ‘advanced find’
Add them to the
Marketing List here
June 29, 2015 97
Marketing List
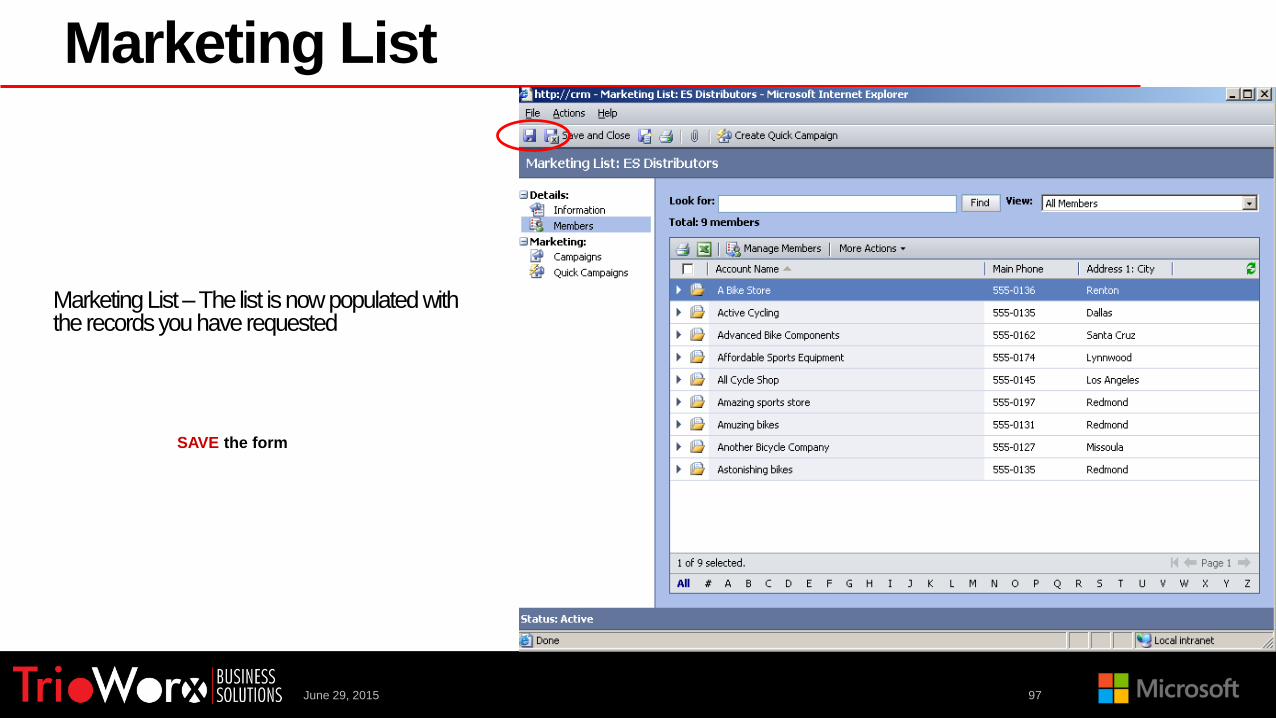
Marketing List –The list is now populated with the records you have requested
SAVE the form
June 29, 2015 98
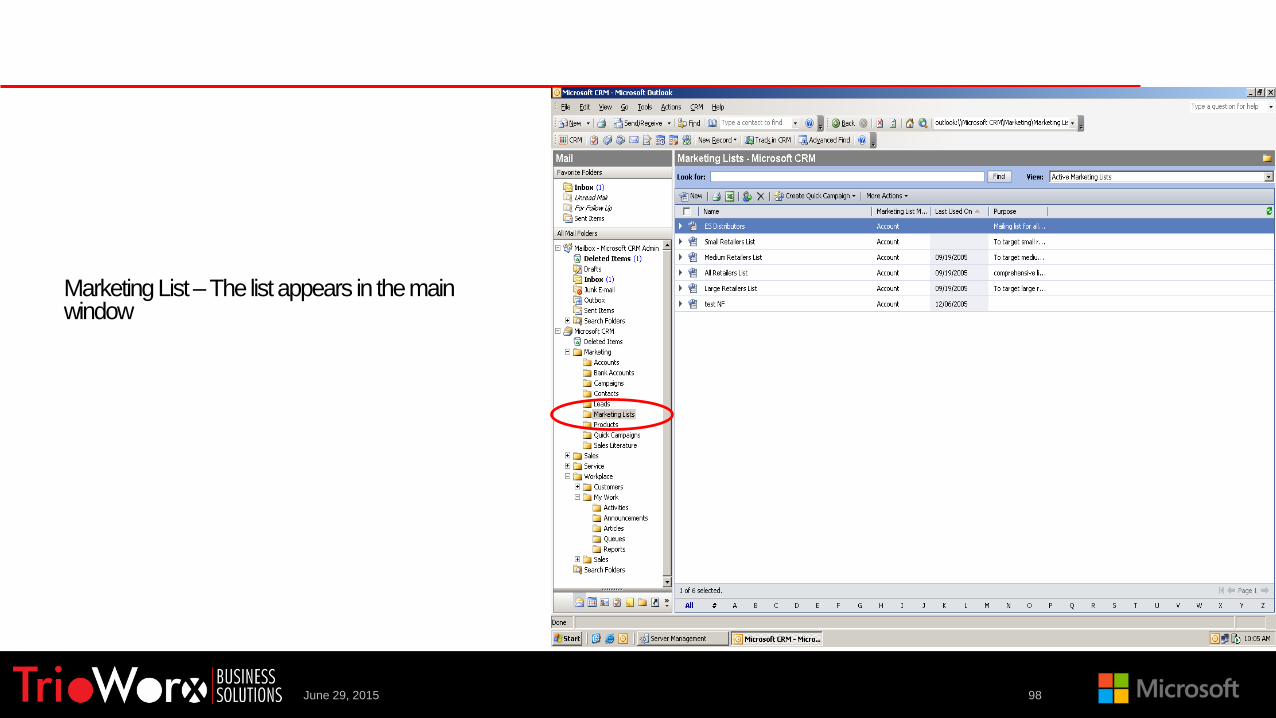
Marketing List –The list appears in the main window

PazarlamaQUICK CAMPAIGN
June 29, 2015 99
June 29, 2015 100
Quick Campaign
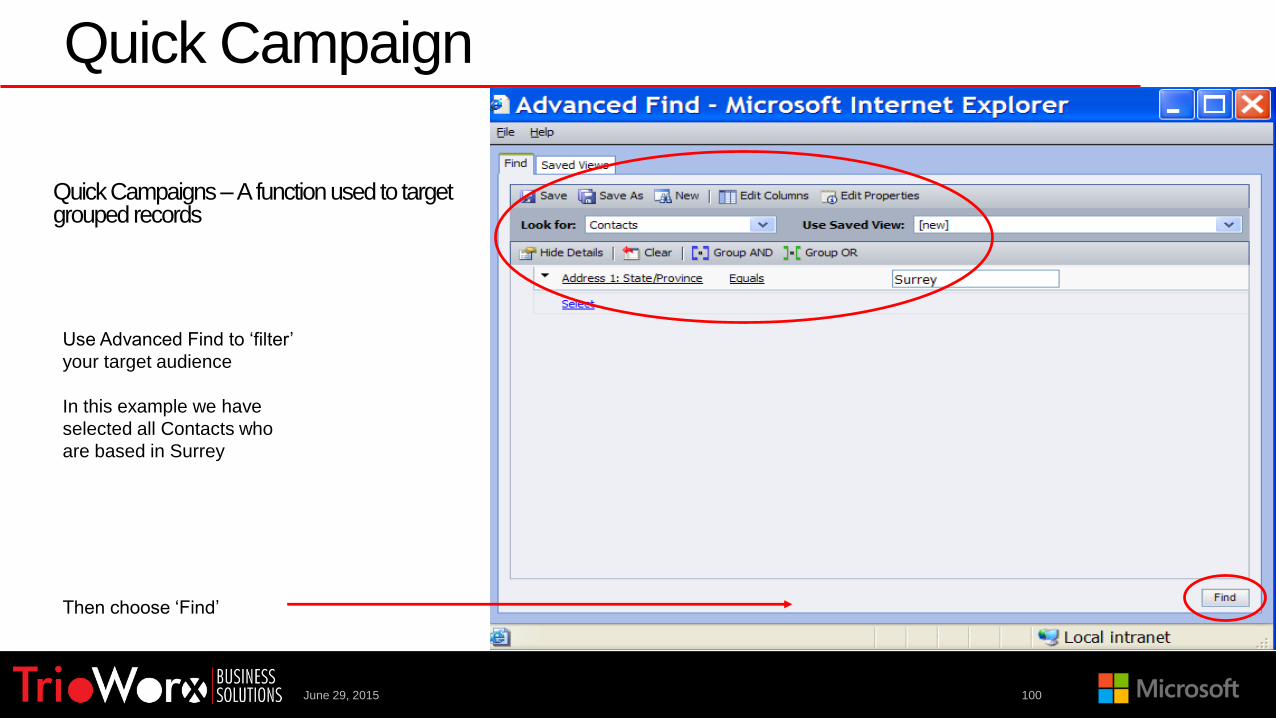
Quick Campaigns –A function used to target grouped records
Use Advanced Find to ‘filter’
your target audience
In this example we have
selected all Contacts who
are based in Surrey
Then choose ‘Find’
June 29, 2015 101
Quick Campaign
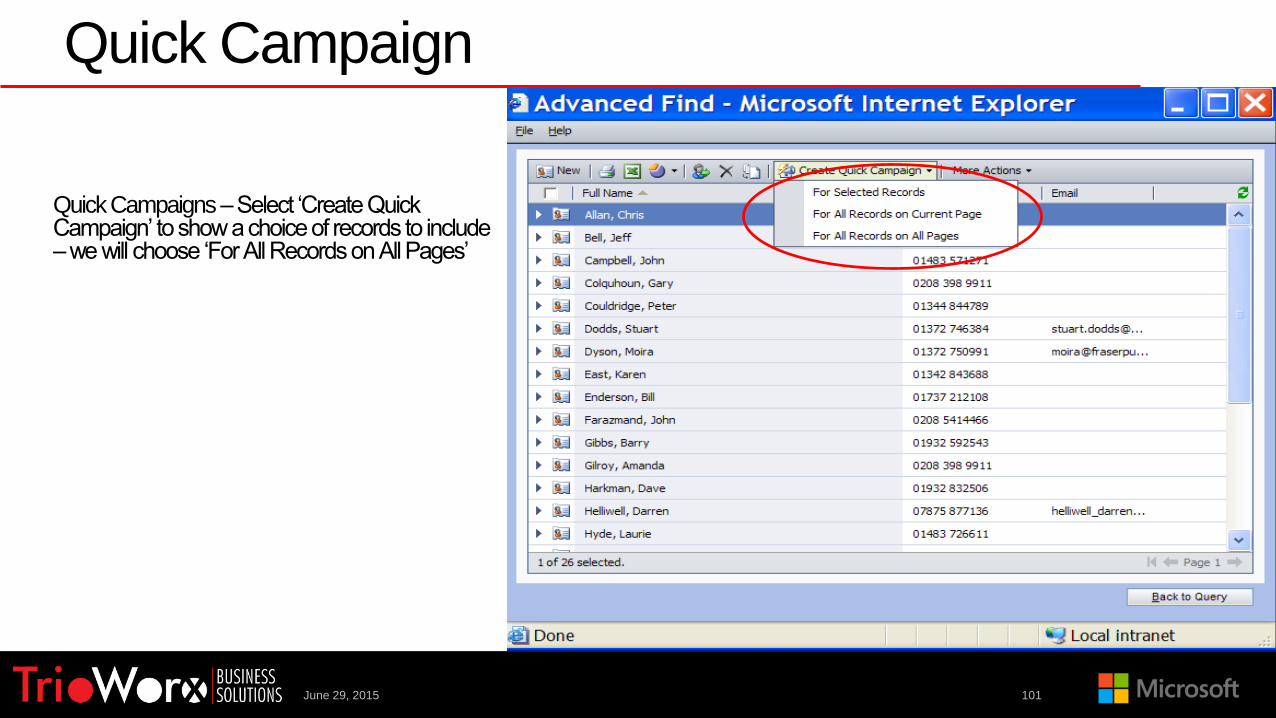
Quick Campaigns –Select ‘Create Quick Campaign’ to show a choice of records to include –we will choose ‘For All Records on All Pages’
June 29, 2015 102
Quick Campaign
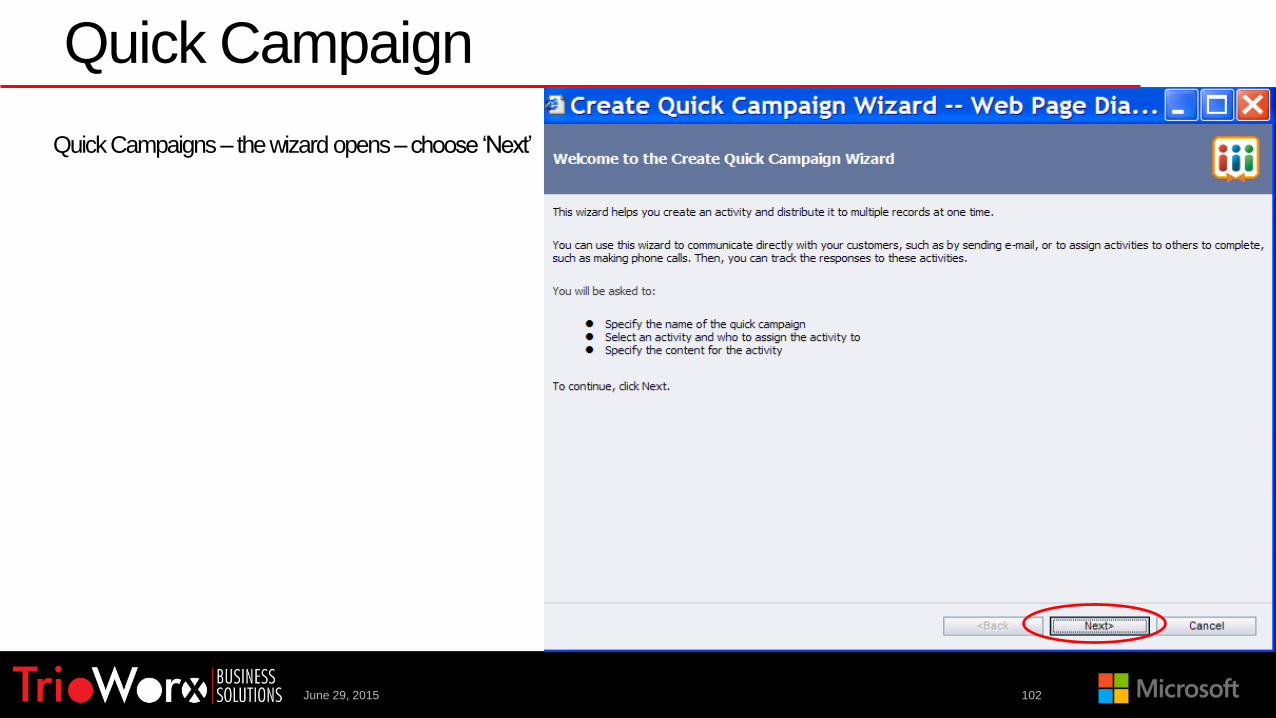
Quick Campaigns – the wizard opens –choose ‘Next’

June 29, 2015 103
Quick Campaign
Quick Campaigns –Add a name for the campaign

Quick Campaigns –Select the type of activity that the quick campaign will create.
-Choose who will be the owner of the activity (ie. who will do it).
Quick Campaign
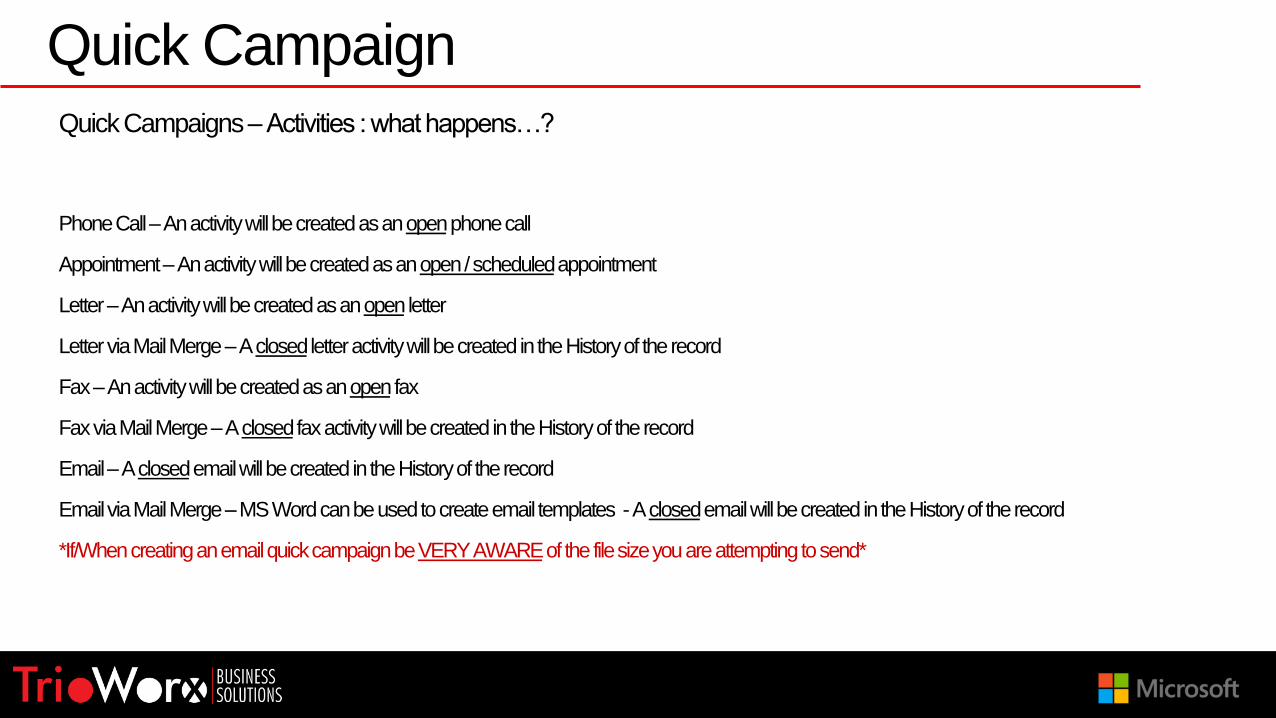
Quick Campaigns – Activities : what happens…?
Phone Call –An activity will be created as an openphone call
Appointment –An activity will be created as an open / scheduledappointment
Letter –An activity will be created as an openletter
Lettervia Mail Merge –A closedletter activity will be created in the History of the record
Fax –An activity will be created as an openfax
Faxvia Mail Merge –A closedfax activity will be created in the History of the record
Email –A closedemail will be created in the History of the record
Email via Mail Merge –MS Word can be used to create email templates -A closedemail will be created in the History of the record
*If/When creating an email quick campaign be VERY AWAREof the file size you are attempting to send*
Quick Campaign

Quick Campaigns – In this example we have chosen a ‘letter’
Quick Campaign
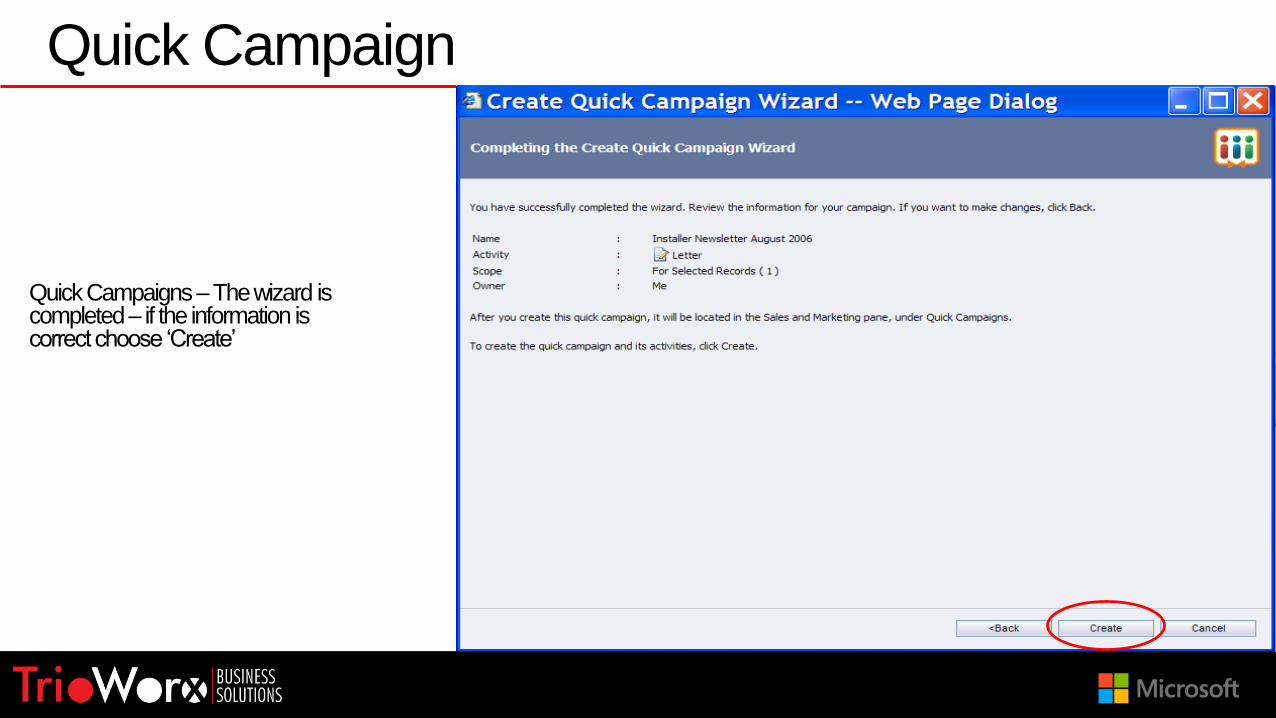
Quick Campaigns –The wizard is completed – if the information is correct choose ‘Create’
Quick Campaign
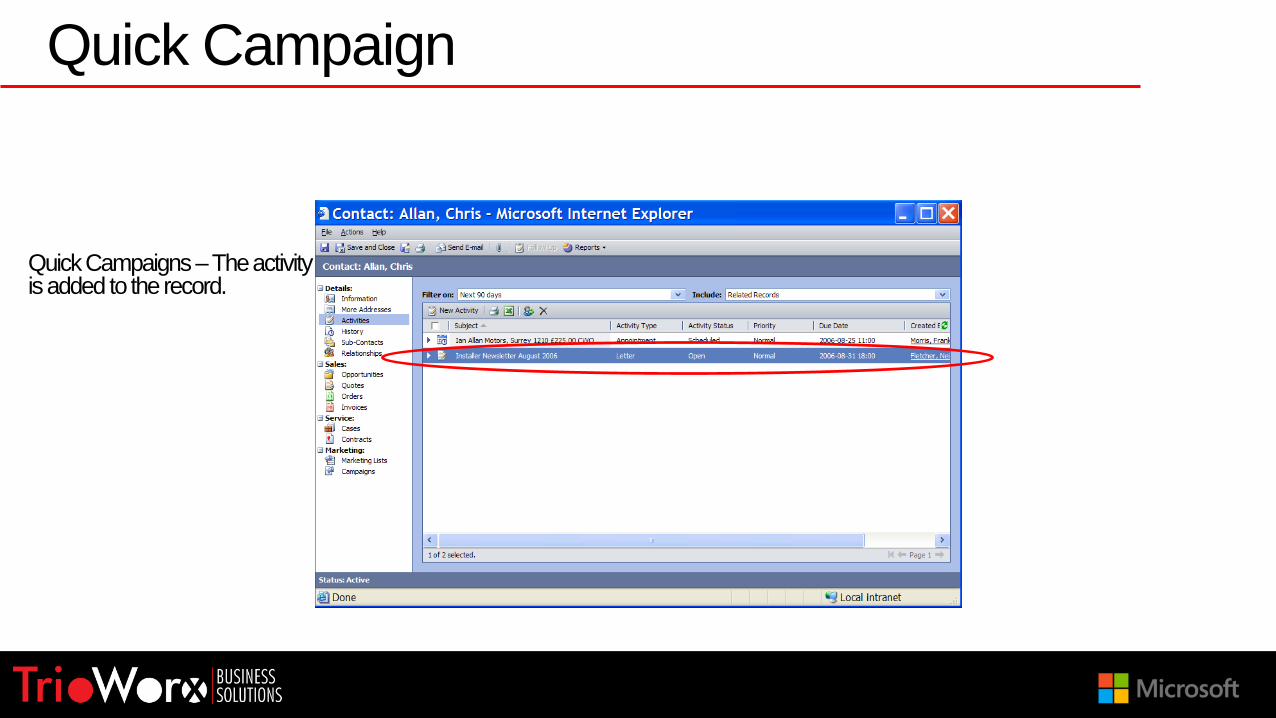
Quick Campaigns –The activity is added to the record.
Quick Campaign
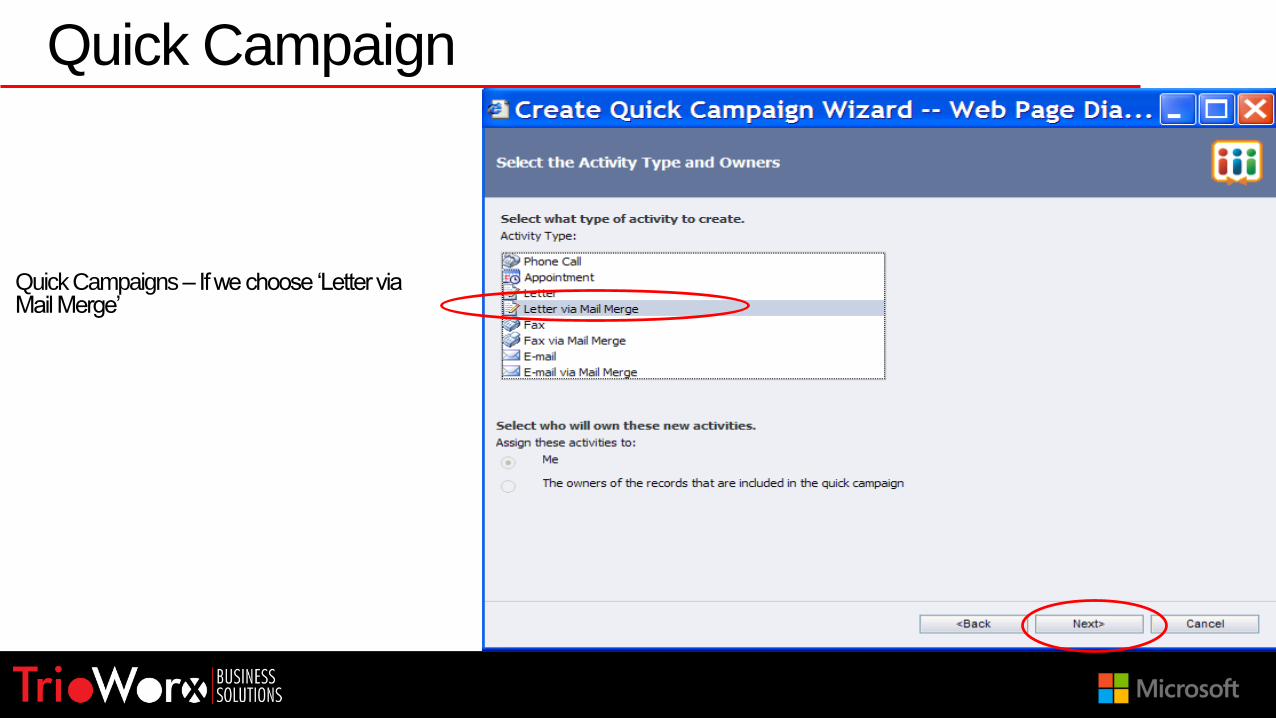
Quick Campaigns – If we choose ‘Letter via Mail Merge’
Quick Campaign
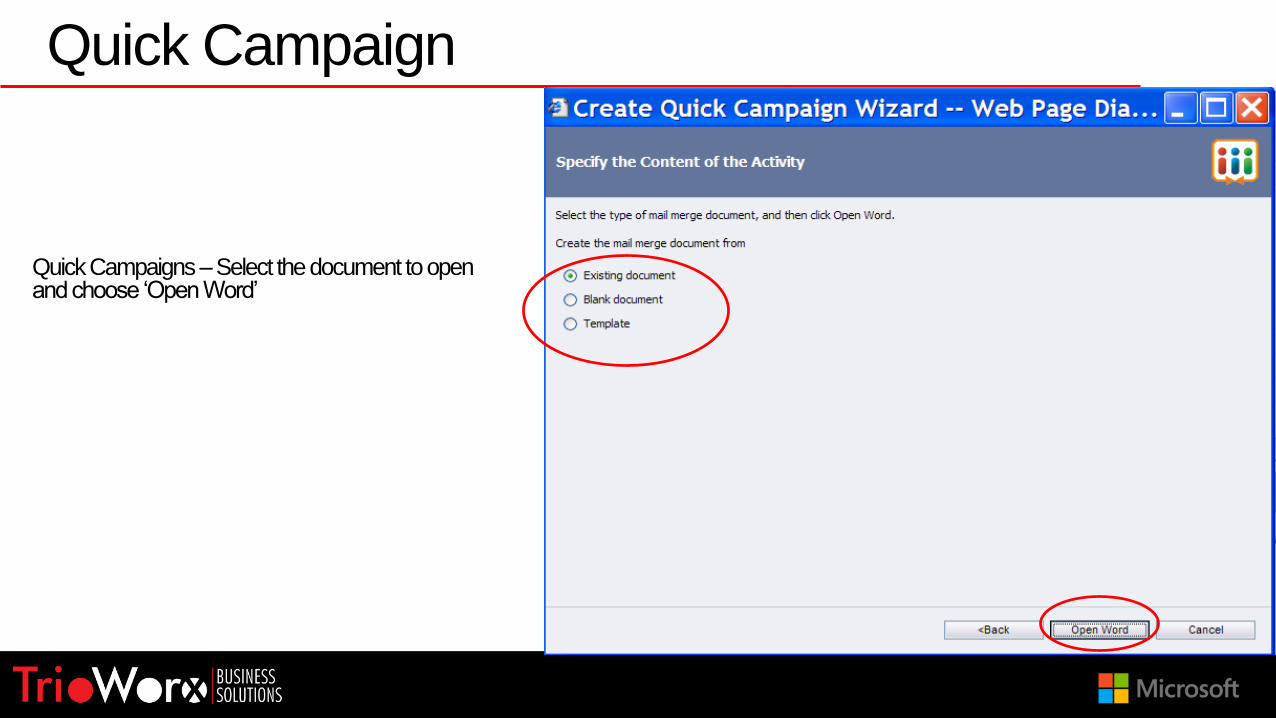
Quick Campaigns –Select the document to open and choose ‘Open Word’
Quick Campaign
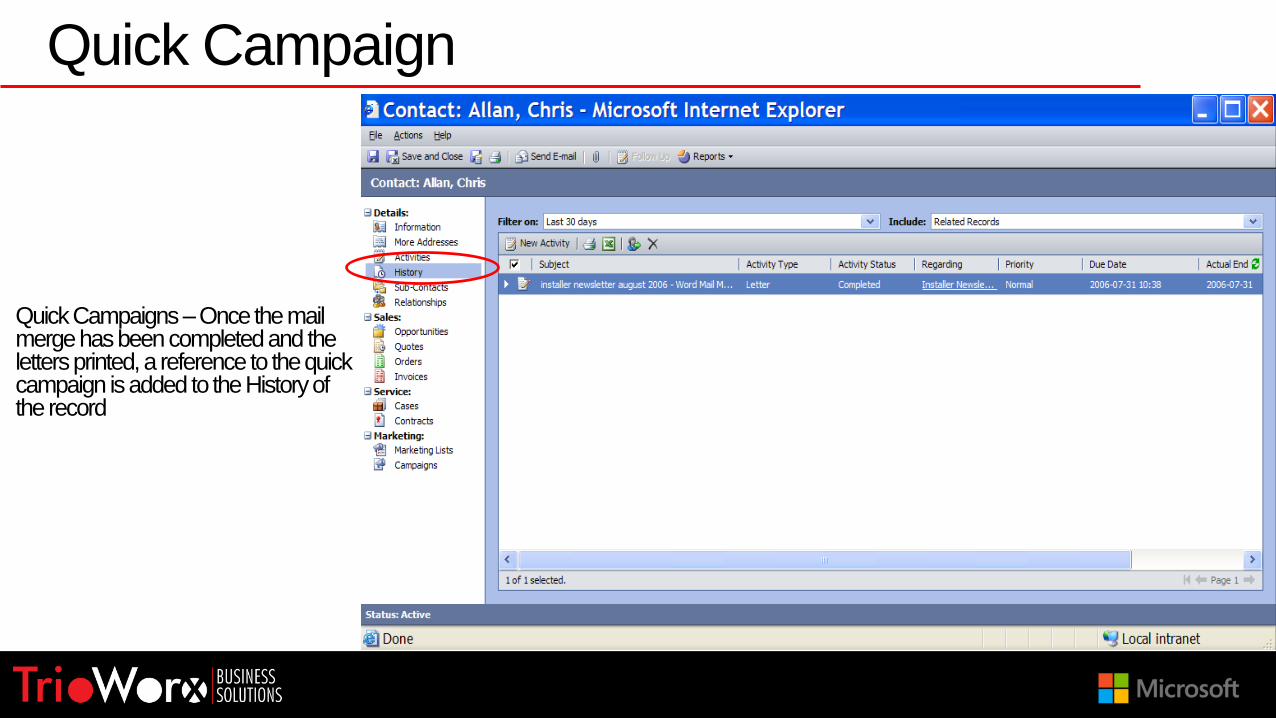
Quick Campaigns –Once the mail merge has been completed and the letters printed, a reference to the quick campaign is added to the History of the record
Quick Campaign

Quick Campaigns –The record can be found in the folder list under Microsoft CRM / Marketing / Quick Campaigns –double click the campaign to open it
Quick Campaign
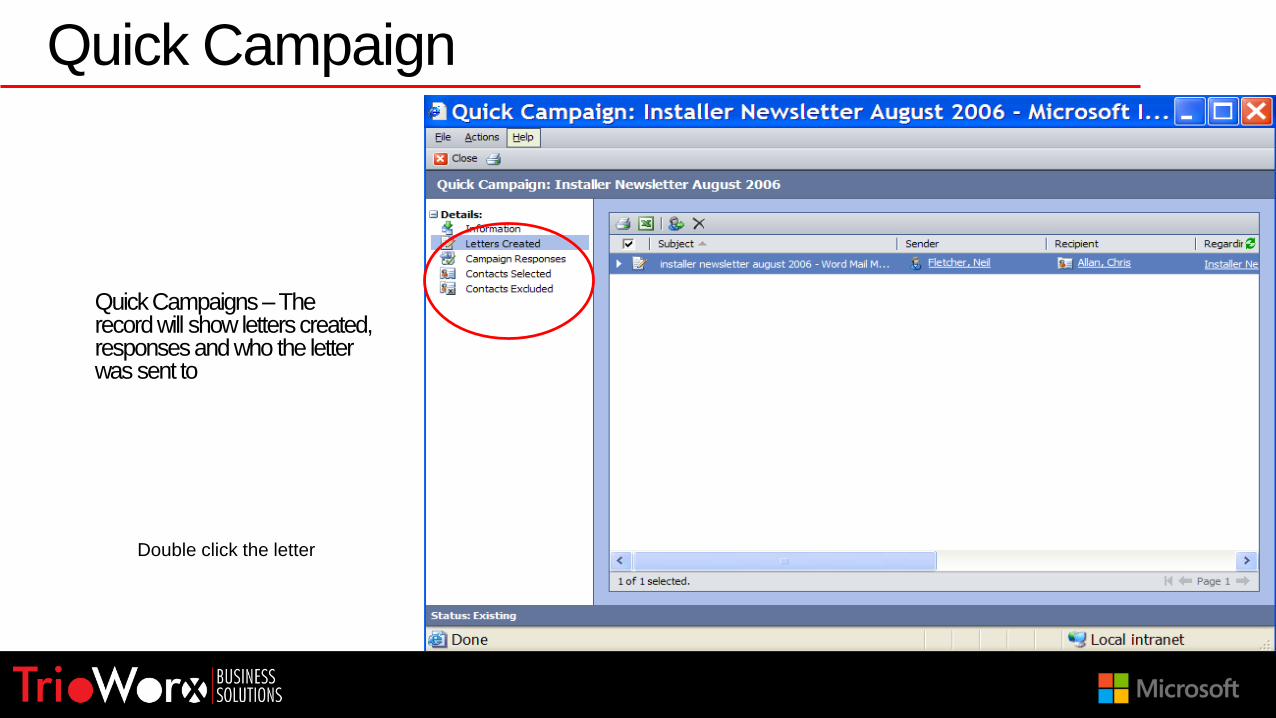
Quick Campaigns –The record will show letters created, responses and who the letter was sent to
Double click the letter
Quick Campaign

PazarlamaCAMPAIGN RESPONSES
June 29, 2015 114
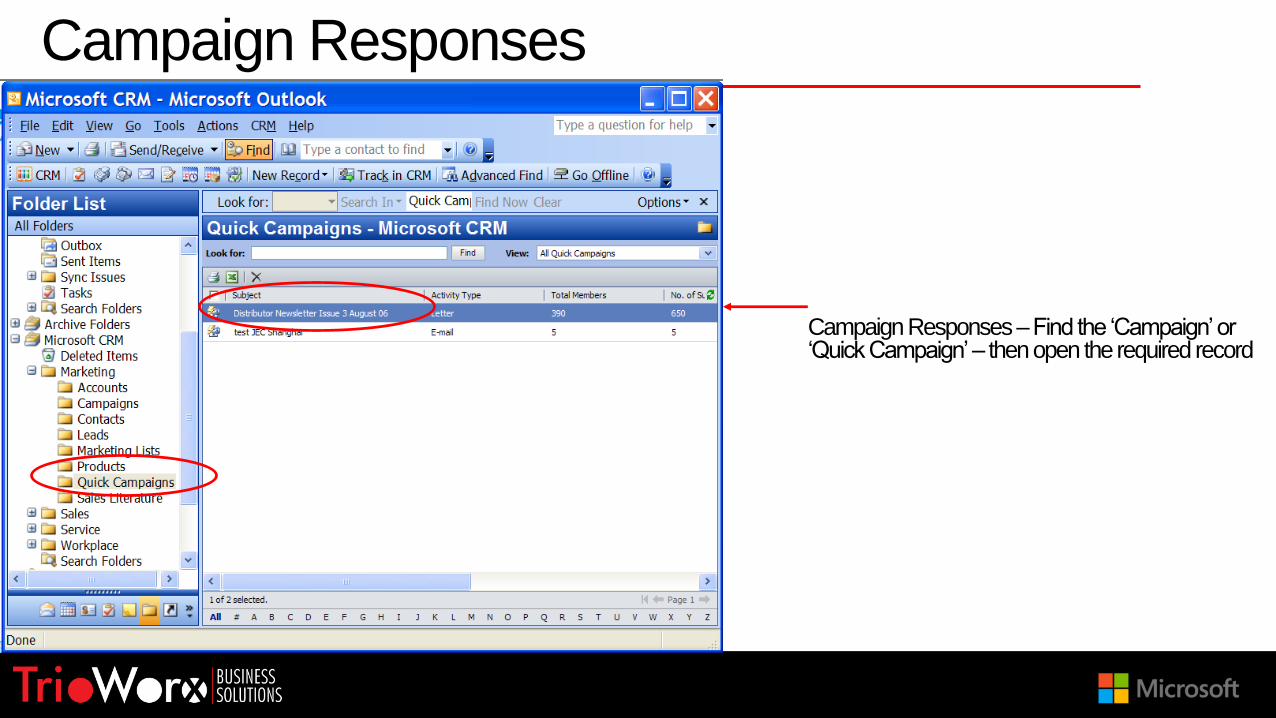
Campaign Responses –Find the ‘Campaign’ or ‘Quick Campaign’ – then open the required record
Campaign Responses

Campaigns –select ‘Campaign Responses’ from the menu –select ‘New’ to create a new response
Campaign Responses
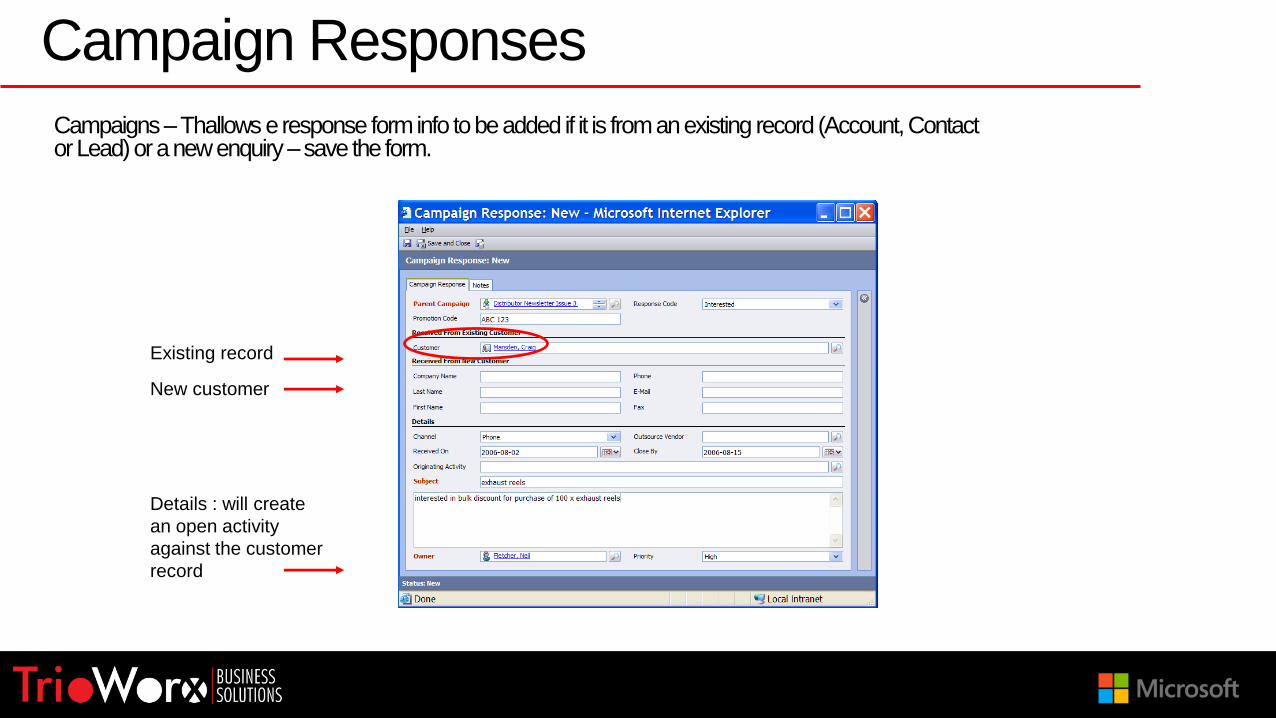
Campaigns –Thallows e response form info to be added if it is from an existing record (Account, Contact or Lead) or a new enquiry –save the form.
Existing record
New customer
Details : will create
an open activity
against the customer
record
Campaign Responses

Campaign Responses –The activity is shown in the Activities section of the database and against the customers record
Closing Campaign Responses
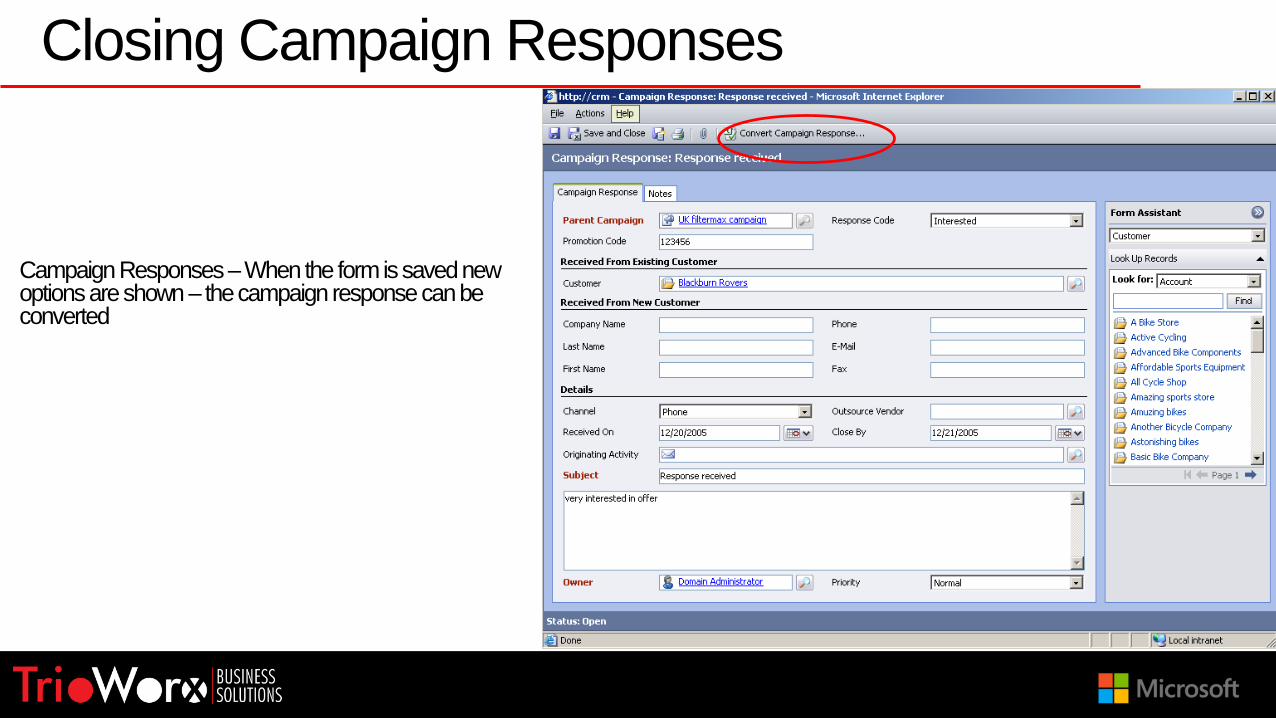
Campaign Responses –When the form is saved new options are shown – the campaign response can be converted
Closing Campaign Responses

Campaigns –Either close the response and convert to a record if further action is required… or close and complete/cancel the response.
Closing Campaign Responses

Diğer ÖzelliklerFORM ASSISTANT
June 29, 2015 121

June 29, 2015 122
Form AssistantForm Assistant – Can be found on most cards on the right hand side. The icon highlighted by can be used to hide or show the assistant

June 29, 2015 123
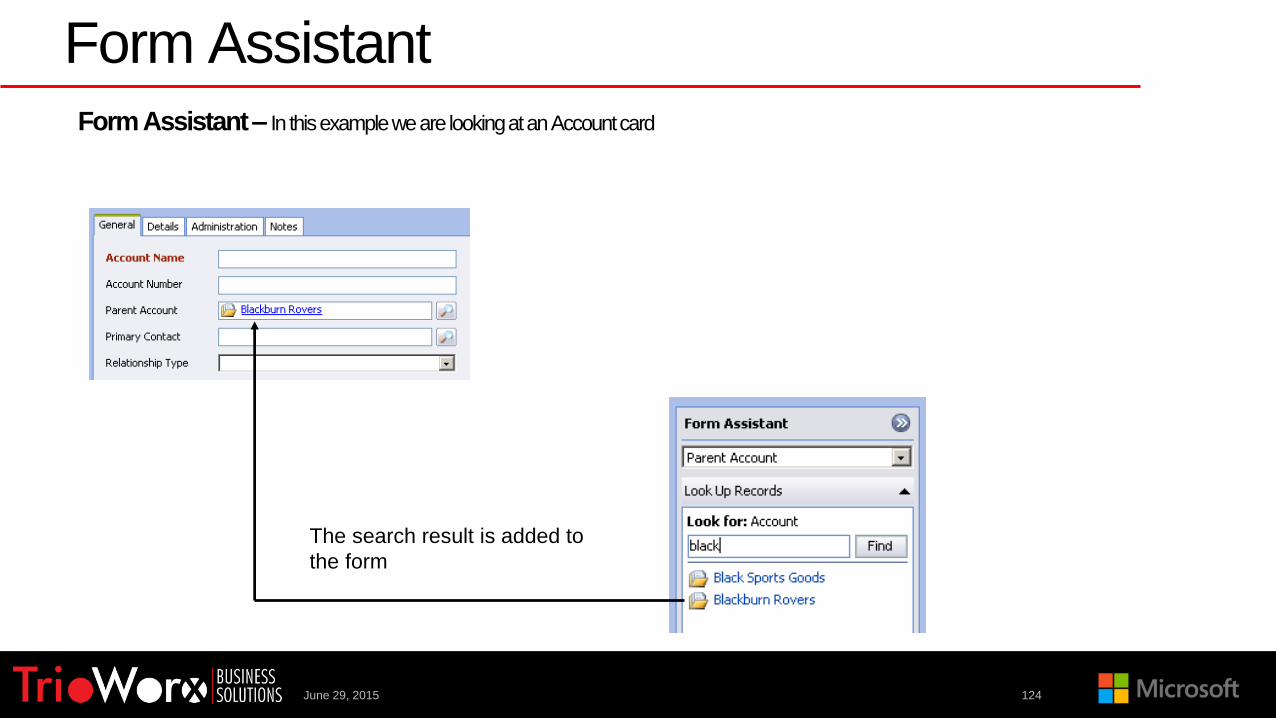
Form Assistant – In this example we are looking at an Account card
The form assistant works with
any field displaying this symbol
Click inside the field
The form assistant displays the corresponding field
Use the find function to search
Click the correct result to add
the details to the form
Form Assistant
June 29, 2015 124
Form Assistant – In this example we are looking at an Account card
The search result is added to
the form
Form Assistant

Diğer ÖzelliklerADVANCED FIND
June 29, 2015 125

June 29, 2015 126
Advanced Find
Advanced Find – from Outlook menu bar select ‘CRM’ / ‘Advanced Find’
Choose which
record to find
Add search
criteria

June 29, 2015 127
Advanced Find
Reports – The results can be opened to work on
Double-click
to open
June 29, 2015 128
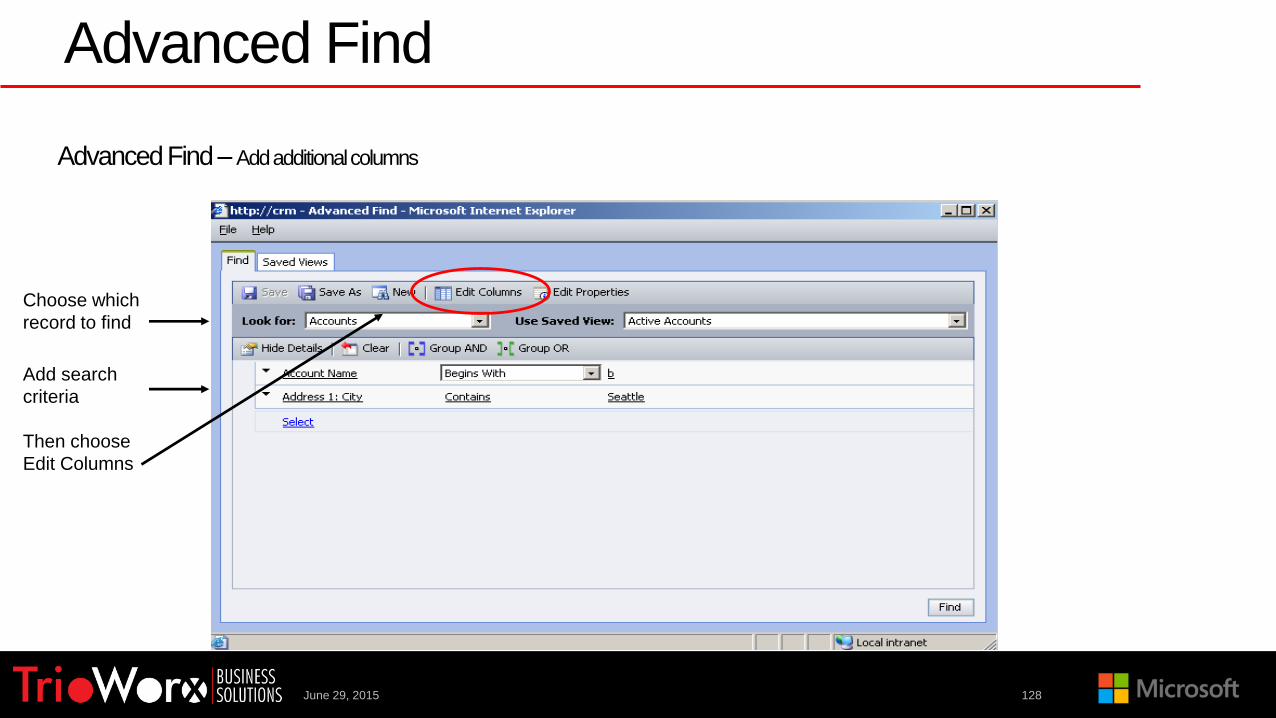
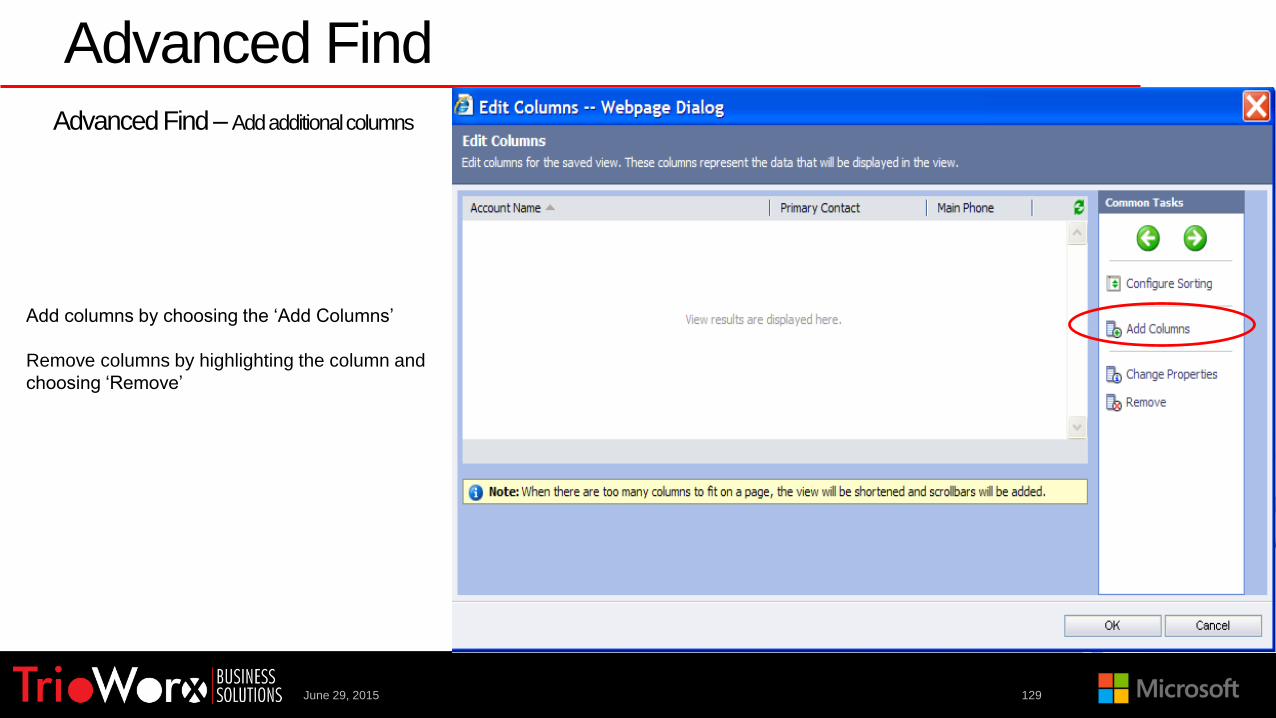
Advanced Find – Add additional columns
Choose which
record to find
Add search
criteria
Then choose
Edit Columns
Advanced Find
June 29, 2015 129
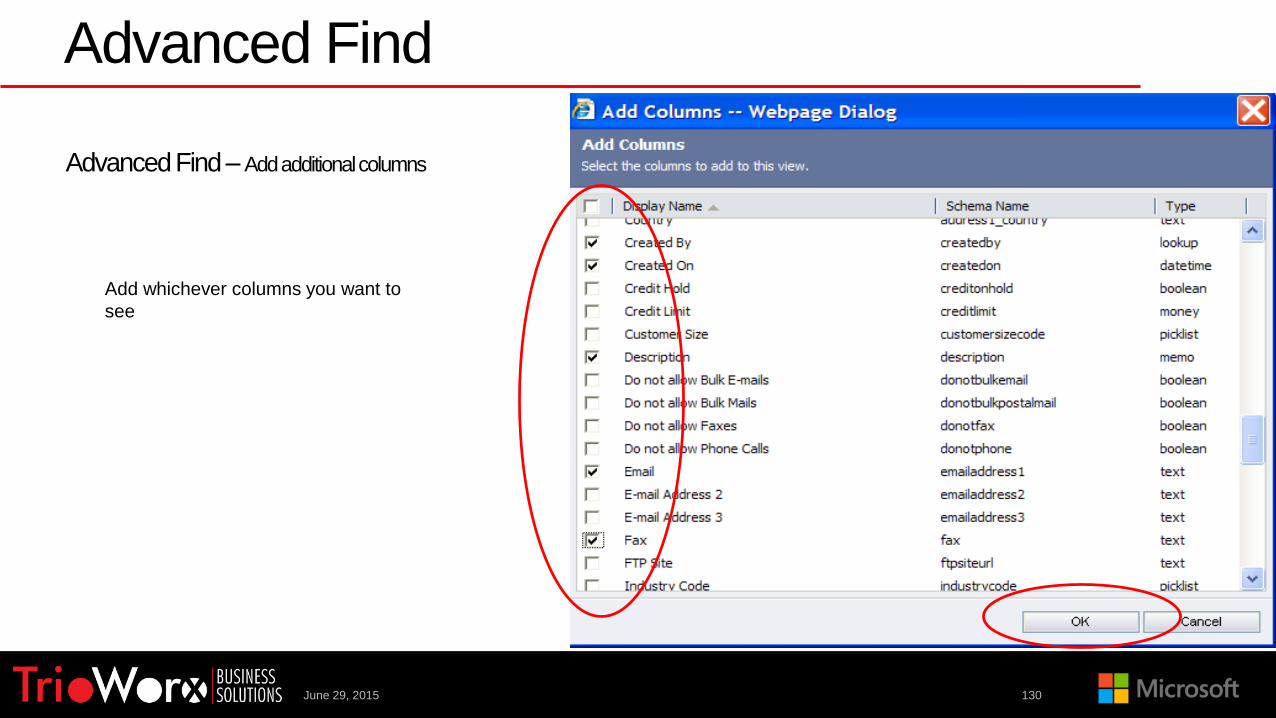
Advanced Find – Add additional columns
Add columns by choosing the ‘Add Columns’
Remove columns by highlighting the column and
choosing ‘Remove’
Advanced Find
June 29, 2015 130
Advanced Find – Add additional columns
Add whichever columns you want to
see
Advanced Find
June 29, 2015 131
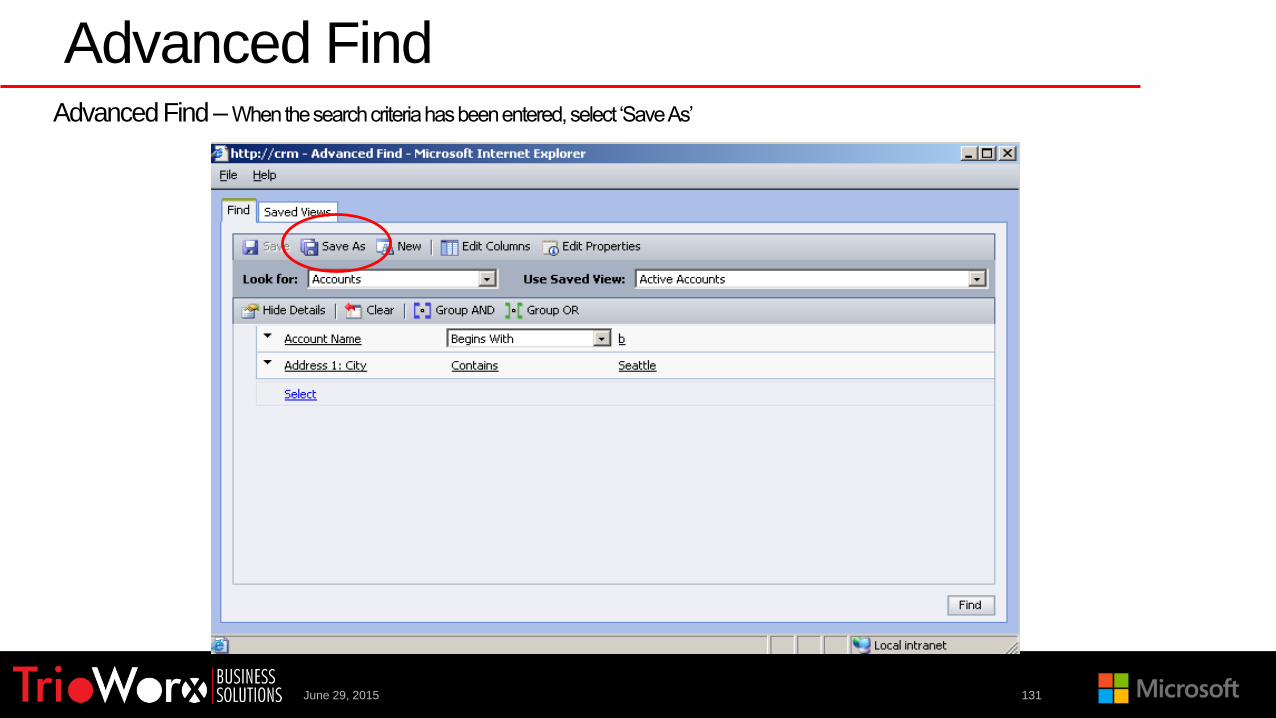
Advanced Find – When the search criteria has been entered, select ‘Save As’
Advanced Find
June 29, 2015 132
Advanced Find
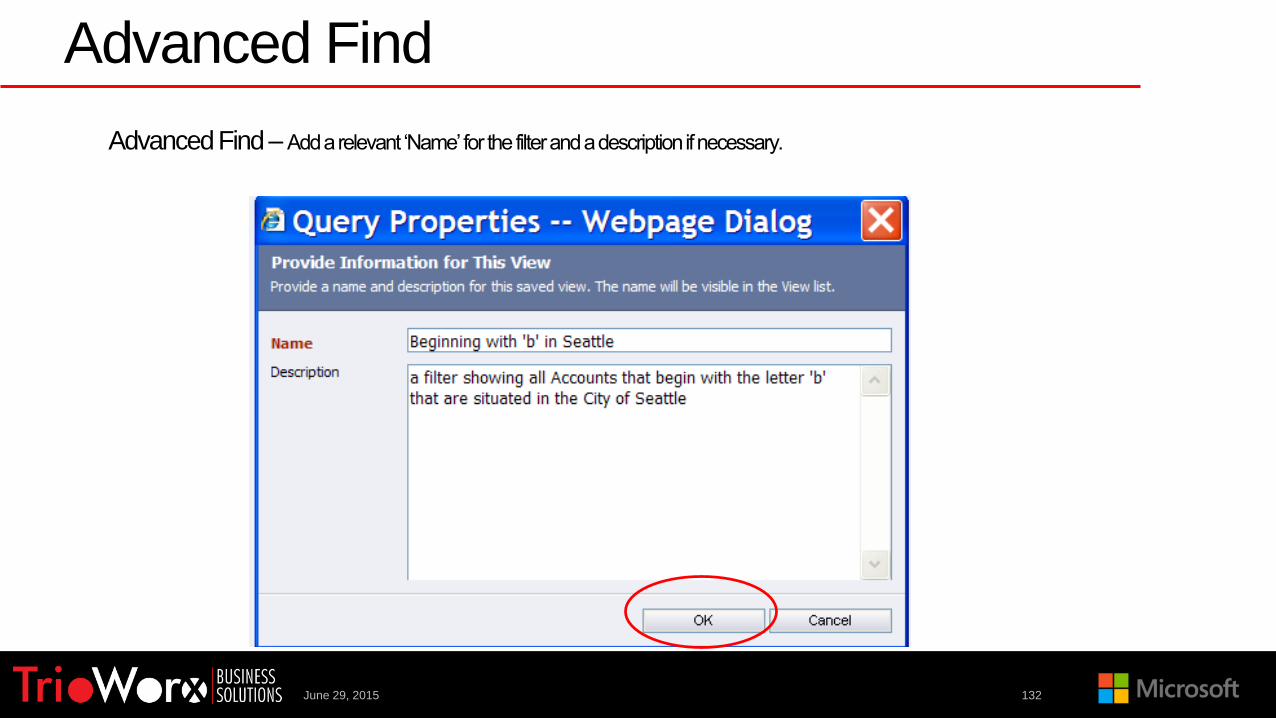
Advanced Find – Add a relevant ‘Name’ for the filter and a description if necessary.
June 29, 2015 133
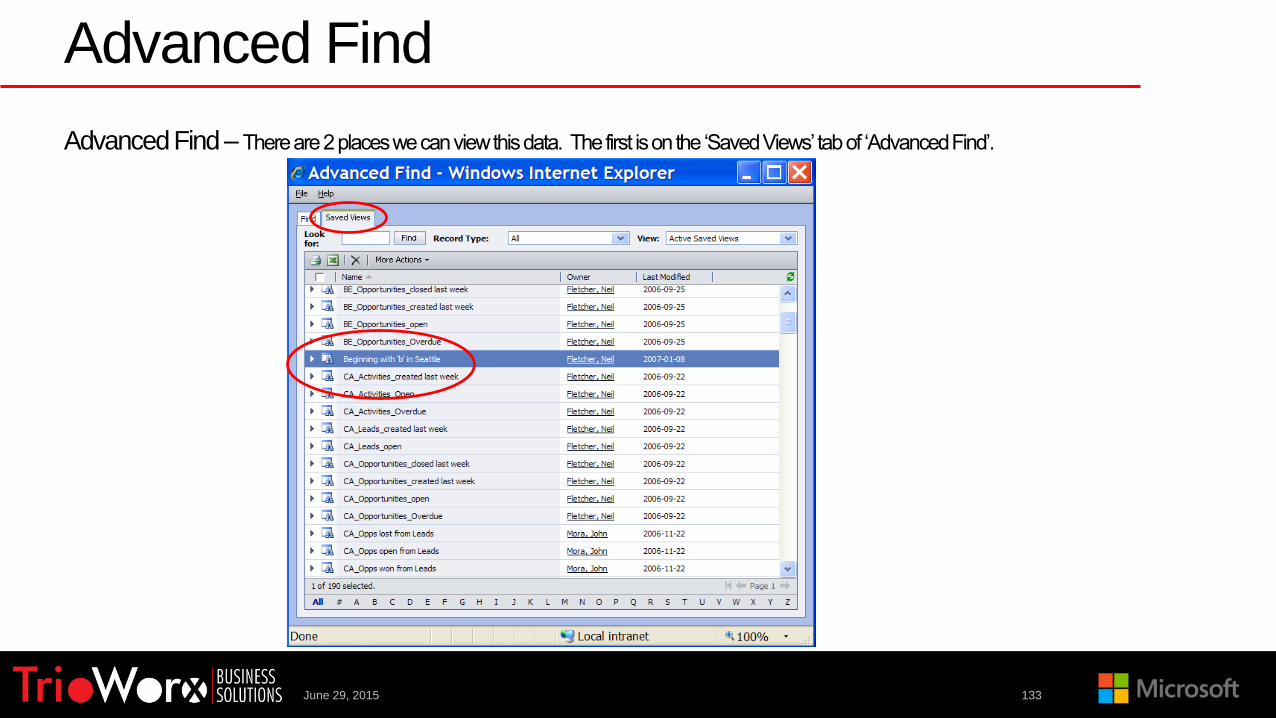
Advanced Find – There are 2 places we can view this data. The first is on the ‘Saved Views’ tab of ‘Advanced Find’.
Advanced Find
June 29, 2015 134
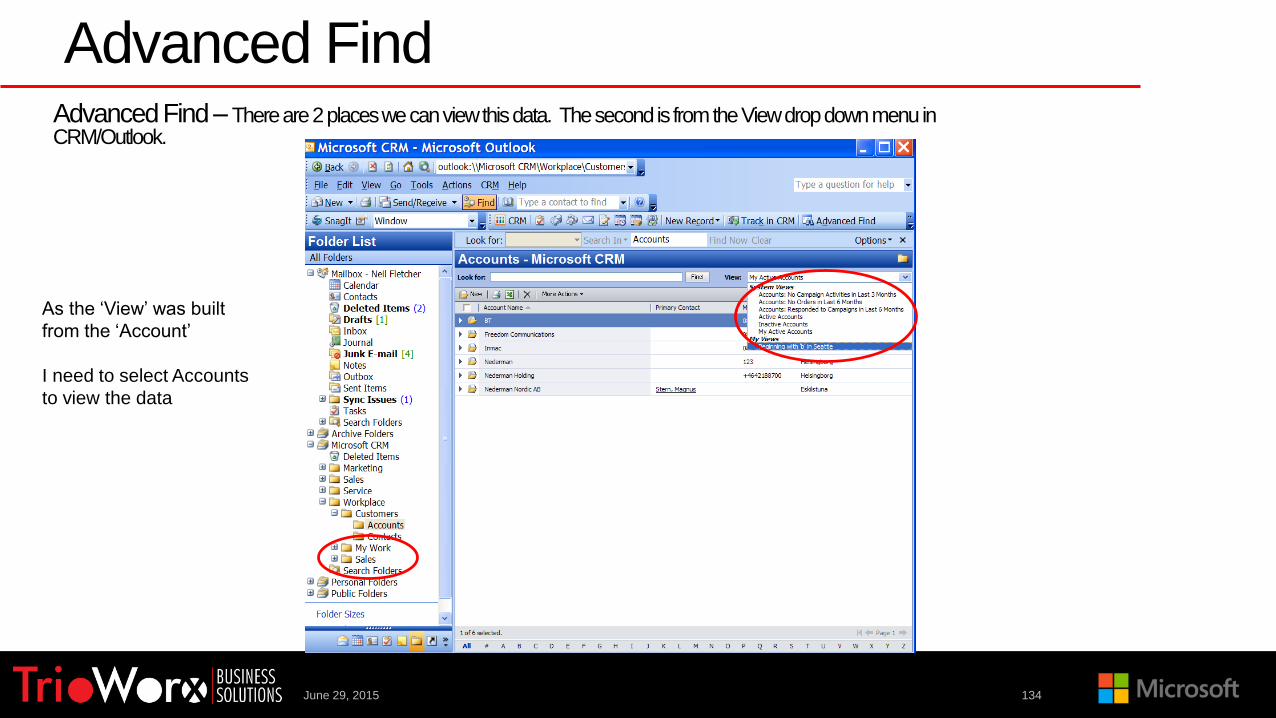
Advanced Find – There are 2 places we can view this data. The second is from the View drop down menu in CRM/Outlook.
As the ‘View’ was built
from the ‘Account’
I need to select Accounts
to view the data
Advanced Find

Contact Us
+90 216 266 33 54
www.trioworx.com