Microline 393 and 393C Setup Guide...
44
-
Upload
trinhthuan -
Category
Documents
-
view
229 -
download
0
Transcript of Microline 393 and 393C Setup Guide...


OIQDATA
MICROLINE® 393 AND 393C
Setup Guide
Note to Customer OKIDATA continually improves and updates its products to bring you the best possible performance. Because of this, some photographs may vary slightly in appearance from the product you receive. We've made every effort, however, to ensure that the information on printer functions in this document is complete, accurate and up-to-date.
©Copyright 1987 by OKI DAT A.
Revised edition August 1988.
Written and produced by the OKIDATA Publications Department. Please address any comments to:
Publications Department OKIDATA
532 Fellowship Road Mount Laurel, NJ 08054
OKIDATA and MICROLINE are registered trademarks of Oki America, Inc. Marques deposees de Oki America, Inc.
Epson is a registered trademark of Seiko Epson Corp. IBM and Proprinter XL are registered trademarks of International Business Machines Corp.

Table of Contents
O Introduction ........................................................................... 1
O Part 1: Setup ......................................................................... 2
Preliminaries .............................................. ..... ............. ....... .... ... .. 2 Personality and Font Cartridges .............................. .. .. ... ... . 2 Making the Connections ..................... .. ................ ... ...... ....... 2 Inserting Ribbon ..... ...... ................................................ ............. 3 Adjusting the Head Gap ........... ............................... ...... ... ... . 4 Paper Handling Configurations ..................... .. ............. ....... 6 Installing the Paper Support ........ ......... ..... .......... ... ...... ...... . 8 Installing the Paper Separator .. .. ........... .... .. .............. .......... 9 Installing the Optional Tractor ......................... .. ...... ........ 10 Installing the Optional Cut Sheet Feeder ............ ....... 13
O Part 2: Operation .............................................................. 16
Loading Rear Feed Paper .. .... .. ...... ... .... .. ..... ....................... 16 Loading Single Sheet Paper ............. ... .. ........................ .... 16 Loading Bottom Feed Paper .. ...... ... ......... ......................... 18 Loading the CSF ............................................... .... ................. 21
Printing Envelopes with the CSF ................... .... .... 22 Setting Top of Form .......... ..... ........ ........ .... ......................... 23 Running a Self Test ............................................... .... .......... 26 Using the Control Panel. ............................................ ........ 27
Basic Controls ................... .......................... .. ................. 27 Print Feature Controls .......... ........................... .... ....... 28 Macros .............................................................................. 28 Menu Select Mode ..... ..... .................................... ........ 29 Menu Select Operation .... .... .. ........................ ............ 30
Cleaning .... ......................................................... ......... ... .......... .. 31 Problem Solving ... .. ... ....... ......................................... ... ....... .... 31
O Appendix: Menu Selections ........................................... 33


O Introduction
This Setup Guide will help you get your new MICROLINE 393 or 393C printer set up and running quickly. Here's how it's organized:
Part 1, Setup, shows you how to get the printer ready, connect it to your computer, and install the standard and optional paper handling accessories.
Part 2, Operation, describes how to load different types of paper, how to run a self test to check out your printer, how to use the control panel, and gives you some hints on what to do if you're having problems.
If you want more details about working with software or advanced topics like graphics, read the Reference Guide, also included. Use it to find out more about particular commands or to explore your MICROLINE's advanced capabilities.
In addition to the manuals and the Customer Service Guide, make sure you have the following items:*
NOTE: If you're missing any of these items, contact your dealer right away.
Follow the steps on the next few pages to get your printer ready to run with your computer. The only tool you'll need is a Phillips screwdriver.
1. MICROLINE printer 2. Epson ® LQ IBM
Proprinte r XL ® compatible personal ity cartridge
3. Platen knobs (2) 4. Power cord 5. Ribbon cartridge
(black for ML393, color for ML393C)
6. Paper separator 7. Paper support
*Paper and interface cable sold separately.
Introduction 1

O Part 1: Setup _______ _
Remove shipping restraint. (Save w i th packing material for resh ipping .)
Insert platen knobs on both sides of printer.
Insert cartridges with label facing up; make sure they're firmly seated.
IMPORTANT: Make sure the printer is OFF before inserting or removing personality or font cartridges.
2 Cartridges
Preliminaries
Front cover open.
Personality and Font Cartridges
••••• •
Personality cartridge goes here.
• • ~l} ~
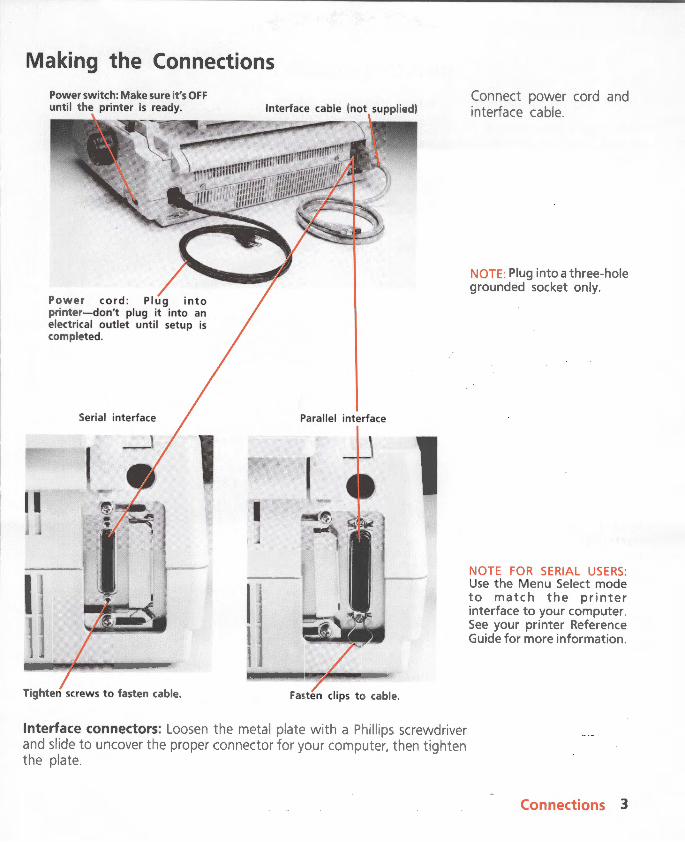
Making the Connections
I I
Power switch: Make sure it's OFF until the printer is ready.
Power cord: Plug into printer-don't plug it into an electrical outlet until setup is completed.
Serial interface
1
Tighten screws to fasten cable.
Interface cable (not supplied)
Parallel interface
I I
Fasten clips to cable.
Interface connectors: Loosen the metal plate with a Phillips screwdriver and slide to uncover the proper connector for your computer, then tighten the plate.
Connect power cord and interface cable.
NOTE: Plug into a three-hole grounded socket only.
NOTE FOR SERIAL USERS: Use the Menu Select mode to match the printer interface to your computer. See your printer Reference Guide for more information.
Connections 3

Unpack the ribbon cartridge.
Note: Your printer can use genuine OKIDATA film ribbons when they are available for crisper, darker printing. When you put a film ribbon in your printer, be sure to change the "Ribbon" menu item to "Film Ribbon" -this adjusts the printing impact so that the ribbon won't be damaged. See the Reference Guide for details on the menu.
Film ribbon is very abrasive, and it increases wear on the printhead and ribbon path. Therefore we recommend that you use film ribbon only for final copies. If you do switch ribbons, make sure the printer's menu is always set for the type of ribbon you're using.
Lay ribbon in printer so that the pins on the cartridge fit into the notches in the side plates of the printer. Push down so that the cartridge clicks into place. (See diagram on cartridge.)
4 Inserting Ribbon
Inserting Ribbon Remove shipping restraint.
Push to right to roller.
Center the printhead.
..... "
Takeup knob
• 1•11

Adjusting the Head Gap The blue head gap lever adjusts the printer for different types of paper. The following are recommended sett ings for commonly used papers. You may want to try varying the settings to get the easiest feeding and best print quality for the paper you're using.
Paper
12-1 5 lb. 20-24 lb. bond Labels Two-part forms Three-part forms Four-part forms Envelopes
Setting
1 2 3-4 3-4 4-5 7 5-9
Fina l ly , turn knob clockwise to take up ribbon slack.
Inserting Ribbon 5

Rear feed of continuous form paper:
• Install the paper support (page 8) and the paper separator (page 9) .
• Turn to page 16 for paper loading instructions.
Top feed of individual single sheets :
• Install the paper support (page 8) and the paper separator (page 9) .
• Turn to page 18 for paper loading instructions.
NOTE: For added conven ience, you can feed si ngle sheets without remov i ng rear - fed cont inuous form paper.
6 Paper Handling
Paper Handling Configurations The ML393 / 393C's paper handling systems are both trouble-free and flexible . Using either the standard configuration or one of the available options, you can set up your printer to handle most common forms of paper. The following pages outline your choices and point you to the proper installation instructions.
With standard equipment:

With options:
" ..... ,.
•••••
Bottom feed of continuous-form paper:
• Do NOT install the paper support and paper separator.
• Install the Tractor Feed Option kit (page 10).
• Turn to page 20 for paper loading instructions.
Automatic feed of single-sheet paper:
• Do NOT install the paper support and paper separator.
• Install the CSF 3001 Cut Sheet Feeder (page 13).
• Turn to page 21 for paper loading and operating instructions.
Alternate automatic feed of letterhead and plain stationery:
• Do NOT install the paper support and paper separator.
• Install the CSF 3002 Dual-bin Cut Sheet Feeder (page 1 3).
• Turn to page 21 for paper loading and operating instructions.
Paper Handling 7
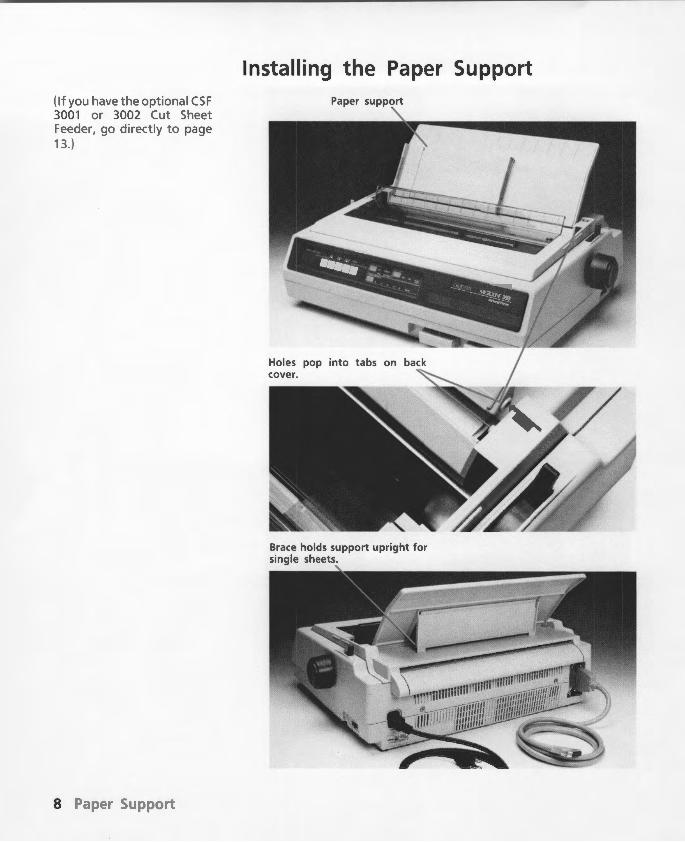
(If you have the optional CSF 3001 or 3002 Cut Sheet Feeder, go directly to page 13.)
8 Paper Support
Installing the Paper Support Paper support
Brace holds support upright for single sheets.

Installing the Paper Separator Opens to prevent paper from curling back into printer.
Paper separator
.,_Back of printer
Front in first, then lower back part to snap in.
Front of printer ,....
Paper Separator 9

To feed paper from the bottom of the printer, you need:
• The optional pull tractor kit
• A slotted printer stand
Remove the pa per separator by tilting it forward and lifting it out.
10 Optional Tractor
Installing the Optional Tractor Acoustic cover
Pull tractor
Open front cover. Open bail. Open back cover.
Paper separator Move paper lever forward.

2. Pull forward on top of tractor until clamps click onto platen.
1. Fit tabs on tracto r in t o notches on printer.
Close back cover.
Fit front tabs of acoustic cover into slots, then tilt into place.
Lower t he tractor onto the printer.
To remove, press the lock buttons and tilt back.
Optional Tractor 11

12 Optional Tractor
Fit paper guide into place on the back of the acoustic cover.
Acoustic cover fits over acoustic shield on front cover.
•••••
Paper guide lies flat.
. ·~·

Epson/IBM Emulation
M ICROLI NE 393 Product Update
58046501
The Personality Module with your Microline 393 printer now includes IBM Proprinter XL and
IBM Proprinter XL Alternate Graphics Mode emulations in addition to Epson LO emulation.
You can choose the emulation you want through your printer's Menu Select mode; see your
Reference Guide for complete details on how to use this feature and how to select the emula
tion that's best for you.
Please note that the Appendix to your Setup Guide does not reflect this upgrade to the menu.
Film Ribbon Capability
Your Microline 393 printer can use film ribbon when it becomes available. This new ribbon
produces crisper, darker characters to make your best documents look even better.
When you put a film ribbon into your printer, you need to change the "Ribbon" item on the
printer's menu to "Film ribbon." (If you don't have a color printer, this item will only have
two settings, "Black ribbon" and "Film ribbon.") This adjusts the amount of impact to match
.1- . .. -.......~t'- !LJ-..........--.!_._ ... .-~_TL._£_! 1--•LL--_. •• . ..!11 L .-__l~~...-____..l _:& •• --.. •• ...1 -- - ·-• '"""• .......... _,,..._.,., !• ..... -

01c-i. ypc 01 r 1u-uuu-ru ui.c. t ''ut: il'lm r'1uuu1r wn11Jt: ucswagt:u r1y-u to "Film ribbon."
Important Note: Although film ribbon enhances your Microline 393's superb print quality, the ribbon material is very abrasive, and it increases wear on the ribbon path and printhead. If you print a great deal with film ribbon, some maintenance will have to be performed more frequently: you'll need to have the printhead replaced after printing approximately 100 million characters (utility mode), and the ribbon shield after approximately 20 million characters. On color printers, the ribbon guide assembly will need replacement after approximately 20 million characters.
For this reason we recommend that you use film ribbon only for final copies; use a normal fabric ribbon for the rest of your printing. If you do switch ribbons, make sure that the printer's menu is always set for the kind of ribbon you have in the printer.

Installing Optional Cut Sheet Feeder The CSF 3001 single-bin and CSF 3002 dual-bin cut sheet feeders are ideal for high-volume printing using single sheet paper. Paper can be fed automatically, controlled either from the front panel or through your computer. The dual bin allows you to alternate between letterhead and plain stationery.
Since the two cut sheet feeders are installed in the same way, we'll illustrate the procedure with the CSF 3001, noting any differences as they appear.
\
CSF 3002
Cut Sheet Feeder 13

Remove the back cover: tilt back slightly and lift off.
Hold CSF over printer.
Make sure the printer is OFF, then plug cable into socket on printer. The arrow on the plug faces up.
14 Cut Sheet Feeder
Open front cover.
Bail lever forward.
Remove back cover.
Fit the CSF hooks over the platen shaf t and lower gently onto the printer.

Fit wire rack(s) into hole(s) in back of bin(s).
I I
I
Slide output tray into channels on sides of CSF.
Move paper lever back to single sheet setting.
Cut Sheet Feeder 15

O Part 2: Operation
Loading Rear Feed Paper
For rear feed, use the built-in tractor.
Be sure to use on ly ful l sheets of paper in these procedures.
Pull lever forward.
Rear cover open.
Insert paper througH here.
16 Continuous Form Paper
Center paper guides on width of the paper.
Pull paper through.

-
Tractor cover Lever
Short Tear (Rear feed paper only)
Open tractor covers, set paper on pins.
Pull lever forward to unlock tractor, slide to adjust to the width of the paper, push lever back to lock in place.
Close the covers . If the printer is ON, press FORM FEED to advance paper to the front of the printer.
To set Top of Form, see page 23.
This ingenious feature lets you remove a printed page from the printer without wasting paper. Activate it by changing the SHORT TEAR OFF menu selection to ON. (See page 30 and the Appendix.) After you load paper and press FORM FEED to feed it, paper advances past the top of form position to the tear bar. It stays in this position until the printer receives data; then paper moves down to the top of form position for printing. A few seconds after printing stops, the paper moves back to the tear bar so you can tear it off without feeding an extra sheet of paper.
To set Top of Form, see page 23.
Tear bar
· ....
a NOTES: Some programs, such as high resolution graphics packages, pause occasionally while sending data to the printer. If the pause lasts more than two seconds, the paper will advance to the tear bar until more data is received. No data will be lost, but this can cause uneven print registration in graphics. If this is a problem, use the menu to deactivate short tear.
Don't use short tear when printing on labels or multi-part forms. Labels should only be fed from the bottom of the printer.
Continuous Form Paper 17

Loading Single Sheet Paper (No paper handling options installed) Switching between continuous forms and single sheet paper is particularly easy with the ML393. Its automatic parking feature lets you back continuous forms out of the paper path at the touch of a button, and the touch of another button automatically positions a single sheet.
Start by tearing off any extra sheets of continuous form paper. With the printer selected (SELECT light on), press the TOP OF FORM button. The paper will retract from the front of the printer.
Next .. .
18 Single Sheet Paper
1. Put a sheet of paper on paper support.
~ ....... 4. Last, press FORM FEED to insert paper.
2. Adjust guides for width of the paper. Start with reference mark for left edge.
t' H
3. Move paper lever back.

See page 23 for instructions on setting Top of Form.
To replace continuous form paper:
1. Remove any single sheet paper still in the printer by pressing the FORM FEED button. If you use the platen knob, this procedure won't work properly- you'll have to turn the printer OFF, then ON again before you continue with the following steps.
2. Move paper lever forward .
3. Press FORM FEED. The paper that was retracted will move back into position.
NOTE: You can use tt10 envelopes (standard business size) in your printer. Be sure to adjust the head gap lever (see page 5). For best results, avoid printing on areas where the flap overlaps the envelope. Printing where the envelope varies in thickness may be uneven.
Single Sheet Paper 19

Push paper up through the slot in the bottom of the printer and pu ll up to the tractor.
Open tractor covers, set paper on pins, close covers.
Pull lever forward t o unlock, adjust to width of paper, push back to lock.
Push ba il lever back.
See page 23 for instructions on sett ing Top of Form.
REMEMBER: The front cover must be closed for th e pr inter to operate.
20 Bottom Feed Paper
Loading Bottom Feed Paper Open acoustic cover.
Pull bail lever forward.
Optional tractor unit
Slide paper guide to about the middle of the paper w idth.
Open front cover.
Pull paper lever forward .
Tractor cover Lever
Wind paper through. Close front cover first, then acoustic cover.

Loading the CSF
Each bin of the optional CSF 3001 and CSF 3002 holds up to 130 sheets of 20 lb. paper, or between 100 and 120 sheets of 24 lb. paper, depending on thickness and texture.
Envelope lever: Back for envelopes, forward for paper.
Fan the paper and square it.
Reset lever: up to load, down to feed.
Paper lever: Back for single sheets.
1. Push reset lever up.
3. Adjust guides to width of paper.
4. Push reset lever down when paper is in position.
NOTE: Be sure to set the head gap lever for the type of paper you 're using (see page 5). Put letterhead stationery in with the letterhead facing down and toward the printer.
Cut Sheet Feeder Loading 21

Select bins on the CSF 3002 as shown.
NOTE: This button has no function on the CSF 3001.
Push the LINE FEED or FORM FEED button to insert paper.
See page 23 for instructions on setting Top of Form.
To eject paper, press FORM FEED.
To control the cut sheet feeder through your computer, see the "Cut Sheet Feeder Control" section of your Reference Guide.
Bin 1 (front bin) is selected when the printer is turned on-light is ON.
Light ON: Bin 1 selected.
To select Bin 2, deselect the printer, and press the BIN SELECT button-the light will go OUT.
Light OFF: Bin 2 selected.
Printing Envelopes with the CSF You can use **1 0 envelopes (standard business size) in your CSF 3001 and in the front bin only of the CSF 3002 . Be sure to adjust the head gap lever (see page 5) and push the envelope lever back. Load envelopes with the flaps facing down and toward the front of the printer.
For best results, avoid printing on areas where the flap overlaps the envelope. Printing where the envelope varies in thickness may be uneven.
22 Cut Sheet Feeder Loading

Setting Top of Form This establishes the position of the first print line on each page (shown by the red line on the ribbon shield ). If you're using a word processor that sets its own top margin, set the Top of Form for the topmost line on the page. Otherwise we recommend positioning the top of the page under the ba il; the first line of printing will then be about one inch below the top of the page.
Red l i ne shows baseline for printing.
Normal Operation (Short Tear inactive) Make sure the SELECT light is out. Press the SELECT button if it isn't.
Use the platen knobs or the LINE FEED button to adjust the paper, then press the TOP OF FORM button.
Setting Top of Form 23

24 Setting Top of Form
Short Tear Active
Activate the short tear feature through the menu. (Set SHORT TEAR OFF to ON; see page 28 and the Appendix.)
Make sure the SELECT light is out. Press the SELECT button if it isn't.
The top of the paper will be even with the tear bar.
Press and hold down the TOP OF FORM button; the paper will move down to the initial printing position ("top of form" ). The top of form is preset to about one inch below the top of the page.
Red line shows baseline of initial printing position.

To adjust the top of form, keep holding the TOP OF FORM button and press ...
... FORM FEED to move forward.
Hold down TOP OF FORM while adjusting print position .
When you have the printing position where you want it, release the buttons. After a few seconds the paper will move back to the tear bar.
Paper stays at tear bar until printing begins.
The printing position will be permanently stored-even when the printer is turned off-until you readjust it. If the paper accidentally gets out of adjustment, make sure the SELECT light is on and press TOP OF FORM; the paper will back out from the platen. Then press FORM FEED- the paper will return to the tear bar with the printing position restored.
NOTES: Some programs, such as high resolution graphics packages, pause occasionally while sending data to the printer. If the pause lasts more than two seconds, the paper will advance to the tear bar until more data is received. No data will be lost, but this can cause uneven print registration in graphics. If this is a problem, use the menu to deactivate short tear.
Don't use short tear when printing on labels or multi-part forms. Labels should only be fed from the bottom of the printer.
Setting Top of Form 25

Running a Self Test After you 've installed the Pressing SELECT stops the ribbon , personality cartridge and paper, you're ready to run either of two self tests .
NOTES: The printer will not run with the front cover open. The bail must be closed (bail lever back) when the printer is turned ON. If it's open, the ALARM light will blink. Push the lever back, and turn the printer OFF, then ON again.
Have this information at hand if you call for service.
26 Self Test
Holding down QUIET wh ile you turn on the printer produces:
ML393 EPS /I BM A P PROGRAM RESID!NT CG SLAVE PROGRAM OPTIOll CG fl
1" 1$\& ' ()"+,-./0123456789o;<•>?IABCD~
1 • t$\& • 1 ) ··, - • 1012 3456789 , 1 <•>?IABCDEr• " t$\& '() •+,- ,/01234567891 ;<•>?IABCDZlGJ tS\& '( )•+,- ./01234567891 1<•>? IABCDIFGH $\& ' ( ) • +, - . / 0123456 789, ; <•>?tABCDE?GHI. \& '() •+, -./01234567891;<•>?tABCOIFGKIJi &'()•+ , -./0123456789o ;<•>?IABCDEFGHIJK: ' I ) •+, - • / 0123456 789 • ; <•>? IABCDl?GHIJKLI ( ) •+, - . / 01234 56 789 I ; <•>? tABCDEFGHIJICLHI ) •+, - . / 0123456 789 I ; <•>?tABCDZFGHIJltLH»1 • +, - • / 0123456 789 I '<•>? tABCOJ:FGHIJ'KLHIJOl + , - . / 0123456789 I; <•>?tABCDBfGHIJKLHllOPI , - . / 0123456 789 • ; <•>?tABCDE?GHIJKLHIOPQI - , / 01234567890 ;< •>?IABCDS?GHIJXLMllOPQR;
Continuous sample of default print style in 14" format.
NOTE: Be sure to use wide
Holding down LINE FEED wh il e you turn on the printer produces:
HL393 EPS /IBH A P PROGRAM
L0 - 10CPI
RE:SID!NT CG SLAVE PROGRAM OPTION CG tl
I" 1$\&' () *+, - . / 0123456789 1 : <•>?IABCOElGJ pqrl!ltuvwxyz{ I } - I .. 1$\& ' ( ) • +, - . / 81 2 3,56 78 ~
abcdetqhilkl•nopqr•tuvwxyz{ I}- I " IS\&r ' () RSTUVWXYZ ( \) "'_' abcdef9hi j kl•nopqrl!ltuvwxy: CDEFGHIJXLHllOPQRSTUVWXYZ ( \ J •_' abcdef11h i j l 4s6189, ~ <•> ? IABCDErGHIJKLHIOPORSTuvwxvz ( · \& ' ( ) •+, - . / 0 123156789 t I <•>? IABCDB!'GHIJILI uvwxyz{I}-
A limited sample of each available print styles in 8 112" format . When complete (about three pages), the printer stops and the SELECT light goes on.
paper! Information on the SELF TEST:
Modol \ U.S.A.
~·· ~,,,. ~ !1!!!:::.i:.. ::; ::::! ~:::;;:::::
Modol Po,,.n•Uty '""""' .::::: "\'1 ver\"·" N~•:• optloo•I
cartridge P=Parallel font (Epson/IBM) S=Serial Optional
font cartridge . (if installed) F1r'!1~are
rev1s1on numbers

Using the Control Panel
The control panel puts many of your printer's functions within reach of your fingertips. It even lets you customize your printer for special applications without programming. Experi ment with these controls and you' ll see how much your MICRO LIN E can do and how easy it is to work. The next few pages explain the basics of using the control panel. You'll find all the details in your Reference Guide.
Basic Controls
Power on when lit.
(When printer is selected or deselected) Advances paper to top of next page.
Alarm condition: Paper out, paper jam, cover open, etc. when lit.
Lights when printer is in quiet mode.
Turns quiet mode on and off; reduces printing noise in Letter Quality and Utility modes.
(When printer is selected or deselected) Moves paper up one line.
(When printer is deselected) Sets position of first print line.
Selects or deselects printer . When selected, the printer is ready to receive data; when deselected, it won't print.
Lights when printer is selected (ready to receive data); goes out when it's deselected. The light blinks when the printer is in Print Suppress mode. (See the Reference Guide for details.)
Control Panel 27

NOTE: When the printer is selected, pressing TOP OF FORM will activate the automatic park feature (page 18).
28 Control Panel
These buttons have special functions when you hold them down while turning the printer on:
LINE FEED: Activates narrow self test (page 24).
QUIET: Activates wide self test (page 24).
FORM FEED: Puts printer in the Menu Select mode (see Reference Guide).
SELECT: Puts printer in the Hex Dump mode (see page 29).
Print Feature Controls
You can select basic printing features from the front panel without programming or modifying your software. With the printer deselected (SELECT light out), simply press the button of the feature you want to control until your selection is lit. For complete details on these features, see your Reference Guide.
Macros
If you use some combinations of features frequently, you can store the settings in macros. Then, instead of cycling through the choices, you only have to push a few buttons to change the settings. You can set up to four macros, and they're stored in a special area of memory, so they stay in the printer even when it's turned off. Macro 1 is the default, so that will automatically be set when you turn on the printer.
For more details on setting and using macros, see your Reference Guide.

SELECT light must be on to enter macro mode.
Macro 4
These buttons correspond to the four macros.
Menu Select Mode
To enter macro mode, press FONT SELECT and CHARACTER PITCH simultaneously.
To call a previously defined macro, hold down the button of the macro you want to invoke and press CHARACTER PITCH.
To save current panel settings as a macro, hold down the button of the macro you want to define and press PRINT QUALITY.
This is another feature that allows you to change printing styles without programming. It is also used to set the printer's serial interface configuration to match your computer. As you step through the menu, each item and selection is printed out. The printer stores changes to the menu in a special area of its memory, so that they are preserved even when the printer is off and they become the default settings (automatically set when you turn the printer on).
You'll find a list of the menu selections in the Appendix; complete information on using the Menu Select mode is in the Reference Guide.
Control Panel 29

30 Control Panel
Activating Menu Select Mode
Method 1: If the printer is OFF, press FORM FEED, and hold it down while you turn the printer ON.
To go directly to first menu item, press FORM FEED.
Method 2: If the printer is ON, hold down PRINT QUALITY and press FONT SELECT.
Method 2 works only with SELECT lit.
To print entire menu with current selections, press SELECT.
Menu Select Operation
To set selection and move to the next item, press FORM FEED.
To move to the previous item, press LINE FEED.
To change selection for a menu item, press SELECT.
To exit Menu Select, press TOP OF FORM.
To move to the next item, press FORM FEED. .

Cleaning Every six months (or after 300 hours of operation), take a clean, dry, soft cloth and dust the area around the carriage shaft and platen. Be sure to remove any loose particles of paper. Do not use solvents or strong detergents on the cabinet. Be sure to turn the printer OFF before cleaning.
Problem Solving Why does nothing happen at all when I turn on the printer?
The printer may not be plugged in. Check the power cord connection to the printer and the outlet.
Why is the ALARM light on?
Check to see if:
• paper is out.
NOTE: For details on service, see the Customer Service Guide, included with your printer.
• the paper lever is not set for the type of paper you're using (single sheet or continuous form).
• the front cover is open.
After correcting the alarm condition, you may have to turn the printer off and on again to make the ALARM light go out.
Why is the ALARM light flashing?
Turn the printer off and check to see if:
• The bail is open. Make sure the bail lever is toward the back of the printer.
• The paper or ribbon is jammed. • Something is blocking the path of the printhead.
If none of these problems exist, call for _service.
Why doesn't the printer print when data is sent from the computer?
You may have the printer deselected. (The SELECT light is out.) Press the SELECT button. If the SELECT light still won't turn on even though the POWER light is on, turn the printer OFF and try reinserting the personality cartridge.
Problem Solving 31

32 Problem Solving
Why are dots m1ssmg in my printouts?
The head gap may not be set correctly. Try moving the head gap lever to a lower setting. (See page 5.) If that doesn't help, the printhead may be damaged; call for service.
How can I check the data that my computer is sending to the printer?
Use the hexadecimal dump mode. To activate it, hold the SELECT button down while you turn on the printer. All data sent to the printer, including text and printer commands, will print in both hexadecimal and ASCII format; In the ASCII format, all non printable codes are represented by two-letter condensations of the standard ASCII abbreviations. (See Appendix B of your Reference Guide.) For example, this line of BASIC code:
LPRINT CHR$(27);CHR$(15);"This is an example of the way data prints in hexadecimal dump mode"
Would print like this:
18 0F 54 68 69 73 20 69 - 73 20 61 6E 20 65 78 61 6D 70 6C 65 20 6F 66 20 - 74 68 65 20 77 61 79 20 64 61 74 61 20 70 72 69 - 6E 74 73 20 69 6E 20 68 65 78 20 64 75 6D 70 20 - 6D 6F 64 65 00 0A
•,•,This is an exa mple of the way data prints in h ex du11p 111ode'1'r
To return to normal printing, turn the printer off, then on again.
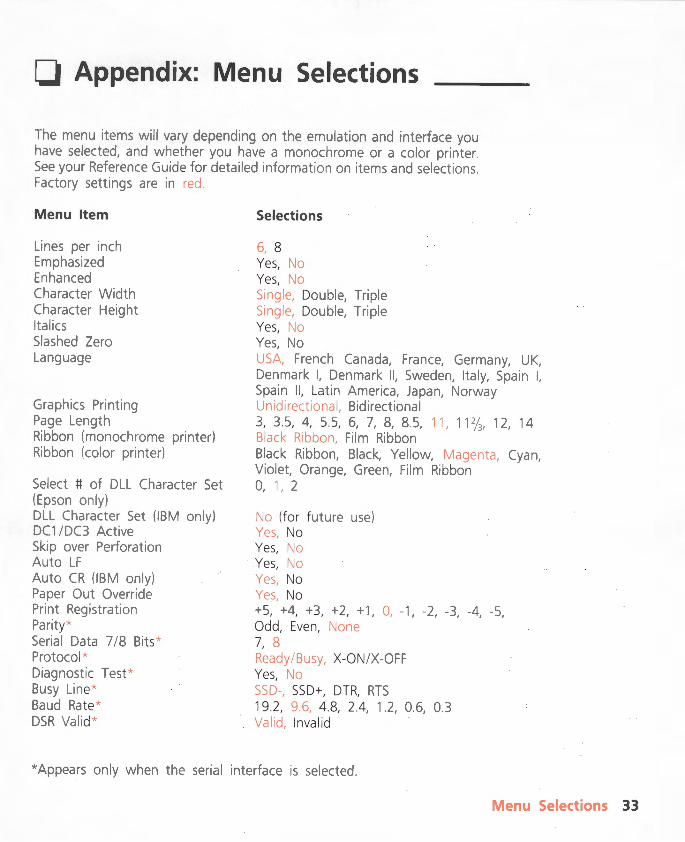
O Appendix: Menu Selections
The menu items will vary depending on the emulation and interface you have selected, and whether you have a monochrome or a color printer. See your Reference Guide for detailed information on items and selections. Factory settings are in red .
Menu Item
Lines per inch Emphasized Enhanced Character Width Character Height Italics Slashed Zero Language
Graphics Printing Page Length Ribbon (monochrome printer) Ribbon (color printer)
Select tt of DLL Character Set (Epson only) DLL Character Set (IBM only) DC1 / DC3 Act ive Skip over Perforation Auto LF Auto CR {IBM only) Paper Out Override Print Registration Parity* Serial Data 7 / 8 Bits * Protocol * Diagnostic Test * Busy Line* Baud Rate * DSR Valid *
Selections
6, 8 Yes, No Yes, No Single, Double, Triple Single, Double, Triple Yes, No Yes, No USA, French Canada, France, Germany, UK, Denmark I, Denmark II, Sweden, Italy, Spain I, Spain II, Latin America, Japan, Norway Unidirectional, Bidirectional 3, 3.5, 4, 5.5, 6, 7, 8, 8.5, 11, 11 %, 1 2, 14 Black Ribbon, Film Ribbon Black Ribbon, Black, Yellow, Magenta, Cyan, Violet, Orange, Green, Film Ribbon 0, 1, 2
No {for future use) Yes, No Yes, No Yes, No Yes, No Yes, No +5, +4, +3, +2, +1, 0, -1, -2, -3, -4, -5, Odd, Even, None 7, 8 Ready/Busy, X-ON /X-OFF Yes, No SSD-, SSD+, DTR, RTS 19.2, 9.6, 4 .8, 2.4, 1 .2, 0.6, 0.3 Valid, Invalid
*Appears only when the serial interface 1s selected .
Menu Selections 33

DTR Signal * Busy Time* Form ·Tear Off Transparency/ Paper Character Set (Epson only) Character Set (IBM only) Emulation
Line Length (IBM only)
Ready on Select, Ready on Power Up 0.2, 1 On, Off Paper, Transparency Epson, IBM Set I, IBM Set II IBM Set I, IBM Set II Epson LQ, IBM Proprinter, IBM Alternate Graphics Mode 13.6 inches, 8 inches
*Appears only when the serial interface is selected.
34 Menu Selections

Federal Communications Commission Radio Frequency Interference Statement
WARNING: This equipment complies with the limits for a Class B computing device in accordance with the specifications in Subpart J of Part 1 5 of FCC rules. These specifications are designed to minimize radio frequency interference in a residential installation; however, there is no guarantee that radio or television interference will not occur in any particular installation. If this equipment does cause interference to radio or television reception, which can be determined by turning the equipment off and on when the radio or television is on, the user is encouraged to try to correct the interference by one or more of the following measures:
• Reorient the radio or television receiving antenna. • Relocate the printer with respect to the receiver. • Move the printer away from the receiver. • Plug the printer into a different outlet so that the printer and receiver
are on different circuits.
If necessary, the user should consult the dealer or an experienced radio/television technician for additional suggestions. The user may find the following booklet prepared by the Federal Communication Commission helpful:
"How to Identify and Resolve Radio/TV Interference Problems"
This booklet is available from the U.S. Government Printing Office, Washington, DC 20402 by ordering stock number 004-000-00345-4.

59227003