Microchip's Accessory Framework for Android(tm)ww1.microchip.com/downloads/en/DeviceDoc/Android...
52
Microchip's Accessory Framework for Android(tm)
Transcript of Microchip's Accessory Framework for Android(tm)ww1.microchip.com/downloads/en/DeviceDoc/Android...
Microchip's Accessory Framework for Android(tm)

Microchip Technology Inc. Copyright (c) 2011. All rights reserved.
Android is a trademark of Google Inc. Use of this trademark is subject to Google Permissions.
Table of Contents
Introduction 1
SW License Agreement 2
Release Notes 10Terms and Definitions 10
Supported Demo Boards 10
Requirements, Limitations, and Potential Issues 11
Getting the Source Code 11
What's Next? 11
Using the Library 12Library Architecture 12
How the Library Works 12
Configuring the Library 12
Required USB callbacks 12
HardwareProfile.h 14
usb_config.h 14
usb_config.c 15
Initialization 16
Keeping the Stack Running 17
Detecting a Connection/Disconnection to an Android Device 17
Sending Data 18
Receiving Data 19
Firmware API 21API Functions 21
AndroidAppIsReadComplete Function 21
AndroidAppIsWriteComplete Function 22
AndroidAppRead Function 23
AndroidAppStart Function 24
AndroidAppWrite Function 25
AndroidTasks Function 25
Error Codes 26
Microchip's Accessory Framework for Android(tm) iii
iii
USB_ERROR_BUFFER_TOO_SMALL Macro 26
Configuration Definitions 27
NUM_ANDROID_DEVICES_SUPPORTED Macro 27
Configuration Functions 27
AndroidAppDataEventHandler Function 27
AndroidAppEventHandler Function 28
AndroidAppInitialize Function 29
Events 30
EVENT_ANDROID_ATTACH Macro 30
EVENT_ANDROID_DETACH Macro 30
Type Definitions 31
ANDROID_ACCESSORY_INFORMATION Structure 31
Running the Demos 33Creating the Setup 33
New to Microchip 33
Getting the Tools 33
New to Android 33
Updating the Android OS 34
Nexus S 34
Updating the SDK 35
Eclipse IDE 35
Version v2.3.x 35
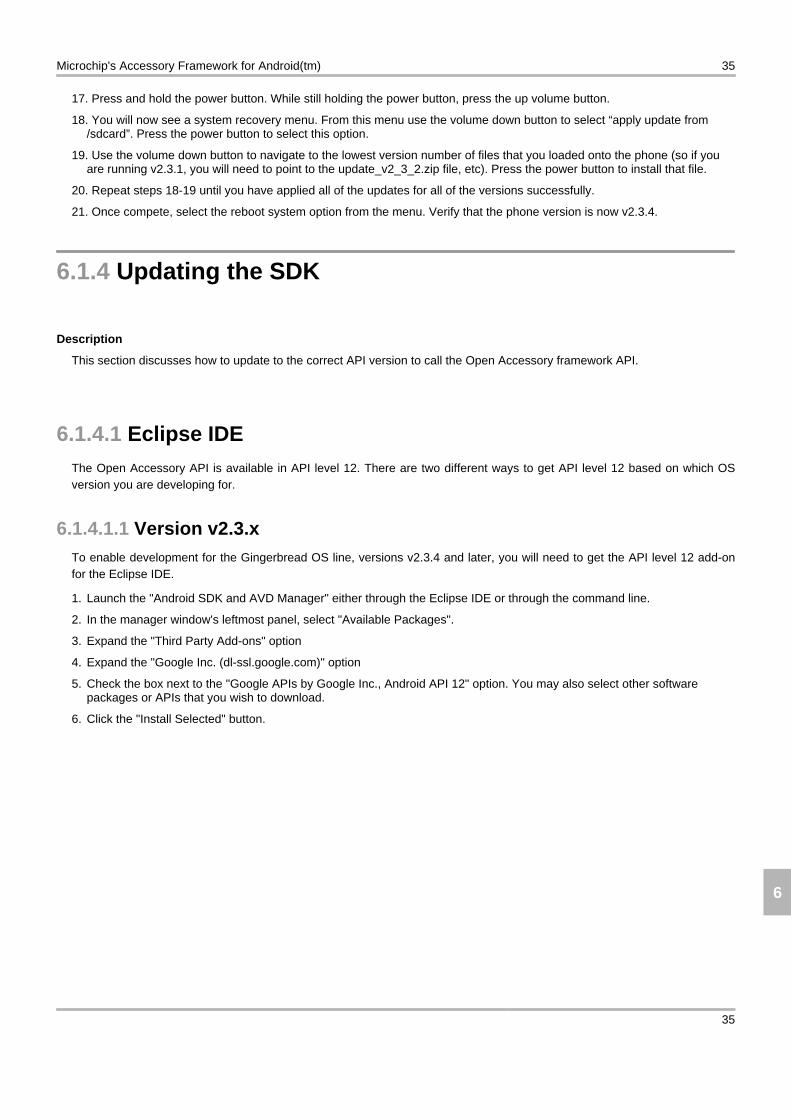
Version v3.x 36
Basic Accessory Demo 37
Getting the Android Application 37
From source 37
From Android Marketplace 37
Preparing the Hardware 38
Running the demo 38
Creating an Android Accessory Application using the Open Accessory Framework
40
Creating the Project 40
Accessing the Accessory From the Application 42
FAQs, Tips, and Troubleshooting 43My PIC32 project gets a run time exception. What could be wrong? 43
Microchip's Accessory Framework for Android(tm) iv
iv
How do I debug without access to ADB? 43
What if I need design assistance creating my accessory? 44
The firmware stops working when I hit a breakpoint. 44
If I hit the "Home" or "Back" buttons while the accessory is attached, the demo no longer works. 44
Why don't all of the features of the demo work? 45
What if I need more support than what is here? 45
Index a
Microchip's Accessory Framework for Android(tm) v
v
1 Introduction
Microchip's Accessory Framework for Android
for
Microchip Microcontrollers
The Microchip's Accessory Framework for Android for Android provides a mechanism to transfer data to and from anAndroid application through the USB of the microcontroller.
Microchip's Accessory Framework for Android(tm) 1
1
1
2 SW License Agreement
IMPORTANT:
MICROCHIP IS WILLING TO LICENSE THE ACCOMPANYING SOFTWARE AND DOCUMENTATION TO YOU ONLY ONTHE CONDITION THAT YOU ACCEPT ALL OF THE FOLLOWING TERMS. TO ACCEPT THE TERMS OF THIS LICENSE,CLICK "I ACCEPT" AND PROCEED WITH THE DOWNLOAD OR INSTALL. IF YOU DO NOT ACCEPT THESE LICENSETERMS, CLICK "I DO NOT ACCEPT," AND DO NOT DOWNLOAD OR INSTALL THIS SOFTWARE.
NON-EXCLUSIVE SOFTWARE LICENSE AGREEMENT FOR ACCOMPANYING MICROCHIP SOFTWARE ANDDOCUMENTATION INCLUDING, BUT NOT LIMITED TO:
GRAPHICS LIBRARY SOFTWARE,
IrDA STACK SOFTWARE,
MCHPFSUSB STACK SOFTWARE,
MEMORY DISK DRIVE FILE SYSTEM SOFTWARE,
mTOUCH™ CAPACITIVE LIBRARY SOFTWARE,
PC PROGRAMS,
SMART CARD LIBRARY SOFTWARE,
TCP/IP STACK SOFTWARE,
AND/OR
MiWi™ DE SOFTWARE
IMPORTANT - READ CAREFULLY.
This Nonexclusive Software License Agreement (“Agreement”) is a contract between you, your heirs, successors andassigns (“Licensee”) and Microchip Technology Incorporated, a Delaware corporation, with a principal place of business at2355 W. Chandler Blvd., Chandler, AZ 85224-6199, and its subsidiary, Microchip Technology (Barbados) Incorporated(collectively, “Microchip”) for the accompanying Microchip software including, but not limited to, Graphics Library Software,IrDA Stack Software, MCHPFSUSB Stack Software, Memory Disk Drive File System Software, mTouch™ Capacitive LibrarySoftware, PC programs, Smart Card Library Software, TCP/IP Stack Software, MiWi™ DE Software, and any updatesthereto (collectively, the “Software”), and accompanying documentation, including images and any other graphic resourcesprovided by Microchip (“Documentation”).
The Software and Documentation are licensed under this Agreement and not sold. U.S. copyright laws, internationalcopyright treaties, and other intellectual property laws and treaties protect the Software and Documentation. Microchipreserves all rights not expressly granted to Licensee in this Agreement.
1. License and Sublicense Grant.
(a) Definitions. As used in this Agreement, the following capitalized terms will have the meanings defined below:
Microchip's Accessory Framework for Android(tm) 2
2
2
(i) “Microchip Products” means Microchip microcontrollers, Microchip digital signal controllers, or other Microchip productsthat use or implement the Software.
(ii) “Licensee Products” means Licensee products that use or incorporate Microchip Products.
(iii) “Object Code” means the Software computer programming code that is in binary form (including related documentation, ifany), and error corrections, improvements, modifications, and updates.
(iv) “Source Code” means the Software computer programming code that may be printed out or displayed in human readableform (including related programmer comments and documentation, if any), and error corrections, improvements,modifications, and updates.
(v) “Third Party” means Licensee’s agents, representatives, consultants, clients, customers, or contract manufacturers.
(vi) “Third Party Products” means Third Party products that use or incorporate Microchip Products.
(b) Software License Grant. Microchip grants strictly to Licensee a non-exclusive, non-transferable, worldwide license to usethe Software, as described below:
(i) Graphics Library Software, MCHPFSUSB Stack Software, Memory Disk Drive File System Software, mTouch™Capacitive Library Software, Smart Card Library, TCP/IP Stack Software, and other accompanying Microchip software nototherwise expressly addressed in Section 1(b)(ii) or Section 1(b)(iii) below:
(1) Licensee may use, modify, copy, and distribute the Software identified in the subheading of this Section 1(b)(i) whensuch Software is embedded in a Microchip Product that is either integrated into Licensee Product or Third Party Productpursuant to Section 1(d) below.
(2) Further, with respect to the TCP/IP Stack Software, Licensee may only port the ENC28J60.c, ENC28J60.h,ENCX24J600.c, and ENCX24J600.h driver source files to a non-Microchip device used in conjunction with a Microchipethernet controller for the sole purpose of interfacing with such ethernet controller.
(ii) IrDA Stack Software:
(1) Licensee may install the IrDA Stack Software on a single computer and use with Microchip Products; and
(2) Use, modify, copy, and distribute the device driver source files of the IrDA Stack Software (“Device Drivers”); providedthat (x) such Device Drivers are only used with Microchip Products, and (y) no Open Source Components (defined in Section2(c) below) are incorporated into such Device Drivers.
(iii) PC Programs:
(1) Licensee may install, use, modify (if Microchip provides Source Code), copy, and distribute the PC programs on anunlimited number of computers; provided that (x) such PC programs are used with Microchip products, and (y) the followingconditions are met when Licensee redistributes any PC programs:
“Copyright (c) Microchip Technology Inc. All rights reserved. Microchip PC programs are provided for your use withMicrochip products only.
Redistributions and use in source and binary forms, with or without modification, are permitted provided that the followingconditions are met:
Microchip's Accessory Framework for Android(tm) 3
3
2
* Redistributions of source code must retain the above copyright notice, this list of conditions and the following disclaimer.
* Redistributions in binary form must reproduce the above copyright notice, this list of conditions and the following disclaimerin the documentation and/or other materials provided with the distribution.
* Neither the name of Microchip nor the names of its contributors may be used to endorse or promote products derived fromthis software without specific prior written permission.
THIS SOFTWARE IS PROVIDED BY MICROCHIP ''AS IS'' AND ANY
EXPRESS OR IMPLIED WARRANTIES, INCLUDING, BUT NOT LIMITED TO, THE IMPLIED WARRANTIES OFMERCHANTABILITY AND FITNESS FOR A PARTICULAR PURPOSE ARE DISCLAIMED. IN NO EVENT WILLMICROCHIP BE LIABLE FOR ANY DIRECT, INDIRECT, INCIDENTAL, SPECIAL, EXEMPLARY, OR CONSEQUENTIALDAMAGES (INCLUDING, BUT NOT LIMITED TO, PROCUREMENT OF SUBSTITUTE GOODS OR SERVICES; LOSS OFUSE, DATA, OR PROFITS; OR BUSINESS INTERRUPTION) HOWEVER CAUSED AND ON ANY THEORY OF LIABILITY,WHETHER IN CONTRACT, STRICT LIABILITY, OR TORT (INCLUDING NEGLIGENCE OR OTHERWISE) ARISING INANY WAY OUT OF THE USE OF THIS SOFTWARE, EVEN IF ADVISED OF THE POSSIBILITY OF SUCH DAMAGE.”
(iv) MiWi™ DE Software: Licensee may use, modify, copy and distribute the Software only when embedded on a MicrochipProduct and used with either a Microchip radio frequency transceiver or UBEC UZ2400 radio frequency transceiver, whichare integrated into Licensee Products or Third Party Products pursuant to Section 1(d) below.
For purposes of clarity, Licensee may NOT embed the Software identified in Section 1(b)(i) (including derivatives ormodifications thereof) on a non-Microchip Product, except as described in Section 1(b)(i)(2). Licensee may NOT use, copy,modify or distribute the IrDA Stack Software, except as described in Section 1(b)(ii)(2) above (relating to Device Drivers) andSection 1(d) below (relating to sublicenses). Licensee may NOT distribute Source Code or Object Code of the Software on astandalone basis, except as described in Section 1(b)(iii) above (relating to PC programs) and Section 1(d) below (relating tosublicense rights). For the MiWi™ DE Software, Licensee may NOT embed the Software (including derivatives ormodifications thereof) on a non-Microchip Product, use the Software with a radio frequency transceiver other than theMicrochip and UBEC transceivers listed in Section 1(b)(iv), or distribute the Software (in Source Code or Object Code)except as described in Section 1(d) below.
(c) Documentation License Grant. Microchip grants strictly to Licensee a non-exclusive, non-transferable, worldwide licenseto use the Documentation in support of Licensee's authorized use of the Software.
(d) Sublicense Grants. Licensee may grant a sublicense to a Third Party to use the Software as described in thissubparagraph (d) provided that Licensee first obtains such Third Party’s agreement in writing to comply with the terms of thisAgreement:
(i) Graphics Library Software, MCHPFSUSB Stack Software, Memory Disk Drive File System Software, mTouch™Capacitive Library Software, Smart Card Library, TCP/IP Stack Software, MiWi™ DE Software, and other accompanyingMicrochip software not otherwise expressly addressed in Section 1(b)(iii) above or Section 1(d)(ii) below:
With respect to Software identified in this Section 1(d)(i), Third Party may:
(1) Modify Source Code for Licensee.
(2) Program Software into Microchip Products for Licensee.
(3) Use the Software to develop and/or manufacture Licensee Products.
Microchip's Accessory Framework for Android(tm) 4
4
2
(4) Use the Software to develop and/or manufacture Third Party Products where either: (x) the sublicensed Softwarecontains Source Code modified or otherwise optimized by Licensee for integration into Third Party Products; and/or (y) thesublicensed Software is programmed into Microchip Products by Licensee on behalf of such Third Party.
(5) Use the Documentation in support of Third Party's authorized use of the Software in conformance with this Section 1(d)(i).
(ii) IrDA Stack Software:
With respect to IrDA Stack Software, Third Party may:
(1) Modify ONLY Device Drivers for Licensee.
(2) Program Software into Microchip Products for Licensee.
(3) Use the Documentation in support of Third Party's authorized use of the Software in conformance with this Section1(d)(ii).
(e) Audit. Microchip’s authorized representatives will have the right to reasonably inspect, announced or unannounced, andits sole and absolute discretion, Licensee's premises and to audit Licensee's records and inventory of Licensee Products,whether located on Licensee's premises or elsewhere at any time, in order to ensure Licensee's adherence to the terms ofthis Agreement.
2. Third Party Requirements; Open Source Components. Licensee acknowledges that it is Licensee’s responsibility tocomply with any third party license terms or requirements applicable to the use of such third party software, specifications,systems, or tools. Microchip is not responsible and will not be held responsible in any manner for Licensee’s failure tocomply with such applicable terms or requirements.
(a) IrDA Stack Software. With respect to the IrDA Stack Software, Licensee further acknowledges that it is Licensee'sresponsibility to obtain a copy of, to familiarize itself fully with, and comply with the requirements of the Infrared DataAssociation, especially regarding the use of IrDA specifications and development of IrDA-compliant products. At the time ofthis Software release, it is Microchip's understanding that Licensee may obtain a copy of IrDA specifications from the IrDAwebsite by either paying an access fee or becoming a member of the Infrared Data Association. For more information go towww.irda.org.
(b) Memory Disk Drive File System Software. With respect to the Memory Disk Drive File Systems Software, Licenseefurther acknowledges that it is Licensee's responsibility to obtain a copy of, familiarize itself fully with, and comply with therequirements and licensing obligations applicable to the use of flash-based media and FAT files systems available fromCompact Flash Association, SD Card Association, Multi Media Card Association, and Microsoft Corporation.
(c) Open Source Components. Notwithstanding the license grant in Section 1 above, Licensee further acknowledges thatcertain components of the Software may be covered by so-called “open source” software licenses (“Open SourceComponents”). Open Source Components means any software licenses approved as open source licenses by the OpenSource Initiative or any substantially similar licenses, including without limitation any license that, as a condition ofdistribution of the software licensed under such license, requires that the distributor make the software available in sourcecode format.
To the extent required by the licenses covering Open Source Components, the terms of such license will apply in lieu of theterms of this Agreement, and Microchip hereby represents and warrants that the licenses granted to such Open Source
Microchip's Accessory Framework for Android(tm) 5
5
2
Components will be no less broad than the license granted in Section 1. To the extent the terms of the licenses applicable toOpen Source Components prohibit any of the restrictions in this Agreement with respect to such Open Source Components,such restrictions will not apply to such Open Source Component.
For purposes of clarity:
QT Framework Version 3: The MCHPFSUSB Stack Software is accompanied by a PC program, the “USB Device – LibUSB– Generic Driver Demo – Linux Application” or “LibUSB Linux example,” that is developed by Microchip using the Qtframework version 3. Such Qt framework version 3 is governed by the GNU General Public License version 2 (“GPL”).Accordingly, Microchip offers the LibUSB Linux example, including Source Code for such program, under the terms of GPLversion 2 as well. For copies of the GPL version 2, please go to http://www.fsf.org.
QT Framework Version 4.7.0: The MCHPFSUSB Stack Software is accompanied by a PC program, the “USB Device – HID– Custom Demos – Generic HID PnP Demo – Cross Platform” or “Custom HID Cross Platform example,” that is developedby Microchip using the Qt framework version 4.7.0. Such Qt framework version 4.7.0 is governed by the GNU LesserGeneral Public License version 2.1 (“LGPL”). For copies of the LGPL version 2.1, please go to http://www.fsf.org. TheCustom HID Cross Platform example is governed by the terms of this Non-Exclusive Software License Agreement.
JPEG Software: Independent JPEG Group’s software and accompanying third party files including, but not limited to, GIFcompressed format files are governed by the terms described in IJG’s license. This license is posted in the “IJG License.pdf”file located at: <Installed Folder>\Microchip\Image Decoders.
(d) Google Static Maps API: Google Static Maps API and Google server usage are governed by the legal notices, terms andconditions posted on the Google website at www.google.com, including but not limited to the Static Maps API DeveloperGuide, the Legal Notices for Google Maps/Google Earth and Google Maps/Google Earth API, the Google Maps/GoogleEarth Terms of Service, and the Google Maps/Google Earth API Terms of Service.
3. Licensee Obligations.
(a) Licensee will ensure Third Party compliance with the terms of this Agreement, and will be liable for any breach of thisAgreement committed by such Third Party.
(b) Licensee will not: (i) engage in unauthorized use, modification, disclosure or distribution of Software or Documentation, orits derivatives; (ii) use all or any portion of the Software, Documentation, or its derivatives except in conjunction withMicrochip Products or Third Party Products; or (iii) reverse engineer (by disassembly, decompilation or otherwise) Softwareor any portion thereof.
(c) Licensee may not remove or alter any Microchip copyright or other proprietary rights notice posted in any portion of theSoftware or Documentation.
(d) Licensee will defend, indemnify and hold Microchip and its subsidiaries harmless from and against any and all claims,costs, damages, expenses (including reasonable attorney's fees), liabilities, and losses, including without limitation productliability claims, directly or indirectly arising from or related to: (i) the use, modification, disclosure or distribution of theSoftware, Documentation, or any intellectual property rights related thereto; (ii) the use, sale and distribution of LicenseeProducts or Third Party Products; and (iii) breach of of this Agreement. THIS SECTION 3(d) STATES THE SOLE AND
Microchip's Accessory Framework for Android(tm) 6
6
2

EXCLUSIVE LIABILITY OF THE PARTIES FOR INTELLECTUAL PROPERTY INFRINGEMENT.
4. Confidentiality.
(a) Licensee agrees that the Software (including but not limited to the Source Code, Object Code and library files) and itsderivatives, Documentation and underlying inventions, algorithms, know-how and ideas relating to the Software and theDocumentation are proprietary information belonging to Microchip and its licensors (“Proprietary Information”). Except asexpressly and unambiguously allowed herein, Licensee will hold in confidence and not use or disclose any ProprietaryInformation and will similarly bind its employees and Third Party(ies) in writing. Proprietary Information will not includeinformation that: (i) is in or enters the public domain without breach of this Agreement and through no fault of the receivingparty; (ii) the receiving party was legally in possession of prior to receiving it; (iii) the receiving party can demonstrate wasdeveloped by the receiving party independently and without use of or reference to the disclosing party's ProprietaryInformation; or (iv) the receiving party receives from a third party without restriction on disclosure. If Licensee is required todisclose Proprietary Information by law, court order, or government agency, such disclosure will not be deemed a breach ofthis Agreement provided that Licensee: (x) gives Microchip prompt notice of such requirement in order to allow Microchip toobject or limit such disclosure; (y) cooperates with Microchip to protect Proprietary Information; and (z) Licensee complieswith any protective order in place and discloses only the information required by process of law.
(b) Licensee agrees that the provisions of this Agreement regarding unauthorized use and nondisclosure of the Software,Documentation and related Proprietary Rights are necessary to protect the legitimate business interests of Microchip and itslicensors and that monetary damages alone cannot adequately compensate Microchip or its licensors if such provisions areviolated. Licensee, therefore, agrees that if Microchip alleges that Licensee or Third Party has breached or violated suchprovision then Microchip will have the right to petition for injunctive relief, without the requirement for the posting of a bond, inaddition to all other remedies at law or in equity.
5. Ownership of Proprietary Rights.
(a) Microchip and its licensors retain all right, title and interest in and to the Software and Documentation (“ProprietaryRights”) including, but not limited to: (i) patent, copyright, trade secret and other intellectual property rights in the Software,Documentation, and underlying technology; (ii) the Software as implemented in any device or system, including all hardwareand software implementations of the Software technology (expressly excluding Licensee and Third Party code developedand used in conformance with this Agreement solely to interface with the Software and Licensee Products and/or Third PartyProducts); and (iii) all copies and derivative works thereof (by whomever produced). Further, copies and derivative works willbe considered works made for hire with ownership vesting in Microchip on creation. To the extent such modifications andderivatives do not qualify as a “work for hire,” Licensee hereby irrevocably transfers, assigns and conveys the exclusivecopyright thereof to Microchip, free and clear of any and all liens, claims or other encumbrances, to the fullest extentpermitted by law. Licensee and Third Party use of such modifications and derivatives is limited to the license rights describedin Sections 1 and 2 above.
(b) Licensee will have no right to sell, assign or otherwise transfer all or any portion of the Software, Documentation, or anyrelated intellectual property rights except as expressly set forth in this Agreement.
6. Termination of Agreement. Without prejudice to any other rights, this Agreement terminates immediately, without notice byMicrochip, upon a failure by Licensee or Third Party to comply with any provision of this Agreement. Further, Microchip mayalso terminate this Agreement upon reasonable belief that Licensee or Third Party failed to comply with this Agreement.Upon termination, Licensee and Third Party will immediately stop using the Software, Documentation, and derivativesthereof, and immediately destroy all such copies.
Microchip's Accessory Framework for Android(tm) 7
7
2
7. Warranties and Disclaimers. THE SOFTWARE AND DOCUMENTATION ARE PROVIDED “AS IS” WITHOUTWARRANTY OF ANY KIND, EITHER EXPRESS OR IMPLIED, INCLUDING WITHOUT LIMITATION, ANY WARRANTY OFMERCHANTABILITY, TITLE, NON-INFRINGEMENT AND FITNESS FOR A PARTICULAR PURPOSE. MICROCHIP ANDITS LICENSORS ASSUME NO RESPONSIBILITY FOR THE ACCURACY, RELIABILITY OR APPLICATION OF THESOFTWARE OR DOCUMENTATION. MICROCHIP AND ITS LICENSORS DO NOT WARRANT THAT THE SOFTWAREWILL MEET REQUIREMENTS OF LICENSEE OR THIRD PARTY, BE UNINTERRUPTED OR ERROR-FREE. MICROCHIPAND ITS LICENSORS HAVE NO OBLIGATION TO CORRECT ANY DEFECTS IN THE SOFTWARE. LICENSEE ANDTHIRD PARTY ASSUME THE ENTIRE RISK ARISING OUT OF USE OR PERFORMANCE OF THE SOFTWARE ANDDOCUMENTATION PROVIDED UNDER THIS AGREEMENT.
8. Limited Liability. IN NO EVENT WILL MICROCHIP OR ITS LICENSORS BE LIABLE OR OBLIGATED UNDERCONTRACT, NEGLIGENCE, STRICT LIABILITY, CONTRIBUTION, BREACH OF WARRANTY, OR OTHER LEGAL OREQUITABLE THEORY FOR ANY DIRECT OR INDIRECT DAMAGES OR EXPENSES INCLUDING BUT NOT LIMITED TOINCIDENTAL, SPECIAL, INDIRECT, PUNITIVE OR CONSEQUENTIAL DAMAGES, LOST PROFITS OR LOST DATA,COST OF PROCUREMENT OF SUBSTITUTE GOODS, TECHNOLOGY, SERVICES, OR ANY CLAIMS BY THIRDPARTIES (INCLUDING BUT NOT LIMITED TO ANY DEFENSE THEREOF), OR OTHER SIMILAR COSTS. The aggregateand cumulative liability of Microchip and its licensors for damages hereunder will in no event exceed $1000 or the amountLicensee paid Microchip for the Software and Documentation, whichever is greater. Licensee acknowledges that theforegoing limitations are reasonable and an essential part of this Agreement.
9. General.
(a) Governing Law, Venue and Waiver of Trial by Jury. THIS AGREEMENT WILL BE GOVERNED BY AND CONSTRUEDUNDER THE LAWS OF THE STATE OF ARIZONA AND THE UNITED STATES WITHOUT REGARD TO CONFLICTS OFLAWS PROVISIONS. Licensee agrees that any disputes arising out of or related to this Agreement, Software orDocumentation will be brought in the courts of the State of Arizona. The parties agree to waive their rights to a jury trial inactions relating to this Agreement.
(b) Attorneys' Fees. If either the Microchip or Licensee employs attorneys to enforce any rights arising out of or relating tothis Agreement, the prevailing party will be entitled to recover its reasonable attorneys' fees, costs and other expenses.
(c) Entire Agreement. This Agreement will constitute the entire agreement between the parties with respect to the subjectmatter hereof. It will not be modified except by a written agreement signed by an authorized representative of the Microchip.
(d) Severability. If any provision of this Agreement will be held by a court of competent jurisdiction to be illegal, invalid orunenforceable, that provision will be limited or eliminated to the minimum extent necessary so that this Agreement willotherwise remain in full force and effect and enforceable.
(e) Waiver. No waiver of any breach of any provision of this Agreement will constitute a waiver of any prior, concurrent orsubsequent breach of the same or any other provisions hereof, and no waiver will be effective unless made in writing andsigned by an authorized representative of the waiving party.
(f) Export Regulation. Licensee agrees to comply with all export laws and restrictions and regulations of the Department ofCommerce or other United States or foreign agency or authority.
(g) Survival. The indemnities, obligations of confidentiality, and limitations on liability described herein, and any right of action
Microchip's Accessory Framework for Android(tm) 8
8
2
for breach of this Agreement prior to termination, will survive any termination of this Agreement.
(h) Assignment. Neither this Agreement nor any rights, licenses or obligations hereunder, may be assigned by Licenseewithout the prior written approval of Microchip except pursuant to a merger, sale of all assets of Licensee or other corporatereorganization, provided that assignee agrees in writing to be bound by the Agreement.
(i) Restricted Rights. Use, duplication or disclosure by the United States Government is subject to restrictions set forth insubparagraphs (a) through (d) of the Commercial Computer-Restricted Rights clause of FAR 52.227-19 when applicable, orin subparagraph (c)(1)(ii) of the Rights in Technical Data and Computer Software clause at DFARS 252.227-7013, and insimilar clauses in the NASA FAR Supplement. Contractor/manufacturer is Microchip Technology Inc., 2355 W. ChandlerBlvd., Chandler, AZ 85225-6199.
If Licensee has any questions about this Agreement, please write to Microchip Technology Inc., 2355 W. Chandler Blvd.,Chandler, AZ 85224-6199 USA. ATTN: Marketing.
Copyright © 2010 Microchip Technology Inc. All rights reserved.
License Rev. No. 02-020111
Microchip's Accessory Framework for Android(tm) 9
9
2
3 Release Notes
Microchip's Accessory Framework for Android Version 1.0.0, May 20, 2011
Peripherals
Type/Use Specific/Configurable Polled/Interrupt Limitations ( see page 11)
USB module in host mode USB1 module Interrupt None
3.1 Terms and Definitions This section defines some of the terms used in this document.
Open Accessory API or Open Accessory Framework - this is the API/framework in the Android development environmentthat allows the Android applications to transmit data in and out of the available USB port. This is provided by Google throughthe Android SDK.
Microchip's Accessory Framework for Android - This defines the firmware library and Android application examplesprovided in this package by Microchip.
3.2 Supported Demo Boards The following demo boards are supported in this release:
• Accessory Development Starter Kit for Android (PIC24F Version) (DM240415)
• Explorer 16 (DM240001) with USB PICtail+ Board (AC164131) with any of the following Processor Modules:
• PIC24FJ256GB110 PIM (MA240014)
• PIC24FJ64GB004 PIM (MA240019)
• PIC24FJ256GB210 PIM (MA240021)
• PIC32MX460F512L PIM (MA320002)
• PIC32MX795F512L PIM (MA320003)
• PIC24F Starter Kit 1 (DM240011)
• PIC32 USB Starter Kit I or II (DM320003-2)
• PIC32 Ethernet Starter Kit (DM320004)
Since each board has different hardware features, there may be limitations on some of the boards for each of the demos.For example, if the board does not have a potentiometer but the demo uses one, that feature of the demo will not work.
Microchip's Accessory Framework for Android(tm) 10
10
3
3.3 Requirements, Limitations, and Potential Issues
This section describes the limitations and requirements for using the Microchip's Accessory Framework for Android.
Requirements:
The Microchip's Accessory Framework for Android requires Android versions v2.3.4 or v3.1 or later. The Open AccessoryAPI is not available in OS versions earlier than this. If the target device is using an older version than this, the library will notbe able to connect to that device.
Please see the Creating the Setup ( see page 33) section for details about how to get the correct tool versions. Pleaserefer to the Creating the Android Application ( see page 40) section for more information about how to select the right toolset when creating a new Android application.
Limitations and Potential Issues:
1. The read() function in the Android OS will not throw an IOException when the file stream under it is closed on file streams created from the USB Open Accessory API. This creates issues when applications or services close down and try to free resources. If a read is in progress, then this can result in the ParcelFileDescriptor object being locked until the accessory is detached from the Android device. This is present in version v2.3.4 and v3.1 of the Android OS.
2. The available() function in the Open Accessory API in the Android OS always throws an IOException error. This function is not available for use.
3. This release only shows connecting to an Android device with the Android device as the USB device. Most phones and tablets operate in this mode. A few Android devices at the time of this release are capable of being a USB host as well. Examples for using this mode of operation are not provided in this release. Firmware to talk to these host capable Android devices can be found at www.microchip.com/usb or www.microchip.com/mal. Application example to access accessories running in device mode will follow shortly. The Open Accessory API allows connections in either direction.
3.4 Getting the Source Code If you are working from the pre-compiled version and would like to get the source code version of these projects, please visitwww.microchip.com/mal. The source code is provided in that download (version 2011-06-xx or later).
3.5 What's Next? This section describes what Microchip is working on or considering next. This section makes no statement that these itemswill ever actually be released. Projects on this list may be discontinued indefinitely.
1. Example boot loader for Android Accessories.
2. Examples using the Host mode features of the Open Accessory Framework
Microchip's Accessory Framework for Android(tm) 11
11
3
4 Using the Library
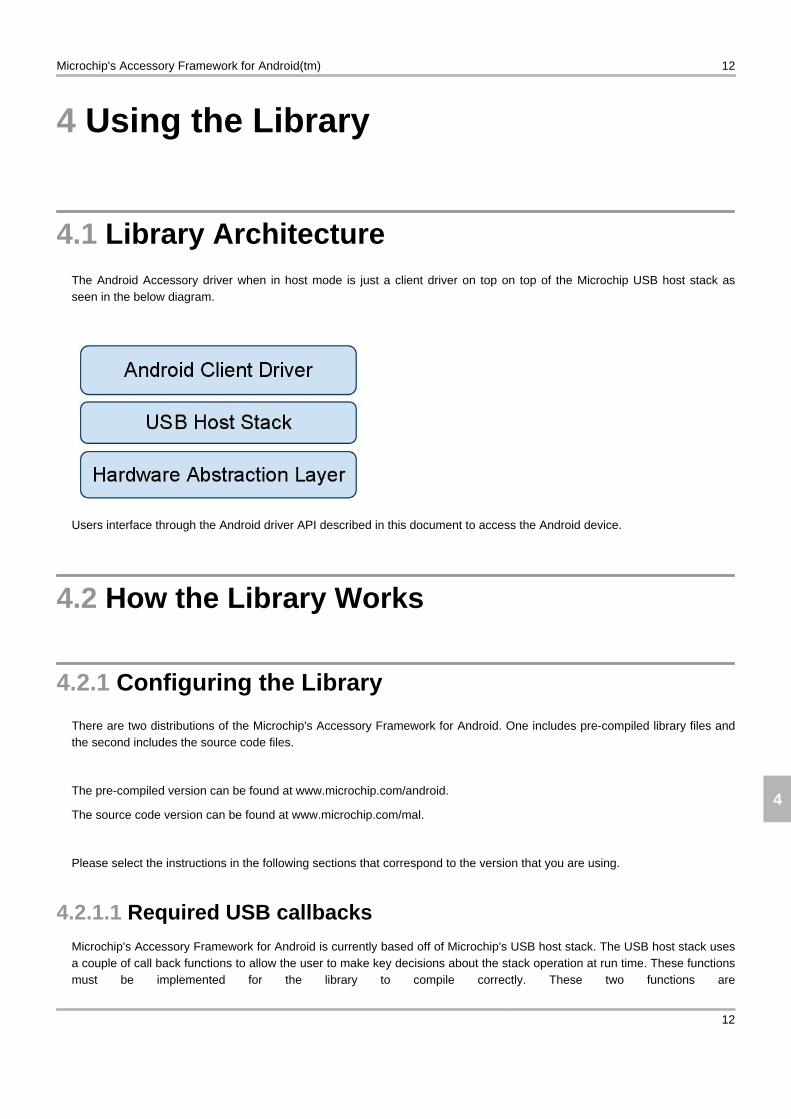
4.1 Library Architecture The Android Accessory driver when in host mode is just a client driver on top on top of the Microchip USB host stack asseen in the below diagram.
Users interface through the Android driver API described in this document to access the Android device.
4.2 How the Library Works
4.2.1 Configuring the Library
There are two distributions of the Microchip's Accessory Framework for Android. One includes pre-compiled library files andthe second includes the source code files.
The pre-compiled version can be found at www.microchip.com/android.
The source code version can be found at www.microchip.com/mal.
Please select the instructions in the following sections that correspond to the version that you are using.
4.2.1.1 Required USB callbacks Microchip's Accessory Framework for Android is currently based off of Microchip's USB host stack. The USB host stack usesa couple of call back functions to allow the user to make key decisions about the stack operation at run time. These functionsmust be implemented for the library to compile correctly. These two functions are
Microchip's Accessory Framework for Android(tm) 12
12
4
USB_ApplicationDataEventHandler() and USB_ApplicationEventHandler() for the pre-compiled example. Forthe source example the function names are configurable through the usb_config.h ( see page 14) file (see the usb_config.h( see page 14) section for more information). For more detailed information about these functions or the USB library,please refer to www.microchip.com/mal. This download includes the USB host library code as well as more detaileddocumentation about that library.
The data events are consumed by the Android client driver. So the user application data event handler doesn't need to doanything. It needs to be present for the library to link successfully but it can just return FALSE.
BOOL USB_ApplicationDataEventHandler( BYTE address, USB_EVENT event, void *data, DWORD size ){ return FALSE;}
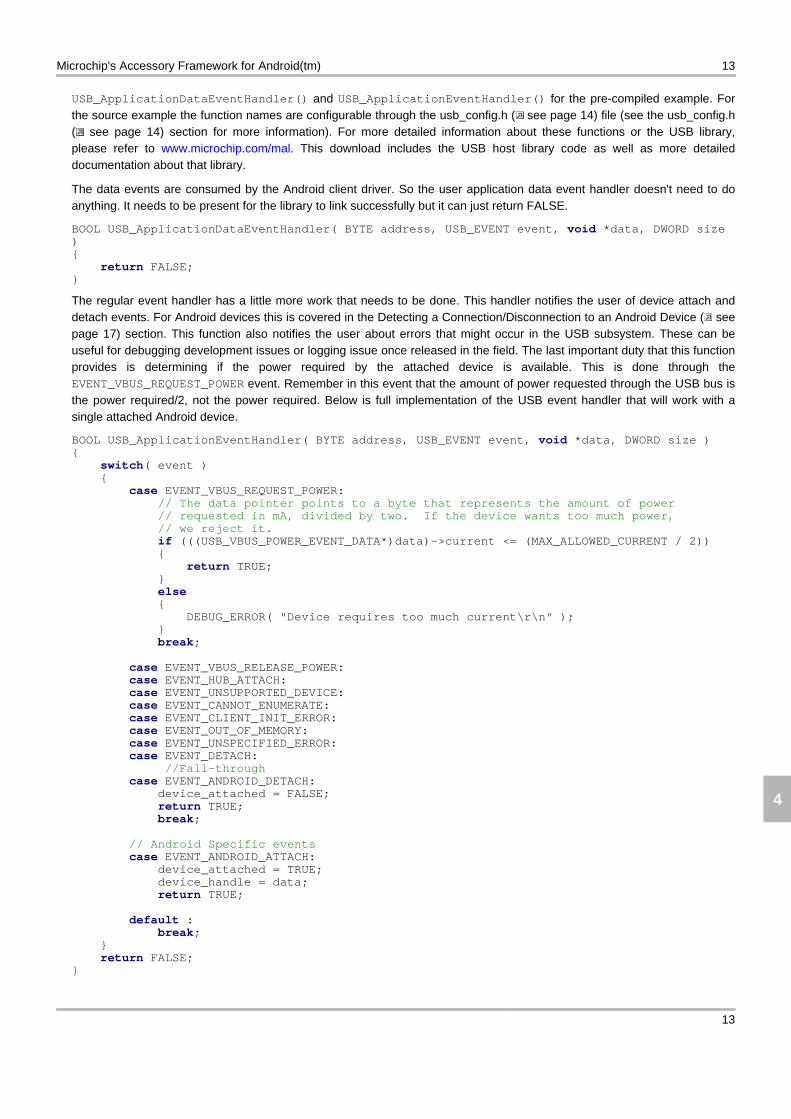
The regular event handler has a little more work that needs to be done. This handler notifies the user of device attach anddetach events. For Android devices this is covered in the Detecting a Connection/Disconnection to an Android Device ( seepage 17) section. This function also notifies the user about errors that might occur in the USB subsystem. These can beuseful for debugging development issues or logging issue once released in the field. The last important duty that this functionprovides is determining if the power required by the attached device is available. This is done through theEVENT_VBUS_REQUEST_POWER event. Remember in this event that the amount of power requested through the USB bus isthe power required/2, not the power required. Below is full implementation of the USB event handler that will work with asingle attached Android device.
BOOL USB_ApplicationEventHandler( BYTE address, USB_EVENT event, void *data, DWORD size ){ switch( event ) { case EVENT_VBUS_REQUEST_POWER: // The data pointer points to a byte that represents the amount of power // requested in mA, divided by two. If the device wants too much power, // we reject it. if (((USB_VBUS_POWER_EVENT_DATA*)data)->current <= (MAX_ALLOWED_CURRENT / 2)) { return TRUE; } else { DEBUG_ERROR( "Device requires too much current\r\n" ); } break; case EVENT_VBUS_RELEASE_POWER: case EVENT_HUB_ATTACH: case EVENT_UNSUPPORTED_DEVICE: case EVENT_CANNOT_ENUMERATE: case EVENT_CLIENT_INIT_ERROR: case EVENT_OUT_OF_MEMORY: case EVENT_UNSPECIFIED_ERROR: case EVENT_DETACH: //Fall-through case EVENT_ANDROID_DETACH: device_attached = FALSE; return TRUE; break; // Android Specific events case EVENT_ANDROID_ATTACH: device_attached = TRUE; device_handle = data; return TRUE; default : break; } return FALSE;}
Microchip's Accessory Framework for Android(tm) 13
13
4
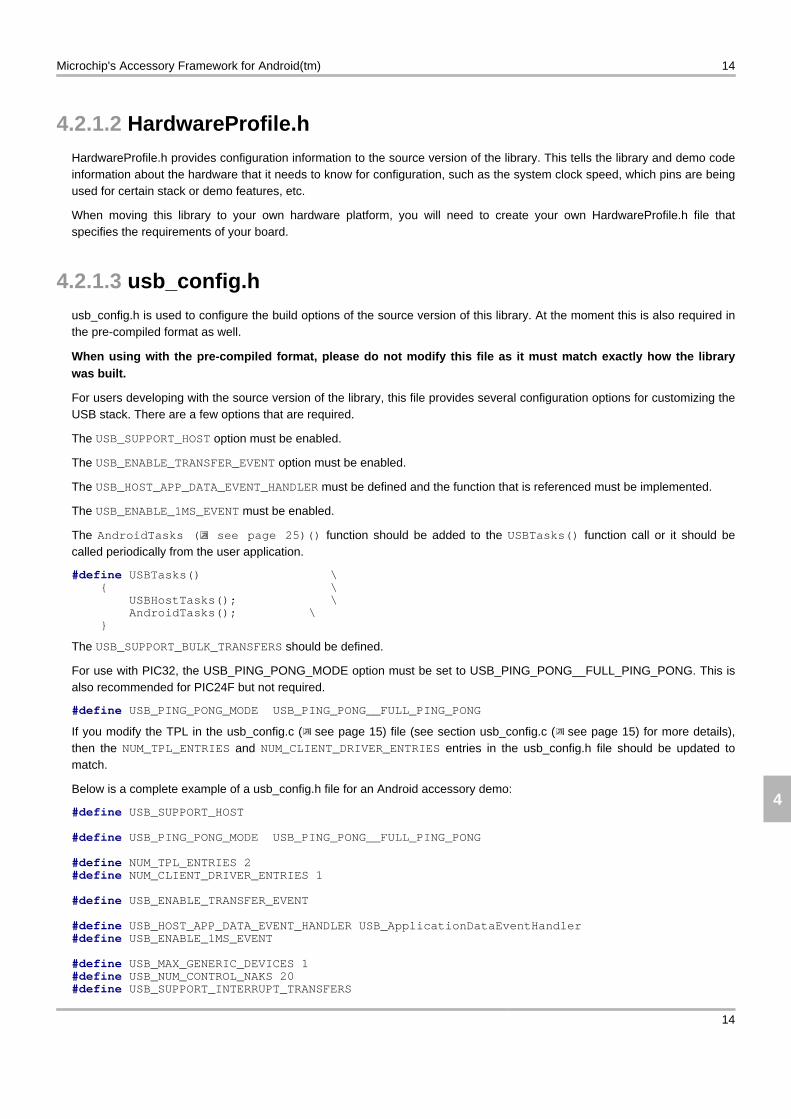
4.2.1.2 HardwareProfile.h HardwareProfile.h provides configuration information to the source version of the library. This tells the library and demo codeinformation about the hardware that it needs to know for configuration, such as the system clock speed, which pins are beingused for certain stack or demo features, etc.
When moving this library to your own hardware platform, you will need to create your own HardwareProfile.h file thatspecifies the requirements of your board.
4.2.1.3 usb_config.h usb_config.h is used to configure the build options of the source version of this library. At the moment this is also required inthe pre-compiled format as well.
When using with the pre-compiled format, please do not modify this file as it must match exactly how the librarywas built.
For users developing with the source version of the library, this file provides several configuration options for customizing theUSB stack. There are a few options that are required.
The USB_SUPPORT_HOST option must be enabled.
The USB_ENABLE_TRANSFER_EVENT option must be enabled.
The USB_HOST_APP_DATA_EVENT_HANDLER must be defined and the function that is referenced must be implemented.
The USB_ENABLE_1MS_EVENT must be enabled.
The AndroidTasks ( see page 25)() function should be added to the USBTasks() function call or it should becalled periodically from the user application.
#define USBTasks() \ { \ USBHostTasks(); \ AndroidTasks(); \ }
The USB_SUPPORT_BULK_TRANSFERS should be defined.
For use with PIC32, the USB_PING_PONG_MODE option must be set to USB_PING_PONG__FULL_PING_PONG. This isalso recommended for PIC24F but not required.
#define USB_PING_PONG_MODE USB_PING_PONG__FULL_PING_PONG
If you modify the TPL in the usb_config.c ( see page 15) file (see section usb_config.c ( see page 15) for more details),then the NUM_TPL_ENTRIES and NUM_CLIENT_DRIVER_ENTRIES entries in the usb_config.h file should be updated tomatch.
Below is a complete example of a usb_config.h file for an Android accessory demo:
#define USB_SUPPORT_HOST #define USB_PING_PONG_MODE USB_PING_PONG__FULL_PING_PONG #define NUM_TPL_ENTRIES 2#define NUM_CLIENT_DRIVER_ENTRIES 1 #define USB_ENABLE_TRANSFER_EVENT #define USB_HOST_APP_DATA_EVENT_HANDLER USB_ApplicationDataEventHandler#define USB_ENABLE_1MS_EVENT #define USB_MAX_GENERIC_DEVICES 1#define USB_NUM_CONTROL_NAKS 20#define USB_SUPPORT_INTERRUPT_TRANSFERS
Microchip's Accessory Framework for Android(tm) 14
14
4
#define USB_SUPPORT_BULK_TRANSFERS#define USB_NUM_INTERRUPT_NAKS 3#define USB_INITIAL_VBUS_CURRENT (100/2)#define USB_INSERT_TIME (250+1)#define USB_HOST_APP_EVENT_HANDLER USB_ApplicationEventHandler #define USBTasks() \ { \ USBHostTasks(); \ AndroidTasks(); \ } #define USBInitialize(x) \ { \ USBHostInit(x); \ }
For more information about the usb_config.h file, please refer to the MCHPFSUSB stack help file.
4.2.1.4 usb_config.c The usb_config.c file is only required for those working with the source code implementation of the library. This file is notused in the pre-compiled version of the library.
There are two main sections to the usb_config.c file. The first is the Targeted Peripheral List (TPL). The TPL is defied by theUSB OTG specification as the list of devices that are allowed to enumerate on the device. The TPL is just an array ofUSB_TPL objects that specify the devices that can be attached. There are two ways that these devices are entered into thetable. They are either entered as Class/Subclass/Protocol pairs (CL/SC/P). The second method is by Vendor ID (VID) andProduct ID (PID) pairs. This will allow a specific device, not device type, to enumerate.
There are two entries that are needed for Android devices. Since each Android device may appear different to the hostcontroller, there isn't an easy way to add support for a given Class/Subclass/Protocol pair since each Android device mightexpose different USB interface types. Likewise, since there isn't a list of all VID/PIDs for Android devices, and thisimplementation isn't future-proof, you can use the normal VID/PID entry either. For cases like these Microchip hasimplemented the VID/PID combination of 0xFFFF/0xFFFF to indicate that this driver should enumerate every deviceregardless of its interfaces or its actual VID/PID pair.
The other entry in the table is the entry for the Android device once it has actually entered accessory mode. This can beeither entered using the CL/SC/P of the Accessory interface or the magic VID/PID combinations specified by Google Inc.The magic VID/PID combination method is probably the preferred method (seen below):
// *****************************************************************************// USB Embedded Host Targeted Peripheral List (TPL)// *****************************************************************************USB_TPL usbTPL[] ={ /*[1] Device identification information [2] Initial USB configuration to use [3] Client driver table entry [4] Flags (HNP supported, client driver entry, SetConfiguration() commands allowed --------------------------------------------------------------------- [1] [2][3] [4] ---------------------------------------------------------------------*/ { INIT_VID_PID( 0x18D1ul, 0x2D00ul ), 0, 0, {0} }, // Android accessory { INIT_VID_PID( 0x18D1ul, 0x2D01ul ), 0, 0, {0} }, // Android accessory { INIT_VID_PID( 0xFFFFul, 0xFFFFul ), 0, 0, {0} }, // Enumerates everything};
All of the entries that correspond to the Android accessory device should point to the entry in the Client Driver table thecorresponds to the Android drivers. In the above example all three entries point to the client driver entry 0 (as noted by entry[3] set to 0). The client driver table needs register the functions used by each driver. The functions that need to be registeredare the Initialization function, the event handler, the data event handler (if implemented), and the initialization flags value(see example below).
// *****************************************************************************
Microchip's Accessory Framework for Android(tm) 15
15
4
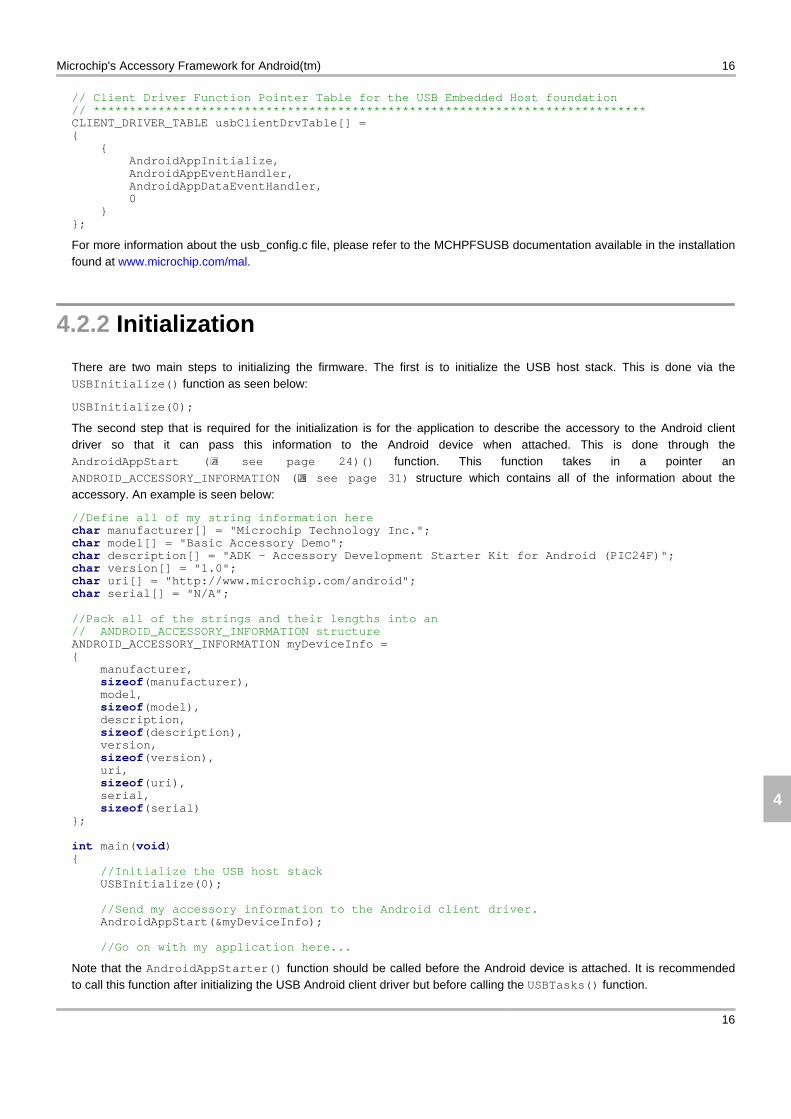
// Client Driver Function Pointer Table for the USB Embedded Host foundation// *****************************************************************************CLIENT_DRIVER_TABLE usbClientDrvTable[] ={ { AndroidAppInitialize, AndroidAppEventHandler, AndroidAppDataEventHandler, 0 }};
For more information about the usb_config.c file, please refer to the MCHPFSUSB documentation available in the installationfound at www.microchip.com/mal.
4.2.2 Initialization
There are two main steps to initializing the firmware. The first is to initialize the USB host stack. This is done via theUSBInitialize() function as seen below:
USBInitialize(0);
The second step that is required for the initialization is for the application to describe the accessory to the Android clientdriver so that it can pass this information to the Android device when attached. This is done through theAndroidAppStart ( see page 24)() function. This function takes in a pointer anANDROID_ACCESSORY_INFORMATION ( see page 31) structure which contains all of the information about theaccessory. An example is seen below:
//Define all of my string information herechar manufacturer[] = "Microchip Technology Inc.";char model[] = "Basic Accessory Demo";char description[] = "ADK - Accessory Development Starter Kit for Android (PIC24F)";char version[] = "1.0";char uri[] = "http://www.microchip.com/android";char serial[] = "N/A"; //Pack all of the strings and their lengths into an// ANDROID_ACCESSORY_INFORMATION structureANDROID_ACCESSORY_INFORMATION myDeviceInfo ={ manufacturer, sizeof(manufacturer), model, sizeof(model), description, sizeof(description), version, sizeof(version), uri, sizeof(uri), serial, sizeof(serial)}; int main(void){ //Initialize the USB host stack USBInitialize(0); //Send my accessory information to the Android client driver. AndroidAppStart(&myDeviceInfo); //Go on with my application here...
Note that the AndroidAppStarter() function should be called before the Android device is attached. It is recommendedto call this function after initializing the USB Android client driver but before calling the USBTasks() function.
Microchip's Accessory Framework for Android(tm) 16
16
4

4.2.3 Keeping the Stack Running
The Microchip USB host stack receives and logs events via an interrupt handler, but processes them as the USBTasks() (orUSBHostTasks()) function is called. This limits the amount of time spent in an interrupt context and helps limit context relatedissues. This means that in order to keep the USB host stack running, the USBTasks() function needs to be calledperiodically in order to keep processing these events.
int main(void){ //Initialize the USB stack USBInitialize(0); //Pass my accessory information to the Android client driver AndroidAppStart(&myDeviceInfo); while(1) { //Keep the USB stack running USBTasks(); //Do my application specific stuff here //... }}
The rate at which USBTasks() is called will contribute to determining the throughput that the stack is able to get, thetimeliness of the data reception, and the accuracy and latency of the events thrown from the stack.
4.2.4 Detecting a Connection/Disconnection to an Android Device
The USB Host stack notifies users of attachment and detachment events through an event handler call back function. Thename of this function is configurable in source code projects. In pre-compiled projects, this function is namedUSB_ApplicationEventHandler().
The Android client driver uses this same event handler function to notify the user of the attachment or detachment of Androiddevices. The Android client driver adds the EVENT_ANDROID_ATTACH ( see page 30) andEVENT_ANDROID_DETACH ( see page 30) events. These two events are key to interfacing to the attached Androiddevice. The data field of the attach event provides the handle to the Android device. This handle must be passed to all ofthe read/write functions to it is important to save this information when it is received. Similarly the detach event specifies thehandle of the device that detached so that the application knows which device detached (if multiple devices are attached).
void* device_handle = NULL;static BOOL device_attached = FALSE; int main(void){ //Initialize the USB stack USBInitialize(0); //Send the accessory information to the Android client driver AndroidAppStart(&myDeviceInfo); while(1) { //Keep the USB stack running USBTasks(); //If the device isn't attached yet,
Microchip's Accessory Framework for Android(tm) 17
17
4
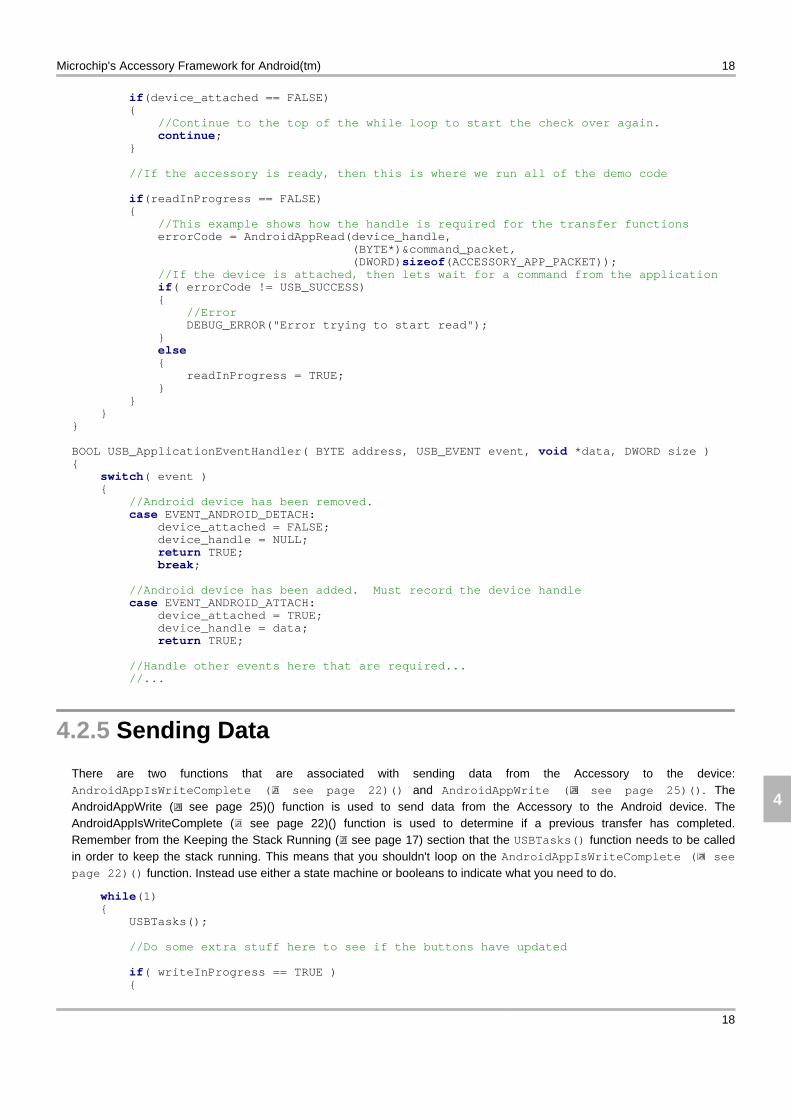
if(device_attached == FALSE) { //Continue to the top of the while loop to start the check over again. continue; } //If the accessory is ready, then this is where we run all of the demo code if(readInProgress == FALSE) { //This example shows how the handle is required for the transfer functions errorCode = AndroidAppRead(device_handle, (BYTE*)&command_packet, (DWORD)sizeof(ACCESSORY_APP_PACKET)); //If the device is attached, then lets wait for a command from the application if( errorCode != USB_SUCCESS) { //Error DEBUG_ERROR("Error trying to start read"); } else { readInProgress = TRUE; } } }} BOOL USB_ApplicationEventHandler( BYTE address, USB_EVENT event, void *data, DWORD size ){ switch( event ) { //Android device has been removed. case EVENT_ANDROID_DETACH: device_attached = FALSE; device_handle = NULL; return TRUE; break; //Android device has been added. Must record the device handle case EVENT_ANDROID_ATTACH: device_attached = TRUE; device_handle = data; return TRUE; //Handle other events here that are required... //...
4.2.5 Sending Data
There are two functions that are associated with sending data from the Accessory to the device:AndroidAppIsWriteComplete ( see page 22)() and AndroidAppWrite ( see page 25)(). TheAndroidAppWrite ( see page 25)() function is used to send data from the Accessory to the Android device. TheAndroidAppIsWriteComplete ( see page 22)() function is used to determine if a previous transfer has completed.Remember from the Keeping the Stack Running ( see page 17) section that the USBTasks() function needs to be calledin order to keep the stack running. This means that you shouldn't loop on the AndroidAppIsWriteComplete ( see
page 22)() function. Instead use either a state machine or booleans to indicate what you need to do.
while(1) { USBTasks(); //Do some extra stuff here to see if the buttons have updated if( writeInProgress == TRUE ) {
Microchip's Accessory Framework for Android(tm) 18
18
4
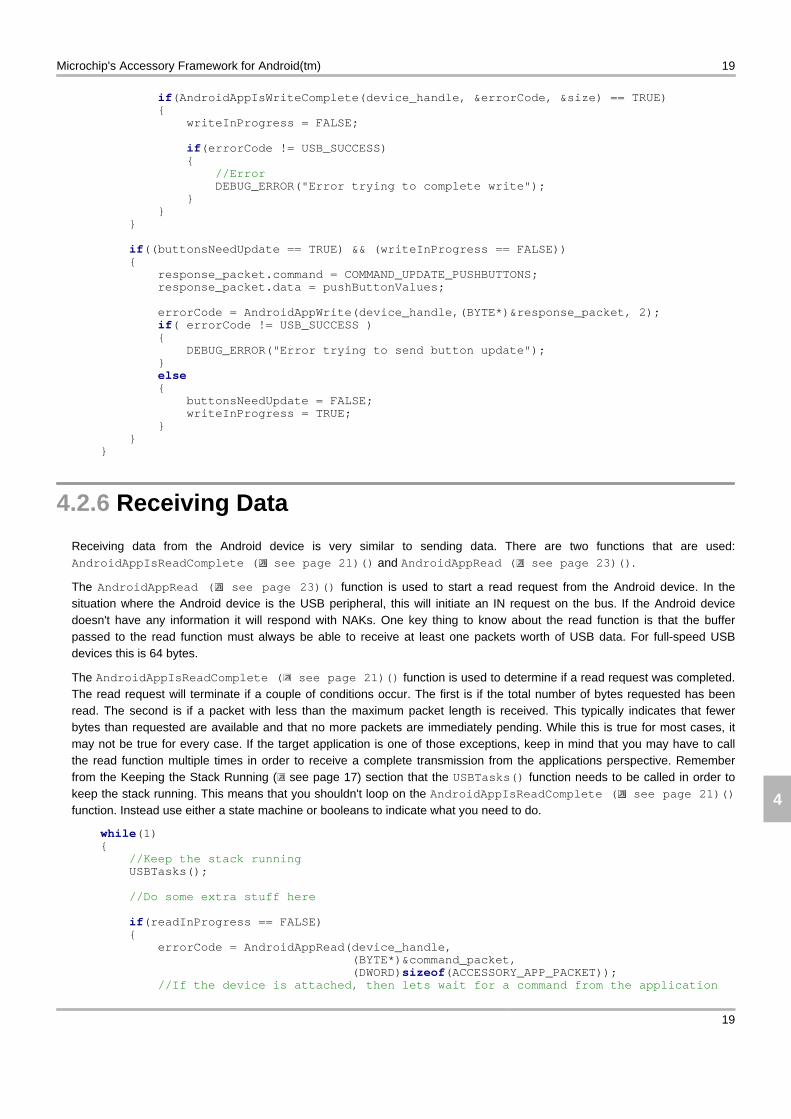
if(AndroidAppIsWriteComplete(device_handle, &errorCode, &size) == TRUE) { writeInProgress = FALSE; if(errorCode != USB_SUCCESS) { //Error DEBUG_ERROR("Error trying to complete write"); } } } if((buttonsNeedUpdate == TRUE) && (writeInProgress == FALSE)) { response_packet.command = COMMAND_UPDATE_PUSHBUTTONS; response_packet.data = pushButtonValues; errorCode = AndroidAppWrite(device_handle,(BYTE*)&response_packet, 2); if( errorCode != USB_SUCCESS ) { DEBUG_ERROR("Error trying to send button update"); } else { buttonsNeedUpdate = FALSE; writeInProgress = TRUE; } } }
4.2.6 Receiving Data
Receiving data from the Android device is very similar to sending data. There are two functions that are used:AndroidAppIsReadComplete ( see page 21)() and AndroidAppRead ( see page 23)().
The AndroidAppRead ( see page 23)() function is used to start a read request from the Android device. In thesituation where the Android device is the USB peripheral, this will initiate an IN request on the bus. If the Android devicedoesn't have any information it will respond with NAKs. One key thing to know about the read function is that the bufferpassed to the read function must always be able to receive at least one packets worth of USB data. For full-speed USBdevices this is 64 bytes.
The AndroidAppIsReadComplete ( see page 21)() function is used to determine if a read request was completed.The read request will terminate if a couple of conditions occur. The first is if the total number of bytes requested has beenread. The second is if a packet with less than the maximum packet length is received. This typically indicates that fewerbytes than requested are available and that no more packets are immediately pending. While this is true for most cases, itmay not be true for every case. If the target application is one of those exceptions, keep in mind that you may have to callthe read function multiple times in order to receive a complete transmission from the applications perspective. Rememberfrom the Keeping the Stack Running ( see page 17) section that the USBTasks() function needs to be called in order tokeep the stack running. This means that you shouldn't loop on the AndroidAppIsReadComplete ( see page 21)()
function. Instead use either a state machine or booleans to indicate what you need to do.
while(1) { //Keep the stack running USBTasks(); //Do some extra stuff here if(readInProgress == FALSE) { errorCode = AndroidAppRead(device_handle, (BYTE*)&command_packet, (DWORD)sizeof(ACCESSORY_APP_PACKET)); //If the device is attached, then lets wait for a command from the application
Microchip's Accessory Framework for Android(tm) 19
19
4
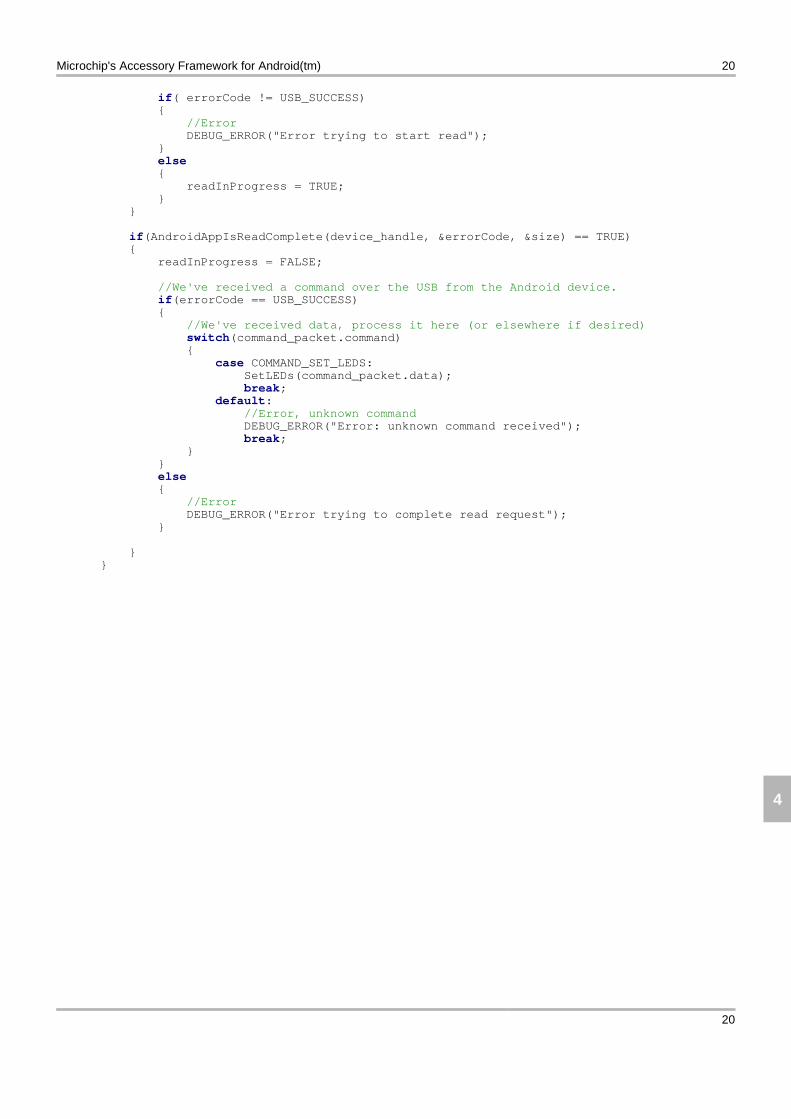
if( errorCode != USB_SUCCESS) { //Error DEBUG_ERROR("Error trying to start read"); } else { readInProgress = TRUE; } } if(AndroidAppIsReadComplete(device_handle, &errorCode, &size) == TRUE) { readInProgress = FALSE; //We've received a command over the USB from the Android device. if(errorCode == USB_SUCCESS) { //We've received data, process it here (or elsewhere if desired) switch(command_packet.command) { case COMMAND_SET_LEDS: SetLEDs(command_packet.data); break; default: //Error, unknown command DEBUG_ERROR("Error: unknown command received"); break; } } else { //Error DEBUG_ERROR("Error trying to complete read request"); } } }
Microchip's Accessory Framework for Android(tm) 20
20
4
5 Firmware API
This section covers the API routines available in this distribution. These descriptions cover more of the interface of thesefunctions. For example usages and more details about how to use these functions in conjunction with each other and in yoursystem, please refer to the Using the Library ( see page 12) section of the document.
5.1 API Functions Functions
Name Description
AndroidAppIsReadComplete ( see page 21)
Check to see if the last read to the Android device was completed
AndroidAppIsWriteComplete ( see page 22)
Check to see if the last write to the Android device was completed
AndroidAppRead ( see page 23)
Attempts to read information from the specified Android device
AndroidAppStart ( see page 24)
Sets the accessory information and initializes the client driver information after the initial power cycles.
AndroidAppWrite ( see page 25)
Sends data to the Android device specified by the passed in handle.
AndroidTasks ( see page 25)
Tasks function that keeps the Android client driver moving
5.1.1 AndroidAppIsReadComplete Function
Check to see if the last read to the Android device was completed
File
usb_host_android.h
C
BOOL AndroidAppIsReadComplete( void* handle, BYTE* errorCode, DWORD* size);
Description
Check to see if the last read to the Android device was completed. If complete, returns the amount of data that was sent andthe corresponding error code for the transmission.
Remarks
Possible values for errorCode are:
• USB_SUCCESS - Transfer successful
• USB_UNKNOWN_DEVICE - Device not attached
• USB_ENDPOINT_STALLED - Endpoint STALL'd
• USB_ENDPOINT_ERROR_ILLEGAL_PID - Illegal PID returned
Microchip's Accessory Framework for Android(tm) 21
21
5
• USB_ENDPOINT_ERROR_BIT_STUFF
• USB_ENDPOINT_ERROR_DMA
• USB_ENDPOINT_ERROR_TIMEOUT
• USB_ENDPOINT_ERROR_DATA_FIELD
• USB_ENDPOINT_ERROR_CRC16
• USB_ENDPOINT_ERROR_END_OF_FRAME
• USB_ENDPOINT_ERROR_PID_CHECK
• USB_ENDPOINT_ERROR - Other error
Preconditions
Transfer has previously been requested from an Android device.
Parameters
Parameters Description
void* handle the handle passed to the device in the EVENT_ANDROID_ATTACH ( see page 30) event
BYTE* errorCode a pointer to the location where the resulting error code should be written
DWORD* size a pointer to the location where the resulting size information should be written
Return Values
Return Values Description
TRUE Transfer is complete.
FALSE Transfer is not complete.
Function
BOOL AndroidAppIsReadComplete(void* handle, BYTE* errorCode, DWORD* size)
5.1.2 AndroidAppIsWriteComplete Function
Check to see if the last write to the Android device was completed
File
usb_host_android.h
C
BOOL AndroidAppIsWriteComplete( void* handle, BYTE* errorCode, DWORD* size);
Description
Check to see if the last write to the Android device was completed. If complete, returns the amount of data that was sent andthe corresponding error code for the transmission.
Remarks
Possible values for errorCode are:
• USB_SUCCESS - Transfer successful
• USB_UNKNOWN_DEVICE - Device not attached
• USB_ENDPOINT_STALLED - Endpoint STALL'd
• USB_ENDPOINT_ERROR_ILLEGAL_PID - Illegal PID returned
Microchip's Accessory Framework for Android(tm) 22
22
5
• USB_ENDPOINT_ERROR_BIT_STUFF
• USB_ENDPOINT_ERROR_DMA
• USB_ENDPOINT_ERROR_TIMEOUT
• USB_ENDPOINT_ERROR_DATA_FIELD
• USB_ENDPOINT_ERROR_CRC16
• USB_ENDPOINT_ERROR_END_OF_FRAME
• USB_ENDPOINT_ERROR_PID_CHECK
• USB_ENDPOINT_ERROR - Other error
Preconditions
Transfer has previously been sent to Android device.
Parameters
Parameters Description
void* handle the handle passed to the device in the EVENT_ANDROID_ATTACH ( see page 30) event
BYTE* errorCode a pointer to the location where the resulting error code should be written
DWORD* size a pointer to the location where the resulting size information should be written
Return Values
Return Values Description
TRUE Transfer is complete.
FALSE Transfer is not complete.
Function
BOOL AndroidAppIsWriteComplete(void* handle, BYTE* errorCode, DWORD* size)
5.1.3 AndroidAppRead Function
Attempts to read information from the specified Android device
File
usb_host_android.h
C
BYTE AndroidAppRead( void* handle, BYTE* data, DWORD size);
Description
Attempts to read information from the specified Android device. This function does not block. Data availability is checked viathe AndroidAppIsReadComplete ( see page 21)() function.
Remarks
None
Preconditions
A read request is not already in progress and an Android device is attached.
Microchip's Accessory Framework for Android(tm) 23
23
5
Parameters
Parameters Description
void* handle the handle passed to the device in the EVENT_ANDROID_ATTACH ( see page 30) event
BYTE* data a pointer to the location of where the data should be stored. This location should be accessible by the USB module
DWORD size the amount of data to read.
Return Values
Return Values Description
USB_SUCCESS Read started successfully.
USB_UNKNOWN_DEVICE Device with the specified address not found.
USB_INVALID_STATE We are not in a normal running state.
USB_ENDPOINT_ILLEGAL_TYPE Must use USBHostControlRead to read from a control endpoint.
USB_ENDPOINT_ILLEGAL_DIRECTION Must read from an IN endpoint.
USB_ENDPOINT_STALLED Endpoint is stalled. Must be cleared by the application.
USB_ENDPOINT_ERROR Endpoint has too many errors. Must be cleared by the application.
USB_ENDPOINT_BUSY A Read is already in progress.
USB_ENDPOINT_NOT_FOUND Invalid endpoint.
USB_ERROR_BUFFER_TOO_SMALL ( see page 26)
The buffer passed to the read function was smaller than the endpoint size being used (buffer must be larger than or equal to the endpoint size).
Function
BYTE AndroidAppRead(void* handle, BYTE* data, DWORD size)
5.1.4 AndroidAppStart Function
Sets the accessory information and initializes the client driver information after the initial power cycles.
File
usb_host_android.h
C
void AndroidAppStart( ANDROID_ACCESSORY_INFORMATION* accessoryInfo);
Description
Sets the accessory information and initializes the client driver information after the initial power cycles. Since this resets alldevice information this function should be used only after a compete system reset. This should not be called while the USBis active or while connected to a device.
Remarks
None
Preconditions
USB module should not be in operation
Parameters
Parameters Description
ANDROID_ACCESSORY_INFORMATION *info
the information about the Android accessory
Microchip's Accessory Framework for Android(tm) 24
24
5

Function
void AndroidAppStart( ANDROID_ACCESSORY_INFORMATION ( see page 31) *info)
5.1.5 AndroidAppWrite Function
Sends data to the Android device specified by the passed in handle.
File
usb_host_android.h
C
BYTE AndroidAppWrite( void* handle, BYTE* data, DWORD size);
Description
Sends data to the Android device specified by the passed in handle.
Remarks
None
Preconditions
Transfer is not already in progress. USB module is initialized and Android device has attached.
Parameters
Parameters Description
void* handle the handle passed to the device in the EVENT_ANDROID_ATTACH ( see page 30) event
BYTE* data the data to send to the Android device
DWORD size the size of the data that needs to be sent
Return Values
Return Values Description
USB_SUCCESS Write started successfully.
USB_UNKNOWN_DEVICE Device with the specified address not found.
USB_INVALID_STATE We are not in a normal running state.
USB_ENDPOINT_ILLEGAL_TYPE Must use USBHostControlWrite to write to a control endpoint.
USB_ENDPOINT_ILLEGAL_DIRECTION Must write to an OUT endpoint.
USB_ENDPOINT_STALLED Endpoint is stalled. Must be cleared by the application.
USB_ENDPOINT_ERROR Endpoint has too many errors. Must be cleared by the application.
USB_ENDPOINT_BUSY A Write is already in progress.
USB_ENDPOINT_NOT_FOUND Invalid endpoint.
Function
BYTE AndroidAppWrite(void* handle, BYTE* data, DWORD size)
5.1.6 AndroidTasks Function
Tasks function that keeps the Android client driver moving
Microchip's Accessory Framework for Android(tm) 25
25
5
File
usb_host_android.h
C
void AndroidTasks();
Description
Tasks function that keeps the Android client driver moving. Keeps the driver processing requests and handling events. Thisfunction should be called periodically (the same frequency as USBHostTasks() would be helpful).
Remarks
This function should be called periodically to keep the Android driver moving.
Preconditions
AndroidAppStart ( see page 24)() function has been called before the first calling of this function
Function
void AndroidTasks(void)
5.2 Error Codes Macros
Name Description
USB_ERROR_BUFFER_TOO_SMALL ( see page 26)
Error code indicating that the buffer passed to the read function was too small. Since the USB host can't control how much data it will receive in a single packet, the user must provide a buffer that is at least the size of the endpoint of the attached device. If a buffer is passed in that is too small, the read will not start and this error is returned to the user.
5.2.1 USB_ERROR_BUFFER_TOO_SMALL Macro
File
usb_host_android.h
C
#define USB_ERROR_BUFFER_TOO_SMALL USB_ERROR_CLASS_DEFINED + 0
Description
Error code indicating that the buffer passed to the read function was too small. Since the USB host can't control how muchdata it will receive in a single packet, the user must provide a buffer that is at least the size of the endpoint of the attacheddevice. If a buffer is passed in that is too small, the read will not start and this error is returned to the user.
Microchip's Accessory Framework for Android(tm) 26
26
5
5.3 Configuration Definitions Macros
Name Description
NUM_ANDROID_DEVICES_SUPPORTED ( see page 27)
Defines the number of concurrent Android devices this implementation is allowed to talk to. This definition is only used for implementations where the accessory is the host and the Android device is the slave. This is also most often defined to be 1. If this is not defined by the user, a default of 1 is used.This option is only used when compiling the source version of the library. This value is set to 1 for pre-compiled versions of the library.
5.3.1 NUM_ANDROID_DEVICES_SUPPORTED Macro
File
usb_host_android.h
C
#define NUM_ANDROID_DEVICES_SUPPORTED 1
Description
Defines the number of concurrent Android devices this implementation is allowed to talk to. This definition is only used forimplementations where the accessory is the host and the Android device is the slave. This is also most often defined to be 1.If this is not defined by the user, a default of 1 is used.
This option is only used when compiling the source version of the library. This value is set to 1 for pre-compiled versions ofthe library.
5.4 Configuration Functions Functions
Name Description
AndroidAppDataEventHandler ( see page 27)
Handles data events from the host stack
AndroidAppEventHandler ( see page 28)
Handles events from the host stack
AndroidAppInitialize ( see page 29)
Per instance client driver for Android device. Called by USB host stack from the client driver table.
5.4.1 AndroidAppDataEventHandler Function
Handles data events from the host stack
Microchip's Accessory Framework for Android(tm) 27
27
5
File
usb_host_android.h
C
BOOL AndroidAppDataEventHandler( BYTE address, USB_EVENT event, void * data, DWORD size);
Description
Handles data events from the host stack
Remarks
This is a internal API only. This should not be called by anything other than the USB host stack via the client driver table
Preconditions
None
Parameters
Parameters Description
BYTE address the address of the device that caused the event
USB_EVENT event the event that occured
void* data the data for the event
DWORD size the size of the data in bytes
Return Values
Return Values Description
TRUE the event was handled
FALSE the event was not handled
Function
BOOL AndroidAppDataEventHandler( BYTE address, USB_EVENT event, void *data, DWORD size )
5.4.2 AndroidAppEventHandler Function
Handles events from the host stack
File
usb_host_android.h
C
BOOL AndroidAppEventHandler( BYTE address, USB_EVENT event, void * data, DWORD size);
Description
Handles events from the host stack
Remarks
This is a internal API only. This should not be called by anything other than the USB host stack via the client driver table
Microchip's Accessory Framework for Android(tm) 28
28
5
Preconditions
None
Parameters
Parameters Description
BYTE address the address of the device that caused the event
USB_EVENT event the event that occured
void* data the data for the event
DWORD size the size of the data in bytes
Return Values
Return Values Description
TRUE the event was handled
FALSE the event was not handled
Function
BOOL AndroidAppEventHandler( BYTE address, USB_EVENT event, void *data, DWORD size )
5.4.3 AndroidAppInitialize Function
Per instance client driver for Android device. Called by USB host stack from the client driver table.
File
usb_host_android.h
C
BOOL AndroidAppInitialize( BYTE address, DWORD flags, BYTE clientDriverID);
Description
Per instance client driver for Android device. Called by USB host stack from the client driver table.
Remarks
This is a internal API only. This should not be called by anything other than the USB host stack via the client driver table
Preconditions
None
Parameters
Parameters Description
BYTE address the address of the device that is being initialized
DWORD flags the initialization flags for the device
BYTE clientDriverID the clientDriverID for the device
Return Values
Return Values Description
TRUE initialized successfully
FALSE does not support this device
Microchip's Accessory Framework for Android(tm) 29
29
5
Function
BOOL AndroidAppInitialize( BYTE address, DWORD flags, BYTE clientDriverID )
5.5 Events Macros
Name Description
EVENT_ANDROID_ATTACH ( see page 30)
This event is thrown when an Android device is attached and successfully entered into accessory mode already. The data portion of this event is the handle that is required to communicate to the device and should be saved so that it can be passed to all of the transfer functions. Always use this definition in the code and never put a static value as the value of this event may change based on various build options.
EVENT_ANDROID_DETACH ( see page 30)
This event is thrown when an Android device is removed. The data portion of the event is the handle of the device that has been removed. Always use this definition in the code and never put a static value as the value of this event may change based on various build options.
5.5.1 EVENT_ANDROID_ATTACH Macro
File
usb_host_android.h
C
#define EVENT_ANDROID_ATTACH ANDROID_EVENT_BASE + 0
Description
This event is thrown when an Android device is attached and successfully entered into accessory mode already. The dataportion of this event is the handle that is required to communicate to the device and should be saved so that it can bepassed to all of the transfer functions. Always use this definition in the code and never put a static value as the value of thisevent may change based on various build options.
5.5.2 EVENT_ANDROID_DETACH Macro
File
usb_host_android.h
C
#define EVENT_ANDROID_DETACH ANDROID_EVENT_BASE + 1
Description
This event is thrown when an Android device is removed. The data portion of the event is the handle of the device that hasbeen removed. Always use this definition in the code and never put a static value as the value of this event may changebased on various build options.
Microchip's Accessory Framework for Android(tm) 30
30
5
5.6 Type Definitions Structures
Name Description
ANDROID_ACCESSORY_INFORMATION ( see page 31)
This structure contains the informatin that is required to successfully create a link between the Android device and the accessory. This information must match the information entered in the accessory filter in the Android application in order for the Android application to access the device. An instance of this structure should be passed into the AndroidAppStart ( see page 24)() at initialization.
5.6.1 ANDROID_ACCESSORY_INFORMATION Structure
File
usb_host_android.h
C
typedef struct { char* manufacturer; BYTE manufacturer_size; char* model; BYTE model_size; char* description; BYTE description_size; char* version; BYTE version_size; char* URI; BYTE URI_size; char* serial; BYTE serial_size;} ANDROID_ACCESSORY_INFORMATION;
Members
Members Description
char* manufacturer; String: manufacturer name
BYTE manufacturer_size; length of manufacturer string
char* model; String: model name
BYTE model_size; length of model name string
char* description; String: description of the accessory
BYTE description_size; length of the description string
char* version; String: version number
BYTE version_size; length of the version number string
char* URI; String: URI for the accessory (most commonly a URL)
BYTE URI_size; length of the URI string
char* serial; String: serial number of the device
BYTE serial_size; length of the serial number string
Description
This structure contains the informatin that is required to successfully create a link between the Android device and theaccessory. This information must match the information entered in the accessory filter in the Android application in order for
Microchip's Accessory Framework for Android(tm) 31
31
5
the Android application to access the device. An instance of this structure should be passed into the AndroidAppStart ( seepage 24)() at initialization.
Microchip's Accessory Framework for Android(tm) 32
32
5
6 Running the Demos
6.1 Creating the Setup
6.1.1 New to Microchip
This section covers where to find Microchip tools and how to set those tools up for those that are new to Microchip.
6.1.1.1 Getting the Tools If you are new to Microchip, then we welcome you to development on our line of processors. There are a few tools that youwill need in order to get started developing.
You will need our IDE, MPLAB. There are two versions of the IDE available. The current released version of the IDE isavailable for Windows based computers and can be downloaded from www.microchip.com/mplab. For Macintosh or Linuxusers, you are welcome to use the beta version of MPLAB X, our upcoming IDE version, fromhttp://ww1.microchip.com/downloads/mplab/X_Beta/index.html.
You will need a compiler. Windows users can download the appropriate compilers from www.microchip.com/c30 for the16-bit based processors and www.microchip.com/c32 for the 32-based processors. Linux or Macintosh users can downloadversions of the compilers at http://ww1.microchip.com/downloads/mplab/X_Beta/index.html.
Finally you will need a programmer or debugger. If you order the Accessory Development Starter Kit for Android, you willhave received our PICkit 3 programmer/debugger with that board. This is one of our lower end programmer/debuggers.Other programmer/debuggers are available from the following links:
• www.microchip.com/icd3
• www.microchip.com/realice
6.1.2 New to Android
This section points users to resources and tools for those that are new to developing on the Android platform.
Description
If you are new to developing under Android, there is extensive information available from the Android developer's website:http://developer.android.com/index.html.
For instructions on where to find the development tools and how to install them, please refer to the following links:
• http://developer.android.com/sdk/index.html
• http://developer.android.com/sdk/installing.html
Once the tools are installed, we recommend that you follow through a few of the example tutorials provided below as well asread through some of the below web pages for more information about Android development before moving forward to your
Microchip's Accessory Framework for Android(tm) 33
33
6
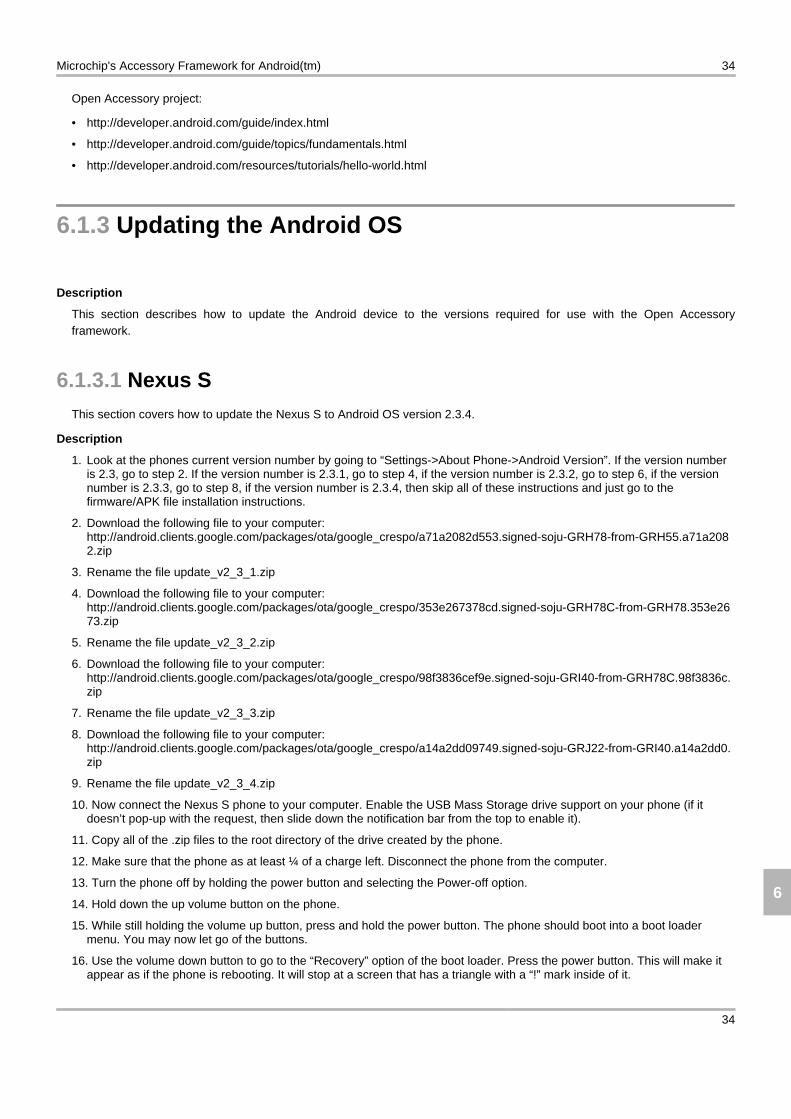
Open Accessory project:
• http://developer.android.com/guide/index.html
• http://developer.android.com/guide/topics/fundamentals.html
• http://developer.android.com/resources/tutorials/hello-world.html
6.1.3 Updating the Android OS
Description
This section describes how to update the Android device to the versions required for use with the Open Accessoryframework.
6.1.3.1 Nexus S This section covers how to update the Nexus S to Android OS version 2.3.4.
Description
1. Look at the phones current version number by going to “Settings->About Phone->Android Version”. If the version number is 2.3, go to step 2. If the version number is 2.3.1, go to step 4, if the version number is 2.3.2, go to step 6, if the version number is 2.3.3, go to step 8, if the version number is 2.3.4, then skip all of these instructions and just go to the firmware/APK file installation instructions.
2. Download the following file to your computer: http://android.clients.google.com/packages/ota/google_crespo/a71a2082d553.signed-soju-GRH78-from-GRH55.a71a2082.zip
3. Rename the file update_v2_3_1.zip
4. Download the following file to your computer: http://android.clients.google.com/packages/ota/google_crespo/353e267378cd.signed-soju-GRH78C-from-GRH78.353e2673.zip
5. Rename the file update_v2_3_2.zip
6. Download the following file to your computer: http://android.clients.google.com/packages/ota/google_crespo/98f3836cef9e.signed-soju-GRI40-from-GRH78C.98f3836c.zip
7. Rename the file update_v2_3_3.zip
8. Download the following file to your computer: http://android.clients.google.com/packages/ota/google_crespo/a14a2dd09749.signed-soju-GRJ22-from-GRI40.a14a2dd0.zip
9. Rename the file update_v2_3_4.zip
10. Now connect the Nexus S phone to your computer. Enable the USB Mass Storage drive support on your phone (if it doesn’t pop-up with the request, then slide down the notification bar from the top to enable it).
11. Copy all of the .zip files to the root directory of the drive created by the phone.
12. Make sure that the phone as at least ¼ of a charge left. Disconnect the phone from the computer.
13. Turn the phone off by holding the power button and selecting the Power-off option.
14. Hold down the up volume button on the phone.
15. While still holding the volume up button, press and hold the power button. The phone should boot into a boot loader menu. You may now let go of the buttons.
16. Use the volume down button to go to the “Recovery” option of the boot loader. Press the power button. This will make it appear as if the phone is rebooting. It will stop at a screen that has a triangle with a “!” mark inside of it.
Microchip's Accessory Framework for Android(tm) 34
34
6
17. Press and hold the power button. While still holding the power button, press the up volume button.
18. You will now see a system recovery menu. From this menu use the volume down button to select “apply update from /sdcard”. Press the power button to select this option.
19. Use the volume down button to navigate to the lowest version number of files that you loaded onto the phone (so if you are running v2.3.1, you will need to point to the update_v2_3_2.zip file, etc). Press the power button to install that file.
20. Repeat steps 18-19 until you have applied all of the updates for all of the versions successfully.
21. Once compete, select the reboot system option from the menu. Verify that the phone version is now v2.3.4.
6.1.4 Updating the SDK
Description
This section discusses how to update to the correct API version to call the Open Accessory framework API.
6.1.4.1 Eclipse IDE The Open Accessory API is available in API level 12. There are two different ways to get API level 12 based on which OSversion you are developing for.
6.1.4.1.1 Version v2.3.x To enable development for the Gingerbread OS line, versions v2.3.4 and later, you will need to get the API level 12 add-onfor the Eclipse IDE.
1. Launch the "Android SDK and AVD Manager" either through the Eclipse IDE or through the command line.
2. In the manager window's leftmost panel, select "Available Packages".
3. Expand the "Third Party Add-ons" option
4. Expand the "Google Inc. (dl-ssl.google.com)" option
5. Check the box next to the "Google APIs by Google Inc., Android API 12" option. You may also select other software packages or APIs that you wish to download.
6. Click the "Install Selected" button.
Microchip's Accessory Framework for Android(tm) 35
35
6
6.1.4.1.2 Version v3.x To enable development for the Honeycomb OS line, versions v3.x and later, you will need to get the API level 12 add-on forthe Eclipse IDE.
1. Launch the "Android SDK and AVD Manager" either through the Eclipse IDE or through the command line.
2. In the manager window's leftmost panel, select "Available Packages".
3. Expand the "Android Repository" option
4. Check the box next to the "SDK Platform Android 3.1, API 12" option and the "Documentation for Android SDK, API 12" options. You may also select other software packages or APIs that you wish to download.
5. Click the "Install Selected" button.
Microchip's Accessory Framework for Android(tm) 36
36
6
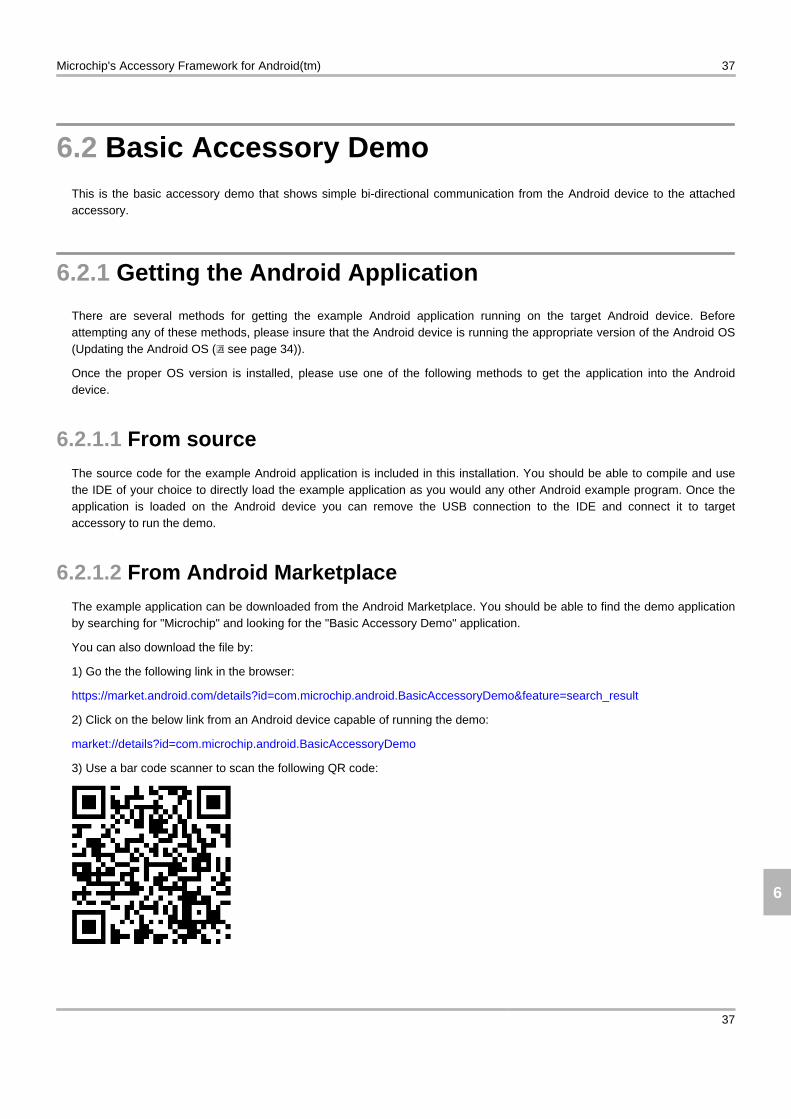
6.2 Basic Accessory Demo This is the basic accessory demo that shows simple bi-directional communication from the Android device to the attachedaccessory.
6.2.1 Getting the Android Application
There are several methods for getting the example Android application running on the target Android device. Beforeattempting any of these methods, please insure that the Android device is running the appropriate version of the Android OS(Updating the Android OS ( see page 34)).
Once the proper OS version is installed, please use one of the following methods to get the application into the Androiddevice.
6.2.1.1 From source The source code for the example Android application is included in this installation. You should be able to compile and usethe IDE of your choice to directly load the example application as you would any other Android example program. Once theapplication is loaded on the Android device you can remove the USB connection to the IDE and connect it to targetaccessory to run the demo.
6.2.1.2 From Android Marketplace The example application can be downloaded from the Android Marketplace. You should be able to find the demo applicationby searching for "Microchip" and looking for the "Basic Accessory Demo" application.
You can also download the file by:
1) Go the the following link in the browser:
https://market.android.com/details?id=com.microchip.android.BasicAccessoryDemo&feature=search_result
2) Click on the below link from an Android device capable of running the demo:
market://details?id=com.microchip.android.BasicAccessoryDemo
3) Use a bar code scanner to scan the following QR code:
Microchip's Accessory Framework for Android(tm) 37
37
6
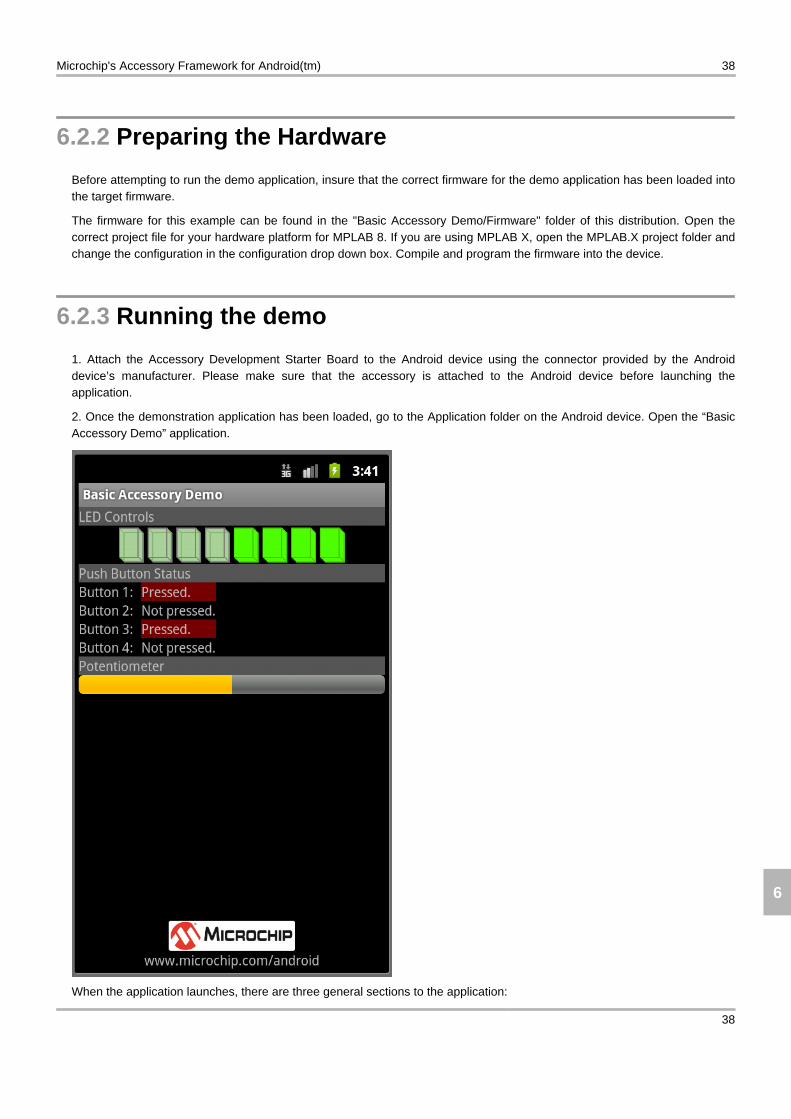
6.2.2 Preparing the Hardware
Before attempting to run the demo application, insure that the correct firmware for the demo application has been loaded intothe target firmware.
The firmware for this example can be found in the "Basic Accessory Demo/Firmware" folder of this distribution. Open thecorrect project file for your hardware platform for MPLAB 8. If you are using MPLAB X, open the MPLAB.X project folder andchange the configuration in the configuration drop down box. Compile and program the firmware into the device.
6.2.3 Running the demo
1. Attach the Accessory Development Starter Board to the Android device using the connector provided by the Androiddevice’s manufacturer. Please make sure that the accessory is attached to the Android device before launching theapplication.
2. Once the demonstration application has been loaded, go to the Application folder on the Android device. Open the “BasicAccessory Demo” application.
When the application launches, there are three general sections to the application:
Microchip's Accessory Framework for Android(tm) 38
38
6
• LED Controls – Pressing any of the 8 buttons on the Android screen sends a command from the Android device to theaccessory, indicating that the LED status has changed and provides the new LED settings. The image on the screen togglesto show the state of the LEDs.
• Push Button Status – This section indicates the status of the push buttons on the accessory board. When a button ispressed, the text will change to Pressed.
• Potentiometer – This indicates the percentage of the potentiometer on the accessory board.
Microchip's Accessory Framework for Android(tm) 39
39
6

7 Creating an Android Accessory Application using the Open Accessory Framework
7.1 Creating the Project When creating a new Android application that is going to be using the Open Accessory framework, it is important to selectthe correct API settings in order to be able to build the project successfully. Please make sure that your SDK is up to dateand has the correct components by following the instructions in the Updating the SDK ( see page 35). Also insure that thedevice that you will working with as the correct OS version that enables these features (Updating the Android OS ( seepage 34) section).
When creating the Android Application project that will use the Open Accessory Framework, you need to make sure selectthe correct Target OS version. For Gingerbread devices (v2.3.4 or later) you need to select API level 10 with the additionalGoogle APIs (seen below).
Microchip's Accessory Framework for Android(tm) 40
40
7
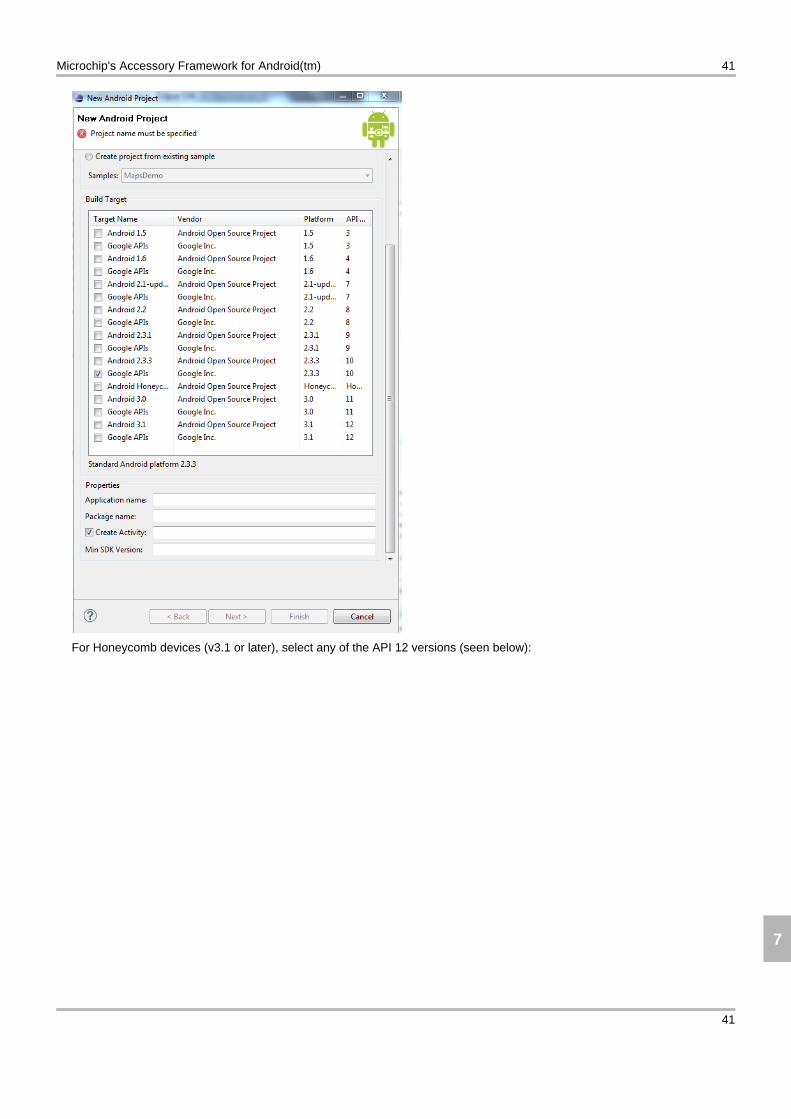
For Honeycomb devices (v3.1 or later), select any of the API 12 versions (seen below):
Microchip's Accessory Framework for Android(tm) 41
41
7
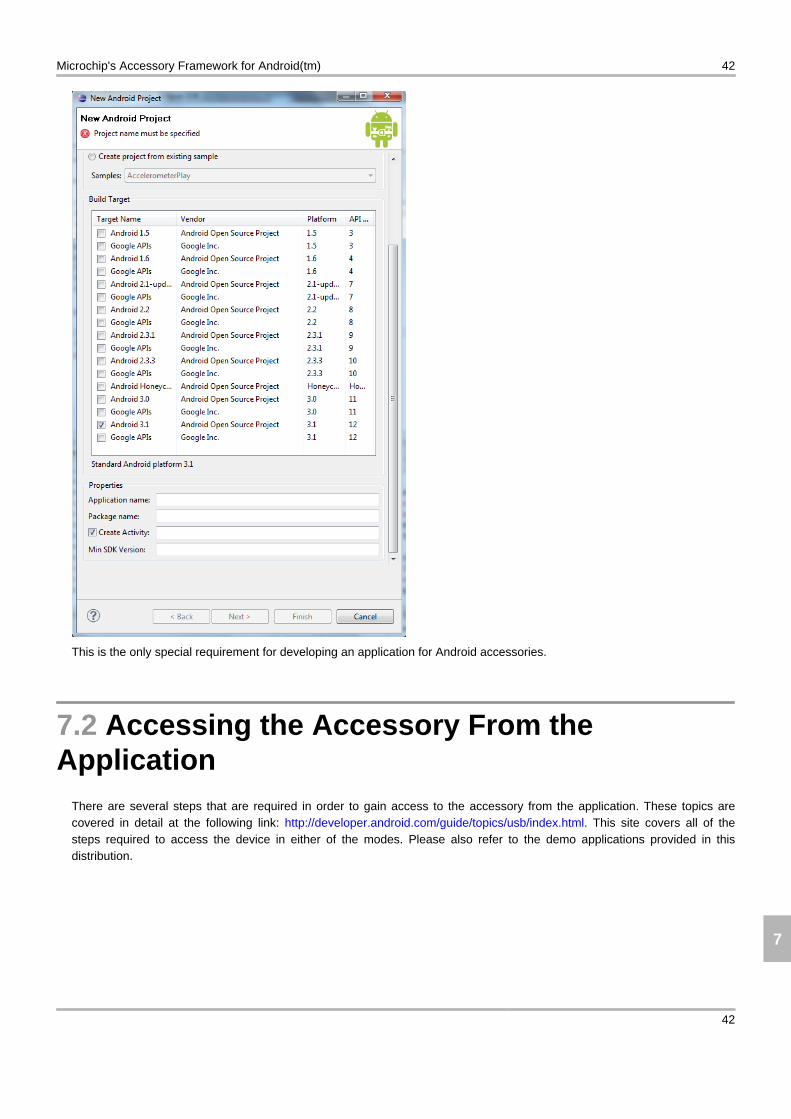
This is the only special requirement for developing an application for Android accessories.
7.2 Accessing the Accessory From the Application
There are several steps that are required in order to gain access to the accessory from the application. These topics arecovered in detail at the following link: http://developer.android.com/guide/topics/usb/index.html. This site covers all of thesteps required to access the device in either of the modes. Please also refer to the demo applications provided in thisdistribution.
Microchip's Accessory Framework for Android(tm) 42
42
7
8 FAQs, Tips, and Troubleshooting
8.1 My PIC32 project gets a run time exception. What could be wrong?
There are several issues that could be causing the runtime exceptions in a PIC32 project. Here are some things to checkthat might help you find the source of the issue.
1. Check to make sure that you have a heap size defined. The USB host stack uses dynamic memory allocation, thus needsa heap size defined. To add a heap to the project, go to the linker settings. This can be found in the "Project->BuildOptions->Project->MPLAB PIC32 Linker" menu in MPLAB 8. This can be found in the "File->Project Properties->(currentbuild configuration)->C32->pic32-ld" in MPLAB X.
2. If a heap size is defined you can use the general exception vector to trap the error and determine what address causedthe exception. This can be done using something similar to the following code:
#if defined(__C32__) void _general_exception_handler(unsigned cause, unsigned status) { unsigned long address = _CP0_GET_EPC(); DEBUG_ERROR("exception"); while(1){} }#endif
This will catch the exception and lock the code in a while(1). From this point you can halt the code and look at the addressvariable to see what address caused the exception. Use the disassembly listing to determine the corresponding line of Ccode.
8.2 How do I debug without access to ADB? Though the USB is connected to the accessory now instead of the IDE for debugging, you can still access the ADB interfacethrough a network. Please see http://developer.android.com/guide/topics/usb/index.html for more information about how toset this up.
You might also consider using a USB analyzer to determine what is actually happening on the USB bus. Please refer to theDebugging the USB connection section for more details.
Microchip's Accessory Framework for Android(tm) 43
43
8
8.3 What if I need design assistance creating my accessory?
If you have questions about the library, our parts, or any of our reference codes/boards, please feel free to contact Microchipfor support (What if I need more support than what is here? ( see page 45)).
If you need someone to assist you in creating a portion of your design, Microchip has design partners that can assist in theportion of your design that you need help with. You can find a list of design partners at the following address:http://microchip.newanglemedia.com/partner_matrix. At the moment there isn't an option to filter for Android specialists. Thebest option to filter by right now is USB.
8.4 The firmware stops working when I hit a breakpoint.
The USB protocol has periodic packets sent out that keep the attached device active. Without this packet, the bus goes intoan idle state. Normally when a breakpoint is hit in the code both the CPU and all peripherals halt at that instruction. Thiscauses the USB module to stop running resulting in the attached peripheral to go into the idle state. The firmware still thinksthat the peripheral is active. This results in a break in communication.
There is a way to tell the microcontroller to leave the peripheral enabled when a breakpoint is hit. This will allow the USBmodule to continue to run and sent out the Start-of-Frame(SOF) packets required to keep the bus alive. This is done via thefollowing methods:
MPLAB 8
Under the debugger->settings menu option, select the "Freeze on Halt" tab. Uncheck the "USB" or "U1CNFG" setting in thelist. If neither of these items are in the list of peripherals, uncheck the "All other peripherals" option at the bottom of the list.
MPLAB X
Go under "File->Project Properties". In the project configuration window, select the project configuration that you are using.Under that configuration, select the debugger that is in use. In the resulting debugger menu, select the "Freeze Peripherals"option in the drop down box. Uncheck the "USB" or "U1CNFG" options if you see them. If you don't see these options,uncheck the "All other peripherals" option.
8.5 If I hit the "Home" or "Back" buttons while the accessory is attached, the demo no longer works.
If you hit the "Home" or "Back" buttons while the accessory is attached and the demo no longer runs, the code likely tried toclose the FileInputStream to release control of the accessory. v2.3.4 and v3.1 of the Android OS have an issue whereclosing the ParcelFileDescriptor or FileInputStream will not cause an IOException in a read() call on the FileInputStream.This results in the ParcelFileDescriptor being locked until either the accessory detaches or until the read function returns for
Microchip's Accessory Framework for Android(tm) 44
44
8
some other reason. Please see the Requirements, Limitations, and Potential Issues ( see page 11) section for other knownissues or limitations.
8.6 Why don't all of the features of the demo work?
The demo application on the Android device was written with the assumption that there were 8 LEDs, 4 push buttons, and apotentiometer available on the accessory. Not all of these features are available on the supported hardware platforms.Where these features are not available, these functions do not work.
The Explorer 16 board is an even more complex situation. Even though the base board does include these features, someprocessor modules don't have all of these features routed to the processor. Also on some processor modules the featuresare routed to the same pin as other features so both can't be used easily in the same demo.
8.7 What if I need more support than what is here?
There are several options that you can use to get various kinds of help.
• You can try our forums at forum.microchip.com. The answers provided here will be by fellow developers and typically not from Microchip employees. The forum often provides a way to get answers very quickly to questions that might take longer for other support routes to answer.
• You can contact your local sales office for support. You can find the local office from www.microchip.com/sales. The local sales team should be able to direct you to a local support team that can help address some issues.
• You can submit support requests to our support system at support.microchip.com or search through the existing hot topics.
• You can also contact [email protected] for support.
Microchip's Accessory Framework for Android(tm) 45
45
8
Index
AAccessing the Accessory From the Application 42
ANDROID_ACCESSORY_INFORMATION structure 31
AndroidAppDataEventHandler function 27
AndroidAppEventHandler function 28
AndroidAppInitialize function 29
AndroidAppIsReadComplete function 21
AndroidAppIsWriteComplete function 22
AndroidAppRead function 23
AndroidAppStart function 24
AndroidAppWrite function 25
AndroidTasks function 25
API Functions 21
BBasic Accessory Demo 37
CConfiguration Definitions 27
Configuration Functions 27
Configuring the Library 12
Creating an Android Accessory Application using the Open Accessory Framework 40
Creating the Project 40
Creating the Setup 33
DDetecting a Connection/Disconnection to an Android Device 17
EEclipse IDE 35
Error Codes 26
EVENT_ANDROID_ATTACH macro 30
EVENT_ANDROID_DETACH macro 30
Events 30
FFAQs, Tips, and Troubleshooting 43
Firmware API 21
From Android Marketplace 37
From source 37
GGetting the Android Application 37
Getting the Source Code 11
Getting the Tools 33
HHardwareProfile.h 14
How do I debug without access to ADB? 43
How the Library Works 12
IIf I hit the "Home" or "Back" buttons while the accessory is attached, the demo no longer works. 44
Initialization 16
Introduction 1
KKeeping the Stack Running 17
LLibrary Architecture 12
MMy PIC32 project gets a run time exception. What could be wrong? 43
NNew to Android 33
New to Microchip 33
Nexus S 34
NUM_ANDROID_DEVICES_SUPPORTED macro 27
PPreparing the Hardware 38
RReceiving Data 19
Microchip's Accessory Framework for Android(tm) a
a
Release Notes 10
Required USB callbacks 12
Requirements, Limitations, and Potential Issues 11
Running the demo 38
Running the Demos 33
SSending Data 18
Supported Demo Boards 10
SW License Agreement 2
TTerms and Definitions 10
The firmware stops working when I hit a breakpoint. 44
Type Definitions 31
UUpdating the Android OS 34
Updating the SDK 35
usb_config.c 15
usb_config.h 14
USB_ERROR_BUFFER_TOO_SMALL macro 26
Using the Library 12
VVersion v2.3.x 35
Version v3.x 36
WWhat if I need design assistance creating my accessory? 44
What if I need more support than what is here? 45
What's Next? 11
Why don't all of the features of the demo work? 45
Microchip's Accessory Framework for Android(tm) b
b