MICROBIOLOGY 1 (MICR2011) · school of biotechnology and biomolecular sciences microbiology 1...
134
SCHOOL OF BIOTECHNOLOGY AND BIOMOLECULAR SCIENCES MICROBIOLOGY 1 (MICR2011) SUBJECT GUIDE AND LABORATORY MANUAL 2019 Student I.D. Tutor Student Name
Transcript of MICROBIOLOGY 1 (MICR2011) · school of biotechnology and biomolecular sciences microbiology 1...

SCHOOL OF BIOTECHNOLOGY AND BIOMOLECULAR SCIENCES
MICROBIOLOGY 1 (MICR2011)
SUBJECT GUIDE AND LABORATORY MANUAL
2019
Student I.D.
Tutor
Student Name

PRACTICAL SCHEDULE. 2
Table of contents Course information ............................................................................................................. 6 Staff contacts ..................................................................................................................... 6 Course outline ..................................................................................................................... 7 Graduate attributes developed in this course .................................................................... 8 Additional resources and support ....................................................................................... 8 Lecture program ................................................................................................................. 9 Tutorial & Laboratory program .......................................................................................... 10 Assessment ...................................................................................................................... 11 Adiministration matters ...................................................................................................... 13 Academic honesty and plagarism ..................................................................................... 14 WEEK 1 RISK ASSESSMENT .......................................................................................... 17WEEK 1 LABORATORY CLASS ..................................................................................... 181. Welcome! ....................................................................................................................... 181.1 Allocation of places ...................................................................................................... 181.2 Introductions ................................................................................................................ 181.3 Laboratory safety ......................................................................................................... 18Microbiology Laboratory Safety Rules ............................................................................... 19Risk management .............................................................................................................. 20Risk Management Form .................................................................................................... 212. Media for the cultivation of microbes ............................................................................. 252.1 Understanding media recipe composition .................................................................... 252.2 Aseptic technique ........................................................................................................ 252.3 Making and sterilising liquid broth and agar plates ...................................................... 27i) Luria broth ....................................................................................................................... 27
Materials ..................................................................................................................... 27Procedure ................................................................................................................... 27
ii) Pouring Luria agar plates ............................................................................................... 28Materials ..................................................................................................................... 28Procedure ................................................................................................................... 28
3. MICR2011 course project .............................................................................................. 30 WEEK 2 RISK ASSESSMENT .......................................................................................... 33WEEK 2 LABORATORY CLASS ..................................................................................... 341. DNA extraction of project samples for sequencing ........................................................ 34Procedure .......................................................................................................................... 34Materials ............................................................................................................................ 35Step One - Sample collection and preparation .................................................................. 36
Solid samples ............................................................................................................ 36 Aqueous samples ...................................................................................................... 36 Surface swab samples .............................................................................................. 37
Step Two – Lysis ............................................................................................................... 37Step Three - Clean up (solid samples only) ....................................................................... 37Step Four - DNA binding and column washing .................................................................. 37Step Five – Elution ............................................................................................................. 38Sequencing ........................................................................................................................ 382. Introduction to light microscopy ..................................................................................... 39Parts of a light microscope ................................................................................................ 39Setting up the light microscope .......................................................................................... 40Resolution .......................................................................................................................... 42

PRACTICAL SCHEDULE. 3
Oil immersion ..................................................................................................................... 42Microscopy trouble shooting .............................................................................................. 433. Staining bacteria for observation by light microscopy .................................................... 44Materials ............................................................................................................................ 44Procedure .......................................................................................................................... 44Smear preparation ............................................................................................................. 44Gram staining your heat fixed bacterial smear .................................................................. 46Observations ...................................................................................................................... 464. Inoculating agar plates to obtain pure cultures and liquid broths as enrichment cultures ........................................................................................................................................... 47Materials ............................................................................................................................ 474.1 Procedure for inoculating samples to obtain single colonies (pure cultures) ............... 474.2 Procedure for setting up enrichment cultures .............................................................. 47Technique for subculturing agar plates for single colonies ................................................ 48 WEEK 3 RISK ASSESSMENT .......................................................................................... 51WEEK 3 LABORATORY CLASS ..................................................................................... 521. Examination of cultures obtained from project samples ................................................ 522. Selective and differential media ..................................................................................... 52Materials ............................................................................................................................ 52Procedure .......................................................................................................................... 53Examples of some commonly used growth media ............................................................ 53
Nutrient agar (NA) ...................................................................................................... 53 Blood agar (HBA) ....................................................................................................... 53 MacConkey agar (MAC) ............................................................................................. 53 Sabouraud agar (SAB) ............................................................................................... 54 Mannitol salt agar (MSA) ............................................................................................ 54
Questions ........................................................................................................................... 54Biochemical tests used for phenotypic characterisation .................................................... 573.1 Catalase ....................................................................................................................... 58
Medium ....................................................................................................................... 58 Test ............................................................................................................................. 58 Interpretation .............................................................................................................. 58
Materials ............................................................................................................................ 59Procedure .......................................................................................................................... 59Results ............................................................................................................................... 593.2 Oxidase ........................................................................................................................ 59
Test ............................................................................................................................. 60 Materials ............................................................................................................................ 60Results ............................................................................................................................... 60Questions ........................................................................................................................... 613.3 Indole ........................................................................................................................... 62Materials ............................................................................................................................ 62Procedure .......................................................................................................................... 62Results: .............................................................................................................................. 62Questions ........................................................................................................................... 634. Viable counts of microorganisms ................................................................................... 64Materials ............................................................................................................................ 64Procedure .......................................................................................................................... 64Dilution steps ..................................................................................................................... 65

PRACTICAL SCHEDULE. 4
WEEK 4 RISK ASSESSMENT .......................................................................................... 69WEEK 4 LABORATORY CLASS ..................................................................................... 701. Winogradsky column ..................................................................................................... 70Development of the microbial population in the column .................................................... 711.1 Winogradsky column demonstration ............................................................................ 732. Soil based Microbial Fuel Cells ...................................................................................... 76Materials ............................................................................................................................ 77Procedure .......................................................................................................................... 773. Maintenance of project microbes ................................................................................... 784. High-throughput 16S (SSU) rRNA sequencing data ...................................................... 785. Viable counts of microorganisms (continued) ................................................................ 78 WEEK 5 RISK ASSESSMENT .......................................................................................... 80WEEK 5 LABORATORY CLASS ..................................................................................... 811. Course project: sub-culturing and storing project microbes ........................................... 81Procedure .......................................................................................................................... 812. Introduction to sequence analysis ................................................................................. 82Exercise 1. Accessing software for phylogenetic analysis of SSU rRNA sequences ........ 84Exercise 2. Sequence browsing and alignment of SSU rRNA gene sequences ............... 85
Opening an Alignment ................................................................................................ 86Aligning Sequences Using Muscle ............................................................................. 87Quality control of your alignment ................................................................................ 87
Exercise 3. Estimating evolutionary distance and creating phylogenetic trees ................. 91Build a phylogenetic tree from your evolutionary distance matrix .............................. 92
Exercise 4. BLAST search for closest relatives using the NCBI database ........................ 933. Record the results of your Microbial Fuel Cell ............................................................... 95 WEEK 6 RISK ASSESSMENT .......................................................................................... 98WEEK 6 LABORATORY CLASS ..................................................................................... 991. DNA extraction from sub-cultured project isolates ......................................................... 99Materials ............................................................................................................................ 99
Step One - Sample collection and preparation ........................................................... 99Step Two - Lysis ......................................................................................................... 99Step Three - DNA binding and column washing ......................................................... 99Step Four - Elution .................................................................................................... 100
2. Assessment of DNA extract quantity and quality ......................................................... 100Materials .......................................................................................................................... 100Procedure ........................................................................................................................ 100Results ............................................................................................................................. 1013. PCR amplification and sequencing of SSU rRNA genes ............................................. 102Materials .......................................................................................................................... 102Procedure ........................................................................................................................ 1034. Record the results of your Microbial Fuel Cell ............................................................. 103 WEEK 7 RISK ASSESSMENT ........................................................................................ 106WEEK 7 LABORATORY CLASS ................................................................................... 107Materials .......................................................................................................................... 107Procedure ........................................................................................................................ 107Results ............................................................................................................................. 107Phenotyping verses genotyping ....................................................................................... 109

PRACTICAL SCHEDULE. 5
WEEK 8 RISK ASSESSMENT ........................................................................................ 112 WEEK 8 LABORATORY CLASS ................................................................................... 1131. Bacteriophage propagation and enumeration .............................................................. 113Materials .......................................................................................................................... 114Procedure ........................................................................................................................ 114
Dilution of the phage stock ....................................................................................... 114Phage absorption and overlaying agar ..................................................................... 114
2. Gene transfer by transduction ..................................................................................... 115Materials .......................................................................................................................... 116Procedure ........................................................................................................................ 116 WEEK 9 RISK ASSSSMENT .......................................................................................... 119WEEK 9 LABORATORY CLASS ................................................................................... 1201. Background .................................................................................................................. 120Ebola virus ....................................................................................................................... 121History .............................................................................................................................. 121Transmission ................................................................................................................... 122Signs and Symptoms ....................................................................................................... 123Control ............................................................................................................................. 1232. Epidemiological investigation ....................................................................................... 1243. ELISA analysis of mock serum samples ...................................................................... 126Materials .......................................................................................................................... 127Procedure ........................................................................................................................ 1274. Tasks for the investigation team .................................................................................. 128Tasks ............................................................................................................................... 128Questions ......................................................................................................................... 1285. Record results for PRD-1 phage enumeration and P1kc transduction experiments ... 129 APPENDIX 1 Identification flow charts …………………………………………………….126

PRACTICAL SCHEDULE. 6
Course Identity Course Code MICR2011 Course Name Microbiology 1 Academic Unit School of Biotechnology and Biomolecular Sciences Level of Course Second year undergraduate Session Offered T1 Prerequisites BABS1201 Hours per Week 7 hours per week Number of Weeks 10 Commencement Date Week 1, Term 1, 2019
Staff Course Coordinators Dr Jai Tree ([email protected])
Professor Peter White ([email protected]) Course Administration Biosciences Student Office, Ground Floor Biological Sciences Building
[email protected] Dr Matthew Clemson [email protected]
Technical Support Tammy Tang ([email protected]) Kate Roberts ([email protected]) Gee Ling ([email protected])

PRACTICAL SCHEDULE. 7
Course Outline Course Description
This course is both for students majoring in microbiology and also those who wish to develop their knowledge and skills in microbiology. The course covers Introductory Microbiology including cell structure, function, physiology, and diversity. The course then focuses on specific areas of microbiology: Environmental Microbiology, Food Microbiology, Medical Microbiology, Microbes in Biotechnology, Virology, and Eukaryotic Microbiology.
Course Aims
Microbiology 1 aims to introduce you to microbes, their process, interactions and the techniques scientists use to study them.
Student Learning Outcomes
By the completion of this course students should know: - the characteristics of Bacteria, Eukarya, Archaea and Viruses; - the fundamental processes carried out by microbes; - the types of interactions that occur between microbial populations; - how microbial growth can be controlled - standard microbiological laboratory techniques and safe, efficient work
practices; - how to conduct effective literature and experimental research; - how to communicate clearly and work constructively as a team.
Teaching Strategies
Lectures are used to introduce the concepts of microbiology and laboratory sessions are used to both complement the lecture material and provide practice in standard microbiological techniques. Laboratories sessions encourage teamwork. Online tutorials are additionally designed to support concepts presented in lectures and practiced in the laboratory, and support students in their research projects. The laboratory research project forms an essential element of the students’ scientific training. The research project, as integrated with the other components of the course, have been designed in accordance with the UNSW Guidelines on Learning that Inform Teaching (www.guidelinesonlearning.unsw.edu.au) to:
- teach students the process of scientific inquiry through progressive cycles of critical analysis of their research and their own thinking;
- facilitate multidisciplinary thinking to reflect current research and professional practice in the sciences;
- reinforce deep learning and promote collaborative inquiry; - integrate students’ disciplinary understanding and research practice with
the development of their communication skills, teamwork, and information literacy skills.
Major Topics (Syllabus Outline)
o Microbial Cell Structure and Function o Evolution of Microbes and Microbial Diversity o Introduction to Archaea o Environmental Microbiology o Microbial Processes and Interactions o Medical Microbiology o Food Microbiology o Virology o Microbes in Biotechnology and Synthetic Biology o Eukaryotic Microbiology

PRACTICAL SCHEDULE. 8
Graduate Attributes Developed in this Course
Science Graduate Attributes
Degree of development 0 = no development 1 = minimal 2 = minor 3 = major
Activities / Assessment
Research, inquiry and analytical thinking abilities
3 Guided laboratory practicals, independent and collaborative lab research, assessment of open-ended investigations.
Capability and motivation for intellectual development
3 Semseter project and associated report; concept quizzes to review procedural and applied thinking.
Ethical, social and professional understanding
2 Lectures address ethical and social issues relevant to the field of microbiology; lectures and discussions on current research in microbiology.
Communication 3 Writing and feedback on Semester Project Report Guidance in the development of scientific writing skills using tutorial materials.
Teamwork, collaborative and management skills
3 Collaborative lab research projects; facilitation of group discussions in Moodle; guided peer review of written research reports.
Information literacy
3 Guided research writing tutorial and critical literacy assessments; scientific literacy tutorial.
Additional Resources and Support
Text Books
Brocks Biology of Microorganisms. 15th edition Pearson Or Prescott, Harley and Klein. Microbiology 10th ed., McGraw Hill. NOTE: Earlier editions are satisfactory; however specific references to page numbers may vary.
Laboratory Manual A course laboratory manual is required and may be purchased from the UNSW Bookshop. Students may also access a PDF of the Manual through the MICR2011 Moodle page.
Internet Site
Students enrolled in the course have access to the MICRO2011 Moodle website and are required to access this regularly. Announcements will be made through Moodle email system. Links to online tutorial material will be provided on Moodle.
Equipment Required A lab coat, covered shoes, and safety glasses must be worn in all laboratory classes.

PRACTICAL SCHEDULE. 9
Lecture Program Week Date Lecture Lecturer 1 Wed 20th Feb Introduction to MICR2011 Dr Jai Tree Thurs 21st Feb Unicellular Structure and Function Dr Jai Tree Fri 22nd Feb Microbial Phylogeny Dr Jai Tree 2 Wed 27th Feb Microbial Bioinformatics Prof Mark Tanaka Thurs 28th Feb Microbial Evolution Dr Jai Tree Fri 1st Mar Microbial Metabolism I Dr Brendan Burns 3 Wed 6th Mar Microbial Metabolism II Dr Brendan Burns Thurs 7th Mar Archaea I Prof Rick Cavicchiolli Fri 8th Mar Archaea II Prof Rick Cavicchiolli 4 Wed 13th Mar Environmental Microbiology I A/Prof. Belinda Ferrari Thurs 14th Mar Environmental Microbiology II A/Prof. Belinda Ferrari Fri 15th Mar Microbial Interactions A/ Prof Suhelen Egan 5 Wed 20th Mar Bacterial Disease Dr Jai Tree Thurs 21st Mar Introduction to Immunology Dr Nancy Wang Fri 22nd Mar MID-SESSION EXAM 6 Wed 27th Mar Antibiotics and Antibiotic Resistance Dr Jai Tree Thurs 28th Mar The Human Microbiome Prof Hazel Mitchell Fri 29th Mar Introduction to Viruses Prof Peter White 7 Wed 3rd Apr Foodborne Pathogens Prof Peter White Thurs 4th Apr HIV and Hepatitis C Prof Peter White Fri 5th Apr Bacteriophages Prof Peter White 8 Wed 10th Apr Microbes and Synthetic Biology I Dr Dominic Glover Thurs 11th Apr Microbes and Synthetic Biology II Dr Matt Baker Fri 12th Apr Fungi I Dr Megan Lenardon 9 Wed 17th Apr Fungi II Dr Megan Lenardon Thurs 18th Apr Course Summary Dr Jai Tree Fri 19th Apr EASTER FRIDAY 10 Wed 24th Apr NO LECTURES
Lecture Times: Wednesday ..................................................................................... 1-2pm Ainsworth Building Room G03 Thursday .................................................................................. 1-2pm Central Lecture Block Room CLB7 Friday ..................................................................................................... 9-10am Physics Lecture Theatre

PRACTICAL SCHEDULE. 10
Tutorial & Laboratory Program Week Date Laboratory Online Tutorial 1 20th and 21st Feb Aseptic technique Sterilisation 2 27th and 28th Feb Project Sample DNA Extraction
Phylogeny and Classification
3 6th and 7th Mar Biochemical Characterisation Biochemical Characterisation 4 13th and 14th Mar Soil Microbial Fuel Cells Microbial Metabolism 5 20th and 21st Mar 16S rDNA Sequence Analysis Exam Revision Quiz 6 27th and 28th Mar Sanger Sequencing of Project Microbes Antibiotics 7 3rd and 4th Apr Food Microbiology Report Writing 8 10th and 11th Apr Bacteriophages Viruses 9 17th and 18th Apr Ebola Outbreak Fungi 10 24th and 25th Apr NO LABORATORY Exam Revision Quiz
Laboratory classes are held in Biosciences South (Building E26) laboratories 11 and 12 on Level 1. You are required to bring a laboratory coat and closed shoes. Online tutorials are accessed through the MICR2011 Moodle website.
NB: For each laboratory you must complete the Pre-Lab Quiz before the lab session. The Pre-Lab Quiz can be accessed from the MICR2011 Moodle page.

PRACTICAL SCHEDULE. 11
Assessment Assessment type Mark Description Due date Mid-session exam 20% Examines material covered in lectures,
practicals, and tutorials up to and including Week 4 of the course.
22nd March
Online tutorials 16% Completion of ALL online tutorials. 25th May Course Project Report 24% Report on microbe isolated and identified during
the course project Week 10
Final theory examination 40% Examines material covered in all lectures, practicals, and tutorials for entire course.
TBA
Pre-lab Quiz No marks assigned
Pre-lab quiz must be completed to participate in the practical class each week.
Each week
Mid-session exam revision quiz
No marks assigned
Revision quiz for mid-session exam Closes end Week 5
Rationale for project sample environment
No marks assigned
500 word rationale of sample environment selected for microbe isolation
Week 3
Final exam revision quiz No marks assigned
Revision quiz for final exam Closes after Final exam

PRACTICAL SCHEDULE. 12
Administration Matters Expectations of Students
A pass in MICR2011 is conditional upon a satisfactory performance in the practical program. A satisfactory performance means that you have:
- attended at least 80% of the practical classes (an attendance record is kept), and;
- kept an accurate and up-to-date laboratory manual, including the recording of all data and completion of calculations and questions.
Assignment Submissions
Requirements vary with each assigned task. Your tutor will advise accordingly.
Workplace Health and Safety1
Information on relevant Workplace Health and Safety policies and expectations at UNSW: https://safety.unsw.edu.au.
Assessment Procedures
Students who believe that their performance, either during the session or in the end of session exams, may have been affected by illness or other circumstances may apply for special consideration. Applications can be made for compulsory class absences such as (laboratories and tutorials), in-session assessments tasks, and final examinations. Students must make a formal application for Special Consideration for the course/s affected as soon as practicable after the problem occurs and within three working days of the assessment to which it refers. Students should consult the A-Z section of the Student Guide, particularly the section on “Special Consideration”, for further information about general rules covering examinations, assessment, special consideration and other related matters. This is information is published free in your UNSW Student Diary and is also available on the web at: https://student.unsw.edu.au/guide HOW TO APPLY FOR SPECIAL CONSIDERATION Applications must be made via Online Services in myUNSW. You must obtain and attach Third Party documentation before submitting the application. Failure to do so will result in the application being rejected. Log into myUNSW and go to My Student Profile tab > My Student Services channel > Online Services > Special Consideration. After applying online, students must also verify supporting their documentation by submitting to UNSW Student Central: • Originals or certified copies of your supporting documentation (Student Central can certify your original documents), and • A completed Professional Authority form. The supporting documentation must be submitted to Student Central for verification within three working days of the assessment or the period covered by the supporting documentation. Applications which are not verified will be rejected. Students will be contacted via the online special consideration system as to the outcome of their application. Students will be notified via their official university email once an outcome has been recorded.
PRACTICAL SCHEDULE. 13
SUPPLEMENTARY EXAMINATIONS: The University does not give deferred examinations. However, further assessment exams may be given to those students who were absent from the final exams through illness or misadventure. Special Consideration applications for final examinations and in-session tests will only be considered after the final examination period when lists of students sitting supplementary exams/tests for each course are determined at School Assessment Review Group Meetings. Students will be notified via the online special consideration system as to the outcome of their application. It is the responsibility of all students to regularly consult their official student email accounts and myUNSW in order to ascertain whether or not they have been granted further assessment. All supplementary exams will be held during the week Monday 27th May – Friday 31st May, 2019.
Equity and Diversity
Those students who have a disability that requires some adjustment in their teaching or learning environment are encouraged to discuss their study needs with the course Convenor prior to, or at the commencement of, their course, or with the Equity Officer (Disability) in the Equity and Diversity Unit (9385 4734 or http://www.studentequity.unsw.edu.au/) Issues to be discussed may include access to materials, signers or note-takers, the provision of services and additional exam and assessment arrangements. Early notification is essential to enable any necessary adjustments to be made. Information on designing courses and course outlines that take into account the needs of students with disabilities can be found at: https://www.unsw.edu.au/sites/default/files/uploads/Accessibility_Guidelines.pdf
Grievance Policy
School Contact
Faculty Contact
University Contact
Contact Biosciences Student Office G27, Tel: 9385 8047 OR Julna Zhao Tel: 9385 8915 For enquiries please use the webform unsw.to/webforms
Dr Gavin Edwards [email protected] Tel: 9385 4652
University Counselling Tel: 9385 5418 https://student.unsw.edu.au/complaint

PRACTICAL SCHEDULE. 14
Academic honesty and plagiarism Plagiarism is the presentation of the thoughts or work of another as one’s own. Examples include:
• Direct duplication of the thoughts or work of another, including by copying work, or knowingly permitting it to be copied. This includes copying material, ideas or concepts from a book, article, report or other written document (whether published or unpublished), composition, artwork, design, drawing, circuitry, computer program or software, web site, Internet, other electronic resource, or another person’s assignment without appropriate acknowledgement.
• Paraphrasing another person’s work with very minor changes keeping the meaning, form and/or progression of ideas of the original.
• Piecing together sections of the work of others into a new whole. • Presenting an assessment item as independent work when it has been produced in whole or part
in collusion with other people, for example, another student or a tutor. • Claiming credit for a proportion a work contributed to a group assessment item that is greater than
that actually contributed. • Submitting an assessment item that has already been submitted for academic credit elsewhere
may also be considered plagiarism. • The inclusion of the thoughts or work of another with attribution appropriate to the academic
discipline does not amount to plagiarism. Students are reminded of their Rights and Responsibilities in respect of plagiarism, as set out in the University Undergraduate and Postgraduate Handbooks, and are encouraged to seek advice from academic staff whenever necessary to ensure they avoid plagiarism in all its forms. The Learning Centre website is the central University online resource for staff and student information on plagiarism and academic honesty. It can be located at: https://student.unsw.edu.au/plagiarism The Learning Centre also provides substantial educational written materials, workshops, and tutorials to aid students, for example, in:
• Correct referencing practices. • Paraphrasing, summarising, essay writing, and time management. • Appropriate use of, and attribution for, a range of materials including text, images, formulae and
concepts. Students are also reminded that careful time management is an important part of study and one of the identified causes of plagiarism is poor time management. Students should allow sufficient time for research, drafting, and the proper referencing of sources in preparing all assessment items.

WEEK 1 LABORATORY 15
WEEK 1 LABORATORY
OVERVIEW This week we welcome you to the BABS teaching laboratories in the Biosciences South Building (E26). The laboratories you will be studying in are Labs 11 and 12 on level 1 of the building. In this three-hour lab class, we will be focussing on laboratory safety, making media for the cultivation of microorganisms, and choosing an environment to sample so that you can isolate a microorganism for your course project. LEARNING OBJECTIVES
• Understand the risks involved in working with microorganisms in a PC2 facility and the personal protective equipment and behaviors required to manage those risks
• Understand how microorganisms are cultivated in the laboratory • Begin to develop skills necessary to isolate and purify microorganisms
ACTIVITIES
1. Welcome! a. Allocation of places b. Introductions c. Laboratory safety
2. Media for cultivation of microbes: a. Understanding media recipe composition (energy, elements and vitamins) b. Making and sterilising liquid broth and agar plates c. Aseptic technique and labelling
3. Introduction to MICR2011 course project

WEEK 1 LABORATORY 16
Contents: WEEK 1 RISK ASSESSMENT .......................................................................................... 17WEEK 1 LABORATORY CLASS ..................................................................................... 181. Welcome! ...................................................................................................................... 181.1 Allocation of places ...................................................................................................... 181.2 Introductions ................................................................................................................ 181.3 Laboratory safety ......................................................................................................... 18Microbiology Laboratory Safety Rules ............................................................................... 19Risk management .............................................................................................................. 20Risk Management Form .................................................................................................... 212. Media for the cultivation of microbes ........................................................................ 252.1 Understanding media recipe composition .................................................................... 252.2 Aseptic technique ........................................................................................................ 252.3 Making and sterilising liquid broth and agar plates ...................................................... 27i) Luria broth ....................................................................................................................... 27
Materials ..................................................................................................................... 27Procedure ................................................................................................................... 27
ii) Pouring Luria agar plates ............................................................................................... 28Materials ..................................................................................................................... 28Procedure ................................................................................................................... 28
3. MICR2011 course project ............................................................................................ 30

WEEK 1 LABORATORY 17
WEEK 1 RISK ASSESSMENT
BABS Teaching Laboratory
MICR2011_RMF_Wk2 Student Risk Assessment
Hazards Risks Controls General See below At all times follow demonstrators instructions when
handling all biological substances, chemicals and equipment items. Notify demonstrator immediately of any spills or other incidents. Proper handwashing with antibacterial handwash before leaving the laboratory.
Collecting biological /environmental samples
Inhalation of bio-aerosol particles (microorganisms) leading to inflammation, allergy, or to serious systemic infection by secondary pathogens.
PPE (lab coats, closed in shoes & gloves as required). Work in PC2 laboratory or Biological Safety Cabinet (BSC) if required e.g. for respiratory pathogens.
Sharps Sharp wire injury Take care when handling wire and place any unused sharp items in the sharps containers provided.
Handling hot items
Electric shock/ electrocution burns
Ensure you are using heat protective mitts when handling hot objects. Stand to side of the water bath when opening it to allow steam to dissipate before removing items. Avoid water/spillages when working with electrical items.
Personal Protective Equipment
Emergency Procedures In the event of an alarm sounding, stop the experiment, turn of electrical equipment and wait for confirmation from demonstrators to evacuate. Then pack up your bags and wash your hands. Follow the instructions of the demonstrators regarding exits and assembly points. The BioScience assembly point is in the lawn in front of the Chancellery. In the event of an injury inform the demonstrator. First aiders and contact details are on display by the lifts.
Clean up and waste disposal All used microfuge tubes should be placed in the biohazard bins. Used test tubes should be placed in the appropriate container on the front bench of the lab. All solutions should be placed in the appropriate liquid waste containers. Used pipette tips should be placed in approved biohazard sharps containers.
Declaration – will be checked by demonstrator at the beginning of the practical class I have read and understand the safety requirements for this practical class and I will observe these requirements. Signature:……………………………………………………………Date:…………………………… Student number:………………………..

WEEK 1 LABORATORY 18
WEEK 1 LABORATORY CLASS 1. Welcome!
1.1 Allocation of places Students should proceed to the appropriate laboratory (Lab 11 or 12 in Biosciences South E26 as advised) where practical class groups will be organised. 1.2 Introductions Students and tutors should get acquainted:
• Briefly introduce individual backgrounds. • A brief discussion of course objectives and requirements. • Explanation of assessable components of this course. • Brief overview of laboratory and tutorial programs.
1.3 Laboratory safety Note: In addition to reading and signing off on the material below all students will be required to complete the laboratory BABS Health and Safety Quiz in Moodle before next week’s class (Week 2). You will not be able to proceed in further practical classes until you have completed this quiz.
In the laboratory, individuals are exposed to hazards not normally found in a regular classroom. It is essential that students follow all laboratory rules and regulations. Failure to follow established rules may result in dismissal of the individual from the class. Laboratories have certain standard safety equipment. These typically include:
• general-purpose fire extinguisher • fire blanket • eyewash • safety shower • cut-off switches for electrical and gas outlets.
It is the responsibility of the student to locate and know how to use the general safety equipment in the laboratory. Additionally, students should be aware of exits from the room in case of emergency, how to summon Campus Security (9385 6666), and how to obtain emergency medical assistance.
The microbiology lab has some additional safety considerations. Since individuals work with potentially pathogenic organisms care must be taken to prevent possible infection or transmission of the organisms from the laboratory. Students must wear protective clothing (including lab coats, safety glasses and closed in shoes) while working in the laboratory. Lab coats may not be worn outside the laboratory. Gloves will be provided and students must wear gloves when handling chemicals or pathogenic microorganisms.
Aseptic technique must be followed while working with microorganisms, and appropriate instruction in aseptic technique will be provided. Bench-tops must be disinfected after lab classes using the disinfectant provided.
You MUST wash your hands before leaving the lab.

WEEK 1 LABORATORY 19
Microbiology Laboratory Safety Rules
All materials and clothes other than those needed for the laboratory are to be kept away from the work area in the lockers provided.
• A lab coat or other protective clothing must be worn during the lab. Lab clothing is not to be worn outside of the laboratory.
• Items heavily contaminated with bacteria must be disposed of properly. Disposable items are to be placed in the BIOHAZARD container. Reusable items are to be placed in the designated area for autoclaving prior to cleaning. Sharps are to be disposed of in the appropriate container.
• Aseptic technique must be observed at all times. No eating, drinking, application of cosmetics or smoking is allowed. Mouth pipetting is not allowed.
• Cuts and scratches must be covered with appropriate dressing. • Long hair should be tied back while in the lab. • All accidents, cuts, and any damaged glassware or equipment should be reported to
the lab demonstrator immediately. • Sterilization techniques will involve the use of Bunsen burners, which constitute a fire
and burn hazard. Keep all combustibles away from the Bunsen burners. • It is the responsibility of the student to know the location and use of all safety
equipment in the lab (eyewash, fire extinguisher, etc.) • Cultures may not be removed from the lab. • Visitors are not allowed in the lab.
Health and Safety Precautions for Electronic devices including laptop computers and mobile phones:
• Mobile phones: For your own safety please ensure your mobile phone is placed in a plastic zip lock bag.
• Computers and tablets: Please cut a section of benchcoat (this will be provided in the lab class) and place your device on this on the lab bench to separate it from your other laboratory work. DO NOT wear gloves when using these devices.
Laboratory clean up instructions
At the end of each practical class you must clear your bench space. This includes: 1) Discard liquid(biological) waste into the aqueous waste container located at the sink. 2) Discard solid waste (e.g. agar plate) into the Biological waste bin located near the end of the bench. 3) Discard sharps (e.g. pipette tips, slides & coverslips) into the sharps container located on the bench. Do not leave Gram stained slides unattended at the staining station. 4) Return used practical materials to the tutor station. 5) Store practical materials accordingly (refer to your demonstrator's instruction). 6) Placed empty tip boxes and microfuge tube jars in the box located at the back of the lab.

WEEK 1 LABORATORY 20
I have read and understand the above rules and agree to follow them. Signed______________________________________Date_______________ Name _________________________________________________________
Risk management:
For every task we perform in the laboratory that involves new equipment or substances that are potentially hazardous we are legally required to prepare a risk management plan (Workplace Health and Safety Act and Regulation 2011). What is Risk Management?
It is about identifying hazards, assessing them and controlling the risk of the hazards. When identifying hazards consider where, how and who is carrying out work. The level of risk is assessed and used to prioritise implementation of risk control measures. The risk control measures are:
• Eliminate the hazard(s) • Substitute for something less hazardous • Isolate the hazard from people • Engineering controls e.g. plant guarding, work in fume cupboard or biosafety cabinet • Administrative controls e.g. training, safe work procedures, signage • Personal protective equipment (PPE) e.g. lab coat, safety glasses, gloves
To prepare a risk management plan/assessment you need to do the following:
• Identify Hazards: Source of potential harm to people, property or environment • Assess Risks: Chance of something happening - consequence vs likelihood • Eliminate or Control Risks
For the practical based studies you will undertaking in this course you will be required to read and sign the risk management plan associated with each individual laboratory class to provide evidence you have understood the associated risks and the control measures that have been put in place to minimise these risks. The risk management plans have been prepared by experienced staff however to help you understand this process we will ask you to identify the hazards and risks you may encounter in a microbiology lab and control measures we can use to minimise these risks and then discuss this with your fellow students and demonstrator. An example of a risk management form for working with a microscope is shown on the next page. Note all risk assessments at UNSW are now submitted on-line using the SafeSys database (http://safety.unsw.edu.au/node/93/).

WEEK 1 LABORATORY 21
Risk Management Form
Document details
Document Number SCI-BABS-RMF-1603 Title Use of the light Microscope
Author Jani O’Rourke Approver Jani O’Rourke
Approval Status Approved Approval Date 02/06/2018
Faculty Science School School of Biotechnology and Biomolecular Science
Next Review date 02/06/2021
Risk Management Details
Risk Management Form Description
Use of the light microscope for the visualisation of bacterial and fungal specimens
Locations All BABS labs
Persons at Risk Workers, Students, Visitors
Consultation Process Persons must read this form
Related Legislation, Standards, Codes of Practice etc
WHS Act 2011; WHS Regulations 2011 AS/NZS 2243 Safety in Laboratories 2010 Appropriate UNSW Procedures and Guidelines
Hazards and Risks
Hazard Task Use of glass microscope slides and glassware Hazard Category Sharps/Needlesticks Associated Harm Cuts to hands and fingers from broken slides Existing Controls Sharp and glass bins are provided for immediate disposal of
broken glass slides Risk Consequence Minor Risk Likelihood Unlikely Risk Rating Low Additional Controls - Hazard Task Use of electrical equipment Hazard Category Electrical Associated Harm Electrocution Existing Controls Annual tagging and testing. If a problem occurs staff are to switch
off the machine, place an out of service notice on the equipment and notify the supervisor immediately. An electrical cut-off switch is located at the front tutor station.
Risk Consequence Moderate Risk Likelihood Rare Risk Rating Medium Additional Controls - Hazard Task Sore back, neck or eyes

WEEK 1 LABORATORY 22
Hazards and Risks
Hazard Category Ergonomic Associated Harm Back, neck or eye strain due to extended use or too high intensity
of light source Existing Controls 4 hour maximum booking allowed. Adjustable chairs provided.
Training and risk assessment Risk Consequence Minor Risk Likelihood Unlikely Risk Rating Low Additional Controls - Hazard Task Exposure to biological materials Hazard Category Biologicals Associated Harm Infection Existing Controls PPE (lab coats, gloves, closed-in shoes, tied back hair, safety
glasses for handing specimens), appropriate disinfection process of specimens and any spills
Risk Consequence Minor Risk Likelihood Rare Risk Rating Low Additional Controls -
Other Risk Management Details
Date All Controls Implemented
02/06/2015
Emergency Procedures Secure your work and turn off power sources and gas supply (if applicable), remove PPE. Advise others in the laboratory of the situation and report any fault or incident causing the shutdown to Lab Supervisor, School H&S representative or Facilities (FM Assist x55111). Fire: Cover the fire with a fire blanket if it can be fully contained underneath the blanket otherwise use a fire extinguisher. Carbon dioxide or dry powder is suitable. Be prepared for re ignition, especially if equipment is involved; do not leave the scene unless fumes or smoke become hazardous. Exposure; remove contaminated protective clothing and examine your clothes for contamination which may have soaked through. If day clothing is contaminated, remove, and wash skin under running water immediately for 15 minutes or until medical attention arrives. Assess if any person requires medical attention – contact first aid officers if required. Advise others of the situation and clear the laboratory if required. Spill: See SCI-BABS-SWP-665 for dealing with biological spills See SCI-BABS-SWP-666 for dealing with chemical spills. Report incident to Lab Supervisor and School H&S representative. For emergencies contact UNSW Security on x 56666.
Competency and Training Required
Training by experienced technical staff
Competency Levels Read Document

WEEK 1 LABORATORY 23
Describe hazards and risks associated with working with unidentified microorganisms.
Describe control measures that can be put in place to mitigate these risks.

WEEK 1 LABORATORY 24

WEEK 1 LABORATORY 25
2. Media for the cultivation of microbes 2.1 Understanding media recipe composition
Notwithstanding the contributions of Leeuwenhoek (first microscope observations), Jenner (first vaccine), Pasteur (vaccines and pasteurisation) and Lister (antiseptic surgery), it was not until Robert Koch’s laboratory invented the petri dish and the agar plate that it was possible to isolate microorganisms. The isolation and cultivation of microorganisms allowed for the confirmation of germ theory and is fundamental to microbiology. Thus, it is important to understand how to handle and grow microbes. This practical class will introduce students to the composition of defined and complex media for growing microbes and techniques for media production. While advances in molecular techniques have allowed for the study of microorganisms in their specific natural environments the selection and isolation of individual organisms is still an important and necessary tool for microbiologists. As such, culture media that allows for the cultivation of microorganisms in the laboratory is required. Culture media must provide an energy source (electron donor) and a range of macronutrients and micronutrients with the exact requirements and composition of these elements varying between individual microbial species. Macronutrients include carbon, hydrogen, oxygen, nitrogen, sulphur, phosphorus, potassium, calcium, magnesium and iron. Micronutrients or trace elements include manganese, zinc, copper, cobalt and molybdenum. In addition, some organisms may require specific growth factors, as they are unable to synthesise certain organic compounds from the available nutrients. The need for growth factors is due to absent or dysfunctional metabolic pathways in these organisms. In a broad sense, there are three types of growth factors:
• Purines and pyrimidines: required for synthesis of nucleic acids (DNA and RNA), • Amino acids: required for the synthesis of proteins, • Vitamins: needed as coenzymes and functional groups of certain enzymes.
Culture media can be divided into two main types – defined and complex. In defined media all the chemical components of the media are known and quantified. It is often used in situations where it is important to know exactly what is being metabolised by the microorganism. By comparison, complex media will have one or more undefined components such as peptone, meat extract or yeast extract. Here we don’t know the exact concentrations of all compounds in the media. Complex media is great when you don’t know the specific nutritional requirements of an organism. While both liquid and solid media are used in microbiology laboratories, the isolation of single colonies for the growth of pure cultures (one microbial lineage in isolation) is performed using solid media. 2.2 Aseptic technique
In order to identify and carry out detailed studies on microbes it is essential that a pure culture be used. Otherwise you can’t unambiguously attribute a trait of interest to a specific organism. For example you can’t attribute a disease to a specific organism if it is mixed with others. It has to show virulence on its own. The ability to obtain pure cultures and maintain them free of external contamination is a basic microbiological technique. In this

WEEK 1 LABORATORY 26
exercise you will have the opportunity of practicing sub-culturing and streak-plating techniques and of isolating organisms in pure culture. It all revolves around something we call aseptic technique. Accidental contamination may ruin your results completely. Aseptic technique is largely a matter of common sense, but it is essential to realise that bacteria and fungi are present almost everywhere. Correct methods of handling cultures and apparatus must be perfected. Consider carefully and remember the following points:
• Air contains many bacterial and fungal cells carried on dust particles or in water droplets.
• Any surface exposed to air quickly becomes contaminated, and if material is to be kept sterile exposure to air must be minimized.
• Instruments which can be sterilised by heating in a Bunsen flame (e.g. metal inoculating loops) can be left exposed, but they must be flamed thoroughly before use, and again before being replaced in the holder.
• Items of equipment that cannot be treated in this way are sterilised in wrappings or containers from which they must not be removed until actually needed. They must not be allowed to touch non-sterile surfaces during use. Plugs and caps of tubes and bottles must not be laid on the bench nor must sterile containers be left open to collect falling dust.
• Clothes, hair, skin and breath all carry a heavy microbial load and where strict asepsis (sterility) is essential (eg. surgery) sterilised gowns, caps, gloves and masks are worn. Even in normal microbiological work care must be taken to prevent contamination from the above-mentioned sources.
• A clean laboratory is the foundation of good aseptic technique. • Microbial contamination in the lab is most often due to currents of non-sterile air.
Ideally biosafety cabinets are used to minimize contamination. In the absence of a biosafety cabinet, a Bunsen burner can be used to create an updraft, thereby preventing contamination by settling dust particles. This protection can also be supplemented by keeping all windows and doors shut and by cutting down movement within the laboratory.
• Before commencing any operation, all necessary materials should be assembled on the bench for convenient access with provision for protecting sterile objects until needed.
At this stage of this practical class each tutor group will be divided into four mini-groups (with 4 students each). You will also use these mini-groups for the main course project. Each group will initially be allocated to one of the following exercises:
1. Pouring agar plates, 2. Making Luria broths, 3. Or choosing your environment for the study of its indigenous microbes
Each group will then rotate through each exercise. It is anticipated that each exercise will take roughly half an hour.

WEEK 1 LABORATORY 27
2.3 Making and sterilising liquid broth and agar plates
Luria broth, originally know as Lysogeny broth, was devised by Giuseppe Bertani in 1952 for growing pathogenic Shigella lineages. It is now commonly used for the growth of enteric species such as the research workhorse Escherichia coli and in recombinant DNA work. It is a complex media that is easy to prepare and contains a wide range of nutrients with the following ingredients:
• Tryptone: peptides and peptones providing essential amino acids • Yeast extract: vitamins, trace elements and certain organic compounds • NaCl: sodium ions for transport and osmotic balance.
i) Luria broth Materials:
• Tryptone • Yeast extract • Sodium chloride • 50ml polyproylene centrifuge tube • Spatula, weighing boat, balance • Specimen container and pipettes.
Procedure:
1. Using a spatula, weighing boat and a balance, each student should weigh out the following ingredients into a conical (Erlenmeyer) flask. Rinse and dry the spatula between different chemicals to avoid mixing (no double dipping).
• Tryptone: 0.2 g • Yeast extract: 0.15 g • NaCl: 0.2 g
2. Dissolve in 20 mL of distilled water. 3. Using a pipette aliquot 2 x 10 mL volumes into the 50 ml tube provided. Label the lid
of your bottles with your name and date and place in the tray provided. The tubes will be autoclaved by the technical staff and returned to you for use in next week’s class.
Please ensure lids are slightly loosened before handing them in. If they are tightly sealed the pressure generated during autoclaving may cause them to deform.
50ml polypropylene centrifuge tube

WEEK 1 LABORATORY 28
Is Luria broth defined or complex? Name one of the carbon and energy sources in the media.
For the three individual components state whether they are defined or undefined. Tryptone: Yeast extract: NaCl:
ii) Pouring Luria agar plates Materials:
• 40 mL Luria agar • sterile petri dishes
Each student will be provided with 40 mL of molten Luria agar. This media has the same ingredients as the Luria broth above but 1.5% (weight/volume) agar has been added as a solidifying agent. Agar dissolves at 100˚C and so will dissolve during autoclaving (121˚C). The agar will not set until the temperature drops to below 40˚C. Agar can be kept in a 60˚C water bath to keep it molten before being poured into petri dishes. Procedure:
1. Collect two petri dishes – take care when handling them as these dishes are sterile inside. Label the bottom of each dish with your name, tutor group and date. Place the dishes on the bench with the lid uppermost in front of a Bunsen burner.
2. Remove a 40 mL bottle of molten agar from the water bath. Take care when handling the molten agar as the bottles will be hot to handle. Use the silicon hand gloves provided.
3. Lift one side of the petri dish lid and carefully pour approximately 20 mL into each plate being careful not to produce any bubbles. Bubbles can be removed with a Bunsen flame. Ask your demonstrator how to do this if required.
4. Leave the plates for 30 minutes to set completely then give them to your demonstrator for storage. Your plates will be stored at 4˚C for use in next week’s class.

WEEK 1 LABORATORY 29
What weight of agar (in grams) would be added to 40 mL Luria broth to give a 1.5% (w/v) concentration?
How do you think petri dishes are sterilised?
Why do we label the bottom of the petri dish?

WEEK 1 LABORATORY 30
3. MICR2011 course project Whilst each weekly practical class involves independent laboratory activities, one exercise runs throughout the session and forms the basis of a total of 24% of the course assessment. In essence, the course project makes a comparison between traditional cultivation based microbiology and contemporary molecular microbiology. In your mini-group of four students will:
1) select an environment of interest 2) extract DNA from the environment of interest 3) identify microbes in that environment from DNA sequence data 4) isolate microbes from the environment of interest 5) identify microbes by DNA sequencing
The project showcases the skills of a modern microbiologist from making media for cultivating microbes to bioinformatics based analysis of sequence data. You will be required to justify your choice of environment at the beginning of the session and produce a scientific research article describing your findings at the end of the session. The project justification is effectively an introduction to your research article. Typically an introduction consists of a claim of centrality (why it is important enough to spend time and money investigating), identification of knowledge gaps (what is not known about the microbiology of the environment you have chosen to investigate) and how you will fill the knowledge gaps. The final project manuscript should be modeled on published research articles in the Journal of Bacteriology. Understand the type of content appropriate for the methods, results and discussion sections. Communicating clearly and concisely is the key to good grades. A rubric for marking the final report will be provided on the Moodle page. The main project for this course involves the selection of a particular environment of your choice for the study of its indigenous microbiota. By the end of the lab you must make your choice. Discuss possible environments with the other members in your mini-group and with your demonstrator. Consider how universal the interest in an environment is, and the experimental feasibility. You will have materials to extract DNA from:
• Solid environments such as soil or food • Aqueous environments such as seawater or pond water • Surface environments such as skin or benches collected by swabbing
Once you have decided your sample, add information about your sample to the OneNote class register (linked here in the PDF) so that materials can be allocated for next week.
END OF WEEK 1
Complete for the Week 3 practical Write a 500 word rationale for studying the environment of choice. Decribe why the enviroment is signficiant and/or scientifically interesting. This will be due at the beginning of the Week 2 laboratory class. Feedback on your Rationale will be returned in Week 4 and will help you write the introduction section of your final report.

WEEK 2 LABORATORY 31
WEEK 2 LABORATORY
OVERVIEW This week we begin the course project. We will take two approaches to studying the microbial communities (microbiomes) of the samples you have chosen. The first is a contemporary molecular approach and the second is a traditional cultivation approach. The molecular approach involves extracting DNA directly from the sample and using DNA sequencing technology to determine what microorganisms are present. We will perform the DNA extraction today and analyse sequence data in subsequent weeks. The cultivation approach involves growing individual microbial lineages present in the sample and subsequently characterising them using biochemical tests, microscopy, and DNA sequencing. We will inoculate growth media today and do some cell staining and microscopy training exercises. LEARNING OBJECTIVES
• Understand the difference between modern DNA sequencing-based techniques and traditional cultivation-based techniques for identification microorganisms.
• Understand the advantages and disadvantages of each approach. • Develop skills for visualising microbial samples by light microscopy. • Be able to Gram stain a bacterial sample and understand the basis of the stain.
ACTIVITIES
1. DNA extraction of project samples for sequencing. 2. Staining bacteria for observation by light microscopy. 3. Inoculating liquid broth and agar plates with student samples.

WEEK 2 LABORATORY 32
Contents: WEEK 2 RISK ASSESSMENT .......................................................................................... 33WEEK 2 LABORATORY CLASS ..................................................................................... 341. DNA extraction of project samples for sequencing ................................................. 34Procedure .......................................................................................................................... 34 Materials ............................................................................................................................ 35 Step One - Sample collection and preparation .................................................................. 36
Solid samples (soil, food etc.) ..................................................................................... 36 Aqueous samples (seawater, pond water etc.) .......................................................... 36 Surface swab samples (skin, ear, benches etc.) ........................................................ 37
Step Two – Lysis ............................................................................................................... 37 Step Three - Clean up (solid samples only) ....................................................................... 37 Step Four - DNA binding and column washing .................................................................. 37 Step Five – Elution ............................................................................................................. 38 Sequencing ........................................................................................................................ 38 2. Introduction to light microscopy ................................................................................ 39Parts of a light microscope ................................................................................................ 39Setting up the light microscope .......................................................................................... 40Resolution .......................................................................................................................... 42Oil immersion ..................................................................................................................... 42Microscopy trouble shooting .............................................................................................. 433. Staining bacteria for observation by light microscopy ............................................ 44Materials ............................................................................................................................ 44Procedure .......................................................................................................................... 44Smear preparation ............................................................................................................. 44Gram staining your heat fixed bacterial smear .................................................................. 46Observations ...................................................................................................................... 464. Inoculating agar plates to obtain pure cultures and liquid broths as enrichment cultures ............................................................................................................................. 47Materials ............................................................................................................................ 474.1 Procedure for inoculating samples to obtain single colonies (pure cultures) ............... 474.2 Procedure for setting up enrichment cultures .............................................................. 47Technique for subculturing agar plates for single colonies ................................................ 48

WEEK 2 LABORATORY 33
WEEK 2 RISK ASSESSMENT
BABS Teaching Laboratory
MICR2011_RMF_Wk3
Student Risk Assessment
Hazards Risks Controls General See below At all times follow demonstrators instructions when
handling all biological substances, chemicals and equipment items. Notify demonstrator immediately of any spills or other incidents. Proper handwashing with antibacterial handwash before leaving the laboratory.
Biological agent (human samples, environmental samples) Glass slides/coverslips Bunsen burner
infection cuts burns
PPE (lab coats, closed in shoes & gloves as required) and Safety glasses when handling human specimens. Adhere to aseptic techniques. Dispose of any broken/used sharp/glass items immediately in Sharps containers provided. Never leave a lit Bunsen Burner unattended or reach over an exposed flame. Keep long hair tied back.
Electrical Equipment (microscope)
Electric shock/ electrocution Exposure to biological agents (see above)
Avoid water/spillages when working with electrical items.
Chemical (DNA extraction)
Irritant for skin and eyes skin or eyes, toxic if ingested.
PPE (lab coats, closed in shoes, safety glasses & gloves. SDS.
Personal Protective Equipment
Emergency Procedures In the event of an alarm sounding, stop the experiment, turn of electrical equipment and wait for confirmation from demonstrators to evacuate. Then pack up your bags and wash your hands. Follow the instructions of the demonstrators regarding exits and assembly points. The BioScience assembly point is in the lawn in front of the Chancellery. In the event of an injury inform the demonstrator. First aiders and contact details are on display by the lifts.
Clean up and waste disposal All used microfuge tubes should be placed in the biohazard bins. Used test tubes should be placed in the appropriate container on the front bench of the lab. All solutions should be placed in the appropriate liquid waste containers. Used pipette tips should be placed in approved biohazard sharps containers.
Declaration – will be checked by demonstrator at the beginning of the practical class I have read and understand the safety requirements for this practical class and I will observe these requirements. Signature:……………………………………………………………Date:…………………………… Student number:………………………..

WEEK 2 LABORATORY 34
WEEK 2 LABORATORY CLASS
1. DNA extraction of project samples for sequencing DNA extraction underpins many modern techniques for the identification of microorganisms. Whether from a pure culture of a bacterial pathogen or a complex microbial consortium such as a stool sample, knowing what microbes you are dealing with starts with DNA extraction. DNA extraction from any given sample involves breaking open the cells, separating the DNA from the cell debris (membranes and proteins) and purifying the DNA by removing remaining contaminants that might interfere with downstream processing such as PCR and sequencing (e.g. RNA, cell metabolites, environmental matrix contaminants). The following procedure describes what you need to do to get a DNA extract from your sample. In your project mini-groups (groups of five), follow the protocol carefully and provide a labelled DNA sample to your tutor once completed. Procedure:
To isolate microbiome DNA from your sample, you will be using a commercial kit, the PureLink™ Microbiome DNA Purification Kit, which has been optimised for efficient microbiome DNA purification from a range of samples. Pay attention to the procedure needed for your particular sample as the protocols differ depending on the starting material. These procedures allow microbiome DNA isolation from the following three sample types:
• Solid environments such as soil or food • Aqueous environments such as seawater or pond water • Surface environments such as skin or benches collected by swabbing
There are four main steps to this DNA extraction protocol. The first is sample collection and preparation. Here the sample is collected from the environment and prepared for DNA extraction. Next is lysis, where the bacterial cells are broken open to release their DNA. This will be achieved by heating the samples in a lysis buffer and mechanically breaking open the cell walls by vigorously shaking the sample with glass beads. After this step, some samples will require an extra clean up step, which eliminates compounds that may inhibit the DNA sequencing process. DNA binding follows when the sample is added to a spin column that contains a filter that will bind the released DNA, allowing contaminants to be washed away by subsequent flushing of the column. The DNA is then eluted by addition of an aqueous buffer that solubilises the DNA. The purified DNA is then ready for analysis by sequencing or PCR. An overview of the workflow is illustrated below. Discuss the procedure within your group. Assign tasks to each group member. This is assessable (25%), so take your time and develop a practical experimental plan to proceed.

WEEK 2 LABORATORY 35
Materials:
• PureLink Microbiome DNA purification kit • Forceps, blades, swabs, saline solution, mortar and pestle • Pipettes, tips, microfuge tubes, microcentrifuges and vortexes

WEEK 2 LABORATORY 36
Step One - Sample collection and preparation: The method used to collect and prepare your sample will depend on the nature of the sample. Follow the appropriate guide for your sample type. Solid samples (soil, food etc.)
i. Add 600 µL of Buffer S1 – lysis buffer to a bead tube (with red screw cap) ii. Weigh out approximately 0.2 grams of your sample using the balance provided, and
add it to the bead tube. For food samples, it may be necessary to crush the sample using a mortar and pestle first.
Aqueous samples (seawater, pond water etc.)
i. Unscrew the blue nut on the top of the Vacuum Filtration Unit and remove the lid ii. Remove a filter from its package using filter and place the filter in a container of
deionized water to wet it completely. iii. Remove the filter from the water using the forceps or soft-nosed tweezers and
center it on a support screen. Make sure that the filter completely covers the screen.
iv. Using forceps, place a nitrocellulose filter disk onto the manifold (A) taking note of the position (1-12).
v. Replace the lid on the manifold and tighten the blue locking nut (B) vi. Place stoppers in any positions around the manifold that do not contain filters. Add
barrel extensions (max volume 50ml). vii. Switch on the vacuum pump and filter the first 50ml of your sample, add more as
the sample is filtered. Turn of the manifold and remove the lid (as in step i). viii. Add 800 µL Buffer S1 – lysis buffer to a bead tube (with red screw cap) and add the
filter membrane.
A: Setting the filter onto the manifold. B: Filter loaded into the manifold. C: Manifold with stoppers and barrel extensions connected to the vacuum pump.
A B
C

WEEK 2 LABORATORY 37
Surface swab samples (skin, ear, benches etc.)
I. Add 600 µL of Buffer S1 – lysis buffer to a bead tube (with red screw cap) II. Moisten the tip of a sterile cotton swab in sterile saline. III. Swab the surface to be sampled thoroughly, making sure to use all sides of the
swab. IV. Place the tip of the swab into the bead tube and cut/break off the remainder.
Ensure that any remaining handle does not prevent you from being able to cap the tube.
Step Two – Lysis
I. Label your bead tube with your groups identification on the side of the tube. II. Add 100 µL of Buffer S2 – lysis enhancer to the bead tube. Cap tightly and mix tube
contents briefly using the vortex mixer. III. Incubate the tube in a heat block at 65°C for ten minutes. IV. Homogenise the sample by shaking on a bead beater for 3 x 45 second cycles.
(Note: This step will be performed by the technical staff) V. Proceed to Step three (in the box below) if you are extracting from a solid sample.
For all other samples proceed directly to Step Four.
Step Three - Clean up (solid samples only)
I. Centrifuge the tube containing your sample at 14,000 x g for 5 minutes. II. Transfer up to 400 µL of supernatant to a clean microcentrifuge tube. Take care to
avoid disturbing the pellet or transferring any debris. III. Add 250 µL of Buffer S3 – Cleanup buffer to the supernatant and vortex
immediately. IV. Incubate on ice for ten minutes. Proceed to DNA binding (Step Four).
Step Four - DNA binding and column washing
I. Centrifuge the tube containing your sample at 14,000 x g for 2 minutes. II. Transfer up to 500 µL of supernatant to a clean microcentrifuge tube, taking care to
avoid disturbing the pellet or transferring any debris. Discard the tube containing the pellet.
III. Add 900 µL of Buffer S4 – Binding buffer to the supernatant and vortex briefly. IV. Open the DNA binding column (supplied in a collection tube) and add 700 µL of
your sample. Cap the column, place the column-tube assembly into a microcentrifuge and centrifuge at 14,000 xg for 1 minute.
V. Remove the column from its collection tube and discard the flow-through. Replace the column in its tube and repeat the previous step with the remaining amount of your sample.
VI. After the second spin, transfer the column (with DNA now bound to the filter inside) to the clean collection tube provided.
VII. Add 500 µL of Buffer S5 – Wash buffer to the column, cap it and centrifuge for 1 minute as above.
VIII. Discard the flow-through, replace the column in the tube and centrifuge for an additional 1 minute (this step removes residual wash buffer from the column).

WEEK 2 LABORATORY 38
Step Five – Elution
I. Transfer the column to a clean microcentrifuge tube labelled with your group identification.
II. Add 50 µL of Buffer S6 – Elution buffer to the column. Cap the column and allow it to sit at room temperature for one minute.
III. Centrifuge the column (in its microcentrifuge tube) at 14,000 x g for 1 minute. The DNA will now be eluted from the column into the tube, and is ready for quality analysis and sequencing. Hand your DNA extract to your demonstrator.
Sequencing: The DNA extracted from your sample will be submitted to the Ramaciotti Centre for Genomics for further analysis. The quality of your DNA samples will be checked by gel electrophoresis and the quantity determined with a Nanodrop UV-Vis spectrophotometer. Those DNA extracts of sufficient quality and quantity will be used as template in a polymerase chain reaction that will amplify (make multiple copies of) a portion of the SSU rRNA genes present in your DNA samples. The product of the PCR (amplicons) will then be subject to sequencing using the Illumina MiSeq platform. If you would like to learn more about Illumina sequencing technology (sequencing by synthesis) then go to: www.illumina.com/documents/products/techspotlights/techspotlight_sequencing.pdf
What are is the advantage(s) of using DNA sequencing-based methods for identification of microorganisms in your sample? What is a disadvantage of only using DNA sequencing-based methods for identifying microorganisms?

WEEK 2 LABORATORY 39
2. Introduction to light microscopy
The compound light microscope is an optical instrument designed for producing magnified images of objects using two or more glass lenses. The term light refers to the method by which light transmits the image to your eye. Compound deals with the microscope having more than one lens. Microscope is the combination of two words; “micro” meaning small and “scope” meaning view. The size of organisms and the internal structures to be observed determine the type of microscopy needed. Use of the oil immersion objective (100x) is required if structures as small as 0.2 µm are to be observed. In this course students are required to demonstrate correct use of a light microscope with all lenses and appropriate illumination. Parts of a light microscope
There are many makes and models of light microscope. However, all light microscopes are fundamentally the same, have similar controls and functions. The microscope illustrated opposite is typical of the light microscope used in UNSW teaching

WEEK 2 LABORATORY 40
Setting up the light microscope:
1. Switching on microscope Turn the power switch ① on. Rotate the voltage control ② clockwise to reduce light intensity or counter clockwise to increase intensity.
2. Specimen placement Open the spring-loaded finger of the specimen holder ① and insert the slide.
3. Focus Swing in the 10x objective ①. Bring the specimen into focus using the course and fine adjustment knobs ②.
4. Interpupillary distance Looking through the binocular tube, move the knurled dovetail slides ① until a suitable binocular vision is obtained.

WEEK 2 LABORATORY 41
5. Dioptre adjustment Look at the image through the right eyepiece with your right eye, and focus on the specimen with the fine focus adjustment. Looking at the image through the left eyepiece with your left eye, rotate the dioptre adjustment ring ① to focus on the specimen without using the focus adjustment knobs. 6. Centration of field iris diaphragm Rotate the diaphragm ring ① counter clockwise to stop down the iris diaphragm to minimum. Rotate the condenser height adjustment knob ② in either direction until the image of the field diaphragm is visible sharply in the field of view.
7. Objective change Swing in the desired objective for use. Ensure that the nosepiece is clicked into position.
8. Aperture iris diaphragm adjustment Turn the diaphragm lever ① counter clockwise to reduce diaphragm opening.
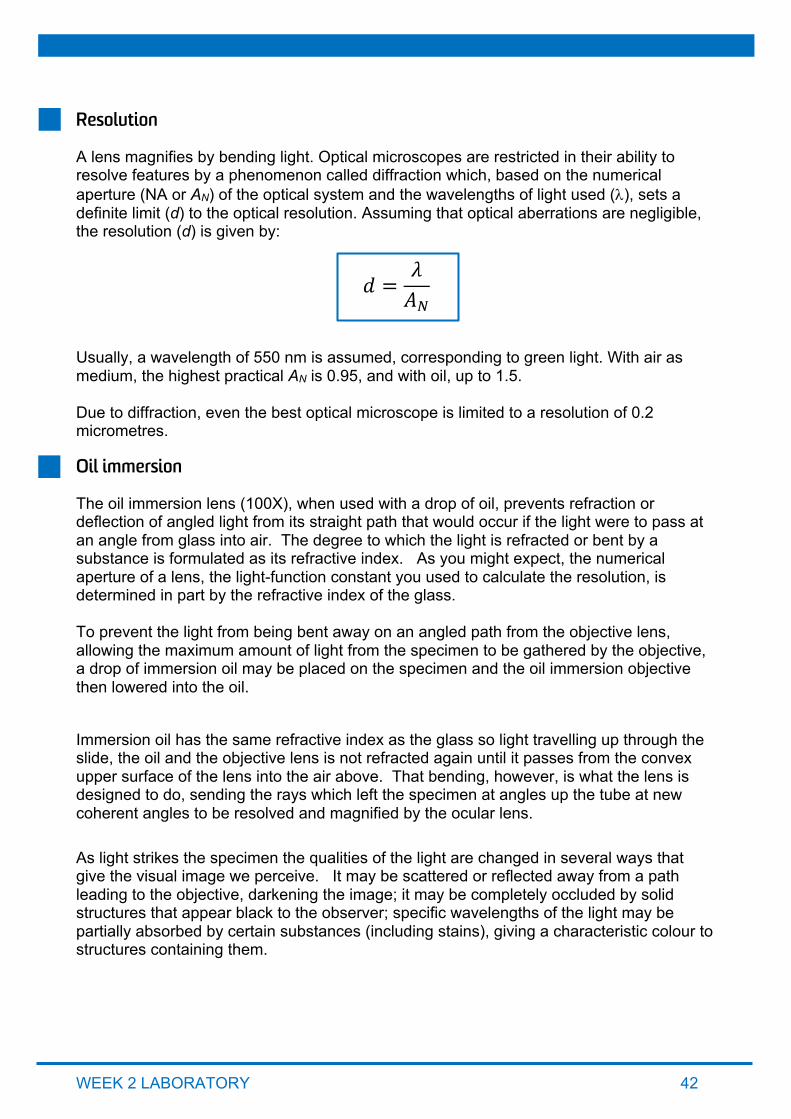
WEEK 2 LABORATORY 42
Resolution
A lens magnifies by bending light. Optical microscopes are restricted in their ability to resolve features by a phenomenon called diffraction which, based on the numerical aperture (NA or AN) of the optical system and the wavelengths of light used (l), sets a definite limit (d) to the optical resolution. Assuming that optical aberrations are negligible, the resolution (d) is given by:
𝑑 =𝜆𝐴%
Usually, a wavelength of 550 nm is assumed, corresponding to green light. With air as medium, the highest practical AN is 0.95, and with oil, up to 1.5. Due to diffraction, even the best optical microscope is limited to a resolution of 0.2 micrometres. Oil immersion
The oil immersion lens (100X), when used with a drop of oil, prevents refraction or deflection of angled light from its straight path that would occur if the light were to pass at an angle from glass into air. The degree to which the light is refracted or bent by a substance is formulated as its refractive index. As you might expect, the numerical aperture of a lens, the light-function constant you used to calculate the resolution, is determined in part by the refractive index of the glass. To prevent the light from being bent away on an angled path from the objective lens, allowing the maximum amount of light from the specimen to be gathered by the objective, a drop of immersion oil may be placed on the specimen and the oil immersion objective then lowered into the oil. Immersion oil has the same refractive index as the glass so light travelling up through the slide, the oil and the objective lens is not refracted again until it passes from the convex upper surface of the lens into the air above. That bending, however, is what the lens is designed to do, sending the rays which left the specimen at angles up the tube at new coherent angles to be resolved and magnified by the ocular lens. As light strikes the specimen the qualities of the light are changed in several ways that give the visual image we perceive. It may be scattered or reflected away from a path leading to the objective, darkening the image; it may be completely occluded by solid structures that appear black to the observer; specific wavelengths of the light may be partially absorbed by certain substances (including stains), giving a characteristic colour to structures containing them.

WEEK 2 LABORATORY 43
Microscopy trouble shooting
Occasionally you may have trouble with working your microscope. The following are some common problems and solutions. • Image is too dark!
Adjust the diaphragm, make sure your light source is on. • There's a spot in the viewing field, even when I move the slide the spot stays in the
same place! Your lens is dirty. Use lens paper, and only lens paper to carefully clean the objective and ocular lens. The ocular lens can be removed to clean the inside.
• Can't see anything under high power!
Remember the steps, if you can't focus low power, you won't be able to focus anything under high power.
• Only half of the viewing field is lit, it looks like there's a half-moon in there! You probably don't have your objective fully clicked into place
Apparent fault Possible cause Correction
Field dark
Power (lamp) not on or turned down too low
Turn power on & check voltage
Condenser diaphragm closed Open diaphragm Lamp filament burnt out Replace lamp
Colour of objects indistinct
Condenser diaphragm closed too far
Open diaphragm
Poor resolution Condenser either too far open or too far closed
Adjust condenser diaphragm
Unable to focus on object
Cover-slip too thick Replace Slide up-side down Invert slide Focusing attempts too rapid Use fine focus and adjust
more slowly Objective has insufficient resolving power
Use higher power
Objective covered with dried immersion oil from previous use
Clean with lens tissue and solvent
Specks in field of view
Dirt on eye lens of ocular Clean with lens tissue Dirt on condenser lens
Dirt on filter Moving shadows in field Air and/or water bubbles in
immersion oil Remove oil with lens tissue. Re-apply
Light suddenly reduced No oil contact between oil immersion objective and slide
Adjust with course /fine focus control

WEEK 2 LABORATORY 44
3. Staining bacteria for observation by light microscopy Unstained cells are nearly transparent when observed by light microscopy and hence are difficult to see. However, most microbes can be readily stained. The Gram stain is the most important differential stain in bacteriology. The majority of bacteria can be classified as Gram positive or Gram negative, a characteristic that is produced by marked differences in cell wall structure and correlates with many other characteristics of the microorganism.
Materials:
• Three broth cultures, one pure culture of a Gram-positive organism, and one pure culture of a Gram-negative organism, and one unknown.
• Gram reagents.
Procedure:
The Gram stain is the most important differential stain in bacteriology. All bacteria can be classified as Gram positive or Gram negative, a characteristic that is produced by marked differences in cell wall structure and correlates with many other characteristics of the microorganism.
Smear preparation:
i. Obtain a clean glass microscope slide. Using an indelible marker such as a CHINAGRAPHâ pencil, draw a small circle on the slide where you intend to locate the smear.

WEEK 2 LABORATORY 45
ii. Sterilise loop by flaming in Bunsen burner as previously described (bacteriological loop method).
iii. Using aseptic technique, collect a portion of a single colony with the loop and mix with the water on the slide to provide a shallow, uniform and slightly turbid layer. If staining organisms from solid media, apply a loop-full of sterile distilled water to the circled area of the slide. (Organisms from liquid or broth culture may be applied to the slide directly).
iv. Allow the smear to air dry. When smear has completely dried, heat fix by passing underside of slide rapidly through the Bunsen flame two or three times. Allow to completely cool before applying any stains.

WEEK 2 LABORATORY 46
Gram staining your heat fixed bacterial smear:
i. Flood air-dried, heat-fixed smear of cells for 1 minute with crystal violet staining reagent. Please note that the quality of the smear (too heavy or too light cell concentration) will affect the Gram Stain results.
ii. Wash slide in a gentle and indirect stream of water for 2 seconds.
iii. Flood slide with the mordant: Gram's iodine. Wait 1 minute.
iv. Wash slide in a gentle and indirect stream of water for 2 seconds.
v. Flood slide with decolorising agent (alcohol). Wait 15 seconds or add drop by drop to slide until decolorizing agent running from the slide runs clear.
vi. Flood slide with counterstain, safranin. Wait 30 seconds to 1 minute.
vii. Wash slide in a gentle and indirect stream of water until no colour appears in the effluent and then blot dry with absorbent paper.
viii. Observe the results of the staining procedure under oil immersion using a light microscope. At the completion of the Gram Stain, Gram-negative bacteria will stain pink/red and Gram-positive bacteria will stain blue/purple.
Observations: Organism Gram reaction Morphology (cell shape) Gram +ve positive
Gram -ve negative
Unknown
What component of the bacterial cell determines the outcome of the Gram stain?
Why are cells counter stained at the end of the staining procedure?

WEEK 2 LABORATORY 47
4. Inoculating agar plates to obtain pure cultures and liquid broths as enrichment cultures Most techniques for the isolation of bacteria involve streaking an aqueous suspension of cells onto agar medium (to dilute the inoculum and obtain single colonies) and incubating for colony development. If a cell can grow on the media it will replicate until ultimately there is a colony of cells visible to the naked eye. The steps taken to obtain pure cultures are usually carried out a number of times in succession to safeguard against the transfer of contaminants. Sub-culturing is a useful microbiological technique and competence in it is desirable. Check your method with your demonstrator. If your plates are not adequate, repeat the initial isolation step.
In some instances, the organisms you are trying to detect may be present in your sample in very low numbers and may not grow successfully on plates directly from the original sample. In such instances the original sample can be incubated in a broth culture that will promote the growth of organisms – i.e. an enrichment culture. This is particularly relevant when trying to detect small numbers of possibly pathogenic organisms in human samples, especially blood cultures, or food samples or isolating microbes from environmental samples with specific abilities (e.g oil degrading bacteria from soil samples). Materials:
• Samples of your choice for course project • Luria broth - that you prepared in last week’s class • Agar plates:
- Luria agar – plates you prepared in last week’s class - LB20 – Luria agar with additional sodium chloride for marine samples - M9 – minimal salts agar with glucose as a carbon and energy source
4.1 Procedure for inoculating samples to obtain single colonies (pure cultures): Each group will make a suspension of their sample and every student will then culture this onto the Luria plates you prepared last week and the M9 plates supplied. For those students working with marine samples, also plate out on LB20, which has an elevated NaCl concentration closer to that of seawater. Label the bottom of your agar plate with your name, date and group number. Also write a suggested incubation temperature on the plate.
Using the 16 streak technique described on page 36, inoculate your sample suspensions onto the agar plates. Give the plates to your demonstrator for incubation. Check the plates next week for colony formation. The colonies will be your project microbes that you will nurture and characterize throughout the rest of the course and ultimately identify.
4.2 Procedure for setting up enrichment cultures: Aseptically transfer 200 µL of your sample suspension into the Luria broths you prepared last week. Label the broths with your name, date and demonstrator’s name and give them to your demonstrator. Suggest an incubation temperature (room temperature, 30oC, or 37oC).

WEEK 2 LABORATORY 48
Don’t despair if you obtain no colony growth on your primary isolation agar plate (3a). Next week you can subculture your enrichment broth using the procedure above. Technique for subculturing agar plates for single colonies:
END OF WEEK 2
A
B
C
The bacteriological loop is sterilised by flaming in a Bunsen burner and allowed to cool. Care is required at all times so that the loop remains sterile (A). Collect a portion of microbial growth with the sterile loop. Working in close proximity to the flame, pick up the base of the new culture plate with your free hand and hold it midway between a vertical and horizontal position (B). Transfer the culture by carefully smearing the inoculum onto the top section of the plate (C1). Take care not to cut into the agar. Replace the plate onto its lid. Flame the loop and allow to cool. Pick up the base of the culture plate again and locate the area previously inoculated. Using the sterile loop, make 3 - 4 streaks out from the original inoculum onto the adjacent section of the agar plate (C2). Replace the plate onto its lid. Flame the loop and repeat the above process 2 – 3 times more so that the agar plate is inoculated around its perimeter (C3 & C4). The final streak can be directed toward the centre of the plate. Take care not to touch the original inoculum on the plate (C5).

WEEK 3 LABORATORY 49
WEEK 3 LABORATORY
OVERVIEW Isolation of microorganisms is required to unambiguously assign a property to the organism. Fulfilling Koch’s postulates requires isolation. Phenotyping is a traditional means of identifying microbes in medical and food diagnostics. This week we will be checking out what grew on our plates from our samples, considering the purpose of enriched, selective and differential media, performing some phenotypic characterisation and learning how to count microorganisms. LEARNING OBJECTIVES
• Understand what enriched, selective, and differential media are and how they can be used to isolate specific microorganisms.
• Understand the basis for some common biochemical tests that can be used to characterise a microorganism.
• Be able to perform a viability count and calculate cell density from the results. ACTIVITIES
1. Examination of cultures obtained from your samples from Week 3. 2. Enriched, selective and differential media. 3. Biochemical tests used for phenotypic characterization.
a. Catalase. b. Oxidase. c. Indole.
4. Viable counts of microorganisms. 5. Submit your Rationale for your Sample of Choice to your demonstrator

WEEK 3 LABORATORY 50
Contents: WEEK 3 RISK ASSESSMENT .......................................................................................... 51 WEEK 3 LABORATORY CLASS ..................................................................................... 52 1. Examination of cultures obtained from project samples ......................................... 52 2. Selective and differential media ................................................................................. 52 Materials ............................................................................................................................ 52 Procedure .......................................................................................................................... 53 Examples of some commonly used growth media ............................................................ 53
Nutrient agar (NA) ...................................................................................................... 53 Blood agar (sheep or horse - SBA or HBA) ................................................................ 53 MacConkey agar (MAC) ............................................................................................. 53 Sabouraud agar (SAB) ............................................................................................... 54 Mannitol salt agar (MSA) ............................................................................................ 54
Questions ........................................................................................................................... 54 3. Biochemical tests used for phenotypic characterisation ........................................ 57 3.1 Catalase ....................................................................................................................... 58
Medium ....................................................................................................................... 58 Test ............................................................................................................................. 58 Interpretation .............................................................................................................. 58
Materials ............................................................................................................................ 59 Procedure .......................................................................................................................... 59 Results ............................................................................................................................... 59 3.2 Oxidase ........................................................................................................................ 59
Test ............................................................................................................................. 60 Materials ............................................................................................................................ 60 Results ............................................................................................................................... 60 Questions ........................................................................................................................... 61 3.3 Indole ........................................................................................................................... 62 Materials ............................................................................................................................ 62 Procedure .......................................................................................................................... 62 Results: .............................................................................................................................. 62 Questions ........................................................................................................................... 63 4. Viable counts of microorganisms .............................................................................. 64 Materials ............................................................................................................................ 64 Procedure .......................................................................................................................... 64 Dilution steps ..................................................................................................................... 65

WEEK 3 LABORATORY 51
WEEK 3 RISK ASSESSMENT
BABS Teaching Laboratory
MICR2011_RMF_Wk4
Student Risk Assessment
Hazards Risks Controls General See below At all times follow demonstrators’ instructions when
handling all biological substances, chemicals and equipment items. Notify demonstrator immediately of any spills or other incidents. Proper handwashing with antibacterial handwash before leaving the laboratory.
Biological agent (Microorganisms, Risk Group I and Risk Group II) Glass slides/coverslips Bunsen burner
infection cuts burns
PPE (lab coats, closed in shoes & gloves as required). Adhere to aseptic techniques. Work in PC2 laboratory or BSC if required. Dispose of any broken/used sharp/glass items immediately in Sharps containers provided. Never leave a lit Bunsen Burner unattended or reach over an exposed flame. Keep long hair tied back.
Chemical (hydrogen peroxidase & indole reagent, gram stain)
corrosive, irritant to eyes, respiratory system and skin
PPE (lab coats, closed in shoes, safety glasses & gloves. SDS.
Electrical Equipment (microscope, vortex)
Electric shock/ electrocution Exposure to biological agents (see above)
Avoid water/spillages when working with electrical items.
Personal Protective Equipment
Emergency Procedures In the event of an alarm sounding, stop the experiment, turn of electrical equipment and wait for confirmation from demonstrators to evacuate. Then pack up your bags and wash your hands. Follow the instructions of the demonstrators regarding exits and assembly points. The BioScience assembly point is in the lawn in front of the Chancellery. In the event of an injury inform the demonstrator. First aiders and contact details are on display by the lifts.
Clean up and waste disposal All used microfuge tubes should be placed in the biohazard bins. Used test tubes should be placed in the appropriate container on the front bench of the lab. All solutions should be placed in the appropriate liquid waste containers. Used pipette tips should be placed in approved biohazard sharps containers.
Declaration – will be checked by demonstrator at the beginning of the practical class I have read and understand the safety requirements for this practical class and I will observe these requirements. Signature:……………………………………………………………Date:…………………………… Student number:………………………..

WEEK 3 LABORATORY 52
WEEK 3 LABORATORY CLASS
1. Examination of cultures obtained from project samples Examine your plates from last week and select isolated colonies for further examination and subculture. Sub-culturing isolates will be a routine exercise until Week 8. If adequate biomass has formed on your plates or in your broth, Gram stain the colonies you have sub-cultured using the protocol described in last weeks’ class. Save and store photos of your plates. Record your Gram stain results here (you’ll need these for your final report):
2. Selective and differential media Specialised media can be used to enrich, isolate and differentiate between different microbes. Enriched media often contain complex substrates such as blood, serum or brain heart infusion that promote the growth of fastidious (fussy) organisms. Selective media are formulated to grow only certain microbes while inhibiting the growth of others. Differential media allow for the differentiation of bacteria based on their biological characteristics such as the fermentation of a particular sugar. Some specialised media can be a combination of two of the above characteristics. For example, MacConkey and Mannitol Salt Agars are both selective and differential and Horse blood agar is enriched and differential. Materials:
• Photograph of a MacConkey agar plate with (per tutor group): - Escherichia coli - Proteus mirabilis
• Photograph of a Mannitol salt agar plate with (per tutor group): - Staphylococcus epidermidis - Staphylococcus aureus
• Photograph of a Horse blood agar plate with (per tutor group): - Streptococcus pyogenes - Streptococcus pneumoniae

WEEK 3 LABORATORY 53
Procedure: Examine all photographs of plates and complete table showing amount of growth and reaction for each organism.
Organism Specialised agar Growth and Appearance
S. epidermidis
S. aureus
E. coli
P. mirabills
S. pyogenes
S. pneumoniae
Examples of some commonly used growth media: Nutrient agar (NA)
A basal medium containing peptones, yeast extract and sodium chloride. Blood agar (sheep or horse - SBA or HBA)
This enriched medium contains whole red blood cells and supports growth of most pathogenic bacteria and yeast. It is also a differential medium.
• ß-haemolysis (complete haemolysis – i.e. a clear zone around the bacterial colonies): Streptococcus pyogenes.
• a-haemolysis (partial haemolysis - i.e. a greenish zone around the bacterial colonies): Viridans streptococci, e.g. Streptococcus sanguis, Streptococcus bovis, Streptococcus mutans, Streptococcus pneumonia.
Most other organisms grow well but any haemolytic effect shown is irrelevant for differentiating between bacterial isolates, e.g. some strains of Staphylococcus aureus produce lysis while other strains show no lysis at all. MacConkey agar (MAC)
Contains bile salts that inhibit many non - enteric organisms making it a selective medium. It also contains the carbohydrate lactose and the pH indicator neutral red, allowing differentiation between lactose fermenting and non-fermenting lineages. This makes it an indicator or differential medium.
• Lactose fermentation positive (pink/red colonies): Escherichia coli, Klebsiella sp. • Non-lactose fermentation (creamy colonies): Proteus sp., Shigella sp., Salmonella
sp., Pseudomonas aeruginosa.

WEEK 3 LABORATORY 54
Sabouraud agar (SAB)
Contains a high concentration of glucose at a low pH that inhibits bacteria. Used for the isolation of yeast and fungi. Mannitol salt agar (MSA)
Contains a high concentration of sodium chloride (7.5%) that is selective for Staphylococcus sp. Also included in the medium is the pH indicator phenol red and the carbohydrate mannitol. Staphylococcus aureus grows luxuriantly, ferment the mannitol, and produces colonies with yellow zones. Non-pathogenic Staphylococcus lineages produce small colonies with no colour change of the surrounding medium. Other bacteria are generally inhibited.
Questions:
What is the media component that makes MacConkey Agar selective? Explain.
What is the media component that makes MacConkey Agar differential? Explain.

WEEK 3 LABORATORY 55
What is the media component that makes Mannitol Salt Agar selective? Explain.
What is the media component that makes Mannitol Salt Agar differential? Explain.
Predict what growth would be seen on a MSA plate inoculated with Staphylococcus epidermidis and incubated anaerobically? Explain.

WEEK 3 LABORATORY 56
What is the media component that makes Horse Blood Agar an enriched agar? Explain.
What is the media component that makes Horse Blood Agar differential? Explain.

WEEK 3 LABORATORY 57
Biochemical tests used for phenotypic characterisation
Staining bacteria and observation by light microscopy provides information about bacterial morphology, gram reaction, and potentially the presence of structures such as endospores. However, microscopic examination alone gives little information as to the genus and species of a particular bacterium. To phenotype bacteria, some form biochemical analysis must be performed. The types of biochemical reactions each organism undergoes acts as a ‘fingerprint’ for its identification. Different species of bacteria have unique DNA and since DNA codes for protein synthesis, then different species of bacteria must, by way of their unique DNA, be able to synthesise different protein enzymes. Enzymes catalyse all the various chemical reactions of which the organism is capable. Therefore, different species of bacteria must carry out unique sets of biochemical reactions. By determining which enzymes are present in an unknown organism a description of that organism may be made and hence a step toward identification by phenotyping. For example, all bacteria contain enzymes that can reduce oxygen to hydrogen peroxide and, in smaller amounts, to the more toxic free radical, superoxide. In most aerobes and facultative anaerobes, accumulation of these two toxic materials is prevented by the action of two enzymes, catalase and superoxide dismutase. Catalase is a hemoprotein enzyme of the oxidoreductase class that catalyses the conversion of hydrogen peroxide to water and oxygen. Superoxide dismutase is a copper-and zinc-containing enzyme present in all oxygen-using organisms that scavenges free radicals and converts them into H2O2 and O2). Organisms that can tolerate exposure to oxygen always contain superoxide dismutase and may contain catalase. Lactic acid bacteria, being unable to synthesize heme molecules, do not contain catalase. Therefore, they are catalase negative. This group contains the enzyme peroxidase which catalyses the oxidation of organic compounds, such as NADH2 by H2O2 which is thereby reduced to water. Lactic acid bacteria are therefore protected from H2O2 toxicity in the absence of catalase. Enzymes are detected by the chemical reaction they carry out. However, it is necessary to have a means of observing and possibly measuring an enzyme’s chemical reaction. One common measuring technique involves the reaction of a pH indicators that respond to the hydrogen ion, (H+), concentration by changing colour as a direct result of an enzyme’s activity. The quantity of H+ in a solution is a measure of how acid or basic (alkaline) a solution is. Thus, if an enzymatic reaction produces acids, which increases the H+ concentration, pH-indicators respond by changing colour as the acidity changes.

WEEK 3 LABORATORY 58
3.1 Catalase
Catalase is an enzyme, containing haemin as the prosthetic group. It is widely distributed in nature, being present in most aerobic cells where its function is to remove the highly toxic peroxide (H2O2) that is formed in small amounts during passage of electrons down the electron transport chain to oxygen. Its presence may be tested by looking for the appearance of gas bubbles after the organism is added to hydrogen peroxide. 2H2O2 2H2O + O2 It is used to distinguish between morphologically similar families of bacteria e.g. distinction of the Gram-positive cocci which are members of the Micrococcaceae (catalase positive) from those belonging to the Streptococcaceae (catalase negative), or Gram-positive rods of the Coryneform group (positive) from those of the Lactobacillaceae (negative). Medium
Any medium supporting growth can be used to obtain cultures for the catalase test with the exception of those containing blood. Blood agar may contain residual catalase sufficient to give a false positive result, and in addition, some streptococci, normally catalase negative, may be able to form catalase if the haem group is supplied by the blood. Test
The catalase test can be performed in several different ways as outlined below:
(a) Place one drop of H2O2 (10 vols.) on a glass slide and emulsify in it a colony from an agar plate or slope.
OR
(b) Pour approximately 2 ml of H2O2 over the surface of a 24 hour agar slope culture and set the tube in an inclined position.
OR Place one drop of H2O2 on a colony on agar medium and one drop, as a control, on
the medium itself, which may contain sufficient catalase to give a false positive reaction (e.g. blood agar).
Interpretation
• Positive result Þ immediate production of bubbles of oxygen • Negative result Þ no bubbles formed

WEEK 3 LABORATORY 59
Materials: • Culture plate of Staphylococcus • Culture plate of Lactobacillus • Hydrogen peroxide
Procedure: For each bacterial culture, place one drop of H2O2 (10%) on a glass slide. Aseptically pick up a colony and emulsify in the drop of H2O2 Results:
Catalase reaction
Staphylococcus
Lactobacillus
What is the gaseous breakdown product of hydrogen peroxide?
3.2 Oxidase
Cytochromes are haem-containing proteins of high molecular weight and are involved in respiratory metabolism. The iron in the haem-moiety of cytochromes is responsible for the reduced or oxidized state of the cytochrome. In the positive oxidase of cytochrome c-test, the cytochrome c must be oxidized Electrons from the reduced cytochrome C are taken up by oxidized cytochrome oxidase which passes them to free oxygen molecules. In the oxidase test, tetramethyl-p-phenylene diamine is oxidized by oxidized cytochrome c to form a purple substance (Wurster’s blue).
A number of bacteria give a positive oxidase reaction and it can be used to distinguish organisms such as members of Enterobacteriaceae (negative) from the Vibrionaceae (positive). Medium Grow organisms for the test on any appropriate medium.

WEEK 3 LABORATORY 60
Test
• Method 1: Pour a freshly prepared 1% aqueous solution of p-phenylene-diaminehydrochloride over colonies and immediately pour off.
Positive Þ Faint purple colony immediately. Þ Reddish purple colony in 3-5 min Þ Intense jet black colony in 30 min
Note: Media may change colour after 30 min. This is not a positive reaction.
Negative Þ No colour change in colony
OR
• Method 2: Soak a filter paper with the reagent. Remove a portion of bacterial growth
and rub onto filter paper using platinum loop. Nichrome loops must not be used because false positive reactions may be obtained because of oxidation of tetramethyl-p-phenylenediamine by nichrome.
Positive Þ Development of purple within 20 seconds
Negative Þ No colour.
Materials:
• Culture plate of Enterobacteriaceae • Culture plate of Vibrionaceae • Oxidase reagent (tetramethyl p-phenylene diaminehydrochloride) • Platinum bacterial loop • Filter paper
Results: Oxidase reaction
Enterobacteriaceae
Vibrionaceae

WEEK 3 LABORATORY 61
Questions:
Can you explain why it is necessary to use a platinum loop?
Why it is necessary to set a strict time limit for observing colour change when carrying out an oxidase test?
Would you expect a strict anaerobe to be oxidase positive or negative? Explain.

WEEK 3 LABORATORY 62
3.3 Indole
Amino acids may arise as a result of the hydrolysis of proteins, peptones and peptides. Tryptophan is an amino acid that can be used as an energy generating substrate by certain genera of bacteria with in the Enterobacteriaceae. Such bacteria can hydrolyse tryptophan, by means of an enzyme tryptophanase (one of the products of this reaction being indole), which can be detected colorimetrically by a simple test. The reaction for detection of indole depends on the reaction between a pyrrole (e.g. indole = benzopyrrole) and a weakly alcoholic solution of p-dimethylaminobenzaldehyde producing a red-pink colour. The gene encoding for tryptophanase (tna A in E. coli) is expressed only when tryptophan is present in the growth medium i.e. tryptophan is required for the induction of enzyme synthesis. In addition, it has been shown that glucose represses expression of the tryptophanase gene. It is essential therefore, when testing for the presence of tryptophanase to ensure that the growth medium contains tryptophan but not glucose. Usually a peptone broth containing 1% L-tryptophan is used. ρ-Dimethylaminocinnamaldehyde (DMACA) is a sensitive indole reagent, capable of detecting 3 μg of indole per millilitre of medium. In fact, the reagent can be mixed with a small amount of bacterial culture to detect the presence of indole in the culture. Indole combines with DMACA to form a blue-green compound. Materials:
• Culture plate of Escherichia coli • Culture plate of Proteus mirabilis • BactiDrop Spot Indole • Filter paper
Procedure:
1. Dispense a drop of BactiDrop Spot Indole test solution onto a piece of filter paper. 2. Smear the growth from an actively growing pure culture onto the saturated filter
paper. 3. Observe for the development of a blue colour within 3 minutes.
Results:
Indole reaction
E. coli
Proteus mirabilis

WEEK 3 LABORATORY 63
Questions:
What is the mechanism of indole test?
Why must glucose be excluded from the growth medium when performing the indole test?

WEEK 3 LABORATORY 64
4. Viable counts of microorganisms The abundance of microorganisms plays a major role in how microbes impact humans, therefore quantifying or enumerating cells is important in microbiology. There are many ways to do this including by directly counting the cells using a microscope and indirectly by viable cell counts on agar plates or by alternative methods such as quantitative PCR, measurement of liquid culture turbidity or quantifying cell substances (e.g. protein, dry weight, total nitrogen). Be mindful of the fact that most of these methods will include dead cells in the final count. A count of viable cells (capable of replication) is valuable when some kinds of microorganisms can be most conveniently distinguished by using a selective characteristic (e.g. presumptive coliform count in drinking water analysis). It is a useful skill for a microbiologist to be able to perform an accurate count of organisms present in a suspension. Today you will learn how to do a viable count. There are three types of prerequisite skills required:
• The ability to estimate the concentrations of organisms in a culture to be counted. • The ability to calculate the appropriate dilutions to culture. • The ability to prepare the dilutions aseptically and to inoculate media appropriately.
This exercise allows each student to practice these three skills. An overnight broth culture of the yeast Saccharomyces cerevisiae (prepared by technical staff) will be counted using the spread plate method. Aliquots (100 µL) of appropriate dilutions will be spread evenly onto the surface of nutrient agar plates. NOTE: Calculations have to be made to ensure that between 30-300 organisms are likely to be in one of the dilutions. You don’t want more than 300 colonies on your agar plate because it gets too crowded to count. You don’t want less because small numbers don’t accurately reflect reality. Materials:
• An overnight culture of Saccharomyces cerevisiae in Sabouraud broth (test sample) • A series of suspensions of S. cerevisiae in Sabouraud broth (reference samples
with known cell concentrations) • 15 mL of sterile saline (per pair of students) • Microfuge tubes • Sterile 1 mL pipettes tips • Sterile plate spreaders • 3 Sabouraud (SAB) agar plates (per pair of student)
Procedure: Work in pairs.
Compare the test culture with the reference suspensions of S. cerevisiae. Estimate the approximate cell concentration of the test culture. Estimate (cells/mL) =

WEEK 3 LABORATORY 65
Based on your estimate of cell concentration, calculate what dilution will result in 30-300 cells in 100 µL. For an accurate determination of viable cell counts you need 30 – 300 colonies per agar plate.
Decide what dilution steps are required to produce this cell concentration. Prepare one set of dilutions of the test culture to suit your calculations using 900 μL of diluent (saline solution). (Note: a 1 in 10 dilution is 100 μL added to 900 μL). With a new pipette tip for each step, transfer 100 μL into the first tube (10-1). Mix thoroughly and then transfer 100 μL from the first to the second tube (10-2) and so on according to your calculations. See diagram below. Dilution steps:
Dilutions: Show your calculations for the spread plates in the table below and check these with your demonstrator.
100 10-1 10-2 10-3 10-4 10-5 10-6 10-7
Expected cells/mL
Expected cells/100 µL
Label your agar plates with your name, date and dilution factor.
10-1 10-2 10-3 10-4 10-5 10-6

WEEK 3 LABORATORY 66
Aliquot a 100 µL sample of the dilution you have estimated will contain 30-300 cells onto one of your agar plates and spread the aliquot evenly over the surface of the plate using a sterile spreader. Repeat the same with the dilutions one factor above and below the dilution used in the previous step on separate agar plates and spread as before. For example, if you estimated that your 10-3 dilution contained 30 - 300 cells then you should spread out dilutions 10-2, 10-3 and 10-4 onto your 3 agar plates. Give your labeled plates to your demonstrator for incubation. The viable cell count expressed as colony forming units per mL (CFU/mL) will be determined in next week’s class. END OF WEEK 3

WEEK 4 LABORATORY 67
WEEK 4 LABORATORY
OVERVIEW In the tutorial and lectures this week you studied microbially driven nutrient and energy cycling. The simplest (and most classic) demonstration of how nutrients and energy are recycled in the environment is the Winogradsky column – discussed in the tutorial. The Winogradsky column demonstrates the development of a stratified microbial community that is inter-dependant, and where the waste of one microbe is the fuel for another. Unfortunately, a Winogradsky column takes about 8 weeks to mature so today you will observe a series of columns at different stages of maturity that have been prepared earlier in the semester for you. Using these columns as a guide, along with the materials in your tutorial, you’ll discuss some of processes occurring in the column. In our Winogradsky columns, sulphates are being reduced by microbial respiration into sulphides – a processes that involves the transfer of electrons. Electron transfer during microbial respiration can be thought of like an electrical current – electrons are moving from one community to another within the column. In fact, there is so much electron transfer occurring during microbial respiration that we can siphon electrons from the community and use the electrical current to power an LED light. We term this type of “battery” a Microbial Fuel Cell. In the second part of this practical you will use the microbial communities present in soil to make a Microbial Fuel Cell and measure the power output over the next 2 weeks. This week you also receive the results from your high-throughput sequencing of 16S (SSU) rRNA sequences of your sample. Take some time to discuss with your mini-group and tutor what these results mean and how your pet microbe might fit with these results. For those that find themselves a little ahead of the class you might want to try the optional ‘stretch goal’ of doing a more in-depth analysis of your Illumina data using the software that we use for research in microbial ecology. LEARNING OBJECTIVES
• Understand how nutrients and energy are passed between communities within the Winogradsky column.
• Understand how microbial respiration can be harnessed to convert microbial metabolism of a wide range of substrates into electrical energy.
• Be able to calculate cell density of your viable count plates ACTIVITIES
1. Winogradsky column. 2. Soil based microbial fuel cells. 3. Maintenance of project microbes and ongoing phenotypic testing. 4. Discuss your high-throughput sequencing results within group.

WEEK 4 LABORATORY 68
Contents: WEEK 4 RISK ASSESSMENT .......................................................................................... 69WEEK 4 LABORATORY CLASS ..................................................................................... 701. Winogradsky column .................................................................................................. 70Development of the microbial population in the column .................................................... 711.1 Winogradsky column demonstration ............................................................................ 732. Soil based microbial fuel cells ................................................................................... 76Materials ............................................................................................................................ 77Procedure .......................................................................................................................... 773. Maintenance of project microbes ............................................................................... 784. High-throughput 16S (SSU) rRNA sequencing data ................................................. 785. Viable counts of microorganisms (continued) ......................................................... 78

WEEK 4 LABORATORY 69
WEEK 4 RISK ASSESSMENT
BABS Teaching Laboratory
MICR2011_RMF_Wk7
Student Risk Assessment
Hazards Risks Controls General See below At all times follow demonstrators’ instructions when
handling all biological substances, chemicals and equipment items. Notify demonstrator immediately of any spills or other incidents. Proper handwashing with antibacterial handwash before leaving the laboratory.
Collecting biological/ environmental samples
Inhalation of bioaerosol particles (microorganisms) leading to inflammation, allergy, or to serious systemic infection by secondary pathogens.
PPE (lab coats, closed in shoes & gloves as required). Work in PC2 laboratory or Biological Safety Cabinet (BSC) if required e.g. for respiratory pathogens.
Sharps when assembling Mudwatt cells
Sharp wire injury Take care when handling wire and place any unused sharp items in the sharps containers provided.
Handling hot items Electrical Equipment (water baths)
Electric shock/ electrocution burns
Ensure you are using heat protective mitts when handling hot objects. Stand to side of the water bath when opening it to allow steam to dissipate before removing items. Avoid water/spillages when working with electrical items.
Personal Protective Equipment
Emergency Procedures In the event of an alarm sounding, stop the experiment, turn of electrical equipment and wait for confirmation from demonstrators to evacuate. Then pack up your bags and wash your hands. Follow the instructions of the demonstrators regarding exits and assembly points. The BioScience assembly point is in the lawn in front of the Chancellery. In the event of an injury inform the demonstrator. First aiders and contact details are on display by the lifts.
Clean up and waste disposal All used microfuge tubes should be placed in the biohazard bins. Used test tubes should be placed in the appropriate container on the front bench of the lab. All solutions should be placed in the appropriate liquid waste containers. Used pipette tips should be placed in approved biohazard sharps containers.
Declaration – will be checked by demonstrator at the beginning of the practical class I have read and understand the safety requirements for this practical class and I will observe these requirements. Signature:……………………………………………………………Date:…………………………… Student number:………………………..

WEEK 4 LABORATORY 70
WEEK 4 LABORATORY CLASS
1. Winogradsky column You have reviewed the Winogradsky column in this week’s tutorial, but if you’d like some more information before answering the questions below, here’s a little refresher: The study of microbial ecology can be approached in 2 ways:
(i) By isolating, identifying, enumerating and studying the physiology of individual bacterial types of the ecosystem
(ii) By studying the activity (for example, chemical conversions) of the microbial
population in the natural habitat. One of the previous lab experiments, the exercise on isolation and identification of a given bacterial type, focuses on the former approach. Bacteria and Archaea exhibit an astonishing metabolic diversity, which far exceeds that of the eukaryotes (animals, plants, fungi and other higher organisms). Bacteria and Archaea literally keep the biological world turning by recycling all the mineral elements necessary for life support. Two famous microbiologists pioneered the study of these processes, Sergius Winogradsky (1856-1953) and Martinus Willem Beijerinck (1851-1931). In contrast to the pure culture studies of other pioneer microbiologists such as Louis Pasteur and Robert Koch, Winogradsky and Beijerinck studied the relationships between different types of microorganisms within mixed communities. A simple laboratory experiment – the Winogradsky column – illustrates how different microorganisms perform their interdependent roles. The activities of one organism enable another to grow, and vice-versa. These columns are complete, self-contained recycling systems, driven only by energy from light! The columns are straightforward to set up with a glass tube, about 30 cm tall and 5 cm diameter. Mud is collected from the bottom of a lake or river and supplemented with cellulose, calcium sulphate and calcium carbonate, then added to the lower one-third of the tube. The rest of the tube is filled with water from the lake or river, and the tube is capped and placed near a source of light. The Winogradsky column is a classic demonstration of the metabolic diversity of Bacteria and Archaea, revealing how microorganisms occupy highly specific niches according to their environmental tolerances and their carbon and energy requirements. The column also enables us to see how mineral elements are cycled in natural environments. All life on earth may be categorised in terms of the organism’s carbon and energy source. Energy can be obtained from light reactions (phototrophs) or from chemical oxidations (of organic or inorganic substances) (chemotrophs). The carbon for cellular synthesis can be obtained from CO2 (autotrophs) or from preformed organic compounds (heterotrophs). Combining these categories, we get the four basic life strategies: photoautotrophs (e.g. plants), chemoheterotrophs (e.g. animals, fungi), photoheterotrophs and chemoautotrophs. Only in the bacteria – and among the bacteria within a single Winogradsky column – do we find all four basic life strategies!

WEEK 4 LABORATORY 71
Development of the microbial population in the column: All the organisms are initially present in low numbers, but when the tubes are incubated for 2 to 3 months the different types of microorganism proliferate and occupy distinct zones where the environmental conditions favour their specific activities. The filter paper (cellulose) simulates organic material in the natural environment. The large amount of cellulose initially promotes rapid microbial growth that soon depletes the oxygen in the sediment and in the water column. Only the very top of the column remains aerated because oxygen diffuses very slowly through water. Heterotrophic bacteria initially grow aerobically using the cellulose as an energy source, and as they do so they use up oxygen (which can diffuse in only slowly through the water column) thereby establishing anaerobic conditions. Anaerobic heterotrophs continue to grow slowly, producing a range of metabolic end products such as organic acids and alcohols, CH4 and H2. Excess acidity is neutralised by the CaCO3 maintaining a near neutral pH. The only organisms that can grow in anaerobic conditions are those that ferment organic matter and those that perform anaerobic respiration. Fermentation is a process in which organic compounds are degraded incompletely; for example, yeasts ferment sugars to alcohol. Anaerobic respiration is a process in which organic substrates are degraded completely to CO2, but using a substance other than oxygen as the terminal electron acceptor. Some bacteria respire by using nitrate or sulphate ions, in the same way as we use oxygen as the terminal electron acceptor during respiration. Some cellulose-degrading Clostridium species start to grow when the oxygen is depleted in the sediment. All Clostridium species are strictly anaerobic because their vegetative cells are killed by exposure to oxygen, but they can survive as endospores in aerobic conditions. They degrade the cellulose to glucose and then ferment the glucose to gain energy, producing a range of simple organic compounds (ethanol, acetic acid, succinic acid, etc.) as the fermentation end products. The sulphur reducing bacteria such as Desulfovibrio can utilise the end products of fermentation by anaerobic respiration, using either sulphate or other partly oxidised forms of sulphur (e.g. thiosulphate) as the terminal electron acceptor, generating large amounts of H2S by this process. In our own aerobic respiration, we use O2 and reduce it to H2O. The H2S will react with any iron in the sediment, producing black ferrous sulphide. This is why lake sediments (and our household drains) are frequently black. However, some of the H2S diffuses upwards into the water column, where it is utilised by other organisms. The diffusion of H2S from the sediment into the water column enables anaerobic photosynthetic bacteria to grow. They are seen usually as two narrow, brightly coloured bands immediately above the sediment – a zone of green sulphur bacteria then a zone of purple sulphur bacteria. The green and purple sulphur bacteria gain energy from light reactions and produce their cellular materials from CO2 in much the same way as plants do. However, there is one essential difference: they do not generate oxygen during photosynthesis because they do

WEEK 4 LABORATORY 72
not use water as the reductant; instead they use H2S. The following simplified equations show the parallel. 6 CO2 + 6 H20 à C6H12O6 + 6 O2 (plant photosynthesis) 6 CO2 + 6 H2S à C6H12O6 + 6 S (bacterial anaerobic photosynthesis) The purple sulphur bacteria typically have large cells and they deposit sulphur granules inside the cells. The green sulphur bacteria have smaller cells and typically deposit sulphur externally.
The sulphur (or sulphate formed from it) produced by the photosynthetic bacteria returns to the sediment where it can be recycled by Desulfovibrio - part of the sulphur cycle in natural waters. Most of the water column above the photosynthetic bacteria is coloured bright red by a large population of purple non-sulphur bacteria. These include species of Rhodopseudomonas, Rhodospirillum and Rhodomicrobium. These bacteria grow in anaerobic conditions, gaining their energy from light reactions but using organic acids as their carbon source for cellular synthesis. So, they are termed photoheterotrophs. The organic acids that they use are the fermentation products of other anaerobic bacteria (e.g. Clostridium species), but the purple non-sulphur bacteria are intolerant of high H2S concentrations, so they occur above the zone where the green and purple sulphur bacteria are found. Many microorganisms can grow in the oxygenated zone at the top of the water column, but three distinctive types are of special interest. (i) Any H2S that diffuses into the aerobic zone can be oxidised to sulphate by the sulphur-oxidising bacteria. These bacteria gain energy from oxidation of H2S, and they synthesise their own organic matter from CO2. So they are termed chemosynthetic organisms, or chemoautotrophs. Similar types of organism occur in soils, gaining energy from the oxidation of ammonium to nitrate, which then leaches from the soil and can accumulate in water supplies. (ii) Photosynthetic cyanobacteria can grow in the upper zones. These are the only bacteria that have oxygen-evolving photosynthesis like that of plants. In fact, there is very strong evidence that the chloroplasts of plants originated as cyanobacteria (or the ancestors of present-day cyanobacteria) that lived as symbionts inside the cells of a primitive eukaryote. Similarly, there is equally strong evidence that the mitochondria of present-day eukaryotes were derived from purple bacteria. Once the cyanobacteria start to grow they can oxygenate much of the water. (iii) The top of the water column can contain large populations of sheathed bacteria. These are aerobic organisms that use organic substrates but are unusual because as the bacterial cells divide they synthesise a rigid tubular sheath from which individual cells can escape and swim away to establish new colonies. Many empty sheaths are seen in older colonies. They are made of a complex mixture of protein, polysaccharide and lipid, and are thought to protect the cells from predation by protozoa. The sheaths also can be encrusted with ferric hydroxide, giving a yellow or rusty appearance to the colonies.

WEEK 4 LABORATORY 73
1.1 Winogradsky column demonstration
At the front of the class there are two mature Winogradsky columns for you to observe. When indicated by your tutor, head to the front of the class and observe the different stratified communities present in the column. Unlike most occasions in microbiology, you can see the different microbial communities and differentiate some simply by their colouring. In the space overleaf, you should sketch the column and indicate the different communities that you can identify with your group and tutor. There are some specific questions below for you to answer back at your bench.

WEEK 4 LABORATORY 74
What is the purpose of the following ingredients that were added to the column?
Mud
Powdered cellulose
Calcium sulphate
Calcium carbonate
Sketch the Winogradsky column below and indicate and microbial communities that you can identify with your group and tutor.

WEEK 4 LABORATORY 75
Predict the location within the column and the chronological order of the appearance of the following: Organism Reasons for location in column Time of appearance Anaerobic heterotrophs
Green algae
Sulphate-reducing bacteria
Non-sulphur purple bacteria (Rhodospirillum)
Aerobic heterotrophs
Green sulphur bacteria (Chlorobium)
Facultative anaerobic heterotrophs
Cyanobacteria
Purple sulphur bacteria (Chromatium)

WEEK 4 LABORATORY 76
2. Soil based Microbial Fuel Cells Harvesting energy from the environment is the primary activity of all living things. There are three principal ways to do this. Photosynthesis, fermentation and chemotrophic respiration. The latter is how we do it. As with humans, respiration in microbes involves the transfer of electrons to a suitable electron acceptor. For us this is oxygen, but for microbes there are many options. For example, bacteria can respire things like oxygen, nitrate, sulphate (seen in the Winogradsky column), iron, uranium, arsenic and even solid electrodes. Electrons can be transferred from bacterial cells to electrodes via soluble charge carrying molecules (electron shuttles), conductive appendages (nanowires or pili) or by direct cell contact. The MudWatts provided (one per group) give us an opportunity not only to play with mud but also to bear witness to microbial respiration by linking the transfer of electrons from bacterial cells via an electrode to an LED. That’s right, microbes can create enough potential in a bioelectrochemical system to make an LED blink. Not bad given the size of them. The following diagram illustrates the flow of electrons.

WEEK 4 LABORATORY 77
Materials:
• Carbon felt cathode and orange wire • Carbon felt anode and green wire • Vessel, hacker board, capacitor and LED • Additional items including, multimeters, buzzers and clocks will be available in
ensuing weeks to play around with. • Mud – this is ‘sampled’ from the beautiful gardens around UNSW… discreetly. You
wil be provided will either: 1. Soil 2. Soil supplemented with extra organic carbon (cellulose) 3. Soil that has been autoclaved and is now sterile
Procedure:
Completely saturate your soil with water. Bend both wires 90° where the plastic sheath ends. Straighten out the bare end of the wire. The green wire will be used to make the anode, and the orange wire will be used to make the cathode. Insert the bare end of the anode (green) wire into the side of the thin felt disc. Try to keep the wire from exiting the felt. Repeat this step with the cathode (orange) wire and the thick felt disc. Pack a layer of mud into the bottom of your container, at least 1 cm deep. Pat down the soil so that you have a smooth layer. Place the anode (with the green wire) on top of the layer of mud. Fill your container with more mud, at least 5 cm deep, pressing down firmly to squeeze out air bubbles. Let your mud rest for a few minutes and drain any excess liquid. Place the cathode (with the orange wire) gently on top of the mud. Do not cover the cathode with mud. Attach the hacker board into the indentation on the lid. Pass the electrode wires through the lid. Facing the semicircular indentation, the cathode (orange) should be on the left and the anode (green) on the right. Now press the lid down onto the jar to snap it into place. Connect the cathode wire (orange) to the ‘+’ and connect the anode wire (green) to the ‘-‘. Place the long end of the capacitor to pin 1 and the short end to pin 2. Connect the long end of the LED to pin 5 and the short end to pin 6. It will take a few days for the microbes in the soil to colonise the anode at the bottom of the vessel and for the LED to start blinking. Over the next 2 weeks you will record the electrical current produced by your Microbial Fuel Cell and then compare with groups using soil, soil + cellulose, or sterile soil. The Fuel Cells will be displayed in the Lab window and mutlimeters will be contected. You must organise for someone from your group to take every 2-3 days. Record your results in the spreadsheet provided on the class

WEEK 4 LABORATORY 78
OneNote Notebook (Content Library > Student Results > Soil microbial fuel cell results) and linked here. 3. Maintenance of project microbes
For those of you that haven’t commenced or completed your phenotypic testing spend some time performing these tests as described previously. Don’t forget to subculture your culture for future use. Photograph your culture plate and any of the tests you have performed. Keep your data and notes here. 4. High-throughput 16S (SSU) rRNA sequencing data This week you’ll receive the analysed data from the Illumina (high-throughput) sequencing of your DNA samples. It’s important to realise that we haven’t sequenced all of the genomic DNA in your sample, instead the 16S (SSU) rRNA sequences have been amplified from your sample DNA and this has been sequenced. This allows sensitive detection of the microbial species in your sample and is analysed using a conceptually similar pipeline to the one that you used last week. The sequencing data has been analysed for you at the Ramaciotti Centre for Genomics and you will be provided with an analysis of community composition to ponder and include in your final report. Discuss the results with your group and tutor.
5. Viable counts of microorganisms (continued) Count the number of S. cerevisiae colonies on the three agar plates you prepared last week. Record your data: Number of colonies on lowest dilution (least dilute): Number of colonies on intermediate dilution: Number of colonies on highest dilution (most dilute): Cell concentration in original solution (CFU/mL) = Was the 10-fold dilution series apparent in your colony counts? If not, give reasons why:
END OF WEEK 4

WEEK 5 LABORATORY 79
WEEK 5 LABORATORY
OVERVIEW This week you’ll be checking on your pet microbes to see if you’ve isolated pure cultures and making your first steps into the exciting world of microbial DNA sequence analysis. LEARNING OBJECTIVES
• Be able to generate a phylogenetic tree from bacterial 16S rRNA sequences. ACTIVITIES
1. Course project: Sub-culturing and storing project microbes 2. Introduction to sequence analysis 3. Record the results of your Microbial Fuel Cell
Contents: WEEK 5 RISK ASSESSMENT .......................................................................................... 80 WEEK 5 LABORATORY CLASS ..................................................................................... 81 1. Course project: sub-culturing and storing project microbes .................................. 81 Procedure .......................................................................................................................... 81 2. Introduction to sequence analysis ............................................................................. 82 Exercise 1. Accessing software for phylogenetic analysis of SSU rRNA sequences ........ 84 Exercise 2. Sequence browsing and alignment of SSU rRNA gene sequences ............... 85
Opening an Alignment ................................................................................................ 86 Aligning Sequences Using Muscle ............................................................................. 87 Quality control of your alignment ................................................................................ 87
Exercise 3. Estimating evolutionary distance and creating phylogenetic trees ................. 91 Build a phylogenetic tree from your evolutionary distance matrix .............................. 92
Exercise 4. BLAST search for closest relatives using the NCBI database ........................ 93 3. Record the results from your Microbial Fuel Cell …………………………………….. 93

WEEK 5 LABORATORY 80
WEEK 5 RISK ASSESSMENT
BABS Teaching Laboratory
MICR2011_RMF_COMP
Student Risk Assessment
Workstation set-up
Ergonomics Electrical
Musculoskeletal pain. Electrical shock/fire
Correct workstation set-up. Check electrical equipment in good condition before use. All portable electrical equipment tested and tagged.
Personal Protective Equipment Not necessary in these practicals. Ensure laboratory has been set up as a DRY laboratory (see door signage). Use benchcoat under laptop/tablet if required.
Emergency Procedures In the event of an alarm sounding, stop the experiment, turn of electrical equipment and wait for confirmation from demonstrators to evacuate. Then pack up your bags and wash your hands. Follow the instructions of the demonstrators regarding exits and assembly points. The BioScience assembly point is in the lawn in front of the Chancellery. In the event of an injury inform the demonstrator. First aiders and contact details are on display by the lifts.
Clean up and waste disposal No apparatus used in these practicals.
Declaration – will be checked by demonstrator at the beginning of the practical class I have read and understand the safety requirements for this practical class and I will observe these requirements. Signature:……………………………………………………...……………………Date:…………………………… Student number:………………………..
Elbow at 90º angle
Adjust seat back for lumbar support
Monitor tilt

WEEK 5 LABORATORY 81
WEEK 5 LABORATORY CLASS
1. Course project: sub-culturing and storing project microbes Examine your agar plates from last week. Take a photo and save to a location where you can access it for your final report (create a MICR2011_Report folder in your student drive). Based on colony morphology do you have a pure culture or mixed lineage growth on your plate? Pick a colony and subculture onto a new plate. Check next week that your microorganism is still alive. To ensure the culture is not lost during the following weeks stocks of the culture can be frozen and revived at a later time point if necessary as follows. Procedure:
- Only continue today with the following if you are sure you have a pure culture. Otherwise, this step can be performed next week.
- Obtain a culture plate showing good growth of a pure culture of your isolate. - Aliquot 0.5 mL of Luria broth (containing 15% glycerol) into a cryotube. - Using a sterile loop, pick two or three colonies and transfer and suspend in the
cryotube from above. - Labeled with your name and date. Give this to your demonstrator who will store it at
-80˚C until required.
Identify your microorganism
Once you are satisfied that you have a pure culture, you may begin your identification. You will use two methods: a more classical biochemical characterisation, and phylogenetic analysis of the 16S rRNA gene from your microorganism.
Flow charts of the tests required to identify your microorganism are provided in Appendix 1 (pg 126) and are adapted from Bergey’s Manual of Determinative Bacteriology. The stains and tests listed (and instructions for performing the tests) are available in the lab and you should discuss with your tutor the best way to identify your microorganism. You will need to start with a Gram stain to determine the Gram reaction and cell morphology. This will also help you determine if you have a pure culture.
Next week you will sequence part of the 16S rRNA gene from your microorganism and, using the skills you will learn today, identify your microorganism using phylogenetics.

WEEK 5 LABORATORY 82
2. Introduction to sequence analysis Bioinformatics now plays a central role in medical and environmental microbiology. From tracking the evolution of pathogenic viruses, to identifying a fungal isolate, or identifying bacteria in a sputum sample, making sense of DNA sequence data is crucial. Over the past decade there has been a technological revolution in sequencing, with the costs dropping dramatically and the amount of sequence data increasing. For example in 2001 the cost of the Human Genome project was $100 million. Today genomes can be sequenced for around $1000. This revolution has meant that sequence data is much more readily available to a wide range of scientists than was previously the case. In microbiology, this has resulted in the capacity to deeply sequence the DNA of microbes from any sample and readily identify community composition and function. As a consequence, much of the skill involved in medical and biotechnological research has moved from the “wet lab” to the computer lab, and you will need to become comfortable using (or even developing) many types of bioinformatic software during your career. One good thing about playing around with bioinformatics is that you can’t really do any harm, spread a dangerous virus, burn down the lab, etc. You can probably take down a server with some bad code but this can generally be fixed pretty easily. Feel free to explore the software we will use (and any other similar packages you can find). Much newly developed software is open source, so if you are computationally inclined downloading, installing and trying out new methods is a great way of advancing your knowledge. If you are less into computers then there are still many ways to get the information you need out of sequence data and move on. There are many different ways to do most analyses, and as long as you develop the conceptual knowledge of what you do at each step of the process you have the flexibility to move between different tools as you see fit. Understanding and flexibility ensure you'll be able to deal with things when they don't go as expected and build checks into your workflows to ensure things stay on track. We will use both old and new sequencing methods in this course. The newer methods are currently known as “next-generation” sequencing technologies. These are for sequencing complex samples and will be discussed next week. The “old-school” method of sequencing is called Sanger sequencing, which is typically used to identify an isolated microbe. It is named after its inventor Fredrick Sanger, who won two Nobel prizes in chemistry (he is one of only two people to have won two Nobel prizes in the same category – who is the other one?). One of his prizes was for developing a robust method for sequencing DNA as you saw in this week’s tutorial. Later in the course you will use Sanger sequencing to identify your project microbe. Today we are going to get a feel for what sequence data looks like and how comparing sequences works. We will look at small subunit (SSU) rRNA gene sequences. These are transcribed to RNA (but not translated to proteins). The SSU rRNA molecule (shown below) becomes part of the structure of the ribosome – which every cellular organism on earth needs to make proteins. Hence these genes are very important, very conserved, and

WEEK 5 LABORATORY 83
present in every organism, so we can compare them to quantify similarity and build phylogenetic trees showing relatedness between organisms.

WEEK 5 LABORATORY 84
The secondary structure of the SSU rRNA molecule is useful to understand the methods we use to explore diversity using the gene. When folded in two dimensions RNA forms a series of stems and loops. In general, as the stems require base-pair bonding, it is important that these regions of the gene are conserved. Nucleotide mutations in stem regions can stop secondary structure formation and render this essential molecule useless and the organism will die. That’s a strong selection pressure for conservation. Loop sequences on the other hand don’t base pair so they mutate more and are less conserved. When you learn and read about using Illumina sequencing to examine microbial assemblages from different environments you will hear about variable regions V2-V3, or V4, or V6. These designations refer to specific sub-parts of the SSU gene that contain variability between species so are useful for telling one species from another. Exercise 1. Accessing software for phylogenetic analysis of SSU rRNA sequences
Today you will be working in pairs and using a software package called MEGA for analysis of your mock SSU rRNA sequences. You will use MEGA to analyse your 16S rDNA Sanger sequencing results of your pet microbe for your final report. The MEGA software package is freeware that allows us to visualise and manipulate sequence data, create multiple alignments, estimate evolutionary distance, and build phylogenetic trees, amongst many other uses. You can access MEGA using your student zID through myAccess: https://www.myaccess.unsw.edu.au Click on Access my apps and select MEGA7 from the arrayed App icons. If you are working on a personal computer you will need to install Citrux using the instructions on the myAccess page.

WEEK 5 LABORATORY 85
Once you have access to MEGA7 you will need to download the file containing 16S rDNA sequences from the MICR2011 Moodle page under Week 5. Exercise 2. Sequence browsing and alignment of SSU rRNA gene sequences
The format of the file is called the FASTA format, a common sequence data format. FASTA files contain two text strings for each sequence – the first starts with a “>” and contains the name of the sequence. The second line contains the DNA sequence. For example:
Note that the DNA sequence is all one single text line but is written across multiple lines to fit neatly on this page. A FASTA file can contain more than one sequence, for example:
Handy hint – text editors like TextWrangler (OSX), NotePad (Windows), or vim/nano (Linux) are useful for opening and editing FASTA files. FASTA files can also be viewed using Microsoft Word but make sure you save in plain text format (.txt) as Word can insert additional hidden characters into your file. You can open the file named ‘Week_5_16S_rDNA_sequences.fasta’ in a text editor to check.
>Prochlorococcus_sp_MIT9313_gene_Sequence GATGAACGCTGGCGGCGTGCTTAACACATGCAAGTCGAACGAACCTTCGGGTTAGTGGCGGACGGGTGAGATGAACGCTGGCGGCGTGCTTAACACATGCAAGTCGAACGAACCTTCGGGTTAGTGGCGGACGGGTGGATGAACGCTGGCGGCGTGCTTAACACATGCAAGTCGAACGAACCTTCGGGTTAGTGGCGGACGGGTG >Prochlorococcus_sp_MIT9313_gene_Sequence GATGAACGCTGGCGGCGTGCTTAACACATGCAAGTCGAACGAACCTTCGGGTTAGTGGCGGA CTGGCGGCGTGCTTAACACATGCAAGTCGAACGAACCTTCGGGTTAGTGGCGGACTGGCGGCGTGCTTAACACATGCAAGTCGAACGAACCTTCGGGTTAGTGGCGGACTGGCGGCGTGCTTAACACATGCAAGTCGAACGAACCTTCGGGTTAGTGGCGGA >Esherichia_coli_st_DP17_gene_JF895181 TGAGTTTGATCATGGCTCAGATTGAACGCTGGCGGCAGGCCTAACACATGCAAGTCGAACGG CGTGCTTAACACATGCAAGTCGAACGAACCTTCGGGTTAGTGGCGGACTGGCGGCGTGCTTAACACATGCAAGTCGAACGAACCTTCGGGTTAGTGGCGGACTGGCGGCGTGCTTAACACATGCAAGTCGAACGAACCTTCGGGTTAGTGGCGGA >Escherichia_coli_st AAATTGAAGAGTTTGATCATGGCTCAGATTGAACGCTGGCGGCAGGCCTAACACATGCAAGTCGAACGGAAATTGAAGAGTTTGATCATGGCTCAGATTGAACGCTGGCGGCAGGCCTAACACATGCAAGTCGAACGGAAATTGAAGAGTTTGATCATGGCTCAGATTGAACGCTGGCGGCAGGCCTAACACATGCAAGTCGAACGGAAATTGAAG
>Prochlorococcus_sp_MIT9313_gene_Sequence GATGAACGCTGGCGGCGTGCTTAACACATGCAAGTCGAACGAACCTTCGGGTTAGTGGCGGACGGGTGAGATGAACGCTGGCGGCGTGCTTAACACATGCAAGTCGAACGAACCTTCGGGTTAGTGGCGGACGGGTGGATGAACGCTGGCGGCGTGCTTAACACATGCAAGTCGAACGAACCTTCGGGTTAGTGGCGGACGGGTG

WEEK 5 LABORATORY 86
Opening an Alignment
The Alignment Explorer is the tool for building and editing multiple sequence alignments in MEGA.
1. Launch the Alignment Explorer by selecting the Align > Edit/Build Alignment on the launch bar of the main MEGA window.
2. Select Create New Alignment and click OK. A dialog box will appear asking, “Are you building a DNA or Protein sequence alignment?” Click the button labeled “DNA”.
3. From the Alignment Explorer main menu, select Data > Open > Retrieve
sequences from File. Select the ‘Micro2011_16S_rRNA_sequences.fasta’ file from the Micro2011 folder. You should see something like this:
Notice the different coloured blocks for each nucleotide (A= green, T= red, C = blue, G = purple) Use the scroll bar at the bottom to see how long each of the sequences are. You can manipulate the order of the sequences by dragging and dropping. Try moving the sequences up or down in order by dragging the names. For example, move Candida_glabrata down so it is above the two Saccharomyces sequences at the bottom. Then move all the eukaryotes to the bottom (Saccharomyces, Candida and Penicillium) Double click in the “Group Name” box next to one of the sequences and type in something to represent the Genus name. e.g. ‘Pro’ for Prochlorococcus. Do this for the rest of the groups (e.g. ‘Bord’ for the Bordetella sequences). Group Candida with the Saccharomyces.

WEEK 5 LABORATORY 87
Aligning Sequences Using Muscle
Before you can do ANYTHING with your sequences they must be aligned (matched up so that you compare the right base pairs to each other).
1. On the Alignment Explorer main menu, select Edit > Select All.
2. Select Alignment > Align by Muscle from the main menu to align the selected sequences data using the Muscle algorithm. Near the bottom of the MUSCLE - AppLink window, you will see a row called Alignment Info. You can read information about the Muscle program.
3. Click on the Compute button (accept the default settings). A Progress window will
keep you informed of Muscle alignment status. When the Muscle program has finished, the aligned sequences will be passed back to MEGA and displayed in the Alignment Explorer window. When its finished you should see something like this, with the sequences moved in the alignment so they “match” up correctly.
Now scroll around and have a look at the alignment. Look for conserved regions and hyper-variable regions. To help look for conserved regions (where all the species have the same base pairs) go to Display > Toggle Conserved Sites and set this to 80% - this means that whenever 80% of the sequences have the same base pair in one position that position is considered conserved. Quality control of your alignment
Doing this highlights the conserved and variable regions better. Notice how Deinococcus radiodurans (AY940039) looks much different to all the other sequences? Even the other Deinococcus sequences. This suggests that we have imported the sequence in the wrong

WEEK 5 LABORATORY 88
orientation, or reverse complemented. (Mostly sequences are read in the 5’ to 3’ orientation, but occasionally someone will submit a sequence to a database in the 3’ to 5’ orientation, and it’s hard to tell without comparing it to other sequences.)
To fix this click on the name of AY940039.1|_Deinococcus radiodurans sequence to highlight it, then go to Data > Reverse complement. This will change the orientation of this sequence. Now you need to select all the sequences and realign them, as above (steps 1-3). Now the alignment of this sequence should look better.
Now we want to make a phylogenetic tree with our sequences to see how they are related. To do this we need to compare the same REGION of the SSU rRNA gene across all species. Notice how the Prochlorococcus NATL1 sequence is shorter than most of the others, both

WEEK 5 LABORATORY 89
at the start and at the finish. This is a problem because you can’t accurately compare sequences of different length. To resolve this we need to do one of two things:
• Delete the base pairs of all the other sequences from the start and end so they match up with NATL1. This will allow us to keep NATL1 in our tree but remove a lot of data we use to build the tree, or
• Remove NATL1 from the alignment before we make the tree, and just trim the ends
to make the other sequences the same length. Your decision will depend on whether you are interested in the position of NATL1 and the intergroup similarities in Prochlorococcus, or more so in the rest of the sequences? If you want remove NATL1 click on the name and then Edit > Delete to remove it. OR If you want to keep all your species for now, delete all the columns in the alignment from the start of the alignment to the start of the NATL1 sequence, and from the end of the alignment to the end of the NATL1 sequence, by highlighting the appropriate grey boxes at the top of the alignment and then Edit > Delete.
Note that if you got rid of NATL1 you still need to trim the remaining sequences to make sure all sequences are the same length. Once our alignment is in order we are ready to compute evolutionary distances between species.
• Save the alignment file: Data > Export alignment > MEGA Format using the prefix Micro16S_aligned_ with the date and your name. For example: Micro16S_aligned_20180328_Carl_Woese
Consider the following questions:

WEEK 5 LABORATORY 90
Next generation sequencing, such as Illumina sequencing, is a common method to survey community composition in microbial ecology. Because Illumina sequences are only short, the entire length of the SSU rRNA gene cannot be sequenced.
Which regions would be good to analyse just the Bacteria?
Which regions would be good for a PCR primer set aimed at amplifying both Bacteria, Archaea AND Fungi in one assay?
Which regions would be good for a quantitative PCR assay targeting the Prochlorococcus species?

WEEK 5 LABORATORY 91
Exercise 3. Estimating evolutionary distance and creating phylogenetic trees:
1. From the main MEGA launch window, select Distance > Compute Pairwise Distance.
2. Choose to use the alignment file you just saved.
3. Click Compute to begin the computation.
A progress indicator will appear briefly and then the distance computation results will be displayed in grid form in a new window. Leave this window open so we can compare the results from the next steps.
This type of grid is a lower triangle. The first column of numbers indicates the pairwise alignment value of each sequence to the first sequence in the list (0.000 means they are identical, 1.000 means they share no base pairs in common) (e.g. Pseudomonas fluorescens is 0.166 (16.6%) different to Prochlorococcus NATL1 (or they are 83.4% similar) but only 0.004 different (99.6% similar to Pseudomonas putida). The second column indicates the pair-wise comparison between each sequence and the second sequence on the list. You can look at the average difference both within and between your groups by clicking on the Average tab. Note: These are essentially the numbers that you would use to group your sequences into operational taxonomic units when using Illumina sequencing data. How different do you think these numbers would be if using only a small variable region as opposed to the full-length SSU gene? And how different would the results be comparing different variable regions?

WEEK 5 LABORATORY 92
Build a phylogenetic tree from your evolutionary distance matrix
1. Go back to the main MEGA window and click on Phylogeny > Construct/Test Neighbour-Joining tree.
2. In the Analysis Preference window, click Test of Phylogeny and select Bootstrap method. Set the No. of Bootstrap Replications to 100. This is actually quite a low number and ideally you would use 500-1000 replications – but we don’t have time to wait for it to process today, so 100 will have to do. You can use a 500-1000 replicates for your Sanger sequences in Week 11. Bootstrapping is a method to determine the confidence that each branching point in your phylogenetic tree is true. In essence, the tree will be regenerated (replicated) the specified number of times, and to determine how robust each branch point is, in each replication a few nucleotides will be replaced. The bootstrap value represents how many of the new phylogenetic trees contain the branch point. For instance, a bootstrap value of 95 indicates that 95/100 phylogenetic trees generated contained that branch point. A bootstrap value of 95% confidence for a branch point is generally thought to be robust.
3. Click Compute to accept the defaults for the rest of the options and begin the
computation. A progress indicator will appear briefly before the tree displays in the Tree Explorer window. This may take a few minutes to process with the bootstrap replication.
Some taxa may be hidden in this tree view as they are very closely related. Play around with the tree viewer and see what you can do, for instance try View > Tree/Branch Style > Circle.
Think about how this process can help you identify an unknown sequence.

WEEK 5 LABORATORY 93
Exercise 4. BLAST search for closest relatives using the NCBI database: The National Centre for Biotechnology Information (NCBI) is the major repository for all sequence data in the world. We can compare our sequences to this database to see if there are other sequences out there that are similar to ours. For this activity you will need to navigate to the Alignment Explorer window (you may currently be working in the Tree Explorer window).
1. Click on the name of a sequence to highlight it, then click Web > Do BLAST Search. This will open the website of NCBI with your highlighted sequence ready to BLAST (align your sequence with the large database at NCBI). Scroll down and click.
2. This will retrieve 100 sequences most similar to yours in the NCBI database. If you had an unknown sequence you could BLAST it first, download the similar sequences and add them to your analysis. You will do this in Week 11 after we sequence your project microbes. Today we’ll import the top 5 sequences – click the check boxes next to the BLAST hit, then click GenBank to obtain the correct format.

WEEK 5 LABORATORY 94
3. Select Summary > GenBank (full) to load the data in the correct format. Once that has loaded, you can import these closely related sequences into MEGA using the Add to Alignment button at the top of the screen.
2
1
3

WEEK 5 LABORATORY 95
4. The related sequences will now be added to your Alignment Explorer window and you can repeat your alignment and phylogenetic tree construction (Exercises 2, 3, and 4) using your additional related SSU sequences. This will be particularly important for Week 11 when you have your unknown project samples and will need to identify closely related, characterised isolates. The Alignment Explorer window may take a few minutes to refresh.
3. Record the results of your Microbial Fuel Cell Over the past week you have been recording the output from your Microbial Fuel Cell. Take this opportunity to take another reading and record your results in the class OneNote spreadsheet under Content Library > Soil Microbial Fuel Cell Results. END OF WEEK 5

WEEK 6 LABORATORY 96
WEEK 6 LABORATORY
OVERVIEW Today you will use DNA sequencing to identify your pet microbe from its 16S (SSU) rDNA sequence. The experiment is conceptually similar to your metagenomics sequencing of all bacteria in your sample with a couple of important differences. 1) You will be sequencing the 16S rRNA of a single species of bacteria (as you have a pure culture). 2) You will be using Sanger sequencing instead of Illumina sequencing. This type of sequencing chemistry yields much longer read lengths (>1000 base pairs compared with 50-150 base pairs from Illumina sequencing). By sequencing the 16S (SSU) rDNA from your pet microbe, you will be able to compare its sequence to the extensive database of 16S sequence available at NCBI and determine how closely related your isolate is to a known bacterial species. These molecular data should complement the phenotypic and biochemical characterisation that you have already done. You may even be able to determine what proportion of the total microbial diversity your pet microbe constitutes in your original sample by comparing your pure culture Sanger sequencing results and metagenomic Illumina data. To sequence the 16S (SSU) rRNA gene from your pet microbe, you will need to extract genomic DNA and then amplify the 16S rRNA gene using PCR. The amplified gene can then be sequenced using Sanger sequencing. In brief, the steps typically used to sequence the SSU rRNA gene are:
I. Extraction of genomic DNA from a pure culture of the microbe. II. PCR amplification of the SSU rRNA gene using universal primers. III. Analysis of the PCR product by agarose gel electrophoresis. IV. Purification of the amplified PCR product. V. Sanger sequencing of the PCR product VI. Searching sequence databases to find similar sequences.
We’ll do the first two steps today. The next three steps will be done for you. You will be doing the final step by yourself in your week 11 online tutorial time. LEARNING OBJECTIVES
• Understand the difference between Sanger sequencing of 16S rRNA sequences from pure cultures and metagenomics profiling of 16S rRNA sequences in complex environmental samples.
• Understand how DNA is isolated and sequenced from bacterial cultures. • Apply skills developed to Week 5 to identify your pet microbe
ACTIVITIES
1. DNA extraction from project microbes. 2. Assessment of DNA extract quantity and quality. 3. PCR amplification of the SSU rRNA gene of project microbes. 4. Record the output of your Microbial Fuel Cell

WEEK 6 LABORATORY 97
Contents: WEEK 6 RISK ASSESSMENT .......................................................................................... 98 WEEK 6 LABORATORY CLASS ..................................................................................... 99 1. DNA extraction from sub-cultured project isolates .................................................. 99 Materials ............................................................................................................................ 99
Step One - Sample collection and preparation ........................................................... 99 Step Two - Lysis ......................................................................................................... 99 Step Three - DNA binding and column washing ......................................................... 99 Step Four - Elution .................................................................................................... 100
2. Assessment of DNA extract quantity and quality ................................................... 100 Materials .......................................................................................................................... 100 Procedure ........................................................................................................................ 100 Results ............................................................................................................................. 101 3. PCR amplification and sequencing of SSU rRNA genes ....................................... 102 Materials .......................................................................................................................... 102 Procedure ........................................................................................................................ 103 4. Record the results of your Microbial Fuel Cell………………………………………. 103

WEEK 6 LABORATORY 98
WEEK 6 RISK ASSESSMENT
BABS Teaching Laboratory
MICR2011_RMF_Wk9
Student Risk Assessment
Hazards Risks Controls General See below At all times follow demonstrators instructions when
handling all biological substances, chemicals and equipment items. Notify demonstrator immediately of any spills or other incidents. Proper handwashing with antibacterial handwash before leaving the laboratory.
Biological agent (Microorganisms, Risk Group I and Risk Group II) Bunsen burner
Infection burns
PPE (lab coats, closed in shoes & gloves as required). Adhere to aseptic techniques. Work in PC2 laboratory or BSC if required. Never leave a lit Bunsen Burner unattended or reach over an exposed flame. Keep long hair tied back.
Chemical (DNA extraction)
Irritant for skin and eyes skin or eyes, toxic if ingested.
PPE (lab coats, closed in shoes, safety glasses & gloves. SDS.
Electrical Equipment (nanodrop, PCR machine)
Electric shock/ electrocution
Avoid water/spillages when working with electrical items.
Personal Protective Equipment
Emergency Procedures In the event of an alarm sounding, stop the experiment, turn of electrical equipment and wait for confirmation from demonstrators to evacuate. Then pack up your bags and wash your hands. Follow the instructions of the demonstrators regarding exits and assembly points. The BioScience assembly point is in the lawn in front of the Chancellery. In the event of an injury inform the demonstrator. First aiders and contact details are on display by the lifts.
Clean up and waste disposal All used microfuge tubes should be placed in the biohazard bins. Used test tubes should be placed in the appropriate container on the front bench of the lab. All solutions should be placed in the appropriate liquid waste containers. Used pipette tips should be placed in approved biohazard sharps containers.
Declaration – will be checked by demonstrator at the beginning of the practical class I have read and understand the safety requirements for this practical class and I will observe these requirements. Signature:…………………………………………………………………………Date:…………………………… Student number:………………………..

WEEK 6 LABORATORY 99
WEEK 6 LABORATORY CLASS
1. DNA extraction from sub-cultured project isolates Working in your mini-group follow the protocol below to extract DNA from the microbes isolated by your group. We’re using the same DNA extraction kit as we did previously so refer back to Week 2 to get an overview of the protocol. Detailed instructions are given below. Materials:
• PureLink DNA Extraction kit • Pipettes, tips and microfuge tubes
Step One - Sample collection and preparation
1. Flood your pure culture plate with 1 mL of phosphate buffered saline. Wash the cells off the surface of the plate with a sterile spreader. Using a sterile pipette collect your bacterial cells in a microfuge tube.
2. Centrifuge at 14,000 xg for 10 minutes to pellet the microbial biomass. 3. Using a pipette, remove and discard the supernatant. Avoid disturbing the pellet. 4. Resuspend the pellet in 800 µL of Buffer S1 – lysis buffer by repeated pipetting and
transfer to a bead tube (with red screw cap). Step Two - Lysis
5. Add 100 µL of Buffer S2 – lysis enhancer to the bead tube. Cap tightly and mix tube contents briefly using the vortex mixer.
6. Incubate the tube in a heat block at 65°C for ten minutes. 7. Homogenise the sample by shaking on a bead beater for 3 x 45 second cycles.
(Note: This step will be performed by the technical staff). Step Three - DNA binding and column washing
8. Centrifuge the tube containing your sample at 14,000 xg for 2 minutes. 9. Transfer up to 500 µL of supernatant to a clean microcentrifuge tube, taking care to
avoid disturbing the pellet or transferring any debris. 10. Add 900 µL of Buffer S4 – Binding buffer to the supernatant and vortex briefly. 11. Open the DNA binding column (supplied in a collection tube) and add 700 µL of
your sample. Cap the column, place the column-tube assembly into a microcentrifuge and centrifuge at 14,000 xg for 1 minute.
12. Remove the column from its collection tube and discard the flow through. Replace the column in its tube and repeat Step 11 with the remaining amount of your sample.
13. After the second spin, transfer the column (with DNA now bound to the filter inside) to the clean collection tube provided.

WEEK 6 LABORATORY 100
14. Add 500 µL of Buffer S5 – Wash buffer to the column, cap it and centrifuge for 1 minute as above.
15. Discard the flow through, replace the column in the tube and centrifuge for an additional 1 minute (this step removes residual wash buffer from the column).
Step Four - Elution
16. Transfer the column to a clean microcentrifuge tube, labelled with your group identification and the date.
17. Add 50 µL of Buffer S6 – Elution buffer to the column. Cap the column and allow it to sit at room temperature for one minute.
18. Centrifuge the column (in its microcentrifuge tube) at 14,000 x g for 1 minute. The DNA will now be eluted from the column into the tube and is ready for quality analysis PCR and sequencing.
2. Assessment of DNA extract quantity and quality To assess the quantity and quality of your DNA we will examine its absorbance spectrum using the Nanodrop, a UV-Vis spectrophotometer. You can use the ability of a solution of DNA to absorb light with a wavelength of 260 nm (to determine its concentration. Other methods for checking DNA quantity and purity that we won’t pursue today include agarose gel electrophoresis combined with fluorescence imaging or quantifying directly with DNA binding fluorescent dyes using Qubit technology. Materials:
• DNA sample from step 1 above • Pipette and tips • Nanodrop and Kimwipes™
Procedure:
1. To determine the absorbance of various wavelengths of electromagnetic radiation by DNA in elution buffer, first you need to see what the elution buffer looks like itself. Aliquot 2 µL of Buffer S6 – Elution buffer onto the Nanodrop stage, lower the arm and instruct the software to take a blank reading. This tells the Nanodrop that this is what the background of the sample looks like. Wipe the droplet off the stage with a Kimwipe™/tissue.
2. Now aliquot 2 μL of your DNA sample onto the Nanodrop stage and instruct the
software to measure the DNA concentration. This will give you a spectrum and a concentration for your DNA.

WEEK 6 LABORATORY 101
3. Your spectrum should look something like this. The absorbance maxima (peak) of the spectrum should be at 260 nm. It is this reading that is used to calculate the DNA concentration. A 50 ng/µL solution of DNA will give you an absorbance at 260 nm of 1 so you can easily figure out DNA concentration from absorbance. The software also gives you absorbance readings at 230 nm and 280 nm. The ratio between the 260 nm and 230 nm readings (260/230 ratio) and the ratio between the 260 nm and the 280 nm readings (260/280 ratio) give you information on purity. The 260/280 ratio should be close to 1.8 for pure DNA. The 260/230 ratio should be above 1 if the sample is free from carbohydrates and phenolics. If your 260/230 and 260/280 ratios are not as expected you should not trust the concentration as measured by the Nanodrop. Note that the Nanodrop tends to slightly overestimate the DNA concentration.
Results: Absorbance (230 nm): Absorbance (260 nm): Absorbance (280 nm): 260/230 ratio: 260:280 ratio: DNA concentration (ng/µL):
260 nm

WEEK 6 LABORATORY 102
Draw the absorbance spectra of your DNA sample below:
3. PCR amplification and sequencing of SSU rRNA genes The DNA sequence that encodes the SSU rRNA sequence is used for taxonomical classification of microbes as there are conserved regions in the sequence (due to the conserved function of SSU rRNA) and hypervariable regions that enable us to distinguish between close relatives. The gene encoding SSU rRNA is approximately 1500 base pairs long and can be amplified in a single PCR to obtain the sequence for the whole gene. Discuss with your demonstrator what primers should be used for sequencing. Sanger sequencing is a method of DNA sequencing based on the selective incorporation of chain-terminating dideoxynucleotides by DNA polymerase during in vitro DNA replication. The chain-termination method requires a single-stranded DNA template, a DNA primer, a DNA polymerase, normal deoxynucleosidetriphosphates (dNTPs), and modified di-deoxynucleosidetriphosphates (ddNTPs), the latter of which terminate DNA strand elongation. The pool of DNA fragments is arranged by length using electrophoresis, the ddNTPs (the end base) are fluorescently labeled for detection in automated sequencing machines (look up ABI capillary sequencing if you are interested). The data collection software converts the fluorescence signal to digital data as a chromatogram. Materials:
• DNA sample • 0.2 µL microfuge tubes • PCR master mix containing
- Forward and reverse primers (30 pmoles each) - dNTPs (an equal mix of dATP, dTTP, dCTP and dGTP) - 10 x Taq polymerase buffer (100 mM Tris-HCl, 500 mM KCl, 20 mM MgCl2) - Taq polymerase enzyme (0.75 units)

WEEK 6 LABORATORY 103
Procedure:
1. Label a 0.2 μL tube at the side as high as possible. 2. Add 20 μL PCR master mix. 3. Add 5 μL DNA template prepared above. 4. Place your sample on ice. 5. The samples will be collected, and the PCR will be done for you using the following
PCR program: 5 min @ 94˚C, 35 cycles of 30 s @ 94˚C, 30 s @ 55˚C, 90 s @ 72˚C, followed by 10 min @ 72˚C.
One sample from each mini-group that shows a single clear PCR band will then be sent to the Ramaciotti Centre for Genomics for further analysis. The PCR product will be purified and sequenced using an appropriate primer. You will then use this sequence in the practical class next week to identify your unknown test bacterium. 4. Record the results of your Microbial Fuel Cell Over the past two weeks you have been recording the output from your Microbial Fuel Cell. Take this opportunity to take another reading and record your results in the class OneNote spreadsheet under Content Library > Soil Microbial Fuel Cell Results. Discuss the results with your group and demonstrator. END OF WEEK 6

WEEK 7 LABORATORY 104
WEEK 7 LABORATORY
OVERVIEW Foods may carry a wide range of microbial contaminants, which come either from the environment in which the food was grown or processed, or from subsequent human handling. As with other habitats, the population of bacteria, which then grows and becomes dominant is selected by the particular properties (pH, composition etc.) of the food and the conditions under which it is stored. Most organisms found are harmless to the consumer's health although they may eventually cause food spoilage and economic loss. Only a few of the possible contaminants, notably Staphylococcus aureus, Salmonella species, Vibrio species, Clostridium botulinum, Clostridium perfringens, can cause food poisoning and public health measures are directed chiefly at these organisms. The microbial population of some foods will be determined in today's exercises. In the first exercise students at each bench will determine the predominant microbial populations in samples of two food types. The exercise will also provide information on degree of selectivity shown by the selective media used. In the second part of this practical you are provided with three 16S (SSU) rRNA sequences from bacteria isolated from the food. You will use these sequences to identify the bacteria. LEARNING OBJECTIVES
• Apply knowledge of selective/differential media to culture microorganisms present on processed and unprocessed food.
• Understand the relative significance of isolating particular microorganisms from food.
• Understand how DNA sequencing technologies and related molecular techniques (like PCR) can be used to identify microorganisms present in food.
ACTIVITIES
1. Using basal, selective, and differential media, isolate microorganisms present in processed and unprocessed food samples.
2. Using the DNA sequences of 16S (SSU) rRNA recovered from food samples, identify the microorganism present in the food sample.

WEEK 7 LABORATORY 105
Contents: WEEK 7 RISK ASSESSMENT ........................................................................................ 106 WEEK 7 LABORATORY CLASS ................................................................................... 107 Materials .......................................................................................................................... 107 Procedure ........................................................................................................................ 107 Results ............................................................................................................................. 107 Phenotyping verses genotyping ....................................................................................... 109

WEEK 7 LABORATORY 106
WEEK 7 RISK ASSESSMENT
BABS Teaching Laboratory
MICR2011_RMF_Wk6
Student Risk Assessment
Hazards Risks Controls General See below At all times follow the demonstrators’ instructions
when handling all biological substances, chemicals and equipment items. Notify demonstrator immediately of any spills or other incidents. Proper handwashing with antibacterial handwash before leaving the laboratory.
Biological agent (Microorganisms, Risk Group I and Risk Group II) Sharps, forceps Bunsen burner
infection cuts burns
PPE (lab coats, closed in shoes & gloves as required). Adhere to aseptic techniques. Dispose of any broken/used sharp/glass items immediately in Sharps containers provided. Take care when handling forceps. Never leave a lit Bunsen Burner unattended or reach over an exposed flame. Keep long hair tied back.
Personal Protective Equipment
Emergency Procedures In the event of an alarm sounding, stop the experiment, turn of electrical equipment and wait for confirmation from demonstrators to evacuate. Then pack up your bags and wash your hands. Follow the instructions of the demonstrators regarding exits and assembly points. The BioScience assembly point is in the lawn in front of the Chancellery. In the event of an injury inform the demonstrator. First aiders and contact details are on display by the lifts.
Clean up and waste disposal All used microfuge tubes should be placed in the biohazard bins. Used test tubes should be placed in the appropriate container on the front bench of the lab. All solutions should be placed in the appropriate liquid waste containers. Used pipette tips should be placed in approved biohazard sharps containers.
Declaration – will be checked by demonstrator at the beginning of the practical class I have read and understand the safety requirements for this practical class and I will observe these requirements. Signature:…………………………………………………………………………Date:…………………………… Student number:………………………..

WEEK 7 LABORATORY 107
WEEK 7 LABORATORY CLASS
Materials:
• 4 plates nutrient agar (per bench group) • 4 plates mannitol salt agar (per bench group) • 4 plates Sabouraud agar (per bench group) • 4 plates MacConkey agar (per bench group) • 2 sterile "Stomacher" bags (per bench group) • 4 x 50 ml volumes physiological diluent (saline) (per group) • 30 g of an unprocessed food in a sterile petri dish (per group) • 30 g of a processed food in a sterile petri dish (per group)
Procedure:
Homogenise the sample of unprocessed food and processed food by placing the entire sample into a sterile "Stomacher" bag, add 50 ml diluent and homogenise for 30 seconds in the "Stomacher". Using aseptic techniques subculture a loopful of the homogenate onto each of 2 plates of all the media supplied, then place them in a box for incubation at 30°C. Dilute by a factor of 10, both homogenates with physiological saline, and inoculate a loopful of the diluted homogenate onto each of 2 plates of all the media supplied, then place in a box for incubation at 30°C.
Results: (Complete in next lab class)
Medium UNPROCESSED FOOD PROCESSED FOOD
Macroscopic Microscopic Macroscopic Microscopic
Nutrient agar
Mannitol salt agar
Sabouraud agar
MacConkey agar

WEEK 7 LABORATORY 108
Macroscopically examine the plates set up last week. Do you have any evidence of different population sizes on the processed and unprocessed foods?
Does comparative growth on different selective media and the colony appearance of the populations suggest any qualitative differences in the populations of the two foods?
Comment on the predominant colony types on each food

WEEK 7 LABORATORY 109
Phenotyping verses genotyping: DNA was isolated from three bacteria that grew from the food sources. You are provided with three 16S sequences from these bacteria. The sequences have been uploaded in fasta format to the MICR2011 Moodle page under Week 7. Download the sequences to the lab computer and use your knowledge of 16S sequencing and analysis to identify the bacteria (hint: refer to Week 5 if you need).
END OF WEEK 7
Use the genotyping results to comment on whether any of the identified bacteria isolated from the foods might be capable of causing disease in humans.
Compare the genotyping results to the phenotyping results. Consider the accuracy and work involved for both techniques.
Comment on whether or not any evidence that the foods might constitute a health risk for consumers.

WEEK 8 LABORATORY
110
WEEK 8 LABORATORY OVERVIEW Bacteriophages are viruses that infect and multiply within bacteria. Bacteriophages play a major role in regulating the abundance of bacteria in the environment, including the human body. Bacteriophages are used to prevent the souring of petroleum resources caused by sulphate reducing bacteria and to prevent, and even treat, bacterial infection. This week you will learn to quantify bacteriophage and examine bacteriophage mediated transfer of genes between bacteria in a process called transduction. LEARNING OBJECTIVES
• Bacteriophages are obligate intracellular parasites and do not form independent colonies. This poses challenges for standard culture-based enumeration. Student’s should understand how to cultivate and enumerate bacteriophages using plaque assays.
• Horizontal gene transfer allows bacteria to exchange DNA between species and accelerates bacterial evolution. Bacteriophages facilitate horizontal gene transfer through transduction and students should understand how this occurs and how we can demonstrate transduction using genetic markers like auxotrophy.
ACTIVITIES
1. Propagation and enumeration of bacteriophage 2. Horizontal gene transfer by bacteriophage transduction

WEEK 8 LABORATORY
111
Contents:
WEEK 8 RISK ASSESSMENT ........................................................................................ 112 WEEK 8 LABORATORY CLASS ................................................................................... 113 1. Bacteriophage propagation and enumeration ........................................................ 113 Materials .......................................................................................................................... 114 Procedure ........................................................................................................................ 114
Dilution of the phage stock ....................................................................................... 114 Phage absorption and overlaying agar ..................................................................... 114
2. Gene transfer by transduction ................................................................................. 115 Materials .......................................................................................................................... 116 Procedure ........................................................................................................................ 116

WEEK 8 LABORATORY
112
WEEK 8 RISK ASSESSMENT
BABS Teaching Laboratory
MICR2011_RMF_Wk8
Student Risk Assessment
Hazards Risks Controls General See below At all times follow demonstrators instructions when
handling all biological substances, chemicals and equipment items. Notify demonstrator immediately of any spills or other incidents. Proper handwashing with antibacterial handwash before leaving the laboratory.
Biological agent (Microorganisms, Risk Group I and Risk Group II) Sharps, forceps Bunsen burner
infection cuts burns
PPE (lab coats, closed in shoes & gloves as required). Adhere to aseptic techniques. Dispose of any broken/used sharp/glass items immediately in Sharps containers provided. Take care when handling forceps. Never leave a lit Bunsen Burner unattended or reach over an exposed flame. Keep long hair tied back.
Personal Protective Equipment
Emergency Procedures In the event of an alarm sounding, stop the experiment, turn of electrical equipment and wait for confirmation from demonstrators to evacuate. Then pack up your bags and wash your hands. Follow the instructions of the demonstrators regarding exits and assembly points. The BioScience assembly point is in the lawn in front of the Chancellery. In the event of an injury inform the demonstrator. First aiders and contact details are on display by the lifts.
Clean up and waste disposal All used microfuge tubes should be placed in the biohazard bins. Used test tubes should be placed in the appropriate container on the front bench of the lab. All solutions should be placed in the appropriate liquid waste containers. Used pipette tips should be placed in approved biohazard sharps containers.
Declaration – will be checked by demonstrator at the beginning of the practical class I have read and understand the safety requirements for this practical class and I will observe these requirements. Signature:…………………………………………………………………………Date:…………………………… Student number:………………………..

WEEK 8 LABORATORY
113
WEEK 8 LABORATORY CLASS
1. Bacteriophage propagation and enumeration Bacteriophage infection consists of a number of sequential events (refer to lecture by Prof. Peter White). The phage is first absorbed by the host cell, then replicates and assembles into mature virions, encapsidating the the phage DNA or RNA. Typically, this growth period is about 30 minutes and phage particles multiply in the cell resulting in a few hundred new viruses. Infection usually ends when the bacterial cell is lysed by the phage. The viral particles released are capable of infecting new susceptible hosts and the so called “lytic cycle” starts all over again. Phages can also integrate into the bacterial host genome to form a prophage, this is known as lysogeny.
The method used to enumerate a bacteriophage suspension is very similar in principle to that used for the enumeration of a bacterial culture. In both cases 10-fold serial dilutions of the microorganism are made and then plated onto agar plates. However, bacteriophages need a bacterial strain (host) in which to replicate. Infection of the host strain results in the formation of “plaques” or clear zones in the areas where cells have been lysed by the phage. As with a bacterial count, where each colony arises from a single cell, in the plaque assay each plaque arises from a single phage particle. This is designated a plaque forming unit (PFU) and is used to quantitate the number of infective phage particles. This week we will be using this theory to enumerate a phage called PRD1 on a lawn of the bacterium Salmonella typhimurium.
PRD1 belongs to a family of lipid-containing double capsid bacteriophages that infect both Gram-negative and Gram-positive bacteria. It has one genus, Tectivirus and unlike many phages PRD1 has no real visible tail (see figure below). It has a virion size of about 66 nm with apical spikes of 20 nm. The capsid encloses an inner membrane vesicle within which the genomic DNA is coiled.
One thing to note, PRD1 plaques are larger than P1 phage plaques (used for the second experiment) – see if you can spot this in the laboratory experiment. The genome is a linear double stranded DNA molecule of 15 kb flanked by inverted repeats. It encodes for 30 proteins and replication is protein-primed.

WEEK 8 LABORATORY
114
Materials:
Per mini group of students:
• 1 x 0.5 mL PRD1 bacteriophage stock
• 1 mL 24 h Z broth culture of Salmonella typhimurium LT2
• 10 mL Z broth • 4 x Z agar plates (1 for control, 1 for each phage dilution to be plated) • 4 x 5 mL 0.7% Z Soft Agar at 50°C
Procedure: Work in mini groups.
Dilution of the phage stock Students are required to sketch the dilution procedures in their lab book before proceeding. The phage stock is to be diluted in Z broth using a series of 3 x 10-fold dilutions, starting with adding 0.1 mL of the original phage stock to a 0.9 mL Z broth (1 in 10 dilution).
Phage absorption and overlaying agar 1. Label all tubes and plates. 2. Obtain one Z soft agar from water bath, and immediately add 0.1 mL of S.
typhimurium LT2 broth culture, and 0.1 mL of 10-1 PRD1 phage dilution. Do not take the soft agar out of water bath unless you are using them immediately or it will set. Do not leave soft agar standing in the 50°C water bath following addition of the bacterial cells and/or phage because they will die.
3. Briefly vortex the soft agar 5 times to mix the bacterial cells and phage particles, and pour onto the centre of the Z agar plate. With the plate sitting flat on the bench, GENTLY move it from side to side to further mix the cells and phage particles until the soft agar is evenly spread on the surface of the plate. Do not swirl the plate.
4. Allow the soft agar layer to set for at least 10 min. 5. Repeat steps 2 to 5 with the 10-2 and 10-3 phage dilutions.

WEEK 8 LABORATORY
115
6. The remaining Z soft agar and Z agar plates will be used as a control. To the soft agar, add 0.1 mL of S. typhimurium LT2 culture only (i.e. no phage). Mix as described in step 3 and pour the soft agar onto a Z agar plate and allow the soft agar to set for at least 10 min.
7. Hand the plates to your demonstrator who will incubate them at 37°C for 24 hours before storing them at 4˚C. Results will be analysed in next week’s practical class.
2. Gene transfer by transduction Apart from infecting and killing bacteria, bacteriophages also play an important role in gene transfer. Some bacteriophages are able to transfer bacterial DNA from one bacterial strain to another. In this practical, we will transfer genes from a donor bacterium to a recipient bacterium, mediated through the P1 bacteriophage P1kc, a generalised transducing phage. As a recipient we will use a strain of E. coli that is unable to live without organic supplements (an auxotroph, E. coli strain AB2828). This strain requires phenylalanine, tyrosine, tryptophan, p-aminobenzoate and p-hydroxybenzoate for growth. The auxotrophy is due to a mutation in the gene aroE blocking the aromatic amino acid biosynthesis pathway. For bacteriophage P1kc to be used as a vector in DNA transfer from a donor to a recipient strain, the phage must infect and be propagated in the donor E. coil strain (AN180) to pick up donor DNA, in this case an aroE+ E. coli strain. Transfer of the DNA then takes place through a second phage infection of the recipient strain.
Bacteriophage P1 (see figure below) was isolated in 1951 by Giuseppe Bertani. P1 has been widely used to construct new bacterial strains and was used extensively to map the E. coli genome. P1 has served as a template virus for different aspects of biology research such as DNA restriction modification, site-specific recombination, plasmid replication, partition systems and plasmid incompatibility. Phage P1 is a virulent bacteriophage of the P1-like virus genus, in the family Myoviridae. This phage can quickly turn an E. coli cell into a P1-producing factory that releases hundreds of phages when the cell ruptures. #Bertani, G (1951) Studies on lysogenesis. I. The mode of phage liberation by lysogenic Escherichia coli. J. Bacteriol. 62:293-300.
The P1 phage has a 94 kb genome that encodes at least 117 genes which are organised in 45 operons. In the capsid, DNA is double stranded, linear and terminally redundant. The terminal region is where foreign pieces of DNA can be inserted as the genes in this region are non-essential. Once the phage has entered into the host the genome circularises and replicates as a plasmid, but only during the lysogenic cycle.
A B
Panel A shows a schematic of the structure of the bacteriophage P1, with head and tail structures. The icosahedral capsid can house the 94 kb genome. Phage P1 exhibits the

WEEK 8 LABORATORY
116
classical morphology of a bacterial virus. It has an icosahedral head and a 220 nm long inflexible tail, with a tube surrounded by a contractile sheath. The virus possesses a baseplate at the bottom of its structure where six bent tail fibres are located. Panel B shows two images of the same P1 phage used in this practical (P1kc) taken at the UNSW Electron Microscopy Unit. Materials: Per mini group of students:
• 1 x 1 mL P1Kc phage stock prepared from E. coli AN180 (aroE +) • 1 x 1 mL Z broth of E. coli strain AB2828 ∆aroE at 109 cells/mL • 1 x 10 mL Z broth • 1 x 5 mL Z broth • 2 x Medium E selection plates (1 for each cell suspension) • 1 x 9 mL Medium A for washing
Procedure: Work in mini-groups.
You have been provided with a lysate of the P1 phage P1kc, and a culture of the recipient E. coli strain AB2828 ∆aroE, that is missing the aroE gene.
1. To 4 mL of Z broth in a 12 mL sterile centrifuge tube, add 1 mL P1kc (AN180) lysate and 0.1 mL E. coli strain AB2828. Label as “Transduction”.
2. To 5 mL Z broth in a 12 mL sterile centrifuge tube, add 0.1 mL E. coli strain AB2828 ∆aroE only. Label as “control”.
3. Incubate at 37°C in a water bath for 60 min (no shaking needed). 4. Centrifuge the tubes at 14,000 xg for 15 min, and re-suspend the cell pellet in 2 mL
of Medium A. Be care to remove as much free bacteriophage (the supernatant) as possible.
5. Repeat step 4 to remove as much free bacteriophage as possible. 6. Spread 0.1 mL cell suspension on Medium E selection plate: one for the control and
one for the transduction. Label accordingly. 7. Hand the plates to your demonstrator who will incubate plates for 48 h at 37°C and
then store them at 4˚C. Results will be analysed in next week’s practical class.
What type of phage is P1kc?
How is a bacteriophage plaque formed on an agar plate?
In centrifugation, what is the difference between rcf and rpm?
END OF WEEK 8

WEEK 9 LABORATORY 117
WEEK 9 LABORATORY OVERVIEW Today you will be looking at how we can track the spread of viruses (or many infectious agents) during an outbreak. Specifically, you’ll be looking at a case study of Ebola infection and using ELISA analysis of blood serum samples to determine the source of the infection. LEARNING OBJECTIVES
• Understand how viral pathogens can be detected and monitored in infected individuals using an ELISA.
• Understand how the combination of molecular detection techniques and patient meta-data is used determine the epidemiology of an infectious agent and trace the source of infection in an outbreak.
ACTIVITIES
1. Background reading on Ebola infection and disease progression 2. Background to the epidemiological investigation 3. ELISA analysis of mock patient serum 4. Tasks for the investigating team – determine the source of the outbreak 5. Record the results from you phage enumeration experiment

WEEK 9 LABORATORY 118
Contents: WEEK 9 RISK ASSSSMENT .......................................................................................... 119WEEK 9 LABORATORY CLASS ................................................................................... 1201. Background ................................................................................................................ 120Ebola virus ....................................................................................................................... 121History .............................................................................................................................. 121Transmission ................................................................................................................... 122Signs and Symptoms ....................................................................................................... 123Control ............................................................................................................................. 1232. Epidemiological investigation .................................................................................. 1243. ELISA analysis of mock serum samples ................................................................. 126Materials .......................................................................................................................... 127Procedure ........................................................................................................................ 1274. Tasks for the investigation team .............................................................................. 128Tasks ............................................................................................................................... 128Questions ......................................................................................................................... 1285. Record results for PRD-1 phage enumeration and P1kc transduction experiments ......................................................................................................................................... 125

WEEK 9 LABORATORY 119
WEEK 9 RISK ASSSSMENT
BABS Teaching Laboratory
MICR2011_RMR_Wk12
Student Risk Assessment
Hazards Risks Controls General See below At all times follow demonstrators instructions when
handling all biological substances, chemicals and equipment items. Notify demonstrator immediately of any spills or other incidents. Proper handwashing with antibacterial handwash before leaving the laboratory.
Biological agent (human samples eg urine, blood, tissue)
Infection Spills
PPE (lab coats, closed in shoes & gloves as required) and Safety glasses when handling human specimens. Adhere to aseptic techniques. Work in PC2 laboratory or BSC if required. Dispose of any broken/used sharp/glass items immediately in the Sharps containers provided.
Chemical (TMB solution)
Non-hazardous PPE (lab coats, closed in shoes, safety glasses & gloves. SDS.
Personal Protective Equipment
Emergency Procedures In the event of an alarm sounding, stop the experiment, turn of electrical equipment and wait for confirmation from demonstrators to evacuate. Then pack up your bags and wash your hands. Follow the instructions of the demonstrators regarding exits and assembly points. The BioScience assembly point is in the lawn in front of the Chancellery. In the event of an injury inform the demonstrator. First aiders and contact details are on display by the lifts.
Clean up and waste disposal All used microfuge tubes should be placed in the biohazard bins. Used test tubes should be placed in the appropriate container on the front bench of the lab. All solutions should be placed in the appropriate liquid waste containers. Used pipette tips should be placed in approved biohazard sharps containers.
Declaration – will be checked by demonstrator at the beginning of the practical class I have read and understand the safety requirements for this practical class and I will observe these requirements. Signature:…………………………………………………………………………Date:…………………………… Student number:………………………..

WEEK 9 LABORATORY 120
WEEK 9 LABORATORY CLASS
1. Background
Figure 1. Reported active human transmission in 2014-2016 (CDC website) Background by Professor Vincent Racaniello, author of “This week in Virology” Reference: http://www.microbe.tv/twiv/twiv-341/ To see more about Vincent: http://www.virology.ws/about/

WEEK 9 LABORATORY 121
Ebola virus:
The widespread outbreaks of Ebola virus in the West African nations, together with the fatality rate of up to 90% have propelled this virus into the limelight in recent years. What is this virus and where did it come from? History: Ebola virus was first identified in 1976 and is named after a river in the Democratic Republic of the Congo (formerly Zaire). Outbreaks have been sporadic since its discovery, and several strains have been identified in outbreaks across the African continent. Between 2014 and 2016 there was the largest Ebola outbreak in history, resulting in the most human fatalities since the discovery of the virus. Following the first confirmed case in March 2014, 28,637 cases were reported in the outbreak that spanned the West African nations of Sierra Leone, Guinea, Nigeria, Mali and Liberia. During the outbreak 11,315 people died, including one man that died in the US after travelling from Liberia for treatment. Ebola resides in rainforests in Africa, and three fruit bats have been identified as the animal reservoirs that carry the virus asymptomatically. Ebola virus can infect non-human primates including apes, gorillas and chimpanzees, and other wild animals including pigs and deer. To date five Ebola virus species have been identified, with four known to cause human disease. The human pathogenic strains include Zaire ebolavirus, Sudan ebolavirus, Taï Forest ebolavirus, (formerly Côte d’Ivoire ebolavirus), and Bundibugyo ebolavirus. The fifth species, Reston ebolavirus, causes disease in non-human primates and farmed animals including pigs, but appears to be non-pathogenic in humans. In contrast, the Zaire ebolavirus is highly pathogenic in humans with fatality rates of up to 90%.

WEEK 9 LABORATORY 122
Outside of Africa there have been several cases of Ebola virus reported in countries including the United States, Russia, Italy and Spain. There have been reports of isolated laboratory infections through occupational exposure in the United Kingdom and Russia. In the United States, Reston ebolavirus has been detected in imported monkeys, with some transmission to humans, resulting in asymptomatic infections. One Spanish nurse was diagnosed with Ebola virus after caring for a priest repatriated from West Africa, although it was reported that she may have cleared the virus spontaneously. Ebola is a member of the Filoviridae family, from the genus Ebolavirus. The negative sense single-stranded RNA genome is around 19 kb in size and encodes seven proteins. The genome is enclosed in a filamentous capsid of helical structure that is around 900 nm long and 80 nm wide. The ‘L gene’ encodes the ‘Large’ protein, which includes the viral polymerase domain and other enzymatic domains needed for replication. The viral envelope glycoprotein is involved in host cell binding and entry. Transmission: Ebola virus is transmitted through direct contact with bodily fluids and aerosols from infected individuals and the use of unsterilised needles. As Ebola causes haemorrhagic disease, the families of infected individuals often become infected through unprotected contact with blood, vomit, urine and faeces when caring for patients. There are several reports of people becoming infected while attending traditional funerals of Ebola victims, and in health-care workers treating infected patients. Sexual transmission has been reported, and Ebola virus has been detected in semen. Transmission from mother to baby through breast milk has also been reported. Zoonotic transmission (from animals to humans) can occur from contact with infected fruit bats, primates and swine. The practice of hunting and eating bushmeat (meat from wild animals including bats and gorillas) is known to be a high-risk factor in zoonotic transmission of Ebola virus. In 2015, transmission to humans following consumption of infected dog meat in Nigeria was reported.

WEEK 9 LABORATORY 123
Signs and Symptoms: Symptoms of pathogenic Ebola infection include fever, severe headaches, muscle pain, weakness, fatigue, diarrhoea, vomiting and severe haemorrhaging. The incubation period is usually between 2 and 21 days after exposure to the virus, with an average of 8-10 days before the onset of symptoms. The first symptoms usually appear around 8-10 days after exposure and include headaches, fever, fatigue and muscle soreness. Around day 10 the patient develops a sudden high fever and starts to vomit blood. By day 11 bruising, brain damage and bleeding from the nose, mouth, eyes and anus occur. The final stages are around day 12 and include loss of consciousness, seizures, shock, respiratory failure, massive internal bleeding, and finally death. Control: Currently there are no FDA approved vaccines or antiviral drugs available for the treatment of Ebola virus infections. There are several experimental vaccines under development, however these have not yet been fully tested for safety and efficacy. Vaccine candidates in clinical trials include the Zaire ebolavirus (ZEBOV) glycoprotein, which is vectored in the recombinant vesicular stomatitis virus (rVSV). The rVSV-ZEBOV vaccine was shown to be 70-100% effective at preventing disease in the latest clinical trial in December 2016. People at risk of Ebola virus exposure should wear full protective clothing including masks, gowns, goggles, gloves and closed footwear with no skin left exposed. Protective wear must also be used when handling exposed objects that may have been contaminated with the virus. It is recommended that medical personnel undergo a 12-day biosafety training course before treating patients. Disinfection of contaminated equipment can be carried out using heat (boiling for five minutes or 60°C for one hour), by using detergents, alcohol-based products or bleach. Bushmeat is an important food source for some African people, and should be hunted and handled with full protective clothing and cooked thoroughly before consumption. Direct contact with infected corpses at traditional West African funerals should be avoided and quarantine is required for all individuals infected and possibly exposed to the virus. While there is no specific treatment available for Ebola virus patients, supportive therapy includes fluid replacement, analgesics and replacement of coagulation factors to prevent fatal hemorrhaging.

WEEK 9 LABORATORY 124
2. Epidemiological investigation September 21st 2018 As part of an Australian foreign aid venture, the Federal Government committed $4.5 million to a two-year project aimed at improving Ebola virus diagnosis in Sierra Leone. The key West African company involved in the project was WABIRT (West African Biotechnology and Industrial Research Technology), a local company that produced a number of virology molecular and serological testing kits, as well as a number of other biotech portfolios. In addition, five major hospitals in and around Freetown, Sierra Leone were recipients of the Australian Foreign Aid funded diagnostic tests and testing equipment, developed at UNSW as a sensitive Ebola antigen detection kit, providing rapid and early detection over antibody tests. These were provided free as part of the aid funds. As part of the project, a foreign aid team including Prof Peter White, Mr. John Wilson and five other AusAID delegates left Australia and travelled to Freetown, Sierra Leone via Nairobi, Kenya on Kenyan Airways. The AusAID team transfer from flight KQ887 to flight KQ504 in Nairobi where they are joined by epidemiologists Dr Jai Tree, Mr Brandon Sy, and Dr Tendai Idowu working with UNSW and the Medical Research Council (MRC), UK. They have been collecting samples from an outbreak of Rift Valley Fever in neighboring western Uganda, and have travelled from Bundibugyo, Uganda to Nairobi Airport. The teams travel on flight KQ504 to Freetown, Sierra Leone. The aim of the trip was to determine how well the aid project is going and how well the new kits were performing. The epidemiological team also aim to collect serum samples from the Ebola outbreak in Sierra Leone and deliver them to MRC Unit in The Gambia where they will be sequenced. The AusAID team want to determine if the Australian diagnostic tests were more capable of detecting early infection of Ebola virus compared to other available kits/tests. To achieve this aim, the team are to liaise with the local participants (hospitals and WABIRT), and also to determine if the equipment supplied to the hospitals through the foreign aid program was being well used. September 23rd 2018 The team hears reports of potential Ebola cases in Kenema and Kambia, so decide to split into 3 groups to distribute the diagnostic tests and provide support for testing. Group 1 travel to Kenema with WABIRT technical staff. The group includes:
- Dr Rowena Benton - Dr Jenny Morgan - Mr. John Wilson
Group 2 travel to Kambia with researchers from University of Makeni and Njala University. The groups includes:
- Prof Bill Roberts - Dr Afia Ayodele, - Dr Gillian Brown - Subira Arendse

WEEK 9 LABORATORY 125
Group 3 remains in Freetown where they work with staff and officials at Abanita Hospital. The group includes:
- Prof Peter White - Prof Zuri Babatunde - Prof Leighton Scott - Dr Jai Tree - Mr Brandon Sy - Dr Tendai Idowu
September 24th 2018 After collecting samples from the Abanita Hosptial in Freetown, the epidemiological research team travel to the MRC Unit in The Gambia to deliver samples of Rift Valley Virus and Ebola for sequencing. The experiments will take 3 weeks, so Brandon Sy and Dr Tendai Idowu leave Freetown early for the MRC Unit and Dr Jai Tree stays behind in Freetown to attend the Grand Opening of the WABIRT laboratories at the end of the week. September 28th 2018 After observing and supporting the implementation of the new testing kits in Kenema and Kambia, the AusAID teams return to Freetown for the Grand Opening of the new Australian Foreign Aid funded WABIRT laboratories. Over 120 invited guests attend including those from WABIRT, University of Makeni, Njala University, the Sierra Leone Ministry of Health, the Australian embassy, the Sierra Leone government, a number of local hospitals and many other sources. Both Dr Rowena Benton and Dr Jenny Morgan have had headaches and sore muscles for the previous 2 days. They do not attend the Opening and Dr Jenny Morgan is admitted to Abanita Hospital in the early afternoon with some blood in her vomit. On examination she was unwell, with a high fever of 39.9°C and signs of bruising and blood from her eyes and nose. Antigen testing (using the new Australian antigen assay) of a blood sample reveals that Jenny had been infected with Ebola virus. Over the subsequent 12 hours Jenny’s haemorrhagic symptoms worsens accompanied by seizures and loss of consciousness. From there, her condition deteriorates and she died at 11:45 pm the following day. October 6th 2018 Seven people who attended The Grand Opening became ill with Ebola-like symptoms and are admitted to Abanita Hosptial. These include: Prof Peter White Dr Afia Ayodele Prof Zuri Babatunde Prof Subira Arendse Dr Masamba Ejiro Mr Amadi Afolabi Dr Tinashe Kayode Due to the death of Dr Jenny Morgan, your team has been assigned by the Australian Embassy to investigate the outbreak. A West African official (your demonstrator) has been assigned to help the investigation by answering your questions where possible and

WEEK 9 LABORATORY 126
obtaining samples under your direction. The official may also help you to trace the whereabouts of specific individuals prior to the Opening. To aid your investigation you have been given a state-of-the-art Enzyme Linked ImmunoSorbent Assay or ELISA (developed at UNSW and commercialised through UNSW Innovations, the commercial arm of the University), which can detect with high sensitivity Ebola antigens (the Ebola virion) in blood samples.
Aim: To trace outbreak of Ebola virus, and identify the source of the outbreak
• First of all find how many of the seven attendees of the Grand Opening who became ill have the Ebola virus. You will also test sera from Drs Benton and Morgan. This will help you become familiar with the ELISA. Include a positive and negative control.
Suspected Cases Ebola Test Result 1 Dr Rowena Benton 2 Dr Jenny Morgan 3 Prof Peter White 4 Dr Afia Ayodele 5 Prof Zuri Babatunde 6 Prof Subira Arendse 7 Dr Masamba Ejiro 8 Mr Amadi Afolabi 9 Dr Tinashe Kayode Positive control Negative control
3. ELISA analysis of mock serum samples This lab includes a mock ELISA test for detecting the presence of Ebola virus antigen from blood (serum) samples. Each team has a number of serum samples available for testing. The ELISA will be used to test for Ebola virus. Working in your mini groups, the samples will be divided between the four mini groups as below: Mini group 1: 2 samples from people displaying symptoms after the Grand Opening (S1 – S2) plus 15 samples from flight KQ504. Mini group 2: 2 samples from people displaying symptoms after the Grand Opening (S3 – S4) plus 15 samples from Abanita hospital. Mini group 3: 2 samples from people displaying symptoms after the Grand Opening (S5 – S6) plus 10 samples from the Kambia Team. Mini group 4: 3 samples from people displaying symptoms after the Grand Opening (S7 – S9) plus 6 samples from the Kenema Team.

WEEK 9 LABORATORY 127
Materials: • Pipettes and tips • Plates • A positive test sample and a negative test sample • Paper towels • Antibody solution • Washing solution • Colour reagent solution (TMB)
On the 6th October blood samples are taken from those people in Freetown that came into contact with Drs Morgan and Benton, and attendees from The Opening. You have blodd samples from:
- Dr Jenny Morgan and Dr Rowena Benton - 6 samples from the Kenema Team - 10 samples from the Kambia Team - 15 samples from the Abanita Hospital - 7 people displaying symptoms after the Grand Opening - 15 samples from passengers on flight KQ504 that were still in Freetown
- 120 samples from The Opening are not available for testing. - 125 samples from flight KQ504 are also not available.
Procedure:
1. Label the tubes appropriately using the marker provided. 2. Your team will run an ELISA assay on your samples using the microtiter plates
provided. Initially each team will do one positive and one negative control. Add 100 µl of a positive test solution into two wells and 100 µl of a negative test solution into a different set of two wells. Be sure to write down which wells are positive and which are negative controls. 100µl should fill one third of the well.
3. Add 100 µl of your nine suspected Ebola virus samples into each of two wells. Record which wells contain your samples.
4. After adding the samples leave the plate on the lab table undisturbed for 5 minutes. 5. Shake off the fluid into a nearby sink or designated container, making sure that the
fluid has emptied from each well. Tap the plate upside down onto the paper towel to remove any excess liquid or bubbles.
6. Wash the plate using 150µl of washing solution in each well. Repeat a total of three times.
7. Remove excess solution and bubbles by again tapping the plate face down onto a paper towel.
8. Add 100 µl of the enzyme conjugated antibody solution to each well. 9. Allow for 5 minutes incubation time on the lab table and then shake off the fluid. 10. Repeat steps 6 and 7. 11. Add 100 µl of the colourising (TMB peroxidase substrate) solution to each well.

WEEK 9 LABORATORY 128
12. Record your observations after 5 minutes. 13. Each group will record the results of the tests and make a list of the infected 14. samples. Use the results of the tests to aid in your investigation.
4. Tasks for the investigation team Once you are familiar with the ELISA and have taken careful note of the positive results, choose samples from the outbreak for further testing. State your reasoning below for choosing the samples. You should have around 30 tests left. You may need the help of other groups to finally determine the source of the outbreak. At the end of the investigation your findings will be pooled with other teams involved in the outbreak to give a fuller picture of the epidemiological spread of the virus. Tasks:
• Sample selection – what samples will you test and why? Are there any samples missing that could give you more information?
• Where possible try to determine who the Ebola virus positive people were infected by
• Try to trace the epidemiological route of the outbreak (a flow diagram of events may help).
• Trace the person who was the source of the outbreak
• Implement recommendations based on your findings to help slow the spread of Ebola virus
Questions:
• In Dr Jenny’s Morgan’s case, why is her death not surprising?
• What are the advantages of the ability of detecting viral antigen, rather than antibodies directed against the Ebola virus?
• What is the current status of the Ebola vaccine? (you can use the internet to find the answer)

WEEK 9 LABORATORY 129
5. Record results for PRD-1 phage enumeration and P1kc transduction experiments Using results from your mini-group and groups within your demonstrator group, record the plaque forming units (PFU) for each dilution of the PRD-1 phage stock below.
Phage dilution (1x10x) 10 10 10 10 10 10 10 10
PFU (per 0.1 mL)
Check for colonies from your P1kc transduction experiment last week and answer the questions below. END OF WEEK 9
What is the concentration of the PRD-1 phage stock solution (expressed as PFU/ml)?
Did you observe any colonies on your “control” or “transduction” plates?
What is the selection provided by the Minimal E plates that prevents growth of the AB12828 ∆aroE strain?
What is the presumed genotype of any colonies growing on your “transduction” plates?

WEEK 9 LABORATORY 130
APPENDIX 1 Identification Flow Charts adapted from Bergey’s Manual of Determinative Bacteriology
Gram Positive Rods ID Flowchart
Gram Positive Rods
Bacillus spp. Clostrididium spp. Corynebacterium spp. Lactobacillus spp. Mycobacterium spp.
Spore Forming
Bacillus spp. Clostrididium spp.
Corynebacterium spp. Lactobacillus spp. Mycobacterium spp.
Acid Fast
Mycobacterium smegmatis
Corynebacterium spp. Lactobacillus spp.
Bacillus spp.
Strict Anaerobes
Clostrididium spp. You sure you have this? Go to Bergey’s.
Catalase
Corynebacterium spp. Lactobacillus spp.
Starch Hydrolysis
Corynebacterium Kutsceri Corynebacterium xerosis
Glucose Ferm. Activity
Lactobacillus fermenti Lactobacillus casei Lactobacillus delbrueckii
Mannitol
Lactobacillus casei Lactobacillus delbrueckii
+
-
+
+
+
+
+
-
-
-
-
Acid & Gas Acid
-
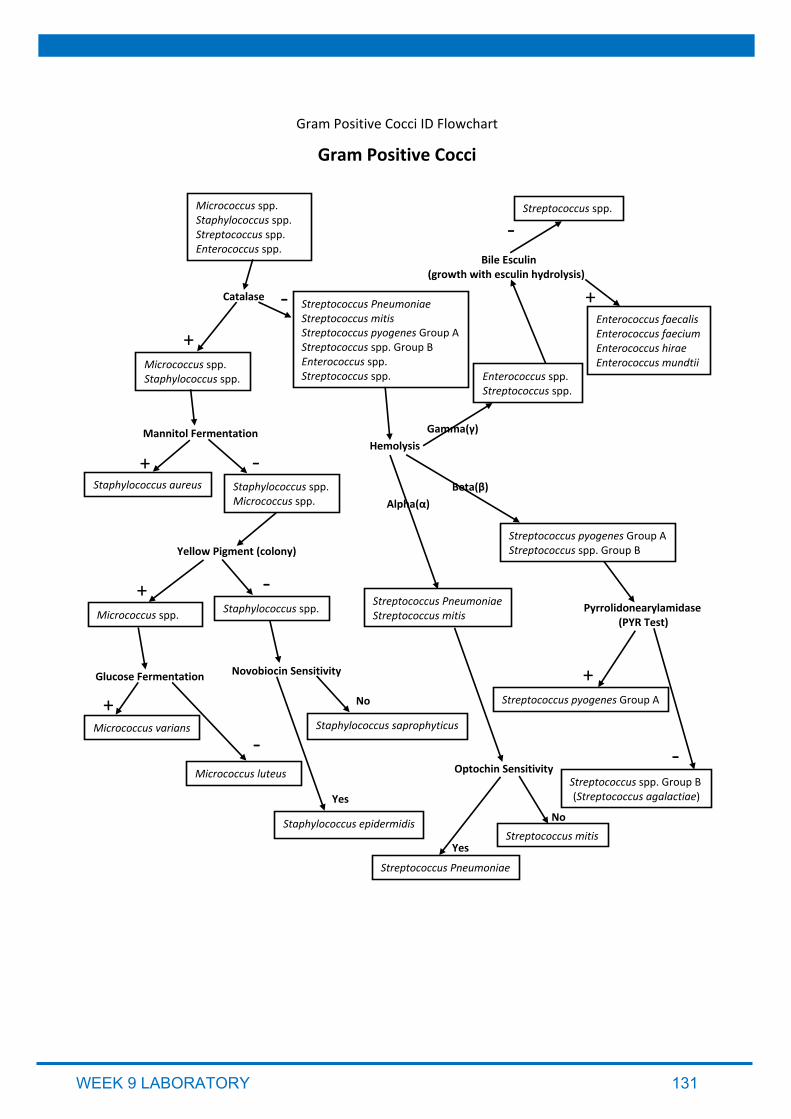
WEEK 9 LABORATORY 131
Gram Positive Cocci ID Flowchart
Gram Positive Cocci
Identification flow charts
Micrococcus spp. Staphylococcus spp. Streptococcus spp. Enterococcus spp.
Catalase
Micrococcus spp. Staphylococcus spp.
Streptococcus Pneumoniae Streptococcus mitis Streptococcus pyogenes Group A Streptococcus spp. Group B Enterococcus spp. Streptococcus spp.
Mannitol Fermentation
Staphylococcus aureus Staphylococcus spp. Micrococcus spp.
Hemolysis
Yellow Pigment (colony)
Micrococcus spp. Staphylococcus spp.
Glucose Fermentation Novobiocin Sensitivity
Micrococcus varians
Micrococcus luteus
Staphylococcus epidermidis
Staphylococcus saprophyticus
Yes
No +
+
+
+
-
-
-
-
Enterococcus spp. Streptococcus spp.
Bile Esculin (growth with esculin hydrolysis)
Streptococcus spp.
Enterococcus faecalis Enterococcus faecium Enterococcus hirae Enterococcus mundtii
Gamma(γ)
Alpha(α) Beta(β)
Streptococcus Pneumoniae Streptococcus mitis
Streptococcus pyogenes Group A Streptococcus spp. Group B
Optochin Sensitivity
Streptococcus Pneumoniae
Streptococcus mitis
Pyrrolidonearylamidase (PYR Test)
Streptococcus pyogenes Group A
Streptococcus spp. Group B (Streptococcus agalactiae)
-
+
+
-
Yes
No

WEEK 9 LABORATORY 132
Gram Negative Rods ID Flowchart
Gram Negative Rods
Identification flow charts
Oxidase Test
Aeromonas, Pseudomonas, Vibrio Enterobacteriaceae
+
-
Glucose Fermentation + Acid - Acid
Vibrio spp., Aeromonas spp. Pseudomonas spp.
Na+ Required for Growth
Vibrio spp. Aeromonas spp.
VP
A. hydrophila A. salmonicida (subsp. masoucida) A. sobria (no gas from glucose) A. veronii
Other Aeromonas spp.
Motility
A. hydrophila A. veronii
A. salmonicida (subsp. masoucida)
H2S Production
A. hydrophila
A. veronii
+
+
+
+ -
-
-
-

WEEK 9 LABORATORY 133
Family Enterobacteriaceae Lactose positive ID Flowchart
Family Enterobacteriaceae
Identification flow charts
Identification flow charts
Lactose Fermentation
Citrobacter diversus Erwinia chrysanthemi Citrobacter freundii Escherichia coli Enterobacter aerogenes Klebsiella oxytoca Enterobacter cloacae Klebsiella pneumoniae Enterobacter amnigenus (subsp. Ozaenae and pneumoniae) Enterobacter intermedius Serratia fonticola Erwinia carotovora Serratia rubidaea
See Lactose Negative Flowchart for Enterobacteriaceae
Indole
Citrobacter diversus Escherichia coli Erwinia chrysanthemi Klebsiella oxytoca
The Rest
MR-VP
Citrate
Citrobacter diversus (VP neg.) Erwinia chrysanthemi (VP and H2S pos.) Klebsiella oxytoca (VP pos and H2S neg.)
Escherichia coli
Enterobacter intermediusi
Citrobacter freundii Serratia fonticola Klebsiella pneumoniae (subsp. ozaenae)
Klebsiella pneumoniae (subsp. pneumoniae) Enterobacter aerogenes Enterobacter cloacae Enterobacter amnigenus Erwinia carotovora Serratia rubidaea
H2S Production
Citrobacter freundii Serratia fonticola Motility pos. Klebsiella pneumoniae subsp. ozaenae Motility neg.
+
+
+/-
+/+
+/-
+
+
-
-
-
-

WEEK 9 LABORATORY 134
Family Enterobacteriaceae Lactose Negative ID Flowchart
Family Enterobacteriaceae Continued
Lactose Negative Flow Chart
Edwardsiella tarda Erwinia cacticida Serratia marcescens Morganella morganii Serratia liquefaciens Proteus mirabilis Shigella spp. (boydii, dysenteriae, flexneri) Proteus penneri Shigella sonnei Proteus vulgaris Yersinia enterocolitica Providencia stuartii Yersinia pestis Salmonella bongori Yersinia pseudotuberculosis Salmonella enterica
Indole Test Edwardsiella tarda Morganella morganii Proteus vulgaris Providencia stuartii
Erwinia cacticida Proteus mirabilis Proteus penneri Salmonella bongori Salmonella enterica Serratia marcescens Serratia liquefaciens Shigella sonnei Yersinia pestis Yersinia pseudotuberculosis
Please See Bergey’s to ID: Shigella spp. (boydii, dysenteriae, flexneri) Yersinia enterocolitica
Urease
Proteus mirabilis Ornithine decarb. pos. Proteus penneri Ornithine decarb. neg., motile Yersinia pseudotuberculosis Ornithine decarb. neg., non-motile
Erwinia cacticida Salmonella bongori Salmonella enterica Serratia marcescens Serratia liquefaciens Shigella sonnei Yersinia pestis
H2S
Edwardsiella tarda Proteus vulgaris
Morganella morganii Providencia stuartii
Proteus vulgaris Edwardsiella tarda
Urease Motility
Erwinia cacticida (lysine decarb. Neg., the rest pos.) Salmonella bongori Salmonella enterica Serratia marcescens Serratia liquefaciens
Shigella sonnei Yersinia pestis
H2S Salmonella bongori KCN growth pos. Salmonella enterica KCN growth neg. (It is this one)
Serratia marcescens Red pigment Serratia liquefaciens No Red pigment
+
+
+
+
+
+
-
-
-
-
-
-
??