Micro Hi-Fi Component System€¦ · 2GB WARNING To prevent fire or shock hazard, do not expose the...
48
Micro Hi-Fi Component System 4-237-828-11 (1) CMT-EP50 © 2001 Sony Corporation Operating Instructions CS GB
Transcript of Micro Hi-Fi Component System€¦ · 2GB WARNING To prevent fire or shock hazard, do not expose the...

Micro Hi-FiComponentSystem
4-237-828-11 (1)
CMT-EP50© 2001 Sony Corporation
Operating Instructions
CS
GB

2GB
WARNINGTo prevent fire or shock hazard, do notexpose the unit to rain or moisture.To avoid electrical shock, do not open the cabinet.Refer servicing to qualified personnel only.
Do not install the appliance in a confined space,such as a bookcase or built-in cabinet.
To prevent fire, do not cover the ventilation of theapparatus with newspapers, table-cloths, curtains, etc.And don’t place lighted candles on the apparatus.
To prevent fire or shock hazard, do not place objectsfilled with liquids, such as vases, on the apparatus.
Don’t throw a battery, dispose it asthe injurious wastes.

3GB
* For European model only
Table of Contents
Parts Identification
Main unit ............................................... 4Remote Control ..................................... 5
Getting Started
Hooking up the system .......................... 6Inserting two size AAA (R03) batteries
into the remote ................................ 7Setting the time ...................................... 7
CD
Loading the CD ..................................... 8Playing the CD
— Normal Play/Shuffle Play/RepeatPlay .................................................. 8
Programing the CD tracks— Program Play .............................. 9
Using the CD display ............................ 9
Tuner
Presetting radio stations ....................... 10Listening to the radio
— Preset Tuning ........................... 11Using the Radio Data System
(RDS)* .......................................... 11
Tape
Loading a tape ..................................... 13Playing a tape ...................................... 13Recording to a tape
— CD Synchro Recording/RecordingManually ....................................... 14
Timer-recording radio programs ......... 15
Sound Adjustment
Adjusting the sound ............................. 16Selecting the audio emphasis .............. 16
Other features
Falling asleep to music— Sleep Timer .............................. 17
Waking up to music— Daily Timer .............................. 17
Additional information
Precautions .......................................... 19Troubleshooting ................................... 20Specifications ...................................... 22
GB

4GB
Cassette compartment qj (13)CD 4 (8, 9, 14)DISPLAY wf (9, 11)Display Window 5 (8, 9, 10)ENTER ql (7, 9, 10, 12)ISS 0 (14)MEGA BASS 8 (16)MONO STEREO 0 (11)MUSIC MENU 9 (16)PHONES jack waPLAY MODE w; (8, 9)PRESET +/– qk (10, 11, 12)
RDS (European model only)/DIRw; (12, 13, 14, 15)
Remote sensor wgTAPE 3 (13)TIMER indicator 2 (15, 18)TUNER 6 (10, 11, 14)TUNER MEM ql (10)TUNING + qf (10, 11, 12, 15)TUNING – qg (10, 11, 12, 15)VOLUME control qd
Parts Identification
The items are arranged in alphabetical order.
Refer to the pages indicated in parentheses ( ) for details.
Main unit
1 2 3 4 5 6 7
8
9
q;
qh
qg
qf
qd
qs
qa
qk
ql
w;
wa
ws
wg
wf
wd
qj
BUTTON DESCRIPTIONS@/1 (power) 1 (7, 11, 15, 18)
CD. m (go back) qg (8, 9)M > (go forward) qf (8, 9)nN (play) qa (8, 9)X (pause) wd (8)Z PUSH OPEN/CLOSE 7 (8)x (stop) qs (8, 9)
TAPEM > (fast forward) qf (13)X (pause) wd (13)nN (play) qa (13, 14, 15)z (recording) ws (14, 15). m (rewind) qg (13)Z PUSH OPEN/CLOSE qh (13)x (stop) qs (13, 14)

Pa
rts Ide
ntific
atio
n
5GB
CD 3 (8, 9, 14)CLOCK/TIMER qg (7, 15, 17)DISPLAY qh (9, 11)MEGA BASS 2 (16)MUSIC MENU wa (16)PLAY MODE/RDS (European
model only)/DIR qj (8, 9, 12,13, 14, 15)
PRESET +/– qk (10, 11)REPEAT 7 (8)SLEEP qd (17)TAPE w; (13)TIMER ON/OFF qf (15, 18)TUNER/BAND 5 (10, 11, 14)TUNER MEM/ENTER 6 (7, 9,
10, 12, 15, 17, 18)TUNING/CLOCK/TIMER +/–ql (7, 10, 11, 12, 15, 17, 18)
VOLUME +/– 4
BUTTON DESCRIPTIONSM (fast forward) > (go
forward) 0 (8, 9, 13). (go back) m (rewind) qa
(8, 9, 13)X (pause) qs (8, 13)nN (play) 8 (8, 9, 13, 14, 15)`/1 (power) 1 (7, 11, 15, 18)x (stop) 9 (8, 9, 13, 14)
Remote Control
1234
5
6
7
8
9
q;
qa
qs
qg
qd
qf
qh
qj
qk
ql
w;
wa

6GB
2Connect the FM/AM antennas.Set up the AM loop antenna, then connectit.
Jack type A
1Connect the speakers.Connect the speaker cords to the SPEAKERterminals as shown below.
Getting Started
Hooking up the systemDo the following procedure 1 to 3 to hook up your system using the supplied cords andaccessories.
3
1
2
2
FM antenna
SPEAKER(IMPEDANCE USE 8Ω)
L
R
Red (3)
Insert only thestripped portion.
Black (#)
AM loopantenna
AM loop antennaExtend the FM leadantenna horizontally.
Left speakerRight speaker
FM ANT
75Ω
COAXIAL
AM ANT

Ge
tting
Sta
rted
7GB
NoteIf you do not use the remote for a long period of time,remove the batteries to avoid possible damage frombattery leakage.
Setting the time
1 Turn on the system.
2 Press CLOCK/TIMER on the remote.When you set the clock for the first time, goto step 5.
3 Press CLOCK/TIMER on the remoterepeatedly until “SET CLK” appears inthe display.
4 Press TUNER MEM/ENTER on theremote.
5 Press TUNING/CLOCK/TIMER + or – onthe remote repeatedly to set the hour.
6 Press TUNER MEM/ENTER on theremote.
7 Press TUNING/CLOCK/TIMER + or – onthe remote repeatedly to set the minute.
8 Press TUNER MEM/ENTER on theremote.
To reset the system clockStart over from step 1.
NoteThe clock settings are canceled when you disconnectthe power cord or if a power failure occurs.
Jack type B
3Connect the power cord to a wall outlet.If the supplied adaptor on the plug does notfit your wall outlet, detach it from the plug(only for models equipped with theadaptor).To turn on the system, press [/ 1 (power).
To attach the speaker padsAttach the supplied speaker pads to the bottomof the speakers to stabilize the speakers andprevent them from slipping.
Inserting two size AAA(R03) batteries into theremote
TipWhen the remote no longer operates the system,replace both batteries with new ones.
AM loop antennaExtend the FM leadantenna horizontally.
FM ANT
75Ω
COAXIAL
AM ANT

8GB
CD
Loading the CD1 Press Z PUSH OPEN/CLOSE down to
open the lid of the CD compartment.
2 Place a CD with the label side up on thecompartment.
3 Press Z PUSH OPEN/CLOSE down toclose the lid of the CD compartment.
Playing the CD— Normal Play/Shuffle Play/Repeat
Play
This system lets you play the CD in differentplay modes.
Other OperationsTo
Stop playback
Pause
Select a track
Find a pointin a track
Play repeatedly(Repeat Play)
Remove the CD
1 Press CD.
2 Press PLAY MODE (PLAY MODE/RDS/DIR on the remote) repeatedly until themode you want appears in the display.
Select
No display
SHUFFLE
PROGRAM
3 Press nN.
To play
The CD in original order.
The tracks on the CD in randomorder.
The tracks on the CD in the orderyou want them to be played. (See“Programing the CD tracks” onpage 9.)
Do this
Press x.
Press X.Press again to resume play.
Press M > (to go forward) or. m (to go back).
During play, press and hold M> (to go forward) or . m(to go back). Release it when youfind the desired point.
Press REPEAT on the remoteduring play until “REPEAT” or“REPEAT 1” appears.REPEAT: For all the tracks on theCD up to five times.REPEAT 1: For a single track only.To cancel playing repeatedly, pressREPEAT on the remote until“REPEAT” or “REPEAT 1”disappears.
Press Z PUSH OPEN/CLOSE.
Track number
Playing time
When you play a CDsingle (8 cm CD),place it on the innercircle of thecompartment.

CD
9GB
Programing the CD tracks— Program Play
You can make a program of up to 32 tracks inthe order you want them to be played.
1 Press CD, then place a CD.
2 Press PLAY MODE (PLAY MODE/RDS/DIR on the remote) repeatedly until“PROGRAM” appears in the display.
3 Press . m or M > until thedesired track appears in the display.
4 Press ENTER (TUNER MEM/ENTER onthe remote).The track is programed. The program stepnumber appears.
5 To program additional tracks, repeatsteps 3 to 4.
6 Press nN.Program Play starts.
To
Cancel ProgramPlay
Add a track tothe end of theprogram
Erase the entireprogram
TipThe program you made remains in the system’smemory even after it has been played back. Press CD,then press nN to play the same program again.
Preset number
Do this
Press PLAY MODE (PLAYMODE/RDS/DIR on the remote)until “PROGRAM” disappearsfrom the display.
Do step 3 and 4 with Program Playstopped.
Press x once, when Program Playis in stop mode, or twice duringProgram Play.
Using the CD display
Press DISPLAY repeatedly.The display changes as follows:
During normal playElapsed playing time on the current track tRemaining time on the current track tRemaining time on the current CD t Clockdisplay (for five seconds) t Elapsed playingtime on the current track t ...
In the stop modeTotal number of tracks and total playing timet Clock display (for five seconds) t Totalnumber of tracks and total playing time t ...
Selected track number(including selected track)

10GB
To tune in a station with a weaksignalPress TUNING (TUNING/CLOCK/TIMER onthe remote) + or – repeatedly in step 2 to tunein the station manually.
To set another station to an existingpreset numberStart over from step 1. After step 3, pressPRESET + or – repeatedly to select the presetnumber where you want to store the otherstation and the press ENTER (TUNER MEM/ENTER on the remote).
You can preset a new station in the selectedpreset number.
To erase all preset stations1 Press and hold TUNER MEM (TUNER
MEM/ENTER on the remote) until“ERASE” and “PRESET” appear alternately.
2 Press ENTER (TUNER MEM/ENTER onthe remote).All preset stations are cleared.
To change the AM tuning interval(except for the European model)Disconnect the power cord from the wall outletfirst, and then set the AM FREQ STEP switchat the rear to 9 kHz or 10 kHz.
TipThe preset stations are retained for half a day even ifyou unplug the power cord or if a power failureoccurs.
Tuner
Presetting radio stationsYou can preset up to 30 stations.
1 Press TUNER (TUNER/BAND on theremote) repeatedly to select FM or AM.
2 Press and hold TUNING (TUNING/CLOCK/TIMER on the remote) + or –until the frequency indication starts tochange, then release it.Scanning stops automatically when thesystem tunes in a station. “STEREO” (for astereo program) appears.If it doesn’t stop automatically, pressTUNING (TUNING/CLOCK/TIMER onthe remote) + or – repeatedly to tune in astation manually.
3 Press TUNER MEM (TUNER MEM/ENTER on the remote).A preset number appears in the display.The stations are stored from preset number1.
4 Press ENTER (TUNER MEM/ENTER onthe remote).The station is stored.
5 Repeat steps 1 to 4 to store otherstations.
Preset number

Tu
ne
r
11GB
Listening to the radio–– Preset Tuning
Preset radio stations in the tuner’s memoryfirst.
1 Press TUNER (TUNER/BAND on theremote) repeatedly to select FM or AM.
2 Press PRESET + or – repeatedly to tunein the desired preset station.The preset number appears in the displayfor a few seconds.When only one station is preset, only thatstation is tuned.
To Do this
Turn off the radio Press ?/1.
To listen to non-preset radio stationsUse manual or automatic tuning in step 2.For manual tuning, press TUNING (TUNING/CLOCK/TIMER on the remote) + or –repeatedly.
For automatic tuning, press and hold TUNING(TUNING/CLOCK/TIMER on the remote) +or –.
Tips• When an FM program is noisy, set MONO
STEREO to MONO so that “MONO” appears inthe display. There will be no stereo effect, but thereception will improve.
• To improve broadcast reception, adjust theantennas.
• You can change the display into the clock display(for five seconds) by pressing DISPLAY.
Using the Radio DataSystem (RDS)
(European model only)
What is the Radio Data System?Radio Data System (RDS) is a broadcastingservice that allows radio stations to sendadditional information along with the regularprogram signal. This tuner offers convenientRDS features like station name display andlocation of stations by program type. RDS isavailable only on FM stations.*
NoteRDS may not work properly if the station you aretuned in is not transmitting the RDS signal properlyor if the signal strength is weak.
* Not all FM stations provide RDS service, nor dothey provide the same types of services. If you arenot familiar with the RDS system, check with yourlocal radio stations for details on RDS services inyour area.
Receiving RDS broadcastsSimply select a station from the FM band.When you tune in a station that provides RDSservices, “RDS” appears in the display.
To check the RDS informationEach time you press DISPLAY, the displaychanges as follows:
Frequency t RDS name* t RDS TEXT*t RDS type* t Clock display (for fiveseconds) t Frequency t ...
* If the RDS broadcast is not received, the RDSname, RDS TEXT and RDS type may not appear inthe display.
continued

12GB
Locating a station byprogram type (PTY)You can locate a station you want by selectinga program type. The system tunes in the type ofprograms currently being broadcast from theRDS stations stored in the tuner’s presetmemory.
The types of programs include NEWS,AFFAIRS (current news), INFO, SPORT,EDUCATE (education programs), DRAMA,CULTURE, SCIENCE, VARIED (interviews,games and comedy), POP M, ROCK M, EASYM, LIGHT M, CLASSICS, OTHER M,WEATHER, FINANCE, CHILDREN,SOCIAL, RELIGION, PHONE IN, TRAVEL,LEISURE, JAZZ, COUNTRY, NATION M,OLDIES, FOLK M , DOCUMENT, TESTALARM and NONE (any programs not definedabove).
1 Press RDS/DIR (PLAY MODE/RDS/DIRon the remote) while listening to theradio.
2 Press PRESET + or – repeatedly toselect the program type you want.
3 Press and hold TUNING (TUNING/CLOCK/TIMER on the remote) + or –.When the tuner receives a program, “PTY”flashes.
Tip“TYPE NOT FOUND” appears when the programtype you select is not currently being broadcast.
To cancel PTYPress RDS/DIR (PLAY MODE/RDS/DIR onthe remote) again.
Using the Radio Data System (RDS)(continued)
Listening to a trafficinformationWhen the tuner receives traffic informationsignal, “TRAFFIC INFORMATION” will bescrolled in the display.
1 Press RDS/DIR (PLAY MODE/RDS/DIRon the remote) repeatedly until “INFOOFF” or “INFO ON” appears whilelistening to an FM program.
2 Press ENTER (TUNER MEM/ENTER onthe remote) to set “INFO ON”.
Setting the time to thebroadcastYou can set the time to the clock informationreceived.
1 Press RDS/DIR (PLAY MODE/RDS/DIRon the remote) repeatedly until “SYNCOFF” or “SYNC ON” appears whilelistening to an FM program.
2 Press ENTER (TUNER MEM/ENTER onthe remote) to set “SYNC ON”.

Ta
pe
13GB
Tape
Loading a tape1 Press TAPE.
2 Press Z PUSH OPEN/CLOSE.
3 Insert a tape in deck with the side youwant to play/record facing forward.
Playing a tapeYou can use TYPE I (normal), TYPE II (CrO2)or TYPE IV (metal) tape.
1 Load a recorded tape.
2 Press TAPE.
3 Press RDS/DIR (PLAY MODE/RDS/DIRon the rmote) repeatedly to select gto play one side, h to play both sides,or j* to play both sides repeatedly.* The tape automatically stops after playing
back five times.
4 Press nN.
Press nN again to play the reverseside.
To
Stop play
Pause
Fast-forward or rewind
Remove the cassette
Insert with the sideyou want to play/record facing forward.
Press
x
XPress again to resume play.
With the tape stopped, press. m/M >
Z PUSH OPEN/CLOSE
Finding the beginning of atrack (AMS*)During playback, press . m or M >.
The tape is wound or rewound to the beginningof the next or current track, and play will startautomatically. The search direction, “+”(forward) or “–” (back), and “1” appear in thedisplay.
* AMS (Automatic Music Sensor)
TipYou can change the display into the clock display (forfive seconds) by pressing DISPLAY.
NoteThe AMS function may not operate correctly underthe following circumstances:– When the unrecorded space between tracks is less
than 4 seconds long.– If completely different information is recorded on
the left and right channels.– When there are continuous sections of extremely
low level or low frequency sound (like those of abaritone sax).
– When the system is placed near a television. (In thiscase, we recommend moving the system fartheraway from the television or turning off thetelevision.)

14GB
Steps Recording from a CD(CD Synchro Recording)
Recording from the radio
1 Load a blank tape.
2 Press CD.
3 Load the CD you want to record.
4 Press z.
The deck stands by for recording.
5 Press nN, if you want to switch the direction.
6 Press RDS/DIR (PLAY MODE/RDS/DIR on the remote) repeatedly to select gto record on one side, h to record on both sides.
7 Press z again.
Recording starts.
Recording to a tape–– CD Synchro Recording/Recording Manually
You can record from a CD or radio. You can use TYPE I (normal) tape.
To stop recordingPress x.
Tips• For recording from a CD to a tape manually, you
can press . m or M > to select tracksduring recording pause mode (after step 4 andbefore step 6).
• When you record on both sides, be sure to startfrom the front side. If you start from the reverseside, recording stops at the end of the reverse side.
• When an AM program is noisy, set ISS to select theposition that most decreases the noise.
Press TUNER (TUNER/BAND on theremote).
Tune in the station you want to record.
Ta
pe
15GB
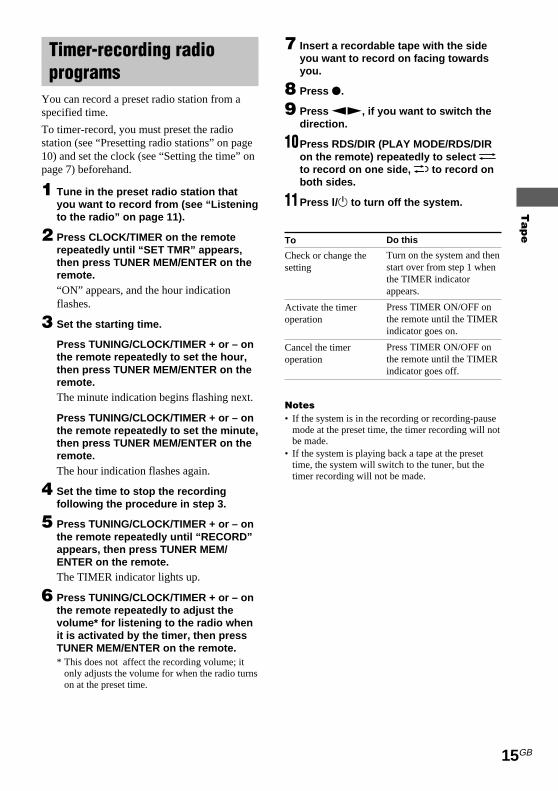
Timer-recording radioprograms
You can record a preset radio station from aspecified time.
To timer-record, you must preset the radiostation (see “Presetting radio stations” on page10) and set the clock (see “Setting the time” onpage 7) beforehand.
1 Tune in the preset radio station thatyou want to record from (see “Listeningto the radio” on page 11).
2 Press CLOCK/TIMER on the remoterepeatedly until “SET TMR” appears,then press TUNER MEM/ENTER on theremote.“ON” appears, and the hour indicationflashes.
3 Set the starting time.
Press TUNING/CLOCK/TIMER + or – onthe remote repeatedly to set the hour,then press TUNER MEM/ENTER on theremote.The minute indication begins flashing next.
Press TUNING/CLOCK/TIMER + or – onthe remote repeatedly to set the minute,then press TUNER MEM/ENTER on theremote.The hour indication flashes again.
4 Set the time to stop the recordingfollowing the procedure in step 3.
5 Press TUNING/CLOCK/TIMER + or – onthe remote repeatedly until “RECORD”appears, then press TUNER MEM/ENTER on the remote.The TIMER indicator lights up.
6 Press TUNING/CLOCK/TIMER + or – onthe remote repeatedly to adjust thevolume* for listening to the radio whenit is activated by the timer, then pressTUNER MEM/ENTER on the remote.* This does not affect the recording volume; it
only adjusts the volume for when the radio turnson at the preset time.
7 Insert a recordable tape with the sideyou want to record on facing towardsyou.
8 Press z.
9 Press nN, if you want to switch thedirection.
10Press RDS/DIR (PLAY MODE/RDS/DIRon the remote) repeatedly to select gto record on one side, h to record onboth sides.
11Press ?/1 to turn off the system.
To
Check or change thesetting
Activate the timeroperation
Cancel the timeroperation
Notes• If the system is in the recording or recording-pause
mode at the preset time, the timer recording will notbe made.
• If the system is playing back a tape at the presettime, the system will switch to the tuner, but thetimer recording will not be made.
Do this
Turn on the system and thenstart over from step 1 whenthe TIMER indicatorappears.
Press TIMER ON/OFF onthe remote until the TIMERindicator goes on.
Press TIMER ON/OFF onthe remote until the TIMERindicator goes off.

16GB
Sound Adjustment
Adjusting the soundPress MEGA BASS.“MEGA BASS” appears in the display. Toreturn to normal sound, press the button again.
Selecting the audioemphasis
Selecting the preset effect from themusic menuPress MUSIC MENU repeatedly to select thepreset effect you desire.
Each time you press the button, the displaychanges as follows:
ROCK t POP t JAZZ t FLAT* tROCK t ...* “FLAT” is displayed for a few seconds.

So
un
d A
dju
stme
nt/O
the
r fea
ture
s
17GB
Waking up to music— Daily Timer
You can wake up to music at a preset timeevery day. Make sure you have set the clock(see page 7).
1 Prepare the sound source you want toplay.• CD: Load a CD.• Tape: Insert a tape with the side you
want to play on facing towards you.• Radio: Tune in the preset station you
want (see page 10).
2 Press CLOCK/TIMER on the remoterepeatedly until “SET TMR” appears,then press TUNER MEM/ENTER on theremote.“ON” appears, and the hour indicationflashes.
3 Set the starting time.
Press TUNING/CLOCK/TIMER + or – onthe remote repeatedly to set the hour,then press TUNER MEM/ENTER on theremote.The minute indication begins flashing next.
Press TUNING/CLOCK/TIMER + or – onthe remote repeatedly to set the minute,then press TUNER MEM/ENTER on theremote.The hour indication flashes again.
4 Set the time to stop the playbackfollowing the procedure in step 3.
5 Press TUNING/CLOCK/TIMER + or – onthe remote repeatedly until the musicsource you want appears, and thenpress TUNER MEM/ENTER on theremote.The display changes as follows:TUNER t RECORD (tuner) t CD tTAPE t TUNER t …The TIMER indicator lights up.
Other features
Falling asleep to music— Sleep Timer
You can set the system to turn off after certainamount of time, so that you can fall asleep tomusic.
Press SLEEP on the remote.Every time you press the button, the minutedisplay (the turn-off time) changes as follows:90 t 80 t 70 t … t 10 t OFF t 90t …While the Sleep Timer is on, “TIMER” flashesin the display.
To
Check theremaining time
Change thetime to turn off
Cancel the SleepTimer function
Press
SLEEP on the remote once.
SLEEP on the remote repeatedlyto select the time you want.
SLEEP on the remote repeatedlyuntil “SLEEP OFF” appears.
continued
18GB
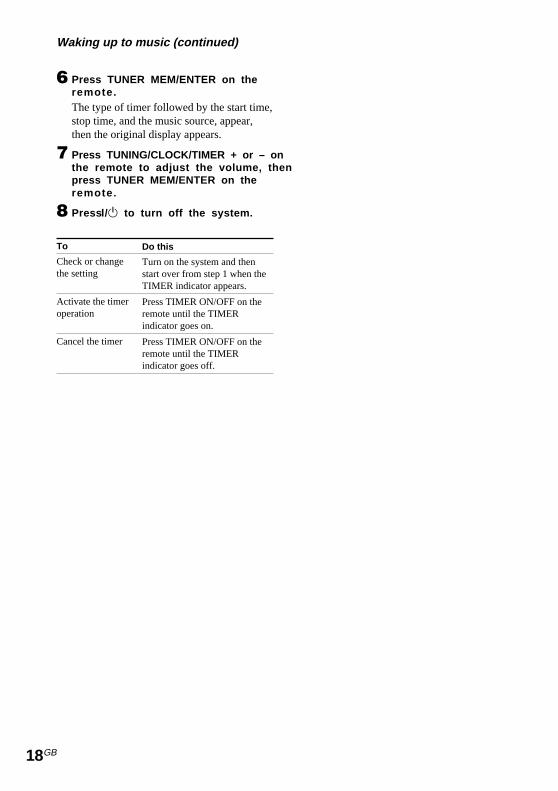
6 Press TUNER MEM/ENTER on theremote.The type of timer followed by the start time,stop time, and the music source, appear,then the original display appears.
7 Press TUNING/CLOCK/TIMER + or – onthe remote to adjust the volume, thenpress TUNER MEM/ENTER on theremote.
8 Press ?/1 to turn off the system.
To
Check or changethe setting
Activate the timeroperation
Cancel the timer
Do this
Turn on the system and thenstart over from step 1 when theTIMER indicator appears.
Press TIMER ON/OFF on theremote until the TIMERindicator goes on.
Press TIMER ON/OFF on theremote until the TIMERindicator goes off.
Waking up to music (continued)

Ad
ditio
na
l Info
rma
tion
19GB
On operation• If the system is brought directly from a cold to a
warm location, or is placed in a very damp room,moisture may condense on the lens inside the CDplayer. Should this occur, the system will notoperate properly. Remove the CD and leave thesystem turned on for about an hour until themoisture evaporates.
• When you move the system, take out any discs.
If you have any questions or problems concerningyour stereo system, please consult your nearest Sonydealer.
Notes on CDs• Before playing, clean the CD with a cleaning cloth.
Wipe the CD from the center out.• Do not use solvents.• Do not expose the CD to direct sunlight or heat
sources.• Discs with non-standard shapes (e.g., heart, square,
star) cannot be played on this system. Attempting todo so may damage the system. Do not use suchdiscs.
Note on CD-R/CD-RW playbackDiscs recorded on CD-R/CD-RW drives may not beplayed back because of scratches, dirt., recordingcondition or the drive’s characteristics. Besides, thediscs, which are not yet finalized at the end ofrecording cannot be played back.
Cleaning the cabinetUse a soft cloth slightly moistened with milddetergent solution.
To save a tape permanentlyTo prevent a tape from being accidentally recordedover, break off the cassette tab from side A or B asillustrated.
If you later want to reuse the tape for recording, coverthe broken tab with adhesive tape.
Additional information
Precautions
On operating voltageBefore operating the system, check that the operatingvoltage of your system is identical with the voltage ofyour local power supply.
On safety• The system is not disconnected from the AC power
source (mains) as long as it is connected to the walloutlet, even if the system itself has been turned off.
• Unplug the system from the wall outlet (mains) if itis not to be used for an extended period of time. Todisconnect the cord (mains lead), pull it out by theplug. Never pull the cord itself.
• Should any solid object or liquid fall into thecomponent, unplug the stereo system and have thecomponent checked by qualified personnel beforeoperating it any further.
• The AC power cord must be changed only at aqualified service shop.
On placement• Place the system in a location with adequate
ventilation to prevent heat build-up the system.• Do not place the system in an inclined position.• Do not place the system in locations where it is;
– Extremely hot or cold– Dusty or dirty– Very humid– Vibrating– Subject to direct sunlight.
On heat buildup– Although the system heats up during operation, this
is not malfunction.– Place the system in a location with adequate
ventilation to prevent heat build-up in the system.
If you continuously use this system at a large volume,the cabinet temperature of the top, side and bottomrises considerably. To avoid burning yourself, do nottouch the cabinet.
To prevent a malfunction, do not cover the ventilationhole for the cooling fan.
Break off thecassette tab ofside A
continued

20GB
TroubleshootingIf you have any problem using this system, usethe following check list.
First, check that the power cord is connectedfirmly and the speakers are connected correctlyand firmly.
Should any problem persist, consult yournearest Sony dealer.
General
The clock setting/radio presetting/timer iscanceled.
• The power cord is disconnected or a powerfailure occurs longer than half a day.Redo the following:— “Setting the time” on page 7— “Presetting radio stations” on page 10If you have set the timer, also redo “Timer-recoding radio programs” on page 15 and“Waking up to music” on page 17.
There is no sound.
• Turn VOLUME clockwise and hold.• The headphones are connected.• Insert only the stripped portion of the speaker
cord into the SPEAKER terminal. Inserting thevinyl portion of the speaker cord will obstruct thespeaker connections.
There is severe hum or noise.
• A TV or VCR is placed too close to the stereosystem. Move the stereo system away from theTV or VCR.
The clock indication does not show the correcttime.
• A power interruption occurred. Set the clock andtimer settings again.
The timer does not function.
• Set the clock correctly.• You cannot activate the Timer-recording and
Daily Timer at the same time.• When you used the Sleep Timer, Daily Timer
and Timer-recording will not turn on the systemuntil the Sleep Timer turns it off.
Before placing a cassette in the tapedeckTake up any slack in the tape. Otherwise the tape mayget entangled in the parts of the tape deck and becomedamaged.
When using a tape longer than 90minutesThe tape is very elastic. Do not change the tapeoperations such as play, stop, and fast-winding (etc.)frequently. The tape may get entangled in the tapedeck.
Cleaning the tape headsClean the tape heads after every 10 hours of use.Make sure to clean the tape heads before you start animportant recording or after playing an old tape. Useseparately sold dry-type or wet-type cleaning cassette.For details, refer to the instructions of the cleaningcassette.
Demagnetizing the tape headsDemagnetize the tape heads and the metal parts thathave contact with the tape every 20 to 30 hours of usewith a separately sold demagnetizing cassette. Fordetails, refer to the instructions of the demagnetizingcassette.
Precautions (continued)

Ad
ditio
na
l Info
rma
tion
21GB
The remote does not function.
• There is an obstacle between the remote and thesystem.
• The remote is not pointing in the direction of thesystem’s sensor.
• The batteries have run down. Replace thebatteries.
The color irregularity on a TV screen persists.
• Turn off the TV set once, then turn it on after 15to 30 minutes. If the color irregularity stillpersists, place the speakers farther away from theTV set.
Speakers
Sound comes from one channel or unbalancedleft and right volume.
• Check the speaker connection and speakerplacement.
Sound lacks bass.
• Check that the speaker’s + and – terminals areconnected correctly.
CD Player
The CD compartment does not close.
• The CD is not placed properly.
The CD will not play.
• The CD is not lying flat in the CD compartment.• The CD is dirty.• The CD is inserted label side down.• Moisture condensation has built up. Remove the
CD and leave the system turned on for about anhour until the moisture evaporates.
Tape Deck
The tape does not record.
• No tape in the cassette compartment.• The tab has been removed from the cassette.• The tape has reeled to the end.
The tape does not record nor play or there is adecrease in sound level.
• The heads are dirty. Clean them (see “Cleaningthe tape heads” on page 20).
• The record/playback heads are magnetized.Demagnetize them (see “Demagnetizing the tapeheads” on page 20).
The tape does not erase completely.
• The record/playback heads are magnetized.Demagnetize them (see “Demagnetizing the tapeheads” on page 20).
There is excessive wow or flutter, or the sounddrops out.
• The capstans or pinch rollers are dirty. Cleanthem (see “Cleaning the tape heads” on page 20).
Noise increases or the high frequencies areerased.
• The record/playback heads are magnetized.Demagnetize them (see “Demagnetizing the tapeheads” on page 20).
Tuner
Noise is heard.
• Adjust the antennas.
A stereo FM program cannot be received instereo.
• Set MONO STEREO so that “STEREO”appears.
MessagesThe following message may appear in thedisplay during operations.
NO DISC
• There is no disc on the CD compartment.

22GB
Specifications
AUDIO POWER SPECIFICATIONS:(U.S.A. model only)POWER OUTPUT AND TOTALHARMONIC DISTORTION:
with 8 Ω loads both channels driven, from 120- 10,000 Hz; rates 12 W per channel minimumRMS power, with no more than 10% totalharmonic distortion from 250 mW to ratedoutput.
Amplifier sectionCanadian model:Continuous RMS power output (reference)
12 + 12 W(8 Ω at 1 kHz, 10% THD)
European model:DIN power output (rated) 11 + 11 W
(8 Ω at 1 kHz, DIN)Continuous RMS power output (reference)
12 + 12 W(8 Ω at 1 kHz, 10% THD)
Music power output (reference)27 + 27 W
Other model:The following measured at AC 230 V, 50/60 HzDIN power output (rated) 11 + 11 W
(8 Ω at 1 kHz, DIN)Continuous RMS power output (reference)
12 + 12 W(8 Ω at 1 kHz, 10% THD)
OutputsPHONES: Accepts headphones of(stereo mini jack) 8 Ω or moreSPEAKER: Accepts impedance of 8 to
16 Ω
CD player sectionSystem Compact disc and digital
audio systemLaser Semiconductor laser
(λ=780 nm)Emission duration:continuous
Frequency response 20 Hz - 20 kHz (±0.5 dB)
Tape player sectionRecording system 4-track 2-channel stereoFrequency response 50 - 13 000 Hz (±3 dB),
using Sony TYPE Icassette
Wow and flutter ±0.15% W.Peak (IEC)0.1% W.RMS (NAB)±0.2% W.Peak (DIN)
Tuner sectionFM stereo, FM/AM superheterodyne tuner
FM tuner sectionTuning range 87.5 - 108.0 MHzAntenna FM lead antennaAntenna terminal 75 Ω coaxialIntermediate frequency 10.7 MHz
AM tuner sectionTuning rangePan-American model: 530 - 1 710 kHz
(with the interval set at10 kHz)531 - 1 710 kHz(with the interval set at9 kHz)
European model: 531 -1 602 kHz(with the interval set at9 kHz)
Other models: 531 - 1 602 kHz(with the interval set at9 kHz)530 - 1 710 kHz(with the interval set at10 kHz)
Antenna AM loop antennaAntenna terminal External antenna terminalIntermediate frequency 450 kHz
Ad
ditio
na
l Info
rma
tion
23GB
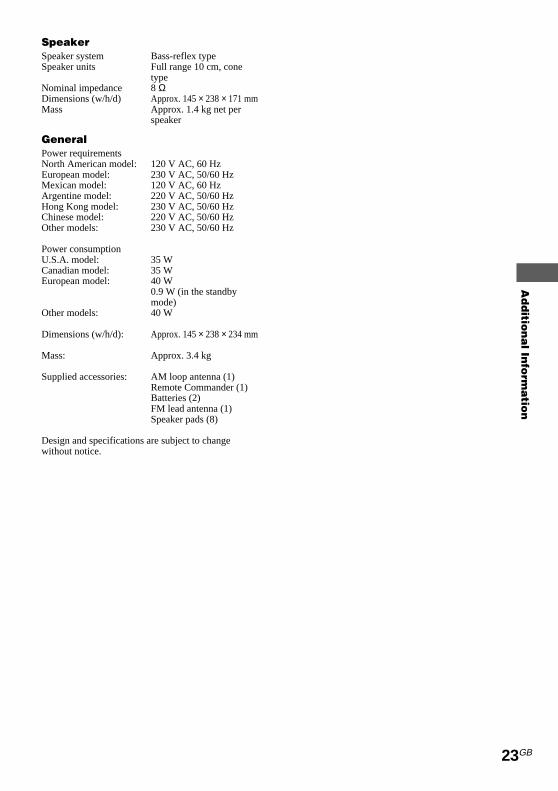
SpeakerSpeaker system Bass-reflex typeSpeaker units Full range 10 cm, cone
typeNominal impedance 8 ΩDimensions (w/h/d) Approx. 145 × 238 × 171 mmMass Approx. 1.4 kg net per
speaker
GeneralPower requirementsNorth American model: 120 V AC, 60 HzEuropean model: 230 V AC, 50/60 HzMexican model: 120 V AC, 60 HzArgentine model: 220 V AC, 50/60 HzHong Kong model: 230 V AC, 50/60 HzChinese model: 220 V AC, 50/60 HzOther models: 230 V AC, 50/60 Hz
Power consumptionU.S.A. model: 35 WCanadian model: 35 WEuropean model: 40 W
0.9 W (in the standbymode)
Other models: 40 W
Dimensions (w/h/d): Approx. 145 × 238 × 234 mm
Mass: Approx. 3.4 kg
Supplied accessories: AM loop antenna (1)Remote Commander (1)Batteries (2)FM lead antenna (1)Speaker pads (8)
Design and specifications are subject to changewithout notice.

2CS
警告
为防止火灾或触电危险,请勿让机器受雨淋或置於潮湿处。
请勿打开机壳以免发生触电危险。请找有资格者为您维修。
别把机器安装在书架或壁橱等狭窄的地方。
为防火灾,请别在装置的通风孔上盖住报纸,餐
巾,窗廉等。也别点着蜡烛放在装置上。
为防火灾或触电危险,请别在装置上放置花瓶等装
满液体的东西。
别随便抛弃电池。必须当有害垃
圾处理。
上海索广电子有限公司上海市 闵行区 剑川路 930 号

3CS
目录
部件识别
主机....................................................4
遥控器 ................................................5
使用准备
联结系统 ............................................6
在遥控器里装入两个AAA,4号(R03)电池 ................................. 7
设定时间 ............................................7
CD
装放CD.............................................. 8
播放CD
— 正常播放/任意顺序播放/反复播放..................................................8
给CD上曲子编程序
— 程序播放 .......................................9
使用CD显示器 ................................. 9
调谐器
预约电台 .......................................... 10
听收音机— 预约调谐 ............................... 11
使用收音机数据系统
(RDS)* .......................................... 11
磁带
装插磁带 .......................................... 13
播放磁带 .......................................... 13
录到磁带上
— CD同步录音/手动录音 ............ 14
定时录收音机节目 ........................... 15
声音调整
调整声音 .......................................... 16
选择声频加强...................................16
其他特点
听着音乐入睡
— 睡眠定时器..................................17
用音乐闹醒— 每日定时器............................ 17
附加信息
使用前须注意...................................19
故障探寻 ......................................... 20
规格 ................................................. 22
*用于欧洲型号为限
CS

4CS
盒带室 qj(13)CD 4(8,9,14)DISPLAY(显示)wf(9,11)显示窗 5(8,9,10)ENTER(输入)ql(7,9,10,12)ISS 0(14)MEGA BASS(强大低音)8(16)MONO STEREO(单耳声立体声)0(11)MUSIC MENU(音乐项目单)9(16)PHONES(耳机)插孔 waPLAY MODE(播放模式)w;(8,9)
PRESET +/–(预调升/降)qk(10,11,12)RDS(欧洲型号为限)/DIR w;(12,13,14,15)遥控传感器 wgTAPE(磁带)3(13)TIMER(定时器)指示灯 2(15,18)TUNER(调谐器)6(10,11,14)TUNER MEM(调谐存储器)ql(10)TUNING +(调谐升)qf(10,11,12,15)TUNING –(调谐降)qg(10,11,12,15)VOLUME(音量)控制器 qd
部件识别
项目是按照字母顺序排列。
详请参考括弧()内所指示页次。
主机
1 2 3 4 5 6 7
8
9
q;
qh
qg
qf
qd
qs
qa
qk
ql
w;
wa
ws
wg
wf
wd
qj
按钮说明
@/1(电源)1(7,11,15,18)CD. m(後退)qg(8,9)M >(前进)qf(8,9)nN(播放)qa(8,9)X(暂停)wd(8)Z PUSH OPEN/CLOSE(按开/闭)7(8)
x(停止) qs(8,9)磁带M >(快进绕)qf(13)X(暂停)wd(13)nN(播放)qa(13,14,15)
z(录音)ws(14,15). m(重绕)qg(13)Z PUSH OPEN/CLOSE(按开/闭)qh(13)
x(停止)qs(13,14)

部件识别
5CS
CD 3(8,9,14)CLOCK/TIMER(时钟/定时器)qg(7,15,17)DISPLAY(显示)qh(9,11)MEGA BASS(强大低音)2(16)MUSIC MENU(音乐项目单)wa(16)PLAY MODE(播放模式)/RDS(欧洲型号为限)/DIRqj(8,9,12,13,14,15)PRESET +/–(预调升/降)qk(10,11)REPEAT(反复)7(8)SLEEP(睡眠)qd(17)TAPE(磁带)w;(13)TIMER ON/OFF(定时器开/关)qf(15,18)TUNER/BAND(调谐器/波段)5(10,11,14)TUNER MEM/ENTER(调谐存储器/输入)6(7,9,10,12,15,17,18)
TUNING/CLOCK/TIMER+/–(调谐/时钟/定时器升/降)ql(7,10,11,12,15,17,18)VOLUME +/–(音量增/减)4
按钮说明
M(快进绕)>(进绕)0(8,9,13)
.(後退)m(重绕)qa(8,9,13)
X(暂停)qs(8,13)nN(播放)8(8,9,13,14,15)
`/1(电源)1(7,11,15,18)
x(停止)9(8,9,13,14)
遥控器
1234
5
6
7
8
9
q;
qa
qs
qg
qd
qf
qh
qj
qk
ql
w;
wa

6CS
使用准备
联结系统
用附带的导线和附件按照下列程序 1 到 3 联结系统。
3
1
2
2
FM 天线
AM 环形天线
左扬声器右扬声器
1连接扬声器。
如下所示,把扬声器导线连接到SPEAKER 端子。
SPEAKER(IMPEDANCE USE 8Ω)
L
R
只插入剥去绝缘的部分
红色(3)
黑色(#)
2连接 FM/AM 天线。
连接前,请先调定好 AM 环形天线。
插孔型 A
FM ANT
75Ω
COAXIAL
AM ANT
水平伸开 FM天线的电线 AM 环形天线
使用准备
7CS
插孔型 B
FM ANT
75Ω
COAXIAL
AM ANT
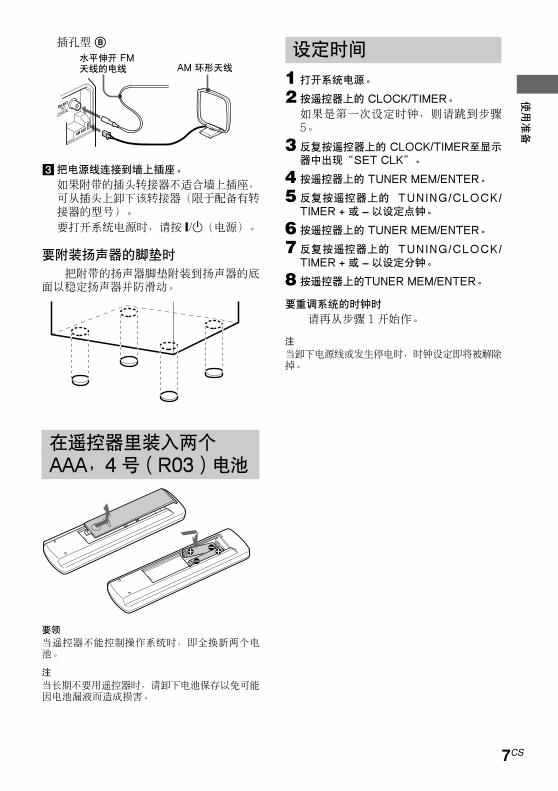
3把电源线连接到墙上插座。
如果附带的插头转接器不适合墙上插座,可从插头上卸下该转接器(限于配备有转接器的型号)。
要打开系统电源时,请按 [/1(电源)。
要附装扬声器的脚垫时
把附带的扬声器脚垫附装到扬声器的底面以稳定扬声器并防滑动。
在遥控器里装入两个AAA,4 号(R03)电池
要领
当遥控器不能控制操作系统时,即全换新两个电池。
注
当长期不要用遥控器时,请卸下电池保存以免可能因电池漏液而造成损害。
水平伸开 FM天线的电线 AM 环形天线
设定时间
1 打开系统电源。
2 按遥控器上的 CLOCK/TIMER。
如果是第一次设定时钟,则请跳到步骤5。
3 反复按遥控器上的 CLOCK/TIMER至显示器中出现“SET CLK”。
4 按遥控器上的 TUNER MEM/ENTER。
5 反复按遥控器上的 TUNING/CLOCK/
TIMER + 或 – 以设定点钟。
6 按遥控器上的 TUNER MEM/ENTER。
7 反复按遥控器上的 TUNING/CLOCK/
TIMER + 或 – 以设定分钟。
8 按遥控器上的TUNER MEM/ENTER。
要重调系统的时钟时
请再从步骤 1 开始作。
注
当卸下电源线或发生停电时,时钟设定即将被解除掉。

8CS
其他操作
要
停止播放
暂停
选择曲子
找出曲中某一
点
反复地播放
(反复播放)
卸下 CD
CD
装放CD
1 按下 Z PUSH OPEN/CLOSE 以打开 CD光盘室的盖子。
2 让标签面朝上地把 CD 装入光盘室。
3 按下 Z PUSH OPEN/CLOSE 以关闭 CD光盘室的盖子。
播放 CD
—正常播放/任意顺序播放/反复播放
本系统可用不同播放模式播放CD。
1 按 CD。
2 反复按 PLAY MODE(遥控器上的 PLAYMODE/RDS/DIR)至显示器中出现了所要
模式。
选择
无显示
SHUFFLE
(任意顺序)
PROGRAM
(程序)
3 按 nN。
当播放单曲 (8 cm CD)CD 时,须把它装在光盘室内圈。
播放时间
曲号
播放
用原来的顺序播放 CD。
任意顺序地播放 CD 上的曲
子。
按照您要的顺序播放 CD 上的
曲子。(参看第 9 页的“给
CD 上曲子编程序”)
请
按 x。
按 X。
再按一次以恢复播放。
按 M >(前进)或 . m
(後退)。
播放中,按住 M >(以前
进)或 . m(以後退)。当
找到所要的点时,把它释放。
播放中按 REPEAT 至出现
“REPEAT”或“REPEAT
1”。
REPEAT:反复 CD 上全所有曲
子最多 5 次。
REPEAT 1:只反复一首曲子。
要解除反复播放时,请按
REPEAT至“REPEAT”或
“REPEAT 1”消失了显示。
按 Z PUSH OPEN/CLOSE。

CD
9CS
给 CD 上曲子编程序
—程序播放
可按照您要播放的顺序编最多32首曲子的程序。
1 按 CD,然後装放 CD。
2 反复按 PLAY MODE(遥控器上的 PLAYMODE / RDS / D I R)至显示器中出现
“PROGRAM”。
3 按 . m 或 M > 至显示器中出现所要曲子。
4 按 ENTER(遥控器上的 TUNER MEM/ENTER)。
曲子即被编入程序。出现下一个程序顺序号。
5 要编入附加曲子的程序时,请反复作步骤3到 4。
6 按 nN。
即开始播放程序。
要
解除程序放音
在程序尾加录
一首曲子
抹去全部程序
要领
所作程序在播放完後仍能保存在系统的存储器中。按CD,然後按 nN 便能播放同程序。
预约号
所选曲号(含所选曲子)
使用CD显示器
反复按 DISPLAY。
显示即将变化如下:
正常播放中
现在曲子的已播放时间 t 现在曲子的剩馀时间 t 现在 CD 的剩馀时间 t 时钟显示(5 秒钟)t 现在曲子的已播放时间 t...
停止模式时
总曲号和总播放时间 t 时钟显示(5 秒钟)t 总曲号和总播放时间 t...
请
反复按 PLAY MODE(或遥控
器上的 PLAY MODE/RDS/
DIR)至显示器中的
“PROGRAM”消失了显示。
在停止程序放音时,步骤 3 和
4。
在停止程序放音时,按一次 x,
或在程序播放中,按两次。

10CS
调谐器
预约电台
能预约30个电台。
1 反复按 TUNER(遥控器上的 TUNER/BAND)以选择 FM 或 AM。
2 按住 TUNING(遥控器上的 TUNING/
CLOCK/TIMER)+ 或 – 至开始改变频率指示,然後释放按钮。
当系统调谐到电台时,即自动停止扫描。并出现“ST E R E O”(立体声节目时)。
如果不能自动停止,即请反复按TUN ING(遥控器上的TUN ING /CLOCK/TIMER)+ 或 – 以便用手动调谐。
3 按 TUNER MEM(遥控器上的 TUNERMEM/ENTER)。
预约号即出现于显示器。
电台即从预约号 1 开始存入。
4 按 ENTER(遥控器上的 TUNER MEM/ENTER)。
电台即被存入。
5 反复步骤 1 到 4 以存入其他电台。
预约号
要调谐信号微弱的电台时
请在步骤 2 反复按 TUNING(遥控器上的 TUNING/CLOCK/TIMER)+ 或 – 以便用手动调谐。
要在存有电台的预约号上设定另外电台时
请再从步骤 1 开始作。在步骤 3 之後,请反复按PRESET + 或 – 以选择您要存入另外电台的预约号并按 ENTER(遥控器上的 TUNER MEM/ENTER)。
您便可在所选预约号上预约新电台。
要抹去所有预约电台时
1 按住 TUNER MEM(遥控器上的 TUNERMEM/ENTER)至交互出现“ERASE”和
“PRESET”。
2 按 ENTER(遥控器上的 TUNER MEM/ENTER)。
所有预约电台都被清除。
要改变 AM 调谐间隔时(欧洲型号除外)
首先从墙上插座拔下电源线,然後把机器後面的 AM FREQ STEP 开关设定于9 kHz 或 10 kHz。
要领
即使您把电源线拔下了或发生停电,预约的电台仍可保留半天。

调谐器
11CS
听收音机
—预约调谐
请先在调谐器上预约好电台。
1 反复按TUNER(遥控器上的TUNER /BAND)以选择FM或AM。
2 反复按PRESET + 或 – 以调入所要预约电台。
预约号即在显示器中出现数秒。
当只预约一个电台时,便只能调入一个电台。
要 请
关掉收音机电源 按 ?/1。
要听非预约电台时
可用手动或自动调谐步骤 2。用手动调谐时,请反复按 TUNING(遥控器上的TUNING/CLOCK/TIMER)+ 或 – 。
用自动调谐时,则请按住 TUNING(遥控器上的 TUNING/CLOCK/TIMER)+ 或 – 。
要领
• 当 FM 节目有噪音时,即请把 MONO STEREO设定于 MONO 时显示器显示“MONO”。此时,将变无立体声效果,但可改善收音状况。
• 为改善收音状况,请调整好天线。• 按DISPLAY,便可以把显示变成时钟显示(5秒钟)。
使用收音机数据系统(RDS)
(欧洲型号为限)
什麽叫收音机数据系统?
收音机数据系统 (RDS) 是一项广播服务,电台能和正常的节目信号一起播送附加信息。本调谐器拥有方便的 RDS 功能,例如电台名显示和按节目型式的电台位置。RDS 限于 FM 电台有效*。
注
如果所收听的电台没有适当地传输 RDS 信号或信号太微弱时,RDS 功能将可能不起适当的作用。
*并非所有的 FM 电台度提供 RDS 服务,它们也不一定提供同类型的服务。您如果不熟悉 RDS 系统,可查询一下当地电台有关该地区的 RDS 服务的详细内容。
接收 RDS 广播
只像普通一样从 FM 波段选择一电台。当您调入了提供有 RDS 服务的电台时,显示器中即出现“RDS”显示。
要检查 RDS 信息时
每次按了 DISPLAY,显示即改变如下:
频率 t RDS 名* t RDS TEXT* tRDS 型式* t 时钟显示(5 秒钟)t 频率t ...
*如果没接收到 RDS 广播,显示器上便可能不显示 RDS 名,RDS TEXT,和 RDS 型式。
接下页

12CS
使用收音机数据系统 (RDS)(续)
用节目型式找出电台 (PTY)
可以利用选择节目型式找出所要的电台。系统能从预存于调谐器预约存储器中的RDS 电台调入现在广播中型式节目的电台。
节目型式包含 N EW S(新闻),AFFAIRS(时事报导),INFO(信息),SPORT(运动),EDUCATE(教育节目),DRAMA(戏剧),CULTURE(文化),SCIENCE(科学),VARIED(采访,游戏,和笑剧),POP M(流行曲),ROCK M(摇滚乐),EASY M(街头音乐),LIGHT M(轻音乐),CLASSICS(古典音乐),OTHER M(其他音乐),WEATHER(天气),FINANCE(金融),C H I L D R E N (儿童节目),SOCIAL(社会),RELIGION(宗教),PHONE IN(听众电话节目),TRAVEL(旅游),LEISURE(馀暇节目),JAZZ(爵士乐),COUNTRY(乡土音乐),NATION M(民族流行歌曲),OLDIES(旧歌),F O L K M (民谣),DOCUMENT(记录影片),TESTALARM(紧急广播用试验信号)和NONE(上述以外的任何节目)。
1 在听收音机时,按 RDS/DIR(遥控器上的PLAY MODE/RDS/DIR)。
2 反复按 PRESET + 或 – 以选择所要的节目型式。
3 按住 TUNING(遥控器上的 TUNING/
CLOCK/TIMER)+ 或 – 。当调谐器接收到节目时,即闪烁着“PTY”。
要领
当所选节目型式并不是现在广播中节目时,即将出现“TYPE NOT FOUND”(找不到型式)。
要解除PTY时
请再按一次 RDS/DIR(遥控器上的PLAY MODE/RDS/DIR)。
收听交通信息
当调谐器接收到交通信息时,“TRAFFIC INFORMATION”(交通信息)将在显示器中轴卷。
1 在收听 FM 节目中,反复按 RDS/DIR(遥控器上的PLAY MODE/RDS/DIR)至出现“INFO OFF”或“INFO ON”显示。
2 按 ENTER(遥控器上的 TUNER MEM/ENTER)以设定“INFO ON”。
能设定配合广播的时间
能设定所接收信息的时钟的时间。
1 在收听 FM 节目中,反复按 RDS/DIR(遥控器上的PLAY MODE/RDS/DIR)至出现“SYNC OFF”或“SYNC ON”显示。
2 按 ENTER(遥控器上的 TUNER MEM/ENTER)以设定“SYNC ON”。

磁带
13CS
磁带
装插磁带
1 按 TAPE。
2 按 Z PUSH OPEN/CLOSE。
3 把磁带装入盒带座,令要播放/录音的面朝前。
播放磁带
可使用 TYPEⅠ(标准),TYPEⅡ(CrO2),TYPEⅣ(金属)磁带。
1 安装录音带。
2 按 TAPE。
3 反复按 RDS/DIR(遥控器上的 PLAYMODE/RDS/DIR)g 去播放磁带的一面,选择 h 去播放双面或选择 j*以反
复播放磁带的双面。
*连续播放五次後,磁带即自动停止播放。
4 按 nN。
再按一次 nN 以播放倒绕面。
要
停止播放
暂停
快进绕或重绕
卸下盒带
请按
x
X
再按一次以恢复播放。
磁带停着时,按
. m/M >
Z PUSH OPEN/
CLOSE
令要播放/录音的面朝前
找出曲子的开头 (AMS*)
播放中,按 . m 或 M > 。
磁带即绕到,或重绕到下一曲,或现在播放中曲子的开头,并自动开始播放。显示器中将显示寻找方向,“+”(前进)或“–”(後退),和“1”。
*AMS(自动乐曲探测)
要领
按 DISPLAY,便可以把显示变成时钟显示(5秒钟)。
注
下列条件下,AMS 功能可能不起正确的作用:–曲子与曲子之间的未录空间短於4秒时。–左,和右频道所录信息完全不同时。–有极低电平或极低频声(例如,中音木管乐器声)的连续部分时。
–系统放置在电视机附近时。(此时,最好是把系统移离电视机或关掉电视机。)

14CS
录到磁带上
— CD 同步录音/手动录音
可以从 CD 或收音机录音。可以使用 TYPEⅠ(标准)磁带。
步骤 从 CD 录音(CD 同步录音) 从收音机录音
1 装一空白磁带。
2 按 CD。 按 TUNER(遥控器上的 TUNER/BAND)。
3 装上要录的 CD。 调入要录的电台。
4 按 z。
磁带座呈录音备用状态。
5 如果要切换方向,可按 nN。
6 反复按 RDS/DIR(遥控器上的PLAY MODE/RDS/DIR)以选择 g 去录单面,选择 h 去录双面。
7 再按一次 z。
即开始录音。
要停止录音时
请按 x。
要领
• 用手动把CD录到磁带时,可在录音暂停模式中按 . m 或 M > 以选择曲子(步骤 4 之後和步骤 6 以前)。
• 要录双面时,一定要从正面开始录。如果是从倒绕面开始录,便将在此倒绕面的终端就停止录音。
• 当 AM 节目有噪音时,请设定 ISS 选择最能减小噪声的位置。

磁带
15CS
定时录收音机节目
您能在所指定的时间进行预约电台录音。
要作定时录音,须先预约好电台(参看第 10 页的“预约电台”)并设定好时钟(参看第 7 页的“设定时间”)。
1 调入要录的预约电台(参看第 11 页的“听收音机”)。
2 反复按遥控器上的 CLOCK/TIMER 至出现“SET TMR”,然後按遥控器上的
TUNER MEM/ENTER。
即出现“ON”,并闪烁着点钟指示。
3 设定开始时间。
反复按遥控器上的TUN ING /CLOCK /TIMER + 或 – 以设定点钟,然後按遥控器上的TUNER MEM/ENTER。
其次,即开始闪烁分钟指示。
反复按遥控器上的TUN ING /CLOCK /TIMER + 或 – 以设定分钟,然後按遥控器上的TUNER MEM/ENTER。
点钟指示再起闪烁。
4 按照步骤 3 所述程序设定停止录音的时间。
5 反复按遥控器上的 TUNING/CLOCK/TIMER + 或 – 至出现“RECORD”,然後按遥控器上的TUNER MEM/ENTER。
即点亮 TIMER指示灯。
6 反复按遥控器上的TUN ING /CLOCK /TIMER + 或 – 以调整已用定时器打开了在听的收音机的音量*,然後按遥控器上的
TUNER MEM/ENTER。
*此项调整,并不会影响录音的音量。它只是调整在预调时刻打开收音机时听到的音量而已。
7 装一可录磁带,让要录音面朝自己方向。
8 按 z。
9 如果要切换方向,可按 nN。
10反复按 RDS/DIR(遥控器上的 PLAYMODE/RDS/DIR)以选择 g 去录单面,选择 h 去录双面。
11按 ?/1 以关掉系统电源。
要
检查或变更设定
激活定时器功能
解除定时器操作
注
• 在预调时刻,如果系统呈录音或录音暂停模式,将不能实施定时器录音。
• 在预调时刻,如果系统正在播放磁带,此时,系统将切换到调谐器,但不能实施定时器录音。
请
打开系统电源而在出现
TIMER 指示灯时,即从
步骤 1 起开始操作。
按遥控器上的 TIMER
ON/OFF 至点亮 TIMER
指示灯。
按遥控器上的 TIMER
ON/OFF 至 TIMER 指
示灯熄灭。

16CS
声音调整
调整声音
按 MEGA BASS。
“MEGA BASS”(强大低音)即出现於显示器。要恢复正常声时,请再按一次按钮。
选择声频加强
从音乐项目单中选择预调效果
反复按 MUSIC MENU 以选择所要的预调效果。
每次按了按钮,显示即变化如下:
ROCK(摇滚乐)t POP(流行曲)t JAZZ(爵士乐)t FLAT* t ROCK(摇滚乐)t ⋯
*显示数秒“FLAT”。

声音调整/其他特点
17CS
接下頁
其他特点
听着音乐入睡
—睡眠定时器
可以将本系统设定於某一段时间之後,自动关掉电源以便听着音乐入睡。
按遥控器上的 SLEEP。
每次按了按钮,分钟显示(到关掉电源的时间)即将变化如下:
90 t 80 t 70 t ... t 10 t OFF t 90 t ...
睡眠定时器 (Sleep Timer) 打开着时,显示器中将闪烁着“TIMER”。
要
检查剩馀时间
改变到关掉电源
的时间
解除睡眠定时器
功能
用音乐闹醒
—每日定时器
您可以在预调的每天一定的时刻用音乐闹醒您。但须设定准时钟(参看第 7 页)。
1 准备好要播放的声源。
• CD:装放好 CD 光盘。• 磁带∶装插磁带,让要播放面对着自己方向。
• 收音机:调入所要的预约电台(参看第10 页)。
2 反复按遥控器上的 CLOCK/TIMER 至出现“SE T T M R”,然後按遥控器上的
TUNER MEM/ENTER。
即出现“ON”,并闪烁着点钟指示。
3 设定开始时间。
反复按遥控器上的 TUNING/CLOCK/
TIMER + 或 – 以设定点钟,然後按遥控器上的TUNER MEM/ENTER。
其次,即开始闪烁分钟指示。
反复按遥控器上的 TUNING/CLOCK/
TIMER + 或 – 以设定分钟,然後按遥控器上的 TUNER MEM/ENTER。
点钟指示再起闪烁。
4 按照步骤 3 所述程序设定停止播放的时间。
5 反复按遥控器上的 TUNING/CLOCK/
TIMER + 或 – 至出现所要音乐信号源,然後按遥控器上的 TUNER MEM/ENTER。
显示即变化如下:
TUNER t RECORD(调谐器) t CDt TAPE t TUNER t ...
即点亮TIMER指示灯。
请
按一次遥控器上的 SLEEP。
反复按遥控器上的 SLEEP 至
出现所要的时间。
反复按遥控器上的 SLEEP 至
出现“SLEEP OFF”显示。

18CS
用音乐闹醒(续)
6 按遥控器上的 TUNER MEM/ENTER。
定时器型式将随开始时间,停止时间,和音乐信号源出现显示,然後恢复原来显示。
7 按遥控器上的 TUNING/CLOCK/TIMER+ 或 – 以调整音量,然後按遥控器上的TUNER MEM/ENTER。
8 按 ?/1 以关掉系统电源。
要 请
检查或改变设定 打开系统电源而在出现
TIMER 指示灯时,即从
步骤1起开始操作。
激活定时器功能 按遥控器上的 TIMER
ON/OFF 至点亮 TIMER
指示灯。
要解除定时器时 按遥控器上 TIMER ON/
OFF(定时器开关)至
TIMER 指示灯熄灭。

附加信息
19CS
操作须知
• 如果把机器从寒冷处直接移到温暖处,或把机器放置在极潮湿的房间里,则 CD 唱机内的透镜面上可能会发生湿气冷凝。因此,机器将不能作适当的操作。此时,请取出 CD,让机器打开着电源放置大约 1 个小时让冷凝水分蒸发乾。
• 要移动机器时,须先取出一切光盘。
关於您的机器如果还有任何疑问或问题,请洽询附近的 Sony 经销店。
CD 须知
• 播放 CD 前,请用清洁布擦拭乾净。须从 CD 的中心向外擦拭。
• 不可用溶剂去清洁 CD。• 别让 CD 直接晒到太阳或暴露於热源旁边。• 本机不能用於播放不规则形的光盘(例如心形,方形,星形)。如勉强试图使用,可能会损坏机器。
CD-R/CD-RW 播放须知
CD-R/CD-RW 激励所录光盘,可能因有刮痕,肮脏,录音条件或激励特性的关系而不能播放。又凡未录到终了的光盘也不能播放的。
清洁机壳
可用软布蘸湿温和的洗涤剂溶液擦拭清洁。
要永久保存录音带时
为防有用的录音带意外地被重录,如图所示,请折除盒带 A 面或 B 面的盒带小翼。
以後如果要再利用此磁带时,可用粘胶带盖住小翼凹孔。
接下页
附加信息
使用前须注意
操作电压须知
在操作使用系统之前,请检查您系统的操作电压是否符合当地的电源电压。
安全须知
• 如果机器电源线仍接插在墙上插座(主电源),则即使关掉了机器的电源开关,机器依然没有断开 AC 电源的。
• 当长期不使用机器时,务请从墙上插座拔下机器的电源线插头。要拔开电源线时,必须抓住插头,别拉着导线部分拔。
• 万一有任何杂物或液体掉进组成机里面时,必须找持有资格的人检查过以後才能再操作使用。
• 要更换 AC 电源线时,必须找专门服务店。
放置时须知
• 机器必须安放在有适当通风的地方以防机器内积热。
• 别把机器放在倾斜的地方。• 别把机器放在如下地方:
–太热或太冷。–多灰尘或太脏。–太朝湿。–有振动。–会直接晒到太阳。
内积热须知
–操作时,机器会发生内积热。这并不是故障。–机器应放置在通风处以防内积热不能散热。
如果长时间用大音量使用本机,则机壳顶面,侧面和底面的温度会升到很高。此时,请不要去摸机壳以免烫伤。
为防机器故障,切勿盖住冷却风扇的通风孔。
折除盒带 A 面的小翼

20CS
使用前须注意(续)
要把盒带装入录音带座之前
请卷紧松懈的录音带。否则录音带可能会缠住录音带座的零件而损坏了机构。
使用 90 分钟以上的长录音带时
这种录音带伸缩性大。故不要频繁地改变播放,停止,和快绕等磁带操作。因为录音带可能会缠住在录音带座内。
清洁磁头
每使用过 10 小时之後,即请清洁一下磁头。每在作重要录音之前或播放了陈旧的录音带之後,都一定要清洁一下磁头。清洁磁头可利用另售乾式或湿式的清洁盒带。
磁头去磁
每使用过 20 到 30 个小时,接请用另售的去磁盒带给磁头和接触到录音带的金属部分去磁。详细,请参考去磁盒带的使用说明书。
故障探寻
用本机时如果发生问题,可用下表检查一下。
首先请检查电源线是否接插稳固和扬声器是否连接妥当而稳固。
问题仍不能解决时,请洽询附近的Sony 销售店。
共通
时钟设定/收音机预约/定时器被解除了。
• 拔下了电源线或发生停电超过半天。请重作下列操作:
–第 7 页的“设定时间”–第 10 页的“预约电台”如果已设定了定时器,也须再做第 15 页的“定时录收音机节目”和第 17 页的“用音乐闹醒”。
没有声音。
• 顺时针方向转住 VOLUME。• 连接着头戴耳机。• 只塞入剥除了绝缘层的扬声器导线到SPEAKER 插孔。如果塞入乙烯树脂绝缘层的扬声器导线部分将制阻扬声器的连接。
有严重的哼声或噪声。
• 电视机或录像机放置太靠近立体声音响系统。请把立体声音响系统移离电视机或录像机。
时钟的时刻指示不准确。
• 发生了停电。请重新设定好时钟和定时器的时间。
定时器不起作用。
• 正确地设定好时钟。• 不能同时打开定时录音和每日定时器。• 当使用睡眠定时器时,在睡眠定时器关掉以前,每日定时器和定时录音设定是不能按照设定打开系统电源的。
附加信息
21CS
遥控器不起作用。
• 在遥控器和本机之间有障碍物。• 遥控器没有正确地指向机器的传感器。• 电池已耗光。请更换电池。
电视机屏幕持续地彩色异常。
• 关掉一下电视机电源,等 15 到 30 分钟之後再打开电源。如果彩色异常仍然存在,即请把扬声器移离电视机远些放置。
扬声器
声音只来自一个频道或左,右音量不平衡。
• 检查扬声器的连接状态和扬声器的配置。
声音缺乏低音效果。
• 检查扬声器的+和 – 端子是否连接妥当。
CD 唱机
CD 托盘不能关闭。
• CD 光盘没有装妥。
CD 不播放。
• CD 没有放平在 CD 光盘室。• CD 脏了。• CD 的标签面朝下地装错了。• 发生了湿气冷凝。请取出 CD 光盘让系统开着电源放置大约 1 个小时至机器里的水分蒸发乾了。
磁带座
磁带不录音。
• 盒带室内没装磁带。• 盒带上的小翼被折除了。• 盒带卷到了末端。
磁带既不能录也不能放,或声音太小。
• 磁头脏了(参看第 20 页的“清洁磁头”)。• 录/放磁头有馀磁。请给去磁(参看第 20 页的“磁头去磁”)。
录音带不能完全抹音。
• 录/放磁头有馀磁。请给去磁(参看第 20 页的“磁头去磁”)。
有过大的频率颤动,或声音脱落。
• 主动轴或紧带轮脏了。请加以清洁(参看第 20 页的“清洁磁头”)。
噪音增大,或高频音被抹去了。
• 录/放磁头有馀磁。请给去磁(参看第 20 页的“磁头去磁”)。
调谐器
有噪音。
• 调整天线。
立体声的 FM 节目不能收听到立体声。
• 设定 MONO STEREO 使出现“STEREO”显示。
提示
操作机器中,可能会出现如下提示。
NO DISC(无光盘)
• CD 光盘室中没装放光盘。
22CS
规格
放大器部分
加拿大型号:连续RMS功率输出(基准)
12 + 12 W(1 kHz 时,8 Ω,10%总谐波失真)
欧洲型号:DIN功率输出(额定) 11 + 11 W
(1 kHz 时,8 Ω,DIN)
连续RMS功率输出(基准)12 + 12 W(1 kHz 时,8 Ω,10%总谐波失真)
音乐功率输出(基准) 27 + 27 W
其他型号:下列数值是在 AC(交流电)230 V(伏),50/60Hz(赫)状况下测得DIN功率输出(额定)
11 + 11 W(1 kHz 时,8 Ω,DIN)
连续RMS功率输出(基准)12 + 12 W(1 kHz 时,8 Ω,10%总谐波失真)
输出(端子)PHONES: 适用 8 Ω 或以上的头戴(立体声小型插孔) 耳机SPEAKER(扬声器):适用 8 Ω 16 欧阻抗
CD 唱机部分
系统 光盘和数字声频系统激光器 半导体激光器
(λ=780 nm)发射延续性:连续
频率响应 20 Hz~20 kHz(±0.5 dB)
磁带唱机部分
录音系统 4 径迹 2 频道立体声频率响应 使用 Sony TYPE Ⅰ盒
带时,50~13 000 Hz(±3 dB)
频率颤动 ±0.15% W.峰值 (IEC)0.1% W.RMS (NAB)±0.2% W.峰值 (DIN)
调谐器部分
FM 立体声,FM/AM 超外差调谐器
FM调谐器部分调谐范围 87.5~108.0 MHz天线 FM 导线天线天线端子 75 Ω 不平衡式中频 10.7 MHz
AM调谐器部分调谐范围全美洲型号: 530~1 710 kHz
(间隔设定于 10 kHz)531~1 710 kHz(间隔设定于 9 kHz)
欧洲型号: 531~1 602 kHz(间隔设定于 9 kHz)
其他型号: 531~1 602 kHz(间隔设定于 9 kHz)530~1 710 kHz(间隔设定于 10 kHz)
天线 AM 环型天线天线端子 外部天线端子中频 450 kHz

附加信息
23CS
扬声器
扬声器系统 低音反射型扬声器单元 全音频范围 10 cm,锥型标称阻抗 8 Ω尺寸(宽/高/纵深) 大约 145×238×171 mm质量 每个扬声器净重大约
1.4 kg
一般规格
电源北美洲型号: 120 V AC,60 Hz欧洲型号: 230 V AC,50/60 Hz墨西哥型号: 120 V AC,60 Hz阿根廷型号: 220 V AC,50/60 Hz香港型号: 230 V AC,50/60 Hz中国型号: 220 V AC,50/60 Hz其他型号: 230 V AC,50/60 Hz
电力消耗美国型号: 35 W加拿大型号: 35 W欧洲型号: 40 W
0.9 W(备用模式中)其他型号: 40 W
尺寸(宽/高/纵深): 大约 145×238×234 mm
质量: 大约 3.4 kg
附带附件: AM 环型天线 (1)遥控器 (1)电池 (2)FM 电线天线 (1)扬声器脚垫 (8)
设计和规格有所变更时,恕不另行奉告。

24CS

Ad
ditio
na
l Info
rma
tion
25CS

26CSSony Corporation Printed in China