Micro Focus RM/COBOL · CodeWatch version 12 is now able to debug service programs running under...
152
Contents Micro Focus RM/COBOL CodeWatch User’s Guide
Transcript of Micro Focus RM/COBOL · CodeWatch version 12 is now able to debug service programs running under...
Contents
Micro Focus RM/COBOL
CodeWatch User’s Guide
Contents
Micro Focus The Lawn 22-30 Old Bath Road Newbury, Berkshire RG14 1QN UK http://www.microfocus.com Copyright © Micro Focus 2017. All rights reserved. MICRO FOCUS, the Micro Focus logo, and Micro Focus product names are trademarks or registered trademarks of Micro Focus Development Limited or its subsidiaries or affiliated companies in the United States, United Kingdom, and other countries. All other marks are the property of their respective owners. Revised 2017-05-31 for version 12.14
Contents
CodeWatch User's Guide iii Second Edition
Contents
Preface ...................................................................................................... 1
Welcome to CodeWatch ............................................................................................................ 1 Prerequisites ............................................................................................................................... 1 About Your Documentation ....................................................................................................... 2 Related Publications................................................................................................................... 3 Symbols and Conventions .......................................................................................................... 3 Technical Support ...................................................................................................................... 5 Support Guidelines .................................................................................................................... 5 Test Cases .................................................................................................................................. 5
Chapter 1: Installation and System Considerations ............................ 7
System Requirements................................................................................................................. 7 Required Hardware .................................................................................................................... 7 Required Software ..................................................................................................................... 8 System Installation ..................................................................................................................... 8
Chapter 2: Getting Started with CodeWatch ...................................... 11
Quick Start Tutorial ................................................................................................................. 11 Starting CodeWatch ................................................................................................................. 17 Starting CodeWatch from Windows ........................................................................................ 17 Starting CodeWatch Using a Saved Workspace ...................................................................... 17 Starting CodeWatch from a Command Prompt ....................................................................... 18 Starting CodeWatch with a Runtime Command Line .............................................................. 19
Exercise 1—Start CodeWatch ................................................................................... 19 Configuring a Workspace ........................................................................................................ 20
Exercise 2—Configure a Workspace with the Workspace Wizard ........................... 21 Viewing and Editing Program Source...................................................................................... 24
Exercise 3—Locate Source Files ............................................................................... 25 Running the Program ............................................................................................................... 25
Exercise 4—Run the Program ................................................................................... 26 Animating the Program ............................................................................................................ 28
Exercise 5—Animate the Program ............................................................................ 28 Controlling the Flow of Execution ........................................................................................... 28 Setting Breakpoints .................................................................................................................. 29
Exercise 6—Set a Breakpoint .................................................................................... 29 Setting Watchpoints ................................................................................................................. 30
Exercise 7—Set a Watchpoint ................................................................................... 30 Inspecting and Modifying Data................................................................................................ 31
Exercise 8—Select a Data Item ................................................................................. 31 Stopping the Program .............................................................................................................. 32
Exercise 9—Stop the Program ................................................................................... 32 Changing the Workspace ......................................................................................................... 33
Contents
iv CodeWatch User's Guide Second Edition
Saving the Workspace.............................................................................................................. 33
Chapter 3: CodeWatch Interface.......................................................... 35
CodeWatch Workspace Wizard ............................................................................................... 35 Introduction (New) Page .......................................................................................................... 36 Set Program to Run Page ......................................................................................................... 38 Set Additional Options Page .................................................................................................... 40 Set Environment Page .............................................................................................................. 41 CodeWatch Main Window ...................................................................................................... 43 Dockable Windows .................................................................................................................. 46 Workspace Window ................................................................................................................. 47
Programs Tab ............................................................................................................. 48 Files Tab .................................................................................................................... 49 Context Menu in a Workspace Window .................................................................... 49
Data Window ........................................................................................................................... 51 Breakpoints Tab ......................................................................................................... 52 Watchpoints Tab ........................................................................................................ 53 Data Files Tab ............................................................................................................ 54 Call Stack Tab ........................................................................................................... 55 Build Results Tab ...................................................................................................... 56 Context Menu in a Data Window .............................................................................. 57
Log Window ............................................................................................................................ 58 Context Menu in a Log Window ............................................................................... 58
Document Windows................................................................................................................. 59 Using Document Windows ...................................................................................................... 59
State of Document Windows ..................................................................................... 59 Document Menu ........................................................................................................ 60 Cycling Through Open Windows .............................................................................. 61 Splitting Document Windows .................................................................................... 61 Closing Document Windows ..................................................................................... 62
Floating Windows .................................................................................................................... 62 Find Dialog Box ....................................................................................................................... 63
Regular Expressions .................................................................................................. 64 Replace Dialog Box ................................................................................................................. 65 Inspect/Modify Dialog Box ..................................................................................................... 66 Menus and Toolbars ................................................................................................................. 68 File Menu ................................................................................................................................. 69 Edit Menu ................................................................................................................................ 74 View Menu .............................................................................................................................. 75 Build Menu .............................................................................................................................. 76 Run Menu ................................................................................................................................ 77 Window Menu ......................................................................................................................... 79 Workspace Properties Dialog Box ........................................................................................... 80 Program Tab ............................................................................................................................ 81 Options Tab.............................................................................................................................. 83 Environment Tab ..................................................................................................................... 85 Command Tab.......................................................................................................................... 87 Breakpoints & Watchpoints Dialog Box .................................................................................. 87 Code Breakpoints Tab.............................................................................................................. 88 Data Watchpoints Tab.............................................................................................................. 89 Item Properties Dialog Box ..................................................................................................... 91 Source File Property Tab ......................................................................................................... 92 Programs Property Tab ............................................................................................................ 93 Build Options Property Tab ..................................................................................................... 93 Select Character Set Dialog Box .............................................................................................. 95
Contents
CodeWatch User's Guide v Second Edition
Chapter 4: Source Code Editor ............................................................ 97
Locating Source Files During Execution ................................................................................. 97 Source Code/Edit Window ...................................................................................................... 97 Contents of the Source Code/Edit Window ............................................................................. 98 Context Menu for the Source Code/Edit Window ................................................................... 99 Using the Source Code/Edit Window .................................................................................... 101 Creating a New Source Code Document ............................................................................... 101 Opening an Existing Source Code File .................................................................................. 102 Viewing Source During Program Execution .......................................................................... 103 Editing Operations in the Source Code/Edit Window ........................................................... 103 Character Sets ........................................................................................................................ 104 The Workspace Character Set ................................................................................................ 106 Choosing an Editor Font ........................................................................................................ 107 Setting Preferences ................................................................................................................ 109 Tabs Tab ................................................................................................................................ 109 Editor Preferences Tab ........................................................................................................... 111 External Editing Tab .............................................................................................................. 112 Miscellaneous Tab ................................................................................................................. 114 Basic Editing Techniques ...................................................................................................... 115 Moving Around in a File ........................................................................................................ 116
Insertion Point ......................................................................................................... 116 How to Move with the Mouse ................................................................................. 116 How to Move with the Keyboard ............................................................................ 117
Selecting Text ........................................................................................................................ 118 How to Select Text with the Mouse......................................................................... 118 How to Select Text with the Keyboard .................................................................... 120
Inserting New Text ................................................................................................................ 120 Overwriting or Replacing Text .............................................................................................. 121
Overwriting Selected Text ....................................................................................... 121 Deleting Text ......................................................................................................................... 121 Correcting and Editing Text ................................................................................................... 121 Cutting, Copying, and Pasting Text ....................................................................................... 123 Using the Windows Clipboard to Duplicate or Move Text.................................................... 123
Chapter 5: Building Programs with CodeWatch .............................. 125
Compiling .............................................................................................................................. 125 Compiling Only Changed Files.............................................................................................. 125 Setting Compilation Options .................................................................................................. 126 The RMPATH and Environment Variables ........................................................................... 128 Using 32-Bit and 64-Bit Compilers ....................................................................................... 129 Locating the Compiler ........................................................................................................... 129 Compiler Output .................................................................................................................... 130
Appendix A: Additional Configuration Options ............................... 131
Runtime Options .................................................................................................................... 131 Setting the RM/COBOL Runtime Registry Key .................................................................... 131 Setting the RM/COBOL Runtime Configuration .exe File .................................................... 131 Selecting a Runtime License Vault ........................................................................................ 132 Compiler Options ................................................................................................................... 132 Setting the RM/COBOL Compiler Registry Key .................................................................. 132 Setting the RM/COBOL Compiler Configuration .exe File................................................... 133 Choosing the 32-bit or 64-bit RM/COBOL Compiler ........................................................... 133 Miscellaneous Options ........................................................................................................... 133 Changing the Log Window Font ............................................................................................ 134
Contents
vi CodeWatch User's Guide Second Edition
Setting the Log Window Size ................................................................................................ 134 Controlling Dependency Checking ........................................................................................ 134
Appendix B: Summary of Enhancements ......................................... 135
Version 12 Enhancements ...................................................................................................... 135 Version 12.12 Enhancements ................................................................................................. 136 Version 12.14 Enhancements ................................................................................................. 136 Version 11 Enhancements ...................................................................................................... 137 Version 10 Enhancements ...................................................................................................... 137 Version 9 Enhancements ........................................................................................................ 137 Version 8 Enhancements ........................................................................................................ 138 Version 7.5 Enhancements ..................................................................................................... 139
Index ..................................................................................................... 141
List of Figures Figure 1: Glyphs in Western (ANSI) Character Set in “Courier New” Font ........................ 105 Figure 2: Glyphs in OEM Character Set in “Terminal” Font ................................................ 105
List of Tables Table 1: Types of Workspace Windows ................................................................................. 46 Table 2: Special Characters Allowed in CodeWatch Regular Expressions ............................ 64 Table 3: Direction Keys ........................................................................................................ 117 Table 4: Text Selection Keys ................................................................................................ 120 Table 5: Editing Keys ........................................................................................................... 121 Table 6: Edit Menu Shortcut Keys ........................................................................................ 123 Table 7: RM/COBOL Compile Command Options Available ............................................. 127
Welcome to CodeWatch Preface
CodeWatch User's Guide 1 Second Edition
Preface
Welcome to CodeWatch This document describes CodeWatch, Micro Focus’ fully integrated development environment for RM/COBOL for Windows.
CodeWatch for Windows supports the entire development cycle, including editing, compiling, and debugging of RM/COBOL applications. CodeWatch can be used to debug and change programs that are independently compiled, without requiring you to build projects. Instead, all the knowledge about the structure of your application is built up during debugging sessions.
The new features for the most recent release of CodeWatch are described in Appendix B: Summary of Enhancements (on page 135).
Note CodeWatch version 12 is now able to debug service programs running under Micro Focus’ Xcentrisity Business Information Server (BIS) on Microsoft Windows under Internet Information Server (IIS). For more information, see the CodeWatch for Xcentrisity Business Information Server User’s Guide Supplement.
Prerequisites Several conditions are necessary before you can run CodeWatch for Windows:
• CodeWatch requires that the following products be installed on your system:
− One of the following operating systems is required:
• Microsoft Windows XP
• Microsoft Windows Server 2003
• Microsoft Windows Vista
• Microsoft Windows Server 2008
• Microsoft Windows Server 2008 R2
• Microsoft Windows 7
About Your Documentation Preface
2 CodeWatch User's Guide Second Edition
• Microsoft Windows 8 and 8.1
• Microsoft Windows Server 2012
• Microsoft Windows Server 2012 R2
• Microsoft Windows 10
− Microsoft Windows Server 2016RM/COBOL for Windows development system, version 12.
• For source-level debugging, the COBOL object files must be compiled using the RM/COBOL version 7.5 or later compiler (note that version 10 or later is strongly recommended), using the Full Debug Information (Y=2 or Y=3) Compile Command Option (see Chapter 6: Compiling of the RM/COBOL User's Guide). This option embeds additional symbol information in the object file. A new option in the rmpgmcom utility, which is provided with the development system, can be used to strip this information from object files without the need to recompile (see Appendix G: Utilities of the RM/COBOL User's Guide).
• For non-source level debugging, a printed RM/COBOL compiler listing file (produced by the compiler when the program was originally compiled) is required. CodeWatch can be used to set breakpoints and watch variables during non-source level debugging.
• To debug programs that use the 64-bit RM/COBOL runtime, CodeWatch version 12.13 (or later) is required.
• To compile programs using the 64-bit RM/COBOL compiler, CodeWatch version 12.14 (or later) is required.
About Your Documentation The CodeWatch documentation consists of a user's guide, which is available in Portable Document Format (PDF) on the product CD, and on the web at https://supportline.microfocus.com/productdoc.aspx, Micro Focus Developer – COBOL and Software Developer Tools | RM/COBOL | 12 | CodeWatch User's Guide.
Note Viewing a PDF file requires Adobe Acrobat Reader. You can download the latest version of Adobe Acrobat Reader free at the Adobe website at http://www.adobe.com.
This user’s guide is divided into the following parts:
Chapter 1—Installation and System Considerations lists the hardware and software required to install CodeWatch for Windows, and describes how to install the product.
Chapter 2—Getting Started with CodeWatch provides a quick start tutorial of CodeWatch followed by a more in-depth, step-by-step walk through of a basic CodeWatch debugging session.
Chapter 3—CodeWatch Interface provides detailed descriptions of the Workspace Wizard, and the various windows, dialog boxes, menus, and toolbars found in CodeWatch.
Chapter 4—Source Code Editor explains how CodeWatch locates source files, describes the Source Code/Edit window and how to use the internal Source Code Editor, discusses setting preferences to customize the editing environment (including configuring an external editor), and provides an overview of the most common and basic editing tasks in CodeWatch.
Chapter 5—Building Programs with CodeWatch provides an overview of how CodeWatch compiles source files.
Related Publications Preface
CodeWatch User's Guide 3 Second Edition
Appendix A—Additional Configuration Options describes a file called rmcw.ini, which is used by CodeWatch to include several optional configuration options and tuning parameters that are not set from within the program.
Appendix B—Summary of Enhancements provides an overview of the new features in the current release, and reviews the changes and enhancements that were added to earlier releases of CodeWatch.
The CodeWatch User’s Guide also includes an index.
Related Publications For additional information, refer to the following publications:
CodeBridge User’s Guide
CodeWatch for Xcentrisity Business Information Server User’s Guide Supplement
RM/COBOL User’s Guide
RM/COBOL Language Reference Manual
RM/COBOL Syntax Summary Help File
WOW Extensions Designer Help File and WOW Extensions Functions and Messages Help File
Xcentrisity Business Information Server (BIS) User’s Guide
XML Extensions User’s Guide
Symbols and Conventions The following typographic conventions are used throughout this manual to help you understand the text material and to define syntax:
1. Words in all capital letters indicate COBOL reserved words, such as statements, phrases, and clauses; acronyms; configuration keywords; environment variables, and RM/COBOL Compiler and Runtime Command line options.
2. Text that is displayed in a monospaced font indicates user input or system output (according to context as it appears on the screen). This type style is also used for sample command lines, program code and file listing examples, and sample sessions.
3. Bold, lowercase letters represent filenames, directory names, and programs.
Words you are instructed to type appear in bold. Bold type style is also used for emphasis, generally in some types of lists.
4. Italic type identifies the titles of other books and names of chapters in this guide, and it is also used occasionally for emphasis.
In syntax, italic text denotes a placeholder or variable for information you supply, as described below.
5. The symbols found in the syntax charts are used as follows:
a. italicized words indicate items for which you substitute a specific value.
Symbols and Conventions Preface
4 CodeWatch User's Guide Second Edition
b. UPPERCASE WORDS indicate items that you enter exactly as shown (although not necessarily in uppercase).
c. ... indicates indefinite repetition of the last item.
d. | separates alternatives (an either/or choice).
e. [ ] enclose optional items or parameters.
f. { } enclose a set of alternatives, one of which is required.
g. {| |} surround a set of unique alternatives, one or more of which is required, but each alternative may be specified only once; when multiple alternatives are specified, they may be specified in any order.
6. All punctuation must appear exactly as shown.
7. Key combinations, sometimes called shortcut keys, are connected by a plus sign (+), for example, Ctrl+X. This notation indicates that you press and hold down the first key while you press the second key. For example, “press Ctrl+X” means to press and hold down the Ctrl key while pressing the X key. Then release both keys.
8. Note the distinction of the following terminology:
• The term “window” refers to a delineated area of the screen, normally smaller than the full screen.
• The term “Windows” refers to Microsoft 32-bit Windows operating systems, including Windows 2000, Windows XP, or Windows Server 2003, Windows Vista, or Windows Server 2008, unless specifically stated otherwise.
Note
RM/COBOL and CodeWatch no longer support earlier Microsoft Windows operating systems, including Microsoft Windows 98, Windows 98 SE, Windows Me, and Windows NT 4.0
Furthermore, any references to these versions, or to the shorthand notation “Windows 9x class” or “Windows NT class” that refer to these operating systems, are included for historical purposes only.
9. RM/COBOL Compile and Runtime Command line options may be preceded by a hyphen. If any option is preceded by a hyphen, then a leading hyphen must precede all options. When assigning a value to an option, the equal sign is optional if leading hyphens are used.
10. In the electronic PDF file, this symbol represents a “note” that allows you to view last-minute comments about a specific topic on the page in which it occurs. This same information is also contained in the README file under the section, Documentation Changes. In Adobe Reader, you can open comments and review their contents, although you cannot edit the comments. Notes do not print directly from the comment that they annotate. You may, however, copy and paste the comment text into another application, such as Microsoft Word, if you wish.
To review notes, do one of the following:
• To view a note, position the mouse over the note icon until the note description pops up.
• To open a note, double-click the note icon.
• To close a note, click the Close box in the upper-left corner of the note window.
Technical Support Preface
CodeWatch User's Guide 5 Second Edition
Technical Support Micro Focus is dedicated to helping you achieve the highest possible performance from the Micro Focus RM/COBOL family of products. The Micro Focus Customer Care team is committed to providing you with prompt and professional service when you have problems or questions about your Micro Focus products.
These technical support services are subject to Micro Focus’ prices, terms, and conditions in place at the time the service is requested.
While it is not possible to maintain and support specific releases of all software indefinitely, we offer priority support for the most current release of each product. For customers who elect not to upgrade to the most current release of the products, support is provided on a limited basis, as time and resources allow.
Support Guidelines When you need assistance, you can expedite your call by having the following information available for the technical support representative:
1. Company name and contact information.
2. Micro Focus RM/COBOL product serial number (found in the Electronic Software Delivery email, on the media label, or in the product banner message).
3. Micro Focus RM/COBOL product version number.
4. Operating system and version number.
5. Hardware, related equipment, and terminal type.
6. Exact message appearing on screen.
7. Concise explanation of the problem and process involved when the problem occurred.
Test Cases You may be asked for an example (test case) that demonstrates the problem. Please remember the following guidelines when submitting a test case:
• The smaller the test case is, the faster we will be able to isolate the cause of the problem.
• Do not send full applications.
• Reduce the test case to the smallest possible combination of components required to reproduce the problem.
• If you have very large data files, write a small program to read in your current data files and to create new data files with as few records as necessary to reproduce the problem.
• Test the test case before sending it to us to ensure that you have included all the necessary components to recompile and run the test case. You may need to include an RM/COBOL configuration file.
When submitting your test case, please include the following items:
1. README text file that explains the problems. This file must include information regarding the hardware, operating system, and versions of all relevant software (including

Technical Support Preface
6 CodeWatch User's Guide Second Edition
the operating system and all Micro Focus products). It must also include step-by-step instructions to reproduce the behavior.
2. Program source files. We require source for any program that is called during the course of the test case. Be sure to include any copy files necessary for recompilation.
3. Data files required by the programs. These files should be as small as possible to reproduce the problem described in the test case.

System Requirements Chapter 1: Installation and System Considerations
CodeWatch User's Guide 7 Second Edition
Chapter 1: Installation and System Considerations
This chapter lists the hardware and software required to install CodeWatch for Windows and describes how to install the product.
Note For information on BIS-based debugging on an IIS web server, see the CodeWatch for Xcentrisity Business Information Server User’s Guide Supplement (Version 12).
System Requirements Your computer configuration is the assembled set of hardware and software that makes up your system. Before you install CodeWatch, please make sure that your computer meets these minimum requirements.
Required Hardware To run CodeWatch, you must have hardware similar to what is needed to run RM/COBOL version 12 for Microsoft 32-bit Windows. These system requirements include:
• An IBM PC or compatible machine, capable of running Microsoft Windows 2000, Microsoft Windows XP, Microsoft Windows Server 2003, Microsoft Windows Vista, or Microsoft Windows Server 2008, is required.
• A minimum of 512 megabytes of random access memory (RAM). Depending on your configuration, CodeWatch may run with less memory, but this is not recommended.
• Ten megabytes of disk space for the CodeWatch program and supporting dynamic-link libraries (DLLs), and for updating system libraries, as required.
• An 1024 x 768 x 256 color display adapter. (1280 x 1024 x 256 or better is recommended, however.) Adapters that support more than 256 colors will eliminate screen flashing as you move between programs. Although CodeWatch will run in 640 x 480 x 256, this is not recommended.
Note Most Micro Focus RM/COBOL products and licenses are distributed electronically. If you elect to receive physical media, an optical drive capable of reading a CD-ROM (for the product) and a 3.5” floppy drive (for the license certificate file) are required at installation time.
System Installation Chapter 1: Installation and System Considerations
8 CodeWatch User's Guide Second Edition
Required Software To run CodeWatch, you must have the following software installed on your computer:
• One of the following operating systems is required:
− Microsoft Windows XP
− Microsoft Windows Server 2003
− Microsoft Windows Vista
− Microsoft Windows Server 2008
− Microsoft Windows Server 2008 R2
− Microsoft Windows 7
− Microsoft Windows 8 and 8.1
− Microsoft Windows Server 2012
− Microsoft Windows Server 2012 R2
− Microsoft Windows 10
− Microsoft Windows Server 2016
• An RM/COBOL development system, version 12 for Microsoft 32-bit Windows or 64-bit Windows.
− To run RM/COBOL programs with the 64-bit runtime system requires CodeWatch version 12.13.
− To compile RM/COBOL programs with the 64-bit compiler requires CodeWatch version 12.14.
System Installation CodeWatch is generally installed when you install an RM/COBOL for Windows development or runtime system. However, if you did not install CodeWatch when you initially installed RM/COBOL, simply reinstall RM/COBOL and select only the CodeWatch component for installation.
You may also automate the installation program for CodeWatch, which allows the installation of CodeWatch to be incorporated with the installation of your application. For more information, navigate to https://supportline.microfocus.com/productdoc.aspx, Micro Focus Developer – COBOL and Software Developer Tools | RM/COBOL | 12 | Windows Installer Guide and refer to the “RM/COBOL CodeWatch Integrated Development Environment” section of the RM-Install Program User’s Reference documentation.
Installation Note After any installation of an RM/COBOL development system, the default character set for new workspaces is OEM/DOS. If you wish to use the ANSI/Windows character set as the default for new workspaces, the RMSETNCS utility, described in the RM/COBOL User's Guide, should be run with the /cs_ansi command line option. Existing workspaces are not affected by the default character set for new workspaces. For information on changing the character set for a workspace, see the Select Character Set dialog box (on page 95). For information on character sets in CodeWatch, see Character Sets (on page 104).
System Installation Chapter 1: Installation and System Considerations
CodeWatch User's Guide 9 Second Edition
For further details on character sets in RM/COBOL for Windows, including details on the RMSETNCS utility, see “Character Set Considerations for Windows” in Chapter 3: Installation and System Considerations for Windows of the RM/COBOL User's Guide.

Quick Start Tutorial Chapter 2: Getting Started with CodeWatch
CodeWatch User's Guide 11 Second Edition
Chapter 2: Getting Started with CodeWatch
This chapter provides a quick start tutorial of CodeWatch. The tutorial is followed by a more in-depth, step-by-step walk through of a basic CodeWatch debugging session, including sections and exercises on:
• Starting CodeWatch (see page 17)
• Configuring a workspace (see page 20)
• Viewing and editing program source (see page 24)
• Running the program (see page 25)
• Changing the workspace (see page 33)
• Saving the workspace (see page 33)
Note The information provided in this tutorial section is for traditional CodeWatch for Windows source code debugging. For BIS-based debugging on an IIS web server, see the CodeWatch for Xcentrisity Business Information Server User’s Guide Supplement (Version 12).
Quick Start Tutorial This section presents an overview of the process of creating a new program in a basic CodeWatch debugging session. The steps include the following:
1. Start CodeWatch from the CodeWatch desktop icon, or click the Windows Start menu, select Programs, RMCOBOL and Development v12, and then click CodeWatch. On Windows 10, click the Windows Start menu, select All Apps, RM Development v12, and then click CodeWatch.
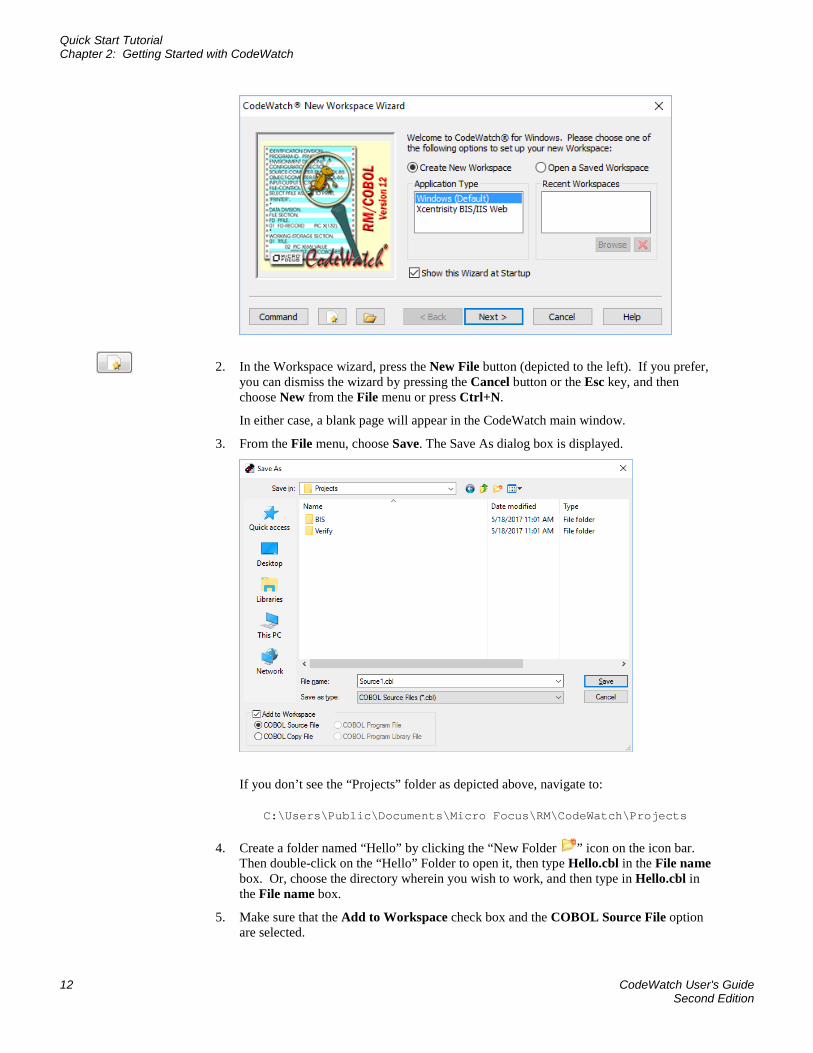
You will see the Workspace wizard, illustrated below. If you do not see the wizard, from the File menu, choose New | Workspace.
Quick Start Tutorial Chapter 2: Getting Started with CodeWatch
12 CodeWatch User's Guide Second Edition
2. In the Workspace wizard, press the New File button (depicted to the left). If you prefer, you can dismiss the wizard by pressing the Cancel button or the Esc key, and then choose New from the File menu or press Ctrl+N.
In either case, a blank page will appear in the CodeWatch main window.
3. From the File menu, choose Save. The Save As dialog box is displayed.
If you don’t see the “Projects” folder as depicted above, navigate to:
C:\Users\Public\Documents\Micro Focus\RM\CodeWatch\Projects
4. Create a folder named “Hello” by clicking the “New Folder ” icon on the icon bar. Then double-click on the “Hello” Folder to open it, then type Hello.cbl in the File name box. Or, choose the directory wherein you wish to work, and then type in Hello.cbl in the File name box.
5. Make sure that the Add to Workspace check box and the COBOL Source File option are selected.
Quick Start Tutorial Chapter 2: Getting Started with CodeWatch
CodeWatch User's Guide 13 Second Edition
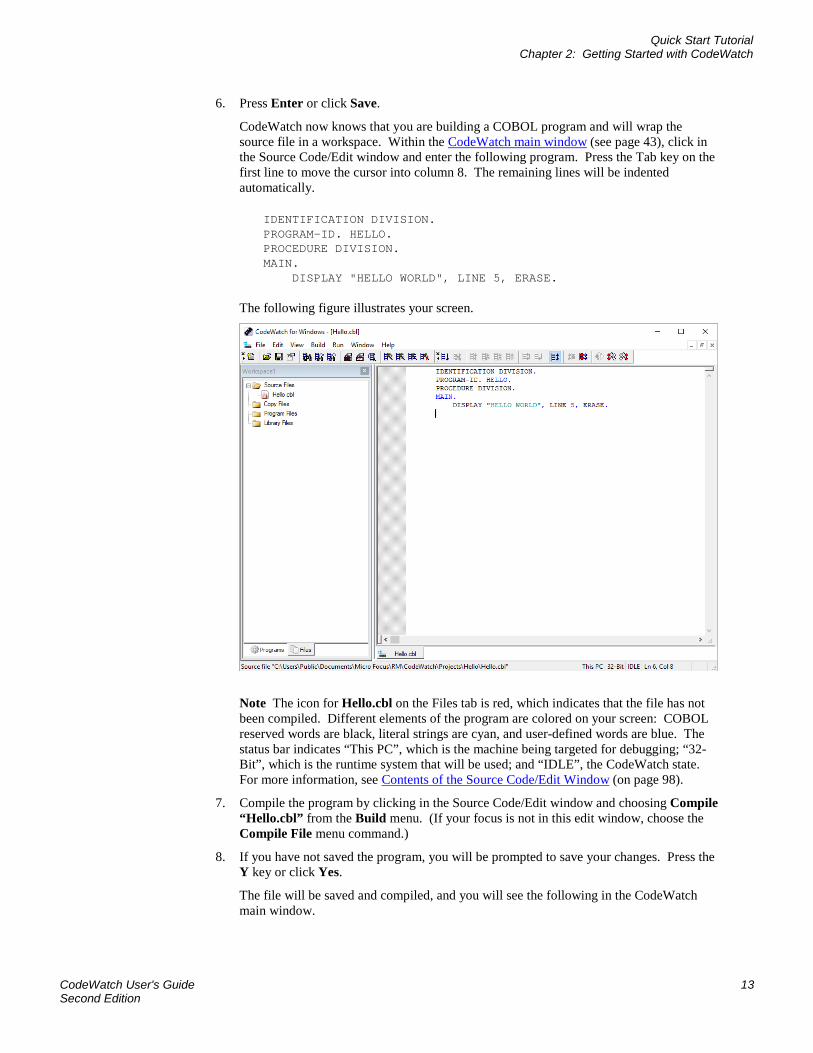
6. Press Enter or click Save.
CodeWatch now knows that you are building a COBOL program and will wrap the source file in a workspace. Within the CodeWatch main window (see page 43), click in the Source Code/Edit window and enter the following program. Press the Tab key on the first line to move the cursor into column 8. The remaining lines will be indented automatically.
IDENTIFICATION DIVISION. PROGRAM-ID. HELLO. PROCEDURE DIVISION. MAIN. DISPLAY "HELLO WORLD", LINE 5, ERASE.
The following figure illustrates your screen.
Note The icon for Hello.cbl on the Files tab is red, which indicates that the file has not been compiled. Different elements of the program are colored on your screen: COBOL reserved words are black, literal strings are cyan, and user-defined words are blue. The status bar indicates “This PC”, which is the machine being targeted for debugging; “32-Bit”, which is the runtime system that will be used; and “IDLE”, the CodeWatch state. For more information, see Contents of the Source Code/Edit Window (on page 98).
7. Compile the program by clicking in the Source Code/Edit window and choosing Compile “Hello.cbl” from the Build menu. (If your focus is not in this edit window, choose the Compile File menu command.)
8. If you have not saved the program, you will be prompted to save your changes. Press the Y key or click Yes.
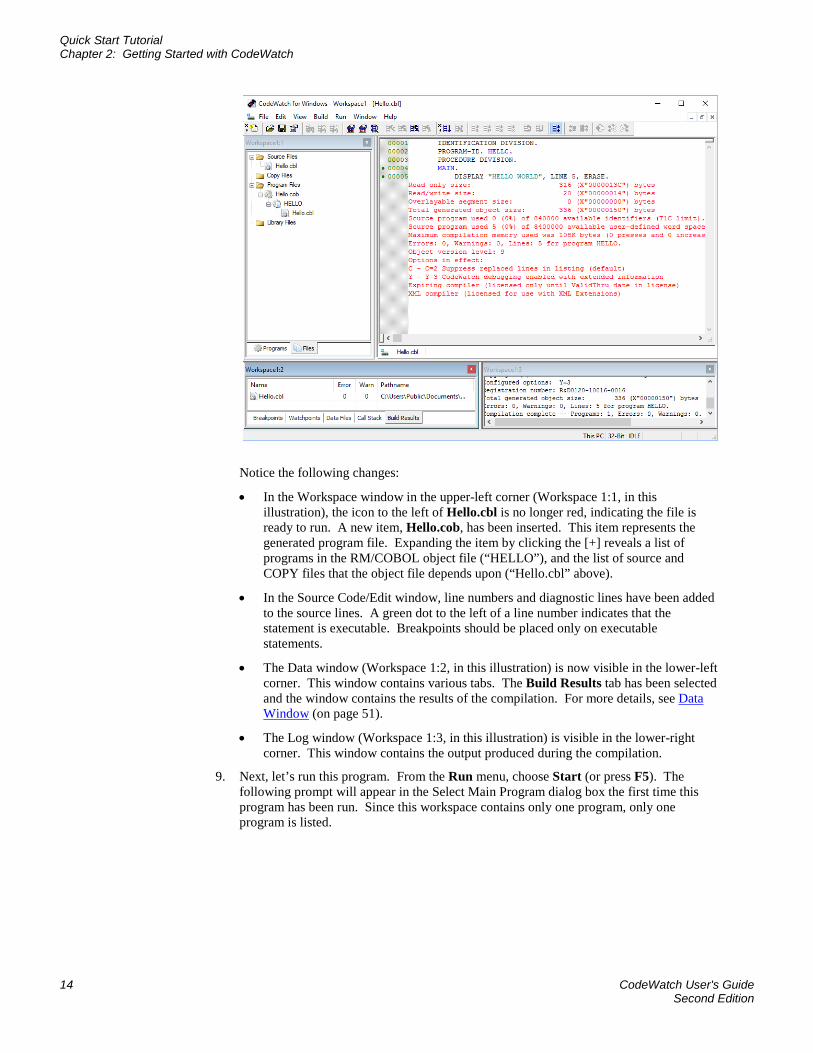
The file will be saved and compiled, and you will see the following in the CodeWatch main window.
Quick Start Tutorial Chapter 2: Getting Started with CodeWatch
14 CodeWatch User's Guide Second Edition
Notice the following changes:
• In the Workspace window in the upper-left corner (Workspace 1:1, in this illustration), the icon to the left of Hello.cbl is no longer red, indicating the file is ready to run. A new item, Hello.cob, has been inserted. This item represents the generated program file. Expanding the item by clicking the [+] reveals a list of programs in the RM/COBOL object file (“HELLO”), and the list of source and COPY files that the object file depends upon (“Hello.cbl” above).
• In the Source Code/Edit window, line numbers and diagnostic lines have been added to the source lines. A green dot to the left of a line number indicates that the statement is executable. Breakpoints should be placed only on executable statements.
• The Data window (Workspace 1:2, in this illustration) is now visible in the lower-left corner. This window contains various tabs. The Build Results tab has been selected and the window contains the results of the compilation. For more details, see Data Window (on page 51).
• The Log window (Workspace 1:3, in this illustration) is visible in the lower-right corner. This window contains the output produced during the compilation.
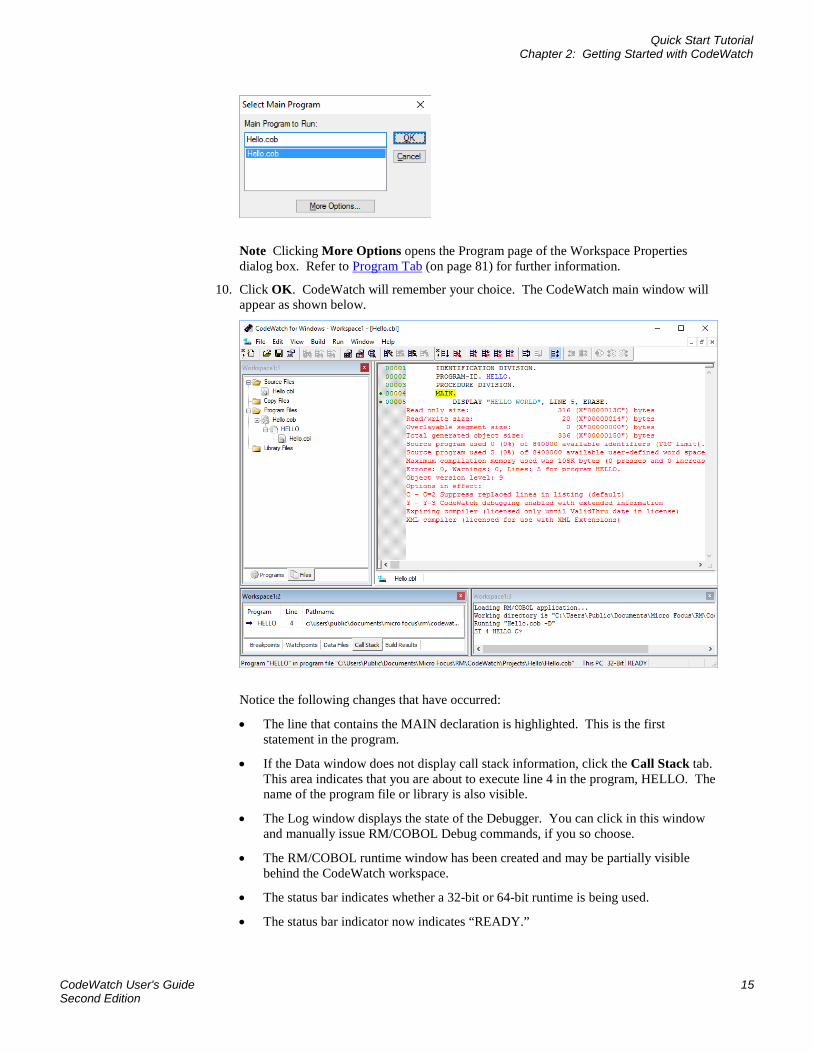
9. Next, let’s run this program. From the Run menu, choose Start (or press F5). The following prompt will appear in the Select Main Program dialog box the first time this program has been run. Since this workspace contains only one program, only one program is listed.
Quick Start Tutorial Chapter 2: Getting Started with CodeWatch
CodeWatch User's Guide 15 Second Edition
Note Clicking More Options opens the Program page of the Workspace Properties dialog box. Refer to Program Tab (on page 81) for further information.
10. Click OK. CodeWatch will remember your choice. The CodeWatch main window will appear as shown below.
Notice the following changes that have occurred:
• The line that contains the MAIN declaration is highlighted. This is the first statement in the program.
• If the Data window does not display call stack information, click the Call Stack tab. This area indicates that you are about to execute line 4 in the program, HELLO. The name of the program file or library is also visible.
• The Log window displays the state of the Debugger. You can click in this window and manually issue RM/COBOL Debug commands, if you so choose.
• The RM/COBOL runtime window has been created and may be partially visible behind the CodeWatch workspace.
• The status bar indicates whether a 32-bit or 64-bit runtime is being used.
• The status bar indicator now indicates “READY.”
Quick Start Tutorial Chapter 2: Getting Started with CodeWatch
16 CodeWatch User's Guide Second Edition
11. To set a breakpoint, click anywhere in line 00005 and from the Run menu, choose Breakpoint | Set or press F9.
A solid red circle will appear to the left of the line number to indicate that a breakpoint has been set.
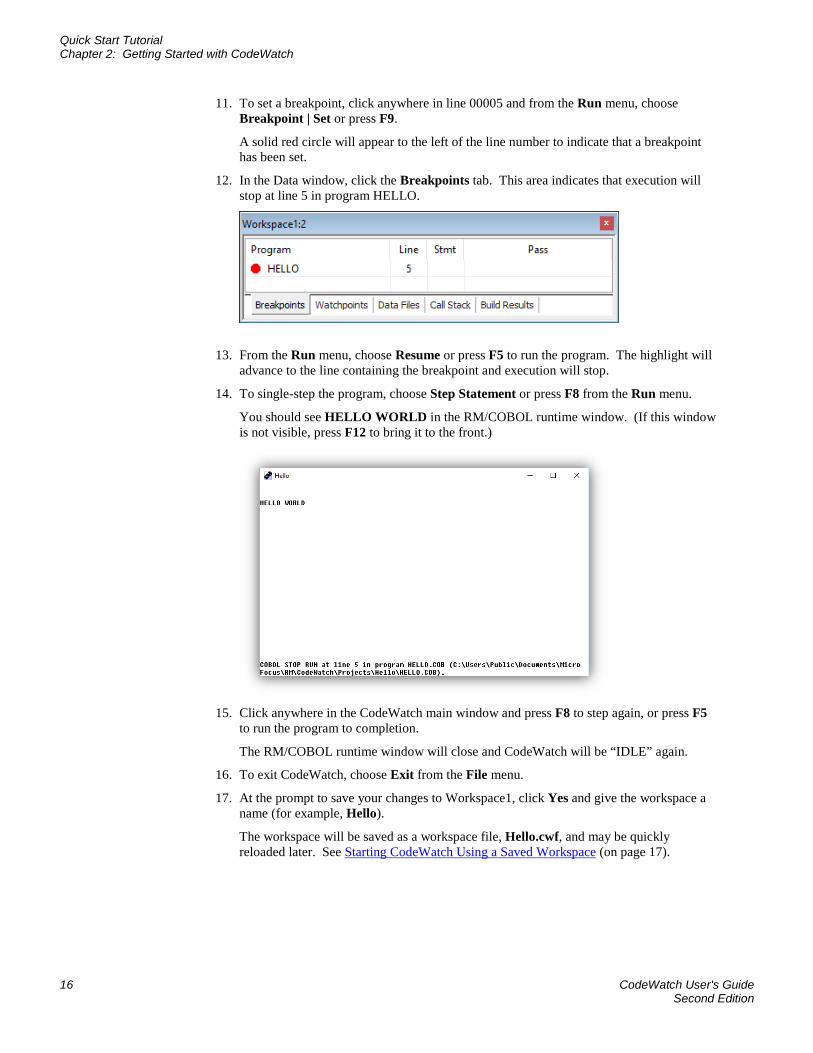
12. In the Data window, click the Breakpoints tab. This area indicates that execution will stop at line 5 in program HELLO.
13. From the Run menu, choose Resume or press F5 to run the program. The highlight will advance to the line containing the breakpoint and execution will stop.
14. To single-step the program, choose Step Statement or press F8 from the Run menu.
You should see HELLO WORLD in the RM/COBOL runtime window. (If this window is not visible, press F12 to bring it to the front.)
15. Click anywhere in the CodeWatch main window and press F8 to step again, or press F5
to run the program to completion.
The RM/COBOL runtime window will close and CodeWatch will be “IDLE” again.
16. To exit CodeWatch, choose Exit from the File menu.
17. At the prompt to save your changes to Workspace1, click Yes and give the workspace a name (for example, Hello).
The workspace will be saved as a workspace file, Hello.cwf, and may be quickly reloaded later. See Starting CodeWatch Using a Saved Workspace (on page 17).
Starting CodeWatch Chapter 2: Getting Started with CodeWatch
CodeWatch User's Guide 17 Second Edition
Starting CodeWatch When you install CodeWatch, the installation process automatically creates a new Start Menu item for CodeWatch in Windows. You have a number of choices for starting CodeWatch, including the following:
• Starting CodeWatch from Windows (see the next topic)
• Starting CodeWatch using a saved workspace (see page 17)
• Starting CodeWatch from a Command Prompt (see page 18)
• Starting CodeWatch with a Runtime Command line (see page 19)
Starting CodeWatch from Windows If you have started and are running Windows, use one of the following methods to start CodeWatch:
• Click the Windows Start menu (usually located at the bottom left corner of your screen), point to RM Development V12 (or Programs, point to RMCOBOL and then Development v12), and then click CodeWatch.
• Click the Windows Search button (or choose the Start menu and choose Run), and then enter rmcw.exe and press Enter.
• From Windows Explorer, navigate to the RM/COBOLv12 Program directory (by default, this is C:\Program Files\Micro Focus\RM\RMCOBOLv12 on Windows 32-bit or C:\Program Files\Micro Focus\RM\RMCOBOLv12-64 or C:\Program Files (x86)\Micro Focus\RM\RMCOBOLv12 on Windows 64-bit), and then double-click the CodeWatch icon (rmcw.exe) that was created by the installation procedure.
• If you elected to create and put a CodeWatch icon (a shortcut) on your desktop during installation, double-click the icon.
Using these methods, CodeWatch normally opens the Workspace wizard to help you establish and configure a workspace for the session. For more information, see Configuring a Workspace (on page 20).
Starting CodeWatch Using a Saved Workspace You may also start CodeWatch by opening an existing workspace file:
• From Windows Explorer, double-click a saved CodeWatch workspace file (workspace files have an extension of .cwf, which represents CodeWatch Workspace File).
• Alternatively, right-click the workspace file in Windows Explorer and select Open from the pop-up context-sensitive menu. This method allows you to resume debugging using the same set of configuration options, program files, program libraries, and source files that you used when you saved the workspace in a previous CodeWatch session.
Note Using Windows Explorer to start a saved workspace requires that the workspace file extension be registered with Windows. If the .cwf files are no longer associated with CodeWatch, you can still launch CodeWatch with a saved workspace by dragging and dropping a saved workspace file onto the CodeWatch icon. It may be necessary to use
Starting CodeWatch Chapter 2: Getting Started with CodeWatch
18 CodeWatch User's Guide Second Edition
this technique if you run other applications that also use the .cwf file type for document files. Once started, CodeWatch will automatically repair the .cwf extension.
• To start CodeWatch with a previously saved CodeWatch workspace, using a command line, enter:
rmcw filename.cwf
This command causes CodeWatch to open the specified workspace file. The .cwf extension must be specified, because it uniquely identifies this command line format.
When you start CodeWatch using a saved workspace file, there are several considerations to keep in mind:
• Workspace files are ASCII text files and can be carefully edited outside of CodeWatch. For additional information, see External Editing Tab (on page 111).
• To avoid ambiguity, COBOL programs should not use the .cwf extension.
• If the filename contains a space, the entire filename must be enclosed in double quotes.
Starting CodeWatch from a Command Prompt You may occasionally want to start CodeWatch from a Microsoft DOS command prompt shell window. Starting CodeWatch from a command prompt provides several options:
• To start CodeWatch from a command prompt, enter:
start rmcw
The Workspace wizard is displayed unless it has been disabled, as described in the following item.
• To start CodeWatch without displaying the Workspace wizard, enter one of the following:
start rmcw /n start rmcw –n
• To start CodeWatch with the name of a saved workspace file:
start rmcw filename.cwf
Note To invoke the Workspace wizard at any time, from the File menu, choose New and then Workspace. If a workspace is currently open, do one of the following to invoke the wizard:
• From the File menu, choose Workspace and then click New.
• From the File menu, choose Workspace and then click Properties.
CodeWatch also may be started with an RM/COBOL Runtime Command line, as described in the following section.
Note In addition to being able to specify a RUNCOBOL command line, or the name of a CodeWatch workspace file, you can also start CodeWatch from a DOS command line with the name of a .CBL or .CPY file. CodeWatch will create a default workspace for the file, and set the current working directory to the directory that contains the file.
Starting CodeWatch Chapter 2: Getting Started with CodeWatch
CodeWatch User's Guide 19 Second Edition
Starting CodeWatch with a Runtime Command Line Note CodeWatch command line parameter options may be specified when CodeWatch is started from a Windows command prompt, from Windows 10 Search, from the Start | Run menu, or within a Windows shortcut icon.
To start CodeWatch with an RM/COBOL Runtime Command line, enter:
start rmcw runcobol-command-line
This command creates a workspace using the RM/COBOL runtime options specified in runcobol-command-line. Note that runcobol-command-line should not include the name of the runtime itself, but may include any runcobol options. For example:
start rmcw mainprog L=lib\lib1.cob L=lib2.cob C=myconfig.cfg
or the equivalent:
start rmcw mainprog /L lib\lib1.cob /L lib2.cob /C mycfg.cfg
When you start CodeWatch with a Runtime Command line, there are several considerations to keep in mind:
• CodeWatch accepts either the Windows or UNIX style, but the two styles cannot be mixed in a single command. See Chapter 7: Running of the RM/COBOL User’s Guide for a complete description of the Runtime Command line syntax.
• A dash (-) may be used instead of a slash (/) in the UNIX style, and the option letters are not case-sensitive in either style.
• If a filename contains a space, the entire filename must be enclosed in double quotes.
• The /D (Debug) Runtime Command Option is always assumed to be present, even if not specified. This allows rmcw to be used instead of runcobol in existing batch scripts. The /D Option may be disabled by choosing Properties from the File menu and selecting the No Debug option on the Program tab (see page 81) of the Workspace Properties dialog box.
• As is true with the RM/COBOL runtime system, some options cannot be set from the Windows command prompt when using CodeWatch. It may be necessary to define RMPATH, RUNPATH, or other environment variables in the Workspace Properties dialog box to completely replicate the execution environment. To open the Workspace Properties dialog box, choose Workspace | Properties from the File menu. Programs running under CodeWatch also inherit any previously set environment variables.
Exercise 1—Start CodeWatch
To start CodeWatch:
1. Start Microsoft Windows.
2. Click the Windows Start menu, point to Programs, point to RMCOBOL and then Development v12, and then click CodeWatch. On Windows 10, click the Windows Start menu, scroll to and select RM Development v12, and then click CodeWatch.
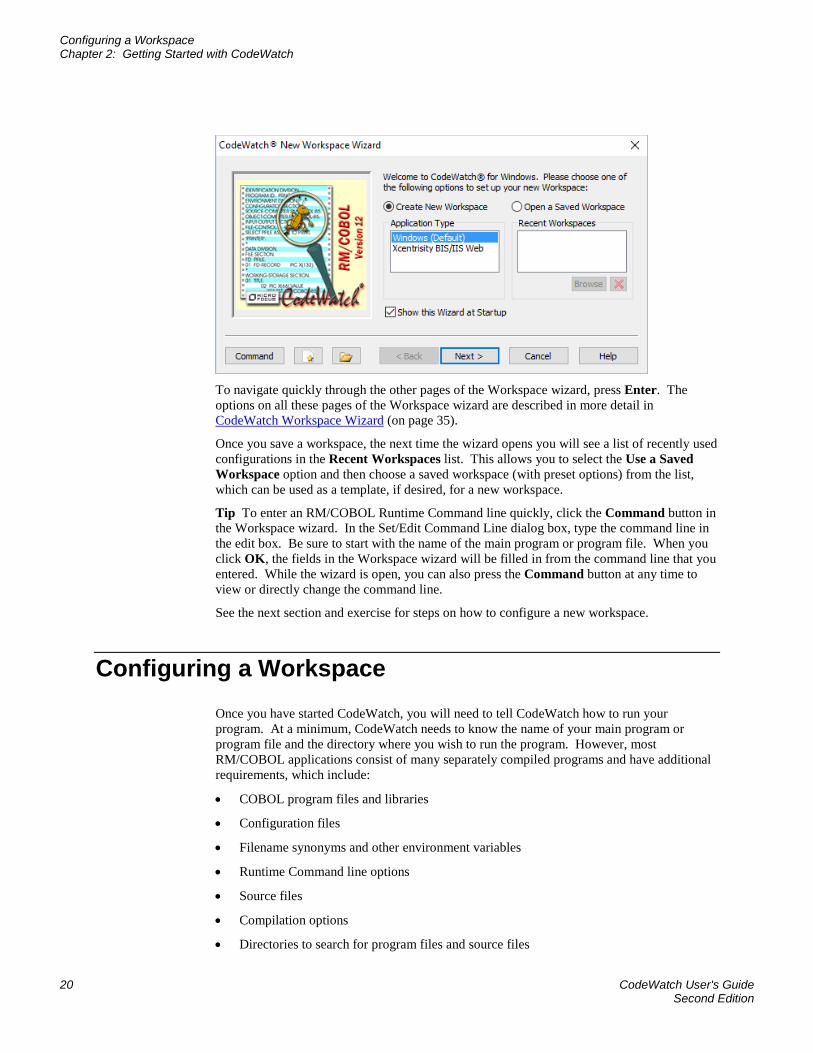
3. CodeWatch starts and displays the first page of the Workspace wizard. By default, the Create New Workspace option is selected.
Configuring a Workspace Chapter 2: Getting Started with CodeWatch
20 CodeWatch User's Guide Second Edition
To navigate quickly through the other pages of the Workspace wizard, press Enter. The options on all these pages of the Workspace wizard are described in more detail in CodeWatch Workspace Wizard (on page 35).
Once you save a workspace, the next time the wizard opens you will see a list of recently used configurations in the Recent Workspaces list. This allows you to select the Use a Saved Workspace option and then choose a saved workspace (with preset options) from the list, which can be used as a template, if desired, for a new workspace.
Tip To enter an RM/COBOL Runtime Command line quickly, click the Command button in the Workspace wizard. In the Set/Edit Command Line dialog box, type the command line in the edit box. Be sure to start with the name of the main program or program file. When you click OK, the fields in the Workspace wizard will be filled in from the command line that you entered. While the wizard is open, you can also press the Command button at any time to view or directly change the command line.
See the next section and exercise for steps on how to configure a new workspace.
Configuring a Workspace Once you have started CodeWatch, you will need to tell CodeWatch how to run your program. At a minimum, CodeWatch needs to know the name of your main program or program file and the directory where you wish to run the program. However, most RM/COBOL applications consist of many separately compiled programs and have additional requirements, which include:
• COBOL program files and libraries
• Configuration files
• Filename synonyms and other environment variables
• Runtime Command line options
• Source files
• Compilation options
• Directories to search for program files and source files
Configuring a Workspace Chapter 2: Getting Started with CodeWatch
CodeWatch User's Guide 21 Second Edition
CodeWatch combines all of this information, and more, into a workspace. For convenience, a workspace can be saved to a file for later retrieval.
There are several ways to create a new workspace:
• Start CodeWatch using any of the methods discussed in Starting CodeWatch (on page 17) without any RM/COBOL Runtime Command line options specified.
• Start CodeWatch with a runcobol command line. See Starting CodeWatch with a Runtime Command Line (on page 19).
• If CodeWatch is already running, from the File menu, choose Workspace | New.
The Workspace wizard opens and then leads you through the process of creating the workspace. The name of the program or program file you wish to run is all that is required (although the working directory may also need to be specified).
Note You can bypass the Workspace wizard by clicking on the Command button in the wizard and entering a command line. To start CodeWatch without starting the wizard, specify /n on the command line. For more details, see Starting CodeWatch from a Command Prompt (on page 18).
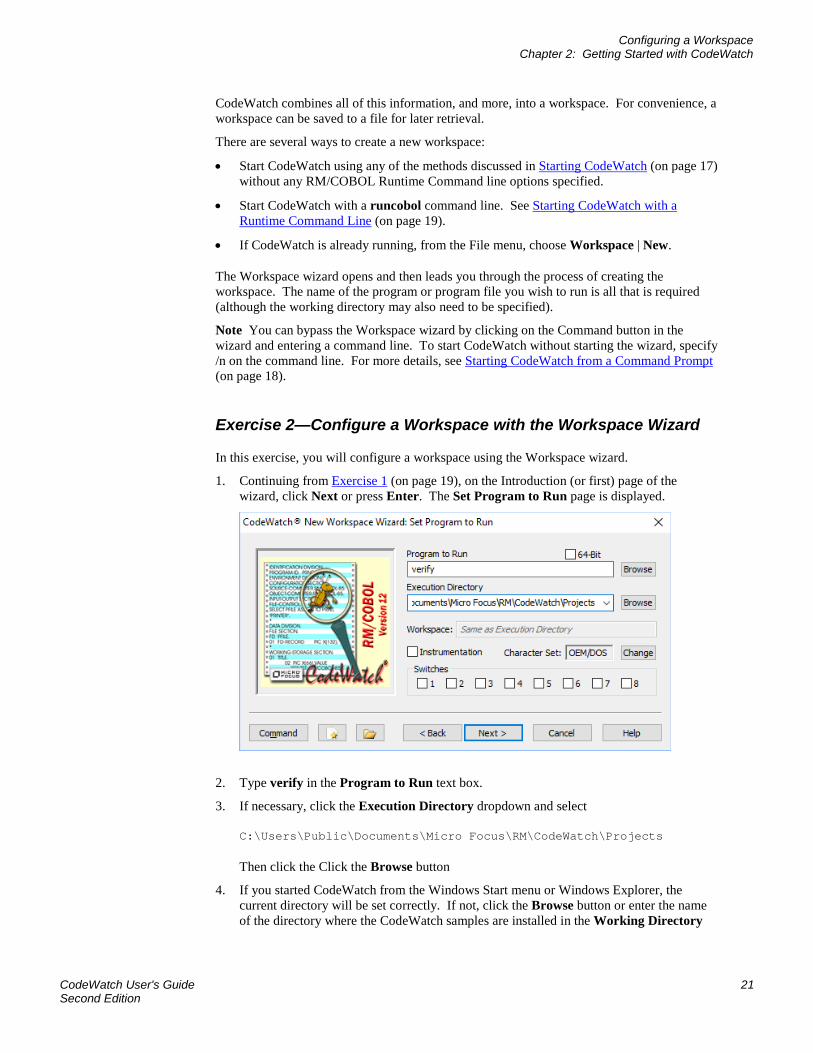
Exercise 2—Configure a Workspace with the Workspace Wizard
In this exercise, you will configure a workspace using the Workspace wizard.
1. Continuing from Exercise 1 (on page 19), on the Introduction (or first) page of the wizard, click Next or press Enter. The Set Program to Run page is displayed.
2. Type verify in the Program to Run text box.
3. If necessary, click the Execution Directory dropdown and select
C:\Users\Public\Documents\Micro Focus\RM\CodeWatch\Projects
Then click the Click the Browse button
4. If you started CodeWatch from the Windows Start menu or Windows Explorer, the current directory will be set correctly. If not, click the Browse button or enter the name of the directory where the CodeWatch samples are installed in the Working Directory
Configuring a Workspace Chapter 2: Getting Started with CodeWatch
22 CodeWatch User's Guide Second Edition
field. Typically, this directory is named C:\Users\Public\Documents\Micro Focus\RM\CodeWatch\Projects\Verify.
5. To use the 64-bit RM/COBOL runtime system, click the 64-Bit checkbox. Note that this checkbox is only enabled if both 32-bit and 64-bit runtime systems are installed. Otherwise, the checkbox is disabled and is checked if a 64-bit runtime system is detected or is cleared if a 32-bit runtime system is detected.
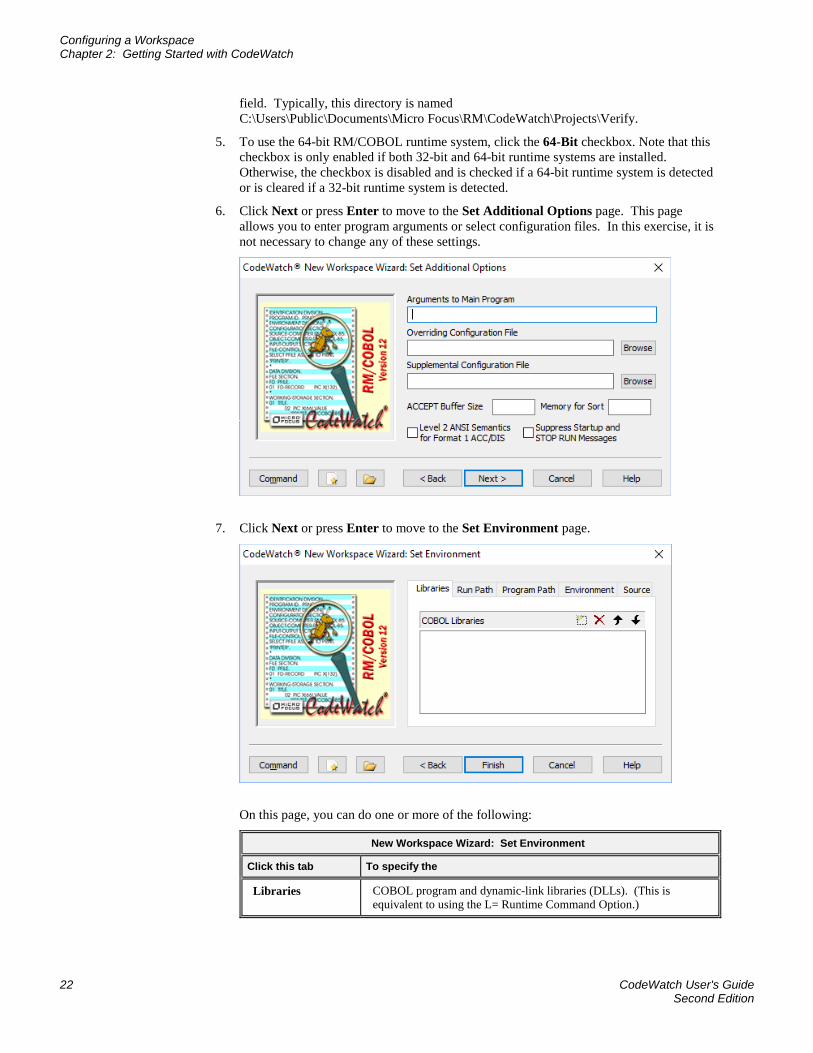
6. Click Next or press Enter to move to the Set Additional Options page. This page allows you to enter program arguments or select configuration files. In this exercise, it is not necessary to change any of these settings.
7. Click Next or press Enter to move to the Set Environment page.
On this page, you can do one or more of the following:
New Workspace Wizard: Set Environment
Click this tab To specify the
Libraries COBOL program and dynamic-link libraries (DLLs). (This is equivalent to using the L= Runtime Command Option.)
Configuring a Workspace Chapter 2: Getting Started with CodeWatch
CodeWatch User's Guide 23 Second Edition
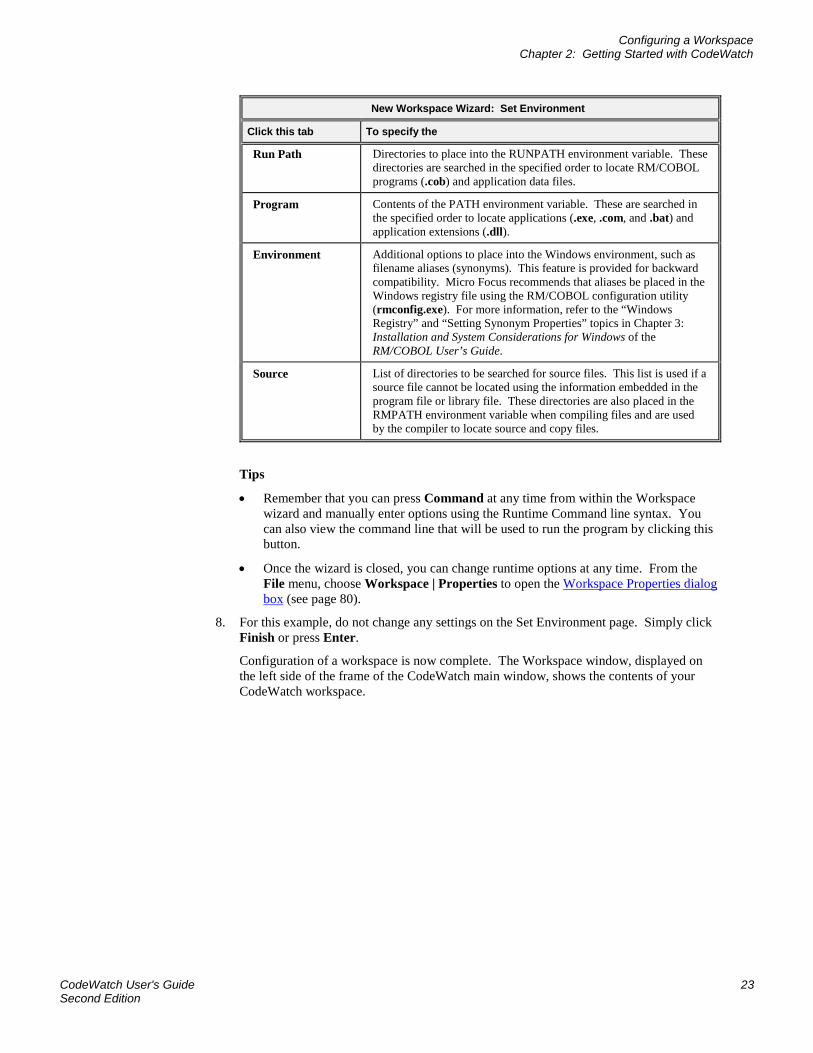
New Workspace Wizard: Set Environment
Click this tab To specify the
Run Path Directories to place into the RUNPATH environment variable. These directories are searched in the specified order to locate RM/COBOL programs (.cob) and application data files.
Program Contents of the PATH environment variable. These are searched in the specified order to locate applications (.exe, .com, and .bat) and application extensions (.dll).
Environment Additional options to place into the Windows environment, such as filename aliases (synonyms). This feature is provided for backward compatibility. Micro Focus recommends that aliases be placed in the Windows registry file using the RM/COBOL configuration utility (rmconfig.exe). For more information, refer to the “Windows Registry” and “Setting Synonym Properties” topics in Chapter 3: Installation and System Considerations for Windows of the RM/COBOL User’s Guide.
Source List of directories to be searched for source files. This list is used if a source file cannot be located using the information embedded in the program file or library file. These directories are also placed in the RMPATH environment variable when compiling files and are used by the compiler to locate source and copy files.
Tips
• Remember that you can press Command at any time from within the Workspace wizard and manually enter options using the Runtime Command line syntax. You can also view the command line that will be used to run the program by clicking this button.
• Once the wizard is closed, you can change runtime options at any time. From the File menu, choose Workspace | Properties to open the Workspace Properties dialog box (see page 80).
8. For this example, do not change any settings on the Set Environment page. Simply click Finish or press Enter.
Configuration of a workspace is now complete. The Workspace window, displayed on the left side of the frame of the CodeWatch main window, shows the contents of your CodeWatch workspace.

Viewing and Editing Program Source Chapter 2: Getting Started with CodeWatch
24 CodeWatch User's Guide Second Edition
The only item in the Main Program folder is the name of the main sample program, <verify>. The angle brackets indicate that possible ambiguities related to the program name have not been resolved; that is, verify may refer either to a standalone program named VERIFY.COB or to a program named verify in a COBOL library that has not yet been configured. CodeWatch cannot resolve these ambiguities until execution begins, as you may not yet have completed configuring the workspace.
Note At the bottom of the Workspace window, the Programs and Files tabs allow you to choose between two views of the workspace. The Programs tab lists the programs in the workspace. The Files tab lists all of the files in the workspace. Currently, there are no files in the Files tab because the program file that contains program verify is not discovered until the workspace is run for the first time. For a more complete description of the CodeWatch windows and user interface, see Chapter 3: CodeWatch Interface (on page 35).
Viewing and Editing Program Source You can view or edit the source for a program by double-clicking the name of the program, or the name of the program file in any window where the name appears. You can also directly open the source for a program file, a library file, or a source file listed in the Workspace window.
If the source file does not appear, it may be due to one of the following reasons:
• The program or library was not compiled with the Full Debug Information (Y=2 or Y=3) Compile Command line option (see Chapter 6: Compiling in the RM/COBOL User's Guide).
• The source file is not in the same location as when the file was originally compiled, and it could not be located using the search sequence described in the following exercise.

Running the Program Chapter 2: Getting Started with CodeWatch
CodeWatch User's Guide 25 Second Edition
• There are program name ambiguities that have not yet been resolved. In this case, the name is shown in angle brackets.
Exercise 3—Locate Source Files
To locate the source file for a COBOL program, CodeWatch uses the following search sequence:
1. First, the absolute path of the source file that was used to produce the program file is searched. Note that the file might have been compiled on a different computer, and, therefore, may not be found on this computer using this technique.
2. Then, the directory that contains the program file is searched, even if the source file was not compiled in this directory.
3. Next, the current working directory is searched.
4. Finally, each directory in the workspace Source Path list is searched. To view and add directories to this list, take the following steps:
a. From the File menu, click Workspace | Properties or click the Workspace Properties toolbar button to display the Workspace Properties dialog box.
b. In the Workspace Properties dialog box, click the Environment tab.
c. On the Environment page, click the Source tab.
d. Click the New (Insert) button (or double-click on the first blank line in the list box) to add a new line.
e. Type the name of the directory that contains your source file and press Enter.
If necessary, click the ellipsis button at the end of the line to open a Select Directory dialog box where you can search for and select the directory.
f. To insert additional directories, click the Move Down button (or press Alt+Down Arrow) and then click in the list box.
Note You can reorder the list of directories by making a selection and pressing the Move Up and Move Down buttons (or the shortcut keys, Alt+Up Arrow and Alt+Down Arrow, respectively) or by dragging the items in the list with the mouse.
g. Click OK to close the Workspace Properties dialog box.
WARNING CodeWatch will load the first occurrence of a given filename that is found when following this search sequence. It is possible that an incorrect file will be displayed if another file of the same name is found first.
Running the Program Once the workspace has been created, you can run the program. Program files may be produced either by CodeWatch using the Build menu or outside CodeWatch by the standalone RM/COBOL compiler. Note that, in order for CodeWatch to display the source for a program, the RM/COBOL compiler /Y2 or /Y3 options must be used.
For the example workspace, it is not necessary to configure any COBOL libraries since verify is a standalone program and is ready to run.
As you run your program, you can also perform the following tasks:
Running the Program Chapter 2: Getting Started with CodeWatch
26 CodeWatch User's Guide Second Edition
• Animating the program (see page 28)
• Controlling the flow of execution (see page 28)
• Setting breakpoints (see page 29)
• Setting watchpoints (see page 30)
• Inspecting and modifying data (see page 31)
• Stopping the program (see page 32)
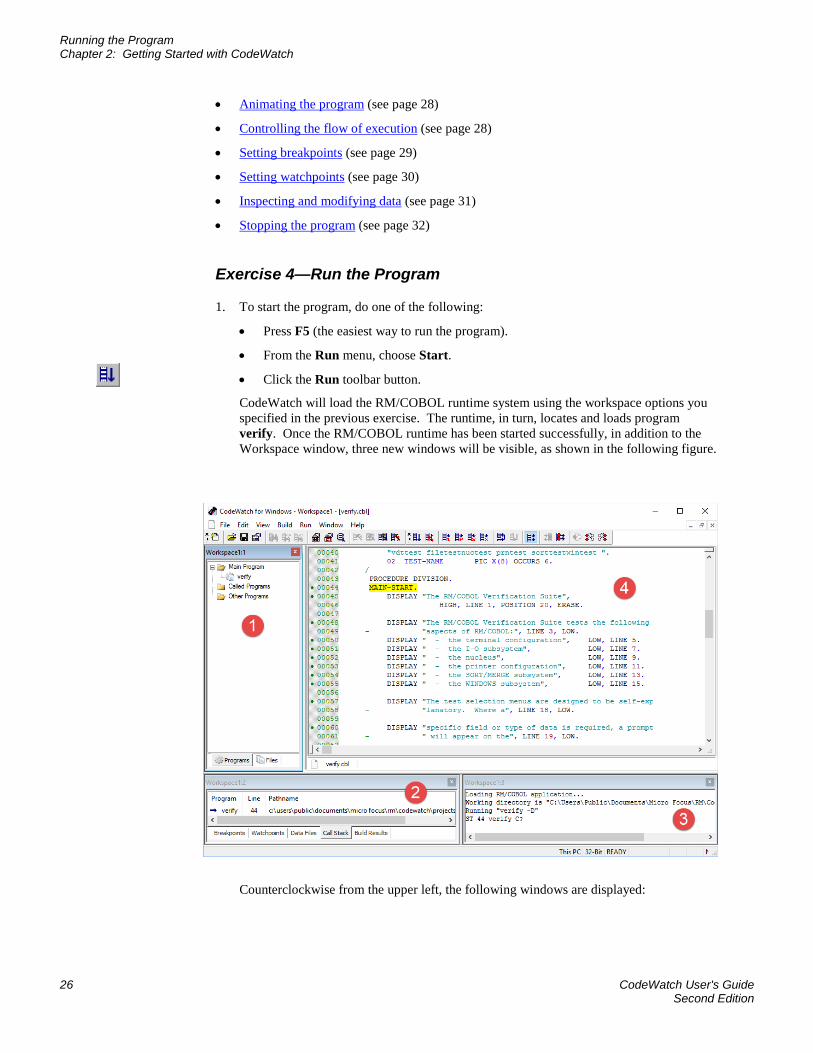
Exercise 4—Run the Program
1. To start the program, do one of the following:
• Press F5 (the easiest way to run the program).
• From the Run menu, choose Start.
• Click the Run toolbar button.
CodeWatch will load the RM/COBOL runtime system using the workspace options you specified in the previous exercise. The runtime, in turn, locates and loads program verify. Once the RM/COBOL runtime has been started successfully, in addition to the Workspace window, three new windows will be visible, as shown in the following figure.
Counterclockwise from the upper left, the following windows are displayed:
Running the Program Chapter 2: Getting Started with CodeWatch
CodeWatch User's Guide 27 Second Edition
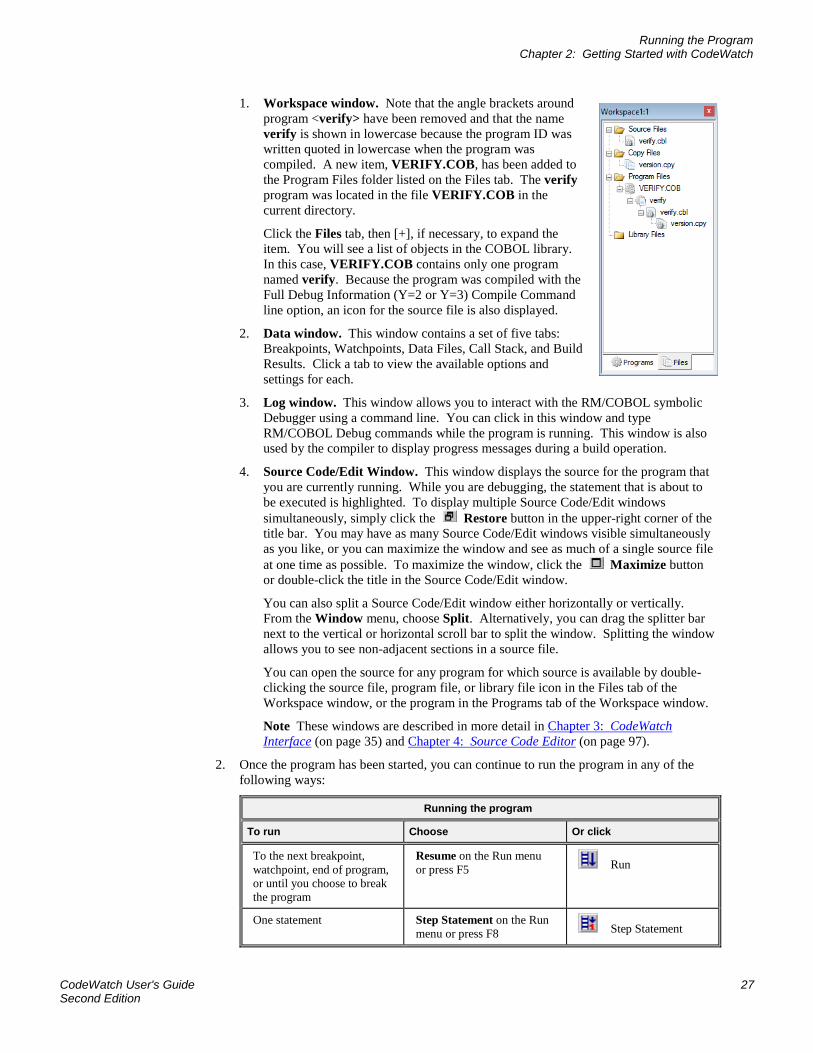
1. Workspace window. Note that the angle brackets around program <verify> have been removed and that the name verify is shown in lowercase because the program ID was written quoted in lowercase when the program was compiled. A new item, VERIFY.COB, has been added to the Program Files folder listed on the Files tab. The verify program was located in the file VERIFY.COB in the current directory.
Click the Files tab, then [+], if necessary, to expand the item. You will see a list of objects in the COBOL library. In this case, VERIFY.COB contains only one program named verify. Because the program was compiled with the Full Debug Information (Y=2 or Y=3) Compile Command line option, an icon for the source file is also displayed.
2. Data window. This window contains a set of five tabs: Breakpoints, Watchpoints, Data Files, Call Stack, and Build Results. Click a tab to view the available options and settings for each.
3. Log window. This window allows you to interact with the RM/COBOL symbolic Debugger using a command line. You can click in this window and type RM/COBOL Debug commands while the program is running. This window is also used by the compiler to display progress messages during a build operation.
4. Source Code/Edit Window. This window displays the source for the program that you are currently running. While you are debugging, the statement that is about to be executed is highlighted. To display multiple Source Code/Edit windows simultaneously, simply click the Restore button in the upper-right corner of the title bar. You may have as many Source Code/Edit windows visible simultaneously as you like, or you can maximize the window and see as much of a single source file at one time as possible. To maximize the window, click the Maximize button or double-click the title in the Source Code/Edit window.
You can also split a Source Code/Edit window either horizontally or vertically. From the Window menu, choose Split. Alternatively, you can drag the splitter bar next to the vertical or horizontal scroll bar to split the window. Splitting the window allows you to see non-adjacent sections in a source file.
You can open the source for any program for which source is available by double-clicking the source file, program file, or library file icon in the Files tab of the Workspace window, or the program in the Programs tab of the Workspace window.
Note These windows are described in more detail in Chapter 3: CodeWatch Interface (on page 35) and Chapter 4: Source Code Editor (on page 97).
2. Once the program has been started, you can continue to run the program in any of the following ways:
Running the program
To run Choose Or click
To the next breakpoint, watchpoint, end of program, or until you choose to break the program
Resume on the Run menu or press F5 Run
One statement Step Statement on the Run menu or press F8 Step Statement
Running the Program Chapter 2: Getting Started with CodeWatch
28 CodeWatch User's Guide Second Edition
Running the program
To run Choose Or click
One paragraph or to the end of the current paragraph
Step Paragraph on the Run menu or press Shift+F8 Step Paragraph
One section or to the end of the current section
Step Section on the Run menu or press Ctrl+F8 Step Section
To the end of this program Step Program on the Run menu or press Alt+F8 Step Program
To run to the next program (Note that this is either the next program called from within this program or the program that called the current program.)
To Program Change from the Run menu or press Alt+F5
Run To Program Change
To run to the line containing the cursor in the Source Code/Edit window
To Cursor on the Run menu or press Shift+F5 Run to Cursor
Animating the Program The animation feature determines whether CodeWatch will trace program execution while running. When enabled, CodeWatch opens the source code for each program in a Source Code/Edit window and highlights each line as it is executed. While this is beneficial for visually observing the flow of control within your program, there is a significant performance penalty for running the program with animation enabled.
Note You can turn animation on and off at any time during program execution.
Exercise 5—Animate the Program
• Continuing from Exercise 4 (on page 26), click Animate from the Run menu to toggle animation on or click the Animate toolbar button.
Note To indicate that this option is selected, a check mark appears next to the menu command.
Controlling the Flow of Execution Once the program begins to execute, CodeWatch will run the program until one of the following events occurs:
• A breakpoint is encountered during execution.
• A watchpoint is encountered during execution.
• The operation has completed, if you are stepping across lines, paragraphs, or sections.
• You tell the program to stop running by choosing Break from the Run menu (see page 77).
• The program terminates for one of the following reasons:
Running the Program Chapter 2: Getting Started with CodeWatch
CodeWatch User's Guide 29 Second Edition
− You choose Stop from the Run menu.
− The end of the RM/COBOL program is reached.
− An error occurs in the RM/COBOL program.
− You terminate CodeWatch or close the CodeWatch main window.
If the program halts for any of the above reasons except for the last, you can resume program execution with the Resume command from the Run menu or any of the other commands on the Run menu. Alternatively, you can choose Stop from the Run menu to terminate the program.
Setting Breakpoints A breakpoint causes program execution to pause, which gives you the opportunity to look around at the program, examine variables, or set additional breakpoints.
Breakpoints are part of the workspace and are, therefore, saved and loaded with the workspace. Any breakpoints that are set when you save a workspace will be set the next time you open the workspace.
Breakpoints are set by program name, line number, and statement number. If you have two programs in your workspace with identical names, and both programs contain the line number on which the breakpoint was set, execution will stop at both lines.
If a line contains a breakpoint, the Source Code Editor displays a red circle in front of the line number. The breakpoint is also reported in the Breakpoints tab (see page 52) of the Data window. If the breakpoint is enabled, the red circle is solid; if the breakpoint is disabled, the red circle is hollow.
Exercise 6—Set a Breakpoint
1. Continuing from Exercise 5 (on page 28), scroll down through the Source Code/Edit window until DISPLAY-MAIN-MENU is visible.
2. To set a breakpoint, click anywhere in the line and press the F9 key.
A red circle appears to the left of the line number and the breakpoint appears in the Breakpoints tab.
Note In addition to pressing F9, you can set breakpoints by using any of the following methods:
• Click on the line in the Source Code/Edit window (see page 97) and choose Breakpoint | Set from the Run menu, or click the Toggle Breakpoint toolbar button.
• Right-click anywhere in the line in the Source Code/Edit window and choose Set Breakpoint from the pop-up menu. Note that you can also remove breakpoints, or temporarily disable and later enable breakpoints by using this menu.
• Press Ctrl+B or click the Edit Breakpoints toolbar button to display the Breakpoints & Watchpoints dialog box and interactively set, remove, or modify breakpoints using the Code Breakpoints tab (see page 88).
• Display the Breakpoints tab (see page 52) in the Data window by choosing Breakpoints Tab from the View menu or pressing Alt+1 to display this tab in the window, if not visible. Then, press Ins to insert a new breakpoint, Del to delete a breakpoint, click the
Running the Program Chapter 2: Getting Started with CodeWatch
30 CodeWatch User's Guide Second Edition
icon (solid red circle) to enable or disable a breakpoint, or press F2 to examine or change a breakpoint’s properties in the Code Breakpoints page of the Breakpoints & Watchpoints dialog box.
• Alternatively, you can cause a break at any time by choosing Break from the Run menu, pressing F5, or by clicking the Run toolbar button again while the program is running.
Setting Watchpoints A watchpoint allows you to examine or modify the contents of your COBOL data items. Watchpoints are displayed in the Watchpoints tab (see page 53) in the Data window and are updated whenever a program break occurs. You can also request that a program break occur when there is a change in the value of the data item being watched.
Watchpoints are part of the workspace and are, therefore, saved and loaded with the workspace. Any watchpoints that are set when you save a workspace will be set the next time you open the workspace.
Exercise 7—Set a Watchpoint
1. Continuing from Exercise 6 (on page 29), scroll down through the Source Code/Edit window until ACCEPT-MAIN-MENU is visible.
2. Double-click on FUNCTION-NUMBER on the next line to highlight the word.
3. Right-click and choose Watch Data Item from the pop-up menu to set the watchpoint.
The Data window switches to the Watchpoints tab. FUNCTION-NUMBER and its location, data type, and present value appear in the window.
4. Click on FUNCTION-NUMBER in the Watchpoints tab and press the Spacebar so that execution will stop when the value in FUNCTION-NUMBER changes.
Alternatively, single click on the solid red circle to left of the data item name. It will turn into a hollow circle.
5. Choose Resume from the Run menu, click the Run toolbar button, or press F5 to run the program.
Since animation is enabled, CodeWatch displays each line as it is executed. When the ACCEPT RETURN-KEY statement is reached, the RM/COBOL program output window will appear.
6. Press Enter and CodeWatch will stop at the watchpoint that you set on the ACCEPT-MAIN-MENU line.
7. Press F5 to continue execution.
The runtime will request a test number.
8. Type 3 and press Enter.
Execution will stop again because FUNCTION-NUMBER has changed.
9. Choose Step Statement from the Run menu, click the Step Statement toolbar button, or press F8 to step over the current statement.
10. Press F8 again and you should see INIT-PARA in program NUCTEST.
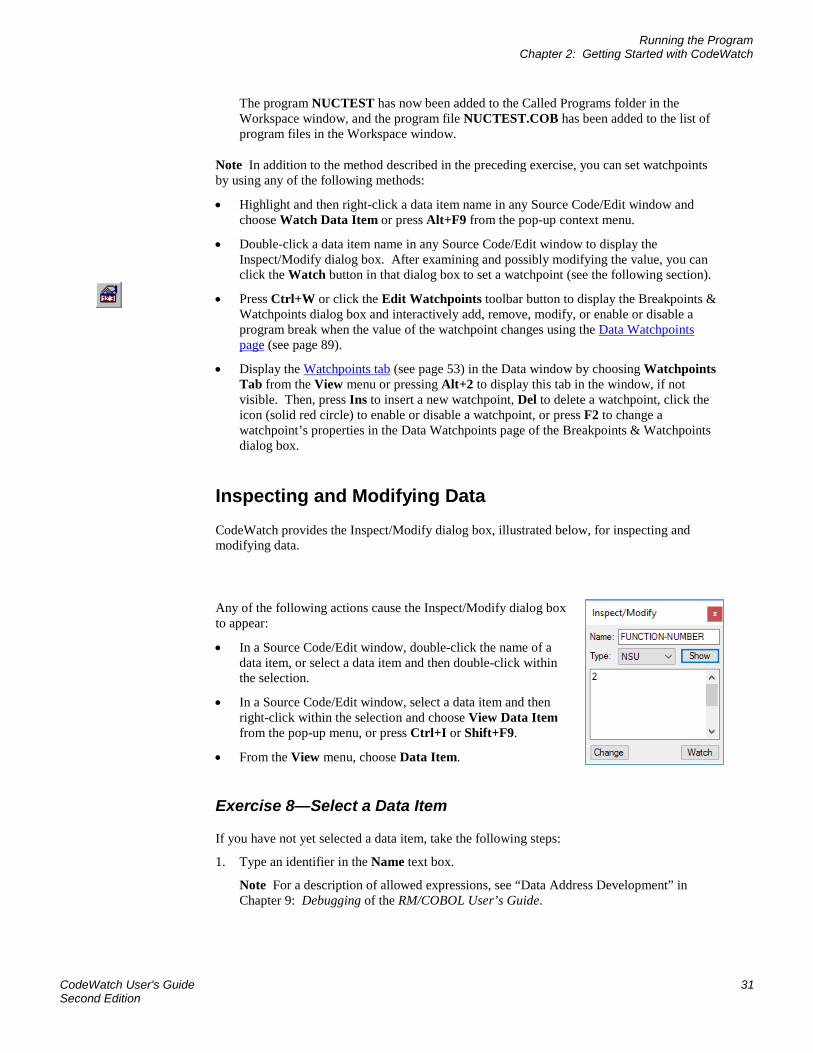
Running the Program Chapter 2: Getting Started with CodeWatch
CodeWatch User's Guide 31 Second Edition
The program NUCTEST has now been added to the Called Programs folder in the Workspace window, and the program file NUCTEST.COB has been added to the list of program files in the Workspace window.
Note In addition to the method described in the preceding exercise, you can set watchpoints by using any of the following methods:
• Highlight and then right-click a data item name in any Source Code/Edit window and choose Watch Data Item or press Alt+F9 from the pop-up context menu.
• Double-click a data item name in any Source Code/Edit window to display the Inspect/Modify dialog box. After examining and possibly modifying the value, you can click the Watch button in that dialog box to set a watchpoint (see the following section).
• Press Ctrl+W or click the Edit Watchpoints toolbar button to display the Breakpoints & Watchpoints dialog box and interactively add, remove, modify, or enable or disable a program break when the value of the watchpoint changes using the Data Watchpoints page (see page 89).
• Display the Watchpoints tab (see page 53) in the Data window by choosing Watchpoints Tab from the View menu or pressing Alt+2 to display this tab in the window, if not visible. Then, press Ins to insert a new watchpoint, Del to delete a watchpoint, click the icon (solid red circle) to enable or disable a watchpoint, or press F2 to change a watchpoint’s properties in the Data Watchpoints page of the Breakpoints & Watchpoints dialog box.
Inspecting and Modifying Data CodeWatch provides the Inspect/Modify dialog box, illustrated below, for inspecting and modifying data.
Any of the following actions cause the Inspect/Modify dialog box to appear:
• In a Source Code/Edit window, double-click the name of a data item, or select a data item and then double-click within the selection.
• In a Source Code/Edit window, select a data item and then right-click within the selection and choose View Data Item from the pop-up menu, or press Ctrl+I or Shift+F9.
• From the View menu, choose Data Item.
Exercise 8—Select a Data Item
If you have not yet selected a data item, take the following steps:
1. Type an identifier in the Name text box.
Note For a description of allowed expressions, see “Data Address Development” in Chapter 9: Debugging of the RM/COBOL User’s Guide.
Running the Program Chapter 2: Getting Started with CodeWatch
32 CodeWatch User's Guide Second Edition
2. In the Type list box (this is an optional field), select or enter a data type. For a description of allowed data types, see “Data Types” under the “General Debug Concepts” section in Chapter 9: Debugging of the RM/COBOL User’s Guide.
3. Click Show or press Enter.
The current value of the identifier is then displayed in the Show text box using either the selected type or the actual type of the identifier. If the identifier cannot be displayed, an error message is displayed in red. Note that the program must be running and the identifier must be “in scope” before a value can be displayed. See the description of the Show option in the Inspect/Modify dialog box (on page 66).
To change the value of a data item:
• In the Show text box, type the new value and click Change.
Be sure that the entered value is compatible with the displayed data type. You can also change the type before clicking Change to set the type using a different encoding style (for example, hexadecimal).
Note The Change button is not enabled if the data item being inspected is a constant-name. Also note that you can select text with the cursor keys in either the Name or the Show text box, and right-click to pop up a menu that allows text to be copied to the Windows Clipboard or pasted from the Clipboard. You can use this technique to copy the contents of one data item into another data item.
To set a watchpoint for the data item:
• Click Watch.
This is a convenient way to set a watchpoint on an item other than a simple variable; for example, a group item or an array element.
Stopping the Program There are several methods you can use to stop your program.
Exercise 9—Stop the Program
1. From the Run menu, choose Stop or click the Stop Run toolbar button.
This action sends a stop request to the RM/COBOL runtime system. The runtime will display a termination message in the RM/COBOL program output window. If this is the case, single-step or choose Stop again to dismiss the output window.
Note If you have set the Persistent runtime property, you will have to close the RM/COBOL program output window manually. See Chapter 3: Installation and System Considerations for Microsoft Windows of the RM/COBOL User’s Guide.
2. Switch to the RM/COBOL program output window and close the window.
Note Closing either the Workspace window or the CodeWatch main window will also stop the program.
Changing the Workspace Chapter 2: Getting Started with CodeWatch
CodeWatch User's Guide 33 Second Edition
Changing the Workspace It is often desirable to change properties or runtime options, or add libraries to a workspace after it has already been created.
To change the workspace:
1. From the File menu, choose Workspace | Properties.
The Workspace Properties dialog box (see page 80) appears. This tabbed dialog box contains the same options that are displayed on the pages of the Workspace wizard.
2. In the Workspace Properties dialog box, select the page for the property that you want to change.
Saving the Workspace To save the workspace for a subsequent debugging session:
• From the File menu, choose Workspace | Save or press Ctrl+Shift+S.
CodeWatch will prompt you for a name if the workspace has not previously been saved.
To save the workspace under a new name:
1. From the File menu, choose Workspace | Save As or press Ctrl+Shift+A.
2. At the prompt, enter a new name for the workspace.
3. Click OK.
The workspace is saved with the new name.
The workspace is saved in a file with an extension of .cwf (CodeWatch Workspace File). This file is an ASCII text file that can be examined and modified with any text editor. If you have a COBOL application with a large number of libraries, it may, in some cases, be easier to create a workspace, close CodeWatch, and then add the libraries to the workspace file using a text editor. This practice, however, is not recommended.
Note When you close CodeWatch or the Workspace window, you will be prompted to save the workspace if any changes have been made.

CodeWatch Workspace Wizard Chapter 3: CodeWatch Interface
CodeWatch User's Guide 35 Second Edition
Chapter 3: CodeWatch Interface
This chapter provides detailed descriptions of the Workspace wizard, and the various windows, dialog boxes, menus, and toolbars found in CodeWatch.
Note The information provided in this user’s guide is for traditional CodeWatch for Windows source code debugging. For BIS-based debugging on an IIS web server, see the CodeWatch for Xcentrisity Business Information Server User’s Guide Supplement (Version 12).
CodeWatch Workspace Wizard The Workspace wizard helps guide you through the steps to create and configure a new workspace. A workspace contains the name of your main program or program file and the directory where you wish to run the program. A workspace can also include information about the following:
• COBOL program files and libraries
• Configuration files
• Filename synonyms and other environment variables
• Runtime Command line options
• Source files
• Compilation options
• Directories to search for program files and source files.
A workspace is displayed in a Workspace window in the CodeWatch main window (see page 43). Workspace files have a .cwf filename extension.
Note CodeWatch does not require that you configure a workspace before you open or create a source file. It will create a default workspace, as required.
The CodeWatch Workspace wizard is displayed when you start CodeWatch without a command line parameter. If CodeWatch is running and no workspace is open, you can display the wizard by choosing the New | Workspace command from the File menu. For more information, see Starting CodeWatch (on page 17).
If a workspace is already open for the session, choose Workspace | New from the File menu to open the wizard. However, since only one workspace may be open at a time, the workspace must be closed before you can open or create a new one. CodeWatch will prompt
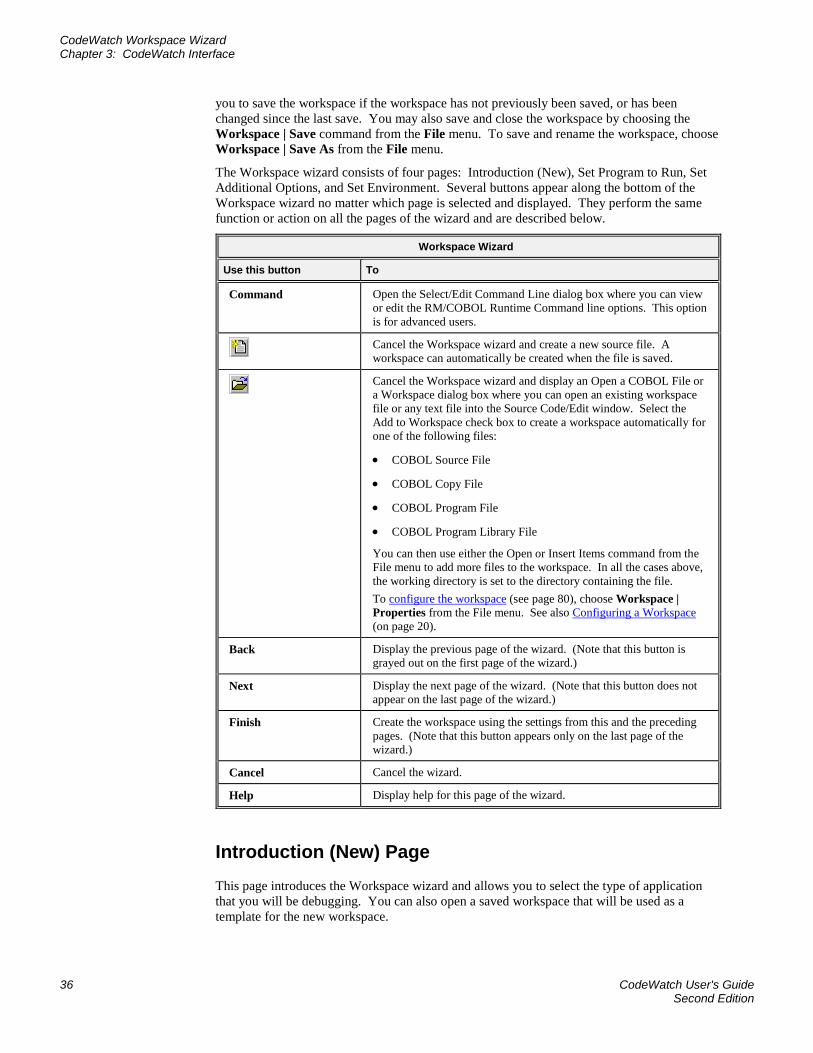
CodeWatch Workspace Wizard Chapter 3: CodeWatch Interface
36 CodeWatch User's Guide Second Edition
you to save the workspace if the workspace has not previously been saved, or has been changed since the last save. You may also save and close the workspace by choosing the Workspace | Save command from the File menu. To save and rename the workspace, choose Workspace | Save As from the File menu.
The Workspace wizard consists of four pages: Introduction (New), Set Program to Run, Set Additional Options, and Set Environment. Several buttons appear along the bottom of the Workspace wizard no matter which page is selected and displayed. They perform the same function or action on all the pages of the wizard and are described below.
Workspace Wizard
Use this button To
Command Open the Select/Edit Command Line dialog box where you can view or edit the RM/COBOL Runtime Command line options. This option is for advanced users.
Cancel the Workspace wizard and create a new source file. A workspace can automatically be created when the file is saved.
Cancel the Workspace wizard and display an Open a COBOL File or a Workspace dialog box where you can open an existing workspace file or any text file into the Source Code/Edit window. Select the Add to Workspace check box to create a workspace automatically for one of the following files:
• COBOL Source File
• COBOL Copy File
• COBOL Program File
• COBOL Program Library File
You can then use either the Open or Insert Items command from the File menu to add more files to the workspace. In all the cases above, the working directory is set to the directory containing the file. To configure the workspace (see page 80), choose Workspace | Properties from the File menu. See also Configuring a Workspace (on page 20).
Back Display the previous page of the wizard. (Note that this button is grayed out on the first page of the wizard.)
Next Display the next page of the wizard. (Note that this button does not appear on the last page of the wizard.)
Finish Create the workspace using the settings from this and the preceding pages. (Note that this button appears only on the last page of the wizard.)
Cancel Cancel the wizard.
Help Display help for this page of the wizard.
Introduction (New) Page This page introduces the Workspace wizard and allows you to select the type of application that you will be debugging. You can also open a saved workspace that will be used as a template for the new workspace.
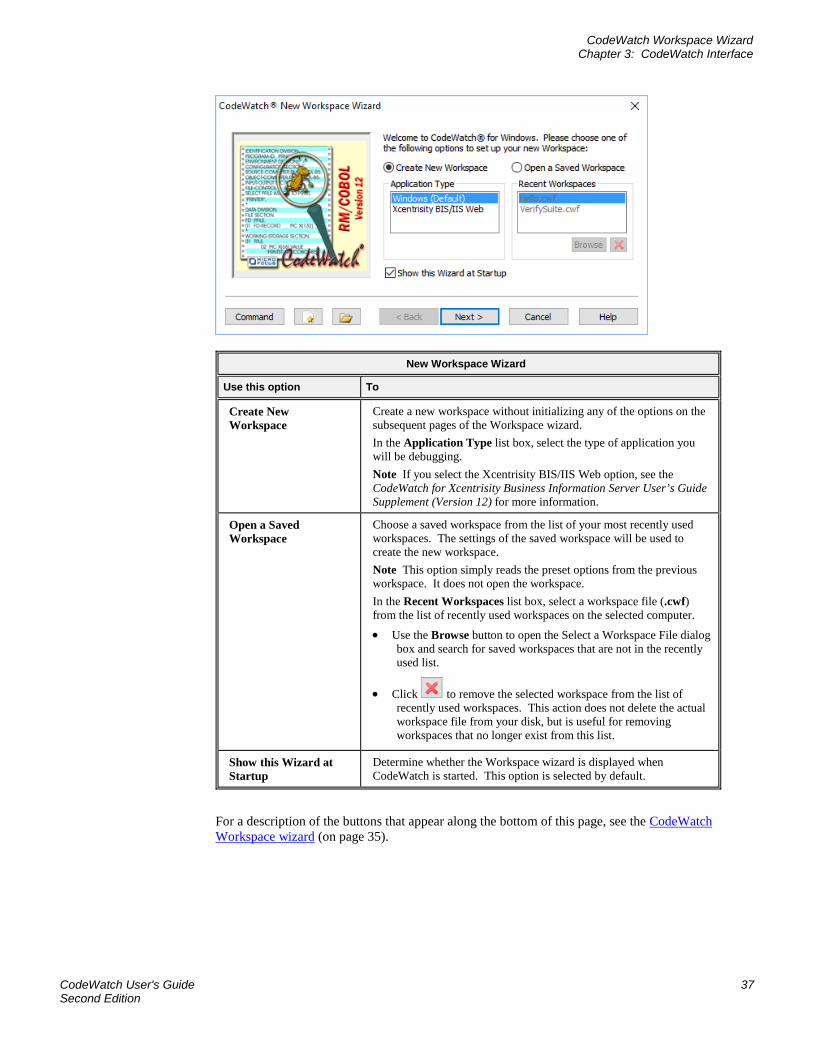
CodeWatch Workspace Wizard Chapter 3: CodeWatch Interface
CodeWatch User's Guide 37 Second Edition
New Workspace Wizard
Use this option To
Create New Workspace
Create a new workspace without initializing any of the options on the subsequent pages of the Workspace wizard. In the Application Type list box, select the type of application you will be debugging. Note If you select the Xcentrisity BIS/IIS Web option, see the CodeWatch for Xcentrisity Business Information Server User’s Guide Supplement (Version 12) for more information.
Open a Saved Workspace
Choose a saved workspace from the list of your most recently used workspaces. The settings of the saved workspace will be used to create the new workspace. Note This option simply reads the preset options from the previous workspace. It does not open the workspace. In the Recent Workspaces list box, select a workspace file (.cwf) from the list of recently used workspaces on the selected computer.
• Use the Browse button to open the Select a Workspace File dialog box and search for saved workspaces that are not in the recently used list.
• Click to remove the selected workspace from the list of recently used workspaces. This action does not delete the actual workspace file from your disk, but is useful for removing workspaces that no longer exist from this list.
Show this Wizard at Startup
Determine whether the Workspace wizard is displayed when CodeWatch is started. This option is selected by default.
For a description of the buttons that appear along the bottom of this page, see the CodeWatch Workspace wizard (on page 35).
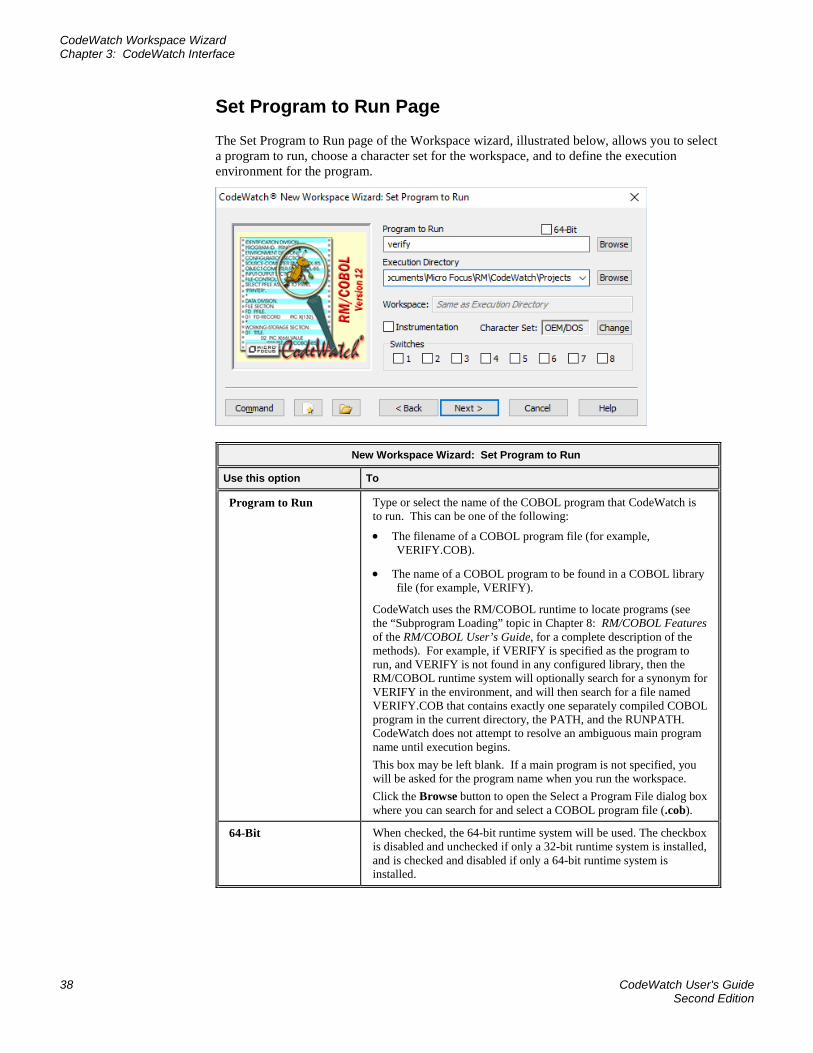
CodeWatch Workspace Wizard Chapter 3: CodeWatch Interface
38 CodeWatch User's Guide Second Edition
Set Program to Run Page The Set Program to Run page of the Workspace wizard, illustrated below, allows you to select a program to run, choose a character set for the workspace, and to define the execution environment for the program.
New Workspace Wizard: Set Program to Run
Use this option To
Program to Run Type or select the name of the COBOL program that CodeWatch is to run. This can be one of the following:
• The filename of a COBOL program file (for example, VERIFY.COB).
• The name of a COBOL program to be found in a COBOL library file (for example, VERIFY).
CodeWatch uses the RM/COBOL runtime to locate programs (see the “Subprogram Loading” topic in Chapter 8: RM/COBOL Features of the RM/COBOL User’s Guide, for a complete description of the methods). For example, if VERIFY is specified as the program to run, and VERIFY is not found in any configured library, then the RM/COBOL runtime system will optionally search for a synonym for VERIFY in the environment, and will then search for a file named VERIFY.COB that contains exactly one separately compiled COBOL program in the current directory, the PATH, and the RUNPATH. CodeWatch does not attempt to resolve an ambiguous main program name until execution begins. This box may be left blank. If a main program is not specified, you will be asked for the program name when you run the workspace. Click the Browse button to open the Select a Program File dialog box where you can search for and select a COBOL program file (.cob).
64-Bit When checked, the 64-bit runtime system will be used. The checkbox is disabled and unchecked if only a 32-bit runtime system is installed, and is checked and disabled if only a 64-bit runtime system is installed.
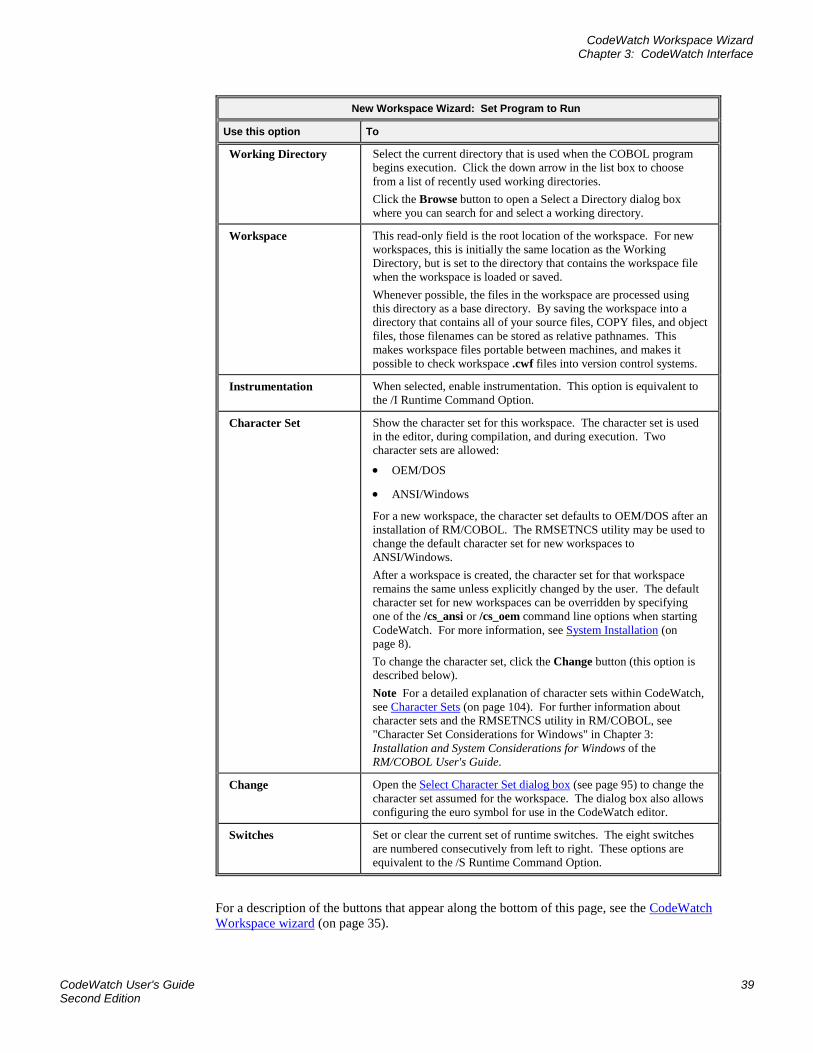
CodeWatch Workspace Wizard Chapter 3: CodeWatch Interface
CodeWatch User's Guide 39 Second Edition
New Workspace Wizard: Set Program to Run
Use this option To
Working Directory Select the current directory that is used when the COBOL program begins execution. Click the down arrow in the list box to choose from a list of recently used working directories. Click the Browse button to open a Select a Directory dialog box where you can search for and select a working directory.
Workspace This read-only field is the root location of the workspace. For new workspaces, this is initially the same location as the Working Directory, but is set to the directory that contains the workspace file when the workspace is loaded or saved. Whenever possible, the files in the workspace are processed using this directory as a base directory. By saving the workspace into a directory that contains all of your source files, COPY files, and object files, those filenames can be stored as relative pathnames. This makes workspace files portable between machines, and makes it possible to check workspace .cwf files into version control systems.
Instrumentation When selected, enable instrumentation. This option is equivalent to the /I Runtime Command Option.
Character Set Show the character set for this workspace. The character set is used in the editor, during compilation, and during execution. Two character sets are allowed:
• OEM/DOS
• ANSI/Windows
For a new workspace, the character set defaults to OEM/DOS after an installation of RM/COBOL. The RMSETNCS utility may be used to change the default character set for new workspaces to ANSI/Windows. After a workspace is created, the character set for that workspace remains the same unless explicitly changed by the user. The default character set for new workspaces can be overridden by specifying one of the /cs_ansi or /cs_oem command line options when starting CodeWatch. For more information, see System Installation (on page 8). To change the character set, click the Change button (this option is described below). Note For a detailed explanation of character sets within CodeWatch, see Character Sets (on page 104). For further information about character sets and the RMSETNCS utility in RM/COBOL, see "Character Set Considerations for Windows" in Chapter 3: Installation and System Considerations for Windows of the RM/COBOL User's Guide.
Change Open the Select Character Set dialog box (see page 95) to change the character set assumed for the workspace. The dialog box also allows configuring the euro symbol for use in the CodeWatch editor.
Switches Set or clear the current set of runtime switches. The eight switches are numbered consecutively from left to right. These options are equivalent to the /S Runtime Command Option.
For a description of the buttons that appear along the bottom of this page, see the CodeWatch Workspace wizard (on page 35).
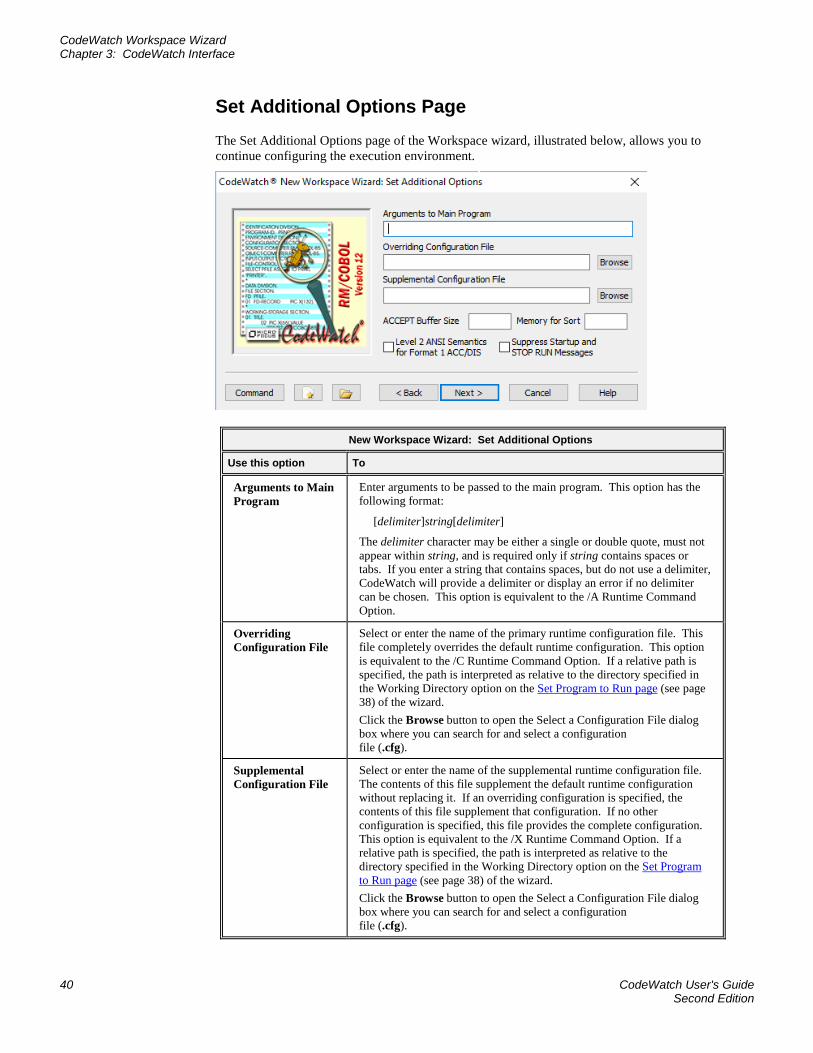
CodeWatch Workspace Wizard Chapter 3: CodeWatch Interface
40 CodeWatch User's Guide Second Edition
Set Additional Options Page The Set Additional Options page of the Workspace wizard, illustrated below, allows you to continue configuring the execution environment.
New Workspace Wizard: Set Additional Options
Use this option To
Arguments to Main Program
Enter arguments to be passed to the main program. This option has the following format:
[delimiter]string[delimiter]
The delimiter character may be either a single or double quote, must not appear within string, and is required only if string contains spaces or tabs. If you enter a string that contains spaces, but do not use a delimiter, CodeWatch will provide a delimiter or display an error if no delimiter can be chosen. This option is equivalent to the /A Runtime Command Option.
Overriding Configuration File
Select or enter the name of the primary runtime configuration file. This file completely overrides the default runtime configuration. This option is equivalent to the /C Runtime Command Option. If a relative path is specified, the path is interpreted as relative to the directory specified in the Working Directory option on the Set Program to Run page (see page 38) of the wizard. Click the Browse button to open the Select a Configuration File dialog box where you can search for and select a configuration file (.cfg).
Supplemental Configuration File
Select or enter the name of the supplemental runtime configuration file. The contents of this file supplement the default runtime configuration without replacing it. If an overriding configuration is specified, the contents of this file supplement that configuration. If no other configuration is specified, this file provides the complete configuration. This option is equivalent to the /X Runtime Command Option. If a relative path is specified, the path is interpreted as relative to the directory specified in the Working Directory option on the Set Program to Run page (see page 38) of the wizard. Click the Browse button to open the Select a Configuration File dialog box where you can search for and select a configuration file (.cfg).
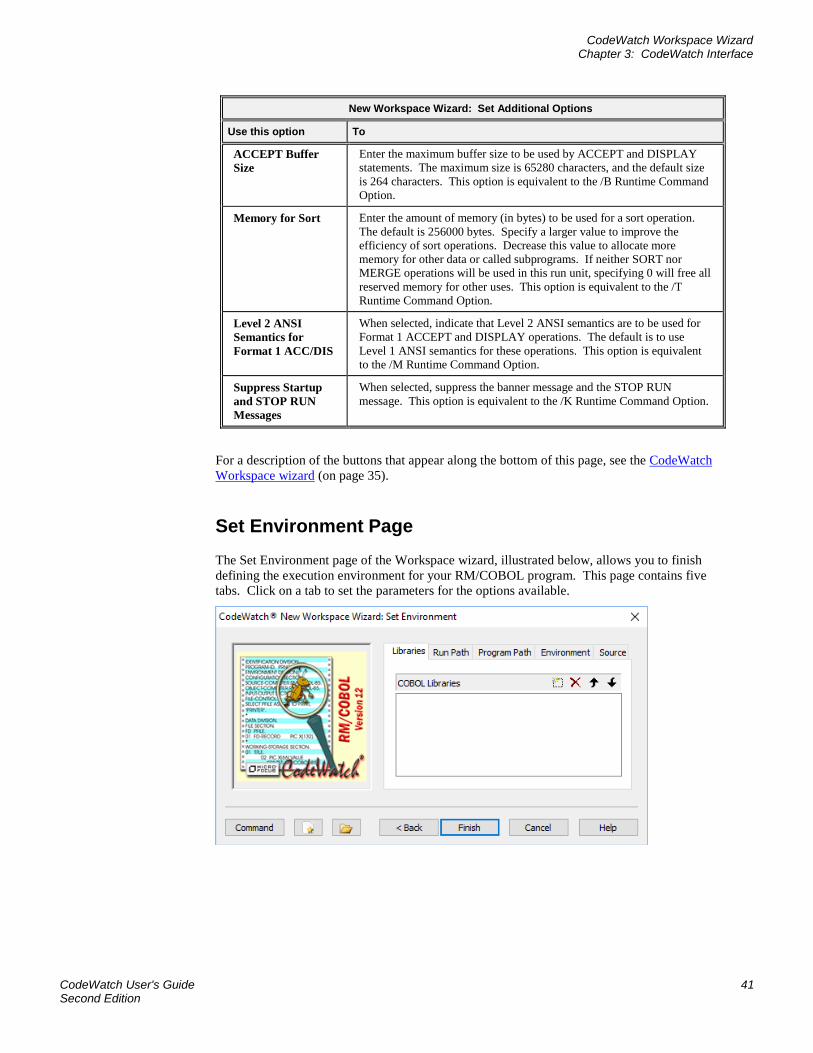
CodeWatch Workspace Wizard Chapter 3: CodeWatch Interface
CodeWatch User's Guide 41 Second Edition
New Workspace Wizard: Set Additional Options
Use this option To
ACCEPT Buffer Size
Enter the maximum buffer size to be used by ACCEPT and DISPLAY statements. The maximum size is 65280 characters, and the default size is 264 characters. This option is equivalent to the /B Runtime Command Option.
Memory for Sort Enter the amount of memory (in bytes) to be used for a sort operation. The default is 256000 bytes. Specify a larger value to improve the efficiency of sort operations. Decrease this value to allocate more memory for other data or called subprograms. If neither SORT nor MERGE operations will be used in this run unit, specifying 0 will free all reserved memory for other uses. This option is equivalent to the /T Runtime Command Option.
Level 2 ANSI Semantics for Format 1 ACC/DIS
When selected, indicate that Level 2 ANSI semantics are to be used for Format 1 ACCEPT and DISPLAY operations. The default is to use Level 1 ANSI semantics for these operations. This option is equivalent to the /M Runtime Command Option.
Suppress Startup and STOP RUN Messages
When selected, suppress the banner message and the STOP RUN message. This option is equivalent to the /K Runtime Command Option.
For a description of the buttons that appear along the bottom of this page, see the CodeWatch Workspace wizard (on page 35).
Set Environment Page The Set Environment page of the Workspace wizard, illustrated below, allows you to finish defining the execution environment for your RM/COBOL program. This page contains five tabs. Click on a tab to set the parameters for the options available.
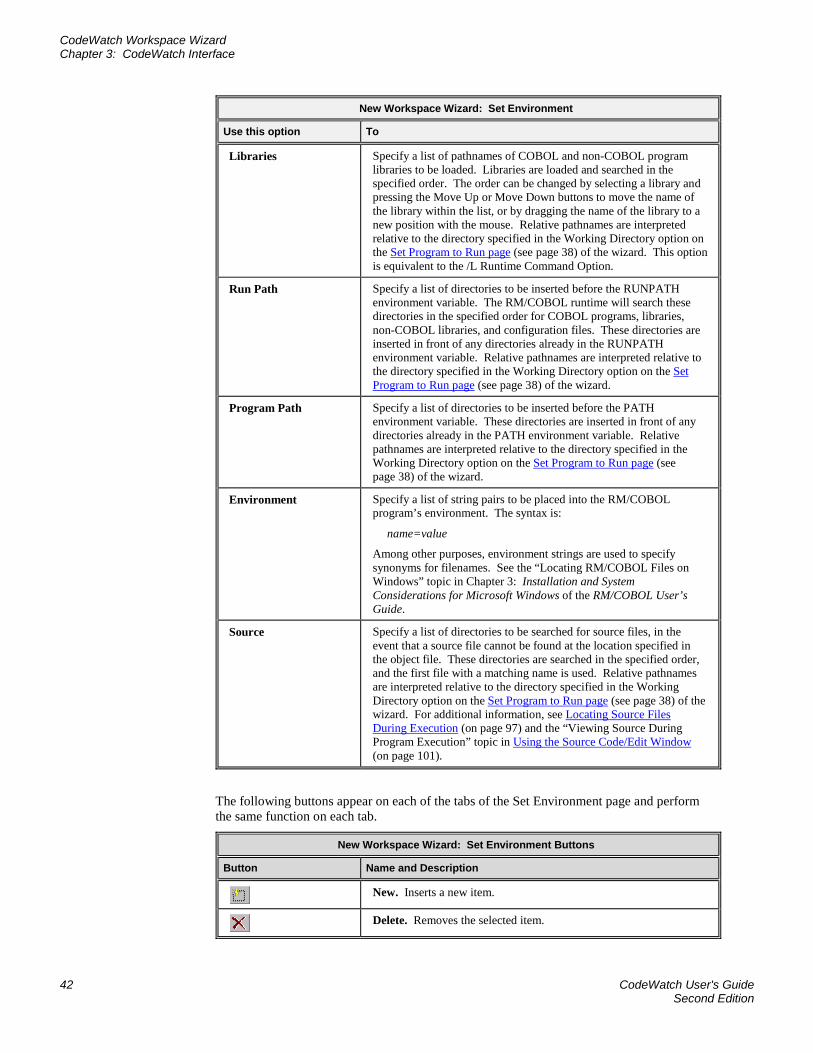
CodeWatch Workspace Wizard Chapter 3: CodeWatch Interface
42 CodeWatch User's Guide Second Edition
New Workspace Wizard: Set Environment
Use this option To
Libraries Specify a list of pathnames of COBOL and non-COBOL program libraries to be loaded. Libraries are loaded and searched in the specified order. The order can be changed by selecting a library and pressing the Move Up or Move Down buttons to move the name of the library within the list, or by dragging the name of the library to a new position with the mouse. Relative pathnames are interpreted relative to the directory specified in the Working Directory option on the Set Program to Run page (see page 38) of the wizard. This option is equivalent to the /L Runtime Command Option.
Run Path Specify a list of directories to be inserted before the RUNPATH environment variable. The RM/COBOL runtime will search these directories in the specified order for COBOL programs, libraries, non-COBOL libraries, and configuration files. These directories are inserted in front of any directories already in the RUNPATH environment variable. Relative pathnames are interpreted relative to the directory specified in the Working Directory option on the Set Program to Run page (see page 38) of the wizard.
Program Path Specify a list of directories to be inserted before the PATH environment variable. These directories are inserted in front of any directories already in the PATH environment variable. Relative pathnames are interpreted relative to the directory specified in the Working Directory option on the Set Program to Run page (see page 38) of the wizard.
Environment Specify a list of string pairs to be placed into the RM/COBOL program’s environment. The syntax is:
name=value
Among other purposes, environment strings are used to specify synonyms for filenames. See the “Locating RM/COBOL Files on Windows” topic in Chapter 3: Installation and System Considerations for Microsoft Windows of the RM/COBOL User’s Guide.
Source Specify a list of directories to be searched for source files, in the event that a source file cannot be found at the location specified in the object file. These directories are searched in the specified order, and the first file with a matching name is used. Relative pathnames are interpreted relative to the directory specified in the Working Directory option on the Set Program to Run page (see page 38) of the wizard. For additional information, see Locating Source Files During Execution (on page 97) and the “Viewing Source During Program Execution” topic in Using the Source Code/Edit Window (on page 101).
The following buttons appear on each of the tabs of the Set Environment page and perform the same function on each tab.
New Workspace Wizard: Set Environment Buttons
Button Name and Description
New. Inserts a new item.
Delete. Removes the selected item.
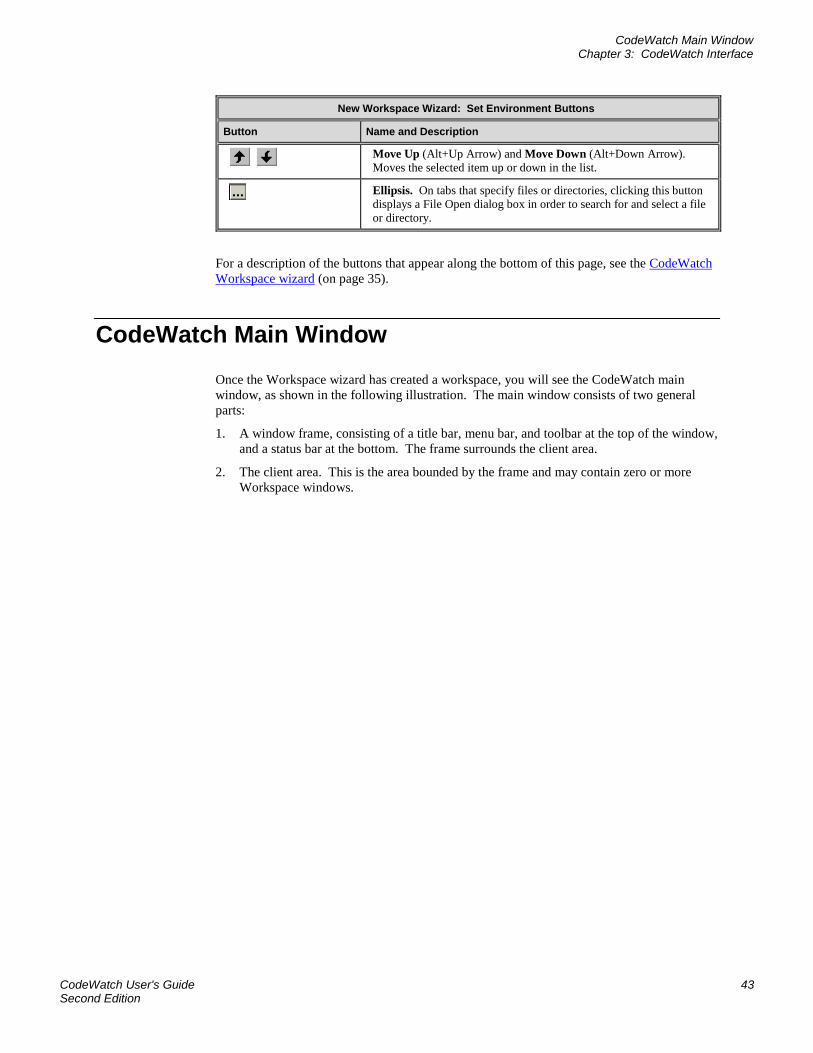
CodeWatch Main Window Chapter 3: CodeWatch Interface
CodeWatch User's Guide 43 Second Edition
New Workspace Wizard: Set Environment Buttons
Button Name and Description
Move Up (Alt+Up Arrow) and Move Down (Alt+Down Arrow). Moves the selected item up or down in the list.
Ellipsis. On tabs that specify files or directories, clicking this button displays a File Open dialog box in order to search for and select a file or directory.
For a description of the buttons that appear along the bottom of this page, see the CodeWatch Workspace wizard (on page 35).
CodeWatch Main Window Once the Workspace wizard has created a workspace, you will see the CodeWatch main window, as shown in the following illustration. The main window consists of two general parts:
1. A window frame, consisting of a title bar, menu bar, and toolbar at the top of the window, and a status bar at the bottom. The frame surrounds the client area.
2. The client area. This is the area bounded by the frame and may contain zero or more Workspace windows.
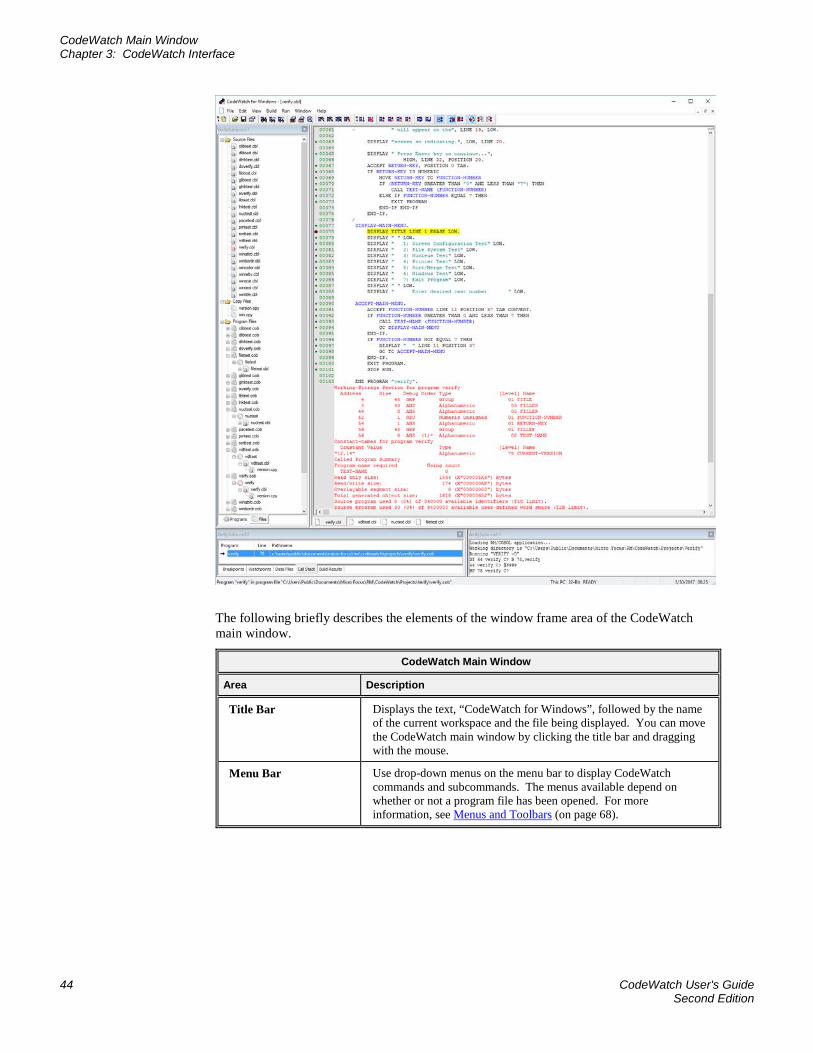
CodeWatch Main Window Chapter 3: CodeWatch Interface
44 CodeWatch User's Guide Second Edition
The following briefly describes the elements of the window frame area of the CodeWatch main window.
CodeWatch Main Window
Area Description
Title Bar Displays the text, “CodeWatch for Windows”, followed by the name of the current workspace and the file being displayed. You can move the CodeWatch main window by clicking the title bar and dragging with the mouse.
Menu Bar Use drop-down menus on the menu bar to display CodeWatch commands and subcommands. The menus available depend on whether or not a program file has been opened. For more information, see Menus and Toolbars (on page 68).
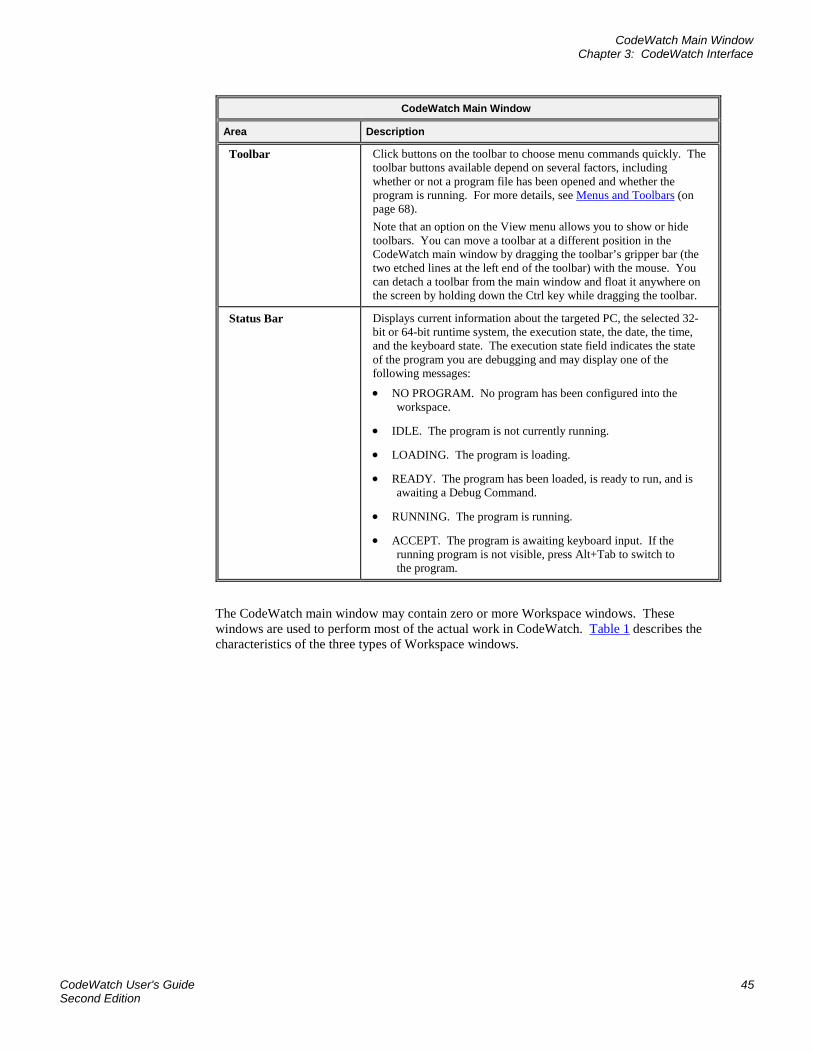
CodeWatch Main Window Chapter 3: CodeWatch Interface
CodeWatch User's Guide 45 Second Edition
CodeWatch Main Window
Area Description
Toolbar Click buttons on the toolbar to choose menu commands quickly. The toolbar buttons available depend on several factors, including whether or not a program file has been opened and whether the program is running. For more details, see Menus and Toolbars (on page 68). Note that an option on the View menu allows you to show or hide toolbars. You can move a toolbar at a different position in the CodeWatch main window by dragging the toolbar’s gripper bar (the two etched lines at the left end of the toolbar) with the mouse. You can detach a toolbar from the main window and float it anywhere on the screen by holding down the Ctrl key while dragging the toolbar.
Status Bar Displays current information about the targeted PC, the selected 32-bit or 64-bit runtime system, the execution state, the date, the time, and the keyboard state. The execution state field indicates the state of the program you are debugging and may display one of the following messages:
• NO PROGRAM. No program has been configured into the workspace.
• IDLE. The program is not currently running.
• LOADING. The program is loading.
• READY. The program has been loaded, is ready to run, and is awaiting a Debug Command.
• RUNNING. The program is running.
• ACCEPT. The program is awaiting keyboard input. If the running program is not visible, press Alt+Tab to switch to the program.
The CodeWatch main window may contain zero or more Workspace windows. These windows are used to perform most of the actual work in CodeWatch. Table 1 describes the characteristics of the three types of Workspace windows.

Dockable Windows Chapter 3: CodeWatch Interface
46 CodeWatch User's Guide Second Edition
Table 1: Types of Workspace Windows
Types of Workspace Windows
Window Type Description
Dockable Windows Dockable windows have a small title bar, and are initially attached to the frame of the CodeWatch main window or to each other. Dockable windows can be:
• Docked to the inside of the frame of the main window.
• Floated outside of the frame of the main window anywhere on the screen.
• Converted to or from a document window. To convert a docked window into a document window or back again, choose Docked from the Window menu.
• To undock a docked window, choose Floating from the Window menu. You can then move the window around by dragging its title bar. To prevent the window from docking as you move it over the window frame, hold down the Ctrl key.
• Right-clicking within the dockable window provides access to a menu that allows you to toggle between Docked and Floating. In addition, right-clicking the title bar of a dockable window displays a menu with additional options that allow you to precisely control how and where the window docks.
For more information, see Dockable Windows (on page 46).
Document Windows Document windows have a large title bar and usually occupy a large part of the CodeWatch main window. A document window cannot be moved outside the boundaries of the frame of the main window but can be positioned anywhere within the frame of the main window not occupied by a dockable window.
When a document window is maximized to occupy the entire document area, the title bar is hidden.
The tab at the bottom of a document window allows a window to be quickly chosen. A traditional MDI window style can be selected by changing the Window Style on the EditView PreferencesMiscellaneous tab.
For more information, see Document Windows (on page 59).
Floating Windows Floating windows are similar in appearance to dockable windows, but cannot be docked and always float free of the frame of the CodeWatch main window. Floating windows are used by the Find command on the Edit menu and the Data Item command on the View menu.
For more information, see Floating Windows (on page 62).
The following sections describe the content of the CodeWatch main window.
Dockable Windows Three of the windows used in CodeWatch are dockable. These include the following:
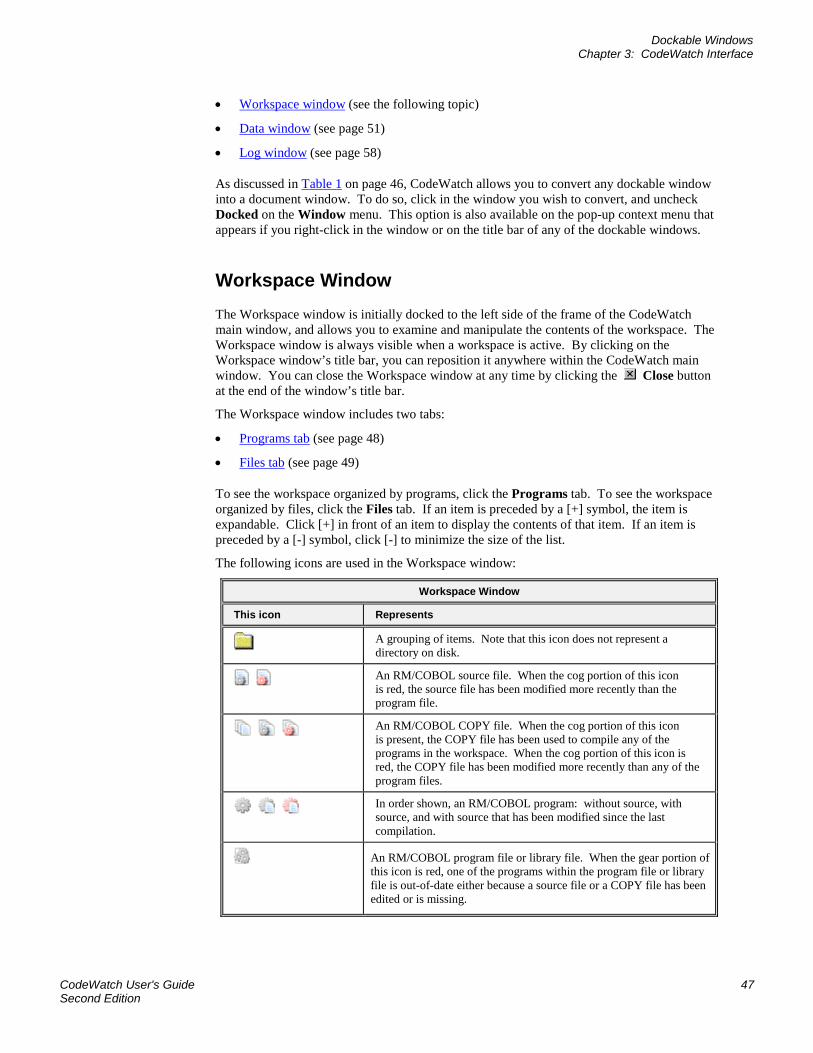
Dockable Windows Chapter 3: CodeWatch Interface
CodeWatch User's Guide 47 Second Edition
• Workspace window (see the following topic)
• Data window (see page 51)
• Log window (see page 58)
As discussed in Table 1 on page 46, CodeWatch allows you to convert any dockable window into a document window. To do so, click in the window you wish to convert, and uncheck Docked on the Window menu. This option is also available on the pop-up context menu that appears if you right-click in the window or on the title bar of any of the dockable windows.
Workspace Window The Workspace window is initially docked to the left side of the frame of the CodeWatch main window, and allows you to examine and manipulate the contents of the workspace. The Workspace window is always visible when a workspace is active. By clicking on the Workspace window’s title bar, you can reposition it anywhere within the CodeWatch main window. You can close the Workspace window at any time by clicking the Close button at the end of the window’s title bar.
The Workspace window includes two tabs:
• Programs tab (see page 48)
• Files tab (see page 49)
To see the workspace organized by programs, click the Programs tab. To see the workspace organized by files, click the Files tab. If an item is preceded by a [+] symbol, the item is expandable. Click [+] in front of an item to display the contents of that item. If an item is preceded by a [-] symbol, click [-] to minimize the size of the list.
The following icons are used in the Workspace window:
Workspace Window
This icon Represents
A grouping of items. Note that this icon does not represent a directory on disk.
An RM/COBOL source file. When the cog portion of this icon is red, the source file has been modified more recently than the program file.
An RM/COBOL COPY file. When the cog portion of this icon is present, the COPY file has been used to compile any of the programs in the workspace. When the cog portion of this icon is red, the COPY file has been modified more recently than any of the program files.
In order shown, an RM/COBOL program: without source, with source, and with source that has been modified since the last compilation.
An RM/COBOL program file or library file. When the gear portion of this icon is red, one of the programs within the program file or library file is out-of-date either because a source file or a COPY file has been edited or is missing.
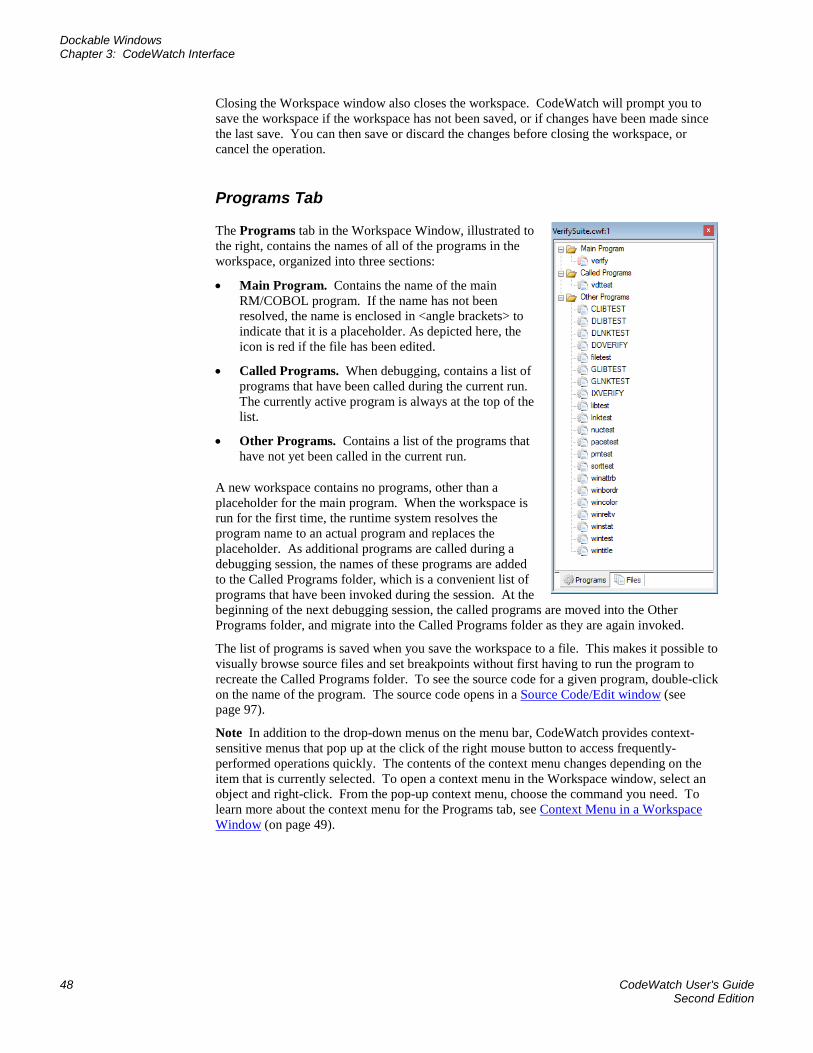
Dockable Windows Chapter 3: CodeWatch Interface
48 CodeWatch User's Guide Second Edition
Closing the Workspace window also closes the workspace. CodeWatch will prompt you to save the workspace if the workspace has not been saved, or if changes have been made since the last save. You can then save or discard the changes before closing the workspace, or cancel the operation.
Programs Tab
The Programs tab in the Workspace Window, illustrated to the right, contains the names of all of the programs in the workspace, organized into three sections:
• Main Program. Contains the name of the main RM/COBOL program. If the name has not been resolved, the name is enclosed in <angle brackets> to indicate that it is a placeholder. As depicted here, the icon is red if the file has been edited.
• Called Programs. When debugging, contains a list of programs that have been called during the current run. The currently active program is always at the top of the list.
• Other Programs. Contains a list of the programs that have not yet been called in the current run.
A new workspace contains no programs, other than a placeholder for the main program. When the workspace is run for the first time, the runtime system resolves the program name to an actual program and replaces the placeholder. As additional programs are called during a debugging session, the names of these programs are added to the Called Programs folder, which is a convenient list of programs that have been invoked during the session. At the beginning of the next debugging session, the called programs are moved into the Other Programs folder, and migrate into the Called Programs folder as they are again invoked.
The list of programs is saved when you save the workspace to a file. This makes it possible to visually browse source files and set breakpoints without first having to run the program to recreate the Called Programs folder. To see the source code for a given program, double-click on the name of the program. The source code opens in a Source Code/Edit window (see page 97).
Note In addition to the drop-down menus on the menu bar, CodeWatch provides context-sensitive menus that pop up at the click of the right mouse button to access frequently-performed operations quickly. The contents of the context menu changes depending on the item that is currently selected. To open a context menu in the Workspace window, select an object and right-click. From the pop-up context menu, choose the command you need. To learn more about the context menu for the Programs tab, see Context Menu in a Workspace Window (on page 49).
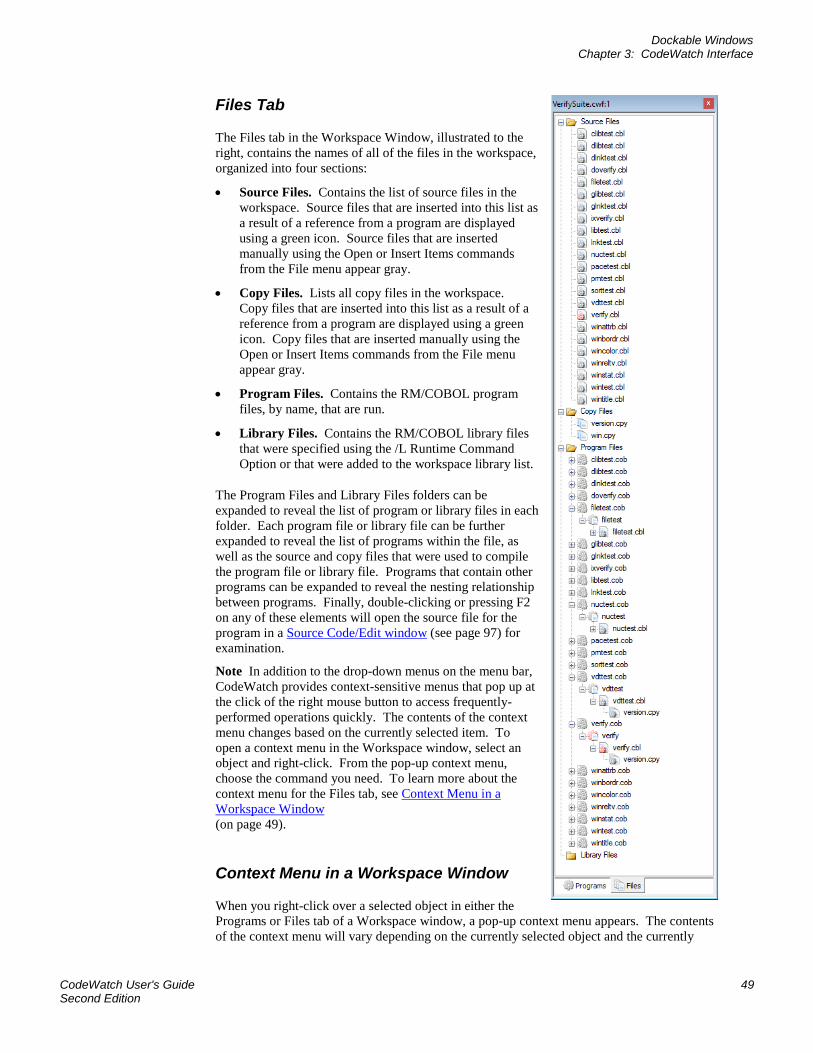
Dockable Windows Chapter 3: CodeWatch Interface
CodeWatch User's Guide 49 Second Edition
Files Tab
The Files tab in the Workspace Window, illustrated to the right, contains the names of all of the files in the workspace, organized into four sections:
• Source Files. Contains the list of source files in the workspace. Source files that are inserted into this list as a result of a reference from a program are displayed using a green icon. Source files that are inserted manually using the Open or Insert Items commands from the File menu appear gray.
• Copy Files. Lists all copy files in the workspace. Copy files that are inserted into this list as a result of a reference from a program are displayed using a green icon. Copy files that are inserted manually using the Open or Insert Items commands from the File menu appear gray.
• Program Files. Contains the RM/COBOL program files, by name, that are run.
• Library Files. Contains the RM/COBOL library files that were specified using the /L Runtime Command Option or that were added to the workspace library list.
The Program Files and Library Files folders can be expanded to reveal the list of program or library files in each folder. Each program file or library file can be further expanded to reveal the list of programs within the file, as well as the source and copy files that were used to compile the program file or library file. Programs that contain other programs can be expanded to reveal the nesting relationship between programs. Finally, double-clicking or pressing F2 on any of these elements will open the source file for the program in a Source Code/Edit window (see page 97) for examination.
Note In addition to the drop-down menus on the menu bar, CodeWatch provides context-sensitive menus that pop up at the click of the right mouse button to access frequently-performed operations quickly. The contents of the context menu changes based on the currently selected item. To open a context menu in the Workspace window, select an object and right-click. From the pop-up context menu, choose the command you need. To learn more about the context menu for the Files tab, see Context Menu in a Workspace Window (on page 49).
Context Menu in a Workspace Window
When you right-click over a selected object in either the Programs or Files tab of a Workspace window, a pop-up context menu appears. The contents of the context menu will vary depending on the currently selected object and the currently
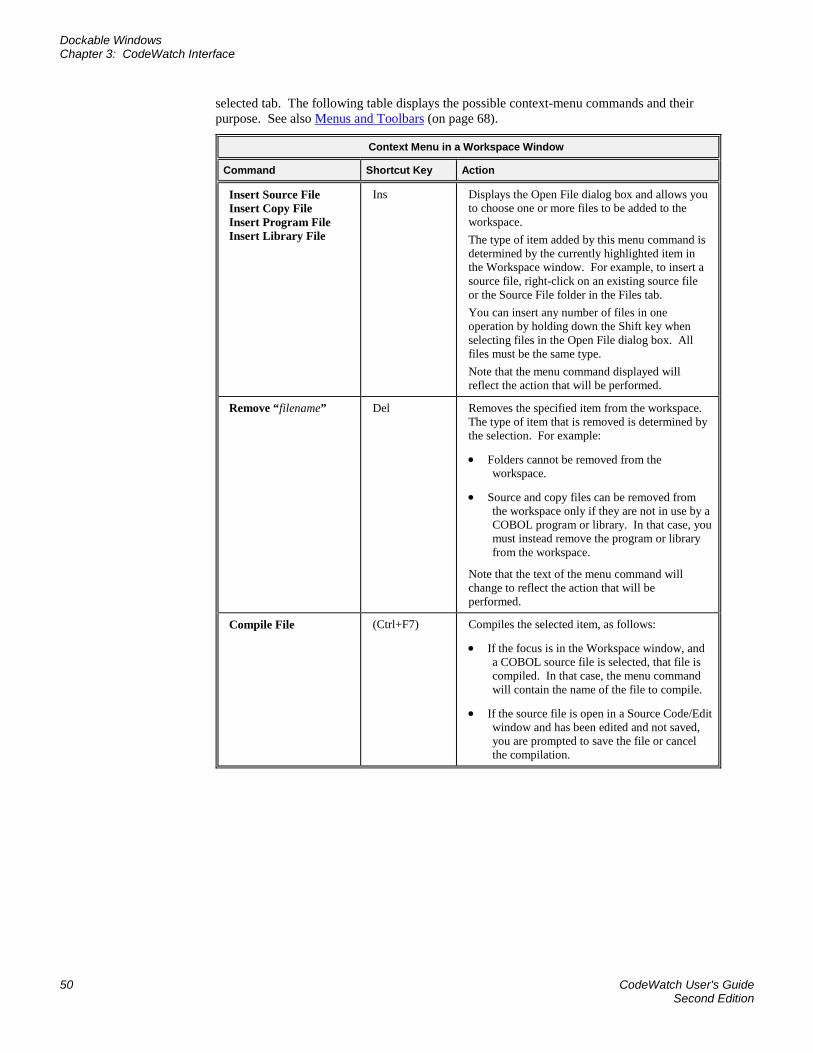
Dockable Windows Chapter 3: CodeWatch Interface
50 CodeWatch User's Guide Second Edition
selected tab. The following table displays the possible context-menu commands and their purpose. See also Menus and Toolbars (on page 68).
Context Menu in a Workspace Window
Command Shortcut Key Action
Insert Source File Insert Copy File Insert Program File Insert Library File
Ins Displays the Open File dialog box and allows you to choose one or more files to be added to the workspace. The type of item added by this menu command is determined by the currently highlighted item in the Workspace window. For example, to insert a source file, right-click on an existing source file or the Source File folder in the Files tab. You can insert any number of files in one operation by holding down the Shift key when selecting files in the Open File dialog box. All files must be the same type. Note that the menu command displayed will reflect the action that will be performed.
Remove “filename” Del Removes the specified item from the workspace. The type of item that is removed is determined by the selection. For example:
• Folders cannot be removed from the workspace.
• Source and copy files can be removed from the workspace only if they are not in use by a COBOL program or library. In that case, you must instead remove the program or library from the workspace.
Note that the text of the menu command will change to reflect the action that will be performed.
Compile File (Ctrl+F7) Compiles the selected item, as follows:
• If the focus is in the Workspace window, and a COBOL source file is selected, that file is compiled. In that case, the menu command will contain the name of the file to compile.
• If the source file is open in a Source Code/Edit window and has been edited and not saved, you are prompted to save the file or cancel the compilation.
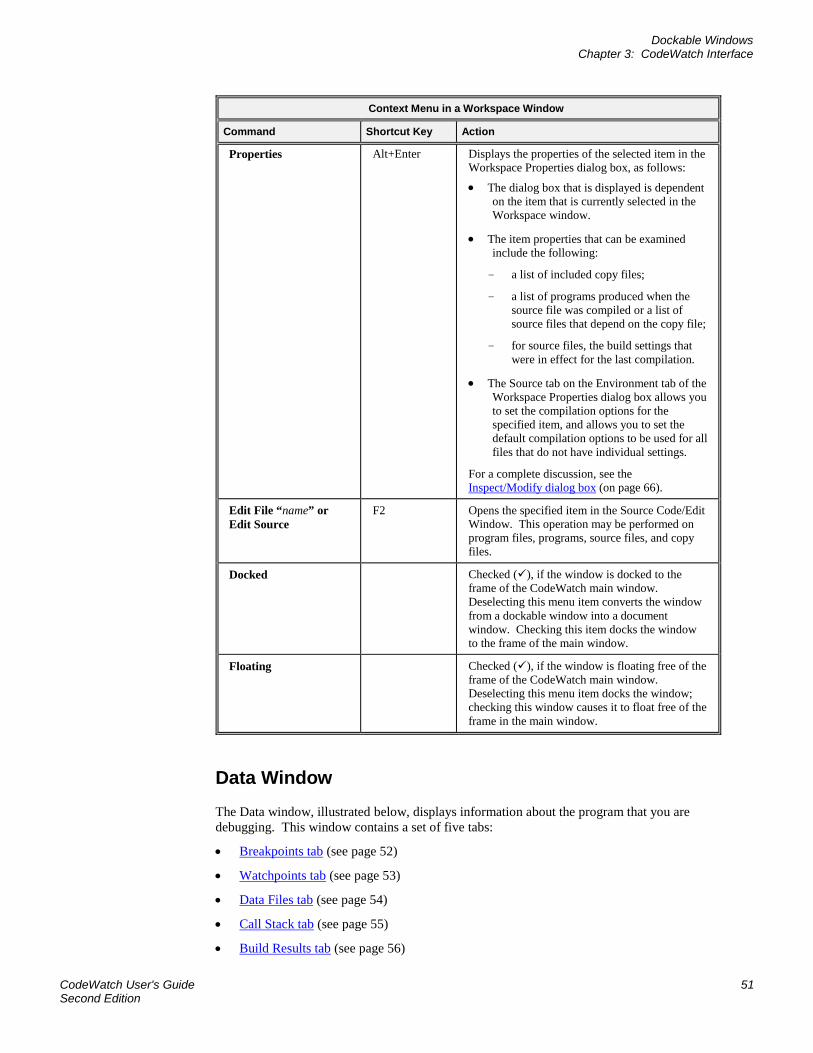
Dockable Windows Chapter 3: CodeWatch Interface
CodeWatch User's Guide 51 Second Edition
Context Menu in a Workspace Window
Command Shortcut Key Action
Properties Alt+Enter Displays the properties of the selected item in the Workspace Properties dialog box, as follows:
• The dialog box that is displayed is dependent on the item that is currently selected in the Workspace window.
• The item properties that can be examined include the following:
- a list of included copy files;
- a list of programs produced when the source file was compiled or a list of source files that depend on the copy file;
- for source files, the build settings that were in effect for the last compilation.
• The Source tab on the Environment tab of the Workspace Properties dialog box allows you to set the compilation options for the specified item, and allows you to set the default compilation options to be used for all files that do not have individual settings.
For a complete discussion, see the Inspect/Modify dialog box (on page 66).
Edit File “name” or Edit Source
F2 Opens the specified item in the Source Code/Edit Window. This operation may be performed on program files, programs, source files, and copy files.
Docked Checked (), if the window is docked to the frame of the CodeWatch main window. Deselecting this menu item converts the window from a dockable window into a document window. Checking this item docks the window to the frame of the main window.
Floating Checked (), if the window is floating free of the frame of the CodeWatch main window. Deselecting this menu item docks the window; checking this window causes it to float free of the frame in the main window.
Data Window The Data window, illustrated below, displays information about the program that you are debugging. This window contains a set of five tabs:
• Breakpoints tab (see page 52)
• Watchpoints tab (see page 53)
• Data Files tab (see page 54)
• Call Stack tab (see page 55)
• Build Results tab (see page 56)
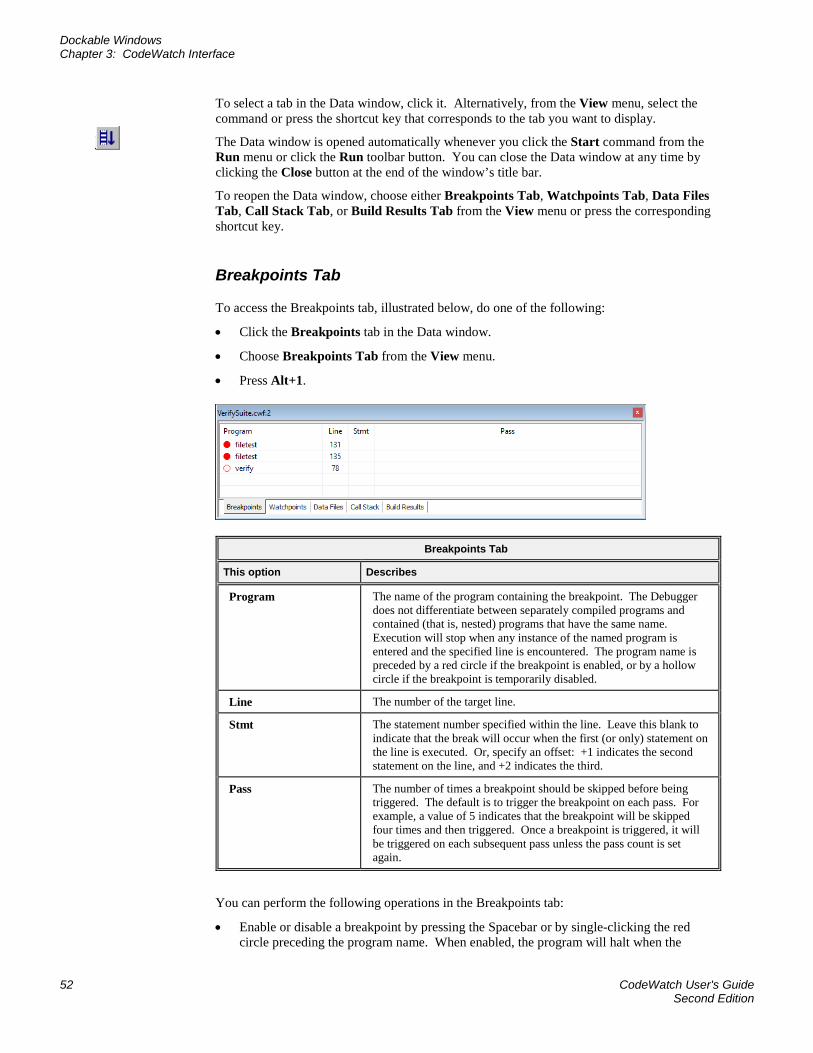
Dockable Windows Chapter 3: CodeWatch Interface
52 CodeWatch User's Guide Second Edition
To select a tab in the Data window, click it. Alternatively, from the View menu, select the command or press the shortcut key that corresponds to the tab you want to display.
The Data window is opened automatically whenever you click the Start command from the Run menu or click the Run toolbar button. You can close the Data window at any time by clicking the Close button at the end of the window’s title bar.
To reopen the Data window, choose either Breakpoints Tab, Watchpoints Tab, Data Files Tab, Call Stack Tab, or Build Results Tab from the View menu or press the corresponding shortcut key.
Breakpoints Tab
To access the Breakpoints tab, illustrated below, do one of the following:
• Click the Breakpoints tab in the Data window.
• Choose Breakpoints Tab from the View menu.
• Press Alt+1.
Breakpoints Tab
This option Describes
Program The name of the program containing the breakpoint. The Debugger does not differentiate between separately compiled programs and contained (that is, nested) programs that have the same name. Execution will stop when any instance of the named program is entered and the specified line is encountered. The program name is preceded by a red circle if the breakpoint is enabled, or by a hollow circle if the breakpoint is temporarily disabled.
Line The number of the target line.
Stmt The statement number specified within the line. Leave this blank to indicate that the break will occur when the first (or only) statement on the line is executed. Or, specify an offset: +1 indicates the second statement on the line, and +2 indicates the third.
Pass The number of times a breakpoint should be skipped before being triggered. The default is to trigger the breakpoint on each pass. For example, a value of 5 indicates that the breakpoint will be skipped four times and then triggered. Once a breakpoint is triggered, it will be triggered on each subsequent pass unless the pass count is set again.
You can perform the following operations in the Breakpoints tab:
• Enable or disable a breakpoint by pressing the Spacebar or by single-clicking the red circle preceding the program name. When enabled, the program will halt when the
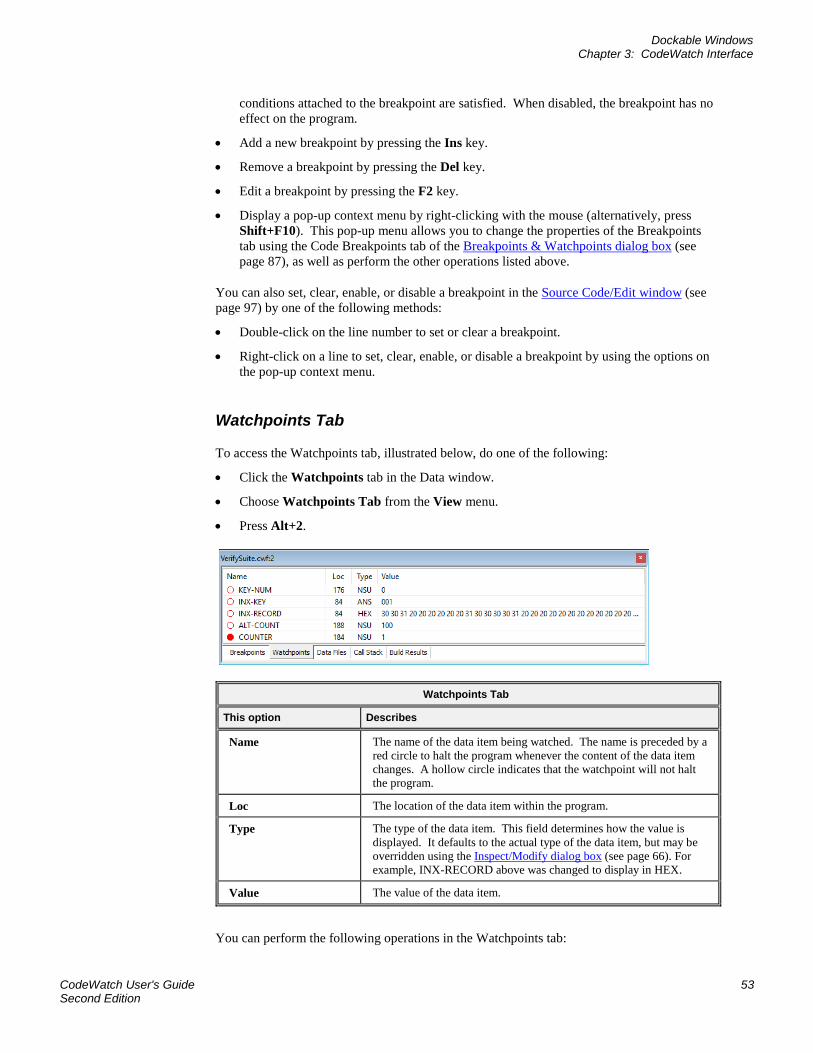
Dockable Windows Chapter 3: CodeWatch Interface
CodeWatch User's Guide 53 Second Edition
conditions attached to the breakpoint are satisfied. When disabled, the breakpoint has no effect on the program.
• Add a new breakpoint by pressing the Ins key.
• Remove a breakpoint by pressing the Del key.
• Edit a breakpoint by pressing the F2 key.
• Display a pop-up context menu by right-clicking with the mouse (alternatively, press Shift+F10). This pop-up menu allows you to change the properties of the Breakpoints tab using the Code Breakpoints tab of the Breakpoints & Watchpoints dialog box (see page 87), as well as perform the other operations listed above.
You can also set, clear, enable, or disable a breakpoint in the Source Code/Edit window (see page 97) by one of the following methods:
• Double-click on the line number to set or clear a breakpoint.
• Right-click on a line to set, clear, enable, or disable a breakpoint by using the options on the pop-up context menu.
Watchpoints Tab
To access the Watchpoints tab, illustrated below, do one of the following:
• Click the Watchpoints tab in the Data window.
• Choose Watchpoints Tab from the View menu.
• Press Alt+2.
Watchpoints Tab
This option Describes
Name The name of the data item being watched. The name is preceded by a red circle to halt the program whenever the content of the data item changes. A hollow circle indicates that the watchpoint will not halt the program.
Loc The location of the data item within the program.
Type The type of the data item. This field determines how the value is displayed. It defaults to the actual type of the data item, but may be overridden using the Inspect/Modify dialog box (see page 66). For example, INX-RECORD above was changed to display in HEX.
Value The value of the data item.
You can perform the following operations in the Watchpoints tab:
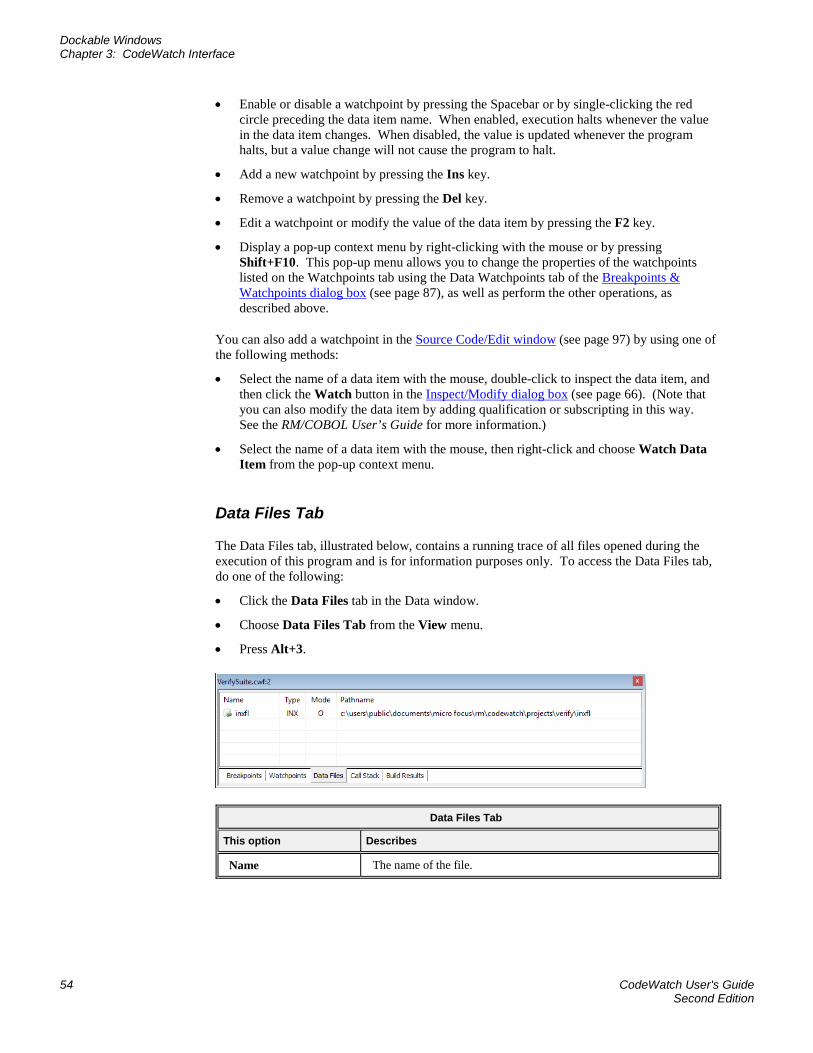
Dockable Windows Chapter 3: CodeWatch Interface
54 CodeWatch User's Guide Second Edition
• Enable or disable a watchpoint by pressing the Spacebar or by single-clicking the red circle preceding the data item name. When enabled, execution halts whenever the value in the data item changes. When disabled, the value is updated whenever the program halts, but a value change will not cause the program to halt.
• Add a new watchpoint by pressing the Ins key.
• Remove a watchpoint by pressing the Del key.
• Edit a watchpoint or modify the value of the data item by pressing the F2 key.
• Display a pop-up context menu by right-clicking with the mouse or by pressing Shift+F10. This pop-up menu allows you to change the properties of the watchpoints listed on the Watchpoints tab using the Data Watchpoints tab of the Breakpoints & Watchpoints dialog box (see page 87), as well as perform the other operations, as described above.
You can also add a watchpoint in the Source Code/Edit window (see page 97) by using one of the following methods:
• Select the name of a data item with the mouse, double-click to inspect the data item, and then click the Watch button in the Inspect/Modify dialog box (see page 66). (Note that you can also modify the data item by adding qualification or subscripting in this way. See the RM/COBOL User’s Guide for more information.)
• Select the name of a data item with the mouse, then right-click and choose Watch Data Item from the pop-up context menu.
Data Files Tab
The Data Files tab, illustrated below, contains a running trace of all files opened during the execution of this program and is for information purposes only. To access the Data Files tab, do one of the following:
• Click the Data Files tab in the Data window.
• Choose Data Files Tab from the View menu.
• Press Alt+3.
Data Files Tab
This option Describes
Name The name of the file.
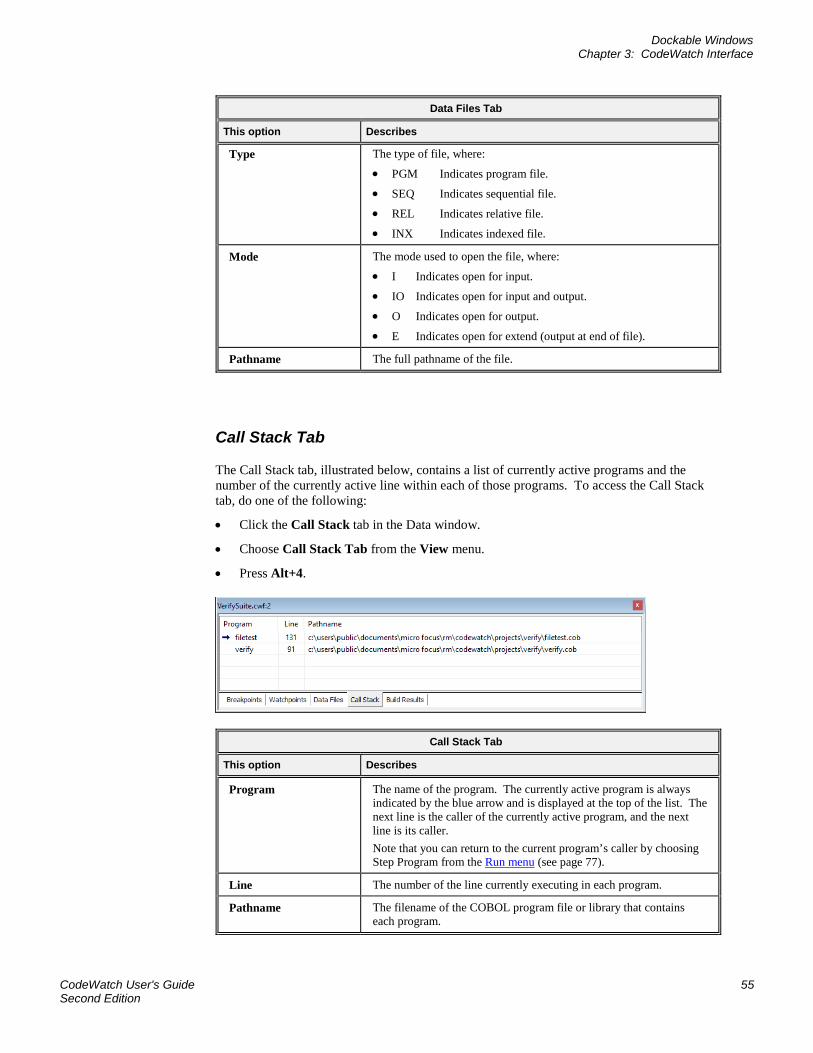
Dockable Windows Chapter 3: CodeWatch Interface
CodeWatch User's Guide 55 Second Edition
Data Files Tab
This option Describes
Type The type of file, where:
• PGM Indicates program file.
• SEQ Indicates sequential file.
• REL Indicates relative file.
• INX Indicates indexed file.
Mode The mode used to open the file, where:
• I Indicates open for input.
• IO Indicates open for input and output.
• O Indicates open for output.
• E Indicates open for extend (output at end of file).
Pathname The full pathname of the file.
Call Stack Tab
The Call Stack tab, illustrated below, contains a list of currently active programs and the number of the currently active line within each of those programs. To access the Call Stack tab, do one of the following:
• Click the Call Stack tab in the Data window.
• Choose Call Stack Tab from the View menu.
• Press Alt+4.
Call Stack Tab
This option Describes
Program The name of the program. The currently active program is always indicated by the blue arrow and is displayed at the top of the list. The next line is the caller of the currently active program, and the next line is its caller. Note that you can return to the current program’s caller by choosing Step Program from the Run menu (see page 77).
Line The number of the line currently executing in each program.
Pathname The filename of the COBOL program file or library that contains each program.
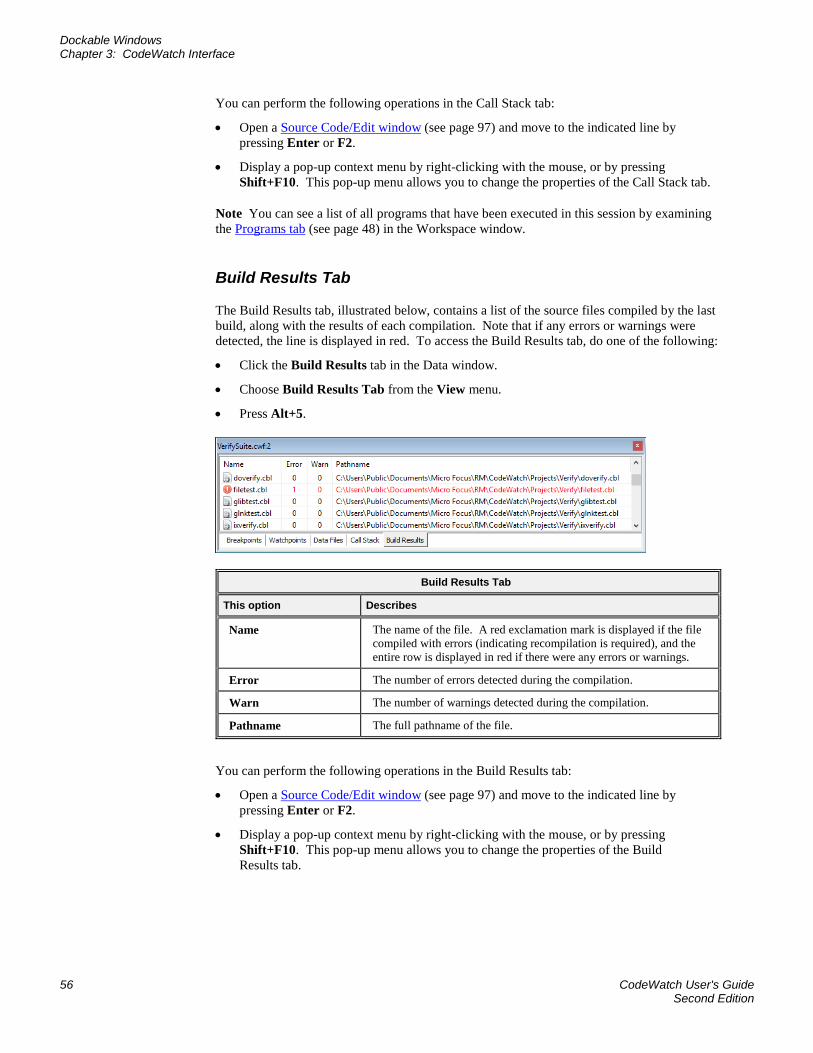
Dockable Windows Chapter 3: CodeWatch Interface
56 CodeWatch User's Guide Second Edition
You can perform the following operations in the Call Stack tab:
• Open a Source Code/Edit window (see page 97) and move to the indicated line by pressing Enter or F2.
• Display a pop-up context menu by right-clicking with the mouse, or by pressing Shift+F10. This pop-up menu allows you to change the properties of the Call Stack tab.
Note You can see a list of all programs that have been executed in this session by examining the Programs tab (see page 48) in the Workspace window.
Build Results Tab
The Build Results tab, illustrated below, contains a list of the source files compiled by the last build, along with the results of each compilation. Note that if any errors or warnings were detected, the line is displayed in red. To access the Build Results tab, do one of the following:
• Click the Build Results tab in the Data window.
• Choose Build Results Tab from the View menu.
• Press Alt+5.
Build Results Tab
This option Describes
Name The name of the file. A red exclamation mark is displayed if the file compiled with errors (indicating recompilation is required), and the entire row is displayed in red if there were any errors or warnings.
Error The number of errors detected during the compilation.
Warn The number of warnings detected during the compilation.
Pathname The full pathname of the file.
You can perform the following operations in the Build Results tab:
• Open a Source Code/Edit window (see page 97) and move to the indicated line by pressing Enter or F2.
• Display a pop-up context menu by right-clicking with the mouse, or by pressing Shift+F10. This pop-up menu allows you to change the properties of the Build Results tab.
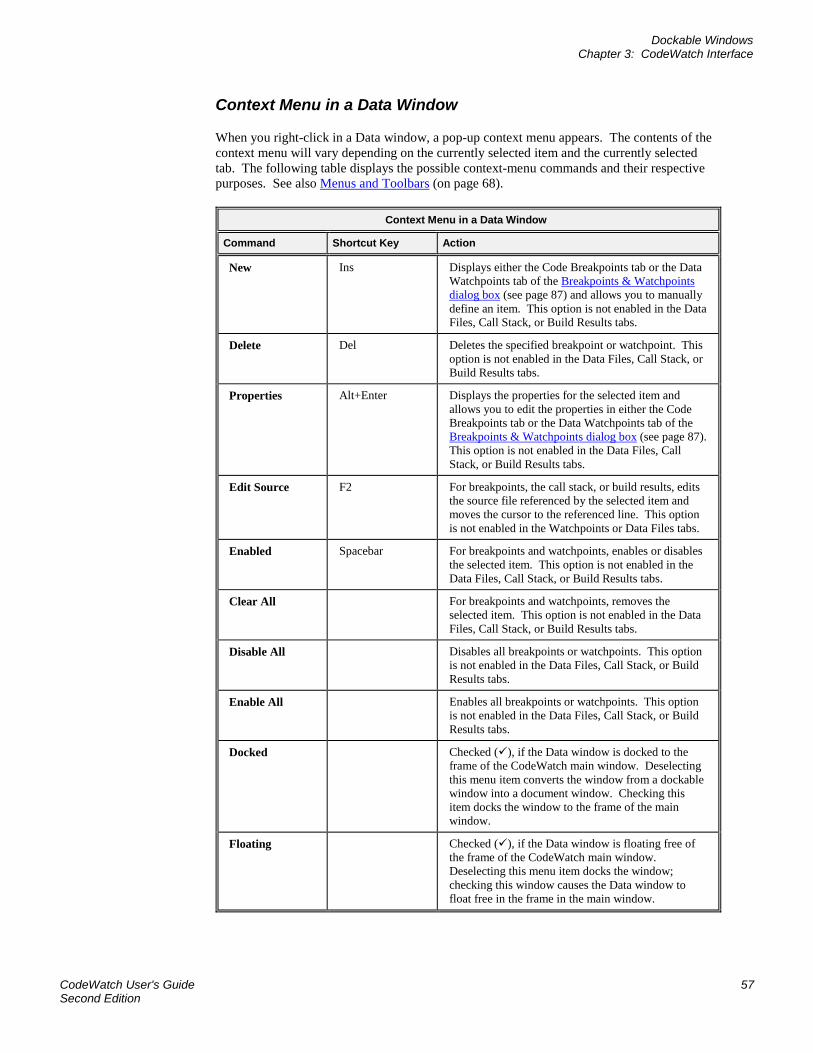
Dockable Windows Chapter 3: CodeWatch Interface
CodeWatch User's Guide 57 Second Edition
Context Menu in a Data Window
When you right-click in a Data window, a pop-up context menu appears. The contents of the context menu will vary depending on the currently selected item and the currently selected tab. The following table displays the possible context-menu commands and their respective purposes. See also Menus and Toolbars (on page 68).
Context Menu in a Data Window
Command Shortcut Key Action
New Ins Displays either the Code Breakpoints tab or the Data Watchpoints tab of the Breakpoints & Watchpoints dialog box (see page 87) and allows you to manually define an item. This option is not enabled in the Data Files, Call Stack, or Build Results tabs.
Delete Del Deletes the specified breakpoint or watchpoint. This option is not enabled in the Data Files, Call Stack, or Build Results tabs.
Properties Alt+Enter Displays the properties for the selected item and allows you to edit the properties in either the Code Breakpoints tab or the Data Watchpoints tab of the Breakpoints & Watchpoints dialog box (see page 87). This option is not enabled in the Data Files, Call Stack, or Build Results tabs.
Edit Source F2 For breakpoints, the call stack, or build results, edits the source file referenced by the selected item and moves the cursor to the referenced line. This option is not enabled in the Watchpoints or Data Files tabs.
Enabled Spacebar For breakpoints and watchpoints, enables or disables the selected item. This option is not enabled in the Data Files, Call Stack, or Build Results tabs.
Clear All For breakpoints and watchpoints, removes the selected item. This option is not enabled in the Data Files, Call Stack, or Build Results tabs.
Disable All Disables all breakpoints or watchpoints. This option is not enabled in the Data Files, Call Stack, or Build Results tabs.
Enable All Enables all breakpoints or watchpoints. This option is not enabled in the Data Files, Call Stack, or Build Results tabs.
Docked Checked (), if the Data window is docked to the frame of the CodeWatch main window. Deselecting this menu item converts the window from a dockable window into a document window. Checking this item docks the window to the frame of the main window.
Floating Checked (), if the Data window is floating free of the frame of the CodeWatch main window. Deselecting this menu item docks the window; checking this window causes the Data window to float free in the frame in the main window.
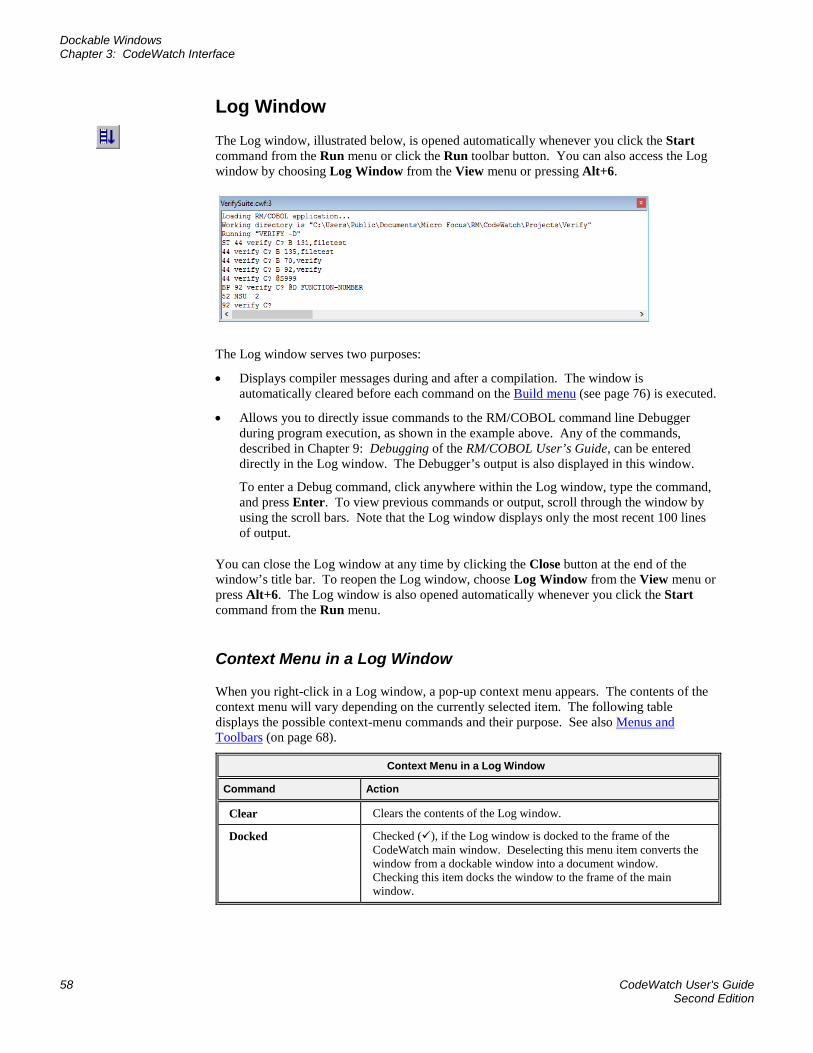
Dockable Windows Chapter 3: CodeWatch Interface
58 CodeWatch User's Guide Second Edition
Log Window The Log window, illustrated below, is opened automatically whenever you click the Start command from the Run menu or click the Run toolbar button. You can also access the Log window by choosing Log Window from the View menu or pressing Alt+6.
The Log window serves two purposes:
• Displays compiler messages during and after a compilation. The window is automatically cleared before each command on the Build menu (see page 76) is executed.
• Allows you to directly issue commands to the RM/COBOL command line Debugger during program execution, as shown in the example above. Any of the commands, described in Chapter 9: Debugging of the RM/COBOL User’s Guide, can be entered directly in the Log window. The Debugger’s output is also displayed in this window.
To enter a Debug command, click anywhere within the Log window, type the command, and press Enter. To view previous commands or output, scroll through the window by using the scroll bars. Note that the Log window displays only the most recent 100 lines of output.
You can close the Log window at any time by clicking the Close button at the end of the window’s title bar. To reopen the Log window, choose Log Window from the View menu or press Alt+6. The Log window is also opened automatically whenever you click the Start command from the Run menu.
Context Menu in a Log Window
When you right-click in a Log window, a pop-up context menu appears. The contents of the context menu will vary depending on the currently selected item. The following table displays the possible context-menu commands and their purpose. See also Menus and Toolbars (on page 68).
Context Menu in a Log Window
Command Action
Clear Clears the contents of the Log window.
Docked Checked (), if the Log window is docked to the frame of the CodeWatch main window. Deselecting this menu item converts the window from a dockable window into a document window. Checking this item docks the window to the frame of the main window.
Document Windows Chapter 3: CodeWatch Interface
CodeWatch User's Guide 59 Second Edition
Context Menu in a Log Window
Command Action
Floating Checked (), if the Log window is floating free of the frame in the CodeWatch main window. Deselecting this menu item docks the window; checking this window causes it to float free of the frame in the main window.
Document Windows The area within the frame of the CodeWatch main window that is not occupied by the dockable windows (see page 46) is reserved for “document” windows. Document windows have a large title bar, are listed in the Window menu, and always float only in the document area of the main window. (If the document window’s title bar is not visible, click the Restore button.) Unlike dockable windows, you can have any number of document windows that are displaying different objects. You can even display the same object in two different document windows. The Source Code/Edit window (see page 97) is an example of a document window.
Note CodeWatch allows you to convert any dockable window into a document window. To do so, click in the window you wish to convert, and uncheck Docked on the Window menu. This option is also available on the pop-up context menu that appears if you right-click in the window or on the title bar of the dockable window.
Using Document Windows The sections in this topic:
• Describe the state of document windows
• Detail the Document menu commands and toolbar buttons
• Explain how to cycle through, split, and close document windows
State of Document Windows
Document windows can take on three different states: minimized, maximized, or normal.
• Normal. In the normal state, all document windows are overlapped in the document area. You can use commands on the Window menu to arrange all of the document windows, either by tiling or cascading the windows.
• Maximized. In the maximized state, only the topmost document window is visible and there is no separate document title bar. You can move between document windows by pressing Ctrl+Tab or by using the Window menu.
• Minimized. In the minimized state, the document window is reduced so only its title bar is visible at the bottom of the document area.
The state of a document window is set by one of the following methods:
Document Windows Chapter 3: CodeWatch Interface
60 CodeWatch User's Guide Second Edition
• Using the Document menu that appears when you click the document icon in the upper-left corner of the title bar. If the document window’s title bar is not visible, restore the document by clicking the Restore button.
• By clicking the Minimize, Maximize, or Close buttons on the upper-right corner of the title bar.
Note If the document window is maximized, the Document menu icon is moved to the left side of the menu bar and the buttons are moved to the right side of the menu bar.
To activate the Document menu from the keyboard:
1. Press the F10 key, or press and release the Alt key. This activates the File menu.
2. Press the Left Arrow key, which activates the Document menu for the current window.
3. Press the Down Arrow key, which drops down the menu.
Document Menu
The Document menu contains the following commands. The corresponding shortcut key and button, if applicable, are also shown.
Document Menu
Command Shortcut Key Button Action
Restore
Restores the views so all document windows are potentially visible in the document area. The Restore button always replaces the Maximize button or the Minimize button when that command is carried out. Use the following commands to arrange the restored windows:
• Window | Cascade to cascade all document windows from left to right, top to bottom across the document area.
• Window | Tile to tile all document windows in the document area so a part of each window is visible.
Move Moves the window. You can use the mouse or the arrow keys to position the window in the document area. This function is not available if the window is maximized. You can also move a window with the mouse by clicking anywhere in the title bar and dragging the window to a new location.
Size Resizes the window. The Up and Down Arrow keys, respectively, increase and decrease the size of the window vertically, and the Left and Right Arrow keys perform the same operation horizontally. This function is not available if the window is maximized or minimized. You can also size a window with the mouse by clicking the frame on any side, or clicking a corner and dragging with the mouse.
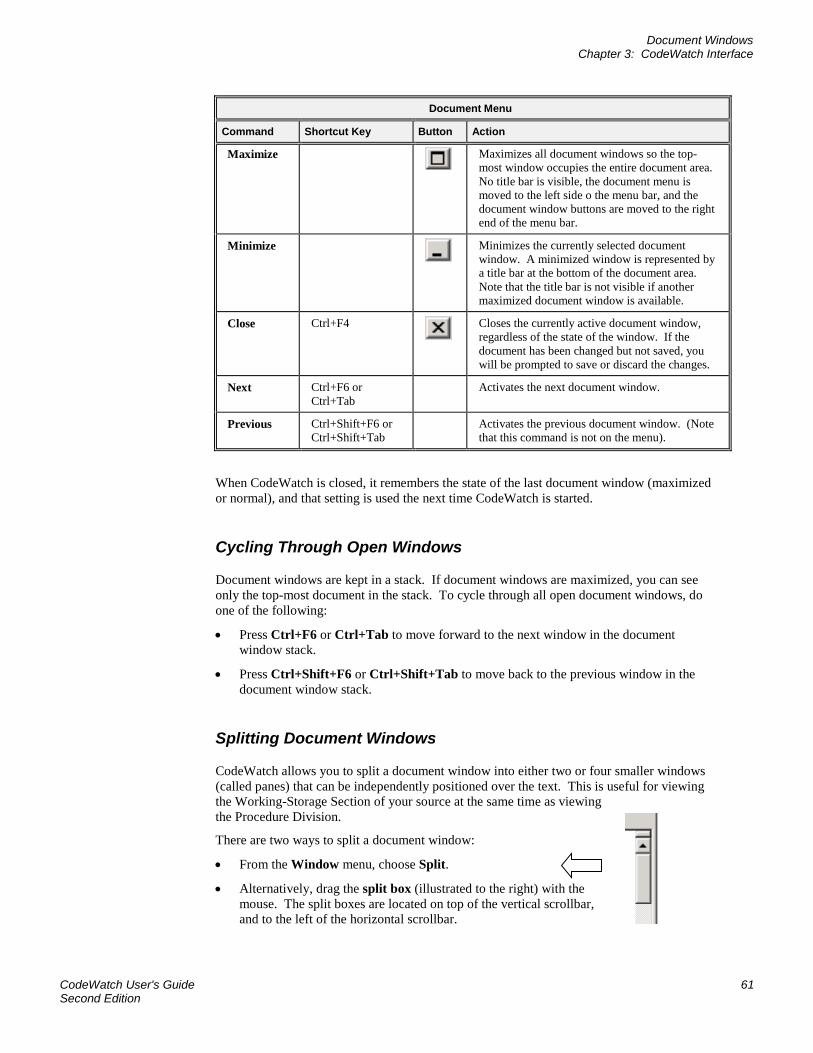
Document Windows Chapter 3: CodeWatch Interface
CodeWatch User's Guide 61 Second Edition
Document Menu
Command Shortcut Key Button Action
Maximize
Maximizes all document windows so the top-most window occupies the entire document area. No title bar is visible, the document menu is moved to the left side o the menu bar, and the document window buttons are moved to the right end of the menu bar.
Minimize
Minimizes the currently selected document window. A minimized window is represented by a title bar at the bottom of the document area. Note that the title bar is not visible if another maximized document window is available.
Close Ctrl+F4
Closes the currently active document window, regardless of the state of the window. If the document has been changed but not saved, you will be prompted to save or discard the changes.
Next Ctrl+F6 or Ctrl+Tab
Activates the next document window.
Previous Ctrl+Shift+F6 or Ctrl+Shift+Tab
Activates the previous document window. (Note that this command is not on the menu).
When CodeWatch is closed, it remembers the state of the last document window (maximized or normal), and that setting is used the next time CodeWatch is started.
Cycling Through Open Windows
Document windows are kept in a stack. If document windows are maximized, you can see only the top-most document in the stack. To cycle through all open document windows, do one of the following:
• Press Ctrl+F6 or Ctrl+Tab to move forward to the next window in the document window stack.
• Press Ctrl+Shift+F6 or Ctrl+Shift+Tab to move back to the previous window in the document window stack.
Splitting Document Windows
CodeWatch allows you to split a document window into either two or four smaller windows (called panes) that can be independently positioned over the text. This is useful for viewing the Working-Storage Section of your source at the same time as viewing the Procedure Division.
There are two ways to split a document window:
• From the Window menu, choose Split.
• Alternatively, drag the split box (illustrated to the right) with the mouse. The split boxes are located on top of the vertical scrollbar, and to the left of the horizontal scrollbar.

Floating Windows Chapter 3: CodeWatch Interface
62 CodeWatch User's Guide Second Edition
In either case, the document window is immediately transected by a horizontal and a vertical divider (called a split bar), and the intersection of the dividers may be moved with the mouse or the arrow keys on the keyboard. Press the Enter key or release the mouse button when you are finished positioning the split bar.
When you split document windows, there are several considerations to keep in mind:
• To divide the window into two panes instead of four, drag the unwanted split bar to the edge of the window.
• The panes may be positioned independently, but only the pane containing the cursor is active.
• To move the cursor into the next pane, choose Pane | Next from the Window menu or press F6. To move the cursor into the previous pane, choose Pane | Previous from the Window menu or press Shift+F6.
Note Neither of the Pane commands will activate a different document window. To activate a different document, press Ctrl+F6 or Ctrl+Shift+F6.
• To adjust the split bar, choose Split from the Window menu. To move the divider with the mouse, simply click and drag the split bar to the new position.
• To close a pane, drag the split bar to the edge of the window with the keyboard or the mouse, or double-click the divider with the mouse.
Closing Document Windows
Closing a document window returns you to the previous document window in the stack. There are several ways to close a document window. Do one of the following:
• Press Ctrl+F4 or click the Close button on the document window’s title bar. If the window is maximized, the Close button is at the right end of the menu bar.
• Choose Close from the Document menu.
These functions close only the currently active document window and close the document if there is only one open document window. If you used the New Window command from the Window menu to create additional windows on the document, the document is not closed until all windows are closed.
To close all windows associated with the current document:
• Choose File | Close.
If the document has been changed, you will be given the option to save the document.
Floating Windows Floating windows “float” over the CodeWatch main window and may be revealed or hidden at any time. Three of the dialog boxes used in CodeWatch are floating type windows:
• Find dialog box (see the following topic)
• Replace dialog box (see page 65)
• Inspect/Modify dialog box (see page 66)

Floating Windows Chapter 3: CodeWatch Interface
CodeWatch User's Guide 63 Second Edition
Find Dialog Box The Find dialog box, illustrated below, allows you to search for text in the source file in various ways. This dialog box is enabled only when a Source Code/Edit window (see page 97) is open.
To display the Find dialog box, do one of the following:
• From the Edit menu, choose Find.
• Click the Find toolbar button.
• Press Ctrl+F or Alt+F3.
Find Dialog Box
Use this option To
Find what For the current file, type the information you want to search for (this is referred to as the search criteria). Or, click a previous search entry from the list.
Match whole word only
Match the search string only if the found occurrence is delimited by:
• spaces, tabs, or the beginning and/or end of the line, or
• any of the following characters:
\ " ' ` ~ - = ! @ # $ % ^ & * _ ( ) + [ ] { } | ; : . , < > / ?
For example, searching for “25” when this option is not checked will match “1255” and “A25”. Checking this option ensures that only “25” is matched.
Match case When selected, find only the text that exactly matches the search text criteria. When not selected, uppercase and lowercase letters are considered to be identical. Therefore, searching for ABC will match “abc” and “AbC” in addition to “ABC”.
Regular expression When selected, specify that the search text is a UNIX-style regular expression. This provides the ability to perform powerful search operations. For more information, see Regular Expressions (on page 64).
Direction Control the direction of the search: select Down to search forward in the file toward the end, or select Up to search backward in the file toward the beginning.
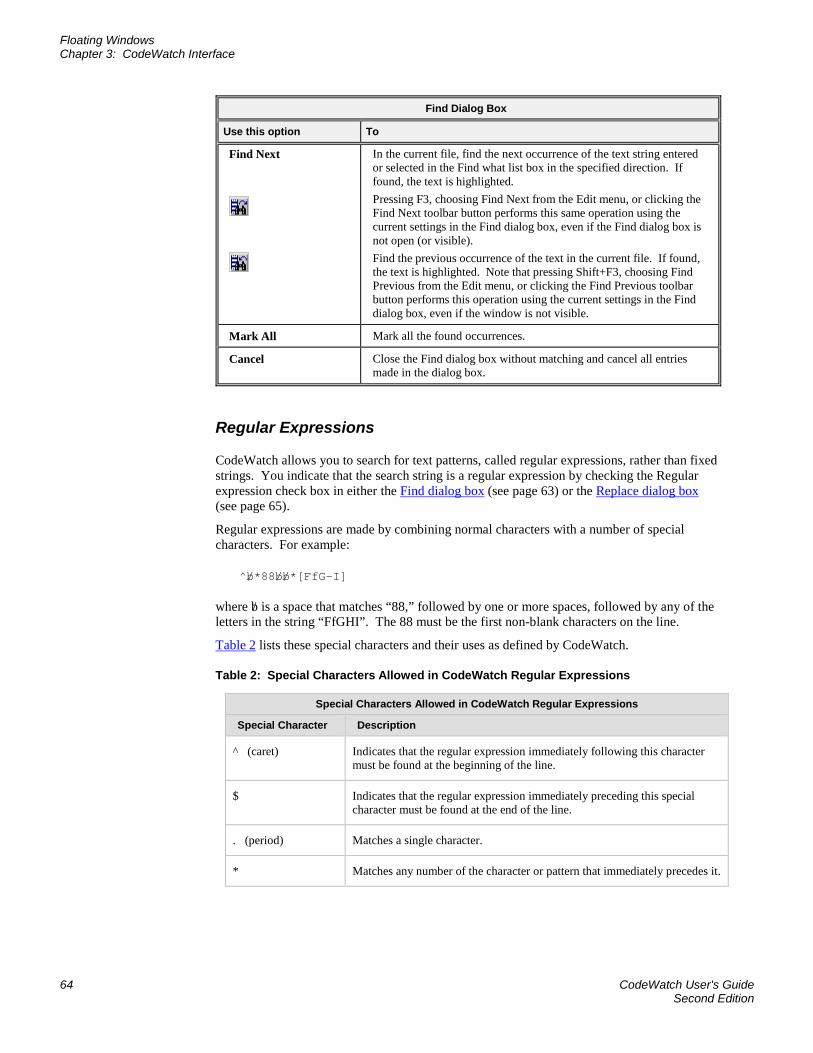
Floating Windows Chapter 3: CodeWatch Interface
64 CodeWatch User's Guide Second Edition
Find Dialog Box
Use this option To
Find Next
In the current file, find the next occurrence of the text string entered or selected in the Find what list box in the specified direction. If found, the text is highlighted. Pressing F3, choosing Find Next from the Edit menu, or clicking the Find Next toolbar button performs this same operation using the current settings in the Find dialog box, even if the Find dialog box is not open (or visible). Find the previous occurrence of the text in the current file. If found, the text is highlighted. Note that pressing Shift+F3, choosing Find Previous from the Edit menu, or clicking the Find Previous toolbar button performs this operation using the current settings in the Find dialog box, even if the window is not visible.
Mark All Mark all the found occurrences.
Cancel Close the Find dialog box without matching and cancel all entries made in the dialog box.
Regular Expressions
CodeWatch allows you to search for text patterns, called regular expressions, rather than fixed strings. You indicate that the search string is a regular expression by checking the Regular expression check box in either the Find dialog box (see page 63) or the Replace dialog box (see page 65).
Regular expressions are made by combining normal characters with a number of special characters. For example:
^b/*88b/b/*[FfG-I]
where b/ is a space that matches “88,” followed by one or more spaces, followed by any of the letters in the string “FfGHI”. The 88 must be the first non-blank characters on the line.
Table 2 lists these special characters and their uses as defined by CodeWatch.
Table 2: Special Characters Allowed in CodeWatch Regular Expressions
Special Characters Allowed in CodeWatch Regular Expressions
Special Character Description
^ (caret) Indicates that the regular expression immediately following this character must be found at the beginning of the line.
$ Indicates that the regular expression immediately preceding this special character must be found at the end of the line.
. (period) Matches a single character.
* Matches any number of the character or pattern that immediately precedes it.
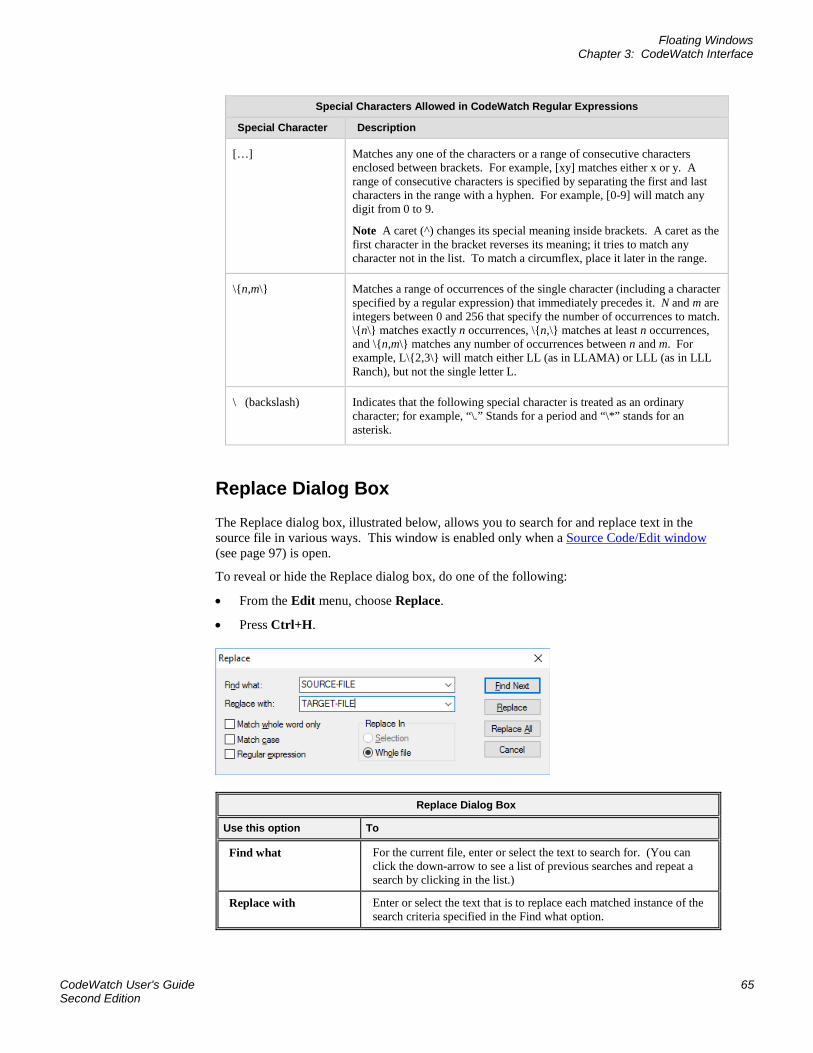
Floating Windows Chapter 3: CodeWatch Interface
CodeWatch User's Guide 65 Second Edition
Special Characters Allowed in CodeWatch Regular Expressions
Special Character Description
[…] Matches any one of the characters or a range of consecutive characters enclosed between brackets. For example, [xy] matches either x or y. A range of consecutive characters is specified by separating the first and last characters in the range with a hyphen. For example, [0-9] will match any digit from 0 to 9.
Note A caret (^) changes its special meaning inside brackets. A caret as the first character in the bracket reverses its meaning; it tries to match any character not in the list. To match a circumflex, place it later in the range.
\{n,m\} Matches a range of occurrences of the single character (including a character specified by a regular expression) that immediately precedes it. N and m are integers between 0 and 256 that specify the number of occurrences to match. \{n\} matches exactly n occurrences, \{n,\} matches at least n occurrences, and \{n,m\} matches any number of occurrences between n and m. For example, L\{2,3\} will match either LL (as in LLAMA) or LLL (as in LLL Ranch), but not the single letter L.
\ (backslash) Indicates that the following special character is treated as an ordinary character; for example, “\.” Stands for a period and “\*” stands for an asterisk.
Replace Dialog Box The Replace dialog box, illustrated below, allows you to search for and replace text in the source file in various ways. This window is enabled only when a Source Code/Edit window (see page 97) is open.
To reveal or hide the Replace dialog box, do one of the following:
• From the Edit menu, choose Replace.
• Press Ctrl+H.
Replace Dialog Box
Use this option To
Find what For the current file, enter or select the text to search for. (You can click the down-arrow to see a list of previous searches and repeat a search by clicking in the list.)
Replace with Enter or select the text that is to replace each matched instance of the search criteria specified in the Find what option.
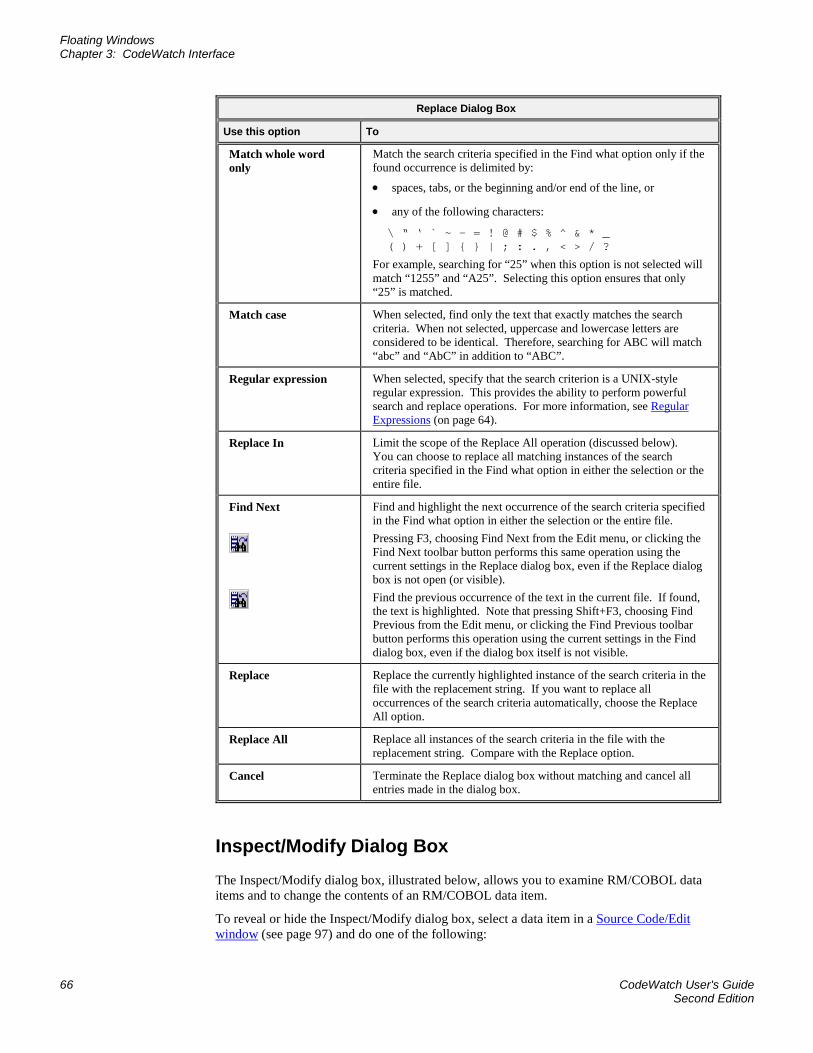
Floating Windows Chapter 3: CodeWatch Interface
66 CodeWatch User's Guide Second Edition
Replace Dialog Box
Use this option To
Match whole word only
Match the search criteria specified in the Find what option only if the found occurrence is delimited by:
• spaces, tabs, or the beginning and/or end of the line, or
• any of the following characters:
\ “ ‘ ` ~ - = ! @ # $ % ^ & * _ ( ) + [ ] { } | ; : . , < > / ?
For example, searching for “25” when this option is not selected will match “1255” and “A25”. Selecting this option ensures that only “25” is matched.
Match case When selected, find only the text that exactly matches the search criteria. When not selected, uppercase and lowercase letters are considered to be identical. Therefore, searching for ABC will match “abc” and “AbC” in addition to “ABC”.
Regular expression When selected, specify that the search criterion is a UNIX-style regular expression. This provides the ability to perform powerful search and replace operations. For more information, see Regular Expressions (on page 64).
Replace In Limit the scope of the Replace All operation (discussed below). You can choose to replace all matching instances of the search criteria specified in the Find what option in either the selection or the entire file.
Find Next
Find and highlight the next occurrence of the search criteria specified in the Find what option in either the selection or the entire file. Pressing F3, choosing Find Next from the Edit menu, or clicking the Find Next toolbar button performs this same operation using the current settings in the Replace dialog box, even if the Replace dialog box is not open (or visible). Find the previous occurrence of the text in the current file. If found, the text is highlighted. Note that pressing Shift+F3, choosing Find Previous from the Edit menu, or clicking the Find Previous toolbar button performs this operation using the current settings in the Find dialog box, even if the dialog box itself is not visible.
Replace Replace the currently highlighted instance of the search criteria in the file with the replacement string. If you want to replace all occurrences of the search criteria automatically, choose the Replace All option.
Replace All Replace all instances of the search criteria in the file with the replacement string. Compare with the Replace option.
Cancel Terminate the Replace dialog box without matching and cancel all entries made in the dialog box.
Inspect/Modify Dialog Box The Inspect/Modify dialog box, illustrated below, allows you to examine RM/COBOL data items and to change the contents of an RM/COBOL data item.
To reveal or hide the Inspect/Modify dialog box, select a data item in a Source Code/Edit window (see page 97) and do one of the following:

Floating Windows Chapter 3: CodeWatch Interface
CodeWatch User's Guide 67 Second Edition
• From the View menu, chose Data Item.
• Click the View/Modify Data toolbar button.
• Double-click the name of a data item.
• Right-click within the selection and choose View Data Item from the pop-up menu, or press Shift+F9 or Ctrl+I.
Inspect/Modify Dialog Box
Use this option To
Name Enter the name of the data item to be inspected or modified. You can enter a simple name or an expression as described in the “Data Address Development” topic of Chapter 9: Debugging of the RM/COBOL User’s Guide.
Type Select or enter the type of the data item. Specifying <default> displays the data item using the actual type of the data item. You can cause the value of a data item to be displayed as a different type by choosing a type from the drop-down list. See “Data Types” under the “General Debug Concepts” section in Chapter 9: Debugging of the RM/COBOL User’s Guide, for a description of allowed data types. In the second illustration above, the HEX data type was selected to show the binary data in INX-RECORD. If the data item is a POINTER data type (PTR), then selecting a non-PTR type from the Type list box causes CodeWatch automatically to dereference the pointer. (An indirect reference is sometimes called a dereferenced pointer.) To dereference the pointer, select the type of the pointed-to data from the list. The pointer will automatically be dereferenced to indicate that the displayed value was obtained indirectly. The value will be displayed in green. If the pointer has not been initialized, or the pointed-to memory cannot be accessed, an error message is displayed in red. To manufacture a pointer to a data item, select “&PTR” from the Type list box. The value of a pointer to the specified data item will be displayed in green. (An “address of” modified reference is sometimes called a manufactured pointer.) One use for this function is to copy the value to the Windows Clipboard, and then replace the value of another pointer with the contents of the Clipboard. To copy and paste this value, select the text with the mouse and use the pop-up menu that appears when the right mouse button is clicked in the Show text box.
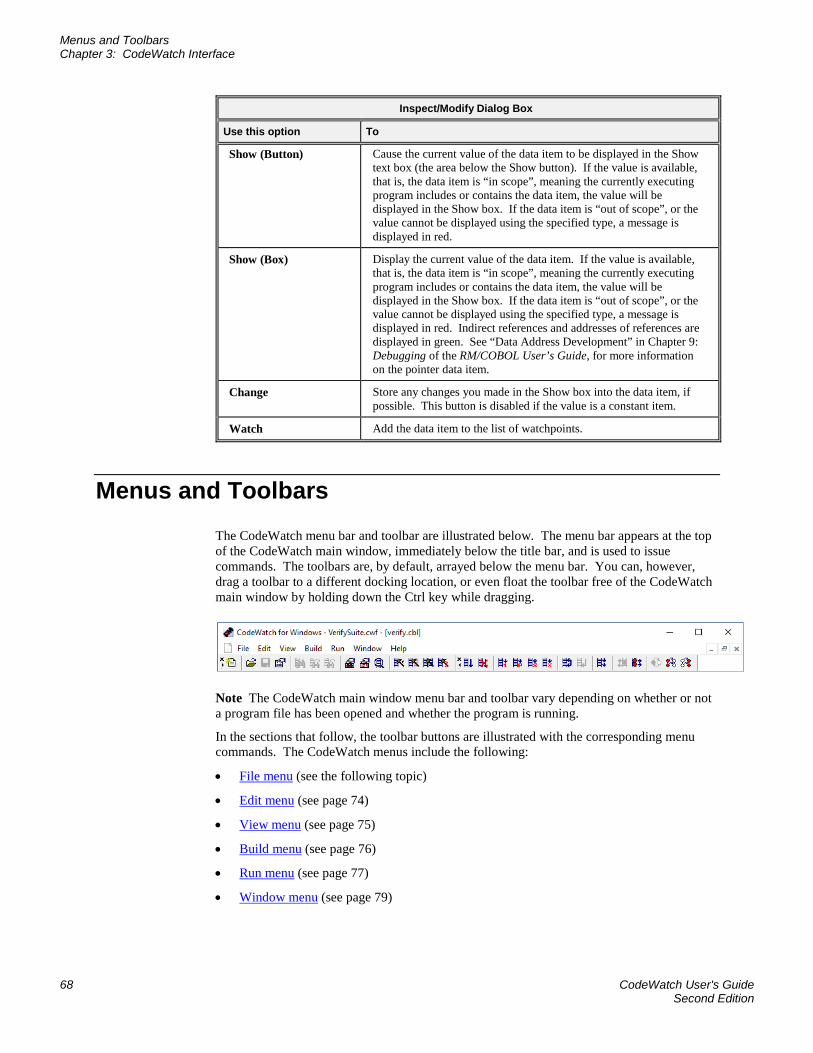
Menus and Toolbars Chapter 3: CodeWatch Interface
68 CodeWatch User's Guide Second Edition
Inspect/Modify Dialog Box
Use this option To
Show (Button) Cause the current value of the data item to be displayed in the Show text box (the area below the Show button). If the value is available, that is, the data item is “in scope”, meaning the currently executing program includes or contains the data item, the value will be displayed in the Show box. If the data item is “out of scope”, or the value cannot be displayed using the specified type, a message is displayed in red.
Show (Box) Display the current value of the data item. If the value is available, that is, the data item is “in scope”, meaning the currently executing program includes or contains the data item, the value will be displayed in the Show box. If the data item is “out of scope”, or the value cannot be displayed using the specified type, a message is displayed in red. Indirect references and addresses of references are displayed in green. See “Data Address Development” in Chapter 9: Debugging of the RM/COBOL User’s Guide, for more information on the pointer data item.
Change Store any changes you made in the Show box into the data item, if possible. This button is disabled if the value is a constant item.
Watch Add the data item to the list of watchpoints.
Menus and Toolbars The CodeWatch menu bar and toolbar are illustrated below. The menu bar appears at the top of the CodeWatch main window, immediately below the title bar, and is used to issue commands. The toolbars are, by default, arrayed below the menu bar. You can, however, drag a toolbar to a different docking location, or even float the toolbar free of the CodeWatch main window by holding down the Ctrl key while dragging.
Note The CodeWatch main window menu bar and toolbar vary depending on whether or not a program file has been opened and whether the program is running.
In the sections that follow, the toolbar buttons are illustrated with the corresponding menu commands. The CodeWatch menus include the following:
• File menu (see the following topic)
• Edit menu (see page 74)
• View menu (see page 75)
• Build menu (see page 76)
• Run menu (see page 77)
• Window menu (see page 79)
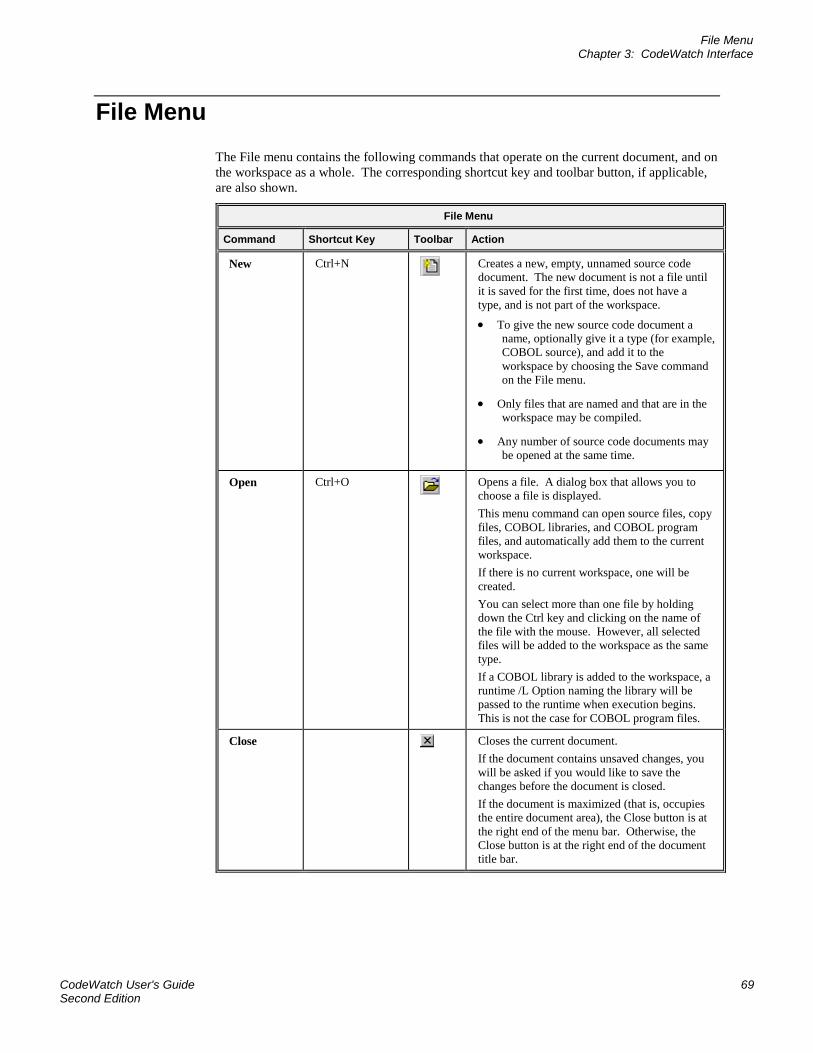
File Menu Chapter 3: CodeWatch Interface
CodeWatch User's Guide 69 Second Edition
File Menu The File menu contains the following commands that operate on the current document, and on the workspace as a whole. The corresponding shortcut key and toolbar button, if applicable, are also shown.
File Menu
Command Shortcut Key Toolbar Action
New Ctrl+N
Creates a new, empty, unnamed source code document. The new document is not a file until it is saved for the first time, does not have a type, and is not part of the workspace.
• To give the new source code document a name, optionally give it a type (for example, COBOL source), and add it to the workspace by choosing the Save command on the File menu.
• Only files that are named and that are in the workspace may be compiled.
• Any number of source code documents may be opened at the same time.
Open Ctrl+O
Opens a file. A dialog box that allows you to choose a file is displayed. This menu command can open source files, copy files, COBOL libraries, and COBOL program files, and automatically add them to the current workspace. If there is no current workspace, one will be created. You can select more than one file by holding down the Ctrl key and clicking on the name of the file with the mouse. However, all selected files will be added to the workspace as the same type. If a COBOL library is added to the workspace, a runtime /L Option naming the library will be passed to the runtime when execution begins. This is not the case for COBOL program files.
Close Closes the current document. If the document contains unsaved changes, you will be asked if you would like to save the changes before the document is closed. If the document is maximized (that is, occupies the entire document area), the Close button is at the right end of the menu bar. Otherwise, the Close button is at the right end of the document title bar.
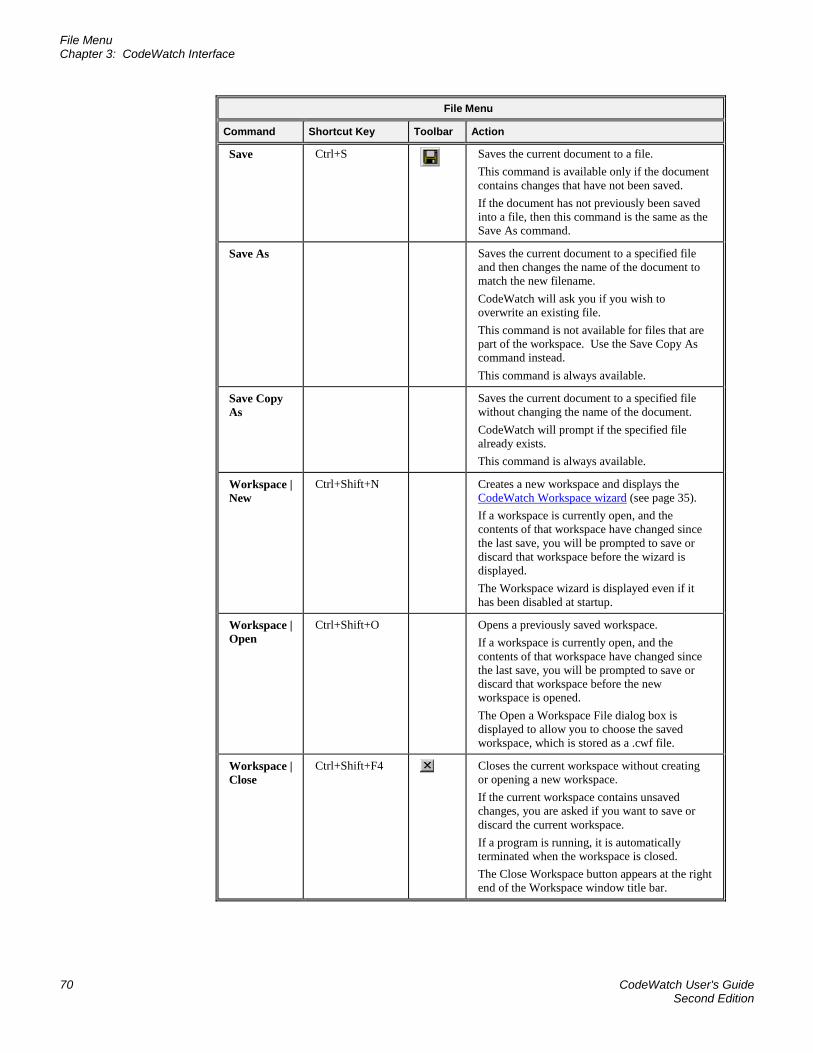
File Menu Chapter 3: CodeWatch Interface
70 CodeWatch User's Guide Second Edition
File Menu
Command Shortcut Key Toolbar Action
Save Ctrl+S
Saves the current document to a file. This command is available only if the document contains changes that have not been saved. If the document has not previously been saved into a file, then this command is the same as the Save As command.
Save As Saves the current document to a specified file and then changes the name of the document to match the new filename. CodeWatch will ask you if you wish to overwrite an existing file. This command is not available for files that are part of the workspace. Use the Save Copy As command instead. This command is always available.
Save Copy As
Saves the current document to a specified file without changing the name of the document. CodeWatch will prompt if the specified file already exists. This command is always available.
Workspace | New
Ctrl+Shift+N Creates a new workspace and displays the CodeWatch Workspace wizard (see page 35). If a workspace is currently open, and the contents of that workspace have changed since the last save, you will be prompted to save or discard that workspace before the wizard is displayed. The Workspace wizard is displayed even if it has been disabled at startup.
Workspace | Open
Ctrl+Shift+O Opens a previously saved workspace. If a workspace is currently open, and the contents of that workspace have changed since the last save, you will be prompted to save or discard that workspace before the new workspace is opened. The Open a Workspace File dialog box is displayed to allow you to choose the saved workspace, which is stored as a .cwf file.
Workspace | Close
Ctrl+Shift+F4 Closes the current workspace without creating or opening a new workspace. If the current workspace contains unsaved changes, you are asked if you want to save or discard the current workspace. If a program is running, it is automatically terminated when the workspace is closed. The Close Workspace button appears at the right end of the Workspace window title bar.
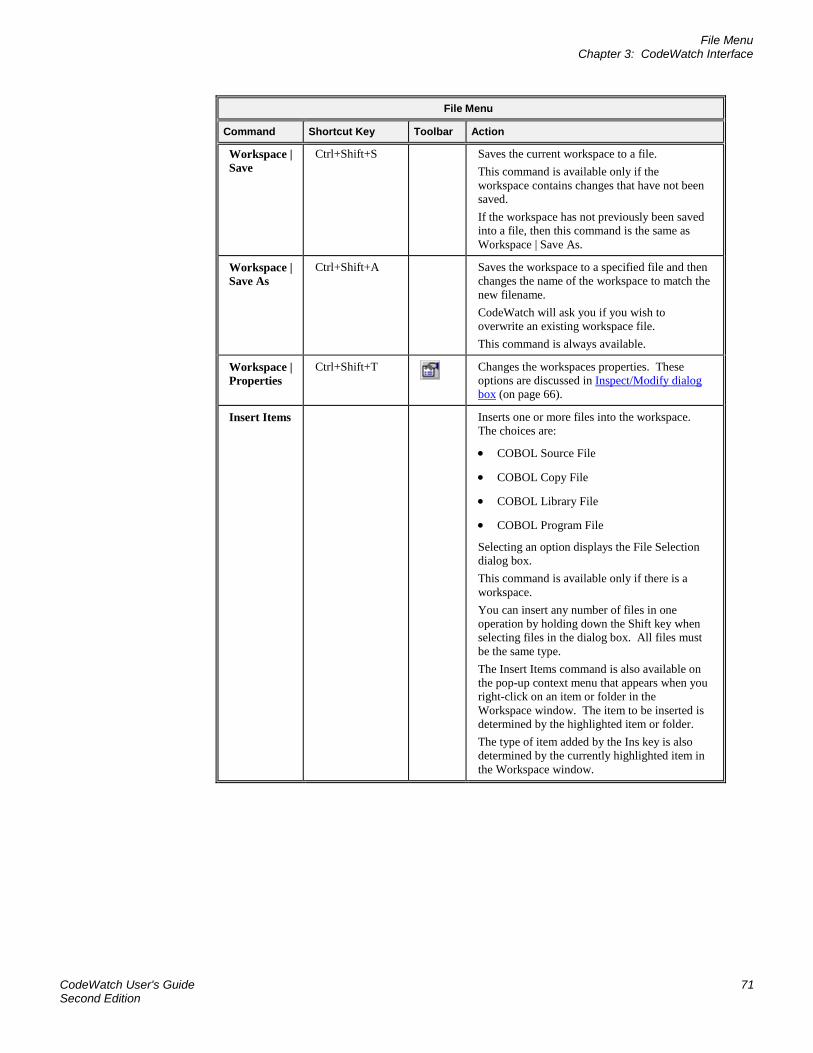
File Menu Chapter 3: CodeWatch Interface
CodeWatch User's Guide 71 Second Edition
File Menu
Command Shortcut Key Toolbar Action
Workspace | Save
Ctrl+Shift+S Saves the current workspace to a file. This command is available only if the workspace contains changes that have not been saved. If the workspace has not previously been saved into a file, then this command is the same as Workspace | Save As.
Workspace | Save As
Ctrl+Shift+A Saves the workspace to a specified file and then changes the name of the workspace to match the new filename. CodeWatch will ask you if you wish to overwrite an existing workspace file. This command is always available.
Workspace | Properties
Ctrl+Shift+T
Changes the workspaces properties. These options are discussed in Inspect/Modify dialog box (on page 66).
Insert Items Inserts one or more files into the workspace. The choices are:
• COBOL Source File
• COBOL Copy File
• COBOL Library File
• COBOL Program File
Selecting an option displays the File Selection dialog box. This command is available only if there is a workspace. You can insert any number of files in one operation by holding down the Shift key when selecting files in the dialog box. All files must be the same type. The Insert Items command is also available on the pop-up context menu that appears when you right-click on an item or folder in the Workspace window. The item to be inserted is determined by the highlighted item or folder. The type of item added by the Ins key is also determined by the currently highlighted item in the Workspace window.
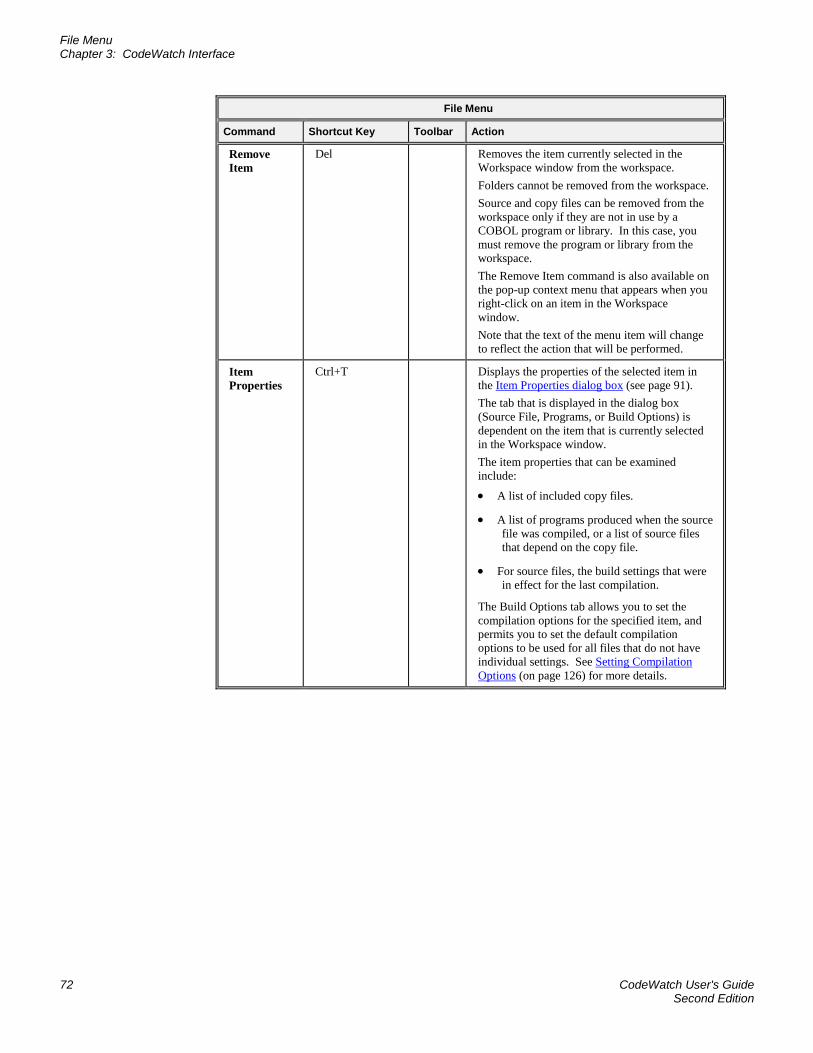
File Menu Chapter 3: CodeWatch Interface
72 CodeWatch User's Guide Second Edition
File Menu
Command Shortcut Key Toolbar Action
Remove Item
Del Removes the item currently selected in the Workspace window from the workspace. Folders cannot be removed from the workspace. Source and copy files can be removed from the workspace only if they are not in use by a COBOL program or library. In this case, you must remove the program or library from the workspace. The Remove Item command is also available on the pop-up context menu that appears when you right-click on an item in the Workspace window. Note that the text of the menu item will change to reflect the action that will be performed.
Item Properties
Ctrl+T Displays the properties of the selected item in the Item Properties dialog box (see page 91). The tab that is displayed in the dialog box (Source File, Programs, or Build Options) is dependent on the item that is currently selected in the Workspace window. The item properties that can be examined include:
• A list of included copy files.
• A list of programs produced when the source file was compiled, or a list of source files that depend on the copy file.
• For source files, the build settings that were in effect for the last compilation.
The Build Options tab allows you to set the compilation options for the specified item, and permits you to set the default compilation options to be used for all files that do not have individual settings. See Setting Compilation Options (on page 126) for more details.
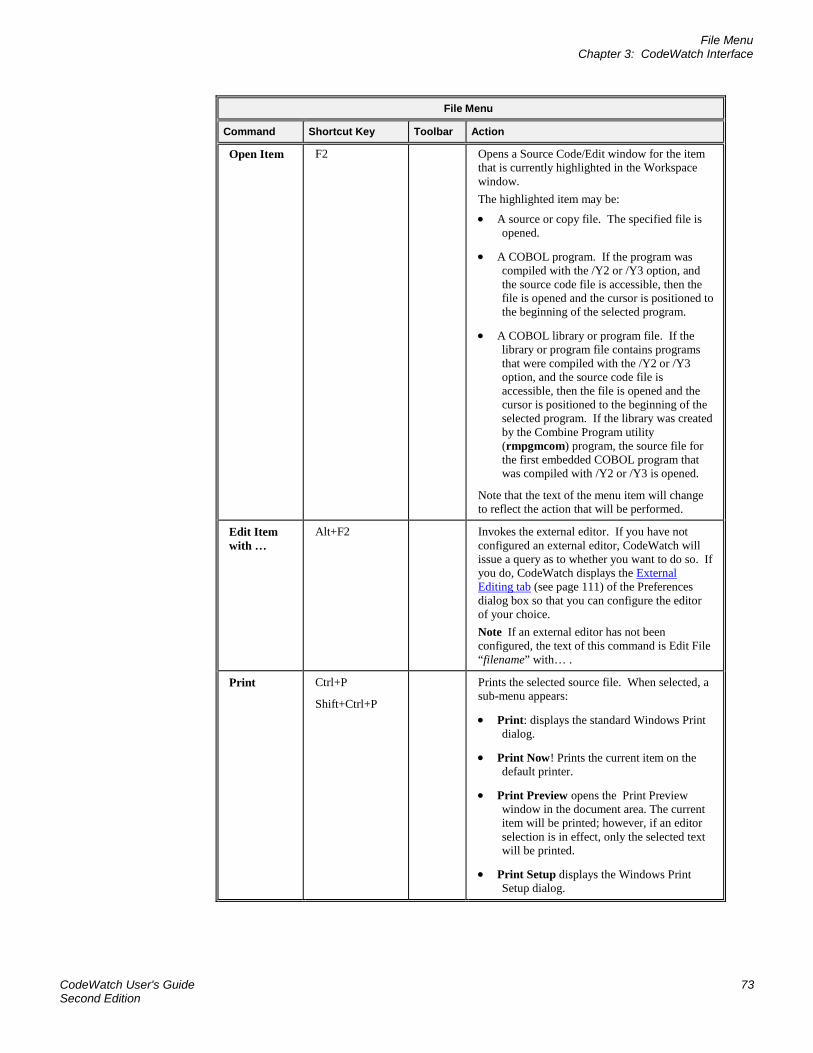
File Menu Chapter 3: CodeWatch Interface
CodeWatch User's Guide 73 Second Edition
File Menu
Command Shortcut Key Toolbar Action
Open Item F2 Opens a Source Code/Edit window for the item that is currently highlighted in the Workspace window. The highlighted item may be:
• A source or copy file. The specified file is opened.
• A COBOL program. If the program was compiled with the /Y2 or /Y3 option, and the source code file is accessible, then the file is opened and the cursor is positioned to the beginning of the selected program.
• A COBOL library or program file. If the library or program file contains programs that were compiled with the /Y2 or /Y3 option, and the source code file is accessible, then the file is opened and the cursor is positioned to the beginning of the selected program. If the library was created by the Combine Program utility (rmpgmcom) program, the source file for the first embedded COBOL program that was compiled with /Y2 or /Y3 is opened.
Note that the text of the menu item will change to reflect the action that will be performed.
Edit Item with …
Alt+F2 Invokes the external editor. If you have not configured an external editor, CodeWatch will issue a query as to whether you want to do so. If you do, CodeWatch displays the External Editing tab (see page 111) of the Preferences dialog box so that you can configure the editor of your choice. Note If an external editor has not been configured, the text of this command is Edit File “filename” with… .
Print Ctrl+P
Shift+Ctrl+P
Prints the selected source file. When selected, a sub-menu appears:
• Print: displays the standard Windows Print dialog.
• Print Now! Prints the current item on the default printer.
• Print Preview opens the Print Preview window in the document area. The current item will be printed; however, if an editor selection is in effect, only the selected text will be printed.
• Print Setup displays the Windows Print Setup dialog.
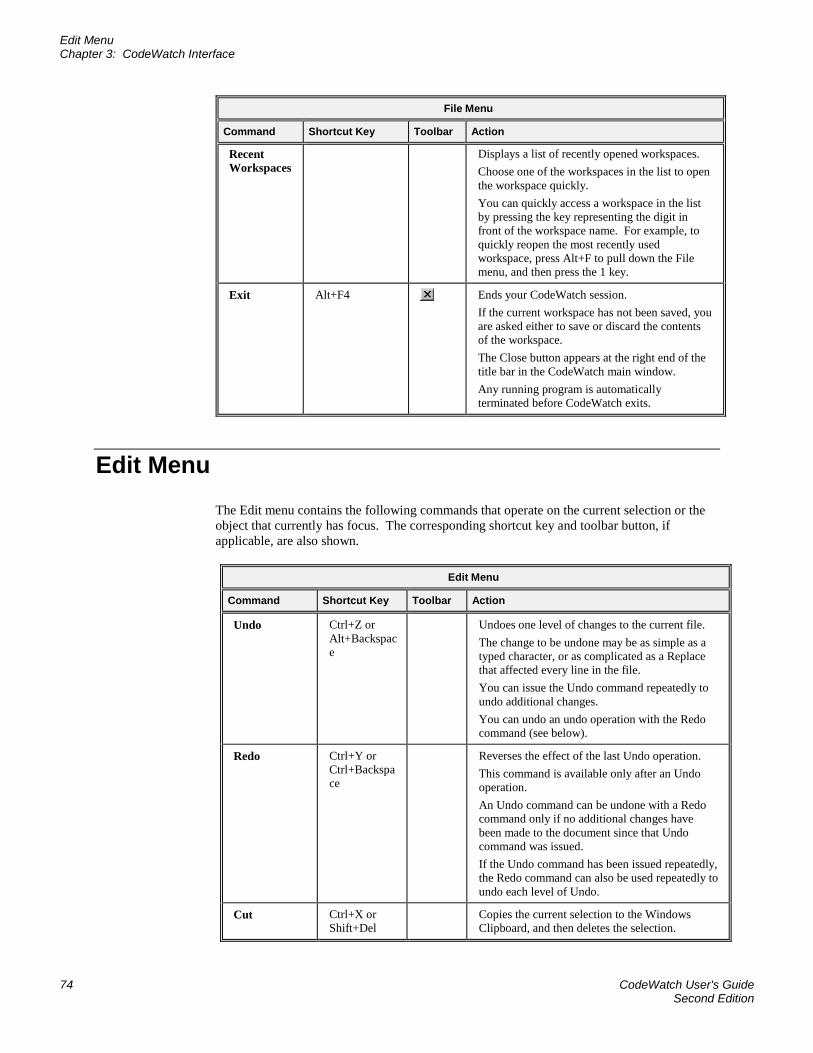
Edit Menu Chapter 3: CodeWatch Interface
74 CodeWatch User's Guide Second Edition
File Menu
Command Shortcut Key Toolbar Action
Recent Workspaces
Displays a list of recently opened workspaces. Choose one of the workspaces in the list to open the workspace quickly. You can quickly access a workspace in the list by pressing the key representing the digit in front of the workspace name. For example, to quickly reopen the most recently used workspace, press Alt+F to pull down the File menu, and then press the 1 key.
Exit Alt+F4 Ends your CodeWatch session. If the current workspace has not been saved, you are asked either to save or discard the contents of the workspace. The Close button appears at the right end of the title bar in the CodeWatch main window. Any running program is automatically terminated before CodeWatch exits.
Edit Menu The Edit menu contains the following commands that operate on the current selection or the object that currently has focus. The corresponding shortcut key and toolbar button, if applicable, are also shown.
Edit Menu
Command Shortcut Key Toolbar Action
Undo Ctrl+Z or Alt+Backspace
Undoes one level of changes to the current file. The change to be undone may be as simple as a typed character, or as complicated as a Replace that affected every line in the file. You can issue the Undo command repeatedly to undo additional changes. You can undo an undo operation with the Redo command (see below).
Redo Ctrl+Y or Ctrl+Backspace
Reverses the effect of the last Undo operation. This command is available only after an Undo operation. An Undo command can be undone with a Redo command only if no additional changes have been made to the document since that Undo command was issued. If the Undo command has been issued repeatedly, the Redo command can also be used repeatedly to undo each level of Undo.
Cut Ctrl+X or Shift+Del
Copies the current selection to the Windows Clipboard, and then deletes the selection.
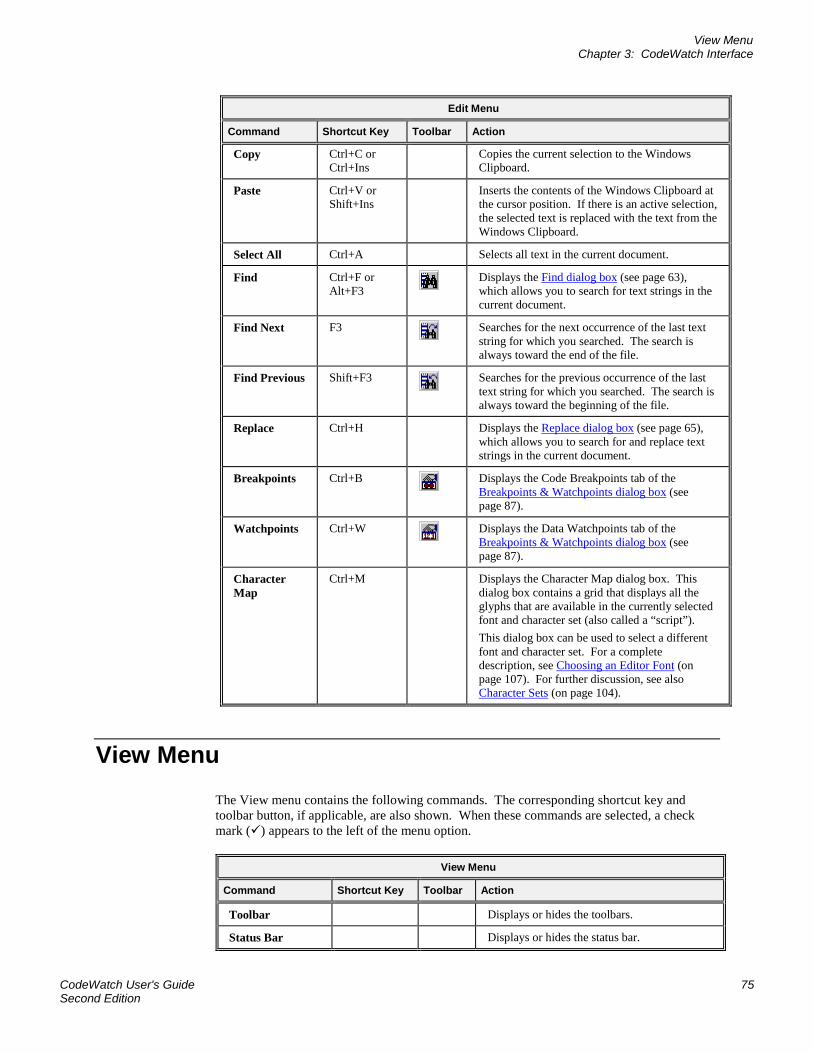
View Menu Chapter 3: CodeWatch Interface
CodeWatch User's Guide 75 Second Edition
Edit Menu
Command Shortcut Key Toolbar Action
Copy Ctrl+C or Ctrl+Ins
Copies the current selection to the Windows Clipboard.
Paste Ctrl+V or Shift+Ins
Inserts the contents of the Windows Clipboard at the cursor position. If there is an active selection, the selected text is replaced with the text from the Windows Clipboard.
Select All Ctrl+A Selects all text in the current document.
Find Ctrl+F or Alt+F3
Displays the Find dialog box (see page 63), which allows you to search for text strings in the current document.
Find Next F3
Searches for the next occurrence of the last text string for which you searched. The search is always toward the end of the file.
Find Previous Shift+F3
Searches for the previous occurrence of the last text string for which you searched. The search is always toward the beginning of the file.
Replace Ctrl+H Displays the Replace dialog box (see page 65), which allows you to search for and replace text strings in the current document.
Breakpoints Ctrl+B
Displays the Code Breakpoints tab of the Breakpoints & Watchpoints dialog box (see page 87).
Watchpoints Ctrl+W
Displays the Data Watchpoints tab of the Breakpoints & Watchpoints dialog box (see page 87).
Character Map
Ctrl+M Displays the Character Map dialog box. This dialog box contains a grid that displays all the glyphs that are available in the currently selected font and character set (also called a “script”). This dialog box can be used to select a different font and character set. For a complete description, see Choosing an Editor Font (on page 107). For further discussion, see also Character Sets (on page 104).
View Menu The View menu contains the following commands. The corresponding shortcut key and toolbar button, if applicable, are also shown. When these commands are selected, a check mark () appears to the left of the menu option.
View Menu
Command Shortcut Key Toolbar Action
Toolbar Displays or hides the toolbars.
Status Bar Displays or hides the status bar.
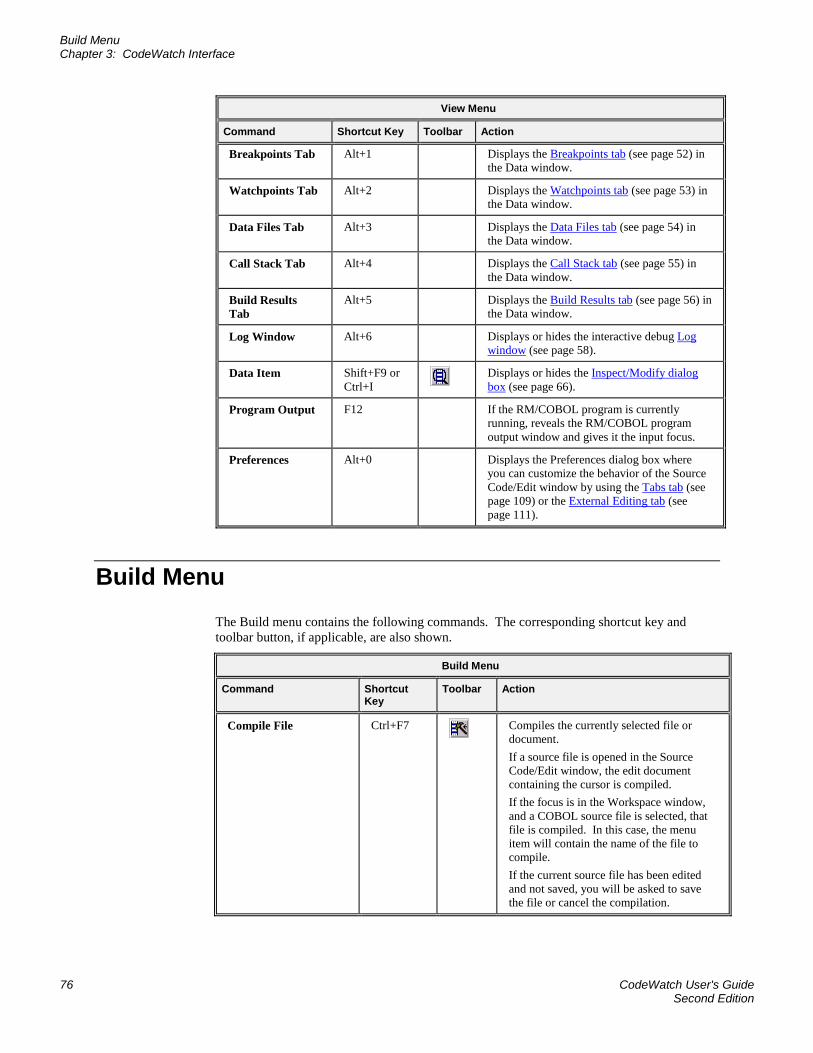
Build Menu Chapter 3: CodeWatch Interface
76 CodeWatch User's Guide Second Edition
View Menu
Command Shortcut Key Toolbar Action
Breakpoints Tab Alt+1 Displays the Breakpoints tab (see page 52) in the Data window.
Watchpoints Tab Alt+2 Displays the Watchpoints tab (see page 53) in the Data window.
Data Files Tab Alt+3 Displays the Data Files tab (see page 54) in the Data window.
Call Stack Tab Alt+4 Displays the Call Stack tab (see page 55) in the Data window.
Build Results Tab
Alt+5 Displays the Build Results tab (see page 56) in the Data window.
Log Window Alt+6 Displays or hides the interactive debug Log window (see page 58).
Data Item Shift+F9 or Ctrl+I
Displays or hides the Inspect/Modify dialog box (see page 66).
Program Output F12 If the RM/COBOL program is currently running, reveals the RM/COBOL program output window and gives it the input focus.
Preferences Alt+0 Displays the Preferences dialog box where you can customize the behavior of the Source Code/Edit window by using the Tabs tab (see page 109) or the External Editing tab (see page 111).
Build Menu The Build menu contains the following commands. The corresponding shortcut key and toolbar button, if applicable, are also shown.
Build Menu
Command Shortcut Key
Toolbar Action
Compile File Ctrl+F7
Compiles the currently selected file or document. If a source file is opened in the Source Code/Edit window, the edit document containing the cursor is compiled. If the focus is in the Workspace window, and a COBOL source file is selected, that file is compiled. In this case, the menu item will contain the name of the file to compile. If the current source file has been edited and not saved, you will be asked to save the file or cancel the compilation.

Run Menu Chapter 3: CodeWatch Interface
CodeWatch User's Guide 77 Second Edition
Build Menu
Command Shortcut Key
Toolbar Action
Compile Changes F7
Compiles all files in the workspace that are marked as requiring recompilation. If a file to be compiled is open in a Source Code/Edit window, has been edited, and has not been saved, you will be asked to save the file or cancel the compilation. The following events will cause a file to be marked as needing recompilation:
• If the file has been edited.
• If a copy file used by the source file has been edited.
• If the program file associated with the source file cannot be located, or if the timestamp of the source file is more recent than the timestamp of the program file.
• If a compilation option has been changed either at the file or at the workspace level and compiling the file with the current options would affect the program.
Compile All Ctrl+Shift+F7
Compiles all source files in the workspace.
Options Alt+F7
Displays the Build Options property tab (see page 93) of the Item Properties dialog box for the currently selected source file. The options on this tab allows you to set compilation options for the current file, or for the entire workspace.
Results | Find Next Results | Find Previous
F4 Shift+F4
Displays a submenu where you can choose to move the cursor to the next or previous error or warning in the current file.
Run Menu The Run menu contains the following commands. The corresponding shortcut key and toolbar button, if applicable, are also shown.
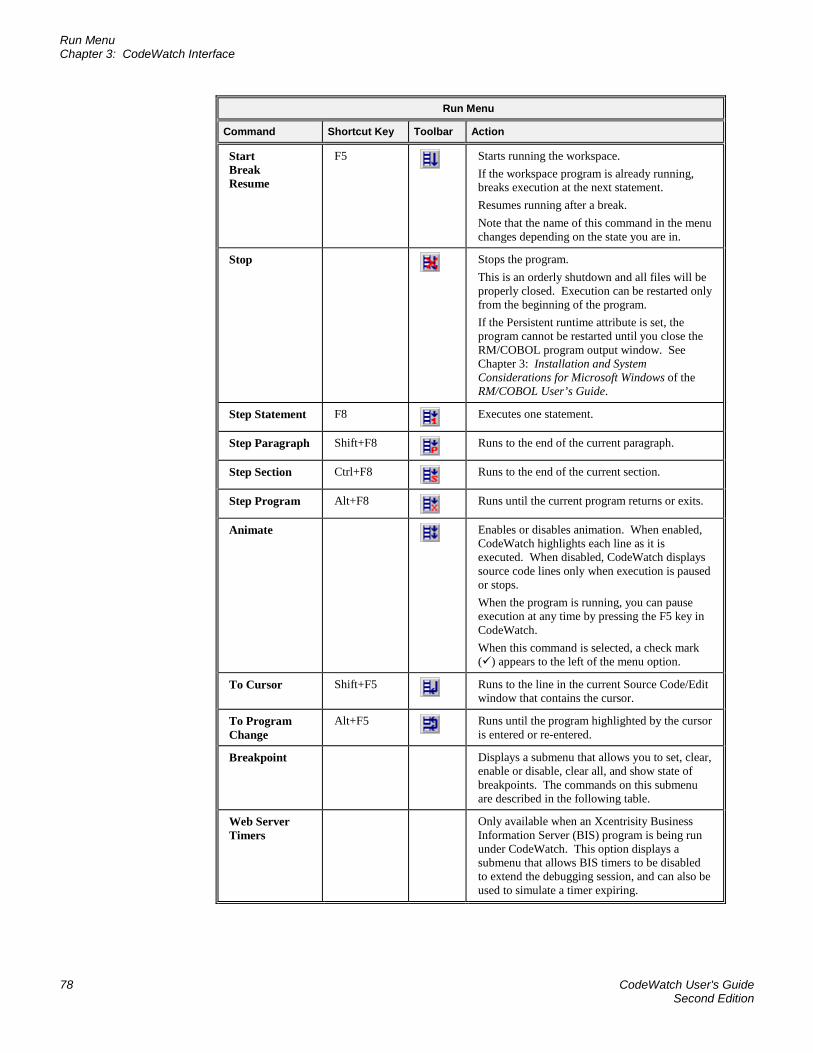
Run Menu Chapter 3: CodeWatch Interface
78 CodeWatch User's Guide Second Edition
Run Menu
Command Shortcut Key Toolbar Action
Start Break Resume
F5
Starts running the workspace. If the workspace program is already running, breaks execution at the next statement. Resumes running after a break. Note that the name of this command in the menu changes depending on the state you are in.
Stop
Stops the program. This is an orderly shutdown and all files will be properly closed. Execution can be restarted only from the beginning of the program. If the Persistent runtime attribute is set, the program cannot be restarted until you close the RM/COBOL program output window. See Chapter 3: Installation and System Considerations for Microsoft Windows of the RM/COBOL User’s Guide.
Step Statement F8
Executes one statement.
Step Paragraph Shift+F8
Runs to the end of the current paragraph.
Step Section Ctrl+F8
Runs to the end of the current section.
Step Program Alt+F8
Runs until the current program returns or exits.
Animate
Enables or disables animation. When enabled, CodeWatch highlights each line as it is executed. When disabled, CodeWatch displays source code lines only when execution is paused or stops. When the program is running, you can pause execution at any time by pressing the F5 key in CodeWatch. When this command is selected, a check mark () appears to the left of the menu option.
To Cursor Shift+F5
Runs to the line in the current Source Code/Edit window that contains the cursor.
To Program Change
Alt+F5
Runs until the program highlighted by the cursor is entered or re-entered.
Breakpoint Displays a submenu that allows you to set, clear, enable or disable, clear all, and show state of breakpoints. The commands on this submenu are described in the following table.
Web Server Timers
Only available when an Xcentrisity Business Information Server (BIS) program is being run under CodeWatch. This option displays a submenu that allows BIS timers to be disabled to extend the debugging session, and can also be used to simulate a timer expiring.
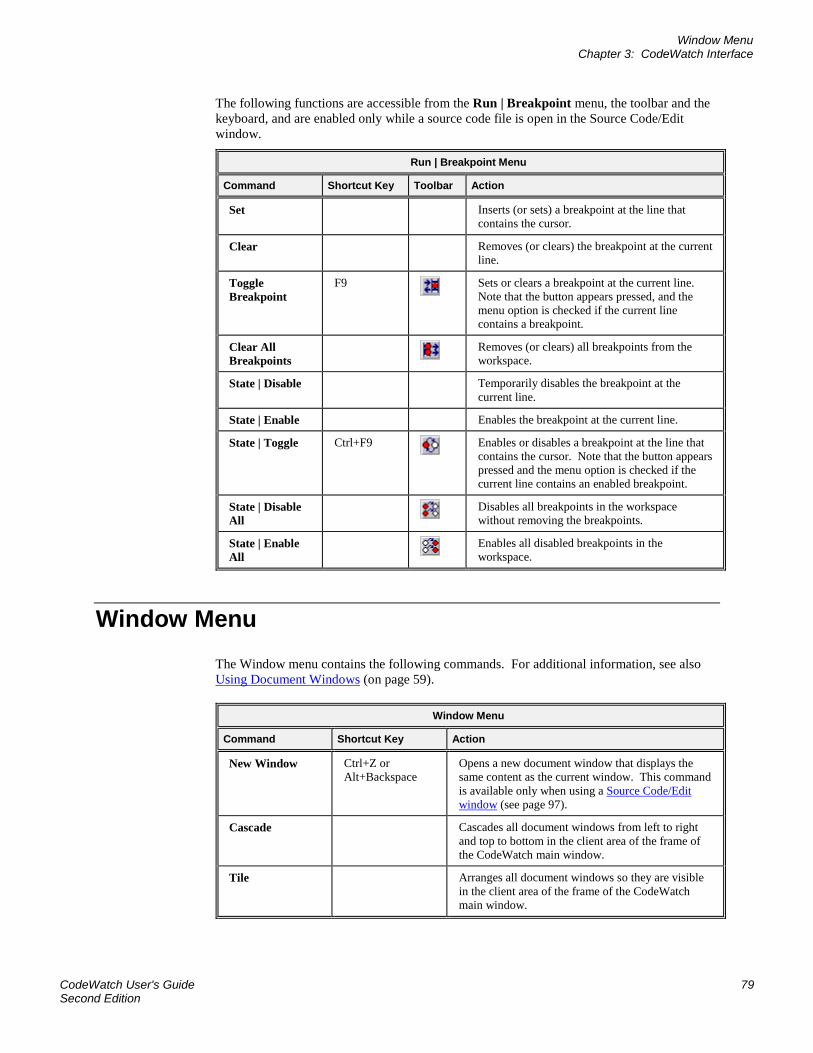
Window Menu Chapter 3: CodeWatch Interface
CodeWatch User's Guide 79 Second Edition
The following functions are accessible from the Run | Breakpoint menu, the toolbar and the keyboard, and are enabled only while a source code file is open in the Source Code/Edit window.
Run | Breakpoint Menu
Command Shortcut Key Toolbar Action
Set Inserts (or sets) a breakpoint at the line that contains the cursor.
Clear Removes (or clears) the breakpoint at the current line.
Toggle Breakpoint
F9
Sets or clears a breakpoint at the current line. Note that the button appears pressed, and the menu option is checked if the current line contains a breakpoint.
Clear All Breakpoints
Removes (or clears) all breakpoints from the workspace.
State | Disable Temporarily disables the breakpoint at the current line.
State | Enable Enables the breakpoint at the current line.
State | Toggle Ctrl+F9
Enables or disables a breakpoint at the line that contains the cursor. Note that the button appears pressed and the menu option is checked if the current line contains an enabled breakpoint.
State | Disable All
Disables all breakpoints in the workspace without removing the breakpoints.
State | Enable All
Enables all disabled breakpoints in the workspace.
Window Menu The Window menu contains the following commands. For additional information, see also Using Document Windows (on page 59).
Window Menu
Command Shortcut Key Action
New Window Ctrl+Z or Alt+Backspace
Opens a new document window that displays the same content as the current window. This command is available only when using a Source Code/Edit window (see page 97).
Cascade Cascades all document windows from left to right and top to bottom in the client area of the frame of the CodeWatch main window.
Tile Arranges all document windows so they are visible in the client area of the frame of the CodeWatch main window.
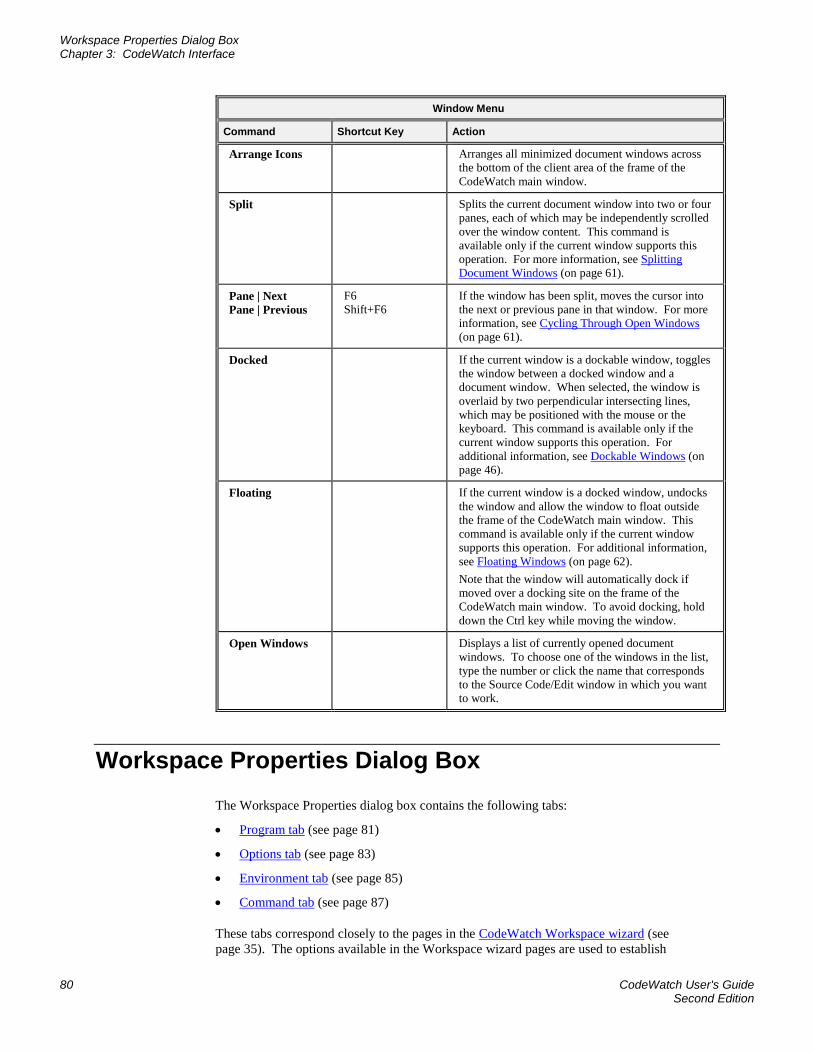
Workspace Properties Dialog Box Chapter 3: CodeWatch Interface
80 CodeWatch User's Guide Second Edition
Window Menu
Command Shortcut Key Action
Arrange Icons Arranges all minimized document windows across the bottom of the client area of the frame of the CodeWatch main window.
Split Splits the current document window into two or four panes, each of which may be independently scrolled over the window content. This command is available only if the current window supports this operation. For more information, see Splitting Document Windows (on page 61).
Pane | Next Pane | Previous
F6 Shift+F6
If the window has been split, moves the cursor into the next or previous pane in that window. For more information, see Cycling Through Open Windows (on page 61).
Docked If the current window is a dockable window, toggles the window between a docked window and a document window. When selected, the window is overlaid by two perpendicular intersecting lines, which may be positioned with the mouse or the keyboard. This command is available only if the current window supports this operation. For additional information, see Dockable Windows (on page 46).
Floating If the current window is a docked window, undocks the window and allow the window to float outside the frame of the CodeWatch main window. This command is available only if the current window supports this operation. For additional information, see Floating Windows (on page 62). Note that the window will automatically dock if moved over a docking site on the frame of the CodeWatch main window. To avoid docking, hold down the Ctrl key while moving the window.
Open Windows Displays a list of currently opened document windows. To choose one of the windows in the list, type the number or click the name that corresponds to the Source Code/Edit window in which you want to work.
Workspace Properties Dialog Box The Workspace Properties dialog box contains the following tabs:
• Program tab (see page 81)
• Options tab (see page 83)
• Environment tab (see page 85)
• Command tab (see page 87)
These tabs correspond closely to the pages in the CodeWatch Workspace wizard (see page 35). The options available in the Workspace wizard pages are used to establish

Workspace Properties Dialog Box Chapter 3: CodeWatch Interface
CodeWatch User's Guide 81 Second Edition
properties when a workspace is being created, whereas the options available on the tabs in the Workspace Properties dialog box allow you to change the properties of an existing workspace. Each tab of the Workspace Properties dialog box is described in detail in the following sections.
To open the Workspace Properties dialog box, do one of the following:
• From the File menu, choose Workspace | Properties.
• Click the Properties toolbar button.
• Press Ctrl+Shift+T.
Several buttons appear along the bottom of the Workspace Properties dialog box no matter which tab is selected and displayed. They perform the same function or action on all the tabs of the dialog box and are described below.
Workspace Properties Dialog Box
Use this button To
OK Save changes and close the dialog box.
Cancel Cancel the dialog box.
Apply Apply changes without closing the dialog box. Changes made with the Apply button cannot be canceled by clicking the Cancel button.
Help Display help for this tab of the dialog box.
Program Tab The Program tab of the Workspace Properties dialog box, illustrated below, allows you to specify the name of the main program to run, modify a character set for the workspace, and to define the execution environment for that program.
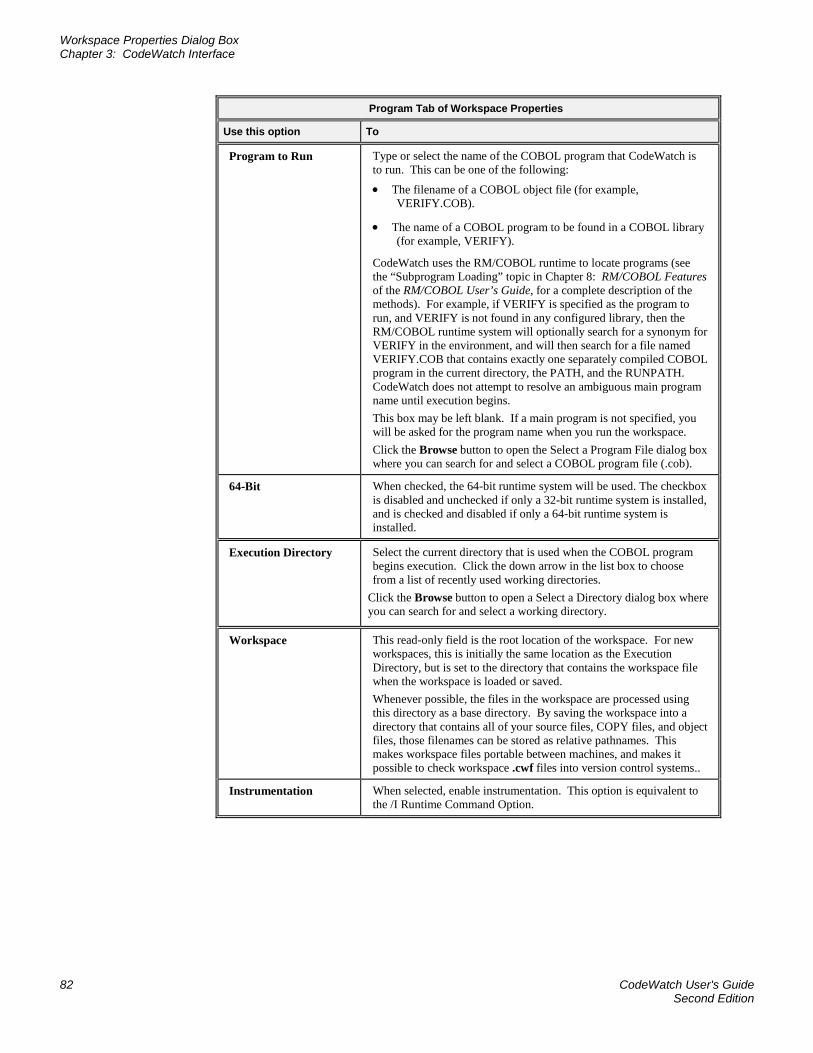
Workspace Properties Dialog Box Chapter 3: CodeWatch Interface
82 CodeWatch User's Guide Second Edition
Program Tab of Workspace Properties
Use this option To
Program to Run Type or select the name of the COBOL program that CodeWatch is to run. This can be one of the following:
• The filename of a COBOL object file (for example, VERIFY.COB).
• The name of a COBOL program to be found in a COBOL library (for example, VERIFY).
CodeWatch uses the RM/COBOL runtime to locate programs (see the “Subprogram Loading” topic in Chapter 8: RM/COBOL Features of the RM/COBOL User’s Guide, for a complete description of the methods). For example, if VERIFY is specified as the program to run, and VERIFY is not found in any configured library, then the RM/COBOL runtime system will optionally search for a synonym for VERIFY in the environment, and will then search for a file named VERIFY.COB that contains exactly one separately compiled COBOL program in the current directory, the PATH, and the RUNPATH. CodeWatch does not attempt to resolve an ambiguous main program name until execution begins. This box may be left blank. If a main program is not specified, you will be asked for the program name when you run the workspace. Click the Browse button to open the Select a Program File dialog box where you can search for and select a COBOL program file (.cob).
64-Bit When checked, the 64-bit runtime system will be used. The checkbox is disabled and unchecked if only a 32-bit runtime system is installed, and is checked and disabled if only a 64-bit runtime system is installed.
Execution Directory Select the current directory that is used when the COBOL program begins execution. Click the down arrow in the list box to choose from a list of recently used working directories.
Click the Browse button to open a Select a Directory dialog box where you can search for and select a working directory.
Workspace This read-only field is the root location of the workspace. For new workspaces, this is initially the same location as the Execution Directory, but is set to the directory that contains the workspace file when the workspace is loaded or saved. Whenever possible, the files in the workspace are processed using this directory as a base directory. By saving the workspace into a directory that contains all of your source files, COPY files, and object files, those filenames can be stored as relative pathnames. This makes workspace files portable between machines, and makes it possible to check workspace .cwf files into version control systems..
Instrumentation When selected, enable instrumentation. This option is equivalent to the /I Runtime Command Option.
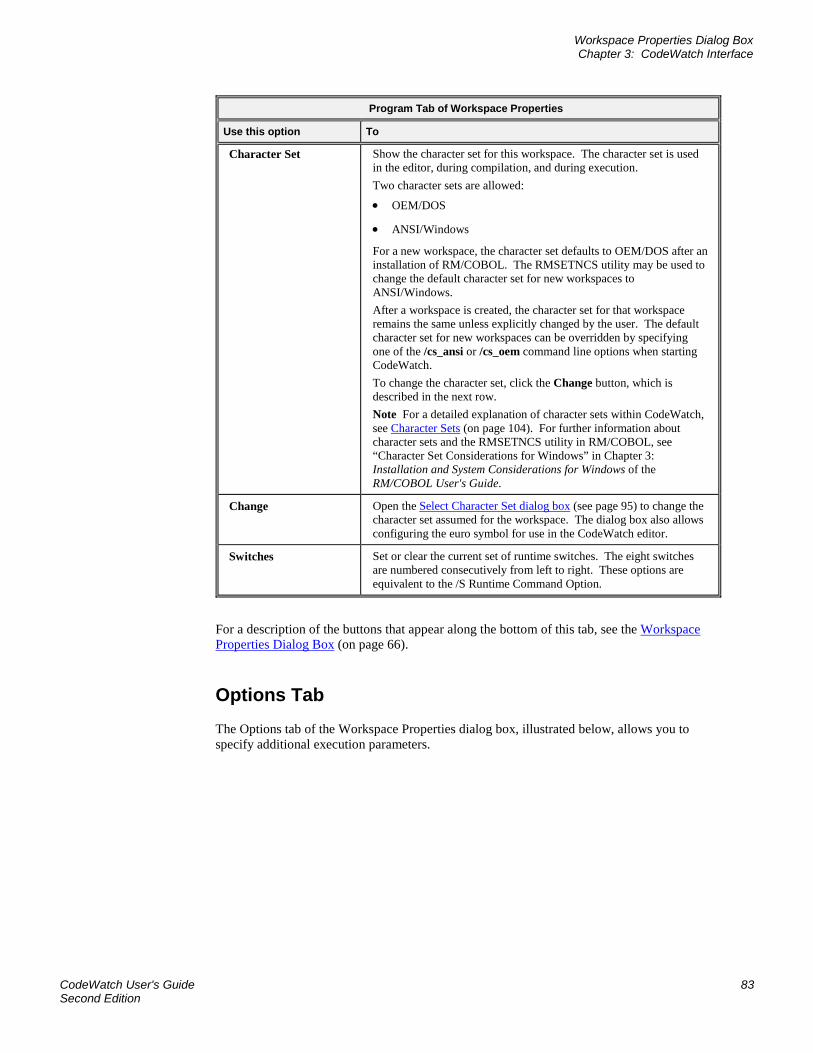
Workspace Properties Dialog Box Chapter 3: CodeWatch Interface
CodeWatch User's Guide 83 Second Edition
Program Tab of Workspace Properties
Use this option To
Character Set Show the character set for this workspace. The character set is used in the editor, during compilation, and during execution. Two character sets are allowed:
• OEM/DOS
• ANSI/Windows
For a new workspace, the character set defaults to OEM/DOS after an installation of RM/COBOL. The RMSETNCS utility may be used to change the default character set for new workspaces to ANSI/Windows. After a workspace is created, the character set for that workspace remains the same unless explicitly changed by the user. The default character set for new workspaces can be overridden by specifying one of the /cs_ansi or /cs_oem command line options when starting CodeWatch. To change the character set, click the Change button, which is described in the next row. Note For a detailed explanation of character sets within CodeWatch, see Character Sets (on page 104). For further information about character sets and the RMSETNCS utility in RM/COBOL, see “Character Set Considerations for Windows” in Chapter 3: Installation and System Considerations for Windows of the RM/COBOL User's Guide.
Change Open the Select Character Set dialog box (see page 95) to change the character set assumed for the workspace. The dialog box also allows configuring the euro symbol for use in the CodeWatch editor.
Switches Set or clear the current set of runtime switches. The eight switches are numbered consecutively from left to right. These options are equivalent to the /S Runtime Command Option.
For a description of the buttons that appear along the bottom of this tab, see the Workspace Properties Dialog Box (on page 66).
Options Tab The Options tab of the Workspace Properties dialog box, illustrated below, allows you to specify additional execution parameters.
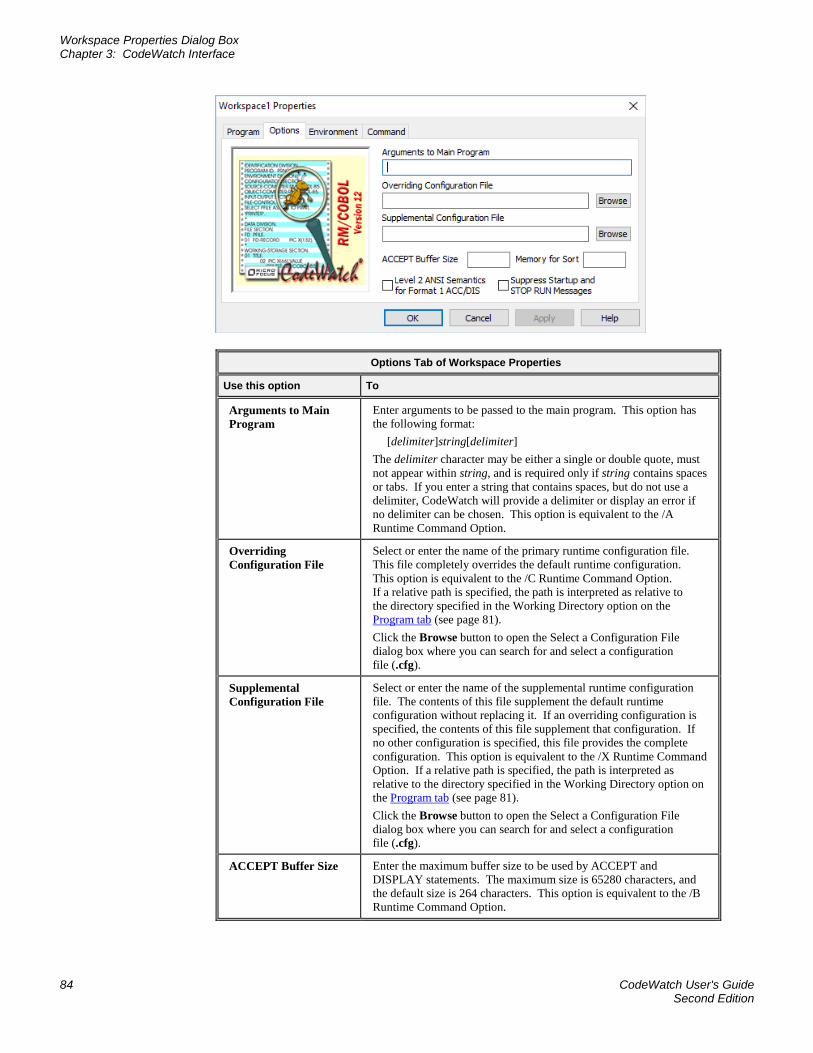
Workspace Properties Dialog Box Chapter 3: CodeWatch Interface
84 CodeWatch User's Guide Second Edition
Options Tab of Workspace Properties
Use this option To
Arguments to Main Program
Enter arguments to be passed to the main program. This option has the following format:
[delimiter]string[delimiter] The delimiter character may be either a single or double quote, must not appear within string, and is required only if string contains spaces or tabs. If you enter a string that contains spaces, but do not use a delimiter, CodeWatch will provide a delimiter or display an error if no delimiter can be chosen. This option is equivalent to the /A Runtime Command Option.
Overriding Configuration File
Select or enter the name of the primary runtime configuration file. This file completely overrides the default runtime configuration. This option is equivalent to the /C Runtime Command Option. If a relative path is specified, the path is interpreted as relative to the directory specified in the Working Directory option on the Program tab (see page 81). Click the Browse button to open the Select a Configuration File dialog box where you can search for and select a configuration file (.cfg).
Supplemental Configuration File
Select or enter the name of the supplemental runtime configuration file. The contents of this file supplement the default runtime configuration without replacing it. If an overriding configuration is specified, the contents of this file supplement that configuration. If no other configuration is specified, this file provides the complete configuration. This option is equivalent to the /X Runtime Command Option. If a relative path is specified, the path is interpreted as relative to the directory specified in the Working Directory option on the Program tab (see page 81). Click the Browse button to open the Select a Configuration File dialog box where you can search for and select a configuration file (.cfg).
ACCEPT Buffer Size Enter the maximum buffer size to be used by ACCEPT and DISPLAY statements. The maximum size is 65280 characters, and the default size is 264 characters. This option is equivalent to the /B Runtime Command Option.
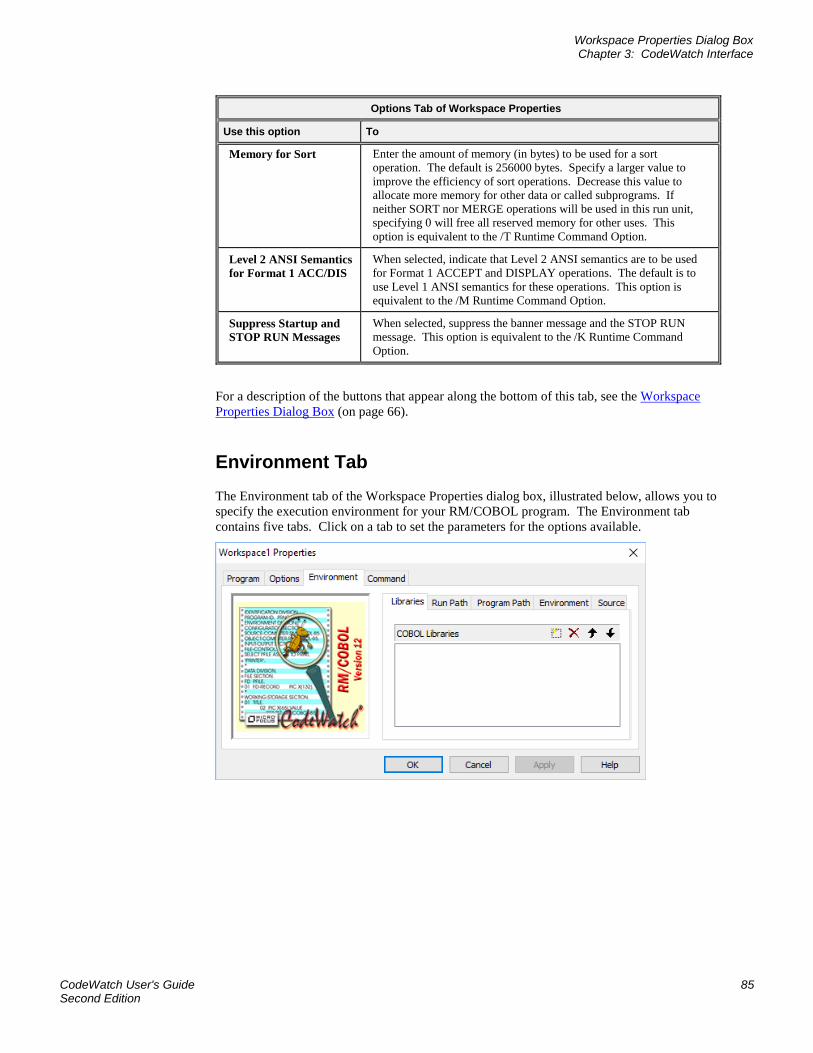
Workspace Properties Dialog Box Chapter 3: CodeWatch Interface
CodeWatch User's Guide 85 Second Edition
Options Tab of Workspace Properties
Use this option To
Memory for Sort Enter the amount of memory (in bytes) to be used for a sort operation. The default is 256000 bytes. Specify a larger value to improve the efficiency of sort operations. Decrease this value to allocate more memory for other data or called subprograms. If neither SORT nor MERGE operations will be used in this run unit, specifying 0 will free all reserved memory for other uses. This option is equivalent to the /T Runtime Command Option.
Level 2 ANSI Semantics for Format 1 ACC/DIS
When selected, indicate that Level 2 ANSI semantics are to be used for Format 1 ACCEPT and DISPLAY operations. The default is to use Level 1 ANSI semantics for these operations. This option is equivalent to the /M Runtime Command Option.
Suppress Startup and STOP RUN Messages
When selected, suppress the banner message and the STOP RUN message. This option is equivalent to the /K Runtime Command Option.
For a description of the buttons that appear along the bottom of this tab, see the Workspace Properties Dialog Box (on page 66).
Environment Tab The Environment tab of the Workspace Properties dialog box, illustrated below, allows you to specify the execution environment for your RM/COBOL program. The Environment tab contains five tabs. Click on a tab to set the parameters for the options available.
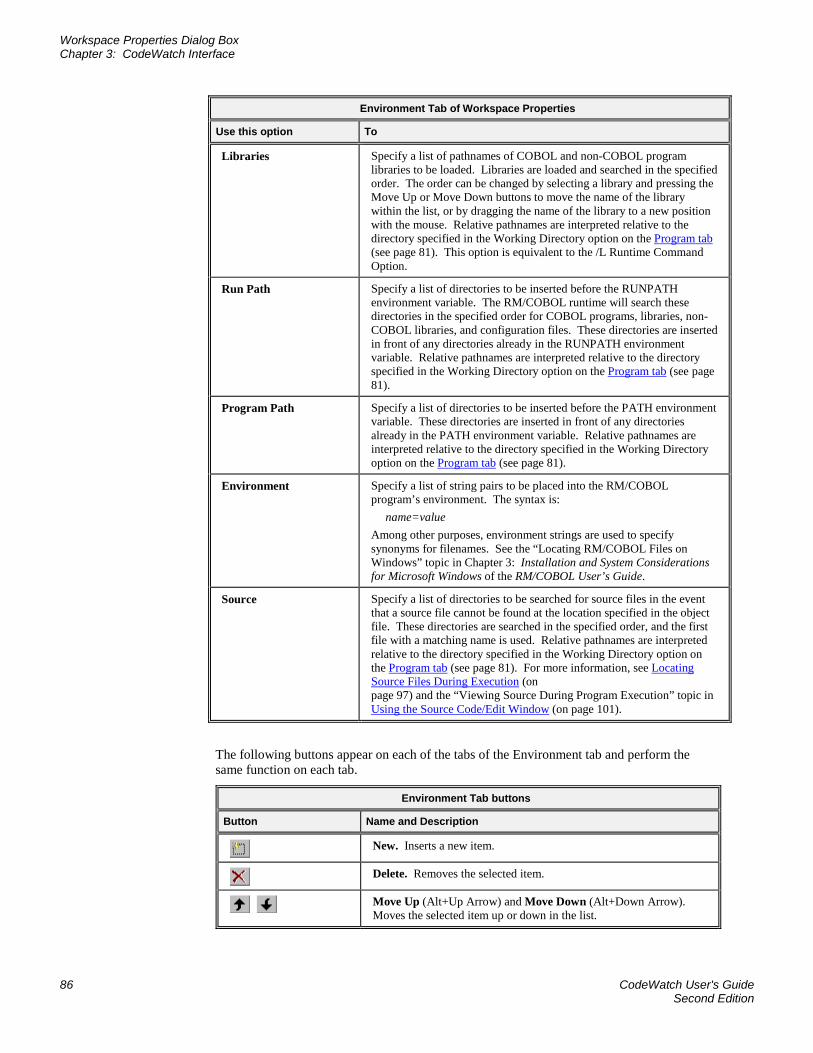
Workspace Properties Dialog Box Chapter 3: CodeWatch Interface
86 CodeWatch User's Guide Second Edition
Environment Tab of Workspace Properties
Use this option To
Libraries Specify a list of pathnames of COBOL and non-COBOL program libraries to be loaded. Libraries are loaded and searched in the specified order. The order can be changed by selecting a library and pressing the Move Up or Move Down buttons to move the name of the library within the list, or by dragging the name of the library to a new position with the mouse. Relative pathnames are interpreted relative to the directory specified in the Working Directory option on the Program tab (see page 81). This option is equivalent to the /L Runtime Command Option.
Run Path Specify a list of directories to be inserted before the RUNPATH environment variable. The RM/COBOL runtime will search these directories in the specified order for COBOL programs, libraries, non-COBOL libraries, and configuration files. These directories are inserted in front of any directories already in the RUNPATH environment variable. Relative pathnames are interpreted relative to the directory specified in the Working Directory option on the Program tab (see page 81).
Program Path Specify a list of directories to be inserted before the PATH environment variable. These directories are inserted in front of any directories already in the PATH environment variable. Relative pathnames are interpreted relative to the directory specified in the Working Directory option on the Program tab (see page 81).
Environment Specify a list of string pairs to be placed into the RM/COBOL program’s environment. The syntax is:
name=value Among other purposes, environment strings are used to specify synonyms for filenames. See the “Locating RM/COBOL Files on Windows” topic in Chapter 3: Installation and System Considerations for Microsoft Windows of the RM/COBOL User’s Guide.
Source Specify a list of directories to be searched for source files in the event that a source file cannot be found at the location specified in the object file. These directories are searched in the specified order, and the first file with a matching name is used. Relative pathnames are interpreted relative to the directory specified in the Working Directory option on the Program tab (see page 81). For more information, see Locating Source Files During Execution (on page 97) and the “Viewing Source During Program Execution” topic in Using the Source Code/Edit Window (on page 101).
The following buttons appear on each of the tabs of the Environment tab and perform the same function on each tab.
Environment Tab buttons
Button Name and Description
New. Inserts a new item.
Delete. Removes the selected item.
Move Up (Alt+Up Arrow) and Move Down (Alt+Down Arrow). Moves the selected item up or down in the list.
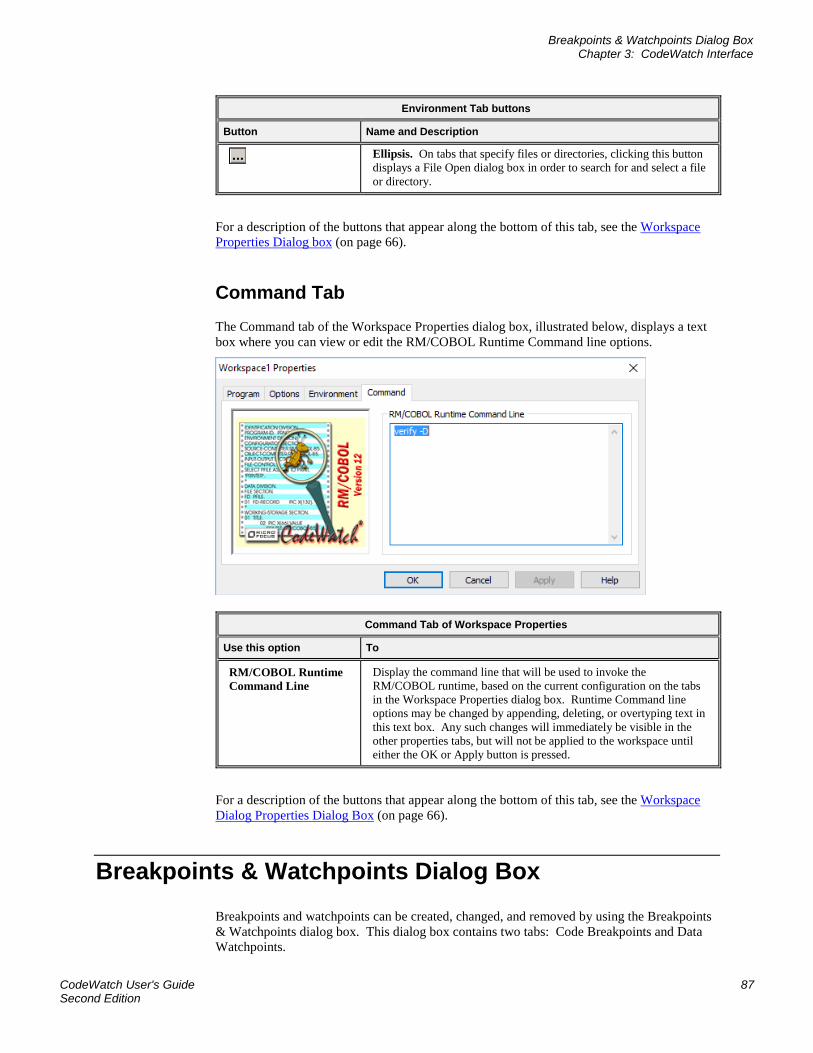
Breakpoints & Watchpoints Dialog Box Chapter 3: CodeWatch Interface
CodeWatch User's Guide 87 Second Edition
Environment Tab buttons
Button Name and Description
Ellipsis. On tabs that specify files or directories, clicking this button displays a File Open dialog box in order to search for and select a file or directory.
For a description of the buttons that appear along the bottom of this tab, see the Workspace Properties Dialog box (on page 66).
Command Tab The Command tab of the Workspace Properties dialog box, illustrated below, displays a text box where you can view or edit the RM/COBOL Runtime Command line options.
Command Tab of Workspace Properties
Use this option To
RM/COBOL Runtime Command Line
Display the command line that will be used to invoke the RM/COBOL runtime, based on the current configuration on the tabs in the Workspace Properties dialog box. Runtime Command line options may be changed by appending, deleting, or overtyping text in this text box. Any such changes will immediately be visible in the other properties tabs, but will not be applied to the workspace until either the OK or Apply button is pressed.
For a description of the buttons that appear along the bottom of this tab, see the Workspace Dialog Properties Dialog Box (on page 66).
Breakpoints & Watchpoints Dialog Box Breakpoints and watchpoints can be created, changed, and removed by using the Breakpoints & Watchpoints dialog box. This dialog box contains two tabs: Code Breakpoints and Data Watchpoints.

Breakpoints & Watchpoints Dialog Box Chapter 3: CodeWatch Interface
88 CodeWatch User's Guide Second Edition
Code Breakpoints Tab The Code Breakpoints tab, illustrated below, allows you to create, remove, or change the properties of any or all breakpoints that are set in your workspace.
To display the Code Breakpoints tab, do one of the following:
• From the Edit menu, choose Breakpoints.
• Click the Edit Breakpoints toolbar button.
• Press Ctrl+B.
• From the Breakpoints tab (see page 52) of the Data window, right-click a program name and select Properties from the pop-up context menu or press Alt+Enter.
Code Breakpoints Tab
Use this option To
Program Select or enter the name of the program that contains the breakpoint.
Line Specify the number of the line that will cause a break to occur when executed.
Stmt Specify the statement number within the line. Leave this blank to indicate that the break will occur when the first (or only) statement on the line is executed. Or, specify an offset: +1 indicates the second statement on the line, and +2 indicates the third.
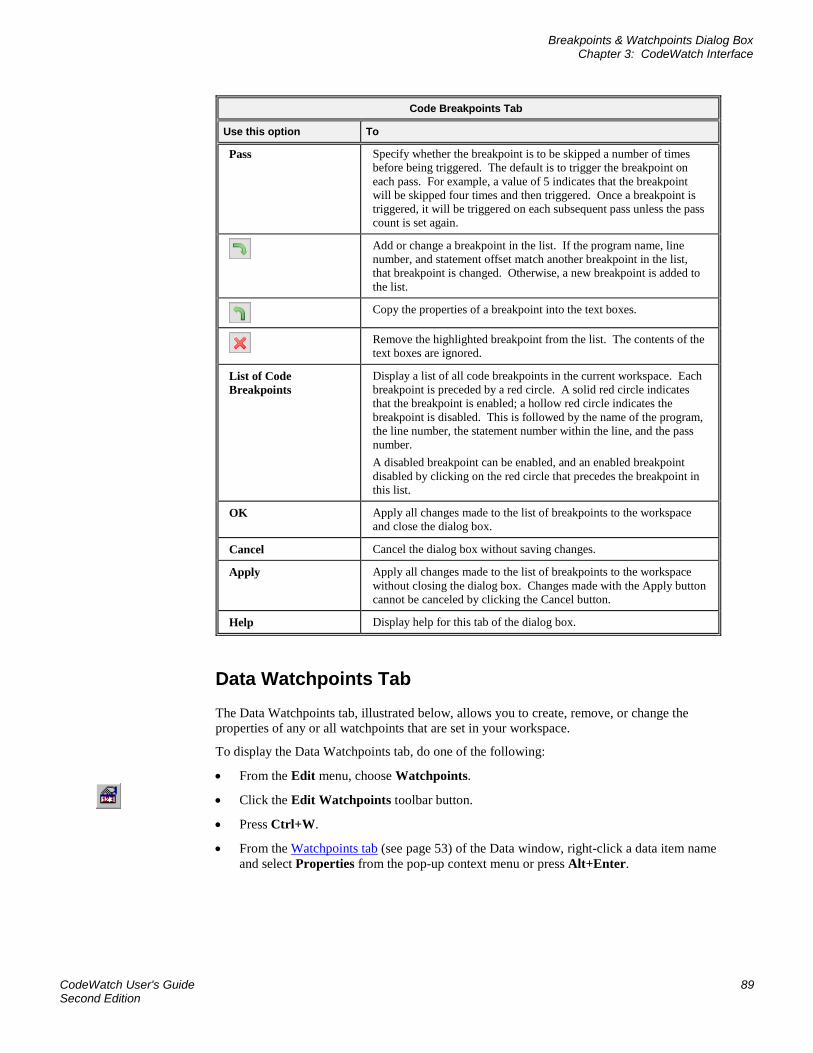
Breakpoints & Watchpoints Dialog Box Chapter 3: CodeWatch Interface
CodeWatch User's Guide 89 Second Edition
Code Breakpoints Tab
Use this option To
Pass Specify whether the breakpoint is to be skipped a number of times before being triggered. The default is to trigger the breakpoint on each pass. For example, a value of 5 indicates that the breakpoint will be skipped four times and then triggered. Once a breakpoint is triggered, it will be triggered on each subsequent pass unless the pass count is set again.
Add or change a breakpoint in the list. If the program name, line number, and statement offset match another breakpoint in the list, that breakpoint is changed. Otherwise, a new breakpoint is added to the list.
Copy the properties of a breakpoint into the text boxes.
Remove the highlighted breakpoint from the list. The contents of the text boxes are ignored.
List of Code Breakpoints
Display a list of all code breakpoints in the current workspace. Each breakpoint is preceded by a red circle. A solid red circle indicates that the breakpoint is enabled; a hollow red circle indicates the breakpoint is disabled. This is followed by the name of the program, the line number, the statement number within the line, and the pass number. A disabled breakpoint can be enabled, and an enabled breakpoint disabled by clicking on the red circle that precedes the breakpoint in this list.
OK Apply all changes made to the list of breakpoints to the workspace and close the dialog box.
Cancel Cancel the dialog box without saving changes.
Apply Apply all changes made to the list of breakpoints to the workspace without closing the dialog box. Changes made with the Apply button cannot be canceled by clicking the Cancel button.
Help Display help for this tab of the dialog box.
Data Watchpoints Tab The Data Watchpoints tab, illustrated below, allows you to create, remove, or change the properties of any or all watchpoints that are set in your workspace.
To display the Data Watchpoints tab, do one of the following:
• From the Edit menu, choose Watchpoints.
• Click the Edit Watchpoints toolbar button.
• Press Ctrl+W.
• From the Watchpoints tab (see page 53) of the Data window, right-click a data item name and select Properties from the pop-up context menu or press Alt+Enter.
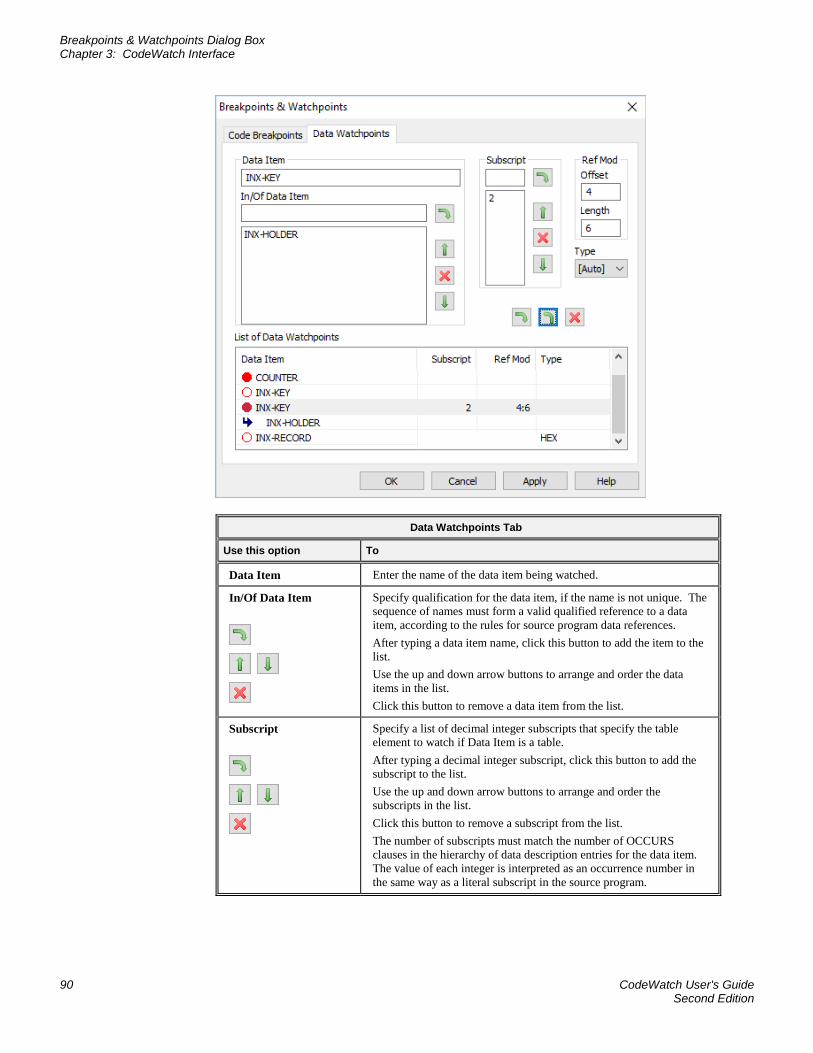
Breakpoints & Watchpoints Dialog Box Chapter 3: CodeWatch Interface
90 CodeWatch User's Guide Second Edition
Data Watchpoints Tab
Use this option To
Data Item Enter the name of the data item being watched.
In/Of Data Item
Specify qualification for the data item, if the name is not unique. The sequence of names must form a valid qualified reference to a data item, according to the rules for source program data references. After typing a data item name, click this button to add the item to the list. Use the up and down arrow buttons to arrange and order the data items in the list. Click this button to remove a data item from the list.
Subscript
Specify a list of decimal integer subscripts that specify the table element to watch if Data Item is a table. After typing a decimal integer subscript, click this button to add the subscript to the list. Use the up and down arrow buttons to arrange and order the subscripts in the list. Click this button to remove a subscript from the list. The number of subscripts must match the number of OCCURS clauses in the hierarchy of data description entries for the data item. The value of each integer is interpreted as an occurrence number in the same way as a literal subscript in the source program.
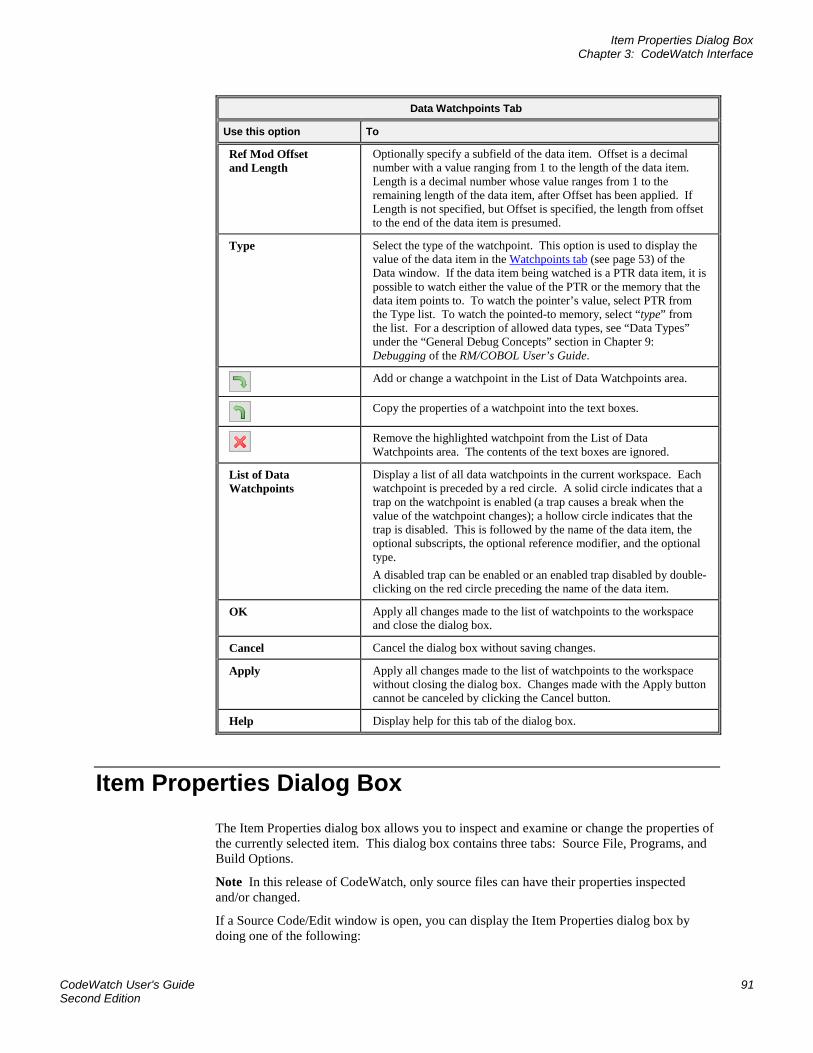
Item Properties Dialog Box Chapter 3: CodeWatch Interface
CodeWatch User's Guide 91 Second Edition
Data Watchpoints Tab
Use this option To
Ref Mod Offset and Length
Optionally specify a subfield of the data item. Offset is a decimal number with a value ranging from 1 to the length of the data item. Length is a decimal number whose value ranges from 1 to the remaining length of the data item, after Offset has been applied. If Length is not specified, but Offset is specified, the length from offset to the end of the data item is presumed.
Type Select the type of the watchpoint. This option is used to display the value of the data item in the Watchpoints tab (see page 53) of the Data window. If the data item being watched is a PTR data item, it is possible to watch either the value of the PTR or the memory that the data item points to. To watch the pointer’s value, select PTR from the Type list. To watch the pointed-to memory, select “type” from the list. For a description of allowed data types, see “Data Types” under the “General Debug Concepts” section in Chapter 9: Debugging of the RM/COBOL User’s Guide.
Add or change a watchpoint in the List of Data Watchpoints area.
Copy the properties of a watchpoint into the text boxes.
Remove the highlighted watchpoint from the List of Data Watchpoints area. The contents of the text boxes are ignored.
List of Data Watchpoints
Display a list of all data watchpoints in the current workspace. Each watchpoint is preceded by a red circle. A solid circle indicates that a trap on the watchpoint is enabled (a trap causes a break when the value of the watchpoint changes); a hollow circle indicates that the trap is disabled. This is followed by the name of the data item, the optional subscripts, the optional reference modifier, and the optional type. A disabled trap can be enabled or an enabled trap disabled by double-clicking on the red circle preceding the name of the data item.
OK Apply all changes made to the list of watchpoints to the workspace and close the dialog box.
Cancel Cancel the dialog box without saving changes.
Apply Apply all changes made to the list of watchpoints to the workspace without closing the dialog box. Changes made with the Apply button cannot be canceled by clicking the Cancel button.
Help Display help for this tab of the dialog box.
Item Properties Dialog Box The Item Properties dialog box allows you to inspect and examine or change the properties of the currently selected item. This dialog box contains three tabs: Source File, Programs, and Build Options.
Note In this release of CodeWatch, only source files can have their properties inspected and/or changed.
If a Source Code/Edit window is open, you can display the Item Properties dialog box by doing one of the following:
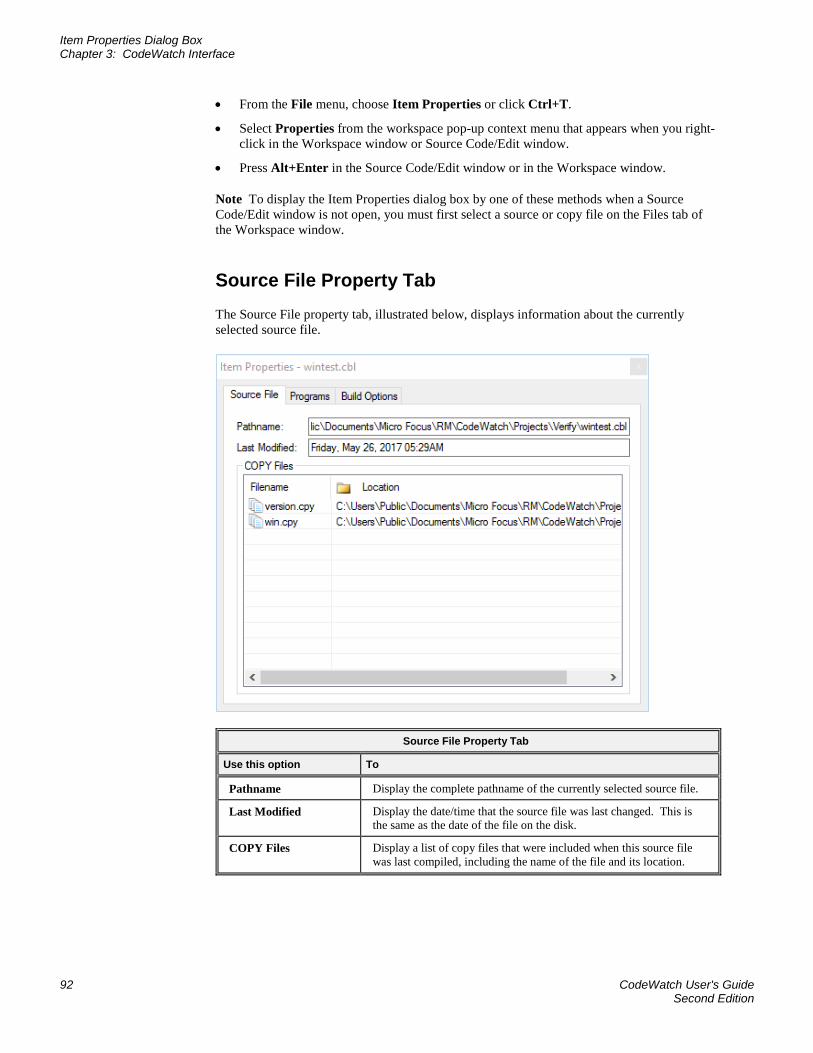
Item Properties Dialog Box Chapter 3: CodeWatch Interface
92 CodeWatch User's Guide Second Edition
• From the File menu, choose Item Properties or click Ctrl+T.
• Select Properties from the workspace pop-up context menu that appears when you right-click in the Workspace window or Source Code/Edit window.
• Press Alt+Enter in the Source Code/Edit window or in the Workspace window.
Note To display the Item Properties dialog box by one of these methods when a Source Code/Edit window is not open, you must first select a source or copy file on the Files tab of the Workspace window.
Source File Property Tab The Source File property tab, illustrated below, displays information about the currently selected source file.
Source File Property Tab
Use this option To
Pathname Display the complete pathname of the currently selected source file.
Last Modified Display the date/time that the source file was last changed. This is the same as the date of the file on the disk.
COPY Files Display a list of copy files that were included when this source file was last compiled, including the name of the file and its location.
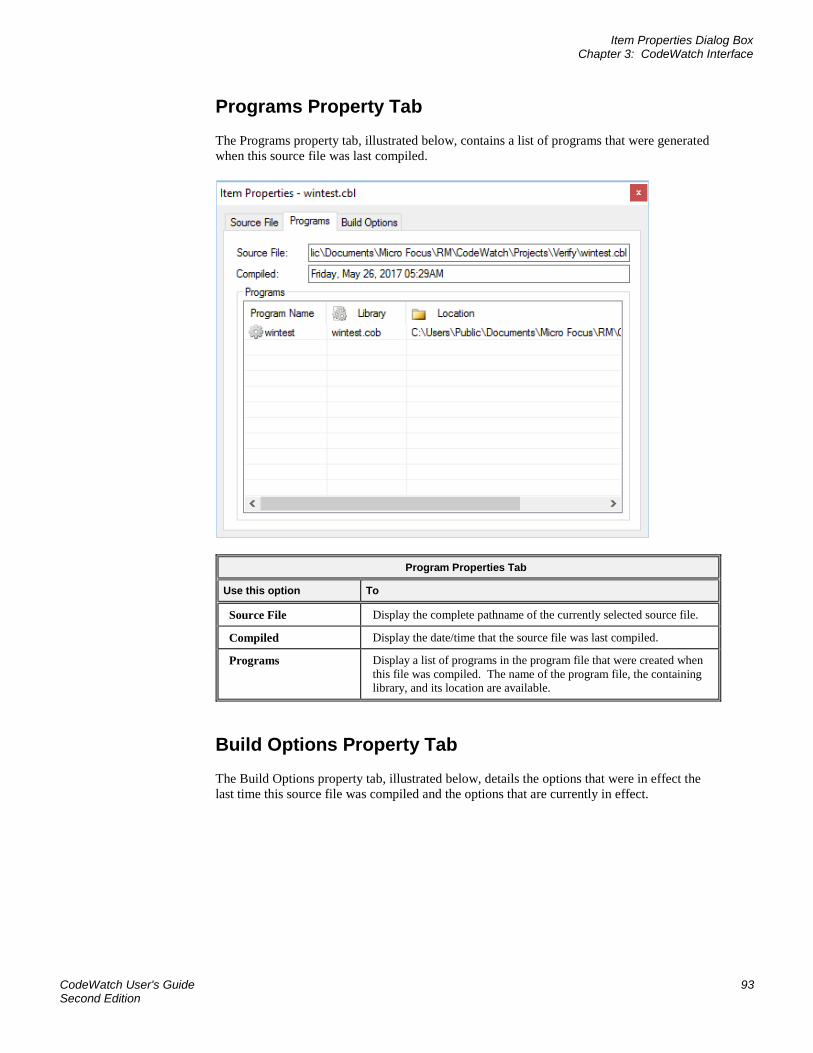
Item Properties Dialog Box Chapter 3: CodeWatch Interface
CodeWatch User's Guide 93 Second Edition
Programs Property Tab The Programs property tab, illustrated below, contains a list of programs that were generated when this source file was last compiled.
Program Properties Tab
Use this option To
Source File Display the complete pathname of the currently selected source file.
Compiled Display the date/time that the source file was last compiled.
Programs Display a list of programs in the program file that were created when this file was compiled. The name of the program file, the containing library, and its location are available.
Build Options Property Tab The Build Options property tab, illustrated below, details the options that were in effect the last time this source file was compiled and the options that are currently in effect.

Item Properties Dialog Box Chapter 3: CodeWatch Interface
94 CodeWatch User's Guide Second Edition
Build Options Property Tab
Use this option To
Source File Display the complete pathname of the currently selected source file.
Compiled Display the date/time that the source file was last compiled.
Build Options Display a list of the compilation options that were in effect the last time this source file was compiled. For each compilation option, this tab also specifies the default settings for the workspace and the settings for this file. The columns in the table provide the following information:
• Option. A description of the RM/COBOL compilation option.
• File. The setting for the currently selected file for each option.
• All. The setting for the workspace. This setting is used if the File column is blank for a given option.
• Last Build. The setting that was used when the file was last compiled. This setting is used if both the File and the All columns are blank for a given option.
Change Setting For Change the setting in the column aligned with the button:
• File. Cycles the setting for the currently selected option between the possible values for the option. You can press this button from the keyboard by typing Alt+F.
• All. Cycles the setting for the currently selected option between the possible values for the option. You can press this button from the keyboard by typing Alt+A.
For options that have discrete values (such as a file or directory name), a dialog box will appear to allow you to set the value.

Select Character Set Dialog Box Chapter 3: CodeWatch Interface
CodeWatch User's Guide 95 Second Edition
Build Options Property Tab
Use this option To
Save Save the changes you made in this tab of the dialog box. Changes do not take effect until you click this button.
Restore Restore this dialog box to its initial state, or to the point where you last clicked the Save button.
For more information about using the options on this tab, see Setting Compilation Options (on page 126).
Select Character Set Dialog Box The Select Character Set dialog box allows you to select the character set for a workspace and to configure the euro character used by the CodeWatch editor when an OEM/DOS character set is selected.
To display the Select Character Set dialog box, do one of the following:
• From the Set Program to Run page (see page 38) of the CodeWatch Workspace wizard, click the Change button.
• From the Program tab (see page 81) of the Workspace Properties tab, click the Change button.
Select Character Set Dialog Box
Use this option To
OEM/DOS Character Set
Select the OEM/DOS character set and enable the rest of the dialog box.
ANSI/Windows Character Set
Select the ANSI/Windows character set and disable the rest of the dialog box.
Apply OEM/DOS RM Euro Correction
Compensate for the fact that the OEM character set frequently does not contain a euro character and allow an OEM code point to be chosen that will be used to represent the euro. For OEM/DOS files, this code point is translated to the specified ANSI code point when the file is read into memory, and translated back when the file is written back to disk.
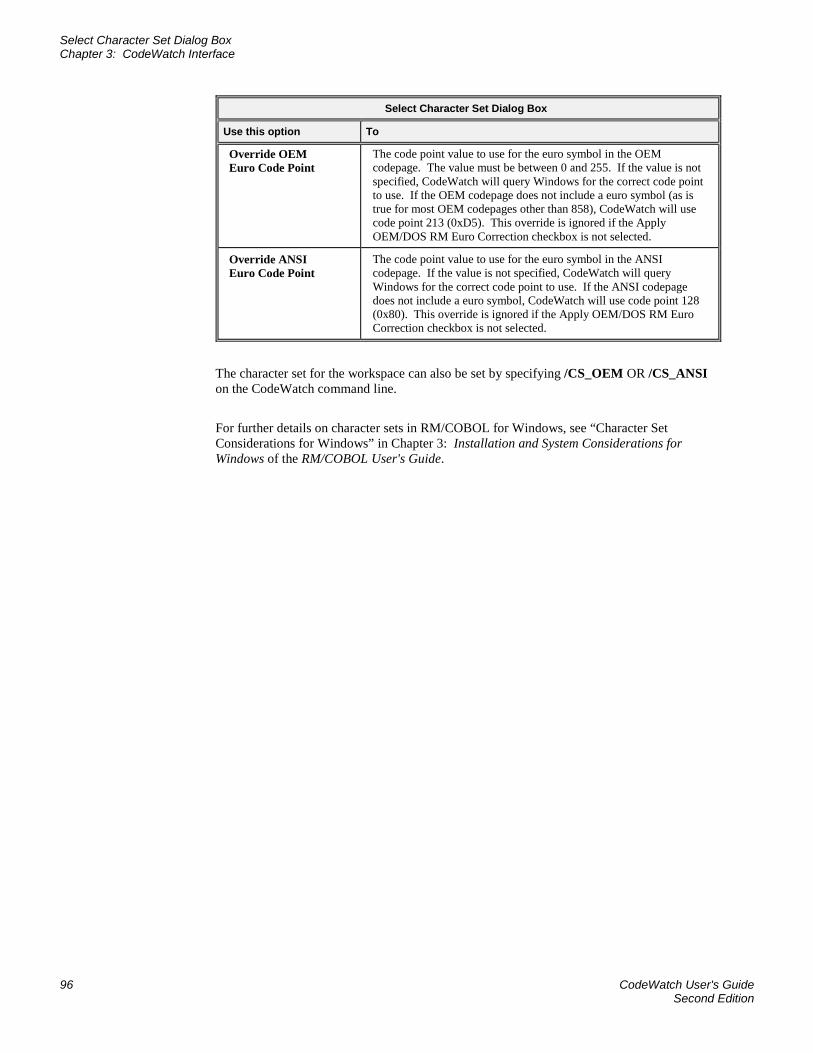
Select Character Set Dialog Box Chapter 3: CodeWatch Interface
96 CodeWatch User's Guide Second Edition
Select Character Set Dialog Box
Use this option To
Override OEM Euro Code Point
The code point value to use for the euro symbol in the OEM codepage. The value must be between 0 and 255. If the value is not specified, CodeWatch will query Windows for the correct code point to use. If the OEM codepage does not include a euro symbol (as is true for most OEM codepages other than 858), CodeWatch will use code point 213 (0xD5). This override is ignored if the Apply OEM/DOS RM Euro Correction checkbox is not selected.
Override ANSI Euro Code Point
The code point value to use for the euro symbol in the ANSI codepage. If the value is not specified, CodeWatch will query Windows for the correct code point to use. If the ANSI codepage does not include a euro symbol, CodeWatch will use code point 128 (0x80). This override is ignored if the Apply OEM/DOS RM Euro Correction checkbox is not selected.
The character set for the workspace can also be set by specifying /CS_OEM OR /CS_ANSI on the CodeWatch command line.
For further details on character sets in RM/COBOL for Windows, see “Character Set Considerations for Windows” in Chapter 3: Installation and System Considerations for Windows of the RM/COBOL User's Guide.
Locating Source Files During Execution Chapter 4: Source Code Editor
CodeWatch User's Guide 97 Second Edition
Chapter 4: Source Code Editor
The internal CodeWatch Source Code Editor displays the source code for the program that is currently executing, if available, in the Source Code/Edit window. You can also edit the source code in the Source Code/Edit window.
This chapter discusses the following topics:
• Locating Source Files During Execution (see the following topic)
• Contents of the Source Code/Edit window (on page 98)
• Using the Source Code/Edit Window (on page 101)
• Setting preferences (on page 109)
• Basic editing techniques (on page 114)
Locating Source Files During Execution In order for CodeWatch to show the source code for a program during execution, the program must be compiled with RM/COBOL version 9 or later compiler, using the Full Debug Information (/Y2 or /Y3) Compile Command line option (see Chapter 6: Compiling of the RM/COBOL User's Guide). In addition, CodeWatch must be able to find the source file. CodeWatch looks for a source file by checking the following:
• The absolute path of the source file at the time it was compiled.
• The directory that contains the program file.
• The current working directory.
• The directories listed under the Source tab on the Environment tab of the Inspect/Modify dialog box (on page 66).
Source Code/Edit Window The Source Code/Edit window is opened when you perform the following operations:
• You use the File | Open command, the File | New command, or double-click on a program name, program file, library, source file, or copy file in the Workspace window (on page 47).
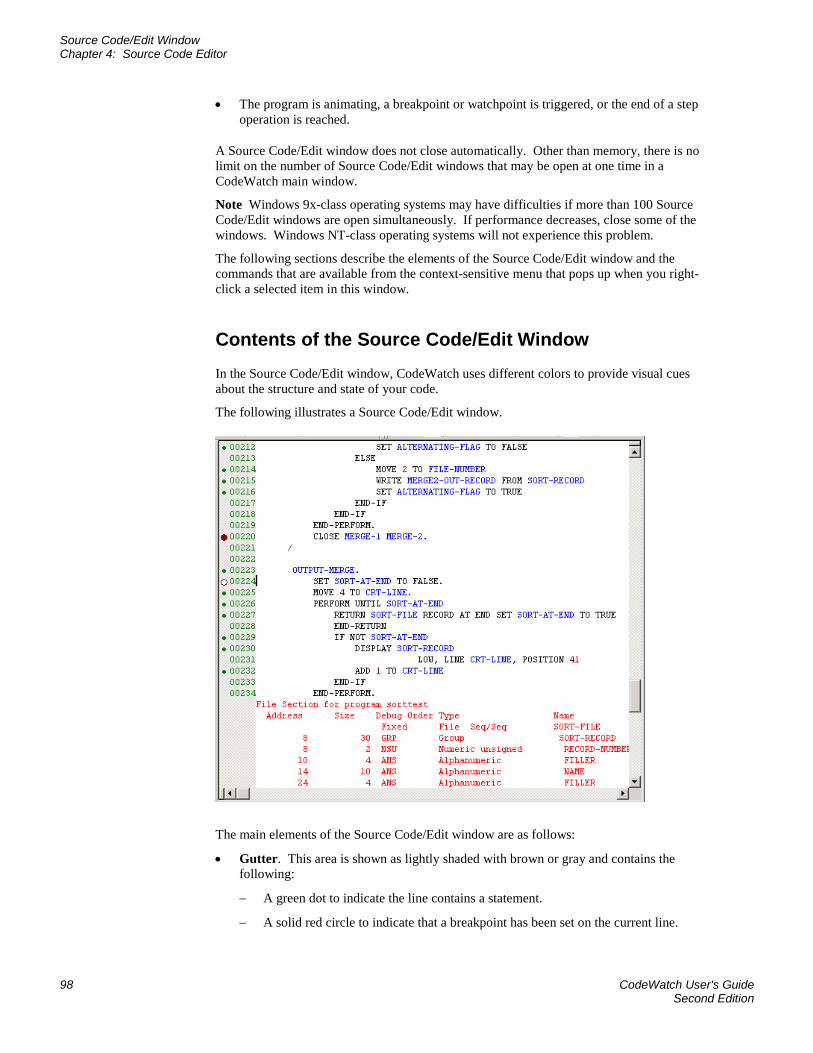
Source Code/Edit Window Chapter 4: Source Code Editor
98 CodeWatch User's Guide Second Edition
• The program is animating, a breakpoint or watchpoint is triggered, or the end of a step operation is reached.
A Source Code/Edit window does not close automatically. Other than memory, there is no limit on the number of Source Code/Edit windows that may be open at one time in a CodeWatch main window.
Note Windows 9x-class operating systems may have difficulties if more than 100 Source Code/Edit windows are open simultaneously. If performance decreases, close some of the windows. Windows NT-class operating systems will not experience this problem.
The following sections describe the elements of the Source Code/Edit window and the commands that are available from the context-sensitive menu that pops up when you right-click a selected item in this window.
Contents of the Source Code/Edit Window In the Source Code/Edit window, CodeWatch uses different colors to provide visual cues about the structure and state of your code.
The following illustrates a Source Code/Edit window.
The main elements of the Source Code/Edit window are as follows:
• Gutter. This area is shown as lightly shaded with brown or gray and contains the following:
− A green dot to indicate the line contains a statement.
− A solid red circle to indicate that a breakpoint has been set on the current line.

Source Code/Edit Window Chapter 4: Source Code Editor
CodeWatch User's Guide 99 Second Edition
− A hollow circle to indicate that a breakpoint has been set on the current line, and the breakpoint is temporarily disabled.
− A compiler-assigned line number. The line number is visible only if a program file has been found for this source file.
• Text Area. This is the area where source code is displayed and edited. Compiler diagnostic lines and lines included from copy files are also displayed in this area, and are displayed in red to indicate that they cannot be changed.
CodeWatch uses color to make your program easier to read:
− Keywords and reserved words are displayed in black.
− Paragraph and variable names are displayed in blue.
− Comments are displayed in green.
− Text that cannot be edited is displayed in red.
− Quoted text strings are displayed in cyan.
− Numbers are displayed in magenta.
− During execution, the active statement is highlighted in yellow, and a suspended statement (for example, one that issued a CALL) is highlighted in blue.
In addition to the items listed above, observe the following:
• Statement Indicators. A small diamond is displayed in the left margin to indicate that a line contains an executable statement. This is useful for setting breakpoints, because only breakpoints that are set on executable lines are honored. The indicators are displayed only in programs compiled with an RM/COBOL version 7.00.01 (or later) compiler. The indicators are not displayed when debugging programs compiled with the version 7.00.00 compiler; however, this does not affect debugging.
• REPLACE Lines. CodeWatch can only properly display listing lines that were modified by the REPLACE statement in programs compiled by the RM/COBOL version 7.00.03 (or later) compiler. If you are having trouble displaying source that uses REPLACE, recompile the program with the version 8.0 or later compiler. Note that COPY REPLACING operations are not affected.
Note The Source Code/Edit window is an example of a document window. For more in-depth information on how a document window works in CodeWatch, see Document Windows (on page 59).
Context Menu for the Source Code/Edit Window When you right-click in the Source Code/Edit window, a pop-up context menu appears. The contents of the context menu will vary depending on the current context.

Source Code/Edit Window Chapter 4: Source Code Editor
100 CodeWatch User's Guide Second Edition
Context Menu for the Source Code/Edit Window
Command Shortcut Key Toolbar Action
Undo Ctrl+Z or Alt+Backspace
Undoes one level of changes to the current file:
• The change to be undone may be as simple as a typed character, or as complicated as a Replace operation that affected every line in the file.
• You can issue the Undo command repeatedly to undo additional changes.
• You can undo an Undo operation with the Redo command.
Redo Ctrl+Y or Ctrl+Backspace
Reverses the effect of the last Undo operation:
• This command is available only after an Undo operation.
• An Undo operation can be undone only while no additional changes have been made to the document since the Undo command was issued.
• If the Undo command has been issued repeatedly, the Redo command can also be used repeatedly to undo each level of Undo.
Cut Ctrl+X or Shift+Del
Copies the current selection to the Windows Clipboard and then deletes the selection.
Copy Ctrl+C or Ctrl+Ins
Copies the current selection to the Windows Clipboard.
Paste Ctrl+V or Shift+Ins
Inserts the contents of the Windows Clipboard at the cursor position. If there is an active selection, the selected text is replaced with the text from the Windows Clipboard.
Select All Ctrl+A Selects all text in the current document.
Set Breakpoint or Remove Breakpoint
F9
Toggles the breakpoint on the current line. Note that the text of this menu changes, and the button border indicates the presence or absence of a breakpoint on the current line.
Enable Breakpoint or Disable Breakpoint
Ctrl+F9
Enables or disables a breakpoint at the line that contains the cursor. Note that the menu option is checked, and the button border indicates the presence of an enabled breakpoint on the current line.
View Data Item Shift+F9 or Ctrl+I
Displays or hides the Inspect/Modify dialog box (on page 66) and initializes the data item field with the contents of the selection. If there is no selection, the word under the cursor is used.
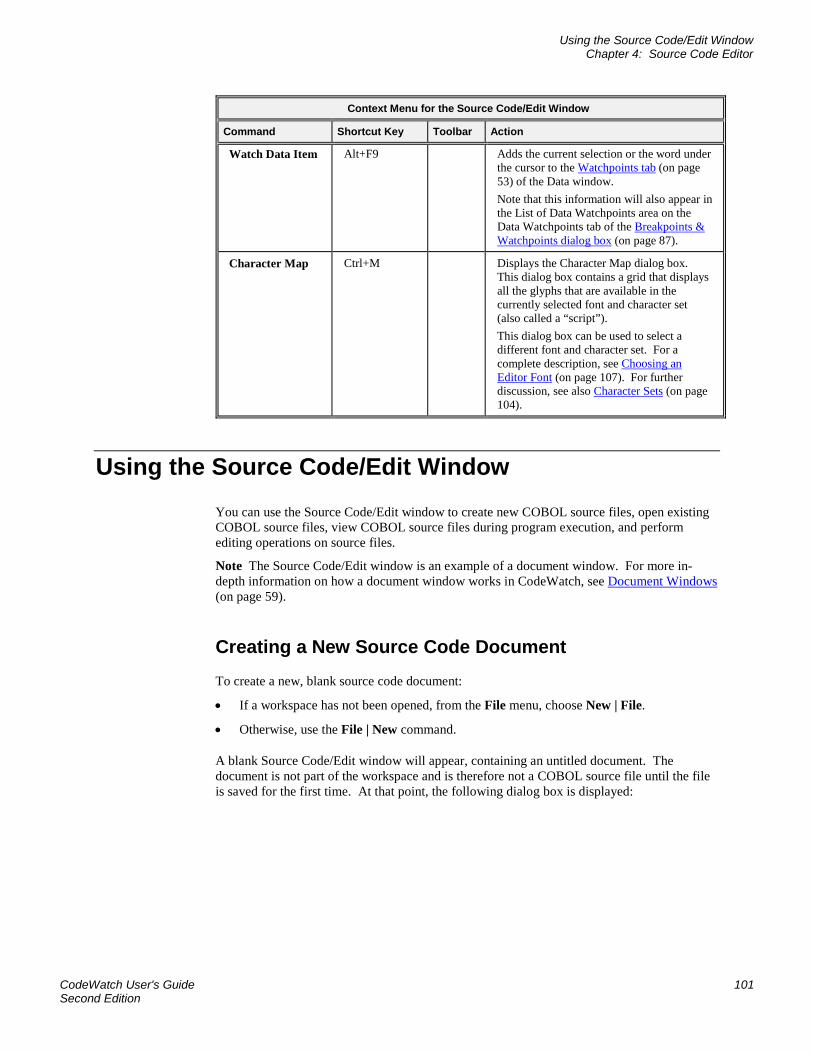
Using the Source Code/Edit Window Chapter 4: Source Code Editor
CodeWatch User's Guide 101 Second Edition
Context Menu for the Source Code/Edit Window
Command Shortcut Key Toolbar Action
Watch Data Item Alt+F9 Adds the current selection or the word under the cursor to the Watchpoints tab (on page 53) of the Data window. Note that this information will also appear in the List of Data Watchpoints area on the Data Watchpoints tab of the Breakpoints & Watchpoints dialog box (on page 87).
Character Map Ctrl+M Displays the Character Map dialog box. This dialog box contains a grid that displays all the glyphs that are available in the currently selected font and character set (also called a “script”). This dialog box can be used to select a different font and character set. For a complete description, see Choosing an Editor Font (on page 107). For further discussion, see also Character Sets (on page 104).
Using the Source Code/Edit Window You can use the Source Code/Edit window to create new COBOL source files, open existing COBOL source files, view COBOL source files during program execution, and perform editing operations on source files.
Note The Source Code/Edit window is an example of a document window. For more in-depth information on how a document window works in CodeWatch, see Document Windows (on page 59).
Creating a New Source Code Document To create a new, blank source code document:
• If a workspace has not been opened, from the File menu, choose New | File.
• Otherwise, use the File | New command.
A blank Source Code/Edit window will appear, containing an untitled document. The document is not part of the workspace and is therefore not a COBOL source file until the file is saved for the first time. At that point, the following dialog box is displayed:
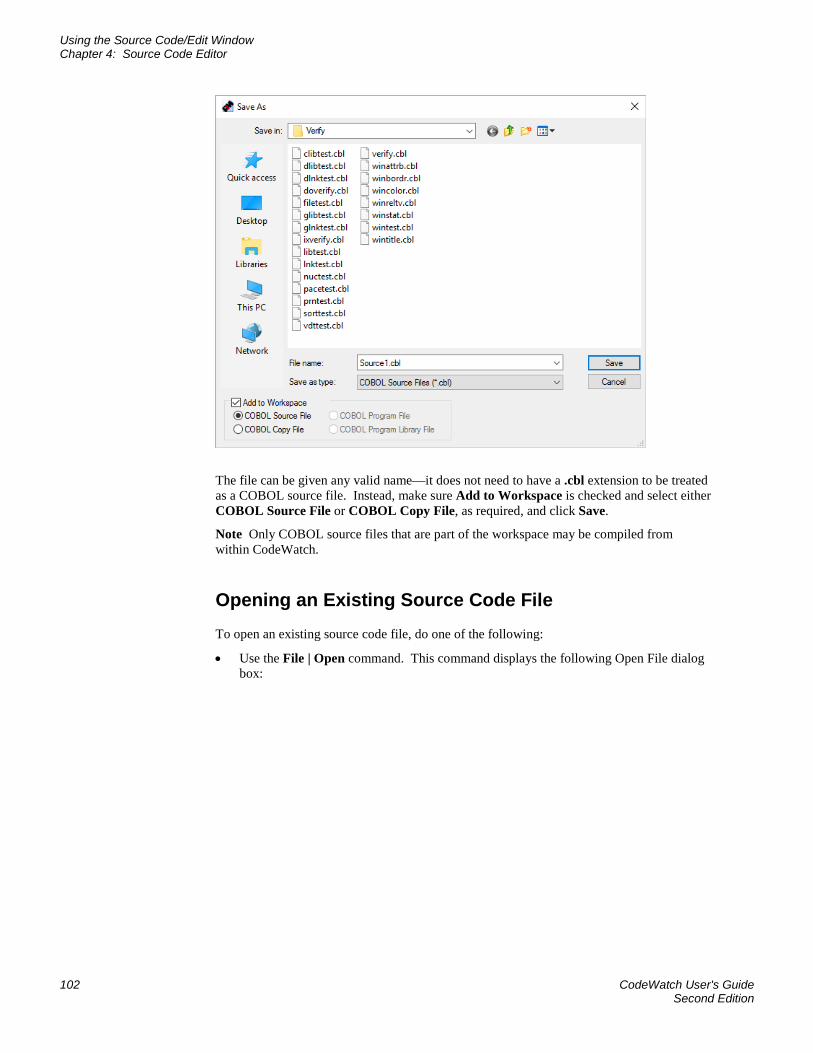
Using the Source Code/Edit Window Chapter 4: Source Code Editor
102 CodeWatch User's Guide Second Edition
The file can be given any valid name—it does not need to have a .cbl extension to be treated as a COBOL source file. Instead, make sure Add to Workspace is checked and select either COBOL Source File or COBOL Copy File, as required, and click Save.
Note Only COBOL source files that are part of the workspace may be compiled from within CodeWatch.
Opening an Existing Source Code File To open an existing source code file, do one of the following:
• Use the File | Open command. This command displays the following Open File dialog box:
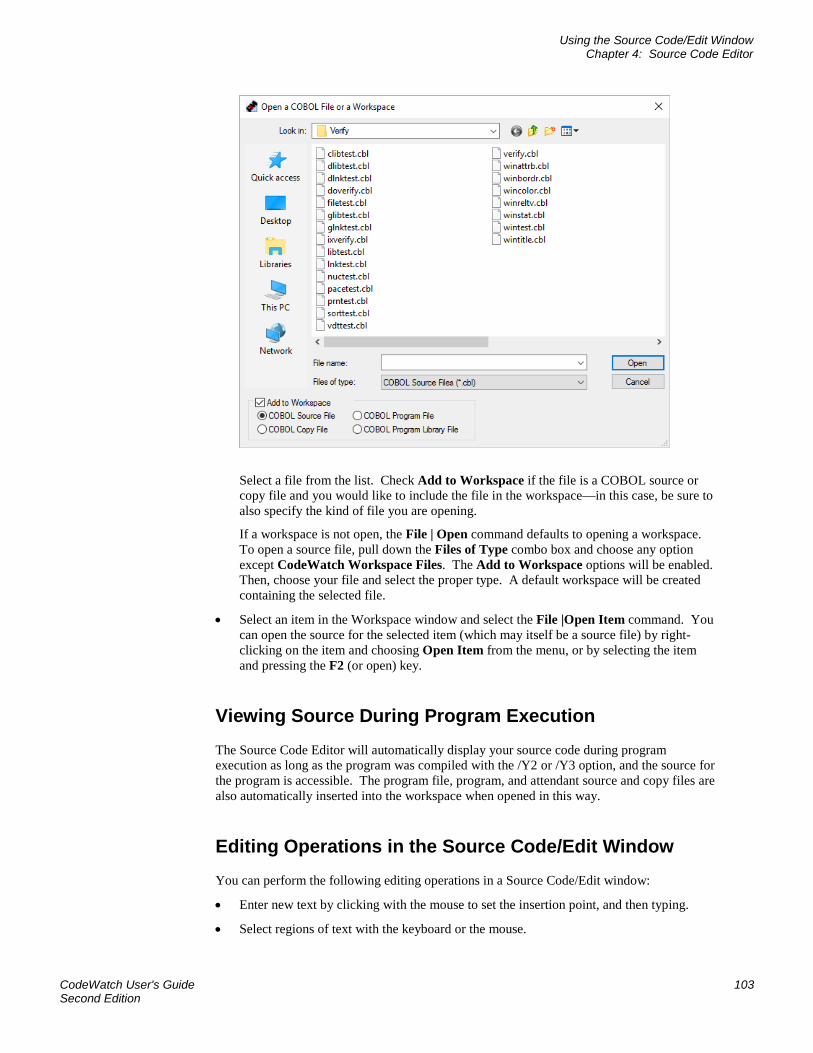
Using the Source Code/Edit Window Chapter 4: Source Code Editor
CodeWatch User's Guide 103 Second Edition
Select a file from the list. Check Add to Workspace if the file is a COBOL source or copy file and you would like to include the file in the workspace—in this case, be sure to also specify the kind of file you are opening.
If a workspace is not open, the File | Open command defaults to opening a workspace. To open a source file, pull down the Files of Type combo box and choose any option except CodeWatch Workspace Files. The Add to Workspace options will be enabled. Then, choose your file and select the proper type. A default workspace will be created containing the selected file.
• Select an item in the Workspace window and select the File |Open Item command. You can open the source for the selected item (which may itself be a source file) by right-clicking on the item and choosing Open Item from the menu, or by selecting the item and pressing the F2 (or open) key.
Viewing Source During Program Execution The Source Code Editor will automatically display your source code during program execution as long as the program was compiled with the /Y2 or /Y3 option, and the source for the program is accessible. The program file, program, and attendant source and copy files are also automatically inserted into the workspace when opened in this way.
Editing Operations in the Source Code/Edit Window You can perform the following editing operations in a Source Code/Edit window:
• Enter new text by clicking with the mouse to set the insertion point, and then typing.
• Select regions of text with the keyboard or the mouse.

Character Sets Chapter 4: Source Code Editor
104 CodeWatch User's Guide Second Edition
• Delete a selected region of text, or copy or cut a region to the Windows Clipboard.
• Paste text from the Windows Clipboard at the insertion point.
• Right-click to display a pop-up menu.
• Undo or redo one or more operations.
To learn more, see Basic Editing Techniques (on page 114).
You can also perform the following non-editing operations in a Source Code/Edit window:
• Set a new breakpoint or clear an existing breakpoint by double-clicking in the indicator column or on the line number. You can set, clear, enable, or disable a breakpoint by right-clicking on a line and choosing the appropriate item from the pop-up context menu, or by using buttons on the toolbar.
For a breakpoint to be effective, it must be set on a line that contains executable code. Such lines are indicated by a small green dot in the gutter. Comment lines are not executed; neither are the second or subsequent lines of statements that span more than one line.
• Examine a data item during execution. To do this, highlight the data item in the Source Code/Edit window by clicking with the mouse; then, double-click the selected item to display the Inspect/Modify dialog box (on page 66). If the data item requires a subscript or qualification, you can edit the name in the Inspect/Modify dialog box. The value of the data item will be updated the next time the Debugger reaches a breakpoint or watchpoint, or you can force the value to be refreshed immediately by choosing Break from the Run menu, or by pressing F5. You can also add a watchpoint by clicking the Watch button, or modify the data item by entering a new value and clicking the Change button in this dialog box.
You can also set a watchpoint by right-clicking on a highlighted data item with the mouse and choosing Watch Data Item or by pressing Alt+F9 from the pop-up menu. Note that you cannot specify qualification or subscripts in this way, but you can edit the watchpoint later to add this information.
• Search for a text string by doing one of the following:
− From the Edit menu, choose Find.
− Click the Find toolbar button.
− Press Alt+F.
You can search again by using the Edit menu and choosing the Find Next or Find Previous command (or by pressing the corresponding toolbar buttons). As an alternative, you can also use the shortcut keys. Press F3 to search forward or press Shift+F3 to search backward in the file.
Character Sets A codepage defines a mapping of character code points (often called bytes) to a set of characters. CodeWatch initially uses the default character set contained in the Courier New font to display and edit text. For systems installed in the United States and Western Europe where the default codepage is 1252, this will be the ANSI character set (also referred to as “Western” script or the Latin-1 code set). Systems installed in other locales will use the default codepage for that locale.
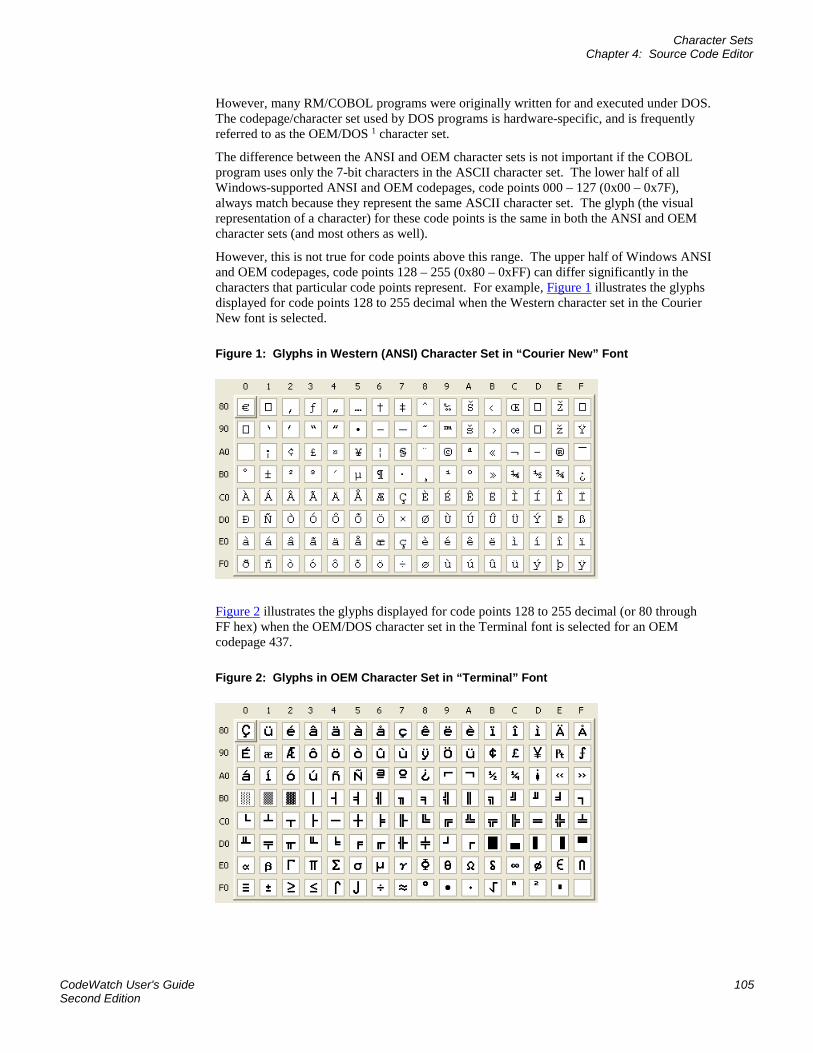
Character Sets Chapter 4: Source Code Editor
CodeWatch User's Guide 105 Second Edition
However, many RM/COBOL programs were originally written for and executed under DOS. The codepage/character set used by DOS programs is hardware-specific, and is frequently referred to as the OEM/DOS 1 character set.
The difference between the ANSI and OEM character sets is not important if the COBOL program uses only the 7-bit characters in the ASCII character set. The lower half of all Windows-supported ANSI and OEM codepages, code points 000 – 127 (0x00 – 0x7F), always match because they represent the same ASCII character set. The glyph (the visual representation of a character) for these code points is the same in both the ANSI and OEM character sets (and most others as well).
However, this is not true for code points above this range. The upper half of Windows ANSI and OEM codepages, code points 128 – 255 (0x80 – 0xFF) can differ significantly in the characters that particular code points represent. For example, Figure 1 illustrates the glyphs displayed for code points 128 to 255 decimal when the Western character set in the Courier New font is selected.
Figure 1: Glyphs in Western (ANSI) Character Set in “Courier New” Font
Figure 2 illustrates the glyphs displayed for code points 128 to 255 decimal (or 80 through FF hex) when the OEM/DOS character set in the Terminal font is selected for an OEM codepage 437.
Figure 2: Glyphs in OEM Character Set in “Terminal” Font
Character Sets Chapter 4: Source Code Editor
106 CodeWatch User's Guide Second Edition
In particular, note the highlighted first glyph in the first column (code point hex 80 or decimal 128). If a Western (ANSI) character set is being used to display this code point, it will appear as a Euro glyph. However, if an OEM/DOS character set is being used to display this code point, it will appear as a C-cedilla glyph. The combination of font and character set is critical if non-ASCII text is to be displayed correctly.
Note While most Windows fonts contain more than one character set, to ensure that characters entered into COBOL literals can be displayed by the RM/COBOL runtime, CodeWatch allows only the default character set in each font to be selected for text editing. An exception is made when using the OEM character set for a workspace; in this case, the OEM/DOS script for a font, if it exists, may be selected.
The Workspace Character Set Because RM/COBOL source files are simply text files, it is not possible for CodeWatch to determine automatically the character set that was used to create the file. Instead, each CodeWatch workspace has an implicit character set that can be set in three ways:
• From the command line when CodeWatch is started. See System Installation (on page 8).
• With the Workspace wizard when the workspace is created. See the Character Set and Change options on the Set Program to Run page (on page 38).
• With the Character Set option on the Program tab (see page 81) in the Workspace Properties dialog box after the workspace has been created.
If the source and copy files use only code points in the ASCII character set, that is, all code points are in the range of 32 to 127 decimal, no further action is required. These code points refer to the same characters in both ANSI and OEM codepages.
For code points outside of this range, there are two options:
1. If you know that the source files were created using the ANSI character set, you simply have to choose a font that contains the correct character set for the current locale. The default is normally just fine. Note that for ANSI workspaces, you must choose a font that defaults to an ANSI character set (this includes most Windows fonts). You cannot choose a font that defaults to the OEM character set. It is not required that the default character set be “Western”—it can be any non-OEM character set.
2. If the source files were created with the OEM/DOS character set (which is often the case for legacy projects originally developed for DOS), you should declare that the workspace uses OEM/DOS files. In this instance, CodeWatch will translate the characters from OEM/DOS to ANSI when they are loaded into the editor, and will translate them back from ANSI to OEM/DOS when the file is rewritten. This translation process is bi-directional: if you choose an ANSI font, not all OEM glyphs will display correctly (ANSI fonts do not contain line-drawing glyphs), but the glyphs will be preserved and not altered unless you choose to overtype them.
To ensure that all OEM/DOS characters are visible in the editor, you should choose to edit with a font that contains an OEM character set. CodeWatch will normally allow you to edit only with the default character set in a font, but this rule is relaxed for OEM character sets—the Character Map dialog box allows you to choose any font that contains an OEM character set. Please be aware that not all these fonts are available to running COBOL programs.
The next section describes how to choose a font.
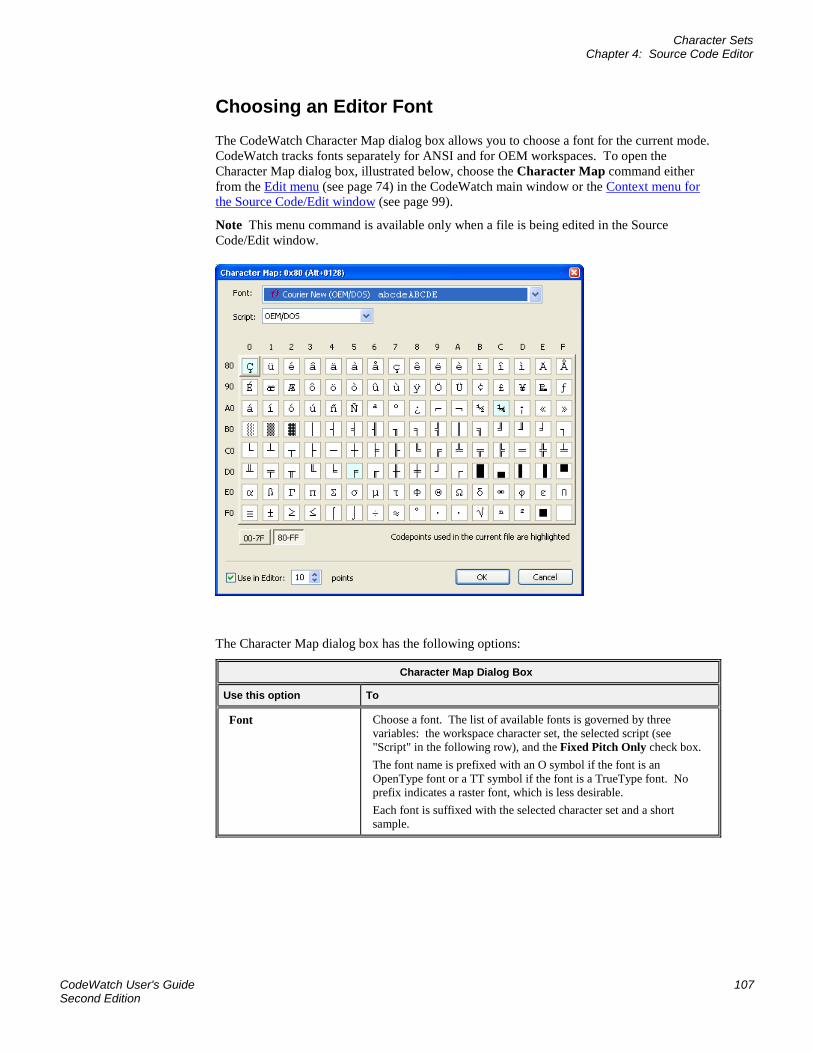
Character Sets Chapter 4: Source Code Editor
CodeWatch User's Guide 107 Second Edition
Choosing an Editor Font The CodeWatch Character Map dialog box allows you to choose a font for the current mode. CodeWatch tracks fonts separately for ANSI and for OEM workspaces. To open the Character Map dialog box, illustrated below, choose the Character Map command either from the Edit menu (see page 74) in the CodeWatch main window or the Context menu for the Source Code/Edit window (see page 99).
Note This menu command is available only when a file is being edited in the Source Code/Edit window.
The Character Map dialog box has the following options:
Character Map Dialog Box
Use this option To
Font Choose a font. The list of available fonts is governed by three variables: the workspace character set, the selected script (see "Script" in the following row), and the Fixed Pitch Only check box. The font name is prefixed with an O symbol if the font is an OpenType font or a TT symbol if the font is a TrueType font. No prefix indicates a raster font, which is less desirable. Each font is suffixed with the selected character set and a short sample.
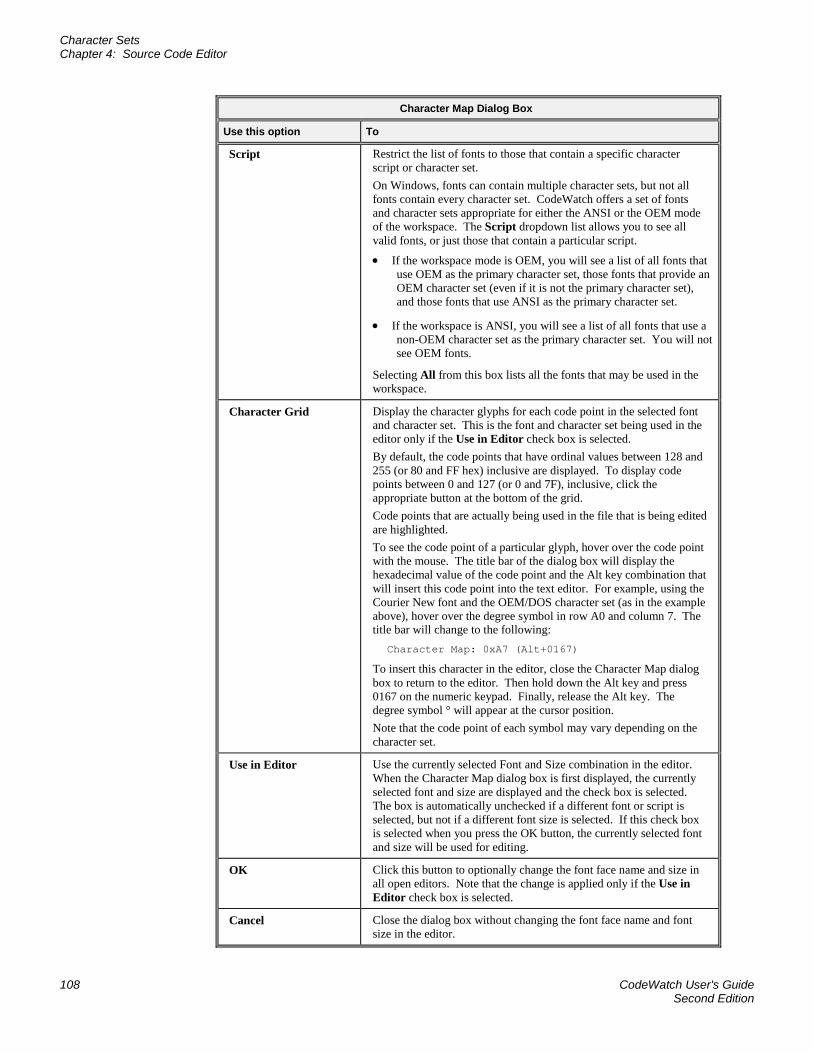
Character Sets Chapter 4: Source Code Editor
108 CodeWatch User's Guide Second Edition
Character Map Dialog Box
Use this option To
Script Restrict the list of fonts to those that contain a specific character script or character set. On Windows, fonts can contain multiple character sets, but not all fonts contain every character set. CodeWatch offers a set of fonts and character sets appropriate for either the ANSI or the OEM mode of the workspace. The Script dropdown list allows you to see all valid fonts, or just those that contain a particular script.
• If the workspace mode is OEM, you will see a list of all fonts that use OEM as the primary character set, those fonts that provide an OEM character set (even if it is not the primary character set), and those fonts that use ANSI as the primary character set.
• If the workspace is ANSI, you will see a list of all fonts that use a non-OEM character set as the primary character set. You will not see OEM fonts.
Selecting All from this box lists all the fonts that may be used in the workspace.
Character Grid Display the character glyphs for each code point in the selected font and character set. This is the font and character set being used in the editor only if the Use in Editor check box is selected. By default, the code points that have ordinal values between 128 and 255 (or 80 and FF hex) inclusive are displayed. To display code points between 0 and 127 (or 0 and 7F), inclusive, click the appropriate button at the bottom of the grid. Code points that are actually being used in the file that is being edited are highlighted. To see the code point of a particular glyph, hover over the code point with the mouse. The title bar of the dialog box will display the hexadecimal value of the code point and the Alt key combination that will insert this code point into the text editor. For example, using the Courier New font and the OEM/DOS character set (as in the example above), hover over the degree symbol in row A0 and column 7. The title bar will change to the following:
Character Map: 0xA7 (Alt+0167)
To insert this character in the editor, close the Character Map dialog box to return to the editor. Then hold down the Alt key and press 0167 on the numeric keypad. Finally, release the Alt key. The degree symbol ° will appear at the cursor position. Note that the code point of each symbol may vary depending on the character set.
Use in Editor Use the currently selected Font and Size combination in the editor. When the Character Map dialog box is first displayed, the currently selected font and size are displayed and the check box is selected. The box is automatically unchecked if a different font or script is selected, but not if a different font size is selected. If this check box is selected when you press the OK button, the currently selected font and size will be used for editing.
OK Click this button to optionally change the font face name and size in all open editors. Note that the change is applied only if the Use in Editor check box is selected.
Cancel Close the dialog box without changing the font face name and font size in the editor.
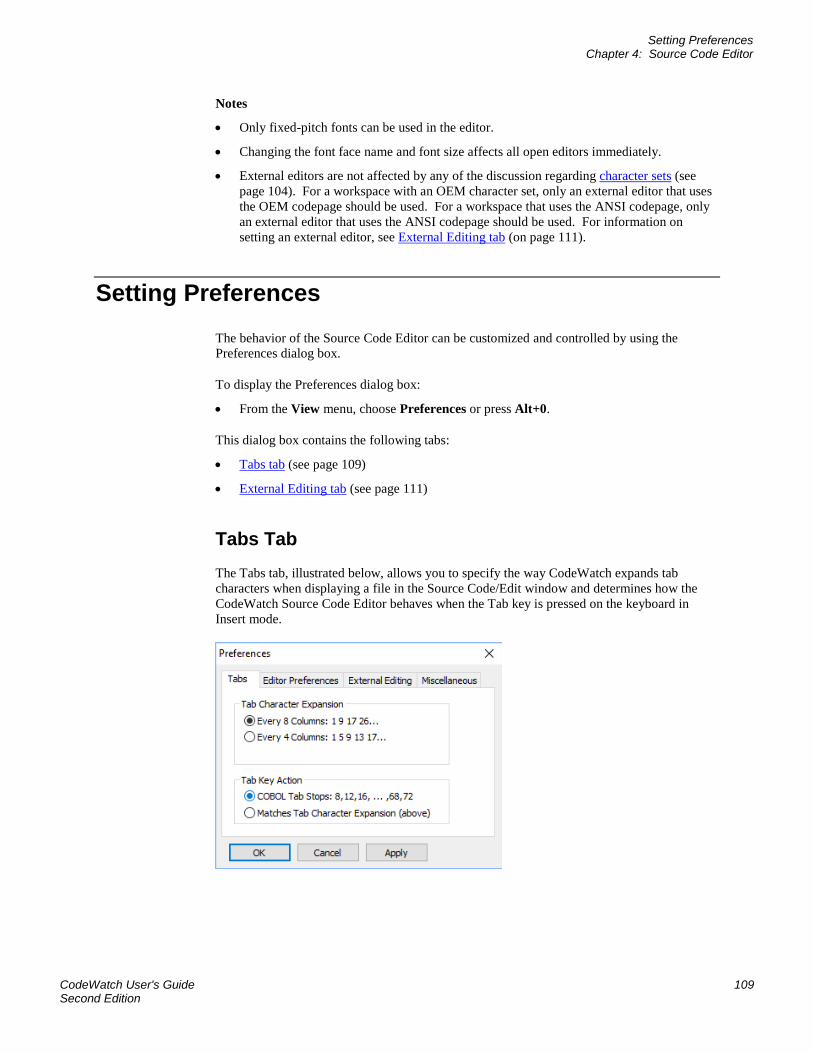
Setting Preferences Chapter 4: Source Code Editor
CodeWatch User's Guide 109 Second Edition
Notes
• Only fixed-pitch fonts can be used in the editor.
• Changing the font face name and font size affects all open editors immediately.
• External editors are not affected by any of the discussion regarding character sets (see page 104). For a workspace with an OEM character set, only an external editor that uses the OEM codepage should be used. For a workspace that uses the ANSI codepage, only an external editor that uses the ANSI codepage should be used. For information on setting an external editor, see External Editing tab (on page 111).
Setting Preferences The behavior of the Source Code Editor can be customized and controlled by using the Preferences dialog box.
To display the Preferences dialog box:
• From the View menu, choose Preferences or press Alt+0.
This dialog box contains the following tabs:
• Tabs tab (see page 109)
• External Editing tab (see page 111)
Tabs Tab The Tabs tab, illustrated below, allows you to specify the way CodeWatch expands tab characters when displaying a file in the Source Code/Edit window and determines how the CodeWatch Source Code Editor behaves when the Tab key is pressed on the keyboard in Insert mode.
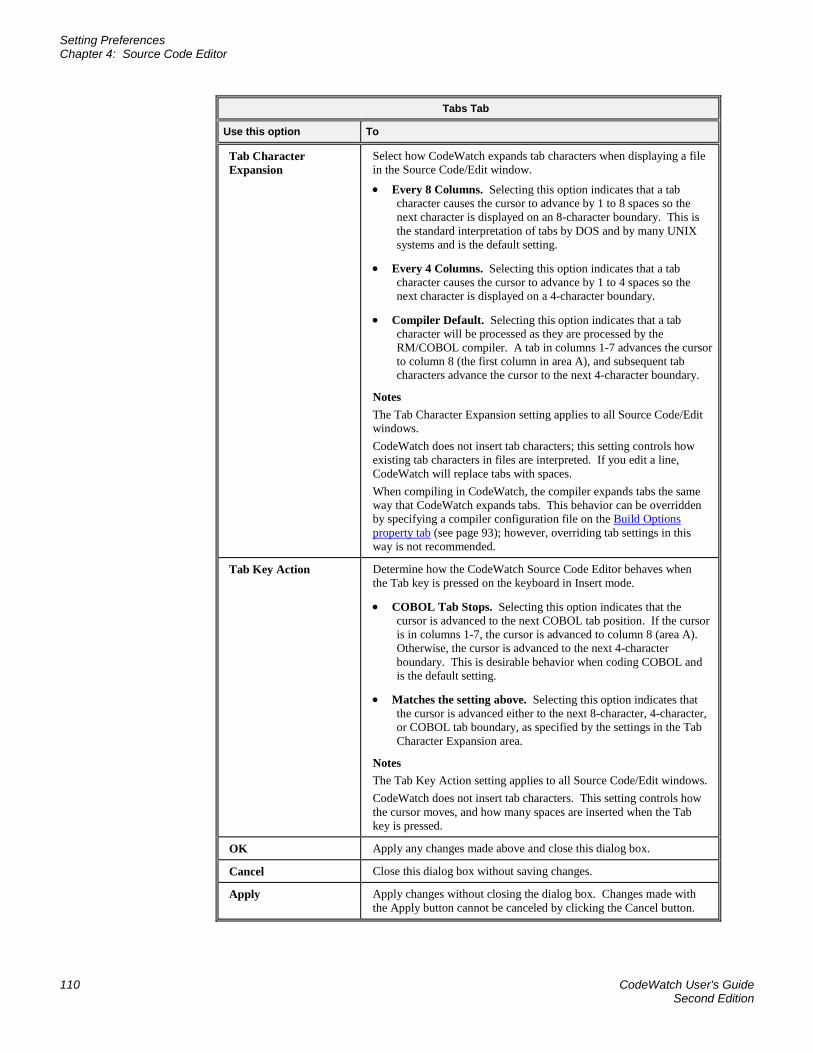
Setting Preferences Chapter 4: Source Code Editor
110 CodeWatch User's Guide Second Edition
Tabs Tab
Use this option To
Tab Character Expansion
Select how CodeWatch expands tab characters when displaying a file in the Source Code/Edit window.
• Every 8 Columns. Selecting this option indicates that a tab character causes the cursor to advance by 1 to 8 spaces so the next character is displayed on an 8-character boundary. This is the standard interpretation of tabs by DOS and by many UNIX systems and is the default setting.
• Every 4 Columns. Selecting this option indicates that a tab character causes the cursor to advance by 1 to 4 spaces so the next character is displayed on a 4-character boundary.
• Compiler Default. Selecting this option indicates that a tab character will be processed as they are processed by the RM/COBOL compiler. A tab in columns 1-7 advances the cursor to column 8 (the first column in area A), and subsequent tab characters advance the cursor to the next 4-character boundary.
Notes The Tab Character Expansion setting applies to all Source Code/Edit windows. CodeWatch does not insert tab characters; this setting controls how existing tab characters in files are interpreted. If you edit a line, CodeWatch will replace tabs with spaces. When compiling in CodeWatch, the compiler expands tabs the same way that CodeWatch expands tabs. This behavior can be overridden by specifying a compiler configuration file on the Build Options property tab (see page 93); however, overriding tab settings in this way is not recommended.
Tab Key Action Determine how the CodeWatch Source Code Editor behaves when the Tab key is pressed on the keyboard in Insert mode.
• COBOL Tab Stops. Selecting this option indicates that the cursor is advanced to the next COBOL tab position. If the cursor is in columns 1-7, the cursor is advanced to column 8 (area A). Otherwise, the cursor is advanced to the next 4-character boundary. This is desirable behavior when coding COBOL and is the default setting.
• Matches the setting above. Selecting this option indicates that the cursor is advanced either to the next 8-character, 4-character, or COBOL tab boundary, as specified by the settings in the Tab Character Expansion area.
Notes The Tab Key Action setting applies to all Source Code/Edit windows. CodeWatch does not insert tab characters. This setting controls how the cursor moves, and how many spaces are inserted when the Tab key is pressed.
OK Apply any changes made above and close this dialog box.
Cancel Close this dialog box without saving changes.
Apply Apply changes without closing the dialog box. Changes made with the Apply button cannot be canceled by clicking the Cancel button.
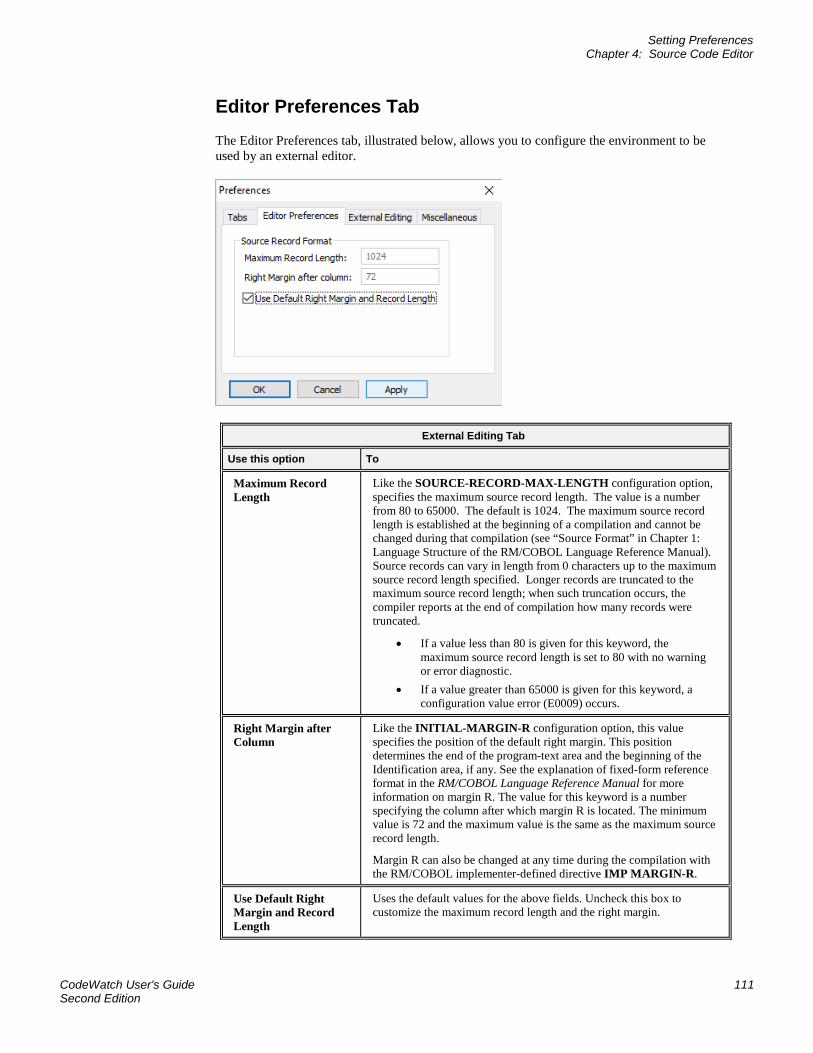
Setting Preferences Chapter 4: Source Code Editor
CodeWatch User's Guide 111 Second Edition
Editor Preferences Tab The Editor Preferences tab, illustrated below, allows you to configure the environment to be used by an external editor.
External Editing Tab
Use this option To
Maximum Record Length
Like the SOURCE-RECORD-MAX-LENGTH configuration option, specifies the maximum source record length. The value is a number from 80 to 65000. The default is 1024. The maximum source record length is established at the beginning of a compilation and cannot be changed during that compilation (see “Source Format” in Chapter 1: Language Structure of the RM/COBOL Language Reference Manual). Source records can vary in length from 0 characters up to the maximum source record length specified. Longer records are truncated to the maximum source record length; when such truncation occurs, the compiler reports at the end of compilation how many records were truncated.
• If a value less than 80 is given for this keyword, the maximum source record length is set to 80 with no warning or error diagnostic.
• If a value greater than 65000 is given for this keyword, a configuration value error (E0009) occurs.
Right Margin after Column
Like the INITIAL-MARGIN-R configuration option, this value specifies the position of the default right margin. This position determines the end of the program-text area and the beginning of the Identification area, if any. See the explanation of fixed-form reference format in the RM/COBOL Language Reference Manual for more information on margin R. The value for this keyword is a number specifying the column after which margin R is located. The minimum value is 72 and the maximum value is the same as the maximum source record length.
Margin R can also be changed at any time during the compilation with the RM/COBOL implementer-defined directive IMP MARGIN-R.
Use Default Right Margin and Record Length
Uses the default values for the above fields. Uncheck this box to customize the maximum record length and the right margin.
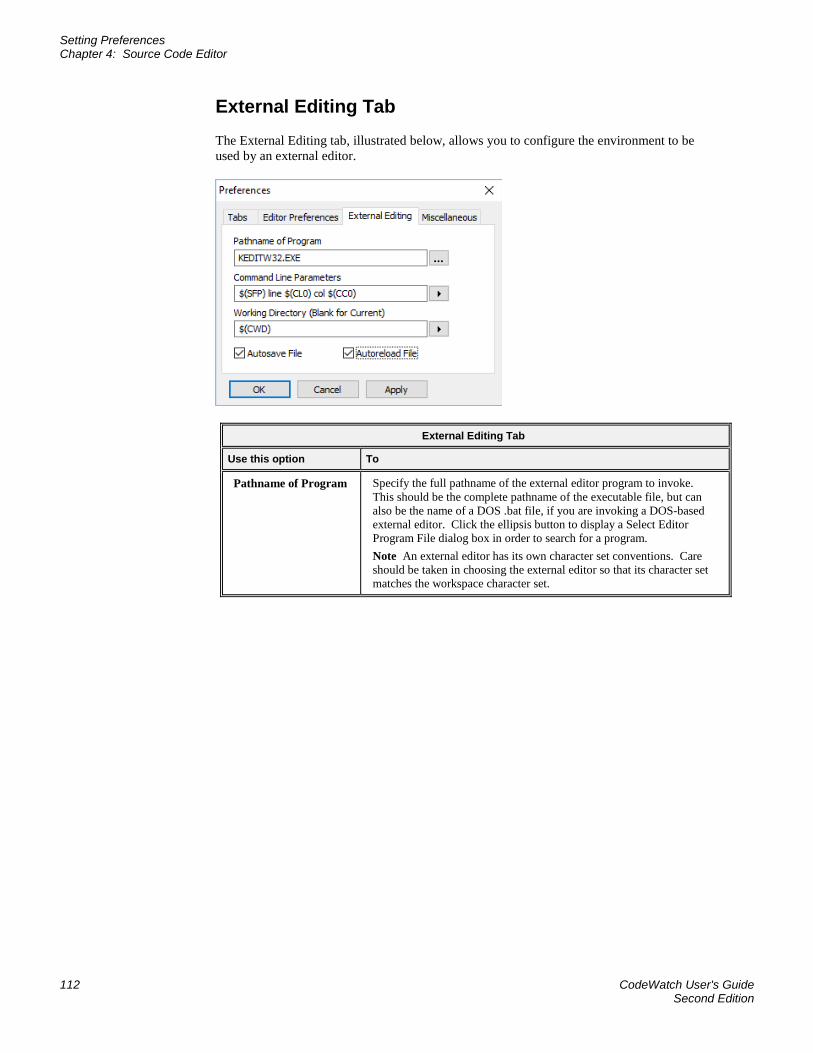
Setting Preferences Chapter 4: Source Code Editor
112 CodeWatch User's Guide Second Edition
External Editing Tab The External Editing tab, illustrated below, allows you to configure the environment to be used by an external editor.
External Editing Tab
Use this option To
Pathname of Program Specify the full pathname of the external editor program to invoke. This should be the complete pathname of the executable file, but can also be the name of a DOS .bat file, if you are invoking a DOS-based external editor. Click the ellipsis button to display a Select Editor Program File dialog box in order to search for a program. Note An external editor has its own character set conventions. Care should be taken in choosing the external editor so that its character set matches the workspace character set.
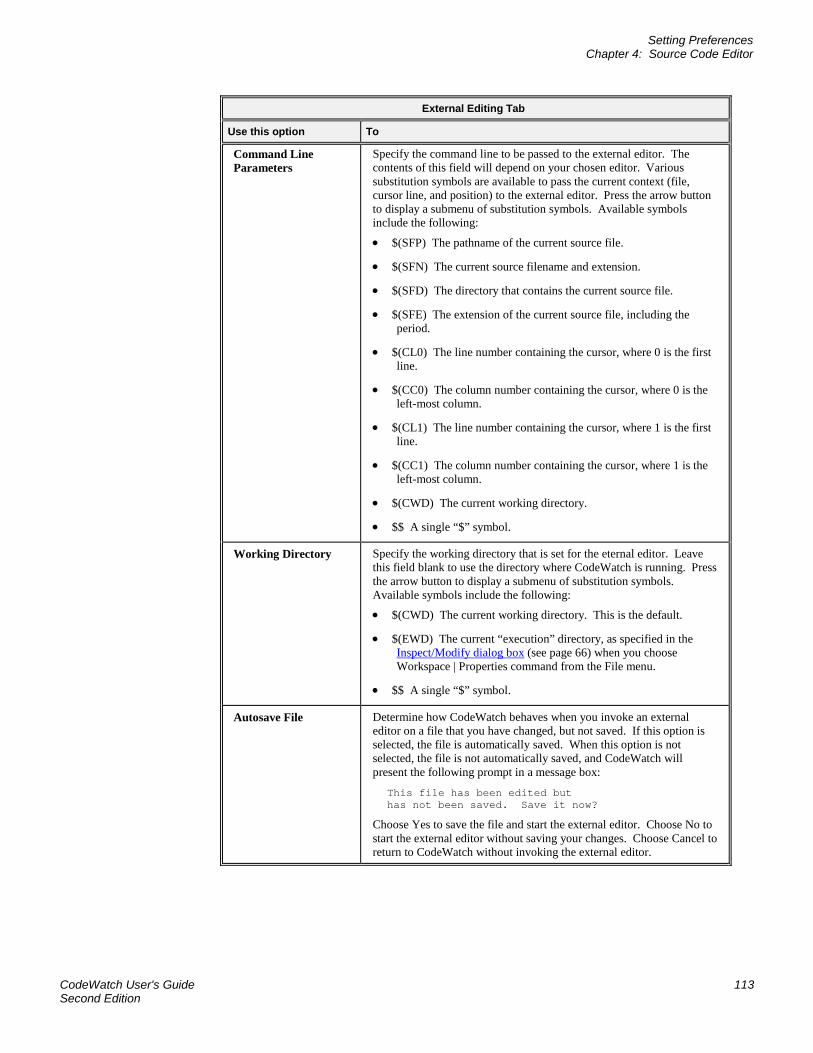
Setting Preferences Chapter 4: Source Code Editor
CodeWatch User's Guide 113 Second Edition
External Editing Tab
Use this option To
Command Line Parameters
Specify the command line to be passed to the external editor. The contents of this field will depend on your chosen editor. Various substitution symbols are available to pass the current context (file, cursor line, and position) to the external editor. Press the arrow button to display a submenu of substitution symbols. Available symbols include the following:
• $(SFP) The pathname of the current source file.
• $(SFN) The current source filename and extension.
• $(SFD) The directory that contains the current source file.
• $(SFE) The extension of the current source file, including the period.
• $(CL0) The line number containing the cursor, where 0 is the first line.
• $(CC0) The column number containing the cursor, where 0 is the left-most column.
• $(CL1) The line number containing the cursor, where 1 is the first line.
• $(CC1) The column number containing the cursor, where 1 is the left-most column.
• $(CWD) The current working directory.
• $$ A single “$” symbol.
Working Directory Specify the working directory that is set for the eternal editor. Leave this field blank to use the directory where CodeWatch is running. Press the arrow button to display a submenu of substitution symbols. Available symbols include the following:
• $(CWD) The current working directory. This is the default.
• $(EWD) The current “execution” directory, as specified in the Inspect/Modify dialog box (see page 66) when you choose Workspace | Properties command from the File menu.
• $$ A single “$” symbol.
Autosave File Determine how CodeWatch behaves when you invoke an external editor on a file that you have changed, but not saved. If this option is selected, the file is automatically saved. When this option is not selected, the file is not automatically saved, and CodeWatch will present the following prompt in a message box:
This file has been edited but has not been saved. Save it now?
Choose Yes to save the file and start the external editor. Choose No to start the external editor without saving your changes. Choose Cancel to return to CodeWatch without invoking the external editor.
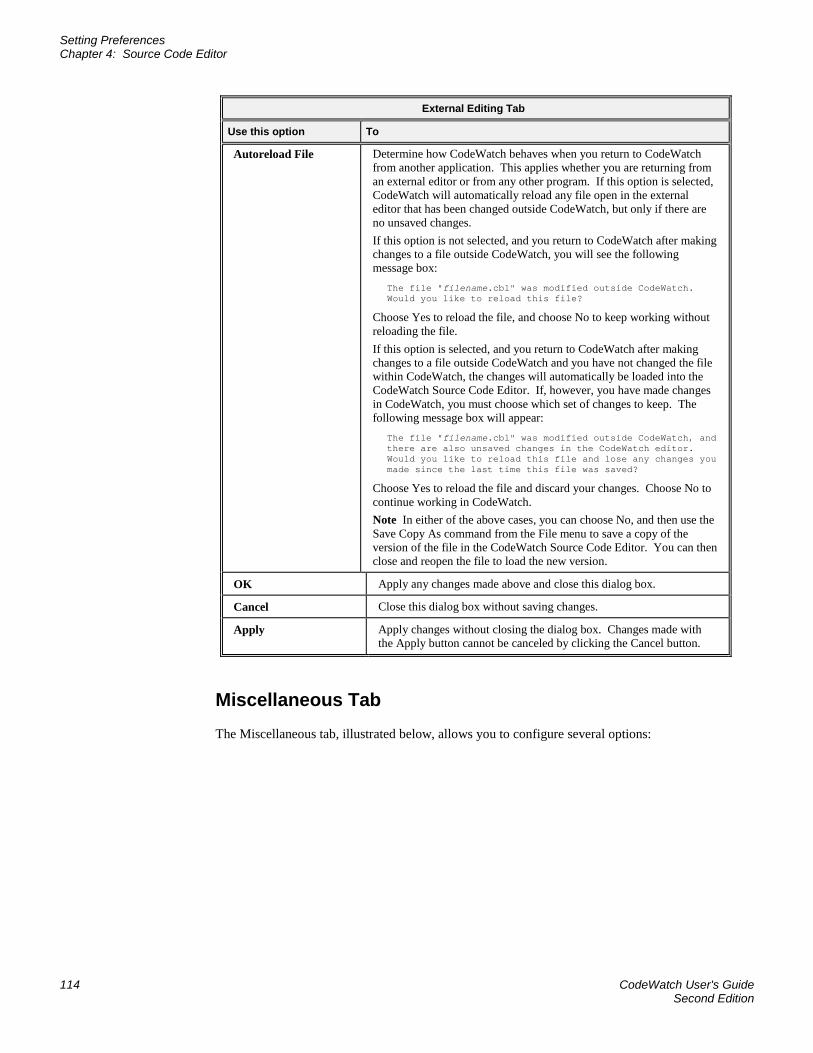
Setting Preferences Chapter 4: Source Code Editor
114 CodeWatch User's Guide Second Edition
External Editing Tab
Use this option To
Autoreload File Determine how CodeWatch behaves when you return to CodeWatch from another application. This applies whether you are returning from an external editor or from any other program. If this option is selected, CodeWatch will automatically reload any file open in the external editor that has been changed outside CodeWatch, but only if there are no unsaved changes. If this option is not selected, and you return to CodeWatch after making changes to a file outside CodeWatch, you will see the following message box:
The file "filename.cbl" was modified outside CodeWatch. Would you like to reload this file?
Choose Yes to reload the file, and choose No to keep working without reloading the file. If this option is selected, and you return to CodeWatch after making changes to a file outside CodeWatch and you have not changed the file within CodeWatch, the changes will automatically be loaded into the CodeWatch Source Code Editor. If, however, you have made changes in CodeWatch, you must choose which set of changes to keep. The following message box will appear:
The file "filename.cbl" was modified outside CodeWatch, and there are also unsaved changes in the CodeWatch editor. Would you like to reload this file and lose any changes you made since the last time this file was saved?
Choose Yes to reload the file and discard your changes. Choose No to continue working in CodeWatch. Note In either of the above cases, you can choose No, and then use the Save Copy As command from the File menu to save a copy of the version of the file in the CodeWatch Source Code Editor. You can then close and reopen the file to load the new version.
OK Apply any changes made above and close this dialog box.
Cancel Close this dialog box without saving changes.
Apply Apply changes without closing the dialog box. Changes made with the Apply button cannot be canceled by clicking the Cancel button.
Miscellaneous Tab The Miscellaneous tab, illustrated below, allows you to configure several options:

Basic Editing Techniques Chapter 4: Source Code Editor
CodeWatch User's Guide 115 Second Edition
External Editing Tab
Use this option To
Reset All Hidden Warning Messages
Some CodeWatch warnings have an option to suppress future messages. To see these again, check the box and press the OK or Apply button.
Window Style Determines how the document window functions. Select the Workbook Style to use tabs across the bottom of the window, which is preferred but takes up some space in the window. Select Traditional to use the standard MDI style. In either style, a list of open document windows is added to the bottom of the Window menu, and this (or Alt+Tab) can be used to move between Windows.
Windows can be cascaded, tiled, or split when either window style is in effect.
Basic Editing Techniques This section provides an overview of the most common and basic editing tasks in CodeWatch, including the following:
• Moving around in a file (see the next topic)
• Selecting text (see page 118)
• Inserting new text (see page 120)
• Overwriting or replacing text (see page 121)
• Deleting text (see page 121)
• Correcting and editing text (see page 121)
• Cutting, copying, and pasting text (see page 123)
• Using the Windows Clipboard to duplicate or move text (see page 123)
You may also find it helpful to refer to the mouse and keyboard techniques, as described in How to Move with the Mouse (on page 116) and How to Move with the Keyboard (on page 117).
Basic Editing Techniques Chapter 4: Source Code Editor
116 CodeWatch User's Guide Second Edition
Moving Around in a File To move around and control the part of the file that is visible in a Source Code/Edit window, you can use the mouse or the keyboard. Both techniques are discussed in this section, starting with the mouse-based choices. First, however, let’s review the insertion point (also known as the cursor or caret). You use the insertion point to specify the location you want to edit in the file.
Insertion Point
The insertion point indicates your current position in the file. The insertion point on the status bar in CodeWatch is referred to as the “Edit point.”
The visual appearance of the insertion point corresponds to the type of text-entry mode: Insert mode, Overtype mode, and Selection mode. You are in Selection mode when you select one or more characters by dragging the mouse or using the keyboard. In all other cases, you are in Insert or Overtype mode. The Ins (Insert) key toggles between Insert mode and Overtype mode. An indicator on the status bar is blank when you are in Insert mode, and indicates OVR when you are in Overtype mode.
For more details on the appearance of the insertion point and these three text-entry mode options, see Selecting Text (on page 118).
You can move the insertion point anywhere within the text of a line on the screen by positioning the I-beam mouse pointer to the desired location and clicking the left mouse button. You can also move the insertion point using the direction keys on the keyboard, as described in Table 3 on page 117.
Note There is one essential difference between using the direction keys on the keyboard to move or page through a file and using the mouse to move or scroll through a file. When you use the keyboard, the insertion point will travel with you as you move through the file. When you use the mouse, however, the insertion point does not change location and remains where it was before you moved. For example, if you use the mouse to view another part of your file and then start entering text, CodeWatch returns you to your starting place and anything you have typed is entered at the original insertion point location.
How to Move with the Mouse
The primary mouse-based navigation tools are the horizontal and vertical scroll bars, and the mouse wheel (if your mouse is so equipped). The boxes within the scroll bars are called scroll boxes, and the arrows at either end of each scroll bar are called scroll arrows.
Note To move the insertion point to a position in the file that is not currently visible, use the scroll bars to make the position visible, then position the I-beam mouse pointer and click the mouse button.
Using the Vertical Scroll Bar
To move through your file one line at a time, click on the scroll arrow at the top or bottom of the vertical scroll bar. Click the bottom arrow to scroll down—or forward—through a file and the top arrow to scroll up—or backward. To move through a file one full screen at a time, click anywhere within the scroll bar—above the scroll box to scroll up, or below the box to scroll down. You can also quickly and continuously scroll forward and backward through a file by clicking and holding down the mouse button over the scroll arrow.
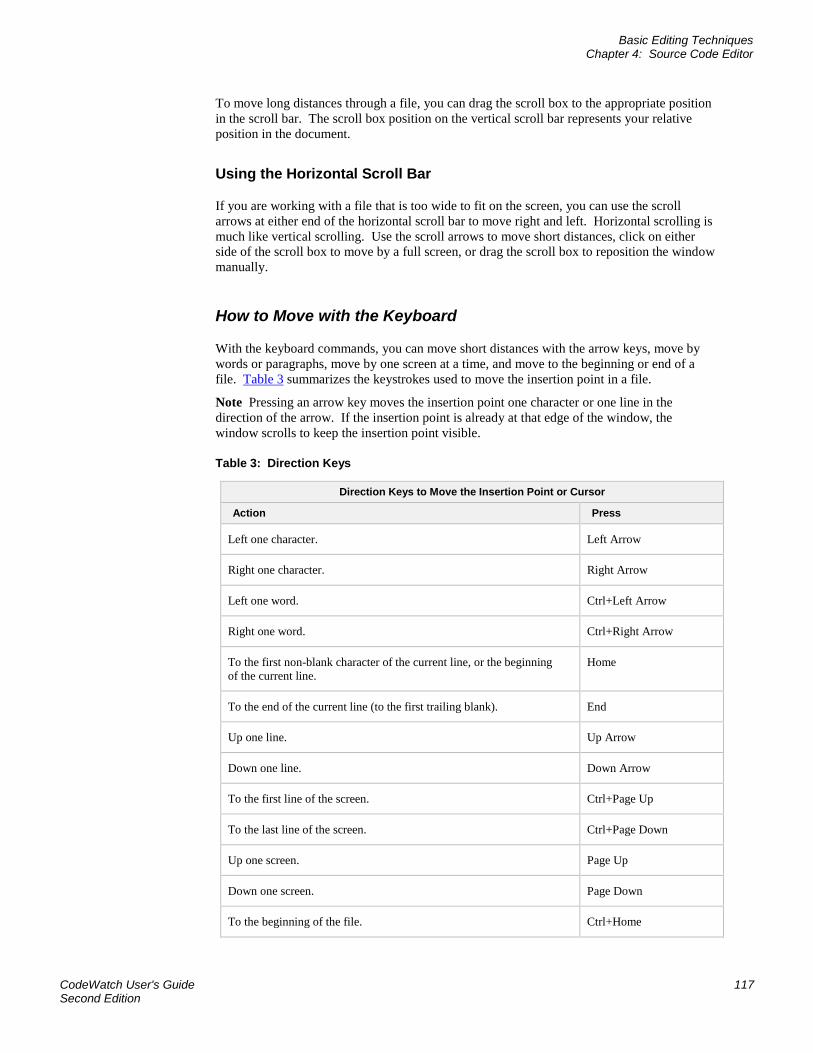
Basic Editing Techniques Chapter 4: Source Code Editor
CodeWatch User's Guide 117 Second Edition
To move long distances through a file, you can drag the scroll box to the appropriate position in the scroll bar. The scroll box position on the vertical scroll bar represents your relative position in the document.
Using the Horizontal Scroll Bar
If you are working with a file that is too wide to fit on the screen, you can use the scroll arrows at either end of the horizontal scroll bar to move right and left. Horizontal scrolling is much like vertical scrolling. Use the scroll arrows to move short distances, click on either side of the scroll box to move by a full screen, or drag the scroll box to reposition the window manually.
How to Move with the Keyboard
With the keyboard commands, you can move short distances with the arrow keys, move by words or paragraphs, move by one screen at a time, and move to the beginning or end of a file. Table 3 summarizes the keystrokes used to move the insertion point in a file.
Note Pressing an arrow key moves the insertion point one character or one line in the direction of the arrow. If the insertion point is already at that edge of the window, the window scrolls to keep the insertion point visible.
Table 3: Direction Keys
Direction Keys to Move the Insertion Point or Cursor
Action Press
Left one character. Left Arrow
Right one character. Right Arrow
Left one word. Ctrl+Left Arrow
Right one word. Ctrl+Right Arrow
To the first non-blank character of the current line, or the beginning of the current line.
Home
To the end of the current line (to the first trailing blank). End
Up one line. Up Arrow
Down one line. Down Arrow
To the first line of the screen. Ctrl+Page Up
To the last line of the screen. Ctrl+Page Down
Up one screen. Page Up
Down one screen. Page Down
To the beginning of the file. Ctrl+Home

Basic Editing Techniques Chapter 4: Source Code Editor
118 CodeWatch User's Guide Second Edition
Direction Keys to Move the Insertion Point or Cursor
Action Press
To the end of the file. Ctrl+End
To one tab stop to the right. Tab
To one tab stop to the left. Shift+Tab (or Back Tab)
To the next item matching the last search item. F3
To the previous item matching the list search item. Shift+F3
To the next word that matches the word under the cursor. Ctrl+F3
To the previous word that matches the word under the cursor. Ctrl+Shift+F3
Into the next pane if this window is split. Ctrl+F6
Into the previous pane if this window is split. Ctrl+Shift+F6
Direction Keys To Move the Window over the Document
Action Press
Scroll the window up one line. Ctrl+Down Arrow
Scroll the window down one line. Ctrl+Up Arrow
Selecting Text Before you can edit a given portion of text, you first have to select it. When you select text, the CodeWatch Source Code Editor enters Selection mode, and the insertion point is displayed highlighting the selected text in reverse video (white text and graphics on a black background rather than the normal black on white).
Note Throughout this user’s guide, this reverse video effect is referred to as selected text or highlighted text.
You can select one or more characters of text in order to edit the entire selection as a single unit. To cancel a selection (and return to Insert or Overtype mode), position the I-beam mouse pointer outside the selected text and click the mouse button, or use any of the direction keys described previously in Table 3. See also Inserting New Text (on page 120) and Overwriting or Replacing Text (on page 121).
You can select text in many ways using the mouse or the keyboard. Each approach offers its own advantages.
How to Select Text with the Mouse
The following sections describe ways to select text using the mouse. To cancel a selection using the mouse, click anywhere outside the selection in the window, or press the Esc key.
Basic Editing Techniques Chapter 4: Source Code Editor
CodeWatch User's Guide 119 Second Edition
Selecting a Word
To select an entire word, hold down the Ctrl key, and single-click in the word. The entire word will be highlighted. Pressing Shift+Ctrl+W has the same effect.
Double-clicking also selects a word. In addition, if the program is running, the Inspect/Modify dialog box (see page 66) is displayed and the word is displayed as if it were an identifier.
Selecting Entire Lines
To select a single line, click in the gutter to the left of the line of text. The entire line will be highlighted. Dragging the mouse in the gutter selects multiple lines.
To select multiple lines, position the I-beam mouse pointer and drag the insertion point so that text from at least two lines is selected.
Selecting the Entire Document
To select the entire document, hold down the Ctrl key and click in the gutter, choose Select All from the Edit menu, or press Ctrl+A anywhere in the file.
Selecting Multiple Characters or Lines
To select one or more characters, position the I-beam mouse pointer and drag over the desired text. Begin by positioning the I-beam mouse pointer just to the left of the text you wish to select. Press and hold down the left mouse button, and without releasing the button, drag to the right until you have highlighted the desired text. Release the mouse button. The characters will remain highlighted. You can use dragging to select any size block of text, from a single character to an entire file.
Similarly, dragging in the gutter will select more than one entire line.
Block Selection
To select a rectangular block of text, hold down the Alt key, and click in one corner of the selection. While holding down the mouse key, drag the mouse to the opposite corner (it need not be in the window—the Source Code/Edit window will scroll if necessary). All text in the rectangle will be selected.
Extending a Selection
To extend a selection, hold down the Shift key while dragging with the mouse.
• To select all text between the cursor and another location on the screen, hold down the Shift key and click with the mouse. All text between the cursor position and the point where the mouse was clicked will be selected.
• If text is selected, you can reshape the selection by holding down the Shift key and clicking with the mouse. All text between the origin of the selection and the location where you clicked will be selected.
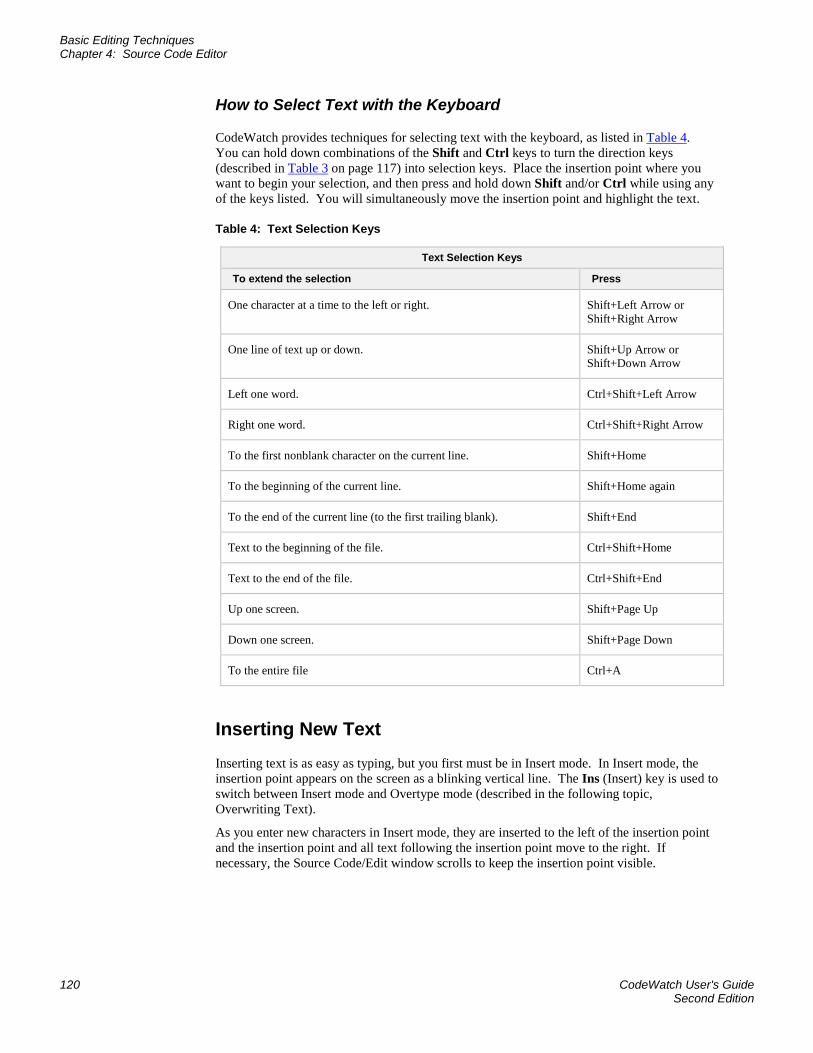
Basic Editing Techniques Chapter 4: Source Code Editor
120 CodeWatch User's Guide Second Edition
How to Select Text with the Keyboard
CodeWatch provides techniques for selecting text with the keyboard, as listed in Table 4. You can hold down combinations of the Shift and Ctrl keys to turn the direction keys (described in Table 3 on page 117) into selection keys. Place the insertion point where you want to begin your selection, and then press and hold down Shift and/or Ctrl while using any of the keys listed. You will simultaneously move the insertion point and highlight the text.
Table 4: Text Selection Keys
Text Selection Keys
To extend the selection Press
One character at a time to the left or right. Shift+Left Arrow or Shift+Right Arrow
One line of text up or down. Shift+Up Arrow or Shift+Down Arrow
Left one word. Ctrl+Shift+Left Arrow
Right one word. Ctrl+Shift+Right Arrow
To the first nonblank character on the current line. Shift+Home
To the beginning of the current line. Shift+Home again
To the end of the current line (to the first trailing blank). Shift+End
Text to the beginning of the file. Ctrl+Shift+Home
Text to the end of the file. Ctrl+Shift+End
Up one screen. Shift+Page Up
Down one screen. Shift+Page Down
To the entire file Ctrl+A
Inserting New Text Inserting text is as easy as typing, but you first must be in Insert mode. In Insert mode, the insertion point appears on the screen as a blinking vertical line. The Ins (Insert) key is used to switch between Insert mode and Overtype mode (described in the following topic, Overwriting Text).
As you enter new characters in Insert mode, they are inserted to the left of the insertion point and the insertion point and all text following the insertion point move to the right. If necessary, the Source Code/Edit window scrolls to keep the insertion point visible.
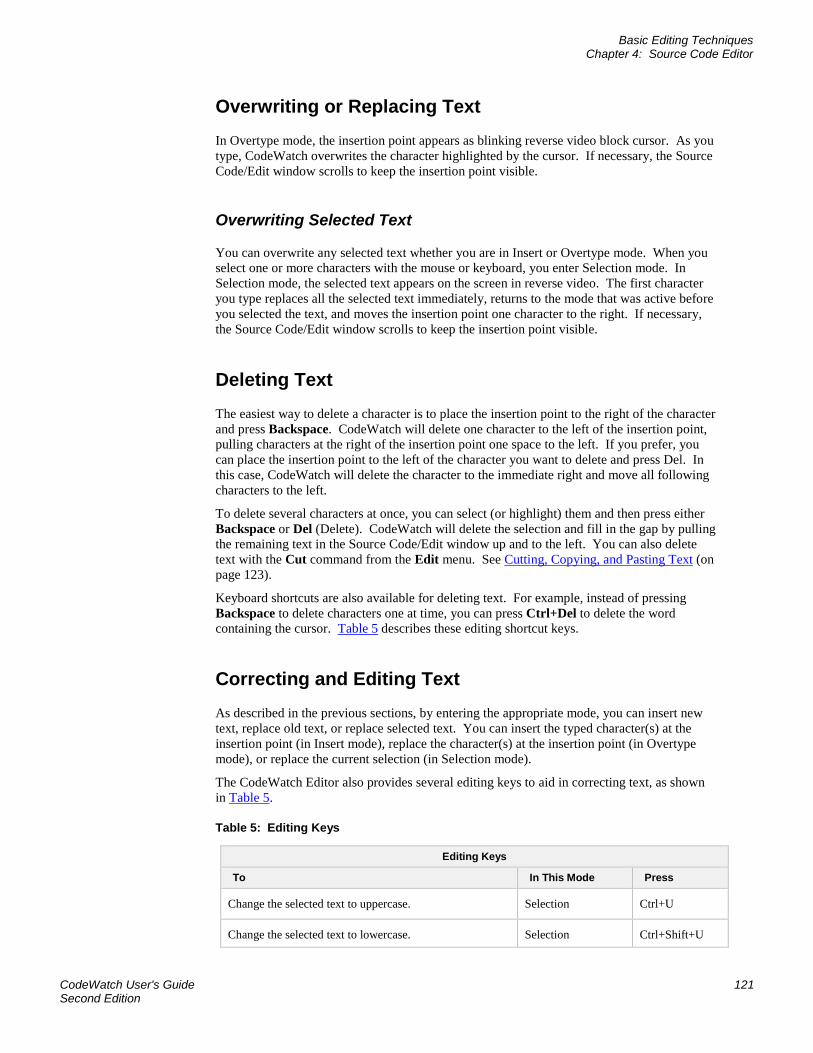
Basic Editing Techniques Chapter 4: Source Code Editor
CodeWatch User's Guide 121 Second Edition
Overwriting or Replacing Text In Overtype mode, the insertion point appears as blinking reverse video block cursor. As you type, CodeWatch overwrites the character highlighted by the cursor. If necessary, the Source Code/Edit window scrolls to keep the insertion point visible.
Overwriting Selected Text
You can overwrite any selected text whether you are in Insert or Overtype mode. When you select one or more characters with the mouse or keyboard, you enter Selection mode. In Selection mode, the selected text appears on the screen in reverse video. The first character you type replaces all the selected text immediately, returns to the mode that was active before you selected the text, and moves the insertion point one character to the right. If necessary, the Source Code/Edit window scrolls to keep the insertion point visible.
Deleting Text The easiest way to delete a character is to place the insertion point to the right of the character and press Backspace. CodeWatch will delete one character to the left of the insertion point, pulling characters at the right of the insertion point one space to the left. If you prefer, you can place the insertion point to the left of the character you want to delete and press Del. In this case, CodeWatch will delete the character to the immediate right and move all following characters to the left.
To delete several characters at once, you can select (or highlight) them and then press either Backspace or Del (Delete). CodeWatch will delete the selection and fill in the gap by pulling the remaining text in the Source Code/Edit window up and to the left. You can also delete text with the Cut command from the Edit menu. See Cutting, Copying, and Pasting Text (on page 123).
Keyboard shortcuts are also available for deleting text. For example, instead of pressing Backspace to delete characters one at time, you can press Ctrl+Del to delete the word containing the cursor. Table 5 describes these editing shortcut keys.
Correcting and Editing Text As described in the previous sections, by entering the appropriate mode, you can insert new text, replace old text, or replace selected text. You can insert the typed character(s) at the insertion point (in Insert mode), replace the character(s) at the insertion point (in Overtype mode), or replace the current selection (in Selection mode).
The CodeWatch Editor also provides several editing keys to aid in correcting text, as shown in Table 5.
Table 5: Editing Keys
Editing Keys
To In This Mode Press
Change the selected text to uppercase. Selection Ctrl+U
Change the selected text to lowercase. Selection Ctrl+Shift+U
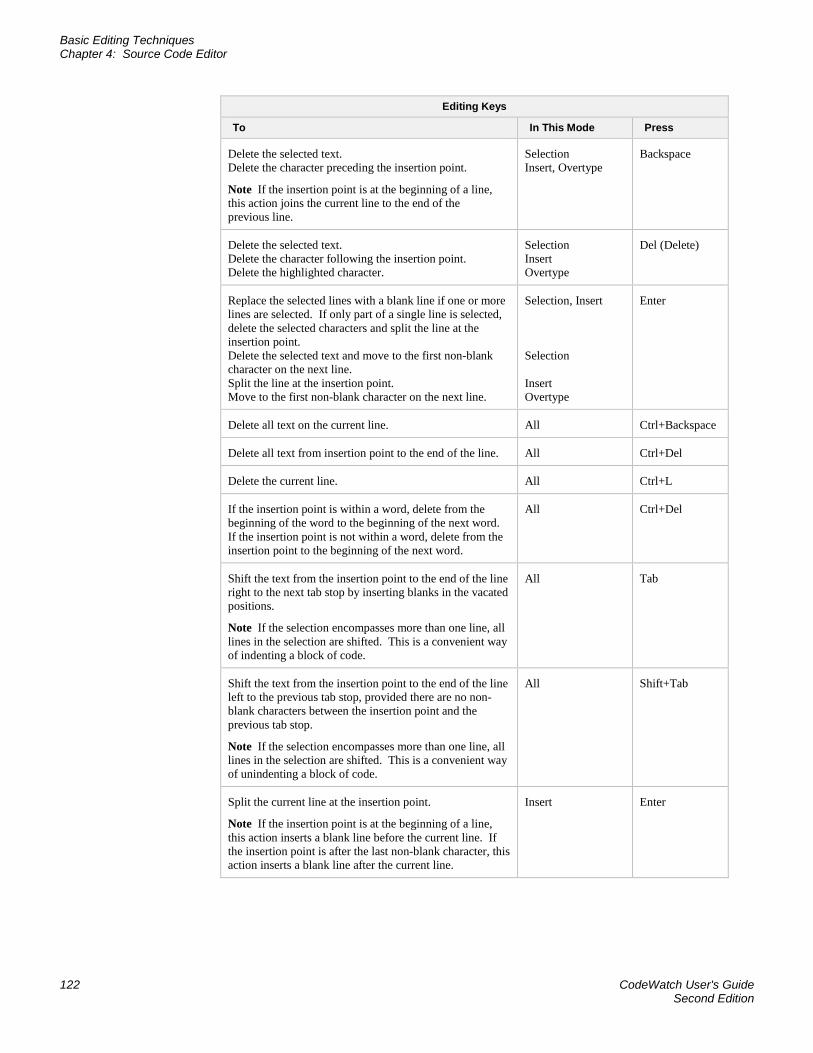
Basic Editing Techniques Chapter 4: Source Code Editor
122 CodeWatch User's Guide Second Edition
Editing Keys
To In This Mode Press
Delete the selected text. Delete the character preceding the insertion point.
Note If the insertion point is at the beginning of a line, this action joins the current line to the end of the previous line.
Selection Insert, Overtype
Backspace
Delete the selected text. Delete the character following the insertion point. Delete the highlighted character.
Selection Insert Overtype
Del (Delete)
Replace the selected lines with a blank line if one or more lines are selected. If only part of a single line is selected, delete the selected characters and split the line at the insertion point. Delete the selected text and move to the first non-blank character on the next line. Split the line at the insertion point. Move to the first non-blank character on the next line.
Selection, Insert Selection Insert Overtype
Enter
Delete all text on the current line. All Ctrl+Backspace
Delete all text from insertion point to the end of the line. All Ctrl+Del
Delete the current line. All Ctrl+L
If the insertion point is within a word, delete from the beginning of the word to the beginning of the next word. If the insertion point is not within a word, delete from the insertion point to the beginning of the next word.
All Ctrl+Del
Shift the text from the insertion point to the end of the line right to the next tab stop by inserting blanks in the vacated positions.
Note If the selection encompasses more than one line, all lines in the selection are shifted. This is a convenient way of indenting a block of code.
All Tab
Shift the text from the insertion point to the end of the line left to the previous tab stop, provided there are no non-blank characters between the insertion point and the previous tab stop.
Note If the selection encompasses more than one line, all lines in the selection are shifted. This is a convenient way of unindenting a block of code.
All Shift+Tab
Split the current line at the insertion point.
Note If the insertion point is at the beginning of a line, this action inserts a blank line before the current line. If the insertion point is after the last non-blank character, this action inserts a blank line after the current line.
Insert Enter
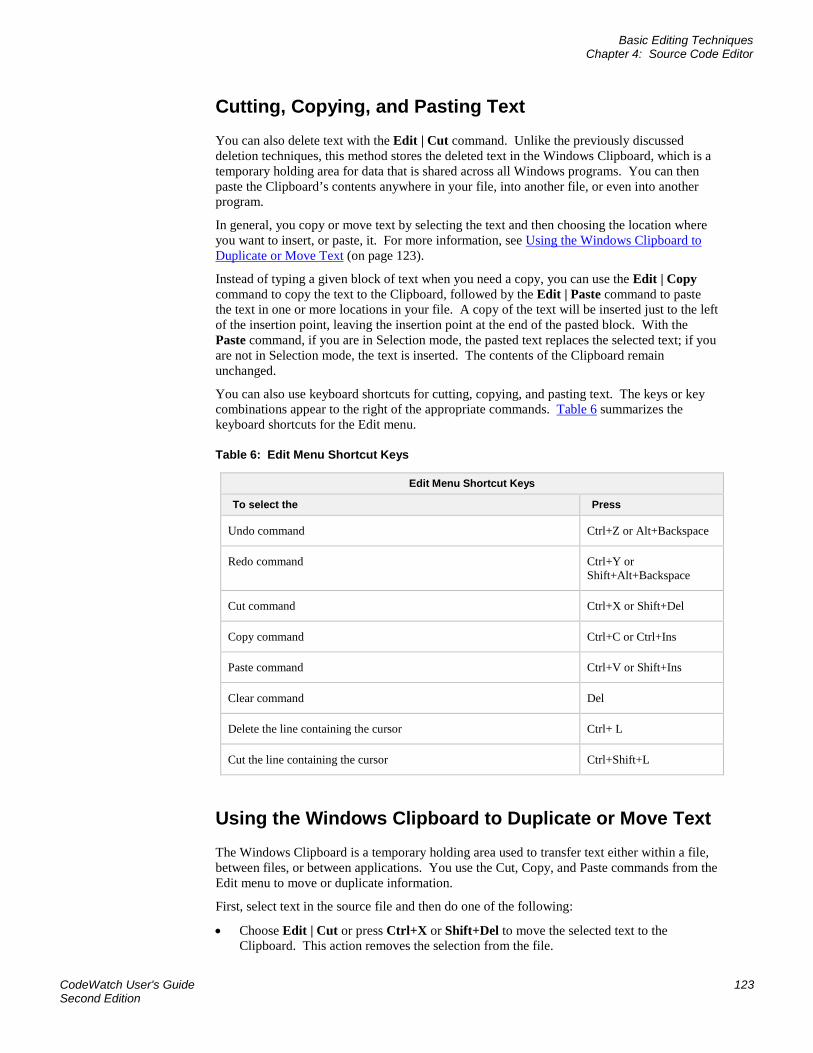
Basic Editing Techniques Chapter 4: Source Code Editor
CodeWatch User's Guide 123 Second Edition
Cutting, Copying, and Pasting Text You can also delete text with the Edit | Cut command. Unlike the previously discussed deletion techniques, this method stores the deleted text in the Windows Clipboard, which is a temporary holding area for data that is shared across all Windows programs. You can then paste the Clipboard’s contents anywhere in your file, into another file, or even into another program.
In general, you copy or move text by selecting the text and then choosing the location where you want to insert, or paste, it. For more information, see Using the Windows Clipboard to Duplicate or Move Text (on page 123).
Instead of typing a given block of text when you need a copy, you can use the Edit | Copy command to copy the text to the Clipboard, followed by the Edit | Paste command to paste the text in one or more locations in your file. A copy of the text will be inserted just to the left of the insertion point, leaving the insertion point at the end of the pasted block. With the Paste command, if you are in Selection mode, the pasted text replaces the selected text; if you are not in Selection mode, the text is inserted. The contents of the Clipboard remain unchanged.
You can also use keyboard shortcuts for cutting, copying, and pasting text. The keys or key combinations appear to the right of the appropriate commands. Table 6 summarizes the keyboard shortcuts for the Edit menu.
Table 6: Edit Menu Shortcut Keys
Edit Menu Shortcut Keys
To select the Press
Undo command Ctrl+Z or Alt+Backspace
Redo command Ctrl+Y or Shift+Alt+Backspace
Cut command Ctrl+X or Shift+Del
Copy command Ctrl+C or Ctrl+Ins
Paste command Ctrl+V or Shift+Ins
Clear command Del
Delete the line containing the cursor Ctrl+ L
Cut the line containing the cursor Ctrl+Shift+L
Using the Windows Clipboard to Duplicate or Move Text The Windows Clipboard is a temporary holding area used to transfer text either within a file, between files, or between applications. You use the Cut, Copy, and Paste commands from the Edit menu to move or duplicate information.
First, select text in the source file and then do one of the following:
• Choose Edit | Cut or press Ctrl+X or Shift+Del to move the selected text to the Clipboard. This action removes the selection from the file.
Basic Editing Techniques Chapter 4: Source Code Editor
124 CodeWatch User's Guide Second Edition
• Choose Edit | Copy or press Ctrl+C or Ctrl+Ins to copy the selected text to the Clipboard. This action leaves the original text in the file.
Next, position the insertion point in the destination (or target) file and do the following:
• Choose Edit | Paste or press Ctrl+V or Shift+Ins to insert the selected text. You can do this any number of times.
Only one Clipboard is available to all Windows programs, so any cut or copy operation in any program will replace the contents of the Clipboard.
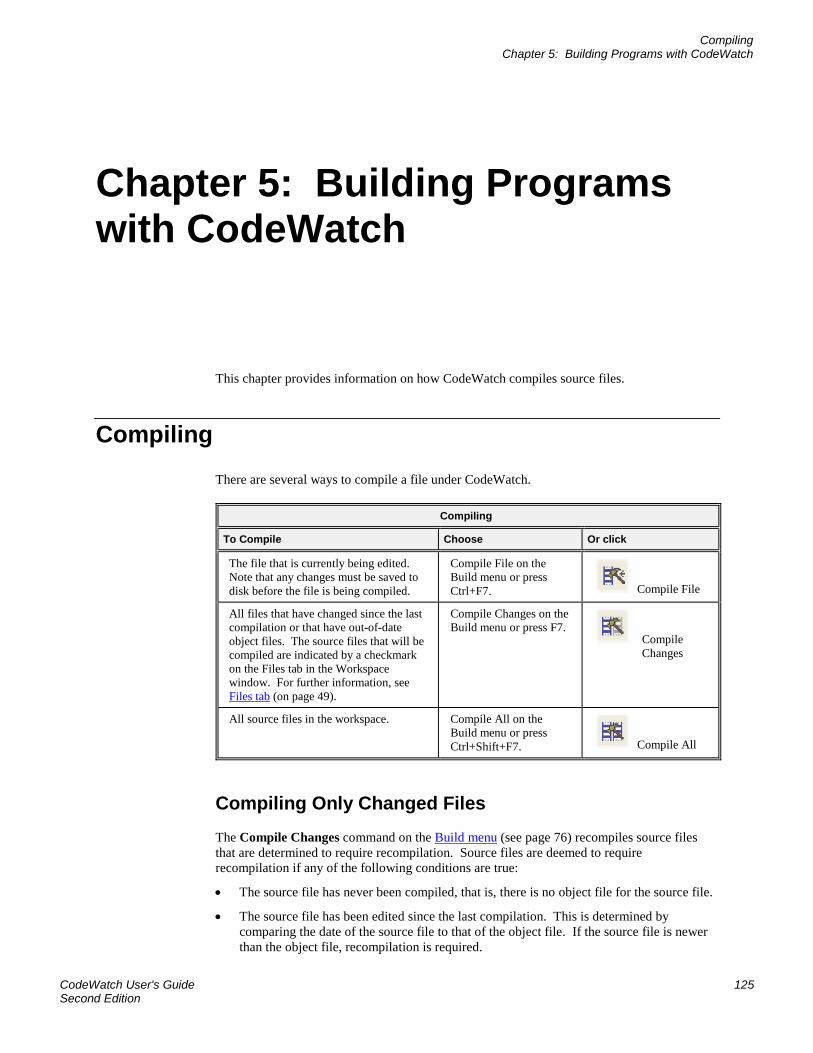
Compiling Chapter 5: Building Programs with CodeWatch
CodeWatch User's Guide 125 Second Edition
Chapter 5: Building Programs with CodeWatch
This chapter provides information on how CodeWatch compiles source files.
Compiling There are several ways to compile a file under CodeWatch.
Compiling
To Compile Choose Or click
The file that is currently being edited. Note that any changes must be saved to disk before the file is being compiled.
Compile File on the Build menu or press Ctrl+F7. Compile File
All files that have changed since the last compilation or that have out-of-date object files. The source files that will be compiled are indicated by a checkmark on the Files tab in the Workspace window. For further information, see Files tab (on page 49).
Compile Changes on the Build menu or press F7.
Compile Changes
All source files in the workspace. Compile All on the Build menu or press Ctrl+Shift+F7. Compile All
Compiling Only Changed Files The Compile Changes command on the Build menu (see page 76) recompiles source files that are determined to require recompilation. Source files are deemed to require recompilation if any of the following conditions are true:
• The source file has never been compiled, that is, there is no object file for the source file.
• The source file has been edited since the last compilation. This is determined by comparing the date of the source file to that of the object file. If the source file is newer than the object file, recompilation is required.
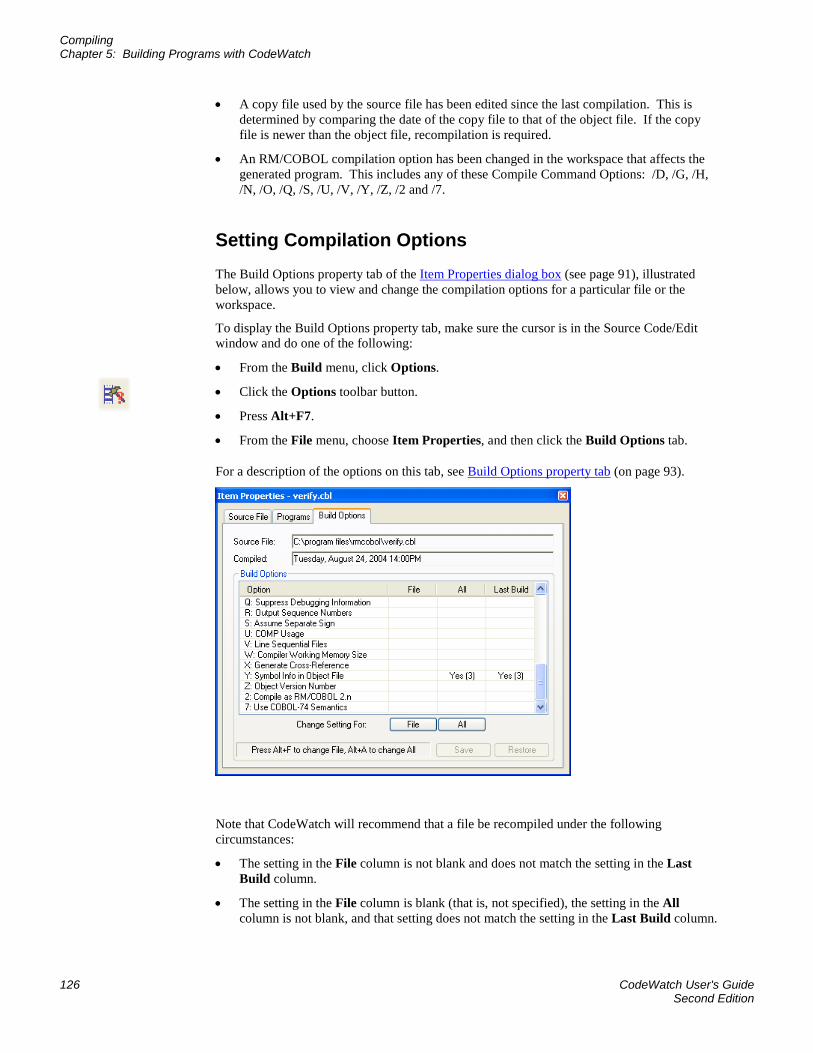
Compiling Chapter 5: Building Programs with CodeWatch
126 CodeWatch User's Guide Second Edition
• A copy file used by the source file has been edited since the last compilation. This is determined by comparing the date of the copy file to that of the object file. If the copy file is newer than the object file, recompilation is required.
• An RM/COBOL compilation option has been changed in the workspace that affects the generated program. This includes any of these Compile Command Options: /D, /G, /H, /N, /O, /Q, /S, /U, /V, /Y, /Z, /2 and /7.
Setting Compilation Options The Build Options property tab of the Item Properties dialog box (see page 91), illustrated below, allows you to view and change the compilation options for a particular file or the workspace.
To display the Build Options property tab, make sure the cursor is in the Source Code/Edit window and do one of the following:
• From the Build menu, click Options.
• Click the Options toolbar button.
• Press Alt+F7.
• From the File menu, choose Item Properties, and then click the Build Options tab.
For a description of the options on this tab, see Build Options property tab (on page 93).
Note that CodeWatch will recommend that a file be recompiled under the following circumstances:
• The setting in the File column is not blank and does not match the setting in the Last Build column.
• The setting in the File column is blank (that is, not specified), the setting in the All column is not blank, and that setting does not match the setting in the Last Build column.
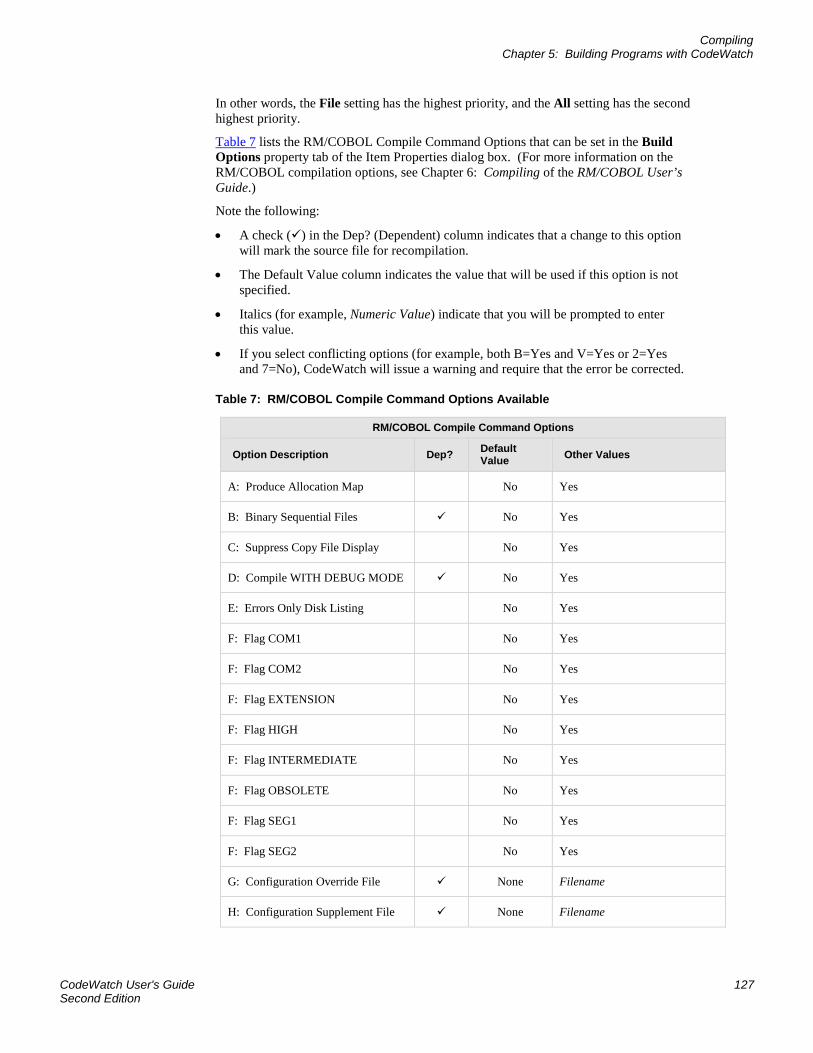
Compiling Chapter 5: Building Programs with CodeWatch
CodeWatch User's Guide 127 Second Edition
In other words, the File setting has the highest priority, and the All setting has the second highest priority.
Table 7 lists the RM/COBOL Compile Command Options that can be set in the Build Options property tab of the Item Properties dialog box. (For more information on the RM/COBOL compilation options, see Chapter 6: Compiling of the RM/COBOL User’s Guide.)
Note the following:
• A check () in the Dep? (Dependent) column indicates that a change to this option will mark the source file for recompilation.
• The Default Value column indicates the value that will be used if this option is not specified.
• Italics (for example, Numeric Value) indicate that you will be prompted to enter this value.
• If you select conflicting options (for example, both B=Yes and V=Yes or 2=Yes and 7=No), CodeWatch will issue a warning and require that the error be corrected.
Table 7: RM/COBOL Compile Command Options Available
RM/COBOL Compile Command Options
Option Description Dep? Default Value Other Values
A: Produce Allocation Map No Yes
B: Binary Sequential Files No Yes
C: Suppress Copy File Display No Yes
D: Compile WITH DEBUG MODE No Yes
E: Errors Only Disk Listing No Yes
F: Flag COM1 No Yes
F: Flag COM2 No Yes
F: Flag EXTENSION No Yes
F: Flag HIGH No Yes
F: Flag INTERMEDIATE No Yes
F: Flag OBSOLETE No Yes
F: Flag SEG1 No Yes
F: Flag SEG2 No Yes
G: Configuration Override File None Filename
H: Configuration Supplement File None Filename
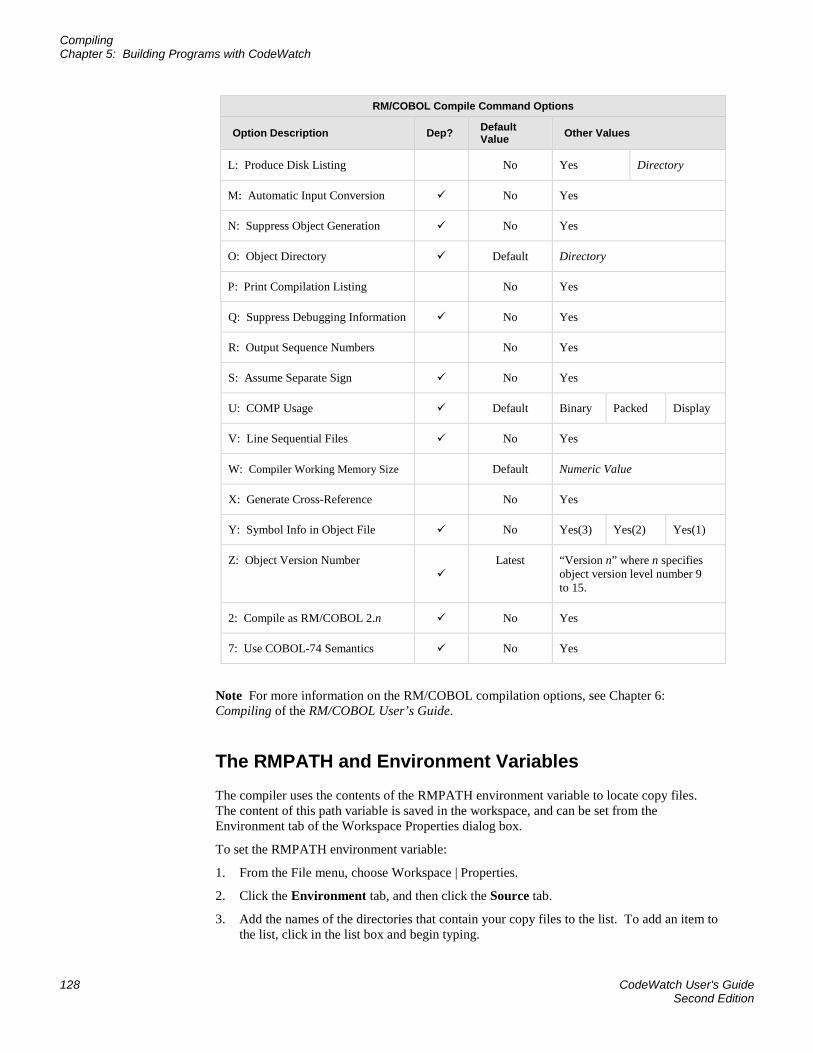
Compiling Chapter 5: Building Programs with CodeWatch
128 CodeWatch User's Guide Second Edition
RM/COBOL Compile Command Options
Option Description Dep? Default Value Other Values
L: Produce Disk Listing No Yes Directory
M: Automatic Input Conversion No Yes
N: Suppress Object Generation No Yes
O: Object Directory Default Directory
P: Print Compilation Listing No Yes
Q: Suppress Debugging Information No Yes
R: Output Sequence Numbers No Yes
S: Assume Separate Sign No Yes
U: COMP Usage Default Binary Packed Display
V: Line Sequential Files No Yes
W: Compiler Working Memory Size Default Numeric Value
X: Generate Cross-Reference No Yes
Y: Symbol Info in Object File No Yes(3) Yes(2) Yes(1)
Z: Object Version Number
Latest “Version n” where n specifies object version level number 9 to 15.
2: Compile as RM/COBOL 2.n No Yes
7: Use COBOL-74 Semantics No Yes
Note For more information on the RM/COBOL compilation options, see Chapter 6: Compiling of the RM/COBOL User’s Guide.
The RMPATH and Environment Variables The compiler uses the contents of the RMPATH environment variable to locate copy files. The content of this path variable is saved in the workspace, and can be set from the Environment tab of the Workspace Properties dialog box.
To set the RMPATH environment variable:
1. From the File menu, choose Workspace | Properties.
2. Click the Environment tab, and then click the Source tab.
3. Add the names of the directories that contain your copy files to the list. To add an item to the list, click in the list box and begin typing.
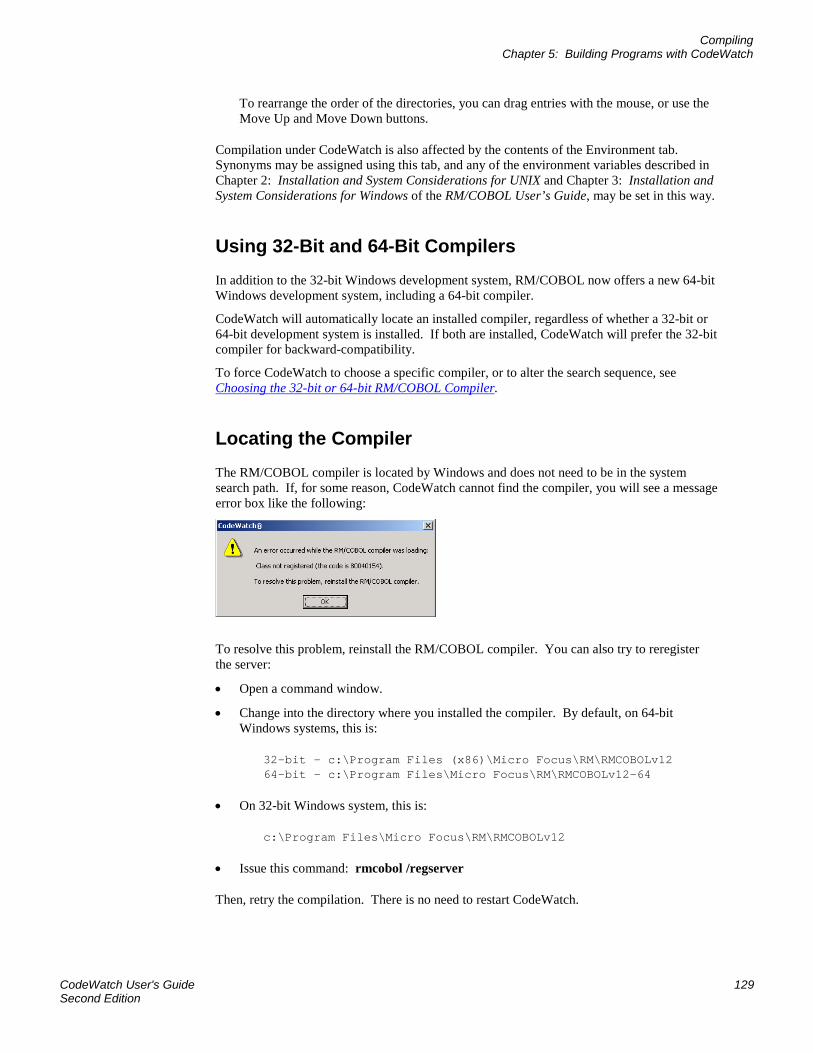
Compiling Chapter 5: Building Programs with CodeWatch
CodeWatch User's Guide 129 Second Edition
To rearrange the order of the directories, you can drag entries with the mouse, or use the Move Up and Move Down buttons.
Compilation under CodeWatch is also affected by the contents of the Environment tab. Synonyms may be assigned using this tab, and any of the environment variables described in Chapter 2: Installation and System Considerations for UNIX and Chapter 3: Installation and System Considerations for Windows of the RM/COBOL User’s Guide, may be set in this way.
Using 32-Bit and 64-Bit Compilers In addition to the 32-bit Windows development system, RM/COBOL now offers a new 64-bit Windows development system, including a 64-bit compiler.
CodeWatch will automatically locate an installed compiler, regardless of whether a 32-bit or 64-bit development system is installed. If both are installed, CodeWatch will prefer the 32-bit compiler for backward-compatibility.
To force CodeWatch to choose a specific compiler, or to alter the search sequence, see Choosing the 32-bit or 64-bit RM/COBOL Compiler.
Locating the Compiler The RM/COBOL compiler is located by Windows and does not need to be in the system search path. If, for some reason, CodeWatch cannot find the compiler, you will see a message error box like the following:
To resolve this problem, reinstall the RM/COBOL compiler. You can also try to reregister the server:
• Open a command window.
• Change into the directory where you installed the compiler. By default, on 64-bit Windows systems, this is:
32-bit - c:\Program Files (x86)\Micro Focus\RM\RMCOBOLv12 64-bit - c:\Program Files\Micro Focus\RM\RMCOBOLv12-64
• On 32-bit Windows system, this is:
c:\Program Files\Micro Focus\RM\RMCOBOLv12
• Issue this command: rmcobol /regserver
Then, retry the compilation. There is no need to restart CodeWatch.
Compiling Chapter 5: Building Programs with CodeWatch
130 CodeWatch User's Guide Second Edition
For more information about registering the compiler and runtime executables, see Chapter 3: Installation and System Considerations for Microsoft Windows of the RM/COBOL User’s Guide.
Compiler Output When one of the Build commands is given, CodeWatch takes the following actions:
• The Log window is cleared.
• The Build Results tab in the Data window is cleared.
• You are asked to save any files that are about to be compiled and are being edited, and that have been changed since they were last saved or opened.
• Each file in the list of files that are awaiting compilation is compiled, using the options that are currently set for that file and for the workspace.
− The output of the compiler is sent to the Log window.
− As each file is compiled, the results are also logged into the Build Results tab of the Data window.
• If a file is open in the editor, the file is reloaded and merged with listing information from the program file.
• Files with errors or warnings are highlighted in the Build Results tab of the Data window.
Runtime Options Appendix A: Additional Configuration Options
CodeWatch User's Guide 131 Second Edition
Appendix A: Additional Configuration Options
CodeWatch includes several configuration options and tuning parameters that are not set from within the program. Instead, these options are read from a file called rmcw.ini. This file is created in the current user’s application data directory when CodeWatch is run for the first time. The rmcw.ini file can be edited with any text editor, including the CodeWatch Source Code Editor. To edit this file in CodeWatch, choose Open from the File menu and enter %APPDATA%\Micro Focus\RM\CodeWatch\rmcw.ini.
WARNING The rmcw.ini file contains other keys that are not described below. These keys are for internal use only, and their values should be altered only under the guidance of Micro Focus Customer Care.
Runtime Options The configuration settings for several RM/COBOL Runtime Command Options are discussed in the following topics.
Setting the RM/COBOL Runtime Registry Key The RM/COBOL runtime system uses the following registry key to read configuration information out of the Windows registry. The RuntimeRegistryKey option needs to be set only if you have renamed your runcobol.exe program. In that case, the specified key should be the same as the name of the runtime, without a directory or the .exe extension.
[Defaults] RuntimeRegistryKey=key
This value is read whenever the RM/COBOL runtime is started from within CodeWatch. If not specified, runcobol is used as the key.
Setting the RM/COBOL Runtime Configuration .exe File When CodeWatch is running, a configuration file is normally specified by using the /C and /X Runtime Command Options. However, an RM/COBOL configuration file also can be
Compiler Options Appendix A: Additional Configuration Options
132 CodeWatch User's Guide Second Edition
attached to runcobol.exe by using the Attach Configuration utility (rmattach) program, as described in Appendix G: Utilities of the RM/COBOL User’s Guide. When runcobol.exe is started outside CodeWatch, the attached configuration file is used to modify the behavior of the RM/COBOL runtime.
CodeWatch, however, runs programs without using runcobol.exe. It is possible to specify the location of an runcobol.exe file that has an attached configuration file to emulate the behavior of the standalone runtime.
[Defaults] RuntimeConfigurationEXE=program-file
If such a configuration .exe file is specified, the name of the file is also used as the default registry key unless the RuntimeRegistryKey option is specified. (For more information, see Setting the RM/COBOL Runtime Registry Key on page 131.) The directory containing the .exe file is used to locate the runtime license vault unless the RuntimeLicensePathname option is specified, as described in the following topic, Selecting a Runtime License Vault.
Selecting a Runtime License Vault Because you may have more than one licensed runtime system installed, there may be times when you need to specify that CodeWatch use a particular license vault.
[Defaults] RuntimeLicensePathname=directory
The RuntimeLicensePathname option allows you to specify a directory that contains a license.vlt file. That license vault will be used for all subsequent debugging sessions.
This option is not required if you are using the development system for debugging. It is required only if you have multiple runtime systems installed, or if you have made multiple copies of the runtime.
Compiler Options The configuration settings for several RM/COBOL Compile Command Options are discussed in the following topics.
Setting the RM/COBOL Compiler Registry Key The RM/COBOL compiler uses the following registry key to read configuration information out of the Windows registry. The CompilerRegistryKey option needs to be set only if you have renamed your rmcobol.exe program. In that case, the specified key should be the same as the name of the compiler, without a directory or the .exe extension.
[Defaults] CompilerRegistryKey=key
This value is read whenever the RM/COBOL compiler is started from within CodeWatch. If not specified, rmcobol is used as the key.
Miscellaneous Options Appendix A: Additional Configuration Options
CodeWatch User's Guide 133 Second Edition
Setting the RM/COBOL Compiler Configuration .exe File When compiling, a configuration file is normally specified by using the /G or /H Compile Command Options. However, an RM/COBOL configuration file also can be attached to rmcobol.exe by using the Attach Configuration utility (rmattach) program, as described in Appendix G: Utilities of the RM/COBOL User’s Guide. When rmcobol.exe is started outside CodeWatch, the attached configuration file is used to modify the behavior of the RM/COBOL compiler.
CodeWatch, however, compiles without using rmcobol.exe. It is possible to specify the location of an rmcobol.exe file that has an attached configuration file to emulate the behavior of the standalone compiler.
[Defaults] CompilerConfigurationEXE=program-file
If such a configuration .exe file is specified, the name of the file is also used as the default registry key unless the CompilerRegistryKey is specified. See the previous topic, Setting the RM/COBOL Compiler Registry Key (on page 132).
Choosing the 32-bit or 64-bit RM/COBOL Compiler In addition to the 32-bit Windows development system, RM/COBOL now offers a new 64-bit Windows development system, including a 64-bit compiler.
CodeWatch will automatically locate an installed compiler, regardless of whether a 32-bit or 64-bit development system is installed. If both are installed, CodeWatch will prefer the 32-bit compiler for backward-compatibility.
It is possible to force CodeWatch to prefer the 64-bit compiler by making a manual entry in the CodeWatch configuration file located here:
[Defaults] CompilerSearchOrder=0
The CompilerSearchOrder values may be set to:
0 Look for the 32-bit compiler, then the 64-bit compiler
1 Look for the 64-bit compiler, then the 32-bit compiler
2 Look for only the 32-bit compiler, ignore any 64-bit compiler
3 Look for only the 64-bit compiler, ignore any 32-bit compiler
The new setting takes effect once CodeWatch is restarted.
Miscellaneous Options The configuration settings for several miscellaneous options are discussed in the following topics.
Miscellaneous Options Appendix A: Additional Configuration Options
134 CodeWatch User's Guide Second Edition
Changing the Log Window Font The default font used in the Log window is the same font that is used in the Source Code Editor window
[Defaults] LogFont=font[,size]
The following example illustrates how you can use this option to change the default font to Lucida Console, 9 point, which would allow more lines to be displayed in the Log window:
LogFont=Lucida Console,9
In order to see this change, however, you must close and reopen the Log window.
Setting the Log Window Size Use this option to change number of lines retained in the Log window.
[Defaults] MaxLogLines=value
By default, only the last 150 lines are retained.
Controlling Dependency Checking When you switch from CodeWatch to another window, and then switch back, CodeWatch checks for source and copy files that may have been changed. To prevent a delay from being noticeable, by default, CodeWatch checks ten files at a time. If you have a very large workspace and notice a significant delay when switching from another window (for example, an external editor) back to CodeWatch, you may wish to reduce this number.
[Defaults] IdleCheckDependencyCount=value
Reducing this value may make CodeWatch more responsive when switching windows, but it should not have an effect during normal operations.
Version 12 Enhancements Appendix B: Summary of Enhancements
CodeWatch User's Guide 135 Second Edition
Appendix B: Summary of Enhancements
This appendix provides a summary of the new features and changes in the various releases of CodeWatch. The enhancements and changes for the most recent release described by this document are listed first.
Note The information in this appendix is historical. It was accurate at the time written for the specific version being described. Various features may have changed in later releases, and, possibly, some features may have been removed.
Version 12 Enhancements Version 12 of CodeWatch complies with the RM/COBOL 12 release level.
Note CodeWatch version 12 will operate only with the version 12 RM/COBOL compiler and runtime system. However, RM/COBOL programs that are compiled with previous versions of the development system do not need to be recompiled in order to be used in CodeWatch. Both CodeWatch and the RM/COBOL version 12 development system will coexist with earlier versions on the same machine as long as the installation directories are different.
The other major enhancements in version 12 of CodeWatch include the following:
• CodeWatch now has the ability to debug service programs running under Xcentrisity Business Information Server (BIS) on an IIS web server. The IIS server can be local (that is, on the machine hosting CodeWatch), or remote and text files (for example, server response files) can be edited on the server from within the CodeWatch environment. For more information, see the CodeWatch for Xcentrisity Business Information Server User’s Guide Supplement.
Note Remote compilation and deployment are not supported in this version.
• Filenames and pathnames in saved CodeWatch Workspace Files (that is, in .cwf files), are now stored as relative paths that are based on the directory that contains the saved workspace. As long as the files that make up the workspace can be located relative to the saved workspace file, this enhancement makes it possible to XCOPY a directory tree between workstations, check out a CodeWatch workspace from a version control system, or load a CodeWatch workspace over the network without adjusting pathnames.
• CodeWatch compatibility with Windows Vista and Windows Server 2008 has been improved. The RMCW.INI file is now stored in the

Version 12 Enhancements Appendix B: Summary of Enhancements
136 CodeWatch User's Guide Second Edition
%APPDATA%\RMCOBOL\CodeWatch directory instead of the C:\Windows directory.
This release of CodeWatch also includes numerous defect corrections.
Version 12.12 Enhancements CodeWatch supports the new RM/COBOL 64-bit runtime system.
• If a 64-bit runtime is selected, it is run as a separate process by CodeWatch – specifically, in the DLLHOST.EXE surrogate host process. Note that the 32-bit runtime is executed in-process as before. Because of the different execution environment, there may be some minor differences in the way that 64-bit COBOL programs function under CodeWatch. One example: runtime-created Windows can appear behind the CodeWatch window. In some cases, it’s possible that the program may have displayed a message box or may be waiting for an ACCEPT and that will cause CodeWatch to appear suspended. If, while debugging, you don’t see the runtime window, please move the CodeWatch window or use Alt-Tab or the task bar to bring the runtime window to the front. Note that running CodeWatch on a second monitor avoids this situation completely and is highly recommended.
• When running on Windows 8 and later, 64-bit programs being debugged will be loaded into memory using large base addresses (that is, the program and data will reside above the 4GB line and have a base address that cannot be stored in 32-bits). If your program calls 3rd-party non-COBOL 64-bit programs, these will also be loaded at large base addresses. Because some 64-bit non-COBOL programs are converted 32-bit programs and may still store pointers in 32-bit integers, such 64-bit programs will not tolerate being loaded into the upper reaches of memory. This may cause them to fail when running under CodeWatch, but may run normally or fail intermittently when not running under CodeWatch. To debug such a 3rd-party program, start CodeWatch, run to the point where the 3rd-party program is loaded, and then attach Visual Studio to the DLLHOST.EXE process (not the CodeWatch RMCW.EXE process) and set breakpoints in the code.
This release of CodeWatch also includes numerous defect corrections.
Version 12.14 Enhancements • CodeWatch supports the new RM/COBOL 64-bit development system, including the 64-
bit compiler.
• The RMCW.INI file is now stored in the %APPDATA%\Micro Focus\RM\CodeWatch directory instead of the %APPDATA%\RMCOBOL\CodeWatch directory. However, to maintain compatibility with previous versions, if an RMCW.INI file is found in the previous location, that file will continue to be used and updated.
This release of CodeWatch also includes numerous defect corrections.
Version 11 Enhancements Appendix B: Summary of Enhancements
CodeWatch User's Guide 137 Second Edition
Version 11 Enhancements Version 11 of CodeWatch complies with the RM/COBOL 11 release level and contains fixes for numerous minor problems. This is the first version of the product to support use on the Microsoft Windows Vista operating system.
Version 10 Enhancements Version 10 of CodeWatch complies with the RM/COBOL 10 release level. This version of CodeWatch also contains the following enhancements:
• The CodeWatch source code editor now has the ability to show and hide COPY files. By default, COPY files are now hidden, making source code editing and navigation faster. A hidden COPY file is denoted by a [+] symbol in the right margin of the source edit window. The hidden COPY file text can be revealed by clicking on the [+] symbol, and a revealed COPY file block can be hidden by clicking on the [-] symbol in the margin. In addition, the F11 key toggles the block that contains the cursor, and the View menu and the editor popup menu contain menu picks to perform these operations, and reveal and/or hide all COPY file blocks in the current file.
Note that Find command on the Edit menu will search only visible COPY file blocks. To search all COPY blocks, use the View | Copy Files | Expand All Blocks command.
• Double-clicking in the leftmost column now sets or clears a code breakpoint on that line.
• The File menu contains options to print the current source. The entire source or simply a selected portion of the source can be printed.
• CodeWatch displays a tab containing the name of each open file or window at the bottom of the document area. Clicking on the tab for a particular window brings that window to the top. This is called “workbook” mode, because the document area has the appearance of a binder. The previous mode can be selected with the "Settings" tab in the View | Preferences dialog box. This feature may also be referred to as “tabbed edit windows.”
• CodeWatch can load large projects and save large source files much faster than in previous versions.
This release of CodeWatch also includes fixes for numerous minor problems such as the problem of the system crash caused by double-clicking the Build button, and the failure to restore watchpoints with subscripts when loading a saved workspace.
Version 9 Enhancements Version 9 of CodeWatch complies with the RM/COBOL 9 release level and contains fixes for numerous minor problems. This version of CodeWatch also contains the following enhancements:
• Dependency checking is more complete. COPY file timestamps are now checked and dependency checking is more efficient overall.
• The time required to load large workspaces—that is, workspaces that contain a very large number of source and COPY files has been greatly reduced.
Version 8 Enhancements Appendix B: Summary of Enhancements
138 CodeWatch User's Guide Second Edition
• Improved file loading performance for very large source files, especially when those files contain a large number of COPY file lines. Compilation performance has been improved, also. A progress indicator is displayed on the status bar during long operations.
• Full support for the RM/COBOL compiler ANSI/OEM switches:
1. Workspaces are now declared to use the OEM or ANSI character sets. This selection is a workspace property and affects the editor, compiler, and runtime. The default is the character set chosen when the version 9 development system or runtime system was last installed.
2. Previous versions of CodeWatch made no assumptions about the set of characters used in source files, which could cause OEM character sets to be displayed incorrectly.
3. CodeWatch recognizes and uses the new /cs_ansi and /cs_oem runtime command line options.
4. For OEM workspaces, CodeWatch allows the “RM Euro Codepoint” to be specified. This is useful when choosing a font that does not contain the Euro character as the default font.
For more information, see Character Sets (on page 104).
• A new dialog box is available from the Edit menu (see page 74). The Character Map dialog box displays a grid of characters in the currently-selected character set and also indicates the characters used in the file that is currently being edited. This is useful for editing programs that contain non-ASCII characters.
This dialog box also allows the font face name and font size to be chosen. CodeWatch allows a font to be chosen for OEM mode and a separate font to be chosen for ANSI mode. In OEM workspaces, fonts that contain an OEM or default to the ANSI character set, may be used. In ANSI workspaces, only fonts that use the ANSI character set may be used. For a complete description of this dialog box, see Choosing an Editor Font (on page 107).
For further information, see Character Sets (on page 104).
• The runtime –V (verbose) and –F (fill character) command line options are now recognized.
• CodeWatch now uses Windows XP Visual Styles.
• Educational and Evaluation versions of the RM/COBOL development system are now supported.
• Numerous minor problems have been corrected (such as the problem of the system crash caused by double-clicking the Build button).
Version 8 Enhancements Version 8 of CodeWatch includes several defect corrections, and the product complies with the RM/COBOL 8 release level.
Version 7.5 Enhancements Appendix B: Summary of Enhancements
CodeWatch User's Guide 139 Second Edition
Version 7.5 Enhancements Version 7.5 of CodeWatch contains the following enhancements:
• The ability to edit and compile your programs without leaving CodeWatch.
− It is now possible to see and correct errors and warnings in an external text editor.
− CodeWatch provides complete support for all RM/COBOL compilation options.
• CodeWatch now contains a fully-integrated text editor (called the Source Code Editor), with the following capabilities:
− Unlimited levels of Undo and Redo.
− Search and replace, including regular expression support.
− Ability to invoke an alternate text editor of your choice with just a keystroke. Many external editors can even position the cursor at the current line and column.

Index
CodeWatch User's Guide 141 Second Edition
Index
- (minus sign) 47
$
$ (dollar sign) 117
+
+ (plus sign) 47
A
All caps, as a document convention 3 Angle brackets, in program names 24, 27, 48 Animate button 28, 80 Animate command (Run) 28, 80 Animating the program 28, 80 ANSI 9, 109, 142 Attach Configuration utility (rmattach) 136, 137
B
Bold type, as a document convention 3 Break command (Run) 79 Breakpoint command (Run) 80, 81 Breakpoints
changing 53, 91 deleting 53, 91 disabling 53 displaying (viewing) 52, 77 enabling 53 setting 29, 91
Breakpoints & Watchpoints dialog box 91 Code Breakpoints page 30 Code Breakpoints tab 91 Data Watchpoints page 31 Data Watchpoints tab 92
Breakpoints command (Edit) 76 Breakpoints Tab command (View) 77
Breakpoints tab, Data window 52 Build menu 78, 129 Build Options property page, Item Properties dialog
box 130 Build Options property tab, Item Properties dialog
box 97 Build Results Tab command (View) 77 Build Results tab, Data window 56, 134
C
Call Stack Tab command (View) 77 Call Stack tab, Data window 55 Canceling a selection 123 Character Map dialog box 76, 105 Character sets 8, 39, 76, 86, 105, 108, 116, 142 Clear All command (Run | Breakpoint) 81 Clear command (Run | Breakpoint) 81 Clipboard
cutting, copying, and pasting text onto 127, 128 using with selections 128 with the Edit menu commands (Source Code/Edit
window) 125, 127 Close button 61 Close command 61, 70 Code See Source code Code Breakpoints page, Breakpoints & Watchpoints
dialog box 30 Code Breakpoints tab, Breakpoints & Watchpoints
dialog box 91 code points 108 codepage 108 CodeWatch
animating the program 28, 80 changing the workspace 33 character sets 8 compiling 78, 97, 129 configuration 135 configuring a workspace 20, 35 configuring initialization file (rmcw.ini) 135 enhancements 1, 139 features, new 139, 141, 142 inspecting and modifying data 32, 67 installation 7 license, runtime system 136 main window, described 43 overview 11 rmcw.ini file, configuring 135 running the program 26 saving a workspace 33 setting
breakpoints 29, 52, 53, 76, 77, 91 watchpoints 30, 53, 76, 77, 92
starting 17 stopping the program 33 system considerations 7
Index
142 CodeWatch User's Guide Second Edition
system requirements, installation 7 tutorial, quick start 11 viewing and editing program source code 25, 101 workspace properties, setting 83
Colors, use of in breakpoints 30, 52, 92 in code 32, 56, 68, 103 in watchpoints 53, 94
Command tab, Workspace Properties dialog box 90 Compilation options, setting 97, 130, 131 Compile All command (Build) 78, 129 Compile Changes command (Build) 129 Compile File command (Build) 78, 129 Compiler registry key, configuring 136 Compiling 129
Build menu commands 78 Build Results tab, Data window 56 changed files 129 compilation options, setting 97, 130, 131 environment variables 132, See also Environment
variables locating the RM/COBOL compiler 133 registering the RM/COBOL compiler 133
Configuration 135 compiler options 136 miscellaneous 138 runtime options 135
Context menus Data window 57 Log window 59 Source Code/Edit window 103 Workspace window 50
Conventions and symbols 3 Copy command (Edit) 75
Source Code/Edit window 127, 128 Copy files 49 Customer Care 5 Cut command (Edit) 75
Source Code/Edit window 127, 128
D
Data files inserting 36, 72 type 55 viewing on Data Files tab 54
Data Files Tab command (View) 77 Data Files tab, Data window 54 Data Item command (View) 67, 77 Data items
inspecting 32, 67 pointer 68, 94 type 32, 54, 68, 94
Data Watchpoints page, Breakpoints & Watchpoints dialog box 31
Data Watchpoints tab, Breakpoints & Watchpoints dialog box 92
Data window Breakpoints tab 52 Build Results tab 56 Call Stack tab 55 context-menu commands 57 Data Files tab 54 described 51 illustrated 27 Watchpoints tab 53
Debugging Full Debug Information (Y) compilation option 25,
27, 101 Dependency checking 138 Directory search sequence 25, 88 Dockable windows 46, 47 Docked command
Workspace windows 51, 58, 59 Document menu 60 Document windows 46, 59
closing 62 cycling through 61 menu 60 splitting 62 state of 60
Dollar sign ($) 117
E
Edit Item command (File) 73 Edit menu 74
Source Code/Edit window 127, 128 Editing source code
with external text editor 115, 116, 118 with Source Code Editor 101
Editing techniques 119 correcting and editing text 126 cutting, copying, and pasting 125, 127, 128 deleting text 125 extending selections 124 inserting new text 125 insertion point 120 moving around in a file 120 overwriting selected text 125 overwriting text 125 replacing text 125, 126 selecting text 122 selections, editing operations with the Clipboard
128 using the Windows Clipboard 128
Ellipsis button, directory searches 25, 43, 90, 116 Enhancements to CodeWatch 1, 139 Environment tab, Workspace Properties dialog box
88 Environment variables
Index
CodeWatch User's Guide 143 Second Edition
PATH 23, 38, 42, 85, 89 RMPATH 19, 132 RUNPATH 19, 23, 38, 42, 85, 89
Euro character 142 Exit command (File) 74 Expressions, regular 64 External text editor, configuring 115, 116, 118
F
Features, new 139, 141, 142 File menu 69 Filenames, conventions for 3 Files tab, Workspace window 49 Find command (Edit) 63, 75 Find dialog box 63 Find Next command (Edit) 64, 75 Find Previous command (Edit) 64, 75 Floating command
Workspace windows 51, 58, 59 Floating windows 46, 63 Full Debug Information (Y) compilation option 25,
27, 101
G
Glyphs 108
H
Hyphens, optional, in RM/COBOL compilation and runtime options 4
I Icons, used in Workspace
window 47 Initialization file (rmcw.ini), configuring 135 Insert Items command (File) 72 Insert mode 125 Insertion point 120 Inspect/Modify dialog box 32, 67 Installation 7 Installation and system considerations 7 Introduction page, Workspace wizard 36 Italic, as a document convention 3 Item Properties command (File) 73 Item Properties dialog box 95
Build Options property page 130 Build Options property tab 97 Programs property tab 96 Source File property tab 95
K
Key combinations, document convention for 4
Keyboard basic techniques
correcting and editing text 126 deleting text 125 inserting text 125 moving the insertion point 121 selecting text 124
Keys for editing 126 for moving the insertion point 121 shortcut keys
on Build menu 78 on Edit menu 74 on Edit menu (Source Code/Edit window) 127 on File menu 69 on Run menu 79 on View menu 76 on Window menu 82
L
Library files 20, 23, 42, 49, 89 Licensed runtime system 136 Locating source code files 25, 88, 101 Log window
compiler output 134 configuring the font and point size 138 configuring the number of lines retained 138 context-menu commands 59 described 58 illustrated 27
Log Window command (View) 77
M
Main window, CodeWatch 43 Maximize button 61 Maximize command 61 Menu bar and menus 44, 68 Minimize button 61 Minimize command 61 Minus sign (-) 47 Mouse
basic techniques scrolling with 120 selecting text 122
N
New command (File) 69
O
OEM 109, 142 Open command (File) 70 Options command (Build) 79, 130
Index
144 CodeWatch User's Guide Second Edition
Options tab, Workspace Properties dialog box 86 Organization of this guide 2 Overtype mode 125
P
Paste command (Edit) 75 Source Code/Edit window 127, 128
PATH environment variable 23, 38, 42, 85, 89 Plus sign (+) 47 Pointer data items 68, 94 Preferences dialog box 113
External Editing tab 115, 116, 118 Tabs tab 113
Program files 20, 49 Program Output command (View) 77 Program tab, Workspace Properties dialog box 84 Programs property tab, Item Properties dialog box 96 Programs tab, Workspace window 48 Properties
item 95 workspace 83
R
Recent Workspaces command (File) 74 Redo command (Edit) 75 Registering the RM/COBOL compiler 133 Regular expressions 64 Remove Item command (File) 72 Replace command (Edit) 65, 76 Replace dialog box 65 Restore button 60 Restore command 60 Results | Find Next command (Build) 79 Results | Find Previous command (Build) 79 Resume command (Run) 79 RM/COBOL
character sets 8 rmsetncs utility 9
RMPATH environment variable 19, 132 rmsetncs utility 9 Run | Breakpoint menu 81 Run menu 79 Running
animate the program 28, 80 control flow of execution 29 inspect and modify data 32, 67 modify and view watchpoints 30, 53, 92 program 26 Run | Breakpoint menu 81 Run menu 79 set breakpoints 29, 52, 91 stop program 33
RUNPATH environment variable 19, 23, 38, 42, 85, 89
Runtime Command line options 90 Runtime license 136 Runtime registry key, configuring 135 RuntimeLicensePathname option 136
S
Save As command (File) 70 Save command (File) 70 Save Copy As command (File) 70 Saving a workspace 33 Scroll bars 121 Scrolling 121 Search string characters 64 Select All command (Edit) 75 Select Character Set dialog box 98 Selecting
with the keyboard 124 with the mouse 123
Selecting text 122 Selection mode 122 Set Additional Options page, Workspace wizard 22,
40 Set command (Run | Breakpoint) 81 Set Environment page, Workspace wizard 22, 41 Set Program to Run page, Workspace wizard 21, 38 Shortcut keys
on Build menu 78 on Edit menu 74 on Edit menu (Source Code/Edit window) 127 on File menu 69 on Run | Breakpoint menu 81 on Run menu 79 on View menu 76 on Window menu 82
Source code 49, See also Source Code Editor; Source Code/Edit window
compilation results on Build Results tab 56 compiling 129 editing 25, 101 locating 101 viewing 25, 107
Source Code Editor 101, See also Source code; Source Code/Edit window
Source Code/Edit window See also Source code; Source Code Editor
basic editing techniques 119 correcting and editing text 126 cutting, copying, and pasting 125, 127, 128 deleting text 125 extending selections 124 inserting new text 125 insertion point 120 moving around in a file 120 overwriting selected text 125 overwriting text 125
Index
CodeWatch User's Guide 145 Second Edition
replacing text 125 selecting text 122 selections, editing operations with the Clipboard
128 using the Clipboard 128
context-menu commands 103 creating new source code file 105 editing source code 25, 101, 107 illustrated 28, 102 locating source code files 88, 101 opening existing source code file 106 preferences, setting 113 viewing source code 25, 101, 107
Source File property tab, Item Properties dialog box 95
Source files See Source code; Source Code Editor; Source Code/Edit window
Special characters, regular expressions 65 Splitting windows 62 Start command (Run) 79 Starting CodeWatch
from a DOS Command Prompt 18 from a saved workspace 17 from RM/COBOL Runtime Command line 19 from Windows 17
State | Disable All command (Run | Breakpoint) 82 State | Disable command (Run | Breakpoint) 81 State | Enable All command (Run | Breakpoint) 82 State | Enable command (Run | Breakpoint) 81 State | Toggle command (Run | Breakpoint) 82 Status bar 45 Status Bar command (View) 76 Step Paragraph command (Run) 80 Step Program command (Run) 80 Step Section command (Run) 80 Step Statement command (Run) 80 Stop command (Run) 79 Stopping the program 33 Support services, technical 5 Symbols and conventions 3 Synonyms 23, 42, 89 System considerations 7 System installation 7 System requirements, installation 7
T
Tab characters 113 Text patterns 64 Title bar 44 To Cursor command (Run) 80 To Program Change command (Run) 80 Toggle command (Run | Breakpoint) 81 Toolbar 45, 68 Toolbar command (View) 76, 77 Tutorial 11
U
Undo command (Edit) 75, 82
V
View menu 76
W
Watchpoints changing 92 deleting 92 displaying 53, 77 setting 30, 92
Watchpoints command (Edit) 76 Watchpoints Tab command (View) 77 Watchpoints tab, Data window 53 Window menu 82 Windows
dockable 46, 47 document 46, 59 floating 46, 63
Workspace changing 33 commands (File) 71 configuring 20, 35 defined 21, 35 filename extension 17, 34 properties, setting 83 saving 33 starting CodeWatch from 17 window
context-menu commands 50 described 47 icons used 47 illustrated 24, 27
wizard 11, 20, 35 Workspace | Close command (File) 71 Workspace | New command (File) 71 Workspace | Open command (File) 71 Workspace | Properties command (File) 71 Workspace | Save As command (File) 71 Workspace | Save command (File) 71 Workspace Properties dialog box 83
Command tab 90 Environment tab 88 Options tab 86 Program tab 84
Workspace window context-menu commands 50 described 47 Files tab 49 icons used 47 illustrated 24, 27 Programs tab 48
Index
146 CodeWatch User's Guide Second Edition
types of dockable 46, 47 document 46, 59 floating 46, 63
Workspace wizard 11, 20, 35 Introduction page 36 Set Additional Options page 40 Set Environment page 41 Set Program to Run page 38