
Interior Lighting in Mental Ray - Treddi.com - Il Portale Italiano Sulla Grafica 3D
Upload
mukesh-rayCategory
view
119download
5
Part 2
Jennifer O'Connor
College of Lake County
Part 2
mental ray 102: Lighting

mental ray 102: The Essentials Lighting 2
MENTAL RAY 102: LIGHTING
Updated: December 2008
Jennifer O’Connor
College of Lake County, Grayslake, Illinois
joconnor at clcillinois.edu
jenni at 4DA-inc.com
There are a number of new features in the new mental ray version 3.5 and 3.6 that make it easier to
make great renderings. We’ll take a look at a few of the new features, and some of the things I’ve
been using a lot lately.
There have been a lot of things written about mental ray, and I’ll try not to duplicate too much here.
My goal is to be succinct, to cover some of the essentials to give you an overview, and get you going
with this powerful renderer in 3ds max 2009.
For more details on these features I highly recommend two books on the subject, "Rendering with
mental ray & 3ds max" by Joep van der Steen, and "Realistic Architectural Visualization with 3ds max
and mental ray" by Roger Cusson and Jamie Cardoso.
I also recommend the training videos at www.mentalboutmax.com. They are very well done, and very
affordable.
The files used in this document are at http://www.4DA-Inc.com/mentalray/index.html. The 'Light
Gallery' scene is a slightly modified version of a mental ray sample provided with 3ds max. For the
Exterior scenes, the file 'Houston.max" is available on the site.
In Part One we looked at the general features of the renderer, and Indirect Illumination using Final
Gather. In Part Two we look at Lighting and Materials, including the new Daylight System, Sky Portals,
the Arch & Design materials and , including the Indirect Illumination technology of Ambient Occlusion.

mental ray 102: The Essentials Lighting 3
CONTENTS
mental ray 102: Lighting ............................................................................................................................... 2
Quick Review .............................................................................................................................................. 4
A Quick Note on Speeding Up Test-Renders ............................................................................................ 4
Daylight System and Exterior Lighting ...................................................................................................... 6
Setting Time and Location .................................................................................................................... 7
Daylight Type .......................................................................................................................................... 8
mr Sun Parameters ............................................................................................................................... 9
mr Sky Parameters ................................................................................................................................ 9
mr Physical Sky ENVIRONMENT MAP ................................................................................................. 10
mr Physical Sky Settings ..................................................................................................................... 11
Sky Settings within the Daylight System ............................................................................................ 14
Exposure Control with the Daylight System ....................................................................................... 14
Color (Gamma) Correction with Daylight System ............................................................................... 15
Standard and Photometric Lights ........................................................................................................... 18
mr Area Omni and mr Area Spot ............................................................................................................. 18
Photometric Lights ................................................................................................................................... 20
Photometrics in 3ds Max 2009 Design .............................................................................................. 20
mr Sky Portal ............................................................................................................................................ 23
Conclusion ................................................................................................................................................... 24

mental ray 102: The Essentials Lighting 4
QUICK REVIEW
The following document will assume that your UI Defaults are set to the "DesignVIZ/mental ray" preset,
as described in the "mental ray 101" document. If you are using 3ds Max Design, this is the default.
A QUICK NOTE ON SPEEDING UP TEST-RENDERS
When you are learning any new rendering tool, it is imperative that you spend some time doing test
renders and playing with settings. This can, and will, take up a lot of computer time, and it is
important to learn a few things that will speed up this test phase in any project and not eat up too
much of your time. Your mileage will vary, and it depends on your scene and computer speed whether
you need to do the following:
1. Use Network Render and a different computer for test renderings. Although not a
requirement, this one is pretty important if your time is tight. It both to frees you up for more
work while the render is burning, and gives you extra computer resources when you need to
do your final renderings. To justify the expense, look at the time lost waiting for test renders,
and what billable time you could use for something else.
2. Enable the "Area Lights/Shadows as Points" option in the Render Dialog->Common tab (F10).
Unless, of course, you need the Area Lights/Shadows for the test or final renders. These
features are a big time killer, and this checkbox should be Enabled (Lights as Points) unless
you are prepping for final renders, and have a more time available to render. See later in this
document for Area Lights.
3. Use 'Draft' mode for Final Gather. It gives you a quick idea of what your lighting and materials
will look like without a lot of overhead.
4. Use the FG pass as a quick preview, and cancel when the render begins. You lose the FG
'image', but do get a good idea what your lighting and materials will look like just from the FG
data.
5. Keep your Sample Rate to 1/4 and 4, or less. Unless you are doing a final render, having
higher settings usually just consumes your time. You'll have small jagged edges on objects in
your render, but save a lot of time.
6. Set the Spatial Contrast setting to 0.9 for RGBA. The Spatial Contrast is the difference it
needs to see between pixels and sub-pixels before it jumps to the higher Sample Rate.
Keeping this high (0.52 is the default) speeds up your rendering considerably as the lower
Sample Rate is almost always chosen.
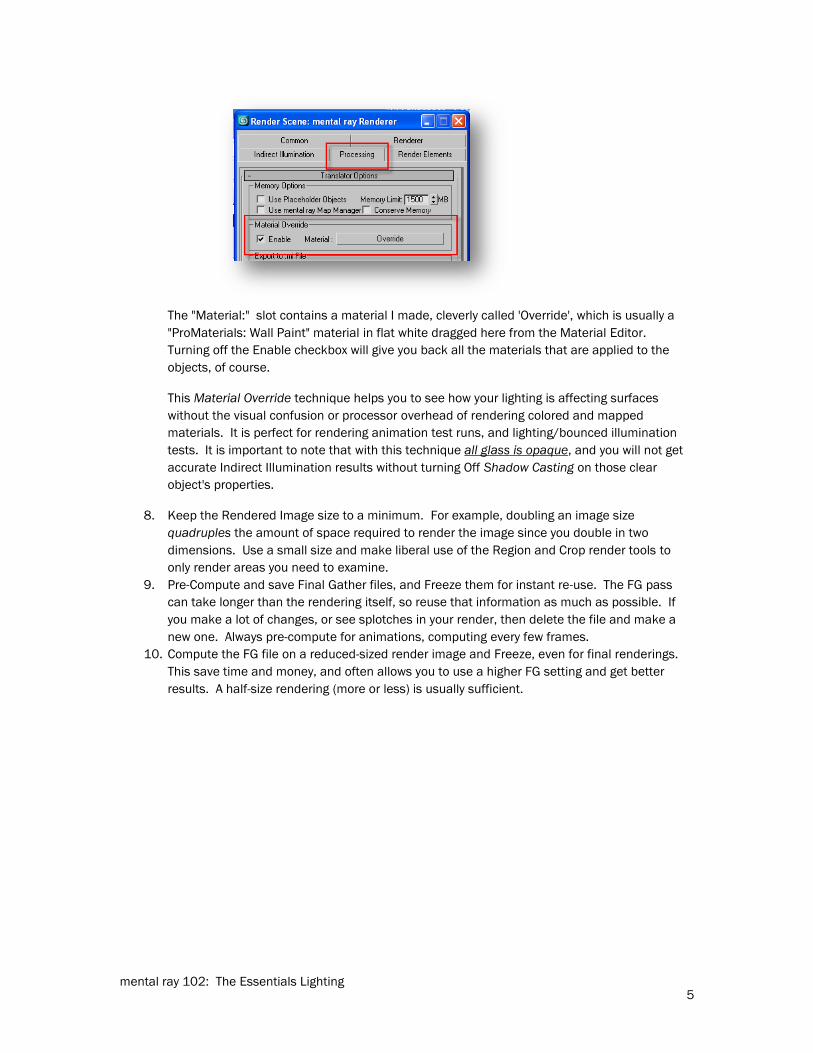
7. Use Material Override. This is a technique that allows you to replace every material in your
scene with a single material, and speeds up renders that do not require maps and materials:
mental ray 102: The Essentials Lighting 5
The "Material:" slot contains a material I made, cleverly called 'Override', which is usually a
"ProMaterials: Wall Paint" material in flat white dragged here from the Material Editor.
Turning off the Enable checkbox will give you back all the materials that are applied to the
objects, of course.
This Material Override technique helps you to see how your lighting is affecting surfaces
without the visual confusion or processor overhead of rendering colored and mapped
materials. It is perfect for rendering animation test runs, and lighting/bounced illumination
tests. It is important to note that with this technique all glass is opaque, and you will not get
accurate Indirect Illumination results without turning Off Shadow Casting on those clear
object's properties.
8. Keep the Rendered Image size to a minimum. For example, doubling an image size
quadruples the amount of space required to render the image since you double in two
dimensions. Use a small size and make liberal use of the Region and Crop render tools to
only render areas you need to examine.
9. Pre-Compute and save Final Gather files, and Freeze them for instant re-use. The FG pass
can take longer than the rendering itself, so reuse that information as much as possible. If
you make a lot of changes, or see splotches in your render, then delete the file and make a
new one. Always pre-compute for animations, computing every few frames.
10. Compute the FG file on a reduced-sized render image and Freeze, even for final renderings.
This save time and money, and often allows you to use a higher FG setting and get better
results. A half-size rendering (more or less) is usually sufficient.

mental ray 102: The Essentials Lighting 6
DAYLIGHT SYSTEM AND EXTERIOR LIGHTING
A Daylight System is an object that combines two lights that simulate the direct illumination of the Sun
and diffuse illumination of the Sky, for a particular place, date and time. It greatly simplifies outdoor
lighting set up, and produces exceptional results. The mental ray lighting used in a Daylight System
simulate physically real outdoor illumination - the Sun is the intensity of
the real sun - which allows for physically-real direct and indirect
lighting effects.
You can find the Daylight system in the Create Tab, Systems category,
as shown at right:
The Daylight System positions the Sun in the sky based on its settings
in the Motion tab for Time, Date and Location. Time and Date can be
animated to produce Sunlight Studies, showing the position of sun
and building shadow over the course of a day.
The basic procedure to create mental ray Daylight:
1. Create the Daylight System (Choose Yes for now to any pop-
up dialogs you get): Select menu items Create->Systems-
>Daylight, then click and drag in the viewport to place a
Compass Rose, moving slightly to set the size of the Compass
Rose (keep it small), then release and move the mouse and
click again to set the Orbital Scale offset of the light
assembly.
2. In the Modify tab, ensure the lights in the Daylight system are
mr Sky and mr Sun. (This is the default if your UI Defaults are
set to DesignVIZ/mental ray. Choose Yes to any pop-up
dialogs if you change these to the mr types).
3. Click the Setup button in the Modify tab to go to the Motion
tab.
4. Change the Location and Time/Date of the Daylight object to
match your scene and desired Sun position in the sky.
5. Set the North Direction to align the Compass Rose to your scene's true North angle.
If you use 3ds Max Design or the UI setting for "DesignVIZ/mental ray", these next settings are
prompted for in pop-up dialog boxes, and don't need to be set again:
6. Set the Environment map to use the mr Physical Sky shader. (Press 8 for dialog).
7. Use the mr Photographic Exposure Control. (Press 8 for dialog).
A LITTLE MORE DETAIL
When you create the Daylight System, you may get a dialog that asks if you want to use the mr
Photographic Exposure control, and set it to a daylight setting of 15. Saying Yes to this is fine for now,
and you can tweak this later.

mental ray 102: The Essentials Lighting 7
When prompted you will also want to change the Environment Background to the mr Physical Sky
map. This map dynamically creates a cloudless sky with correct coloring and
Adjust Compass Rose Size and Orbital Scale values as necessary so that the Compass Rose is not so
large that you can't see it in the viewport, and I usually ensure that the Orbital Scale is outside the
extents of my geometry but close enough so that I can find it when I need. The Daylight object will
work perfectly fine with any setting you choose for these values.
In the Modify tab, you'll see an object called "Daylight01", and in the stack you'll see the base object
"DaylightAssemblyHead", along with the settings for the Sun and Skylights. You'll find settings for the
Position and Time of Day for the Daylight object within the Motion tab.
Again, ensure that the Sunlight and Skylight drop-down menus are both set to the mr Sun and mr Sky
options, respectively. If you have your UI Defaults set to mr, then this should be all set.
Clicking on the Position's 'Setup...' button just brings you to the Motion tab, where you can change the
Date, Time and Location.
A little about Assemblies
An Assembly, such as the Daylight Assembly Head, is typically a combination of Geometry and Lights
combined into a new 'assembly' object, similar to a group. When you create your own Assemblies from
the Group->Assembly pull-down menus, you will have a group-like object with a handy Multiplier
setting within the Modify tab you can use to set the intensity of the light.
The Daylight assembly is more sophisticated than a normal assembly object, and consists of a
Compass Rose, a Skylight object, and a light to represent the Sun, and a number of settings for both
lights.
SETTING TIME AND LOCATION
3ds max 2009 now has the ability to set the position and intensity of the Daylight System based on a
Weather Data File, provided by the US government, going back many years and to various points
around the globe. The default option is to have you set the location and Date/Time yourself, and not
to use a weather file.
With the Daylight assembly selected, pressing the Setup button in the
Modify tab, or going to the Motion tab, brings you to the Time, Date and
Location settings for the Daylight object.
Settings you will want to use:
Usually it is important that the lighting reflect reality for your outdoor
scene and its position on Earth, so one of the first things to do after
creating the Daylight object is to click on the Get Location button, and
select a location close to where your environment is located. (This is
found in the Motion Tab when the Daylight object is selected).
When the "Geographic Location..." map dialog opens, click on the map
to set the location to a city nearby. If your part of the world is not
shown, you can choose a different location from the Map drop-down

mental ray 102: The Essentials Lighting 8
list, or you can choose a Lat/Lon location in the settings to specify a point on the Earth.
You also want to make certain that the compass rose is pointed towards the North Direction of your
scene. By default North is pointing in the positive Y direction of your World Coordinates.
DAYLIGHT TYPE
Let's take a look at the essential settings in the Modify Tab...
If you used the UI switcher and one of the mental ray options, or use Max Design, then the default
lights for the Daylight object are the mr Sun and mr Sky. If not, then the default light types for the
Daylight system are a Standard (non-photometric) light for the sun and a standard Skylight for the sky,
and you will need to change these lights manually to the mr Sun and mr Sky light types.
In the Modify tab image below, the Sun and Sky were switched from Standard lights to the new mr
types, and once the Sky was switched to mr Sky, the dialog shown below-right pops up to ask if you
want to use the 'mr Physical Sky' map for the environment in your scene. Choose yes, and we'll go
over what this is in a little bit.

mental ray 102: The Essentials Lighting 9
Again, if you used the UI switcher to select a mental ray UI,or are using Max 2009 Design, then going
to the Modify Tab will show that the Daylight system is already set to use the new mental ray mr Sun
and mr Sky . You may still get the mental ray mr Sky warning when creating the Daylight object.
The nice thing about using the mr Physical Sky is that the background sky image will change based on
the time of day and position of the sun.
MR SUN PARAMETERS
I tend to not adjust the values in the Daylight system's Sun, relying
on the correct representation provided by the object. Instead, most
of my adjustments are in the Exposure Controls for the mr
Photographic Exposure, discussed later.
Settings you might use:
mr Sun Photons
o Use Target: Enable the use of the Radius setting.
o Radius: This value allows you to focus photons
from the sun into a specific area (radius) around
the target for the light. This is an optimization,
and is used, for instance, where you use the mr
Sun to produce light for an interior scene; you
don't need photons throughout the outdoor
portion of your scene, and can focus them through
a window, for example.
O Photons are needed for GI and Caustics, but not for Final Gather.
MR SKY PARAMETERS
3ds Max 2009 introduced three different lighting models
for the mr Sky instead of just the one found in Max 9 and
Max 2008. The mr Sky model in those versions was the
same as the default for max 2009, the "Haze Driven" sky
model. Basically this model produces a nice blue sky and
is great for beautiful architectural renderings. It is not for
Lighting Analysis or for true physical accuracy.
The Perez All Weather sky model is a physically-accurate
sky model, recognized as an industry standard. It is good
for daytime renderings, and not twilight or night renderings.
It should be used when using the new Lighting Analysis
tools.
The CIE sky model is another industry-standard physically
accurate sky representation. It has settings for Overcast
(default) or Clear Sky. I usually change this to Clear.

mental ray 102: The Essentials Lighting 10
Settings you might want to use:
Multiplier: Obviously, the intensity of the sky. This isn't
something I usually change. I just want to point out that
although the documentation would lead you to believe this
affects illumination, you can only really see this in the
environment mr Physical Sky unless you turn on Indirect
Illumination's Final Gather tool. Without FG, only the
environment background image changes. With FG it greatly
affects overall illumination.
For CIE Sky: Turn on the Clear Sky option if needed -
Overcast is the default - or your scene will seem dark. I
usually keep the other settings as-is.
For CIE and Perez: I usually leave the options for the
Diffuse Horiz and Direct Normal illumination as-is. Note,
however, that these are animatable if you aren't using a
Weather Data file.
Haze: For Haze-driven model. Basically, 'Smog' in the air,
default 0.0 and maximum 15.0. Creates a yellow tinge that
gets deeper as you look further into the distance. Affects
the overall sky and the rendered object colors, and makes
me wheeze a bit.
Horizon: A general Sky setting for all. This group creates a
colored ground plane and a fuzzy 'horizon line' terminator
between the ground plane and the sky.
o Height: Vertical position of the horizon line, which
affects not only it's appearance in the sky but also
the position at which the sun 'sets'. You can compensate for your point of view, so if
you are at a high elevation and the horizon is below you, you can move the line with a
negative value. A slight negative value can remove the horizon from most scenes at
ground level.
o Blur: Adds a slight blur between ground and sky. 0.1 is default, and 0.0 is a sharp
line. Useful up to 0.5.
o Ground Color: This should be set to an average color for your ground plane. It
represents the 'floor' of your environment, and affects the color of the horizon line. If
you do not have a ground plane in your scene, this color is visible in your
environment, generates reflected illumination, and affects the lighting and color of
your scene.
Aerial Perspective. This is the fuzzy horizon that is added to your background image. This is
usually fine if you are using the mr Physical Sky map for your environment, but will Not look
correct if you have a bitmap there. I'll turn this option off when using a background image.
MR PHYSICAL SKY ENVIRONMENT MAP
One of the great things about the mental ray flavor of the Daylight system is that it can control an
environment map type called "mr Physical Sky". With this Environment map, as the time of day
changes in your Daylight system the environment map sky in your renderings will adjust accordingly

mental ray 102: The Essentials Lighting 11
both in intensity and color. You'll even have a sun disk properly positioned in the sky, and the sky will
glow brighter where the sun is located, and fade and change color appropriately as the sun rises and
sets. You can also get simulated haze effects which interact with the light effect from the mr Sky light.
The disadvantage to the mr Physical Sky is that there are no clouds, however it does support custom
environment maps with some caveats.
As we saw earlier, 3ds Max may automatically prompt you to add the mr Physical Sky map to your
environment settings when setting up the Daylight system to use the mr Sky. This map can also be
added in the usual way, via the Environment settings (press 8 for dialog).
ACCESSING THE MR PHYSICAL SKY'S SETTINGS
To examine and edit the settings for the mr Physical Sky (or any environment map), you must bring it
into the material editor:
Open the Environment Dialog and the Material Editor at the same time.
If it isn't already, set the Environment Map to the mr Physical Sky map type.
Click and drag the map button from the Environment and Effects dialog to a sample area in
the Material Editor, and create an Instance type.
Instancing the map allows you to change settings in the Material Editor and have the changed
reflected in the Environment. You'll find many map types in max that can only be edited by dragging
them into the Material Editor.
MR PHYSICAL SKY SETTINGS
Generally, the settings are set to use what has been configured within the Daylight system, and there
is not much here to tweak. Let's assume you'll keep this configuration as we are only covering the
essentials and not the little-used details. :)

mental ray 102: The Essentials Lighting 12
Settings you might use:
In the "Sun Disk Appearance" section you can change the size of the sun (Scale), the intensity of the
disk, and the surrounding glow. The sun is overly-large by default, and usually that looks pretty good.
Decreasing the Intensity can give the effect of a dense atmosphere, blocking some of the sun.
Decreasing the Glow will make the atmosphere look crisper, as with less diffraction of light.
These are all 6am in San Francisco. The Custom Background Image, as you can see, eliminates the
appearance of the Sun and Glow in the rendering, and the color and intensity will not automatically
match the Daylight - you'll have to make adjustments. Background image maps may also need their

mental ray 102: The Essentials Lighting 13
"RGB Level" multiplier increased in the bitmap Output setting for it to be visible. (These are in the
settings for the background bitmap, not the mr Physical Sky)
Using a custom background image is the only way to get static clouds in your scene. A bitmap RGB
Level setting of 150+ is not uncommon for non-HDRI images.
Also be aware that the Custom Background is only visible as a background in the rendering, and
reflections will still be of the physical sky.
Adjusting the Daylight to a daylight time of the day will give you a clear blue sky with the default mr
Physical Sky settings:
As you can see, the Sun and the glow around the sun are present (as seen in the reflections), and
moved into a position correct for noon, in this instance. No custom background is used.

mental ray 102: The Essentials Lighting 14
SKY SETTINGS WITHIN THE DAYLIGHT SYSTEM
The other settings that are available are found within the Daylight System, and similar settings are in
the mr Physical Sky map. For simplicity we'll assume you'll want the mr Physical Sky tied to the
Position, time of day and other settings of the Daylight assembly.
EXPOSURE CONTROL WITH THE DAYLIGHT SYSTEM
There are two exposure controls you should consider, the Logarithmic and mr Photographic Exposure
controls. Personally, I stick with the mr Photographic Exposure Control for all mental ray work.
THE LOGARITHMIC EXPOSURE CONTROL
Here are the Logarithmic Exposure Control settings I use with a Daylight System:
o Make sure that the Exterior Daylight checkbox is turned on.
o Set Brightness from 50 to 55. The default 65 is too washed-out, IMHO.
o Set Contrast to 75-80. The default of 50 is too low.
o You can change the Color Correction – which is similar to a camera's ‘white balance’
setting, to shift the colors and help eliminate some of the bluish tint that you get from
the sky.
o Optional is to adjust the Mid-Tones down slightly.
o Change the Physical Scale to a number between 80000.0 and 100000.0. Changing
this setting scales up any non-physical lights to be in the correct scale for the
brightness of your scene, but also has a huge impact on any HDRI bitmaps that you
use in the Environment settings of your scene. It does not affect non-HDR images in
the Environment. I usually use 90000.0 or 100000.0 for this, as it is the intensity
range of the sunlight.
o The checkbox for "Process Environment and Background Maps" only affects HDRI
images used for the background/environment.
One disadvantage to the Logarithmic control (compared to the mr Photographic Exposure) is that the
Daylight option is not animatable so you cannot go from outdoors to indoors easily.
Also, because the Logarithmic control does such a good job shifting your rendering into a usable color
range, it is easy to produce a greatly over or under lit scene without realizing it. Overly-bright lighting
ends up pushed down to a moderately bright range, and an under-lit scene is shifted upwards. It is
not smart about the use of Gamma when that is enabled in Max.
The advantage to the Logarithmic control is that it is faster than the mr Photographic.
THE MR PHOTOGRAPHIC EXPOSURE CONTROL
The mr Photographic Exposure Control was introduced recently in 3ds Max, and includes both camera-
like exposure controls such as f-Stop, Film ISO and Shutter Speed, and also a simple 'Exposure value'
that is the end-result of the other three variables. There is a preset drop-down menu where you can
choose from setting such as "Physically Based Lighting, Outdoor Daylight, Clear Sky" all the way down
to "Physically Based Lighting, Indoor Nighttime" and even "Non physically Based Lighting".

mental ray 102: The Essentials Lighting 15
Setting you might use:
Certainly, the easiest thing is to start with a
preset from the drop-down menu, and then
tweak values from there. That gets you in
the general range.
The radio-button for "Photographic
Exposure" may be set, and you'll be
tweaking Shutter Speed, f-stop, and ISO.
Make your life easy and switch to the
Exposure Value (EV) option (shown at right).
As you render scenes you'll figure out what
values work best for you, up-or-down from
the presets.
I usually use 14.5 for an outdoor scene, but
might use even lower if using a Perez or CIE
sky model.
Indoor scenes can be anywhere, based on
your lights. If your scene renders black,
then start at 0.5 and see what you get.
The Highlight (Burn) created blooms around
very bright lights and reflections. Tweak this
down a bit if needed.
COLOR (GAMMA) CORRECTION WITH DAYLIGHT SYSTEM
Gamma correction compensates for differences in color display of various devices, including CRTs,
LCDs, printers, and scanners. Their color inputs and outputs are not linear, and to produce correct
results the colors need to be shifted based on a Gamma correction value. Every device will be slightly
different.
Settings you will use:
As a rule you should set your display Gamma in Max, via the Customize->Preferences and the Gamma
and LUT tab. Enable Gamma/LUT, and choose the Gamma option. Adjust the slider value until the
inner and outer square are about the same intensity:

mental ray 102: The Essentials Lighting 16
As you can see above, my monitor's Gamma setting is 2.07 and for me the two squares look about the
same inside Max, yet in this printout the two squares are very different. Different Gammas and very
different results.
The other two highlighted setting groups at the Input Gamma and Output Gamma values, and the
Affect Colors and Affect materials options. It is generally accepted that setting the Input and Output to
2.2, and enabling the Materials and Colors options, is a good idea. I have used settings from 1.6 to
2.2. With my monitor at 2.07, an output value of around 2.0 would look the best for me.
Input and Output Gamma Settings
You will find with the Daylight System that many colors get very washed-out looking in the process of
rendering. This is because photographs of materials, for instance, are already photographed in bright
lighting and are most likely gamma corrected to look good on your monitor. The Input Gamma setting
will shift these back to where they need to be so that the colors render correctly and are not
overexposed.
If you use Targa images that contain Gamma information, you may have to set the Gamma inside the
Bitmap parameters in the material editor to use the Inverse (1/gamma) value. You find this in the File
dialog when selecting the file on your drive.
The output Gamma setting shifts the colors to a range that will display well on computer displays. A
value of 1.8 is fine for computer displays, but 2.2 is common for video. Without this setting, images
you put on the Internet or share with others will generally be too dark.

mental ray 102: The Essentials Lighting 17
Figure 1: Comparison between Input Gamma =1.7 (left) and Input Gamma=1.0 (right) (logarighmic exposure).
A 2.2 Input Gamma will darken the grass bitmap even more (mr Photographic Exposure w/o cloudy sky):

mental ray 102: The Essentials Lighting 18
STANDARD AND PHOTOMETRIC LIGHTS
There are two basic classes of lights in 3ds Max: Standard and Photometric.
Standard lights do not use real-world units for their intensity values, and can break the laws of physics.
They support lighting that does not decay over distance, or may perform a linear decay rather than a
natural inverse-square decay, but also support natural inverse-square decay.
Photometric lights always obey the laws of physics when it comes to the natural decay of light over
distance (inverse-square law). They also use real-world units for light intensity (lumens, candela and
lux). Photometric lights also support the use of industry-standard IES, CIBSE and LTLI 'Photometric
Web' files to produce illumination that accurately simulates specific bulbs and light fixtures.
Both classes of lights support all shadow modes, or no shadows at all.
MR AREA OMNI AND MR AREA SPOT
The mr Area Omni and mr Area Spot are not Photometric lights, and
should not be used in physically-real lighting situations. That said, they
work very nicely in scenes where you want to soften the lighting and
shadow effects, and produce soft area shadows. Like other Standard
lights, you can ignore the physics of light.
The settings with these lights that are different than other Standard lights
are within the 'Area Light Parameter" roll-down, as shown at right.
The "Show Icon in Renderer" option obviously makes the light object
visible in your rendering, and also produce realistic highlights in your
reflective objects.
U and V samples are the number of lights in an array to make up the area light. Since we ct that area,
we have to pare that down. Incresent that area, we have to pare that down. Increase this value if you
are seeing uneven results in your renderings.
An Area Omni light can be a Sphere or a Cylinder, and an Area Spot can be a Disc or Rectangle. Here
is a Cylinder (on right) that is visible in the rendering:

mental ray 102: The Essentials Lighting 19
For this, the scene is using the mr Photographic Exposure control with a EV of 7 and Unitless selected
with a value of 15000. The 15000 value is about the highest brightness around the window (daylight
system light), and acts as a multiplier for the non-standard light to get it into the photometric range.
Realistic values for this light would be much less.

mental ray 102: The Essentials Lighting 20
PHOTOMETRIC LIGHTS
Photometric light use real-world parameters such as candela and Lux to represent the intensity of the
light, and always follow the laws of physics for the natural decay of light. They can also use
manufacturer-supplied IES files that specify the intensity and distribution of light from a bulb or fixture,
further enhancing the realism and accuracy of your rendering.
The Photometric lights in 3ds max are fully supported in mental ray. Photometric lights are the correct
style of lights to use in any scene where you need accurate lighting results, obviously, but are also
essential for getting correct results out of the new Arch & Design and Pro Materials, Indirect
Illumination and the new Lighting Analysis tools.
The A&D and Pro materials are 'energy conserving', which means that the material is physically
correct, cannot break the laws of physics by producing more energy that it receives, and generates a
high-dynamic-range (HDR) result. Photometric lights, being physically correct, are the correct lights to
use with A&D materials.
Accurate results with GI rely on lights having the proper inverse-square decay, such as of photometric
lights.
PHOTOMETRICS IN 3DS MAX 2009 DESIGN
With this release, Autodesk has simplified the interface for the Photometric lights, and you now only
have a Target and a Free option. Any photometric light can be an Area light, including spherical and
linear
Above is the Light Gallery scene illuminated by a single Photometric light, which is using a new preset
for a 100 watt incandescent bulb. Exposure was set to mr Photographic, and the EV is 1.0. Scene
utilizes both GI and Final gather. You'll notice the warm yellow glow of the light, rather than the pure
white light of previous images.

mental ray 102: The Essentials Lighting 21
Settings you might use:
In the simplified UI at right are the general settings. Where it says
"100W Bulb" is the Template drop-down for the preset bulbs, and a
great place to start and to see what settings are used for what type
of bulb.
Also shown in the bottom-right of the image is the drop-down for the
Distribution of light from the object: Photometric Web, Spotlight,
Uniform Diffuse and Uniform Spherical.
Photometric Web uses an IES, CIBSE or LTLI file to specify the
3D shape of light distribution, along with the intensity of light
that it produces. Max now will show you a graphical
representation of that distribution within the UI and viewports.
IES Light Distribution:
Spotlight is as you would expect.
Uniform Diffuse: Light comes from a single Hemisphere,
rather than omni-directional.
Uniform Spherical: An omni-directional light in all directions.
LIGHT COLOR, INTENSITY AND ATTENUATION
SETTINGS
Settings you might use:
The drop-down for Color has a number of presets for common bulbs, including Incandescent,
Fluorescent, Halogen, and so on. A good place to start. If you don't want your bulbs a natural

mental ray 102: The Essentials Lighting 22
color, then choose one of the Reference White presets or choose your own color based on Kelvin
degrees.
The light Template preset mentioned earlier will set the Intensity value for you, and again, that is a
good starting point.
Intensity: An obvious one. Be sure to keep near the range of the bulb you are trying to simulate.
Use Templates as a starting point, but be aware those templates might overwrite other settings.
Dimming: Another obvious effect, however this can be combined with the new Incandescent Color
Shifting to give a real-world effect to a dimmed light. As it gets dimmer, it gets a warmer color. If
you just want to change the intensity as a percentage, then leave the color shift off.
Attenuation: This is new for 2009. When the 'Use' checkbox is on, you can now control how far
the light will travel, and potentially speed up your renderings considerably. The Start value is
where the light is at its normal intensity, and it fades to black between there and the End value.
After the End, Max ignores the light, speeding up rendering. Being photometric, the light still
follows the inverse-square law.
SHAPE AND AREA SHADOWS
Photometric lights can be a variety of shapes, as shown at right:
Point: An infinitely small point in space, like a Standard
light.
Line: 1D line with only a Length value.
Rectangle: a 2D rectangular plane with Length and Width.
Disc: A 2D circle.
Sphere and Cylinder: These are new for 2009, and are 3D
light shapes similar to what we saw for the mr Area lights.
Setting you might use:
The Emit light from (Shape) drop-down. Remember, the
more complex the light, the more time it is to render.
Point is fastest, then line, then Rectangle and Disc, and
then the 3D shapes.
Light Dimensions (not shown). Obvious. You'll need to rotate your light into the
position/orientation you need, and should see the light's shape in the viewport.
Light Shape Visible checkbox. If you need accurate light reflections in materials, for instance.
Shadow Samples: The higher the number, the higher quality of your rendering, and also the
higher the render times. Use as small as needed for best performance.

mental ray 102: The Essentials Lighting 23
MR SKY PORTAL
The mr Sky Portal helps to bring in light from outdoors, through a portal (window or skylight), improving
the accuracy and quality of interior day-lit renders while also reducing the need for high final gather
settings. It is a rectangular light, placed just outside you window or
opening.
Without a mr Sky Portal, in an indoor scene illuminated from a
'portal', you will find that the illumination is often low and that the
Final Gather results will be very spotty, even with fairly high FG
settings. The mr Sky portal boosts the realism and illumination in
your scene, and allows you to reduce the FG settings, reducing your
render time. mr Sky portals have some overhead themselves, so
your results will vary based on the number and size of opening, and
the settings in the portal.
The easiest way to create a mr Sky portal is to choose the light in the
Create Panel and turn on the AutoGrid option. Then, from the
outside of your building, click around one corner of the opening to
place the AutoGrid, and then drag to the opposite corner. You should
see a rectangle, and a vector in the center pointing inwards.
Settings you might use:
Multiplier and Shadows. Obvious. I usually leave these
alone for good results.
From Outdoors: I usually leave off as it greatly increases
render time. Brings shadows from outside inside.
Shadow Samples. Keep this as low as needed to keep render
times down, and as high as you can manage. Too low and you lose shadow detail. Large
windows may need higher settings than smaller openings.
Dimensions: Obvious. The light should be slightly larger than the opening, and placed slightly
outside the opening, from what I've heard. This is not required. Be certain not to overlap
portals.

mental ray 102: The Essentials Lighting 24
CONCLUSION
Please let me know if you find any issues with the document. It is a work in progress, as all things are
in life!
Enjoy!
Jenni
jenni at 4da-inc.com


