
MELDAS 600 Series CONNECTION MANUAL -...
141
CONNECTION MANUAL BNP-B2158C (ENG) 600 Series
Transcript of MELDAS 600 Series CONNECTION MANUAL -...

CONNECTION MANUAL
BNP-B2158C (ENG)
600 Series
i
Precautions for Safety Always read the specifications issued by the machine maker, this manual, related manuals and enclosed documents before starting installation, operation, programming, maintenance or inspection to ensure correct usage. Thoroughly understand the basics, safety information and precautions of this numerical controller before using the unit. This manual ranks the safety precautions into "DANGER", "WARNING" and "CAUTION".
DANGER When there is a great risk that the user could be subject to fatalities or serious injuries if handling is mistaken.
WARNING When the user could be subject to fatalities or serious injuries if handling is mistaken.
CAUTION When the user could be subject to injuries or when physical damage
Note that even if the items is ranked as " CAUTION", incorrect handling could lead to serious results. Important information is described in all cases, so please observe the items.
DANGER
Not applicable in this manual.
WARNING
1. Items related to prevention of electric shocks
Do not operate the switches with wet hands, as this may lead to electric shocks.
Do not damage, apply excessive stress, place heavy things on or sandwich the cables, as this may lead to electric shocks.
ii
CAUTION
1. Items related to noise
Always treat the shield cables indicated in this manual with grounding measures such as cable clamps.
Separate the signal wire from the drive line/power line when wiring.
2. Items related to installation
Install the control unit and operation board on noncombustible material. Installation directly on or near combustible material may lead to fires.
Always observe the installation direction.
Do not install or operate a control unit or operation board that is damaged or that have missing parts.
Do not allow conductive foreign matter such as screws or metal chips or combustible foreign matter such as oil enter the control unit and operation board.
The control unit and operation board are precision devices so do not drop or apply strong impacts on them.
Do not install the operation board where it may be subject to cutting oil.
3. Items related to connection
Do not apply voltages other than those indicated in this manual on the connector. Doing so may lead to destruction or damage.
Incorrect connections may damage the devices, so connect the cables to the specified connectors.
When using an inductive load such as relays, always connect a diode in parallel to the load as a noise measure.
When using a capacitive load such as a lamp, always connect a protective resistor serially to the load to suppress rush currents.
Do not connect or disconnect the connection cables between each unit while the power is ON.
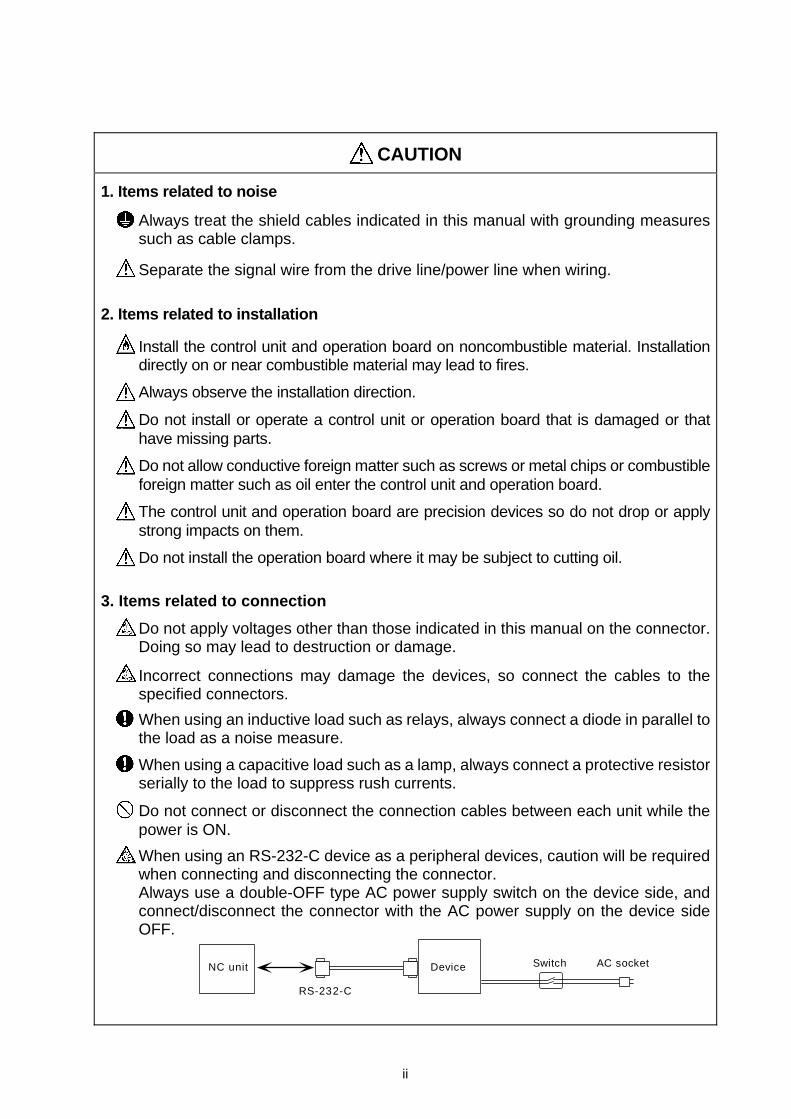
When using an RS-232-C device as a peripheral devices, caution will be required when connecting and disconnecting the connector. Always use a double-OFF type AC power supply switch on the device side, and connect/disconnect the connector with the AC power supply on the device side OFF.
RS-232-C
NC unit Device Switch AC socket

iii
CONTENTS CHAPTER 1 OUTLINE ..................................................................................................................... 1 CHAPTER 2 CONFIGURATION.................................................................................... 2 2.1 System Configuration ......................................................................................... 2 2.2 List of Configuration Units.................................................................................... 3 CHAPTER 3 INSTALLATION........................................................................................ 7 3.1 General Specification........................................................................................... 7 3.2 Designing Conditions of Operation Box............................................................... 9 3.2.1 Depth of Operation Box................................................................................ 9 3.2.2 Operation Box Heat Radiation Countermeasures........................................ 10 3.3 Noise Countermeasures ...................................................................................... 11 3.3.1 Connection of Frame Ground (FG) .............................................................. 11 3.3.2 Shield Clamping of Cables........................................................................... 12 3.3.3 Connecting Spark Killers.............................................................................. 13 3.3.4 Protective Measures against Lightning Surge.............................................. 14 3.4 Installation ........................................................................................................... 16 3.4.1 Installation of Control Unit with Display........................................................ 16 CHAPTER 4 SYSTEM CONNECTION .......................................................................... 17 4.1 General System Diagram .................................................................................... 17 4.1.1 M615/M635 .................................................................................................. 17 4.1.2 M610/M630 .................................................................................................. 18 4.2 Connection of Control Unit................................................................................... 19 4.2.1 Control Unit Connector Layout Drawing....................................................... 19 4.2.2 Control Unit Connector Pin Assignment....................................................... 20 4.2.3 Connection of Floppy Disk Drive.................................................................. 23 4.2.4 Connection of PC Card (PCMCIA)............................................................... 24 4.2.5 Connecting of Hard Disk Drive..................................................................... 25 4.3 Connection of Power Supply ............................................................................... 27 4.3.1 Connection for Using PD25A Unit................................................................ 27 4.3.2 Connection for Using General-purpose Stabilized Power Supply................ 30 4.4 Connection of Operation Board ........................................................................... 31 4.4.1 Connection of M615/635.............................................................................. 31 4.4.2 Connection of M610/630.............................................................................. 33 4.4.3 Operation Board Connector Layout Drawing ............................................... 36 4.4.4 Operation Board Connector Pin Assignment ............................................... 37 4.4.5 Connection of RS-232-C (Serial 1, serial 2)................................................. 40 4.4.6 Connection of RS-232-C (Serial 3, serial 4)................................................. 40 4.4.7 Keyboard and Mouse Connection................................................................ 41 4.4.8 Connection of Manual Pulse Generator ....................................................... 41 4.4.9 Connection of Operation Board I/O.............................................................. 42 4.4.10 Connection of ON/OFF Switch................................................................... 43 4.4.11 POS (Power OFF Sequence) Connection ................................................. 44 4.5 Connection of Emergency Stop ........................................................................... 45 CHAPTER 5 CONNECTION OF I/O INTERFACE......................................................... 46 5.1 Outline of I/O Interface......................................................................................... 46 5.1.1 Types of I/O Interfaces................................................................................. 46 5.1.2 Example of DI/DO Connection ..................................................................... 47 5.2 Connection of Base I/O Unit ................................................................................ 48 5.2.1 Base I/O Connection System Drawing......................................................... 48 5.2.2 Base I/O Unit Connector Layout Drawing .................................................... 49 5.2.3 Base I/O Unit Connector Pin Assignment .................................................... 50
iv
5.2.4 Base I/O Unit Input/Output Specifications.................................................... 53 5.2.5 Connection of Servo Amplifier...................................................................... 55 5.2.6 Connection of Encoder ................................................................................ 55 5.2.7 Connection of Sensor Signal (skip).............................................................. 56 5.3 Connection of Card-sized I/O .............................................................................. 57 5.3.1 Examples of Card-sized I/O Usage.............................................................. 57 5.3.2 Card-sized I/O Specifications....................................................................... 58 5.3.3 Card-sized I/O Connector Pin Assignment .................................................. 59 5.3.4 Precautions for Wiring Card-sized I/O.......................................................... 59 5.3.5 Card-sized I/O Input/Output Circuit .............................................................. 60 5.3.6 Installation of Card-sized I/O........................................................................ 62 5.3.7 Card-sized Analog I/O Connection............................................................... 63 5.4 Scan I/O............................................................................................................... 65 5.4.1 Types of Scan I/O ........................................................................................ 65 5.4.2 Scan I/O Connector Layout Drawing............................................................ 65 5.4.3 Scan I/O Connector...................................................................................... 66 5.4.4 Scan I/O Station No. Setting ........................................................................ 67 5.4.5 Scan I/O Connection.................................................................................... 68 CHAPTER 6 CONNECTION OF REMOTE I/O UNIT .................................................... 73 6.1 Outline of Remote I/O Unit................................................................................... 73 6.2 Names of Each Remote I/O Unit Section ............................................................ 74 6.3 Connection of Remote I/O Power ........................................................................ 75 6.4 Outline of Digital Signal Input Circuit ................................................................... 76 6.5 Outline of Digital Signal Output Circuit ................................................................ 78 6.6 Outline of Analog Signal Output Circuit ............................................................... 79 6.7 Outline of Analog Signal Input Circuit .................................................................. 80 6.8 Connection of FCUA-DX10 /13/14 Unit and Machine Control Signal............ 81 6.9 Connection of FCUA-DX11 Unit and Machine Control Signal .......................... 83 6.10 Connection of FCUA-DX12 Unit and Machine Control Signal.......................... 85 6.11 Connection of FCUA-DX13 Unit and Handle.................................................... 87 6.12 Outline of FCUA-DX13 Unit Pulse Input Circuit................................................ 88 6.13 Connection of FCUA-DX14 Unit and Analog Input/Output Signal .................... 89 6.14 Setting of Channel No. when Using Multiple Remote I/O Units........................... 90 6.15 Cables ................................................................................................................. 91 APPENDIX 1 INSTALLATION DIMENSIONS............................................................... 92 Appendix 1.1 Control Unit Outline Drawing...................................................... 92 Appendix 1.2 Display Unit Outline Drawing...................................................... 93 Appendix 1.3 External Power Supply Unit (PD25) Outline Drawing................. 94 Appendix 1.4 Base I/O Unit Outline Drawing ................................................... 95 Appendix 1.5 Remote I/O Unit Outline Drawing ............................................... 97 Appendix 1.6 Card-sized I/O Outline Drawing.................................................. 98 Appendix 1.7 Scan I/O Card Outline Drawing .................................................. 99 Appendix 1.8 Manual Pulse Generator (HD60) Outline Drawing ..................... 100 Appendix 1.9 Encoder (OSE-1024-3-15-68) Outline Drawing.......................... 101 Appendix 1.10 Floppy Disk Drive Unit Outline Drawing ..................................... 102 Appendix 1.11 F Installation Plate Outline Drawing ........................................... 103 Appendix 1.12 External Hard Disk Drive Unit Outline Drawing .......................... 103 Appendix 1.13 NC Keyboard Outline Drawing ................................................... 104 Appendix 1.14 Grounding Plate and Clamp Fitting Outline Drawings................ 105 APPENDIX 2 CABLE MANUFACTURING DRAWINGS............................................... 106 Appendix 2.1 Cable type name: SH21 cable (Servo amplifier) ................. 107 Appendix 2.2 Cable type name: SH41 cable (Remote I/O) ....................... 107 Appendix 2.3 Cable type name: FCUA-R211 cable
v
(Remote I/O) ................................................................................ 108 Appendix 2.4 Cable type name: R301 cable (DI/DO) ............................... 108 Appendix 2.5 Cable type name: F010 cable (I/O interface)...................... 109 Appendix 2.6 Cable type name: F020 cable (Manual pulse generator) ............................................................. 110 Appendix 2.7 Cable type name: F030 cable (RS-232-C) ......................... 111 Appendix 2.8 Cable type name: F032 cable (RS-232-C) ......................... 111 Appendix 2.9 Cable type name: F031 cable (RS-232-C) ......................... 112 Appendix 2.10 Cable type name: F040/041 cable (Encoder) ............................ 113 Appendix 2.11 Cable type name: F050 cable (NC keyboard) .................... 113 Appendix 2.12 Cable type name: F060 cable (PC INTERFACE) ............... 114 Appendix 2.13 Cable type name: F070 cable (+24V input) ........................ 114 Appendix 2.14 Cable type name: F110 cable (+24V input, power off detection) ................................................. 114 Appendix 2.15 Cable type name: F120 cable (Emergency stop) ............... 115 Appendix 2.16 Cable type name: F130 cable (Floppy disk drive) .............. 115 Appendix 2.17 Cable type name: F170 cable (ON/OFF switch)................. 116 Appendix 2.18 Cable type name: F171 cable (ON/OFF switch)................. 116 Appendix 2.19 Cable type name: F172 cable (ON/OFF switch)................. 116 Appendix 2.20 Cable type name: ENC-SP1 cable (Spindle amplifier)............... 117 Appendix 2.21 Cable type name: ENC-SP2 cable (FR-TK)............................... 117 APPENDIX 3 EMC INSTALLATION GUIDELINES....................................................... 118 1. Introduction.............................................................................................................. 118 2. EMC Instructions ..................................................................................................... 119 3. EMC Measures........................................................................................................ 120 4. Panel Structure........................................................................................................ 121 4.1 Measures for Control Panel Body ................................................................... 121 4.2 Measures for Door .......................................................................................... 122 4.3 Measures for Power Supply ............................................................................ 123 5. Measures for Wiring in Panel .................................................................................. 124 5.1 Precautions for Wiring in Panel....................................................................... 124 5.2 NC Unit Grounding Wire ................................................................................. 125 5.3 Shield Treatment of Cables............................................................................. 127 6. Parts for EMC Measures ......................................................................................... 129 6.1 Shield Clamp Fitting........................................................................................ 129 6.2 Ferrite Core..................................................................................................... 130 6.3 Surge Protector ............................................................................................... 131 6.4 Selection of Stabilized Power Supply.............................................................. 134
CHAPTER 1 OUTLINE
1
CHAPTER 1 OUTLINE
This manual explains the structure, electrical specifications and connection methods required when connecting the NC unit and a machine. This manual assumes that all functions are added, but the actually delivered device may not have all functions. Refer to the following documents for explanations on the functions.
M6 Specifications Manual BNP-B2236 M6 PLC Interface Manual BNP-B3950-003 MELDAS AC Servo/Spindle MDS-B Series Specifications Manual BNP-B3759 MELDAS MDS-SVJ2 Specifications Manual BNP-B3937
Refer to the following documents for explanations on the EMC Directives for the European CE Marking.
EMC Installation Guideline BNP-B2230 Before connecting a peripheral device of a commercial personal computer to the NC unit, fully comprehend the structure, electrical specifications and connection method of the peripheral device.
CHAPTER 2 CONFIGURATION 2.1 System Configuration
2
CHAPTER 2 CONFIGURATION 2.1 System Configuration
# 1 #2 #3
∗M615/635
0 0
PCMCIA Slot
(For maintenanceand service)
Servo amplif ier/spindle amplif ier
Remote I/O units
Option
Installed by machine tool maker
MDS-B-V1/V2MDS-B-SVJ2MDS-B-SPMDS-B-SPJ2
PC card
Programming support unit
Manual pulse generator
Machine electric cabinetFloppy disk unit
PC Key board
PS/2 Mouse
Operation board
Installed by machine tool maker
Servomotors/spindle motors
NC unit
Base I/O unit
CHAPTER 2 CONFIGURATION 2.2 List of Configuration Units
3
2.2 List of Configuration Units 1. M615/M635 Control unit
Type Configuration elements Details HR081/082 card Power supply card HR111 card CPU card HR121 card PC base card
FCU6-MU501 Control unit built in personal computer (for display unit STN)
Card PC PC001 HR082 card Power supply card HR113 card CPU card HR121 card PC base card
FCU6-MU511 Control unit built in personal computer (for display unit STN)
Card PC PC001 HR082 card Power supply card HR113 card CPU card HR121 card PC base card
FCU6-MU512 Control unit built in personal computer (for display unit TFT)
Card PC PC002 HR082 card Power supply card HR113 card CPU card HR121 card PC base card
FCU6-MU513 Control unit built in personal computer (for display unit STN)
Card PC PC005 HR082 card Power supply card HR113 card CPU card HR121 card PC base card
FCU6-MU514 Control unit built in personal computer (for display unit TFT)
Card PC PC004 HR083 card Power supply card HR113 card CPU card HR122 card PC base card HR123 card
FCU6-MU515 Control unit built in personal computer (for display unit TFT)
Card PC PC004 HR083 card Power supply card HR113 card CPU card HR122 card PC base card HR123 card
FCU6-MU515-12 Control unit built in personal computer (for display unit TFT)
Card PC PC010 HR083 card Power supply card HR113 card CPU card HR122 card PC base card HR123 card
FCU6-MU515-23 Control unit built in personal computer (for display unit TFT)
Card PC PC020 HR083 card Power supply card HR113 card CPU card HR122 card PC base card HR123 card
FCU6-MU516 Control unit built in personal computer (for display unit STN)
Card PC PC005 HR083 card Power supply card HR113 card CPU card HR122 card PC base card HR123 card
FCU6-MU516-12 Control unit built in personal computer (for display unit STN)
Card PC PC011 HR083 card Power supply card HR113 card CPU card HR122 card PC base card HR123 card
FCU6-MU516-23 Control unit built in personal computer (for display unit STN)
Card PC PC021
2. M615/M635 Control unit option Type Configuration elements Details
HR841 card PCMCIA slot card FCU6-EP201-1 PCMCIA interface F150 cable HR251 card IC card interface FCU6-EP101-1 IC card interface F160 cable
HR553 Base card for IC card interface
HR553 card Expansion card (used as a set with FCU6-EP101-1)
CHAPTER 2 CONFIGURATION 2.2 List of Configuration Units
4
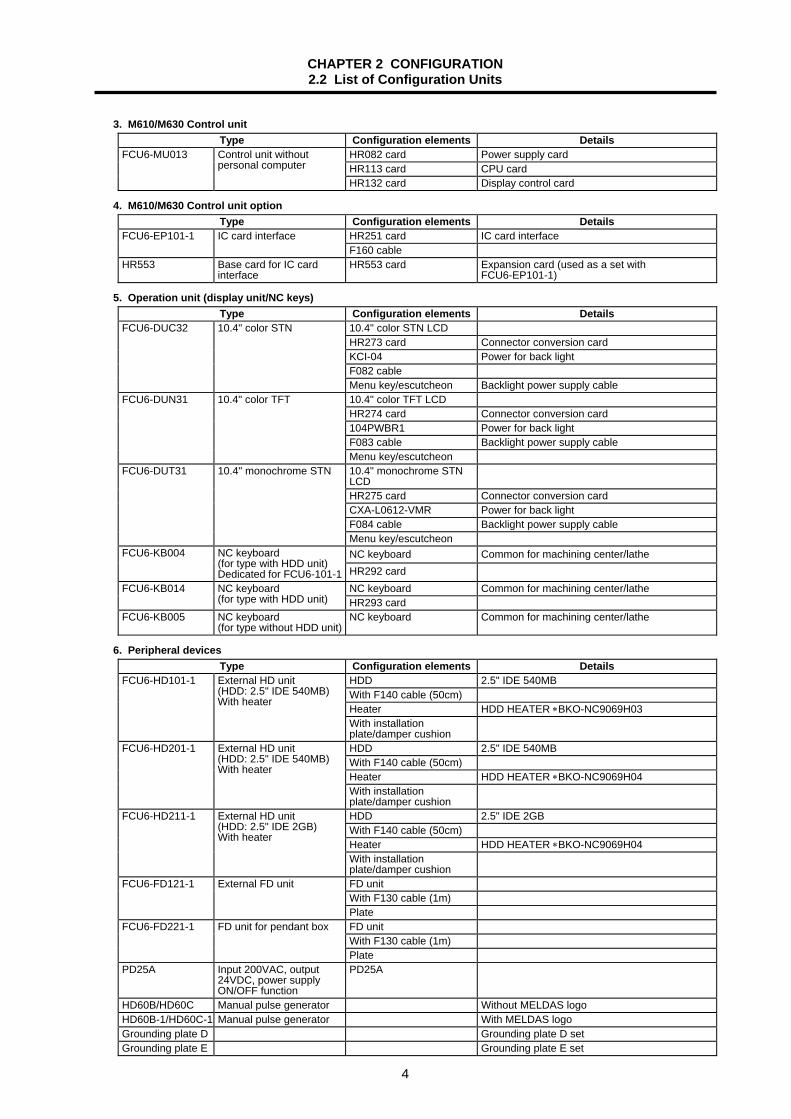
3. M610/M630 Control unit Type Configuration elements Details
HR082 card Power supply card HR113 card CPU card
FCU6-MU013 Control unit without personal computer
HR132 card Display control card
4. M610/M630 Control unit option Type Configuration elements Details
HR251 card IC card interface FCU6-EP101-1 IC card interface F160 cable
HR553 Base card for IC card interface
HR553 card Expansion card (used as a set with FCU6-EP101-1)
5. Operation unit (display unit/NC keys) Type Configuration elements Details
10.4" color STN LCD HR273 card Connector conversion card KCI-04 Power for back light F082 cable
FCU6-DUC32 10.4" color STN
Menu key/escutcheon Backlight power supply cable 10.4" color TFT LCD HR274 card Connector conversion card 104PWBR1 Power for back light F083 cable Backlight power supply cable
FCU6-DUN31 10.4" color TFT
Menu key/escutcheon 10.4" monochrome STN LCD
HR275 card Connector conversion card CXA-L0612-VMR Power for back light F084 cable Backlight power supply cable
FCU6-DUT31 10.4" monochrome STN
Menu key/escutcheon NC keyboard Common for machining center/lathe FCU6-KB004 NC keyboard
(for type with HDD unit) Dedicated for FCU6-101-1 HR292 card
NC keyboard Common for machining center/lathe FCU6-KB014 NC keyboard (for type with HDD unit) HR293 card
FCU6-KB005 NC keyboard (for type without HDD unit)
NC keyboard Common for machining center/lathe
6. Peripheral devices Type Configuration elements Details
HDD 2.5" IDE 540MB With F140 cable (50cm) Heater HDD HEATER ∗BKO-NC9069H03
FCU6-HD101-1 External HD unit (HDD: 2.5" IDE 540MB) With heater
With installation plate/damper cushion
HDD 2.5" IDE 540MB With F140 cable (50cm) Heater HDD HEATER ∗BKO-NC9069H04
FCU6-HD201-1 External HD unit (HDD: 2.5" IDE 540MB) With heater
With installation plate/damper cushion
HDD 2.5" IDE 2GB With F140 cable (50cm) Heater HDD HEATER ∗BKO-NC9069H04
FCU6-HD211-1 External HD unit (HDD: 2.5" IDE 2GB) With heater
With installation plate/damper cushion
FD unit With F130 cable (1m)
FCU6-FD121-1 External FD unit
Plate FD unit With F130 cable (1m)
FCU6-FD221-1 FD unit for pendant box
Plate PD25A Input 200VAC, output
24VDC, power supply ON/OFF function
PD25A
HD60B/HD60C Manual pulse generator Without MELDAS logo HD60B-1/HD60C-1 Manual pulse generator With MELDAS logo Grounding plate D Grounding plate D set Grounding plate E Grounding plate E set

CHAPTER 2 CONFIGURATION 2.2 List of Configuration Units
5
7. Base I/O unit
Type Configuration elements Details
HR325 DI (sink/source)/DO (sink)=48/48
FCU6-DX210 DI (sink/source)/DO (sink)=48/48 With servo, RIO, SKIP ENC I/F Aluminum die cast
HR335 DI (sink/source)/DO (source)=48/48
FCU6-DX211 DI (sink/source)/DO (sink)=48/48 With servo, RIO, SKIP ENC I/F Aluminum die cast
HR327 DI (sink/source)/DO (sink)=64/64
FCU6-DX220 DI (sink/source)/DO (sink)=64/64 With servo, RIO, SKIP ENC I/F Aluminum die cast
HR337 DI (sink/source)/DO (source)=64/64
FCU6-DX221 DI (sink/source)/DO (sink)=64/64 With servo, RIO, SKIP ENC I/F Aluminum die cast
HR325 DI (sink/source)/DO (sink)=48/48 RX323-1 DI (sink/source)/DO (sink)=32/16
FCU6-DX310 DI (sink/source)/DO (sink)=80/64 With servo, RIO, SKIP ENC I/F Aluminum die cast
HR335 DI (sink/source)/DO (source)=48/48 RX324-1 DI (sink/source)/DO (source)=32/16
FCU6-DX311 DI (sink/source)/DO (sink)=80/64 With servo, RIO, SKIP ENC I/F Aluminum die cast
HR325 DI (sink/source)/DO (sink)=48/48 RX323 DI (sink/source)/DO (sink)=32/16
Analog output 1 point
FCU6-DX320 DI (sink/source)/DO (sink)=80/64Analog output 1 point With servo, RIO, SKIP ENC I/F
Aluminum die cast HR335 DI (sink/source)/DO (source)=48/48 RX324 DI (sink/source)/DO (source)=32/16
Analog output 1 point
FCU6-DX321 DI (sink/source)/DO (sink)=80/64Analog output 1 point With servo, RIO, SKIP ENC I/F
Aluminum die cast HR325 DI (sink/source)/DO (sink)=48/48 RX331 Manual pulse generator 2ch
FCU6-DX330 DI (sink/source)/DO (sink)=48/48Manual pulse generator 2ch With servo, RIO, SKIP ENC I/F Aluminum die cast
HR335 DI (sink/source)/DO (source)=48/48 RX331 Manual pulse generator 2ch
FCU6-DX331 DI (sink/source)/DO (sink)=48/48Manual pulse generator 2ch With servo, RIO, SKIP ENC I/F Aluminum die cast
HR325 DI (sink/source)/DO (sink)=48/48 RX341 Analog input 4 points, analog output 1 point
FCU6-DX340 DI (sink/source)/DO (sink)=48/48Analog input 4 points, analog output 1 point With servo, RIO, SKIP ENC I/F Aluminum die cast
HR335 DI (sink/source)/DO (source)=48/48 RX341 Analog input 4 points, analog output 1 point
FCUA-DX341 DI (sink/source)/DO (sink)=48/48Analog input 4 points, analog output 1 point With servo, RIO, SKIP ENC I/F Aluminum die cast
HR327 DI (sink/source)/DO (sink)=64/64 RX323-1 DI (sink/source)/DO (sink)=32/16
FCU6-DX410 DI (sink/source)/DO (sink)=96/80 With servo, RIO, SKIP ENC I/F Aluminum die cast
HR337 DI (sink/source)/DO (source)=64/64 RX324-1 DI (sink/source)/DO (source)=32/16
FCU6-DX411 DI (sink/source)/DO (sink)=96/80 With servo, RIO, SKIP ENC I/F Aluminum die cast
HR327 DI (sink/source)/DO (sink)=64/64 RX323 DI (sink/source)/DO (sink)=32/16
Analog output 1 point
FCU6-DX420 DI (sink/source)/DO (sink)=96/80Analog output 1 point With servo, RIO, SKIP ENC I/F
Aluminum die cast HR337 DI (sink/source)/DO (source)=64/64 RX324 DI (sink/source)/DO (source)=32/16
Analog output 1 point
FCU6-DX421 DI (sink/source)/DO (sink)=96/80Analog output 1 point With servo, RIO, SKIP ENC I/F
Aluminum die cast HR327 DI (sink/source)/DO (sink)=64/64 RX331 Manual pulse generator 2ch
FCU6-DX430 DI (sink/source)/DO (sink)=64/64Manual pulse generator 2ch With servo, RIO, SKIP ENC I/F Aluminum die cast
HR337 DI (sink/source)/DO (source)=64/64 RX331 Manual pulse generator 2ch
FCU6-DX431 DI (sink/source)/DO (sink)=64/64Manual pulse generator 2ch With servo, RIO, SKIP ENC I/F Aluminum die cast
HR327 DI (sink/source)/DO (sink)=64/64 RX341 Analog input 4 points, analog output 1 point
FCU6-DX440 DI (sink/source)/DO (sink)=64/64Analog input 4 points, analog output 1 point With servo, RIO, SKIP ENC I/F Aluminum die cast
HR337 DI (sink/source)/DO (source)=64/64 RX341 Analog input 4 points, analog output 1 point
FCU6-DX441 DI (sink/source)/DO (sink)=64/64Analog input 4 points, analog output 1 point With servo, RIO, SKIP ENC I/F Aluminum die cast
CHAPTER 2 CONFIGURATION 2.2 List of Configuration Units
6
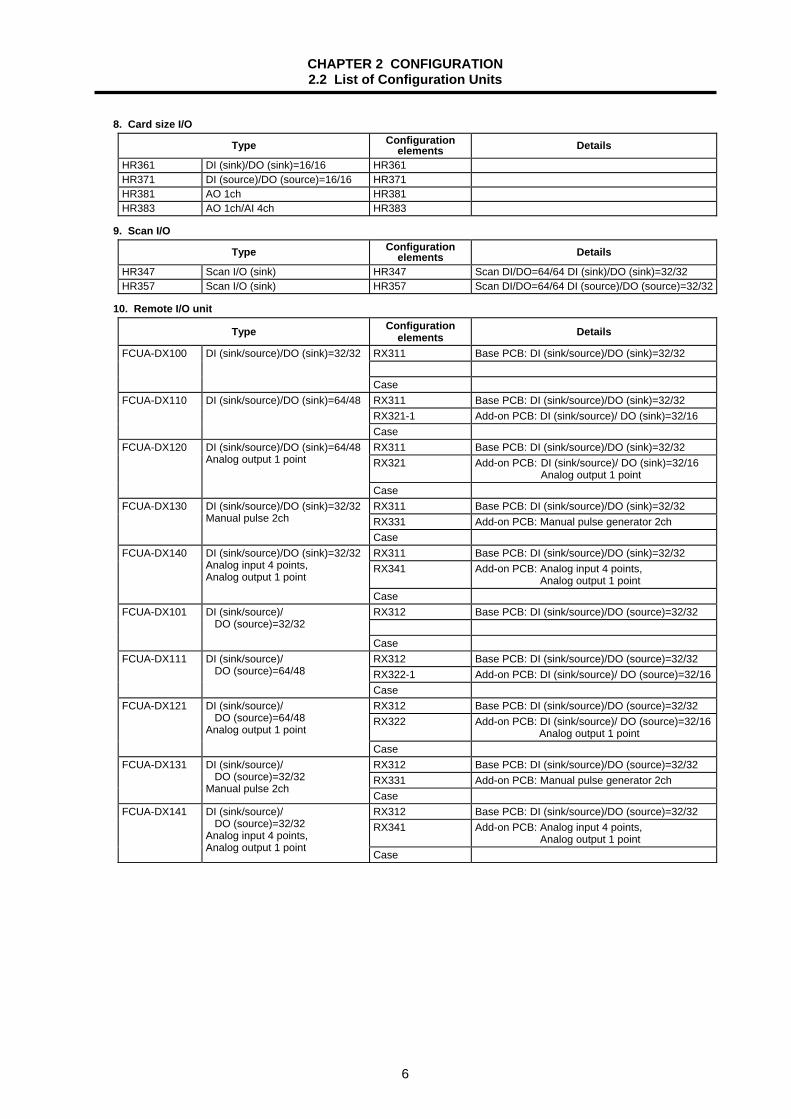
8. Card size I/O
Type Configuration elements Details
HR361 DI (sink)/DO (sink)=16/16 HR361 HR371 DI (source)/DO (source)=16/16 HR371 HR381 AO 1ch HR381 HR383 AO 1ch/AI 4ch HR383
9. Scan I/O
Type Configuration elements Details
HR347 Scan I/O (sink) HR347 Scan DI/DO=64/64 DI (sink)/DO (sink)=32/32 HR357 Scan I/O (sink) HR357 Scan DI/DO=64/64 DI (source)/DO (source)=32/32
10. Remote I/O unit
Type Configuration elements Details
RX311 Base PCB: DI (sink/source)/DO (sink)=32/32
FCUA-DX100 DI (sink/source)/DO (sink)=32/32
Case RX311 Base PCB: DI (sink/source)/DO (sink)=32/32 RX321-1 Add-on PCB: DI (sink/source)/ DO (sink)=32/16
FCUA-DX110 DI (sink/source)/DO (sink)=64/48
Case RX311 Base PCB: DI (sink/source)/DO (sink)=32/32 RX321 Add-on PCB: DI (sink/source)/ DO (sink)=32/16
Analog output 1 point
FCUA-DX120 DI (sink/source)/DO (sink)=64/48Analog output 1 point
Case RX311 Base PCB: DI (sink/source)/DO (sink)=32/32 RX331 Add-on PCB: Manual pulse generator 2ch
FCUA-DX130 DI (sink/source)/DO (sink)=32/32Manual pulse 2ch
Case RX311 Base PCB: DI (sink/source)/DO (sink)=32/32 RX341 Add-on PCB: Analog input 4 points,
Analog output 1 point
FCUA-DX140 DI (sink/source)/DO (sink)=32/32Analog input 4 points, Analog output 1 point
Case RX312 Base PCB: DI (sink/source)/DO (source)=32/32
FCUA-DX101 DI (sink/source)/ DO (source)=32/32
Case RX312 Base PCB: DI (sink/source)/DO (source)=32/32 RX322-1 Add-on PCB: DI (sink/source)/ DO (source)=32/16
FCUA-DX111 DI (sink/source)/ DO (source)=64/48
Case RX312 Base PCB: DI (sink/source)/DO (source)=32/32 RX322 Add-on PCB: DI (sink/source)/ DO (source)=32/16
Analog output 1 point
FCUA-DX121 DI (sink/source)/ DO (source)=64/48 Analog output 1 point
Case RX312 Base PCB: DI (sink/source)/DO (source)=32/32 RX331 Add-on PCB: Manual pulse generator 2ch
FCUA-DX131 DI (sink/source)/ DO (source)=32/32 Manual pulse 2ch
Case RX312 Base PCB: DI (sink/source)/DO (source)=32/32 RX341 Add-on PCB: Analog input 4 points,
Analog output 1 point
FCUA-DX141 DI (sink/source)/ DO (source)=32/32 Analog input 4 points, Analog output 1 point
Case

CHAPTER 3 INSTALLATION 3.1 General Specification
7
CHAPTER 3 INSTALLATION 3.1 General Specification
(1) Environment conditions in operation box Type name MCU6-MU MCU6-DUN3 /DUC3 /DUT3 Unit name Control unit Display unit
During operation 0~55°C (∗1: Working temperature 5~55°C)
0~50°C (Display unit surface temperature)(∗2) Ambient
temperature During storage −20~60°C During operation 45~75% RH (with no dew condensation) Ambient
humidity During storage 45~80% RH (with no dew condensation) Vibration resistance 0.5G or less (during operation) Shock resistance 3G or less (during operation)
Gen
eral
spe
cific
atio
ns
Working atmosphere No corrosive gas, dust and oil mist Power voltage
24VDC±5% Ripple ±5% (P-P)
Momentary stop tolerance time 20ms (when using external power supply unit) Pow
er
spec
ifica
tions
Current consumption 3A (max.) Heating value 31W (typ.) 72W (max.) Weight 3.5kg Unit size Refer to appendix.
(∗1) When using the model with built-in hard disk (FCU6-MU5 ), the hard disk will not start up if the
temperature in the panel is 5°C or less when the power is turned ON. The hard disk will start up automatically after the hard disk temperature has risen to 5°C with the heater.
(∗2) The display quality (contrast/hues) will drop at 45°C and above. With the FCU6-DUC3 (color STN) model, the surface temperature is up to 40°C.
(2) Environment conditions in electric cabinet
Type name HR361/HR371 PD25 Unit name Card size I/O External power supply unit
During operation 0~55°C Ambient temperature During storage −20~60°C
During operation 45~75% RH (with no dew condensation) Ambient humidity During storage 45~80% RH (with no dew condensation) Vibration resistance 0.5G or less (during operation) Shock resistance 3G or less (during operation)
Gen
eral
spe
cific
atio
ns
Working atmosphere No corrosive gas, dust and oil mist
Power voltage
24VDC±5% Ripple ±5% (P-P)
200~230VAC +10% −15% 50/60Hz ±1Hz
Pow
er
spec
ifica
tions
Current consumption 5V 0.4A 24V 1.2A (∗1) 0.6A Heating value 15W (∗3) 35W Weight 300g 1.5kg Unit size Refer to appendix.

CHAPTER 3 INSTALLATION 3.1 General Specification
8
Type name
FCU6-DX210 FCU6-DX211 FCU6-DX330 FCU6-DX331 FCU6-DX340 FCU6-DX341
FCU6-DX220 FCU6-DX221 FCU6-DX430 FCU6-DX431 FCU6-DX440 FCU6-DX441
FCU6-DX310 FCU6-DX311 FCU6-DX320 FCU6-DX321
FCU6-DX410 FCU6-DX411 FCU6-DX420 FCU6-DX421
Unit name Base I/O unit During operation 0~55°C Ambient
temperature During storage −20~60°C During operation 45~75% RH (with no dew condensation) Ambient
humidity During storage 45~80% RH (with no dew condensation) Vibration resistance 0.5G or less (during operation) Shock resistance 3G or less (during operation)
Gen
eral
spe
cific
atio
ns
Working atmosphere No corrosive gas, dust and oil mist
Power voltage
24VDC±5% Ripple ±5% (P-P)
Pow
er
spec
ifica
tions
Current consumption 3.6A 4.8A 5.0A 6.2A Heating value (max.) 35W (∗3) 45W (∗3) 50W (∗3) 60W (∗3) Weight 2.0kg Unit size Refer to appendix.
(∗3) Heating value for when all DI/DO points are ON.

CHAPTER 3 INSTALLATION 3.2 Designing Conditions of Operation Box
9
3.2 Designing Conditions of Operation Box 3.2.1 Depth of Operation Box
10.4"LCD
2.0 1
W H D
(95)(12)
1
DEPTH D = 1 2 0 m m must be kept. (Note: For standard specif ications.)
D = 2 0 0 m m must be kept. (Note: For expanded specif ications)
LCD Fil ter(t=2.0)
CNC Mother board
I/O Cable
(Rear side)
Operation box depth dimensions 120 (For standard specif ications)
Control Unit
200 (For expanded specif ications)
Note 1: Provide a structure that allows the control unit cover to be opened and closed.Note 2: With the FCU6-MU515/516, the fan cover is 5mm higher, and the height is 173mm.
17.613
220×168×95
(Front s ide)

CHAPTER 3 INSTALLATION 3.2 Designing Conditions of Operation Box
10
3.2.2 Operation Box Heat Radiation Countermeasures Please refer to following method for heat radiation countermeasures method.
<Hypothetical conditions> (1) Average temperature in cabinet : 55°C (2) Cabinet peripheral temperature : Ta ≤ 0°C~45°C (3) Internal temperature rise value : ∆T = T − Ta (max) = 10°C
<Supplement> (1) Refer to "3.1 General Specification" for
the heat generated by each unit. (2) Enclosed cabinet (thin steel plate)
cooling capacity (W1) calculation equation W1 = U × A × ∆T U : 6W/m2 × °C ... with internal circulation fan 4W/m2 × °C ... without internal circulation fan A : Effective heat radiation area (m2) ∆T : Internal temperature rise value (10°C) (Area where heat can be radiated from cabinet) <Caution> When calculating the effective heat radiation area, do not include the parts that contact other objects.
(3) Points of caution for heat radiation countermeasures when designing mounting state ∗Consider convection in cabinet (eliminate heat spots) ∗Collect hot air at suction port in heat exchanger panel.
(4) Evaluation standards for internal temperature rise distribution data ∆T (average value) ≤ 10°C ∆Tmax (maximum value) ≤ 15°C R (inconsistency ∆Tmax − ∆Tmin) ≤ 6°C (Evaluate existence of heat spots)
Refer to "Section 3.1 General Specifications" for the heating value of each unit. With the operation box, heat could accumulate at the top of the control unit, so install a circulation fan.
Install a circulation fan in the panel when the following conditions are not satisfied.
Evaluation standards for internal temperature rise distribution data
∆T (average value) ≤ 10°C ∆Tmax (maximum value) ≤ 15°C
Procedures for heat design and verification
Example of heat radiation countermeasures
Calculate total heat generation of eachmounted unit (W)
Comparison of W and W1 W≦W1
Collection of internal temperature rise distribution data
Mounting design
Improvements
Completion
Selection of heat exchanger
Evaluation
W>W1
T≦10°C
T>10°C
Calculate cabinet’s cooling capacity (W1)
CHAPTER 3 INSTALLATION 3.3 Noise Countermeasures
11
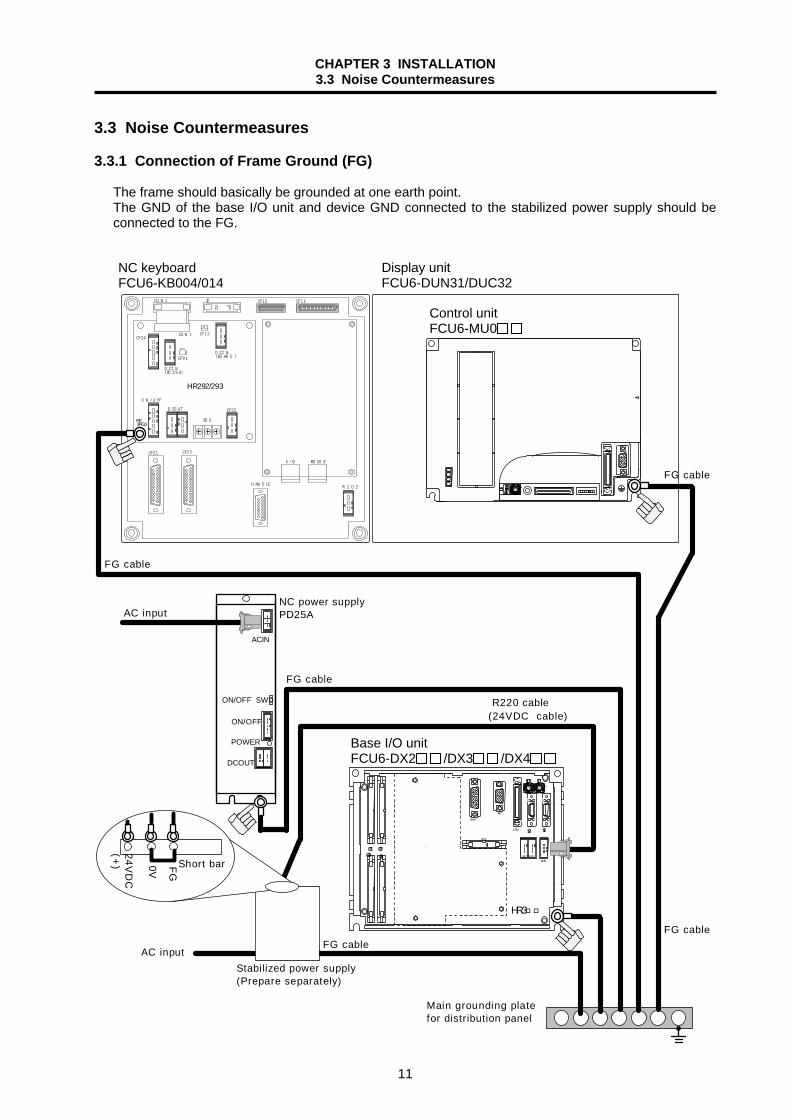
3.3 Noise Countermeasures 3.3.1 Connection of Frame Ground (FG)
The frame should basically be grounded at one earth point. The GND of the base I/O unit and device GND connected to the stabilized power supply should be connected to the FG.
0
0 0
CF31 CF32CF34CF33
SV2 SV1
HR3
RIO1RIO2DCIN
CF10
ENC
CR31
SKIP
FG cable
R220 cable(24VDC cable)
Short bar
FG cableAC input
HR292/293
FG cable
AC input
FG cable
NC power supplyPD25A
FG cable
ACIN
ON/OFF SW
ON/OFF
POWER
DCOUT
0V
Stabilized power supply(Prepare separately)
Main grounding platefor distribution panel
24VD
C(+
)
DCIN(BOARD)
CF25
POS
ON/OFF
CF24
DCIN(PD25A)
CF01
CF13
DCOUT
PE(FG)
J2 CF11CF12
CON1
CON1
CF21 CF22
K/B MOUSE
HANDLE RIO3
FG
NC keyboard FCU6-KB004/014
Display unit FCU6-DUN31/DUC32
Base I/O unit FCU6-DX2 /DX3 /DX4
Control unit FCU6-MU0
CHAPTER 3 INSTALLATION 3.3 Noise Countermeasures
12
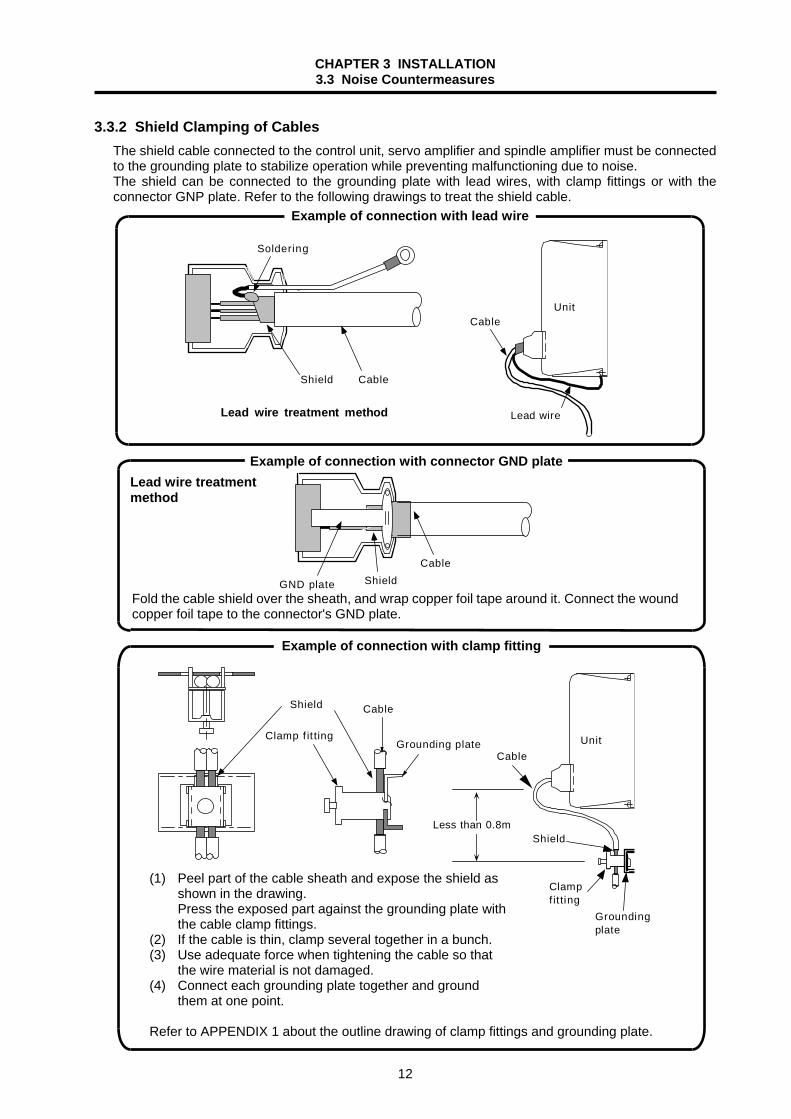
3.3.2 Shield Clamping of Cables The shield cable connected to the control unit, servo amplifier and spindle amplifier must be connected to the grounding plate to stabilize operation while preventing malfunctioning due to noise. The shield can be connected to the grounding plate with lead wires, with clamp fittings or with the connector GNP plate. Refer to the following drawings to treat the shield cable.
Lead wire treatment method
Soldering
Shield Cable
Cable
Lead wire
Unit
GND plate ShieldCable
Fold the cable shield over the sheath, and wrap copper foil tape around it. Connect the wound copper foil tape to the connector's GND plate.
Shield
Clamp f it ting
Cable
CableGrounding plate Unit
ShieldLess than 0.8m
Clampfit ting
Groundingplate
Example of connection with clamp fitting
(1) Peel part of the cable sheath and expose the shield as shown in the drawing. Press the exposed part against the grounding plate with the cable clamp fittings.
(2) If the cable is thin, clamp several together in a bunch. (3) Use adequate force when tightening the cable so that
the wire material is not damaged. (4) Connect each grounding plate together and ground
them at one point. Refer to APPENDIX 1 about the outline drawing of clamp fittings and grounding plate.
Example of connection with lead wire
Example of connection with connector GND plate Lead wire treatment method

CHAPTER 3 INSTALLATION 3.3 Noise Countermeasures
13
All connected cable must be connected to the FG. Refer to "Section 3.3.2 Shield Clamping of Cables" or "Appendix 2. Cable drawings" for the details on the connection methods.
Unit name Connector name Application/function Cable shield treatment
Control unit (FCU6-MU )
CF10 ENC2
I/O INTERFACE Encoder
Required Required
NC keyboard (FCU6-KB )
HANDLE CF21 CF22 K/B
MOUSE
Manual pulse generator RS-232-C (CH1, 2) RS-232-C (CH3, 4)
PS/2 keyboard PS/2 mouse
Required Required Required Required Required
Base I/O unit (FCU6-DX2 )(FCU6-DX3 )(FCU6-DX4 )
CF10 SV1 SV2
ENC1 SKP RIO1 RIO2
I/O interface Servo/spindle amplifier Servo/spindle amplifier
Spindle encoder Skip
Remote I/O unit Remote I/O unit
Required Required Required Required Required Required Required
3.3.3 Connecting Spark Killers
The generated noise must be removed when the coil/contact operates. As a measure, connect a spark killer in parallel with the coil/contact.
Coi l
Contact
E
SK
SK
The CR compound element is useful for eliminating noise generated by magnetic induction.
Spark killer C: 0.033 ~ 0.1µF R: 10 ~ 120Ω

CHAPTER 3 INSTALLATION 3.3 Noise Countermeasures
14
3.3.4 Protective Measures against Lightning Surge
Generally, lightning surge infiltrates the control power supply from the power supply line. Then the internal circuit is damaged by this control power supply, or via this control power supply. The Mitsubishi NC unit has a surge absorber on the control power supply for the NC control section and NC control section. However, this measure is not taken through the control panel, as shown in Fig. 1, so the lightning surface could flow over the signal line and damage the other devices.
Power supply line
NC controlsection
Power supplyfor panel
NC drive section (Servo, spindle amplifier)
Control panel(Relay panel,etc.)
Lightning surge path
Fig. 1 Path of damage caused by lightning surge
(1) Methods of protective measures Install the surge absorber on the power supply line for the separately prepared power supply units, etc., as shown in Fig. 2 and Fig. 3. The following two measures are required as protection against general damage.
1) Installation of surge absorber 2) Installation of circuit protector
Other device(power supplyfor panel, etc.)
Circuitprotector
Surge absorber (1)
Power supply lineControl panel(Relay panel,
etc.)
Fig. 2 Lightning surge measures for single-phase power supply line
Other device(power supplyfor panel, etc.)
Circuitprotector
Surge absorber (3)Surge absorber (2)
Power supply line Control panel(Relay panel,
etc.)
Fig. 3 Lightning surge measures for 3-phase power supply line
CHAPTER 3 INSTALLATION 3.3 Noise Countermeasures
15
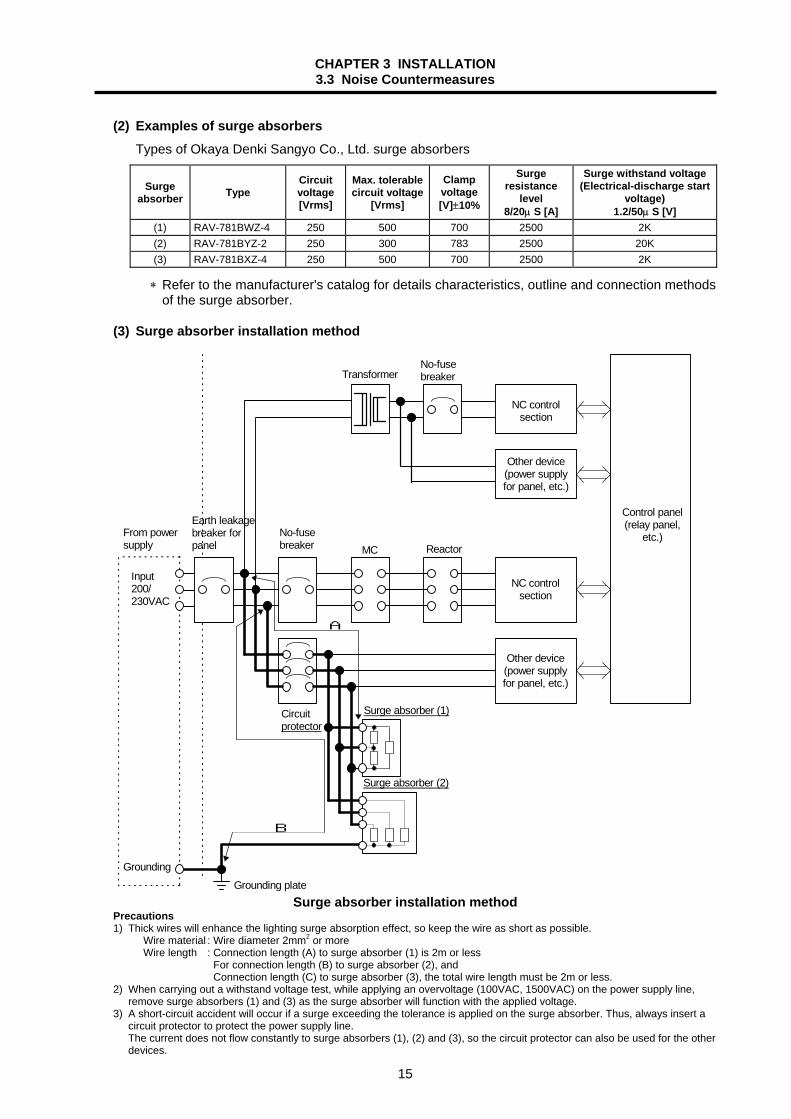
(2) Examples of surge absorbers Types of Okaya Denki Sangyo Co., Ltd. surge absorbers
Surge absorber Type
Circuit voltage [Vrms]
Max. tolerable circuit voltage
[Vrms]
Clamp voltage[V]±10%
Surge resistance
level 8/20µ S [A]
Surge withstand voltage (Electrical-discharge start
voltage) 1.2/50µ S [V]
(1) RAV-781BWZ-4 250 500 700 2500 2K (2) RAV-781BYZ-2 250 300 783 2500 20K (3) RAV-781BXZ-4 250 500 700 2500 2K
∗ Refer to the manufacturer's catalog for details characteristics, outline and connection methods of the surge absorber.
(3) Surge absorber installation method
NC controlsection
Control panel(relay panel,
etc.)
Surge absorber (2)
Surge absorber (1)
Other device(power supplyfor panel, etc.)
Earth leakagebreaker forpanel
Input200/230VAC
MC Reactor
Transformer
No-fusebreaker
No-fusebreaker
Circuitprotector
GroundingGrounding plate
From powersupply
B
A
NC controlsection
Other device(power supplyfor panel, etc.)
Surge absorber installation method
Precautions 1) Thick wires will enhance the lighting surge absorption effect, so keep the wire as short as possible.
Wire material : Wire diameter 2mm2 or more Wire length : Connection length (A) to surge absorber (1) is 2m or less
For connection length (B) to surge absorber (2), and Connection length (C) to surge absorber (3), the total wire length must be 2m or less. 2) When carrying out a withstand voltage test, while applying an overvoltage (100VAC, 1500VAC) on the power supply line,
remove surge absorbers (1) and (3) as the surge absorber will function with the applied voltage. 3) A short-circuit accident will occur if a surge exceeding the tolerance is applied on the surge absorber. Thus, always insert a
circuit protector to protect the power supply line. The current does not flow constantly to surge absorbers (1), (2) and (3), so the circuit protector can also be used for the other devices.

CHAPTER 3 INSTALLATION 3.4 Installation
16
3.4 Installation
The control unit with display and each unit are installed in a sealed structure cabinet as a principle. Observe the following points when installing into the cabinet.
3.4.1 Installation of Control Unit with Display
(1) To stably operate the hard disk drive, install the control unit with display vertically.
(2) Secure the space shown below for ventilation in consideration of the control unit's heat dissipation and wiring.
(3) When using the PCMCIA option, provide sufficient wiring allowance at the top of the control unit to wire the Ethernet communication cable and SCSI cable.
(Top)
(Bottom)
50mm or more
Control unit
Display unit
Display section
15mm or more(heat dissipation, ventilation)
150mm or more(allowance forheat dissipationand wiring)
Operation pendant
Front surface
80mm or morewhen the expansioncard is mounted(allowance for wir ing)

CHAPTER 4 SYSTEM CONNECTION 4.1 General System Diagram
17
CHAPTER 4 SYSTEM CONNECTION 4.1 General System Diagram 4.1.1 M615/M635
OFF
ON
CF01
CF24
CF25
DCOUTON/OFF
CF22F171
F172
HR292/293
F030/F031
CF11 CF12
F050F060 F149
CF13
F140
T2
T3
PE
MR-J2-CT
L11L21
L+
MDS-B-SV/
MDS-B-SP
Converter
L2L3
L11L21
B-AL
R
R
RIO
CF10CF31
CF32
CF33
CF34
ENC1
SKIP
SV1 SV2 RIO1 RIO2
F0 7 0 FCU6-DX***
FCUA-R211(SH41) 24VDC
DX1**
QY231
J 4 CSH41A
DCIN RIO1RIO2
FCUA-R211(SH41)
R
R
F040/F041
R301
DI
DI
DO
DO
R301
R301
R301
24VDC DCIN
L1
2 4 V D C
FDDF130
FCU6-DUN31/DUC32/DUT31F090
MOUSE2
PARALLEL
CF14
F110
F120 F010
F250
FCU6-MU5**(M615/M635)
CF11 CF12 HDISP
HD
CF14
CFD
LCD
CF01 DCIN EMG CF10
EMG
CSH41B
Display unit
RS-232-Cdevice
HDD unit
Control unit
Heater power cable
Base I/O unit
Remote I/O cardMachine control relay/contact
MC link BTerminatorR-TM
To next remote I/O unit
Electric cabinet
Synchronous feed encoderSensor contactMax. 8 points
Servo amplifier
Machine control relay/contact Remote I/O unit
AC reactor
(Note 3) (Note 4)
(Note 5) (Note 5)NC axisamplifierspindle
Wire spliting PCB
KB
MOUSE
DCIN(HEATR)
DCIN(PD25A)
POS
RIO3
CON1
HANDLE
CF21
F07024VDC
F110
F070
24VDC
F020/F021/F022
F030/F031
R
R
DX1**/HR357
DCIN RIO1 RIO2
FCUA-R211(SH41)
FCUA-R211(SH41)
FCU6-KB004/KB014
PD25ADCOUT
ON/OFF
ACIN
NFB
FG
MC
MC
CN1ACN1B
L11L21
L1L2L3
L-
CN1A
CN4CN1B
L+L-
MC1
CN4
24VDC
F0 7 0
NFB
SR T
RA
FG
FCUA-R211(SH41)
FCUA-R211(SH41)
Manual pulse generator(FCUA-HD60)
TerminatorR-TM
P-OFF signal
NC keyboard
24VDC(+)stabilizedpower supply
OT release switch
MC link BTerminatorR-TM
To next remote I/O unit
External powersupply unit
No fuse breaker(NFB)
3-phase 200V~230VAC
Remote I/O unit
To next remote I/O unit
Machine control relay/contact
(Note 1) (Note 6)(Note 2)
(Note 5)
(Note 5)
(Note 5)(Note 5)
(Note 1) Refer to "Section 4.3.1 (2)" when not using the PD25A power supply. (Note 2) After connecting the DO output selected by the user and the application software running on Windows has ended, turn
the external power supply unit's power OFF with the DO output. (Note 3) Connect the F149 cable pin 8 side [HD ISP] connection to the ISP terminal at the side of CF12. The target units are only FCU6-MU501 to FCU6-MU514. This is not used by the other units. (Note 4) CF14 is used only for FCU6-MU515/516. This is not used by the other units. (Note 5) Normally, use the FCUA-R211 cable for the RIO cable. If the cable length is short due to bridging between units in the same panel, the SH41 cable can be used. (Note 6) The DCIN (HEATER) connector is not used with FCU6-KB014.

CHAPTER 4 SYSTEM CONNECTION 4.1 General System Diagram
18
4.1.2 M610/M630
F110
24VDC
FG
SR T
PD25ADCOUT
ON/OFF
ACIN
NFB
OFF
ON F170
F120EMG
RA
NFB
R
R
RIO
CF10CF31
CF32
CF33
CF34
ENC1
SKIP
SV1 SV2 RIO1 RIO2
F070 FCU6-DX***
FCUA-R211(SH41)
FCUA-R211(SH41)
24VDC
24VDCF070
F070
DX1**
QY231
DCIN RIO1 RIO2
FCUA-R211(SH41)
FCUA-R211(SH41)
R
R
F040/F041
R301
DI
DI
DO
DO
R301
R301
R301
24VDC DCIN
MC
MC
T2
T3
PE
MR-J2-CT
CN1ACN1B
L11L21
L1L2
L3
L11L21
L+L-
MDS-B-SV/
MDS-B-SP
CN1A
CN4CN1B
L1L2L3
L11L21L+L-
MC1
CN4
B-AL
FDDF130
FCU6-KB005
RIO3
HANDLE
CF21
F070
24VDC
F020/F021/F022
F030/F031
CF11
F050
CF11
CFD
CF01 DCIN EMG CF10
FCU6-MU0**
F010
FG
R
R
DX1**/HR357
DCIN RIO1 RIO2
FCUA-R211(SH41)
FCUA-R211(SH41)
(M610/M630)
LCD
FCU6-DUN31/DUC32/DUT31
F090
J 4 CSH41A CSH41B
Converter
(Note 2)
(Note 1)
(Note 2)(Note 2)
Display unit
Manual pulse generator(FCUA-HD60)
RS-232-Cdevice
Control unit
TerminatorR-TM
NC keyboard
24VDC(+)stabilize dpower supply
OT release switch
Base I/O unit
Remote I/O cardMachine control relay/contact
MC link BTerminatorR-TM
MC link BTerminatorR-TM
To next remote I/O unit
To next remote I/O unit
Electric cabinet
Synchronous feed encoderSensor contactMax. 8 points
Servo amplifier
External powersupply unit
No fuse breaker(NFB)
3-phase 200V~230VACRemote I/O unit
To next remote I/O unit
Machine control relay/contact
Machine control relay/contact Remote I/O unit
(Note 2)
(Note 2)(Note 2 )
AC reactor
RIO
NC axisamplifierspindle
(Note 1) Refer to section 4.3.1 (2) when not using the PD25A power supply. (Note 2) Normally, use the FCUA-R211 cable for the RIO cable. If the cable length is short due to bridging between units in the same panel, the SH41 cable can be used.

CHAPTER 4 SYSTEM CONNECTION 4.2 Connection of Control Unit
19
4.2 Connection of Control Unit 4.2.1 Control Unit Connector Layout Drawing
The connector layout drawing of the control unit is shown below.
8
0 1 2 35
79A
BC
D
E F
4
6
8
OPEN
CBUS 2
DC INDC OUTPS EMG
BAT ALM
PCRST
CFD
CF12 LCD
CF11NCRST
NCSYS
NCLED
WDER CF10
ENC2
HD
CBUS 1
CF14
DC
INEM
GC
F01C
F02
Bottom
Front
(Note 1) Connector CF12 is not provided on the M610/630 control unit. (Note 2) Connector CF14 is provided only on the FCU6-MU515/516.
CHAPTER 4 SYSTEM CONNECTION 4.2 Connection of Control Unit
20
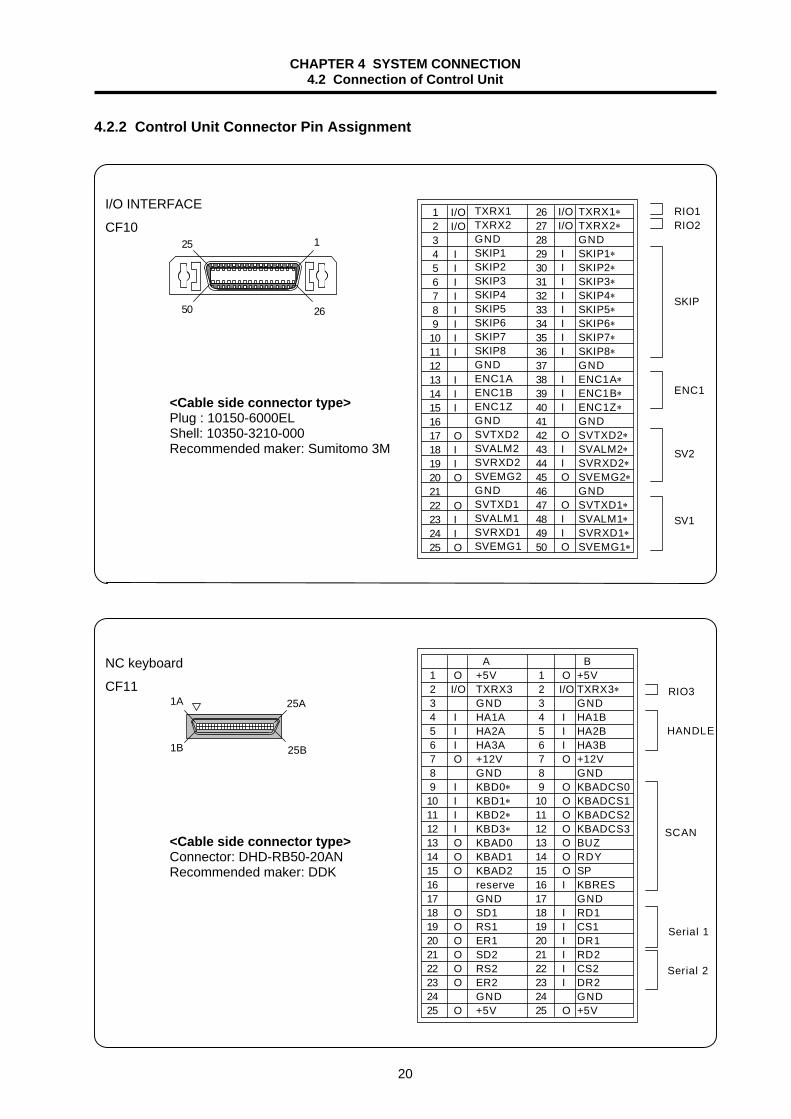
4.2.2 Control Unit Connector Pin Assignment I/O INTERFACE
CF10 125
50 26
<Cable side connector type> Plug : 10150-6000EL Shell: 10350-3210-000 Recommended maker: Sumitomo 3M
NC keyboard
CF11 25A1A
25B1B
<Cable side connector type> Connector: DHD-RB50-20AN Recommended maker: DDK
TXRX1∗TXRX2∗GNDSKIP1∗SKIP2∗SKIP3∗SKIP4∗SKIP5∗SKIP6∗SKIP7∗SKIP8∗GNDENC1A∗ENC1B∗ENC1Z∗GNDSVTXD2∗SVALM2∗SVRXD2∗SVEMG2∗GNDSVTXD1∗SVALM1∗SVRXD1∗SVEMG1∗
TXRX1TXRX2GNDSKIP1SKIP2SKIP3SKIP4SKIP5SKIP6SKIP7SKIP8GNDENC1AENC1BENC1ZGNDSVTXD2SVALM2SVRXD2SVEMG2GNDSVTXD1SVALM1SVRXD1SVEMG1
1 2 3 4 5 6 7 8 910111213141516171819202122232425
26272829303132333435363738394041424344454647484950
I/OI/O
I I I I I I I I
I I I
O I I O
O I I O
I/OI/O
I I I I I I I I
I I I
O I I O
O I I O
RIO1RIO2
SKIP
ENC1
SV2
SV1
B+5VTXRX3∗GNDHA1BHA2BHA3B+12VGNDKBADCS0KBADCS1KBADCS2KBADCS3BUZRDYSPKBRESGNDRD1CS1DR1RD2CS2DR2GND+5V
A+5VTXRX3GNDHA1AHA2AHA3A+12VGNDKBD0∗KBD1∗KBD2∗KBD3∗KBAD0KBAD1KBAD2reserveGNDSD1RS1ER1SD2RS2ER2GND+5V
1 2 3 4 5 6 7 8 910111213141516171819202122232425
OI/O
I I I O
I I I I O O O
O O O O O O
O
1 2 3 4 5 6 7 8 910111213141516171819202122232425
OI/O
I I I O
O O O O O O O I
I I I I I I
O
RIO3
HANDLE
SCAN
Serial 1
Serial 2
CHAPTER 4 SYSTEM CONNECTION 4.2 Connection of Control Unit
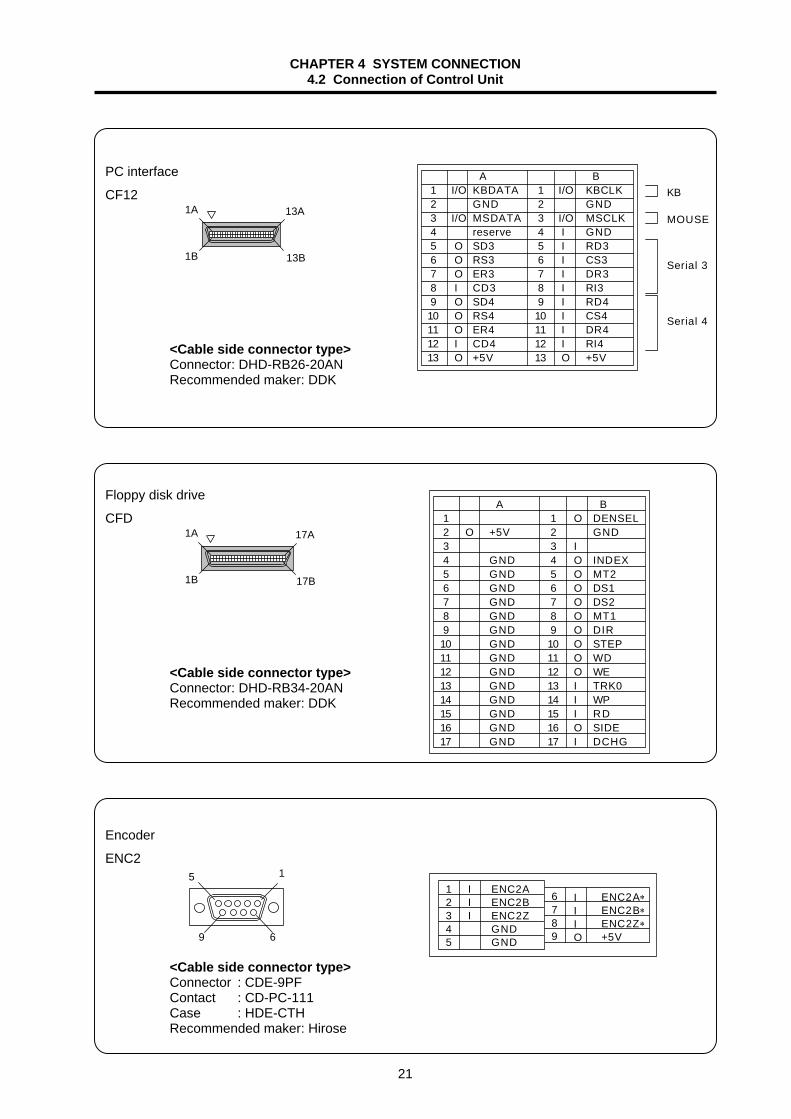
21
PC interface
CF12
13A1A
13B1B
<Cable side connector type> Connector: DHD-RB26-20AN Recommended maker: DDK
Floppy disk drive
CFD
17A1A
17B1B
<Cable side connector type> Connector: DHD-RB34-20AN Recommended maker: DDK
Encoder
ENC2
15
69
<Cable side connector type> Connector : CDE-9PF Contact : CD-PC-111 Case : HDE-CTH Recommended maker: Hirose
BKBCLKGNDMSCLKGNDRD3CS3DR3RI3RD4CS4DR4RI4+5V
AKBDATAGNDMSDATAreserveSD3RS3ER3CD3SD4RS4ER4CD4+5V
1 2 3 4 5 6 7 8 910111213
I/O
I/O
O O O I O O O I O
1 2 3 4 5 6 7 8 910111213
I/O
I/O I I I I I I I I I O
KB
Serial 3
Serial 4
MOUSE
BDENSELGND
INDEXMT2DS1DS2MT1DIRSTEPWDWETRK0WPRDSIDEDCHG
A
+5V
GNDGNDGNDGNDGNDGNDGNDGNDGNDGNDGNDGNDGNDGND
1 2 3 4 5 6 7 8 91011121314151617
O 1 2 3 4 5 6 7 8 91011121314151617
O
IOOOOOOOOOIIIOI
ENC2AENC2BENC2ZGNDGND
12345
III
ENC2A∗ENC2B∗ENC2Z∗+5V
6789
IIIO

CHAPTER 4 SYSTEM CONNECTION 4.2 Connection of Control Unit
22
PC interface 2
CF14
20A
20B
1A
1B
+24V input
DCIN
Emergency stop
EMG
Power off detection
CF01
Do not apply voltages other than those indicated in this manual on the connector. Doing so may lead to destruction or damage.
Incorrect connections may damage the devices, so connect the cables to the specified connectors.
BGNDGNDGNDGNDPD7PD6PD5PD4PD3PD2PD1PD0PSTB∗MDATA2GNDVSYNCREDGREENBLUEGND
AGNDGNDGNDGNDPSLIN∗PINIT∗PERR∗AFD∗PSLCT∗PENDPBUSY∗PACK∗+5VMCLK2OPMSHSYNCREDRETGREENRETBLUEERTGND
1 2 3 4 5 6 7 8 91011121314151617181920
O O I O I I I I
I/O I O O O O
1 2 3 4 5 6 7 8 91011121314151617181920
I/OI/OI/OI/OI/OI/OI/OI/O OI/O
O O O O
Paral lel
Mouse 2
Display unitfor maintenance
I +24VGNDFG
123
1 2 3
12
3
FGEMG INCOM
123
IO
12
I
GNDACFAIL
12
<Cable side connector type> Connector : DHD-RB40-20AN Recommended maker: DDK
<Cable side connector type>Connector : 51030-0330 Contact : 50084-8160 Recommended maker: Morex
<Cable side connector type>Connector : 51030-0330 Contact : 50084-8160 Recommended maker: Morex
CAUTION
<Cable side connector type>Connector : 51030-0230 Contact : 50084-8160 Recommended maker: Morex
<Cable side connector type> Connector : 2-178288-3 Contact : 1-175218-5 Recommended maker: Japan AMP
CHAPTER 4 SYSTEM CONNECTION 4.2 Connection of Control Unit
23
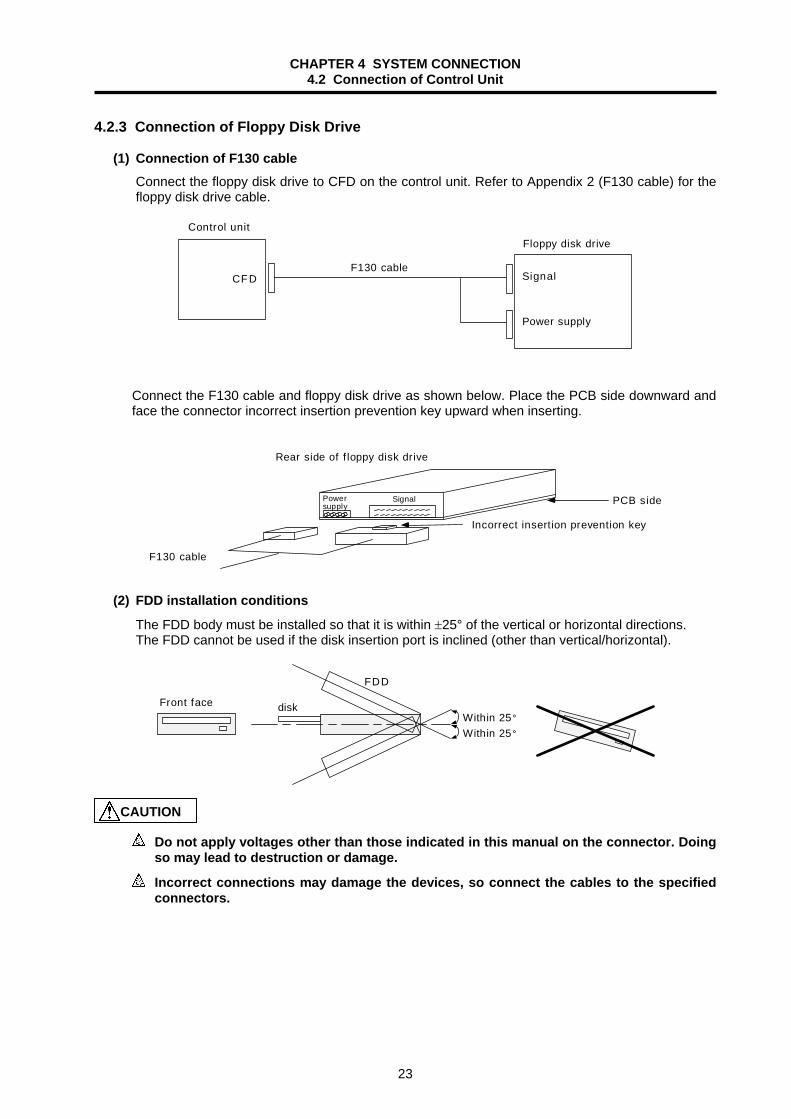
4.2.3 Connection of Floppy Disk Drive
(1) Connection of F130 cable Connect the floppy disk drive to CFD on the control unit. Refer to Appendix 2 (F130 cable) for the floppy disk drive cable.
Control unit
CF11
F130 cableCFD
Floppy disk drive
Signal
Power supply
Connect the F130 cable and floppy disk drive as shown below. Place the PCB side downward and face the connector incorrect insertion prevention key upward when inserting.
F130 cable
Incorrect insertion prevention key
Rear side of f loppy disk drive
PCB sidePowersupply
Signal
(2) FDD installation conditions
The FDD body must be installed so that it is within ±25° of the vertical or horizontal directions. The FDD cannot be used if the disk insertion port is inclined (other than vertical/horizontal).
Within 25°
Within 25°
FDD
diskFront face
Do not apply voltages other than those indicated in this manual on the connector. Doing so may lead to destruction or damage.
Incorrect connections may damage the devices, so connect the cables to the specified connectors.
CAUTION

CHAPTER 4 SYSTEM CONNECTION 4.2 Connection of Control Unit
24
4.2.4 Connection of PC Card (PCMCIA)
The PC card (PCMCIA) is inserted in the control unit from the top of the control unit. When inserting the card, a space of 100 mm or more is required at the top of the control unit. To remove the card, press the eject button.
100
53
48
85.5 764
15
Control unit
PC
car
d #1
(rea
r si
de)
PC
car
d #2
105
Label attachment
(PC card specifications) The PCMCIA I/F mounted on the control unit satisfies the following specifications.
Standards : PCMCIA_V2.1, JEIDA_4.2 compliance No. of slots : 2 slots PC card power supply (Vcc) : 5 V, 800 mA Program power supply (Vpp) : 12 V, 120 mA
(Note 1) PC card thickness
Type I (3.3mm) Type II (5.5mm) Type III (10.5mm)
(Note 2) Limited to the 5V specification part (cannot be used with the 3.3V specifications)
Up to two cards can be used
Only one card can be used
CHAPTER 4 SYSTEM CONNECTION 4.2 Connection of Control Unit
25
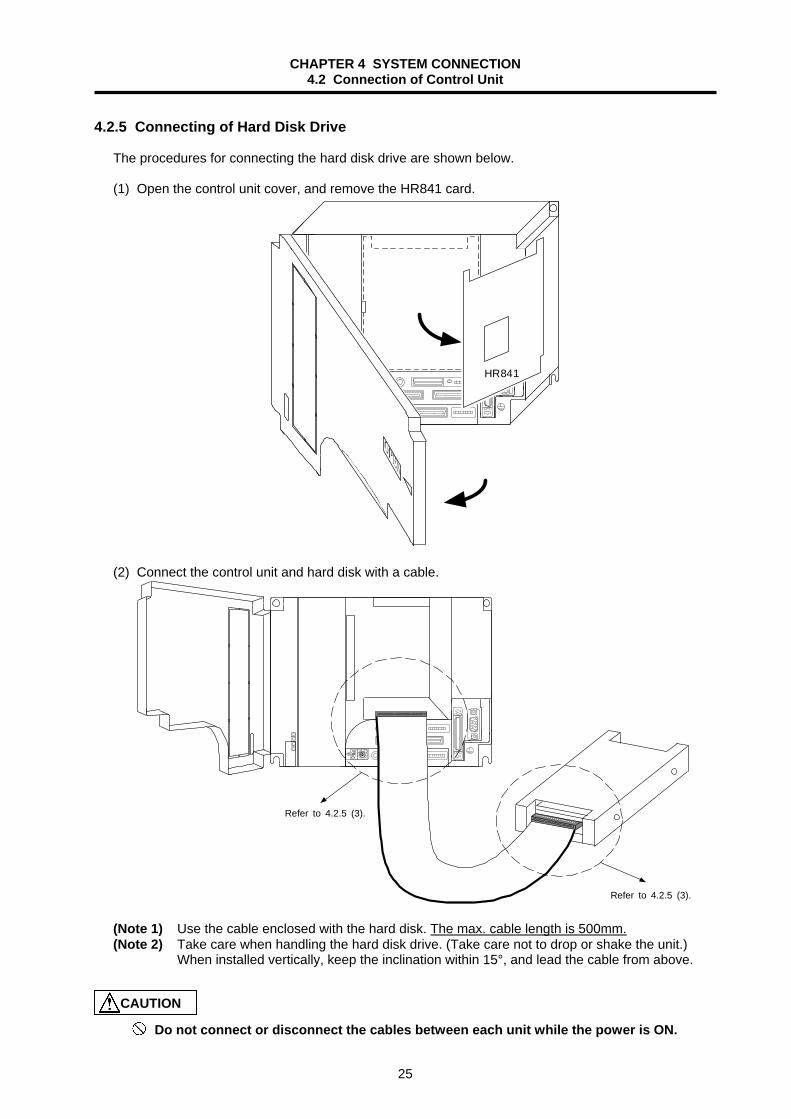
4.2.5 Connecting of Hard Disk Drive The procedures for connecting the hard disk drive are shown below. (1) Open the control unit cover, and remove the HR841 card.
0
HR841
(2) Connect the control unit and hard disk with a cable.
0
Refer to 4.2.5 (3).
Refer to 4.2.5 (3). (Note 1) Use the cable enclosed with the hard disk. The max. cable length is 500mm. (Note 2) Take care when handling the hard disk drive. (Take care not to drop or shake the unit.) When installed vertically, keep the inclination within 15°, and lead the cable from above.
Do not connect or disconnect the cables between each unit while the power is ON. CAUTION
CHAPTER 4 SYSTEM CONNECTION 4.2 Connection of Control Unit
26
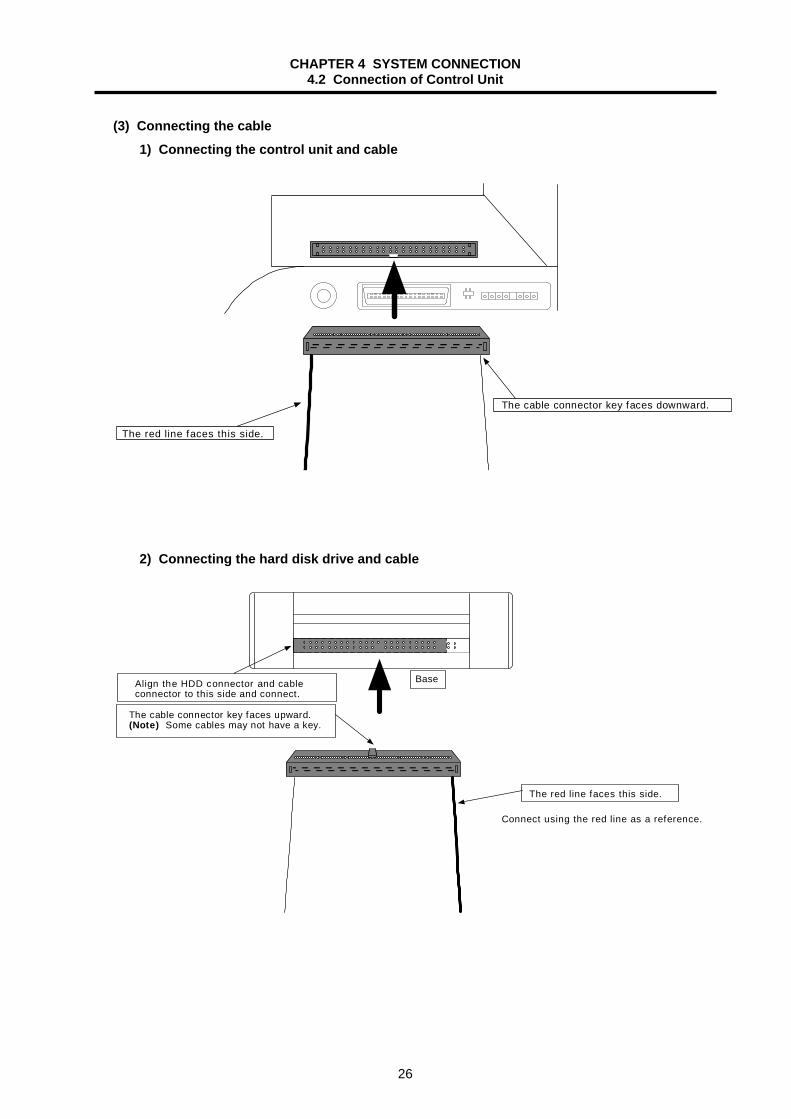
(3) Connecting the cable 1) Connecting the control unit and cable
The red line faces this side.
The cable connector key faces downward.
2) Connecting the hard disk drive and cable
Align the HDD connector and cableconnector to this side and connect.
The cable connector key faces upward.(Note) Some cables may not have a key.
Base
The red line faces this side.
Connect using the red line as a reference.

CHAPTER 4 SYSTEM CONNECTION 4.3 Connection of Power Supply
27
4.3 Connection of Power Supply 4.3.1 Connection for Using PD25A Unit
The PD25A power supply is used to protect the hard disk in the M6 Series. After the power is turned OFF, 24VDC is output for 300mSec to prevent the power from being cut off while writing to the hard disk.
(1) PD25A connection
Control unit
ON/OFF switch
R S T
NFB
PD25A
ACIN
ON/OFF
DCOUT
NFBF171
F110
ONOFF
Display unit
HR292/HR293
CF01
DCIN(PD25A)
CF01
DCINF110
CF24
ON/OFF
F172
FCU6-KB004/014
Operation board
Control unit
Caution) Refer to "Section 4.4 Connection of Operation Board" for details on connecting with the operation board.
(2) Power supply specifications
Input : 200/230VAC (−15%, +10%)
Output : 24VDC 3A max
External power supply unitUnit size 130 × 65 × 230 Back up time 300msec
(Caution) The power cannot be turned ON immediately after the PD25A power has been turned OFF. Wait approx. two seconds before turning the power ON.
Do not damage, apply excessive stress, place heavy things on or sandwich the cables, as
this may lead to electric shocks.
Separate the signal wire from the drive line/power line when wiring.
Do not connect or disconnect the connection cables between each unit while the power is ON.
CAUTION
WARNING

CHAPTER 4 SYSTEM CONNECTION 4.3 Connection of Power Supply
28
(3) Connector layout drawing
ACIN : 200VAC input ON/OFF SW : Switch ON (↑ upward) --- +24V output Switch OFF (↓ downward) --- +24V output OFF
ON/OFF : Connect to the escutcheon ON/OFF switch
POWER : Green lamp lights during +24V output
DCOUT : Left connector --- +24V output Right connector --- Power off detection signal (ACFAIL) output
Caution) Normally use the ON/OFF switch on the operation board side to turn the power ON and OFF.
(4) PD25A connector pin assignment
200VAC input
ACIN
+24V input Power OFF detection
DCOUT
ON-OFF control
ON-OFF
Do not apply voltages other than those indicated in this manual on the connector. Doing so may lead to destruction or damage.
Incorrect connections may damage the devices, so connect the cables to the specified connectors.
ACIN
ON/OFF SW
ON/OFF
POWER
DCOUT
I +24VGNDFG
123
1 2 3
1A 2A 3A
1B 2B 3B
I ACFAILGNDFG
A (X)123
+24VGNDFG
B (Y)
1 5 I
I
NCP-OFFGNDGNDP-ON
12345
<Cable side connector type> Connector : 2-178128-3 Contact : 1-175218-5 Recommended maker: Japan AMP
CAUTION
<Cable side connector type> Connector : 3-178128-6 Contact : 1-175218-5 Recommended maker: Japan AMP
<Cable side connector type> Connector : 1-178288-5 Contact : 1-175218-5 Recommended maker: Japan AMP
CHAPTER 4 SYSTEM CONNECTION 4.3 Connection of Power Supply
29
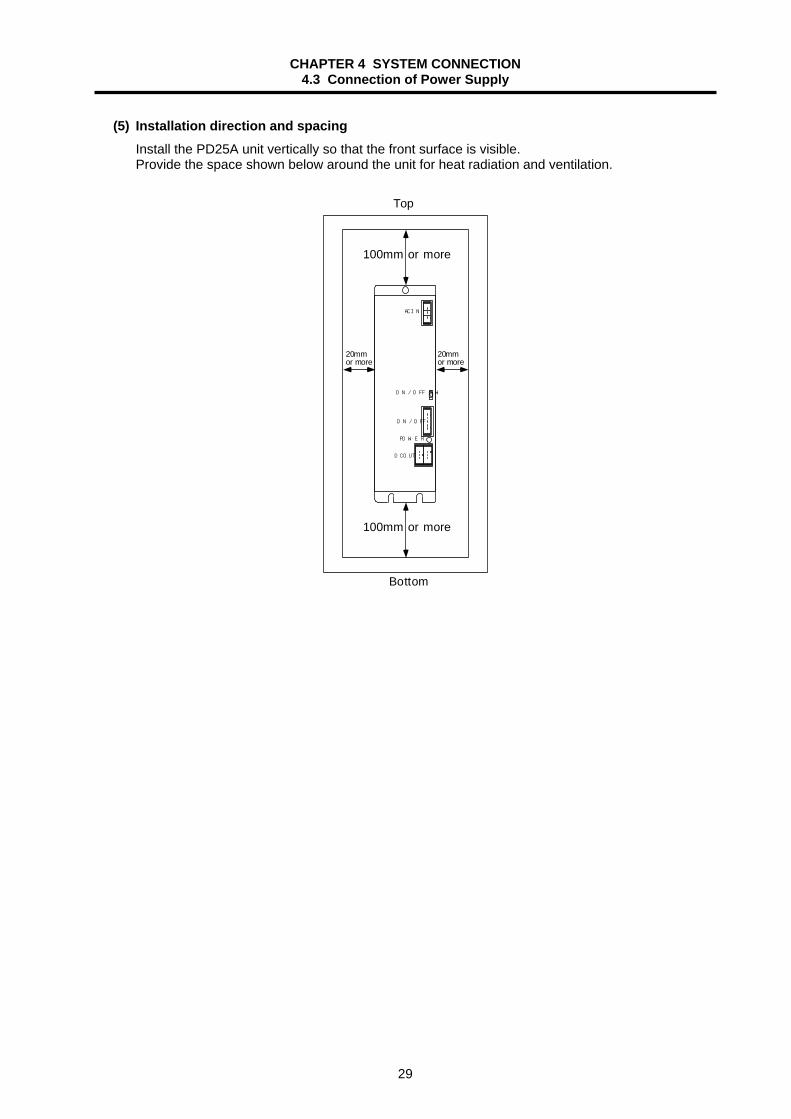
(5) Installation direction and spacing Install the PD25A unit vertically so that the front surface is visible. Provide the space shown below around the unit for heat radiation and ventilation.
20mmor more
20mmor more
Top
Bottom
100mm or more
100mm or more
ACIN
ON/OFF SW
ON/OFF
POWER
DCOUT
100mm or more
100mm or more
20mmor more
20mmor more

CHAPTER 4 SYSTEM CONNECTION 4.3 Connection of Power Supply
30
4.3.2 Connection for Using General-purpose Stabilized Power Supply
A general-purpose stabilized power supply is used with the M6 Series (M610/630) not provided with a hard disk.
(1) General-purpose stabilized power supply connection
DCIN
Control unitONOFF
Display unit
MC2
MC for ON/OFF
NFB
MC2
MC2
NFB
R S T
Control unitpower
General-purpose stabilizedpower supply
1. Refer to section "4.2.2 Control unit connector pin assignment" for details on the control unit's DCIN connection.
2. Leave CF01 on the control unit open.
Do not damage, apply excessive stress, place heavy things on or sandwich the cables, as this may lead to electric shocks.
(2) Power supply specification Control unit power specifications
Output voltage +24V±5% Ripple ±5% (P-P) Output current 3A
Caution) Prepare a control unit power supply (general-purpose stabilized power supply) separate
from the base I/O and remote I/O unit power supply.
MC2 (ON/OFF MC) specifications Contact rating 250VAC/1 A or more Operation coil 250VAC/0.2 A or less No. of contacts 3a or more
Standards VDE Standards approved part
WARNING

CHAPTER 4 SYSTEM CONNECTION 4.4 Connection of Operation Board
31
4.4 Connection of Operation Board 4.4.1 Connection of M615/635
(1) With 10.4" color STN
PO
SC
F25
CF2
1C
F22
K/B
MOU
SE
HA
ND
LERIO
3
CF01
HR29
2(K
B00
4)
HR29
3(K
B01
4)
CF
01
HDD CF12
CF11
DC
IN
CF1
0
ENC
2
J2
En
clo
sed
cab
le
F0
60
F0
50
HDD U
NIT
(FC
U6-
HD
101-
1)
CFD
F050
F140
F0
60
F120
F130
F082
F010
F140
F11
0
CF02
LC
DE
ncl
ose
dca
ble
F070
HR
273
F110
F171
FCU
A-R
211(
SH
41)
F030
/031
F030
/031
CO
N1
F090
J2
F040/041
CF1
2
LCD
F090
CF1
1
CO
N1
DC
IN
F02
0/021
/02
2
DC
IN(P
D25A
)PD
25A
(ON/O
FF S
W)
CF2
4
ON
/OFF
DC
OU
T
Enco
der
F091
F092
ON
/OFF
SW
CF1
3
ISP
F17
2(+
)(-
)
EM
G S
W
EM
G
(FC
U6-
DU
C32
)
Dis
play
uni
t(F
CU
6-K
B00
4/K
B014
)
NC
key
boar
d
(FC
U6-M
U5*
*)
Con
trol
uni
t
(Req
uire
d on
ly fo
r KB0
04)
(FC
U6-
HD
211-
1)
F149
(Req
uire
d on
ly fo
r KB0
04)
LCD inverter
Base
I/O
uni
t(F
CU
6-D
X∗∗∗
)FD
D u
nit
(FCU
6-FD
221-
1)
MEN
U k
ey
10.4
" col
or S
TNC
able
enc
lose
d w
ith m
enu
keys
Cab
le e
nclo
sed
with
hea
ter
PD25
Apo
wer s
uppl
y
Gen
eral
pur
pose
powe
r sup
ply
Prep
ared
by
user
Do
inpu
tfo
r pow
er O
FF
Seria
l ch1
/2Se
rial c
h3/4
Man
ual p
ulse
gene
rato
rPC
key
boar
d
Boar
d I/O
CHAPTER 4 SYSTEM CONNECTION 4.4 Connection of Operation Board
32
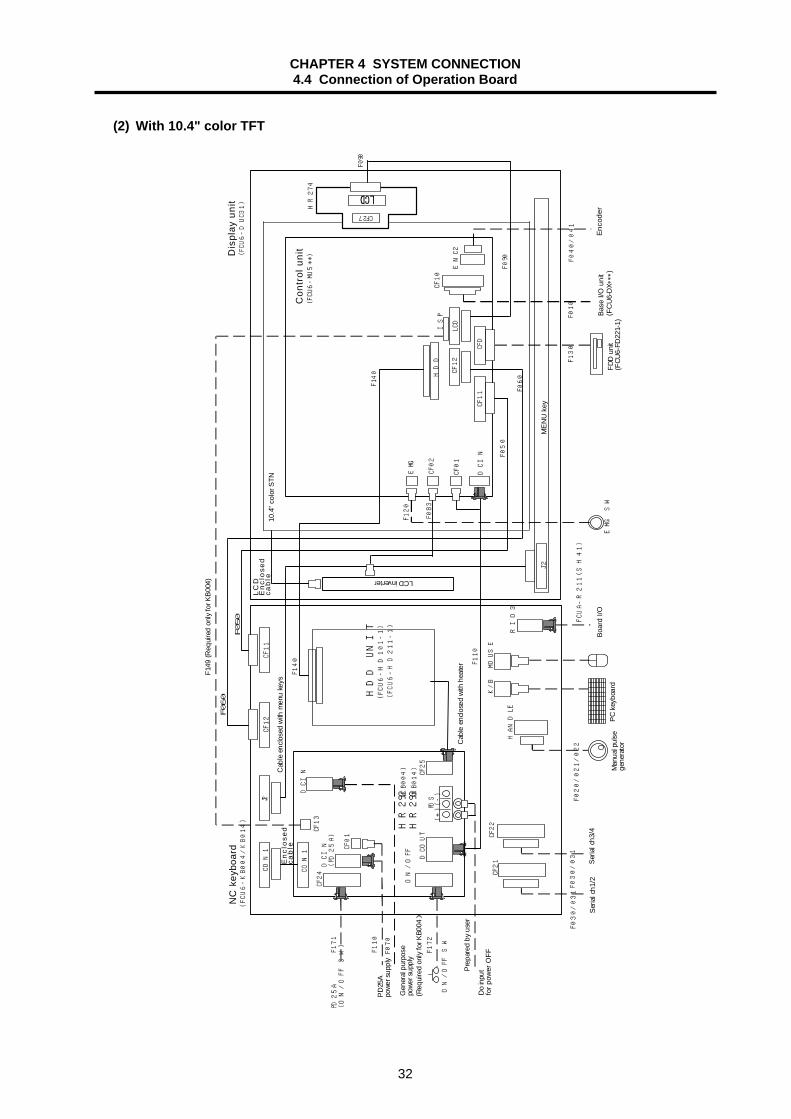
(2) With 10.4" color TFT
HR
274
CF27
POS
CF25
CF21
CF22
K/B
MO
US
E
HA
ND
LE
RIO
3
CF01
CF01
HD
D
CF12
CF11
DC
IN
CF10
EN
C2
J2
F0
60
F0
50
HD
D U
NIT
(FC
U6
-H
D1
01
-1
)
CFD
F050
F14
0
F06
0
F120
F130
F083
F010
F140 F110
CF02
F07
0
F09
0
F11
0
F17
1
FC
UA
-R
211
(SH
41)
F030/031
F030/031
CO
N1
J2
F040/041
CF12
LC
D
F090
CF11
CO
N1
DC
IN
F020/021/022
DC
IN(P
D25A
)P
D25A
(ON
/O
FF
SW
)
CF24
ON
/O
FF D
CO
UT
ON
/OFF
SW
CF13
ISP
F172
(+)(
-)
EM
G S
W
EMG
(FC
U6-D
UC
31)
(FC
U6
-K
B00
4/K
B014)
(FC
U6-M
U5**)
HR
292(
KB
004)
HR
293(
KB
014)
(FC
U6
-H
D2
11
-1
)
En
clo
sed
cab
le
LC
DE
ncl
ose
dca
ble
Enco
der
Dis
play
uni
tN
C k
eybo
ard
Con
trol
uni
t
(Req
uire
d on
ly fo
r KB0
04)
LCD inverter
Base
I/O
uni
t(F
CU
6-D
X∗∗∗
)FD
D u
nit
(FCU
6-FD
221-
1)
MEN
U k
ey
10.4
" col
or S
TNC
able
enc
lose
d w
ith m
enu
keys
Cab
le e
nclo
sed
with
hea
ter
PD25
Apo
wer s
uppl
y
Gen
eral
pur
pose
powe
r sup
ply
Prep
ared
by
user
Do
inpu
tfo
r pow
er O
FF
Seria
l ch1
/2Se
rial c
h3/4
Man
ual p
ulse
gene
rato
rPC
key
boar
d
Boar
d I/O
F149
(Req
uire
d on
ly fo
r KB0
04)

CHAPTER 4 SYSTEM CONNECTION 4.4 Connection of Operation Board
33
4.4.2 Connection of M610/630 (1) With 10.4" monochrome STN
CO
N1
J2
CF12
CF11
TE
3
CF21
CF22
K/B
MO
US
E
HA
ND
LE
RIO
3
CF01
CF1
1D
CIN
CF1
0
EN
C2
J2
F0
50
(FC
U6-M
U013)
(FC
U6-K
B005)
(FC
U6-D
UT
31)
EM
G
EM
G S
W
Boar
d I/O
Remo
te I/O
F020/021/022
LCD
CF02
F084
F120
F050
F01
0F0
70
24VD
C po
wer s
upply
F030/031
F040
/041
F090
F090
F091
The
conn
ecto
rs in
dica
ted
with
a s
hade
d bo
x
c
anno
t be
use
d.(N
ote)
LC
DE
nc
losed
cable LCD inverter
MEN
U ke
y
Enco
der
Dis
play
uni
tN
C k
eybo
ard
Con
trol
uni
t
Base
I/O
uni
t(F
CU
6-D
X∗∗∗
)
10.4
" mon
ochr
ome
STN
Cab
le e
nclo
sed
with
men
u ke
ys
Seria
l ch1
/2
Man
ual p
ulse
gene
rato
r
FC
UA
-R
211
(SH
41)
CHAPTER 4 SYSTEM CONNECTION 4.4 Connection of Operation Board
34
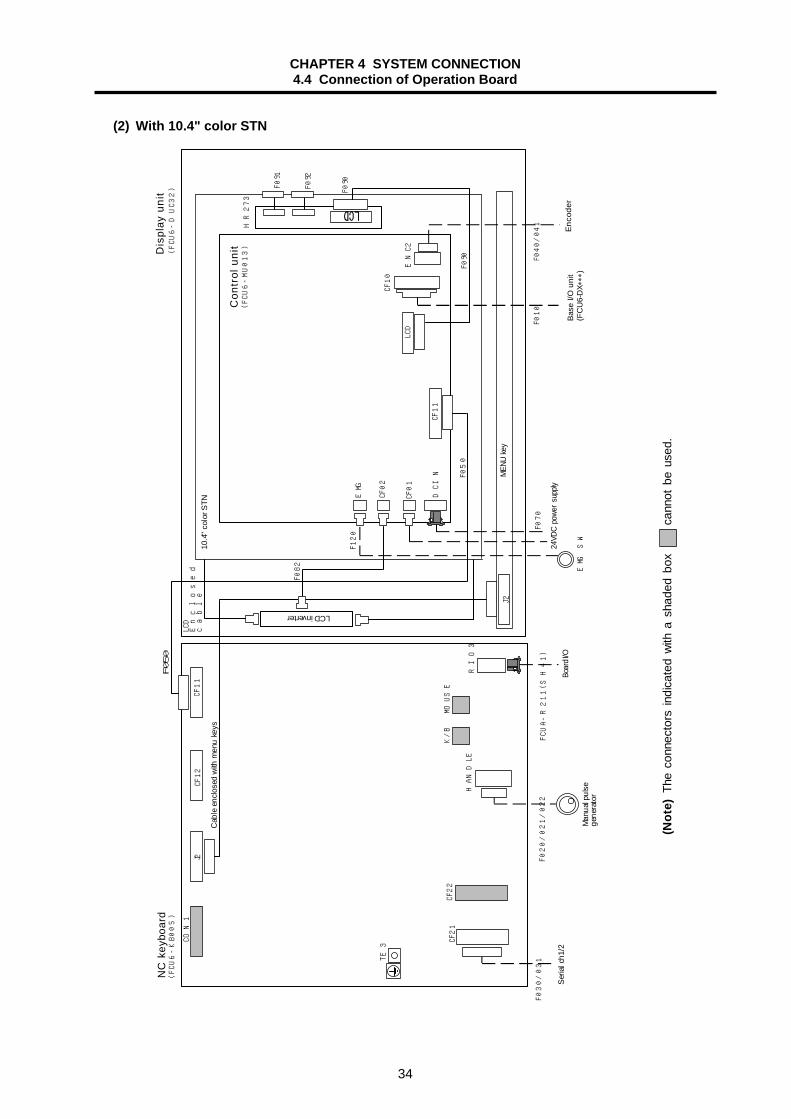
(2) With 10.4" color STN
CO
N1
J2
CF12
CF11
TE
3
CF21
CF22
K/B
MO
US
E
HA
ND
LE
RIO
3
CF01
CF11
DC
IN
CF10
EN
C2
J2
F0
50
(FC
U6-M
U01
3)
(FC
U6
-K
B00
5)
(FC
U6-
DU
C32
)
EM
G
EM
G S
W
Boar
d I/O
F020/021/022
LC
D
CF02
F120
F050
F010
F070
24VD
C po
wer s
upply
F030/031
F040
/041
F090
F090
F091
HR
273
F092
F082
FC
UA
-R
211
(SH
41)
LC
DE
nc
losed
cable LCD inverter
MEN
U ke
y
The
conn
ecto
rs in
dica
ted
with
a s
hade
d bo
x
c
anno
t be
use
d.(N
ote)
Enco
der
Dis
play
uni
tN
C k
eybo
ard
Con
trol
uni
t
Base
I/O
uni
t(F
CU
6-D
X∗∗∗
)
10.4
" col
or S
TNC
able
enc
lose
d w
ith m
enu
keys
Seria
l ch1
/2
Man
ual p
ulse
gene
rato
r

CHAPTER 4 SYSTEM CONNECTION 4.4 Connection of Operation Board
35
(3) With 10.4" color TFT
CO
N1
J2
CF12
CF11
TE
3
CF2
1C
F22
K/B
MOU
SE
HA
ND
LERIO
3
CF01
CF11
DC
IN
CF10
EN
C2
J2
F0
50
(FC
U6-M
U01
3)
(FC
U6
-K
B00
5)
(FC
U6-
DU
N31
)
EM
G
EM
G S
W
F020/
021
/02
2
LC
D
CF02
F120
F050
F083
F010
F070
F030
/031
F040/041
F090
HR
274
GF27
F090
FCU
A-R
211
(SH
41)
Boar
d I/O
LC
DE
nc
losed
cable LCD inverter
24VD
C po
wer s
upply
The
conn
ecto
rs in
dica
ted
with
a s
hade
d bo
x
c
anno
t be
use
d.(N
ote)
Enco
der
Dis
play
uni
tN
C k
eybo
ard
Con
trol
uni
t
Base
I/O
uni
t(F
CU
6-D
X∗∗∗
)
10.4
" col
or S
TNC
able
enc
lose
d w
ith m
enu
keys
Seria
l ch1
/2
Man
ual p
ulse
gene
rato
r
MEM
U k
ey
CHAPTER 4 SYSTEM CONNECTION 4.4 Connection of Operation Board
36
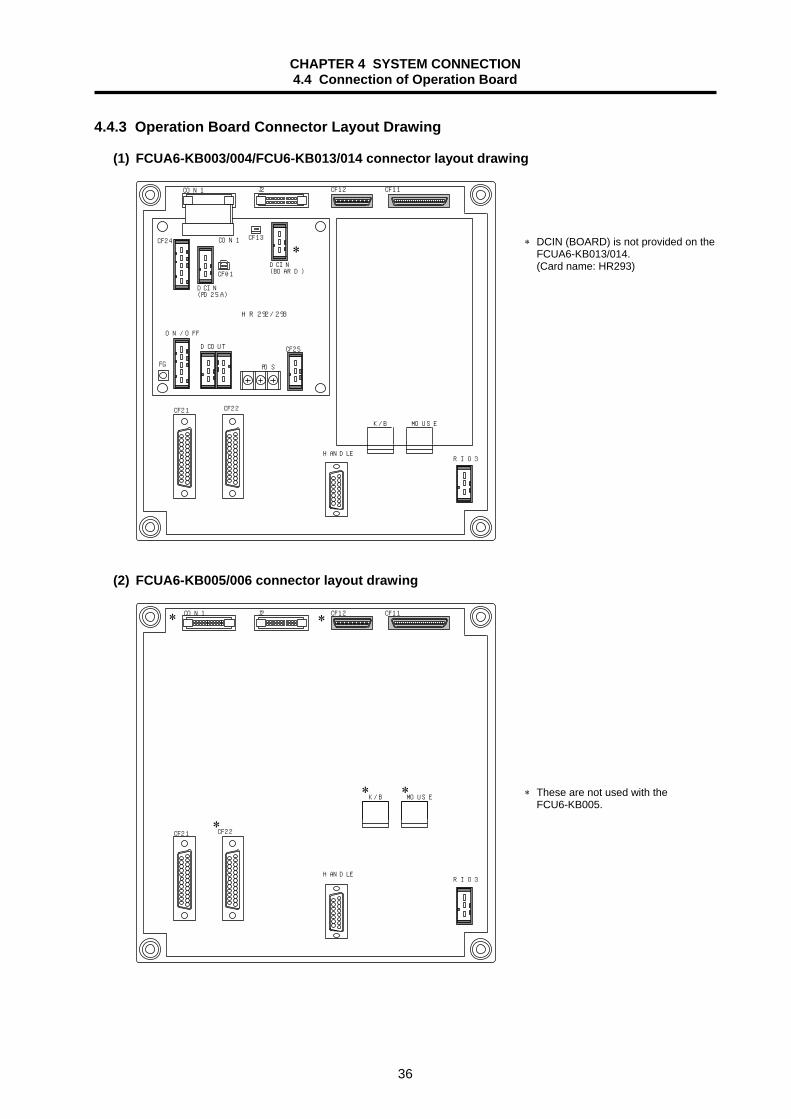
4.4.3 Operation Board Connector Layout Drawing
(1) FCUA6-KB003/004/FCU6-KB013/014 connector layout drawing
DCIN(BOARD)
CF25
POS
ON/OFF
CF24
DCIN(PD25A)
CF01
CF13
DCOUT
FG
J2 CF11CF12
CON1
CON1
CF21 CF22
HANDLERIO3
K/B MOUSE
HR292/293
∗
(2) FCUA6-KB005/006 connector layout drawing
J2 CF11CF12CON1
CF21
HANDLERIO3
CF22
K/B MOUSE
∗ ∗
∗ ∗
∗
∗ These are not used with the FCU6-KB005.
∗ DCIN (BOARD) is not provided on the FCUA6-KB013/014. (Card name: HR293)
CHAPTER 4 SYSTEM CONNECTION 4.4 Connection of Operation Board
37
4.4.4 Operation Board Connector Pin Assignment NC keyboard
CF11
25A1A
25B1B
<Cable side connector type> Connector: DHD-RB50-20AN Recommended maker: DDK
PC interface
CF12
13A1A
13B1B
<Cable side connector type> Connector: DHD-RB26-20AN Recommended maker: DDK
Manual pulse generator
HANDLE
18
915 <Cable side connector type> Connector : CDA-15P Contact : CD-PC-111 Case : HDA-CTH Recommended maker: Hirose Denki
Remote I/O
R103
1 2 3
Do not apply voltages other than those indicated in this manual on the connector. Doing so may lead to destruction or damage.
Incorrect connections may damage the devices, so connect the cables to the specified connectors.
Refer to section 4.2.2 Control unit connector pin assignment (CF11) for details on the connector pin assignment.
Refer to section 4.2.2 Control unit connector pin assignment (CF12) for details on the connector pin assignment.
1HA1HB2HA2HB3HA3HB
12345678
IIIIII
GND+12VGND+12VGND+12V
9101112131415
O
O
O
I/OI/O
TXRX3TXRX3∗GND
123
<Cable side connector type> Connector : 1-178288-3 Contact : 1-175218-5 Recommended maker: Japan AMP
CAUTION
CHAPTER 4 SYSTEM CONNECTION 4.4 Connection of Operation Board
38
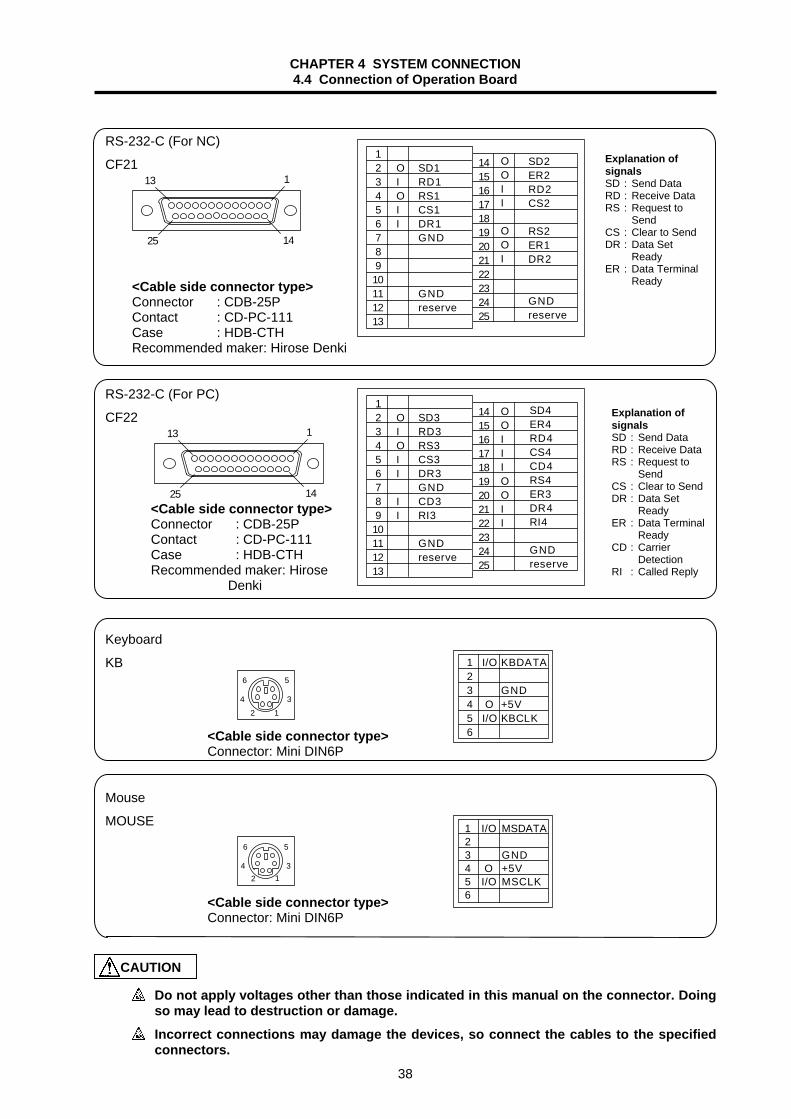
RS-232-C (For NC)
CF21 113
1425 <Cable side connector type> Connector : CDB-25P Contact : CD-PC-111 Case : HDB-CTH Recommended maker: Hirose Denki
RS-232-C (For PC)
CF22
113
1425 <Cable side connector type> Connector : CDB-25P Contact : CD-PC-111 Case : HDB-CTH Recommended maker: Hirose Denki
Keyboard
KB
5
3
12
4
6
<Cable side connector type> Connector: Mini DIN6P
Mouse
MOUSE
5
312
4
6
<Cable side connector type> Connector: Mini DIN6P
Do not apply voltages other than those indicated in this manual on the connector. Doing so may lead to destruction or damage.
Incorrect connections may damage the devices, so connect the cables to the specified connectors.
SD1RD1RS1CS1DR1GND
GNDreserve
1 2 3 4 5 6 7 8 910111213
OIOII
SD2ER2RD2CS2
RS2ER1DR2
GNDreserve
141516171819202122232425
OOII
OOI
SD3RD3RS3CS3DR3GNDCD3RI3
GNDreserve
1 2 3 4 5 6 7 8 910111213
OIOII
II
SD4ER4RD4CS4CD4RS4ER3DR4RI4
GNDreserve
141516171819202122232425
OOIIIOOII
I/O
OI/O
KBDATA
GND+5VKBCLK
123456
I/O
OI/O
MSDATA
GND+5VMSCLK
123456
Explanation of signals SD : Send Data RD : Receive DataRS : Request to Send CS : Clear to SendDR : Data Set Ready ER : Data Terminal Ready CD : Carrier Detection RI : Called Reply
CAUTION
Explanation of signals SD : Send Data RD : Receive DataRS : Request to Send CS : Clear to SendDR : Data Set Ready ER : Data Terminal Ready

CHAPTER 4 SYSTEM CONNECTION 4.4 Connection of Operation Board
39
+24V input
DCIN (PD25A) DCIN (BOARD)
1 2 3
Power OFF detection
CF01 12
+24V input Power OFF detection
DC OUT 1B 2B 3B
1A 2A 3A
ON-OFF control
CF24 1 5
ON-OFF control
ON/OFF 1 5
Do not apply voltages other than those indicated in this manual on the connector. Doing
so may lead to destruction or damage. Incorrect connections may damage the devices, so connect the cables to the specified
connectors.
I +24VGNDFG
123
IGNDACFAIL
12
I ACFAILGNDFG
123
+24VGNDFG
A B
I
I
NCP-OFFGNDGNDP-ON
12345
I
I
NCPowerONLGONPowerOFFDC24V
12345
<Cable side connector type> Connector : 2-178288-3 Contact : 1-175218-5 Recommended maker: Japan AMP
<Cable side connector type> Connector : 51030-0230 Contact : 50084-8160 Recommended maker: Molex
CAUTION
<Cable side connector type> Connector : 3-178128-6 Contact : 1-175218-5 Recommended maker: Japan AMP
<Cable side connector type> Connector : 1-178288-5 Contact : 1-175218-5 Recommended maker: Japan AMP
<Cable side connector type> Connector : 1-178288-5 Contact : 1-175218-5 Recommended maker: Japan AMP

CHAPTER 4 SYSTEM CONNECTION 4.4 Connection of Operation Board
40
4.4.5 Connection of RS-232-C (Serial 1, serial 2)
Connect the NC side RS-232-C (serial 1, serial 2) to CF21 on the NC keyboard.
CF21
Operation board
Serial 1
Serial 2
<Related items> Cable manufacturing drawing: Appendix 2 (F030/031/033 cable) Connector pin assignment : 4.4.3 Operation board connector pin assignment (CF21)
4.4.6 Connection of RS-232-C (Serial 3, serial 4)
Connect the personal computer side RS-232-C (serial 3, serial 4) to CF22 on the NC keyboard.
Operation board
Serial 3
Serial 4
CF22
<Related items> Cable manufacturing drawing: Appendix 2 (F030/031/033 cable) Connector pin assignment : 4.4.3 Operation board connector pin assignment (CF22)
RS-232-C connection cable Serial Cable name
3 4 F030 cable F031 cable F032 cable
RS-232-C connection cable Serial Cable name
1 2 F030 cable F031 cable F032 cable
: Connection possible

CHAPTER 4 SYSTEM CONNECTION 4.4 Connection of Operation Board
41
4.4.7 Keyboard and Mouse Connection
Connect the keyboard to KB on the NC keyboard. Connect the mouse to MOUSE on the NC keyboard.
K/B MOUSE
Operation board
This connector is used for maintenance and service. If a commercial keyboard or mouse is used, the system could malfunction or stop.
4.4.8 Connection of Manual Pulse Generator
Connect the manual pulse generator to HANDLE on the NC keyboard. Up to three channels can be connected for the manual pulse generator.
(1 channel)
(2 channel)
(3 channel)
Operation board
HANDLE
<Related items> Outline drawing: Appendix 1 Cable manufacturing drawing: Appendix 2 (F020 cable) Connector pin assignment : 4.4.3 Operation board connector pin assignment (HANDLE)
CAUTION
Specifications Keyboard PS/2 compatible Mouse PS/2 compatible
Manual pulse generator connection cable Channel Cable name
1 2 3 F020 cable F021 cable F022 cable
: Connection possible

CHAPTER 4 SYSTEM CONNECTION 4.4 Connection of Operation Board
42
4.4.9 Connection of Operation Board I/O
The M6 Series operation board I/O is connected to RIO3 on the NC keyboard. Normally, connect the remote I/O unit to RIO3, and configure the No. of I/O points according to the user specifications. (Fig. 1) Refer to Chapter 6 Connection of remote I/O unit for details on the remote I/O unit. When using the card-sized I/O for the operation board I/O, the user must manufacture a connector PCB for the card-sized I/O. (Fig. 2) Refer to section 5.3 Connection of card-sized I/O for details. (When using remote I/O unit)
Remote I/O unitOperation board
RIO3
FCUA-R211 cable
Fig. 1
(When using remote I/O unit)
FCUA-R211 cable
Connector PCB for card size I/O
Card size I/ODI
DO
Operation board I/O
Operation board
RIO3
Fig. 2 <Related items> Cable manufacturing drawing: Appendix 2 (FCUA-R211 SH41 cable) Connector pin assignment : 4.4.3 Operation board connector pin assignment

CHAPTER 4 SYSTEM CONNECTION 4.4 Connection of Operation Board
43
4.4.10 Connection of ON/OFF Switch
The machine maker must prepare the ON/OFF switch. Connect the cable to the ON/OFF connector on the NC keyboard.
OFF switch
ON switch
F172 cable
Operation board
ON/OFF
(Note) Use an A contact connection for both the ON switch and OFF switch.
Do not apply voltages other than those indicated in this manual on the connector. Doing so may lead to destruction or damage.
Incorrect connections may damage the devices, so connect the cables to the specified connectors.
The pin Nos. of the ON/OFF connector connected to HR292/HR293 and the ON/OFF connector connected to PD25A differ. Take care when connecting.
CAUTION

CHAPTER 4 SYSTEM CONNECTION 4.4 Connection of Operation Board
44
4.4.11 POS (Power OFF Sequence) Connection
This turns OFF the power when Windows is ended. Connect the random DO output, set by the machine manufacturer, to the POS terminal block.
(+) (-)
(M3)
POS
GND
Enlarged view
+24V
(M3)POS
24V output from I/O unit
Refer to the "PLC Interface Manual" for details on changing the output designation.
The DO circuit can be either a sink output or source output. However, make sure that +24 V is connected to the (+) side of the POS terminal block, and the GND is connected to the (−) side.
The DO output to the POS terminal is selected with the R115 register. Register Output bit R115 0000 0000 In the above case, the Y00 output is connected to the POS terminal.
CAUTION
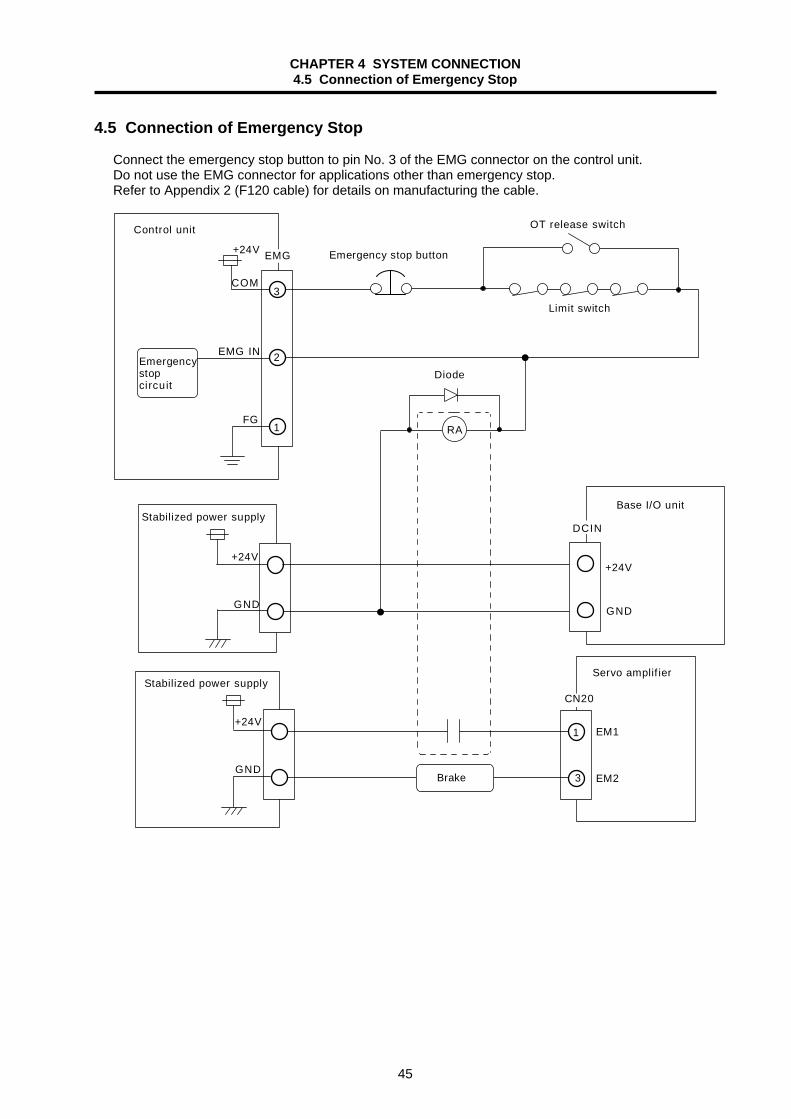
CHAPTER 4 SYSTEM CONNECTION 4.5 Connection of Emergency Stop
45
4.5 Connection of Emergency Stop
Connect the emergency stop button to pin No. 3 of the EMG connector on the control unit. Do not use the EMG connector for applications other than emergency stop. Refer to Appendix 2 (F120 cable) for details on manufacturing the cable.
COM
FG1
EMG IN
+24V
GND
EM1
EM2
1
3
3
2
+24V
RA
+24V
GND GND
+24V
Control unit
Emergencystopcircuit
Emergency stop button
OT release switch
Limit switch
Diode
Stabilized power supplyBase I/O unit
Servo amplif ier
Brake
Stabilized power supplyCN20
EMG
DCIN
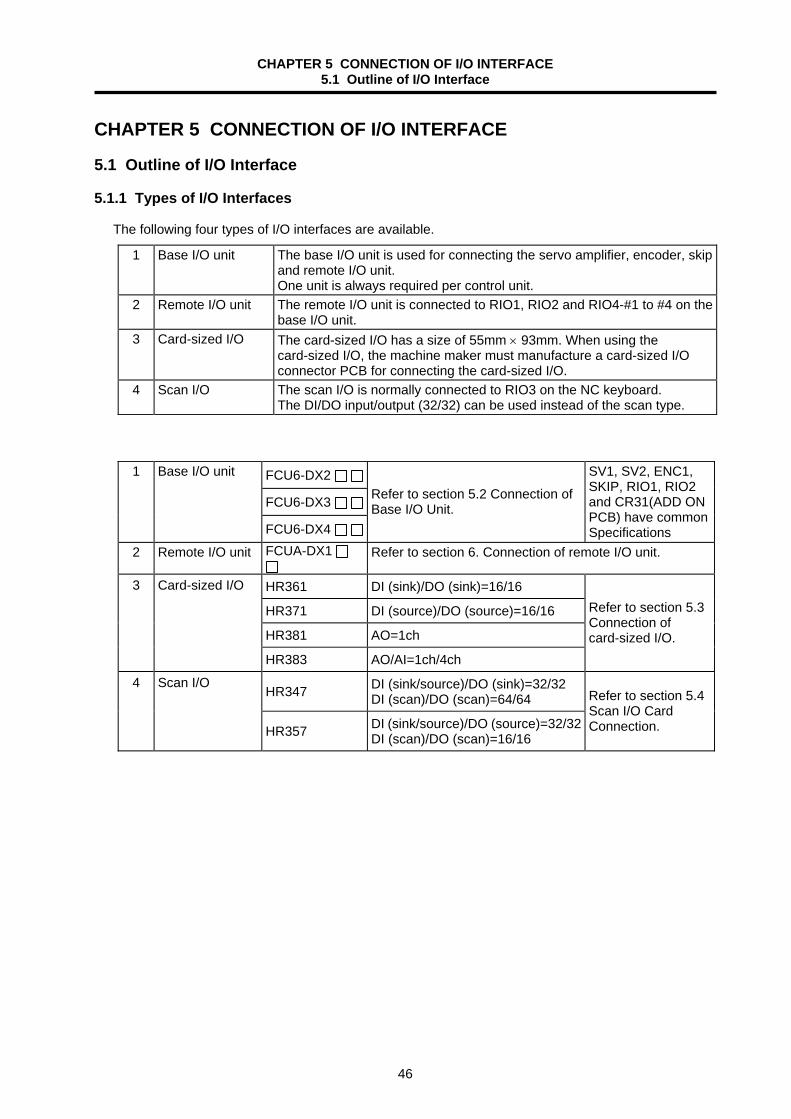
CHAPTER 5 CONNECTION OF I/O INTERFACE 5.1 Outline of I/O Interface
46
CHAPTER 5 CONNECTION OF I/O INTERFACE 5.1 Outline of I/O Interface 5.1.1 Types of I/O Interfaces
The following four types of I/O interfaces are available.
1 Base I/O unit The base I/O unit is used for connecting the servo amplifier, encoder, skip and remote I/O unit. One unit is always required per control unit.
2 Remote I/O unit The remote I/O unit is connected to RIO1, RIO2 and RIO4-#1 to #4 on the base I/O unit.
3 Card-sized I/O The card-sized I/O has a size of 55mm × 93mm. When using the card-sized I/O, the machine maker must manufacture a card-sized I/O connector PCB for connecting the card-sized I/O.
4 Scan I/O The scan I/O is normally connected to RIO3 on the NC keyboard. The DI/DO input/output (32/32) can be used instead of the scan type.
FCU6-DX2
FCU6-DX3
1 Base I/O unit
FCU6-DX4
Refer to section 5.2 Connection of Base I/O Unit.
SV1, SV2, ENC1, SKIP, RIO1, RIO2 and CR31(ADD ON PCB) have common Specifications
2 Remote I/O unit FCUA-DX1
Refer to section 6. Connection of remote I/O unit.
HR361 DI (sink)/DO (sink)=16/16
HR371 DI (source)/DO (source)=16/16
HR381 AO=1ch
3 Card-sized I/O
HR383 AO/AI=1ch/4ch
Refer to section 5.3 Connection of card-sized I/O.
HR347 DI (sink/source)/DO (sink)=32/32 DI (scan)/DO (scan)=64/64
4 Scan I/O
HR357 DI (sink/source)/DO (source)=32/32 DI (scan)/DO (scan)=16/16
Refer to section 5.4 Scan I/O Card Connection.

CHAPTER 5 CONNECTION OF I/O INTERFACE 5.1 Outline of I/O Interface
47
5.1.2 Example of DI/DO Connection
The DI/DO for the M600 Series has four types shown in section 5.1.1 I/O interface. Normally one base I/O unit is used, and the remote I/O unit is connected to RIO1 or RIO2. The No. of I/O points are configured according to the user specifications. Refer to Chapter 6 Connection of remote I/O unit for details on the remote I/O unit. When using the card-sized I/O for the operation board I/O, the user must manufacture a connector PCB for the card-sized I/O. (Fig. 2) Refer to section 5.3 Connection of card-sized I/O for details. (When using remote I/O unit)
Base I/O unit
RIO1
RIO2
FCUA-R211(SH41)cable
Remote I/O unit
I/O = 48/48orI/O = 64/64
Remote I/O unit
FCUA-R211(SH41)cable
Terminator R-TM
Terminator R-TM
Fig. 1
(When using card-sized I/O)
RIO1
RIO2
Card-sized I/O connector PCB
Card-sized I /ODI
DO
Electr ic Cabinet I/O
DI
DO
I/O = 48/48orI/O = 64/64
FCUA-R211(SH41) cable
Card-sized I/O connector PCB
Electr ic Cabinet I/O
Card-sized I /O
Base I/O unit
FCUA-R211(SH41) cable
Fig. 2
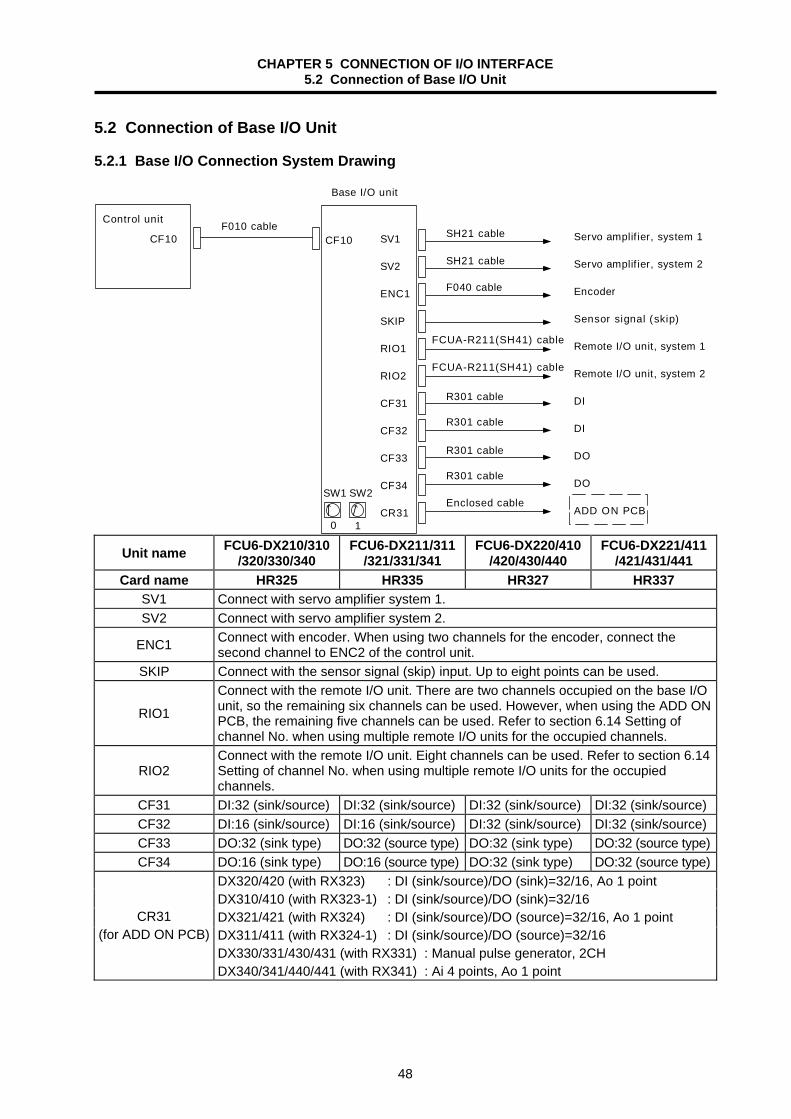
CHAPTER 5 CONNECTION OF I/O INTERFACE 5.2 Connection of Base I/O Unit
48
5.2 Connection of Base I/O Unit 5.2.1 Base I/O Connection System Drawing
Control unit
CF10 SV1
SV2
ENC1
SKIP
RIO1
RIO2
CF31
CF32
CF33
CF34
CR31↑ ↑0 1
F010 cable
Base I/O unit
CF10 Servo amplif ier, system 1
Servo amplif ier, system 2
Encoder
Sensor signal (skip)
Remote I/O unit, system 1
Remote I/O unit, system 2
DI
DI
DO
DO
ADD ON PCB
SH21 cable
F040 cable
FCUA-R211(SH41) cable
R301 cable
R301 cable
R301 cable
R301 cable
Enclosed cableSW1 SW2
SH21 cable
FCUA-R211(SH41) cable
Unit name FCU6-DX210/310
/320/330/340 FCU6-DX211/311
/321/331/341 FCU6-DX220/410
/420/430/440 FCU6-DX221/411
/421/431/441 Card name HR325 HR335 HR327 HR337
SV1 Connect with servo amplifier system 1. SV2 Connect with servo amplifier system 2.
ENC1 Connect with encoder. When using two channels for the encoder, connect the second channel to ENC2 of the control unit.
SKIP Connect with the sensor signal (skip) input. Up to eight points can be used.
RIO1
Connect with the remote I/O unit. There are two channels occupied on the base I/O unit, so the remaining six channels can be used. However, when using the ADD ON PCB, the remaining five channels can be used. Refer to section 6.14 Setting of channel No. when using multiple remote I/O units for the occupied channels.
RIO2 Connect with the remote I/O unit. Eight channels can be used. Refer to section 6.14 Setting of channel No. when using multiple remote I/O units for the occupied channels.
CF31 DI:32 (sink/source) DI:32 (sink/source) DI:32 (sink/source) DI:32 (sink/source)CF32 DI:16 (sink/source) DI:16 (sink/source) DI:32 (sink/source) DI:32 (sink/source)CF33 DO:32 (sink type) DO:32 (source type) DO:32 (sink type) DO:32 (source type)CF34 DO:16 (sink type) DO:16 (source type) DO:32 (sink type) DO:32 (source type)
CR31 (for ADD ON PCB)
DX320/420 (with RX323) : DI (sink/source)/DO (sink)=32/16, Ao 1 point DX310/410 (with RX323-1) : DI (sink/source)/DO (sink)=32/16 DX321/421 (with RX324) : DI (sink/source)/DO (source)=32/16, Ao 1 point DX311/411 (with RX324-1) : DI (sink/source)/DO (source)=32/16 DX330/331/430/431 (with RX331) : Manual pulse generator, 2CH DX340/341/440/441 (with RX341) : Ai 4 points, Ao 1 point
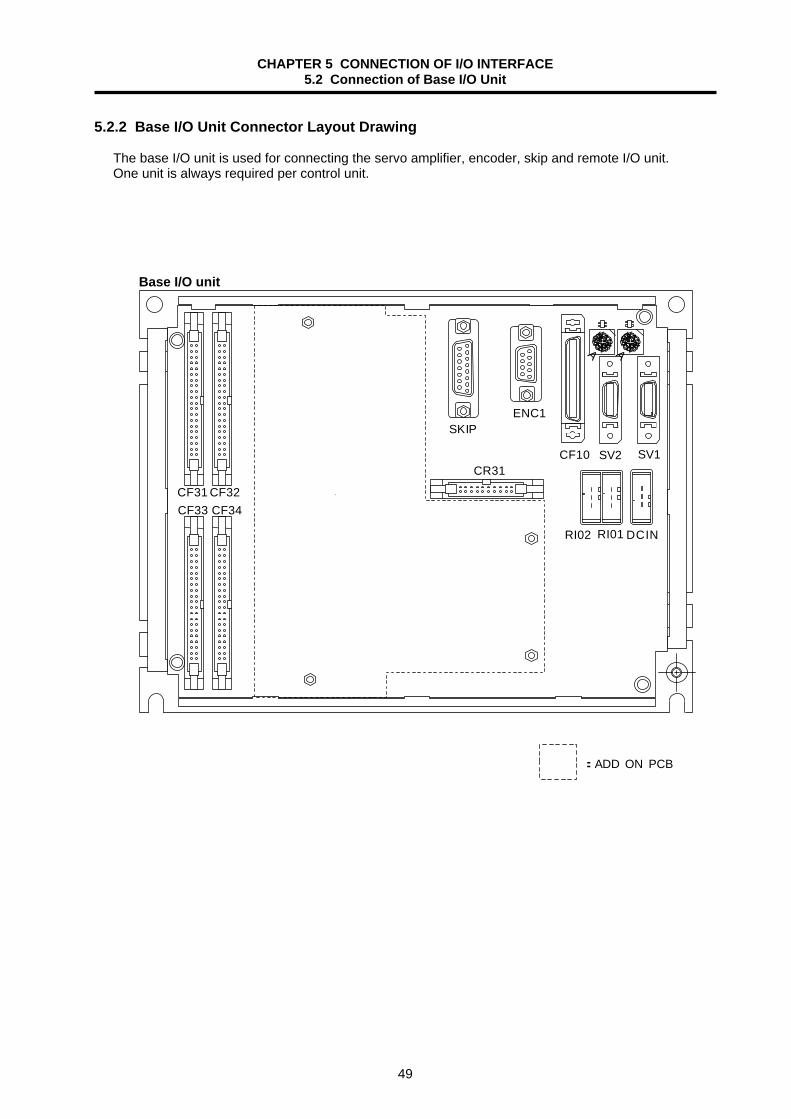
CHAPTER 5 CONNECTION OF I/O INTERFACE 5.2 Connection of Base I/O Unit
49
5.2.2 Base I/O Unit Connector Layout Drawing
The base I/O unit is used for connecting the servo amplifier, encoder, skip and remote I/O unit. One unit is always required per control unit. Base I/O unit
RI02 RI01 DCIN
0123579
A
BCDEF46 0123579
A
BCDEF46
CF31 CF32CF34CF33
CF10 SV2 SV1
SKIPENC1
8 8:ADD ON PCB
CR31
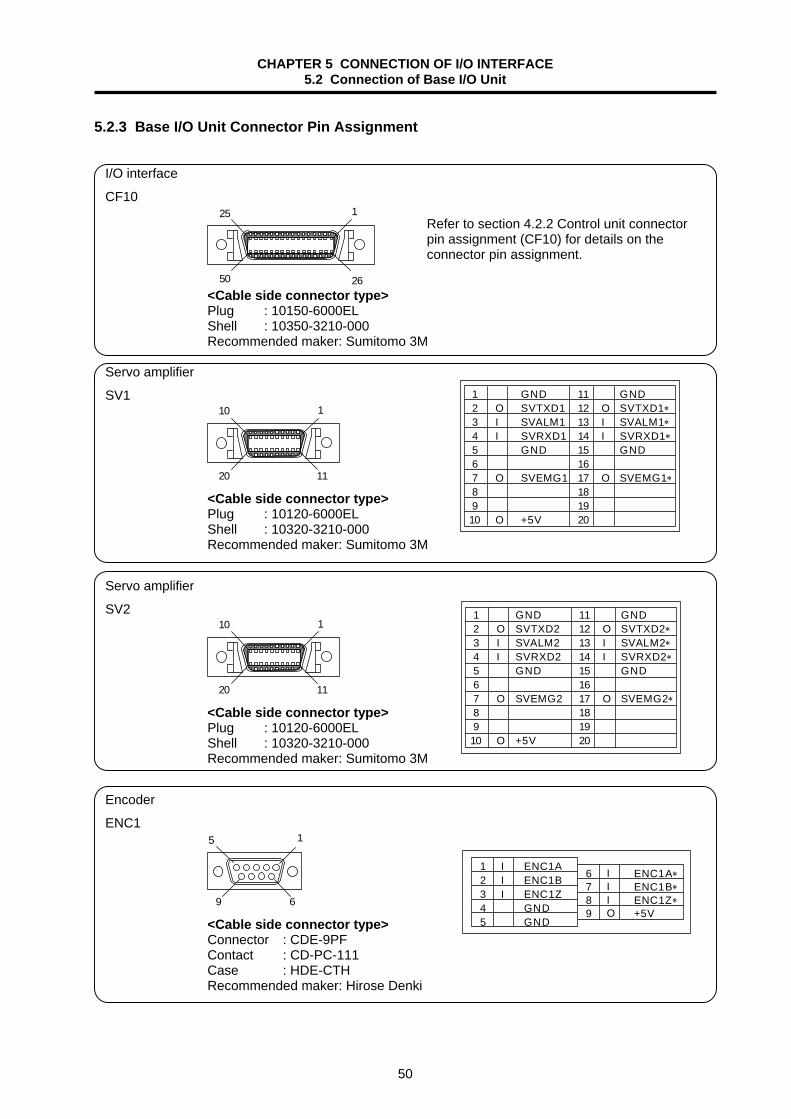
CHAPTER 5 CONNECTION OF I/O INTERFACE 5.2 Connection of Base I/O Unit
50
5.2.3 Base I/O Unit Connector Pin Assignment I/O interface
CF10 125
50 26 <Cable side connector type> Plug : 10150-6000EL Shell : 10350-3210-000 Recommended maker: Sumitomo 3M
Servo amplifier
SV1 110
1120 <Cable side connector type> Plug : 10120-6000EL Shell : 10320-3210-000 Recommended maker: Sumitomo 3M
Servo amplifier
SV2 110
1120 <Cable side connector type> Plug : 10120-6000EL Shell : 10320-3210-000 Recommended maker: Sumitomo 3M
Encoder
ENC1 15
69 <Cable side connector type> Connector : CDE-9PF Contact : CD-PC-111 Case : HDE-CTH Recommended maker: Hirose Denki
Refer to section 4.2.2 Control unit connectorpin assignment (CF10) for details on the connector pin assignment.
GNDSVTXD1SVALM1SVRXD1GND
SVEMG1
+5V
GNDSVTXD1∗SVALM1∗SVRXD1∗GND
SVEMG1∗
1 2 3 4 5 6 7 8 910
11121314151617181920
OII
O
O
OII
O
GNDSVTXD2SVALM2SVRXD2GND
SVEMG2
+5V
GNDSVTXD2∗SVALM2∗SVRXD2∗GND
SVEMG2∗
1 2 3 4 5 6 7 8 910
11121314151617181920
OII
O
O
OII
O
ENC1AENC1BENC1ZGNDGND
12345
III
ENC1A∗ENC1B∗ENC1Z∗+5V
6789
IIIO

CHAPTER 5 CONNECTION OF I/O INTERFACE 5.2 Connection of Base I/O Unit
51
Skip
SKIP 18
915 <Cable side connector type> Connector : CDA-15P Contact : CD-PC-111 Case : HDA-CTH Recommended maker: Hirose Denki
Remote I/O
RIO1 Remote I/O
RIO2 +24V input
DCIN
Do not apply voltages other than those indicated in this manual on the connector. Doing so may lead to destruction or damage.
Incorrect connections may damage the devices, so connect the cables to the specified connectors.
GNDSKIP IN1SKIP IN3
SKIP IN5SKIP IN7
GND
12345678
II
II
GNDSKIP IN2SKIP IN4
SKIP IN6SKIP IN8GND
9101112131415
II
II
1 2 3
I/OI/O
TXRX1TXRX1∗GND
123
1 2 3I/OI/O
TXRX2TXRX2∗GND
123
1 2 3 I +24VGNDFG
123
<Cable side connector type> Connector : 1-178288-3 Contact : 1-175218-5 Recommended maker: Japan AMP
<Cable side connector type> Connector : 1-178288-3 Contact : 1-175218-5 Recommended maker: Japan AMP
<Cable side connector type> Connector : 2-178288-3 Contact : 1-175218-5 Recommended maker: Japan AMP
CAUTION
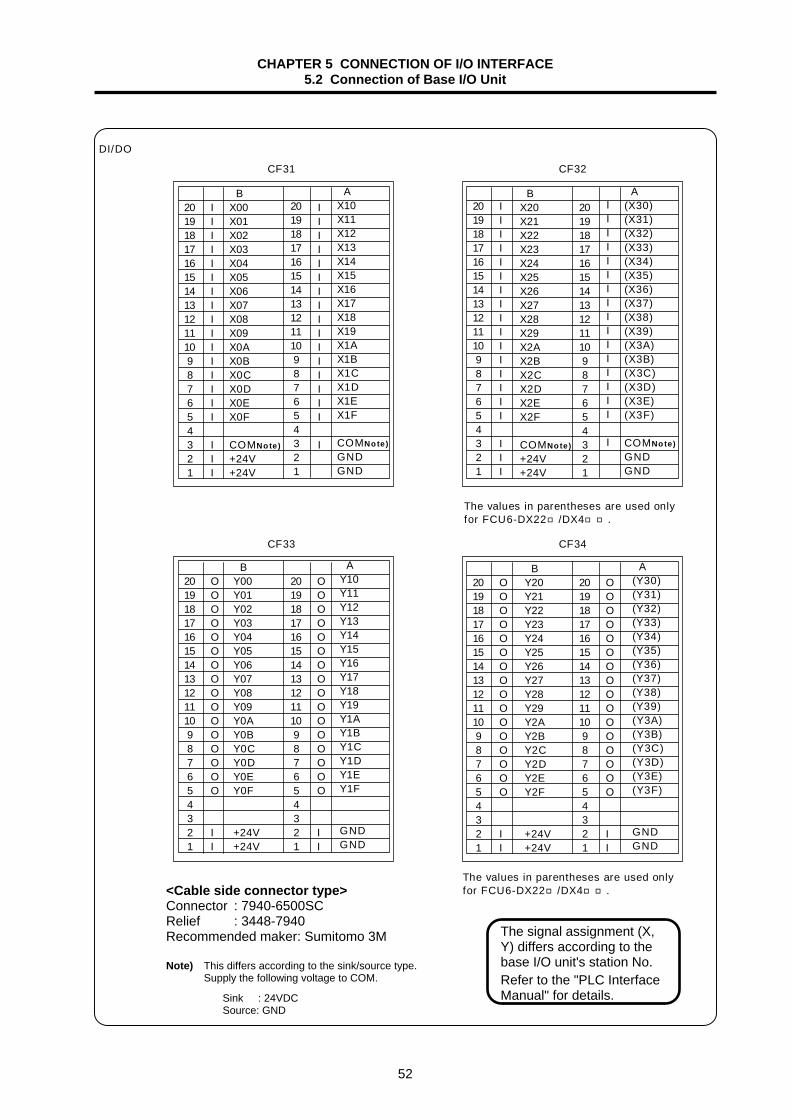
CHAPTER 5 CONNECTION OF I/O INTERFACE 5.2 Connection of Base I/O Unit
52
AX10X11X12X13X14X15X16X17X18X19X1AX1BX1CX1DX1EX1F
COMNo te)GNDGND
BX00X01X02X03X04X05X06X07X08X09X0AX0BX0CX0DX0EX0F
COMNo te)+24V+24V
2019181716151413121110 9 8 7 6 5 4 3 2 1
IIIIIIIIIIIIIIII
III
2019181716151413121110 9 8 7 6 5 4 3 2 1
IIIIIIIIIIIIIIII
I
CF31
2019181716151413121110 9 8 7 6 5 4 3 2 1
IIIIIIIIIIIIIIII
III
2019181716151413121110 9 8 7 6 5 4 3 2 1
IIIIIIIIIIIIIIII
I
BX20X21X22X23X24X25X26X27X28X29X2AX2BX2CX2DX2EX2F
COMNo te)+24V+24V
A(X30)(X31)(X32)(X33)(X34)(X35)(X36)(X37)(X38)(X39)(X3A)(X3B)(X3C)(X3D)(X3E)(X3F)
COMNo te)GNDGND
CF32
The values in parentheses are used onlyfor FCU6-DX22/DX4.
BY00Y01Y02Y03Y04Y05Y06Y07Y08Y09Y0AY0BY0CY0DY0EY0F
+24V+24V
2019181716151413121110 9 8 7 6 5 4 3 2 1
OOOOOOOOOOOOOOOO
II
2019181716151413121110 9 8 7 6 5 4 3 2 1
OOOOOOOOOOOOOOOO
II
AY10Y11Y12Y13Y14Y15Y16Y17Y18Y19Y1AY1BY1CY1DY1EY1F
GNDGND
CF33
2019181716151413121110 9 8 7 6 5 4 3 2 1
OOOOOOOOOOOOOOOO
II
2019181716151413121110 9 8 7 6 5 4 3 2 1
OOOOOOOOOOOOOOOO
II
BY20Y21Y22Y23Y24Y25Y26Y27Y28Y29Y2AY2BY2CY2DY2EY2F
+24V+24V
A(Y30)(Y31)(Y32)(Y33)(Y34)(Y35)(Y36)(Y37)(Y38)(Y39)(Y3A)(Y3B)(Y3C)(Y3D)(Y3E)(Y3F)
GNDGND
CF34
The values in parentheses are used onlyfor FCU6-DX22/DX4.
DI/DO
<Cable side connector type> Connector : 7940-6500SC Relief : 3448-7940 Recommended maker: Sumitomo 3M Note) This differs according to the sink/source type. Supply the following voltage to COM.
Sink : 24VDC Source: GND
The signal assignment (X, Y) differs according to the base I/O unit's station No. Refer to the "PLC Interface Manual" for details.

CHAPTER 5 CONNECTION OF I/O INTERFACE 5.2 Connection of Base I/O Unit
53
5.2.4 Base I/O Unit Input/Output Specifications
(1) Rotary switch (SW1, SW2) settings
Refer to Chapter 6 for the base I/O unit rotary switch (SW1, SW2) settings. Reference item: 6.14 Setting of channel No. when using multiple remote I/O units
Normal setting SW1 0 SW2 1 The base I/O unit occupies two channels.
(2) RIO1, RIO2 terminator
Connect a terminator to the final end of the remote I/O unit connected to RIO1 and RIO2. Terminator type: R-TM (3) CF31, CF32 input circuit
Refer to Chapter 6 for the base I/O unit CF31 and CF32 input circuits. Reference item: 6.4 Outline of digital signal input circuit
1 Unit name FCU6-DX210 FCU6-DX211 FCU6-DX220 FCU6-DX221 2 Card name HR325 HR335 HR327 HR337 3 Input type Sink/source Sink/source Sink/source Sink/source 4 COM pin connection +24V/GND +24V/GND +24V/GND +24V/GND 5 No. of input points 48 points 48 points 64 points 64 points 6 Pin used for input X0~X2F X0~X2F X0~X3F X0~X3F
(4) CF33, CF34 output circuit
Refer to Chapter 6 for the base I/O unit CF33 and CF34 output circuits. Reference item: 6.5 Outline of digital signal output circuit
1 Unit name FCU6-DX210 FCU6-DX211 FCU6-DX220 FCU6-DX2212 Card name HR325 HR335 HR327 HR337 3 Output type Sink type Source type Sink type Source type 4 Output current 60mA/point 60mA/point 60mA/point 60mA/point 5 No. of output points 48 points 48 points 64 points 64 points 6 Pin used for output Y0~Y2F Y0~Y2F Y0~Y3F Y0~Y3F

CHAPTER 5 CONNECTION OF I/O INTERFACE 5.2 Connection of Base I/O Unit
54
(5) Specifications of ADD ON PCB connected to CR31 Refer to Chapter 6 for the ADD ON PCB specifications. The ADD ON PCB occupies one channel.
Name Reference item Reference connector name
DX320/DX420 (RX323) 6.10 Connection of FCUA-DX12 unit and machine control signal FCUA-DX120: DI-R, DO-R
DX310/DX410 (RX323-1) 6.9 Connection of FCUA-DX11 unit and machine control signal FCUA-DX110: DI-R, DO-R
DX321/DX421 (RX324) 6.10 Connection of FCUA-DX12 unit and machine control signal FCUA-DX121: DI-R, DO-R
DX311/DX411 (RX324-1) 6.9 Connection of FCUA-DX11 unit and machine control signal FCUA-DX111: DI-R, DO-R
DX330/DX331/DX430/DX431 (RX331)
6.11 Connection of FCUA-DX13 unit and handle FCUA-DX13 : HANDLE
DX340/DX341/DX440/DX441 (RX341)
6.13 Connection of FCUA-DX14 unit and analog input/output signal
FCUA-DX14 : AIO
Refer to Chapter 6 for the analog output specifications. Reference item: 6.6 Outline of analog signal output circuit
Refer to Chapter 6 for the analog input specifications. Reference item: 6.7 Outline of analog signal input circuit (6) Connection of base I/O unit power supply
Supply the +24V power to the base I/O unit from the DCIN connector.
B2B1A2A1
+24V
GND
FG
B2B1A2A1
CF32
B2B1A2A1
+24V
GND
FG
B2B1A2A1
CF34
Stabilized power
Base I/O unit
CF31
CF33
DCIN
(Note) A +24V power supply must be input for both the sink type and source type.
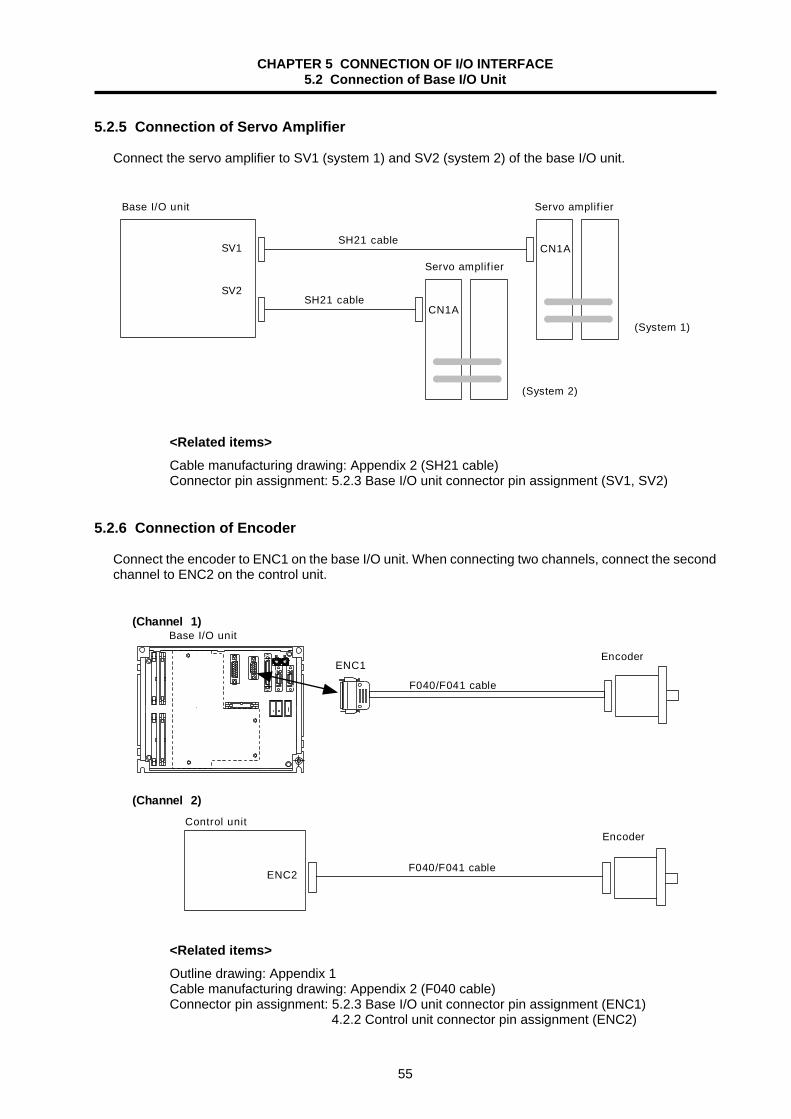
CHAPTER 5 CONNECTION OF I/O INTERFACE 5.2 Connection of Base I/O Unit
55
5.2.5 Connection of Servo Amplifier Connect the servo amplifier to SV1 (system 1) and SV2 (system 2) of the base I/O unit.
Base I/O unit
SV1
SV2
Servo amplif ier
CN1A
CN1AServo amplif ier
SH21 cable
SH21 cable
(System 1)
(System 2)
<Related items> Cable manufacturing drawing: Appendix 2 (SH21 cable) Connector pin assignment: 5.2.3 Base I/O unit connector pin assignment (SV1, SV2)
5.2.6 Connection of Encoder
Connect the encoder to ENC1 on the base I/O unit. When connecting two channels, connect the second channel to ENC2 on the control unit.
Base I/O unit
F040/F041 cable
ENC1
Control unit
F040/F041 cableENC2
Encoder
Encoder
(Channel 1)
(Channel 2)
0 0
<Related items> Outline drawing: Appendix 1 Cable manufacturing drawing: Appendix 2 (F040 cable) Connector pin assignment: 5.2.3 Base I/O unit connector pin assignment (ENC1)
4.2.2 Control unit connector pin assignment (ENC2)
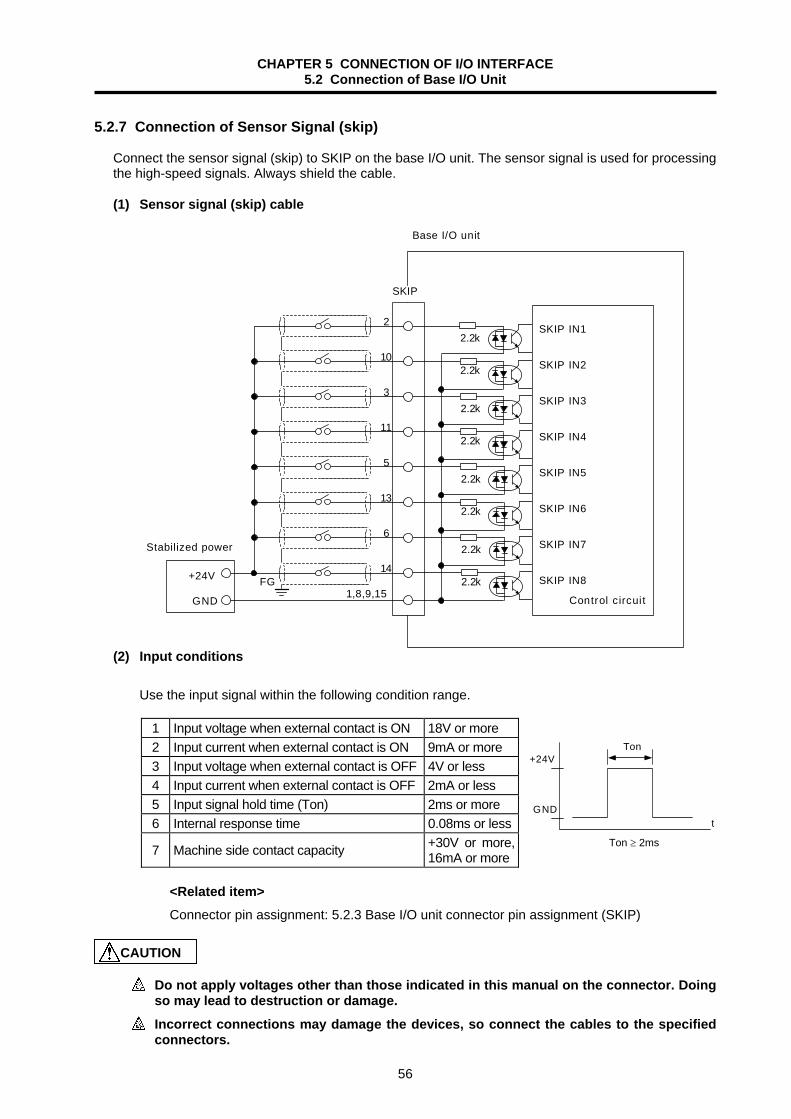
CHAPTER 5 CONNECTION OF I/O INTERFACE 5.2 Connection of Base I/O Unit
56
5.2.7 Connection of Sensor Signal (skip)
Connect the sensor signal (skip) to SKIP on the base I/O unit. The sensor signal is used for processing the high-speed signals. Always shield the cable. (1) Sensor signal (skip) cable
Base I/O unit
2.2k
2.2k
2.2k
2.2k
2.2k
2.2k
2.2k
2.2k
Control circuit
2
10
3
11
5
13
6
14
1,8,9,15+24V
GND
FG
SKIP IN1
SKIP IN2
SKIP IN3
SKIP IN4
SKIP IN5
SKIP IN6
SKIP IN7
SKIP IN8
Stabilized power
SKIP
(2) Input conditions
Use the input signal within the following condition range.
1 Input voltage when external contact is ON 18V or more 2 Input current when external contact is ON 9mA or more 3 Input voltage when external contact is OFF 4V or less 4 Input current when external contact is OFF 2mA or less 5 Input signal hold time (Ton) 2ms or more 6 Internal response time 0.08ms or less
7 Machine side contact capacity +30V or more, 16mA or more
<Related item> Connector pin assignment: 5.2.3 Base I/O unit connector pin assignment (SKIP)
Do not apply voltages other than those indicated in this manual on the connector. Doing so may lead to destruction or damage.
Incorrect connections may damage the devices, so connect the cables to the specified connectors.
Ton+24V
GNDt
CAUTION
Ton ≥ 2ms
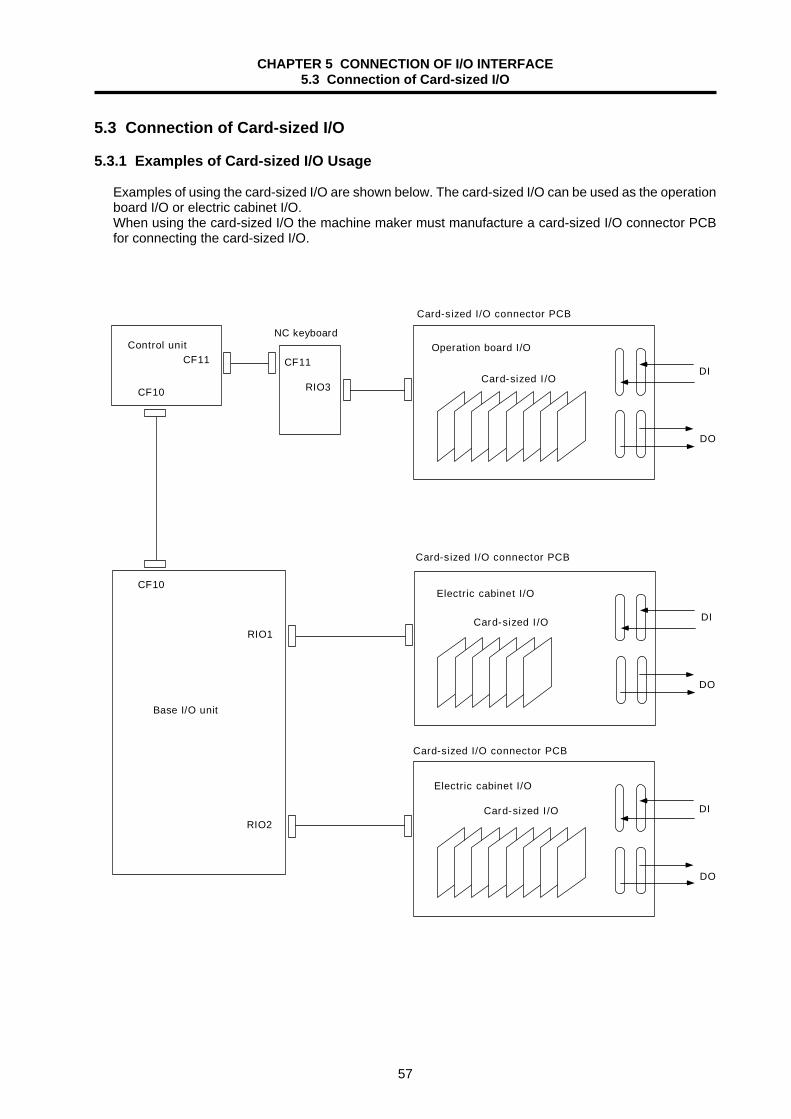
CHAPTER 5 CONNECTION OF I/O INTERFACE 5.3 Connection of Card-sized I/O
57
5.3 Connection of Card-sized I/O 5.3.1 Examples of Card-sized I/O Usage
Examples of using the card-sized I/O are shown below. The card-sized I/O can be used as the operation board I/O or electric cabinet I/O. When using the card-sized I/O the machine maker must manufacture a card-sized I/O connector PCB for connecting the card-sized I/O.
Control unit Operation board I/O
Card-sized I /ODI
DO
DI
DO
DI
DO
Base I/O unit
CF10
RIO1
RIO2
Electric cabinet I/O
CF10
CF11 CF11
RIO3
NC keyboard
Card-sized I/O connector PCB
Card-sized I/O connector PCB
Card-sized I/O connector PCB
Card-sized I /O
Card-sized I /O
Electric cabinet I/O

CHAPTER 5 CONNECTION OF I/O INTERFACE 5.3 Connection of Card-sized I/O
58
5.3.2 Card-sized I/O Specifications
The card-sized I/O (HR361/HR371) specifications are shown below. The card-sized I/O has 16 input points and 16 output points per card. When the card-sized I/O connector PCB is connected to RIO1, up to six cards can be used, and when connected to RIO2 and RIO3, up to eight cards can be used. The power supply (+24V, +5V) must be supplied from an external source.
HR361/HR371Outline drawing
+24Vpower supply
DI
DOCommunication signal(TXRX、TXRX∗)
SEL1SEL2SEL3
+5Vpower supply
(1) Basic specifications
Item HR361 HR371 Remarks No. of input points 16 points No. of output points 16 points Input/output type Sink type Source type HR361/HR371 PCB size 55mm × 93mm Connector PCB connector 9150-4500SC (50 pin) Sumitomo 3M HR361/HR371 usage connector 7650-5002SC (50 pin) Sumitomo 3M
(2) Setting the channel No.
The card-sized I/O does not have a rotary switch, etc., for setting the channel No. Connect the connector CF30 SEL1 to 3 signal pin to +5V or GND on the base PCB as shown below. The card-sized I/O occupies one channel. Refer to section 6.14 Setting of channel No. when using multiple remote I/O units for the occupied channels.
Channel No. selection signal
(pin No.)
Channel 1 CF30-1
Channel 2CF30-2
Channel 3CF30-3
Channel 4CF30-4
Channel 5CF30-5
Channel 6 CF30-6
Channel 7CF30-7
Channel 8CF30-8
SEL1 (CF30-A3) GND +5V GND +5V GND +5V GND +5V SEL2 (CF30-B3) GND GND +5V +5V GND GND +5V +5V SEL3 (CF30-A4) GND GND GND GND +5V +5V +5V +5V
(3) External power supply specifications
The power supply (+24V, +5V) for the card-sized I/O must be supplied from an external source. Prepare a power supply (stabilized power) that satisfies the following conditions per card. +24V power supply +5V power supply Output voltage +24V ±5% Output voltage +5V ±5% Ripple/noise 240mVp-p Ripple/noise 50mVp-p Output current 1A Output current 0.4A
The output current is the value when 60mA x 16 points are used. Prepare a power supply that satisfies the total output current of the +24V output.

CHAPTER 5 CONNECTION OF I/O INTERFACE 5.3 Connection of Card-sized I/O
59
5.3.3 Card-sized I/O Connector Pin Assignment
1 2 3 4 5 6 7 8 910111213141516171819202122232425
AGNDTXRX∗SEL1SEL3+24VGNDYFYEYDYCYBYAY9Y8GNDXFXEXDXCXBXAX9X8GND+5V
I/O I I I
O O O O O O O O
I I I I I I I I
I
BGNDTXRXSEL2+24V+24VGNDY7Y6Y5Y4Y3Y2Y1Y0GNDX7X6X5X4X3X2X1X0GND+5V
1 2 3 4 5 6 7 8 910111213141516171819202122232425
I/O I I I
O O O O O O O O
I I I I I I I I
I
CF30
5.3.4 Precautions for Wiring Card-sized I/O
(1) Connection of terminator A terminator is required between the communication signal cables (TXRX, TXRX*) of the card-sized I/O. Connect a terminator to the card-sized I/O connector PCB signal lines as shown below.
(Example) When four connectors are installed on card-sized I/O connector PCB.
TXRX
TXRX∗
Connector (CF30) on card-sized I/O connector PCB
NC control unit(CF10,CF11)
100Ω
B2
A2
(2) Shield treatment of communication signal cable
The card-sized I/O's communication signal cables (TXRX, TXRX∗) communicate at a high speed, so they must be wired separately from other signal cables. Shield each end of the signal with a GND pattern as shown below, and ground at several places.
TXRX
TXRX∗
The signal assignment (X, Y) differs according to the base I/O unit's station No.Refer to the "PLC Interface Manual" for details.
Recommended resistance 100Ω 1/4W RN14C2E101F (Koa Denko)

CHAPTER 5 CONNECTION OF I/O INTERFACE 5.3 Connection of Card-sized I/O
60
5.3.5 Card-sized I/O Input/Output Circuit
(1) Input circuit The sink type (HR361) input circuit corresponding to the machine side sink output and the source type (HR371) input circuit corresponding to the machine side source output are shown below.
+24V2.2k
2.2k
HR371
GND
(Machine side)CF30
2.2k
2.2k
Controlcircuit
HR361(Machine side)
GND
GND
+24V
CF30
Sink type Source type
COM COM
Controlcircuit
Do not apply voltages other than those indicated in this manual on the connector. Doing so may lead to destruction or damage.
(2) Input conditions
Use the input signal within the following condition ranges. HR361 HR371 1 Input voltage when external contact is ON 6V or less 18V or more 2 Input current when external contact is ON 9mA or more 3 Input voltage when external contact is OFF 20V or more 4V or less 4 Input current when external contact is OFF 2mA or less 5 Tolerable chattering time 3ms or less (Refer to T1 below) 6 Input signal hold time 40ms or more (Refer to T2 below) 7 Input circuit operation delay time 3ms ≤ T3 =. . T4 ≤ 20ms 8 Machine side contact capacity +30V or more, 16mA or more
T1 T1 T1 T1
T2 T2
T3 T4 T3 T4
External signal+24V
+5VInternal signal
CAUTION
Input signal hold time: 40 ms or more is the guideline, and if not held for longer than the ladder processing cycle time, the input signal will not be recognized.

CHAPTER 5 CONNECTION OF I/O INTERFACE 5.3 Connection of Card-sized I/O
61
(3) Output circuit The HR361 output circuit is a sink type (sink output), and the HR371 output circuit is a source type (source output).
+24V
RA
RPL
GND
HR371
GND
+24V
HR361
RA
RPL
GND
Sink type Source type
Controlcircuit
Controlcircuit
(Machine side) (Machine side)
CF30 CF30
Do not apply voltages other than those indicated in this manual on the connector. Doing so may lead to destruction or damage.
(4) Output conditions
Output current 60mA/point Saturated voltage (HR371 only) 1.6V (standard)
Output delay time 40µs
CAUTION
∗ When using an inductive load such as relays, always connect a diode (withstand voltage 100V or more, 100mA or more) in parallel to the load as a noise measure.
∗ When using a capacitive load such as a lamp, always connect a protective resistor (R=150Ω) serially to the load to suppress rush currents. (Make sure that the current, including the instantaneous current, is less than the above tolerable current.)
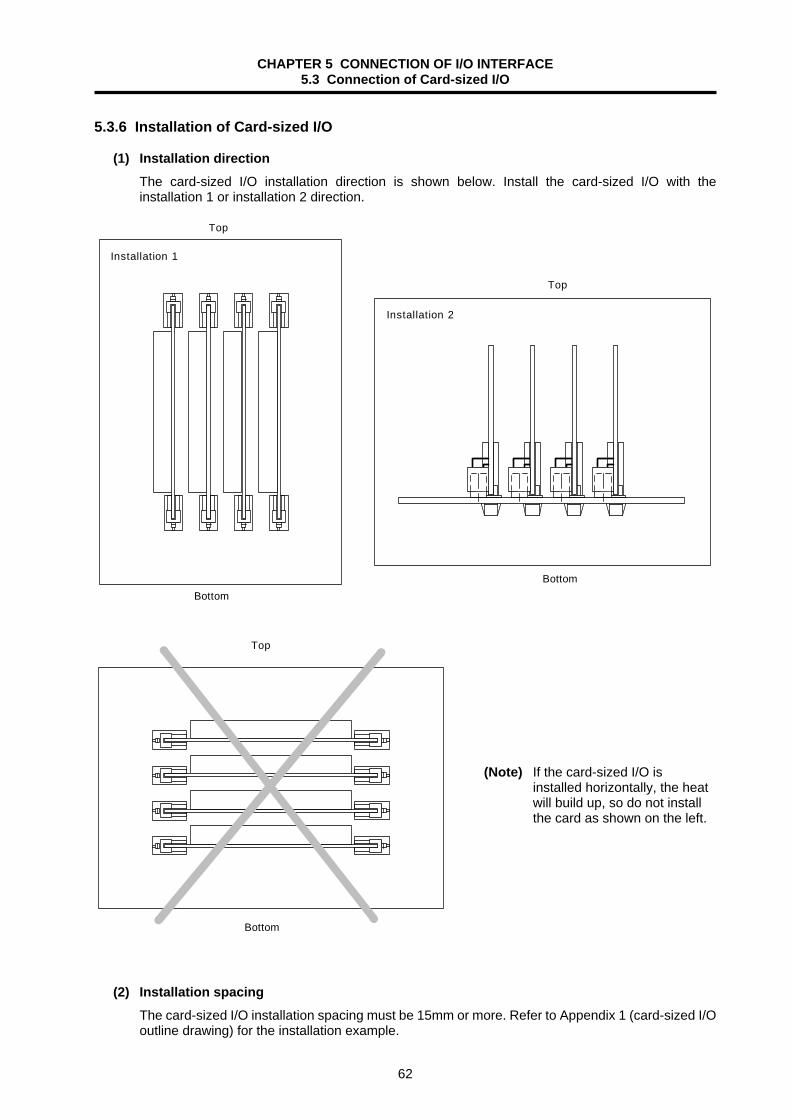
CHAPTER 5 CONNECTION OF I/O INTERFACE 5.3 Connection of Card-sized I/O
62
5.3.6 Installation of Card-sized I/O
(1) Installation direction The card-sized I/O installation direction is shown below. Install the card-sized I/O with the installation 1 or installation 2 direction.
Top
Bottom
Installation 1
Installation 2
Top
Bottom
Top
Bottom
(2) Installation spacing The card-sized I/O installation spacing must be 15mm or more. Refer to Appendix 1 (card-sized I/O outline drawing) for the installation example.
(Note) If the card-sized I/O is installed horizontally, the heat will build up, so do not install the card as shown on the left.
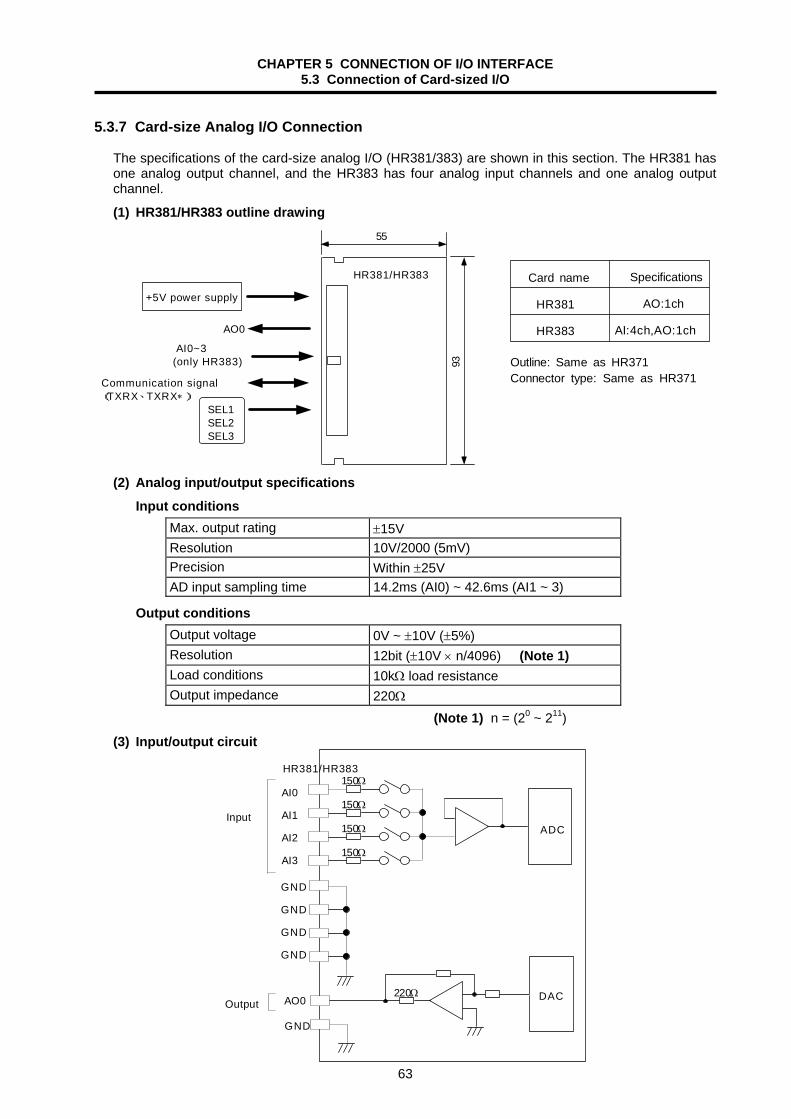
CHAPTER 5 CONNECTION OF I/O INTERFACE 5.3 Connection of Card-sized I/O
63
5.3.7 Card-size Analog I/O Connection
The specifications of the card-size analog I/O (HR381/383) are shown in this section. The HR381 has one analog output channel, and the HR383 has four analog input channels and one analog output channel.
(1) HR381/HR383 outline drawing
HR381/HR383
AO0
Communication signal(TXRX、TXRX∗)
SEL1SEL2SEL3
55
Card name
HR381
HR383
Specifications
AO:1ch
AI:4ch,AO:1ch AI0~3(only HR383) Outline: Same as HR371
Connector type: Same as HR371
+5V power supply
93
(2) Analog input/output specifications Input conditions
Max. output rating ±15V Resolution 10V/2000 (5mV) Precision Within ±25V AD input sampling time 14.2ms (AI0) ~ 42.6ms (AI1 ~ 3)
Output conditions Output voltage 0V ~ ±10V (±5%) Resolution 12bit (±10V × n/4096) (Note 1) Load conditions 10kΩ load resistance Output impedance 220Ω
(Note 1) n = (20 ~ 211)
(3) Input/output circuit
150Ω
150Ω
150Ω
150Ω
ADCInput
HR381/HR383
AI0
AI1
AI2
AI3
DAC220ΩOutput AO0
GND
GND
GND
GND
GND
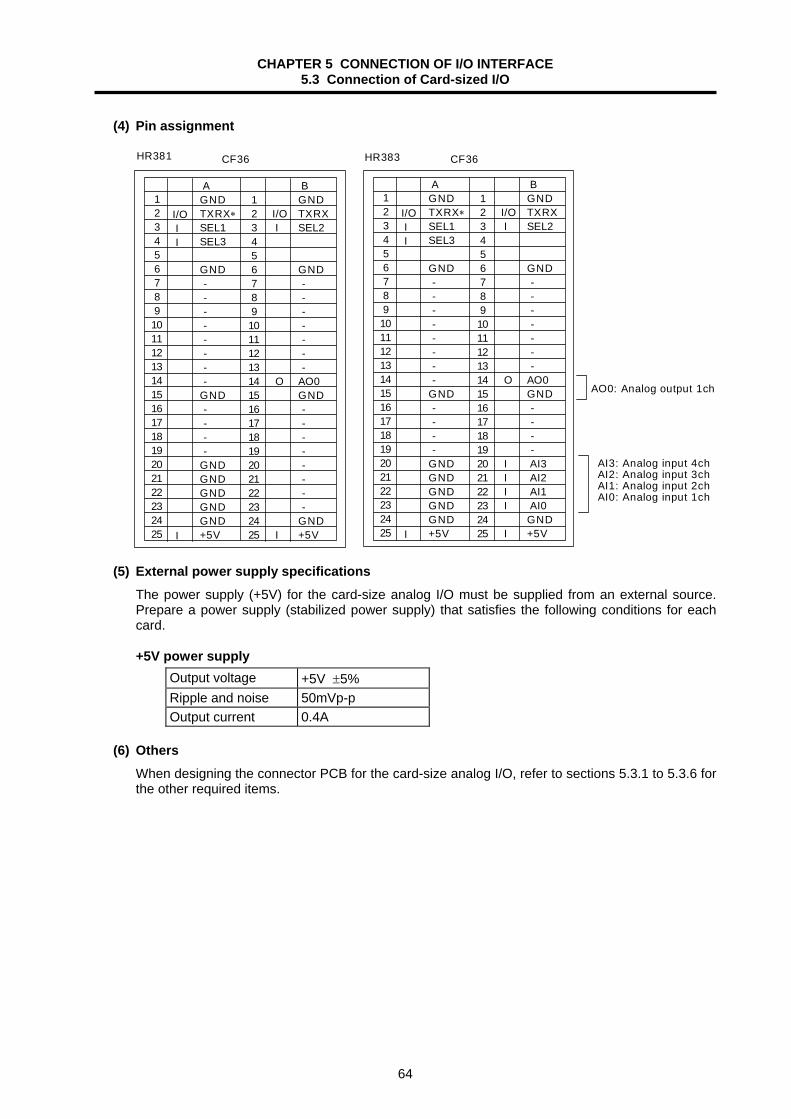
CHAPTER 5 CONNECTION OF I/O INTERFACE 5.3 Connection of Card-sized I/O
64
(4) Pin assignment
1 2 3 4 5 6 7 8 910111213141516171819202122232425
AGNDTXRX∗SEL1SEL3
GND - - - - - - - -GND - - - -GNDGNDGNDGNDGND+5V
I/O I I
I
BGNDTXRXSEL2
GND - - - - - - -AO0GND - - - - - - - -GND+5V
1 2 3 4 5 6 7 8 910111213141516171819202122232425
I/O I
O
I
CF36HR381
1 2 3 4 5 6 7 8 910111213141516171819202122232425
AGNDTXRX∗SEL1SEL3
GND - - - - - - - -GND - - - -GNDGNDGNDGNDGND+5V
I/O I I
I
BGNDTXRXSEL2
GND - - - - - - -AO0GND - - - - AI3 AI2 AI1 AI0GND+5V
1 2 3 4 5 6 7 8 910111213141516171819202122232425
I/O I
O
I I I I
I
CF36HR383
AO0: Analog output 1ch
AI3: Analog input 4chAI2: Analog input 3chAI1: Analog input 2chAI0: Analog input 1ch
(5) External power supply specifications
The power supply (+5V) for the card-size analog I/O must be supplied from an external source. Prepare a power supply (stabilized power supply) that satisfies the following conditions for each card.
+5V power supply
Output voltage +5V ±5% Ripple and noise 50mVp-p Output current 0.4A
(6) Others
When designing the connector PCB for the card-size analog I/O, refer to sections 5.3.1 to 5.3.6 for the other required items.

CHAPTER 5 CONNECTION OF I/O INTERFACE 5.4 Scan I/O
65
5.4 Scan I/O 5.4.1 Types of Scan I/O
The scan I/O is an input/output card for the machine operation board, and is provided with a digital input/output and scan input/output. The following two types of scan I/O are available.
HR347 HR357 Remarks
No. of input points 64 64 Scan No. of output points 64 64
5V system
No. of input points 32 32 No. of output points 32 32 Digital Input/output type Sink Source
24V system
(1) Scan input
64 DI points are configured with a matrix of eight common signals x eight data signals. (5V system) (2) Scan output
64 DO points are configured with (four common signals × eight data signals) + (four common signals × eight data signals). (5V system)
(3) Digital input
DI having an interface for each input point. (24V system) (4) Digital output
DO having an interface for each output point. (24V system) 5.4.2 Scan I/O Connector Layout Drawing
0 0 0
AB
25 1
Scan DI/DO:64/64
CF35
DIO SCAN2 SCAN1
RIO3 DCIN
AB
CF33
120
DO:32ABDI:32
CF31
20 1
AB
HR347/357

CHAPTER 5 CONNECTION OF I/O INTERFACE 5.4 Scan I/O
66
5.4.3 Scan I/O Connector Remote I/O
RIO3A/B 1 2 3
+24V input
DCIN 1 2 3
DI/DO
AX50X51X52X53X54X55X56X57X58X59X5AX5BX5CX5DX5EX5F
COMGNDGND
BX40X41X42X43X44X45X46X47X48X49X4AX4BX4CX4DX4EX4F
COM+24V+24V
2019181716151413121110 9 8 7 6 5 4 3 2 1
IIIIIIIIIIIIIIII
III
2019181716151413121110 9 8 7 6 5 4 3 2 1
IIIIIIIIIIIIIIII
I
CF31
BY40Y41Y42Y43Y44Y45Y46Y47Y48Y49Y4AY4BY4CY4DY4EY4F
+24V+24V
2019181716151413121110 9 8 7 6 5 4 3 2 1
OOOOOOOOOOOOOOOO
II
2019181716151413121110 9 8 7 6 5 4 3 2 1
CF33
OOOOOOOOOOOOOOOO
II
AY50Y51Y52Y53Y54Y55Y56Y57Y58Y59Y5AY5BY5CY5DY5EY5F
GNDGND
Note) Note)
I/OI/O
TXRX3TXRX3∗GND
123
I +24VGNDFG
123
<Cable side connector type> Connector : 1-178288-3 Contact : 1-175218-5 Recommended maker: Japan AMP
<Cable side connector type> Connector : 2-178288-3 Contact : 1-175218-5 Recommended maker: Japan AMP
<Cable side connector type> Connector : 7940-6500SC Relief : 3448-7940 Recommended maker: Sumitomo 3M Note) This differs according to the sink/source type. Supply the following voltage to COM.
Sink : 24VDC Source: GND
The signal assignment (X, Y) differs according to the base I/O unit's station No. Refer to the "PLC Interface Manual" for details.
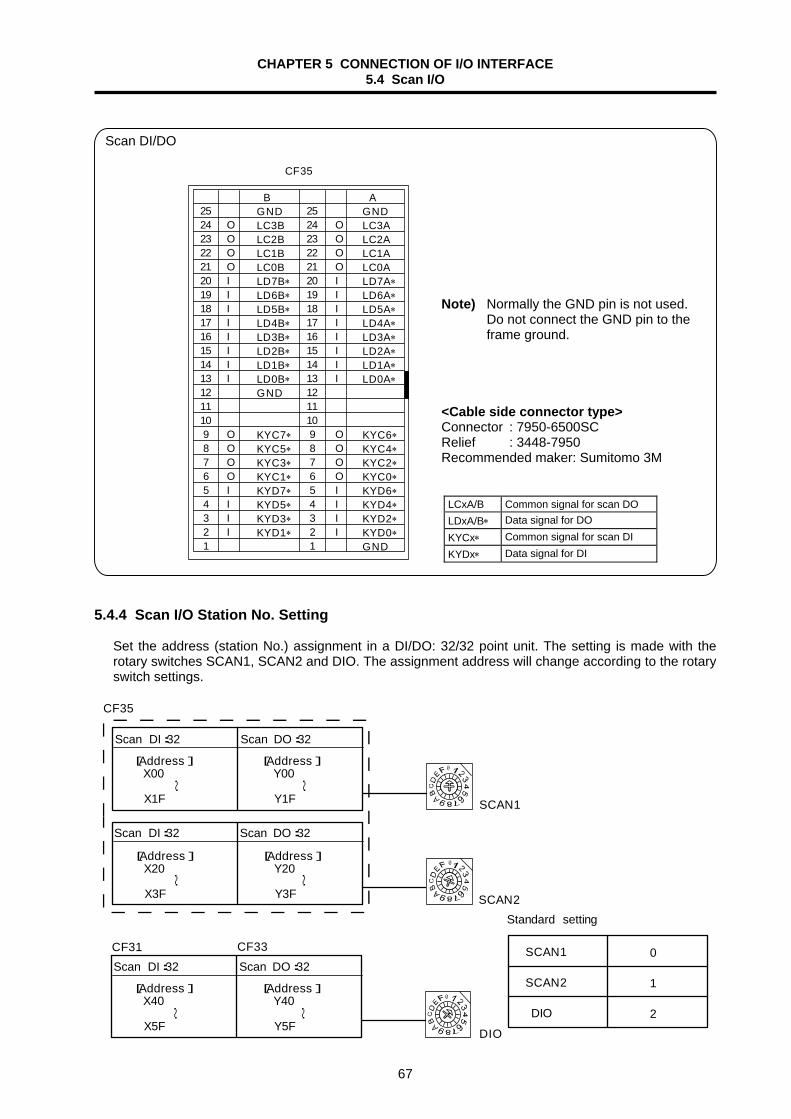
CHAPTER 5 CONNECTION OF I/O INTERFACE 5.4 Scan I/O
67
Scan DI/DO
AGNDLC3ALC2ALC1ALC0ALD7A∗LD6A∗LD5A∗LD4A∗LD3A∗LD2A∗LD1A∗LD0A∗
KYC6∗KYC4∗KYC2∗KYC0∗KYD6∗KYD4∗KYD2∗KYD0∗GND
BGNDLC3BLC2BLC1BLC0BLD7B∗LD6B∗LD5B∗LD4B∗LD3B∗LD2B∗LD1B∗LD0B∗GND
KYC7∗KYC5∗KYC3∗KYC1∗KYD7∗KYD5∗KYD3∗KYD1∗
25242322212019181716151413121110 9 8 7 6 5 4 3 2 1
OOOOIIIIIIII
OOOOIIII
25242322212019181716151413121110 9 8 7 6 5 4 3 2 1
OOOOIIIIIIII
OOOOIIII
CF35
5.4.4 Scan I/O Station No. Setting
Set the address (station No.) assignment in a DI/DO: 32/32 point unit. The setting is made with the rotary switches SCAN1, SCAN2 and DIO. The assignment address will change according to the rotary switch settings.
SCAN1
0
0
Scan DI:32 Scan DO:32
[Address] X00
X1F
[Address] Y00
Y1F
CF35
SCAN2
Scan DI:32 Scan DO:32
[Address] X20
X3F
[Address] Y20
Y3F
CF31
0
Scan DI:32 Scan DO:32
[Address] X40
X5F
[Address] Y40
Y5F
CF33
DIO
Standard setting
SCAN1
SCAN2
DIO
0
1
2
~ ~
~ ~
~ ~
Note) Normally the GND pin is not used.Do not connect the GND pin to the frame ground.
<Cable side connector type> Connector : 7950-6500SC Relief : 3448-7950 Recommended maker: Sumitomo 3M
LCxA/B Common signal for scan DO LDxA/B∗ Data signal for DO KYCx∗ Common signal for scan DI KYDx∗ Data signal for DI
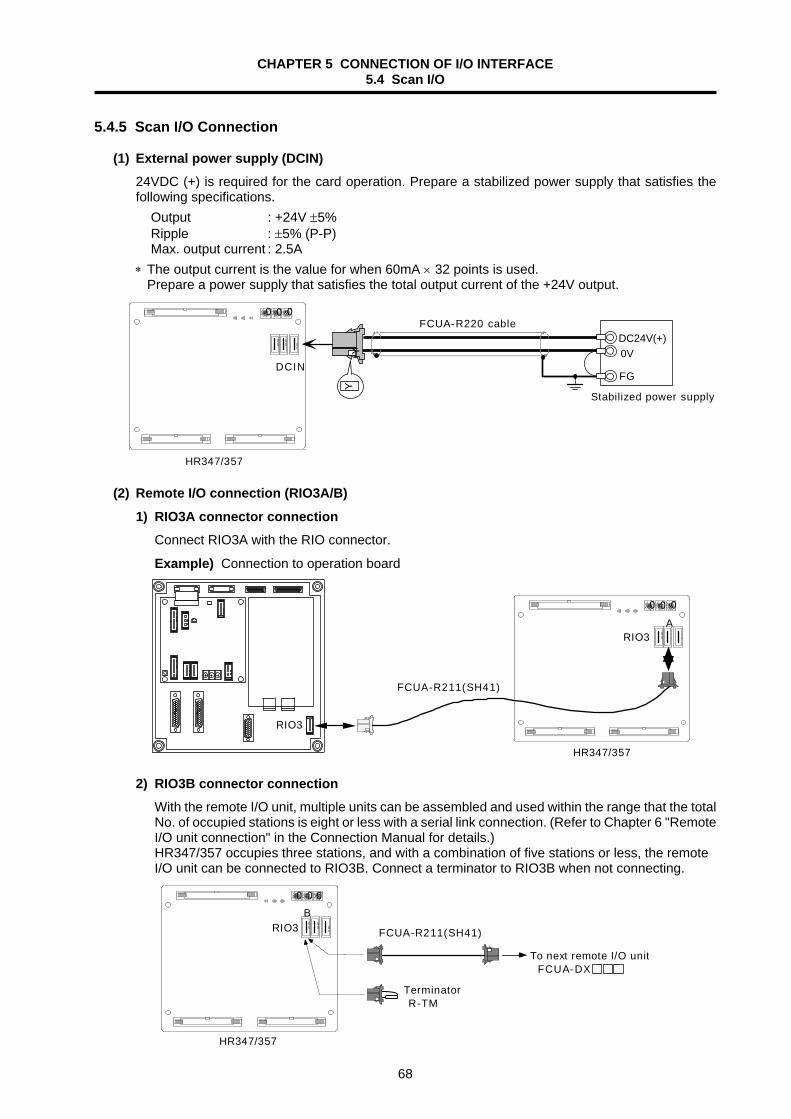
CHAPTER 5 CONNECTION OF I/O INTERFACE 5.4 Scan I/O
68
5.4.5 Scan I/O Connection
(1) External power supply (DCIN) 24VDC (+) is required for the card operation. Prepare a stabilized power supply that satisfies the following specifications.
Output : +24V ±5% Ripple : ±5% (P-P) Max. output current : 2.5A
∗ The output current is the value for when 60mA × 32 points is used. Prepare a power supply that satisfies the total output current of the +24V output.
00 0
DCIN
DC24V(+)
FG
0VY
HR347/357
Y
FCUA-R220 cable
Stabilized power supply
(2) Remote I/O connection (RIO3A/B) 1) RIO3A connector connection
Connect RIO3A with the RIO connector.
Example) Connection to operation board
00 0
RIO3A
HR347/357
RIO3
FCUA-R211(SH41)
2) RIO3B connector connection With the remote I/O unit, multiple units can be assembled and used within the range that the total No. of occupied stations is eight or less with a serial link connection. (Refer to Chapter 6 "Remote I/O unit connection" in the Connection Manual for details.) HR347/357 occupies three stations, and with a combination of five stations or less, the remote I/O unit can be connected to RIO3B. Connect a terminator to RIO3B when not connecting.
0 0 0
RIO3B
Terminator R-TM
To next remote I/O unit FCUA-DX
HR347/357
FCUA-R211(SH41)
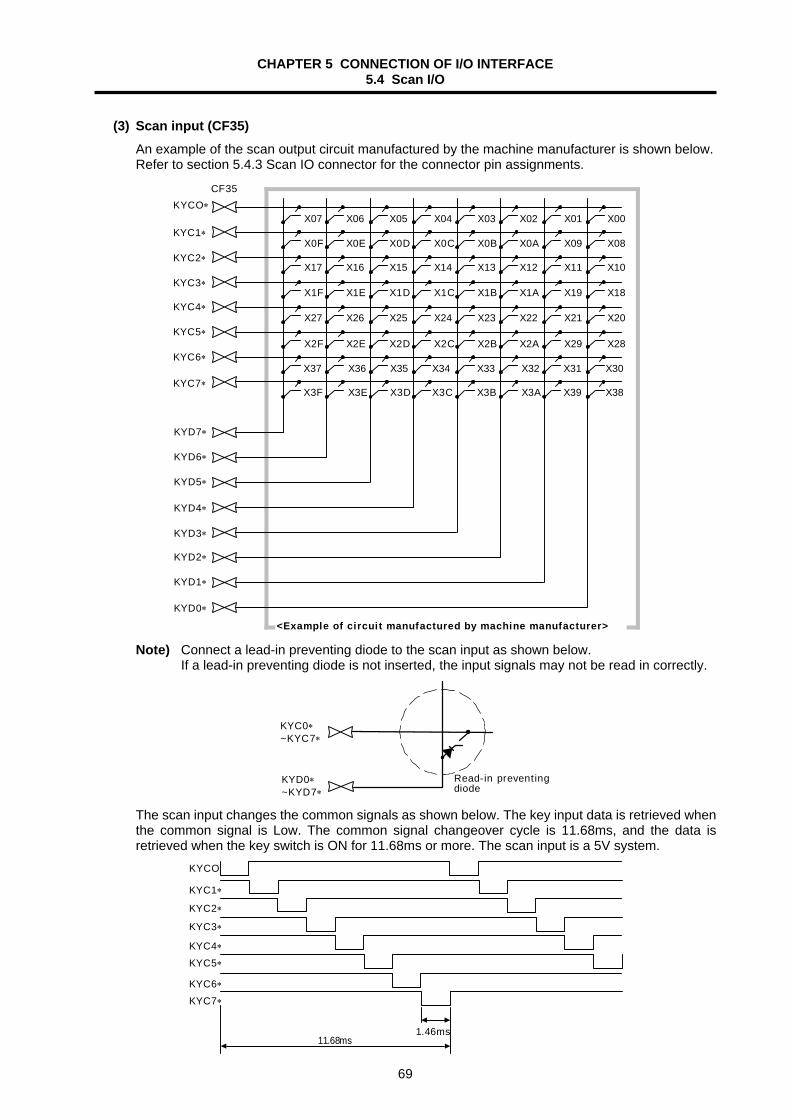
CHAPTER 5 CONNECTION OF I/O INTERFACE 5.4 Scan I/O
69
(3) Scan input (CF35) An example of the scan output circuit manufactured by the machine manufacturer is shown below. Refer to section 5.4.3 Scan IO connector for the connector pin assignments.
KYCO∗
KYC1∗
KYC2∗
KYC3∗
KYC4∗
KYC5∗
KYC6∗
KYC7∗
KYD7∗
KYD6∗
KYD5∗
KYD4∗
KYD3∗
KYD2∗
KYD1∗
KYD0∗
CF35
X07 X06 X05 X04 X03 X02 X01 X00
X0F X0E X0D X0C X0B X0A X09 X08
X17 X16 X15 X14 X13 X12 X11 X10
X1F X1E X1D X1C X1B X1A X19 X18
X27 X26 X25 X24 X23 X22 X21 X20
X2F X2E X2D X2C X2B X2A X29 X28
X37 X36 X35 X34 X33 X32 X31 X30
X3F X3E X3D X3C X3B X3A X39 X38
<Example of circuit manufactured by machine manufacturer>
Note) Connect a lead-in preventing diode to the scan input as shown below. If a lead-in preventing diode is not inserted, the input signals may not be read in correctly.
KYC0∗~KYC7∗
Read-in preventingdiode
KYD0∗~KYD7∗
The scan input changes the common signals as shown below. The key input data is retrieved when the common signal is Low. The common signal changeover cycle is 11.68ms, and the data is retrieved when the key switch is ON for 11.68ms or more. The scan input is a 5V system.
KYCO*
KYC1∗
KYC2∗
KYC3∗
KYC4∗
KYC5∗
KYC6∗
KYC7∗
1.46ms11.68ms

CHAPTER 5 CONNECTION OF I/O INTERFACE 5.4 Scan I/O
70
(4) Scan output (CF35) An example of the scan output circuit manufactured by the machine manufacturer is shown below. Refer to section 2. (2) Pin assignment for the connector pin assignments.
LC3B
LC0BLC1BLC2B
LD4B∗
LD7B∗LD6B∗LD5B∗
LDOB∗
LD3B∗
LD2B∗LD1B∗
CF35
Y29
Y39
Y28
Y38
Y2A
Y3A
Y2B
Y3B
Y2C
Y3C
Y2D
Y3D
Y2E
Y3E
Y2F
Y3F
Y20
Y30
Y21
Y31
Y22
Y32
Y23
Y33
Y24
Y34
Y25
Y35
Y26
Y36
Y27
Y37
LC3A
LC0ALC1ALC2A
LD4A∗
LD7A∗LD6A∗LD5A∗
LDOA∗
LD3A∗LD2A∗LD1A∗
CF35
Y00Y01Y02Y03Y04Y05Y06Y07
Y09Y08
Y0AY0BY0CY0DY0EY0F
Y10Y11Y12Y13Y14Y15Y16Y17
Y18Y19Y1AY1BY1CY1DY1EY1F
<Example of circuit manufactured bymachine manufacturer>
<Example of circuit manufactured bymachine manufacturer>
330Ω
LCnA/B
LDnA/B∗
CF35
〈HR347/357〉
5V
Output circuit <Manufactured by machine manufacturer>
The scan output changes the common signals as shown below. The LED lights only when the data is output and the common signal is High. The common signal changes four signals in order. It lights only for 1.46ms once every 5.84ms. The scan output is a 5V system.
LC3A
LC0A
LC1A
LC2A
1.46ms5.84ms
LC3B
LC0B
LC1B
LC2B
1.46ms5.84ms

CHAPTER 5 CONNECTION OF I/O INTERFACE 5.4 Scan I/O
71
(5) Digital input (CF31) A sink type input circuit corresponding to the machine side sink output, and a source type input circuit corresponding to the machine side source output are shown below.
+24V2.2k
2.2k
HR357
GND
(Machine side)
2.2k
2.2k
Controlcircuit
HR347(Machine side)
GND
GND
+24V
Sink type Source type
Controlcircuit
CF30
COM COM
CF30
Input conditions
Use the input signal within the following condition ranges. Sink type Source type 1 Input voltage when external contact is ON 6V or less 18V or more 2 Input current when external contact is ON 9mA or more 3 Input voltage when external contact is OFF 20V or more 4V or less 4 Input current when external contact is OFF 2mA or less 5 Tolerable chattering time 3ms or less (Refer to T1 below) 6 Input signal hold time 40ms or more (Refer to T2 below) 7 Input circuit operation delay time 3ms ≤ T3 =. . T4 ≤ 20ms 8 Machine side contact capacity +30V or more, 16mA or more
Do not apply voltages other than those indicated in this manual on the connector. Doing so may lead to destruction or damage.
T1 T1 T1 T1
T2 T2
External signal+24V
+5VInternal signal
T3 T4 T3 T4
CAUTION
Input signal hold time: 40 ms or more is the guideline, and if not held for longer than the ladder processing cycle time, the input signal will not be recognized.
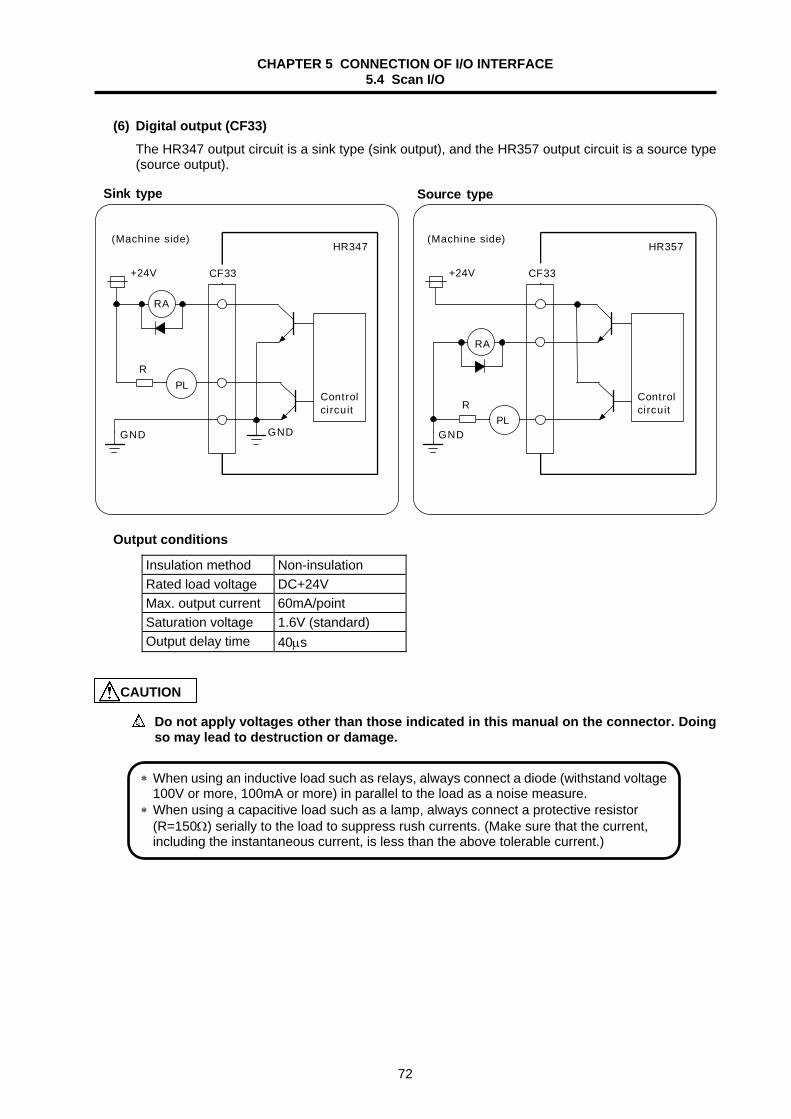
CHAPTER 5 CONNECTION OF I/O INTERFACE 5.4 Scan I/O
72
(6) Digital output (CF33) The HR347 output circuit is a sink type (sink output), and the HR357 output circuit is a source type (source output).
+24V
RA
RPL
GND
HR357
GND
+24V
HR347
RA
RPL
GND
Sink type Source type
Controlcircuit
Controlcircuit
(Machine side) (Machine side)
CF33 CF33
Output conditions
Insulation method Non-insulation Rated load voltage DC+24V Max. output current 60mA/point Saturation voltage 1.6V (standard) Output delay time 40µs
Do not apply voltages other than those indicated in this manual on the connector. Doing so may lead to destruction or damage.
∗ When using an inductive load such as relays, always connect a diode (withstand voltage 100V or more, 100mA or more) in parallel to the load as a noise measure.
∗ When using a capacitive load such as a lamp, always connect a protective resistor (R=150Ω) serially to the load to suppress rush currents. (Make sure that the current, including the instantaneous current, is less than the above tolerable current.)
CAUTION
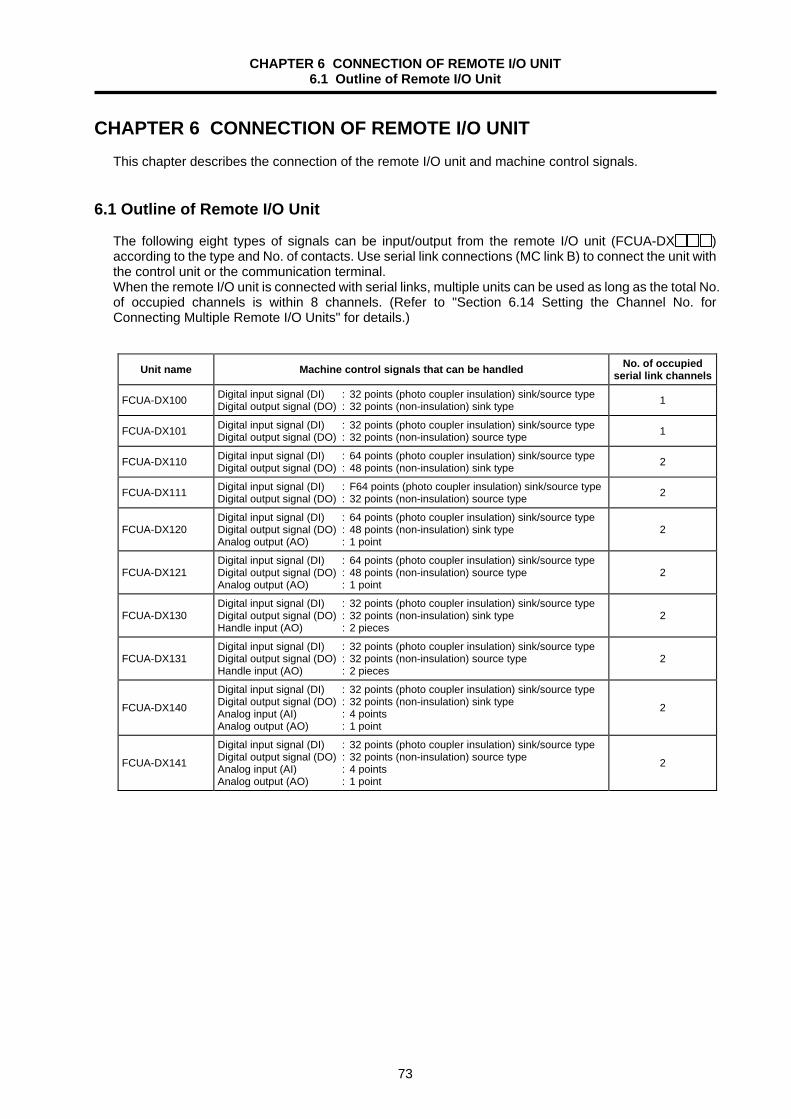
CHAPTER 6 CONNECTION OF REMOTE I/O UNIT 6.1 Outline of Remote I/O Unit
73
CHAPTER 6 CONNECTION OF REMOTE I/O UNIT
This chapter describes the connection of the remote I/O unit and machine control signals. 6.1 Outline of Remote I/O Unit
The following eight types of signals can be input/output from the remote I/O unit (FCUA-DX ) according to the type and No. of contacts. Use serial link connections (MC link B) to connect the unit with the control unit or the communication terminal. When the remote I/O unit is connected with serial links, multiple units can be used as long as the total No. of occupied channels is within 8 channels. (Refer to "Section 6.14 Setting the Channel No. for Connecting Multiple Remote I/O Units" for details.)
Unit name Machine control signals that can be handled No. of occupied serial link channels
FCUA-DX100 Digital input signal (DI) : 32 points (photo coupler insulation) sink/source type Digital output signal (DO) : 32 points (non-insulation) sink type 1
FCUA-DX101 Digital input signal (DI) : 32 points (photo coupler insulation) sink/source type Digital output signal (DO) : 32 points (non-insulation) source type 1
FCUA-DX110 Digital input signal (DI) : 64 points (photo coupler insulation) sink/source type Digital output signal (DO) : 48 points (non-insulation) sink type 2
FCUA-DX111 Digital input signal (DI) : F64 points (photo coupler insulation) sink/source type Digital output signal (DO) : 32 points (non-insulation) source type 2
FCUA-DX120 Digital input signal (DI) : 64 points (photo coupler insulation) sink/source type Digital output signal (DO) : 48 points (non-insulation) sink type Analog output (AO) : 1 point
2
FCUA-DX121 Digital input signal (DI) : 64 points (photo coupler insulation) sink/source type Digital output signal (DO) : 48 points (non-insulation) source type Analog output (AO) : 1 point
2
FCUA-DX130 Digital input signal (DI) : 32 points (photo coupler insulation) sink/source type Digital output signal (DO) : 32 points (non-insulation) sink type Handle input (AO) : 2 pieces
2
FCUA-DX131 Digital input signal (DI) : 32 points (photo coupler insulation) sink/source type Digital output signal (DO) : 32 points (non-insulation) source type Handle input (AO) : 2 pieces
2
FCUA-DX140
Digital input signal (DI) : 32 points (photo coupler insulation) sink/source type Digital output signal (DO) : 32 points (non-insulation) sink type Analog input (AI) : 4 points Analog output (AO) : 1 point
2
FCUA-DX141
Digital input signal (DI) : 32 points (photo coupler insulation) sink/source type Digital output signal (DO) : 32 points (non-insulation) source type Analog input (AI) : 4 points Analog output (AO) : 1 point
2
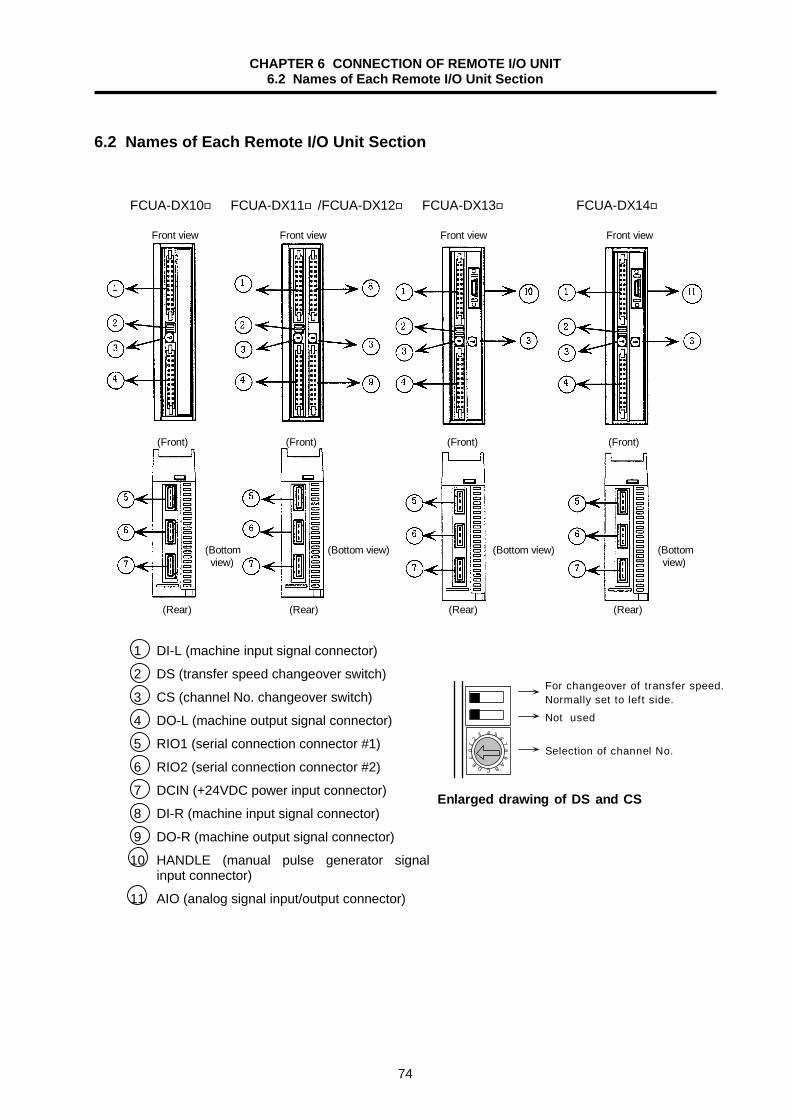
CHAPTER 6 CONNECTION OF REMOTE I/O UNIT 6.2 Names of Each Remote I/O Unit Section
74
6.2 Names of Each Remote I/O Unit Section
(Bottom (Bottom view) (Bottom view) (Bottom view) view)
(Rear) (Rear) (Rear) (Rear)
(Front) (Front) (Front) (Front)
FCUA-DX10 FCUA-DX11/FCUA-DX12 FCUA-DX13 FCUA-DX14
Front view Front view Front view Front view
1
42
5 67
A
D
9
B
F
E
0
C
8
3
Enlarged drawing of DS and CS
Not used
Selection of channel No.
For changeover of transfer speed.Normally set to lef t side.
1 DI-L (machine input signal connector)
2 DS (transfer speed changeover switch)
3 CS (channel No. changeover switch)
4 DO-L (machine output signal connector)
5 RIO1 (serial connection connector #1)
6 RIO2 (serial connection connector #2)
7 DCIN (+24VDC power input connector)
8 DI-R (machine input signal connector)
9 DO-R (machine output signal connector)
10 HANDLE (manual pulse generator signal input connector)
11 AIO (analog signal input/output connector)
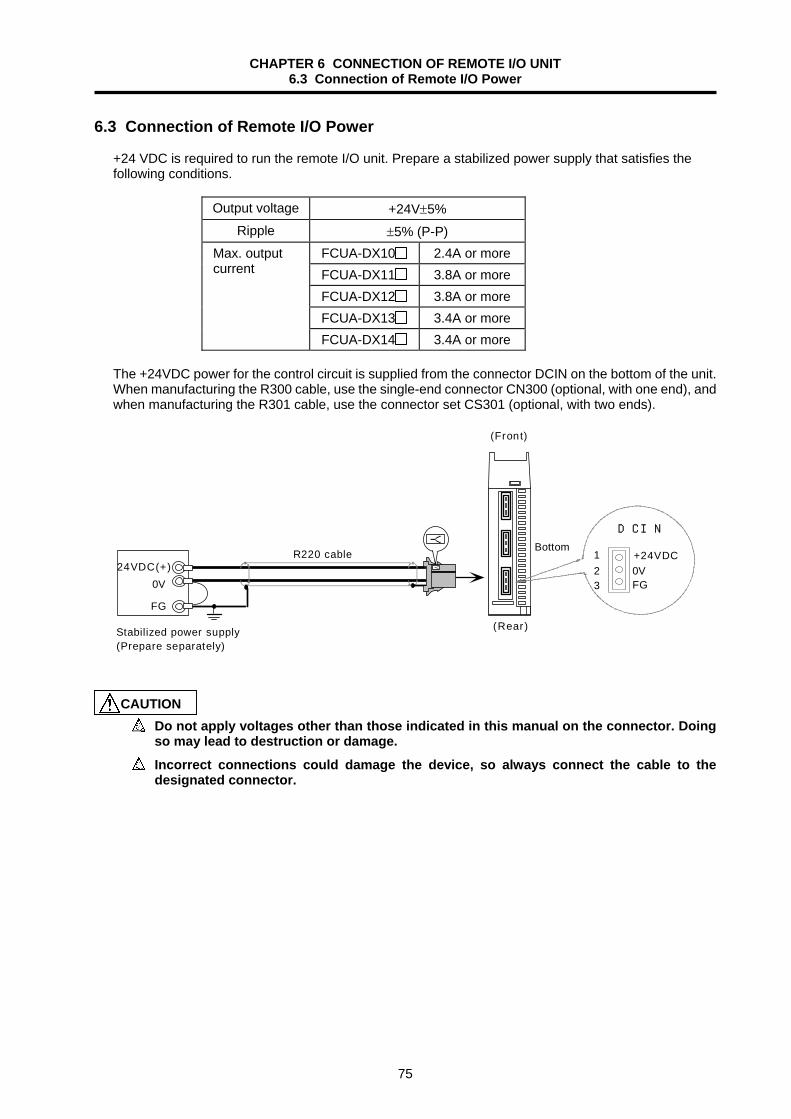
CHAPTER 6 CONNECTION OF REMOTE I/O UNIT 6.3 Connection of Remote I/O Power
75
6.3 Connection of Remote I/O Power
+24 VDC is required to run the remote I/O unit. Prepare a stabilized power supply that satisfies the following conditions.
Output voltage +24V±5%
Ripple ±5% (P-P) FCUA-DX10 2.4A or more FCUA-DX11 3.8A or more FCUA-DX12 3.8A or more FCUA-DX13 3.4A or more
Max. output current
FCUA-DX14 3.4A or more
The +24VDC power for the control circuit is supplied from the connector DCIN on the bottom of the unit. When manufacturing the R300 cable, use the single-end connector CN300 (optional, with one end), and when manufacturing the R301 cable, use the connector set CS301 (optional, with two ends).
Bottom
(Front)
(Rear)
DCIN
+24VDC
FG0V
123
R220 cable24VDC(+)
FG
0V
Stabilized power supply(Prepare separately)
YY
Do not apply voltages other than those indicated in this manual on the connector. Doing so may lead to destruction or damage.
Incorrect connections could damage the device, so always connect the cable to the designated connector.
CAUTION

CHAPTER 6 CONNECTION OF REMOTE I/O UNIT 6.4 Outline of Digital Signal Input Circuit
76
6.4 Outline of Digital Signal Input Circuit
The input circuit can be selected from sink type or source type in card units.
Input circuit
COMA3, B3
0V
0V
0V
0V
0V
2.2k
2.2k
2.2k
2.2k
2.2k
DI-L/DI-R
Sink type
Controlcircuit
(Machine side)
+24VDC
Source type
Controlcircuit
(Machine side)
+24VDC
+24VDC
+24VDC
+24VDC
+24VDC
COMA3, B3
0V
2.2k
2.2k
2.2k
2.2k
2.2k
DI-L/DI-R
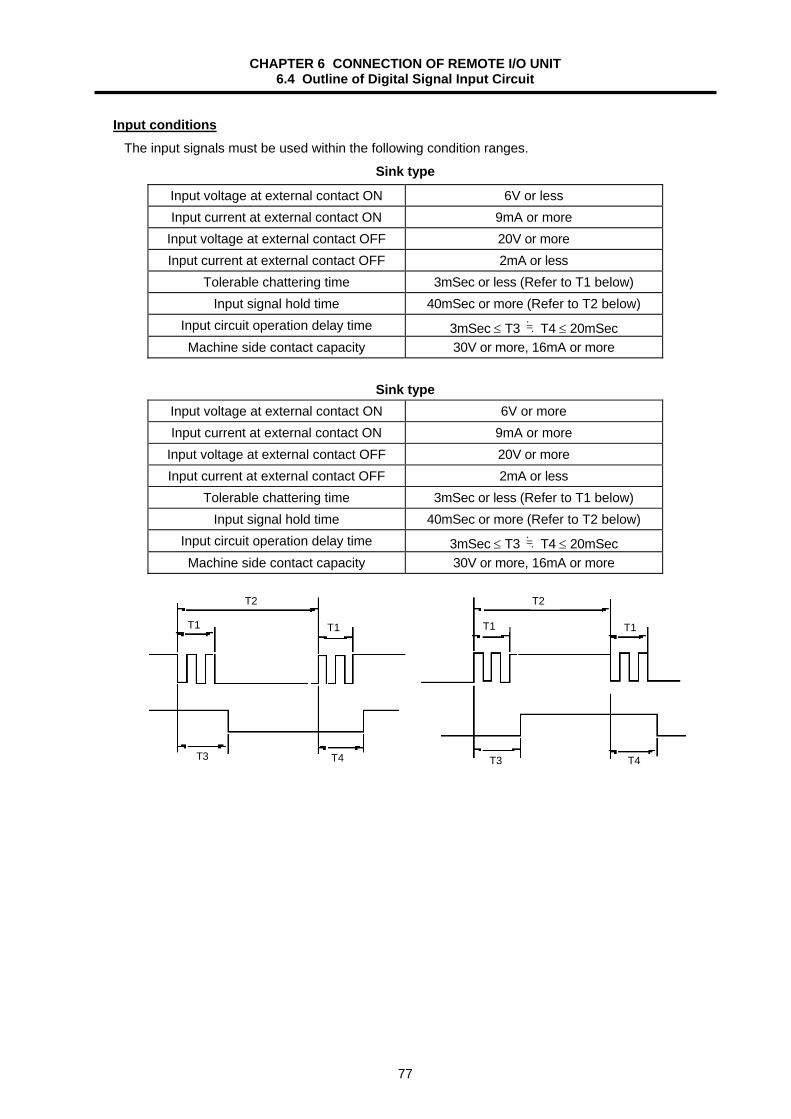
CHAPTER 6 CONNECTION OF REMOTE I/O UNIT 6.4 Outline of Digital Signal Input Circuit
77
Input conditions The input signals must be used within the following condition ranges.
Sink type
Input voltage at external contact ON 6V or less Input current at external contact ON 9mA or more
Input voltage at external contact OFF 20V or more Input current at external contact OFF 2mA or less
Tolerable chattering time 3mSec or less (Refer to T1 below) Input signal hold time 40mSec or more (Refer to T2 below)
Input circuit operation delay time 3mSec ≤ T3 =. . T4 ≤ 20mSec Machine side contact capacity 30V or more, 16mA or more
Sink type
Input voltage at external contact ON 6V or more Input current at external contact ON 9mA or more
Input voltage at external contact OFF 20V or more Input current at external contact OFF 2mA or less
Tolerable chattering time 3mSec or less (Refer to T1 below) Input signal hold time 40mSec or more (Refer to T2 below)
Input circuit operation delay time 3mSec ≤ T3 =. . T4 ≤ 20mSec Machine side contact capacity 30V or more, 16mA or more
T2
T1 T1 T1 T1
T2
T4 T3 T4 T3
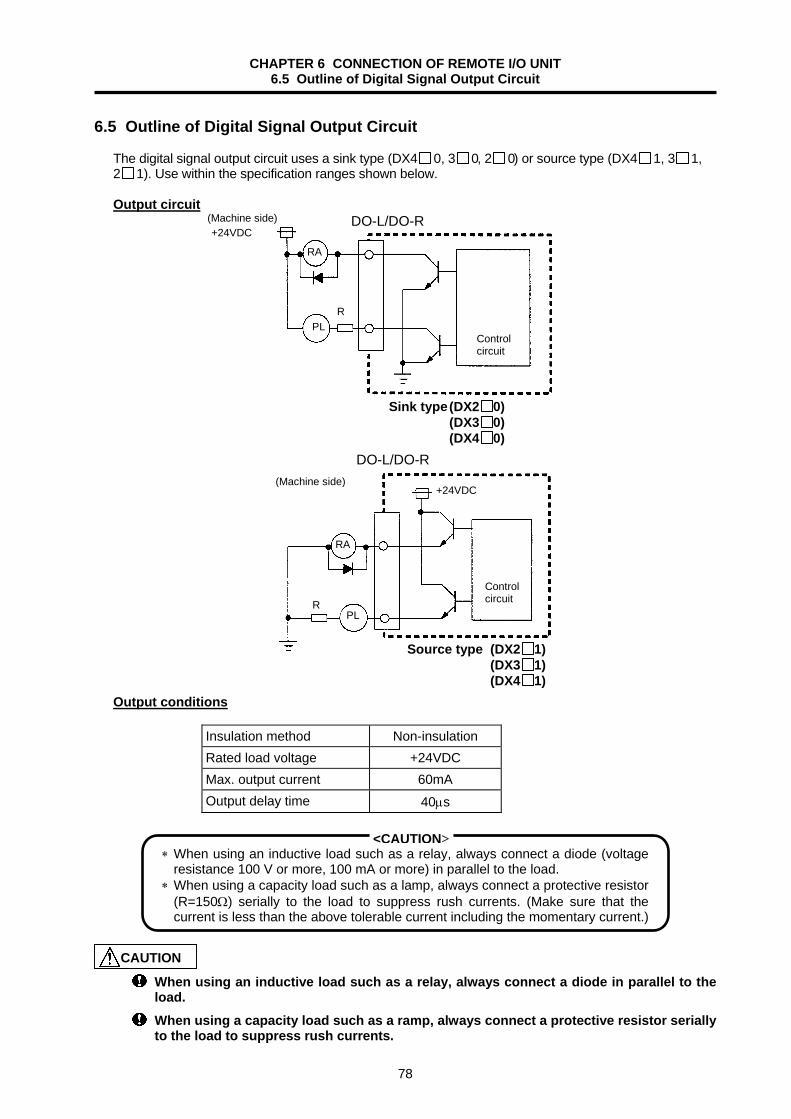
CHAPTER 6 CONNECTION OF REMOTE I/O UNIT 6.5 Outline of Digital Signal Output Circuit
78
6.5 Outline of Digital Signal Output Circuit
The digital signal output circuit uses a sink type (DX4 0, 3 0, 2 0) or source type (DX4 1, 3 1, 2 1). Use within the specification ranges shown below. Output circuit
Controlcircuit
Sink type(DX2 0)(DX3 0)(DX4 0)
(Machine side)
R
+24VDCDO-L/DO-R
PL
RA
Controlcircuit
(Machine side)+24VDC
Source type (DX2 1)(DX3 1)(DX4 1)
R
DO-L/DO-R
PL
RA
Output conditions
Insulation method Non-insulation Rated load voltage +24VDC Max. output current 60mA Output delay time 40µs
When using an inductive load such as a relay, always connect a diode in parallel to the load.
When using a capacity load such as a ramp, always connect a protective resistor serially to the load to suppress rush currents.
∗ When using an inductive load such as a relay, always connect a diode (voltage resistance 100 V or more, 100 mA or more) in parallel to the load.
∗ When using a capacity load such as a lamp, always connect a protective resistor (R=150Ω) serially to the load to suppress rush currents. (Make sure that the current is less than the above tolerable current including the momentary current.)
<CAUTION>
CAUTION

CHAPTER 6 CONNECTION OF REMOTE I/O UNIT 6.6 Outline of Analog Signal Output Circuit
79
6.6 Outline of Analog Signal Output Circuit
The analog signal output circuit can be used only for the FCUA-DX120/DX121/DX140/DX141. Output circuit
A0∗
A0220Ω DAC
R
R
Output conditions
(Note) n = (20 to 211)
Output voltage 0V~±10V (±5%) Resolution 12 bit (±10V × n/4096) (Note) Load conditions 10kΩ load resistance Output impedance 220Ω
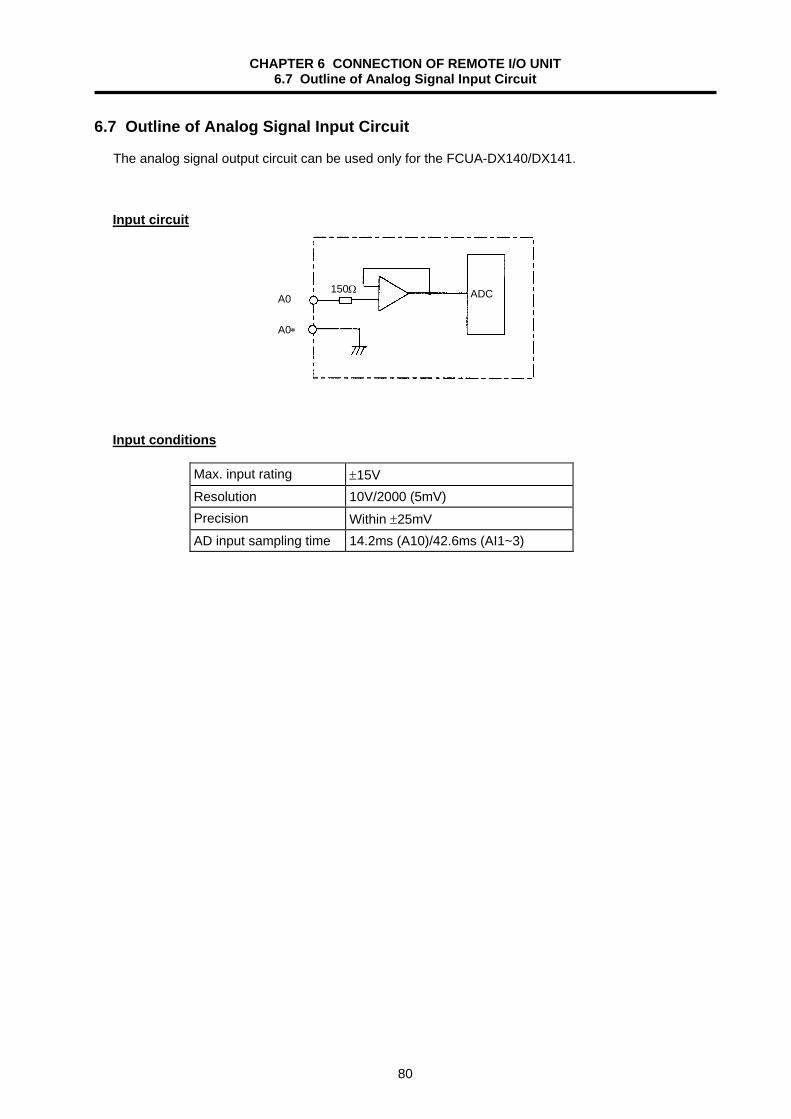
CHAPTER 6 CONNECTION OF REMOTE I/O UNIT 6.7 Outline of Analog Signal Input Circuit
80
6.7 Outline of Analog Signal Input Circuit
The analog signal output circuit can be used only for the FCUA-DX140/DX141.
Input circuit
A0∗
A0150Ω ADC
Input conditions
Max. input rating ±15V Resolution 10V/2000 (5mV) Precision Within ±25mV AD input sampling time 14.2ms (A10)/42.6ms (AI1~3)

CHAPTER 6 CONNECTION OF REMOTE I/O UNIT 6.8 Connection of FCUA-DX10 /13 /14 Unit and Machine Control Signal
81
6.8 Connection of FCUA-DX10 /13 /14 Unit and Machine Control Signal
Input Output Type of machine input/output signal and No. of points 32 points 32 points
R300 cable/R301 cable
Machine signalDI-L
DO-L
FCUA-DX10orFCUA-DX13orFCUA-DX14
R300 cable/R301 cable
Machine signal
The single-end connector CN300 (optional, with one end) includes the DI-L and DO-L connectors. The connector set CS301 (optional) includes the DI-L and DO-L connectors, and two connectors for connection with the terminal block ∗). ∗ ) Izumi Denki I/O terminal BX1F-T40 Tel.: 052-262-6946
<Outline of connection>
RIO1 RIO2
B3
A1
1 2
Input circuitsink type
Input circuitsource type
Stabilized power
A3
Output circuitsource type
Stabilized power
Machinecontrol panel
COMDI-L
DO-L
2.2k
DCIN
Controlcircuit
A2
B1B2A1A2
0V
24VDC(+)
3
B1B2
Output circuitsink type
RA
PL
24VDC(+)
0V24VDC(+) FG
Machinecontrol panel
RIO1 RIO2
B3
A1
1 2
A3 COMDI-L
DO-L
2.2k
DCIN
A2
B1B2A1A2
0V
24VDC(+)
3
B1B2
0V24VDC(+) FG
0V
RA
PL
Controlcircuit
FCUA-DX101/131/141FCUA-DX100/130/140
Incorrect connections could damage the device, so always connect the cable to the designated connector.
Do not connect or disconnect the connection cables between each unit while the power is ON.
CAUTION

CHAPTER 6 CONNECTION OF REMOTE I/O UNIT 6.8 Connection of FCUA-DX10 /13 /14 Unit and Machine Control Signal
82
<Signal assignment table>
Remote I/O unit
Control unit
Communica-tion terminal
R-TM
FCUA-DX10/13/14
RI0221 3
LG
DCIN
+24V1 2 3
FG0V
RI01
1 2 3LG
AMPD-3
XAMP
D-3
YAMP
D-3
DI-L
DI-L
DO-L
Machine sidecontrol panel, etc.
0V
PL
RA
0V
24VDC(+)
0V
<CAUTION>
T X R X T X R X * T X R X T X R X *
B
B
X00
X01
X02
X03
X04
X05
X06
X07
X08
X09
X0A
X0B
X0C
X0D
X0E
X0F
COM
+24V
+24V
A
A
X10
X11
X12
X13
X14
X15
X16
X17
X18
X19
X1A
X1B
X1C
X1D
X1E
X1F
COM
0V
0V
2 0
1 9
1 8
1 7
1 6
1 5
1 4
1 3
1 2
1 1
1 0
9
8
7
6
5
4
3
2
1
B
B
Y00
Y01
Y02
Y03
Y04
Y05
Y06
Y07
Y08
Y09
Y0A
Y0B
Y0C
Y0D
Y0E
Y0F
+24V
+24V
A
A
Y10
Y11
Y12
Y13
Y14
Y15
Y16
Y17
Y18
Y19
Y1A
Y1B
Y1C
Y1D
Y1E
Y1F
0V
0V
2 0
1 9
1 8
1 7
1 6
1 5
1 4
1 3
1 2
1 1
1 0
9
8
7
6
5
4
3
2
1
DO-L
DO-L
X
When using two or more remote I/Ounits or when connecting to thecommunication terminal, the signalallocat ion wi ll dif fer.Refer to the "PLC interface manual"for detai ls.
24VDC(+)
24VDC(+)
<Adaptive connector>
AMPD-3
X
Crimp type connector: 7940-6500SC Maker: Sumitomo 3M Maker: Japan AMP
Connector : 1-178288-3Contact : 1-175218-2Maker : Japan AMP
Connector : 2-178288-3 Contact : 1-175218-5 Maker : Japan AMP
Terminator (R-TM) RIO1/RIO2 (CN211)
DI-L/DO-L (CN300) DCIN (CN220)

CHAPTER 6 CONNECTION OF REMOTE I/O UNIT 6.9 Connection of FCUA-DX11 Unit and Machine Control Signal
83
6.9 Connection of FCUA-DX11 Unit and Machine Control Signal
Input Output Type of machine input/output signal and No. of points 64 points 48 points
FCUA-DX11
DCIN
RIO2
Machine signal
RIO1
DI-L
DO-L
R300 cable/R301 cable
R300 cable/R301 cable
Machine signal
DI-R
DO-R
The single-end connector CN300 (optional, with one end) includes the DI-L (DI-R) and DO-L (DO-R) connectors. The connector set CS301 (optional) includes the DI-L and DO-L connectors, and two connectors for connection with the terminal block ∗). ∗ ) Izumi Denki I/O terminal BX1F-T40 Tel.: 052-262-6946
<Outline of connection>
RIO1 RIO2
B3
A1
1 2
A3 COMDI-L/R
DO-L/R
2.2k
DCIN
A2
B1B2A1A2
0V
24VDC(+)
3
B1B2
RA
PL
24VDC(+)
0V24VDC(+) FG
RIO1 RIO2
B3
A1
1 2
A3 COMDI-L/R
DO-L/R
2.2k
DCIN
A2
B1B2A1A2
0V
24VDC(+)
3
B1B2
0V24VDC(+) FG
0V
RA
PL
Input circuitsink type
Stabilized power
Controlcircuit
Output circuitsink type
Machinecontrol panel
Input circuitsource type
Stabilized power
Controlcircuit
Output circuitsource type
Machinecontrol panel
FCUA-DX110 FCUA-DX111
Incorrect connections could damage the device, so always connect the cable to the designated connector.
Do not connect or disconnect the connection cables between each unit while the power is ON.
CAUTION

CHAPTER 6 CONNECTION OF REMOTE I/O UNIT 6.9 Connection of FCUA-DX11 Unit and Machine Control Signal
84
<Signal assignment table>
FCUA-DX11<CAUTION>
DO-L
DO-R
D I - L
D I - R
DO-R
D I - L D I - R
R-T M
RI02
21 3
LG
DCIN
+24V1 2 3
FG0V
RI01
1 2 3LG
AMP
D-3
X
AMPD-3
Y
AMPD-3
T X R X T X R X * T X R X T X R X *
2 0
1 9
1 8
1 7
1 6
1 5
1 4
1 3
1 2
1 1
1 0
9
8
7
6
5
4
3
2
1
B
B
X00
X01
X02
X03
X04
X05
X06
X07
X08
X09
X0A
X0B
X0C
X0D
X0E
X0F
COM
+24V
+24V
AX10
X11
X12
X13
X14
X15
X16
X17
X18
X19
X1A
X1B
X1C
X1D
X1E
X1F
COM
0V
0V
X20
X21
X22
X23
X24
X25
X26
X27
X28
X29
X2A
X2B
X2C
X2D
X2E
X2F
COM
+24V
+24V
B
B
X30
X31
X32
X33
X34
X35
X36
X37
X38
X39
X3A
X3B
X3C
X3D
X3E
X3F
COM
0V
0V
A
A
2 0
1 9
1 8
1 7
1 6
1 5
1 4
1 3
1 2
1 1
1 0
9
8
7
6
5
4
3
2
1
2 0
1 9
1 8
1 7
1 6
1 5
1 4
1 3
1 2
1 1
1 0
9
8
7
6
5
4
3
2
1
Y20
Y21
Y22
Y23
Y24
Y25
Y26
Y27
Y28
Y29
Y2A
Y2B
Y2C
Y2D
Y2E
Y2F
+24V
+24V
B
B
0V
0V
A
A
A
Y00
Y01
Y02
Y03
Y04
Y05
Y06
Y07
Y08
Y09
Y0A
Y0B
Y0C
Y0D
Y0E
Y0F
+24V
+24V
AB
B
Y10
Y11
Y12
Y13
Y14
Y15
Y16
Y17
Y18
Y19
Y1A
Y1B
Y1C
Y1D
Y1E
Y1F
0V
0V
2 0
1 9
1 8
1 7
1 6
1 5
1 4
1 3
1 2
1 1
1 0
9
8
7
6
5
4
3
2
1
DO- L
0V
PL
RA
0V
0V
PL
RA
0V
0V
X
Remote I/O unit
Control unit
Communica-tion terminal
Machine sidecontrol panel, etc.
24VDC(+)
When using two or more remote I/O unitsor when connecting to the communicationterminal, the signal allocation will dif f er.Refer to the "PLC interface manual"for detai ls.
24VDC(+)
24VDC(+)
24VDC(+)
24VDC(+)
A
<Adaptive connector>
DCIN (CN220) RIO1/RIO2 (CN211) DI-L/DO-L (CN300) Terminator (R-TM)
YAMP
D-3
XAMP
D-3
AMPD-3
X
Crimp type connector: 7940-6500SC Maker: Sumitomo 3M Maker: Japan AMP
Connector : 1-178288-3Contact : 1-175218-2Maker : Japan AMP
Connector : 2-178288-3 Contact : 1-175218-5 Maker : Japan AMP
DI-R/DO-R
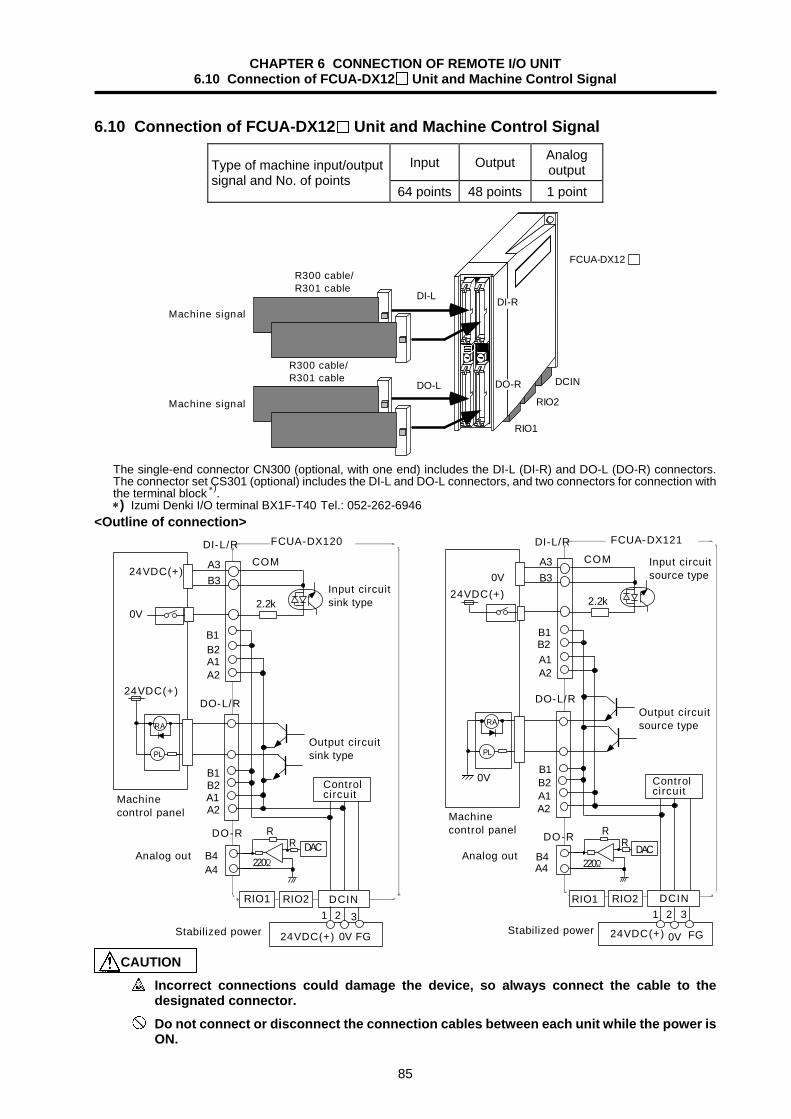
CHAPTER 6 CONNECTION OF REMOTE I/O UNIT 6.10 Connection of FCUA-DX12 Unit and Machine Control Signal
85
6.10 Connection of FCUA-DX12 Unit and Machine Control Signal
Input Output Analog output Type of machine input/output
signal and No. of points 64 points 48 points 1 point
FCUA-DX12
DCIN
RIO2
Machine signal
Machine signal
RIO1
DI-L
DO-L
R300 cable/R301 cable
R300 cable/R301 cable DO-R
DI-R
The single-end connector CN300 (optional, with one end) includes the DI-L (DI-R) and DO-L (DO-R) connectors. The connector set CS301 (optional) includes the DI-L and DO-L connectors, and two connectors for connection with the terminal block ∗). ∗) Izumi Denki I/O terminal BX1F-T40 Tel.: 052-262-6946
<Outline of connection>
B3
A1
A3 COMDI-L/R
DO-L/R
2.2k
A2
B1B2A1A2
0V
24VDC(+)
B1B2
RA
PL
24VDC(+)
B3
A1
A3 COMDI-L/R
DO-L/R
2.2k
A2
B1B2A1A2
0V
24VDC(+)
B1B2
0V
RA
PL
DO-R
A4B4Analog out
DACR
220Ω
R
RIO1 RIO21 2
DCIN3
0V24VDC(+) FG
DO-R
A4B4
DAC
R
220Ω
R
RIO1 RIO21 2
DCIN3
0V24VDC(+) FG
Input circuitsink type
Stabilized power
Controlcircuit
Output circuitsink type
Machinecontrol panel
Analog out
Input circuitsource type
Stabilized power
Controlcircuit
Output circuitsource type
Machinecontrol panel
FCUA-DX120 FCUA-DX121
Incorrect connections could damage the device, so always connect the cable to the designated connector.
Do not connect or disconnect the connection cables between each unit while the power is ON.
CAUTION
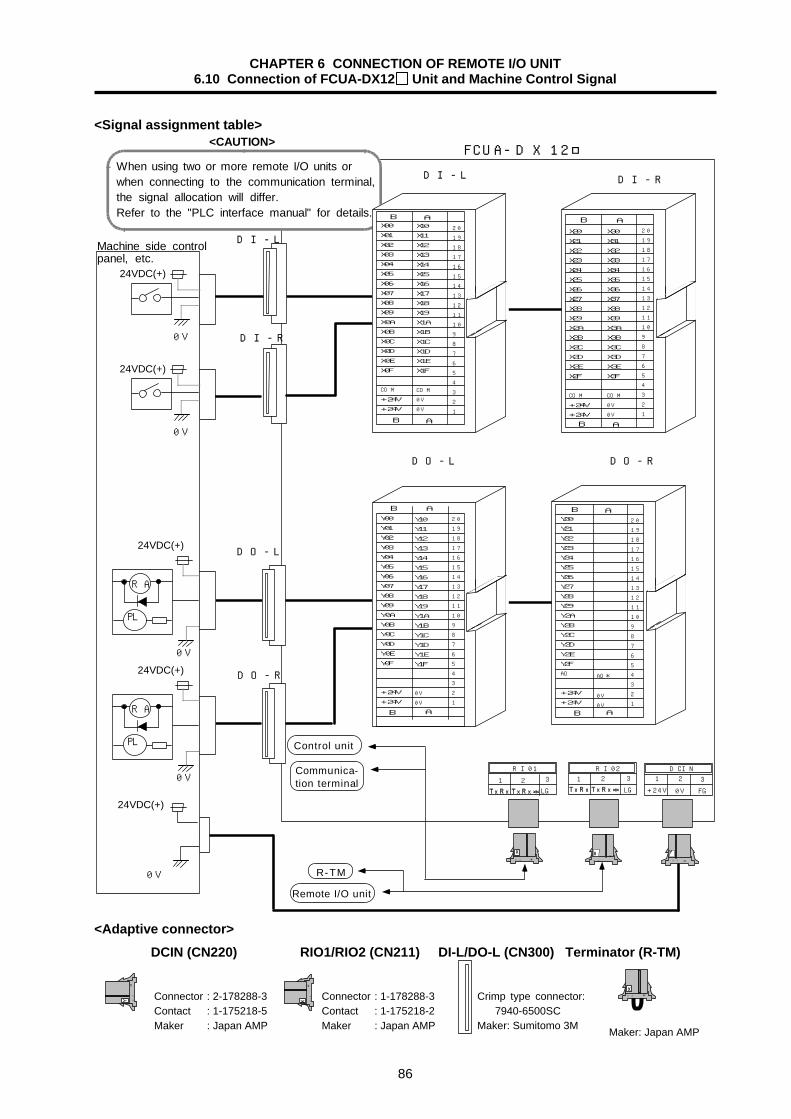
CHAPTER 6 CONNECTION OF REMOTE I/O UNIT 6.10 Connection of FCUA-DX12 Unit and Machine Control Signal
86
<Signal assignment table>
FCUA-DX12
D O - L
D O - R
D I - L
D I - R
D O - L D O - R
D I - L
RI02
21 3
LG
DCIN
+24V
1 2 3
FG0V
RI01
1 2 3
LG
AMP
D-3
X
AMPD-3
Y
AMPD-3
T X R X T X R X * T X R X T X R X *
D I - R
2 0
1 9
1 8
1 7
1 6
1 5
1 4
1 3
1 2
1 1
1 0
9
8
7
6
5
4
3
2
1
B
B
X00
X01
X02
X03
X04
X05
X06
X07
X08
X09
X0A
X0B
X0C
X0D
X0E
X0F
COM
+24V
+24V
A
A
X10
X11
X12
X13
X14
X15
X16
X17
X18
X19
X1A
X1B
X1C
X1D
X1E
X1F
COM
0V
0V
X20
X21
X22
X23
X24
X25
X26
X27
X28
X29
X2A
X2B
X2C
X2D
X2E
X2F
COM
+24V
+24V
B
B
X30
X31
X32
X33
X34
X35
X36
X37
X38
X39
X3A
X3B
X3C
X3D
X3E
X3F
COM
0V
0V
A
A
2 0
1 9
1 8
1 7
1 6
1 5
1 4
1 3
1 2
1 1
1 0
9
8
7
6
5
4
3
2
1
A
Y00
Y01
Y02
Y03
Y04
Y05
Y06
Y07
Y08
Y09
Y0A
Y0B
Y0C
Y0D
Y0E
Y0F
+24V
+24V
AB
B
Y10
Y11
Y12
Y13
Y14
Y15
Y16
Y17
Y18
Y19
Y1A
Y1B
Y1C
Y1D
Y1E
Y1F
0V
0V
2 0
1 9
1 8
1 7
1 6
1 5
1 4
1 3
1 2
1 1
1 0
9
8
7
6
5
4
3
2
1
2 0
1 9
1 8
1 7
1 6
1 5
1 4
1 3
1 2
1 1
1 0
9
8
7
6
5
4
3
2
1
Y20
Y21
Y22
Y23
Y24
Y25
Y26
Y27
Y28
Y29
Y2A
Y2B
Y2C
Y2D
Y2E
Y2F
AO
+24V
+24V
B
B
AO*
0V
0VA
A
0V
PL
RA
0V
0V
PL
RA
0V
0V
X
When using two or more remote I/O units orwhen connecting to the communication terminal,the signal allocation will differ.Refer to the "PLC interface manual" for details.
Remote I/O unit
Control unit
Communica-tion terminal
R-TM
24VDC(+)
24VDC(+)
24VDC(+)
24VDC(+)
24VDC(+)
<CAUTION>
Machine side controlpanel, etc.
<Adaptive connector> DCIN (CN220) RIO1/RIO2 (CN211) DI-L/DO-L (CN300) Terminator (R-TM)
AMP
D-3
Y XAM
PD
-3
AMPD-3
X
Crimp type connector: 7940-6500SC Maker: Sumitomo 3M Maker: Japan AMP
Connector : 1-178288-3Contact : 1-175218-2Maker : Japan AMP
Connector : 2-178288-3 Contact : 1-175218-5 Maker : Japan AMP
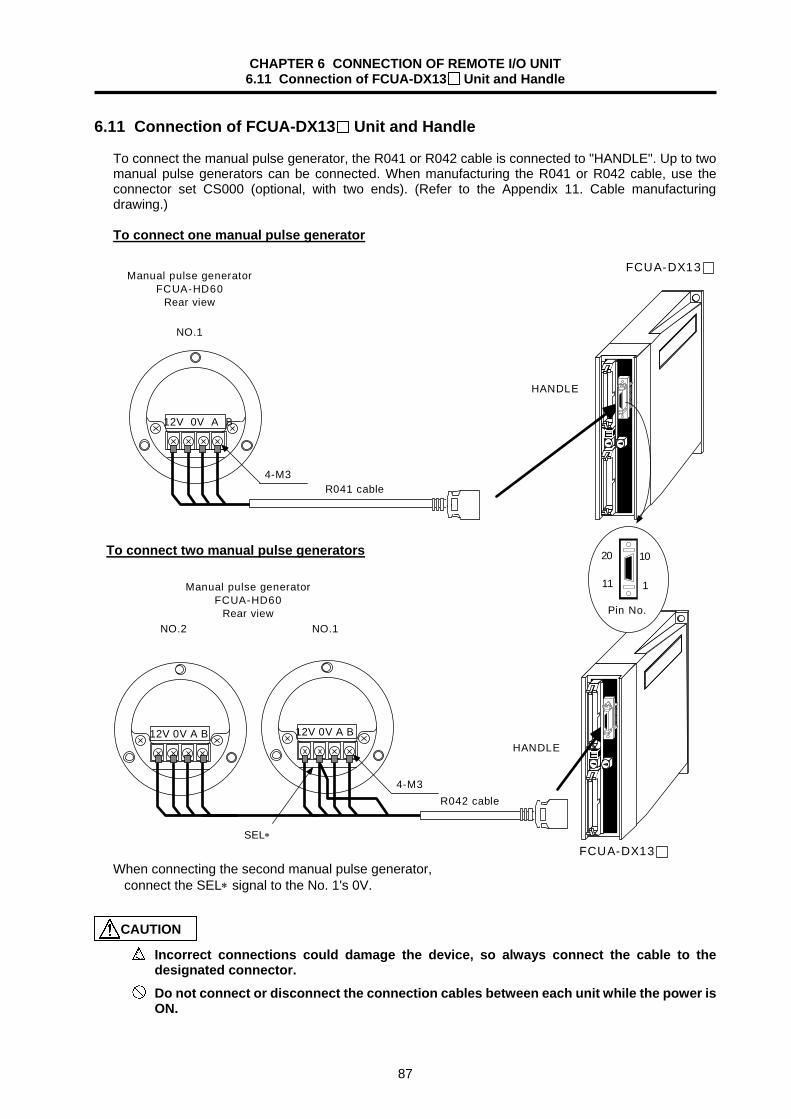
CHAPTER 6 CONNECTION OF REMOTE I/O UNIT 6.11 Connection of FCUA-DX13 Unit and Handle
87
6.11 Connection of FCUA-DX13 Unit and Handle
To connect the manual pulse generator, the R041 or R042 cable is connected to "HANDLE". Up to two manual pulse generators can be connected. When manufacturing the R041 or R042 cable, use the connector set CS000 (optional, with two ends). (Refer to the Appendix 11. Cable manufacturing drawing.)
To connect one manual pulse generator
HANDLE
FCUA-DX13
12V 0V A B
Manual pulse generatorFCUA-HD60
Rear view
4-M3
NO.1
R041 cable
12V 0V A B 12V 0V A B
4-M3
SEL∗
NO.1NO.2
R042 cable
HANDLE
FCUA-DX13
1
10
11
20
Pin No.
Manual pulse generatorFCUA-HD60
Rear view
When connecting the second manual pulse generator, connect the SEL∗ signal to the No. 1's 0V.
Incorrect connections could damage the device, so always connect the cable to the designated connector.
Do not connect or disconnect the connection cables between each unit while the power is ON.
CAUTION
To connect two manual pulse generators

CHAPTER 6 CONNECTION OF REMOTE I/O UNIT 6.12 Outline of FCUA-DX13 Unit Pulse Input Circuit
88
6.12 Outline of FCUA-DX13 Unit Pulse Input Circuit
When connecting a device (pulse generator) other than the manual pulse generator to the FCUA-DX13 unit, use within the following specifications.
Input/output conditions
Input pulse signal format 2 signals of A-phase and B-phase potential
difference 90 deg. (Refer to waveform below)
Input voltage H level 3.5 V or more, L level 1.0 V or less Max. frequency of input pulse 100kHz Output voltage 12V ± 10% Max. output current 300mA
Input waveform
The difference of the input waveform potential must be ±45 deg. or less.
A(B) phase
B(A) phase
e
T Input/output circuit
+12V 6
10V
Output
Input
470
220 4700P3
470
220 4700P13
470
220 4700P4
470
220 4700P14
Controlcircuit
HC14-phaseor equivalent
HA2
HB2
HA1
HB1
FCUA-DX13
Connector pin No. +5V
+5V
+5V
+5V
The R041-3M (for one unit) and R042-3M (for two units) are available for the handle cables.
e: Rising edge potential difference of A-phase or B-phase
T: A or B-phase cycle (min. 10µs)

CHAPTER 6 CONNECTION OF REMOTE I/O UNIT 6.13 Connection of FCUA-DX14 Unit and Analog Input/Output Signal
89
6.13 Connection of FCUA-DX14 Unit and Analog Input/Output Signal For the analog input/output signal, the R031 cable is connected to "AI0". Up to four input points and one output point of the analog input/output signal can be connected. When manufacturing the R031, use the connector set CS000 (optional, with two ends). (Refer to the Appendix 2.11. Cable manufacturing drawing.)
AIO
FCUA-DX14
R031 cable
1
10
11
20
Pin No.
DAC220ΩR
R
150Ω
ADC
A10
A11
A12
A13
A0
150Ω
150Ω
150Ω
2
12
3
13
1
11
5
15
7
GND
GND
GND
GND
Connector pin No.
Input
Output
FCUA-DX14
Incorrect connections could damage the device, so always connect the cable to the designated connector.
Do not connect or disconnect the connection cables between each unit while the power is ON.
CAUTION
Input/output circuit
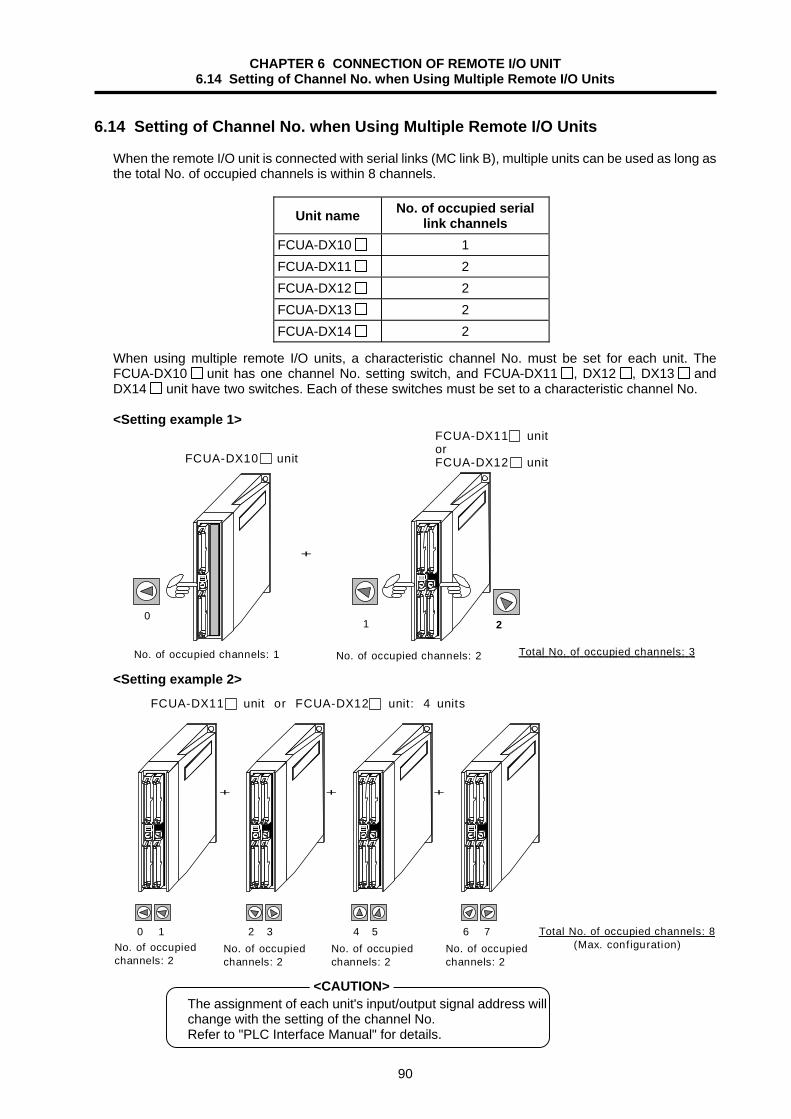
CHAPTER 6 CONNECTION OF REMOTE I/O UNIT 6.14 Setting of Channel No. when Using Multiple Remote I/O Units
90
6.14 Setting of Channel No. when Using Multiple Remote I/O Units
When the remote I/O unit is connected with serial links (MC link B), multiple units can be used as long as the total No. of occupied channels is within 8 channels.
Unit name No. of occupied serial link channels
FCUA-DX10 1 FCUA-DX11 2 FCUA-DX12 2 FCUA-DX13 2 FCUA-DX14 2
When using multiple remote I/O units, a characteristic channel No. must be set for each unit. The FCUA-DX10 unit has one channel No. setting switch, and FCUA-DX11 , DX12 , DX13 and DX14 unit have two switches. Each of these switches must be set to a characteristic channel No.
<Setting example 1>
FCUA-DX10 unit
FCUA-DX11 unit orFCUA-DX12 unit
01
No. of occupied channels: 1 T o t a l N o . o f o c c u p i e d c h a n n e l s : 3
+
2
No. of occupied channels: 2 <Setting example 2>
0 1 2 3 4 5 6 7
+ + +
No. of occupiedchannels: 2
FCUA-DX11 unit or FCUA-DX12 unit: 4 units
No. of occupiedchannels: 2
No. of occupiedchannels: 2
No. of occupiedchannels: 2
T o t a l N o . o f o c c u p i e d c h a n n e l s : 8 (Max. conf iguration)
The assignment of each unit's input/output signal address will
change with the setting of the channel No. Refer to "PLC Interface Manual" for details.
<CAUTION>
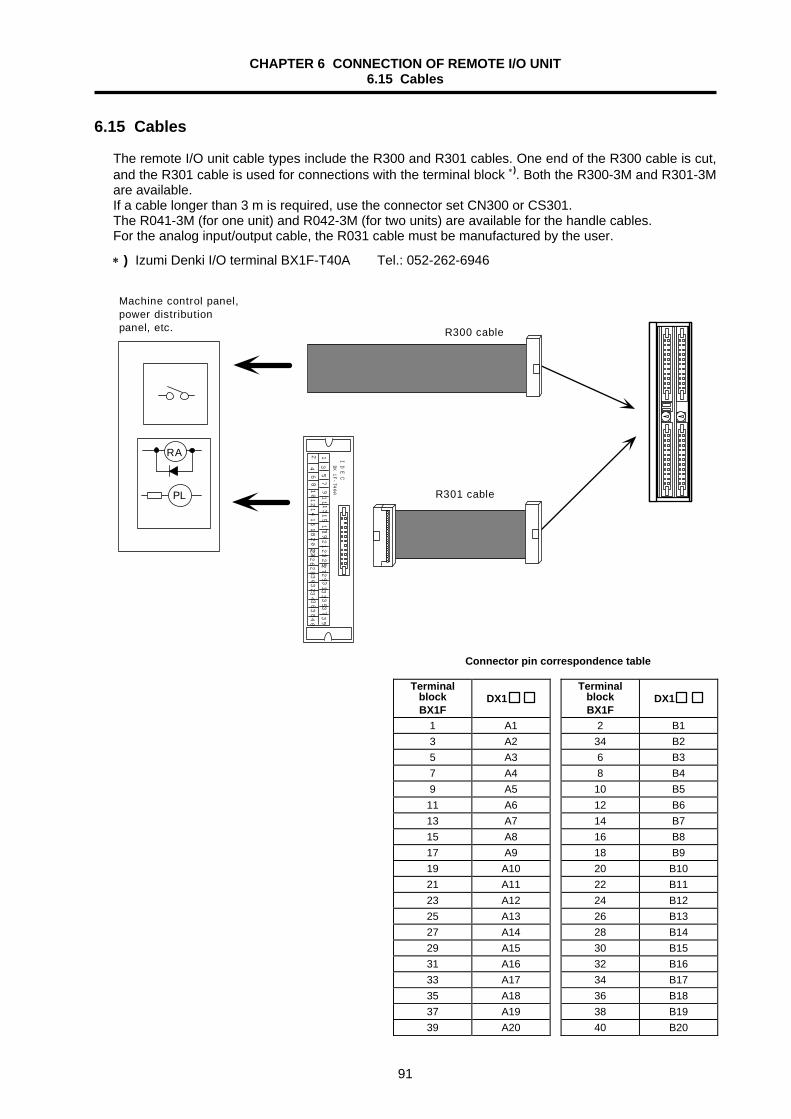
CHAPTER 6 CONNECTION OF REMOTE I/O UNIT 6.15 Cables
91
6.15 Cables
The remote I/O unit cable types include the R300 and R301 cables. One end of the R300 cable is cut, and the R301 cable is used for connections with the terminal block ∗). Both the R300-3M and R301-3M are available. If a cable longer than 3 m is required, use the connector set CN300 or CS301. The R041-3M (for one unit) and R042-3M (for two units) are available for the handle cables. For the analog input/output cable, the R031 cable must be manufactured by the user.
∗ ) Izumi Denki I/O terminal BX1F-T40A Tel.: 052-262-6946
RA
PL R301 cable
IDECBX
1F-T
40A
R300 cable
19
35
13
57
91113
15
17
212325
27
2931
33
37
39
24
68
10
1214
16
18
20
222426
28
30
34
32
36
38
40
Machine control panel,power distributionpanel, etc.
Terminal block BX1F
DX1
2 B1 34 B2 6 B3 8 B4
10 B5 12 B6 14 B7 16 B8 18 B9 20 B10 22 B11 24 B12 26 B13 28 B14 30 B15 32 B16 34 B17 36 B18 38 B19 40 B20
Terminal block BX1F
DX1
1 A1 3 A2 5 A3 7 A4 9 A5
11 A6 13 A7 15 A8 17 A9 19 A10 21 A11 23 A12 25 A13 27 A14 29 A15 31 A16 33 A17 35 A18 37 A19 39 A20
Connector pin correspondence table

APPENDIX 1 INSTALLATION DIMENSIONS Appendix 1.1 Control Unit Outline Drawing
92
APPENDIX 1 INSTALLATION DIMENSIONS Appendix 1.1 Control Unit Outline Drawing
0
OPEN
CBUS 2
DC INDC OUTPS EMGBAT ALM
PCRST
CF D
CF12 LCD
CF11NCRST
NCSYS
NCLED
WDER CF10
ENC2
HD
Hole for 4-M5 screw
6 6208
220
CBUS 1
8123579ABCDEF468
156
168
66
DC
INE
MG
CF
01C
F02
85
5
55102
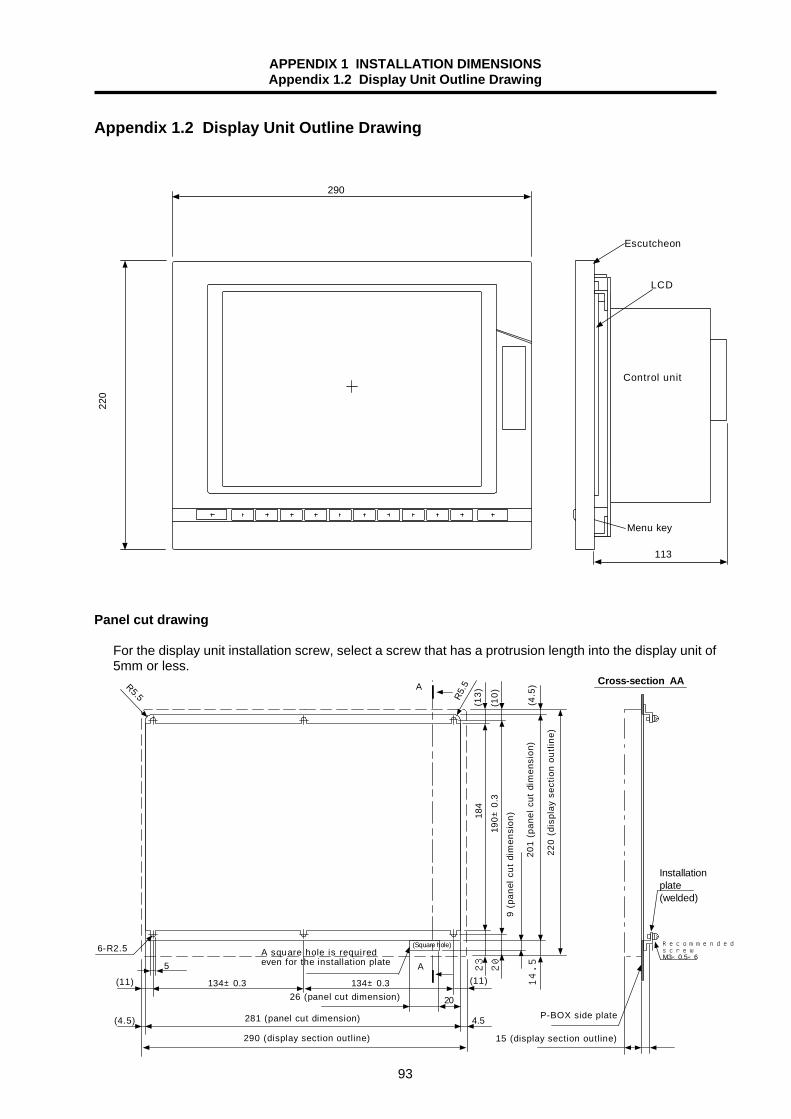
APPENDIX 1 INSTALLATION DIMENSIONS Appendix 1.2 Display Unit Outline Drawing
93
Appendix 1.2 Display Unit Outline Drawing
290
Control unit
113
220
Escutcheon
LCD
Menu key
Panel cut drawing
For the display unit installation screw, select a screw that has a protrusion length into the display unit of 5mm or less.
(10)
5(11)
(4.5)
134±0.3(11)
20
134±0.3
4.5
23
14.5
190±
0.3
(13)
(4.5
)
20
184
R5.5A
R5.5
A
6-R2.5 RecommendedscrewM3×0.5×6
290 (display section outline)
281 (panel cut dimension)
26 (panel cut dimension)
201
(pan
el c
ut d
imen
sion
)
220
(dis
play
sec
tion
outli
ne)
9 (p
anel
cut
dim
ensi
on)
A square hole is requiredeven for the installation plate
Installationplate(welded)
P-BOX side plate
15 (display section outline)
Cross-section AA
(Square hole)
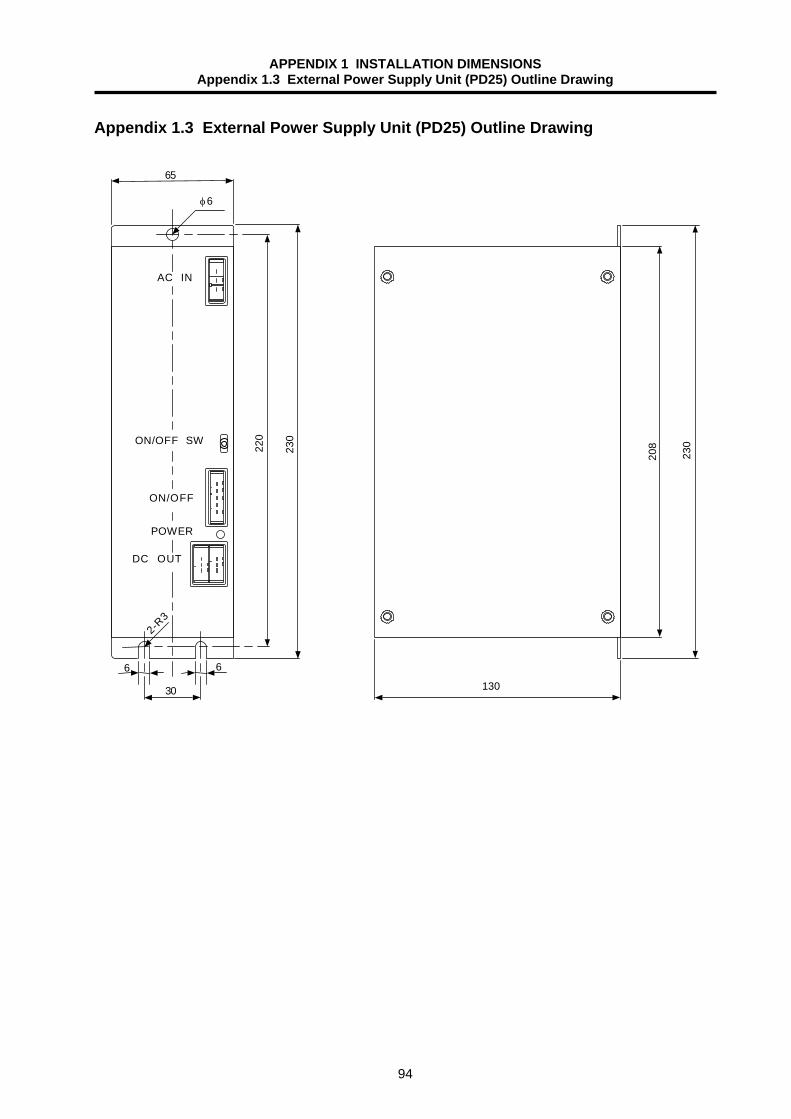
APPENDIX 1 INSTALLATION DIMENSIONS Appendix 1.3 External Power Supply Unit (PD25) Outline Drawing
94
Appendix 1.3 External Power Supply Unit (PD25) Outline Drawing
65
φ6
220
230
2-R3
30
6623
0130
208
AC IN
ON/OFF SW
ON/OFF
POWER
DC OUT
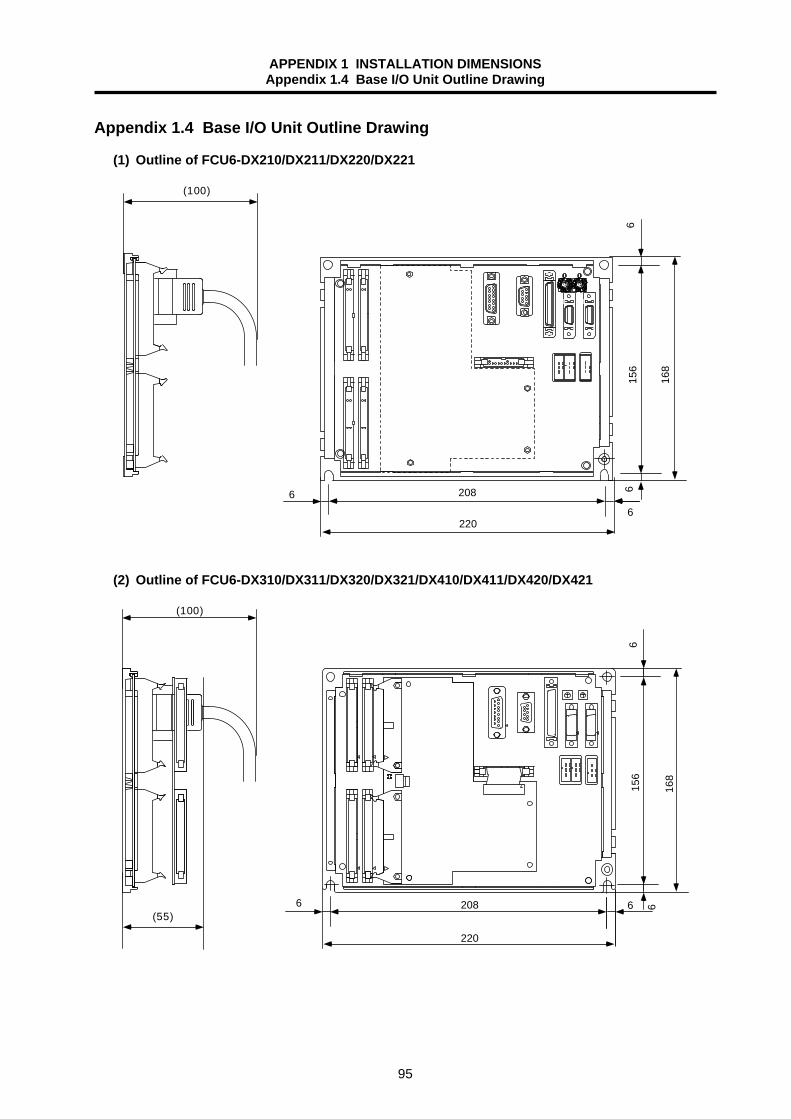
APPENDIX 1 INSTALLATION DIMENSIONS Appendix 1.4 Base I/O Unit Outline Drawing
95
Appendix 1.4 Base I/O Unit Outline Drawing
(1) Outline of FCU6-DX210/DX211/DX220/DX221
0 0
(100)
220
66
208
168
156
66
(2) Outline of FCU6-DX310/DX311/DX320/DX321/DX410/DX411/DX420/DX421
220
208
168
156
6
66
(100)
(55)6
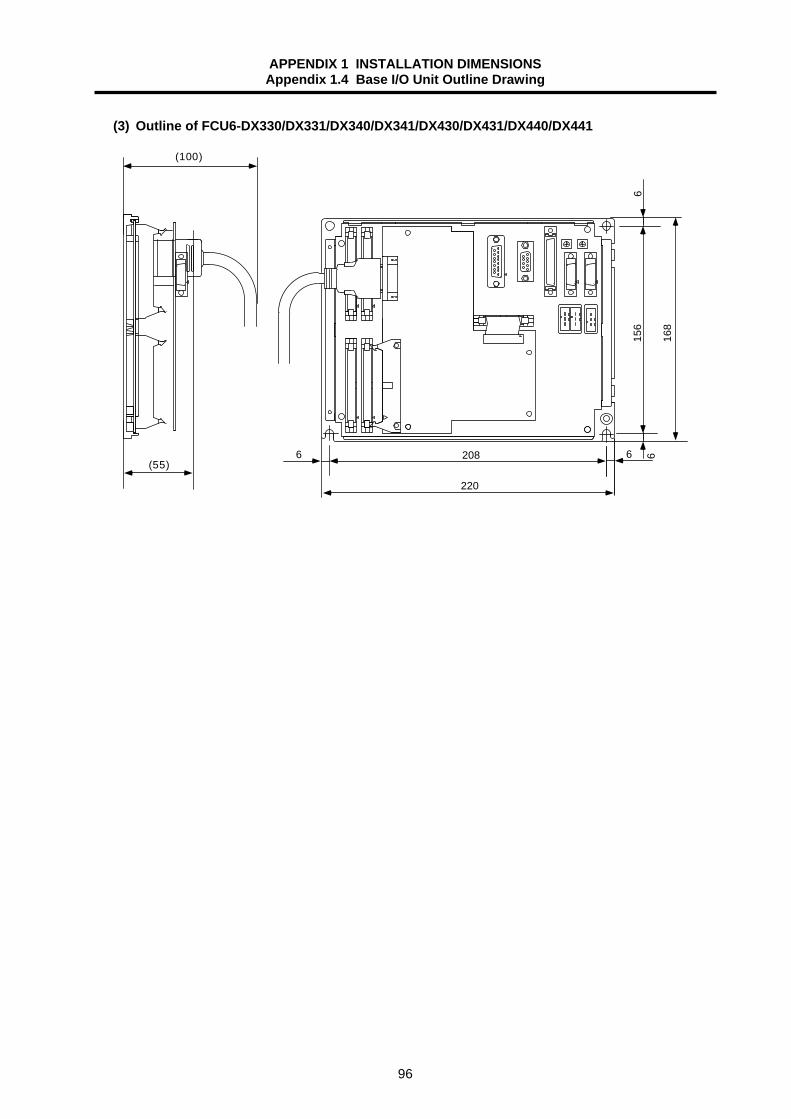
APPENDIX 1 INSTALLATION DIMENSIONS Appendix 1.4 Base I/O Unit Outline Drawing
96
(3) Outline of FCU6-DX330/DX331/DX340/DX341/DX430/DX431/DX440/DX441
(100)
(55)
220
208
168
156
666 6
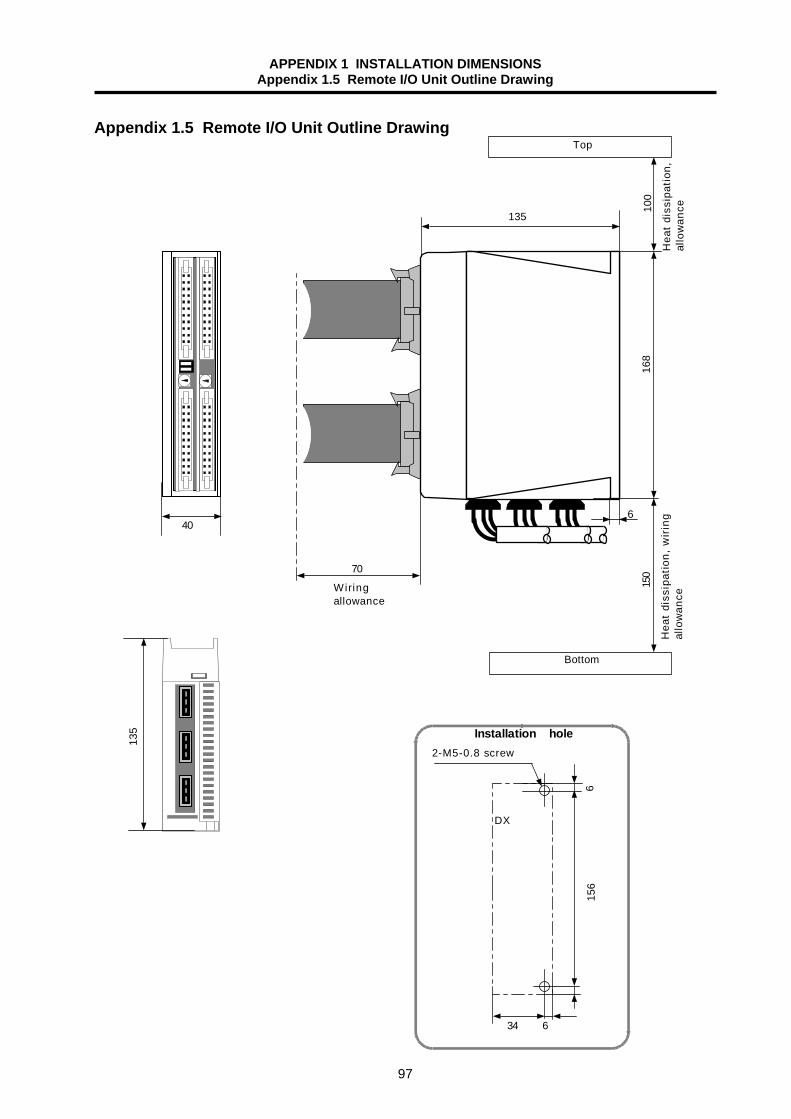
APPENDIX 1 INSTALLATION DIMENSIONS Appendix 1.5 Remote I/O Unit Outline Drawing
97
Appendix 1.5 Remote I/O Unit Outline Drawing
168
40
135
156
2-M5-0.8 screw
Installation hole
6
6
34
DX
70
6
135
Wiringallowance
Bottom
Top
Hea
t di
ssip
atio
n, w
irin
gal
low
ance
Hea
t di
ssip
atio
n,al
low
ance10
015
0

APPENDIX 1 INSTALLATION DIMENSIONS Appendix 1.6 Card-sized I/O Outline Drawing
98
Appendix 1.6 Card-sized I/O Outline Drawing
Use the card corner holder for fixing the card-sized I/O. [Card corner holder] Type: KGCH-20-0 Recommended maker: Kitakawa Kogyo
0 -0.2
93
55
7.1
5.5
5.5
+0 . 10
+0.10
+0.1
0
R0.8
86
5.25
15
3x15=45
8
10
156.2
1.8
5.47
6.5 5
201.
56.
53.
5
7.7
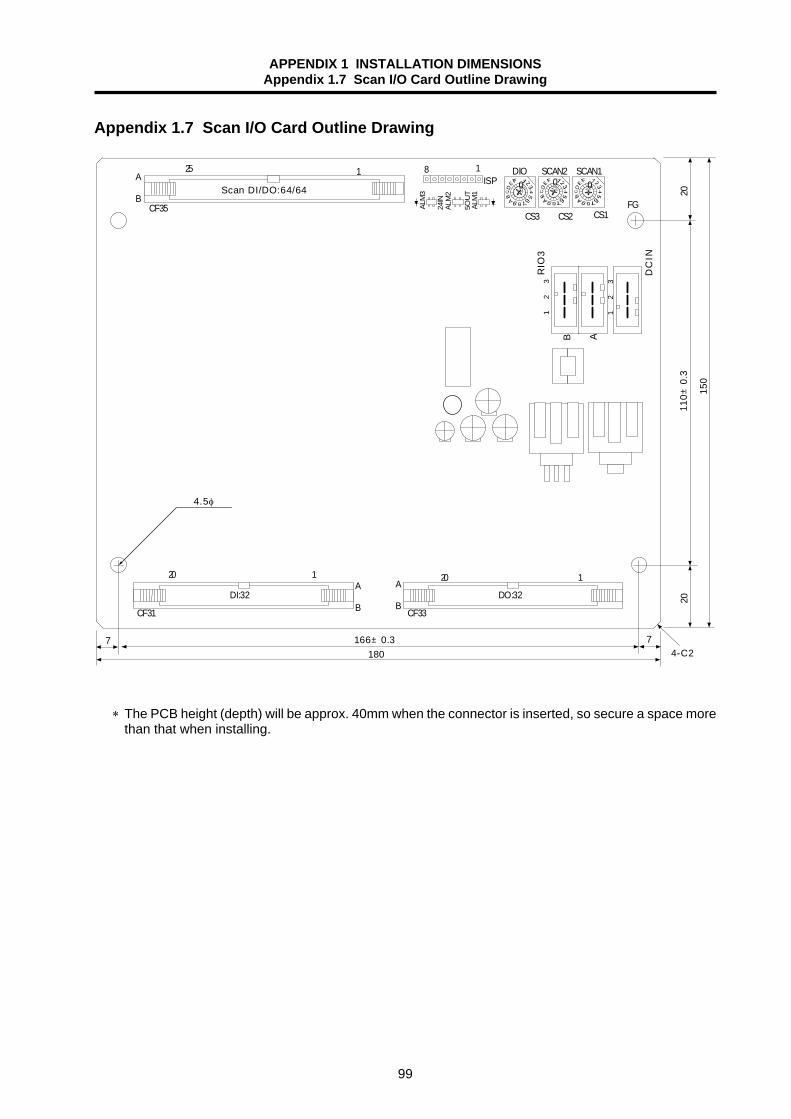
APPENDIX 1 INSTALLATION DIMENSIONS Appendix 1.7 Scan I/O Card Outline Drawing
99
Appendix 1.7 Scan I/O Card Outline Drawing
ISP
CF35
A
B
25 1 8 1 DIO SCAN1
FG
SCAN2
CF31
A
B
120
0 0 0
DO:32
CF33
A
B
20 1
CS3 CS2 CS1
4.5φ
DI:32
7 166±0.3180
74-C2
RIO
3
DC
IN
B A
1
2
3
ALM
1
ALM
2
ALM
3
5OU
T
24IN
1
2
3
2011
0±0.
3
150
20Scan DI/DO:64/64
∗ The PCB height (depth) will be approx. 40mm when the connector is inserted, so secure a space more than that when installing.

APPENDIX 1 INSTALLATION DIMENSIONS Appendix 1.8 Manual Pulse Generator (HD60) Outline Drawing
100
Appendix 1.8 Manual Pulse Generator (HD60) Outline Drawing
Rubber shield t2.03.6
16 24 27±0.5
φ77 ±
0.5
3-M4 stud bolts L10
8.89 7.60
12V 0V A B
120゜
Panel cut drawing
3 - φ4.8
φ62 +20
φ72 ± 0.2
Uniform
φ80 ±
1
φ60 ±
0.5
φ60 ±
0.5
(Tr isect io
n)
Installation other thanM3 x 6 not possible

APPENDIX 1 INSTALLATION DIMENSIONS Appendix 1.9 Encoder (OSE-1024-3-15-68) Outline Drawing
101
Appendix 1.9 Encoder (OSE-1024-3-15-68) Outline Drawing
Detector(1024P/rev)
Encoder side 97F3102E20-29P (or equivalent)Applicable cabel side MS3106A20-29S
Caution plate
19.5
102
135
5 3
33
2
φ68
28
20
56
68
4-φ5.4 hole
68 56
φ50
-0.0
09-0
.025
The effective depth of the key way is 21mm.
φ14.
3-0
.11
0
1.15 1.15
2
26
φ16
φ15
-0.0
06-0
.017
-0.0
09-0
.025
2
-0.042
3+0.1
0
φ50
+0.140
+0.140
-0..012
5
A 1chA K 0V B 2chZ L C 3chB M D N 1chA
E Case grounding P 2chZ
F R 3chB G S H +5V T J
Cross-section BB
Enlarged view of key
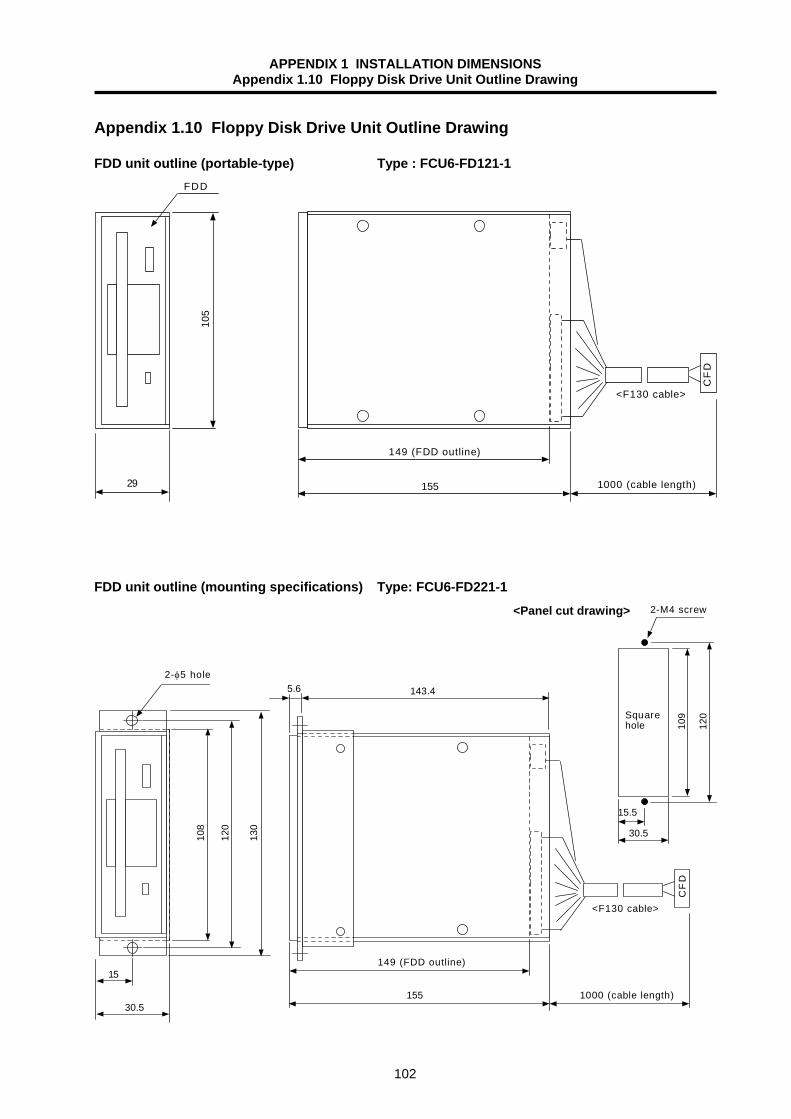
APPENDIX 1 INSTALLATION DIMENSIONS Appendix 1.10 Floppy Disk Drive Unit Outline Drawing
102
Appendix 1.10 Floppy Disk Drive Unit Outline Drawing FDD unit outline (portable-type) Type : FCU6-FD121-1
149 (FDD outline)
155
<F130 cable>
1000 (cable length)
CF
D
FDD
29
105
FDD unit outline (mounting specifications) Type: FCU6-FD221-1
15.5
30.5
109
120
149 (FDD outline)
155 1000 (cable length)
CF
D5.6 143.4
30.5
108
120
130
15
2-M4 screw
2-φ5 hole
Squarehole
<F130 cable>
<Panel cut drawing>

APPENDIX 1 INSTALLATION DIMENSIONS Appendix 1.11 F Installation Plate Outline Drawing
103
Appendix 1.11 F Installation Plate Outline Drawing
76
38
655.5 5.5
42.6±0.2
47.1±0.2
The plate thickness is 1.6 mm.
Square hole
5
2-R2.5
2-R1.75 12±
0.2
12
24
Appendix 1.12 External Hard Disk Drive Unit Outline Drawing
125
110
4-M4 screw countersunk
25
84
42
7.5 7.5
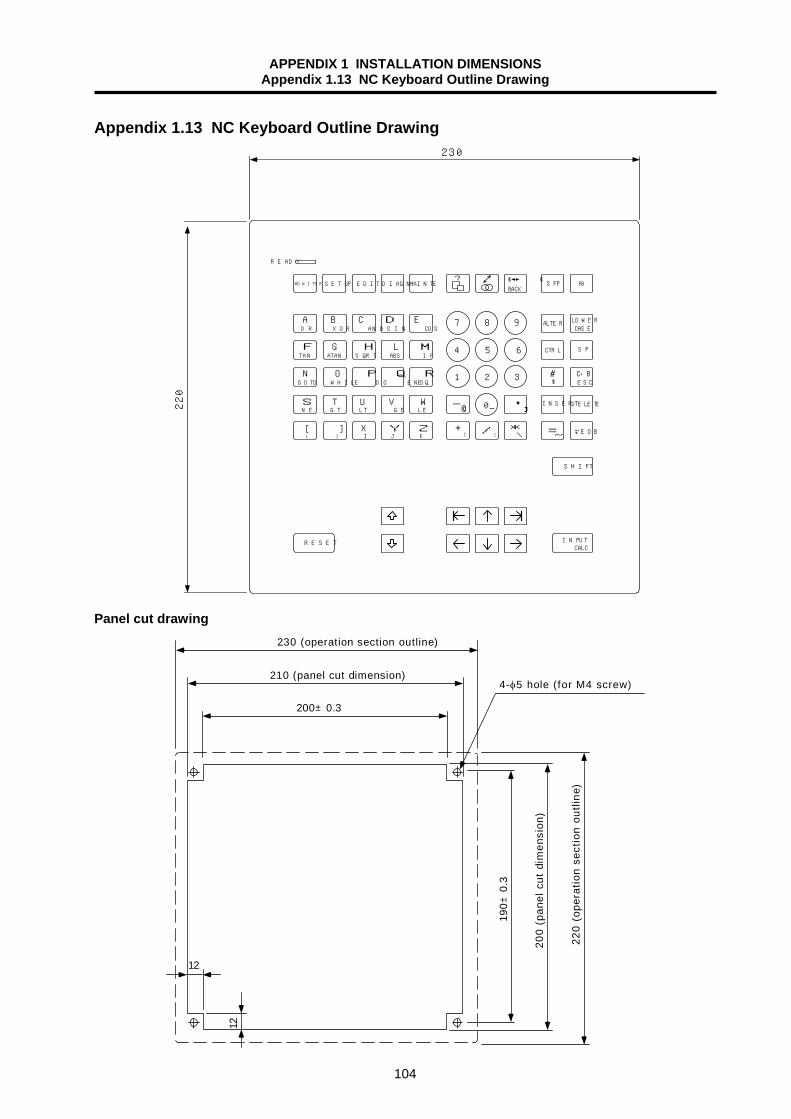
APPENDIX 1 INSTALLATION DIMENSIONS Appendix 1.13 NC Keyboard Outline Drawing
104
Appendix 1.13 NC Keyboard Outline Drawing
NE GE
GOTO WHILE D O END
TA N ATAN SQRT ABS I F
O R XOR AND
READY
DIAGN SFP?
F0BACK
INPUTCALC
A B C D E
F G H L M
N O P Q R
S T U V W
ZYX[ ]KJI( )
7 8 9
4 5 6
1 2 3
- ・ ,/ *
\!+
SP
#$
;/EOB
LOWERCASE
=
DELETE
ESCC・B
INSERT
CTRL
ALTER
@
: ~
SHIFT
RESET
220
0_
MAINTEEDITSET UPMONITOR
S I N COS
E Q
L TGT L E
$ $
230
Panel cut drawing 230 (operation section outline)
210 (panel cut dimension)
200±0.3
190±
0.3
200
(pan
el c
ut d
imen
sion
)
220
(ope
ratio
n se
ctio
n ou
tline
)
12
12
4-φ5 hole (for M4 screw)
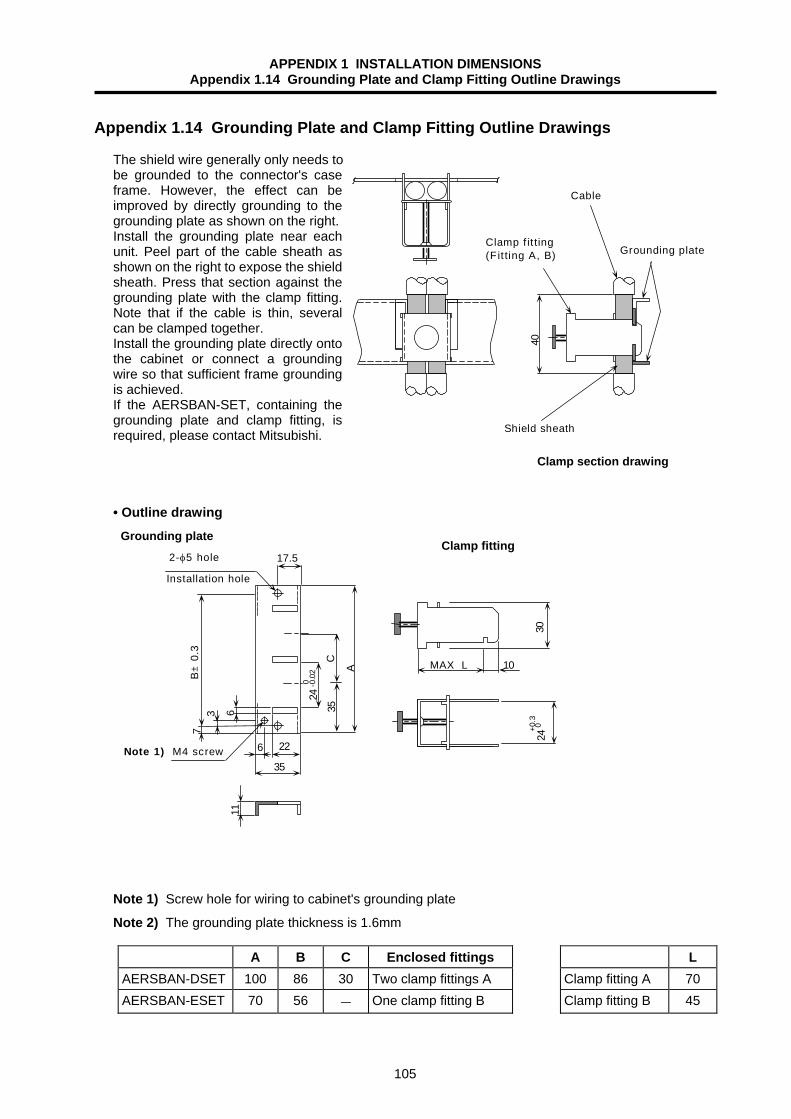
APPENDIX 1 INSTALLATION DIMENSIONS Appendix 1.14 Grounding Plate and Clamp Fitting Outline Drawings
105
Appendix 1.14 Grounding Plate and Clamp Fitting Outline Drawings
The shield wire generally only needs to be grounded to the connector's case frame. However, the effect can be improved by directly grounding to the grounding plate as shown on the right. Install the grounding plate near each unit. Peel part of the cable sheath as shown on the right to expose the shield sheath. Press that section against the grounding plate with the clamp fitting. Note that if the cable is thin, several can be clamped together. Install the grounding plate directly onto the cabinet or connect a grounding wire so that sufficient frame grounding is achieved. If the AERSBAN-SET, containing the grounding plate and clamp fitting, is required, please contact Mitsubishi.
• Outline drawing
11
35
6 22
35
A
C24
17.5
637
B±
0.3
2-φ5 hole
Installation hole
Note 1) M4 screw
0 -0.0
2
MAX L 10
24
300+0
.3
Note 1) Screw hole for wiring to cabinet's grounding plate
Note 2) The grounding plate thickness is 1.6mm
A B C Enclosed fittings L AERSBAN-DSET 100 86 30 Two clamp fittings A Clamp fitting A 70 AERSBAN-ESET 70 56 - One clamp fitting B Clamp fitting B 45
40
Cable
Clamp f it ting(Fit ting A, B) Grounding plate
Shield sheath
Clamp section drawing
Grounding plate Clamp fitting

APPENDIX 2 CABLE MANUFACTURING DRAWINGS
106
APPENDIX 2 CABLE MANUFACTURING DRAWINGS
Cable type name table
No. Appendix No. Cable type Application Max. length Remarks
1 Appendix 2.1 SH21 cable Servo amplifier ∗30m 2 Appendix 2.2 SH41 cable Remote I/O ∗1m Used between units in the same panel.3 Appendix 2.3 FCUA-R211 cable Remote I/O ∗50m 4 Appendix 2.4 R301 cable DI/DO 50m 5 Appendix 2.5 F010 cable I/O INTERFACE 20m 6 Appendix 2.6 F020 cable Manual pulse generator : 1ch 50m 7 Appendix 2.6 F021 cable Manual pulse generator : 2ch 50m 8 Appendix 2.6 F022 cable Manual pulse generator : 3ch 50m 9 Appendix 2.7 F030 cable RS-232-C : 1ch 15m
10 Appendix 2.7 F031 cable RS-232-C : 2ch 15m 11 Appendix 2.7 F032 cable RS-232-C : 1ch 15m 12 Appendix 2.8 F040 cable Encoder: Straight ∗50m 13 Appendix 2.8 F041 cable Encoder: Right angle ∗50m 14 Appendix 2.9 F050 cable NC keyboard 1m 15 Appendix 2.10 F060 cable PC INTERFACE 1m 16 Appendix 2.11 F070 cable +24V input 30m 17 Appendix 2.12 F110 cable +24V input, power off
detection 15m
18 Appendix 2.13 F120 cable Emergency stop 30m 19 Appendix 2.14 F130 cable Floppy disk drive 1m 20 Appendix 2.15 F170 cable ON/OFF switch 15m Use of the PC built-in type is prohibited.21 Appendix 2.16 F171 cable ON/OFF switch 15m 22 Appendix 2.17 F172 cable ON/OFF switch 15m 23 Appendix 2.18 ENC-SP1 cable Spindle amplifier 50m 24 Appendix 2.19 ENC-SP2 cable FR-TK 50m
(Note 1) For the cables marked with ∗ in the max. length cable column, the max. length is the sum (L1 + L2) of the cable length
(L1) from the control unit to the base I/O unit and the cable length (L2) from the base I/O unit to each unit.
Control unit
Base I/O unit
Maximum cable length
SV1SV2
RIO1RIO2
ENC
F010Servo amplif ier
Remote I/O unit
Encoder
L2L1
SH21
FCUA-R211 (SH41)
F040
(Note 2) Symbols for writing cable manufacturing drawing The following symbols are used in the cable manufacturing drawing.
1. indicates twist.
2.
indicates the shield sheath.
3.
indicates shield clamping to the ground plate.
4. In the cable manufacturing drawings, the partner of the twisted pair cable is given a priority, so the pin Nos. of the
connectors at both end are not necessary in number of order. 5. Equivalent parts can be used for the connector, contact and wire material.

APPENDIX 2 CABLE MANUFACTURING DRAWINGS
107
Cable type name: SH21 cable Usage: Servo amplifier Appendix 2.1
Note: Fold the wire material shield over the sheath, and wrap copper foil tape over it. Clamp with the connector case GND plate.
Cable type name: SH41 cable Usage: Remote I/O Appendix 2.2
TXRX
TXRX∗
GND
1
2
3
1
2
3
TXRX
TXRX∗
GND
RIO1,RIO2,RIO3(CSH41) (CSH41)
Note 1. Protect both side of cable by isolated bush. 2. RIO1, RIO2, RIO3 can be used as common. 3. Use this cable if the cable length is short such as when bridging between remote I/O units in the same panel.
Normally, use the FCUA-R11 cable having a high noise resistance level.
Plug : 10120-6000EL Shell : 10320-3210-000 Recommended maker: Sumitomo 3M
Wire material: UL20276 AWG28×10P Recommended maker: Toyokuni Densen
SV1, SV2 (CSH21) Plug : 10120-6000EL Shell : 10320-3210-000 Recommended maker: Sumitomo 3M
(CSH41) Connector : 1-178288-3 Contact : 1-175218-5 Recommended maker: Japan AMP Wire material: MVVS 3C×0.3SQ (MIC 3C×0.3SQ)
Recommended maker: Takeuchi Densen
RIO1, RIO2, RIO3 (CSH41) Connector : 1-178288-3 Contact : 1-175218-2 Recommended maker: Japan AMP
Connector name : SV1, SV2 (CSH21)Servo amplifier
Connector name : RIO1, RIO2, RIO3 (CSH41) Connector name : (CSH41)

APPENDIX 2 CABLE MANUFACTURING DRAWINGS
108
Cable type name: FCUA-R211 cable Usage: Remote I/O Appendix 2.3
TXRX
TXRX∗
LG
1
2
3
1
2
3
TXRX
TXRX∗
LG
RIO1,RIO2,RIO3(FCUA-R211) (FCUA-R211)
FG FG
Cable type name: R301 cable Usage: DI/DO Appendix 2.4
Precautions 1. Protect both ends of the
cable with insulated bushing.
2. RIO1, RIO2 and RIO3 can be used commonly.
(FCUA-R211) Connector : 1-178288-3 Contact : 1-175218-2 Recommended maker: Japan AMP Wire material: MVVS 3C×0.3SQ (MIC 3C×0.3SQ)
Recommended maker: Takeuchi Densen
RIO1, RIO2, RIO3 (FCUA-R211) Connector : 1-178288-3 Contact : 1-175218-2 Recommended maker: Japan AMP
Wire material: B40-S Recommended maker: Oki Densen
Connector : 7940-6500SC Recommended maker: Sumitomo 3M
Connector : 7940-6500SC Relief : 3448-7940 Recommended maker: Sumitomo 3M
Connector name : RIO1, RIO2, RIO3 (FCUA-R211)
Connector name : DI-L/DO-L, DI-R/DO-R CF31,CF32, CF33, CF34
Connector name : (FCUA-R211)
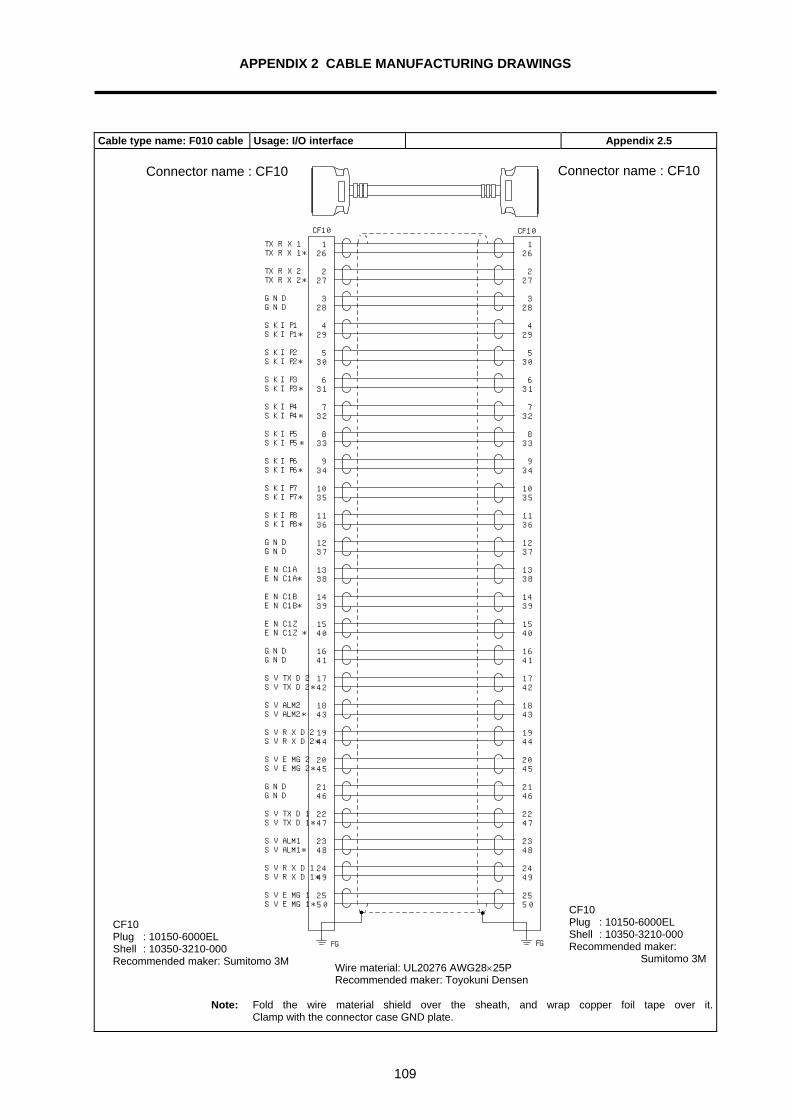
APPENDIX 2 CABLE MANUFACTURING DRAWINGS
109
Cable type name: F010 cable Usage: I/O interface Appendix 2.5
TXRX1TXRX1*
TXRX2TXRX2*
GNDGND
SKIP1SKIP1*
SKIP2SKIP2*
SKIP3SKIP3*
SKIP4SKIP4*
SKIP5SKIP5*
SKIP6SKIP6*
SKIP7SKIP7*
SKIP8SKIP8*
GNDGND
ENC1AENC1A*
ENC1BENC1B*
ENC1ZENC1Z*
GNDGND
SVTXD2SVTXD2*
SVALM2SVALM2*
SVRXD2SVRXD2*
SVEMG2SVEMG2*
GNDGND
SVTXD1SVTXD1*
SVALM1SVALM1*
SVRXD1SVRXD1*
SVEMG1SVEMG1*
126
227
328
429
530
631
732
833
934
1035
1136
1237
1338
1439
1540
1641
1742
1843
1944
2045
2146
2247
2348
2449
2550
126
227
328
429
530
631
732
833
934
1035
1136
1237
1338
1439
1540
1641
1742
1843
1944
2045
2146
2247
2348
2449
2550
FG FG
CF10 CF10
Note: Fold the wire material shield over the sheath, and wrap copper foil tape over it. Clamp with the connector case GND plate.
CF10 Plug : 10150-6000EL Shell : 10350-3210-000 Recommended maker:
Sumitomo 3MWire material: UL20276 AWG28×25P Recommended maker: Toyokuni Densen
CF10 Plug : 10150-6000EL Shell : 10350-3210-000 Recommended maker: Sumitomo 3M
Connector name : CF10 Connector name : CF10

APPENDIX 2 CABLE MANUFACTURING DRAWINGS
110
Cable type name: F020 cable Usage: Manual pulse generator Appendix 2.6
1
2
10
9
3
4
12
11
5
6
14
13
1HA
1HB
+12V
GND
2HA
2HB
+12V
GND
3HA
3HB
+12V
GND
1ch
2ch
3ch
FG
HANDLE
Note: Fold the wire material shield over the sheath, and wrap copper foil tape over it. Clamp with the connector case GND plate.
Wire material: B-22 (19) U×2SJ-1×9 Recommended maker: Sumitomo Denko
Cable name 1ch 2ch 3chF020 cable F021 cable F022 cable
Note:
means channels which are used.
Connector : CDA-15P Contact : CD-PC-111 Case : HDA-CTH Recommended maker: Hirose Denki
Crimp terminal: V1.25-3 Recommended maker: Japan Solderless
Connector name : HANDLE

APPENDIX 2 CABLE MANUFACTURING DRAWINGS
111
Cable type name: F030 cable Usage: RS-232-C Appendix 2.7
2
3
4
5
6
20
8
9
7
2
3
4
5
6
20
8
9
7
CF21(CF22)
SD1(SD3)
RD1(RD3)
RS1(RS3)
CS1(CS3)
DR1(DR3)
ER1(ER3)
CD3
RI3
GND
CH1
FG
F installation plate: Refer to Appendix 1 (F installation plate outline drawing).
Note: Fold the wire material shield over the sheath, and wrap copper foil tape over it. Clamp with the connector case GND plate.
Cable type name: F032 cable Usage: RS-232-C Appendix 2.8
14
16
19
17
21
15
18
22
24
2
3
4
5
6
20
8
9
7
CF21(CF22)
SD2(SD4)
RD2(RD4)
RS2(RS4)
CS2(CS4)
DR2(DR4)
ER2(ER4)
CD4
RI4
GND
CH2
FG
F installation plate: Refer to Appendix 1 (F installation plate outline drawing).
Note: Fold the wire material shield over the sheath, and wrap copper foil tape over it. Clamp with the connector case GND plate.
Wire material: DPVVSB 6P×0.2SQ (DPVVSB 12P×0.2SQ) Recommended maker: Banto Electric Wire
Wire material: DPVVSB 6P×0.2SQ (DPVVSB 12P×0.2SQ) Recommended maker: Banto Electric Wire
Note: 1. The signal names given in
parentheses are equivalent to CF22.
Note: 1. The signal names given in
parentheses are equivalent to CF22.
CF21 or CF22 Connector : CDB-25P Contact : CD-PC-111 Case : HDB-CTH Recommended maker: Hirose Denki
Connector : CDB-25S Contact : CD-SC-111 Cable clamp: HD-LNA Recommended maker: Hirose Denki
CF21 or CF22 Connector : CDB-25P Contact : CD-PC-111 Case : HDB-CTH Recommended maker: Hirose Denki
Connector : CDB-25S Contact : CD-SC-111 Cable clamp: HD-LNA Recommended maker: Hirose Denki
Connector name : CF21 or CF22
Connector name : CF21 or CF22
Connector name : CH1
Connector name : CH2

APPENDIX 2 CABLE MANUFACTURING DRAWINGS
112
Cable type name: F031 cable Usage: RS-232-C Appendix 2.9
2
3
4
5
6
20
8
9
7
14
16
19
17
21
15
18
22
24
2
3
4
5
6
20
8
9
7
2
3
4
5
6
20
8
9
7
FG
CF21(CF22)
SD1(SD3)
RD1(RD3)
RS1(RS3)
CS1(CS3)
DR1(DR3)
ER1(ER3)
CD3
RI3
GND
SD2(SD4)
RD2(RD4)
RS2(RS4)
CS2(CS4)
DR2(DR4)
ER2(ER4)
CD4
RI4
GND
CH1
CH2
F installation plate: Refer to Appendix 1 (F installation plate outline drawing).
Note: Fold the wire material shield over the sheath, and wrap copper foil tape over it. Clamp with the connector case GND plate.
Wire material: DPVVSB 6P×0.2SQ (DPVVSB 12P×0.2SQ) Recommended maker: Banto Electric Wire
Note: 1. The signal names given in
parentheses are equivalent to CF22.
CF21 or CF22 Connector : CDB-25P Contact : CD-PC-111 Case : HDB-CTH Recommended maker: Hirose Denki
Connector : CDB-25S Contact : CD-SC-111 Cable clamp: HD-LNA Recommended maker: Hirose Denki
Connector name : CF21 (CF22)
Connector name : CH2
Connector name : CH1

APPENDIX 2 CABLE MANUFACTURING DRAWINGS
113
Cable type name: F040/041 cable Usage: Encoder Appendix 2.10
ENC1A (ENC2A)
ENC1A*(ENC2A*)
ENC1B (ENC2B)
ENC1B*(ENC2B*)
ENC1Z (ENC2Z)
ENC1Z*(ENC2Z*)
GND
GND
+5V
1
6
2
7
3
8
4
5
9
ENC1(ENC2)
A
N
C
R
B
P
K
H
FG
Connector:MS3106B20-29SCable clamp:MS3057-12ARecommended maker :ITT cannon
F040 cable
Connector:MS3108B20-29SCable clamp:MS3057-12ARecommended maker :ITT cannon
F041 cable
Note: Fold the wire material shield over the sheath, and wrap copper foil tape over it. Clamp with the connector case GND plate.
Cable type name: F050 cable Usage: NC keyboard Appendix 2.11
Wire material: DPVVSB 6P×0.2SQ Recommended maker: Banto Electric Wire
Note: Signal name ( ) is for ENC2.
ENC1 (ENC2) Connector : CDE-9PF Contact : CD-PC-111 Case : HDE-CTH Recommended maker: Hirose Denki
Cable name : K/S DHD-RB50-20AN×2 (Recommended maker: DDK) Wire material : UL20528-50×28AWG (7/0.127)Recommended maker: Fujikura Densen
CF11 Connector : DHD-RB50-20AN Recommended maker: DDK
CF11 Connector : DHD-RB50-20AN Recommended maker: DDK
Connector name : CF11 Connector name : CF11
Connector name : ENC1(ENC2)
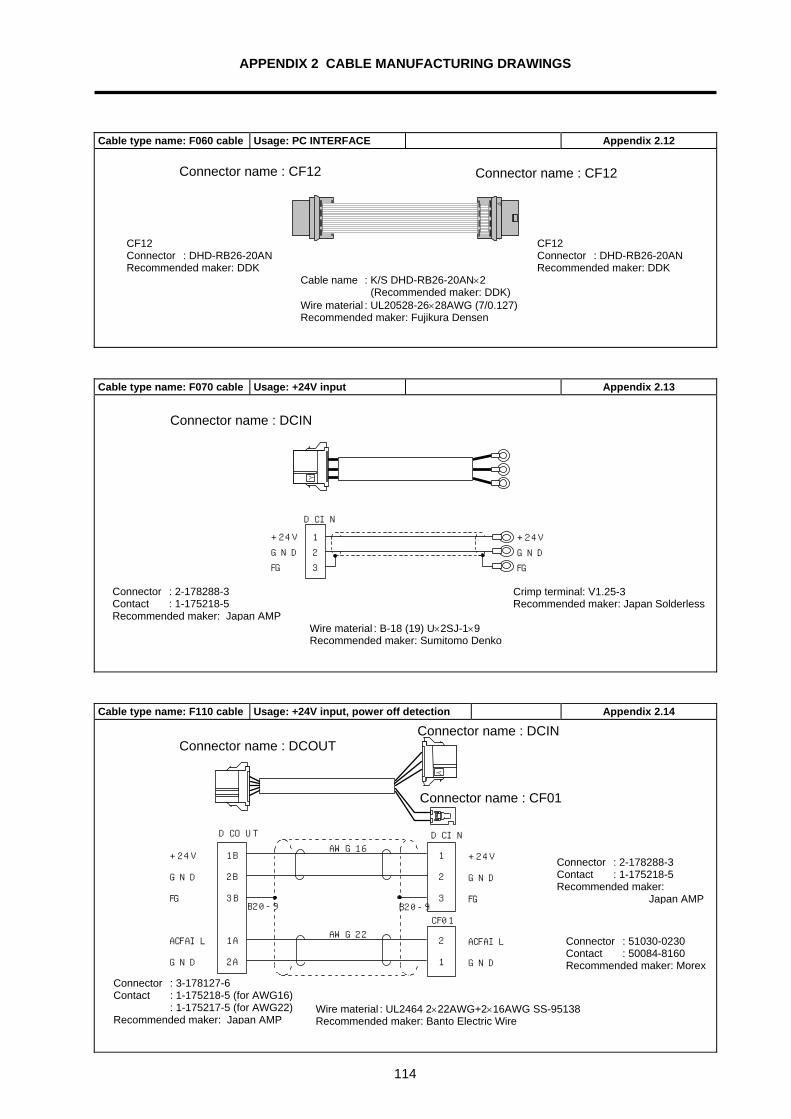
APPENDIX 2 CABLE MANUFACTURING DRAWINGS
114
Cable type name: F060 cable Usage: PC INTERFACE Appendix 2.12
Cable type name: F070 cable Usage: +24V input Appendix 2.13
Y
DCIN
+24V
GND
FG
1
2
3
+24V
GND
FG
Cable type name: F110 cable Usage: +24V input, power off detection Appendix 2.14
Y
+24V
GND
FG
ACFAIL
GND
1B
2B
3B
1A
2A
1
2
3
2
1
+24V
GND
FG
ACFAIL
GND
AWG16
AWG22
B20-9 B20-9
DCOUT DCIN
CF01
Cable name : K/S DHD-RB26-20AN×2 (Recommended maker: DDK) Wire material : UL20528-26×28AWG (7/0.127)Recommended maker: Fujikura Densen
CF12 Connector : DHD-RB26-20AN Recommended maker: DDK
CF12 Connector : DHD-RB26-20AN Recommended maker: DDK
Wire material : B-18 (19) U×2SJ-1×9 Recommended maker: Sumitomo Denko
Crimp terminal: V1.25-3 Recommended maker: Japan Solderless
Connector : 2-178288-3 Contact : 1-175218-5 Recommended maker: Japan AMP
Wire material : UL2464 2×22AWG+2×16AWG SS-95138 Recommended maker: Banto Electric Wire
Connector : 3-178127-6 Contact : 1-175218-5 (for AWG16) : 1-175217-5 (for AWG22) Recommended maker: Japan AMP
Connector : 2-178288-3 Contact : 1-175218-5 Recommended maker:
Japan AMP
Connector : 51030-0230 Contact : 50084-8160 Recommended maker: Morex
Connector name : CF12 Connector name : CF12
Connector name : DCOUT Connector name : DCIN
Connector name : CF01
Connector name : DCIN

APPENDIX 2 CABLE MANUFACTURING DRAWINGS
115
Cable type name: F120 cable Usage: Emergency stop Appendix 2.15
FG
EMG IN
COM
1
2
3
EMG IN
COM
EMG
B22-9
Cable type name: F130 cable Usage: Floppy disk drive Appendix 2.16
1A 3A 4A 5A 6A 7A 8A 9A10A11A12A13A14A15A16A17A 1B 3B 4B 5B 6B 7B 8B 9B10B11B12B13B14B15B16B17B
2A 2B
CFD
FD2
17B15B14B13B12B11B10B 9B 8B 7B 6B 5B 4B 3B 2B 1B17A15A14A13A12A11A10A 9A 8A 7A 6A 5A 4A 3A 2A 1A
1 2
+5VGND
FD1
Signal
Power supply
Wire material : B-22 (19) U×2SJ-1×9 Recommended maker: Sumitomo Denko
Crimp terminal: V1.25-3 Recommended maker: Japan Solderless
Connector : 51030-0330 Contact : 50084-8160 Recommended maker: Morex
Cable product: K/S DHD-RB34-20AN×2 (Recommended maker: DDK) Wire material : UL20528-34×28AWG (7/0.127) Recommended maker: Fujikura Densen
CFD Connector : DHD-RB34-20AN Recommended maker: DDK
Power supply Connector : 171822-4 Contact : 170204-1 Recommended maker: Japan AMP
Signal Connector : FRC5-A034-20TN Recommended maker: DDK
Connector name : EMG
Connector name : CFD

APPENDIX 2 CABLE MANUFACTURING DRAWINGS
116
Cable type name: F170 cable Usage: ON/OFF switch Appendix 2.17
X
PD25AON/OFF
NC
P-OFF
GND
GND
P-ON
1
2
3
4
5
OFF-1
OFF-2
ON-1
ON-2
Cable type name: F171 cable Usage: ON/OFF switch Appendix 2.18
X
ON/OFF
NC
P-OFF
GND
GND
P-ON
1
2
3
4
5
ON/OFF
1
2
3
4
5
NC
P-OFF
GND
GND
P-ON
PD25A HR29
Cable type name: F172 cable Usage: ON/OFF switch Appendix 2.19
X
HR29ON/OFF
NC
PowerON
LGON
PowerOFF
DC24v
1
2
3
4
5
ON-1
ON-2
OFF-1
OFF-2
Wire material : DPVVSB 3P×0.3SQ Recommended maker: Banto Electric Wire
Wire material : DPVVSB 3P×0.3SQ Recommended maker: Banto Electric Wire
Wire material : DPVVSB 3P×0.3SQ Recommended maker: Banto Electric Wire
Caution Do not use the personal computer built-in type for this cable.
Connector : 1-178288-5 Contact : 1-175218-5 Recommended maker: Japan AMP
Connector : 1-178288-5 Contact : 1-175218-5 Recommended maker: Japan AMP
Connector : 1-178288-5 Contact : 1-175218-5 Recommended maker: Japan AMP
Connector : 1-178288-5 Contact : 1-175218-5 Recommended maker: Japan AMP
Connector : 1-178288-5 Contact : 1-175218-5 Recommended maker: Japan AMP
Connector name : ON/OFF
Connector name : ON/OFF Connector name : CF24
Connector name : CF24
Connector name : ON/OFF Connector name : CF24
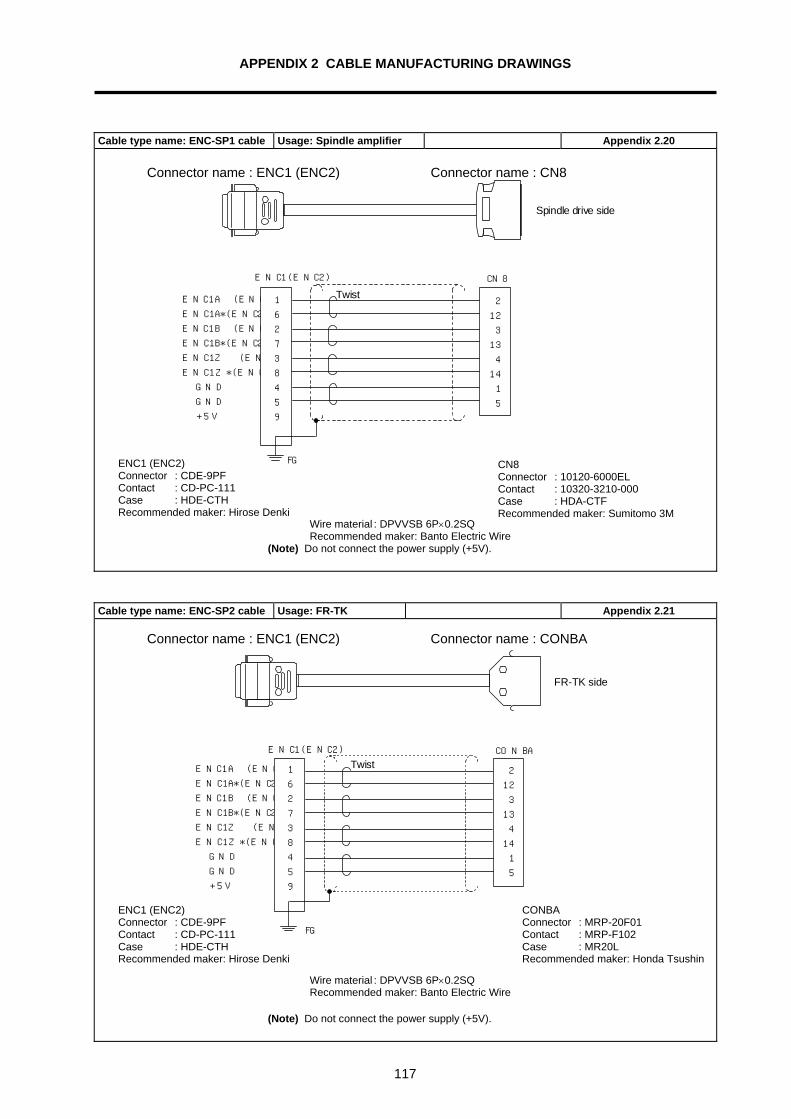
APPENDIX 2 CABLE MANUFACTURING DRAWINGS
117
Cable type name: ENC-SP1 cable Usage: Spindle amplifier Appendix 2.20
ENC1A (ENC2A)
ENC1A*(ENC2A*)
ENC1B (ENC2B)
ENC1B*(ENC2B*)
ENC1Z (ENC2Z)
ENC1Z*(ENC2Z*)
GND
GND
+5V
1
6
2
7
3
8
4
5
9
TwistENC1(ENC2) CN8
2
12
3
13
4
14
1
5
Spindle drive side
FG (Note) Do not connect the power supply (+5V).
Cable type name: ENC-SP2 cable Usage: FR-TK Appendix 2.21
ENC1A (ENC2A)
ENC1A*(ENC2A*)
ENC1B (ENC2B)
ENC1B*(ENC2B*)
ENC1Z (ENC2Z)
ENC1Z*(ENC2Z*)
GND
GND
+5V
1
6
2
7
3
8
4
5
9
TwistENC1(ENC2) CONBA
2
12
3
13
4
14
1
5
FR-TK side
FG (Note) Do not connect the power supply (+5V).
Wire material : DPVVSB 6P×0.2SQ Recommended maker: Banto Electric Wire
Wire material : DPVVSB 6P×0.2SQ Recommended maker: Banto Electric Wire
CN8 Connector : 10120-6000EL Contact : 10320-3210-000 Case : HDA-CTF Recommended maker: Sumitomo 3M
ENC1 (ENC2) Connector : CDE-9PF Contact : CD-PC-111 Case : HDE-CTH Recommended maker: Hirose Denki
ENC1 (ENC2) Connector : CDE-9PF Contact : CD-PC-111 Case : HDE-CTH Recommended maker: Hirose Denki
CONBA Connector : MRP-20F01 Contact : MRP-F102 Case : MR20L Recommended maker: Honda Tsushin
Connector name : ENC1 (ENC2) Connector name : CN8
Connector name : ENC1 (ENC2) Connector name : CONBA
APPENDIX 3 EMC INSTALLATION GUIDELINES 1. Introduction
118
APPENDIX 3 EMC INSTALLATION GUIDELINES 1. Introduction
EMC Instructions became mandatory as of January 1, 1996. The subject products must have a CE mark attached indicating that the product complies with the Instructions. As the NC unit is a component designed to control machine tools, it is believed that it is not a direct EMC Instruction subject. However, we would like to introduce the following measure plans to back up EMC Instruction compliance of the machine tool as the NC unit is a major component of the machine tools.
(1) Methods of installation in control/operation panel (2) Methods of wiring cables to outside of panel (3) Introduction of members for measures
Mitsubishi is carrying out tests to confirm the compliance to the EMC Instructions under the environment described in this manual. However, the level of the noise will differ according to the equipment type and layout, control panel structure and wiring lead-in, etc. Thus, we ask that the final noise level be confirmed by the machine manufacturer. This section corresponds to the following Series.
MELDAS 600 Series Matters related to the EMC measures in this manual have a priority over the details given in the Connection Manual.
This section is an excerpt of the "EMC Installation Guidelines BNP-B2230". Only the pages related to the M600 Series are given. Refer to the "EMC Installation Guidelines [BNP-B8582-45]" for details on the drive section (servo amplifier/spindle amplifier).

APPENDIX 3 EMC INSTALLATION GUIDELINES 2. EMC Instructions
119
2. EMC Instructions
The EMC Instructions largely regulate the following two items.
• Emission Capacity to prevent output of obstructive noise that adversely affects external devices.
• Immunity Capacity to not malfunction due to obstructive noise from external source. The details of each level are classified below in Table 1. It is assumed that the Standards and test details required for a machine tool are the same as these.
Class Name Details EMC Standard
Radiated noise Restriction of electromagnetic noise radiated through the air
Emission Conductive noise Restriction of electromagnetic noise discharged
from power supply line
EN50081-2 EN61800-3 (Industrial environment)
EN55011 (CLASS: A)
Static electricity electrical discharge
Example) Regulation of withstand level of static electricity accumulated in human body IEC61000-4-2
Radiation immunity Example) Simulation of immunity from digital wireless telephones IEC61000-4-3
Burst immunity Example) Regulation of withstand level of noise
from relay or live wire being inserted or removed
IEC61000-4-4
Conductive immunity Example) Regulation of withstand level of noise flowed from power supply wires, etc. IEC61000-4-6
Power supply frequency field
Example) Regulation of electromagnetic noise of 50/60Hz power supply frequency IEC61000-4-8
Power supply dip (fluctuation)
Example) Regulation of power voltage drop withstand level IEC61000-4-11
Immunity
Surge Example) Regulation of withstand level of noise caused by lightning
EN50082-2 EN61800-3 (Industrial environment)
IEC61000-4-5

APPENDIX 3 EMC INSTALLATION GUIDELINES 3. EMC Measures
120
3. EMC Measures
The main items relating to EMC measures include the following.
(1) Store the device in an electrically sealed metal panel. (2) Ground all conductors that are floating electrically. Decrease the impedance. (3) Increase the distance between the power cable and signal wire. (4) Shield the cables wired outside of the panel. (5) Install a noise filter.
Take care to the following items to suppress the noise radiated outside of the panel.
(1) Accurately ground the devices. (2) Use shielded cables. (3) Increase the electrical seal of the panel. Reduce the gaps and holes.

APPENDIX 3 EMC INSTALLATION GUIDELINES 4. Panel Structure
121
4. Panel Structure
The design of the panel is a very important factor for the EMC measures, so take the following measures into consideration.
4.1 Measures for Control Panel Body
(1) Use metal for all members configuring the panel. (2) When joining the top plate and side plates, etc., treat the welded or contacting sections so that the
impedance is reduced, and then fix with screws.
Painting mask
Joining clearance: approx. 20cm
(3) Note that if the plate warps due to the screw fixing, etc., by that creating a clearance, noise could leak from that place.
(4) Plate (nickel, tin) the metal plate surface at the grounding plate, and connect the connections with a
low impedance. (5) If there is a large opening, such as ventilation holes, make sure to close the hole.
Control panel
Mesh cover(conductive sponge)
Opening
• Using screws to fix the plates that have been painted is the same as an insulated state. Peel the paint and fix the screws.
CAUTION
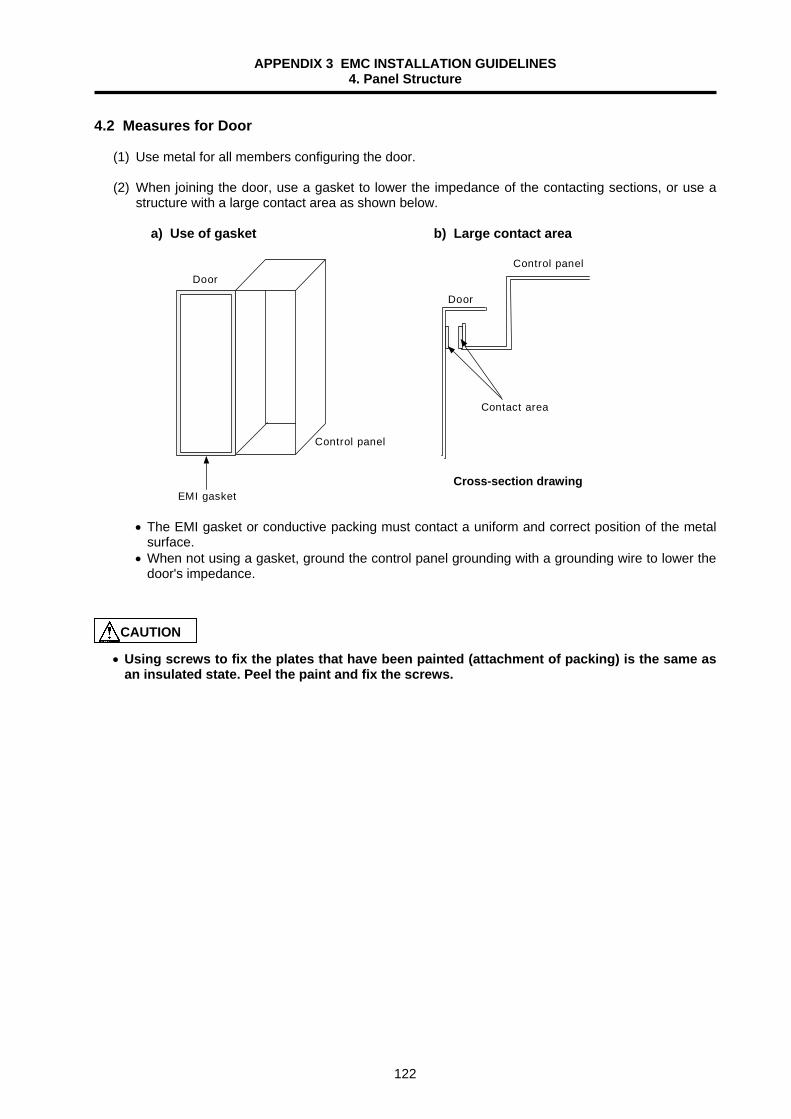
APPENDIX 3 EMC INSTALLATION GUIDELINES 4. Panel Structure
122
4.2 Measures for Door
(1) Use metal for all members configuring the door. (2) When joining the door, use a gasket to lower the impedance of the contacting sections, or use a
structure with a large contact area as shown below. a) Use of gasket b) Large contact area
EMI gasket
Control panel
Contact area
Control panelDoor
Door
• The EMI gasket or conductive packing must contact a uniform and correct position of the metal surface.
• When not using a gasket, ground the control panel grounding with a grounding wire to lower the door's impedance.
• Using screws to fix the plates that have been painted (attachment of packing) is the same as an insulated state. Peel the paint and fix the screws.
CAUTION
Cross-section drawing
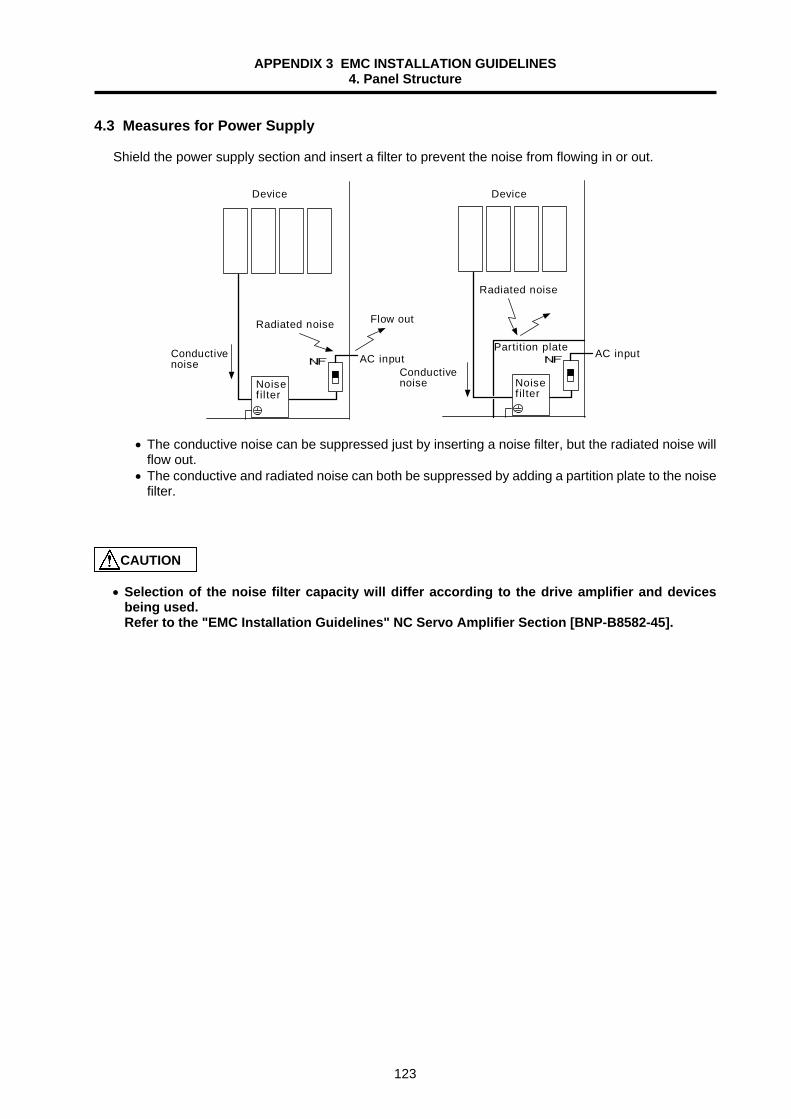
APPENDIX 3 EMC INSTALLATION GUIDELINES 4. Panel Structure
123
4.3 Measures for Power Supply
Shield the power supply section and insert a filter to prevent the noise from flowing in or out.
NF NF
Device Device
Conductivenoise
Conductivenoise
Radiated noise
Radiated noise
Noisef il ter
Noisef il ter
Flow out
AC input AC inputPartition plate
• The conductive noise can be suppressed just by inserting a noise filter, but the radiated noise will flow out.
• The conductive and radiated noise can both be suppressed by adding a partition plate to the noise filter.
• Selection of the noise filter capacity will differ according to the drive amplifier and devices being used. Refer to the "EMC Installation Guidelines" NC Servo Amplifier Section [BNP-B8582-45].
CAUTION

APPENDIX 3 EMC INSTALLATION GUIDELINES 5. Measures for Wiring in Panel
124
5. Measures for Wiring in Panel
Cables act as antennas to propagate unnecessary noise, and thus must be appropriately shielded and treated. The following measures must be sufficiently considered for the cables (SH21/F010/FCUA-R211) that carry out high-speed communication.
5.1 Precautions for Wiring in Panel
(1) If the cables are led unnecessary in the panel, they will be contaminated by noise. Thus, keep the device layout and wiring length as short as possible.
Device
Noise
Device Device Device Device Device
(2) Always connect the grounding wire to the FG terminal indicated on the device. (3) Keep the distance between the power cable and detector cable to the drive section motor as far
apart as possible when wiring. (4) Do not lead the power wire around the panel without using a filter.
Device
Radiated
Noise
AC inputPartition plateNF
NoiseNoisef il ter
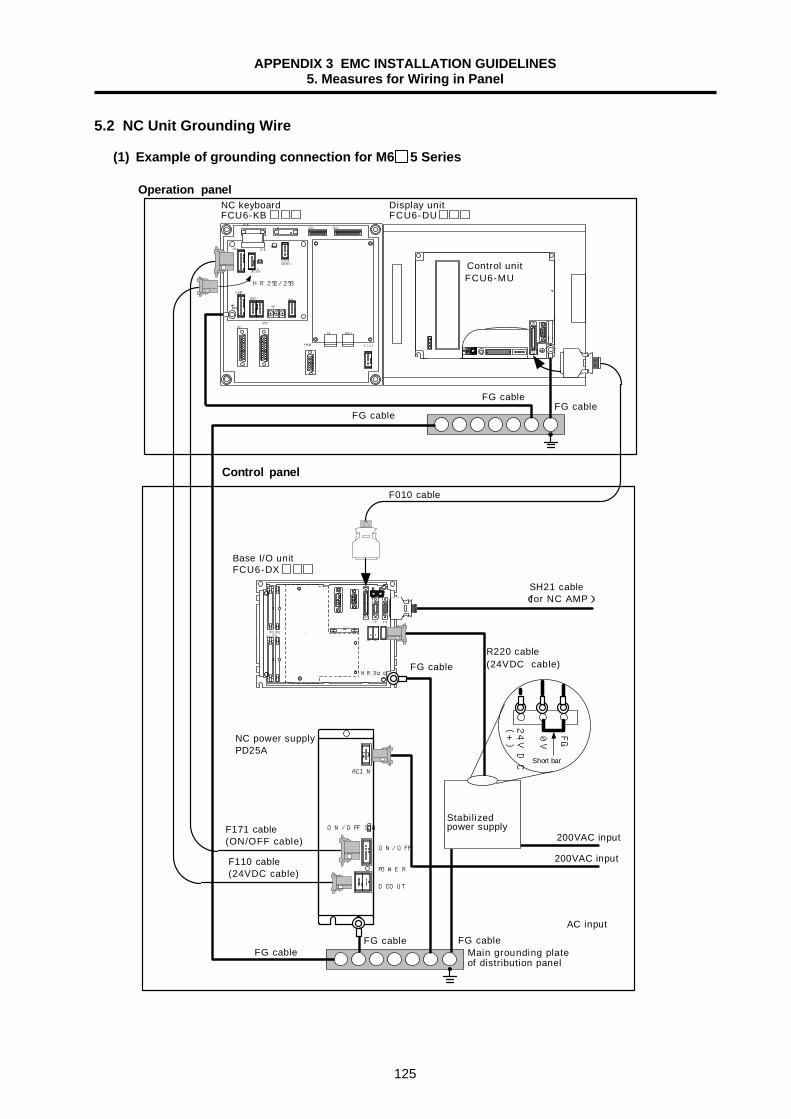
APPENDIX 3 EMC INSTALLATION GUIDELINES 5. Measures for Wiring in Panel
125
5.2 NC Unit Grounding Wire
(1) Example of grounding connection for M6 5 Series
Main grounding plateof distribution panel
R220 cable(24VDC cable)
FG
0V
Short bar
FG cable
200VAC input
FCU6-DXBase I/O unit
FG cable
ACIN
ON/OFF SW
ON/OFF
POWER
DCOUT
AC input
FG cable
NC power supplyPD25A
200VAC input
SH21 cable(for NC AMP)
F010 cable
F171 cable(ON/OFF cable)
F110 cable(24VDC cable)
0
0
CF31CF32CF34CF33
SV2 SV1
HR3
RIO1RI O2
DC IN
C F 1 0
E N C
C R 3 1
SK IP
0
DCIN(BOARD)
CF25
POS
ON/OFF
CF24
DCIN(PD25A)
CF01
CF13
DCOUT
PE(FG)
J2 CF11CF12
CON1
CON1
CF21
CF22
K/B MOUSE
HANDLE RIO3
Control unit24V
DC
(+)
FCU6-MUHR292/293
Display unitFCU6-DU
NC keyboardFCU6-KB
FG cable
Operation panel
FG cable
FG cableFG cable
Control panel
Stabilizedpower supply

APPENDIX 3 EMC INSTALLATION GUIDELINES 5. Measures for Wiring in Panel
126
(2) Example of grounding connection for M6 0 Series
Main grounding plateof distribution panel
R220 cable(24VDC cable)
0V
Short bar
FG cable
200VAC input
FCU6-DXBase I/O unit
FG cable
AC inputStabilizedpower supply
SH21 cable(for NC AMP)
F010 cable
0
0
CF31 CF32CF34
CF33
SV2 SV1
HR3
RIO1RIO2
DC IN
C F 1 0
E N C
C R 3 1
SK I P
0
J2 CF11CF12
CON1
CF21
CF22
K/B MOUSE
HANDLE RIO3
Control unitFCU6-MU
Display unitFCU6-DU
NC keyboardFCU6-KB
FG cable
FG cable
FG cableFG cable
R220 cable(24VDC cable)
24VDC
(+) FG
Operation panel
Control panel
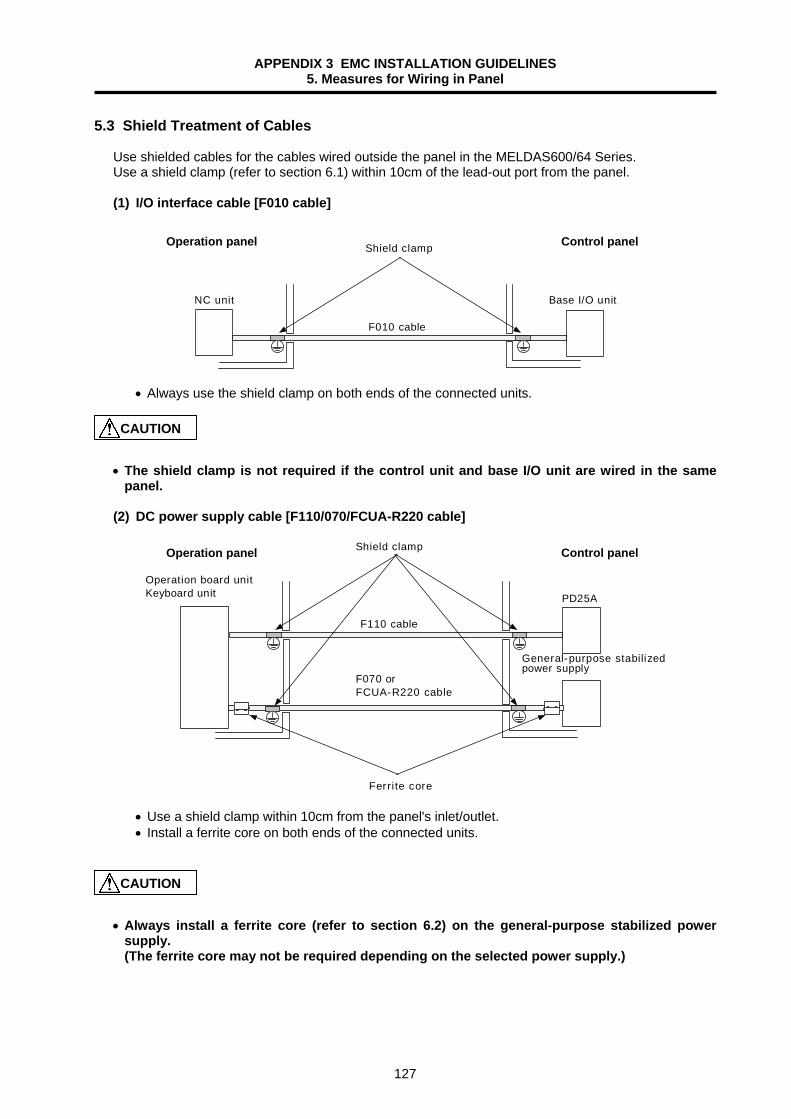
APPENDIX 3 EMC INSTALLATION GUIDELINES 5. Measures for Wiring in Panel
127
5.3 Shield Treatment of Cables
Use shielded cables for the cables wired outside the panel in the MELDAS600/64 Series. Use a shield clamp (refer to section 6.1) within 10cm of the lead-out port from the panel. (1) I/O interface cable [F010 cable]
NC unit
F010 cable
Shield clamp
Base I/O unit
• Always use the shield clamp on both ends of the connected units.
• The shield clamp is not required if the control unit and base I/O unit are wired in the same panel.
(2) DC power supply cable [F110/070/FCUA-R220 cable]
PD25A
F110 cable
F070 orFCUA-R220 cable
Operation board unitKeyboard unit
General-purpose stabilizedpower supply
Ferrite core
Shield clamp
• Use a shield clamp within 10cm from the panel's inlet/outlet. • Install a ferrite core on both ends of the connected units.
• Always install a ferrite core (refer to section 6.2) on the general-purpose stabilized power supply. (The ferrite core may not be required depending on the selected power supply.)
CAUTION
CAUTION
Control panel Operation panel
Control panel Operation panel
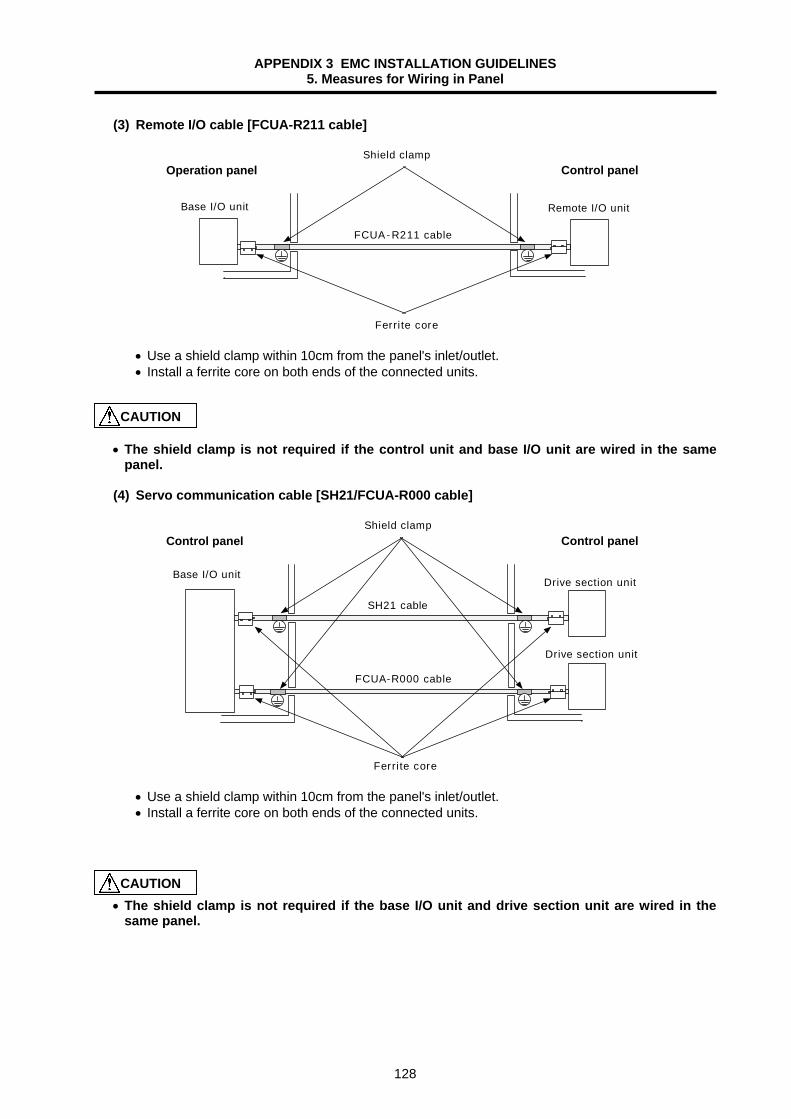
APPENDIX 3 EMC INSTALLATION GUIDELINES 5. Measures for Wiring in Panel
128
(3) Remote I/O cable [FCUA-R211 cable]
Shield clamp
Remote I/O unit
Ferri te core
FCUA-R211 cable
Base I/O unit
• Use a shield clamp within 10cm from the panel's inlet/outlet. • Install a ferrite core on both ends of the connected units.
• The shield clamp is not required if the control unit and base I/O unit are wired in the same panel.
(4) Servo communication cable [SH21/FCUA-R000 cable]
Shield clamp
Ferrite core
Base I/O unitDrive section unit
SH21 cable
Drive section unit
FCUA-R000 cable
• Use a shield clamp within 10cm from the panel's inlet/outlet. • Install a ferrite core on both ends of the connected units.
• The shield clamp is not required if the base I/O unit and drive section unit are wired in the same panel.
CAUTION
CAUTION
Control panel Operation panel
Control panel Control panel
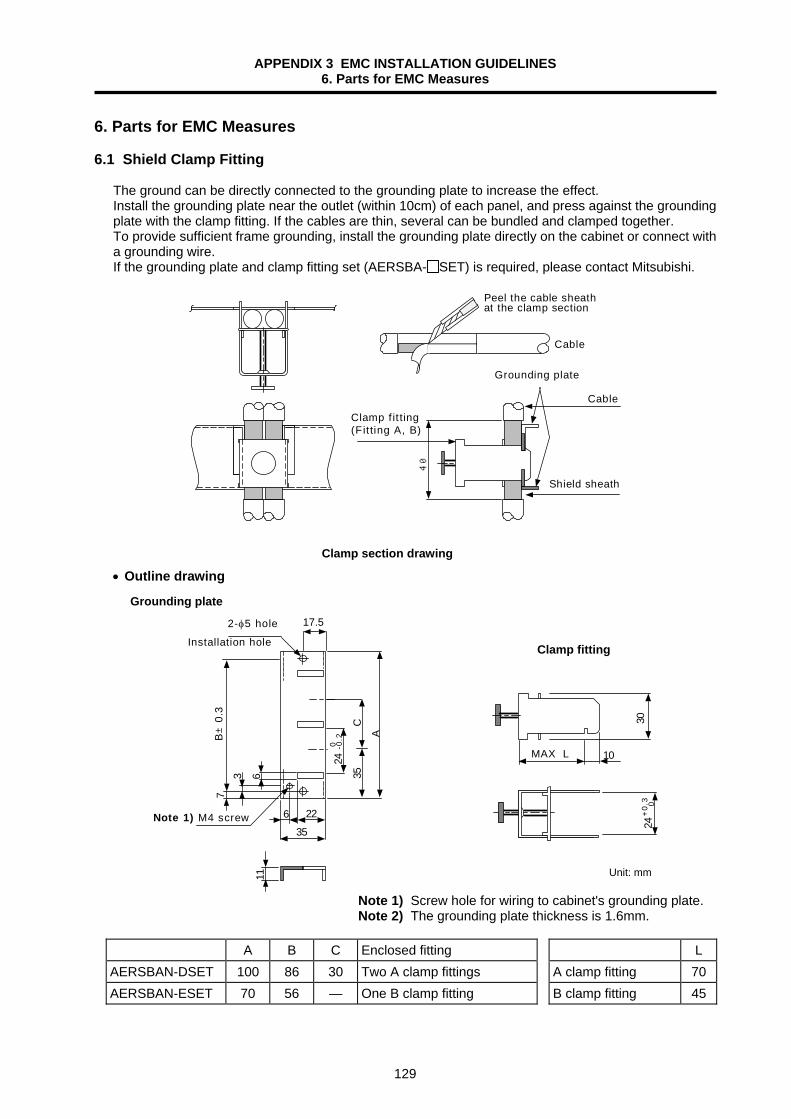
APPENDIX 3 EMC INSTALLATION GUIDELINES 6. Parts for EMC Measures
129
6. Parts for EMC Measures 6.1 Shield Clamp Fitting
The ground can be directly connected to the grounding plate to increase the effect. Install the grounding plate near the outlet (within 10cm) of each panel, and press against the grounding plate with the clamp fitting. If the cables are thin, several can be bundled and clamped together. To provide sufficient frame grounding, install the grounding plate directly on the cabinet or connect with a grounding wire. If the grounding plate and clamp fitting set (AERSBA- SET) is required, please contact Mitsubishi.
40
Peel the cable sheathat the clamp section
Cable
Clamp f it ting(Fit ting A, B)
Grounding plate
Shield sheath
Cable
• Outline drawing
MAX L 10
11
356 22
17.530
+0.
3
0
24
35
A
C
240 -0
.2
637
B±
0.3
2-φ5 hole
Note 1) M4 screw
Installation hole
Note 1) Screw hole for wiring to cabinet's grounding plate. Note 2) The grounding plate thickness is 1.6mm.
A B C Enclosed fitting L AERSBAN-DSET 100 86 30 Two A clamp fittings A clamp fitting 70AERSBAN-ESET 70 56 — One B clamp fitting B clamp fitting 45
Unit: mm
Clamp section drawing
Grounding plate
Clamp fitting

APPENDIX 3 EMC INSTALLATION GUIDELINES 6. Parts for EMC Measures
130
6.2 Ferrite Core
The ferrite core is mounted integrally with the plastic case. This can be installed with one touch without cutting the interface cable or power supply cable. This ferrite core is effective against common mode noise, allowing measures against noise without affecting the quality of the signal.
Recommended ferrite core TDK ZCAT Series
推奨フェライトコア
Shape and dimensions ZCAT type
Fig. 4
Fig. 3 Fig. 2Fig. 1
ZCAT-C type
ZCAT-B type ZCAT-A type
Recommended ferrite core Unit: mm
Part name Fig. A B φC φD E Applicable cable outer diamter Weight (g)
ZCAT1518-0730-M (-BK)*1 1 22±1 18±1 7±1 15±1 — 7max. 6 ZCAT1518-0730-M (BK)*2 1 22±1 18±1 7±1 15±1 — 7max. 6 ZCAT2017-0930-M (-BK) 1 21±1 17±1 9±1 20±1 — 9max. 11 ZCAT2032-0930-M (-BK)*1 1 36±1 32±1 9±1 19.5±1 — 9max. 22 ZCAT2032-0930 (-BK)*2 1 36±1 32±1 9±1 19.5±1 — 9max. 22 ZCAT2132-1130-M (-BK)*1 1 36±1 32±1 11±1 20.5±1 — 11max. 22 ZCAT2132-1130 (-BK)*2 1 36±1 32±1 11±1 20.5±1 — 11max. 22
ZCAT3035-1330-M (-BK)*1 1 39±1 34±1 13±1 30±1 — 13max. 63 ZCAT3035-1330 (-BK)*2 1 39±1 34±1 13±1 30±1 — 13max. 63
ZCAT1325-0530A-M (-BK)*1 2 25±1 20±1 5±1 12.8±1 11.2±1 3 ~ 5 (USB) 7 ZCAT1325-0530A (-BK) 2 25±1 20±1 5±1 12.8±1 11.2±1 3 ~ 5 (USB) 7 ZCAT1730-0730A-M (-BK) 2 30±1 23±1 7±1 16.5±1 15±1 4 ~ 7 (USB/IEE1394) 12 ZCAT2035-0930A-M (-BK)*1 2 35±1 28±1 9±1 19.5±1 17.4±1 6 ~ 9 22 ZCAT2035-0930A (-BK) 2 35±1 28±1 9±1 19.5±1 17.4±1 6 ~ 9 22 ZCAT2235-1030A-M (-BK) 2 35±1 28±1 10±1 21.5±1 20±1 8 ~10 27 ZCAT2436-1330A-M (-BK) 2 36±1 29±1 13±1 23.5±1 22±1 10 ~13 29 ZCAT2017-0930B-M (-BK) 3 21±1 17±1 9±1 20±1 28.5±1 9max. 12 ZCAT2749-0430M (-BK) 4 49±1 27±1 4.5±1 19.5±1 — 4.5max. 26
*1. The M stamp is attached. *2. A fixing band is attached at shipment. • ZCAT-B type: Cabinet fixing type installation hole φ4.8 to 4.9mm, plate thickness 0.5 to 2mm • ZCAT-C type: Structure that prevents easy opening after case is closed.
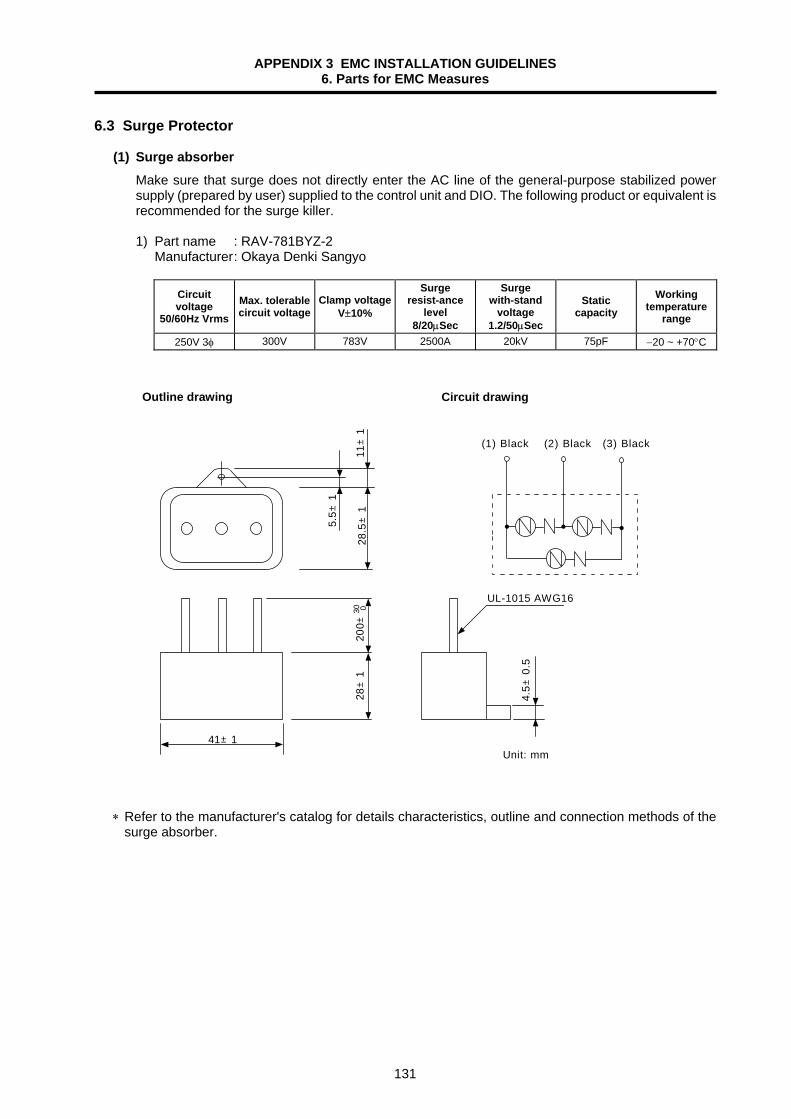
APPENDIX 3 EMC INSTALLATION GUIDELINES 6. Parts for EMC Measures
131
6.3 Surge Protector
(1) Surge absorber Make sure that surge does not directly enter the AC line of the general-purpose stabilized power supply (prepared by user) supplied to the control unit and DIO. The following product or equivalent is recommended for the surge killer.
1) Part name : RAV-781BYZ-2
Manufacturer : Okaya Denki Sangyo
Circuit voltage
50/60Hz Vrms Max. tolerable circuit voltage
Clamp voltageV±10%
Surge resist-ance
level 8/20µSec
Surge with-stand
voltage 1.2/50µSec
Static capacity
Working temperature
range 250V 3φ 300V 783V 2500A 20kV 75pF −20 ~ +70°C
28.5
±1
5.5±
1
11±
128
±1
200±
030
41±1
UL-1015 AWG16
4.5±
0.5
(1) Black (2) Black (3) Black
Unit: mm
∗ Refer to the manufacturer's catalog for details characteristics, outline and connection methods of the surge absorber.
Circuit drawing Outline drawing
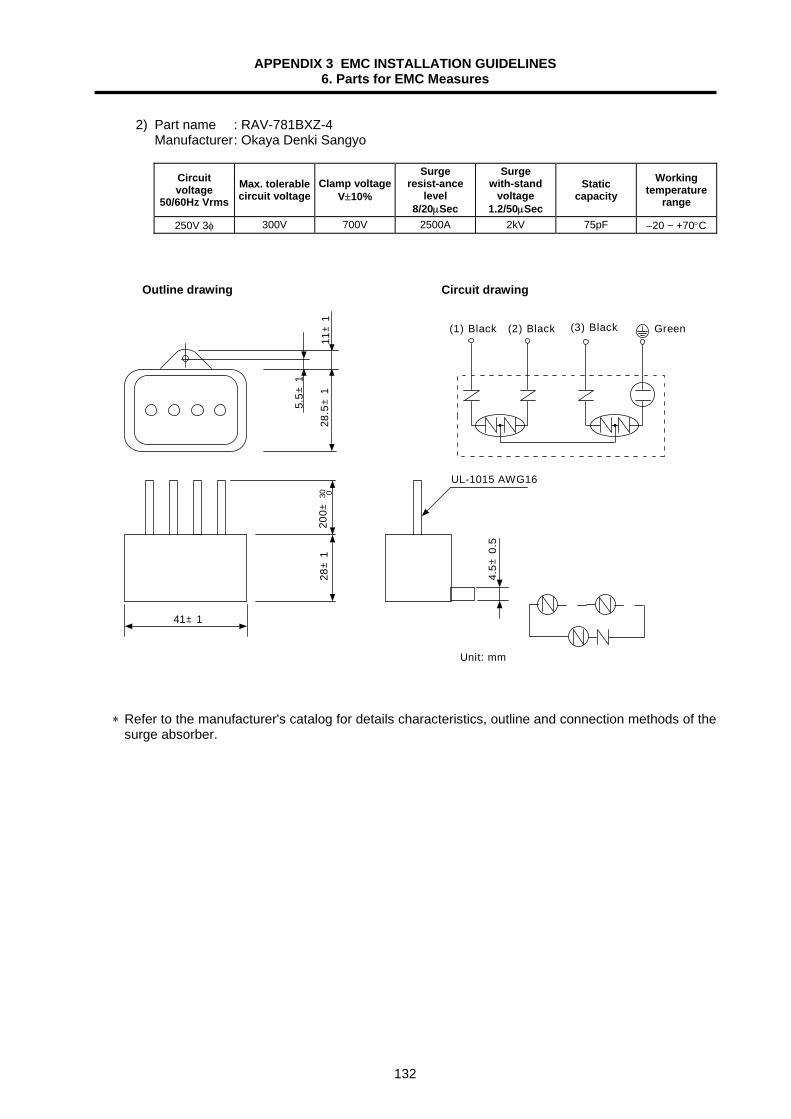
APPENDIX 3 EMC INSTALLATION GUIDELINES 6. Parts for EMC Measures
132
2) Part name : RAV-781BXZ-4 Manufacturer : Okaya Denki Sangyo
Circuit voltage
50/60Hz Vrms Max. tolerable circuit voltage
Clamp voltageV±10%
Surge resist-ance
level 8/20µSec
Surge with-stand
voltage 1.2/50µSec
Static capacity
Working temperature
range 250V 3φ 300V 700V 2500A 2kV 75pF −20 ~ +70°C
(1) Black (2) Black (3) Black
Unit: mm
28.5
±1
5.5±
1
11±
128
±1
200±
30 0
41±1
UL-1015 AWG164.
5±0.
5
Green
∗ Refer to the manufacturer's catalog for details characteristics, outline and connection methods of the
surge absorber.
Circuit drawing Outline drawing
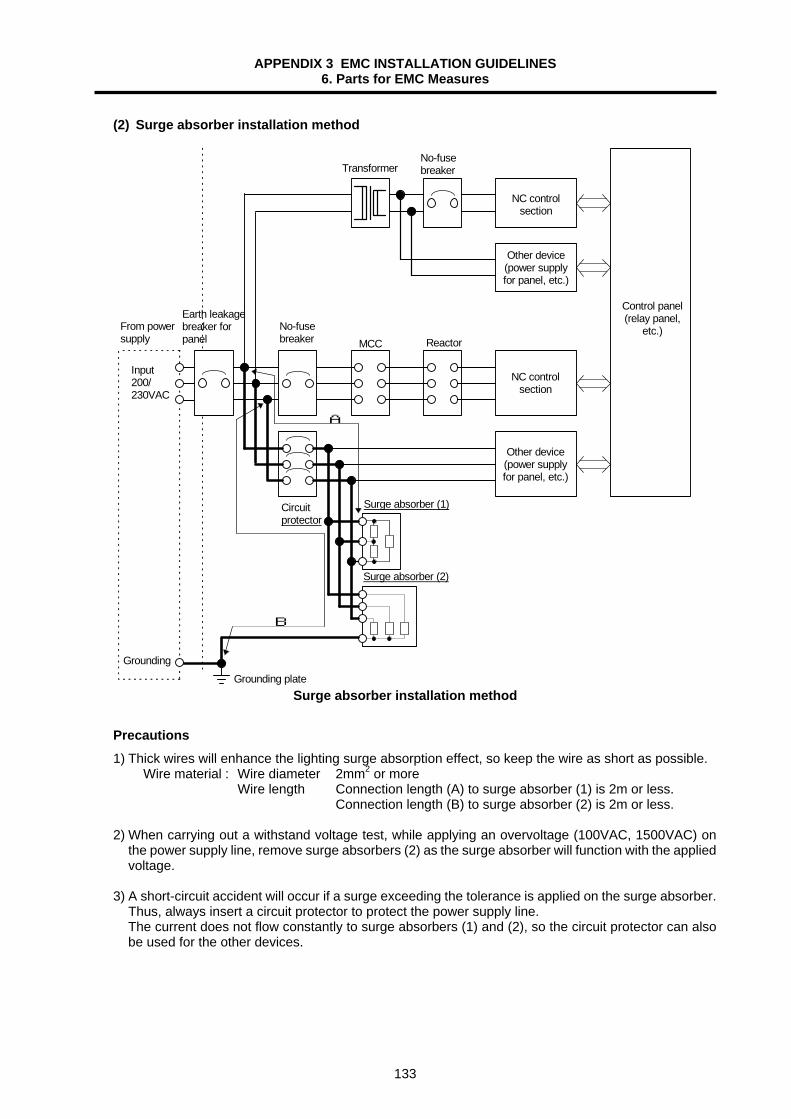
APPENDIX 3 EMC INSTALLATION GUIDELINES 6. Parts for EMC Measures
133
(2) Surge absorber installation method
NC controlsection
Control panel(relay panel,
etc.)
Surge absorber (2)
Surge absorber (1)
Other device(power supplyfor panel, etc.)
Earth leakagebreaker forpanel
Input200/230VAC
MCC Reactor
Transformer
No-fusebreaker
No-fusebreaker
Circuitprotector
GroundingGrounding plate
From powersupply
B
A
NC controlsection
Other device(power supplyfor panel, etc.)
Surge absorber installation method
Precautions 1) Thick wires will enhance the lighting surge absorption effect, so keep the wire as short as possible.
Wire material : Wire diameter 2mm2 or more Wire length Connection length (A) to surge absorber (1) is 2m or less.
Connection length (B) to surge absorber (2) is 2m or less.
2) When carrying out a withstand voltage test, while applying an overvoltage (100VAC, 1500VAC) on the power supply line, remove surge absorbers (2) as the surge absorber will function with the applied voltage.
3) A short-circuit accident will occur if a surge exceeding the tolerance is applied on the surge absorber.
Thus, always insert a circuit protector to protect the power supply line. The current does not flow constantly to surge absorbers (1) and (2), so the circuit protector can also be used for the other devices.

APPENDIX 3 EMC INSTALLATION GUIDELINES 6. Parts for EMC Measures
134
6.4 Selection of Stabilized Power Supply
Consider the following characteristics when selecting the stabilized power supply. Use a power supply that complies with CE Marking or that follows the safety standards given below.
Stabilized power supply selection items
Item Symbol Conditions Voltage fluctuation % ±5max. ±5% or less of 24VDC output Output
fluctuation Ripple noise mV 120max. ±5% or less of 24VDC output Spike noise mV 500max. Output current A −− Refer to the Connection Manual. Output holding time ms 20min. Instantaneous off time
Standards Safety Standards : UL1950, CSA C22.2 No. 234 approved, IEC950 compliant Noise Terminal Voltage : FCC Class A, VCCI-1 Class High Harmonics Current Restrictions : IEC1000-3-2

Revision History
Revision Date of revision Revision details * 97/03 First edition was issued.
A 97/04 Mistakes were corrected. B 97/05 Mistakes were corrected. C 99/01 Mistakes were corrected. D 01/9/17 Design of the cover and the back cover were changed.
MODEL, MODEL CODE, and Manual No. were added on the back cover.