Medically Endorsed Store Training - Home :: … · System uses industry standard security best...
154
Medically Endorsed Store Guidance DOH 608-023 August 2018 1
-
Upload
vuongquynh -
Category
Documents
-
view
214 -
download
0
Transcript of Medically Endorsed Store Training - Home :: … · System uses industry standard security best...

Medically Endorsed Store Guidance
DOH 608-023 August 20181
Establish a voluntary, confidential database by contracting with a third party to create and administer.
Create a process for producing recognition cards for qualifying patients and designated providers.
Adopt rules relating to the operation of the database.
Department of Health Required to:

Who Has Access to the Database System Certified medical marijuana consultants and other medically endorsed marijuana store employees
Law enforcement to verify cards only
Healthcare practitioners to view authorized patients
Database administrator
State agencies for technical support, aggregate reporting, and auditing:• Washington State Department of Health (DOH)• Washington State Liquor and Cannabis Board (WSLCB)• Washington State Department of Revenue (DOR)
Note: Other state and federal agencies cannot search the database to see if specific people are in it.

Why Should Patients Join the DatabasePatients entered into the database receive a medical marijuana recognition card which provides the following benefits:
Purchase up to three times the current recreational limits.Purchase products sales-tax free.Purchase high THC compliant products.Possess up to 15 plants and 16 ounces of usable marijuana, as authorized.Participate in cooperative garden.Arrest protection.
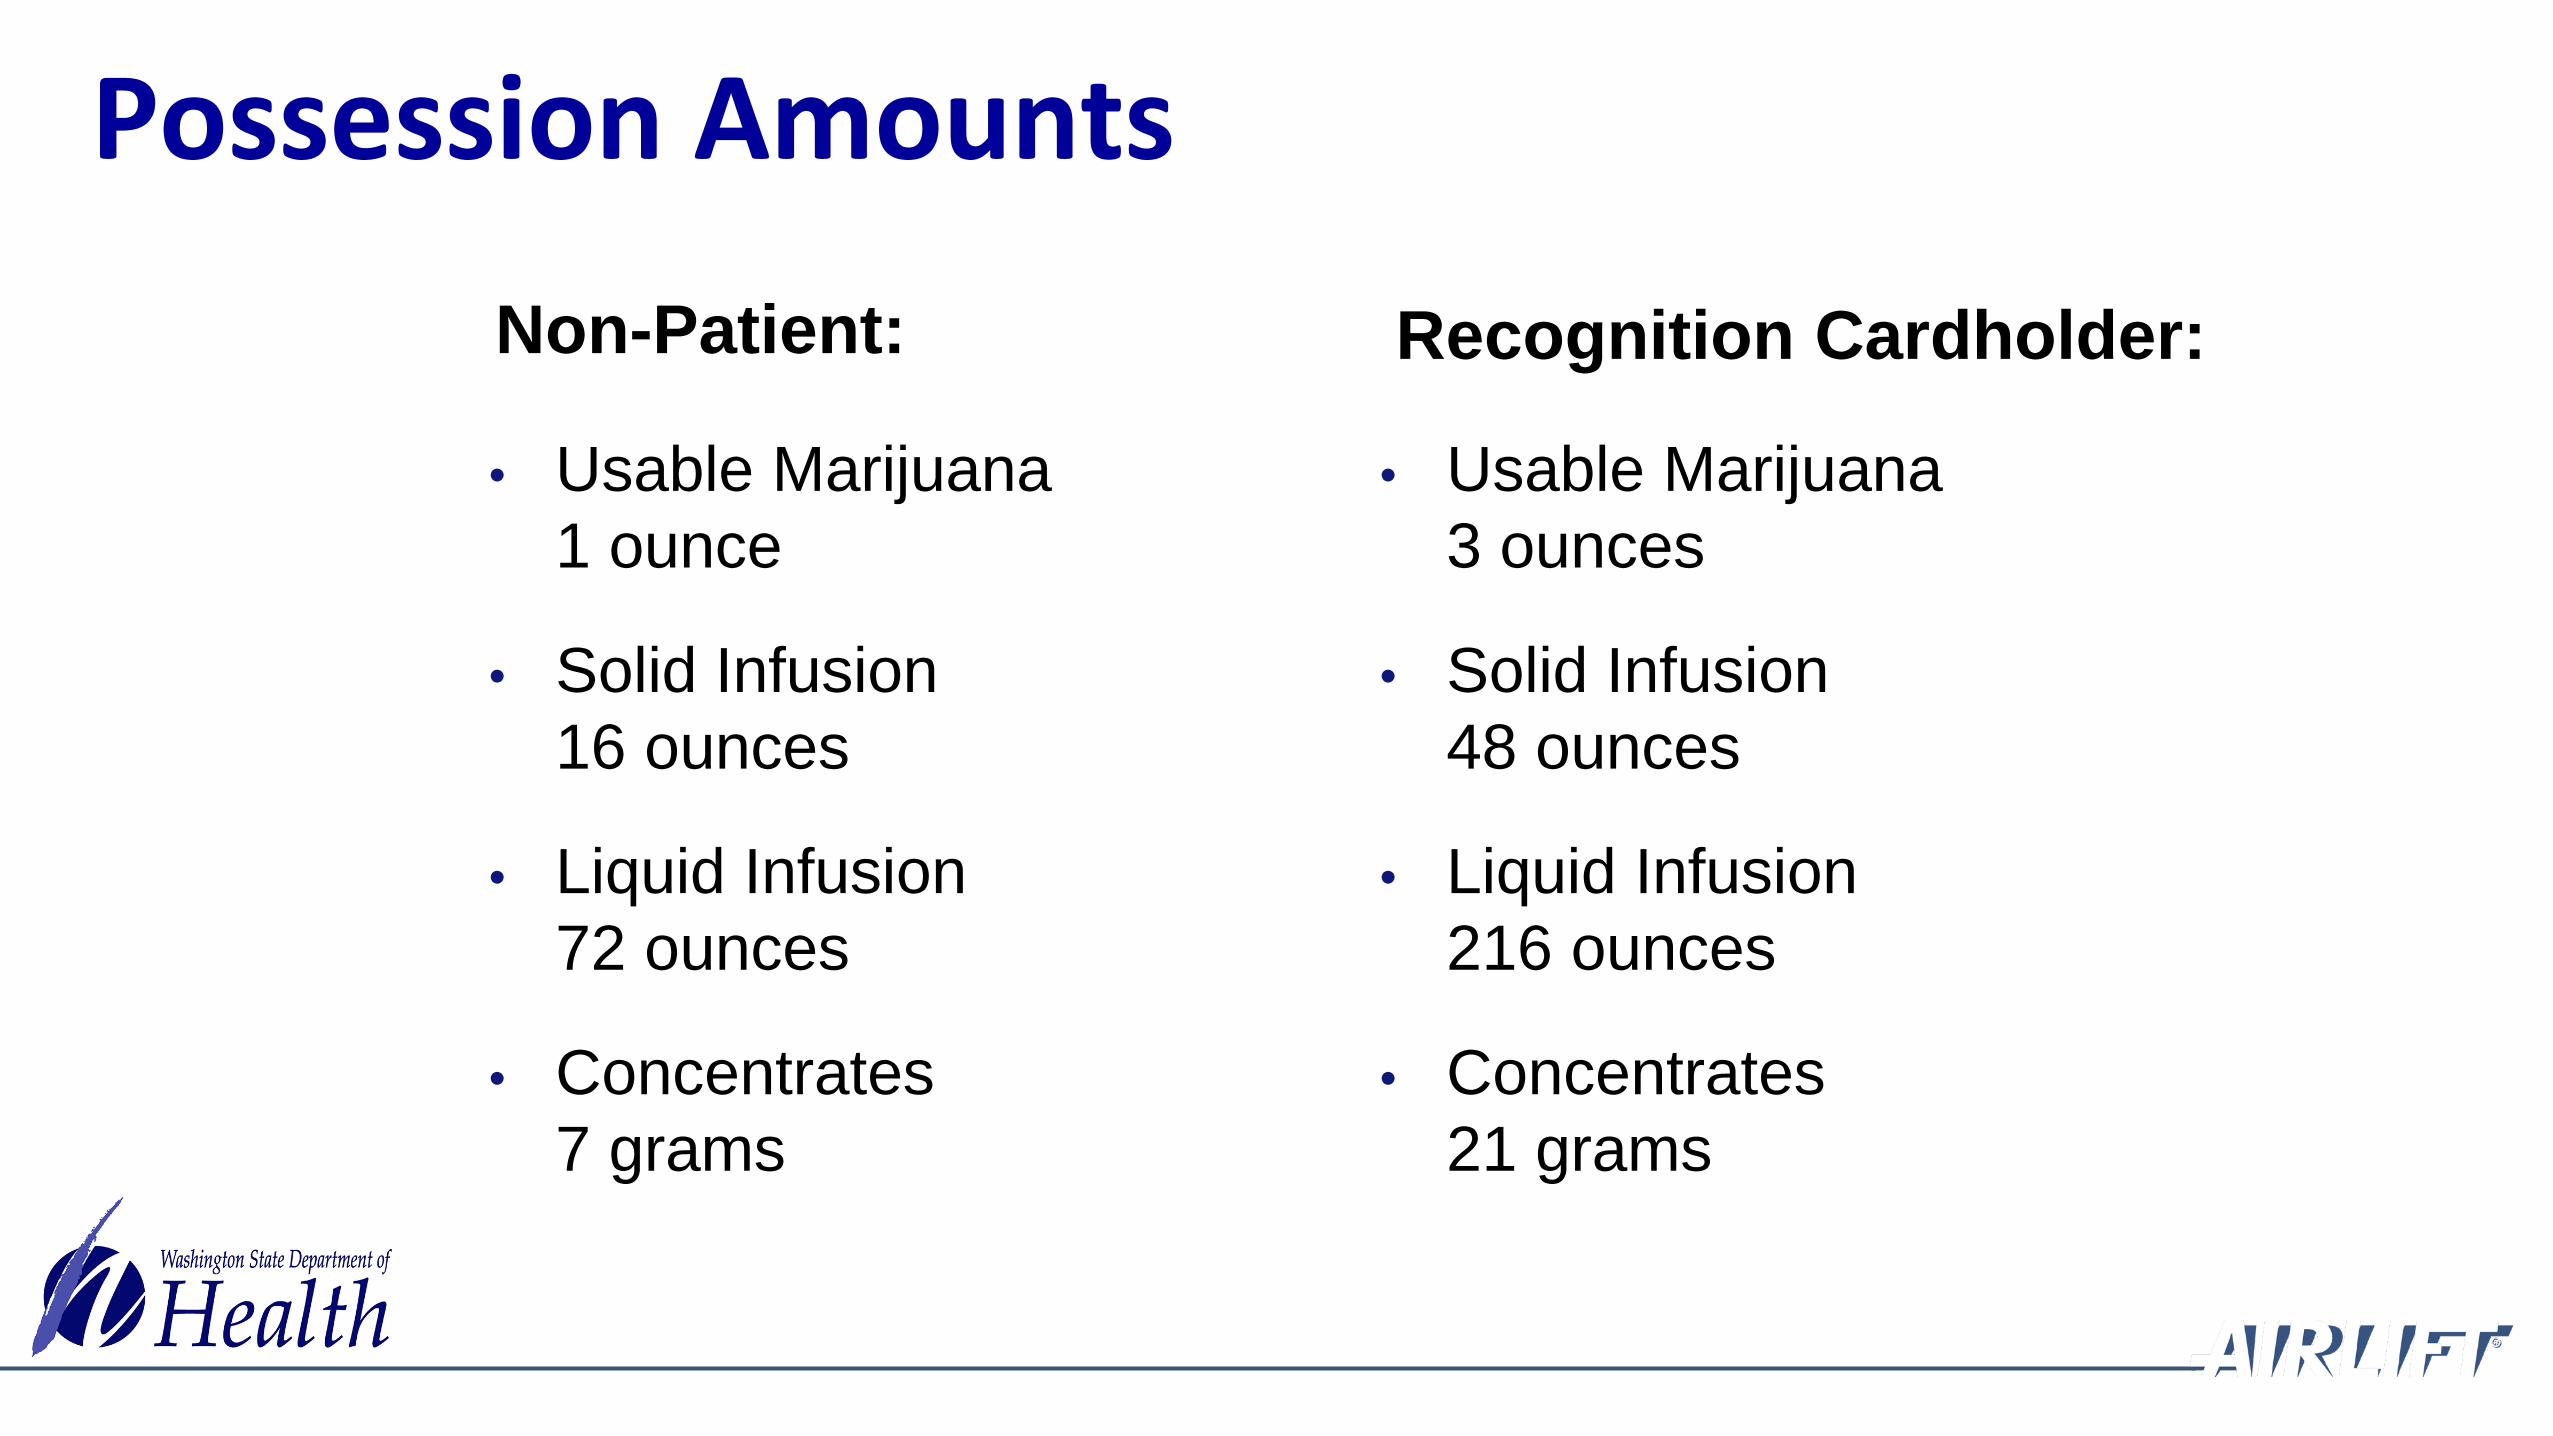
Possession AmountsNon-Patient: Recognition Cardholder:
• Usable Marijuana1 ounce
• Solid Infusion16 ounces
• Liquid Infusion72 ounces
• Concentrates 7 grams
• Usable Marijuana3 ounces
• Solid Infusion48 ounces
• Liquid Infusion216 ounces
• Concentrates21 grams

Hosted in the cloud using a browser-based Software as a Service (SaaS) application.
Will never require user to load updates.
Responsive, mobile design
Modern, intuitive, easy to use
About the System

System uses industry standard security best practices.
Other safety features: intrusion detection, web application firewalls, and monitoring software are in place to detect, alert, and prevent unauthorized access.
Requires users to login at least monthly or their account will be temporarily deactivated.
Privacy policy is published here: cloudpwr.com/privacy
System is Secure
Presenter
Presentation Notes

Equipment Requirements
By law, the following equipment is required to access the database system and create recognition cards.

Any modern computer or mobile device. The system is optimized for Mobile iOS.
Modern web browser. The system is optimized for Google Chrome.
Anti-virus software and ad blockers can affect system – you may need to disable.
Hardware

Digital camera with memory card or cable connection to transfer image from camera to system or iOS device.
Light color blank backdrop – may want to have two options to accommodate patients with very light hair.
Good lighting to eliminate shadows.
Camera and Photo-Taking Area
At least 300 dpi color laser or ink-jet printer.
Note: To ensure all cards look the same and that all security features work, the cards may only be printed on blank white paper and in color.
Printer

Heated lamination only.
Laminator
Presenter
Presentation Notes

BudtenderCertified ConsultantDelegate
User Roles & Permissions
Master Account Holder
There are four roles within the system and everyone in the store has a role.Note: Everyone who accesses the system must log-in at least once per month to keep their profile active. If your profile becomes deactivated, contact the department at 360-236-4819, Option 1.
The system validates against various data:
o Owners are checked against WSLCB data.
o Consultants must enter their DOH consultant certificate number to be recognized in that role within the system.
o Employees are vetted and linked to store(s) by master account holder or delegate.
Roles Validation

Store Owner:
1. Activates store(s)
Store assignment based on data from the WSLCB Only one master account holder per storeMay remove ownership (do with caution)
2. Links employees (consultants/budtenders) to store
3. Delegate responsibility
Master Account Holder
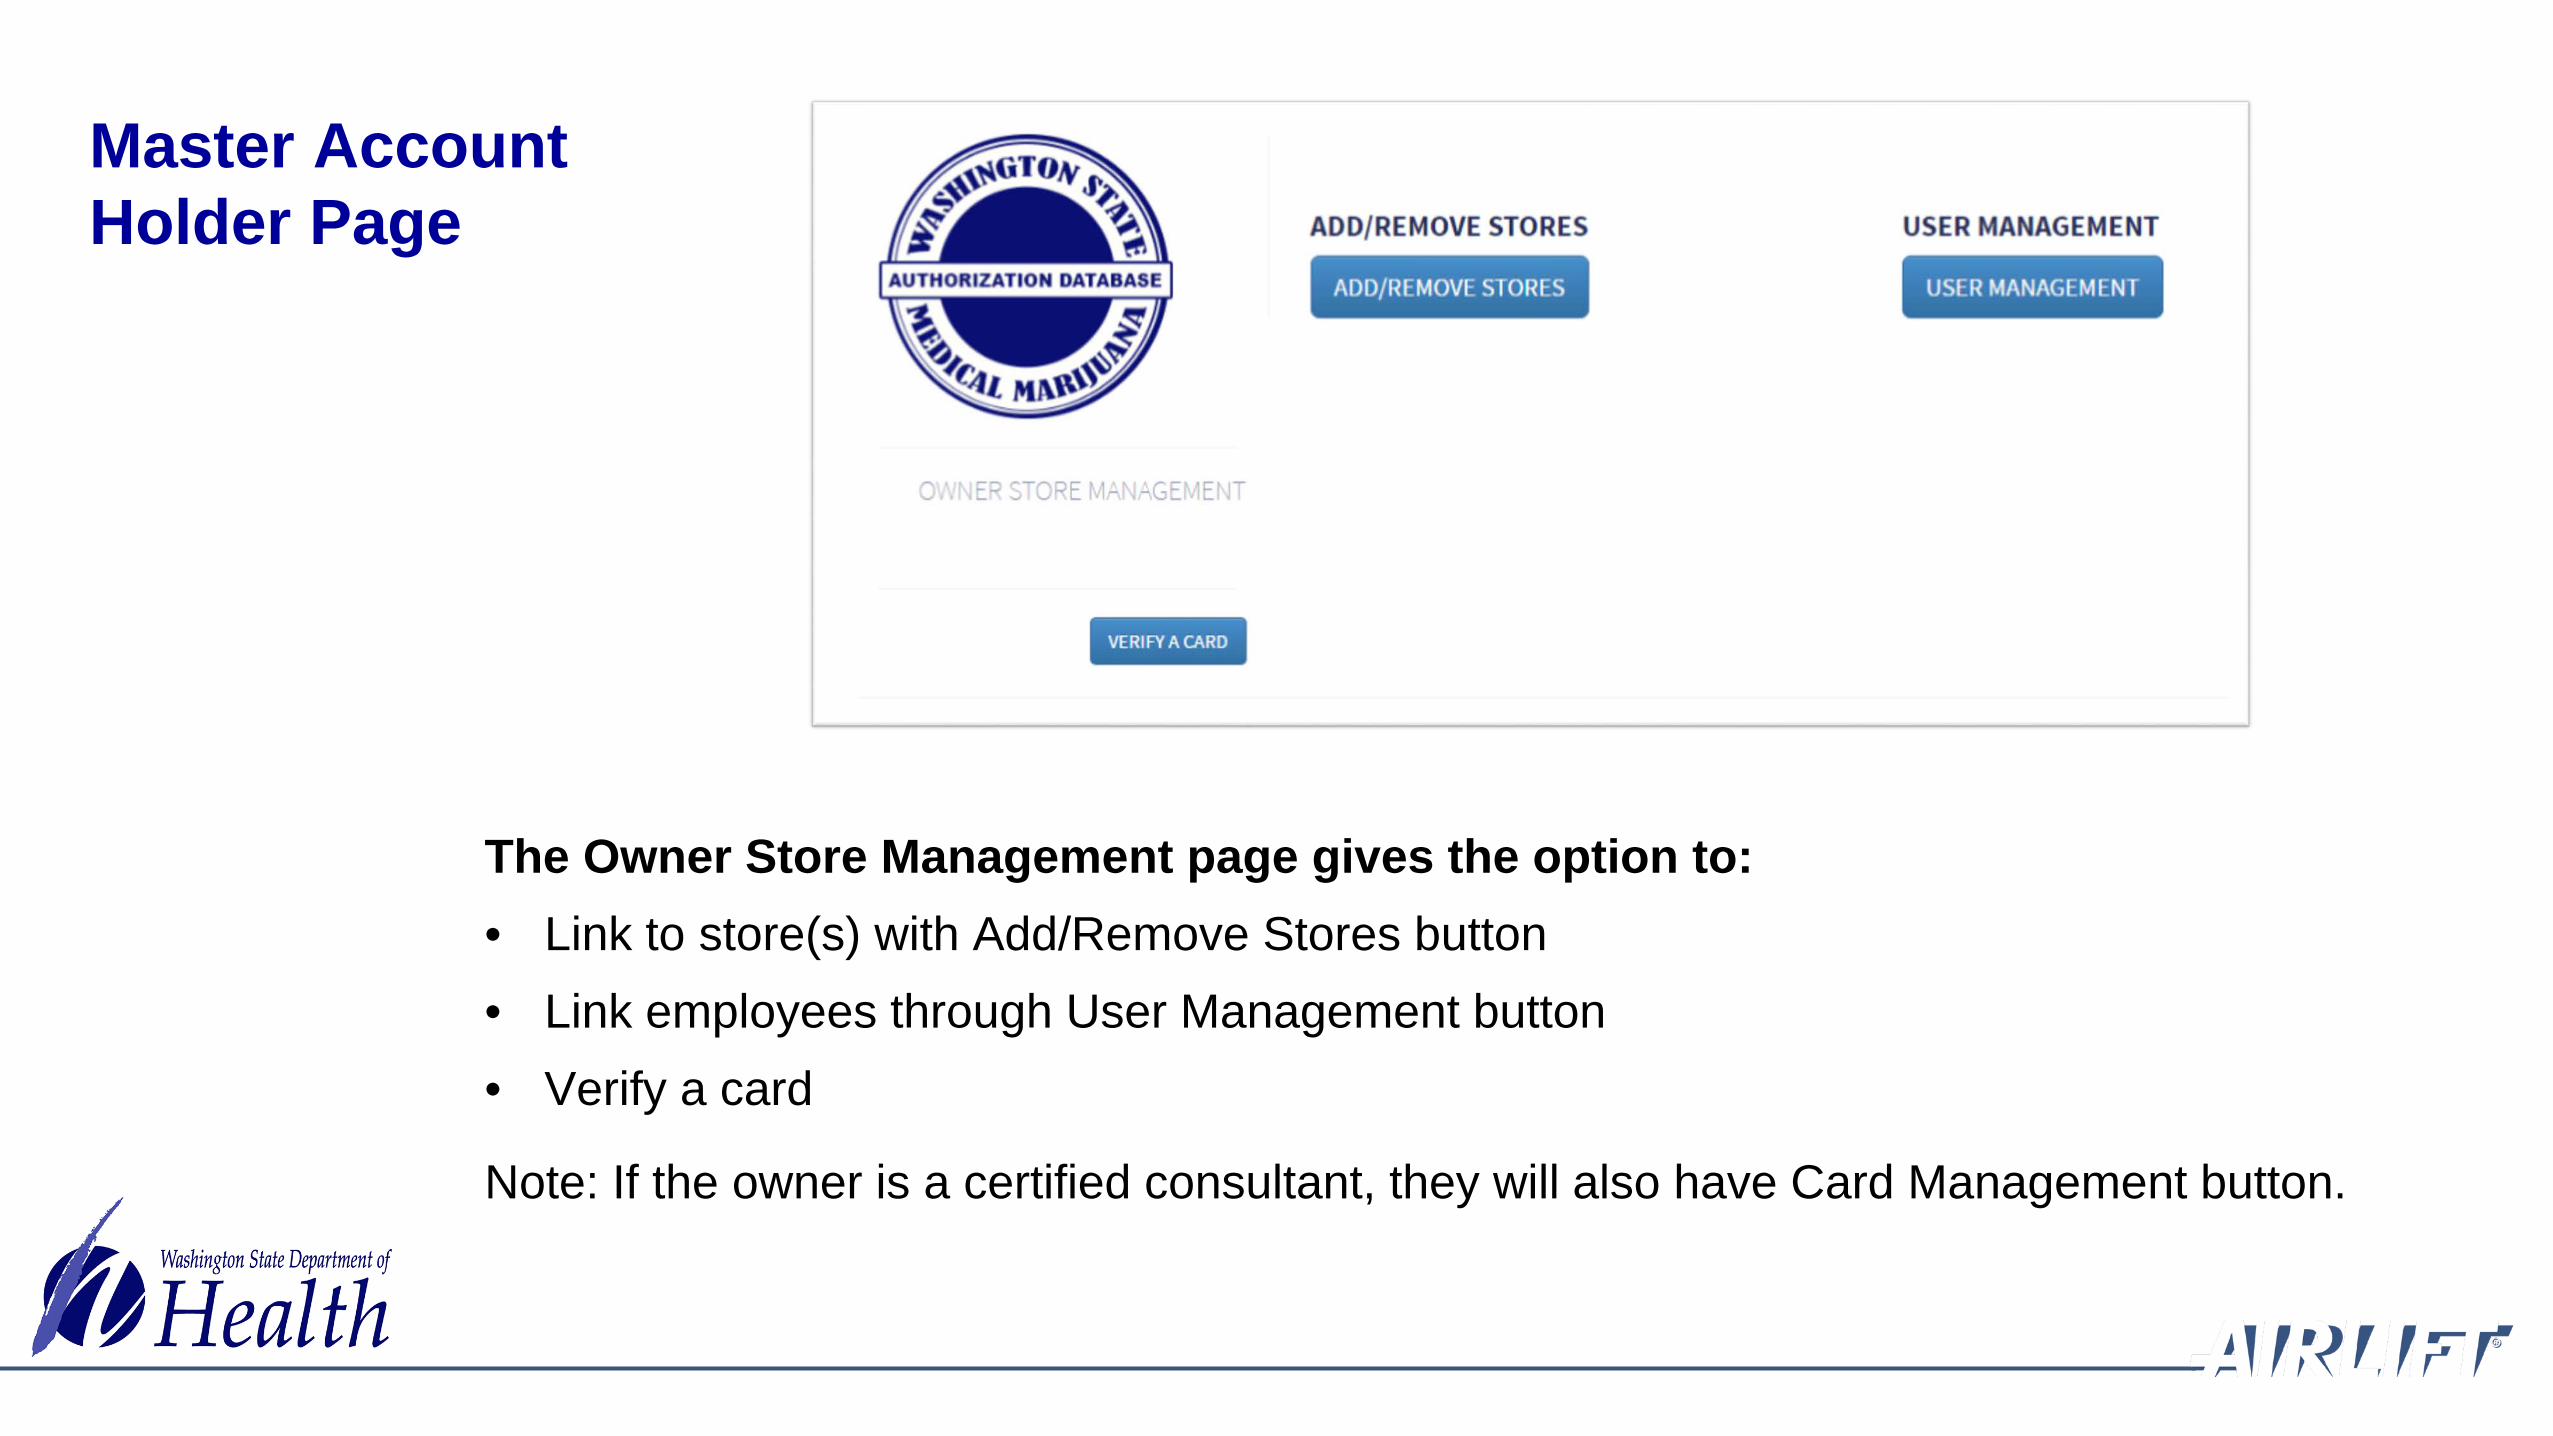
The Owner Store Management page gives the option to:• Link to store(s) with Add/Remove Stores button• Link employees through User Management button• Verify a card
Note: If the owner is a certified consultant, they will also have Card Management button.
Master Account Holder Page

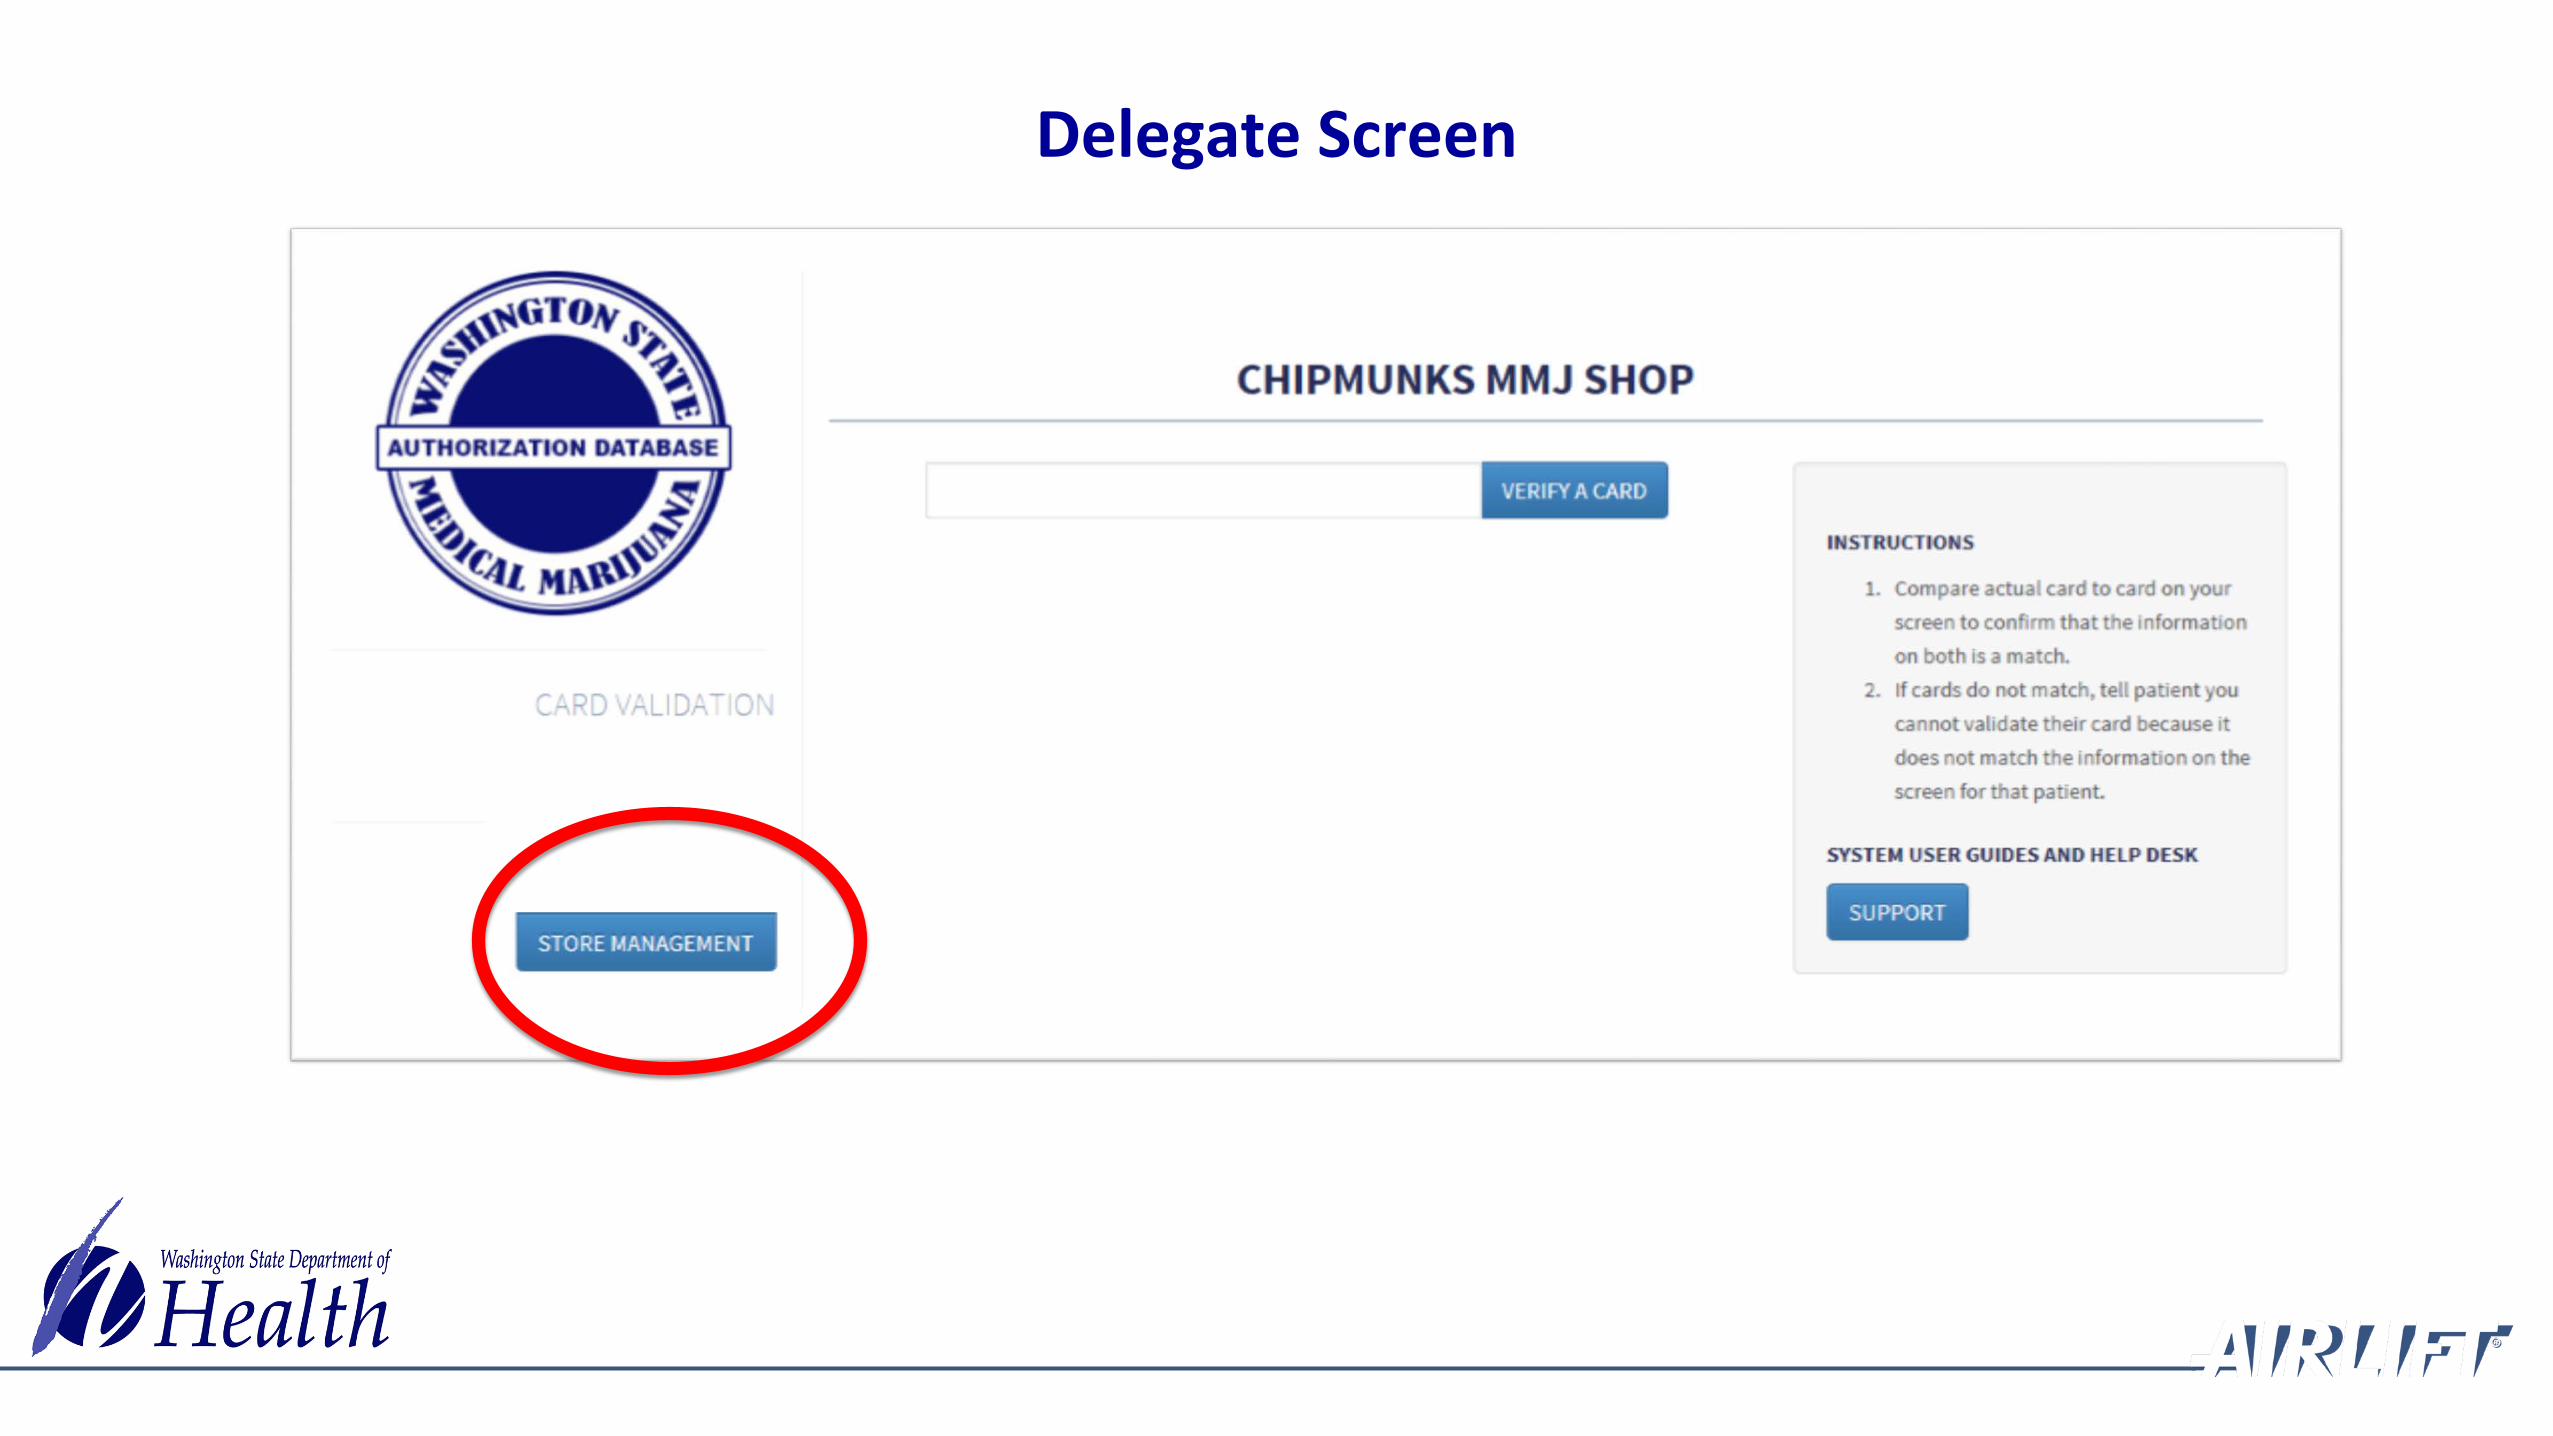
Supervisor/Manager:
Assumes functions of store management
May be assigned the task of linking employees and consultants
Must be linked to store by master account holder (store owner)
May be assigned to multiple stores
Store may have multiple delegates
Delegate
Delegate Screen
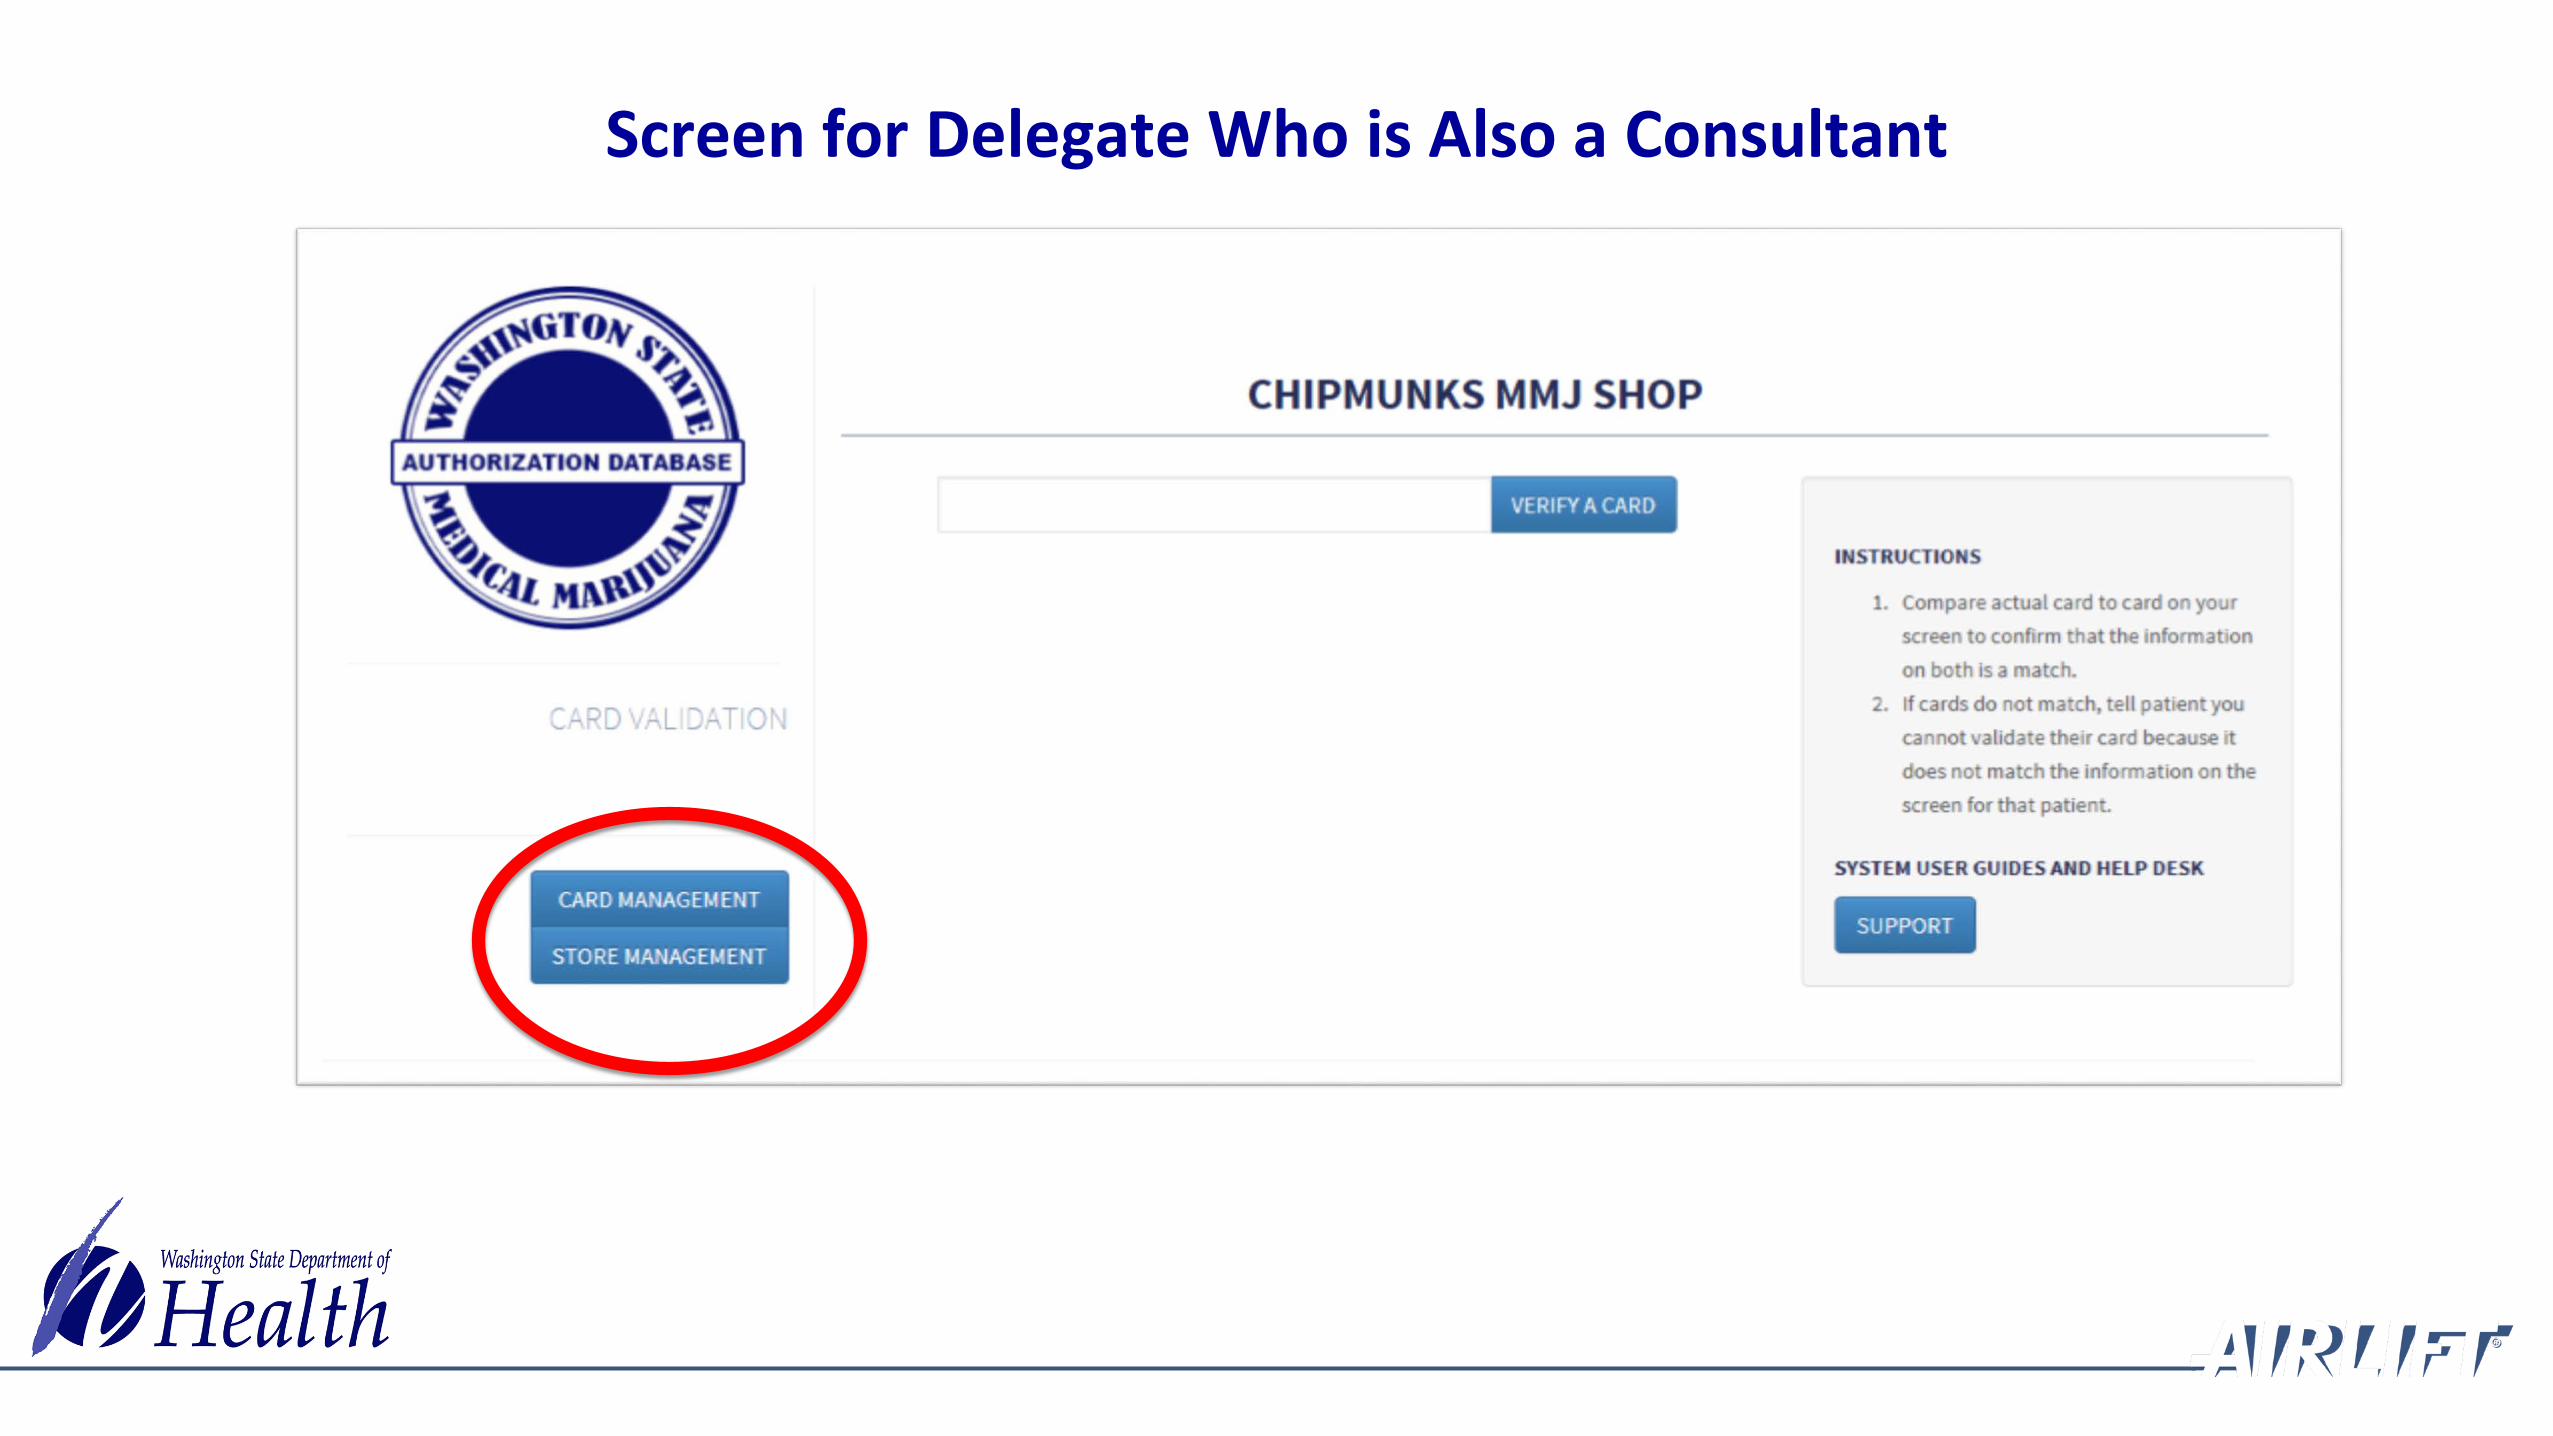
Screen for Delegate Who is Also a Consultant
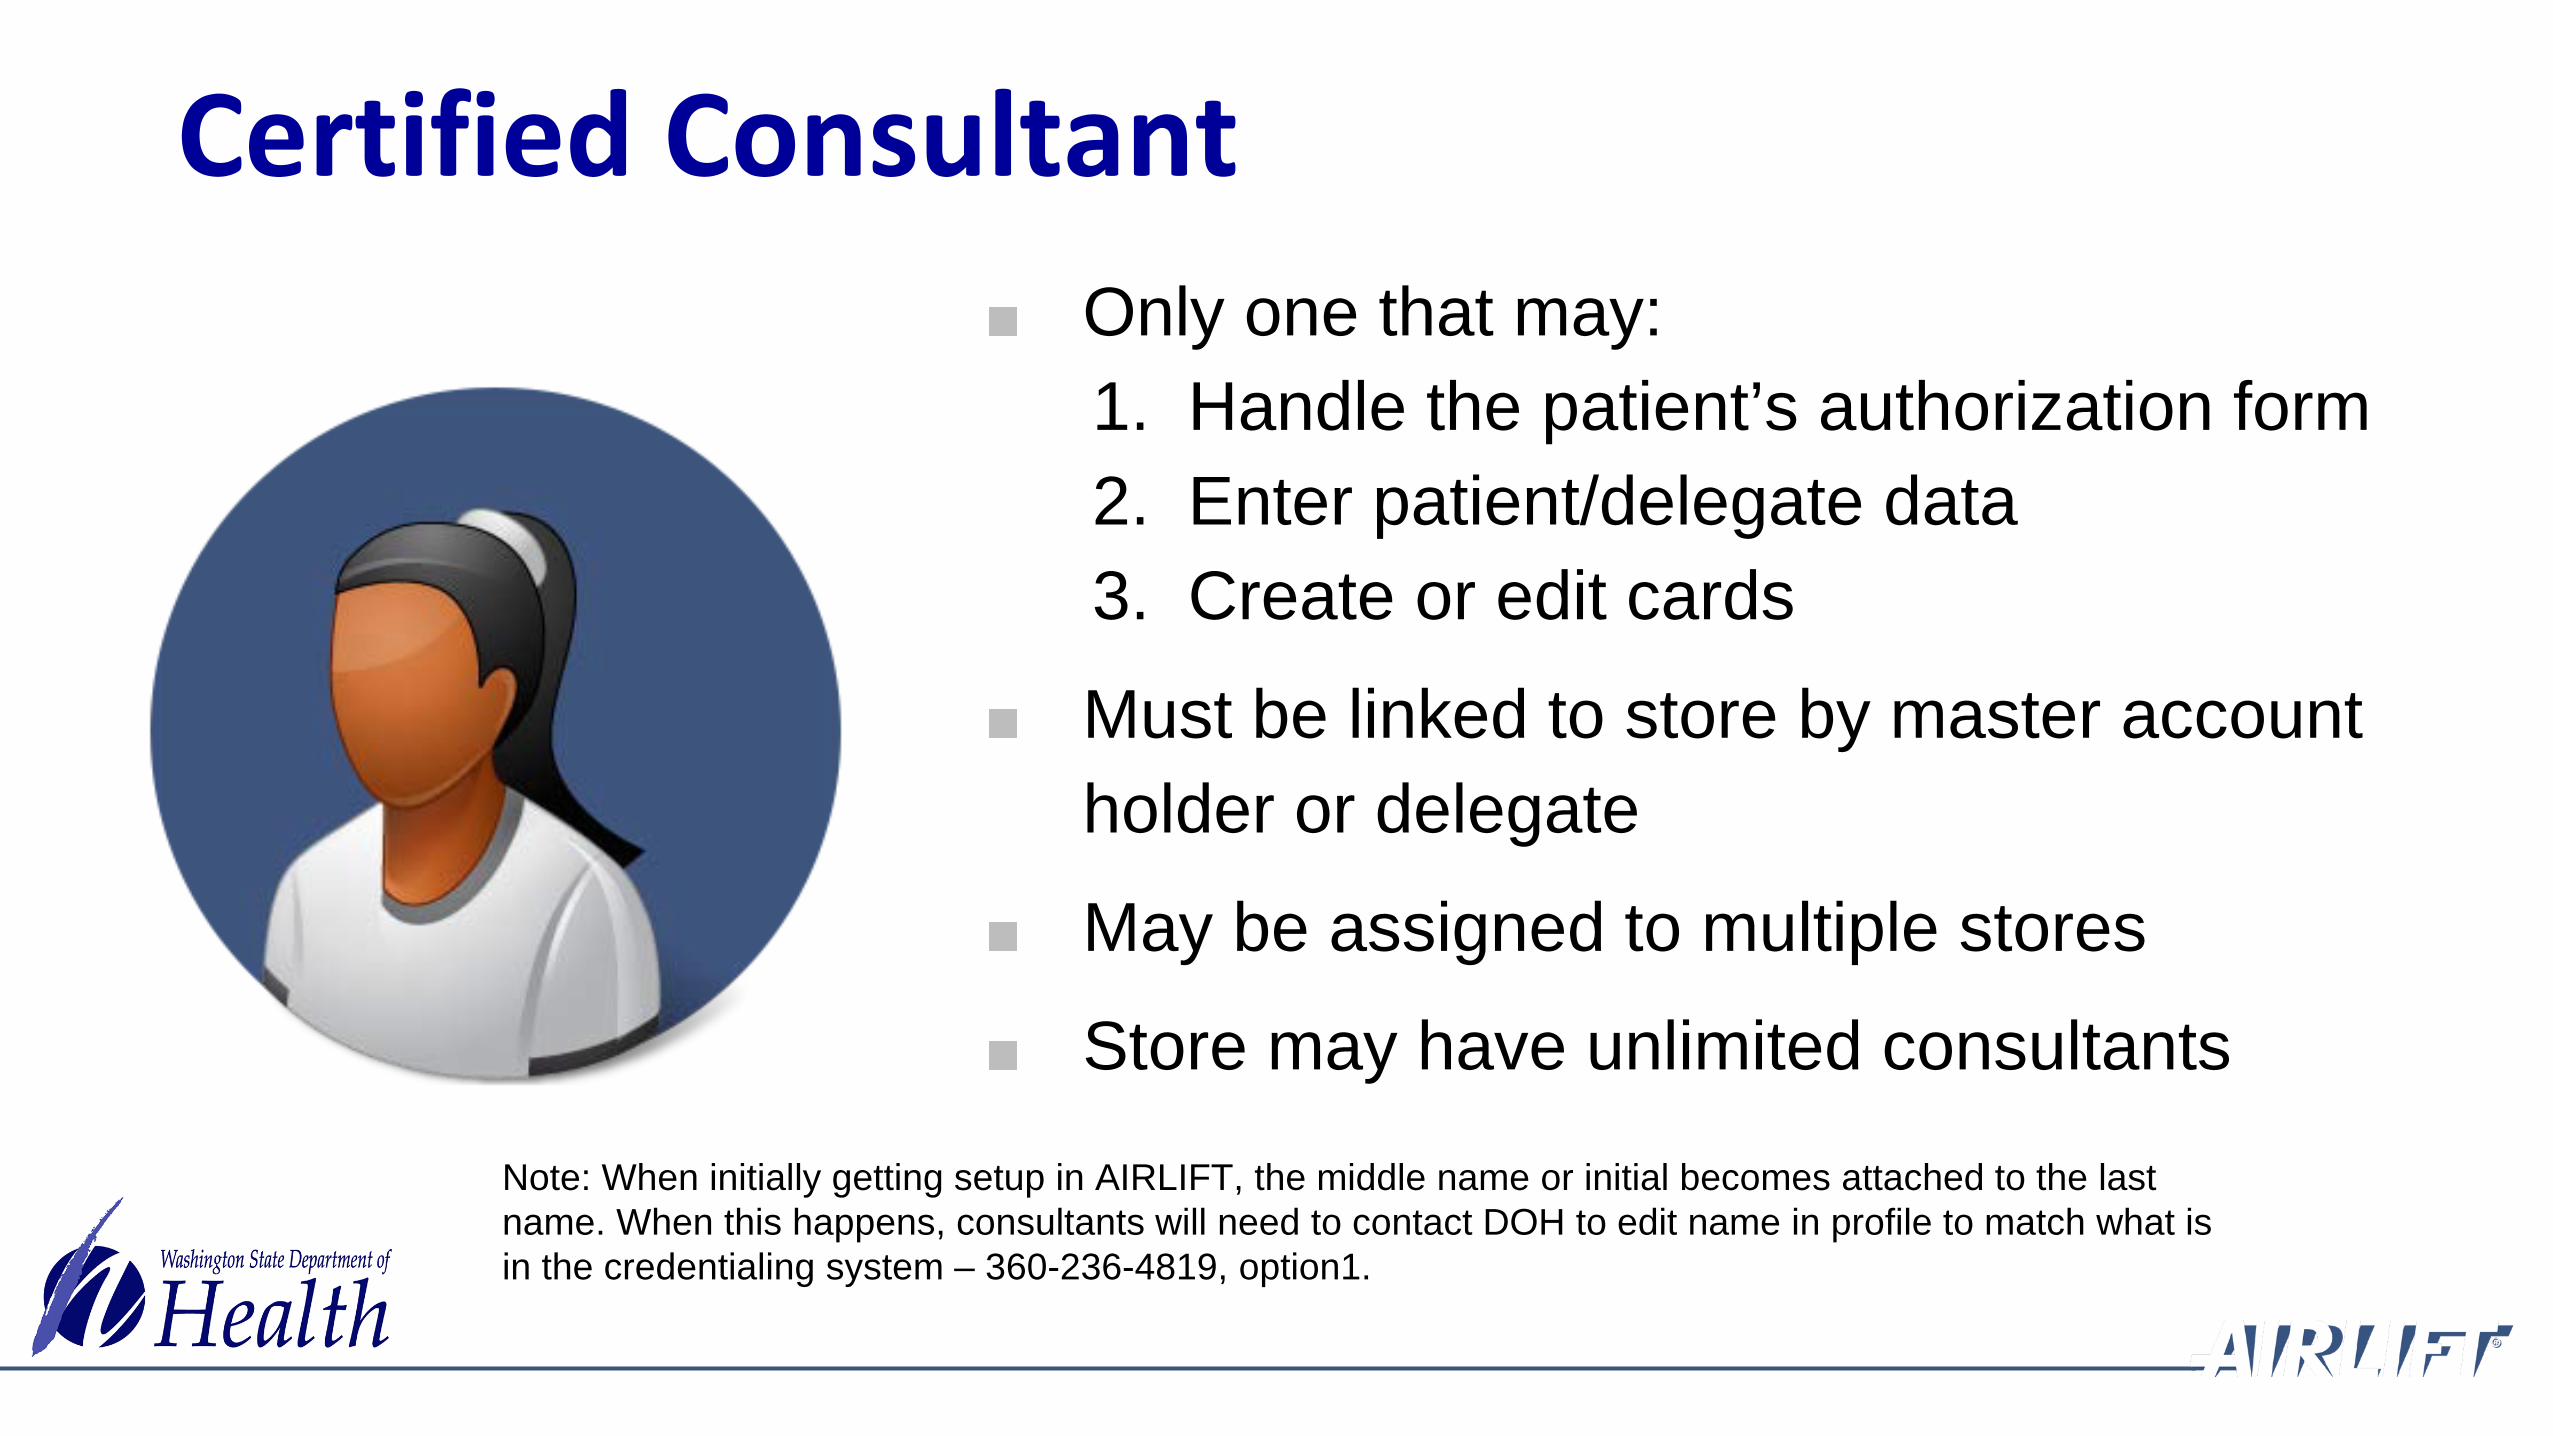
Only one that may:1. Handle the patient’s authorization form2. Enter patient/delegate data3. Create or edit cards
Must be linked to store by master account holder or delegate
May be assigned to multiple stores
Store may have unlimited consultants
Certified Consultant
Note: When initially getting setup in AIRLIFT, the middle name or initial becomes attached to the last name. When this happens, consultants will need to contact DOH to edit name in profile to match what is in the credentialing system – 360-236-4819, option1.

Consultant Screen

May only verify cards and complete sales.Must be linked to the store by master account holder or delegate May be assigned to multiple storesStore may have unlimited employees
Note: All medical sales must be verified through the medical marijuana database system and entered into your Point of Sale (POS) system using just the recognition card number. Do not enter any personal identifying patient information into the POS.
Budtender
Presenter
Presentation Notes
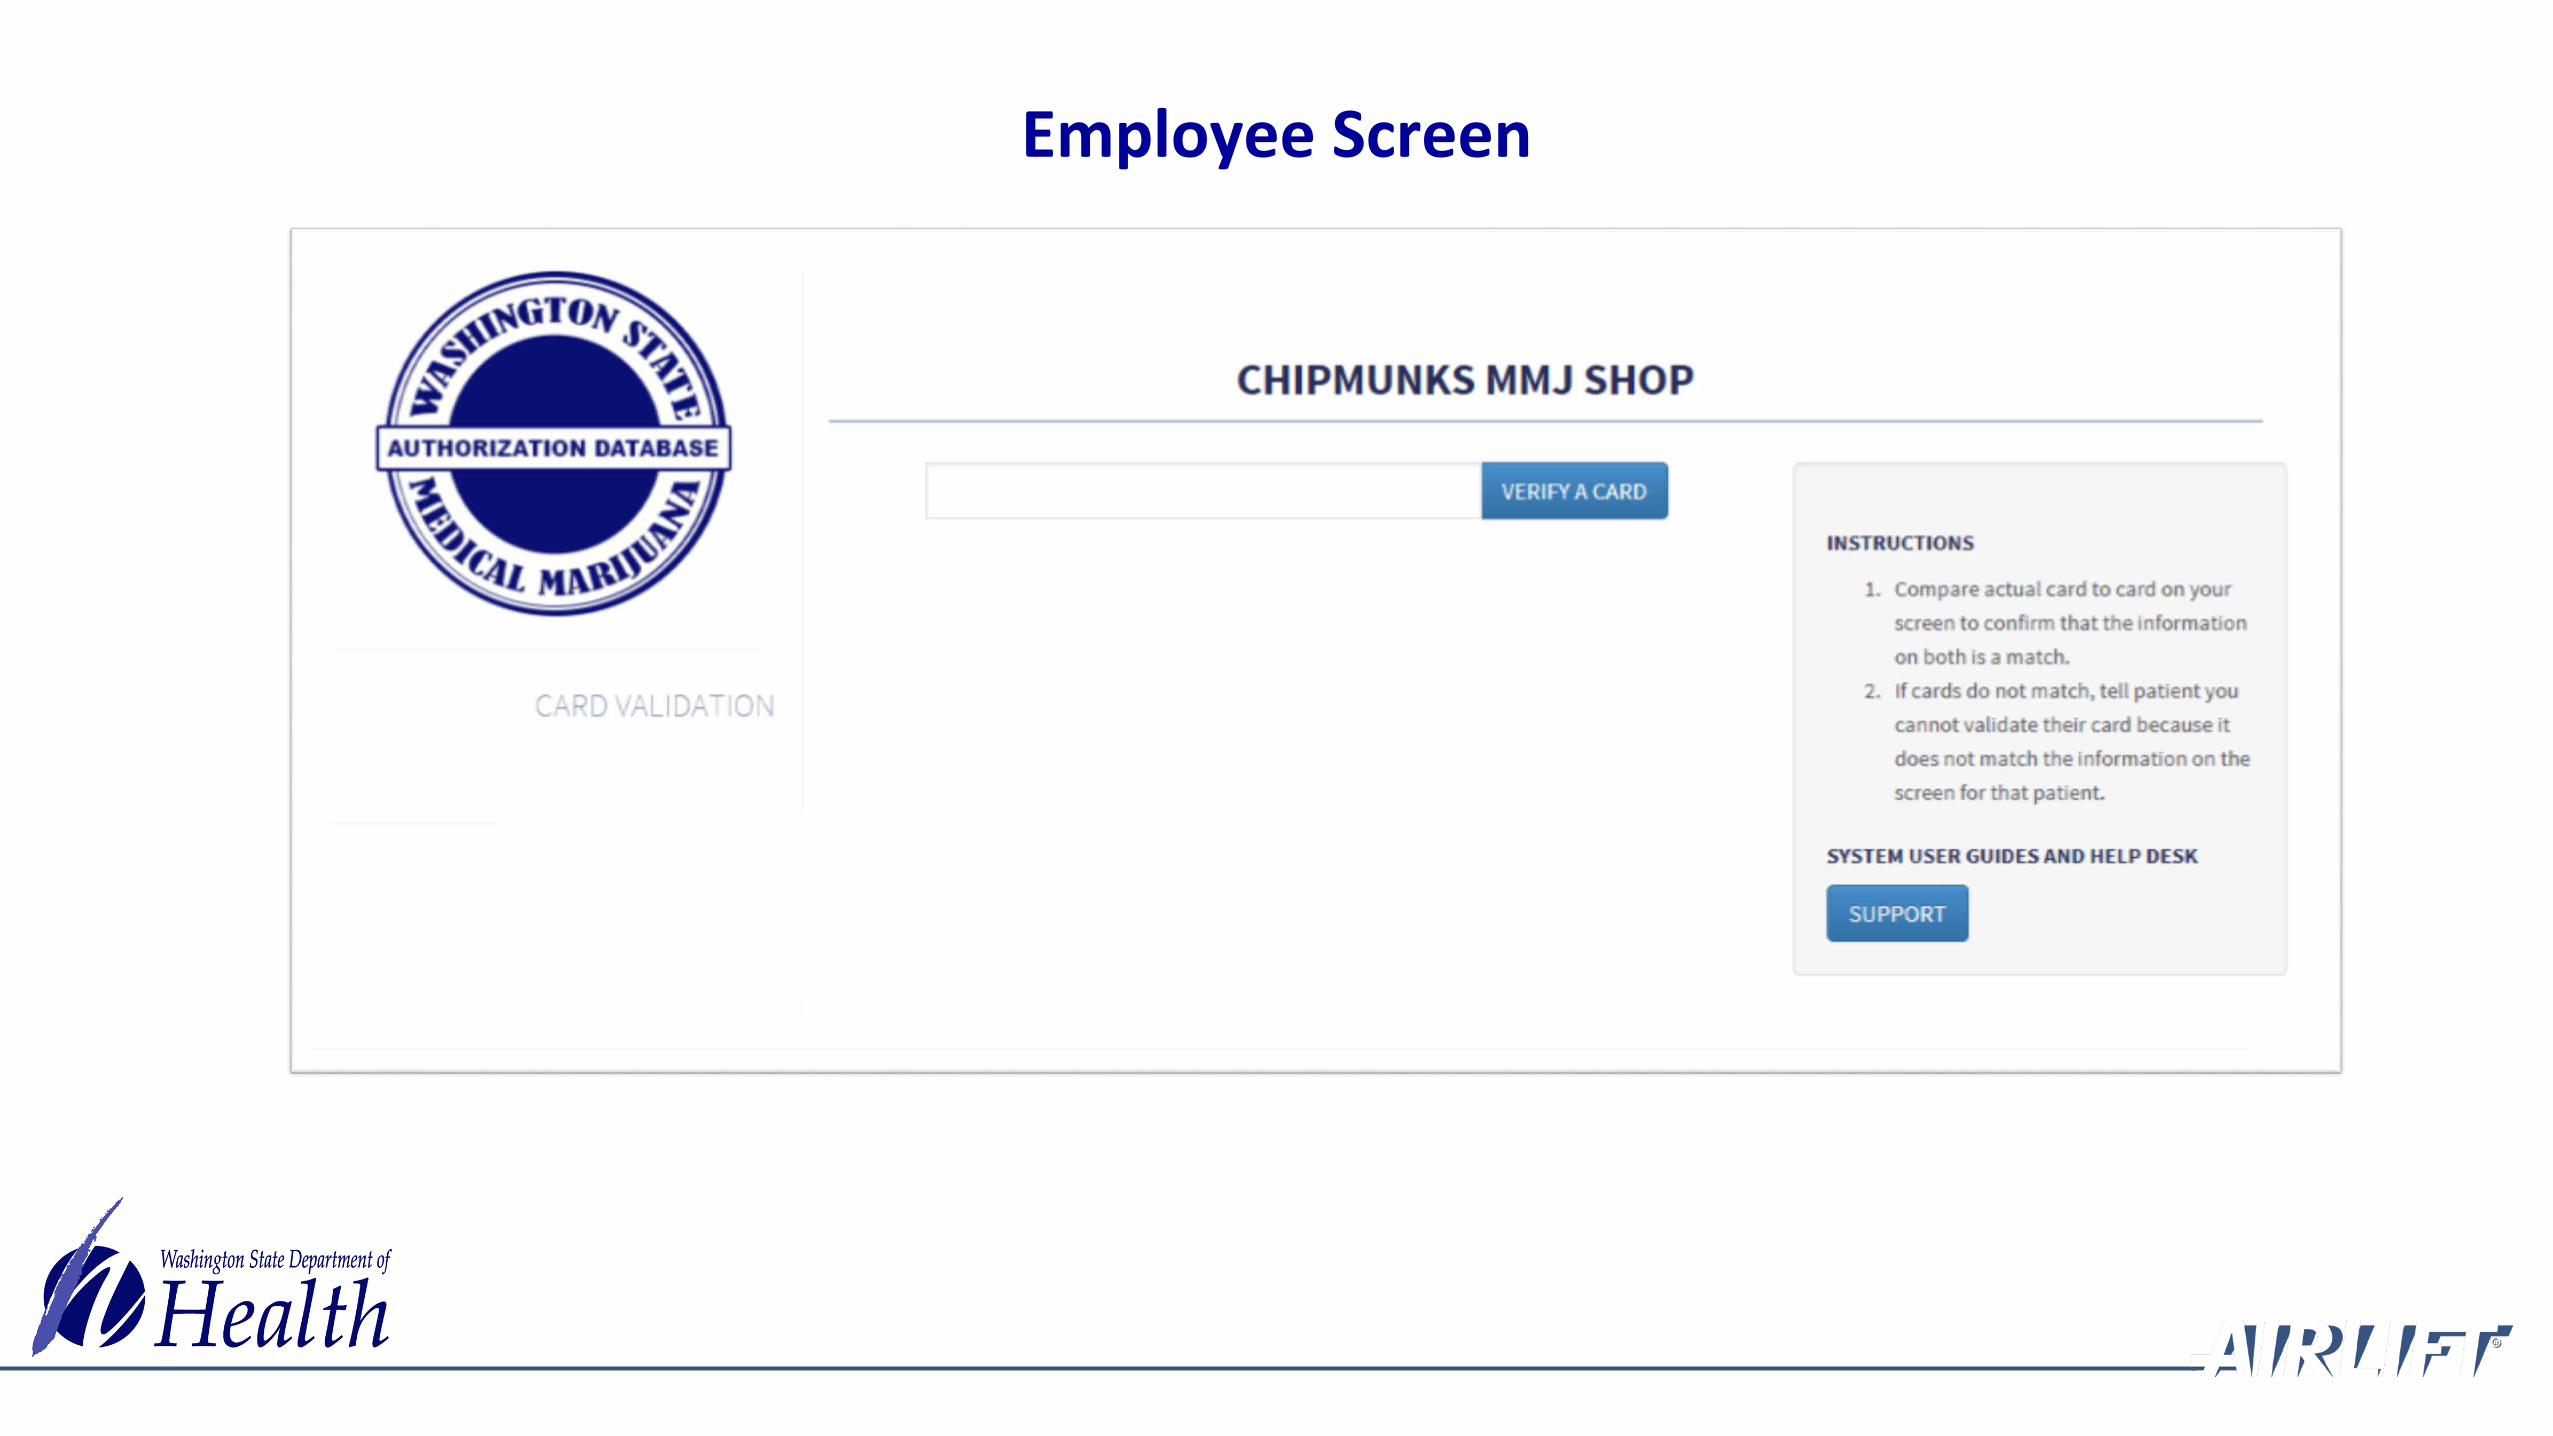
Employee Screen

Part 2: How do i register to use the database?
All store staff who will be completing purchases or creating cards for patients should create their own user account. This training will walk you through the steps below to register in SecureAccess Washington (SAW):
Step 1: Each user will create their own SAW account
Step 2: Complete the identity verification process
Step 3: Add the Medical Marijuana Authorization System (MMJAS) service to your profile
Step 4: Complete multi-factor authentication (MFA) to add security to your account
Step 5: Complete SAW registration
Step 6: Access the Medical Marijuana Authorization Database (Airlift)
Presenter
Presentation Notes
TITLE & CONTENT Quick Help Tips Text Box: just add text More text boxes can be added if needed
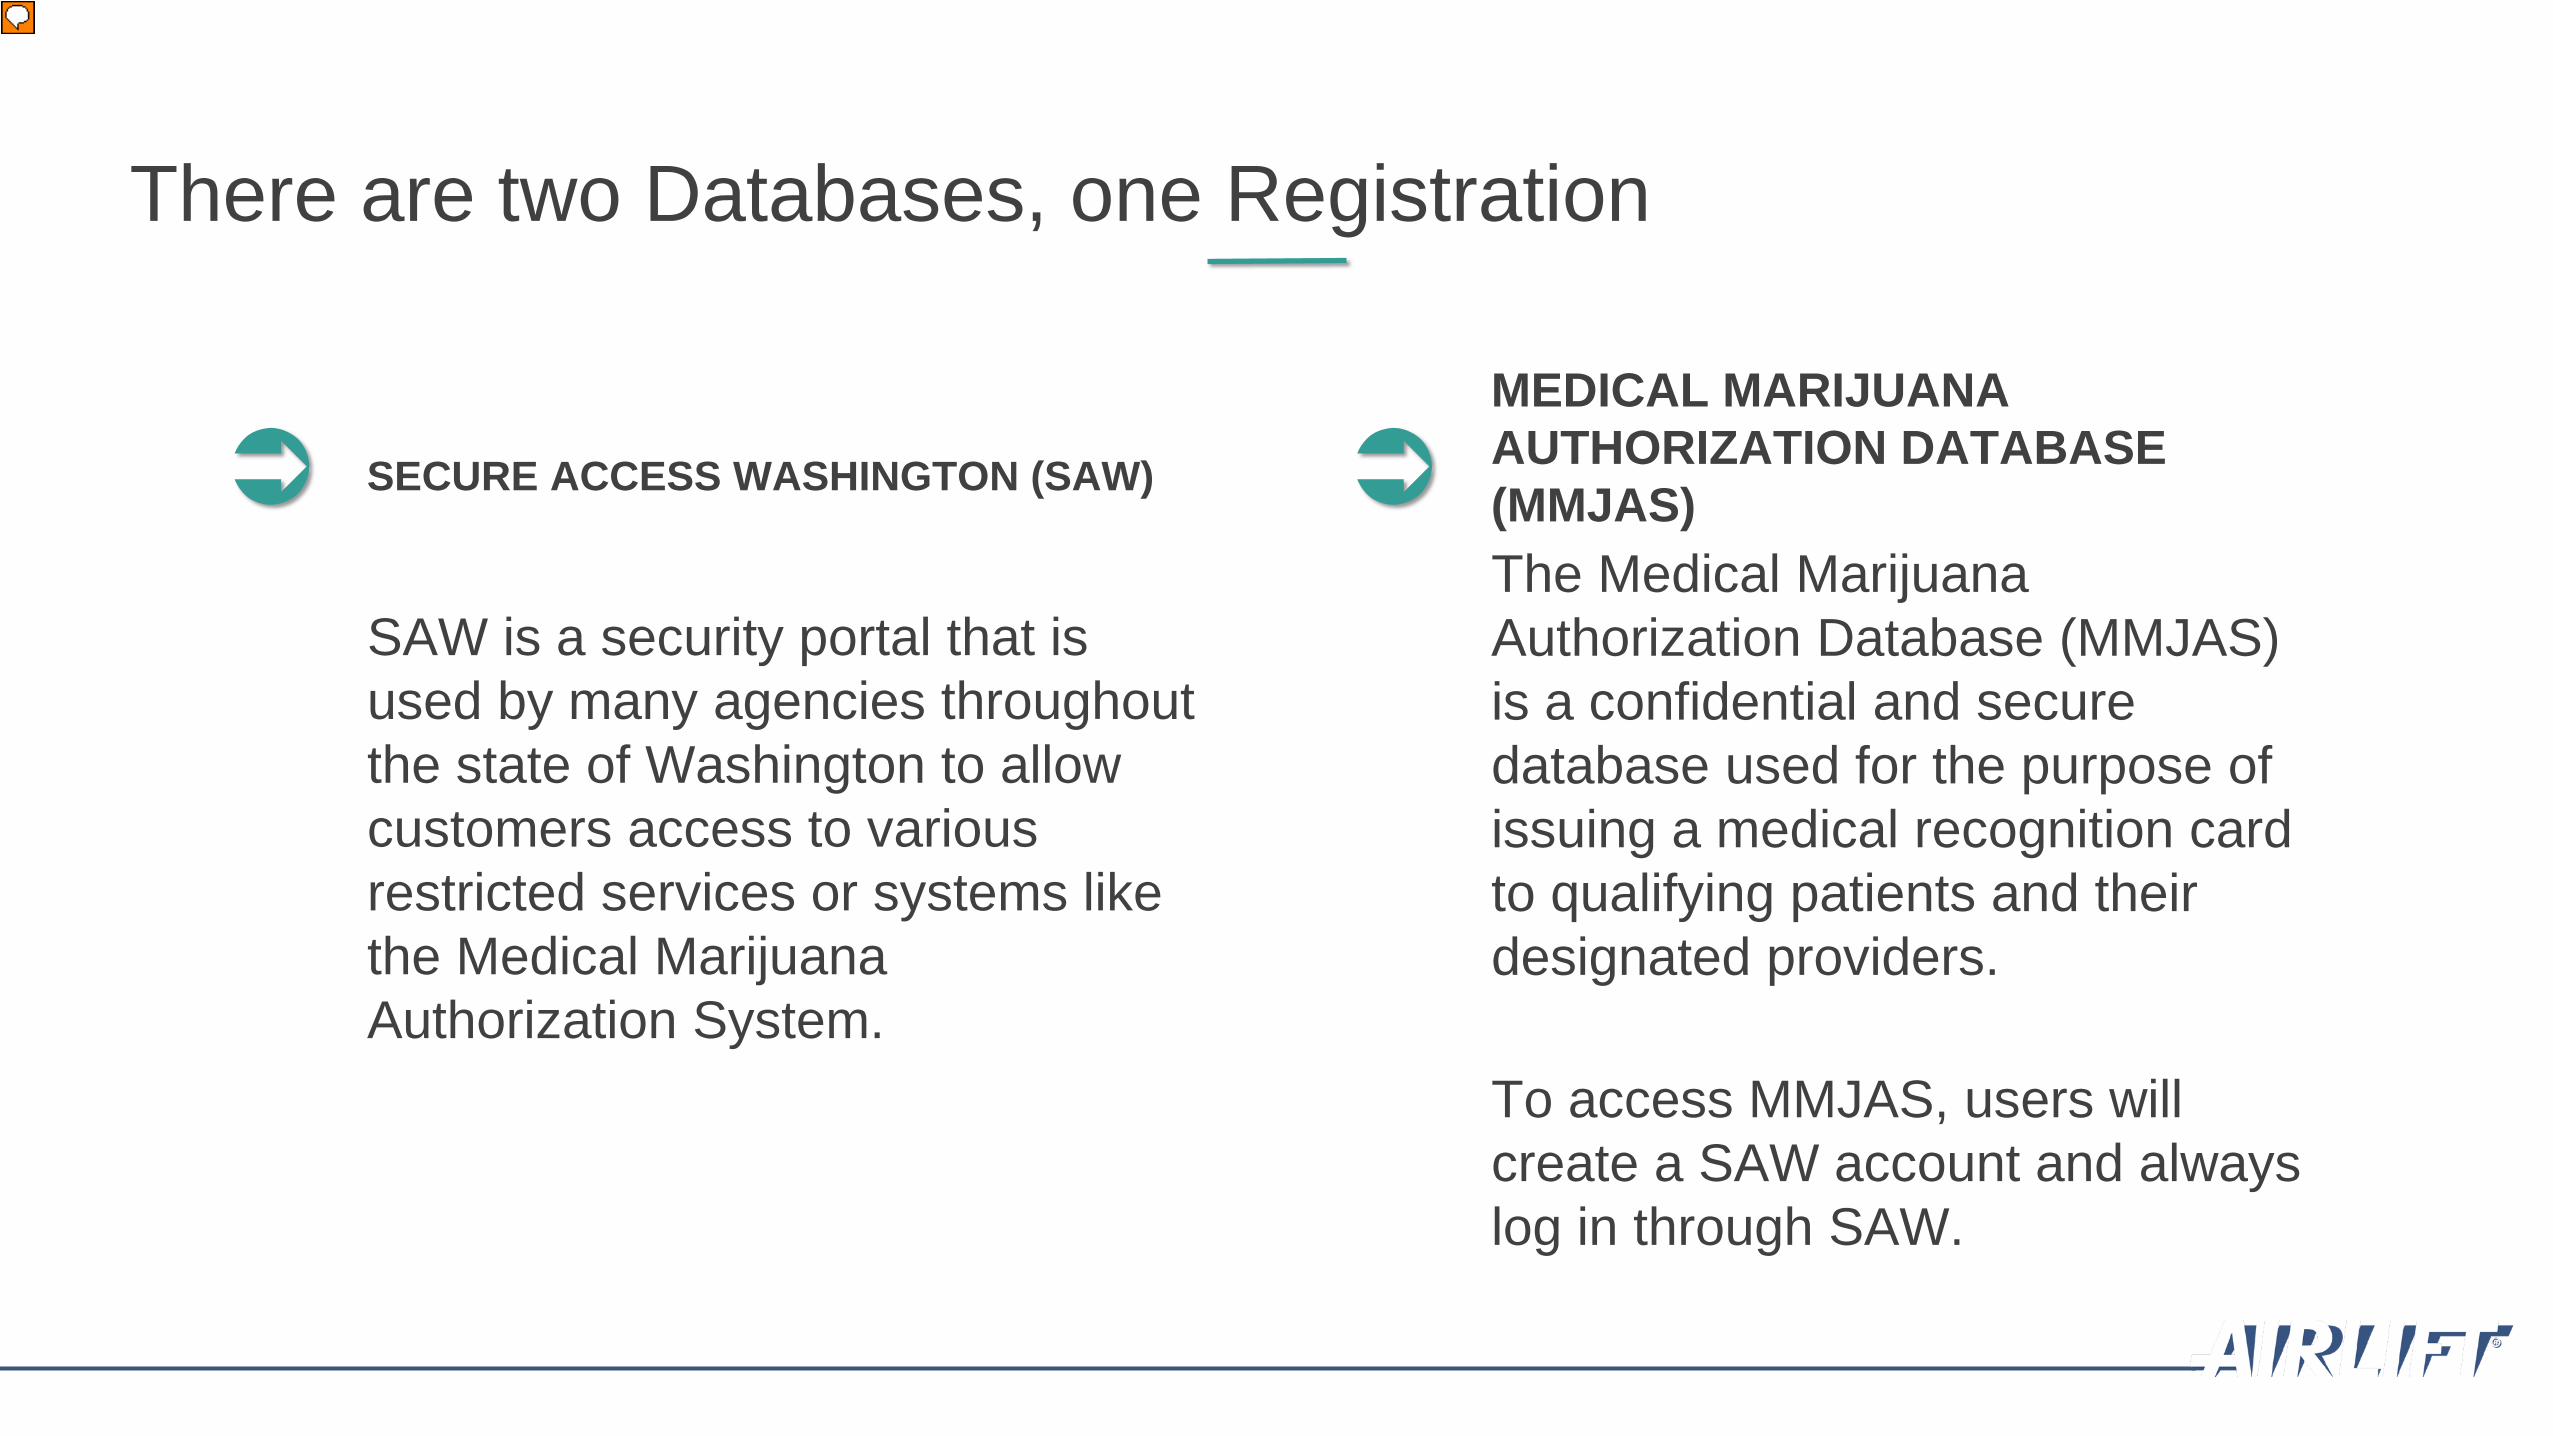
There are two Databases, one Registration
SECURE ACCESS WASHINGTON (SAW)
MEDICAL MARIJUANA AUTHORIZATION DATABASE (MMJAS)
SAW is a security portal that is used by many agencies throughout the state of Washington to allow customers access to various restricted services or systems like the Medical Marijuana Authorization System.
The Medical Marijuana Authorization Database (MMJAS) is a confidential and secure database used for the purpose of issuing a medical recognition card to qualifying patients and their designated providers.
To access MMJAS, users will create a SAW account and always log in through SAW.
Presenter
Presentation Notes
UNORDERED LIST 1 Quick Help Tips Unordered List 1 Box: just add text Text Boxes: just add text Additional Text Boxes: just add text

STEP 1
Create A Secure Access Washington (Saw) Account
Presenter
Presentation Notes
SECTION DIVIDER SLIDE Quick Help Tips Section Divider Box: just add text Chapter Title Box: just add text text is already set to ALL CAPS (preferred look) but it can be changed to sentence cased under Font More text boxes can be added if needed
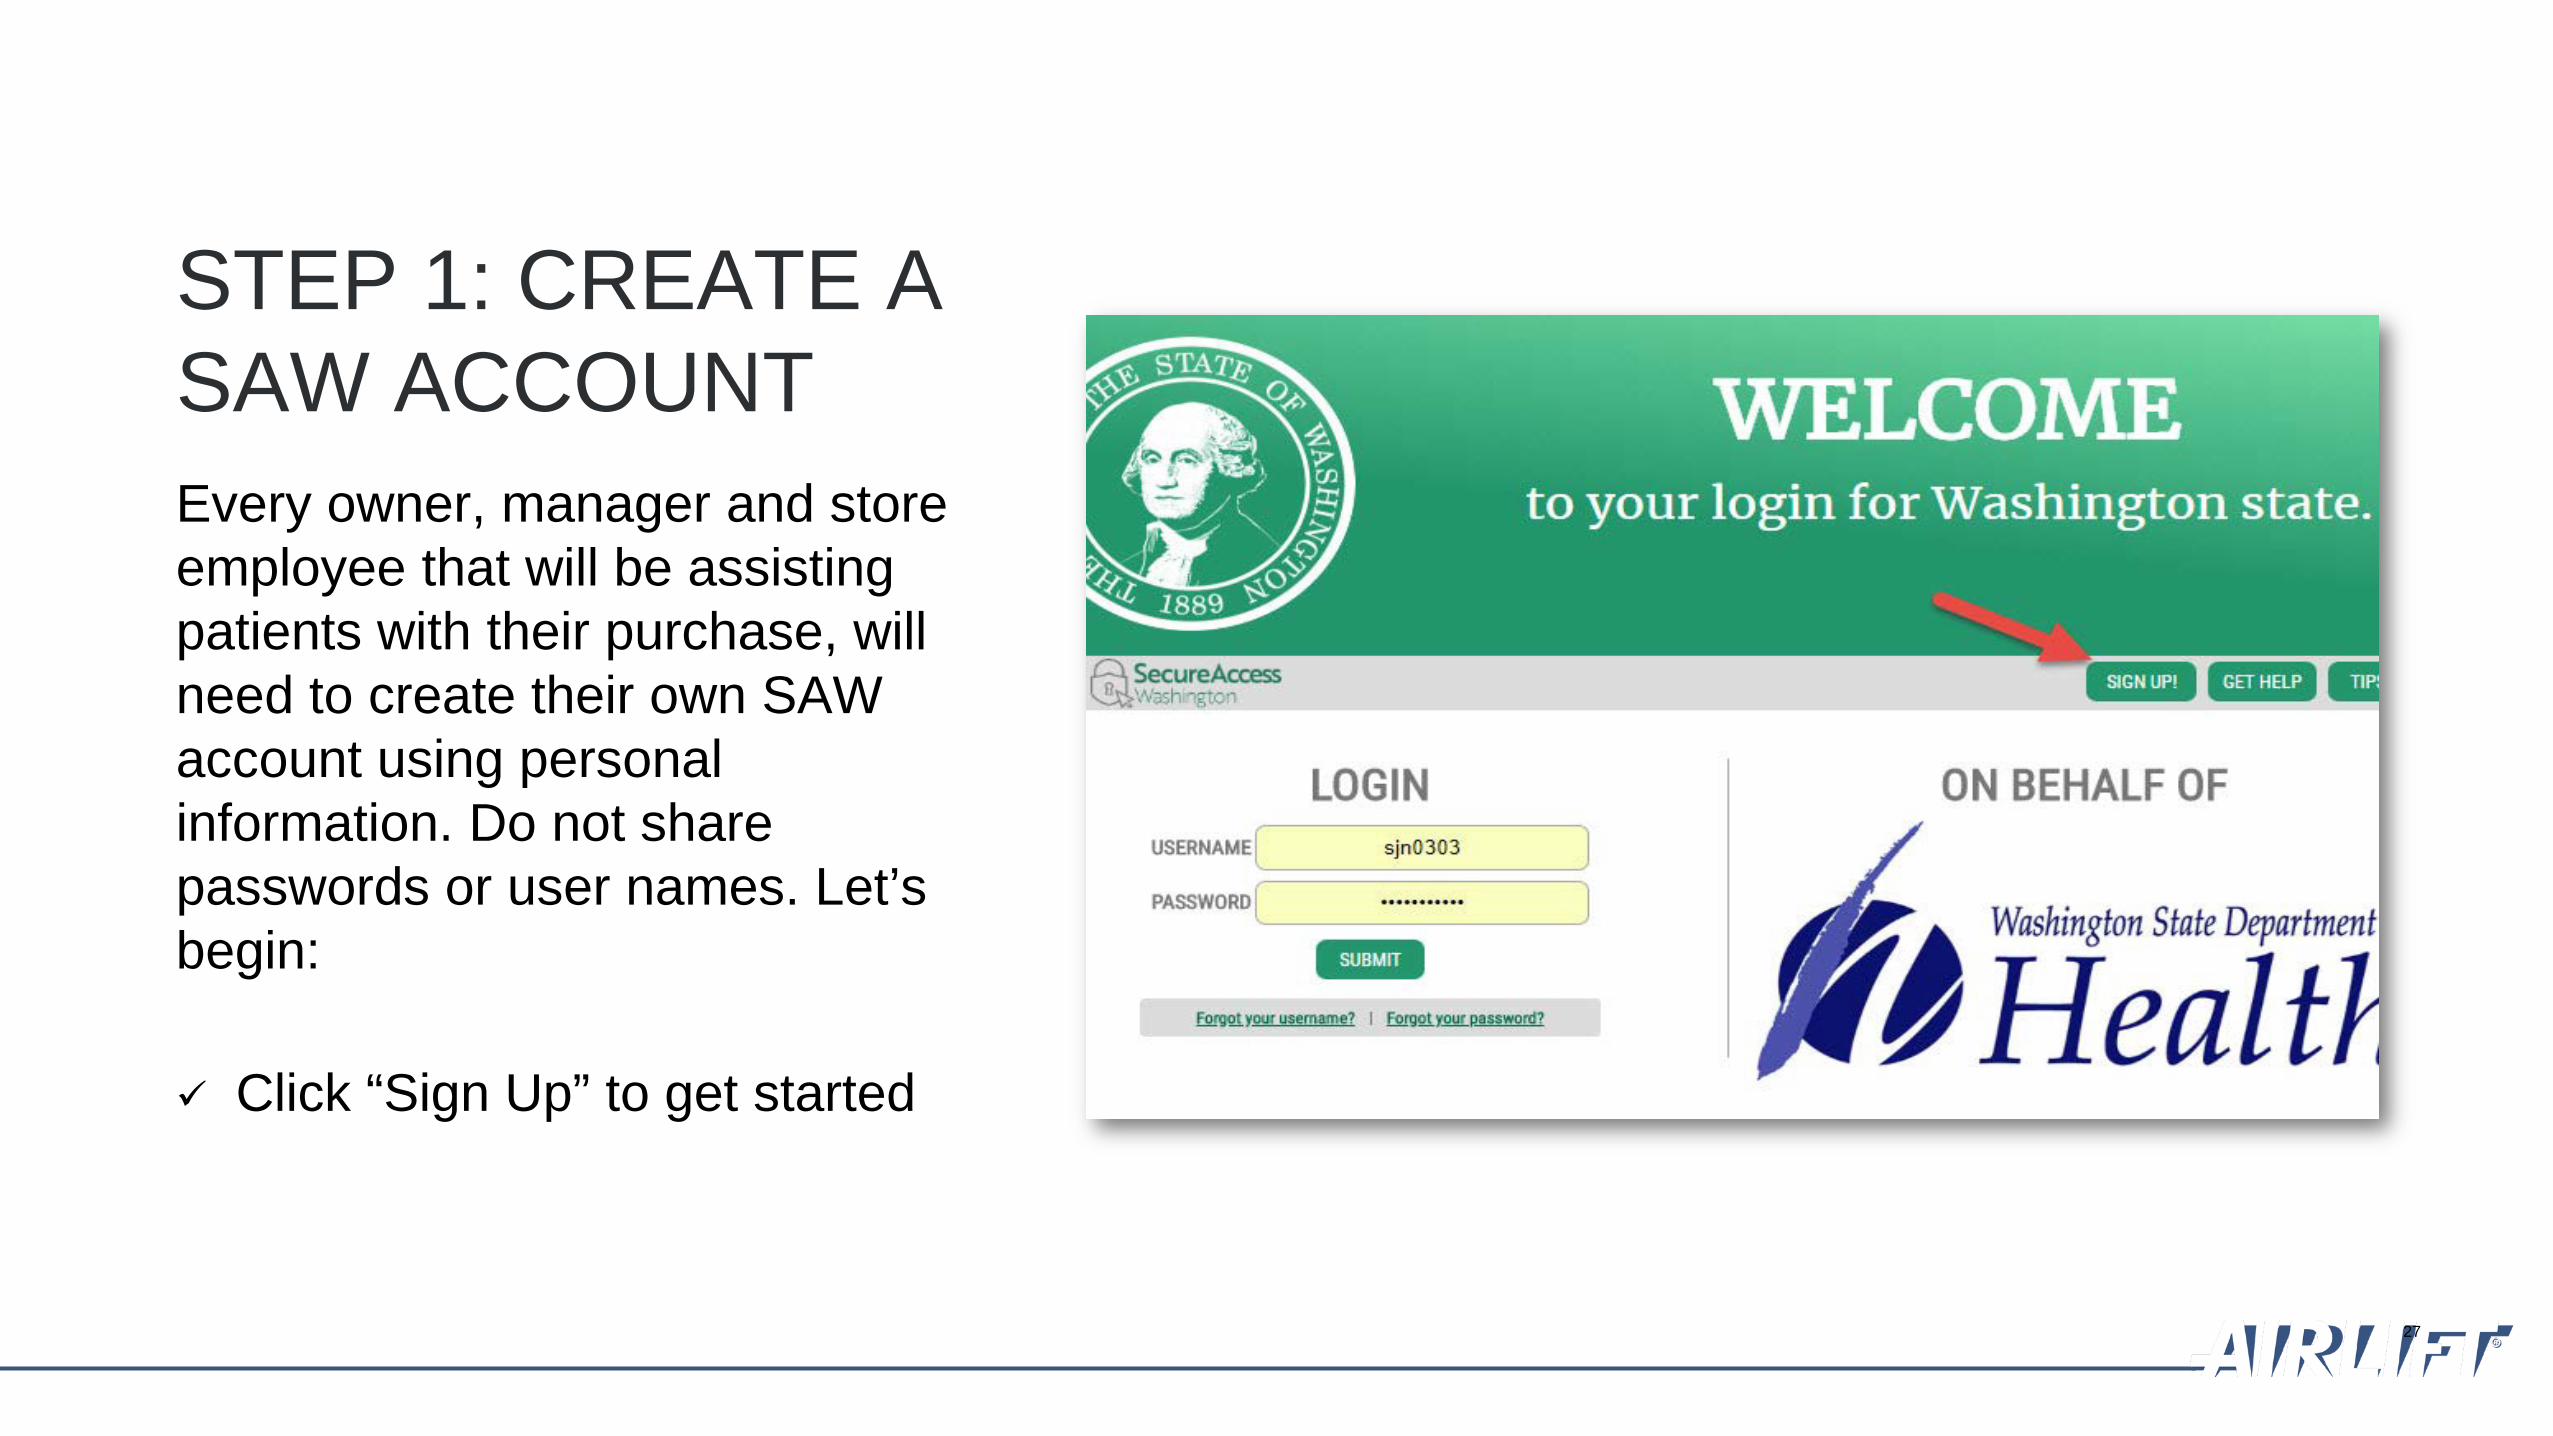
STEP 1: CREATE A SAW ACCOUNTEvery owner, manager and store employee that will be assisting patients with their purchase, will need to create their own SAW account using personal information. Do not share passwords or user names. Let’s begin:
Click “Sign Up” to get started
27

STEP 1: CREATE A SAW ACCOUNTSTOP! If you think you already have a SAW account and you want to continue using that one instead of creating a new one, click on the “Check Now” button to confirm.
If you are a new user, follow the steps below to create a SAW account:1. Complete the information on the form
2. Click ”I’m not a robot”
3. Click “Submit”
28

STEP 1: CREATE A SAW ACCOUNTNext, the SAW system will send you an activation link to the email account you registered with.
1. Check your email. Click on the activation link to activate your account.
2. Your account is now active! Click “Login”
29

STEP 1: CREATE A SAW ACCOUNTLogin to your account to continue:
1. Enter your user name and password
2. Click “Submit”
30

STEP 2
Complete the identity verification process
Presenter
Presentation Notes
SECTION DIVIDER SLIDE Quick Help Tips Section Divider Box: just add text Chapter Title Box: just add text text is already set to ALL CAPS (preferred look) but it can be changed to sentence cased under Font More text boxes can be added if needed

STEP 2: IDENTITY VERIFICATIONSAW will walk you through the identity verification process where you will be asked a series of questions based on public record data.
1. Review your name and edit if necessary
2. Complete the address form
3. Click “Continue”
32

STEP 3
Add a new service to your SAW user account
Presenter
Presentation Notes
SECTION DIVIDER SLIDE Quick Help Tips Section Divider Box: just add text Chapter Title Box: just add text text is already set to ALL CAPS (preferred look) but it can be changed to sentence cased under Font More text boxes can be added if needed

STEP 3: ADD A NEW SERVICENext, you will add the Medical Marijuana Authorization System (database) service to your SAW profile.
Click on the red “Add a new service” button
34
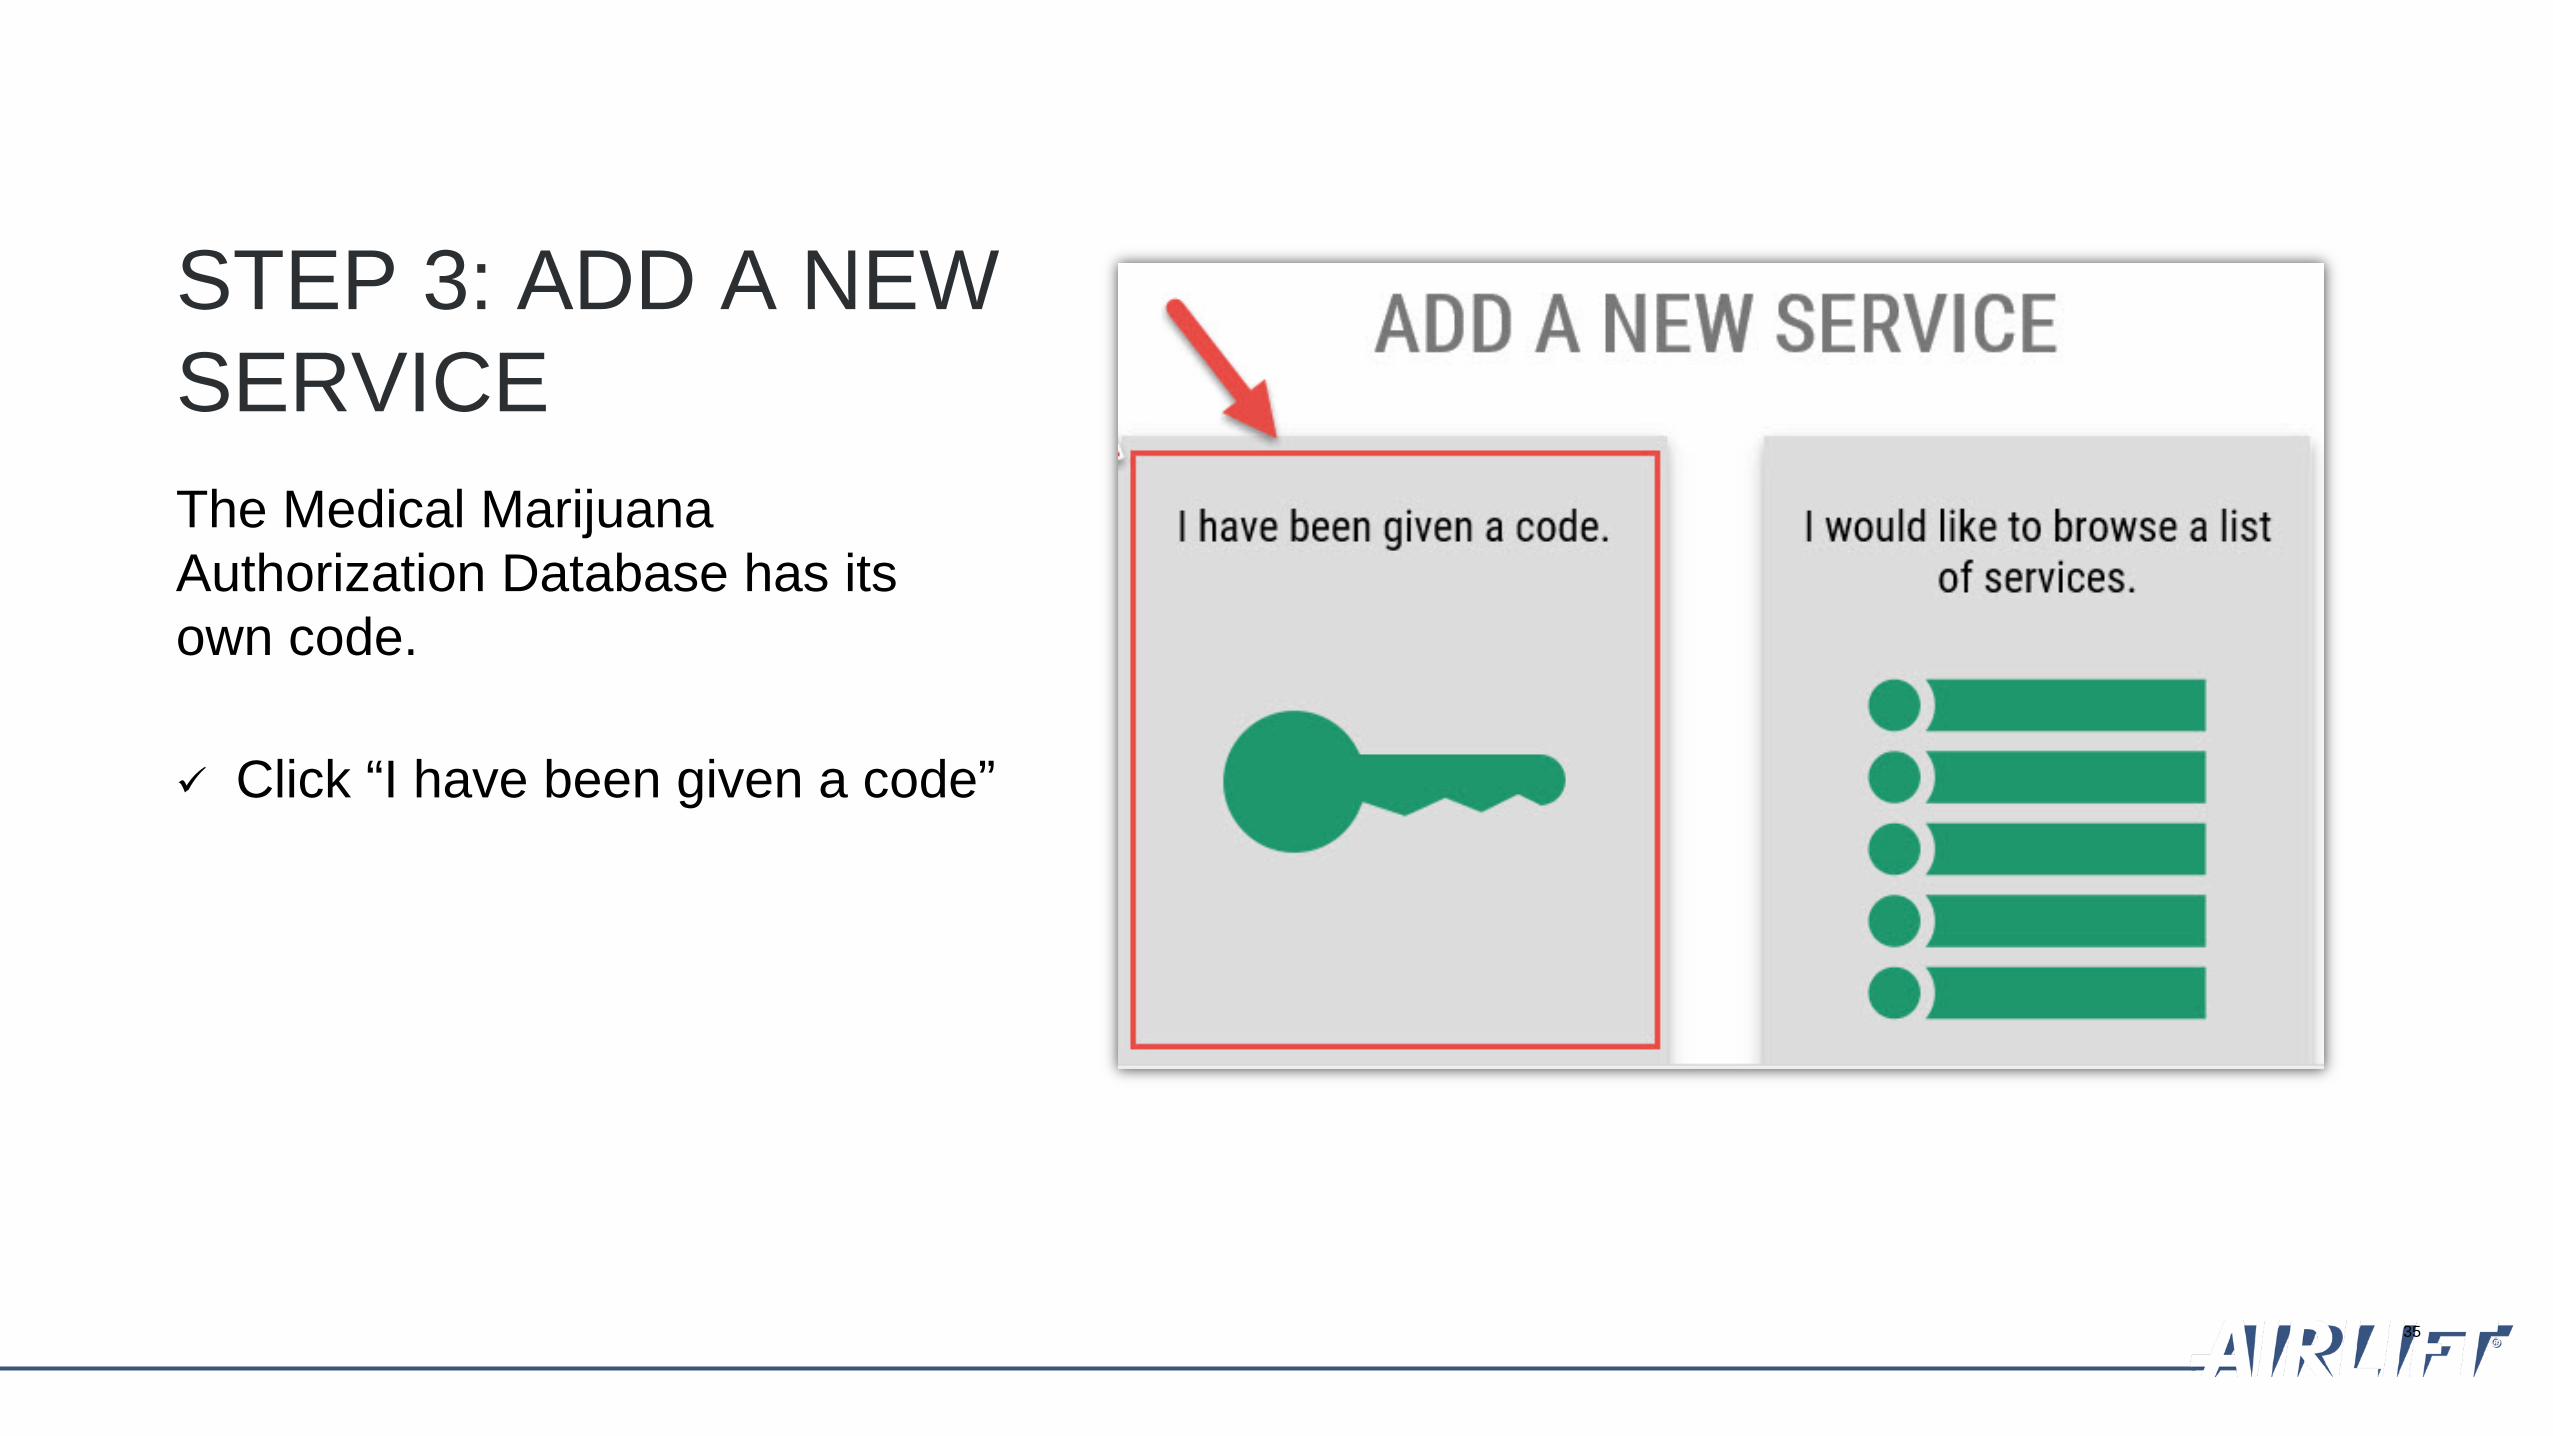
STEP 3: ADD A NEW SERVICEThe Medical Marijuana Authorization Database has its own code.
Click “I have been given a code”
35

STEP 3: ADD A NEW SERVICE
Enter the code “MMJAS”
Click “Submit”
36

STEP 4
Add security to your account through multi-factor authentication (MFA)
Presenter
Presentation Notes
SECTION DIVIDER SLIDE Quick Help Tips Section Divider Box: just add text Chapter Title Box: just add text text is already set to ALL CAPS (preferred look) but it can be changed to sentence cased under Font More text boxes can be added if needed
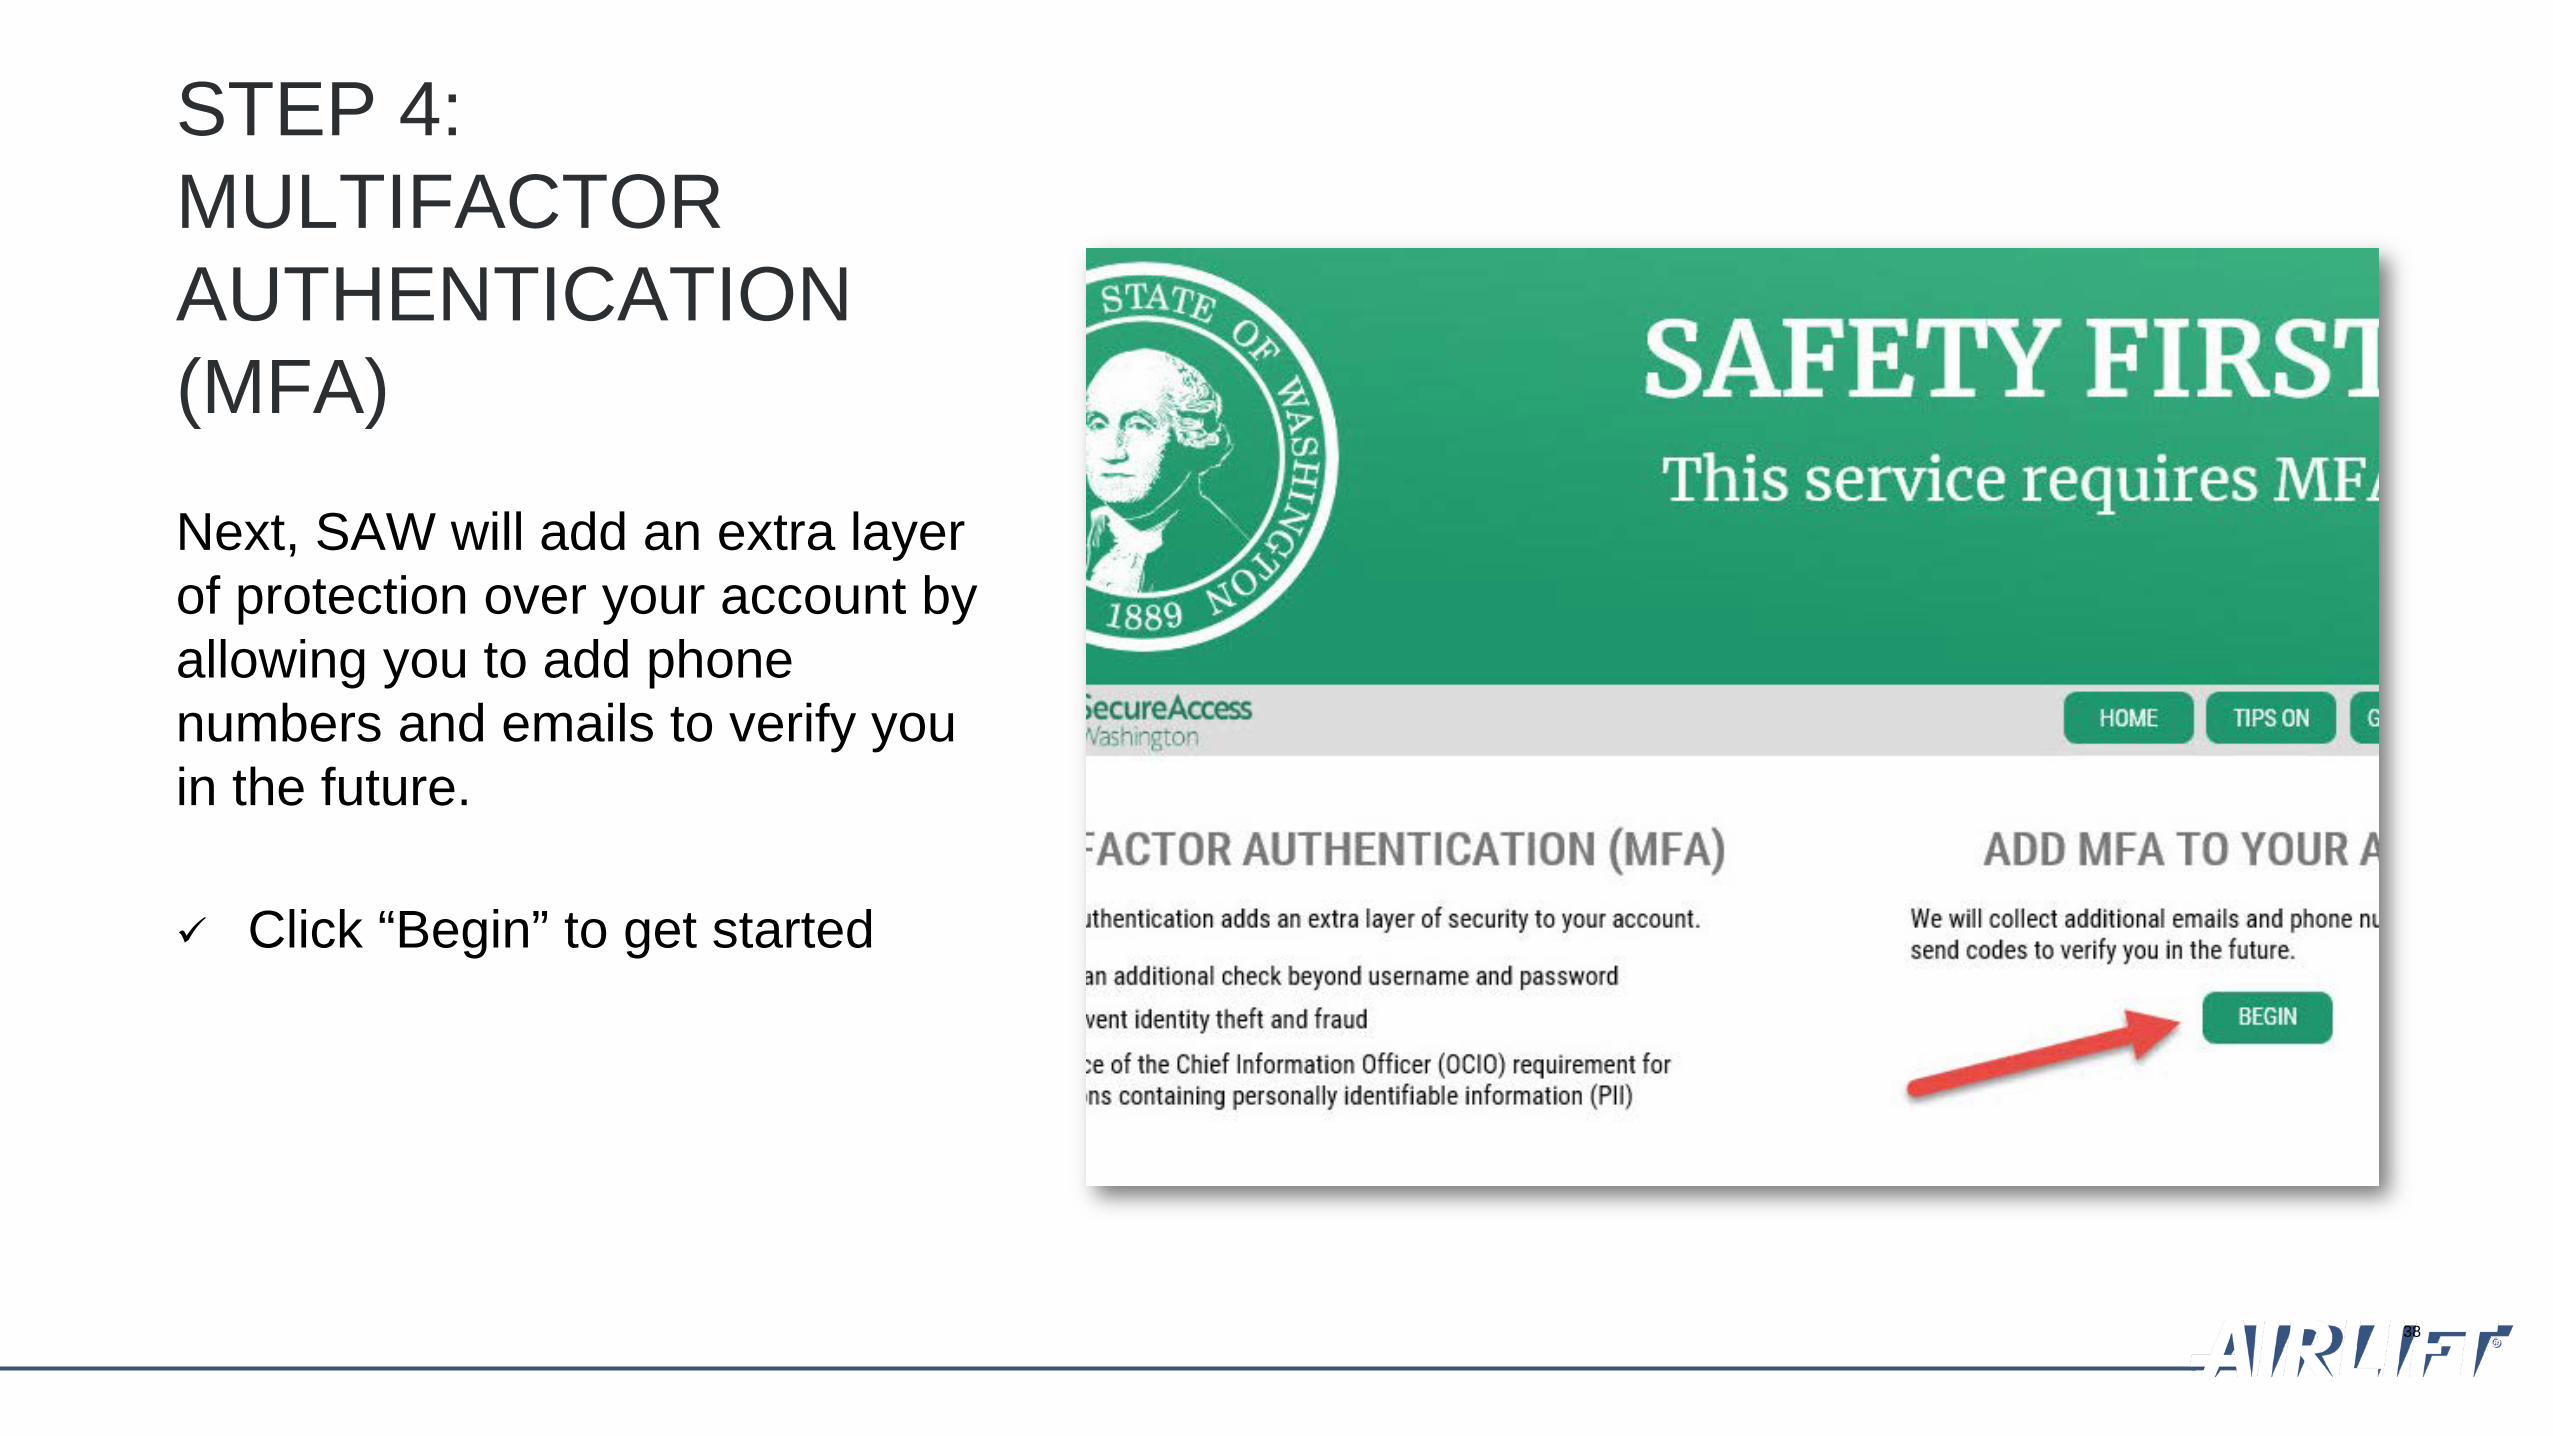
STEP 4: MULTIFACTOR AUTHENTICATION (MFA)
Next, SAW will add an extra layer of protection over your account by allowing you to add phone numbers and emails to verify you in the future.
Click “Begin” to get started
38

STEP 4: MULTIFACTOR AUTHENTICATION (MFA)
SAW uses multifactor authentication to verify the right person is accessing the account by sending a verification code that can be received by phone, text or email.
Enter a primary email
If you are using an email provided by your employer, please use your personal email as “Optional”
39

STEP 4: MULTIFACTOR AUTHENTICATION (MFA)
Next, SAW will ask you to add a primary phone number.
1. Enter a primary phone number where you can be reached to be given a verification code
2. The optional number is not required, but you can enter a secondary number
40

STEP 4: MULTIFACTOR AUTHENTICATION (MFA)
Now, review your information and finalize.
1. Review your phone and email for accuracy. To correct or edit, click on the “Change” button at the bottom of the screen.
2. Click “Submit” if everything looks good.
41

STEP 5
Complete the SAW registration process
Presenter
Presentation Notes
SECTION DIVIDER SLIDE Quick Help Tips Section Divider Box: just add text Chapter Title Box: just add text text is already set to ALL CAPS (preferred look) but it can be changed to sentence cased under Font More text boxes can be added if needed

Step 5: Finalize SAW RegistrationNow that you have created your SAW user profile, the Department of Health wants to know what type of user you are.
1. Choose “Marijuana Retail Stores”
2. Click “Submit”
43

Step 5: Finalize SAW Registration
You have now completed SAW registration.
Click “OK” to access the service
44

STEP 6
Access the Medical Marijuana Authorization Database
Presenter
Presentation Notes
SECTION DIVIDER SLIDE Quick Help Tips Section Divider Box: just add text Chapter Title Box: just add text text is already set to ALL CAPS (preferred look) but it can be changed to sentence cased under Font More text boxes can be added if needed

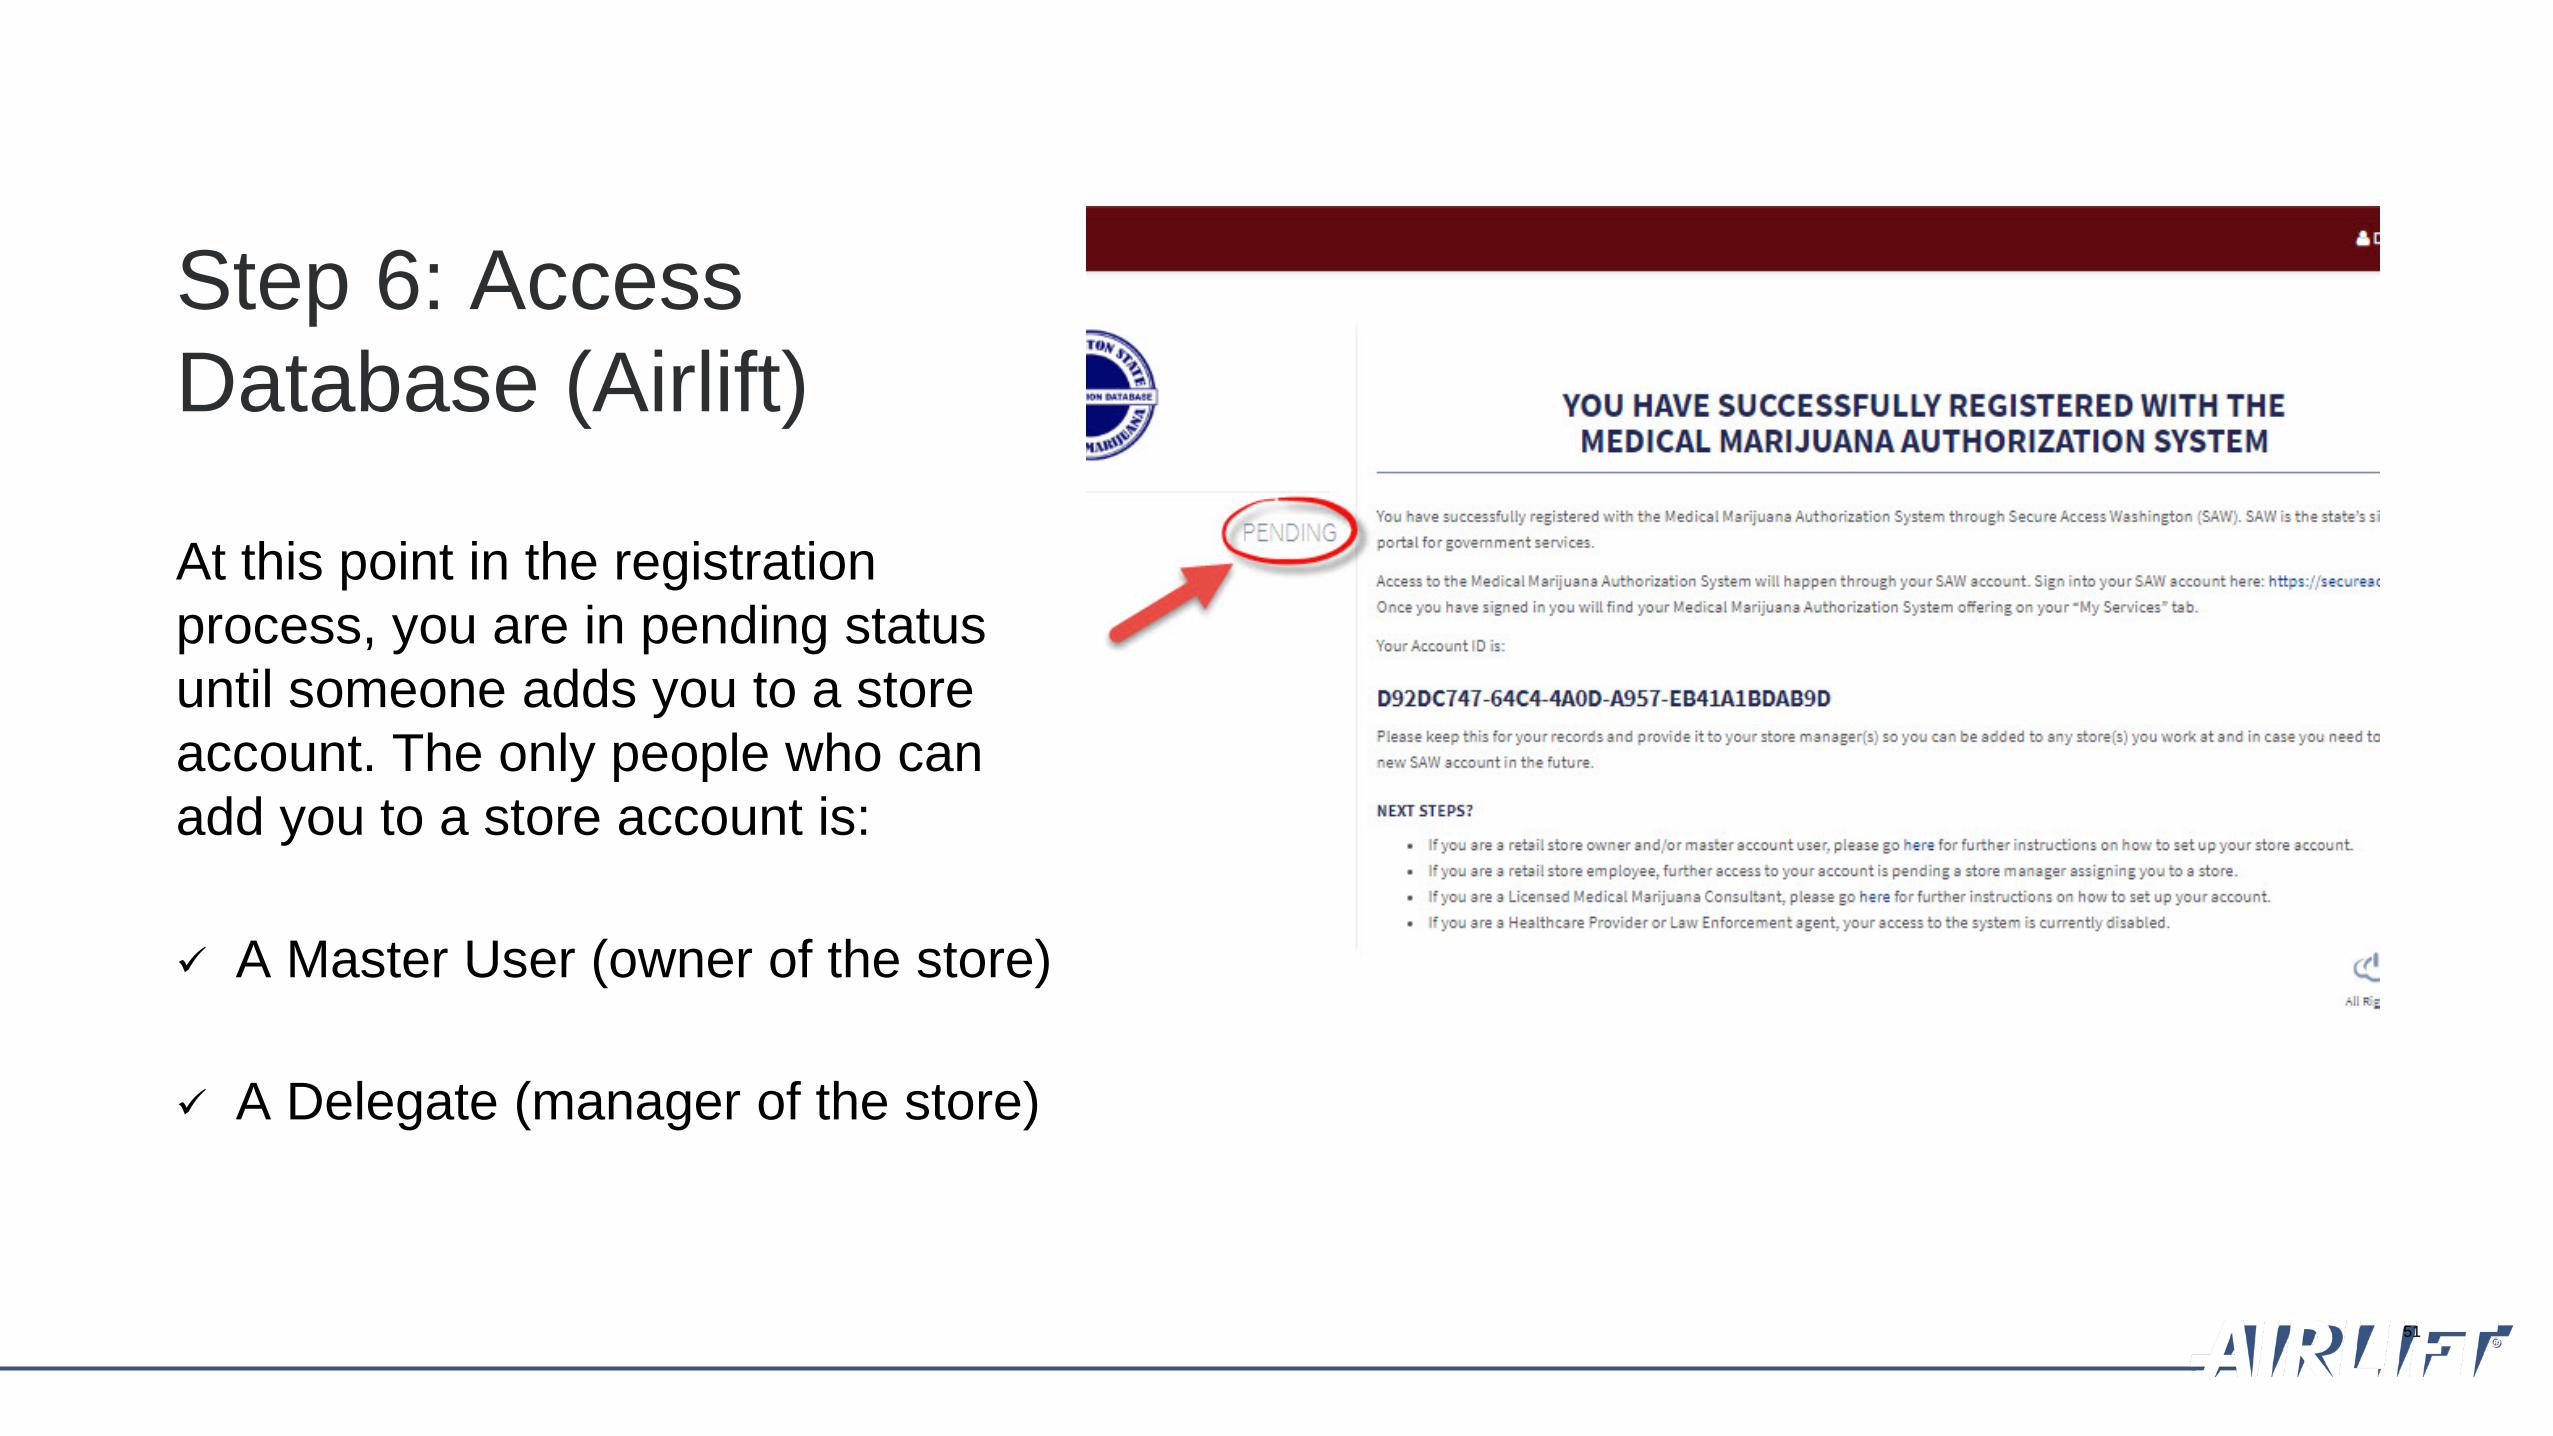
Step 6: Access Database (Airlift)
On this screen you can see three things:
1. Description of the service you signed up for
2. Membership status (Active)
3. Action button that allows you to remove the service (not advised)
To access the service, click the “Medical Marijuana Authorization System” link
46

Step 6: Access Database (Airlift)This page is a reminder you are leaving the SAW portal and entering a different database, the Medical Marijuana Authorization Database, also known as Airlift.
Click “Continue”
47

Step 6: Access Database (Airlift)Once inside Airlift, the database will want to know who you are also. You will be required complete your Airlift profile.
Read the “Terms of Service”
Click “I Agree”
48

STEP 6: ACCESS DATABASE (Airlift)Required fields are indicated by a red *
Complete each field of the form
Consultants only: Enter your DOH Consultant Certificate Number
Click “Save”
49

Step 6: Access Database (Airlift)
Congratulations! You have successfully registered with the Medical Marijuana Authorization System.
Click “Continue”
50
Step 6: Access Database (Airlift)
At this point in the registration process, you are in pending status until someone adds you to a store account. The only people who can add you to a store account is:
A Master User (owner of the store)
A Delegate (manager of the store)
51
Pending status means that you are successfully registered, however, you have no functions in the system until the store owner or store delegate links you to the store(s).
This is a security measure that only allows store employees to be linked to the store where they work.
The system tracks every transaction that every employee, consultant, delegate and owner makes in the system.
Why Pending Status?

3 Steps for Owner to Setup Store
1 2 3Assign DelegateClaim Store Link Employees
Master account holder (owner) and store are matched by the system based on WSLCB data.
Owner may have multiple stores to claim.
Only one owner may claim a store.
Once the owner has registered, the system will match their information with what has been given to the database administrators from WSLCB. Make sure you keep information up to date.
Reminder: Store owner must log into system at least once per month or their profile will be deactivated.
Step 1: Claim Store

Claim store:• Store owner logs in through SAW and selects the
Medical Marijuana Access System.• To claim, the owner will select the Add/Remove
Stores button.

Select the store(s) you want to add.• This is a verification feature you only have to do once unless
there is a change to the store coming from the WSLCB.
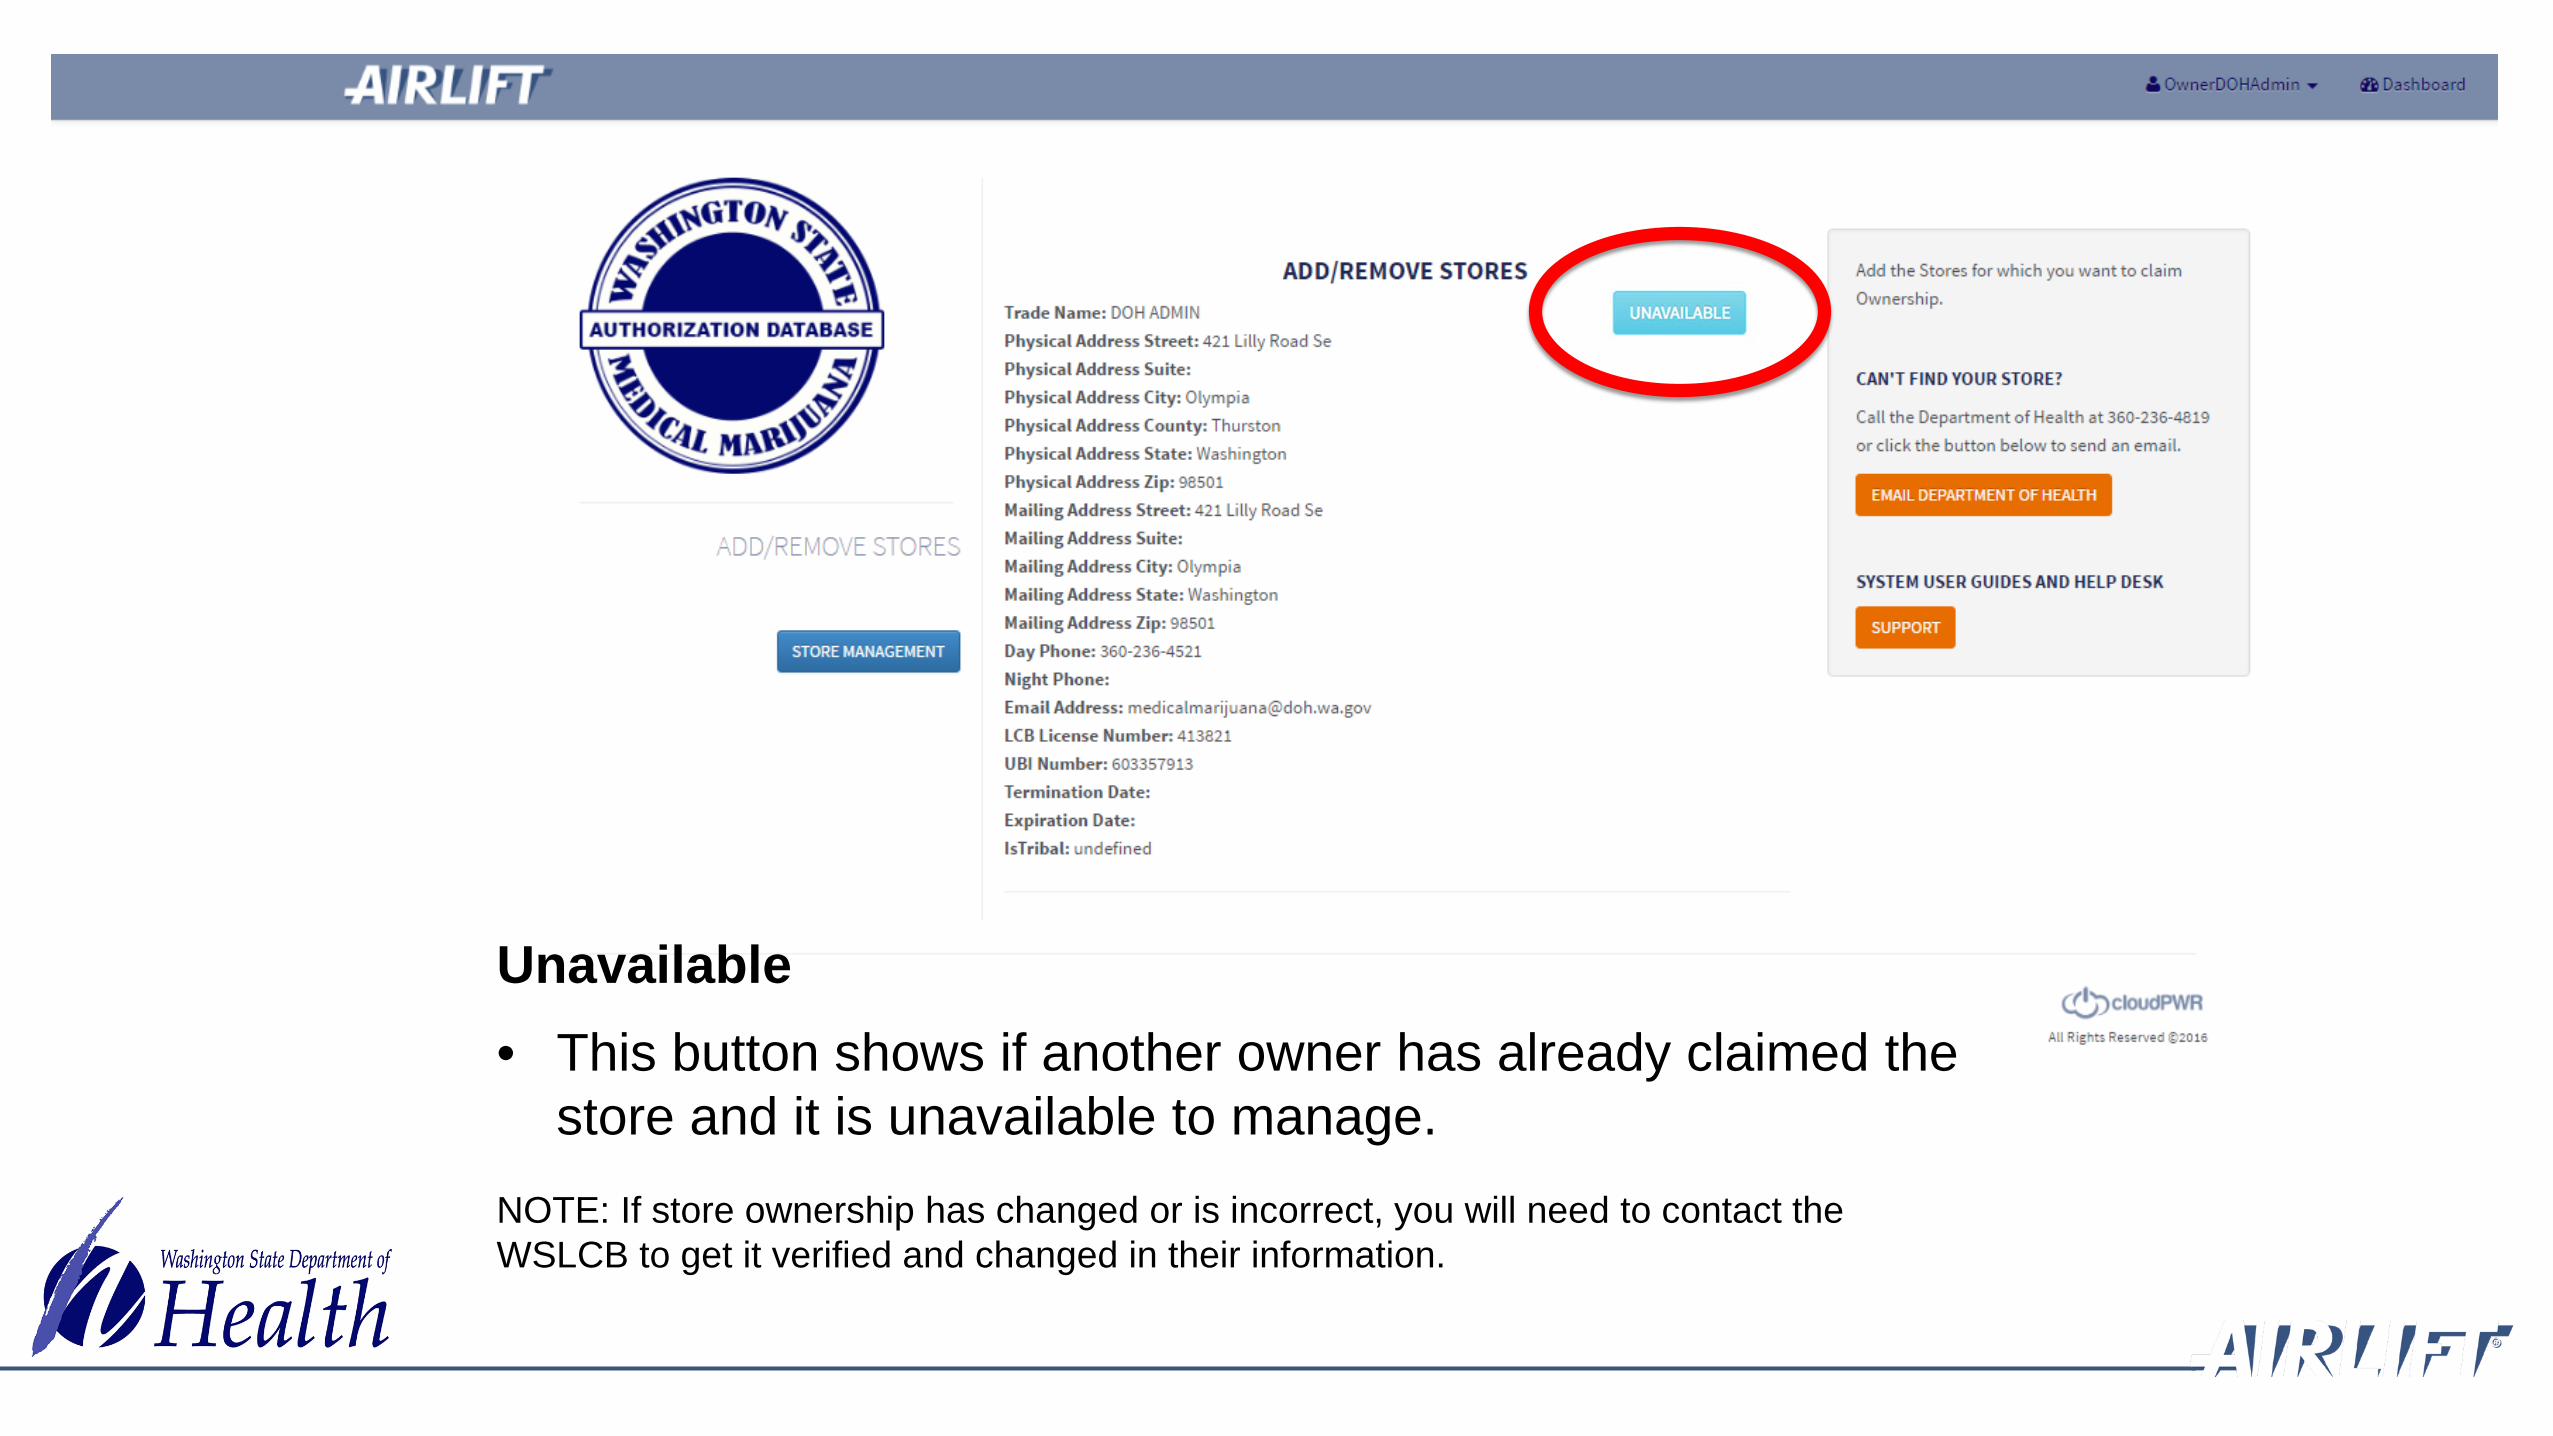
Unavailable• This button shows if another owner has already claimed the
store and it is unavailable to manage.NOTE: If store ownership has changed or is incorrect, you will need to contact the WSLCB to get it verified and changed in their information.

Remove• An owner can select to remove a store if they are no
longer the master account holder.
WARNING: When you do this all employees attached to that store will be unlinked in seven days from selecting this button.

Can’t find your store• Owner registration data must match exactly what the
WSLCB sends to the system.• If for some reason your store doesn’t show, you can
select the button at right for help or give DOH a call.
Presenter
Presentation Notes

Link to the employees who have completed the registration process in SAW and AIRLIFT.
Be sure to unlink employees that are no longer working for your store.
Quarterly Confirmation:To ensure employees who no longer work at the store aren’t still able to access the system, the owner will receive a message every quarter to verify that all employees in the system are in fact still working (i.e. linked) to your store.
Step 2: Link Employees to Store

• To link employees to your store, click on the User Management button.

• Each employee must have their own individual SAW account to be registered in the system, so the owner can add them to the store.
• Click the Add User button for the store you wish to add employees to.
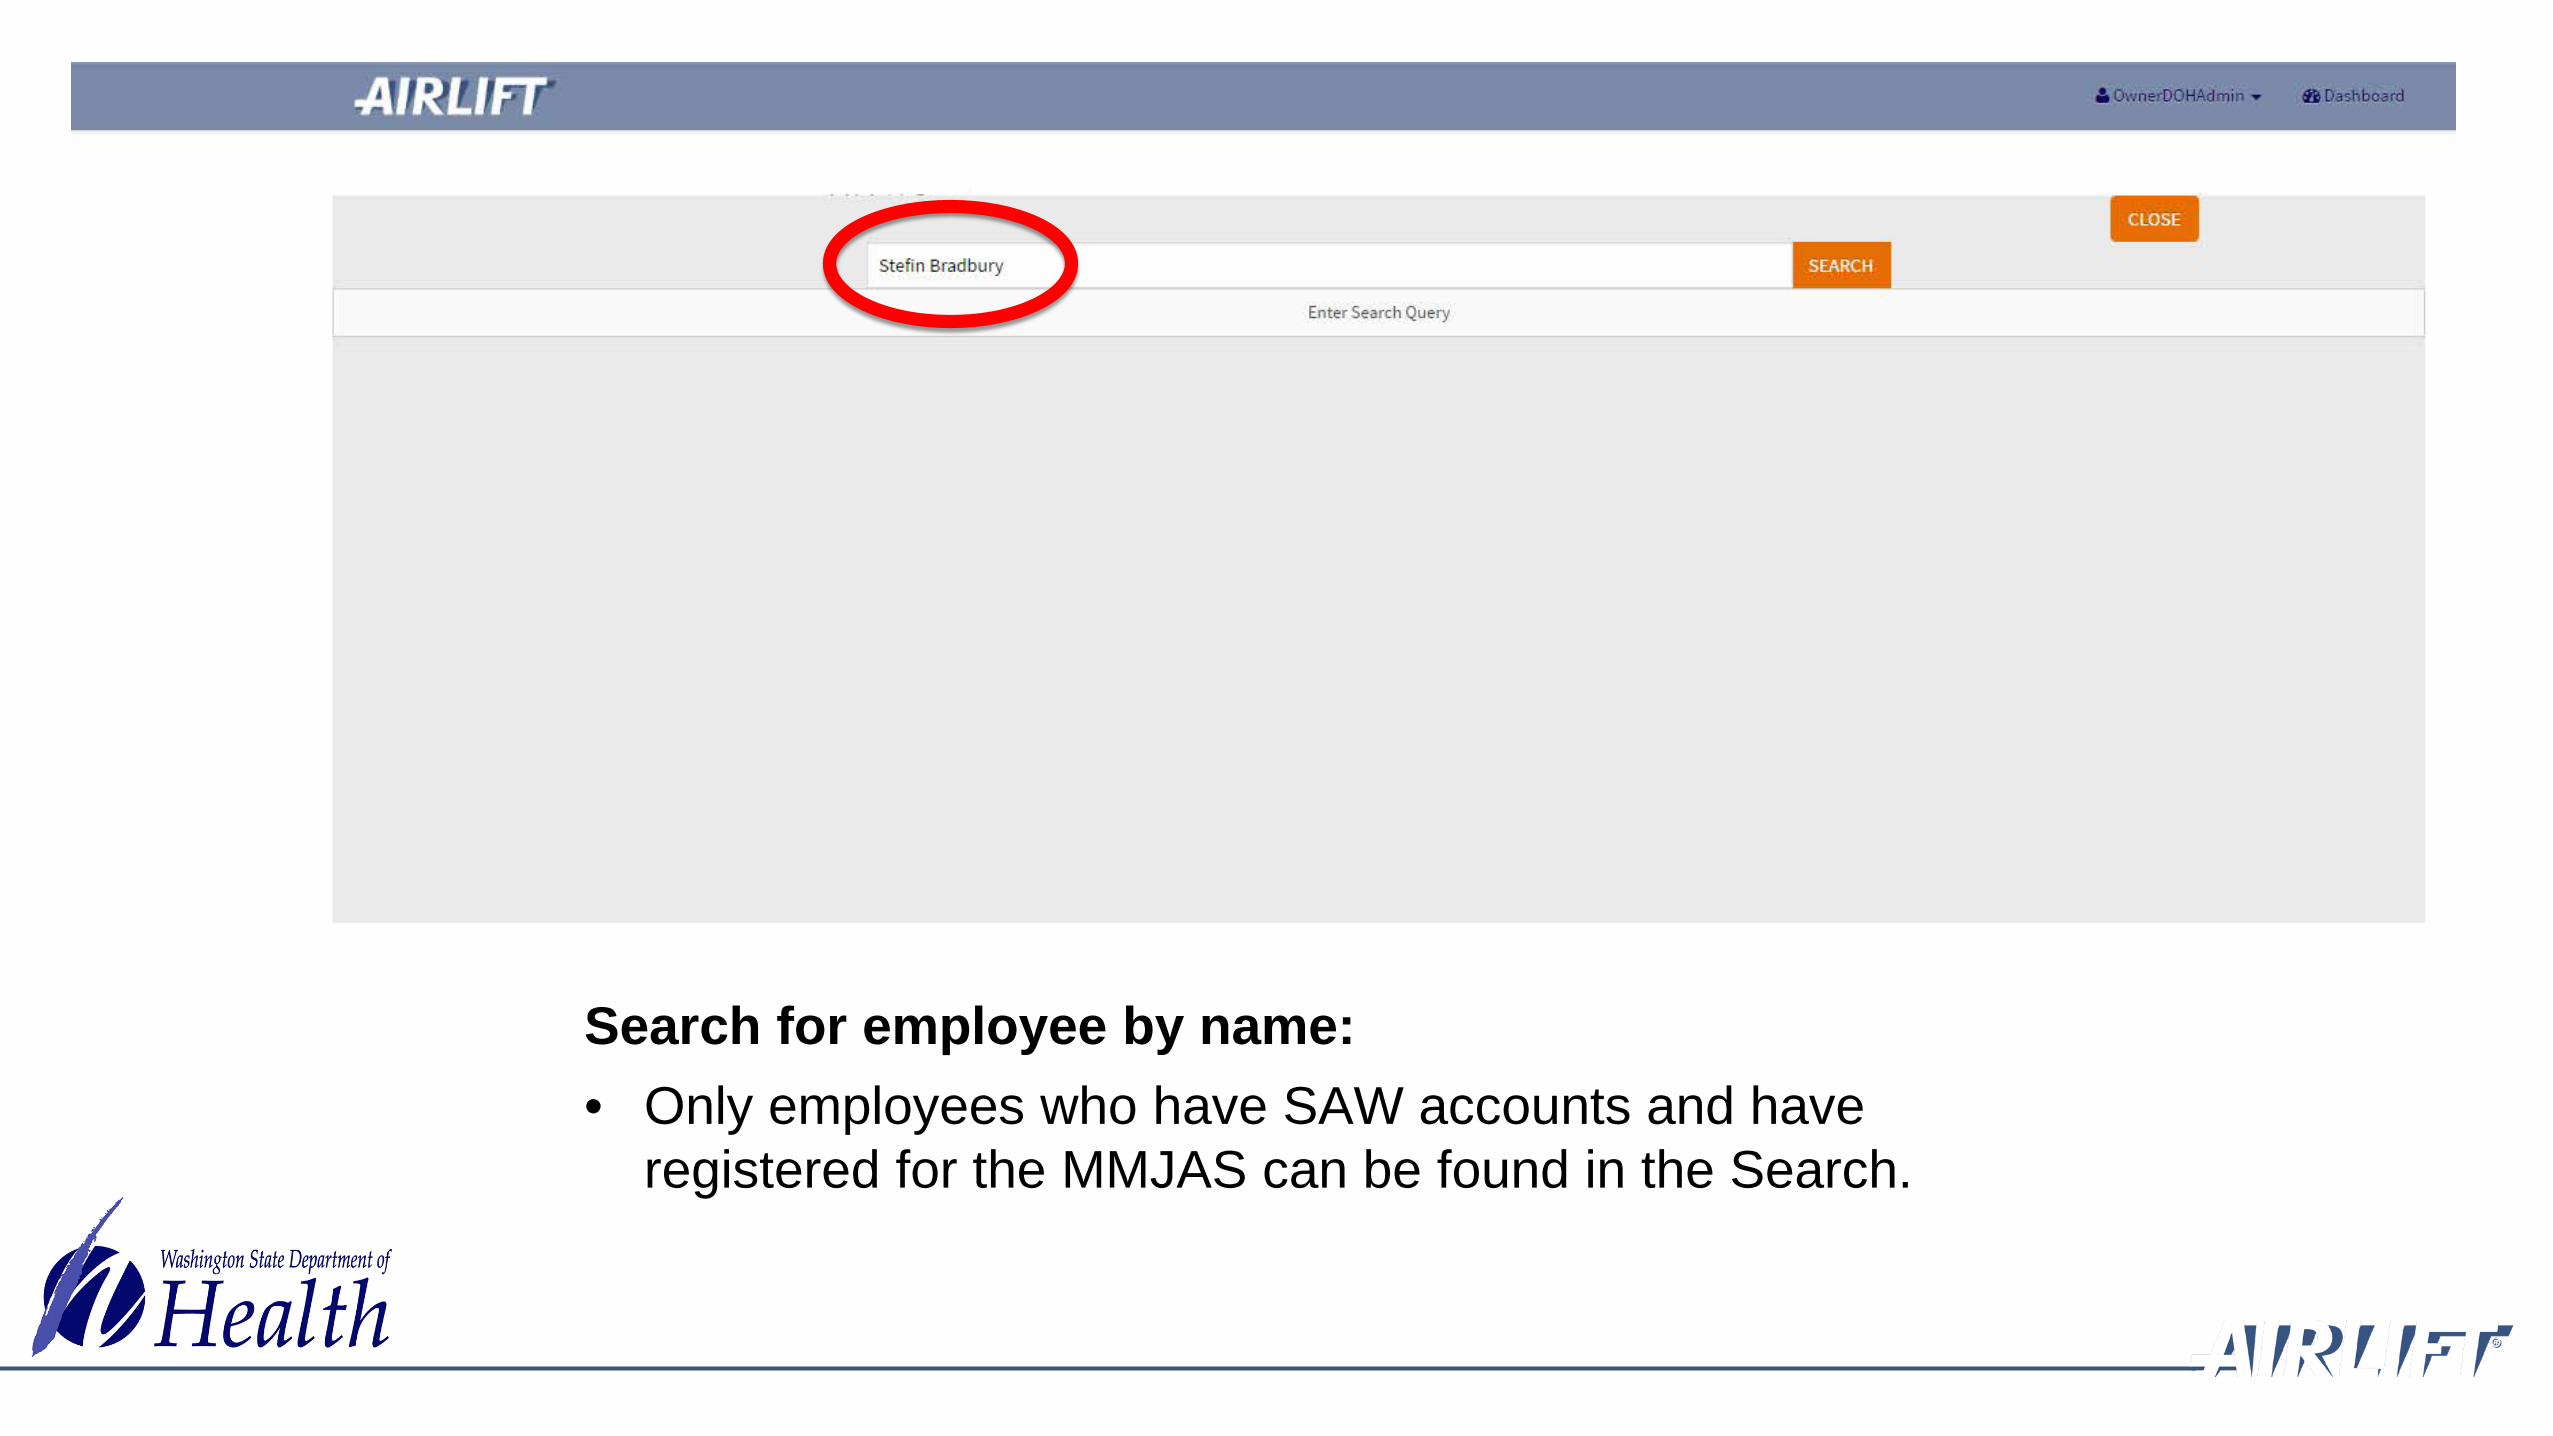
Search for employee by name: • Only employees who have SAW accounts and have
registered for the MMJAS can be found in the Search.

A successful search will return the employee name: • Watch for similar names and make sure you choose
the correct employee.• Click add to link this employee to your store.

The employee is now added to the list of employees linked to the store:• You see that you can now remove the user if the
employee leaves employment, or • Set as a delegate if the employee is a manager
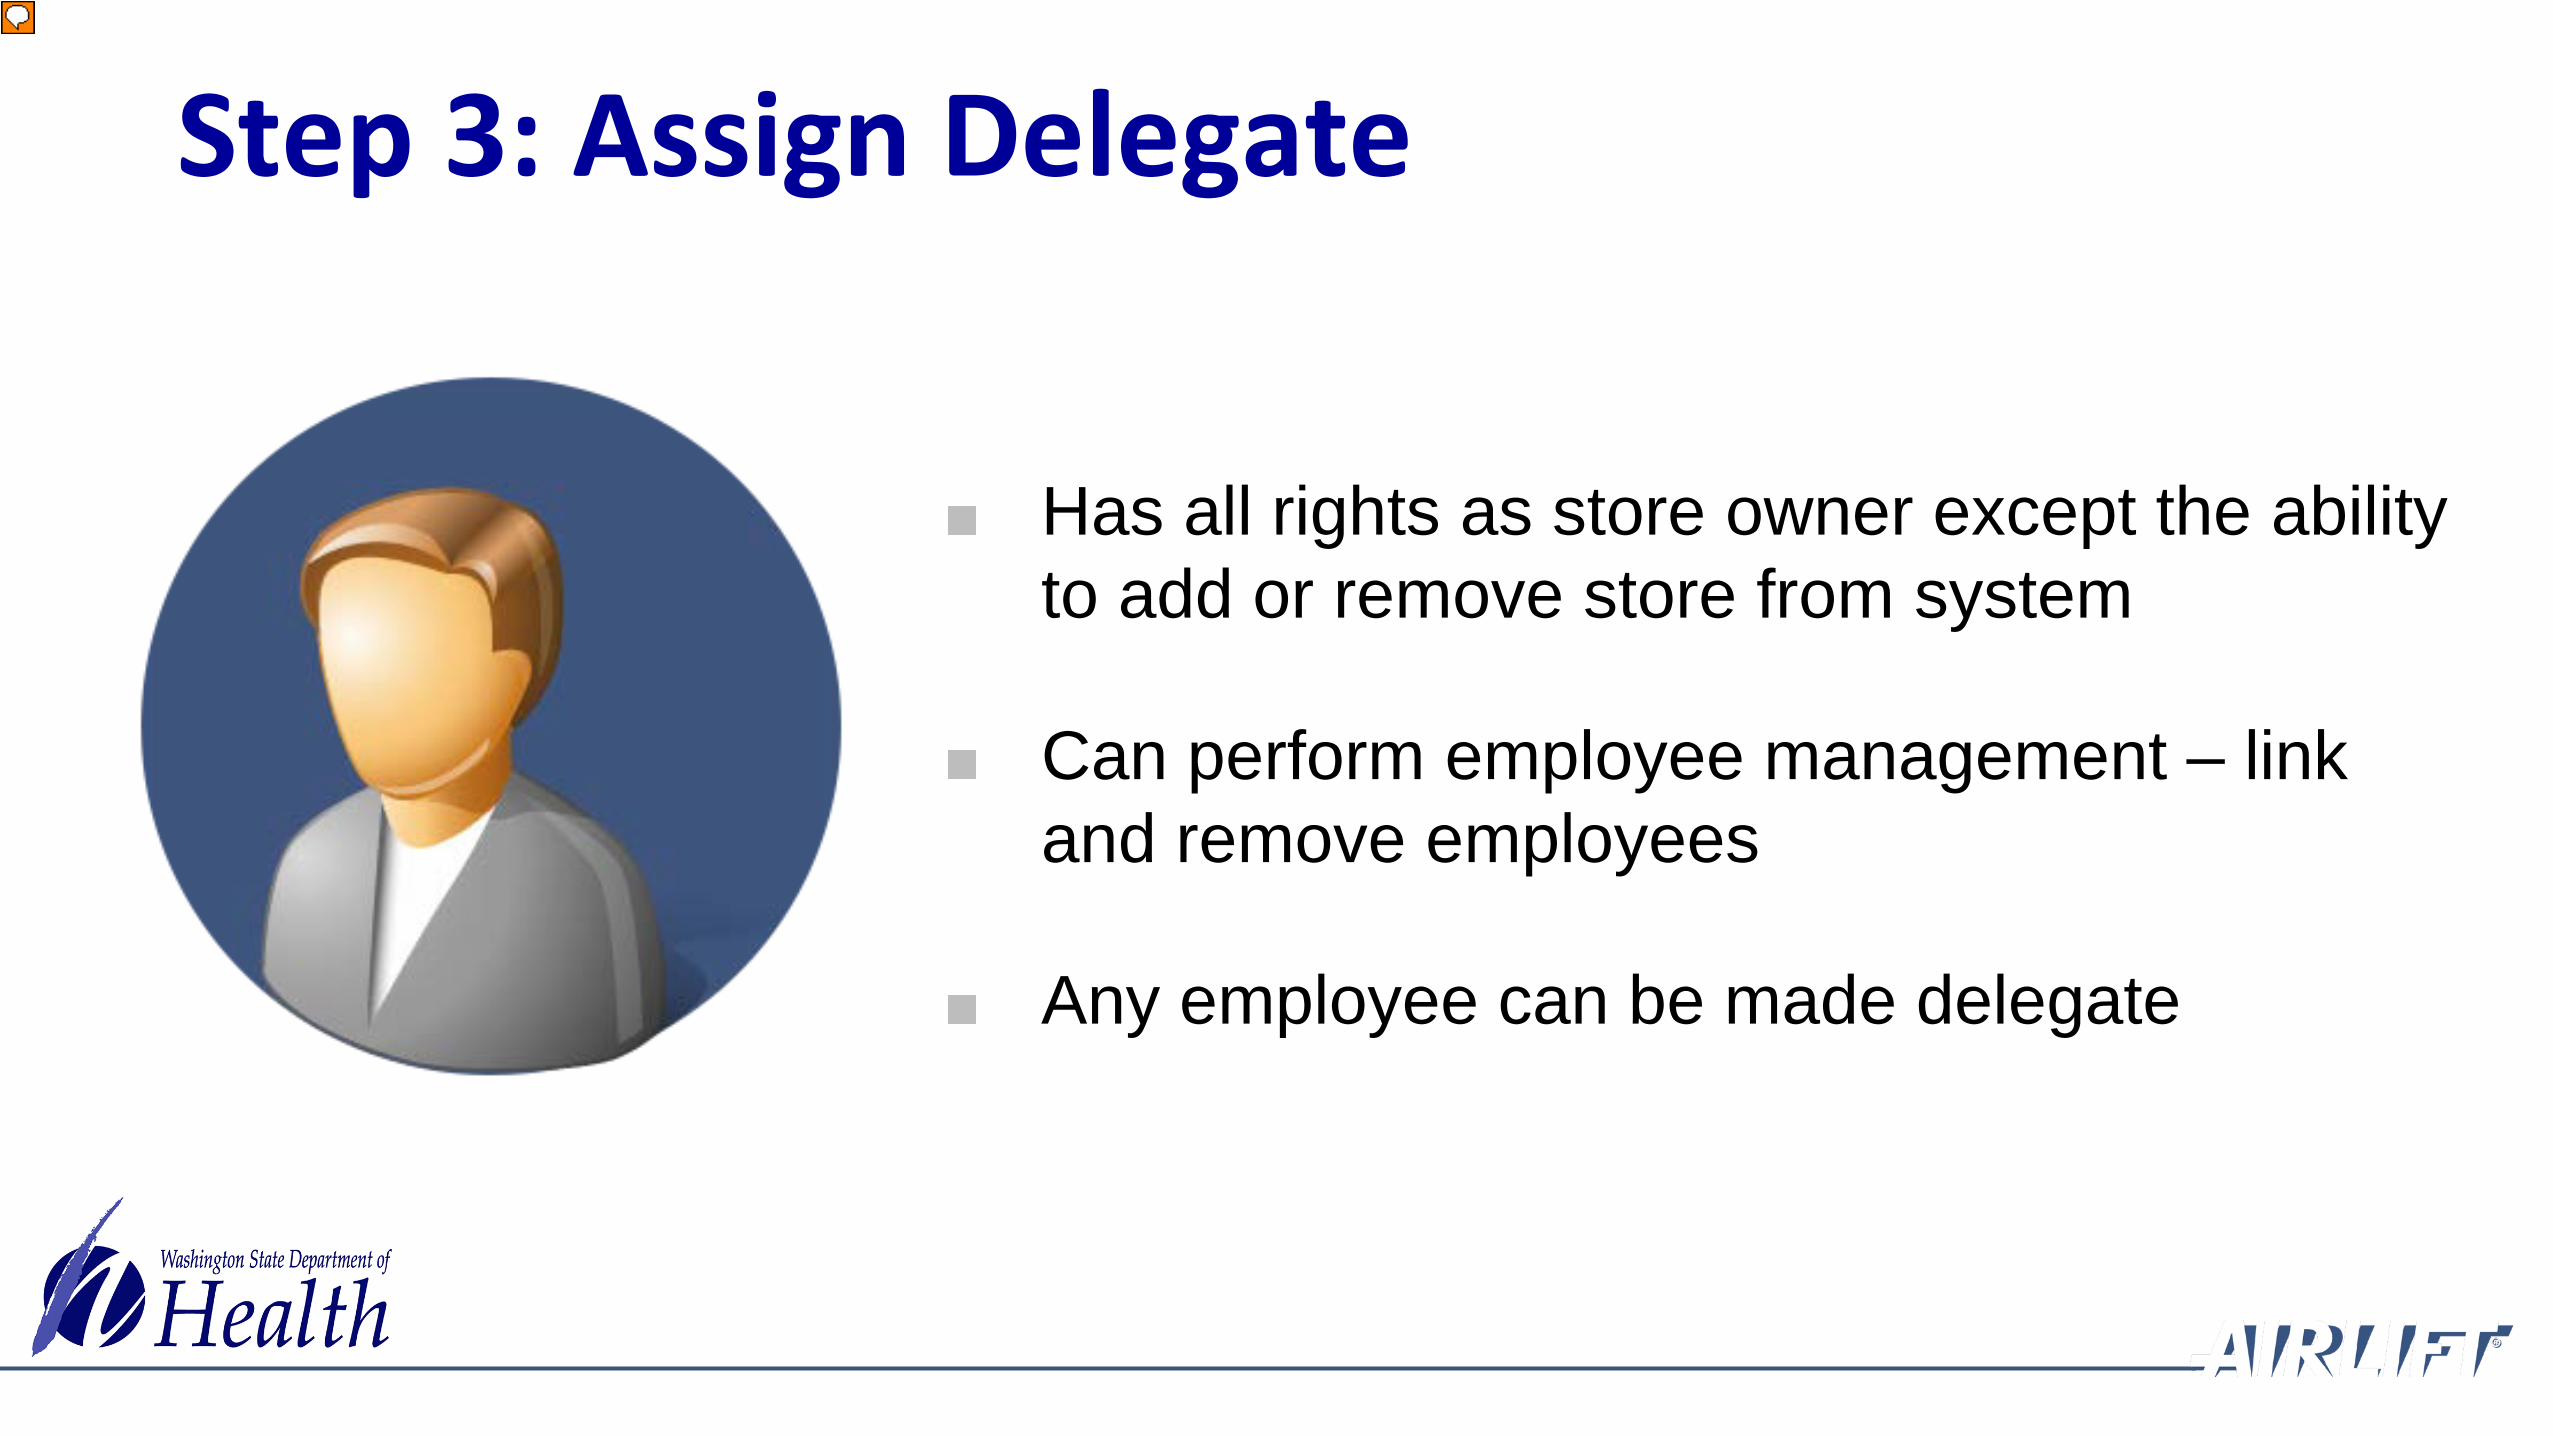
Has all rights as store owner except the ability to add or remove store from system
Can perform employee management – link and remove employees
Any employee can be made delegate
Step 3: Assign Delegate
Presenter
Presentation Notes

Store Owner Main page:• Select User Management button.

Choose from employees linked to store:• Select Set Delegate button
Presenter
Presentation Notes

Note: The Set Delegate button turns to Remove Delegate when you set an employee to be a delegate.
Presenter
Presentation Notes

Overview of Authorization Form
Valid Form
Tamper Resistant Paper
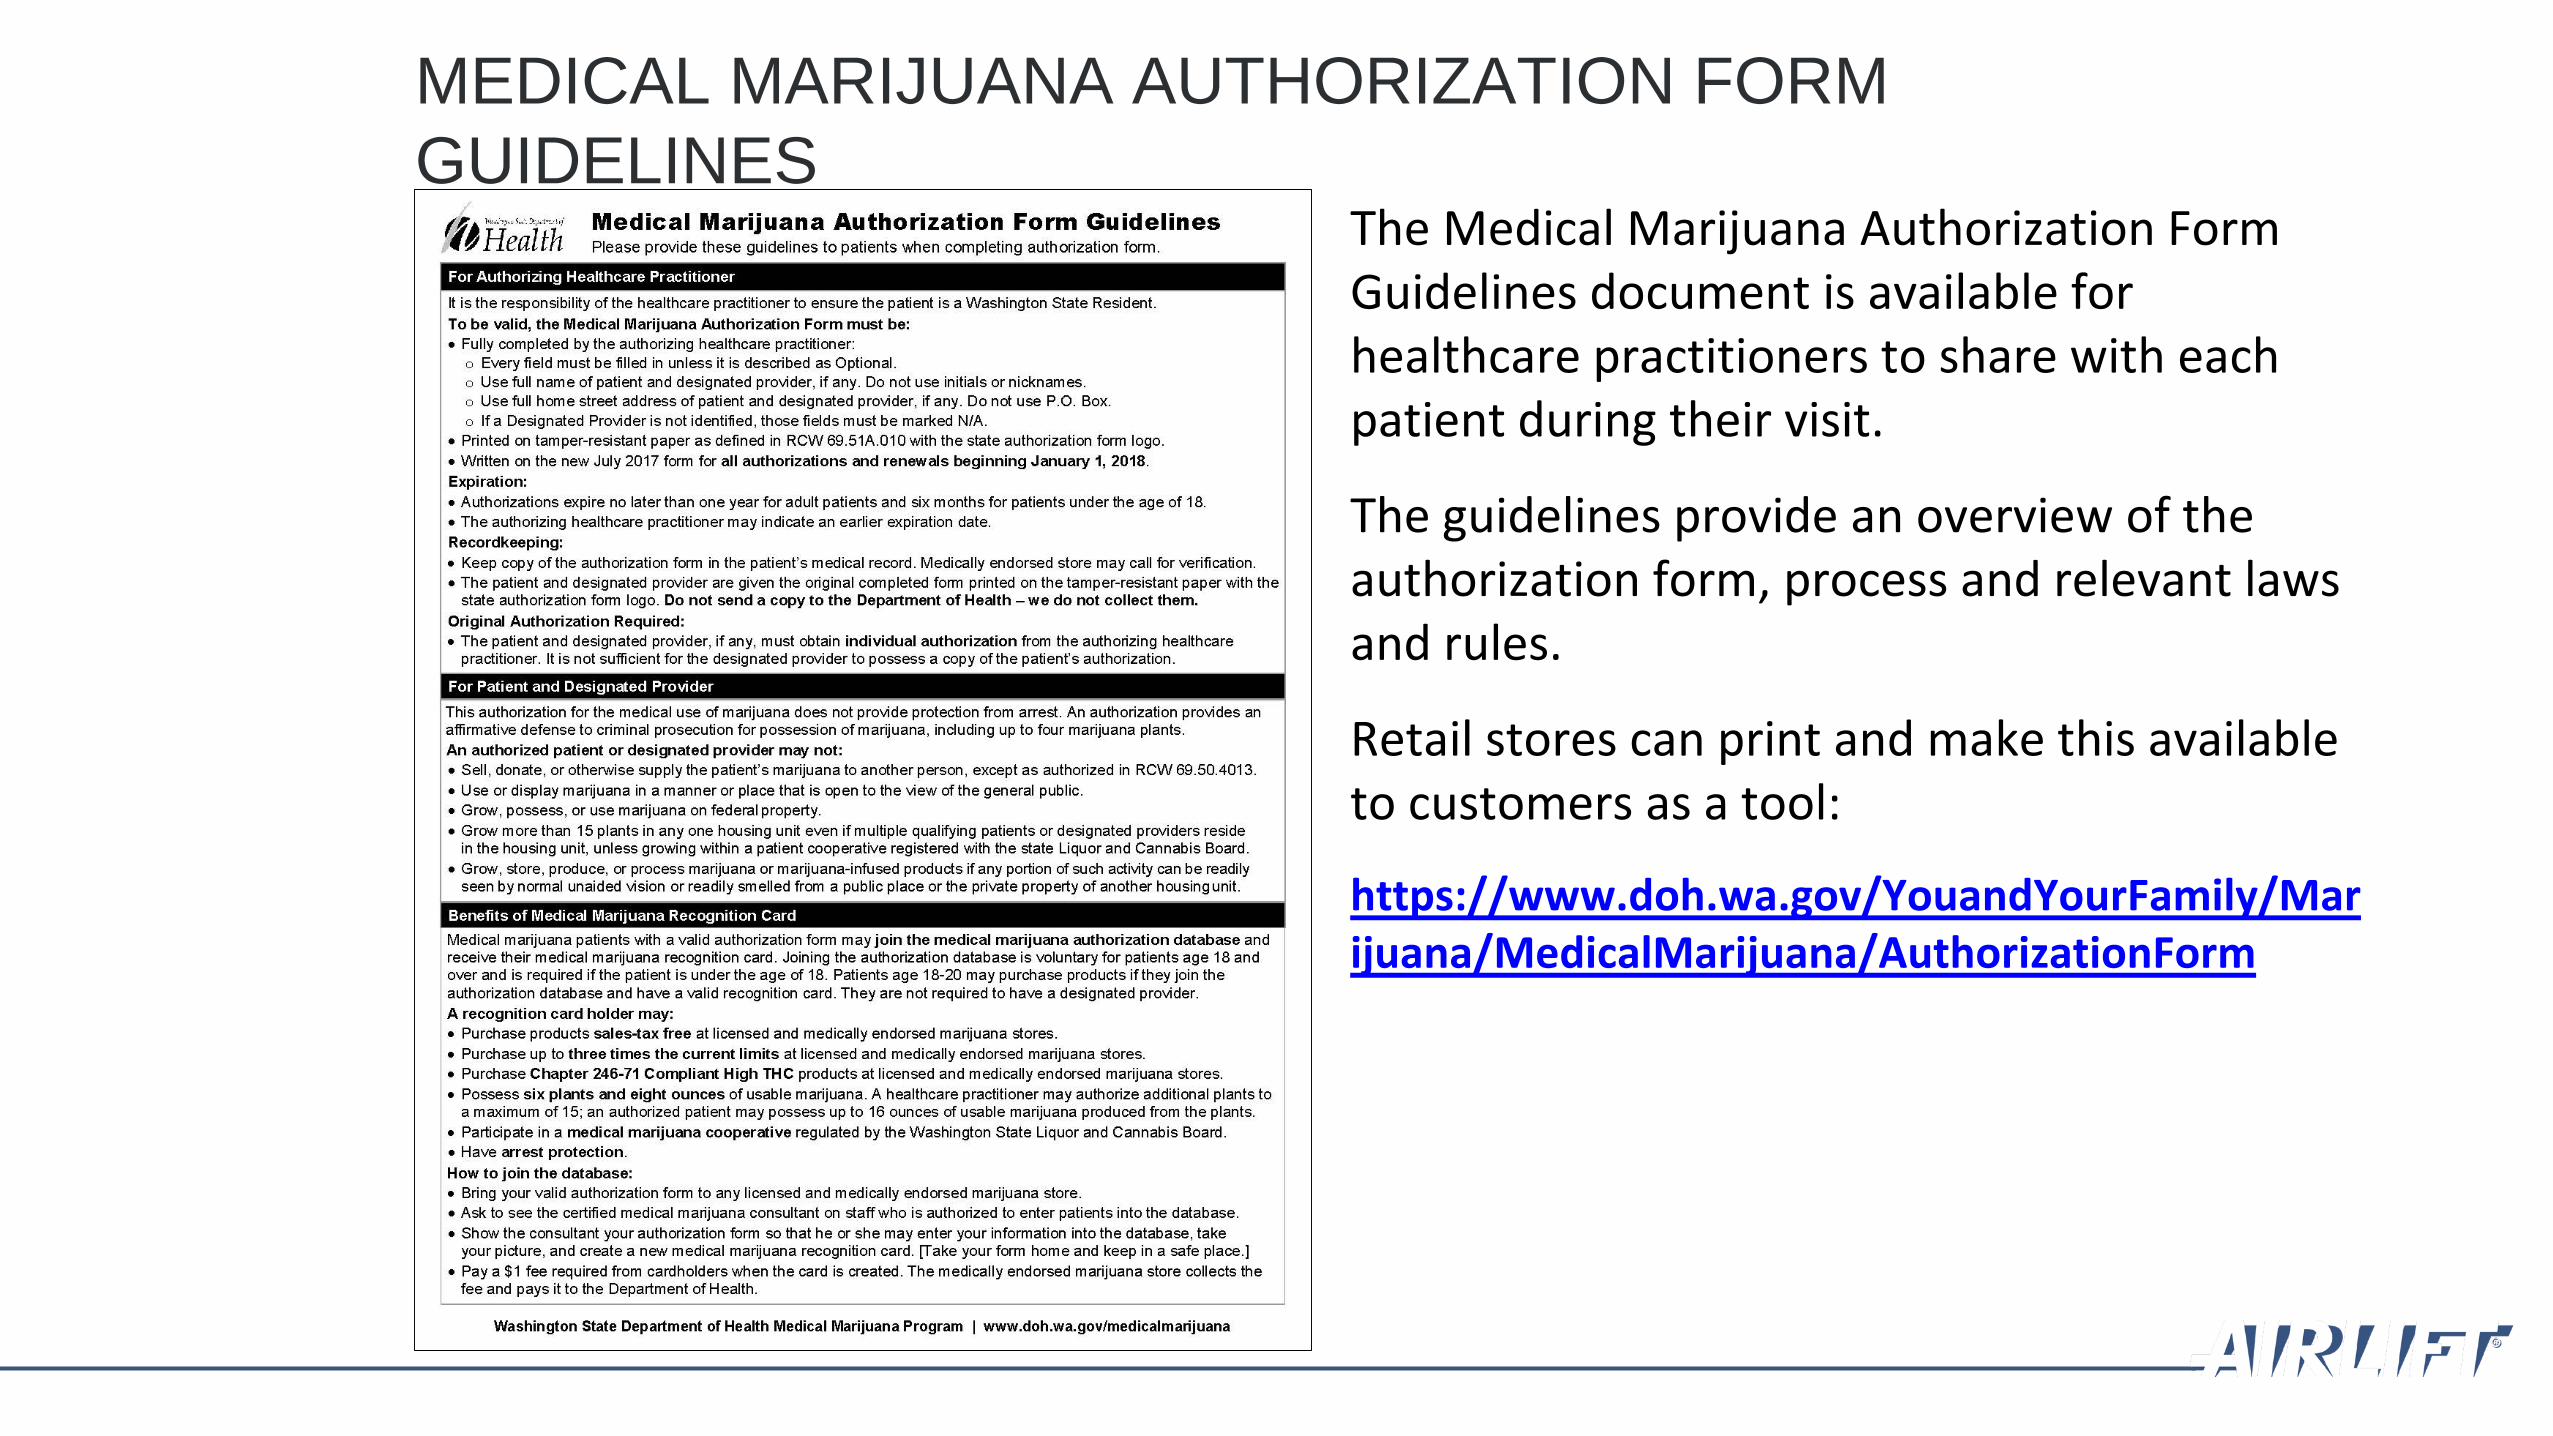
MEDICAL MARIJUANA AUTHORIZATION FORM GUIDELINES
The Medical Marijuana Authorization Form Guidelines document is available for healthcare practitioners to share with each patient during their visit.
The guidelines provide an overview of the authorization form, process and relevant laws and rules.
Retail stores can print and make this available to customers as a tool:
https://www.doh.wa.gov/YouandYourFamily/Marijuana/MedicalMarijuana/AuthorizationForm
What is an authorization form?
• An authorization is not a prescription as defined in RCW 69.51A.101• A form developed by the Department of Health• Completed, signed and dated by a patient’s healthcare practitioner and printed on
tamper-resistant paper to authorize a patient to use marijuana for medical purposes• Allows the patient to enter the medical marijuana authorization database and receive
a marijuana recognition card• Is a written designation for an individual to be a designated provider for one patient
only• Provides a patient with “affirmative defense”, unless entered in the database• Allows a patient to grow 4 plants, unless entered in the database
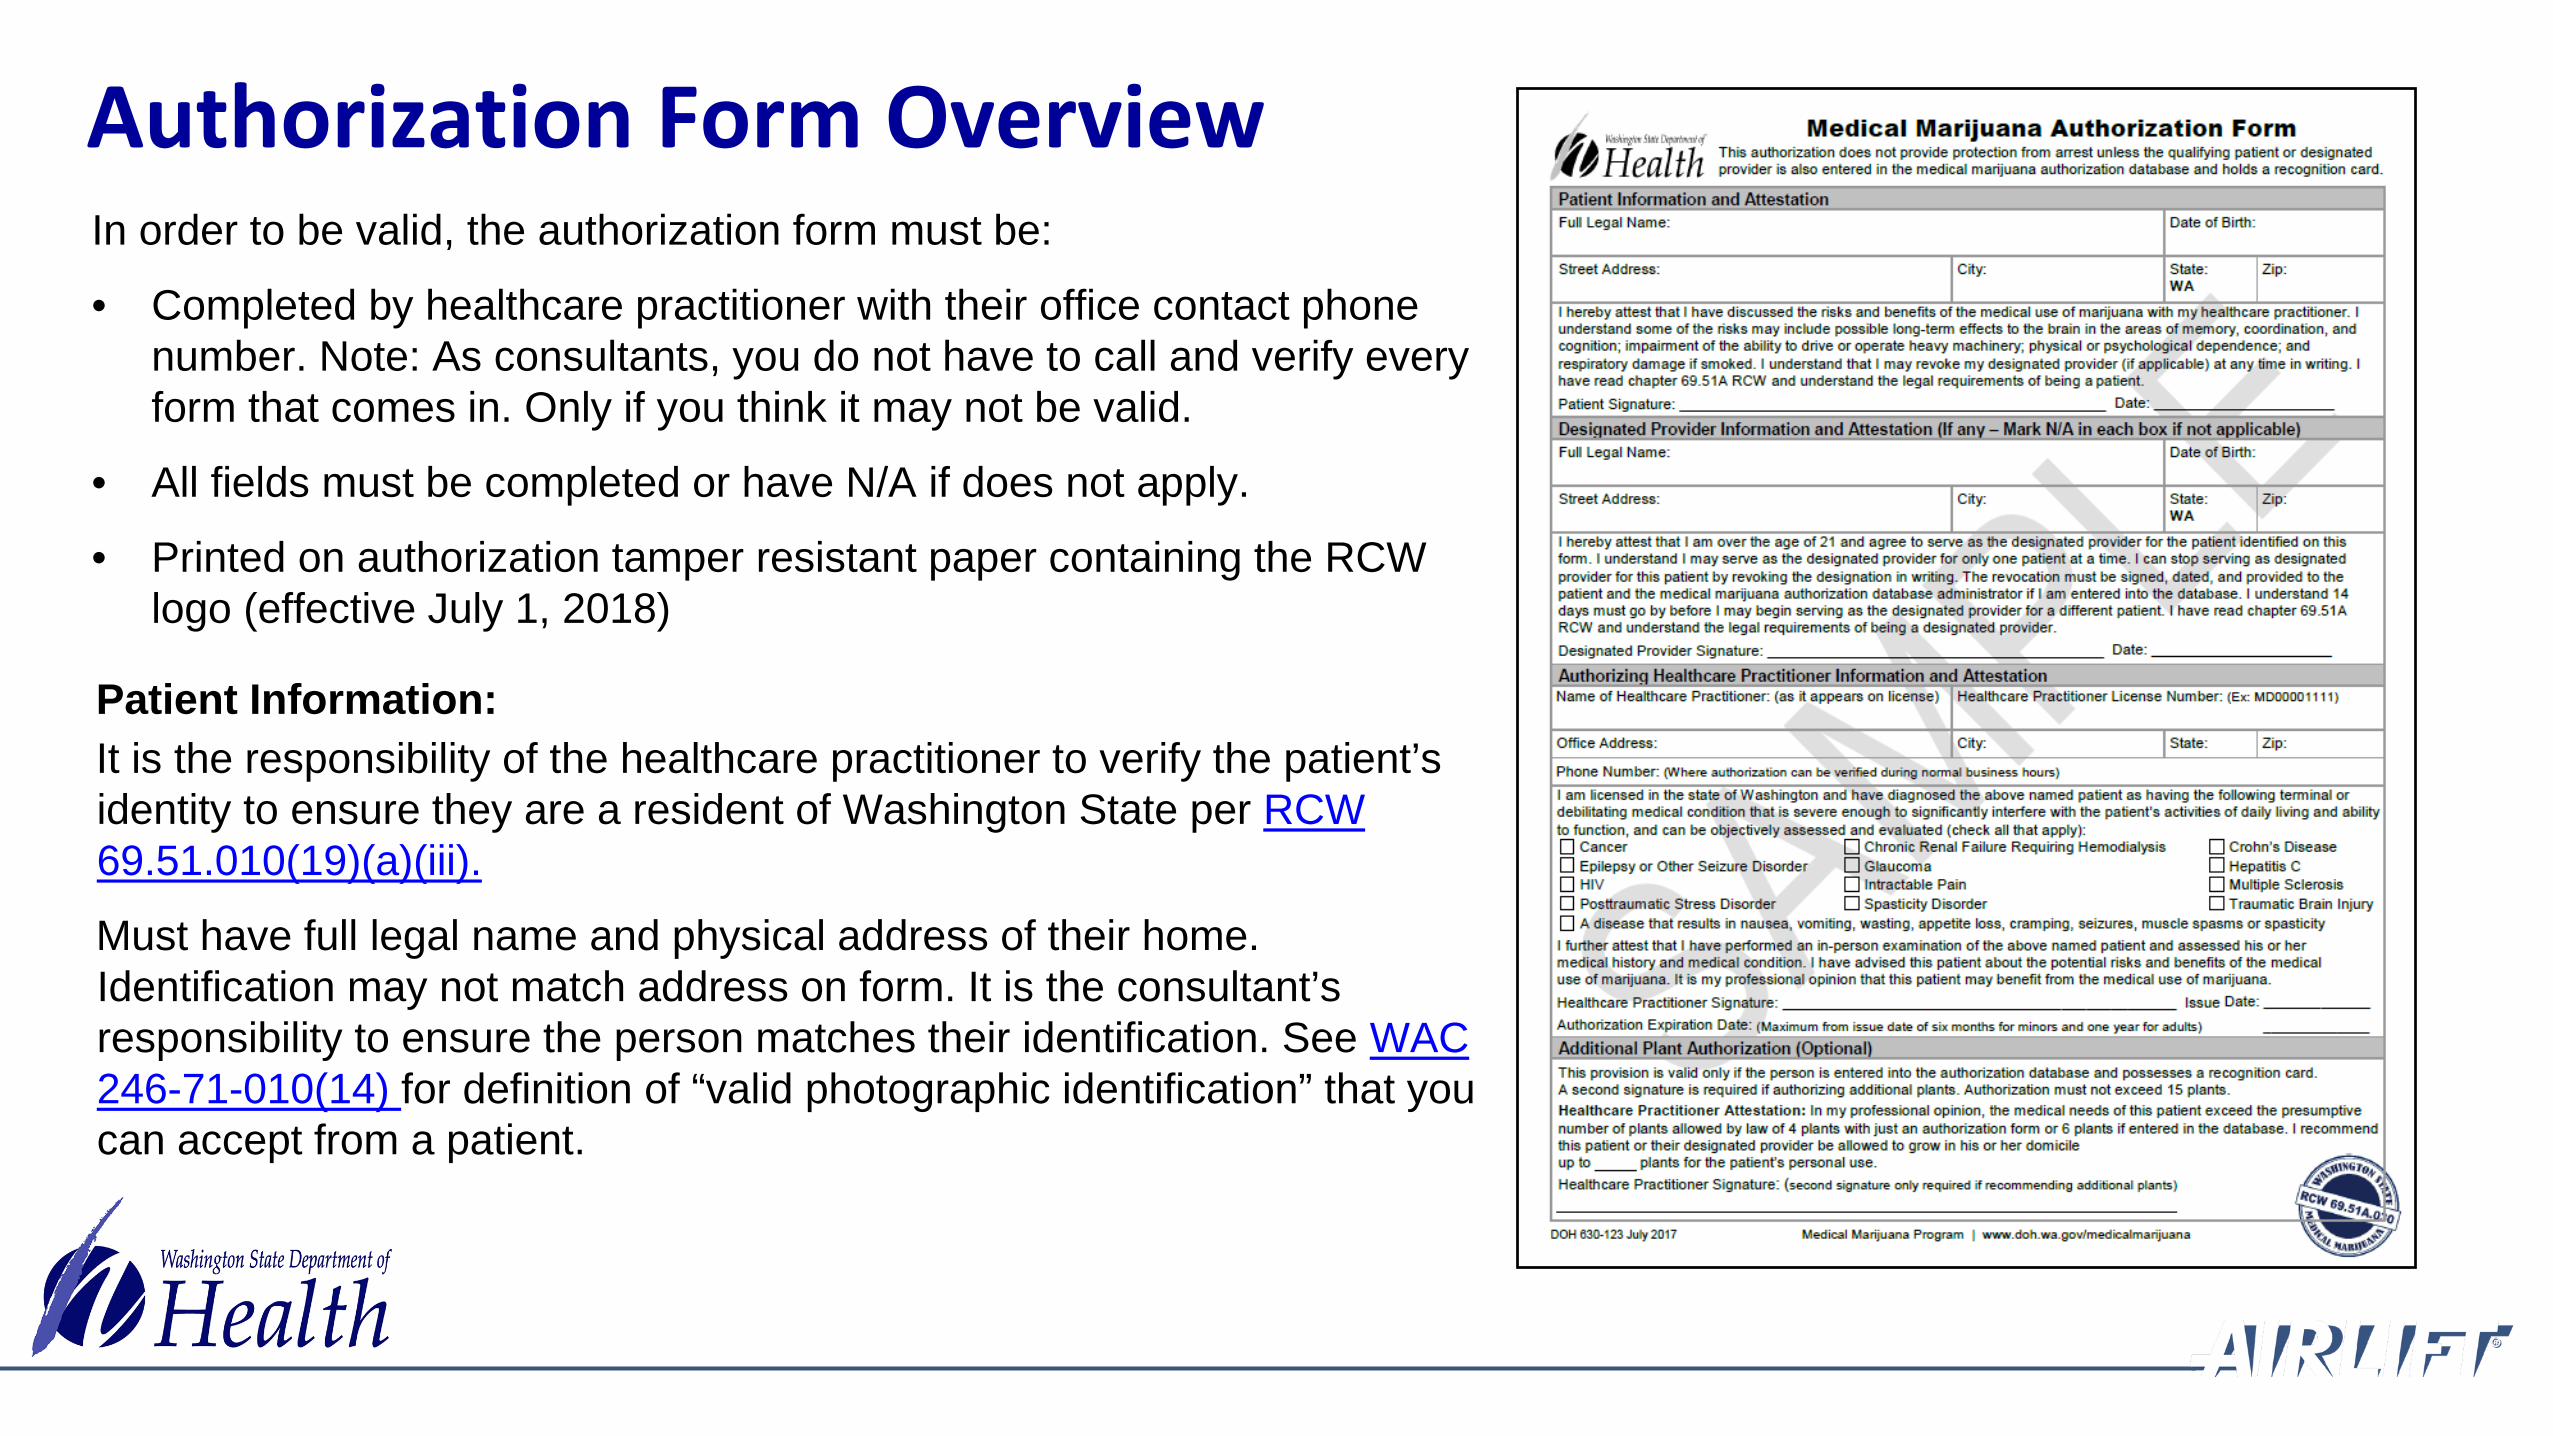
Authorization Form OverviewIn order to be valid, the authorization form must be:
• Completed by healthcare practitioner with their office contact phone number. Note: As consultants, you do not have to call and verify every form that comes in. Only if you think it may not be valid.
• All fields must be completed or have N/A if does not apply.
• Printed on authorization tamper resistant paper containing the RCW logo (effective July 1, 2018)
Patient Information:It is the responsibility of the healthcare practitioner to verify the patient’s identity to ensure they are a resident of Washington State per RCW 69.51.010(19)(a)(iii).
Must have full legal name and physical address of their home. Identification may not match address on form. It is the consultant’s responsibility to ensure the person matches their identification. See WAC 246-71-010(14) for definition of “valid photographic identification” that you can accept from a patient.

Patient information and attestation sectionThe Patient Information and Attestation section includes the following:1. Full legal name and date of birth of the patient2. Patient’s street address is the physical address of the person’s residence where the
plants may be grown under chapter 69.51A RCW. (Do not use a P.O. Box)3. Original signature and date of patient’s attestation
1
2
3
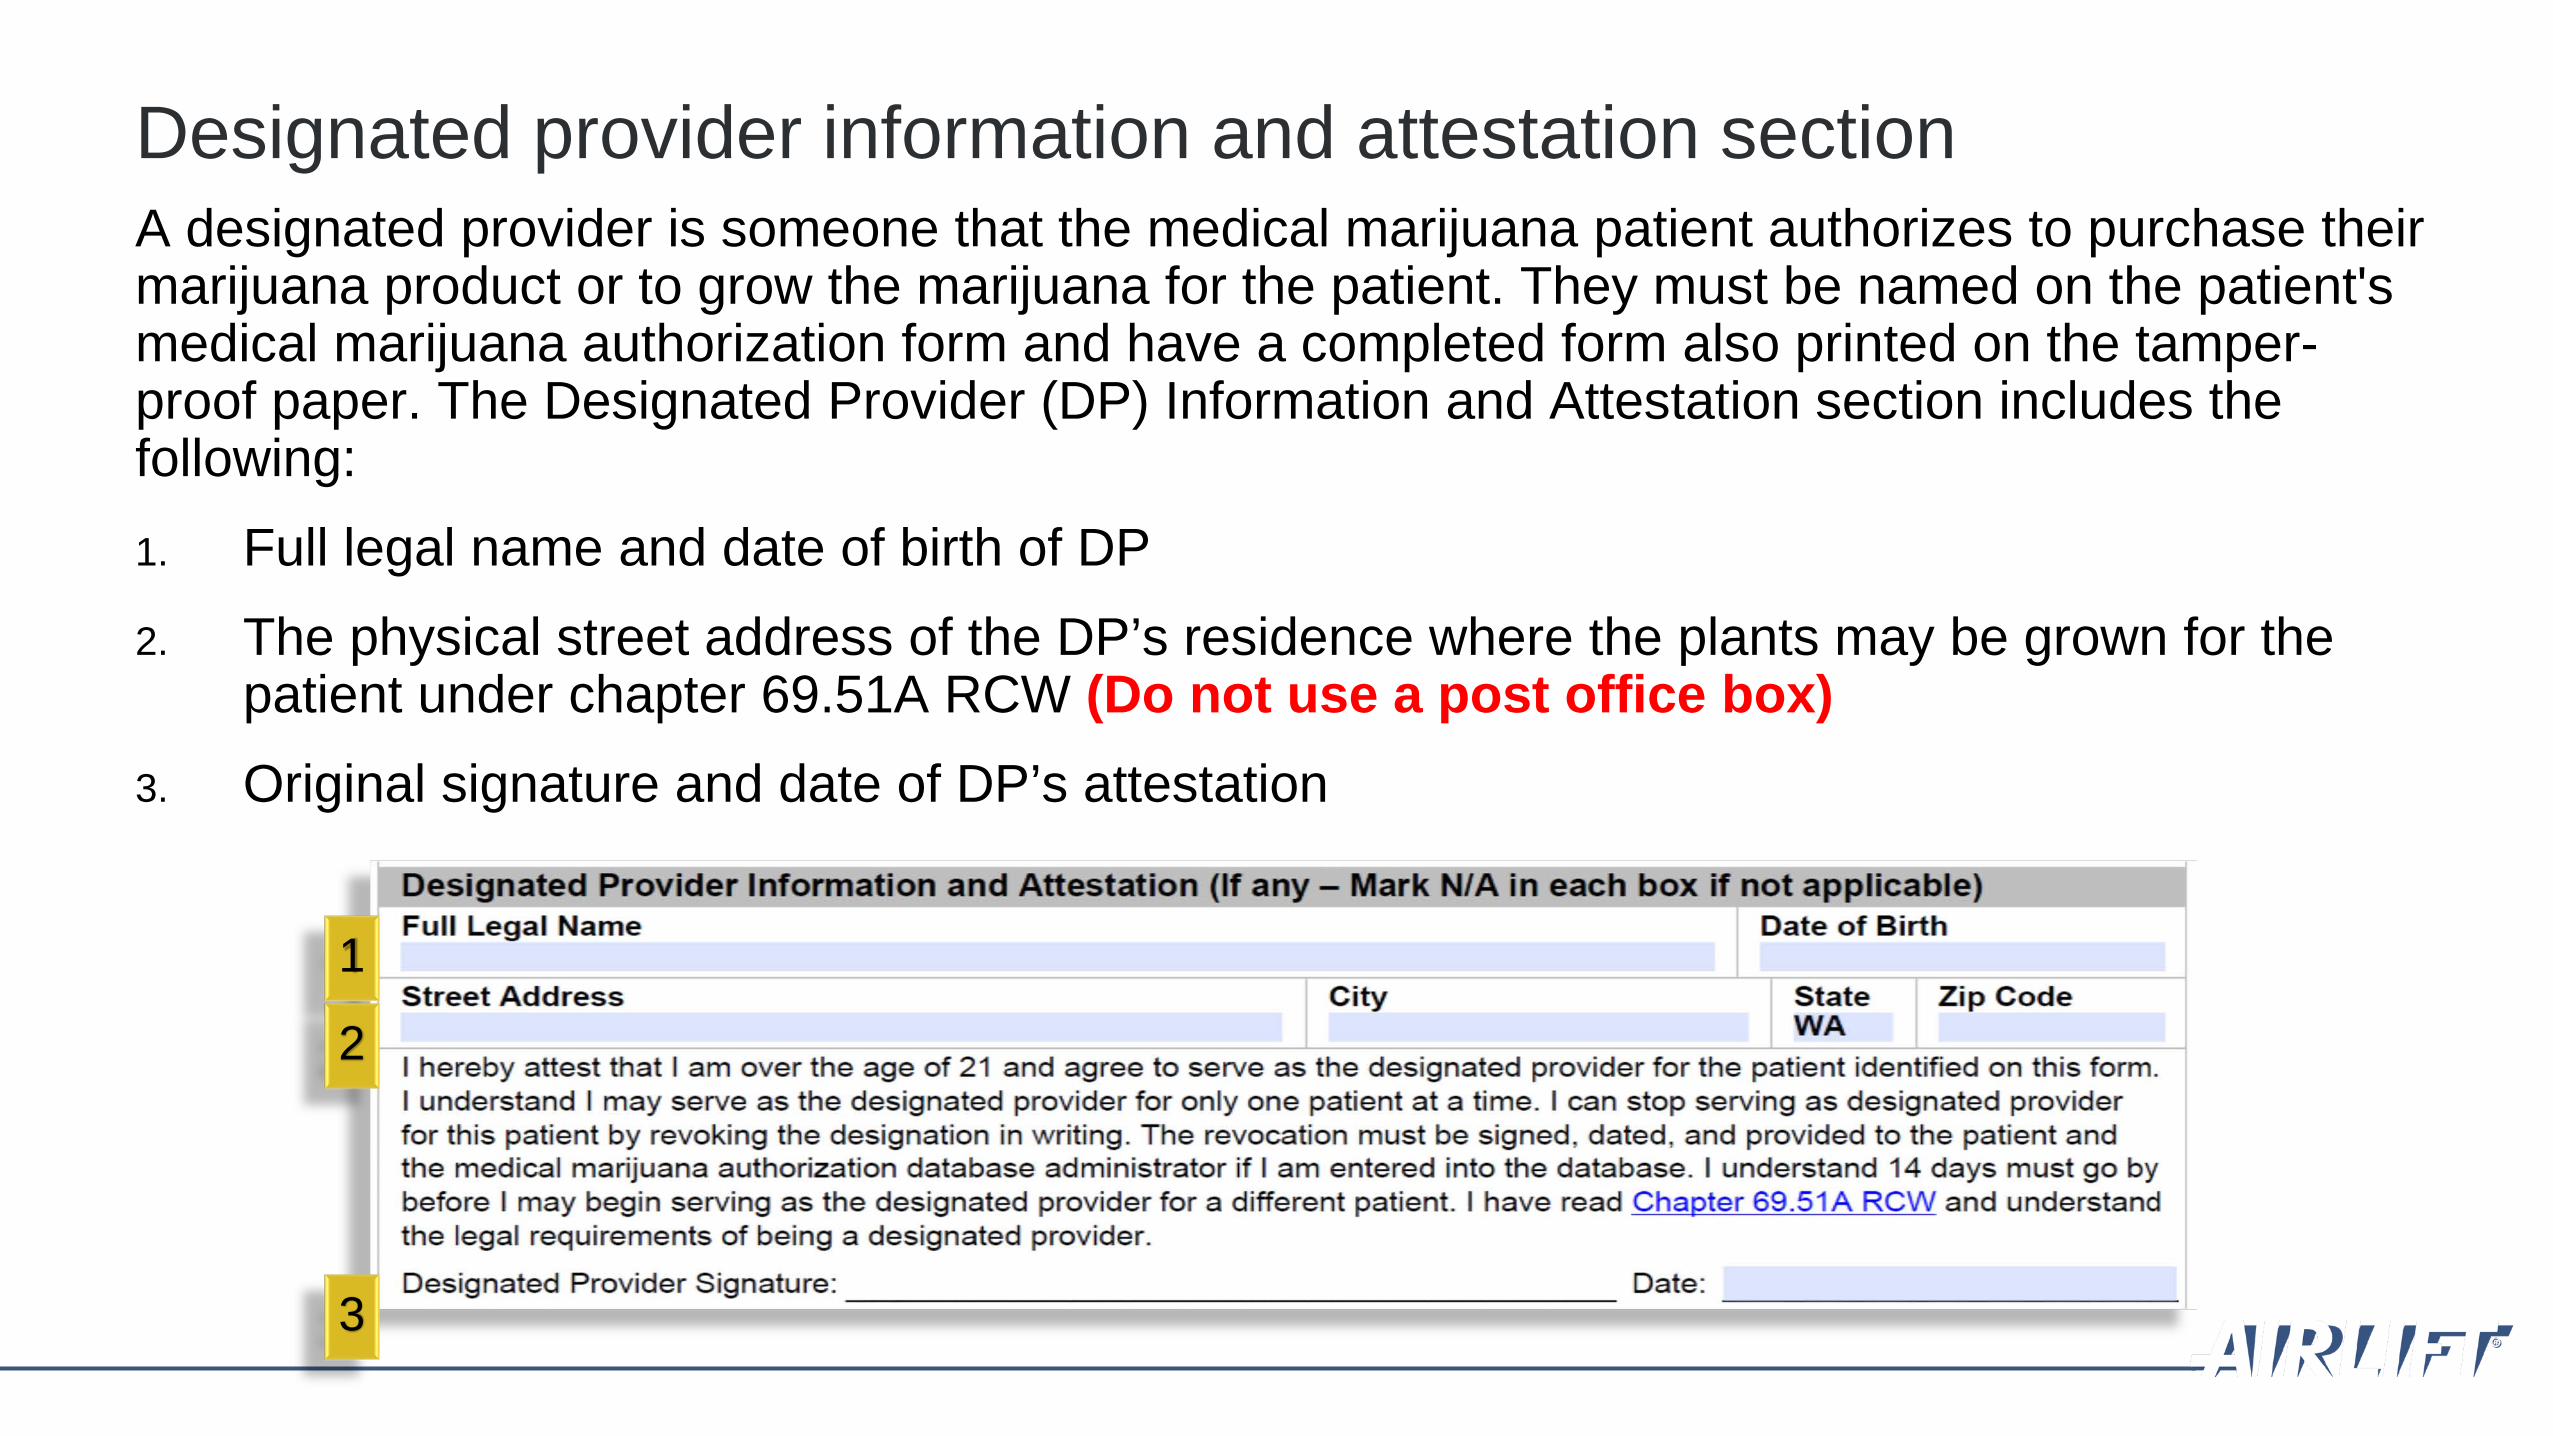
Designated provider information and attestation sectionA designated provider is someone that the medical marijuana patient authorizes to purchase their marijuana product or to grow the marijuana for the patient. They must be named on the patient's medical marijuana authorization form and have a completed form also printed on the tamper-proof paper. The Designated Provider (DP) Information and Attestation section includes the following:1. Full legal name and date of birth of DP2. The physical street address of the DP’s residence where the plants may be grown for the
patient under chapter 69.51A RCW (Do not use a post office box)3. Original signature and date of DP’s attestation
1
3
2

The Authorizing Healthcare Practitioner Information and Attestation section includes the following:• The healthcare practitioner (doctor) must complete the form, sign and enter the issue and
expiration date. • A patient cannot be registered in the database if the system cannot find the number listed.
Contact the department if the system will not accept the number.• A qualifying condition must be checked.
12
3
45
Authorizing Healthcare Practitioner Information section

Additional plant authorization sectionThis section is optional and used by healthcare practitioner to recommend additional marijuana plants to meet the medical needs of the patient.
1. Healthcare practitioner’s plant recommendation (no more than 15)
2. Healthcare practitioner’s original signature
If the practitioner does not complete and sign this section, the patient can legally grow four marijuana plants within their domicile.
1
2
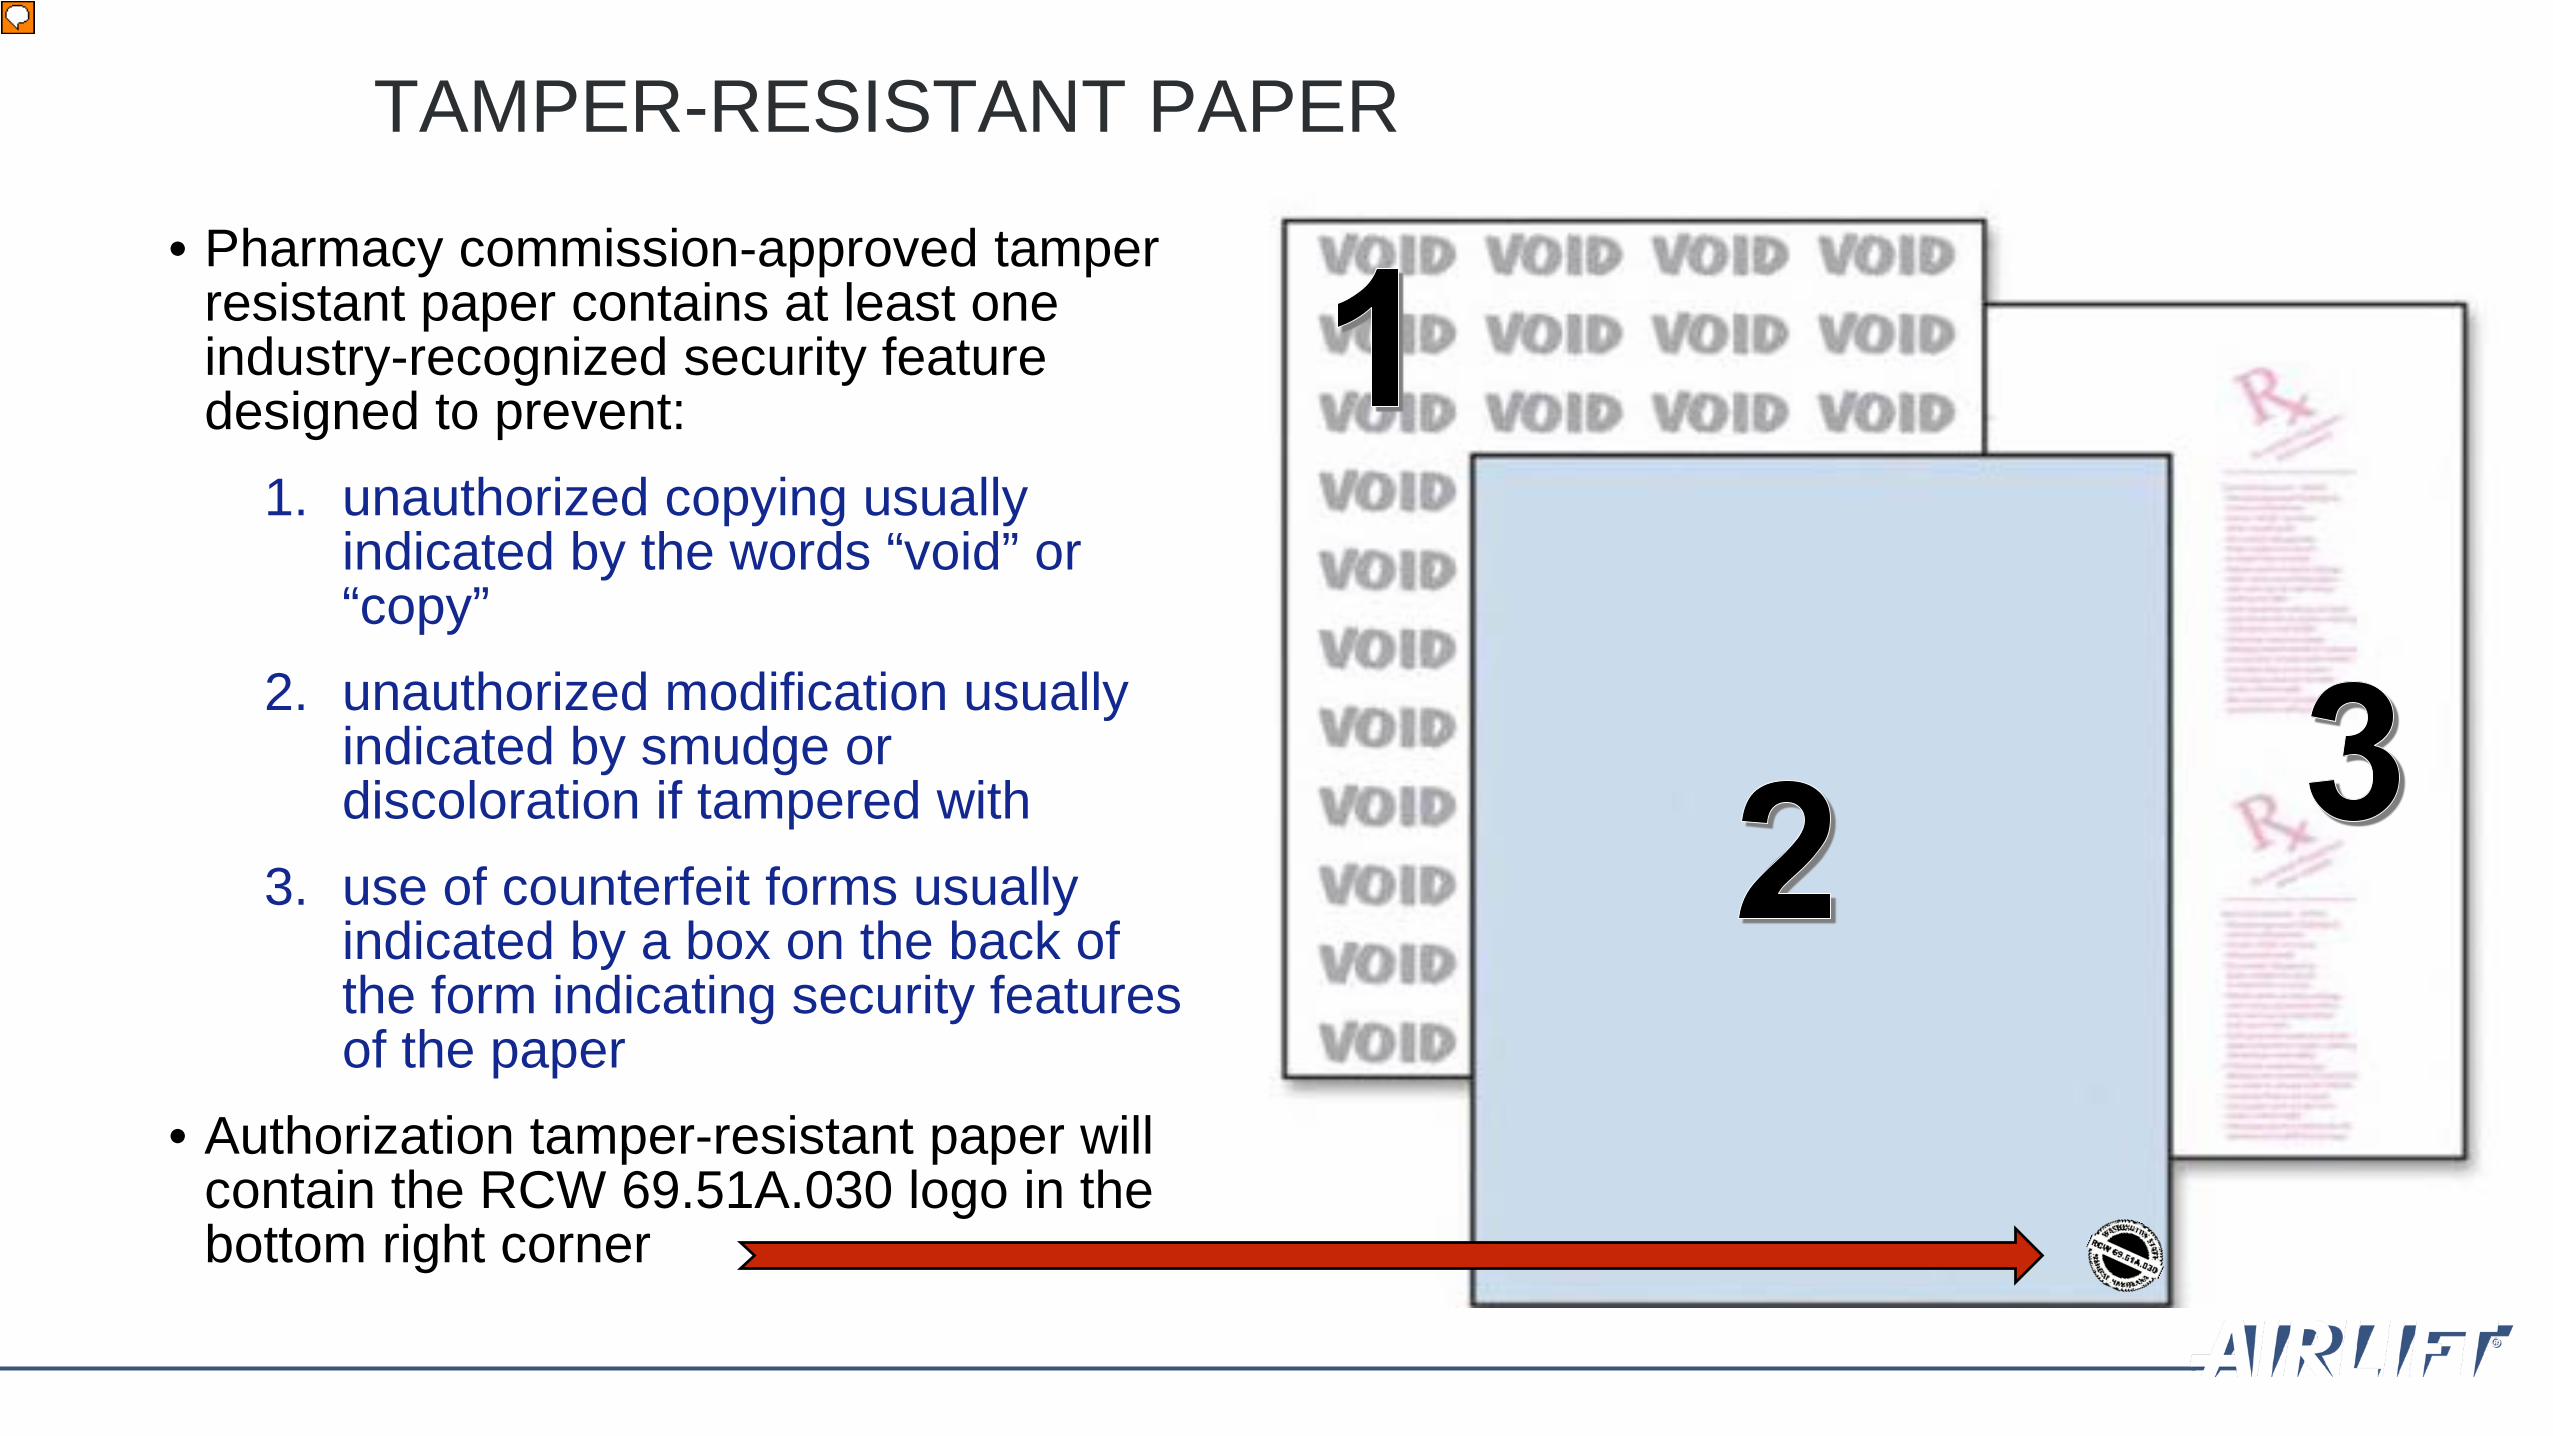
TAMPER-RESISTANT PAPER
• Pharmacy commission-approved tamper resistant paper contains at least one industry-recognized security feature designed to prevent:
1. unauthorized copying usually indicated by the words “void” or “copy”
2. unauthorized modification usually indicated by smudge or discoloration if tampered with
3. use of counterfeit forms usually indicated by a box on the back of the form indicating security features of the paper
• Authorization tamper-resistant paper will contain the RCW 69.51A.030 logo in the bottom right corner
Presenter
Presentation Notes
Posted to our website in late June 2015. Must be used for all new authorizations or renewals beginning July 24, 2015. Must be used for all authorizations beginning July 1, 2016. Authorizations on any other form are invalid beginning July 1, 2016. NOTE: Currently not fillable. We will be releasing a new form following the legislative session that will be on one page and be fillable.

Recognition Cards
Minor PatientDesignated ProviderAdult Patient
There are three types of cards that can be created in the database. • Each card indicates the type of card next to the cardholder’s picture. • The back of the card is the same for all card types.

Adult Patient Recognition Card
Presenter
Presentation Notes

Designated Provider Card
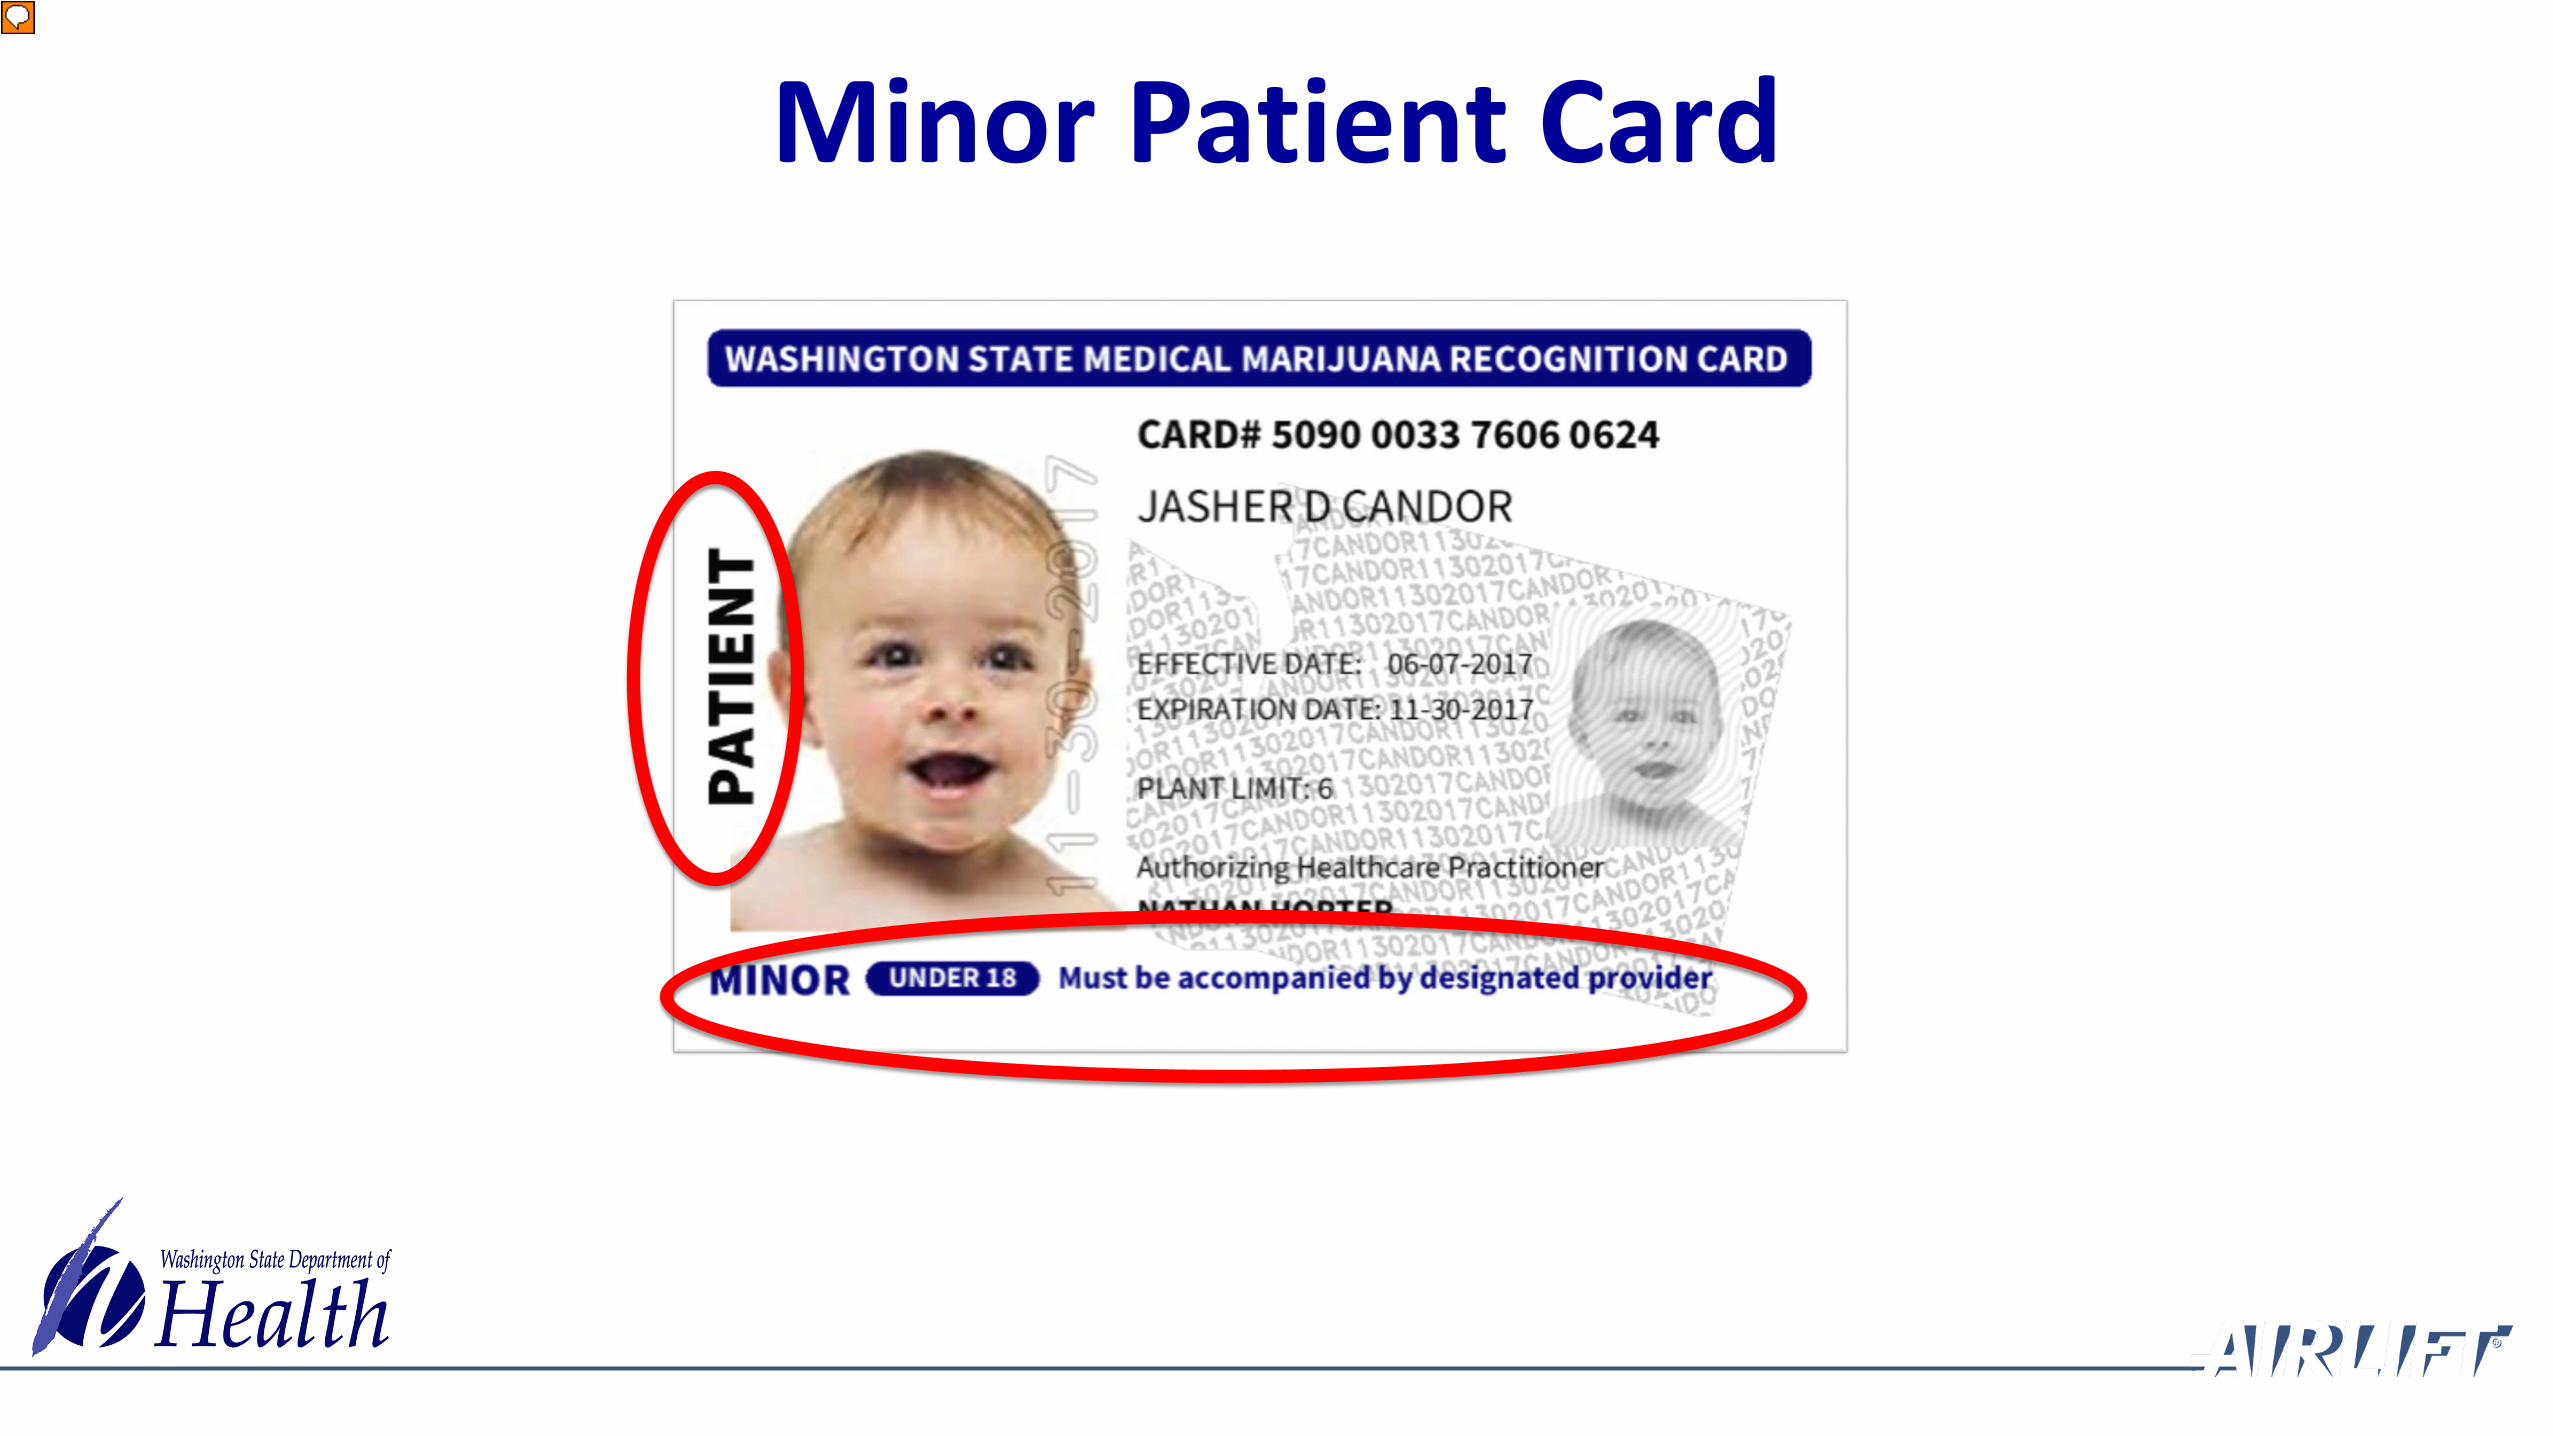
Minor Patient Card
Presenter
Presentation Notes
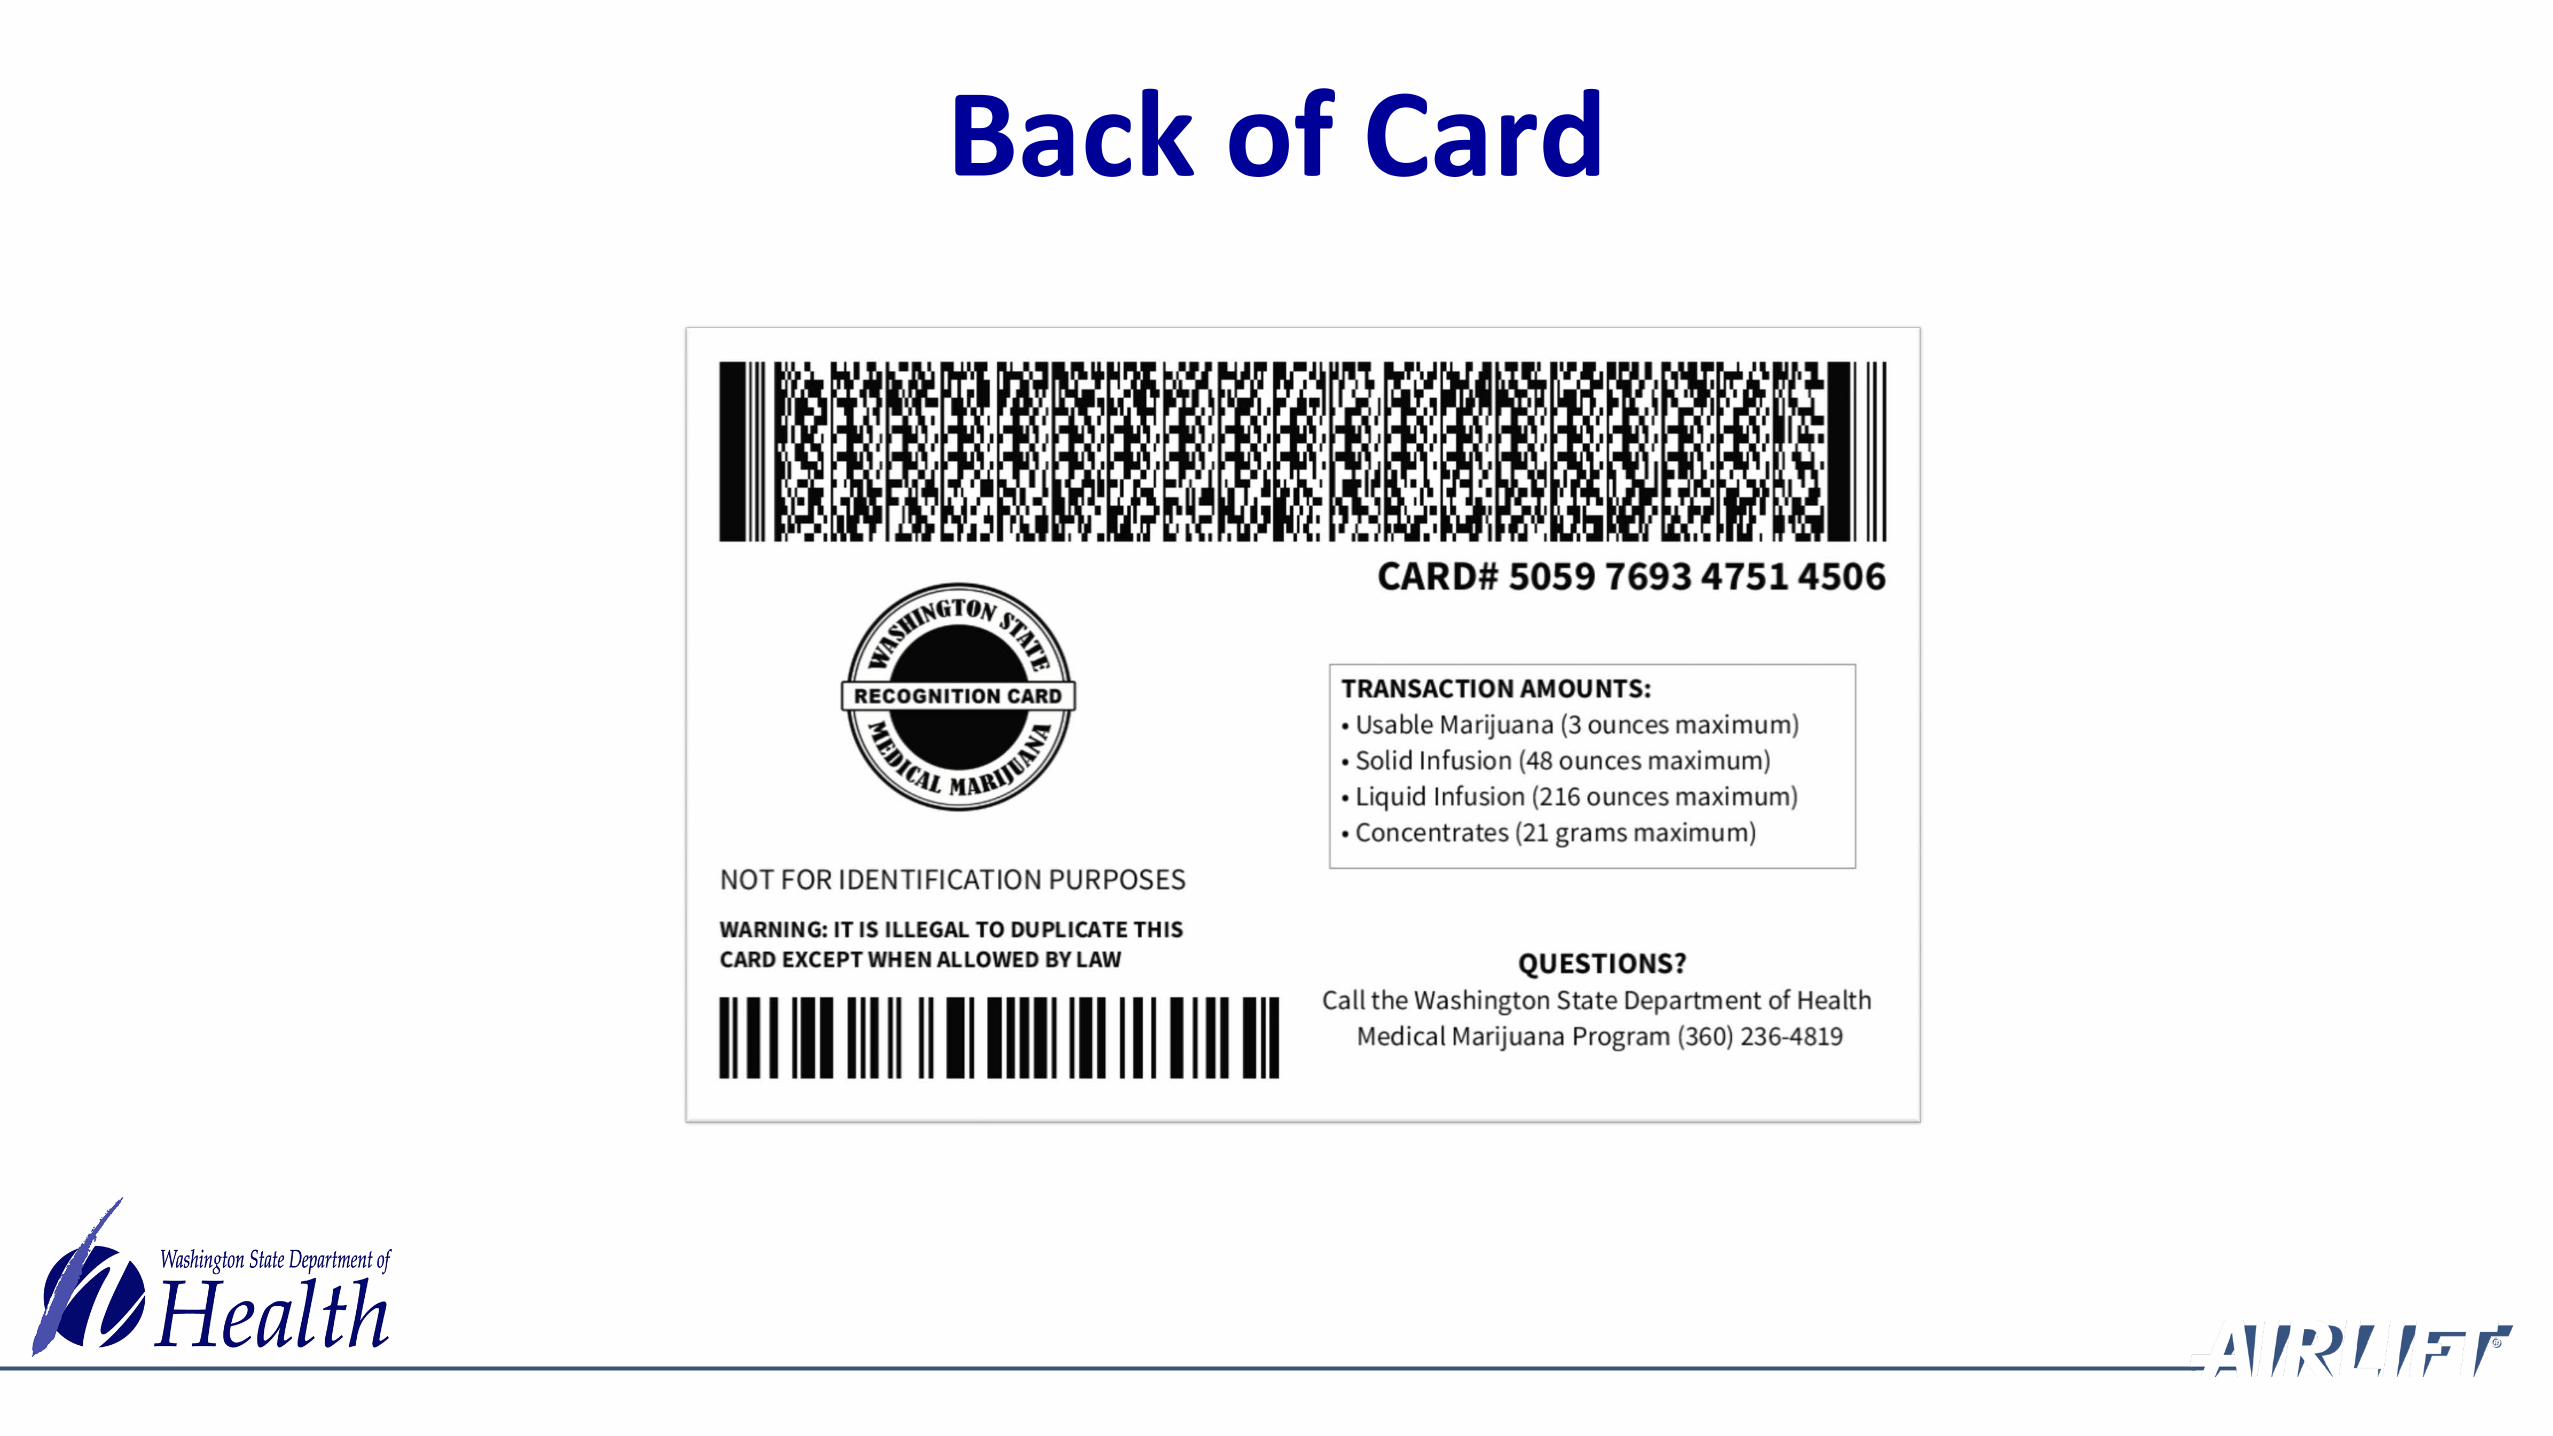
Back of Card

12
34
Card Security Features

5 Steps for Consultant to Create Card
Create, Print & Laminate Card
Take photo and save in file
Enter forminformationVerify ID
1 2 3 4 5Collect $1 card fee

Check identification to ensure the person is who they say they are.
Address on identification does not have to match what is on the form. It is up to the healthcare practitioner to ensure they are a Washington State resident.*
Minor patients do not require identification, however, their designated provider does.
Step 1: Check Identification
*If you are unsure about anything on the authorization, you may call the authorizing healthcare practitioner to confirm.

Solid white or light background Stabilize camera Face forward with eye contactGood lighting to eliminate shadows on and around faceEnsure there is background showing all around behind their head/hair and shouldersNo head coveringJust head/shoulder shot
Step 2. Take Photo

Before you begin data entry, visually scan the authorization form to make sure it is completely filled out and signed by both the doctor and the patient or the designated provider.
Enter information as it appears on the authorization form.
Step 3: Enter information into database
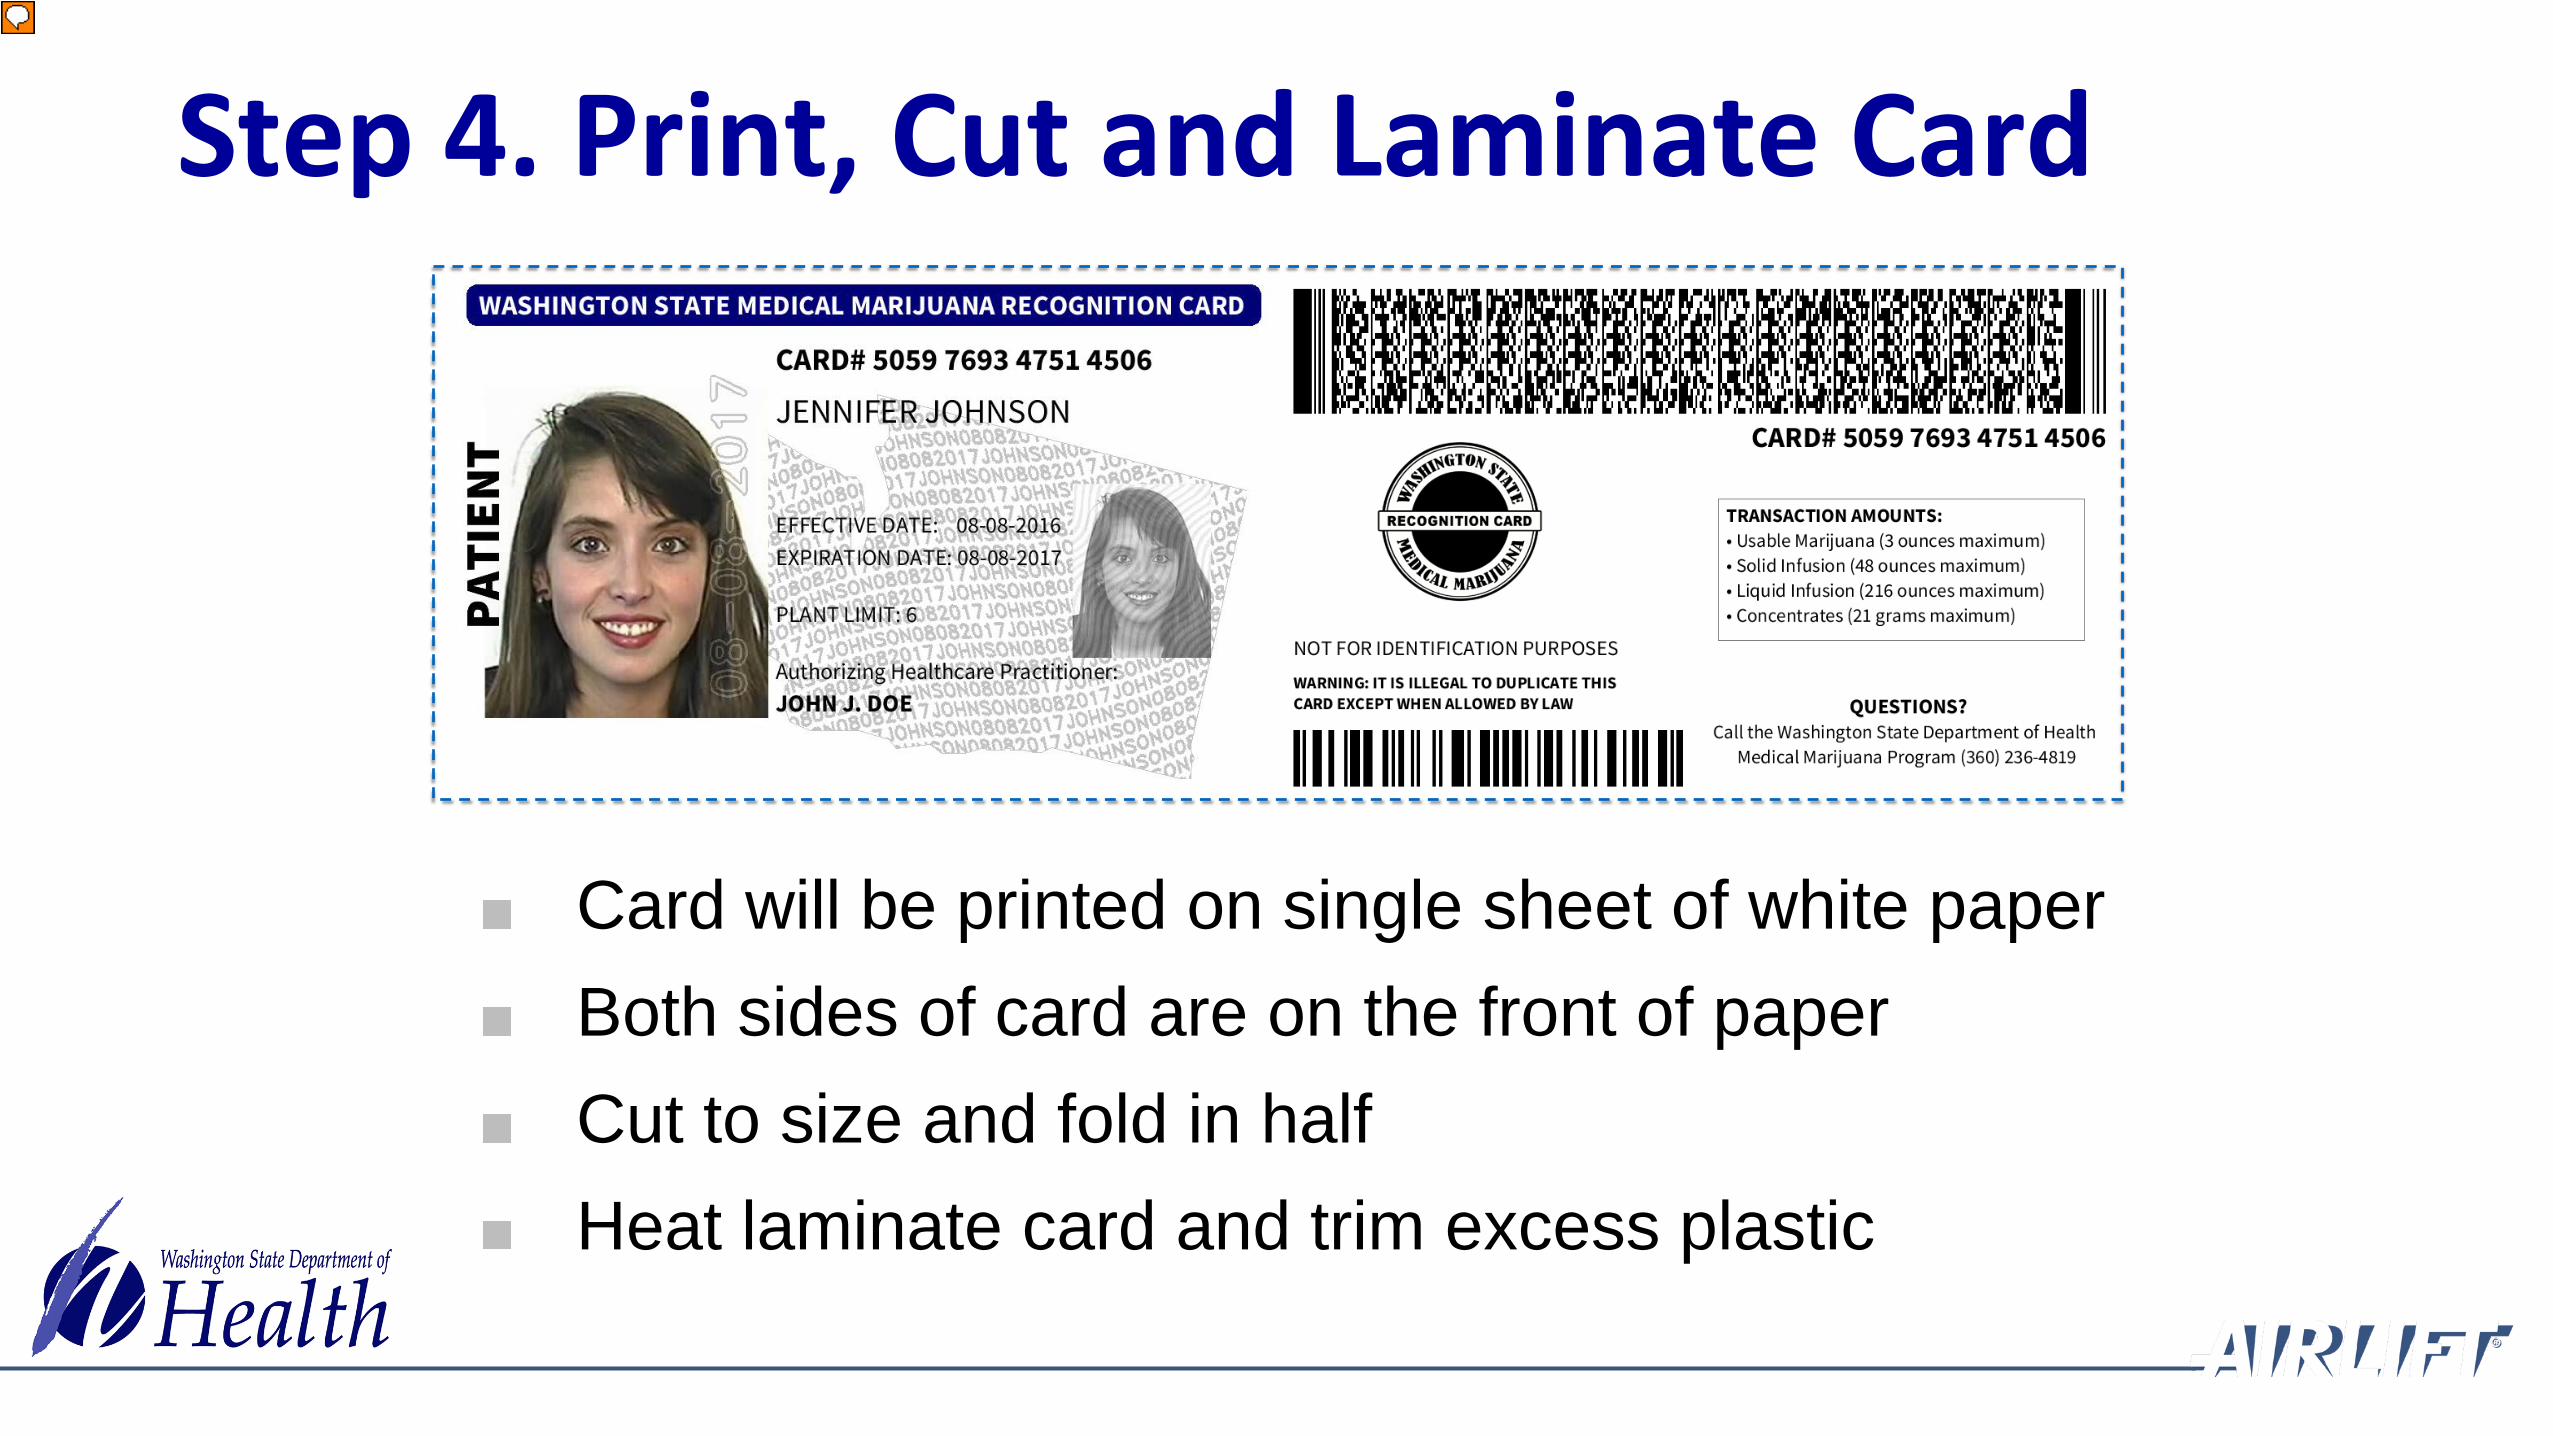
Card will be printed on single sheet of white paperBoth sides of card are on the front of paperCut to size and fold in halfHeat laminate card and trim excess plastic
Step 4. Print, Cut and Laminate Card
Presenter
Presentation Notes

Law requires $1 fee from card holder.
Stores remit fees to Department of Health via a quarterly invoice.
System tracks creations that require fee:
1. New card
2. Renewed card
3. Replace lost card
Step 5. Collect Fee
Create Card Example
Adult Patient

Select Card Management button.

Choose the type of card you are going to create by selecting the Search button underneath it.
This is to ensure they do not already have an active card in the system.

Jennifer Johnson 01/14/1993
Enter patient name and date of birth.
Select Search button.

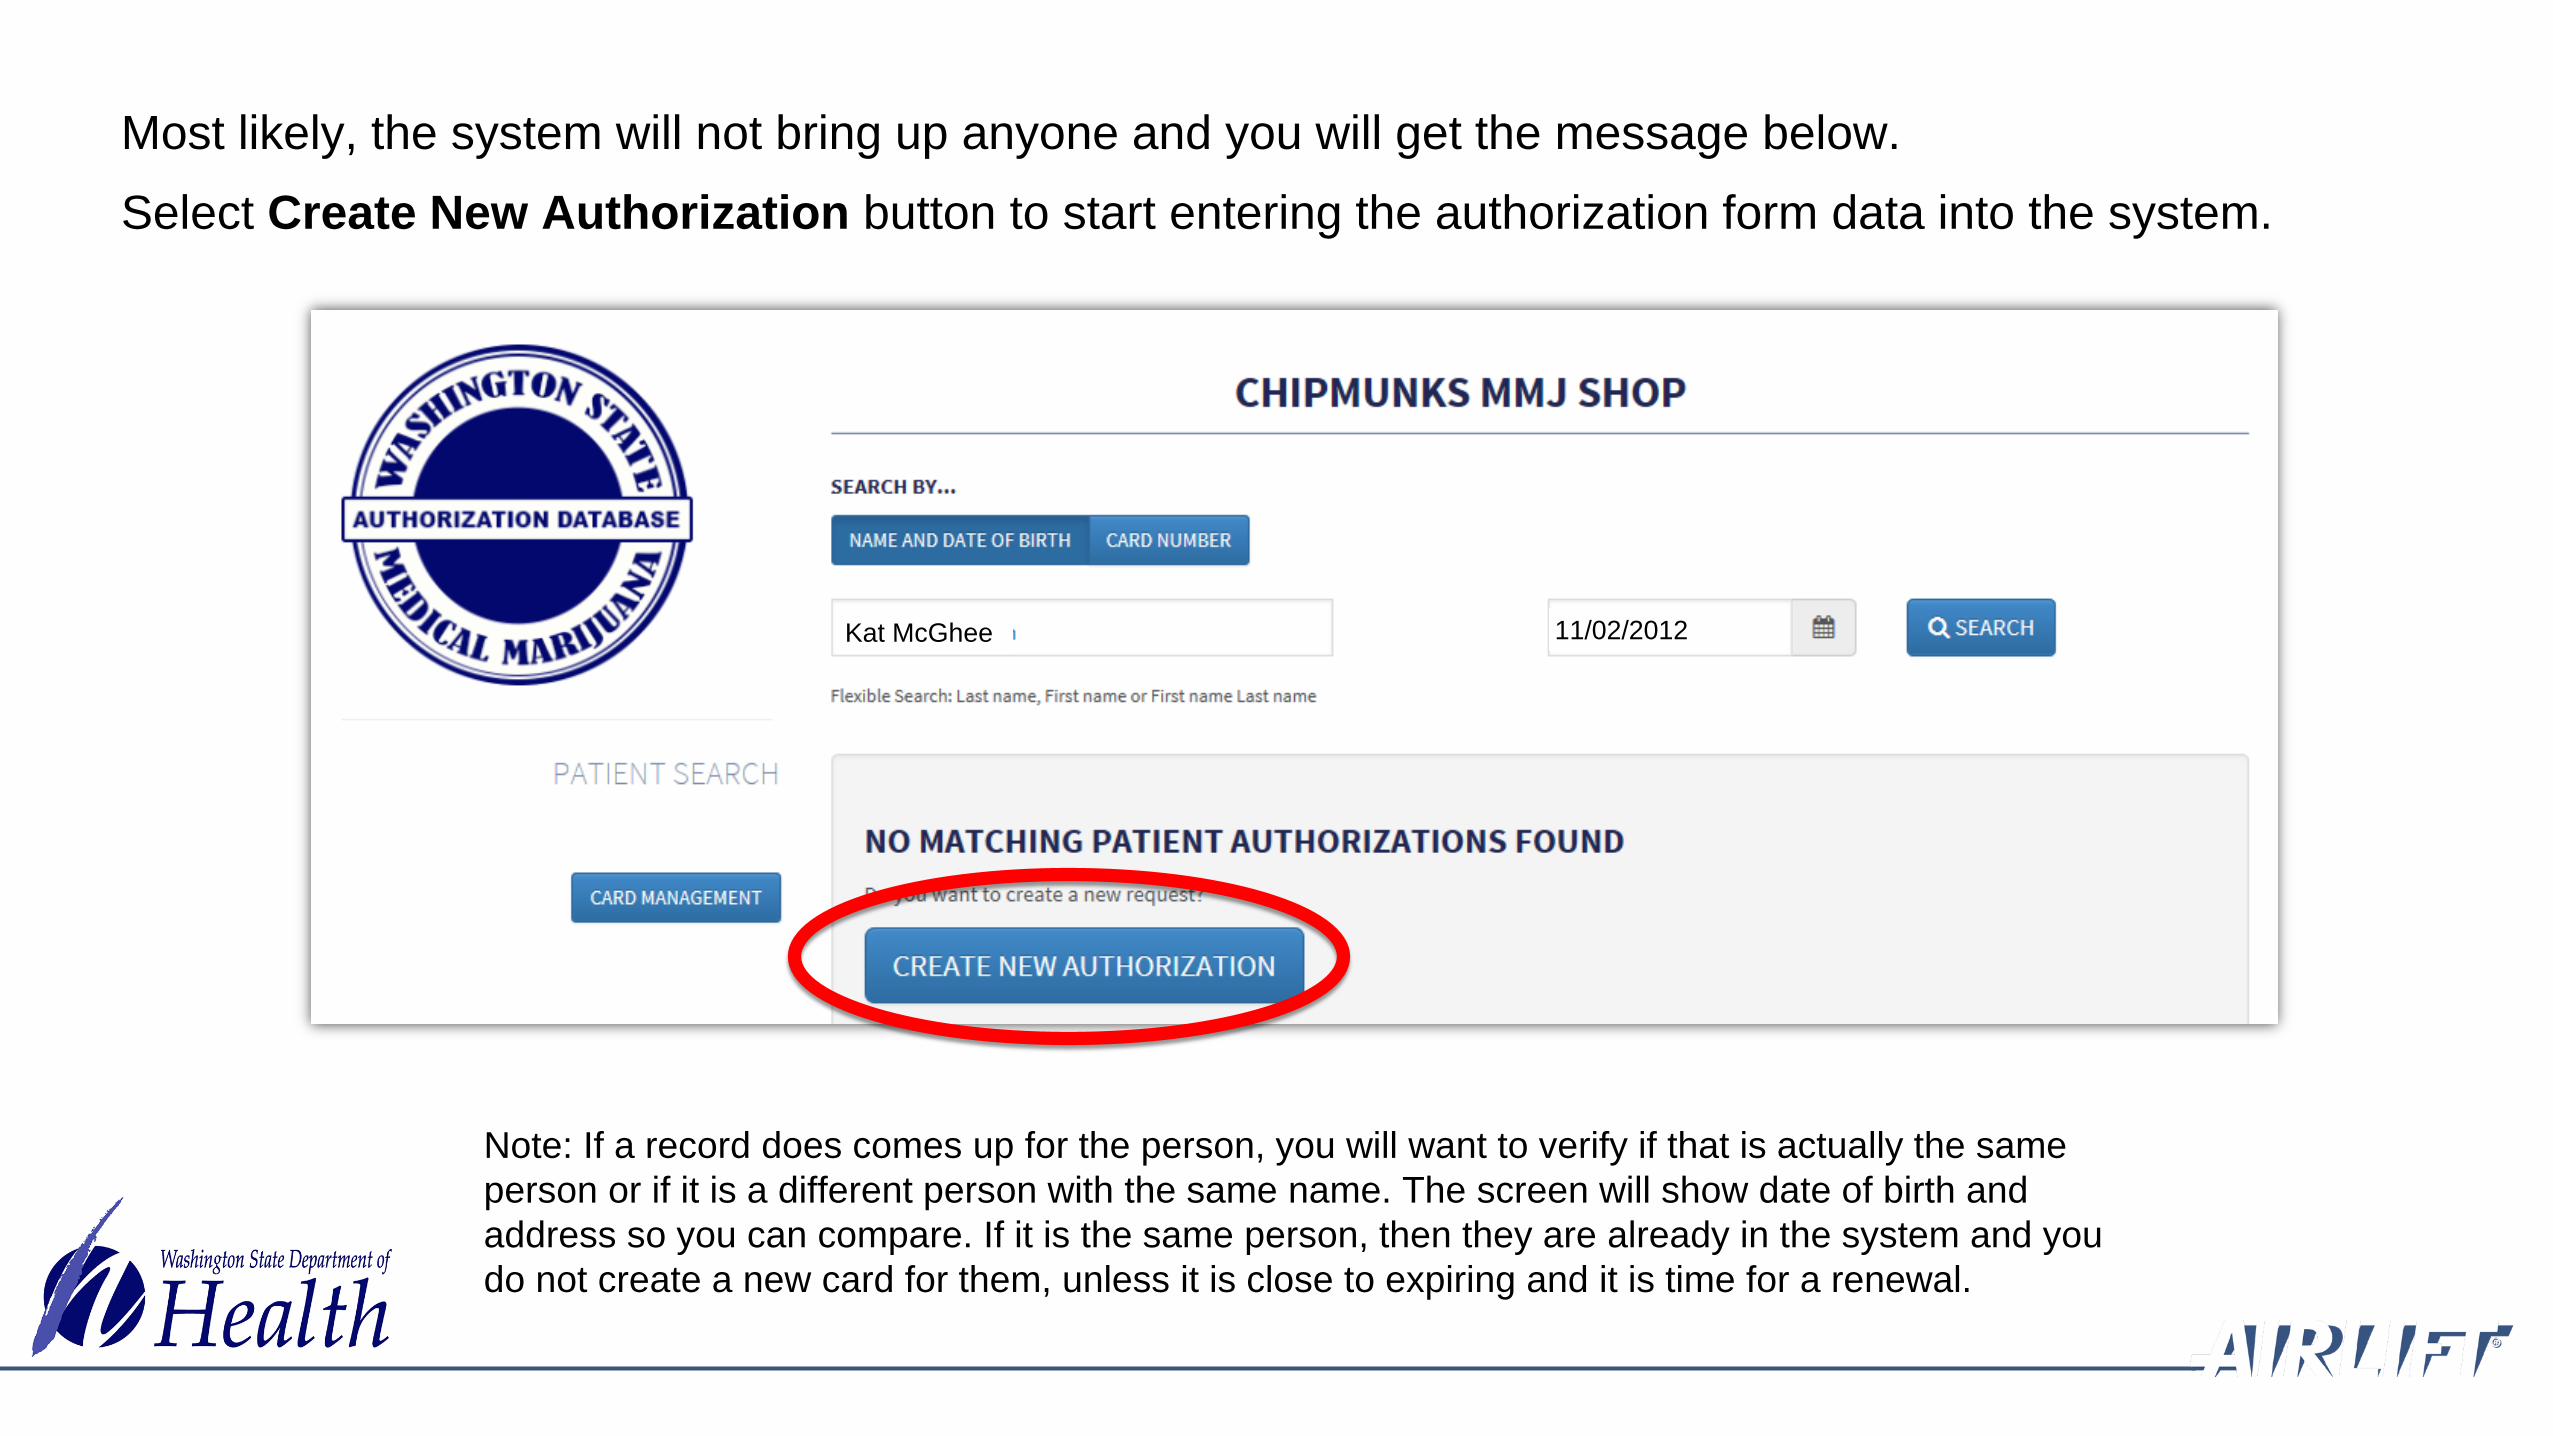
Most likely, the system will not bring up anyone and you will get the message below. Select Create New Authorization button to start entering the authorization form data into the system.
Note: If a record does comes up for the person, you will want to verify if that is actually the same person or if it is a different person with the same name. The screen will show date of birth and address so you can compare. If it is the same person, then they are already in the system and you do not create a new card for them, unless it is close to expiring and it is time for a renewal.

Once you have verified that you will be creating a new card, take the patient’s photo.
Refer to the reminders at right.
Upload the photo to the equipment you are using so you will be prepared to use it when entering data.
Photo Reminders: Solid white or light background Stabilize camera Face forward with eye contact Good lighting to eliminate
shadows on and around face Ensure there is background
showing all around behind their head/hair and shoulders
No head covering Just head/shoulder shot

Enter patient information exactly as written on their authorization form.

Browse your files to find the picture you just took to upload. Continue entering information.
Reminder: Once you complete creating the card, be sure to delete the photo from your files.
NOTE: If it appears to be good, yet does not let you create card when you get to the end, you need to clear your internet browser history (cache) and begin again. If it still will not allowing you to create a card, e-mail: [email protected]
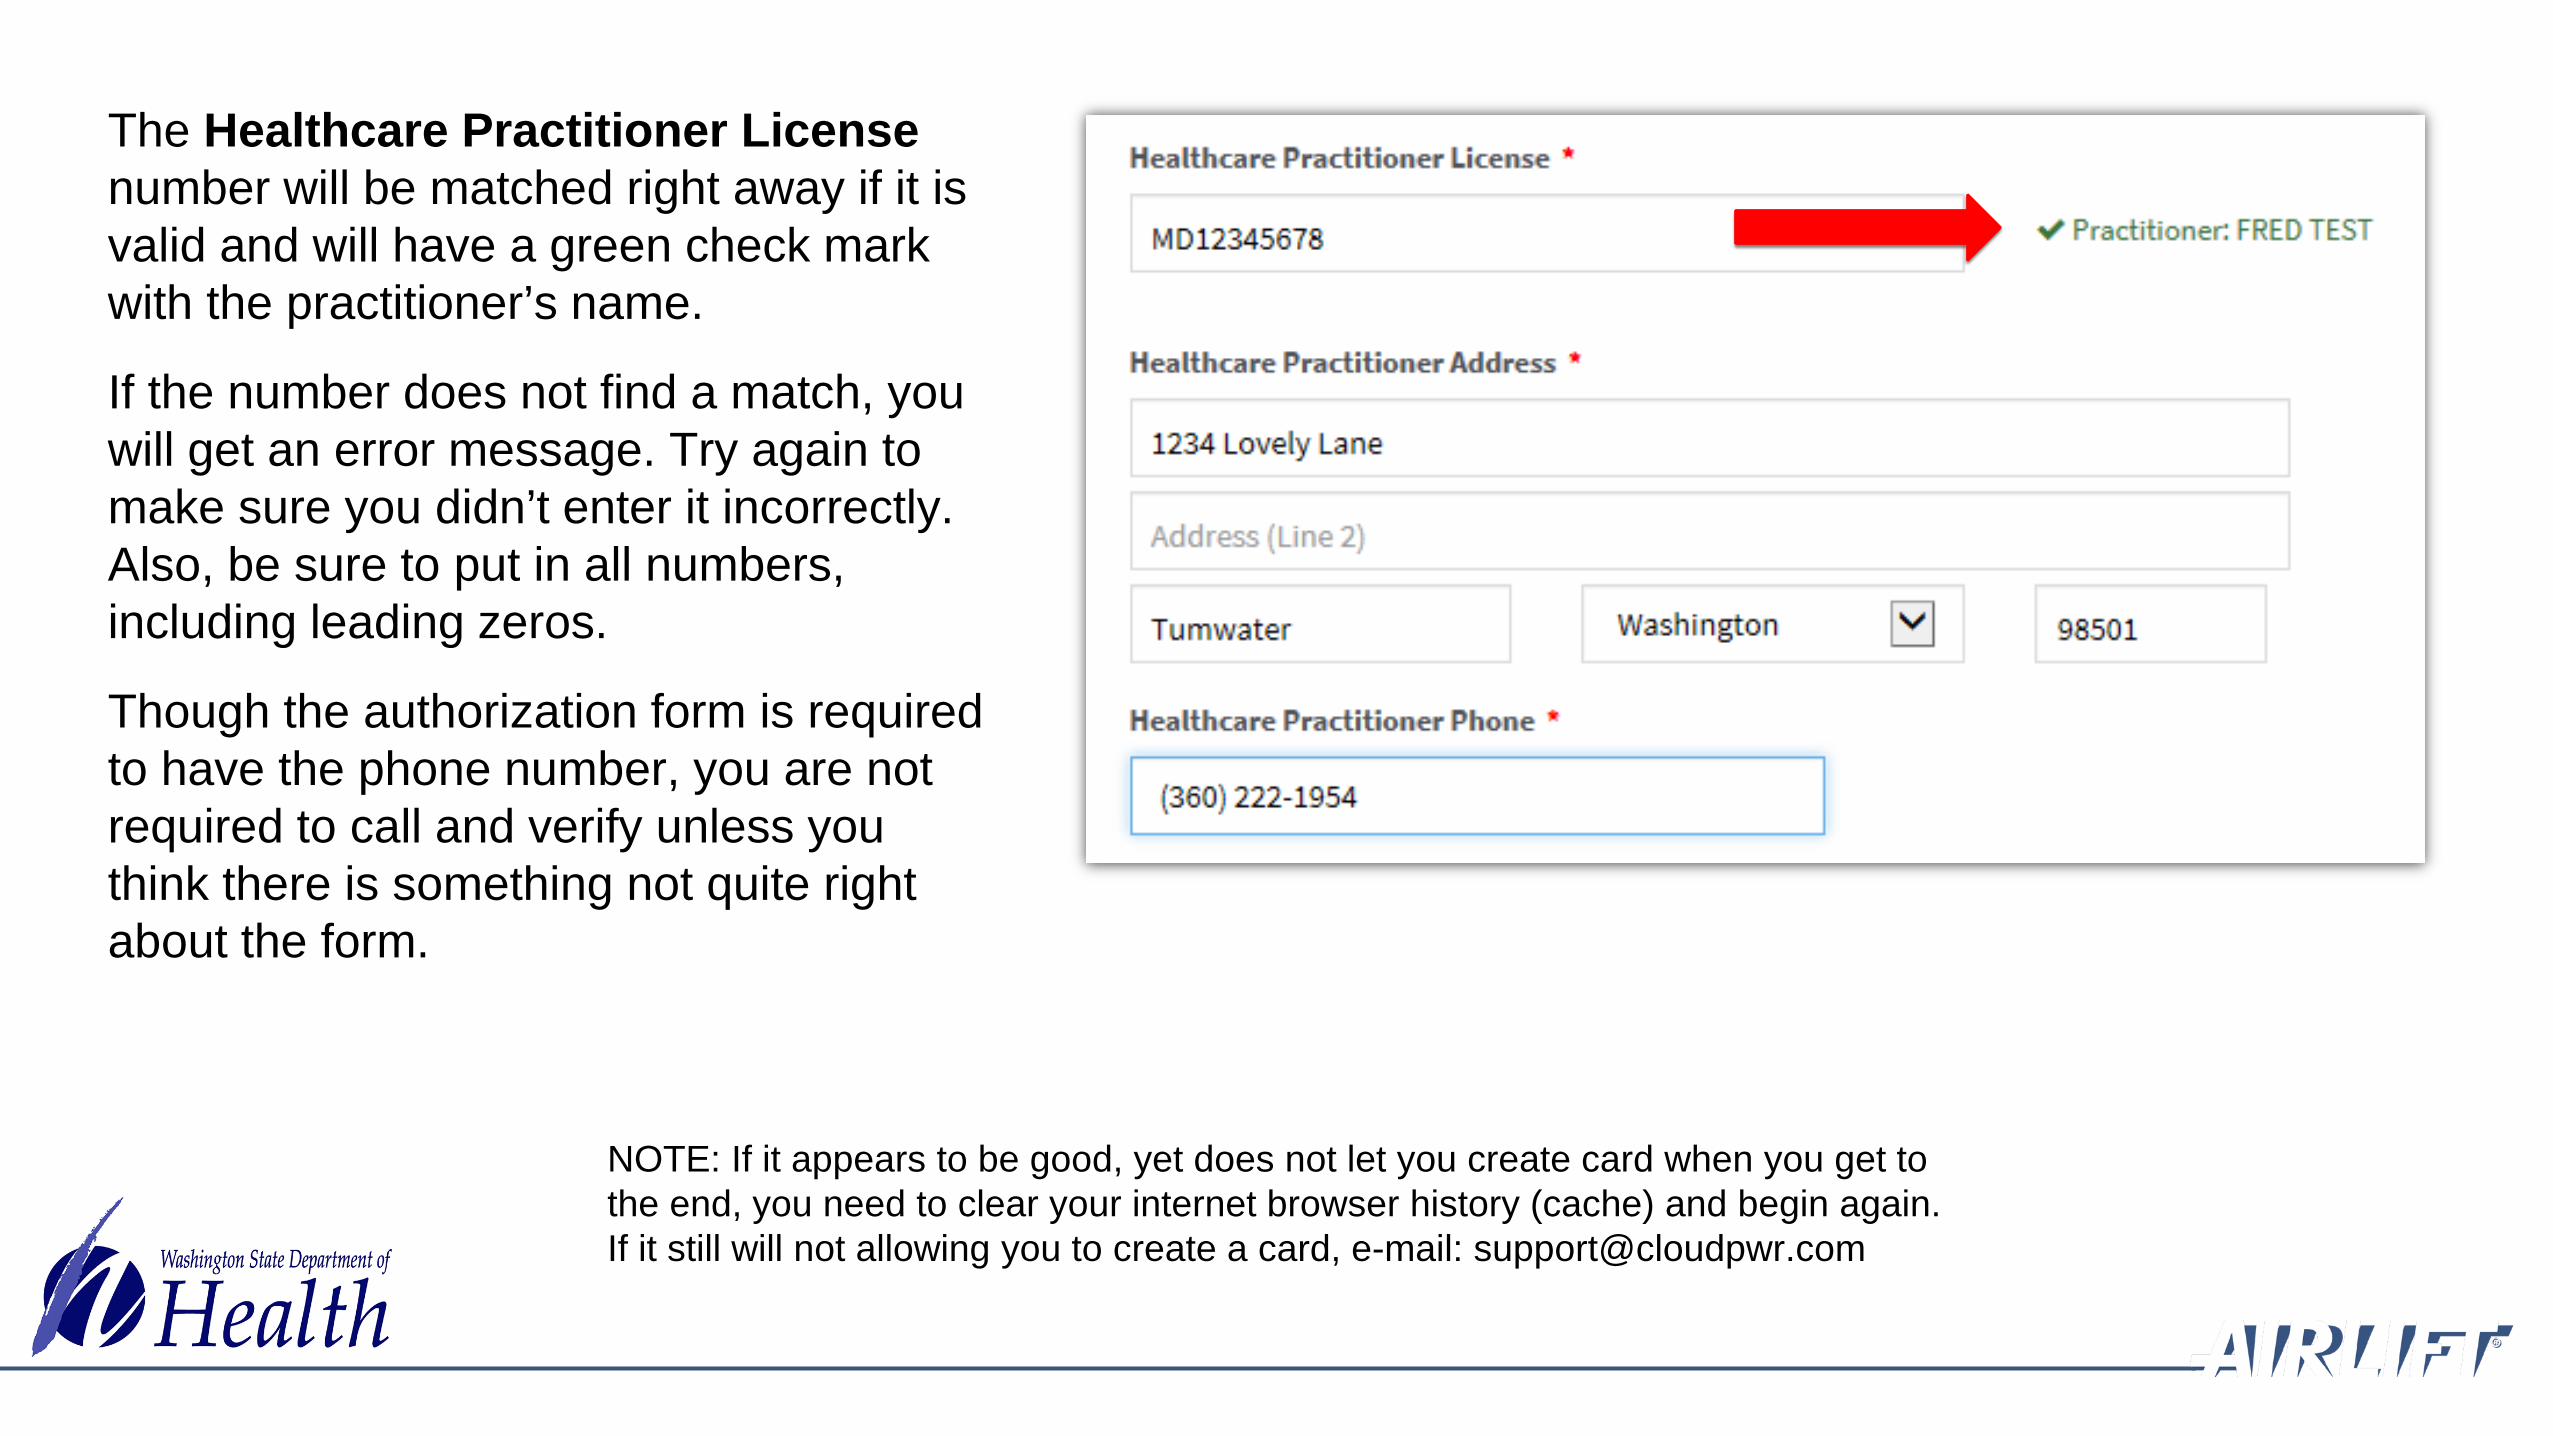
The Healthcare Practitioner License number will be matched right away if it is valid and will have a green check mark with the practitioner’s name.
If the number does not find a match, you will get an error message. Try again to make sure you didn’t enter it incorrectly. Also, be sure to put in all numbers, including leading zeros.
Though the authorization form is required to have the phone number, you are not required to call and verify unless you think there is something not quite right about the form.

Plant limitations default number in the database is 6. Even if the healthcare practitioner put in a lower number or left it blank, you will put in the number 6.
In order to have more than 6 plants entered, the healthcare practitioner would have had to write in a number in the blank space and sign the authorization form a second time.
Presenter
Presentation Notes

The Authorization Expiration Date may not always work due to how the system calculates number of days in a month. Therefore, you are allowed to put in a date a day (or more) earlier. However, you cannot extend the date past what is written on the authorization.
When complete, select Save Patient Record button.
Presenter
Presentation Notes

The final step is to merge the entered data and the photo together.
Verify information is accurate. If there is an error, select Edit Authorization button.
When all is accurate, select Generate Card button.

A picture of what the card will look like is on the screen for review.
Select Print button.
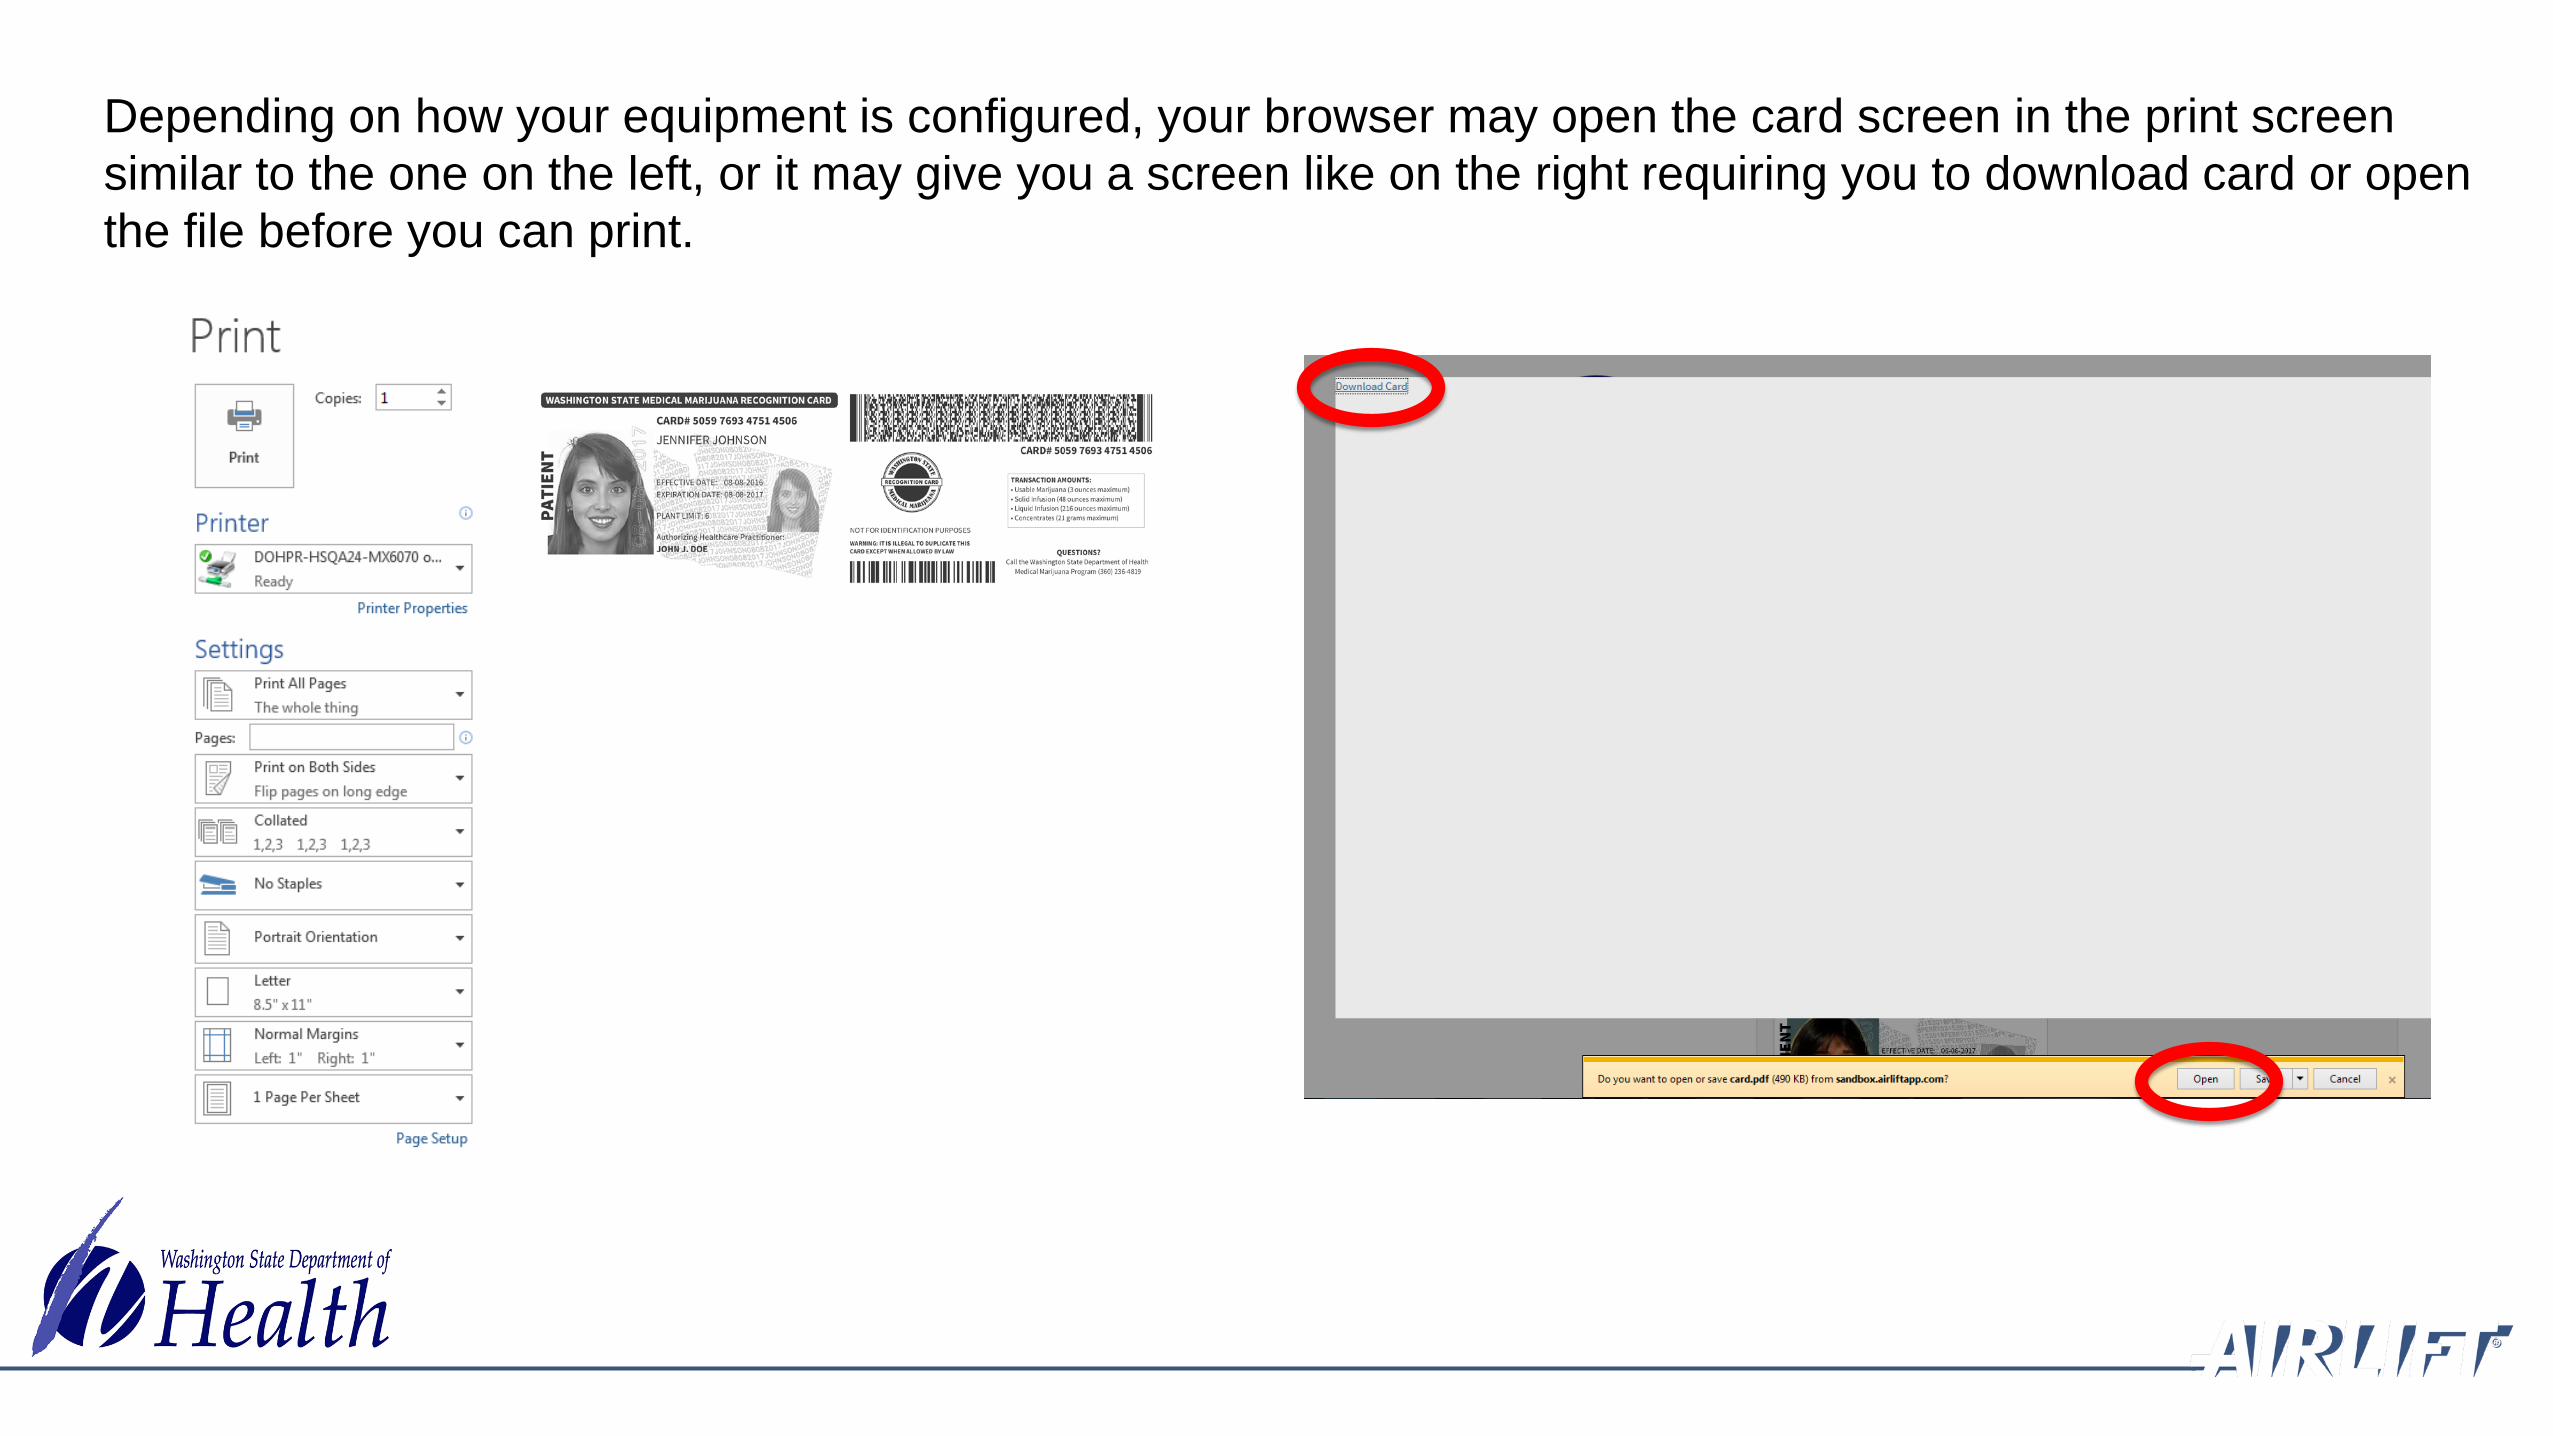
Depending on how your equipment is configured, your browser may open the card screen in the print screen similar to the one on the left, or it may give you a screen like on the right requiring you to download card or open the file before you can print.

Card creation is now complete.
To get out of the card screen, select Verify a Card button.

Cut, fold and hot laminate card. Trim excess plastic to make card wallet size.

Designated Provider
Create Card Example

Select Card Management button.

A designated provider for a patient entered in the database will need to have their card created after the patient’s card has been created.
Select Designated Provider to search name to ensure they are not already in the database as a designated provider for another patient.

A message should come back that there is no designated provider.
Note: If the designated provider card does appear, then that means they are already connected to a patient. You will not be able to create a card for them because they can only be a designated provider to one patient.

The system will next prompt you to Select Patient Authorized to Assist.

Enter name of patient and select Search button.

In most instances, you will get the screen below which will allow you to add this patient to the designated provider’s profile.
Verify it is the correct patient, select Add button.

If the patient already has a designated provider, you will get the message below.
A patient may only have one designated provider, therefore the system will not allow you to create the designated provider card.

In most instances, there will not already be a designated provider linked to the patient.You will next enter the information for the designated provider exactly how it is written on the authorization form.
Note: You will see the patient information at the top of the screen.
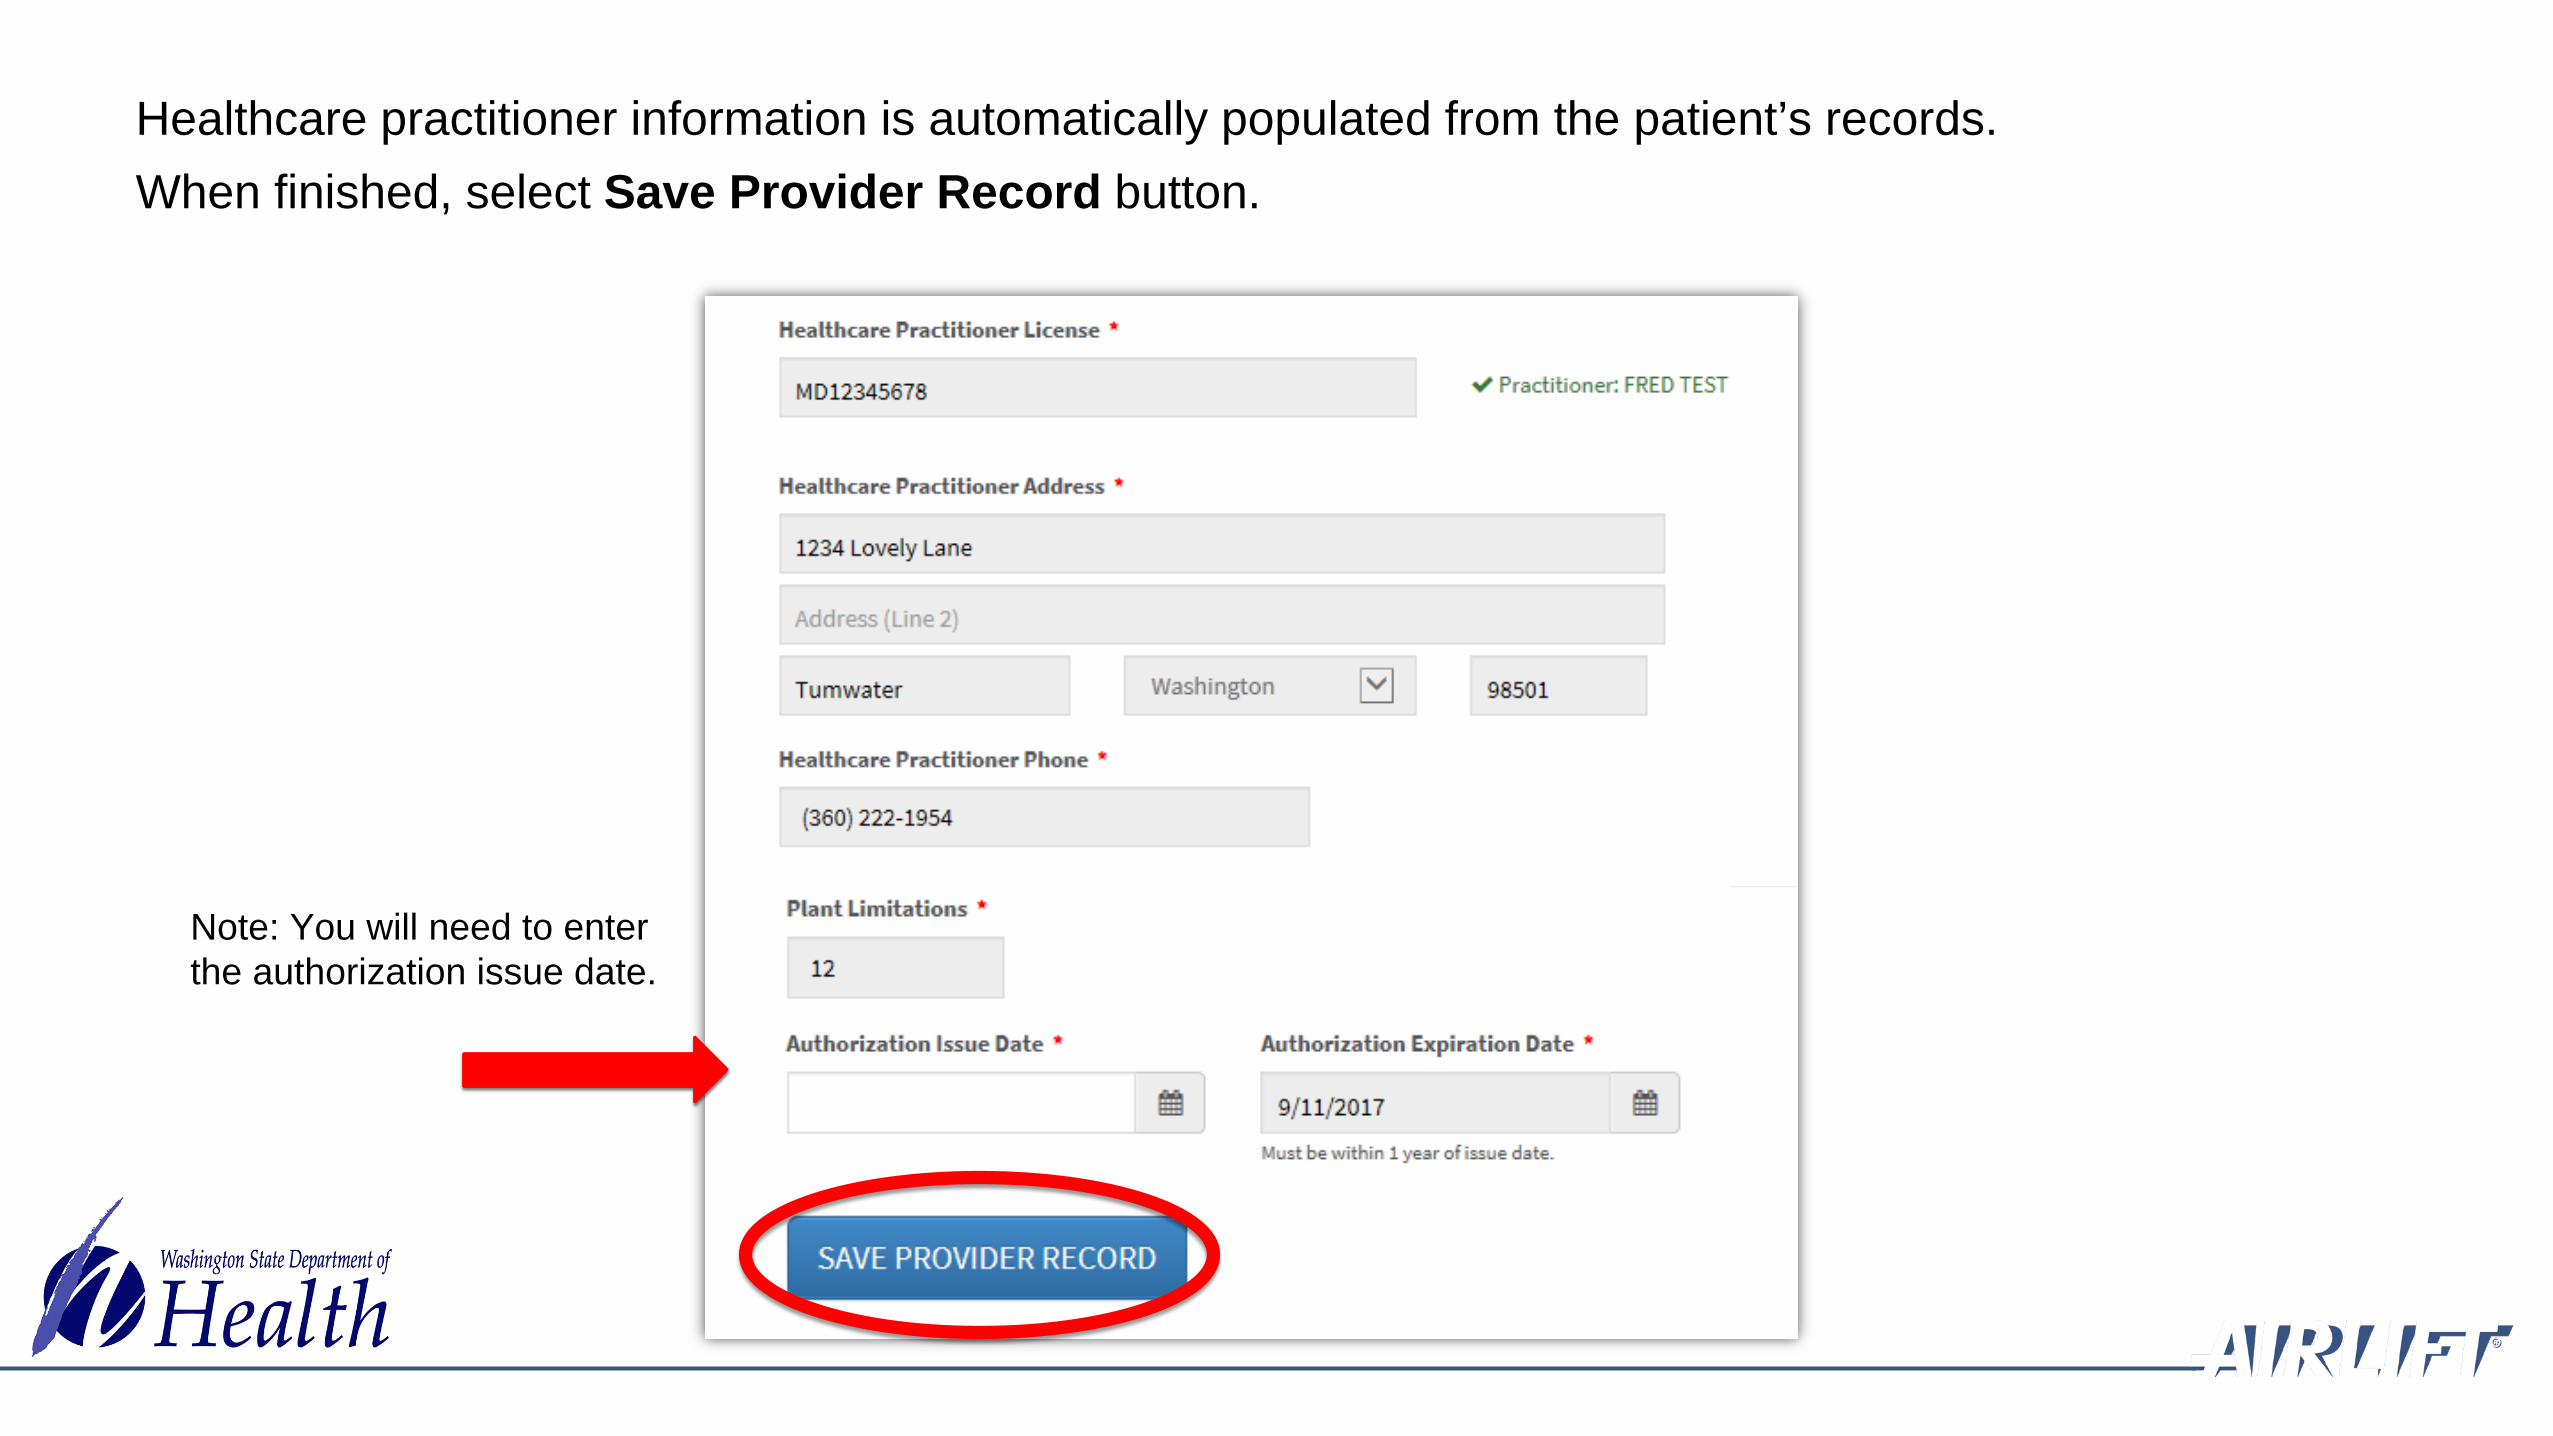
Healthcare practitioner information is automatically populated from the patient’s records. When finished, select Save Provider Record button.
Note: You will need to enter the authorization issue date.

The final step is to merge the entered data and the photo together.
Verify information is accurate. If there is an error, select Edit Authorization button.
When all is accurate, select Generate Card button.
Note: There is a hyperlink to the patient’s card.

A picture of what the card will look like is on the screen for review.
Select Print button.

Print from your system to your full-color printer on plain white paper.
Cut, fold, hot laminate and trim excess plastic to make it credit card size.
Note: The designated provider card will have the patient’s card number under the picture.

Card creation is now complete.
To get out of the designated provider card screen, select Verify a Card button.

Minor Patient
Create Card Example
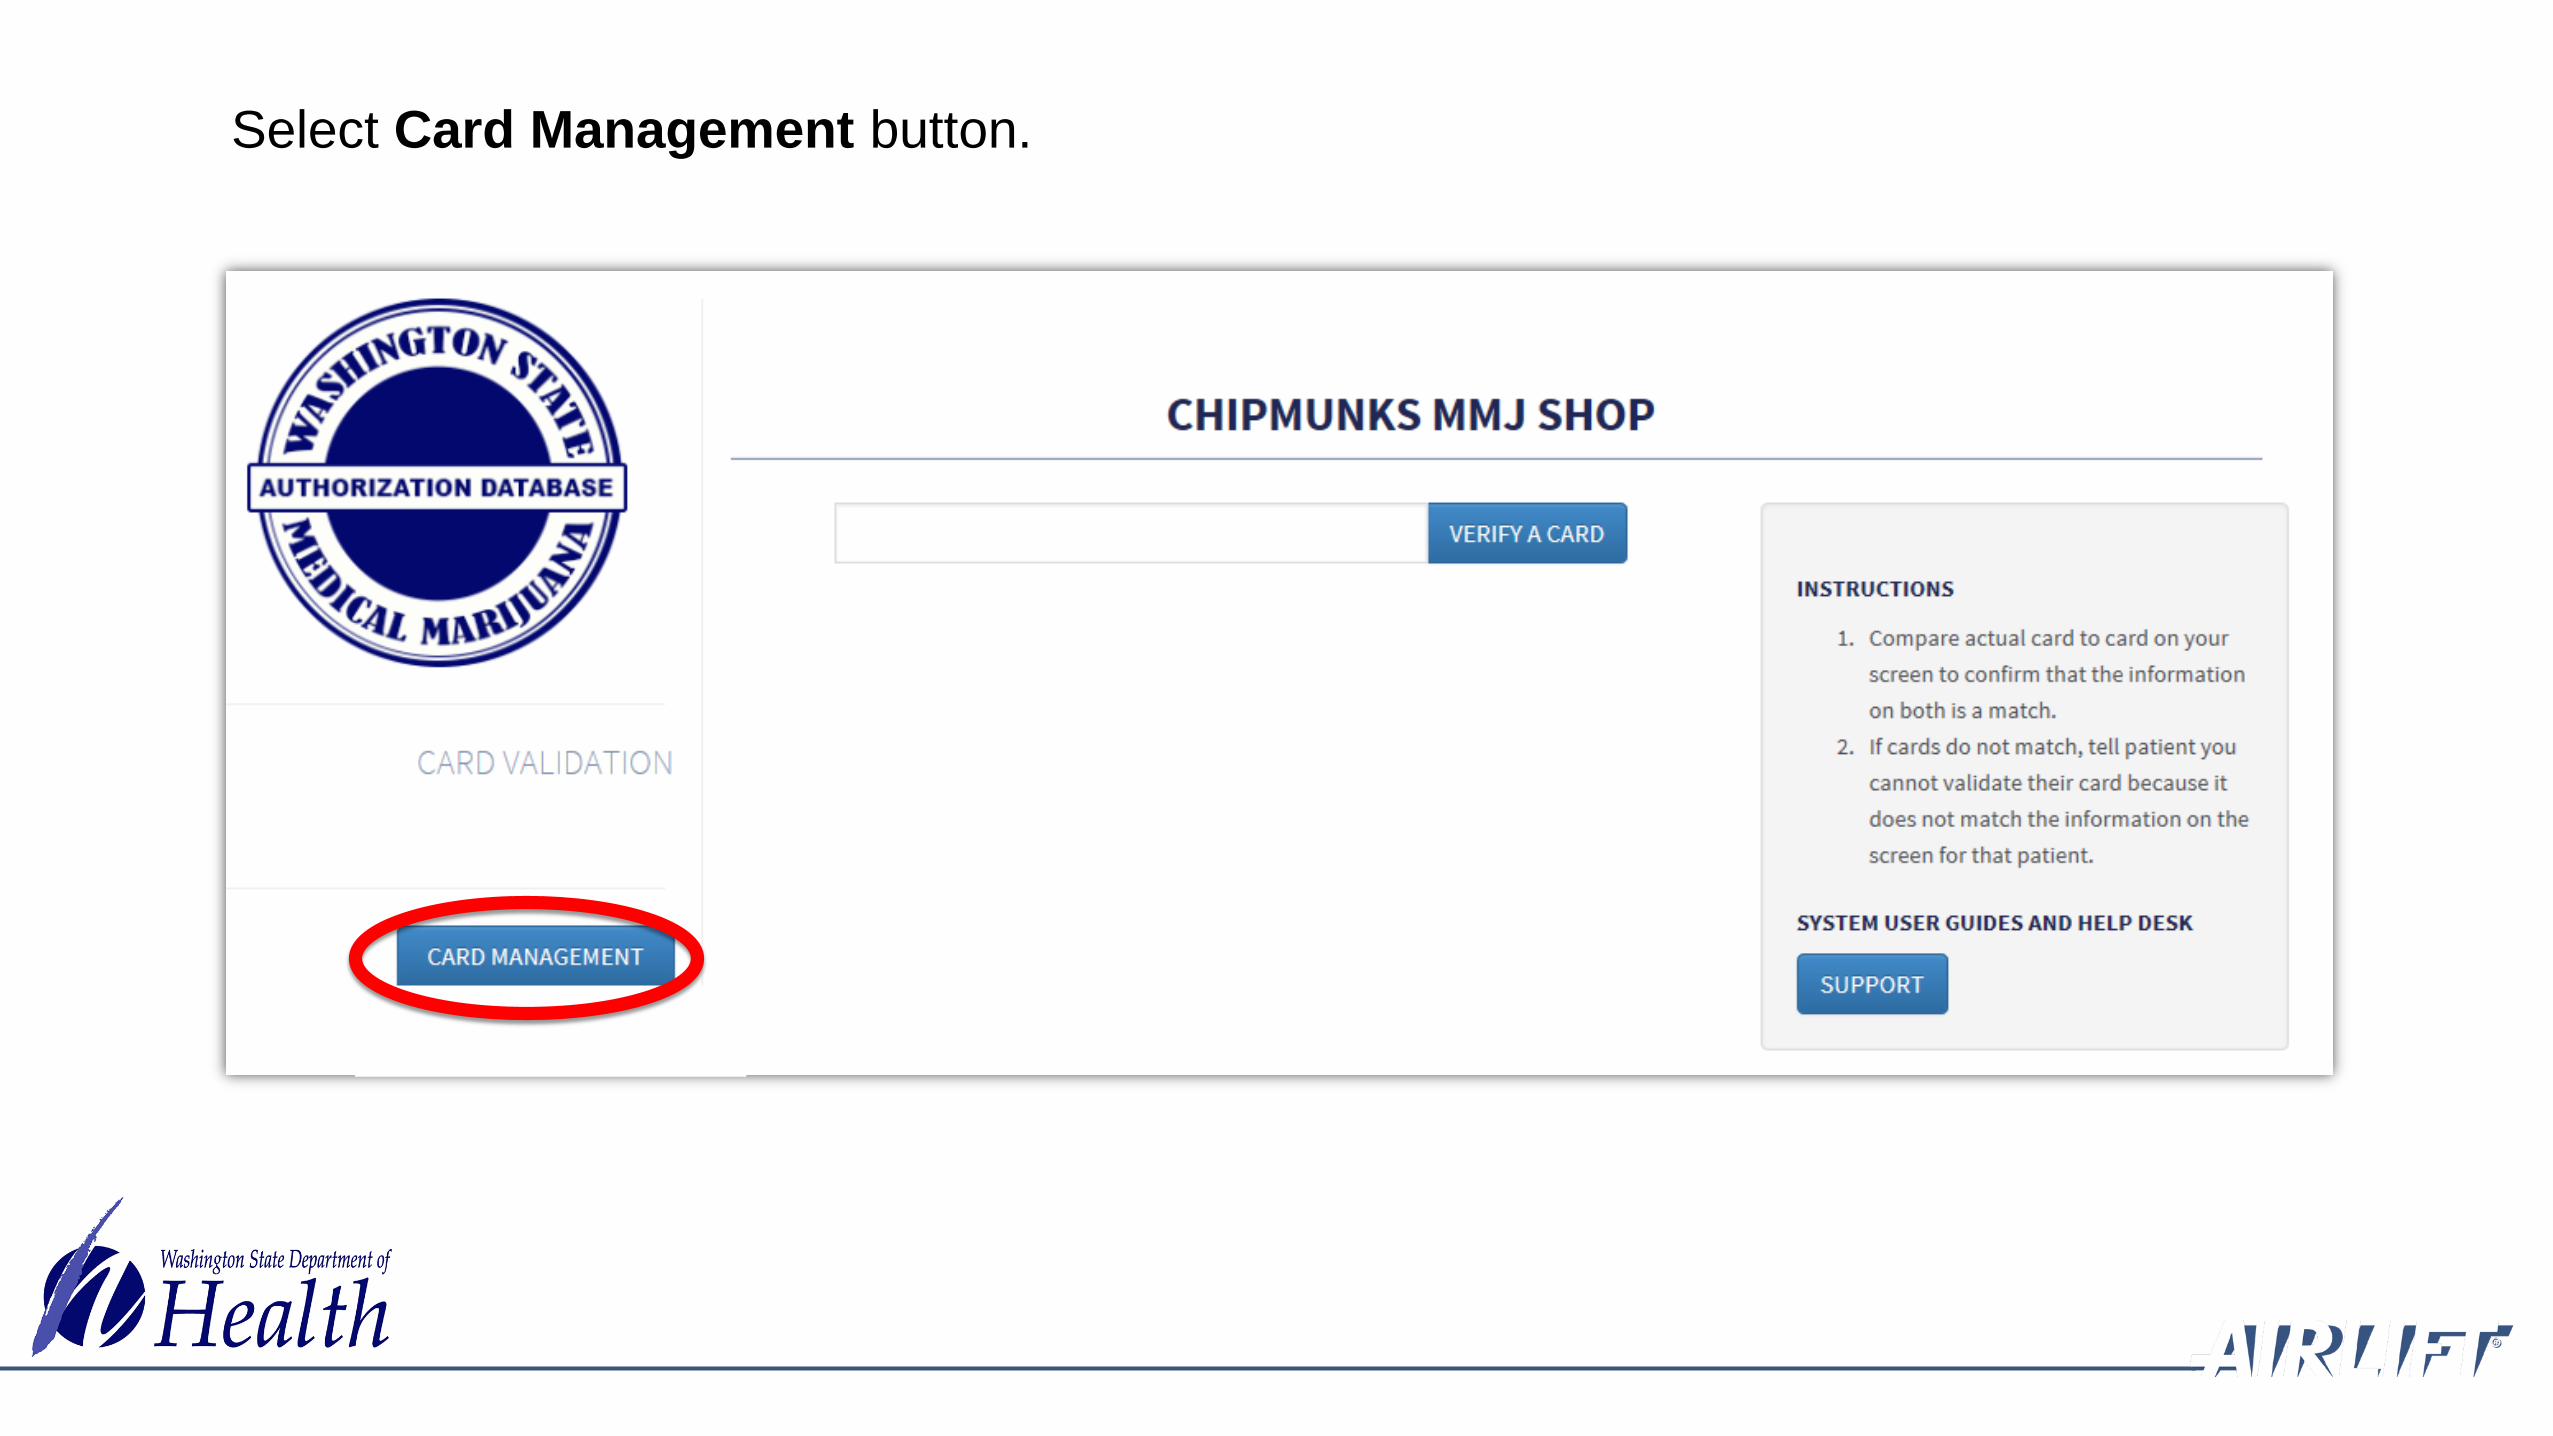
Select Card Management button.

Select Search under Minor Patient to search name.
Note: A minor patient must be accompanied by their designated provider at all times in your store.

Kat McGhee 11/02/2012
Enter minor patient name and date of birth.
Select Search button.
Most likely, the system will not bring up anyone and you will get the message below. Select Create New Authorization button to start entering the authorization form data into the system.
Note: If a record does comes up for the person, you will want to verify if that is actually the same person or if it is a different person with the same name. The screen will show date of birth and address so you can compare. If it is the same person, then they are already in the system and you do not create a new card for them, unless it is close to expiring and it is time for a renewal.
Kat McGhee 11/02/2012

A minor patient is not required to have identification. You may enter identification information if they have it.
You will be required to enter the designated providers identification information when you create their card.

Complete healthcare practitioner information, qualifying condition, plant limit.
Enter authorization date and expiration date. System only allows for 6 months for minors.
When finished, select Save Patient Record button.

The system automatically takes you to the screen to enter the designated provider information.
All information is auto-populated from the minor entry except the Authorization Issue Date, which is a required field you will need to enter.
Note: The patient’s information is shown at top of the screen.

Enter the designated provider information exactly as written on the authorization form.
When finished, select Save Provider Record button.
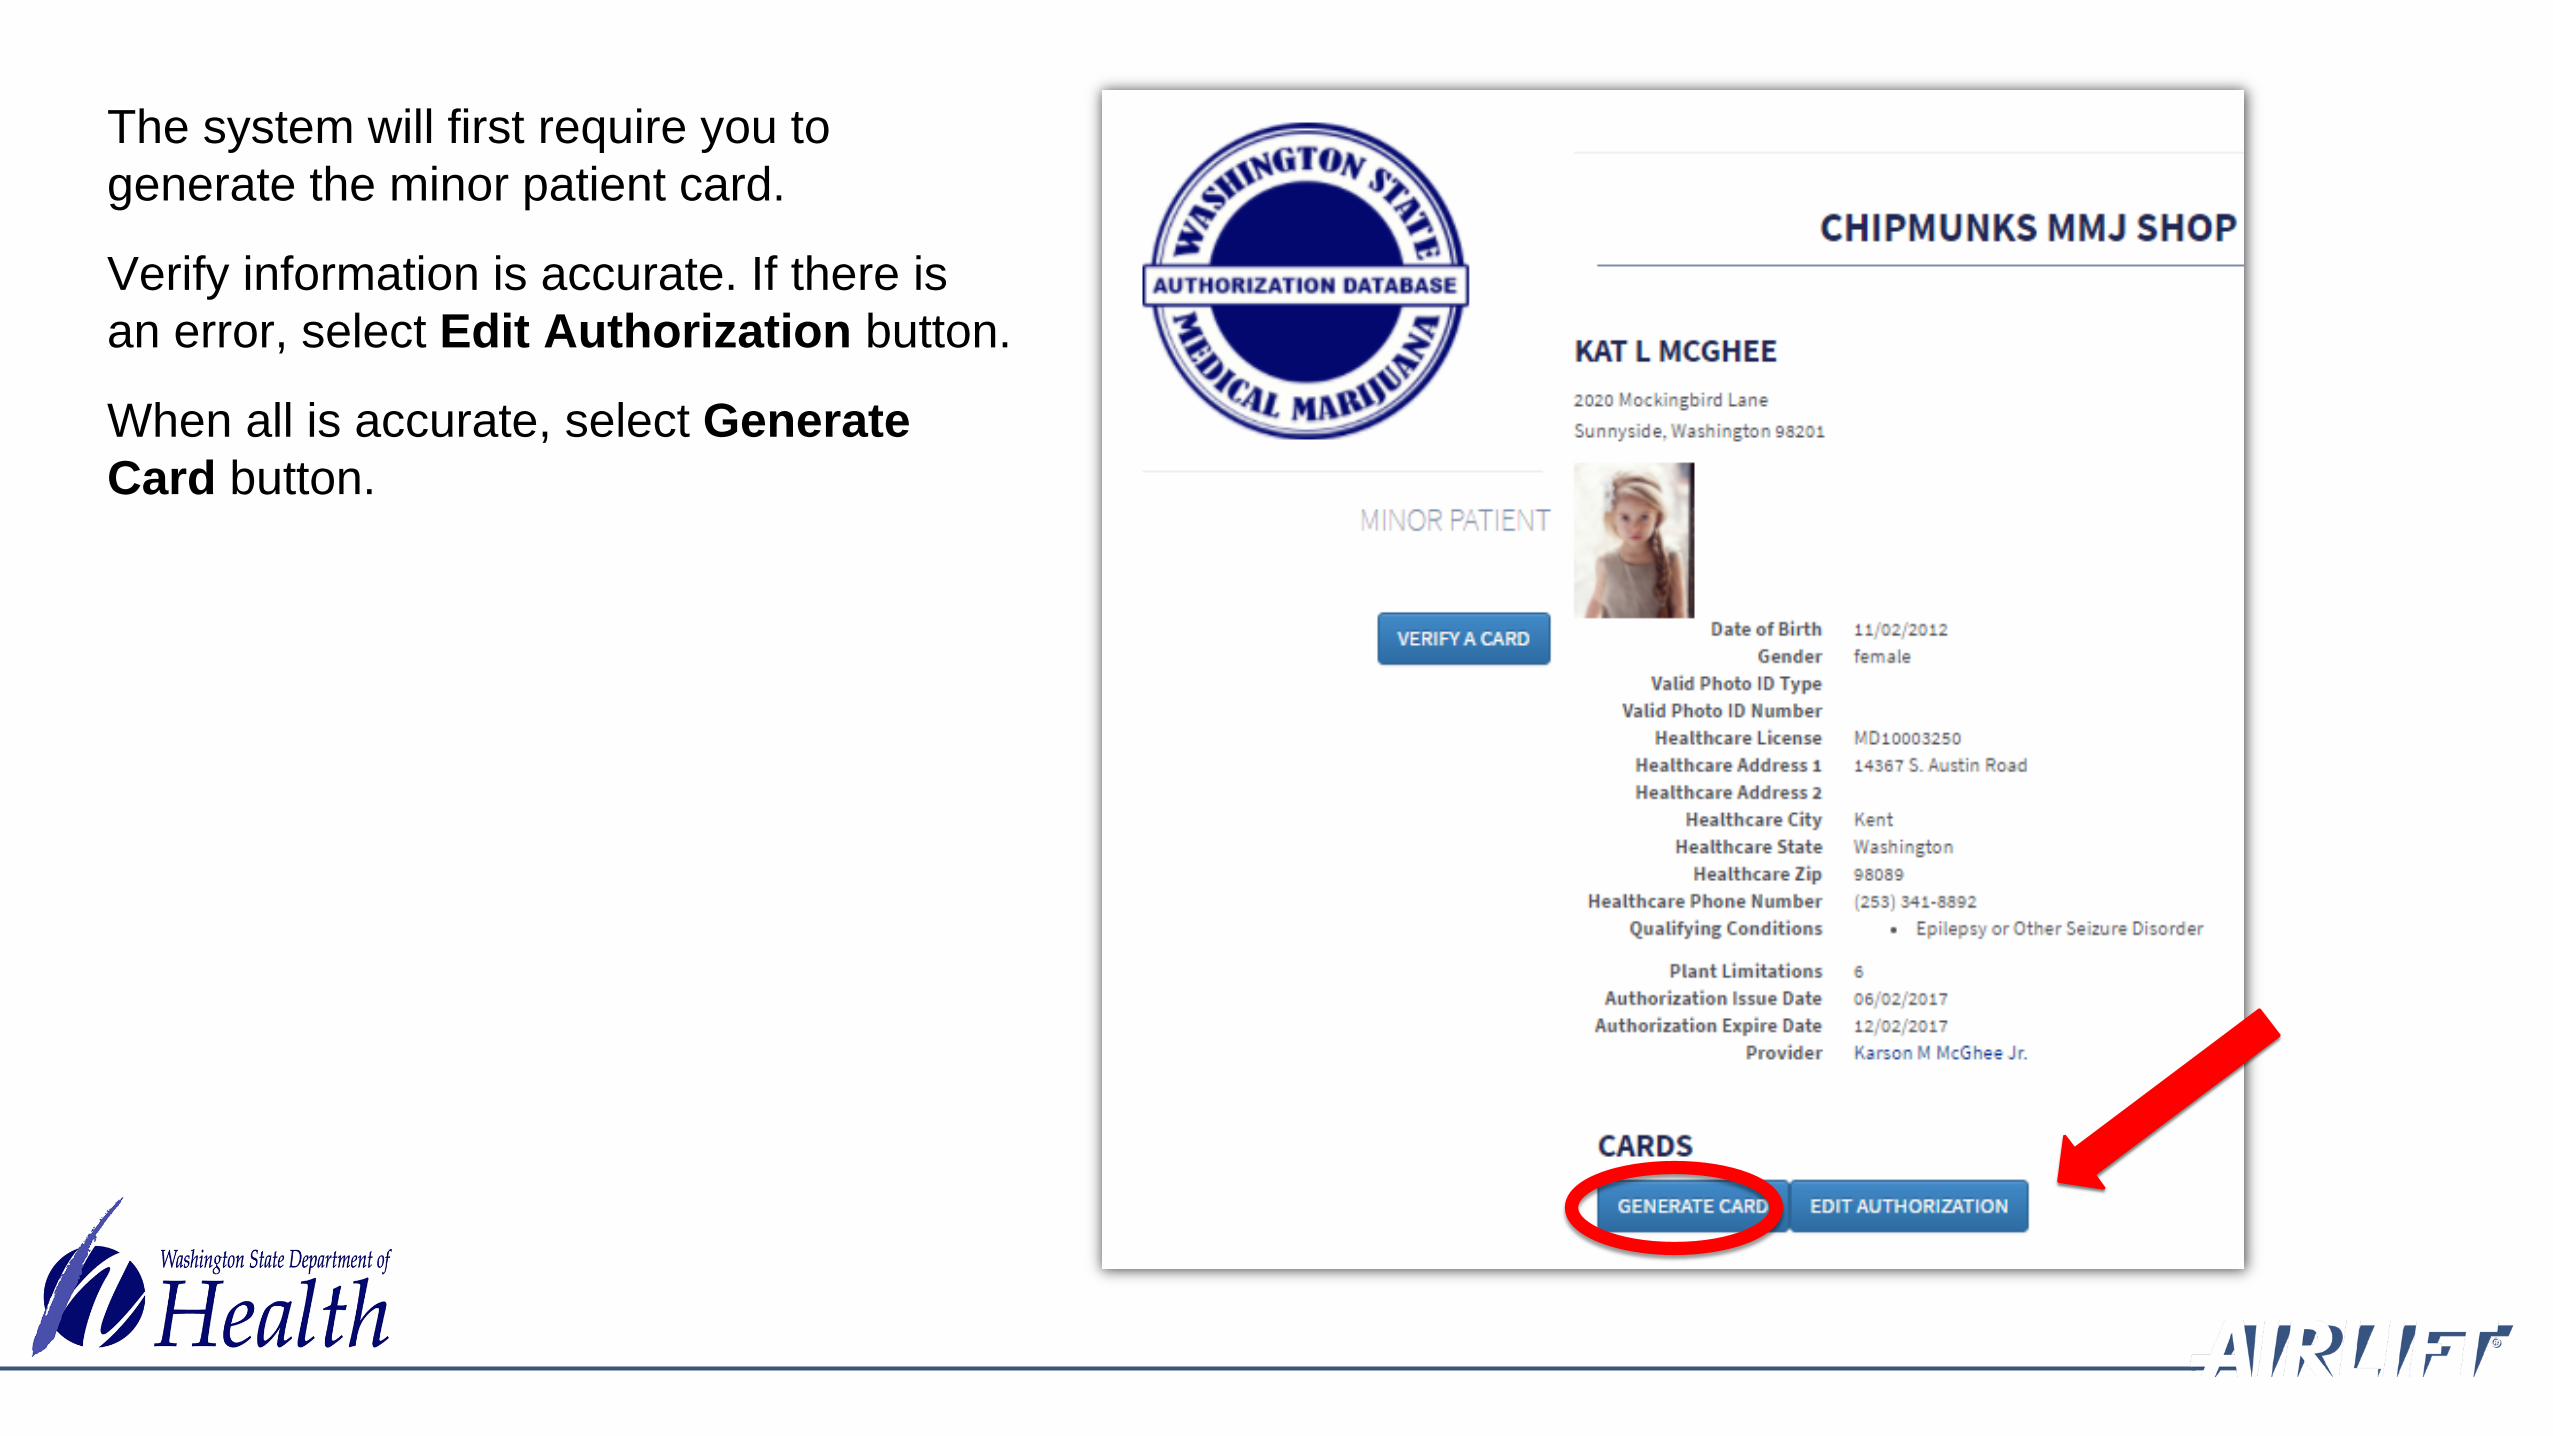
The system will first require you to generate the minor patient card.
Verify information is accurate. If there is an error, select Edit Authorization button.
When all is accurate, select Generate Card button.

Note: There is a hyperlink to the designated provider’s card.
A picture of what the card will look like is on the screen for review.
Select Print button.

Print from your system to your full-color printer on plain white paper.
Cut, fold, hot laminate and trim excess plastic to make it credit card size.

When finished printing, close print screen to return to minor patient screen.
Select the designated provider name to go to their profile screen.
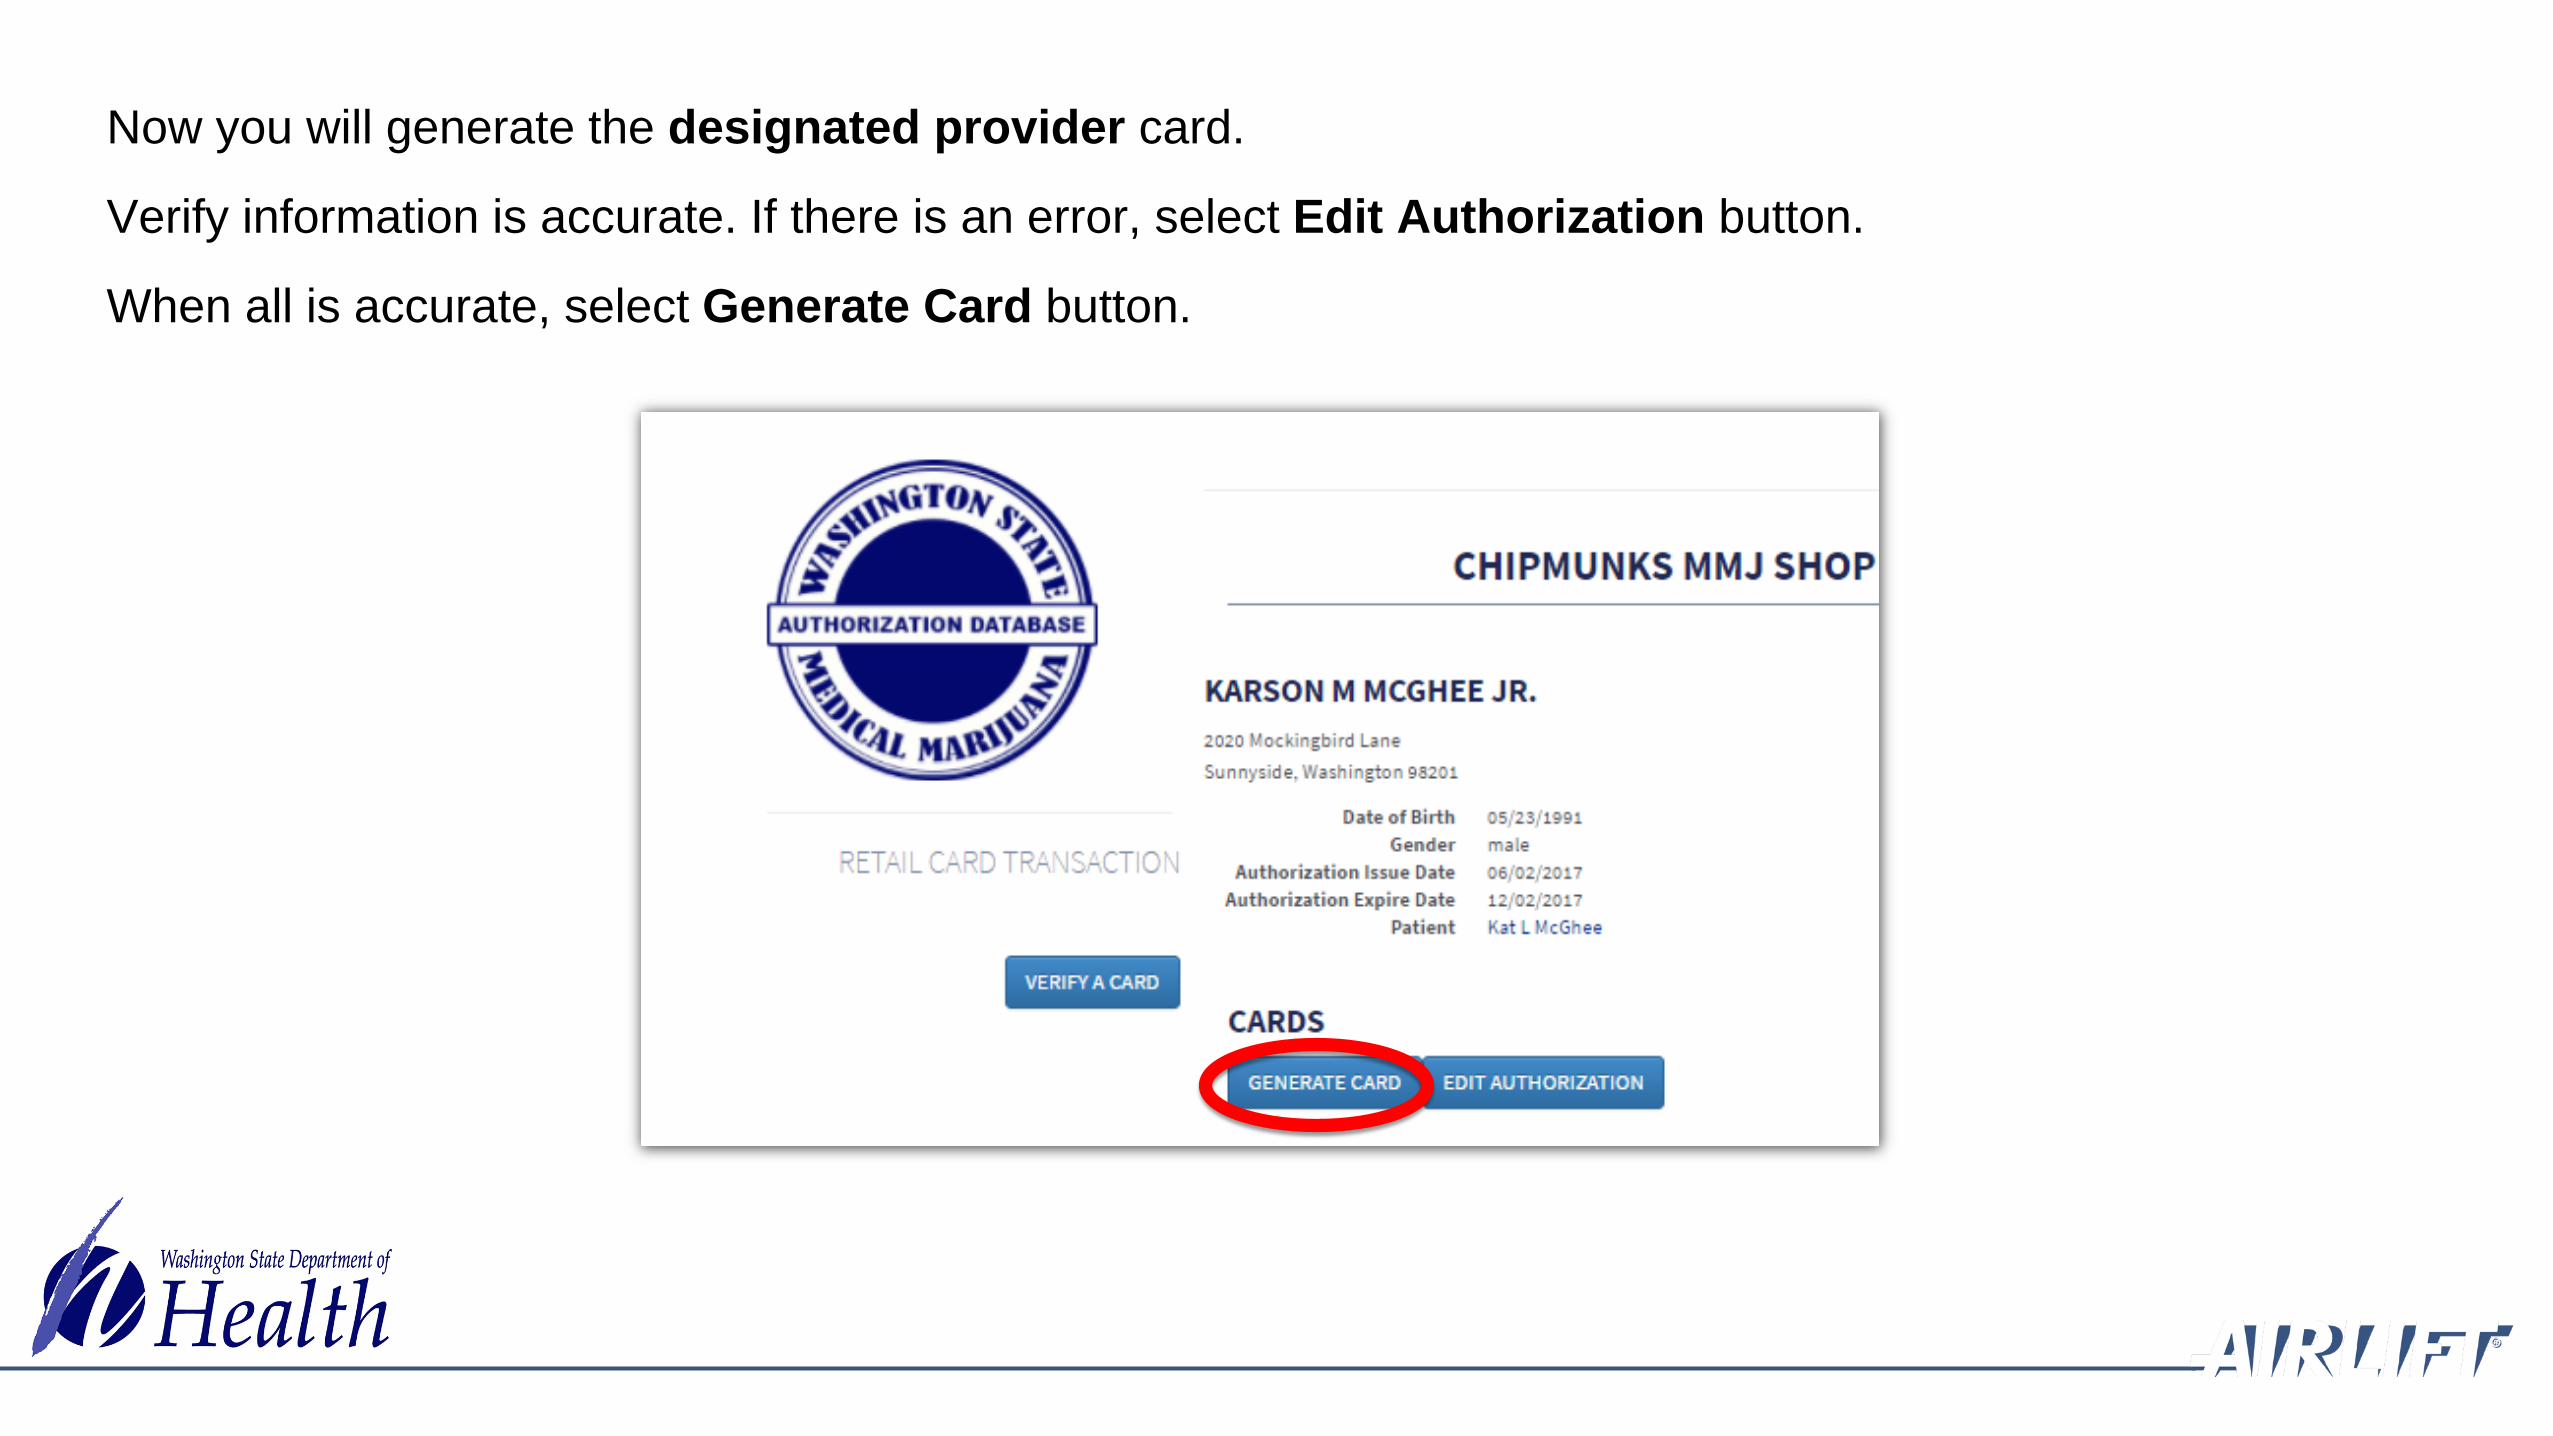
Now you will generate the designated provider card.
Verify information is accurate. If there is an error, select Edit Authorization button.
When all is accurate, select Generate Card button.

Note: You will be able to link to the minor patient information for printing once you have finished printing the designated provider card.
A picture of what the card will look like is on the screen for review.
Select Print button.

Print from your system to your full-color printer on plain white paper.
Cut, fold, hot laminate and trim excess plastic to make it credit card size.

Card creation is now complete.
To get out of the designated provider card screen, select Verify a Card button.

Verify
Other Card Functions
Renew
Replace
Correct
Reprint

5 Steps for Verification and Sale
Employee compares physical card with image shown on
screen
Store employee inputs card
number
Store employee logs into system
Customer presents card to store employee
PROCEEDS WITH SALE
NO MEDICAL
SALE
1 2 3 4 5Every recognition card must be verified in the database system before making a medical sale. This is to protect the store when audited by the Washington State Department of Revenue.
Presenter
Presentation Notes
We are going to start with Card Verification since all employees registered in the database can do this and will probably be what you do the most of. VERIFY CARD in the left sidebar screen is the default.

Verify Card
Presenter
Presentation Notes

• Type in the card number from the top of the card
OR• Use your 1-D or 2-D scanner to
scan the bar code on the back to enter in the number
Presenter
Presentation Notes
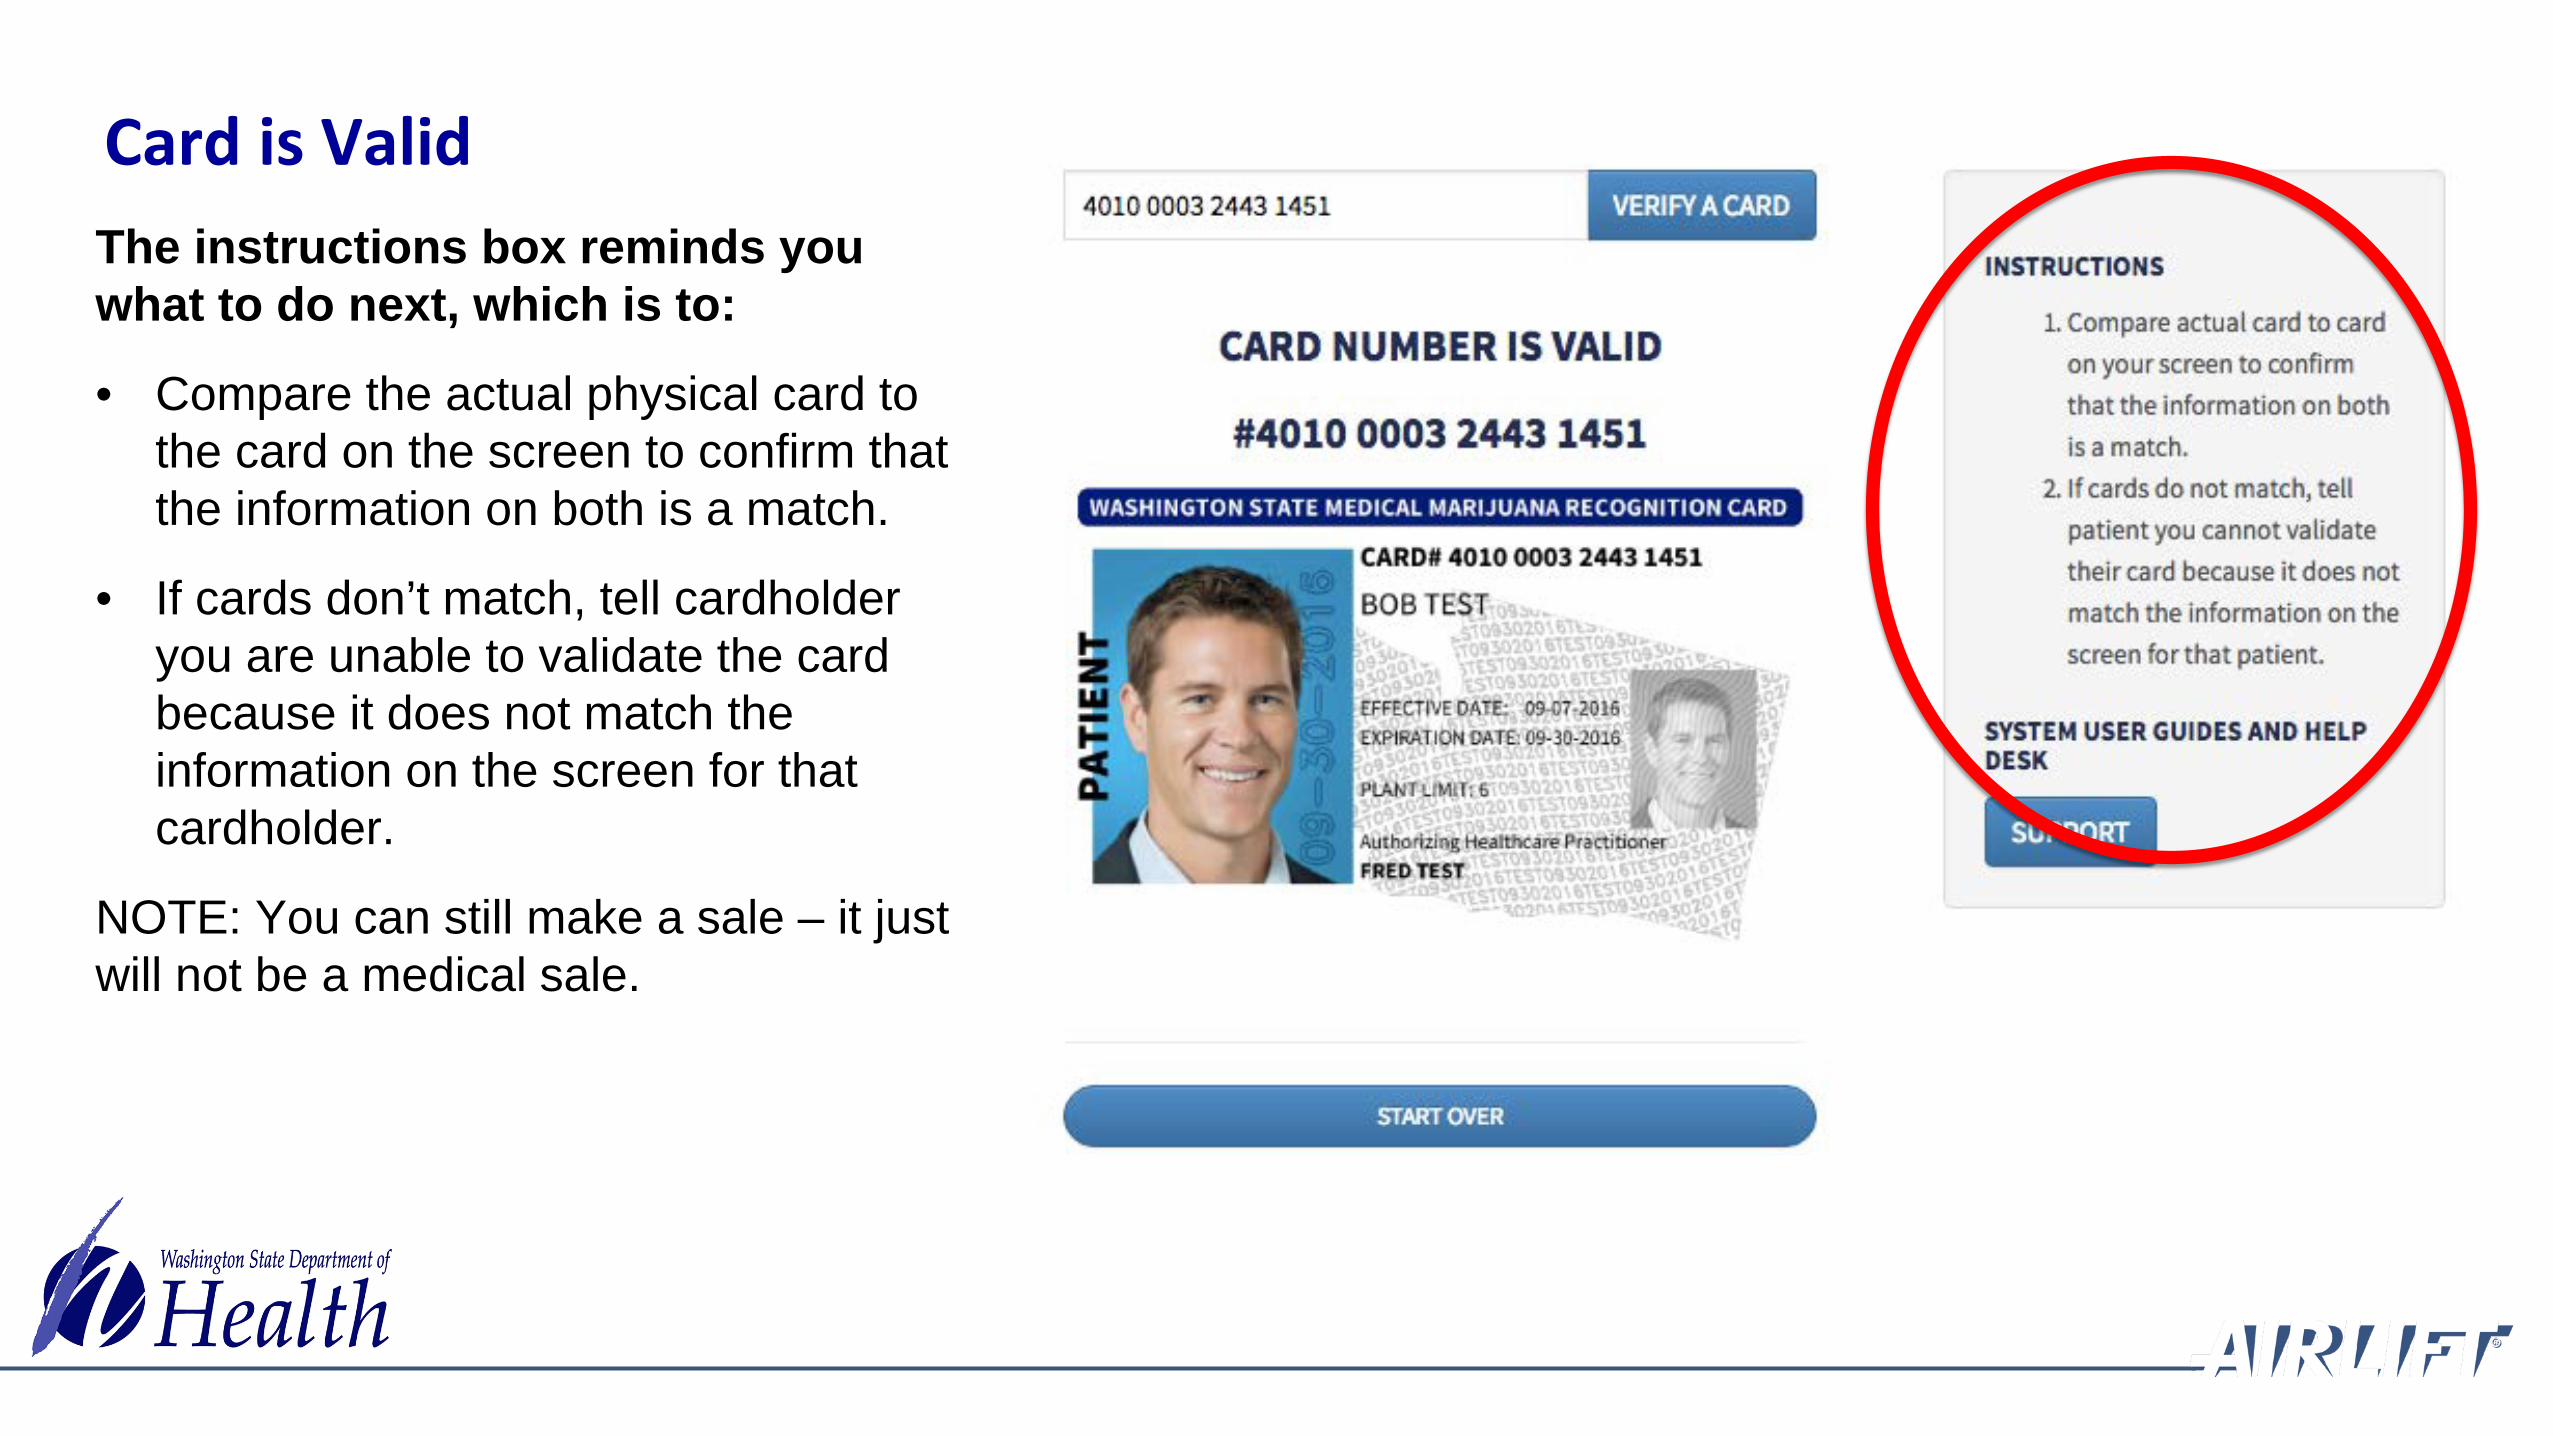
The instructions box reminds you what to do next, which is to:
• Compare the actual physical card to the card on the screen to confirm that the information on both is a match.
• If cards don’t match, tell cardholder you are unable to validate the card because it does not match the information on the screen for that cardholder.
NOTE: You can still make a sale – it just will not be a medical sale.
Card is Valid

This will appear if the card number is not found in the system. Possible reasons are:• Card has expired – check expiration
date• Entered card number incorrectly –
retry typing in the number• Healthcare Practitioner revoked card• Patient revoked Designated Provider
NOTE: You can still make a sale – it just will not be a medical sale.
Card Not Found

Renew Card
Jennifer Johnson 01/14/1993
Jennifer Johnson 1993-01-14 female Lacey Washington
Before Expiration of Current Card:• Search name and birthdate• Search screen comes up and you type
in name.• It will then bring up the person and you
will get four options – Renew, Replace, Correct or Print.
• When they come up, select the Renew button.
• Enter information from the new authorization form.
• Complete same steps for taking a picture and generating a card.
• Collect $1 fee for card renewal.

Jennifer Johnson 01/14/1993
Renew Card
After Expiration:• If they are not found you will be
prompted to create a new authorization.
• Enter the information from the new authorization form.
• Complete same steps for taking a picture and generating a card.
• Collect $1 fee for card renewal.
Note: In either case, Renew is like creating a new card.

Replace Card
Jennifer Johnson 01/14/1993
Jennifer Johnson 1993-01-14 female Lacey Washington
The cardholder has lost their card:• Search name and birthdate.• Search screen comes up and you type
in name.• When they come up, compare photo on
card to identification of customer and information on their authorization form.
• If it is a match, select the Replacebutton.
• Complete same steps for generating a card.
• Collect $1 fee for card replacement.

Correct Card
Jennifer Johnso 01/14/1993
Jennifer Johnso 1993-01-14 female Lacey Washington
A correction would be for anything that actually shows on the card – typically a typo made by the consultant:• To make a correction on a card, you will go back to
the Create Card screen and search for the patient.• It will then bring up the person and you will get the four
options – Renew, Replace, Correct or Reprint.• Make sure if there is more than one person with the
same name that you select the right one.• Verify the information from the authorization form.• If it is a match, select Correct button. • Make corrections and then go through the print
process again.• The $1 fee is not charged for a correction.

Reprint Card
Jennifer Johnson 01/14/1993
Jennifer Johnson 1993-01-14 female Lacey Washington
This would be if the store printer jammed or lost power in the middle of the print job:• If the system shut down in the middle of
the print, search name and birthdate.• When the name comes up, select
Print button.• The $1 fee is not charged for a reprint.

AIRLIFT Troubleshooting TipIf you get a blank screen when trying to print a card or other error messages while creating a card, you will need to clear out your cache and reload the page by doing the following:
1. In the top right of your Chrome browser click on the 3 vertical dots to open the Options menu.
2. Choose "More tools" then "Developer tools"
This will open up a window showing HTML code.
3. Right click the browser refresh button on the upper left bar,
Choose "Empty Cache and Hard Reload“
4. Close the side window and continue to print the card.
12
3

Compliant Products
High THC
Compliant
High CBD
Compliant
General Use
Compliant
Any Product Available for Sale in a Retail Store with a Medical Endorsement
Patients and Designated Providers with Recognition Card*
Any Adult Consumer
*All purchases made by a recognition cardholder are sales tax free. +Any adult may purchase High CBD Compliant sales tax-free.
+
General use compliant products are any marijuana product allowed by the WSLCB, including edibles, flowers and concentrates.
Packaged Servings: • May be packaged in servings or applications that contain up to 10 mg of
active THC. • A unit must not contain more than 10 servings or applications and must
not exceed 100 mg total of active THC.
Who can purchase: • Adults age 21 or older. Purchase subject to sales tax.• Qualifying patients age 18 and over or designated providers who are entered
into the medical marijuana authorization database and hold a valid medical marijuana recognition card. Purchase sales tax-free.
Where to buy:• At any licensed marijuana store.

High THC compliant marijuana products containing more than 10 mg but not more than 50 mg of active THC per serving or application. Only the following types of marijuana products qualify for High THC classification: capsules, tablets, tinctures, transdermal patches, and suppositories.
Packaged Servings: • High THC compliant products may be packaged in servings or applications
containing up to 50 mg of active THC. • A unit must not contain more than 10 servings or applications and must not
exceed 500 mg total of active THC.
Who can purchase: • Only qualifying patients age 18 and over or designated providers who are
entered into the medical marijuana authorization database and hold a valid medical marijuana recognition card. Purchase sales tax-free.
Where to buy:• Only at a licensed and medically endorsed marijuana store.
High CBD compliant marijuana product allowed by the WSLCB, including edibles -except marijuana intended for smoking. Packaged Servings: • Concentrates containing not more than 2% THC concentration and at least
25 times more CBD concentration by weight. • Marijuana-infused edible products that contain not more than 2 mg of active
THC and at least 5 times more CBD per serving by weight for solids or volume for liquids.
• Marijuana-infused topical products containing at least 5 times more CBD concentration than THC concentration.
Who can purchase: • Adults age 21 or older. Purchase sales tax-free. Purchase sales tax-free. • Qualifying patients age 18 and over or designated providers who are entered
into the medical marijuana authorization database and hold a valid medical marijuana recognition card. Purchase sales tax-free.
Where to buy: • At any licensed marijuana store.

Monday – Friday, 8 am – 5 pm
360-236-4819, Option 1
www.doh.wa.gov/medicalmarijuana
Need Help?