MDS Operations.docx
58
Master Data Services Operations Guide Author: Karan Gulati Reviewer: Josh Gerszewski (SQL BI 3T), Artur Vieira, Alexandre Mendeiros, Derrick VanArnam Version – October, 2013 Applies to: SQL Server 2012 Master Data Services
-
Upload
fabian-acevedo -
Category
Documents
-
view
267 -
download
0
Transcript of MDS Operations.docx

Master Data Services Operations Guide
Author: Karan Gulati
Reviewer: Josh Gerszewski (SQL BI 3T), Artur Vieira, Alexandre Mendeiros, Derrick VanArnam
Version – October, 2013
Applies to: SQL Server 2012 Master Data Services
Summary: This article describes how a Database Administrator can configure, monitor, and manage Microsoft SQL Server 2012 Master Data Services.

ContentsIntroduction.................................................................................................................................................4
SQL Server 2012 Master Data Services (MDS).............................................................................................4
Install Master Data Services........................................................................................................................4
System Configuration..............................................................................................................................5
Create a Web Server (IIS) role.................................................................................................................5
Install and Configure Master Data Services.................................................................................................9
Install Master Data Services....................................................................................................................9
Configure Master Data Services............................................................................................................12
Configure MDS.......................................................................................................................................12
Setup a Master Data Services database.............................................................................................13
Use the Master Data Services Add-in for Excel to connect to MDS...........................................................22
Upgrade SQL Server 2012 Master Data Services.......................................................................................24
To Upgrade Master Data Services.........................................................................................................24
Version incompatible error....................................................................................................................26
Troubleshoot installation and configuration issues...............................................................................29
Master Data Services Security (MDS)........................................................................................................29
Deploy Master Data Services Models........................................................................................................29
Packages Contents.................................................................................................................................30
Deploying Model Deployment Tools.....................................................................................................30
Prerequisites for using Deployment tools..........................................................................................30
Model Deployment wizard....................................................................................................................31
Create a Package using Model Deployment Wizard..............................................................................31
Deploy a Package using Model Deployment wizard..............................................................................31
For more information about how to deploy MDS Samples in SQL Server 2012, see Deploying MDS Samples in SQL Server 2012..................................................................................................................33
MDSModelDeploy tool..........................................................................................................................33
Create a Package using MDSModelDeploy........................................................................................33
Deploy a Package using MDSModelDeploy.......................................................................................33
Backup an MDS Database......................................................................................................................35
Restore an MDS Database.....................................................................................................................35
Disaster Recovery Plan..............................................................................................................................36
Monitoring MDS........................................................................................................................................37
High Availability in MDS.............................................................................................................................37
MDS Extract, Transform, and Load (ETL) Package Monitoring..................................................................38
Subscription Handling............................................................................................................................38
Subscription View..............................................................................................................................38
How to create an MDS Subscription View.........................................................................................39
Master Data Export and Import Sample................................................................................................40
Setup the Master Data Export and Import Sample................................................................................43
Setup a Subscription View.....................................................................................................................43
Create the Import Package....................................................................................................................43
Test the Solution....................................................................................................................................47
Conclusion.................................................................................................................................................48
Resources..................................................................................................................................................48
Case Studies..............................................................................................................................................48

Introduction This article provides guidance about how to install, configure and manage SQL Server 2012 Master Data Services.
SQL Server 2012 Master Data Services (MDS)SQL Server Master Data Services provides a central data hub that ensures the integrity of information and consistency of data is constant across different applications. With MDS, you can implement a master data management (MDM) hub to manage the master data that is stored in an enterprise database.
Master data management (MDM) describes the efforts made by an organization to discover and define non-transactional lists of data, with the goal of compiling maintainable master lists. An MDM project generally includes an evaluation and restructuring of internal business processes along with the implementation of MDM technology. The result of a successful MDM solution is reliable, centralized data that can be analyzed to uncover insights for better business decisions.
With the right training, most business-domain experts can implement an MDS solution. In addition, you can use MDS to manage any domain; it is not specific to managing lists of customers, products, or accounts. When MDS is first installed, it does not include the structure for any domains—you define the domains you need by creating domain specific models.
Other MDS features include hierarchies, granular security, transactions, data versioning, and business rules.
Master Data Services includes the following components and tools:
Master Data Services Configuration Manager, a tool you use to create and configure Master Data Services databases and web applications.
Master Data Manager, a web application you use to perform administrative tasks, such as creating a domain model or business rules, and that user’s access to update data.
MDSModelDeploy.exe, a tool to create packages containing your model objects and data to deploy to other environments.
Master Data Services web service, which developers can use to extend or develop custom solutions for Master Data Services.
Master Data Services Add-in for Excel, which you use to manage data and create new entities and attributes.
Install Master Data ServicesTo learn how to install Master Data Services, see Install Master Data Services. In the Install Master Data Services article, you can find hardware and software requirements to install SQL Server 2012.

System Configuration Internet Information Services (IIS) installed on one of the following Windows Server operating
systems:o Windows Server 2012, Windows Server 2008 SP2, Windows Server 2008 R2o Windows 8o Windows 7 Professional, Enterprise, and Ultimateo Windows Vista Business, Enterprise, and Ultimate SP2
For more information about specific editions of the Windows operating systems that are supported for your edition of SQL Server 2012, see Hardware and Software Requirements for Installing SQL Server 2012.
To use MDS, you need to configure a Web Server (IIS) role.
Create a Web Server (IIS) roleBefore you configure MDS, install the Web Server (IIS) server role.
1. Log on into the SQL Server machine using an account that is a part of the built-in Administrators group.
2. Go to Server Management under Start > Administrative Tools > Server Management. 3. In the Roles section, click Add Roles.
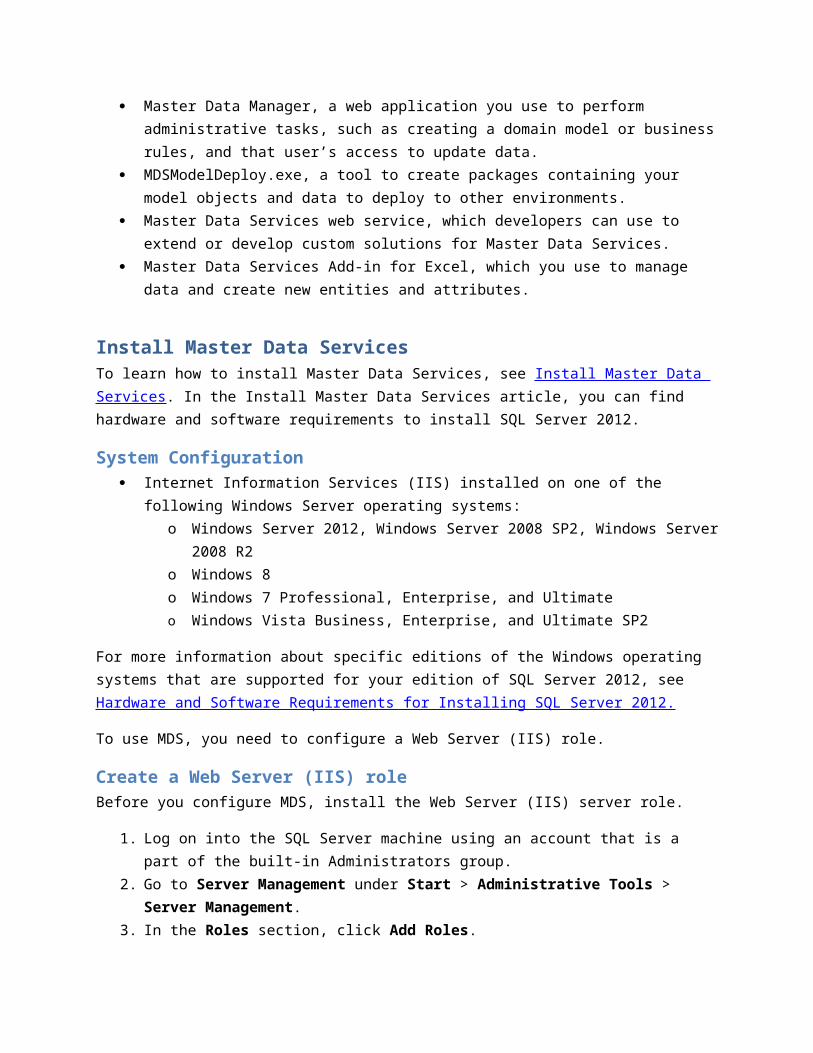
4. In the Add Roles Wizard window, click Next, choose Web Server (IIS) and click Next.
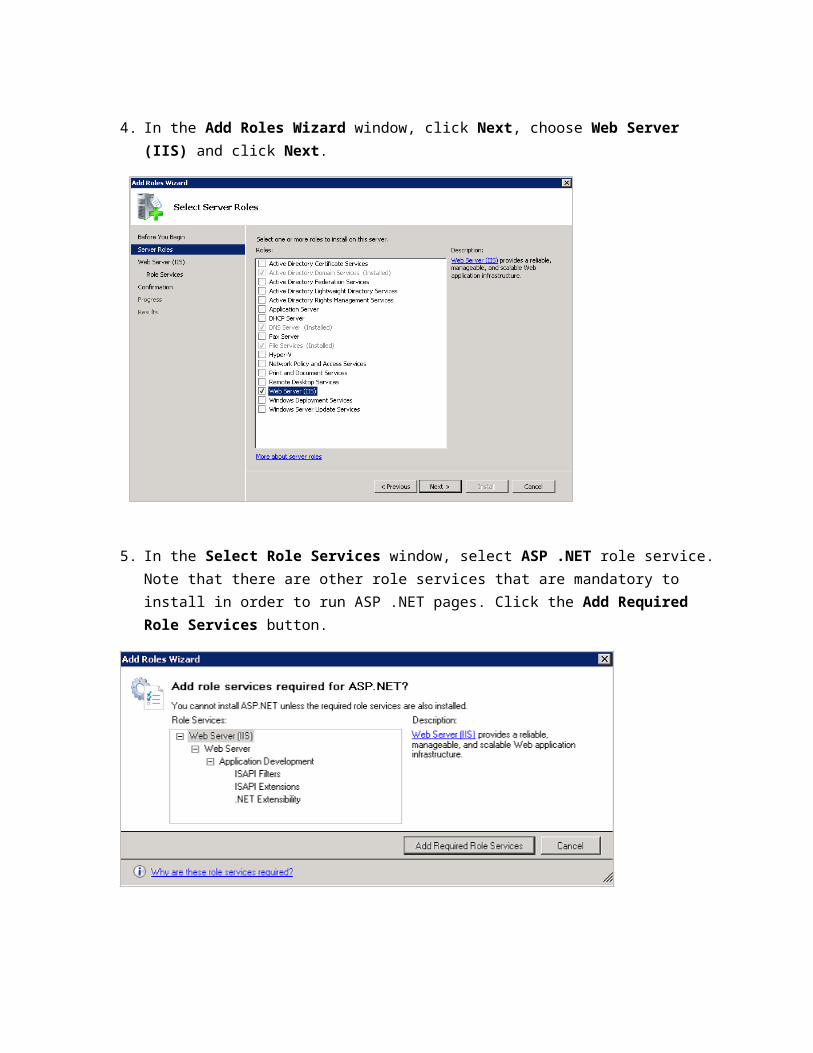
5. In the Select Role Services window, select ASP .NET role service. Note that there are other role services that are mandatory to install in order to run ASP .NET pages. Click the Add Required Role Services button.
[Type

6. Under the Security section, select the Windows Authentication option.
7. Click Next, and Install.
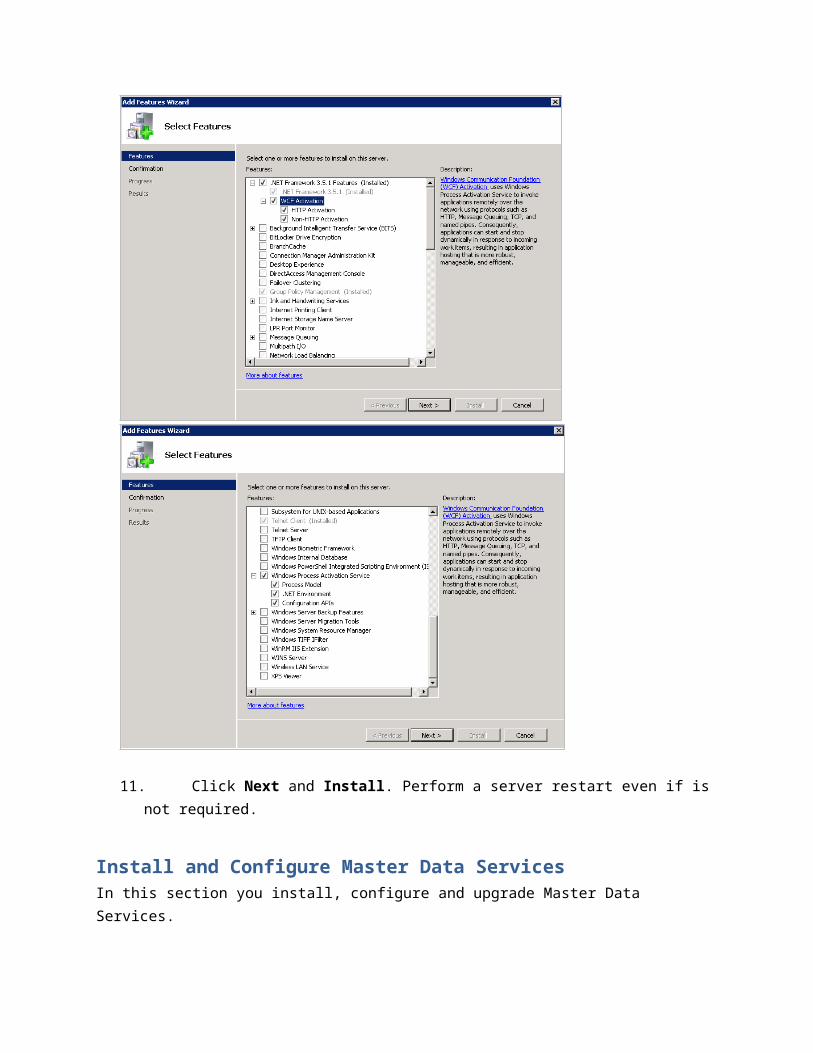
8. After IIS has been installed, you must enable the WCF Activation and Windows Process Activation Service options in the server Features section for the .NET Framework.
9. In the Server Manager window left treeview, click Features. In the right panel, click the Add Feature.
10. Add .NET Framework 3.5.1 and WCF Activation and the Windows Process Activation features.

11. Click Next and Install. Perform a server restart even if is not required.
Install and Configure Master Data ServicesIn this section you install, configure and upgrade Master Data Services.
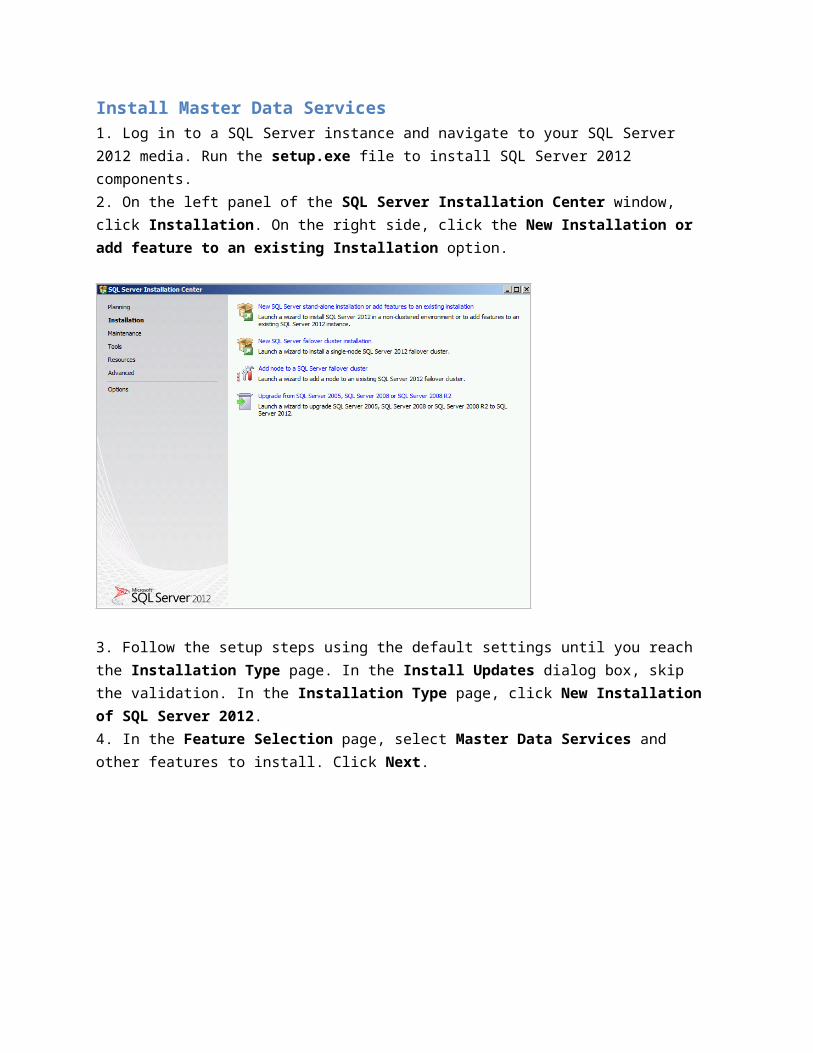
Install Master Data Services1. Log in to a SQL Server instance and navigate to your SQL Server 2012 media. Run the setup.exe file to install SQL Server 2012 components.

2. On the left panel of the SQL Server Installation Center window, click Installation. On the right side, click the New Installation or add feature to an existing Installation option.
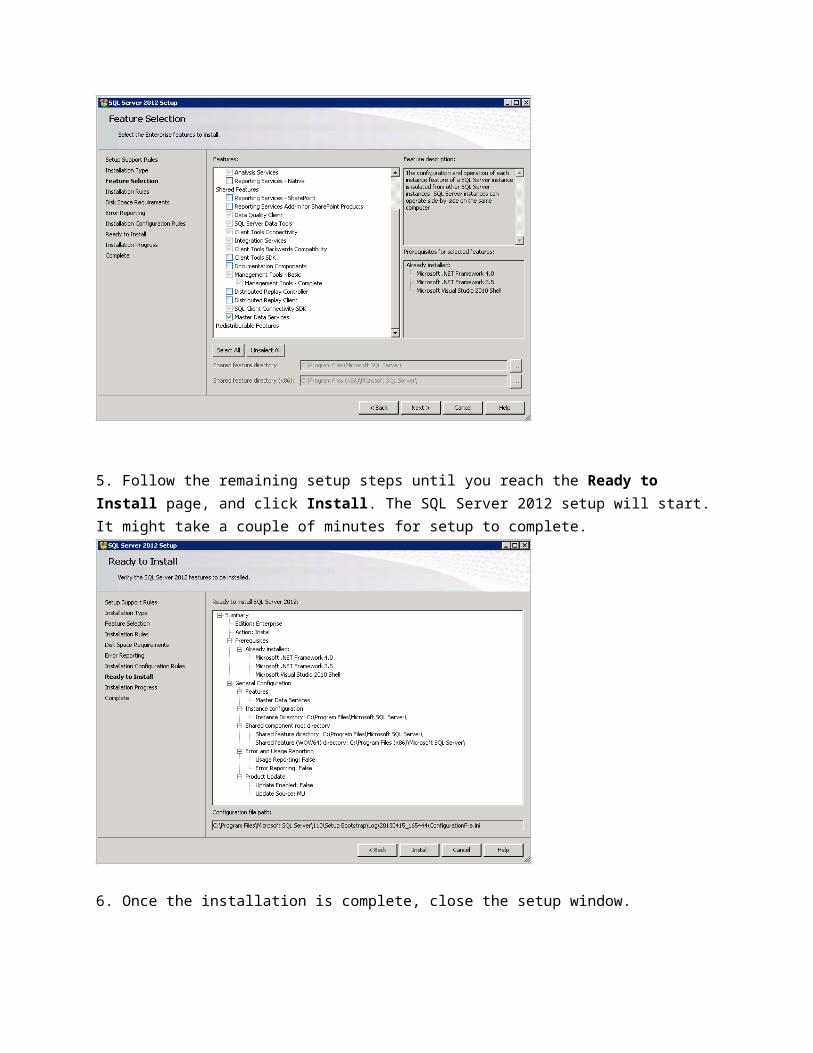
3. Follow the setup steps using the default settings until you reach the Installation Type page. In the Install Updates dialog box, skip the validation. In the Installation Type page, click New Installation of SQL Server 2012. 4. In the Feature Selection page, select Master Data Services and other features to install. Click Next.
5. Follow the remaining setup steps until you reach the Ready to Install page, and click Install. The SQL Server 2012 setup will start. It might take a couple of minutes for setup to complete.
6. Once the installation is complete, close the setup window.
Configure Master Data Services Since MDS will run under .NET Framework 4.0, we need to configure the IIS application pool to use this version of the .NET Framework runtime. To do so, you first need to register the .NET Framework in IIS.
1. Download .NET Framework 4.1 if not installed at http://www.microsoft.com/enyus/download/details.aspx?id=17851.
2. Open a new Command Prompt with administration privileges. In the Start menu, right click Command Prompt and click Run as Administrator.
3. Navigate to the C:\Windows\Microsoft.NET\Framework64\v4.0.30319 path and run the command:
aspnet_regiis.exe –i
4. Once MDS and all related Windows features have been installed, you are ready to configure MDS.
Configure MDSThe MDS configuration process has two parts:
1. Master Data Services database setup.2. Master Data Manager Web Application configuration.
Setup a Master Data Services database1. Open the Master Data Services Configuration Manager utility. To launch this utility, click Start >
Microsoft SQL Server 2012 > Master Data Services > Master Data Services Configuration Manager.

2. When the Master Data Services Configuration Manager utility launches, it confirms the PowerShell and IIS requirements. In the left panel, you configure the database and web settings.
3. When you click the Database Configuration section, the database configuration page provides high-level information about your SQL Server instance, the MDS database and database version. You can also update your MDS instance system settings in this section.

4. To start the configuration process, click Create Database to launch the Create Database wizard. The Create Database wizard consists of the following steps:
a. Specify a SQL Server instance where the MDS database will be located and the account that will create the MDS database, and click Next.

b. Define the MDS Database name and choose either the default Database collation or configure the database Windows collation based on your own requirements. Name the database MasterDB, and click Next.

c. Define an Administrator Account. This account is given full access to all models in the MDS database. Leave .\Administrator in the User name textbox, and click Next.
d. In the Summary page, review your database configuration information and click Next prior to the actual database setup.
e. After the database is configured, you are taken back to the database configuration page where the Current Instance section reflects your database configuration.


5. To continue the configuration process, click Web Configuration to launch the Web Configuration wizard. The Web Configuration wizard consists of the following steps:a) You use the Master Data Services Configuration Manager to install an MDS web site
and application pool to the web server (IIS) host. Select one of several options: Go to Web Configuration section and in the Website section choose Default
Web Site option. Click Create Application to create a new web application. Alternatively, you can choose to create a non-default web site for MDS to run
within its own site.
b) When you click Create Application, you configure the MDS web site in the Create Web Application dialog box. Enter a valid user name and password for the website to work properly. Configure the Application Pool settings with the following options:
Name: MDS Application Pool
User name: {hostname}\Administrator

Password and Confirm Password: {your password}
c. In the Create Web Application window, click OK. d. With the web application configuration complete, you associate the database with the
website. a. Click Select under the Associate Application with Database section. b. Click Connect. Once connected, select the MDSDB database and then click OK.

e. In the Master Data Services Configuration Manager window, click Apply, and wait a couple of minutes until MDS configuration has finished successfully.
f. A window appears with a message describing that configuration is complete. Leave the option to launch the web application in a browser and click OK to check if the MDS web site opens correctly.
g. You should see an informational web page that has links to help you learn about Master Data Services. There is also a link to navigate to the main MDS web page to begin working with MDS features such as models and entities.

NOTE: The MDS web site url is http://localhost/MDS.
After you follow the Database Configuration and Web Configuration steps, you have updated the Master Data Manager Web Application configuration (web.config) file to point to the MDS database.
Use the Master Data Services Add-in for Excel to connect to MDSIn order to have the Master Data Services Add-in for Excel, you must install the Visual Studio 2010 Tools for Office Runtime and Master Data Services Add-in for Excel. Navigate to C:\{Download location} and run the following installers in this order:
1. Visual Studio 2010 Tools for Office Runtime - vstor_redist.exe. 2. Master Data Services Add-in for Excel - MasterDataServicesExcelAddin.msi.
To test the connection to the MDS endpoints using Master Data Services Add-in for Excel.
1. Open Excel 2013 or Excel 2010 with a blank workbook.

2. In the Master Data ribbon tab, click Connect > Manage Connections.
3. Click New to create a new connection. 4. In the Add New Connection dialog box
a. Enter a Description such as MDS.b. Enter your MDS server address as http://{hostname}/MDS.c. Click OK.
5. Click Test to check the connection. You are now ready to use the Master Data Services Add-in for Excel.
6. Click Close.

Upgrade SQL Server 2012 Master Data ServicesBefore upgrading Master Data Services, you should back up your MDS databases before you proceed with any schema or binary files changes. When upgrading MDS, you should alert MDS users about the scheduled maintenance according to your organization’s change control processes. To prevent users from modifying MDS, you should stop the IIS web site and application pool while performing an MDS upgrade.
To Upgrade Master Data Services1. Log into your Windows server using an Administrator login.2. You can optionally stop the application pool that contains the MDS web application and
service, or you can stop the MDS web site that contains the web application and service.
For more information about how to Start or Stop an IIS Application Pool, see Start or Stop an Application Pool. For more information about how to Start or Stop an IIS Web Site, see Start or Stop a Web Site.
NOTE: If you stop the application pool, you stop requests for all applications in that application pool. If you stop the Web site, you stop only traffic to the Web site and any applications and services it contains. In our case, we will not stop IIS site or the application pool.
3. Navigate to http://support.microsoft.com/kb/2812412, and download and run SQLServer2012_SP1_CU3_2812412_11_0_3349_x64. This installer contains the SQL Server 2012 SP1 Cumulative Update 3 (CU3).
In the SQL Server 2012 SP1 CU3 update window click Next.4. Accept the license terms and click Next.5. Review the SQL Server 2012 features to be upgraded:
Database engine Analysis Services Data Quality Services and Data Quality Client Master Data Services Integration Services SQL Server Data Tools Management Tools

6. Click Next. 7. In the Check Files In use page, wait for check files operation to complete, and click Next. 8. In the Ready to update page, review installation operations, and click Update. 9. In the Complete page, click Close.

10. Navigate to your MDS web site.
Version incompatible errorWhen you navigate to your MDS web site after performing an upgrade, you might get a version incompatible error. This is expected behavior when the schema version increases because the MDS binaries are upgraded, but the database is not yet upgraded. Each patch is different and may not update the database schema so these steps are not always necessary.
At this point in upgrade guide, binaries and scripts are upgraded to 11.0.3349.0 version.

To resolve the version incompatible error, you upgrade the MDS database schema.
1. Open the Master Data Services Configuration Manager. To launch this utility, click the Start > Microsoft SQL Server 2012 > Master Data Services > Master Data Services Configuration Manager.
NOTE: To upgrade the MDS database schema, you must be logged in as an Administrator Account that was specified when the MDS database was created. In the MDS database, in mdm.tblUser, this user has the ID value of 1.
2. In the left pane, click Database Configuration.3. In the right pane, click Select Database and click Connect to get database information
from SQL Server 2012 database instance.
4. Master Data Services Configuration Manager will automatically detect the MDS_DB for you.
5. Click OK.

6. The Database Configuration page displays a warning message to upgrade MDS database. Click Upgrade Database to start the Upgrade Database Wizard.
7. Click Next to review the database configuration information, and click Next to start the upgrade. Wait until the upgrade is finished.
8. To close the Upgrade Database Wizard, click Finish.9. Open a new Internet Explorer window and navigate to http://localhost/MDS/. You
should be able to see the MDS start page without the upgrade message.
NOTE: To check the MDS version, go to upper right corner in the MDS web site and click in the down arrow next to the question mark and click About Master Data Manager.

Troubleshoot installation and configuration issuesFor more information about how to troubleshoot installation and configuration issues, see Troubleshooting Installation and Configuration Issues (Master Data Services) that discusses common installation and configuration issues.
Master Data Services Security (MDS)The next section discusses how to deploy Master Data Services models. Before describing MDS models, you should become familiar with security in MDS. In Master Data Services, use security to ensure that users have access to the specific master data necessary to do their jobs, and to prevent them from accessing data that should not be available to them. For more information about security in MDS, see Security (Master Data Services).
Deploy Master Data Services ModelsIn Master Data Services, a package is an XML file that contains a model structure to deploy to an MDS environment, and optionally, data from the model. Use model packages to move copies of models from one MDS environment to another, or to create new models in your existing MDS environment.

Packages Contents
A model package is an XML file with the .pkg extension. When you create a deployment package, you can decide whether or not to include data. If you decide to include data, you select a version of the data to include.
The following model objects are included in a package:
Entities Attributes Attribute groups Hierarchies Collections Business rules Version flags Subscription views
User-defined metadata, file attributes, business rule notification information, and user and group permissions are not included. After you deploy a model, you must update these items manually.
Deploying Model Deployment Tools
MDSModelDeploy tool: To create and deploy model objects and data, use the MDSModelDeploy.exe tool. If you selected the default path when installing MDS, this tool is located on drive\Program Files\Microsoft SQL Server\110\Master Data Services\Configuration.
Model Deployment wizard: To create and deploy packages of the model structure only, use the wizard in the Master Data Manager web application. You cannot use this wizard to deploy data.
Model Package Editor: To edit a model package, use the ModelPackageEditor.exe that launches the Model Package Editor wizard. You use this wizard to edit a package that was created by the MDSModelDeploy tool or the Model Deployment wizard. If you selected the default path when installing MDS, this tool is located on drive:\Program Files\Microsoft SQL Server\110\Master Data Services\Configuration.
Prerequisites for using Deployment tools
In the Master Data Manager web application, you must have permission to access the System Administration functional area.
You must be a model administrator. A model must exist for you to create a package.

Model Deployment wizard
Create a Package using Model Deployment Wizard
1. In Master Data Manager, click System Administration.2. On the Model View page, from the menu bar, click System > Deployment.3. On the Model Deployment wizard, click Create.4. On the Create Package page, select a model from the Model list.5. Click Next.6. Click Download.7. Save the file.8. Click Close.
Deploy a Package using Model Deployment wizardYou can use the Model Deploy wizard to create a new model, create a clone of a model, or update an existing model and its data. If you use the MDSModelDeploy tool to update an existing model and its data, and the package does not contain an entity, attribute, or member that exists in the destination model, MDSModelDeploy will not delete that entity, attribute, or member from the model.
1. In Master Data Manager, click System Administrator.
2. On the Model View page, from the menu bar, click System > Deployment.
3. Click Browse and navigate to the product_en.pkg sample package in C:\Program Files\Microsoft SQL Server\110\Master Data Services\Samples\Packages\product_en.pkg.

4. Click Next to import the model structure.
For more information about how to deploy MDS Samples in SQL Server 2012, see Deploying MDS Samples in SQL Server 2012.
MDSModelDeploy toolYou use the MDSModelDeploy tool to create a new model, create a clone of a model, or update an existing model and its data.

Create a Package using MDSModelDeploy
1. Open a command prompt as an administrator.2. Navigate to MDSModelDeploy.exe.
o If MDS was installed in the default location, the file is in drive:\Program Files\Microsoft SQL Server\110\Master Data Services\Configuration.
o If MDS was not installed in the default location, search the local computer for MDSModelDeploy.exe.
3. Optional: View options and help.o To display all available options, type MDSModelDeploy and press Enter.o To display help for an option, type the following, where OptionName is the name
of the option: MDSModelDeploy help OptionName.4. Optional: If you have multiple web applications, determine the name of the service you
will deploy to by typing this command and press Enter:
MDSModelDeploy listservices
A list of values is returned, for example MDS1, Default Web Site, MDS. The first value in this list (in this case, MDS1) is needed to deploy the model.
5. To create a package that contains model objects and data, type the following, where ModelName, VersionName, ServiceName, and PackageName are the names of the model, version, service, and of the .pkg output file respectively:
MDSModelDeploy createpackage -model ModelName -version VersionName -service ServiceName -package PackageName -includedata
If you do not want to include data, do not use the -version and -includedata switches.
6. Press Enter. When the package is successfully created, a message stating “MDSModelDeploy operation completed successfully” is displayed.
Deploy a Package using MDSModelDeploy
1. If you already have a model named Product you will need to rename the model since you are about to import a new Product model. 2. Navigate to Master Data Manager, click System Administration. 3. On the Model View page, from the menu bar, click Manage > Models. 4. Click on the Product model and click Edit Model. Change the name to Product_BeforeDataExport. 5. Deploy the Master Data Services sample model package product_en.pkg located at C:\Program Files\Microsoft SQL Server\110\Master Data Services\Samples\Packages. Launch a command prompt as an administrator from Start > Cmd and right click. Choose Run as Administrator option.

6. Navigate to the SQL Folder:
cd "C:\Program Files\Microsoft SQL Server\110\Master Data Services\Configuration"
7. List the MDS web services to connect to if you are unsure of the service name. The default is MDS1 as shown by this command:
MDSModelDeploy.exe listservices
8. Review the list that was returned and use the first one in the list that is MDS1. 9. Deploy the package by pointing to the package file, and connect to the MDS1 service.
Run the following command: MDSModelDeploy.exe deploynew -package "C:\Program Files\Microsoft SQL Server\110\Master Data Services\Samples\Packages\product_en.pkg" -model ProductsSample -service MDS1
10. On the Master Data Manager web page, click the Refresh cached information hyperlink on the right so that the cache gets the latest list of models, and you can explore the newly added sample model.
Backup an MDS DatabaseCreating a backup of an MDS database is the same as creating a backup of another SQL Server database.

1) In Microsoft SQL Server Management Studio, right click on an MDS database.2) Click Tasks > Back Up.3) In the Back Up Database dialog box, click OK.
For details about how to back up a SQL Server database, see Back Up and Restore of SQL Server Databases.
Restore an MDS Database1) Stop your MDS web site.2) Restore your MDS database. For details about how to restore a SQL Server database,
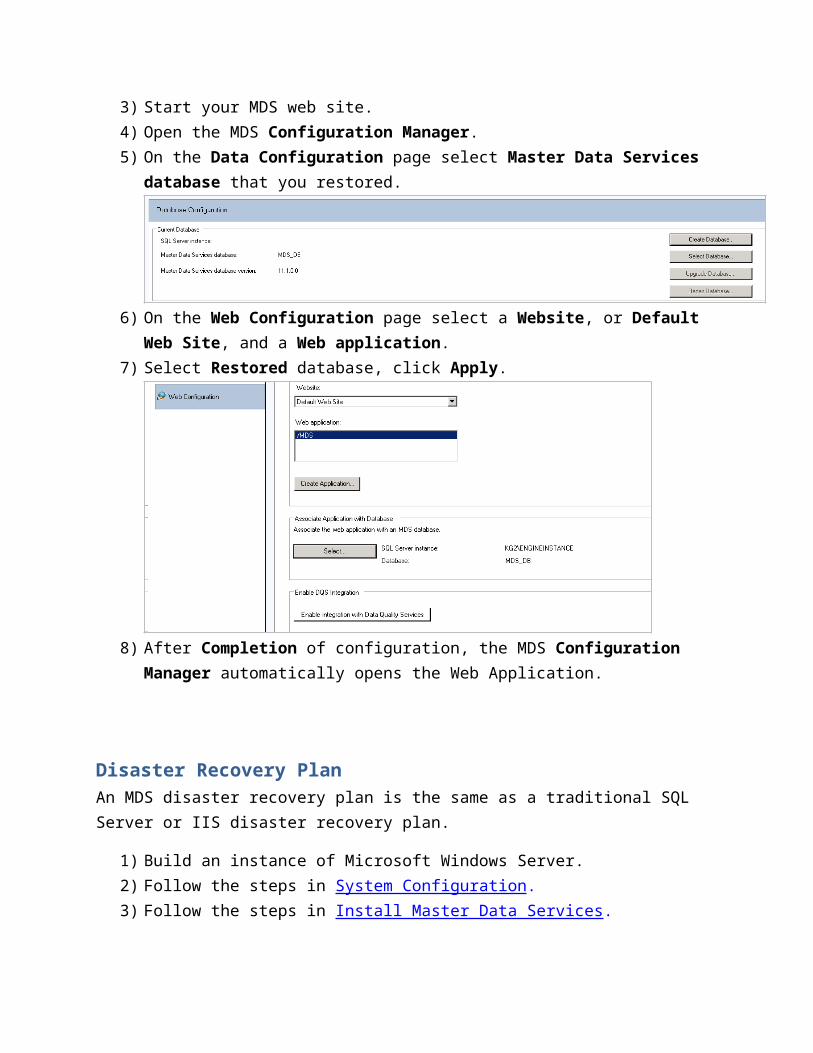
see Back Up and Restore of SQL Server Databases.3) Start your MDS web site.4) Open the MDS Configuration Manager.5) On the Data Configuration page select Master Data Services database that you
restored.
6) On the Web Configuration page select a Website, or Default Web Site, and a Web application.
7) Select Restored database, click Apply.
8) After Completion of configuration, the MDS Configuration Manager automatically opens the Web Application.

Disaster Recovery PlanAn MDS disaster recovery plan is the same as a traditional SQL Server or IIS disaster recovery plan.
1) Build an instance of Microsoft Windows Server.2) Follow the steps in System Configuration.3) Follow the steps in Install Master Data Services.4) Restore your MDS database back up and follow the steps in Restore MDS Database.5) Follow the steps in Configuration Master Data Services.6) In the Configuration Manager Database Configuration Page, select the database that
you restored in step 4.
7) Follow steps 23 to 34 in Configure Master Data Services Section.
Monitoring MDSMDS trace logging is not recommended to enable longer than necessary when troubleshooting an MDS issue. The log file can quickly grow large and there is no clean-up process or size limitations for the log. For more information about MDS logging, see How to enable Trace Logging in SQL Server 2008 R2 and 2012 Master Data Services.
SQL Login
MasetrDB

High Availability in MDS Starting with 2012 RTM CU1, you can cluster an MDS database. For more information
how to cluster an MDS database, see FIX: Master Data Services is not supported on a clustered installation of SQL Server 2012.
Starting with 2012 SP1, you can install MDS in an AlwaysOn environment. For more information, see Installing Master Data Services in an AlwaysOn Environment.
To learn more about how to scale out an MDS web application, see Web Application Requirements (Master Data Services); however, most of the work is done on the database backend so we do not see it implemented much. MDS load balancing can be easily configured with IIS tools like ARR.
MDS Extract, Transform, and Load (ETL) Package MonitoringYou can monitor the ETL process outside of MDS. Although there are no built-in tools for ETL in MDS, you can use SQL Server Integration Services (SSIS) to monitor MDS:
Import and Export - Use SSIS packages to import and export data and implement monitoring and logging tasks during those processes using SQL Server staging tables and subscription views.
Data validation and change tracking - You can run external SSIS workflow tasks containing business rules that are triggered by data changes. Within the workflow you can implement monitoring and logging tasks. For more information about change tracking using business rules, see Change Tracking (Master Data Services) and Initiate Actions Based on Attribute Value Changes (Master Data Services).
Subscription Handling Subscription views are best suited to bulk, batch-oriented exports of master data. For event-based integration, use change tracking notification. In Master Data Services, you can create a business rule to initiate actions based on changes to attribute values. For more information, see Initiate Actions Based on Attribute Value Changes (Master Data Services).
Subscription ViewMDS subscription views appear as ordinary views within the MDS master data management (MDM) schema. The view formats include the following:
The Attributes view format lists all leaf, consolidated, or collection members for an entity, and it includes columns for all attributes. Each domain-based attribute in a subscription view is identified by three columns: Name, Node, and ID.
The Hierarchy view format represents hierarchies as level-based columns, in which each column represents a level, or parent-child relationship, in which each row represents a

relationship of one child to one parent. Hierarchy views provide relationship data for all types of relationships in MDS, including explicit and derived hierarchies, and collection members.
Subscription views contain system attributes that are not in the master data. System attributes provide context about the master data: version data, validation data (for attribute views), and data about when the master data was entered and by whom. Subscribers can use context data to determine how to update their records with master data. For example, when you import the data into a subscribing system, you can filter the master data by the following:
The date and time that the data was last changed. Validation status, to ensure that you are only using valid data. Only those rows that have a certain type of data, such as price. Only data created by a specific user.
Subscription view limitations
Subscription views do not enforce MDS application security permissions. There is no row-level or member-level security on subscription views. As a result, permissions to subscription views should only be granted to those who have permissions to the MDS data.
After you create a subscription view for an entity or hierarchy, changes to the associated model objects are not automatically reflected in the view. You will need to regenerate a subscription view in Master Data Manager to reflect changes to model objects. The Changed column on the Export page is updated to true when model objects change. If this value is true, you should regenerate the view.
You cannot create a subscription view on a recursive derived hierarchy that has one or more non-recursive levels beneath the recursion.
There is no direct correlation between the order of entity columns in an MDS model and the order of columns in the subscription view.
Querying the MDS tables directly is not recommended because schema changes are likely in subsequent releases and if done incorrectly it can cause locking and performance issues. The supported method is to use subscription views and query the related SQL view.
How to create an MDS Subscription View1. On the Master Data Management home page, select the model, and click Integration
Management.2. From the menu bar, click Create Views.3. On the Subscription Views page, click the Add subscription view icon.

4. In the Create Subscription View pane, in the Subscription view name box, enter “ProductEntityLeafAttributes”.
5. From the Model list, select product_en.6. Click Version option, and click VERSION_1.7. Click Entity, and select Product from the list.8. In the Format dropdown, select Leaf members.9. Click Save.
10. Open SQL Server Management Studio, move to the MDS database Views folder, and verify that the mdm.ProductEntityLeafAttributes view has been created.
Master Data Export and Import SampleThe Master Data Export and Import sample demonstrates how to import master data from a subscription view into a SQL Server database table using a SQL Server Integration Services (SSIS) package. The sample compares selected data in each row of the subscription view to the data in the destination database. The sample inserts data in a row if it is new, updates data if it has changed, and increments a counter if the data is the same. The workflow in the Master Data Export and Import sample includes creation of the subscription view and an SSIS package.

Figure 1: Master Data Export and Import sample package flow
The sample works as follows:
1. In the Create Staging Table task, the package creates an MDS_Merge_Records staging table to temporarily store data returned from the lookup. If the MDS_Merge_Records table already exists, this step drops the table.
2. In the MDS Subscription View task of the Load Data from MDS control flow, the package accesses the master data stored in three columns of the view, and then it passes the data to the lookup shape.
3. In the Lookup task, the package compares the data returned from the view with the data that already exists in the destination table. The package sends matched results to the Count Unchanged Rows task and unmatched results to the Staging Table for Changed and New record tasks.
4. In the Count Unchanged Rows task, the count of matched rows is incremented if a row in the staging table matches a row in the destination table.

5. In the Staging Table for Changed and New Records task, all records in the staging table that have changed from the data currently in the destination table, and all new records, are saved in the staging table.
6. In the Merge New and Updated records task, all records in the staging table that have changed are updated in the destination table and all records that are new are inserted into the destination table.
The control flow and data flow of the SSIS package are as follows.
Export and import control flow
Setup the Master Data Export and Import Sample1. Install SQL Server 2012 on a test computer with Master Data Services and Integration
Services installed and the Master Data Management web application configured. This sample is designed to work on a single computer.
2. Deploy the Master Data Services sample model package product_en.pkg. For steps about how to deploy an MDS package, see Deploy Master Data Services Models.
3. Create a destination SQL Server database named “Contoso”. In that database, create a table:
CREATE TABLE [dbo].[Product.Price]([ProductName] [nvarchar](250) NULL,[ProductCode] [nvarchar](250) NOT NULL,[MSRP] [numeric](34, 4) NULL
)
4. In the Contoso database, create a staging table:
CREATE TABLE [dbo].[MDS_Merge_Records]([Name] [nvarchar](250) NULL,[Code] [nvarchar](250) NULL,[MSRP] [numeric](34, 4) NULL
)
Setup a Subscription ViewTo setup the subscription view, see Setup a Subscription View.
Create the Import Package1. Create a new Integration Services project:
a. On the Start menu, click All Programs > Microsoft SQL Server 2012 > SQL Server Data Tools.
b. In the Microsoft Visual Studio Start page, click New Project. c. In the Installed Templates pane, under Business Intelligence, click Integration
Services.d. In the middle pane, click Integration Services Project. e. In the Name text box, enter “Import Master Data”, and click OK.f. In the Solution Explorer pane, name the SSIS package (Package.dtsx)
ImportPackage.dtsx.2. Create an MDS Load Data task:
a. Drag a Data Flow task onto the SSIS workflow design workspace.b. Name the task “Load Data from MDS”.

c. Double-click the Load Data from MDS task to open the Data Flow design workspace.
3. Create a Source task:a. Drag a Source Assistant onto the design workspace.b. In the Add New Source dialog box, select SQL Server, and double-click New on
the data source.c. In the Connection Manager dialog box, for Provider select Microsoft OLE DB
Provider for SQL Server under Native OLE DB, and click OK.d. For Server name, enter “localhost” (or “.”).e. Leave Use Windows Authentication selected.f. In Select or enter a database name, select the name of your MDS database. g. Click Test Connection, ensure a successful test, click OK, and click OK again.h. Name the OLE DB Source task “MDS Subscription View”.i. Double-click the MDS Subscription View task. In the OLE DB Source Editor dialog
box, ensure that Table or view is selected for Data Access mode.j. In Name of the table or the view, select [mdm].[ProductEntityLeafAttributes].
Note that this is in the views section of the list.k. Click Columns, clear Name at the top, and select Name (fifth row from the top),
Code, and MSRP.l. Click OK.
4. Create a Lookup task:a. Drag a Lookup task onto the design workspace and position it under the MDS
Subscription View task.b. Select the MDS Subscription View task, and drag the left-pointing arrow from
the MDS Subscription View task to the Lookup task.c. Double-click the Lookup task.d. In the Lookup Transformation Editor, select General, No Cache for the Cache
mode, and OLE DB connection manager for Connection type.e. For Specify how to handle rows with no matching entries, select Redirect rows
to no match output.f. Select Connection. In OLE DB connection manager, click New.g. In the Configure OLE DB Connection Manager dialog box, click New.h. In the Connection Manager dialog box, for Provider select Microsoft OLE DB
Provider for SQL Server under Native OLE DB, and click OK. For Server name enter “Localhost”. For Select or enter a database name, select Contoso.
i. Test the connection, and if successful, click OK twice.j. For Use a table or a view, select [dbo].[Product.Price].
Derrick VanArnam, 09/18/13,
Or click?
Karan Gulati (DSD 3T), 09/24/13,
On the data source

k. Select Columns. Select Name at the top of the rightmost Available Lookup Columns, and drag arrows from Name to ProductName, Code to ProductCode, and MSRP to MSRP. Leave Lookup Operation as <Add as new column> for all three mappings.
l. Click OK.5. Create a Destination task:
a. Drag the Destination Assistant onto the design workspace.b. In the Add New Destination dialog box, with SQL Server selected, double-click
New.c. In the Connection Manager dialog box, for Provider select Microsoft OLE DB
Provider for SQL Server under Native OLE DB, and click OK.d. Enter “localhost” for Server name.e. Leave Use Windows Authentication selected.f. With Select or enter a database name selected, select Contoso. g. Click Test Connection, ensure a successful test and click OK, and click OK again.h. Name the OLE DB Destination task “Staging Table for Changed and New
Records”.i. Select the Lookup task, and drag the left-pointing arrow from the Lookup task to
Staging Table for Changed and New Records.j. In the Input Output Selection dialog box, select Lookup No Match Output for
Output. Click OK.k. Double-click the Staging Table for Changed and New Records task. Ensure that
Data access mode is set to Table or view. For Name of the table or the view, select MDS_Merge_Records.
l. Click Mappings, and verify that there are mappings from Name to Name, Code to Code, and MSRP to MSRP. Click OK.
6. Add a task to create the staging table:a. Click Control Flow.b. Drag an Execute SQL task onto the design workspace above the Load Data from
MDS task.c. Name the task “Create Staging Table”.d. Double-click the Create Staging Table task. In the Execute SQL Task Editor, set
ConnectionType to OLE DB, and for Connection select Localhost.Contoso.e. Select SQL Statement, click the ellipsis, and enter the following.
IF OBJECT_ID ('[MDS_Merge_Records]') IS NOT NULL DROP TABLE [MDS_Merge_Records]
GO

CREATE TABLE [MDS_Merge_Records] ( [Name] nvarchar(250), [Code] nvarchar(250), [MSRP] numeric(34,4))
f. Click OK, and click OK again.g. Drag the arrow from the Create Staging Table task to the Load Data from MDS
task.7. Add a row count function:
a. Click Data Flow.b. Drag Row Count to the right of the Lookup task.c. Name the Row Count task “Count Unchanged Rows”.d. Select the Lookup task, and drag the leftmost free arrow for Lookup Match
Output from the Lookup task to the Count Unchanged Rows task.e. Click the Add Variable icon in the Variables pane. Name the variable
“UnmatchedRowCount".f. Double-click the Count Unchanged Rows task. Select the
User::UnmatchedRowCount variable.g. Click OK.
8. Merge records:a. Click Control Flow.b. Drag an Execute SQL task to under the Load Data from MDS task.c. Right-click the task, click Rename, and enter “Merge New and Updated
Records”.d. Double-click the Merge New and Updated Records task. In Execute SQL Task
Editor, set ConnectionType to OLE DB, and for Connection select Localhost.Contoso.
e. Select SQL Statement, click the ellipsis, and enter the following.
MERGE INTO [dbo].[Product.Price] AS Target USING [dbo].[MDS_Merge_Records] AS MDS ON MDS.Code = Target.ProductCode WHEN MATCHED THEN
UPDATE SET Target.ProductName = MDS.NAME,Target.MSRP = MDS.MSRP
WHEN NOT MATCHED THEN

INSERT (ProductName, ProductCode, MSRP) VALUES (MDS.Name, MDS.Code, MDS.MSRP);
f. Click OK, and click OK again.g. Select the Load Data from MDS task, and drag arrow from the Load Data from
MDS task to the Merge New and Updated Records task.h. In Visual Studio, click File and click Save All.
Test the Solution1. With ImportPackage.dtsx displayed, press F5.2. When the run is complete, verify that there are green checks by all tasks in
ImportPackage.dtsx. 3. Click Data Flow, and verify that there are green checks by all those tasks. Verify that 505
rows were sent from the MDS Subscription View task to the Lookup task, and from the Lookup task to the Staging Table for Changed and New Records task.
4. Open SQL Server Management Studio, and connect to the Database Engine on the local server.
5. Right-click the dbo.Product.Price table in the Contoso database, and click Select Top 1000 Rows. Verify that 505 rows are found in the table (if you have not changed the sample model).
6. Execute the following query and verify that no records are returned:
SELECT * FROM [Contoso].[dbo].[Product.Price] WHERE ProductName = 'Bike Computer'
7. Open Internet Explorer, and navigate to your Master Data Manager Web site.8. Select the “product_en” sample Model, click Explorer.9. Verify that the Product Entity is displayed. Click Add Member. In the Details pane, enter
“Bike Computer” for Name, “BC-1112” for Code, and “79.99” for MSRP.10. Open SQL Server Management Studio, move to the mdm.ProductEntityLeafAttributes
view under the Views folder for your MDS database, and execute the following query and verify that a single row for the Bike Computer is displayed:
SELECT * FROM [MDS].[mdm].[ProductEntityLeafAttributes] WHERE Name = 'Bike Computer'
11. Open ImportPackage.dtsx in Visual Studio. Stop debugging if necessary. Press F5.12. When the run is complete, verify that there are green checks by all the tasks in
ImportPackage.dtsx.

13. Click Data Flow, and verify that 506 rows were sent from the MDS Subscription View task to the Lookup task, the majority were sent to the Count Unchanged Rows task, and at least one row was sent from the Lookup task to the Staging Table for Changed and New Records task.
14. Open SQL Server Management Studio.15. Click the dbo.Product.Price table in the Contoso database, and execute the following
query:
SELECT * FROM [Contoso].[dbo].[Product.Price] WHERE ProductName = 'Bike Computer'
16. Verify that a single record for the Bike Computer is returned.
ConclusionIn this guide, you learned how to configure, monitor and manage SQL Server 2012 Master Data Services. You also learned how to deploy a Master Data Services model and create a SQL Server Integration Services (SSIS) solution to monitor MDS.
Resources Developer’s Guide Samples
Case Studies City of Charlotte (2012) Vizio (2012) Rackspace Hosting (2012) Oranta Insurance (2012) RealtyTrac (2012) China Guangdong Nuclear Power Holding Corporation (2012) Super 8 Hotels (2012) Areva (2012)