Maximo Installation Document - Win 7 Pro
51
IBM Maximo EAM, Manual Installation on Windows 7 Professional - Guide Envision Enterprise Solutions Pvt Ltd Amrutha Hill, Panjagutta, Hyderabad Pin 500082 +91-40-65343853 By: Atish Jadhav
-
Upload
bhargav-eswar -
Category
Documents
-
view
221 -
download
0
Transcript of Maximo Installation Document - Win 7 Pro

7/23/2019 Maximo Installation Document - Win 7 Pro
http://slidepdf.com/reader/full/maximo-installation-document-win-7-pro 1/50
IBM Maximo EAM, Manual
Installation on Windows 7
Professional - Guide
E n v i s i o n E n t e r p r i s e S o l u t i o n s P v t L t d
A m r u t h a H i l l , P a n j a g u t t a , H y d e r a b a d
P i n 5 0 0 0 8 2
+ 9 1 - 4 0 - 6 5 3 4 3 8 5 3 By: Atish Jadhav

7/23/2019 Maximo Installation Document - Win 7 Pro
http://slidepdf.com/reader/full/maximo-installation-document-win-7-pro 2/50
1 | P a g e
Maximo 7 Manual Installation
Windows 7 Professional

7/23/2019 Maximo Installation Document - Win 7 Pro
http://slidepdf.com/reader/full/maximo-installation-document-win-7-pro 3/50
2 | P a g e
Contents1. Enabling Windows 7 Administrator Account ........................................................................................ 4
1.1. Layers for Installing Maximo ......................................................................................................... 4
2. Installing Web Sphere Application Server (WAS).................................................................................. 5
3. Installing DB2 ...................................................................................................................................... 11
4. Configuring WAS Console. .................................................................................................................. 17
5. Configuring DB2 .................................................................................................................................. 22
4. Installing Maximo ................................................................................................................................ 36

7/23/2019 Maximo Installation Document - Win 7 Pro
http://slidepdf.com/reader/full/maximo-installation-document-win-7-pro 4/50
3 | P a g e
Note: This book is just for guidance purpose only.

7/23/2019 Maximo Installation Document - Win 7 Pro
http://slidepdf.com/reader/full/maximo-installation-document-win-7-pro 5/50
4 | P a g e
1.
Enabling Windows 7 Administrator Account
It is mandatory to activate the administrator account. Go to command prompt and type the
following command without quotes “net<space>user<space>administrator<space>/active:yes
The other way to enable administrator account is right click on My Computer>Manage>Local
Users and Groups> right click on administrator> select properties and enable it. If setting
password go back to administrator in user and group only and right click on it and click set
password…
1.1. Layers for Installing Maximo
Info: Extract these files with winrar. WAS is the first layer on that there will be database layer
and upon that you install Maximo EAM Essentials.
1.
Install WAS (Web Sphere Application Server) first which can be found inD:\7.5_EAM_Launch_32bitInstall_2\Tiv_Middl_Instlr_750_1of3_Win_x86-
32\windows\WS-WAS_ND_7.0_Custom_FP15
2. Install DB2, which can be found in
D:\7.5_EAM_Launch_32bitInstall_2\Tiv_Middl_Instlr_750_2of3_Win_x86-
32\windows\DB2-ESE_9.7_FP4
3. Install Maximo EAM, which can be found in
D:\7.5_EAM_Launch_32bitInstall_2\CI407ML\Install\MAM

7/23/2019 Maximo Installation Document - Win 7 Pro
http://slidepdf.com/reader/full/maximo-installation-document-win-7-pro 6/50
5 | P a g e
2.
Installing Web Sphere Application Server (WAS)
Info: Make sure you disable windows firewall completely, go to services.msc and right click on
Windows Firewall Properties disable windows firewall. Start installing Web Sphere
Application Layer now.
Info: WAS is not compatible through Launchpad for some technical reasons but you can install
it manually. Ignore the warning message as displayed below slide.
7/23/2019 Maximo Installation Document - Win 7 Pro
http://slidepdf.com/reader/full/maximo-installation-document-win-7-pro 7/50
6 | P a g e

7/23/2019 Maximo Installation Document - Win 7 Pro
http://slidepdf.com/reader/full/maximo-installation-document-win-7-pro 8/50
7 | P a g e
Info: Do not check that checkbox.

7/23/2019 Maximo Installation Document - Win 7 Pro
http://slidepdf.com/reader/full/maximo-installation-document-win-7-pro 9/50
8 | P a g e
7/23/2019 Maximo Installation Document - Win 7 Pro
http://slidepdf.com/reader/full/maximo-installation-document-win-7-pro 10/50
9 | P a g e
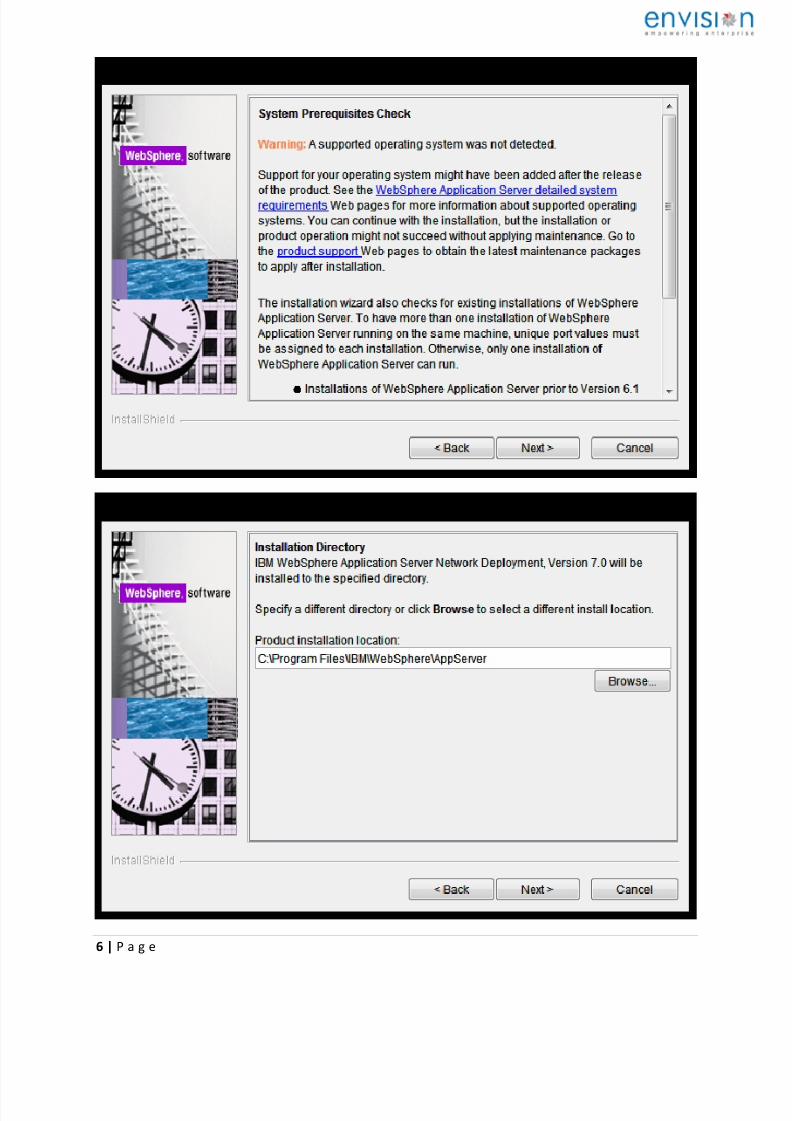
Info: Click on finish to complete the installation process, you get installation verification screen popped
as displayed below. Click on verification, to complete the installation verification process.

7/23/2019 Maximo Installation Document - Win 7 Pro
http://slidepdf.com/reader/full/maximo-installation-document-win-7-pro 11/50
10 | P a g e
Info: You can now log in into WAS console, open internet explorer and typehttp://www.localhost:9060/admin this confirms that WAS is successfully installed onto your
system.

7/23/2019 Maximo Installation Document - Win 7 Pro
http://slidepdf.com/reader/full/maximo-installation-document-win-7-pro 12/50
11 | P a g e
3.
Installing DB2
Info: Click on install product and on right window pane click on Install New to start setting up
new database.

7/23/2019 Maximo Installation Document - Win 7 Pro
http://slidepdf.com/reader/full/maximo-installation-document-win-7-pro 13/50
12 | P a g e
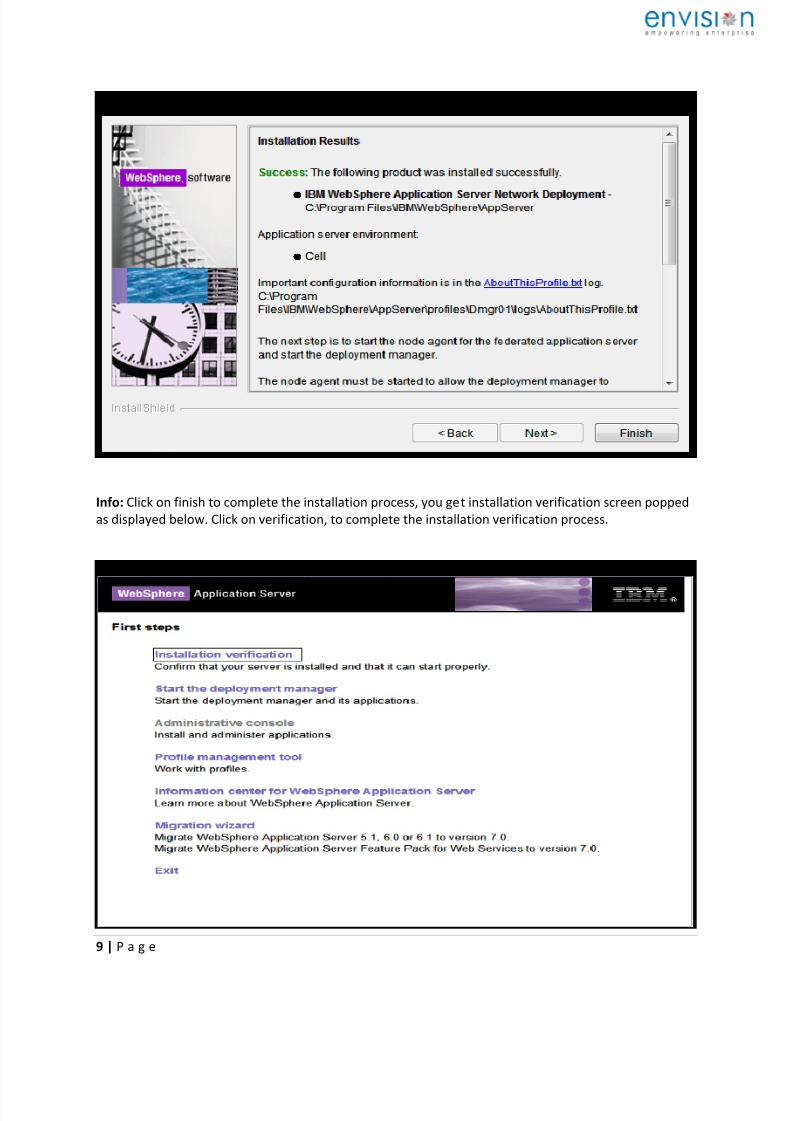
Info: Typical installation only.
7/23/2019 Maximo Installation Document - Win 7 Pro
http://slidepdf.com/reader/full/maximo-installation-document-win-7-pro 14/50
13 | P a g e
Info: Set username & password

7/23/2019 Maximo Installation Document - Win 7 Pro
http://slidepdf.com/reader/full/maximo-installation-document-win-7-pro 15/50
14 | P a g e
Info: Un-Check the checkbox as shown below.

7/23/2019 Maximo Installation Document - Win 7 Pro
http://slidepdf.com/reader/full/maximo-installation-document-win-7-pro 16/50
15 | P a g e
Info: Un-Check the checkbox as shown above.

7/23/2019 Maximo Installation Document - Win 7 Pro
http://slidepdf.com/reader/full/maximo-installation-document-win-7-pro 17/50
16 | P a g e
Info: Copy and save the current settings details as it contains all the database information and
will be required for future purposes.
Click on finish to Install DB2.

7/23/2019 Maximo Installation Document - Win 7 Pro
http://slidepdf.com/reader/full/maximo-installation-document-win-7-pro 18/50
17 | P a g e
4. Configuring WAS Console.
Open the Internet Explorer and type http://localhost:9060/admin into the address bar. Enter
WAS user name and password and then click on server types>web sphere application server.
Select the existing server1 (if you doing through Launchpad the name will be MXserver) check
box and delete it. Look at the screen shot below.

7/23/2019 Maximo Installation Document - Win 7 Pro
http://slidepdf.com/reader/full/maximo-installation-document-win-7-pro 19/50
18 | P a g e
Info: Click on review and synchronize it and then click on web servers from the left pane.
Info: Create new web server, go to, serversServer TypesWeb Servers, select the node,
enter the server name and select type of server.

7/23/2019 Maximo Installation Document - Win 7 Pro
http://slidepdf.com/reader/full/maximo-installation-document-win-7-pro 20/50
19 | P a g e
Info: Do not change port number, default will be selected automatically.
Info: Click on finish to complete WAS configuration.
7/23/2019 Maximo Installation Document - Win 7 Pro
http://slidepdf.com/reader/full/maximo-installation-document-win-7-pro 21/50
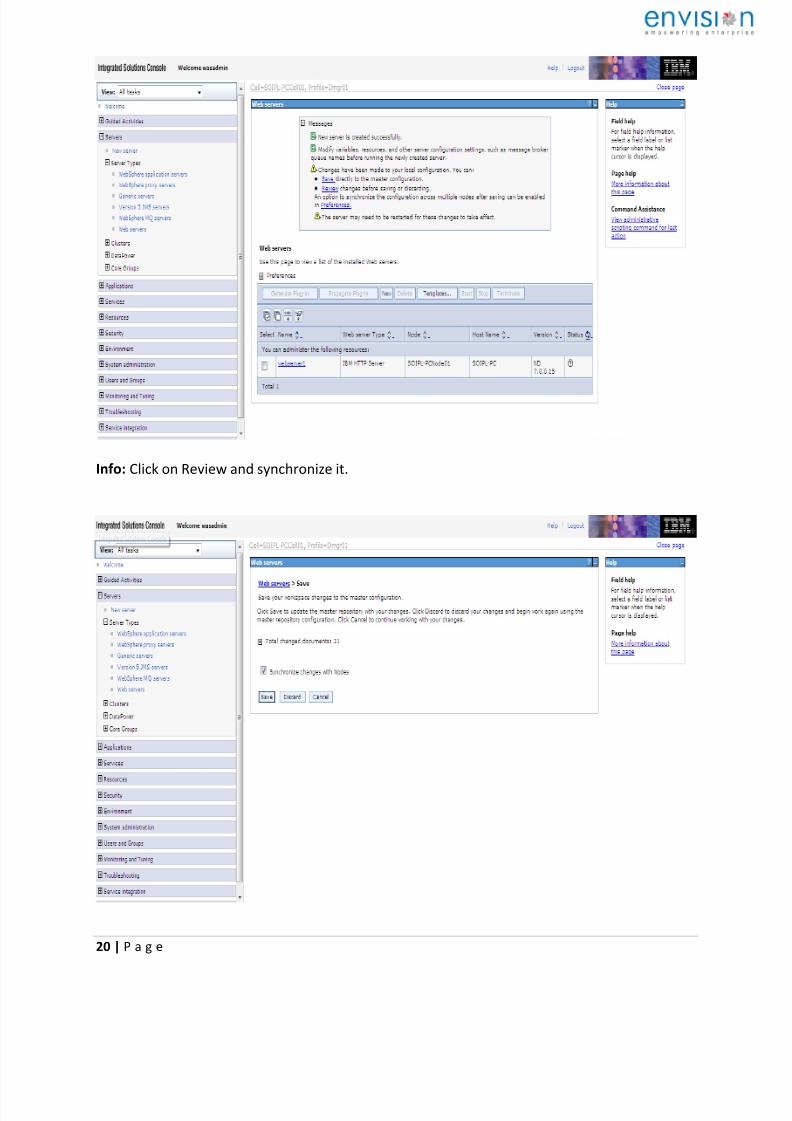
20 | P a g e
Info: Click on Review and synchronize it.

7/23/2019 Maximo Installation Document - Win 7 Pro
http://slidepdf.com/reader/full/maximo-installation-document-win-7-pro 22/50
21 | P a g e

7/23/2019 Maximo Installation Document - Win 7 Pro
http://slidepdf.com/reader/full/maximo-installation-document-win-7-pro 23/50
22 | P a g e
5.
Configuring DB2
Info: From the task bar or from start programs menu open DB2 Control Center
Info: Click on database to see the list of database. Select the database and follow the steps
mentioned below

7/23/2019 Maximo Installation Document - Win 7 Pro
http://slidepdf.com/reader/full/maximo-installation-document-win-7-pro 24/50
23 | P a g e
Info: Click on database to see the list of database. Select the database and follow the steps
mentioned below
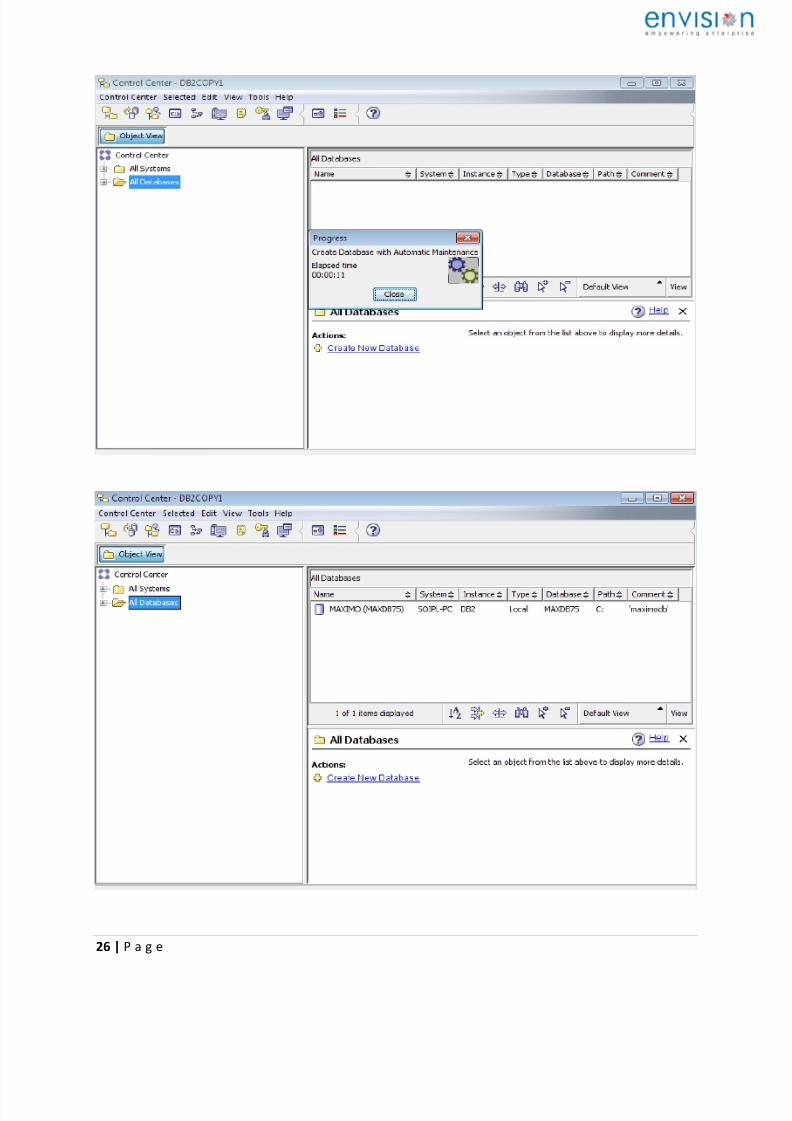
Info: Right Click on All Database>Select Create Database>Automatic Maintenance
Info: Enter the database name, alias name, comment.

7/23/2019 Maximo Installation Document - Win 7 Pro
http://slidepdf.com/reader/full/maximo-installation-document-win-7-pro 25/50
24 | P a g e
Info: Let it be default

7/23/2019 Maximo Installation Document - Win 7 Pro
http://slidepdf.com/reader/full/maximo-installation-document-win-7-pro 26/50
25 | P a g e
Info: Only, if you have your system connected into LAN environment, you need to enter SMTP
server.
7/23/2019 Maximo Installation Document - Win 7 Pro
http://slidepdf.com/reader/full/maximo-installation-document-win-7-pro 27/50
26 | P a g e

7/23/2019 Maximo Installation Document - Win 7 Pro
http://slidepdf.com/reader/full/maximo-installation-document-win-7-pro 28/50
27 | P a g e
Info: Create user called Maximo as shown below

7/23/2019 Maximo Installation Document - Win 7 Pro
http://slidepdf.com/reader/full/maximo-installation-document-win-7-pro 29/50
28 | P a g e
Info: Right click on database select database authorities add the user Maximo and
administrator and grant allwith all grant
Info: Now, Create Schema for Maximo as shown below.

7/23/2019 Maximo Installation Document - Win 7 Pro
http://slidepdf.com/reader/full/maximo-installation-document-win-7-pro 30/50
29 | P a g e
Info: After creating schema below that there’s option to create Table Space. Enter the name for
table space as MAXDATA

7/23/2019 Maximo Installation Document - Win 7 Pro
http://slidepdf.com/reader/full/maximo-installation-document-win-7-pro 31/50
30 | P a g e
Info: Click on create button to create buffer pool.

7/23/2019 Maximo Installation Document - Win 7 Pro
http://slidepdf.com/reader/full/maximo-installation-document-win-7-pro 32/50
31 | P a g e
Info: Set Buffer Pool Name: MAXBUFFPOL and Page Size: 32
Info: Click Next
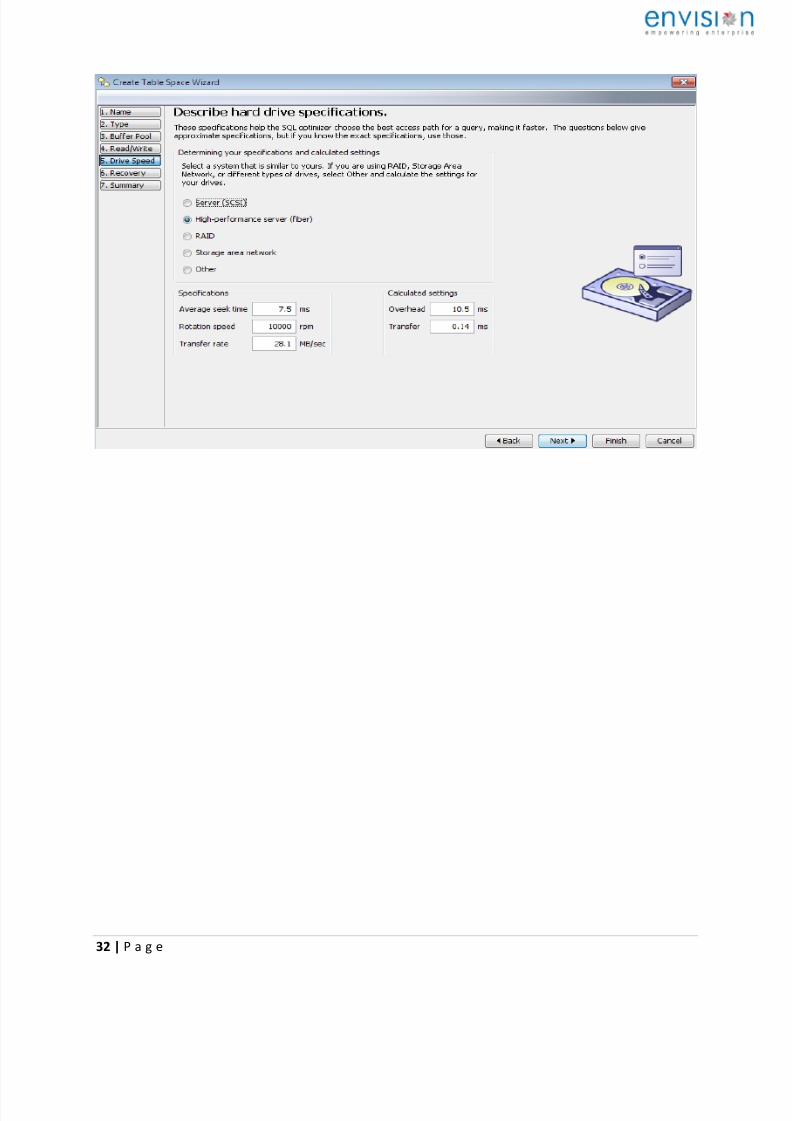
Info: Do not enter anything, click next
7/23/2019 Maximo Installation Document - Win 7 Pro
http://slidepdf.com/reader/full/maximo-installation-document-win-7-pro 33/50
32 | P a g e

7/23/2019 Maximo Installation Document - Win 7 Pro
http://slidepdf.com/reader/full/maximo-installation-document-win-7-pro 34/50
33 | P a g e

7/23/2019 Maximo Installation Document - Win 7 Pro
http://slidepdf.com/reader/full/maximo-installation-document-win-7-pro 35/50
34 | P a g e
Info: Give privileges to all the table spaces, make sure you are adding the names of the users, in
my case its maximo and administrator.
Info: Click Table Spaces >select Max Data from right window pane>right click on it and
Privileges and add Maximo and Administrator to the list and grant all with grant option.
7/23/2019 Maximo Installation Document - Win 7 Pro
http://slidepdf.com/reader/full/maximo-installation-document-win-7-pro 36/50
35 | P a g e
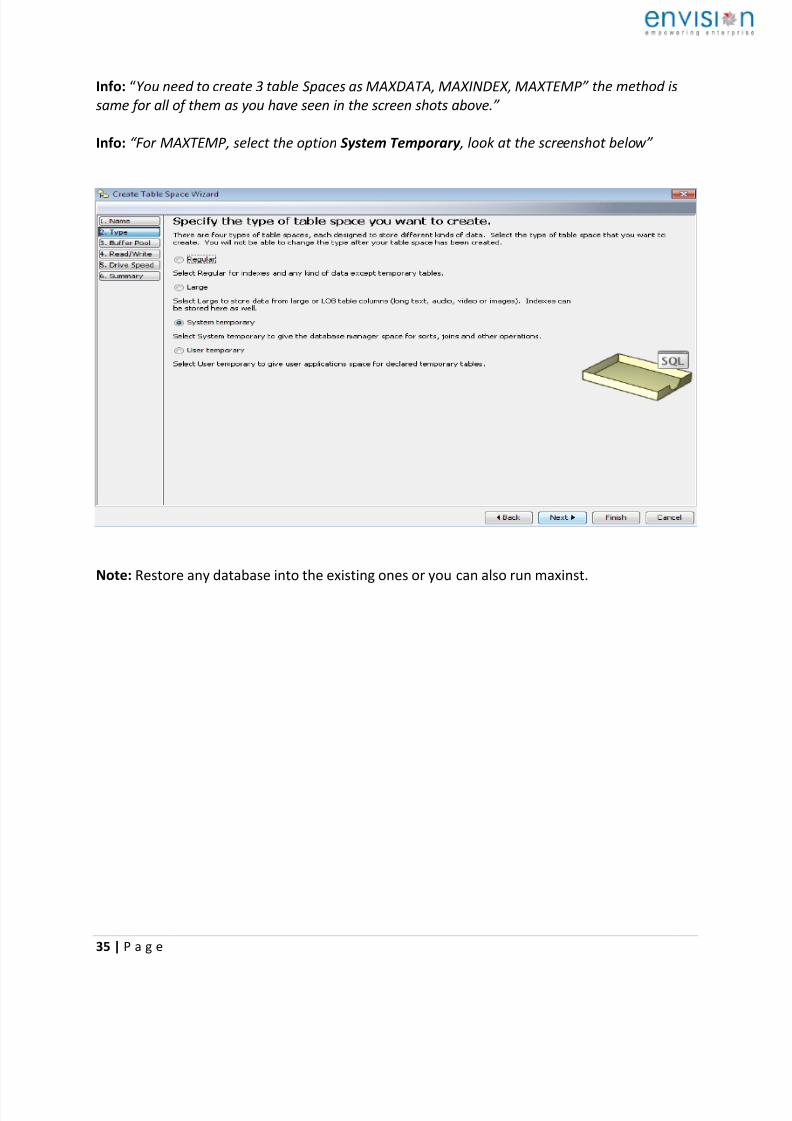
Info: “You need to create 3 table Spaces as MAXDATA, MAXINDEX, MAXTEMP” the method is
same for all of them as you have seen in the screen shots above.”
Info: “For MAXTEMP , select the option System Temporary , look at the screenshot below”
Note: Restore any database into the existing ones or you can also run maxinst.

7/23/2019 Maximo Installation Document - Win 7 Pro
http://slidepdf.com/reader/full/maximo-installation-document-win-7-pro 37/50
36 | P a g e
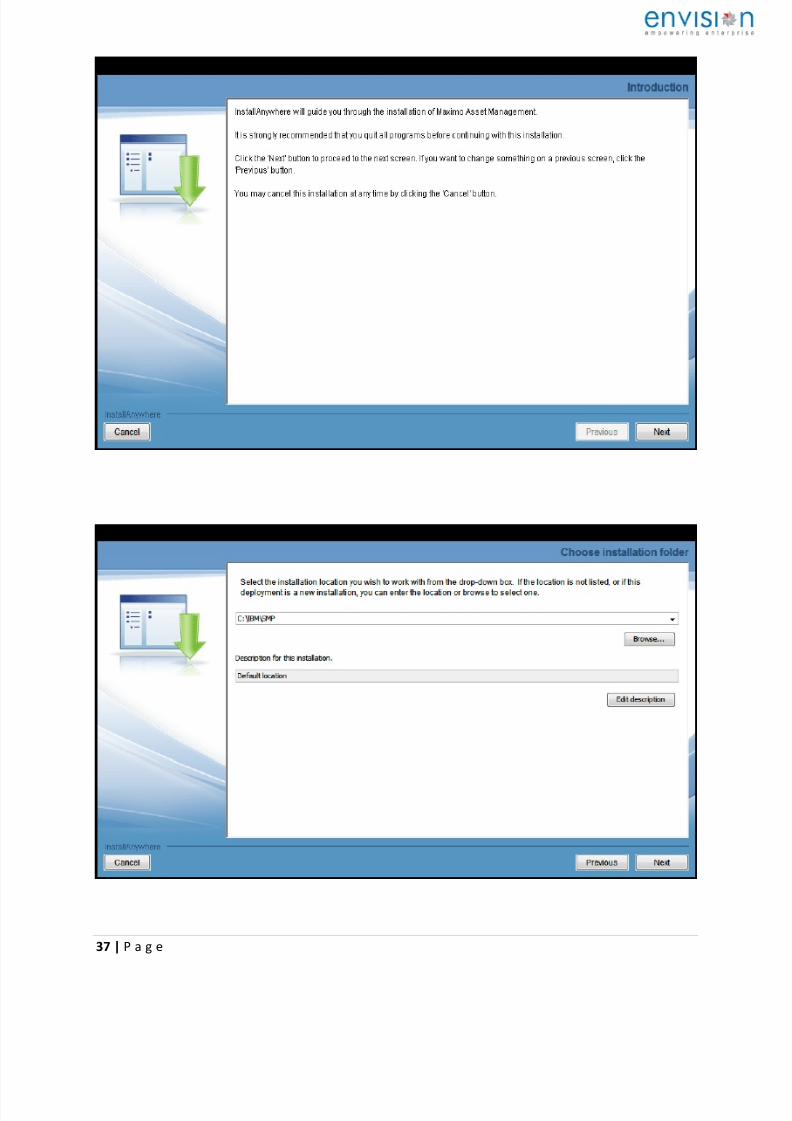
4. Installing Maximo
D:\7.5_EAM_Launch_32bitInstall_2\CI407ML\Install\MAM
7/23/2019 Maximo Installation Document - Win 7 Pro
http://slidepdf.com/reader/full/maximo-installation-document-win-7-pro 38/50
37 | P a g e

7/23/2019 Maximo Installation Document - Win 7 Pro
http://slidepdf.com/reader/full/maximo-installation-document-win-7-pro 39/50
38 | P a g e

7/23/2019 Maximo Installation Document - Win 7 Pro
http://slidepdf.com/reader/full/maximo-installation-document-win-7-pro 40/50
39 | P a g e

7/23/2019 Maximo Installation Document - Win 7 Pro
http://slidepdf.com/reader/full/maximo-installation-document-win-7-pro 41/50
40 | P a g e
Info: Do the custom install only

7/23/2019 Maximo Installation Document - Win 7 Pro
http://slidepdf.com/reader/full/maximo-installation-document-win-7-pro 42/50
41 | P a g e
Note: Enter the host name (find hostname of your PC, look into my computer properties)
because Maximo doesn’t accept other host names. Also, make sure you give full stop after the
host name, FYI make sure you do installation in the administrator environment of your PC.
Info: Select DB2

7/23/2019 Maximo Installation Document - Win 7 Pro
http://slidepdf.com/reader/full/maximo-installation-document-win-7-pro 43/50
42 | P a g e
Info: Enter host name, change port number to 50000, instance name, schema name, database
user id and passwords.
Info: whatever the table spaces you created will be reflected here.

7/23/2019 Maximo Installation Document - Win 7 Pro
http://slidepdf.com/reader/full/maximo-installation-document-win-7-pro 44/50
43 | P a g e
Info: Enter host name, user id and password.

7/23/2019 Maximo Installation Document - Win 7 Pro
http://slidepdf.com/reader/full/maximo-installation-document-win-7-pro 45/50
44 | P a g e
Info: Enter your operating system username and password, make sure you enter administrator
mode username and password. Also keep in mind in regards of profile name because I have
removed “ctg” which was prefixed with Dmgr01.

7/23/2019 Maximo Installation Document - Win 7 Pro
http://slidepdf.com/reader/full/maximo-installation-document-win-7-pro 46/50
45 | P a g e
Info: Enter user names and password as shown in above pic.

7/23/2019 Maximo Installation Document - Win 7 Pro
http://slidepdf.com/reader/full/maximo-installation-document-win-7-pro 47/50
46 | P a g e
7/23/2019 Maximo Installation Document - Win 7 Pro
http://slidepdf.com/reader/full/maximo-installation-document-win-7-pro 48/50
47 | P a g e

7/23/2019 Maximo Installation Document - Win 7 Pro
http://slidepdf.com/reader/full/maximo-installation-document-win-7-pro 49/50
48 | P a g e

7/23/2019 Maximo Installation Document - Win 7 Pro
http://slidepdf.com/reader/full/maximo-installation-document-win-7-pro 50/50