Masterpieces of the woodworker’s art and the …areksmurrayclock.com/manuals/floorsetup.pdf ·...
20
Masterpieces of the woodworker’s art and the timekeeper’s science... 2-564 Weber St. N. Waterloo, Ontario Canada N2C 5C6 www.hentschelclock.com
Transcript of Masterpieces of the woodworker’s art and the …areksmurrayclock.com/manuals/floorsetup.pdf ·...

Masterpieces of the woodworker’s art and the timekeeper’s science...
2-564 Weber St. N.Waterloo, OntarioCanada N2C 5C6www.hentschelclock.com

Masterpieces of the woodworker’s art and the timekeeper’s science...
ContentsThe Face................................................................1
The Movement....................................................2
Tools you will need ............................................3
Identification label..............................................3
Unpacking the carton ........................................3
Choosing a location............................................4
Unpacking the clock ..........................................5
Unpacking the movement and chimes ..........5
Putting the clock into operation ......................6
The pendulum.....................................................6
The weights..........................................................7
Decorative finial(s) .............................................7
Starting the pendulum swing ..........................7
Setting the time ...................................................7
Setting the moving moon .................................8
Setting the calendar dial....................................8
Winding the clock...............................................9
Regulation fast/slow .......................................10
Suspension spring replacement.....................10
Synchronization, hour strike ..........................11
Minute hand adjustment.................................11
The chimes .........................................................12
Your questions about the chimes ..................13
Automatic night shut off.................................13
Moving your clock ...........................................14
Care tips for the cabinet ..................................15
Care tips for the movement............................15
Limited warranty..............................................16
Record of ownership........................................16
Record of service...............................................16
Troubleshooting ................................................17
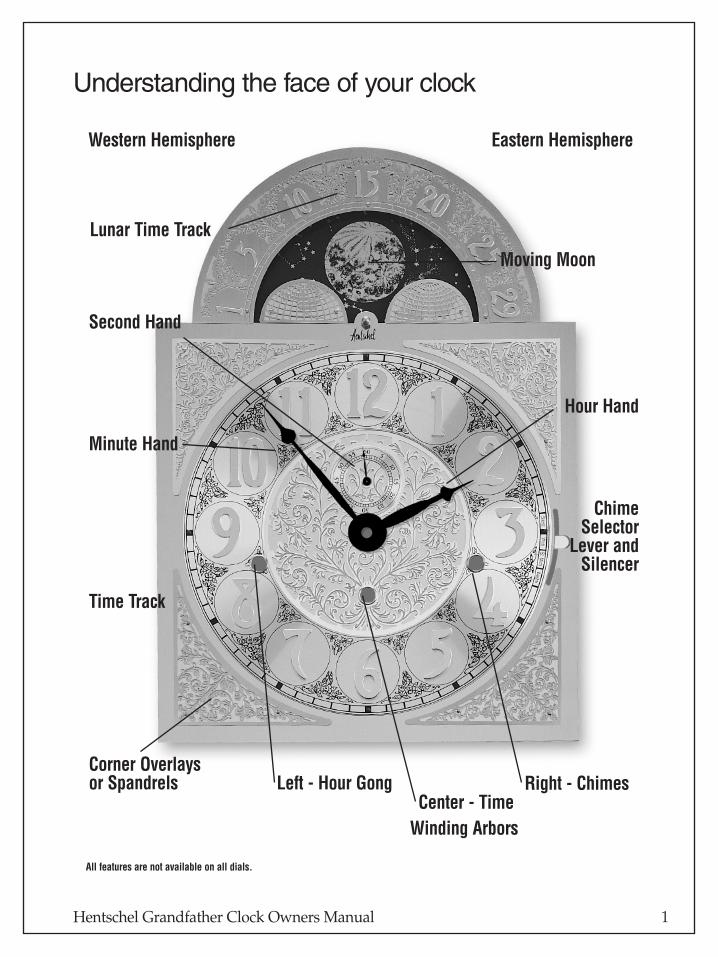
Western Hemisphere
Second Hand
Hour Hand
Corner Overlays or Spandrels
Lunar Time Track
Moving Moon
Eastern Hemisphere
Time Track
ChimeSelector
Lever and Silencer
Minute Hand
Winding Arbors
Left - Hour GongCenter - Time
Right - Chimes
All features are not available on all dials.
Understanding the face of your clock
Hentschel Grandfather Clock Owners Manual 1
2 Hentschel Grandfather Clock Owners Manual
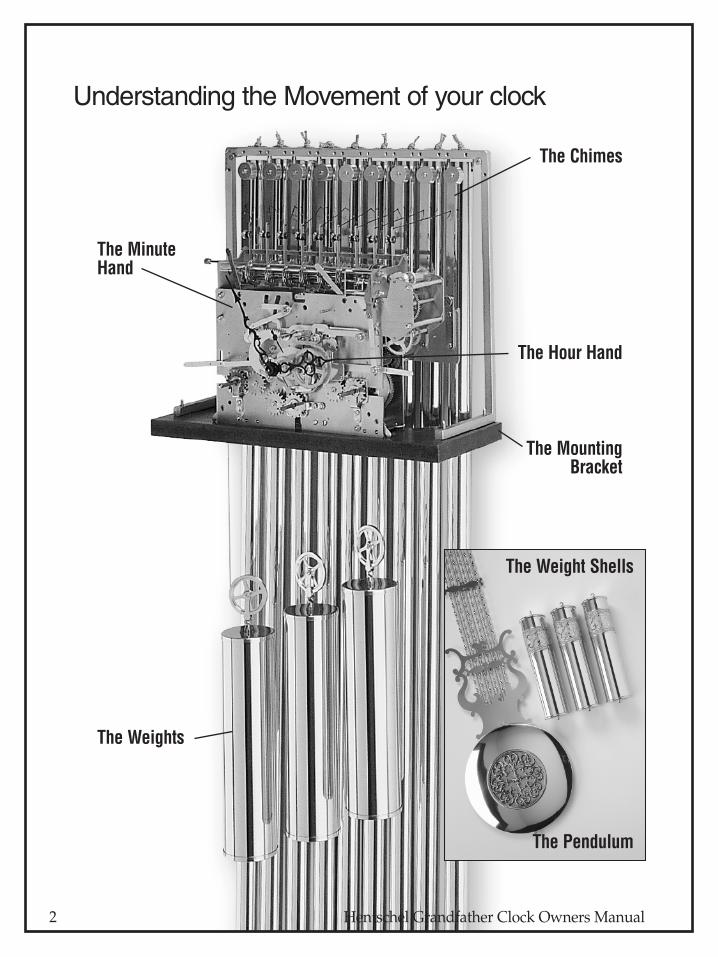
Understanding the Movement of your clock
The Weights
The Chimes
The MinuteHand
The Hour Hand
The MountingBracket
The Weight Shells
The Pendulum
Hentschel Grandfather Clock Owners Manual 3
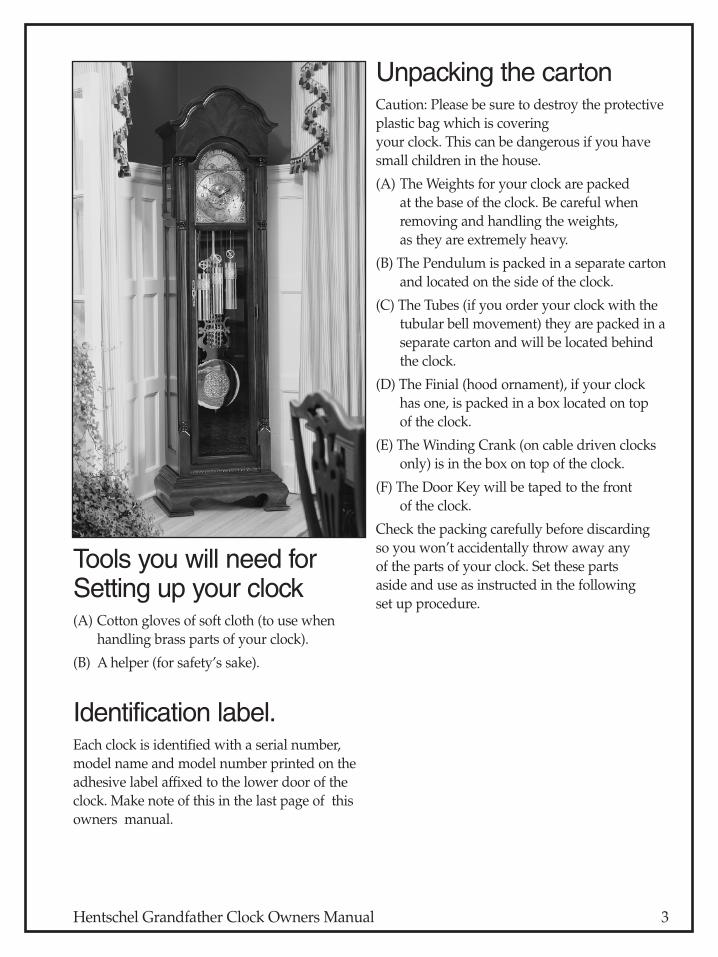
Tools you will need forSetting up your clock(A) Cotton gloves of soft cloth (to use when
handling brass parts of your clock).
(B) A helper (for safety’s sake).
Identification label.Each clock is identified with a serial number,model name and model number printed on theadhesive label affixed to the lower door of theclock. Make note of this in the last page of thisowners manual.
Unpacking the cartonCaution: Please be sure to destroy the protectiveplastic bag which is covering your clock. This can be dangerous if you havesmall children in the house.
(A) The Weights for your clock are packed at the base of the clock. Be careful whenremoving and handling the weights, as they are extremely heavy.
(B) The Pendulum is packed in a separate cartonand located on the side of the clock.
(C) The Tubes (if you order your clock with thetubular bell movement) they are packed in aseparate carton and will be located behindthe clock.
(D) The Finial (hood ornament), if your clockhas one, is packed in a box located on top of the clock.
(E) The Winding Crank (on cable driven clocksonly) is in the box on top of the clock.
(F) The Door Key will be taped to the front of the clock.
Check the packing carefully before discarding so you won’t accidentally throw away any of the parts of your clock. Set these parts aside and use as instructed in the following set up procedure.

Choosing a location for your clockWhen choosing a location for your clock thereare several situations or conditions you shouldconsider.
(A) Avoid placing the cabinet in direct sunlight.The portion of the cabinet that receives themost exposure may lighten or otherwisedistort the finish.
(B) Avoid placing the clock directly in front of or below a heating or air conditioning vent.Since there is a certain amount of dust aswell as hot or cold air blown through thevents, you will find your clock needs to becleaned and lubricated more frequently inorder to operate correctly.
(C) The volume of the chimes will be affected bythe size and furnishings in a room. A clockplaced in an uncarpeted foyer, for instance,would be much louder than the same clockplaced in a room with plush carpet andheavy drapes.
(D) When possible, avoid heavy traffic areas,especially if small children are in the home.This will prevent possible injury to the childor damage to the clock.
(E) Move the clock to its permanent locationand level the clock (using the glide levelerson the base). You may use a spirit (bubble)level to make this adjustment but it is notnecessary. You should make sure the clock is resting firmly on all four levelers and is“sight” level, as viewed from the front and side.
If your clock is placed on plush carpet you mayneed to re-level the clock after it “settles”.
4 Hentschel Grandfather Clock Owners Manual

Hentschel Grandfather Clock Owners Manual 5
Unpacking The ClockFor safety’s sake, (yours and your clock’s) 2people are suggested to handle set up.
(A) After removing the clock from the carton, setit near its permanent location.
(B) Tilt the clock to make sure the four glidelevelers located on each corner of the basemove freely. You will adjust the glides whenyou move the clock to its permanentposition.
Caution: Your clock is extremely heavy and careshould be taken when tilting.
Unpacking the Movementand ChimesThere are 3 different types of packing methodsused. Select the instruction that matches yourclock.
(A) Tubular Bell Movement
1. Unhook the rubber band holding thePendulum leader.
2. Remove wood hammer retainer bar.
3. Unscrew red screw (left side of clock) this is only used to secure the move-ment during shipping.
(B) Chime Rod Movement
1. Remove the masking tape from the Chime Hammers.
2. Unhook the rubber band holding the pendulum leader.
3. The cardboard packing for the chime rods should be slid down the chime rodsand removed.
4. Remove rubber bands securing the 3 cable pulleys, or chain to the door hinge.
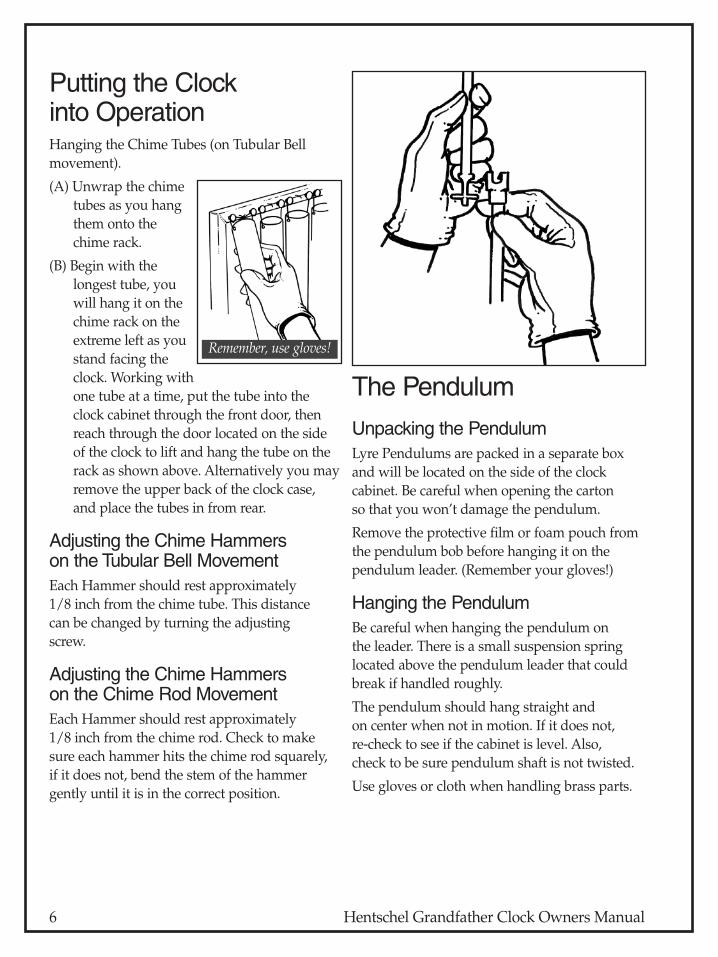
Putting the Clock into OperationHanging the Chime Tubes (on Tubular Bellmovement).
(A) Unwrap the chimetubes as you hangthem onto the chime rack.
(B) Begin with thelongest tube, youwill hang it on thechime rack on theextreme left as youstand facing theclock. Working withone tube at a time, put the tube into theclock cabinet through the front door, thenreach through the door located on the sideof the clock to lift and hang the tube on therack as shown above. Alternatively you mayremove the upper back of the clock case, and place the tubes in from rear.
Adjusting the Chime Hammers on the Tubular Bell MovementEach Hammer should rest approximately 1/8 inch from the chime tube. This distance can be changed by turning the adjusting screw.
Adjusting the Chime Hammers on the Chime Rod MovementEach Hammer should rest approximately 1/8 inch from the chime rod. Check to makesure each hammer hits the chime rod squarely, if it does not, bend the stem of the hammergently until it is in the correct position.
The Pendulum
Unpacking the PendulumLyre Pendulums are packed in a separate boxand will be located on the side of the clockcabinet. Be careful when opening the carton so that you won’t damage the pendulum.
Remove the protective film or foam pouch fromthe pendulum bob before hanging it on thependulum leader. (Remember your gloves!)
Hanging the PendulumBe careful when hanging the pendulum on the leader. There is a small suspension springlocated above the pendulum leader that couldbreak if handled roughly.
The pendulum should hang straight and on center when not in motion. If it does not, re-check to see if the cabinet is level. Also, check to be sure pendulum shaft is not twisted.
Use gloves or cloth when handling brass parts.
6 Hentschel Grandfather Clock Owners Manual
Remember, use gloves!
Hentschel Grandfather Clock Owners Manual 7
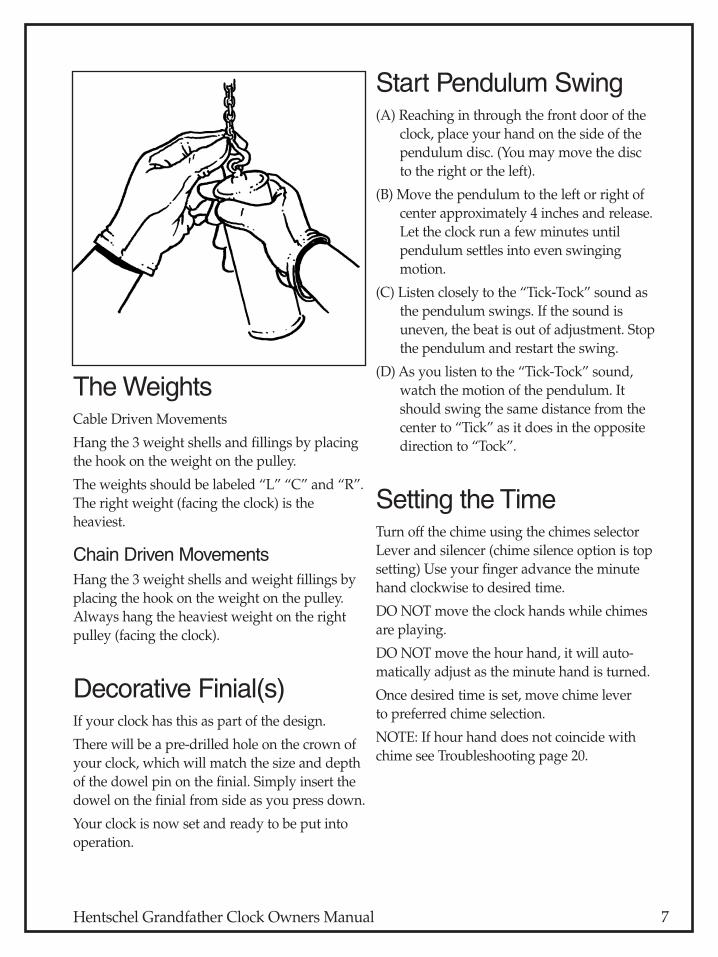
The WeightsCable Driven Movements
Hang the 3 weight shells and fillings by placingthe hook on the weight on the pulley.
The weights should be labeled “L” “C” and “R”.The right weight (facing the clock) is theheaviest.
Chain Driven MovementsHang the 3 weight shells and weight fillings byplacing the hook on the weight on the pulley.Always hang the heaviest weight on the rightpulley (facing the clock).
Decorative Finial(s)If your clock has this as part of the design.
There will be a pre-drilled hole on the crown ofyour clock, which will match the size and depthof the dowel pin on the finial. Simply insert thedowel on the finial from side as you press down.
Your clock is now set and ready to be put intooperation.
Start Pendulum Swing(A) Reaching in through the front door of the
clock, place your hand on the side of thependulum disc. (You may move the disc to the right or the left).
(B) Move the pendulum to the left or right ofcenter approximately 4 inches and release.Let the clock run a few minutes untilpendulum settles into even swingingmotion.
(C) Listen closely to the “Tick-Tock” sound asthe pendulum swings. If the sound isuneven, the beat is out of adjustment. Stopthe pendulum and restart the swing.
(D) As you listen to the “Tick-Tock” sound,watch the motion of the pendulum. Itshould swing the same distance from thecenter to “Tick” as it does in the oppositedirection to “Tock”.
Setting the TimeTurn off the chime using the chimes selectorLever and silencer (chime silence option is topsetting) Use your finger advance the minutehand clockwise to desired time.
DO NOT move the clock hands while chimesare playing.
DO NOT move the hour hand, it will auto-matically adjust as the minute hand is turned.
Once desired time is set, move chime lever to preferred chime selection.
NOTE: If hour hand does not coincide withchime see Troubleshooting page 20.
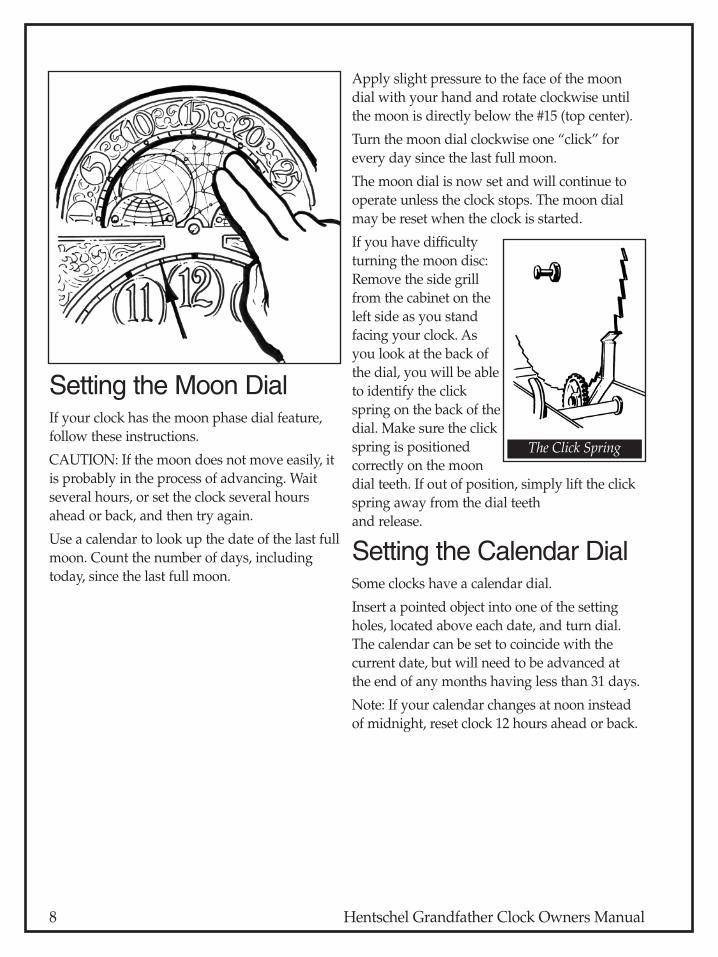
Setting the Moon DialIf your clock has the moon phase dial feature,follow these instructions.
CAUTION: If the moon does not move easily, itis probably in the process of advancing. Waitseveral hours, or set the clock several hoursahead or back, and then try again.
Use a calendar to look up the date of the last fullmoon. Count the number of days, includingtoday, since the last full moon.
Apply slight pressure to the face of the moondial with your hand and rotate clockwise untilthe moon is directly below the #15 (top center).
Turn the moon dial clockwise one “click” forevery day since the last full moon.
The moon dial is now set and will continue tooperate unless the clock stops. The moon dialmay be reset when the clock is started.
If you have difficultyturning the moon disc:Remove the side grillfrom the cabinet on the left side as you standfacing your clock. Asyou look at the back ofthe dial, you will be ableto identify the clickspring on the back of thedial. Make sure the clickspring is positionedcorrectly on the moondial teeth. If out of position, simply lift the clickspring away from the dial teeth and release.
Setting the Calendar Dial Some clocks have a calendar dial.
Insert a pointed object into one of the settingholes, located above each date, and turn dial.The calendar can be set to coincide with thecurrent date, but will need to be advanced at the end of any months having less than 31 days.
Note: If your calendar changes at noon insteadof midnight, reset clock 12 hours ahead or back.
8 Hentschel Grandfather Clock Owners Manual
The Click Spring
Hentschel Grandfather Clock Owners Manual 9
Winding the ClockThe weights are the driving power that makesyour clock operate. In order for your clock torun continuously, you will need to wind (raisethe weights) regularly. Although there is usuallyenough cable or chain on the clock movement to allow the weight to fall for eight days (this is where the term “eight day clock” originates)the length of time can be altered by design of the cabinet or the type of movement installed in the cabinet.
We use two different types of movements –Cable and Chain. Please select the instructionthat matches your clock.
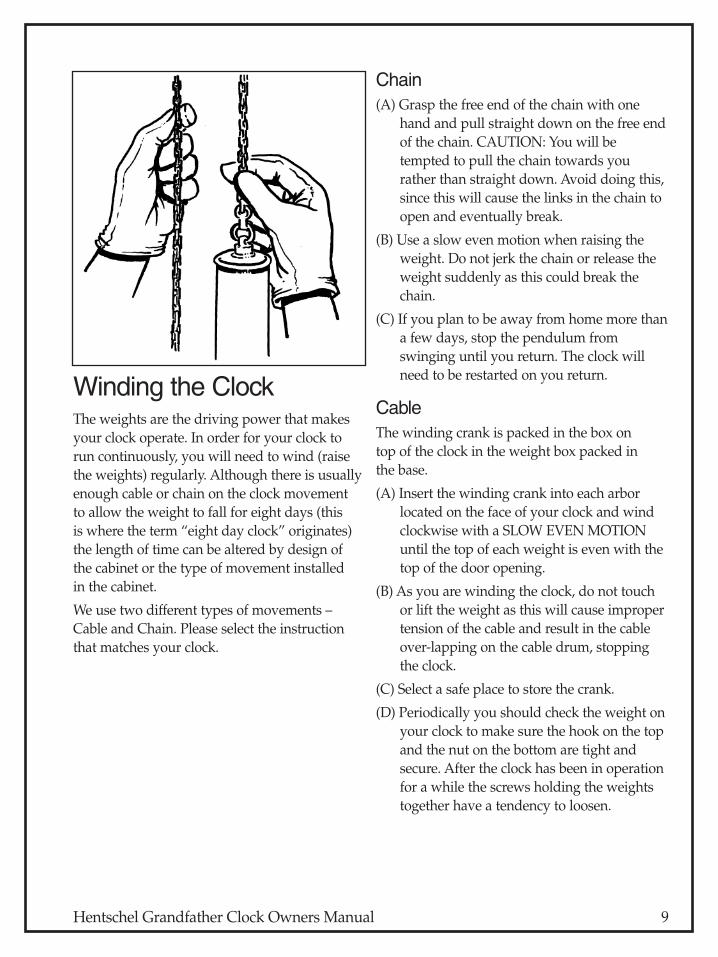
Chain(A) Grasp the free end of the chain with one
hand and pull straight down on the free endof the chain. CAUTION: You will betempted to pull the chain towards yourather than straight down. Avoid doing this,since this will cause the links in the chain toopen and eventually break.
(B) Use a slow even motion when raising theweight. Do not jerk the chain or release theweight suddenly as this could break thechain.
(C) If you plan to be away from home more thana few days, stop the pendulum fromswinging until you return. The clock willneed to be restarted on you return.
CableThe winding crank is packed in the box on top of the clock in the weight box packed in the base.
(A) Insert the winding crank into each arborlocated on the face of your clock and windclockwise with a SLOW EVEN MOTIONuntil the top of each weight is even with thetop of the door opening.
(B) As you are winding the clock, do not touchor lift the weight as this will cause impropertension of the cable and result in the cableover-lapping on the cable drum, stoppingthe clock.
(C) Select a safe place to store the crank.
(D) Periodically you should check the weight onyour clock to make sure the hook on the topand the nut on the bottom are tight andsecure. After the clock has been in operationfor a while the screws holding the weightstogether have a tendency to loosen.
Regulation for MakingYour Clock Run Faster or Slower.
The distance thependulum disc hangsfrom the clock move-ment determines howfast or how slow yourclock will run. Thisdistance can be short-ened or lengthened byturning the nut whichis located below thependulum disc. Tomake your clock runfaster, turn the nut tothe right. To make yourclock run slower, turnthe nut to the left. Oneturn = 1 minute for 24hours. When makingthis adjustment to yourclock, hold the pendu-lum steady with onehand while turning theadjusting nut with theother and making theadjustment in this way,
will prevent the pendulum from twisting andpossibly damaging the suspension spring whichis located at the top of the pendulum.
When making the adjustment for speed if thependulum disc does not move freely:
Remove the pendulum from the clock and checkto make sure the rods are inserted through therod guides properly.
Regulation of the Time is Your Responsibilityand Not the Responsibility of Your Servicemanor Your Dealer
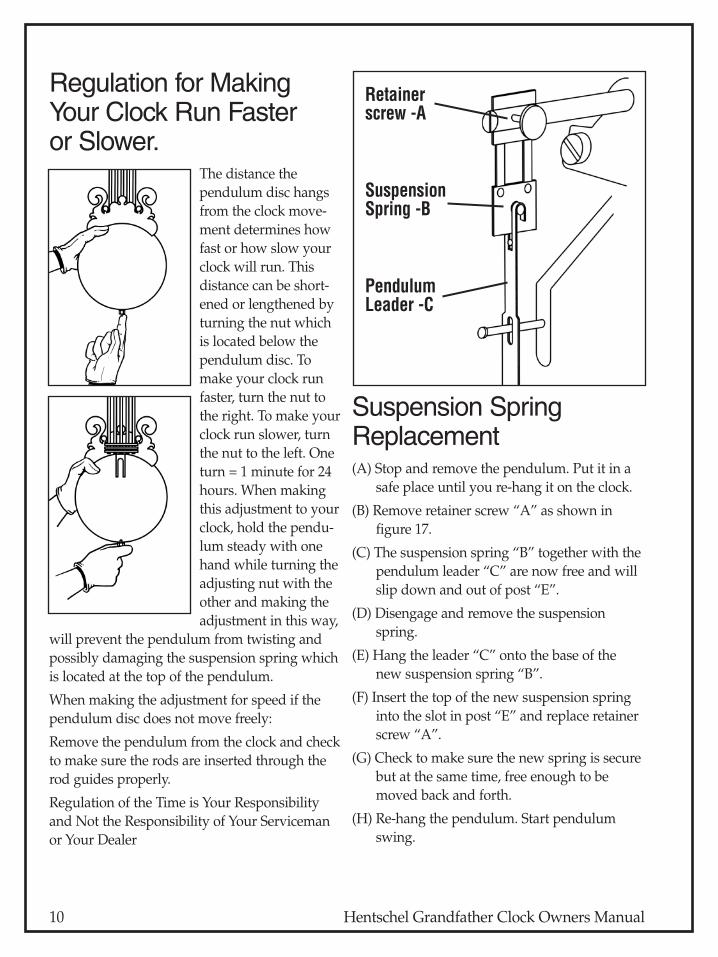
Suspension SpringReplacement(A) Stop and remove the pendulum. Put it in a
safe place until you re-hang it on the clock.
(B) Remove retainer screw “A” as shown infigure 17.
(C) The suspension spring “B” together with thependulum leader “C” are now free and willslip down and out of post “E”.
(D) Disengage and remove the suspensionspring.
(E) Hang the leader “C” onto the base of thenew suspension spring “B”.
(F) Insert the top of the new suspension springinto the slot in post “E” and replace retainerscrew “A”.
(G) Check to make sure the new spring is securebut at the same time, free enough to bemoved back and forth.
(H) Re-hang the pendulum. Start pendulumswing.
10 Hentschel Grandfather Clock Owners Manual
Retainer screw -A
SuspensionSpring -B
PendulumLeader -C
Hentschel Grandfather Clock Owners Manual 11
Synchronization – Hour StrikeIf the hour strike and the time does notcorrespond, you will need to make thisadjustment. Example: The clock shows 4:00 andstrikes a different number of times. Follow theseinstructions for correcting.
(A). DO NOT SILENCE THE CHIMES WHILEMAKING THIS ADJUSTMENT.
(B) Move the hour hand (shortest) clockwise orcounter-clockwise, whichever is moreconvenient, slowly to the hour that itactually struck. Example: If the clock struckonly three times, move the hour hand slowlyuntil it points directly to the 3. You willnotice that the hour hand turnsindependently of the minute hand.
(C) Then turn the minute hand (longest)clockwise, or counter-clockwise, whicheveris more convenient, slowly until the propertime setting is reached. Be careful not tocatch the hour hand as you take the minutehand around.
(D) The chime and strike will now adjustthemselves to the proper sequence. It takesapproximately 1 - 2 hours for the movementto re-adjust itself.
Minute Hand AdjustmentThis adjustment is used if your clock does notbegin the chime exactly on the hour, usually 1 to2 minutes before or after.
(A) Stop the pendulum. NOTE THE POSITIONOF THE MINUTE HAND.
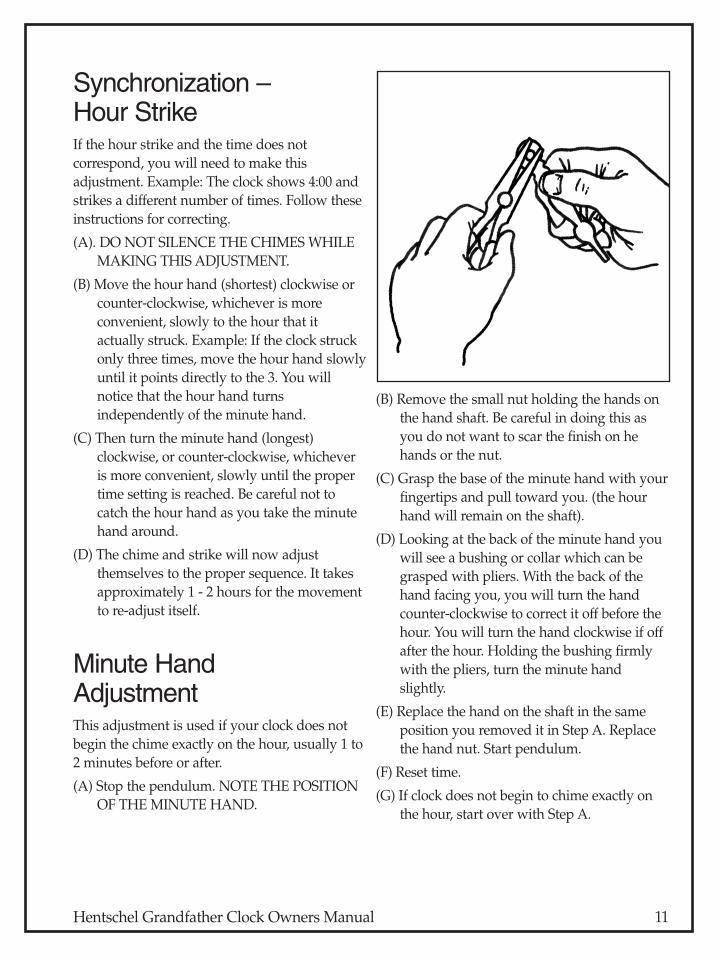
(B) Remove the small nut holding the hands onthe hand shaft. Be careful in doing this asyou do not want to scar the finish on hehands or the nut.
(C) Grasp the base of the minute hand with yourfingertips and pull toward you. (the hourhand will remain on the shaft).
(D) Looking at the back of the minute hand youwill see a bushing or collar which can begrasped with pliers. With the back of thehand facing you, you will turn the handcounter-clockwise to correct it off before thehour. You will turn the hand clockwise if offafter the hour. Holding the bushing firmlywith the pliers, turn the minute handslightly.
(E) Replace the hand on the shaft in the sameposition you removed it in Step A. Replacethe hand nut. Start pendulum.
(F) Reset time.
(G) If clock does not begin to chime exactly onthe hour, start over with Step A.

The ChimesYour clock has beautiful chimes which can beturned off at night if you are a light sleeper.Some models play only the Westminster Chime,while others will give you a selection of threedifferent melodies. A glance at the dial of yourclock will tell you which chimes can be heard on your clock. If the dial simply states “Chime –Silent”, your clock has only the WestminsterChime. If your clock has a triple chimemovement you will see on the dial where the lever should be moved to hear each of them. All clocks have the Big Ben Gong which will toll the hour.
As you move the selector lever from one chimeto another or from chime to silent you will beable to feel the lever fall into the next position.Make sure the lever is resting in a position andnot between two. The Chime selection lever should not be moved
while the clock is chiming or striking. When youwant to change melodies, move the lever to theselected chime after the chime has completed on the quarter hour, half, three quarter or hour.
(Five minutes before each quarter, themovement adjusts itself to chime on the quarter.In clock-master’s terminology you would saythe clock “warns” five minutes before chime. If you listen closely, you will be able to hear thesound your clock makes at that time.) If youchange the melody after the movement makesthis adjustment (or warns), you may damage the movement or cause it to not chime at all.
The Chimes may be turned on at any time.
12 Hentschel Grandfather Clock Owners Manual
Chime Selector Lever and Silencer
Hentschel Grandfather Clock Owners Manual 13
Answers to Your Questions about The Chimes
Can the chimes be made softer?Suggestions to soften the chimes:
(A) Place the clock in a carpeted area rather than on tile or hardwood floor.
(B). Make sure there is a small space between the back of the clock and the wall. Placingthe clock flat against the wall will cause the wall to act as a sounding board andmake the chimes louder.
(C). The proper adjustment for the chimehammer if 1/8" from the chime roads when not in motion. If you adjust them a little further away from the rods this will soften the chimes slightly.
Can the chimes be made louder?Yes, but not to any great degree. There isn’t a volume control on the clock meant to turn the chimes up or down.
Suggestions to increase the volume:
(A) Reverse suggestion 1 and 2 for softening the chimes.
(B) Make sure the chime hammers are adjustableto approximately 1/8" from the chime rodswhen not in motion.
The size of the room makes a difference in thevolume of the chimes. A clock placed in a hall or foyer will sound much louder than the sameclock placed in a larger room with carpet anddrapes.
A word about the chimesYour clock was primarily made to tell time. It was not intended or constructed to be amusical instrument with the perfection onewould expect from such. Chime tone will varyfrom clock to clock according to the soundingboard wood and how much moister the woodabsorbs or loses from changes in the weather.Chime rods are mass produced and do not “go out of tune”. Chimes are tuned in sets and have no definite pitch or key. The hourchord requires only that it be different enoughfrom the other chords to tell when the hour isbeing struck. Chime speed is set and cannot be changed, however, speed will slow down as the movement becomes dirty. Cleaning will restore the chime speed.
Automatic Night Shut-OffAll cable movements feature “Automatic NightShut-Off”. When activated, the clock will notchime between 10:00 p.m. and 7:00 a.m.
Depending on the model, this feature isactivated in one or two ways:
1) By a lever jutting out of a slot at the 9:00position on the dial face, to activate, movelever to the “on” position.
2) By a long brass rod hanging below the dial.To activate, push the rod “up”.
Note: When this feature is activated, the left and right weights will not drop as much as thecenter weight.
Moving Your Clock to a New Location within Your HomeMoving your clock is not recommended andshould only be done when absolutely necessary.If you decide to move your clock, followingthese instructions will prevent problems fromoccurring.
Remember to use a soft cloth or gloves whenhandling the weights, pendulum and tubes ofyour clock.
1. Stop the pendulum from swinging.
2. Remove the weights and put them in a safe place.
3. Remove the tubes (on tubular bellmovement) and put them in a safe place.
4. Keeping the clock in an upright position at all times, move it to the new location. Re-adjust leveling feet if needed.
5. Rehang tubes, pendulum and weights. After weights are hung in position, windyour clock and set time.
Do not wind without weights being hung. This will cause the chain to come off thesprocket (on chain driven movements), and cause cables to overlap (on cable driven movements).
Moving Your Clock to a New HomeIn preparing your clock for a major move itwould be advisable to ask one of your localauthorized clock-masters to help you pack the clock. If this is not possible, we suggest that you refer to the procedure for setting upyour clock, and simply reverse this procedure.
14 Hentschel Grandfather Clock Owners Manual
Hentschel Grandfather Clock Owners Manual 15
Care Tips for the CabinetYour clock will require very little attention.There are a few things you should do, however,to keep the cabinet beautiful.
1. Check periodically to see if your clock restsfirmly on all four levelers. This is especiallyimportant the first few months if the clock ison carpet, it could be thrown out of balance.
2. Wax or polish your clock occasionally with a non-silicone liquid or paste. In betweentimes, dust the cabinet with a dry, lint-freecloth or a cloth dampened with warm water.
Care Tips for the Movement1. Do not put any type of cleaner, polish, water
etc. on the brass parts of your clock. If youinsist, they must be cleaned - do so with alint-free dry cloth.
2. Ask your local clock-master about futureservice on the movement. Since themechanical parts of your clock can beaffected by humidity, heat and cold, the time to lubricate or clean it would vary from one location to another.
3. Do not attempt to clean or lubricate themovement unless you are a qualified clock-master. Do not use a spray lubricant on the movement or the oil“grandma used on her sewing machine”.
4. We recommend you have your movement oiled approximately every two years andcleaned every five to seven years.
Only the finest clock oil should be used.
Keep this manual near your clock for futurereference. Minor adjustments and precautionswill keep your clock in working order for manyyears. If things not covered in this manualhappen to your clock, do not attempt todismantle the clock or make repairs your-self – unless you are a qualified clock-master.The movement and dial is of the finest made in the world today – but it is mechanical andwill periodically need cleaning and lubrication.When your clock needs service you should call the clock-master who installed the clock in your home.
The adjustments covered in this manual are not covered by the warranty.
Cleaning and lubrication are not covered by warranty.
Please read the warranty coverage on your clock carefully. Your dealer will be able toanswer any of your questions concerningcoverage.
Limited WarrantyThis clock is fully guaranteed against defectiveworkmanship and materials for a period of two years from date of delivery.
This guarantee applies under conditions ofnormal use only. It does not apply to defects thatresult from negligence, misuse or accidents.
Report any defects to your dealer. If a repair iscalled for, your dealer is authorized to make allnecessary arrangements with the manufacturer.We will handle promptly and fairly all consumercomplaints submitted in accordance with ourguarantee.
We hope that you enjoy the pride of ownershipthat your handcrafted clock so richly deserves.
Ownership RecordAs your clock is passed from one generation to another, its value will be enhanced by itshistory. Record this history below and keep it with your clock.
Original Owner: ........................................................
Date: .............................................................................
Serial Number: ...........................................................
Model Number: .........................................................
Model Name: .............................................................
Owner: .........................................................................
Date: .............................................................................
Owner: .........................................................................
Date: .............................................................................
Owner: .........................................................................
Date: .............................................................................
Owner: .........................................................................
Date: .............................................................................
Owner: .........................................................................
Date: .............................................................................
Owner: .........................................................................
Date: .............................................................................
Owner: .........................................................................
Date: .............................................................................
Record of ServiceDate: .............................................................................
Servicing Agent: ........................................................
Details of Service: ......................................................
.......................................................................................
Date: .............................................................................
Servicing Agent: ........................................................
Details of Service: ......................................................
.......................................................................................
16 Hentschel Grandfather Clock Owners Manual
Hentschel Grandfather Clock Owners Manual 17
Troubleshooting
If your clock will not run...1. Has all the packing material
been removed? (pg. 8)
2. Restart and regulate clock. (pg. 9)
3. Is the pendulum hitting the chime rods or rubbing back of case?Make sure your clock is hanging straightand level. Adjust chime rods. (pg. 16)
5. Check the click spring of the moon dial.Look through the left upper side door of the clock. The long strip spring on the backof the dial should rest on the edge of themoon disk. If it has slipped in front orbehind the moon disk, replace it on top of the teeth. (pg. 11)
6. Have you checked the hand clearance?Don’t let the hour hand hit the second handbetween 11:00 and 1:00. If the second handrubs the dial face, it can be pulled outslightly. If the hour hand rubs against theback of the minute hand, it can be pushedcloser to the dial face. With your thumb onthe center portion of the hand, push towardsthe dial.
7. Check the suspension spring.If damaged, replace. (pg. 13)
8. Make sure the pendulum hanger is in the center of the crutch.
If it is not, check the level of your clock from front to back. If the hanger still rubsthe front or back of the crutch, you mayhave to slightly bend the crutch tocompensate.
If your clock will not chime or strike properly...1. Check items #1, #3 and #4 under the
heading “If your clock will not run...”
2. Check Selection Lever. Is your selection lever in the silent position, or halfwaybetween two chime positions? (pg. 15)
3. Check your hammer adjustment. Make sure no two hammers touch. (pg. 9)
4. To correct the hour strike adjustment, try the following:Move the minute hand around to the hour,let the clock chime and strike.
Count the number of hour strikes and movethe hour hand to that hour. The hour hand is friction fit and will move easily.
Example: if the clock strikes 4 times and thehour hand points to 5 o’clock, then move the hour hand to the number 4 on the dial.The number of strikes and the time on thedial will now match.
Now, to set the clock to the correct time,move the minute hand to the correct time on the dial.