Masternode Guide #1 - gobyte.network · Prerequisites: a - A remote server (Virtual Private Server,...
23
Masternode Guide #1 Single masternode on Linux VPS (Ubuntu)+ Control wallet on local PC (Windows) (VPS installation with script :-) )
Transcript of Masternode Guide #1 - gobyte.network · Prerequisites: a - A remote server (Virtual Private Server,...
Masternode Guide #1Single masternode on Linux VPS
(Ubuntu)+ Control wallet on local PC (Windows)
(VPS installation with script :-) )

Prerequisites:
a - A remote server (Virtual Private Server, VPS) which will be our masternode wallet.
b - A local computer running under Windows 7, 8.1 or 10 which will be our control wallet.
c - PuTTY, which will be used to setup the server (install the dependencies, the wallet itself, and configure everything) after the initial configuration.
d - 1001 GBX as collateral (1000 GBX + 1 GBX to cover the transaction fees)

Plan of action:
1 - Update Windows 10.2 - Buy VPS service and setup Ubuntu on it. You’ll need to have one CPU and at least 1GB of RAM on it to be able to compile and run the wallet.
3 - Download PuTTY here http://www.putty.org/, install it, run it and connect to your server. 4 - Login as root and run our script for installing everything on the server side.
5 - Download GoByte Windows Wallet from http://gobyte.network/ and set up the installation.6 - Setup our masternode and our control wallet :)
* Notes: This guide was written on testnet, a few links on the following screenshots are related to the testnet. The correct links and commands are always in text.

#1For the purpose of this guide I have used Windows 10. Everything was installed and configured on Windows 10. Other different versions of Windows might require some adjustments which won’t be covered in this guide.
First of all, we need to update our Windows installation to make sure we are running a secured system. Install all the available updates.

#2For the purpose of this guide I have used a VPS provider HETZNER (https://www.hetzner.com/)
Linux distro under which the wallet was compiled and run is Ubuntu 16.04. Other different versions of Linux might require some other commands or syntax which won’t be covered in this guide.
Important: The server configuration is bare minimum 1 CPU and 1 GB of RAM. This is enough to run the wallet but might not be enough to compile it. To compile the wallet you need 2GB of ram or if you have a 1GB RAM server you need to create a Swap file of 1GB. Detailed instructions on how to do it are provided further on.
Choose the password option here

As soon as your order will be processed, Hetzner will send you an email with your login information along with the static IP of your server.

#3Download PuTTY here http://www.putty.org/, install it then run it. Fill the Host Name field with your server’s IP. Click on the open button to connect and access to the terminal. Use the default port (22). You don’t need to change any option. An error message may appears, ignore it.

Use login details from your VPS provider to access the server and run our script. For this guide, we assume you uploaded it in /usr/bin
#4
sudo ./build.sh
Important: in Linux to copy a text we use buttons Ctrl+Insert and to paste Shift+Insert - [Ctrl+C/V won’t work] please use these buttons from now on. Paste into the terminal window following commands and hit Enter to confirm. Commands are in blue font - copy and paste only these into your terminal window.
Hit enter when prompted then copy paste this exemple configuration file:
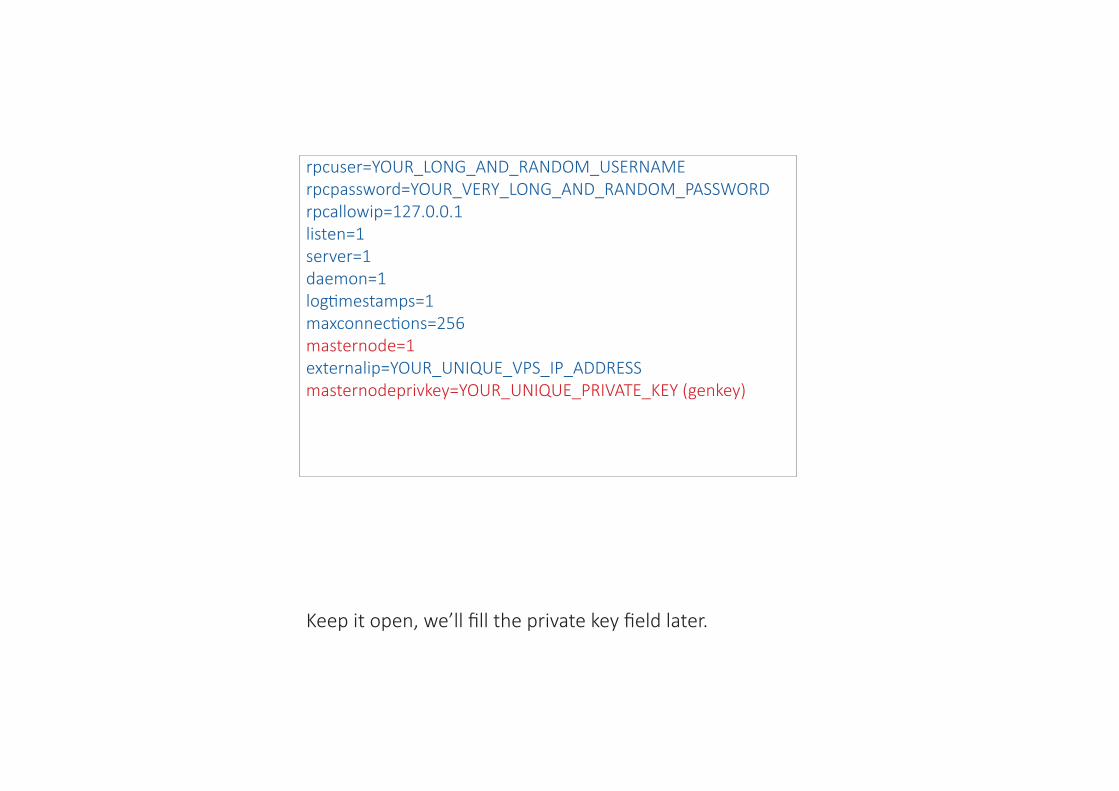
rpcuser=YOUR_LONG_AND_RANDOM_USERNAME rpcpassword=YOUR_VERY_LONG_AND_RANDOM_PASSWORD rpcallowip=127.0.0.1listen=1server=1daemon=1logtimestamps=1maxconnections=256masternode=1 externalip=YOUR_UNIQUE_VPS_IP_ADDRESSmasternodeprivkey=YOUR_UNIQUE_PRIVATE_KEY (genkey)
Keep it open, we’ll fill the private key field later.

#5
Download GoByte Windows wallet from http://gobyte.network/
Create a folder on your windows desktop. Name it GoByte.Copy gobyted-qt.exe, gobyte-cli.exe, gobyted.exe and gobyte-tx.exe in C:\Users\your_username\Desktop\GoByte

Run the control wallet. Use gobyte-qt. It’ll ask for a data directory, use the default settings.Allow connections through windows firewall when prompted.
This wallet will be our control wallet.

Now we will use the coins we have to fill the control wallet and generate the genkey we need.Go to the receive tab, enter MN1 as label and click on request payment.Copy the address.
#6

Go to the send tab, the address you copied, MN1 as label and 1000 GBX.
Click Send.

Go to the debug console and execute the commands: masternode genkey masternode outputs
Copy the private key and outputs in tempMN1.txt
Open notepad and save a temporary .txt file we are going to use for storing the data we will need to configure our masternode. Name it tempMN1.txt

Important! Don’t copy paste everything and format your data into tempMN1.txt file like this:<IP:PORT> <masternode genkey> <masternode output>
In this exemple, your tempMN1.txt file should look like this:

Go to C:\Users\your_username\appdata\Roaming\GoByteCore and open masternode.conf. This file is telling our control wallet how to communicate with our masternode. Copy the content of tempMN1.txt into this configuration file. Then save it and close it.
Add MN1 before <VPS_IP_ADDRESS>:17771 <masternode genkey> <masternode output>Save and close masternode.conf. Close the wallet.
Now we have all the data needed from our control wallet, we need to configure our masternode.

rpcuser=YOUR_LONG_AND_RANDOM_USERNAME rpcpassword=YOUR_VERY_LONG_AND_RANDOM_PASSWORD rpcallowip=127.0.0.1listen=1server=1daemon=1logtimestamps=1maxconnections=256masternode=1 externalip=YOUR_UNIQUE_VPS_IP_ADDRESSmasternodeprivkey=YOUR_UNIQUE_PRIVATE_KEY (genkey)
rpcuser=randomnamerpcpassword=superpasswordrpcallowip=127.0.0.1listen=1server=1daemon=1logtimestamps=1maxconnections=256masternode=1externalip=82.223.18.239masternodeprivkey=8KqvTqddyt3Mn6Nfysstx ...
Exemple:
Go back to PuTTy and simply change the appropriate fields then exit nano (CTRL+X then Y and ENTER):

Your configuration file must look like this.
To add more nodes, just edit the gobyte.conf file.

Now go back on local. We will create our control wallet gobyte.conf for allowing it to talk with our masternode. Go to %appdata%/roaming/GoByteCore
and create a gobyte.conf file. Edit it like this with notepad:
rpcuser=YOUR_LONG_AND_RANDOM_USERNAME rpcpassword=YOUR_VERY_LONG_AND_RANDOM_PASSWORD rpcallowip=127.0.0.1

Your configuration file must look like this.
To add more nodes, just edit the gobyte.conf file.

Close our control wallet then reopen it. Go to the masternode tab and click Start all to start our masternode :)

Enjoy your GBX :)
Notes: If your masternode isn’t reachable, you might need to open your 12455 port on your VPS. Execute the following commands: iptables -t nat -I OUTPUT -d <your_vps_ip> -p tcp --dport 12455 -j REDIRECT --to-ports 12455 cd.. /etc/init.d/iptables restart
and/or start your masternode through the terminal on your VPS with: masternode start-alias <alias name>
To get your default unlabelled wallet address just execute ./gobyte-cli getaccountaddress «»To get a labelled wallet address just execute ./gobyte-cli getaccountaddress <label>To see the list of addresses and their balances just execute ./gobyte-cli listaccountsTo send GBX to another wallet just execute ./gobyte-cli sendtoaddress <address> <amount of GBX>To stop the wallet just execute ./gobyte-cli stop