Mastering Citrix® XenDesktop® - Sample Chapter
63
Free Sample
-
Upload
packt-publishing -
Category
Technology
-
view
62 -
download
1
Transcript of Mastering Citrix® XenDesktop® - Sample Chapter

Free Sample
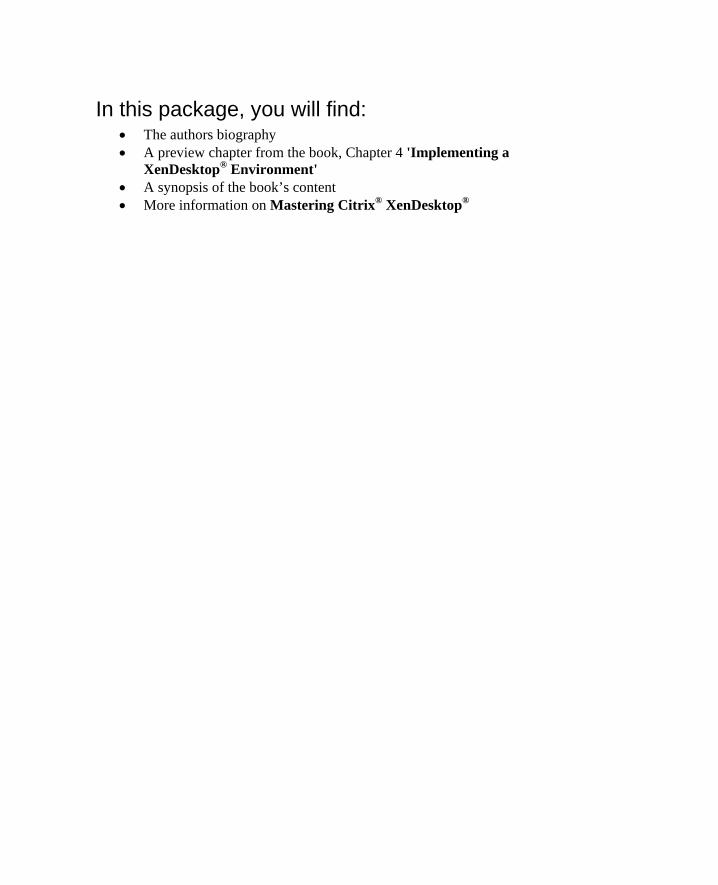
In this package, you will find: • The authors biography • A preview chapter from the book, Chapter 4 'Implementing a
XenDesktop® Environment' • A synopsis of the book’s content • More information on Mastering Citrix® XenDesktop®

About the Author
Govardhan Gunnala is a Technical Architect with knowledge of cross-platform technologies understanding and applying them to complex business requirements. He is a computer science graduate and a Microsoft and Citrix® Certifi ed professional specialized in server, desktop, and application virtualization technologies. He is a skilled IT network security analyst and is highly regarded for sophisticated automation using Perl and PowerShell scripting. He has designed and delivered various cloud software solutions based on web, Citrix®, and VMware technologies. He is also responsible for data center architecture and network security administration. He earlier worked as a senior systems engineer and member of IT systems at a global investment and technology development fi rm. He is also a technical blogger, corporate and institutional trainer with more than 9 years of experience in the IT software industry.
You can follow his blog at http://gunnalag.com/.
Daniele Tosatto is a Windows Infrastructure Architect specialized in Citrix® and Microsoft technologies with 15 years of experience. He is a Microsoft Certifi ed Solutions Expert, Microsoft Solutions Associate, and Citrix® Certifi ed Administrator. He has been working with Microsoft products since 2000 as a systems administrator. He currently works as a project manager for the Italian Citrix® Platinum Partner in medium to large Citrix® and virtualization projects.

Preface
PrefaceThe adoption of Cloud computing and the maturity of server virtualization have led many enterprises to consider transforming their traditional desktop infrastructures from physical to virtual. Desktop virtualization has become one of the new top priorities for IT. Many organizations are now approaching or evaluating desktop virtualization solutions. Having virtual desktops centrally maintained in your data center using desktop virtualization, your users can gain Cloud computing capabilities, such as freedom to work from anywhere and from any device at any time. This increases user productivity and overall IT operational effi ciency, while reducing the total cost of ownership of the desktop infrastructure.
Citrix® XenDesktop® is the industry leader in Virtual Desktop Infrastructure (VDI) solutions to implement a scalable and high-performance virtual desktop environment. Citrix® XenDesktop® delivers end-user experience that rivals traditional physical desktop environments, while supporting most of its features, such as audio/video conferencing, media streaming, and high-end 3D graphics rendering. Whether you are new to desktop virtualization or an IT professional with expertise, as you work through this book, you will quickly learn the technical skills you need to successfully design, set up, and maintain a XenDesktop® environment, meeting the emerging requirements for your organization and your business.
Mastering XenDesktop® gives you a practical approach to achieve the advanced desktop virtualization requirements using XenDesktop®. The detailed use case analysis, step-by-step instructions that are supplemented with screenshots makes it easier to understand and implement the discussed solution in real time. You'll notice that this book also covers the other Citrix® (such as NetScaler) and non-Citrix® technologies (such as Amazon Cloud, NVidia GRID, and so on) to the extent they are relevant to the use case with XenDesktop®. You will be able to master both the basic functions and the advanced features and confi gurations of XenDesktop®. You will also gain the strong technical skills needed to start-off or resume desktop virtualization projects using XenDesktop® technology. As always, you should validate the advanced confi gurations discussed in the book in a test lab, since they involve multiple technologies.

Preface
What this book coversChapter 1, Evolution and Core Strengths of XenDesktop®, walks you through the evolution of XenDesktop® from the start to its current latest version. It also introduces the core strengths and future roadmap of XenDesktop®, which help you understand why you need to choose XenDesktop® for your desktop virtualization.
Chapter 2, Understanding the XenDesktop® Architecture in Detail, introduces the core and additional components of XenDesktop® in detail. It explains the XenDesktop® architecture (FMA) and features in great depth. This basic knowledge gives you a strong foundation to easily understand the advanced confi gurations discussed in the later chapters.
Chapter 3, Designing XenDesktop® for Complex Environments, describes the process of designing XenDesktop® using a layered approach and Citrix® design tools. It exclusively covers how to design XenDesktop® for highly available and scalable enterprise environments. It also discusses how to design and deploy XenDesktop® for complex environments, including multisite XenDesktop® environments, using application orchestration for multi-forest Active Directory environments, and deploying XenDesktop® in private, public, and AWS hybrid Cloud environments.
Chapter 4, Implementing a XenDesktop® Environment, gives you practical knowledge through a step-by-step presentation of implementing the XenDesktop® environment. You'll learn how to install XenDesktop® core components, confi gure them, and verify the XenDesktop® site and its setup. This basic knowledge helps you quickly start your XenDesktop® deployments.
Chapter 5, Delivering Virtual Desktops and Optimizing XenDesktop®, provides you with advanced skills on how to confi gure additional instances of XenDesktop® core components to build highly available environments. It covers how to confi gure VDA, machine catalogs, and delivery group entities to deliver virtual desktops. It also explains how to optimize XenDesktop® for performance, through Citrix® policies at server side and VDA performance optimizations at client side.
Chapter 6, Confi guring XenDesktop® for Advanced Use Cases, exclusively covers how to confi gure XenDesktop® for a unique compilation of advanced use cases by enterprises and businesses. You'll master how to confi gure XenDesktop® for these advanced use cases, which include high-end 3D applications, streaming media applications, web fi ltering, and so on. It also covers advanced fi ne-tuning and customization of XenDesktop® capabilities, including virtual display, Local App Access integration, and seamless and in-browser session interfaces. This unique content would be highly useful for Desktop-as-a-Service (DaaS) providers.

Preface
Chapter 7, Networking for XenDesktop®, describes the various layers of networking required for the successful functioning of your deployment and connectivity of sessions from users in detail. It explains the sequence of steps that occur during a user connection with a virtual desktop from an external access in detail. It makes you aware of all the required networking concepts and their confi guration, to the extent that they are relevant to the scope of XenDesktop® networking. This knowledge effectively helps you understand, plan, and implement the networking for your deployment.
Chapter 8, Monitoring and Troubleshooting XenDesktop®, focuses on the usage and features of Citrix®-provided tools for the effective monitoring and troubleshooting of XenDesktop® environments. You'll gain deep understanding of the functionality and usage of Citrix® Director and EdgeSight®, Citrix® Studio, and Citrix® Insight Services using Citrix® Scout to effectively monitor and troubleshoot XenDesktop® environments. It also covers the various advanced Citrix® tools available for troubleshooting to effi ciently handle real-time issues.
Chapter 9, XenDesktop® PowerShell SDK for Automation, introduces the PowerShell SDK provided by Citrix® for automating XenDesktop® tasks and operations. It covers the detailed usage and functioning of commonly-used SDK command-lets and how to author your own PowerShell scripts for automation. This knowledge empowers you with the most sought-after skill of automating XenDesktop® tasks using the PowerShell SDK.
Chapter 10, XenDesktop® and App-V Integration, focuses on implementing and integrating Microsoft App-V technology-based application delivery with XenDesktop®. It discusses how you can quickly learn to deliver App-V-based applications with an easy-to-follow practical approach. It also covers all the prerequisite confi guration steps needed for you to start off.
Chapter 11, XenDesktop® Licensing, discusses the Citrix® licensing for XenDesktop®, including the license types, and the editions of licenses available for Citrix® XenDesktop®. It provides you with a deep understanding of the process of license discovery and allocation.

[ 123 ]
Implementing a XenDesktop® Environment
In the last chapter, we discussed the XenDesktop design and the XenDesktop infrastructure components.
Now it is time to start the setup of our fi rst XenDesktop environment. At the end of this chapter, you will be able to install and confi gure a basic infrastructure, and this will give you the ability to deliver applications and desktops to your users.
In this chapter, we will cover the following topics:
• Installing of the main components of XenDesktop• Configuring and verifying the XenDesktop setup• XenDesktop site database concepts and configuration
Installing of XenDesktop®'s main componentsAs we saw in the previous chapter, a XenDesktop infrastructure includes many components, and some of them are essential for successfully installing XenDesktop.
In this chapter, we will install and confi gure the essential elements of XenDesktop, such as:
• Citrix Licensing• Citrix Delivery Controller• Citrix Studio
Implementing a XenDesktop® Environment
[ 124 ]
• Citrix Director• Citrix Storefront
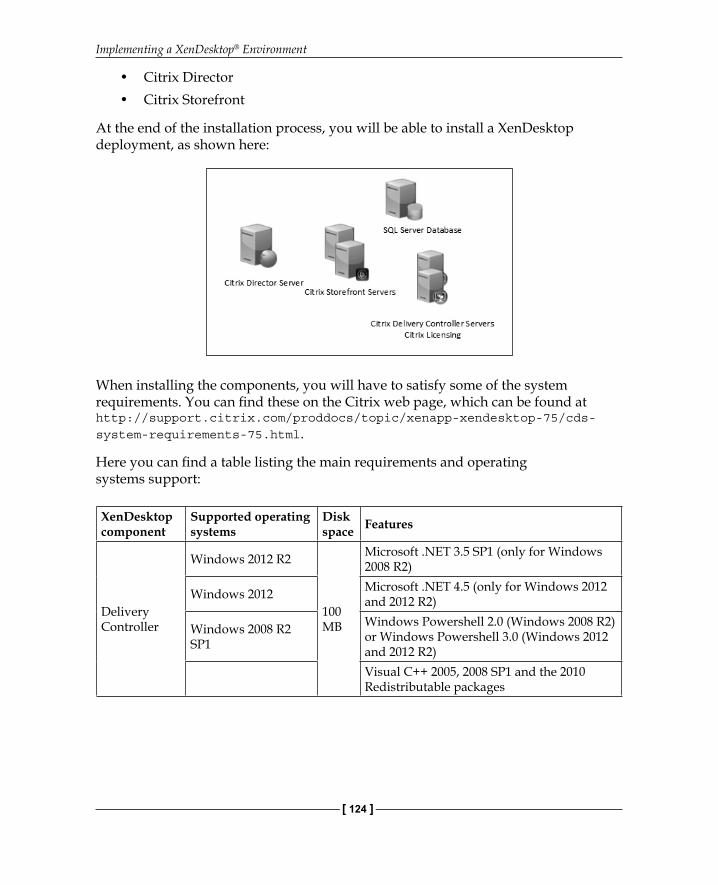
At the end of the installation process, you will be able to install a XenDesktop deployment, as shown here:
When installing the components, you will have to satisfy some of the system requirements. You can fi nd these on the Citrix web page, which can be found at http://support.citrix.com/proddocs/topic/xenapp-xendesktop-75/cds-system-requirements-75.html.
Here you can fi nd a table listing the main requirements and operating systems support:
XenDesktop component
Supported operating systems
Disk space Features
Delivery Controller
Windows 2012 R2
100 MB
Microsoft .NET 3.5 SP1 (only for Windows 2008 R2)
Windows 2012 Microsoft .NET 4.5 (only for Windows 2012 and 2012 R2)
Windows 2008 R2 SP1
Windows Powershell 2.0 (Windows 2008 R2) or Windows Powershell 3.0 (Windows 2012 and 2012 R2)Visual C++ 2005, 2008 SP1 and the 2010 Redistributable packages

Chapter 4
[ 125 ]
XenDesktop component
Supported operating systems
Disk space Features
Studio
Windows 2012 R2
75 MB
Microsoft .NET 3.5 SP1 (only for Windows 2008 R2 and Windows 7)
Windows 2012 Microsoft .NET 4.5 (only for Windows 2012, 2012 R2 and Windows 8.x)
Windows 2008 R2 SP1
Windows Powershell 2.0 (Windows 2008 R2) or Windows Powershell 3.0 (Windows 2012 and 2012 R2)
Windows 8.xWindows 7
Director
Windows 2012 R250 MB
Microsoft .NET 4.5Windows 2012 Microsoft IIS 7.0 and ASP.NET 2.0Windows 2008 R2 SP1
StoreFront Windows 2012 R2 Microsoft .NET 3.5 SP1 (only for Windows 2008 R2)
Windows 2012 Microsoft .NET 4.5 (only for Windows 2012, 2012 R2)
Windows 2008 R2 SP1 Microsoft IIS 7.0 and ASP.NET 2.0
Database
SQL Server 2012 SP1, Express, Standard and Enterprise EditionsSQL Server 2008 R2 SP2, Express, Standard, Enterprise and Datacenter Editions
As you can see, the table doesn't list any information about processor and memory requirements. Citrix doesn't provide any guidelines about this, but it does recommend a minimum allocation of 3 GB of memory if all the components are to be installed on a single server.
Based on my working experience and the XenDesktop implementations, allocating two processors and 4 GB of memory for each system hosting infrastructure component is suffi cient for obtaining a good performance.
In any case, suffi cient resources should be assigned to the infrastructure's server in order to avoid bottlenecks.
Implementing a XenDesktop® Environment
[ 126 ]
The database server sizing is quite different. We will discuss it later.
When you install the XenDesktop components, make sure to also consider the infrastructure that you have to implement and the business requirements you have to satisfy.
For example, if you plan to serve very few users, or a laboratory for testing, you can choose to install all the components on a single server.
On the contrary, if you have to provide access to virtual desktops or applications to many users, you should consider splitting the components across different systems.
Now we can begin the installation of each component.
Installing Citrix® LicensingThe Citrix Licensing component is used for managing the Citrix licenses. This component is required for many Citrix products.
Citrix Licensing is available as a Windows installer and a virtual appliance (format .xva), and you can import these into a Citrix XenServer host.
If you decide to use the virtual appliance, note that XenServer 6.1 and 6.2 are the only supported platforms.
The installer is available on the XenDesktop ISO, or on the Citrix website at http://www.citrix.com/downloads/licensing.html.
You need a MyCitrix account for downloading either the installer or the appliance. You can create an account for free.
At the time of writing this chapter, the release 11.12.1 was available for downloading from the Citrix website.
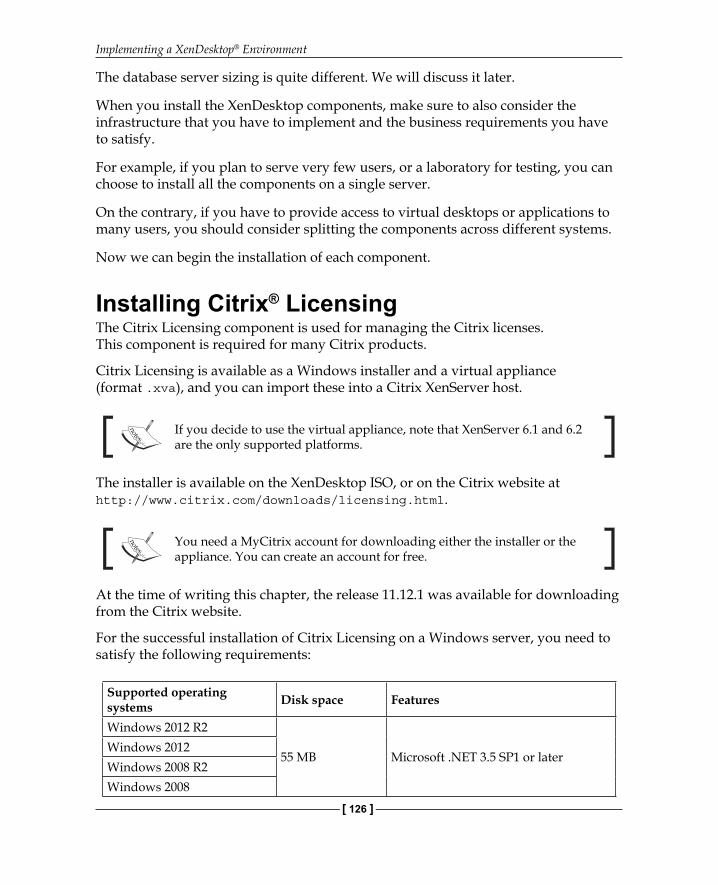
For the successful installation of Citrix Licensing on a Windows server, you need to satisfy the following requirements:
Supported operating systems Disk space Features
Windows 2012 R2
55 MB Microsoft .NET 3.5 SP1 or laterWindows 2012Windows 2008 R2Windows 2008

Chapter 4
[ 127 ]
Updated information about the system requirements are available athttp://docs.citrix.com/en-us/licensing/11-12-1/lic-licensing-prerequisites.html.
Citrix Licensing is a light workload, so you don't need to install or confi gure a dedicated server for a medium sized environment. You can also manage the different Citrix products (for example, Citrix XenDesktop, XenApp, provisioning services, and so on) with the same unique license server.
If you plan to manage many Citrix XenDesktop environments alongside thousands of users/licenses, you should install a dedicated machine with one processor and 2 GB memory.
You could be thinking that installing a single license server could be a single point of failure, but you should remember that if the license server is unavailable, then Citrix XenDesktop (and other products) will continue to work for 30 days (grace period). So, it is not vital to provide high availability for this component.
If you have to provide high availability for the Citrix Licensing component, note that the Citrix license server installation is also supported by a cluster environment.
You can fi nd more information regarding this at http://support.citrix.com/proddocs/topic/licensing-11121/lic-cl-citrix-environment-c.html.
We can now approach the Citrix Licensing installation.
We will install the latest version of the component on the server named XD-CtxDC, which is based on Windows 2012 R2. It will also act as a delivery controller for the XenDesktop environment.
Citrix recommends using the latest version of Citrix Licensing, especially if you are upgrading or installing new versions of the products.

Implementing a XenDesktop® Environment
[ 128 ]
The installation process will execute the CTX_Licensing installer, as shown here:
The process is very easy. Begin by accepting the license agreement and then select the installation folder. When you are ready, click on the Install button.

Chapter 4
[ 129 ]
The setup will complete the installation of Citrix Licensing. To exit the installation wizard, click on the Finish button.

Implementing a XenDesktop® Environment
[ 130 ]
At the end of the installation process, the confi guration page will be displayed.
By default, Citrix Licensing uses the TCP port numbers 27000, 7279, 8082, and 8083 for communicating with other Citrix products.
The confi guration wizard will require you to confi rm or change the aforementioned TCP ports.
If the Windows fi rewall has been enabled on the machine, where you are installing Citrix Licensing, the installer will create the necessary fi rewall exceptions.
If you plan to install Citrix Licensing and the other XenDesktop components on different networks and a fi rewall appliance has been confi gured, create the rules for the Citrix Licensing communication.It is recommended to only change the default ports if necessary.

Chapter 4
[ 131 ]
Furthermore, the user performing the installation will be confi gured as the default administrator. In this example, it is XD-CTXDC\Administrator.
You will be able to add more administrators by using the License Administration Console.
When you are satisfi ed with the confi guration, click on the Confi gure button.
The wizard will apply your desired confi guration, and it will also give you an option between License Administration Console and the Simple License Service, as shown in the following screenshot:
Simple License Service is a tool which enables the installation of license fi les on a license server with the help of a web browser.
We have installed the fi rst component of the XenDesktop infrastructure.

Implementing a XenDesktop® Environment
[ 132 ]
Remember that you need to install the Citrix license fi les for XenDesktop to work. We will discover how to install them in Chapter 11, XenDesktop® Licensing.
Understanding the site databaseIn the previous section, we discussed the Citrix Licensing installation.
Before we go any further, it is important to have a look at the site database. This plays a key role in a XenDesktop environment.
Earlier in this chapter, we discovered that XenDesktop supports different editions of the Microsoft SQL Server.
The installer for the SQL Server 2012 Express edition has been included in the ISO image of XenDesktop, and if you don't have database server in your company, you can install it on the same machine while the fi rst delivery controller is created.
Installing SQL Express is a good choice for installing a testing environment and for providing virtual desktops to a few non-critical users.
For medium and large deployments, it is better to install the site database on a dedicated database server.
A database server with two processors and 4 GB memory will support an environment of up to 5000 users.
When deciding the size of your database server for the XenDesktop environment, also consider the future growth of the deployment. It is better to allocate more hardware resources so as to ensure the expected performance and stability.
Because the database contains all the data of the XenDesktop deployment, the database server could be a single point of failure.
If the site database fails, or if it is not available, then you cannot manage your XenDesktop environment, the users will not be able to start new ICA sessions, and existing connections to the virtual desktops will continue to function until a user either logs off or disconnects.

Chapter 4
[ 133 ]
If you need to provide high availability for your environment, then you should confi gure your site database with the help of any one of the following SQL Server features:
• SQL clustering• SQL mirroring• AlwaysOn Availability groups
Standard Edition is recommended for hosting a site database that is in the production environment. You can either create a 2-nodes SQL cluster or use the SQL Mirroring/AlwaysOn Availability group for protecting the Citrix database.SQL Express doesn't support any of the high availability features.You can fi nd more about the SQL high-availability solutions at https://msdn.microsoft.com/en-us/library/ms190202(v=sql.110).aspx.
Typically, the size of the site database is small and it is based on a number of virtual desktop agents and active sessions in the environment. The size can reach up to 400 MB in very large deployments, which have thousands of users.
The following two databases are used by XenDesktop and are created during the setup.
• The monitoring database: This contains all the monitoring information about the deployment
• The configuration logging database: This records all the administrative changes that are performed on the XenDesktop site
For more information about database sizing, refer to the XenDesktop 7.x Database Sizing document, which can be found at http://support.citrix.com/article/CTX139508.
Typically, the site database is created during XenDesktop site creation. You need the dbcreator and the securityadmin server rights in order to complete this task.
If your account does not have the required SQL server permissions for creating the site database, you can generate some scripts for the manual database creation and ask your database administrator to use them when creating the needed databases for the XenDesktop environment.
We will learn how to use these scripts later in this chapter.

Implementing a XenDesktop® Environment
[ 134 ]
You need the Latin1_General_100_CI_AS_KS collation when creating the database.
Installing the Delivery ControllerAfter we have installed the Citrix Licensing, we can start the installation of the fi rst server acting as the delivery controller of the XenDesktop site.
In this example, we will confi gure XenDesktop as a typical environment for a medium sized enterprise. Here, each component will be distributed across the different servers.
We will start the installation process by using the ISO image of XenDesktop on the server named XD-CtxDC. This server is based on Windows 2012 R2.
You can download the XenDesktop ISO image from http://www.citrix.com/downloads/xendesktop/product-software.html.
1. Click on the Delivery Controller area for starting the installation wizard, as shown here:

Chapter 4
[ 135 ]
2. Accept the license agreement, and then click on the Next button to continue, as shown in the following fi gure:
3. We will install the Delivery Controller and Studio components. Director and Storefront will be installed on different machines.
You can also install Citrix Studio on your Windows client machine.It is the best practice, especially for large deployments that have more Citrix administrators, to configure one or more XenDesktop management machines to avoid performance impact on the servers that act as Delivery Controllers.

Implementing a XenDesktop® Environment
[ 136 ]
By default, C:\Program Files\Citrix folder would have been used as the location. If you want, you can change the installation directory.
4. Click on the Next button to continue. The wizard tells you to install the Microsoft SQL Server Express on the server. We will deselect the checkbox because we want to use a different machine as the database server.

Chapter 4
[ 137 ]
5. Click on the Next button to continue.6. The wizard will ask you how to confi gure the Windows fi rewall. You can
either leave the default selection, which will be Automatically, or select the other option, which will be Manually.

Implementing a XenDesktop® Environment
[ 138 ]
If you have a firewall appliance on your network, remember to check that the TCP ports 80 and 443 have been opened.

Chapter 4
[ 139 ]
7. Click on the Next button to continue.

Implementing a XenDesktop® Environment
[ 140 ]
The wizard will show you a summary of the configuration that you have selected for reviewing. When you are satisfied with the selections, you can click on the Install button to start the installation process.
At the end, you will receive a summary reporting that the installation has finished successfully. This summary will also report any errors or give warnings regarding any errors that might have occurred during the setup.By default, the Launch Studio checkbox would have been selected. In this example, it has been deselected.
8. To close the wizard, click on the Finish button.
Later in this chapter, we will discover how to install a second Delivery Controller for providing high availability.

Chapter 4
[ 141 ]
Creating the XenDesktop® siteAfter the installation of the Delivery Controller and Citrix Studio, we will be ready for creating the XenDesktop site that will be providing virtual desktops and applications to users.
We will start the creation process by launching Citrix Studio, which is on the Start menu, on the XD-CtxDC server:
1. To create the site, click on the Deliver applications and desktops to your users option on the Studio console.
Implementing a XenDesktop® Environment
[ 142 ]
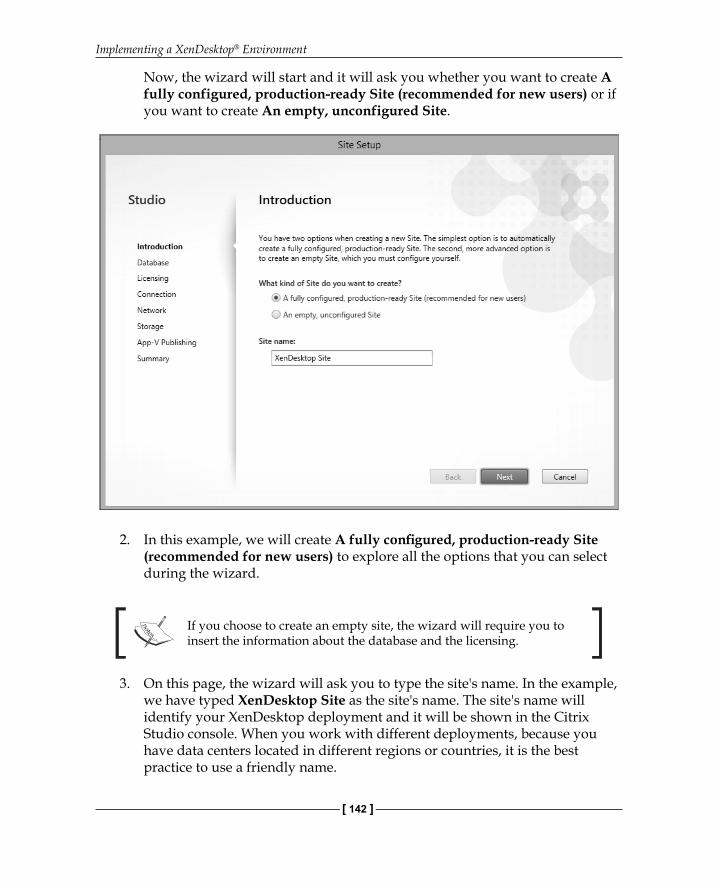
Now, the wizard will start and it will ask you whether you want to create A fully configured, production-ready Site (recommended for new users) or if you want to create An empty, unconfigured Site.
2. In this example, we will create A fully confi gured, production-ready Site (recommended for new users) to explore all the options that you can select during the wizard.
If you choose to create an empty site, the wizard will require you to insert the information about the database and the licensing.
3. On this page, the wizard will ask you to type the site's name. In the example, we have typed XenDesktop Site as the site's name. The site's name will identify your XenDesktop deployment and it will be shown in the Citrix Studio console. When you work with different deployments, because you have data centers located in different regions or countries, it is the best practice to use a friendly name.
Chapter 4
[ 143 ]
When you are ready, click on the Next button to continue.
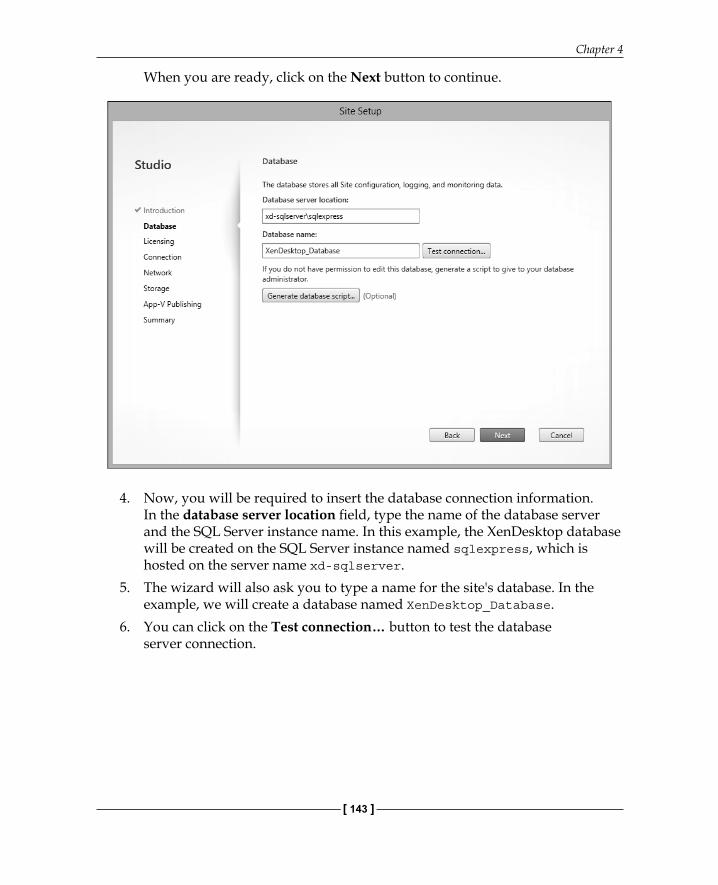
4. Now, you will be required to insert the database connection information.In the database server location fi eld, type the name of the database server and the SQL Server instance name. In this example, the XenDesktop database will be created on the SQL Server instance named sqlexpress, which is hosted on the server name xd-sqlserver.
5. The wizard will also ask you to type a name for the site's database. In the example, we will create a database named XenDesktop_Database.
6. You can click on the Test connection… button to test the database server connection.

Implementing a XenDesktop® Environment
[ 144 ]
7. If the database that you have specifi ed is not accessible, you will receive the following information:
8. If your user does not have suffi cient privileges for accessing the database's server, or for creating the database, you will have to ask a database administrator to perform the task, as shown here:
You can click on the Generate database script button for creating the two SQL files named Script_For_Database_SQL-Server_Database-Name and Script_For_Mirror_Database_SQL-Server_Database-Name, where SQL-Server is the name of the database server and Database-Name is the name of the database that you have to create. Note that the second script will only be used if you have to create a mirrored database.
You can find more information about the SQL roles and permissions that are required for creating a site on the addresses http://support.citrix.com/article/CTX132269 and http://support.citrix.com/article/CTX127998.You can also find more about how to create a mirrored database on the web address http://support.citrix.com/proddocs/topic/xenapp-xendesktop-75/cds-plan-high-avail-rho.html.

Chapter 4
[ 145 ]
9. When you are ready, click on the Next button to continue.10. Later, the wizard will require you to confi gure the Licensing, as shown in the
following screenshot:
11. You will have to provide the name of the license server and then select the existing license you want to use.
If the Citrix licensing has been installed on the same server, it is automatically discovered, and localhost will be inserted in the field License server address
If no licenses are discovered, you can continue configuring the XenDesktop site and use the free 30-day trial
12. Click on the Next button to continue.

Implementing a XenDesktop® Environment
[ 146 ]
13. Now, the wizard will require you to create a connection to a Cloud environment or a virtualization environment, such as Citrix XenServer, VMware Vsphere, or Amazon EC2 cloud.
XenDesktop 7.5 supports the following virtual hypervisor and Cloud environments:
• Citrix XenServer 6.02, 6.1 or 6.2• Vmware Vsphere 5.0 Update 2, 5.5 Update 2 or 5.5• Microsoft System Center Virtual Machine Manager 2012, 2012 SP1 or 2012 R2• Amazon Web Services• Citrix CloudPlatform 4.2.1 with hotfixes 4.2.1-4
According to your selection, you have to provide some information for creating the connection.

Chapter 4
[ 147 ]
For example, if you select Citrix XenServer, VMware vSphere or Microsoft Virtual Machine Manager, you will have to type the following:
• Connection address: This is the address that XenDesktop will use to connect to your virtual infrastructure. For XenServer and VMware, you will have to use HTTP (or HTTPS for secure communications).
• Username: This is the name of the user that you will use for connecting to the virtual infrastructure.
• Connection name: This is the name that you want to use for identifying the connection in Citrix Studio.
Use a friendly name for naming the connection. This will help you to identify them quickly.
If you select the Cloud environment option on the Connection Type, you will have to provide the API and secret key to complete the connection wizard successfully.
Visit the following web addresses to learn more about the requirements for creating connections to virtual environments:Citrix Xenserver: http://support.citrix.com/proddocs/topic/xenapp-xendesktop-75/cds-install-create-site.html
VMware vSphere: http://support.citrix.com/proddocs/topic/xenapp-xendesktop-76/xad-install-prep-host-vmware.html
Microsoft System Center Virtual Machine Manager: http://support.citrix.com/proddocs/topic/xenapp-xendesktop-76/xad-install-prep-host-msscvmm.html
Furthermore, you are required to select if you want to use Machine Creation Services or any other tools for creating machines in the virtualization environment.
Machine Creation Services are based on a master image, which is present within your environment. This option will offer the possibility of delivering virtual machines (desktop or server), managing and updating the target devices through a master image.

Implementing a XenDesktop® Environment
[ 148 ]
In the example shown here, we will create a connection with a Citrix XenServer host.
1. Click on the Next button to continue.
If you are creating a connection with Microsoft System Center Virtual Machine Manager, then install the Virtual Machine Manager console on the Delivery Controller.Citrix Studio could generate a fatal error when creating a connection to Virtual Machine Manager.If you experience the error shown here, check the registry value. HKLM\Software\Microsoft\Microsoft System Center Virtual Machine Manager Administrator Console\Settings\IndigoTcpPort
The value has to be REG_DWORD with 1FA4 (which is the hexadecimal of 8100).Export the registry key before changing it for backup.

Chapter 4
[ 149 ]
2. Now, the wizard will ask you to type a name for identifying the resources and for selecting a virtual network for virtual machines. These network resources have been discovered by the wizard by using the connection we have already created.Now, click on the Next button to continue.
Implementing a XenDesktop® Environment
[ 150 ]
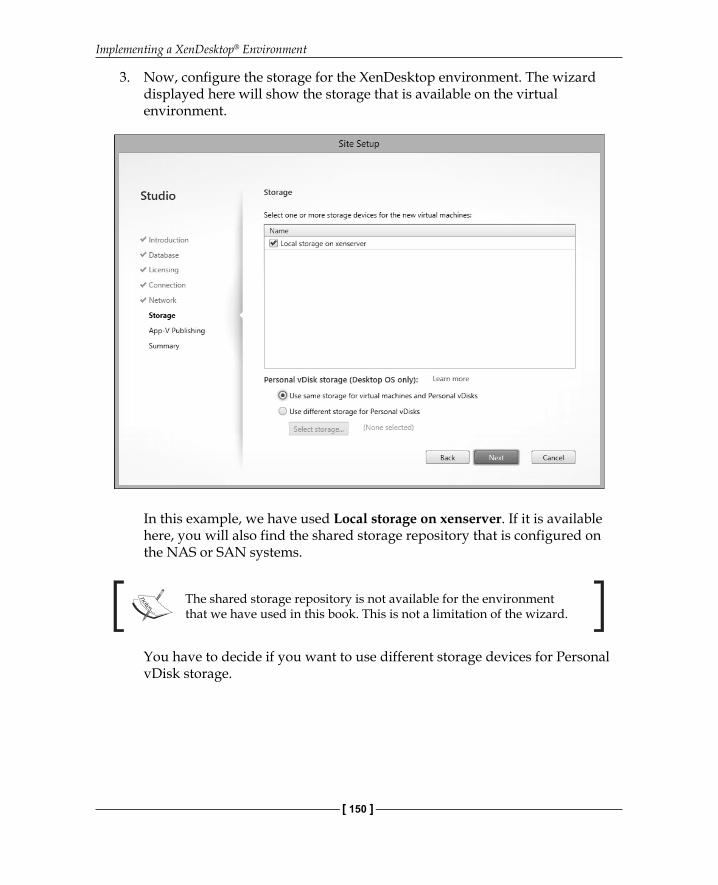
3. Now, confi gure the storage for the XenDesktop environment. The wizard displayed here will show the storage that is available on the virtual environment.
In this example, we have used Local storage on xenserver. If it is available here, you will also find the shared storage repository that is configured on the NAS or SAN systems.
The shared storage repository is not available for the environment that we have used in this book. This is not a limitation of the wizard.
You have to decide if you want to use different storage devices for Personal vDisk storage.

Chapter 4
[ 151 ]
The Personal vDisk feature was introduced by Citrix in XenDesktop version 5.6. The administrators can manage the base virtual machines, while providing the users with a customized and personalized desktop experience. The users do not lose their customizations and personal applications when the Citrix administrators change or update the base image.In the example shown here, we will not change the default selection, which is Use same storage for virtual machines and Personal vDisks.If you select a different storage, you will be required to select it. To do this, click on the Select storage button and then choose an available storage. When you are ready, click on the OK button to close the box, as shown in the following screenshot:
4. Now, click on the Next button to continue.5. The wizard will prompt you to select if you want to add an App-V
publishing server.

Implementing a XenDesktop® Environment
[ 152 ]
App-V is an application virtualization and streaming solution provided by Microsoft. You will learn more about App-V in Chapter 10, XenDesktop® and App-V Integration.
In this example, we have decided not to add an App-V publishing server.
6. Next, click on the Next button to continue. The wizard will display the summary page. Here, you can review the decisions that were made regarding the environment.
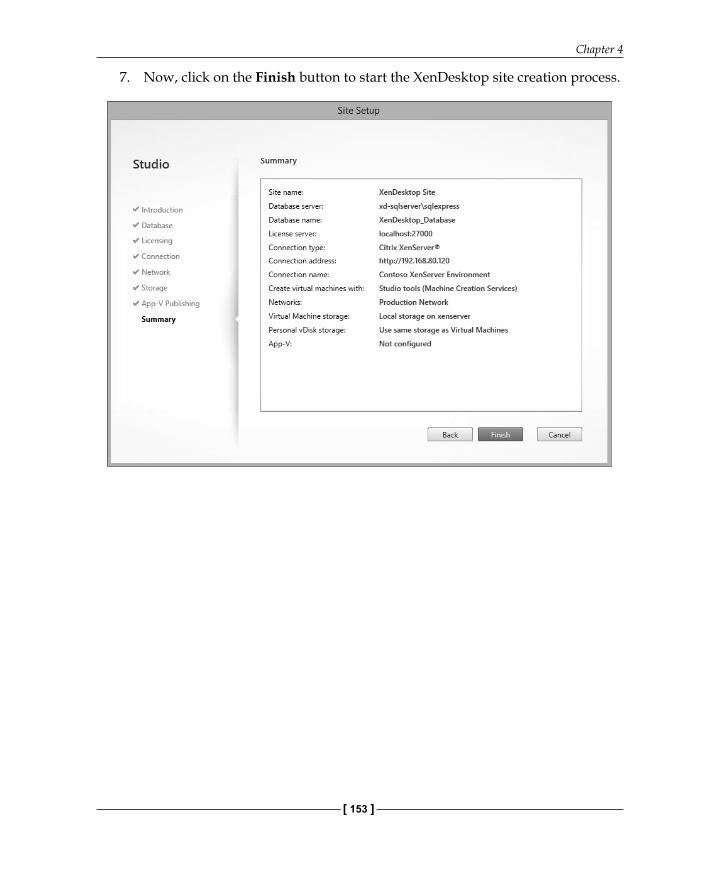
Chapter 4
[ 153 ]
7. Now, click on the Finish button to start the XenDesktop site creation process.
Implementing a XenDesktop® Environment
[ 154 ]
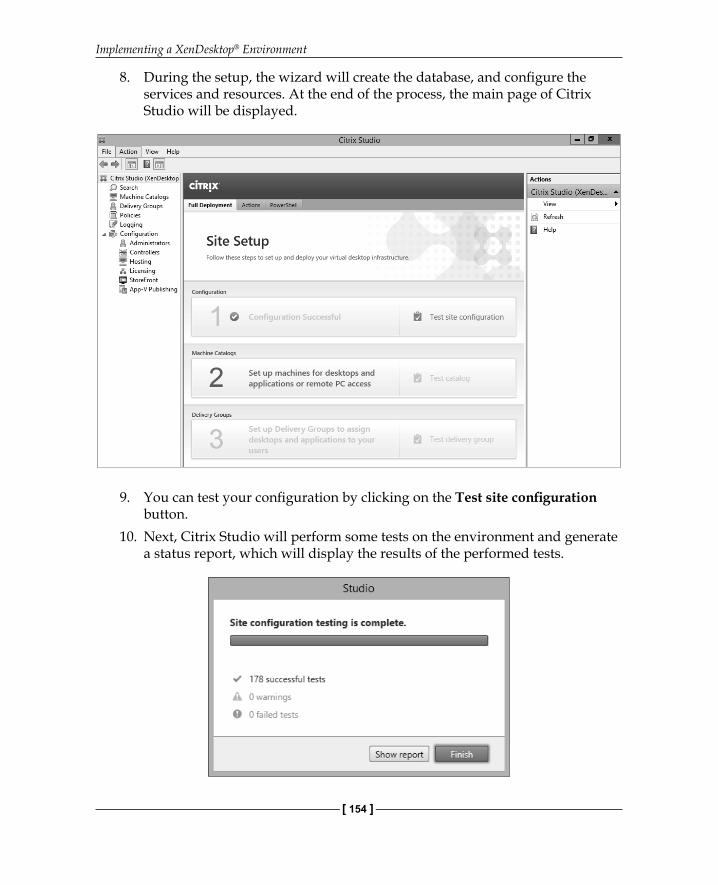
8. During the setup, the wizard will create the database, and confi gure the services and resources. At the end of the process, the main page of Citrix Studio will be displayed.
9. You can test your confi guration by clicking on the Test site confi guration button.
10. Next, Citrix Studio will perform some tests on the environment and generate a status report, which will display the results of the performed tests.

Chapter 4
[ 155 ]
Installing Citrix® DirectorIn the previous sections, we installed Citrix Licensing, Citrix Delivery Controller, and Citrix Studio. We also confi gured a basic XenDesktop site. In this section, we will discover another component of a XenDesktop environment, Citrix Director.
Director is a web management portal, that provides an overview of the virtual desktops, applications, and users' sessions.
You will also use it for performing maintenance tasks, such as remotely assisting a user, disconnecting a user, killing processes, monitoring deployment, and troubleshooting any system issues.
The following Internet browsers are supported for viewing the Citrix Director:
• Internet Explorer 9, 10, or 11• Firefox ESR• Chrome
At the beginning of the chapter, we identifi ed the system requirements for installing the Citrix Director.
In a production environment, you should install this component on a dedicated machine because Director is a processor and memory intensive application, especially when you have many administrators working on it at the same time.
The server hosting Director should be confi gured with four processors and a minimum of 4 GB memory.
In my deployments, I always confi gure the Director machine with 8 GB memory.
Citrix Director requires Microsoft Internet Information Services. This role gets automatically installed during the setup.
When installing Citrix Director, you must visit http://support.citrix.com/article/CTX139382 in order to understand the best practice.

Implementing a XenDesktop® Environment
[ 156 ]
Now, we will install Director on the server named XD-CtxDir, which is based on Windows 2012 R2 by using the installer included in the XenDesktop ISO image.
1. You can begin the installation process by clicking on Citrix Director in the Extend Deployment section.

Chapter 4
[ 157 ]
2. Accept the license agreement, and then click on the Next button to continue.

Implementing a XenDesktop® Environment
[ 158 ]
3. The wizard will display the component that is going to be installed and will then provide the option of changing the installation directory. By default, the C:\Program Files\Citrix folder will be used as the location by the wizard.
4. Now, click on the Next button to continue.5. The wizard will ask you to enter the address (by using Fully Qualifi ed
Domain Name) of an existing Delivery Controller.Here, we will insert the name of the first Delivery Controller that we created, which would be XD-CTXDC.contoso.local.

Chapter 4
[ 159 ]
If you want to provide high availability, add two or more Delivery Controllers. If you have configured two or more Citrix Delivery Controllers in your deployment, you should know that they auto balance themselves.
6. After you enter the name, click on the Add button to confi rm. The Microsoft Active Directory domain hosting the XenDesktop environment is named Contoso.local.

Implementing a XenDesktop® Environment
[ 160 ]
You can also click on the Test Connection button to verify that the Delivery Controller which you have added is reachable.
7. Now, you can click on the Next button to continue.8. In the Features screen, the wizard will require you to choose to either enable
or disable Windows Remote Assistance. This option is enabled by default.
Chapter 4
[ 161 ]
The help-desk staff uses Windows Remote Assistance for shadowing and helping connected users.
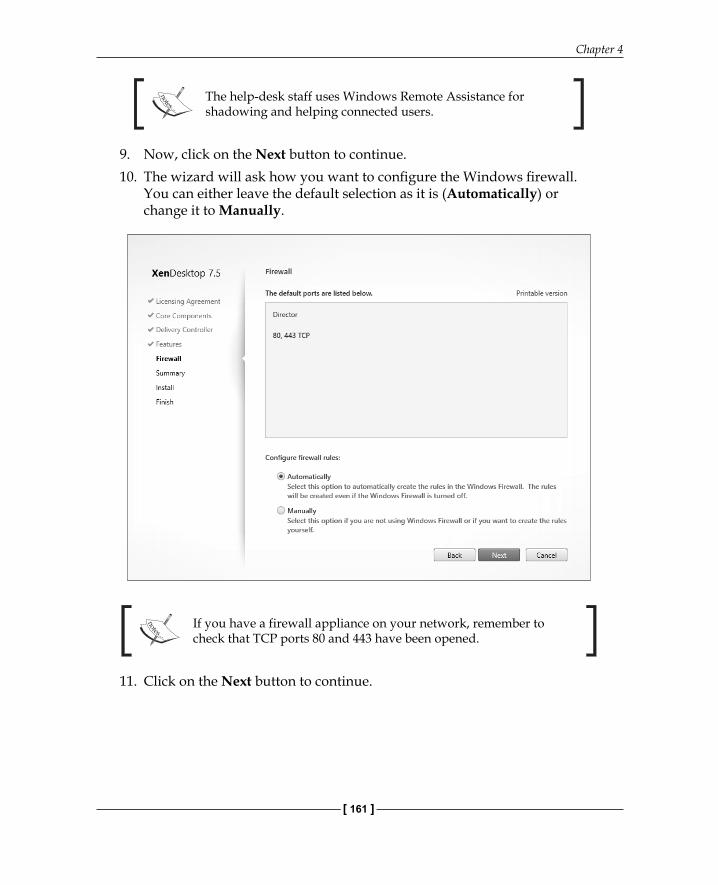
9. Now, click on the Next button to continue.10. The wizard will ask how you want to confi gure the Windows fi rewall.
You can either leave the default selection as it is (Automatically) or change it to Manually.
If you have a firewall appliance on your network, remember to check that TCP ports 80 and 443 have been opened.
11. Click on the Next button to continue.

Implementing a XenDesktop® Environment
[ 162 ]
12. The wizard will display the Summary page. Review it, and then click on the Install button to start the installation process.
13. At the end of the installation process, you will receive a status report. After receiving it, you can launch the Citrix Director.

Chapter 4
[ 163 ]
You can open Director either from the Start menu or from the web address http://server_name/Director, where the server_name is the name of your Director's server.

Implementing a XenDesktop® Environment
[ 164 ]
In the screenshot shown here, you can see the main page of Citrix Director:
When you try to login to Citrix Director, you might experience the following error:
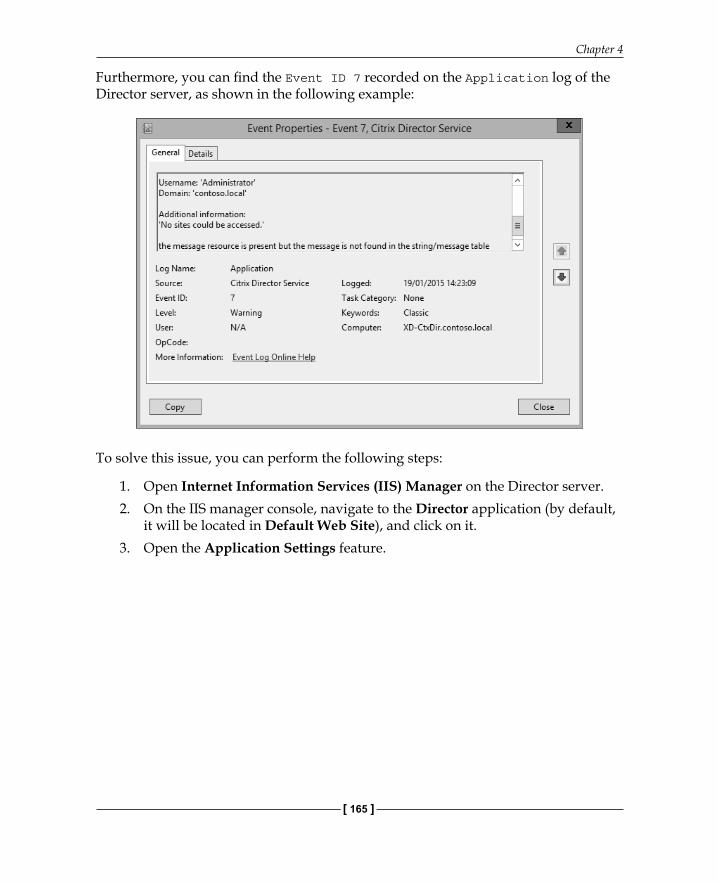
Chapter 4
[ 165 ]
Furthermore, you can fi nd the Event ID 7 recorded on the Application log of the Director server, as shown in the following example:
To solve this issue, you can perform the following steps:
1. Open Internet Information Services (IIS) Manager on the Director server.2. On the IIS manager console, navigate to the Director application (by default,
it will be located in Default Web Site), and click on it.3. Open the Application Settings feature.

Implementing a XenDesktop® Environment
[ 166 ]
4. Double click on Service.AutoDiscoveryAddresses, and then type the hostname of the Delivery Controller in the value fi eld.
5. Click on the OK button , and then open a command prompt (which has admin rights).
6. Run the iisreset command.
Installing Citrix® StoreFrontOne of the last steps for confi guring your XenDesktop environment is installing Citrix StoreFront.
Citrix StoreFront is a web application which gives users access to the virtual desktops and applications that are delivered by XenDesktop, with the help of Citrix Receiver.
Citrix StoreFront also aggregates resources that are provided by other Citrix products, such as XenApp, XenMobile App Controller, and VDI-in-a-Box.

Chapter 4
[ 167 ]
StoreFront is built on Microsoft Internet Information Services and the Microsoft .NET framework. These roles and features get installed during the setup.
You can learn more about the system requirements by reading the introduction to this chapter and by navigating to http://support.citrix.com/proddocs/topic/dws-storefront-25/dws-system-requirements.html.
Reserve at least 2 GB RAM for the StoreFront services. A server with 4 GB RAM can serve up to 10,000 user connections per hour.
The users can access their desktops and applications through different ways by using StoreFront, such as Citrix Receiver or an HTML5-compatible web browser.
A list of compatible devices and browsers is available at http://support.citrix.com/proddocs/topic/dws-storefront-25/dws-system-requirements-client.html.
In this section, you will learn how to install and perform a basic setup of Storefront. In the next chapter, you will discover how to confi gure it in detail.
In a production environment, it is the best practice to install more than one Citrix StoreFront server in order to provide load balancing and high availability. If you install only one server and the server is not available, users will not able to access your XenDesktop environment.
Installing StoreFront in a multiple server deployment creates a server group, wherein the servers belonging to the same group share the same confi guration.
If a server becomes unavailable, for example, because of network or hardware issues, the confi guration data on the failed server will automatically get updated when it is reconnected to the server group.
The StoreFront servers belonging to the same group must have the same operating system and locale. They must also be joined to the same Active Directory domain.
Implementing a XenDesktop® Environment
[ 168 ]
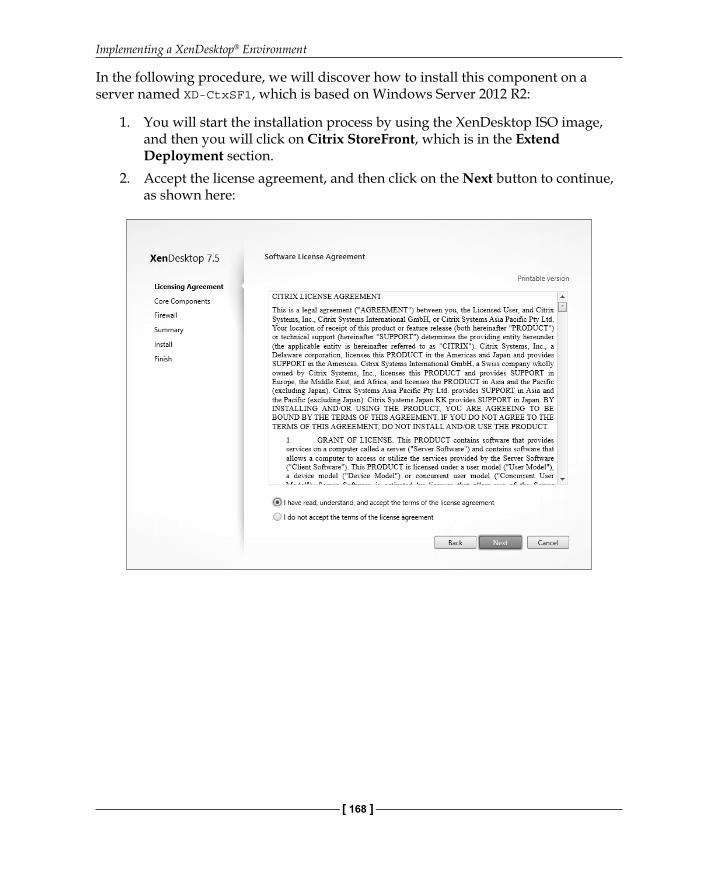
In the following procedure, we will discover how to install this component on a server named XD-CtxSF1, which is based on Windows Server 2012 R2:
1. You will start the installation process by using the XenDesktop ISO image, and then you will click on Citrix StoreFront, which is in the Extend Deployment section.
2. Accept the license agreement, and then click on the Next button to continue, as shown here:

Chapter 4
[ 169 ]
The wizard will display the component that is going to be installed. Here, it will give you the option of changing the installation directory's location, which, by default, would have been the C:\Program Files\Citrix folder.
3. Now, click on the Next button to continue.4. The wizard will give you the option of confi guring the Windows
fi rewall. Here, you can leave the default selection (Automatically).

Implementing a XenDesktop® Environment
[ 170 ]
In a production environment, Citrix recommends using HTTPS for securing the communications between StoreFront and users' devices. If you want to access your StoreFront from the Internet, you will have to deploy Citrix Netscaler Gateway.Furthermore, the TCP port 808 is used for communications among StoreFront servers. The TCP port 8008 is used when users connect to StoreFront through an HTML5-compatible web browser.

Chapter 4
[ 171 ]
5. Make your selection, and then click on the Next button to continue.6. The wizard will display the Summary page. Review it, and then click on the
Install button to start the installation process.

Implementing a XenDesktop® Environment
[ 172 ]
7. At the end of the installation process, you will receive a status report. Then, you will be able to open the Citrix StoreFront management console for setting up the initial confi guration.

Chapter 4
[ 173 ]
Creating a Citrix® StoreFront storeIn this section, you will learn how to perform the initial confi guration of Citrix StoreFront.
In this scenario, we will create a new deployment and then connect it to the XenDesktop site, which we confi gured earlier in the chapter.
1. To start the confi guration, click on the Create a new deployment section in the StoreFront console.
2. In the Base URL fi eld, confi rm the web address for the deployment. If need be, you can change this value in the future.In the example shown here, we will use http://xd-ctxsf1.contoso.local.

Implementing a XenDesktop® Environment
[ 174 ]
Type the FQDN of the server, or specify the load-balanced URL if you are using a balancer such as Citrix Netscaler.You can also use Alias (CNAME record) for the Citrix Storefront URL. After this if, you change your Storefront server, you won't have to reconfigure the new address for Citrix Receiver clients.Note that the Citrix Receiver uses HTTPS by default. The wizard will advise you to configure StoreFront by using the HTTP protocol. If you want to use HTTPS here, then SSL should be configured before starting the wizard.
3. Click on the Next button to continue.4. Now, the wizard will prompt you to type a name for the store. A store is
used for aggregating desktops and applications; it also makes them available to users.In our example, we will use the name CitrixStore. You can use the name that you prefer, but keep it simple and friendly.The name of the store will be displayed on Citrix Receiver.

Chapter 4
[ 175 ]
5. Now, click on the Next button to continue.6. Next, set the Delivery Controller that StoreFront has to connect to by clicking
on the Add button:

Implementing a XenDesktop® Environment
[ 176 ]
In the Add Delivery Controller box, enter a Display Name. For this, use a friendly name that will help you to identify the XenDesktop environment. In this example, we have used XenDesktop Site. In the Servers area, click on the Add button, and then insert either the DNS name or the IP address of one or more Delivery Controllers.If you want to provide fault tolerance, add at least two Delivery Controllers. StoreFront will automatically contact the second server given in the list in case the first server is not reachable. In this example, we will add the Delivery Controller that was created earlier in the chapter, xd-ctxdc.contoso.local. By default, HTTPS was used as the transport type. In this example, we have selected HTTP.
7. After you have fi nished confi guring the Delivery Controllers, click on the Next button to continue.
8. Now, you can set how the users should connect to StoreFront from the Internet by using the Citrix Netscaler Gateway appliance. For the moment, Netscaler Gateway is out of scope, so we will not change the default setting, which is None.
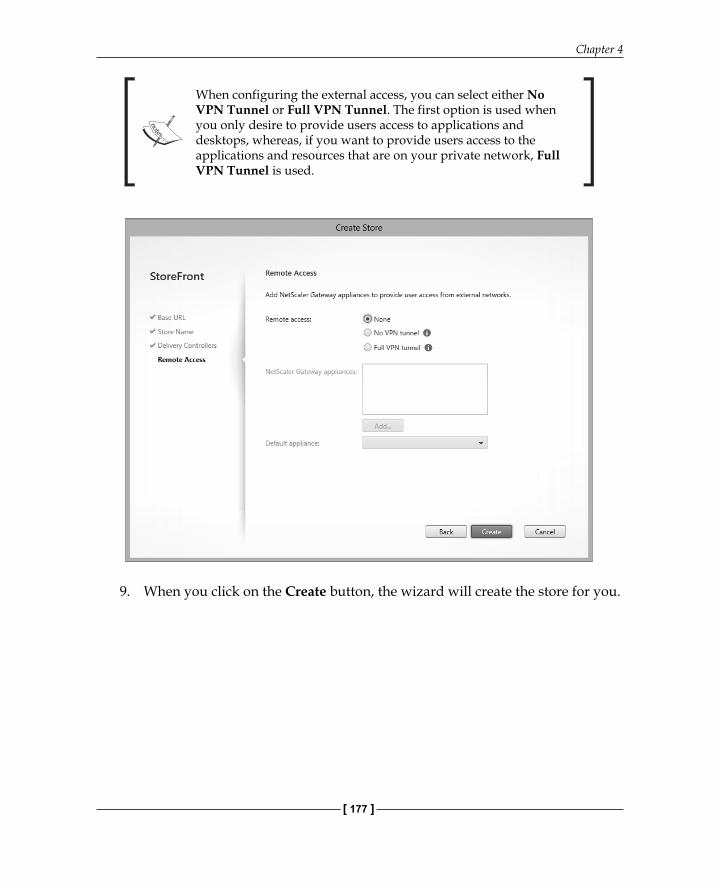
Chapter 4
[ 177 ]
When configuring the external access, you can select either No VPN Tunnel or Full VPN Tunnel. The first option is used when you only desire to provide users access to applications and desktops, whereas, if you want to provide users access to the applications and resources that are on your private network, Full VPN Tunnel is used.
9. When you click on the Create button, the wizard will create the store for you.

Implementing a XenDesktop® Environment
[ 178 ]
At the end of the process, a screen similar to the following will be displayed:
Note the web address. You can use it to connect to the store. In our example, http://xd-ctxsf1.contoso.local/Citrix/CitrixStoreWeb has been used as the web address.
SummaryIn this chapter, we learnt how to install the core components of Citrix XenDesktop. We also discovered some useful information and tips about the system sizing and initial confi guration.
In the next chapter, we will learn how to create machine catalogs and delivery groups. We will also understand how to optimize Citrix XenDesktop. We will discuss some of the customizations that are used for providing the best experience to the users.

Where to buy this book You can buy Mastering Citrix® XenDesktop® from the Packt Publishing website. Alternatively, you can buy the book from Amazon, BN.com, Computer Manuals and most internet book retailers.
Click here for ordering and shipping details.
www.PacktPub.com
Stay Connected:
Get more information Mastering Citrix® XenDesktop®