Mastercycler / Mastercycler gradient Operating Manual · The Eppendorf Mastercycler and...
65
Scientific Mastercycler / Mastercycler gradient Operating Manual
Transcript of Mastercycler / Mastercycler gradient Operating Manual · The Eppendorf Mastercycler and...

S c i e n t i f i c
Mastercycler
/ Mastercycler
gradient
Operating Manual
Authorized Thermal Cycler
This instrument, Serial No.
5331
, is an Authorized Thermal Cycler.
This instrument, Serial No.
5333
, is an Authorized Thermal Cycler.
Its purchase price includes the up-front fee component of a license under the patents on thePolymerase Chain Reaction (PCR) process, which are owned by Hoffmann-La Roche Inc. andF. Hoffmann-La Roche Ltd., to practice the PCR process for internal research and developmentusing this instrument. The running royalty component of that license may be purchased fromPerkin-Elmer or obtained by purchasing Authorized Reagents. This instrument is also anAuthorized Thermal Cycler for use with applications licenses available from Perkin-Elmer. Its usewith Authorized Reagents also provides a limited PCR license in accordance with the label rightsaccompanying such reagents. Purchase of this product does not itself convey to the purchaser acomplete license or right to perform the PCR process. Further information on purchasing licensesto practice the PCR process may be obtained by contacting the Director of Licensing at ThePerkin-Elmer Corporation, 850 Lincoln Centre Drive, Foster City, California 94404.
Transfer of the thermal cycler without serial number and/or this certificate terminates theauthorization and the thermal cycler shall cease to be an Authorized Thermal Cycler.
Perkin-Elmer does not guarantee the performance of this instrument.
No part of this publication may be reproduced without the prior permission of the copyright owner.Copyright
1997 by Eppendorf – Netheler – Hinz GmbH, Hamburg
5331 900.046/03-1199
Certificate

Mastercycler
is a registered trademarkUS Reg. No. 2,273,536Canadian Reg. No. TMA510572

1
1 Introduction
. . . . . . . . . . . . . . . . . . . . . . . . . . . . . . . . . . . . . . . . . . . . . . . . . . . . . . . . . . . . . . . . . . . 3
2 Safety precautions
. . . . . . . . . . . . . . . . . . . . . . . . . . . . . . . . . . . . . . . . . . . . . . . . . . . . . . . . . . . . . 4
3 Installation
. . . . . . . . . . . . . . . . . . . . . . . . . . . . . . . . . . . . . . . . . . . . . . . . . . . . . . . . . . . . . . . . . . . . 53.1 Delivery package . . . . . . . . . . . . . . . . . . . . . . . . . . . . . . . . . . . . . . . . . . . . . . . . . . . . . . . . . . . . . . . 53.2 Setting up the device . . . . . . . . . . . . . . . . . . . . . . . . . . . . . . . . . . . . . . . . . . . . . . . . . . . . . . . . . . . . 53.3 Starting up the device. . . . . . . . . . . . . . . . . . . . . . . . . . . . . . . . . . . . . . . . . . . . . . . . . . . . . . . . . . . . 5
4 Technical description
. . . . . . . . . . . . . . . . . . . . . . . . . . . . . . . . . . . . . . . . . . . . . . . . . . . . . . . . . . . 64.1 Device construction . . . . . . . . . . . . . . . . . . . . . . . . . . . . . . . . . . . . . . . . . . . . . . . . . . . . . . . . . . . . . 64.2 Keys . . . . . . . . . . . . . . . . . . . . . . . . . . . . . . . . . . . . . . . . . . . . . . . . . . . . . . . . . . . . . . . . . . . . . . . . . 74.3 Display . . . . . . . . . . . . . . . . . . . . . . . . . . . . . . . . . . . . . . . . . . . . . . . . . . . . . . . . . . . . . . . . . . . . . . . 8
5 Description of menus
. . . . . . . . . . . . . . . . . . . . . . . . . . . . . . . . . . . . . . . . . . . . . . . . . . . . . . . . . . . 95.1 Main menu . . . . . . . . . . . . . . . . . . . . . . . . . . . . . . . . . . . . . . . . . . . . . . . . . . . . . . . . . . . . . . . . . . . . 95.2 Start . . . . . . . . . . . . . . . . . . . . . . . . . . . . . . . . . . . . . . . . . . . . . . . . . . . . . . . . . . . . . . . . . . . . . . . . 105.3 FILES . . . . . . . . . . . . . . . . . . . . . . . . . . . . . . . . . . . . . . . . . . . . . . . . . . . . . . . . . . . . . . . . . . . . . . . 105.3.1 Edit . . . . . . . . . . . . . . . . . . . . . . . . . . . . . . . . . . . . . . . . . . . . . . . . . . . . . . . . . . . . . . . . . . . . . . . . . 105.3.2 Load . . . . . . . . . . . . . . . . . . . . . . . . . . . . . . . . . . . . . . . . . . . . . . . . . . . . . . . . . . . . . . . . . . . . . . . . 115.3.3 Standard . . . . . . . . . . . . . . . . . . . . . . . . . . . . . . . . . . . . . . . . . . . . . . . . . . . . . . . . . . . . . . . . . . . . . 115.3.4 New. . . . . . . . . . . . . . . . . . . . . . . . . . . . . . . . . . . . . . . . . . . . . . . . . . . . . . . . . . . . . . . . . . . . . . . . . 115.3.5 Delete . . . . . . . . . . . . . . . . . . . . . . . . . . . . . . . . . . . . . . . . . . . . . . . . . . . . . . . . . . . . . . . . . . . . . . 115.4 OPTIONS . . . . . . . . . . . . . . . . . . . . . . . . . . . . . . . . . . . . . . . . . . . . . . . . . . . . . . . . . . . . . . . . . . . . 125.4.1 Editor . . . . . . . . . . . . . . . . . . . . . . . . . . . . . . . . . . . . . . . . . . . . . . . . . . . . . . . . . . . . . . . . . . . . . . . 125.4.2 Printer . . . . . . . . . . . . . . . . . . . . . . . . . . . . . . . . . . . . . . . . . . . . . . . . . . . . . . . . . . . . . . . . . . . . . . . 135.4.3 Gradient . . . . . . . . . . . . . . . . . . . . . . . . . . . . . . . . . . . . . . . . . . . . . . . . . . . . . . . . . . . . . . . . . . . . . 135.4.4 GENERAL . . . . . . . . . . . . . . . . . . . . . . . . . . . . . . . . . . . . . . . . . . . . . . . . . . . . . . . . . . . . . . . . . . . 155.5 Lid . . . . . . . . . . . . . . . . . . . . . . . . . . . . . . . . . . . . . . . . . . . . . . . . . . . . . . . . . . . . . . . . . . . . . . . . . 175.6 Incubate . . . . . . . . . . . . . . . . . . . . . . . . . . . . . . . . . . . . . . . . . . . . . . . . . . . . . . . . . . . . . . . . . . . . . 18
6 Operation
. . . . . . . . . . . . . . . . . . . . . . . . . . . . . . . . . . . . . . . . . . . . . . . . . . . . . . . . . . . . . . . . . . . . 196.1 Preparation . . . . . . . . . . . . . . . . . . . . . . . . . . . . . . . . . . . . . . . . . . . . . . . . . . . . . . . . . . . . . . . . . . 196.1.1 Loading the samples . . . . . . . . . . . . . . . . . . . . . . . . . . . . . . . . . . . . . . . . . . . . . . . . . . . . . . . . . . . 196.1.2 Sample volume . . . . . . . . . . . . . . . . . . . . . . . . . . . . . . . . . . . . . . . . . . . . . . . . . . . . . . . . . . . . . . . . 206.1.3 Heated lid . . . . . . . . . . . . . . . . . . . . . . . . . . . . . . . . . . . . . . . . . . . . . . . . . . . . . . . . . . . . . . . . . . . . 206.1.4 Temperature-control of the block . . . . . . . . . . . . . . . . . . . . . . . . . . . . . . . . . . . . . . . . . . . . . . . . . . 206.2 Switching on the device . . . . . . . . . . . . . . . . . . . . . . . . . . . . . . . . . . . . . . . . . . . . . . . . . . . . . . . . . 216.3 Starting a program . . . . . . . . . . . . . . . . . . . . . . . . . . . . . . . . . . . . . . . . . . . . . . . . . . . . . . . . . . . . . 216.4 Displaying the running time of a program . . . . . . . . . . . . . . . . . . . . . . . . . . . . . . . . . . . . . . . . . . . . 236.5 Interrupting a program . . . . . . . . . . . . . . . . . . . . . . . . . . . . . . . . . . . . . . . . . . . . . . . . . . . . . . . . . . 236.6 Continuing an interrupted program. . . . . . . . . . . . . . . . . . . . . . . . . . . . . . . . . . . . . . . . . . . . . . . . . 246.7 Aborting a program. . . . . . . . . . . . . . . . . . . . . . . . . . . . . . . . . . . . . . . . . . . . . . . . . . . . . . . . . . . . . 246.8 Switching off the device . . . . . . . . . . . . . . . . . . . . . . . . . . . . . . . . . . . . . . . . . . . . . . . . . . . . . . . . . 24
7 Programming
. . . . . . . . . . . . . . . . . . . . . . . . . . . . . . . . . . . . . . . . . . . . . . . . . . . . . . . . . . . . . . . . 257.1 Command description. . . . . . . . . . . . . . . . . . . . . . . . . . . . . . . . . . . . . . . . . . . . . . . . . . . . . . . . . . . 257.1.1 CNTRL . . . . . . . . . . . . . . . . . . . . . . . . . . . . . . . . . . . . . . . . . . . . . . . . . . . . . . . . . . . . . . . . . . . . . . 257.1.2 Lid. . . . . . . . . . . . . . . . . . . . . . . . . . . . . . . . . . . . . . . . . . . . . . . . . . . . . . . . . . . . . . . . . . . . . . . . . . 267.1.3 T . . . . . . . .Selection also possible using 1 . . . . . . . . . . . . . . . . . . . . . . . . . . . . . . . . . . . . . . . . . . 267.1.4 HOLD . . . .Selection also possible using 2 . . . . . . . . . . . . . . . . . . . . . . . . . . . . . . . . . . . . . . . . . . 287.1.5 PAUSE . . .Selection also possible using 3 . . . . . . . . . . . . . . . . . . . . . . . . . . . . . . . . . . . . . . . . . . 287.1.6 GOTO . . . .Selection also possible using 4 . . . . . . . . . . . . . . . . . . . . . . . . . . . . . . . . . . . . . . . . . . 287.1.7 SOUND. . .Selection also possible using 5 . . . . . . . . . . . . . . . . . . . . . . . . . . . . . . . . . . . . . . . . . . 287.1.8 LINK . . . . .Selection also possible using 6 . . . . . . . . . . . . . . . . . . . . . . . . . . . . . . . . . . . . . . . . . . 287.1.9 END . . . . . . . . . . . . . . . . . . . . . . . . . . . . . . . . . . . . . . . . . . . . . . . . . . . . . . . . . . . . . . . . . . . . . . . . 29
Contents
2
7.2 Creating a new program . . . . . . . . . . . . . . . . . . . . . . . . . . . . . . . . . . . . . . . . . . . . . . . . . . . . . . . . . 297.2.1 Programming . . . . . . . . . . . . . . . . . . . . . . . . . . . . . . . . . . . . . . . . . . . . . . . . . . . . . . . . . . . . . . . . . 307.2.2 Saving a program . . . . . . . . . . . . . . . . . . . . . . . . . . . . . . . . . . . . . . . . . . . . . . . . . . . . . . . . . . . . . . 327.3 Modifying a program . . . . . . . . . . . . . . . . . . . . . . . . . . . . . . . . . . . . . . . . . . . . . . . . . . . . . . . . . . . . 337.4 Creating programs using an example program. . . . . . . . . . . . . . . . . . . . . . . . . . . . . . . . . . . . . . . . 357.5 Deleting a program . . . . . . . . . . . . . . . . . . . . . . . . . . . . . . . . . . . . . . . . . . . . . . . . . . . . . . . . . . . . . 357.6 Examples of programming . . . . . . . . . . . . . . . . . . . . . . . . . . . . . . . . . . . . . . . . . . . . . . . . . . . . . . . 367.6.1 Gradient PCR (for Mastercycler
gradient only) . . . . . . . . . . . . . . . . . . . . . . . . . . . . . . . . . . . . . . 367.6.2 Hot Start PCR. . . . . . . . . . . . . . . . . . . . . . . . . . . . . . . . . . . . . . . . . . . . . . . . . . . . . . . . . . . . . . . . . 367.6.3 Touch Down PCR . . . . . . . . . . . . . . . . . . . . . . . . . . . . . . . . . . . . . . . . . . . . . . . . . . . . . . . . . . . . . . 377.6.4 Long PCR . . . . . . . . . . . . . . . . . . . . . . . . . . . . . . . . . . . . . . . . . . . . . . . . . . . . . . . . . . . . . . . . . . . . 387.6.5 PCR "Fingerprinting" (RAPD-PCR) . . . . . . . . . . . . . . . . . . . . . . . . . . . . . . . . . . . . . . . . . . . . . . . . 397.6.6 Sample cooling and subsequent PCR . . . . . . . . . . . . . . . . . . . . . . . . . . . . . . . . . . . . . . . . . . . . . . 40
8 Short instructions
. . . . . . . . . . . . . . . . . . . . . . . . . . . . . . . . . . . . . . . . . . . . . . . . . . . . . . . . . . . . . 41
9 Personal card
. . . . . . . . . . . . . . . . . . . . . . . . . . . . . . . . . . . . . . . . . . . . . . . . . . . . . . . . . . . . . . . . 439.1 Safety precautions . . . . . . . . . . . . . . . . . . . . . . . . . . . . . . . . . . . . . . . . . . . . . . . . . . . . . . . . . . . . . 439.2 Operation . . . . . . . . . . . . . . . . . . . . . . . . . . . . . . . . . . . . . . . . . . . . . . . . . . . . . . . . . . . . . . . . . . . . 439.3 Processing programs . . . . . . . . . . . . . . . . . . . . . . . . . . . . . . . . . . . . . . . . . . . . . . . . . . . . . . . . . . . 44
10 Interface description
. . . . . . . . . . . . . . . . . . . . . . . . . . . . . . . . . . . . . . . . . . . . . . . . . . . . . . . . . . 4510.1 Printer / PC connection. . . . . . . . . . . . . . . . . . . . . . . . . . . . . . . . . . . . . . . . . . . . . . . . . . . . . . . . . . 4510.2 Program transfer . . . . . . . . . . . . . . . . . . . . . . . . . . . . . . . . . . . . . . . . . . . . . . . . . . . . . . . . . . . . . . . 48
11 Maintenance
. . . . . . . . . . . . . . . . . . . . . . . . . . . . . . . . . . . . . . . . . . . . . . . . . . . . . . . . . . . . . . . . . 49
12 Troubleshooting
. . . . . . . . . . . . . . . . . . . . . . . . . . . . . . . . . . . . . . . . . . . . . . . . . . . . . . . . . . . . . . 5012.1 Error messages . . . . . . . . . . . . . . . . . . . . . . . . . . . . . . . . . . . . . . . . . . . . . . . . . . . . . . . . . . . . . . . 5012.2 Test program . . . . . . . . . . . . . . . . . . . . . . . . . . . . . . . . . . . . . . . . . . . . . . . . . . . . . . . . . . . . . . . . . . 55
13 Technical data
. . . . . . . . . . . . . . . . . . . . . . . . . . . . . . . . . . . . . . . . . . . . . . . . . . . . . . . . . . . . . . . . 56
14 Ordering information
. . . . . . . . . . . . . . . . . . . . . . . . . . . . . . . . . . . . . . . . . . . . . . . . . . . . . . . . . . 57
15 Index
. . . . . . . . . . . . . . . . . . . . . . . . . . . . . . . . . . . . . . . . . . . . . . . . . . . . . . . . . . . . . . . . . . . . . . . . 59
EC Conformity Declaration
3
The Eppendorf Mastercycler
and Mastercycler
gradient are PCR devices for all molecular biological and biochemical laboratories in the field of basic research or routine diagnostics.
Temperature control is carried out with Peltier elements, which enable extremely rapid changes in temperature of up to 3
°
C per second. This allows the temperature of the samples to be controlled extremely rapidly between 4
°
C and 99
°
C.
A special "tube control" mode has been developed for temperature-controlling samples in various different tubes with various different filling volumes.
The thermoblock has been constructed as a universal block which can accommodate microtiter plates in the 8 x 12 format, 96 Eppendorf PCR test tubes of 0.2 ml, 77 thin-walled Eppendorf PCR test tubes of 0.5 ml or other suitable tubes – without the block having to be exchanged.
With the aid of the
in situ
Adapter,
in situ
reactions may be carried out on up to four glass slides.
To prevent the formation of condensation, the devices have a heated lid which has been perfectly tailored to suit all tubes.
The devices are easy to operate, with user guidance available in the integrated, eight-line display. Experiments and tests can be documented with the aid of a printer which may be connected up to the devices.
One particular advantage of the Mastercycler
gradient is the Gradient function, which greatly facilitates the optimization of PCR experiments. The gradient enables the temperature across the entire block to be varied within a range of up to 20
°
C; it can be programmed with every temperature step.
.The Mastercyclers are authorized cyclers licensed by the Perkin-Elmer Corporation.
1 Introduction

4
Before using the Mastercycler
or Mastercycler
gradient for the first time, please read the complete operating manual.
It is essential to observe the following safety precautions:
Voltage:Before starting up the device, please compare the power supply with the voltage requirements listed on the identification plate.The device must be plugged into a grounded socket.
Explosive materials:The Mastercycler
or Mastercycler
gradient must not be used to process explosive or highly reactive substances and must not be operated in a hazardous or potentially explosive environment.
Liquids:Please ensure that no liquid enters the device.
Danger of burning:The thermoblock, the inside of the heated lid and the micro test tubes / microtiter plates can rapidly reach a temperature in excess of 50
°
C. Care must therefore be taken to avoid burns! Do not open the heated lid until the temperatures have decreased to 30
°
C or less.Do not use any materials (tubes, lid locks, foils, mats) which are not sufficiently temperature-stable (up to 120
°
C).
Operating environment:Please ensure that the ventilation for the device remains unblocked at all times.
Symbol on the thermoblock:This symbol warns the user that the thermoblock (
▼
) or the inside of the lid (
▲
) may be hot .
shows that when the Gradient mode is in operation, the temperature is higher on the right-hand side than on the left-hand side.
Repairs may only be carried out by an authorized specialist. Only use spare parts recommended by Eppendorf. Disconnect the device from the mains supply before opening.
The Mastercycler
and Mastercycler
gradient are designed for in vitro applications only.
Eppendorf – Netheler – Hinz GmbH reserves the right to make technical modifications to this product.
No part of this publication may be reproduced without written permission from Eppendorf – Netheler – Hinz GmbH.
Caution: Hot Surface
2 Safety precautions

5
3.1 Delivery package
The delivery package contains the following items:
1 Mastercycler
or Mastercycler
gradient1 Main power cable1 Operating manual (German / English)1 Personal card1 bag of 0.2 ml PCR test tubes (100 pieces)1 bag of 0.5 ml PCR test tubes (100 pieces)
3.2 Setting up the device
When setting up the device, please ensure that enough space is available to allow the ventilation slit to remain uncovered and to allow air to flow under the device for cooling purposes. Please ensure that no objects are under the device (e.g. lab bench paper).
No special equipment is required for transporting the device. It can be lifted up and carried by being held on both sides.
Space requirements: Width: 26 cmDepth: 41 cmHeight: 27 cm
Mains connection: 1 shockproof socket for the Mastercycler
/ Mastercycler
gradient. If a printer is to be connected up, a second mains connection must be used.
The delivery packaging should be stored in a safe place to enable the device to be shipped in the event that repairs are necessary.
3.3 Starting up the device
Remove the adhesive strip on the heated lid and take out the bubble-wrap from below the heated lid.
The Mastercycler
/ Mastercycler
gradient is connected to the mains supply using the mains cable.Before starting up the device, please compare the power supply with the voltage requirements listed on the identification plate (see Sec. 4.1, Fig. 3.5).
The procedure for connecting and starting up a printer is described in Sec. 10.1.
3 Installation

6
4 Technical description
4.1 Device construction
Fig. 1: Front view
1 Heated lid2 Locking button3 Display and control panel4 Personal card reader
Fig. 2: Side view
1 Heated lid2 Thermoblock
(not visible in this picture)3 Ventilation slit4 Brightness regulator5 PC connection socket6 Printer connection socket
Fig. 3: Rear view
1 Ventilation slit2 Main power switch3 Fuses4 Main power socket5 Identification plate
12
3
4
1
2
3
6 5 4
432
1
5
4 Technical description
7
4 Technical description
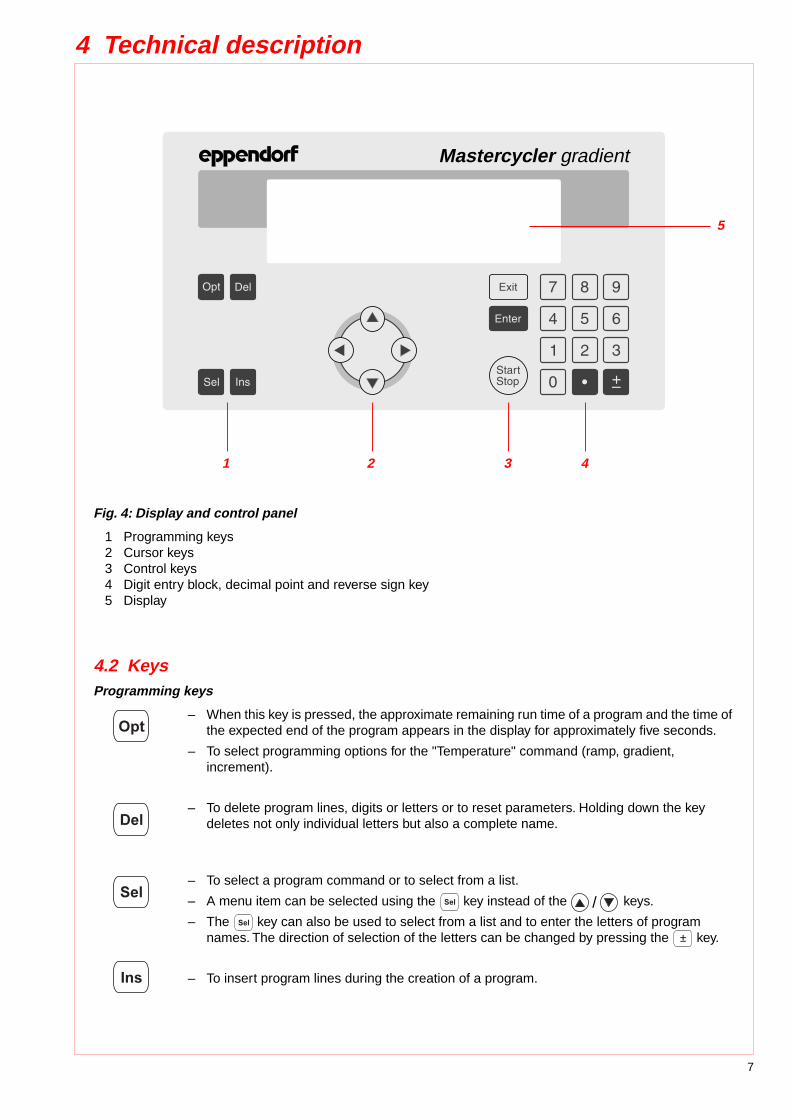
Fig. 4: Display and control panel
1 Programming keys2 Cursor keys3 Control keys4 Digit entry block, decimal point and reverse sign key5 Display
4.2 Keys
Programming keys
– When this key is pressed, the approximate remaining run time of a program and the time of the expected end of the program appears in the display for approximately five seconds.
– To select programming options for the "Temperature" command (ramp, gradient, increment).
– To delete program lines, digits or letters or to reset parameters. Holding down the key deletes not only individual letters but also a complete name.
– To select a program command or to select from a list.
– A menu item can be selected using the key instead of the keys.
– The key can also be used to select from a list and to enter the letters of program names. The direction of selection of the letters can be changed by pressing the key.
– To insert program lines during the creation of a program.
Mastercycler gradient
1 2 3 4
5
/
8
4 Technical description
Cursor keys
The cursor appears in the display as a dark field.
– If a menu should be selected, the cursor must be moved to that menu and the selection should then be confirmed by pressing .
– The cursor is also used to move into, or to change between, input fields. Entries do not have to be confirmed by pressing ; they are stored immediately.
Control keys
– To exit a menu or to return to the next-highest menu level.
– After a program has been started, the display of the program can be exited, e.g. in order to work in the programming level.
– To call up a menu which has been selected using the cursor.
– To confirm an entry.
– To quick-start a program from the processing level ("FILES/Edit" menu). If another program needs to be started, the "Start" menu must be used.
– To cancel or to interrupt a program.
4.3 Display
Press the main power switch on the rear of the device (Sec. 4.1, Fig. 3.2). The device name and the software version installed appear briefly in the display.
The main menu then appears in the display:
The eight-line display is divided into two areas. The menu field on the left-hand side contains a list of the selectable programs. The programming field is used for programming and for setting the device parameters.
Main-Menu Start FILES . . OPTIONS . . Lid IncubateSTANDARD – –/25.0° Lid:105° 10:22:06
Menu field Programming field
❋❋❋ MASTERCYCLER ❋❋❋
gradient 5331eppendorf
Version ❋.❋❋.❋❋

9
5 Description of menus
5.1 Main menu
A menu or a sub-menu can be called up in three different ways:
1. Select using the keys and confirm by pressing .
2. Select using the key and confirm by pressing .
3. Select the menu using the internal position number (shown in brackets in the text) and confirm by pressing .
The program in the processing level can be started immediately by pressing the key. Menus are exited by pressing the
key. To access the main menu, it may be necessary to press the key several times.
Menus written in capital letters have additional sub-items. For ease of reference, the menu name appears on the left-hand side of the display or as a headline above the menu or as a sub-item.
Overview of the entire menu structure:
Main-Menu Start FILES . . OPTIONS . . Lid IncubateSTANDARD – –/25.0° Lid:105° 10:22:06
Menu name
Sub-menus
Program in processing levelTime
Lid temperature
Nominal/actual block temperature
(only when lid is switched on)
/
Main-Menu
Start (1) To start programs
FILES . . (2) To programEdit (1) To change a program in the processing levelLoad (2) To load and change any programStandard (3) Example programNew (4) To create new programsDelete (5) To delete programs
OPTIONS . . (3) System settingsEditor (1) To display additional functionsPrinter (2) To connect a printerGradient (3) To display the temperature distributionGENERAL . . (4)
Clock (1) To set the clockRemote (2) To connect a PCSound (3) ToneEtc (4)VALID . . (5) To test the device
Lid (4) To preheat the lid
Incubate (5) To preheat the thermoblock and the lid
5 Description of menus

10
5 Description of menus
5.2 Start
Only programs can be started from the "Start" menu.
The program displayed in the processing level can be started directly by pressing the key (1).
If a program which has been stored has to be started, it is selected with the cursor keys from the displayed list after has been pressed (2) and cofirmed by pressing .
The "Start" menu has no sub-programs.
5.3 FILES
The "FILES" menu is used to change, load, create or delete programs.
5.3.1 Edit
The "Edit" menu is used to change existing programs. The program which is to be changed may already be in the "processing level" or it is loaded into the processing level via the "Load" menu. This is applicable for programs from the internal device memory or from a personal card.
The program which has been changed can be checked by pressing the key after the program has been saved under a new name. The processing level is not deleted when this program is saved. The program data remains stored even when the device is switched off and is overwritten only when the "New" or "Standard" sub-menu is called up.
Note
:
If the program which has been changed (without being saved under a new name) is started, there are then two different programs with the same name (one in the internal memory and one in the processing level).
Main-Menu Start STANDARD FILES . . TEST1 OPTIONS . . TEST2 Lid IncubateSTANDARD – –/25.0°
Main-Menu Start FILES . . OPTIONS . . Lid IncubateRunning/STANDARD 95.0/94.7°
Main-Menu Start FILES . . OPTIONS . . Lid IncubateRunning/TEST2 – –/25.0°
Main-Menu Start FILES . . OPTIONS . . Lid IncubateSTANDARD – –/25.0°
(1)
(2)
Processing level
Main-Menu Start FILES . . OPTIONS . . Lid IncubateSTANDARD – –/25.0°
FILES . . Edit Load Standard New DeleteSTANDARD – –/25.0°

11
5 Description of menus
5.3.2 Load
"Load" is used to call up a list of existing programs. These programs may be taken from the internal memory or from a personal card. The selected program is loaded into the "Edit" processing level. If the "Edit" processing level contains a program which has not been saved, a safety check appears in the display, which then enables the program to be saved.
If the user does not want to save the program, it is overwritten when the new program is loaded. As the "Edit" processing level is called up automatically, the program can be changed immediately and can then be tested for test purposes.
The procedure for loading programs from a personal card is described in Sec. 9.3.
5.3.3 Standard
An example program called "Standard" is available for creating new programs. It is not necessary to rewrite a program completely; the example program can be supplemented or changed and then saved under a new name. All programs which are in the internal memory can be used as an example program.
Following a safety check, the example program is loaded into the processing level. The process is described in more detail in Sec. 7.4.
Although the "Standard" example program cannot be deleted, it can be changed to suit individual requirements. After the changes have been made, the example program is saved under the name "Standard". To restore the original example program, the "Standard" program must be deleted in the"Delete" sub-menu. When "Standard" is called up again, it is the original example program which is then loaded into the processing level.
5.3.4 New
"New" can be used to call up the processing level automatically. To create a new program, an existing program is deleted.
The essential input CNTRL BLOCK, Lid =0
°
, NOWAIT AUTO, end is simulated automatically and the program is given the provisional title UNNAMED.
5.3.5 Delete
Programs can be deleted from the internal memory or from a personal card. After "Delete" has been selected, a list of program names appears in the display. A program can be selected from this list using the cursor key and can be deleted by pressing . The program in the processing level cannot be deleted.
The procedure for deleting programs from a personal card is described in Sec. 9.3.

12
5 Description of menus
5.4 OPTIONS
The "OPTIONS" menu can be used to define general system settings for the program editor, printer, time/date, etc.
Selection of YES/NO, ON/OFF and other settings can be carried out using the key.
The menu is exited by pressing the key.
5.4.1 Editor
Show Ext. Steps
To display temperature options.
YES
All options (temperature increment, time increment, ramp, ramp increment, gradient) for each step appear in the display.
NO
Only the nominal temperature and the cycle time appear in the display. If the options have been defined, the command is marked with an "
*
" for information purposes when the program is called up. Nonetheless, the options can be called up by pressing the key and can then be entered or displayed.
OPTIONS . . Editor Printer Gradient GENERAL . .
STANDARD – –/25.0°
Main-Menu Start FILES . . OPTIONS . . Lid IncubateSTANDARD – –/25.0°
OPTIONS . . Editor Printer Gradient GENERAL . .
STANDARD – –/22.0°
Editor Mode
Show Ext. Steps: YES

13
5 Description of menus
5.4.2 Printer
Entries are necessary only when a printer is connected.
Printout Editor
YES: The program in the "Edit" processing level is printed out.If "YES" has been selected, but no printer is accessible, the error message "Printer: No Response" appears in the display.
NO: Appears automatically when the program printout has finished.
Print Protocol
ON: When the program starts, the commands are printed out; during the run, every completed command is printed out together with the time.
OFF: No printout is made.
OPTIONS . . Editor Printer Gradient GENERAL . .
STANDARD – –/22.0°
Printer Mode
Printout Editor: NOPrint Protocol: OFF

14
5 Description of menus
5.4.3 Gradient
The Gradient function can be selected with the Mastercycler
gradient only.
The Gradient function can be used to vary the temperature distribution across the block.
In every temperature step, the thermoblock can be programmed so that each of the 12 columns has a different temperature. The lowest temperature is in the cavities on the left-hand side. It then rises gradually across the block so that the highest temperature is on the right-hand side.
Show Gradient
The "Show Gradient" menu can be used to show which temperature is in which column:
The tube type "0.2 ml, 0.5 ml, 0.5 ml thin, plate" is selected by and confirmed by pressing .
After a temperature and a gradient have been entered, the temperature distribution across the block appears in the display:
The gradient may be a maximum of
±
10
°
C with a resolution of 0.1
°
C. This means that the overall temperature span is 20
°
C. The selected temperature is in the middle of the block. The left-hand side is temperature-controlled to nominal temperature – gradientThe right-hand side is temperature-controlled to nominal temperature + gradient.
OPTIONS Show Gradient Editor Tube: 0.2 ml T=60.0 G=7.0 °C Printer Gradient GENERAL . .
STANDARD – –/22.0° 10:22:06
OPTIONS Show Gradient Editor Settings: Tube: 0.2 ml T=60.0C G= 7.0C Printer Pos. 1: 52.9C Pos. 5: 56.9C Pos. 9: 64.3C Gradient Pos. 2: 53.2C Pos. 6: 58.7C Pos:10: 65.8C GENERAL . . Pos. 3: 54.0C Pos. 7: 60.6C Pos.11: 66.9C
Pos. 4: 55.2C Pos. 8: 62.5C Pos.12: 67.5CSTANDARD Print Results <OPT> – –/22.0° 10:22:06

15
5 Description of menus
5.4.4 GENERAL
To enter general settings and to test the device.
Clock
Format: The time in the 24-(military) or 12-hour-clock format (choice of PM or AM) can beselected using the key.
Time: To enter the current time in hours:minutes:seconds.
Date: To enter the current date as day/month/year.The month can be selected using the key.
Remote
Baud rate: The transmission rate of 19,200, 9,600, 4,800, 2,400 or 1,200 for a PC connection can be selected using the key.
Sound
KeyClick: ON: Every keyclick is confirmed by an acoustic signal.OFF: The acoustic signal for keyclicks is switched off.
Warnings: ON: In addition to the warning text, warnings are acknowledged by anacoustic signal.
OFF: No acoustic signal is emitted to acknowledge a warning.
Note:
Errors are always acknowledged by an acoustic signal,irrespective of this setting.
Etc
Start with: MAIN: After the device has been switched on, the main menu appearsin the display.
LAST: After the device has been switched on, the most-recently used menu appears in the display.
Auto Restart: YES: In the event of a power failure, an active program continues when thepower supply is restored within three minutes. The time and the stageat which the program was interrupted appear in the display:
When any key is pressed, the program continues from the point atwhich it was interrupted. If the program is to be cancelled, press the
key and confirm by pressing .
NO: In the event of a power failure, an active program is cancelled.
GENERAL . . Clock Remote Sound EtcVALID . .
– –/22.0°
AutoRestart! PROGRAM restarted: Time Date Step:x Cyc:y Press any key!
16
5 Description of menus
VALID . .
These programs can be used to test the device. The measurements can be documented byconnecting a printer to the device. The "Validate" and "Calibrate" menus require the temperature-validation system (order no.: 5331 222.005). This system consists of a special temperature sensor and a personalcard with the corresponding software. For more detailed information on operating the "Validate" and "Calibrate" programs, see the operating manual for the temperature-validation system.
Test: This program can be used to monitor the thermal and electrical functions of thebuilt-in heating and cooling elements (see Sec. 12.2).
Validate: To check the device temperature with the aid of a temperature-measuring device. This measuring device forms part of the temperature-validation system and isconnected via the serial interface of the Mastercycler.
Calibrate: To align the device temperature with the aid of a temperature-measuring device.This measuring device forms part of the temperature-validation system and isconnected via the serial interface of the Mastercycler.

17
5 Description of menus
5.5 Lid
The "Lid" menu in the main menu can be used to determine the temperature of the heated lid and to switch the heated lid on or off (e.g. to preheat the lid).
LidTemp: Nominal/actual temperature.To enter the temperature for the heated lid.The lid heating switches off when a temperature value of 0
°
C is entered.
Heater is On: Lid heating is on.
Heater is Off: Lid heating is off.
When sensitive PCRs are carried out, it may be important to delay the start until the lid temperature has prevented condensation. This can be achieved by programming the "WAIT" setting, which means that the program does not start until the lid reaches the specified temperature.
In addition, the lid can also be preheated. After the device has been switched on, the "Lid" menu is selected, the desired lid temperature is entered and "Heater is On" is selected by pressing the key.
When a program starts, it is the program settings which have priority.
When a program is running, the lid heating cannot be switched on or off.
Main-Menu Start FILES . . OPTIONS . . Lid IncubateSTANDARD – –/22.0°
Lid Temp
LidTemp: 105/55°CHeater is Off
18
5 Description of menus
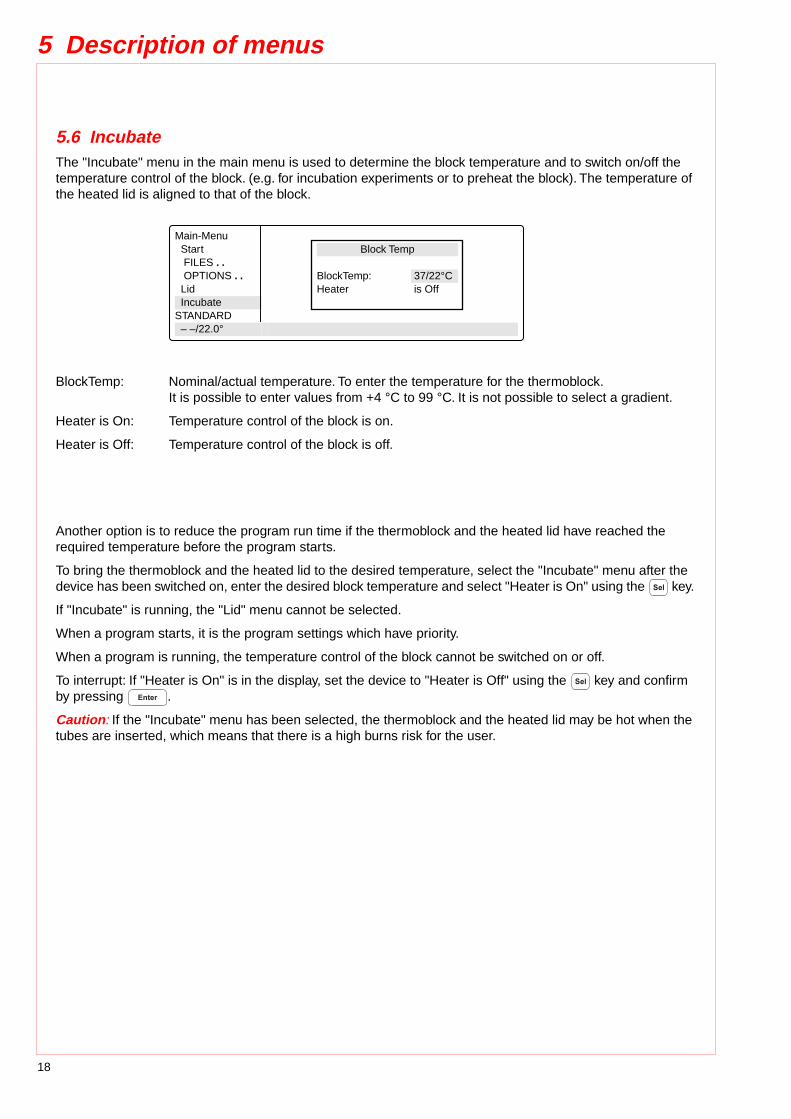
5.6 Incubate
The "Incubate" menu in the main menu is used to determine the block temperature and to switch on/off the temperature control of the block. (e.g. for incubation experiments or to preheat the block). The temperature of the heated lid is aligned to that of the block.
BlockTemp: Nominal/actual temperature. To enter the temperature for the thermoblock. It is possible to enter values from +4
°
C to 99
°
C. It is not possible to select a gradient.
Heater is On: Temperature control of the block is on.
Heater is Off: Temperature control of the block is off.
Another option is to reduce the program run time if the thermoblock and the heated lid have reached the required temperature before the program starts.
To bring the thermoblock and the heated lid to the desired temperature, select the "Incubate" menu after the device has been switched on, enter the desired block temperature and select "Heater is On" using the key.
If "Incubate" is running, the "Lid" menu cannot be selected.
When a program starts, it is the program settings which have priority.
When a program is running, the temperature control of the block cannot be switched on or off.
To interrupt: If "Heater is On" is in the display, set the device to "Heater is Off" using the key and confirm by pressing .
Caution
:
If the "Incubate" menu has been selected, the thermoblock and the heated lid may be hot when the tubes are inserted, which means that there is a high burns risk for the user.
Main-Menu Start FILES . . OPTIONS . . Lid IncubateSTANDARD – –/22.0°
Block Temp
BlockTemp: 37/22°CHeater is Off
19
6 Operation
6.1 Preparation
6.1.1 Loading the samples
The thermoblock can be loaded with three different types of tubes without needing to be exchanged. It can accommodate 96 PCR test tubes of 0.2 ml or 77 thin-walled PCR test tubes of 0.5 ml (special tube from Eppendorf) or 1 microtiter plate (8x12).
To achieve optimal temperature transition, only sample tubes and microtiter plates with a V-shaped base should be used (see "Ordering information"). Test tubes must fit tightly into the thermoblock and should not wobble or move in any way. Tubes which are not sufficiently temperature-stable (up to approx. 120
°
C) should not be used.
In general, this also applies to foils used to seal microtiter plates. However, due to the temperature-controlled lid heating, it is also possible to use foils which would melt above 100
°
C. In this case, the lid heating can be set, for example, to 95
°
C.
The thermoblock has 96 narrow positions for 0.2 ml test tubes and microtiter plates and 77 wide positions for 0.5 ml test tubes. To enable the maximum possible number of 0.5 ml test tubes to be inserted into the thermoblock, the tubes must be positioned in rows. In addition, in order to ensure that the heated lid is closed evenly, it is strongly recommended to position a tube in each corner of the thermoblock. Loading should be carried out as follows:
96 x 0.2 ml PCR test tubesormicrotiter plates (8x12)(PCR plate 96)
77 x 0.5 ml thin-walled PCR test tubes(special tube from Eppendorf)
39 x 0.5 ml Eppendorf Safe-Lock micro test tubes
0.5 ml test tubes with wide lid(e.g. 0.5 ml Eppendorf micro test tubes) should be loaded in a staggered way
in situ
reactions require the
in situ
Adapter. With the aid of the "pegs" on the base, the metal carrier for a maximum of four glass slides is inserted into the 0.5 ml positions of the thermoblock.
6 Operation
20
6 Operation
6.1.2 Sample volume
Temperature control can be set to thermoblock or to sample.The device can adapt to the actual sample quantity and test tube type via the command "CNTRL /TUBE". For maximum flexibility, the program will prompt for tube sizes and volumes when it is startetd.
The following sample quantities should be used:0.2 ml test tubes or "plate": not larger than 50
µ
l0.5 ml or 0.5 ml thin-walled test tubes: not larger than 100
µ
l
When
"in situ"
is selected, the sample quantity is not taken into consideration.
6.1.3 Heated lid
After the samples have been loaded, the heated lid is closed over the thermoblock and locked using the locking lever in accordance with the type of tube used.
Note
:
Some types of PCR plates lock into position at the 0.2 ml tube level. Do not force the locking lever when this happens.
Since the heated lid prevents the liquid from condensing in the upper part of the tube, it is not necessary to use an oil layer.
Note:
Different tube types should not be loaded together as they cannot be sealed correctly by the heated lid.If it is absolutely necessary to process different tube types simultaneously in the thermoblock, an oil layer is necessary for the smaller tubes.
The lid temperature (up to 110
°
C) is controlled automatically by the program. The user can decide whether the program should start immediately (NOWAIT) or whether it should start after a preset lid temperature has been attained (WAIT). If the program has to start quickly, the heated lid can be preheated using the "Lid" menu.
All tubes are easily accessible during the temperature-control procedure since the lid can be opened at any time.
Caution:
To avoid the risk of burns (110
°
C) caused by touching the inner surface of the lid or the thermoblock, do not open the lid while the program is running.Depending on the processing temperatures used, test tubes and microtiter plates may also be extremely hot.
During
in situ
reactions, the heated lid is not temperature-controlled and remains open at all times.
6.1.4 Temperature-control of the block
To carry out incubation experiments or to speed up the start of a method, it is possible to preheat the thermoblock and the heated lid. The "Incubate" menu is selected in the main menu, a block temperature is entered and "Heater" is set to "on".
Caution:
Since the thermoblock and the heated lid can become very hot, there is a burns risk for the user when test tubes and microtiter plates are inserted.
21
6 Operation
6.2 Switching on the device
6.3 Starting a program
– Switch on the device using the main power switch on the rear of the device.
The current software version appears briefly in the display. The main menu then appears.
The program which is ready to be started appears in the processing level.
– The program in the processing level can be started immediately bypressing the key.
To start another program, – press .
A list of the programs appears in the display.
– Select the program name using the or key (the program name
appears with a dark background).
The procedure for starting programs which are stored on a personal card is described in Sec. 9.3.
– Press .
The program starts immediately after a "Testing Program".
Main-Menu Start FILES . . OPTIONS . . Lid IncubateSTANDARD – –/25.0° Lid:105° 10:22:06
❋❋❋ MASTERCYCLER ❋❋❋
gradient 5331eppendorf
Version ❋.❋❋.❋❋
Main-Menu Start FILES . . OPTIONS . . Lid IncubateSTANDARD – –/25.0° Lid:105° 10:22:06
Main-Menu Run a Program: Start STANDARD FILES . . TEST1 OPTIONS . . TEST2 Lid IncubateSTANDARD – –/25.0° Lid:105° 10:22:06
Main-Menu Run a Program: Start 1 T=95.0° 0:00:05 FILES . . OPTIONS . . Lid IncubateRunning/STANDARD Cyc:4 95.0/94.7° Lid:105° 10:22:06

22
6 Operation
If the program contains the "CNTRL/TUBE" command (temperature control set to sample), it is necessary to enter the tube type and the filling volume after the program has started.
– Select the tube type: 0.2 ml, 0.5 ml (e.g. Safe-Lock), 0.5 ml thin (thin-walled tubes), plate (microtiter plate) or
in situ
using the key and confirm by pressing .
– Enter the filling volume and confirm by pressing .
Tube type 0.2 ml/plate: 5 to 50
µ
lTube type 0.5 ml/thin: 5 to 100
µ
l
in situ:
no entry necessary
If no entries are made for "Tube" and "Fill.Vol.", the program will not run."EnterTube" appears in the main menu instead of the program name and a long acoustic signal is emitted until the entry is made.
After the start of the program and while it is running, the name of the program appears in the main menu in alternation with "Running".
A flashing temperature display indicates that the nominal temperature has not been attained and that heating/cooling is currently taking place.
– The display of a program can be exited at any time (e.g. to programin the "Edit" processing level) by pressing .
Main-Menu Run a Program: Start CNTRL TUBE FILES . . Tube: 0.2 ml OPTIONS . . Lid IncubateEnter Tube 22.0/25.0° Lid:105° 10:22:06
Main-Menu Run a Program: Start CNTRL TUBE FILES . . Fill.Vol.: 20 µl OPTIONS . . Lid IncubateSTANDARD 22.0/25.0° Lid:105° 10:22:06
Main-Menu Run a Program: Start 1 T=95.0° 0:00:05 FILES . . OPTIONS . . Lid IncubateRunning/STANDARD Cyc:4 95.0/97.0° Lid:105° 10:22:06
2 3 4 5 6
1 Program flashes in alternation with "Running"2 Nominal/actual block temperature3 Lid temperature
(only when lid is switched on)4 Program line number, program command
Example: Temperature command (T)with nominal temperature and cycle length
5 Number of completed cycles6 Time
1

23
6 Operation
6.4 Displaying the running time of a program
6.5 Interrupting a program
While a program is running, the approximate run time and the expected end time of the program can be shownin the display.
– Press .
The key is effective only when a program run appears in the display, not in the main menu, with other menus or sub-menus.
A program can be aborted, paused or continued at any point by pressing .
– Press .
Using the key, select between:
Stop To abort the programPause To interrupt the programRun To return to the display of
the program sequence
– Using the key, move to "Pause".
– Confirm "Program:PAUSE" by pressing .
The program is interrupted, time counting stops and the last nominal temperature is retained.
The name of the interrupted program appears in the main menu in alternation with "Paused" and the "Start" menu changes to the display "Stop".
Main-Menu Run a Program: Start Run Time: 1:03 FILES . . Finish Time: OPTIONS . . 17/Jun/1997 15:06 Lid IncubateRunning/STANDARD Cyc:4 22.0/25.0° Lid:105° 14:02:30
Main-Menu Run a Program: Start STANDARD running... FILES . . Program: STOP OPTIONS . . Lid IncubateRunning/STANDARD 95.0/94.5° Lid:105° 10:22:06
Main-Menu Run a Program: STOP ! STANDARD running... FILES . . Program: PAUSE OPTIONS . . Lid IncubatePaused/STANDARD 95.0/94.5° Lid:105° 10:22:06
Current timeProgram end
Run time in hours:minutes

24
6 Operation
6.6 Continuing an interrupted program
6.7 Aborting a program
6.8 Switching off the device
To switch off the device, move the main power switch on the rear of the device to .
The name of the program appears in the display in alternation with "Paused"
– Press .
Using the key, select between:Stop To abort the programPause To interrupt the programResume To continue the program
– Using the key, move to "Resume".
– Confirm "Program:RESUME"by pressing ;the program is continued.
– Press .
– Confirm "Program:STOP" by pressing .
After a program has been completed, the following appears in the display:
If a new program has to be started, exit the old program by pressing .
Main-Menu Run a Program: STOP ! STANDARD PAUSED FILES . . Program: PAUSE OPTIONS . . Lid IncubatePaused/STANDARD 95.0/94.5° Lid:105° 10:22:06
Main-Menu Run a Program: STOP ! STANDARD PAUSED FILES . . Program: RESUME OPTIONS . . Lid IncubatePaused/STANDARD 95.0/94.5° Lid:105° 10:22:06
Main-Menu Run a Program: STOP ! STANDARD running... FILES . . Program: STOP OPTIONS . . Lid IncubatePaused/STANDARD 95.0/94.5° Lid:105° 10:22:06
Main-Menu Run a Program: Start End of program FILES . . OPTIONS . . Lid IncubateSTANDARD 22.0/25.0° Lid:105° 14:02:30
>0<

25
7 Programming
7.1 Command description
A program contains two basic commands for controlling the temperature of the thermoblock and of the heated lid as well as six different commands for programming.
A program can contain up to 40 program lines. The commands may be repeated as desired.
Digits or letters may be entered or selections are made using the key.
When digits are entered, the message "Value out of range" appears when values are entered which are not within the given specifications. The permitted limit value is then entered automatically.
7.1.1 CNTRL
With this command is determined the type of temperature control for the block.
BLOCK
The temperature is measured on the thermoblock and the nominal temperature is then set.
TUBE
The software adapts the temperature of the thermoblock to the temperature of the tubes and the sample quantity. For this reason, the tube type and the filling volume must be entered immediately after the start of the program. No further entries are necessary when
in situ
is selected.
Tube type 0.2 ml or plate: 5 to 50
µ
l filling volume0.5 ml or 0.5 ml thin: 5 to 100
µ
l filling volume
FILES... Edit UNNAMED Edit CNTRL BLOCK Load LID=0° Standard NOWAIT AUTO New DeleteUNNAMED- - - - - - - - - - - - - - - - - - - - - - - - - - - - - - - - - - - - - - - - - - - - - - - - -
1 T=❋❋❋❋° ❋❋:❋❋:❋❋
+0.0° +0:00R=3.0°/s +0.0°/sG=0.0°
2 Hold ❋❋❋❋° ENTER
3 PAUSE PRESS ENTER
4 GOTO❋❋❋ REP❋❋❋
5 SOUND❋❋
6 LINK❋❋❋❋❋❋❋❋
end – –/22.0° 10:22:06
7 Programming
26
7 Programming
7.1.2 Lid
To determine the temperature of the heated lid. If 0
°
C is selected, the heated lid remains switched off.
Permitted values 0 to 110
°
CEntry increments 1
°
C
In addition to the entry for the temperature of the heated lid, it is also possible to determine the behavior of the lid temperature at the start and at the end of a program:
At the start
NOWAIT
The program is started, independent of the lid temperature.
WAIT
The program is not started until the programmed lid temperature has been attained.
Note
:
To accelerate the start of the program, the lid may be preheated using the "Lid" menu.
At the end
FIX
The lid temperature does not depend on the block temperature. The lid heating is switched off at the end of the program.
AUTO
The lid temperature depends on the block temperature. If 22
°
C is maintained for longer than five minutes, the lid heating switches off; this is also applicable in the case of a Hold command at temperatures < 22
°
C.
The six commands for programming can be called up directly using the allotted number.
7.1.3 T Selection also possible using 1
To enter the temperature and the cycle time as well as the accompanying specific options.
The options are entered by positioning the cursor on the program line number and pressing the key.
The options may be entered for every temperature command.
T =
❋❋❋❋
°
❋❋
:
❋❋
:
❋❋
Nominal temperature, cycle time
+ 0.0
°
+ 0:00
Temperature increment, time increment
R = 3
°
/s + 0.0
°
/
s Ramp, ramp increment
G = 0.0
Gradient (for Mastercycler
gradient only)
T =
❋❋❋❋
°
The nominal temperature is entered in degrees Celsius (
°
C).
Permitted values 4 to 99.0
°
CEntry increments 0.1
°
C
❋❋
:
❋❋
:
❋❋
The cycle time is entered in "hours:minutes:seconds".
Permitted values 0:00:01 to 9:59:59Entry increments 1 s
27
7 Programming
+ 0.0
°
Temperature increment (
±
°
C): For each cycle, the temperature is increased or decreased by the value entered here.
Please note that the temperature cannot exceed 99
°
C. For example, with a temperature increment of +0.1
°
C and 25 cycles, the starting temperature cannot be greater than 96.5
°
C.
Entry for temperature increase "+" Entry for temperature decrease " – "
Permitted values
±
0.0 to
±
10.0
°
CEntry increments 0.1
°
C
+ 0:00
Time increment (
±
s): For each cycle, the time is extended or reduced by the value entered here.
Entry for time extension "+" Entry for time reduction " – "
Permitted values 0:01 to 1:00Entry increments 1 s
R = 3
°
/s
Ramp (
°
C/s): The ramp states the speed of the heating or cooling curve of a cycler. The higher the value entered, the more rapidly the heating or cooling takes place. Most reactions require rapid heating or cooling rates, i.e. a high value. For processes in which heating or cooling should take place slowly, different values may be entered for the ramp.
Permitted values 0.3 to 3
°
C/sEntry increments 0.1
°
C/s
+ 0.0
°
/s
Ramp increment (
±
s): For each cycle, the ramp is raised or lowered by the value entered here.
Please note that the ramp cannot exceed 3
°
C/s, i.e. with an initial ramp entry of 0.3 and a ramp increment of 0.1, a maximum of 27 cycles is possible.
Permitted values
±
0.1 to
±
1.0
°
C/sEntry increments 0.1
°
C/s
Possible with Mastercycler
gradient only.
G = 0.0
Gradient: When an entry is made here, each column of the block is set to a different temperature. The nominal temperature set at "T" is in the center of the block. The lowest temperature is on the left-hand side and increases gradually up to the highest temperature on the right-hand side. This means that a temperature difference of up to 20
°
C across the block can be generated (see Sec. 5.4.3). The temperature distribution can be viewed in the OPTIONS/Gradient program. With 0.2 ml test tubes, a maximum of 12 different temperatures may be set whereas only 11 can be set when 0.5 ml test tubes are used.
Please note that the temperature cannot exceed 99
°
C, i.e. if a gradient of +10
°
C is built up, the nominal temperature may not be greater than 89
°
C.
Permitted values
±
10
°
CEntry increments 0.1
°
C
The gradient has no effect when the
"in situ"
type is used.

28
7 Programming
7.1.4 HOLD Selection also possible using 2
The program holds the temperature at the value which was entered. The program is continued or ended by pressing .
Note
:
A program should not begin with a HOLD command and a temperature < 22
°
C because the temperature-control for the lid will not start. If, for example, 4
°
C is required at the beginning of a program, HOLD should be connected to the main program via a LINK command (see Sec. 7.6, "Examples of programming").
HOLD xx ENTER
Permitted values 4 to 99
°
CEntry increments 0.1
°
C
7.1.5 PAUSE Selection also possible using 3
The program is interrupted and the temperature remains at the value for the last temperature command. The program is continued by pressing .
A user-defined text may be entered instead of the preset text "PRESS ENTER".
PAUSE PRESS ENTER
Text length 0 to 11 characters
7.1.6 GOTO Selection also possible using 4
To enter data for cycle repeats. It is possible to branch to another program line number (GOTO) where the program should be continued. The number of times this should be carried out (REP) is also given.
GOTO xxx REP xxx
Permitted valuesProgram line number 1 to 40Repeats 1 to 99
7.1.7 SOUND Selection also possible using 5To emit an acoustic signal (e.g. for displaying a programmed pause or when a program is ended).
SOUND ❋❋
Permitted repeats 1 to 10 tones
7.1.8 LINK Selection also possible using 6To link up with another program in the internal memory. Via the LINK command, the current program is ended and the selected program is started. With the aid of LINK commands, a maximum of five programs may be run in succession. The CNTRL, Lid, NOWAIT/WAIT, AUTO/FIX commands in the program head are not taken into consideration during the subsequent programs.It is not possible to branch to programs in the processing level ("Edit") or on the personal card using LINK commands (it is possible from the personal card to programs in the internal memory).
LINK ❋❋❋❋❋❋❋❋
Permitted number of programs 5
The name of the program to be called up must be entered (select letters using the key). If the name of the program itself is entered, the program goes into an endless loop and can only be cancelled by pressing "Stop".

29
7 Programming
7.1.9 ENDEND appears automatically as the last line of a program. It switches off the temperature control for the block and for the lid.
7.2 Creating a new programThe process for entering program commands is identical for the Mastercycler and the Mastercycler gradient. A gradient can also be programmed with the Mastercycler gradient.
Example for a program sequence:
Initial denaturation 95 °C for 2 minutes
20 cycles:Denaturation 95 °C for 45 secondsAnnealing 61 °C for 45 seconds with a temperature increment of –1 °C
A gradient of ± 10 °C is programmed (with Mastercycler gradient only)Elongation 72 °C for 45 seconds
Final elongation 72 °C for 2 minutes
Cooling of samples 22 °C
When the gradient is set at 61 °C ± 10 °C when 12 x 0.2 ml test tubes are used, the temperature distribution in the individual columns of the thermoclock is as follows:
When 0.5 ml test tubes are used, the 11 rows of the block have the following temperatures:
Tube row 1 2 3 4 5 6 7 8 9 10 11 12
Temperature 51.0 51.3 52.5 54.2 56.5 59.1 61.8 64.5 67.0 69.1 70.6 71.5
Tube row 1 2 3 4 5 6 7 8 9 10 11
Temperature 51.1 51.9 53.3 55.4 57.8 60.5 63.2 65.8 68.1 69.9 71.1
30
7 Programming
7.2.1 Programming
– Select the "FILES" menu using the or key and call up by pressing .
– Select the "New" menu usingthe or keyand call up by pressing .
CNTRL BLOCK – Using the key
or confirm by pressing .
LID=105° NOWAIT AUTO– Enter the values
and press the , , keys. Change "Nowait" and "Auto" ( key)or confirm by pressing .
Initial denaturationT=95.0° 0:02:00
– Select command T (Temperature) using the key (it may be necessary to press the keyseveral times) and confirm by pressing .
– Enter the temperature, press the , keysand confirm by pressing .
– Enter the time (seconds:minutes:hours).
Press the , , keysand confirm by pressing .
Main-Menu Start FILES . . OPTIONS . . Lid IncubateSTANDARD – –/22.0° 10:22:06
FILES . . Edit UNNAMED Edit CNTRL BLOCK Load LID=0° Standard NOWAIT AUTO New end DeleteUNNAMED – –/22.0° 10:22:06
1 >0< 5
FILES . . Edit UNNAMED Edit CNTRL BLOCK Load LID=105° Standard NOWAIT AUTO New end DeleteUNNAMED – –/22.0° 10:22:06
FILES . . Edit UNNAMED Edit CNTRL BLOCK Load LID=105° Standard NOWAIT AUTO New 1 T=❋❋❋❋° ❋❋:❋❋:❋❋
Delete endUNNAMED – –/22.0° 10:22:06
9 5FILES . . Edit UNNAMED Edit CNTRL BLOCK Load LID=105° Standard NOWAIT AUTO New 1 T=95.0° ❋❋:❋❋:❋❋
Delete endUNNAMED – –/22.0° 10:22:06
>0< >0< 2
FILES . . Edit UNNAMED Edit CNTRL BLOCK Load LID=105° Standard NOWAIT AUTO New 1 T=95.0° 00:02:00 Delete endUNNAMED – –/22.0° 10:22:06

31
7 Programming
DenaturationT=95.0° 0:00:45
Programming: see page 30.
AnnealingT=61.0° 0:00:45
– Press the key for options for the temperature command (temperature- and time increment, ramp, ramp increment, gradient).The cursor must be on the program line number in front of the temperature command.
– Press the , keys and confirm by pressing .
– Press the keys and confirm by pressing .
– Press to proceed to Gradient or Elongation.
GradientPossible with Mastercycler gradient only.G=10.0°
– Enter the gradient,press the , keys andconfirm by pressing .
ElongationT=72.0° 0:00:45Select the command T.
– Press the , keys andconfirm by pressing .
– Press the keys andconfirm by pressing .
CycleGOTO 2 REP 19
– Select the GOTO command using the key (it may be necessaryto press the key several times) Confirm by pressing .
– Enter the line number for the beginning of the program section which is to be repeated. Confirm by pressing .Enter the number of repeats (REP). Confirm by pressing .
Note: The total number of cycles is REP + 1.
FILES . . Edit UNNAMED Edit Lid 105° Load NOWAIT AUTO Standard 1 T= 95.0° 0:02:00 New 2 T= 95.0° 0:00:45 Delete 3 T= 61.0° 0:00:45UNNAMED + 0.0 +0:00 – –/22.0° 10:22:06
6 1
4 5
1 >0<
FILES . . Edit UNNAMED Edit 1 T= 95.0° 0:02:00 Load 2 T= 95.0° 0:00:45 Standard 3 T= 61.0° 0:00:45 New + 0.0 +0:00 Delete R= 3.0°/s +0:0°/sUNNAMED G= 10.0° – –/22.0° 10:22:06
7 2
4 5
FILES . . Edit UNNAMED Edit 2 T= 95.0° 0:00:45 Load 3 T= 61.0° 0:00:45 Standard + 0.0 +0:00 New R= 3.0°/s +0:0 Delete G= 10.0°UNNAMED 4 T= 72.0° 00:00:45 – –/22.0° 10:22:06
FILES . . Edit UNNAMED Edit 3 T= 61.0° 0:00:45 Load + 0.0 +0:00 Standard R= 3.0°/s +0:0 New G= 10.0° Delete 4 T= 72.0° 00:00:45UNNAMED 5 GOTO❋❋❋ REP❋❋❋
– –/22.0° 10:22:06

32
7 Programming
7.2.2 Saving a program
Final elongationT=72.0° 0:02:00
Programming see page 30.
Cooling of samplesHOLD 22.0° ENTER
– Select the HOLD command using the key (it may be necessary to press the key several times) and confirm by pressing .
– Enter the temperature. Confirm by pressing .
– Exit the "New" menu using the key.
– To save, press the key; the device asks for the program name.
In the case of a new program, the device suggests the name "UNNAMED".
– Confirm the name by pressing or – if an other name is desired –delete by pressing (if the key is held down, the entire name is deleted; if the keys is pressed briefly, individual letters only are deleted).
– Enter the new program name.Select letters using the key. Press the key to move to the next position etc. and confirm by pressing .
If the program is to be saved under an existing name, the question appears:
FILES . . Edit UNNAMED Edit + 0.0 +0:00 Load R= 3.0°/s +0:0 Standard G= 10.0° New 4 T= 72.0° 00:00:45 Delete 5 GOTO 2 REP 19UNNAMED 6 T= 72.0° 00:02:00 – –/22.0° 10:22:06
FILES . . Edit UNNAMED Edit R= 3.0°/s +0:0 Load G= 10.0° Standard 4 T= 72.0° 00:00:45 New 5 GOTO 2 REP 19 Delete 6 T= 72.0° 00:02:00UNNAMED 7 Hold 22.0° ENTER – –/22.0° 10:22:06
FILES . . Edit UNNAMED Edit UNNAMED not saved Load SAVE: YES Standard ProgName: UNNAMED New DeleteUNNAMED – –/22.0° 10:22:06
FILES . . Edit UNNAMED Edit UNNAMED not saved Load SAVE: YES Standard ProgName: Gradient New DeleteUNNAMED – –/22.0° 10:22:06

33
7 Programming
If a program is not saved ("Save:NO"), it remains in the processing level and can be supplemented or modified by calling up "Edit". Safety checks in other sub-items prevent a program which has not been saved from being accidentally overwritten.
The internal memory can accommodate a maximum of 99 programs. The number possible depends on the length of the programs.
The program in the processing level can be started by pressing the key.
Note: The procedure for saving programs on a personal card is described in Sec. 9.3.
7.3 Modifying a programA program which is already in the internal memory or on a personal card can be modified by being loaded into the processing level. The program resident in the "Edit" processing level is thus deleted. If a program which has not yet been saved is in the processing level, it can be saved following a safety check prior to deletion.
– "Overwrite:YES"Confirm overwriting by pressing
.
If you do not want to overwrite the existing program, select "NO" using the key, press and enter a new name. Confirm the new name by pressing .
– Select the "FILES" menu using the or key and confirm by
pressing .
– Select the "Load" menu using the or key and call up by
pressing .
A list of existing programs appears in the display.
– Select the program using the or key and load by pressing .
FILES . . Edit UNNAMED Edit Testing... Load Gradient exists Standard Overwrite: YES New DeleteUNNAMED – –/22.0° 10:22:06
Main-Menu Start FILES . . OPTIONS... Lid IncubateSTANDARD – –/22.0° 10:22:06
FILES . . Load to Editor Edit STANDARD Load TEST1 Standard TEST2 New DeleteSTANDARD – –/22.0° 10:22:06
FILES... Edit STANDARD Edit 1 T= 94.0° 0:02:00 Load 2 T= 94.0° 0:00:15 Standard 3 T= 44.0° 0:00:15 New 4 T= 72.0° 0:00:30 Delete + 0.0° +0:01STANDARD R= 3.0°/s +0:0°/s – –/22.0° 10:22:06

34
7 Programming
Changing the program line– Using the keys, move the flashing cursor onto the parameter which is to be changed.
– Enter data using the digit blockor select between settings using the key orenter letters using the key.
Inserting a program line– Move the flashing cursor in front of the line.
The cursor must be positioned on the program line number.
– Press the key. A new line is inserted above the cursor.
– Select the command using the key.
Note: Press the key for options regarding the temperature command. In this case, the cursor must be positioned on the program line number in front of the temperature command.
Deleting a program line– Move the flashing cursor to the program line number.
– Press the key. The line is deleted.
– After a program has been changed, exit the "Edit" processing level by pressing the key.
– Confirm the safety check "Save:YES" by pressing .
– The program can be saved using the same name.Confirm the check "Overwrite:YES" by pressing .
– If the program should not be overwritten, and a new program is to be created, answer "Overwrite:" with "NO" ( and keys) and enter a new program name.
Changing and checking programs– Load the program that is to be changed / checked ("Load" menu; the program name must be in the
bottom left in the processing level).
– Change the program.
– Exit the program using the key. "Program not saved – Save YES" appears in the display.Either save the program or exit by pressing .Caution: If the changed program is not stored under a new name, there will be two different programs with the same name. The program which has been changed is in the processing level and the program which has not been changed is in the device memory.
– Start the program: Press the key. The program which has been changed starts running.
– Program end: "End of Program" appears in the display. Press the key.
– If you now want to save the program which has been changed, select the "Load" menu and press . "Program not saved – Save YES" appears in the display.
– Save the program: Press .
/
35
7 Programming
7.4 Creating programs using an example programIt is possible to program quickly with the aid of the "Standard" example program. A program does not need to be completely rewritten; the sample can be supplemented, modified and then saved under a new name.
– Select the "FILES" menu and call up by pressing .
– Select "Standard" and call up by pressing .
The example program is loaded into the processing level. It is structured in the following way:
Although the example program cannot be deleted, individual changes can be made. After changes have been made, the example program must be saved under the name "Standard". To restore the original example program, the "Standard" program in the "Delete" sub-menu must be deleted. When "Standard" ís called up, the original example program is reloaded into the processing level.
7.5 Deleting a program– Select the "FILES" menu and call up by pressing .
– Select the program name.
– Confirm by pressing . The program is deleted.
The procedure for deleting programs on a personal card is described in Sec. 9.3.
CNTRL BLOCK Temperature control for the block.
LID=105° Sets heated lid to 105 °C.
NOWAIT AUTO NOWAIT = Program is started immediately.AUTO = Lid heating is switched off automatically
when temperature (22 °C) is maintainedfor more than 5 minutes.
1 T=94.0° 0:02:00 Maintains 94 °C for 2 min. (initial denaturation)
2 T=94.0° 0:00:15 Maintains 94 °C for 15 secs. (denaturation)
3 T=44.0° 0:00:15 Maintains 44 °C for 15 secs. (annealing)
4 T=72.0° 0:00:30 Maintains 72 °C for 30 secs. (elongation)
5 GOTO 2 REP 24 Repeats 24 times from program step 2 onwards.The total number of cycles is 25.
6 T=72.0° 0:00:30 Maintains 72 °C for 30 secs. (final elongation)
7 HOLD 22.0° ENTER Cools down to 22 °C and maintains temperature.
end Program end
– Select "Delete" and call up by pressing .
A list of the existing programs appears in the display.
FILES . . Delete Program Edit TEST 1 Load TEST 2 Standard New DeleteSTANDARD – –/22.0° 10:22:06

36
7 Programming
7.6 Examples of programmingThe following passage contains several examples of the versatility of the commands and functions of the Mastercyclers.
7.6.1 Gradient PCR (for Mastercycler gradient only)The Gradient PCR is used to optimize temperatures in a PCR experiment. The gradient may be programmed with a temperature range of up to 20 °C with every temperature command.
The most common application is the determination of the optimal annealing temperature (see example), for which a gradient of, for example, ± 10 °C is built up. The recommended mean gradient is 5 °C higher than the calculated annealing temperature.
Gradient PCRTemperature control of tubes Control tubeTemperature control of lid lid 105°
Nowait auto1 Initial denaturation 94° 2 min2 Denaturation 94° 15 sec3 Annealing 60° 15 sec
Gradient G=10 °4 Elongation 72° 30 sec5 Number of cycles go to 2 Rep 296 Final elongation 72° 2 min7 Cooling and storage Hold 20° enter
End end

37
7 Programming
7.6.2 Hot Start PCRThe "Pause" command is used to interrupt the program. The most-recently entered temperature is maintained. A text explaining the reason for the interruption may be entered as required. After confirmation by pressing , the program is continued.
The "Hold" command enables all possible temperatures to be maintained until the program is continued by pressing .
In the exampleof a Hot Start PCR listed below, the program is stopped folllowing initial denaturation in order to add a reaction component. After the final elongation, the block is cooled down to room temperature.
Hot Start PCRTemperature control of tubes Control tubeTemperature control of lid lid 105°
Nowait auto1 Initial denaturation 94° 2 min2 Pause for adding substance Pause Adding3 Denaturation 94° 15 sec4 Annealing 55° 15 sec5 Elongation 72° 30 sec6 Number of cycles go to 3 Rep 297 Final elongation 72° 2 min8 Cooling and storage Hold 20° enter
End end

38
7 Programming
7.6.3 Touch Down PCRThe temperature increment, which can be programmed as desired with every temperature command, allows the temperature to be reduced or increased by a defined value with every cycle.
Touch Down PCR can be used to increase the specificity of the PCR by changing the the annealing temperature in succession from higher to lower temperatures.
In the example given, the annealing temperature is reduced by 1 °C per cycle for the first 15 cycles, until 50 °C has been attained. At this annealing temperature,14 additional cycles are carried out.
7.6.4 Long PCRThe time increment, which can be programmed as desired with every temperature command, enables a defined extension of the lag time at a specific temperature for each cycle.
With Long PCR, this function can be used to amplify long fragments for a successive extension of the elongation.
In the example given, the elongation time is extended by 10 seconds for each cycle, which means that, for the 30th cycle, the elongation time is 290 seconds longer than for the first cycle.
Touch Down PCRTemperature control of tube Control tubeTemperature control of lid lid 105°
Nowait auto1 Initial denaturation 94° 2 min2 Denaturation 94° 15 sec3 Annealing 65° 15 sec
Temperature increment –1 °4 Elongation 72° 30 sec5 Number of cycles go to 2 Rep 156 Denaturation 94° 15 sec7 Annealing 50° 15 sec8 Elongation 72° 30 sec9 Number of cycles go to 6 Rep 1310 Final elongation 72° 2 min11 Cooling and storage Hold 20° enter
End end
Long PCRTemperature control of tubes Control tubeTemperature control of lid lid 105°
Nowait auto1 Initial denaturation 94° 2 min2 Denaturation 94° 15 sec3 Elongation 68° 10 min
Time increment +0:10 sec4 Number of cycles go to 2 Rep 295 Final elongation 72° 15 min6 Cooling and storage Hold 20° enter
End end
39
7 Programming
7.6.5 PCR "Fingerprinting" (RAPD-PCR)Variable heating and cooling rates, which can be programmed as desired with each temperature command, enable the temperature-control speed to be aligned to the temperature.
With the RAPD-PCR process or with PCR with A/T-rich primer/template hybrids, it may be necessary to heat up carefully after annealing.
In the example given, the elongation temperature is attained at a speed of 1 °C/s.
Temperature-control speeds, which may be as slow as the user desires, can be selected by means of program loops, with which a gradual change in temperature is obtained via temperature increments.
In the following example, the elongation temperature is raised slowly to 72 °C after annealing with the aid of a program loop.
RAPD-PCRTemperature control of tube Control tubeTemperature control of lid lid 105°
Nowait auto1 Initial denaturation 94° 2 min2 Denaturation 94° 15 sec3 Annealing 55° 15 sec4 Elongation 72° 30 sec
Heating rate R=1 °/s5 Number of cycles go to 2 Rep 296 Final elongation 72° 2 min7 Cooling and storage Hold 20° enter
End end
RAPD-PCRTemperature control of tube Control tubeTemperature control of lid lid 105°
Nowait auto1 Initial denaturation 94° 2 min2 Denaturation 94° 15 sec3 Annealing 55° 15 sec4 Elongation 56° 7 sec
Temperature increment Heating rate
+1°R=0.3°/s
5 Number of cycles go to 4 Rep 166 Number of cycles go to 2 Rep 297 Final elongation 72° 2 min8 Cooling and storage Hold 20° enter
End end
40
7 Programming
7.6.6 Sample cooling and subsequent PCRIf sensitive samples should remain cooled until the PCR takes place, the thermoblock must be preheated. This can be carried out in two ways:
1. Set the "Incu" menu to 4 °C and "Heater is On".
2. Adapt an initial program and connect via a "LINK" command.For this purpose, the temperature of the thermoblock is brought to 4 °C using the first program. After the samples have been inserted into the cold thermoblock, the second program with the PCR protocol is called up via a LINK command.
Programming should take place as follows:
Program 1 e.g. COOL
CNTRL TUBE The entries in the first program are also valid for the programs which are addedLid via LINK. The lid setting "Fix" must be selected.NOWAIT FIX
1 Hold 4 °C Enter The thermoblock cools until the processing program (e.g. PCRPROT) is started via the LINK command by pressing .
2. Link PCRPROT Link to the second program with the PCR protocol. end
Program 2 PCRPROT
CNTRL TUBE If the program also contains the "Tube control" command, further entries for tube type and filling volume are no longer necessary; the entries made for the first program are valid for all further programs.

41
8 Short instructions
It is essential to read the operating manual completely before working with the short instructions.
Switching on the device
Programming
– Select the FILES menu using the keys and press .
Changing the "Standard" example program
– Select Standard using the key and press .– Select the program commands using the key, enter the settings or the texts and confirm by pressing .– Using the , , , keys, move the cursor to or between the entry positions.
Program commands
T Temperatures, times, increments, ramp, gradientHOLD To maintain temperature entered until program is continued with
Enter
(4–99
°
C)PAUSE To interrupt program (e.g. for addition of reagent) until program is continued with
Enter
(0–11 characters)GOTO/REP To repeat program parts and number of cycles (1–40 lines, 1–99 repeats)SOUND Acoustic signal (1–10 tones)LINK To branch to other programs (1–5 programs)
– Confirm entries by pressing .– Enter the options for the temperature command using the key. The cursor must be positioned on the program line
number.
– Complete programming by pressing .– Save the program.
CNTRL To define temperature regulation BLOCK For the thermoblock TUBE For different tubesLid To determine the lid temperatureNOWAIT To start a program immediatelyWAIT Program waits for lid temperature AUTO Lid switches off at < 22
°
Cand time > 5 min.
FIX Lid switches off at end of program
T Temperature (0–99
°
), Time (0:00:01–9.59:59)
Temperature increment (
±
0.0 –
±
10.0
°
), Time increment (0:01–1:00),
R Ramp (0.3–3
°
C/s), Ramp increment (
±
0.1 –
±
1.0
°
/s)G Gradient (
±
10
°
C) (for Mastercycler
gradient only)
Menu nameTo start any program ProgrammingSystem settingsTo preheat the lidTo temperature-control block and heated lidProgram in processing levelNominal/actual block temperatureLid temperature(only when lid is switched on)
Main-Menu Start FILES . . OPTIONS . . Lid IncubateSTANDARD – –/25.0° Lid:105° 10:22:06
/
To edit the program in the processing level
To load and process the example program
To delete any program
To load and edit any program
To create a new program
FILES . . Edit Load Standard New DeleteSTANDARD – –/22.0° 10:22:06
FILES . . Edit STANDARD Edit CNTRL BLOCK Load LID=105° Standard NOWAIT AUTO New 1 T=94.0° 0:02:00 Delete 2 T=94.0° 0:00:15STANDARD 3 T=44.0° 0:00:15 – –/22.0° 10:22:06
FILES . . STANDARD Edit 3 T=44.0° 0:00:15 Load 4 T=72.0° 0:00:30 Standard +0.0° +0:01 New R= 3.0°/s +0.0°/s Delete G=0.0°STANDARD 5 GOTO 2 REP 24 – –/22.0° 10:22:06
8 Short instructions
Time

42
8 Short instructions
Adding a program line
– Using the keys, move the cursor to the front of the line.– Press the key; a new line is then added above the cursor.
Deleting a program line
– Using the keys, move the cursor onto the program line number.– Press the key; the line is then deleted and the cursor moves to the next line.
System settings
To temperature-control lid and block Incubate menu Block temperature 37
°
C, Heater is ONTo preheat the lid Lid menu LidTemp 105
°
C, Heater is ONTo print programming OPTION menu Printout Editor: YESTo print program sequence OPTION menu PrintProtocol: ON
Continuing an interrupted program
– Press the key.
– Using the key, select "Resume".
– Confirm by pressing .
Saving a program
– Exit the program using the key.
– Answer the question "Save: YES" by pressing .
– Define the program name using the key.
– Confirm the name by pressing .
Starting a program
– Switch on the device. If necessary, preheat the lid and the block.
– Select the "Start" menu using the keys and press .
– Select the program name using the keys and press .
– With CNTRL TUBE, select the tube typeusing the key. Enter the filling volume.0.2 ml/plate: 5 to 50
µ
l0.5 ml/thin: 5 to 100
µ
l– Confirm by pressing .
The program starts immediately.
– To see the program run time, press the key.
Interrupting a program
– Press the key.
– Using the key, select the "Pause" program.
– Confirm by pressing .
Stopping a program
– Press the key.
– Confirm "Stop" by pressing .
– Exit the program by pressing .
FILES . . Edit STANDARD Edit STANDARD not saved Load SAVE: YES Standard ProgName: STANDARD New DeleteSTANDARD – –/22.0° 10:22:06
/
/
/
/
Main-Menu Run a Program: Start STANDARD FILES . . TEST1 OPTIONS . . TEST2 Lid Incubate STANDARD – –/25.0° 10:22:06
Main-Menu Run a Program: Start 1 T=95.0° 0:00:05 FILES . . OPTIONS . . Lid IncubateRunning/STANDARD Cyc:4 95.0/94.5° Lid:105° 10:22:06
Main-Menu Run a Program: Start STANDARD running . . . FILES . . Program: PAUSE OPTIONS . . Lid IncubatePaused/STANDARD 95.0/94.5° Lid:105° 10:22:06
Main-Menu Run a Program: Start STANDARD running . . FILES . . Program: STOP OPTIONS . . Lid IncubateSTANDARD 95.0/94.5° Lid:105° 10:22:06

43
9 Personal card
Depending on the length of the program, a maximum of ten programs can be stored on a personal card. When a program is started from a personal card, the program is loaded into a temporary memory (but not into the internal memory or into the processing level) for the duration of the program processing.
Programs can be transferred to other devices of the Mastercycler
, Mastercycler
gradient and Mastercycler
personal using the personal card.
For the "Start", "FILES/Load", "FILES/Edit" and "FILES/Delete" menus, a difference will be made between the memory of the personal card
⟨
MCARD
⟩
and the internal memory of the Mastercycler
⟨
INTERN
⟩
only when the personal card has been inserted.
Menus "Start", "FILES/Load" and "FILES/Delete" Only the programs of a memory appear in the display. The memory which is currently closed appearsin the display at the head of a program list as
⟨
INTERN
⟩
or
⟨
MCARD
⟩
. The closed memory can be opened by selecting and then confirmed by pressing . This also closes the previous memory.
Menu "FILES/Edit" The memory target (Target) must be selected using the key before the program name is determined.
9.1 Safety precautions
The gold-colored contact area on the personal card must not be damaged, scratched or contaminated in any way. Avoid touching the contact area with your fingers.
Electrostatic charges can destroy stored programs.
9.2 Operation
Inserting the card
– With the arrow facing forwards and the gold-colored contact area facing upwards, insert the card into the slot under the control panel.
– Insert the card up to the stop. It clicks into place automatically.
Removing the card
– Insert the card up to the stop.
– The card is pushed out by spring pressure and can then be removed.
Formatting the card
A new card must be formatted. The request for formatting appears automatically in the display only when it is necessary. The request for formatting is also made if the card has been erroneously inscribed.
– "Memory card not valid"Confirm "Format: Yes" by pressing .
The nominal/actual steps appear in the bottom line of the display.
9 Personal card

44
9 Personal card
9.3 Processing programs
Starting a program from a card
– Select the "Start" menu item and call up by pressing .
– Select
⟨
MCARD
⟩
and call up by pressing .
If the memory name
⟨
INTERN
⟩
appears in the display instead of
⟨
MCARD
⟩
, this means that the program memory of the personal card has already been opened.
– Select a program and call up by pressing .
Note:
For starting purposes, programs are not loaded into the internal memory or into the "Edit" processing level. After the program has ended, the program which has been started by the card is no longer available on the device.
Deleting a program from a card
– Select the "FILES/Delete" menu and call up by pressing .
– Select
⟨
MCARD
⟩
and call up by pressing . If the memory name
⟨
INTERN
⟩
appears in the display instead of
⟨
MCARD
⟩
, this means that the program memory of the personal card has already been opened.
– Select a program and delete by pressing .
Loading a program from a card into the processing level
– Select the "FILES/Load" menu and call up by pressing .
– Select
⟨
MCARD
⟩
and call up by pressing . If the memory name
⟨
INTERN
⟩
appears in the display instead of
⟨
MCARD
⟩
, this means that the program memory of the personal card has already been opened.
– Select a program and load by pressing .
Saving a program on a card
– After a program has been compiled or modified, exit the processing level by pressing .
– Confirm the inquiry "Save: YES" by pressing .
– For the inquiry "Target:INTERN", select
⟨
MCARD
⟩
using the key and confirm by pressing .
– Enter the program name (max. 8 characters) and confirm by pressing .
Note:
The program can be saved under the same name as in the memory of the Mastercycler.
Programs with LINK commands
A program cannot be started from a personal card if it contains program branching – LINK commands – to other programs on the personal card. It is possible to start the program if branching to another program in the internal memory of the devices is available.
A program from the internal memory cannot call up a program from the personal card using a LINK command.

45
10 Interface description
10.1 Printer / PC connection
Printer connection
The printer connection socket (25 pins, Centronics parallel interface, PC compatible) is located below the PC connection socket on the right-hand side of the device (see Sec. 4.1, Fig. 2.6).
Connect the Mastercycler
or Mastercycler
gradient and printer via a commercially available PC printer cable. The cyclers and printer must be switched off during installation. If the printer is not used frequently,the printer cable should be disconnected from the cycler port and only be installed when needed.
The parameters for the printer are set in the "OPTIONS/Printer" menu.
Print programming
Printout Editor: NO
Printing is switched off.
Printout Editor: YES
The program in the "Edit" menu is printed out. Select "YES" using the key and confirm by pressing . "Printout Editor: NO" is selected automatically after the printout.
Print program protocol
Print Protocol: OFF
The program sequence is not printed out.
Print Protocol: ON
The program sequence is printed out.
10 Interface description

46
10 Interface description
Example of a program printout:
✼ ✼ M A S T E R C Y C L E R g r a d i e n t 5 3 3 1 ✼ ✼ Eppendorf-Netheler-Hinz GmbHVersion x.xx.xxTime: 13:41:02Date: 14/Apr/1999
✼ ✼ ✼ ✼ ✼ ✼ ✼ ✼ ✼ ✼ ✼ ✼ ✼ ✼ ✼ ✼ ✼ ✼ ✼ ✼ ✼ ✼ ✼ ✼ ✼ ✼
L I S T I N GProgram: STANDARDCreated: 13/Apr/1999 11:46Step:
CNTRL BLOCK
LID=105C NOWAIT AUTO
1 T = 94.0C 0:02:00 +0.0C + 0:00
R = 3.0C/s +0.0C/sG = 0.0C
2 T = 44.0C 0:00:15 +0.0C + 0:00
R = 3.0C/s +0.0C/sG = 0.0C
. .
. .
. .
7 HOLD 22.0C ENTER
E N D O F L I S T I N G
Program nameDate last stored

47
10 Interface description
Example of a program protocol:
Prior to the start, the program is printed (see page 46) and during the program sequence, all temperatures and times are printed in a protocol.
Program ... started at – Date and time of start of programInitial Blocktemp – Block temperature at startInitial Lidtemp – Lid temperature at startRun Time – Estimated run timeFinish Time – Estimated time for end of programCount – Count of program stepsCycle – Count of cyclesStep – Program step no. from programmingCommand – Command type and programmed valuesTime – Time at end of a commandCompletion Time _ Time at end of program
Program STANDARD started at Date: 15/Apr/1999 7:56:12Initial Blocktemp: 24.7 CInitial Lidtemp: 25 CRun Time: 1:26Finish Time: 15/Apr/1999 9:22
Count Cycle Step Command Time
Tube:0.2 ml Fill.Vol.:20 µl
CNTRL TUBE 7:56:21
LID=105C NOWAIT AUTO 7:56:22
1 1 1 T=94.0C 0:02:00+0.0C + 0:00
R=3.0C/s +0.0C/sG=0.0C 7:59:05
2 1 2 T=94.0C 0:00:15+0.0C + 0:00
R=3.0C/s +0.0C/sG=0.0C 7:59:21
.
.
Completion Time: 15/Apr/1999 9:24:55
E N D O F P R O T O C O L

48
10 Interface description
PC connection
The 9 pin PC connection socket (serial interface RS 232) is located above the printer port on the right-hand side of the device (see Sec. 4.1, Fig. 2.5).
The parameters for the computer are set in the "OPTIONS/GENERAL/Remote" menu.
Selection of transfer rate: Baud rate 19,200, 9,600, 4,800, 2,400 or 1,200
Detailed information about PC connection and the connecting cable required is available on request.
The computer to be connected must correspond to the EN 60950 or UL 1950 regulations.
A special operating manual is available for serial communication. Further information is available on request.
10.2 Program transfer
If programs are stored on a personal card, they can be transferred via the card to other Mastercycler
, Mastercycler
gradient and Mastercycler
personal devices. Programs created on a Mastercycler
personal can also be transferred to a Mastercycler
gradient. The Mastercycler
gradient has an additional function, whereby a Gradient function is added to the temperature command, i.e. a temperature gradient can be built up in the thermoblock. This function cannot be used when programs are transferred to the Mastercycler
and Mastercycler
personal.

49
The devices do not require regular maintenance.
It can be cleaned using water or a mild laboratory cleaning agent.The device should not come into contact with organic solvents or aggressive solutions. Ensure that no liquid enters the device. For safety reasons, the device must be switched off and disconnected from the power supply before cleaning begins.
The electrical safety fuses are located between the main power switch and the main power plug at the rear of the device. They can be removed by sliding them up one catch. Only fuses with the correct voltage values may be used (information on the fuse type can be found at the rear of the device).
The device may only be opened by qualified service personnel. The warranty will not be honored in the event of damage caused by unauthorized servicing.
11 Maintenance

50
12 Troubleshooting
Programming errors or errors regarding the handling of the personal card can be eliminated after the cause of the error has been established.
Technical errors can be caused by interference (e.g. power failure or power fluctuations). In some cases, it is possible to eliminate the error by switching off the device for a short period. Wait ten seconds before switching on the device again. If the error recurs, contact a service technician.
12.1 Error messages
Error message Cause Solution
B
LOCK ChkSumErr Technical defect. Contact SERVICE.
B
LOCK TOO HOT! Defective regulation or defective electronics.
Contact SERVICE.
C
ard changed Card removed immediately before being inscribed.
Insert card correctly and repeat procedure.
C
ard content not o.k. Content of card is defective. Card must be formatted.Automatic procedure when program is saved.
C
ard not in slot Card removed during saving process. Insert card correctly and repeat procedure.
E
nter Tube Not all entries have been made fora program which has been started.
Enter tube type and sample volume.
E
rr GOTO (1) Branching to a program line number is impossible because this program line number is in a program area which has already been selectedfor repeating using another GOTO command.
Check GOTO command and modify or delete if necessary. Program line number for additional GOTOcommand must not be in a section which is already addressed by a GOTO command.
E
rr GOTO (2) More than three GOTO commands used for one program range.
Three GOTO commands can be used in one program range when the areas which have been addressed overlay each other completely, i.e. theprogram area of the second command is greater than that of the first command. The third GOTOcommand must cover an even greater area than that of the second command.
E
rr Invalid Invalid command.Parameter has not been entered.
Enter command completely or delete command.
12 Troubleshooting
51
12 Troubleshooting
E
rr Link (1)...Line ..
LINK command cannot be executed.Program not found.Program name and program line of defective LINK command appear in the display.
Only programs from the internal memory can be called up by the LINK command. Programs on a personal card and the program in the processing level ("Edit") cannot be called up by the LINK command.
E
rr Link (2)...Line ..
Too many programs are connected by LINK commands.Program name and program line of defective LINK command appear in the display.
A maximum of five programs, i.e. four LINK commands, can be processed in succession.
E
rr No Program No executable program available in memory.
Load program from memory or personal card, or define a program in "Edit" menu and restart.
F
AN ERROR! Defective internal fan. Switch off device.Contact SERVICE.
F
AT Full Number of programs which can be administrated has been exceeded.Internal memory: 99 programspersonal card: 10 programs
Delete programs which are not required.
I
nternal EE-Err Technical defect. Contact SERVICE.
L
EFT BLOCK DEFEKTIV!
Defective regulator or electronicson left-hand block.
Switch off device.Contact SERVICE.
L
ID TOO HOT! Defective electronics. Contact SERVICE.
L
ink not found Program branching is not possible because the program which was supposed to be called up has been deleted.
Check the LINK command.Enter the missing program.
L
ink Error Program branching is not possible because the program which was supposed to be called up has been deleted.
Check the LINK command.Enter the missing program.
M
Card Error The memory of the personal card is defective.
Evaluate further messages.
M
emory corrupted The internal memory is defective. The internal memory must be deleted.This deletes all programs.
Error message Cause Solution

52
12 Troubleshooting
M
emory Error The internal memory for programsis defective.
Evaluate further messages.
M
emory full! Memory is full. Before storing, delete programs which are not required.
M
emoryCard (Blank)
Card has incorrect logicalidentification and/or is blank.
Card must be formatted.Automatic procedure when program is saved.
M
emoryCard Defective!
Card is defective. Use a new card.
M
emoryCard HdChksumErr
Error in check sum. Card must be formatted.Automatic procedure when program is saved.
M
emoryCard ManIDErr
Incorrect identification. Card must be formatted.Automatic procedure when program is saved.
M
emoryCard MemOverErr!
Incorrect memory address. Card must be formatted.Automatic procedure when program is saved.
M
emoryCard MemRangeErr
Error in memory range. Card must be formatted.Automatic procedure when program is saved.
M
emoryCard MemSizeErr
Incorrect memory size. Card must be formatted.Automatic procedure when program is saved.
M
emoryCard MemUnderErr!
Incorrect memory address. Card must be formatted.Automatic procedure when program is saved.
M
emoryCard Missing!
No card has been inserted. Insert card.
M
emoryCard Not Valid
Card is invalid. – Insert card correctly (check that card is facing in the correct direction).
– Card should be formatted before saving begins.
M
emoryCard Read Err!
Card cannot be read. Insert card correctly (check that card is facing in the correct direction).
Error message Cause Solution
53
12 Troubleshooting
M
emoryCard Read-Only!
Card is marked as write-protected. Card must be formatted.Automatic procedure when program is saved.
M
emoryCard Write Err!
Writing error on card. – Insert card correctly (check that card is facing in correct direction).
– Do not touch/move card during saving.
M
ID BLOCK DEFEKTIV!
Defective regulator or electronicson middle block.
Switch off device.Contact SERVICE.
N
ame Invalid! Program name contains an invalid character.
Enter program name again.
P
OWER ERROR! Voltage error or defective fuse. Contact SERVICE.
P
rinter: OFF LINE Printer is not ready to receive. Select the "ON LINE" printer setting.
P
rinter: no response No printer is available or the printeris not switched on.
– Select "OFF" in the menu OPTION/Printer/Print Protocol.
– Switch on the printer.
P
rogram is running! A program is being processed. Lid temperature cannot be modified at the moment.
P
rogram too large! Program is too large. Max. 40 program lines possible.
R
estarting Program! A power failure occurs or the deviceis switched off briefly when a program is running.
The program continues automatically.
R
IGHT
BLOCK DEFEKTIV!
Defective regulator or electronicson right-hand block.
Switch off device.Contact SERVICE.
S
LOWING DOWN! The heating rate or cooling rate has slowed down.
If error recurs, contact SERVICE.
S
teps free Display of free memory spaces is < 100 steps. 1 step = 1 program line.
Delete programs which are not required or store them on the personal card.
T
Sensor_Err – Permitted operating conditions have not been maintained.
– Technical defect.
– Operate device at permitted temperature and humidity only
– Contact SERVICE.
Error message Cause Solution

54
12 Troubleshooting
V
alue out of range! Value is not within the permittedvalue range.
The closest permitted value is entered automatically.
W
arn Ramp Max...Line ...
The ramp is limited to 3
°
C/s. Check entries for ramp and ramp increment, and change entries if necessary.
W
arn Ramp Min...Line ...
The ramp is limited to 0.3
°
C/s. Check entries for ramp and ramp increment, and change entriesif necessary.
W
arn Temp Max Temperature limits of 99
°
C exceeded. If program is started, temperature is limited to 99
°
C.
Check temperature commandsand reduce value of temperature increment so that only values below 99
°
C can be reached.
W
arn Temp Min Temperature limit of 4
°
C not reached. If program is started, temperature is limited to 4
°
C.
Check temperature commandsand modify values of temperature increment so that only values above 4
°
C can be reached.
W
arn Time Max Cycle time of 9:59:59 exceeded.If program is started, cycle time is limited to 9:59:59.
Check temperature commands and modify values of time increment so that only values below 9:59:59 can be reached.
W
arn Time Min Cycle time of 0:00:01 not reached. If program is started, cycle time islimited to 0:00:01.
Check temperature commands and modify values of time increment so that only values above 0:00:01 can be reached.
Error message Cause Solution
55
12 Troubleshooting
12.2 Test program
This program can be used to monitor the thermal and electrical functions of the built-in heating and cooling elements.
The basis of this program is the monitoring of individual factors which are necessary for setting specific temperatures for heating and cooling. The result is provided in the form of a number (index), which indicates the condition of these elements. The device status can be documented by repeating the test program at regular intervals.
How to execute the program
All positions of the block of the Mastercycler
and Mastercycler
gradient remain empty (i.e. no tubes are inserted). The heated lid is closed but not locked. Please ensure that the device has been set up correctly. The test should take place at room temperature (22
°
C); any deviations in the ambient conditions when the test is repeated should be recorded.
– Select the test program (Main-Menu/OPTIONS../GENERAL../VALID..../TEST) and confirm by pressing
.
– When a printer is connected, select "Use printer:YES" using the key and confirm by pressing .
– Start the program by pressing the key.
Note
:
The duration of the program is approximately 25 minutes; no more entries are necessary during this period.
The program ends with an index value appearing in the display.
– Exit the program by pressing the key.
VALID . . . . Test Validate Calibrate
UNNAMED – –/22° 10:22:01
VALID . . . . Test Test Use Printer: YES Validate Calibrate
UNNAMED – –/22° 10:22:02
VALID . . . . Test Test Status: Press Start Validate Calibrate
UNNAMED – –/22° 10:22:03
VALID . . . . Test Test Results: Validate Index: xx.xx Calibrate
UNNAMED – –0/22° 10:22:04
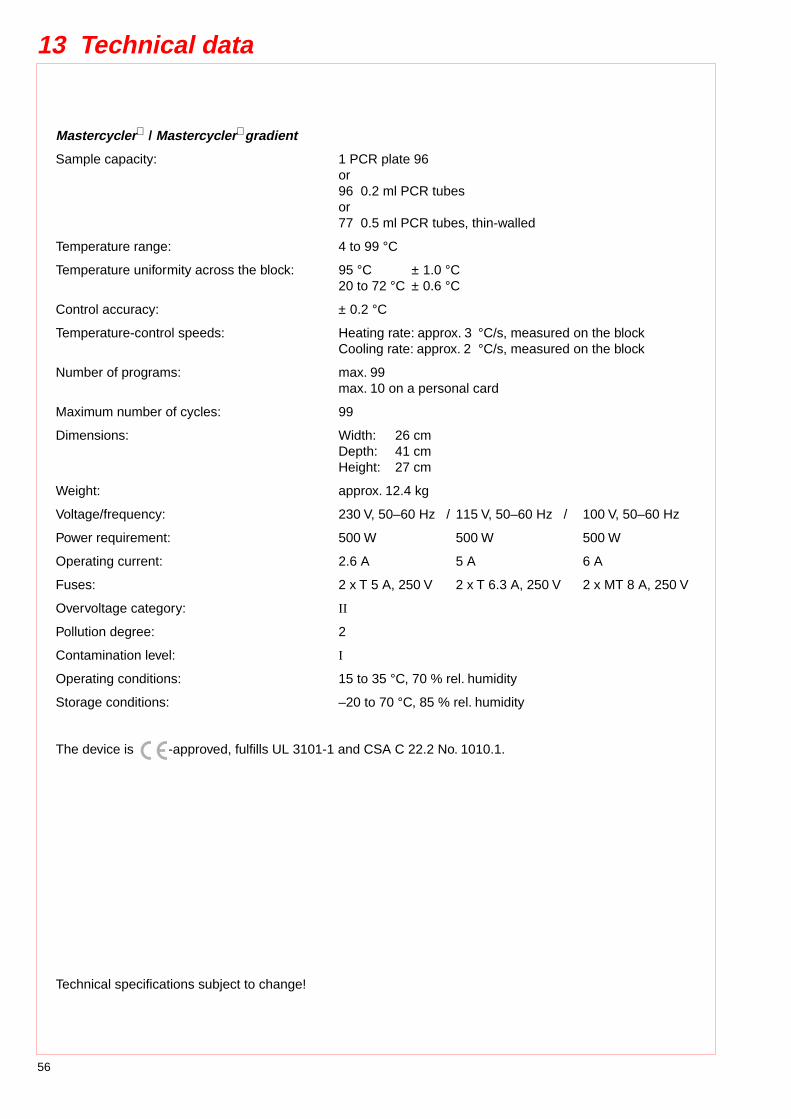
56
Mastercycler
/
Mastercycler
gradient
Sample capacity: 1 PCR plate 96or96 0.2 ml PCR tubesor77 0.5 ml PCR tubes, thin-walled
Temperature range: 4 to 99
°
C
Temperature uniformity across the block: 95
°
C
±
1.0
°
C20 to 72
°
C
±
0.6
°
C
Control accuracy:
±
0.2
°
C
Temperature-control speeds: Heating rate: approx. 3
°
C/s, measured on the blockCooling rate: approx. 2
°
C/s, measured on the block
Number of programs: max. 99max. 10 on a personal card
Maximum number of cycles: 99
Dimensions: Width: 26 cmDepth: 41 cmHeight: 27 cm
Weight: approx. 12.4 kg
Voltage/frequency: 230 V, 50–60 Hz / 115 V, 50–60 Hz / 100 V, 50–60 Hz
Power requirement: 500 W 500 W 500 W
Operating current: 2.6 A 5 A 6 A
Fuses: 2 x T 5 A, 250 V 2 x T 6.3 A, 250 V 2 x MT 8 A, 250 V
Overvoltage category:
II
Pollution degree: 2
Contamination level:
I
Operating conditions: 15 to 35
°
C, 70 % rel. humidity
Storage conditions: –20 to 70
°
C, 85 % rel. humidity
The device is -approved, fulfills UL 3101-1 and CSA C 22.2 No. 1010.1.
Technical specifications subject to change!
13 Technical data
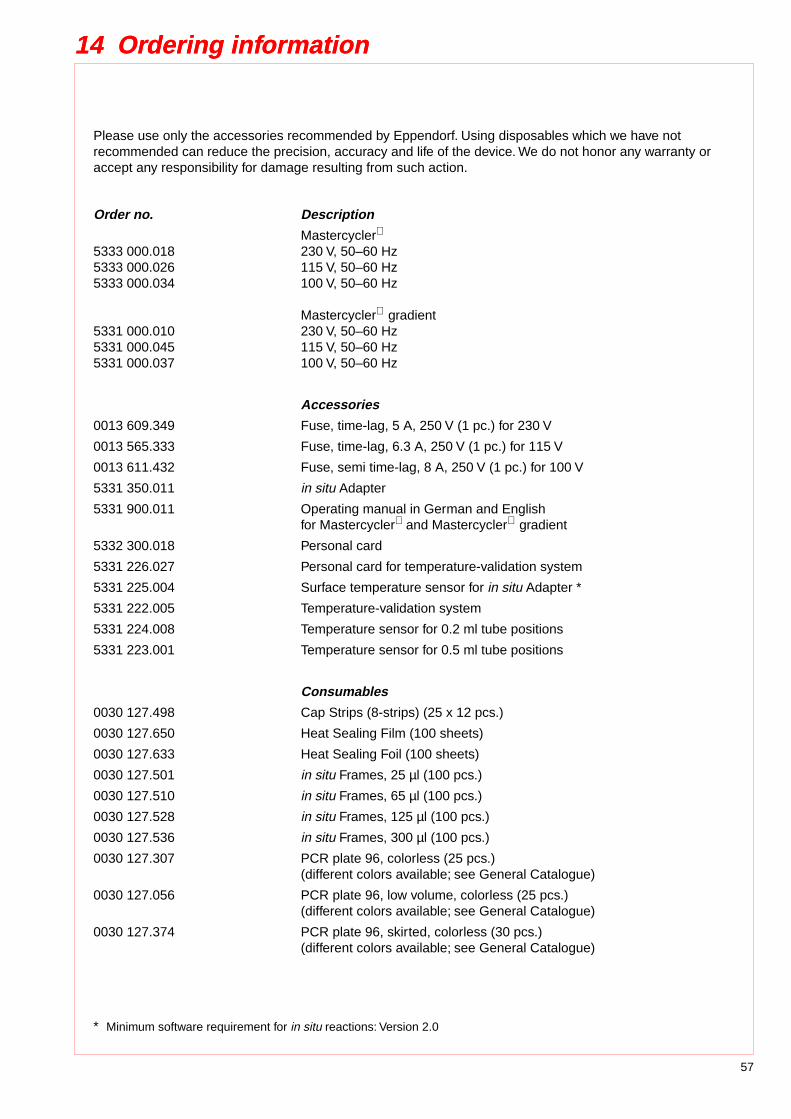
57
14 Ordering information
Please use only the accessories recommended by Eppendorf. Using disposables which we have not recommended can reduce the precision, accuracy and life of the device. We do not honor any warranty or accept any responsibility for damage resulting from such action.
Order no. Description
Mastercycler
5333 000.018 230 V, 50–60 Hz5333 000.026 115 V, 50–60 Hz5333 000.034 100 V, 50–60 Hz
Mastercycler
gradient 5331 000.010 230 V, 50–60 Hz5331 000.045 115 V, 50–60 Hz5331 000.037 100 V, 50–60 Hz
Accessories
0013 609.349 Fuse, time-lag, 5 A, 250 V (1 pc.) for 230 V
0013 565.333 Fuse, time-lag, 6.3 A, 250 V (1 pc.) for 115 V
0013 611.432 Fuse, semi time-lag, 8 A, 250 V (1 pc.) for 100 V
5331 350.011
in situ
Adapter
5331 900.011 Operating manual in German and Englishfor Mastercycler
and Mastercycler
gradient
5332 300.018 Personal card
5331 226.027 Personal card for temperature-validation system
5331 225.004 Surface temperature sensor for
in situ
Adapter *
5331 222.005 Temperature-validation system
5331 224.008 Temperature sensor for 0.2 ml tube positions
5331 223.001 Temperature sensor for 0.5 ml tube positions
Consumables
0030 127.498 Cap Strips (8-strips) (25 x 12 pcs.)
0030 127.650 Heat Sealing Film (100 sheets)
0030 127.633 Heat Sealing Foil (100 sheets)
0030 127.501
in situ
Frames, 25
µ
l (100 pcs.)
0030 127.510
in situ
Frames, 65
µ
l (100 pcs.)
0030 127.528
in situ
Frames, 125
µ
l (100 pcs.)
0030 127.536
in situ
Frames, 300
µ
l (100 pcs.)
0030 127.307 PCR plate 96, colorless (25 pcs.)(different colors available; see General Catalogue)
0030 127.056 PCR plate 96, low volume, colorless (25 pcs.)(different colors available; see General Catalogue)
0030 127.374 PCR plate 96, skirted, colorless (30 pcs.)(different colors available; see General Catalogue)
*
Minimum software requirement for
in situ
reactions: Version 2.0
14 Ordering information

58
14 Ordering information
Consumables
0030 127.480 PCR Film, adhesive (100 sheets)
0030 127.471 PCR Foil, adhesive (100 sheets)
0030 124.200 PCR tubes, 0.2 ml, colorless (1000 pcs.)
0030 124.502 PCR tubes, 0.5 ml, colorless, thin-walled (500 pcs.)
0030 124.227 PCR tubes 0.2 ml, colorless, 8-strip (8 x 125 pcs.)
0030 121.023 Safe-Lock microcentrifuge tubes, 0.5 ml, colorless (500 pcs.)
0030 127.463 Sealing Mat 96 (5 pcs.)
Recommended auxiliary equipment
5425 715.005 Adapter for 0.2 ml PCR tubes for 1.5/2.0 ml rotor (6 pcs.)**
5425 716.001 Adapter for 0.5/0.6 ml tubes for 1.5/2.0 ml rotor (6 pcs.)**
0030 127.153 Capping Aid, sealing PCR tubes and plates (1 pc.)
4830 000.017 Eppendorf Biomaster
4830and Mastertips
for contamination-free pipettingaccording to the positive-displacement principlein the volume range from 1
µ
l to 20
µ
lBiomaster Kit = 1 Biomaster and 96 Mastertips
0030 127.641 Foil Stripper
0030 124.243 Frame for work tray (set of 5)
5390 000.016 Heat Sealer 115 V / 60 Hz
5390 000.024 Heat Sealer 230 V / 50 Hz
0030 127.455 PCR Rack, random colors (10 pcs.)
0030 124.235 Work tray for 0.2 ml PCR tubes (set of 10 )
PCR Reagents
0032 003.001 dNTP (Deoxynucleotide) Mix, 10 mM (200
µ
L)
0032 003.109 dNTP (Deoxynucleotide) Mix, 10 mM (1000
µ
L)
0032 003.206 dNTP set (Deoxynucleotides), set of 4, 100 mM (4 x 100
µ
L)
0032 003.303 dNTP set (Deoxynucleotides), set of 4, 100 mM (4 x 250
µ
L)
0032 002.404 MasterTaq Kit (100 U)
0032 002.501 MasterTaq Kit (250 U)
0032 003.702 MasterTaq Kit (1000 U, 4 x 250 U)
0032 002.200 Taq DNA Polymerase (100 U)
0032 002.307 Taq DNA Polymerase (250 U)
0032 003.508 Taq DNA Polymerase (1000 U, 4 x 250 U)
**
For centrifugation

59
A
Actual temperature 22Annealing 31
B
Baud rate 15BLOCK 18, 25Brightness regulator 6
C
Command AUTO 26, 41CNTRL 20, 22, 25, 41FIX 26, 41GOTO 28, 50GOTO/REP 41HOLD 28, 32, 40LINK 28, 44, 51NOWAIT 20, 26, 41PAUSE 28, 37SOUND 28WAIT 20, 26, 41
Creating new programs 29Cursor 7, 8, 31, 34Cycle 31
time 26, 54
D
Display 8Denaturation 29, 30, 31
E
Elongation 29, 31END 29Entering date 15Example program 11, 35, 41
F
Filling volume 22, 25
G
Gradient 3, 4, 14, 26, 27, 29, 31, 36
H
Heated lid 4, 17, 18, 20, 26
I
in situ
Adapter 3, 19INTERN 43, 44
L
Locking button 6
15 Index
M
Main menu 8, 9, 21, 22Main power switch 6Maintenance 49MCARD 43, 44Menu
Delete 11, 41Edit 10, 41Editor 12, 45FILES 10GENERAL 15Gradient 13Incubate 18, 20, 41Lid 17, 26Load 11, 41New 11, 30, 41OPTIONS 12, 45Printer 13Standard 11, 35Start 10VALID 16
N
Nominal temperature 22, 26
O
Ordering information 57
P
Pause 23, 24, 42PC connection socket 6Peltier element 3Personal card 5, 43, 50, 52
reader 6Power failure 15Printer connection socket 6, 45Processing level 8, 9, 10, 11, 21, 33, 41, 44Program
line, adding 34line, deleting 34line number 22, 26, 28, 31, 41, 42name 10, 11, 21, 32, 44sequence 47sequence, printing 42, 45– aborting 8, 24, 42– changing 33, 34– continuing 24, 42– deleting 35, 41– interrupting 8, 23– loading 33– saving: see "storing"– starting 21– storing 10, 32, 42– transferring 48

60
R
Ramp 26, 27, 39, 41, 54Ramp increment 26, 27, 41, 54Restart 15Resume 24, 42Reverse sign 7Run 23Run time 7, 17, 23
S
Safety precautions 4, 43Sample
quantity 20tube 19
Setting the time 15Signal 15Startup 4, 5Stop 23, 24
T
Temperature 14, 22, 26, 28, 30, 41, 54increment 26, 27, 38, 39, 41, 54options 12
Thermoblock 3, 4, 14, 18, 19, 20Time increment 26, 27, 38, 41, 54Tube control 3, 25Tube type 20, 22, 42
V
Ventilation 4slit 5, 6
15 Index

S c i e n t i f i c
Printed in Germany eppendorf
®
is a registered trademark
Eppendorf Scientific, Inc.One Cantiague Road, P.O. Box 1019Westbury, New York 11590-0207 (USA)Phone 800-421-9988Fax 516-876-8599
e-mail: [email protected]

© 2
005
Ep
pen
dor
f A
G.
Ep
pen
dor
f®is
a r
egis
tere
d t
rad
emar
k of
Ep
pen
dor
f A
G.
Ad
d o
ther
tra
dem
ark
info
rmat
ion
here
.P
rod
uct
app
eara
nce,
sp
ecifi
catio
ns,
and
/or
pric
es a
re s
ubje
ct t
o ch
ange
with
out
notic
e.
Support and Services Directory
www.eppendorf.com • Email: [email protected] • Application hotline: 516-515-2258
In the U.S.: Eppendorf North America, Inc. 800-645-3050 • In Canada: Brinkmann Instruments (Canada) Ltd. 800-263-8715
For more information contact your Eppendorf North America Sales Representative at 800-645-3050.
Contact Information
United States Canada
Customer 800-645-3050, menu option 2 800-263-8715, menu option 1Support: [email protected] [email protected]
Repair: 800-645-3050, ext. 2404 800-263-8715, ext. [email protected] [email protected]
Applications 800-645-3050, ext. 2258 800-645-3050, ext. 2258 (U.S.)Lab: [email protected] [email protected]
Business Hours: 8:30 a.m. to 6:00 p.m. EST 8:30 a.m. to 6:00 p.m. EST
Phone: 800-645-3050 800-263-8715516-334-7500 905-826-5525
Fax: 516-334-7506 905-826-5424
Address: Eppendorf North America, Inc. Brinkmann Instruments (Canada) Ltd.One Cantiague Road 6670 Campobello RoadWestbury, NY 11590-0207 Mississauga, ONT L5N 2L8
Website: www.eppendorf.com www.brinkmann.comEmail: [email protected] [email protected]