MASSACHUSETTS NURSERY INDUSTRY BEST MANAGEMENT PRACTICES...
135
MASSACHUSETTS NURSERY INDUSTRY BEST MANAGEMENT PRACTICES GUIDE
Transcript of MASSACHUSETTS NURSERY INDUSTRY BEST MANAGEMENT PRACTICES...
MASSACHUSETTS NURSERY
INDUSTRY BEST MANAGEMENT
PRACTICES GUIDE
i
TABLE OF CONTENTS
ACKNOWLEDGEMENTS ........................................................................................................ iii
OVERVIEW OF BEST MANAGEMENT PRACTICES......................................................... 1
TYPES OF NURSERIES ............................................................................................................. 1
CHECKLIST, BMPs for FIELD NURSERIES: REGULATIONS, SITE SELECTION,
WATER MANAGEMENT .......................................................................................................... 4
ESTABLISHING FIELD NURSERIES: REGULATIONS, SITE SELECTION, WATER
MANAGEMENT .......................................................................................................................... 5
CHECKLIST, BMPs FOR CONTAINER NURSERIES AND HORTICULTURE
DISTRIBUTION CENTERS: REGULATIONS, SITE SELECTION, WATER
MANAGEMENT .......................................................................................................................... 9
ESTABLISHING CONTAINER NURSERIES AND HORTICULTURE DISTRIBUTION
CENTERS: REGULATIONS, SITE SELECTION, WATER MANAGEMENT................ 12
CHECKLIST, BMPs NUTRIENT MANAGEMENT............................................................. 24
NUTRIENT MANAGEMENT .................................................................................................. 25
CHECKLIST, BMPs FERTILIZER STORAGE AND HANDLING ................................... 30
FERTILIZER STORAGE AND HANDLING......................................................................... 31
CHECKLIST, BMPs FIELD NURSERIES—NUTRIENT MANAGEMENT..................... 33
FIELD NURSERIES—NUTRIENT MANAGEMENT .......................................................... 34
CHECKLIST, BMPs CONTAINER NURSERIES—NUTRIENT MANAGEMENT......... 36
CONTAINER NURSERIES—NUTRIENT MANAGEMENT.............................................. 38
CHECKLIST, BMPs SOIL CONSERVATION ...................................................................... 42
FIELD NURSERIES—SOIL CONSERVATION ................................................................... 44
CONTAINER NURSERIES—SOIL CONSERVATION....................................................... 52
CHECKLIST, BMPs MASSACHUSETTS PROHIBITED PLANTS................................... 53
MASSACHUSETTS PROHIBITED PLANTS........................................................................ 54
CHECKLIST, BMPs WORKER PROTECTION STANDARD ........................................... 55
ii
WORKER PROTECTION STANDARD................................................................................. 56
CHECKLIST, BMPs PESTICIDE STORAGE ....................................................................... 58
PESTICIDE STORAGE ............................................................................................................ 60
CHECKLIST, BMPs PESTICIDE LICENSING .................................................................... 64
PESTICIDE LICENSING.......................................................................................................... 65
CHECKLIST, BMPs PEST MANAGEMENT ........................................................................ 66
PEST MANAGEMENT ............................................................................................................. 67
CHECKLIST, BMPs DISEASE MANAGEMENT................................................................. 79
DISEASE MANAGEMENT ...................................................................................................... 81
CHECKLIST, BMPs WEED MANAGEMENT...................................................................... 88
WEED MANAGEMENT ........................................................................................................... 89
CHECKLIST, BMPs WILDLIFE MANGEMENT ................................................................ 93
WILDLIFE MANAGEMENT................................................................................................... 95
PLANT PROBLEM DIAGNOSTIC SERVICE .................................................................... 100
CHECKLIST, BMPs ORGANIC WASTE MANAGEMENT—COMPOSTING.............. 102
ORGANIC WASTE MANAGEMENT................................................................................... 103
CHECKLIST, BMPs INORGANIC WASTE ........................................................................ 108
INORGANIC WASTE MANAGEMENT .............................................................................. 109
CHECKLIST, BMPs ENERGY CONSERVATION............................................................. 111
ENERGY CONSERVATION FOR GREENHOUSES AND FIELD NURSERIES .......... 111
References .................................................................................................................................. 116
Resources ................................................................................................................................... 119
Appendix A, Massachusetts Prohibited Plant List. ............................................................... 123
Appendix B, Soil and Tissue Testing Service ......................................................................... 127
Appendix C, Interpretation of Soluble Salt and pH Measurements by Extraction Method
..................................................................................................................................................... 129
iii
ACKNOWLEDGEMENTS
Compiled by Tina Smith and Paul Lopes, University of Massachusetts Extension Edited by: Weed Management, Randall Prostak, University of Massachusetts Pest Management, Robert Childs, University of Massachusetts Disease Management, Dan Gilman, University of Massachusetts Energy Conservation, John W. Bartok, Jr., University of Connecticut Soil Conservation, reviewed by Thomas Akin, Natural Resource Conservation Service (NRCS) Composting, reviewed by Gerard Kennedy, Massachusetts Department of Agricultural Resources Nutrition, reviewed by Dr. Douglas Cox, University of Massachusetts The Nursery BMP Manual was reviewed by a Grower Advisory Board consisting of Pat Bigelow, Bigelow Nurseries, Inc.; Wayne Mezitt, Weston Nurseries, Inc.; John Kinchla, Amherst Nurseries; Fred Dabney, Quansett Nurseries; Jim McBratney, Sylvan Nursery, Inc.; and Rena Sumner, Executive Director, Massachusetts Nursery and Landscape Association. Prepared October 2008 Disclaimers
Mention of trade names and products is for information purposes only and constitutes neither an endorsement of, recommendation of, nor discrimination against similar products not mentioned. Although this guide contains research-based information and the contributors have used their best efforts in preparing this guide, the contributors make no warranties, express or implied, with respect to the use of this guide. Users of this guide maintain complete responsibility for the accuracy and appropriate application of this guide for their intended purpose(s). In no event shall the contributors be held responsible or liable for any indirect, direct, incidental, or consequential damages or loss of profits or any other commercial damage whatsoever resulting from or related to the use or misuse of this guide. The contributors emphasize the importance of consulting experienced and qualified consultants, advisors, and other business professionals to ensure the best results for producing nursery stock.
Overview of Best Management Practices
1
OVERVIEW OF BEST MANAGEMENT PRACTICES
A set of production guidelines known as Best Management Practices (BMPs) for the purposes of this manual are voluntary activities undertaken to minimize negative effects on the environment. The manual is not intended for regulations. BMP considerations for field and container nurseries and horticulture distribution centers include nursery layout, water management and irrigation, nutrient management, soil conservation, composting, prohibited plants, pesticide use and storage, insect, mite, disease and weed management, wildlife damage management, organic and inorganic waste management, and alternative energy and energy conservation. BMPs are adaptable for the diversity that exists within the industry. Applying these practices will help Massachusetts nurseries to remain (or become) healthy and profitable.
TYPES OF NURSERIES
There are three types of nurseries: field, container, and horticulture distribution centers or holding areas. Each type has advantages and disadvantages, and many nurseries use a combination of the three systems. Nurseries produce either finished plants or growing-on stock. Finished plants are ready for planting in the landscape or retailing through garden centers. Stock for growing-on is sold to other nurseries for finishing.
Types of Field Nurseries Bare root production is generally used for small groundcovers, herbaceous perennials, ornamental grasses, and small deciduous trees and shrubs. Field-planted seedlings are lifted bare root while they are dormant, and used as nursery liners, fruit trees, Christmas tree seedlings, windbreaks, and conservation plantings.
Plants that are dug with a portion of their roots contained in a ball of soil are called balled-and-burlapped or balled-in-burlap (B&B). B&B is used for evergreen as well as deciduous plants, and for much larger plants than those that are harvested bare root. Most B&B harvesting is done while plants are dormant, but recent improvements in holding and acclimating techniques have allowed increased digging during the growing season. B&B harvesting requires trained staff, and at times requires hydraulic tree spades and other mechanical harvesting equipment as B&B plants are heavy to handle.
Field production of nursery stock has several advantages. It is often less demanding than container production in terms of water and fertilizer requirements. In addition, the labor required during production is less intensive than in container production. Field production also offers growers the option to avoid or minimize winter protection methods.
Field production also has several disadvantages. A primary disadvantage is the loss of topsoil from B&B nursery operations. Over the long term, B&B harvesting can deplete the farm's most important resource. Also, digging is typically limited to specific windows during the year--spring and fall--and the harvest operation is very labor intensive. Although improvements have been made in recent years the process is still labor intensive and difficult.
Overview of Best Management Practices
2
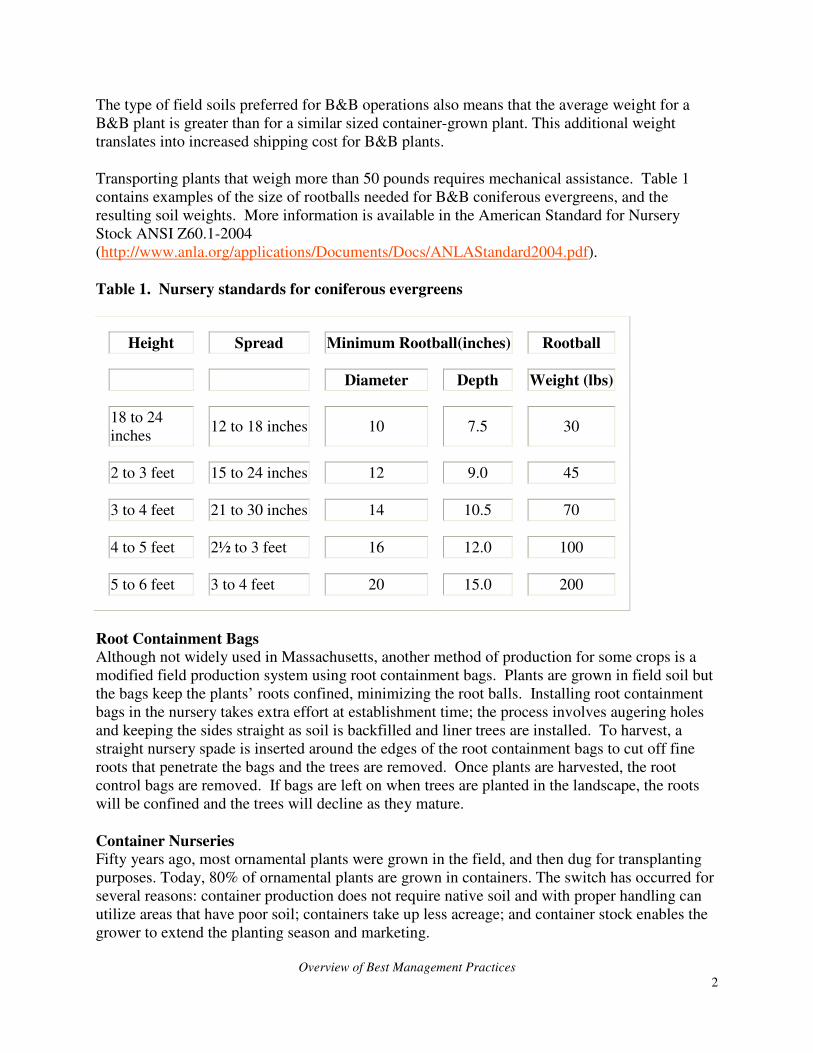
The type of field soils preferred for B&B operations also means that the average weight for a B&B plant is greater than for a similar sized container-grown plant. This additional weight translates into increased shipping cost for B&B plants.
Transporting plants that weigh more than 50 pounds requires mechanical assistance. Table 1 contains examples of the size of rootballs needed for B&B coniferous evergreens, and the resulting soil weights. More information is available in the American Standard for Nursery Stock ANSI Z60.1-2004 (http://www.anla.org/applications/Documents/Docs/ANLAStandard2004.pdf).
Table 1. Nursery standards for coniferous evergreens
Height Spread Minimum Rootball(inches) Rootball
Diameter Depth Weight (lbs)
18 to 24 inches
12 to 18 inches 10 7.5 30
2 to 3 feet 15 to 24 inches 12 9.0 45
3 to 4 feet 21 to 30 inches 14 10.5 70
4 to 5 feet 2½ to 3 feet 16 12.0 100
5 to 6 feet 3 to 4 feet 20 15.0 200
Root Containment Bags
Although not widely used in Massachusetts, another method of production for some crops is a modified field production system using root containment bags. Plants are grown in field soil but the bags keep the plants’ roots confined, minimizing the root balls. Installing root containment bags in the nursery takes extra effort at establishment time; the process involves augering holes and keeping the sides straight as soil is backfilled and liner trees are installed. To harvest, a straight nursery spade is inserted around the edges of the root containment bags to cut off fine roots that penetrate the bags and the trees are removed. Once plants are harvested, the root control bags are removed. If bags are left on when trees are planted in the landscape, the roots will be confined and the trees will decline as they mature.
Container Nurseries
Fifty years ago, most ornamental plants were grown in the field, and then dug for transplanting purposes. Today, 80% of ornamental plants are grown in containers. The switch has occurred for several reasons: container production does not require native soil and with proper handling can utilize areas that have poor soil; containers take up less acreage; and container stock enables the grower to extend the planting season and marketing.

Overview of Best Management Practices
3
Other advantages are the handling convenience in production and shipping and the ability to customize the growing media to meet the needs of the plants. Container production also allows producers to grow "transplant sensitive" crops with less attentiveness.
While container production offers many advantages, it also has several disadvantages. The growing media used in containers--soilless mixes--require more frequent monitoring of water and fertilizer than do field production soils. Container-grown plants require special overwintering structures and are prone to blowing over and circling roots. Exposure of roots to temperature extremes in summer and winter causes stresses not often seen in field-grown plants. Container-grown plants cannot be held as easily for as long as B&B plants. Unsold crops of field-grown plants can simply stay in the field; unsold container plants will likely require transplanting to larger containers, which adds to the cost of the final products. In general, initial land development costs (e.g., grading, bed preparation) for container nurseries are higher than for starting field nurseries.
There are many types of containers used for nursery production. Starting in the early 1990s, a hybrid production system began to appear in the nursery field called pot-in-pot (PIP). This system combines features of both field and container production systems. Socket pots are permanently buried with their top rims extending somewhat above ground level. Production pots containing the trees or shrubs in customized soilless growing media are then set into the socket pots and watered using drip irrigation. The field production system advantages of PIP are elimination of plant blow-over, even though plants are growing in containers; conservation of soil; and less dramatic fluctuation in root zone temperatures. Because the plants are actually growing in rigid containers placed in the field soil, PIP grown plants are easier to harvest than traditional field-grown plants. The major disadvantages to the PIP system are the initial expense of land preparation and the necessity of placing two pots in the ground per plant. Lack of drainage can be another disadvantage and drainage systems need to be installed under the socket pots.
Horticulture Distribution Centers
Although not used for production, horticulture distribution centers play an important role in the nursery industry. They may consist of growers who produce plants themselves, or nursery professionals who purchase and hold large numbers of container and B&B plants on their lots for retail or wholesale markets. Horticulture distribution centers can follow the same BMP considerations as container nurseries for water use and runoff.
Establishing Field Nurseries: Regulations, Site Selection, Water Management
4
CHECKLIST
BMPs for FIELD NURSERIES
REGULATIONS, SITE SELECTION, WATER MANAGEMENT
Regulations
� For information on the Wetlands Protection Act or the Water Management Act, contact the Massachusetts Department of Environmental Protection (http://www.mass.gov/dep/water/approvals/wmgforms.htm).
Site Selection
� Before a field is used, collect the history of the field, including previous crops grown and types of herbicides and pesticides previously applied.
� Choose a site with well drained soils, free from flooding, high water table, and rocks.
Soil Types
� Test soils for pH, phosphorus (P), potassium (K) and certain micronutrients. Soil pH should range from 6.0 to 6.5 for most plants, and lower (5.0 to 6.0) for acid-loving plants like rhododendrons and azaleas.
� Check soil survey maps for data on soil texture for your site; these are available from the Natural Resources Conservation Service (NRCS) (http://www.ma.nrcs.usda.gov/technical/soils/index.html).
Slope
� Avoid steep slopes to prevent erosion and low areas which are prone to cold pockets. Gently sloping land is best.
Runoff Water Management
� Lay out and plant fields across slopes and on contours. � Provide grassed roadways and vegetative aisles between rows when topography creates
erosive conditions. � Install field border strips to reduce movement of sediment from a field. � Seed the areas between rows of trees with a green manure crop, such as winter rye, or a
more permanent crop, such as a turf grass mix, to prevent erosion. � For information on conservation practices to prevent erosion contact your local NRCS
office (http://www.ma.nrcs.usda.gov).
Irrigation
� Plan for an adequate water supply for irrigated field nurseries. Growing nursery stock may require 1 to 2 applications of an inch of irrigation per week.
� Design an irrigation system as part of the plan for field layout and planting strategy. � Use drip irrigation when possible. Drip irrigation conserves water and fertilizer and
reduces weed competition. Drip Irrigation Tips
� Be sure that the drip system is installed correctly and operated properly. � Be sure that the water supply is very clean and free of sediment and minerals. Use
filters to remove particulate matter.

Establishing Field Nurseries: Regulations, Site Selection, Water Management
5
ESTABLISHING FIELD NURSERIES
Site Selection Considerations Field grown nursery crops are grown in the ground in three- to five-year production cycles. Before a field is used, collect information about the field’s history, including previous crops grown and types of herbicides and pesticides previously applied. Field grown nursery crops require well-drained soils that are free from flooding and do not have a high water table during winter months. Soils should be relatively free of rocks to facilitate digging when planting, as well as deep enough to allow digging of root balls. Field grown nursery crops can be hand-dug and balled and burlapped, but are usually harvested with mechanical tree spades and placed in burlap lined wire baskets. Mechanical digging has allowed nursery crops to be successfully grown in a wide range of soil types. Hand-digging causes more soil disturbance and makes it difficult to keep sandy soil around plant roots. Most nurseries use mechanical digging equipment.
Soil Types for Field Nurseries
The ideal soil type depends on the type of nursery crop grown. An important consideration is soil texture. Soil texture measures the relative amounts of sand, silt, and clay in the soil. These amounts, in conjunction with the amount of organic matter, will strongly affect the drainage and the fertility of the soil. Check soil survey maps, available from the Natural Resources Conservation Service (NRCS), for data on soil texture for your site
Site Selection Considerations:
Wetlands Protection Act and Water Management Act
Wetland and water resources are found on many Massachusetts farms. These resource areas include (but are not limited to) streams, ponds, bogs, marshes, swamps, floodplains, isolated land subject to flooding, wet meadows, salt ponds, salt marshes, and fish runs. Agricultural activities are subject to the jurisdiction of the Massachusetts Wetland Protection Act (WPA) when they occur within the resource areas (and their 100-foot buffer zones) defined in the Act. Many normal farming activities are exempt from regulations under the WPA. Others require a certain level of review by local Conservation Commissions. For information on the WPA contact the Massachusetts Department of Environmental Protection (http://www.mass.gov/dep/water/waterres.htm, phone [617]-292-5500).
The Water Management Act (WMA) authorizes the Massachusetts Department of Environmental Protection to regulate the quantity of water withdrawn from both surface and groundwater supplies. The WMA consists of a registration program and permit program. Persons planning to withdraw water from ground or surface sources for purposes in excess of an annual average of 100,000 gallons per day or 9 million gallons in any three month period must apply for a WMA permit. For information on the WMA contact the Massachusetts Department of Environmental Protection (http://www.mass.gov/dep/water/approvals/wmgforms.htm, phone [617]-292-5706).
Establishing Field Nurseries: Regulations, Site Selection, Water Management
6
(http://www.ma.nrcs.usda.gov/technical/soils/index.html). Sandy loam soils are desirable for trees harvested bare root, which are then sold as is, or containerized for sale. Heavier soils, loam to clay loam, are more suited to trees that will be B&B harvested. Trees generally do not grow well in very sandy soils due to rapid nutrient leaching or in heavy clay soils due to poor drainage. However, heavy soils can be improved by adding organic matter or growing green manure crops for several years. Subsurface drain tiles can be used to increase the percolation of clay soils. For information, contact NRCS (http://www.nrcs.usda.gov/technical/ENG/). Soil pH should range from 6.0 to 6.5 for most plants, and lower (5.0 to 6.0) for acid-loving plants like rhododendrons and azaleas. Soils should be tested for pH; phosphorus (P), potassium (K), and certain micronutrients; and possible herbicide residues, depending on prior uses of the site. Slope Gently sloping land promotes air movement and surface water drainage, yet still allows uniform crop development and efficient operation of equipment and irrigation systems. Steep slopes are subject to erosion, can produce irregular crops, and limit layout options. Low areas can be cold spots prone to frost, and may not drain properly during periods of high rainfall, thereby increasing the potential for appearance of soilborne diseases like Phytophthora.
Runoff Water Management
Field nurseries should be managed to avoid sheet and rill erosion and formation of gullies. Fields should be planted across slopes and on contours. Grassed roadways and vegetative aisles between rows are preferred when topography creates erosive conditions. To prevent soil erosion and reduce pest problems, the areas between rows of trees may be seeded with a green manure crop like annual rye, or a more permanent crop like a turf grass mix. There should be about a 3-foot clean strip around the tree. Field border strips can also be installed to reduce movement of sediment from the field. For information on conservation practices to prevent erosion contact your local NRCS office (http://www.ma.nrcs.usda.gov).
Irrigation for Field Nurseries Some field nurseries are not irrigated, but irrigation capability should be considered when choosing land for field production. Over time, irrigated crops outgrow non-irrigated crops, have less dieback, and can result in a production cycle shortened by one to two years. As a consequence, most growers conclude that irrigation equipment pays for itself quickly.
An irrigation system is best designed during the planning for field layout and planting strategy. The main irrigation trunk lines will need to be buried in the field, usually along roads, with the valves located at convenient intervals. Plan for a method of draining irrigation lines to avoid damage caused by winter freezing. If a traveling gun will be used for irrigation, consider this in the plan as well.
Hose reel or gun types of irrigation are designed to apply large volumes of water. For optimal growth, nursery stock may require 1 to 2 inches of water per week. Generally, 1 acre inch is equal to approximately 27,000 gallons of water. Overhead irrigation provides water to large areas causing weed seeds to germinate which increases weed competition. Other disadvantages
Establishing Field Nurseries: Regulations, Site Selection, Water Management
7
of using overhead irrigation are water waste due to evaporation, the potential for erosion and runoff, and increased foliar diseases. Drip irrigation is a better choice for irrigating field grown nursery stock. PIP stock is almost exclusively irrigated by drip, trickle, or spray-stake irrigation. Drip Irrigation
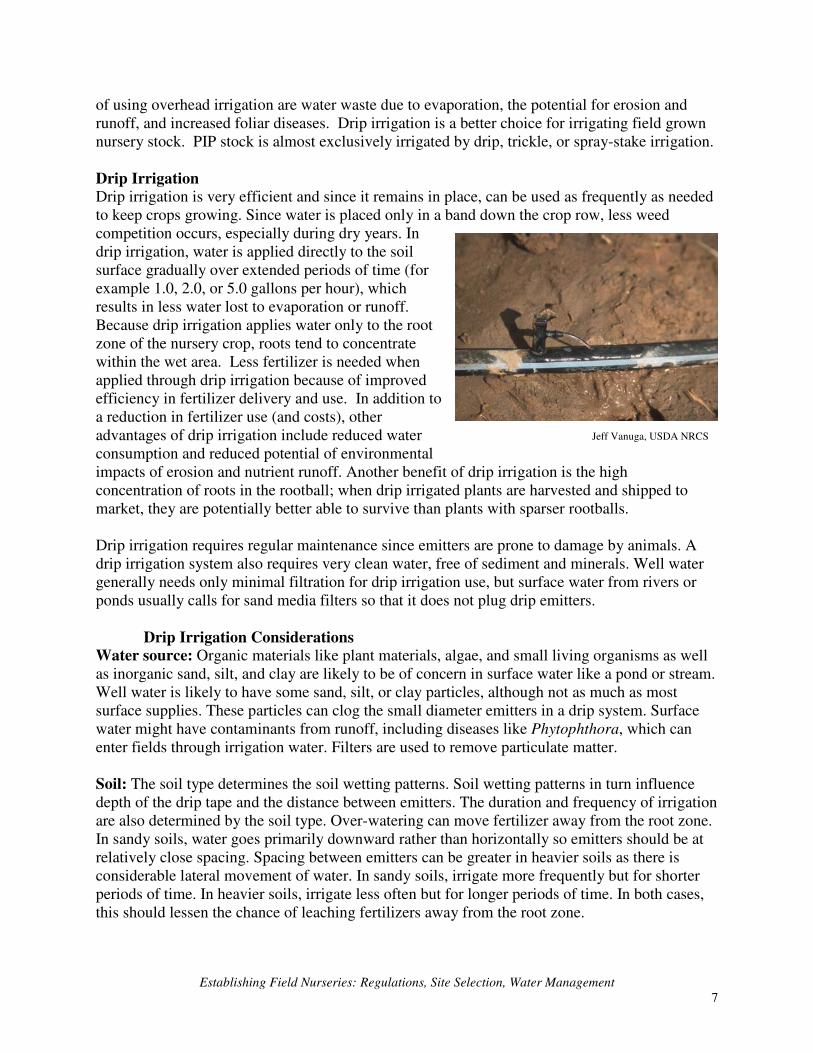
Drip irrigation is very efficient and since it remains in place, can be used as frequently as needed to keep crops growing. Since water is placed only in a band down the crop row, less weed competition occurs, especially during dry years. In drip irrigation, water is applied directly to the soil surface gradually over extended periods of time (for example 1.0, 2.0, or 5.0 gallons per hour), which results in less water lost to evaporation or runoff. Because drip irrigation applies water only to the root zone of the nursery crop, roots tend to concentrate within the wet area. Less fertilizer is needed when applied through drip irrigation because of improved efficiency in fertilizer delivery and use. In addition to a reduction in fertilizer use (and costs), other advantages of drip irrigation include reduced water consumption and reduced potential of environmental impacts of erosion and nutrient runoff. Another benefit of drip irrigation is the high concentration of roots in the rootball; when drip irrigated plants are harvested and shipped to market, they are potentially better able to survive than plants with sparser rootballs. Drip irrigation requires regular maintenance since emitters are prone to damage by animals. A drip irrigation system also requires very clean water, free of sediment and minerals. Well water generally needs only minimal filtration for drip irrigation use, but surface water from rivers or ponds usually calls for sand media filters so that it does not plug drip emitters. Drip Irrigation Considerations
Water source: Organic materials like plant materials, algae, and small living organisms as well as inorganic sand, silt, and clay are likely to be of concern in surface water like a pond or stream. Well water is likely to have some sand, silt, or clay particles, although not as much as most surface supplies. These particles can clog the small diameter emitters in a drip system. Surface water might have contaminants from runoff, including diseases like Phytophthora, which can enter fields through irrigation water. Filters are used to remove particulate matter. Soil: The soil type determines the soil wetting patterns. Soil wetting patterns in turn influence depth of the drip tape and the distance between emitters. The duration and frequency of irrigation are also determined by the soil type. Over-watering can move fertilizer away from the root zone. In sandy soils, water goes primarily downward rather than horizontally so emitters should be at relatively close spacing. Spacing between emitters can be greater in heavier soils as there is considerable lateral movement of water. In sandy soils, irrigate more frequently but for shorter periods of time. In heavier soils, irrigate less often but for longer periods of time. In both cases, this should lessen the chance of leaching fertilizers away from the root zone.
Jeff Vanuga, USDA NRCS

Establishing Field Nurseries: Regulations, Site Selection, Water Management
8
Installation and operation of a trickle system requires expertise. Consult with a knowledgeable professional. A poorly designed system can result in over-or under-watering and clogged lines. Any or all of these problems can completely offset the potential cost savings from using drip.
Establishing Container Nurseries and Distribution Centers: Regulations, Site Selection, Water Management
9
CHECKLIST
BMPs FOR CONTAINER NURSERIES AND DISTRIBUTION CENTERS
REGULATIONS, SITE SELECTION, WATER MANAGEMENT
Regulations
For information on the Wetlands Protection Act or the Water Management Act, contact Massachusetts Department of Environmental Protection (http://www.mass.gov/dep/water/approvals/wmgforms.htm). See also “Site Selection Considerations: Wetlands Protection Act and Water Management Act” in this manual, page 4.
� Considerations
Site Selection
� Choose a site with an adequate source of clean water. Container-grown plants need to be irrigated frequently, often daily, throughout the growing season.
� Choose a site with a firm surface and good surface drainage. � Ideally, choose a site that slopes slightly and offers water drainage to a pond or retention
basin for recycling back to the crop. � Consider the proximity of wet areas and the drainage patterns to minimize the efforts
needed to curb water and soil contamination through runoff. � Consider operating procedures and practices to control site runoff which can result in the
discharge of nutrients and pollutants to waters.
Water Quality and Quantity
� Plan for 1 acre inch (approximately 27,000 gallons) of irrigation storage per acre of nursery stock per day for irrigation supplies.
� Plan for water storage for irrigation for 30 days. � Provide a water source that is free of sediment and mineral deposits like iron and calcium
bicarbonate.
Runoff Water Management
� Develop a plan for erosion and sediment control for each container nursery. � Seed, sod, or stabilize in some manner newly constructed or barren areas to prevent
erosion and sediment loss. � Address unsuitable site-specific topographical characteristics before establishment of
vegetation. � Use temporary vegetation when bare areas will exist for 30 days or longer. � Establish permanent vegetation to stabilize disturbed areas and reduce erosion and
sediment loss. � Use mulch to control erosion on disturbed land prior to vegetation establishment. � Use erosion control blankets or netting to hold mulch in place as necessary during
vegetation establishment. � Use filter strips to prevent erosion. � Use ground covers to provide means of erosion and sediment control on slopes where
mowing is not feasible or grass establishment is difficult.

Establishing Container Nurseries and Distribution Centers: Regulations, Site Selection, Water Management
10
Grassed Waterways
� Provide grassed waterways for the uniform movement of water resulting in reduced sediment and other substances delivered to collection basins.
� Do not use grassed waterways as travel lanes; maintain vegetation. � Use lined waterways to reduce erosion in concentrated flow areas.
Management of Stormwater
� Use stormwater management to minimize erosion. � Never discharge stormwater runoff directly into surface or ground waters. Route runoff
over a long distance, through grassed waterways, wetlands, vegetative buffers and other places designed to increase overland flow.
Irrigation
� Apply irrigation water uniformly over the growing area and apply the correct amount of water for the desired crops.
� Determine the correct amount of water to use while irrigating by measuring the leaching fraction from containers.
� Use low-pressure/low-volume irrigation systems, which use drip emitters or spray-stakes for container (5 gallon and greater) production.
� Use cyclic irrigation to decrease the amount of water and nutrients exiting the container. � Periodically check the nozzle orifices for wear or plugging. � Install a backflow prevention valve at the water source or pump to prevent cross-
contamination of water supplies. � Recycle subirrigation water that contains fertilizer to prevent discharge of contaminants
to the environment. � Space containers under fixed overhead irrigation to maximize amount of water striking
plants and reduce water waste between containers.
Growing Media and Water Management
� Choose components of container growing media that are best adapted to plants and management.
� To prevent leaching of pesticides and nutrients, avoid media with a high proportion of coarse particles and air space, and a relatively low water holding capacity.
Water Quality for Irrigation
� Monitor irrigation water quality to ensure pollutants are not discharged.
Management Strategies for Water Conservation
� Do not over-water. Do not water if the soil is still wet. Irrigate according to the requirements of the plants, not on a fixed schedule. The duration of irrigation is typically what needs to be modified based on evapotransiration.
� Use rain shutoff devices to prevent irrigation system operation and minimize nutrient runoff.
� Collect irrigation and rain runoff and use for irrigation. � Manage irrigation runoff to minimize the possibility of polluting surface or ground
Establishing Container Nurseries and Distribution Centers: Regulations, Site Selection, Water Management
11
waters. � Keep B&B stock and container stock out of the wind in holding yards. � Cover B&B stock with moisture-retaining materials such as sawdust or wood chips. � Plug sprinkler heads that are not watering plants, keep sprinkler heads as close as
possible to the plants, and use larger water droplet size to reduce irrigation time. � Group plants according to water needs for efficient irrigation. � Water early in the morning or between the hours of 6 PM and 10 AM when temperatures
and winds are at their lowest levels to reduce water loss. Watering at night will also minimize leaf wetness period to prevent foliar diseases.
Overwintering Structures
� Use BMPs for plastic disposal, energy use (heated structures), water use, nutrient management, rodent and pest management, drainage, and runoff.
Establishing Container Nurseries and Distribution Centers: Regulations, Site Selection, Water Management
12
CONTAINER NURSERIES AND HORTICULTURE DISTRIBUTION CENTERS
Site Selection Considerations
Growing plants in containers presents different challenges than growing plants in field soil. Container plants are grown in media that contain a limited amount of water, retain small quantities of nutrients, and confine roots in a limited space. Consequently, inputs like irrigation and fertilizer applications must be precise and properly timed in quantities to maximize benefits to the container plant production system, while minimizing negative effects on the environment. An opportunity exists to use the best possible management strategies, even with the site-specific nature of nursery production facilities. BMPs include operating procedures and practices to control site runoff which can result in the discharge of nutrients and pollutants to waters. Since container production entails growing plants above ground using customized soilless growing media, the type of native soil at the site is not as important as it is with field-grown crops. Generally, container production requires a firm surface with good surface drainage. The ideal site has a slightly sloping topography for proper air movement and offers water drainage to a pond or retention basin for recycling back to the crop. Container nurseries are best sited on soils with low permeability. Consider the proximity of wet areas and drainage patterns to minimize the efforts needed to curb water and soil contamination through runoff. The site should also be chosen to minimize the loss of quality native soil in accommodating the production area. An adequate source of clean water is important. Water Quality and Quantity for Container Nurseries
Water is the most important consideration for growing nursery crops in containers. Most container nurseries irrigate daily or every other day during the growing season. Professionals who design irrigation systems for container nurseries suggest using a figure of no less than 1 acre inch (approximately 27,000 gallons) of irrigation storage per acre of nursery stock per day when planning irrigation supplies. Nurseries should have storage capacity at least a 30 day irrigation supply. High quality water, free of sediment and mineral deposits like iron and calcium bicarbonate, is necessary to avoid clogging drip, spray stake, or mist nozzles. Water treatment to remove such elements is expensive. Groundwater from deep wells usually provides the highest quality irrigation water. Irrigation water should be tested each year for pH, alkalinity, sodium (Na), chloride (Cl), and electrical conductivity (EC). More information about these tests can be found in the section Nutrient Management – Container Nurseries: Irrigation Water Testing.
Runoff Water Management
Container nurseries are especially susceptible to erosion (the process by which the land surface is worn away by the action of water, wind, ice, or gravity) and sedimentation (the process where soil
particles settle out of suspension as the velocity of water decreases) after new development and prior to filling empty container beds. Water flowing over exposed soil picks up detached soil particles and debris that may possess chemicals harmful to receiving waters. As the velocity of flowing

Establishing Container Nurseries and Distribution Centers: Regulations, Site Selection, Water Management
13
water increases, additional soil particles are detached and transported. Water flows have a tendency to concentrate, creating small channels and eventually gullies of varying widths and depths. Larger and heavier soil particles carried in these water flows—sand and gravel—settle out more rapidly than fine silt and clay particles. Totally eliminating the transportation of these fine particles is
difficult, but managing runoff from both irrigation and stormwater to minimize erosion and sedimentation—and protect water quality—is critical. Drainage Channels and Grassed Waterways
Drainage channels can be established with permanent vegetation such as fescue grass or even aquatic plants. Permanent vegetation in drainage channels slows water velocity, reduces erosion, and reduces sediment and nutrients in runoff water. Permanent vegetation located at outlets of drainage channels also traps organic material, solids, soil, nutrients and other dissolved pollutants in runoff before the water returns to irrigation supplies.
Grassed waterways are natural or constructed channels, shaped or graded to required dimensions and established with suitable vegetation for the stable conveyance of runoff. These structures are used to reduce erosion in a concentrated flow area, such as in a gully or in temporary gullies. They are also used to reduce the amount of sediment and substances delivered to collection basins, nearby waterways, or sensitive areas. Vegetation may act as a filter in removing some of the sediment delivered to waterways, although this is not the primary function of grassed
Jeff Vanuga, USDA NRCS
Establishing Container Nurseries and Distribution Centers: Regulations, Site Selection, Water Management
14
waterways. Do not use grassed waterways as travel lanes. Maintain vegetation to prevent erosion and control runoff. Water and Sediment Control Basins
The use of water and sediment control basins may be a primary means of reducing water quality problems. The goal of each operation is to prevent irrigation water from leaving the property. Evaluation of each site will determine if collection basins are necessary or possible. Basins or other structures must have all necessary state and local permits prior to construction. Collection basins are constructed with clay-like materials with good scaling characteristics or lined with an acceptable membrane liner. Basins should have emergency overflows to prevent dike damage in the event of overtopping. If rainwater is allowed to discharge from the property, it must be considered in the design of water collection basins. More information is available on the NRCS National Handbook of Conservation Practices Web site (http://www.nhq.nrcs.usda.gov/CCS/Buffers.html#Anchor-Benefits). Underground Collection
The use of systems where irrigation water is collected underground and re-used in outdoor sub-irrigation facilities should be considered. Such systems are commercially available but not widely used due to the expense. Collection/storage structures would not only serve to reduce nursery runoff, but also provide a renewable water supply and provide buffering capacity for reclaimed water and rainfall.
Management of Stormwater
Stormwater runoff is water flowing over the land, during and immediately following a rainstorm. On-site storage of stormwater can reduce peak runoff rates; provide for settling and dissipation of pollutants; lower the probability of downstream flooding stream erosion, and sedimentation; and provide water for other uses. Never discharge stormwater runoff into surface or ground waters. Route runoff over a longer distance, through grassed waterways, wetlands, vegetative buffers and other places designed to increase overland flow. These components increase infiltration and evaporation, allow suspended solids to settle and remove potential pollutants before they are introduced to other water sources. Whenever possible, construct the components of stormwater management systems on contours following the topography. This will minimize erosion and stabilization problems caused by excessive velocities. It will also slow the runoff allowing for greater infiltration and filtering. If systems are not constructed on contours, their components must be stabilized to prevent erosion (e.g. outlet terraces and grade stabilization structures). The NRCS National Handbook of Conservation Practices Web site provides standards for at least three types of irrigation, water and sediment, and tailwater structures (www.nrcs.usda.gov/technical/standards/nhcp.html).
Establishing Container Nurseries and Distribution Centers: Regulations, Site Selection, Water Management
15
Irrigation for Container Nurseries
Irrigation application efficiency is relative to irrigation system design and management. While some irrigation systems are more efficient than others, it is important to recognize that poor management of a relatively efficient system can reduce or negate system efficiency and increase pollutant discharge to runoff or percolating waters. When evaluating irrigation efficiency, take into consideration the uniformity of application; the amount of water retained within the media following irrigation; and, for overhead irrigation, the amount of water that enters containers compared to that which falls between containers.
Measuring Uniformity and Amount
Two BMPs to irrigate efficiently are making sure all irrigation is applied uniformly over the growing area and checking that the correct amount of water is applied for the desired crops. One way to measure uniformity is to place plastic bags within empty pots throughout a block or zone before an irrigation cycle, collect the water applied, and measure the amounts in each container. If the volume collected among containers is highly variable, risers and nozzle orifices should be inspected. Risers should be straightened so that they are perpendicular to the ground and nozzle orifices should be replaced if they appear irregular in shape or larger than new orifice openings. If wind frequently interferes with water distribution, consider creating a windbreak.
Determine the correct amount of water to use while irrigating by measuring the leaching fraction from containers. A leaching fraction is the amount of water which drains from containers after irrigation divided by the total amount of water applied to the container during irrigation. It can be multiplied by 100 to obtain the percent leachate: (volume of leachate/total volume irrigation entering the container X 100= percent leachate or leaching fraction). To measure the amount of water applied during irrigation, simply put a plastic bag in an empty pot and leave it in the irrigation zone. To collect the amount of water that drains from a plant’s container after irrigation, place another plastic bag in an empty pot. This time, place a containerized plant inside the plastic-bag-lined container. Do this for each crop in different-sized containers. After the last irrigation cycle of the day, compare the amount of water collected in the bag placed in the empty pots to the amount of water collected in the bags below various crops. The amount of water in bags under crops should be approximately 10 to 20% of the amount collected in the empty container. If it is considerably more than 10 to 20%, plants may be receiving more irrigation than necessary. This is one way to determine if plants are over-watered and enables growers to conserve water during the production period. Leaching fractions can be affected by the plants’ canopies. Canopies can gather, repel, or have little effect on the amount of water entering containers. Plants can be removed from containers and the degree of uniform wetness in the container media can be observed. If irrigation is adequate, there will be no dry spots in the container root zones and it will be obvious that water has moved through the entire depth of the container profile. Increasing irrigation efficiency (by correcting water distribution uniformity and maintaining a 10 to 20% leaching fraction) is the
Volume of leachate Total volume irrigation entering container
= Leaching fraction X 100 = Percent leachate

Establishing Container Nurseries and Distribution Centers: Regulations, Site Selection, Water Management
16
best water-conservation practice that growers can adopt if they are facing water shortages or want to reduce water runoff.
Methods of Application
Most nursery crops grown in 1- to 5-gallon containers are irrigated by overhead-impact sprinkler irrigation. Each sprinkler nozzle may need a supply of up to 15 gallons of water per hour for proper performance.
In recent years, nurseries have adopted several water-conserving application practices. Low-pressure/low-volume irrigation systems, which use drip emitters or spray-stakes, are being used for both field production and larger container (5 gallons and greater) production. These emitters often require only 10 to 20 pounds per square inch (psi) pressure and 0.5 to 15 gallons per hour of water. Where there are long distribution lines or uneven terrain, pressure-compensated emitters are available to ensure even distribution of water.
Drip irrigation provides a consistent, direct application of water to the root zone during production. Another advantage of low-volume/low-pressure systems is direct injection of fertilizers within the irrigation water. Applying nutrients directly to the root zone increases nutrient use efficiency because nutrient application is more closely controlled by the grower. When nutrients are applied in granular form as a top-dress, there is always the possibility of losing nutrients in the runoff after periods of heavy rains.
During the growing season most nurseries irrigate on a daily basis in which the daily water allotment is applied in a single application (continuously). An alternative to continuous irrigation is cyclic irrigation in which the daily water allotment is applied in more than one application with timed intervals between applications. Cyclic Irrigation
Cyclic irrigation is a BMP that applies the necessary daily amount of irrigation in more than one application with timed intervals between applications. Several 15-minute applications of water are used, with a pause of 30 to 60 minutes between applications. Using this method, runoff is minimized and water use is reduced by about 25% compared to one long, single application from an overhead sprinkler. For example, if 0.6 inches of water are required per day within an irrigation zone, 0.2 inches will be applied three separate times with approximately 1 hour between irrigation cycles. Cyclic irrigation requires automated irrigation controllers, which schedule irrigation between nursery container blocks throughout the day. After all blocks are irrigated once, the rotation begins again.
Many nurseries have adopted cyclic irrigation over a daily, single irrigation cycle to conserve water and nutrients. A single irrigation cycle commonly distributes water over a growing block for an hour, and in most nurseries 0.5 to 1 inch of water is applied. Similar to a downpour, water applied continuously to a container can move through the media quickly collecting nutrients in the leachate. Very little lateral wetting of the media occurs, while a large portion of the water and nutrients are lost through the bottom of the container. If the nursery is near surface water like a stream or river, production area runoff can potentially impact surface water quality. In other locations, particularly areas with sandy soils and shallow aquifers, high volumes of irrigation can leach nutrients.
Establishing Container Nurseries and Distribution Centers: Regulations, Site Selection, Water Management
17
In contrast, during the first application of water in cycled irrigation, the foliage canopy and the surface medium are moistened but not saturated. Because only one-third of the total water is applied, water moves laterally and downward into the media slowly. More water moves into small pore spaces between media particles, resulting in greater wetting and moisture retention than effected by one long irrigation application. The second irrigation cycle continues moving the wetting front (the arc of water moving downward and laterally from the surface of the container) slowly down the container column. Ideally, the third irrigation cycle pushes the wetting front to the bottom of the container.
Effects of Growing Media Characteristics on Water Management
The predominant potting media components in nurseries are pine bark, sand, and sphagnum peat moss. Some alternative materials being used are shredded coconut husks (coir), composted yard wastes and animal wastes, composted hardwood bark, and other composted materials. Pine bark media require frequent irrigation and have very high unavailable water content. Screened pine bark used alone as a potting media has a water-holding capacity of approximately 65% water (by volume), but only about 32% is available for plant use.
During drought, a 4-to-1 ratio blend of pine bark and sand is better, since the blend’s water-holding capacity is equal to bark alone and approximately 41% of the water held is available to plants. The mixture of pine bark and sand also wets faster and more uniformly during irrigation, since the infiltration rate (downward movement) of water is slowed and better lateral wetting occurs. The trade-off is that this substrate weighs over twice as much as pine bark alone, and some plants may not grow as rapidly if water is never limited because much of the air space in the pot is replaced by sand particles. A 10% addition of peat moss increases water retention even more than sand, but does have the potential of becoming waterlogged and it is difficult to wet when dry.
Horticultural wetting agents are effective in retaining water in potting media without creating waterlogged conditions. These characteristics can be very useful for enhancing root growth and establishing newly potted liners. However, one application of a wetting agent may lose effectiveness before the end of the growing season. In most cases, newly potted plants are well established in containers by that time, and reapplication is not necessary.
Synthetic hydrogels have been shown to enhance growth of established plants in containers in very coarse media such as pine bark. They appear to have little effect on newly potted plants. The water absorption of hydrogels is affected by fertilizers and compounds in organic potting media, but they still retain significant quantities of moisture that are available as established plants extend roots into and adjacent to the cubes in the potting mix. In effect, they act as miniature oases for roots. Since they must be incorporated to be effective, the need for these materials must be anticipated prior to drought for them to be beneficial.
A substrate’s absorption capacity is related to the pre-irrigation substrate water content. The wetter a substrate is, the less water it will hold, so adjust the daily irrigation volume according to the substrate water content in order to minimize leaching.
Establishing Container Nurseries and Distribution Centers: Regulations, Site Selection, Water Management
18
Water Quality
Irrigation water quality is a critical factor for production of container-grown nursery plants. Poor water quality applied with overhead irrigation can result in damage to foliage, change substrate pH, or result in unsightly foliar residues or stains. Use of poor quality water in irrigation systems can also clog mist nozzles and micro-irrigation emitters. Irrigation, fertilizer, and pesticide efficacy are more easily managed when using good quality water. To ensure water has desirable qualities, monitor the irrigation water constituents. Monitor water quality at least twice a year (summer and winter); more frequent monitoring is needed to alter production practices in response to changes in water quality.
Reclaimed water, runoff water, or recycled water may require some reconditioning before using since disease organisms, soluble salts, and traces of organic chemicals may be present. Water quality should be tested to ensure it is acceptable for plant growth and to minimize the risk of discharging pollutants to surface or ground water.
Grouping Plants for Efficient Irrigation
To apply irrigation more uniformly, growers can group stock based on container size, substrate, plant type, plant water requirements, plant leaf type, and plant canopy. Because small containers will be saturated before large container plants receive enough water, most growers group containers by size in separate irrigation zones. Likewise, plants growing in very different potting media should not be grouped under the same irrigation regimes. This can be the case when plants are brought in from other nurseries. Nursery crops such as azaleas, rhododendrons, and camellias are often grown in mixes containing peat moss and may require less frequent irrigation.
Different cultivars of one type of plant, like juniper or holly, should be grouped and irrigated according to container size. It is more difficult to determine how to group different types of plants for most efficient irrigation. Various published lists do indicate which plants will tolerate similar moisture conditions in the landscape: dry, moist, or wet. These lists can help growers decide how to segregate plants in nurseries for similar irrigation needs.
Some nursery studies have also compared plant water use. Generally, plants with thick, waxy cuticles or thick, fleshy leaves can be grouped together and watered less frequently than plants with thin leaves. Deciduous plants usually require more water than broadleaved evergreens during the growing season but less when they are dormant. In general, junipers and conifers require less frequent irrigation than do broadleaved evergreens. Depending on winter protection provided, most container plants require occasional irrigation during winter months.
Establishing Container Nurseries and Distribution Centers: Regulations, Site Selection, Water Management
19
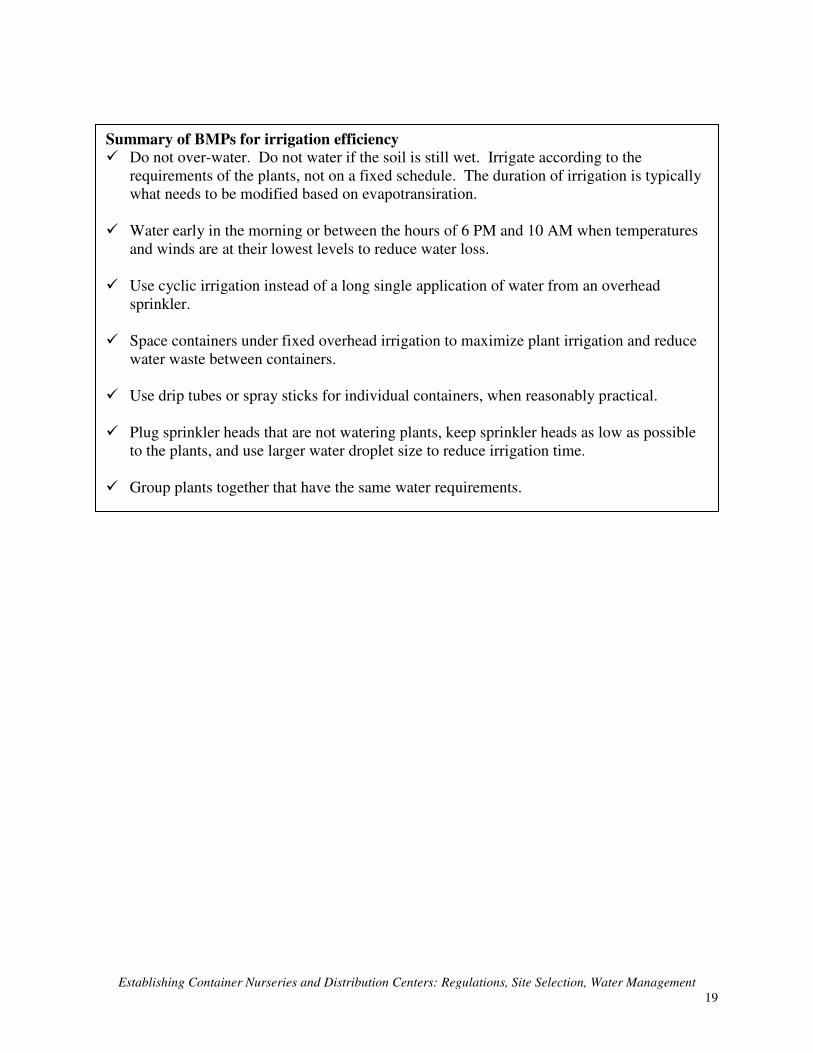
Summary of BMPs for irrigation efficiency
� Do not over-water. Do not water if the soil is still wet. Irrigate according to the requirements of the plants, not on a fixed schedule. The duration of irrigation is typically what needs to be modified based on evapotransiration.
� Water early in the morning or between the hours of 6 PM and 10 AM when temperatures
and winds are at their lowest levels to reduce water loss. � Use cyclic irrigation instead of a long single application of water from an overhead
sprinkler. � Space containers under fixed overhead irrigation to maximize plant irrigation and reduce
water waste between containers. � Use drip tubes or spray sticks for individual containers, when reasonably practical. � Plug sprinkler heads that are not watering plants, keep sprinkler heads as low as possible
to the plants, and use larger water droplet size to reduce irrigation time. � Group plants together that have the same water requirements.
Establishing Container Nurseries and Distribution Centers: Regulations, Site Selection, Water Management
20
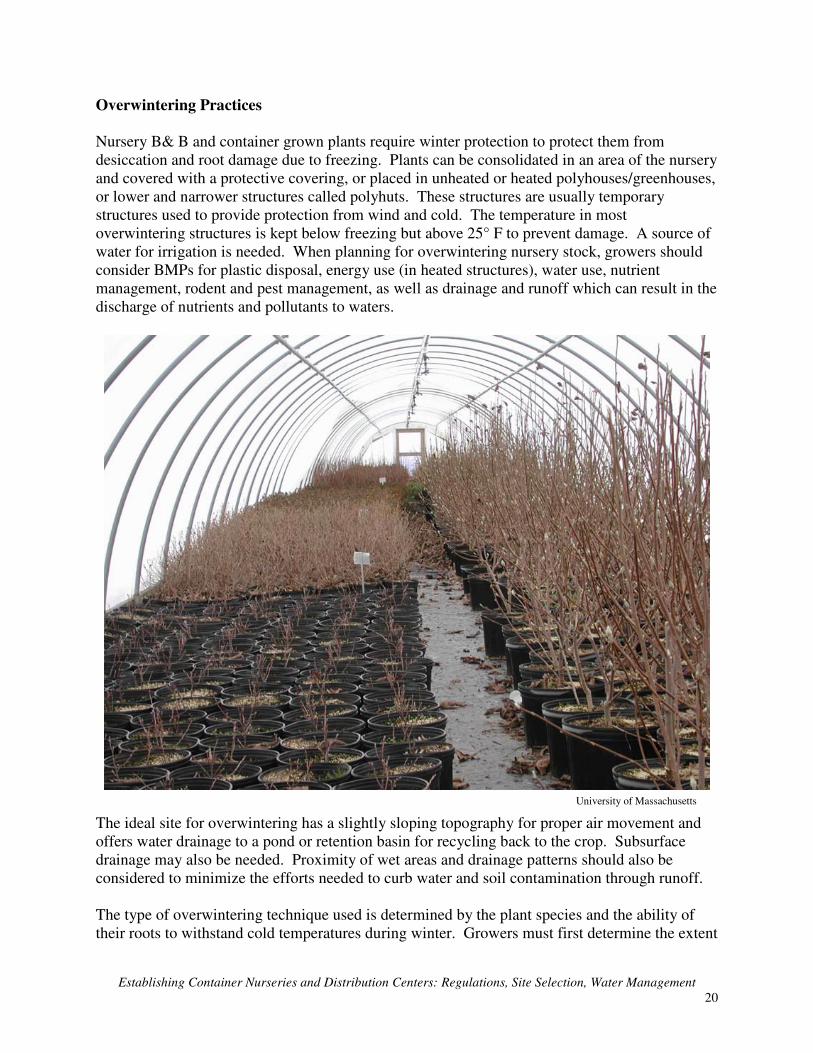
Overwintering Practices
Nursery B& B and container grown plants require winter protection to protect them from desiccation and root damage due to freezing. Plants can be consolidated in an area of the nursery and covered with a protective covering, or placed in unheated or heated polyhouses/greenhouses, or lower and narrower structures called polyhuts. These structures are usually temporary structures used to provide protection from wind and cold. The temperature in most overwintering structures is kept below freezing but above 25° F to prevent damage. A source of water for irrigation is needed. When planning for overwintering nursery stock, growers should consider BMPs for plastic disposal, energy use (in heated structures), water use, nutrient management, rodent and pest management, as well as drainage and runoff which can result in the discharge of nutrients and pollutants to waters.
The ideal site for overwintering has a slightly sloping topography for proper air movement and offers water drainage to a pond or retention basin for recycling back to the crop. Subsurface drainage may also be needed. Proximity of wet areas and drainage patterns should also be considered to minimize the efforts needed to curb water and soil contamination through runoff. The type of overwintering technique used is determined by the plant species and the ability of their roots to withstand cold temperatures during winter. Growers must first determine the extent
University of Massachusetts
Establishing Container Nurseries and Distribution Centers: Regulations, Site Selection, Water Management
21
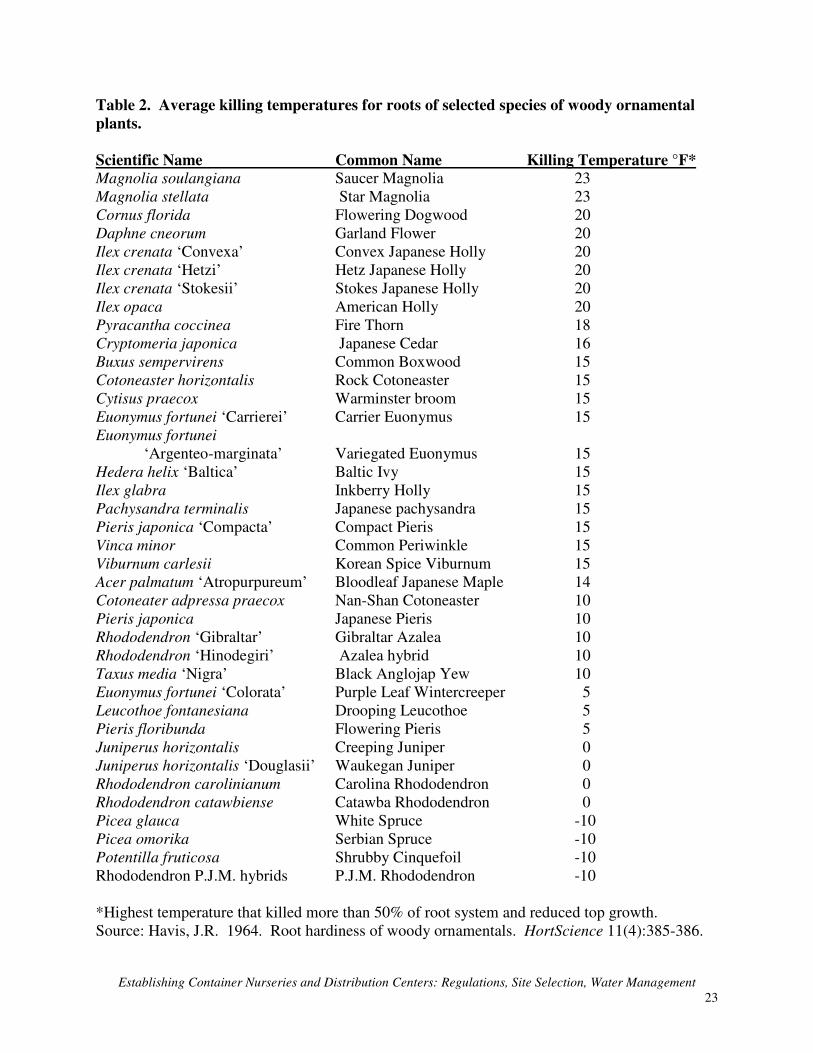
of winter protection required for the plants being grown. Plants whose roots are killed at higher temperatures than the average low temperature in their geographic area will need some type of protection. Plants with roots that can withstand colder temperatures may need less protection. Table 2 lists killing temperatures for roots of selected woody ornamental plants. Plants develop the ability to survive winter temperatures following exposure to shortening days and lower temperatures (acclimation). In order to develop maximum tolerance to cold the plants must be exposed to freezing temperatures. Ultimately, if exposed to consistently lower temperatures, without sudden damaging drops or swings up and down, many plants are able to tolerate very cold temperatures. Cultural practices, such as fertilizing, watering, and pruning impact a plant’s ability to acclimate. Any practice that stimulates late season growth should be avoided.
Covering Plants
Do not cover plants before they have acclimated to cold temperatures. This is usually sometime in November around Thanksgiving for much of Massachusetts. Watering
Before covering, consolidate plants as close as possible and water well. Moist media freezes more slowly than dry media and releases heat, offering root protection. Check moisture level of the media during the winter and irrigate if necessary. Rodent Management
The final step prior to covering plants is to provide some type of rodent control. Many growers use commercially available baits while others have reported that human hair or cut up deodorant soap works for them. In addition to using baits, make overwintering greenhouses rodent tight. Use fine mesh screen wire like hardware cloth around the perimeter of the greenhouse. Bury it under ground to a depth of 8 to 12 inches, creating a subterranean barrier.
Leave about 6 to 8 inches of extra hardware cloth at the bottom, and bend it outward at a 90° angle to form an L-shape. This will help to keep pests from burrowing under. Mow and clean up the natural vegetation close around the greenhouses to eliminate protected areas for rodents.
Managing Temperature Extremes
Temperature extremes are often managed with timely ventilation and supplemental heat. Depending on daytime winter temperature, overwintering structures may be ventilated to reduce rising temperature inside the structure. For certain plant species, supplemental heat may be
Methods of Overwintering
Massachusetts has six hardiness zones representing a wide range of temperatures. As a result, growers here use many different methods for overwintering plants. Some experimentation will be necessary to determine which method works best for your situation:
1. Push pots together with protection at the edges 2. Mulching 3. Microfoam with a poly cover directly over plants placed on the ground 4. Greenhouse with single-layer poly (white poly) 5. Greenhouse with double-layer poly 6. Greenhouse with double-layer poly and a poly blanket 7. Greenhouse with double-layer poly and a microfoam blanket 8. Greenhouse with double-layer poly and
heat
Establishing Container Nurseries and Distribution Centers: Regulations, Site Selection, Water Management
22
necessary to avoid rapid temperature drop and prolonged cold. Uncover plants when temperatures begin to rise in early spring but after the danger of subfreezing temperatures has passed. In early spring, holes can be cut in the poly to ensure adequate ventilation while still providing adequate protection from frosts. Plastic Disposal
The poly film used to cover overwintering structures and the microfilm used to protect overwintering plants present a disposal problem at the end of every winter season. In Massachusetts, the Department of Environmental Protection open burning regulations do not permit burning of agricultural plastic. Burning plastic can release toxic and potentially cancer-causing chemicals into the air. If you have plastic waste for disposal, first check with your local municipal recycling center or a plastic recycling company. The second option for proper disposal is to hire a commercial waste hauler.
Establishing Container Nurseries and Distribution Centers: Regulations, Site Selection, Water Management
23
Table 2. Average killing temperatures for roots of selected species of woody ornamental
plants.
Scientific Name Common Name Killing Temperature °F*
Magnolia soulangiana Saucer Magnolia 23 Magnolia stellata Star Magnolia 23 Cornus florida Flowering Dogwood 20 Daphne cneorum Garland Flower 20 Ilex crenata ‘Convexa’ Convex Japanese Holly 20 Ilex crenata ‘Hetzi’ Hetz Japanese Holly 20 Ilex crenata ‘Stokesii’ Stokes Japanese Holly 20 Ilex opaca American Holly 20 Pyracantha coccinea Fire Thorn 18 Cryptomeria japonica Japanese Cedar 16 Buxus sempervirens Common Boxwood 15 Cotoneaster horizontalis Rock Cotoneaster 15 Cytisus praecox Warminster broom 15 Euonymus fortunei ‘Carrierei’ Carrier Euonymus 15 Euonymus fortunei ‘Argenteo-marginata’ Variegated Euonymus 15
Hedera helix ‘Baltica’ Baltic Ivy 15 Ilex glabra Inkberry Holly 15 Pachysandra terminalis Japanese pachysandra 15 Pieris japonica ‘Compacta’ Compact Pieris 15 Vinca minor Common Periwinkle 15 Viburnum carlesii Korean Spice Viburnum 15 Acer palmatum ‘Atropurpureum’ Bloodleaf Japanese Maple 14 Cotoneater adpressa praecox Nan-Shan Cotoneaster 10 Pieris japonica Japanese Pieris 10 Rhododendron ‘Gibraltar’ Gibraltar Azalea 10 Rhododendron ‘Hinodegiri’ Azalea hybrid 10 Taxus media ‘Nigra’ Black Anglojap Yew 10 Euonymus fortunei ‘Colorata’ Purple Leaf Wintercreeper 5 Leucothoe fontanesiana Drooping Leucothoe 5 Pieris floribunda Flowering Pieris 5 Juniperus horizontalis Creeping Juniper 0 Juniperus horizontalis ‘Douglasii’ Waukegan Juniper 0 Rhododendron carolinianum Carolina Rhododendron 0 Rhododendron catawbiense Catawba Rhododendron 0 Picea glauca White Spruce -10 Picea omorika Serbian Spruce -10 Potentilla fruticosa Shrubby Cinquefoil -10 Rhododendron P.J.M. hybrids P.J.M. Rhododendron -10 *Highest temperature that killed more than 50% of root system and reduced top growth. Source: Havis, J.R. 1964. Root hardiness of woody ornamentals. HortScience 11(4):385-386.
Overview of Nutrient Management for Field and Container Nurseries
24
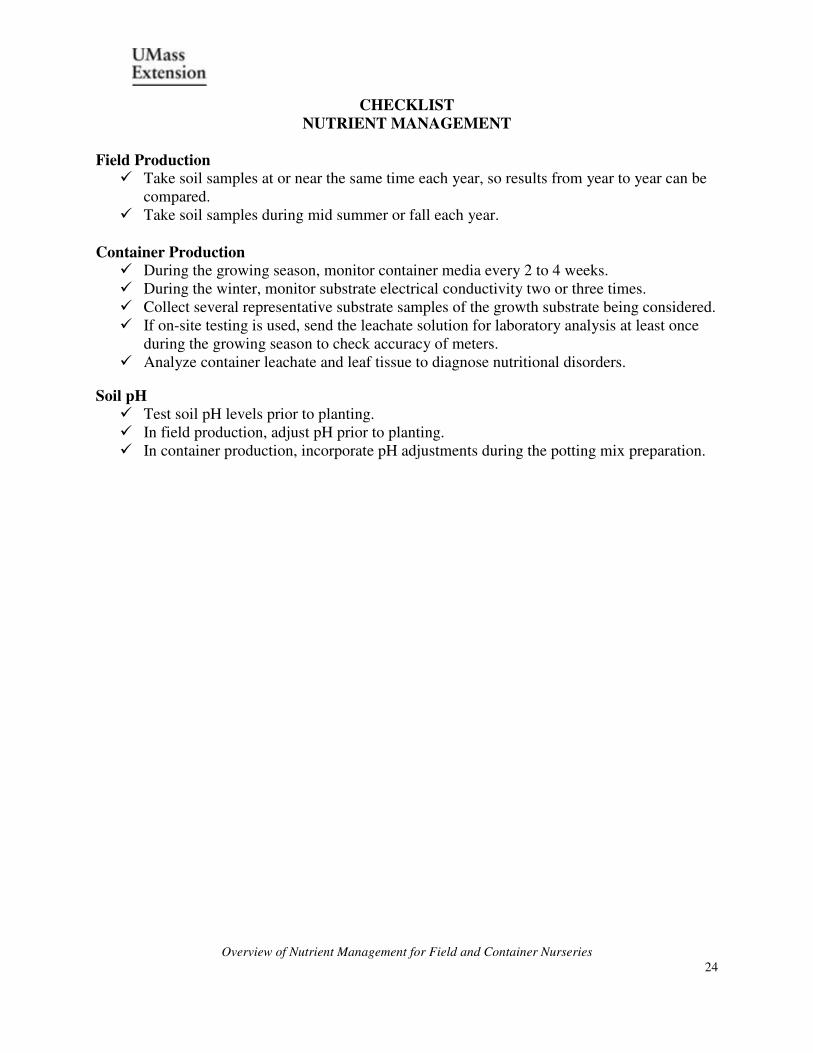
CHECKLIST
NUTRIENT MANAGEMENT
Field Production
� Take soil samples at or near the same time each year, so results from year to year can be compared.
� Take soil samples during mid summer or fall each year.
Container Production
� During the growing season, monitor container media every 2 to 4 weeks. � During the winter, monitor substrate electrical conductivity two or three times. � Collect several representative substrate samples of the growth substrate being considered. � If on-site testing is used, send the leachate solution for laboratory analysis at least once
during the growing season to check accuracy of meters. � Analyze container leachate and leaf tissue to diagnose nutritional disorders.
Soil pH
� Test soil pH levels prior to planting. � In field production, adjust pH prior to planting. � In container production, incorporate pH adjustments during the potting mix preparation.
Overview of Nutrient Management for Field and Container Nurseries
25
NUTRIENT MANAGEMENT
Soil Testing A soil test is important for several reasons: to optimize crop production, to protect the environment from contamination by runoff and leaching of excess fertilizers, to aid in the diagnosis of plant culture problems, to improve the soil’s nutritional balance, to save money and conserve energy by applying only the amount of fertilizer needed, and to identify soils contaminated with lead or other heavy metals. Determining the pH and fertility level of a soil through a soil test is the first step in planning a sound lime and fertilization program. A soil test provides the means of monitoring the soil so deficiencies, excesses and imbalances can be avoided. Avoid sampling when the soil is very wet or has been recently limed or fertilized. Soils that look different or have been used differently should be sampled and tested separately. Areas where there is poor growth should also be tested separately. The numerical results of a soil test reflect analytical procedures used by specific laboratories. For this reason, soil test results from different laboratories should not be compared.
Field Production Soil samples from field nurseries can be taken any time during the year; however, midsummer to fall is the most desirable time to determine fertilizer needs for the following year. Soils should be dry enough to till when sampling, and fields are usually dry and easily accessible in the fall. The soil pH and nutrient levels will be at or near their lowest points during late summer and early fall. Therefore, samples collected in the fall are more representative of the actual fertility conditions during the growing season than samples collected in late winter or early spring. Fall sampling also allows sufficient time for results and recommendations to be received from the laboratory so any necessary limestone and fertilizer can be applied before planting.
Soil nutrient levels change during the year depending on the temperature and moisture content of the soils. It is important, therefore, that samples be taken at or near the same time each year, so results from year to year can be compared.
Container Production
Soil samples from soilless mixes are tested differently than samples from field soil. There are three commonly used methods of testing soilless media based on the use of water as an extracting solution: 1:2 dilution method, saturated media extract (SME), and leachate Pour Thru. The value representing the level of soluble salts from a soil test using a 1:2 dilution method will mean something different than results from SME or leachate Pour Thru. For example, 2.6 would be “extreme” (too high) for the 1:2 method, “normal” for SME, and “low” for leachate Pour Thru. Likewise, values for specific nutrients are likely to differ with testing methods. Always use the interpretative data for the specific soil testing method used to avoid incorrect interpretation of the results. For more details, see Appendix C, Interpretation of Soluble Salt and pH Measurements.

Overview of Nutrient Management for Field and Container Nurseries
26
Most fertilizers (except urea) are salts and when placed in solution they conduct electricity. Thus, the electrical conductivity (EC or soluble salts) of a substrate solution is indicative of the amount of fertilizer available to plant roots. In addition to carrying out a complete soil test, container growers should routinely check the EC and pH of their container crops and irrigation water. These checks can be done onsite using portable testing meters, or samples can be sent to the University of Massachusetts soil test laboratory. Growing media for long-term crops should be tested at least monthly, but biweekly monitoring during the summer may be necessary to track fluctuations in EC. Even when controlled-release fertilizers are used, substrate nutritional levels will gradually fall during the growing season to levels that may not support optimal growth. Sending the leachate solution collected from the Pour Thru method for laboratory analysis at least once during the growing season is a good idea, so that actual nutrient levels in the container can be determined and corrected if needed. The accuracy of EC and pH meters can also be checked by sending a leachate sample to the laboratory at least once during the growing season. Growers can plot or record average leachate EC and pH values from 3 to 5 containers scattered within a block of plants in an irrigation zone. Routinely sample leachates for EC and pH to obtain data on when fertilizer runs out, whether or not irrigation volume is appropriate, and whether or not irrigation distribution over the block is uniform. Sample containers diagonally across a growing block to help diagnose poor uniformity in irrigation patterns. High temperatures in overwintering structures can result in nutrient release from controlled-release fertilizers. Monitor substrate EC two or three times during the winter to ensure levels are not toxic.
When plant foliage becomes chlorotic or off-color, analyzing container leachate and leaf tissue are the best diagnostic steps to determine nutritional disorders. A leaf tissue laboratory sample should include 20 to 100 (depending on the size of the leaves) of the most recently fully expanded leaves. Send a leachate sample with the leaf tissue sample to supply information about recent and current nutrient conditions in the container. Test results generally provide insight into problems related to nutritional imbalances in the plant or substrate.
pH and EC Monitoring Equipment
Many horticulture or nursery supply companies carry pH and EC testing equipment, usually in the form of pens or meters. Most pens and meters are temperature-compensating; however, the instructions that come with the equipment will help growers determine if any adjustments are necessary related to environmental conditions. A buffer (standardizing) solution (pH 4 or 7) should be purchased with pH meters or pens. A standard solution should also be purchased with EC pens and meters to assure that equipment is calibrated and working
properly.
Overview of Nutrient Management for Field and Container Nurseries
27
Soil Sampling Instructions
Sampling can be done at any time; but if pH adjustments are necessary, test as early as possible prior to planting. Avoid sampling soils that have been fertilizer very recently. The following procedure covers taking a soil sample to be sent to the soil test laboratory or tested onsite using the 1:2 method:
1. Soils that are distinctly different as judged by appearance, crop growth or past treatment should be sampled separately. 2. Each field nursery sample submitted for testing should be a mixture of approximately 12 separate samplings taken over a well-defined area. For container production take a sample at root depth from several pots and mix together. Skip to step 6. 3. Look over the field or property. Define a sample area based on uniformity of texture, slope, drainage, color, and past pest and fertility management. 4. Avoid sampling very wet soils. In soils where fertilizer has been placed in bands (rows), do not sample directly in a band. It is best not to obtain samples very near the edge of a field or plot. 5. Using a clean spade, auger, or sampling tube, obtain soil from the surface through the primary rooting zone of the crop. Rooting depth will vary with crop type. For most plants the top 6 to 8 inches is appropriate. 6. Place each of the 12 randomly spaced samplings in a clean container (pail or bag) and mix thoroughly. Spread the mixture out on a clean paper to air dry (do not place soil in an oven). 7. Mix the soil again. Obtain a one cup measure of the soil mixture and place it in a zip-lock type bag. 8. Label the outside of the bag clearly with your name, address, and your name for the sample (ID). Send the sample to the University of Massachusetts Soil and Tissue Testing Laboratory, West Experiment Station, 682 North Pleasant Street, UMass, Amherst, MA 01003. For more information, see Appendix B, Soil and Tissue Testing Service. Soil samples from container crops can be tested onsite for pH and EC using the 1:2 soil testing method. For information, access the online fact sheet “How to Use pH and EC ‘Pens’ to Monitor Greenhouse Crop Nutrition” (http://www.umass.edu/umext/floriculture/fact_sheets/greenhouse_management/phecpens.html).
Overview of Nutrient Management for Field and Container Nurseries
28
Pour Thru Procedure for Collecting and Testing Leachate from Container Nursery Crops
In addition to collecting a soil sample to test, growers can collect leachate from container grown stock using the Pour Thru method. The leachate that is collected can be tested onsite to determine EC and pH for container crops or it can be sent to a laboratory for a complete test. Simply testing container leachate without adhering to the following procedure will lead to misinterpretation of results:
1. Irrigate nursery containers to container capacity (10% to 20 % leaching expected). 2. Wait 30 minutes to 2 hours for equilibration of nutrients in container solution. 3. Place containers to be tested in a shallow saucer to collect leachate. Pour ½ cup (120 milliliters; 4.0 fl.oz.) of water over the surface of a 1 gallon container. Pour 1½ cups (360 milliliters; 12 fl.oz.) over the surface of a 3 gallon container. 4. An alternative for nursery containers is to lift and tip containers to drain leachate into a collection vessel. 5. Calibrate the pH and EC test equipment using manufacturers’ descriptions and appropriate standard solutions. 6. Read and record results. 7. Develop a log book for crops and irrigation zones for the season. Make conductivity and pH equipment readily available to employees; keeping it in their vehicle or work area provides them with an opportunity to check EC and pH as part of the routine nursery scouting program. If equipment is kept in a truck cab, place it in an insulated cold drink cooler. This will reduce exposure of the equipment to extreme heat, cold, and evaporative conditions, thus extending its useful life. Train employees to use and calibrate the equipment using clean, fresh standards. Calibrate pH and EC equipment daily before use or each time before testing a group of solutions, and between samples, if critical decisions are going to be made based on results or if the readings seem questionable.
Soil pH A fertility program for woody plants begins with obtaining an analysis of soil pH, or level of acidity. Soil pH is measured on a scale of 0 to 14. Soils with a pH below 7 are acidic while those above 7 are alkaline. Adjusting pH is important not only because specific plants grow best within a certain pH range, but also because soil pH affects the availability of both major and minor nutrient elements. Furthermore, soil pH influences the level of microbial activity in soils. Microbes involved in mineralization of organic matter are most active between a pH of 6 and 7. At extremes in pH, many nutrients occur in forms unavailable for uptake by plant roots.
Analysis of soil pH should be routinely made prior to planting. Typically, limestone is required to adjust pH upward while sulfur is used to lower pH. These materials are best incorporated (in the field or in containers) prior to planting, since surface applications are slow to affect pH. In
Overview of Nutrient Management for Field and Container Nurseries
29
the field, most liming and sulfur recommendations are based on the assumption that the material will be worked in to a depth of 8 inches. Deeper incorporation of either limestone or sulfur will require adjustments in application rates to accommodate larger volumes of soil. In container production, pH adjustments are made during the potting mix preparation.
Fertilizer Choices A distinction is necessary between field production and container production regarding plant nutrition. Field nurseries grow in soil and container nurseries grow in soilless potting mixes.
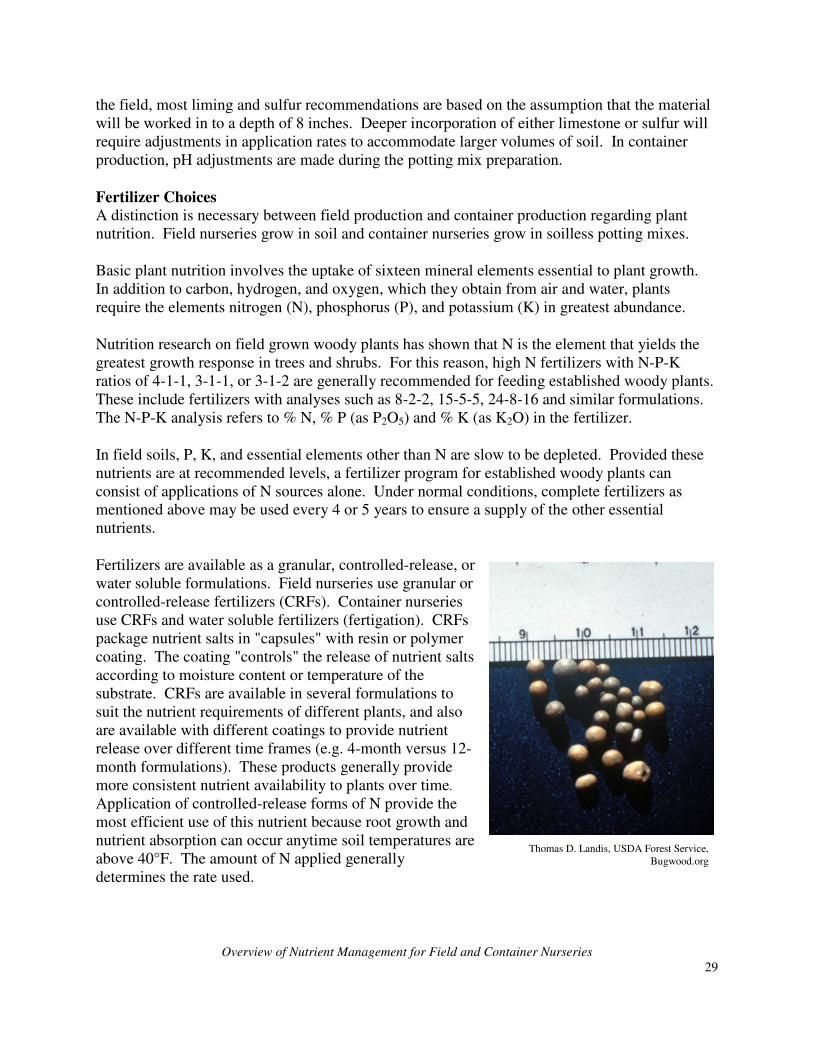
Basic plant nutrition involves the uptake of sixteen mineral elements essential to plant growth. In addition to carbon, hydrogen, and oxygen, which they obtain from air and water, plants require the elements nitrogen (N), phosphorus (P), and potassium (K) in greatest abundance.
Nutrition research on field grown woody plants has shown that N is the element that yields the greatest growth response in trees and shrubs. For this reason, high N fertilizers with N-P-K ratios of 4-1-1, 3-1-1, or 3-1-2 are generally recommended for feeding established woody plants. These include fertilizers with analyses such as 8-2-2, 15-5-5, 24-8-16 and similar formulations. The N-P-K analysis refers to % N, % P (as P2O5) and % K (as K2O) in the fertilizer.
In field soils, P, K, and essential elements other than N are slow to be depleted. Provided these nutrients are at recommended levels, a fertilizer program for established woody plants can consist of applications of N sources alone. Under normal conditions, complete fertilizers as mentioned above may be used every 4 or 5 years to ensure a supply of the other essential nutrients.
Fertilizers are available as a granular, controlled-release, or water soluble formulations. Field nurseries use granular or controlled-release fertilizers (CRFs). Container nurseries use CRFs and water soluble fertilizers (fertigation). CRFs package nutrient salts in "capsules" with resin or polymer coating. The coating "controls" the release of nutrient salts according to moisture content or temperature of the substrate. CRFs are available in several formulations to suit the nutrient requirements of different plants, and also are available with different coatings to provide nutrient release over different time frames (e.g. 4-month versus 12-month formulations). These products generally provide more consistent nutrient availability to plants over time.
Application of controlled-release forms of N provide the most efficient use of this nutrient because root growth and nutrient absorption can occur anytime soil temperatures are above 40°F. The amount of N applied generally determines the rate used.
Thomas D. Landis, USDA Forest Service, Bugwood.org
Fertilizer Storage and Handling
30
CHECKLIST
FERTILIZER STORAGE AND HANDLING
� Consult with local authorities and professional engineers for specific zoning ordinances and technical advice prior to site selection and construction.
� Separate storage areas for pesticides and fertilizers that are secured, and keep the products out of the weather (locate storage buildings at least 50 feet from other buildings).
� Provide secondary containment of the stored products. � Provide a safe mixing and loading area away from water resources.
Fertilizer Storage and Handling
31
FERTILIZER STORAGE AND HANDLING
Storage and handling of fertilizers in their concentrated forms pose the highest potential risk to ground or surface water from agricultural chemicals. For this reason, it is essential that facilities for the storage and handling of fertilizers be properly sited, designed, constructed, and operated. Operators who use fertilizers should observe Best Management Practices (BMPs) for handling these concentrated products. Consult with local authorities and professional engineers for specific zoning ordinances and technical advice prior to site selection and construction. Agricultural fertilizer facilities include storage and the mixing and loading sites. The size and function of these facilities will vary depending on whether operators are small private land owners or large commercial dealers. However, all operators need properly designed facilities which promote worker safety and environmental protection. The ideal facility provides separate storage areas for pesticides and fertilizers that are secured and kept out of the weather (storage buildings should be located at least 50 feet from other buildings), secondary containment of the stored products, and a safe mixing and loading area away from water resources. Site Selection
Always consider human and environmental safety before locating fertilizer or pesticide facilities. Determine the potential vulnerability of the groundwater at the site by comparing aquifer depth and the permeability of the overlying material. To prevent surface water contamination, consider the distance, slope, and runoff at the site. Seek professional help if you are unsure how to meet local codes and evaluate environmental vulnerability. Existing Sites
Evaluate the existing site to determine its suitability for fertilizer storage and handling before building any new facilities. Determine baseline values for environmental contaminants on the construction site by testing soil, groundwater, and surface water. If these baseline values are not established and the site is later found to be contaminated, it will be difficult to determine if the contamination was a result of the old site or the new facilities. An environmental assessment may be a valuable tool to use in deciding where to locate a facility. The assessment will determine baseline information and the suitability of the site. It is intended to detect the presence of contamination, if any, and the extent of contamination. If any contamination is found, sample soil and groundwater to determine the full extent of the contamination.
New Sites
Choose a new site based on the same concerns as an existing site. Environmental assessment of new sites is also recommended prior to purchase to determine suitability of the site for the operation. Consider the new location in relation to water supplies, populated areas, traffic patterns, and potential future development. Facility Site Plan
When considering the construction of a facility, sketch out a site plan and document the following: location of proposed chemical facilities in relation to surrounding property and traffic

Fertilizer Storage and Handling
32
patterns; soil type; depth to groundwater; depth and location of wells, both on the site and within 100 feet of the property; distance and direction to surface water; plan of construction; proximity to 100-year flood plain; drainage of water across the property during storms; and an operational plan for containment areas showing the containment strategy, handling of recovered chemicals and rinse water, and handling of precipitation accumulation and waste.
Nutrient Management—Field Nurseries
33
CHECKLIST
FIELD NURSERIES—NUTRIENT MANAGEMENT
� Test soils each year (midsummer to fall) to determine fertilizer needs for fields the following year. Have soil tested to indicate if other soil nutrients are required as pre-plant adjustments.
� Complete liming and applying superphosphate (if needed) before planting. � Incorporate nitrogen (N) fertilizer during field preparation based on soil test. Use soil
test results to add other soil nutrients as required prior to planting. � After the first year, surface application of N is based on an amount of N per plant rather
than pounds of N per acre. Place fertilizer within the root zone as a side dress at the rate of 0.25 to 0.5 ounce of N per plant.
� If supplemental fertilizer is required the first year for fall-transplanted plants, each plant should receive 0.25 to 0.5 ounce of N before bud break. During the second year, each plant should receive 0.5 to 1.0 ounce distributed in split applications: the first two-thirds of the total amount should be applied before bud break, and the second application should be made by mid-June. During the third and following years, each plant should receive 1.0 to 2.0 ounces in split applications as described for the second year.
� Slower-growing cultivars or species should be fertilized at the lower application rates, whereas vigorous plants will have increased growth if the higher application rate is used.

Nutrient Management—Field Nurseries
34
FIELD NURSERIES
Nutrient Management
Best Management Practices (BMPs) for fertilizer applications focus on water quality and nutrient runoff as well as maximizing growth of nursery stock.
Certain practices such as liming and applying superphosphate should be completed before planting so that these materials can be thoroughly mixed with the top 6 to 8 inches of soil during normal soil preparation practices. Soil test results will indicate if other soil nutrients are required as pre-plant adjustments. In soils where phosphorus (P) and potash (potassium, K) tend to remain high once adequate levels are established, N may be the only required yearly addition. Currently, ammonium nitrate (33-0-0) and urea (46-0-0) are the most popular soluble fertilizers. Where yearly P application is also warranted, di-ammonium phosphate (18-46-0) is often used as an N and P source.
Certain recommended fertilizer practices for field nurseries have been adopted in other states to reduce runoff while meeting the fertility needs of plants. For example, during field preparation, the practice of incorporating fertilizer at 50 pounds of N per acre reduces runoff potential and usually meets the N requirements of new plants during the first year. Other nutrients as recommended by soil tests should be incorporated before planting. In subsequent years, surface application of N is based on an amount of N per plant rather than pounds of N per acre. It is suggested that
fertilizer be placed within the root zone as a side dress at the rate of 0.25 to 0.5 ounce of N per plant rather than applying previous recommendations of 100 to 200 pounds of N per acre. Doing so maximizes growth with a minimum amount of fertilizer. If supplemental fertilizer is required the first year for fall-transplanted plants, each plant should receive 0.25 to 0.5 ounce of N before bud break. During the second year, each plant should receive 0.5 to 1.0 ounce distributed in split applications: the first two-thirds of the total amount should be applied before bud break, and the second application should be made by mid-June. During the third and following years, each plant should receive 1.0 to 2.0 ounces in split applications as described for the second year. Slower-growing cultivars or species should be fertilized at the lower application rates, whereas vigorous plants will have increased growth if the higher application rate is used. Higher rates can contribute to nutrient runoff and water quality impacts. Recently, slow-release fertilizers developed specifically for field use have been introduced. Although these fertilizers are more expensive, one application may last the entire growing season.
Base timing of fertilization on plant growth habit. For plants that have a single flush of growth, fertilize in the fall and early spring before growth begins. For plants that have multiple flushes, split recommended applications among fall, spring, and when the first flush begins to slow down.
Thomas D. Landis, USDA Forest Service, Bugwood.org

Nutrient Management—Field Nurseries
35
Fall fertilization (late August through September) is effective because roots continue to absorb nutrients until soil temperatures approach freezing. N that is absorbed in fall will be stored and converted to forms used to support the spring flush of growth. Nutritionally balanced plants have the best chance of withstanding winter conditions. Note: N generally
stimulates growth, and when applied late in the growing season (late summer) to plants
that have multiple flushes of growth, it can prevent growth cessation and thus reduce the
potential for cold hardiness in a woody plant. Avoid fertilizing field stock in late fall or early winter; fertilizer can easily run off frozen ground.
Nutrient Management—Container Nurseries
36
CHECKLIST
CONTAINER NURSERIES— NUTRIENT MANAGEMENT
Mixing and Handling Growing Media
� Test the media pH, electrical conductivity, and wettability before use. � Do not make changes to current growing media without experimenting first to see if
changes may affect cultural practices. � When mixing, thoroughly mix components, but do not over-mix, especially if a medium
contains vermiculite or controlled release fertilizer. � Do not store media that contains fertilizer especially if the media is moist. � Avoid contamination of components for finished media by keeping amendments in
closed bags or by covering outdoor piles. � Do not allow mixes containing peat most to dry out.
Using Fertilizers
� Use a backflow preventer to ensure that water containing fertilizer or pesticide is not mixed with water used for human consumption.
� Apply fertilizer only when needed. Use a fertilizer nutrient ratio of approximately 3:1:2 N: P205: K20.
� Use soil test results and product manufacturer guidelines to determine fertilizer rates. � Amend the growth substrate prior to potting with controlled-release fertilizer (CRF)
rather than applying fertilizer to the substrate surface if containers are subject to blow over.
� Mix CRFs uniformly throughout the growth substrate. � Do not add superphosphate to the container substrate. � Adjust application rates for fall and winter (after first frost) or when using subirrigation.
Application rates are usually one-half the rates used in summer. � Apply supplemental fertilization or reapplication by injecting fertilizer into irrigation
water or placing fertilizer on the surface of container substrate. � If injection is used with overhead irrigation systems, collect runoff or take steps to
address nutrient runoff. � Inject an individual element or a combination of elements in concentrations slightly less
than desirable levels to be maintained in the growth substrate. � Surface-applied fertilizer should be applied to small blocks or groups of plants to
minimize nutrient runoff. � Avoid broadcast fertilizer applications unless containers are pot to pot. � Record fertilizer product name and analysis, date and location applied, and general notes
about plant and environmental conditions. Use past records for troubleshooting current problems.
� Group plants according to their fertilizer needs so supplemental fertilizer applications can be made only to plants requiring additional fertilizer. This is particularly important if fertilizer is injected in irrigation water.
Monitoring Nutrient Status
� During the growing season, monitor container media every 2 to 4 weeks. � During the winter, monitor substrate electrical conductivity two or three times.

Nutrient Management—Container Nurseries
37
� Collect several representative substrate samples to ensure that samples represent the growth substrate being considered.
� Have irrigation water tested at least once each year.
Nutrient Management—Container Nurseries
38
CONTAINER NURSERIES
NUTRIENT MANAGEMENT
Growing Media
The most common components in an outdoor container nursery mix are bark, sphagnum peat moss, and sand. Some alternative materials being used are shredded coconut husks (coir), composted yard wastes and animal wastes, composted hardwood bark, and other composted materials. Softwood bark typically comprises from 80 to 100% of a mix. Peat is often included to increase the water-holding capacity of a mix, while sand and soil are often added to increase the weight, which reduces container tip-over. Many growers use a recipe of 80% pine bark, 10% peat and 10% sand.
Use of Composts in Nursery Potting Media
Organic materials that have been properly composted can also be used in nursery potting mixes. For container use, be cautious and use approximately 10% compost by volume in pine bark mixes. The compost should be considered a substitute for peat moss and sand. Conduct a soil test before adding fertilizer. Addition of minor elements will probably be recommended. For container production, the use of slow-release fertilizers is also recommended. Dolomitic limestone should be omitted or reduced to no more than 3 pounds per cubic yard of potting mix. The soluble salts level and pH should be monitored during the growing season. Before using compost on any nursery crop, establish a small test area to determine the material's suitability for the particular ornamental species.
Mixing and Handling Growing Media
• Test the media pH, electrical conductivity and wettability before use.
• Do not make changes to your current growing media without experimenting first to see if changes may affect your cultural practices.
• If mixing your own media, thoroughly mix components, but do not over-mix, especially if a media contains vermiculite or controlled release fertilizer.
• Do not store media that contains fertilizer especially if the media is moist.
• Avoid contamination of components for finished media by keeping amendments in closed bags or by covering outdoor piles.
• Do not allow mixes containing peat most to dry out.
Fertilizing Container Nurseries
Container-grown plants are fertilized using water soluble fertilizers through an irrigation system or controlled-release fertilizers (CRFs). The amount of N applied generally determines the rate used. When fertilizer is injected in the overhead irrigation system, steps need to be taken to address the irrigation water leaving the property, because much of the water from overhead irrigation systems falls between containers. Fertilizing through irrigation water is appropriate for low-volume irrigation systems in which irrigation water is delivered to the container such as drip irrigation. Even then, care needs to be taken to minimize leaching from the container to prevent nutrient runoff from entering surface or ground water.
Nutrient Management—Container Nurseries
39
When preparing a nutrient management plan for a container operation, a nutrient management consultant should conduct an environmental risk assessment. The purpose is to evaluate the potential risk to the environment of nutrient movement from container growing areas.
• Apply fertilizer only when needed. Use a fertilizer nutrient ratio of approximately 3:1:2 N: P205: K20.
• Use soil test results and product manufacturer guidelines to determine fertilizer rates.
CRFs supply essential plant nutrients for an extended period of time (months). Fertilizers are available that contain different mechanisms of nutrient release and different components.
• Amend the growing media prior to potting with CRF, rather than applying fertilizer to the surface, to prevent fertilizer being spilled if containers blow over. Also, surface-applied fertilizer encourages weed growth.
• Mix CRFs uniformly throughout the growth substrate.
• Do not broadcast fertilizer on spaced containers. Nutrients in the growing media can be leached regardless of the type of fertilizer applied. Irrigation practices play an important role for preventing fertilizer runoff. P leaches rapidly from a soilless growing media. Complete CRFs applied during the growing season should supply adequate P. Therefore, do not add superphosphate to the growing media.
CRF application rates vary from product to product, but also depend on plant species and container size. The goal of a fertilizer program is to apply the least amount of fertilizer for the desired growth so that nutrient leaching is minimized. Apply CRF at the manufacturer’s recommended rate and reapply fertilizer when substrate solution status is below desirable levels. Application rates should be adjusted for fall and winter (after first frost) or when subirrigation is used since the rates used then are usually one half the rates used in summer. When supplemental fertilization is needed, fertilizer is either injected into irrigation water or CFR is placed on the surface. If injection is used with overhead irrigation systems, runoff must be collected or steps taken to address nutrient runoff. When CFR fertilizer is applied to the surface as a supplemental fertilizer it should be applied to small blocks or groups of plants to minimize nutrient loss and runoff. Surface applied fertilizer should not be broadcast unless containers are pot to pot. Group plants according to their fertilizer needs so supplemental fertilizer applications can be made only to plants requiring additional fertilizer. This is particularly important if fertilizer is injected in irrigation water. Record fertilizer product name and analysis, date and location applied, and general notes about plant and environmental conditions. Use past records for troubleshooting current problems.
Nutrient Management—Container Nurseries
40
Preventing Backflow
All potable water must be protected against backflow to ensure that water containing fertilizer or pesticides is not mixed with that used for human consumption. Backflow or backsiphoning occurs when a negative pressure develops in the water supply line, causing water that contains fertilizer or pesticides to be drawn back into the supply lines. The National Plumbing Code, which has been adopted in most states, requires that backflow preventers be installed on any supply fixture when the outlet may be submerged. Examples of this are hoses that fill spray tanks or barrels, fertilizer injectors, or equipment wash tubs.
Monitoring Nutrient Status for Container Production The longevity of the release of CRFs is influenced by environmental factors. To ensure that adequate nutrient levels are maintained in the growing media, monitor the nutrient status and use the results to determine fertilizer reapplication frequency. Regular monitoring is important because plants may not show visible symptoms of excessive or inadequate nutritional levels, however growth may be reduced. High concentrations of nutrients can result from media components, inadequate irrigation frequency and duration, water source, and/or fertilizer materials and application methods. Nutrients may also accumulate during the overwintering of plants in polyhouses. Excessive nutrient concentrations injure roots, restricting water and nutrient uptake. Rainfall and excessive irrigation can leach nutrients from containers resulting in inadequate nutrient levels and runoff. Growing media used for long-term crops should be tested at least monthly, but biweekly monitoring during the summer may be necessary to track fluctuations in electrical conductivity (EC), which is used as a relative indicator of the nutritional status of the container media. Even when CRFs are used, media nutritional levels will gradually fall during the growing season to levels that may not support optimal growth. High temperatures in overwintering structures can result in nutrient release from CRFs. Monitor EC two or three times during the winter.
• During the growing season, monitor container media every two to four weeks.
• During the winter, monitor EC two or three times.
• Collect several representative media samples to ensure that samples represent the growing media being considered.
Irrigation Water Testing
In addition to monitoring the nutrient status of the growing media, irrigation water should be tested for pH, alkalinity, sodium (Na), chloride (Cl), and EC each year. pH is a measure of the concentration of hydrogen ions (H+). In general, water for irrigation should have a pH between 5.0 and 7.0. Water with pH below 7.0 is termed “acidic” and water with pH above 7.0 is termed “basic;” pH 7.0 is “neutral”. Alkalinity is a measure of the water’s ability to neutralize acidity. An alkalinity test measures the level of bicarbonates, carbonates and hydroxides in water and test results are generally expressed as “parts per million (ppm) of calcium carbonate (CaCO3)”. The desirable range for irrigation water is 0 to 100 ppm CaCO3. Levels between 30 and 60 ppm are considered optimum for most plants.
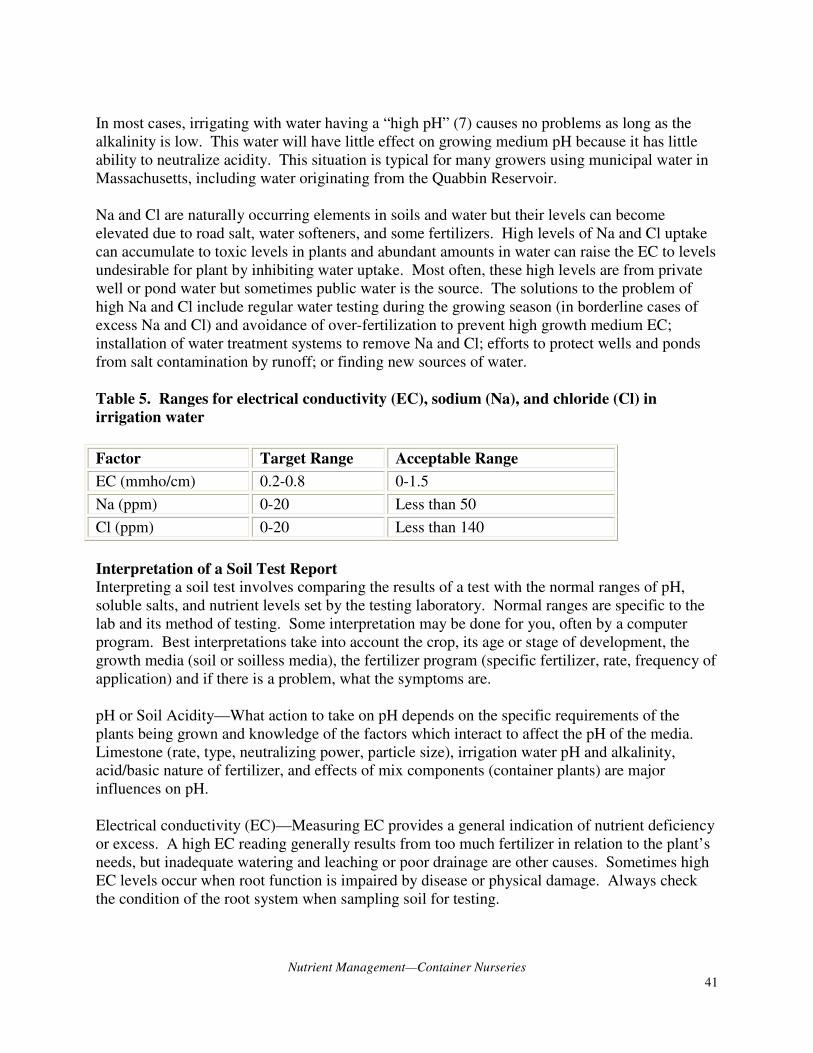
Nutrient Management—Container Nurseries
41
In most cases, irrigating with water having a “high pH” (7) causes no problems as long as the alkalinity is low. This water will have little effect on growing medium pH because it has little ability to neutralize acidity. This situation is typical for many growers using municipal water in Massachusetts, including water originating from the Quabbin Reservoir. Na and Cl are naturally occurring elements in soils and water but their levels can become elevated due to road salt, water softeners, and some fertilizers. High levels of Na and Cl uptake can accumulate to toxic levels in plants and abundant amounts in water can raise the EC to levels undesirable for plant by inhibiting water uptake. Most often, these high levels are from private well or pond water but sometimes public water is the source. The solutions to the problem of high Na and Cl include regular water testing during the growing season (in borderline cases of excess Na and Cl) and avoidance of over-fertilization to prevent high growth medium EC; installation of water treatment systems to remove Na and Cl; efforts to protect wells and ponds from salt contamination by runoff; or finding new sources of water. Table 5. Ranges for electrical conductivity (EC), sodium (Na), and chloride (Cl) in
irrigation water
Factor Target Range Acceptable Range
EC (mmho/cm) 0.2-0.8 0-1.5
Na (ppm) 0-20 Less than 50
Cl (ppm) 0-20 Less than 140
Interpretation of a Soil Test Report
Interpreting a soil test involves comparing the results of a test with the normal ranges of pH, soluble salts, and nutrient levels set by the testing laboratory. Normal ranges are specific to the lab and its method of testing. Some interpretation may be done for you, often by a computer program. Best interpretations take into account the crop, its age or stage of development, the growth media (soil or soilless media), the fertilizer program (specific fertilizer, rate, frequency of application) and if there is a problem, what the symptoms are. pH or Soil Acidity—What action to take on pH depends on the specific requirements of the plants being grown and knowledge of the factors which interact to affect the pH of the media. Limestone (rate, type, neutralizing power, particle size), irrigation water pH and alkalinity, acid/basic nature of fertilizer, and effects of mix components (container plants) are major influences on pH. Electrical conductivity (EC)—Measuring EC provides a general indication of nutrient deficiency or excess. A high EC reading generally results from too much fertilizer in relation to the plant’s needs, but inadequate watering and leaching or poor drainage are other causes. Sometimes high EC levels occur when root function is impaired by disease or physical damage. Always check the condition of the root system when sampling soil for testing.
Soil Conservation—Field and Container Nurseries
42
CHECKLIST
SOIL CONSERVATION
Field Nurseries
Minimizing Soil Loss
� After harvest, incorporate composted manure, straw, or other organic materials. This practice adds stable forms of organic matter which enhances native soil fertility, soil structure, water holding capacity, and resistance to erosion.
� Plant cover crops between rows to protect against winter erosion. This practice also adds considerable amounts of organic matter to the soil. Cover crop roots also help to develop soil structure.
� Always plant cover crops in any field that is out of production. � Plant crops along the contours of the land to reduce erosion. Planting along the contour
produces a series of dams that will intercept overland water flow and thus reduce soil erosion. The feasibility of contour planting will be based on the ability of farm equipment to safely traverse the slope of the land.
� Install subsurface drainage systems in upland soils to reduce soil saturation and to minimize the presence of surface water, thereby reducing surface runoff and erosion.
� Use the largest feasible pot size when planting container nursery stock out into the field. This practice educes the amount of native soil lost during harvest.
� Practice root pruning for all B&B plant material to keep root balls as small as possible. � Dedicate a minimum of one year of rest between nursery crop cycles in a field with a
seeded cover crop. At least one planting of a cover crop should be seeded and then worked into the soil after it has grown. This practice will trap nutrients and provide more organic matter to the soil.
Animal Manure
� Use composted manures, not fresh manure. � Avoid using manures on newly planted fields. � Early spring to early summer is the best time to apply composted manures.
Organic Matter Spreading Techniques to Prevent Water Contamination
Contact EPA and local authorities for rules before spreading organic matter.
Organic matter, in the form of manure or compost should not be spread:
� On steep slopes where erosion and/or surface runoff is likely to occur. � On saturated soils, where manures will not infiltrate into the soil. � Within the high water mark of field depressions during times of the year when there is a
high risk of direct surface runoff to an open watercourse. � In excess winds where drift can occur. � On frozen or snow-covered ground where runoff of snowmelt to open watercourses might
occur. � On areas having standing water.
Soil Conservation—Field and Container Nurseries
43
Cover crops
� Grow cover crops to maintain vegetative cover on soils instead of leaving them bare. Cover crops protect the soil from erosion by water and wind, reduce competition from weeds, and improve soil tilth and soil fertility.
Field Storage of Manure and Compost
� Field storage should not exceed two weeks in duration. � Field storage should not be located in natural drainage ways or where runoff will reach
waterways. � Field storage should not be located on coarse-textured or gravelly soils. � Field storage should not take place at times of high rainfall or high water tables. � If rainfall occurs, storage piles must be immediately covered to keep rainfall from
entering the piles.
Container Nurseries
Soil Conservation
� Do not use native topsoil (field soil) as growth medium inside pot-in-pot culture, or in above-ground pots.
� Do not strip and stockpile native topsoil (field soil) to accommodate production.
Soil Conservation—Field and Container Nurseries
44
SOIL CONSERVATION
Field Nurseries
Field nursery production involves the use of unique soil management practices. Soil conservation practices such as grassed waterways, water and sediment control basins, contour farming, nutrient management, planting cover crops, and crop rotation are all important to maintain good soil and water quality. Many of these conservation practices will also improve soil structure, fertility, and organic matter that ultimately produce high quality nursery crops. Minimizing Soil Loss
Growers recognize that soil loss is a normal part of agricultural production. If this soil is not replaced, the field is losing the soil that, over time, may reduce it productive capacity. It is estimated that the harvesting of 44-inch diameter balled-and-burlapped stock can result in the loss of 470 tons of soil per acre. This is an average of 94 tons of soil lost per acre over a five-year rotation or 2.8 inches of topsoil lost in five years. Many field growers have begun using compost to replace some of the topsoil that is lost. Aged compost with a lower organic content could be applied at high rates if thoroughly incorporated into the soil; some composts that are two to three years old have only ~20% organic matter and could be classified as organic soils. Another option for rejuvenating depleted soils is applying large quantities (6 to 9 inches over the surface of the field) of wood chips and/or bark mulch; this process requires at least one year of fallow management (growing green manure cover crops such as buckwheat or oats) to allow the huge volume of material to decompose. To speed decomposition, the organics must be thoroughly soil-incorporated. The objective of all field production operations should be to minimize all forms of soil removal. This can be accomplished through minimizing soil erosion, adding mineral and organic matter during the growing cycle, and using operational practices designed to minimize soil loss during harvest. The following guidelines should be followed in all field operations:
• After harvest, incorporate composted manure, straw or other organic materials. This practice adds stable forms of organic matter which enhances native soil fertility, soil structure, water holding capacity, and resistance to erosion.
• Plant cover crops between rows to protect against winter erosion. This practice also adds considerable amounts of organic matter to the soil, and cover crop roots help to develop soil structure.
• Always plant cover crops in any field that is out of production.
• Plant crops along the contours of the land to reduce erosion. Planting along the contour produces a series of dams that will intercept overland water flow and thus reduce soil erosion. The feasibility of contour planting is based on the ability of farm equipment to safely traverse the slope of the land.
• Install subsurface drainage systems in upland soils to reduce soil saturation and minimize the presence of surface water, thereby reducing surface runoff and erosion.
• Use the largest feasible pot size when planting container nursery stock out into the field. This practice reduces the amount of native soil lost during harvest.
Soil Conservation—Field and Container Nurseries
45
• Minimize rootball size by practicing root pruning for all B & B plant material. Rootballs should be kept as small as possible.
• Follow manufacturer directions for using root-containment bags to minimize rootball size.
• Dedicate a minimum of one year of rest between nursery crop cycles in a field with a seeded cover crop. At least one planting of a cover crop should be seeded and then worked into the soil after it has grown. This practice will trap nutrients and provide more organic matter to the soil.
Soil Conservation
The continual removal of large quantities of soil from field operations, especially balled and burlapped operations, represents a serious problem affecting the long-term viability of the land. Soil removal can be considered a form of erosion. Some erosion occurs naturally but is offset by processes of soil formation. Erosion occurring in excess of an acceptable level leads to soil degradation and loss of productivity.
To some extent, degraded soils can be managed to achieve reasonable productivity through fertilizer additions, but soil degradation jeopardizes the stability of the production system. Operations that are dependent on additions of chemical fertilizers for all their nutrient requirements may have greater problems, such as nutrient leaching and water quality concerns. In addition, degraded soils typically contain less organic matter which results in poor soil structure stability. This leads to erosion and compaction, lower available water storage capacity, and increased irrigation requirements. Soils with low organic matter content are also more susceptible to water and wind erosion, initiating a cycle of further degradation.
Soil removal generally affects the topsoil, or the A horizon of the native soil. The A horizon contains large quantities of organic matter and plant nutrients relative to the underlying B and C horizons (subsoil), but the mineral soil materials (sand, silt, and clay) are often similar throughout the soil profile. Natural processes of soil formation result in a slow but steady conversion of the upper A and B horizons. This occurs as small amounts of topsoil are lost to erosion and weathering under natural conditions. Similarly, parent materials at the upper boundary of the C horizon slowly take on the characteristics of the B horizon.
It is very expensive to replace lost topsoil. A better strategy is to encourage the development of a fertile surface horizon through the addition of composted residues or manures and the use of cover crops. Two benefits result:
� The fertility of the native topsoil will be enhanced and an "artificial" A horizon will be developed which will have most of the beneficial properties of the original A horizon.
� A greater proportion of the soil materials removed during harvest will consist of the added materials and their decomposition products, reducing the loss of native soil materials.
Soil Erosion From Rain
Protecting the soil surface from soil erosion is a serious concern for nursery operations because of the openness of the crops. If exposed, the soil surface is subjected to destructive forces
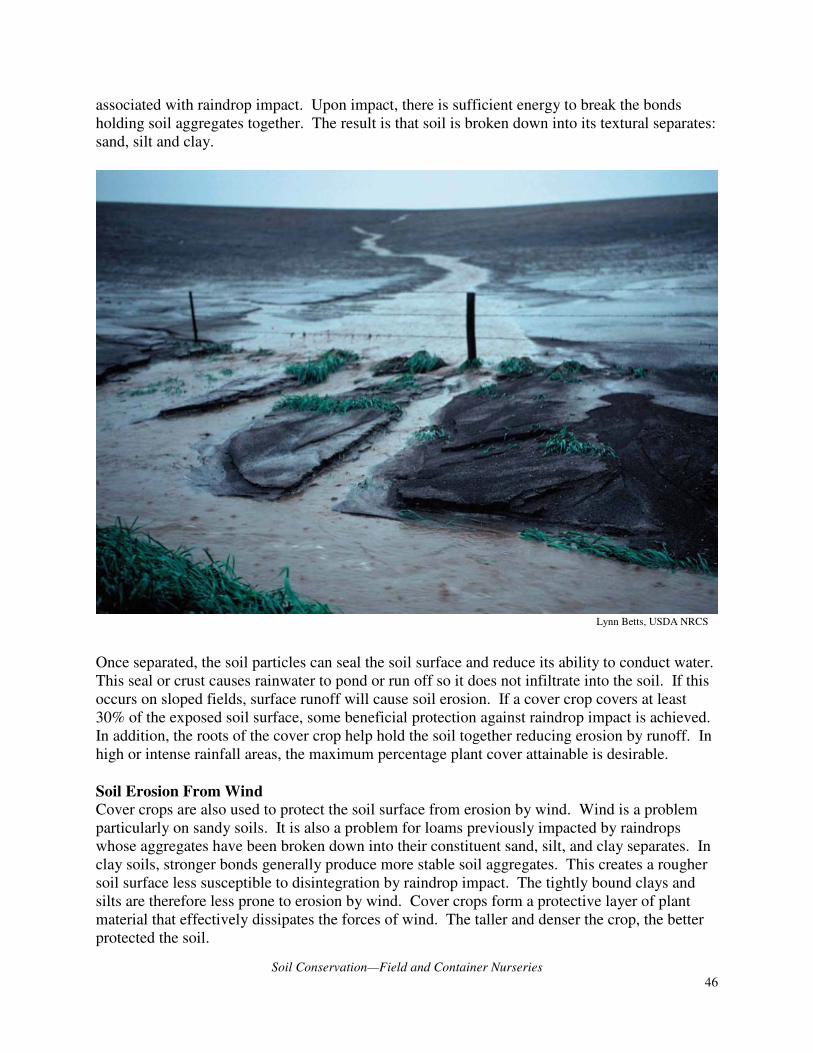
Soil Conservation—Field and Container Nurseries
46
associated with raindrop impact. Upon impact, there is sufficient energy to break the bonds holding soil aggregates together. The result is that soil is broken down into its textural separates: sand, silt and clay.
Once separated, the soil particles can seal the soil surface and reduce its ability to conduct water. This seal or crust causes rainwater to pond or run off so it does not infiltrate into the soil. If this occurs on sloped fields, surface runoff will cause soil erosion. If a cover crop covers at least 30% of the exposed soil surface, some beneficial protection against raindrop impact is achieved. In addition, the roots of the cover crop help hold the soil together reducing erosion by runoff. In high or intense rainfall areas, the maximum percentage plant cover attainable is desirable.
Soil Erosion From Wind
Cover crops are also used to protect the soil surface from erosion by wind. Wind is a problem particularly on sandy soils. It is also a problem for loams previously impacted by raindrops whose aggregates have been broken down into their constituent sand, silt, and clay separates. In clay soils, stronger bonds generally produce more stable soil aggregates. This creates a rougher soil surface less susceptible to disintegration by raindrop impact. The tightly bound clays and silts are therefore less prone to erosion by wind. Cover crops form a protective layer of plant material that effectively dissipates the forces of wind. The taller and denser the crop, the better protected the soil.
Lynn Betts, USDA NRCS
Soil Conservation—Field and Container Nurseries
47
Cover crops can be grouped into the following categories:
� Dead mulches � Live mulches � N contributing cover crops � Organic matter producing cover
crops � Interplanted cover crops � Nutrient capture crops � Erosion control cover crops
Sandy soils erode by a process in which individual sand grains are lifted and return to the ground a short distance downwind, sort of "hopping" down the field. The smaller and lighter the sand grains, the higher the hop and the greater the distance the soil particles move. When the sand grains return to the ground, they do so with considerable force. By this process more and more sand grains are caused to jump, accelerating the soil erosion.
The windblown sand sandblasts the nursery crop causing physical damage to stems and leaves. The damaged plants are susceptible to disease, fungus, and pests. The sandblasting occurs on equipment and buildings as well. Other problems caused by windblown sand are sedimentation of perimeter ditches and surface levelling issues.
Strong winds can blow the clays and silts of unprotected loamy soils into dust clouds. The erosion of silts and clays represents a serious and permanent loss as these fine-textured soil constituents give fertility and structure to the soil.
Cover Crops
Traditional methods to increase organic matter in fields include the establishment of winter cover crops (to prevent late season erosion and capture nutrients before they hit the water table) and/or a green manure crop rotation. Since the primary concern with a green manure program is increasing organic matter levels in the soil, grasses and small grains are generally used in a double cropping system. Small grains are sown in the fall then killed with herbicide or plowed in before they produce seed in the spring. Sorghum-sudan hybrids are commonly used as summer cover crops sown in April or May. Sorghum-sudan hybrids should be mowed at least twice to prevent seed formation, and then they are generally plowed under in the fall. To begin a green manure program, it is necessary to mix in previous crop stubble, fertilizer, lime, and soil amendments. Tall weeds should be mowed before seed dispersal then disked or plowed under. This permits more effective soil mixing during plowing and minimizes the problem of long, coarse stems becoming entwined in equipment.
Cover crops are grown to maintain vegetative cover on soils. Cover cropping is an important farm management practice that provides many immediate cultural benefits while sustaining, or very likely improving, the productivity of the soil. Cover crops protect the soil from erosion by water and wind and reduce competition from weeds. Equally as important, cover crops improve soil tilth and soil fertility. To optimize the benefits from cover cropping practices, practices must be integrated into each nursery grower's specific operation. By choosing between different types of cereals, grasses, legumes, and brassicas, and by seeding at appropriate times, the nursery grower selects an optimal strategy to get the desired benefits.
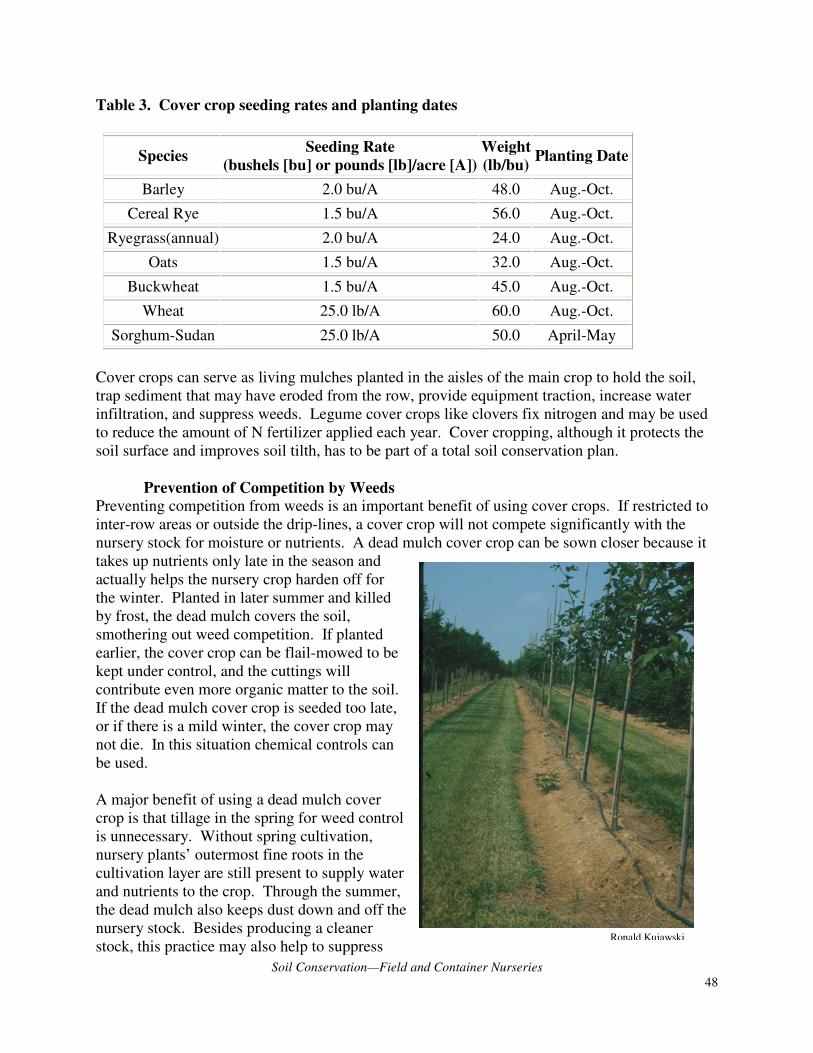
Soil Conservation—Field and Container Nurseries
48
Table 3. Cover crop seeding rates and planting dates
Species Seeding Rate
(bushels [bu] or pounds [lb]/acre [A])
Weight
(lb/bu) Planting Date
Barley 2.0 bu/A 48.0 Aug.-Oct.
Cereal Rye 1.5 bu/A 56.0 Aug.-Oct.
Ryegrass(annual) 2.0 bu/A 24.0 Aug.-Oct.
Oats 1.5 bu/A 32.0 Aug.-Oct.
Buckwheat 1.5 bu/A 45.0 Aug.-Oct.
Wheat 25.0 lb/A 60.0 Aug.-Oct.
Sorghum-Sudan 25.0 lb/A 50.0 April-May
Cover crops can serve as living mulches planted in the aisles of the main crop to hold the soil, trap sediment that may have eroded from the row, provide equipment traction, increase water infiltration, and suppress weeds. Legume cover crops like clovers fix nitrogen and may be used to reduce the amount of N fertilizer applied each year. Cover cropping, although it protects the soil surface and improves soil tilth, has to be part of a total soil conservation plan.
Prevention of Competition by Weeds
Preventing competition from weeds is an important benefit of using cover crops. If restricted to inter-row areas or outside the drip-lines, a cover crop will not compete significantly with the nursery stock for moisture or nutrients. A dead mulch cover crop can be sown closer because it takes up nutrients only late in the season and actually helps the nursery crop harden off for the winter. Planted in later summer and killed by frost, the dead mulch covers the soil, smothering out weed competition. If planted earlier, the cover crop can be flail-mowed to be kept under control, and the cuttings will contribute even more organic matter to the soil. If the dead mulch cover crop is seeded too late, or if there is a mild winter, the cover crop may not die. In this situation chemical controls can be used.
A major benefit of using a dead mulch cover crop is that tillage in the spring for weed control is unnecessary. Without spring cultivation, nursery plants’ outermost fine roots in the cultivation layer are still present to supply water and nutrients to the crop. Through the summer, the dead mulch also keeps dust down and off the nursery stock. Besides producing a cleaner stock, this practice may also help to suppress
Ronald Kujawski
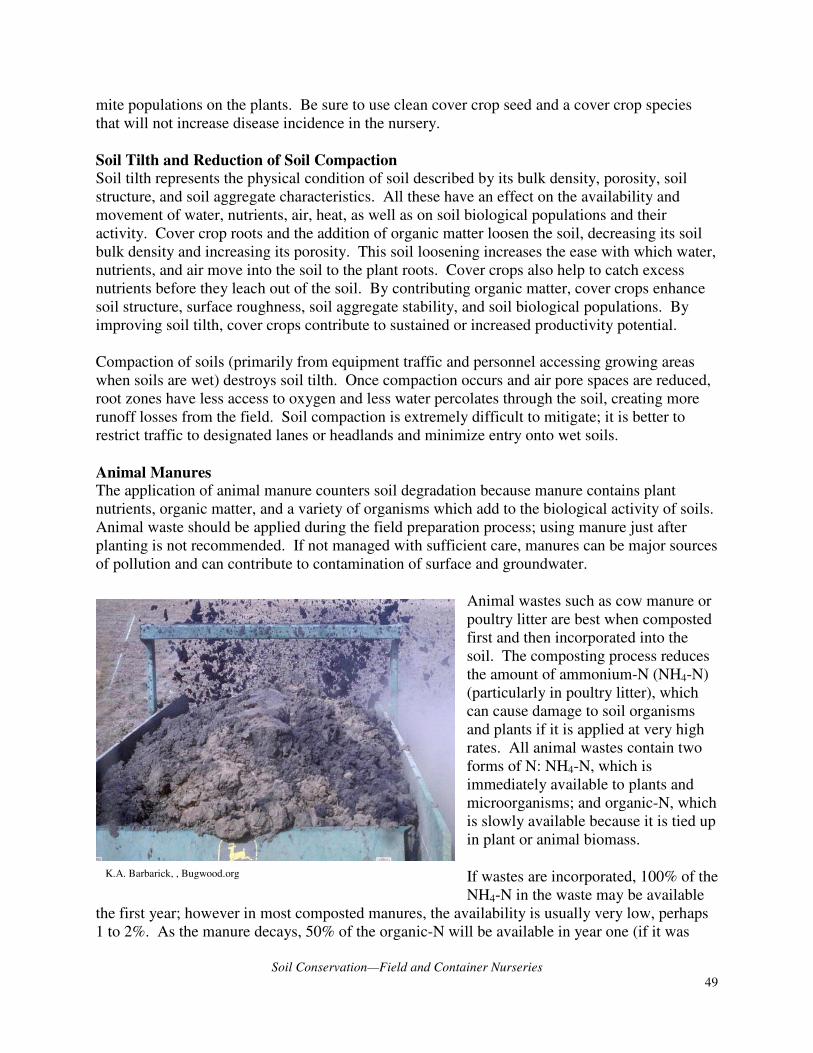
Soil Conservation—Field and Container Nurseries
49
mite populations on the plants. Be sure to use clean cover crop seed and a cover crop species that will not increase disease incidence in the nursery.
Soil Tilth and Reduction of Soil Compaction
Soil tilth represents the physical condition of soil described by its bulk density, porosity, soil structure, and soil aggregate characteristics. All these have an effect on the availability and movement of water, nutrients, air, heat, as well as on soil biological populations and their activity. Cover crop roots and the addition of organic matter loosen the soil, decreasing its soil bulk density and increasing its porosity. This soil loosening increases the ease with which water, nutrients, and air move into the soil to the plant roots. Cover crops also help to catch excess nutrients before they leach out of the soil. By contributing organic matter, cover crops enhance soil structure, surface roughness, soil aggregate stability, and soil biological populations. By improving soil tilth, cover crops contribute to sustained or increased productivity potential. Compaction of soils (primarily from equipment traffic and personnel accessing growing areas when soils are wet) destroys soil tilth. Once compaction occurs and air pore spaces are reduced, root zones have less access to oxygen and less water percolates through the soil, creating more runoff losses from the field. Soil compaction is extremely difficult to mitigate; it is better to restrict traffic to designated lanes or headlands and minimize entry onto wet soils.
Animal Manures The application of animal manure counters soil degradation because manure contains plant nutrients, organic matter, and a variety of organisms which add to the biological activity of soils. Animal waste should be applied during the field preparation process; using manure just after planting is not recommended. If not managed with sufficient care, manures can be major sources of pollution and can contribute to contamination of surface and groundwater.
Animal wastes such as cow manure or poultry litter are best when composted first and then incorporated into the soil. The composting process reduces the amount of ammonium-N (NH4-N) (particularly in poultry litter), which can cause damage to soil organisms and plants if it is applied at very high rates. All animal wastes contain two forms of N: NH4-N, which is immediately available to plants and microorganisms; and organic-N, which is slowly available because it is tied up in plant or animal biomass.
If wastes are incorporated, 100% of the NH4-N in the waste may be available
the first year; however in most composted manures, the availability is usually very low, perhaps 1 to 2%. As the manure decays, 50% of the organic-N will be available in year one (if it was
K.A. Barbarick, , Bugwood.org
Soil Conservation—Field and Container Nurseries
50
incorporated), and as the decay process continues, 25 to 30% is available the second year, 8 to 10% in year 3, etc. The amount of manure applied to a crop should be governed by soil test recommendations and a nutrient analysis of the manure. If the amount of N exceeds crop needs, N losses to the environment will be excessive over time, and more importantly, P will have been over-applied and may cause even more environmental damage than the lost N. In wet environments, nutrients added in excess of crop requirements are subject to runoff into streams and lakes, and leaching to groundwater. In dry environments, the problems are reduced, but nutrients may still be carried to water bodies in irrigation runoff water and to ground water through normal percolation of water through the soil profile. Most of the leaching losses of N occur in the fall after most crops have ceased growing.
The nutrients present in raw manures are readily available to plants and microorganisms; however, if manure is over-applied, excess nitrates produced through the mineralization process and not taken up by plants may leach during wet weather. Composted manures have similar nutrient content, but the N is in a more stable form that is less susceptible to leaching; however, this form of N is also less available to the plants in the short term.
Fine-textured soils (clays) retain nutrients and prevent leaching losses to a greater extent than coarse-textured soils (sands), which have a very limited nutrient retention capacity. Also, since rain or irrigation water enters fine-textured soils slowly, surface runoff may contain more nutrients. Coarse-textured soils readily admit water and groundwater quality may be at risk.
Heavier application rates for composted manures than for raw manures may be acceptable since the nutrients are converted to more stable forms during composting. Heavy applications should only be made in the "rest" year of a cycle and in combination with an aggressive cover cropping program. Research in this area is ongoing.
The timing of manure application is important. Ideally, manure should be applied so that nutrients will be released from the manure at the same time plants are actively growing. Early spring to early summer is the best time to apply composted manures. This will ensure that the crop takes up more nutrients, and lesser amounts are susceptible to leaching. Manure application in the fall and early winter are to be avoided for this reason.
Composts
As water quality and solid waste disposal regulations become stricter, the amount of organic material being composted will increase. The landscape and nursery industries are prime candidates for using these products, but only if the materials produced meet high quality standards and can be used in an environmentally responsible manner. The incorporation of composted organic materials into soil and nursery media will provide environmental and economic benefits.
Composts from municipal yard wastes may become an affordable organic source for amending fields. Application rates of stabilized composted wastes can be 50 to 200 tons per acre since composted yard wastes may have only 0.2 to 0.5% N content and nutrient loss is of less concern. The 50 tons per acre application rate represents approximately ½-inch coverage over a 1-acre area, while the 200 tons per acre rate would cover approximately 2 inches over a 1-acre area.

Soil Conservation—Field and Container Nurseries
51
Table 4. Suggested compost application rates for landscape beds and nursery field
production
Type of Compost Suggested Rate (tons or pounds [lbs]/square foot [sq ft])
Yard waste compost 2 to 3 inches incorporated (2 to 3 tons/1,000 sq ft)
Animal waste compost ½ to ¾ inch incorporated (880 to 1,300 lbs/1,000 sq ft)
Organic Matter Spreading Techniques to Prevent Water Contamination
Contact the Environmental Protection Agency (EPA) and local authorities for rules before spreading organic matter. Organic matter, in the form of manure or compost should not be spread:
� On steep slopes where erosion and/or surface runoff is likely to occur. � On saturated soils, where manures will not infiltrate into the soil. � Within the high water mark of field depressions during times of the year when there is a
high risk of direct surface runoff to an open watercourse. � In excess winds where drift can occur. � On frozen or snow-covered ground where runoff of snowmelt to open watercourses might
occur. � On areas having standing water.
An alternative to applying organic materials over the entire field is to incorporate the organic matter in planting rows only. If rows in the field are spaced 12 feet apart and the root zone area of plants is considered to be 2 feet on each side of the stem, a 4-foot strip would receive the organic matter, thus reducing the amount of organic matter applied in the field by two-thirds.
Field Storage of Manure and Compost
This BMP generally applies to solid manures or composted organic materials. If field storage of manures or other composted organic materials is necessary, the following guidelines should be adhered to:
� Field storage should not exceed two weeks in duration. � Field storage should not be located in natural drainage ways or where runoff will reach
waterways. � Field storage should not be located on coarse-textured or gravelly soils. � Field storage should not take place at times of high rainfall or high water tables. � If rainfall occurs, storage piles must be immediately covered to keep rainfall from
entering the piles.

Soil Conservation—Field and Container Nurseries
52
Container Nurseries
Soil Conservation
Sound cultural practices should be included to conserve soil in above-ground production, as well as in field nurseries. For example, topsoil native to the nursery (field soil) should not be used as growing media inside pot-in-pot culture or above-ground pots. Growing media used in containers should be soilless mix or soil compost mix. Also, growing media should not come from sources that degrade other farmland areas. When selecting a site for container production, the site should be chosen to minimize the loss of quality native soils.
Massachusetts Prohibited Plants
53
CHECKLIST
MASSACHUSETTS PROHIBITED PLANTS
� Do not grow or sell plants identified as either noxious and/or invasive. The Massachusetts
Department of Agricultural Resources (MDAR) bans the importation and sale of more than 140 plants identified as either noxious and/or invasive in the Commonwealth.
� For information, see the list of plant material (effective 1/1/06) that is in Appendix A and is also available on the MDAR website (http://www.mass.gov/agr/farmproducts/Prohibited_Plant_Index2.htm).
� For more information, see Strategic Recommendations for Managing Invasive Plants in
Massachusetts and other supporting publications available on the Massachusetts Nursery & Landscape Association website (http://www.mnla.com).

Massachusetts Prohibited Plants
54
MASSACHUSETTS PROHIBITED PLANTS
The Massachusetts Department of Agricultural Resources (MDAR) bans the importation and sale of more than 140 plants identified as either noxious and/or invasive in the Commonwealth. The Department derives its authority to take this action under Massachusetts General Law including but not limited to, Chapter 128 Section 2 and sections 16 through 31A. The list of prohibited plant material (effective 1/1/06) is in Appendix A and is also available on the MDAR website (http://www.mass.gov/agr/farmproducts/Prohibited_Plant_Index2.htm). The Massachusetts Invasive Plant Advisory Group (MIPAG) represents numerous public and private interests working together since 1999 to develop an effective response to the problem of invasive plant species. The MIPAG offers its strategic recommendations to prevent, control and, where possible, eradicate invasive plant species in the Commonwealth of Massachusetts. These recommendations complement efforts at both the regional and national levels to establish an early detection and rapid response system for invasive plants. Strategic Recommendations for Managing Invasive Plants in Massachusetts and other supporting publications are available on the Massachusetts Nursery & Landscape Association website (http://www.mnla.com).
Worker Protection Standard
55
CHECKLIST
WORKER PROTECTION STANDARD
The Environmental Protection Agency's (EPA’s) Worker Protection Standard (WPS) is a regulation aimed at reducing the risk of pesticide poisonings and injuries among agricultural workers and pesticide handlers. The WPS contains requirements for pesticide safety training, notification of pesticide applications, use of personal protective equipment, restricted entry intervals following pesticide application, decontamination supplies, and emergency medical assistance.
� All agricultural employers, owners, and managers, as well as labor contractors, are required to comply with the WPS when pesticides with labeling that refers to the WPS have been used on an agricultural establishment.
� The EPA Web site (http://www.epa.gov/oecaagct/htc.html) provides information to help employers comply with the WPS, including a Quick Reference Guide, sample forms, fact sheets, and checklists. The document can be downloaded as one large file or in smaller sections by unit.
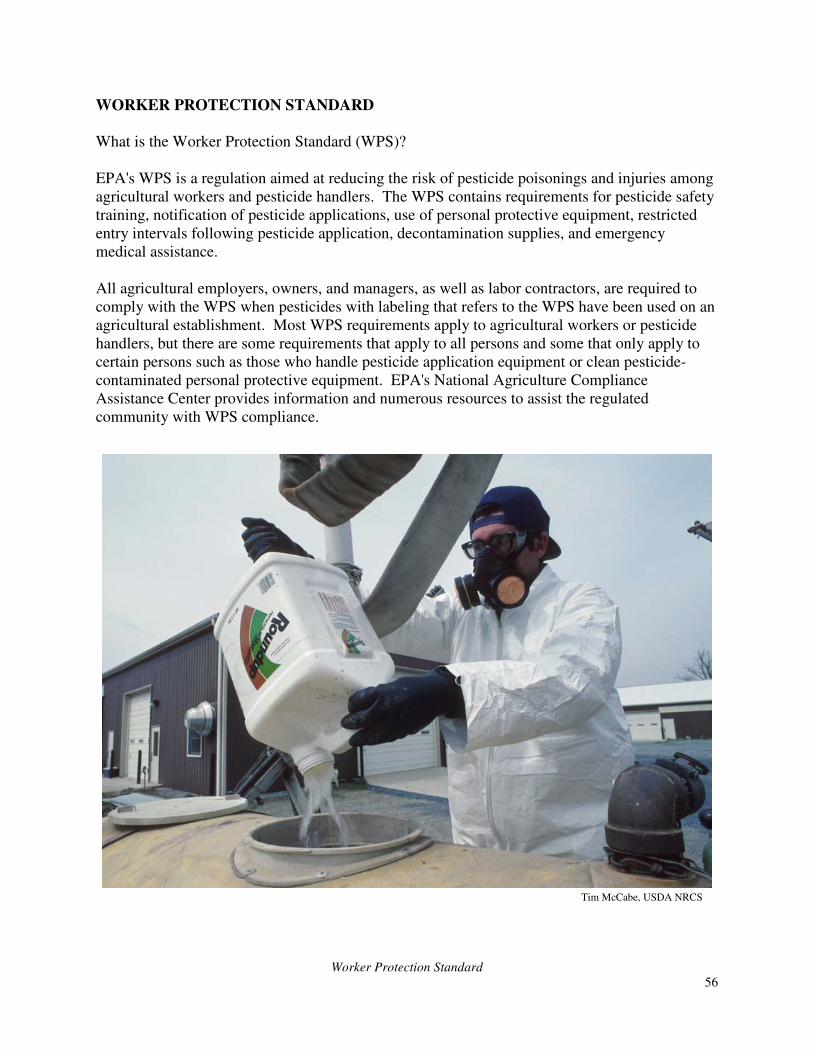
Worker Protection Standard
56
WORKER PROTECTION STANDARD
What is the Worker Protection Standard (WPS)? EPA's WPS is a regulation aimed at reducing the risk of pesticide poisonings and injuries among agricultural workers and pesticide handlers. The WPS contains requirements for pesticide safety training, notification of pesticide applications, use of personal protective equipment, restricted entry intervals following pesticide application, decontamination supplies, and emergency medical assistance. All agricultural employers, owners, and managers, as well as labor contractors, are required to comply with the WPS when pesticides with labeling that refers to the WPS have been used on an agricultural establishment. Most WPS requirements apply to agricultural workers or pesticide handlers, but there are some requirements that apply to all persons and some that only apply to certain persons such as those who handle pesticide application equipment or clean pesticide-contaminated personal protective equipment. EPA's National Agriculture Compliance Assistance Center provides information and numerous resources to assist the regulated community with WPS compliance.
Tim McCabe, USDA NRCS
Worker Protection Standard
57
Implementation of the Worker Protection Standard
Implementing the WPS is a key part of EPA’s strategy for reducing occupational exposures to agricultural pesticides. EPA has taken a number of steps to ensure effective national implementation and enforcement of the WPS regulation. EPA works closely with its state pesticide regulatory and extension partners to communicate WPS requirements to the regulated community and assure the regulation is being adequately implemented and enforced. State pesticide regulatory agencies, which have primary jurisdiction over pesticide use enforcement, have conducted thousands of WPS inspections nationwide, resulting in numerous enforcement actions for WPS violations. For additional information, please visit EPA's Office of Enforcement and Compliance Assurance Web page about national WPS inspection and enforcement accomplishments. Certification and Training
To protect the health and safety of workers and handlers, employers are responsible for training them in the safe use of pesticides. Certification and training regulations require pesticide applicators to meet certain training and/or testing requirements before they use or supervise the use of pesticides labeled "restricted use." In addition, the pesticide label indicates how a pesticide may be used and what protective clothing or other measures may be necessary for maintaining worker safety. Training Manual
The Worker Protection Standard for Agricultural Pesticides How To Comply Manual has been updated (2005) to reflect amendments to the WPS. The revised manual provides detailed information on who is covered by the WPS and how to meet regulatory requirements. The updated manual will facilitate better protection of pesticide workers and handlers in agriculture from the potential risks of pesticides. The link http://www.epa.gov/oecaagct/htc.html provides information to help employers comply with the WPS, including a Quick Reference Guide, sample forms, fact sheets, and checklists. The document can be downloaded as one large file or in smaller sections by unit.
Pesticide Storage
58
CHECKLIST
PESTICIDE STORAGE
� Locate a pesticide storage facility away from human habitat. Ideally, a facility should be built as a separate structure dedicated to pesticide storage.
� The storage site must not be in an area known to flood and should be situated so that runoff from spills and leaks cannot contaminate water sources. The storage site should be situated at least 100 feet away from sensitive areas such as wellheads, streams and rivers, and ponds or lakes.
� Keep it securely locked. Post legible signs on doors and windows to alert people that pesticides are stored there. The signs should clearly state, “DANGER PESTICIDES -
KEEP OUT.” “NO SMOKING” signs should also be posted. � Store sacks of dry pesticide on pallets. � The storage site should be indoors, whenever possible. Choose a cool, well-ventilated
room or building that is insulated or temperature-controlled to prevent freezing or overheating.
� Control the temperature. The temperature range normally recommended for liquid
pesticides is 40 to 100 °F. The pesticide label may provide more specific temperature information for the product.
� The storage site should be well lighted. � The floor of the storage site should be made of sealed cement, glazed ceramic tile, no-
wax sheet flooring, or another easily cleaned material. � Shelving and pallets should be made of nonabsorbent materials like plastic or metal. � Store only pesticides, pesticide containers, pesticide equipment, and a spill cleanup kit at
the storage site. � Keep pesticide containers securely closed whenever they are being stored. � Take precautions to prevent cross-contamination of pesticides. � Store pesticide containers with the labels in plain sight. � Store pesticides in their original containers. � Isolate waste products. � Mark each container with the date of purchase before it is stored. Use older materials
first. � Purchase only the quantities of pesticides required for a single season
� Each time a pesticide is added to or removed from the storage site, update the inventory list. Other useful pieces of information to keep on hand are the product labels, material safety data sheets, a building floor plan showing the exact location of the pesticides, and emergency telephone numbers.
� Store protective equipment and clothing in a nearby location that provides immediate access but is away from pesticides and their fumes, dusts, or possible spills. Provide an immediate supply of clean water and have an eyewash dispenser immediately available for emergencies. Soap and a first aid kit are also necessary.
� Establish procedures to control, contain, and clean up spills. Familiarize everyone with the procedures and provide tools and absorbent materials to clean up spills. Prevent pesticide fires. Some pesticides are highly flammable; others do not catch fire easily. The labeling of the pesticides that require extra precautions often will contain a warning statement in the “Physical and Chemical Hazards” section or the “Storage and Disposal”

Pesticide Storage
59
section. � Install fire detection systems in large storage sites and equip each storage site with a
working fire extinguisher that is approved for all types of fires, including chemical fires. � If highly toxic pesticides or large amounts of any pesticides are stored, inform the local
fire department, hospital, public health officials, and police of the location of the pesticide storage facility before a fire emergency occurs.
� Tell fire department officials what types of pesticides are regularly stored at the site. Provide a floor plan, and work with them to develop an emergency response plan.
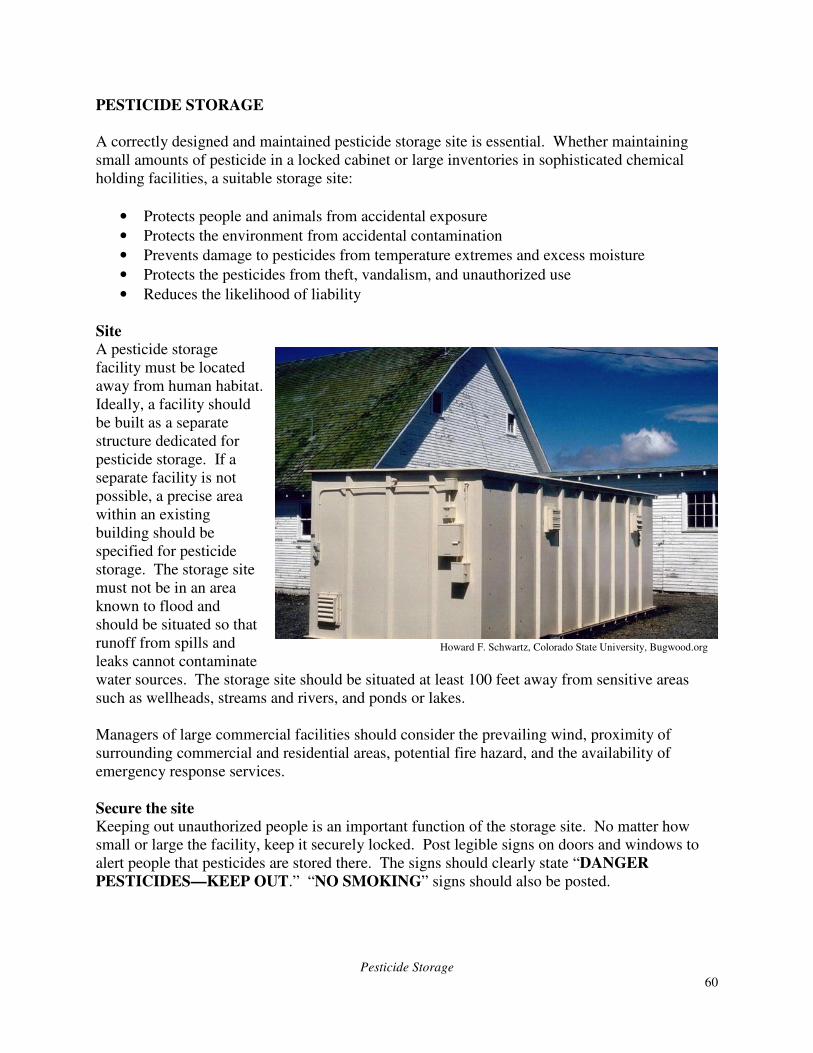
Pesticide Storage
60
PESTICIDE STORAGE
A correctly designed and maintained pesticide storage site is essential. Whether maintaining small amounts of pesticide in a locked cabinet or large inventories in sophisticated chemical holding facilities, a suitable storage site:
• Protects people and animals from accidental exposure
• Protects the environment from accidental contamination
• Prevents damage to pesticides from temperature extremes and excess moisture
• Protects the pesticides from theft, vandalism, and unauthorized use
• Reduces the likelihood of liability Site
A pesticide storage facility must be located away from human habitat. Ideally, a facility should be built as a separate structure dedicated for pesticide storage. If a separate facility is not possible, a precise area within an existing building should be specified for pesticide storage. The storage site must not be in an area known to flood and should be situated so that runoff from spills and leaks cannot contaminate water sources. The storage site should be situated at least 100 feet away from sensitive areas such as wellheads, streams and rivers, and ponds or lakes. Managers of large commercial facilities should consider the prevailing wind, proximity of surrounding commercial and residential areas, potential fire hazard, and the availability of emergency response services. Secure the site
Keeping out unauthorized people is an important function of the storage site. No matter how small or large the facility, keep it securely locked. Post legible signs on doors and windows to alert people that pesticides are stored there. The signs should clearly state “DANGER
PESTICIDES—KEEP OUT.” “NO SMOKING” signs should also be posted.
Howard F. Schwartz, Colorado State University, Bugwood.org
Pesticide Storage
61
Labeling statements
Typical pesticide labeling storage instructions include:
• Store at temperatures above 32 °F.
• Do not contaminate feed, foodstuffs or drinking water during storage.
• Store in original container only.
• Do not store near ignition sources such as electrical sparks, flames, or heated surfaces.
• Flammable. Do not use, pour, spill, or store near heat or open flame. Do not cut or weld container.
Prevent water damage
Take precautions to prevent water damage. Water from burst pipes, spills, overflows, excess rain or irrigation, or flooding streams can damage pesticide containers and pesticides. Water or excess moisture can cause metal containers to rust; paper and cardboard containers to split or crumble; pesticide labeling to become unreadable; dry pesticides to clump, degrade, or dissolve; slow-release products to release their pesticide; and pesticides to move away from the storage site. If the storage site is not protected from the weather or if it tends to be damp, consider placing metal, cardboard, and paper containers in sturdy plastic bags or cans for protection. Large metal containers and dry pesticides should be placed on pallets within the storage site. The storage site should be indoors, whenever possible. Choose a cool, well-ventilated room or building that is insulated or temperature-controlled to prevent freezing or overheating. Keep an ideal temperature. The temperature range normally recommended for liquid pesticides
is 40 to 100 °F. The pesticide label may provide more specific temperature information for the product. Freezing temperatures can cause glass, metal and plastic containers to break. Excessive heat can cause plastic containers to melt, glass containers to explode, and some pesticides to volatilize and drift away from the storage site. Another adverse effect of temperature extremes is that the potency of the pesticide can be destroyed. Provide adequate lighting. The storage site should be well lighted. Pesticide handlers using the facility must be able to see well enough to read pesticide container labeling; notice whether containers are leaking, corroding, or otherwise disintegrating; and clean up spills or leaks. Use nonporous materials
Use nonporous material for storage area flooring. The floor of the storage site should be made of sealed cement, glazed ceramic tile, no-wax sheet flooring, or another easily cleaned material. Carpeting, wood, soil and other absorbent floors are difficult or impossible to decontaminate in case of a leak or spill. For ease of cleanup, shelving and pallets should be made of nonabsorbent materials such as plastic or metal. If wood or fiberboard materials are used, they should be coated or covered with plastic or a polyurethane or epoxy paint. Maintain the storage site. Store only pesticides, pesticide containers, pesticide equipment, and a spill cleanup kit at the storage site. Do not keep food, drinks, tobacco, feed, medical or
Pesticide Storage
62
veterinary supplies or medications, seeds, or personal protective equipment -- other than equipment necessary for emergency response -- at the site. These items could be contaminated by vapors, dusts, or spills and cause accidental exposure to people or animals. Keep pesticide containers securely closed whenever they are being stored. Tightly closed containers help protect against spills; cross-contamination with other stored products; evaporation of liquid pesticides or solvents; clumping or caking of dry pesticides in humid conditions; and dust, dirt, and other contaminants getting into the pesticide, causing it to be unusable. Take precautions to prevent cross-contamination of your pesticides. If liquid and dry pesticides are stored in close proximity, store the dry formulations above the liquid pesticides in case of a spill or leak. Each class of pesticide should be stored in its own area. For example, keep herbicides apart from insecticides and fungicides. If possible, store volatile products separately. Vapors from opened containers of these products can move into other nearby pesticides and chemicals and make them useless. The labeling of volatile herbicides usually will direct you to store them separately from seeds, fertilizers, and other types of pesticides. Store pesticide containers with the labels in plain sight. Costly errors can result if the wrong pesticide is chosen by mistake. Labels should always be legible. They may be damaged or destroyed by exposure to moisture, dripping pesticide, diluents, or dirt. You can use transparent tape or a coating of lacquer or polyurethane to protect the labels. If the labels are destroyed or damaged, request replacements from the pesticide dealer or the pesticide manufacturers immediately. Store pesticides in their original containers. Never put pesticides in containers that might cause children and other people to mistake them for food or drink. You are legally responsible if someone or something is injured by pesticides you have placed in unlabeled or unsuitable containers. Isolate waste products. If you have pesticides and pesticide containers that are being held for disposal, store them in a special section of the storage site. Accidental use of pesticides meant for disposal can be a costly mistake. Keep an up-to-date inventory of the pesticides you have in storage. Each time a pesticide is added to or removed from the storage site, update the inventory list. The list will help you keep track of your stock and will be essential in a fire or flood emergency. The inventory list also will aid in insurance settlements and in estimating future pesticide needs. Other useful pieces of information to keep on hand are the product labels, material safety data sheets, a building floor plan showing the exact location of the pesticides, and emergency telephone numbers. The shelf life of pesticides is variable. Some have a relatively short shelf life and cannot be carried over from year to year. Mark each container with the date of purchase before it is stored. Use older materials first. Whenever possible, purchase only the quantities of pesticides required for a single season to minimize the need for off-season storage. If the product has a shelf life listed in the labeling, the purchase date will indicate whether it is still usable. Excessive
Pesticide Storage
63
clumping, poor suspension, layering, or abnormal coloration may be indications that the pesticide has broken down. If uncertain about the shelf life of a pesticide, call the dealer or manufacturer for advice. Safety tips for the storage facility
• Store protective equipment and clothing in a nearby location that provides immediate access but is away from pesticides and their fumes, dusts, or possible spills. Provide an immediate supply of clean water and have an eyewash dispenser immediately available for emergencies. Soap and a first aid kit are also necessary.
• Establish procedures to control, contain, and clean up spills. Familiarize everyone with the procedures and provide tools and absorbent materials to clean up spills. Prevent pesticide fires. Some pesticides are highly flammable; others do not catch fire easily. The labeling of the pesticides that require extra precautions often will contain a warning statement in the “Physical and Chemical Hazards” section or the “Storage and Disposal” section.
• Install fire detection systems in large storage sites and equip each storage site with a working fire extinguisher that is approved for all types of fires, including chemical fires.
• If highly toxic pesticides or large amounts of any pesticides are stored, inform the local fire department, hospital, public health officials, and police of the location of the pesticide storage facility before a fire emergency occurs.
• Tell fire department officials what types of pesticides are regularly stored at the site. Provide a floor plan, and work with them to develop an emergency response plan.

Pesticide Licensing
64
CHECKLIST
PESTICIDE LICENSING
Massachusetts pesticide law requires that all persons who apply pesticides in public areas and private places for human occupation and habitation must be in possession of a valid license or certification issued by the Massachusetts Department of Agricultural Resources (MDAR).
� For information about how to obtain a Massachusetts pesticide license or certification contact the MDAR Pesticide Bureau at http://www.mass.gov/agr/pesticides or (617) 626-1785.
� If needed, attend optional 2-day workshops held by the UMass Extension Pesticide
Education program. The workshops are designed to help individuals prepare for the pesticide applicator license exam. Preregistration is required. For information contact the UMass Extension Pesticide Education Program at http://www.umass.edu/pested/ or call (413) 545-1044.

Pesticide Licensing
65
PESTICIDE LICENSING
Massachusetts pesticide law requires that all persons who apply pesticides in public areas and private places for human occupation and habitation must be in possession of a valid license or certification issued by the Massachusetts Department of Agricultural Resources (MDAR). In accordance with the Massachusetts Pesticide Control Act and the current pesticide regulations, the MDAR conducts written examinations to measure competency to use, sell, and apply pesticides in Massachusetts. Information about how to obtain a Massachusetts pesticide license or certification is available from the MDAR Pesticide Bureau Web site http://www.mass.gov/agr/pesticides or by calling (617) 626-1785. Optional 2-day workshops by the UMass Extension Pesticide Education program are designed to help individuals prepare for the pesticide applicator license exam. Preregistration is required. For information contact the UMass Extension Pesticide Education Program at http://www.umass.edu/pested/ or call (413) 545-1044.
Pest Management
66
CHECKLIST
PEST MANAGEMENT
� Know the plant’s normal habits of growth. � Use proper cultural practices. � Know what a specific pest looks like and understand the biology and timing of each
individual pest species. � Monitor for pests. Methods of monitoring include visual inspection, collection of small
pests by shaking branches over a white piece of paper, and use of pheromone and colored traps.
� Predict when pests are vulnerable or when pest activity should begin for insects and mites by using the calculation of growing degree days (GDD) and correlation of pest development with plant phenology.
� Prevent or alleviate a problem by changing a horticultural practice like fertilization, watering method, culling out diseased plants, planting in the correct place, and pruning to increase air circulation.
� Access weekly and bi-weekly updates throughout the growing season for current insect activity and management strategies along with updates for pathogens, weeds, and weather information through the UMass Extension Landscape, Nursery, and Urban Forestry program. To access this very valuable and timely information, visit http://www.umassgreeninfo.org and click on “Landscape Message.”
� Correctly identify the problem, have the correct product, and apply the product at the correct time for maximum effectiveness.
� Keep continuous records of as many factors as possible: temperature, rainfall, emergence time for specific pests, developmental stage of plants, soil pH, soil fertility, the source of water used for the spray tank and its mineral content as well as pH, specific pest and their life stage when ‘managed,’ method or material for management, and whatever else seems pertinent at the time.
Plant Health Care (PHC)
� Research individual crop needs, susceptible pests, their timing, population levels, when to act, and how to implement the least toxic means of management.
� Be pro-active rather than reactive. � Review and implement cultural practices like soil testing and proper plant nutrition,
pruning, and correct watering techniques to enhance plant health.
Pest Management
67
PEST MANAGEMENT
Integrated Pest Management (IPM) and Plant Health Care (PHC)
Various definitions for Integrated Pest Management (IPM) exist, but all contain the essential foundation philosophy of striving to manage pests of plants in a logical manner that reduces pest numbers to acceptable levels while considering and protecting the environment, non-target organisms, and human health. It has been said that IPM is a toolbox and the most important tool in that box is the practitioner’s knowledge. IPM does allow for the use of pesticides but only after a rigid examination of all available options. Once it is decided that a pesticide is necessary, the least toxic materials are always considered first. Currently, public concerns and legislation at the state and federal levels have forced pesticide manufacturers to develop newer compounds that fit into this IPM philosophy. As a result, many new products now exist that work via unique modes of action that target specific pest groups while leaving most others unharmed (see New Products and How They Work in this section). Integrated Pest Management (IPM) can be broken down into seven essential steps that can be customized for any agricultural commodity (e.g. vegetable production, lawn care, greenhouse, landscape, nursery, and all other sectors of agriculture). The definitions of these steps are as follows:
1) Identification:
Know the Plants
Every practitioner of IPM needs to be familiar with the plants in their care. This does not just include being able to identify the genus and species (and, in some cases, variety) but also knowing the plants’ normal habits of growth and their biological needs. All too often, plants are subjected to incorrect soil pH or fertility or environmental conditions (e.g. plants that grow very well in the shade suffer when planted in sunnier locations). A recent trend in the nursery and landscape industries is the use of plants that are not native to the region. We create landscapes with plants that originate from various parts of the country and even the world, and we expect these plants to perform well together. All too often, we experience failure. If we know an individual plant’s biological needs and are able to recognize early the signs that tell us that a plant is not healthy, we can avoid much greater problems in the future and reduce the need for human input (i.e. pesticides). Being successful with nursery and landscape plants means having a vision of what they will look like in 40 or more years and taking care of them properly now to ensure that reality. Know the Pests
In addition to knowing the plants, a practitioner also needs to be familiar with the pests common to those plants. One needs to know more than just what specific pests look like; it is also necessary to understand the biology and timing of individual pest species. Many of the newer insecticides, in particular, work extremely well but need to be applied at critical times during an insect’s life cycle to be fully effective. Many of the insect and mite pests of woody nursery and landscape plants are actually named after their preferred host (e.g. birch leafminer, euonymus scale, azalea lacebug). Some pathogens, like fungi, are also named for preferred hosts (e.g.
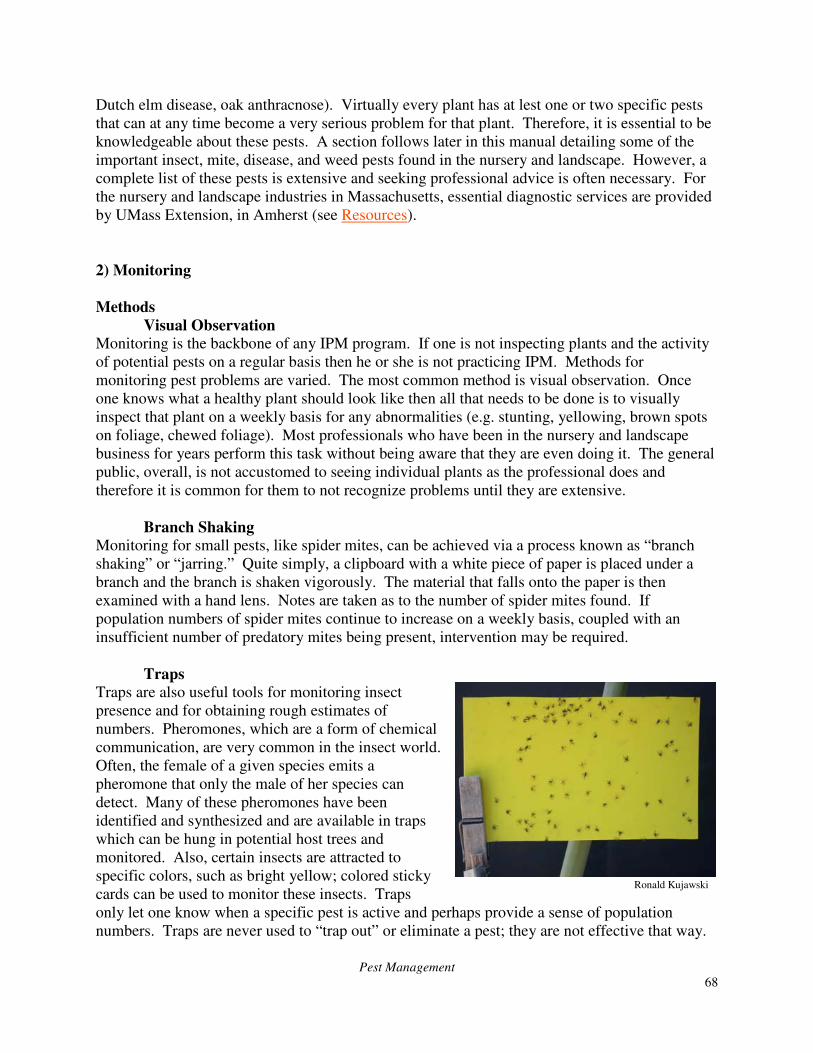
Pest Management
68
Dutch elm disease, oak anthracnose). Virtually every plant has at lest one or two specific pests that can at any time become a very serious problem for that plant. Therefore, it is essential to be knowledgeable about these pests. A section follows later in this manual detailing some of the important insect, mite, disease, and weed pests found in the nursery and landscape. However, a complete list of these pests is extensive and seeking professional advice is often necessary. For the nursery and landscape industries in Massachusetts, essential diagnostic services are provided by UMass Extension, in Amherst (see Resources).
2) Monitoring Methods
Visual Observation
Monitoring is the backbone of any IPM program. If one is not inspecting plants and the activity of potential pests on a regular basis then he or she is not practicing IPM. Methods for monitoring pest problems are varied. The most common method is visual observation. Once one knows what a healthy plant should look like then all that needs to be done is to visually inspect that plant on a weekly basis for any abnormalities (e.g. stunting, yellowing, brown spots on foliage, chewed foliage). Most professionals who have been in the nursery and landscape business for years perform this task without being aware that they are even doing it. The general public, overall, is not accustomed to seeing individual plants as the professional does and therefore it is common for them to not recognize problems until they are extensive. Branch Shaking Monitoring for small pests, like spider mites, can be achieved via a process known as “branch shaking” or “jarring.” Quite simply, a clipboard with a white piece of paper is placed under a branch and the branch is shaken vigorously. The material that falls onto the paper is then examined with a hand lens. Notes are taken as to the number of spider mites found. If population numbers of spider mites continue to increase on a weekly basis, coupled with an insufficient number of predatory mites being present, intervention may be required.
Traps
Traps are also useful tools for monitoring insect presence and for obtaining rough estimates of numbers. Pheromones, which are a form of chemical communication, are very common in the insect world. Often, the female of a given species emits a pheromone that only the male of her species can detect. Many of these pheromones have been identified and synthesized and are available in traps which can be hung in potential host trees and monitored. Also, certain insects are attracted to specific colors, such as bright yellow; colored sticky cards can be used to monitor these insects. Traps only let one know when a specific pest is active and perhaps provide a sense of population numbers. Traps are never used to “trap out” or eliminate a pest; they are not effective that way.
Ronald Kujawski
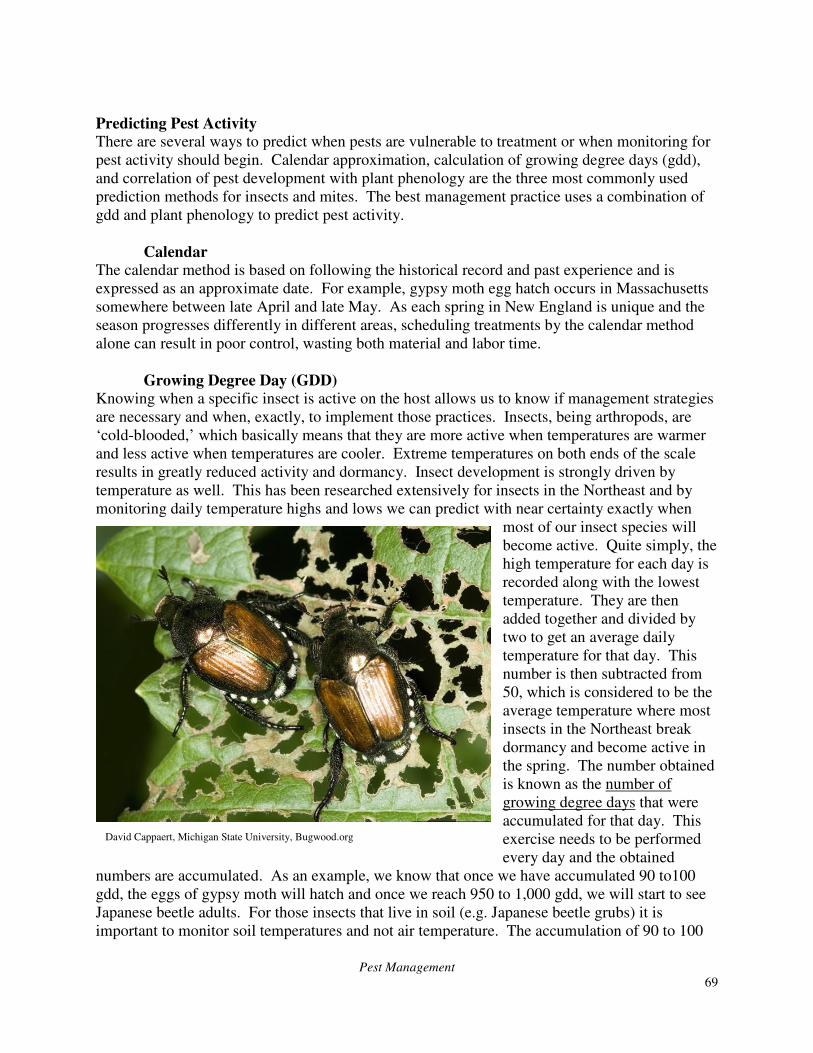
Pest Management
69
Predicting Pest Activity
There are several ways to predict when pests are vulnerable to treatment or when monitoring for pest activity should begin. Calendar approximation, calculation of growing degree days (gdd), and correlation of pest development with plant phenology are the three most commonly used prediction methods for insects and mites. The best management practice uses a combination of gdd and plant phenology to predict pest activity. Calendar
The calendar method is based on following the historical record and past experience and is expressed as an approximate date. For example, gypsy moth egg hatch occurs in Massachusetts somewhere between late April and late May. As each spring in New England is unique and the season progresses differently in different areas, scheduling treatments by the calendar method alone can result in poor control, wasting both material and labor time.
Growing Degree Day (GDD)
Knowing when a specific insect is active on the host allows us to know if management strategies are necessary and when, exactly, to implement those practices. Insects, being arthropods, are ‘cold-blooded,’ which basically means that they are more active when temperatures are warmer and less active when temperatures are cooler. Extreme temperatures on both ends of the scale results in greatly reduced activity and dormancy. Insect development is strongly driven by temperature as well. This has been researched extensively for insects in the Northeast and by monitoring daily temperature highs and lows we can predict with near certainty exactly when
most of our insect species will become active. Quite simply, the high temperature for each day is recorded along with the lowest temperature. They are then added together and divided by two to get an average daily temperature for that day. This number is then subtracted from 50, which is considered to be the average temperature where most insects in the Northeast break dormancy and become active in the spring. The number obtained is known as the number of growing degree days that were accumulated for that day. This exercise needs to be performed every day and the obtained
numbers are accumulated. As an example, we know that once we have accumulated 90 to100 gdd, the eggs of gypsy moth will hatch and once we reach 950 to 1,000 gdd, we will start to see Japanese beetle adults. For those insects that live in soil (e.g. Japanese beetle grubs) it is important to monitor soil temperatures and not air temperature. The accumulation of 90 to 100
David Cappaert, Michigan State University, Bugwood.org
Pest Management
70
gdd typically falls within the first week of May in Massachusetts and 1,000 gdd are usually accumulated by the last week in June or early July. Occasionally, we have very warm springs or very cool springs which alter the normal accumulation of gdd’s. It is not uncommon during warm springs for gypsy moth eggs to hatch in mid-April and if one relies solely on a calendar to manage pests, they may miss their window of opportunity by two to three weeks. Also, Massachusetts is extremely small geographically but it has some very complex and differing climates between the mountains of the Berkshires, the Connecticut River Valley, and the coastal areas. Often in the spring, specific pest activity can be staggered by as much as two full weeks over less than 200 miles of terrain within the state. Therefore, it is strongly recommended that managers of insect problems rely on the use of GDD, which can be obtained on a weekly basis during the growing season by going to http://www.umassgreeninfo.org and clicking on ‘Landscape Message.’
Plant Phenology Plant growth also responds to accumulating heat units to some degree. Bud swell, leaf emergence, flowering, fruiting, and other growth stages can be correlated to the growth stages of some insects and mites. In the example of gypsy moth, egg hatch is said to occur about the time Amelanchier (shadbush) is in bloom. However, as day length and other environmental factors can affect specific events in a plant’s life cycle and cultivars frequently have different bloom periods, these correlations are less precise than using GDD, but more accurate than using calendar dates. As landscapers and nursery workers can easily observe bloom and other plant events as they perform their normal routines, this is an attractive method for basing monitoring and management. Plant phenology and GDD information relative to Massachusetts’ plants and insects have been researched and incorporated into fact sheets and newsletters. Weekly GDD accumulations and current plant bloom are available through the University of Massachusetts Extension Landscape Message (see below). As caution should be used with the calendar approach, so should it be exercised when using GDD and phenology. Both are meant as an aid to monitoring, not as a substitute for visual confirmation. A great source of monitoring information for the professional is UMass Extension’s Landscape, Nursery, and Urban Forestry program Web site. For up-to-date information concerning insects, diseases, and weeds of the nursery and landscape, visit http://www.umassgreeninfo.org. In the upper right-hand corner of the homepage, click on “Landscape Message,” which details current information broken down by regions of the state. The site also provides IPM-based recommendations for the management of most pests.
3) Knowing When to Act
Economic Threshold In traditional (food) agriculture, the Economic Threshold is defined as “when the potential loss at harvest time (in dollars) equals the cost of treatment NOW.” Virtually all of the known pests for food crops have had their tolerance levels established through decades of research. As an example, it is well known that if x-number of Colorado potato beetles are found per potato plant in June, then it relates directly to a known loss in harvest volume in September. Numbers of potential bushels lost can then be multiplied by the expected value per bushel to come up with a fair estimate of what the loss to the grower will be if steps are not taken to suppress the population early in the season. If the estimated loss per acre is determined to be $80 per acre,
Pest Management
71
which is determined by the number of beetles present in June, and if it costs approximately $80 per acre to treat that pest in June, then this is the Economic Threshold and actions should be taken. Landscape plants have value in their appearance; there is no “harvest.” In the nursery, the “harvest” is when plants are ready for resale to the garden center, landscaper, or homeowner. For landscape and nursery plants, the real value is in appearance and this is known as the Aesthetic Value, which is a subjective value determined by the one buying or observing. Nursery and garden center plants can suffer damage from insects that is minimal in terms of how it affects the health of the plant; however, if it renders the plant unattractive then the dollar value (economic value) of that plant can be severely affected. 4) Knowing the Correct Management Strategy The old style for managing pests was always referred to as “control.” In IPM, “management” is the preferred term for dealing with pests. “Control” implies a total dominance that suggests eradication. When dealing with insects, pathogens and weeds, this is nearly impossible to achieve. Therefore, learning what level of pest population is tolerable and how best to maintain pests at that level requires a great deal of understanding and thoughtful management practices. Many serious pest problems in the past were actually created by our attempts to “control” some other pest. Our tools were broad-spectrum and harsh on the natural controls (parasites and predators) thus creating new problems in an endless cycle of pesticide application. More importantly, the word “management” should not immediately lead us to consider pesticides as the only options available. Many times in the nursery and landscape, pests are encouraged by our horticultural practices, and preventing or alleviating a problem can be as simple as changing one of those practices (e.g. fertilization, watering method, culling out of diseased plants, planting in the correct place, pruning techniques to increase air circulation).
5) Knowing the Correct Timing for Implementing Management Strategies
In past decades, practitioners could get very close to the economic threshold with insect pests and then apply a broad-spectrum nerve toxin insecticide and achieve high levels of control almost immediately. Today, because many pests are able to quickly develop resistance to those compounds and because of our concern for health and the environment, we have different products that work very well but perhaps only at specific times in pests’ life cycles. Therefore, being able to correctly identify a problem and having the correct product may not be enough to fix the problem; we also need to apply the product at the correct time for maximum effectiveness. (See New Products and How They Work in this section.) 6) Record Keeping
Keeping continuous records of as many factors as possible will result in a great tool for the IPM practitioner. Nature is diverse and often unpredictable. Records help us gain knowledge and understanding of such fluid dynamics and ultimately allow the IPM professional to better perform their job. Consider recording information about temperature, rainfall, emergence time for specific pests, developmental stage of plants, soil pH, soil fertility, the source of water used for the spray tank and its mineral content as well as pH, specific pest and their life stage when ‘managed,’ method or material for management, and whatever else seems pertinent at the time.
Pest Management
72
7) Evaluation
This step allows the practitioner to always work towards improvement. Examining practices, learning new techniques, staying current with research via Extension educational endeavors, and striving to manage problems in a holistic manner contribute greatly to the development of the professional. Having quality records to refer to provides much insight into where one is performing well and to where changes may be necessary. Being a good IPM practitioner does not mean that one adheres to a strict set of rules but rather that he or she has a strong underlying commitment to keeping plants healthy, reducing pesticide use, and protecting the environment, and is open to adopting new practices as technology and understanding develops.
Plant Health Care (PHC)
IPM was first developed for fruit and vegetable production and later adapted to non-food agricultural commodities; Plant Health Care (PHC) grew from that adaptation. It has been said that IPM’s primary focus is the pest while that of PHC is the plant. Many PHC adopters often strive to separate PHC from IPM; in reality the two practices are remarkably similar with subtle, yet important, differences. As with IPM, PHC requires a keen understanding of plants, pests, their timing, and population levels; knowing when to act; and implementing the least toxic means of management. Many consider PHC to be the most holistic approach for managing potential problems of trees and shrubs. The major tenet of PHC is “Be pro-active rather than reactive,” which is not only sound advice, but creates a valid doctrine for managing pests of plants. It is much easier to prevent a pest outbreak than to ‘cure’ one that has exploded into a massive problem. PHC includes involving customers, mapping of clients’ properties, recording potential pests for monitoring and perhaps later treatment, as well as implementing horticultural practices such as soil testing and soil amendments, pruning to enhance plant health, correct watering techniques, mulching, and many other horticultural aspects. PHC is better adapted to the landscape setting than it is to the nursery. New Products and How They Work
For decades, the standard method for managing most of the insect and mite problems on woody ornamentals was heavily reliant on the use of chemical insecticides. Although very useful tools, many of these products raised questions about their long-term effects on the environment, human health, and the loss of beneficial organisms like parasites and predators; the fact that they were "broad-spectrum" products meant that not only did they kill the target pest but also that they were detrimental to most of the incidentals. In the modern era, many of these products no longer meet the requirements of a well-educated general public, and it has been this evolving attitude that has driven legislatures at the state and federal levels to seek stronger laws to address these issues. As a direct result, many new laws have been enacted in the past decade that have greatly changed the status of pesticide availability and registered uses. New laws, such as the Food Quality Protection Act of 1996 (FQPA), uses data gathered over many years from national scientific studies, which strongly indicate that children, with their developing bodies, are at a 10-times greater risk than adults to potential ill-effects that may be generated by pesticide exposure. The law also considers aggregate exposures to specific chemical products that children may encounter, which include pesticide residue on foods,
Pest Management
73
exposure from landscape and turf applications, and exposure from parks and athletic fields that have been treated. These new criteria for considering residues and potential effects to children's development have been responsible for many of the well-known compounds disappearing from standard use in recent years. Chlorpyrifos (Dursban®), Diazinon, and Carbaryl (Sevin®) are a few of the products that have been heavily affected by this new legislation. Many of these are organophosphate and carbamate insecticides that work on the peripheral nervous system as cholinesterase inhibitors. The loss of so many familiar products initially created a void in the war on insect management. However, “Necessity is truly the mother of invention” in this case, and many new products with very unique modes of action are now emerging onto the market for professionals in the green industry. Also, previous to the FQPA of 1996, the Environmental Protection Agency (EPA), in 1993, defined “Reduced Risk Pesticides” as those that pose a lower risk to the environment and human health. This was coupled with incentives for the development of new products with modes of action to fit these new criteria. Many of the newer products today tend to be rather “surgical” in their method for reducing the numbers of pest insects by targeting only the pest and for having a reduced negative effect on beneficial organisms, such as parasites and predators. As examples, some of the newer miticides will kill pest spider mites (family: Tetranychidae) but not harm predatory mites (family: Phytosiidae), while some of the new insecticides are only effective on Lepidopteran caterpillars (moth larvae) and not on other orders of insects that are incidental or perhaps beneficial. Also, the potential for these products to harm the environment, human health, or to persist in the environment are for the most part significantly different from the chemicals of years past. Insect Growth Regulators (IGRs)
Insect Growth Regulators, commonly known as IGRs, have been around for decades but very few products have been available for the green industry until recently. These compounds work in specific ways to disrupt the normal developmental processes, often by interfering with the molting process. There are several modes of action for IGRs:
• Chitin Synthesis Inhibitors. Chitin is the major building block molecule of an insect' s exoskeleton. If an insect cannot process compounds in order to build a new exoskeleton when it is about to molt, then molting becomes lethal. Compounds like Diflubenzuron (Dimilin®) have been utilized for many years against such lepidoperan pests as gypsy moth, browntail moth, and spruce budworm. A new member with this mode of action is Cyromazine (Citiation®) and is labeled mostly for Dipteran (true flies) pests, such as fungus gnats and certain leaf miners. These compounds, while fairly specific to their labeled target pests, are also very toxic to aquatic invertebrates and great care must be taken to avoid contaminating streams, rivers, ponds, and other natural bodies of water.
• Juvenile Hormone Mimics / Inhibitors. The developmental and molting process of insects is quite complicated but all of it is strongly driven by specific hormones in their bodies. One such hormone is called “Juvenile Hormone.” When high levels of this hormone are present, it informs the insect's brain that the insect is still very immature. As the insect feeds, grows, and molts
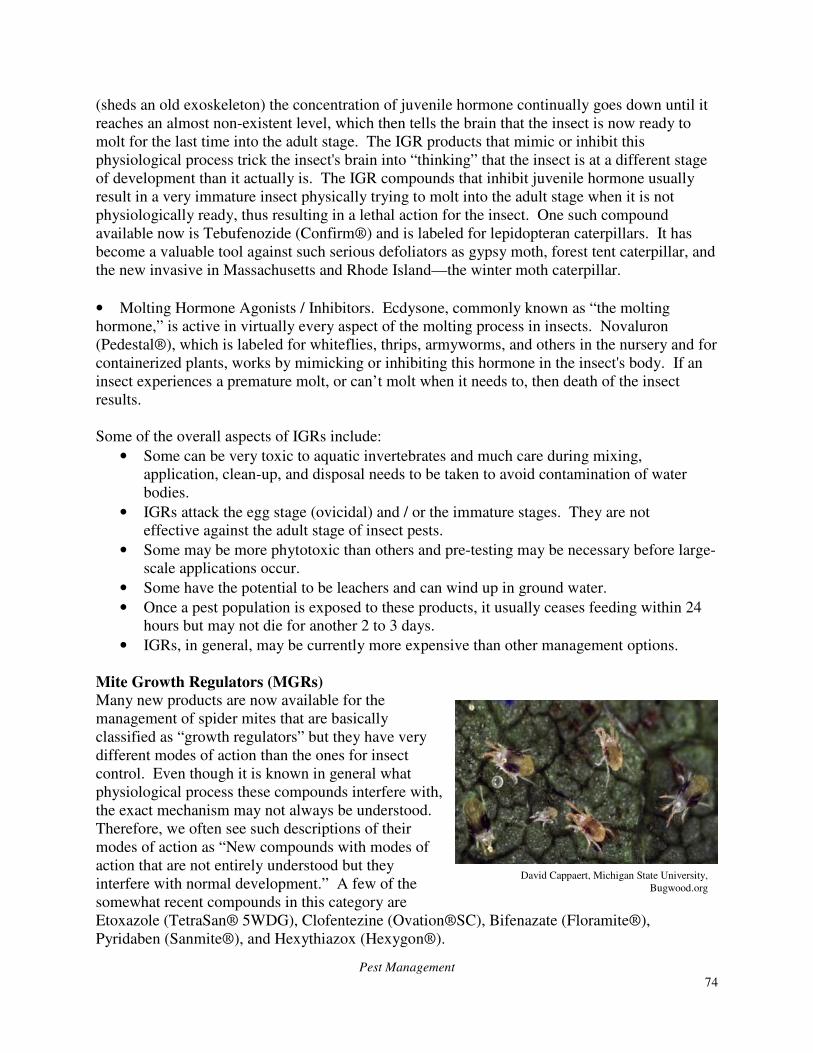
Pest Management
74
(sheds an old exoskeleton) the concentration of juvenile hormone continually goes down until it reaches an almost non-existent level, which then tells the brain that the insect is now ready to molt for the last time into the adult stage. The IGR products that mimic or inhibit this physiological process trick the insect's brain into “thinking” that the insect is at a different stage of development than it actually is. The IGR compounds that inhibit juvenile hormone usually result in a very immature insect physically trying to molt into the adult stage when it is not physiologically ready, thus resulting in a lethal action for the insect. One such compound available now is Tebufenozide (Confirm®) and is labeled for lepidopteran caterpillars. It has become a valuable tool against such serious defoliators as gypsy moth, forest tent caterpillar, and the new invasive in Massachusetts and Rhode Island—the winter moth caterpillar.
• Molting Hormone Agonists / Inhibitors. Ecdysone, commonly known as “the molting hormone,” is active in virtually every aspect of the molting process in insects. Novaluron (Pedestal®), which is labeled for whiteflies, thrips, armyworms, and others in the nursery and for containerized plants, works by mimicking or inhibiting this hormone in the insect's body. If an insect experiences a premature molt, or can’t molt when it needs to, then death of the insect results. Some of the overall aspects of IGRs include:
• Some can be very toxic to aquatic invertebrates and much care during mixing, application, clean-up, and disposal needs to be taken to avoid contamination of water bodies.
• IGRs attack the egg stage (ovicidal) and / or the immature stages. They are not effective against the adult stage of insect pests.
• Some may be more phytotoxic than others and pre-testing may be necessary before large-scale applications occur.
• Some have the potential to be leachers and can wind up in ground water.
• Once a pest population is exposed to these products, it usually ceases feeding within 24 hours but may not die for another 2 to 3 days.
• IGRs, in general, may be currently more expensive than other management options. Mite Growth Regulators (MGRs)
Many new products are now available for the management of spider mites that are basically classified as “growth regulators” but they have very different modes of action than the ones for insect control. Even though it is known in general what physiological process these compounds interfere with, the exact mechanism may not always be understood. Therefore, we often see such descriptions of their modes of action as “New compounds with modes of action that are not entirely understood but they interfere with normal development.” A few of the somewhat recent compounds in this category are Etoxazole (TetraSan® 5WDG), Clofentezine (Ovation®SC), Bifenazate (Floramite®), Pyridaben (Sanmite®), and Hexythiazox (Hexygon®).
David Cappaert, Michigan State University, Bugwood.org
Pest Management
75
Some of these are very specific to Tetranychids (spider mites) and do not harm the Phytosiids (predatory mites) that may be on the same plant. However, some of these (such as Pyridaben) can be more toxic to predators, and this issue should be understood before application. The target stages for mite growth regulators are often the egg stage or the immatures. MGRs are not known to kill adult spider mites but in some cases they may sterilize adult female mites thus preventing them from laying viable eggs. Most of these products work best when spider mite populations are low to moderate in size. Plants that are experiencing a spider mite outbreak probably should not be treated with one of these products until the population has been significantly lowered by other means. A few of these miticides, such as TetraSan®, have translaminar attributes that aid in their success. Within this group, there is a wide range of variability in their toxicity to vertebrate organisms. Unique Modes of Action (MOA):
Insect and mite control is now at a very exciting time, given the current wave of development and availability of new compounds. We are now, and will be more so in the near future, controlling pests in ways unimaginable just a few years ago. Frequently, another new MOA gets discovered. In addition to the above described MOAs, we currently have the following compounds either already on the market or they are just coming onto the market, for our battle against insects and mites:
• Spiromesifen (Forbid®4F). This compound is a “Lipid Synthesis Inhibitor.” By preventing this necessary biological process in the insect's body, it becomes lethal. Currently, it is labeled for the control of whiteflies (nymphs and “pupae”) and mites in all stages.
• Fermentation Products (Spinosad [Conserve SC®] and A vermectin). These have been around for a number of years and are now experiencing greater use. These products start out as a bacterium, but are then put through a fermentation process to obtain the end compound(s) which has insecticidal and, sometimes, miticidal properties. The EPA has designated this group as Reduced Risk Pesticides. Spinosad works very well on all types of caterpillars including sawfly larvae, leafbeetle larvae, and thrips. Its MOA “affects nicotine acetylcholinesterase receptors” and is possibly a “GABA (a neurotransmitter) inhibitor.” Products in this group tend to have a low mammalian toxicity rating. However, the label for Spinosad, in particular, states that it is very toxic to foraging honeybees but this factor diminishes significantly after the spray has dried.
Plant Disease and Fungicides:
The world of plant disease (pathogen) management has also benefited recently from new products. Many of these fall into the “reduced risk” category. One of the greatest advancements has been with the development of the Strobilurin fungicides. These commercial compounds were initially derived from the fungus Strobilurus tenacellus. The active ingredient is Strobilurin A, which is now available as a synthetic. The presence of Strobilurin inhibits the growth of other fungi. When it is already present on a plant, and a new pathogen arrives, the Strobilurin greatly inhibits that pathogen from successfully colonizing (invading) that plant. Strobilurin fungicides can be applied as a foliar spray as well as a soil drench, in some cases. They also have translaminar capabilities. Strobilurin fungicides are labeled as being protective, curative, and
Pest Management
76
systemic; they are deemed to be “reduced risk;” and they are active against the major groups of disease-causing fungi. They are labeled for such problems as powdery mildews, scab, downy mildews, crown and root rots (Pythium and Phytophthora), Fusarium, leaf spots, leaf blights, and rusts. They are even being investigated for possible uses against Ramorum Blight (Phytophthora
ramorum = “Sudden Oak Death”). As with all pesticide products, it is strongly recommended that Strobilurin products not be relied upon exclusively and that rotation with other modes of action be implemented into plant disease management programs in order to avoid the development resistance. A very thorough article about the new fungicides, including detailed information about the Strobilurins, was written by Dr. Janna Beckerman from the University of Minnesota and appeared in the June 15, 2005 (Issue 12, Volume 201) issue of American Nurseryman magazine and is highly recommended reading. The article is entitled “Fairly New Fungicides.” Pesticide Products and Their Target Pests
In addition to reduced risk pesticides, conventional pesticides such as organophoshate and carbamate insecticides that work on the peripheral nervous system as cholinesterase inhibitors are still effectively used by growers today. Pesticide recommendations for pest management are available in the guide “Pesticide Recommendations for Insects, Diseases and Weeds in New England,” available from the UMass Extension Bookstore (http://www.umassextensionbookstore.com). Horticultural oils
• Oils work on soft-bodied and stationary pests, such as aphids, lacebugs (nymphs in particular), adelgids, whiteflies, scale insects (especially the crawler stage), very young caterpillars (both lepidoptera and hymenopotera), very young leaf beetle larvae, and spider mites. Oils are also effective for killing the egg stage when the individual egg can be covered by the spray.
Insecticidal Soap
• Soap works best on small and soft-bodied targets: aphids, adelgids, very young caterpillars, and spider mites. Overall, soap is probably not as effective as oil sprays. Like oils, the product must cover the pest at the time of application to be effective. Soap is not effective against the egg stage.
Fermentation Products (e.g. Spinosad)
• Fermentation products are very effective against all caterpillars of all ages (lepidoptera and hymenoptera) and against leaf beetle larvae (but not the adults). These products work well for certain piercing-sucking insects but not spider mites.
Bacillus thuringiensis Kurstaki
• This is a bacterium that specifically attacks lepidoptera caterpillars. It works best on the younger caterpillars, and does not work on hymenoptera caterpillars (sawflies).
Neonicotinoids
Pest Management
77
• These chemicals are nerve toxins but they mostly target specific nerve sites that, in certain insects, paralyze mouth muscles so the insects starve. Imidacloprid was the first labeled product in this category but now there are many others. Most of these work best against insects that have a piercing-sucking mouth type. Some of the newer products work well against certain insects with a chewing mouth type. Some (like imidacloprid) demonstrate great systemic qualities. Some others have translaminar qualities. Most are labeled for both armored and soft scales but really only show good results against soft scales and not the armored scales. However, one of the new neonicotinoids, Dinotefuran (Safari®), does work well against armored scales. Many of these products have a very long residual activity, especially those that are systemic.
Insect Growth Regulators (IGR’s) and Mite Growth Regulators
• These attack the pest at a very specific part of their development and disrupt normal development. Some even target the developing embryo while still in the egg and keep it from ever developing and hatching. Most are fairly specific to an insect order OR mite family. There are 3 basic ways that these products work: Chitin Synthesis Inhibitors, Juvenille Hormone mimics OR Inhibitors, Molting Hormone mimics OR Inhibitors.
Entomopathogenic (Beneficial) Nematodes
• These need to stay wet long enough to be effective. Therefore, they work best for soil-inhabiting insects and those that live in wood but keep their tunnels open. Nematodes get into the insect and a bacterium that they carry then starts to multiply. The nematode feeds on the bacteria. However, the bacteria produce by-products that kill the insect. Pyrethroids
• These are nerve toxins and are the harshest and most broad-spectrum chemicals that are still mostly available. These are usually chosen when none of the above-mentioned products will work effectively. They mostly provide quick knockdown and a relatively short residual.
Why Products Fail
In the January 15, 2004 (Issue 2, Volume 199) issue of American Nurseryman magazine, another plant pathologist, Dr. Jim Chatfield from Ohio State University, wrote an article called “Why Fungicides Fail.” His observations and recommendations within that article are highly pertinent when considering disease management. Furthermore, they also have merit for all areas of pest control, insects included, especially when the practitioner is working within the realm of IPM and Plant Health Care. The highlights from that article follow.
Why Products Fail
1) Not implementing continued observations. We all know that regular monitoring is the backbone of any IPM program. If one doesn't know what is happening in the “system” under his or her management, then that person is not truly practicing IPM. 2) Improper diagnosis. It is absolutely imperative that we know the exact problem before implementing any type of management. This is Step #1 in any pest management program. Incorrect diagnosis generally leads to improper treatment, which often results in greater problems. 3) The use of the incorrect pesticide for the problem at hand. See #2 above and then read the end
Pest Management
78
of this article for obtaining detailed information about the new pesticide products. 4) Over-reliance on pesticide products. Sprays are not always the answer, as we know. This is where our ever-increasing desire for new information plays a strong role. Using plant material that is resistant to key pests, culling out infested (infected) plants, watering properly so as not to encourage pathogen growth and to alleviate drought stress, planting the right plant in the right place to begin with, establishing aesthetic injury levels, and then only treating when necessary, are the real long-term solutions to successful, pest management that meets today’s criteria. How to Stay Current with New Products
The influx of new insecticide, miticide, and fungicide products coupled with the newer modes of action is almost overwhelming these days, even for the professional Extension entomologist whose job it is to understand and educate about such things. A couple of sources for information are outlined below and these should continue to offer tremendous benefit for those seeking information about both the older and newer products. Kelly Solutions
http://www.kellysolutions.com/MA/pesticideindex.htm This site gives registration status for commercial pesticide products in Massachusetts
Crop Data Management Systems, Inc
http://www.cdms.net This site lists nearly 100 pesticide companies that produce products for the turf and ornamentals (T&O) market (as well as ag products). Users of this site can obtain specimen labels of specific products along with the Material Safety Data Sheets (MSDS) that accompany the labels.
Greenbook
http://www.greenbook.net This site lists a phenomenal number of products and can be easily searched by company, active ingredient, and product trade name. Along with being able to obtain specimen labels and the MSDS, users can usually also access a “product summary sheet,” Department of Transportation (DOT) information, mode of action sheet, state registration information, supplemental label information, as well as other valuable information about each product. Bear in mind that pesticide labels that are provided on such sites are almost always the “Specimen Label,” which means that it is the federal label as allowed by the EPA. However, another piece of federal legislation, the Federal Insecticide Fungicide and Rodenticide Act (FIFRA) amendments of 1972, says that individual states reserve the right to make a pesticide label more strict (but not less). This means that any state has the right to prohibit uses in their state that appear on the specimen label. They can even refuse to register the product for any uses within the state even though the EPA has granted the company a label.
Disease Management
79
CHECKLIST
DISEASE MANAGEMENT
General Cultural Practices for Disease Prevention
� Minimize prolonged leaf wetness. Moisture plays an important role in disease cycles, as moisture is needed for most microorganisms to spread, germinate, and infect plant material. Reducing the duration of leaf wetness reduces the potential for disease infection. When possible, water should only be applied to the soil or growing medium to avoid wetting the foliage. If overhead irrigation practices cannot be altered, watering should occur at night or before midday to prevent prolonged leaf wetness and break up the period of leaf wetness. Properly spacing plants that are pruned to improve air circulation and sunlight penetration also improves drying of foliage.
� Prune out infected twigs and branches and rake up leaf-spotted leaves. Dispose of these materials away from the affected plants. Plant debris, such as fallen leaves and twigs, serve as overwintering sites for disease-causing propagules. Plants which exhibited disease symptoms one season can potentially be infected the next season if plant debris is not removed.
� Select plants that are best suited to the site conditions and provide adequate water and nutrients. Plants with good vitality are more likely to limit infections and recover from plant diseases and other stresses than weakened plants.
� When working with plants, such as during propagation, work in blocks or sections. After each section, disinfect tools and wash hands. This will reduce the chance that disease will be spread to fresh cuts. Prune or take cuttings during dry weather. Disinfect tools with a commercial disinfectant, 70% alcohol, or 10% bleach solution. Rinse tools after using bleach as it will corrode metal.
� Do not reuse growing media. � Keep hose nozzles off the ground at all times, especially in greenhouses. � Use new containers or containers that have been cleaned of debris and then disinfected. � Prepare growing mix on a large slab or platform located above the level of water runoff.
Assign equipment that is only used on the slab. Avoid unnecessary foot traffic on the slab.
� Minimize plant contamination by runoff water and soil splash. Build gravel beds with the center higher than the edge. Place gravel on top of porous plastic sheets.
� Regularly monitor root health as part of scouting program. � Promptly remove diseased plants from the growing area to reduce innoculum. � Quarantine recoverable plants to monitor and treat them. � The disposal site for seriously diseased plant material should be away from the growing
area, storage area, propagation area, and water source. � Quarantine all plant material new to the nursery. Practice prompt disease management. � Space plants for good air movement and sunlight. This results in rapid drying of foliage
and better spray coverage. � Avoid irrigation extremes which predispose plants to root diseases. Avoid over-watering
plants resulting in saturated growing media. � Grow trees well adapted to the site and resistant to diseases common in the area. � Identify key (high maintenance) plants that require regular interventions. These plants
may not only be more disease-prone, but their appearance has high value to the client.
Disease Management
80
� Consider the cost-benefits of all available interventions. � Monitor weather data and scouting reports to anticipate disease development. � Spray only when needed and when most beneficial. Apply chemical controls when
moisture, temperature, and age of plants support their use. � Examine new plants closely and aim toward transplanting only healthy plants.
Propagation Areas
� Routinely monitor propagation areas every two days. Check misting system for proper functioning. Monitor the wetness of rooting media.
� Monitor seedlings for damping off and vegetative cuttings. Look for localized symptoms such as root lesions, cutting end rot, leaf spots, and shoot blights.
Production Areas
� Monitor production areas every 10 to 14 days. Examine a minimum of 5% of the plants in each bed. During subsequent inspections inspect different plants. Check both old and new growth. Generally monitor plants randomly. However, carefully monitor plants closely on windward side of block and sides of the bed that border uncultivated areas.
� Maintain good records of observations. When disease is found, look closely at similar plants.
� Monitor roots for root rot symptoms. Look for reduced plant vigor, off-colored foliage, small leaf size, and wilted leaves. Remove plants from containers and examine peripheral roots. Indications of root rot are dark roots with poor integrity and lack of roots in the lower 1/3 of the media.
� Quarantine all plants received from outside of the nursery for at least 3 weeks. Inspect plants weekly. Correct or discard problem plants.
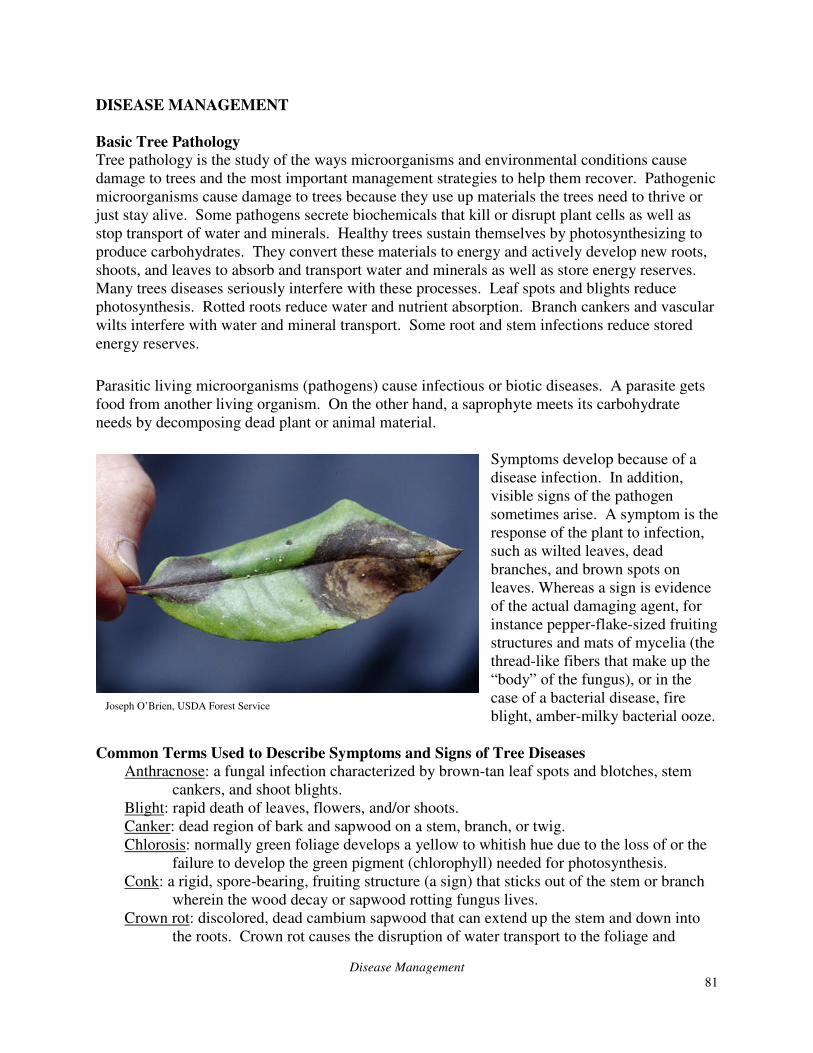
Disease Management
81
DISEASE MANAGEMENT
Basic Tree Pathology
Tree pathology is the study of the ways microorganisms and environmental conditions cause damage to trees and the most important management strategies to help them recover. Pathogenic microorganisms cause damage to trees because they use up materials the trees need to thrive or just stay alive. Some pathogens secrete biochemicals that kill or disrupt plant cells as well as stop transport of water and minerals. Healthy trees sustain themselves by photosynthesizing to produce carbohydrates. They convert these materials to energy and actively develop new roots, shoots, and leaves to absorb and transport water and minerals as well as store energy reserves. Many trees diseases seriously interfere with these processes. Leaf spots and blights reduce photosynthesis. Rotted roots reduce water and nutrient absorption. Branch cankers and vascular wilts interfere with water and mineral transport. Some root and stem infections reduce stored energy reserves.
Parasitic living microorganisms (pathogens) cause infectious or biotic diseases. A parasite gets food from another living organism. On the other hand, a saprophyte meets its carbohydrate needs by decomposing dead plant or animal material.
Symptoms develop because of a disease infection. In addition, visible signs of the pathogen sometimes arise. A symptom is the response of the plant to infection, such as wilted leaves, dead branches, and brown spots on leaves. Whereas a sign is evidence of the actual damaging agent, for instance pepper-flake-sized fruiting structures and mats of mycelia (the thread-like fibers that make up the “body” of the fungus), or in the case of a bacterial disease, fire blight, amber-milky bacterial ooze.
Common Terms Used to Describe Symptoms and Signs of Tree Diseases
Anthracnose: a fungal infection characterized by brown-tan leaf spots and blotches, stem cankers, and shoot blights.
Blight: rapid death of leaves, flowers, and/or shoots. Canker: dead region of bark and sapwood on a stem, branch, or twig. Chlorosis: normally green foliage develops a yellow to whitish hue due to the loss of or the
failure to develop the green pigment (chlorophyll) needed for photosynthesis. Conk: a rigid, spore-bearing, fruiting structure (a sign) that sticks out of the stem or branch
wherein the wood decay or sapwood rotting fungus lives. Crown rot: discolored, dead cambium sapwood that can extend up the stem and down into
the roots. Crown rot causes the disruption of water transport to the foliage and
Joseph O’Brien, USDA Forest Service
Disease Management
82
branches above the rotted basal stem and root flares. Dieback: death of shoots, branches, and roots from their ends, which often progresses and
kills the entire plant part. Gall/knot: a swollen or overgrown plant part due to an infection by certain pathogens as well
as insect infestations. Leaf blister: a localized bulging/distorted area on the surface of affected leaves. Leaf blotch: an unevenly shaped dead area on leaves, which often expands until the leaf dies
or drops off. Leaf spot: a rounded, well-defined lesion that is usually limited in size. Necrosis: the death of plant parts, which then dry out and turn brown. Needle cast: a fungal disease of needles that kills them and causes their premature loss. Root rot: infected roots collapse, turn brown, readily fall apart, and no longer take up water
and minerals for the plant. Rust: a host-specialized, fungal disease of living foliage, branches, stems, and fruit. In most
rust diseases of trees, one or more stages in the life cycle of the rust fungus produce spores that are rust/orange colored.
Scab: an uneven, discolored, raised spot on the surface of infected leaves or fruit. A disease that develops these symptoms on infected plant parts.
Scorch: browning of leaf edges or needle tips due to inadequate water uptake or transport to the foliage as well as excessive transpiration from the foliage. Scorch may develop because of stem, vascular, or root diseases. However, unfavorable environmental conditions in which replenishment of moisture cannot keep up with its loss, such as extended periods of dryness, soil compaction, physical damage to stems or roots, and winter sunscald, can cause the same symptoms.
Low vigor: a reduction in tree growth or development. Symptoms associated with low vigor include small foliage, thin crowns, shorter than normal shoot elongation, lack of sufficient roots, premature fall coloration, and branch dieback.
Wilt: limpness of leaves and stems due to excessive water loss or a lack of water to these plant parts.
Witches’ broom: dense, broom-like cluster of shoots caused by phytoplasmas, fungi, insects, or de-icing salt.
Causes of Infectious Disease
Several types of microorganisms cause diseases on woody ornamentals and trees including nematodes, viruses, phytoplasmas, parasitic higher plants, fungi, and bacteria.
Nematodes
Nematodes that feed on woody ornamentals and trees in New England are small, cylindrical, worm-like microbes that primarily feed on roots, with the notable exception of the pine wood nematode. Diagnosis of nematode diseases involves extraction of nematodes from plant material or soil, microscopic examination and identification of adults, and then counting the types of nematodes present to determine if they are parasitic on the plant of concern and are present in sufficient numbers to cause damage. Virus
A nucleic acid covered with a protein coat makes up the body of a virus. Plants infected with a virus may show no obvious symptoms, have subtle foliar discoloration and stunted growth, or
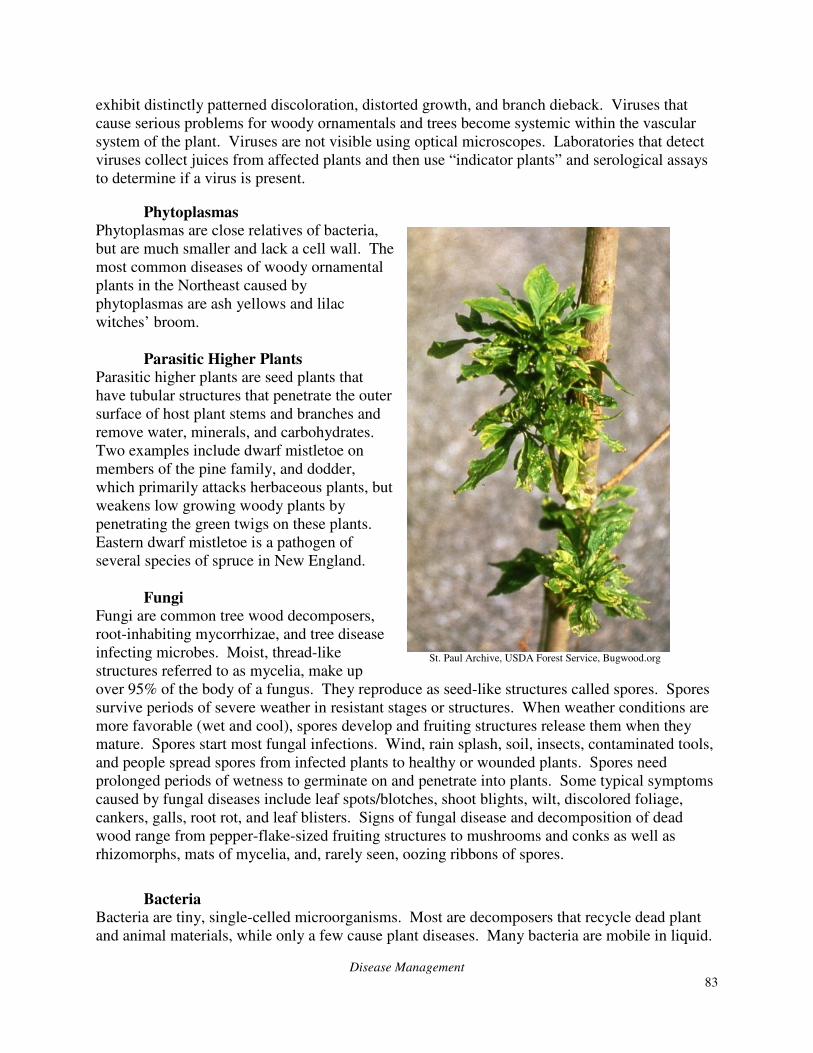
Disease Management
83
exhibit distinctly patterned discoloration, distorted growth, and branch dieback. Viruses that cause serious problems for woody ornamentals and trees become systemic within the vascular system of the plant. Viruses are not visible using optical microscopes. Laboratories that detect viruses collect juices from affected plants and then use “indicator plants” and serological assays to determine if a virus is present.
Phytoplasmas
Phytoplasmas are close relatives of bacteria, but are much smaller and lack a cell wall. The most common diseases of woody ornamental plants in the Northeast caused by phytoplasmas are ash yellows and lilac witches’ broom. Parasitic Higher Plants
Parasitic higher plants are seed plants that have tubular structures that penetrate the outer surface of host plant stems and branches and remove water, minerals, and carbohydrates. Two examples include dwarf mistletoe on members of the pine family, and dodder, which primarily attacks herbaceous plants, but weakens low growing woody plants by penetrating the green twigs on these plants. Eastern dwarf mistletoe is a pathogen of several species of spruce in New England. Fungi
Fungi are common tree wood decomposers, root-inhabiting mycorrhizae, and tree disease infecting microbes. Moist, thread-like structures referred to as mycelia, make up over 95% of the body of a fungus. They reproduce as seed-like structures called spores. Spores survive periods of severe weather in resistant stages or structures. When weather conditions are more favorable (wet and cool), spores develop and fruiting structures release them when they mature. Spores start most fungal infections. Wind, rain splash, soil, insects, contaminated tools, and people spread spores from infected plants to healthy or wounded plants. Spores need prolonged periods of wetness to germinate on and penetrate into plants. Some typical symptoms caused by fungal diseases include leaf spots/blotches, shoot blights, wilt, discolored foliage, cankers, galls, root rot, and leaf blisters. Signs of fungal disease and decomposition of dead wood range from pepper-flake-sized fruiting structures to mushrooms and conks as well as rhizomorphs, mats of mycelia, and, rarely seen, oozing ribbons of spores.
Bacteria
Bacteria are tiny, single-celled microorganisms. Most are decomposers that recycle dead plant and animal materials, while only a few cause plant diseases. Many bacteria are mobile in liquid.
St. Paul Archive, USDA Forest Service, Bugwood.org

Disease Management
84
When they infect plants they do not grow larger; on the other hand, they rapidly multiply in number. Bacteria reproduce very quickly by a special process of division in which they split in half (binary fission). There are no fruiting structures and there is no process of sexual reproduction. Rain splash, soil, insects, cutting tools, and people are the primary means of bacterial dispersal. Individual bacteria infect plants by swimming in water on the plant surface, penetrating natural openings and wounds, and once they have a nutrient source, engaging in binary fission. Symptoms of bacterial infection include angular leaf spots, shoot, flower and shoot blights, cankers, wilt, fruit rot, and galls. The only common sign of infection is bacterial ooze that exudes from the margins of certain bacterial cankers or blights.
Conditions Necessary for Disease
A practical way to picture the process of infection is the disease pyramid. There are three conditions necessary for infection: a susceptible host plant, an infective pathogen, and a wet plant surface. The fourth component that completes the pyramid is time. Time (along with temperature in certain situations) influences the infection process in a couple of ways. First, immature plants and their tender, green parts are more vulnerable to infection than mature plant tissues with disease resistant biochemical and structural defenses. Secondly, the longer the plant surface remains wet the more time there is for spores and bacteria to infect the plant. Air temperature can play an important role in this situation. If it is too cold (below 40o F), the chill does not kill the pathogen, but the microbe is not biologically active enough to initiate growth and establish an infection. On the other hand, once the air temperature approaches 85o F, water evaporates quickly and the warmth inhibits the development of many fungi. The optimal temperature range for fungal infections is 60o to 75o F.
Favorable environment (wet and cool)
Time (4th dimension): Wetness period
Susceptible host plant Infective pathogen Age of plant and parts
Disease development
There are a series of steps in the development of a fungal or bacterial disease infection in woody ornamentals and trees. The process begins with the release of inoculum (infectious parts of plant pathogens). These are usually spores from fungi and the whole microbe in the case of bacteria. An infective pathogen enters a susceptible plant if conditions are wet long enough. Once inside the plant, it depends on whether the pathogen finds materials it can use to nourish itself as to whether a true infection happens. As the pathogen consumes minerals and carbohydrates from the plant and releases enzymes and hormones that affect plant growth, symptoms begin to appear. If the disease microbes find what they need to thrive, they grow, multiply, and move within the plant. Once they are well established, they can produce spores in the case of fungi or form bacterial ooze on the margin of some infections that allow them to spread to other parts of the plant or to nearby plants. This whole process can take a few days or several months depending on the pathogen. As a final point, the pathogen needs to survive unfavorable weather, especially cold and dryness, in order to be available to infect plants next growing season. Each pathogen has a resistive structure or an ability to go into a resting state that allows it to stay alive during unfavorable conditions. This completes the disease cycle for the current season, but also allows it to restart the following spring.
Disease Management
85
Managing Infectious Diseases
Effective disease management begins with understanding disease development. Infection is a process and effective interventions begin with avoidance of the conditions that enhance that process and providing good plant care to help trees defend themselves from extensive damage. Remove infected plants and plant parts to reduce inoculum available to initiate new infections. Maintain plant vitality to optimize resistance. Water during extended periods of dry weather, while ensuring there is adequate soil drainage. Prune to provide sound branch structure as well as good sunlight penetration and air movement to avoid long periods of leaf wetness. When replacement of high maintenance plants is possible, an effective means of disease management is to grow those well adapted to the site and resistant to diseases common in the area. Resistant plants defend themselves with biochemical and structural responses that preexist or that they make in reaction to infection to prevent or limit growth of the pathogen. When plants are of high value, proper chemical treatments are useful tools to prevent or minimize damage from certain fungal and bacterial diseases. Apply or inject trees with chemical materials to kill or inhibit growth of the pathogen, to protect healthy plants, or before infection is extensive. Most protective fungicides must be on or in plants in advance of the pathogen to effectively defend them from subsequent infections. Apply sprays so there is thorough coverage to all vulnerable surfaces, so the fungicide forms a protective barrier. Broad-spectrum protective fungicides are, for the most part, ineffective after symptoms appear/infection happens. They are not absorbed or translocated within infected portions of plants. Untreated new plant growth that develops after prior treatments is vulnerable to infection during wet seasons, so reapply sprays at labeled intervals. Systemic fungicides have variable movement within treated plants. Some are locally systemic in foliage, while translocation of others is more extensive within plants. Fungicides injected into stems and root flares move upward from the point of injection into branches and foliage and may be effective for longer periods. A caution about the repeated use of systemic fungicides is that the pathogen can develop resistance to it. To impede this process, alternate use of specific systemic fungicides with broad-spectrum, protective fungicides. The systemic fungicide does most of disease control, while the protective fungicide kills resistant pathogens that might otherwise become the dominant agent of disease on the plants. Cultural Practices for Disease Prevention
Details of how to implement management approaches with specific diseases of woody ornamentals are available in the Woody Ornamental Pest Management Guide available from University of Massachusetts Extension; however, the following cultural practices will help prevent diseases.
• Minimize prolonged leaf wetness. Moisture plays an important role in disease cycles, as moisture is needed for most microorganisms to spread, germinate and infect plant material. Reducing the duration of leaf wetness reduces the potential for disease infection. When possible, water should only be applied to the soil or growing medium to avoid wetting the foliage. If overhead irrigation practices cannot be altered, watering should occur at night or before midday to prevent prolonged leaf wetness and break up the period of leaf wetness. Properly spacing plants that are pruned to improve air circulation and sunlight penetration also improves drying of foliage.
Disease Management
86
• Prune out infected twigs and branches and rake up leaf-spotted leaves. Dispose of these materials away from the affected plants. Plant debris, such as fallen leaves and twigs, serve as overwintering sites for disease causing propagules. Plants which exhibited disease symptoms one season can potentially be infected the next season if plant debris is not removed.
• Healthy plants are better able to resist pathogens. Select plants that are best suited to the site conditions and are resistant to diseases common in the area; provide them with adequate water and nutrients. Plants with good vitality are more likely to limit infections and recover from plant diseases and other stresses than weakened plants.
• When working with plants such as during propagation, work in blocks or sections. Disinfect tools after each section and wash hands. This will reduce the chance that disease will be spread to fresh cuts. Prune or take cuttings during dry weather. Disinfect tools with a commercial disinfectant, 70% alcohol, or 10% bleach solution. Rinse tools after using bleach as it will corrode metal.
• Do not reuse growing media.
• Keep hose nozzles off the ground at all times.
• Use new containers or containers that have been clean of debris and then disinfected.
• Prepare growing mix on a large slab or platform located above the level of water runoff. Assign equipment that is only used on the slab. Avoid unnecessary foot traffic on the slab.
• Minimize plant contamination by runoff water and soil splash. Build gravel beds with the center higher than the edge. Place gravel on top of porous plastic sheets.
• Regularly monitor root health as part of a scouting program.
• Promptly remove diseased plants from the growing area to reduce innoculum.
• Quarantine recoverable plants to monitor and treat them.
• The disposal site for seriously diseased plant material should be away from the growing area, storage area, propagation area, and water source.
• Quarantine all plant material new to the nursery and aim toward transplanting only healthy plants. Practice prompt disease management.
• Space plants for good air movement and sunlight. This results in rapid drying of foliage and better spray coverage.
• Avoid irrigation extremes which predispose plants to root diseases. Avoid over-watering plants resulting in saturated growing media.
• Identify key (high maintenance) plants that require regular interventions. These plants may not only be more disease-prone, but their appearance has high value to the client.
• Consider the cost-benefits of all available interventions.
• Monitor weather data and scouting reports to anticipate disease development.
• Spray only when needed and when most beneficial. Apply chemical controls when moisture, temperature, and age of plants support their use.
Propagation Area
• Routinely monitor propagation areas every two days. Check the misting system for proper functioning. Monitor the wetness of rooting media.
• Monitor seedlings for damping off and vegetative cuttings. Look for localized symptoms such as root lesions, cutting end rot, leaf spots, and shoot blights.

Disease Management
87
Production Area
• Monitor production areas every 10 to 14 days. Examine a minimum of 5% of the plants in each bed. During subsequent inspections inspect different plants. Check both old and new growth. Generally monitor plants randomly. However, carefully monitor plants closely on the windward side of the block and sides of the bed that border uncultivated areas.
• Maintain good records of observations. When disease is found, look closely at similar plants.
• Monitor roots for root rot symptoms. Look for reduced plant vigor, off-colored foliage, small leaf size, and wilted leaves. Remove plants from containers and examine peripheral roots. Indications of root rot are dark roots with poor integrity and lack of roots in the lower 1/3 of media.
• Quarantine all plants received from outside of the nursery for at least 3 weeks. Inspect plants weekly. Correct or discard problem plants.
Weed Management
88
CHECKLIST
WEED MANAGEMENT
� Scout all areas of the nursery (nursery fields, container yards, hoophouses, greenhouses, potting and propagation areas, holding areas, and areas adjacent to these locations) for the presence of weeds on a regular basis.
� Correctly identify and record all weeds. � Develop a weed management program before planting. � Prevent weeds from going to seed in all areas of the nursery. Control measures include
mowing, hand-pulling, and herbicides. � Optimize the production cycle and minimize the duration in which container and field
nursery stock remains in the nursery. � Control weeds in nursery fields before planting. � Maintain a weed-free ground cover in field nurseries. � Maintain a weed-free area around the base of nursery stock. � Maintain cover crops in fields that are not being used. � Maintain weed-free areas around and between greenhouses and hoophouses. � Maintain potted and propagated areas of the nursery in a manner that keeps them weed-
free. � Use nursery fabrics in container areas to prevent weed growth. Clean container media
that has spilled or has fallen from nursery container drain holes and all plant debris from container area.
� Use container growing media that is weed-free. � Use nursery liners and transplants that are weed-free. Inspect purchased liners and
transplants for weed growth. � Thoroughly wash nursery containers that are going to be reused. Washing should be
done in a manner that removes all leftover growing media and weed seeds. � Routinely scout and monitor newly potted plants. Recently planted nursery containers
can be very prone to weed growth. � Use container surface covers or weed-mulch materials as container surface covers to
reduce weed growth in nursery containers. Herbicides and Herbicide Applications
� Consider all characteristics of a particular herbicide when selecting an herbicide. � Read and understand the product labels of all herbicide products before application. � Rotate herbicides based on mode of action and weed spectrum controlled. � Combine herbicides to increase the spectrum of weeds controlled. � Calibrate all herbicide application equipment on a regular basis. � Apply herbicides based on the germination period and growth stage of the specific weeds. � Keep accurate records of all herbicide applications on file. � Avoid over-watering container and field nursery stock. Over-watering can increase weed
germination and establishment. � Clean herbicide application equipment after application.
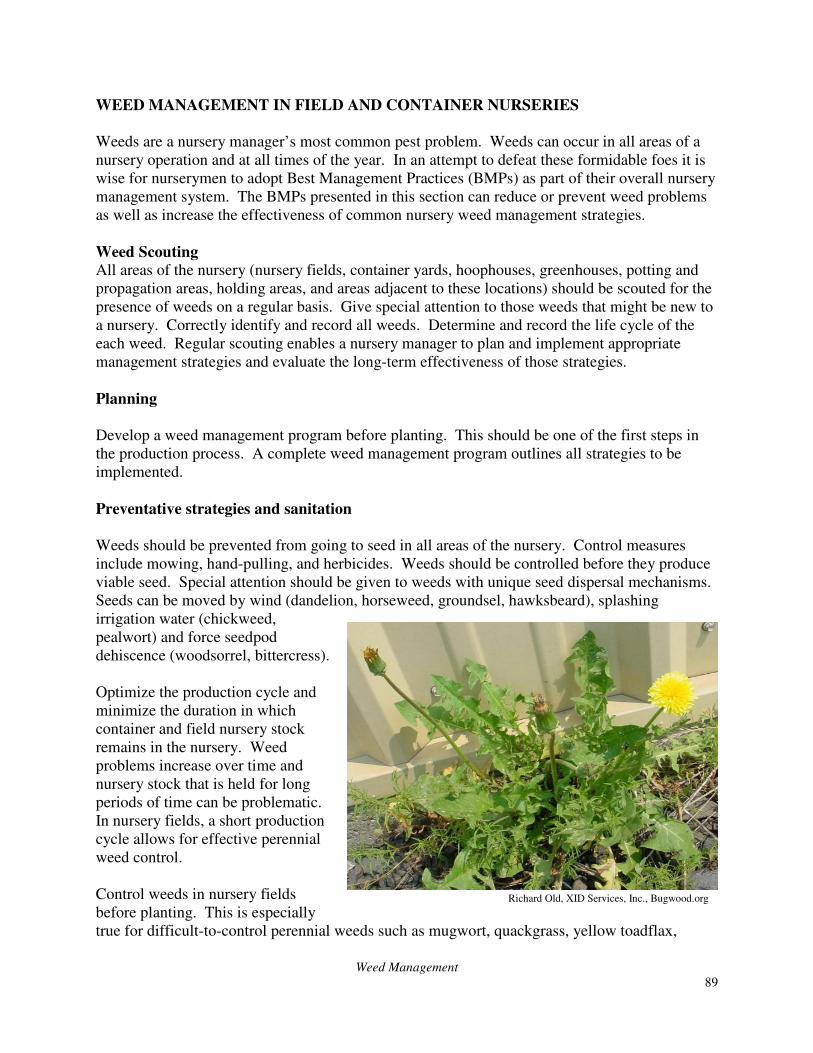
Weed Management
89
WEED MANAGEMENT IN FIELD AND CONTAINER NURSERIES
Weeds are a nursery manager’s most common pest problem. Weeds can occur in all areas of a nursery operation and at all times of the year. In an attempt to defeat these formidable foes it is wise for nurserymen to adopt Best Management Practices (BMPs) as part of their overall nursery management system. The BMPs presented in this section can reduce or prevent weed problems as well as increase the effectiveness of common nursery weed management strategies. Weed Scouting
All areas of the nursery (nursery fields, container yards, hoophouses, greenhouses, potting and propagation areas, holding areas, and areas adjacent to these locations) should be scouted for the presence of weeds on a regular basis. Give special attention to those weeds that might be new to a nursery. Correctly identify and record all weeds. Determine and record the life cycle of the each weed. Regular scouting enables a nursery manager to plan and implement appropriate management strategies and evaluate the long-term effectiveness of those strategies. Planning
Develop a weed management program before planting. This should be one of the first steps in the production process. A complete weed management program outlines all strategies to be implemented. Preventative strategies and sanitation
Weeds should be prevented from going to seed in all areas of the nursery. Control measures include mowing, hand-pulling, and herbicides. Weeds should be controlled before they produce viable seed. Special attention should be given to weeds with unique seed dispersal mechanisms. Seeds can be moved by wind (dandelion, horseweed, groundsel, hawksbeard), splashing irrigation water (chickweed, pealwort) and force seedpod dehiscence (woodsorrel, bittercress). Optimize the production cycle and minimize the duration in which container and field nursery stock remains in the nursery. Weed problems increase over time and nursery stock that is held for long periods of time can be problematic. In nursery fields, a short production cycle allows for effective perennial weed control. Control weeds in nursery fields before planting. This is especially true for difficult-to-control perennial weeds such as mugwort, quackgrass, yellow toadflax,
Richard Old, XID Services, Inc., Bugwood.org
Weed Management
90
bindweed, and Canada thistle. Once the nursery is planted, it becomes increasing more difficult to control these weeds. Pre-plant applications of a non-selective, translocated herbicide will effectively control many perennial weed species. Cultivation, unless it is done multiple times over a period of time, may spread perennials weeds. The potential for erosion should be assessed before cultivation is used in a specific nursery field. Cultivation also can result in the loss of soil structure and organic matter. If weed populations are considerably different among nursery fields within a particular nursery, cultivation equipment should be washed to remove soil and weed seeds. Maintain a weed-free ground cover in field nurseries. The maintenance of weed-free ground will over time reduce weed populations and the likelihood of weed problems. Depending on the type of nursery stock being grown, fields can be maintained either vegetation-free or in a system in which the weed-free areas are maintained in the rows and a persistent sod grassway is established and maintained in the alleys. Weed control in the rows can be achieved with programs that include residual preemergence herbicides and both selective and non-selective postemergence herbicides. These areas can also be mulched. If cultivation is used to control weeds in the row, pay special attention to the movement of soil over time. Cultivators control weeds near the base of nursery stock by burying them with soil. Newly establish nursery stock may die from being buried too deep. Over time, a substantial ridge of soil may develop at the base of nursery stock and be detrimental. Cultivation may also result in damage associated with root pruning and should not be done on large, well-established trees. Sod grassways will support equipment and allow field access for digging, spraying, mowing, and other practices to continue when soils are muddy and snow covered. Sod grassways can reduce water and wind erosion. Additionally, sod grassways can effectively compete with weeds and prevent their spread. These areas are traditionally managed by mowing; however, plant growth regulators can also be used. Maintain a weed-free area around the base of nursery stock. Nursery stock that is surrounded by weeds is prone to rodent damage. Weeds around the base of nursery stock can compete for water and nutrients. Maintain cover crops in fields that are not being used. Cover crops will not only improve soil but also reduce weed growth. Winter rye and oats can be used as cool-season cover crops. Buckwheat and sudangrass can be used as cover crops for the summer months. Maintain weed-free areas around and between greenhouses and hoophouses. These areas can be a source of weed seed that can infest container nursery stock. An early season preemergence herbicide or a postemergence non-selective and preemergence herbicide tank-mix can be used. Potting and propagation areas of the nursery should be maintained in a manner that keeps them weed-free. Ground or floor coverings that are not conducive to weed germination and establishment are preferable. Container media that has spilled or has fallen from nursery container drain holes and all plant debris should be cleaned from potting and propagation areas. All weeds should be controlled in container areas. Nursery fabrics can be used in container areas to prevent weed growth. Container media that has spilled or has fallen from nursery container drain holes and all plant debris should be cleaned from container areas.
Weed Management
91
Use container growing media that is weed-free. While initially weed-free, growing media that is stored improperly or in an open area can quickly become contaminated with weed seeds. Covering the pile or storage indoors should be considered as strategies to keep weed seeds from entering the media. If soil or compost is a component of a container media the weed levels should be determined. Nursery liners and transplants should be weed-free. Inspect purchased liners and transplants for weed growth. If weeds are present, remove as many as possible, especially those near the surface, before planting. Ask the supplier questions about their production process weed management programs and weed levels before purchase. Nursery containers that are going to be reused should be washed thoroughly. Washing should be done in a manner that removes all leftover growing media and weed seeds. Many weeds are very small and can easily be missed when containers are inspected visually so washing is necessary. Routinely scout and monitor newly potted plants. Recently planted nursery containers can be very prone to weed growth. If weeds do appear examine the nursery container closely and determine if the weeds are germinating from the liner or from the growing media. Take the appropriate action based on the location of the weeds. Implement management strategies that are targeted toward preventing weed growth in container nursery stock. Several container surface covers can be used to reduce weed growth in nursery containers, including geodiscs, plastic lids, and fiber disks. Clean weed-free bark mulch, cocoa hulls, or buckwheat hulls can be used as a container topping to prevent weed growth. Herbicides and Herbicide Applications
All characteristics of a particular herbicide should be considered when selecting an herbicide, including weed species controlled and longevity of effective control, weed growth stage at time of application, crop tolerance to herbicide and potential for injury, herbicide rate and activation requirement including rainfall/irrigation free period, application timing, herbicide formulation, herbicide mode of action, herbicide persistence and speed of degradation, potential for leaching and runoff, potential for injury from spray drift and volatility, selective vs. non-selective, contract vs. systemic/translocated, and cost. The product labels of all herbicide products should be read and understood before application. Make applications according to label directions. Combine herbicides to increase the spectrum of weeds controlled. Most herbicides used singly do not control all the weeds at a specific site. A particular preemergence herbicide is generally stronger on “grassy weeds” or “broadleaf weeds” and therefore a tank-mix of “grass” and “broadleaf” herbicides will increase the spectrum of weeds controlled. Apply preemergence herbicides at frequent enough intervals to maintain effective weed control. Rotate herbicides based on mode of action and weed spectrum controlled. Using the same herbicide or herbicides with the same mode of action at a specific site can result in a shift in
Weed Management
92
weed populations as well as increase the potential for herbicide resistance. If weeds that had previously been controlled with a specific herbicide are not currently being controlled, herbicide resistant weed populations may be developing. Steps should be taken to prevent suspected weeds from producing seed and spreading. All herbicide application equipment should be calibrated on a regular basis. Check delivery rate and application pattern on all sprayers and spreaders and adjust accordingly. Replace worn or damaged spray tips. Apply herbicides based on the germination period and growth stage of the specific weeds. Postemergence herbicide applications should be made only to weeds that are actively growing and not under moisture stress. Weeds should not be mowed for 2 weeks prior to and 1 to 2 weeks after application. An accurate record of all herbicide applications should be kept on file. Information recorded should include application date, herbicide used and formulation, herbicide rate and spray volume output, weeds present and their growth stage, crops and their growth stage, location and amount of area treated, weather (air temperature, dewpoint temperature, wind speed and direction, post application rainfall), soil moisture, application problems, and other information that might be helpful. Avoid over-watering container and field nursery stock. Over-watering can increase weed germination and establishment. The effectiveness of preemergence herbicides can be significantly decreased as a result of herbicide degradation as a result of over-watering. Thoroughly clean herbicide application equipment after application. Evaluate herbicide applications for effectiveness. Use the information collected to make appropriate adjustments to the herbicide program.
Wildlife Management
93
CHECKLIST
WILDLIFE MANAGEMENT
Identify the problem wildlife before choosing a management practice.
Voles
� Monitor nurseries for signs of vole activity to detect vole population increases and to evaluate the effectiveness of baiting programs and the need for follow-up treatments.
� Lower rodent numbers by careful mowing, cultivation, and herbicide treatment because voles require green, growing vegetation for survival and breeding. Rotary mowers are much more effective than sickle-bar types for removing ground cover and thatch.
� Eliminate meadow voles by using an herbicide strip, or cultivating beneath the trees and along the tree rows.
� Use wire guards to protect younger trees from meadow voles and rabbits; ¼-inch wire mesh has proven most satisfactory.
� For baiting pine voles, hand place baits in tunnels or under roofing shingles, slabs of wood, or similar protected bait stations. The optimal time to apply baits is in the late fall.
� For nurseries with recurring meadow vole problems, an annual fall baiting program is recommended.
� Do not apply baits to areas with bare ground, including vegetation-free cultivated strips under trees, because this may increase the chance of feeding and mortality of non-target song and game birds.
� Always follow label directions for rates and observe all precautions. Because there is evidence that bait shyness may occur with repeated use of zinc phosphide baits, a single, complete bait coverage of the site during a period of fair weather is best. Ideally, this should follow close mowing of sod areas.
� Acute toxicants such as zinc phosphide should not be used more than once every six months, preferably only once a year.
Deer
� Use a variety of non-chemical alternatives such as exclusion and habitat modification to reduce wildlife damage to nursery stock and ornamental shrubs.
� Some damage must be tolerated with the use of repellents, even if browsing pressure is low.
� Repellents should be applied before damage is likely to occur and a feeding pattern is established.
Managing Wildlife in Overwintering Greenhouses
� Make overwintering greenhouses rodent tight. Use fine mesh screen wire such as hardware cloth around the perimeter of the greenhouse. Bury it under ground and bend it
outward at a 90° angle, leaving it at least 6 inches deep. � Mow and clean up the natural vegetation close around the greenhouses to eliminate
protected areas for rodents. � Trapping is not effective for controlling large vole populations, but can be used to control
small populations. Place mouse snap traps containing bait perpendicular to the runways.

Wildlife Management
94
� Chemical repellents are available that can be used on plants. Some repel by giving off an offensive odor and others are taste repellents. Some of these products may not be persistent and some are easily washed off and need to be reapplied.
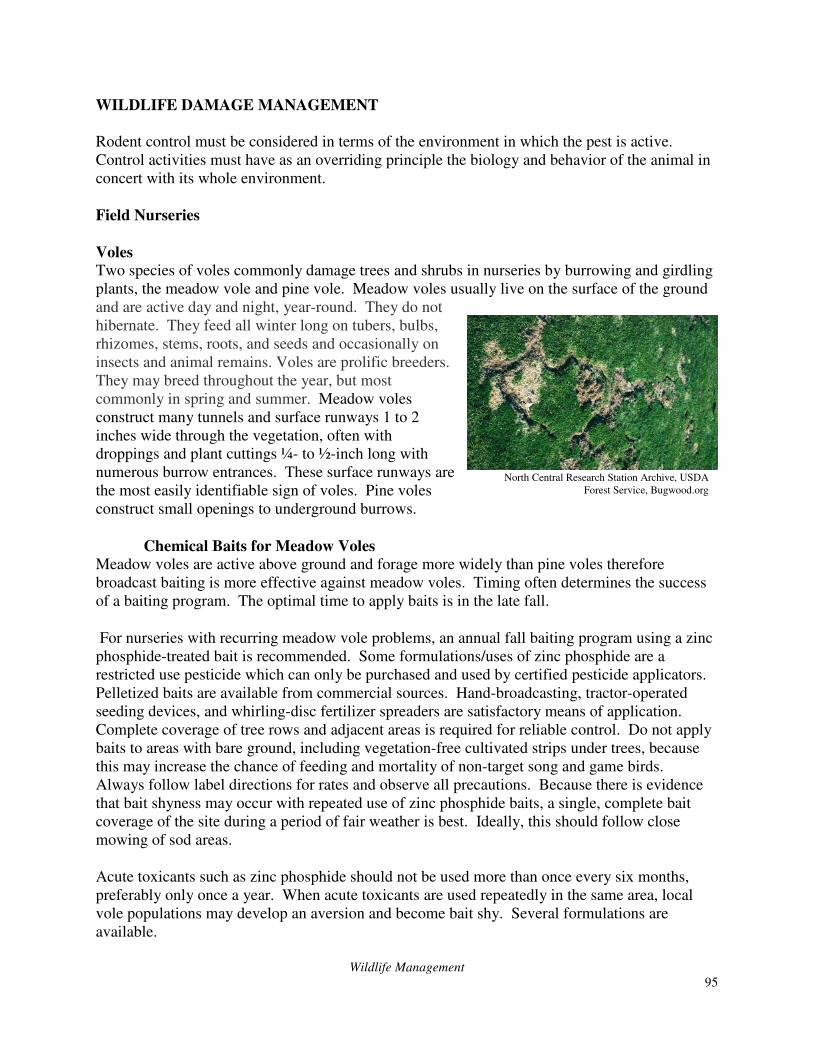
Wildlife Management
95
WILDLIFE DAMAGE MANAGEMENT
Rodent control must be considered in terms of the environment in which the pest is active. Control activities must have as an overriding principle the biology and behavior of the animal in concert with its whole environment.
Field Nurseries
Voles
Two species of voles commonly damage trees and shrubs in nurseries by burrowing and girdling plants, the meadow vole and pine vole. Meadow voles usually live on the surface of the ground and are active day and night, year-round. They do not hibernate. They feed all winter long on tubers, bulbs, rhizomes, stems, roots, and seeds and occasionally on insects and animal remains. Voles are prolific breeders. They may breed throughout the year, but most commonly in spring and summer. Meadow voles construct many tunnels and surface runways 1 to 2 inches wide through the vegetation, often with droppings and plant cuttings ¼- to ½-inch long with numerous burrow entrances. These surface runways are the most easily identifiable sign of voles. Pine voles construct small openings to underground burrows.
Chemical Baits for Meadow Voles Meadow voles are active above ground and forage more widely than pine voles therefore broadcast baiting is more effective against meadow voles. Timing often determines the success of a baiting program. The optimal time to apply baits is in the late fall.
For nurseries with recurring meadow vole problems, an annual fall baiting program using a zinc phosphide-treated bait is recommended. Some formulations/uses of zinc phosphide are a restricted use pesticide which can only be purchased and used by certified pesticide applicators. Pelletized baits are available from commercial sources. Hand-broadcasting, tractor-operated seeding devices, and whirling-disc fertilizer spreaders are satisfactory means of application. Complete coverage of tree rows and adjacent areas is required for reliable control. Do not apply baits to areas with bare ground, including vegetation-free cultivated strips under trees, because this may increase the chance of feeding and mortality of non-target song and game birds. Always follow label directions for rates and observe all precautions. Because there is evidence that bait shyness may occur with repeated use of zinc phosphide baits, a single, complete bait coverage of the site during a period of fair weather is best. Ideally, this should follow close mowing of sod areas.
Acute toxicants such as zinc phosphide should not be used more than once every six months, preferably only once a year. When acute toxicants are used repeatedly in the same area, local vole populations may develop an aversion and become bait shy. Several formulations are available.
North Central Research Station Archive, USDA Forest Service, Bugwood.org
Wildlife Management
96
Chemical Baits for Pine Voles Because of their underground habits, pine voles can be difficult to manage. In nurseries with pine vole problems, the placement of toxic baits beneath previously established baiting stations can provide control. It is important to establish one or two bait stations at trees with vole activity and have them in place long enough for the pine voles to establish a burrow system. Place baits by hand in tunnels or under wooden slabs, tarpaper, shingles, or PVC pipe, creating bait stations. Do not broadcast bait like the method used for meadow voles. Late fall is the best time for rodenticide treatments.
Frequent use of zinc phosphide can lead to bait shyness (voles that consume sublethal doses no longer eat the bait). Rebaiting only results in reduced control and reinforces aversion to the rodenticide. Avoid using zinc phosphide more than once every six months if possible, preferably only once per year. However, heavy pine vole infestations, as indicated by numerous burrows and fresh dirt at several adjacent trees, may require a second application of bait about two weeks after the first.
Placement and Timing of Chemical Baits
With all management efforts, it is also important to treat adjacent edges and weedy areas to avoid vole reinvasion from nearby blocks. The most important consideration in timing a control program is to achieve the greatest vole reduction just before onset of winter. Voles that remain alive in the nursery will survive under the protection of snow cover and will cause plant damage during winter months.
Monitoring
Monitoring nurseries for signs of vole activity enables growers to detect increases in vole populations and to evaluate the effectiveness of their baiting programs and the need for follow-up treatments. Voles usually have sudden population irruptions every few years, and growers should monitor their nurseries even in years of low vole densities. Negligence may lead to rapid population increases and plant damage. Young trees (ranging in age from 1 to 15 years) are most susceptible to vole damage.
Cultural Practices to Reduce Vole Populations
Cultural practices can reduce or even eliminate the need for rodenticides. Careful mowing, cultivation, and herbicide treatment will lower rodent numbers because voles require green, growing vegetation for survival and breeding. Efforts to reduce the density of ground cover will aid vole control. The meadow vole is especially vulnerable to close mowing of turf areas, and rotary mowers are much more effective than sickle-bar types for removing ground cover and thatch.
The use of an herbicide strip, or cultivation beneath the trees and along the tree rows are cultural practices that can effectively eliminate meadow voles. In addition, wire guards will protect younger trees from meadow voles as well as rabbits; ¼-inch wire mesh has proven most satisfactory.
Repellents for Deer and Rabbits
A variety of commercial repellents, that contain ingredients such as egg solids, ammonium
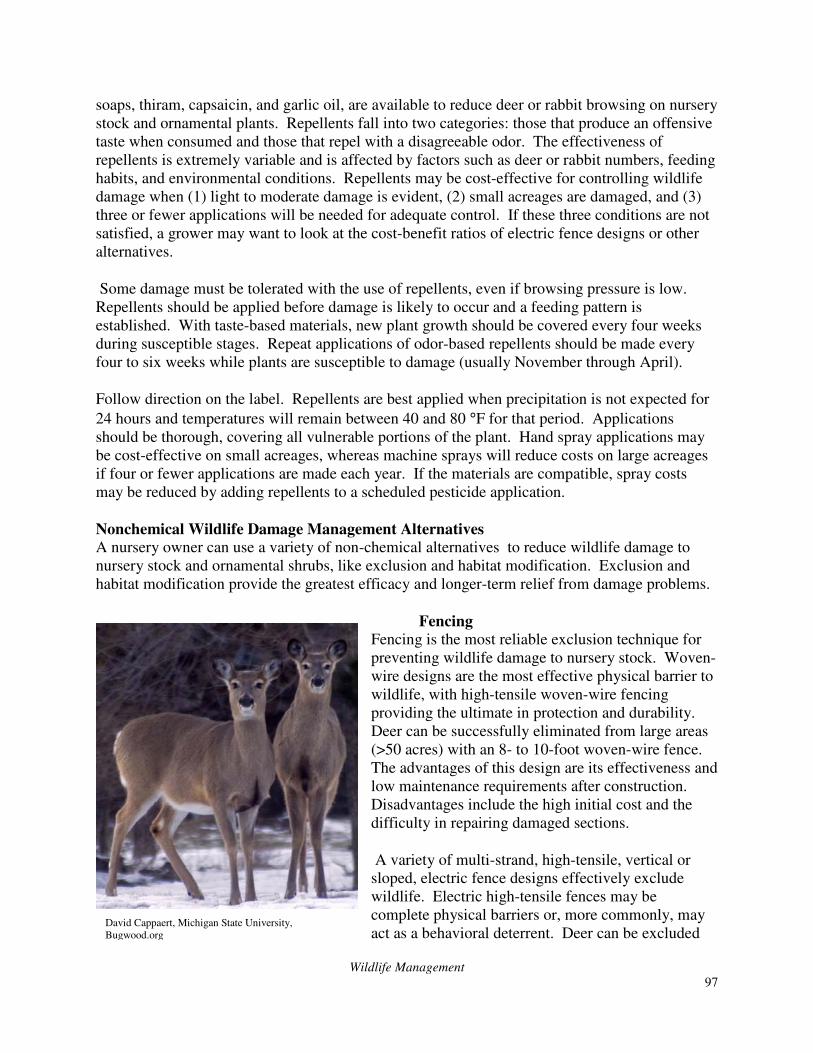
Wildlife Management
97
soaps, thiram, capsaicin, and garlic oil, are available to reduce deer or rabbit browsing on nursery stock and ornamental plants. Repellents fall into two categories: those that produce an offensive taste when consumed and those that repel with a disagreeable odor. The effectiveness of repellents is extremely variable and is affected by factors such as deer or rabbit numbers, feeding habits, and environmental conditions. Repellents may be cost-effective for controlling wildlife damage when (1) light to moderate damage is evident, (2) small acreages are damaged, and (3) three or fewer applications will be needed for adequate control. If these three conditions are not satisfied, a grower may want to look at the cost-benefit ratios of electric fence designs or other alternatives.
Some damage must be tolerated with the use of repellents, even if browsing pressure is low. Repellents should be applied before damage is likely to occur and a feeding pattern is established. With taste-based materials, new plant growth should be covered every four weeks during susceptible stages. Repeat applications of odor-based repellents should be made every four to six weeks while plants are susceptible to damage (usually November through April).
Follow direction on the label. Repellents are best applied when precipitation is not expected for
24 hours and temperatures will remain between 40 and 80 °F for that period. Applications should be thorough, covering all vulnerable portions of the plant. Hand spray applications may be cost-effective on small acreages, whereas machine sprays will reduce costs on large acreages if four or fewer applications are made each year. If the materials are compatible, spray costs may be reduced by adding repellents to a scheduled pesticide application.
Nonchemical Wildlife Damage Management Alternatives
A nursery owner can use a variety of non-chemical alternatives to reduce wildlife damage to nursery stock and ornamental shrubs, like exclusion and habitat modification. Exclusion and habitat modification provide the greatest efficacy and longer-term relief from damage problems.
Fencing
Fencing is the most reliable exclusion technique for preventing wildlife damage to nursery stock. Woven-wire designs are the most effective physical barrier to wildlife, with high-tensile woven-wire fencing providing the ultimate in protection and durability. Deer can be successfully eliminated from large areas (>50 acres) with an 8- to 10-foot woven-wire fence. The advantages of this design are its effectiveness and low maintenance requirements after construction. Disadvantages include the high initial cost and the difficulty in repairing damaged sections.
A variety of multi-strand, high-tensile, vertical or sloped, electric fence designs effectively exclude wildlife. Electric high-tensile fences may be complete physical barriers or, more commonly, may act as a behavioral deterrent. Deer can be excluded
David Cappaert, Michigan State University, Bugwood.org

Wildlife Management
98
from crops with a 5- to 6-foot electric fence, even though they can easily jump over woven-wire fences of this height. The most frequent reasons why electric fences fail to prevent wildlife damage include the selection of an unsuitable fence design, failure to install fencing according to manufacturers’ specifications, and inadequate maintenance. Electric fences will not exclude wildlife unless adequate voltage is constantly maintained on the wires. High-tensile electric fences are easily repaired and may cost half as much as 8- to 10-foot woven-wire designs. Disadvantages include frequent monitoring and the need for vegetation control to maintain shocking power.
Physical Barriers Other physical barriers that can prevent wildlife damage include wire cages, plastic tubing, bud caps, and bird netting. Large-scale use of these materials may be uneconomical because of the labor required to apply and remove these barriers. Wire or plastic tree guards can be used to protect trees from trunk girdling by rodents or rabbits. The more expensive wire guards provide longer-term damage prevention.
Habitat Modification
Habitat modifications can make areas less suitable for nuisance wildlife. Damage prevention with cultural manipulations should begin with site selection and plant establishment. In nurseries, plowing or disking reduces vole populations, facilitates the establishment of the desired cover crop between rows, and simplifies future vegetation control. Removal of brush, stone piles, and non-mowable wet areas will reduce the attractiveness of sites to rodents and rabbits. Mowing in established plantings can reduce preferred wildlife foods, remove protective cover, enhance predation, and expose animals to severe weather conditions. Sites adjacent to crop lands should also be mowed to reduce pest numbers.
Capturing and Moving Animals
To protect people and wildlife, do not relocate problem wildlife. Often people want to catch the problem animals and release them someplace else. Capturing a wild animal and releasing it in another area is prohibited by Massachusetts law. This law has been in effect for many years. Rabies in raccoons is spreading throughout the eastern United States. Moving animals from one area to another may spread this or other diseases to new areas.
Information on methods or techniques to control damage caused by wildlife is available from the Massachusetts Division of Fisheries and Wildlife (http://www.mass.gov/dfwele/dfw/wildlife/wildlife_home.htm) or by contacting the MassWildlife District office (http://www.mass.gov/dfwele/dfw/facilities/districts.htm) that serves your community.
Trapping
Trapping in Massachusetts is a highly regulated activity. Regulations and laws are restrictive and can be complex. Know the current laws and regulations before you trap. Environmental Police Officers enforce trapping laws.
Problem Animal Control (PAC) agents are private individuals licensed by the Division of Fisheries and Wildlife to assist the public in situations involving sick animals or animals causing
Wildlife Management
99
property damage. To become a PAC agent, one must possess a valid trapping license and register and tag all traps and submit an application to the Division of Fisheries and Wildlife. For more information contact the Massachusetts Division of Fisheries and Wildlife (http://www.mass.gov/masswildlife, [617] 626-1590).
Reducing animal numbers by lethal methods may fail to provide long-term relief from damage. Where habitat conditions are suitable and exclusion is not attempted, most pest species will repopulate the site soon after control efforts have ceased, as animals will move into the control area from adjacent lands. Habitat modification and exclusion methods often require more initial effort and expense, but these techniques may provide longer-term damage prevention, especially when a few pest individuals can inflict substantial losses.
Container Nurseries
Wildlife Damage Management in Overwintering
Small animals will invade overwintering structures, girdle stems, and burrow into pots if given the chance. The most likely critter to cause havoc is the meadow vole. Meadow voles construct many tunnels and surface runways with numerous burrow entrances. These surface runways are the most easily identifiable sign of voles. By the time the runways are noticed, damage is usually done.
The first step to prevent damage caused by rodents is to deny them access to overwintering greenhouses. Make them rodent tight by using fine mesh screen wire such as hardware cloth
around the perimeter of the greenhouse. Bury it under ground and bend it outward at a 90° angle leaving it at least 6 inches deep.
Next, mow and clean up the natural vegetation close around the greenhouses to eliminate protected areas for rodents. Most of our wildlife animals will not venture across a wide-open space because they are much more vulnerable to natural predators.
Trapping is not effective for controlling large vole populations, but can be used to control small populations. Place mouse snap traps containing bait perpendicular to the runways.
Chemical repellents are available that can be used on plants. Some repel by giving off an offensive odor and others are taste repellents. These products reportedly work for a number of animal pests. Some of these products may not be persistent and some are easily washed off and need to be reapplied.
Finally, when all else fails, there are toxic baits that are effective for reducing the population. One of the most effective and common baits is zinc phosphide treated cracked corn or oats. It is a single-dose toxicant available in pelleted and grain bait formulations and as a concentrate. Anti-coagulant baits are also effective in controlling voles. Anticoagulants are slow acting toxicants requiring from 5 to 15 days to take effect. Multiple feedings are needed for most anti-coagulants to be effective. Toxic baits can be harmful to children, pets and wildlife and should be used with utmost caution. Read and carefully follow the directions and safety precautions on the label of any of these products.
Plant Problem Diagnostic Service
100
PLANT PROBLEM DIAGNOSTIC SERVICE
The University of Massachusetts Amherst recognizes the importance of reliable and prompt diagnosis of plant problems for the turf, floriculture, vegetable, nursery, urban forestry and landscape industries. To this end, the UMass Extension Plant Diagnostic Laboratory serves farmers, horticulturists, landscape contractors, turf managers, arborists, nurseries, and others in agriculture and the green industries. The laboratory also assesses ticks for Lyme disease as a service to the public. The UMass Extension Plant Diagnostic Laboratory is located in Holdsworth Hall on the UMass Amherst campus. Each diagnosis performed by the laboratory includes a written report with pest management strategies that are research based, economically sound, and environmentally appropriate for the situation. Notes for Diagnostic Sample Submission
A completed Diagnostic Form is required for each specimen (or particular problem). Diagnostic forms for various types of samples, along with instructions, can be accessed by following the links below. Remember that accurate diagnosis requires both a representative sample and sufficient information about the cultural practices and environmental conditions associated with the problem. The information you record on the form can be more important to the diagnosis than the sample itself! Photos of the problem are also extremely helpful. No sample will be
diagnosed without a completed submission form. There is a fee per specimen (or particular problem) payable to the University of Massachusetts, and the appropriate fee must accompany each sample. For a list of fees and to obtain a submission form see http://www.umass.edu/agland/diagnostics. The UMass Extension Plant Diagnostic Laboratory will call and/or send a written report when a conclusion has been reached on the diagnosis or identification. Detailed management recommendations are included with disease, insect, and weed diagnoses. Tree & Shrub Diagnostics Guidelines for Sending Tree & Shrub Specimens
Please submit samples based on the following guidelines for tree and shrub diseases, tree and shrub insect identification, and landscape weed identification. For proper diagnosis, specimens must be received in good condition. Contact the UMass Extension Plant Diagnostic Laboratory first at (413) 545-3208 to see if sending a sample is necessary. Hand-deliver samples if possible, or send them by the fastest means available. Include accompanying information (such as photos) regarding the symptoms that are of particular concern to you.
1. Ship samples so that they will be delivered in 48 hours or less. Federal Express, UPS, and Two-day Priority Mail through the U.S. Postal Service deliver directly to the building. Be sure to pack the specimen in a sturdy envelope or box.
2. Fill out the Tree and Shrub Diagnostic Form as completely as possible. This form must
Plant Problem Diagnostic Service
101
accompany each specimen sent to the laboratory. The information supplied will allow a more thorough and accurate diagnosis. Include your phone number, e-mail, and a fax number, if available, so that we may contact you for further information or inform you of the diagnosis.
3. Disease Samples: Send several plants/leaves/branches etc. showing a range of symptoms that are representative of the problem. Select samples from the area at the margin between the diseased portion of the plant and the healthy tissue. Dead plant material usually is of little value because it often contains secondary organisms that may make detection of the primary pathogen difficult. Place leaves, branches, and other plant parts in a plastic bag and seal it. Do not add moist towels or moisten the sample before sealing it. When sending entire plants, dig, rather than pull, roots from the soil. Wrap roots and attached soil in a plastic bag and secure to the trunk with a twist tie. Place a second bag over the foliage and punch a few holes through this bag for ventilation. Do not add additional water or moist towels. Vascular wilt specimens: Plants or plant parts that suddenly wilt may be infected with a vascular disease. Branch or stem sections ¼ to 1 inch in diameter and 4 to 6 inches long should be taken from the wilting plant or recently wilted plant part. Avoid sending plant material that has been dead for any length of time.
4. Insect Samples: Immature and soft-bodied insects should be placed in 70% ethyl alcohol (rubbing alcohol is not ideal, but may work). Other insects must be carefully packaged. Do not place loose insects into envelopes for mailing, as the automatic process for handling mail will most likely destroy the specimens.
5. Weed Samples: Collect whole plant, including the roots, if possible. Wrap roots in a wet paper towel. Place plant in a zip-lock or freezer bag and seal with some air in the bag in order to prevent crushing. Place bag in a sturdy box or envelope for mailing.
Address packages to: UMass Extension Plant Diagnostic Laboratory
Holdsworth Natural Resources Center, 160 Holdsworth Way University of Massachusetts, Amherst, MA 01003-9285 Phone (413) 545-3208 Fax (413) 545-4385 Use exact address to ensure delivery. Call for fees for diagnosing samples.
Organic Waste Management
102
CHECKLIST
ORGANIC WASTE MANAGEMENT - COMPOSTING
� Follow all state and local regulations regarding composting. Contact Massachusetts Department of Agricultural Resources Composting Program for more information (http://www.mass.gov/agr/programs/compost/index.htm).
� Most organic waste materials generated by a nursery or landscaping service can be composted.
� Avoid composting grass clippings that has been treated with herbicides. � Compost piles should always be distant and downwind from sensitive neighbors and not
sited close to residential property. � Piles should be protected from surface water and storm water runoff. � Proportions of carbon to nitrogen are critical to successful composting. The materials
being composted will determine the exact recipe for any given operation. Materials with high carbon to nitrogen ratios, such as 100:1, should be balanced with materials having low carbon to nitrogen ratios, e.g. 15:1.
� Pile structure is important because the air needed for composting comes from passive air flow through the pile, not from turning.
� Regular turning of the pile will mix the nutrients and re-establish pile structure. � Moisture content can be adjusted during turning. � After the compost has gone through several heating and cooling cycles and the original
waste has decomposed, the compost process should slowly finish in a curing pile. � Activities that tend to release odors should be scheduled to minimize negative impacts. � Avoid dealing with odorous compost on weekends, holidays, and evenings. � Consider wind conditions before opening compost piles. � Stronger winds can disperse odors but also create dust concerns. Care should be taken to
control dust when grinding and turning piles. � Most odor problems can be avoided, controlled, or minimized by keeping the compost
pile aerobic, porous, well aerated, and well mixed. Odor problems are most likely when anaerobic decomposition is occurring.
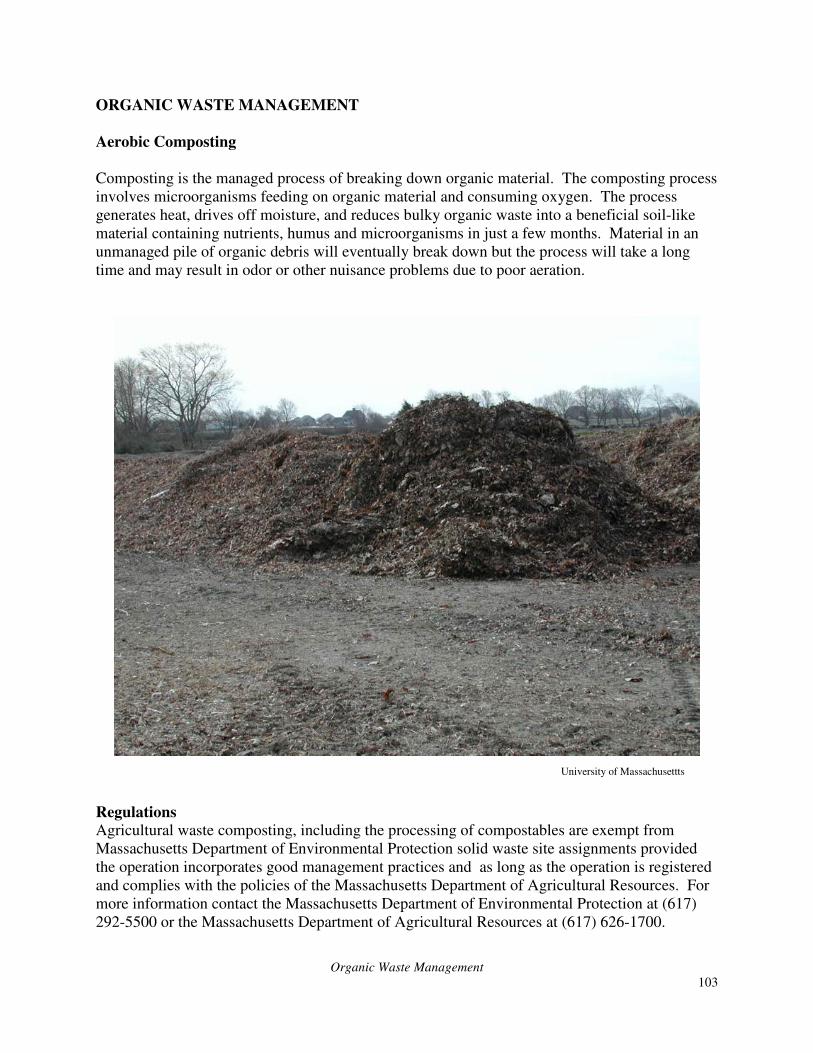
Organic Waste Management
103
ORGANIC WASTE MANAGEMENT
Aerobic Composting Composting is the managed process of breaking down organic material. The composting process involves microorganisms feeding on organic material and consuming oxygen. The process generates heat, drives off moisture, and reduces bulky organic waste into a beneficial soil-like material containing nutrients, humus and microorganisms in just a few months. Material in an unmanaged pile of organic debris will eventually break down but the process will take a long time and may result in odor or other nuisance problems due to poor aeration.
Regulations
Agricultural waste composting, including the processing of compostables are exempt from Massachusetts Department of Environmental Protection solid waste site assignments provided the operation incorporates good management practices and as long as the operation is registered and complies with the policies of the Massachusetts Department of Agricultural Resources. For more information contact the Massachusetts Department of Environmental Protection at (617) 292-5500 or the Massachusetts Department of Agricultural Resources at (617) 626-1700.
University of Massachusettts
Organic Waste Management
104
The Massachusetts Department of Agriculture Resources may register agricultural composting operations if the Department determines that: 1) the compost operation is located on agricultural unit; 2) the applicant has submitted a completed application; 3) the applicant agrees to a site visit; and 4) the applicant demonstrates knowledge and capability to conduct the agricultural composting operation to produce a stabilized compost product. Agricultural Waste Composting A composting operation for agricultural wastes, when located on a farm engaged in “agriculture” or “farming” as defined in M.G.L. c. 128, § 1A. Such composting operation may, in addition to agricultural wastes, utilize the following compostable materials, provided the operation is registered and complies with policies of the Department of Food and Agriculture: 1. leaf and yard waste; 2. wood wastes; 3. clean newspaper or cardboard; 4. clean, compostable (i.e. thin) shells, and clean bones; 5. non-agricultural sources of manures and animal bedding materials; 6. less than 20 cubic yards or less than 10 tons per day of vegetative material; and 7. less than 10 cubic yards or less than 5 tons per day of food material. Composting methods should be chosen based on site conditions, types of available raw materials and equipment available to create aerobic composting conditions. What to Compost Most organic waste materials generated by a nursery or landscaping service can be composted. Large material will need to be shredded before it is added to a carefully-constructed compost pile. Some material may begin to decompose in a storage pile but full composting will not occur until the material is mixed and managed in the correct proportions of carbon to nitrogen (C:N ratio), with adequate airflow and moisture. Composting is an excellent method of recycling grass clippings. However, do not compost grass clippings or any other plant residues that have been treated with herbicides. If carried out properly, it can reduce the potential weed seeds and diseases from being reintroduced into the fields. The finished compost is a stable organic material which is a useful soil conditioner or nutrient source. Due to the characteristics of fresh grass clippings (high-moisture, high-nitrogen content and small particle size), co-composting with a high-carbon bulking agent is essential.
Acceptable Materials For Composting Green and woody plants Clippings and trimmings Soil and planting media Untreated wood and uncoated paper scraps
Unacceptable Materials For Composting Chemically treated wood products Plastic, e.g. pots, bags, and sheet film
Organic Waste Management
105
Unprocessed sod and chunks of soil Large and bulky items, e.g. stumps, pallets, concrete, and asphalt
Site Selection for Compost Piles Available sites should be analyzed for conditions potentially detrimental to production and access. There needs to be enough space to store and process waste, operate and turn active windrows or piles, and store and cure finished compost. A facility that is short on space will eventually experience problems. Composting can have off-site impacts. Compost piles should always be distant and downwind from sensitive neighbors and not sited close to residential property. Composting can also create water quality problems. Piles should be protected from surface water and storm water runoff. Piles may need to be protected from rain. This is because a compost pile can get saturated, stop working and, become anaerobic. This will create odor problems. Saturated piles will need to be remixed and rebuilt. Runoff from an active compost pile or stored compost can also create water pollution problems. Standing water can cause odor problems. Compost piles should always be sited so that runoff is minimized. Any runoff should be collected and used rather than allowed to leave the property.
• State and Local regulations regarding composting facilities should be thoroughly investigated. Contact Massachusetts Department of Agricultural Resources Composting Program for more information (http://www.mass.gov/agr/programs/compost/index.htm).
• Compost piles should always be distant and downwind from sensitive neighbors and not sited close to residential property.
• Piles should be protected from surface water and storm water runoff. The Composting Process: Pre-compost Preparation Materials intended as components for compost may need to be ground before composting to increase the surface area allowing more rapid decomposition. Bulking agents or amendments may be needed to improve porosity in a mix. Finished composts may need grinding or screening to accommodate the end use.
Mixing Compost components must be thoroughly mixed to allow proper combination of carbonaceous and nitrogenous elements. Proportions of carbon to nitrogen are critical to successful composting. The materials being composted will determine the exact recipe for any given operation. Materials with high C:N ratios, such as 100:1, should be balanced with materials having low C:N ratios, e.g. 15:1. Pile Construction Pile construction is dependent on the types of materials being composted, the method of turning and the composting site. Generally, piles should be broad across the base with sloping sides and

Organic Waste Management
106
flat tops. Several smaller piles will work easier than one large pile. When piles are too large or lose their structure, they can become anaerobic in the center and cause odors when opened. Monitoring Compost must be carefully monitored to measure moisture and oxygen content and temperature during the active composting process and the curing process. Temperature and air flow must be managed for composting to work effectively. If these elements are not controlled, the composting process may slow down and offensive odors could be released when the pile is disturbed. Since the microorganisms that decompose organic waste generate heat, a new compost pile will heat up to about 130 °F and then start to cool as available nutrients, moisture or oxygen are depleted. Active composting occurs between 105 and 145 °F. The pile will also settle as decomposition takes place. Regular turning of the pile will mix the nutrients and re-establish pile structure. Moisture
Moisture content can be adjusted during turning. The material in windrows and static piles will stop composting when the moisture level is too low. If the moisture level is too high or the air flow is blocked, the pile may go anaerobic and generate offensive odors.
Turning In windrow systems, turning the windrows or piles insures aeration and moisture distribution and allows the entire mass time in the center of the pile where the thermophilic organisms are most active. Frequency of turning depends on the materials being composted, whether they are in a structure or exposed to the elements and climate. Generally, windrows should be turned as often as is practical once pile temperature exceeds 100 oF. Curing Compost cures at lower temperatures, below 105 °F, and allows the compost to stabilize. This step is vital to product consistency and usability. Finished compost should be tested for the following characteristics: moisture content, pH, organic matter, C:N ratio, soluble salts, total nitrogen, nitrate, ammonium, extractable heavy metals (lead, cadmium, nickel and chromium) and extractable major and minor nutrients (phosphorus, potassium, calcium, magnesium, zinc, boron, iron, manganese and copper). Uncured compost can be detrimental to plants. Runoff Controls Composting can produce leachate with high levels of nitrogen and other groundwater contaminants. Systems must be provided to account for this possibility.
Organic Waste Management
107
Types of Compost Piles
There are several types of compost piles. The Windrow consists of long rows 6 to 20 feet wide and 4 to 12 feet high. Rows are managed based on process time and temperature of the pile. Windrow turning equipment is available but not required. Total compost and curing time is five to ten months without turning. Turning will speed the process by three to five months. This type does not require a special facility; the pile can be constructed and managed with a front loader. Composting time is fast, most composting conditions can be controlled, and more than one pile is possible. Static Pile consists of a single pile with passive aeration and may be left unturned during the whole the composting process. Piles can cause odors when they become anaerobic in the center. There is a long composting time and uneven composting can occur within pile. Composting conditions can not be controlled. The Aerated Pile Windrow consists of air that is blown or sucked through in windrow or static piles. Blowers are controlled by time or the temperature of the piles. Total compost and curing time is shorter than other methods at one to two months; however, it requires air blowers, piping, power utilities, and may require a concrete base slab. Piles are difficult to construct and removal requires careful operation. Composting can be uneven.
In-Vessel consists of material that is composted inside a structure like a concrete bunker, or inside a vessel tank or drum. The container provides greater control of composting conditions. Odor Control Odor is the most common complaint from the public. Most odor problems can be avoided, controlled, or minimized by keeping the compost pile aerobic, porous, and well mixed. Attention to pile structure and frequent turning will deter most odor problems. Since all composting activities will generate some odor, good management should include placing the compost pile downwind from neighbors as far as possible. Activities that tend to release odors should be scheduled to minimize negative impacts. Avoid dealing with odorous compost on weekends, holidays, and evenings. Odor will carry in moist, still air or on a gentle breeze, so consider wind conditions before opening compost piles. Stronger winds can disperse odors but also create dust concerns. Care should be taken to control dust when grinding and turning piles. If necessary, persistent odors can be filtered, treated, or masked with perfumes.
Inorganic Waste Management
108
CHECKLIST
INORGANIC WASTE
Pesticide Disposal
� If you are not able to use a pesticide according the label because it is too old and/or no longer legal to use the pesticide, it is considered hazardous waste.
� Contact the Massachusetts Department of Agricultural Resources to find out if there are collection events planned (http://www.mass.gov/agr/pesticides/waste/index.htm).
� Contact your town administration to find out if there are pesticide disposal collection programs happening at the local or regional level.
� Contact a Licensed Hazardous Waste Hauler.
Agricultural Plastics
� In Massachusetts, the Department of Environmental Protection open burning regulations does not allow for the burning agricultural plastics.
� Check with your local municipal recycling center. � Contact a plastic recycler company. � Hire a commercial waste hauler.
Inorganic Waste Management
109
INORGANIC WASTE MANAGEMENT
Pesticide Disposal
Many pesticide labels will have instructions for proper disposal. If you are not able to use the pesticide according the label because it is too old and/or no longer legal to use, the pesticide is considered hazardous waste. The Massachusetts Department of Agricultural Resources has held many subsidized collection events in the past. Also, individual communities throughout Massachusetts have annual household hazardous waste collection events. If you are not able to participate in these types of events, then you will have to contact a licensed hazardous waste hauler company. Contact the Massachusetts Department of Agricultural Resources (http://www.mass.gov/agr/pesticides/waste/index.htm) and your town administration to find out if there are pesticide disposal collection programs happening at the local or regional level OR Contact a Licensed Hazardous Waste Hauler. The Massachusetts Statewide Contract for Hazardous Materials Collection lists the following vendors:
• Clean Harbors
• Enviro-Safe Corporation
• Medical Waste Disposal Company
• Triumvirate Environmental Services
• Stericycle, Inc.
• Veolia Environmental Services Technical Solutions, LLC (formerly Onyx Environmental)
Agricultural Plastics
The term “agricultural plastics” (or “ag plastics”) covers a wide variety of products and plastic types. These include:
• Low density polyethylene (LDPE) and low linear density polyethylene (LLDPE) film used to make silage and haylage bags, bunker silo covers, greenhouse covers, bale wrap, mulch film, and other flexible products.
• High density polyethylene (HDPE), a more rigid plastic used in pesticide containers and nursery pots.
• Polystyrene (PS), another rigid plastic used in nursery containers and flats.
• Polypropylene (PP), used in nursery pots, row covers and woven tarps. Recycling
Recycled plastics are typically chopped and washed to remove contaminants. They are then dried, melted, and formed into pellets that serve as the raw material to make garbage bags, pilings, fencing, road signs, roofing materials, and many other products. For a successful plastic recycling program, nurseries must have an on-site system for:
Inorganic Waste Management
110
• Collecting and storing plastics. • Separating the plastics into different types. • Ensuring the recycled plastics are dry and clean. Contact a plastic recycler company for more information. For a list of companies in the Northeast see the fact sheet “Recycling Your Used Agricultural Plastics” at http://www.umassgreeninfo.org/fact_sheets/plant_culture/recycle_ag_plastic.pdf Disposal
In Massachusetts, the Department of Environmental Protection open burning regulations does not allow for the burning agricultural plastics. Burning plastic can release toxic and potentially cancer-causing chemicals into the air, where they can be inhaled by humans and animals and deposited in soil and surface water. If you have plastic waste for disposal, first check with your local municipal recycling center or a plastic recycler company. The second option for proper disposal is to hire a commercial waste hauler.
Energy Conservation for Greenhouses and Field Nurseries
111
CHECKLIST
ENERGY CONSERVATION FOR GREENHOUSES AND FIELD NURSERIES Increasing energy costs make conservation and efficient use of facilities an important part of today's greenhouse operation. New greenhouse designs, better glazing, improved heating and ventilating equipment and new management systems should be included when upgrading or adding on. With typical annual energy usage being 75% for heating, 15% for electricity, and 10% for vehicles, efforts and resources should be put where the greatest savings can be realized.
Reduce Air Leaks � Keep doors closed - use door closer or springs. � Weatherstrip doors, vents, and fan openings. For example, a 48-inch fan louver that fails
to close properly leaving 1-inch gaps, allows 23,000 Btu/hr of heat to escape, costing $0.35 if you are burning $1.50 fuel oil.
� Lubricate louvers frequently so that they close tightly. A partially open louver may allow several air changes per hour. Additional fuel is needed to heat this air. Shut off some fans during the winter and cover openings with insulation or plastic to reduce infiltration of air.
� Repair broken glass or holes in the plastic covering. Double Covering
� Line sidewalls and endwalls of greenhouse inside with poly or bubble wrap to achieve the thermopane effect. Install double wall polycarbonate structured sheets to get insulation effect and reduce recovering labor.
� Use poly with an infrared inhibitor on the inner layer for 15% savings. Payback is two to three months.
� Add a single or double layer of plastic over older glasshouses to reduce infiltration and heat loss by 50%.
Energy Conserving Blanket � Install a thermal blanket for 20 to 50% savings. Cost is $1.00 to $2.50 per square foot.
Payback is one to two years. Tight closures should be maintained where curtains meet sidewalls, framing or gutters. Use a U-shaped trap to prevent heat from escaping overhead. Heat and water lines should be insulated or located below the blanket.
Foundation and Sidewall Insulation � Insulate the foundation. Place 1- to 2-inch polyurethane or polystyrene board to 18
inches below ground to reduce heat loss. This can increase the soil temperature near the
sidewall as much as 10 °F during the winter. � Insulate the kneewall or sidewall to bench height. Use 1- to 2-inch insulation board.
Applying 2 inches of foam insulation to a 3-foot-high kneewall on a 28-foot by 100-foot greenhouse will save about 400 gallons of fuel oil per year.
� Insulate behind sidewall heat pipes. Use aluminum faced building paper or insulation board behind to radiant heat back into the growing area. Leave air space next to wall to prevent frost damage to the wall.
Site Location � Locate new greenhouses in sheltered areas to reduce wind-induced heat loss, if this does
not reduce light. � Install windbreaks on the north and northwest sides of the greenhouse. The windbreak
Energy Conservation for Greenhouses and Field Nurseries
112
can be a double row of conifer trees or plastic snow fence. Space Utilization
� Increase space utilization to 80 to 90% with peninsular or movable benches. � Install multi-level racks for crops that don't require high light levels. � Grow a crop of hanging baskets on overhead rails or truss-mounted conveyor system. � A roll-out bench system can double growing space. Plants are moved outside during the
day. Efficient Heating System
� Installation of floor or under-bench heat will allow air temperature to be set 5 to 10 ºF lower.
� Yearly maintenance - Check boiler, burner and backup systems to make sure they are operating at peak efficiency. Have furnaces cleaned and adjusted and an efficiency test run before heating season. A 2% increase in efficiency for a 30-foot by 150-foot greenhouse will save about 200 gallons of fuel oil.
� Clean heating pipes and other radiation surfaces frequently. � Check accuracy of thermostats - correcting a reading that is 2 ºF high will save $100 to
$200. � Install electronic thermostats or controllers with a 1 °F accuracy. Potential yearly savings
of 500 gallons of fuel oil in a 30 foot by 100 foot greenhouse when changing from a mechanical to electronic thermostat or controller.
� Aspirate thermostats or sensors for more uniform temperature control. Differential between on and off can be reduced as much as 6 ºF.
� Install horizontal air flow (HAF) fans to get more uniform temperature in the growing area.
� Insulate distribution pipes in areas where heat is not required. � Check and repair leaks in valves, steam traps, and pipes.
Efficient Cooling System � Build a new greenhouse with open-roof design to eliminate the need for fans. � Install roll-up or guillotine sides to reduce the need for fan ventilation. � Use shading to reduce the need for mechanical cooling. � Install evaporative cooling to get better temperature control during the summer. � Select fans that meet AMCA standards and have a Ventilation Efficiency Ratio greater
than 15. � Use the largest diameter fan with the smallest motor that meets ventilation requirements. � Keep doors closed when fans are operating. Locate intake louvers to give uniform
cooling. Conserve Electricity
� Have wiring system inspected for overloading, corroded parts, and faulty insulation. � Replace 3 hp or larger motors with high efficiency ones to reduce electric consumption
by 2 to 5%. � Check for proper belt tension and alignment. � Replace incandescent bulbs with low wattage fluorescent or HID bulbs. Save two-thirds
on electricity. � Install motion detectors to control security lights so they are not on all the time.
Trucks and Tractors � Regularly scheduled tune-ups can save 10% on fuel usage. Keep tires properly inflated.

Energy Conservation for Greenhouses and Field Nurseries
113
� Avoid lengthy idling. Idling can consume 15 to 20% of the fuel used. � Run equipment in the proper gear for the load.
Water Systems � Locate hot water tanks as close as possible to the largest and most frequent use. Insulate
pipes. � Heat water to the lowest temperature needed; usually 120 ºF is adequate. � Use pipe size large enough to supply necessary water at minimum friction loss. � Eliminate water leaks. A dripping faucet at 60 drops per minute will waste 113 gallons
per month. Management
� Lower night temperature. Fuel consumption is reduced 3% for each 1 ºF night temperature is lowered.
� Delay starting the greenhouse by a week or more. Build a germination/growth chamber to start seedlings.
� Keep growing areas full at all times.
Additional information can be found in Energy Conservation for Commercial Greenhouses
- NRAES-3, 100 pages, $20.00 available from the Department of Natural Resources Mgt. & Engr., 1376 Storrs Rd., University of Connecticut, Storrs, CT 06269-4087. Make check payable to UConn. Price includes postage and handling. Energy Conservation in the Field
� Practice good nutrient management. � Consider used oil as equipment fuel. � Keep equipment maintained. � Provide operator training. � Keep irrigation engines serviced and well-tuned. � Consider the cost of different fuels in terms of energy value.

Energy Conservation for Greenhouses and Field Nurseries
114
Energy Conservation in the Field
Consider Used Oil as Equipment Fuel
Waste engine oil and hydraulic oil also can be filtered (5 micron filter or smaller) and burned in a diesel solution in tractors and in other equipment. A good starting point is 90% diesel and 10% oil, although up to 100% oil use is possible with good filtration and preheating. Be sure to check with the engine manufacturer before burning waste oil in engines under warranty. With vegetable oil prices low (20 cents or less per pound) and diesel prices high, soybean or cotton seed oil blends with diesel fuel may be economical.
Practice Efficiency
Good equipment maintenance and operator training go hand in hand toward saving energy. A faster, more efficient job saves fuel. Clean or replace air filters, and use appropriate equipment ballast to keep wheels from slipping and using more fuel. Keep tires properly inflated.
Save Energy on Irrigation
Keep irrigation engines serviced and well-tuned. Make sure electric motors, switches, and control panels are clean and free of dirt, insects, or bird nests. Check connections to ensure they are tight, and lubricate moving parts that require it. Use an irrigation scheduling method to time irrigations for more efficient fuel and water use. Start irrigation before soils are completely dry. Other Energy Management Tips
Compare Fuel Efficiency
Consider the cost of different fuels in terms of energy value. To determine the cost and value of a fuel, first consider the number of British Thermal Units (Btu) produced by the fuel (Table 5). To determine the Btu value per dollar, divide the fuel's Btu per unit by the unit price.
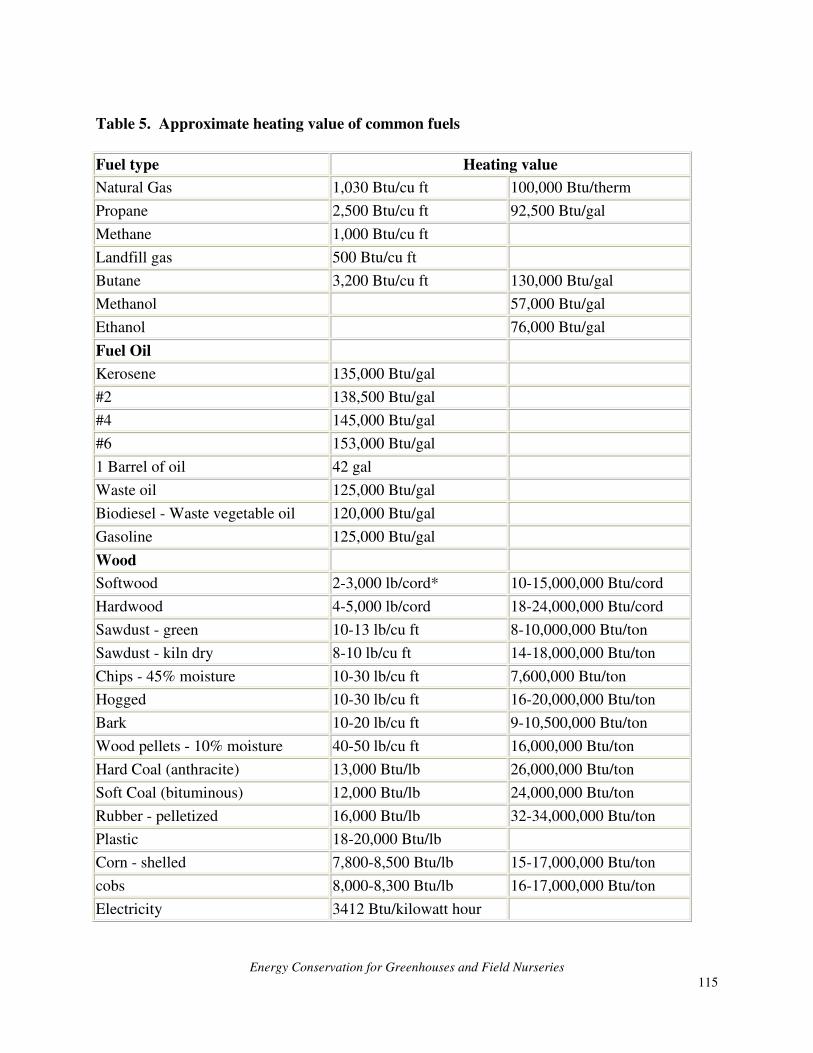
Energy Conservation for Greenhouses and Field Nurseries
115
Table 5. Approximate heating value of common fuels
Fuel type Heating value
Natural Gas 1,030 Btu/cu ft 100,000 Btu/therm
Propane 2,500 Btu/cu ft 92,500 Btu/gal
Methane 1,000 Btu/cu ft
Landfill gas 500 Btu/cu ft
Butane 3,200 Btu/cu ft 130,000 Btu/gal
Methanol 57,000 Btu/gal
Ethanol 76,000 Btu/gal
Fuel Oil
Kerosene 135,000 Btu/gal
#2 138,500 Btu/gal
#4 145,000 Btu/gal
#6 153,000 Btu/gal
1 Barrel of oil 42 gal
Waste oil 125,000 Btu/gal
Biodiesel - Waste vegetable oil 120,000 Btu/gal
Gasoline 125,000 Btu/gal
Wood
Softwood 2-3,000 lb/cord* 10-15,000,000 Btu/cord
Hardwood 4-5,000 lb/cord 18-24,000,000 Btu/cord
Sawdust - green 10-13 lb/cu ft 8-10,000,000 Btu/ton
Sawdust - kiln dry 8-10 lb/cu ft 14-18,000,000 Btu/ton
Chips - 45% moisture 10-30 lb/cu ft 7,600,000 Btu/ton
Hogged 10-30 lb/cu ft 16-20,000,000 Btu/ton
Bark 10-20 lb/cu ft 9-10,500,000 Btu/ton
Wood pellets - 10% moisture 40-50 lb/cu ft 16,000,000 Btu/ton
Hard Coal (anthracite) 13,000 Btu/lb 26,000,000 Btu/ton
Soft Coal (bituminous) 12,000 Btu/lb 24,000,000 Btu/ton
Rubber - pelletized 16,000 Btu/lb 32-34,000,000 Btu/ton
Plastic 18-20,000 Btu/lb
Corn - shelled 7,800-8,500 Btu/lb 15-17,000,000 Btu/ton
cobs 8,000-8,300 Btu/lb 16-17,000,000 Btu/ton
Electricity 3412 Btu/kilowatt hour

References
116
References Agrios, George N. 1997. Plant Pathology, 4th edition. Academic Press. San Diego, CA.
Aldrich R.A. and J. Bartok, Jr. 1994. Greenhouse Engineering. NRAES-33. Bailey D., T. Bilderback, and D. Bir. 1999. Water Considerations for Container Production of
Plants. Department of Horticultural Science, North Carolina State University. Hort. Information Leaflet No. 557:1-11. http://www.ces.ncsu.edu/depts/hort/hil/hil-557.html
Bartok, J.W., Jr. 2005. Fuels and Alternative Heat Sources for Commercial Greenhouses. http://www.umass.edu/umext/floriculture/fact_sheets/greenhouse_management/jb_fuels.htm
Beeson, R.C., Jr., M.A. Arnold, T.E. Bilderback, B. Boluski, S. Chandler, H.M. Gramling, J.D. Lea-Cox, J.R. Harris, P.J. Klinger, H.M. Mathers, J.M. Ruter, and T.H. Yeager. 2004. A Strategic Vision of Container-Nursery Irrigation Over the Next 10 Years. Journal of
Environmental Horticulture 22(2). http://www.nursery.umd.edu/extension/Strategic_Vision.pdf
Bilderback, T.E. Site Conservation and Nutrient Management for Field Production of Nursery
Stock. Department of Horticultural Science, North Carolina State University. http://www.ces.ncsu.edu/depts/hort/nursery/pdf/cultural_practices/field-bmps/conserv-manage-field.pdf
Bilderback, T.E. 2001. Using The Pour Thru Procedure For Checking EC and pH For Nursery
Crops. North Carolina Cooperative Extension Service. Revised 6/01 -- Author Reviewed 6/01 Hort Information Leaflet No. 401. http://www.ces.ncsu.edu/depts/hort/hil/hil-401.html Bilderback, T.E. and M.A. Powell. Using Compost in Landscape Beds and Nursery Substrates. North Carolina Cooperative Extension Service. Publication Number: AG 473-14. http://www.bae.ncsu.edu/programs/extension/publicat/wqwm/ag473_14.html
Bilderback, T.E. and R. Bir. Building Nursery Soils. North Carolina Cooperative Extension Service. http://www.ces.ncsu.edu/depts/hort/nursery/pdf/cultural_practices/field-bmps/building_nursery_soils.pdf
Bonner J., J. Thomas, H. Wilcutt, M. Broome, and L. Oldham. Reduce Energy Costs in
Agriculture. Department of Agricultural and Biological Engineering, Department of Plant and Soil Sciences, Mississippi State University Extension Service. Information Sheet 1621. http://msucares.com/pubs/infosheets/is1621.html Cox D.A. How to Use pH and EC "Pens" to Monitor Greenhouse Crop Nutrition. University of Massachusetts Extension. http://www.umass.edu/umext/floriculture/fact_sheets/greenhouse_management/phecpens.html
References
117
Cox D.A. Current Methods of Greenhouse Media Testing and How They Differ. University of Massachusetts Extension. http://www.umass.edu/umext/floriculture/fact_sheets/greenhouse_management/ghmedia_tests.htm Dunwell, W.C. and R. McNiel. Overwintering Nursery Crops. University of Kentucky Department of Horticulture. http://www.ca.uky.edu/HLA/Dunwell/ovrwtr9.html
Curtis, P.D. 2008. Vertebrate Pest Management. 2008 Pest Management Guide for
Commercial Production and Maintenance of Trees and Shrubs. Cornell University Cooperative Extension. http://ipmguidelines.org/treesandshrubs/default.asp Fishel, F. 2002. Pesticide Storage. Integrated Pest Management MU Guide. MU Extension, University of Missouri-Columbia. Havis, J.R. 1964. Root Hardiness of Woody Ornamentals. HortScience 11(4):385-386. Howell, J. and A. Carter. Trickle Irrigation. Department of Plant and Soil Sciences, University of Massachusetts Extension. http://www.umassgreeninfo.org/fact_sheets/plant_culture/trickle_irrigation.pdf Kujawski, R. and H.D. Ryan. 2000. Fertilizing Trees and Shrubs. http://www.umassgreeninfo.org/fact_sheets/plant_culture/fert_trees_shrubs.htm
LeBude, A.V1., T.E. Bilderback1, J. Neal1, C. Adkins2, C. Safely3, and T. Feitshans3. 2006. A
Manual for Field Production of Nursery Stock. North Carolina State University, College of Agriculture and Life Sciences. 1Department of Horticulture Science, 2NC Cooperative Extension, Area Agent, 3Department of Agriculture and Resource Economics. 12.14.06 http://www.ces.ncsu.edu/depts/hort/nursery/pdf/cultural_practices/field-bmps/field-bmp-man-rev-aug06.pdf Lloyd, J. 1997. Plant Health Care for Woody Ornamentals. International Society of Arboriculture and University of Illinois Cooperative Extension Service. Urbana-Champaign, IL.
Miller, C. Best Management Practices for Field Nursery Production. Natural Resources Conservation Service, Plant Materials Specialist. Unpublished.
Ministry of Agriculture, Food & Rural Affairs, Guelph Ontario. Horticultural Crops, Nursery
Crops. http://www.omafra.gov.on.ca/english/environment/hort/nursery.htm Moorman, G. W. 1992. Scouting and Controlling Woody Ornamental Diseases in Landscapes
and Nurseries. Penn State University Cooperative Extension. University Park, PA.

References
118
Natural Resources Conservation Service. 2008. Alley Cropping. Natural Resources Conservation Service Conservation Practice Standard, Connecticut.
North Carolina State University. Best Management Practices for Field Production of Nursery
Stock. http://www.bae.ncsu.edu/programs/extension/ag-env/nursery/
North Carolina State University Nursery Crop Science Website. http://www.ces.ncsu.edu/depts/hort/nursery/
Sinclair, W. A., H. H. Lyon, and W. T. Johnson. 2005. Diseases of Trees and Shrubs, 2nd edition. Cornell University Press. Ithaca, NY. State of Oregon Department of Environmental Quality. 2003. Best Practices: Nursery
Composting and Management of Organic Waste at Nursery, Landscaping and Lawn Care
Facilities. http://www.oregondeq.org/lq/pubs/docs/sw/compost/BestPracticesNurseryComposting.pdf Waskom R. and M. Yergert. 1994. Best Management Practices for Pesticide and Fertilizer
Storage and Handling. Colorado State University Cooperative Extension. 1994 Bulletin #XCM-178. http://www.ext.colostate.edu/pubs/crops/XCM178.pdf
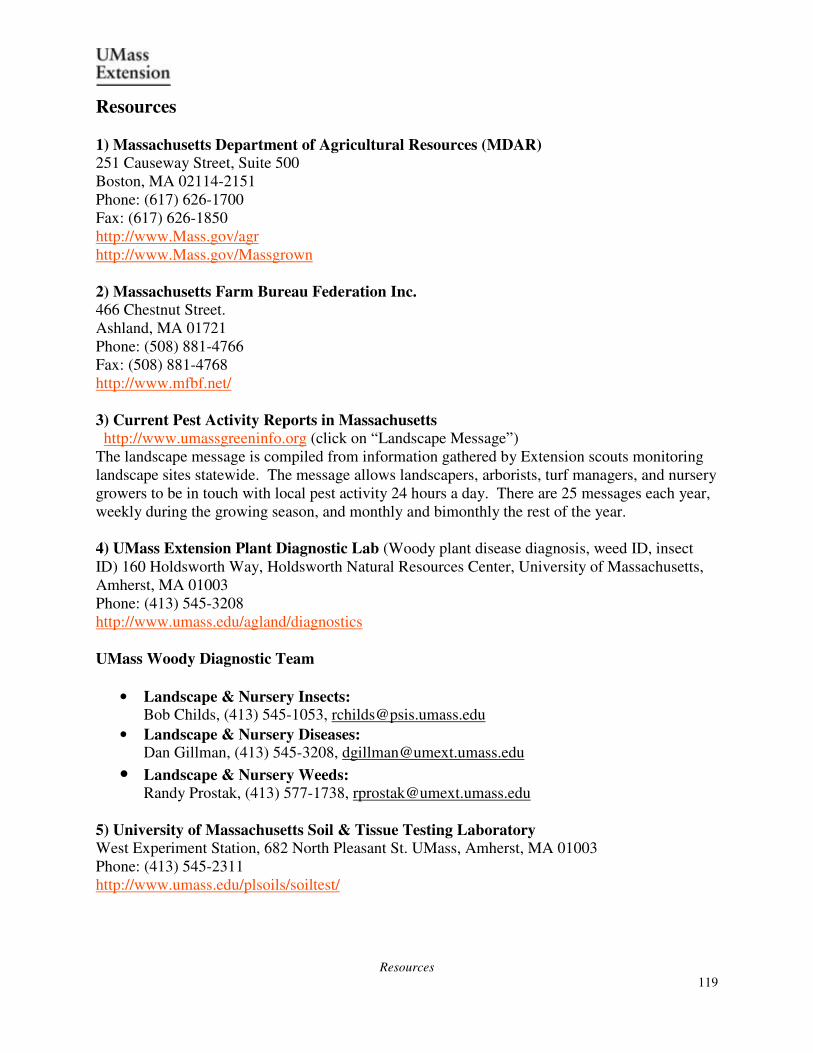
Resources
119
Resources
1) Massachusetts Department of Agricultural Resources (MDAR) 251 Causeway Street, Suite 500 Boston, MA 02114-2151 Phone: (617) 626-1700 Fax: (617) 626-1850 http://www.Mass.gov/agr http://www.Mass.gov/Massgrown 2) Massachusetts Farm Bureau Federation Inc. 466 Chestnut Street. Ashland, MA 01721 Phone: (508) 881-4766 Fax: (508) 881-4768 http://www.mfbf.net/ 3) Current Pest Activity Reports in Massachusetts http://www.umassgreeninfo.org (click on “Landscape Message”) The landscape message is compiled from information gathered by Extension scouts monitoring landscape sites statewide. The message allows landscapers, arborists, turf managers, and nursery growers to be in touch with local pest activity 24 hours a day. There are 25 messages each year, weekly during the growing season, and monthly and bimonthly the rest of the year. 4) UMass Extension Plant Diagnostic Lab (Woody plant disease diagnosis, weed ID, insect ID) 160 Holdsworth Way, Holdsworth Natural Resources Center, University of Massachusetts, Amherst, MA 01003 Phone: (413) 545-3208 http://www.umass.edu/agland/diagnostics
UMass Woody Diagnostic Team
• Landscape & Nursery Insects: Bob Childs, (413) 545-1053, [email protected]
• Landscape & Nursery Diseases: Dan Gillman, (413) 545-3208, [email protected]
• Landscape & Nursery Weeds: Randy Prostak, (413) 577-1738, [email protected]
5) University of Massachusetts Soil & Tissue Testing Laboratory
West Experiment Station, 682 North Pleasant St. UMass, Amherst, MA 01003 Phone: (413) 545-2311 http://www.umass.edu/plsoils/soiltest/

Resources
120
6) Pesticide Recommendations for Insects, Diseases and Weeds in New England Professional Management Guide for Insects, Diseases and Weeds of Trees and Shrubs. (130 pages, 3-ring binding). A UMass Extension Publication. Available through: UMass Extension Bookstore, 101 University Drive, Suite A4, Amherst, MA 01002. Phone: (413) 545-2717 OR on-line at: http://www.umassextensionbookstore.com
7) Registration Status for Commercial Pesticide Products in Massachusetts
http://www.kellysolutions.com/MA/pesticideindex.htm
8) Pesticide Labels
Crop Data Management Systems, Inc. http://www.cdms.net This site lists nearly 100 pesticide companies that produce products for the turf and ornamentals (T&O) market (as well as ag products). The user of this site can obtain specimen labels of specific products along with the Material Safety Data Sheets (MSDS) that accompany the labels. Greenbook http://www.greenbook.net This site lists a number of products and can be easily searched by company, active ingredient, and product trade name. Along with being able to obtain specimen labels and the MSDS, the user can usually also access a “product summary sheet,” Department of Transportation (DOT) information, mode of action sheet, state registration information, supplemental label information, and other valuable information about each product. 9) USDA-Natural Resource Conservation Service (NRCS) 451 West Street, Amherst, MA 01002
Phone: (413) 253-4350 http://www.ma.nrcs.usda.gov http://www.nrcs.usda.gov/technical/ENG/ (Conservation Engineering) http://www.ma.nrcs.usda.gov/technical/soils/index.html (Massachusetts Soil Surveys) The Natural Resources Conservation Service is the federal agency that shows farmers and landowners how to improve and protect their natural resources. NRCS is not a regulatory agency. Its mission is to introduce people to conservation practices and federal conservation programs that can improve water quality and maintain healthy and productive lands. Landowners and NRCS specialists work together on a voluntary basis. 10) Massachusetts Department of Environmental Protection (Mass DEP)
One Winter Street, Boston, MA 02108 Phone: (617) 292-5500 Fax: (617)556-1049 http://www.mass.gov/dep/water/waterres.htm Wetland information http://www.mass.gov/dep/recycle/index.htm Composting information

Resources
121
11) Massachusetts Department of Environmental Protection
Water Management Program
One Winter Street, Boston, MA 02108 Phone: (617) 292-5706 http://www.mass.gov/dep/water/approvals/wmgforms.htm 12) Massachusetts Division of Fisheries and Wildlife
251 Causeway St., Suite 400, Boston, MA 02114 Phone: (617) 626-1590 http://www.mass.gov/masswildlife 13) Worker Protections Standards
http://www.epa.gov/oecaagct/htc.html 14) North Carolina State Nursery Crops Fact Sheets (Pour Thru, Production information)
http://www.ces.ncsu.edu/depts/hort/nursery/
15) Energy Resources
Energy Conservation for Commercial Greenhouses - NRAES-3, 100 pages, $20.00 available from the Department of Natural Resources Mgt. & Engr., 1376 Storrs Rd. , UConn, Storrs CT 06269-4087. Make check payable to UConn. Price includes postage and handling.
Renewable Energy Resources for Massachusetts Farms and Greenhouses University of Massachusetts Extension http://www.umass.edu/agland/green_energy/index.html Massachusetts Department of Agriculture Energy Program http://www.mass.gov/agr/programs/energy/index.htm The MDAR Energy Program’s primary function is to promote energy knowledge and awareness and to facilitate the implementation of energy related projects for our agri-businesses through energy efficiency, energy conservation, and renewable energy applications, as a means to reduce both energy costs and environmental pollution. Biomass Energy Crops: Potential for Massachusetts http://www.mass.gov/doer/programs/renew/bio-ma-potential-crop.pdf
16) Recycling Your Used Agricultural Plastics Fact Sheet List of companies in the Northeast http://www.umassgreeninfo.org/fact_sheets/plant_culture/recycle_ag_plastic.pdf 17) Membership Grower Associations
Massachusetts Nursery and Landscape Association (MNLA) http://www.mnla.com/ Massachusetts Flower Growers Association http://www.massflowergrowers.com/

Resources
122
New England Nursery Association Inc. http://www.nensyassn.org/ American Nursery and Landscape Association (ANLA) http://www.anla.org/ 18) American Standard for Nursery Stock ANSI Z60.1-2004.
http://www.anla.org/applications/Documents/Docs/ANLAStandard2004.pdf
19) Best Management Practices Guide for Producing Container-Grown Plants. Yeager, Thomas, Charles Gilliam, Ted Bilderback, Donna Fare, Kenneth Tilt, and Alex Niemiera. 1997. Available from the Southern Nursery Association, 1000 Johnson Ferry Road, Suite E-130, Marietta, GA 30068-2100. Phone: (770) 973-9026; Fax: (770) 973-9097
20) Greenhouse Engineering. J.A. Aldrich and J. Bartok Jr. NRAES-33. 1994. Available
from the Northeast Regional Agricultural Engineering Service
http://www.nraes.org/nra_order.taf?_function=detail&pr_booknum=nraes-33
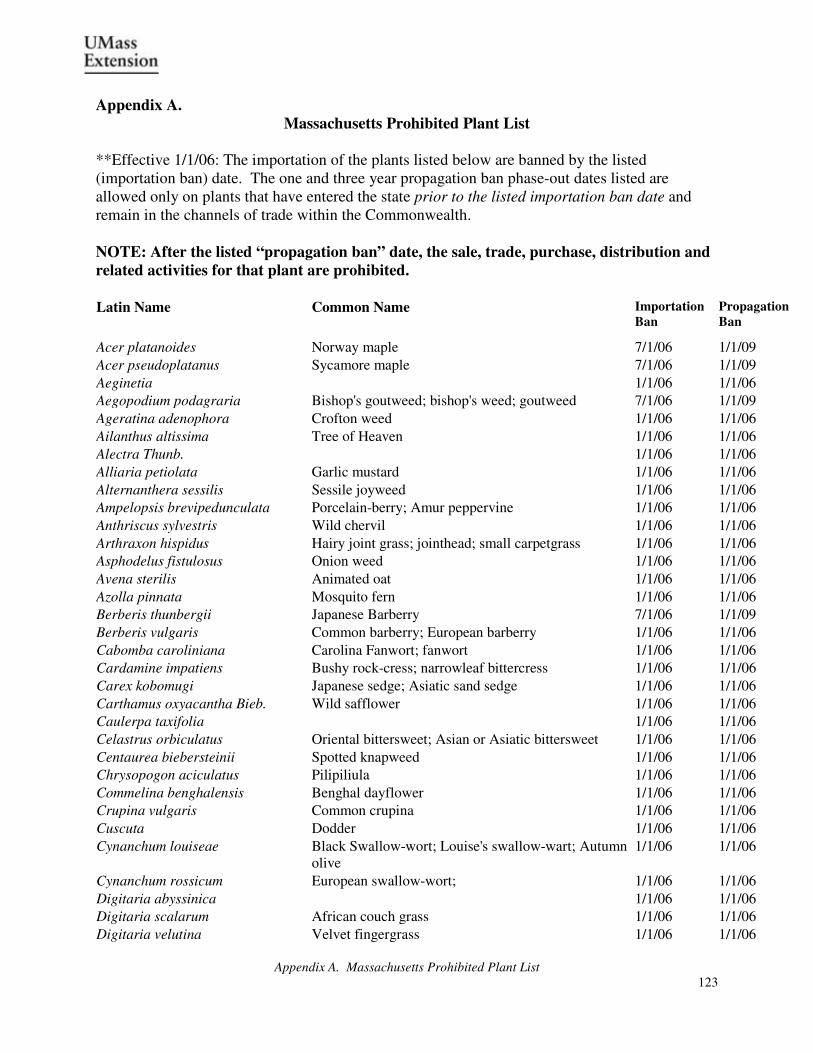
Appendix A. Massachusetts Prohibited Plant List
123
Appendix A.
Massachusetts Prohibited Plant List
**Effective 1/1/06: The importation of the plants listed below are banned by the listed (importation ban) date. The one and three year propagation ban phase-out dates listed are allowed only on plants that have entered the state prior to the listed importation ban date and remain in the channels of trade within the Commonwealth.
NOTE: After the listed “propagation ban” date, the sale, trade, purchase, distribution and
related activities for that plant are prohibited.
Latin Name
Common Name Importation
Ban
Propagation
Ban
Acer platanoides Norway maple 7/1/06 1/1/09
Acer pseudoplatanus Sycamore maple 7/1/06 1/1/09
Aeginetia 1/1/06 1/1/06
Aegopodium podagraria Bishop's goutweed; bishop's weed; goutweed 7/1/06 1/1/09
Ageratina adenophora Crofton weed 1/1/06 1/1/06
Ailanthus altissima Tree of Heaven 1/1/06 1/1/06
Alectra Thunb. 1/1/06 1/1/06
Alliaria petiolata Garlic mustard 1/1/06 1/1/06
Alternanthera sessilis Sessile joyweed 1/1/06 1/1/06
Ampelopsis brevipedunculata Porcelain-berry; Amur peppervine 1/1/06 1/1/06
Anthriscus sylvestris Wild chervil 1/1/06 1/1/06
Arthraxon hispidus Hairy joint grass; jointhead; small carpetgrass 1/1/06 1/1/06
Asphodelus fistulosus Onion weed 1/1/06 1/1/06
Avena sterilis Animated oat 1/1/06 1/1/06
Azolla pinnata Mosquito fern 1/1/06 1/1/06
Berberis thunbergii Japanese Barberry 7/1/06 1/1/09
Berberis vulgaris Common barberry; European barberry 1/1/06 1/1/06
Cabomba caroliniana Carolina Fanwort; fanwort 1/1/06 1/1/06
Cardamine impatiens Bushy rock-cress; narrowleaf bittercress 1/1/06 1/1/06
Carex kobomugi Japanese sedge; Asiatic sand sedge 1/1/06 1/1/06
Carthamus oxyacantha Bieb. Wild safflower 1/1/06 1/1/06
Caulerpa taxifolia 1/1/06 1/1/06
Celastrus orbiculatus Oriental bittersweet; Asian or Asiatic bittersweet 1/1/06 1/1/06
Centaurea biebersteinii Spotted knapweed 1/1/06 1/1/06
Chrysopogon aciculatus Pilipiliula 1/1/06 1/1/06
Commelina benghalensis Benghal dayflower 1/1/06 1/1/06
Crupina vulgaris Common crupina 1/1/06 1/1/06
Cuscuta Dodder 1/1/06 1/1/06
Cynanchum louiseae Black Swallow-wort; Louise's swallow-wart; Autumn olive
1/1/06 1/1/06
Cynanchum rossicum European swallow-wort; 1/1/06 1/1/06
Digitaria abyssinica 1/1/06 1/1/06
Digitaria scalarum African couch grass 1/1/06 1/1/06
Digitaria velutina Velvet fingergrass 1/1/06 1/1/06
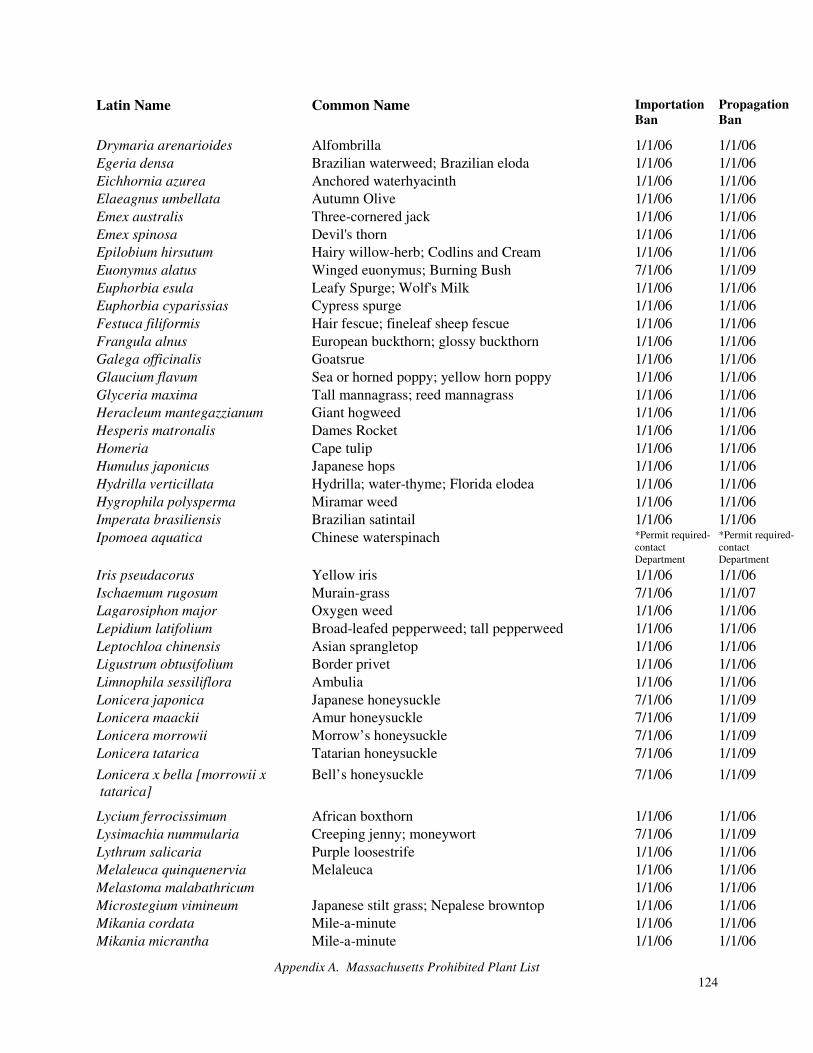
Appendix A. Massachusetts Prohibited Plant List
124
Latin Name
Common Name Importation
Ban
Propagation
Ban
Drymaria arenarioides Alfombrilla 1/1/06 1/1/06
Egeria densa Brazilian waterweed; Brazilian eloda 1/1/06 1/1/06
Eichhornia azurea Anchored waterhyacinth 1/1/06 1/1/06
Elaeagnus umbellata Autumn Olive 1/1/06 1/1/06
Emex australis Three-cornered jack 1/1/06 1/1/06
Emex spinosa Devil's thorn 1/1/06 1/1/06
Epilobium hirsutum Hairy willow-herb; Codlins and Cream 1/1/06 1/1/06
Euonymus alatus Winged euonymus; Burning Bush 7/1/06 1/1/09
Euphorbia esula Leafy Spurge; Wolf's Milk 1/1/06 1/1/06
Euphorbia cyparissias Cypress spurge 1/1/06 1/1/06
Festuca filiformis Hair fescue; fineleaf sheep fescue 1/1/06 1/1/06
Frangula alnus European buckthorn; glossy buckthorn 1/1/06 1/1/06
Galega officinalis Goatsrue 1/1/06 1/1/06
Glaucium flavum Sea or horned poppy; yellow horn poppy 1/1/06 1/1/06
Glyceria maxima Tall mannagrass; reed mannagrass 1/1/06 1/1/06
Heracleum mantegazzianum Giant hogweed 1/1/06 1/1/06
Hesperis matronalis Dames Rocket 1/1/06 1/1/06
Homeria Cape tulip 1/1/06 1/1/06
Humulus japonicus Japanese hops 1/1/06 1/1/06
Hydrilla verticillata Hydrilla; water-thyme; Florida elodea 1/1/06 1/1/06
Hygrophila polysperma Miramar weed 1/1/06 1/1/06
Imperata brasiliensis Brazilian satintail 1/1/06 1/1/06
Ipomoea aquatica Chinese waterspinach *Permit required- contact Department
*Permit required- contact Department
Iris pseudacorus Yellow iris 1/1/06 1/1/06
Ischaemum rugosum Murain-grass 7/1/06 1/1/07
Lagarosiphon major Oxygen weed 1/1/06 1/1/06
Lepidium latifolium Broad-leafed pepperweed; tall pepperweed 1/1/06 1/1/06
Leptochloa chinensis Asian sprangletop 1/1/06 1/1/06
Ligustrum obtusifolium Border privet 1/1/06 1/1/06
Limnophila sessiliflora Ambulia 1/1/06 1/1/06
Lonicera japonica Japanese honeysuckle 7/1/06 1/1/09
Lonicera maackii Amur honeysuckle 7/1/06 1/1/09
Lonicera morrowii Morrow’s honeysuckle 7/1/06 1/1/09
Lonicera tatarica Tatarian honeysuckle 7/1/06 1/1/09
Lonicera x bella [morrowii x
tatarica]
Bell’s honeysuckle 7/1/06 1/1/09
Lycium ferrocissimum African boxthorn 1/1/06 1/1/06
Lysimachia nummularia Creeping jenny; moneywort 7/1/06 1/1/09
Lythrum salicaria Purple loosestrife 1/1/06 1/1/06
Melaleuca quinquenervia Melaleuca 1/1/06 1/1/06
Melastoma malabathricum 1/1/06 1/1/06
Microstegium vimineum Japanese stilt grass; Nepalese browntop 1/1/06 1/1/06
Mikania cordata Mile-a-minute 1/1/06 1/1/06
Mikania micrantha Mile-a-minute 1/1/06 1/1/06
Appendix A. Massachusetts Prohibited Plant List
125
Latin Name
Common Name Importation
Ban
Propagation
Ban
Mimosa diplotricha 1/1/06 1/1/06
Mimosa invisa Giant sensitive plant 1/1/06 1/1/06
Mimosa pigra L. Catclaw mimosa 1/1/06 1/1/06
Miscanthus sacchariflorus Plume grass; Amur silvergrass 7/1/06 1/1/07
Monochoria hastata Monochoria 1/1/06 1/1/06
Monochoria vaginalis Pickerel weed 1/1/06 1/1/06
Myosotis scorpioides Forget-me-not 7/1/06 1/1/07
Myriophyllum aquaticum Parrot-feather; water-feather; Brazilian water-milfoil 1/1/06 1/1/06
Myriophyllum heterophyllum Variable water-milfoil; Two-leaved water-milfoil 1/1/06 1/1/06
Myriophyllum spicatum Eurasian or European water-milfoil; Spike water-milfoil
1/1/06 1/1/06
Najas minor Brittle water-nymph; lesser naiad 1/1/06 1/1/06
Nassella trichotoma Serrated tussock 1/1/06 1/1/06
Nymphoides peltata Yellow floating heart 1/1/06 1/1/06
Opuntia aurantiaca Jointed prickly pear 1/1/06 1/1/06
Orobanche L. Broomrape 1/1/06 1/1/06
Oryza longistaminata Red rice 1/1/06 1/1/06
Oryza punctata Red rice 1/1/06 1/1/06
Oryza rufipogon Griffiths Red rice 1/1/06 1/1/06
Ottelia alismoides Duck-lettuce 1/1/06 1/1/06
Paspalum scrobiculatum Kodo-millet 1/1/06 1/1/06
Pennisetum clandestinum Kikuyugrass 1/1/06 1/1/06
Pennisetum macrourum Trin. African feathergrass 1/1/06 1/1/06
Pennisetum pedicellatum Trin. Kyasuma-grass 1/1/06 1/1/06
Pennisetum polystachyon Missiongrass 1/1/06 1/1/06
Phalaris arundinacea Reed canary-grass 1/1/06 1/1/06
Phellodendron amurense Amur cork-tree 1/1/06 1/1/06
Phragmites australis Common reed 1/1/06 1/1/06
Polygonum cuspidatum Japanese knotweed; Japanese arrowroot 1/1/06 1/1/06
Polygonum perfoliatum Mile-a-minute vine or weed; Asiatic Tearthumb 1/1/06 1/1/06
Potamogeton crispus Crisped pondweed; curly pondweed 1/1/06 1/1/06
Prosopis pallida Kiawe 1/1/06 1/1/06
Prosopis reptans Tornillo 1/1/06 1/1/06
Prosopis strombulifera Argentine screwbean 1/1/06 1/1/06
Prosopis velutina 1/1/06 1/1/06
Pueraria montana Kudzu; Japanese arrowroot 1/1/06 1/1/06
Ranunculus ficaria Lesser celandine; fig buttercup 1/1/06 1/1/06
Ranunculus repens Creeping buttercup 1/1/06 1/1/06
Rhamnus cathartica Common buckthorn 1/1/06 1/1/06
Robinia pseudoacacia Black locust 1/1/06 1/1/06
Rorippa amphibia Water yellowcress; great yellowcress 1/1/06 1/1/06
Rosa multiflora Multiflora rose 1/1/06 1/1/06
Rottboellia cochinchinensis Itchgrass 1/1/06 1/1/06
Rubus fruticosus Wild blackberry complex 1/1/06 1/1/06
Rubus moluccanus Wild blackberry 1/1/06 1/1/06
Rubus phoenicolasius Wineberry; Japanese wineberry; wine raspberry 1/1/06 1/1/06
Appendix A. Massachusetts Prohibited Plant List
126
Latin Name
Common Name Importation
Ban
Propagation
Ban
Saccharum spontaneum Wild sugarcane 1/1/06 1/1/06
Sagittaria sagittifolia Arrowhead 1/1/06 1/1/06
Salsola vermiculata Wormleaf salsola 1/1/06 1/1/06
Salvinia auriculata Giant salvinia 1/1/06 1/1/06
Salvinia biloba Giant salvinia 1/1/06 1/1/06
Salvinia herzogii de la Sota Giant salvinia 1/1/06 1/1/06
Salvinia molesta Giant salvinia 1/1/06 1/1/06
Senecio jacobaea Tansy ragwort; stinking Willie 1/1/06 1/1/06
Setaria pallidifusca Cattail grass 1/1/06 1/1/06
Setaria pumila 1/1/06 1/1/06
Solanum tampicense Wetland nightshade 1/1/06 1/1/06
Solanum torvum Turkeyberry 1/1/06 1/1/06
Solanum viarum Tropical soda apple 1/1/06 1/1/06
Sparganium erectum Exotic bur-reed 1/1/06 1/1/06
Spermacoce alata Borreria 1/1/06 1/1/06
Striga Lour. Witchweed 1/1/06 1/1/06
Trapa natans Water-chestnut 1/1/06 1/1/06
Tridax procumbens Coat buttons 1/1/06 1/1/06
Tussilago farfara Coltsfoot 1/1/06 1/1/06
Urochloa panicoides Liverseed grass 1/1/06 1/1/06
Appendix B. Soil and Tissue Testing Information
127
Appendix B
Soil and Tissue Testing Service UMass Extension offers a variety of soil test options at the University of Massachusetts Amherst Soil and Tissue Testing Laboratory. (Contact laboratory for current price list,
http://www.umass.edu/soiltest.)
The tests listed DO NOT identify plant growth problems associated with soil drainage,
insects, plant diseases (whether soil-borne or not), weeds, winter injury, the misuse of
pesticides, or the spillage of petroleum products.
Again, pesticide residues and petroleum contaminants are not identified by these tests. Analyses for these are expensive, but may be obtained through the private sector.
1. Standard Soil Test - includes pH and lime requirement, levels of available plant nutrients, and abnormally high levels of several toxic elements. Based on this test the client receives recommendations on the amount of lime and fertilizer to add to the soil and what actions to take should an unusually high level of lead be present. 2. pH Test only - 3. Standard Soil plus Organic Matter - includes all the elements of the standard test listed above plus the percentage of organic matter in the soil. 4. Soil Texture only - provides the percentages of sands, silts, and clay. 5. Tissue Test without Nitrogen - provides concentrations of total tissue phosphorus, potassium, calcium, magnesium, sulphur, iron, manganese, zinc, copper, boron, and molybdenum. Lead, cadmium, nickel, and chromium levels available on request. 6. Tissue Test with Nitrogen - provides concentrations of all elements listed in #5 plus nitrogen. Tissue Sampling
Tissue samples should be taken from the specific plant part, at a specific location on the plant, at a specific stage of growth as noted below: Sample fully expanded leaves from current growth midshoot during late July or August. Tissue Sampling Procedure
1. When there is a plant-growth problem, always attempt to sample the problem areas and then take a second sample from the same variety showing satisfactory growth. Send these two samples in separate containers with separate payments. 2. When no plant growth problem exists, but there is interest in assessing the nutritional status, your results will be compared with those in the scientific literature or from previously sampled crops.

Appendix B. Soil and Tissue Testing Information
128
3. Remove leaves (or selected plant part) from a representative area. For example, remove leaves from 10 to 20 plants scattered through the area to be sampled (rather than 10 to 20 plants from one end of the planting). 4. Make certain management practices have been uniform within the sampling area. If soil characteristics vary significantly over the area, sampling should be refined to reflect these differences. 5. Take 10 to 50 leaves (or selected plant part), depending on crop, and rinse thoroughly with tap water to remove any chemicals, foliar-applied fertilizer, and soil particles. Place them on clean paper to air-dry. 6. Once air-dried, carefully place tissue (avoiding contamination with foreign material) in paper bag. Send soil or tissue samples, with a check made payable to the University of Massachusetts,
to:
Soil & Tissue Testing Laboratory
West Experiment Station, 682 North Pleasant Street, UMass, Amherst, MA 01003-9302
Phone (413)545-2311
http://www.umass.edu/soiltest
Appendix C. Interpretation of Soluble Salt and pH Measurements
129
Appendix C
Interpretation of Soluble Salt and pH Measurements by Extraction Method
The following information was adapted from “Measuring Soluble Salts and pH with the Pour-
Through Method” by John M. Ruter, Nursery Crops Research and Melvin P. Garber, Extension
Horticulturist, University of Georgia College of Agricultural and Environmental Sciences
Cooperative Extension Service, Horticulture Fact Sheet H-93-015.
The University of Massachusetts Soil and Tissue Testing Laboratory in Amherst uses the saturation media extraction method for soilless growing media. Methods used by growers of container crops on-site are 1:2 dilution method and the Pour-Through method.
Pour-Through Procedure
1. The container to be tested is placed on a pvc ring or other suitable material to elevate the bottom of the container above the collection vessel. The collection vessel should be wide enough to collect all leachate (an 8-inch saucer works well for 1 gallon containers). (See Figure 1.)
2. Distilled water is added to the surface of the container medium such that approximately 50 ml (5 oz) of leachate is accumulated in the collection vessel. Typically, 150 ml (15 oz) of distilled water per 1 gallon container is sufficient for most media. For bedding plants, use 5 to 10 ml per cell. With plug trays, try 200 ml (20 oz) per tray. Five minutes will be sufficient time for leachate to drain from the container medium for collection. Uniform media moisture content is important; therefore, all samples should be collected when the medium is near its maximum water-holding capacity (approximately 2 hours after irrigation). A minimum of three containers from each block of plants should be tested.
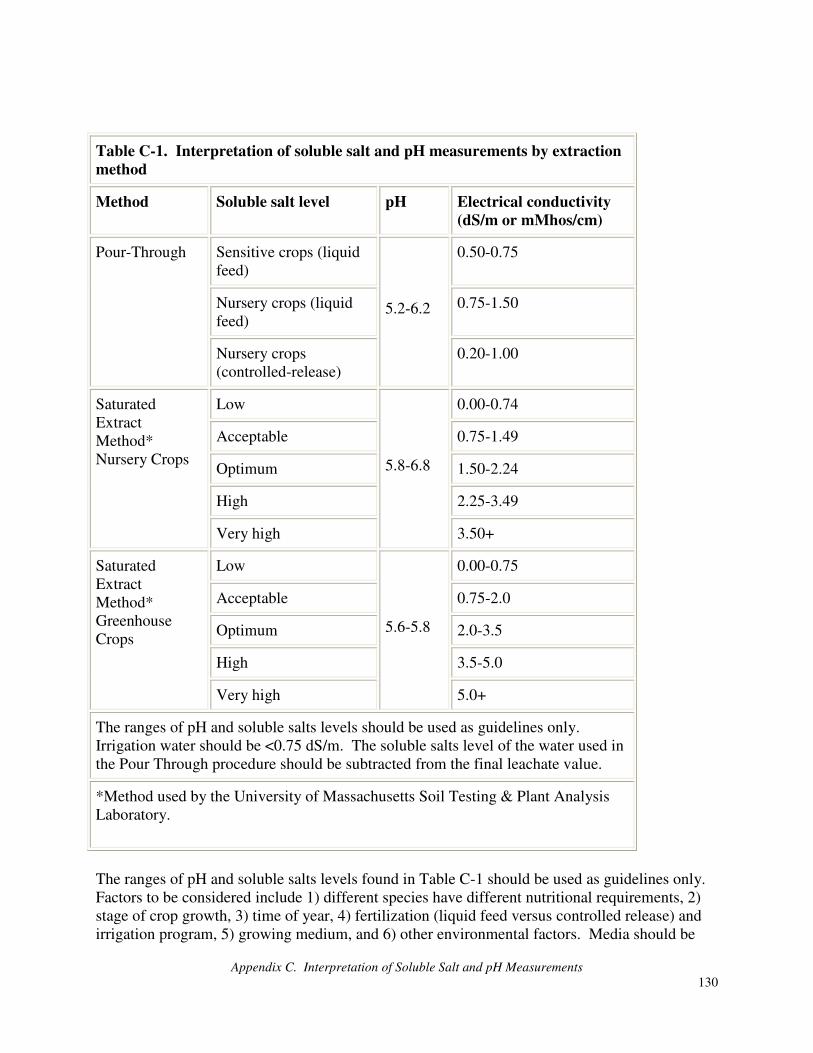
Appendix C. Interpretation of Soluble Salt and pH Measurements
130
Table C-1. Interpretation of soluble salt and pH measurements by extraction
method
Method Soluble salt level pH Electrical conductivity
(dS/m or mMhos/cm)
Sensitive crops (liquid feed)
0.50-0.75
Nursery crops (liquid feed)
0.75-1.50
Pour-Through
Nursery crops (controlled-release)
5.2-6.2
0.20-1.00
Low 0.00-0.74
Acceptable 0.75-1.49
Optimum 1.50-2.24
High 2.25-3.49
Saturated Extract Method* Nursery Crops
Very high
5.8-6.8
3.50+
Low 0.00-0.75
Acceptable 0.75-2.0
Optimum 2.0-3.5
High 3.5-5.0
Saturated Extract Method* Greenhouse Crops
Very high
5.6-5.8
5.0+
The ranges of pH and soluble salts levels should be used as guidelines only. Irrigation water should be <0.75 dS/m. The soluble salts level of the water used in the Pour Through procedure should be subtracted from the final leachate value.
*Method used by the University of Massachusetts Soil Testing & Plant Analysis Laboratory.
The ranges of pH and soluble salts levels found in Table C-1 should be used as guidelines only. Factors to be considered include 1) different species have different nutritional requirements, 2) stage of crop growth, 3) time of year, 4) fertilization (liquid feed versus controlled release) and irrigation program, 5) growing medium, and 6) other environmental factors. Media should be

Appendix C. Interpretation of Soluble Salt and pH Measurements
131
tested at least every two weeks to determine if adequate nutrient levels are being maintained. Since the soluble salt level gives an indication of the concentration of total salts and not individual elements, nursery operators should have individual nutrient concentrations checked every four to six weeks. A growth medium that tests in the low range will generally not have sufficient levels of nutrients to support good growth. Plants on a constant liquid feed program can be grown at levels in the acceptable range for the Pour Thru method. Soluble salt levels of 3.00 dS/m will generally result in decreased plant quality and injury in young plants and seedlings.
Reference:
Ruter J. and M. Garber. Measuring Soluble Salts and pH with the Pour-Through Method. University of Georgia College of Agricultural and Environmental Sciences, Cooperative Extension Service Hort Fact Sheet H-93-015.