Manuale di Istruzione Instruction Manual - Welcome to Beretta … · The new Beretta 90-two...
46
Manuale di Istruzione Instruction Manual
Transcript of Manuale di Istruzione Instruction Manual - Welcome to Beretta … · The new Beretta 90-two...

Manuale di IstruzioneInstruction Manual

2
Fig. 9
Fig. 11
Fig. 13
Fig. 10
Fig. 12
Fig. 14
Fig. 16Fig. 15

45
Illustrations on pages2, 53, 54, 85 and 86
ENGLISH
WE RECOMMEND THE USE OF ORIGINAL BERETTA SPAREPARTS AND ACCESSORIES. THE USE OF OTHERMANUFACTURER’S SPARE PARTS AND ACCESSORIES COULDCAUSE MALFUNCTIONS AND/OR BREAKAGES THAT WILLNOT BE COVERED BY THE BERETTA WARRANTY.
ALWAYS KEEP THIS MANUAL WITH YOUR FIREARM. INCLUDE ITWITH THE PISTOL WHEN IT CHANGES OWNERSHIP OR WHEN ITIS LOANED OR PRESENTED TO ANOTHER PERSON.
CAUTION:The Manufacturer and/or its Local Official Distributorsassume no responsibility for product malfunction or for physicalinjury or property damage resulting in whole or in part fromcriminal or negligent use of the product, improper or carelesshandling, unauthorized modifications, use of defective, improper,hand-loaded, reloaded or remanufactured ammunition*,customer abuse or neglect of the product, or other influencesbeyond manufacturer's direct and immediate control.* See paragraph “Ammunition”.
WARNING: Always ensure that the safety is full engaged (ifpresent) until ready to fire. A safety, which is not fully engaged,will not prevent firearm discharge.
WARNING: ALL FIREARMS HAVE LETHAL POTENTIAL. READ THEBASIC SAFETY RULES CAREFULLY AND UNDERSTAND THEMFULLY BEFORE ATTEMPTING TO USE THIS FIREARM.
In addition to the Basic Safety Rules, there are other SafetyRules pertaining to the loading, unloading, disassembly,assembly and use of this firearm, located throughout thismanual.
WARNING: READ THE ENTIRE MANUAL CAREFULLY BEFOREUSING THIS FIREARM. MAKE SURE THAT ANY PERSON USINGOR HAVING ACCESS TO THIS FIREARM READS ANDUNDERSTANDS ALL OF THIS MANUAL PRIOR TO USE ORACCESS.
!
!
!

46
CONTENTSPage
BASIC SAFETY RULES 47
DESCRIPTION 55
SAFETY FEATURES 55
OPERATIONAL FEATURES 57
DESIGN AND ANATOMICAL FEATURES 60
SPECIFICATIONS AND TECHNICAL DATA 61
OPERATION 62
LOAD CHECK 62
BARREL OBSTRUCTIONS CHECK 64
FIELD STRIPPING 64
REASSEMBLY 65
AMMUNITION 66
LOADING 67
UNLOADING 70
FIRING 72
MAINTENANCE 76
HOW TO REPLACE THE INTEGRAL GRIP 78
HOW TO REVERSE THE MAGAZINE RELEASE BUTTON 80
TROUBLESHOOTING 81
STORAGE 82
This instruction manual consists of 86 pages.

47
!
!
BASIC SAFETY RULESWARNING: PLEASE READ THIS MANUAL BEFORE HANDLINGYOUR FIREARM.
WARNING: FIREARMS CAN BE DANGEROUS AND CANPOTENTIALLY CAUSE SERIOUS INJURY, DAMAGE TO PROPERTYOR DEATH, IF HANDLED IMPROPERLY. THE FOLLOWING SAFETYRULES ARE AN IMPORTANT REMINDER THAT FIREARM SAFETY ISYOUR RESPONSIBILITY.
1. NEVER POINT A FIREARM AT SOMETHING THAT IS NOTSAFE TO SHOOT. Never let the muzzle of a firearm point at any part of your bodyor at another person. This is especially important whenloading or unloading the firearm. When you are shooting at atarget, know what is behind it. Some bullets can travel over amile. If you miss your target or if the bullet penetrates thetarget, it is your responsibility to ensure that the shot doesnot cause unintended injury or damage.
2. ALWAYS TREAT A FIREARM ASIF IT WERE LOADED.Never assume that a firearm isunloaded. The only certain wayto ensure that a firearm has thechamber(s) empty is to open thechamber and visually andphysically examine the inside tosee if a round is present.

48
Removing or unloading the magazine will not guarantee thata firearm is unloaded or cannot fire. Shotguns and rifles canbe checked by cycling or removing all rounds and by thenopening and inspecting the chamber so that a visualinspection of the chamber for any remaining rounds can bemade.
3. STORE YOUR FIREARM SO THAT CHILDREN CANNOT GAINACCESS TO IT.It is your responsibility to ensure that children under the ageof 18 or other unauthorized persons do not gain access toyour firearm. To reduce the risk of accidents involvingchildren, unload your firearm, lock it and store theammunition in a separate locked location. Please note thatdevices intended to prevent accidents - for example, cablelocks, chamber plugs, etc, - may not prevent use or misuse ofyour firearm by a determined person. Firearm storage in asteel gun safe may be more appropriate to reduce thelikelihood of intentional misuse of a firearm by anunauthorized child or person.

49
4. NEVER SHOOT AT WATER OR AT A HARD SURFACE.Shooting at the surface of water or ata rock or other hard sur faceincreases the chance of ricochets orfragmentation of the bullet or shot,which can result in the projectilestriking an unintended or peripheraltarget.
5. KNOW THE SAFETY FEATURES OF THE FIREARM YOU AREUSING, BUT REMEMBER: SAFETY DEVICES ARE NOT ASUBSTITUTE FOR SAFE HANDLING PROCEDURES.Never rely solely on a safety device to prevent an accident. Itis imperative that you know and use the safety features of theparticular firearm you are handling, but accidents can best beprevented by following the safe handling proceduresdescribed in these safety rules and elsewhere in the productmanual. To further familiarize yourself with the proper use ofthis or other firearms, take a Firearms Safety Course taughtby an expert in firearms use and safety procedures.
6. PROPERLY MAINTAIN YOUR FIREARM.Store and carry your firearm so that dirt or lint does notaccumulate in the working parts. Clean and oil your firearm,following the instructions providedin this manual, after each use toprevent corrosion, damage to thebarrel or accumulation of impuritieswhich can prevent use of the gun inan emergency. Always check thebore and chamber(s) prior to loadingto ensure that they are clean andfree from obstructions. Firing withan obstruction in the barrel orchamber can rupture the barrel and injure you or othersnearby. In the event you hear an unusual noise whenshooting, stop firing immediately, engage the manual safety

50
and unload the firearm. Make sure the chamber and barrelare free from any obstruction, like a bullet blocked inside thebarrel due to defective or improper ammunition.
7. USE PROPER AMMUNITION.Only use factory-loaded, new ammunition manufactured toindustry specifications: CIP (Europe and elsewhere), SAAMI®
(U.S.A.). Be certain that each round you use is in the propercaliber or gauge and type for the particular firearm. Thecaliber or gauge of the firearm is clearly marked on the barrelsof shotguns and on the slide or barrel of pistols. The use ofreloaded or remanufactured ammunition can increase thelikelihood of excessive cartridge pressures, case-headruptures or other defects in the ammunition that can causedamage to your firearm and injury to yourself or others nearby.
8. ALWAYS WEAR PROTECTIVE GLASSES AND EARPLUGSWHEN SHOOTING.The chance that gas, gunpowder ormetal fragments will blow back andinjure a shooter who is firing a gunis rare, but the injury that can besustained in such circumstancescan be severe, including thepossible loss of eyesight. Ashooter must always wear impactresistant shooting glasses whenfiring any firearm. Earplugs or otherhigh-quality hearing protectors help reduce the chance ofhearing damage from shooting.
9. NEVER CLIMB A TREE, FENCE OR OBSTRUCTION WITH ALOADED FIREARM. Open and empty the chamber(s) of your firearm and engagethe manual safety before climbing or descending a tree orbefore climbing a fence or jumping over a ditch or otherobstruction. Never pull or push a loaded firearm towardyourself or another person. Always unload a firearm, visually

51
and physically check to see that themagazine, loading mechanism andchamber are unloaded, and actionis open before handing it to anotherperson. Never take a firearm fromanother person unless it isunloaded, visually and physicallychecked to confirm it is unloaded,and the action is open.
10. AVOID ALCOHOLIC BEVERAGES OR JUDGMENT/REFLEXIMPAIRING MEDICATION WHEN SHOOTING.Do not drink and shoot. If you takemedication that can impair motorreactions or judgment, do nothandle a firearm while you areunder the influence of themedication.
11. NEVER TRANSPORT A LOADED FIREARM.Unload a firearm before putting it in a vehicle (chamberempty, magazine empty). Hunters and target shootersshould load their firearm only at their destination, and onlywhen they are ready to shoot. If you carry a firearm for self-protection, leaving the chamber unloaded can reduce thechance of an unintentional discharge.
12. LEAD WARNING.Discharging firearms in poorly ventilated areas, cleaningfirearms, or handling ammunition may result in exposure tolead and other substances known to cause birth defects,reproductive harm, and other serious physical injury. Haveadequate ventilation at all times. Wash hands thoroughlyafter exposure.

52
!
!
WARNING: It is YOUR responsibility to know and abide byFederal, State and Local laws governing the sale, transportationand use of firearms in your area.
WARNING: This firearm has the capability of taking your life orthe life of someone else! Always be extremely careful with yourfirearm. An accident is almost always the result of not followingbasic firearm safety rules.
Especially for U.S. consumers:For information about Firearm Safety Courses in your area,please visit the National Rifle Association’s web site atwww.nra.org.

53
Fig. 1
Fig. 2
Type F
Type F
ADO
L
G
F
L
G
P1
R
Q
P2
R
I
H HC
E
E A B
N
I
MQ

54
hammer half-cocked,safety disengaged
hammer decocked,safety disengaged
hammer decocked,safety engaged
Fig. 5 Fig. 6
Fig. 7 Fig. 8
hammer cocked,safety disengaged
Type D
Fig. 4Fig. 3
Type G

55
DESCRIPTIONThe new Beretta 90-two semiautomatic pistol incorporates newand unique benefits while maintaining all of the advancedperformance and safety features that have made the 92 pistolseries an international legend.The new Beretta 90-two features a brand new look withinnovative lines and rounded contours that permit comfortablecarry and a smooth and rapid extraction from the holster.Designed with extreme care in every detail, the Beretta 90-two iscomplete with a large array of safety features. Each one isspecifically studied to take into account the ergonomics, designand to obtain the best accessibility to the hand that grips thepistol. The interchangeability and modularity of the components,together with the integral accessory rail and the removable gripunit, make this pistol ready to meet any operational requirement.The Beretta 90-two is available in both the traditionalsingle/double action and in the double-action-only version. Allfeature new higher capacity magazines in the 9mm x 19Parabellum (Luger), 9mm x 21 IMI and .40 S&W calibers.
SAFETY FEATURESWARNING: Each version of the Beretta 90-two pistol offersdifferent features. Carefully read the following paragraph thatdescribes the specific characteristic of your 90-two model. Theyprovide important safety information.
NOTICE: The numbers in the figures refer to the photos on pages53 and 54.
90-two Type F (Fig. 1-2): Double/single action. Ambidextrousmanual safety on the slide with hammer decocking function,automatic firing pin block safety (Fig. 5, 6, 7 and 8).90-two Type G (Fig. 3): Double/single action. Ambidextrousmanual lever on the slide with hammer decocking function withthe return of the lever to the firing position, automatic firing pinblock safety.90-two Type D (Fig. 4): Double action only. Without manualsafety-hammer decocking. The spurless hammer, after eachshot, returns to the decocked position. Automatic firing pin blocksafety.
!

56
Manual safety-hammer decocking lever (Type F only)(Fig. 1-2/A). The Beretta 90-two pistols in Type F version areequipped with an ambidextrous safety lever positioned on theslide that disconnects the linkage between the trigger and thesear, allowing to decock the hammer (if cocked or if positionedon the half-cock position) with maximum safety, thanks to therotation of the rear part of the firing pin. The safety may beengaged also with the hammer decocked (Fig. 6) and with slideopen.
Hammer decocking lever on the slide (Type G only) (Fig. 3). InG configuration, the lever only decocks the hammer and rotatesthe rear part of the firing pin (the hammer decocking lever, afteroperation, automatically returns to the firing position).
Loaded Chamber Indicator (On all models) (Fig. 2/B). Theloaded chamber indicator is a small red tab (extractor) thatprotrudes further from the slide when a round is in the chamber.The tab is located on the right side of the pistol’s slide, near thecartridge chamber, and can be both seen and felt, allowing theuser to check the chamber at night by feel or during the day bychecking for the increased protrusion of the red tab.
Note: The most certain way to check whether a pistol is loadedis to pull back on the slide and visually inspect the chamber fora round. Loaded chambers indicator are designed primarily toallow noiseless inspection of the pistol to ensure that is loadedin situations when it may be dangerous to operate the slide (theaction of pulling back on the slide may make noise and willtemporarily render the pistol inoperable) or when it is dark.
WARNING: In order to permit the use of the pistol in emergencysituations, these models are NOT provided with a magazinesafety. They are therefore capable of firing, when a round ischambered, even if the magazine has not been inserted or if ithas been removed or if it has been dislodged from its seat.
Automatic firing pin block safety (All models) (Fig. 1/C). TheBeretta 90-two pistols have a blocking device that preventsforward movement of the firing pin unless the trigger iscompletely pulled.
Slide catch (slide stop) (On all models) (Fig. 1/D). The slidecatch is a lever that holds the slide open and rearward after the
!

57
last round is fired. This allows the user to immediately determinethat the pistol does not have a round in the chamber or in themagazine.
Slide overtravel stop (On all models). The hammer pin head hasbeen enlarged to enter a matching groove cut into the slide railto stop slide breech recoil over travel.
External hammer (Type F and G) (Fig. 1-2/E and Fig. 3). Theexternal hammer (hammer spur) allows to immediately check ifthe hammer is cocked, on the half-cock notch, or decocked. Thehammer in D configuration (Type D) is spurless (Fig. 4).
Half-cock notch (on hammer) (Type F and G) (Fig. 7). The hammerin 90-two Type F and G configurations has a half-cock notch thatwill catch on the sear, before striking the firing pin, should thehammer be released inadvertently by violently striking ordropping the pistol. In Type D configuration, double action onlyversion, the hammer is spurless (Fig. 4).
OPERATIONAL FEATURESNOTICE: The numbers in the figures refer to the photos on pages53 and 54.
Semiautomatic firing. All 90-two Beretta pistols willautomatically reload after each round is fired, as long as thereare cartridges in the magazine.
The locked-breech locking system with falling locking block andthe barrel short recoil operation are a warranty of long-life andshooting accuracy.
Single/double action (Type F and G only). The Type F and Gversions fire double action on the first round (the pull on thetrigger in the double action mode will first cock the hammercompletely and then release it to strike the firing pin) and singleaction on the following rounds (as the hammer stays in thecocked position after the first round). The first round can be firedalso in single action mode if the hammer is manually cockedprior to pulling the trigger. The short and light single action trigger

58
pull allows for faster, more accurate discharge of subsequentrounds. The long and heavy double action trigger pull isconsidered a safety feature because it also helps reduce thelikelihood of unintentional discharge.
The hammer of the models Type F and G has three differentpositions (the hammer of the Type D version is spurless and hasno half-cock notch):
1. Decocked hammer (Fig. 5-6): The hammer is in the fullylowered position. The pull on the trigger in the double actionmode will first cock the hammer completely and then release itto strike the firing pin (double action).2. Hammer in the half-cocked position (Fig. 7): By pulling thehammer rearward for a few millimeters its half-cock notch will becaught on the sear. You will feel and hear the hammer “click” intothe half-cocked position. The pull on the trigger in the doubleaction mode will first cock the hammer completely and thenrelease it to strike the firing pin (double action).3. Cocked hammer (Fig. 8): By pulling the hammer rearwardcompletely you will feel and hear the hammer (click) into the full-cocked position. The hammer is now in the firing position. Thepull on the trigger will release the hammer immediately to strikethe firing pin (single action).
Double action only (Type D) (Fig. 4). The pull on the trigger willfirst cock the hammer completely and then release it to strikethe firing pin in the same motion. On Type D version (doubleaction only) the hammer follows the slide rearward and forwardto come to rest every time in the decocked position. The longand heavy double action trigger pull is considered a safetyfeature because it also helps reduce the likelihood ofunintentional discharge.
Accessory rail (On all models) (Fig. 2/F). Located forward andunder the barrel, a rail is machined integral to the frame andallows the mounting of light and laser accessories. A practicalaccessory rail cover (Fig. 1-2/G) (which can be mounted whenan accessory is not used) protects the rail from accidentalimpacts and covers its corners to facilitate the insertion andextraction of the pistol from holsters.

59
Interchangeable, luminescent Superluminova® sights (On allmodels) (Fig. 1/H). The high definition 3-dot sight system iscoated in Superluminova®, a special photosensitive material.Short exposure to any kind of light, is enough to ensure longlasting luminescence. Rear and front sights can be removed forreplacement with other types of sights of different height. The unique design of the sights has resulted in a 5mm increaseto the sight radius when compared to the classic Model 92series. This results in a more precise alignment of the barrel tothe target during shooting. Tritium night sights are also available,upon request.
High capacity magazine (Fig. 1-2/I). The Beretta 90-two pistolshave an easily removable, high capacity staggered magazine,that allows for rapid reloading and extended use of the firearmin special operating situations:The type and capacity of magazine for the 90-two pistols is asfollows:
90-two cal. 9mmx19 Parabellum - staggered magazine with 10,15 or 17 rounds*90-two cal. 9mmx21 IMI - staggered magazine with 15 rounds90-two cal. .40 S&W - staggered magazine with 10, 11 or 12rounds
* For some markets and in compliance to local legal restrictions,extended magazine bottoms can be applied to increase themagazine capacity to 20 rounds for caliber 9mmx19.
CAUTION: Consult local authorities for magazine capacityrestrictions that may apply in your locale.
Skeletonized hammer (Type F and G) (Fig. 1-2/E and Fig. 3).The distinctive hammer is significantly faster and lighter.
Simple field stripping, cleaning and re-assembly (On all models)(Fig. 1-2/L). The pistol is designed for extremely quick andsimple field stripping and to avoid casual or involuntarydisassembly. Reassembly is easy and accidental misassembly ofparts is prevented by the distinctive design. The slide locksautomatically when it passes beyond the rear section of theframe.

60
DESIGN AND ANATOMICALFEATURESNOTICE: The numbers in the figures refer to the photos on pages53 and 54.
THE FOLLOWING FEATURES ARE COMMON TO ALL90-TWO MODELSNewly designed frame. (Fig. 2/M) The Beretta 90-two is a lightand technically advanced pistol that ensures trouble-freeinsertion and holster extraction, thanks to its rounded and trulysnag-free surfaces. Inside the frame, near the disassembly lever, a metallic recoilbuffer reduces the impact of the slide assembly against theframe during the shooting cycle. By redistributing the stresses,the recoil buffer increases the service life of the firearm.Trigger guard (Fig. 1/N) is also rounded to ensure, when firingwith two hands, the correct positioning of the supporting hand.
Newly designed slide (Fig. 1/O) and slide catch (Fig. 1/D). Thesides of the slide are smoothed and snag-proofed easing theinsertion and removal of the pistol from its holster. The reartransversal serrations on the slide allow for a firm grip even inmoist conditions, facilitating slide operation and safety control.The slide catch (slide stop) has been redesigned to conform tothe unique lines of the slide and frame. The slide and othermetal parts such as the slide catch, the disassembly latch, thesafety lever (if present) and the sights are coated with Bruniton,a material that provides superior corrosion resistance andreduced friction between frame and slide.
Ergonomic and modular grip (Fig. 1-2/P1 and P2). The newlocking mechanism of the single-piece grip unit allows for quickand easy standard grip (P1) replacement. An optional slimaccessory grip (P2) is available to better adapt to smaller hands.The rear upper part of the grip is precisely curved and relievedfor a firmer, more comfortable grip and to snugly fit the shooter’shand. Both the front and the rear part of the integral grip boasta comfortable scaled surface that, not only has great aestheticimpact, but considerably improves grip, even in moist conditions.
Reversible magazine release button (Fig. 1-2/Q). The newlydesigned magazine release button can be mounted on eitherside depending on shooter preference.
61
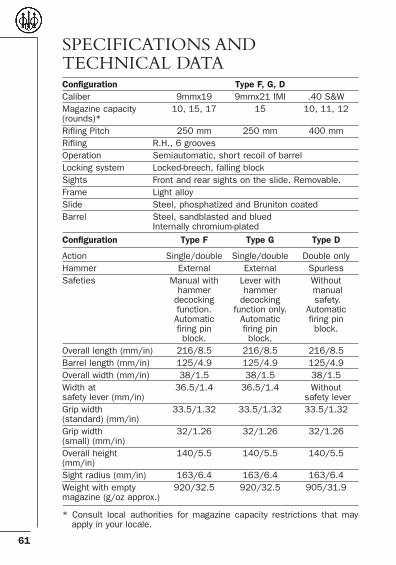
SPECIFICATIONS ANDTECHNICAL DATAConfiguration Type F, G, DCaliber 9mmx19 9mmx21 IMI .40 S&WMagazine capacity 10, 15, 17 15 10, 11, 12(rounds)*Rifling Pitch 250 mm 250 mm 400 mmRifling R.H., 6 groovesOperation Semiautomatic, short recoil of barrel Locking system Locked-breech, falling blockSights Front and rear sights on the slide. Removable. Frame Light alloySlide Steel, phosphatized and Bruniton coated Barrel Steel, sandblasted and blued
Internally chromium-platedConfiguration Type F Type G Type D
Action Single/double Single/double Double onlyHammer External External SpurlessSafeties Manual with Lever with Without
hammer hammer manualdecocking decocking safety.function. function only. AutomaticAutomatic Automatic firing pinfiring pin firing pin block.block. block.
Overall length (mm/in) 216/8.5 216/8.5 216/8.5Barrel length (mm/in) 125/4.9 125/4.9 125/4.9Overall width (mm/in) 38/1.5 38/1.5 38/1.5Width at 36.5/1.4 36.5/1.4 Withoutsafety lever (mm/in) safety leverGrip width 33.5/1.32 33.5/1.32 33.5/1.32(standard) (mm/in)Grip width 32/1.26 32/1.26 32/1.26(small) (mm/in)Overall height 140/5.5 140/5.5 140/5.5(mm/in)Sight radius (mm/in) 163/6.4 163/6.4 163/6.4Weight with empty 920/32.5 920/32.5 905/31.9magazine (g/oz approx.)
* Consult local authorities for magazine capacity restrictions that mayapply in your locale.

62
OPERATIONThe Beretta 90-two pistol is a semiautomatic firearm using ashort recoil locked-breech system with falling block. When the pistol is fired, the recoil energy pushes the slide-barrelassembly backward. After a short run of barrel-slide assembly,the locking block falls and releases the slide letting it recoil whilethe barrel stops against the frame. The slide, during its rearwardmovement, extracts and ejects the fired cartridge case, cocksthe hammer and activates the recoil spring. Pushed by the recoilspring, the slide then moves forward feeding the next cartridgefrom the magazine into the chamber and causing barrel-slidelocking.The slide is designed to stay open after the last cartridge hasbeen fired and the spent shell casing has been ejected.
LOAD CHECKAt various points in this manual you will be instructed to “visuallycheck to be certain your 90-two pistol is unloaded.” This shouldbecome second nature to you, as you should:•Never assume that a firearm is unloaded.•Never point or push a firearm toward yourself or another
person. •Always visually check to see that the chamber is unloaded.•Remove the magazine and block the slide in the open position
before handing the pistol to another person.•Never take or pull this pistol from another person unless the
magazine has been removed, the slide blocked in the openposition and the chamber has been visually checked to confirmit is unloaded.
To visually check to be certain your pistol is unloaded carefullyfollow the steps below.
WARNING: Keep your finger OFF THE TRIGGER and the barrelpointed in a SAFE direction.
NOTICE: The numbers in the figures refer to the photos on pages2 and 53.
!

63
•Remove the magazine by pushing the magazine release button(Fig. 9).
•Retract the slide. Visually inspect the cartridge chamber toensure that it is empty. The chamber is empty when nocartridge is visible when looking into the open chamber(Fig. 10).
Releasing the slide when a magazine is not in the pistol willautomatically close the slide. Always keep your finger away fromthe ejection port. To keep the slide in the open position, withoutthe magazine in the pistol, fully retract the slide and press theslide catch upward with your thumb (Fig. 1/D) and release theslide. The slide will be blocked in the open position. The slide willremain open when an empty magazine is inserted or when theslide catch is pressed upwards.
If the pistol is unloaded, proceed to the following step, otherwiserefer to the procedure: “UNLOADING”.
•Gently move the slide to the closed position. If the slide isblocked in the open position by the slide catch or by an emptymagazine inserted in the pistol, press the slide catchdownward to close the slide.
WARNING: Always keep your finger away from the ejection port.
WARNING: In 90-Two Type F and Type G models the hammerremains in the cocked position. When you are certain that thefirearm is unloaded, decock the hammer by pushing the manualsafety/hammer decocking lever for type F version (the safetyremains engaged) and the hammer decocking lever for type Gversion (the lever returns to the firing position) down all the way.On D configuration, the hammer automatically returns to thedecocked position by following the slide forward.
!
!

64
BARREL OBSTRUCTIONSCHECKCheck the barrel to be sure there are no obstructions in thechamber and bore. This is extremely important because ifanother cartridge is fired into an obstructed barrel, acatastrophic failure can result.
•Follow the field stripping operations in the following paragraphand disassemble the pistol.
•After disassembly, look down the barrel from the muzzle (orfront end) so that you can see completely through the barrel tomake sure no obstruction exists.
•If an obstruction in the barrel is detected, a qualified gunsmithmust remove the obstruction and inspect the pistol before itcan be fired.
•Reassemble the pistol by following the procedures given in theappropriate section of this manual.
FIELD STRIPPINGWARNING: Make sure the pistol is unloaded. See chapter “LOADCHECK”. If not, unload it following the “UNLOADING” procedure.Engage the manual safety-decocking lever (model type F) bylowering the lever downwards.
Notice: It is advisable to perform field stripping and assemblyoperations over a table to catch components should they drop.
NOTICE: The numbers in the figures refer to the photos on page59 and 85.
•Press the magazine release button to remove the magazine(Fig. 9).
•With the index finger press the disassembly latch releasebutton which protrudes from the right side of the pistol(Fig. 11). While pressing the button, rotate the disassemblylatch on the left side of the frame with the thumb clockwiseapprox. 90° downward (Fig. 12).
!

65
•Pull the slide-barrel assembly with locking block, recoil springand spring guide forwards (Fig. 13).
•Slightly press recoil spring and spring guide (Fig. 14).•Lift spring guide and recoil spring and extract its front part from
the hole of the slide (Fig. 15). •Depress the locking block plunger (Fig 16). •Remove the barrel with locking block from the slide (Fig. 17).
To remove the accessory rail cover: Located forward and under the barrel, the rail (Fig. 1-2/G) ismachined integral to the frame and allows the mounting of lightand laser accessories. To access this rail, it is necessary toremove the rail cover. To do this, raise the retention clip (Fig. 18– see arrow) under the rail cover using a finger nail, or similarnon-marring tool, while sliding the rail cover forward (Fig. 19).
CAUTION: It is recommended that the rail cover be usedwhenever accessories are not attached to the pistol. This willprotect the rail from accidental impacts.
CAUTION: No further disassembly (Fig. 20) is recommendedunless done by a competent gunsmith.
REASSEMBLYNOTICE: The numbers in the figures refer to the photos on pages2, 53 and 85.
Reassemble the pistol following the Field Stripping procedure inreverse order.
It is advisable to pay attention to the following points:
•When the barrel and locking block assembly are correctlyinserted into the slide, they should rest securely inside theslide without movement. (The extractor must lie in its groove inthe barrel).
•The locking block lugs should rest firmly in their seats in theslide (the locking block plunger should protrude from thebarrel) (Fig. 21).

66
•The recoil spring guide head (flat part) should lodge in thecenter of its groove in the locking block (Fig. 14).
•When the slide and barrel assembly are placed back on theframe (Fig. 22), the slide/barrel assembly should be alignedwith the frame or pushed beyond the rear of it to allow thedisassembly latch to rotate and return to its original position(with the disassembly latch lever parallel to the slide). Pleasemake sure that the disassembly latch lever is parallel to theslide. If not, by retracting the slide as indicated, manuallyrotate the disassembly latch to allow it to return to its originalposition.
•Retract the slide to check the correct assembly operation. •Decock the hammer.
- by operating the manual safety/hammer decocking lever(model Type F)
- by operating the hammer decocking lever (model Type G)- in model Type D, the hammer is already decocked.
AMMUNITIONAMMUNITION (CARTRIDGE) NOTICE: Beretta specificallydisclaims responsibility for any damage or injury occurring with,or as the result of, the use of faulty, non-standard,“remanufactured,” hand-loaded or reloaded ammunition, orcartridges other than those for which the firearm was originallychambered. Serious damage or injury, even death, could resultfrom the use of incorrect ammunition, from firing against boreobstructions and from propellant overloads. Use of improperammunition, such as listed previously will void themanufacturer’s warranty. Use only high-quality, commercially-manufactured ammunition made in accordance with CIP (Europeand elsewhere) or SAAMI® (USA) standards. Be certain that theammunition is the appropriate caliber and load for the firearmand is in clean, dry, good condition. Use of reloaded ammunitionwill void the manufacturer’s warranty. The pistol caliber ismarked on the barrel.
WARNING: Carefully inspect each cartridge before it is loaded inthe magazine. Be certain the cartridge cases are not split,deformed, and that the cartridges do not possess any otherdents or defects. This warning even applies to factoryammunition.
!

67
Do not fire old ammunition. Primers, powder, cartridge cases,and bullets can deteriorate with time and cause damage to thefirearm, or injury to the shooter or others.
WARNING: The extended use of +P or +P+ ammunition maydecrease component part service life expectancy. DO NOT usesub-machine gun ammunition because the chamber pressuremay reach or exceed proof load pressure. Lead bullets have atendency to cause bore leading, which may dramatically increasethe discharge pressure. Be sure to remove all chamber and borelead accumulation after each use. DO NOT shoot cartridges withjacketed bullets through a barrel previously fired with lead bulletsbefore the bore is thoroughly deleaded.
DRY FIRING/”DUMMY” ROUNDS
Dry firing is defined as firing a firearm with no ammunition in thechamber. Long term dry firing your Beretta 90-two pistol mayresult in damage to the firing pin. “Snap caps” (inert chamberinserts that allow a firearm to be dry-fired without damaging theaction) are available at most gun stores for those who wish topractice firing without live ammunition.
CAUTION: If you want to practice shooting your pistol withoutusing live ammunition (called “dry firing”), insert an appropriate“snap cap” into the chamber to cushion the fall of the firing pinand reduce the chance of firing pin breakage. “Snap cap”cartridges with spring loaded “primers” are ideal.The “Snap cap” cartridges with empty primer pockets aresuitable for loading/unloading practice but DO NOT PROTECT thefiring pin during dry firing.
LOADINGWARNING: Whenever a live round is in the chamber, this pistolcan fire, even if the magazine is empty or has been removed.
WARNING: Before loading the firearm, become familiar with thefollowing loading procedures without the use of ammunition.Never handle a loaded firearm until you are fully familiar with theloading procedures. Always point the firearm in a safe direction.
!
!
!

68
WARNING: Always keep your finger away from the triggerwhenever you do not intend to fire. Make sure the pistol isunloaded. See paragraph “LOAD CHECK” .
WARNING: LOAD THE CHAMBER ONLY WHEN READY TO FIRE.
NOTICE: The numbers in the figures refer to the photos on pages2, 54 and 85.
LOADING THE MAGAZINE
WARNING: Be sure that you have the correct cartridges for yourpistol.
•To load the magazine, remove it from the pistol by depressingthe magazine release button. (Fig. 9).
•Hold the magazine in one hand. With the other hand, place acartridge on the magazine follower in front of the lips at the topof the magazine. Press the cartridge down onto the followerand slide the cartridge completely under the lips until it islodged fully inside the magazine body (Fig. 23).
•Repeat process until magazine is fully loaded. The holes on theback of the magazine allow for visual counting of cartridges.
CAUTION: Do not try to force more than the maximum numberof rounds indicated for your particular pistol into the magazine.An overloaded magazine may not function properly.
LOADING THE PISTOL AND THE FIRING CHAMBER
WARNING: Beretta assumes no responsibility for any injury orproperty damage resulting from improper or careless handling,intentional or accidental discharge of the firearm.
WARNING: Be sure that the obstruction check has beencompleted prior to loading.
WARNING: Point the firearm in a safe direction. Do not touch thetrigger until you are ready to shoot and are sure of your targetand backstop.
!
!
!
!
!
!

69
The firing chamber is the portion of the barrel into which thecartridge is fed. The firing chamber may be loaded in one of threeways:
1. LOADING FROM MAGAZINE
WARNING: Always engage the manual safety/hammer decockinglever (model Type F) by completely pushing the safety lever downall the way in order to cover the red warning dot (Fig. 6). The reddot is visible when the manual safety is disengaged and thefirearm is ready to fire (Fig. 5).
•Completely push the loaded magazine into the pistol grip toinsure catch engagement.
•Pull back the slide and release it. The slide will automaticallypick up a cartridge from the top of the magazine and feed it intothe chamber (Fig. 24).
2. DIRECT CHAMBER LOADING
WARNING: Always engage the manual safety/hammer decockinglever (model Type F) by completely pushing the safety lever downall the way in order to cover the red warning dot (Fig. 6). The reddot is visible when the manual safety is disengaged and thefirearm is ready to fire (Fig. 5).•Retract the slide. The slide remains open when an empty
magazine is inserted or if the slide catch is pushed upwards. •Insert the round in the chamber through the ejection port
(Fig. 24). •Press the slide catch to close the slide (Fig. 25).
WARNING:The model 90-two Type F pistol is now CHAMBER LOADED WITHHAMMER DECOCKED AND SAFETY ENGAGED (Fig. 6). Keep yourfinger away from the trigger whenever you do not intend to fire.The manual safety is merely a mechanical device and is in noway a substitute for the Basic Safety Rules of firearm handling.The model 90-two Type G pistol is now CHAMBER LOADED WITHHAMMER COCKED. Decock the hammer by rotating thedecocking lever downward. This version does not have a manualsafety. The lever returns to the firing position.
!
!

70
Keep your finger away from the trigger whenever you do notintend to fire.The model 90-two Type D pistol is now CHAMBER LOADED WITHHAMMER DECOCKED. This version does not have a manualsafety.
WARNING: Keep your finger away from the trigger whenever youdo not intend to fire.
CAUTION: All Beretta 90-two pistols are equipped with anautomatic safety, which prevents firing pin protrusion beyond thebreech face. This safety is overcome only by trigger pull (Fig. 26).
3. AS LONG AS THERE IS AMMUNITION IN THE MAGAZINE, APISTOL WHICH IS LOADED AND FIRED, WILLAUTOMATICALLY PICK UP THE NEXT ROUND AND FEED ITINTO THE FIRING CHAMBER.
To replace a round which has been chambered from themagazine; (remember that you are handling a loaded firearm witha live round in the chamber):•Check that the manual safety/hammer decocking lever is
engaged (model Type F) (Fig. 6).•Remove the magazine from the pistol by depressing the
magazine release button.•Insert one more cartridge into the magazine.•Completely push the loaded magazine into the pistol grip to
insure catch engagement.
WARNING: THE FIREARM YOU ARE HANDLING IS LOADED WITHA LIVE ROUND IN THE CHAMBER. Keep your finger away from thetrigger whenever you do not intend to fire.
UNLOADINGWARNING: Always unload the firearm whenever you do notintend to shoot.
WARNING: Be certain the pistol is pointed in a SAFE direction.Keep your finger away from the trigger.
!
!
!
!

71
NOTICE: The numbers in the figures refer to the photos on pages2 and 54.
•Check that the manual safety/hammer decocking lever isengaged (model Type F). The hammer will automatically lowerin complete safety (if cocked). The safety will remain engaged(Fig. 6). Model Type G: decock the hammer (if cocked) byrotating the decocking lever downward. The lever will return tothe ready to fire position. (Fig. 3). Model Type D: The hammeris in decocked position (Fig. 4). Keeping the firearm pointed ina safe direction and fingers away from the trigger, proceed tothe following steps.
•Remove the loaded magazine from the frame.•Always using safety precautions grasp the slide serrations with
thumb and index finger and fully retract the slide to remove thechambered cartridge.
WARNING: Always visually inspect the firing chamber to ensurethat it is empty. The chamber is empty when no cartridge isvisible when looking from the ejection port into the openchamber (Fig. 10).
WARNING: If you are ejecting unfired cartridges, use extremecare to be sure they are ejected onto an appropriate surface.Never attempt to catch cartridges or fired cartridge cases asthey fall.
WARNING: Never allow anything to come in contact with theprimer of unfired ammunition. Doing so could cause theammunition to explode.
•When sure that the chamber is empty and the cartridge hasbeen ejected, release the slide.
WARNING: Releasing the fully retracted slide when a loadedmagazine is in the pistol will feed a cartridge into the pistol’sfiring chamber. If the hammer is cocked, the pistol will be able tofire immediately.
CAUTION: It is recommended to store the firearm unloaded, withempty magazine, manual safety engaged (Type F model) andhammer decocked (Fig. 6).
!
!
!
!

72
UNLOADING THE MAGAZINE•To unload the magazine, grasp it with one hand around the
magazine box, bottom down and front end forward. With the tipof the thumb firmly press down on the cartridge rim and pushtowards the front of magazine box. As the cartridge movesforward, tip it slightly upward with the index finger.
•Repeat until the magazine is unloaded.
FIRINGWARNING: Beretta assumes no responsibility for any injury orproperty damage resulting from improper or careless handling,intentional or accidental discharge of the firearm.
WARNING: Be certain the firearm is pointed in a SAFE direction.Never put your finger on the trigger unless you intend to shoot.Never disengage the manual safety lever (model Type F) unlessyou intend to shoot.
WARNING: Always wear high-quality eye and ear protection whenfiring any firearm. When firing any firearm, be certain that othersnear-by are wearing high-quality eye and ear protection and areto the rear of the shooter.
NOTICE: The numbers in the figures refer to the photos on pages2, 54, 85 and 86.
•Insert the magazine into the pistol and the round into the firingchamber by following the previously given instructions.
•Check that the manual safety is engaged – model Type F(safety lever rotated downward and red warning dot covered)(Fig. 6). The hammer automatically lowers in complete safety.On model Type G decock the hammer (if cocked) by pressingthe decocking lever downward. The lever will return to the readyto fire position (Fig. 3).
WARNING: The manual safety is merely a mechanical device andis in no way a substitute for the Basic Safety Rules of firearmhandling.
WARNING: Do not touch the trigger until you are ready to shootand are sure of your target and backstop.
!
!
!
!
!

73
•Without placing the finger on the trigger or inside the triggerguard, point the pistol at the intended target and aim the pistolby aligning the front and rear sights on the target. Point thesight at 6 o'clock in the center of the target. The front sightshould be in focus, the target and the rear sight slightly blurredor out of focus.
WHEN YOU ARE READY TO FIRE:
•Disengage the manual safety by pushing the safety lever up allthe way (Type F model). Rotating the lever in this way restoresthe connection between the trigger and the sear.
The red warning dot indicates that the safety is off when thesafety lever is rotated completely upward (Fig. 5, 7 and 8).
WARNING: THE PISTOL IS NOW READY TO FIRE.
Models Type G and Type D are always in position TO FIRE!
•Place your index finger inside the trigger guard.
WARNING: Ensure that fingers or other parts of the hands andthe face are kept away from the recoiling slide. Not respectingthis warning can lead to serious injury since, during the firingcycle, the slide recoils backwards violently and with great energy.Ensure that the other hand is kept away from the muzzle of thebarrel.
•Gently squeeze the trigger, being careful not to upset thealignment of the front and rear sights. THE PISTOL WILL FIRE.
WARNING:- Models 90-two Type F and Type G:
When the hammer is decocked or in the half-cocked position,the pull on the trigger first cocks the hammer and thenreleases it to strike the firing pin. This firing mode is calleddouble action. When the hammer is cocked, pulling the triggerreleases the hammer, allowing it to strike the firing pin. Thisfiring mode is called single action. After the first shot the pistolwill always fire in the single action mode.
- Model 90-two Type D: This model is designed to fire in doubleaction only. The hammer never stays cocked; allowing the slideto move forward to rest in the decocked position.
!
!
!

74
The discharge will recoil the slide which, in turn, will eject thefired cartridge case, cock the hammer and activate the recoilspring. Then the slide will automatically close, feeding the nextcartridge from the magazine into the chamber.
WARNING: THE PISTOL IS STILL CHAMBER LOADED, COCKEDAND READY TO FIRE AGAIN. Keep your finger away from thetrigger whenever you do not intend to fire and engage the manualsafety if present.
•When the last round has been fired the slide remains open(Fig. 27).
•To fire again, remove the empty magazine and insert a loadedone.
•Press the slide catch to close the slide and to load thechamber.
WARNING: THE HAMMER IS COCKED (models Type F and TypeG). When you have completed shooting, remove the magazine,check that the firing chamber is empty and close the slide bypressing the slide catch. Decock the hammer by pressing themanual safety/hammer decocking lever (model Type F) and thehammer decocking lever (model Type G). In model Type D, thehammer is already decocked.
WARNING: Always unload the firearm immediately after shootingis completed. Never store a loaded firearm. To store the pistolsee the paragraph “STORAGE”.
If while firing the trigger is pulled and the firearm does notimmediately fire:
CEASE FIRING IMMEDIATELY! •Keep the firearm pointed in a SAFE direction in the event a
“hang-fire” has occurred. A hang-fire occurs when there is adelay in a cartridge’s ignition.
•With the pistol pointed in a SAFE direction, wait one (1) fullminute.
•After one (1) full minute has elapsed, completely unload thefirearm by following the unloading instructions in this manual.
•Carefully inspect your ammunition.•Immediately refer to a qualified gunsmith if the firing pin indent
!
!
!

75
on a fired cartridge’s primer is light, off-center or does notexist.
•Following the disassembly instructions given in the manual,field strip the pistol and look down the barrel from the muzzle(or front) end to make sure that no obstruction exists. If abarrel obstruction is detected, a qualified gunsmith mustremove the obstruction and inspect the pistol before it can befired.
WARNING: If another cartridge is fired into an obstructed barrel,catastrophic failure can result.
WARNING: Never attempt to fire ammunition that did not fire thefirst time.
If, while firing, you hear a change in the sound of a firedcartridge, or feel a change in the amount of recoil, or detect anyother irregularity:
CEASE FIRING IMMEDIATELY!
•Keep the firearm pointed in a SAFE direction. A “squib load”may have occurred. A “squib” occurs when a cartridge fires,but with insufficient force to drive the bullet out of the barrel.This can result in a dangerous bore obstruction.
WARNING: If another cartridge is fired into an obstructed barrel,a catastrophic failure can result.
•With the gun pointed in a SAFE direction, completely unload thefirearm by following the unloading instructions in this manual.
•Following the disassembly instructions given in the manual,field strip the pistol and look down the barrel from the muzzle(or front) end to make sure that no obstruction exists. If abarrel obstruction is detected, a qualified gunsmith mustremove the obstruction and inspect the pistol before it can befired.
•Carefully inspect your ammunition.
WARNING: Never attempt to reuse or fire ammunition that didnot fire the first time. Dispose of unfired or damaged ammunitionproperly, per the ammunition manufacturer’s recommendation.
!
!
!
!

76
MAINTENANCEThe firearm should be cleaned as soon as possible after firing orat least once every month. Field strip the pistol as indicated inthe appropriate section of this manual.
WARNING: Make sure the pistol is unloaded. See chapter “LOADCHECK”. If not, unload it following the “UNLOADING” procedure.Engage the manual safety-decocking lever (model type F) bylowering the lever downwards.
WARNING: Excess oil and grease obstructing the bore, evenpartially, is very dangerous when firing and may cause barrelrupture and serious injury to the shooter and bystanders. Neverspray or apply oil to the cartridges. Use lubricants properly. Youare responsible for the proper care and maintenance of yourfirearm.
NOTICE: Use only high-quality, commercially available firearmcleaning solvents (or the Beretta Gun Oil) and cleaningequipment.
NOTICE: The firearm should not be disassembled for routinemaintenance beyond what is described in the paragraph: “FIELDSTRIPPING”. It is not necessary to remove the integral grip.
BARREL•Spray the supplied brush with gun oil. Insert the brush into the
barrel from the chamber and scrub the chamber and borethoroughly. If necessary, first clean the bore with a gun solvent.
•Dry the chamber and bore by pushing a cotton patch throughthe chamber and bore with the brush. Repeat with a new patchuntil it emerges clean.
CAUTION:Do not push the cleaning brush from the muzzle endtowards the chamber if the barrel is still assembled on thepistol. Cleaning the barrel from the breech (chamber) end willavoid damaging the muzzle or bore.
•Clean the locking block with a coton patch soaked in gun oil; ifnecessary use the supplied brush.
•Lightly oil the inside of the barrel by passing through it a cleancotton patch soaked in gun oil.
!
!

77
SLIDE•Clean the slide with a cloth soaked in gun oil paying particular
attention to the breech face, the extractor, the slide rails, thelocking shoulders and locking recesses. If necessary, use thesupplied brush. Dry slide surfaces with a clean cloth.
•Lightly oil the slide.
RECOIL SPRING - SPRING GUIDE ASSEMBLY•Lightly oil the recoil spring-spring guide assembly with gun oil.
After extensive use it may be necessary to first clean theseparts using the supplied brush and gun oil.
FRAME•With a cotton patch soaked in gun oil clean all areas covered
by gunpowder residue and dirt.•Wipe outer frame surfaces and lightly lubricate the rails and
moving parts. Lightly oil the disassembly latch, magazinerelease button, slide catch, trigger system, hammer, sear andlevers in front of the hammer.
MAGAZINE•Make sure the magazine is thoroughly clean and that the
follower slides easily downward if pressed.•If necessary, using gun oil, lightly oil the internal walls of the
magazine box.•Dry the internal walls of the magazine box with a cloth. Do not
leave any oil in the magazine.
CAUTION:Do not apply excess oil. Accumulation of oil attractsdirt and dust, which can interfere with the functioning andreliability of the firearm.
CAUTION: There are numerous Beretta special parts andaccessories that allow for the personalization of your pistol. Torequest this extensive line of parts and accessories, pleasecontact your local Beretta dealer.

78
HOW TO REPLACE THEINTEGRAL GRIPWARNING: Make sure the pistol is unloaded. See chapter “LOADCHECK”. If not, unload it following the “UNLOADING” procedure.Engage the manual safety-decocking lever (model type F) bylowering the lever downwards.
CAUTION: The grip should be removed only to replace withanother type of grip or to reverse the magazine button (seerelative chapter). Do not remove the grip for standardmaintenance or to lubricate the pistol.
Notice: It is advisable to perform field stripping and assemblyoperations over a table to catch components should they drop.
NOTICE: The numbers in the figures refer to the photos on pages53, 85 and 86.
•Remove the magazine from the frame.•After having verified that the firearm is unloaded, point it in a
safe direction and lower the hammer if it is cocked or half-cocked, by engaging the manual safety/hammer decockinglever (Type F models) or the hammer decocking lever (Type Gmodels). On Type D models the hammer rests in the decockedposition.
•Obtain a pin punch or similar tool with a maximum diameter of2mm.
•Operating over a firm work surface, grip the upper portion ofthe pistol with one hand and press the lanyard loop, located inthe lower portion of the frame, against the surface. You shouldfeel the lanyard loop (Fig. 1-2/R) move and compress slightly,freeing the internal grip catch.
•While keeping the lanyard loop depressed, insert the pin punchinto the small hole located in the lower left side of the grip andfully push the internal grip catch (Fig. 28 see arrow). This willrelease the grip completely. The lanyard loop will remain slightlydepressed inside the frame.
•Remove the grip by pulling it firmly downwards (Fig. 29).
!

79
CAUTION: To keep the internal frame mechanisms clean, it isrecommended to always have the grip installed. Never store thepistol without the grip installed.
To replace the same or different grip:
•Verify that the grip catch does not protrude from either side ofthe frame.
CAUTION: If the catch protrudes a few millimetres from eitherside of the frame, you will not be able to assemble the grip.Depress the lanyard loop and using the pin punch push laterallythe internal grip catch until it fits flush with the frame walls.
•Insert the grip unit in the lower part of the frame by incliningthe grip slightly rearward (Fig. 30 and 31).
CAUTION: It is important to strictly follow the precedingprocedure for a proper installation of the grip and to avoidpossible damage to its four retention wings on the inside.
•Once the retention wings are inserted correctly into the frame,straighten out the grip on the frame and push it upwards intoits seat. Verify that the surfaces of the grip are in contact withthe corresponding surfaces of the frame.
CAUTION: Do not force the insertion of the grip into the frame inorder to avoid damage to its retention wings. If the grip does notinsert or seat properly, remove it and repeat the aboveprocedures.
•Insert the pin punch into the hole in the lower right side of thegrip and fully push the catch (Fig. 32). A distinctive click will beheard and the lanyard loop will return to its original position(lanyard loop completely protruding from the bottom of theframe).
•Verify the correct installation by trying to pull the gripdownwards and visually check that the internal grip catchprotrudes from the side of the lanyard loop.

80
HOW TO REVERSE THEMAGAZINE RELEASE BUTTONWARNING: Make sure the pistol is unloaded. See chapter “LOADCHECK”. If not, unload it following the “UNLOADING” procedure.Engage the manual safety-decocking lever (model type F) bylowering the lever downwards.
NOTICE: It is advisable to perform field stripping and assemblyoperations over a table to catch components should they drop.
CAUTION:THESE OPERATIONS SHOULD BE CARRIED OUT BY ACOMPETENT GUNSMITH.
•Remove the magazine by pushing the magazine release button. •Remove the integral grip from the frame (see previous
paragraph). •Press the button head on the right side of the frame (in case
of button mounted for right-handed shooters) of the magazinerelease button down and away. The magazine releaseassembly will then drop out.
•Reverse the magazine release button and insert the button inposition tilting slightly.
•Holding the button (the reversed head) of the magazine releaseassembly firmly in place, press its opposite side and push ituntil it clicks into place. The operation is done correctly whenthe magazine slides easily into its housing.
•Reassemble the integral grip on the frame (see previousparagraph).
!

81
TROUBLESHOOTINGMALFUNCTION PROBABLE CAUSE REMEDY
Mis-introduction Defective cartridge Inspect andof a cartridge replace cartridge
into the chamber
Mis-fire Defective cartridge Pull the triggeronce more orreplace cartridge
Mis-extraction or Dirty cartridge Clean anddefective extraction chamber lubricate
cartridge chamber
Defective or dirty Replace or cleanammunition cartridges
Dirt under the Clean theextractor extractor seat
WARNING: Do not attempt to make repairs to any firearmwithout proper knowledge or training. Do not alter parts or usesubstitute parts not made by Beretta. Any necessary alterationsor adjustments to the operating mechanism should beperformed by the Manufacturer or by its Local Official Distributor.
WARNING: Do not attempt to alter the internal parts of yourpistol’s firing mechanism. Altering internal parts can causeunsafe condition.
WARNING: Altering the internal parts of your pistol’s firingmechanism voids the manufacturer’s warranty.
!
!
!

82
STORAGEWARNING: Always store the pistol UNLOADED, magazine empty,manual safety engaged (model Type F) and the hammerdecocked.
WARNING: Always store your firearm so that children cannot gainaccess to it. To reduce the risk of accidents involving children,unload your firearm, lock it and store the ammunition in aseparate locked location.
CAUTION: It is recommended to store the firearm in the suppliedcase. Before storage, always check the conditions of the pistoland its case. Make sure the case is dry and that the firearm isdry and oiled. Traces of moisture or drops of water could damagethe pistol.
CAUTION: Do not store your pistol in a leather, fabric, canvasholster or case. These materials attract moisture, even thoughthey may appear to be perfectly dry.
!
!

83
NOTES:

84
NOTES:

Fig. 17
Fig. 19
Fig. 21
Fig. 18
Fig. 20
Fig. 22
Fig. 24Fig. 23
85

86
Fig. 28
Fig. 30
Fig. 32
Fig. 27
Fig. 25 Fig. 26
Fig. 31
Fig. 29

Le illustrazioni e descrizioni di questo opuscolo si intendono fornite a titoloindicativo. La Casa si riserva pertanto il diritto di apportare ai suoi modelli, inqualsiasi momento e senza preavviso, quelle modifiche che ritenesse utili permigliorarli o per qualsiasi esigenza di carattere costruttivo e commerciale.
The illustrations and descriptions given in this brochure are intended as a generalguide only, and must not be taken as binding. The Company, therefore, reservesthe right to make, at any moment and without prior notice, any changes it thinksnecessary to improve its models or to meet any requirements of manufacturing orcommercial nature.
Printed in Italybatan - Gardone V.T.
Beretta Pubblicità - C6960912/05

Fabbrica d'Armi Pietro Beretta S.p.A.Via Pietro Beretta, 1825063 GARDONE VAL TROMPIA (Brescia) ItaliaTel. (030) 8341.1 www.beretta.com