Manual - Rolling Thunder Games, Inc. Home Page
86
ROLLING THUNDER GAMES PRESENTS SuperNova: Rise of the Empire
Transcript of Manual - Rolling Thunder Games, Inc. Home Page

R O L L I N G T H U N D E R G A M E S P R E S E N T S
SuperNova: Rise of the Empire

Rolling Thunder Games, Inc. PO Box 310
Eastlake, CO 80614-0310
Web site – www.rollingthunder.com Email – [email protected]
� Voice – 303 452 7700 (9:00am-5:00pm M-F Mountain Standard Time) � � Fax – 303 920 7270 �
Copyright © 2002-2003 by Rolling Thunder Games, Inc. All rights reserved.
v.2.50

I N T R O D U C T I O N
Introduction Sixteen Glorb’ton Assault Battlecruisers and a dozen Frigates materialized in the Proxima star system. Fifty-four Thallani Federation Heavy Drone Cruisers flanked by eight awesome Base Stations pounded the Glorb’ton ships with withering fire, but two of the Battlecruisers managed to survive and their shields and defensive systems came fully on-line. Six of the Thallani Cruisers were vaporized by Glorb’ton Fusion Blasters while Thallani drones swarmed about the warp point. Another wave of Glorb’ton ships popped in, but this time two of the dreaded mobile Monitors were in their midst. Four Thallani Base Stations, bristling with X-Ray Lasers and towed to the Warp Point to provide short range firepower, disappeared under massive Glorb’ton Fusion Blaster fire. Their Drone Cruisers’ shields were never designed to withstand this much firepower, and twenty were incinerated as their very atoms were induced to begin irreversible nuclear chain reactions. The Thallanians had never heard of Phase Inverter technology, and suffered dearly for this shortfall, while the Glorb’ton ships were agile and outfitted with special armor coatings to counter the known Thallani weapons. More Glorb’ton ships poured into the system, and the Thallani crews knew they were doomed. Their commander ordered his ships to concentrate on the Frigates and other enemy screening vessels, hoping to take down as many as possible before his command crumbled. The rest of the Thallani force went code Omega and were blown into oblivion as the remainder of the Glorb’ton Autocracy 52nd Greater Claw Task Force rumbled through the warp tunnel. Soon the hated Thallanians would be ground under scaly Glorb’ton tentacles, glorifying the rule of His Majesty, Ur-Lord Kahnn’ta….
W H A T I S S U P E R N O V A ?
SuperNova: Rise of the Empire, or SN:ROTE, is an interactive game of galactic conquest, colonization and exploration based on the highly popular SuperNova system. Rolling Thunder Games moderates SN:ROTE using a computer network for data storage, order processing, combat resolution and a host of other game-related features. As a player, you choose your own objectives, interact with an unlimited number of other players and control your own destiny. You will construct mighty warfleets, colonize entire worlds and explore the galaxy in search of the unknown. You will make decisions that will affect the course of your Empire, the destiny of other neighboring Empires and perhaps influence the history of the galaxy itself. SN:ROTE provides a playing environment of incredible detail, diversity and flexibility. The galaxies of SN:ROTE are a complete space fantasy environment featuring detailed planets, diverse lifeforms and many, many unknown elements that wait to be discovered. You will discover all this and more as your exploration vessels leave your home system to explore the stars.
There are no winners or losers determined in SN:ROTE, as the game does not end. Players set their own goals and decide how they want the game to proceed. In some cases, many Players will have to work together to defeat common threats. Other Players might wish to remain neutral and aloof, slowly building up their Empires and finding enjoyment in solving their problems without outside aid. Computer-controlled neutrals exist in the game as well, and can be ignored or conquered as the Players see fit. They may even ally with Players who use in-game diplomacy with such positions. The possibilities for how the game will develop are endless, as the Players set the stage for a grand space opera of galactic proportions.
Chapter

I N T R O D U C T I O N
W H A T I S T H E P L A Y E R ’ S R O L E ?
Each player represents the leader of a world of beings that is just now reaching out to the stars. The various nations or factions present on your homeworld for countless generations have united under your rule, and you alone control the destiny of your civilization. Countless other Players from all around the world are also directing their Empires to explore the stars and make names for themselves. Some may live near you, in other states, or even in other countries. Many of these Players will never meet, while others will form alliances, discuss endless strategies by email or phone, fight in titanic battles or simply live in peace. Resources and Items can be exchanged between Empires, allowing for a vibrant trade system that depends only on the needs and desires of the various trading partners. Internally, as leader of your civilization, you will have plenty of economic decisions to make. Will you devote your starting resources to the construction of warfleets with which to conquer your neighbors? Perhaps building up your infrastructure and biding your time until your scientists can develop superior technology would be wise. Colonization and mining of other planets may be something to consider as well. With countless other Players making the same decisions, some beginning near your precious homeworld, these decisions are of the utmost importance to the very survival of your Empire. If another Player decides to be aggressive and shows up on your doorstep with a warfleet, things could get ugly. It’s hard to deny: blasting another Empire into radioactive ruin can be a lot of fun, especially if you’ll never have to face that Empire’s Player in real life. On the other hand, alliances can secure your borders and let every ally grow in peace, to be prepared to face a common threat.
H O W C A N I P L A Y T H I S G A M E ?
Rolling Thunder Games, or RTG, maintains the central computer database and manages every aspect of the game. Players submit orders, generally every two weeks, which are processed by the RTG computers. Results are sent back to the Players, who then plan their next moves. A lot of diplomacy takes place on the Player’s end as you confer with allies, threaten enemies and perhaps try to make new friends.
To begin play, all you need to do is fill out the Empire Setup form found at the end of these rules. You’ll choose your Empire Name, Imperial Emblem and Imperial Tradition, and will design every aspect of your lifeform. Check out Chapter 11 for more details on the incredible lifeform design system—you can choose to be anything from an Amphibious Cephalopod to a Winged Reptile. Send this in to Rolling Thunder Games along with some funds to get your account started, and during the next processing cycle the RTG gamemasters will get you set up and ready to go. The best way to pay for your turns is to send us $10.00 or more to get your account started, and then replenish this amount each time you have used up what is in your account. We recommend paying with check or money order (don’t send cash through the mail!). Many players set up their accounts to be replenished automatically via a MasterCard or VISA card; when your account reaches zero dollars, RTG charges your credit card a set amount, so you never have to worry about running out of funds. You also have the option of paying via the PayPal system if you prefer that method (see our website for details).
G A M E E V O L U T I O N
SN:ROTE is designed with growth in mind. As the game progresses, we may add new elements to expand upon the game and make it more enjoyable for all concerned. If you wish to participate in this process, simply send us your ideas. If they are practical and within the scope of the game we may be able to include them in a future upgrade. If you have any questions about the game, feel free to contact RTG any time.
P R O C E S S I N G F E E S
Here’s a list of the charges associated with playing SuperNova: Rise of the Empire. Each turn sheet is charged $6.00, with additional turn sheets being available if you need more orders. It will be a while before you need to submit more than one or two turn sheets, but if you become really huge you could conceivably submit many hundreds of orders in a single turn—you’d have to be really big and powerful for that, though. Almost every Player will get by just fine on the regular 30-60 order turns. You can run as many Empires as you wish—many Players like to try out new Empire ideas, such as devoting one to research while another is more suited to combat or colonization.
If you play by post (mailing your turns in and/or receiving your results by hard copy), there is an extra fee (turn sheets cost $8.00) to cover the time it takes us to enter your orders manually and then print and mail your results back to you. We strongly encourage every player to use the entry program to submit your orders, as it virtually eliminates order entry errors, and the turn results are emailed out—so you get your results very quickly. It’s also a lot easier for you to store your results electronically, so you can refer to old turns with ease.
The rulebook & all other game materials (including player-developed game aids) can be downloaded free of charge from the RTG web site at www.rollingthunder.com
By the way, the average cost of a SN:ROTE Empire is about $12-$24 per month. Considering the time you will spend reading your turn results, working out your next set of orders, designing your ships, talking to your allies, threatening your sworn enemies (you can bet you’ll have some!), figuring out clues to galactic history, guessing as to the use of alien artifacts and planning gloriously successful military campaigns, we believe you will find that your average cost to play SN:ROTE is about $1 an hour or lower. We hope that you will find this to be an excellent value for your entertainment budget.

I N T R O D U C T I O N
Schedule of Fees $USD
Rulebook $10.00
Set up a new Empire $10.00
Turn (30 orders) $6.00
Postal Turn (30 orders) $8.00
S T A N D I N G O R D E R S
Standing Orders can be submitted just like regular orders. At the beginning of each subsequent turn, all of your Standing Orders are appended to whatever regular orders you submit for that turn cycle. If you don’t submit any regular orders, your Standing Orders will still be processed. They represent an excellent way to avoid writing the same orders over and over again each turn. There is also no charge for Standing Orders so you can use them to get more value for your $ on your turns.
The first time that you submit a particular Standing Order, it will be stored for future use and executed that turn as well, in whatever order Priority it was issued. In future turns, it will be added to end of the regular orders that you submit.
All orders beginning with the letter “X” are Standing Order versions of regular orders. Standing Orders are displayed on every turn result, and you can delete Standing Orders with the DELS order. Refer to the Order Supplement booklet for more details on the precise format for each of these orders.
Standing Orders
XBOMB (Orbital Bombardment) XNM (Naval Movement)
XCTRN (Colonist Training) XOC (Offload Cargo)
XDIP (Diplomacy) XSENS (Sensor Sweep)
XEXPL (Exploration) XSHIP (Build Ship)
XLC (Load Cargo) XSKIM (Skim Gas Giant)
XLFE (Live Fire Exercise) XTR (Transfer Items)
XMOVE (Move To Warp Point) XWARP (Warp Movement)
A U T O T U R N S
In the event that you miss submitting orders for your empire, an Auto Turn will run instead so that your empire does not sit idle. All your installations will operate normally on an Auto Turn (shipyards, mines, etc.) and all of your tooled production orders will execute normally as well. Standing Orders, if you have any set up, will execute along with all other normal processing events for the turn (i.e. research will be conducted, Legendary Characters may be discovered/promoted, etc.).
Auto Turns are charged at the single turn rate of $6.00 for email players and $8.00 for postal players and you will receive your results as normal. Since an Auto Turn is the norm when you miss submitting orders for an empire, it is important that you contact us and let us know if you no longer wish to play a given empire.

I N T R O D U C T I O N

T H E U N I V E R S E
2222----1111
The Universe Your home planet orbits a star in a fairly typical spiral galaxy. The nature of the stars, planets, asteroids and other astronomically interesting heavenly bodies is discussed herein.
H I S T O R Y O F T H E U N I V E R S E
You can surmise there is a greater Universe outside of the Galaxy that you live in. Much of this Universe and its history is unknown to your people. The history of the Universe is a topic to occupy the thoughts of advanced starfaring races, not those of young races just beginning to reach out to the stars around them. As your Empire advances, however, Universal events will take on much more importance. You might begin the search for knowledge of the Universe and of the events that took place in the distant past, and perhaps make additions of your own.
H I S T O R Y O F T H E G A L A X Y
The Galaxy, of which your home star system is but a mote, consists of an incredible number of suns. Initially, your race will be concerned with the more immediate needs of a young, growing Empire but, in time, you will become aware of the deeds of past civilizations and the secrets which have been lost for uncounted thousands of years. As your Empire expands amongst the stars, you will slowly become aware of events that happened long ago. It is fabled that ancient races once roamed the Galaxy at will, but some unknown cataclysm brought them to extinction. It is believed that some still exist, but little is known of them. Why is it that your tiny Empire is just now beginning to reach for the stars, at a time when, surely, many other races are doing the same thing? And why do you possess some fairly advanced technologies, while knowledge of other advances remains unknown? The answers to these and other mysteries may lie hidden among the stars….
T H E G A L A C T I C M A P
The region of the Galaxy in which your homeworld resides is but a small fraction of the Galaxy as a whole. Even so, many tens of thousands of stars, and countless planets, asteroids and other objects are tracked by the central SN:ROTE database manager. Exploring every star system is a virtually impossible task, though through collaborative mapping efforts, many Empires may be able to construct an accurate map of a section of the Galaxy.
Every star system is connected to at least one other star system by means of a Warp Point. Some star systems may have many Warp Points, making a web or mesh of Warp Lines that connect every system to every other system. The grid of Warp connections can become quite convoluted, making an accurate map of a large area a truly valuable resource. Fleets of ships may pass through these Warp Points to travel from one stellar object to another, and indeed this is the only known way to move ships about.. Though STL (Slower Than Light) travel is theoretically possible, the travel time for such journeys is so long as to extend beyond the scope of the game.
The challenge in actually mapping the Galaxy will be interesting, for there are no arbitrary “XYZ” references given to each star system. By analyzing the various Warp Point connections in a region of space, you will construct your own map that you can then use to determine the best way to move from one system to another nearby star. To ease the exchange of knowledge between Empires, every star system has been given a unique name that does not change for each Empire. Thus, if you and another player both discover a star system named “Khartoum”, you can be certain that your Empires share a common border.
Chapter
T H E U N I V E R S E
2222----2222
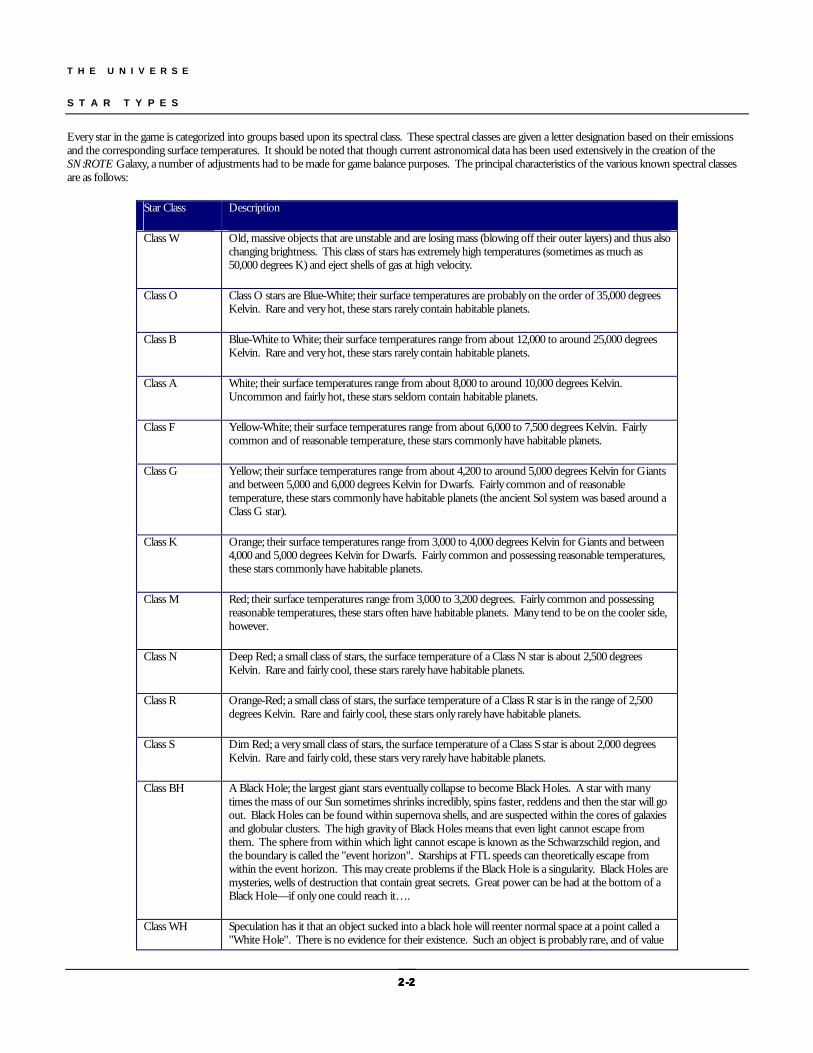
S T A R T Y P E S
Every star in the game is categorized into groups based upon its spectral class. These spectral classes are given a letter designation based on their emissions and the corresponding surface temperatures. It should be noted that though current astronomical data has been used extensively in the creation of the SN:ROTE Galaxy, a number of adjustments had to be made for game balance purposes. The principal characteristics of the various known spectral classes are as follows:
Star Class Description
Class W Old, massive objects that are unstable and are losing mass (blowing off their outer layers) and thus also changing brightness. This class of stars has extremely high temperatures (sometimes as much as 50,000 degrees K) and eject shells of gas at high velocity.
Class O Class O stars are Blue-White; their surface temperatures are probably on the order of 35,000 degrees Kelvin. Rare and very hot, these stars rarely contain habitable planets.
Class B Blue-White to White; their surface temperatures range from about 12,000 to around 25,000 degrees Kelvin. Rare and very hot, these stars rarely contain habitable planets.
Class A White; their surface temperatures range from about 8,000 to around 10,000 degrees Kelvin. Uncommon and fairly hot, these stars seldom contain habitable planets.
Class F Yellow-White; their surface temperatures range from about 6,000 to 7,500 degrees Kelvin. Fairly common and of reasonable temperature, these stars commonly have habitable planets.
Class G Yellow; their surface temperatures range from about 4,200 to around 5,000 degrees Kelvin for Giants and between 5,000 and 6,000 degrees Kelvin for Dwarfs. Fairly common and of reasonable temperature, these stars commonly have habitable planets (the ancient Sol system was based around a Class G star).
Class K Orange; their surface temperatures range from 3,000 to 4,000 degrees Kelvin for Giants and between 4,000 and 5,000 degrees Kelvin for Dwarfs. Fairly common and possessing reasonable temperatures, these stars commonly have habitable planets.
Class M Red; their surface temperatures range from 3,000 to 3,200 degrees. Fairly common and possessing reasonable temperatures, these stars often have habitable planets. Many tend to be on the cooler side, however.
Class N Deep Red; a small class of stars, the surface temperature of a Class N star is about 2,500 degrees Kelvin. Rare and fairly cool, these stars rarely have habitable planets.
Class R Orange-Red; a small class of stars, the surface temperature of a Class R star is in the range of 2,500 degrees Kelvin. Rare and fairly cool, these stars only rarely have habitable planets.
Class S Dim Red; a very small class of stars, the surface temperature of a Class S star is about 2,000 degrees Kelvin. Rare and fairly cold, these stars very rarely have habitable planets.
Class BH A Black Hole; the largest giant stars eventually collapse to become Black Holes. A star with many times the mass of our Sun sometimes shrinks incredibly, spins faster, reddens and then the star will go out. Black Holes can be found within supernova shells, and are suspected within the cores of galaxies and globular clusters. The high gravity of Black Holes means that even light cannot escape from them. The sphere from within which light cannot escape is known as the Schwarzschild region, and the boundary is called the "event horizon". Starships at FTL speeds can theoretically escape from within the event horizon. This may create problems if the Black Hole is a singularity. Black Holes are mysteries, wells of destruction that contain great secrets. Great power can be had at the bottom of a Black Hole—if only one could reach it….
Class WH Speculation has it that an object sucked into a black hole will reenter normal space at a point called a "White Hole". There is no evidence for their existence. Such an object is probably rare, and of value

T H E U N I V E R S E
2222----3333
for research.
Class CV A pulsating Cepheid Variable star that often experiences a change in magnitude every 1-50 days. Most appear in two main categories. Type I Cepheid Variables are younger and are about 1.5 magnitudes brighter than Type II’s. Luminosity periods of 5-10 days are typical. Type II Cepheid Variables have luminosity periods of 12-30 days. Observing a Cepheid Variable star from a safe distance can be quite exhilarating.
Class NN The ultimate fate of a star depends on its mass. A star with enough mass (at least four times that of our Sun) may go supernova, while the remaining core will collapse until the pressure of the neutrons equals the pressure exerted by gravity—creating a Neutron Star. A typical Neutron Star is a hot, dim object only 20 miles across, with a very powerful gravity. There is evidence that Neutron Stars may retain planets, although any such are almost often airless and ocean-free, charred by the supernova blast. The matter of a Neutron Star (Neutronium) is extremely dense—a teaspoonful weighing billions of standard tons.
Class P Neutron Stars with a powerful magnetic field and a rapid rotation emit pulses of high energy—visible light and hard radiation—at regular intervals, making them Pulsars. The pulse of such a star is visible only in the plane of rotation--viewing the star from the directions of its poles, it would not seem to pulse. The pulse is extremely hazardous to all but the most heavily-shielded ships. Pulsars may retain planets.
Class T A large gaseous sphere, held together by its own gravitational attraction, that shrinks and compresses to become a class T Protostar.
Class RR Change of one magnitude in 1 - 24 hours. Type RR’s are called Lyrae Variables and are often old giant stars. Spectral types range from A7 to F5
Class SS Another star with a changing magnitude, Class SS Cygni Variables are similar to RR Lyrae Variables but Cygnis sometimes exhibit nova-like bursts of energized particles. This pulse is incredibly dangerous and can be difficult to predict.
Class UV The UV Ceti Flare class of stars is extremely rare, and little is known of them. The chance of finding habitable planets around such stars is thought to be quite low.
Class WD After a red giant throws off its last planetary nebula, the core that remains is a White Dwarf star—a ball of degenerate matter at a uniform temperature. It is small but extremely dense, rarely larger than a medium-sized planet. If any worlds survive, they are usually long-dead, outer-orbit cinders (the inner worlds were destroyed when the star became a red giant)
Class BD Huge gas giants that masquerade as Red Dwarfs due to the heat generated by compression (they are not hot enough to ignite a thermonuclear reaction). Class BD Brown Dwarfs are roughly 70 times Jupiter's mass. Once they compress to 0.90 Jupiter's diameter, they stop shrinking and cool off, slowly dimming over the next few billion years. A dim body of less than 0.1 solar masses with not enough self-gravity to fuse hydrogen to helium, Brown Dwarfs are not thought to have much chance of containing habitable planets.
Class KD White dwarf stars eventually cool and become dark and dead, a Black Dwarf. Any remaining worlds are perpetually frozen. Formerly inhabited worlds of such suns will be eerie museums, full of relics of their vanished people.
Class X These are X-Ray Binaries where one component is a normal star and the other is either a Black Hole or Neutron Star. Matter from the normal star flows to its companion, producing radiation. If a Black Hole is involved, the radiation is continuous and includes radiation all across the spectrum, including visible light and gamma rays
Class XX A subclass of the X-Ray Binary, Class XX’s are binaries where the companion is a Neutron Star. In this case the effect of the flowing radiation is more nova-like, and very energetic, producing frequent bursts of hard X-rays. The Class XX is called an X-Ray Burster and is an exceedingly dangerous system to be in.

T H E U N I V E R S E
2222----4444
Class Y A Nova star system. When two stars of unequal mass form a close binary pair, the larger star will use its fuel faster - going to Red Giant and then White Dwarf stage before its companion. When a Red Giant is a close companion with a White Dwarf star, the White Dwarf will collect hydrogen from the Red Giant's stellar atmosphere. The hydrogen compresses under the dwarf's gravity until it flares into a brief thermonuclear reaction—a nova. Such a binary pair may "go nova" several times in its lifetime. Each time, ejected material forms a spherical shell of gas or "nova shell" around the system, up to 12 parsecs across. It is probable that there are other mechanisms—for instance, collision with a large planet or even a dense nebula—that could create a nova or nova-like effect. Creation of a nova through artificial means would certainly make for a terrible weapon of war.
Class Z Unlike novae, Class Z Supernovae are formed by single stars, and are the result of fusion of heavier elements than hydrogen. The great Blue Giant stars often blow themselves apart quite spectacularly, shining for several months more brightly than all the other stars in their region of the galaxy combined. The explosion causes a shock-wave effect, which may help form gas clouds and trigger the formation of new stars. A star only goes Supernova once, leaving behind a huge gas shell up to 60 parsecs across, and often a Neutron Star or Black Hole at is core.
T Y P E I S U P E R N O V A E
Two main sequence stars that are no more than eight solar masses each begin as a close binary. The more massive of the two evolves faster, turning into a Red Giant while the other is still in its main sequence stage. As the Red Giant expands, its outer layers are captured by the gravity of the second star and several solar masses of hydrogen flow from the Red Giant to its main sequence companion. Hydrogen from the red giant may build up so quickly that the companion's gravity cannot hold it all. Some of the escaping gas then forms a cloud that cloaks both stars. This shared envelope drags on the stars and changes their orbits, bringing them closer together (the distance between the two decreasing by as much as 90 percent) and their orbital movement creates an eggbeater effect that churns up the envelope, sending most of it flying out of the binary system. All that remains of the Red Giant after the loss of matter is a dense core that has fused to carbon and oxygen. Stripped bare, this core becomes a White Dwarf, a star as massive as the Sun but no bigger than earth. The White Dwarf and its main sequence companion, which now contains the only hydrogen in the system, continue to orbit their common center, but at much closer range. In time the second star reaches the Red Giant phase and produces a swollen hydrogen envelope that is eventually captured by the gravity of the White Dwarf. The cycle begins again with hydrogen flowing from the Red Giant to the White Dwarf and another shared envelope is formed. The envelope brings the two closer together again while their orbital action drives out most of the hydrogen. Eventually, two White Dwarfs are left in an extremely close orbit with each other. Their gravitational interaction produces gravity waves that carry away some of their orbital energy, making their eventual merger inevitable. The two White Dwarfs eventually circle so closely that, in effect, the stars merge, the mass of one accumulating on the surface of the denser companion. This added mass further compresses the receiving star, exceeding the critical limit of 1.44 solar masses and igniting a thermonuclear flame. As the thermonuclear fire rips through the combined mass of the two stars, carbon and oxygen atoms are fused into a variety of heavy elements, some with strong radioactive emissions. As with the explosion of a Type II Supernova, this stellar conflagration flings matter into space but without even a trace of the hydrogen with which the stars began.
T Y P E I I S U P E R N O V A E
A massive star burns up its hydrogen rapidly, ending its time on the main sequence and swelling into a Red Supergiant. It is possible for a Blue Supergiant to bypass the Red Giant stage and become a Supernova directly (SN1987A—the Blue Supergiant Sanduleak, is an example of this). As the gravitational collapse in the core pushes its temperature past 170 million degrees, a new series of fusion reactions begins. Helium atoms fuse to form heavier elements, primarily carbon and oxygen. The energy released by this fusion halts the contraction of the core and holds the star stable for about a million years. The center of the star now consists of a hot, dense shell of helium that encloses an even hotter and denser carbon and oxygen core. When most of the helium in the inner shell has been used up, fusion energy once again cannot counteract gravitational collapse and the core begins to collapse (1,000 years to go). When gravitational contraction raises the temperature of the carbon core to 700 million degrees, fusion reactions begin converting carbon to neon and magnesium. When the temperature at the heart of the star's collapsing core reaches 1.5 billion degrees (7 years to go), neon atoms fuse to form more oxygen and magnesium. As the core temperature soars above two billion degrees (1 year to go), the most tightly compressed oxygen atoms fuse to form silicon and sulfur. Surrounding these elements are concentric shells of oxygen, neon, carbon, helium and hydrogen. The mounting pressure of the collapse drives the temperature past three billion degrees (a few days to go), converting silicon and sulfur in the heart of the contracting core to a tighly compressed sphere of iron that measures approximately 1.44 solar masses. Because of the iron's nuclear structure, which does not permit its atoms to fuse into heavier elements, this is the last reaction that can take place in the core. When the fusion reactions in the innermost core cease (tenths of a second to go), the star begins the final phase of gravitational collapse. The iron heart of the star crushes in on itself at speeds approaching 45,000 miles per second (about 25% the speed of light). The core's temperature rises to 100 billion degrees as an earth-size object is packed into a sphere just ten miles across. Matter in the core has now reached the point physicists call "maximum scrunch" and can endure no further compression. The repulsive force between the nuclei overcomes the force of gravity, and like a tensely coiled spring, the inner part of the iron core snaps back. The recoil of the central cores hurls matter out from the heart of the star in an explosive shock wave that blasts through the silicon layer, heating it and fusing some of its nuclei into radioactive isotopes of nickel and other heavy elements. The explosion will continue to create new elements at it speeds out through the layers of the core. As the shock wave sends matter from the interior into space, all that remains is a small superdense sphere composed almost entirely of neutrons—a new Neutron Star has been born.
T H E U N I V E R S E
2222----5555
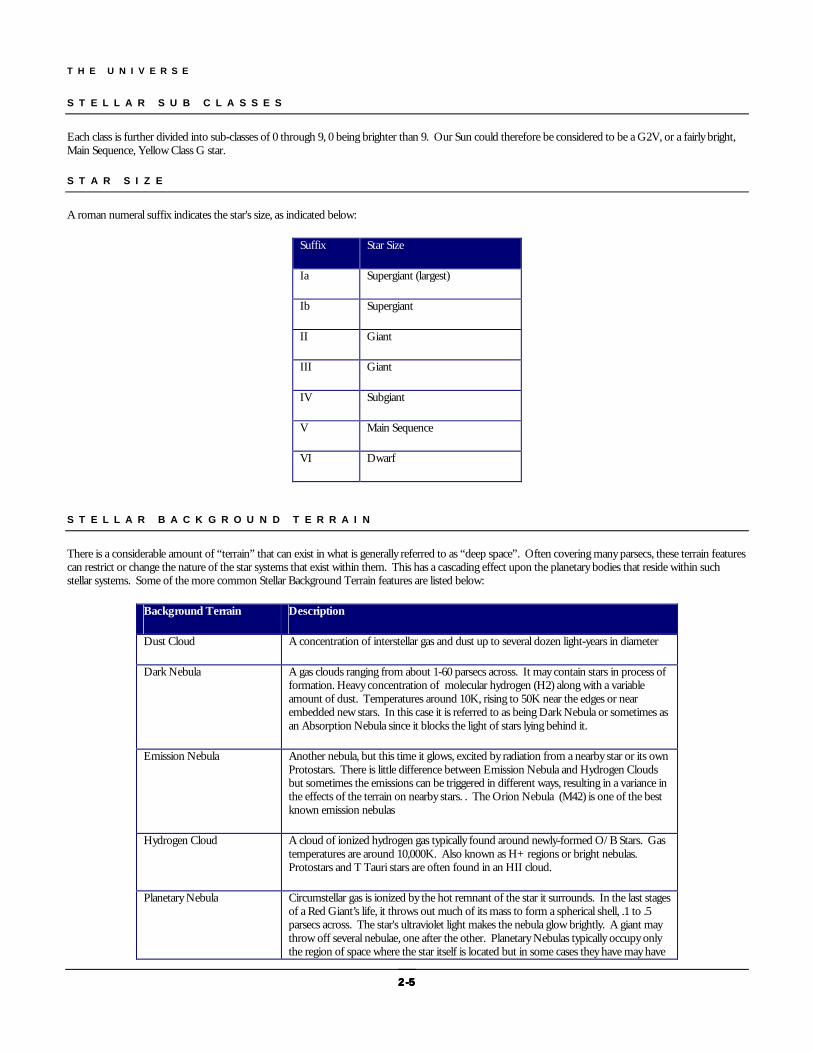
S T E L L A R S U B C L A S S E S
Each class is further divided into sub-classes of 0 through 9, 0 being brighter than 9. Our Sun could therefore be considered to be a G2V, or a fairly bright, Main Sequence, Yellow Class G star.
S T A R S I Z E
A roman numeral suffix indicates the star's size, as indicated below:
Suffix Star Size
Ia Supergiant (largest)
Ib Supergiant
II Giant
III Giant
IV Subgiant
V Main Sequence
VI Dwarf
S T E L L A R B A C K G R O U N D T E R R A I N
There is a considerable amount of “terrain” that can exist in what is generally referred to as “deep space”. Often covering many parsecs, these terrain features can restrict or change the nature of the star systems that exist within them. This has a cascading effect upon the planetary bodies that reside within such stellar systems. Some of the more common Stellar Background Terrain features are listed below:
Background Terrain Description
Dust Cloud A concentration of interstellar gas and dust up to several dozen light-years in diameter
Dark Nebula A gas clouds ranging from about 1-60 parsecs across. It may contain stars in process of formation. Heavy concentration of molecular hydrogen (H2) along with a variable amount of dust. Temperatures around 10K, rising to 50K near the edges or near embedded new stars. In this case it is referred to as being Dark Nebula or sometimes as an Absorption Nebula since it blocks the light of stars lying behind it.
Emission Nebula Another nebula, but this time it glows, excited by radiation from a nearby star or its own Protostars. There is little difference between Emission Nebula and Hydrogen Clouds but sometimes the emissions can be triggered in different ways, resulting in a variance in the effects of the terrain on nearby stars. . The Orion Nebula (M42) is one of the best known emission nebulas
Hydrogen Cloud A cloud of ionized hydrogen gas typically found around newly-formed O/B Stars. Gas temperatures are around 10,000K. Also known as H+ regions or bright nebulas. Protostars and T Tauri stars are often found in an HII cloud.
Planetary Nebula Circumstellar gas is ionized by the hot remnant of the star it surrounds. In the last stages of a Red Giant’s life, it throws out much of its mass to form a spherical shell, .1 to .5 parsecs across. The star's ultraviolet light makes the nebula glow brightly. A giant may throw off several nebulae, one after the other. Planetary Nebulas typically occupy only the region of space where the star itself is located but in some cases they have may have

T H E U N I V E R S E
2222----6666
expanded into neighboring star systems as well. The star Betelgeuse is surrounded by a Planetary Nebula; the Ring Nebula (M57) is another example.
Radiation Cloud Temperature of 1,000,000K and density of less than 0.1 atoms per cubic centimeter. It emits X-rays and can also be detected by UV absorption lines of highly ionized atoms. Radiation Clouds can create dangerous conditions and should be traversed with care.
SNR Nebula An expanding Supernova Remnant Nebula, consisting of the stellar matter ejected by a Supernova. There is not always a Supernova star system of interest inside an SNR Nebula, but the SNR can create interesting effects on the star systems located within it.
Weak Space In some regions of space the very fabric of the galaxy has been torn asunder, leaving gaps where other dimensions intrude upon space-time as we know it. The very laws of physics are ignored, often causing totally unpredictable effects.
P L A N E T A R Y D A T A
As your fleets explore new star systems, you will encounter planets that are beyond your experience. They will differ in size, gravity, density, axial tilt, hydrographics, atmosphere, resources and a number of other areas. Few, if any, will be exactly like your homeworld. Descriptions of the more common planetary attributes follows. It should be noted that this is not a complete list of everything you might find on a given planet, but these charts do give you a good start.
P L A N E T C L A S S
Each world, when originally created, is determined to be of a certain basic type. This Planet Class is then used to figure the remaining aspects of the world in question. The star system where the planet resides, along with Stellar Background Terrain, play primary roles in this determination.
Planet Class Description
Asteroids Asteroids may be present in the place of a planet that never coalesced into a larger world, the could be interstellar debris captured by the primary of the system, or perhaps are the remnants of a world obliterated by weapons of epic power. Asteroids can be colonized just like any other “planet”, but your colonists should be prepared for a cold, airless welcome upon arrival.
Frozen Rockball Frozen Rockballs often result in cold worlds located on the outer fringes of a star system. Riches can be found on such worlds, but you’ll have to dig beneath many layers of snow and ice to find them.
Frozen Terrestrial Frozen Terrestrial worlds often appear on the outskirts of a star system. If within the star’s biozone (distance from the star where habitable planets are most often found), such planets are generally cooler than normal.
Gas Giant A massive ball of gas that was not massive enough to ignite and become a star. Gas Giants are often rich in industrial-grade gases and chemicals. They can be colonized, almost always through use of orbiting habitats. Ships with Fuel Shuttles can also skim Gas Giants for unrefined gases which can then be used to fuel their Jump Drives.
Hot Rockball Hot Rockballs are most often found from the star out to the inner limit of the biozone. Though any world can possess a wide range of resources, Hot Rockballs have the best chance to possess both heavy and light metals.
Terrestrial Terrestrial planets have the best chance of becoming useful colonies. They are most often found with the stellar biozone, but otherwise exhibit a wide variety of Terrain Types.

T H E U N I V E R S E
2222----7777
P O I N T T E R R A I N
Specific terrain types that occur at the star system level are known as Planetary Point Terrain types, or more simply as Point Terrain. These are the terrain features that you will most concern you since they can have dramatic effects on the survival of your star fleets. Combat within any of these areas can have drastic effects. Just surviving them is bad enough, but fighting in one? You’re taking your chances, to be sure. It should be noted that the density and power of these terrain features is considered to be artificially high so as to make life more…interesting…for your starships. In reality, the density of a Meteor Storm would be so low as to cause few troubles for a starship with decent scanners. But reality doesn’t always make for good game dynamics….
Point Terrain Description
Circumstellar Shell This is a shell of gas and solar particles thrown outward from a sun. It can be dangerous for ships that are not protected against certain types of particle emissions.
Cometary Cloud A large group of asteroid-sized bodies of dusty ice that travels in an elongated orbit around a star. Chunks of ice moving in every direction often fills such an area.
Cometary Storm Similar to a Cometary Cloud, but with many more comets moving at extreme velocities. A Cometary Storm is no place for slow ships lacking in point defense weaponry.
Coronal Gas Cloud Coronal Gas Clouds are very similar to the Stellar Background Terrain known as a Radiation Cloud. Temperatures can exceed 1,000,000°K but it often has low densities of less than 0.1 atoms per cubic centimeter. A CGC emits x-rays and can also be detected by UV absorption lines of highly ionized atoms. Often created by Supernovae. The extreme heat and radiation can pose problems for explorers.
Dust Cloud Heavy concentrations of dust and microscopic particles gathered together into a dangerous cloud.
Gravity Well Zone Powerful gravitational forces can sometimes create a Gravity Well Zone. Ships with weak engines that enter such an area could be sucked into whatever created the Gravity Well. This spells doom for the ship as it is crushed into the size of a small pancake in mere seconds.
Heat Zone Super hot gases and radiated emissions can create an area that is so hot as to be nearly impassable for unshielded ships. Unprotected starships can expect to have their hulls melted away into slag in a few minutes.
Ion Storm Ionized particles moving in a deadly cloud can severely disrupt the electronic equipment of any starship unfortunate enough to be caught unprotected in its midst.
Meteor Storm A Meteor Storm is an incredibly dense group of asteroids traveling at high speeds through a star system. Ships without sufficient protection from kinetic energy weapons should expect to be pulverized by the vengeful meteors.
Plasma Cloud Plasma Clouds are regions of space filled with gases that somehow became heated into a free standing plasma state. Starships without proper protection will find themselves vaporized on contact with hotter portions of this deadly cloud.
Radiation Zone Fantastic radiation emissions could wreak havoc on an unshielded starship. It may be possible for a properly protected ship to survive a Radiation Zone, but the crew of an unshielded ship are likely goners.
Solar Flare Zone This is a region of space, often close to a star, where solar flares are common. Most of the time, a Solar Flare Zone is safe for travelers. A starship might remain in one for weeks and not see any solar activity. For long periods of time, everything is quiet. In the next instant, a plasmatic arm of death could reach out and incinerate the ship without any warning. One second you’re there…and the next, you’re gone.
Temporal Rift Zone Space-time is a funny thing. Temporal Rift Zones can appear just about anywhere, perhaps caused by unstable regions of space, or maybe even as a result of the use of advanced weapons of incredible power. Ships caught in an Temporal Rift Zone might find themselves teleported

T H E U N I V E R S E
2222----8888
forward or backward in time, with utterly unpredictable results.
Unstable Space Zone Temporal Rift Zones aren’t the only danger when a ship comes into an area of weak or disrupted space. A starship entering an Unstable Space Zone might find itself transported halfway across the galaxy, or into another dimension from which return is improbable. If there’s a defense against the destructive effects of an Unstable Space Zone, or a way to control it, the technology would surely be extremely advanced in nature.
A T M O S P H E R E
The Atmosphere of a planet is given as the predominant or active gas present. Thus, an Atmosphere of Oxygen means that Oxygen is either extremely abundant or that it is the active gas needed to support life on the world in question. Other elements are also present in large quantities, as are trace gases which are often vital to a healthy Atmosphere.
Atmosphere Description
Ammonia The irritant Ammonia often mixes with Nitrogen, a common semi-irritable gas, to form a viable atmosphere. Ammonia, which has a sharp, pungent odor, forms the active component needed to support life on the world.
Carbon Dioxide A common non-irritant gas. Carbon Dioxide atmospheres have the property of trapping heat, causing a high greenhouse effect. Planets with Carbon Dioxide atmospheres generally have relatively high surface temperatures.
Chlorine Chlorine is an irritant gas. It is greenish-yellow in color, corrosive and a deadly poison to lifeforms not accustomed to it. Chlorine concentrations are easily detected by their odor and color.
Hydrogen A non-irritant gas, Hydrogen makes up a significant portion of the atmosphere of many cold worlds, as well as most Gas Giants. In the case of most Gas Giants, the Hydrogen and other gases deep in the gravity well compresses and becomes quite hot.
Ionized Metals Ionized Metal atmospheres are found on worlds with exceedingly high surface temperatures. Ionized Metal atmospheres are deadly to most lifeforms.
Methane A non-irritant gas, Methane is odorless and colorless. Methane generally forms the active component of an atmosphere on cold worlds.
Nitrogen A purely Nitrogen atmosphere is very rare; instead, Nitrogen often bonds with Ammonia or Oxygen to form a viable atmosphere. Atmospheres with large amounts of Nitrogen are almost always cooler in nature, if not outright frigid.
Oxygen A standard Oxygen/Nitrogen gas mix similar to that found on Earth. Oxygen forms the active component needed to support life on the world.
Sulfur Dioxide Sulfur Dioxide is an irritant. It is yellowish in color, corrosive and deadly to lifeforms not accustomed to it. This unpleasant smell of old eggs is pervasive.
Vacuum Vacuum worlds are generally either too hot or too cold to retain a viable atmosphere. Inhospitable and devoid of free standing bodies of liquids, some of these worlds may have had an atmosphere in the past, but it was stripped away countless thousands of years ago by some cataclysmic event.

T H E U N I V E R S E
2222----9999
H Y D R O G R A P H I C P E R C E N T A G E
Some planets have large bodies of free standing liquids present on their surface. Like all other terrain types, the percentage of the planetary surface area covered by oceans is given as a result of a Planet Map mission. Such oceans could consist of water, liquid ammonia, seas of methane, liquid nitrogen, molten metals, acids or any of a variety of bizarre compounds. The exact composition of the oceans would depend on the atmosphere and the average temperature of the planet.
T E R R A I N T Y P E S
The terrain present on any world is used primarily as a factor in ground combat and colonization (your troops and colonists are used to fighting and surviving in the terrain types that they have grown up around), raw resource availability and special exploration finds. The presence of any given terrain on a world depends on many factors, most importantly including the World Class, Temperature Class, Star Type and Atmosphere. The possible combinations of terrain types on any given world are nearly endless, resulting in incredible variety on the worlds you will explore.
Terrain Description
Frozen Gases Extremely cold planets have layers of high freezing-point gases in various degrees of solidification, making for some very unusual land masses. Some elements can exhibit peculiar and unpredictable properties under these conditions.
Barren Rock Lacking useful vegetation of any sort, this is a common and inhospitable terrain. Rocky outcroppings, treacherous footing and endless stretches of landscape covered with boulders and other rock fragments makes this a bleak environment.
Mountains A natural elevation of a planetary surface having considerable mass and generally steep sides. Mountains are often caused by seismic or volcanic activity, or the collision of continents because of the movement of tectonic plates.
Liquid Gases A semi-solid terrain dominated by vast areas of liquid substances normally found as gases on warmer planets.
Crystal Forest Towering tree-like formations of living crystals form huge forests that sparkle with a multitude of colors. The forests are often totally interconnected by branching crystal structures that can reach hundreds of miles in length.
Glacier A huge mass of ice flowing slowly over a land mass, formed from compacted snow in an area where snow accumulation exceeds melting and sublimation.
Ice Fields A vast, level expanse of ice-covered plains that can be several miles thick. Often featureless except where broken up by seismic or volcanic activity. The temperature in such areas can drop precipitously during nighttime and especially during a period of high winds.
Crystal Plains Vast fields of living crystals that form a beautiful mosaic of reflected colors. The crystals rarely rise to more than a few feet above the ground, preferring to spread out sideways.
Snow Drifts Frozen precipitation often in the form of white or translucent ice crystals. Vast snow drifts could be considered the equivalent of a desert in an extremely cold environment.
Permafrost Permanently frozen subsoil that prevents the ground from thawing more than a few inches down. Only the hardiest of plants or animals can survive in this terrain.
Tundra A treeless, forbidding region similar to Permafrost in that it has a perpetually frozen subsoil, but supporting low-growing vegetation such as mosses, lichens and stunted shrubs.
Desert A dry, often sandy region of little rainfall, extreme temperatures, and sparse vegetation. Generally barren and desolate, though some creatures have evolved to survive under such conditions. Deserts can exist both in cold and hot climates. In both cases it is an empty, forsaken wasteland.

T H E U N I V E R S E
2222----10101010
Forested Mountains A mountainous region that supports the growth of hardy, usually coniferous, trees and plants.
Plains Vast, grass-covered flatlands that experience a moderate amount of rainfall. Soil conditions are generally excellent for agricultural production.
Conifer Forest A forest composed of a variety of scale-leafed or needle-leafed, chiefly evergreen, cone-bearing gymnospermous trees or shrubs such as pines, spruces and firs.
Marsh An area of soft, wet, low-lying land, characterized by grassy vegetation and often forming a transition zone between a body of water (or other liquid) and land.
Steppe A vast, semiarid grass-covered plain having insufficient rainfall to support trees or woody plants.
Deciduous Forest A forest of tall, broad-leafed plants with comparatively shallow root systems. Deciduous trees usually shed or lose their foliage at the end of each growing season.
Swamp A lowland region either saturated with water or seasonally flooded, with more woody plants than a marsh and better drainage than a bog. Swamps can make surface movement difficult as treacherous quicksand and mud flats can cause serious problems for an unwary traveler.
Forested Swamp A swamp with a dense growth of plants, trees and underbrush. Travel can be dangerous but not nearly as bad as in a swamp as the undergrowth generally covers up or allows for passage around areas of quicksand or mud.
Primitive Forest A forest containing plant and animal lifeforms that have not yet evolved to superior forms. Giant fern-like plants and a variety of primitive vegetative life are common here.
Bog An area having a wet, spongy, acidic substrate composed chiefly of sphagnum moss and peat in which characteristic shrubs and herbs and sometimes trees grow.
Jungle Land densely overgrown with tropical vegetation. Dense thickets and other growths abound. The wildly overgrown forests found in this terrain generally have diverse animal and vegetative life. Heavy precipitation and seasonal rainy periods are common.
Rain Forest A dense evergreen forest usually occupying a tropical region with an annual rainfall of at least 2.5 meters.
Hot Swamp A lowland region saturated with liquids either brought in by tidal forces or flooded as a result of geyser or hot spring activity. This is always a hot, nasty environment filled with bubbling mud pits and treacherous areas of hot quicksand.
Salt Flats Usually a low coastal grasslands area frequently overflowed by a salt-bearing tide. Invariably an extremely hostile environment, salt flats are sometimes caused by the wholesale evaporation of a large body of liquid containing large quantities of mineral salts held in suspension.
Crystal Jungle Similar to a Crystal Forest but present in a much hotter environment and filled with much more undergrowth. Crystal Jungles are generally a tangled mess composed of razor-sharp living crystals that can make short work of an unwary traveler. Movement through such a region is virtually impossible to anyone who is not experienced with such terrain. Still, the gorgeous array of colors refracted from the crystals, especially during sunrise or sunset, is hard to beat.
Crystal Swamp Similar to a Crystal Jungle but Crystal Swamp terrain presents a more forbidding environment. Crystal Swamps are invariably a tangled nightmare with huge pits of melted crystal shards and low-lying crystal bogs. Movement through such a region is exceedingly hazardous for even the most experienced of travelers because it is virtually impossible to distinguish between a solid crystal surface and a deadly semi-liquid pit.
Cracked Rock Similar to Barren Rock but covered with broken and flaking rock fragments , typically with a myriad of fissures, crevasses and chasms. Extreme seismic activity is not uncommon.

T H E U N I V E R S E
2222----11111111
Volcanoes An opening in the planetary crust through which molten lava, ash and various hot gases spew forth. The presence of volcanoes usually indicates a region of shifting terrain and frequent violent seismic activity. Mountains or islands are often formed from the materials ejected from an active volcano.
A X I A L T I L T
Axial Tilt represents the angle that a planet is at in relation to its orbital plane. A standard Axial Tilt is considered to range from 10° to 30°. This results in normal seasonal changes and weather patterns on the world. An Axial Tilt under 10° will result in limited season changes. An Axial Tilt of more than 30°will result in extreme seasonal variations. A high or low Axial Tilt will affect the habitability of the world.
G R A V I T Y
The Gravity rating of a planet is expressed in G’s, or multiples of standard Earth Gravity. The density and diameter of the world in question are taken into account when the Gravity rating is determined. A planet rated at 1.0 Gravities is similar to Earth. Gravity ratings range from 0.1 to 5.0, with the exception of certain unusual planetary bodies such as Gas Giants which are given fixed Gravity ratings for colonization purposes. Gravity is used primarily for ground combat operations, resource availability and colonization.
M I C R O O R G A N I S M S
Most habitable planets will have microorganisms of some sort present in their atmosphere, soil or their free standing surface liquids. In most cases these microorganisms will be harmless. There is a possibility, however, that they will be harmful or even deadly to your race. Microorganisms can be introduced to a world on purpose by means of various weapons of mass destruction. It is a good idea, therefore, to be prepared to counter such weapons either by technological means, Installations designed for such things, or simply do not allow enemy warships access to your skies.
Microorganisms Rating Description
Harmless There is no evidence of harmful microorganisms on the planet.
Harmful Microorganisms that are harmful to your race are present. Colonial attrition losses will be increased as a result, and a decrease in population is possible if not offset by population growth or technological advances. Additional ground combat losses should be expected if not countered by certain technologies.
Deadly Microorganisms that are extremely deadly to your race are present on this planet. Colonial attrition losses will be increased significantly if not offset by population growth or technological advances. Significant ground combat losses should be expected without countermeasures put into place.
Virulent Microorganisms that are extremely deadly to your race are present on this planet. Colonial attrition losses will increase sharply as a result and a steady decrease in population levels is possible if not offset by a high population growth rate or advanced technology. The planet may be considered uninhabitable in some cases. Troop deployments on such worlds should be restricted unless you have advanced technologies at your disposal.
P O L L U T A N T S
The Pollutants index for a world indicates the damage caused by environmental pollution, and evaluates the hazards imposed on lifeforms inhabiting the planet. Pollutants can be caused by industrial expansion, severe mining, weapons of mass destruction or natural causes such as volcanic eruptions. Various Installations and technological advances can counter Pollutants, no matter how they are caused. Keep your Pollutants index from rising too fast and you’ll be okay.

T H E U N I V E R S E
2222----12121212
Pollution Index Description
None The planet is relatively untainted by pollutants of any kind
Normal Low to medium levels of pollutants are present, generally as a result of a fairly extensive period of industrialization by intelligent lifeforms. This should not prove significant enough to have a major effect on lifeforms inhabiting the planet.
Harmful Medium to high levels of pollutants are present on this world. Heavy industrialization and environmental neglect have begun to significantly affect the ecosphere. Increased death rates and lowered life expectancies are common. Planetary population levels may actually decrease if the fatalities are not offset by a high population growth rate or technological advances.
Hazardous This planet has a high level of pollutants. Heavy industrialization and environmental neglect, or perhaps a severe natural catastrophe or advanced weapon usage, has significantly affected the quality of the environment. Death rates have escalated and the life expectancy of the average inhabitant is greatly reduced. Planetary population levels stand an excellent chance of decreasing rather than increasing unless countered by population growth or advanced technology. Cleaning up the pollution before it gets any worse would be a good idea.
Deadly The planet is approaching an ecological disaster. Heavy industrialization, total environmental neglect, widespread use of advanced weapons or bad fortune from natural disasters have had a severe impact upon the ecology of this world. Death rates have escalated dramatically and life expectancies are greatly reduced. It would be best to take action immediately, or face the prospect of the planet slowly becoming barren and lifeless.
Extremely Deadly An ecological disaster of epic proportions has gripped this world in a deadly embrace. Criminal neglect of the environment, whether intentional or as a result of a cataclysmic natural disaster, planetary-scale usage of weapons of mass destruction or industrialization and mining run rampant, will soon make this world uninhabitable. The majority of the planet’s population will die within months if not countered immediately. Drastic measures are strongly advised before the planet deteriorates into a lifeless hunk of rock.
P L A N E T A R Y R E S O U R C E S
The specific uses of the various resources that may be available on a world are detailed more closely in the chapter discussing Economics, but they are described here for clarity. The Terrain Types present on a planet, combined with the Star Type, Planet Class and Stellar Background Terrain play predominant roles in determining resource availability and yield. Resource Yield represents both the quality of the resources present and the number of production Installations (such as Iron Mines) that can be constructed on a world to extract the resource in question. Construction of production Installations beyond the Yield limit will not prove to be a particularly efficient way to extract the resources you need to run your Empire. It should be noted that Yield ignores Population Groups and is a global, worldwide limit.
Note that produced items such as Electronics are not Planetary Resources. Crystals may be present on a planet, meaning they can be extracted using a Crystal Refinery, but to make Electronics would require that other resources be extracted and converted into superior trade goods first. For example, each ton of Electronics requires 2 tons of Refined Crystals and 1 ton of Synthetic Materials. Refined Crystals must be created from 3 tons of raw Crystals, while Synthetic Materials are made out of 1 ton of Gaseous Elements, 1 ton of Petrochemicals and 1 ton of Industrial Chemicals.
Resource Description
Caldaran Crystals These are translucent crystals with a blue-white tinge. They are found in underground caverns in small, naturally-formed deposits. The perfectly shaped crystals are crucial for the production of a number of advanced pieces of technology. Unfortunately, they are quite rare and the slightest crack will ruin the crystal and render it valueless.
Coal Coal is a resource that is most often used by primitive societies as a power source. The poor efficiency of coal compared to more advanced resources generally discourages its use once power production facilities such as Fission or Fusion power plants can be constructed.

T H E U N I V E R S E
2222----13131313
Crystals Natural crystalline growths or quasiperiodic solids valued primarily for their industrial applications but also used in the production of luxury goods. Quartz, glass, amethyst and cryptocrystalline substances such as chert and chalcedony are excellent examples of this type of tradegood.
Fibers Fibers are often derived from forest or farm products such as flax, bark, hemp or the roots and leaves of a number of plants. Fabrics such as cloth, linen, silk, embroidered tapestries and woolen textiles made by weaving or knitting together natural fibers as a material base are the result of Fibers usage.
Fruits & Vegetables Edible fruits and vegetables such as apples, bananas, peaches, pears, tomatoes, corn, lettuce and tubers of all sorts.
Gaseous Elements Helium, neon, argon, hydrogen compounds, ammonia, flourine, methane, phosphine, xenon, chlorine, carbon dioxide and a variety of methane and nitrogen compounds fall into this category. All are valued for industrial applications and as energy sources.
Gemstones Valuable gems prized for their beauty or industrial applications, such as diamonds, emeralds, rubies and sapphires.
Ghuran Demonblood This is a vile, oily blue-black liquid that is found most often in pure form in underground ice caverns where it collects in small pools. Ghuran Demonblood remains a liquid even at temperatures that come close to absolute zero. The liquid is highly corrosive and can be safely handled only when it is kept extremely cold. As the liquid warms it becomes unstable and a deadly vapor is produced. Synthetic production of the stuff is exceedingly dangerous. The liquid is collected and used in units of approximately one quart at a time, is extremely rare, and is used only for special applications.
Grains Grains such as wheat, rice and corn, along with fruits, vegetables, flour and many types of grasses.
Industrial Chemicals Any of a variety of chemicals, compounds and byproducts used to increase industrial productivity.
Iron Common ferrous metal ores valued for their industrial applications include iron, nickel, tungsten and molybdenum.
Light Metals Common non-ferrous metal ores valued for their industrial applications. This tradegood category includes such metals as copper, tin, lead, mercury and zinc.
Lumber Raw timber and other wood products. Often used in the production of construction materials.
Meat Meats, animal fats, dairy products such as milks and cheeses, eggs, furs and leather.
Mineral Fertilizers Phosphates, nitrates, pyrites and potash. Valued for some industrial applications but most often used in agriculture.
Petrochemicals Chemicals, such as butane, derived from petroleum or natural gas. Petrochemicals are valued in many industrial uses and can be used as an energy source.
Precious Metals Rare metals prized for their industrial applications or used for coinage. Gold, silver and platinum are the most commonly sought-after Precious Metals.
Radioactive Elements The entire series of group IIIb elements (the actinide series), including actinium, thorium, protactinium, uranium, neptunium, plutonium, americium, curium, berkelium, californium, einsteinium, fermium, mendelevium, nobelium and lawrencium. Uranium through lawrencium are grouped together to form the transuranium elements. This tradegood category is valued for all manner of industrial applications and as an energy source.

T H E U N I V E R S E
2222----14141414
Rare Elements Unusual minerals such as bastnasite, cerite, euxenite, gadolinite, and all elements of the lanthanide series (Lanthanum, Cerium, Praseodymium and so forth through Lutium). Often used in such applications as the making of ceramic glazes, glassmaking, glass-polishing abrasives, catalysts for petroleum refining, projection-tube phosphors and laser construction among other things.
Rare Herbs & Spices Uncommon herbs, spices, pungent or aromatic plant substances and poisonous plants. Valued for medicinal and recreational purposes.
Raw Resources Raw Resources represent generic resources available on all planets. Raw Resources can be converted into any other basic Resource type, but conversion is inefficient (10 Raw Resources create 1 of any other basic Resource) and valuable industrial output is tied up in the process. Still, if you need Steel, which requires Iron to be produced, and you don’t have enough operating Iron Mines, conversion of 10 Raw Resources into each ton of Iron that you need is often the only solution available.
Shenn Stones Shenn Stones are dull red crystalline rocks in rough form, becoming a translucent reddish crystal of incredible beauty once refined and polished. The crystal is usually found in underground caverns in small, naturally-formed deposits. The perfect crystals are required as a focusing device in the production of a variety of advanced pieces of technology. The slightest trace of impurities will ruin the crystal's use as a focusing lens, rendering it useless.
Water Primarily H20, but also including many other gases in liquid or solid form. Most often valued for industrial and agricultural applications. Typically transported in solid form (ice).

T H E U N I V E R S E
2222----15151515

T H E U N I V E R S E
2222----16161616

T H E E M P I R E
3333----1111
The Empire As the new leader of your people, you are confronted by many complex decisions and your actions will determine the course of the Empire and perhaps the fate of your kind. The years of turmoil and unending conflict have ended on your world as your race has finally united under a centralized planetary government. Faced with dwindling resources and an unquenchable desire to explore the unknown, the time has come for your race to expand outward.
E C O N O M I C C O N S I D E R A T I O N S
Economic advisors have long ago warned of the dwindling resources of your homeworld and the need to secure new sources of raw materials. The necessity of formulating a long range economic growth plan to deal with the otherwise inevitable collapse is clear. The essential points contained in their report follow.
R A W M A T E R I A L S O U R C E S
The need for new raw materials of all types, but most especially Iron, is evident but not immediate. The principal source of new deposits will be other worlds, but extensive construction of mining facilities on the homeworld can alleviate the need to colonize other planets for quite some time. Still, the homeworld does not have every resource available to be mined, and though conversion of plentiful Raw Resources is a possibility, it is inefficient in the long run. Rich new worlds should be located and colonized as soon as is feasible so that mining complexes can begin operations there at the earliest possible date.
E C O N O M I C A D V I S O R Y P A N E L
Your economic advisors have analyzed the Empire’s basic needs and present their summary reports in the following paragraphs. Certainly, as leader of your people, your decisions are final. You need not follow the advise of your experts, for many paths to victory lie ahead.
I N D U S T R I A L R E Q U I R E M E N T S
In theory, large numbers of Stripmining Complexes could be constructed on the homeworld to secure a vast supply of Raw Resources for industrial expansion. Unfortunately, conversion of Raw Resources to specific useful Resources such as Iron, Crystals and Industrial Chemicals is inefficient. It consumes 10 tons of Raw Resources per ton of useful Resource and requires a large number of Industries just to perform the work of conversion. In the long run, it would be far better to have Iron Mines directly on the homeworld, producing Iron for our industrial needs. Crystal Refineries could produce Crystals and so on. Unfortunately, we expect to become a large and powerful Empire in the coming years, and our homeworld simply does not have sufficient Resource Yields to support our expected needs.
We therefore conclude that in the short term, since they have little else to do, our Industries should be placed on conversion duty. Converting as many Raw Resources as possible into useful Resources would be wise indeed. Colonies on other worlds should directly mine useful Resources instead of Raw Resources so that the finished product (Iron, for example) can be shipped home and used without further industrial dependency. In this way, we can build Industries mostly in one place—the homeworld—and concentrate mines on planets that have superior Yields for the resources that we will need for our expansion. As time passes, we can free up Industries at the homeworld that are on Raw Resource conversion duty and put them to more useful pursuits (the construction of
Chapter

T H E E M P I R E
3333----2222
items needed to assemble space defense forces comes to mind). You can’t go wrong in creating large stockpiles of Crystals, Gaseous Elements, Industrial Chemicals, Iron and Petrochemicals, as all of these basic Resource types are useful for many applications.
T H E M E R C H A N T M A R I N E
Presently, the Empire exists only on the homeworld and has no need of a Merchant Marine to transport goods to or from other planets. However, if we wish to colonize other worlds, we will need a substantial number of ships equipped with Colonial Berthing spaces. Merchants designed with large Cargo Holds will also be needed, because they will be required to transport basic construction materials to new colonies. These same Freighters could then be used to transport Resources back to the homeworld for industrial uses, and more construction materials back out to the colonies to build up their mining operations.
M I L I T A R Y N E E D S
At this point, we know of no other Empires expanding outward as we plan to do, and do not expect to need a strong military arm for some time to come. However, one cannot predict the future with accuracy, and hostile aliens could be right around the corner. We should examine the weapons, propulsion systems and defensive mechanisms available to our Empire and determine what sorts of warships we could construct if our needs become urgent. It takes time to construct significant numbers of warships, and the proper components such as Electronics, Steel and other useful products will need to be produced ahead of time. Fleet and Army High Commands have warned that they are currently unable to defend the homeworld from a concerted enemy attack, and keenly await your orders with great anticipation. They understand the need to develop superior technologies, but are anxious to get on with the business of defense.
For now, we recommend identifying the technologies that would most serve the Empire’s military needs—weaponry and defensive systems come to mind. We could then concentrate on researching superior versions of those items so that when the time does come to construct a mighty armada, we will at least be using the best possible equipment at our disposal.
R E S E A R C H L I M I T A T I O N S
The scientific community is concerned primarily with the advancement of science and the exploration of space. Scientific research centers have already been constructed to the limits of your scientists’ ability to research new technologies. It is absolutely essential to the future of the Empire that we choose wisely what we want our research centers to study. Technological progression forms the basis for future endeavors, and the scientific community anticipates great discoveries and a wealth of knowledge. There is a general disdain for the military in some quarters of the scientific community, with the hope that the Empire will not squander the future for the distorted desires of the armed forces. However, many scientists view military research with pride, knowing full well that hostile alien Empires could easily crush our fledgling Empire at any time—so long as we are defenseless. Trying to combat an enemy with Light Beam Lasers and 10cm Autocannons when they are using Energized Plasmatic Pulsing Death Rays will not serve us well.
General advice from your scientists is that while multiple research centers can be assigned to study the same technology, diminishing returns factors heavily into their work. Placing all 25 research centers onto one item—say, Medium Beam Laser, for instance—would certainly result in the development of that technology in rapid order. Unfortunately, nothing else would be learned during that time. Furthermore, it is entirely possible that the Medium Beam Laser needed far fewer than all 25 research centers to be developed in the same time frame—the excess being wasted (gasps from scientists all around the planet at the thought of wasted research). Finally, if total research output were the only consideration, it would be best to place each research center onto a different area of technology. In this way, 25 different technologies would be developed over time, and at no waste in research output—no overkill, as it were. This is the slowest way to develop technologies, but generates more total research points by far than concentrating onto just one technology area. A balance is considered to be the best bet, with several research centers being assigned to each of the most important advances. Develop the key technologies as fast as is reasonable, and spread out to cover our bases on other technologies that we will need eventually anyway.
Finally, your scientists note that every technology advance has prerequisites that must be met before they can ever hope to develop superior items. For instance, Medium Beam Laser technology requires that the Empire have knowledge of the Light Beam Laser first. Since we happen to understand Light Beam Laser technology already, the Medium Beam Laser is a valid target for our research centers to study right now. If Medium Beam Lasers required that we understood Superconductors, for instance (in fact, they do not, but for this purpose we will assume otherwise), then we could not research the Medium Beam Laser until after we had completed Superconductor research. Furthermore, anything that required Medium Beam Laser technology as a prerequisite, and anything that had those items as prerequisites, would be closed to us until such time as we finally researched Superconductors and then Medium Beam Lasers. It is like the branches of a complex tree. Most of the time we will have so many useful items to research that it won’t matter. However, advancing far down one branch of the tree may have requirements along some other branch that happens to touch, so reasonable balance is prudent. Fortunately, it is rare that directly competing technologies have cross-connecting requirements—we do not expect that advancement down the Laser branch will ever require simultaneous advancement down the Autocannon chain, for instance. Still, ignoring a crucial line of research could have severe repercussions later on. Reasonable balance is needed, tempered of course by desperate need during times of crisis.

T H E E M P I R E
3333----3333

T H E E M P I R E
3333----4444

E C O N O M I C S
4444----1111
Economics The economic system revolves around the concept of making your Empire as efficient as possible. You could mine Raw Resources on your homeworld and never colonize offworld, but you would have to convert those Raw Resources to useful Resources on your homeworld, and that is not only inefficient but it takes a lot of Industries to do it. One could easily imagine streams of Iron, Crystals, Gaseous Elements and other Resources flowing into the homeworld’s Industries, being converted into Steel, Electronics and other goods, and then into Light Beam Lasers, Standard Hull Plate, Nuclear Jump Drives and more….your shipyards then combining these components into warships with which to drive your enemies into ruin. It’s more about converting Resources into weapons and other useful items than simply constructing more and more Industries.
P O P U L A T I O N G R O U P S
The population on a given planet are not always concentrated into the same Population Group. They could be, but there are advantages to spreading them out over several Population Groups. For one thing, each Population Group is a distinct entity. Neighboring Population Groups do not share their Resources. This can be helpful when you want to organize your Resource production into distinct lines. Secondly, the Shipyards of a Population Group operate at the same time. If you had all of your Shipyards in one Population Group, they would only be able to work on one chain of ships—the topmost ship in the queue would have to be completed before the next could be started. Many ships could be completed in one turn, but it would be impossible to add new ships to the top of the queue without bumping every other ship downward. Shipyards in several Population Groups would allow you to continue producing whatever ships you wanted to crank out in Population Group # 1 while adding, for instance, some new Colonial Transports to the Shipyard queue in Population Group # 2.
It is possible for several Empires to colonize the same planet. Each Empire would settle its own Population Group(s), and manage them independently from the other Empires co-existing on the planet. Global Resource Yield limitations would still apply to every Population Group, regardless of Empire. Under multi-Empire colonization situations, it is therefore wise to agree on how many Iron Mines, for instance, that each Empire should build. Diminishing returns would affect all Empires if the Iron Yield limit were exceeded, and that is bad for everybody.
New “blank” Population Groups are needed to invade enemy worlds. A Colonial Beacon order can be used to create a new Population Group at any world where you have a Fleet. Troops can then be deployed onto the world, into your Population Group. So long as the enemy did not attack, you could shuttle new troops down until you were ready to assault his forces. You could transport construction materials along with some population to that world and build Field Fortresses there, if you wished, or even mines and Industries.
Items can be transferred freely between Population Groups so long as both have a Transportation Center Installation constructed within them. A global transportation network is crucial when you have many Population Groups (don’t set up too many Population Groups, or your organizational needs will become extreme, not to mention requiring many expensive Transportation Centers). This allows you to use direct Population Group-to-Population Group transfers, dismissing the need for costly Freighters sitting in orbit to perform slow cargo transshipments. It should be noted that items can be transferred to Population Groups without regard for Empire ownership. This is true for both Population Group-to-Population Group transfers and Fleets offloading goods from orbit. It is often far better to make friends with a neighboring Empire than it is to crush him into space dust. He can research technologies you will never
Chapter

E C O N O M I C S
4444----2222
develop, and give you the finished product, while you do the same for him. Both of you would be substantially more powerful than if one had conquered the other. In this way, the Industrial output of both of your Empires would be geared to helping the union of your Empires, to the detriment of your enemies.
I N S T A L L A T I O N S
Installations cover every aspect of constructed items within a Population Group. Industries, Shipyards, Field Fortifications, Iron Mines, Stripmining Complexes—all are Installations. A list of most of the Installations you are able to build at the beginning of the game is included in the Installation Supplement. You will receive information regarding new Installations that you can construct as a result of advanced technologies, but such Installations are rare.
Building a new Installation consumes 1 Population from the Pop Group in which it is constructed. This represents the employees or other workers permanently assigned to the Installation. Construction Materials are also consumed. To ease game play, there are no technological requirements, so it is possible for you build a Fission Power Plant in a conquered Population Group inhabited by primitive rock-throwing lizards, and they will man it. Train them to stay out of the room marked “Damping Rods—KEEP OUT” and all will be just fine. Chucking rocks in there could be hazardous to their health. You will find, however, that most of the time those primitives will have Pop Groups that are so small as to make construction of most of the fancy Installations pointless in any event.
I T E M C O N S T R U C T I O N
To build any Item in the game, you must first complete research on that Item. Then, your Industries assemble the appropriate components to create the finished product. That Item is often used by Shipyards for the construction of starships.
Step Description
1 Use Installations such as Iron Mines to dig Resources directly from a planet. Alternatively, use Stripmining Complexes to extract Raw Resources from a planet.
2 If insufficient Resources (such as Iron) are available, use Industries to convert Raw Resources into the Resources that you need. The conversion rate for changing otherwise useless Raw Resources into useful Resources is 10 : 1. It is therefore more efficient to dig Iron out of the ground, than convert Raw Resources into Iron—but Raw Resources are plentiful, and you might not have easy access to the Resource you need.
3 Use Industries to convert Resources (Iron, Crystals, Gaseous Elements and so forth) into useful Items such as Electronics and Steel.
4 Use Industries to assemble Items like Electronics and Steel into more complex Items, such as Light Beam Lasers.
5 Use Shipyards to construct starships out of Light Beam Lasers, Standard Hull Plate, Nuclear Engines and so on. If Construction Materials were created by your Industries, use the Construct Installation order to fabricate new Installations in the Population Group where the Construction Materials are stored (or ship the Construction Materials elsewhere, to be assembled in a different Population Group).
Let’s take the Pathfinder class Fleet Scout that you start the game with. The following Items are required for its construction by your Shipyards.
Item Quantity Construction Requirements
Mk I Computer System 1 500 Electronics
Mk I Jump Survey Sensor 1 20,000 Electronics; 5,000 Synthetic Materials
Mk I Nuclear Engine 1 200 Steel; 100 Electronics; 100 Synthetic Materials; 100 Processed Radioactives
Mk I Nuclear Jump Drive 1 100 Steel; 100 Electronics; 100 Synthetic Materials; 100 Rare Elements

E C O N O M I C S
4444----3333
Mk I Short Range Sensor 10 1,000 Transaluminum; 4,000 Electronics (for 10 Mk I Short Range Sensors)
Standard Hull Plate 1,200 6,000 Steel (for all 1,200 tons of Standard Hull Plate)
Survey Lander 1 2,400 Steel; 600 Electronics
Type A Defense Screen 1 1,000 Transaluminum; 2,000 Electronics; 1,000 Synthetic Materials; 1,000 Rare Elements
Type A Science Lab 1 1,000 Transaluminum; 4,000 Electronics
10cm Autocannon 1 400 Steel; 100 Electronics
Fuel Tankage 1,200 6,000 Steel (for all 1,200 tons of Fuel Tankage)
Fuel Shuttle 1 2,400 Steel; 600 Electronics
The Construction Requirements total to the following:
Item Resource Requirements Total
32,000 Electronics 2 Refined Crystals; 1 Synthetic Materials 64,000 Refined Crystals; 32,000 Synthetic Materials
100 Processed Radioactives 3 Radioactive Elements 300 Radioactive Elements
1,100 Rare Elements 1 Rare Elements 1,100 Rare Elements
17,500 Steel 3 Iron 52,500 Iron
6,200 Synthetic Materials 1 Synthetic Materials 6,200 Synthetic Materials
3,000 Transaluminum 3 Light Metals 9,000 Light Metals
Refined Crystals are produced from 3 Crystals each, so the final tally comes out as follows.
Basic Resource Quantity
Crystals 192,000
Iron 52,500
Light Metals 9,000
Radioactive Elements 300
Rare Elements 1,100
Synthetic Materials 38,200
That’ a grand total of 293,100 tons of materials for one Pathfinder class Fleet Scout. Since the Pathfinder relies heavily on equipment that uses Electronics, it’s mostly Crystals with a lot of Iron and Synthetic Materials needed as well. Note that the Pathfinder is a small ship—only 12,000 tons in final mass. There is

E C O N O M I C S
4444----4444
clearly a lot of Industrial work involved, and a good deal of tonnage is lost in the process of converting basic Resources into the final product. Shipping that many tons home will take a lot of merchant ships, so mining as many of these Resources at the same location as you have Shipyards would be a good idea. Alternatively, you could process these Resources into Electronics, Steel and so on wherever they are mined, and then ship the Electronics and Steel home. That would require far less Cargo space on your merchant vessels. Someday, you will be constructing very large warships in bulk. You’ll need a lot of basic Resources churning through your Industrial pipeline to keep your Shipyards busy.
Suppose you wanted the Pathfinder to be the mainstay of your fleet (eyestalks rise and tentacles flail in agitation all around the Imperial Audience Chamber at the thought of using Pathfinders to defend the Empire). You’d need to secure a significant supply of Crystals, a lot of Iron, and lesser amounts of Light Metals, Radioactive Elements, Rare Elements and Synthetic Materials. If you had no Crystals at all, you could use Raw Resources, converting them to the required Crystals, but that would take 1,920,000 Raw Resources for the Crystals alone. Use actual Crystals instead, if you can!
I N D U S T R I E S
Industries are used to refine Resources such as Iron into Steel. The Steel can then be used to manufacture Standard Hull Plate, which could be a design element for a starship produced by Shipyards. To tell your Industries to work on something, assign an Item to a Population Group’s Industries with the Build Item order. All Industries in a Population Group have their output values summed, and at the end of each turn they try to produce as many Items as they can in the Industrial Production queue that you set up. The BI order needs to know the quantity and the Item that you want constructed along with the Population Group ID where you want it built. Priority is the order that you want the Items produced, with a low Priority # showing up on the top of the queue. If you Tool an Item, it will not be deleted from the Industrial Production queue until you delete it with a Remove Item order. Normally, when an Item in an Industrial Production queue is completely finished (the quantity remaining to be produced by your Industries reaches zero), it is cleared automatically. Sometimes, however, you want your Industries to continue manufacturing that Item forever, so you would Tool that Item. A good example would be the conversion of Iron into Steel—once you know how much Steel you need to be produced every turn on your homeworld, you might want to set aside some Industrial production, Tooled, to crank out just the right amount of Steel every turn.
S H I P Y A R D S
Shipyards function much like Industries. They exist in Population Groups and are summed to determine the total output capabilities of that Population Group’s Shipyards. The more Shipyards that you have in a Population Group, the more tonnage of starships that can be completed per turn. When you first build a Shipyard in a Population Group, a single Shipyard Slip is created for free there. Each Shipyard Slip allows the Shipyards to work on one starship at a time. If you want to crank out more than one starship per turn from that Population Group’s Shipyards, you should build more Shipyard Slips there. If the Shipyards in a Pop Group have more tonnage output capability than they can use (say, you place one Pathfinder into a Shipyard queue but you have 20 Shipyards in that Population Group—capable in theory of constructing many Pathfinders per turn), the excess Shipyard output is wasted. You should therefore build as many Shipyard Slips as you expect to use every turn, given the output capability of your Shipyards. Since Shipyard Slips are extremely expensive, and each Slip can handle one ship of any size, you are encouraged to keep the number of Shipyard Slips down and increase the size of your ships instead.
The Build Ship order is used to place ship designs into a Shipyard queue. You can fool around with the Priority values of the ships you place in a Shipyard queue so that the starships you want now can be placed at the top of the queue. Your Shipyards begin their manufacturing process at the conclusion of every turn, working on the topmost starship first. If they complete that ship, have tonnage output remaining, and there is at least one more Shipyard Slip available, they will try to work on the next ship in the queue. A large ship placed at the top of the queue will therefore be worked on until it is finished, but no other ships will be constructed until it has been completed.
Starships must be paid for when they are placed into the Shipyard queue, not when they are actually completed. The Items that make up the appropriate ship design must therefore be available in the Population Group at the time when the Build Ship order is issued.
When ships are completed by Shipyards, they are assigned to the Fleet that you designated when you issued the Build Ship order. If that Fleet is located elsewhere or does not exist, a new Fleet will be created for you and the ships assigned accordingly. The Fleet ID # used for these new Fleets begins numbering at 1001 and continues to increment by 1’s until an unused Fleet ID # is found.
R E S O U R C E P R O D U C T I O N N O T E S
Stripmining Complexes produce a flat 1,000 Raw Resources each turn, and can be built in limitless numbers. They aren't very efficient (each 10 Raw Resources can be converted into 1 regular resource like Iron, consuming Industrial output capacity in the process), but you can build a lot of them. Conventional resource extraction installations such as Iron Mines, Lumber Mills and Crystal Refineries produce their resources based on the resource yields present on the world. The first such installation built produces very close to the yield in output. Additional installations of the same type present on that world are assumed to be constructed on increasingly inferior locations (the first Iron Mine goes on the highest grade Iron deposit on the world). Using Iron Mines as an example, the production formula is: Iron Produced = (# of Iron Mines) * (Iron Yield - # Iron Mines / 10)

E C O N O M I C S
4444----5555
Thus if you have an Iron Yield of 400, and you built 1000 Iron Mines, you would produce 1000 * (400-100) = 300,000 Iron each turn. If you only built 500 Iron Mines, they would produce more efficiently, but you would end up with less Iron in the end: 500 * (400-50) = 175,000 Iron each turn.
Game Note: The optimum number of extraction installations, using this formula, is approximately Resource Yield * 5.
Installations such as Fuel Refineries take one resource and convert it into another. Fuel Refineries, for instance, consume 2 tons of Gaseous Elements and produce 10 tons of Fuel.
P R O D U C T I O N S E Q U E N C E N O T E S
Installations operate at the end of the turn in a predefined sequence. The sequence is as follows: Power Generation Shipyards Fuel Refineries Resource Extraction Stripmining Complexes Industrial Complexes Other The order within Resource Extraction is unimportant, but happens to be alphabetical. Shipyards run immediately after power generation so that they are virtually guaranteed to have Power for their operation. Note that Shipyards do not use items that might be produced by your Industrial Complexes that turn in any event (ships placed into Shipyards are paid for during the execution of the Build Ship order), so Shipyards are placed high for Power consumption advantage reasons and not after Industrial Complexes. Resource Extraction installations include such things as Iron Mines, Hydroponic Gardens and so forth; they are more efficient than Stripmining Complexes and therefore gain earlier access to potentially limited Power supplies. Stripmining Complexes run just before Industrial Complexes, which actually produce Items based on all of the mined goods you just gained (plus those stockpiled from previous turns, naturally). "Other" represents a variety of unusual Installations, which come last in the Power hierarchy and generally do not exist in large quantities in any event.

E C O N O M I C S
4444----6666

T H E S P A C E F L E E T
5555----1111
The Space Fleet Starships move about in Fleets rather than as independent entities.. There is no limit to the number of ships that may be combined into a single Fleet, and you may create as many Fleets as you desire.
C R E A T I N G F L E E T S
The New Fleet order can be used at any time to create a new Fleet at the location of any Fleet that you already have in existence. You choose the name and ID # of the new Fleet. The name could duplicate that of any of your other Fleets, but you would be wise to choose unique names to avoid confusion. The ID # must be unique and can be any reasonable positive number that you like. A common approach to numbering one’s Fleets is to set aside a certain series of Fleet ID #’s for your exploration ships, another series for defensive Fleets, and other groups of numbers for offensive or auxiliary ships. Other players will not see your Fleet #’s, but they will see the names that you issue. Please keep the names of your Fleets in good taste, and of a science fiction or military background. Fleet names deemed offensive or inappropriate may be edited at RTG’s discretion. Fleets with no ships in them remain active until you destroy that Fleet with a Decommission Fleet order.
T R A N S F E R R I N G S H I P S B E T W E E N F L E E T S
The Reorganize Naval order is used to transfer ships from one Fleet to another. Details of this order are given in the Orders Supplement.
F L E E T C O M M A N D E R S
Legendary Characters known as Naval Commanders can provide substantial bonuses to your naval operations. Simply assign a Legendary Character to one of your fleets. He’ll travel with that fleet as it moves about. If the fleet is involved in a battle, he will make use of his considerable naval battle training to improve the performance of your units during that battle. Battle damage to fleet units can, of course, result in the loss of a good naval commander so take care in their assignments. Good naval officers are a valuable resource.
S T A N D I N G O R D E R S
There are a few standing orders that can be given to a Fleet. Most of the time, your Fleets will be “On Station”, which simply means that they are standing to at their assigned location, and await further orders. They’ll involve themselves in battle if attacked, or may initiate engagements if they encounter enemy ships and have orders to open fire. One standing order of note is the “Refuel” order. This instructs the Fleet to attempt to transfer Fuel to every other Fleet at its current location. Such Fuel transfers would occur at the end of each turn, and can be very useful when you are moving other fleets through star systems where Fuel can be difficult to obtain.
F L E E T B A T T L E P L A N
Every Fleet is given a Fleet Battle Plan in case it becomes involved in a fight. The Fleet Battle Plan contains detailed combat instructions for all units in each Fleet. A Fleet, in battle, will be divided up into various “battle formations” based on the mission classification of each ship within it. Each battle formation will then be issued orders detailing its role in the coming battle.
Chapter

T H E S P A C E F L E E T
5555----2222
All ships in each battle formation are assigned to the same tactical deployment location on the battle grid. Most of the time you will have your warships up front, while your auxiliaries hang back. Fighter and Drone Operation Orders are also assigned to each battle formation. Most of the time you launch all of your Fighters and Drones at the enemy. There are times, especially when the enemy has strong anti-Fighter or anti-Drone defensive systems in place, where you would prefer to hold back your Fighter or Drone deployments.
Ships assigned to the front ranks (Deployment Location 1) can deliver their full broadsides to the enemy. They have no restrictions on their movements and can engage freely. They are prime targets for enemy weapons fire and receive full attention by enemy commanders. As ships are deployed farther and farther back, they lose freedom of movement and will find it more difficult to engage enemy vessels with maximum firepower. Such ships do, however, enjoy the advantage that friendly ships closer to the front lines will be receiving the brunt of the enemy fire. Fighters and Drones launched by Carriers or Drone ships suffer no offensive weapon degradation but the mother ships themselves, armed with main weapons batteries, would suffer normally. It does you no good to build nothing but Carriers, load them up with Fighters, and assign your Carriers to Deployment Location 12 (that’s as far back as they can go). The enemy will defend against the Fighters normally, but won’t find any other ships of yours to engage, and therefore will come right after your Carriers. You should have built some escorts—tough ones, if possible—and assigned them to the front lines to screen fire from your Carriers.
C R E A T I N G N E W F L E E T B A T T L E P L A N S
You can create new FBP’s by using the New Force Battle Plan order. Issuing an NFBP duplicates another Fleet Battle Plan and gives it a new name that you choose. You can then alter the specific orders given to the various battle formations within the FBP to suit your needs.
R U L E S O F E N G A G E M E N T
Each Fleet is given Rules of Engagement orders. Fleet ROE directives indicate under what conditions the Fleet may fire upon alien forces. When changing a Fleet’s ROE setting, use the single letter code rather than the full name. If you have multiple Fleets at a battle site with different ROE orders, the commanders on the scene will use their judgment. They often use the most aggressive ROE setting.
ROE Name Description
P Papa Ignore any alien encountered whenever possible
Q Quebec Ignore any alien encountered unless attacked
R Romeo Attack any declared enemy. This is the default setting
S Sierra Attack declared enemies and unknown aliens
T Tango Attack declared enemies, unknown aliens, and known aliens with whom you have no political agreement
U Uniform Attack declared enemies, unknown aliens, and known aliens with no agreement or a Cease Fire agreement
V Victor Attack declared enemies, unknown aliens, and known aliens with no agreement or a Cease Fire agreement or Trade Pact
W Whiskey Attack enemies, unknown aliens, and known aliens with no agreement or a Cease Fire agreement, Trade Pact or Non-Aggression Pact
X X-Ray Attack enemies, unknown aliens, and known aliens with no agreement or a Cease Fire agreement, Trade Pact, Non-Aggression Pact or Military Agreement
Y Yankee Attack enemies, unknown aliens, and known aliens with no agreement or a Cease Fire agreement, Trade Pact, Non-Aggression Pact, Military Agreement or Alliance
Z Zulu Attack any alien encountered, including Total Allies

T H E S P A C E F L E E T
5555----3333
F L E E T M O V E M E N T
There are three orders that you can use to move your Fleets about. The Naval Movement order directs a Fleet to move from one orbital location to another in the same star system. Move To Warp Point is used to move a Fleet to a Warp Point within a system, but the Warp Point is not actually entered upon arrival. The Warp Movement order has a Fleet that is already at a Warp Point move through it to another star system. Every ship in the Fleet must be Warp-capable or the Fleet will not execute the Warp Movement order.
Fuel is consumed only during a successful Warp transition. It is stored as Fleet cargo and is available to every ship therein, even those without Fuel Tankage. It is assumed that such ships have their Jump Drives supercharged with Fuel before the journey and they can transit the Warp Point along with the other ships. If there is insufficient Fuel for the entire Fleet to execute the Warp Movement order, no ships will move. Furthermore, each ship stores the number of Warp movements it is capable of performing each turn. At the beginning of the game this is just one Warp transition. Superior Jump Drives can yield more Warps per turn. This value is stored at the ship level, so if a Fleet makes a single Warp transition, every ship in the Fleet is marked as having executed one Warp Movement. If one of the ships in the Fleet were capable of another Warp move, it could be transferred to another Fleet which could make another Warp transition so long as all other ships in that Fleet were still capable of Warping. Naturally, that Fleet would need to have sufficient Fuel for its own Warp move.
A C T I O N P O I N T S
Every ship is given a number of Action Points each turn. The number that each ship receives is 2 plus a variable bonus amount based upon its Engine output. Engines means Items such as the Mk I Nuclear Engine, not Jump Drives like the Mk I Nuclear Jump Drive. Quick ships can therefore perform more Actions each turn than their slower brethren can. Such ships also have an advantage in battle when combating certain types of weapons, but most weaponry does not worry about target speed. Unfortunately, Engines can eat up a lot of space on your ships. The following chart shows the number of Action Points required for each pertinent Fleet order.
Warp Movement is a special case. Action Points are not checked when a Fleet executes a Warp Movement order, so a Fleet could have zero Action Points and still perform a Warp transition. However, at the conclusion of a successful Warp Movement order, the Action Points of the Fleet are set directly to zero. This precludes the Fleet from performing other orders that require 1 Action Point later in the same turn, but does not prevent it from executing another Warp Movement order. A Fleet could not, therefore, Warp to another star system and then perform a System Scan in the same turn. Transferring ships out of the Fleet after the Warp Movement is concluded does not get around this, since Action Points are stored at the ship level, and the zero available Action Points would follow such ships around.
Order Action Points Expended Order Action Points Expended
Colonial Beacon 1 Colonial Survey 1
Offload Cargo 0 Diplomacy 1
Orbital Bombardment 1 Orbital Reconnaissance 1
Exploration 1 Planet Map 1
Geological Survey 1 Reorganize Naval 0
Jettison Cargo 1 Scuttle Ship 0
Live Fire Exercise 1 Sensor Sweep 1
Load Cargo 0 Skim Gas Giant 1
Embark Army Force 1 System Scan 1
Move To Warp Point 1 Warp Movement See Notes
Naval Movement 1 Warp Survey 1

T H E S P A C E F L E E T
5555----4444
N A V A L B A T T L E S
At the conclusion of each Processing Pulse, checks for naval engagements are made at each potential conflict site. The Rules of Engagement for each Fleet is checked, and if a battle is warranted, it will be resolved before the next Processing Pulse is adjudicated. If multiple Empires have Fleets at the same location, things can get messy. Two sides are created, with each Empire’s Fleets joining one side or the other, or perhaps remaining neutral. If a Fleet’s ROE orders direct it to attack both sides, it will almost always remain out of the battle. Allies will try to fight on the same side so long as individual Fleet ROE’s do not foul everything up. If you do not know what else to do, leave your Fleet’s ROE’s set to R (Romeo). You’ll defend your allies unless they choose to shoot at your ships.
Since engagements are not actually checked until the conclusion of each Processing Pulse, it is possible for alien Fleets to “pass in the night”. That is, your Fleet could execute a Warp Movement to another system, and you know that enemy ships are stationed at the arrival location of that Warp Point. However, the enemy Fleets might move away, perhaps executing a Warp Movement into your system, during the exact same Processing Pulse. In this case there would be no battle since no enemy forces are co-located when the battle checks are made.
During a naval engagement, the designs of the various combatants play a major role in the battle outcome. Each ship, surface fortress and orbiting installation targets at least one enemy unit, fires its weapons and tries to avoid taking damage in return. Fighters and drones can be launched to engage enemy units independently of their mother ships. The number of targets that can be destroyed in a single round of combat depends greatly on the command-and-control facilities present on the units involved, and can be improved by sensors, Legendary Characters and other factors. Forward-deployed ships dish out the most damage and are considered priority targets. Ships deployed far from the front lines lose firepower but are more difficult for the enemy to target. Weapon fire is simultaneous in most cases, though there are range considerations for some types of weaponry. A weapon always inflicts full damage on the enemy when it hits, but that damage can be degraded by defensive systems such as screens, reflective armor coatings, electronic countermeasures, deflectors and a host of other passive and active measures. Shields, if present, do not counter enemy weapons fire but instead absorb damage that has passed through the defensive countermeasure envelope. Defensive systems thin out enemy firepower more efficiently than do shields, but shields absorb damage out right and are crucial if you want to avoid suffering any battle damage. Defensive systems between different ships interlock to provide umbrella coverage, with an efficiency depending on the design of your ships, while shields and the hit points of each combatant are considered on a per-ship basis. Thus, enemy missiles that are screaming in on a target can be intercepted by nearby friendly ships as well s the target (assuming those ships have the capability to elude or pick off the missiles), but once they strike home, the target’s shields and overall hit points are what count. The amount of damage that is required to destroy a ship once its defensive systems and shields have been penetrated depends entirely on the ship design. Armor in particular has more hit points per ton than any other Item. Damaged ships drop in effectiveness immediately, making them easier targets later in the engagement. If you can degrade enemy weapons fire with defensive systems and then absorb what remains into your ships’ shields, your force will suffer no damage. Inflicting damage upon the enemy while accomplishing this lofty goal is, of course, the whole idea.
Ships defending a Warp Point arrival location are at a significant advantage. The width of the Warp Point from the aggressor’s point of view severely restricts the number of ships that can traverse the Warp Point during battle conditions. Note that the width can vary for the same two-way Warp Point, depending on which way your ships are travelling. During times of peace, ships appear at their leisure, reform and move on. Battle conditions change everything. Only so many ships can fit within the confines of the Warp tunnel at any given point, restricting the number that can materialize in the target system at the same instant. Several seconds, at the very least, will often pass before another wave of attacking ships can materialize and make their presence felt in a battle. The defenders are all on station, however, and will undoubtedly be pouring massive firepower into the poor outnumbered attackers who happen to be unlucky enough to materialize first. To counter this, attacking ships are sequenced by their battle formations, with Assault ships up front. The following chart shows where each battle formation lies when it comes time to see which ships make their jumps first. Assault ships try to appear first, followed by Battle Line vessels, but ships from other Battle Formations may very well appear before them.
Jump Order Battle Formation Jump Order Battle Formation Jump Order Battle Formation
1 A (Assault) 7 D (Drone) 13 Y (Special #2)
2 B (Battle Line) 8 V (Carrier) 14 Z (Special #3)
3 H (Heavy Screen) 9 S (Standoff) 15 P (PDC)
4 L (Light Screen) 10 T (Transport) 16 K (Orbital Command Group)
5 E (Escort) 11 O (Auxiliary) 17 N (Non Combatants)
6 G (Missile) 12 X (Special #1)
Another way to counter the Warp Point ship limit is to install many Jump Drives on your ships. Each type of Jump Drive has an energy output that dictates the size of the warp bubble that it creates around its ship. Any ship can perform a Warp Movement with just one Jump Drive. The energy output value of its Jump Drives, however, dictates how many ships the vessel in question counts for when compared to the Warp Point ship limit. The tighter the warp bubbles

T H E S P A C E F L E E T
5555----5555
around your ships, the more that can fit side-by-side inside the Warp tunnel. That’s good for battles, and absolutely critical for Jump assaults, but bad for ship tonnage (Jump Drives are massive in terms of output-per-ton). For example, suppose you attacked an enemy with many Pathfinder class Fleet Scouts. Each Pathfinder masses 12,000 tons and has a single Mk I Nuclear Jump Drive. Each Mk I NJD has an energy output value of 1,000. The Pathfinder therefore counts as a woeful 12 ships each for purposes of determining how many Pathfinders will appear during each instant of a battle. At least one Pathfinder will always materialize into the battle grid during each battle pulse, even if the Warp Point had a ship limit of less than 12. Unfortunately, a ratio of 12:1 will not bode well for your Fleet Scouts. Why were you attacking with Pathfinders anyway? If you had attacked with a single Behemoth class Battle Dreadnought, also equipped with a single Mk I NJD, it would have appeared even if it had a Jump Drive energy output ratio of many hundreds to one. Make it an Assault ship and hope that it can absorb some firepower until the rest of your Fleet arrives.
It is entirely possible that a determined enemy can make passage through a particular Warp Point so painful that you will either not want to assault him through it, or you will simply not be able to. The defender holds all the cards, if he can put enough muscle behind his determination. There are high technology solutions to help break blockades, but even these can be very costly. He can’t defend every Warp Point into his Empire, can he?
F I G H T E R A N D D R O N E O P E R A T I O N S
Fighters and Drones in your combat Fleets can be given a variety of battle options through use of the Formation Battle Plan order. Drones are unmanned but are equipped with a variety of warheads and other weapons with which to perform their missions. Fighters are manned small craft equipped with lasers, torpedoes, standoff missiles and a wide variety of antiship weapons. It should be noted that the Kamikaze Cover and Kamikaze Attack Fighter Operations Options are not very effective until certain technology advances have been made.
Fighter Operations Option Drone Operations Option
No Launch No Launch
Standard Attack Standard Attack
Close Support Cover Attack
Cover Focused Attack
Deep Strike -
Forward Support -
Kamikaze Cover -
Kamikaze Attack -
O R B I T A L B O M B A R D M E N T
Fleets can utilize their ship-mounted weapons and a variety of Mass Destruction Devices stored in cargo holds to devastate enemy Population Groups. Damage can range from minor to world-shattering, depending on the nature of the weapons used. Your Fleets will refuse to engage Population Groups owned by your Empire.

T H E S P A C E F L E E T
5555----6666
T H E A R M Y
6666----1111
The Army Starships might be able to rain death down from the skies, but the only way to take a world is to send in the grunts.
C R E A T I N G A R M I E S
The New Army order can be used at any time to create a new Army inside any Population Group that you own. You choose the name and ID # of the new Army. The name could duplicate that of any of your other Armies, but you would be wise to choose unique names to avoid confusion. The ID # must be unique and can be any reasonable positive number that you like. Other players will not see your Army #’s, but they will see the names that you issue. Please keep the names of your Armies in good taste, and of a science fiction or military background. Army names deemed offensive or inappropriate may be edited at RTG’s discretion. Armies with no Divisions in them remain active until you destroy that Army with a Disband Ground Force order.
A R M Y C O M M A N D E R S
Army Commanders can provide substantial bonuses to your ground combat operations. Simply assign a Legendary Character to one of your Armies. He’ll stay with that Army on whatever planet it is stationed at. If you are involved in a battle, he will make use of his considerable tactical battle training. Armies with excellent Tactical Ratings will benefit the most from the presence of an Army Commander.. Good field officers are rare, and should be protected, but leaving them behind on the homeworld won’t do your troops much good.
D I V I S I O N S
Armies are just placeholders that keep track of your Divisions when they are on planets. The Divisions themselves do all of the real work. Each Division is rated in a number of categories called Tactical Ratings that form the basis for its strength in battle. When a ground combat erupts, the firepower and defensive capabilities of each Division is modified depending on how they compare to the enemy force. For example, if you built nothing but Infantry Divisions, your Armor Tactical Rating would be fairly low even if you had outstanding technology at your disposal. This would put your Army at a disadvantage in the Armor category, which would affect the firepower of all of your Divisions. It is best to have decent ratings in every category so that the enemy does not gain unreasonable bonuses in any of them. If you dominate every Tactical Rating and have excellent firepower, you’ll probably win the battle. This can be difficult to achieve, so just do the best you can and remember that combined arms wins out over the brute force method of building just one type of Division to the exclusion of all else.
The concept of combined arms is basically one of teamwork. A group of units working together as a team, each with different strengths and weaknesses, will be more effective than those same units working individually. Simply put, the whole is greater than the sum of the parts. Different types of Divisions work together so that their weaknesses are minimized and their combined strength is based on mutual support. Combined arms is particularly important when specialist units are brought into play. Specialists units, by definition, are good at one specific thing and weak in many other areas. An Intelligence unit, for example, may have great capabilities for gathering intelligence, but its inherent combat capabilities are minimal. It must be shielded by combat units to avoid being destroyed in combat. In return, it provides its intelligence services to the entire force. The addition of the Intelligence unit to your Army added insignificant firepower in its own right, but because your entire force gained a valuable Intelligence asset, the firepower of the Army as a whole went up. The SN:ROTE ground combat system makes rather extensive use of the combined arms concept. A wide variety of specialist and regular combat unit types are available for use.
Chapter

T H E A R M Y
6666----2222
Every Division is given firepower in each of the following Tactical Ratings. These firepower factors are then multiplied by the best ground unit technology that you have developed in the appropriate area. Mobility is treated on a Divisional basis, with various Division types having inherent mobility advantages or disadvantages depending on the terrain in which they are deployed. If you are defending in predominantly swampy terrain, use Imperial Marines Infantry instead of Imperial Guards Heavy Tanks, or your troopers will complain later about having to pull tanks out of the muck.
Tactical Rating
Air Defense Bio Weapons Defense Environmental Security
Air Support Biological Weapons ESP Small Arms
Air-to-Air Combat Broken Terrain Heavy Weapons Space Defense
Ammunition Camouflage Intelligence Special Weapons
Amphibious Operations Chem Weapons Defense Medical Subterranean Terrain
Antitank Chemical Weapons Nuclear Weapons Defense Telekinesis
Aquatic Terrain Close Combat Nuclear Weapons Telepathics
Armor Electronics Warfare Open Terrain Transport
Artillery Engineering Orbital Bombardment -
G R O U N D U N I T R E S E A R C H
You will find an incredible array of individual technologies that can be researched to boost the strength of your Divisions in combat. These technologies are not constructed, but instead modify the Tactical Ratings of the Divisions that you do build. For example, if you construct an Armor Division and send it into battle, it will use whatever firepower it happens to possess. If you want to boost the Armor Tactical Rating, research Light Tanks. Every Division you own will then use the Armor rating of the Light Tank instead of that of the old Armored Cars. For an Armor Division that relies heavily upon its Armor Tactical Rating, this is a big boost. You do not need to upgrade your Divisions when you research a new technology. To ease game play, It is assumed that the new technology is made available to your forces immediately.
T R A N S F E R R I N G D I V I S I O N S B E T W E E N A R M I E S
Divisions can be moved from one Army to another, using the Reorganize Army order, so long as both Armies are located on the same planet. Armies do not carry cargo, so there are no cargo considerations as with Fleets.
T R A N S P O R T I N G A R M I E S O N F L E E T S
When an Army is loaded onto a Fleet using the Embark Army Force order, every Division in the Army is loaded aboard the Fleet as cargo. Sufficient Troop Berthings must be present on the Fleet to hold the Divisions. The Army remains behind in the Population Group as an empty shell, and will exist until you destroy it using a Disband Ground Force order.
To shuttle troops from an orbiting Fleet into an Army in a Population Group, use the Disembark Army Force order. The Divisions specified will be transferred to the Army by troop shuttles. Note that since the Fleet must be in orbit to perform this mission, it will need to survive possible enemy fire upon arrival. Troopships are often held back until after an assault Fleet can secure orbital space above a potential target world. A new Population Group would then be created by the attacking Fleet. The ID # of the Population Group would be unknown, however, until the following turn, so there would be no way to create an empty Army there on the same turn that the skies are secured. Once a Population Group has been created on the target world, the troopships might consider moving in and deploying their troops to a newly-created Army on the planetary surface. A ground battle could ensue on the same turn that the troops are dropped onto the world.
Armies that engage in a battle are flagged so that they cannot be loaded aboard a Fleet using the Embark Army Force order. This prevents Divisions from engaging in many battles on different worlds during the same turn.

T H E A R M Y
6666----3333
O F F E N S I V E A R M Y C O M B A T O R D E R S
When an Army Group is ready to go on the offensive, a primary combat order is issued. After an Army attacks, it cannot be issued any other orders for the duration of the turn. Divisions in that Army cannot be transferred out or loaded aboard ships. Armies that defend against enemy attacks are under no such restrictions, and could therefore counterattack later in the turn or even be embarked aboard friendly ships and moved away from the world entirely. The following combat orders are available to your field commanders. The various strategies yield multipliers that are applied to some of the Tactical Ratings enjoyed by your forces. These multipliers will give your Divisions advantages in certain areas while reducing their effectiveness in others. All of your units will always attack, no matter which Primary Combat Order you choose—it’s just a question of what you are emphasizing in your attack plan. During battle, your offensive orders and the defensive standing orders of the enemy are compared, tactical ratings modified based on planetary conditions and the Divisions present, and the engagement takes place. Fire is simultaneous and often deadly.
Offensive Combat Order Description
Aerial Bombardment This is similar to Artillery Bombardment, but strategic bombers and fighter-bombers make sweeps over enemy territory looking for targets of opportunity. Fighters run escort missions to ensure air supremacy. Other units will attack as well, but the safety of friendly airfields is of the utmost priority.
Airmobile Assault Mobile airborne and special forces units are deployed behind enemy lines while battle line units make widespread attacks all along the front. The idea is to take out key enemy units where possible, and to inflict damage in areas where the enemy least expects to be attacked.
Artillery Bombardment Long range artillery units are deployed into offensive positions and begin bombarding enemy positions with relentless artillery strikes. Other troops support the artillery units either by pinning enemy forces or by stationing themselves into defensive positions to protect friendly artillery.
Encircle Slower Divisions prepare and launch an assault against enemy positions while mobile units maneuver to hit the enemy in the flanks. The idea is to encircle enemy Divisions, cutting them off from support and prevent the enemy’s withdrawal. This is an effective strategy to use if you want to tie down and eliminate weaker enemy units. It relies upon the use of highly mobile Divisions to do most of the work.
Frontal Assault All Divisons prepare and launch a coordinated, determined assault on enemy positions. Frontal Assaults are most effective at taking out heavy defenses, and rely upon brute force to accomplish the objective of overwhelming the enemy. If working with a mobile reserve, front line units will try to create an opening in enemy lines to allow a breakthrough attack to be launched. This is the default Offensive Combat Order.
Harassing Attack The main body maintains position and takes limited offensive action.s. The primary attack is carried out by artillery, air, naval and special forces assets (depending on availability). This attack mode allows your front line units to remain in prepared defensive positions while still inflicting attritional losses on the enemy.
Living Wave Assault Divisions given the Wave Assault combat order will launch an all-out wave attack on enemy units. All units charge enemy positions with wave after wave of soldiers until the defenders are buried by the weight of the attack or until the attackers are annihilated in the attempt. This tactic can be quite effective, but it depends on the strength of your soldiers rather than mobile units or complex use of support Divisions. It can be useful when you don’t care about heavy loss of life, are willing to suffer massive casualties to secure an objective, or when you are desperate and have little to lose.
NBC Strike Full release authorization is given to your battlefield commanders for liberal use of nuclear, biological and chemical special weapons. If not countered, such weapons can spell total destruction for enemy forces. This tactic is most effective when enemy Divisions can be pinned down—the local commander calls in a nuclear strike and atomizes the enemy where they stand. This process is repeated all across the battlefield, as the enemy is consumed in the cleansing flames of nuclear detonations. Biological and chemical weapons are most often used to interdict enemy movements and force them into positions vulnerable to annihilation by atomic weapons.

T H E A R M Y
6666----4444
Reconnaissance In Force An Army with Recon In Force orders will probe enemy defenses, testing their strength and pulling back at once if powerful forces are encountered. If enemy defenses are weak, your forces will exploit and launch a full scale attack against their positions. Mobile and support units are useful here, since this is a carefully planned, coordinated attack all along the front.
S T A N D I N G D E F E N S E O R D E R S
The Standing Defense Orders of an Army are used whenever your units are caught on the defensive. As with Offensive Combat Orders, multipliers are applied to various Tactical Ratings to determine the final firepower of your units. All of your Divisions will utilize all of the firepower at their disposal no matter what Standing Defense Order you give them—it’s just a matter of what you want them to emphasize in battle.
Standing Defense Order Description
Counterattack An Army using the Counterattack option will attempt to stop enemy advances in their tracks, force them to withdraw and then launch an immediate counterattack against it. The Counterattack itself is much like a Frontal Assault, but the overall tactic requires more mobility and well coordinated use of support assets.
Delaying Action Units involved in a Delaying Action will attempt to slow down the enemy advance without having to fully engage. Hit and run tactics are often used all along the front to impede enemy progress and inflict irritating losses while friendly forces steadily withdraw from full contact. This tactic is most useful when the terrain favors your forces and you have units that can take advantage of their surroundings.
Fortify All units dig in and hold their positions against any enemy attack. Retrograde movement is not an option. Killing fields are set up in front of your units so as to maximize enemy losses. Fortified strong points force the enemy to crack every defended location without regard to fancy maneuvers. Though this tactic can stop an enemy in his tracks, it is vulnerable to long range strikes, particularly if nuclear weapons are being used by enemy units. Heavy air defenses would be wise to have in place. If available, nuclear/biological/chemical defenses would be a good idea as well.
Mobile Defense An Army with Mobile Defense orders depends a great deal on its having a speed advantage over its opponent. Defending units will use their mobility advantage to outmaneuver the enemy, launching small counterattacks only to quickly break off and strike at another area of the front. This tends to keep the enemy off balance and, hopefully, confused.
Nuclear Release Full release authorization is given to your battlefield commanders for liberal use of nuclear, biological and chemical special weapons against attacking forces. Enemy units are allowed to concentrate for a major attack and then the local commander calls in a nuclear strike and atomizes the enemy where they stand. Biological and chemical weapons are used to interdict enemy movements and channel them into positions vulnerable to annihilation by the searing fires of atomic weapons. Civilian casualties and damage to the environment are considered secondary to the total destruction of enemy forces. Sometimes, tactical nuclear weapons are used even against small concentrations of enemy troops, just to prove to the enemy that they are not safe from certain destruction, wherever they might be. This can be most effective in fouling up enemy attacks, as they never know when the entire front might light up in a maelstrom of atomic fire.
Ready Reserve Mobile reserve assets are dedicated to countering the actions of enemy mobile units. The force will also move to halt an enemy main body that has overrun your main body and is advancing as a continuation. This last action may well be fatal but it could slow or stop the enemy continuation attack, allowing your rear area units to survive and deploy to safer locations. Air units are used extensively as an outstanding reserve asset, able to strike anywhere as needed.
Stand and Defend Your forces will defend their positions to the utmost of their abilities. Soldiers will dig in and hold their ground if possible. This is the default Standing Defense Order.

T H E A R M Y
6666----5555
Withdraw An Army with Withdraw orders has no intention of engaging in any drawn-out battles. The sole purpose of the Withdraw order is to reduce casualties and play for time. Ambushes are set whenever possible and terrain use is maximized.

T H E A R M Y
6666----6666

S H I P D E S I G N
7777----1111
Ship Design Naval unit design is a major aspect of SN:ROTE, requiring both strategic and tactical level thinking. You have the option of designing three different types of naval units (starships, orbital installations and surface fortresses) and will have a wide range of technology available to work with during the design process. You must determine the needs of the Empire and then design and build the proper units to meet those needs while taking into account the technology and resources available. The Empire will not have unlimited resources or construction ability, so your units must be both capable and efficient.
N A V A L U N I T D E S I G N B A S I C S
The ship design system is based on mass and Item function. All of the components that you have available to you for unit design will have a mass rated in tons and possess many features that make the Item useful on a ship. Weapons will have offensive firepower ratings in specific damage categories. Different types of defensives systems such as the Type A Defense Screen will protect against certain types of enemy weapons fire. Armor increases the survivability of your ships once their shields are breached. There are no limits to the size of the units you design and there are no volume considerations to take into account. You can design tiny Frigates or gigantic Dreadnoughts if you like. You have a great deal of freedom in how you design your starships, orbital installations and fortresses. Balancing a design so that it can perform the mission you have planned for it while keeping construction time and unit costs down will, however, require time to perfect.
A unit design “template” is created whenever you submit a new unit design. This template is kept on file and is used whenever you submit a construction order for units of that particular design. There are no limitations on the total number of designs that you may have on file for your Empire. All units maintain their own design records after they enter service so you do not need to maintain original design records for these units. Original design records are only required when units of that design are placed on order (the Shipyards must have a design on file to work from).
When you are ready to design a new naval unit, use the Naval Unit Design order. The NUD order requires the following information. A design must end with at least 1,000 total tons of equipment, or additional items will be added to make up the difference. Be aware that the naval combat system strongly encourages you to use fewer large ships instead of a huge swarm of small ships. Small ships have their uses, but you would be wise not to depend on huge numbers of them in battle. Use them as screening vessels, and depend on the big brutes for your real firepower. Each design may contain up to 24 different Items, with any desired quantities of those Items.
Chapter

S H I P D E S I G N
7777----2222
NUD Order Section Description
Design Type Your design must be a Starship, Orbital Installation or Surface Fortress
Design Name You can name your design anything you like, but please keep it in good taste. Design names deemed offensive or inappropriate may be edited at RTG’s discretion The name must be unique within your Empire.
Mission Class This is the battle formation that you want this design to be assigned to when Fleet Battle Plans are called upon during naval engagements.
Item & Quantity You then list a series of Items and the Quantities of those Items that you want installed in your design. Any Item that can fit on a ship is allowable here (there’s no point in adding Shotguns to your starships, as Shotgun is a ground unit technology).
Once the design has been submitted, your Imperial Naval Unit Design Board will determine what the ship class is. Your design elements dictate this choice directly. If you design a ship that contains a lot of Cargo Holds, it will likely be classified as a Free Trader class vessel. The more precise ship class name (Trader, Light Freighter, Medium Freighter and so on) will depend on the total tonnage of the vessel. Your design decisions are used exclusively to determine the final ship class name.
That’s all there is to it. Surface Fortresses and Orbital Installations cannot move (no Jump Drives or Engines allowed), but otherwise they can be designed freely. They are treated as starships in all respects except that they cannot move. Once completed by your Shipyards, they are placed into Fleets just like your regular starships. They are incapable of movement, but do receive defensive advantages because of the nature of their design. Surface Fortresses are forever located on the world where they are constructed. Orbital Installations can be towed to other locations by Tug class vessels. Large Orbital Installations generally require a lot of Tugs to be moved about. You could also use a single massive Tug to do the job, depending entirely upon your Tug design choices.
Armor installed onto Orbital Installations can be utilized to reinforce interior bulkheads as well as improving the sturdiness of the overall ship structure. Because of this, Orbital Installations with a lot of Armor can be very difficult to destroy. Surface Fortresses receive the maximum benefit from installed Armor, and a heavily armored Surface Fort can be exceedingly difficult to knock out.

E X P L O R A T I O N
8888----1111
Exploration Exploration of the galaxy will take on the utmost importance as your young Empire seeks out resources, habitable planets, other spacefaring races and the unknown. It will in fact be a never-ending task, for the galaxy is vast beyond imagining and your initial knowledge is limited to your home system. The presence of alien races capable of space travel is a near certainty, and accurate intelligence on their activities could mean the difference between life and death for your race. The quest for knowledge will occupy a great deal of your Empire’s time, energy and assets.
E X P L O R A T I O N B A S I C S
Exploring other star systems and planets using your Fleets is straightforward. You will probably use expendable Fleet Scouts for most of your simple needs. If a Warp Point transition ends inside the photosphere of another star, the loss of a single Fleet Scout will not spell the end of your Empire. To explore the destination star system you would have to either find another way in or use a starship capable of surviving the incredible heat and radiation on arrival. Exploring planets is simple—just move a ship to the world, map it using the Planet Map order, and conduct an Orbital Recon to check out any intelligence lifeforms that might be present.
T H E E X P L O R A T I O N O R D E R
You can also use the Exploration order to search for unusual items or lifeforms that may be found on a planet. If there is an Alien Laboratory on a world, the Exploration order is the way to discover it. If you unearth something unusual on a world, you will almost always be rewarded with an Item or some research points dedicated toward an Item that you do not yet understand. For example, suppose one of your Fleets discovers an ancient alien ground battlefield on a planet. Your explorers might come away with a better understanding of how to develop some sort of super heavy tank—in this case, research points are added directly to the appropriate Item, as if you had assigned some of your Research Centers to work on that Item. Some day, if you should actually work on that particular Item, it will be developed faster than usual because you already have some research completed in that particular field of study. It is also possible that your Explorers could discover some useful Items on the battlefield. Perhaps an alien ship crashed in the vicinity of the ground battle, and some of the components of that ship survived intact. Your teams will load those Items onto their Fleet as long as there is sufficient Cargo space to handle them. It is therefore a good idea to always have Cargo Holds set aside when you send your Fleets out to perform Exploration missions. If you don’t have enough Cargo space to handle discovered Items, they are lost. They are not stored on the planet for later pickup, but instead are discarded (lost forever). Sometimes the Items found are of little use to you, while other times you’ll find something interesting. If it’s a ship component—say, a highly advanced spinal rail gun—just make a new ship design incorporating that Item and build a new starship based on that design. You might not be able to build that spinal rail gun in bulk (without the necessary technology, you can’t build them at all), but the one that you do have can be incorporated into one of your ships.
It’s possible to find just about any Item in the game, at any of a wide variety of discovery sites. You could find starship parts in an alien temple, or a stockpile of Steel in a warehouse. You just never know what’s out there….
Chapter

E X P L O R A T I O N
8888----2222
L E G E N D A R Y E X P L O R E R S
It is a very good idea to place Legendary Characters specializing in Exploration aboard your Fleets performing the Exploration mission. They will substantially increase your chances of finding something interesting. Explorers are also good at navigating Warp Points.

C O L O N I Z A T I O N
9999----1111
Colonization The colonization of other planets will be of prime importance to your Empire as you expand. The shortage of raw materials on the homeworld is a major motivating factor to colonial expansion. Having an industrial base far from home is also a good idea. Shipyards on distant planets can produce defenses for their worlds.
T H E C O L O N I Z A T I O N P R O C E S S
You will need to secure substantial sources of raw materials to feed the hungry maw of your homeworld’s industries. There’s no way your homeworld will be able to produce enough Resources to keep your industries busy. Once you find a suitable world—perhaps one with huge Iron, Crystals, Gaseous Elements or other good Resource Yields, you should send a Fleet there to set a Colonial Beacon. This creates a new Population Group on that planet. Once you have the Population Group ID # in hand, you can transport Construction Materials to the new world and build some Cities and mining facilities. You’ll need some population as well, because each Installation absorbs 1 Population Unit from the Population Group it is constructed in. Thus, Colonial Transports and Merchant vessels will be needed to colonize new worlds. Unless you want to move huge numbers of colonists about, you’ll need more Merchants than Colonial Transports, because you’ll need far more Construction Materials to start up a colony than you’ll need population. Later on you can add more colonists as needed.
C O L O N I A L A T T R I T I O N
Every world has its own set of hazards. The perfect world would be one that is absolutely identical to your homeworld. Unfortunately, this ideal is almost never found in reality. Atmosphere, Gravity, Temperature Class, Axial Tilt, Terrain and other planetary factors such as Microorganisms, Pollution and Radiation all come into play. Technological advances can go a long way to countering these difficulties. Construction of domed or subterranean Cities to house your colonists can also be very helpful. Natural population growth can offset attritional losses, or you could simply continually ship in new colonists to make up for losses (this is a rather harsh way to stake a claim to a new world, however). If attrition results in the loss of colonists, unassigned Population Units will always be lost first. Only when there are no more unassigned Population Units will those incorporated into Installations be lost. If that occurs, the Installation is destroyed along with the Population Unit. This can be an extremely costly problem, so try to protect your colonists from such severe conditions.
Atmosphere and Ocean type play huge roles in attrition, each resulting in a substantial fixed increase in the colonial attrition rate. Microorganisms, Pollution and Radiation, if present in hazardous levels, can create problems as well. Other factors such as Gravity, Axial Tilt and Temperature Class can also boost the attrition rate. Each of these areas has a “Comfort Zone” where the attrition rate rises in a linear fashion. Once beyond the Comfort Zone, attrition rates rise in a dramatic, logarithmically unfavorable way. For example, if the world you are colonizing is up to 30 degrees hotter than your homeworld, you will suffer an increase in attrition based on a linear formula up to that 30 degree difference. This is not overly severe and can easily be overcome by constructing certain types of Installations. Your lifeform’s Colonization modifier might even overcome it. However, if the colony world happened to be more than 30 degrees hotter than your homeworld, attrition rates begin to rise dramatically for each degree in excess of the 30 degree Comfort Zone limit. Comfort Zones are detailed in the following chart. Note that familiar terrain does not have an associated Comfort Zone, but instead provides a flat favorable attrition modifier based on the amount of familiar terrain present on the colonized world.
Chapter

C O L O N I Z A T I O N
9999----2222
Planetary Feature Comfort Zone
Atmosphere Flat penalty if Atmosphere is different than that of the homeworld
Axial Tilt ± 10 degrees
Gravity ± 1 gravities
Microorganisms ± 10 Microorganisms index
Pollution ± 10 Pollution index
Radiation ± 10 Radiation index
Temperature Class Up to 30 degrees hotter or 60 degrees colder than the homeworld
Terrain Each % point of familiar terrain (matching with that present on the homeworld) reduces attrition slightly
The best ways to counter attrition is to have a lifeform design that has huge colonial attrition bonuses, construct Installations that aid in the survival of your colonists, and to develop technologies that give your colonists a fighting chance on harsh new worlds. Many Installations increase the Comfort Zone for various planetary features. This can have an extremely positive effect since attrition rates do not rise quickly within the Comfort Zone of any individual planetary feature, but increase dramatically once the Comfort Zone is exceeded.
Attrition results take effect at the conclusion of each turn cycle, so you have time to construct some new Installations on the same turn that you drop new colonists onto a world.
Y O U R F I R S T C O L O N Y
Here’s what you need to do in order to colonize your first world. Some of the following steps can be done ahead of time—for instance, if you design and build a colonial transport ship and have it ready to go, loaded with Colonists and at least one Colony Beacon, it can move directly to a suitable world as soon as you survey a planet that you like.
Step Description
1 Build at least one Colony Beacon by issuing a Build Item order for it. You will need one Colony Beacon for each Population Group that you want to create on another planet. Most of the time, you will colonize an entire world with just one Population Group.
2 Design a colonial transport ship. Each “Colonial Berthing” designed onto a ship can carry one unit of Colonists. Each “Cargo Bay” carries one ton of regular cargo such as Construction Materials, which are used to build most Installations. Colony Beacons are stored in Cargo Bays.
3 Build at least one of your newly-designed colonial transports by assigning it to a shipyard with a SHIP order.
4 Move a Fleet to a world you are interested in and perform Planet Map, Orbital Reconnaissance, Geological Survey and Colonial Survey missions.
5 Move a Fleet to a world that you decide to colonize and execute a Colonial Beacon mission. The Fleet needs to have a Colony Beacon in its cargo holds. The COLB mission will return a Population Group ID # that you can use in the following turn (you can’t transfer Items to your new colony until you know the Pop Group #).
6 Make some Colonists at your homeworld by using the Colonist Training order. This converts regular Population into Colonists that are stored in your Imperial Stockpiles. The Colonists are then available to be loaded onto Fleets for transport elsewhere.
7 Load at least one Colonist onto a Fleet by using a Load Cargo order. You might want to load some Construction Materials onto the Fleet as well. Each Colonial Berthing that is designed onto a ship can carry one unit of Colonists. Construction Materials are carried in Cargo Bays. Colony Beacons are stored in Cargo Bays.

C O L O N I Z A T I O N
9999----3333
8 Move your colony Fleet to the world that you want to colonize, and use the Offload Cargo order to transfer all of the Items that you want down to the Population Group that you have already created. Transferring Colonists to a Population Group in this way automatically converts them back into regular Population, ready to be employed in an Installation.
9 At this point you have a Population Group on a new world with at least one Population unit. If you want to build Installations there, you would need Construction Materials. Almost every Installation you can build requires the expenditure of Construction Materials and one Population unit to create. Multiple Population units would be needed for several Installations.
T H E M I N I M U M P O S S I B L E C O L O N Y
The smallest possible viable colony that you can build would be a new Population Group with one Population unit in it. Since mining resources is extremely important, you will probably want to build some mining facilities there. You’ll need Power to run those mines. A reasonably viable small mining outpost could therefore contain the following Items.
Suppose you want to build a single Iron Mine on another world. You will want to build more there, but getting that first Iron Mine operational is the key to getting started. Suppose you want to provide Power for your Iron Mine by using a Coal Fired Power Plant, which consume 30 tons of Coal to produce 10 Power. You would need to transport 2 Population Units, 1000 Construction Materials and at least 30 Coal to your new colony world. You’ve already set down a Colony Beacon there, which disappeared in the process of executing a Colonial Beacon mission (that’s what created the Population Group that will become your new colony).
That means you’ll need a ship that has 2 Colonial Berthings and 1030 Cargo Bays. You could design smaller ships and make several runs if you like, but a single large ship can be cranked through your available shipyard slips the fastest. Colonial Berthings are large at 10,000 tons apiece, while Cargo Bays are 1 ton each. Slap a single 100 ton Mk I Nuclear Engine on to give your colonial transport some movement capability, and you’ve got your first colonial liner. Load it with 2 Colonists, 1000 Construction Materials and 30 Coal and deliver those Items to your colony. Build a Coal Fired Power Plant and an Iron Mine with Construct Installation orders, and you’ll end up with a colony that contains 1 Iron Mine, 1 Coal Fired Power Plant and 30 Coal. At the end of that turn, all 30 Coal will be consumed and converted into 10 Power., which will be used to run the Iron Mine (Coal Fired Power Plants do not burn any Power, just Coal). Note that Power producing facilities do generate their Power before any other Installations run. Assuming the Iron resource is present on the world (you checked that with a Geological Survey mission before you ever colonized this rock!), the Iron Mine will crank out some Iron.
Now you have some Iron, your Iron Mine and the Coal Fired Power Plant, but are out of Coal. You could either build a Coal Mine there (assuming there is any Coal resource available on the planet) or ship in Coal the hard way. A Coal Mine would require some more Construction Points and another Colonist. Since the 10 Power produced by a Coal Fired Power Plant is enough to run 10 Iron Mines, you could build another 9 Iron Mines before having to worry about constructing any more Power-generating facilities. At first, since you have huge Industrial capacity on your homeworld, it’s best to simply produce Construction Materials at your homeworld and ship them out to your colonies.

C O L O N I Z A T I O N
9999----4444

D I P L O M A C Y
10101010----1111
Diplomacy Diplomacy is the art of saying “Nice, Doggie…” whilst reaching for a stick.
T H E D I P L O M A T I C P R O C E S S
Diplomatic discussions with other races could have a major impact on the future of your Empire. In SN:ROTE, you will encounter two types of alien Empires: Player-controlled, and Computer-controlled neutrals. If you encounter a Player-controlled Empire, you might want to communicate directly with the other Player. Contact with Computer-controlled Empires is discussed in more detail below.
Negotiating with other Players is straightforward. Use the Request Empire Address order to obtain the name and address of another Empire in the game. This order can be blocked if the Player in question has turned his Privacy option on. In this case the other Player will have to contact you, since you will not be able to obtain his address. You could still use the Send Message order to communicate with him, but he is under no compunction to respond. The communications that take place between you and another Player are outside the game, and you can make any sort of agreements that you like. Your deals are your own, and will not be enforced by Rolling Thunder Games. The game rules are enforced by Rolling Thunder Games, but not the myriad of deals that might take place between various Players.
Diplomacy with Computer-controlled Empires is handled through use of the Diplomacy order. When you build up enough favor with such an Empire, it is possible to propose formal, binding agreements that tie your Empires together in economic or military ways. Of course, you can skip diplomacy and go straight to military conquest. Once conquered, the Computer-controlled Empire will become part of your Empire, and you will directly control their Industries, Mining facilities and so forth. They won’t like you very much, and might rebel against what they consider your oppressive rule, but your forces are in charge and can be difficult to dislodge.
Government Type, Imperial Tradition, the choices that you make when issuing a Diplomacy order and even the title that you give your Leader will all affect the chances for success when conducting diplomatic missions with Computer-controlled Empires.
E M P I R E N A M E
The name that you choose for your Empire has no effect on any game mechanics functions. It is listed here because it is extremely visible, showing up whenever your ships or worlds are identified by other Players. You may select any name that you like that is 50 or fewer total characters in length including spaces and punctuation. You can base it on your lifeform, your political views or anything else that you desire. We would, however, encourage you to name your Empire in the spirit of the game. Ridiculous names such as “The Tooty Fruity Empire” will be rejected or edited to preserve the flavor of the gaming environment. In addition, the use of profanity is not permitted.
G O V E R N M E N T T Y P E
Your Government Type reflects how your people are governed, what privileges and requirements are placed upon them, how your society views the rights of its citizens and what sort of individuals aspire to positions of prominence. Your society generally follows the morals of the government that you choose, rewarding those who conform to the wishes of society as a whole. Though you can deal with other players in any way that you see fit, diplomatic negotiations with Computer-controlled neutrals will depend heavily on the Government Types of the involved parties. You will need to make two selections from the following chart. The first choice represents your society’s primary government type, while the second modifies that type in some way. For example, if you selected Federation and Piracy, your government would be a Piratic Federation., Your primary government type would be Federation, but your society would
Chapter

D I P L O M A C Y
10101010----2222
have significant Piratical tendencies. The league formed by your Federation would control the overall affairs of your society but pirates probably hold the reins of power behind the scenes. The two choices cannot be the same.
Government Type Description
Autocracy Government by an individual with unlimited, self-derived, absolute power.
Barbarism An aggregate of kingdoms rules by great leader-warriors.
Bureaucracy Administration through bureaus or departments staffed with nonelected officials.
Corporate State Government by powerful business corporations or merchant-princes.
Democracy Government by the people, either directly or through representatives.
Dictatorship Government by an individual with despotic or dictatorial control.
Federation A government formed from a league or association of smaller political bodies that have opted to create a more powerful federal union.
Feudalism A political/economic system where land is held in fief and there exists a lord to vassal relationship of power.
Hierarchy Government based on the categorization of people according to ability or status.
Imperium A political unit ruled by a single supreme authority advised by a council or senate of elected representatives.
Militocracy Government controlled by the leaders of the armed forces.
Matriarchy Government controlled by the females of the species.
Monarchy A state ruled by a sovereign leader.
Oligarchy Government by a few individuals, usually a small faction or group of ruling families.
Piracy A coalition of pirate kingdoms ruled by buccaneers or brigands.
Plutocracy Government by the wealthy.
Republic Government by a political body of representatives of the general electorate.
Technocracy Government by learned scholars.
Theocracy Government headed by an individual who represents a religious authority or divine being.
Totalitarian Government wherein the individual is totally subordinated to the will of the reigning political authority, which commands centralized and absolute power over all aspects of life. Opposing cultural and political views are ruthlessly stamped out.
I M P E R I A L T R A D I T I O N
Tradition is the passing down of certain skills or beliefs from one generation to the next. Imperial Tradition represents something that your people have long specialized in, and many of the most skilled individuals in your Empire will strive to be the best at whatever Imperial Tradition that you choose. If you pick Science, for example, you are likely to produce more Scientists than other leader types, but this does not preclude the appearance of other leader types. As a side note, Martial Artists can be useful in certain ground combat and exploration situations.
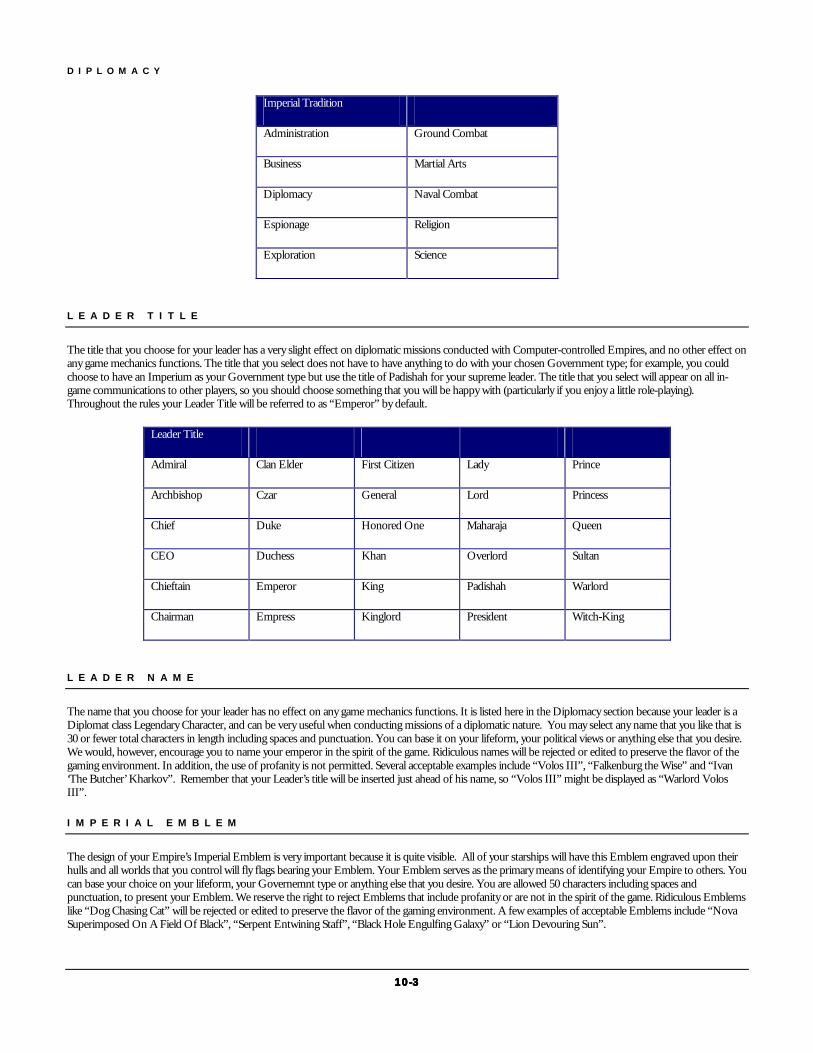
D I P L O M A C Y
10101010----3333
Imperial Tradition
Administration Ground Combat
Business Martial Arts
Diplomacy Naval Combat
Espionage Religion
Exploration Science
L E A D E R T I T L E
The title that you choose for your leader has a very slight effect on diplomatic missions conducted with Computer-controlled Empires, and no other effect on any game mechanics functions. The title that you select does not have to have anything to do with your chosen Government type; for example, you could choose to have an Imperium as your Government type but use the title of Padishah for your supreme leader. The title that you select will appear on all in-game communications to other players, so you should choose something that you will be happy with (particularly if you enjoy a little role-playing). Throughout the rules your Leader Title will be referred to as “Emperor” by default.
Leader Title
Admiral Clan Elder First Citizen Lady Prince
Archbishop Czar General Lord Princess
Chief Duke Honored One Maharaja Queen
CEO Duchess Khan Overlord Sultan
Chieftain Emperor King Padishah Warlord
Chairman Empress Kinglord President Witch-King
L E A D E R N A M E
The name that you choose for your leader has no effect on any game mechanics functions. It is listed here in the Diplomacy section because your leader is a Diplomat class Legendary Character, and can be very useful when conducting missions of a diplomatic nature. You may select any name that you like that is 30 or fewer total characters in length including spaces and punctuation. You can base it on your lifeform, your political views or anything else that you desire. We would, however, encourage you to name your emperor in the spirit of the game. Ridiculous names will be rejected or edited to preserve the flavor of the gaming environment. In addition, the use of profanity is not permitted. Several acceptable examples include “Volos III”, “Falkenburg the Wise” and “Ivan ‘The Butcher’ Kharkov”. Remember that your Leader’s title will be inserted just ahead of his name, so “Volos III” might be displayed as “Warlord Volos III”.
I M P E R I A L E M B L E M
The design of your Empire’s Imperial Emblem is very important because it is quite visible. All of your starships will have this Emblem engraved upon their hulls and all worlds that you control will fly flags bearing your Emblem. Your Emblem serves as the primary means of identifying your Empire to others. You can base your choice on your lifeform, your Governemnt type or anything else that you desire. You are allowed 50 characters including spaces and punctuation, to present your Emblem. We reserve the right to reject Emblems that include profanity or are not in the spirit of the game. Ridiculous Emblems like “Dog Chasing Cat” will be rejected or edited to preserve the flavor of the gaming environment. A few examples of acceptable Emblems include “Nova Superimposed On A Field Of Black”, “Serpent Entwining Staff”, “Black Hole Engulfing Galaxy” or “Lion Devouring Sun”.

D I P L O M A C Y
10101010----4444
D I P L O M A T I C O P T I O N S
The Diplomacy order is used by your Fleets when you wish to encourage a Computer-controlled Empire to change its views toward you. The following primary options and the desired outcomes are listed below. It should be noted that the presence of a skilled Diplomat can positively affect the outcome of any of these missions.
Diplomacy Option Description
Aggressive Your diplomats threaten the targeted Empire with severe repercussions if they do not submit to the will of your Empire. Their fate is made clear if they do not agree to join your Empire as a Resisted World. Weapons are often provided to aggressive factions on the world who promise to aid your forces. This is similar to a subversion attempt in some ways, but is far more aggressive—the idea is to topple the current government outright and forcefully inject your own form of leadership upon the natives. Certain special abilities and most definitely a hostile, aggressive Appearance on your lifeform can positively affect the success of this mission.
Alliance An Alliance is a high level agreement between two Empires. It is useful as a tool in Rules of Engagement options given to your Fleets. To sign an Alliance with another Player, both of you must submit Alliance proposals to each other. You will need to build up a sufficient number of diplomatic favor points before the Alliance can be signed—this should be done before the second Empire submits his agreement to the Alliance proposal.
Break Agreement Your diplomats attempt to break whatever agreement you might have with the targeted Empire. This option does not require your Fleet to be present over a world owned by the targeted Empire. If successful, favor points will be lost between your Empires. This may result in total favor points dropping below the minimum needed to maintain whatever agreement you happen to have in place. If that happens, the agreement level will downgrade by one level. For example, a Military Alliance would become a Trade Pact. Non-Aggression Pacts become No Agreement.
Cease Fire If you are at War with another Empire and want to end the hostilities, sign a Cease Fire agreement with them. Once signed, diplomatic favor between your Empires will improve steadily until you are totally neutral with each other. Neutrals weaker than you, and not at a terrifically low favor status with your Empire, are the most likely to sign a Cease Fire agreement. If you are at War with another Player, both of you must submit Cease Fire proposals to each other to end the War.
Declare War You can Declare War against another Empire at any time. Diplomatic favor between your Empires instantly drops to a very negative level and declines every turn whether you are actually fighting or not. Signing a Cease Fire agreement ends the war. This option does not require your Fleet to be present over a world owned by your new enemy.
Demand Tribute The goal of a Demand Tribute is to obtain Items from a neutral Empire in exchange for leaving them in peace. The chance for a neutral to agree is higher than it is for submitting to an Ultimatum. In addition, if the tribute demand is rejected, the chance for the populace hardening their will against future political actions is less than it would be for a rejected Ultimatum. Your Fleet should contain enough ships with empty Cargo Holds to handle the tribute given to you—if the Fleet has insufficient Cargo Holds, excess tribute is lost. Each Demand Tribute action, whether successful or not, has a chance of hardening the will of the populace against all future political actions—they rankle under the steady demands of greedy aliens.
Military Alliance A Military Alliance is a mid-level agreement between two Empires. It is useful as a tool in Rules of Engagement options given to your Fleets. To sign a Military Alliance with another Player, both of you must submit Military Alliance proposals to each other. You will need to build up a sufficient number of diplomatic favor points before the proposal can be signed—this should be done before the second Empire submits his agreement to the proposal.
Neutralize This is an attempt to force another Player’s Associate World, Client State, Member World or Resisted World to drop from that Player’s control and become neutral to them. This is a very difficult mission to pull off. Failure results in a loss of favor between both your Empire and the other Player’s Empire, and between your Empire and the neutral Empire itself.

D I P L O M A C Y
10101010----5555
Non-Aggression Pact A Non-Aggression Pact is a very minor agreement between two Empires. It is useful as a tool in Rules of Engagement options given to your Fleets. To sign a NAP with another Player, both of you must submit Non-Aggression Pact proposals to each other. You will need to build up a sufficient number of diplomatic favor points before the Pact can be signed—this should be done before the second Empire submits his agreement to the NAP proposal.
Peaceful The goal of peaceful negotiation is to convince the world to join your Empire as an Associate World under your protection and control. Promises of assistance, protection and so forth are customary. Funding in the form of Item gifts is often provided to allow for assistance programs designed to promote friendship and overcome stubbornness and hostility. Talks can drag on for some time since many races are either too primitive or obstinate to understand the value of being a member of an expanding, vibrant Empire. A low Appearance rating (from your lifeform design) means that your race is pleasant-looking and appears friendly—this can be very beneficial when conducting peaceful diplomatic missions.
Present Gifts The presentation of gifts to a neutral world will have several effects. The world may become economically stronger or even advance to a higher technological level. The world will become more open to your diplomats. A steady flow of gifts is an outstanding way to improve your relations with a neutral. . Care needs to be taken not to provide more funding than a small, primitive race can handle, since their society could become overwhelmed by the advanced technological nature of your gifts. Is is therefore better to give smaller gifts over a period of time than to present them with a massive influx of Items all at once.
Slander Bad-mouth another Player Empire to the neutral. Your diplomats tell stories about the misdeeds of another Player, bring proof of the other Empire’s heinous activities, or outright fabricate evidence and present it to the neutral as fact. If successful, the neutral’s standing with the other Empire will drop.
Subversion The goal of subversive diplomacy is to influence the society of the target world, gain control of a particular segment of that society, and then to use your influence and power to bring that faction into control of the targeted Empire. Your guidance and backing is designed to bring the target world into your control as a Client State. Unsuccessful attempts stand a good chance of angering the populace, with their will hardened so that future political actions will be more difficult. Subversion can be faster than peaceful negotiations, but the penalties for failure can prove to be irritating setbacks. The presence of special mental abilities and physical attributes can have a major impact on the success of a Subversion attempt. Appearance is not a significant factor during subversive activities.
Total Alliance A Total Alliance is an agreement of total commitment between two Empires. It is useful as a tool in Rules of Engagement options given to your Fleets. To sign a Total Alliance with another Player, both of you must submit Total Alliance proposals to each other. You will need to build up a sufficient number of diplomatic favor points before the agreement can be signed—this should be done before the second Empire submits his agreement to the TA proposal.
Trade Pact A Trade Pact is a minor agreement between two Empires. It is useful as a tool in Rules of Engagement options given to your Fleets. To sign a Trade Pact with another Player, both of you must submit Trade Pact proposals to each other. You will need to build up a sufficient number of diplomatic favor points before the Pact can be signed—this should be done before the second Empire submits his agreement to the Trade Pact proposal.
Ultimatum The goal of an Ultimatum is to force the target world to submit to your rule without requiring you to take direct military action. The issuance of an Ultimatum is usually made by a naval fleet that is in orbit about the target planet. The strength of your fleet will affect the outcome of the mission since “gunboat diplomacy” of this nature depends heavily on a show of force. If the world submits to your Ultimatum, it immediately becomes a Subjugate World under your control. If it rejects your demands you may be forced to take stronger measures, because the populace of the targeted Empire will harden their will against future political actions. Offers of gifts are pointless here, since the whole idea is bring diplomacy to a rapid close. The most common Ultimatum issued is “Surrender, or die”. “Surrender or we will vaporize randomly-selected cities until you are all dead” is popular, too. Certain alien Empires actually view the presence of Subjugate Worlds under your control in a favorable light.

D I P L O M A C Y
10101010----6666
Union Your diplomats make an offer of amalgamation with a neutral who is already an Associate World, Client State or Resisted World in your Empire. If successful, the planet will become a full Member World. This has the effect of making it more difficult for other Players to Neutralize them, and possessing Member Worlds is viewed favorably by certain alien Empires.
A G R E E M E N T L E V E L S
It may be easier to visualize the various diplomatic agreements that can be reached by means of the following chart.
Agreement Description
Total Alliance This is the highest level of diplomatic agreement between two Player Empires.
Alliance This is the second highest level of diplomatic agreement between two Player Empires.
Military Alliance This is the third highest level of diplomatic agreement between two Player Empires.
Trade Pact This is the fourth highest level of diplomatic agreement between two Player Empires.
Non-Aggression Pact This is the lowest level of diplomatic agreement between two Player Empires.
No Agreement This represents that two Empires have had some diplomatic contact, but have not yet signed any agreements.
Cease Fire Two Empires that agree to end a War can sign a Cease Fire agreement. A Cease Fire slowly improves diplomatic relations between the former combatants. This status remains until diplomatic favor between the two Empires reaches zero, at which point the Cease Fire changes to No Agreement.
War Two Empires in conflict are deemed to be at War.
W O R L D S T A T U S
When a Player Empire takes control of a Computer-controlled neutral, the neutral world is flagged with one of the following status levels.
World Status Description
Member World This is the highest level of diplomatic agreement between a Player Empire and a Computer-controlled neutral. The Player controls all aspects of the world in question as if it were simply a large colony. To become a Member World, the neutral must first be an Associate World, a Client State or a Subjugate World. Member Worlds are solidly in the camp of the Player Empire.
Associate World This is an agreement between a Player Empire and a Computer-controlled neutral. The Player controls all aspects of the world in question as if it were simply a large colony. Associate status can occur as the result of peaceful negotiations.
Client State This is an agreement between a Player Empire and a Computer-controlled neutral. The Player controls all aspects of the world in question as if it were simply a large colony. Client State status can occur as the result of subversive activities.
Resisted World This is an agreement between a Player Empire and a Computer-controlled neutral. The Player controls all aspects of the world in question as if it were simply a large colony. Resisted World status can occur as the result of aggressive negotiations.

D I P L O M A C Y
10101010----7777
Subjugate World This status can exist as a result of a successful Ultimatum or because the Player Empire dropped Divisions onto the world and conquered it with military force. The neutral dislikes the Player Empire intensely but can do little about it. The Player controls all aspects of the world in question as if it were simply a large colony. The former government goes into hiding and dreams of the day when its oppressed peoples can rise up and overthrow the hated Player Empire.

D I P L O M A C Y
10101010----8888

L I F E F O R M D E S I G N
11111111----1111
Lifeform Design The capabilities and features of the lifeform you design will be a factor in a number of important areas including combat and diplomacy and if you enjoy role-playing your position, lifeform design can be a defining moment for your empire. The SN:ROTE lifeform design system was developed with the key goal being the design of viable lifeforms. All lifeforms will have their advantages and disadvantages. The key to success will be in how you run your empire.
L I F E F O R M D E S I G N B A S I C S
The design process itself is somewhat lengthy but it is pretty easy to use and can become addicting as you create design after design. Design is done on a step-by-step basis and all design options are rated based on the number of setup points (SP) that they require. In some cases, you receive bonus SP points for taking a disadvantage. There are no arbitrary limits on the number of SP points you may expend on your lifeform design as long as you do not exceed the total number of SP points available for the Empire setup. Remember that this entire process is meant to be a fun part of setting up a new empire. It is not critical to your success and you do not have to design a lifeform for your Empire if you do not want to do so. Choose a lifeform from our list of Standard Lifeforms if you wish to avoid this stage of the setup. You will have 2,000 SP total to work with. Any Setup Points left over will be saved and used to boost your technological development as the game progresses.
S A V E D S E T U P P O I N T S
Any Setup Points that you did not spend designing your lifeform get converted into Research Points. The first time you issue a Set Research Priority order, these saved Research Points will become available to your scientists (that way, they won’t be used on the Research Priorities that your Empire starts the game with—they’re saved for use on whatever specific research goals that you have in mind). At the conclusion of each turn, when your scientists are working on a new Item, points will be deducted from the stored Research Point pool to try and complete research on the Item that is being worked on by your #1 Research Group. This will lead to rapid technological advancement early in the game, as any Item being worked on in Research Group #1 that isn’t finished by your scientists on their own will be completed immediately—until the Research Point pool is exhausted. Thus, it is possible to design a lifeform using very few of your starting 2,000 RP’s and still be a force in the game. You’d be on a clock, in a way—your technological advantage would be chipped away over time as other Empires slowly caught up with you. Your scientists would continue to make advances as well, of course, but your initial edge would mean less over the long haul…so make use of your advantage while you can. Your scientists are only able to utilize the Research Points resulting from saved Setup Points on lower technology Items. After the first few generations of technological advancement in a particular Item have been gained, your scientists will be on their own to produce refinements without the benefit of the saved Setup Points. Furthermore, saved Setup Points will only result in the gaining of at most one newly researched Item per turn. It will take a while for as many as 2,000 RP’s to be expended in this way, but your research will inexorably grind onward.
L I F E F O R M D E S I G N F E A T U R E S - G E N E R A L I N F O R M A T I O N
The Physical Size of a lifeform will determine the base Strength, Speed & Agility, Defense and Appearance ratings for that lifeform. Physical Size can be modified by a number of lifeform features. Defense and Appearance base ratings, in addition, may be modified by lifeform features which have a Defense Bonus and/or Appearance Modifier. Research Bonuses affect the efficiency of your research efforts (i.e. more or less results for the effort invested) and Colonization Bonuses affect the cost of colonization efforts and of world development efforts. Space Combat and Ground Combat Bonuses apply only in combat situations. Close Combat Bonuses apply in certain ground combat and space combat situations. Special Bonuses are situational advantages that apply only in unusual conditions. Special Bonuses include diplomacy bonuses, exploration bonuses and everything else not covered by one of the other bonus areas.
Chapter

L I F E F O R M D E S I G N
11111111----2222
All bonus % values are summed into a final % before they are applied to the base numbers. For example, two features, one with a 30% Defense Bonus and one with a 40% Defense Bonus, will yield a total Defense Bonus of 70%. You setup results will include a chart showing how your lifeform fares in the various bonus areas.
The charts given in many of the following sections will have +’s and –‘s to give you an idea about what features grant bonuses or penalties in the appropriate areas. These represent ranges, so if you see two features that have different SP costs but an identical ++ rating in the same category (Space Combat Bonus, for example), you should not assume that those features are receiving the exact same bonus in that area. One feature might be getting a +12% bonus while the other is receiving +15%. The exact %’s given for each feature are fixed, but hidden behind the +’s and –‘s. Designing your lifeform is an art, not an exacting science that must take every last detail into mind. Every feature you take will prove beneficial in some way.
D E F I N I T I O N S :
SP Cost (SP)
The SP Cost (Setup Point) of a feature, based on its overall game value. The most valuable features will have high SP Costs while features which represent a disadvantage will have negative SP Costs (giving you points that can be used for other purposes).
Size
The physical size of the lifeform
Appearance
The appearance of the lifeform for diplomacy purposes. The higher the Appearance, the more intimidating the lifeform. Appearance is not a major factor in diplomacy, but it helps.
Research Bonus (RB)
Research Bonuses are awarded for features that contribute to scientific advancement. Generally, these features involve either intelligence or sensory ability and they can be quite expensive. There are features that carry Research Penalties instead of Bonuses. Such features have a negative SP cost and can be taken to reduce the overall SP cost of your lifeform (or to give you bonus SP that you can spend on other areas)
Colonization Bonus (CB)
Colonization Bonuses are awarded for features that reduce the costs of colonization and world development. Fast reproduction, versatile ingestion and general constitution are typical features that give positive colonization bonuses. There are features that carry colonization penalties instead of bonuses. Such features have a negative SP cost and can be taken to reduce the overall SP cost of your lifeform (or to give you bonus SP that you can spend on other areas)
Special Bonus (SB)
Special Bonuses are awarded for a variety of features that can be beneficial in the right situation. Exploration & diplomacy bonuses are common examples of special bonus areas.
Space Combat Bonus (SCB)
Space Combat Bonuses are awarded for features that have the ability to contribute in space combat situations.
Ground Combat Bonus (GCB)
Ground Combat Bonuses are awarded for features that have the ability to contribute in routine ground combat operations.
Close-Combat Bonus (CCB)
Close-Combat Bonuses are awarded for features that are particularly useful in close-combat (naval boarding actions, subterranean combat & other special situations).
Defensive Bonus (DB)
Defensive Bonuses are awarded for features that make a given lifeform harder to kill. Defensive Bonuses have advantages in any combat situation and they also carry over to civilians, making them more difficult to kill in bombardments or collateral damage situations.
Strength
The physical strength of the lifeform
Speed & Agility
The overall speed and physical agility of the lifeformS T E P 1 B A S I C L I F E F O R M ( P I C K O N E - R E Q U I R E D )
The Basic Lifeform selection determines the basic structure of the lifeform, its general body structure, favored environments and some general capabilities (such as the ability to fly). It is also a major factor in determining what design options may be purchased for the lifeform. Basic Lifeforms can be divided into eight major types: mammals, avians, reptiles, amphibians, arthropods (insects & spiders), crustaceans, cephalopods (octopuses & squids) and plants. The type of Basic Lifeform cannot be changed during the course of the game (i.e. a mammal cannot become a reptile) but changes within a type are possible (i.e. the wonders of science may allow a mammal to become a glider mammal). Such changes are, however, extremely difficult to make so the basic lifeform choice is an important one (i.e. if you eventually want a winged reptile, it is best to choose that basic lifeform now).

L I F E F O R M D E S I G N
11111111----3333
Option SP Size App RB CB SB SCB GCB CCB DB
Mammal 0
Sub. Mammal 0
Glider Mammal -60 ++ + _ _
Winged Mammal -120 ++++ ++ _ _ _ _
Amphib. Mammal 0
Aquatic Mammal 0
Avian -120 ++++ ++ _ _ _ _
Flightless Avian -30 + + _
Reptile -50 _
Sub. Reptile -50 _
Glider Reptile -110 ++ + _ _ _
Winged Reptile -170 ++++ ++ _ _ _ _ _
Amphib. Reptile -50 _
Aquatic Reptile -50 _
Amphibian -50 _
Glider Amphibian -110 ++++ + _ _ _
Arthropod 170 + ++++
Sub. Arthropod 170 + ++++
Glider Arthropod 110 ++ + + ++
Winged Arthropod 50 ++++ ++ +
Crustacean 170 + ++++
Aquatic Crustacean 170 + ++++
Cephalopod 140 + +++
Amphib Cephalopod 140 + +++
Plant 90 +++
Glider Plant 60 ++ + ++
Floater Plant 30 ++++ ++ +

L I F E F O R M D E S I G N
11111111----4444
Aquatic Plant 90 +++
Mammal
Warm-blooded, air-breathing vertebrate with body hair. Very versatile lifeform capable of living in a wide range of environments.
Subterranean Mammal
A mammal at home in a subterranean environment. Basic tunneling ability.
Winged Mammal
A mammal provided with wings and possessing the ability to fly.
Glider Mammal
A mammal that is provided with deployable membranes which serve as natural airfoils and give it the ability to glide on air currents. The lifeform cannot fly, per se, and is very dependent on the proper conditions.
Amphibious Mammal
A mammal that is equipped to handle life in a liquid-environment as well as on land. It may have a combination lung-gill or it may have to surface to breath but it will be able to function well in either environment.
Aquatic Mammal
A mammal that is equipped solely to handle life in a liquid-environment.
Avian
Warm-blooded, air-breathing vertebrate with feathers. Equipped with wings and an excellent flyer. A versatile lifeform that is capable of living in a wide range of environments.
Flightless Avian
An avian which does not have the ability to fly.
Reptile
Cold-blooded (internal body temperature varies according to their environment), air-breathing vertebrate with scales. Cold-blooded nature leads to a preference for warmer environments.
Subterranean Reptile
A reptile at home in a subterranean environment. Basic tunneling ability.
Winged Reptile
A reptile provided with wings and possessing the ability to fly.
Glider Reptile
A reptile that is provided with deployable membranes which serve as natural airfoils and give it the ability to glide on air currents. The lifeform cannot fly, per se, and is very dependent on the proper conditions.
Amphibious Reptile
A reptile that is equipped to handle life in a liquid-environment as well as on land. It may have a combination lung-gill or it may have to surface to breath but it will be able to function well in either environment.
Aquatic Reptile
A reptile that is equipped solely to handle life in a liquid-environment
Amphibian
Cold-blooded, air-breathing vertebrate with smooth & moist skin. It may have a combination lung-gill or it may have to surface to breath but it will be able to function well in either environment. Favors warm & wet environments.
Glider Amphibian
An amphibian that is provided with deployable membranes which serve as natural airfoils and give it the ability to glide on air currents. The lifeform cannot fly, per se, and is very dependent on the proper conditions.
Arthropod (Insects & Spiders)
Segmented invertebrate with jointed legs and exoskeletons. Versatile lifeform capable of living in a wide range of environments.
Subterranean Arthropod
A arthropod at home in a subterranean environment. Basic tunneling ability.
Winged Arthropod
An arthropod provided with wings and possessing the ability to fly.
Glider Arthropod
An arthropod that is provided with deployable membranes which serve as natural airfoils and give it the ability to glide on air currents. The lifeform cannot fly, per se, and is very dependent on the proper conditions.

L I F E F O R M D E S I G N
11111111----5555
Crustacean
An amphibious, segmented invertebrate (much the same as an arthropod) with a much heavier exoskeleton (partial and full carapaces are common). Favors warm & wet environments.
Aquatic Crustacean
A crustacean that is equipped solely to handle life in a liquid-environment.
Cephalopod
An aquatic invertebrate with a flexible body and tentacles (octopus, squid, cuttlefish, nautiluses).
Amphibious Cephalopod
A cephalopod that is capable of living both on land and in fluids. Best adapted for life in fluids however and even when on land, it requires a semi-wet environment (moist, humid, etc.).
Plant
Intelligent plantlife. Unusual in many ways but very versatile. Capable of thriving in a wide range of environments but they generally dislike extremes of heat and cold.
Floater Plant
A plant capable equipped with gas bags and capable of slow flight.
Glider Plant
A plant that is provided with deployable membranes which serve as natural airfoils and give it the ability to glide on air currents. The lifeform cannot fly, per se, and is very dependent on the proper conditions.
Aquatic Plant
A plant that is equipped solely to handle life in a liquid-environment.
S T E P 2 P R I M A R Y C O N F I G U R A T I O N ( P I C K O N E - R E Q U I R E D )
The Primary Configuration selection further defines the overall shape and appearance of the lifeform. The Primary Configuration of a lifeform affects the overall size of the lifeform and it defines the limits for certain design options (like the number of sets of claws you can have, one per limb). The Primary Configuration of the lifeform is combined with the Basic Lifeform selection to define the overall appearance of the lifeform. A lifeform that is defined as a "two-headed insectoid arthropod", for example, would consider its own general appearance normal and would therefore react most favorably to other "two-headed insectoid arthropods" and would consider a "humanoid mammal" (i.e. a human being) to be something bizarre. The appearance rating of the other lifeform would also be important since the alien "two-headed insectoid arthropod" may well be larger, more powerful and covered with external weapons (something to be feared).
There are 15 primary configurations available including some that are very specialized and that are limited only to certain basic lifeform types:
Mammal Options
Configuration SP Size DB
Humanoid 0
Triped 30 + +
Centauroid 60 ++ ++
Hexaped 120 ++++ ++++
Octoped 180 ++++++
++++++
Avian Options
Configuration SP Size DB
Pure Avian 0
Humanoid 30 + +
Arthropod Options
Configuration SP Size DB
Insectoid 0
Arachnoid 0

L I F E F O R M D E S I G N
11111111----6666
Crustacean Options
Configuration SP Size DB
Crustacean 0
Cephalopod Options
Configuration SP Size DB
Octoped 0
Decaped 30 + +
Reptile Options
Configuration SP Size DB
Humanoid 0
Triped 30 + +
Centauroid 60 ++ ++
Hexaped 120 ++++ ++++
Octoped 180 ++++++
++++++
Serpentine 150 +++++
+++++
Amphibian Options
Configuration SP Size DB
Humanoid 0
Triped 30 + +
Centauroid 60 ++ ++
Hexaped 120 ++++ ++++
Octoped 180 ++++++ ++++++
Serpentine 150 +++++ +++++
Plant Options
Configuration SP Size DB
Bushlike 0
Treelike 30 + +
Drifter 60 ++ ++
Floater 120 ++++ ++++
Primary Configuration Notes:
Arachnoid (Arthropods only)
A spider-like lifeform featuring a segmented body (abdomen, cephalothorax [a combined thorax/head], exoskeleton) and eight legs. Manipulation is handled typically by a combination of mouth and forelegs. Arachnids may also be equipped with additional limbs featuring heavy pincers which may also be used for manipulation.
Bush-like Plant (Plants, Aquatic Plants only)
A light and flexible variety of plantlife. Manipulation and slow locomotion possible using a combination of vines, tendrils and flexible root structures.
Centauroid (M, R, Am only)
A lifeform that has quadrupedal locomotion (4 legs), a horizontal axis and two arms for manipulation.
Crustacean (Crustaceans only)
A segmented invertebrate very similar to insects and spiders but featuring a much tougher exoskeleton and much more capable of handling aquatic environments. Crustaceans typically have eight legs for locomotion and two limbs with pincers for manipulation (legs and mouth are often used in combination with pincers)
Decapoda (Cephalopods only)
A decapoda cephalopod (invertebrate) has ten (10) tentacles which are used in much the same manner as those of an Octopodal Cephalopod (manipulation and locomotion). The Decapoda configuration can also be used to represent a Nautilus (actually a tetrabranch with 80 to 90 small tentacles)

L I F E F O R M D E S I G N
11111111----7777
Drifter Plant (Glider Plant, Aquatic Plant only)
An extremely specialized form of plantlife that is designed to move by gliding with air or liquid currents. Manipulation and local movement achieved through the use of a network of lightweight constriction vines.
Floater Plant (Floater Plant only)
Another specialized form of plantlife that is adapted for flight. Gas bags give the lifeform the positive buoyancy and locomotion is achieved via a combination of small gas jets and natural sail structures. Manipulation is handled by a combination of constriction vines and/or tendrils.
Hexapodal (M, R, Am only)
A lifeform that has hexapedal locomotion (6 legs), a horizontal axis and two arms for manipulation.
Humanoid (M, Av, R, Am only)
A lifeform that has bipedal locomotion (2 legs), either a vertical or semi-upright axis (posture) and two arms for manipulation.
Insectoid (Arthropods only)
An insect-like lifeform featuring a segmented body (abdomen, thorax, head, exoskeleton) and six legs. Manipulation is handled typically by a combination of mouth and forelegs. Insectoids may also be equipped with additional limbs featuring heavy pincers which may also be used for manipulation.
Octopodal (M, R, Am, Ce only)
A lifeform that has octopedal locomotion (8 legs), a horizontal axis and two arms for manipulation. Cephalopods (invertebrates) may also be Octopodals although in their case, Octopodal means having eight (8) tentacles which are used both for secondary locomotion (primary locomotion being a water-jet effect) and manipulation. An Octopodal Cephalopod is an invertebrate as well (examples, Octopuses and Argonauts).
Pure Avian (Avians only)
A natural configuration for avians. Feathered, bipedal and winged. The wings typically have a pair of wing claws and manipulation is accomplished by using wing claws, legs and beak in concert.
Serpentine (R, Am only)
A lifeform that has a snake-like lower body and moves by constriction & extension of that lower body. Such a lifeform may possess 2, 3, 4 or 6 arms (2 is standard) which are primarily for manipulation but may also be used as a movement aid.
Tripedal (M, R, Am only)
A lifeform that has tripedal locomotion (3 legs), either a vertical or semi-upright axis (posture) and three arms for manipulation.
Tree-like Plant (Plant, Aquatic Plant only)
A heavier form of plantlife where the main body is typically covered with a protective bark. Manipulation is achieved using a combination of flexible limbs and locomotion is achieved via a flexible root structure.
Note: M = Mammal, Av = Avian, R = Reptile, Am = Amphibian, Ar = Arthropods, Cr = Crustacean, Ce = Cephalopods).
S T E P 3 C O N F I G U R A T I O N O P T I O N S ( O P T I O N A L )
There are seven configuration options available that can be purchased as add-ons to the primary configuration (i.e. you might be a "two-headed, three-armed humanoid" which is just about as unusual a humanoid as you could be). You may take up to three configuration options (assuming your lifeform is allowed them); one head option (either two or three headed), one arm option (either three, four or six-armed) and one tail option (either single, twin or triple).
Head Options
Configuration SP Size DB
Two-Headed 30 + +
Three-Headed 60 + ++
Arm Options
Configuration SP Size DB
Three-Armed 15 + +
Four-Armed 15 + +
Six-Armed 15 + +

L I F E F O R M D E S I G N
11111111----8888
Tail Options
Configuration SP Size DB
Tailed * * *
Twin Tailed * * *
Triple Tailed * * *
• - Varies with the type of tail.
Head Option Notes
Two-Headed
Any non-plant lifeform may also be two-headed. A second head allows the lifeform to be equipped with more than one set of fangs, mandibles, etc.).
Three-Headed
As with Two-Headed only this lifeform is equipped with three heads.
Arm Option Notes
Three-Armed
Lifeform has a third arm or manipulative member. Humanoid, Centauroid, Hexapodal, Octopodal (non-cephalopods only) and Serpentine lifeforms may be three-armed. Tripeds are naturally three-armed and Pure Avians cannot be three-armed.
Four-Armed
Lifeform has four arms or manipulative members. Humanoid, Triped and Serpentine lifeforms may be four-armed.
Six-Armed
Lifeform has six arms or manipulative members. Only Serpentine lifeforms may be six-armed.
Tail Option Notes
Tailed
Lifeform is equipped with a single tail (type of tail can vary). Any non-cephalopod, non-crustacean, non-plant lifeform may have a tail.
Twin-Tailed
Lifeform is equipped with two tails (of identical type). Any non-cephalopod, non-crustacean, non-plant lifeform may be twin-tailed.
Triple-Tailed
Lifeform is equipped with three tails (of identical type). Any non-cephalopod, non-crustacean, non-plant lifeform may be triple-tailed.
S T E P 4 T A I L S ( O P T I O N A L )
If your lifeform has selected the "Tailed", "Twin-Tailed" or "Triple-Tailed" Configuration option, you will now select the type of tail. (Note: Multi-tailed creatures still have only one tail type. Tail types cannot be mixed).
Option SP Size App RB CB SB SCB GCB CCB DB
Light Tail 0 + +
Prehensile Tail 19 + ++ + + +
Whip Tail 39 + +++ + ++ +
Heavy Tail 66 ++ ++++ + ++ +

L I F E F O R M D E S I G N
11111111----9999
Tail Option Notes:
Light Tail
Light, decorative tail. Limited movement (swishable). May have value as a counterweight. Not usable as a weapon.
Prehensile Tail
Flexible tail capable of grasping an object by wrapping around it. Useful in a variety of ways.
Whip Tail
A more rigid, whip-like tail that is capable of being used as a weapon. May be equipped with a Tail Spike or Tail Stinger.
Heavy Tail
A heavy tail that is more suitable for bashing attacks but may also be equipped with a Tail Spike or Tail Stinger.
S T E P 5 I N T E L L I G E N C E ( P I C K O N E - R E Q U I R E D )
The Intelligence level of your lifeform can be a critical (and expensive) decision of lifeform design. It is important to note that all six intelligence options will result in viable lifeforms. A lifeform that takes a "slow" intelligence option can develop anything a lifeform with a "superior" intelligence can; the only real difference is speed. The lifeform with the "slow" intelligence can expect to develop new technology at a slower pace so it may want to be more selective about what it chooses to research. The drawback to taking a higher Intelligence option, of course, is cost. Intelligence options are extremely expensive and if you take a "below average" or "slow" intelligence you can recoup a lot of SP points which can then be spent on other things (perhaps on buying additional initial technology to jump start your empire in this area).
There are six Intelligence options available to all lifeforms.
Option SP Size App RB CB SB SCB GCB CCB DB
Slow -740 _ _ _ _ _ _ _ _ _ _ _
Below Average -370 _ _ _ _ _ _
Average 0
Above Average 370 + + + + +
Superior 740 ++ ++ ++ ++ ++
Phenomenal 1,110 +++ +++ +++ +++ ++
S T E P 6 M E N T A L P O W E R S ( O P T I O N A L )
The acquisition of mental powers for your lifeform can be another important decision, not so much because of the cost of acquiring said powers but because of the path said powers will tend to lead you down. Mental power acquisition is fairly inexpensive initially because all that you are really buying is mental power potential. A lifeform will receive no bonuses or abilities simply for having the potential for a given mental power. The true rewards for having a mental power come only when you have devoted the research & development time necessary to bring out the potential of that power. R & D efforts dedicated toward such goals, however, can only come at the expense of projects dedicated to technical achievements so the price for developing such powers will be an increasing reliance on those abilities and the capabilities they provide you with and less dependence on technical solutions.
Mental powers are broken down into three standard categories initially: Telepathic powers, ESP powers and Telekinetic powers.
Telepathic
Telepathic mental powers involve the use of the mind as a sensory organ, as a means of communication and, ultimately, as weapon of control. Telepaths typically utilize their powers in an indirect manner, improving communications between themselves, gathering intelligence from their enemies and as an edge in diplomatic situations. The use of their abilities as a direct weapon, requires considerable natural ability (at least Class 4 potential) and training.

L I F E F O R M D E S I G N
11111111----10101010
ESP
ESP (extra-sensory perception) mental powers convey the ability to perceive events in paranormal ways. ESPers typically utilize their powers to gather information at range. Intelligence gathering abilities of this nature can be of great value, particularly in combat & exploration situations where dealing with the unknown is a constant. A powerful ESPer may be able to perceive events out of time as well which could allow for the acquisition of knowledge which could not be obtained in any other way.
Telekinetic
Telekinetic mental powers allow for the manipulation of matter and energy by the mind. Telekinetics deal primarily with inanimate objects, unlike telepaths, and their abilities serve as a tool as well as a weapon. Powerful telekinetics can be extremely dangerous in combat situations and their powers have obvious scientific & industrial advantage potential as well.
Initially, all mental powers have four levels or classes of potential available, 1-4, with the higher class representing the greater potential. The potential a lifeform has in a given mental power determines how far that lifeform can develop its mental powers before it reaches a developmental dead-end which can only be overcome by increasing natural potential. Increasing potential at a later date or acquiring potential if you did not originally have any is possible, assuming you’ve developed the methods for doing so, but the cost can be high and the development time long. Note that a lifeform with greater potential in a given mental power is not necessarily more powerful or capable than another lifeform with lesser potential. The key is in how much R & D each lifeform has dedicated to developing its abilities. The lifeform with the greater potential is simply allowed to develop its abilities further than a lifeform with lesser potential.
The acquisition of mental power potential can be a disadvantage if you choose not to develop that ability. Lifeforms with undeveloped mental power potential can be more vulnerable to lifeforms with developed powers than those lifeforms which have no mental power potential at all. There are other potential hazards as well and, generally, it is not advisable to acquire mental power potential unless you plan on putting some effort into developing that potential.
Lifeforms may acquire potential for more than one mental power (i.e. Telepathics and ESP) if they so desire.
Mental Power Potential SP Size App RB CB SB SCB GCB CCB DB
Class 1 Telepath 50
Class 2 Telepath 100
Class 3 Telepath 150
Class 4 Telepath 200
Class 1 ESP 50
Class 2 ESP 100
Class 3 ESP 150
Class 4 ESP 200
Class 1 Telekinetic 50
Class 2 Telekinetic 100
Class 3 Telekinetic 150
Class 4 Telekinetic 200
Note: Remember that the true rewards of having mental powers are realized only when you have developed the training & equipment needed to exploit that potential.

L I F E F O R M D E S I G N
11111111----11111111
S T E P 7 S E N S O R Y A B I L I T Y ( P I C K O N E - R E Q U I R E D )
The Sensory Ability level of your lifeform is a general rating that covers all five basic senses: taste, touch, sight, smell and sound. An above average sensory ability may mean above average ability in several senses or maybe only a phenomenal ability in one or two senses and minimal ability in others. Either way, the overall sensory ability works out as the average of all five senses. In any event, Sensory Ability is another expensive area that carries bonuses or penalties in just about every area, including research. The choice you face is much the same as the one you faced with Intelligence. Higher Sensory Ability levels have many rewards but are extremely expensive. Lower Sensory Ability levels cost less and may even give you SP points that can be spent on other options. There are six Sensory Ability options available to all lifeforms.
Option SP Size App RB CB SB SCB GCB CCB DB
Minimal -460 _ _ _ _ _ _ _ _ _ _ _
Poor -230 _ _ _ _ _ _
Average 0
Excellent 230 + + + + ++
Superior 460 ++ ++ ++ ++ +++
Phenomenal 690 +++ +++ +++ +++ ++++
S T E P 8 G E N E R A L C O N S T I T U T I O N ( P I C K O N E - R E Q U I R E D )
General Constitution options represent the ability of your lifeform to sustain physical damage (and keep alive), its resistance to disease and its general sensitivity to environmental change.
There are ten General Constitution options available to all lifeforms.
Option SP Size App RB CB SB SCB GCB CCB DB
Minimal -340 _ _ _ _ _ _ _ _ _
Poor -170 _ _ _ _ _
Average 0
Excellent 170 ++ + ++
Superior 340 +++ ++ ++++
Phenomenal 440 +++ ++ +++++++
Class 1 Regen 590 +++ +++ ++++++++
Class 2 Regen 750 +++ +++ +++++++++
Class 3 Regen 960 ++++ ++++ ++++++++++
Class 4 Regen 1,270 ++++ ++++ ++++++++++++

L I F E F O R M D E S I G N
11111111----12121212
Notes:
Class 1 Regeneration
Very active biological defenses and accelerated regeneration of damaged tissues.
Class 2 Regeneration
Excellent biological defenses and rapid regeneration of physical damage, including the loss of limbs.
Class 3 Regeneration
Superior biological defenses and rapid regeneration of physical damage, including the loss of limbs and the replacement of most organs.
Class 4 Regeneration
Phenomenal biological defenses and rapid regeneration of physical damage. Able to repair just about any damage that is not instantly fatal.
S T E P 9 I N G E S T I O N M O D E ( P I C K O N E - R E Q U I R E D )
The Ingestion Mode of your lifeform is an another important consideration because of the effect it will have on your colonization and world development efforts.
There are six Ingestion Mode options available to all lifeforms.
Ingestion Mode Option SP Size App RB CB SB SCB GCB CCB DB
Carnivorous -150 _ _ _
Herbivorous -100 _ _
Omnivorous 0
Omnivorous Plus 200 +++
Limited Photosynthesis 250 +++
Full Photosynthesis 400 +++++
Ingestion Mode Notes:
Carnivorous Ingestion
The lifeform is a meat-eater, feeding on animal tissues exclusively. Carnivores suffer from a restricted diet and an inefficient food production system (they must maintain herds of animals, typically herbivores, as food stock.
Herbivorous Ingestion
The lifeform is a plant-eater (and may not feed on animal tissues). Herbivores although restricted to plants only, enjoy the benefits of a more efficient food production system.
Omnivorous Ingestion
Omnivorous lifeforms can feed on both plants and animal tissue. A versatile digestive system allows them to rely either on agricultural or animal husbandry (usually a combination), whichever is better suited to local conditions.
Omnivorous Plus Ingestion
Lifeforms with Omnivorous Plus Ingestion acquire the ability to digest just about anything that is organic (and possibility a few inorganic materials as well). Such versatility can be a great advantage to colonizing efforts on unfriendly worlds.

L I F E F O R M D E S I G N
11111111----13131313
Limited Photosynthesis
A lifeform with Limited Photosynthesis is able to convert light into food energy (like a plant with Full Photosynthesis) but not at a fast enough rate to allow it to survive via photosynthesis alone so the lifeform is usually considered an omnivore as well. Any lifeform may take Limited Photosynthesis as an ingestion mode, including plants.
Full Photosynthesis
The ability to convert light into food energy (carbohydrates). Full Photosynthesis is perhaps the most versatile of all forms of ingestion since it only requires light of the proper type and amount (artificial if necessary). Restricted to plant lifeforms.
S T E P 1 0 R E P R O D U C T I V E R A T E ( P I C K O N E - R E Q U I R E D )
The Reproductive Rate of your lifeform is an another important consideration because of the effect it will have on your colonization and world development efforts. The higher the reproductive rate, the lower the cost of initial colonization efforts and the cheaper it will be to develop your world.
There are five Reproductive Rate options available to all lifeforms.
Option SP Size App RB CB SB SCB GCB CCB DB
Minimal -400 _ _ _ _ _
Poor -200 _ _ _
Average 0
Excellent 200 +++
Superior 400 +++++
S T E P 1 1 S P E C I A L F E A T U R E S ( O P T I O N A L )
Special Features represent optional abilities and/or capabilities that may be selected by any lifeform. Lifeforms may opt for as many special features as they wish as long as they meet the specific requirements and/or limitations of the options being selected.
Special Feature Option SP Size App RB CB SB SCB GCB CCB DB
Radiation Sensitive -270 _ _ _ _ _ _ _ _ _ _ _ _
Radiation Tolerant 270 + ++++ ++ ++ + ++
High Temp. Resistant 320 ++ ++++ ++ ++ + ++
Low Temp. Resistant 320 ++ ++++ ++ ++ + ++
High Temp. Sensitive -320 _ _ _ _ _ _ _ _ _ _ _ _ _
Low Temp. Sensitive -320 _ _ _ _ _ _ _ _ _ _ _ _ _
Very Low Gravity Tolerant
380 ++ +++++ ++ ++ ++ ++
Low Gravity Tolerant 190 + ++++ + + + +
High Gravity Tolerant 190 + ++++ + + + +

L I F E F O R M D E S I G N
11111111----14141414
Very High Gravity Tolerant
380 ++ +++++ ++ ++ ++ ++
Advanced Respiratory System
370 ++ ++++ ++ ++ + ++
Natural Chemical Exchanger
546 ++++
++++ ++ +++ ++ ++
Natural Linguistic Ability 50 ++++
Natural Ferocity 95 ++++
++ + + +++ +
Natural Cowardliness -95 _ _ _ _
_ _ _ _ _ _ _ _
Attractive Features 20 +++ ++
Hideous Features -20 _ _ _ _ _
Short Life Cycle -250 _ _ _
Long Life Cycle 250 + ++
Natural Psi Resistance 100 +++++
Natural Psi Disruption 150 +++++++
Special Feature Notes:
Radiation Sensitive
The lifeform fairly sensitive to certain types of radiation. A drawback when colonizing/exploring alien worlds and in combat situations.
Radiation Resistant
The lifeform is resistant to a wider range of radiation than normal. A useful trait when colonizing/exploring alien worlds and in combat situations.
Note: A lifeform may not be Radiation Sensitive and Radiation Resistant at the same time.
High Temperature Resistant
The lifeform is resistant to higher than normal temperatures (a higher range of acceptable body temperature or a natural method for venting excessive heat and maintaining a constant body temperature).
High Temperature Sensitive
Lifeform is particularly sensitive to higher than normal temperatures (difficulty in venting excessive heat and maintaining a constant body temperature.

L I F E F O R M D E S I G N
11111111----15151515
Low Temperature Resistant
The lifeform is resistant to lower than normal temperatures (the lifeform has some natural means for conserving heat and maintaining a constant body temperature).
Low Temperature Sensitive
Lifeform is particularly sensitive to lower than normal temperatures (difficulty in conserving heat and maintaining a constant body temperature.
Note: A lifeform may only have one form of temperature tolerance at any given time.
Very Low Gravity Tolerant
The lifeform is able to tolerate much lower than normal gravity without serious physiological problems.
Low Gravity Tolerant
The lifeform is able to tolerate lower than normal gravity without serious physiological problems.
High Gravity Tolerant
The lifeform is able to tolerate higher than normal gravity without serious physiological problems.
Very High Gravity Tolerant
The lifeform is able to tolerate much higher than normal gravity without serious physiological problems.
Note: A lifeform may only have one form of gravity tolerance at any given time.
Advanced Respiratory System
Allows the lifeform to breath normally in less than optimum conditions without the need for a artificial breathing apparatus.
Natural Chemical Exchanger
Allows the lifeform to breath normally in a wide range of conditions.
Note: A lifeform may have an Advanced Respiratory System or the Natural Chemical Exchanger option but not have both at the same time.
Natural Linguistic Ability
The lifeform has a natural ability for linguistics. Skilled at developing and understanding alien methods of communication. Can be quite an advantage for a diplomat. Serves to modify the success chance of any diplomatic activity.
Natural Ferocity
The lifeform has a natural ferocity that is difficult to contain. Aggressive, menacing and given to sudden, savage rages. An advantage in some situations, a serious disadvantage in others. May not have Herbivorous Ingestion, Limited Photosynthesis or Full Photosynthesis (must have been either a carnivore or an omnivore during its evolutionary climb to sapience).
Natural Cowardliness
The lifeform has a natural cowardliness that is difficult to hide. Timid, fearful and quick to defer. Such instincts, however, can be quite useful in certain situations (and, of course, quite disastrous in others). Any lifeform can be a natural coward (even a carnivore who would most likely be a scavenger of some kind).

L I F E F O R M D E S I G N
11111111----16161616
Note: A lifeform may not have Natural Ferocity and Natural Cowardliness at the same time.
Attractive Features
A combination of external features, smell and behavior. Harmonious features and coloring, attractive scent, etc. All seemingly designed to soothe or attract. Of course, such features only really work on lifeforms of the same basic type but it can be a significant edge in such cases.
Hideous Features
The opposite of Attractive Features. Lifeform has a true knack for being rude, repulsive and generally offensive. Again, such features only really affect lifeforms of the same basic type.
Note: A lifeform may not have Attractive Features and Hideous Features at the same time.
Short Life Cycle
The lifeform has a higher than average metabolic rate and a shorter than average lifespan as a result. A detriment to research & colonizing efforts and a feature that can shorten the lifespan of special characters.
Long Life Cycle
The lifeform has a lower than average metabolic rate and a longer than average lifespan as a result. A boon to research & colonizing efforts and a feature that can lengthen the lifespan of special characters.
Note: A lifeform may not have a Short Life Cycle and a Long Life Cycle at the same time.
Natural Psi Resistance
The lifeform has a natural resistance to psionic (mental) powers. This resistance primarily hinders lifeforms with telepathic abilities but may also affect lifeforms with ESP and Telekinetic powers.
Natural Psi Disruptor
The lifeform generates a form of mental static which affects all lifeforms with mental powers. This ability makes it difficult for lifeforms to use their mental powers in close proximity and can, in fact, even cause some pain to such lifeforms. Lifeforms with Natural Psi Disrupter abilities, consequently, are universally loathed by beings with mental powers.
Note: A lifeform may not have Natural Psi Resistance and Natural Psi Disrupter ability at the same time.
S T E P 1 2 N A T U R A L B O D Y A R M O R ( O P T I O N A L )
Natural Body Armor options allow you to upgrade the standard external body covering (skin, fur, scales, etc.) of your lifeform to something more durable. Natural Body Armor option limitations are based on Basic Lifeform types. If no Natural Body Armor option is selected, your lifeform will be assumed to have a standard external covering for a lifeform of its type (no benefits, no penalties, no cost).
Option SP Size App RB CB SB SCB GCB CCB DB
Thick Skin 60 + + ++
Thick Fur 60 + + ++
Thick Feathers 60 + + ++
Thick Scales 90 ++ ++ +++

L I F E F O R M D E S I G N
11111111----17171717
Thick Exoskeleton 90 ++ ++ +++
Thick Shell 90 ++ ++ +++
Thick Bark 90 ++ ++ +++
Heavy Plate 240 ++++ +++ +++++++
Heavy Exoskeleton 240 ++++ +++ +++++++
Heavy Shell 240 ++++ +++ +++++++
Heavy Bark 240 ++++ +++ +++++++
Natural Body Armor Notes:
<Class 1 Body Armor>
Thick Skin (Mammals, Amphibians, Cephalopods only)
Thick Fur (Mammals only)
Thick Feathers (Avians only)
Thick Scales (Reptiles only)
Thick Exoskeleton (Arthropods, Crustaceans only)
Thick Shell (Cephalopods only)
Thick Bark (Plants only)
Note: A lifeform may not have a Class 1 and a Class 2 Body Armor option at the same time.
<Class 2 Body Armor>
Heavy Shell (Cephalopods only)
Heavy Plate Scales (Reptiles only)
Heavy Bark (Plants only)
Heavy Exoskeleton (Arthropods, Crustaceans only)
Note: Class 2 Body Armor options not available to any “Winged” or “Glider” lifeform variation. A lifeform may also not have a Class 1 and a Class 2 Body Armor option at the same time.
S T E P 1 3 T Y P E A C O M B A T F E A T U R E S ( O P T I O N A L )
Type A Combat Features are basic physical modifications that can normally be purchased in multiples (depending on the feature). Typically they are add-ons to other body features (heads, limbs, tails) so limitations are usually based on lifeform configuration (number of heads/limbs/tails). A number of features are, additionally, restricted by basic lifeform type.

L I F E F O R M D E S I G N
11111111----18181818
Type A Combat Feature SP Size App RB CB SB SCB GCB CCB DB
Throwing Tail Spikes 24 + +++ + ++
Tail Spike 12 + ++ + +
Tail Stinger 4 + ++ +
Defensive Spike 5 + + + +
Crushing Jaws 4 + ++ +
Fangs 4 + + +
Tusks 4 + ++ +
Horn 2 + ++ +
Ram 4 + ++ +
Claws 4 + + +
Retractable Claws 4 + +
Heavy Pincer 12 + + + +
Heavy Mandibles 4 + +++ +
Heavy Beak 4 + + +
Hooked Beak 4 + + +
Talons 4 + + +
Retractable Talons 4 + +
Plant Jaws 4 + +++ +
Whip Vine 12 + +++ + +
Constriction Vine 24 + +++ + ++
Thorn Cluster 5 + + + +
Shooting Thorns 24 + +++ + ++
Heavy Boring Tendrils 30 + +++ + ++
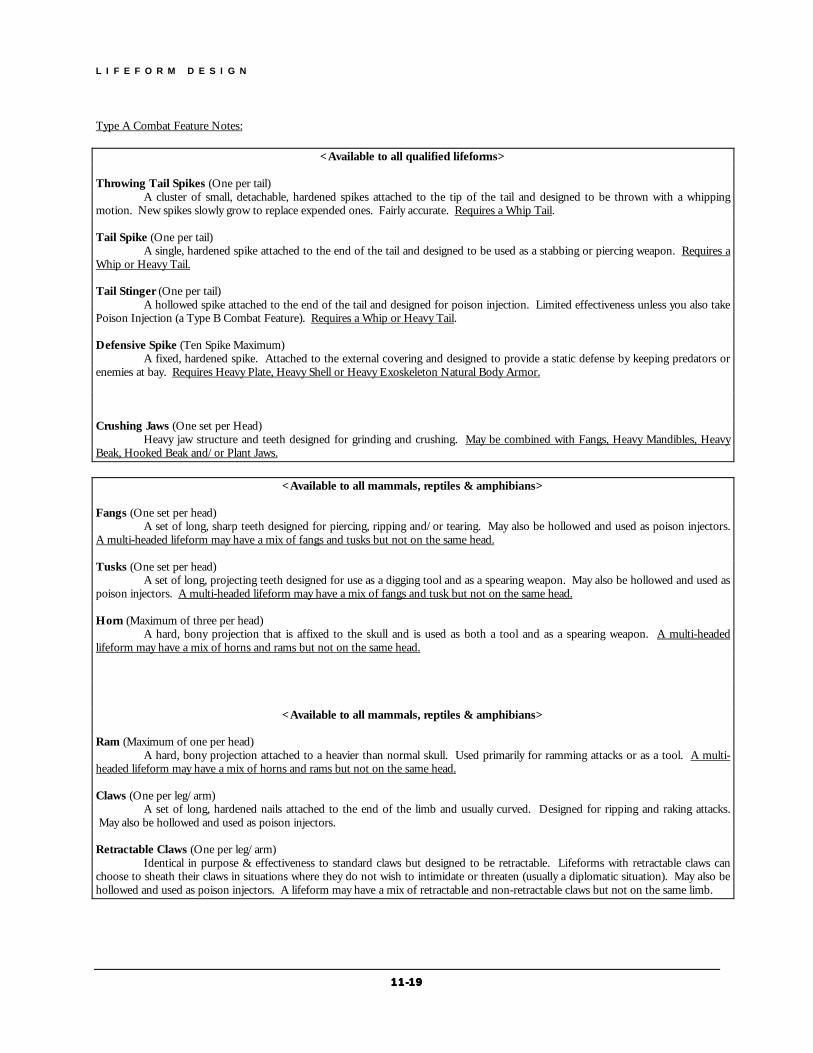
L I F E F O R M D E S I G N
11111111----19191919
Type A Combat Feature Notes:
<Available to all qualified lifeforms> Throwing Tail Spikes (One per tail) A cluster of small, detachable, hardened spikes attached to the tip of the tail and designed to be thrown with a whipping motion. New spikes slowly grow to replace expended ones. Fairly accurate. Requires a Whip Tail. Tail Spike (One per tail) A single, hardened spike attached to the end of the tail and designed to be used as a stabbing or piercing weapon. Requires a Whip or Heavy Tail. Tail Stinger (One per tail) A hollowed spike attached to the end of the tail and designed for poison injection. Limited effectiveness unless you also take Poison Injection (a Type B Combat Feature). Requires a Whip or Heavy Tail. Defensive Spike (Ten Spike Maximum) A fixed, hardened spike. Attached to the external covering and designed to provide a static defense by keeping predators or enemies at bay. Requires Heavy Plate, Heavy Shell or Heavy Exoskeleton Natural Body Armor. Crushing Jaws (One set per Head) Heavy jaw structure and teeth designed for grinding and crushing. May be combined with Fangs, Heavy Mandibles, Heavy Beak, Hooked Beak and/or Plant Jaws.
<Available to all mammals, reptiles & amphibians> Fangs (One set per head) A set of long, sharp teeth designed for piercing, ripping and/or tearing. May also be hollowed and used as poison injectors. A multi-headed lifeform may have a mix of fangs and tusks but not on the same head. Tusks (One set per head) A set of long, projecting teeth designed for use as a digging tool and as a spearing weapon. May also be hollowed and used as poison injectors. A multi-headed lifeform may have a mix of fangs and tusk but not on the same head. Horn (Maximum of three per head) A hard, bony projection that is affixed to the skull and is used as both a tool and as a spearing weapon. A multi-headed lifeform may have a mix of horns and rams but not on the same head.
<Available to all mammals, reptiles & amphibians> Ram (Maximum of one per head) A hard, bony projection attached to a heavier than normal skull. Used primarily for ramming attacks or as a tool. A multi-headed lifeform may have a mix of horns and rams but not on the same head. Claws (One per leg/arm) A set of long, hardened nails attached to the end of the limb and usually curved. Designed for ripping and raking attacks. May also be hollowed and used as poison injectors. Retractable Claws (One per leg/arm) Identical in purpose & effectiveness to standard claws but designed to be retractable. Lifeforms with retractable claws can choose to sheath their claws in situations where they do not wish to intimidate or threaten (usually a diplomatic situation). May also be hollowed and used as poison injectors. A lifeform may have a mix of retractable and non-retractable claws but not on the same limb.

L I F E F O R M D E S I G N
11111111----20202020
<Available to all arthropods & crustaceans> Heavy Pincer (Maximum of two) Heavy Pincers are designed primarily for combat (they may be used for crude manipulation) and they come with their own segmented limb. Heavy pincers are grasping and crushing weapons. Heavy Mandibles (One set per head) Heavier than normal mandibles and designed primarily for combat. Used for piercing, ripping and crushing (particularly if combined with "crushing jaws") attacks. May also be hollowed and used as poison injectors.
<Available to all cephalopods> Heavy Beak (Maximum of one) Heavier than normal beak and designed primarily for combat. Used to for piercing, ripping and crushing (particularly if combined with "crushing jaws") attacks. May also be hollowed and used a poison injector.
<Available to all avians> Hooked Beak (One per head) A vicious, hooked beak designed for ripping and tearing. May also be hollowed and used as poison injector. Talons (One per limb) A set of long, hardened nails attached to the end of the limb and usually curved. Designed for ripping and raking attacks much the same as claws but also used extensively for grasping and crushing. May also be hollowed and used as poison injectors. A lifeform may have a mix of retractable and non-retractable talons but not on the same limb. Retractable Talons (One per limb) Identical in purpose & effectiveness to standard talons but designed to be retractable. Lifeforms with retractable talons can choose to sheath their talons in situations where they do not wish to intimidate or threaten (usually a diplomatic situation). May also be hollowed and used as poison injectors. A lifeform may have a mix of retractable and non-retractable talons but not on the same limb.
<Available to all plants> Plant Jaws (Maximum of one) The plant equivalent of a set of jaws. Designed for use by carnivorous plants and for combat. Used to grasp and crush primarily. Whip Vine (Maximum of four) A flexible, whip-like vine that the plant can used either for lashing attacks or for deployment of Shooting Thorns. Whip Vines are typically equipped with piercing thorns, abrasive surfaces and/or edged surfaces. May also be poison-tipped. Constriction Vine (Maximum of four) A flexible, prehensile vine that is designed primarily for constriction attacks. Thorn Cluster (Ten Cluster Maximum) One or more fixed, hardened spines or thorns. Attached to the external covering and designed to provide a static defense by keeping predators or enemies at bay. May also be poison-tipped. Shooting Thorns (Maximum of four) A cluster of small, detachable, hardened thorns attached to the tip of a whip vine and designed to be thrown with a whipping motion. New thorns rapidly grow to replace expended ones. Fairly accurate. Each cluster of Shooting Thorns requires a Whip Vine as well. May also be poison-tipped. Heavy Boring Tendrils (Maximum of two)

L I F E F O R M D E S I G N
11111111----21212121
A set of tough, motile tendrils capable of boring through most normal materials (given time). Typically equipped with abrasive pads and able to secret various acids. Limited effectiveness unless Acid Expulsion ability is taken as well (Type B Combat Feature)
S T E P 1 4 T Y P E B C O M B A T F E A T U R E S
Type B Combat Features represent general abilities and capabilities. Type B features, unlike Type A, cannot be taken in multiples (the lifeform either has it or it does not). There are a wide range of options available and you can purchase as many as you wish (as long as your lifeform meets any specific requirements of the options being taken). Appearance modifiers are often brought into play deliberately, with your diplomats showing off or otherwise demonstrating their special abilities in some fashion to impress the target of a diplomatic mission.
Type B Combat Feature SP Size App RB CB SB SCB GCB CCB DB
Poison Injection 180 ++++ ++ +++ ++++++
Electric Shock 180 ++++ ++ +++ ++++++
Acid Expulsion 180 ++++ ++ +++ ++++++
Sonic Attack 180 ++++ ++ +++ ++++++
Energy Drain 180 ++ ++ +++ ++++++
Constriction Attack 180 +++ ++ +++ ++++++
Gas Expulsion 180 ++++ ++ +++ ++++++
Gas Expulsion, Defensive
110 +++ ++ + +++ +
Chameleon Ability 165 +++ +++ ++ +++ +
Shapeshifter Ability 330 ++++ ++++ + +++ ++++++ ++
Reflective Body Surface 98 ++++ ++ + +++ +
Energy Focus 102 ++++ ++ ++ ++++
Type B Combat Feature Notes:
Poison Injection
The ability to inject poison. Requires either Tail Stinger, Fangs, Tusks, Claws, Retractable Claws, Heavy Mandibles, Heavy Beak, Hooked Beak, Talons, Retractable Talons, Thorn Cluster, Whip Vines and/or Shooting Thorns as a means of delivery.

L I F E F O R M D E S I G N
11111111----22222222
Electric Shock
The ability to generate or store a substantial electrical charge and to discharge it at will once physical contact is achieved with the target.
Acid Expulsion
The ability to generate, store and discharge various acids. Discharge may be either in liquid or gaseous form and delivery is limited either to contact or limited-range acid clouds or jets.
Sonic Attack
The ability to generate damaging sound waves. Attack may come in the form of either low or high frequency sound and it is limited to short and medium ranges.
Energy Drain
A very special ability to drain energy from a target lifeform, leaving it either weakened or dead. A modern day "vampire". A successful attack requires physical contact.
Constriction Attack
The ability to utilize flexible limbs or torso for a crushing, constriction attack. Successful attacks require physical contact. Requires either a serpentine primary configuration, a prehensile tail or a constriction vine. Note that the effectiveness of any constriction attack is often negated if the attacker does not have a greater strength rating than the defender.
Gas/Liquid Expulsion
The ability to generate, store and discharge gases. Discharge is typically in the form of a directed breath weapon and may consist of any number of harmful gases (acids, flammable gases which may be ignited, asphyxiation gases and so forth).
Gas/Liquid Expulsion, Defensive
Similar to G/L Expulsion but this ability is primarily defensive in nature. Discharge is usually sudden and massive, designed to instantly create an opaque cloud of gas or liquid which can be used to hide from an enemy (usually while attempting to escape).
Chameleon Ability
The ability to change, fairly rapidly, the coloration of your external body covering so as to blend in with the local environment. Primarily a defensive ability but also quite useful for various types of special operations. Restricted to Reptiles, Amphibians, Arthropods, Cephalopods and Plants. May not be taken in combination with "Reflective Body Surface".
Shapeshifter Ability
The lifeform has the ability to change form and appear as another lifeform. This ability allows a lifeform to mimic other lifeforms appearance and it can be quite useful for various covert activities and, of course, diplomacy.
The shapeshifter ability does not give the lifeform the ability to acquire the actual features of other lifeforms. It only gives the ability to change appearance. A shapeshifter may take on the appearance of a gigantic winged reptile with a whip tail and tail stinger but it would not gain the bonuses of those features (except with regards to appearance). The shapeshifter would not have the strength of the other lifeform nor would it be able to fly or use the tail stinger. The shapeshifter ability does not confer the internal structure or innate knowledge/reflexes to use the features it mimics.
A shapeshifter with a great understanding of alien psychology can vary its appearance so as to gain the most advantageous reaction from an alien species during diplomatic negotiations. It should be noted, however, that a shapeshifter without a good understanding of alien psychology is prone to mistakes and will often generate a negative reaction as a result of misjudging the reaction of the alien. Intense studies in the field of psychology, therefore, are recommended for races with this ability.

L I F E F O R M D E S I G N
11111111----23232323
The shapeshifter ability is not foolproof of course. The shapeshifter is often given away by behavioral anomalies so it tries to avoid certain situations (i.e. it tries to avoid contact with lifeforms that have psionic capabilities and when engaged in covert activities, extra care is taken to avoid drawing attention to itself).
Shapeshifters gain a small Space Combat Bonus for their ability to squeeze into unusual spaces at need. This can prove extremely handy when emergency repairs need to be made under combat situations.
Reflective Body Surface
The external body covering is capable of reflecting incoming energy (certain types, limited power). A static defense feature that may be turned into a weapon if "Energy Focus" is purchased as well. May not be taken in combination with "Chameleon Ability".
Energy Focus
A special attack form that requires that the lifeform have "Reflective Body Surface". This ability allows the lifeform to not only reflect energy but to direct and focus that energy so it becomes a weapon. Limited power makes it a weapon for short and medium ranges only.
S T E P 1 5 T Y P E C C O M B A T F E A T U R E S
Type C Combat Features represent more specialized capabilities which may only be possessed by certain types of lifeforms. A lifeform may only have a single Type C Combat Feature, even if it qualifies for more than one.
Type C Combat Feature SP Size App RB CB SB SCB GCB CCB DB
Superior Flying Ability 260 +++ ++ ++ +++ ++++ +
Superior Gliding Ability 200 +++ ++ + +++ ++++ +
Superior Leaping Ability 180 +++ ++ +++ ++++ +
Superior Climbing Ability
180 +++ ++ +++ ++++ +
Superior Swimming Ability
200 +++ ++ +++ ++++ +
Superior Tunneling Ability
200 +++ ++ +++ ++++ +
Type C Combat Feature Notes:
Superior Flying Ability
Imparts exceptional flying abilities to lifeforms already capable of flight. Restricted to Avians (non-flightless), Winged Mammals, Winged Reptiles, Winged Arthropods and Floater Plants. A Strength of “Average” or better, or an Agility of “Deft” or better is recommended.
Superior Gliding Ability
Exceptional gliding abilities for lifeforms already capable of gliding. Restricted to Glider Mammals, Glider Reptiles, Glider Amphibians, Glider Arthropods and Glider Plants.

L I F E F O R M D E S I G N
11111111----24242424
Superior Leaping Ability
The ability to make exceptional leaps (and to land safely). Available to all non-plant lifeforms. Agility of “Deft” or better is recommended.
Superior Climbing Ability
Exceptional climbing abilities. Available to all lifeforms. Strength of “Average” or better is recommended.
Superior Swimming Ability
Exceptional swimming abilities for aquatic and amphibious lifeforms. Restricted to Amphibious Mammals, Aquatic Mammals, Amphibious Reptiles, Aquatic Reptiles, Amphibians, Glider Amphibians, Crustaceans, Aquatic Crustaceans, Cephalopods, Amphibious Cephalopods and Aquatic Plants. A Strength of “Average” or better is recommended. May not be taken in combination with either "Heavy Shell", “Heavy Bark”, “Heavy Plate Scales” or "Heavy Exoskeleton" Natural Body Armor.
Superior Tunneling Ability
The ability to tunnel through the ground rapidly. Restricted to Subterranean Mammals, Subterranean Reptiles and Subterranean Arthropods. "Acid Expulsion" (a Type B Combat Feature) or Strength of “Brawny” or better is recommended.
S T E P 1 6 P H Y S I C A L S I Z E ( P I C K O N E - R E Q U I R E D )
The Physical Size selection is a critical choice with regard to ground combat, as larger lifeforms have a big advantage when it comes to smashing their opponents on the field of battle. They often wield larger weapons and are generally more imposing in combat.
Physical Size SP
Tiny -480
Very Small -240
Small -120
Average 0
Large 120
Huge 240
Gigantic 480
S T E P 1 7 S T R E N G T H ( P I C K O N E – R E Q U I R E D )
The importance of Strength is realized in when determining the natural Personal Equipment Class (PEC) for a lifeform. PEC is used in ground combat situations to determine the relative size/weight of the equipment being carried by a given lifeform. Heavier weapons typically are larger, have bigger power packs and dish out more damage in battle.

L I F E F O R M D E S I G N
11111111----25252525
Strength SP
Decrepit -480
Weak -240
Average 0
Brawny 120
Robust 240
Mighty 480
Titanic 890
S T E P 1 8 S P E E D & A G I L I T Y ( P I C K O N E – R E Q U I R E D )
The importance of natural Speed & Agility is realized when determining the Mobility rating for a lifeform. Mobility is important in combat situations, particularly offensive operations requiring movement by your forces. The importance of the Mobility advantage will depend upon the combat tactics in use since some tactics will be more dependent on movement than others.
Speed & Agility SP
Clumsy -560
Awkward -280
Average 0
Deft 140
Nimble 280
Dextrous 560
Agile 980
S T E P 1 9 P H Y S I C A L D E S C R I P T I O N
All lifeforms will have a general physical description that will be Player submitted. The description is limited in length to 500 characters and will often be used whenever your race is encountered by an alien. The Physical Description should be a brief description of the overall appearance of your lifeform as it would appear to an observer.

L I F E F O R M D E S I G N
11111111----26262626
S A M P L E L I F E F O R M : H U M A N
A typical Human lifeform would have the following characteristics. The total Setup Point Cost comes out to zero, and since all starting players begin with 2,000 Setup Points to spend, all would be left over to provide for rapid technological advancement early in the game.
Category Lifeform Feature Setup Point Cost
Basic Lifeform Mammal 0
Primary Configuration Humanoid 0
Intelligence Average 0
Sensory Ability Average 0
General Constitution Average 0
Ingestion Mode Omnivorous 0
Reproductive Rate Average 0
Physical Size Average 0
Strength Average 0
Speed & Agility Average 0