Manual Plant 4D Athena SP2 - P&ID Tutorial-master
53
Plant 4D Athena SP2 P&ID Tutorial Version 1.2 © Copyright 1996-2007 CEA Technology B.V., The Netherlands
Transcript of Manual Plant 4D Athena SP2 - P&ID Tutorial-master

Plant 4D Athena SP2
P & I D T u t o r i a lVersion 1.2
© Copyright 1996-2007 CEA Technology B.V., The Netherlands

Table of contents
1. Introduction.......................................................................................21.1. Legal notice ......................................................................................................... 21.2. About Plant-4D .................................................................................................... 21.3. About this manual ................................................................................................3
2. Database-oriented software ............................................................42.1. Basic databases used by Plant-4D. ...................................................................... 4
3. Creating and Configuring a Project ................................................63.1. Starting Plant-4D.................................................................................................. 63.2. Creating a project................................................................................................. 7
4. Exercise 1: Drafting with Plant-4D................................................134.1. Starting Plant-4D and creating a new drawing .................................................... 134.2. Starting the drawing and setting toolbars & toolboxes......................................... 14
4.2.1. AutoCAD ................................................................................................................154.2.2. Microstation ............................................................................................................17
4.3. Initial Settings and Drawing Frame..................................................................... 184.4. Setting the User Level........................................................................................ 194.5. Drafting in Plant-4D............................................................................................ 204.6. Placing equipment ............................................................................................. 22
4.6.1. Placing a vessel......................................................................................................224.6.2. Placing pumps ........................................................................................................22
4.7. Working with lines and reducers......................................................................... 234.7.1. Drawing process lines .............................................................................................234.7.2. Place flow arrows and reversing the flow direction....................................................254.7.3. Placing more lines...................................................................................................264.7.4. Placing reducers .....................................................................................................284.7.5. Drawing bypass lines ..............................................................................................294.7.6. Drawing a secondary line ........................................................................................29
4.8. Copying objects ................................................................................................. 304.9. Moving objects................................................................................................... 314.10. Placing manual valves.................................................................................... 324.11. Placing control valves..................................................................................... 334.12. Inserting instrumentation................................................................................. 364.13. Instrumentation practice ................................................................................. 38
5. Exercise 2: Working with Data and Annotations.........................405.1. Setting User Level.............................................................................................. 40

5.2. Working with equipment data and annotations.................................................... 415.2.1. Modifying tag numbers............................................................................................415.2.4. Annotating equipment .............................................................................................425.2.8. Entering the equipment data....................................................................................42
5.3. Working with piping data and annotations........................................................... 435.4. Editing and annotating manual valves ................................................................ 435.5. Editing control valves ......................................................................................... 445.6. Editing instrumentation....................................................................................... 445.7. Adding Intelligent On/Off page Connectors......................................................... 455.8. Linking drawings by connectors.......................................................................... 475.9. Manipulating the drawing contents ..................................................................... 485.10. Conclusion ..................................................................................................... 48
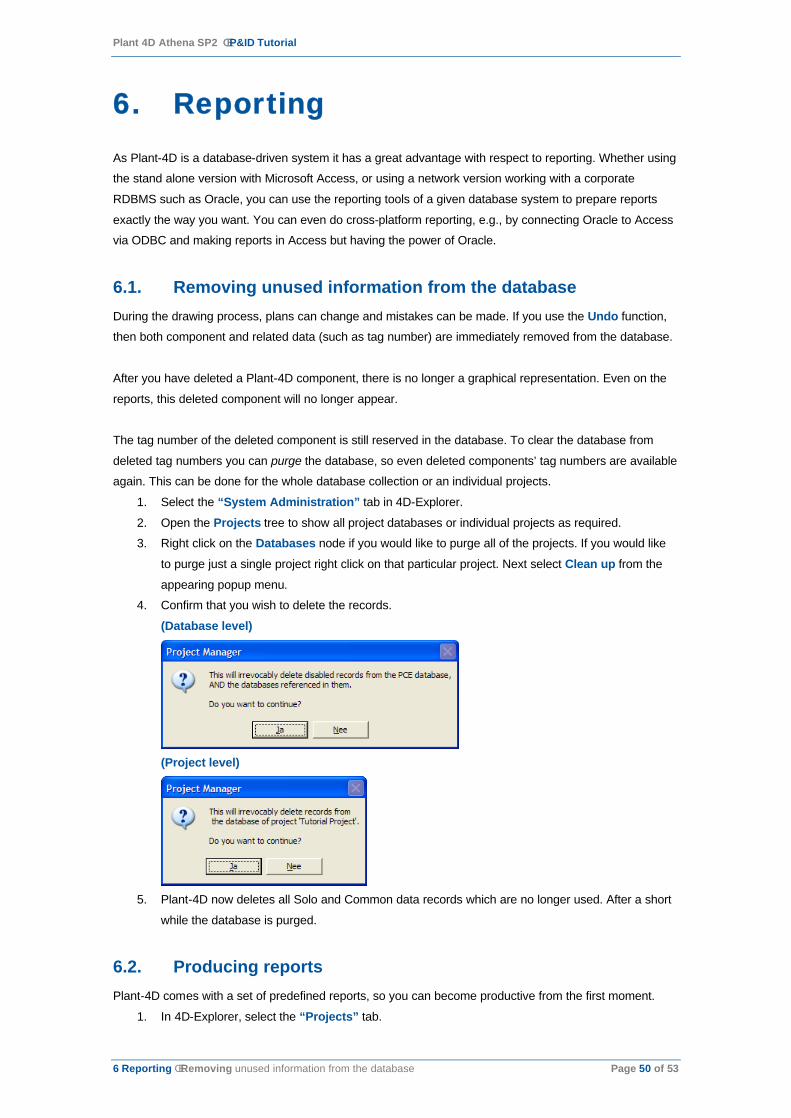
6. Reporting.........................................................................................506.1. Removing unused information from the database ............................................... 506.2. Producing reports............................................................................................... 50

Plant 4D Athena SP2 ê P&ID Tutorial
1 Introduction ê Legal notice Page 2 of 53
1. Introduction
1.1. Legal noticeThis publication or parts thereof, may not be reproduced in any form, by any method, for any purpose
without the express written consent of CEA Technology.
CEA Technology makes no warranty of any kind with regard to this material, including, but not limited to,
the implied warranties of merchantability and fitness for a particular purpose.
CEA Technology, or any of its subsidiaries, shall not be liable for errors contained herein or for incidental
or consequential damages in connection with the furnishing, performance, or use of this material.
The information contained in this document is subject to change without notice. The name Plant-4D® is a
registered trademark of CEA Technology B.V., The Netherlands.
If you have any questions during the installation or operation, please contact your local Plant-4D dealer or
visit the CEA website for more information:
© Copyright 1996-2007 CEA Technology B.V., The Netherlands
1.2. About Plant-4DPlant-4D is a modern database-driven and object-oriented CAD system intended for the production of
P&ID and Piping drawings as well as the complete maintenance of the data related to all aspects of the
project work.
Database-driven means that both all graphics and primitives as well as data are stored in a relational
database (RDBMS). This approach has the following advantages:
¡ The program can be run on a network by a group of engineers, or a single user can work with it on a
stand-alone machine.
¡ The program can run simultaneously on AutoCAD and Microstation. Part of the drawing can be made
in Microstation, be revised in AutoCAD by another party, the drawing can be finished in Microstation,
and be delivered to the customer as an AutoCAD drawing, for instance. The CAD program is only
used to display the drawings, to serve as an interface where the drafting occurs, and to enter the
data through data entry windows. In other words, Plant-4D is CAD platform independent.¡ The drawing can be completely created or reworked by manipulating the data in the database.
¡ Interfaces to simulation programs, such as ChemCAD exist.
¡ Interfaces to instrumentation systems such as INtools exist.
¡ Translation tools to import existing CAD drawings from non-database systems exist.
¡ Interfaces to other database-driven CAD systems are feasible.
¡ Interfaces to Plant Management systems are feasible.
¡ Reporting is highly customizable through a variety of database reporting tools.
¡ Object oriented means that the elements used for drawing (for instance symbols or lines) are stored
in the database as objects:

Plant 4D Athena SP2 ê P&ID Tutorial
1 Introduction ê About this manual Page 3 of 53
Creating your own symbols is extremely easy, and can be done from the CAD program or at the
database level
There is no graphical storage. A large drawing or a model doesn’t need to be saved, as every
object is saved to the database at the moment it is inserted in CAD. Any possible crash of
Windows or lack of power supply will not affect the work done so far.
Objects can inherit properties. For instance, a control valve can inherit process and mechanical
data from the pipe it is located on. This means that less work is needed to complete all
necessary data.
The object-oriented concept makes it easy to transfer the data and do the reporting.
1.3. About this manualThe main purpose of this book is to guide you through Plant-4D from start to finish.
This part of the Plant-4D Training book has been prepared for the PID module, and this means that we will
concentrate mostly upon the information required to make you familiar with 2D model designing with Plant-
4D. Additionally you can find chapters in this book that will help you to understand what the 4D-Explorer is,
what its features are and how to work with it.
As a result you should learn everything that is required to start a job (all activities related with the project
setup), to perform it (2D model creation with most of its common features) and eventually to produce
related documentation (like reports).
In this P&ID Tutorial we assume the following:
¡ You have a basic understanding of the CAD program you are using; in particular, you can apply
drawing aids such as Ortho, Snap and Osnap tools of AutoCAD, or Axis/Grid/Snap Locks, Snaps
and AccuDraw of Microstation. We will cover the major differences between usage of Plant-4D on
AutoCAD and Microstation.
¡ You have a basic understanding of Microsoft Access
¡ You have installed Plant-4D with at least the 4D-Explorer and P&ID modules for your version of
Microsoft Access
In this tutorial we will not cover in detail the operation of Plant-4D in a network database such as SQL or
Oracle since the program’s operation, with the exception of reporting, is not any different.
This book is divided into two major parts:
¡ Chapters 3 through Chapter 5 describe a Basic Tutorial. It helps you to start using the program
out-of-box.
Chapter 3 will describe how to create and configure projects.
Chapter 4 will explain how to quickly create the major part of the drawing.
Chapter 5 will tell how to enter the data into the database and how to annotate the drawing.
¡ Chapter 6 will describe the standard way of reporting in Plant-4D.

Plant 4D Athena SP2 ê P&ID Tutorial
2 Database-oriented software ê Basic databases used by Plant-4D. Page 4 of 53
2. Database-oriented software
As you know from the Plant-4D manuals, this program is completely database-oriented.
Although Plant-4D uses both Microstation and AutoCAD as graphics editors, all data of the PID is stored in
the database. The stored data includes:
The graphical definition of each PID component;
The process data associated to each PID component;
All non-Plant-4D graphical elements like lines, text definitions.
AutoCAD and Microstation are used only to represent this data graphically and allow the user to input data
via an interface they are already familiar with. This means that you can create this visual representation
directly in the database as well, which of course is much more difficult and not recommended. No data is
stored with the drawing; in fact, Plant-4D does not create any drawings.
2.1. Basic databases used by Plant-4D.Now that you know the database-oriented concept of Plant-4D, we can explore the following:
¡ How many databases Plant-4D is using?
¡ What data is stored in which database?
Plant-4D uses electronic files with the extension “mdb”, which are MS Access program files. Below is a
list of all the “mdb” files used by the Plant-4D PIPE module:
2.1.1. PCE.MDB
This database file contains general setting data that includes settings about available standard projects
(delivered with the software) and user created projects. In addition, information about components,
graphical and dimensional databases, and workgroups can be found there. Simply: what is created using
the 4D-Explorer is stored in this file. You will rarely use this database directly with MS Access to enter any
modifications to the data stored there. It is much easier and safer to change this data using Plant-4D
commands from within 4D-Explorer.
2.1.2. COMPPID.MDB
This is a Plant-4D database file, which contains graphical representation of all the drawing objects used in
the PID module. The drawing objects are represented mathematically as collections of graphical primitives.
The component databases do not store any actual large drawing objects, but keep parameters that in turn
will be substituted by real values during drafting.
2.1.3. SPEC.MDB
This file contains the standard Plant-4D Specifications. A specification performs three functions. First of all,
a specification is a selection of components from component databases that can be treated as a material
class. Secondly, a specification holds the actual sizes of objects used in piping drawings and this way it
performs the role of a material database (or standard). Finally, a specification holds extended information
about an object, such as its description.

Plant 4D Athena SP2 ê P&ID Tutorial
2 Database-oriented software ê Basic databases used by Plant-4D. Page 5 of 53
2.1.4. PRJ_1.MDB
This is a project-related file that contains all the data about components used in the projects. In this case
the Tutorial Project is assigned to this project id. You can verify this by opening up the Databases table in
the PCE.MDB (if you have not deleted this project from your computer). So when you create a new project,
a new number associated with the “PRJ_” prefix will be used as the name of the related database file (for
the next project it will be PRJ_2.MDB and so on). Refer to the Plant-4D User guide for additional
information on creating projects. When you start placing Plant-4D components or AutoCAD/Microstation
primitives (line, text and so on), each element will be recorded as one record in one of the respective
tables of this file.
2.1.5. PRJ_PROT.MDB
This is a template file that can be copied with a new name (PRJ_#) every time you create a new project.
This is quite useful because it can enforce any company standards built into the template.

Plant 4D Athena SP2 ê P&ID Tutorial
3 Creating and Configuring a Project ê Starting Plant-4D Page 6 of 53
3. Creating and Configuring a Project
In this chapter, you will learn how to create and configure a new Plant-4D project. This will include:
¡ Creating a new project database
¡ Selecting settings for the project
¡ Defining access rights for workgroups
¡ Selecting CAD programs used with Plant-4D
¡ Defining project users
¡ Installing the configuration files
3.1. Starting Plant-4DWhen you launch the 4D-Explorer application from the Windows Startmenu >> Programs >> Plant-4D,
you will see the 4D-Explorer page with the “Plant-4D Login”-dialog as shown on the next image.
The login dialog asks for a Username and Password to access the 4D-Explorer module. By default the
system comes with a Username “sa” and password also “sa” both using lowercase characters.
This “sa” user holds system administration rights. Make sure that this password gets changed after
installation to prevent unauthorized usage of the products.
Warning: If the picture above does not appear correctly on your screen please check if the dongle is attached to the system, the license service is running and the proper licenses are assigned. If this is the case, please make a note of the error messages displayed and forward those in e-mail to your local Plant-4D support organization.

Plant 4D Athena SP2 ê P&ID Tutorial
3 Creating and Configuring a Project ê Creating a project Page 7 of 53
The login dialog is the first and most important protection of the program. If somebody is not assigned to
any workgroup, he is not allowed to enter Plant-4D at all. If he is a member of one workgroup, then,
depending on the workgroup rights assigned to it, he has access to all program options and data (usually
administrator) or is limited to a couple of options or data.
When you log in, you will see the main screen of the 4D-Explorer module and the Project tree will be
displayed in the left pane as shown below. Two tabs are available to access the Projects and System
administration trees and a third tab is available for the help files.
3.2. Creating a projectOn creating a project, a new project folder and a project database is created, based on the prototype
named:
1 \\CEA\Projects\prj_prot.mdb.
For instance, when you create a project, the folder \PRJ_<#> is created beneath \\CEA\Projects, where ‘#’
is the unique number of the project. The “PRJ_<#>.mdb” Access database is set up in that folder as a copy
of the source/template database. The newly created project/database and its settings you enter are
recorded in the so called “Project Control Environment” (PCE) database, which is named PCE.mdb and
stored in the folder:
1 \\CEA\Projects\ folder
Note: In addition to a prototype database, a project by the name, Tutorial, will be loaded in the standard installation and will be available under the Project tree.
Click the “System Administration” tab. When you expand Databases, the categories “Projects”,“Specifications”, “Components” and “Miscellaneous” are shown.
Plant 4D Athena SP2 ê P&ID Tutorial
3 Creating and Configuring a Project ê Creating a project Page 8 of 53
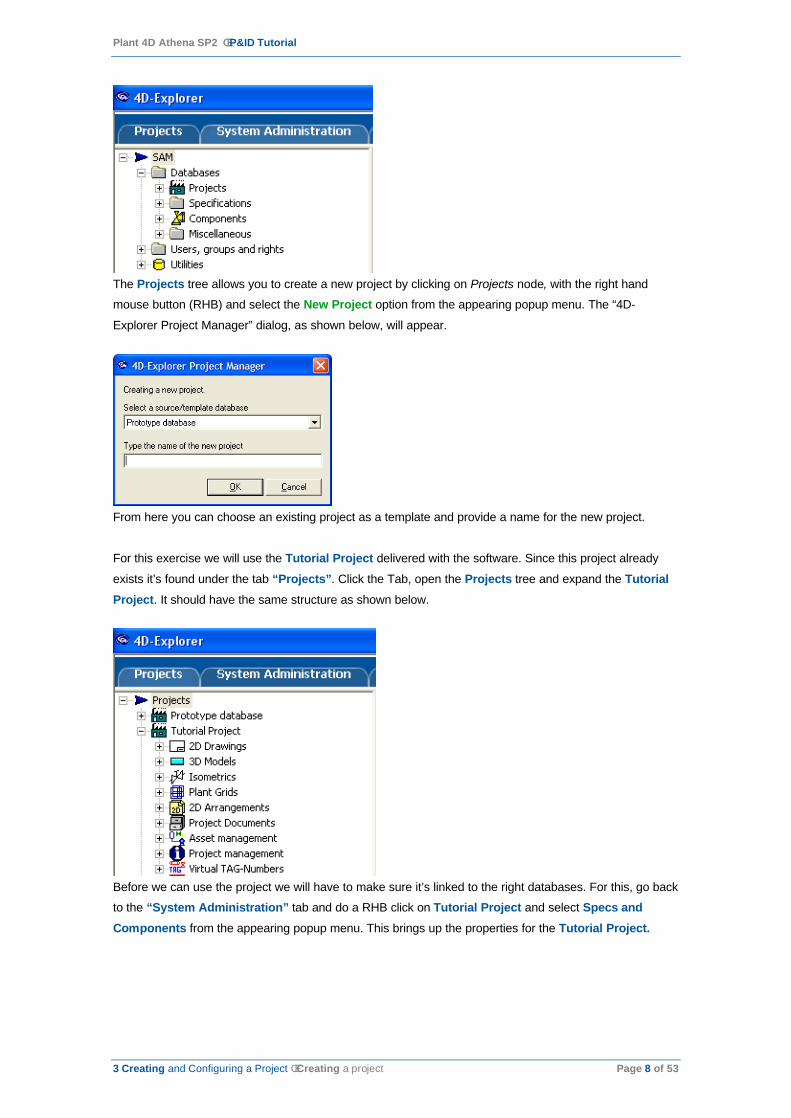
The Projects tree allows you to create a new project by clicking on Projects node, with the right hand
mouse button (RHB) and select the New Project option from the appearing popup menu. The “4D-
Explorer Project Manager” dialog, as shown below, will appear.
From here you can choose an existing project as a template and provide a name for the new project.
For this exercise we will use the Tutorial Project delivered with the software. Since this project already
exists it’s found under the tab “Projects”. Click the Tab, open the Projects tree and expand the Tutorial Project. It should have the same structure as shown below.
Before we can use the project we will have to make sure it’s linked to the right databases. For this, go back
to the “System Administration” tab and do a RHB click on Tutorial Project and select Specs and Components from the appearing popup menu. This brings up the properties for the Tutorial Project.

Plant 4D Athena SP2 ê P&ID Tutorial
3 Creating and Configuring a Project ê Creating a project Page 9 of 53
Now click on the “Components” tab and verify that the Comppid database is selected.

Plant 4D Athena SP2 ê P&ID Tutorial
3 Creating and Configuring a Project ê Creating a project Page 10 of 53
From here you can select the database containing the ‘components’ you would like to use in our project.
Plant-4D is shipped with a default set of symbols and components, which is a single database. But Plant-
4D is able to handle multiple database in a project. E.g. when has defined your own database with special
symbols and want to combine them with Plant-4D’s default symbols. That is the reason you need to
specify which component database to use.
Just like component database Plant-4D is able to work with multiple specifications and specification
databases. For that reason you need to select the appropriate specification(s) also. Select the
“Specifications” tab for that.
Make sure the “SPEC” database is switched on in the Specification Databases field. Select the
“ANSI_PID#PID” and “PID_TOTAL#PID” as the specifications to use from the Specification Table field.
Note: Specifications that end in “#PID” are a collection of P&ID symbols based on all standards found in Plant-4D. This suffix also distinguish the applicability of the specification; 3D specifications, which usually contains other types of data, has a “#PIP” prefix.
Now that the specifications and components databases are assigned we can proceed to create the users,
PE (process engineer) and ME (mechanical engineer).
Click on the Users, Groups and Rights node and expand the tree as shown below. Right click on Usersand choose New to bring up the “4D-Explorer Add user” dialog. Enter the information for PE (use a
password of pe) and select the Process group.

Plant 4D Athena SP2 ê P&ID Tutorial
3 Creating and Configuring a Project ê Creating a project Page 11 of 53
Click on to make PE a member of the selected group and click OK. Closing and reopening the Userstree now shows the new user, PE.
Now you can do the same for the ME user, (use ‘me’ as the password), and make him part of the “Pipe”group. Try logging on to Plant-4D with one of the new logins you have created and notice the changes in
access. Because of the restricted access of those logins, for this tutorial it is recommended to use the
System Administration account. So re-login with username ‘sa’ and password ‘sa’ so that you have all the
access you require.
Note: You can view the rights assigned to any group or user by left clicking the group or user and observing the right hand pane. Below the Process group (which is assigned to the Common Rights group) is selected and the respective access information is shown. For additional information on creating Groups and Right Groups see the “4D-Explorer User Guide”.
This completes your exercise in setting up a new project and users. Now you have:

Plant 4D Athena SP2 ê P&ID Tutorial
3 Creating and Configuring a Project ê Creating a project Page 12 of 53
¡ Set up the TUTORIAL Project.
¡ Added two new users to this project, so that you can simulate a real work environment.
¡ Properly assigned the rights, by assigning the users to workgroups with certain rights.
Note: Remember that all of those settings are stored in the PCE.MDB file.
Now we can go back to the Projects tree in 4D-Explorer by clicking the “Projects” tab.

Plant 4D Athena SP2 ê P&ID Tutorial
4 Exercise 1: Drafting with Plant-4D ê Starting Plant-4D and creating a new drawing Page 13 of 53
4. Exercise 1: Drafting with Plant-4D
This chapter will show you how to make P&ID drawings using Plant-4D. We will describe the easiest way
of drafting, without any knowledge (yet) of the data related to fluid properties, instrumentation details and
construction details. Plant-4D will insert the minimum required data such as equipment or instrument
names automatically. When you acquire the necessary information (such as fluid properties, mechanical
piping data, or instrumentation data), you will be able to return to the database to enter or correct the
stored information.
4.1. Starting Plant-4D and creating a new drawingIf you have logged out of 4D-Explorer, log back in as described in section 3.1 “Starting Plant-4D”.
Enter ‘sa’ as the password and click OK. You are entering Plant-4D as the user system administrator (to
ensure you can perform all the functions demonstrated in the tutorial.
So far, no drawing has been created. A Plant-4D "drawing" is not a drawing in the traditional sense - it is
the definition of the drawing in the database. When you create a new Plant-4D drawing, you record it in the
database. Click the Projects tab and expand the Tutorial project. Click with RHB on P&ID Drawings and
select New PID from the appearing popup menu. You will have to enter the name of the new Plant-4D
drawing. Name it “My First Drawing” and click OK. This drawing name is not a file name, so it can be
quite a long descriptive text. The system will notify you when your drawing is created:

Plant 4D Athena SP2 ê P&ID Tutorial
4 Exercise 1: Drafting with Plant-4D ê Starting the drawing and setting toolbars & toolboxes Page 14 of 53
4.2. Starting the drawing and setting toolbars & toolboxesClose and re-expand the P&ID Drawings and notice that your new drawing is now listed.
Note: Changes in your tree are usually not directly visible in your tree. Collapsing a node and re-expand it is a commonly used technique to force a refresh of your tree, throughout the 4D-Explorer.
Now let’s start this drawing by a RHB click on the drawing. Select Start from the appearing popup menu.
Your CAD application (AutoCAD or Microstation) will then launch. After a couple of seconds (on the first
usage this takes awhile longer) the system gets completely loaded.
Note: Plant-4D is able to support both AutoCAD and Microstation on single system. In that case Plant-4D will not automatically start a CAD application, but will prompt you which one to use.

Plant 4D Athena SP2 ê P&ID Tutorial
4 Exercise 1: Drafting with Plant-4D ê Starting the drawing and setting toolbars & toolboxes Page 15 of 53
Note that AutoCAD and Microstation use different toolbars and has slightly different behavior. In the next
section we will discuss them for both CAD environments.
4.2.1. AutoCADWhen starting AutoCAD you will find the environment like you are familiar with. Plant-4D only has added a
few elements to gain access to and use its functions.
First we have the additional Plant-4D pull down menu. It contains several Plant-4D commands. It has been
grouped into different sections for ease of use.
Probably the most used element while drafting is the so called “Plant-4D P&ID” toolbar. It is a toolbar just
like the built-in toolbars By default, it is not docked. You are allowed to select various toolbars from the
Plant-4D >> Application Toolbars menu and dock them at the screen’s edges for convenience. In this
tutorial we will use the standard “Plant-4D P&ID” toolbar, which contains the main functions & tools for
drawing P&ID’s.
To be able to draw P&ID symbols using a specific standard, you need to select the appropriate component
toolbar from the Plant-4D >> Modules menu. We will be using the “ANSI” toolbar in this tutorial:

Plant 4D Athena SP2 ê P&ID Tutorial
4 Exercise 1: Drafting with Plant-4D ê Starting the drawing and setting toolbars & toolboxes Page 16 of 53
You can use any of the component toolbars as long as your specification includes your symbols. The
PID_TOTAL#PID specification covers symbols found in all P&ID component toolbars.
A few tips:
¡ Moving the mouse pointer onto a button in the toolbar and clicking the left mouse button will activate
the function of the clicked button.
¡ Keeping the mouse pointer over a button in the toolbar will display it’s tooltip describing the current
button functionality.
If a button includes a small arrow , holding the mouse button with the pointer on the button will display a
fly-out toolbar of the AutoCAD screen.
You can drag and drop any of the toolbars to any side of the AutoCAD screen. We have removed some of
the typical AutoCAD toolbars and placed the two required toolbars.
It is important to note that Plant-4D toolbars will only be present when running Plant-4D, and will not affect
your CAD platform at any other time.
The following example shows some of the typical toolbars available:
Plant-4D main (P&ID) toolbarPlant-4D floating menu
Module/standard specific toolbar

Plant 4D Athena SP2 ê P&ID Tutorial
4 Exercise 1: Drafting with Plant-4D ê Starting the drawing and setting toolbars & toolboxes Page 17 of 53
4.2.2. Microstation
The integral parts of Plant-4D on Microstation are the Plant-4D pull down menu, the Plant-4D floating
menu and the Plant-4D toolbar.
The toolbar provides all main functions and tool to support you during drafting P&ID’s.
You can open all toolbars from the Plant-4D pull down menu. Unlike AutoCAD Microstation doesn’t provide
the so called fly-out menus. When you select an item from the toolbar which refers to multiple options, the
underlying toolbar of the function will be opened.
Unlike AutoCAD in Microstation all of the functions and components are also accessible from the pull down
menu. However every this is available from here, when drafting it will be much quicker to place
components by using toolbars. But it is good to keep in mind that every item also is available here.
To be able to draw P&ID symbols according to a standard, you need to select the appropriate component
toolbox. You can access the component toolboxes or modules from the Plant-4D PID >> Modules menu.
We will be using the “ANSI” toolbox in this tutorial:
You can use any of the component navigators as long as your chosen specification includes your symbols.
The PID_TOTAL#PID specification covers the symbols found in all P&ID component toolboxes.
A few tips:

Plant 4D Athena SP2 ê P&ID Tutorial
4 Exercise 1: Drafting with Plant-4D ê Initial Settings and Drawing Frame Page 18 of 53
¡ Moving the mouse pointer onto a button in the toolbox and clicking the left mouse button will activate
the function of the clicked button.
¡ Keeping the mouse pointer over a button in the toolbox will display the current button functionality in
the status line and title bar of the toolbox.
¡ You can drag and drop any of the toolboxes to dock them at any side of the MicroStation screen.
The following example shows some of the typical toolbars available:
4.3. Initial Settings and Drawing FrameAs a CAD user, you are probably accustomed to starting your drafting with a drawing frame. A drawing
frame usually consists of the border and a title block. Typically, the drawing frame is loaded from a
template or prototype drawing.
Plant-4D P&ID as a database driven program handles this matter differently:
¡ Your CAD preferences (such as drawing limits, snap, grid, and ortho mode in AutoCAD) are written
to the database the first time you set your settings. Therefore, you don’t need any template for initial
settings. The same relates to line types etc. Everything that defines a drawing can be found in the
database.
¡ The Plant-4D drawing frame is an object that is stored in the database as a reference drawing or as
a Plant-4D component. This frame, once selected, would appear in both supported CAD interfaces,
does not matter whether the original file was DWG or a Plant-4D component. You can even create
the drawing frame as a Plant-4D P&ID drawing. This allows you to add intelligence to the frame.
4.3.1. AutoCAD
¡ Use AutoCAD commands to set the drawing parameters to be:
LIMITS (0,0) (420,297)
SNAP 5, SNAP ON
GRID 10, GRID ON
Plant-4D main (P&ID) toolbarPlant-4D floating menu
Module/standardspecific toolbar
Equipment specific toolbarSpecification menu

Plant 4D Athena SP2 ê P&ID Tutorial
4 Exercise 1: Drafting with Plant-4D ê Setting the User Level Page 19 of 53
ORTHO ON
Zoom to Extents
Use Plant-4D >> Reference Drawing >> AutoCAD pulldown menu and navigate to:
1 C:\CEA\Plant-4D\Common\Sheets.
Select and open a3.dwg drawing frame. Specify insertion point of (0,0), direction to the right, and scale
factor of 1.0.
The last drawing settings made by a user are recorded in the database and stay there for this particular
user until he changes them.
4.3.2. Microstation
You should be working with AccuDraw, and you can preset drawing aids according to your wishes. Plant-
4D will remember your last settings. Place a drawing frame now:
Use File >> Reference >> Tools >> Attach and navigate to the folder:
1 C:\CEA\Plant-4D\Common\Sheets.
Select a3.dgn and attach it to the PID with the origin at (0,0) and the direction to the right. The drawing
frame will appear.
4.4. Setting the User Level
The ‘User Level’ is a feature that controls the way data is entered and viewed.
On User Level 0 (No Information), the person who views the drawing cannot access the data. The person
who creates the drawing is asked only necessary questions, and the minimum data is entered
automatically by Plant-4D.
On User Level 1 to 4, users granted with a User Level any less than the current one can only view the
data. If a user was granted the appropriate User Level by the System Administrator, he/she can modify the
data belonging to that level as well as the data of lower User Levels.
Users having User Level 5 have full control over the data when making drawings. If the drawing is made
on User Level 5, Plant-4D will ask many questions which will fill in all the data at the moment the object is
inserted in the drawing.
The User Level for a given class of data is set during the project configuration, the access rights are also
granted at the time of the project configuration by the System Administrator. The System Administrator can
grant or revoke access rights any time during the life of a project.
Although the Process Engineer is allowed to work at the User Level 5, we will show you how you can
effectively make the drawing User Level 0.

Plant 4D Athena SP2 ê P&ID Tutorial
4 Exercise 1: Drafting with Plant-4D ê Drafting in Plant-4D Page 20 of 53
4.4.1. AutoCAD
Move the mouse pointer to the second button in the Plant-4D P&ID Toolbar and hold the left mouse
button down to see the pull down toolbar as shown here:
Click the Set user level button: .
You will see the "User Level" dialog as shown below:
Move the slider in the dialog box until you see User Level equal to 0, then click OK.
4.4.2. Microstation
Move the mouse pointer to the settings button in the “Plant-4D” toolbar. The “Settings” toolbar will
appear.
Next click the User Info button to open the “User Level” dialog.
Move the slider in the dialog box until you see User Level equal to 0. You can close the "User Level"dialog now.
4.5. Drafting in Plant-4DYou will be better off placing and editing Plant-4D components (symbols of equipment, piping and
instrumentation as well as other symbols delivered with the program or customized by you), by using
dedicated tools – e.g. AutoCAD or Microstation. Although your favorite CAD commands still work, we
recommend that you use tools found in the Plant-4D Modify toolbar/box to erase, copy, move, rotate,
mirror, stretch or flip objects, as being database-driven we need to amend information in the database as
well as what you see on screen.

Plant 4D Athena SP2 ê P&ID Tutorial
4 Exercise 1: Drafting with Plant-4D ê Drafting in Plant-4D Page 21 of 53
4.5.1. AutoCAD Microstation…
If you make a mistake when placing or editing components, you can always press the undo button or the
Ctrl+Z keys.
Note: Plant-4D supports multiple Undo’s, even between the sessions. There is no separate Plant-4D Undo button, when used through Plant-4D your CAD platform Undo command will alter the database for you.
To Redo an action, use Ctrl+Y or the Edit >> Redo You are allowed to place and edit primitives, such as lines, circles, arcs, rectangles, ellipses or text, with
the standard functions of your CAD program. Standard Redo’s and Undo’s work with primitives.
You do not need to save a drawing. It is enough to click the / in the main window to exit the CAD
program. The changes to the drawing are recorded in the database the moment you place or edit a
component or primitive.
If the symbol you are inserting has the wrong size (scale), you can make use of the Plant-4D >> Settings >> Scale Factor menu (ACAD) or Settings >> Design File >> Active Scale in Microstation.
If you cannot see any effect of your command, click the Refresh button . This will refresh the drawing
from the database. Note: CAD commands like REDRAW or refresh the CAD view only, while the
current definition of the drawing is in the database.
Erase
Rotate
Copy Data
Move
Write Component
Break Line
Flip Direction
Flip Orientation
Place Assembly
Keep Link
Erase
Rotate
Component Stretch
Stretch
Copy
Move
Scale
Flip Direction
Flip Orientation
Properties

Plant 4D Athena SP2 ê P&ID Tutorial
4 Exercise 1: Drafting with Plant-4D ê Placing equipment Page 22 of 53
4.6. Placing equipment
4.6.1. Placing a vessel
1. Click the Design Vessel button ( ) in the “Plant-4D” toolbar. You will see the “Design Vessel”
dialog.
AutoCAD
MicroStation
From here you are able to select the vessel orientation, head & bottom (or left & right) type, and the type of
vessel internals. You can construct many types of vessel symbols in this way.
2. Now select the desired configuration and accept the settings by clicking OK.
3. The program will now ask you for the coordinates of the vessel body’s top-left corner. We suggest
that you pick the point (110,220). The next question will be to show the location of the second vessel
corner. Use (135,165) or point relative to the first one (@25,-55). You will see a plain vessel symbol
appearing in the drawing.
You will not see the vessel tag, because you are currently working at User Level 0.
4.6.2. Placing pumps
Now, you will add two pumps.

Plant 4D Athena SP2 ê P&ID Tutorial
4 Exercise 1: Drafting with Plant-4D êWorking with lines and reducers Page 23 of 53
1. In AutoCAD, click the Centrifugal Pump button ( ) in the “ANSI” toolbar. In Microstation, click the
Pump button in the “ANSI” toolbar, which will open the “ANSI Pumps” toolbar in turn, and click the
Centrifugal Pump button there. You will see a ghost image of the pump symbol. Pick the point
(220,160) and click the mouse button. The program will now ask for the direction of the pump
symbol, click any point to the right and the pump symbol will appear without any tag.
2. Repeat the last action and place the next pump at (220,110).
4.7. Working with lines and reducers
You are never asked any questions about line data; you merely place them. In this next section we will
place two main runs of piping and two secondary lines.
4.7.1. Drawing process linesUnlike a plain line in AutoCAD or Microstation a Plant-4D line does contain much more information and
provide a certain behavior. For that reason some settings are required before we draw our first line.
First we have to setup the diameter of the ‘process line’.
1. Expand the “Settings” toolbar by depressing the mouse on the Settings button from the “Plant-4D” toolbar
AutoCAD Microstation
Click the Set Diameter button: . The “Processline” dialog as shown below will appear.
Select 150 mm as the Diameter and confirm by clicking OK. This will be default line size used by Plant-4D
for all lines that you draw for this moment. You will be able to change such sizes later, after getting
relevant information, e.g. from hydraulics calculations.
Now we are ready to draw our first process/Plant-4D line:

Plant 4D Athena SP2 ê P&ID Tutorial
4 Exercise 1: Drafting with Plant-4D êWorking with lines and reducers Page 24 of 53
1. Open the Tools menu from the “Plant-4D P&ID” floating menu. Select the Process Line ( )
button from the pull down menu.
Note: Plant-4D versions prior to Athena SP2 provides this functionality also in the toolbar. In case this is wanted in Athena SP2 also, you can customize your toolbar. For explanation about such customizations, we would like to refer to the Customization Manual.
2. After clicking on this menu item, the “Line styles list” dialog box appears:
(Similar for AutoCAD and Microstation)
3. Select New Major Process Line and click OK to confirm and close the dialog.
4. Pick the following points:
a) (30,240).
b) Point at 85 mm right of the first one.
c) Point at the vessel's head.
(Refer to the picture at the right.)
As you touch the vessel's head while placing the last point, the program will ask you whether you want to
link the line to the component data. This would mean that a change in the vessel’s process data would
update the process data of the line and vice versa.

Plant 4D Athena SP2 ê P&ID Tutorial
4 Exercise 1: Drafting with Plant-4D êWorking with lines and reducers Page 25 of 53
5. Do not enable the Link to component data check box and click OK to confirm and close the dialog.
4.7.2. Place flow arrows and reversing the flow direction
Now, you will learn how to draw a line from a convenient point and
reverse the flow. Plant-4D records the direction in which you draw the
line and takes it as the flow direction. If you draw a line in the opposite
direction, you have to tell Plant-4D that.
1. Repeat the function to draw a New Major Process line and place the first point in the middle of the
first pump. Don’t check the “Link” checkbox, as you want to have the line as an independent run.
d) Place the next point 60 to the left.
e) Place the next vertex 30 down relative to the previous point.
f) Draw the next segment 30 to the left of the last point.
g) Place the last point at the bottom vessel's head.
h) When placing the last point, do not accept any linking of the line to the component, as we want
an independent run.
2. Select the Flow Arrow from the “Plant-4D” toolbar.
3. Place the arrow near to where the line enters the pump symbol (205,160).

Plant 4D Athena SP2 ê P&ID Tutorial
4 Exercise 1: Drafting with Plant-4D êWorking with lines and reducers Page 26 of 53
4. Select on the Reverse Flow item, which is found in the “Plant-4D P&ID Menu”.
5. Finally click on the last line you have inserted.
You have just reversed the flow for this line, as you can see the flow arrow has also changed, but what you
can’t see is that the database has been updated as well.
4.7.3. Placing more lines
Now, you will add more lines.
1. Add another New Major Process Line, from point (180,160), which is on the previously inserted
line.
2. The program displays the following dialog:
3. Just leave all items unchecked and click OK to confirm and close the dialog.
Start

Plant 4D Athena SP2 ê P&ID Tutorial
4 Exercise 1: Drafting with Plant-4D êWorking with lines and reducers Page 27 of 53
The program has detected that you are trying to connect to an existing line. By taking over the process,
you copy the process data for the new run with the process data of the old one. Taking the data over
makes sense if you work from the very beginning with Info Level higher than 0. As there is no data for your
existing line run, there’s nothing to copy.
Note: ‘Takeover’ is a copy process. ‘Linking’ is joining data of two objects for future use.
4. Pick another point at (180,110). Finish drawing by picking the point in the
center of the second pump.
The program will ask you whether you wish to link the line to the component’s
data. This makes sense if you are sure that the general data for line, such as
properties of fluids will be used with the pump later.
5. Click OK, as for this tutorial we do want to link to the component.
6. Place the flow arrow on the new line (205,110). You do not need to reverse the flow this time, as you
have drawn the line in the correct direction.
7. Start another line. It should begin at the upper quadrant of the top pump (220,167.5). Neither take
the process data over (copy), nor link the line to the pump data. Click OK.
8. Pick the next point 90 to the right, then 30 mm down, and then 60 mm to the right, where you should
finish the line.
9. Draw a line beginning at the top of the lower pump (220,117.5), extend it 80 mm to the right, than go
up until it meets the previous line (300,167.5). Do not copy or link any data. The line will end
automatically.
10. Make a new line run, starting at the outlet line of the first pump, at (330,137.5). Don’t check any
boxes just accept. Move up 80 mm, then left by 50 mm, then up 20 mm, then left by 150 mm near to
the vessel’s top head. Pick the last point at the vessel's top head (130,225). Bypass the Takeover
dialog. Place a flow arrow at (130,230) to indicate the flow direction to the vessel.

Plant 4D Athena SP2 ê P&ID Tutorial
4 Exercise 1: Drafting with Plant-4D êWorking with lines and reducers Page 28 of 53
4.7.4. Placing reducers
1. Click the Reducer button which can be found in the “Plant-4D P&ID Menu” for both AutoCAD
and Microstation:
Select the process line at the exit of the top pump (235,167.5). Place the reducer on the process line
at (235,167.5). Locating and rotating the reducer, the program will ask you which side of the reducer
should be the reduced one. Pick a point at the pump side of the line. The following dialog will
appear.
2. After selected the size to update you will be prompted to select a diameter for that side. Select 80
mm the list in the dialog.
Note that you will find a filtered list of diameters, depending on the existing diameter of the process
line and the side to update. E.g. when your main diameter is 100mm and you have selected the
‘reduced’ side of the reducer, then this list will provide only diameters smaller than 100mm.|
3. This dialog is automatically followed by an annotation describing the main and reduced sides of the
reducer. You are asked to place the annotation. If you wish to have the annotation, pick a point for
its placement and show the text direction. If you do not want to place it then cancel the command.

Plant 4D Athena SP2 ê P&ID Tutorial
4 Exercise 1: Drafting with Plant-4D êWorking with lines and reducers Page 29 of 53
4. Now place another reducer of similar size at point (235,117.5).
4.7.5. Drawing bypass lines
1. Draw the next line. It should start at (255,167.5) on the outlet line of the top pump. It should go up
10, right 15, and then it should go down until it meets the original line. Skip the ‘takeover’ dialogs.
2. Draw a similar bypass line for the outlet line of the second pump.
4.7.6. Drawing a secondary line
1. Create another line, this time a New Minor Process Line. Start at (280, 167.5) and move down by
25, then left by 60, then 12.5 down, then 30 to the left. Skip the ‘takeover’ dialogs.
2. Start another New Minor Process Line at the vertex (220,142,5). that you are asked to select an
element. This happens when Plant-4D does not know if you intend to connect to objects. Click on
the previously drawn line and skip the ‘takeover’ dialog. Draw the line 20 mm to the left, then 10
mm up.
3. If you are using drawing aids, for instance the Ortho or Snap modes, switch them off now, because
you will be drawing a skewed line. Pick the last point at the pump symbol body. When you pick the
last point, you will be asked to select element again. Just click one more time on the pump circle.
4. Reverse the flow direction of the last inserted line using the Reverse Flow function from the “Plant-4D P&ID Menu”.

Plant 4D Athena SP2 ê P&ID Tutorial
4 Exercise 1: Drafting with Plant-4D ê Copying objects Page 30 of 53
5. Place flow arrows at (260,142.5) and (200,147.5). This will ensure you that you have placed
everything properly.
4.8. Copying objects
Copying objects using the Plant-4D copy function is done inside the database. The copied objects can get
linked to existing records (that means that both the copy and the original share the same data), or new
records can be created for the copied objects.
1. Click the Copy button in the Modify toolbar/box. Select the objects exactly as shown, using the
selection tools of the CAD program.

Plant 4D Athena SP2 ê P&ID Tutorial
4 Exercise 1: Drafting with Plant-4D ê Moving objects Page 31 of 53
2. Copy as you normally would in your CAD program, placing the copied components on the second
pump line. The only difference with AutoCAD is that the program will ask whether the new records
should be created for the copied objects.
You should answer Yes, because the copied object should be treated as a new object. The copied
part of the drawing should be similar to:
However, as you can notice, the bottom line got into the drawing frame! You will learn how to move objects
in Plant-4D now.
4.9. Moving objects
4.9.1. AutoCAD
Click the Move button in the Modify fly-out toolbar. Select all objects in the drawing by window. Show
any point as the base point and specify @0,25 as the point of displacement. Plant-4D will recalculate all
coordinates in the database and will move the drawing to the destination.

Plant 4D Athena SP2 ê P&ID Tutorial
4 Exercise 1: Drafting with Plant-4D ê Placing manual valves Page 32 of 53
4.9.2. Microstation
Use the command Place Fence around all objects you have drawn so far, excluding the drawing frame.
Click the Move button in the Modify toolbox. You will see a box representing the fence you placed and
that the Plant-4D Modify Move command uses. Select any point as the base point and relocate the
drawing 25 mm up. Plant-4D will recalculate all coordinates in the database and will move the drawing to
the destination.
4.10. Placing manual valves
This activity is very straightforward.
4.10.1. AutoCAD
You should ensure that the “ANSI Components” toolbar is active in your screen, so that you can expand
the Valves fly-out by moving the mouse pointer onto the valve symbol by keeping the mouse button
pressed. Then you can select any of the valve symbols.
4.10.2. Microstation
You should ensure that the “ANSI Components” toolbar is active in your screen. Clicking the Valvebutton will open the “Valve” toolbar, from which you can select any valve symbol.
Now take the following steps for both AutoCAD and Microstation:
1. Click the Gate Valve button and pick the point (190,185) at the inlet line of the top pump. The
valve will be inserted in the line.
2. Insert more gate valves at: (190,135), (280,180), (280,130)
3. Insert gate valves at the skewed segments near to the pumps:
(207.5,180) and (207.5,130). You will see that Plant-4D handles this
type of insertion without any problem.
4. Insert gate valves at (200,155), (200,105), (265,202.5) and
(265,152.5).
5. Click the Check Valve button , and insert the valve at (262.5,192.5) and another one at
(262.5,142.5).
This part of the drawing should now look like this:

Plant 4D Athena SP2 ê P&ID Tutorial
4 Exercise 1: Drafting with Plant-4D ê Placing control valves Page 33 of 53
4.11. Placing control valves
The control valve symbol is constructed by combining a valve body type with an actuator type. The
insertion routine will prompt the user to place a control valve balloon and a balloon leader. You will not be
asked to enter the detailed valve information, as you are working on User Level 0. You will be able to enter
this information when you work with the data.
4.11.1. AutoCAD
1. Use the Plant-4D >> Settings >> Scale Factor menu to set the general scale factor to 0.5,0.5.
2. Click the Design Valve button . Now the “Valve Design” dialog will appear.
3. Select the Globe body type and Diaphragm actuator as shown. Click OK to confirm and close the
dialog.
4. Insert the valve into the line by picking point (100,265).

Plant 4D Athena SP2 ê P&ID Tutorial
4 Exercise 1: Drafting with Plant-4D ê Placing control valves Page 34 of 53
5. Next you will be prompted to select a style for the annotation by the “Annotations” dialog. Select the
3 line annotation style from the list and click OK to confirm and close the dialog.
6. Now the “Place Instrument” dialog appears - the program asks you to select the line style used for
the balloon leader. Select Default Instrument Line for the balloon leader and click OK to confirm
and close the dialog.
7. Now you will be prompted by the “Takeover Data” dialog. Check the Link to Component Dataoption. With this setting you will be able to retrieve the control valve information by clicking the
balloon later. Click OK to confirm the selection and close the dialog.
8. Switch off any drawing aids (such as Ortho mode) and pick a point at the top and right of the valve.
This is where the leader ends.
9. End the line-drawing command by a RHB click. The balloon will appear at the end of the leader.
10. You will notice that the name (actually it’s a ‘tag’) of the valve is 1 CV 0001. Because we have set
the User Level to 0, you weren’t prompted for entering a ‘tag’. In such cases Plant-4D will
automatically assign a unique tag. You will be shown how to override such a default tag in the next
chapter.

Plant 4D Athena SP2 ê P&ID Tutorial
4 Exercise 1: Drafting with Plant-4D ê Placing control valves Page 35 of 53
11. Enter another control valve of the same type at the vertical segment of the line at (330,175).
12. Insert a Globe control valve with the Actuator normal at (170,185). Place the
balloon at the top-left side of the valve.
4.11.2. Microstation
1. Use Settings >> Design File >> Active Scale >> Halve. This will make the control valve symbols
appear at the proper relative size in the drawing.
2. Click the Design Valve button .
3. Select the Globe body type and Diaphragm actuator as shown, then click OK.
4. Insert the valve into the line by picking point (100,265). Two dialogs appear:
5. Select Default Instrument Line and 3 line annotation from the respective dialogs. Place the
balloon to the top-right of the valve by clicking Accept then click Cancel mouse button to finish the
operation.
You will notice that the name of the valve is 1-CV-0001. You will be shown how to edit this name in the
next chapter.
1. Enter another control valve of the same type at the vertical segment of the line at
(330,175).

Plant 4D Athena SP2 ê P&ID Tutorial
4 Exercise 1: Drafting with Plant-4D ê Inserting instrumentation Page 36 of 53
2. Insert a Globe control valve with the Actuator normal at (170,185). Place the
balloon at the top-left side of the valve.
4.12. Inserting instrumentation
As there are many instrument symbols, the “Instruments” toolbars are quite extensive.
4.12.1. AutoCAD
You can expand the “Instruments” toolbar by keeping the mouse pointer on the Instrument button in
the Plant-4D toolbar, or use Plant-4D >> Modules >> Instruments to display the “Instruments” toolbar
independently.
The “Instruments” toolbar is divided in several categories, so every button here is actually also a fly-out
menu with the underlying items within the selected category of instrument type:
Similarly, the function symbols have their own fly-out. Now let’s add the necessary instrumentation to our
P&ID:
1. Click the Instrument button ( ) from the “Plant-4D P&ID” toolbar. The “Annotations” dialog will
appear for selecting the appropriate type of annotation. Select 3 line annotation and click OK.
2. Next place the instrument balloon at point (195, 195).
Note: However Instruments are not drawn as an inline component of the process line, you actually need to connect them to a process line. An instrument is actually part of a process and will inherit the data of the process line it is connected to. There are two possibilities to establish such a connection:
a) When you start by picking a point on a process line, Plant-4D will first start with drawing the
leader and will automatically position the Instrument balloon at the end point of the leader.
b) When you start by picking a point outside of any process, Plant-4D will start with the Instrument
balloon and next starts drawing the leader at a process line. When you finish on a process line
you will be prompted to connect it to that process.
In de steps discussed here, we use the last option. Note that the sequence of actions and appearing
dialogs will vary between those two methods.
3. Select Default Instrument line from the “Place Instrument” dialog and click OK.

Plant 4D Athena SP2 ê P&ID Tutorial
4 Exercise 1: Drafting with Plant-4D ê Inserting instrumentation Page 37 of 53
4. Left click (195,185) on the process line beneath the instrument balloon. Because finish at a process
line, the command for drawing the leader has quit automatically.
5. Plant-4D will detect you picked a point on a process line and will prompt you by the “Takeover Data” dialog. If you wish to associate the balloon with the process data of the line, you can check
the Takeover Process option. Click OK to confirm and close the dialog. If it is not obvious which
process should be taken over, Plant-4D may prompt you to select the appropriate process line.
6. Repeat steps 1-5 to insert three instruments:
c) 1 Type 102 at (245,205);
d) 1 Type 103 at (195,145)
e) 1-Type 104 at (245,155).
4.12.2. Microstation
Clicking the Instrument button in the “Plant-4D” toolbox will expand the “Instruments” toolbox.
Clicking a button from this toolbox will expand an individual toolbox.
Similarly, the function symbols have their own toolboxes.
1. Click the Left Instrument button. The “Annotations” and “Place Instrument” dialogs appear. Select
3 line Instrument from the “Annotations” dialog and Default Instrument Line from the “Place Instrument” dialog.
2. Place the balloon at point (195,195).
3. Pick a point at the inlet pump line to end the balloon leader.
4. You will be prompted by the “Takeover Data” dialog. If you wish to associate the balloon with the
process data of the line, you can check the Takeover Process option. Click OK to confirm and
close the dialog. If it is not obvious which process should be taken over, Plant-4D may prompt you to
select the appropriate process line.
5. Repeat steps 1-4 to insert three instruments:
f) 1 Type 102 at (245,205);
g) 1 Type 103 at (195,145)
h) 1-Type 104 at (245,155).

Plant 4D Athena SP2 ê P&ID Tutorial
4 Exercise 1: Drafting with Plant-4D ê Instrumentation practice Page 38 of 53
4.13. Instrumentation practiceYou will place more instrumentation using the Instruments and Valves menus. We will give you an outline
of the work, and leave you to try to complete this part of the drawing:
1. First, place a Round balloon at the left hand side of the upper Gate valve with diaphragm (the
one at the inlet of the vessel) without drawing a leader. Plant-4D will name it 1 Type 005.
To skip drawing the leader, press the Cancel button in the “Place Instruments” dialog (for
AutoCAD only) or terminate the drawing command before you place the leader (for both AutoCAD
and Microstation).
2. When drawing 1 Type 006, use 3 lines for
annotation, and terminate the Software Line a little bit
above the instrument.
3. 1-Type 007 using , with 3 lines annotation, and no signal line. To avoid drawing
the signal line, cancel the “Place Instruments” dialog (ACAD) or cancel drawing a
leader by Cancel mouse button in Microstation.
4. Select the Process line button from the floating menu to draw instrument lines. Select a Default line and start drawing the line at the actuator’s top quadrant. Click twice at the actuator and skip a
question to take over the data. End the line before it reaches the drawing frame.
5. Draw a Default line to cross the line that starts at the actuator. You can place a flow arrow at the
end of it to indicate vent.
6. Insert the Three-way valve at the intersection of instrument lines.

Plant 4D Athena SP2 ê P&ID Tutorial
4 Exercise 1: Drafting with Plant-4D ê Instrumentation practice Page 39 of 53
7. Connect 1 Type 005 with 1 Type 006 by a Default line. Answering the "connector" question, you
will have to click twice on all objects. Do not link the instrument lines to components nor take over
the process.
8. Connect 1 Type 005 with the actuator as shown. When asked the "take over" question, click the
object you are connecting to one more time.
9. Draw 1 Type 008 as shown and end the Software Line leader slightly to the left of the balloon. Draw
1-Type-009 with 3 lines annotation and after answering the connector question (click at the object
you are connecting to), terminate the Default line leader at the air supply line.
10. Zoom out to see the complete drawing.

Plant 4D Athena SP2 ê P&ID Tutorial
5 Exercise 2: Working with Data and Annotations ê Setting User Level Page 40 of 53
5. Exercise 2: Working with Data and Annotations
At an early stage in a project, you usually don’t know all of the data, so it may be more practical to
concentrate upon drafting and let Plant-4D enter default information into the database for you. Then at a
later date, you can increase the User Level and replace the default information with real values.
In this tutorial you will edit tag numbers and line numbers, edit and enter data for equipment, process lines,
valves, control valves and instruments.
As some information is shared between objects (via links), you will notice that some data does not need to
be re-entered. We refer to the data shared between objects as called ‘Common Data’ and the data, which
is specific to the object, we call ‘Solo Data’.
5.1. Setting User Level
5.1.1. AutoCAD
Move the mouse pointer to the second fly-out menu in the “Plant-4D P&ID” toolbar and keep the mouse
button pressed to see the “Settings” toolbar as shown here.
Click the Info level button . You will see the "User Level" dialog.
Move the slider in the dialog box until you see the User Level is equal to 5, then click OK.
5.1.2. Microstation…
Move the mouse pointer to the Settings button in the “Plant-4D P&ID” toolbox and click the mouse button
to open the Settings toolbox:
Click the Info Level button . You will see the "User Level" dialog:
Move the slider in the dialog box until you see the User Level is equal to 5. You can now close the "User Level" dialog.

Plant 4D Athena SP2 ê P&ID Tutorial
5 Exercise 2: Working with Data and Annotations ê Working with equipment data and annotations Page 41 of 53
¡ When you start a new Plant-4D P&ID session, you will not have to set the User Level again, because
a new session always begins at the maximum allowed User Level.
¡ We advise you to continue working with halved scale factor.
5.2. Working with equipment data and annotations
5.2.1. Modifying tag numbers
5.2.2. AutoCAD
1. Click the Edit Tag Number button in AutoCAD from the “Plant-4D P&ID” toolbar
2. Change the pump numbers to “P-0001” and “P-0002”.
5.2.3. Microstation
3. Expand the toolbox by clicking the Edit Data button in the “Plant-4D” toolbar.
4. Now click the Edit Tag Number button . Select any point on the vessel body. Edit the tag
number so that it becomes V 0001.
5. Change the pump numbers to “P-0001” and “P-0002”.
Note: Plant-4D always tries to keep a unique sequential name for the object. If an object with the same name already exists in the database, it will be recognized and will be prompted if you want to create a link between the current object and the existing one.
Linking objects on their tag number means that Plant-4D will handle them as one single entity in Plant-4D.
So they will share their data and will be shown as single items in reports and lists. When changing data
from one component the other one will also be updated, because they use the same data.
However it is a commonly used technique for relating P&ID en 3D components to each other, you have to
be aware of the consequences: Once components are linked, you can’t easily unlink them. (Changing the
tag of one object, will cause an tag update of the linked items too.)
Only if you really want to link to a particular object, confirm this in the dialog box, and the data of the object
previously inserted will be re-used. If you want a new object, choose “No” and you can change the tag
number to a unique name.
Note: If you remove a certain object it’s tag and related data will remain in the database. So if you refer to
a previously used but currently unused tag, you will also be prompted to link to the existing object

Plant 4D Athena SP2 ê P&ID Tutorial
5 Exercise 2: Working with Data and Annotations ê Working with equipment data and annotations Page 42 of 53
5.2.4. Annotating equipment
5.2.5. AutoCAD
1. Click the Annotation button from the “Plant-4D P&ID” toolbar.
5.2.6. Microstation
2. In Microstation click the Annotation button of the “Plant-4D” toolbox. then select the Standard Tag number in the list that will appear.
5.2.7. AutoCAD & Microstation
1. Pick any point on the vessel body. Place the tag number in the middle of the vessel symbol and pick
a point to the right to indicate a direction of 0 degrees. The tag number “V-0001” will appear.
2. Annotate the pumps in a similar fashion. Place annotations below each pump.
5.2.8. Entering the equipment data
1. Select Edit Data button from the toolbox and pick any point on the vessel body. Enter the data as
shown below and then click OK.
2. Enter the description for both pumps: “Feed Pump”
You can customize the database and the dialog definitions to store any kind of data you wish. Please see
the Customization tutorial to learn more.

Plant 4D Athena SP2 ê P&ID Tutorial
5 Exercise 2: Working with Data and Annotations ê Working with piping data and annotations Page 43 of 53
5.3. Working with piping data and annotations
The Common Data in Plant-4D is shared between objects. The relevant equipment data of the vessel is
automatically available for the inlet line, because the latter has been linked to the vessel component data.
When you enter more data for lines, it will become available for components such as valves belonging to it.
1. Use the Edit Data button, and point to the inlet line of the vessel. You will see that the temperature
and pressure parameters of the vessel automatically become available for the line. Complete the
data entry dialog as shown in the next picture, then close the dialog.
2. In AutoCAD, click the Line Number Annotation button from the annotation toolbar.
Or:
In Microstation click the Annotation button , and then select Line Number from the annotation
list. Pick a point on the vessel inlet line. Place the line number somewhere below.
3. Repeat the previous steps to enter the following data for the next set of lines and annotate them:
a) Vessel outlet line: TUTOR1-A1A-ST, 200b) Bottom pump inlet line: TUTOR3-A1A-ST, 200c) Top pump outlet line (after the reducer): TUTOR2-A1A-ST, 150d) Bottom pump outlet line (after the reducer): TUTOR4-A1A-ST, 150e) Top pump sloped line: SLOPE1-A1A-ST, 25f) Bottom pump sloped line: SLOPE2-A1A-ST, 25g) The recycle line: TUTOR5-A1A-ST, 80
Note: You should edit line sizes using the scrollable Diameter list in Process Line dialogs.
5.4. Editing and annotating manual valvesSometimes it is necessary to annotate the drawing with manual valve tag numbers. With standard
configuration, Plant-4D sets manual valve tag numbers as HV 0001, HV 0002... and so on.
1. Click the Tag Number Annotation button. Click the top check valve. You will see that, if you exactly
followed the sequence of this tutorial, this valve was given the name 1 HV 0011. ‘Rename’ this valve
into 1 CHK 0001 by changing its tag number and click OK.

Plant 4D Athena SP2 ê P&ID Tutorial
5 Exercise 2: Working with Data and Annotations ê Editing control valves Page 44 of 53
2. Repeat this for the bottom check valve to 1 CHK 0002.3. Ensure your drawing scale is halved (or equal to 0.5,0.5)
4. Click the Tag Number Annotation button. Click on the body of valve 1 CHK 0001, and then place
the annotation below the symbol. Give the direction by pointing to the right and then clicking with
your mouse button.
5. Annotate valve 1 CHK 0002 in a similar fashion.
6. Restore the drawing scale to 1.0,1.0.
5.5. Editing control valvesThe control valves you inserted into the drawing are automatically tagged as 1-CV-0001, 1-CV-0002, and
1-CV-0003. You will need to specify the real names for the valves now.
1. Click on the Tag Number Annotation button and click on the body or balloon of the first control
valve (you have linked the balloon to the valve body/actuator).
2. Change the default tag number of 1-CV-0001 into 1 XV 0100 and click OK.
3. Similarly, replace 1-CV 0002 with 1 XV 0101, and 1-CV 0003 with 1-AOV-0100.
You can also check that the control valves inherit some Common Data from the line they are inserted into.
4. Click Edit Data button and point to valve XV 0101. In the dialog that appears, you can enter the
specific data for the valve. You can see that the size has been inherited from the line TUTOR5-A1A-ST. Click OK to close the dialog.
5.6. Editing instrumentation1. Click Edit Tag Number button. Click on the balloon of 1-Type 001 instrument. Change the name to
“1-PI 101”.2. Rename Type 002 and Type 004 to “PI 102” and “PI 104” respectively similar to the previous step.
3. Refresh to see the changes in the drawing.
4. Click Edit Data and point to 1-PI 101. In the “Instrument” data dialog enter the description:
“Pressure Gauge”, then click OK to confirm changes and close the dialog.
5. Enter the “Pressure Gauge” description for the other PI's as well. If you want, you can copy and
paste the name between the dialogs, to speed this process up.
Note: It is possible to customize Plant-4D dialogs to contain lists, for instance a list of instrument types, however that is beyond the scope of this tutorial.
6. Rename the instrumentation of the 1-XV 100 valve we have placed in chapter 0:
a) 1-Type 005 ð 1-ZSO 100
b) 1-Type 006 ð 1-OI 100 A
c) 1-Type 007 ð 1-ZAL 100
d) 1-Type 008 ð 1-HS 100
e) 1-Type 009 ð 1-OI 100 B
1. Click the Refresh button to see the changes in the drawing.
Once you have followed all of these steps, the P&ID should look as follows:

Plant 4D Athena SP2 ê P&ID Tutorial
5 Exercise 2: Working with Data and Annotations ê Adding Intelligent On/Off page Connectors Page 45 of 53
5.7. Adding Intelligent On/Off page ConnectorsConnectors play an important role in Plant-4D, they can be found in the “Plant-4D P&ID Menu" for both
AutoCAD and Microstation. They not only appear as graphical objects, but they also connect different
drawings through process data.
Below is the procedure for placing an On-page and an Off-page connector:

Plant 4D Athena SP2 ê P&ID Tutorial
5 Exercise 2: Working with Data and Annotations ê Adding Intelligent On/Off page Connectors Page 46 of 53
1. Select the Page Connector button from the “Plant-4D P&ID Menu”. The following dialog
appears:
2. As you notice in the Select drawing field, you will only find the current drawing since we don’t have
any other drawings in our project. For now we are going to place a connector without a linked
drawing. So don’t select any drawing. Since we are placing a connector symbolizing ‘entering’ the
drawing, we need to create an Onpage connector. So select the Onpage Connector option. Click
New to proceed.
3. If you have selected the Connect to line option you first need to select the process line you would
like to connect too. In that case the arrow will be placed automatically. When you have chosen not to
connect, you have to place the arrow itself.
In both cases the arrow should be positioned at the beginning of line 150 mm-TUTOR0 (the line
entering the drawing and the inlet for the vessel).
4. In the “Off-/On-page connector” dialog, enter “PID 200 00001” as description. Close the dialog by
clicking OK.

Plant 4D Athena SP2 ê P&ID Tutorial
5 Exercise 2: Working with Data and Annotations ê Linking drawings by connectors Page 47 of 53
5. Select the ANNODESC from the “Annotation dialog” to use the description of the connector as
annotation. Close the dialog by clicking OK.
6. Next pick a point where the Tag label should appear.
7. Add an Off-page connector in the same manner. At this point, remember that you have already
inserted an On-page connector in steps 1 till 4. Therefore, when the “Plant-4D Page connector”
dialog appears, it is giving you the opportunity to make a link between two drawings that logically
follow each other. Now do select the Connect to line option, so we can continue the process line
the connector is connected to in the next chapter.
8. Click New and place it at the end of the outlet line (far right) ‘going off’ the drawing and name the
connector PID 300 00001.
5.8. Linking drawings by connectorsTo show how simple it is to link drawings via connectors we must first create a simple new drawing.
1. Exit your CAD interface (AutoCAD or Microstation).
2. In 4D-Explorer, create a new drawing and call it Linked Drawing. Highlight it in the P&ID Drawingslist and open it (right click then Start…).
3. Select Page Connector from the “Plant-4D P&ID Menu”.
4. First select the drawing you want to link too (My First Drawing). You will find a list of available
connectors in the selected drawing.

Plant 4D Athena SP2 ê P&ID Tutorial
5 Exercise 2: Working with Data and Annotations ê Manipulating the drawing contents Page 48 of 53
Note: This list is aware of its context: because only off-page connectors in the selected drawing will be shown when you selected to place an On-page connector and vice versa.
5. Since we would like to create a link with the off-page connector just placed at our first drawing, we
need to select the Onpage option. Next select the connector presented in the Select Page Connector list. Click Place to proceed.
6. Place a New Major Process Line starting from the on-page connector. Plant-4D will prompt you to
select if you want to link data
By selecting Link to component data here, the data of the off-going process line will be inherited
for this new line. Plant-4D will handle it as the same process although it is located over several
drawings.
7. Now we have linked our two drawings we can switch between those drawing from our CAD
environment:
Use the Open linked Drawing button from the “Plant-4D” toolbar (located at the same fly-out
as the Flow Arrow) (AutoCAD) or from the Edit Data toolbox (Microstation). Click on the
connector. Plant-4D will open the drawing linked via the connector.
5.9. Manipulating the drawing contentsAs you can see, we have been specifying coordinates so that the drawing nearly touches the drawing
frame at the top. To make the drawing more aesthetically pleasing we shall move the frame’s contents
down by 0.25”.
1. Use the Move button from “Modify” toolbar/toolbox. Select all objects inside the drawing frame and
move them down by 0.25” as if you were doing so with standard Move command of your CAD
interface. In AutoCAD, select objects by Window. In Microstation, place Fence Block Inside before
applying the Move command.
2. Answer Yes to the question whether you want to modify linked components.
5.10. Conclusion
You have made a simple P&ID drawing, and explored most of the drafting and data management features
of Plant-4D P&ID.
Exit AutoCAD or Microstation by clicking / in the main application window.

Plant 4D Athena SP2 ê P&ID Tutorial
5 Exercise 2: Working with Data and Annotations ê Conclusion Page 49 of 53
The complete drawing is shown on the next page.
Plant 4D Athena SP2 ê P&ID Tutorial
6 Reporting ê Removing unused information from the database Page 50 of 53
6. Reporting
As Plant-4D is a database-driven system it has a great advantage with respect to reporting. Whether using
the stand alone version with Microsoft Access, or using a network version working with a corporate
RDBMS such as Oracle, you can use the reporting tools of a given database system to prepare reports
exactly the way you want. You can even do cross-platform reporting, e.g., by connecting Oracle to Access
via ODBC and making reports in Access but having the power of Oracle.
6.1. Removing unused information from the databaseDuring the drawing process, plans can change and mistakes can be made. If you use the Undo function,
then both component and related data (such as tag number) are immediately removed from the database.
After you have deleted a Plant-4D component, there is no longer a graphical representation. Even on the
reports, this deleted component will no longer appear.
The tag number of the deleted component is still reserved in the database. To clear the database from
deleted tag numbers you can purge the database, so even deleted components’ tag numbers are available
again. This can be done for the whole database collection or an individual projects.
1. Select the “System Administration” tab in 4D-Explorer.
2. Open the Projects tree to show all project databases or individual projects as required.
3. Right click on the Databases node if you would like to purge all of the projects. If you would like
to purge just a single project right click on that particular project. Next select Clean up from the
appearing popup menu.
4. Confirm that you wish to delete the records.
(Database level)
(Project level)
5. Plant-4D now deletes all Solo and Common data records which are no longer used. After a short
while the database is purged.
6.2. Producing reportsPlant-4D comes with a set of predefined reports, so you can become productive from the first moment.
1. In 4D-Explorer, select the “Projects” tab.
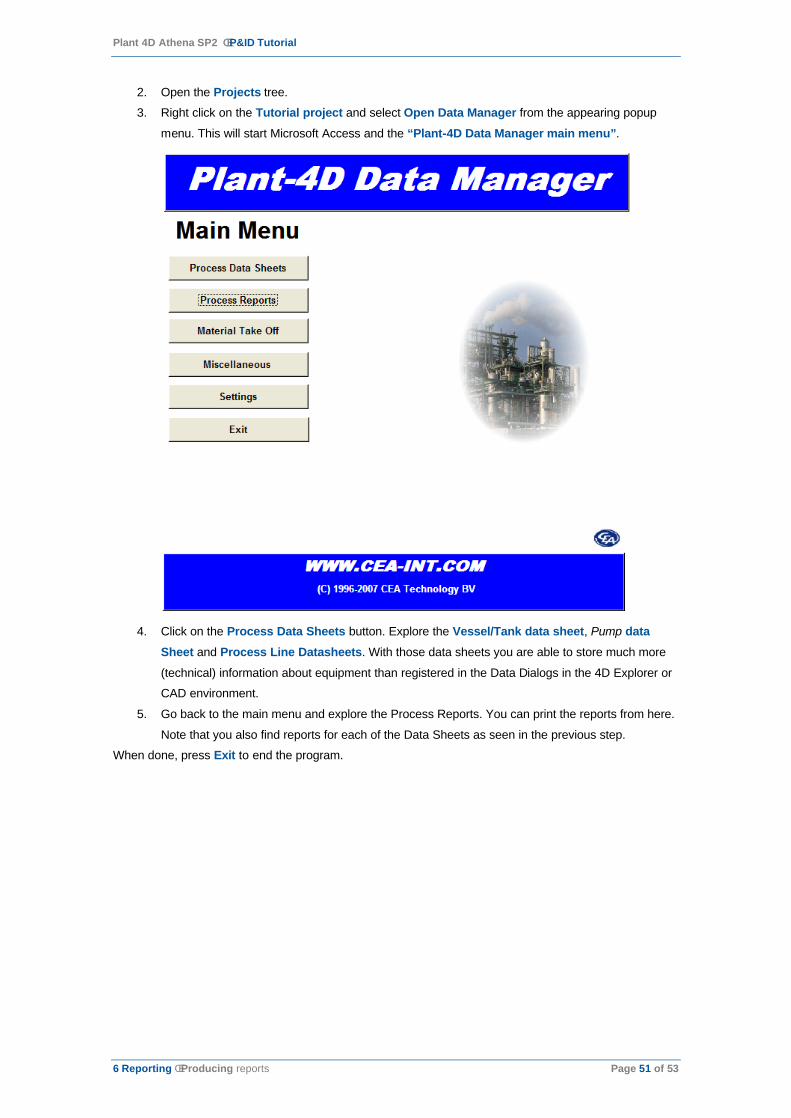
Plant 4D Athena SP2 ê P&ID Tutorial
6 Reporting ê Producing reports Page 51 of 53
2. Open the Projects tree.
3. Right click on the Tutorial project and select Open Data Manager from the appearing popup
menu. This will start Microsoft Access and the “Plant-4D Data Manager main menu”.
4. Click on the Process Data Sheets button. Explore the Vessel/Tank data sheet, Pump data Sheet and Process Line Datasheets. With those data sheets you are able to store much more
(technical) information about equipment than registered in the Data Dialogs in the 4D Explorer or
CAD environment.
5. Go back to the main menu and explore the Process Reports. You can print the reports from here.
Note that you also find reports for each of the Data Sheets as seen in the previous step.
When done, press Exit to end the program.


![ATHENA - Coordinate System Document...[RD02] ATHENA Mission Requirements Document (MRD), ATHENA-ESA-URD-0010 [RD03] ATHENA Product Tree, ATHENA-ESA-PT-0001 [RD04] Ariane 5 User’s](https://static.fdocuments.in/doc/165x107/5ff23cd84225de2c7f4f21b6/athena-coordinate-system-document-rd02-athena-mission-requirements-document.jpg)