Manual (Navigation System)
195
BASIC FUNCTIONS 1 BASIC FUNCTIONS Basic information before operation Touch switch operation 2 . . . . . . . . . . . . . . . . . . . . . . . . . . . . . . . . . . . . . . . . . . . . . . . . Inputting letters and numbers 2 . . . . . . . . . . . . . . . . . . . . . . . . . . . . . . . . . . . . . . . . . . . Current position display 4 . . . . . . . . . . . . . . . . . . . . . . . . . . . . . . . . . . . . . . . . . . . . . . . . Screen scroll operation (one–touch scroll) 5 . . . . . . . . . . . . . . . . . . . . . . . . . . . . . . . . Map scale 8 . . . . . . . . . . . . . . . . . . . . . . . . . . . . . . . . . . . . . . . . . . . . . . . . . . . . . . . . . . . Orientation of the map 9 . . . . . . . . . . . . . . . . . . . . . . . . . . . . . . . . . . . . . . . . . . . . . . . . . Limitations of the navigation system 9 . . . . . . . . . . . . . . . . . . . . . . . . . . . . . . . . . . . . . Map database information and updates 12 . . . . . . . . . . . . . . . . . . . . . . . . . . . . . . . . . SECTION I
description
manual de navegación Nissan
Transcript of Manual (Navigation System)
BASIC FUNCTIONS
1
BASIC FUNCTIONSBasic information before operationTouch switch operation 2. . . . . . . . . . . . . . . . . . . . . . . . . . . . . . . . . . . . . . . . . . . . . . . . Inputting letters and numbers 2. . . . . . . . . . . . . . . . . . . . . . . . . . . . . . . . . . . . . . . . . . . Current position display 4. . . . . . . . . . . . . . . . . . . . . . . . . . . . . . . . . . . . . . . . . . . . . . . . Screen scroll operation (one–touch scroll) 5. . . . . . . . . . . . . . . . . . . . . . . . . . . . . . . . Map scale 8. . . . . . . . . . . . . . . . . . . . . . . . . . . . . . . . . . . . . . . . . . . . . . . . . . . . . . . . . . . Orientation of the map 9. . . . . . . . . . . . . . . . . . . . . . . . . . . . . . . . . . . . . . . . . . . . . . . . . Limitations of the navigation system 9. . . . . . . . . . . . . . . . . . . . . . . . . . . . . . . . . . . . . Map database information and updates 12. . . . . . . . . . . . . . . . . . . . . . . . . . . . . . . . .
SECTION I
BASIC FUNCTIONS
2
Touch switch operationThis system is operated mainly by theswitches on the screen. To prevent dam-age to the screen, lightly touch switcheson the screen with your finger. When youtouch a switch on the screen, a beepsounds.Do not use objects other than your fingerto touch the screen.
INFORMATION� If the system does not respond to a
touch of a switch, move your fingeraway from the screen and then touchit again.
� You cannot operate dimmedswitches.
� Wipe off fingerprints on the surface ofthe display using a glass cleaningcloth.
� The displayed image may becomedarker and moving images may beslightly distorted when the display iscold.
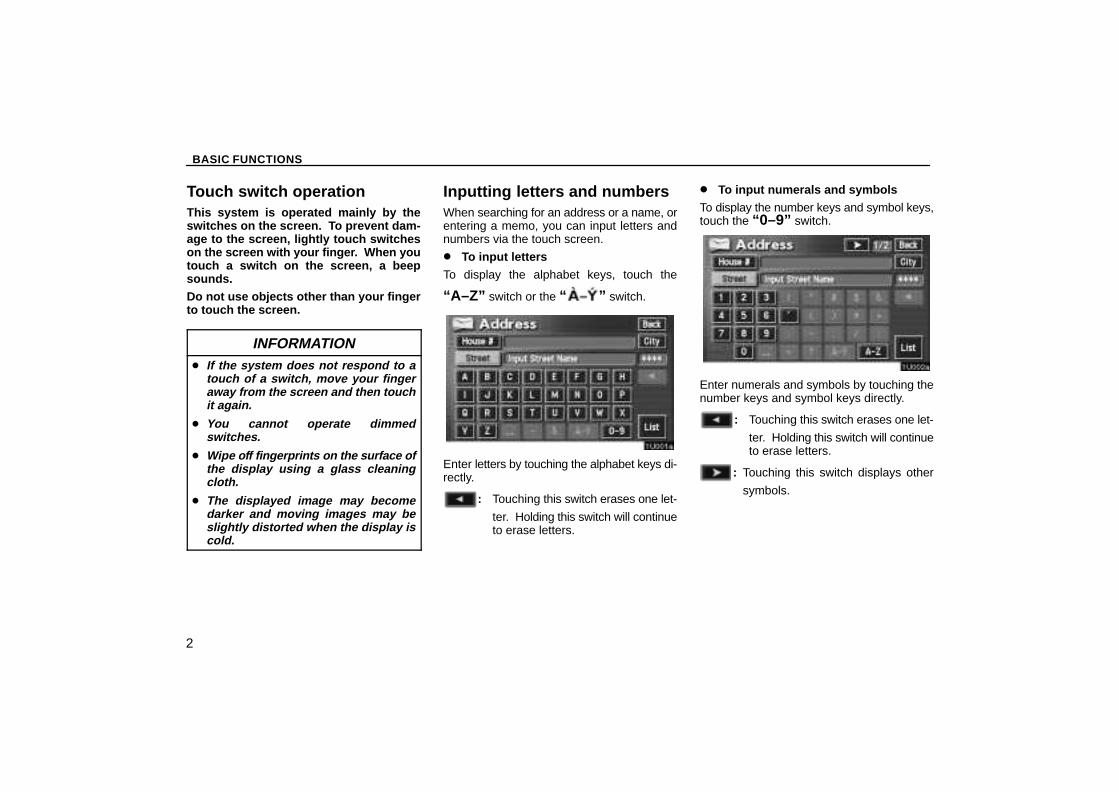
Inputting letters and numbersWhen searching for an address or a name, orentering a memo, you can input letters andnumbers via the touch screen.
� To input lettersTo display the alphabet keys, touch the
“A–Z” switch or the “ ” switch.
Enter letters by touching the alphabet keys di-rectly.
: Touching this switch erases one let-
ter. Holding this switch will continueto erase letters.
� To input numerals and symbolsTo display the number keys and symbol keys,touch the “0–9” switch.
Enter numerals and symbols by touching thenumber keys and symbol keys directly.
: Touching this switch erases one let-
ter. Holding this switch will continueto erase letters.
: Touching this switch displays other
symbols.
BASIC FUNCTIONS
3
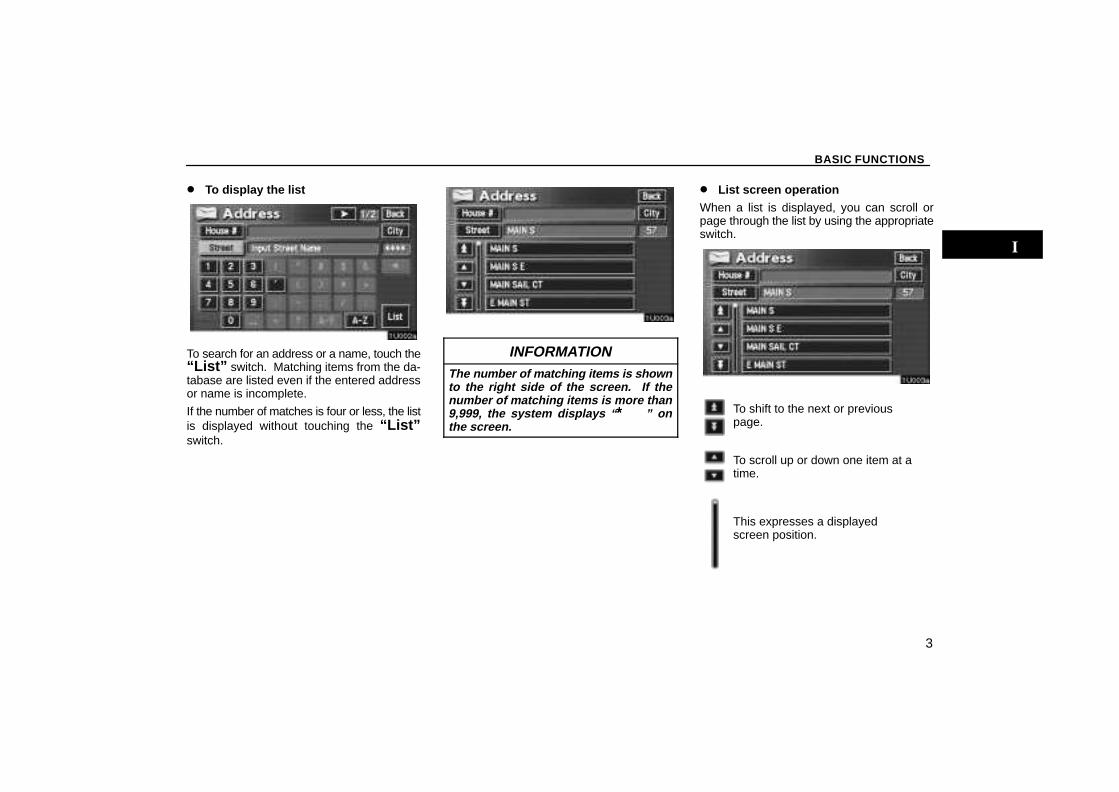
� To display the list
To search for an address or a name, touch the“List” switch. Matching items from the da-tabase are listed even if the entered addressor name is incomplete.
If the number of matches is four or less, the listis displayed without touching the “List”switch.
INFORMATIONThe number of matching items is shownto the right side of the screen. If thenumber of matching items is more than9,999, the system displays “ ∗∗∗∗ ” onthe screen.
� List screen operationWhen a list is displayed, you can scroll orpage through the list by using the appropriateswitch.
To shift to the next or previouspage.
To scroll up or down one item at atime.
This expresses a displayedscreen position.
BASIC FUNCTIONS
4
If appears to the right of theitem name, the complete name istoo long for the display. Touchto scroll to the end of the name.
Touch to scroll to thebeginning of the name.
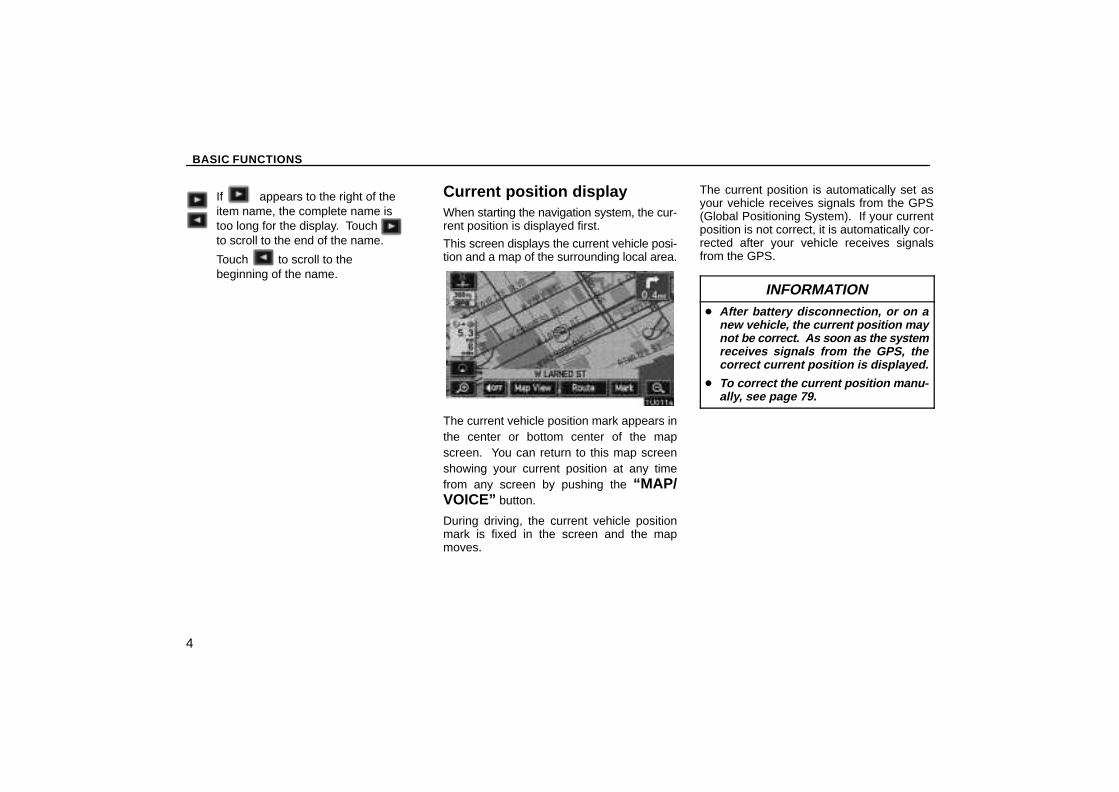
Current position displayWhen starting the navigation system, the cur-rent position is displayed first.
This screen displays the current vehicle posi-tion and a map of the surrounding local area.
The current vehicle position mark appears inthe center or bottom center of the mapscreen. You can return to this map screenshowing your current position at any timefrom any screen by pushing the “MAP/VOICE” button.
During driving, the current vehicle positionmark is fixed in the screen and the mapmoves.
The current position is automatically set asyour vehicle receives signals from the GPS(Global Positioning System). If your currentposition is not correct, it is automatically cor-rected after your vehicle receives signalsfrom the GPS.
INFORMATION� After battery disconnection, or on a
new vehicle, the current position maynot be correct. As soon as the systemreceives signals from the GPS, thecorrect current position is displayed.
� To correct the current position manu-ally, see page 79.
BASIC FUNCTIONS
5
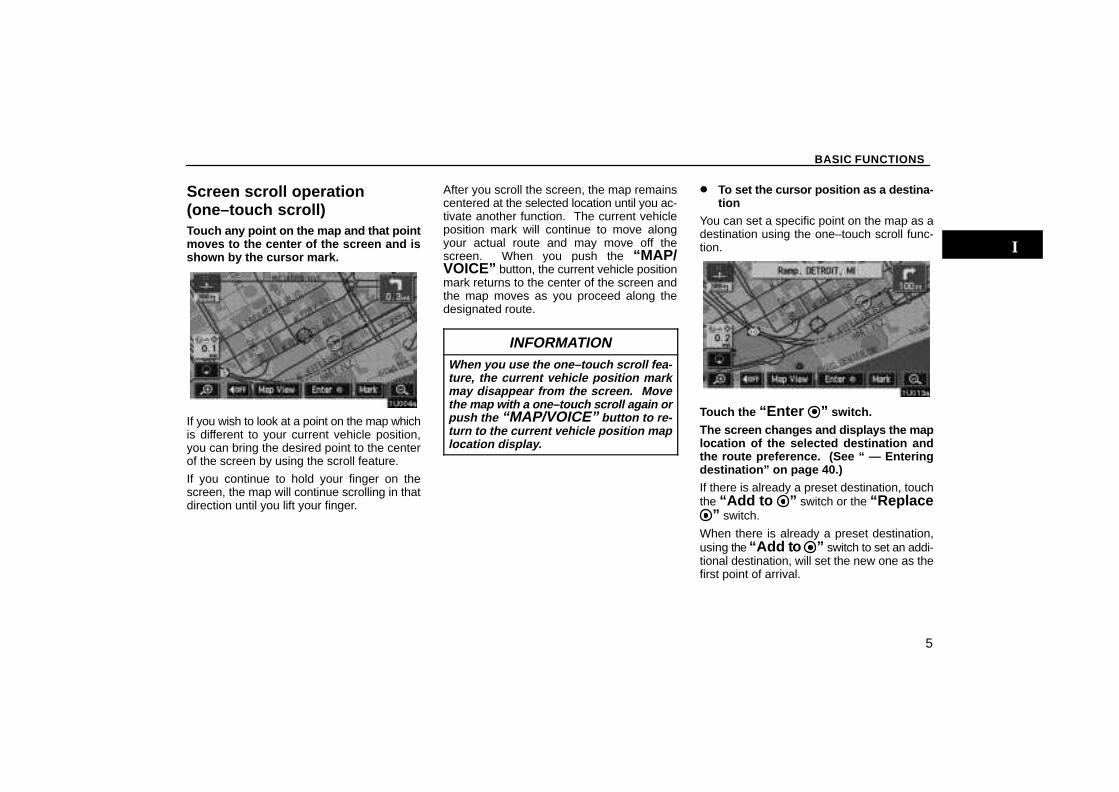
Screen scroll operation(one–touch scroll)Touch any point on the map and that pointmoves to the center of the screen and isshown by the cursor mark.
If you wish to look at a point on the map whichis different to your current vehicle position,you can bring the desired point to the centerof the screen by using the scroll feature.
If you continue to hold your finger on thescreen, the map will continue scrolling in thatdirection until you lift your finger.
After you scroll the screen, the map remainscentered at the selected location until you ac-tivate another function. The current vehicleposition mark will continue to move alongyour actual route and may move off thescreen. When you push the “MAP/VOICE” button, the current vehicle positionmark returns to the center of the screen andthe map moves as you proceed along thedesignated route.
INFORMATIONWhen you use the one–touch scroll fea-ture, the current vehicle position markmay disappear from the screen. Movethe map with a one–touch scroll again orpush the “MAP/VOICE” button to re-turn to the current vehicle position maplocation display.
� To set the cursor position as a destina-tion
You can set a specific point on the map as adestination using the one–touch scroll func-tion.
Touch the “Enter ” switch.
The screen changes and displays the maplocation of the selected destination andthe route preference. (See “ — Enteringdestination” on page 40.)If there is already a preset destination, touchthe “Add to ” switch or the “Replace
” switch.
When there is already a preset destination,using the “Add to ” switch to set an addi-tional destination, will set the new one as thefirst point of arrival.
BASIC FUNCTIONS
6
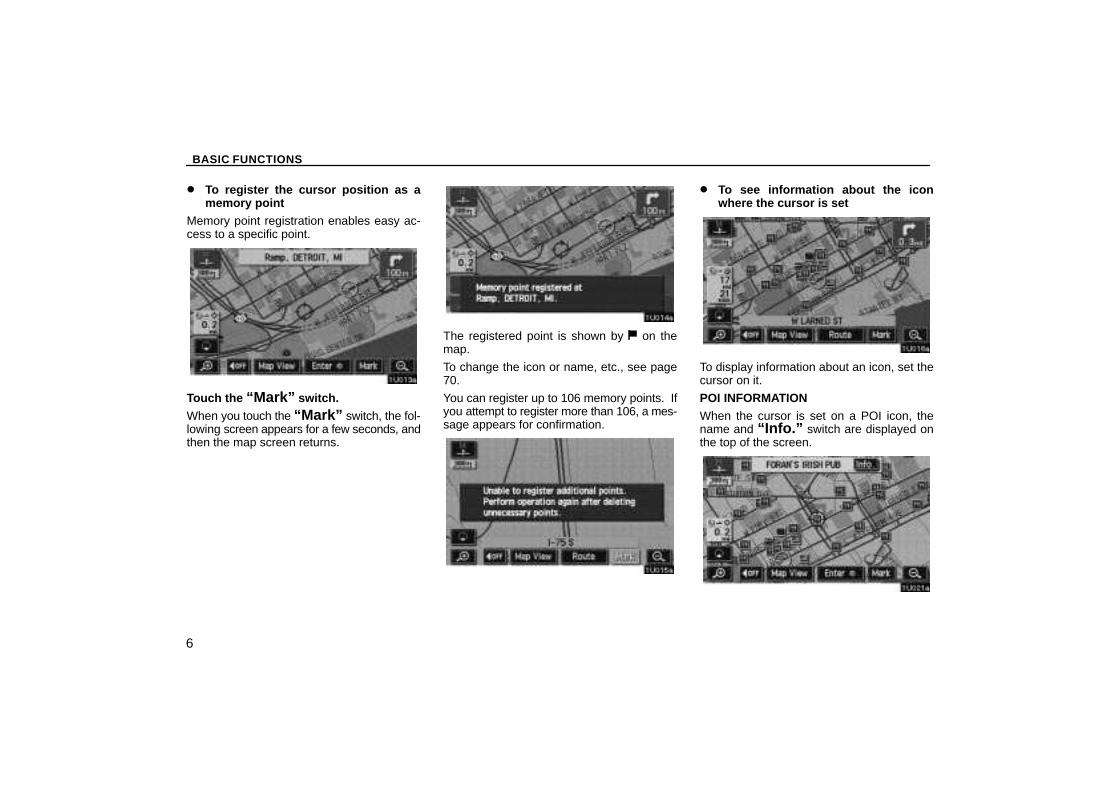
� To register the cursor position as amemory point
Memory point registration enables easy ac-cess to a specific point.
Touch the “Mark” switch.When you touch the “Mark” switch, the fol-lowing screen appears for a few seconds, andthen the map screen returns.
The registered point is shown by on themap.
To change the icon or name, etc., see page70.
You can register up to 106 memory points. Ifyou attempt to register more than 106, a mes-sage appears for confirmation.
� To see information about the iconwhere the cursor is set
To display information about an icon, set thecursor on it.
POI INFORMATIONWhen the cursor is set on a POI icon, thename and “Info.” switch are displayed onthe top of the screen.
BASIC FUNCTIONS
7
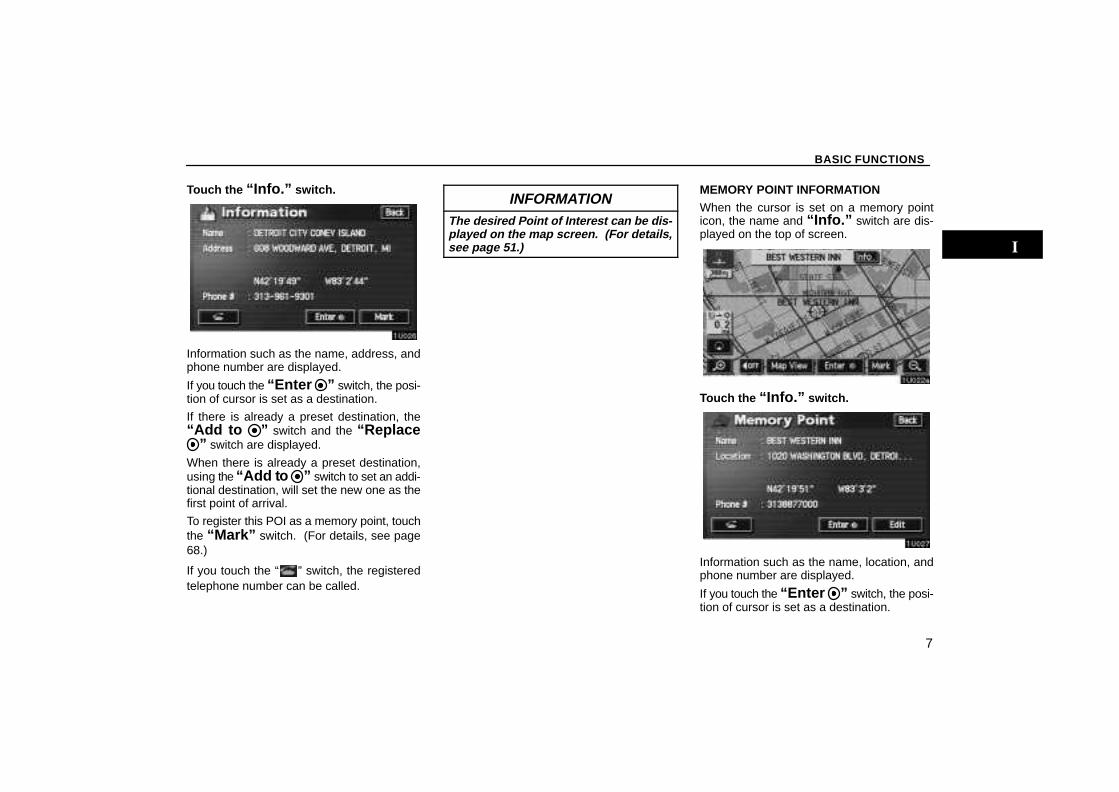
Touch the “Info.” switch.
Information such as the name, address, andphone number are displayed.
If you touch the “Enter ” switch, the posi-tion of cursor is set as a destination.
If there is already a preset destination, the“Add to ” switch and the “Replace
” switch are displayed.
When there is already a preset destination,using the “Add to ” switch to set an addi-tional destination, will set the new one as thefirst point of arrival.
To register this POI as a memory point, touchthe “Mark” switch. (For details, see page68.)
If you touch the “ ” switch, the registeredtelephone number can be called.
INFORMATIONThe desired Point of Interest can be dis-played on the map screen. (For details,see page 51.)
MEMORY POINT INFORMATIONWhen the cursor is set on a memory pointicon, the name and “Info.” switch are dis-played on the top of screen.
Touch the “Info.” switch.
Information such as the name, location, andphone number are displayed.
If you touch the “Enter ” switch, the posi-tion of cursor is set as a destination.
BASIC FUNCTIONS
8
If there is already a set destination, the “Addto ” switch and the “Replace ”switch are displayed.
When there is already a preset destination,using the “Add to ” switch to set an addi-tional destination, will set the new one as thefirst point of arrival.
To edit a memory point, touch the “Edit”switch. (For details, see page 70.)
If you touch the “ ” switch, the registeredtelephone number can be called.
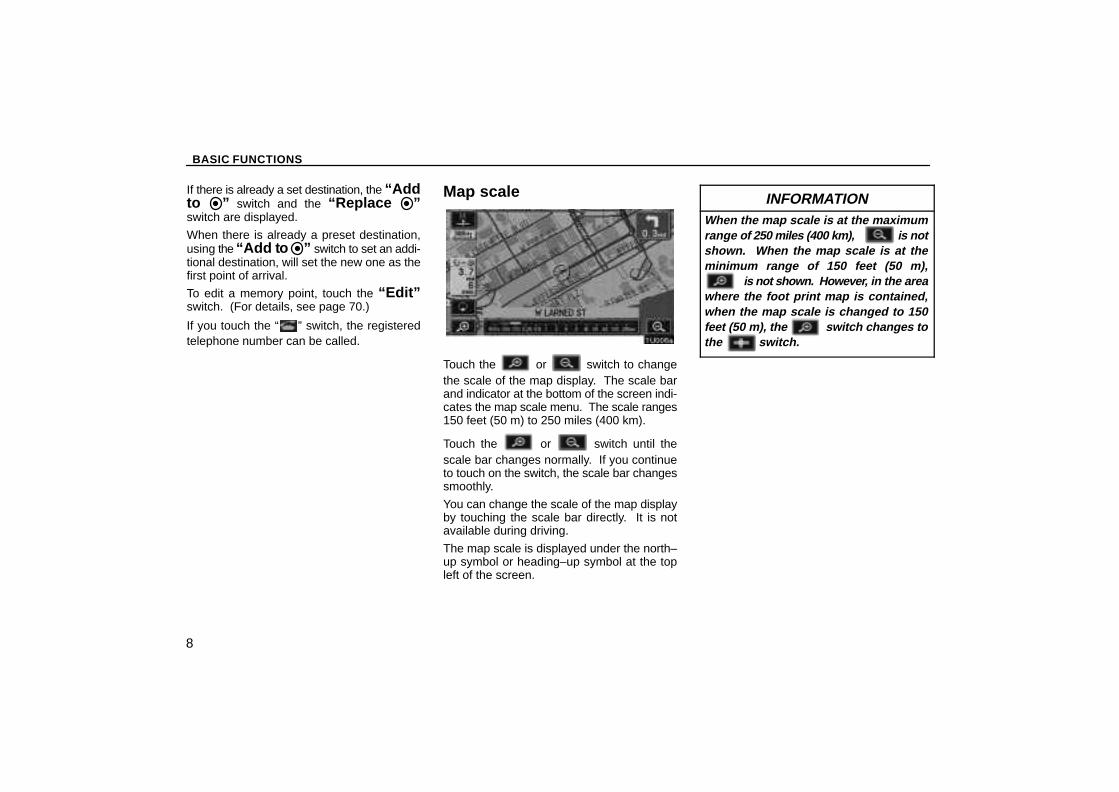
Map scale
Touch the or switch to changethe scale of the map display. The scale barand indicator at the bottom of the screen indi-cates the map scale menu. The scale ranges150 feet (50 m) to 250 miles (400 km).
Touch the or switch until thescale bar changes normally. If you continueto touch on the switch, the scale bar changessmoothly.
You can change the scale of the map displayby touching the scale bar directly. It is notavailable during driving.
The map scale is displayed under the north–up symbol or heading–up symbol at the topleft of the screen.
INFORMATIONWhen the map scale is at the maximumrange of 250 miles (400 km), is notshown. When the map scale is at theminimum range of 150 feet (50 m), is not shown. However, in the areawhere the foot print map is contained,when the map scale is changed to 150feet (50 m), the switch changes tothe switch.

BASIC FUNCTIONS
9
Orientation of the map
North–up screen
Heading–up screen
You can change the orientation of the mapfrom North–up to Heading–up by touchingthe orientation symbol at the top left of thescreen.
North–up symbol
Regardless of the direction of vehicle travel,North is always up.
Heading–up symbol
The direction of vehicle travel is always up.A red arrow indicates North.
Limitations of the navigationsystemThis navigation system calculates the cur-rent vehicle position using satellite sig-nals, various vehicle signals, map data,etc. However, the accurate position maynot be shown depending on the satellitecondition, road configuration, vehiclecondition or other circumstances.The Global Positioning System (GPS) devel-oped and operated by the U.S. Department ofDefense provides an accurate current vehicleposition using 3 to 4 satellites. The GPS sys-tem has a certain level of inaccuracy. Whilethe navigation system will compensate forthis most of the time, occasional positioningerrors of up to 300 feet (100 m) can andshould be expected. Generally, position er-rors will be corrected within a few seconds.
BASIC FUNCTIONS
10
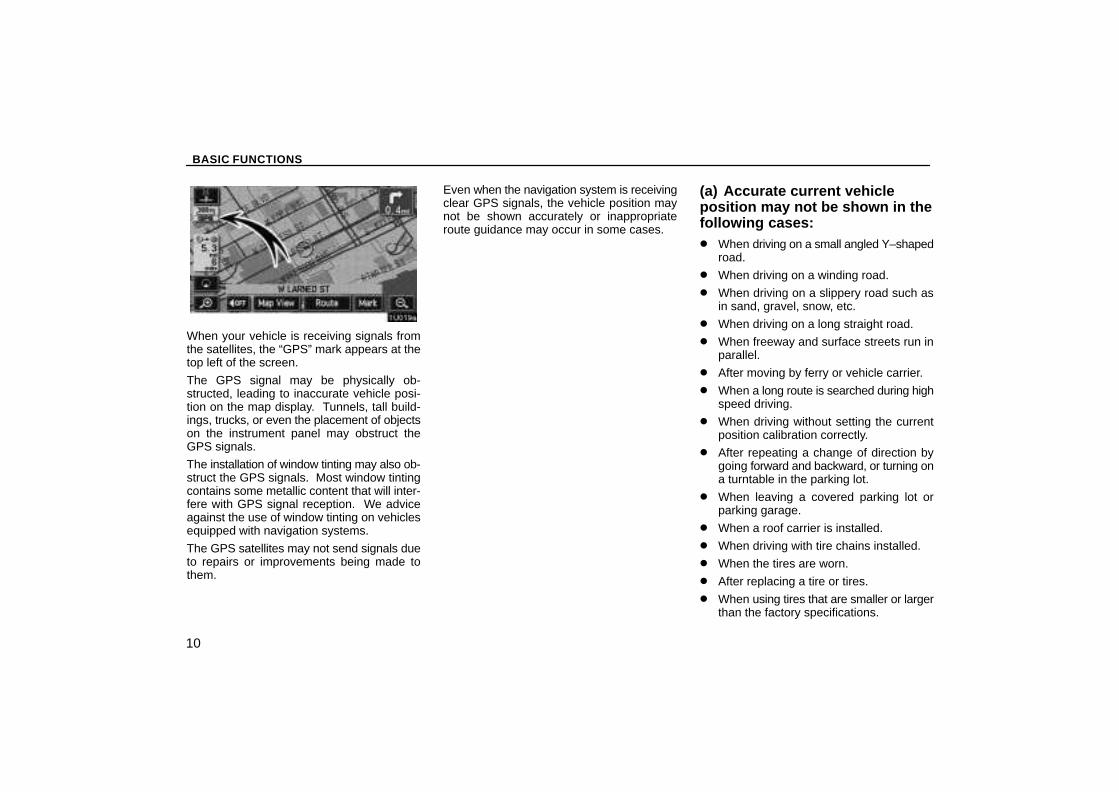
When your vehicle is receiving signals fromthe satellites, the “GPS” mark appears at thetop left of the screen.
The GPS signal may be physically ob-structed, leading to inaccurate vehicle posi-tion on the map display. Tunnels, tall build-ings, trucks, or even the placement of objectson the instrument panel may obstruct theGPS signals.
The installation of window tinting may also ob-struct the GPS signals. Most window tintingcontains some metallic content that will inter-fere with GPS signal reception. We adviceagainst the use of window tinting on vehiclesequipped with navigation systems.
The GPS satellites may not send signals dueto repairs or improvements being made tothem.
Even when the navigation system is receivingclear GPS signals, the vehicle position maynot be shown accurately or inappropriateroute guidance may occur in some cases.
(a) Accurate current vehicleposition may not be shown in thefollowing cases:� When driving on a small angled Y–shaped
road.
� When driving on a winding road.
� When driving on a slippery road such asin sand, gravel, snow, etc.
� When driving on a long straight road.
� When freeway and surface streets run inparallel.
� After moving by ferry or vehicle carrier.
� When a long route is searched during highspeed driving.
� When driving without setting the currentposition calibration correctly.
� After repeating a change of direction bygoing forward and backward, or turning ona turntable in the parking lot.
� When leaving a covered parking lot orparking garage.
� When a roof carrier is installed.
� When driving with tire chains installed.
� When the tires are worn.
� After replacing a tire or tires.
� When using tires that are smaller or largerthan the factory specifications.
BASIC FUNCTIONS
11
� When the tire pressure in any of the fourtires is not correct.
INFORMATIONIf your vehicle cannot receive GPS sig-nals, you can correct the current posi-tion manually. For information on set-ting the current position calibration, seepage 79.
(b) Inappropriate route guidancemay occur in the followingcases:� When turning at an intersection off the
designated route guidance.
� If you set more than one destination butskip any of them, auto reroute will displaya route returning to the destination on theprevious route.
� When turning at an intersection for whichthere is no route guidance.
� When passing through an intersection forwhich there is no route guidance.
� During auto reroute, the route guidancemay not be available for the next turn tothe right or left.
� It may take a long time to operate auto re-route during high speed driving. In autoreroute, a detour route may be shown.
� After auto reroute, the route may not bechanged.
� An unnecessary U–turn may be shown orannounced.
� A location may have multiple names andthe system will announce one or more.
� Some routes may not be searched.
� If the route to your destination includesgravel, unpaved roads or alleys, the routeguidance may not be shown.
� Your destination point might be shown onthe opposite side of the street.
� When a portion of the route has regula-tions prohibiting the entry of the vehiclethat vary by time or season or other rea-sons.
� The road and map data stored in your nav-igation system may not be complete ormay not be the latest version.
After replacing the tire, implement the op-eration described in the “ � Tire changecalibration”. (For details, see page 80.)This navigation system uses tire turning dataand is designed to work with factory–speci-fied tires for your vehicle. Installing tires thatare larger or smaller than the originallyequipped diameter may cause inaccuratedisplay of the vehicle’s position. The tire pres-sure also affects the diameter of the tires soplease make sure the tire pressure of all fourtires is correct.
BASIC FUNCTIONS
12
Map database information andupdatesThis system uses the maps of DENSO.
GDT, Geographic Data Technology,Inc.Data by infoUSA Copyright 2003, AllRights Reserved. 2003 VISA CorporationNational Research Bureau 2003
END USER LICENSE AGREEMENTPLEASE READ THIS AGREEMENTCAREFULLY BEFORE USING THENAVIGATION SYSTEM
THIS IS A LICENSE AGREEMENT FORYOUR COPY OF THE MAP DATABASE(“The DATABASE”), ORIGINALLYMADE BY Geographic Data Technology,Inc. (“GDT”), USED IN THENAVIGATION SYSTEM. BY USING THEDATABASE, YOU ACCEPT ANDAGREE TO ALL TERMS ANDCONDITIONS SET FORTH BELOW.
OWNERSHIPThe DATABASE and the copyrights andintellectual property or neighboring rightstherein are owned by GDT or itslicensors.
LICENSE GRANTGDT grants you a non–exclusive licenseto use your copy of the DATABASE foryour personal use or for use in yourbusiness’ internal operations. Thislicense does not include the right to grantsub–licenses.
LIMITATIONS ON USE The DATABASE is restricted for use inthe specific system for which it wascreated. Except to the extent explicitlypermitted by mandatory laws, you maynot extract or re–utilize any portion of thecontents of the DATABASE, norreproduce, copy, modify, adapt,translate, disassemble, decompile, orreverse engineer any portion of theDATABASE.
TRANSFERYou may not transfer the DATABASE tothird parties, except together with thesystem for which it was created, providedthat you do not retain any copy of theDATABASE, and provided that thetransferee agrees to all terms andconditions of this AGREEMENT.
DISCLAIMER OF WARRANTYGDT does not warrant or make anyrepresentations regarding, eitherexpress or implied, regarding the use orresults of the use of the DATABASE interms of its correctness, accuracy,reliability, or otherwise, and expresslydisclaims any implied warranties ofquality, performance, merchantability,fitness for a particular purpose ornon–infringement. GDT does notwarrant that the DATABASE is or will beerror free. No oral or written informationor advice provided by GDT, your supplieror any other person shall create awarranty.
BASIC FUNCTIONS
13
LIMITATION OF LIABILITYThe price of the DATABASE does notinclude any consideration for assumptionof risk of consequential, indirect orunlimited direct damages which mayarise in connection with your use of theDATABASE. Accordingly, in no eventshall GDT or supplier of the navigationsystem using the DATABASE(“Supplier”) be liable for anyconsequential, special, incidental orindirect damages, including withoutlimitation, loss of revenue, data, or use,incurred by you or any third party arisingout of your use of the DATABASE,whether in an action in contract or tort orbased on a warranty, even if GDT or theSupplier has been advised of thepossibility of such damages. In anyevent GDT’s liability for direct damagesis limited to the price of your copy of theDATABASE.THE DISCLAIMER OF WARRANTYAND LIMITATION OF LIABILITY, SETFORTH IN THIS AGREEMENT, DO NOTAFFECT OR PREJUDICE YOURSTATUTORY RIGHTS WHERE YOUHAVE ACQUIRED THE DATABASEOTHERWISE THAN IN THE COURSEOF A BUSINESS. Some states and lawsdo not allow the exclusion of impliedwarranties, so the above disclaimer maynot apply to you.
WARNINGSThe DATABASE reflects reality asexisting before you received theDATABASE and it comprises data andinformation from government and othersources, which may contain errors andomissions. Accordingly, the DATABASEmay contain inaccurate or incompleteinformation due to the passage of time,changing circumstances, and due to thenature of the sources used. TheDATABASE does not include or reflectinformation on – inter alia –neighborhood safety; law enforcement;emergency assistance; constructionwork; road or lane closures; vehicle orspeed restrictions; road slope or grade;bridge height, weight or other limits; roador traffic conditions; special events;traffic congestion; or travel time.
GOVERNMENT END USERSIf the DATABASE is for a region of NorthAmerica and is being acquired by or onbehalf of the United States governmentor any other entity seeking or applyingrights similar to those customarilyclaimed by the United Statesgovernment, the DATABASE is licensedwith “limited rights.” Utilization of theDATABASE is subject to the restrictionsspecified in the “Rights in Technical Dataand Computer Database” clause atDFARS 252.227–7013, or the equivalentclause for non–defense agencies.Manufacturer of the DATABASE forNorth America is Geographic DataTechnology, Inc., at 11 Lafayette Street,Lebanon, New Hampshire 03766, USA.

BASIC FUNCTIONS
14
END USER NOTICEPLEASE READ THIS NOTICECAREFULLY BEFORE USING THISNAVIGATION SYSTEM
The Point Of Interest Data (“POI” Data) inthe navigation system is in part providedby infoUSA Inc. (“infoUSA”). By usingthe POI Data, you accept and agree to allterms and conditions set forth below.
1. OwnershipAll rights, title and interest to the infoUSAPOI Data shall be retained by infoUSA.
2. Limitations on useExcept to the extent explicitly permittedby mandatory laws, you may not extractor re–utilize any portion of the contents ofthe POI Data, nor reproduce, copy,modify, adapt, translate, disassemble,decompile, or reverse engineer anyportion of the POI Data.
3. TransferYou may not transfer the POI Data to thirdparties, except together with the systemfor which it was created, provided thatyou do not retain any copy of the POIData.
4. Disclaimer of warrantyEXCEPT AS STATED HEREIN,INFOUSA MAKES NO EXPRESS ORIMPLIED WARRANTIES, INCLUDING,WITHOUT LIMITATION, ANYEXPRESS OR IMPLIED WARRANTYOF FITNESS FOR A PARTICULARPURPOSE OR WARRANTY OFMERCHANTABILITY.
5. Limitation of LiabilityEITHER INFOUSA OR SUPPLIER OFPOI DATA SHALL NOT BE LIABLE FORANY INDIRECT, CONSEQUENTIAL ORINCIDENTAL DAMAGES MADE ORALLEGED IN CONNECTION WITHYOUR USE OF THE POI DATA.
END USER LICENSE AGREEMENTPersonal Use Only. You agree to use thisinformation for solely personal,non–commercial purposes, and not forservice bureau, time–sharing or othersimilar purposes. You may not modifythe information or remove any copyrightnotices that appear on the information inany way. You may not decompile,disassemble or reverse engineer anyportion of this information, and may nottransfer or distribute it in any form, for anypurpose. Without limiting the foregoing,you may not use this information with anyproducts, systems, or applicationsinstalled or otherwise connected to or incommunication with vehicles, capable ofvehicle navigation, positioning, dispatch,real time route guidance, fleetmanagement or similar applications.
BASIC FUNCTIONS
15
No Warranty. This information isprovided to you “as is,” and you agree touse it at your own risk. DENSO and itslicensors (and their licensors andsuppliers, collectively “DENSO”) makeno guarantees, representations orwarranties of any kind, express orimplied, arising by law or otherwise,including but not limited to, and DENSOexpressly disclaims any warrantiesregarding content, quality, accuracy,completeness, effectiveness, reliability,fitness for a particular purpose,non–infringement, usefulness, use orresults to be obtained from thisinformation, or that the information orserver will be uninterrupted or error–free.Some states, territories and countries donot allow certain warranty exclusions, soto that extent, the above exclusion maynot apply to you.
Disclaimer of Liability: DENSO SHALLNOT BE LIABLE TO YOU FOR ANYCLAIM, DEMAND OR ACTION,IRRESPECTIVE OF ITS NATURE,ALLEGING ANY LOSS, INJURY ORDAMAGES, WHETHER DIRECT,INDIRECT, INCIDENTAL, SPECIAL ORCONSEQUENTIAL DAMAGES,INCLUDING ANY LOSS OF PROFIT,REVENUE OR CONTRACTS ARISINGOUT OF YOUR POSSESSION, USE OFOR INABILITY TO USE THISINFORMATION, ANY DEFECT IN THEINFORMATION, OR THE BREACH OFTHESE TERMS OR CONDITIONS,WHETHER IN AN ACTION INCONTRACT OR TORT OR BASED ONA WARRANTY, EVEN IF DENSO ORITS LICENSORS HAVE BEENADVISED OF THE POSSIBILITY OFSUCH DAMAGES. Some states,territories and countries do not allowcertain liability exclusions or damageslimitations, so to that extent the abovemay not apply to you.
Indemnity. You agree to indemnify,defend and hold DENSO and itslicensors (including their respectivelicensors, suppliers, assignees,subsidiaries, affiliated companies, andthe respective officers, directors,employees, shareholders, agents andrepresentatives of each of them) free andharmless from and against any liability,loss, injury (including injuries resulting indeath), demand, action, cost, expense,or claim of any kind or character,including but not limited to attorney’sfees, arising out of or in connection withany use or possession by you of thisinformation.
END USER NOTICEThe marks of companies displayed bythis product to indicate businesslocations are the marks of theirrespective owners. The use of suchmarks in this product does not imply anysponsorship, approval, or endorsementby such companies of this product.
BASIC FUNCTIONS
16
END–USER TERMSThe data (“Data”) is provided for yourpersonal, internal use only and not for re-sale. It is protected by copyright, and issubject to the following terms and condi-tions which are agreed to by you, on theone hand, and DENSO CORPORATION(hereinafter referred to as “DENSO”)(“DENSO”) and its licensors (includingtheir licensors and suppliers) on the otherhand.
2003 NAVTEQ. All rights reserved.
TERMS AND CONDITIONS
Personal Use Only. You agree to use thisData together with the navigation systemfor the solely personal, non–commercialpurposes for which you were licensed,and not for service bureau, time–sharingor other similar purposes. Accordingly,but subject to the restrictions set forth inthe following paragraphs, you may copythis Data only as necessary for your per-sonal use to (i) view it, and (ii) save it, pro-vided that you do not remove any copy-right notices that appear and do notmodify the Data in any way. You agreenot to otherwise reproduce, copy, modify,decompile, disassemble or reverse engi-neer any portion of this Data, and may nottransfer or distribute it in any form, for anypurpose, except to the extent permittedby mandatory laws.
Restrictions. Except where you havebeen specifically licensed to do so byDENSO, and without limiting the preced-ing paragraph, you may not (a) use thisData with any products, systems, or ap-plications installed or otherwise con-nected to or in communication with ve-hicles, capable of vehicle navigation,positioning, dispatch, real time routeguidance, fleet management or similarapplications; or (b) with or in communica-tion with any positioning devices or anymobile or wireless–connected electronicor computer devices, including withoutlimitation cellular phones, palmtop andhandheld computers, pagers, and per-sonal digital assistants or PDAs.
No Warranty. This Data is provided toyou “as is,” and you agree to use it at yourown risk. DENSO and its licensors (andtheir licensors and suppliers) make noguarantees, representations or warran-ties of any kind, express or implied, aris-ing by law or otherwise, including but notlimited to, content, quality, accuracy,completeness, effectiveness, reliability,fitness for a particular purpose, useful-ness, use or results to be obtained fromthis Data, or that the Data or server will beuninterrupted or error–free.
Disclaimer of Warranty: DENSO ANDITS LICENSORS (INCLUDING THEIRLICENSORS AND SUPPLIERS)DISCLAIM ANY WARRANTIES,EXPRESS OR IMPLIED, OF QUALITY,PERFORMANCE,MERCHANTABILITY, FITNESS FOR APARTICULAR PURPOSE ORNON–INFRINGEMENT. Some States,Territories and Countries do not allowcertain warranty exclusions, so to thatextent the above exclusion may not applyto you.
BASIC FUNCTIONS
17
Disclaimer of Liability: DENSO AND ITSLICENSORS (INCLUDING THEIRLICENSORS AND SUPPLIERS) SHALLNOT BE LIABLE TO YOU: IN RESPECTOF ANY CLAIM, DEMAND OR ACTION,IRRESPECTIVE OF THE NATURE OFTHE CAUSE OF THE CLAIM, DEMANDOR ACTION ALLEGING ANY LOSS,INJURY OR DAMAGES, DIRECT ORINDIRECT, WHICH MAY RESULTFROM THE USE OR POSSESSION OFTHE INFORMATION; OR FOR ANYLOSS OF PROFIT, REVENUE,CONTRACTS OR SAVINGS, OR ANYOTHER DIRECT, INDIRECT,INCIDENTAL, SPECIAL ORCONSEQUENTIAL DAMAGESARISING OUT OF YOUR USE OF ORINABILITY TO USE THISINFORMATION, ANY DEFECT IN THEINFORMATION, OR THE BREACH OFTHESE TERMS OR CONDITIONS,WHETHER IN AN ACTION INCONTRACT OR TORT OR BASED ONA WARRANTY, EVEN IF DENSO ORITS LICENSORS HAVE BEENADVISED OF THE POSSIBILITY OFSUCH DAMAGES. Some States,Territories and Countries do not allowcertain liability exclusions or damageslimitations, so to that extent the abovemay not apply to you.
Disclaimer of Endorsement: Referenceto any products, services, processes,hypertext links to third parties or otherData by trade name, trademark,manufacturer, supplier or otherwise doesnot necessarily constitute or imply itsendorsement, sponsorship or recom-mendation by DENSO or its licensors.Product and service information are thesole responsibility of each individualvendor. The NAVTEQ Corporation nameand logo, the NAVTEQ and NAVTEQ ONBOARD trademarks and logos, and othertrademarks and trade names owned byNAVTEQ Corporation may not be used inany commercial manner without the priorwritten consent of NAVTEQ.
Export Control. You agree not to exportfrom anywhere any part of the Data pro-vided to you or any direct product thereofexcept in compliance with, and with all li-censes and approvals required under,applicable export laws, rules and regula-tions.
Indemnity. You agree to indemnify, de-fend and hold DENSO and its licensors(including their respective licensors, sup-pliers, assignees, subsidiaries, affiliatedcompanies, and the respective officers,directors, employees, shareholders,agents and representatives of each ofthem) free and harmless from andagainst any liability, loss, injury (includinginjuries resulting in death), demand, ac-tion, cost, expense, or claim of any kindor character, including but not limited toattorney’s fees, arising out of or in con-nection with any use or possession byyou of this Data.
Entire Agreement. These terms and con-ditions constitute the entire agreementbetween DENSO (and its licensors, in-cluding their licensors and suppliers) andyou pertaining to the subject matter here-of, and supersedes in their entirety anyand all written or oral agreements pre-viously existing between us with respectto such subject matter.
BASIC FUNCTIONS
18
Governing Law. The above terms andconditions shall be governed by the lawsof the Illinois, without giving effect to (i) itsconflict of laws provisions, or (ii) theUnited Nations Convention for Contractsfor the International Sale of Goods, whichis explicitly excluded. You agree to sub-mit to the jurisdiction of Illinois for any andall disputes, claims and actions arisingfrom or in connection with the Data pro-vided to you hereunder.
Government End Users. If the NAVTEQData is being acquired by or on behalf ofthe United States government or any oth-er entity seeking or applying rights similarto those customarily claimed by theUnited States government, (i) for acquisi-tions conducted by the Department ofDefense, the NAVTEQ Data is licensedwith “Limited Rights” in accordance withthe rights set forth at DFARS252.227–7013(b)(3), TECHNICALDATA–NONCOMMERCIAL ITEMS, andNAVTEQ Data delivered or otherwisefurnished with “Limited Rights” shall bemarked with the following “Limited RightsNotice” set forth at DFARS252.227–7013(f)(3), and shall be treatedin accordance with such Notice:
LIMITED RIGHTSCONTRACT NO.:
CONTRACTOR (MANUFACTURER/SUPPLIER) NAME: NAVTEQ Corporation
CONTRACTOR(MANUFACTURER/SUPPLIER)
ADDRESS: 222 Merchandise MartPlaza, Suite 900, Chicago, Illinois
60654.
The Government’s rights to use,modify, reproduce, release, perform,display, or disclose these technicaldata are restricted by paragraph (b)(3)of the Rights in Technical Data–Non-commercial Items clause contained inthe above identified contract. Any re-production of technical data or portionsthereof marked with this legend mustalso reproduce the markings. Any per-son, other than the Government, whohas been provided access to such datamust promptly notify the above namedContractor.
and; (ii) for civilian agency acquisitions,the NAVTEQ Data is licensed inaccordance with the rights set forth atFAR 52.227–14(g)(1), RIGHTS INDATA–GENERAL (Protection of limitedrights data and computer software). Inthe event that the Contracting Officerrequires the delivery of limited rightsNAVTEQ Data that has been withheld orwould otherwise be withholdable inaccordance with FAR 52.227–14(g)(1),the NAVTEQ Data is licensed with“Limited Rights” as set forth in thefollowing “Limited Rights Notice” at FAR52.227–14(g)(2) (Alternate II), whichshall be affixed to the NAVTEQ Data andthe NAVTEQ Data shall be treated inaccordance with such Notice (which shallbe marked on any reproduction of thesedata, in whole or in part):

BASIC FUNCTIONS
19
LIMITED RIGHTS NOTICE (JUN 1987)
These data are submitted with limitedrights under Government Contract No.
(and subcontract , if ap-propriate). These data may be repro-duced and used by the Governmentwith the express limitation that they willnot, without written permission of theContractor, be used for purposes ofmanufacture nor disclosed outside theGovernment; except that the Govern-ment may disclose these data outsidethe Government for the following pur-poses, if any, provided that the Gov-ernment makes such disclosure sub-ject to prohibition against further useand disclosure: There are no addition-al purposes permitting disclosure ofsuch Data.
The manufacturer/supplier of the Datais NAVTEQ Corporation, 222 Mer-chandise Mart Plaza, Suite 900, Chica-go, Illinois 60654.
If the Contracting Officer refuses to useeither of the licenses provided in (i) or (ii),herein, the Contracting Officer mustnotify NAVTEQ Corporation prior toseeking additional or alternative rights inthe NAVTEQ Data.
There are two types of areas available forroute guidance. In one type of area, pri-marily around metropolitan centers, de-tailed route guidance is available for theentire area. In the other type of area, allroads are displayed on the map but routeguidance is limited. The navigation routemight lack precision because the data (noright turns, one–way traffic, etc.) is notcomplete. It is still possible to reach thedestination by following the arrow direc-tion and distance as shown on the bottomleft of the screen. The arrow points in thedirection of the destination. The distanceshown is as measured in a straight linefrom the current vehicle position to thedestination area.In order to provide you with as accurate mapinformation as possible, we are always gath-ering information such as on road repairs andcarrying out on–site investigations. However,the names of roads, streets, facilities, andtheir locations are often changed. In someplaces, construction on roads may be in pro-gress. For that reason, information on someareas in this system might be different fromthe actual location.
The map database is normally updated oncea year. Contact your dealer for informationabout the availability and pricing of an update.

BASIC FUNCTIONS
20
� To confirm the database version anddisc coverage area
1. Push the “MENU” button.
2. Touch the “Map DVD” switch.
Make sure the version of the database on thisscreen. (The database version on the screenabove may be different from the actualscreen.)
To display the disc coverage area, touch the“Covered Area” switch. Confirm thecovered area on the screen.
Contact your dealer to find out if there is amore recent update released.

DESTINATION INPUT AND ROUTE GUIDANCE
21
DESTINATION INPUT AND ROUTE GUIDANCEBasic functions in frequent useDestination input 22. . . . . . . . . . . . . . . . . . . . . . . . . . . . . . . . . . . . . . . . . . . . . . . . . . .
Selecting the search area 22. . . . . . . . . . . . . . . . . . . . . . . . . . . . . . . . . . . . . . . . . . Destination input by Home 24. . . . . . . . . . . . . . . . . . . . . . . . . . . . . . . . . . . . . . . . . . Destination input by Quick access 24. . . . . . . . . . . . . . . . . . . . . . . . . . . . . . . . . . . Destination input by “Address” 24. . . . . . . . . . . . . . . . . . . . . . . . . . . . . . . . . . . . . . Destination input by “POI Name” 28. . . . . . . . . . . . . . . . . . . . . . . . . . . . . . . . . . . . Destination input by “POI Category” 31. . . . . . . . . . . . . . . . . . . . . . . . . . . . . . . . . . Destination input by “Emergency” 34. . . . . . . . . . . . . . . . . . . . . . . . . . . . . . . . . . . . Destination input by “Memory” 35. . . . . . . . . . . . . . . . . . . . . . . . . . . . . . . . . . . . . . . Destination input by “Previous” 36. . . . . . . . . . . . . . . . . . . . . . . . . . . . . . . . . . . . . . Destination input by “Map” 36. . . . . . . . . . . . . . . . . . . . . . . . . . . . . . . . . . . . . . . . . . Destination input by “Intersection” 37. . . . . . . . . . . . . . . . . . . . . . . . . . . . . . . . . . . Destination input by “Freeway Ent./Exit” 38. . . . . . . . . . . . . . . . . . . . . . . . . . . . . . Destination input by “Coordinates” 39. . . . . . . . . . . . . . . . . . . . . . . . . . . . . . . . . . . Destination input by “Phone #” 39. . . . . . . . . . . . . . . . . . . . . . . . . . . . . . . . . . . . . .
Starting route guidance 40. . . . . . . . . . . . . . . . . . . . . . . . . . . . . . . . . . . . . . . . . . . . . Entering destination 40. . . . . . . . . . . . . . . . . . . . . . . . . . . . . . . . . . . . . . . . . . . . . . . Route guidance screen 42. . . . . . . . . . . . . . . . . . . . . . . . . . . . . . . . . . . . . . . . . . . . . Typical voice guidance prompts 42. . . . . . . . . . . . . . . . . . . . . . . . . . . . . . . . . . . . .
Setting and deleting destination 44. . . . . . . . . . . . . . . . . . . . . . . . . . . . . . . . . . . . . . . . Setting and deleting route 46. . . . . . . . . . . . . . . . . . . . . . . . . . . . . . . . . . . . . . . . . . . . . Show POI icons 51. . . . . . . . . . . . . . . . . . . . . . . . . . . . . . . . . . . . . . . . . . . . . . . . . . . . . Route overview 53. . . . . . . . . . . . . . . . . . . . . . . . . . . . . . . . . . . . . . . . . . . . . . . . . . . . . . Route preview 54. . . . . . . . . . . . . . . . . . . . . . . . . . . . . . . . . . . . . . . . . . . . . . . . . . . . . . . Screen configuration 55. . . . . . . . . . . . . . . . . . . . . . . . . . . . . . . . . . . . . . . . . . . . . . . . . Distance and time to destination 59. . . . . . . . . . . . . . . . . . . . . . . . . . . . . . . . . . . . . . . Foot print map 60. . . . . . . . . . . . . . . . . . . . . . . . . . . . . . . . . . . . . . . . . . . . . . . . . . . . . . .
SECTION II
DESTINATION INPUT AND ROUTE GUIDANCE
22
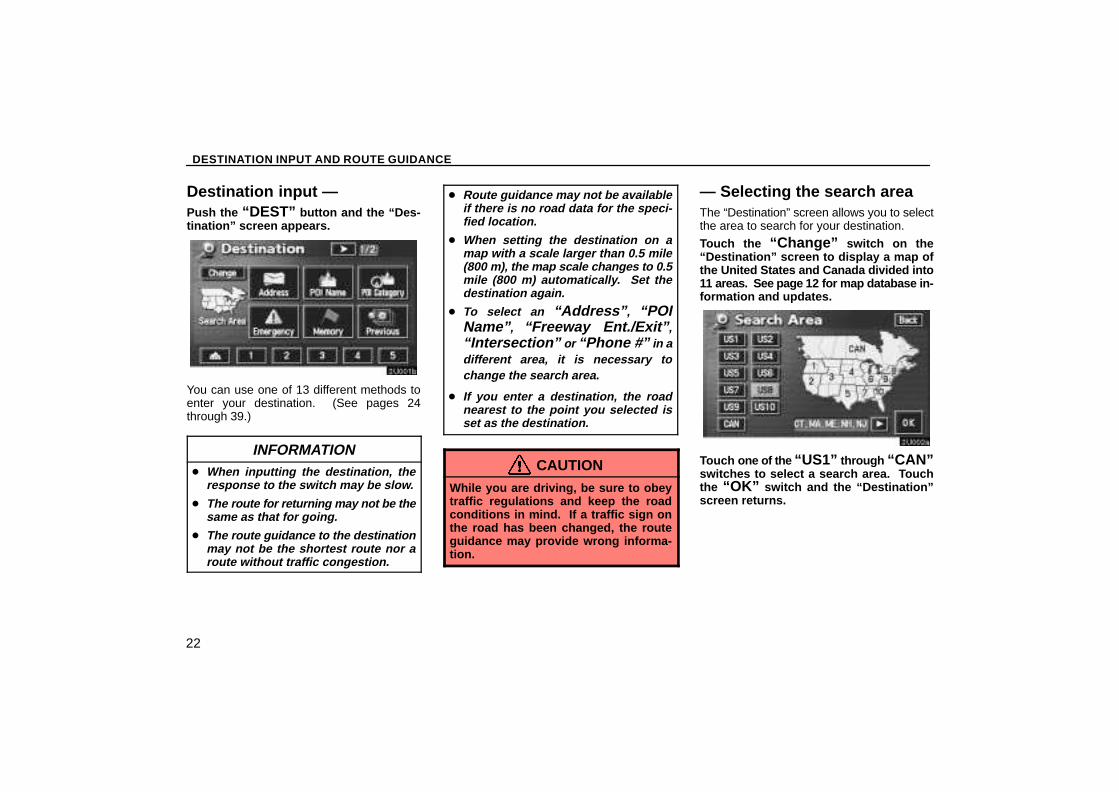
Destination input —Push the “DEST” button and the “Des-tination” screen appears.
You can use one of 13 different methods toenter your destination. (See pages 24through 39.)
INFORMATION� When inputting the destination, the
response to the switch may be slow.
� The route for returning may not be thesame as that for going.
� The route guidance to the destinationmay not be the shortest route nor aroute without traffic congestion.
� Route guidance may not be availableif there is no road data for the speci-fied location.
� When setting the destination on amap with a scale larger than 0.5 mile(800 m), the map scale changes to 0.5mile (800 m) automatically. Set thedestination again.
� To select an “Address” , “POIName” , “Freeway Ent./Exit” ,“Intersection” or “Phone #” in adifferent area, it is necessary tochange the search area.
� If you enter a destination, the roadnearest to the point you selected isset as the destination.
CAUTIONWhile you are driving, be sure to obeytraffic regulations and keep the roadconditions in mind. If a traffic sign onthe road has been changed, the routeguidance may provide wrong informa-tion.
— Selecting the search areaThe “Destination” screen allows you to selectthe area to search for your destination.
Touch the “Change” switch on the“Destination” screen to display a map ofthe United States and Canada divided into11 areas. See page 12 for map database in-formation and updates.
Touch one of the “US1” through “CAN”switches to select a search area. Touchthe “OK” switch and the “Destination”screen returns.

DESTINATION INPUT AND ROUTE GUIDANCE
23
U.S.A.
Switch States included in the search area
“US1”IdahoOregonWashington
“US2” CaliforniaNevada
“US3”
ArizonaColoradoMontanaNew MexicoUtahWyoming
“US4”
IowaKansasMinnesotaMissouriNorth DakotaNebraskaSouth Dakota
“US5” OklahomaTexas
“US6”
IllinoisIndianaKentuckyMichiganOhioWisconsin
“US7”
ArkansasAlabamaLouisianaMississippiTennessee
“US8”
ConnecticutMassachusettsMaineNew HampshireNew JerseyNew YorkRhode IslandVermont
“US9”
Washington, D.C.DelawareMarylandNew JerseyPennsylvaniaVirginiaWest Virginia
“US10”
FloridaGeorgiaNorth CarolinaSouth Carolina
Canada
Switch Provinces and regions included inthe search area
“CAN” All provinces and regions inCanada included in this switch.
DESTINATION INPUT AND ROUTE GUIDANCE
24
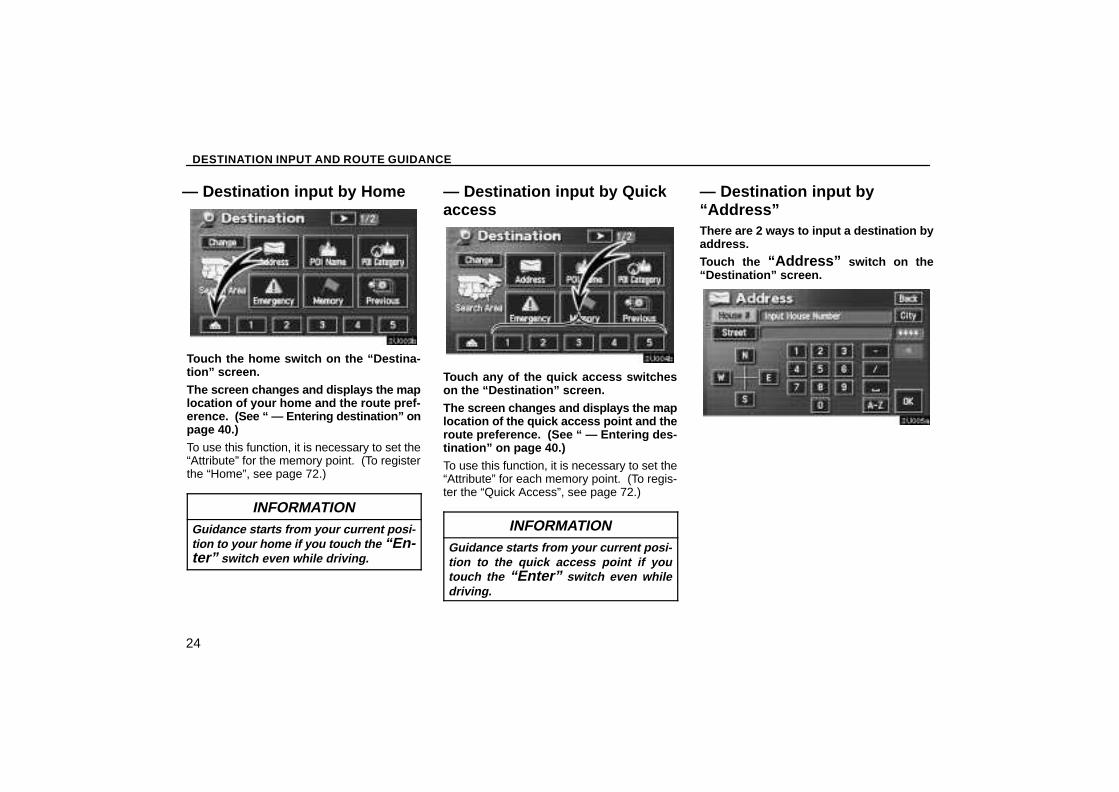
— Destination input by Home
Touch the home switch on the “Destina-tion” screen.The screen changes and displays the maplocation of your home and the route pref-erence. (See “ — Entering destination” onpage 40.)To use this function, it is necessary to set the“Attribute” for the memory point. (To registerthe “Home”, see page 72.)
INFORMATIONGuidance starts from your current posi-tion to your home if you touch the “En-ter” switch even while driving.
— Destination input by Quickaccess
Touch any of the quick access switcheson the “Destination” screen.The screen changes and displays the maplocation of the quick access point and theroute preference. (See “ — Entering des-tination” on page 40.)To use this function, it is necessary to set the“Attribute” for each memory point. (To regis-ter the “Quick Access”, see page 72.)
INFORMATIONGuidance starts from your current posi-tion to the quick access point if youtouch the “Enter” switch even whiledriving.
— Destination input by“Address”There are 2 ways to input a destination byaddress.Touch the “Address” switch on the“Destination” screen.
DESTINATION INPUT AND ROUTE GUIDANCE
25
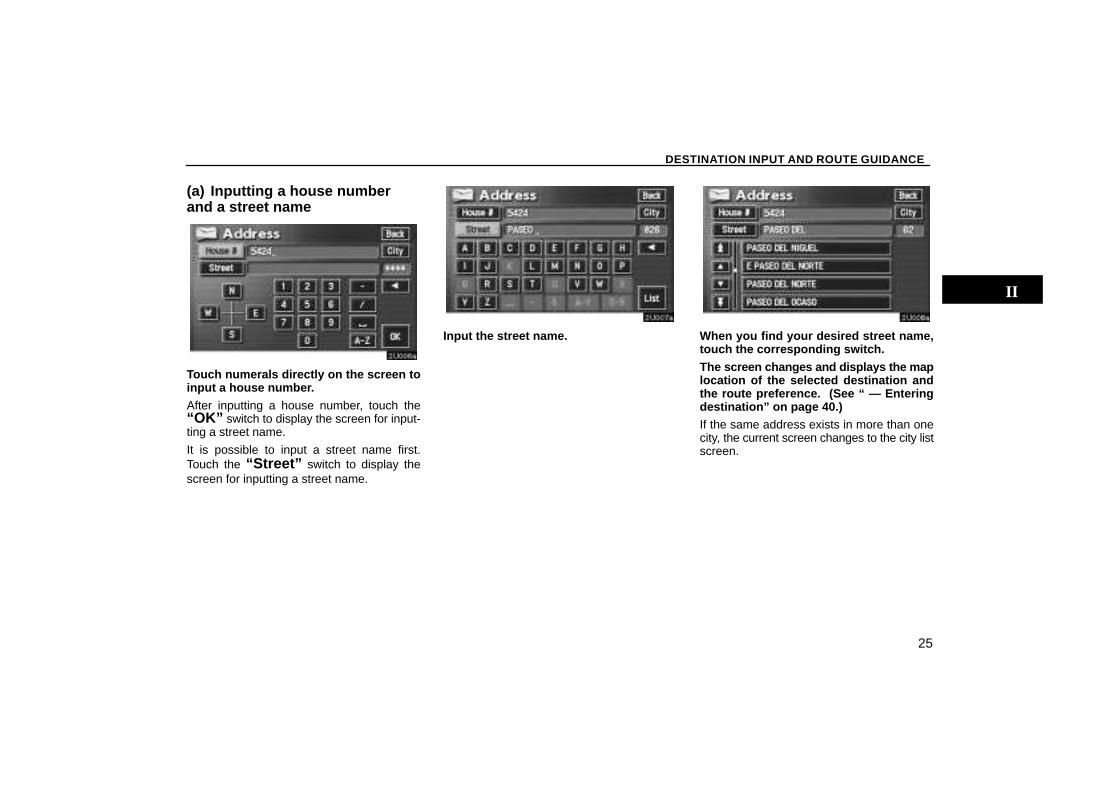
(a) Inputting a house numberand a street name
Touch numerals directly on the screen toinput a house number.After inputting a house number, touch the“OK” switch to display the screen for input-ting a street name.
It is possible to input a street name first.Touch the “Street” switch to display thescreen for inputting a street name.
Input the street name. When you find your desired street name,touch the corresponding switch.The screen changes and displays the maplocation of the selected destination andthe route preference. (See “ — Enteringdestination” on page 40.)If the same address exists in more than onecity, the current screen changes to the city listscreen.
DESTINATION INPUT AND ROUTE GUIDANCE
26
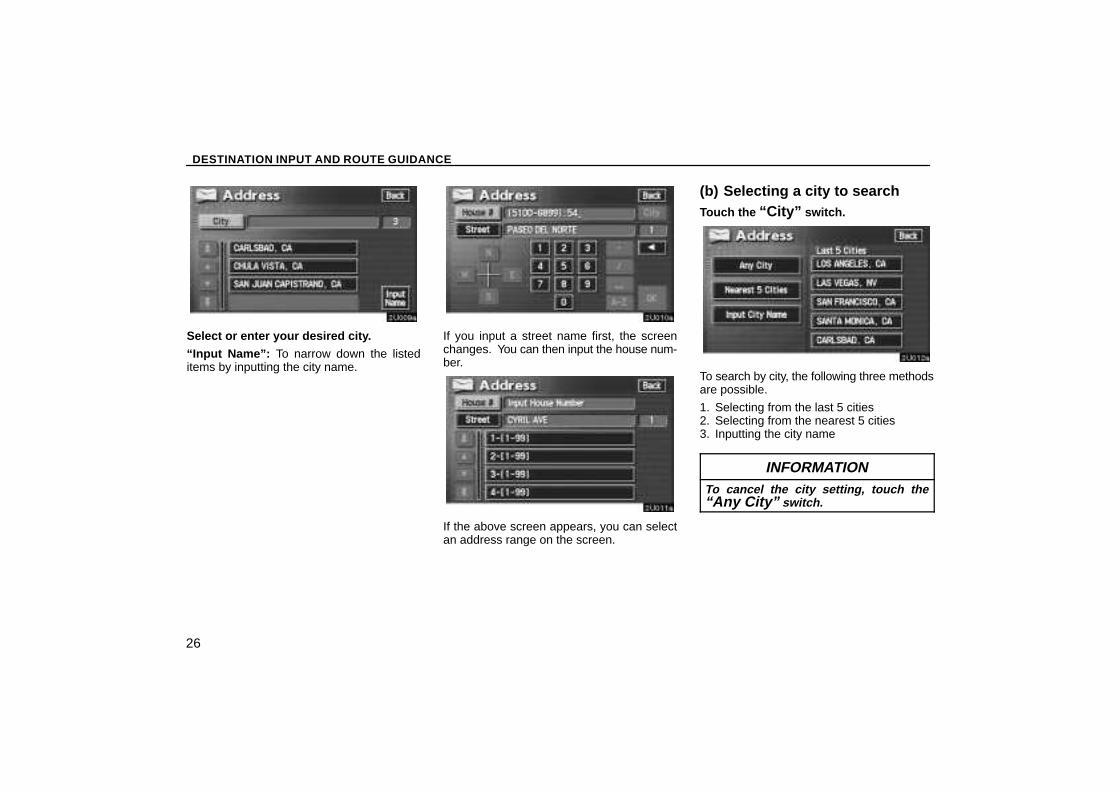
Select or enter your desired city.“Input Name”: To narrow down the listeditems by inputting the city name.
If you input a street name first, the screenchanges. You can then input the house num-ber.
If the above screen appears, you can selectan address range on the screen.
(b) Selecting a city to searchTouch the “City” switch.
To search by city, the following three methodsare possible.
1. Selecting from the last 5 cities2. Selecting from the nearest 5 cities3. Inputting the city name
INFORMATIONTo cancel the city setting, touch the“Any City” switch.
DESTINATION INPUT AND ROUTE GUIDANCE
27
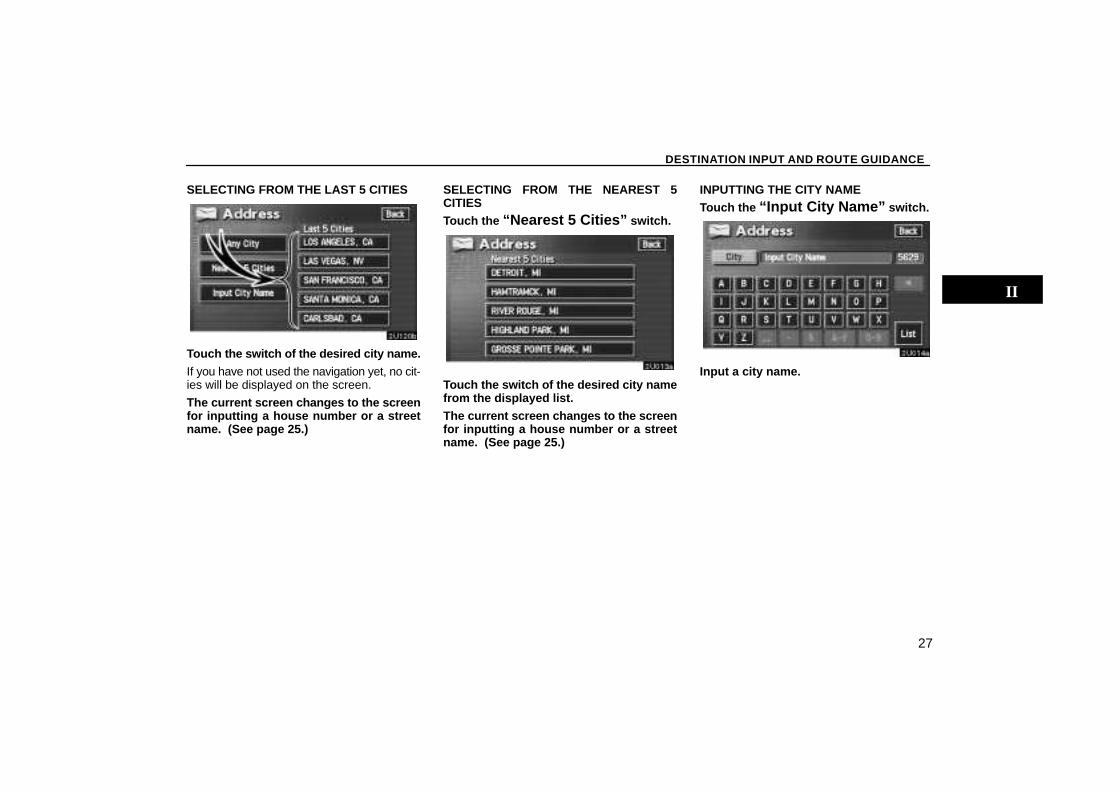
SELECTING FROM THE LAST 5 CITIES
Touch the switch of the desired city name.If you have not used the navigation yet, no cit-ies will be displayed on the screen.
The current screen changes to the screenfor inputting a house number or a streetname. (See page 25.)
SELECTING FROM THE NEAREST 5CITIESTouch the “Nearest 5 Cities” switch.
Touch the switch of the desired city namefrom the displayed list.The current screen changes to the screenfor inputting a house number or a streetname. (See page 25.)
INPUTTING THE CITY NAMETouch the “Input City Name” switch.
Input a city name.
DESTINATION INPUT AND ROUTE GUIDANCE
28
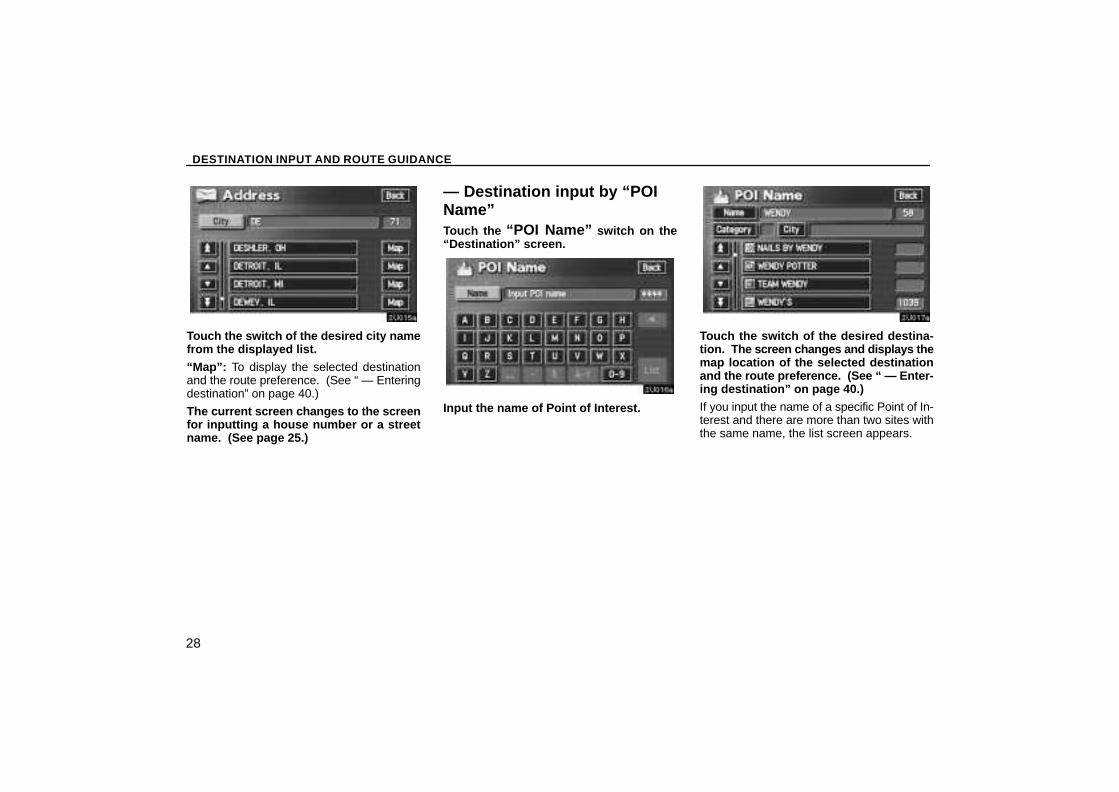
Touch the switch of the desired city namefrom the displayed list.“Map”: To display the selected destinationand the route preference. (See “ — Enteringdestination” on page 40.)
The current screen changes to the screenfor inputting a house number or a streetname. (See page 25.)
— Destination input by “POIName”Touch the “POI Name” switch on the“Destination” screen.
Input the name of Point of Interest.
Touch the switch of the desired destina-tion. The screen changes and displays themap location of the selected destinationand the route preference. (See “ — Enter-ing destination” on page 40.)If you input the name of a specific Point of In-terest and there are more than two sites withthe same name, the list screen appears.
DESTINATION INPUT AND ROUTE GUIDANCE
29
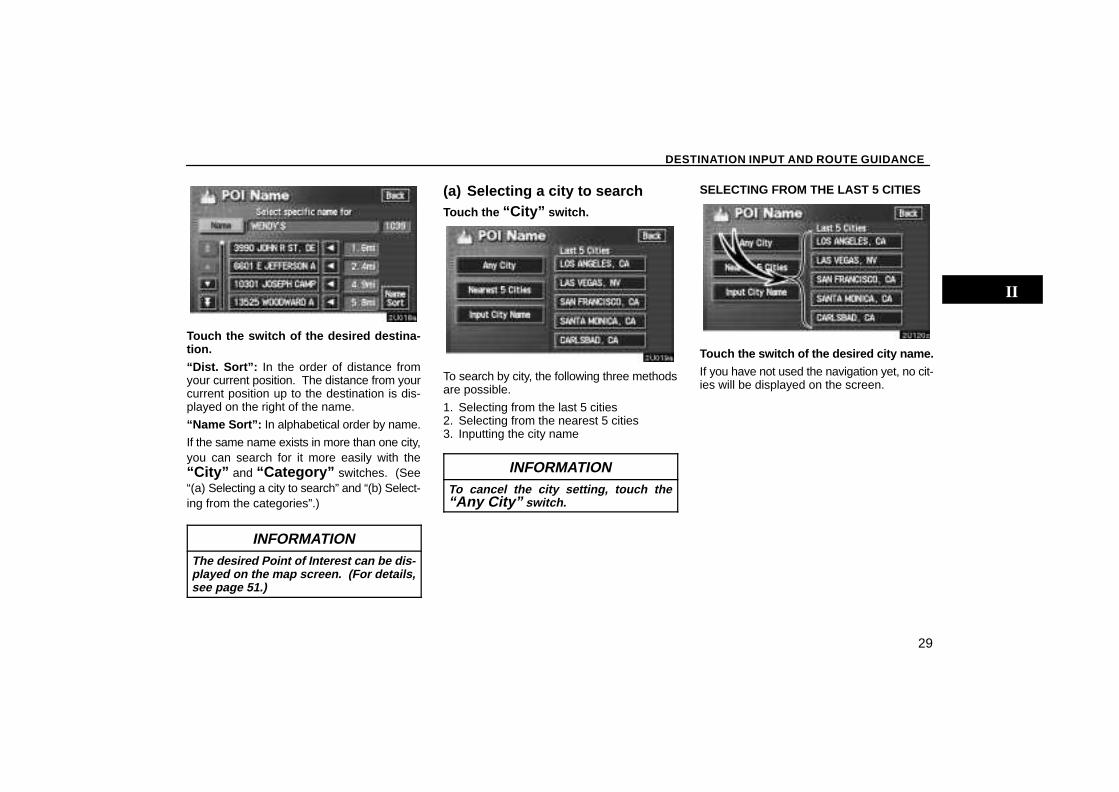
Touch the switch of the desired destina-tion.“Dist. Sort”: In the order of distance fromyour current position. The distance from yourcurrent position up to the destination is dis-played on the right of the name.
“Name Sort”: In alphabetical order by name.
If the same name exists in more than one city,you can search for it more easily with the“City” and “Category” switches. (See“(a) Selecting a city to search” and “(b) Select-ing from the categories”.)
INFORMATIONThe desired Point of Interest can be dis-played on the map screen. (For details,see page 51.)
(a) Selecting a city to searchTouch the “City” switch.
To search by city, the following three methodsare possible.
1. Selecting from the last 5 cities2. Selecting from the nearest 5 cities3. Inputting the city name
INFORMATIONTo cancel the city setting, touch the“Any City” switch.
SELECTING FROM THE LAST 5 CITIES
Touch the switch of the desired city name.If you have not used the navigation yet, no cit-ies will be displayed on the screen.
DESTINATION INPUT AND ROUTE GUIDANCE
30
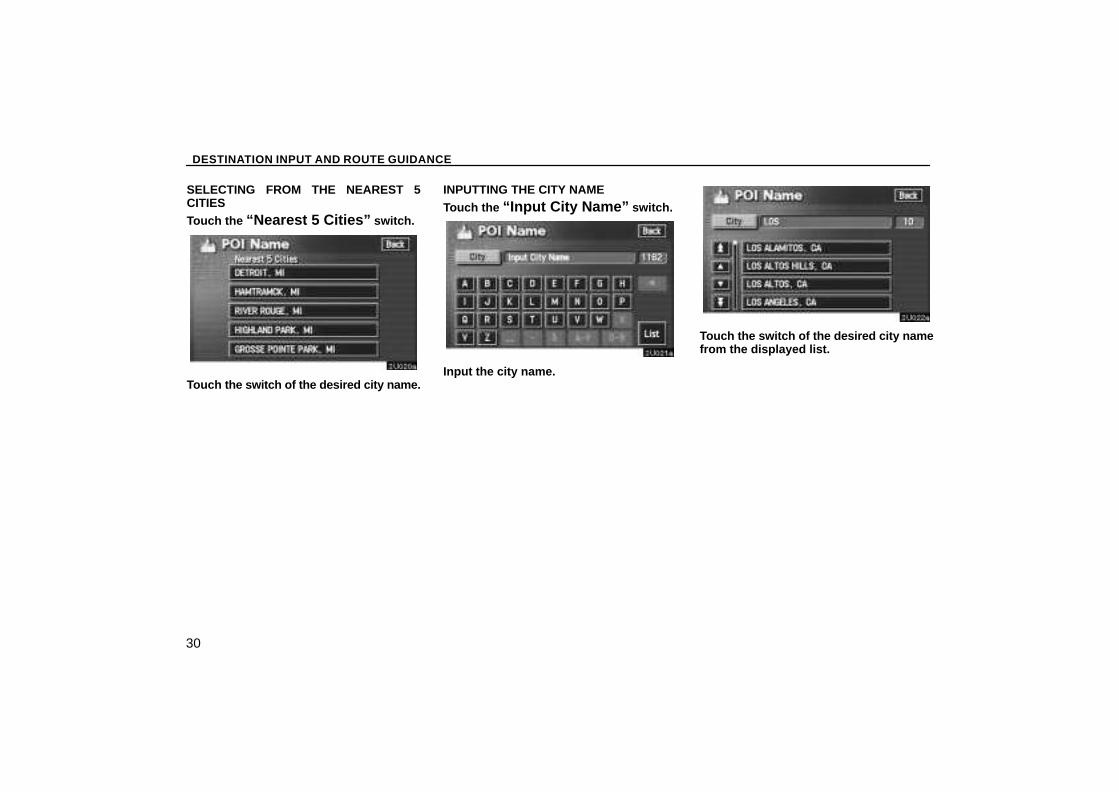
SELECTING FROM THE NEAREST 5CITIESTouch the “Nearest 5 Cities” switch.
Touch the switch of the desired city name.
INPUTTING THE CITY NAMETouch the “Input City Name” switch.
Input the city name.
Touch the switch of the desired city namefrom the displayed list.
DESTINATION INPUT AND ROUTE GUIDANCE
31
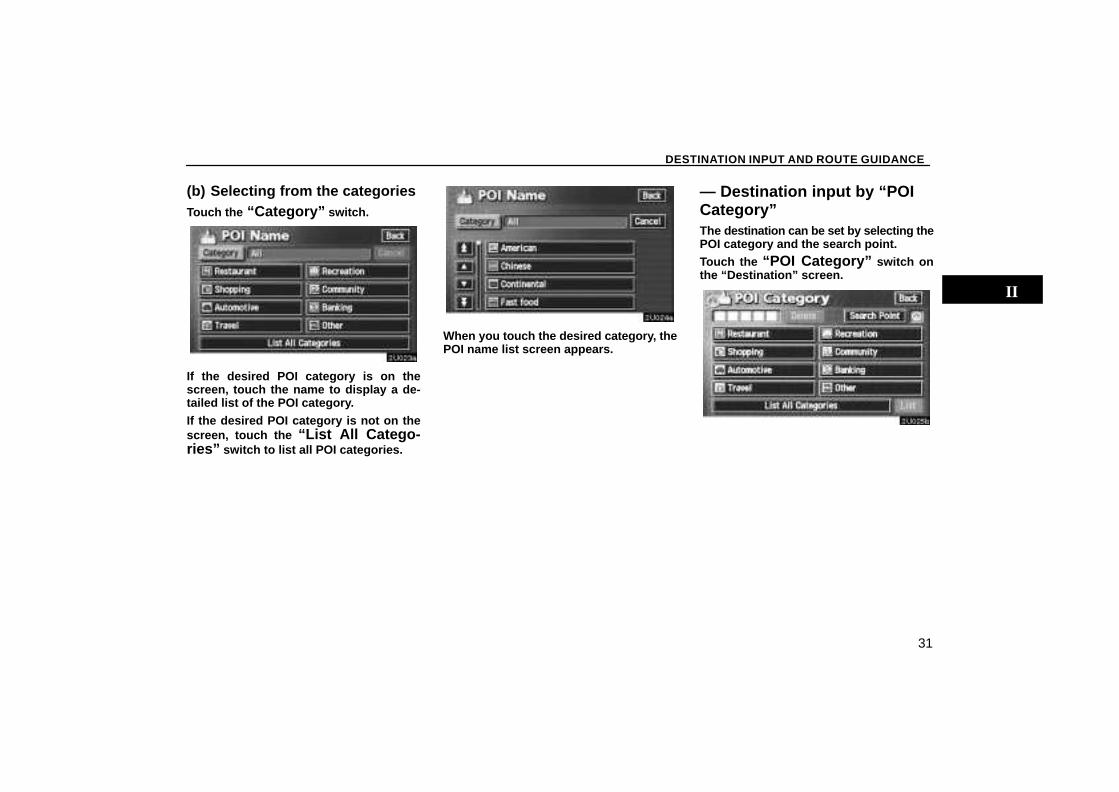
(b) Selecting from the categoriesTouch the “Category” switch.
If the desired POI category is on thescreen, touch the name to display a de-tailed list of the POI category.If the desired POI category is not on thescreen, touch the “List All Catego-ries” switch to list all POI categories.
When you touch the desired category, thePOI name list screen appears.
— Destination input by “POICategory”The destination can be set by selecting thePOI category and the search point.Touch the “POI Category” switch onthe “Destination” screen.
DESTINATION INPUT AND ROUTE GUIDANCE
32
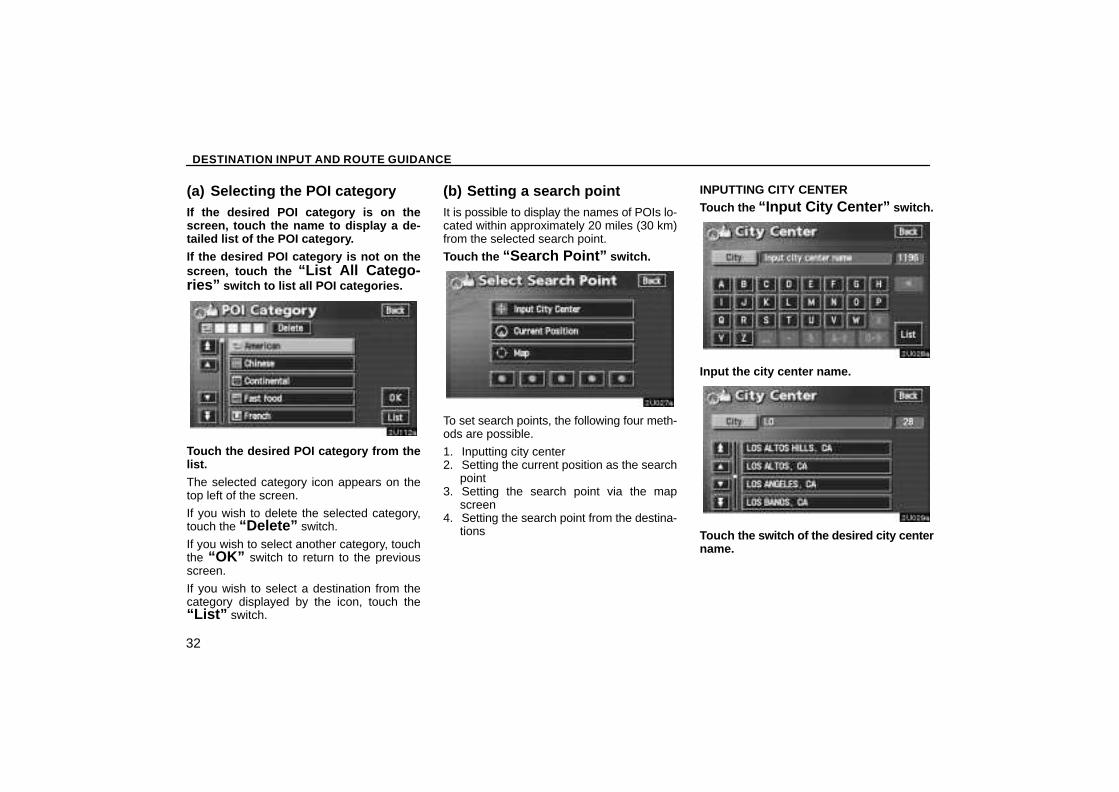
(a) Selecting the POI categoryIf the desired POI category is on thescreen, touch the name to display a de-tailed list of the POI category.If the desired POI category is not on thescreen, touch the “List All Catego-ries” switch to list all POI categories.
Touch the desired POI category from thelist.The selected category icon appears on thetop left of the screen.
If you wish to delete the selected category,touch the “Delete” switch.
If you wish to select another category, touchthe “OK” switch to return to the previousscreen.
If you wish to select a destination from thecategory displayed by the icon, touch the“List” switch.
(b) Setting a search pointIt is possible to display the names of POIs lo-cated within approximately 20 miles (30 km)from the selected search point.
Touch the “Search Point” switch.
To set search points, the following four meth-ods are possible.
1. Inputting city center2. Setting the current position as the search
point3. Setting the search point via the map
screen4. Setting the search point from the destina-
tions
INPUTTING CITY CENTERTouch the “Input City Center” switch.
Input the city center name.
Touch the switch of the desired city centername.
DESTINATION INPUT AND ROUTE GUIDANCE
33
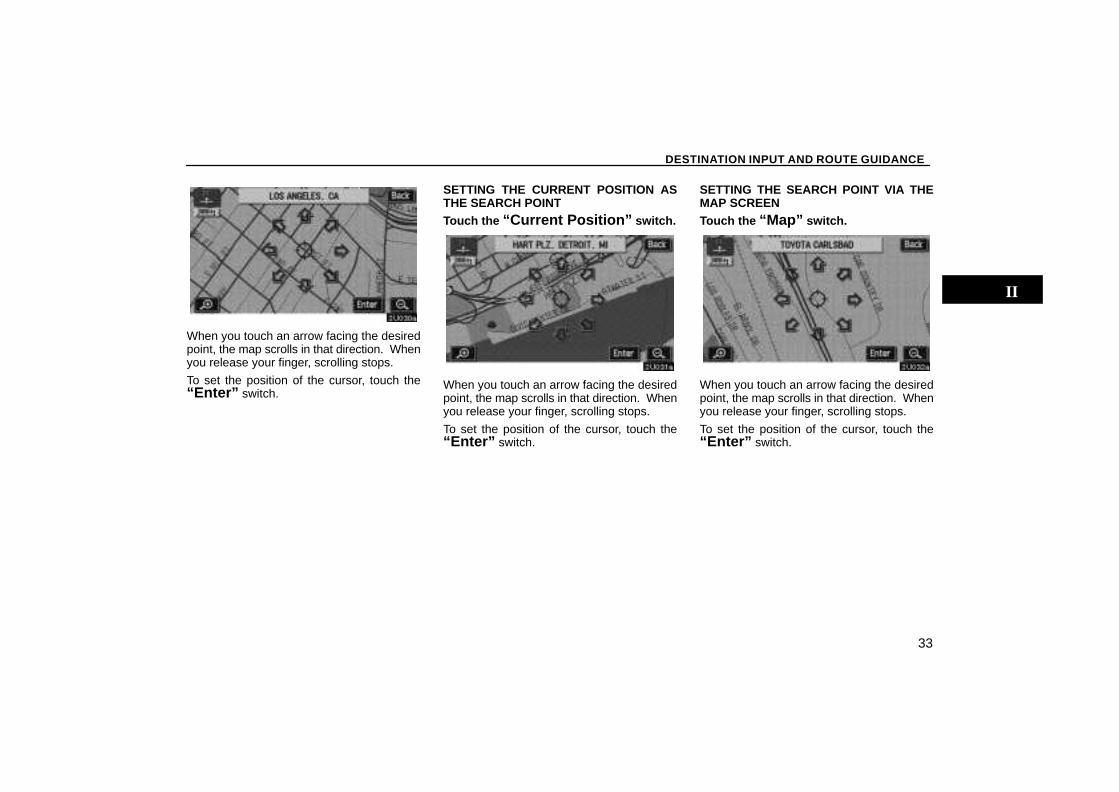
When you touch an arrow facing the desiredpoint, the map scrolls in that direction. Whenyou release your finger, scrolling stops.
To set the position of the cursor, touch the“Enter” switch.
SETTING THE CURRENT POSITION ASTHE SEARCH POINTTouch the “Current Position” switch.
When you touch an arrow facing the desiredpoint, the map scrolls in that direction. Whenyou release your finger, scrolling stops.
To set the position of the cursor, touch the“Enter” switch.
SETTING THE SEARCH POINT VIA THEMAP SCREENTouch the “Map” switch.
When you touch an arrow facing the desiredpoint, the map scrolls in that direction. Whenyou release your finger, scrolling stops.
To set the position of the cursor, touch the“Enter” switch.

DESTINATION INPUT AND ROUTE GUIDANCE
34
SETTING THE SEARCH POINT FROM THEDESTINATIONSTouch the destination switches at the bot-tom of the screen.
When you touch an arrow facing the desiredpoint, the map scrolls in that direction. Whenyou release your finger, scrolling stops.
To set the position of the cursor, touch the“Enter” switch.
(c) Selecting from a listYou can select the desired destination fromthe listed POI names.
When you touch the switch of the desireditem, the screen changes and displays themap location of the selected destinationand the route preference. (See “ — Enter-ing destination” on page 40.)“Dist.”: To sort in the order of distance fromyour current location.
“Icon”: To sort in the order of the POI icons.
“Name”: To sort in alphabetical order byname.
“On Route”: When the indicator is illumi-nated by touching this switch, the list of theitems searched along the route is displayed.
— Destination input by“Emergency”By touching the “Emergency” switchon the “Destination” screen, the displaychanges to a screen to select dealers, hos-pitals or police stations. During driving,only nearby police stations, hospitals ordealers are shown. The current position isshown with an address, the latitude andthe longitude at the top of the screen.
When you touch the desired emergency cate-gory, the selected emergency category list isdisplayed.

DESTINATION INPUT AND ROUTE GUIDANCE
35
Touch the switch of the desired destina-tion. The screen changes and displays themap location of the selected destinationand the route preference. (See “ — Enter-ing destination” on page 40.)“Dist. Sort”: To sort in the order of distancefrom your current position. The distance fromyour current position up to the destination isdisplayed on the right of the name.
“Name Sort”: To sort in alphabetical order byname.
INFORMATIONThe navigation system does not guide inareas where route guidance is unavail-able. (See page 11.)
— Destination input by“Memory”Touching the “Memory” switch on the“Destination” screen displays your list ofregistered memory points. See page 68for registering and editing memory points.
When you touch the switch of your de-sired memory point, the screen changesand displays the map location of the se-lected destination and the route prefer-ence. (See “ — Entering destination” onpage 40.)
There are 4 ways to list the memory pointby touching switches on the bottom of thescreen.“Date”: To list the memory points in order ofregistered date.
“Icon”: To list the memory points by the regis-tered icon.
“Name”: To list the memory points in alpha-betical order.
“Attribute”: To list the memory points by theregistered attribute.

DESTINATION INPUT AND ROUTE GUIDANCE
36
— Destination input by“Previous”Touch the “Previous” switch on the“Destination” screen.
The previous starting point and up to 99 pre-viously set destinations are displayed on thescreen.
Touch the switch of the desired destina-tion. The screen changes and displays themap location of the selected destinationand the route preference. (See “ — Enter-ing destination” on page 40.)“Date”: To list the previous destinations in or-der of registered date.
“Name”: To list the previous destinations inalphabetical order.
INFORMATIONYou can delete the list of previous des-tinations while your vehicle is stopped,if you no longer need them. (See page93.)
— Destination input by “Map”Touch the “Map” switch on the “Destina-tion” screen.
The screen changes and displays the maplocation that was previously displayedjust before the destination input operationand the route preference. (See “ — Enter-ing destination” on page 40.)
INFORMATIONGuidance starts if you touch the “En-ter” switch even while driving. Howev-er, the cursor cannot be moved.
DESTINATION INPUT AND ROUTE GUIDANCE
37
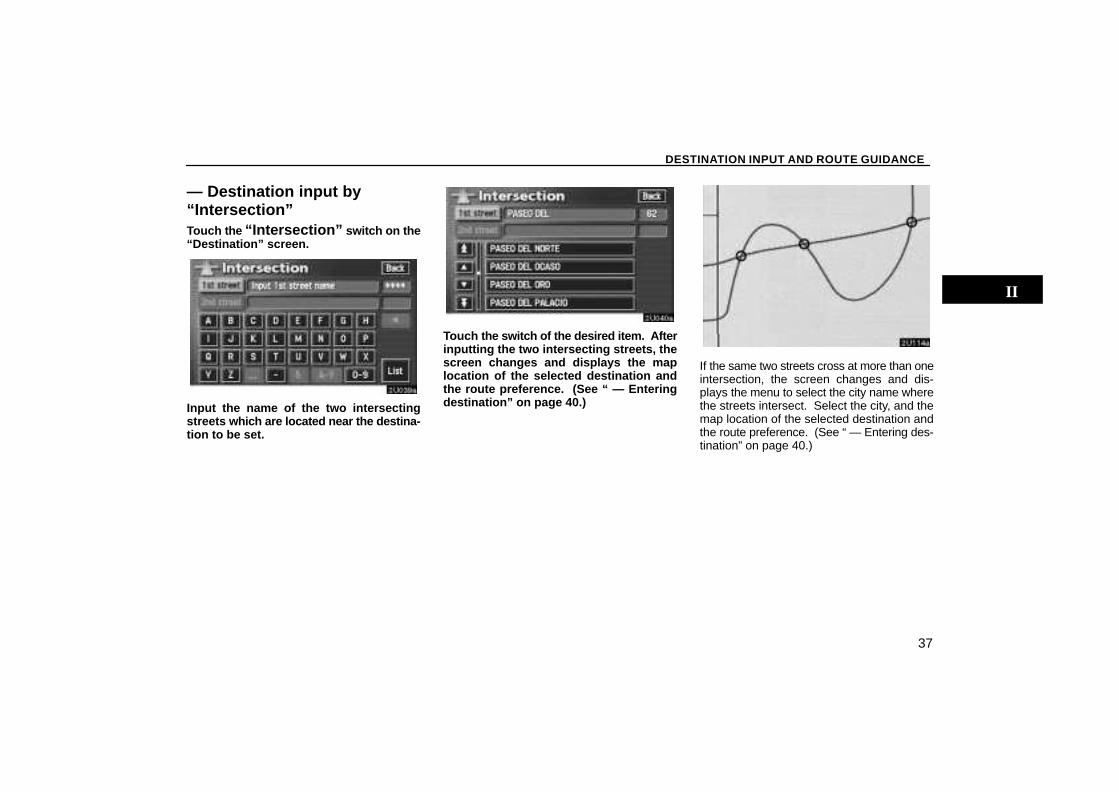
— Destination input by“Intersection”Touch the “Intersection” switch on the“Destination” screen.
Input the name of the two intersectingstreets which are located near the destina-tion to be set.
Touch the switch of the desired item. Afterinputting the two intersecting streets, thescreen changes and displays the maplocation of the selected destination andthe route preference. (See “ — Enteringdestination” on page 40.)
If the same two streets cross at more than oneintersection, the screen changes and dis-plays the menu to select the city name wherethe streets intersect. Select the city, and themap location of the selected destination andthe route preference. (See “ — Entering des-tination” on page 40.)

DESTINATION INPUT AND ROUTE GUIDANCE
38
— Destination input by“Freeway Ent./Exit”To input a freeway entrance or exit, touchthe “Freeway Ent./Exit” switch on the“Destination” screen.
Be sure to use the complete name of the free-way or highway, including the hyphen, whenentering the destination. Freeways and inter-states use an “I” (I–405). US highways usethe state designation before the number(CA–118).
Select the desired freeway by touchingthe switch.
You can then select either a freeway “En-trance” or “Exit” .
Touch the switch of the desired entranceor exit name. The screen changes and dis-plays the map location of the selected des-tination and the route preference. (See“ — Entering destination” on page 40.)“Dist. Sort”: In the order of distance fromyour current position. The distance from yourcurrent position up to the destination is dis-played on the right of the name.
“Name Sort”: In alphabetical order by name.
“Input Name”: An applicable list is displayedby touching this switch and inputting name.
DESTINATION INPUT AND ROUTE GUIDANCE
39
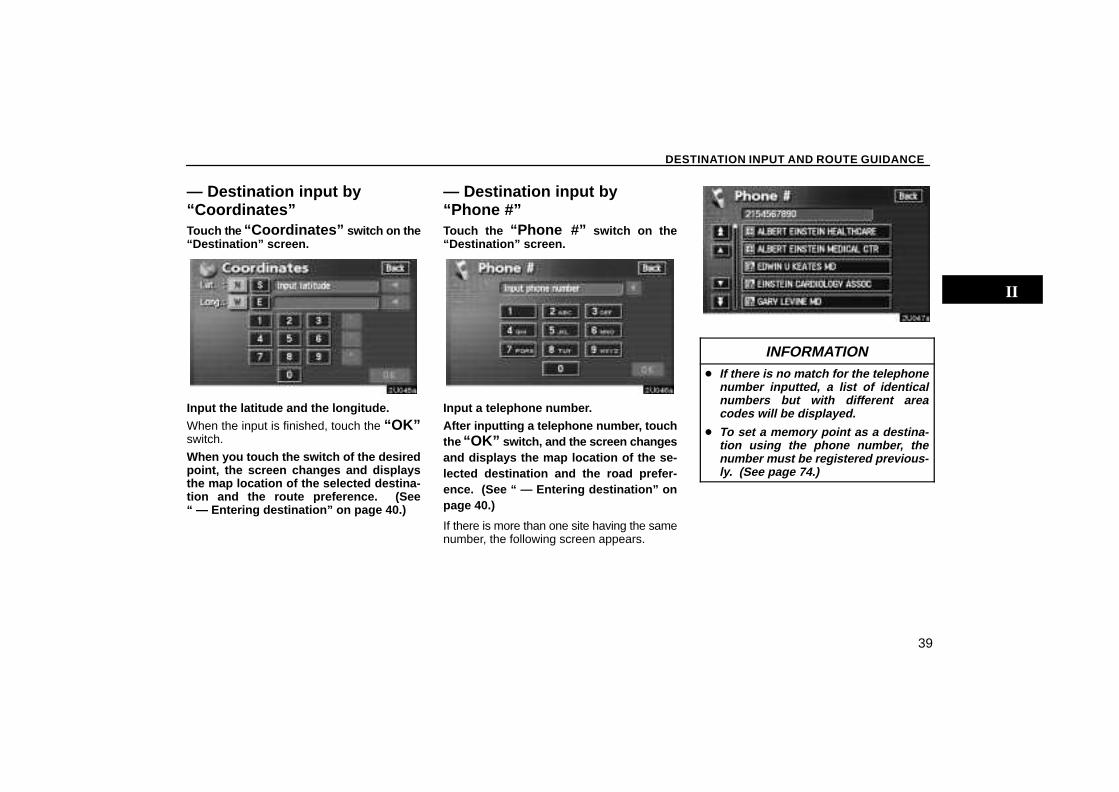
— Destination input by“Coordinates”Touch the “Coordinates” switch on the“Destination” screen.
Input the latitude and the longitude.When the input is finished, touch the “OK”switch.
When you touch the switch of the desiredpoint, the screen changes and displaysthe map location of the selected destina-tion and the route preference. (See“ — Entering destination” on page 40.)
— Destination input by “Phone #”Touch the “Phone #” switch on the“Destination” screen.
Input a telephone number.After inputting a telephone number, touchthe “OK” switch, and the screen changesand displays the map location of the se-lected destination and the road prefer-ence. (See “ — Entering destination” onpage 40.)
If there is more than one site having the samenumber, the following screen appears.
INFORMATION� If there is no match for the telephone
number inputted, a list of identicalnumbers but with different areacodes will be displayed.
� To set a memory point as a destina-tion using the phone number, thenumber must be registered previous-ly. (See page 74.)
DESTINATION INPUT AND ROUTE GUIDANCE
40
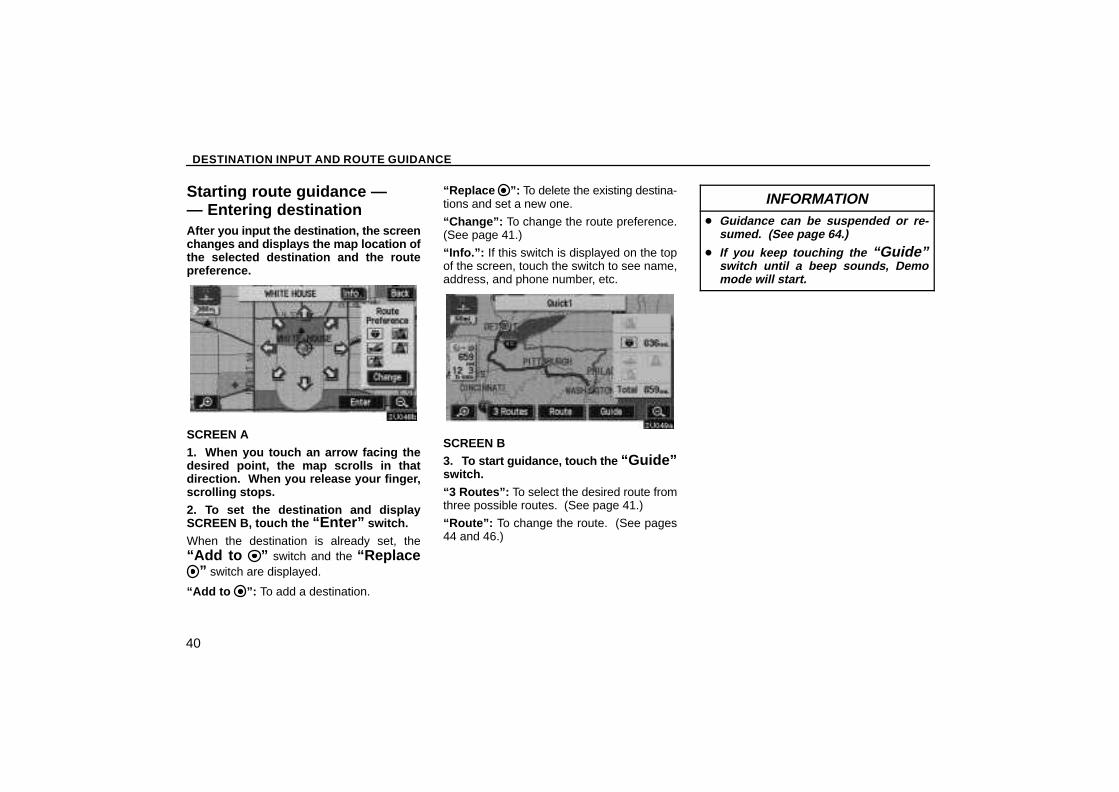
Starting route guidance —— Entering destinationAfter you input the destination, the screenchanges and displays the map location ofthe selected destination and the routepreference.
SCREEN A1. When you touch an arrow facing thedesired point, the map scrolls in thatdirection. When you release your finger,scrolling stops.2. To set the destination and displaySCREEN B, touch the “Enter” switch.When the destination is already set, the“Add to ” switch and the “Replace
” switch are displayed.
“Add to ”: To add a destination.
“Replace ”: To delete the existing destina-tions and set a new one.
“Change”: To change the route preference.(See page 41.)
“Info.”: If this switch is displayed on the topof the screen, touch the switch to see name,address, and phone number, etc.
SCREEN B3. To start guidance, touch the “Guide”switch.“3 Routes”: To select the desired route fromthree possible routes. (See page 41.)
“Route”: To change the route. (See pages44 and 46.)
INFORMATION� Guidance can be suspended or re-
sumed. (See page 64.)
� If you keep touching the “Guide”switch until a beep sounds, Demomode will start.
DESTINATION INPUT AND ROUTE GUIDANCE
41
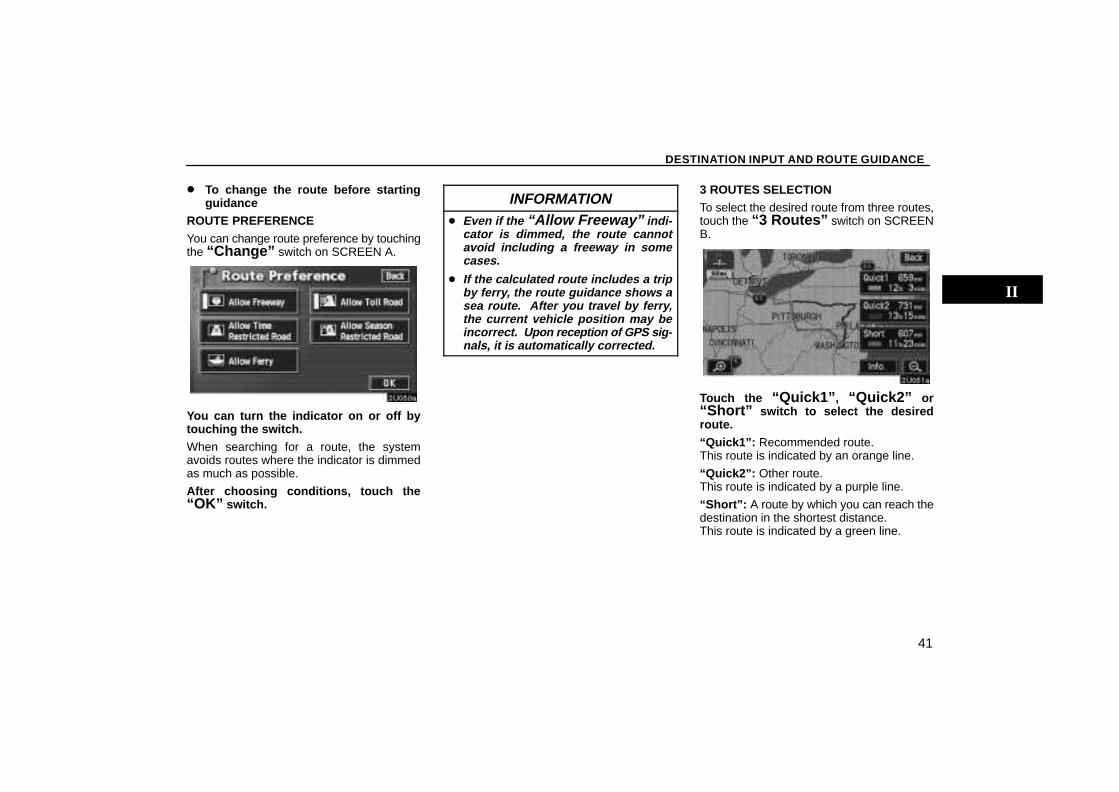
� To change the route before startingguidance
ROUTE PREFERENCEYou can change route preference by touchingthe “Change” switch on SCREEN A.
You can turn the indicator on or off bytouching the switch.When searching for a route, the systemavoids routes where the indicator is dimmedas much as possible.
After choosing conditions, touch the“OK” switch.
INFORMATION� Even if the “Allow Freeway” indi-
cator is dimmed, the route cannotavoid including a freeway in somecases.
� If the calculated route includes a tripby ferry, the route guidance shows asea route. After you travel by ferry,the current vehicle position may beincorrect. Upon reception of GPS sig-nals, it is automatically corrected.
3 ROUTES SELECTIONTo select the desired route from three routes,touch the “3 Routes” switch on SCREENB.
Touch the “Quick1” , “Quick2” or“Short” switch to select the desiredroute.“Quick1”: Recommended route. This route is indicated by an orange line.
“Quick2”: Other route.This route is indicated by a purple line.
“Short”: A route by which you can reach thedestination in the shortest distance.This route is indicated by a green line.
DESTINATION INPUT AND ROUTE GUIDANCE
42
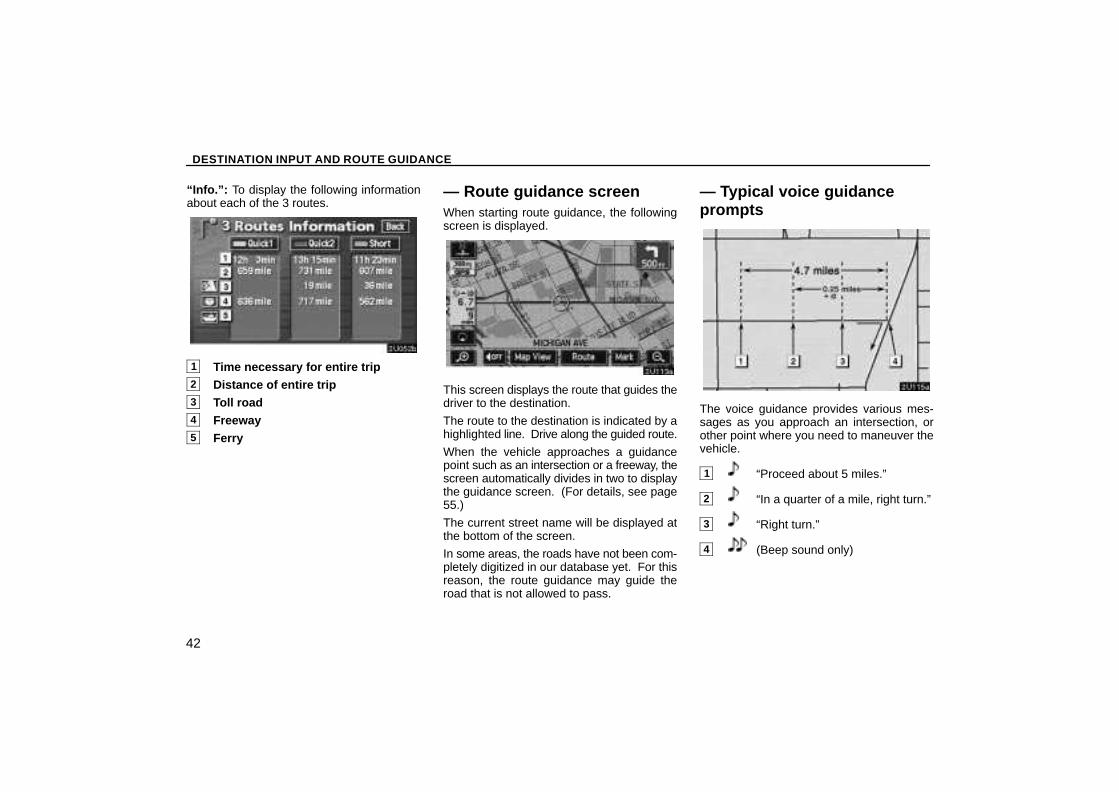
“Info.”: To display the following informationabout each of the 3 routes.
1 Time necessary for entire trip2 Distance of entire trip3 Toll road4 Freeway5 Ferry
— Route guidance screenWhen starting route guidance, the followingscreen is displayed.
This screen displays the route that guides thedriver to the destination.
The route to the destination is indicated by ahighlighted line. Drive along the guided route.
When the vehicle approaches a guidancepoint such as an intersection or a freeway, thescreen automatically divides in two to displaythe guidance screen. (For details, see page55.)
The current street name will be displayed atthe bottom of the screen.
In some areas, the roads have not been com-pletely digitized in our database yet. For thisreason, the route guidance may guide theroad that is not allowed to pass.
— Typical voice guidanceprompts
The voice guidance provides various mes-sages as you approach an intersection, orother point where you need to maneuver thevehicle.
1 “Proceed about 5 miles.”
2 “In a quarter of a mile, right turn.”
3 “Right turn.”
4 (Beep sound only)
DESTINATION INPUT AND ROUTE GUIDANCE
43
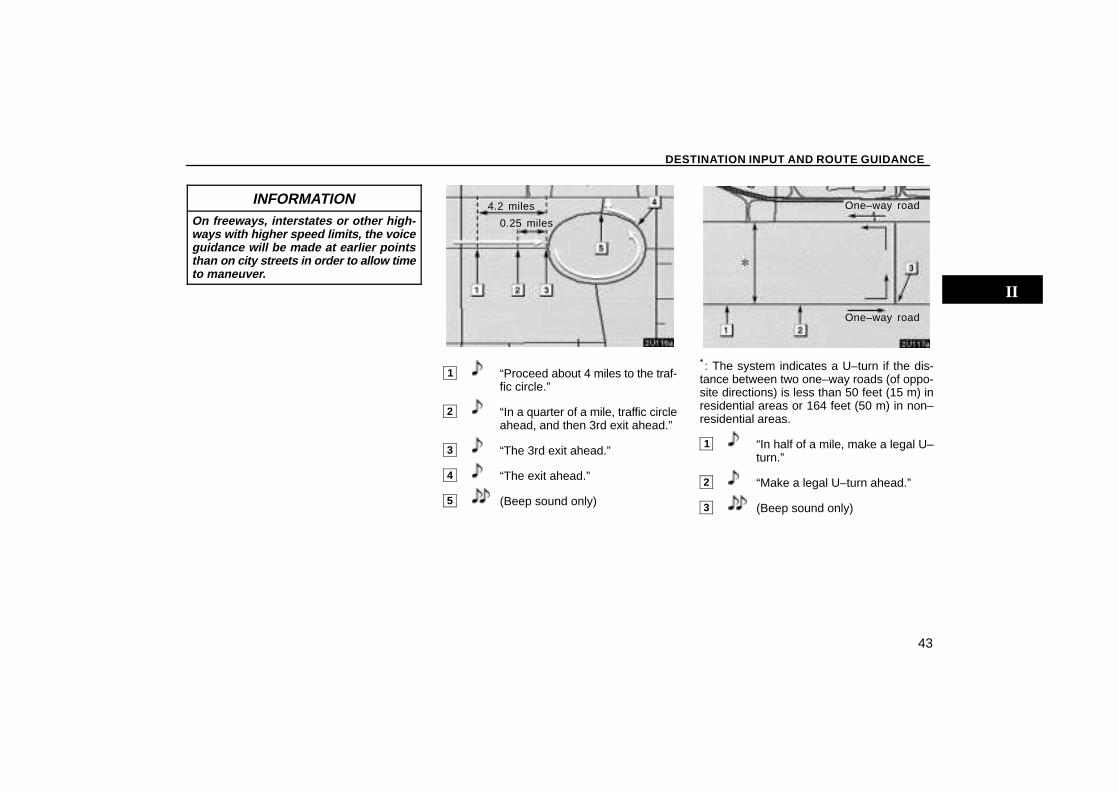
INFORMATIONOn freeways, interstates or other high-ways with higher speed limits, the voiceguidance will be made at earlier pointsthan on city streets in order to allow timeto maneuver.
4.2 miles
0.25 miles
1 “Proceed about 4 miles to the traf-fic circle.”
2 “In a quarter of a mile, traffic circleahead, and then 3rd exit ahead.”
3 “The 3rd exit ahead.”
4 “The exit ahead.”
5 (Beep sound only)
One–way road
One–way road
∗ : The system indicates a U–turn if the dis-tance between two one–way roads (of oppo-site directions) is less than 50 feet (15 m) inresidential areas or 164 feet (50 m) in non–residential areas.
1 “In half of a mile, make a legal U–turn.”
2 “Make a legal U–turn ahead.”
3 (Beep sound only)

DESTINATION INPUT AND ROUTE GUIDANCE
44
The system announces your approach to thefinal destination.
1 “Your destination is ahead.”
2 “You have arrived at your destina-tion. The route guidance is nowfinished.”
INFORMATION� If the system cannot determine the
current vehicle position correctly (incases of poor GPS signal reception),the voice guidance may be made ear-ly or delayed.
� If you did not hear the voice guidancecommand, push the “MAP/VOICE”button to hear it again.
� To adjust the voice guidance volume,see page 65.
Setting and deletingdestination(a) Adding destinationsYou can add destinations and searchagain for the routes.
1. Touch the “Route” switch.
2. Touch the “Add” switch of “Destina-tion”.
DESTINATION INPUT AND ROUTE GUIDANCE
45
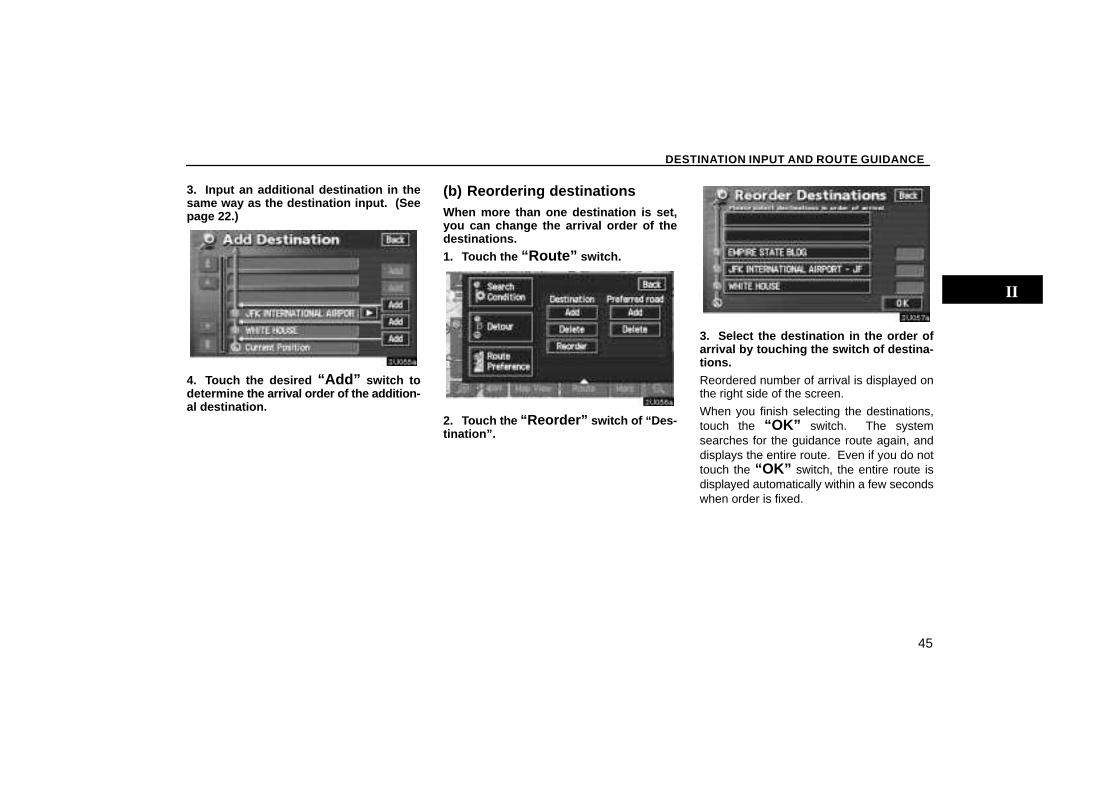
3. Input an additional destination in thesame way as the destination input. (Seepage 22.)
4. Touch the desired “Add” switch todetermine the arrival order of the addition-al destination.
(b) Reordering destinationsWhen more than one destination is set,you can change the arrival order of thedestinations.1. Touch the “Route” switch.
2. Touch the “Reorder” switch of “Des-tination”.
3. Select the destination in the order ofarrival by touching the switch of destina-tions.Reordered number of arrival is displayed onthe right side of the screen.
When you finish selecting the destinations,touch the “OK” switch. The systemsearches for the guidance route again, anddisplays the entire route. Even if you do nottouch the “OK” switch, the entire route isdisplayed automatically within a few secondswhen order is fixed.

DESTINATION INPUT AND ROUTE GUIDANCE
46
(c) Deleting destinationYou can delete a set destination.1. Touch the “Route” switch.
2. Touch the “Delete” switch of “Des-tination”.
3. When more than one destination is set,a list will appear on the screen. Touch thedestination on the screen you wish to de-lete.
“Delete All”: To delete all destinations on thelist.
4. A message appears to confirm your re-quest to delete. To delete the destina-tion(s), touch the “Yes” switch.If you touch the “Yes” switch, the data can-not be recovered.
If you touch the “No” switch, the previousscreen will return.
5. If more than one destination is set,touch the “OK” switch after deleting thedestinations. The system searches for theguidance route again, and displays the en-tire route.
Setting and deleting route(a) Adding preferred roadYou can add points you wish to passthrough.
1. Touch the “Route” switch.
2. Touch the “Add” switch of “Preferredroad”.
DESTINATION INPUT AND ROUTE GUIDANCE
47
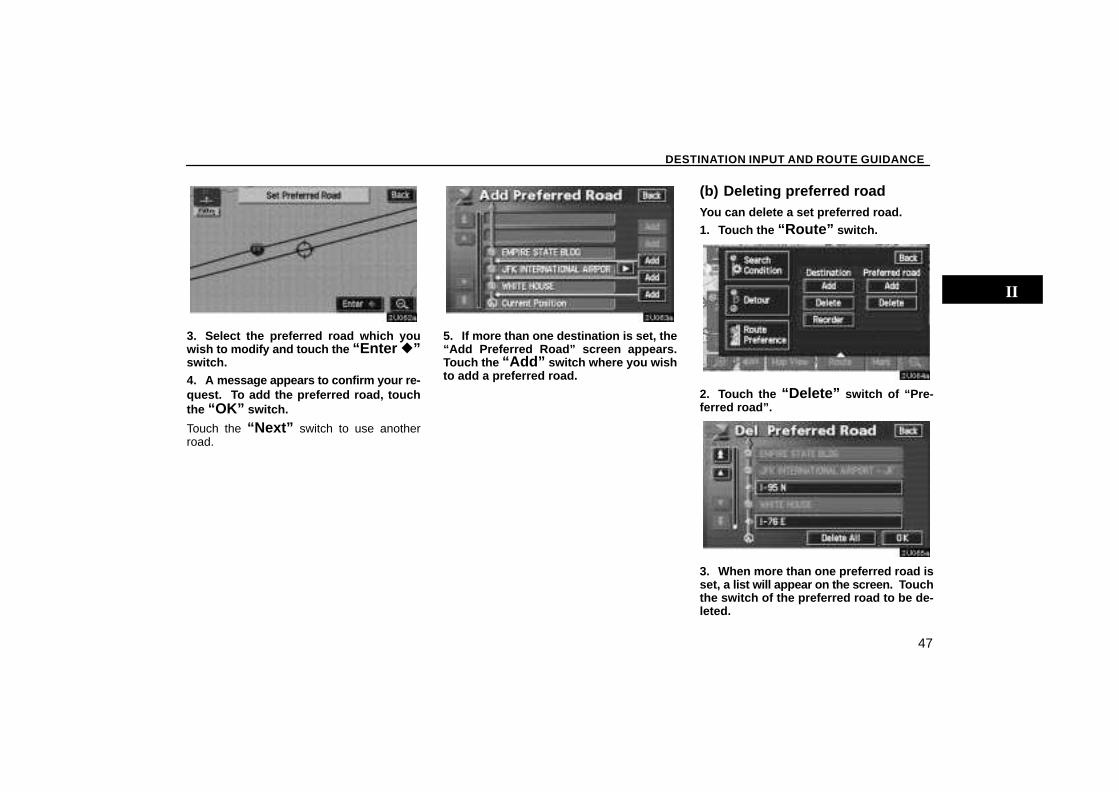
3. Select the preferred road which youwish to modify and touch the “Enter �”switch.4. A message appears to confirm your re-quest. To add the preferred road, touchthe “OK” switch.
Touch the “Next” switch to use anotherroad.
5. If more than one destination is set, the“Add Preferred Road” screen appears.Touch the “Add” switch where you wishto add a preferred road.
(b) Deleting preferred roadYou can delete a set preferred road.1. Touch the “Route” switch.
2. Touch the “Delete” switch of “Pre-ferred road”.
3. When more than one preferred road isset, a l ist will appear on the screen. T ouchthe switch of the preferred road to be de-leted.
DESTINATION INPUT AND ROUTE GUIDANCE
48
“Delete All”: To delete all the listed preferredroad.
4. A message appears to confirm your re-quest to delete. To delete the preferredroad, touch the “Yes” switch.If you touch the “Yes” switch, the data can-not be recovered.
If you want to try again or cancel deletion,touch the “No” switch. The previous screenwill return.
5. If more than one preferred road is set,touch the “OK” switch after deleting thepreferred road. The system searches forthe guidance route again, and displays en-tire route.
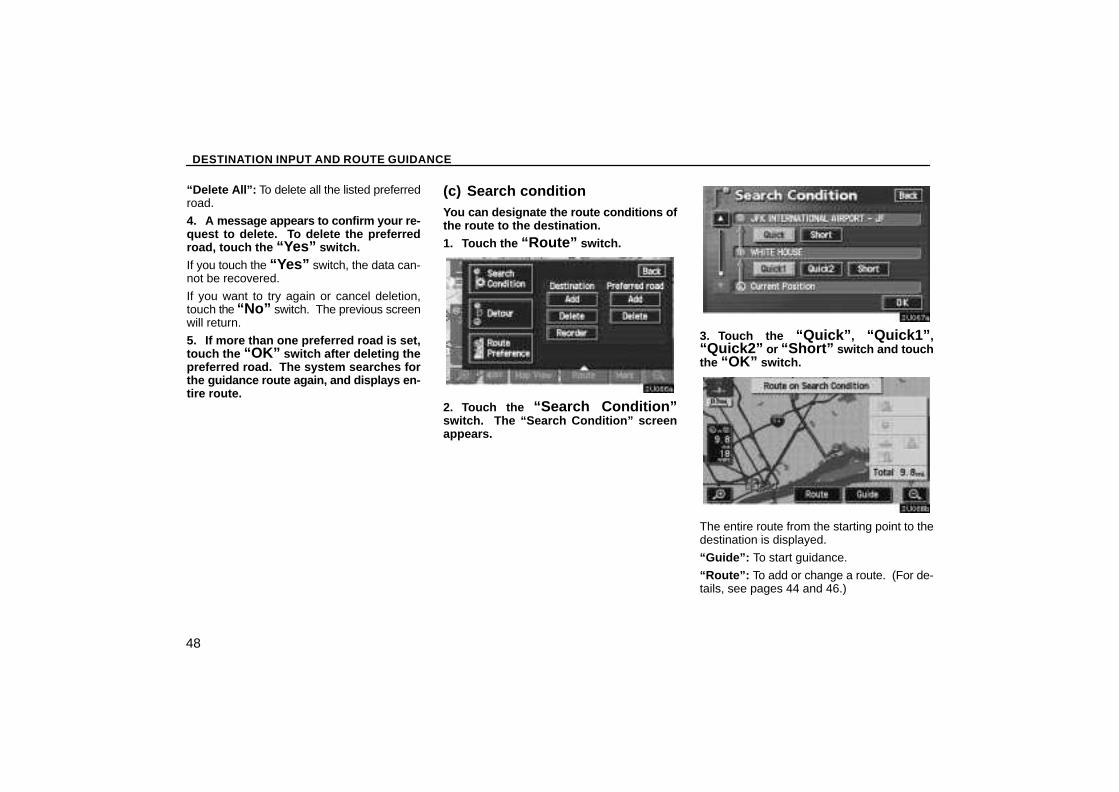
(c) Search conditionYou can designate the route conditions ofthe route to the destination.1. Touch the “Route” switch.
2. Touch the “Search Condition”switch. The “Search Condition” screenappears.
3. Touch the “Quick” , “Quick1” ,“Quick2” or “Short” switch and touchthe “OK” switch.
The entire route from the starting point to thedestination is displayed.
“Guide”: To start guidance.
“Route”: To add or change a route. (For de-tails, see pages 44 and 46.)
DESTINATION INPUT AND ROUTE GUIDANCE
49
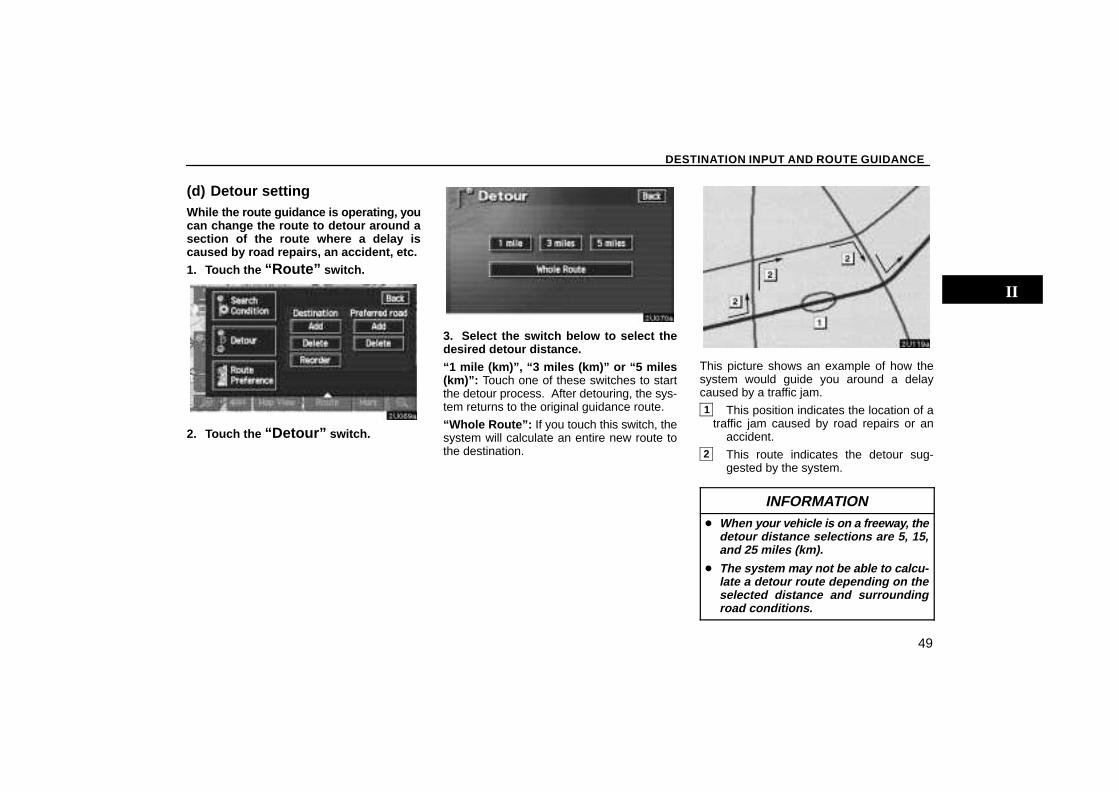
(d) Detour settingWhile the route guidance is operating, youcan change the route to detour around asection of the route where a delay iscaused by road repairs, an accident, etc.1. Touch the “Route” switch.
2. Touch the “Detour” switch.
3. Select the switch below to select thedesired detour distance.“1 mile (km)”, “3 miles (km)” or “5 miles(km)”: Touch one of these switches to startthe detour process. After detouring, the sys-tem returns to the original guidance route.
“Whole Route”: If you touch this switch, thesystem will calculate an entire new route tothe destination.
This picture shows an example of how thesystem would guide you around a delaycaused by a traffic jam.1 This position indicates the location of a
traffic jam caused by road repairs or anaccident.
2 This route indicates the detour sug-gested by the system.
INFORMATION� When your vehicle is on a freeway, the
detour distance selections are 5, 15,and 25 miles (km).
� The system may not be able to calcu-late a detour route depending on theselected distance and surroundingroad conditions.

DESTINATION INPUT AND ROUTE GUIDANCE
50
(e) Route preferenceYou are given a number of choices on theconditions which the system uses to de-termine the route to your destination.1. Touch the “Route” switch.
2. Touch the “Route Preference”switch to change the c onditions which areto determine the route to your destination.
3. You can turn the indicator on or off bytouching the switch.When searching for a route, the systemavoids routes where the indicator is dimmedas much as possible.
After choosing the conditions, touch the“OK” switch.
(f) Starting route from adjacentroadYou can start the route guidance from theadjacent road.(ex. When the route guidance guides theroute on the freeway, but you drive on the par-allel way along a freeway.)
1. Touch the “Route” switch.
2. Touch the “Start from AdjacentRoad” switch.When there is no adjacent road, this switchwill not appear.
DESTINATION INPUT AND ROUTE GUIDANCE
51
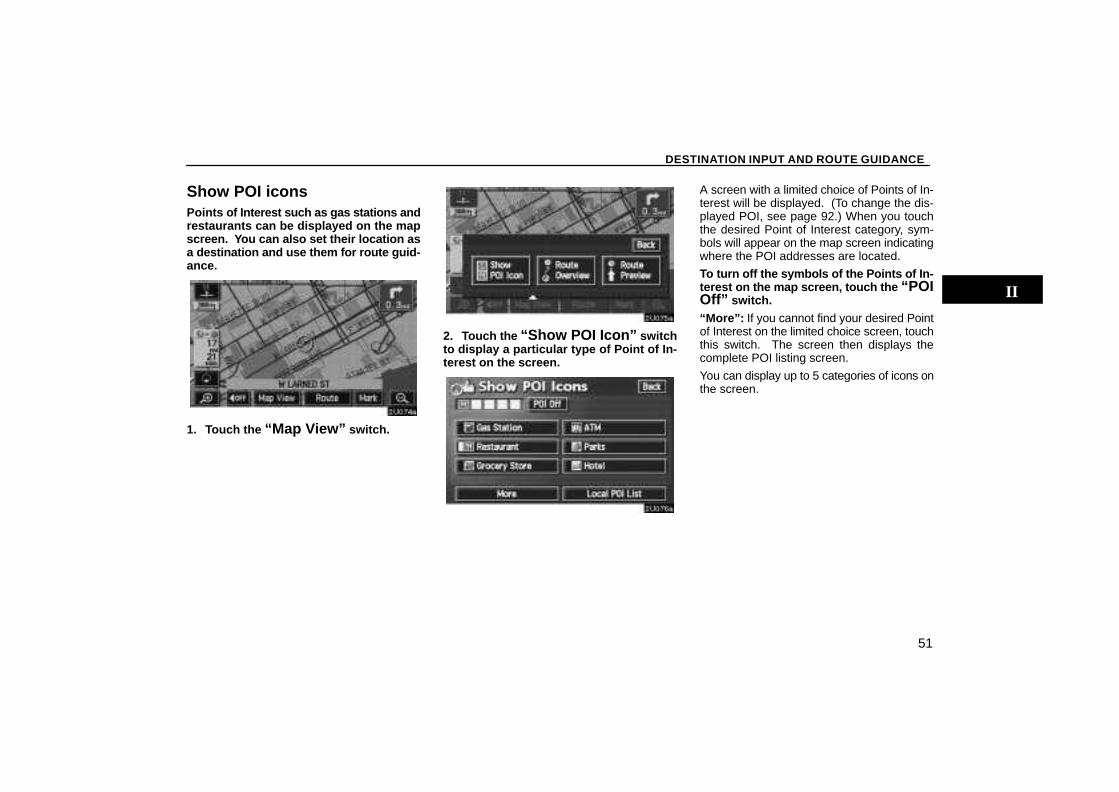
Show POI iconsPoints of Interest such as gas stations andrestaurants can be displayed on the mapscreen. You can also set their location asa destination and use them for route guid-ance.
1. Touch the “Map View” switch.
2. Touch the “Show POI Icon” switchto display a particular type of Point of In-terest on the screen.
A screen with a limited choice of Points of In-terest will be displayed. (To change the dis-played POI, see page 92.) When you touchthe desired Point of Interest category, sym-bols will appear on the map screen indicatingwhere the POI addresses are located.
To turn off the symbols of the Points of In-terest on the map screen, touch the “POIOff” switch.“More”: If you cannot find your desired Pointof Interest on the limited choice screen, touchthis switch. The screen then displays thecomplete POI listing screen.
You can display up to 5 categories of icons onthe screen.
DESTINATION INPUT AND ROUTE GUIDANCE
52
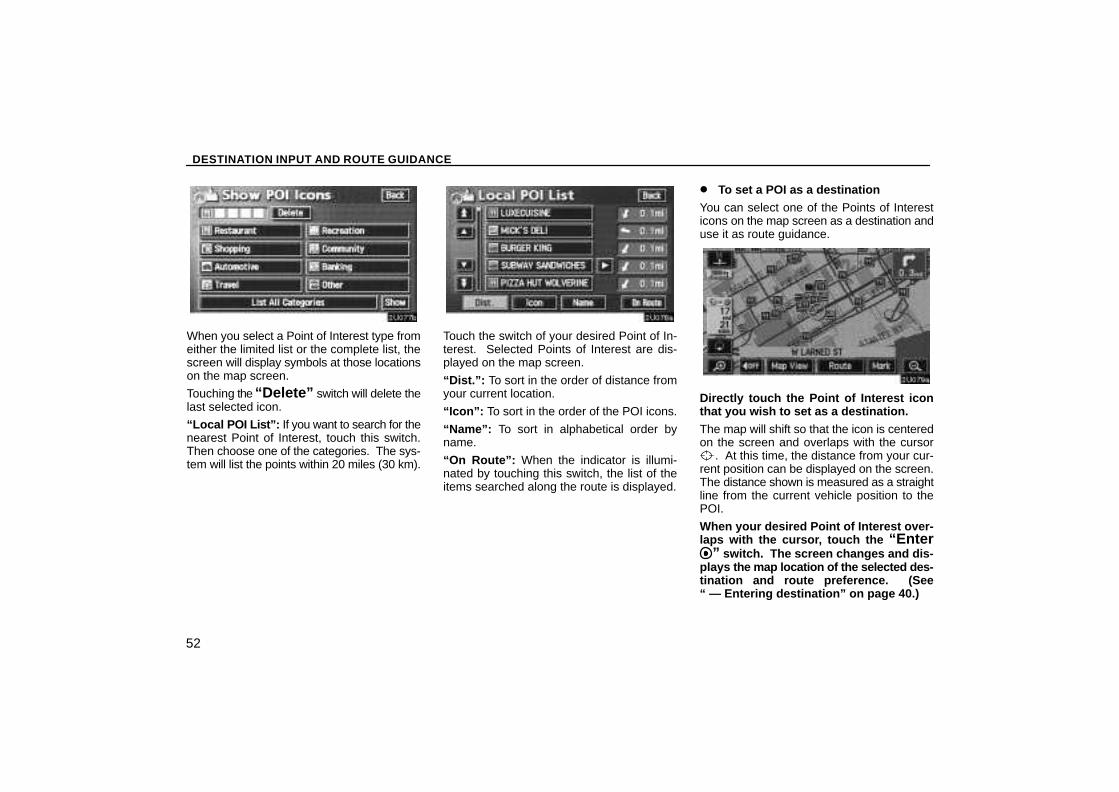
When you select a Point of Interest type fromeither the limited list or the complete list, thescreen will display symbols at those locationson the map screen.
Touching the “Delete” switch will delete thelast selected icon.
“Local POI Li st”: If you want to search for thenearest Point of Interest, touch this switch.Then choose one of the categories. The sys-tem will list the points within 20 miles (30 km).
Touch the switch of your desired Point of In-terest. Selected Points of Interest are dis-played on the map screen.
“Dist.”: To sort in the order of distance fromyour current location.
“Icon”: To sort in the order of the POI icons.
“Name”: To sort in alphabetical order byname.
“On Route”: When the indicator is illumi-nated by touching this switch, the list of theitems searched along the route is displayed.
� To set a POI as a destinationYou can select one of the Points of Interesticons on the map screen as a destination anduse it as route guidance.
Directly touch the Point of Interest iconthat you wish to set as a destination.The map will shift so that the icon is centeredon the screen and overlaps with the cursor
. At this time, the distance from your cur-rent position can be displayed on the screen.The distance shown is measured as a straightline from the current vehicle position to thePOI.
When your desired Point of Interest over-laps with the cursor, touch the “Enter
” switch. The screen changes and dis-plays the map location of the selected des-tination and route preference. (See“ — Entering destination” on page 40.)
DESTINATION INPUT AND ROUTE GUIDANCE
53
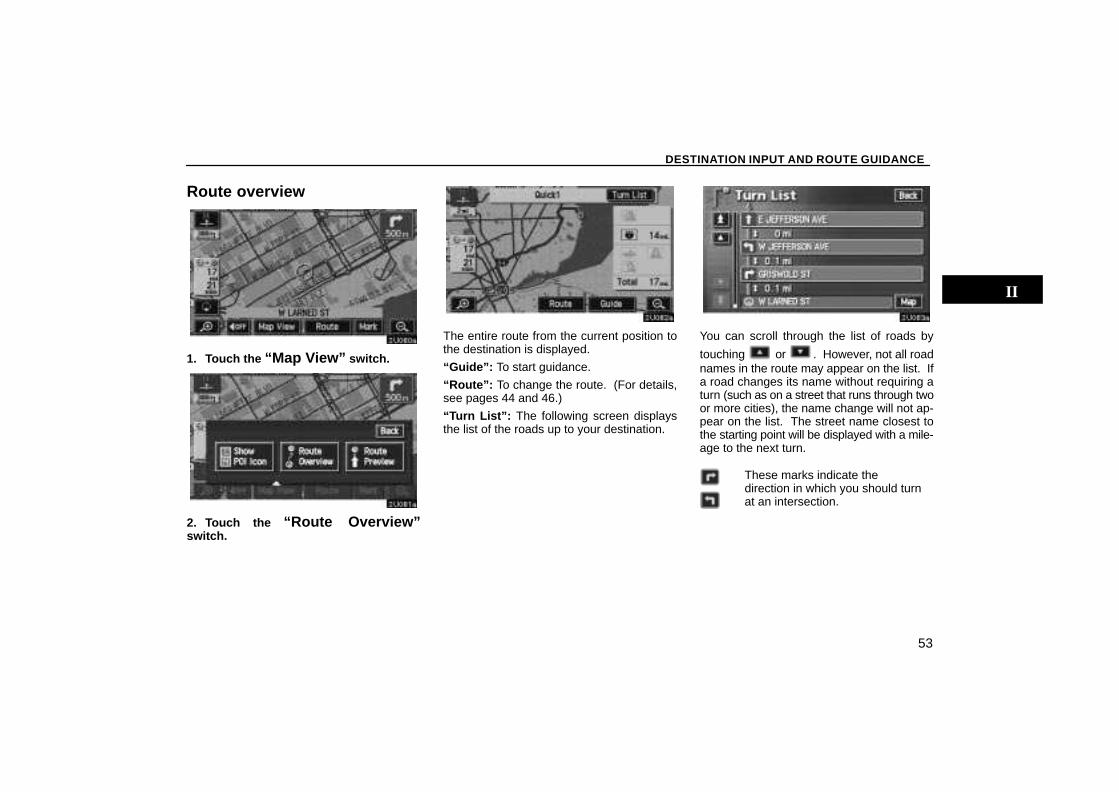
Route overview
1. Touch the “Map View” switch.
2. Touch the “Route Overview”switch.
The entire route from the current position tothe destination is displayed.
“Guide”: To start guidance.
“Route”: To change the route. (For details,see pages 44 and 46.)
“Turn List”: The following screen displaysthe list of the roads up to your destination.
You can scroll through the list of roads by
touching or . However, not all roadnames in the route may appear on the list. Ifa road changes its name without requiring aturn (such as on a street that runs through twoor more cities), the name change will not ap-pear on the list. The street name closest tothe starting point will be displayed with a mile-age to the next turn.
These marks indicate thedirection in which you should turnat an intersection.
DESTINATION INPUT AND ROUTE GUIDANCE
54
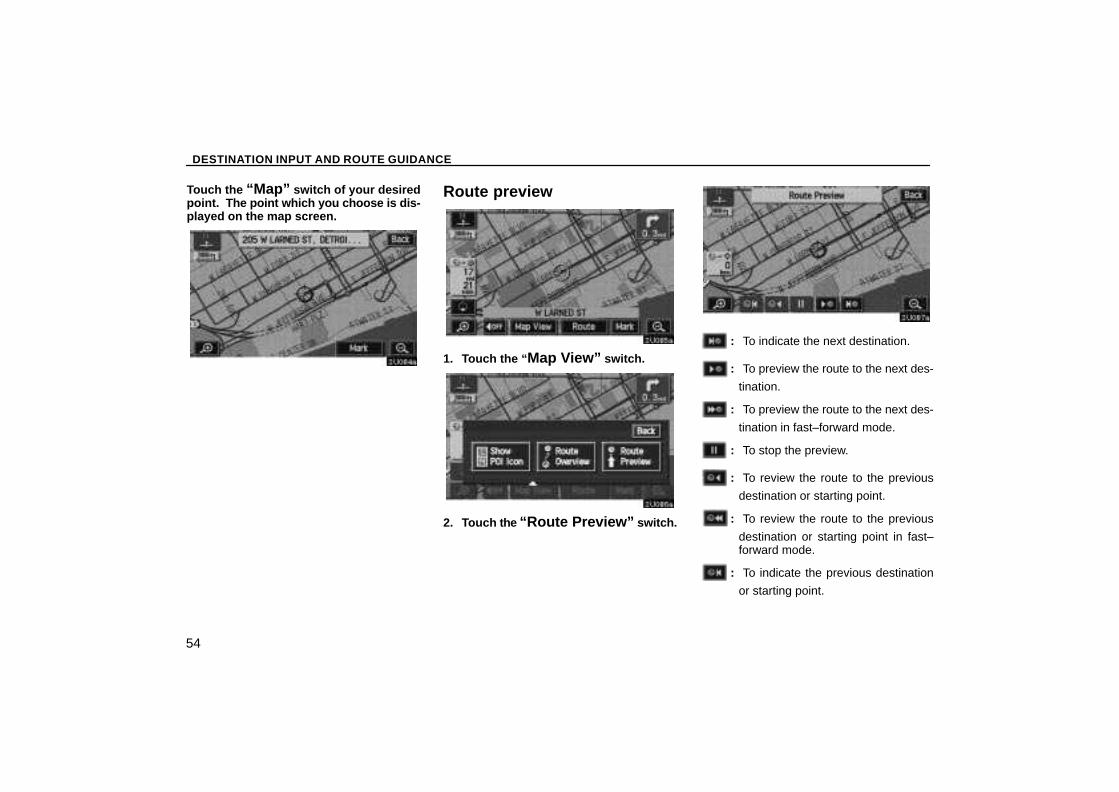
Touch the “Map” switch of your desiredpoint. The point which you choose is dis-played on the map screen.
Route preview
1. Touch the “ Map View” switch.
2. Touch the “Route Preview” switch.
: To indicate the next destination.
: To preview the route to the next des-
tination.
: To preview the route to the next des-
tination in fast–forward mode.
: To stop the preview.
: To review the route to the previous
destination or starting point.
: To review the route to the previous
destination or starting point in fast–forward mode.
: To indicate the previous destination
or starting point.
DESTINATION INPUT AND ROUTE GUIDANCE
55
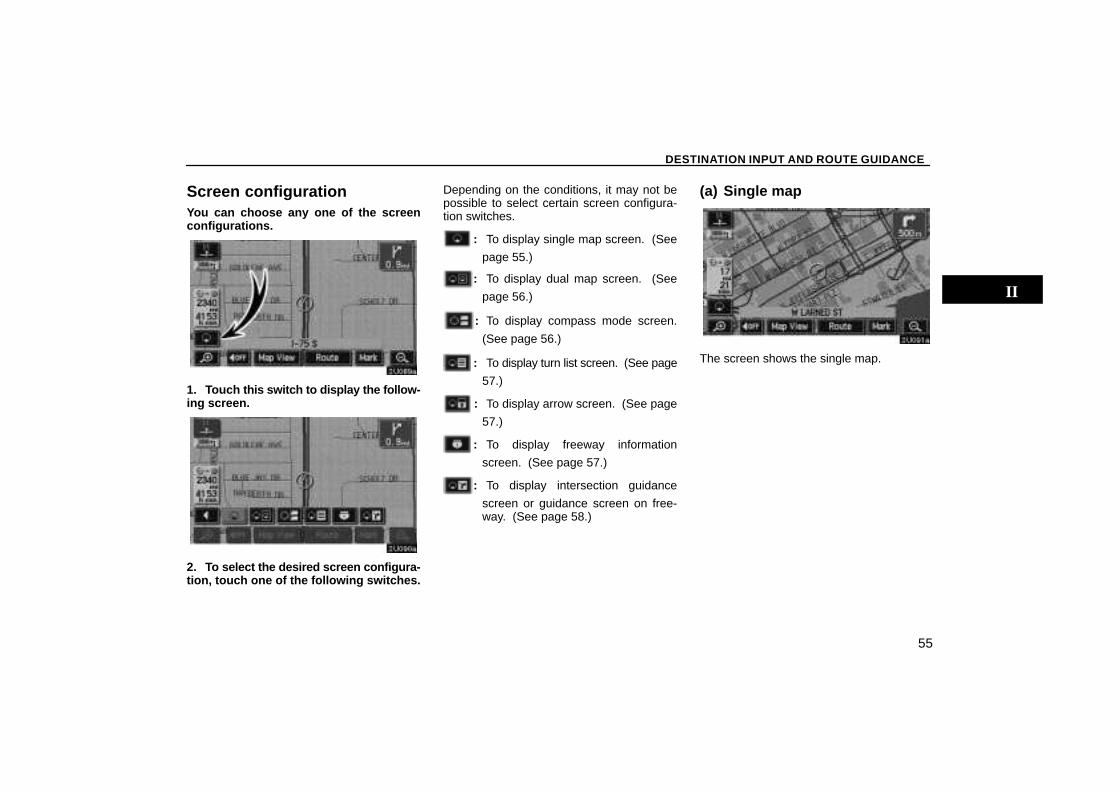
Screen configurationYou can choose any one of the screenconfigurations.
1. Touch this switch to display the follow-ing screen.
2. To select the desired screen configura-tion, touch one of the following switches.
Depending on the conditions, it may not bepossible to select certain screen configura-tion switches.
: To display single map screen. (See
page 55.)
: To display dual map screen. (See
page 56.)
: To display compass mode screen.
(See page 56.)
: To display turn list screen. (See page
57.)
: To display arrow screen. (See page
57.)
: To display freeway information
screen. (See page 57.)
: To display intersection guidance
screen or guidance screen on free-way. (See page 58.)
(a) Single map
The screen shows the single map.
DESTINATION INPUT AND ROUTE GUIDANCE
56
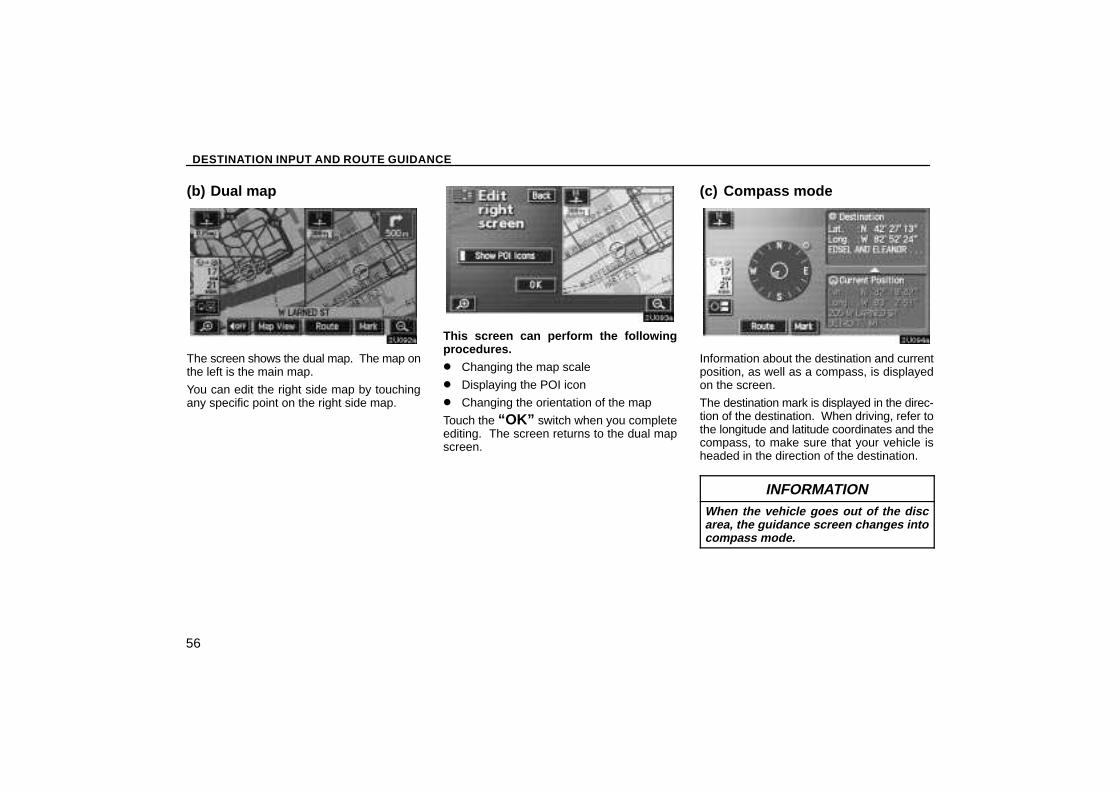
(b) Dual map
The screen shows the dual map. The map onthe left is the main map.
You can edit the right side map by touchingany specific point on the right side map.
This screen can perform the followingprocedures.� Changing the map scale
� Displaying the POI icon
� Changing the orientation of the map
Touch the “OK” switch when you completeediting. The screen returns to the dual mapscreen.
(c) Compass mode
Information about the destination and currentposition, as well as a compass, is displayedon the screen.
The destination mark is displayed in the direc-tion of the destination. When driving, refer tothe longitude and latitude coordinates and thecompass, to make sure that your vehicle isheaded in the direction of the destination.
INFORMATIONWhen the vehicle goes out of the discarea, the guidance screen changes intocompass mode.
DESTINATION INPUT AND ROUTE GUIDANCE
57
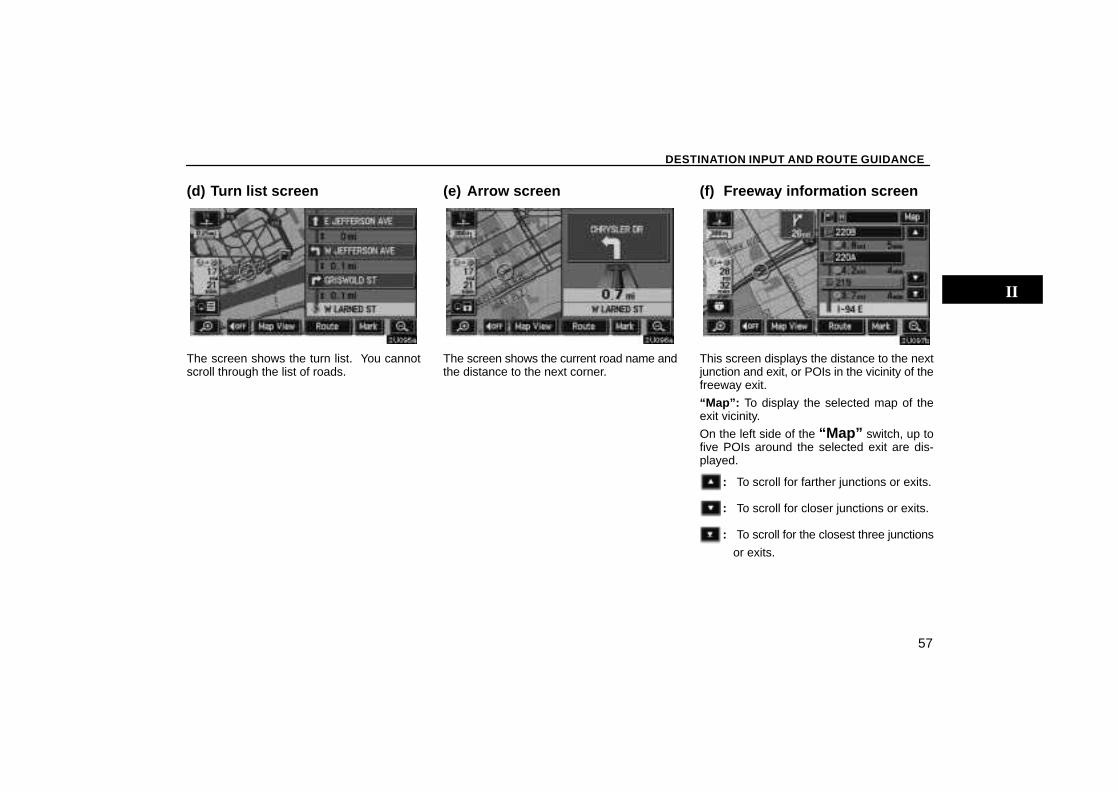
(d) Turn list screen
The screen shows the turn list. You cannotscroll through the list of roads.
(e) Arrow screen
The screen shows the current road name andthe distance to the next corner.
(f) Freeway information screen
This screen displays the distance to the nextjunction and exit, or POIs in the vicinity of thefreeway exit.
“Map”: To display the selected map of theexit vicinity.
On the left side of the “Map” switch, up tofive POIs around the selected exit are dis-played.
: To scroll for farther junctions or exits.
: To scroll for closer junctions or exits.
: To scroll for the closest three junctions
or exits.
DESTINATION INPUT AND ROUTE GUIDANCE
58
INFORMATIONWhen you drive on a freeway, the screenis automatically divided into two parts,with freeway information screen on theright side.
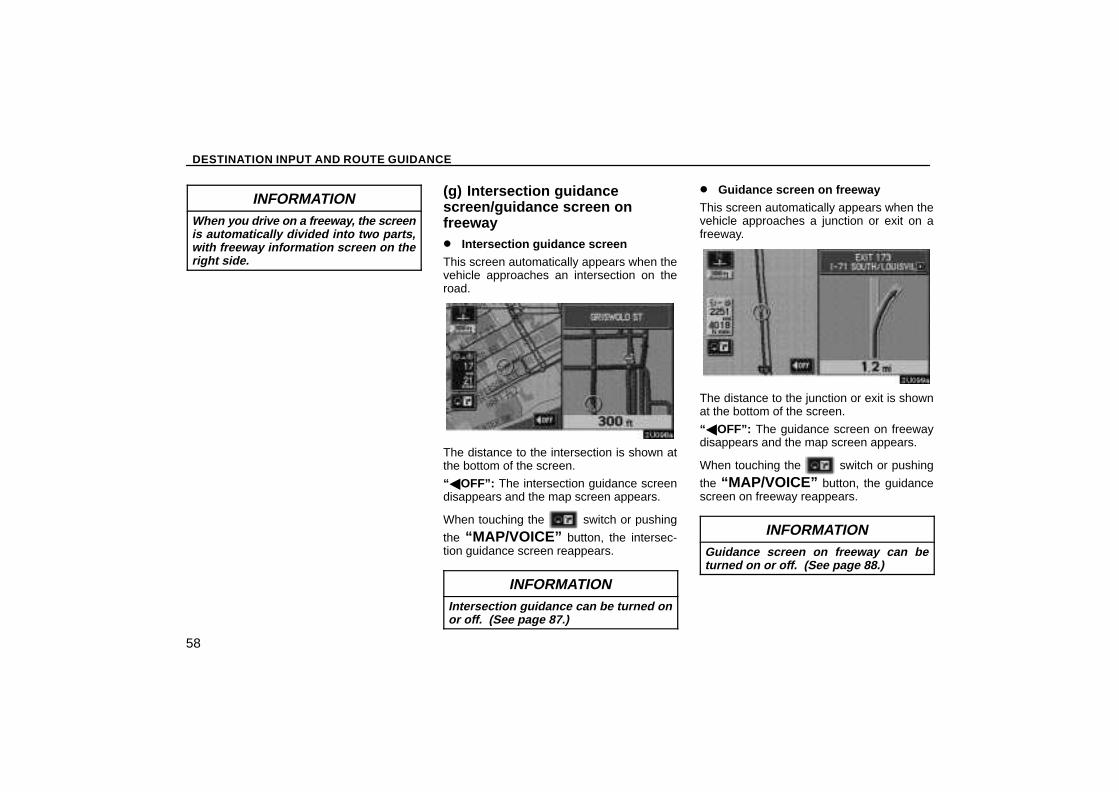
(g) Intersection guidancescreen/guidance screen onfreeway� Intersection guidance screenThis screen automatically appears when thevehicle approaches an intersection on theroad.
The distance to the intersection is shown atthe bottom of the screen.
“�OFF”: The intersection guidance screendisappears and the map screen appears.
When touching the switch or pushing
the “MAP/VOICE” button, the intersec-tion guidance screen reappears.
INFORMATIONIntersection guidance can be turned onor off. (See page 87.)
� Guidance screen on freewayThis screen automatically appears when thevehicle approaches a junction or exit on afreeway.
The distance to the junction or exit is shownat the bottom of the screen.
“�OFF”: The guidance screen on freewaydisappears and the map screen appears.
When touching the switch or pushing
the “MAP/VOICE” button, the guidancescreen on freeway reappears.
INFORMATIONGuidance screen on freeway can beturned on or off. (See page 88.)
DESTINATION INPUT AND ROUTE GUIDANCE
59
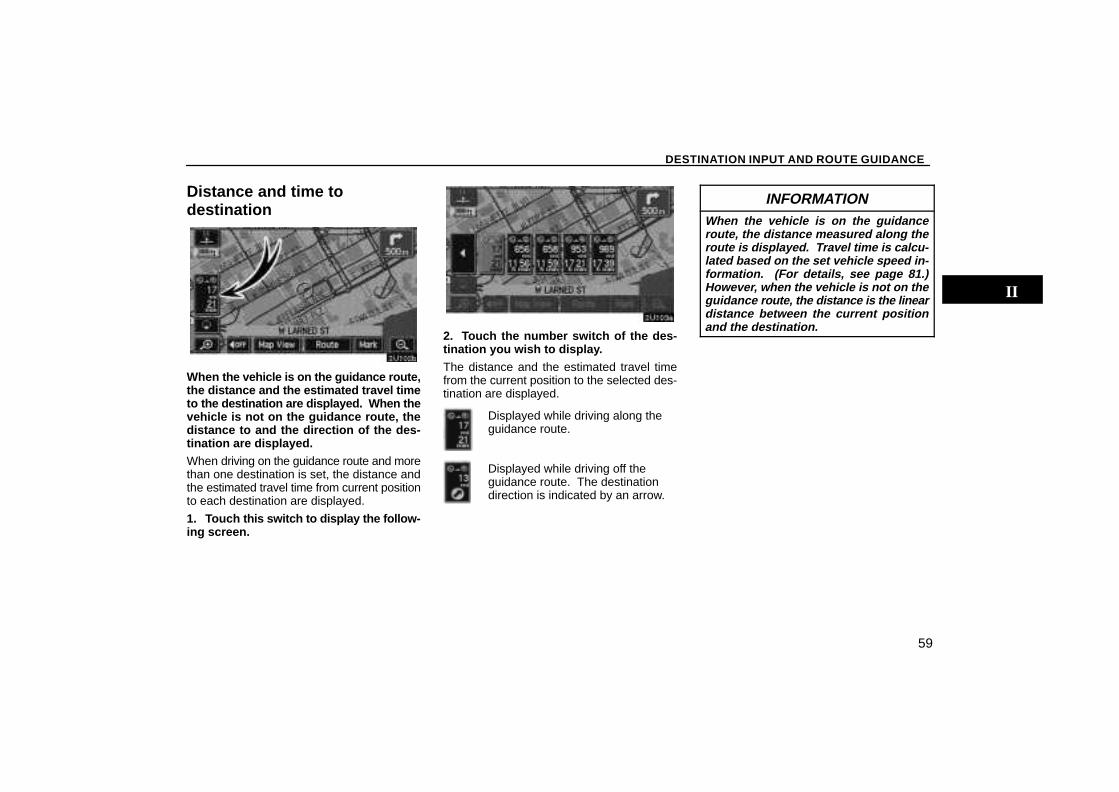
Distance and time todestination
When the vehicle is on the guidance route,the distance and the estimated travel timeto the destination are displayed. When thevehicle is not on the guidance route, thedistance to and the direction of the des-tination are displayed.When driving on the guidance route and morethan one destination is set, the distance andthe estimated travel time from current positionto each destination are displayed.
1. Touch this switch to display the follow-ing screen.
2. Touch the number switch of the des-tination you wish to display.The distance and the estimated travel timefrom the current position to the selected des-tination are displayed.
Displayed while driving along theguidance route.
Displayed while driving off theguidance route. The destinationdirection is indicated by an arrow.
INFORMATIONWhen the vehicle is on the guidanceroute, the distance measured along theroute is displayed. Travel time is calcu-lated based on the set vehicle speed in-formation. (For details, see page 81.)However, when the vehicle is not on theguidance route, the distance is the lineardistance between the current positionand the destination.
DESTINATION INPUT AND ROUTE GUIDANCE
60
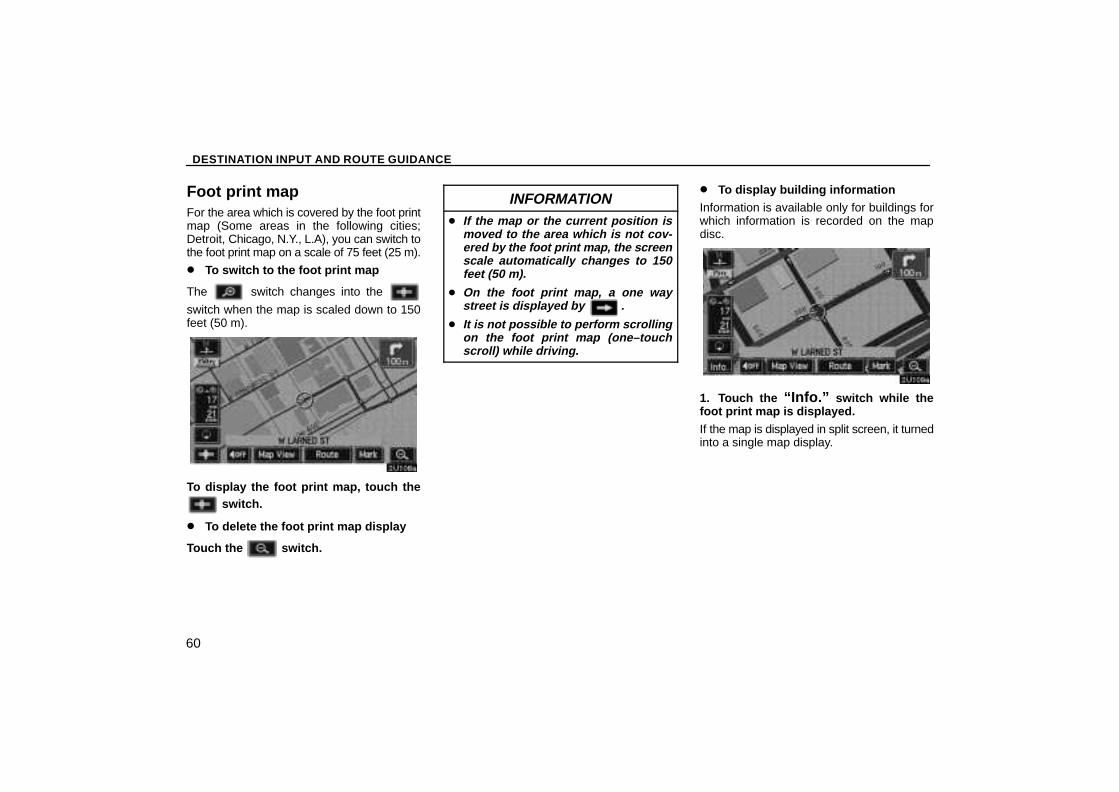
Foot print mapFor the area which is covered by the foot printmap (Some areas in the following cities;Detroit, Chicago, N.Y., L.A), you can switch tothe foot print map on a scale of 75 feet (25 m).
� To switch to the foot print map
The switch changes into the
switch when the map is scaled down to 150feet (50 m).
To display the foot print map, touch the switch.
� To delete the foot print map display
Touch the switch.
INFORMATION� If the map or the current position is
moved to the area which is not cov-ered by the foot print map, the screenscale automatically changes to 150feet (50 m).
� On the foot print map, a one waystreet is displayed by .
� It is not possible to perform scrollingon the foot print map (one–touchscroll) while driving.
� To display building informationInformation is available only for buildings forwhich information is recorded on the mapdisc.
1. Touch the “Info.” switch while thefoot print map is displayed.If the map is displayed in split screen, it turnedinto a single map display.
DESTINATION INPUT AND ROUTE GUIDANCE
61
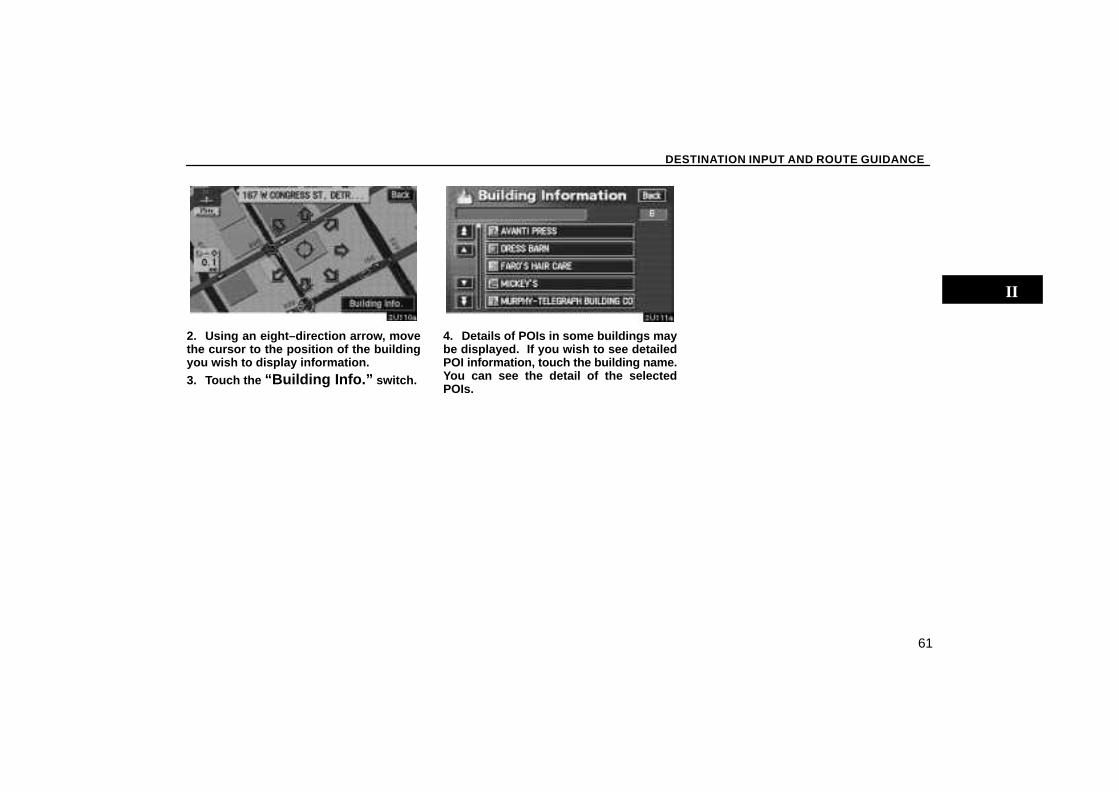
2. Using an eight–direction arrow, movethe cursor to the position of the buildingyou wish to display information.3. Touch the “Building Info.” switch.
4. Details of POIs in some buildings maybe displayed. If you wish to see detailedPOI information, touch the building name.You can see the detail of the selectedPOIs.

DESTINATION INPUT AND ROUTE GUIDANCE
62
ADVANCED FUNCTIONS
63
ADVANCED FUNCTIONSDescriptions of functions for more effective useSuspending and resuming guidance 64. . . . . . . . . . . . . . . . . . . . . . . . . . . . . . . . . . . Volume 65. . . . . . . . . . . . . . . . . . . . . . . . . . . . . . . . . . . . . . . . . . . . . . . . . . . . . . . . . . . . User selection 65. . . . . . . . . . . . . . . . . . . . . . . . . . . . . . . . . . . . . . . . . . . . . . . . . . . . . . My places 68. . . . . . . . . . . . . . . . . . . . . . . . . . . . . . . . . . . . . . . . . . . . . . . . . . . . . . . . . . Area to avoid 75. . . . . . . . . . . . . . . . . . . . . . . . . . . . . . . . . . . . . . . . . . . . . . . . . . . . . . . Setup 78. . . . . . . . . . . . . . . . . . . . . . . . . . . . . . . . . . . . . . . . . . . . . . . . . . . . . . . . . . . . . . Current position calibration 79. . . . . . . . . . . . . . . . . . . . . . . . . . . . . . . . . . . . . . . . . . . . Distance unit 81. . . . . . . . . . . . . . . . . . . . . . . . . . . . . . . . . . . . . . . . . . . . . . . . . . . . . . . Estimated travel time 81. . . . . . . . . . . . . . . . . . . . . . . . . . . . . . . . . . . . . . . . . . . . . . . . . Auto reroute 83. . . . . . . . . . . . . . . . . . . . . . . . . . . . . . . . . . . . . . . . . . . . . . . . . . . . . . . . Adjusting time zone 83. . . . . . . . . . . . . . . . . . . . . . . . . . . . . . . . . . . . . . . . . . . . . . . . . . Auto voice guidance 84. . . . . . . . . . . . . . . . . . . . . . . . . . . . . . . . . . . . . . . . . . . . . . . . . Voice guidance in all modes 85. . . . . . . . . . . . . . . . . . . . . . . . . . . . . . . . . . . . . . . . . . Notifying traffic restriction 86. . . . . . . . . . . . . . . . . . . . . . . . . . . . . . . . . . . . . . . . . . . . . Intersection guidance 87. . . . . . . . . . . . . . . . . . . . . . . . . . . . . . . . . . . . . . . . . . . . . . . . Guidance screen on freeway 88. . . . . . . . . . . . . . . . . . . . . . . . . . . . . . . . . . . . . . . . . . Street name on scroll map 89. . . . . . . . . . . . . . . . . . . . . . . . . . . . . . . . . . . . . . . . . . . . Display of building shape 90. . . . . . . . . . . . . . . . . . . . . . . . . . . . . . . . . . . . . . . . . . . . . Screen layout function ( Function) 91. . . . . . . . . . . . . . . . . . . . . . . . . . . . . . . . . POI category change (Show POI Icons) 92. . . . . . . . . . . . . . . . . . . . . . . . . . . . . . . . Delete previous point 93. . . . . . . . . . . . . . . . . . . . . . . . . . . . . . . . . . . . . . . . . . . . . . . . Map color 94. . . . . . . . . . . . . . . . . . . . . . . . . . . . . . . . . . . . . . . . . . . . . . . . . . . . . . . . . . Screen animation 95. . . . . . . . . . . . . . . . . . . . . . . . . . . . . . . . . . . . . . . . . . . . . . . . . . . .
SECTION III
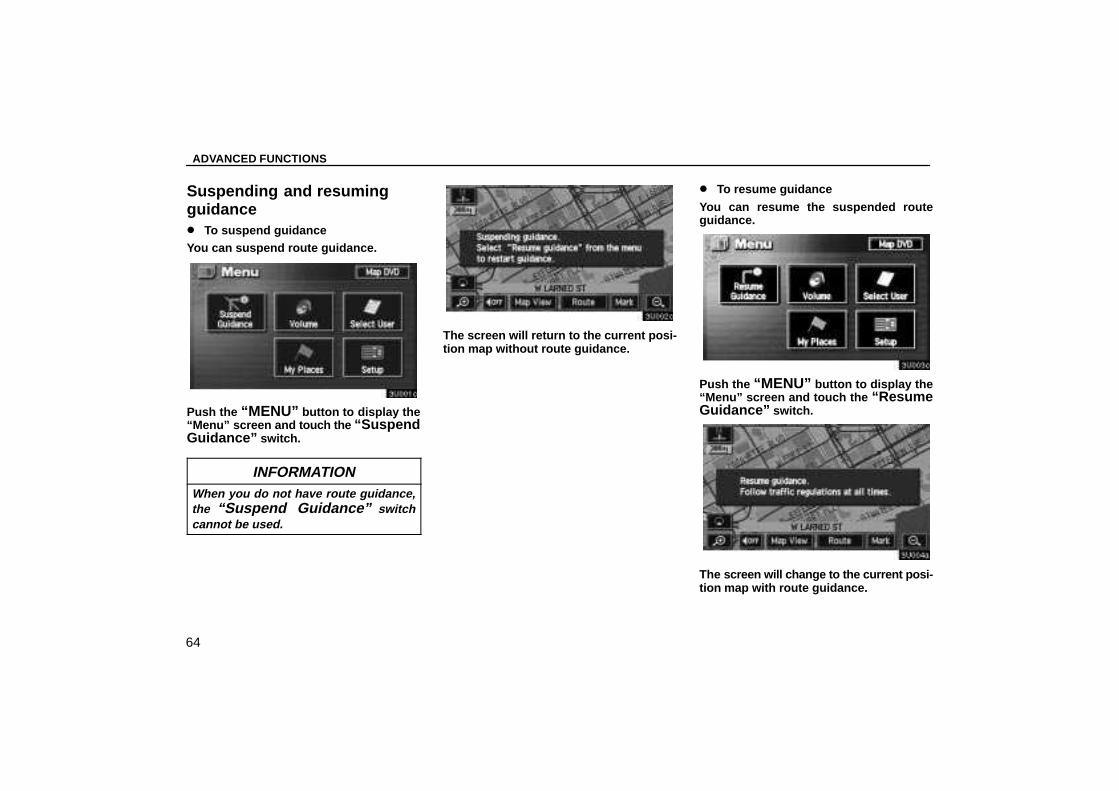
ADVANCED FUNCTIONS
64
Suspending and resumingguidance� To suspend guidanceYou can suspend route guidance.
Push the “MENU” button to display the“Menu” screen and touch the “SuspendGuidance” switch.
INFORMATIONWhen you do not have route guidance,the “Suspend Guidance” switchcannot be used.
The screen will return to the current posi-tion map without route guidance.
� To resume guidance
You can resume the suspended routeguidance.
Push the “MENU” button to display the“Menu” screen and touch the “ResumeGuidance” switch.
The screen will change to the current posi-tion map with route guidance.
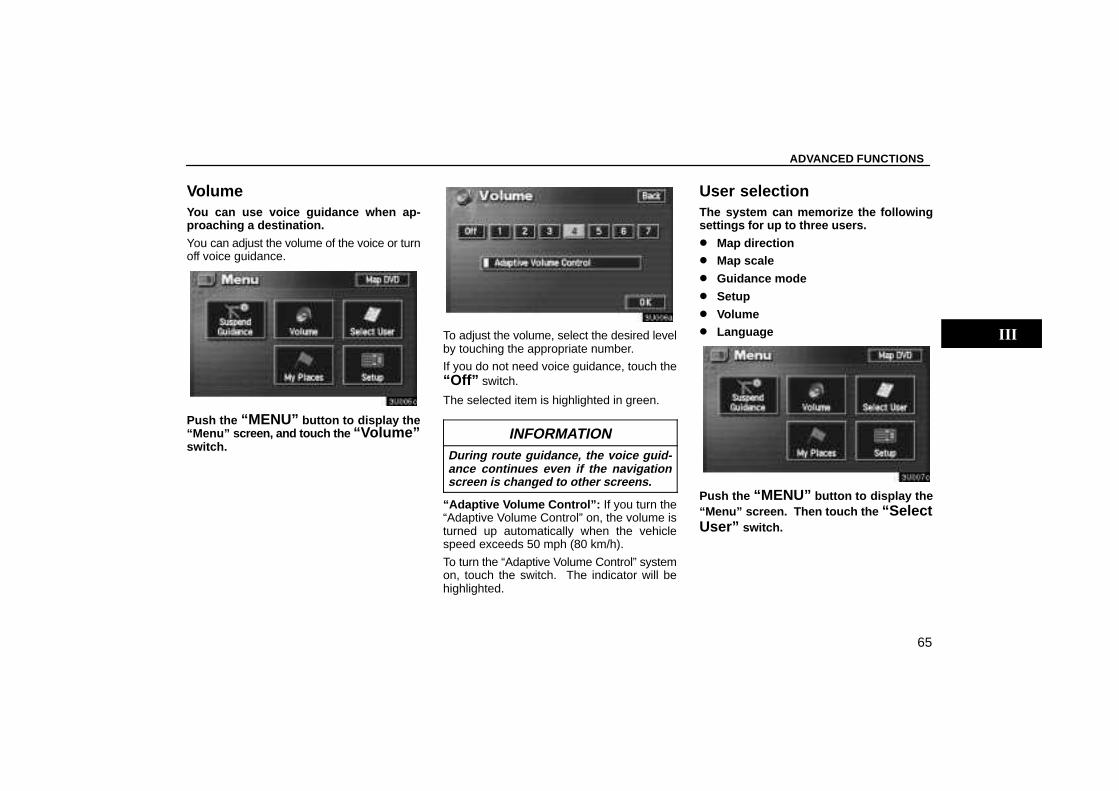
ADVANCED FUNCTIONS
65
VolumeYou can use voice guidance when ap-proaching a destination.
You can adjust the volume of the voice or turnoff voice guidance.
Push the “MENU” button to display the“Menu” screen, and touch the “Volume”switch.
To adjust the volume, select the desired levelby touching the appropriate number.
If you do not need voice guidance, touch the“Off” switch.
The selected item is highlighted in green.
INFORMATIONDuring route guidance, the voice guid-ance continues even if the navigationscreen is changed to other screens.
“Adaptive Volume Control”: If you turn the“Adaptive Volume Control” on, the volume isturned up automatically when the vehiclespeed exceeds 50 mph (80 km/h).
To turn the “Adaptive Volume Control” systemon, touch the switch. The indicator will behighlighted.
User selectionThe system can memorize the followingsettings for up to three users.
� Map direction� Map scale
� Guidance mode
� Setup
� Volume� Language
Push the “MENU” button to display the“Menu” screen. Then touch the “SelectUser” switch.
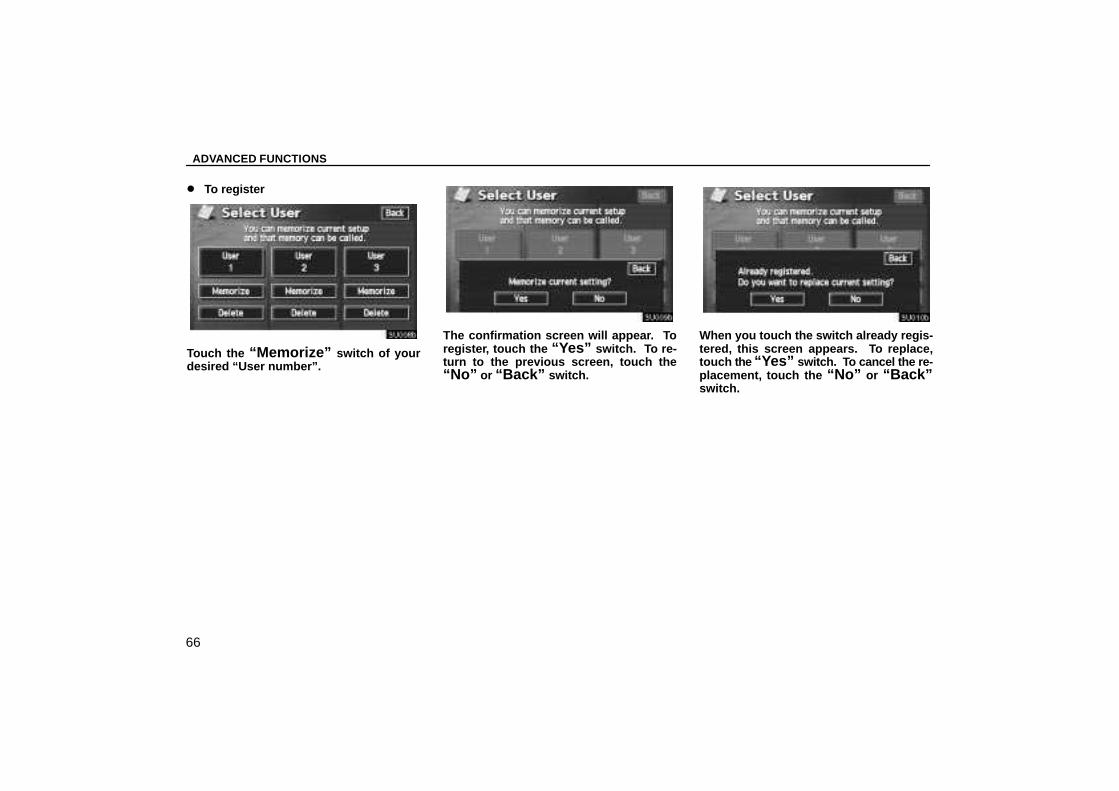
ADVANCED FUNCTIONS
66
� To register
Touch the “Memorize” switch of yourdesired “User number”.
The confirmation screen will appear. Toregister, touch the “Yes” switch. To re-turn to the previous screen, touch the“No” or “Back” switch.
When you touch the switch already regis-tered, this screen appears. To replace,touch the “Yes” switch. To cancel the re-placement, touch the “No” or “Back”switch.
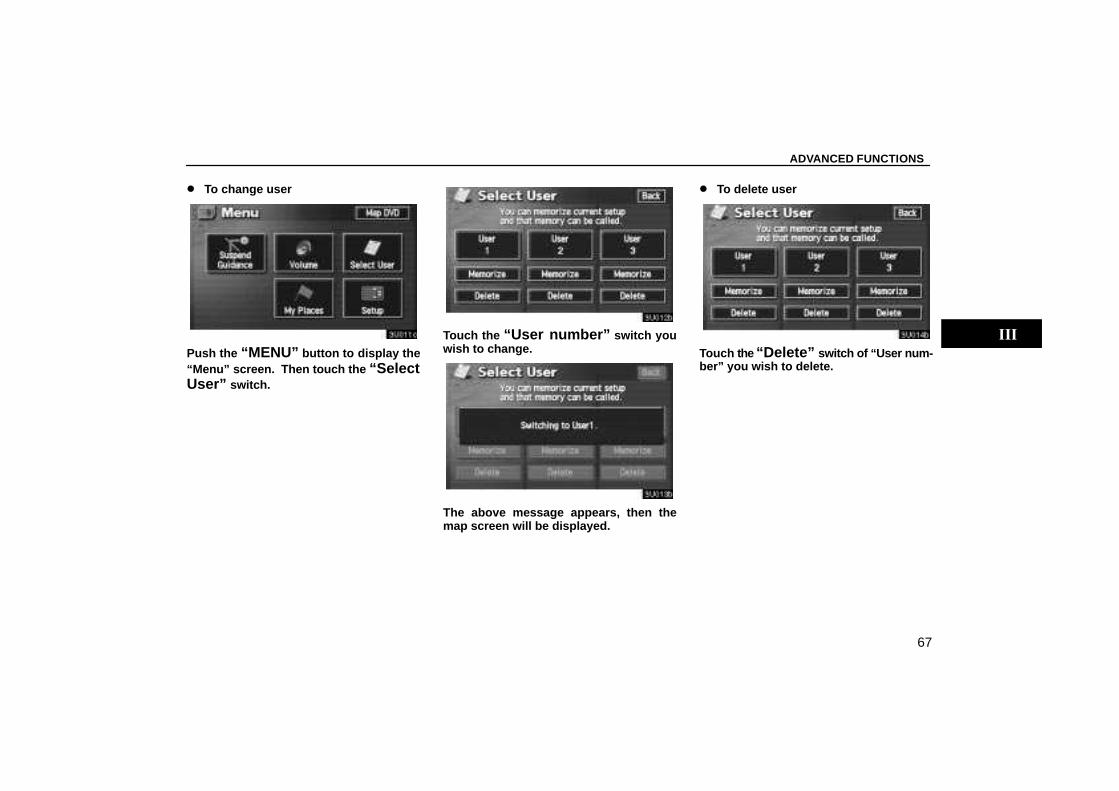
ADVANCED FUNCTIONS
67
� To change user
Push the “MENU” button to display the“Menu” screen. Then touch the “SelectUser” switch.
Touch the “User number” switch youwish to change.
The above message appears, then themap screen will be displayed.
� To delete user
Touch the “Delete” switch of “User num-ber” you wish to delete.
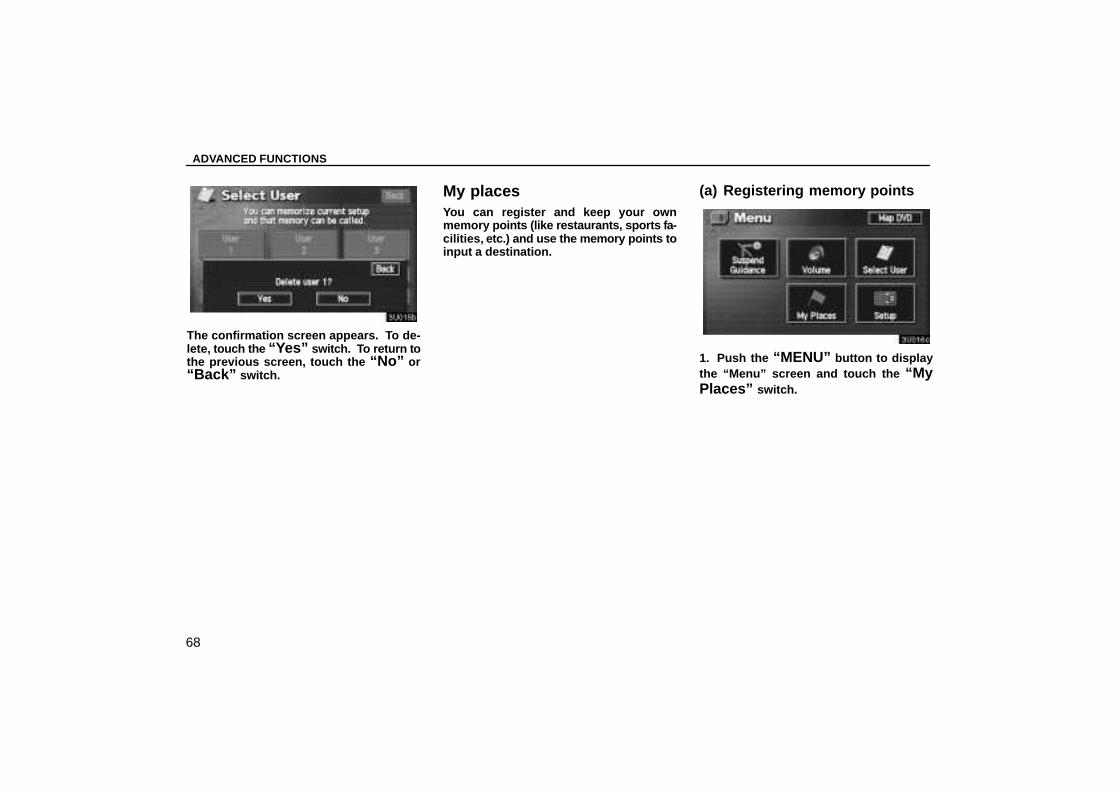
ADVANCED FUNCTIONS
68
The confirmation screen appears. To de-lete, touch the “Yes” switch. To return tothe previous screen, touch the “No” or“Back” switch.
My placesYou can register and keep your ownmemory points (like restaurants, sports fa-cilities, etc.) and use the memory points toinput a destination.
(a) Registering memory points
1. Push the “MENU” button to displaythe “Menu” screen and touch the “MyPlaces” switch.
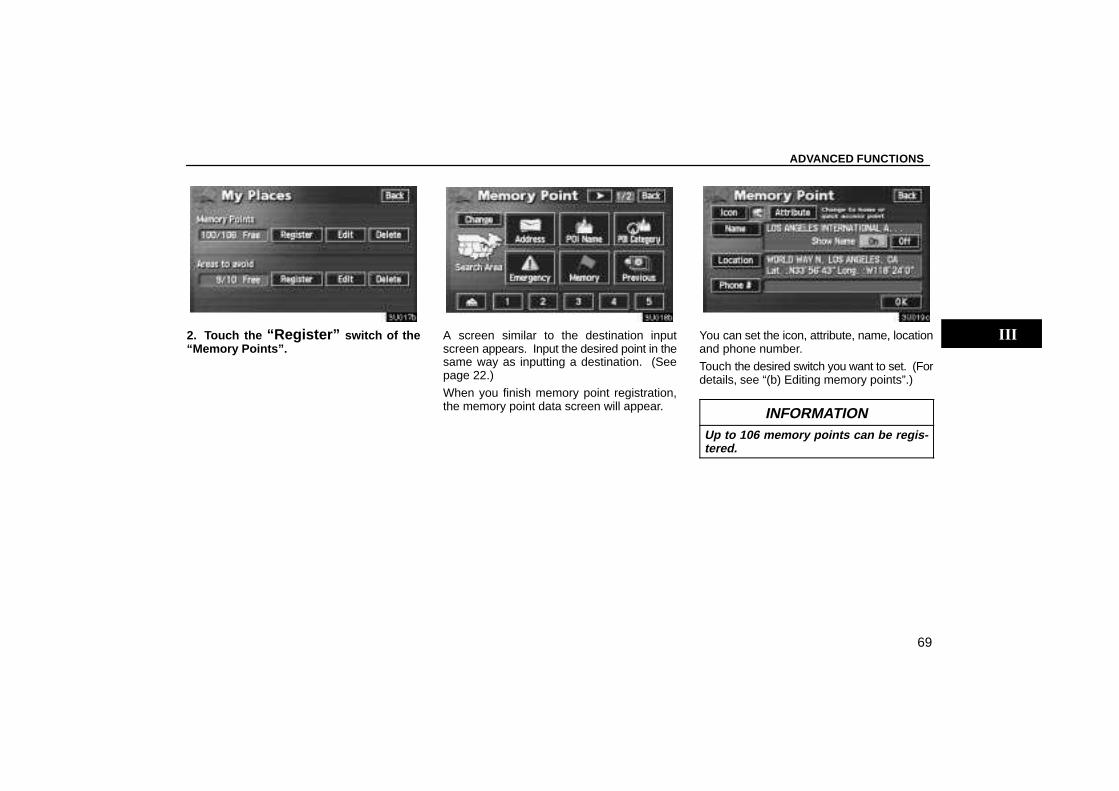
ADVANCED FUNCTIONS
69
2. Touch the “Register” switch of the“Memory Points”.
A screen similar to the destination inputscreen appears. Input the desired point in thesame way as inputting a destination. (Seepage 22.)
When you finish memory point registration,the memory point data screen will appear.
You can set the icon, attribute, name, locationand phone number.
Touch the desired switch you want to set. (Fordetails, see “(b) Editing memory points”.)
INFORMATIONUp to 106 memory points can be regis-tered.
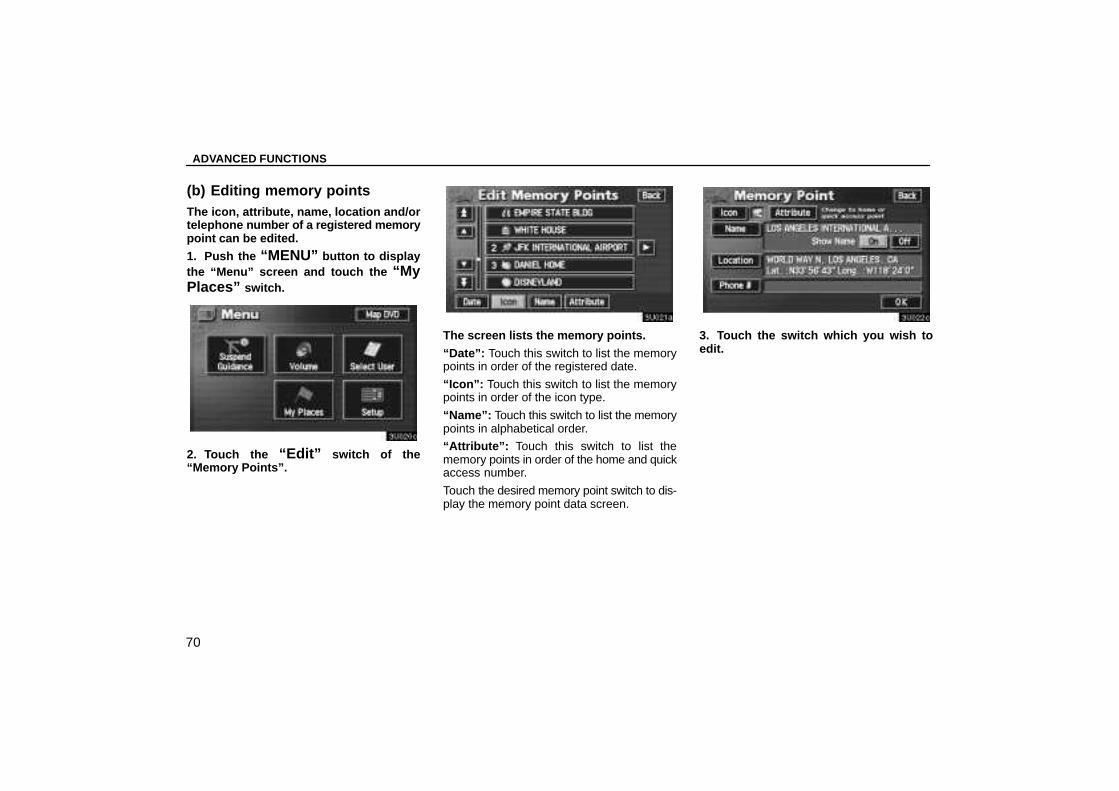
ADVANCED FUNCTIONS
70
(b) Editing memory pointsThe icon, attribute, name, location and/ortelephone number of a registered memorypoint can be edited.
1. Push the “MENU” button to displaythe “Menu” screen and touch the “MyPlaces” switch.
2. Touch the “Edit” switch of the“Memory Points”.
The screen lists the memory points.
“Date”: Touch this switch to list the memorypoints in order of the registered date.
“Icon”: Touch this switch to list the memorypoints in order of the icon type.
“Name”: Touch this switch to list the memorypoints in alphabetical order.
“Attribute”: Touch this switch to list thememory points in order of the home and quickaccess number.
Touch the desired memory point switch to dis-play the memory point data screen.
3. Touch the switch which you wish toedit.
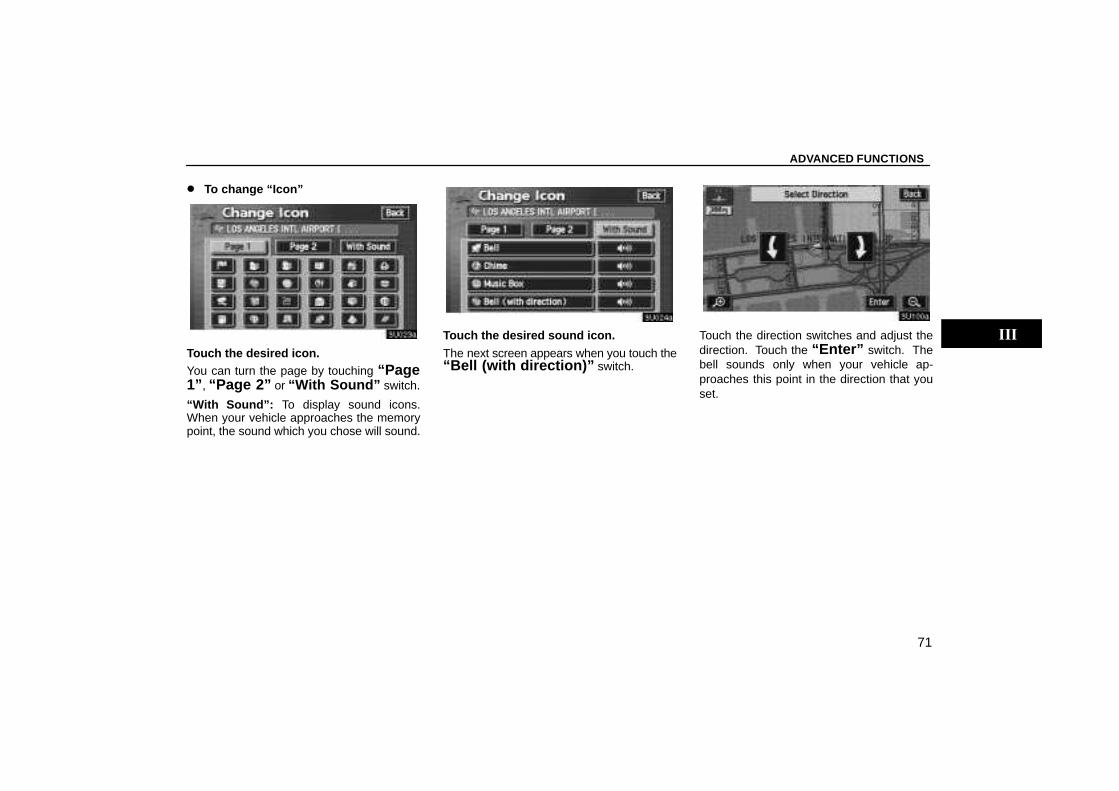
ADVANCED FUNCTIONS
71
� To change “Icon”
Touch the desired icon.You can turn the page by touching “Page1” , “Page 2” or “With Sound” switch.
“With Sound”: To display sound icons.When your vehicle approaches the memorypoint, the sound which you chose will sound.
Touch the desired sound icon.
The next screen appears when you touch the“Bell (with direction)” switch.
Touch the direction switches and adjust thedirection. Touch the “Enter” switch. Thebell sounds only when your vehicle ap-proaches this point in the direction that youset.
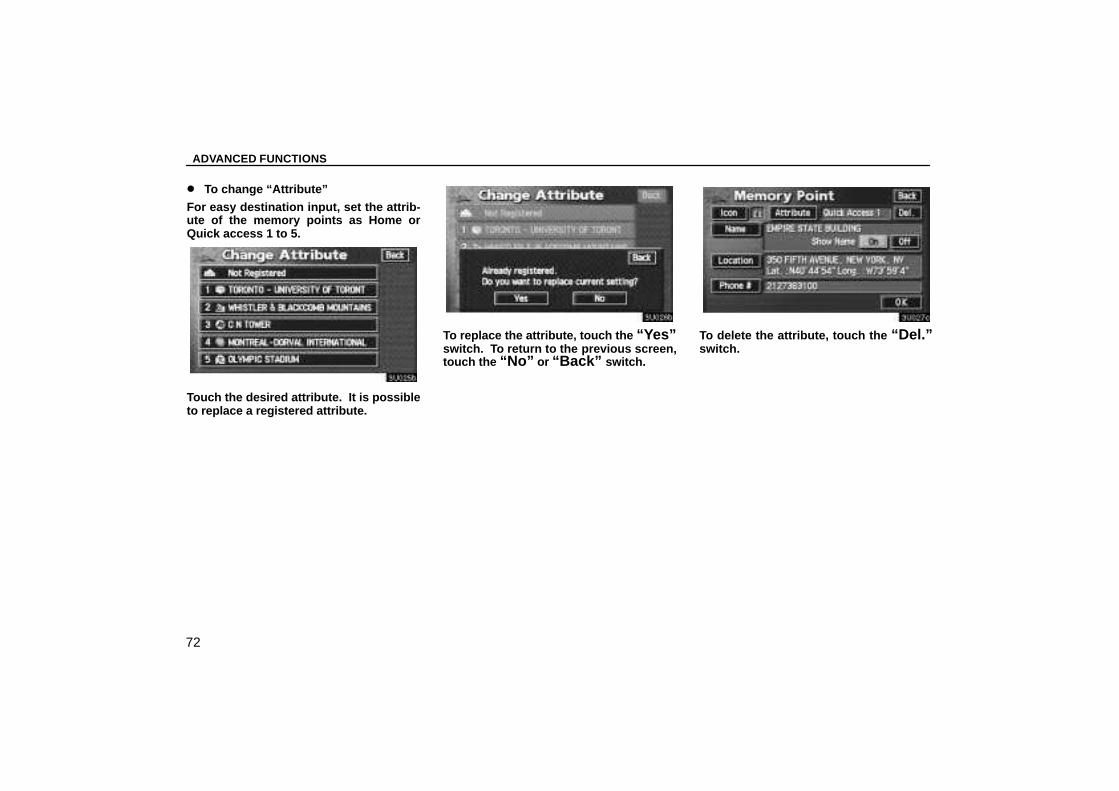
ADVANCED FUNCTIONS
72
� To change “Attribute”
For easy destination input, set the attrib-ute of the memory points as Home orQuick access 1 to 5.
Touch the desired attribute. It is possibleto replace a registered attribute.
To replace the attribute, touch the “Yes”switch. To return to the previous screen,touch the “No” or “Back” switch.
To delete the attribute, touch the “Del.”switch.
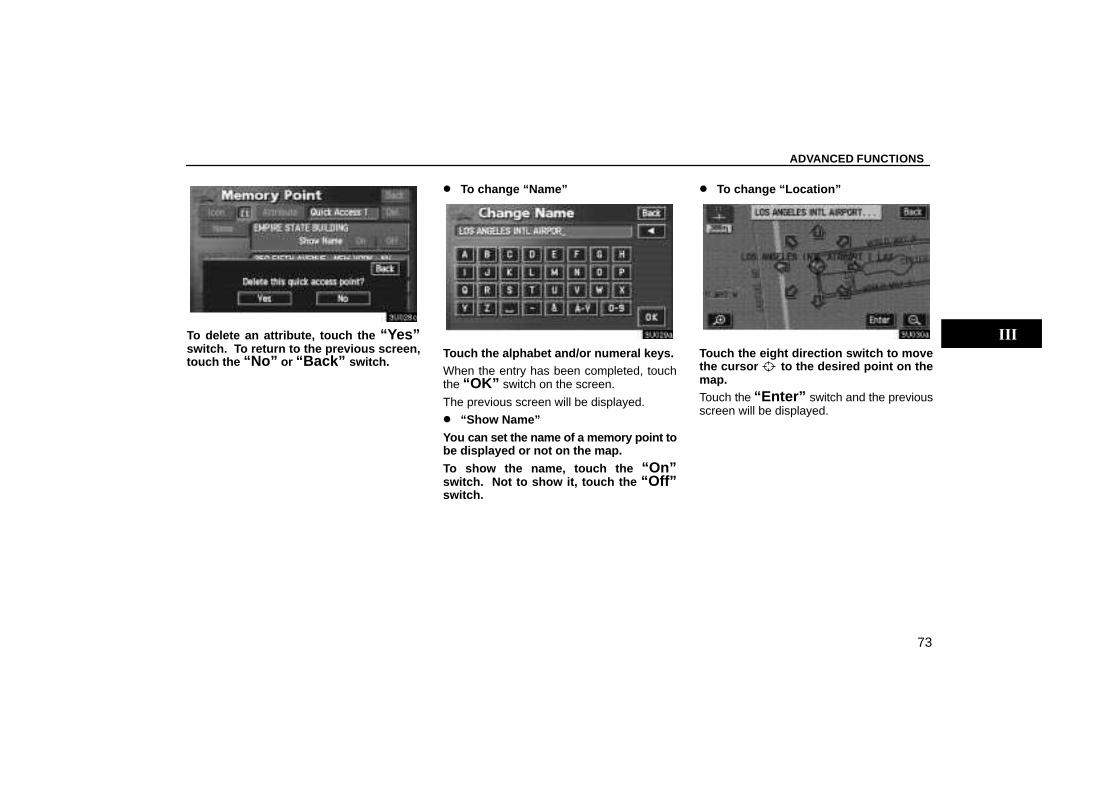
ADVANCED FUNCTIONS
73
To delete an attribute, touch the “Yes”switch. To return to the previous screen,touch the “No” or “Back” switch.
� To change “Name”
Touch the alphabet and/or numeral keys.When the entry has been completed, touchthe “OK” switch on the screen.
The previous screen will be displayed.
� “Show Name”
You can set the name of a memory point tobe displayed or not on the map.
To show the name, touch the “On”switch. Not to show it, touch the “Off”switch.
� To change “Location”
Touch the eight direction switch to movethe cursor to the desired point on themap.Touch the “Enter” switch and the previousscreen will be displayed.
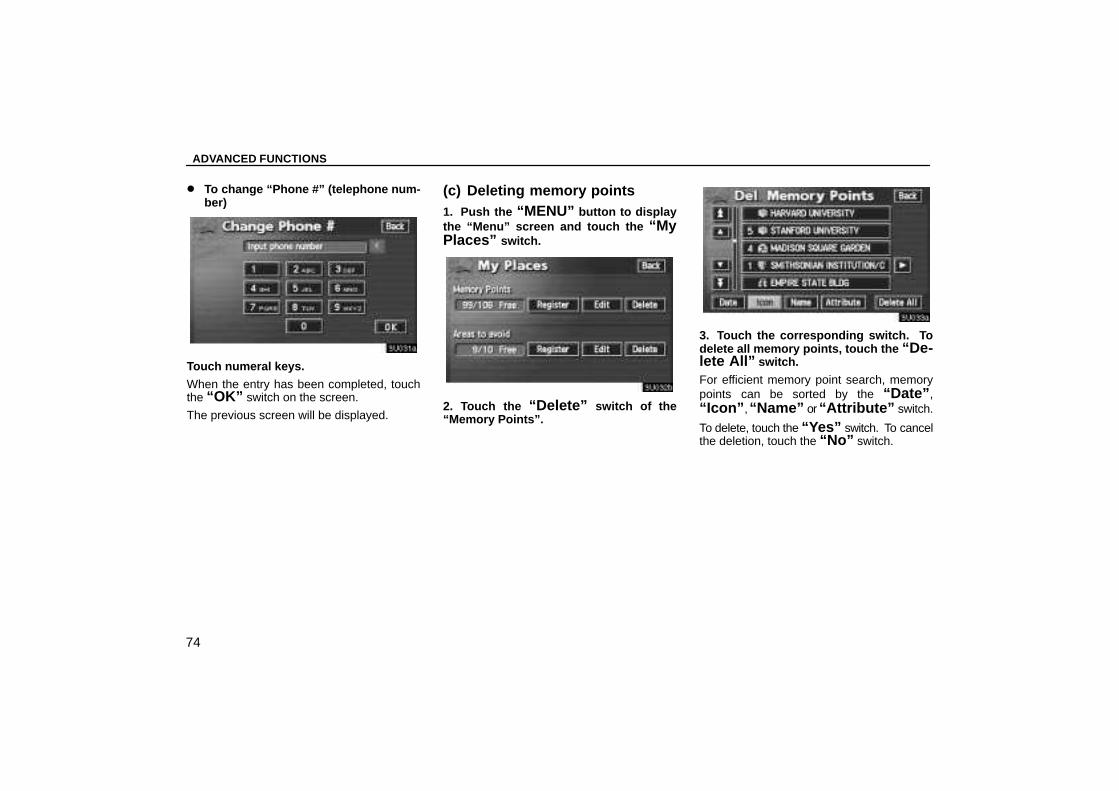
ADVANCED FUNCTIONS
74
� To change “Phone #” (telephone num-ber)
Touch numeral keys.
When the entry has been completed, touchthe “OK” switch on the screen.
The previous screen will be displayed.
(c) Deleting memory points1. Push the “MENU” button to displaythe “Menu” screen and touch the “MyPlaces” switch.
2. Touch the “Delete” switch of the“Memory Points”.
3. Touch the corresponding switch. Todelete all memory points, touch the “De-lete All” switch.
For efficient memory point search, memorypoints can be sorted by the “Date” ,“Icon” , “Name” or “Attribute” switch.
To delete, touch the “Yes” switch. To cancelthe deletion, touch the “No” switch.

ADVANCED FUNCTIONS
75
Area to AvoidAreas you wish to avoid because of trafficjams, construction work or other reasonscan be registered as areas to avoid.Push the “MENU” button to display the“Menu” screen and then touch the “MyPlaces” switch to display the followingscreen.
INFORMATIONIf a destination is inputted in the area toavoid or the route calculation cannot bemade without running through the areato avoid, a route passing through thearea to avoid may be shown.
(a) Registering area to avoid1. Touch the “Register” switch of the“Areas to avoid”.
2. Enter the location in the same way asinputting a destination, or display the mapof the area you wish to avoid. (See page22.)
INFORMATIONUp to 10 locations can be registered aspoint/area to avoid. If there are 10 loca-tions already registered, the message“Unable to register additional points.Perform operation again after deletingunnecessary points.” appears on thescreen.
3. Set the cursor in the center of the areato avoid, and touch the “Enter” switch.
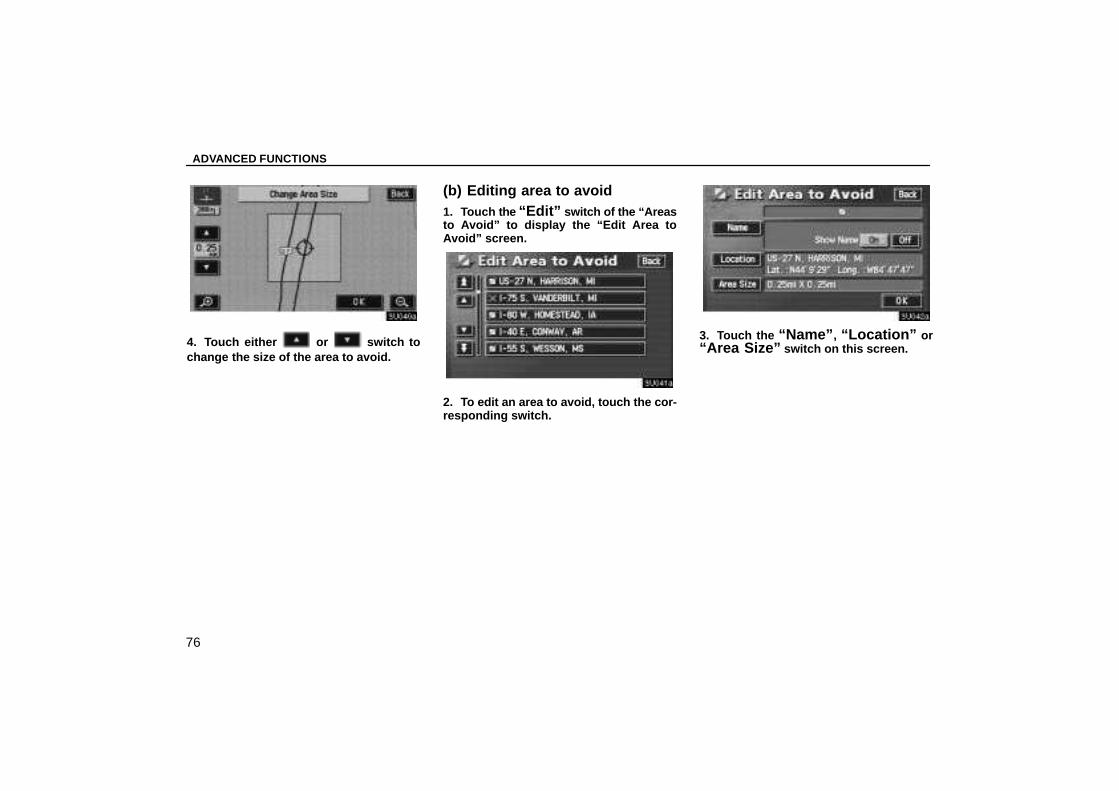
ADVANCED FUNCTIONS
76
4. Touch either or switch tochange the size of the area to avoid.
(b) Editing area to avoid1. Touch the “Edit” switch of the “Areasto Avoid” to display the “Edit Area toAvoid” screen.
2. To edit an area to avoid, touch the cor-responding switch.
3. Touch the “Name” , “Location” or“Area Size” switch on this screen.
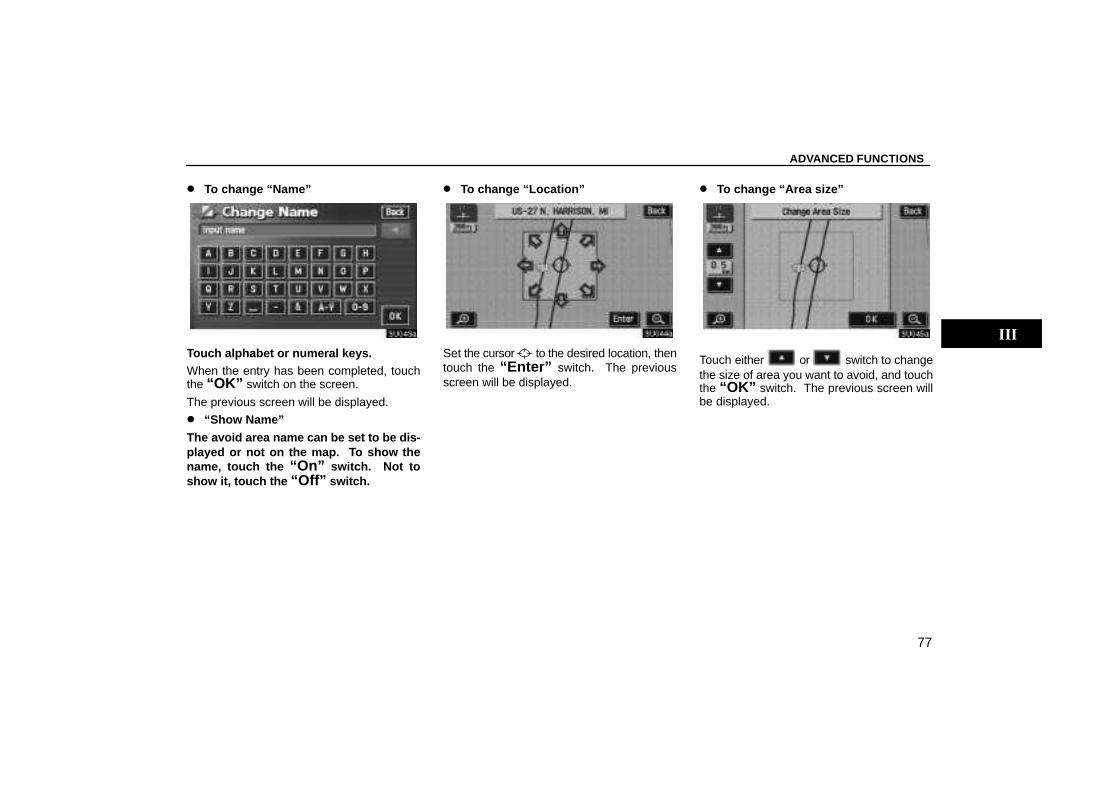
ADVANCED FUNCTIONS
77
� To change “Name”
Touch alphabet or numeral keys.When the entry has been completed, touchthe “OK” switch on the screen.
The previous screen will be displayed.
� “Show Name”
The avoid area name can be set to be dis-played or not on the map. To show thename, touch the “On” switch. Not toshow it, touch the “Off” switch.
� To change “Location”
Set the cursor to the desired location, thentouch the “Enter” switch. The previousscreen will be displayed.
� To change “Area size”
Touch either or switch to changethe size of area you want to avoid, and touchthe “OK” switch. The previous screen willbe displayed.

ADVANCED FUNCTIONS
78
(c) Deleting area to avoid1. Touch the “Delete” switch of the“Areas to Avoid” to display the “DeleteArea to Avoid” screen.
2. Touch the area you wish to delete fromthe list.
“Delete a ll”: To delete all registered areas toavoid in the system.
3. To delete, touch the “Yes” switch. Tocancel the deletion, touch the “No”switch.
SetupYou can set the items shown on the “Set-up” screen.
1. Push the “MENU” button.
2. To display the “Setup” menu screen,touch the “Setup” switch. Touch theitems you wish to set.
3. Touch the “OK” switch on the screenand then the previous screen will be dis-played.
“Default”: This switch initializes all of the set-tings.
“Calibration”: You can adjust the current ve-hicle position mark manually.
“Distance”: You can select “km” or “miles” asthe distance unit.
“Estimated Travel Time”: You can set thesystem to display the travel time to the des-tination on the route guidance screen.
“Auto Reroute”: You can set the system toautomatically search for a new route to thedestination.
“Adjust T ime Zone”: You can select your de-sired time zone.
“Auto Voice Guidance”: You can set the au-tomatic voice guidance.
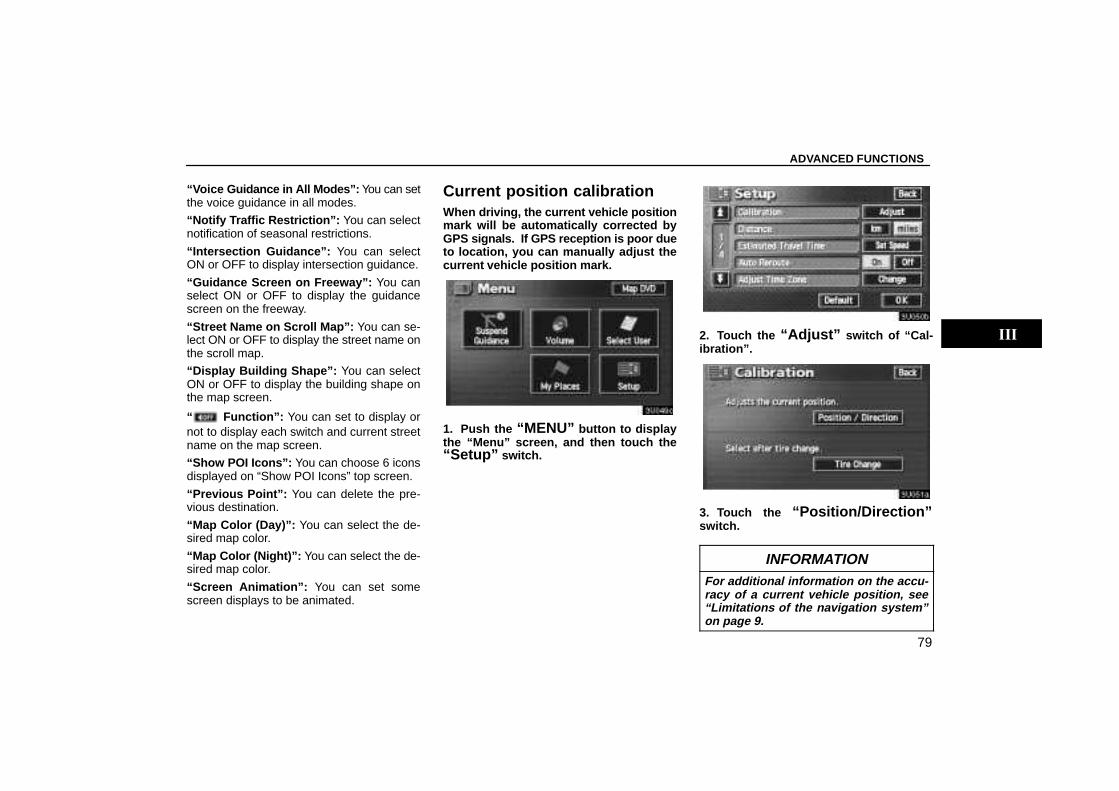
ADVANCED FUNCTIONS
79
“Voice G uidance in All Modes”: You can setthe voice guidance in all modes.
“Notify Traffic Restriction”: You can selectnotification of seasonal restrictions.
“Intersection Guidance”: You can selectON or OFF to display intersection guidance.
“Guidance Screen on Freeway”: You canselect ON or OFF to display the guidancescreen on the freeway.
“Street Name on Scroll Map”: You can se-lect ON or OFF to display the street name onthe scroll map.
“Display Building Shape”: You can selectON or OFF to display the building shape onthe map screen.
“ Function”: You can set to display ornot to display each switch and current streetname on the map screen.
“Show POI Icons”: You can choose 6 iconsdisplayed on “Show POI Icons” top screen.
“Previous Point”: You can delete the pre-vious destination.
“Map Color (Day)”: You can select the de-sired map color.
“Map Color (Night)”: You can select the de-sired map color.
“Screen Animation”: You can set somescreen displays to be animated.
Current position calibrationWhen driving, the current vehicle positionmark will be automatically corrected byGPS signals. If GPS reception is poor dueto location, you can manually adjust thecurrent vehicle position mark.
1. Push the “MENU” button to displaythe “Menu” screen, and then touch the“Setup” switch.
2. Touch the “Adjust” switch of “Cal-ibration”.
3. Touch the “Position/Direction”switch.
INFORMATIONFor additional information on the accu-racy of a current vehicle position, see“Limitations of the navigation system”on page 9.
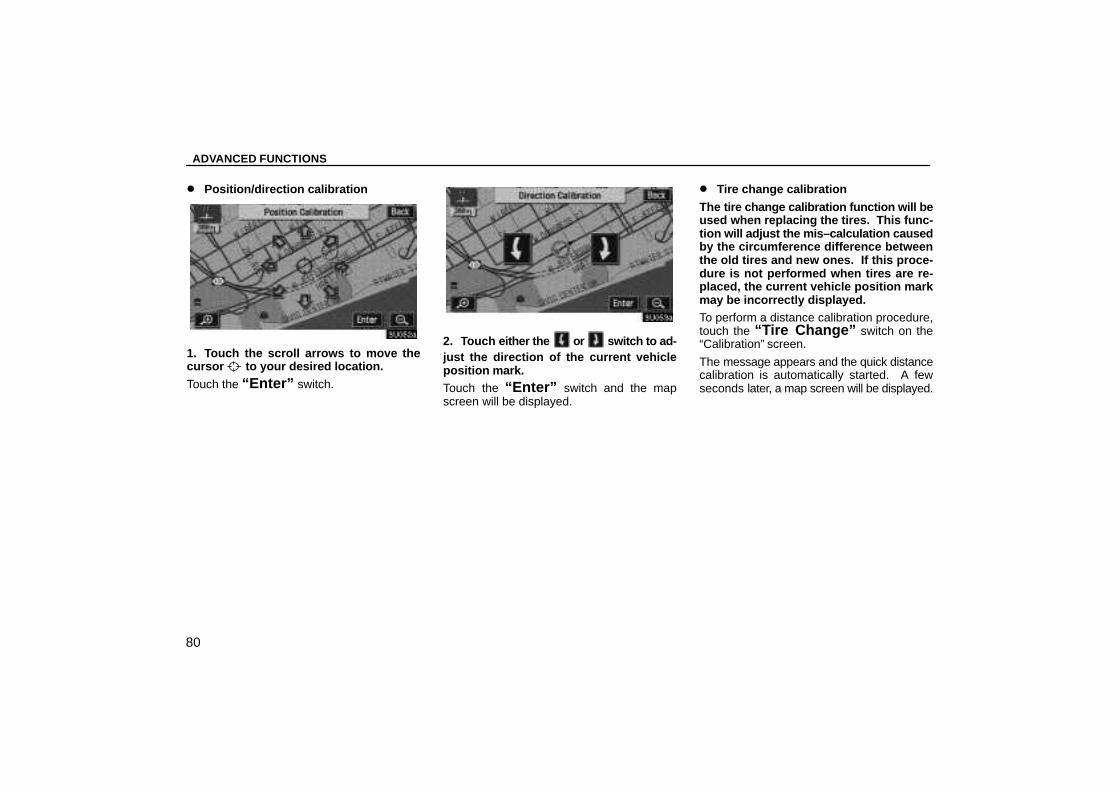
ADVANCED FUNCTIONS
80
� Position/direction calibration
1. Touch the scroll arrows to move thecursor to your desired location.
Touch the “Enter” switch.
2. Touch either the or switch to ad-just the direction of the current vehicleposition mark.Touch the “Enter” switch and the mapscreen will be displayed.
� Tire change calibration
The tire change calibration function will beused when replacing the tires. This func-tion will adjust the mis–calculation causedby the circumference difference betweenthe old tires and new ones. If this proce-dure is not performed when tires are re-placed, the current vehicle position markmay be incorrectly displayed.To perform a distance calibration procedure,touch the “Tire Change” switch on the“Calibration” screen.
The message appears and the quick distancecalibration is automatically started. A fewseconds later, a map screen will be displayed.
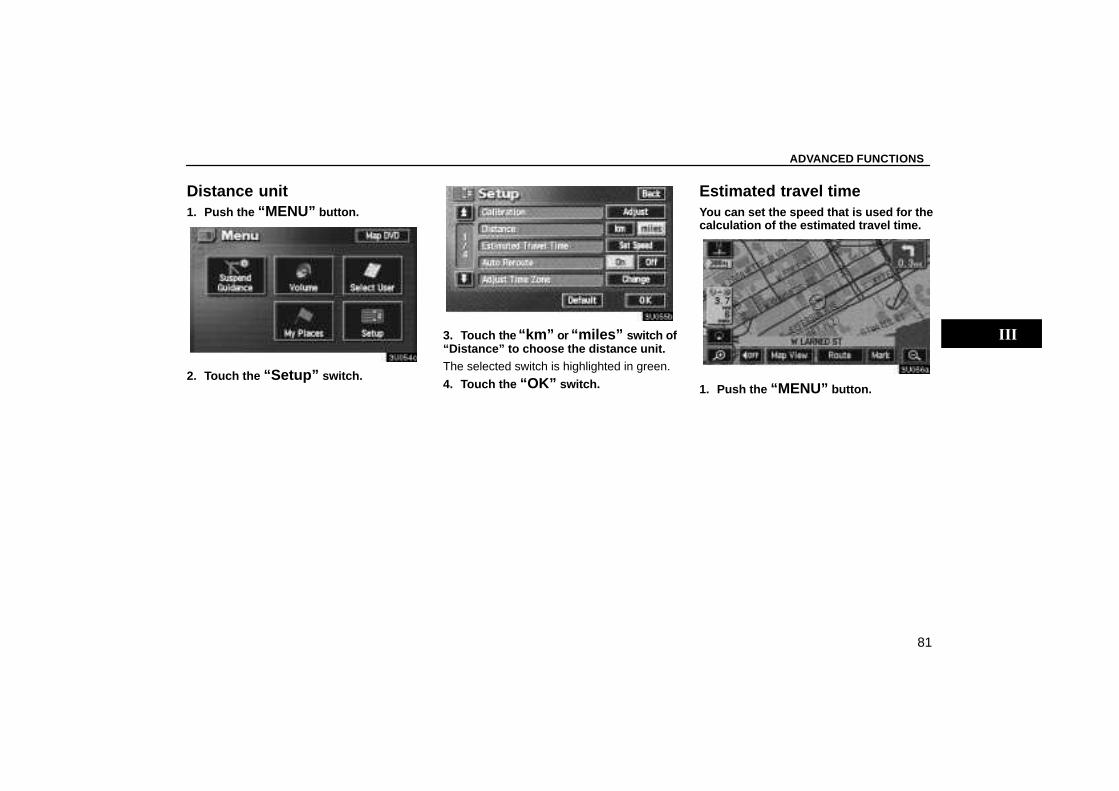
ADVANCED FUNCTIONS
81
Distance unit1. Push the “MENU” button.
2. Touch the “Setup” switch.
3. Touch the “km” or “miles” switch of“Distance” to choose the distance unit.The selected switch is highlighted in green.
4. Touch the “OK” switch.
Estimated travel timeYou can set the speed that is used for thecalculation of the estimated travel time.
1. Push the “MENU” button.

ADVANCED FUNCTIONS
82
2. Touch the “Setup” switch.
3. Touch the “Set Speed” switch of the“Estimated Travel Time”.
4. Touch or to set the average ve-hicle speeds for driving on a Freeway,Main street, and Residential.To set the default speeds, touch the “De-fault” switch.
5. When you finish setting the desiredspeeds, touch the “OK” switch.
INFORMATION� The displayed time to the destination
is the approximate driving time that iscalculated based on the speeds youselected and your actual positionalong the guidance route.
� The time shown on the screen mayvary greatly depending on your prog-ress along the route, which may be af-fected by road conditions such astraffic jams, construction work.
� It is possible to display up to 99 hours59 minutes.
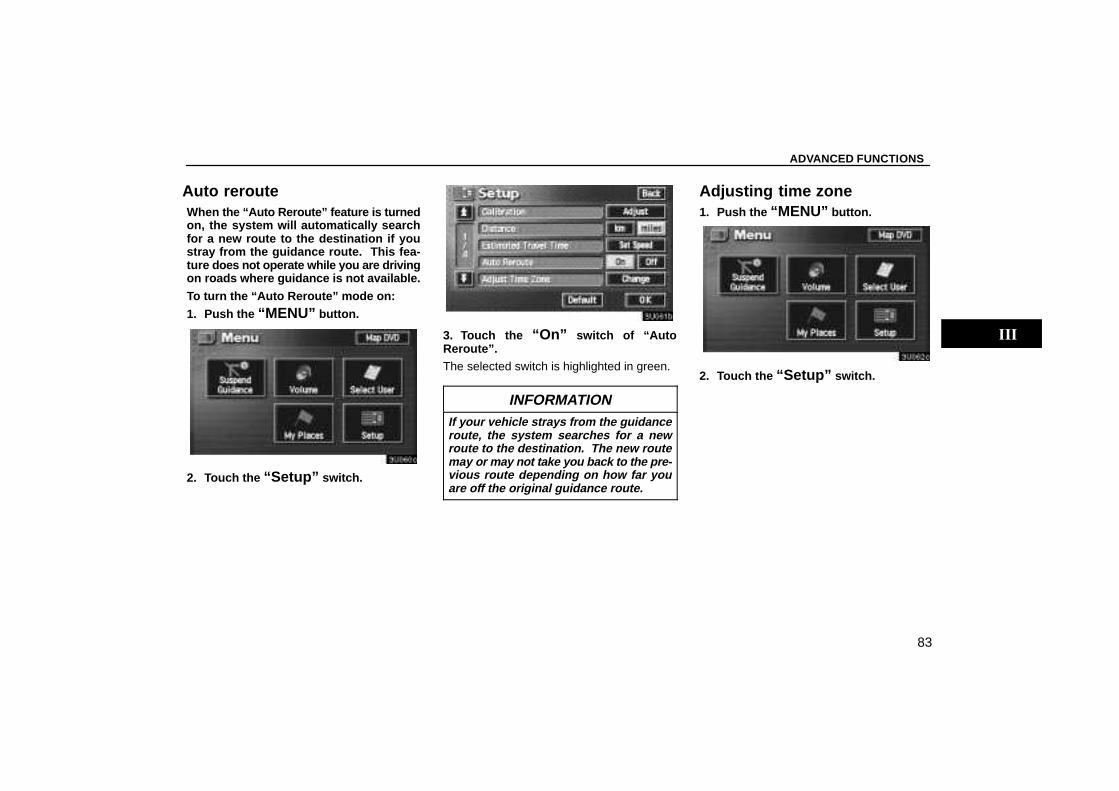
ADVANCED FUNCTIONS
83
Auto rerouteWhen the “Auto Reroute” feature is turnedon, the system will automatically searchfor a new route to the destination if youstray from the guidance route. This fea-ture does not operate while you are drivingon roads where guidance is not available.
To turn the “Auto Reroute” mode on:
1. Push the “MENU” button.
2. Touch the “Setup” switch.
3. Touch the “On” switch of “AutoReroute”.The selected switch is highlighted in green.
INFORMATIONIf your vehicle strays from the guidanceroute, the system searches for a newroute to the destination. The new routemay or may not take you back to the pre-vious route depending on how far youare off the original guidance route.
Adjusting time zone1. Push the “MENU” button.
2. Touch the “Setup” switch.
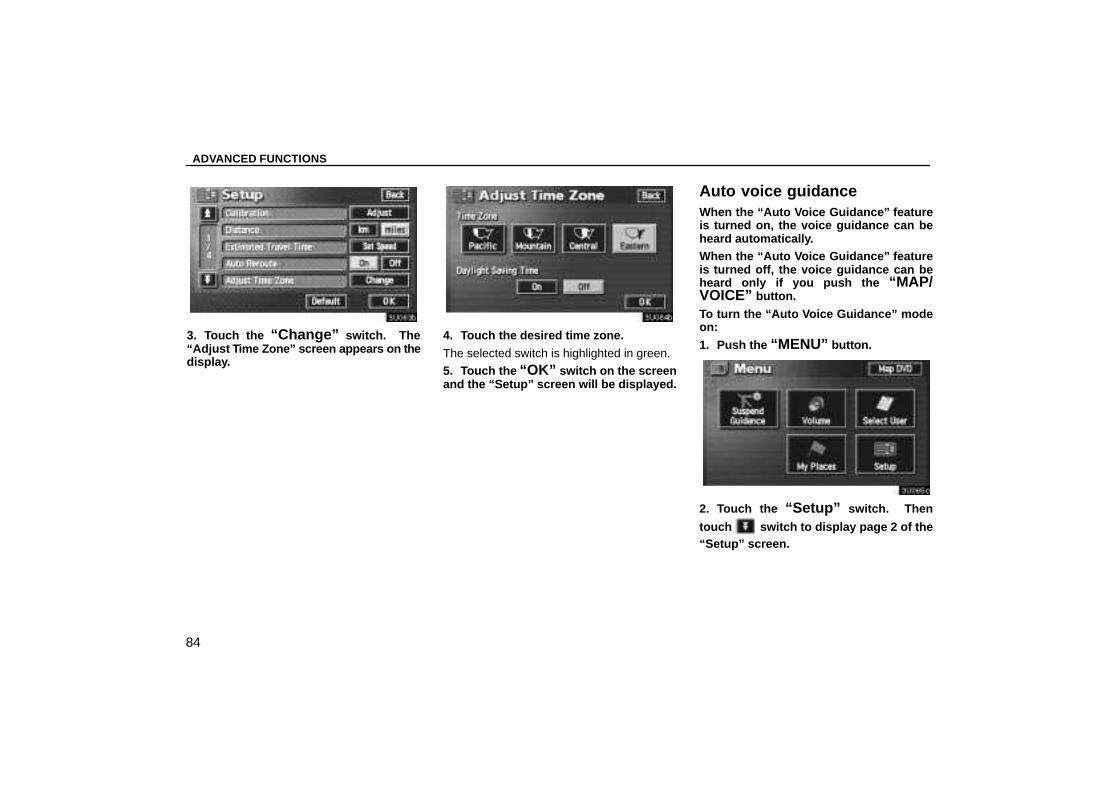
ADVANCED FUNCTIONS
84
3. Touch the “Change” switch. The“Adjust T ime Zone” screen appears on thedisplay.
4. Touch the desired time zone.
The selected switch is highlighted in green.
5. Touch the “OK” switch on the screenand the “Setup” screen will be displayed.
Auto voice guidanceWhen the “Auto Voice Guidance” featureis turned on, the voice guidance can beheard automatically.When the “Auto Voice Guidance” featureis turned off, the voice guidance can beheard only if you push the “MAP/VOICE” button.
To turn the “Auto Voice Guidance” modeon:
1. Push the “MENU” button.
2. Touch the “Setup” switch. Then
touch switch to display page 2 of the“Setup” screen.
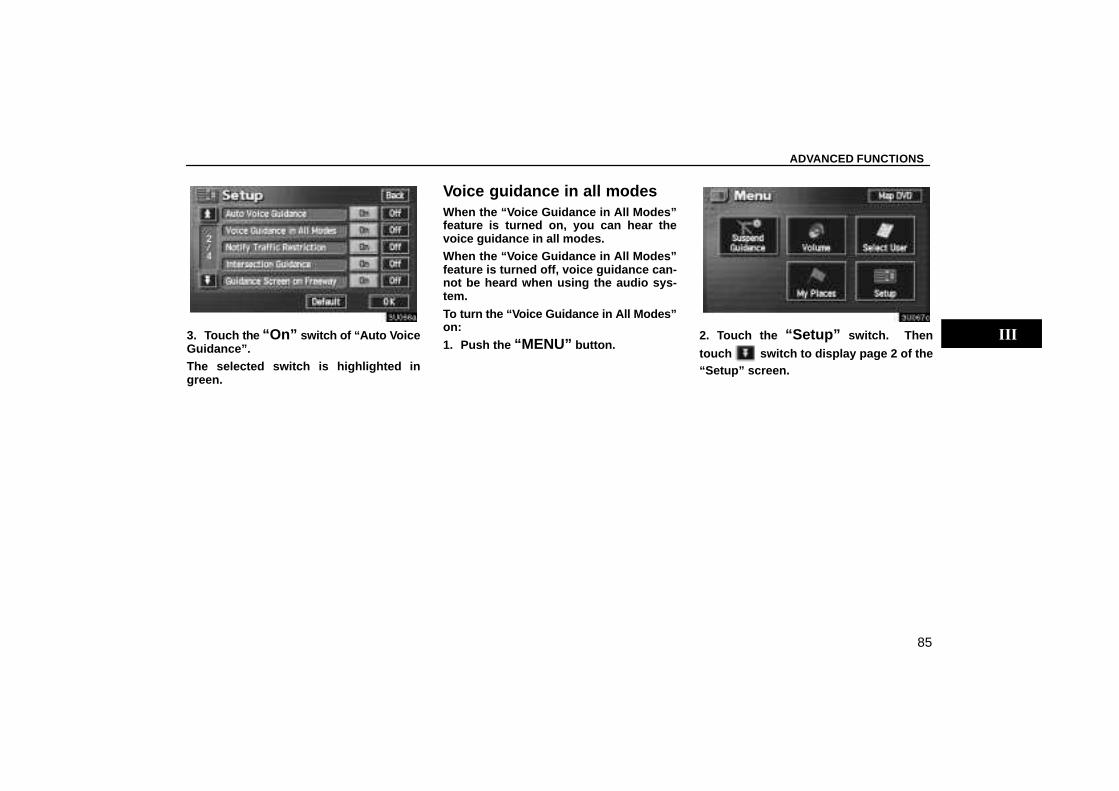
ADVANCED FUNCTIONS
85
3. Touch the “On” switch of “Auto V oiceGuidance”.The selected switch is highlighted ingreen.
Voice guidance in all modesWhen the “Voice Guidance in All Modes”feature is turned on, you can hear thevoice guidance in all modes.When the “Voice Guidance in All Modes”feature is turned off, voice guidance can-not be heard when using the audio sys-tem.
To turn the “Voice Guidance in All Modes”on:
1. Push the “MENU” button.2. Touch the “Setup” switch. Then
touch switch to display page 2 of the“Setup” screen.

ADVANCED FUNCTIONS
86
3. Touch the “On” switch of “Voice Guid-ance in All Modes” and touch the “OK”switch.
Notifying traffic restrictionWhen the “Notify Traffic Restriction” fea-ture is turned on, the system notifies youof traffic or seasonal restrictions.
To turn the “Notify Traffic Restriction”mode on:1. Push the “MENU” button.
2. Touch the “Setup” switch. Then
touch switch to display page 2 of the“Setup” screen.
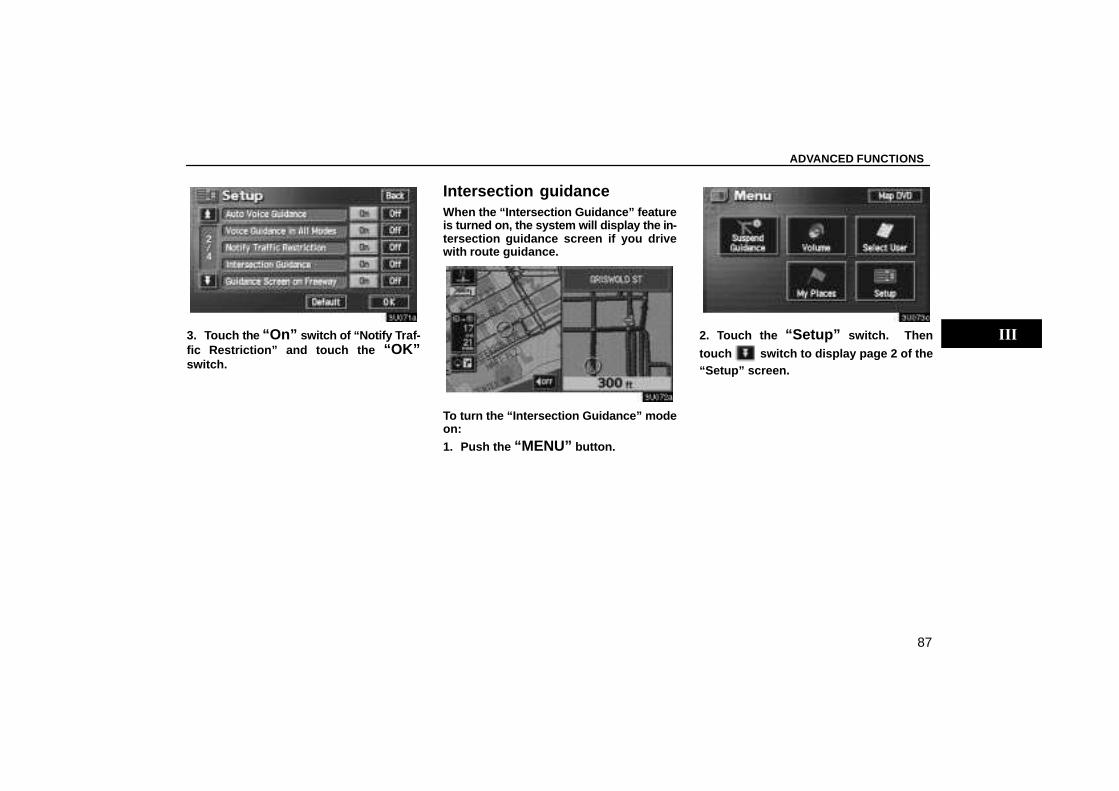
ADVANCED FUNCTIONS
87
3. Touch the “On” switch of “Notify Traf-fic Restriction” and touch the “OK”switch.
Intersection guidanceWhen the “Intersection Guidance” featureis turned on, the system will display the in-tersection guidance screen if you drivewith route guidance.
To turn the “Intersection Guidance” modeon:
1. Push the “MENU” button.
2. Touch the “Setup” switch. Then
touch switch to display page 2 of the“Setup” screen.
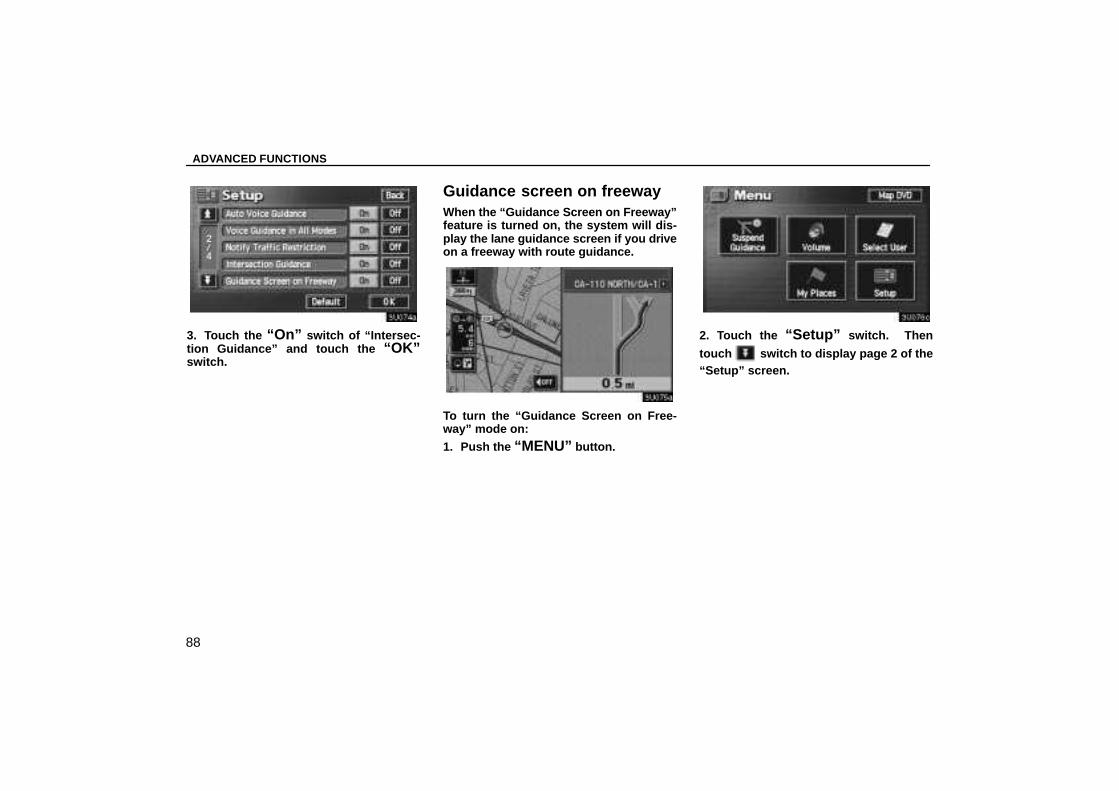
ADVANCED FUNCTIONS
88
3. Touch the “On” switch of “Intersec-tion Guidance” and touch the “OK”switch.
Guidance screen on freewayWhen the “Guidance Screen on Freeway”feature is turned on, the system will dis-play the lane guidance screen if you driveon a freeway with route guidance.
To turn the “Guidance Screen on Free-way” mode on:
1. Push the “MENU” button.
2. Touch the “Setup” switch. Then
touch switch to display page 2 of the“Setup” screen.
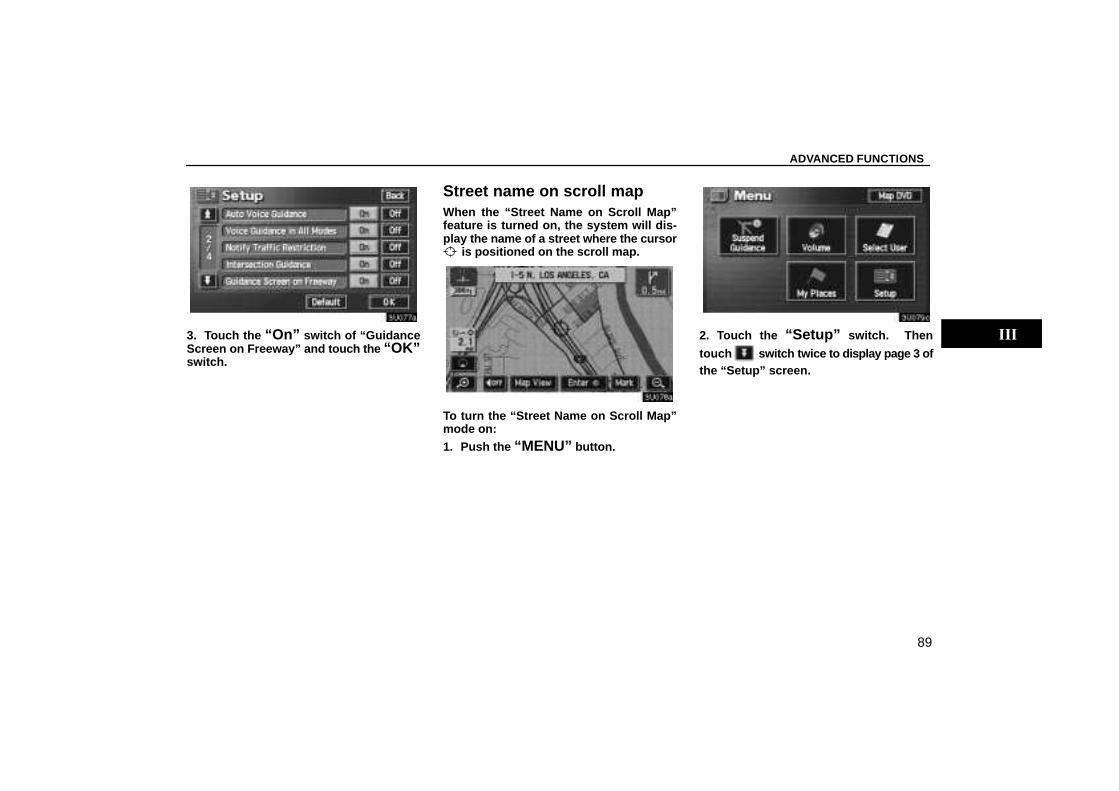
ADVANCED FUNCTIONS
89
3. Touch the “On” switch of “GuidanceScreen on Freeway” and touch the “OK”switch.
Street name on scroll mapWhen the “Street Name on Scroll Map”feature is turned on, the system will dis-play the name of a street where the cursor
is positioned on the scroll map.
To turn the “Street Name on Scroll Map”mode on:
1. Push the “MENU” button.
2. Touch the “Setup” switch. Then
touch switch twice to display page 3 ofthe “Setup” screen.
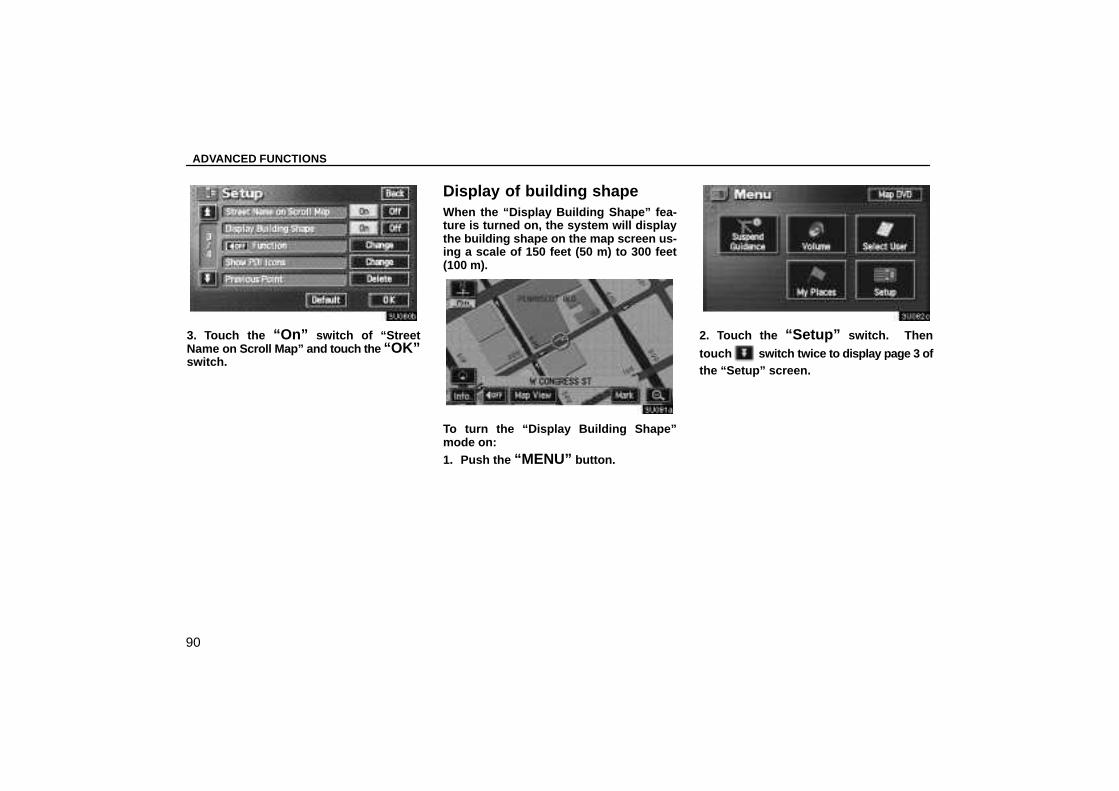
ADVANCED FUNCTIONS
90
3. Touch the “On” switch of “StreetName on Scroll Map” and touch the “OK”switch.
Display of building shapeWhen the “Display Building Shape” fea-ture is turned on, the system will displaythe building shape on the map screen us-ing a scale of 150 feet (50 m) to 300 feet(100 m).
To turn the “Display Building Shape”mode on:1. Push the “MENU” button.
2. Touch the “Setup” switch. Then
touch switch twice to display page 3 ofthe “Setup” screen.
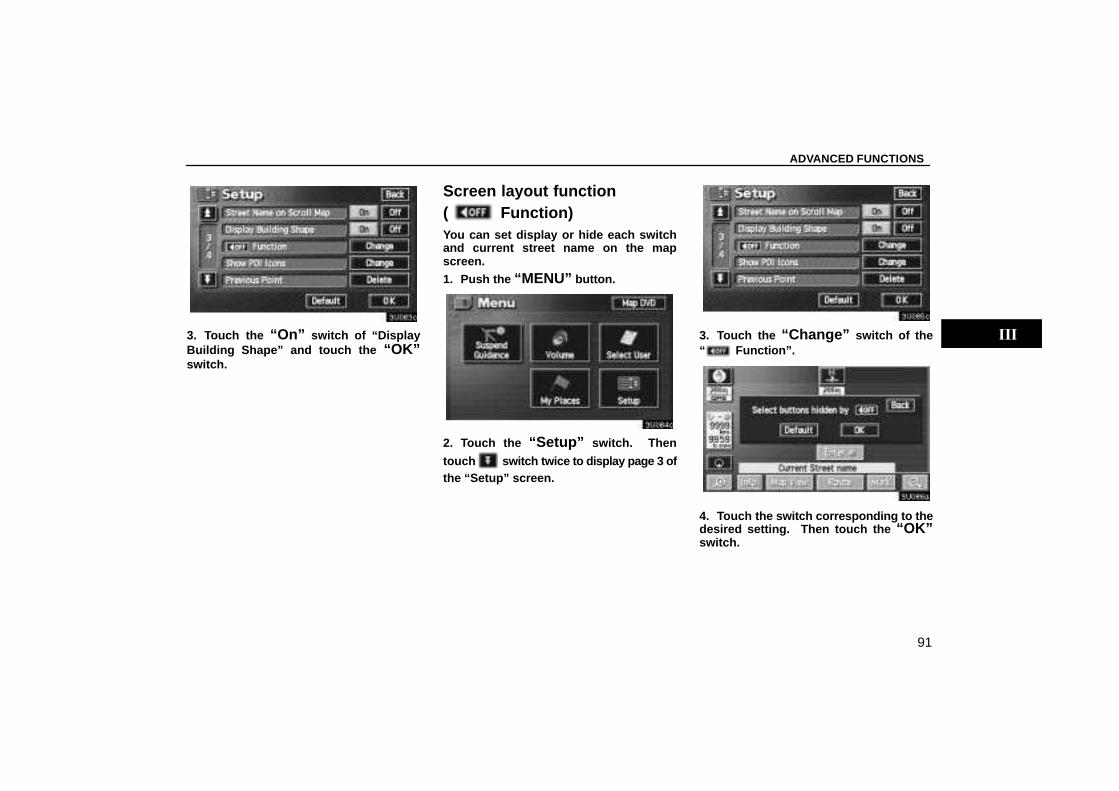
ADVANCED FUNCTIONS
91
3. Touch the “On” switch of “DisplayBuilding Shape” and touch the “OK”switch.
Screen layout function ( Function)You can set display or hide each switchand current street name on the mapscreen.
1. Push the “MENU” button.
2. Touch the “Setup” switch. Then
touch switch twice to display page 3 ofthe “Setup” screen.
3. Touch the “Change” switch of the“ Function”.
4. Touch the switch corresponding to thedesired setting. Then touch the “OK”switch.
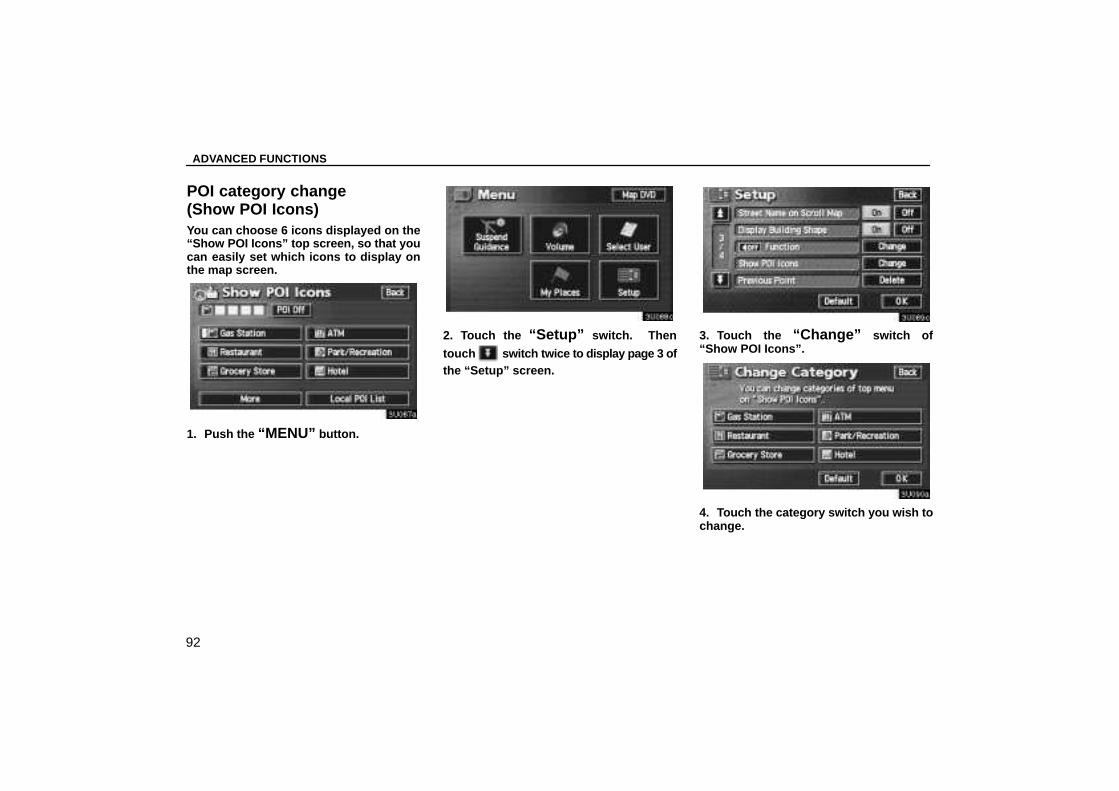
ADVANCED FUNCTIONS
92
POI category change (Show POI Icons)You can choose 6 icons displayed on the“Show POI Icons” top screen, so that youcan easily set which icons to display onthe map screen.
1. Push the “MENU” button.
2. Touch the “Setup” switch. Then
touch switch twice to display page 3 ofthe “Setup” screen.
3. Touch the “Change” switch of“Show POI Icons”.
4. Touch the category switch you wish tochange.
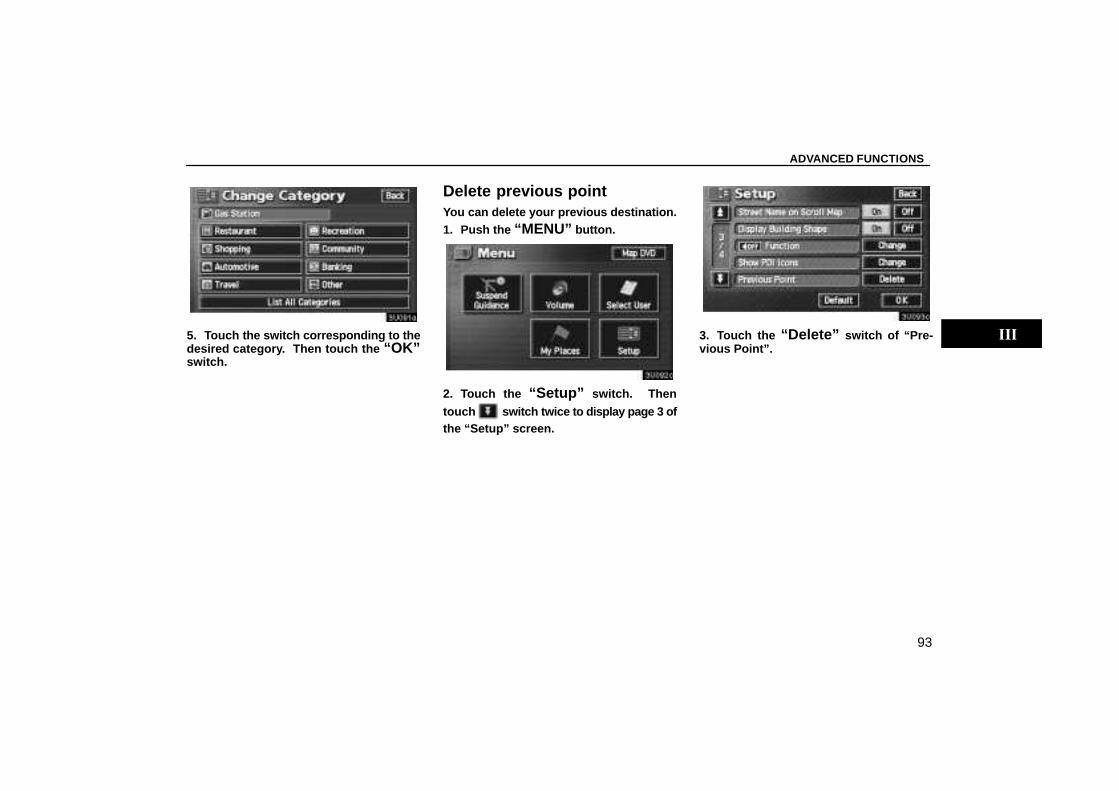
ADVANCED FUNCTIONS
93
5. Touch the switch corresponding to thedesired category. Then touch the “OK”switch.
Delete previous pointYou can delete your previous destination.1. Push the “MENU” button.
2. Touch the “Setup” switch. Then
touch switch twice to display page 3 ofthe “Setup” screen.
3. Touch the “Delete” switch of “Pre-vious Point”.
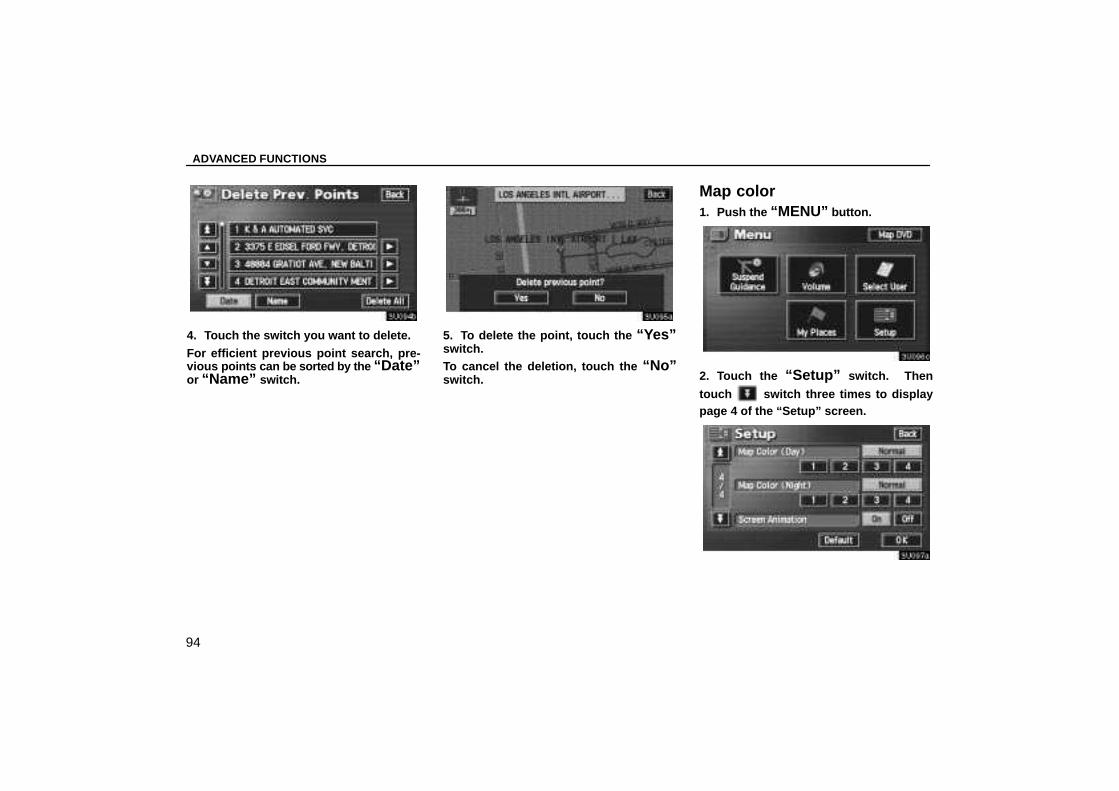
ADVANCED FUNCTIONS
94
4. Touch the switch you want to delete.
For efficient previous point search, pre-vious points can be sorted by the “Date”or “Name” switch.
5. To delete the point, touch the “Yes”switch.To cancel the deletion, touch the “No”switch.
Map color1. Push the “MENU” button.
2. Touch the “Setup” switch. Then
touch switch three times to displaypage 4 of the “Setup” screen.

ADVANCED FUNCTIONS
95
3. Touch the desired color for day and/ornight map and then touch the “OK”switch to return the map screen.
Touch the “Normal” switch to return to thedefault map color.
Screen animationWhen the “Screen Animation” feature isturned on, some switches and screens be-come animated. (e.g.: change map guid-ance on the map screen)
To turn the “Screen Animation” mode on:1. Push the “MENU” button.
2. Touch the “Setup” switch. Then
touch switch three times to displaypage 4 of the “Setup” screen.
3. Touch the “On” switch of “ScreenAnimation” and touch the “OK” switch.

ADVANCED FUNCTIONS
96
OTHER FUNCTIONS
97
OTHER FUNCTIONSOther functions Maintenance informationn 98. . . . . . . . . . . . . . . . . . . . . . . . . . . . . . . . . . . . . . . . . . . . Calendar with memo 103. . . . . . . . . . . . . . . . . . . . . . . . . . . . . . . . . . . . . . . . . . . . . . . . Hands–free system 110. . . . . . . . . . . . . . . . . . . . . . . . . . . . . . . . . . . . . . . . . . . . . . . . . Speech command system 127. . . . . . . . . . . . . . . . . . . . . . . . . . . . . . . . . . . . . . . . . . . Help screen 129. . . . . . . . . . . . . . . . . . . . . . . . . . . . . . . . . . . . . . . . . . . . . . . . . . . . . . . Screen setting 129. . . . . . . . . . . . . . . . . . . . . . . . . . . . . . . . . . . . . . . . . . . . . . . . . . . . . Screen adjustment 130. . . . . . . . . . . . . . . . . . . . . . . . . . . . . . . . . . . . . . . . . . . . . . . . . Rear seat entertainment system 132. . . . . . . . . . . . . . . . . . . . . . . . . . . . . . . . . . . . . .
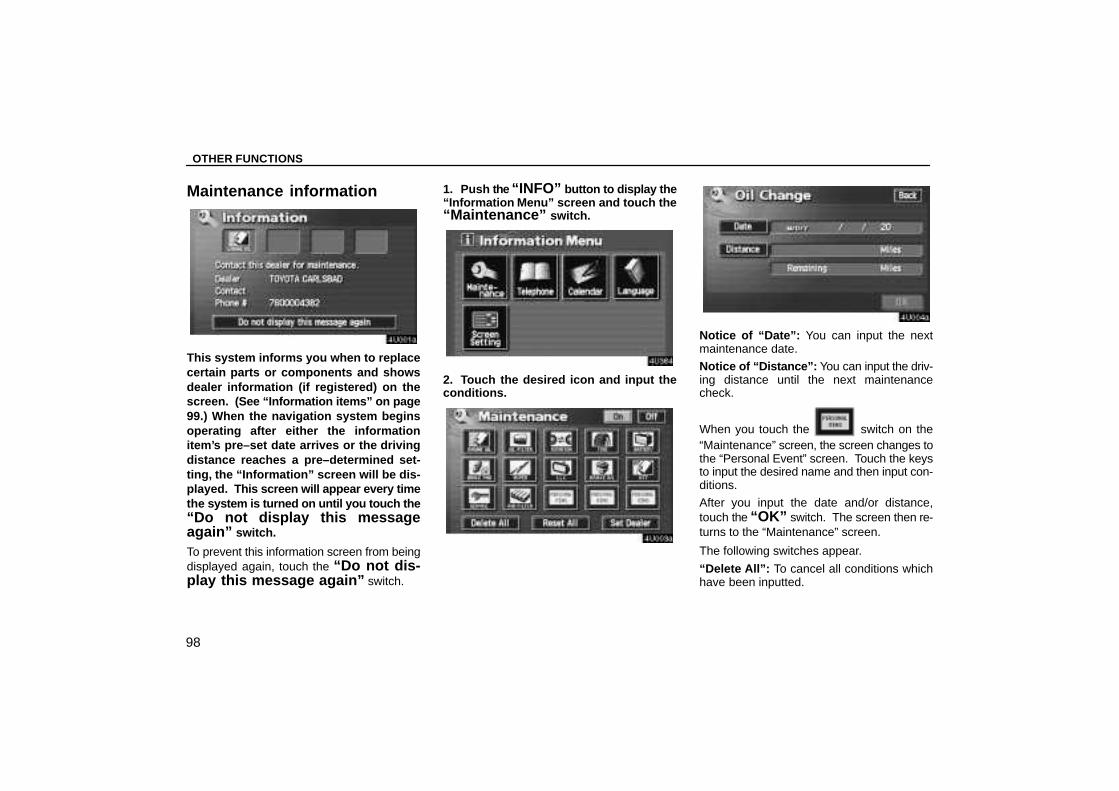
OTHER FUNCTIONS
98
Maintenance information
This system informs you when to replacecertain parts or components and showsdealer information (if registered) on thescreen. (See “Information items” on page99.) When the navigation system beginsoperating after either the informationitem’s pre–set date arrives or the drivingdistance reaches a pre–determined set-ting, the “Information” screen will be dis-played. This screen will appear every timethe system is turned on until you touch the“Do not display this messageagain” switch.
To prevent this information screen from beingdisplayed again, touch the “Do not dis-play this message again” switch.
1. Push the “INFO” button to display the“Information Menu” screen and touch the“Maintenance” switch.
2. Touch the desired icon and input theconditions.
Notice of “Date”: You can input the nextmaintenance date.
Notice of “Distance”: You can input the driv-ing distance until the next maintenancecheck.
When you touch the switch on the“Maintenance” screen, the screen changes tothe “Personal Event” screen. Touch the keysto input the desired name and then input con-ditions.
After you input the date and/or distance,touch the “OK” switch. The screen then re-turns to the “Maintenance” screen.
The following switches appear.
“Delete All”: To cancel all conditions whichhave been inputted.
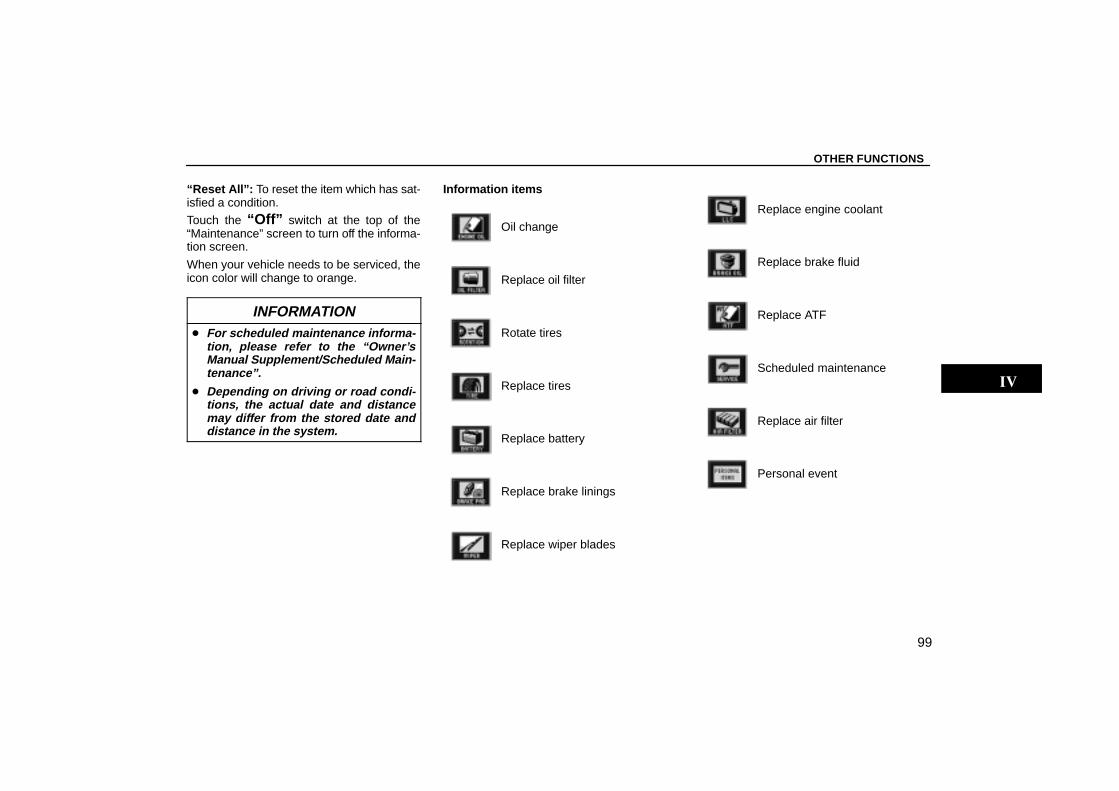
OTHER FUNCTIONS
99
“Reset All”: To reset the item which has sat-isfied a condition.
Touch the “Off” switch at the top of the“Maintenance” screen to turn off the informa-tion screen.
When your vehicle needs to be serviced, theicon color will change to orange.
INFORMATION� For scheduled maintenance informa-
tion, please refer to the “Owner’sManual Supplement/Scheduled Main-tenance”.
� Depending on driving or road condi-tions, the actual date and distancemay differ from the stored date anddistance in the system.
Information items
Oil change
Replace oil filter
Rotate tires
Replace tires
Replace battery
Replace brake linings
Replace wiper blades
Replace engine coolant
Replace brake fluid
Replace ATF
Scheduled maintenance
Replace air filter
Personal event

OTHER FUNCTIONS
100
(a) Register dealerYou can register the dealer name, staff,location and phone number.
1. Touch the “Set Dealer” switch onthe “Maintenance” screen.
2. Enter the location of the dealer in thesame way as for destination input. (Seepage 22.)
After you input the dealer, the screen changesand displays the map location of the dealer.If it is OK, touch the “Enter” switch.
The screen changes to “Edit Dealer” screen.(See “(b) Edit dealer”.)
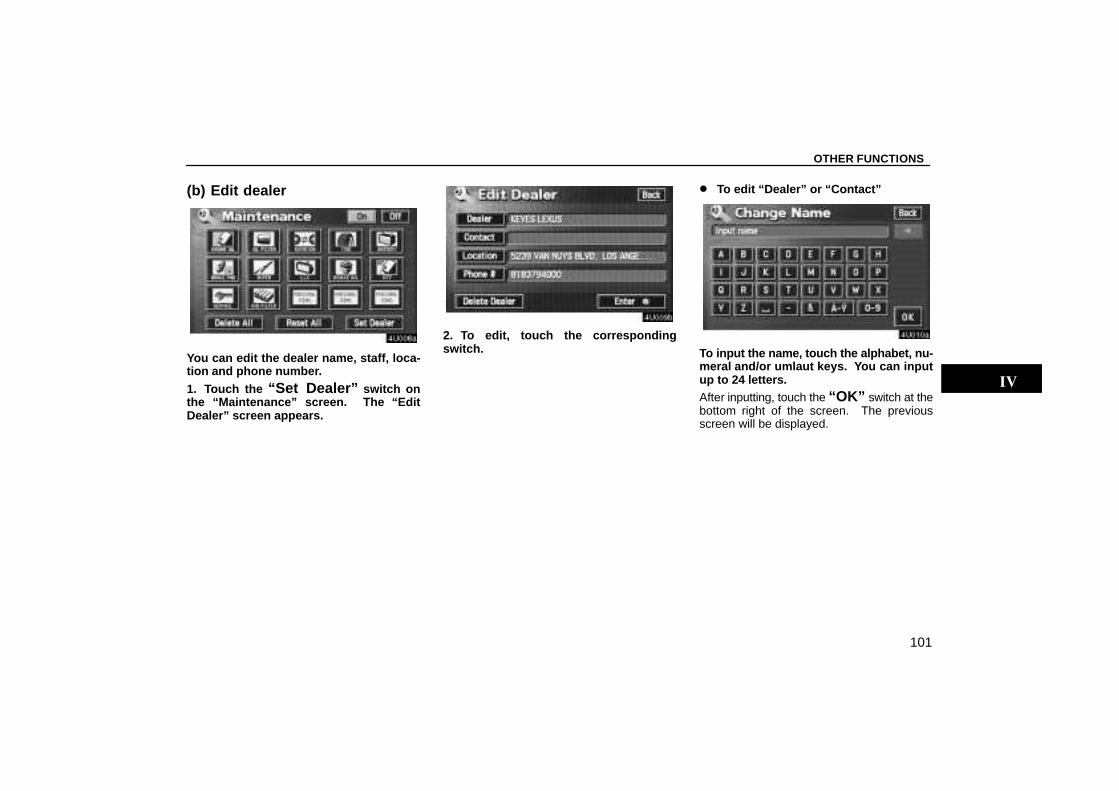
OTHER FUNCTIONS
101
(b) Edit dealer
You can edit the dealer name, staff, loca-tion and phone number.
1. Touch the “Set Dealer” switch onthe “Maintenance” screen. The “EditDealer” screen appears.
2. To edit, touch the correspondingswitch.
� To edit “Dealer” or “Contact”
To input the name, touch the alphabet, nu-meral and/or umlaut keys. You can inputup to 24 letters.After inputting, touch the “OK” switch at thebottom right of the screen. The previousscreen will be displayed.
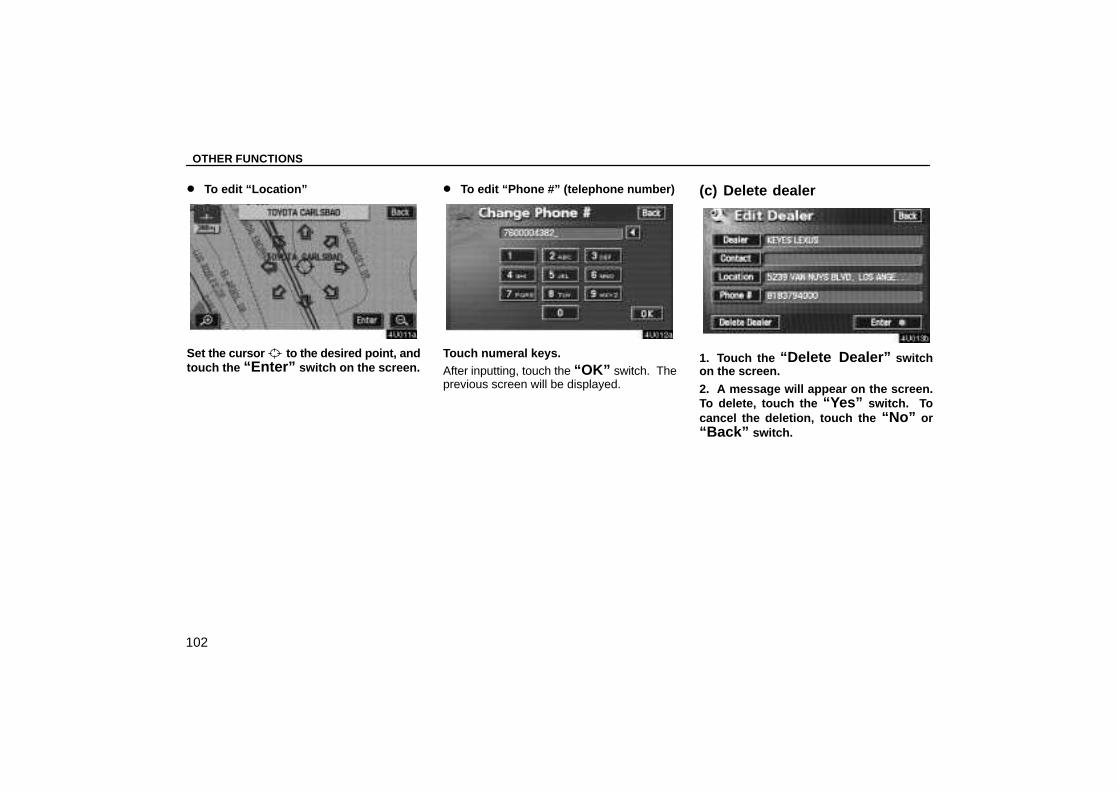
OTHER FUNCTIONS
102
� To edit “Location”
Set the cursor to the desired point, andtouch the “Enter” switch on the screen.
� To edit “Phone #” (telephone number)
Touch numeral keys.After inputting, touch the “OK” switch. Theprevious screen will be displayed.
(c) Delete dealer
1. Touch the “Delete Dealer” switchon the screen.
2. A message will appear on the screen.To delete, touch the “Yes” switch. Tocancel the deletion, touch the “No” or“Back” switch.
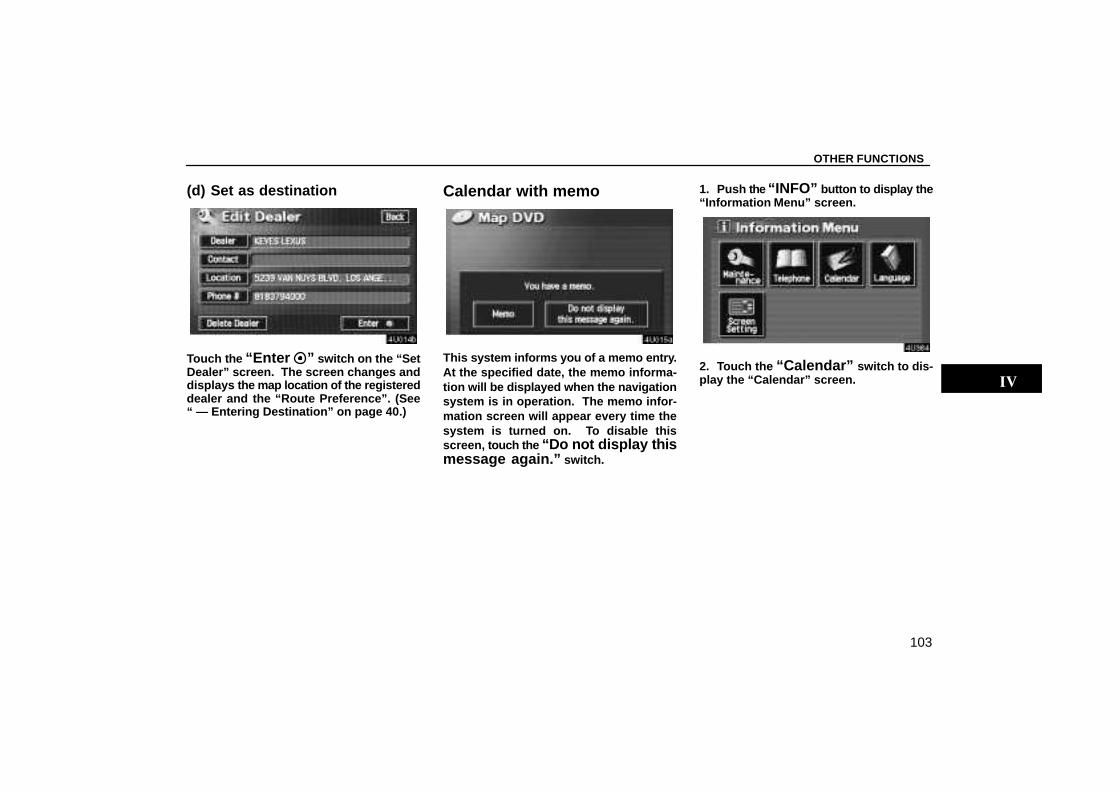
OTHER FUNCTIONS
103
(d) Set as destination
Touch the “Enter ” switch on the “SetDealer” screen. The screen changes anddisplays the map location of the registereddealer and the “Route Preference”. (See“ — Entering Destination” on page 40.)
Calendar with memo
This system informs you of a memo entry.At the specified date, the memo informa-tion will be displayed when the navigationsystem is in operation. The memo infor-mation screen will appear every time thesystem is turned on. To disable thisscreen, touch the “Do not display thismessage again.” switch.
1. Push the “INFO” button to display the“Information Menu” screen.
2. Touch the “Calendar” switch to dis-play the “Calendar” screen.
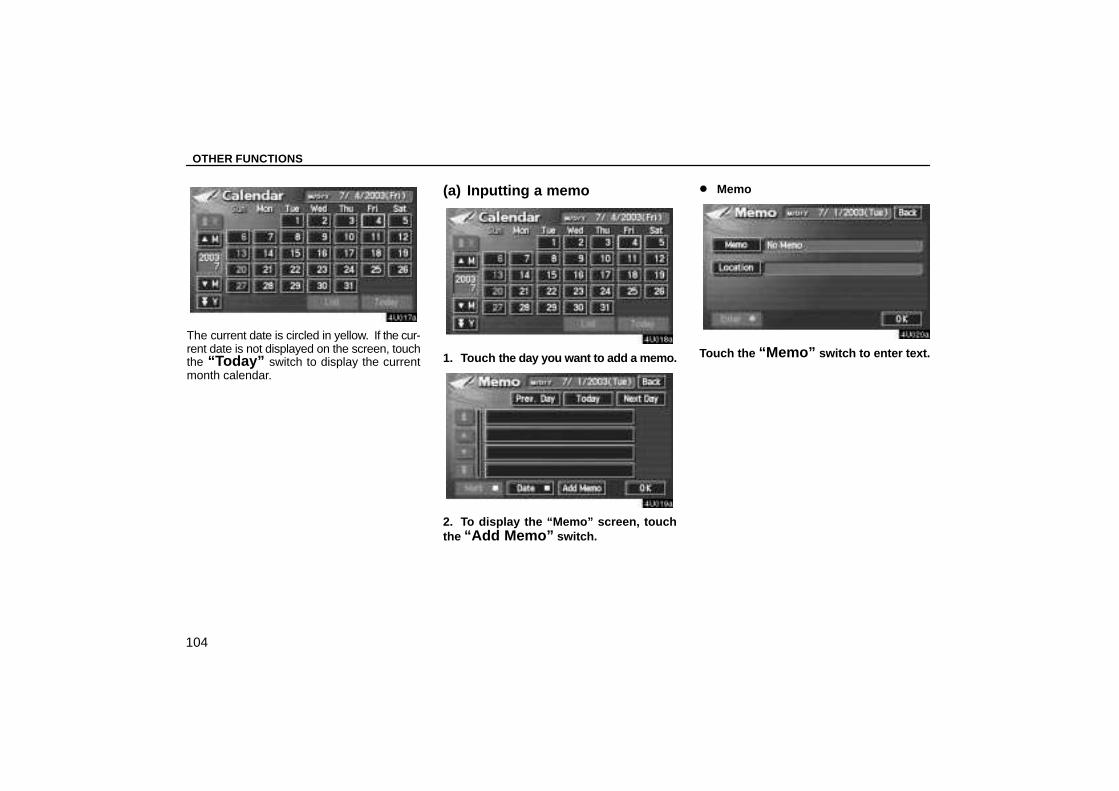
OTHER FUNCTIONS
104
The current date is circled in yellow. If the cur-rent date is not displayed on the screen, touchthe “Today” switch to display the currentmonth calendar.
(a) Inputting a memo
1. Touch the day you want to add a memo.
2. To display the “Memo” screen, touchthe “Add Memo” switch.
� Memo
Touch the “Memo” switch to enter text.
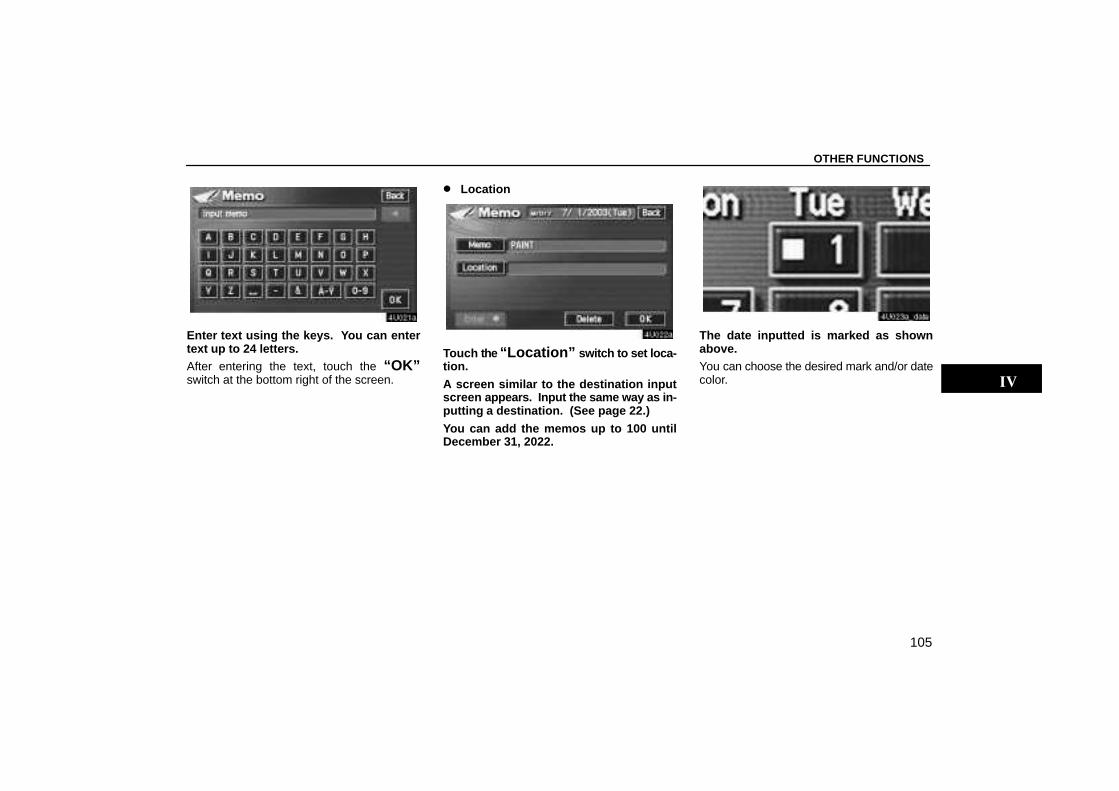
OTHER FUNCTIONS
105
Enter text using the keys. You can entertext up to 24 letters.After entering the text, touch the “OK”switch at the bottom right of the screen.
� Location
Touch the “Location” switch to set loca-tion.
A screen similar to the destination inputscreen appears. Input the same way as in-putting a destination. (See page 22.)
You can add the memos up to 100 untilDecember 31, 2022.
The date inputted is marked as shownabove.You can choose the desired mark and/or datecolor.
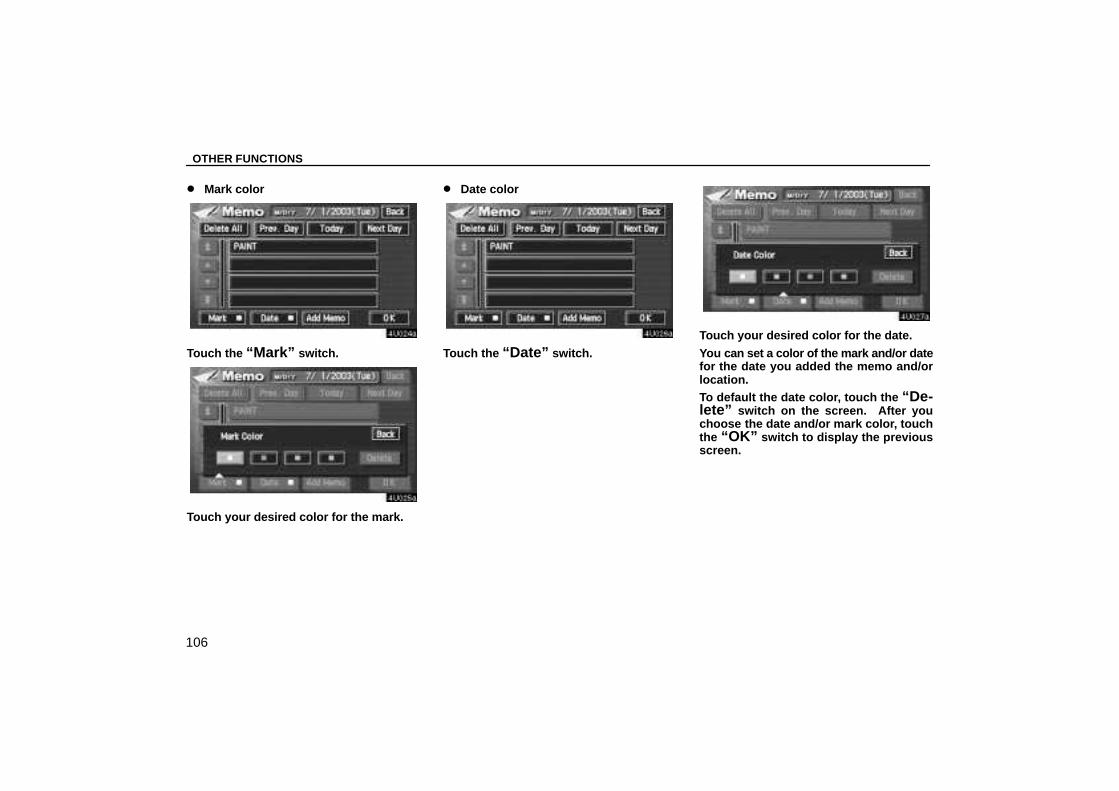
OTHER FUNCTIONS
106
� Mark color
Touch the “Mark” switch.
Touch your desired color for the mark.
� Date color
Touch the “Date” switch.
Touch your desired color for the date.
You can set a color of the mark and/or datefor the date you added the memo and/orlocation.To default the date color, touch the “De-lete” switch on the screen. After youchoose the date and/or mark color, touchthe “OK” switch to display the previousscreen.
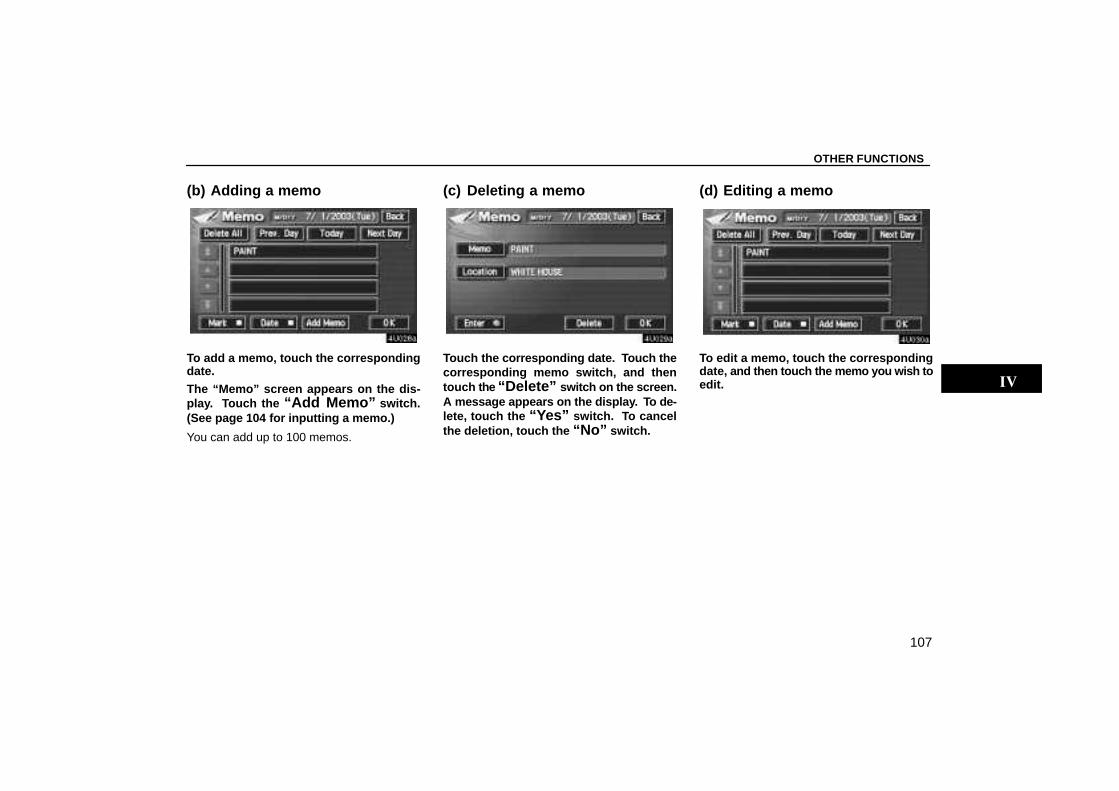
OTHER FUNCTIONS
107
(b) Adding a memo
To add a memo, touch the correspondingdate.
The “Memo” screen appears on the dis-play. Touch the “Add Memo” switch.(See page 104 for inputting a memo.)
You can add up to 100 memos.
(c) Deleting a memo
Touch the corresponding date. Touch thecorresponding memo switch, and thentouch the “Delete” switch on the screen.A message appears on the display. To de-lete, touch the “Yes” switch. To cancelthe deletion, touch the “No” switch.
(d) Editing a memo
To edit a memo, touch the correspondingdate, and then touch the memo you wish toedit.

OTHER FUNCTIONS
108
Touch the “Memo” or “Location”switch.
(e) Memo list
1. To list the memos you added, touch the“List” switch.
2. Touch the desired search condition tolist the memos. The “Memo List” is dis-played on the screen.
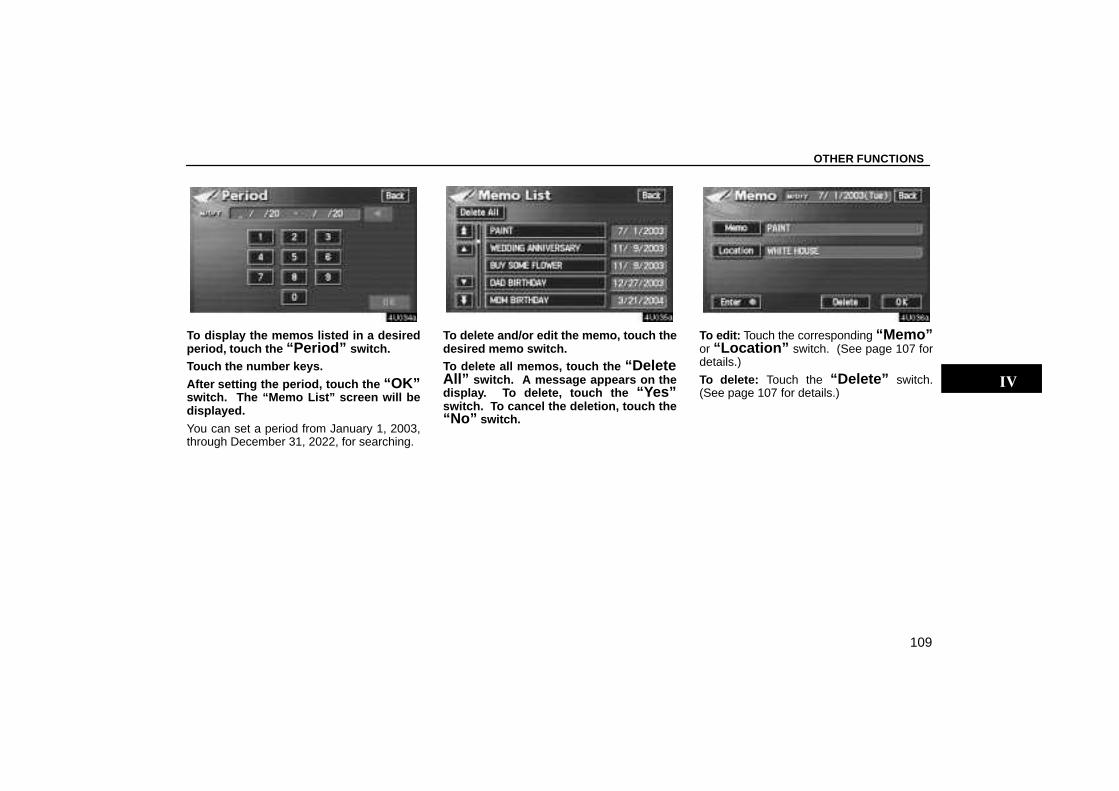
OTHER FUNCTIONS
109
To display the memos listed in a desiredperiod, touch the “Period” switch.Touch the number keys.
After setting the period, touch the “OK”switch. The “Memo List” screen will bedisplayed.
You can set a period from January 1, 2003,through December 31, 2022, for searching.
To delete and/or edit the memo, touch thedesired memo switch.To delete all memos, touch the “DeleteAll” switch. A message appears on thedisplay. To delete, touch the “Yes”switch. To cancel the deletion, touch the“No” switch.
To edit: Touch the corresponding “Memo”or “Location” switch. (See page 107 fordetails.)
To delete: Touch the “Delete” switch.(See page 107 for details.)

OTHER FUNCTIONS
110
Hands–free systemHands–free system allows you to make orreceive a call without taking your handsoff the steering wheel by connecting yourcellular phone.
This system supports the Bluetooth. Blue-tooth is a data wireless system by which youcan call without your cellular phone connect-ing with a cable or placing on a cradle.
If your cellular phone does not support theBluetooth, this system can not function.
CAUTIONWhile you are driving, do not use a cellu-lar phone or connect the Bluetoothphone.
NOTICE
Do not leave your cellular phone in thecar. The temperature indoor may behigh and damage the phone.
INFORMATIONIn the following conditions, the systemmay not function.
� The cellular phone is turned OFF.
� The current position is outside thecommunication area.
� The cellular phone is not connected.
� The cellular phone has a low battery.
By pushing the telephone button above,you can receive a call or hang up withouttaking your hands off the steering wheel.
You can use the microphone above whentalking on the phone.
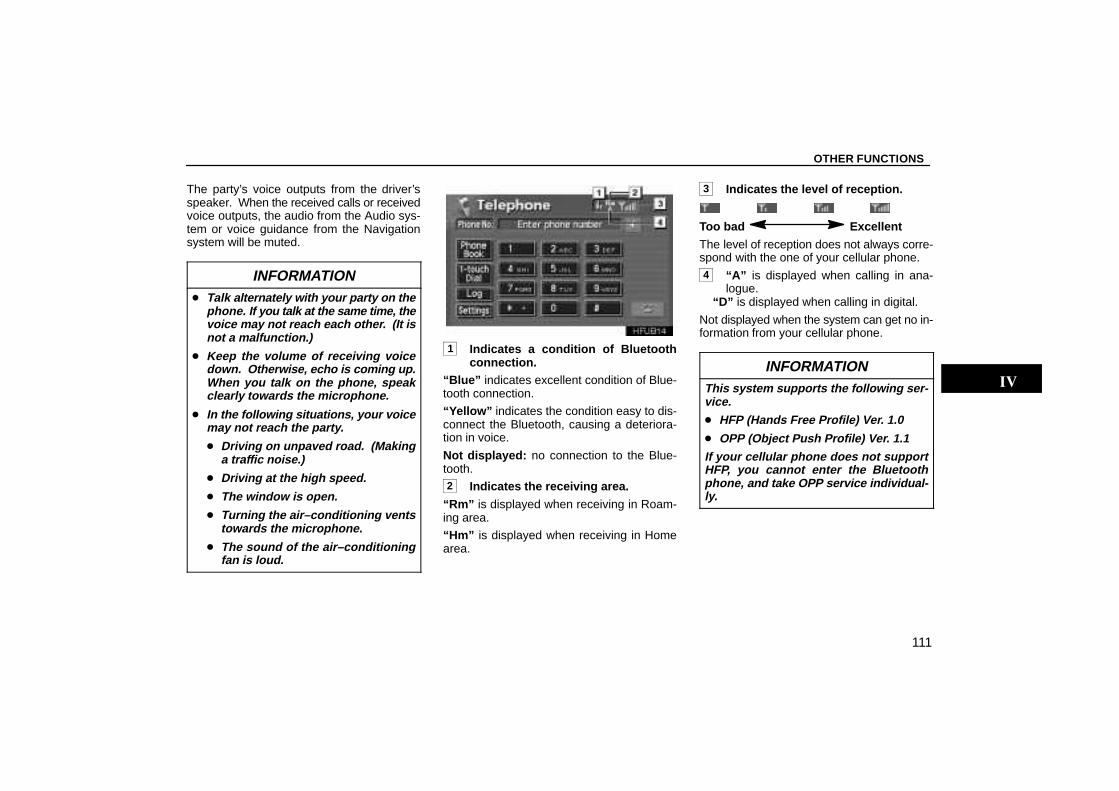
OTHER FUNCTIONS
111
The party’s voice outputs from the driver’sspeaker. When the received calls or receivedvoice outputs, the audio from the Audio sys-tem or voice guidance from the Navigationsystem will be muted.
INFORMATION� Talk alternately with your party on the
phone. If you talk at the same time, thevoice may not reach each other. (It isnot a malfunction.)
� Keep the volume of receiving voicedown. Ot herwise, echo is coming up.When you talk on the phone, speakclearly towards the microphone.
� In the following situations, your voicemay not reach the party.
� Driving on unpaved road. (Makinga traffic noise.)
� Driving at the high speed.
� The window is open.
� Turning the air–conditioning ventstowards the microphone.
� The sound of the air–conditioningfan is loud.
1 Indicates a condition of Bluetoothconnection.
“Blue” indicates excellent condition of Blue-tooth connection.
“Yellow” indicates the condition easy to dis-connect the Bluetooth, causing a deteriora-tion in voice.
Not displayed: no connection to the Blue-tooth.2 Indicates the receiving area.
“Rm” is displayed when receiving in Roam-ing area.
“Hm” is displayed when receiving in Homearea.
3 Indicates the level of reception.
Too bad Excellent
The level of reception does not always corre-spond with the one of your cellular phone.4 “A” is displayed when calling in ana-
logue.“D” is displayed when calling in digital.
Not displayed when the system can get no in-formation from your cellular phone.
INFORMATIONThis system supports the following ser-vice.� HFP (Hands Free Profile) Ver. 1.0
� OPP (Object Push Profile) Ver. 1.1If your cellular phone does not supportHFP, you cannot enter the Bluetoothphone, and take OPP service individual-ly.
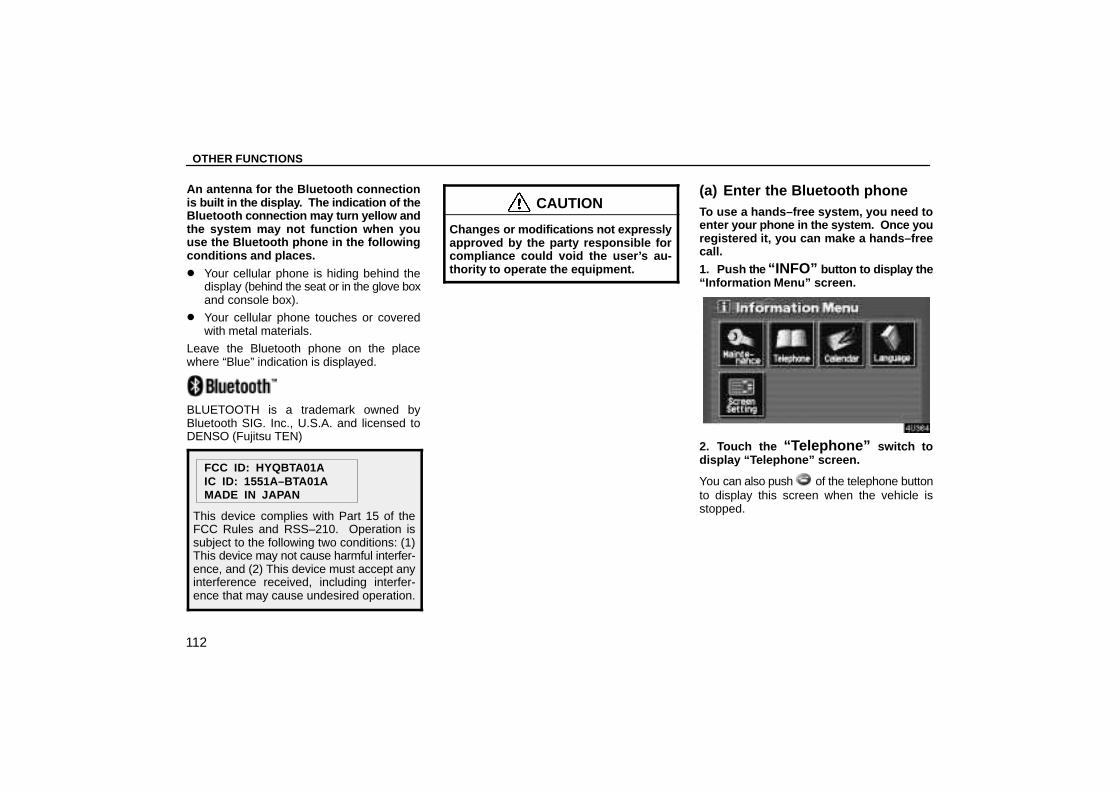
OTHER FUNCTIONS
112
An antenna for the Bluetooth connectionis built in the display. The indication of theBluetooth connection may turn yellow andthe system may not function when youuse the Bluetooth phone in the followingconditions and places.
� Your cellular phone is hiding behind thedisplay (behind the seat or in the glove boxand console box).
� Your cellular phone touches or coveredwith metal materials.
Leave the Bluetooth phone on the placewhere “Blue” indication is displayed.
BLUETOOTH is a trademark owned byBluetooth SIG. Inc., U.S.A. and licensed toDENSO (Fujitsu TEN)
FCC ID: HYQBTA01AIC ID: 1551A–BTA01AMADE IN JAPAN
This device complies with Part 15 of theFCC Rules and RSS–210. Operation issubject to the following two conditions: (1)This device may not cause harmful interfer-ence, and (2) This device must accept anyinterference received, including interfer-ence that may cause undesired operation.
CAUTION
Changes or modifications not expresslyapproved by the party responsible forcompliance could void the user’s au-thority to operate the equipment.
(a) Enter the Bluetooth phoneTo use a hands–free system, you need toenter your phone in the system. Once youregistered it, you can make a hands–freecall.
1. Push the “INFO” button to display the“Information Menu” screen.
2. Touch the “Telephone” switch todisplay “Telephone” screen.
You can also push of the telephone buttonto display this screen when the vehicle isstopped.
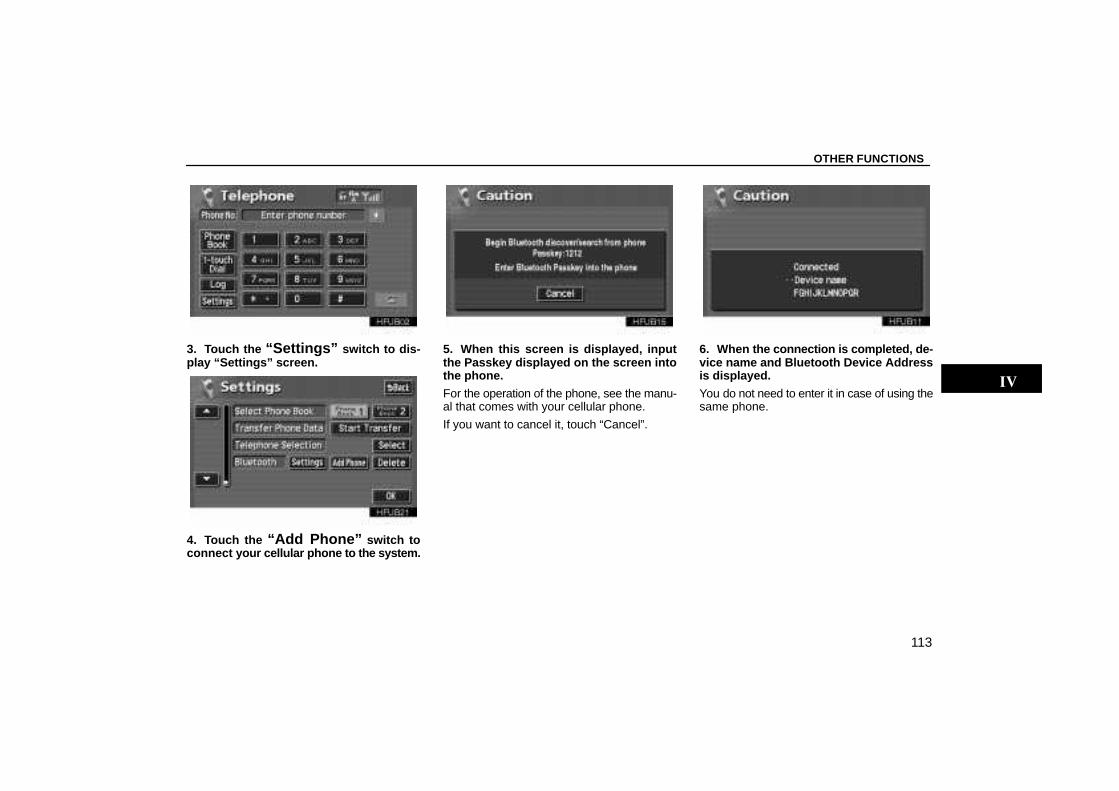
OTHER FUNCTIONS
113
3. Touch the “Settings” switch to dis-play “Settings” screen.
4. Touch the “Add Phone” switch toconnect your cellular phone to the system.
5. When this screen is displayed, inputthe Passkey displayed on the screen intothe phone.
For the operation of the phone, see the manu-al that comes with your cellular phone.
If you want to cancel it, touch “Cancel”.
6. When the connection is completed, de-vice name and Bluetooth Device Addressis displayed.
You do not need to enter it in case of using thesame phone.
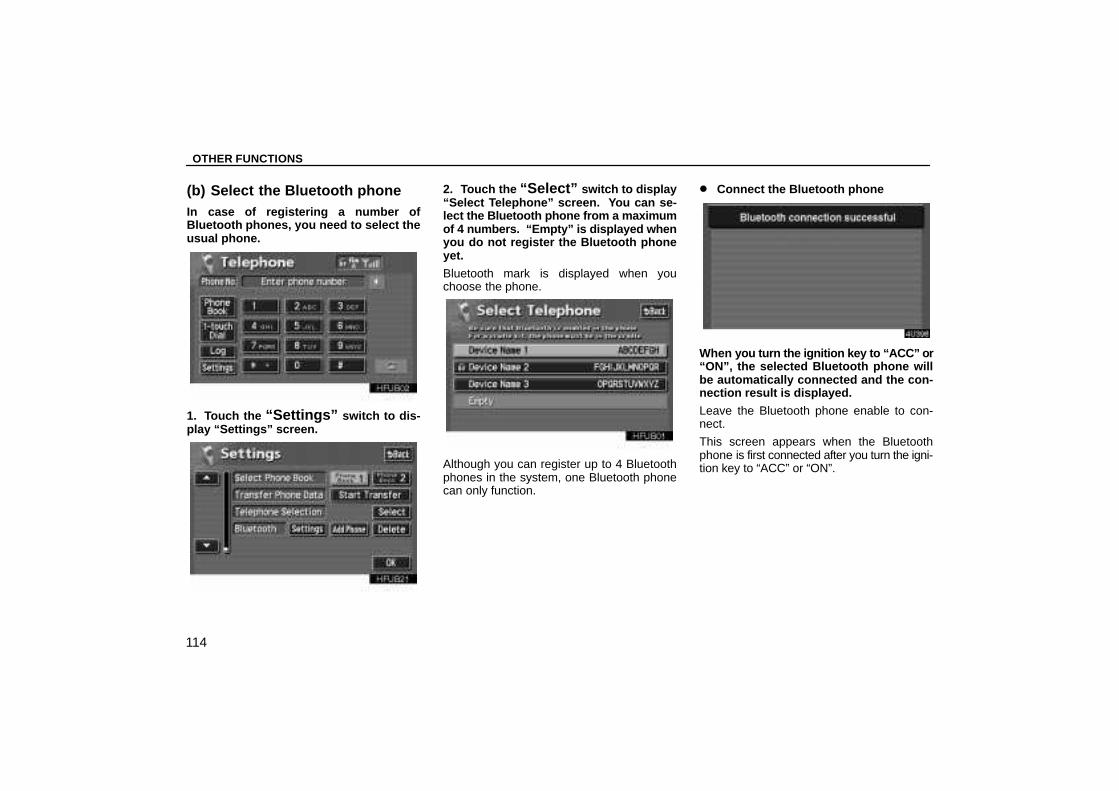
OTHER FUNCTIONS
114
(b) Select the Bluetooth phoneIn case of registering a number ofBluetooth phones, you need to select theusual phone.
1. Touch the “Settings” switch to dis-play “Settings” screen.
2. Touch the “Select” switch to display“Select Telephone” screen. You can se-lect the Bluetooth phone from a maximumof 4 numbers. “Empty” is displayed whenyou do not register the Bluetooth phoneyet.
Bluetooth mark is displayed when youchoose the phone.
Although you can register up to 4 Bluetoothphones in the system, one Bluetooth phonecan only function.
� Connect the Bluetooth phone
When you turn the ignition key to “ACC” or“ON”, the selected Bluetooth phone willbe automatically connected and the con-nection result is displayed.
Leave the Bluetooth phone enable to con-nect.
This screen appears when the Bluetoothphone is first connected after you turn the igni-tion key to “ACC” or “ON”.
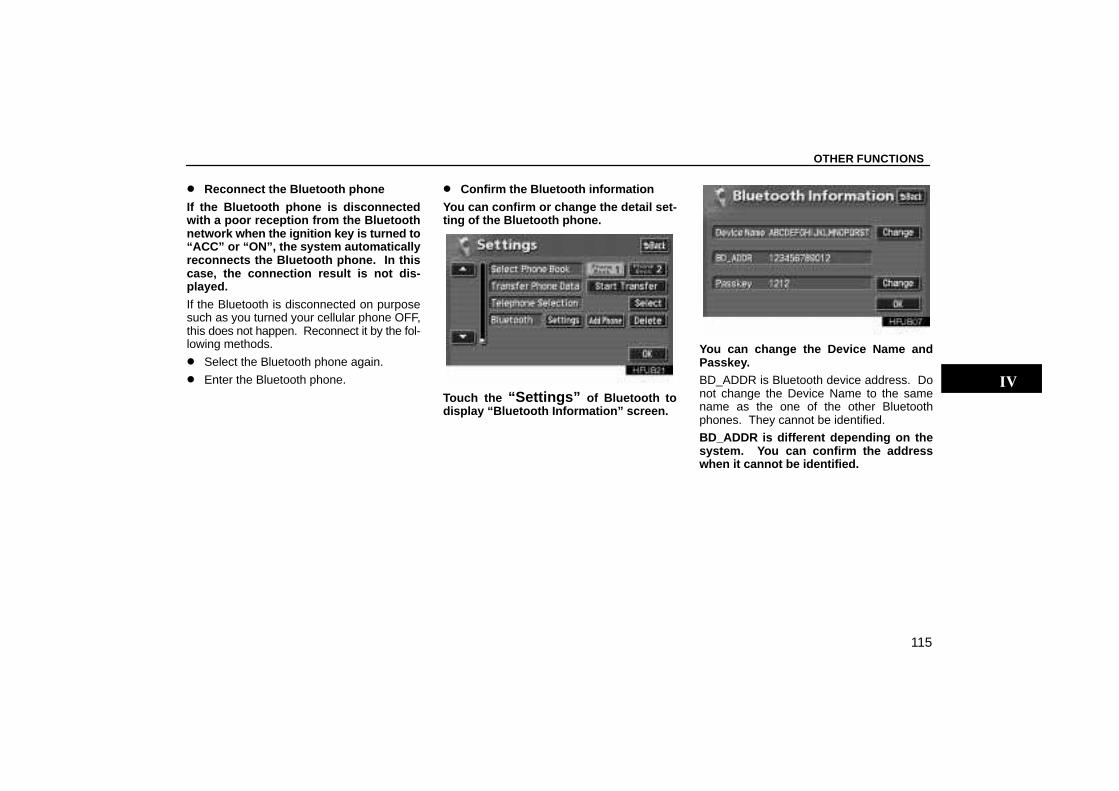
OTHER FUNCTIONS
115
� Reconnect the Bluetooth phone
If the Bluetooth phone is disconnectedwith a poor reception from the Bluetoothnetwork w hen the ignition key is turned to“ACC” or “ON”, the system automaticallyreconnects the Bluetooth phone. In thiscase, the connection result is not dis-played.
If the Bluetooth is disconnected on purposesuch as you turned your cellular phone OFF,this does not happen. Reconnect it by the fol-lowing methods.
� Select the Bluetooth phone again.
� Enter the Bluetooth phone.
� Confirm the Bluetooth information
You can confirm or change the detail set-ting of the Bluetooth phone.
Touch the “Settings” of Bluetooth todisplay “Bluetooth Information” screen.
You can change the Device Name andPasskey.BD_ADDR is Bluetooth device address. Donot change the Device Name to the samename as the one of the other Bluetoothphones. They cannot be identified.
BD_ADDR is different depending on thesystem. You can confirm the addresswhen it cannot be identified.
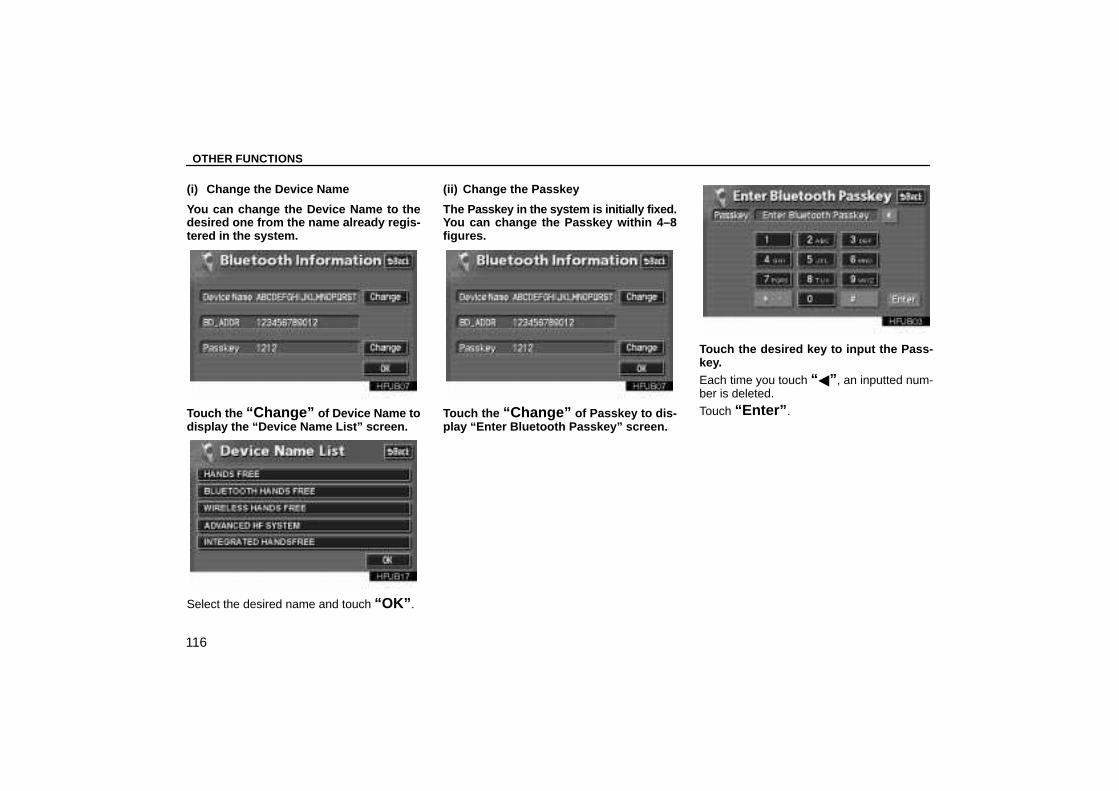
OTHER FUNCTIONS
116
(i) Change the Device Name
You can change the Device Name to thedesired one from the name already regis-tered in the system.
Touch the “Change” of Device Name todisplay the “Device Name List” screen.
Select the desired name and touch “OK” .
(ii) Change the Passkey
The Passkey in the system is initially fixed.You can change the Passkey within 4–8figures.
Touch the “Change” of Passkey to dis-play “Enter Bluetooth Passkey” screen.
Touch the desired key to input the Pass-key.Each time you touch “�” , an inputted num-ber is deleted.
Touch “Enter” .
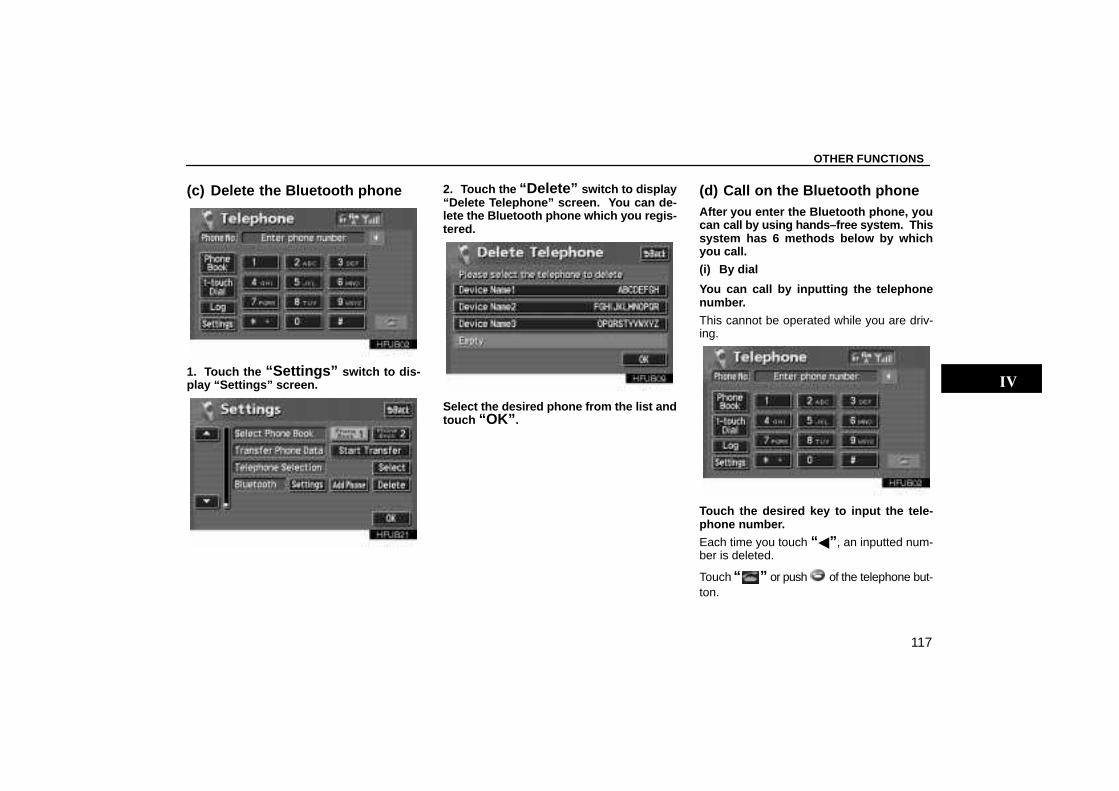
OTHER FUNCTIONS
117
(c) Delete the Bluetooth phone
1. Touch the “Settings” switch to dis-play “Settings” screen.
2. Touch the “Delete” switch to display“Delete Telephone” screen. You can de-lete the Bluetooth phone which you regis-tered.
Select the desired phone from the list andtouch “OK” .
(d) Call on the Bluetooth phoneAfter you enter the Bluetooth phone, youcan call by using hands–free system. Thissystem has 6 methods below by whichyou call.
(i) By dial
You can call by inputting the telephonenumber.
This cannot be operated while you are driv-ing.
Touch the desired key to input the tele-phone number.
Each time you touch “�” , an inputted num-ber is deleted.
Touch “ ” or push of the telephone but-ton.
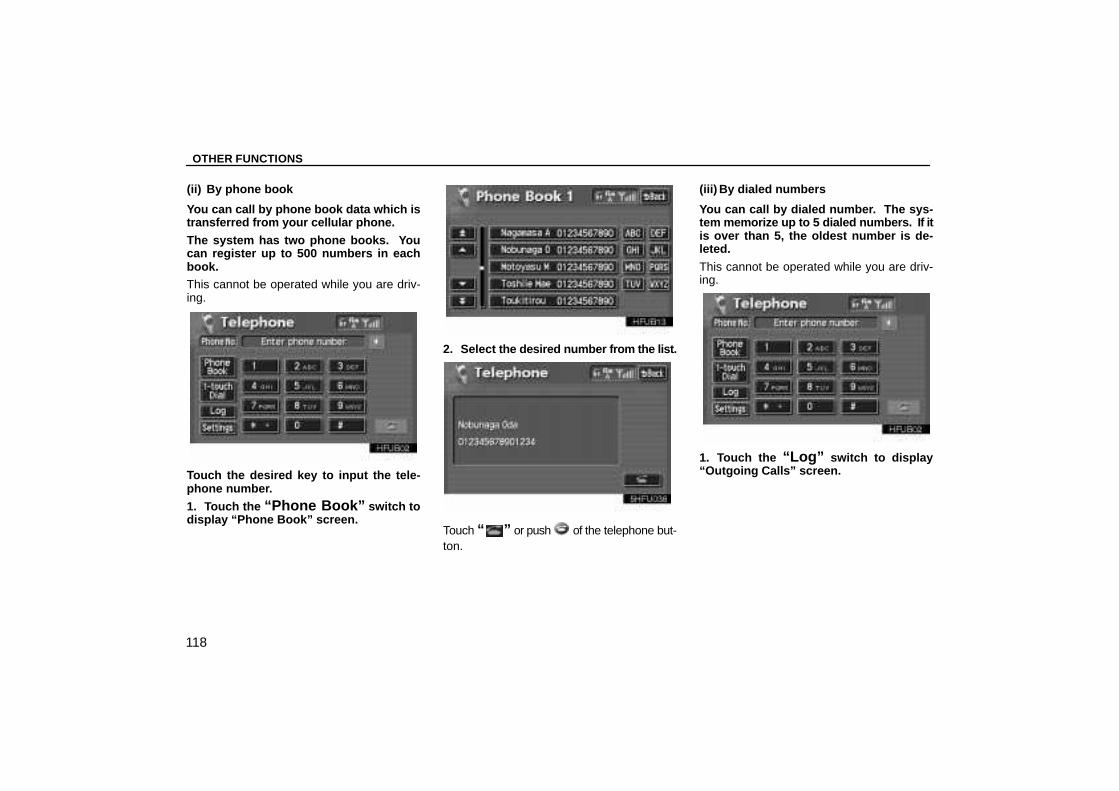
OTHER FUNCTIONS
118
(ii) By phone book
You can call by phone book data which istransferred from your cellular phone.
The system has two phone books. Youcan register up to 500 numbers in eachbook.This cannot be operated while you are driv-ing.
Touch the desired key to input the tele-phone number.
1. Touch the “Phone Book” switch todisplay “Phone Book” screen.
2. Select the desired number from the list.
Touch “ ” or push of the telephone but-ton.
(iii) By dialed numbers
You can call by dialed number. The sys-tem memorize up to 5 dialed numbers. If itis over than 5, the oldest number is de-leted.
This cannot be operated while you are driv-ing.
1. Touch the “Log” switch to display“Outgoing Calls” screen.
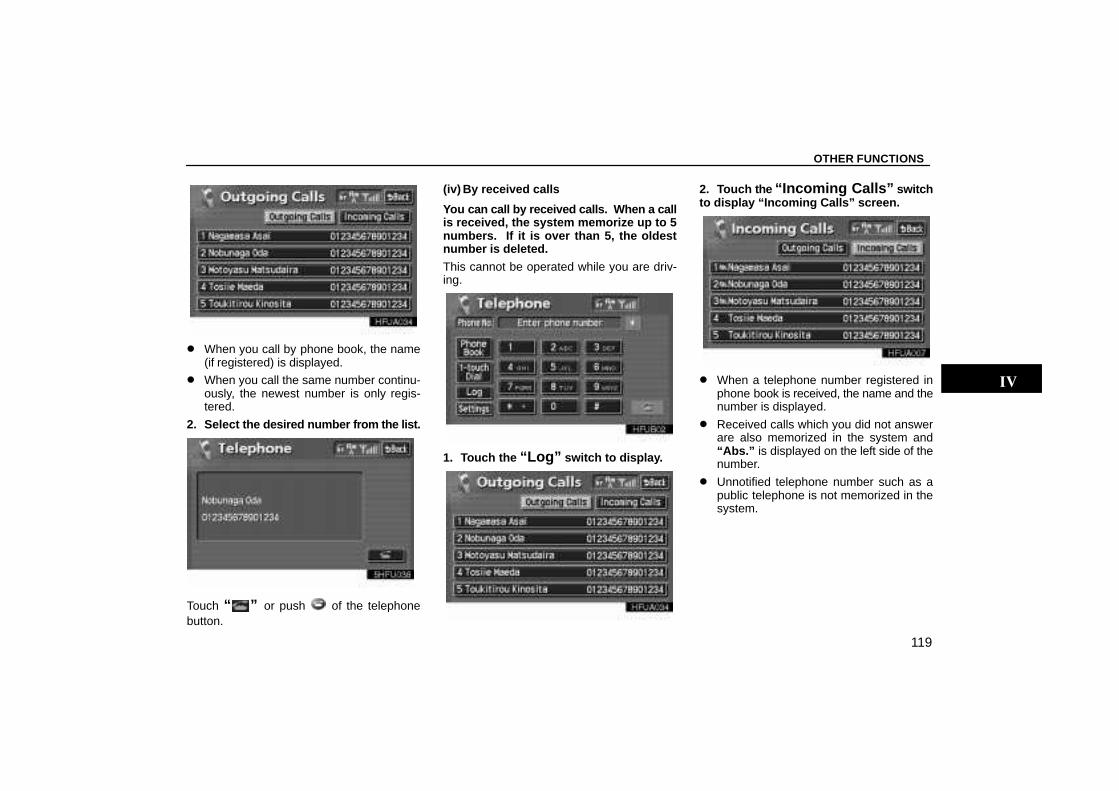
OTHER FUNCTIONS
119
� When you call by phone book, the name(if registered) is displayed.
� When you call the same number continu-ously, the newest number is only regis-tered.
2. Select the desired number from the list.
Touch “ ” or push of the telephonebutton.
(iv) By received calls
You can call by received calls. When a callis received, the system memorize up to 5numbers. If it is over than 5, the oldestnumber is deleted.
This cannot be operated while you are driv-ing.
1. Touch the “Log” switch to display.
2. Touch the “Incoming Calls” switchto display “Incoming Calls” screen.
� When a telephone number registered inphone book is received, the name and thenumber is displayed.
� Received calls which you did not answerare also memorized in the system and“Abs.” is displayed on the left side of thenumber.
� Unnotified telephone number such as apublic telephone is not memorized in thesystem.
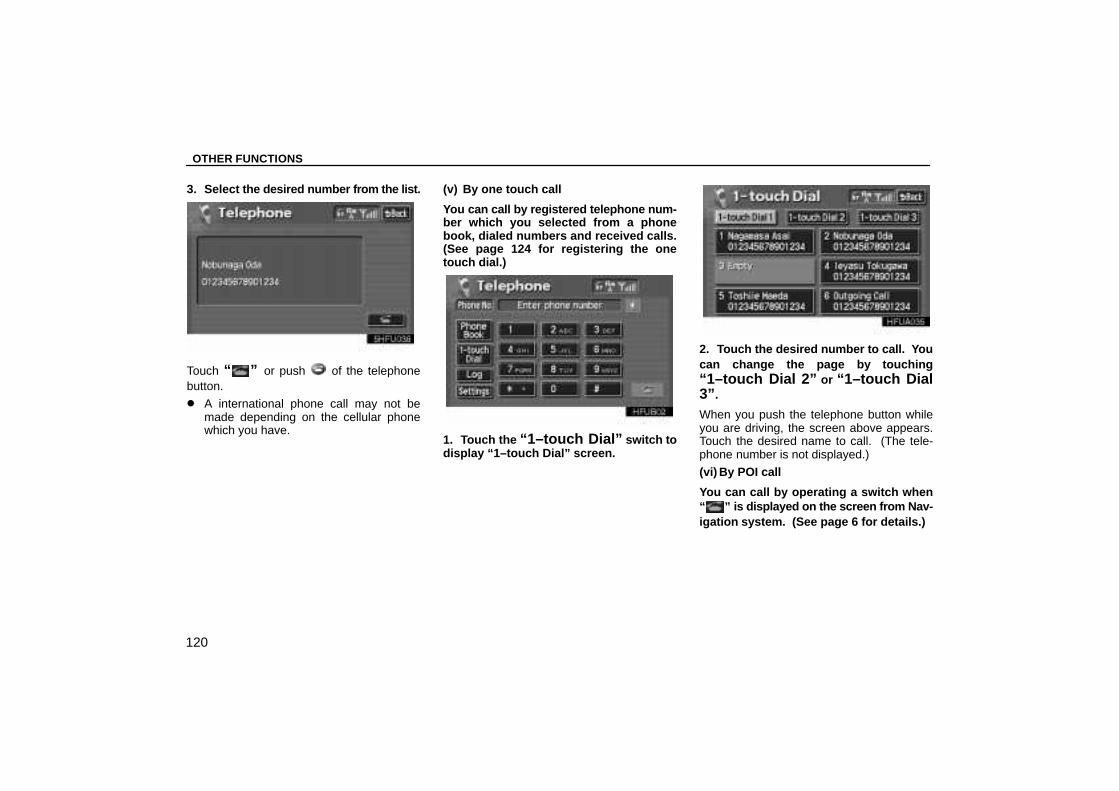
OTHER FUNCTIONS
120
3. Select the desired number from the list.
Touch “ ” or push of the telephonebutton.
� A international phone call may not bemade depending on the cellular phonewhich you have.
(v) By one touch call
You can call by registered telephone num-ber which you selected from a phonebook, dialed numbers and received calls.(See page 124 for registering the onetouch dial.)
1. Touch the “1–touch Dial” switch todisplay “1–touch Dial” screen.
2. Touch the desired number to call. Youcan change the page by touching“1–touch Dial 2” or “1–touch Dial3” .
When you push the telephone button whileyou are driving, the screen above appears.Touch the desired name to call. (The tele-phone number is not displayed.)
(vi) By POI call
You can call by operating a switch when“ ” is displayed on the screen from Nav-igation system. (See page 6 for details.)
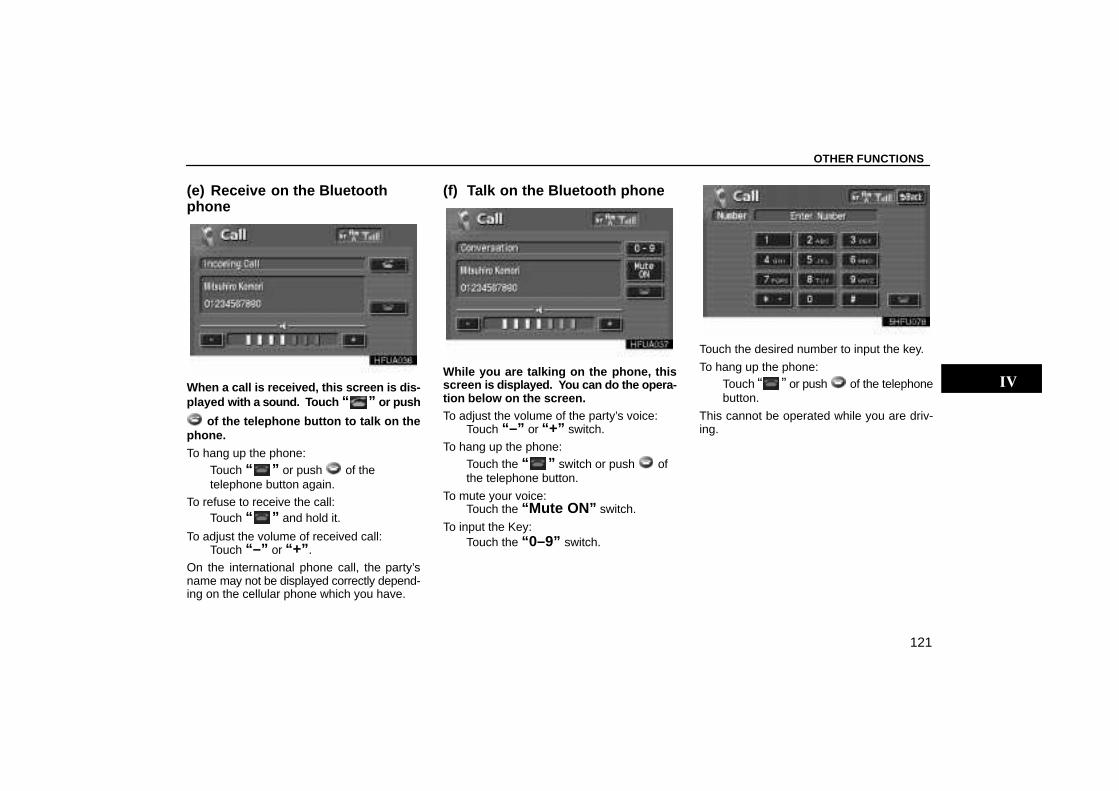
OTHER FUNCTIONS
121
(e) Receive on the Bluetoothphone
When a call is received, this screen is dis-played with a sound. T ouch “ ” or push
of the telephone button to talk on thephone.
To hang up the phone:Touch “ ” or push of the telephone button again.
To refuse to receive the call:Touch “ ” and hold it.
To adjust the volume of received call:Touch “–” or “+” .
On the international phone call, the party’sname may not be displayed correctly depend-ing on the cellular phone which you have.
(f) Talk on the Bluetooth phone
While you are talking on the phone, thisscreen is displayed. You can do the opera-tion below on the screen.To adjust the volume of the party’s voice:
Touch “–” or “+” switch.
To hang up the phone:Touch the “ ” switch or push of the telephone button.
To mute your voice:Touch the “Mute ON” switch.
To input the Key:Touch the “0–9” switch.
Touch the desired number to input the key.
To hang up the phone:Touch “ ” or push of the telephonebutton.
This cannot be operated while you are driv-ing.
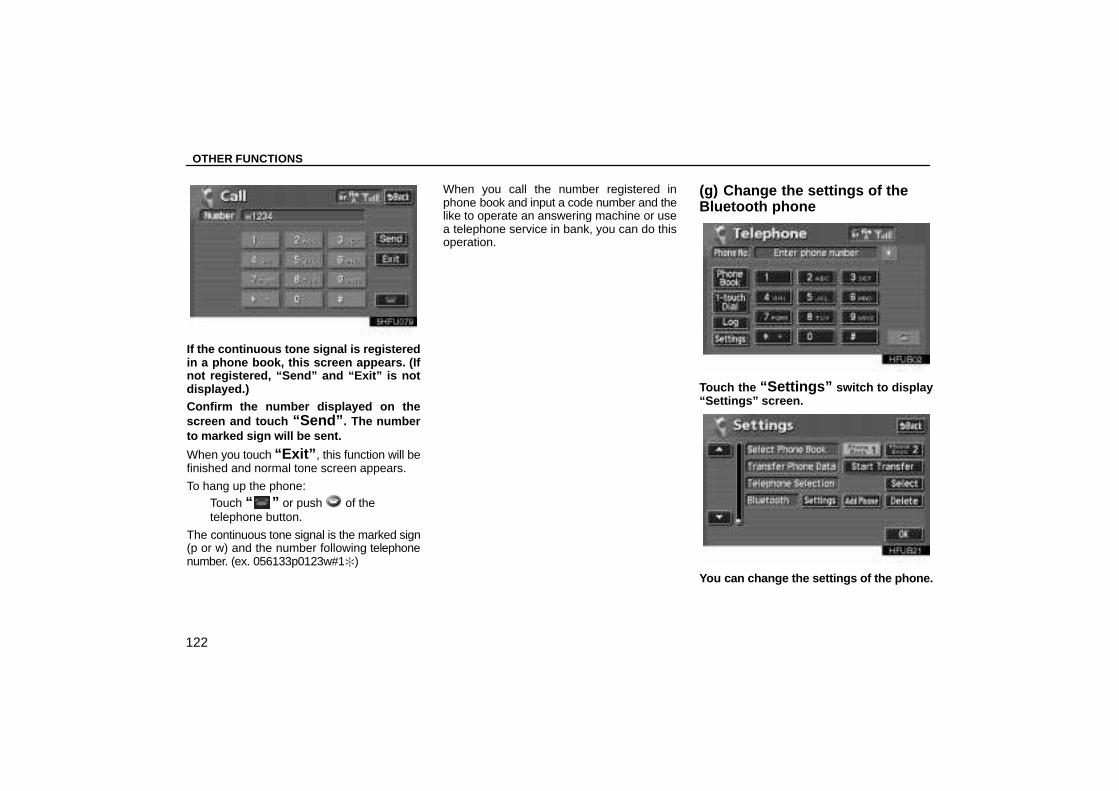
OTHER FUNCTIONS
122
If the continuous tone signal is registeredin a phone book, this screen appears. (Ifnot registered, “Send” and “Exit” is notdisplayed.)Confirm the number displayed on thescreen and touch “Send” . The numberto marked sign will be sent.
When you touch “Exit” , this function will befinished and normal tone screen appears.
To hang up the phone:Touch “ ” or push of the telephone button.
The continuous tone signal is the marked sign(p or w) and the number following telephonenumber. (ex. 056133p0123w#1�)
When you call the number registered inphone book and input a code number and thelike to operate an answering machine or usea telephone service in bank, you can do thisoperation.
(g) Change the settings of theBluetooth phone
Touch the “Settings” switch to display“Settings” screen.
You can change the settings of the phone.
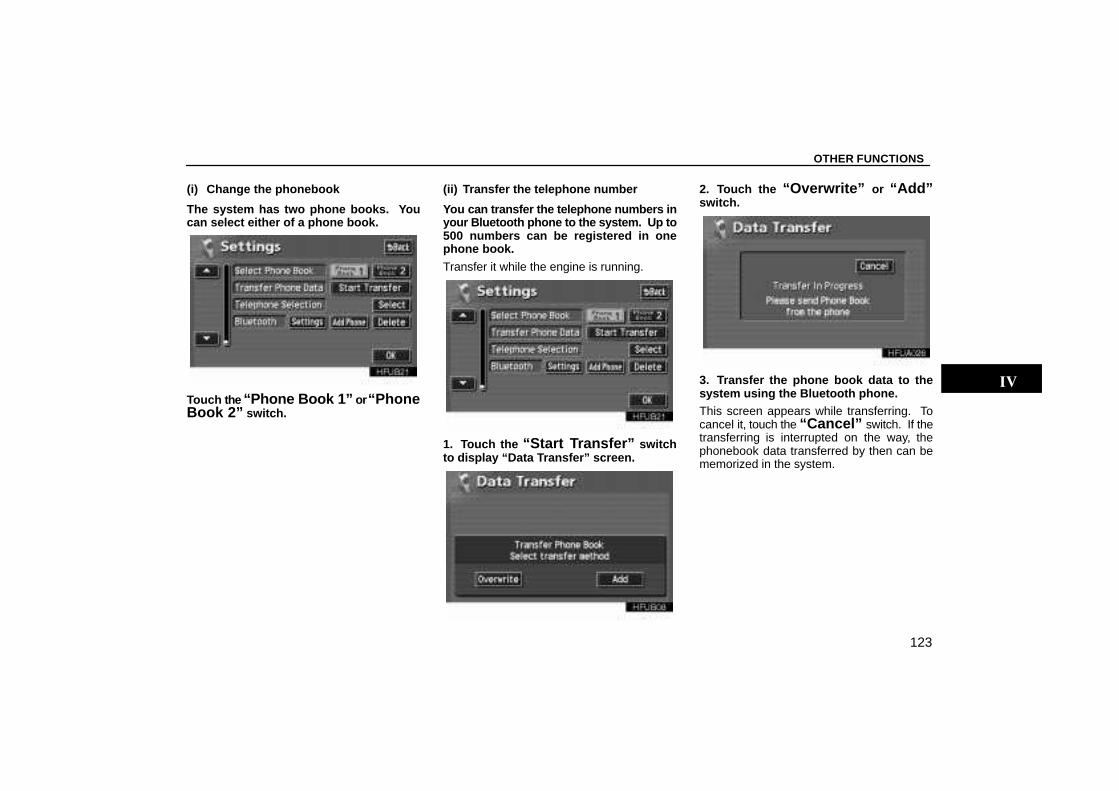
OTHER FUNCTIONS
123
(i) Change the phonebook
The system has two phone books. Youcan select either of a phone book.
Touch the “Phone Book 1” or “PhoneBook 2” switch.
(ii) Transfer the telephone number
You can transfer the telephone numbers inyour Bluetooth phone to the system. Up to500 numbers can be registered in onephone book.
Transfer it while the engine is running.
1. Touch the “Start Transfer” switchto display “Data Transfer” screen.
2. Touch the “Overwrite” or “Add”switch.
3. Transfer the phone book data to thesystem using the Bluetooth phone.This screen appears while transferring. Tocancel it, touch the “Cancel” switch. If thetransferring is interrupted on the way, thephonebook data transferred by then can bememorized in the system.
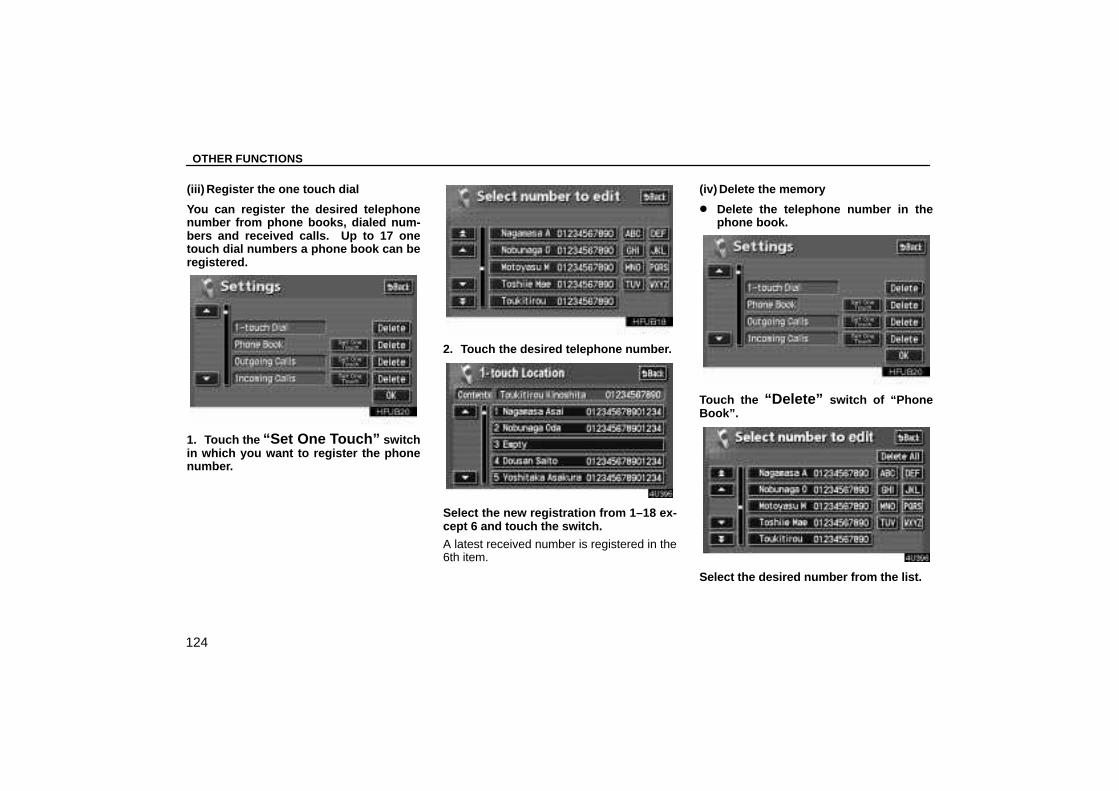
OTHER FUNCTIONS
124
(iii) Register the one touch dial
You can register the desired telephonenumber from phone books, dialed num-bers and received calls. Up to 17 onetouch dial numbers a phone book can beregistered.
1. Touch the “Set One Touch” switchin which you want to register the phonenumber.
2. Touch the desired telephone number.
Select the new registration from 1–18 ex-cept 6 and touch the switch.
A latest received number is registered in the6th item.
(iv) Delete the memory
� Delete the telephone number in thephone book.
Touch the “Delete” switch of “PhoneBook”.
Select the desired number from the list.
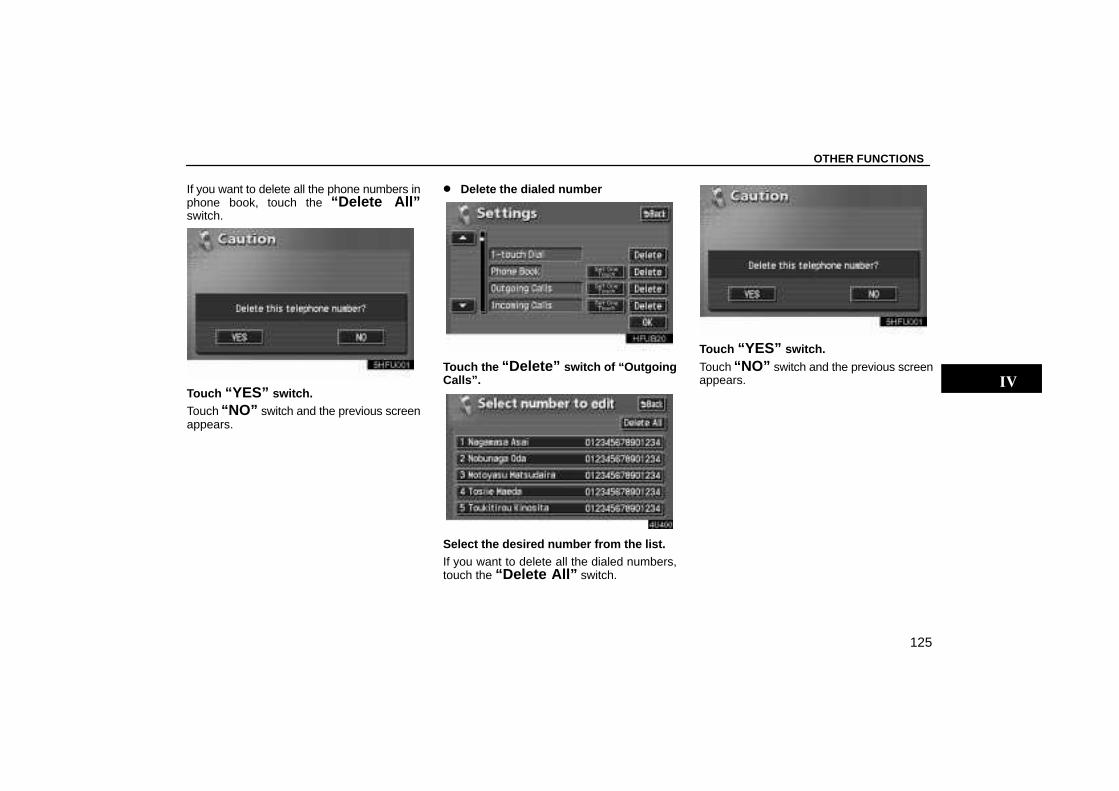
OTHER FUNCTIONS
125
If you want to delete all the phone numbers inphone book, touch the “Delete All”switch.
Touch “YES” switch.Touch “NO” switch and the previous screenappears.
� Delete the dialed number
Touch the “Delete” switch of “OutgoingCalls”.
Select the desired number from the list.If you want to delete all the dialed numbers,touch the “Delete All” switch.
Touch “YES” switch.
Touch “NO” switch and the previous screenappears.
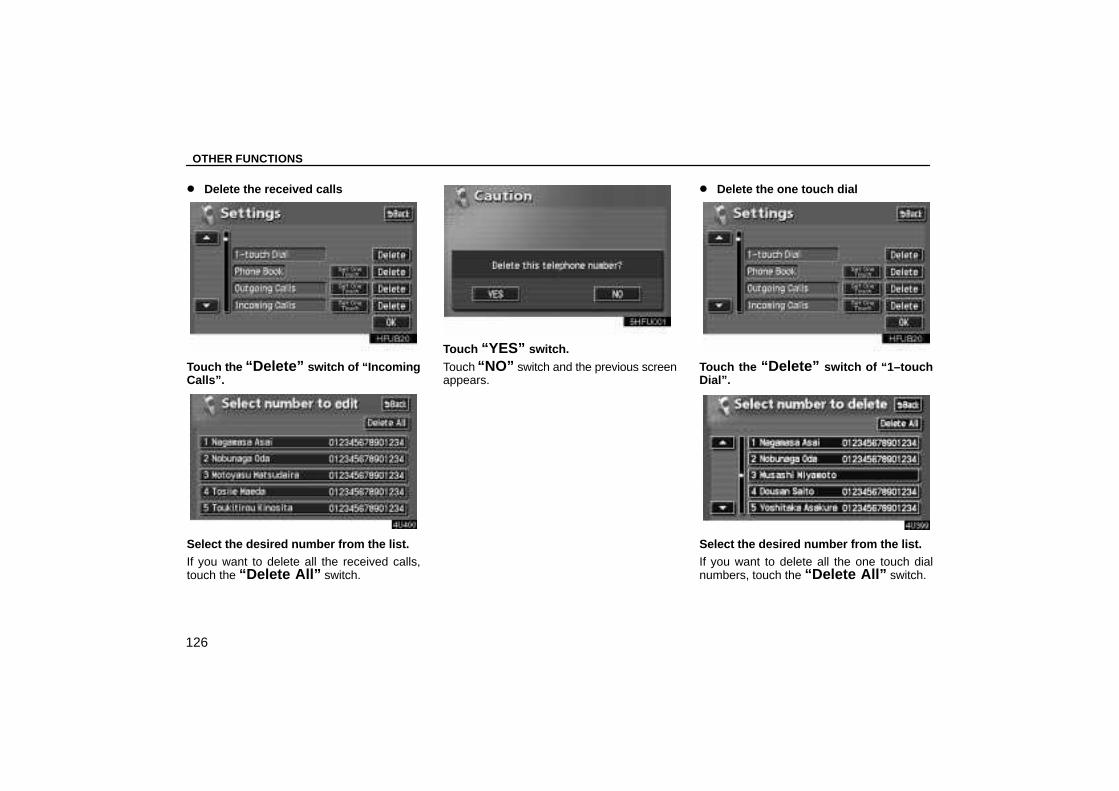
OTHER FUNCTIONS
126
� Delete the received calls
Touch the “Delete” switch of “IncomingCalls”.
Select the desired number from the list.If you want to delete all the received calls,touch the “Delete All” switch.
Touch “YES” switch.
Touch “NO” switch and the previous screenappears.
� Delete the one touch dial
Touch the “Delete” switch of “1–touchDial”.
Select the desired number from the list.If you want to delete all the one touch dialnumbers, touch the “Delete All” switch.
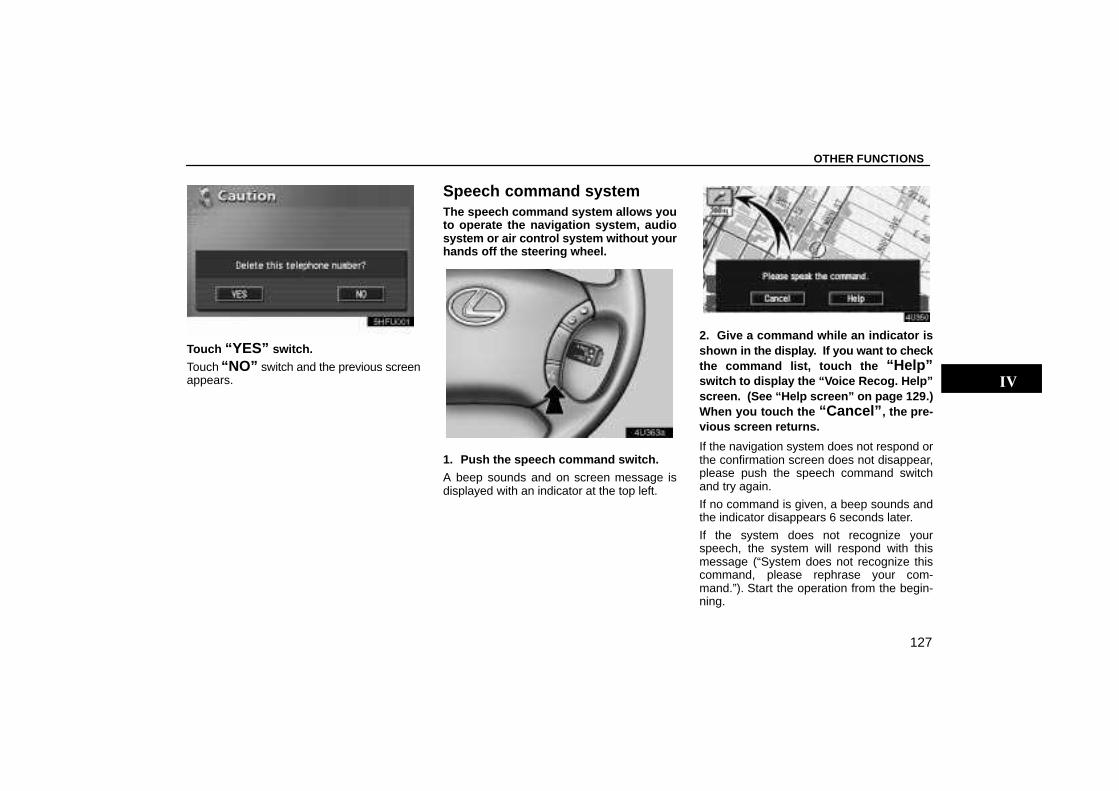
OTHER FUNCTIONS
127
Touch “YES” switch.
Touch “NO” switch and the previous screenappears.
Speech command systemThe speech command system allows youto operate the navigation system, audiosystem or air control system without yourhands off the steering wheel.
1. Push the speech command switch.
A beep sounds and on screen message isdisplayed with an indicator at the top left.
2. Give a command while an indicator isshown in the display. If you want to checkthe command list, touch the “Help”switch to display the “Voice Recog. Help”screen. (See “Help screen” on page 129.)When you touch the “Cancel” , the pre-vious screen returns.
If the navigation system does not respond orthe confirmation screen does not disappear,please push the speech command switchand try again.
If no command is given, a beep sounds andthe indicator disappears 6 seconds later.
If the system does not recognize yourspeech, the system will respond with thismessage (“System does not recognize thiscommand, please rephrase your com-mand.”). Start the operation from the begin-ning.
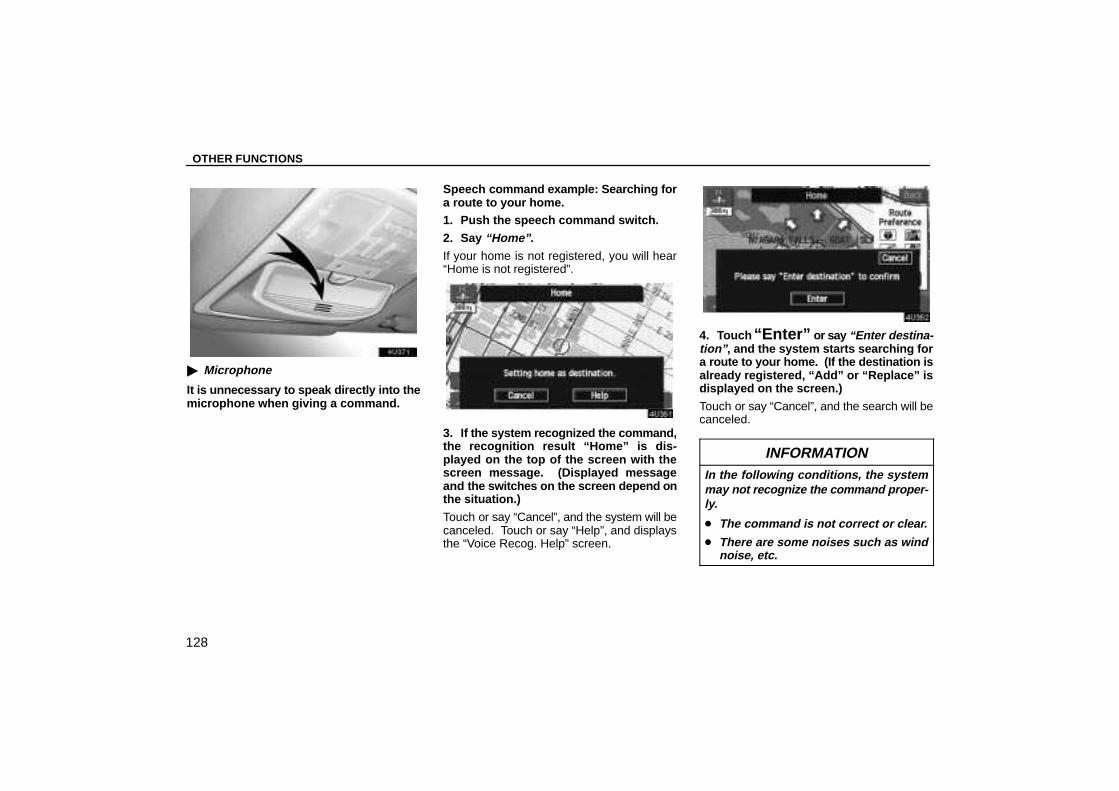
OTHER FUNCTIONS
128
� Microphone
It is unnecessary to speak directly into themicrophone when giving a command.
Speech command example: Searching fora route to your home.1. Push the speech command switch.
2. Say “Home” .
If your home is not registered, you will hear“Home is not registered”.
3. If the system recognized the command,the recognition result “Home” is dis-played on the top of the screen with thescreen message. (Displayed messageand the switches on the screen depend onthe situation.)
Touch or say “Cancel”, and the system will becanceled. Touch or say “Help”, and displaysthe “Voice Recog. Help” screen.
4. Touch “Enter” or say “Enter destina-tion” , and the system starts searching fora route to your home. (If the destination isalready registered, “Add” or “Replace” isdisplayed on the screen.)
Touch or say “Cancel”, and the search will becanceled.
INFORMATIONIn the following conditions, the systemmay not recognize the command proper-ly.
� The command is not correct or clear.
� There are some noises such as windnoise, etc.
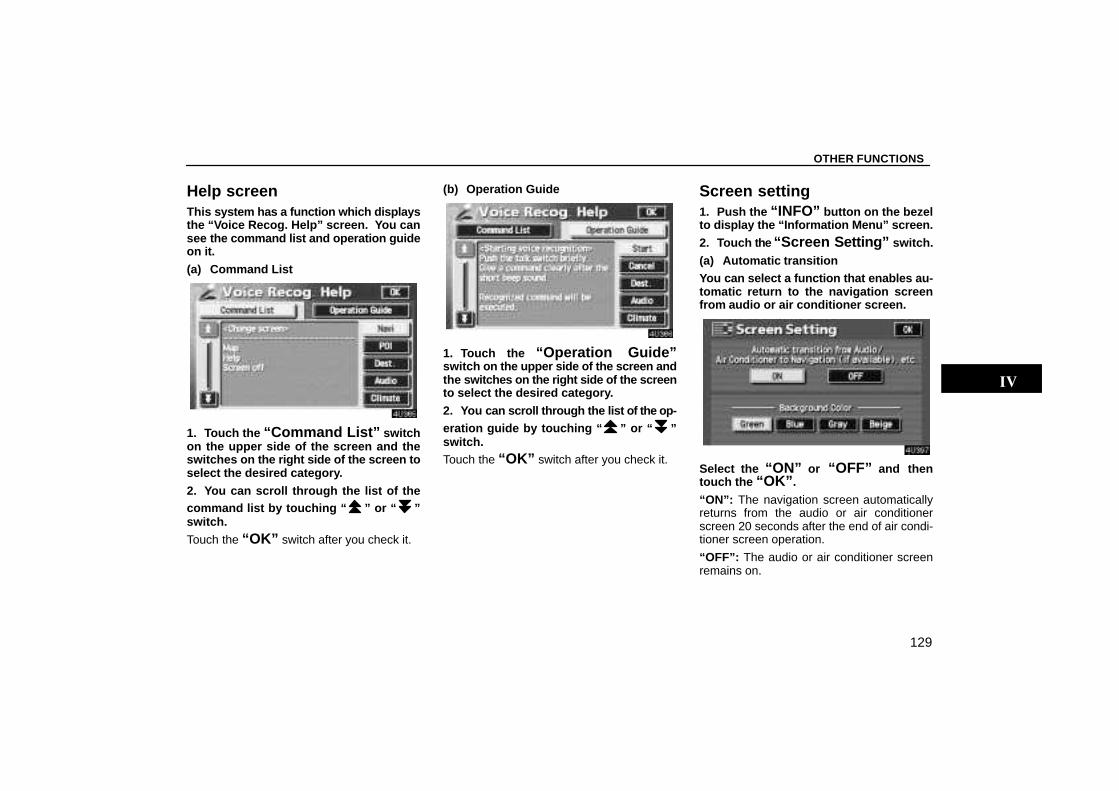
OTHER FUNCTIONS
129
Help screenThis system has a function which displaysthe “Voice Recog. Help” screen. You cansee the command list and operation guideon it.
(a) Command List
1. Touch the “Command List” switchon the upper side of the screen and theswitches on the right side of the screen toselect the desired category.
2. You can scroll through the list of thecommand list by touching “ ” or “ ”switch.
Touch the “OK” switch after you check it.
(b) Operation Guide
1. Touch the “Operation Guide”switch on the upper side of the screen andthe switches on the right side of the screento select the desired category.
2. You can scroll through the list of the op-eration guide by touching “ ” or “ ”switch.Touch the “OK” switch after you check it.
Screen setting1. Push the “INFO” button on the bezelto display the “Information Menu” screen.
2. Touch the “Screen Se tting” switch.
(a) Automatic transitionYou can select a function that enables au-tomatic return to the navigation screenfrom audio or air conditioner screen.
Select the “ON” or “OFF” and thentouch the “OK” .
“ON”: The navigation screen automaticallyreturns from the audio or air conditionerscreen 20 seconds after the end of air condi-tioner screen operation.
“OFF”: The audio or air conditioner screenremains on.
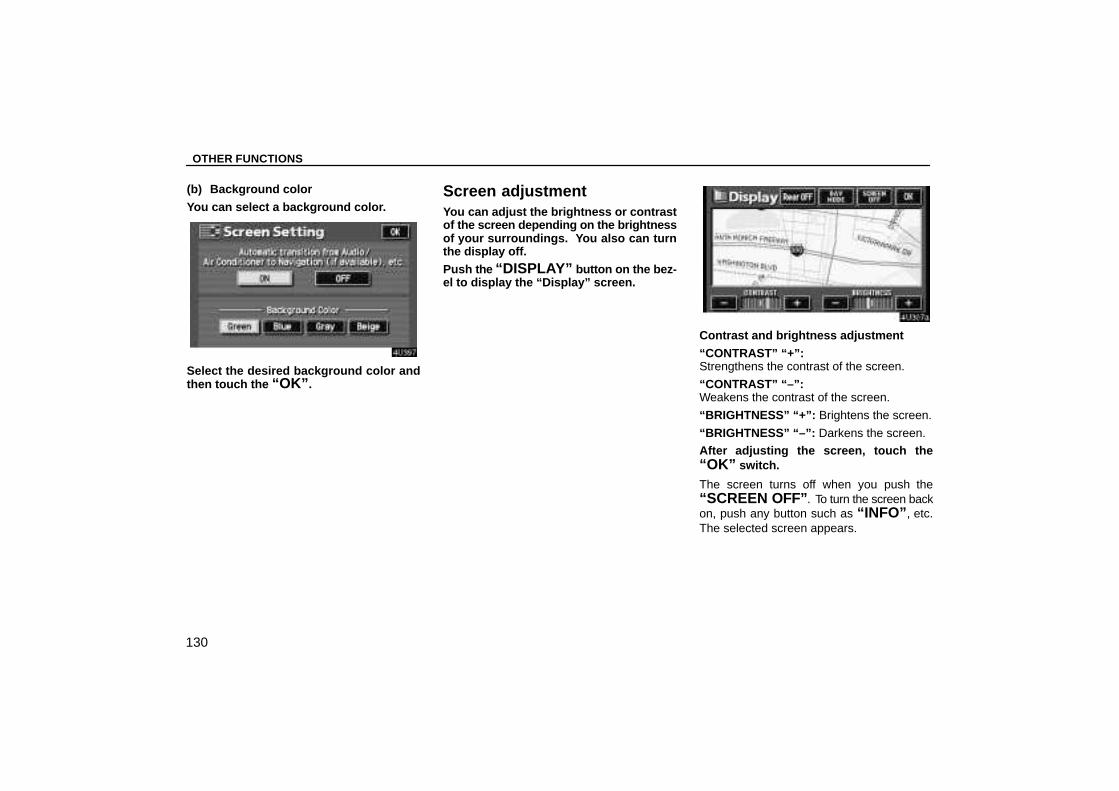
OTHER FUNCTIONS
130
(b) Background color
You can select a background color.
Select the desired background color andthen touch the “OK” .
Screen adjustmentYou can adjust the brightness or contrastof the screen depending on the brightnessof your surroundings. You also can turnthe display off.
Push the “DISPLAY” button on the bez-el to display the “Display” screen.
Contrast and brightness adjustment
“CONTRAST” “+”:Strengthens the contrast of the screen.
“CONTRAST” “–”:Weakens the contrast of the screen.
“BRIGHTNESS” “+”: Brightens the screen.
“BRIGHTNESS” “–”: Darkens the screen.
After adjusting the screen, touch the“OK” switch.
The screen turns off when you push the“SCREEN OFF” . To turn the screen backon, push any button such as “INFO” , etc.The selected screen appears.
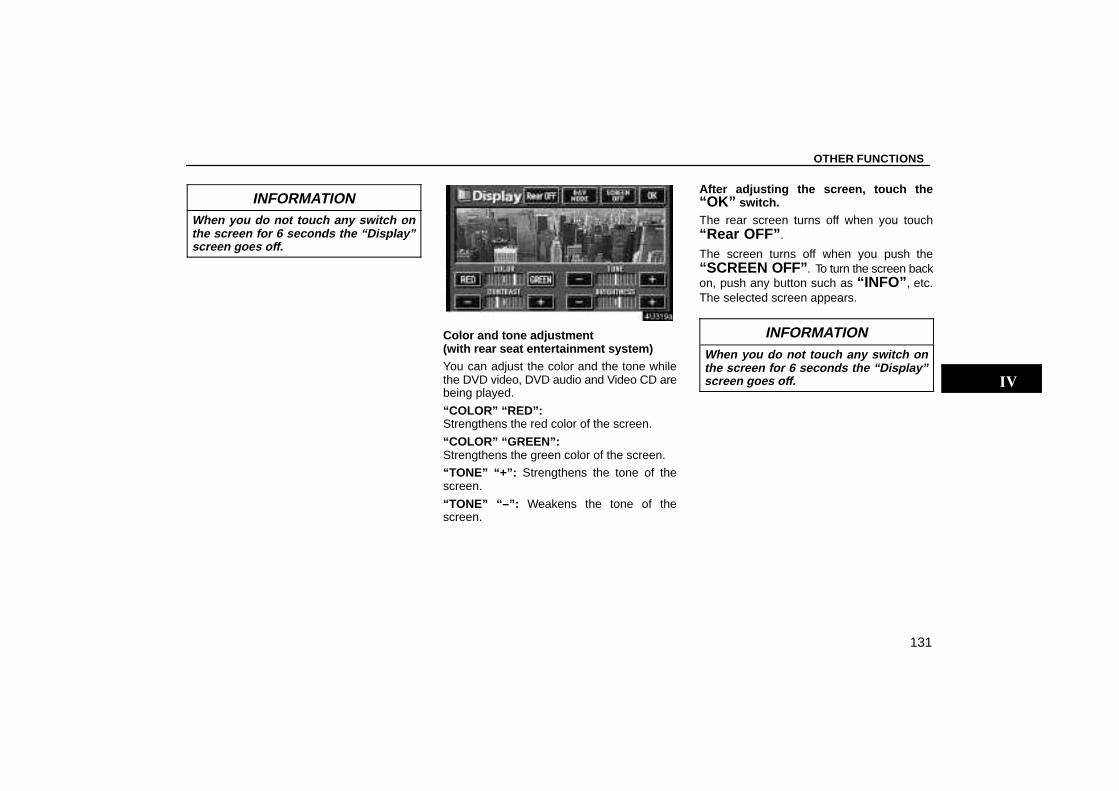
OTHER FUNCTIONS
131
INFORMATIONWhen you do not touch any switch onthe screen for 6 seconds the “Display”screen goes off.
Color and tone adjustment (with rear seat entertainment system)You can adjust the color and the tone whilethe DVD video, DVD audio and Video CD arebeing played.
“COLOR” “RED”:Strengthens the red color of the screen.
“COLOR” “GREEN”:Strengthens the green color of the screen.
“TONE” “+”: Strengthens the tone of thescreen.
“TONE” “–”: Weakens the tone of thescreen.
After adjusting the screen, touch the“OK” switch.The rear screen turns off when you touch“Rear OFF” .
The screen turns off when you push the“SCREEN OFF” . To turn the screen backon, push any button such as “INFO” , etc.The selected screen appears.
INFORMATIONWhen you do not touch any switch onthe screen for 6 seconds the “Display”screen goes off.
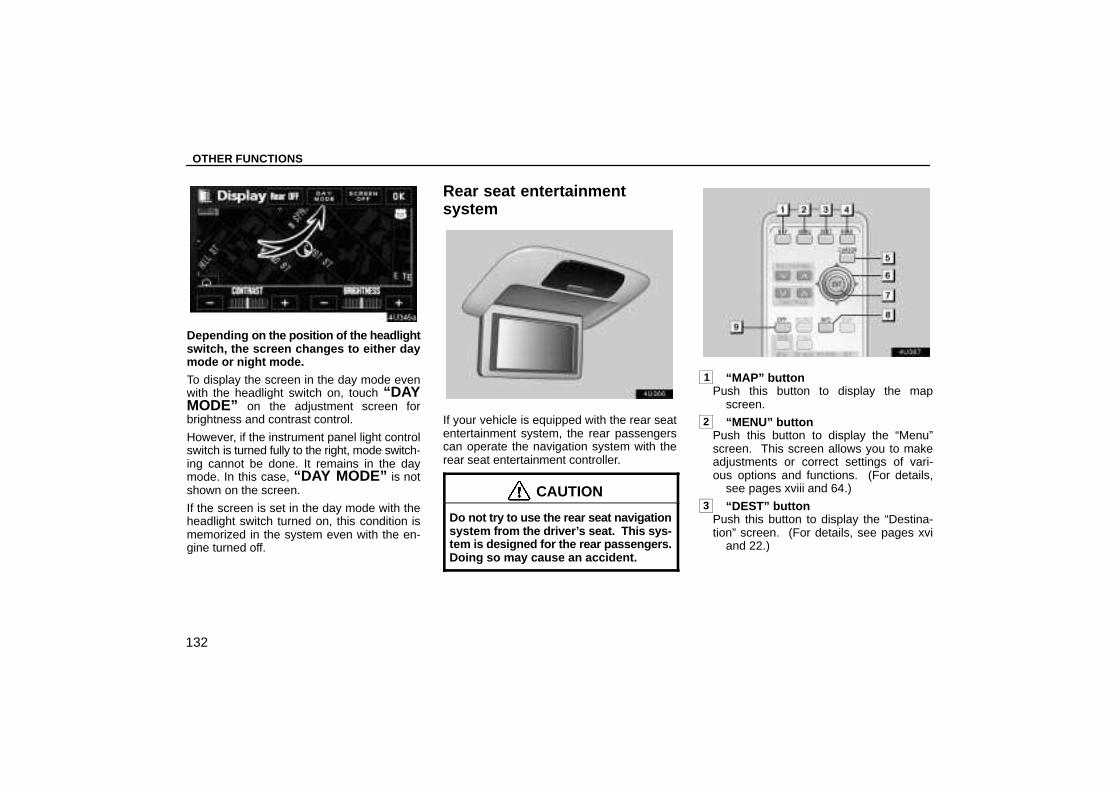
OTHER FUNCTIONS
132
Depending on the po sition of the headlightswitch, the screen changes to either daymode or night mode.
To display the screen in the day mode evenwith the headlight switch on, touch “DAYMODE” on the adjustment screen forbrightness and contrast control.
However, if the instrument panel light controlswitch is turned fully to the right, mode switch-ing cannot be done. It remains in the daymode. In this case, “DAY MODE” is notshown on the screen.
If the screen is set in the day mode with theheadlight switch turned on, this condition ismemorized in the system even with the en-gine turned off.
Rear seat entertainmentsystem
If your vehicle is equipped with the rear seatentertainment system, the rear passengerscan operate the navigation system with therear seat entertainment controller.
CAUTION
Do not try to use the rear seat navigationsystem from the driver’s seat. This sys-tem is designed for the rear passengers.Doing so may cause an accident.
1 “MAP” buttonPush this button to display the map
screen.2 “MENU” button
Push this button to display the “Menu”screen. This screen allows you to makeadjustments or correct settings of vari-ous options and functions. (For details,
see pages xviii and 64.)3 “DEST” button
Push this button to display the “Destina-tion” screen. (For details, see pages xvi
and 22.)

OTHER FUNCTIONS
133
4 “REAR” buttonPush this button to operate the naviga-tion system while the vehicle is in mo-
tion.5 “CURSOR” button
Push this button to display the cursor tooperate the navigation system.
6 Joy stickUse this joy stick to move the cursor.
7 “ENT” buttonPush this button to touch and enter the
switches on the screen.8 “INFO” button
Push this button to display the “Informa-tion Menu” screen. The following func-tions can be operated on the “Informa-
tion Menu” screen.
� Maintenance information on your vehicle(See page 98.)
� Hands–free system (See page 110.)
� Calendar with memo (See page 103.)
� Screen setting (See page 129.)
� Language selection (See page iii.)9 “OFF” button
Push this button to turn the rear screenoff.
INFORMATIONThe following instructions are for therear passengers. Please let the rear pas-sengers read and follow the instructionswhen the rear passengers use the rearseat navigation system.
Push the “MAP” button on the rear seatentertainment controller to turn the rearnavigation system on. The “CAUTION”screen will be displayed on the rearscreen. If you select and enter “I Agree”on the screen, the map screen will be dis-played on the rear screen.
At this time, the system will display the infor-mation that a rear passenger is using the navi-gation system in the rear seat on the frontscreen. When the rear seat navigation sys-tem is operated, the navigation system on thefront screen operates simultaneously.
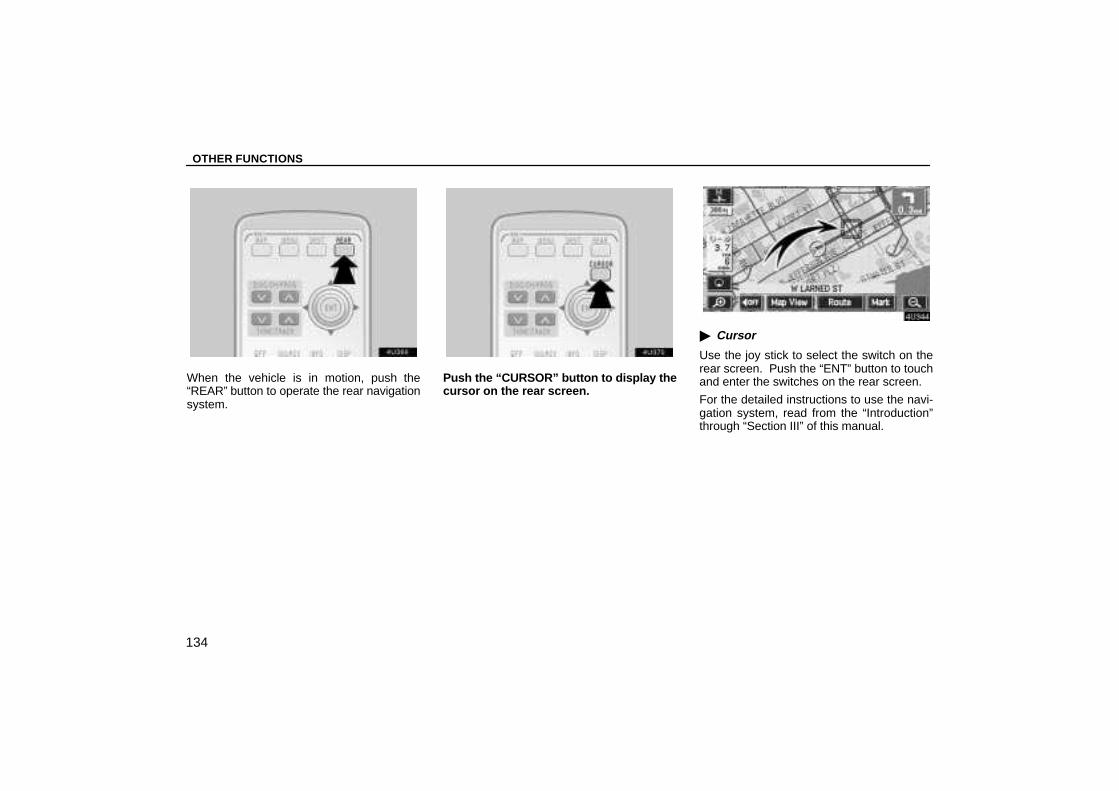
OTHER FUNCTIONS
134
When the vehicle is in motion, push the“REAR” button to operate the rear navigationsystem.
Push the “CURSOR” button to display thecursor on the rear screen.
� Cursor
Use the joy stick to select the switch on therear screen. Push the “ENT” button to touchand enter the switches on the rear screen.
For the detailed instructions to use the navi-gation system, read from the “Introduction”through “Section III” of this manual.
AUDIO SYSTEM
135
AUDIO SYSTEMAudio systemQuick reference 136. . . . . . . . . . . . . . . . . . . . . . . . . . . . . . . . . . . . . . . . . . . . . . . . . . . . Using your audio system 137. . . . . . . . . . . . . . . . . . . . . . . . . . . . . . . . . . . . . . . . . . . . Audio system operating hints 171. . . . . . . . . . . . . . . . . . . . . . . . . . . . . . . . . . . . . . . . .
For the “Rear seat entertainment system” instructions,please refer to the “Owner’s Manual”.
V
SECTION V
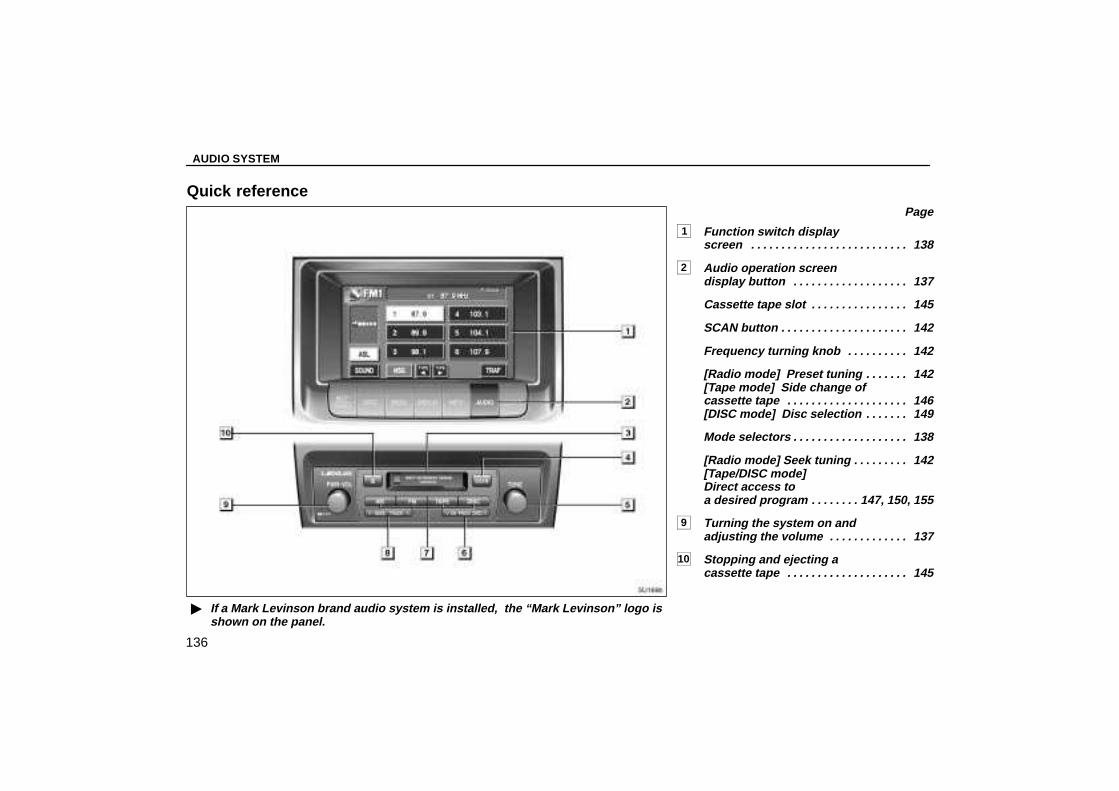
� If a Mark Levinson brand audio system is installed, the “Mark Levinson” logo isshown on the panel.
AUDIO SYSTEM
136
Quick referencePage
1 Function switch displayscreen 138. . . . . . . . . . . . . . . . . . . . . . . . . .
2 Audio operation screen display button 137. . . . . . . . . . . . . . . . . . .
3 Cassette tape slot 145. . . . . . . . . . . . . . . .
4 SCAN button 142. . . . . . . . . . . . . . . . . . . . .
5 Frequency turning knob 142. . . . . . . . . .
6 [Radio mode] Preset tuning 142. . . . . . . [Tape mode] Side change ofcassette tape 146. . . . . . . . . . . . . . . . . . . . [DISC mode] Disc selection 149. . . . . . .
7 Mode selectors 138. . . . . . . . . . . . . . . . . . .
8 [Radio mode] Seek tuning 142. . . . . . . . . [Tape/DISC mode] Direct access to a desired program 147, 150, 155. . . . . . . .
9 Turning the system on and adjusting the volume 137. . . . . . . . . . . . .
10 Stopping and ejecting a cassette tape 145. . . . . . . . . . . . . . . . . . . .

AUDIO SYSTEM
137
Using your audio system — — Some basicsThis section describes some of the basic fea-tures of the Lexus audio system. Some in-formation may not pertain to your system.
Your audio system works when the ignitionkey is in the “ACC” or “ON” position.
NOTICE
To prevent the battery from beingdischarged, do not leave the car audioon longer than necessary when theengine is not running.
Speech command system
By pushing the switch above, you can op-erate the speech command system.
For the operation of the speech commandsystem and the command, see pages 127and 129.
(a) Turning the system on and off
“PWR·VOL”: Push this knob to turn the audiosystem on and off. Turn this knob to adjust thevolume. The system turns on in the last modeused.
“AUDIO”: Push this button to displayswitches for audio system.
V

AUDIO SYSTEM
138
Push the “AM”, “FM”, “TAPE” or “DISC”button to turn on that mode. The selectedmode turns on directly.
Push these buttons if you want to switch fromone mode to another.
If the tape or disc is not set, the cassette play-er or compact disc player does not turn on.
You can turn off each player by ejecting thecassette tape or compact disc. If the audiosystem was previously off, then the entire au-dio system will be turned off when you ejectthe cassette tape or compact disc. If the otherfunction was previously playing, it will comeon again.
The switches for radio, cassette tape anddisc player operation are displayed on thescreen. Touch them lightly and directly onthe screen.
The selected switch is highlighted in green oryellow.
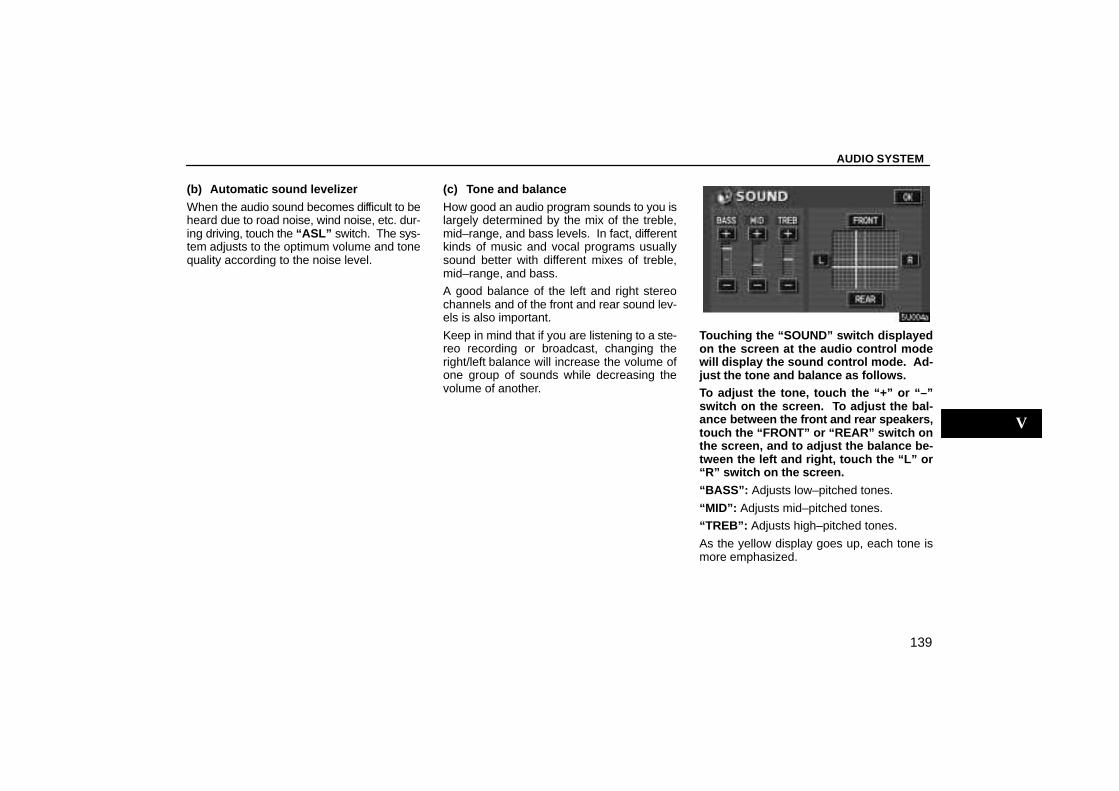
AUDIO SYSTEM
139
(b) Automatic sound levelizer
When the audio sound becomes difficult to beheard due to road noise, wind noise, etc. dur-ing driving, touch the “ASL” switch. The sys-tem adjusts to the optimum volume and tonequality according to the noise level.
(c) Tone and balance
How good an audio program sounds to you islargely determined by the mix of the treble,mid–range, and bass levels. In fact, differentkinds of music and vocal programs usuallysound better with different mixes of treble,mid–range, and bass.
A good balance of the left and right stereochannels and of the front and rear sound lev-els is also important.
Keep in mind that if you are listening to a ste-reo recording or broadcast, changing theright/left balance will increase the volume ofone group of sounds while decreasing thevolume of another.
Touching the “SOUND” switch displayedon the screen at the audio control modewill display the sound control mode. Ad-just the tone and balance as follows.To adjust the tone, touch the “+” or “–”switch on the screen. To adjust the bal-ance bet ween the front and rear speakers,touch the “FRONT” or “REAR” switch onthe screen, and to adjust the balance be-tween the left and right, touch the “L” or“R” switch on the screen.
“BASS”: Adjusts low–pitched tones.
“MID”: Adjusts mid–pitched tones.
“TREB”: Adjusts high–pitched tones.
As the yellow display goes up, each tone ismore emphasized.
VV
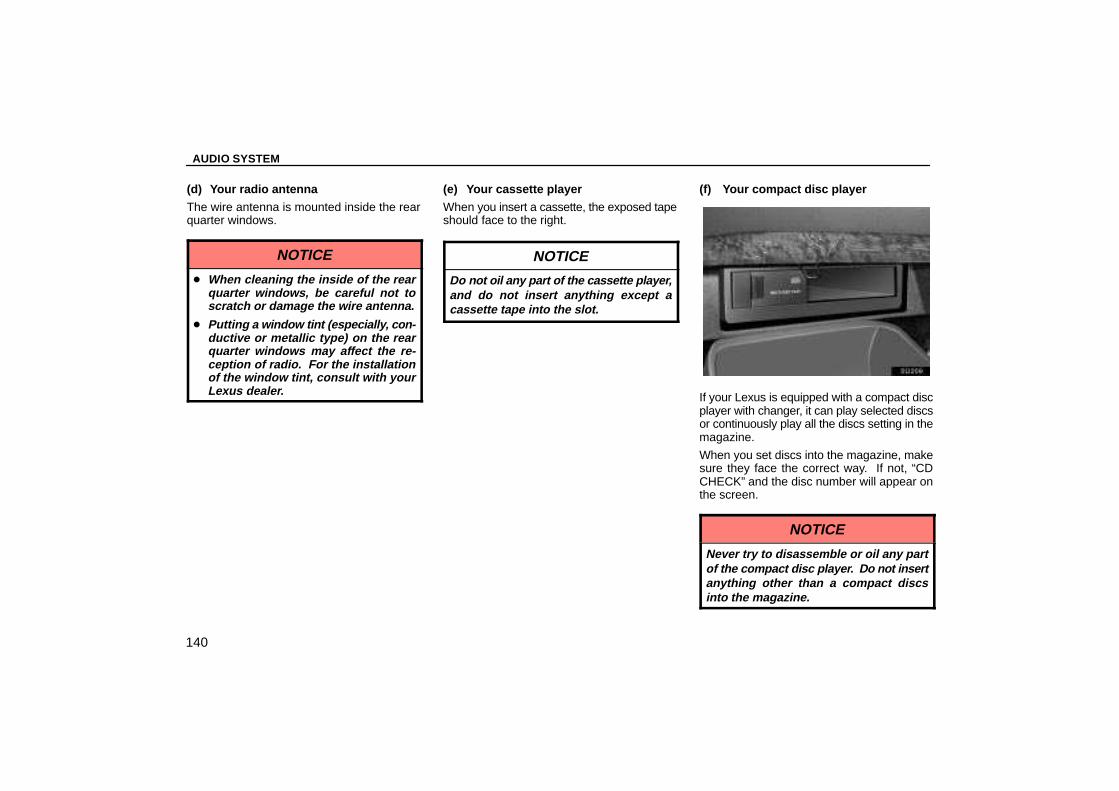
AUDIO SYSTEM
140
(d) Your radio antenna
The wire antenna is mounted inside the rearquarter windows.
NOTICE
� When cleaning the inside of the rearquarter windows, be careful not toscratch or damage the wire antenna.
� Putting a window tint (especially, con-ductive or metallic type) on the rearquarter windows may affect the re-ception of radio. For the installationof the window tint, consult with yourLexus dealer.
(e) Your cassette player
When you insert a cassette, the exposed tapeshould face to the right.
NOTICE
Do not oil any part of the cassette player,and do not insert anything except acassette tape into the slot.
(f) Your compact disc player
If your Lexus is equipped with a compact discplayer with changer, it can play selected discsor continuously play all the discs setting in themagazine.
When you set discs into the magazine, makesure they face the correct way. If not, “CDCHECK” and the disc number will appear onthe screen.
NOTICE
Never try to disassemble or oil any partof the compact disc player. Do not insertanything other than a compact discsinto the magazine.
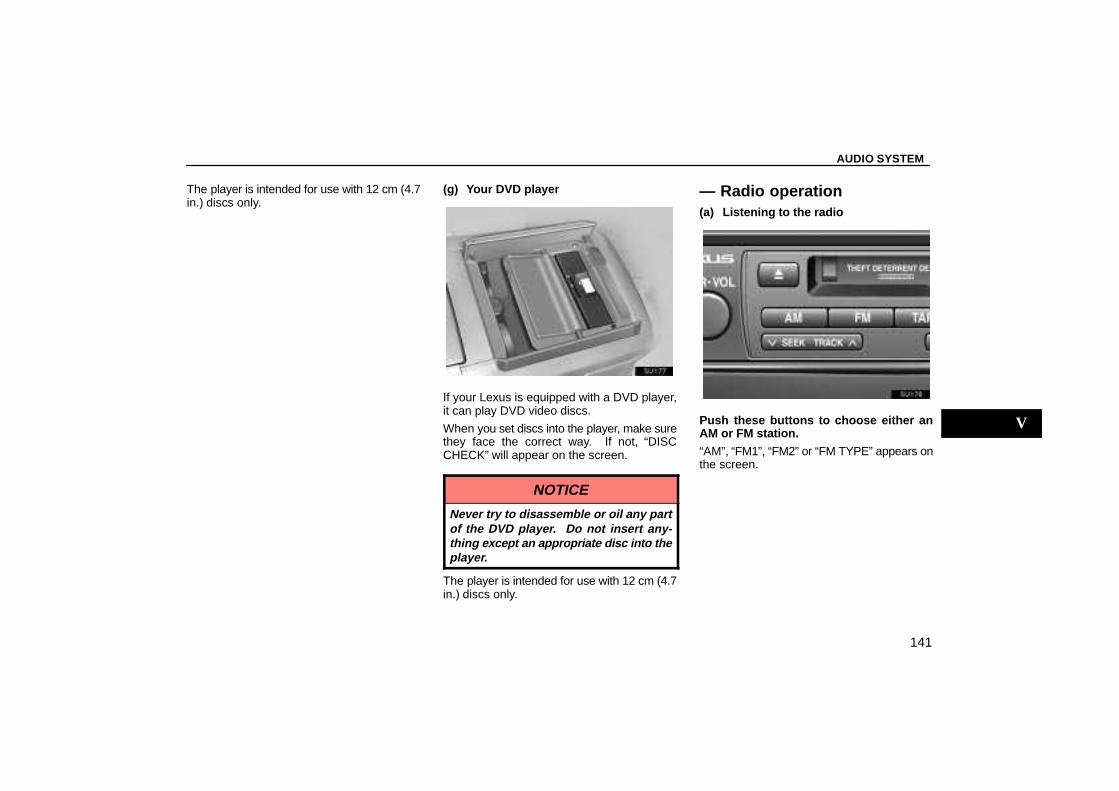
AUDIO SYSTEM
141
The player is intended for use with 12 cm (4.7in.) discs only.
(g) Your DVD player
If your Lexus is equipped with a DVD player,it can play DVD video discs.
When you set discs into the player, make surethey face the correct way. If not, “DISCCHECK” will appear on the screen.
NOTICE
Never try to disassemble or oil any partof the DVD player. Do not insert any-thing except an appropriate disc into theplayer.
The player is intended for use with 12 cm (4.7in.) discs only.
— Radio operation(a) Listening to the radio
Push these buttons to choose either anAM or FM station.
“AM”, “FM1”, “FM2” or “FM TYPE” appears onthe screen.
V
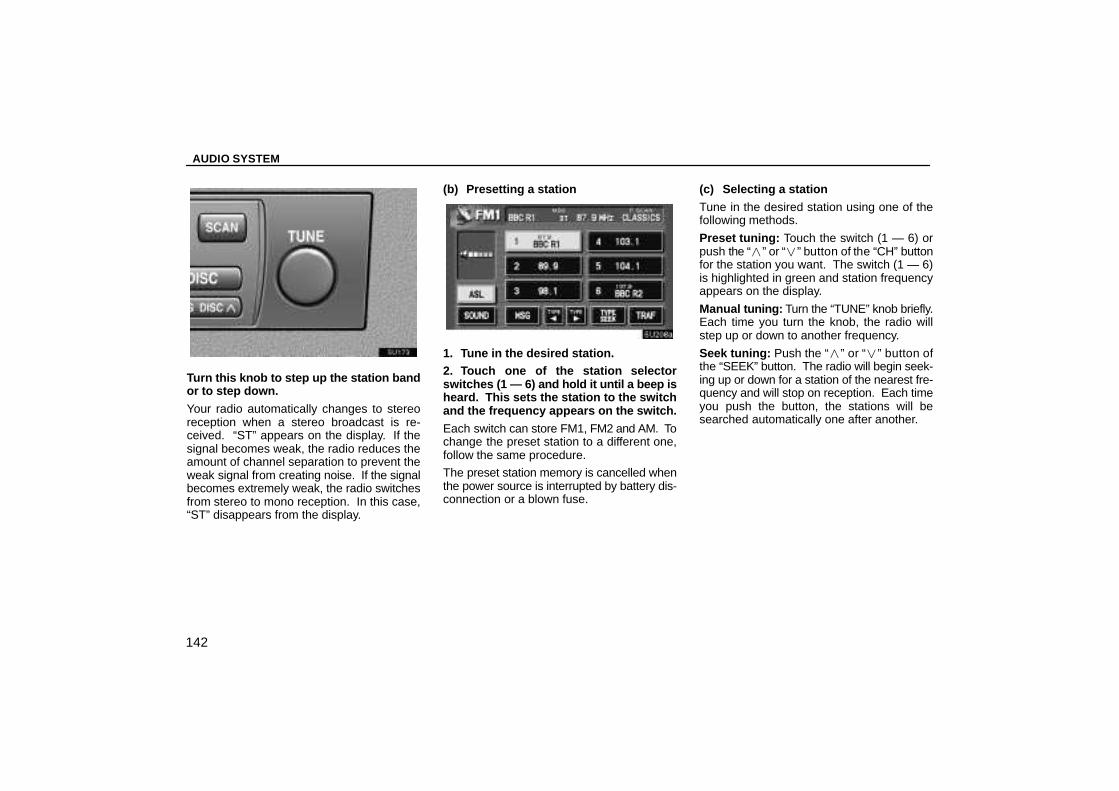
AUDIO SYSTEM
142
Turn this knob to step up the station bandor to step down.
Your radio automatically changes to stereoreception when a stereo broadcast is re-ceived. “ST” appears on the display. If thesignal becomes weak, the radio reduces theamount of channel separation to prevent theweak signal from creating noise. If the signalbecomes extremely weak, the radio switchesfrom stereo to mono reception. In this case,“ST” disappears from the display.
(b) Presetting a station
1. Tune in the desired station.2. Touch one of the station selectorswitches (1 — 6) and h old it until a beep isheard. This sets the station to the switchand the frequency appears on the switch.
Each switch can store FM1, FM2 and AM. Tochange the preset station to a different one,follow the same procedure.
The preset station memory is cancelled whenthe power source is interrupted by battery dis-connection or a blown fuse.
(c) Selecting a station
Tune in the desired station using one of thefollowing methods.
Preset tuning: Touch the switch (1 — 6) orpush the “�” or “�” button of the “CH” buttonfor the station you want. The switch (1 — 6)is highlighted in green and station frequencyappears on the display.
Manual tuning: Turn the “TUNE” knob briefly.Each time you turn the knob, the radio willstep up or down to another frequency.
Seek tuning: Push the “�” or “�” button ofthe “SEEK” button. The radio will begin seek-ing up or down for a station of the nearest fre-quency and will stop on reception. Each timeyou push the button, the stations will besearched automatically one after another.
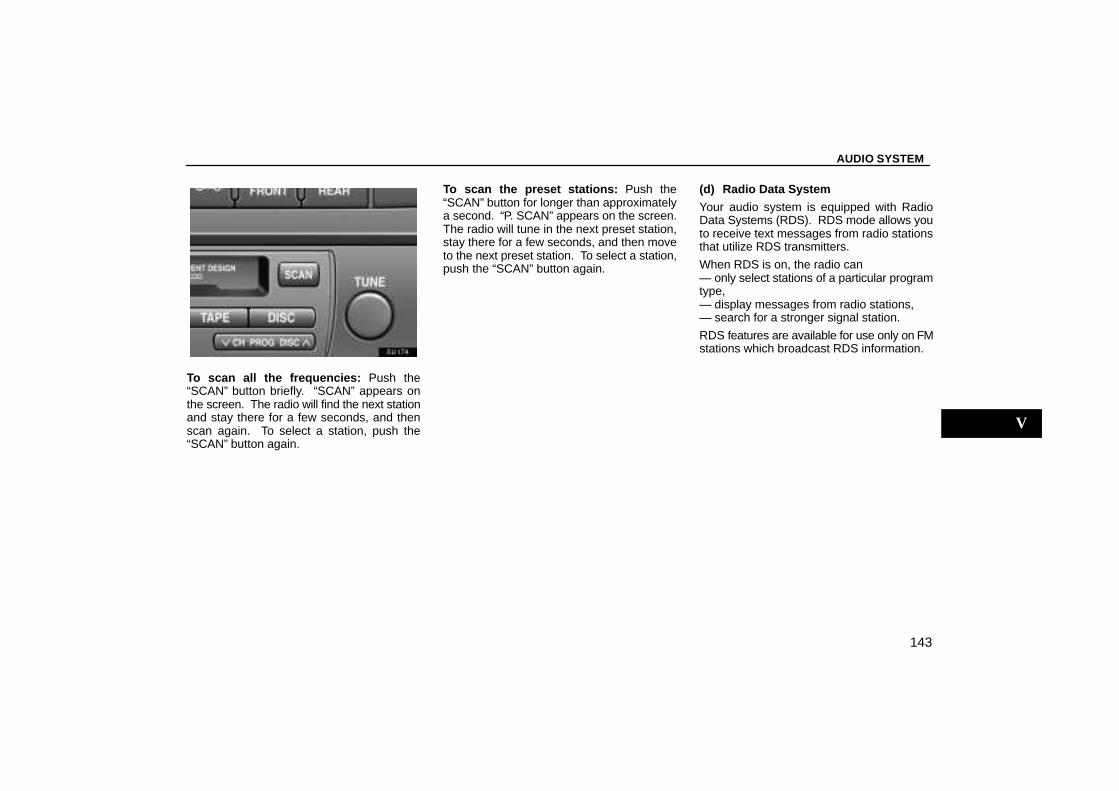
AUDIO SYSTEM
143
To scan all the frequencies: Push the“SCAN” button briefly. “SCAN” appears onthe screen. The radio will find the next stationand stay there for a few seconds, and thenscan again. To select a station, push the“SCAN” button again.
To scan the preset stations: Push the“SCAN” button for longer than approximatelya second. “P. SCAN” appears on the screen.The radio will tune in the next preset station,stay there for a few seconds, and then moveto the next preset station. To select a station,push the “SCAN” button again.
(d) Radio Data System
Your audio system is equipped with RadioData Systems (RDS). RDS mode allows youto receive text messages from radio stationsthat utilize RDS transmitters.
When RDS is on, the radio can— only select stations of a particular programtype,— display messages from radio stations,— search for a stronger signal station.
RDS features are available for use only on FMstations which broadcast RDS information.
V

AUDIO SYSTEM
144
“TYPE � �” switch
If the system receives no RDS stations, “NOPTY” appears on the display.
Each time you touch the “TYPE �” or “TYPE�” switch, the program type changes as fol-lows:
� ROCK
� MISC (Miscellaneous)
� Inform (Information)
� Easy Lis (Easy listening)
� Cls/Jazz (Classical music and Jazz)
� R & B (Rhythm and Blues)
� Religion
� Alert (Emergency message)
“TYPE SEEK” switch
When a program is set, “TYPE SEEK” switchappears. Touch the switch and the systemstarts to seek the station in the relevant pro-gram type.
If any type program station is not found,“NOTHING” appears on the display.
“MSG” (MESSAGE) switch
If the system receives a radio text from anRDS station, “MSG” appears on the display.Touch the “MSG” switch, and a text messageis displayed on the screen.
In case a text message is not accepted in ascreen, you can touch the “MSG” switch andhold it to display the rest of the message.
When the system can show the station name,“RDS” appears on the display. Each time youtouch the “MSG” switch, indication on the dis-play changes from the band to the stationname, to radio text in this order. After six sec-onds pass, indication returns to the band.
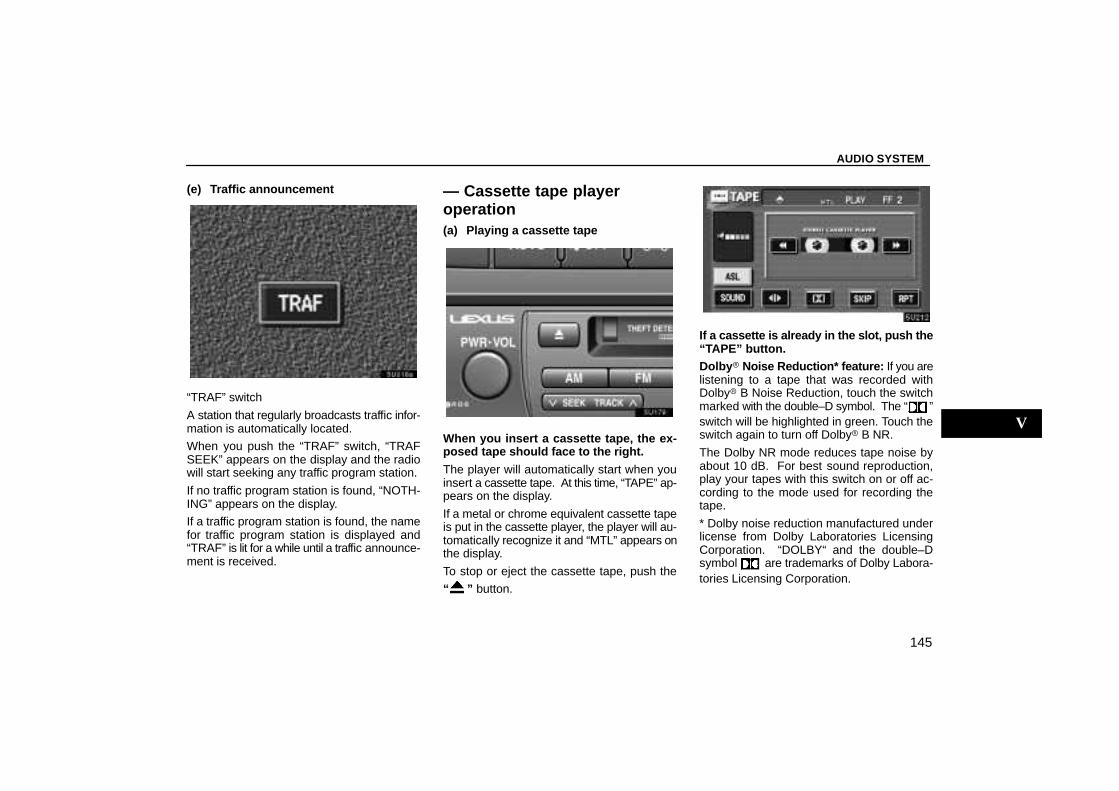
AUDIO SYSTEM
145
(e) Traffic announcement
“TRAF” switch
A station that regularly broadcasts traffic infor-mation is automatically located.
When you push the “TRAF” switch, “TRAFSEEK” appears on the display and the radiowill start seeking any traffic program station.
If no traffic program station is found, “NOTH-ING” appears on the display.
If a traffic program station is found, the namefor traffic program station is displayed and“TRAF” is lit for a while until a traffic announce-ment is received.
— Cassette tape playeroperation(a) Playing a cassette tape
When you insert a cassette tape, the ex-posed tape should face to the right.
The player will automatically start when youinsert a cassette tape. At this time, “TAPE” ap-pears on the display.
If a metal or chrome equivalent cassette tapeis put in the cassette player, the player will au-tomatically recognize it and “MTL” appears onthe display.
To stop or eject the cassette tape, push the
“ ” button.
If a cassette is already in the slot, push the“TAPE” button.Dolby � Noise Reduction* feature: If you arelistening to a tape that was recorded withDolby� B Noise Reduction, touch the switchmarked with the double–D symbol. The “ ”switch will be highlighted in green. Touch theswitch again to turn off Dolby� B NR.
The Dolby NR mode reduces tape noise byabout 10 dB. For best sound reproduction,play your tapes with this switch on or off ac-cording to the mode used for recording thetape.
* Dolby noise reduction manufactured underlicense from Dolby Laboratories LicensingCorporation. “DOLBY“ and the double–Dsymbol are trademarks of Dolby Labora-tories Licensing Corporation.
V
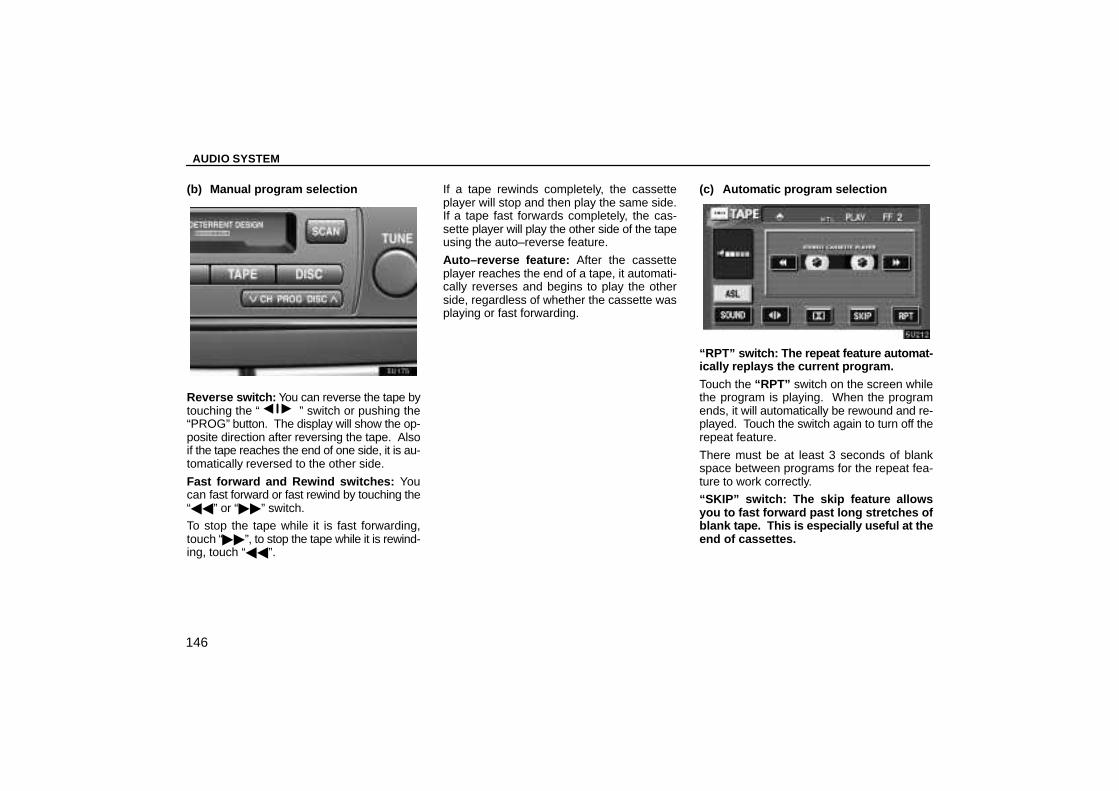
AUDIO SYSTEM
146
(b) Manual program selection
Reverse switch: You can reverse the tape bytouching the “ � � ” switch or pushing the“PROG” button. The display will show the op-posite direction after reversing the tape. Alsoif the tape reaches the end of one side, it is au-tomatically reversed to the other side.
Fast forward and Rewind switches: Youcan fast forward or fast rewind by touching the“��” or “��” switch.
To stop the tape while it is fast forwarding,touch “��”, to stop the tape while it is rewind-ing, touch “��”.
If a tape rewinds completely, the cassetteplayer will stop and then play the same side.If a tape fast forwards completely, the cas-sette player will play the other side of the tapeusing the auto–reverse feature.
Auto–reverse feature: After the cassetteplayer reaches the end of a tape, it automati-cally reverses and begins to play the otherside, regardless of whether the cassette wasplaying or fast forwarding.
(c) Automatic program selection
“RPT” switch: The repeat feature automat-ically replays the current program.
Touch the “RPT” switch on the screen whilethe program is playing. When the programends, it will automatically be rewound and re-played. Touch the switch again to turn off therepeat feature.
There must be at least 3 seconds of blankspace between programs for the repeat fea-ture to work correctly.
“SKIP” switch: The skip feature allowsyou to fast forward past long stretches ofblank tape. This is especially useful at theend of cassettes.

AUDIO SYSTEM
147
Touch the “SKIP” switch on the screen. Theplayer will automatically skip any blank por-tions of 15 seconds or more and play the nextprogram. To cancel it, touch the switch onceagain.
“Automatic program selection” button:The automatic program selection feature al-lows you to program your cassette player toskip forward or backward to locate the songyou want to hear. You can skip up to 9 pro-grams at a time.
Push this button on the “�” side to skip for-ward. “FF” and the number will appear on thescreen. Push the button until the number youwant to skip appears on the screen. After that,the player will automatically skip forward.
When the end of the tape is reached, the play-er automatically reverses sides and resumesnormal play.
Push this button on the “�” side to skip back-ward. Push the button until “REW” and thenumber you want to skip appear on thescreen.
� If you set “REW 1”, the player will rewindto the beginning of the current program.
� When counting the number of programsyou want to rewind, remember to count thecurrent program as well. For example, ifyou want to rewind to a song that is two be-fore the song you are listening to, push thisbutton until “REW 3” appears on thescreen.
When the beginning of the tape is reached,the player automatically resumes normalplay.
There must be at least 5 seconds of blankspace between programs for this feature towork correctly.
“RPT”, “SKIP” or “Automatic programselection” features: These features may notwork well with some spoken word, live or clas-sical recordings.
— Compact disc playeroperationThe compact disc player is an optional acces-sory that your vehicle is pre–wired to accept.Although your audio system has a DISC but-ton, your vehicle may or may not be equippedwith a CD player. Please contact your dealerfor additional details if you would like to havethe optional CD player installed.
(a) Inserting compact discs
1. Pull the lever and open the glove boxdoor.
V
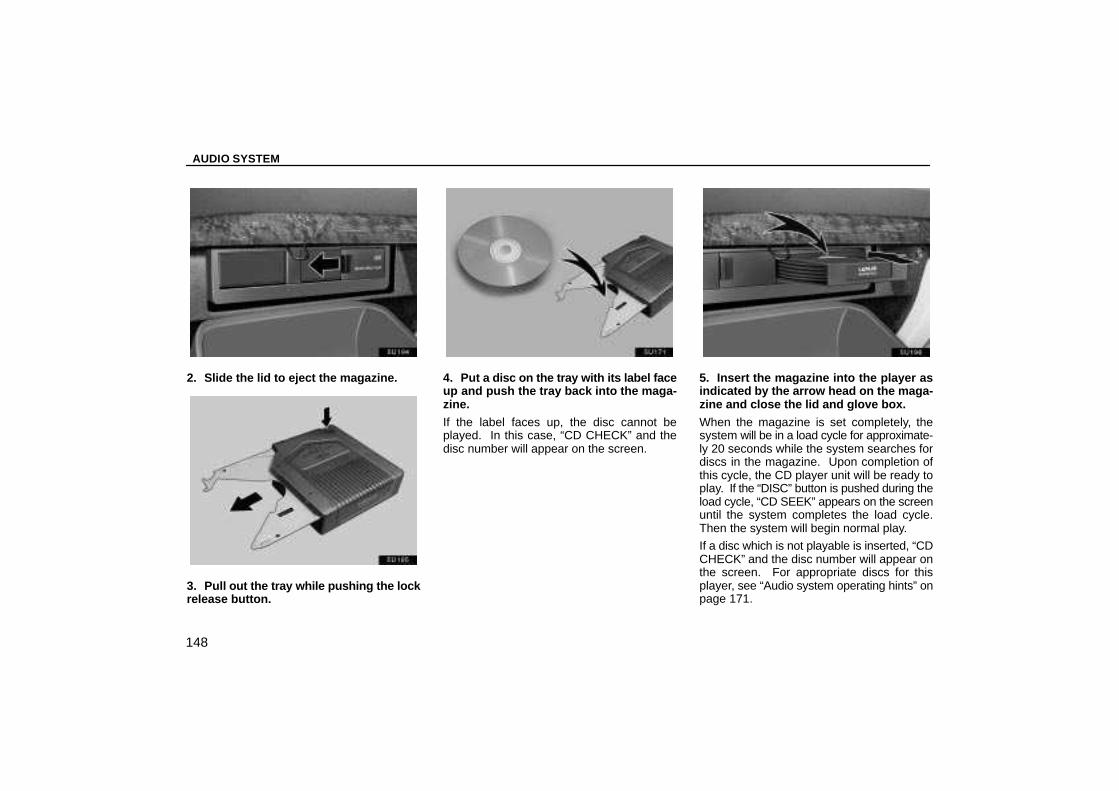
AUDIO SYSTEM
148
2. Slide the lid to eject the magazine.
3. Pull out the tray while pushing the lockrelease button.
4. Put a disc on the tray with its label faceup and push the tray back into the maga-zine.
If the label faces up, the disc cannot beplayed. In this case, “CD CHECK” and thedisc number will appear on the screen.
5. Insert the magazine into the player asindicated by the arrow head on the maga-zine and close the lid and glove box.
When the magazine is set completely, thesystem will be in a load cycle for approximate-ly 20 seconds while the system searches fordiscs in the magazine. Upon completion ofthis cycle, the CD player unit will be ready toplay. If the “DISC” button is pushed during theload cycle, “CD SEEK” appears on the screenuntil the system completes the load cycle.Then the system will begin normal play.
If a disc which is not playable is inserted, “CDCHECK” and the disc number will appear onthe screen. For appropriate discs for thisplayer, see “Audio system operating hints” onpage 171.
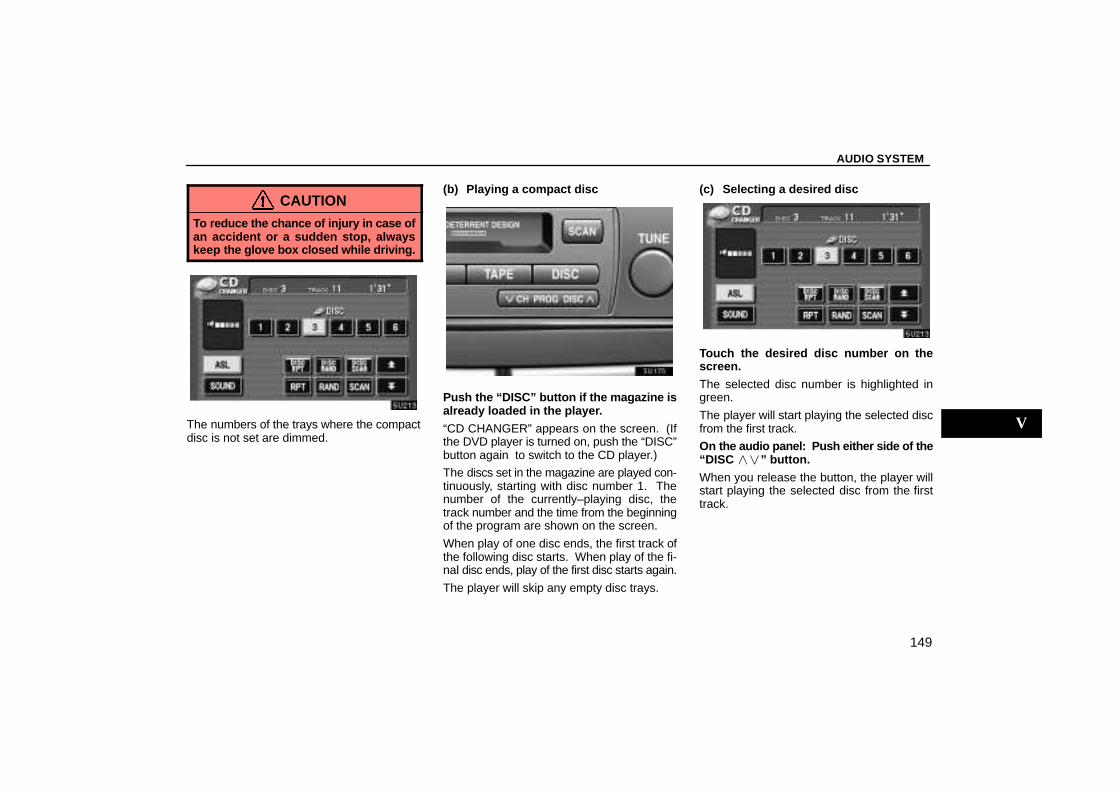
AUDIO SYSTEM
149
CAUTIONTo reduce the chance of injury in case ofan accident or a sudden stop, alwayskeep the glove box closed while driving.
The numbers of the trays where the compactdisc is not set are dimmed.
(b) Playing a compact disc
Push the “DISC” button if the magazine isalready loaded in the player.
“CD CHANGER” appears on the screen. (Ifthe DVD player is turned on, push the “DISC”button again to switch to the CD player.)
The discs set in the magazine are played con-tinuously, starting with disc number 1. Thenumber of the currently–playing disc, thetrack number and the time from the beginningof the program are shown on the screen.
When play of one disc ends, the first track ofthe following disc starts. When play of the fi-nal disc ends, play of the first disc starts again.
The player will skip any empty disc trays.
(c) Selecting a desired disc
Touch the desired disc number on thescreen.
The selected disc number is highlighted ingreen.
The player will start playing the selected discfrom the first track.
On the audio panel: Push either side of the“DISC ��” button.
When you release the button, the player willstart playing the selected disc from the firsttrack.
V
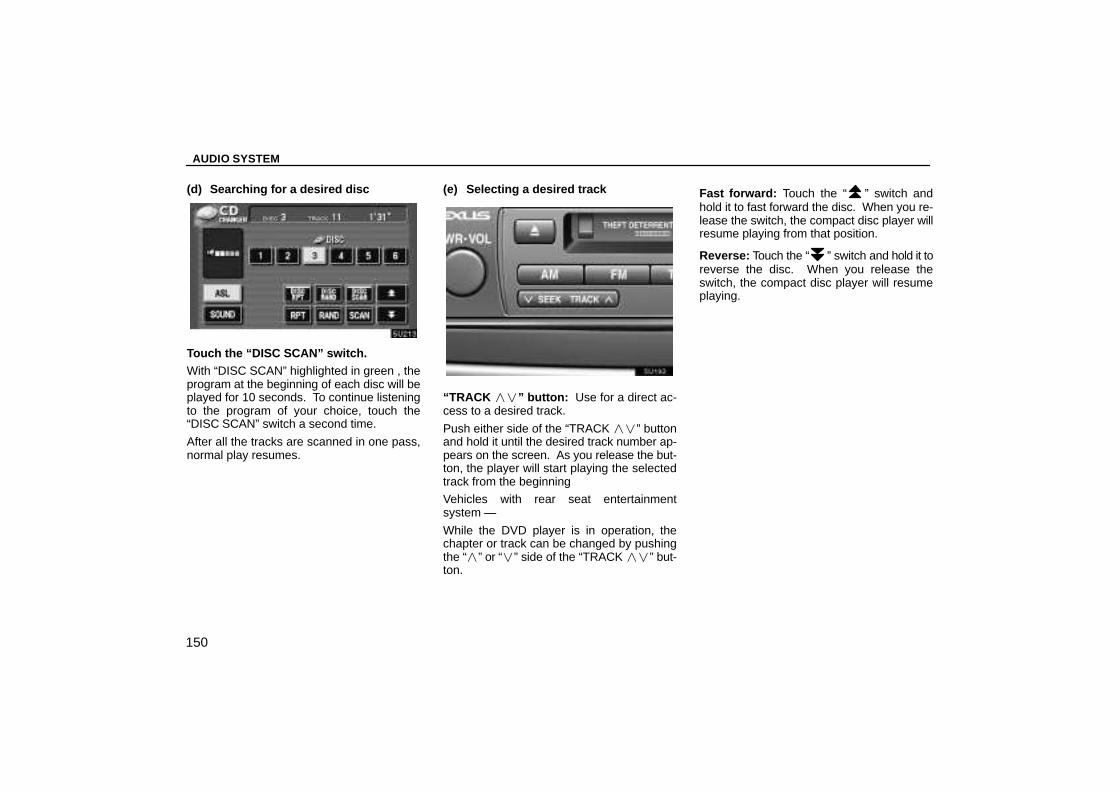
AUDIO SYSTEM
150
(d) Searching for a desired disc
Touch the “DISC SCAN” switch.With “DISC SCAN” highlighted in green , theprogram at the beginning of each disc will beplayed for 10 seconds. To continue listeningto the program of your choice, touch the“DISC SCAN” switch a second time.
After all the tracks are scanned in one pass,normal play resumes.
(e) Selecting a desired track
“TRACK ��” button: Use for a direct ac-cess to a desired track.
Push either side of the “TRACK ��” buttonand hold it until the desired track number ap-pears on the screen. As you release the but-ton, the player will start playing the selectedtrack from the beginning
Vehicles with rear seat entertainmentsystem —
While the DVD player is in operation, thechapter or track can be changed by pushingthe “�” or “�” side of the “TRACK ��” but-ton.
Fast forward: Touch the “ ” switch andhold it to fast forward the disc. When you re-lease the switch, the compact disc player willresume playing from that position.
Reverse: Touch the “ ” switch and hold it toreverse the disc. When you release theswitch, the compact disc player will resumeplaying.
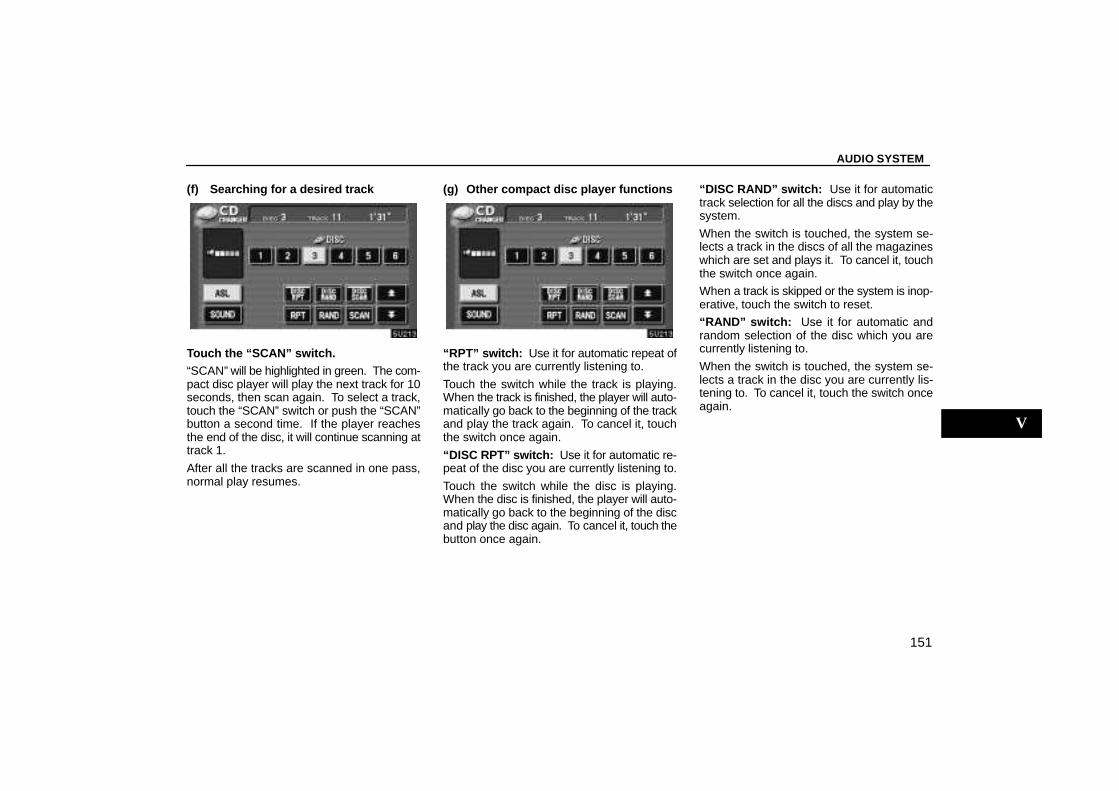
AUDIO SYSTEM
151
(f) Searching for a desired track
Touch the “SCAN” switch.“SCAN” will be highlighted in green. The com-pact disc player will play the next track for 10seconds, then scan again. To select a track,touch the “SCAN” switch or push the “SCAN”button a second time. If the player reachesthe end of the disc, it will continue scanning attrack 1.
After all the tracks are scanned in one pass,normal play resumes.
(g) Other compact disc player functions
“RPT” sw itch: Use it for automatic repeat ofthe track you are currently listening to.
Touch the switch while the track is playing.When the track is finished, the player will auto-matically go back to the beginning of the trackand play the track again. To cancel it, touchthe switch once again.
“DISC RPT” switch: Use it for automatic re-peat of the disc you are currently listening to.
Touch the switch while the disc is playing.When the disc is finished, the player will auto-matically go back to the beginning of the discand play the disc again. To cancel it, touch thebutton once again.
“DISC RAND” switch: Use it for automatictrack selection for all the discs and play by thesystem.
When the switch is touched, the system se-lects a track in the discs of all the magazineswhich are set and plays it. To cancel it, touchthe switch once again.
When a track is skipped or the system is inop-erative, touch the switch to reset.
“RAND” switch: Use it for automatic andrandom selection of the disc which you arecurrently listening to.
When the switch is touched, the system se-lects a track in the disc you are currently lis-tening to. To cancel it, touch the switch onceagain.
V
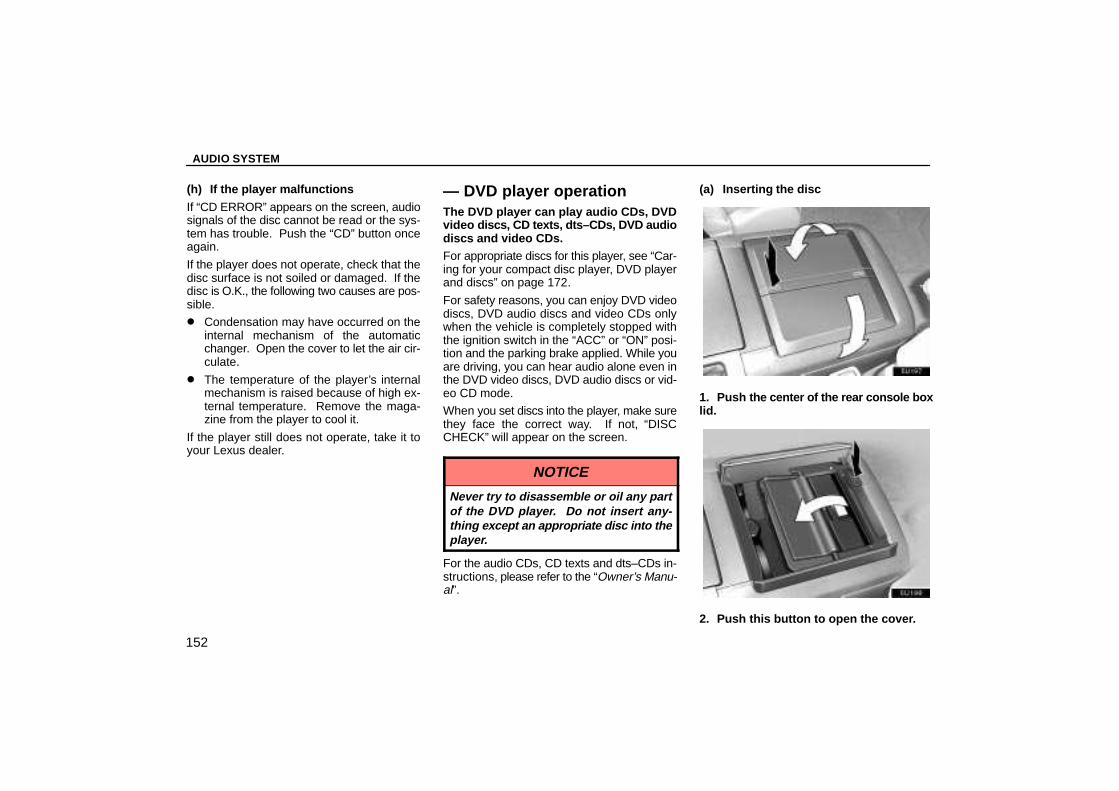
AUDIO SYSTEM
152
(h) If the player malfunctions
If “CD ERROR” appears on the screen, audiosignals of the disc cannot be read or the sys-tem has trouble. Push the “CD” button onceagain.
If the player does not operate, check that thedisc surface is not soiled or damaged. If thedisc is O.K., the following two causes are pos-sible.
� Condensation may have occurred on theinternal mechanism of the automaticchanger. Open the cover to let the air cir-culate.
� The temperature of the player’s internalmechanism is raised because of high ex-ternal temperature. Remove the maga-zine from the player to cool it.
If the player still does not operate, take it toyour Lexus dealer.
— DVD player operationThe DVD player can play audio CDs, DVDvideo discs, CD texts, dts–CDs, DVD audiodiscs and video CDs.For appropriate discs for this player, see “Car-ing for your compact disc player, DVD playerand discs” on page 172.
For safety reasons, you can enjoy DVD videodiscs, DVD audio discs and video CDs onlywhen the vehicle is completely stopped withthe ignition switch in the “ACC” or “ON” posi-tion and the parking brake applied. While youare driving, you can hear audio alone even inthe DVD video discs, DVD audio discs or vid-eo CD mode.
When you set discs into the player, make surethey face the correct way. If not, “DISCCHECK” will appear on the screen.
NOTICE
Never try to disassemble or oil any partof the DVD player. Do not insert any-thing except an appropriate disc into theplayer.
For the audio CDs, CD texts and dts–CDs in-structions, please refer to the “Owner’s Manu-al”.
(a) Inserting the disc
1. Push the center of the rear console boxlid.
2. Push this button to open the cover.
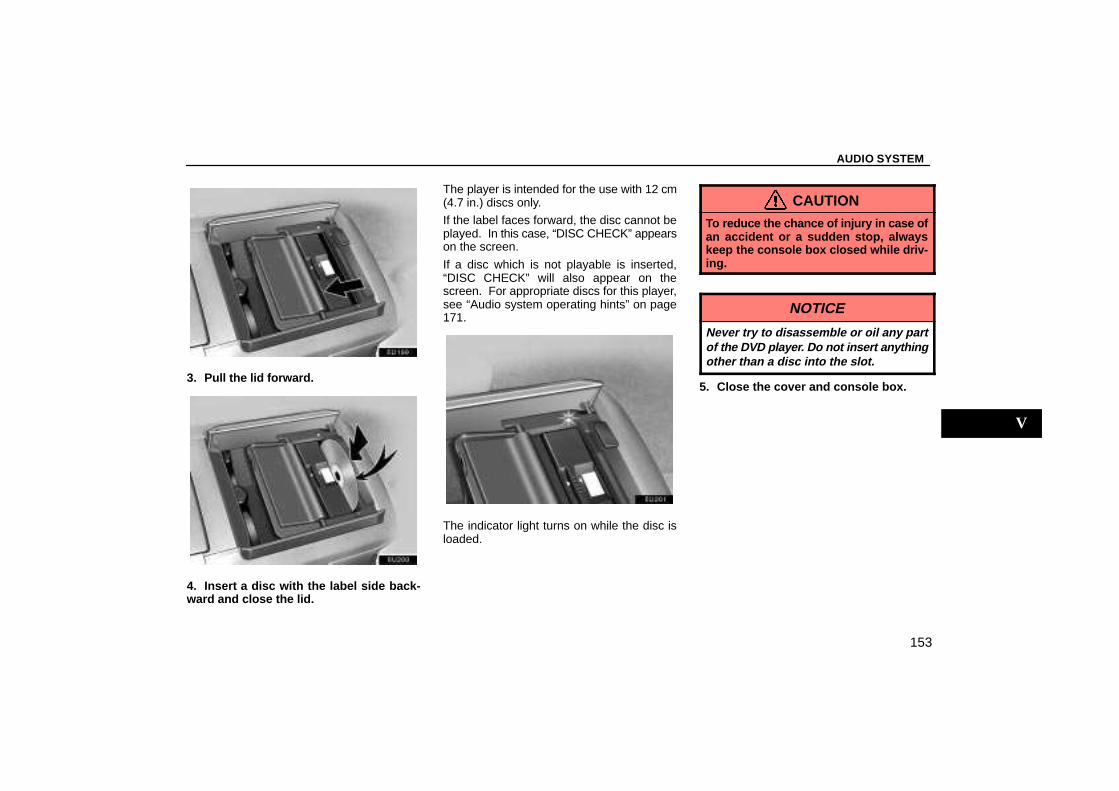
AUDIO SYSTEM
153
3. Pull the lid forward.
4. Insert a disc with the label side back-ward and close the lid.
The player is intended for the use with 12 cm(4.7 in.) discs only.
If the label faces forward, the disc cannot beplayed. In this case, “DISC CHECK” appearson the screen.
If a disc which is not playable is inserted,“DISC CHECK” will also appear on thescreen. For appropriate discs for this player,see “Audio system operating hints” on page171.
The indicator light turns on while the disc isloaded.
CAUTIONTo reduce the chance of injury in case ofan accident or a sudden stop, alwayskeep the console box closed while driv-ing.
NOTICE
Never try to disassemble or oil any partof the DVD player. Do not insert anythingother than a disc into the slot.
5. Close the cover and console box.
V
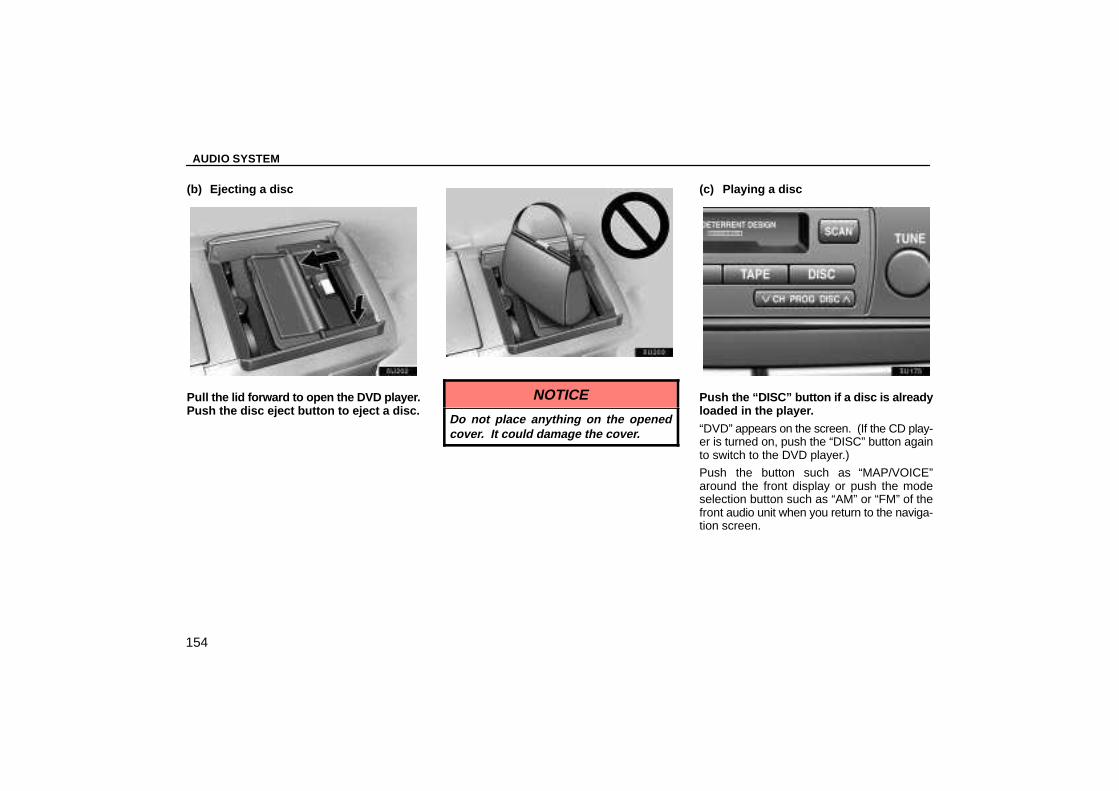
AUDIO SYSTEM
154
(b) Ejecting a disc
Pull the lid forward to open the DVD player.Push the disc eject button to eject a disc.
NOTICE
Do not place anything on the openedcover. It could damage the cover.
(c) Playing a disc
Push the “DISC” button if a disc is alreadyloaded in the player.
“DVD” appears on the screen. (If the CD play-er is turned on, push the “DISC” button againto switch to the DVD player.)
Push the button such as “MAP/VOICE”around the front display or push the modeselection button such as “AM” or “FM” of thefront audio unit when you return to the naviga-tion screen.
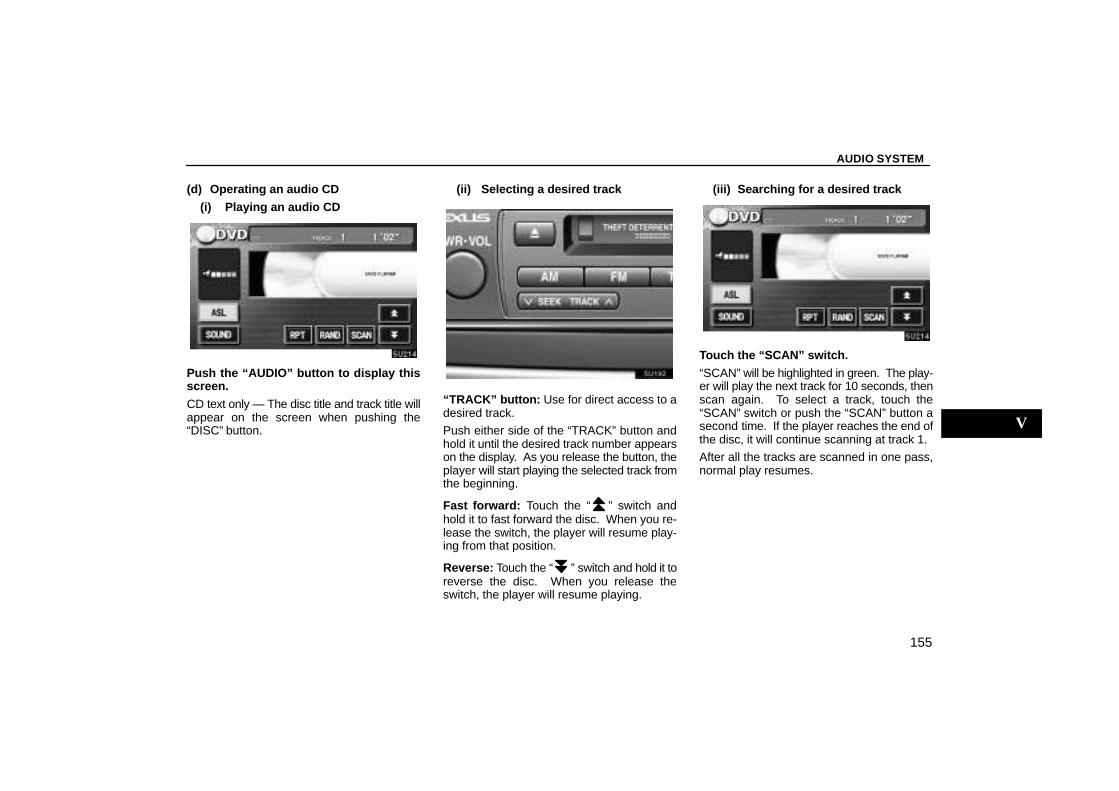
AUDIO SYSTEM
155
(d) Operating an audio CD
(i) Playing an audio CD
Push the “AUDIO” button to display thisscreen.
CD text only — The disc title and track title willappear on the screen when pushing the“DISC” button.
(ii) Selecting a desired track
“TRACK” button: Use for direct access to adesired track.
Push either side of the “TRACK” button andhold it until the desired track number appearson the display. As you release the button, theplayer will start playing the selected track fromthe beginning.
Fast forward: Touch the “ ” switch andhold it to fast forward the disc. When you re-lease the switch, the player will resume play-ing from that position.
Reverse: Touch the “ ” switch and hold it toreverse the disc. When you release theswitch, the player will resume playing.
(iii) Searching for a desired track
Touch the “SCAN” switch.
“SCAN” will be highlighted in green. The play-er will play the next track for 10 seconds, thenscan again. To select a track, touch the“SCAN” switch or push the “SCAN” button asecond time. If the player reaches the end ofthe disc, it will continue scanning at track 1.
After all the tracks are scanned in one pass,normal play resumes.
V
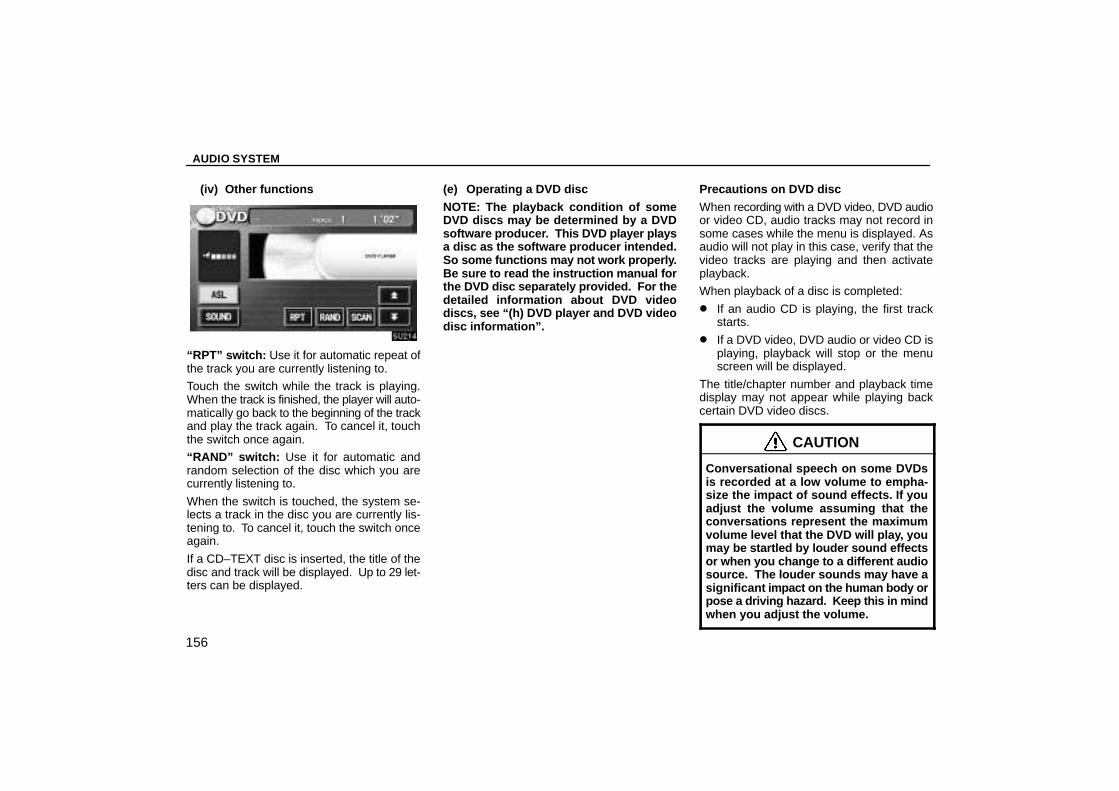
AUDIO SYSTEM
156
(iv) Other functions
“RPT” switch: Use it for automatic repeat ofthe track you are currently listening to.
Touch the switch while the track is playing.When the track is finished, the player will auto-matically go back to the beginning of the trackand play the track again. To cancel it, touchthe switch once again.
“RAND” switch: Use it for automatic andrandom selection of the disc which you arecurrently listening to.
When the switch is touched, the system se-lects a track in the disc you are currently lis-tening to. To cancel it, touch the switch onceagain.
If a CD–TEXT disc is inserted, the title of thedisc and track will be displayed. Up to 29 let-ters can be displayed.
(e) Operating a DVD disc
NOTE: The playback condition of someDVD discs may be determined by a DVDsoftware producer. This DVD player playsa disc as the software producer intended.So some functions may not work properly.Be sure to read the instruction manual forthe DVD disc separately provided. For thedetailed information about DVD videodiscs, see “(h) DVD player and DVD videodisc information”.
Precautions on DVD disc
When recording with a DVD video, DVD audioor video CD, audio tracks may not record insome cases while the menu is displayed. Asaudio will not play in this case, verify that thevideo tracks are playing and then activateplayback.
When playback of a disc is completed:
� If an audio CD is playing, the first trackstarts.
� If a DVD video, DVD audio or video CD isplaying, playback will stop or the menuscreen will be displayed.
The title/chapter number and playback timedisplay may not appear while playing backcertain DVD video discs.
CAUTION
Conversational speech on some DVDsis recorded at a low volume to empha-size the impact of sound effects. If youadjust the volume assuming that theconversations represent the maximumvolume level that the DVD will play, youmay be startled by louder sound effectsor when you change to a different audiosource. The louder sounds may have asignificant impact on the human body orpose a driving hazard. Keep this in mindwhen you adjust the volume.
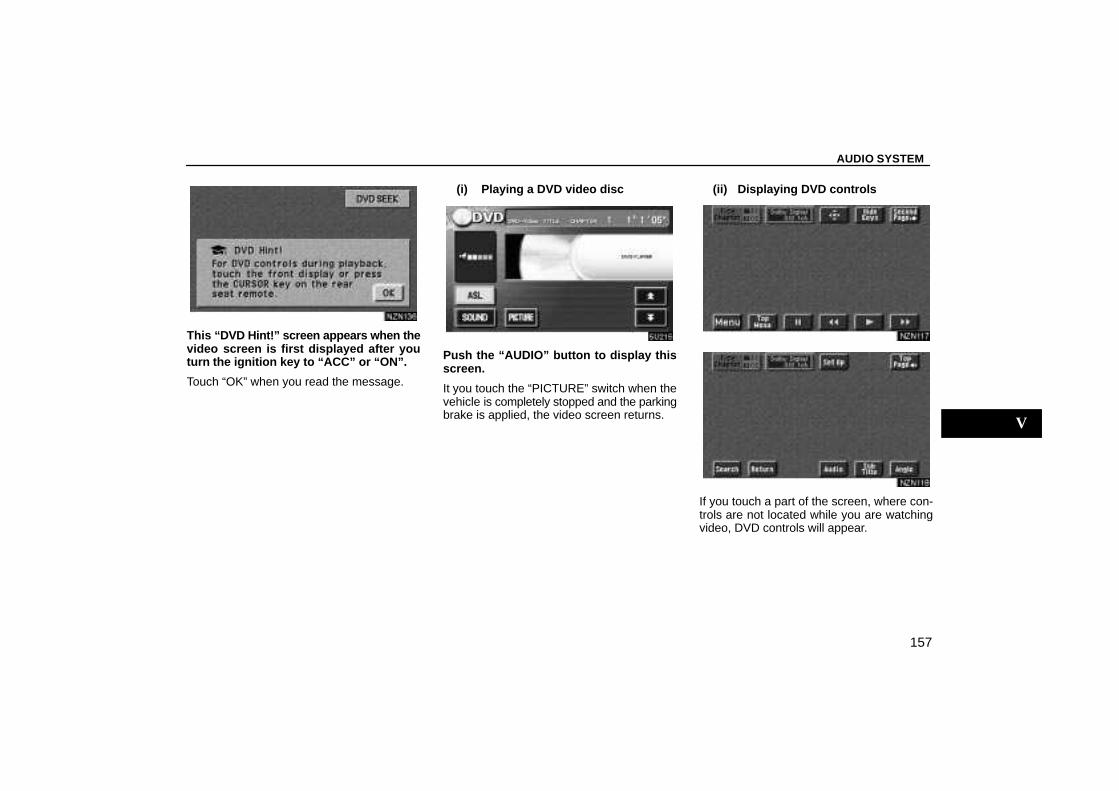
AUDIO SYSTEM
157
This “DVD Hint!” screen appears when thevideo screen is first displayed after youturn the ignition key to “ACC” or “ON”.
Touch “OK” when you read the message.
(i) Playing a DVD video disc
Push the “AUDIO” button to display thisscreen.
It you touch the “PICTURE” switch when thevehicle is completely stopped and the parkingbrake is applied, the video screen returns.
(ii) Displaying DVD controls
If you touch a part of the screen, where con-trols are not located while you are watchingvideo, DVD controls will appear.
V
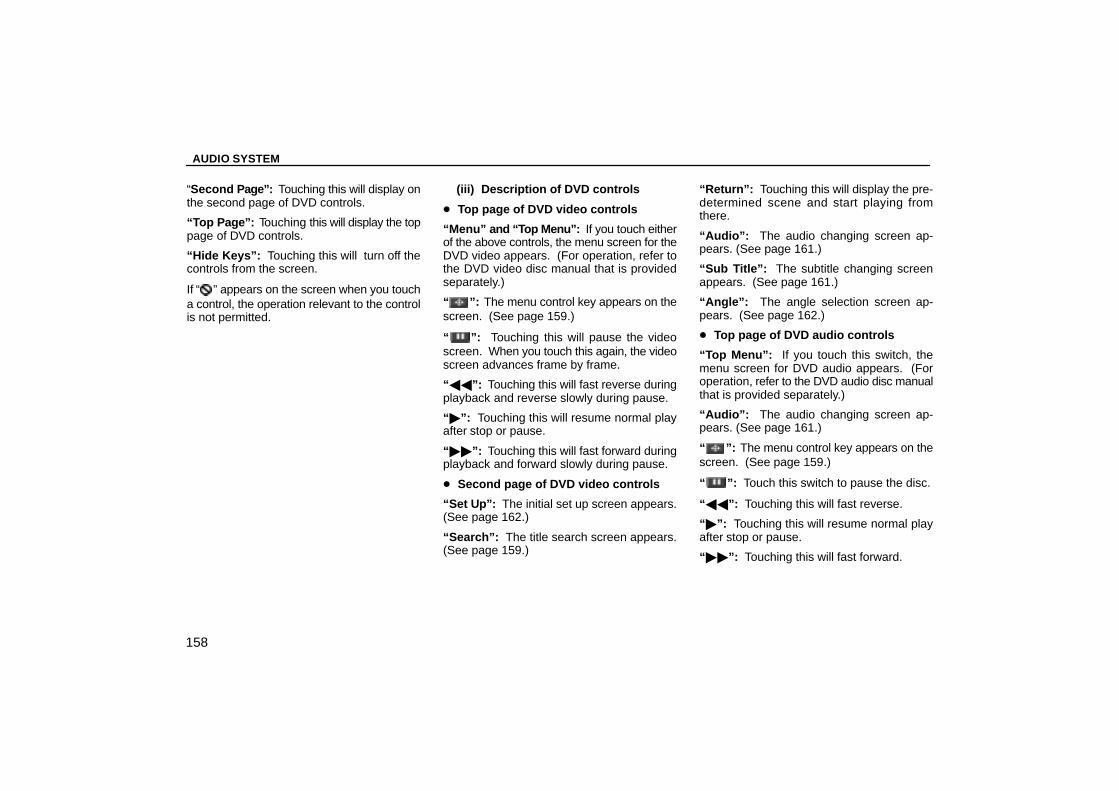
AUDIO SYSTEM
158
“Second Page”: Touching this will display onthe second page of DVD controls.
“Top Page”: Touching this will display the toppage of DVD controls.
“Hide Keys”: Touching this will turn off thecontrols from the screen.
If “ ” appears on the screen when you toucha control, the operation relevant to the controlis not permitted.
(iii) Description of DVD controls
� Top page of DVD video controls
“Menu” and “Top Menu”: If you touch eitherof the above controls, the menu screen for theDVD video appears. (For operation, refer tothe DVD video disc manual that is providedseparately.)
“ ”: The menu control key appears on thescreen. (See page 159.)
“ ”: Touching this will pause the videoscreen. When you touch this again, the videoscreen advances frame by frame.
“��”: Touching this will fast reverse duringplayback and reverse slowly during pause.
“�”: Touching this will resume normal playafter stop or pause.
“��”: Touching this will fast forward duringplayback and forward slowly during pause.
� Second page of DVD video controls
“Set Up”: The initial set up screen appears.(See page 162.)
“Search”: The title search screen appears.(See page 159.)
“Return”: Touching this will display the pre-determined scene and start playing fromthere.
“Audio”: The audio changing screen ap-pears. (See page 161.)
“Sub Title”: The subtitle changing screenappears. (See page 161.)
“Angle”: The angle selection screen ap-pears. (See page 162.)
� Top page of DVD audio controls
“Top Menu”: If you touch this switch, themenu screen for DVD audio appears. (Foroperation, refer to the DVD audio disc manualthat is provided separately.)
“Audio”: The audio changing screen ap-pears. (See page 161.)
“ ”: The menu control key appears on thescreen. (See page 159.)
“ ”: Touch this switch to pause the disc.
“��”: Touching this will fast reverse.
“�”: Touching this will resume normal playafter stop or pause.
“��”: Touching this will fast forward.
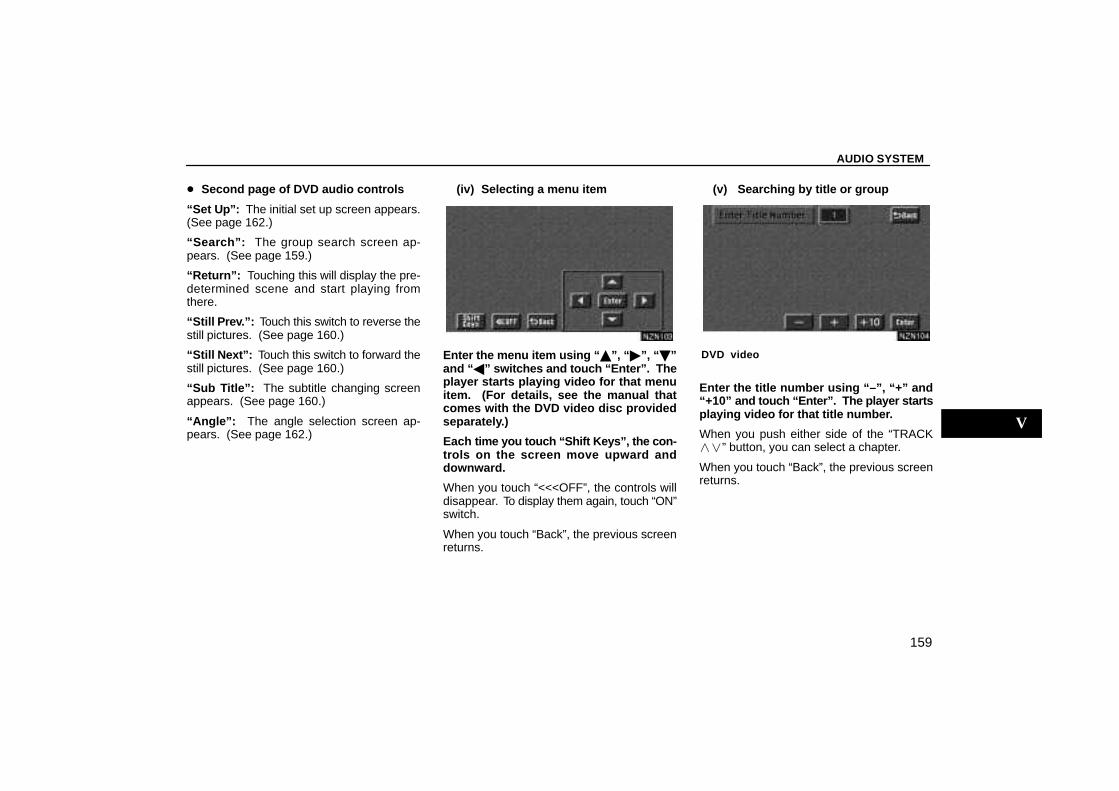
AUDIO SYSTEM
159
� Second page of DVD audio controls
“Set Up”: The initial set up screen appears.(See page 162.)
“Search”: The group search screen ap-pears. (See page 159.)
“Return”: Touching this will display the pre-determined scene and start playing fromthere.
“Still Prev.”: Touch this switch to reverse thestill pictures. (See page 160.)
“Still N ext”: Touch this switch to forward thestill pictures. (See page 160.)
“Sub Title”: The subtitle changing screenappears. (See page 160.)
“Angle”: The angle selection screen ap-pears. (See page 162.)
(iv) Selecting a menu item
Enter the menu item using “ �”, “ �”, “ �”and “ �” switches and touch “Enter”. Theplayer starts playing video for that menuitem. (For details, see the manual thatcomes with the DVD video disc providedseparately.)
Each time you touch “Shift Keys”, the con-trols on the screen move upward anddownward.
When you touch “<<<OFF”, the controls willdisappear. To display them again, touch “ON”switch.
When you touch “Back”, the previous screenreturns.
(v) Searching by title or group
DVD video
Enter the title number using “–”, “+” and“+10” and touch “Enter”. The player startsplaying video for that title number.
When you push either side of the “TRACK��” button, you can select a chapter.
When you touch “Back”, the previous screenreturns.
V
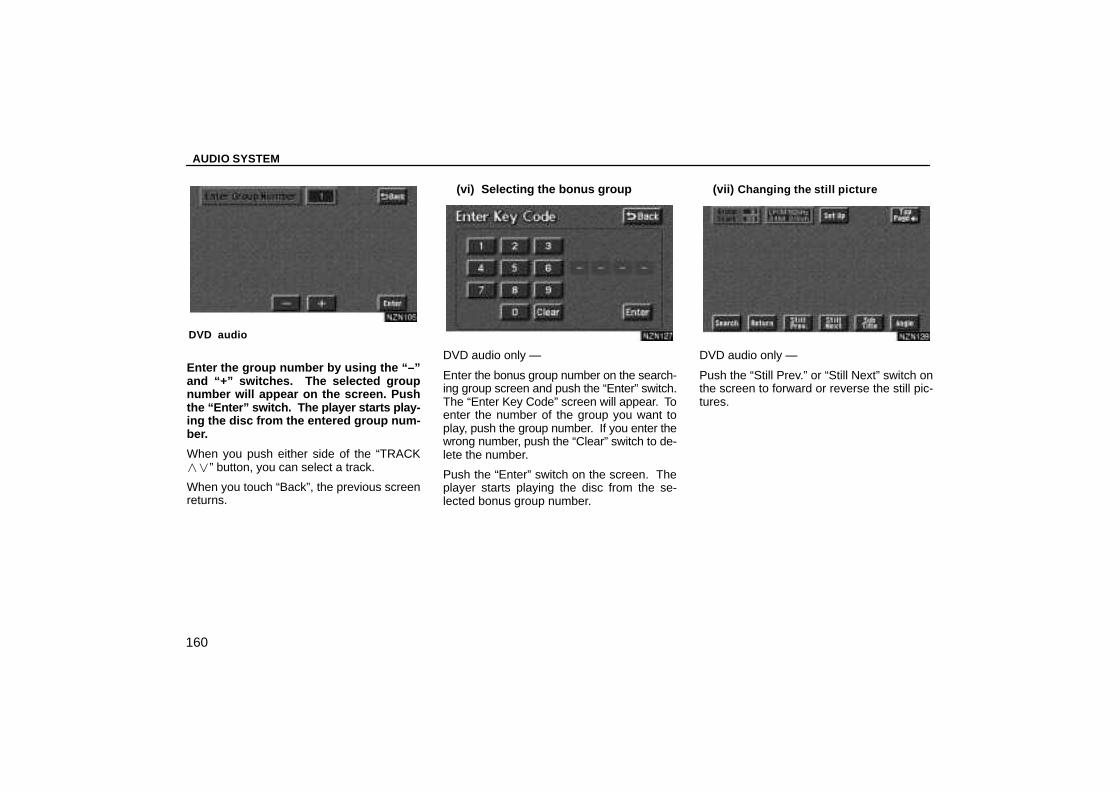
AUDIO SYSTEM
160
DVD audio
Enter the group number by using the “–”and “+” switches. The selected groupnumber will appear on the screen. Pushthe “Enter” switch. The player starts play-ing the disc from the entered group num-ber.
When you push either side of the “TRACK��” button, you can select a track.
When you touch “Back”, the previous screenreturns.
(vi) Selecting the bonus group
DVD audio only —
Enter the bonus group number on the search-ing group screen and push the “Enter” switch.The “Enter Key Code” screen will appear. Toenter the number of the group you want toplay, push the group number. If you enter thewrong number, push the “Clear” switch to de-lete the number.
Push the “Enter” switch on the screen. Theplayer starts playing the disc from the se-lected bonus group number.
(vii) Changing the still picture
DVD audio only —
Push the “Still Prev.” or “Still Next” switch onthe screen to forward or reverse the still pic-tures.
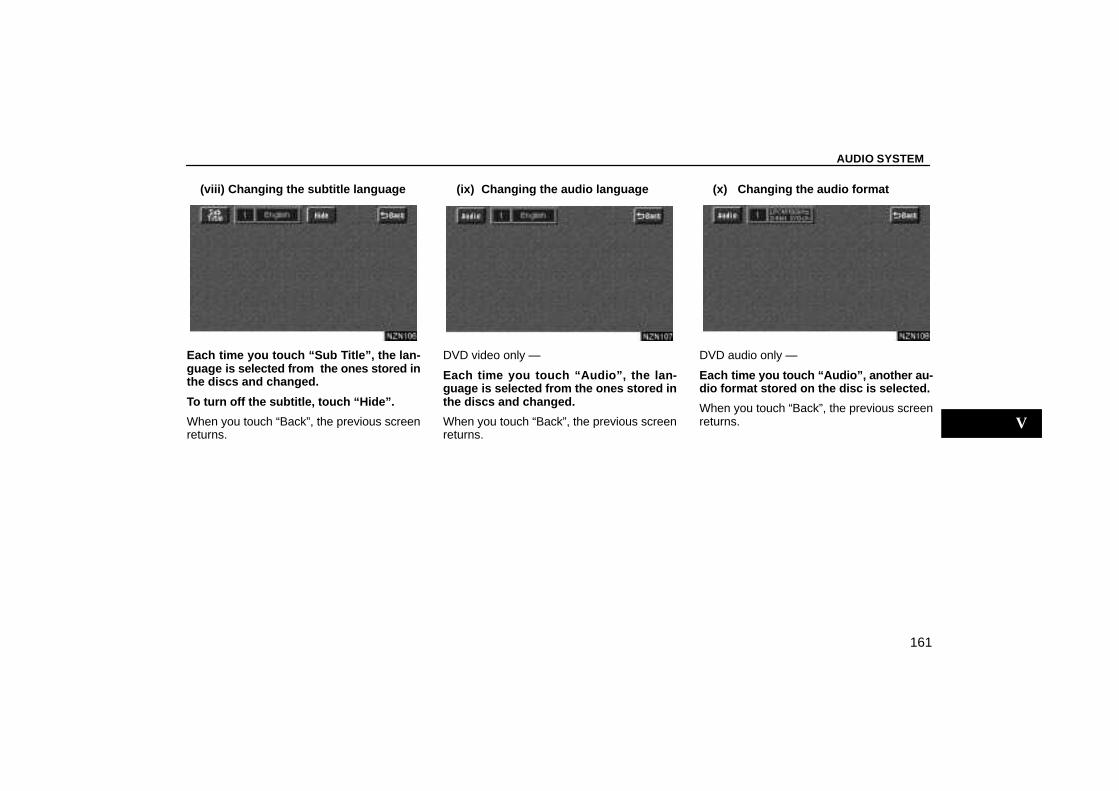
AUDIO SYSTEM
161
(viii) Changing the subtitle language
Each time you touch “Sub Title”, the lan-guage is selected from the ones stored inthe discs and changed.
To turn off the subtitle, touch “Hide”.
When you touch “Back”, the previous screenreturns.
(ix) Changing the audio language
DVD video only —
Each time you touch “Audio”, the lan-guage is selected from the ones stored inthe discs and changed.
When you touch “Back”, the previous screenreturns.
(x) Changing the audio format
DVD audio only —
Each time you touch “Aud io”, another au-dio format stored on the disc is selected.
When you touch “Back”, the previous screenreturns. V
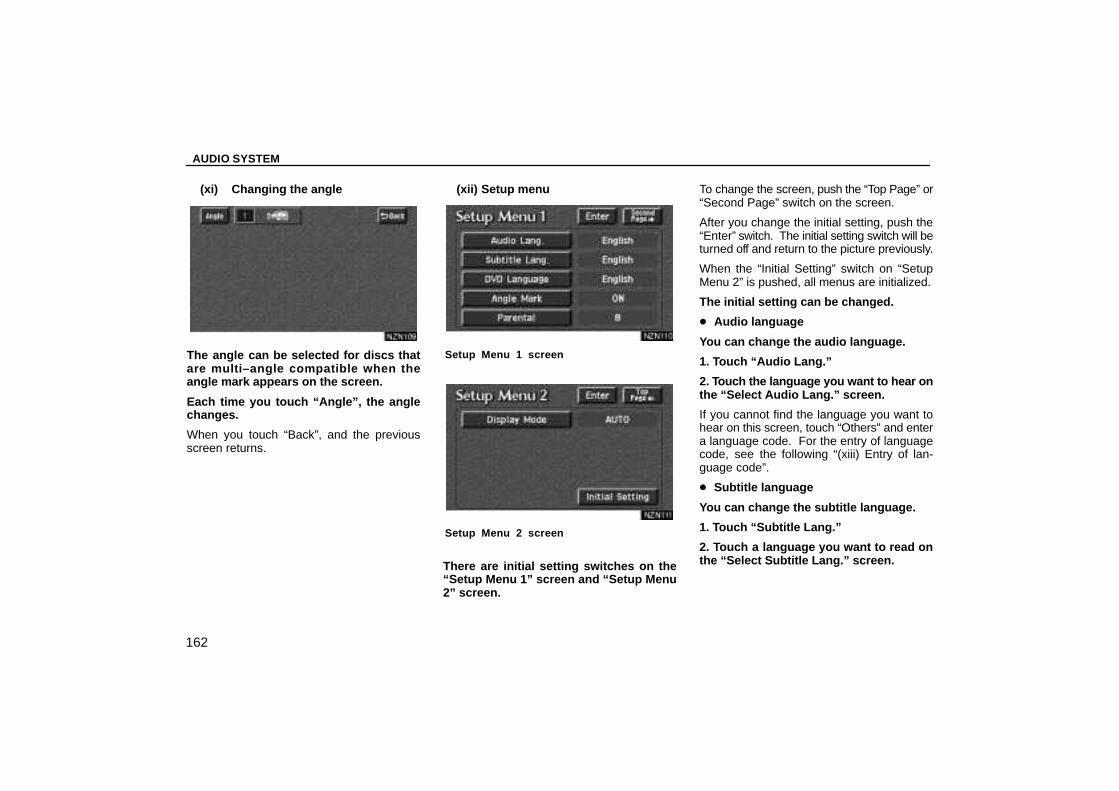
AUDIO SYSTEM
162
(xi) Changing the angle
The angle can be selected for discs thatare multi–angle compatible when theangle mark appears on the screen.
Each time you touch “Angle”, the anglechanges.
When you touch “Back”, and the previousscreen returns.
(xii) Setup menu
Setup Menu 1 screen
Setup Menu 2 screen
There are initial setting switches on the“Setup Menu 1” screen and “Setup Menu2” screen.
To change the screen, push the “Top Page” or“Second Page” switch on the screen.
After you change the initial setting, push the“Enter” switch. The initial setting switch will beturned off and return to the picture previously.
When the “Initial Setting” switch on “SetupMenu 2” is pushed, all menus are initialized.
The initial setting can be changed.
� Audio language
You can change the audio language.
1. Touch “Audio Lang.”
2. Touch the language you want to hear onthe “Select Audio Lang.” screen.
If you cannot find the language you want tohear on this screen, touch “Others” and entera language code. For the entry of languagecode, see the following “(xiii) Entry of lan-guage code”.
� Subtitle language
You can change the subtitle language.
1. Touch “Subtitle Lang.”
2. Touch a language you want to read onthe “Select Subtitle Lang.” screen.
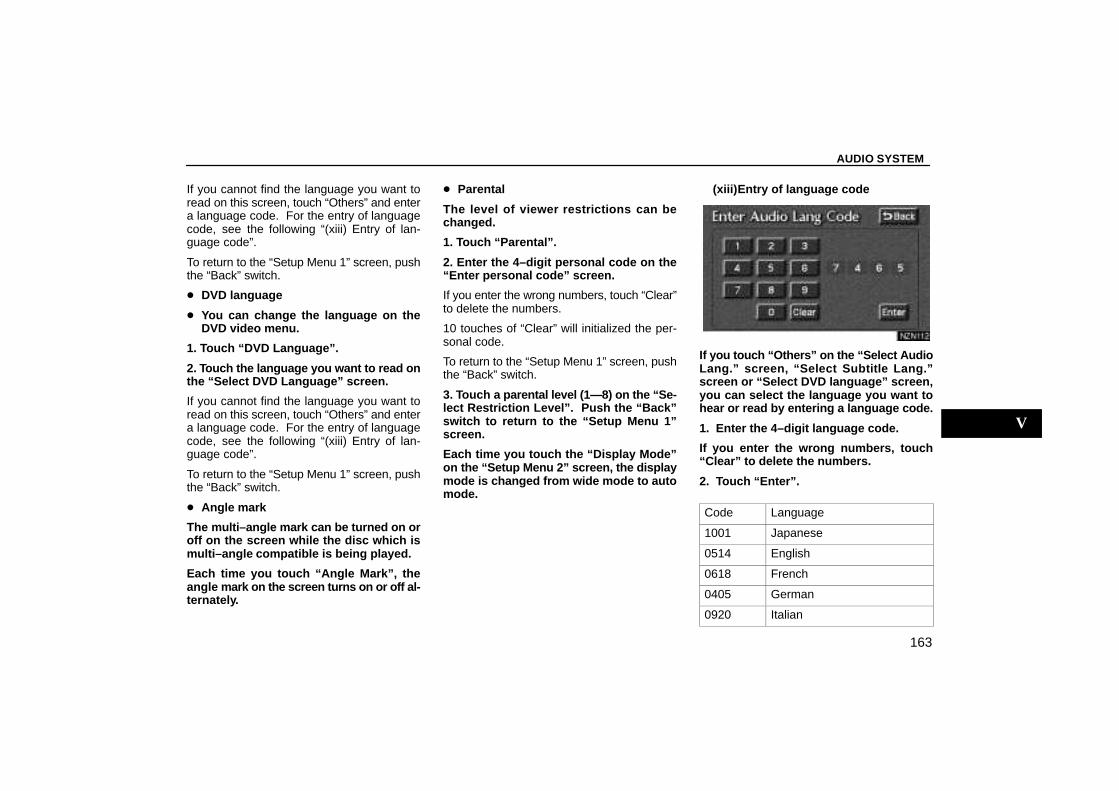
AUDIO SYSTEM
163
If you cannot find the language you want toread on this screen, touch “Others” and entera language code. For the entry of languagecode, see the following “(xiii) Entry of lan-guage code”.
To return to the “Setup Menu 1” screen, pushthe “Back” switch.
� DVD language
� You can change the language on theDVD video menu.
1. Touch “DVD Language”.
2. Touch the language you want to read onthe “Select DVD Language” screen.
If you cannot find the language you want toread on this screen, touch “Others” and entera language code. For the entry of languagecode, see the following “(xiii) Entry of lan-guage code”.
To return to the “Setup Menu 1” screen, pushthe “Back” switch.
� Angle mark
The multi–angle mark can be turned on oroff on the screen while the disc which ismulti–angle compatible is being played.
Each time you touch “Angle Mark”, theangle m ark on the screen turns on or off al-ternately.
� Parental
The level of viewer restrictions can bechanged.
1. Touch “Parental”.
2. Enter the 4–digit personal code on the“Enter personal code” screen.
If you enter the wrong numbers, touch “Clear”to delete the numbers.
10 touches of “Clear” will initialized the per-sonal code.
To return to the “Setup Menu 1” screen, pushthe “Back” switch.
3. Touch a parental level (1—8) on the “Se-lect Restriction Level”. Push the “Back”switch to return to the “Setup Menu 1”screen.
Each time you touch the “Display Mode”on the “Setup Menu 2” screen, the displaymode is changed from wide mode to automode.
(xiii)Entry of language code
If you touch “Others” on the “Select AudioLang.” screen, “Select Subtitle Lang.”screen or “Select DVD language” screen,you can select the language you want tohear or read by entering a language code.
1. Enter the 4–digit language code.
If you enter the wrong numbers, touch“Clear” to delete the numbers.
2. Touch “Enter”.
Code Language
1001 Japanese
0514 English
0618 French
0405 German
0920 Italian
V

AUDIO SYSTEM
164
0519 Spanish
2608 Chinese
1412 Dutch
1620 Portuguese
1922 Swedish
1821 Russian
1115 Korean
0512 Greek
0101 Afar
0102 Abkhazian
0106 Afrikaans
0113 Amharic
0118 Arabic
0119 Assamese
0125 Aymara
0126 Azerbaijani
0201 Bashkir
0205 Byelorussian
0207 Bulgarian
0208 Bihari
0209 Bislama
0214 Bengali
0215 Tibetan
0218 Breton
0301 Catalan
0315 Corsican
0319 Czach
0325 Welsh
0401 Danish
0426 Bhutani
0515 Esperanto
0520 Estonian
0521 Basque
0601 Persian
0609 Finnish
0610 Fiji
0615 Faroese
0625 Frisian
0701 Irish
0704 Scots–Gaelic
0712 Galician
0714 Guarani
0721 Gujarati
0801 Hausa
0809 Hindi
0818 Croatian
0821 Hungarian
0825 Armenian
0901 Interlingua
0905 Interlingue
0911 Inupiak
0914 Indonesian
0919 Icelandic
0923 Hebrew
1009 Yiddish
1023 Javanese
1101 Georgian
1111 Kazakh
1112 Greenlandic
1113 Cambodian
1114 Kannada
1119 Kashmiri
1121 Kurdish
1125 Kirghiz
1201 Latin
1214 Lingala

AUDIO SYSTEM
165
1215 Laothian
1220 Lithuanian
1222 Latvian
1307 Malagasy
1309 Maori
1311 Macedonian
1312 Malayalam
1314 Mongolian
1315 Moldavian
1318 Marathi
1319 Malay
1320 Maltese
1325 Burmese
1401 Nauru
1405 Nepali
1415 Norwegian
1503 Occitan
1513 (Afan)Oromo
1518 Oriya
1601 Panjabi
1612 Polish
1619 Pashto, Pushto
1721 Quechua
1813 Rhaeto–Romance
1814 Kirundi
1815 Romanian
1823 Kinyarwanda
1901 Sanskrit
1904 Sindhi
1907 Sangho
1908 Serbo–Croatian
1909 Sinhalese
1911 Slovak
1912 Slovenian
1913 Samoan
1914 Shona
1915 Somali
1917 Albanian
1918 Serbian
1919 Siswati
1920 Sesotho
1921 Sundanese
1923 Swahili
2001 Tamil
2005 Telugu
2007 Tajik
2008 Thai
2009 Tigrinya
2011 Turkmen
2012 Tagalog
2014 Setswana
2015 Tonga
2018 Turkish
2019 Tsonga
2020 Tatar
2023 Twi
2111 Ukrainian
2118 Urdu
2126 Uzbek
2209 Vietnamese
2215 Volapük
2315 Wolof
2408 Xhosa
2515 Yoruba
2621 Zulu
V
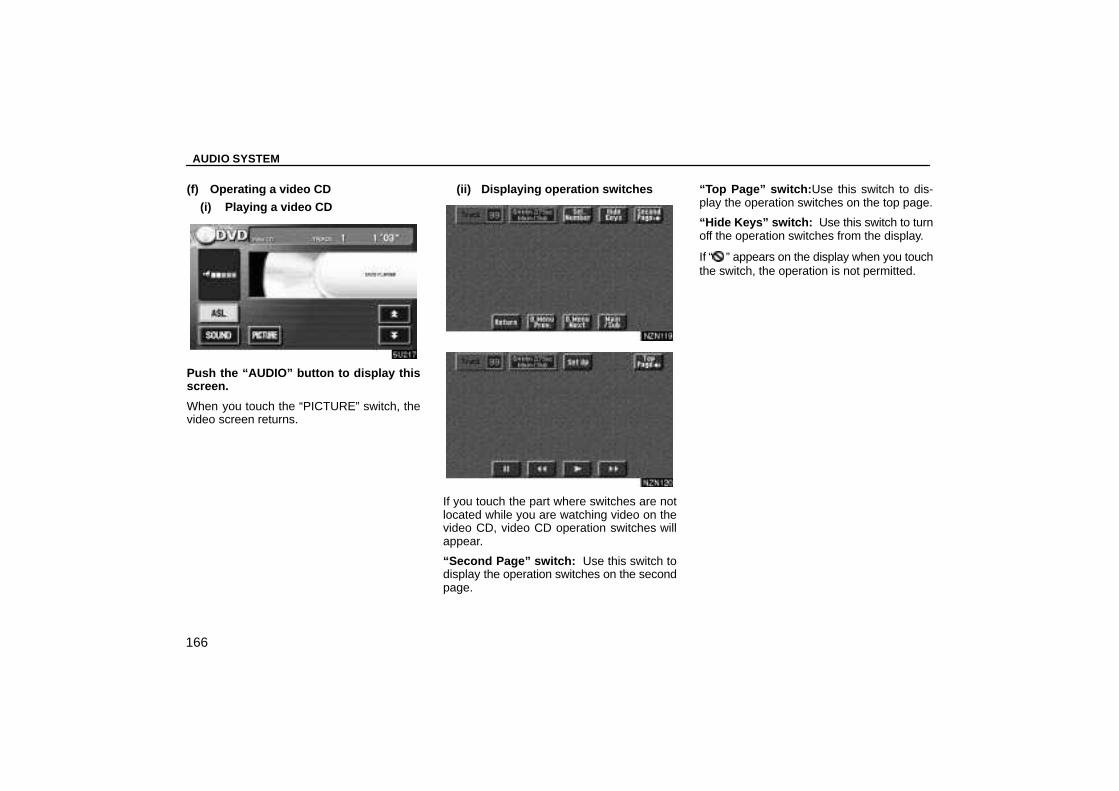
AUDIO SYSTEM
166
(f) Operating a video CD
(i) Playing a video CD
Push the “AUDIO” button to display thisscreen.
When you touch the “PICTURE” switch, thevideo screen returns.
(ii) Displaying operation switches
If you touch the part where switches are notlocated while you are watching video on thevideo CD, video CD operation switches willappear.
“Second Page” switch: Use this switch todisplay the operation switches on the secondpage.
“Top Page” switch: Use this switch to dis-play the operation switches on the top page.
“Hide Keys” switch: Use this switch to turnoff the operation switches from the display.
If “ ” appears on the display when you touchthe switch, the operation is not permitted.
AUDIO SYSTEM
167
(iii) Description of each switch
� Switches on top page
“Sel. Number” switch: The track or numbersearch screen appears. (See “Searching bytrack” on page 167.)
“D. Menu Prev.” switch: When you touchthis switch while the disc menu is displayed,the previous page appears on the screen. Ifyou touch this switch while the player is play-ing video, the previous track is searched andplayed.
“D. Menu Next” switch: When you touchthis switch while the disc menu is displayed,the next page appears on the display. If youtouch this switch while the player is playingvideo, the next track is searched and played.
“Main/Sub” switch: A multiplex transmis-sion changing switch. The mode changesfrom Main/Sub to Main, to Sub and back toMain/Sub by touching this switch.
� Switches on second page
“ ” switch: Use this switch to pause thevideo screen. When you touch this switchagain, the video screen advance frame byframe.
“��” switch: Touch this switch to fast re-verse during playback.
“�” switch: Touch this switch during pauseto resume playing.
“��” switch: Touch this switch to fast for-ward during the playback and start playingslowly during pause.
(iv) Searching by track
Enter the track numbers using “–”, “+”and “+10” switches and touch “Enter”.The player starts playing video for that titlenumber.
You can select a track number by pushing “�”or “�” on the “TRACK” button.
Touch “Back”, and the previous screen re-turns.
V
AUDIO SYSTEM
168
(g) If the player malfunctions
If the player or another unit equipped with theplayer malfunction, your audio system will dis-play one of the three following messages.
If “DISC CHECK” appears on the display:It indicates that the disc dirty, damaged, or itwas inserted upside down. Clean the disc orinsert it correctly. If a disc which is not play-able is inserted, “DISC CHECK” will also ap-pear on the screen. For appropriate discs forthis player, see “Audio system operatinghints” on page 171.
If “REGION CODE ERROR” appears on thedisplay: It indicates that the DVD region codeis not set properly.
If “DVD ERROR” appears on the display: Itindicates that the inside of the player unit maybe too hot due to the very high ambient tem-perature. Remove the magazine from theplayer and allow the player to cool down.
If the malfunction is not rectified: Take yourvehicle to your Lexus dealer.
(h) DVD player and DVD video disc infor-mation
(i) DVD video discs
This DVD player conforms to NTSC colorTV formats. The DVD video disc conform-ing to another formats such as PAL or SE-CAM cannot be used.
Region codes: Some DVD video discs havea region code indicating a country where youcan use the DVD video disc on this DVD play-er. If the DVD video disc is not labeled as“ALL” or “1”, you cannot use it on this DVDplayer. If you attempt to play an inappropriateDVD video disc on this player, “REGIONCODE ERROR” appears on the screen.Even if the DVD video disc does not have a re-gion code, there is a case that you cannot useit.
Marks shown on DVD video discs:
Indicates NTSC format ofcolor TV.
Indicates the number ofaudio tracks.
Indicates the number oflanguage subtitles.
Indicates the number ofangles.
Indicates the screen tobe selected.Wide screen: 16:9Standard: 4:3
Indicates a region codeby which this video disccan be played.ALL: in all countriesNumber: region code
AUDIO SYSTEM
169
(ii) DVD video disc glossary
DVD video discs: Digital versatile Disc thatholds video. DVD video discs have adopted“MPEG2”, one of the world standards of digi-tal compression technologies. The picturedata is compressed by 1/40 on average andstored. Variable rate encoded technology inwhich the volume of data assigned to the pic-ture is changed depending on the picture for-mat has also been adopted. Audio data isstored using PCM and Dolby digital, whichenables higher quality of sound. Further-more, multi–angle and multi–language fea-tures will also help you enjoy the more ad-vanced technology of DVD video.
Viewer res trictions: This feature limits whatcan be viewed in conformity with a level of re-strictions of the country. The level of restric-tions varies depending on the DVD videodisc. Some DVD video discs cannot beplayed at all, or violent scenes are skipped orreplaced with other scenes.
Level 1: DVD video discs for children can beplayed.
Level 2 – 7: DVD video discs for children andG–rated movie can be played.
Level 8: All types of the DVD video discs canbe played.
Multi–angle feature: You can enjoy thesame scene at different angles.
Multi–language feature: You can select alanguage of the subtitle and audio.
Region codes: The region codes are pro-vided on DVD players and DVD discs. If theDVD video disc does not have the same re-gion code as the DVD player, you cannot playthe disc on the DVD player. For region codes,see page 168.
Audio: This DVD player can play liner PCM,Dolby digital and MPEG audio format DVD.Other decoded type cannot be played.
Title and chapter: Video and audio pro-grams stored in DVD video disc are divided inparts by title and chapter.
Title: The largest unit of the video and audioprograms stored on DVD video discs. Usual-ly, one piece of movie, one album, or one au-dio program is assigned as a title.
Chapter: The unit smaller than that of title. Atitle comprises plural chapters.
Manufactured under license from DolbyLaboratories. “Dolby”, “Pro Logic”, andthe double–D symbol are trademarks ofDolby Laboratories. Confidential unpub-lished works.�1992–1997 Dolby Laboratories. Allrights reserved.
This product incorporates copyrightprotection technology that is protected bymethod claims of certain U.S. patents andother intellectual property rights owned byMacrovision Corporation and other rightsowners. Use of this copyright protectiontechnology must be authorized by Macro-vision Corporation, and is intended forhome and other limited viewing uses onlyunless otherwise authorized by Macrovi-sion Corporation. Reverse engineering ordisassembly is prohibited.
“DTS” is a trademark of Digital TheaterSystems, Inc.
V
AUDIO SYSTEM
170
Audio remote controls (steering switches)
The switches are installed on the left side ofthe steering wheel.
“MODE” switch: Use this switch to turn on oroff the audio system, or change the audiomode.
� To turn on the system, push the switchbriefly. To turn off the system, push andhold the switch until you hear a beep.
� To change the audio mode, turn on thesystem and push the switch briefly. If atape, disc or magazine is not inserted, the“TAPE” or “DISC” mode is skipped.
The DVD player will be selectable if a rearseat entertainment system is installed in yourvehicle.
“ ” switches: Use these switches to ad-just the volume.
To increase the volume, push the “+”. To de-crease the volume, push the “–”. The volumecontinues to increase or decrease while theswitch is being pressed.
(a) When the radio mode is selected
“ �” or “ �”switch: Use this switch for seektuning or to select a preset station.
� To select a preset station, push this switchbriefly. The station you assigned to aswitch on the audio system will be se-lected.
� To seek a station, push and hold thisswitch until you hear a beep. The radio willbegin seeking up or down for a station,and will stop on reception.
(b) When the “TAPE” mode is selected
“ �” or “ �”switch: Use this switch to fastforward or rewind the tape or for automaticprogram selection.
� To skip forward or reward for automaticprogram selection, push this switch briefly.When automatically selecting a program,you can skip up to 9 programs at a time.For details, see page 147 for details.
� To fast forward or rewind the tape, pushthis switch until you hear a beep. To stopfast forwarding or rewinding, push andhold the same side on the switch until youhear a beep.
(c) When the “DISC” mode is selected
“ �” or “ �”switch: Use this switch to selecta desired track or disc.
� To select a desired track or chapter, pushthis switch briefly.
� CD changer only — To select a desireddisc, push and hold this switch until the de-sired number of the disc appears and youhear a beep.

AUDIO SYSTEM
171
Audio system operating hints
NOTICE
To ensure correct audio system opera-tions:
� Be careful not to spill beverages overthe audio system.
� Do not put anything other than a cas-sette tape or CD magazine into thecassette tape slot or CD changer.
� Do not put anything other than an ap-propriate disc into the DVD player.
� The use of a cellular phone inside ornear the vehicle may cause a noisefrom the speakers of the audiosystem which you are listening to.However, this does not indicate amalfunction.
Radio receptionUsually, the problem with radio receptiondoes not mean there is a problem with your ra-dio – it is just the normal result of conditionsoutside the vehicle.
For example, nearby buildings and terraincan interfere with FM reception. Power linesor telephone wires can interfere with AM sig-nals. And of course, radio signals have a lim-ited range, and the farther you are from a sta-tion, the weaker its signal will be. In addition,reception conditions change constantly asyour vehicle moves.
Here are some common reception problemsthat probably do not indicate a problem withyour radio:
FM
Fading and drifting stations — Generally,the effective range of FM is about 40 km (25miles). Once outside this range, you may no-tice fading and drifting, which increase withthe distance from the radio transmitter. Theyare often accompanied by distortion.
Multi–path — FM signals are reflective, mak-ing it possible for two signals to reach your an-tenna at the same time. If this happens, thesignals will cancel each other out, causing amomentary flutter or loss of reception.
Static and fluttering — These occur whensignals are blocked by buildings, trees, or oth-er large objects. Increasing the bass levelmay reduce static and fluttering.
Station swapping — If the FM signal you arelistening to is interrupted or weakened, andthere is another strong station nearby on theFM band, your radio may tune in the secondstation until the original signal can be pickedup again.
AMFading — AM broadcasts are reflected by theupper atmosphere — especially at night.These reflected signals can interfere withthose received directly from the radio station,causing the radio station to sound alternatelystrong and weak.
Station interference — When a reflected sig-nal and a signal received directly from a radiostation are very nearly the same frequency,they can interfere with each other, making itdifficult to hear the broadcast.
Static — AM is easily affected by externalsources of electrical noise, such as high ten-sion power lines, lightening, or electrical mo-tors. This results in static.
V
AUDIO SYSTEM
172
Caring for your cassette player and tapes
For high performance from your cassetteplayer and tapes:
Clean the tape head and other parts regularly.
� A dirty tape head or tape path can de-crease sound quality and tangle your cas-sette tapes. The easiest way to cleanthem is by using a cleaning tape. (A wettype is recommended.)
Use high–quality cassettes:
� Low–quality cassette tapes can causemany problems, including poor sound, in-consistent playing speed, and constantauto–reversing. They can also get stuckor tangled in the cassette player.
� Do not use a cassette if it has been dam-aged or tangled or if its label is peeling off.
� Do not leave a cassette in the player if youare not listening to it, especially if it is hotoutside.
� Store cassettes in their cases and out ofdirect sunlight.
� Avoid using cassettes with a total playingtime longer than 100 minutes (50 minutesper side). The tape used in these cas-settes is thin and could get stuck ortangled in the cassette player.
Caring for your compact disc player, DVDplayer and discs� Your compact disc player and DVD player
are intended for use with 12 cm (4.7 in.)discs only.
� Extremely high temperatures can keepyour compact disc player and DVD playerfrom working. On hot days, use the airconditioning to cool the vehicle interior be-fore you use the players.
� Bumpy roads or other vibrations maymake your compact disc player and DVDplayer skip.
� If moisture gets into your compact discplayer and DVD player, the players maynot play even though they appear to beworking. Remove the disc from the playerand wait until it dries.
CAUTIONCompact disc players and DVD playersuse an invisible laser beam which couldcause hazardous radiation exposure ifdirected outside the unit. Be sure to op-erate the players correctly.
� Compact disc player
� Use only compact discs marked as shownabove. The products such as the follow-ing may not be playable on your CD play-er.
SACDdts–CDCopy–protected CDCD–R (CD–Recordable)CD–RW (CD–Re–writable)CD–ROM
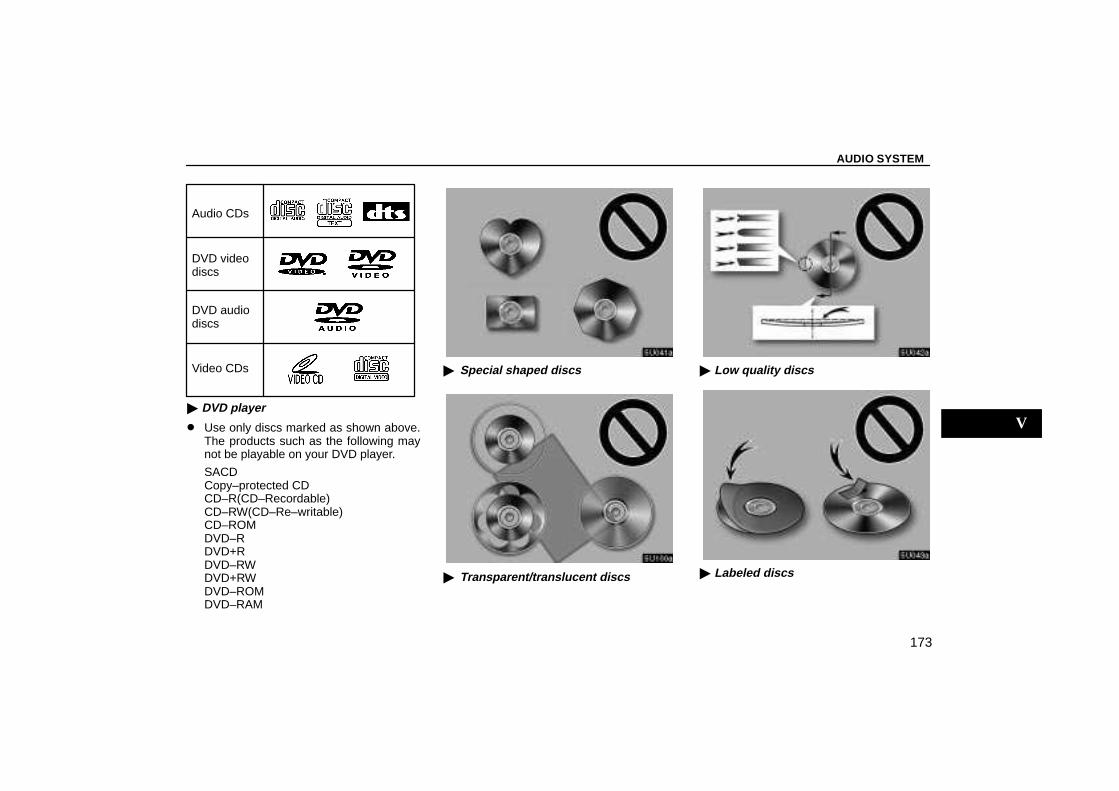
AUDIO SYSTEM
173
Audio CDs
DVD videodiscs
Video CDs
DVD audiodiscs
� DVD player
� Use only discs marked as shown above.The products such as the following maynot be playable on your DVD player.
SACDCopy–protected CDCD–R(CD–Recordable)CD–RW(CD–Re–writable)CD–ROMDVD–RDVD+RDVD–RWDVD+RWDVD–ROMDVD–RAM
� Special shaped discs
� Transparent/translucent discs
� Low quality discs
� Labeled discs
V
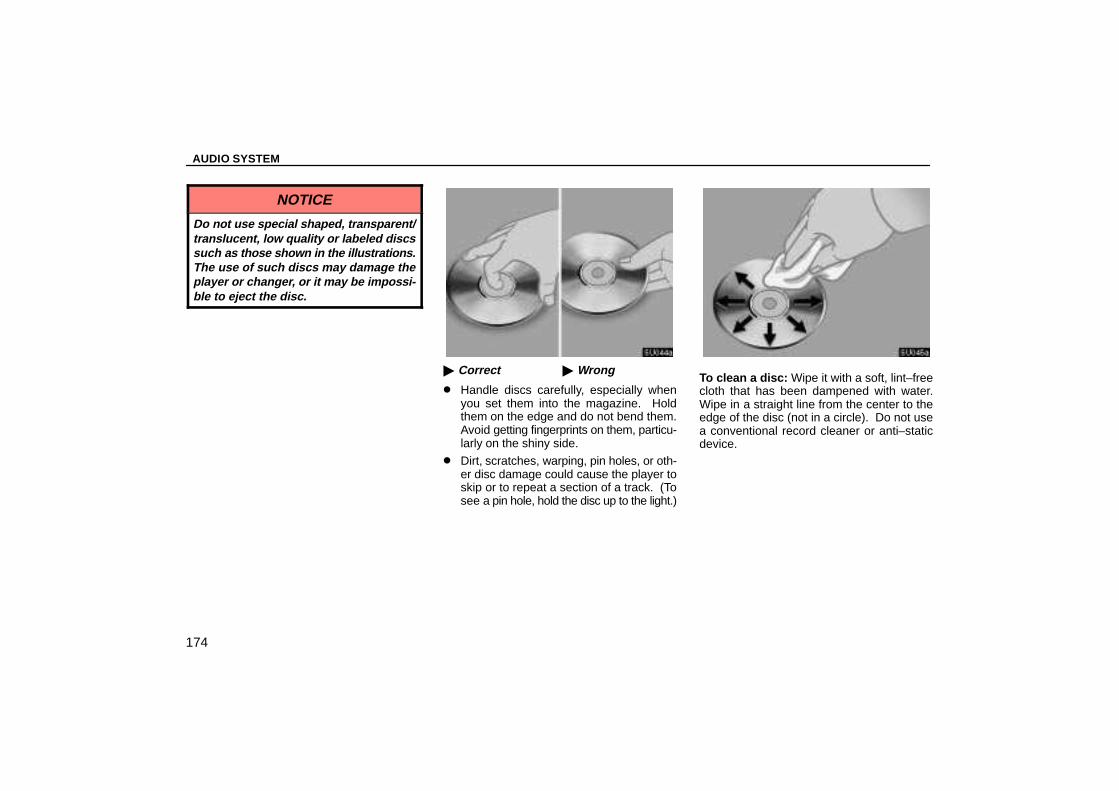
AUDIO SYSTEM
174
NOTICE
Do not use special shaped, transparent/translucent, low quality or labeled discssuch as those shown in the illustrations.The use of such discs may damage theplayer or changer, or it may be impossi-ble to eject the disc.
� Correct � Wrong
� Handle discs carefully, especially whenyou set them into the magazine. Holdthem on the edge and do not bend them.Avoid getting fingerprints on them, particu-larly on the shiny side.
� Dirt, scratches, warping, pin holes, or oth-er disc damage could cause the player toskip or to repeat a section of a track. (Tosee a pin hole, hold the disc up to the light.)
To clean a disc: Wipe it with a soft, lint–freecloth that has been dampened with water.Wipe in a straight line from the center to theedge of the disc (not in a circle). Do not usea conventional record cleaner or anti–staticdevice.
AIR CONDITIONING
175
AIR CONDITIONINGAir conditioningAutomatic air conditioning controls 176. . . . . . . . . . . . . . . . . . . . . . . . . . . . . . . . . . . . Rear cooler controlss 185. . . . . . . . . . . . . . . . . . . . . . . . . . . . . . . . . . . . . . . . . . . . . . .
SECTION VI
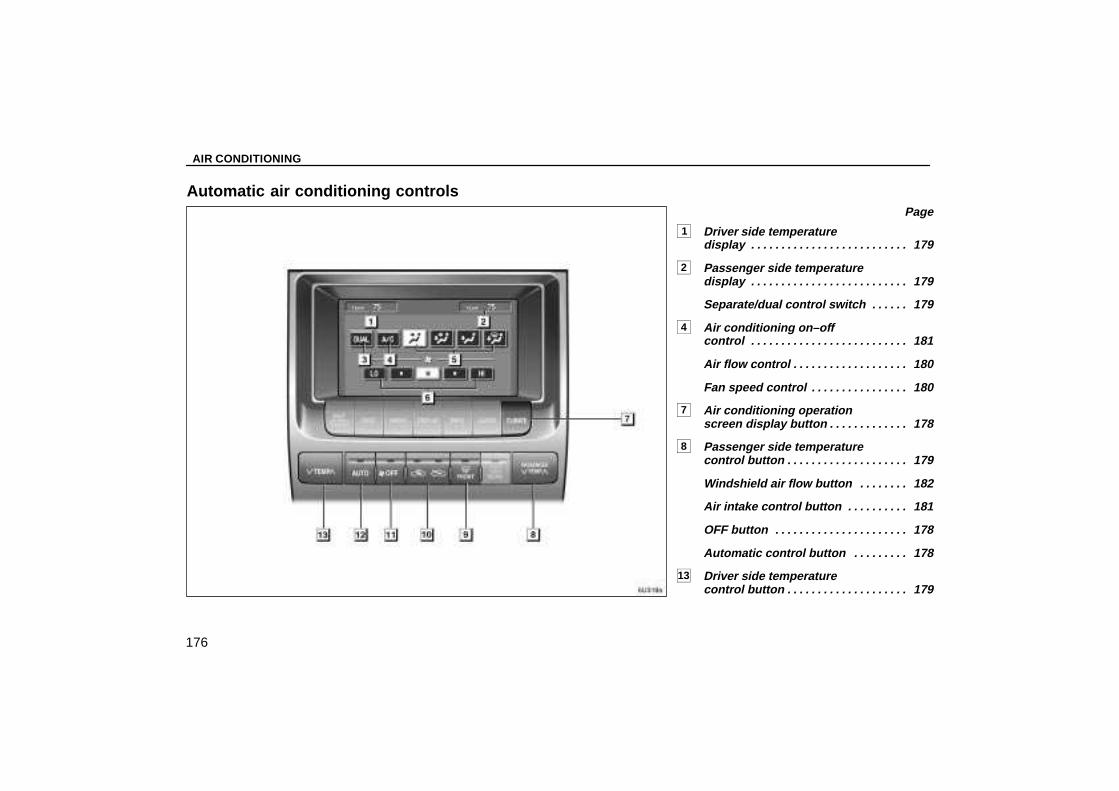
AIR CONDITIONING
176
Automatic air conditioning controlsPage
1 Driver side temperature display 179. . . . . . . . . . . . . . . . . . . . . . . . . .
2 Passenger side temperature display 179. . . . . . . . . . . . . . . . . . . . . . . . . .
3 Separate/dual control switch 179. . . . . .
4 Air conditioning on–off control 181. . . . . . . . . . . . . . . . . . . . . . . . . .
5 Air flow control 180. . . . . . . . . . . . . . . . . . .
6 Fan speed control 180. . . . . . . . . . . . . . . .
7 Air conditioning operationscreen display button 178. . . . . . . . . . . . .
8 Passenger side temperature control button 179. . . . . . . . . . . . . . . . . . . .
9 Windshield air flow button 182. . . . . . . .
10 Air intake control button 181. . . . . . . . . .
11 OFF button 178. . . . . . . . . . . . . . . . . . . . . .
12 Automatic control button 178. . . . . . . . .
13 Driver side temperature control button 179. . . . . . . . . . . . . . . . . . . .
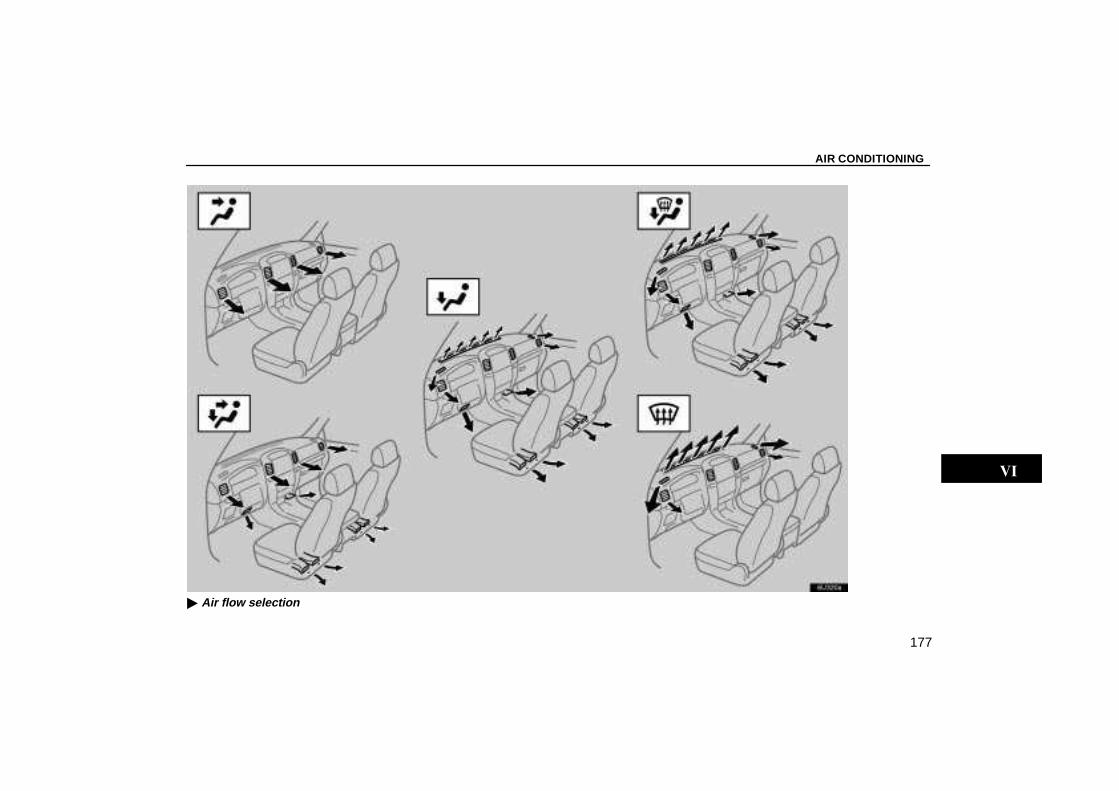
AIR CONDITIONING
177
6U320a
� Air flow selection
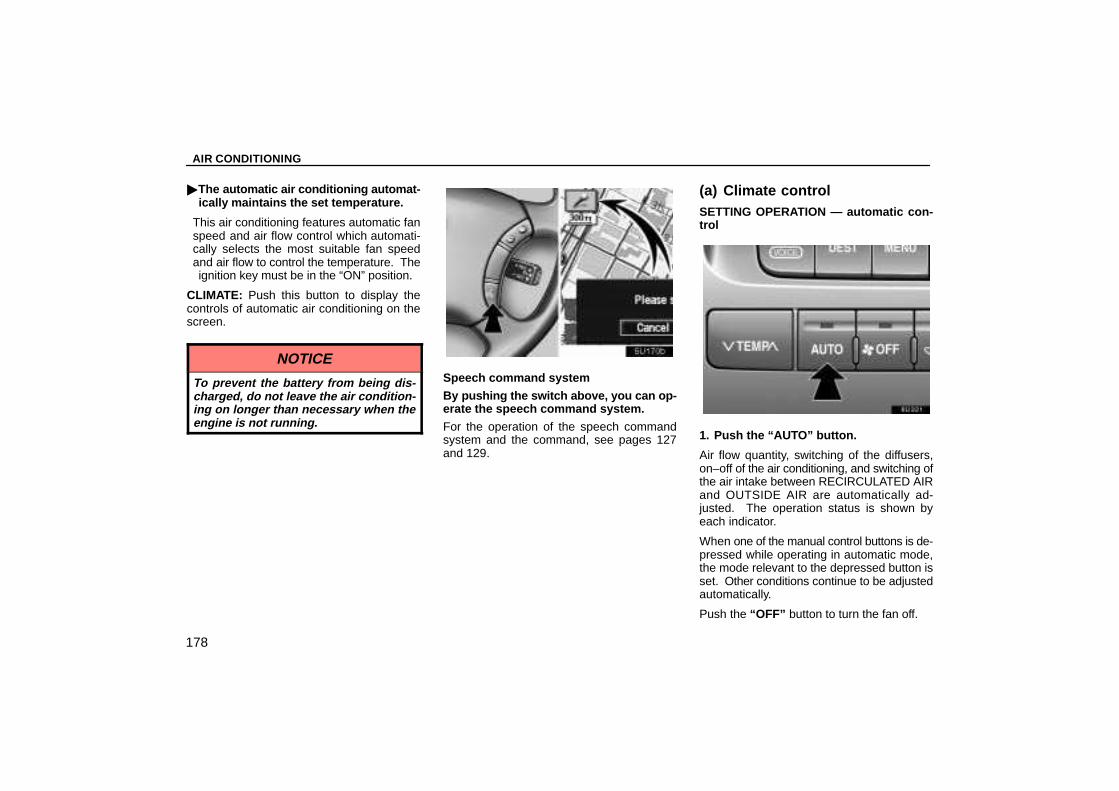
AIR CONDITIONING
178
�The automatic air conditioning automat-ically maintains the set temperature.
This air conditioning features automatic fanspeed and air flow control which automati-cally selects the most suitable fan speedand air flow to control the temperature. Theignition key must be in the “ON” position.
CLIMATE: Push this button to display thecontrols of automatic air conditioning on thescreen.
NOTICE
To prevent the battery from being dis-charged, do not leave the air condition-ing on longer than necessary when theengine is not running.
Speech command system
By pushing the switch above, you can op-erate the speech command system.
For the operation of the speech commandsystem and the command, see pages 127and 129.
(a) Climate controlSETTING OPERATION — automatic con-trol
1. Push the “AUTO” button.
Air flow quantity, switching of the diffusers,on–off of the air conditioning, and switching ofthe air intake between RECIRCULATED AIRand OUTSIDE AIR are automatically ad-justed. The operation status is shown byeach indicator.
When one of the manual control buttons is de-pressed while operating in automatic mode,the mode relevant to the depressed button isset. Other conditions continue to be adjustedautomatically.
Push the “OFF” button to turn the fan off.
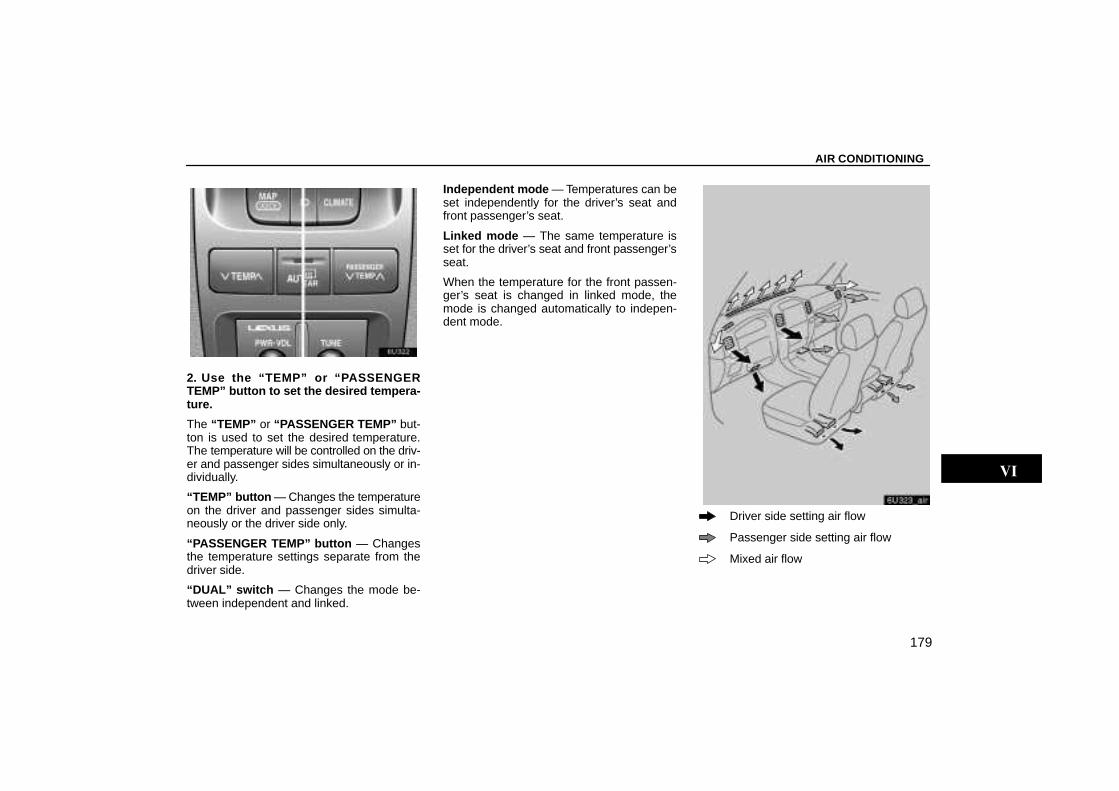
AIR CONDITIONING
179
2. Use the “TEMP” or “PASSENGERTEMP” button to set the desired tempera-ture.
The “TEMP” or “PASSENGER TEMP” but-ton is used to set the desired temperature.The temperature will be controlled on the driv-er and passenger sides simultaneously or in-dividually.
“TEMP” button — Changes the temperatureon the driver and passenger sides simulta-neously or the driver side only.
“PASSENGER TEMP” button — Changesthe temperature settings separate from thedriver side.
“DUAL” switch — Changes the mode be-tween independent and linked.
Independent mode — Temperatures can beset independently for the driver’s seat andfront passenger’s seat.
Linked mode — The same temperature isset for the driver’s seat and front passenger’sseat.
When the temperature for the front passen-ger’s seat is changed in linked mode, themode is changed automatically to indepen-dent mode.
6U323_air
Driver side setting air flow
Passenger side setting air flow
Mixed air flow
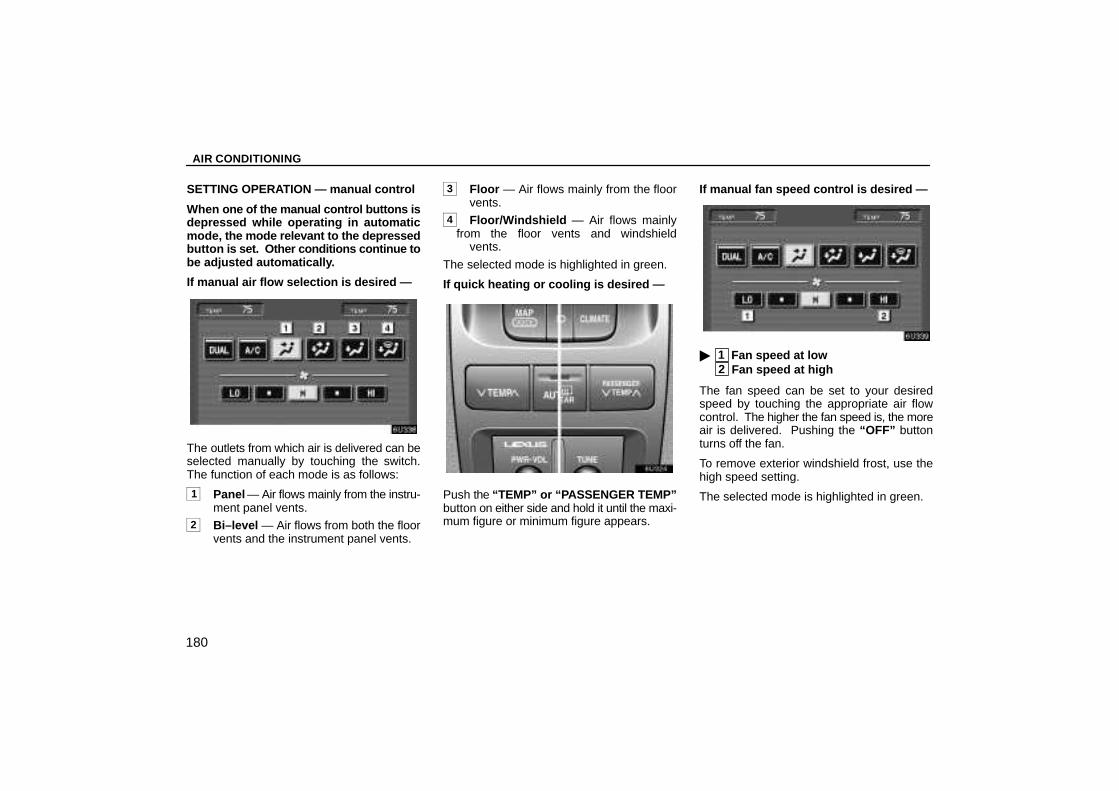
AIR CONDITIONING
180
SETTING OPERATION — manual control
When one of the manual control buttons isdepressed while operating in automaticmode, the mode relevant to the depressedbutton is set. Other conditions continue tobe adjusted automatically.
If manual air flow selection is desired —
The outlets from which air is delivered can beselected manually by touching the switch.The function of each mode is as follows:
1 Panel — Air flows mainly from the instru-ment panel vents.
2 Bi–level — Air flows from both the floorvents and the instrument panel vents.
3 Floor — Air flows mainly from the floorvents.
4 Floor/Windshield — Air flows mainlyfrom the floor vents and windshield
vents.
The selected mode is highlighted in green.
If quick heating or cooling is desired —
Push the “TEMP” or “PASSENGER TEMP”button on either side and hold it until the maxi-mum figure or minimum figure appears.
If manual fan speed control is desired —
� 1 Fan speed at low 2 Fan speed at high
The fan speed can be set to your desiredspeed by touching the appropriate air flowcontrol. The higher the fan speed is, the moreair is delivered. Pushing the “OFF” buttonturns off the fan.
To remove exterior windshield frost, use thehigh speed setting.
The selected mode is highlighted in green.
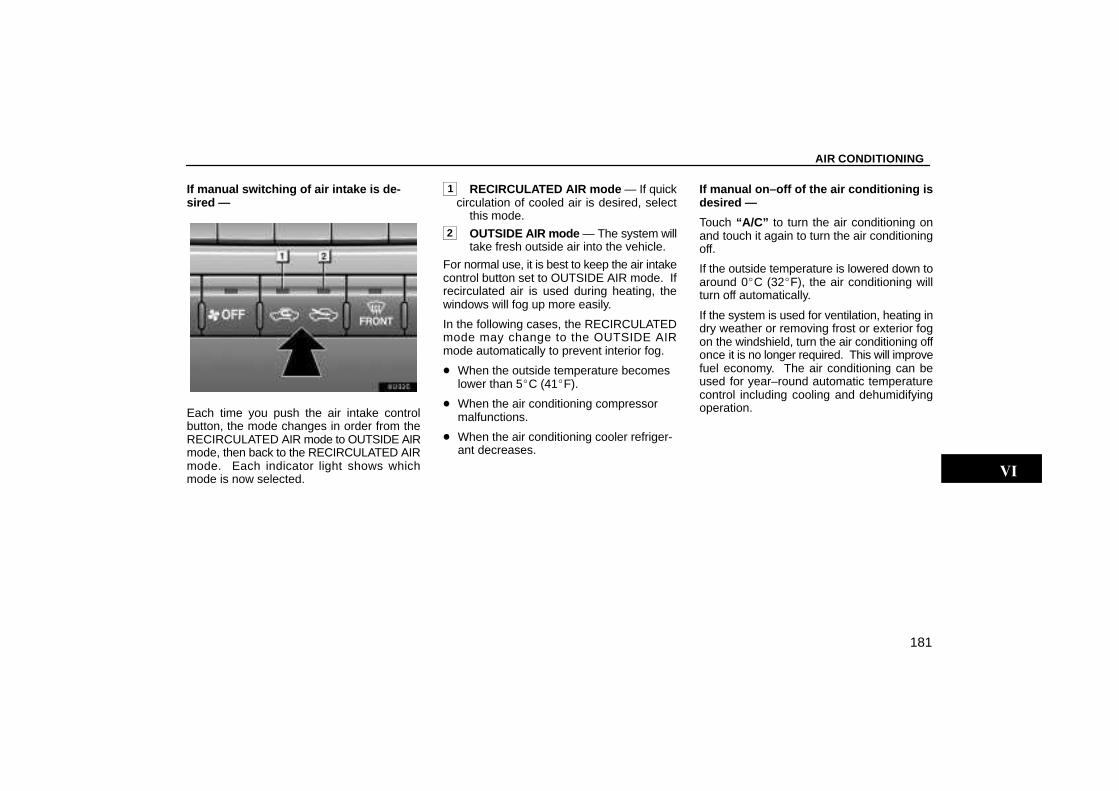
AIR CONDITIONING
181
If manual switching of air intake is de-sired —
Each time you push the air intake controlbutton, the mode changes in order from theRECIRCULATED AIR mode to OUTSIDE AIRmode, then back to the RECIRCULATED AIRmode. Each indicator light shows whichmode is now selected.
1 RECIRCULATED AIR mode — If quickcirculation of cooled air is desired, select
this mode.2 OUTSIDE AIR mode — The system will
take fresh outside air into the vehicle.
For normal use, it is best to keep the air intakecontrol button set to OUTSIDE AIR mode. Ifrecirculated air is used during heating, thewindows will fog up more easily.
In the following cases, the RECIRCULATEDmode may change to the OUTSIDE AIRmode automatically to prevent interior fog.
� When the outside temperature becomeslower than 5�C (41�F).
� When the air conditioning compressormalfunctions.
� When the air conditioning cooler refriger-ant decreases.
If manual on–off of the air conditioning isdesired —
Touch “A/C” to turn the air conditioning onand touch it again to turn the air conditioningoff.
If the outside temperature is lowered down toaround 0�C (32�F), the air conditioning willturn off automatically.
If the system is used for ventilation, heating indry weather or removing frost or exterior fogon the windshield, turn the air conditioning offonce it is no longer required. This will improvefuel economy. The air conditioning can beused for year–round automatic temperaturecontrol including cooling and dehumidifyingoperation.
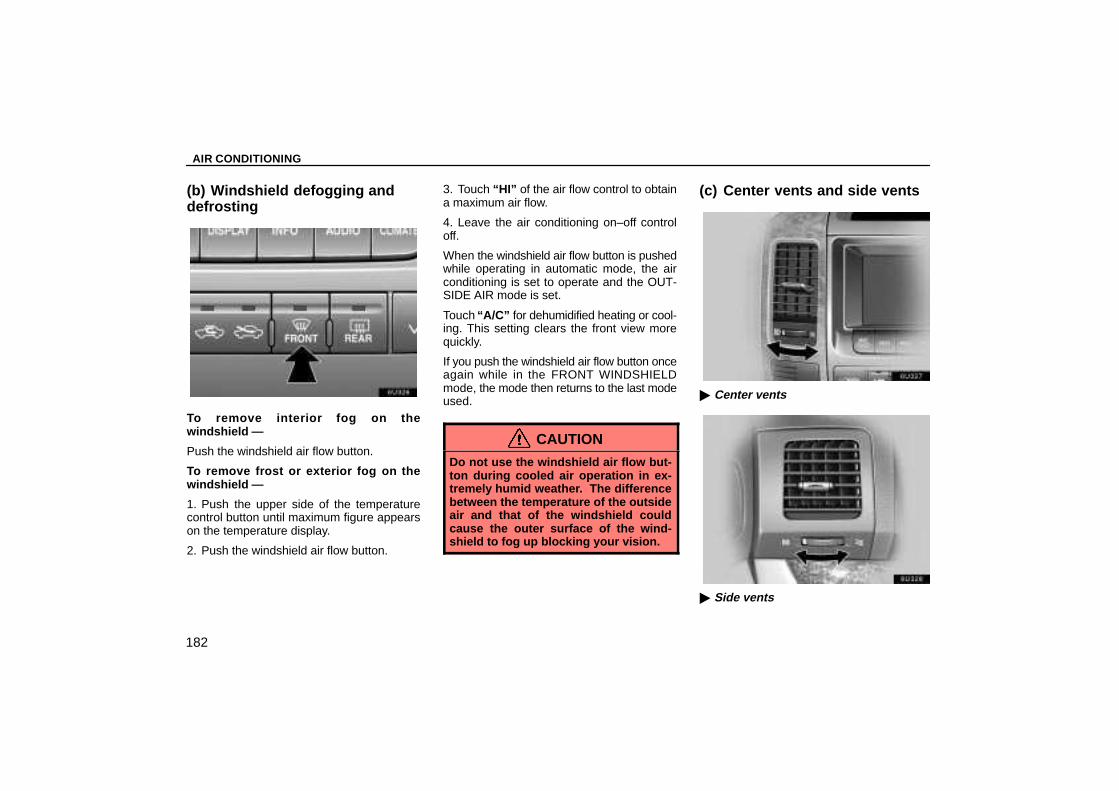
AIR CONDITIONING
182
(b) Windshield defogging anddefrosting
To remove interior fog on thewindshield —
Push the windshield air flow button.
To remove frost or exterior fog on thewindshield —
1. Push the upper side of the temperaturecontrol button until maximum figure appearson the temperature display.
2. Push the windshield air flow button.
3. Touch “HI” of the air flow control to obtaina maximum air flow.
4. Leave the air conditioning on–off controloff.
When the windshield air flow button is pushedwhile operating in automatic mode, the airconditioning is set to operate and the OUT-SIDE AIR mode is set.
Touch “A/C” for dehumidified heating or cool-ing. This setting clears the front view morequickly.
If you push the windshield air flow button onceagain while in the FRONT WINDSHIELDmode, the mode then returns to the last modeused.
CAUTION
Do not use the windshield air flow but-ton during cooled air operation in ex-tremely humid weather. The differencebetween the temperature of the outsideair and that of the windshield couldcause the outer surface of the wind-shield to fog up blocking your vision.
(c) Center vents and side vents
� Center vents
� Side vents

AIR CONDITIONING
183
If air flow control is not satisfactory, checkthe center vents and side vents. The cen-ter vents and side vents may be opened orclosed as shown.
(d) Checking and replacing theair conditioning filter
The air conditioning filter information labelis placed in the glove box as shown and in-dicates that a filter has been installed.
The air conditioning filter prevents dust fromentering the vehicle through the air condition-ing vent.
The air conditioning filter is behind theglove box.
The air conditioning filter may clog after longuse. The filter may need to be replaced if theair flow of the air conditioner and heater expe-riences extreme reductions in operating effi-ciency, or if the windows begin to fog up easily.
To maintain the air conditioning efficiency, in-spect and replace the air conditioning filter ac-cording to the maintenance schedule. Industy areas or areas with heavy traffic flow,such as inner city or desert areas, early re-placement may be required. (For scheduledmaintenance information, please refer to the“Owner’s Manual Supplement / ScheduledMaintenance”.)
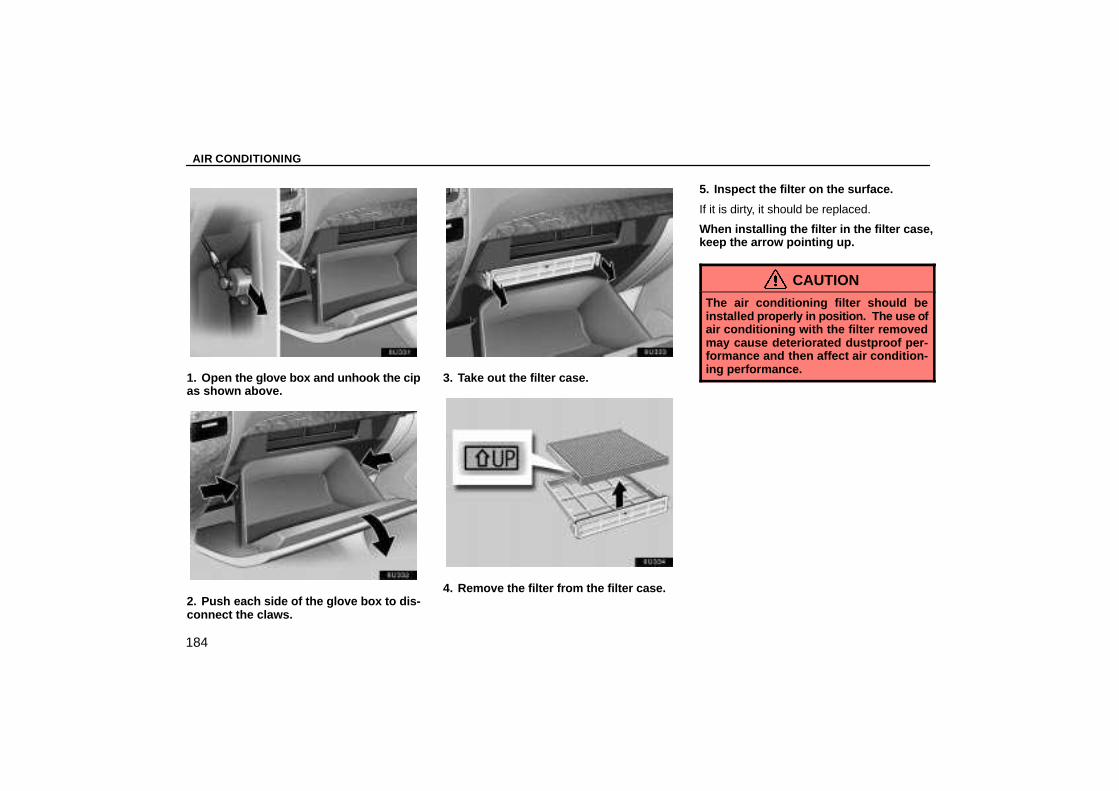
AIR CONDITIONING
184
1. Open the glove box and unhook the cipas shown above.
2. Push each side of the glove box to dis-connect the claws.
3. Take out the filter case.
4. Remove the filter from the filter case.
5. Inspect the filter on the surface.
If it is dirty, it should be replaced.
When installing the filter in the filter case,keep the arrow pointing up.
CAUTIONThe air conditioning filter should beinstalled properly in position. The use ofair conditioning with the filter removedmay cause deteriorated dustproof per-formance and then affect air condition-ing performance.
AIR CONDITIONING
185
Rear cooler controls
6U340_air
1 Rear cooler vents 2 Fan speed control button 3 “REAR COOL” button 4 “TEMP” (temperature control)
button
(a) Rear cooler ON–OFFTo turn the rear cooler on, push the “REARCOOL” button with front air conditioningon. To turn the rear cooler off, push thebutton once again.
When you turn the rear cooler on with the frontair conditioning off, the cooling device is notoperated.
(b) Air flow controlThe fan speed can be set to your desiredspeed by pushing the appropriate side ofthe fan speed control button.
“AUTO” mode: The fan speed is automati-cally adjusted only when the air flow setting ofthe front air conditioning is in the panel mode.
(c) Temperature controlThe temperature of the cooled air can beadjusted between �10�F (�5�C) of thetemperature of the front air conditioningsystem. Push the left side of the button tolower the temperature.
NOTICE
To prevent the battery from being dis-charged, do not leave the rear cooler onlonger than necessary when the engineis not running.
i
Introduction
Thank you for your purchase of the Navigation System. Please read this manual carefully to ensure proper use. Keep this manua lin your vehicle at all times.
The Navigation System is one of the most technologically advanced vehicle accessories ever developed. The system receives satellite signalsfrom the Global Positioning System (GPS) operated by the U.S. Department of Defense. Using these signals and other vehicle sensors, thesystem indicates your present position and assists in locating a desired destination.
The navigation system is designed to select efficient routes from your present starting location to your destination. The system is designedto direct you to a destination that is unfamiliar to you in an efficient manner. The system uses the maps of DENSO. The calculated routesmay not be the shortest nor the least traffic congested. Your own personal local knowledge or “short cut” may at times be faster than the calcu-lated routes.
The navigation system’s database includes about 75 Point of Interest categories to allow you to easily select destinations such as restaurantsand banks. If a destination is not in the database, you can enter the street address or a major intersection close to it and the system will guideyou there. The system will provide both a visual map and audio instructions. The audio instructions will announce the distance remainingand the direction to turn in approaching a fork or intersection. These voice instructions will help you keep your eyes on the road and are timedto provide enough time to allow you to maneuver, change lanes or slow down.
Please be aware that all current vehicle navigation systems have certain limitations that may affect their ability to perform properly.The accuracy of the vehicle’s position depends on the satellite condition, road configuration, vehicle condition or other circu mstan-ces. For more information on the limitations of the system, refer to pages 9 through 11.
ii
Important information about this manual
For safety reasons, this manual indicatesitems requiring particular attention with thefollowing marks.
CAUTION
This is a warning against anythingwhich may cause injury to people if thewarning is ignored. You are informedabout what you must or must not do inorder to reduce the risk of injury toyourself and others.
NOTICE
This is a warning against anythingwhich may cause damage to the ve-hicle or its equipment if the warning isignored. You are informed about whatyou must or must not do in order toavoid or reduce the risk of damage toyour vehicle and its equipment.
INFORMATIONThis provides additional information.
Initial screen
When you start the engine or turn the ignitionswitch to the “ACC” position, the initialscreen appears and the system beginsoperating.
CAUTIONWhen the vehicle is stopped with theengine running, always apply the park-ing brake for safety.
After a few seconds, the “CAUTION” screenappears.
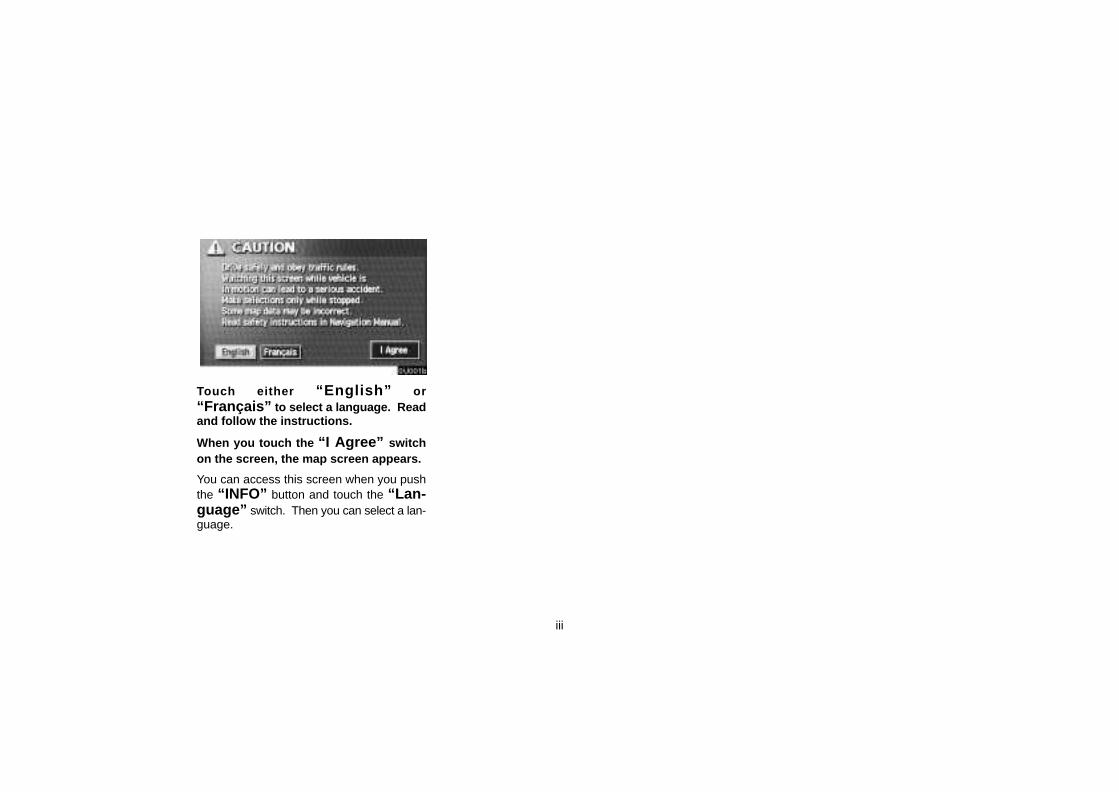
iii
Touch either “English” or“Français” to select a language. Readand follow the instructions.
When you touch the “I Agree” switchon the screen, the map screen appears.
You can access this screen when you pushthe “INFO” button and touch the “Lan-guage” switch. Then you can select a lan-guage.
iv
Safety Instruction
To use your system in the safest possiblemanner, follow all the safety tips shown be-low.
This system is intended to assist you inreaching your destination and, if used prop-erly, can do so. You, as the driver, are solelyresponsible for the safe operation of your ve-hicle and the safety of your passengers.
Do not use any feature of this system to theextent it distracts you from safe driving. Yourfirst priority while driving should always bethe safe operation of your vehicle. While youare driving, be sure to observe all traffic regu-lations.
Prior to the actual use of this system, learnhow to use it and become thoroughly familiarwith it. Read the entire Navigation SystemOwner’s Manual to make sure you under-stand the system. Do not allow others to usethis system until they have read and under-stood the instructions in this manual.
For your safety, some functions may becomeinoperable when you start driving. Unavail-able switches are dimmed. You can inputyour destination and select your route onlywhen the vehicle is not moving.
CAUTION� For safety, the driver should not
operate the navigation system whilehe/she is driving. Inattention to theroad and traffic may cause anaccident.
� While you are driving, be sure toobey the traffic regulations andmaintain awareness of the roadconditions. If a traffic sign on theroad has been changed, routeguidance may provide wronginformation such as the direction ofa one way street.

v
While you are driving, listen to the voice in-structions as much as possible and glance atthe screen briefly and only when it is safe.However, do not totally rely on voice gui-dance. Use it just for your information. If thesystem cannot determine your current posi-tion correctly, there is a possibility of incor-rect, late or non–voice guidance.
The data in the system may occasionally beincomplete. Road conditions, including driv-ing restrictions (no left turns, street closures,etc.) frequently change. Therefore, beforeyou follow any instruction from the system,look to see whether you can comply with theinstruction safely and legally.
This system cannot warn you about suchthings as the safety of an area, condition ofstreets, and availability of emergency servi-ces. If you are unsure about the safety of anarea, do not drive into it. Under no circum-stances is this system a substitute for thedriver’s personal judgement.
Use this system only in locations where it islegal to do so. Some states/provinces mayhave laws prohibiting video screens withinsight of the driver.
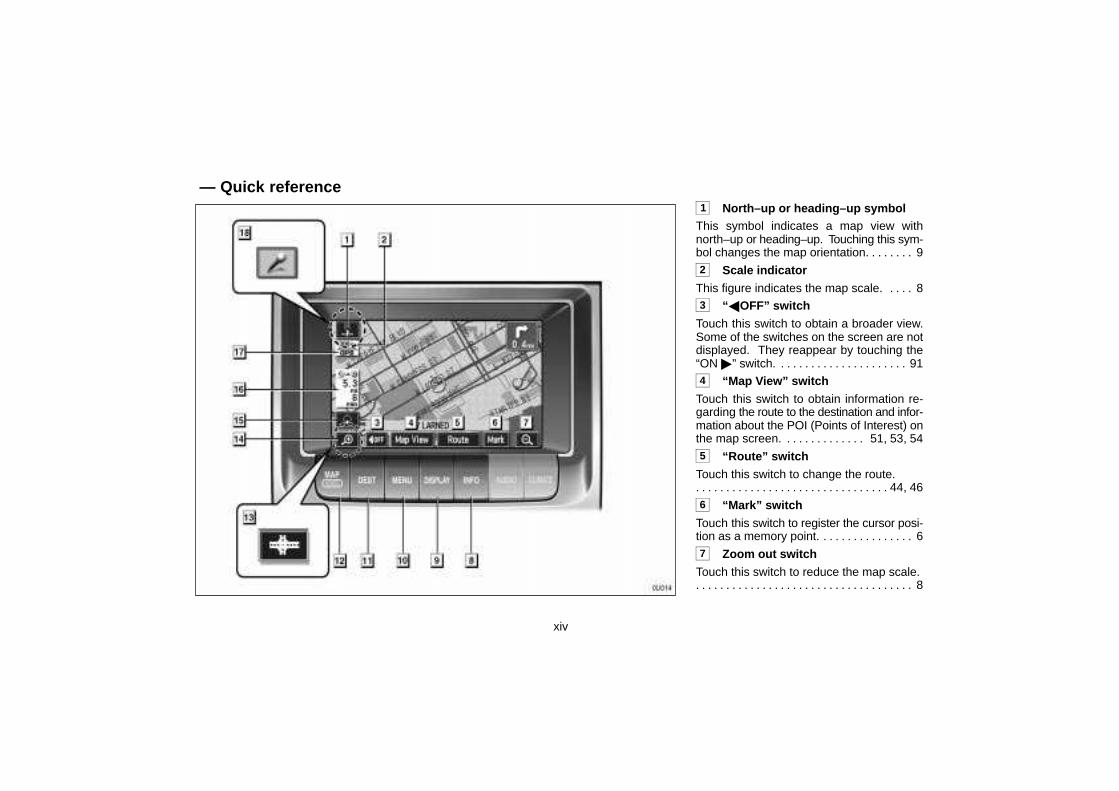
xiv
1 North–up or heading–up symbolThis symbol indicates a map view withnorth–up or heading–up. Touching this sym-bol changes the map orientation. 9. . . . . . . 2 Scale indicator
This figure indicates the map scale. 8. . . . 3 “�OFF” switch
Touch this switch to obtain a broader view.Some of the switches on the screen are notdisplayed. They reappear by touching the“ON �” switch. 91. . . . . . . . . . . . . . . . . . . . . 4 “Map View” switch
Touch this switch to obtain information re-garding the route to the destination and infor-mation about the POI (Points of Interest) onthe map screen. 51, 53, 54. . . . . . . . . . . . . 5 “Route” switch
Touch this switch to change the route.44, 46. . . . . . . . . . . . . . . . . . . . . . . . . . . . . . . .
6 “Mark” switch
Touch this switch to register the cursor posi-tion as a memory point. 6. . . . . . . . . . . . . . . 7 Zoom out switch
Touch this switch to reduce the map scale.8. . . . . . . . . . . . . . . . . . . . . . . . . . . . . . . . . . . .
— Quick reference

xv
8 “INFO” button
Push this button to display the “InformationMenu” screen. iii, 98, 103, 112, 129. . . . . . 9 “DISPLAY” button
Push this button to display the “Display”screen. 130. . . . . . . . . . . . . . . . . . . . . . . . . . . 10 “MENU” button
Push this button to display the “Menu”screen. xviii, 20, 64. . . . . . . . . . . . . . . . . . . . 11 “DEST” button
Push this button to display the “Destination”screen. xvi, 22. . . . . . . . . . . . . . . . . . . . . . . . 12 “MAP/VOICE” buttonPush this button to repeat a voice guidance,cancel one touch scroll, start guidance anddisplay the current position. 4, 5, 44. . . . . 13 Foot print map switch
Touch this switch to display the foot printmap and the building information. 60. . . . . 14 Zoom in switch
Touch this switch to magnify the map scale.8. . . . . . . . . . . . . . . . . . . . . . . . . . . . . . . . . . . .
15 Screen configuration switch
Touch this switch to change the screenmode. 55. . . . . . . . . . . . . . . . . . . . . . . . . . . . . 16 Distance and time to destination
Displays the distance and the estimatedtravel time to the destination. 59. . . . . . . . . 17 “GPS” mark (Global Positioning
System)Whenever your vehicle is receiving signalsfrom the GPS, this mark is displayed.
9. . . . . . . . . . . . . . . . . . . . . . . . . . . . . . . . . . . . 18 Speech command system indicator
This indicator is shown by pushing thespeech command switch. The speech com-mand system can be operated while this in-dicator is shown. 127. . . . . . . . . . . . . . . . . .
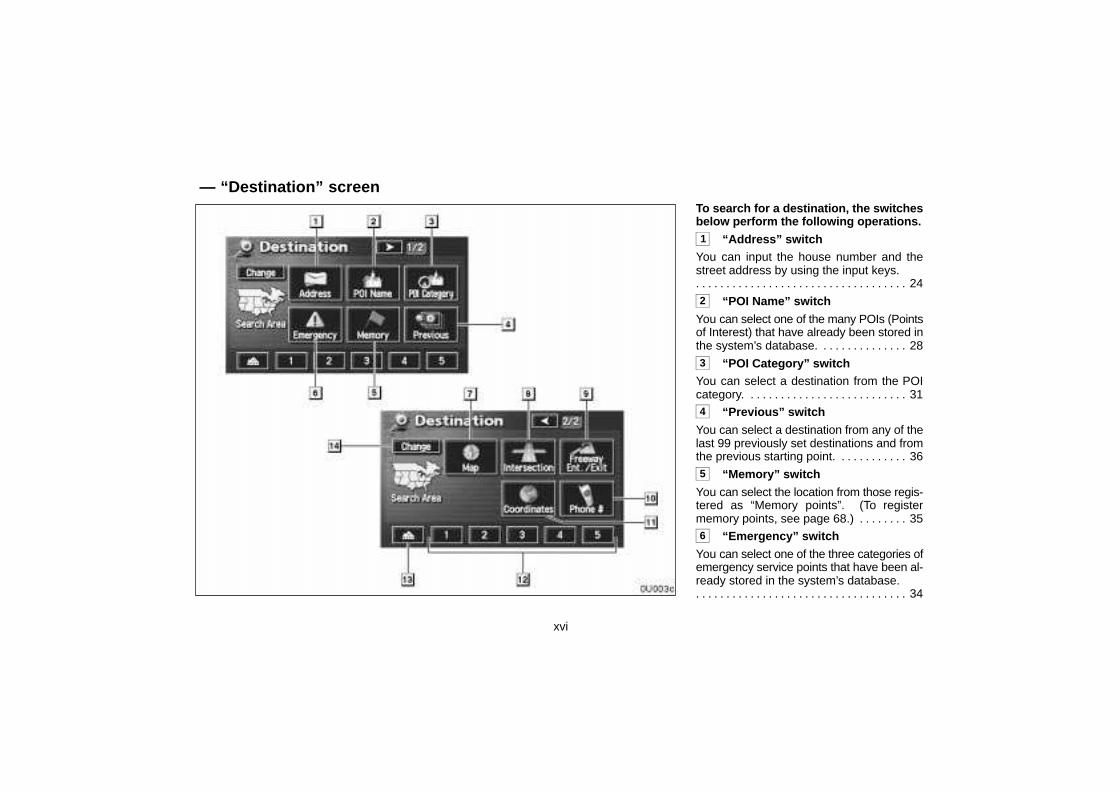
xvi
To search for a destination, the switchesbelow perform the following operations.1 “Address” switch
You can input the house number and thestreet address by using the input keys.
24. . . . . . . . . . . . . . . . . . . . . . . . . . . . . . . . . . . 2 “POI Name” switch
You can select one of the many POIs (Pointsof Interest) that have already been stored inthe system’s database. 28. . . . . . . . . . . . . . 3 “POI Category” switch
You can select a destination from the POIcategory. 31. . . . . . . . . . . . . . . . . . . . . . . . . . 4 “Previous” switch
You can select a destination from any of thelast 99 previously set destinations and fromthe previous starting point. 36. . . . . . . . . . . 5 “Memory” switch
You can select the location from those regis-tered as “Memory points”. (To registermemory points, see page 68.) 35. . . . . . . . 6 “Emergency” switch
You can select one of the three categories ofemergency service points that have been al-ready stored in the system’s database.
34. . . . . . . . . . . . . . . . . . . . . . . . . . . . . . . . . . .
— “Destination” screen
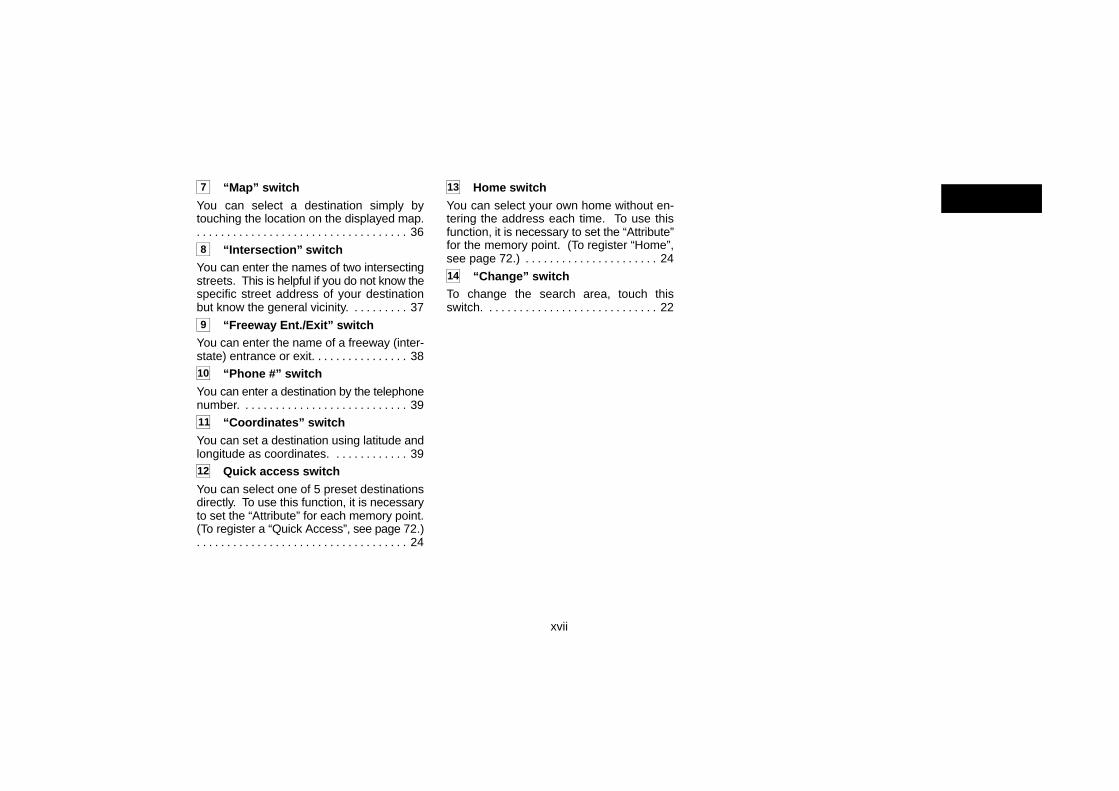
xvii
7 “Map” switch
You can select a destination simply bytouching the location on the displayed map.
36. . . . . . . . . . . . . . . . . . . . . . . . . . . . . . . . . . . 8 “Intersection” switch
You can enter the names of two intersectingstreets. This is helpful if you do not know thespecific street address of your destinationbut know the general vicinity. 37. . . . . . . . . 9 “Freeway Ent./Exit” switch
You can enter the name of a freeway (inter-state) entrance or exit. 38. . . . . . . . . . . . . . . 10 “Phone #” switch
You can enter a destination by the telephonenumber. 39. . . . . . . . . . . . . . . . . . . . . . . . . . . 11 “Coordinates” switch
You can set a destination using latitude andlongitude as coordinates. 39. . . . . . . . . . . . 12 Quick access switch
You can select one of 5 preset destinationsdirectly. To use this function, it is necessaryto set the “Attribute” for each memory point.(To register a “Quick Access”, see page 72.)
24. . . . . . . . . . . . . . . . . . . . . . . . . . . . . . . . . . .
13 Home switch
You can select your own home without en-tering the address each time. To use thisfunction, it is necessary to set the “Attribute”for the memory point. (To register “Home”,see page 72.) 24. . . . . . . . . . . . . . . . . . . . . . 14 “Change” switchTo change the search area, touch thisswitch. 22. . . . . . . . . . . . . . . . . . . . . . . . . . . .
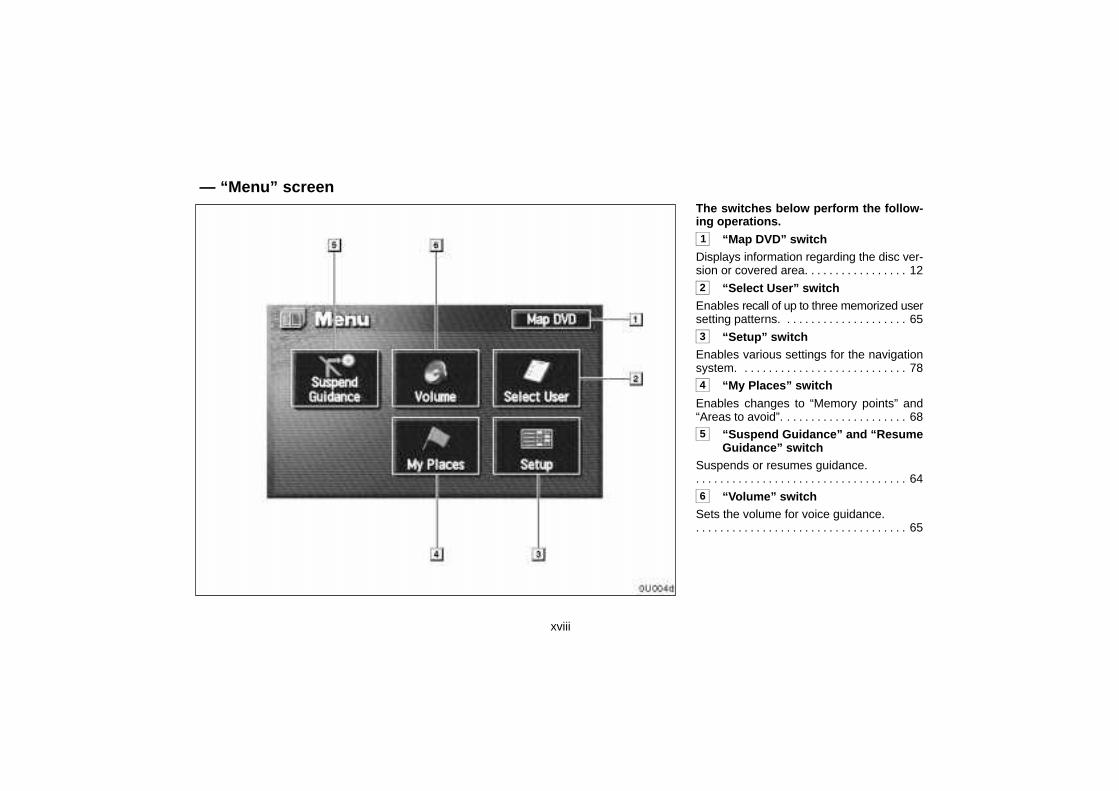
xviii
The switches below perform the follow-ing operations.1 “Map DVD” switch
Displays information regarding the disc ver-sion or covered area. 12. . . . . . . . . . . . . . . . 2 “Select User” switch
Enables recall of up to three memorized usersetting patterns. 65. . . . . . . . . . . . . . . . . . . . 3 “Setup” switch
Enables various settings for the navigationsystem. 78. . . . . . . . . . . . . . . . . . . . . . . . . . . 4 “My Places” switch
Enables changes to “Memory points” and“Areas to avoid”. 68. . . . . . . . . . . . . . . . . . . . 5 “Suspend Guidance” and “Resume
Guidance” switchSuspends or resumes guidance.
64. . . . . . . . . . . . . . . . . . . . . . . . . . . . . . . . . . . 6 “Volume” switch
Sets the volume for voice guidance.65. . . . . . . . . . . . . . . . . . . . . . . . . . . . . . . . . . .
— “Menu” screen


![SERVICE MANUAL CAR NAVIGATION SYSTEM - … · car navigation system service manual model: lan1100ehvf service manual model: lan1100ehvf [contents] ... gps 5 v 100 ma max3295 3.3 v](https://static.fdocuments.in/doc/165x107/5b651ddf7f8b9af84b8e2983/service-manual-car-navigation-system-car-navigation-system-service-manual.jpg)