Manual - Green Walls - Intercoast Building Solutions · 6 Additional: - Installation and attaching...
55
1 2013/2014 Sempergreen Vertical Systems Version 1.4.13 Manual - Green Walls
Transcript of Manual - Green Walls - Intercoast Building Solutions · 6 Additional: - Installation and attaching...

1
2013/2014
Sempergreen Vertical Systems
Version 1.4.13
Manual - Green Walls

2
Contents
1. System description
1.1 Flexipanel 3
2. Advantages and strengths Flexipanel system 4
3. Installation instructions
3.1 Specification text 5
3.2 Installation with Omega-Profiles 9
4. Irrigation
4.1 Advanced Automatic Web Based Irrigation System 12
4.2 Pressure booster with break tank/compressed air unit 14
4.3 Shut off irrigation during wintertime 15
5. Lightning information indoor Green walls 16 6. Specifications
6.1 Installation materials 17
6.2 Flexipanel 21
6.3 Fastening materials 22
7. Maintenance
7.1 Maintenance schedule 24
7.2 Fertilizers 26
7.3 Routine maintenance 27
8. Drawings
8.2 Flexipanel on wood 29
8.3 Flexipanel on stone 39
9. References 49

3
1. System description
1.1 Flexipanel The Sempergreen® Flexipanel is the most flexible system on the market today. The pre-grown panels of 62 x 52 cm are easily mounted on any wall. The panels can be used inside or outside, in full sun or in the shade and can even be applied to slightly curved wall. The lightweight materials combined with the special design ensure simple and quick installation and uncomplicated maintenance. The panels can be installed either on Omega / Z profiles, or using ventilated cladding façade metalwork for high wall elevations, always leaving a gap for air circulation. For installation of indoor green walls, the wall itself might need to be waterproofed prior to installing the panel. This can be achieved either by using a layer of EPDM foil which can be fixed mechanically or non-mechanically by gluing it directly on the wall, in both cases with a small overlap, or by using an appropriate low VOC coating that will allow the wall to breathe. On top of every Flexipanel there is a horizontal sleeve through which one pulls the drip irrigation line. After installing each row of Flexipanels, the drip irrigation line has to be installed through this sleeve which is important - more detail on this specific point can be found later in this manual. To prevent dehydration from the panel tops and sides, a flashing detail must be used on the vertical and top and bottom sides of the green wall, leaving a space for air circulation. The bottom flashing would act as a gutter to collect potential excess water coming from the system.

4
2. Advantages and strengths of the Flexipanel system
The Flexipanel is the lightest Green Wall system on the market at just 40-50kg/m2 saturated. It was designed to be easy to grow, handle and install. Its modularity allows us to pre-grow the panels prior to installation that delivers our end user an instant green wall the day the project is completed.
The modular panels can be used indoors, outdoors, on curved surfaces and even on
sharp corners thus providing an answer for any type of wall profile. Flexipanels can be custom cut in place to address further customization.
Most importantly, as you ‘join’ a multitude of Flexipanels on a wall, they are now acting
as a single system, a single environment that restricts no roots from migrating, and localized moisture and temperature differences will be spread throughout the system creating a calm and well balanced system that is the opposite of the more volatile ‘box’ or ‘tray’ approach applied in other systems.
Every panel provides 0.32 m2 of area for the roots to develop without root binding the
plants, which can develop freely within the growing medium, which is designed to hold and distribute water to all areas evenly and consistently.
A special UV stabilized water absorption fleece on top of the Rockwool carrier block
which is attached mechanically to a reinforced TPO membrane, offers not only an extremely light and flexible panel but also an particularly strong weather proof carrier.
This modularity also allows us to offer simpler and faster maintenance, simply by
replacing plants when needed .This also makes it possible for customers to have access to the wall behind by simply removing the panels and re-installing again.
The combination of a special Rockwool with a capillary fleece offers optimal water
absorption, meaning the plants can survive days even if there is no active irrigation (e.g. power failure or lack of water supply).
The Flexipanel system combined with our advanced Climate and irrigation system uses the least amount of water of any Green Wall system on the market.
Outdoor walls can be further protected by the Climate computer that automatically empties out the water lines with compressed air when temperatures fall below certain ranges, and will also automatically refill those lines with water ready for irrigation when temperatures rise once more.

5
3. Installation instructions 3.1 Specification text In this chapter you will find an overview of the specifications text from our green wall systems. You will find on page 6 and 7 the specification text to install against concrete or brick walls and at page 8 and 9 the specification text to install against wood.
GREEN WALL APPLICATION, PREGROWN PANNELS AGAINST CONCRETE OR BRICK WALLS. 0. GREEN WALL APLICATION AGAINST CONCRETE OR BRICK WALLS Method of attachment: - Attachment: follow the manufacturer’s requirements. - Omega / Z profile against/attached to wall structure. Measurements and profile
material per manufacturer’s recommendations.
- Between concrete or brick wall structure and the profiles: potentially poly/membrane against the wall structure (breathable in outdoor situation and vapour proof in indoor situation). Poly/membrane to be applied according to the manufacturer’s requirements. - Horizontal safety bar along front side of the Sempergreen Flexipanels: Stainless Steel
30mm x 4 mm, fastened with stainless steel separators (steel tubing) and stainless steel M8 bolts to the wall facing omega profiles. (might be required for Flexipanel systems that reach heights above and beyond 20m in total height)
- Fasten according to the requirements of the manufacturer. Detailed finish of topside: - Cap profile Detailed finish of side covering: - Flashing profile Detailed finish of the bottom gutter: - Gutter profile, with optional drip reflector (indoor only) - Gutter connects to PVC water disposal (40mm round) - Measurements and specifications gutter according to manufacturer. Fine tuning irrigation system: - Irrigation system to be approved by complete green wall system supplier 1. PRE-GROWN FLEXIPANELS Manufacturer: Sempergreen Vertical Systems: Type: Flexipanel 60-50: Specifications: - Flexible TPO membrane, size 720mm x 620mm, supplied with install - Substrate of Rockwool covered with water absorbing fleece, measuring 620mm x 520mm, thickness 60mm. - Over the water absorbing fleece a UV protective fleece, sewn onto the TPO. - Saturated weight Sempergreen Flexipanel: approximately 40 kg/m2.

6
Additional: - Installation and attaching methods (according to supplier) - Finish edge detail and gutter structure - Extra strip membrane in the internal corners - Horizontal safety bar along front side of the Sempergreen Flexipanels: Stainless Steel 30mm x 4 mm, fastened with stainless steel separators (steel tubing) and stainless steel M8 bolts to the wall facing omega profiles. (required for Flexipanel systems that reach heights above and beyond 20 meters in total height) 2. IRRIGATION SYSTEMS Manufacturer: Supplied by Sempergreen Type: Fully automated Irrigation System Other: - Install hardware; - Irrigation lines; - Control system; 3. PLANT CHOICES Supplier: Sempergreen or Sempergreen approved vendors Type: - Plant mix for indoors - Plant mix for outdoors - Ferns

7
GREEN WALL SYSTEMS, PRE-GROWN PANELS, AGAINST WOOD FRAME. 0. GREEN WALL SYSTEM FOR WOOD FRAME. Install procedure: - Installation according to requirements of the manufacturer. - Omega profile against frame or wood facade. Specifications and materials of profile
according to specifications of the manufacturer. - Between wooden rear wall land omega profile: poly/membrane against wall facade (breathable membrane inside, and vapor tight in outside scenario). Membrane to be applied according to manufacturer. - In case of wood frame wall construction attach the omega profile against plywood back board with minimum thickness of 18mm. - Installation hardware to be used according to the manufacturers requirements. - Stainless Steel 30mm x 4 mm, fastened with stainless steel separators (steel tubing) and stainless steel M8 bolts to the wall facing omega profiles. (required for Flexipanel systems that reach heights above and beyond 20 meters in total height) Detailed finish of topside: - Cap profile Detailed finish of side covering: - Cap profile Detailed finish of the bottom gutter: - Gutter profile, with optional drip reflector (indoor only). - Gutter connects to PVC water disposal (40mm round) - Measurements and specifications gutter according to manufacturer. Fine tuning irrigation system: - Irrigation system to be approved by complete green wall system supplier 1. PRE-GROWN PANELEN Brand: Sempergreen Vertical Systems Type: Flexipanel 60-50 Specifications: - Flexible TPO membrane, size 720mm x 620mm, supplied with install - Substrate of Rockwool covered with water absorbing fleece, measuring 620mm x 520mm, thickness 60mm. - Over the water absorbing fleece a UV protective fleece, sewn onto the TPO. - Saturated weight Sempergreen Flexipanel: approximately 40 kg/m2. Additional: - Installation and attaching methods (according to supplier) - Finish edge detail and gutter structure - Extra strip membrane in the internal corners - Horizontal safety bar along front side of the Sempergreen Flexipanels: Stainless Steel 30mm x 4 mm, fastened with stainless steel separators (steel tubing) and stainless steel M8 bolts to the wall structure. (required for Flexipanel systems that reach heights above and beyond 20 meters in total height)

8
2. IRRIGATION SYSTEMS Manufacturer: Sempergreen or recommended by Sempergreen Type: Fully automated Irrigation System Other: - Install hardware; - Irrigation lines; - Control system; 3. PLANT CHOICES Supplier: Sempergreen Vertical Wall Systems Type: - Plant mix for indoors - Plant mix for outdoors - Ferns

9
3.2 Installation with Omega-Profiles Before starting installation of the wall, prepare all profiles and edging details. Clean off every metal sheet and drill holes in the edging detail, gutter and profiles.
Gutter: every 40 inches drill a mounting hole (at least 4 holes per gutter)
Flashing detail: a mounting hole every 40 inches) (at least 4 holes per section)
Omega and Z-profiles: Every 30 inches for the vertical wall connector in a zigzag pattern (at least 4 per profile),
Preparing bolts in omega’s to hang the Flexipanels: Every 52cm / 20,47 inches (this is the vertical distance between the holes in the panel). For the panel hanging point, drill a hole with a diameter of 7 mm in the middle of the profile. Then fix the bolt from behind so the panels will be can hung against the omega profiles.
Starting point is our empty wall. As mentioned above, it doesn’t matter if the wall is curved. In case of brick or concrete walls all holes in the wall itself need to be filled up with cement or plaster. This to provide a stable fixing point for the anchors or screws on which the subsequent profiles will be mounted. For indoor green walls we generally advise applying a
water proofing membrane directly on the wall.
For outdoors green walls it may not necessary to
apply a waterproofing membrane, provided you are
comfortable that the existing water resistant
characteristics of the wall are adequate and that
there are no signs of leakage internally. The spacing
left by the profiles creates an air circulation zone
leaving the walls free to breathe, but if there is any
doubt about the water resistance of an outdoor wall,
then we recommend applying a waterproofing
membrane.

10
Confirm that the structural support wall is capable of supporting the weight of the green wall at +/- 55 kilo/m2 saturated and grown with vegetation. You start by first installing the omega profiles on the wall. The 2 vertical sides are always Z-profiles for the purpose of applying the flashing or to facilitate the vertical plumbing and cables. We recommend you first put the gutter and the flashing on the wall to get and hold the right measurements during installation.
Then put the flashing detail with a small overlap (5 – 10 cm) in the gutter on the wall, directly against it you put the Z-profile to the flashing detail. Now place the omega profiles with a 60cm (24,41 inches) gap between the 2 panel bolts on the wall and tighten them on the wall. If you need more than one length omega profile create a small overlap with each subsequent profile.
Then, if this is not be done already, you put the top flashing detail on top of the omega profiles and connect the top with self-tapping screws to the profiles. Be aware that the profiles are every time in front of the gutter.
60cm (24,41 in)
52cm (20,47”)
52 cm (20,47 in)
11
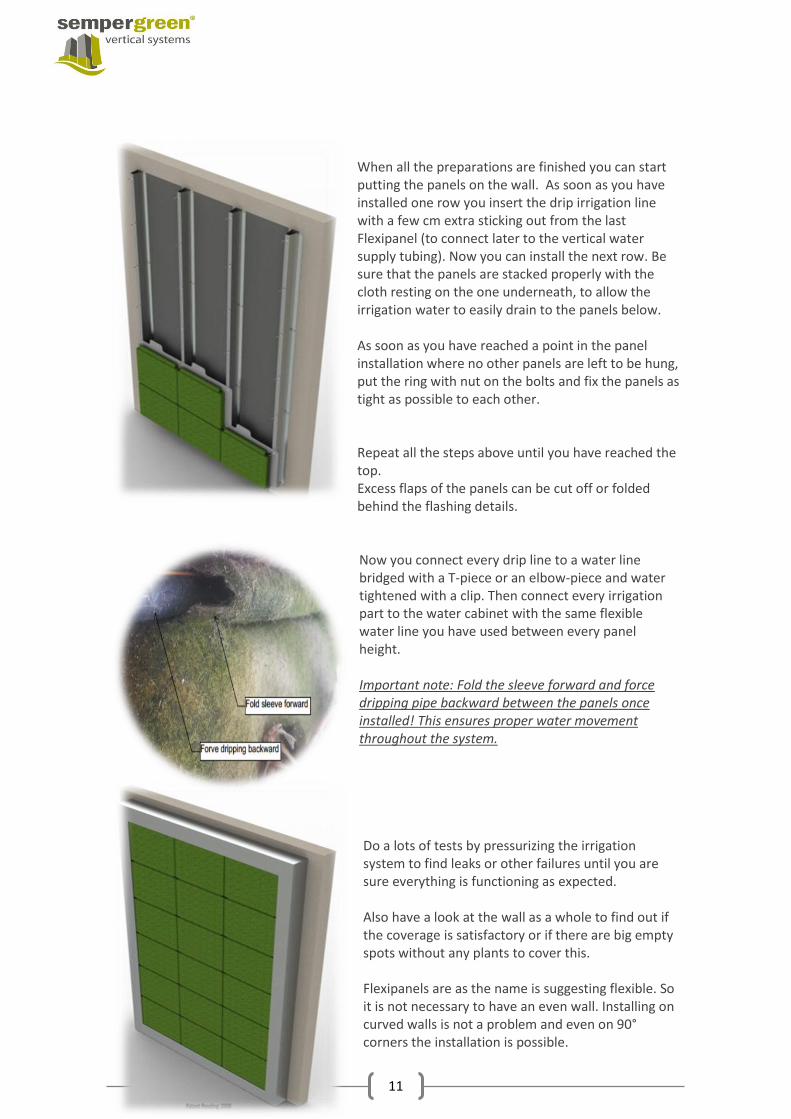
When all the preparations are finished you can start putting the panels on the wall. As soon as you have installed one row you insert the drip irrigation line with a few cm extra sticking out from the last Flexipanel (to connect later to the vertical water supply tubing). Now you can install the next row. Be sure that the panels are stacked properly with the cloth resting on the one underneath, to allow the irrigation water to easily drain to the panels below. As soon as you have reached a point in the panel installation where no other panels are left to be hung, put the ring with nut on the bolts and fix the panels as tight as possible to each other. Repeat all the steps above until you have reached the top. Excess flaps of the panels can be cut off or folded behind the flashing details.
Now you connect every drip line to a water line bridged with a T-piece or an elbow-piece and water tightened with a clip. Then connect every irrigation part to the water cabinet with the same flexible water line you have used between every panel height. Important note: Fold the sleeve forward and force dripping pipe backward between the panels once installed! This ensures proper water movement throughout the system. Do a lots of tests by pressurizing the irrigation system to find leaks or other failures until you are sure everything is functioning as expected. Also have a look at the wall as a whole to find out if the coverage is satisfactory or if there are big empty spots without any plants to cover this. Flexipanels are as the name is suggesting flexible. So it is not necessary to have an even wall. Installing on curved walls is not a problem and even on 90° corners the installation is possible.

12
4. Irrigation systems
Sempergreen Vertical Systems are using the most advanced irrigations systems for green walls. We recommend only one system: the web based fully automated irrigation. See below the specifications of this system. The Tucor irrigation system is an adaptation of the most advanced system Sempergreen uses to irrigate the US nursery. The Tucor senses the moisture level in the panels and determines when to irrigate. It fertilizes with each water stroke with each micro-burst of water that can last as little as 1 second. Our special irrigation lines are always flooded but wont drip at low psi, but when the computer releases a valve, the pressure rises and the complete system starts to drip instantaneously. No need to wait for the lines to fill, no excess water to flush through the system to get the far ends moist. An air compressor will be alerted by the system to prevent freeze damage by automatically winterizing the system by blowing out the lines.
4.1 Advanced Automated web based irrigation system
The System contains: Main valve (manually).
Backflow preventopr
Heavy duty Steel cabinet that is ventilated
Screen filter 130micron.
Tucor irrigation controller.
Gallon counter with alarm
Dosatron fertilizer injector.
Fertilizer tank with alarm (bypasses injection pump)
Max flow of each valve aprox. 800ltr/hr.
Pressure detection.
Netafim Valves for each zone
Moisture sensors throughout system to save water.
Temperature Sensor
Air compressor (outside system only)
Tucor provides a complete automatic moisture sensor managed system. In other words, water is no longer provided on a time unit basis but based on the moisture demand
of the plants themselves. Consequently, water is supplied on demand, resulting in a very sparing use of water when the system is set up correctly
The Tucor system allows for web-based access to log into the system and see current and past environmental data and system log. It will display moisture conditions in the wall, fertilizer levels and any alarms that may be triggered.

13
An online view of a web based system
1. A fertilising program that allows configuration of both the feed dosage and the time when fertiliser feeding is required. For example, you can reduce the feed dosage in the autumn and increase it again during the growing season.
2. Operation via a clear touch-screen display that can be set to multiple languages(option).
3. The complete control system will be monitored remotely via internet and settings can also be altered remotely using our remote management system.
4. When a limit value is exceeded, for example when the plants are too dry or have received too much water, the system generates a warning message.
5. The water consumption of the individual taps can be displayed along with the moisture volume(WVC) and temperature in a clear (historical) graphic display program.
6. Email generation program that generates an email alert when a breakdown occurs. 7. Broad range of extension options, for example;
o Usage and storage management for rain and/or recycled water. o Winter program with an compressed air device o Ec measurement device.(option)
This controller is linked to a maintenance contract, meaning that complete control and
management of the technical water-related system takes place remotely. We monitor this 7
days a week and 24 hours a day.

14
4.2 Pressure booster with break tank/compressed air unit Pressure booster with break tank/compressed air unit. Since the system injects fertilizer into system, almost all municipalities require a separate break-tank system to prevent the fertilizer from flowing back into the city system.
This is a complete set consisting of:
A pump with a stainless steel pump housing and a maximum working pressure of 51mwc. Full-flow pressure safety, featuring.
Lock-out when no water is present.
Automatic restart after 15 minutes.
Lock-out after 30 minutes when leaks of more than 1 to 2 litres/hour are detected.
Adjustable between 1 and 5 bars.
100 litre polyethylene break tank with a drain.
Float valve with connections.
All assembled into a single compact set.
Compressed air capacity 68ltr/minute at 6.5bar

15
4.3 Shut off irrigation during wintertime
To make sure that the wall during the wintertime will not get damaged, you should follow the
following instructions very carefully when the temperature drops to 25 degrees F .
Stand-alone irrigation unit
Have the irrigation cabinet insulated and protected from freezing weather with heat provision
inside the cabinet and heat cables around the pipes outside the cabinet. If you do not provide
these precautionary measures its required to winterize by hand each time it will freeze. Follow
instructions below:
1. Close the main water supply to the cabinet!
2. Disconnect all flexible tubes from the cabinet and let the water in the tubes drip out.
3. Disconnect the back flow valve right after the gallon counter.
4. To get the water out of the cabinet, also screw the end off from the distributer of the
valves (the blue part!).
5. After the water dripped out of the tubes, add a blower to the tubes and blow per
section at least for 5 minutes air into the tubes so the water will be blown out of the
drippers.
6. Empty the fertilizer tank and press the red alarm button to shut off the noise.
If within 24 hours the temperature reach 40 degrees or more, its highly recommended to re-
connect everything again (reverse procedure as the above). Needless to say an automated
system is more reliable and less expensive in the long run.

16
5. Lightning information indoor Green walls Type of light Plants need a certain amount of light. This also depends on the type of plant; shadow or sun. In white light are three main colors, red, green and blue. With red light the plants grow in width. With blue light the plants grow in height. Green light does almost nothing with the plants, so that light is reflected from the plant. That’s why we see green plants. In ‘figure 1’ we see a curve presenting the colors that does something with the plant. The somewhat shaded grey curve on the figure is what the human eye can see. So you see that we as humans perceive light differently than a plant. You can also see that a plant can ‘see’ red and yellow much better than he can ‘see’ the green color. The light sources which are using must have all the necessary colors for a good growing plant. If this is done correctly by an expert one can create a perfect lightning on the plants with less power.
Figure 1 Lux and Lumen A lamp that produces light is expressed in lumens and not in lux. Lux is the crucial number we are looking for, not lumens. Take for example a lamp of 150 watts, it will give 14500 lumens of light. This tells us nothing about the lux which is measured with a lux meter. When we install a lamp of 150 watts on 2 meters away of the green wall we measure a lot of lux. You do it at a distance of 10 meters away the green wall, then you measure less lux. (while giving the same amount of lumens). The armature (the width of the beam) also ensures that you get different amounts of light. Typical light sources used do have 150 or 250 watts. If there is no daylight in the room perhaps slightly more, but if the plants catching full sun it may be slightly less. A lux meter receives all the light (full spectrum), and translates this using a lux value that we use to calculate. A plant ‘sees’ more than we can see as humans, so the measured lux value say almost nothing about the quality of light as perceived by humans. As a starting point we say that a plant needs between the 1200 and 1500 lux. Advice: Our advice is ± 1200 lux assuming the bulbs are not too close to the plant assembly. Furthermore, one hour per day or 8 to 12 per hour all day is sufficient. This is what you adjust when the plant is growing too fast or too slow.

17
6. Specification
In this chapter you will find all the technical information sheets from the products and materials we use to create our green wall system. Al the materials and product are composed of various sustainable materials that longevity of the green wall will guarantee.
6.1 Installation materials
Aluminum Omega Profile
Description:
Functions:
•
•
SPECIFICATIONS:
Material: Aluminum or Steel
Weight per meter Aluminum: 0,60 kg/mtr
Weight per meter Steel: 1,15 kg/mtr
Thickness: 3 mm
afbeelding
Aluminum or Steel omega profiles with spacers and sufficient strength to mechanically can
be attached to the underlying wall.
For mounting the Flexipanel
Ventilation between Flexipanel and the wall behind.

18
Aluminum edge profile
Description:
Functions:
•
•
SPECIFICATIONS:
Color: Aluminum
Size: 110 mm x 40 mm (each facade is different)
Options On demand in any RAL color to get
Aluminum edge which can be placed around the green wall.
Covers risers next to the green wall.
Realization of a neat edge to the green wall.

19
Aluminum gutter
Description:
Functions:
•
SPECIFICATIONS:
Weight per meter: 1,10 kg/meter
Size: 180 x 150 x 100 mm
Options: On demand in any RAL color to get
Gutter down the wall plants, comprising the eindslab-piece EPDM foil or similar material is
incorporated. Optionally equipped with drip catcher (indoor situation).
Drains leachate from the green wall.

20
Foil
Description:
SPECIFICATIONS:
Thickness: 0.5 mm
Size: 6 x 25 m
Amount will be calculated per project
afbeelding
Foil to make the internal and external corner solutions water resistant.

21
6.2 Flexipanel
Sempergreen® Flexipanel
Description:
SPECIFICATIONS:
Saturated weight including planting: ca. 40 -45 kg / m2
Dimensions 62 cm wide x 52 cm high x 6 cm thick
Material Flexipanel: • TPO at rear
• Specially molded substrate slab
• Capillair, UV protected and strong fleece
Type beplanting: • Specially adapted to the climate mix of
shrubs and perennials.
• Ferns
• Specially formulated mix of houseplants
Pre-grow Sempergreen ® Flexi Panel with an assortment of low maintenance plants. The
flexible panels are mounted consecutively.

22
6.3 Fastening materials
Fasteners
Description:
SPECIFICATIONS:
Material: Staal blank of RVS
Size: Screw: 5,0 x 80
Slagplug: 8,0 x 80
Bolt: M8 x 30
M8 x 100
Material for the purpose of mounting the Sempergreen ® Flexipanel System. Consisting of
a carefully assembled assortment of screws and plugs to mount the Sempergreen®
Flexipanel System in a responsible way.
23
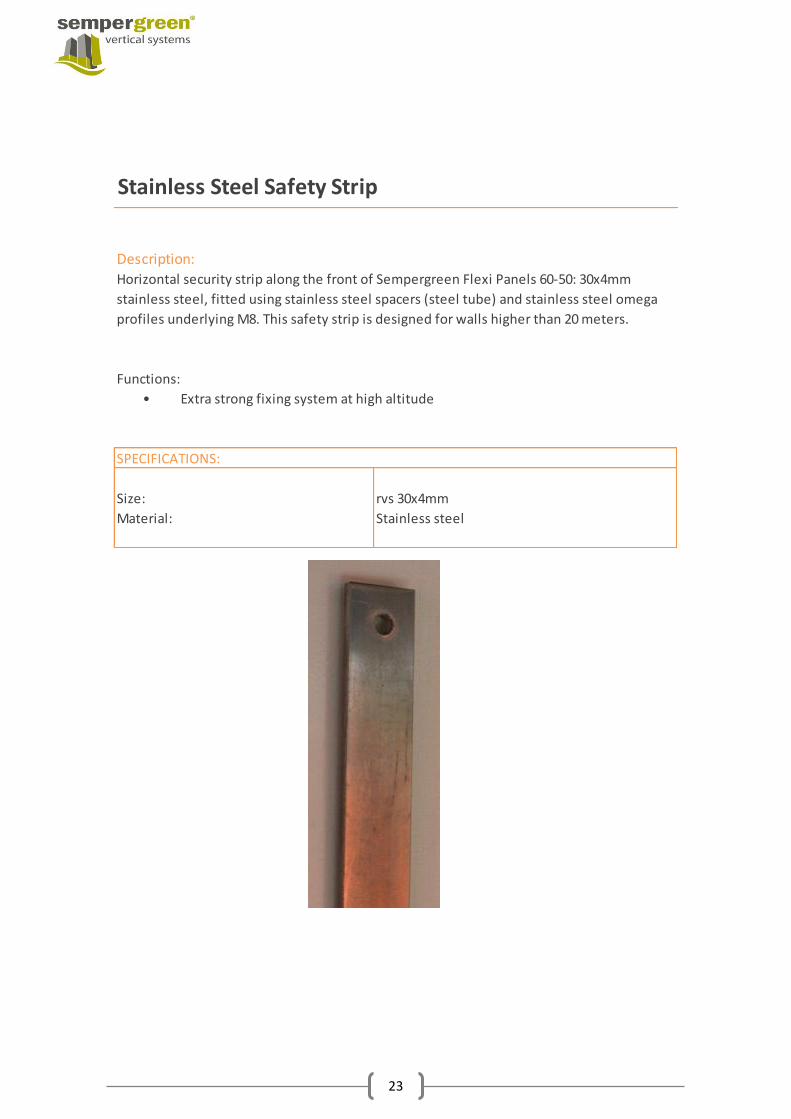
Stainless Steel Safety Strip
Description:
Functions:
•
SPECIFICATIONS:
Size: rvs 30x4mm
Material: Stainless steel
Horizontal security strip along the front of Sempergreen Flexi Panels 60-50: 30x4mm
stainless steel, fitted using stainless steel spacers (steel tube) and stainless steel omega
profiles underlying M8. This safety strip is designed for walls higher than 20 meters.
Extra strong fixing system at high altitude

24
7. Maintenance For every green wall, we recommend an individual maintenance contract covering. This contract is necessary for the long term functioning and a good looking green wall system account. Be aware from the priority of the maintenance and be sure that every step is done well.
7.1 Maintenance schedule green wall outdoor
As each living wall and its environment are unique, it is important to monitor a new project closely following its installation. The proper functioning of the irrigation system must be verified and each irrigation zone must be programmed according to the type of plants selected, the local microclimate and the season.
Please note the following points apply for a stand-alone irrigation unit. Local microclimate Some plants might not adapt well to their new environment in which case, it is better to replace them with another species than the replant the same ones. Localized sun/shade or wind and surrounding equipment such as ventilation exhaust might cause severe desiccation of the living wall. The use of shields may be required.
Seasonal Adaptation Outdoors living walls will require a seasonal adaptation of their irrigation program. Modify the irrigation program according to the seasons. For the winters we offer you a special compressor unit with a special antifreeze software. This compressor blows al the water out of the drippings when the temperature is below zero degrees. This system is recommended in climates where the temperature at night is below zero degrees and at daytime above zero degrees Spring irrigation Start-up When programming the irrigation sequence, it is preferable to irrigate often for shorter period than to irrigate seldom for longer periods. The irrigation schedule will be determined according the plant type, the local climate and the living wall’s exposure.
Summer increased irrigation time and or frequency
As summer months tend to be warmer and dryer, it will be necessary to increase the irrigation time of each zone and /or its frequency. Fall decreased irrigation time and or frequency
As Fall months tend to be colder and wet, It will be necessary to decrease the irrigation time of
each zone and/or its frequency.
Close of automatic irrigation in winter
Subzero temperatures and the expansion of ice can damage the plants and irrigation pipes.
Therefore all water pipes in the winter be drained to avoid the risk of frost damage when the
temperature below 25 degrees. During the winter months the green façade MUST remain
moist, since frost temperatures combined with dry plants a fatal combination. Even in heavy
rain, the facade must be monitored every 2 weeks because vertical surfaces acquire less

25
moisture than horizontal surfaces. If the green facade appears to be dry, the facade needs
watering by means of the manual control of the irrigation program.
Steps for draining green wall hanging for a frost irrigation unit
1. Switch off the irrigation pump to take off the electricity supply.
2. Loose the outgoing water pipes on the outside of the cabinet, or turn the drain valve
when fitted to the wall and let the system drain to empty.
3. If your irrigation cabinet is hanging outdoor and a cabinet heating is used, Always keep
the electricity for the heating on. Without this heating the cabinet and all is in there
will be freezing.
When the temperature at night is not below 25 degrees F anymore, you can restart your
system by following what is written above in reverse order.

26
7.2 Fertilizers
To facilitate the growth of the plants for each green wall fertilizer is required. The control
unit is supplied with a 5 or 20 liter tank.
For each project, we recommend you to use the correct fertilizer for your type of green
wall. The ratio and type fertilizer changes each season. During spring the fertilizer must
encourage the plant to set buds and growth. In the late summer we advise you to change
the ratio and type fertilizer to harden off the cell structure of the leaves so they are better
protected and resistant against the winter cold period. Not only the time of the year, as
well as the location of the wall (indoor, outdoor sun or - shade) will affect the choice of
the right fertilizer, and also the city water quality determines the ratio and type of the
fertilizer. For each project, take a water sample. With this information your fertilizer
company can make a specially composed nutrient program.
The frequency of giving the fertilizer is be done with a dosing pump. This dosing pump
doses approximately 0.69 ml per pulse. The dosing which normally should be used is 1
pulse per liter.
Fertilizer can be refilled by following instructions written below:
1. Put the required amount of liters (5 or 20 liter) of warm water in a bucket.
2. Slowly mix in portions of the required amount of fertilizer in the bucket and stir.
3. Keep stirring until all the fertilizer is dissolved.
4. Pour the liquid fertilizer by using a funnel in the appropriate container.
5. Connect all on the irrigation computer.
Our advice which fertilizers when to use is as follows:
Type of fertilizer for 3 months before starting wall after the winter:
March April Mey
21+07+21+3MgO 21+07+21+3MgO 21+07+21+3MgO
Type of fertilizer for 3 months for a stable growth after the start-up period:
June July Aug
16+11+26+3MgO* 16+11+26+3MgO* 16+11+26+3MgO*
* specially formulated ratio
Type of fertilizer for 6 months for hardening during autumn and winter:
Sept Okt Nov Dec Jan Feb 09+09+36
09+09+36
09+09+36
09+09+36
09+09+36
09+09+36
The ratio of these fertilizers are composed by a fertilizer specialist.
Main conclusions regarding fertilizers:
Always perform a water quality test.
We recommend to give 3 different ratios of fertilizer during the year round. This will
unsure that your will enjoy your green wall for a very long time!

27
7.3 Routine maintenance
Routine Maintenance
After the initial weekly monitoring after installation, monthly monitoring program will be followed. This program will comprise: One weeks after installation:
1. Plant monitoring (health, color and vigor) 2. Verification of the irrigation system (lines, emitters, programming and function) 3. Light monitoring (only interior wall required). Be sure that the lightning is
properly adjusted. The growth of the plants depends on it.
Two weeks after installation: 1. Plant monitoring (health, color and vigor) 2. Verification of the irrigation system (lines, emitters, programming and function) 3. Light monitoring (only interior wall required). Be sure that the lightning is
properly adjusted. The growth of the plants depends on it.
Four weeks after installation: 1. Plant monitoring (health, color and vigor) 2. Verification of the irrigation system (lines, emitters, programming and function) 3. Light monitoring (only interior wall required). Be sure that the lightning is
properly adjusted. The growth of the plants depends on it. 4. Replant if some plant dying in the green wall by climate change.
Each month after the first four weeks:
1. Inventory of describing the status of green wall in a logbook. 2. Preventive protection against diseases and pests. 3. Address any unlikely diseases and pests. 4. Prune plants. 5. Remove dead and withered leaves and branches. 6. In the unlikely event a number of plants die, when plants show 50% defoliation
replace those plants. 7. Maintenance and control of irrigation systems, refilling liquid fertilizer and clean
up the filters. 8. Light monitoring (only interior wall required). Be sure that the lightning is
properly adjusted. The growth of the plants depends on it.

28
8. Drawings
This chapter provides an overview of all technical drawings of our system. Because the
flexibility and easy installation of our system we can install on many surfaces and structures.
To give you a good view as to how we do this, we have put all our technical drawings in this
chapter.
In the table below you can see which drawings can be found on which pages.
Flexipanels on Wood < 20 mtr Page 109 - 114
Flexipanels on Wood > 20 mtr Page 115 - 118
Flexipanels on Stone < 20 mtr Page 119 - 123
Flexipanels on Stone > 20 mtr Page 124 - 128

8.2 Installation Flexipanel on wood

30

31

32

33

34

35

36

37

38

39
8.3 Installation Flexipanels on stone

40

41

42

43

44

45

46

47

48

49
9. References Below you will see some of our realized projects made by Sempergreen Vertical Systems. During the time we have done many project in very different areas and locations. Take a look at the pictures and be aware that your project can be the next one in this list Benelux projects:
Project: Science park Location: Amsterdam, The Netherlands Surface: 104 m² (1119.45 ft²)
Project: Van Diemenstraat Location: Amsterdam, The Netherlands Surface: 93 m² (1001.04 ft²

50
Project: Private residence Location: Keizersgracht, Amsterdam, The Netherlands Surface: 17 m² (182.99 ft²)
Project: Grand Theater Location: Groningen, The Netherlands Surface: 14 m² (150.69 ft²)
Project: Procore office Location: Nieuw-Vennep, The Netherlands Surface: 22 m² (236.81 ft²)

51
Project: Studio Lichtveld Location: Amsterdam, The Netherlands Surface: 1.7 m² (18.30 ft²)
Project: Philips head office Location: Amsterdam, The Netherlands Surface: 15 m² (161.46 ft²)
Project: Roma office Location: Raamsdonksveer, The Netherlands Surface: 51 m² (548.96 ft²)

52
Project: Rabobank head office Location: Utrecht, The Netherlands Surface: 104 m² (1119.45 ft²)
Project: Sint Franciscusschool Location: Nevele, Belgium Surface: 14 m² (150.69 ft²)
Project: Parking Zoetermeer Location: Zoetermeer, the Netherlands Surface: 274 m² (2949.311 ft²)

53
Europe and World Projects
Project: The Westin hotel Location: Vancouver, Canada Surface: 120 m² (1291.67 ft²)
Project: Apartment complex Location: Vancouver, Canada Surface: 30 m² (322.92 ft²)

54
Project: Apartment complex Location: Paris, France Surface: 36 m² (387.50 ft²)
Project: Entrance Bayer Schering Pharma Location: Berlin, Germany Surface: 85 m² (914.93 ft²)
Project: Villa Alang Alang Location: Nice, france Surface: 19 m² (204.51 ft²)

55
Project: Shopping Centre Sainsbury’s Location: Welwyn Garden City, UK Surface: 246 m² (2651.15 ft²)