Manual for PC My Page - jobcan.zendesk.com
31
もくじ文字幅1.5pt広 サイズは 12ptカラーは黒 75 行間を 1.4行文字間 +0.7ポイント P.4 P.5 ------------------------------------------------------------ ------------------------------------------------------------ 大見出し 16pt文字間1.5pt広 サイズは 12ptカラーは黒 75 行間を 1.4行文字間 +0.7ポイント P.4 P.5 ------------------------------------------------------------ ------------------------------------------------------------ 大見出し 16pt文字間1.5pt広 サイズは 12ptカラーは黒 75 行間を 1.4行文字間 +0.7ポイント P.4 P.5 ------------------------------------------------------------ ------------------------------------------------------------ 大見出し 16pt文字間1.5pt広 サイズは 12ptカラーは黒 75 行間を 1.4行文字間 +0.7ポイント P.4 P.5 ------------------------------------------------------------ ------------------------------------------------------------ 大見出し 16pt文字間1.5pt広 サイズは 12ptカラーは黒 75 行間を 1.4行文字間 +0.7ポイント P.4 P.5 ------------------------------------------------------------ ------------------------------------------------------------ 大見出し 16pt文字間1.5pt広 サイズは 12ptカラーは黒 75 行間を 1.4行文字間 +0.7ポイント P.4 P.5 ------------------------------------------------------------ ------------------------------------------------------------ Manual for PC My Page 2020.12
Transcript of Manual for PC My Page - jobcan.zendesk.com

もくじ文字幅1.5pt広
サイズは12ptカラーは黒75行間を1.4行文字間+0.7ポイント
P.4P.5
------------------------------------------------------------------------------------------------------------------------
大見出し16pt文字間1.5pt広
サイズは12ptカラーは黒75行間を1.4行文字間+0.7ポイント
P.4P.5
------------------------------------------------------------------------------------------------------------------------
大見出し16pt文字間1.5pt広
サイズは12ptカラーは黒75行間を1.4行文字間+0.7ポイント
P.4P.5
------------------------------------------------------------------------------------------------------------------------
大見出し16pt文字間1.5pt広
サイズは12ptカラーは黒75行間を1.4行文字間+0.7ポイント
P.4P.5
------------------------------------------------------------------------------------------------------------------------
大見出し16pt文字間1.5pt広
サイズは12ptカラーは黒75行間を1.4行文字間+0.7ポイント
P.4P.5
------------------------------------------------------------------------------------------------------------------------
大見出し16pt文字間1.5pt広
サイズは12ptカラーは黒75行間を1.4行文字間+0.7ポイント
P.4P.5
------------------------------------------------------------------------------------------------------------------------
Manual for PC My Page
2020.12

Check the Attendance Book
Table of Contents
Check the Attendance Book P.10-------------------------------------------------
Attendance amendment
Introduction
Overview of PC My PageReceive an invitation from the administratorSet your name and passwordLogin to My PageTop page of PC My Page
P.4P.5P.6P.7P.8
-----------------------------------------------------------------------------------------------------------------------------------------------------------------------------------------------------------------------------------------------------
Apply for additional clockingDelete the attendance dataModify the attendance dataRequest late reason
P.13P.14P.15P.16
----------------------------------------------------------------------------------------------------------------------------------------------------------------------------------------------------
Shift Requests
Apply for the shiftCancel the requested shiftCheck the confirmed shift
P.18P.19P.20
---------------------------------------------------------------------------------------------------------------------------------------------------
Other RequestsVacation RequestsCheck the Vacation Request ListCancel the Vacation RequestHoliday-Work Request Check the Holiday-Work Request ListCancel the Holiday-Work RequestsOT RequestsCheck the OT Request ListModify the OT RequestCancel the OT Requests
P.22P.23P.24P.25P.26P.27P.28P.29P.30P.31
----------------------------------------------------------------------------------------------------------------------------------------------------------------------------------------------------------------------------------------------------------------------------------------------------------------------------------------------------------------------------------------------------------------------------------------------------------------------------------------------------------
2
IntroductionManual for PC My Page p.4 – p.8

Overview of PC My Page
Top page
This section describes the functions available on PC My Page.
Introduction 4
You can click "PUSH" to clock-in/out, and check the clock-in/out errors on this page.
Attendance BookYou can check past work data and the number of days left for vacation.
RequestsVacation Requests : You can apply for vacations such as paid holidays. OT Requests : You can apply for early-in work and overtime work.Holiday-Work Requests : You can apply for holiday work. You can also select a holiday type.
Clock Time Edition
Shift
Clock Time Edition (By day) : You can make corrections for each clocking and apply for new clock-in/out. Edit Attendance (By month)* : You can edit work data and apply for it on a monthly basis. *Please contact us if you would like this feature as it can be enabled in our setting.
Confirmed Shift : You can check the shift created by the administrator.Shift Requests : You can apply for the desired shift.
Please noteDepending on the administrator settings, the images on the manual and the actual screen may differ. If you have any questions, please ask the administrator.

Receive an invitation from the administrator
We will guide you after you receive the invitation email.
Introduction
The administrator will send you an email with the following text. If you do not receive it, please contact the administrator.
You will receive the following email.Subject : You are invited to use JOBCAN Common ID|JOBCAN Common IDEmail address : [email protected]
*If you have set spam mail, please set it so that you can receive it from this email address.
Please access the URL of the user registration page within the expiration date described in the invitation email. You cannot access the URL after the expiration date. *If the expiration date has passed before the registration procedure, please resend the invitation email yourself or request the administrator to resend it.
キャプチャーが入ります
グレー背景は削除してください
5

Set your name and password
We will show you how to set your name and password.
Introduction
Access the URL described in the invitation email, enter the required information, and click the register button. *If the administrator has already registered as a staff member, the name will be automatically entered.
キャプチャーが入ります
グレー背景は削除してください
6
You can access to the PC My Page from the "Attendance" button on the upper left of the "Account Information" page.

Login to My PageThis section describes the items displayed on the login screen of My Page.
・Email address or staff code Enter one. When entering the user code, it is also necessary to enter the company ID.
・Company ID (Not required if you enter an email address) It is written in the invitation email. Click “Is this user registered in multiple companies?” to display the input field.
・Password This is the password you set after you received the invitation email.
7Introduction

Top page of PC My Page
① Clock-in/out
Here is an overview of the top page of PC My Page.
8
If you click "PUSH", you can clock-in/out from your PC My Page.
② Night Shift Mode
When working over multiple dates, check the [Night Shift Mode] check box before clock-in/out, so that you can add up the time clocking for the previous day. The time when the date changes can be set for each company. E.g.) If you work from 9 pm to 6 am at a company whose date will change at 5 am When you clock in, click "PUSH" as it is, check the “Night Shift Mode” when you clock out, and click "PUSH" after the clock display is changed to “30:00” (= 6 am). * Night shift mode will switch to normal mode in about 10 seconds.
③ Check the error list
You can check the error and shift recruitment status of this month. Click on the number of ”Clock-in/out Errors" to move to the attendance book page. Click the number of “Shift Recruitment” to display the shift period currently being recruited.
①
②
③
Introduction
Check the Attendance BookManual for PC My Page p.10 – p.11

Check the Attendance BookWe will show you how to check the attendance book.
Check the Attendance Book 10① Specify the period you want to show
In the [Specified Month] and [Specified Period] items, select the period you want to check and click ”Show". The attendance information for the specified period will be displayed.
② Download the attendance book
You can download the attendance book in PDF format by clicking "Download" next to the ”Show" button.

11
⑤ Red display of attendance book
In the [Actual Clock-ins] and [Actual Clock-outs] items, you can check the attendance time and leaving time.
⑥ Yellow display of attendance book
If there are omissions or mistakes in the markings, they will be displayed in red.
④Check the remaining vacations
③Check the clocking
In the [Today’s Remaining Vacations] item, you can check the remaining vacations as of today.*Since the number of remaining days is as of today, the number of days for vacations that will be used in the future is also included in it.
If you make a correction request for the clocking or add a clocking request later, it will be displayed in yellow until approved by the administrator.
Check the Attendance Book

Attendance amendmentManual for PC My Page p.13 – p.16

Apply for additional clocking
① Select the day you want to add the clocking
We will show you how to apply for additional clocking.
Attendance amendment 13
② Apply for additional clocking
Enter the correct time in the "Time" field of the ”Revise Clocking Data" item and click ”PUSH" to complete the applicationE.g.) If the clock-in time is 9:00, enter "0900"When the administrator approves, the applied time will be reflected.
If you want to add a clocking due to forgetting to do that, click the day you want to add it on the attendance book page to move to the “Edit clocking” page.

Delete the attendance data
① Select the day you want to delete the clocking from the attendance book
We will show you how to apply for the deleting your attendance data.
14
② Delete the clock-in/out
Click the day to move to the “Edit clocking” page.
Click "Delete" displayed in the ”Revision/Delete" column of the clocking you want to delete.
When the message "Waiting for delete" appears, the deletion application is complete. After approval by the administrator, the attendance record will be deleted.
Attendance amendment

Modify the attendance data
①Select the day you want to modify the clocking from the attendance book
We will show you how to apply for modifying your attendance data.
15
② Edit your attendance data
Click the ”Revision" displayed in the ”Revision/Delete" column.Then, the time to be corrected is displayed in the "Time" column of the ”Revise Clocking Data" item. Enter the correct time in the blank field and click ”PUSH" to complete the correction application. E.g.) If the clock-in is 18:30, enter ”1830".
With the approval of the administrator, the original one will be canceled, and the corrected time will be reflected.
Click the day to move to the “Edit clocking” page.
Attendance amendment

Request late reason
①Select the date
We will show you how to apply for reason for being late.
16
② Apply for the reason
On the “Submit late request” page, fill in the reason for being late, attach the delay certificate, and apply.
From the attendance book, click the day for which you want to apply late and move to the “Edit clocking” page.
Click ”Request late reason" displayed in the upper right of the page.
Attendance amendment

Shift RequestsManual for PC My Page p.18 – p.20

Apply for the shift
①From "Shift" at the left of My Page, click "Shift Requests”.
We will show you how to request the shift.
Shift Requests 18
②Select the shift from the "Shift" column of the desired date by pull-down
③ Click ”Request" at the bottom
The requested shift information will be listed in the “Request Shift” for each date.
Depending on the shift creation method, in addition to the shift pattern, you may also enter the time you want to go to work by specifying the time, or enter a ”day-off".
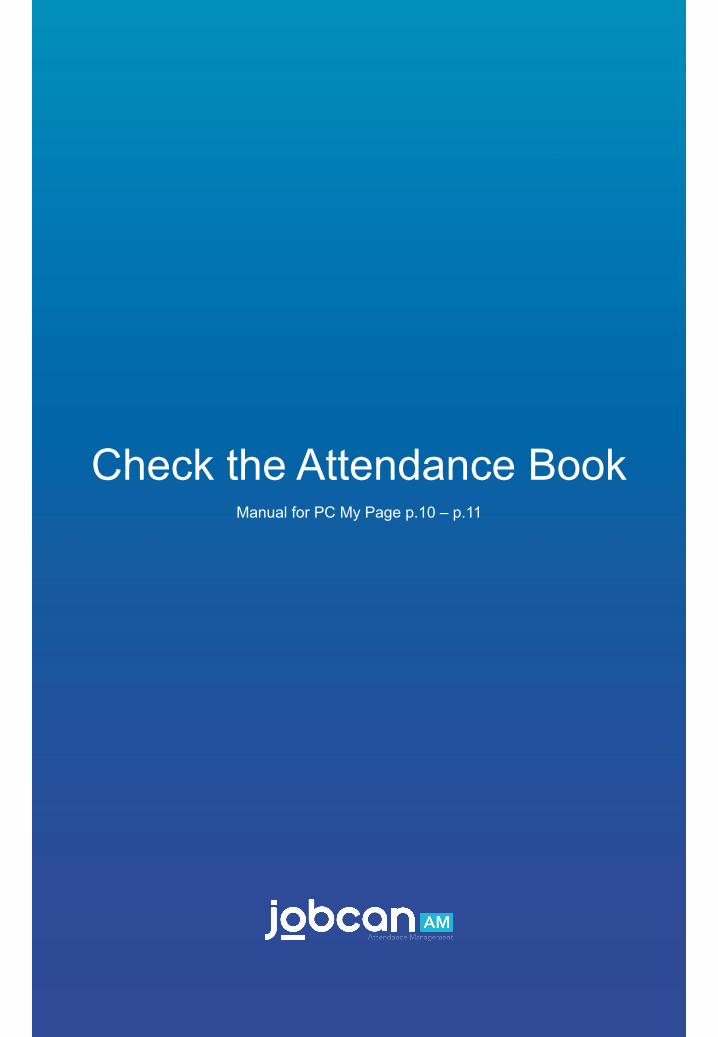
Cancel the requested shiftWe will show you how to cancel the requested shift.
19
② Check the shift of ”Request Shift"
③ Click ”Request" at the bottom
If you add an shift again, The ”Request Shift" column has a new shift. In this sample, ”Early" is changed to "Late".
If you want to request an shift again, specify the desired shift in the ”Add Request" field.
Shift Requests
①From "Shift" at the left of My Page, click "Shift Requests”.

Check the confirmed shift
①From "Shift" at the left of My Page, click ”Confirmed Shift”.
We will show you how to check the confirmed shift.
20
② Specify the period you want to check and click ”Show"
③You can check the confirmed shift
You can also check the shift status of other staff depending on the administrator's settings.
Shift Requests

Other RequestsManual for PC My Page p.22 – p.31

Vacation Requests
①Click "Vacation Requests" from ”Requests" at the left of My Page
We will show you how to apply for vacation. Please note that you cannot apply for two leave applications within the same day.
Other Requests 22
② Click “New Request"
③ Enter the required information in the application form and click ”Go to Review Page”.
④ Check the application details,and if there are no mistakes,click ”Request".

Check the Vacation Request ListWe will show you how to check the vacation request list.
23
② Set the specified period and click ”Show" to display the applications within the specified period
On this page, you can check the approval status of the administrator in the "Approve/Reject" column.
① Click "Vacation Requests" from ”Requests" at the left of My Page
Other Requests

Cancel the Vacation RequestWe will show you how to cancel your vacation request. Please note that you cannot cancel an approved application and change it. Please contact the administrator.
24
① Specify the period when there is an application you want to cancel and click ”Show”.
④ A confirmation will be displayed, so select "Delete" to complete.
② Click ”Request No" of the application you want to cancel.
③ Check the contents and click "Delete" if there are no problems.
Other Requests
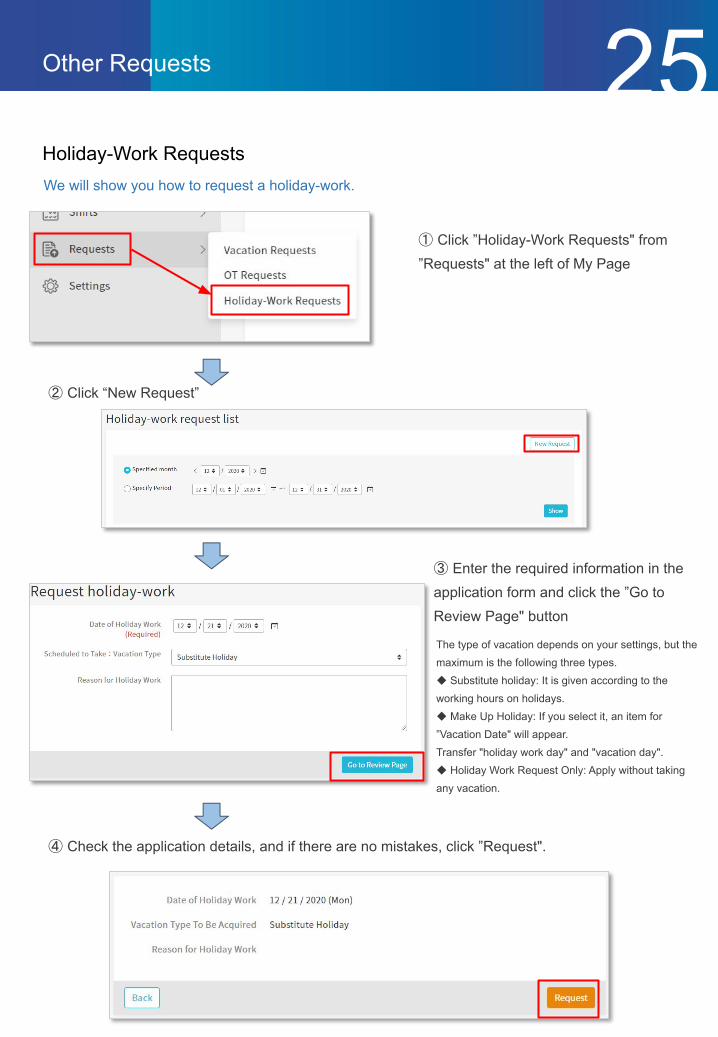
Holiday-Work RequestsWe will show you how to request a holiday-work.
25
The type of vacation depends on your settings, but the maximum is the following three types.◆ Substitute holiday: It is given according to the working hours on holidays. ◆ Make Up Holiday: If you select it, an item for ”Vacation Date" will appear. Transfer "holiday work day" and "vacation day". ◆ Holiday Work Request Only: Apply without taking any vacation.
① Click ”Holiday-Work Requests" from ”Requests" at the left of My Page
② Click “New Request”
③ Enter the required information in the application form and click the ”Go to Review Page" button
④ Check the application details, and if there are no mistakes, click ”Request".
Other Requests

Check the Holiday-Work Request ListWe will show you how to check Holiday-work request list.
26
② Set the specified period and click ”Show" to display the applications within the specified period
On this page, you can check the approval status of the administrator in the "Approve/Reject" column.
① Click ”Holiday-Work Requests" from ”Requests" at the left of My Page
Other Requests
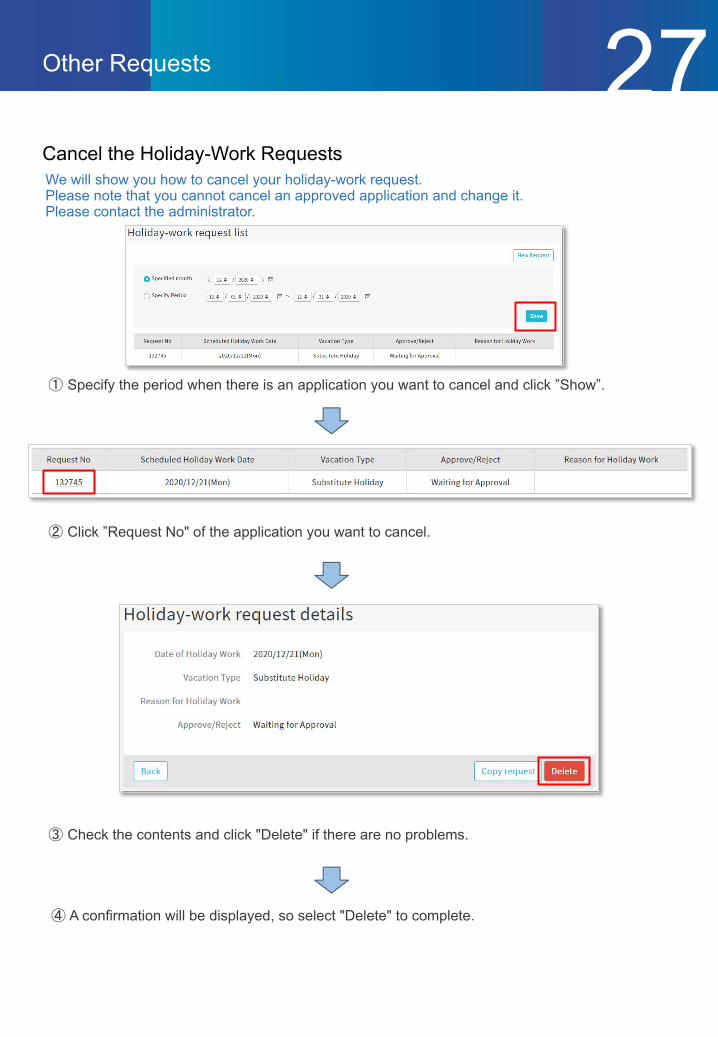
Cancel the Holiday-Work RequestsWe will show you how to cancel your holiday-work request. Please note that you cannot cancel an approved application and change it. Please contact the administrator.
27
① Specify the period when there is an application you want to cancel and click ”Show”.
④ A confirmation will be displayed, so select "Delete" to complete.
② Click ”Request No" of the application you want to cancel.
③ Check the contents and click "Delete" if there are no problems.
Other Requests

OT RequestsWe will show you how to request Overtime-work.
28① Click ” OT Requests" from ”Requests" at the left of My Page
② Select and click “Request OT” or “Request Early-in”
③ Enter the required information in the application form and click the ”Go to Review Page" button
④ Check the application details, and if there are no mistakes, click ”Request".
Other Requests
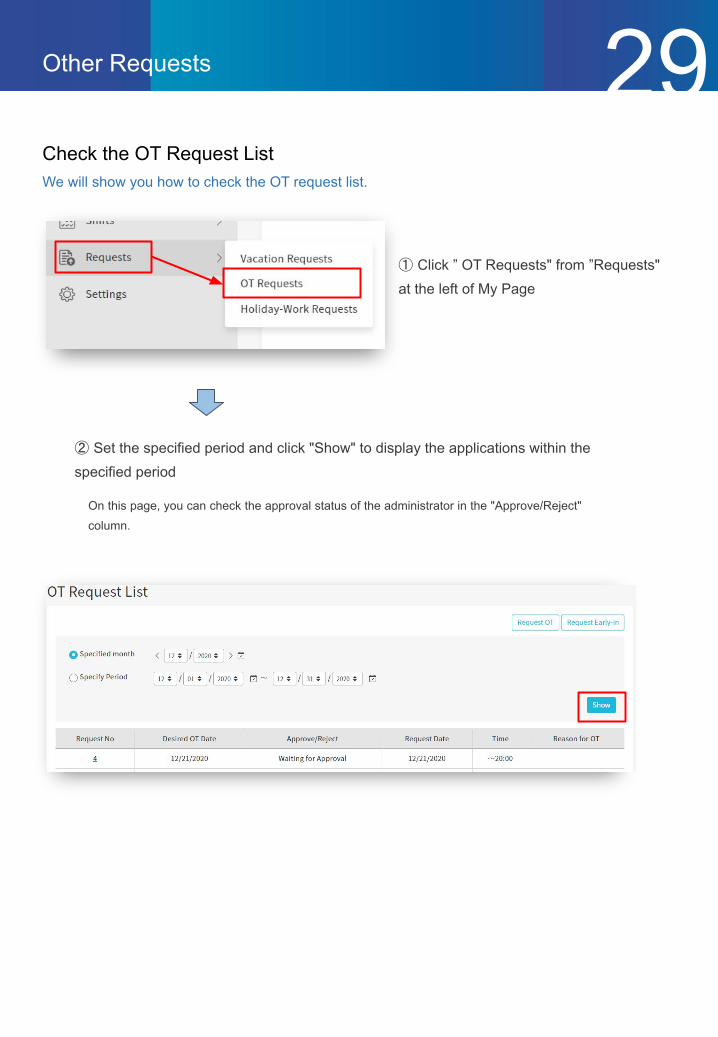
Check the OT Request ListWe will show you how to check the OT request list.
29
① Click ” OT Requests" from ”Requests" at the left of My Page
② Set the specified period and click "Show" to display the applications within the specified period
On this page, you can check the approval status of the administrator in the "Approve/Reject" column.
Other Requests
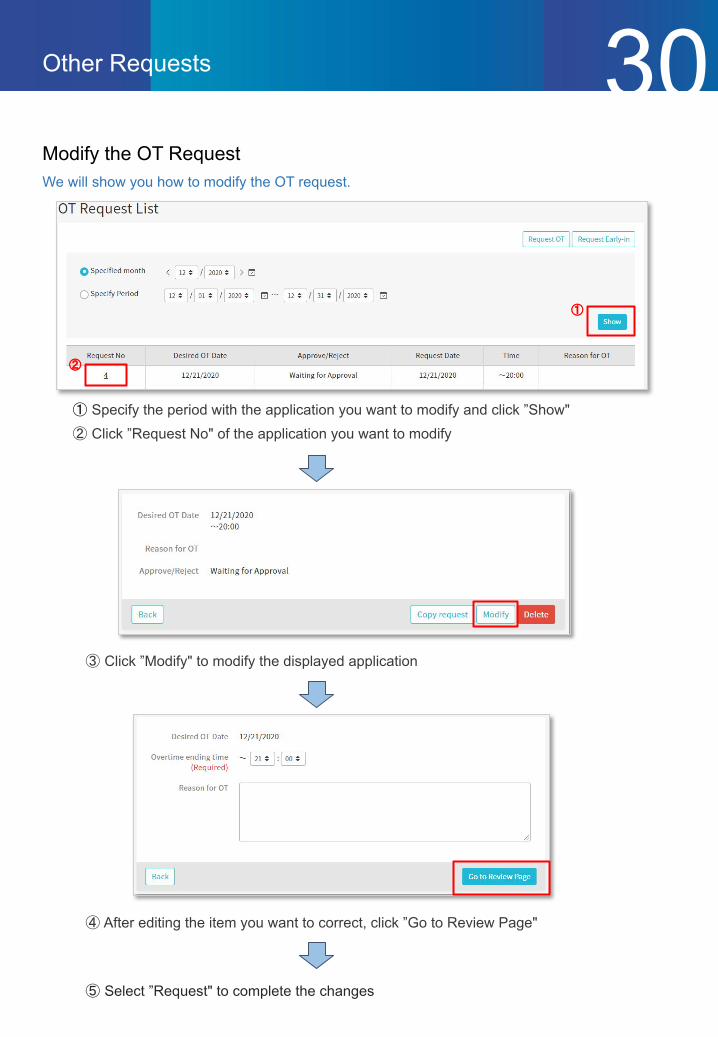
Modify the OT RequestWe will show you how to modify the OT request.
30
① Specify the period with the application you want to modify and click ”Show" ② Click ”Request No" of the application you want to modify
③ Click ”Modify" to modify the displayed application
④ After editing the item you want to correct, click ”Go to Review Page"
⑤ Select ”Request" to complete the changes
Other Requests
①
②

Cancel the OT Requests
We will show you how to cancel your OT request. Please note that you cannot cancel an approved application.
31
① Specify the period when there is an application you want to cancel and click ”Show”. ② Click ”Request No" of the application you want to cancel.
③ Check the contents and click "Delete"
④ A confirmation will be displayed, so select "Delete" to complete.
Other Requests
①
②


![Untitled-2 [3.imimg.com]3.imimg.com/data3/LK/EP/MY-2025837/dormak-catalog.pdfDK 222 . PREMIUM n pc 805 pc 801 pc 807 26 COATED pc 802 Doors pc 803 DORMAK pc 804 Dormak Premium Coated](https://static.fdocuments.in/doc/165x107/5f310fc44c56774f0654b1a6/untitled-2-3imimgcom3imimgcomdata3lkepmy-2025837dormak-dk-222-premium.jpg)