Manual eComStation 1
35
eComStation 1.0 Manual 2001, Mensys BV Chapter 1: Welcome This manual will try to ease the installation process of eComStation 1.0 onto your system. Please refer to it if you have questions or problems during your install. Especially important are the sections on LVM and the Preboot Menu. Make certain you understand how LVM functions before you make changes to your harddisk. This manual contains the following sections: Chapter 2: Installation Describes how to install eComStation using either CD#1 or CD#2 and how some problems can be avoided. Chapter 3: What's Next? Will talk about how to add support for several hardware items and will touch shortly on the installation of additional applications. Chapter 4: Getting Connected Explains briefly how to get connected to the Internet and your Local Network. Also contains a few tips on networking within a Windows Environment. Chapter 5: Getting Involved Describes some ways you can help to support the development and evolution of eComStation Appendix A: License Agreement Appendix B: Trademarks Contains Trademark notices and Acknowledgements Appendix C: LVM Describes in detail the usage of the LVM program Appendix D: Preboot Menu Explains the options available at the advanced boot menu when you start from eComStation CD#1 Appendix E: Troubleshooting Lists some frequently asked questions and answers. Consult this section if you have problems! Appendix F: Getting Support Points you to the available documentation on the several CD's. Appendix G: Coexisting with other OSes. Contains some tips on setting up eComStation alongside other Operating Systems. Chapter 1: Welcome 2
Transcript of Manual eComStation 1
eComStation 1.0Manual
2001, Mensys BV
Chapter 1: Welcome
This manual will try to ease the installation process of eComStation 1.0onto your system. Please refer to it if you have questions or problemsduring your install. Especially important are the sections on LVM andthe Preboot Menu. Make certain you understand how LVM functionsbefore you make changes to your harddisk.
This manual contains the following sections:
Chapter 2: InstallationDescribes how to install eComStation using either CD#1 or CD#2and how some problems can be avoided.
Chapter 3: What's Next? Will talk about how to add support for several hardware items and willtouch shortly on the installation of additional applications.
Chapter 4: Getting ConnectedExplains briefly how to get connected to the Internet and your LocalNetwork. Also contains a few tips on networking within a WindowsEnvironment.
Chapter 5: Getting InvolvedDescribes some ways you can help to support the development andevolution of eComStation
Appendix A: License AgreementAppendix B: Trademarks
Contains Trademark notices and AcknowledgementsAppendix C: LVM
Describes in detail the usage of the LVM programAppendix D: Preboot Menu
Explains the options available at the advanced boot menu when youstart from eComStation CD#1
Appendix E: TroubleshootingLists some frequently asked questions and answers. Consult thissection if you have problems!
Appendix F: Getting SupportPoints you to the available documentation on the several CD's.
Appendix G: Coexisting with other OSes.Contains some tips on setting up eComStation alongside otherOperating Systems.
Chapter 1: Welcome 2

Chapter 2: Installing eComStation
This chapter will describe in some detail the several installation optionsyou have and guide you step by step through the installation process ofeComStation.
Getting started
Your eCS package consists of three CD's:
CD #1 contains the eComStation installerCD #2 contains the IBM (Merlin Convenience Pak) installerCD #3 contains all of the bonuspak applications
Which Installation CD should I use?
If you are planning to install eComStation on your system and you wantto upgrade your existing OS/2 Warp 4, eComStation Preview 1,2 or 3installation, or if you have less then 64 MB of RAM in your system, youare advised to use CD#2 for the installation. If you are going to installeCS on an empty harddisk or volume (partition), it is advised to use themore convenient eComStation installer found on CD#1.
Start your installation
To start the installation process, the computer needs to boot from theinstallation CD. Insert CD 1 or 2 and hit the reset button or turn off yourcomputer and turn it on again. Some computers only scan the CD ROMfor a CD to boot from when they get a "cold boot". If your system bootssuccesfully from CD 1 or 2 you will be prompted with an option menu.CD#1 will let you choose between the normal boot (option 1) and theadvanced boot menu (option 2 - see D for more information). Thedefault is boot from harddisk (option 3). When booting from CD#2 youwill be presented with an option menu that will let you choose to bootfrom CD (option 1) or harddisk (option 2).With both CD's, you should make your choice within 10 seconds. If youdo not select an option within 10 seconds, your system will proceed withthe default action, which is to boot from harddisk.
If you do not see one of these option screens to boot, please refer tothe installation troubleshooting section in Appendix E
Chapter 2: Installation 3
If you are unable to boot from one of the installation CD's you will haveto create BOOT diskettes.
Creating boot diskettes from CD#1
1. Run makedisk.bat on a DOS based machine on which you haveCD ROM access. Or run makedisk.cmd on an OS/2 based machineon which you have CD ROM access. This will create a bootdisk setwith an advanced menu option. For more information about theadvanced boot menu, please read Appendix D.
2. Run mdnocsm.bat on a DOS based machine on which you have CDROM access. Run mdnocsm.cmd on an OS/2 based machine onwhich you have CD ROM access. This will create a set of bootdiskswithout an advanced option menu. This diskset should be sufficientfor computers with only IDE disk controllers.
3. Boot from CD#1 on a different computer. Wait for the desktop buildprocess to finish. In the "eComStation Install Program", select theoption menu and choose "Create Installation Diskettes". Then clickon the create button. After the process has finished you have a set ofdiskettes with the advanced boot menu. To remove the advancedboot menu from the disk, press the button config.sys. You can pressthe "Remove CSM" button. You will be prompted with a prebootscreen (for more information please see appendix D). If you do notneed to apply any changes, just hit enter. Any options you choosein this screen will be stored in the new config.sys on diskette #1.
Creating bootdiskettes from CD#2
1. Use a computer on which you have access to CD rom and runmakedisk.bat If you have access to a CD ROM on an OS/2machine you can run makedisk.cmd.
2. If you have a computer on which OS/2 runs you can also runecsmakedisk.exe from the root of the CD#2. When that programhas started select the option "Tools" and then "Create InstallationDiskettes", press the create button. When you have created the 3installation disks you can insert "installation disk 1" and press thebutton "config.sys". The window is divided in two parts. The upperwindow shows the drivers that are on the diskette and listed in theconfig.sys. You can disable drivers from the config.sys byclicking with the right mouse button on the device driver line you wantto disable. When you then answer yes to the question if you want toremove the driver, it will be 'remmed' out of the config.sys and thedriver will be removed from the disk, which creates space for possible
4 eComStation Manual

other drivers. You can add a driver by dragging and dropping it in thelower window (from a folder off the running system)
Step-by-step: Booting and installing from CD #1
If you want to enable USB support or other features, please refer to atAppendix D (preboot menu).
Features you select in the preboot menu will not only be used duringthe boot process but will also be added to the installation on yourharddisk.
When you have chosen between option 1 or 2 (advanced boot menu),eComStation will begin to boot. This will take about 2 minutes(depending on the speed of your CD ROM player). Wait for the desktopbuild process to finish. If no desktop appears, but a distorted screen ora trap screen (a black screen with numbers and letters on it) pleasecheck the following guidelines:
1. Do you have 64 MB or more then 64 MB of memory in your system?A minimum of 64 MB memory is required for the new installer towork.
2. Reboot the machine and select option 2 (advanced boot menu).Keep pressing the TAB until you reach the option "Legacy VGA",press the space bar to select this option. When selected pressenter. This way eComStation will use the legacy VGA driver for thefirst phase of the installation.
Installation ProgramIt is important you read the information displayed by the installationprogram, especially the introduction to LVM can be very useful. Seealso Appendix C: LVM. When you have finished, click on the option"Install eComStation" and click on the Start Installation button.
At the screen presented to you, you can select just a few settings.
For the best performance and wide range of video card support, select"Scitech Display Doctor". This is a video driver that supports manymodern video chipsets. You can further choose to install eComStationbase System and Multimedia. In most cases it is best to install both.
Click on next to proceed.
Chapter 2: Installation 5
Installation Volume selectionIf there is any partiton already present on you system whicheComStation can be installed, it will be listed on this screen. Click onthe button "Manage Volumes" to invoke LVM. When you have finishedusing LVM, press F3 to exit LVM and save the results. When you havechosen the USB option in the advanced bootmenu and start LVM, thereis a possibilty that you get the message that the partition table on"Physical Disk (x)" is damaged. If you have one HDD installed x will benumber 2. There is nothing wrong, you can ignore the message.
Remember to delete the bootmanager from your hard disk! If youpreviously installed the bootmanager from OS/2 Warp 4, pleasereinstall the bootmanager using the LVM utility. This is necesarrysince the older versions of bootmanager are not LVM aware.
If you want to install VoiceType (speech recognition) later on, pleasemake certain that your boot drive is at least 300 MB larger then what isadvised during the installation.
For some possible problems with LVM please refer to appendix C;LVM and appendix E: Troubleshooting, installation section.
Select to format the partition. Click on the Begin Format button. After asuccesfull format your system will start to copy files, this will takesomewhere between the 8 to 20 minutes (depending on the speed ofyour hard drive, CPU and hard disk). When the copying has finished,press the reboot button.
eComStation Installation - Second PhaseAfter the reboot you will be presented with a screen "eComStationInstallation - Second Phase". Please do not touch the desktop yet, youwill first have to continue with the installation process. You should selectthe options from top to bottom.
1) First check your screen resolution. Change the resolution if you want,the change will take effect on the next reboot.
2) The following selection will let you add a printer. If you have an USBprinter, please wait with the installation of that printer until theinstallation is finished.
3) As a third option you can run the IBM "selective install" utility to installa soundcard.
In NO case should you change the video listed! Just ignore thesetting, even if it is wrong. Nor should you touch the CD ROM options.
6 eComStation Manual
If the installer requests the CD rom with \OS2IMAGE you should(temporarily) insert eCS CD#2. 4) The fourth option is for TCP/IP and Netbios (file and printer sharing).Click on continue and make sure you read the instructions. Click oncontinue when finished.
No networkIf your computer does not have a networkcard installed, press Cancelthen OK to confirm.
Network - only TCP/IP If you do not want to share printers and files with a Windowsworkstation or access printers and files on an OS/2 or Windowsserver, choose TCP/IP only. Again, read the onscreen instructionscarefully! By pressing execute you will invoke an utility called MPTS.Click on Ok and choose to configure MPTS. Click once again onconfigure. Now select the networkcard which is in your computer. Insome cases your networkcard may not be listed because the chipsetis listed and not the manufacturer of your networkcard. If you cannot find the correct networkcard listed but you do have adiskette from your manufacturer with OS/2 drivers you can choose toOther adapters... Follow the instructions to add the driver. It may benecesarry to point to the exact location on your diskette, most of thetimes the OS/2 driver will reside in \NDIS2.When you found the correct NIC, select it and press on the buttonchange. In the window "stage 3" the name of the NIC will changeaccordingly. Then select the protocol "IBM OS/2 NETBIOS" in thestage 3 window and click on the remove button and confirm with aclick on yes. Repeat these steps for Netbios over TCP/IP. Click onOK to exit this program and confirm that changes are written to yourbootdrive.
Network - TCP/IP and Local NetworkingIf you want to use TCP/IP and share files and printers, please pushon Execute instead of the TCP/IP only button. Read the instructionsagain. Insert CD#2 and press on execute when finished reading.
Before pressing ANY button, UNSELECT the options TCP/IP andNetscape! Then click on next.
It is advised to configure the following screen from bottom to top.
TCP/IP
Chapter 2: Installation 7
The option TCP/IP services need only to be configured if you toconnect your computer via a networkcard in your Local Network.Select DHCP server if there is a server in your network that assignsyour computer with an IP address. If you have a small network, youusually do not have a DHCP server and you should manually assignan IP address and netmask. If you connect to an internet provider viamodem or ISDN card these options can be configured later.
File and Printer SharingIf you have selected to also install the file and printer sharing, youneed to fill in an userid and password. Please make certain you donot loose this information! The next option, most users can directlyput a green checkmark before. This option is only needed when youhave more then one NIC in your system. The last option at the top isimportant. The name given to system is as is shows up in yournetwork browser. This name must be unique!
Also assure the domain name is the same as your othereComStation / Windows (Workgroup name) machines if you want toshare files and printers between all machines.
If you keep Netbios over TCP/IP enabled and your machine alsodirectly connects to the internet, this may be a potential security risk.eComStation provides you with a built-in firewall, which you canconfigure with Zampa. Please consider enabling the firewall.
After the Network ConfigurationWhen you are finished, press the Install button, then click on OK.Your system will be shutdown. When your system says so to do so,press CTRL ALT DEL to restart.
At the next reboot the system will load the installer to install the Fileand Print Client. Please sit back and wait for the system to reboot.
When the eComStation desktop has started up again please read thescreen closely. If you do NOT want to share devices or printers thatare available on the computer you are installing eComStation on, donot check the box "replace NET START REQ with....". If you DO wantto share your resources with other machines in your Local Network,check this box.
Finishing your installationAfter you finished the Network configuration (if selected) you will beprompted by WiseMachine to enter the registration key of eComStation
8 eComStation Manual

and your name. Both are case-sensitive! You should have received yourregistration key by email and it is most convenient to save that key to afloppy disk, so you do not have to type it. You can read it from floppy bypressing Import From File. After succesful registration, please wait forthe desktopbuild process to finish.
Ready!This concludes the basic installation of eComStation. Please read on inChapter 3 about using the eCSGuides to install additional applications,supported hardware and other hints and tips!
Chapter 2: Installation 9
Step by Step: Installing from CD #2:
Before starting the installation, make sure that if you have the FAT32driver installed under Warp, you remove partfilt.flt from yourconfig.sys!
When you have booted from the CD you have the following options tocontinue the installation: ! press the ESC button on your keyboard, this will invoke the IBM
installer with the IBM IDE driver. ! press D, the IBM installer will be loaded with the Daniela IDE driver.
Please note that this driver will also be used when eComStation hasfinished installing. The Daniela driver is a good choice if you have alarge harddisk (more then 8 gigabyte) or a computer with an UltraATA 66 or Ultra ATA 100 controller. You will not have the option forthe Daniela driver if you are booting from diskettes created withmakedisk.cmd, makedisk.bat or ecsmakedisk.exe.
! Other options offered are to enable or disable hardware detection,please try these if you experience trouble booting from CD#2.
If you have never run the Logical Volume Manager on your systembefore, the installer will first start the Volume Conversion Utility (VCU)which will create compatibility volumes out of your existing partitions.For more information on volumes, LVM and VCU, refer to Appendix C:LVM. A reboot is required to activate the changes. Boot again from floppy orCD ROM.
You will now get to a textmode screen that welcomes you to theinstaller.
If there is no installable volume available, LVM will be shown (LogicalVolume Manager, see Appendix C)
When you create the installation volume, note that if you want to installVoicetype (speech recognition) later on, you require is 300 MB morespace than is advised during the installation.
If there is already an installable volume available, you can select thevolume to which you want to install.
10 eComStation Manual
If you have installed a bootmanager from Warp 4, please remove itand reinstall it! You need to this because older bootmanagers of OS/2are not LVM aware.
If you are performing an upgrade from a previous installation, you areasked to confirm the volume to which you want to install and if it needsto be formatted. Choose to NOT format the partition. The IBM installerwill now scan your system. If it detects a previously installed OS/2 Warp4, some components may be listed as not being supported or will beremoved. Most of these applications are part of the IBM BonusPak andcan be reinstalled via Wisemachine or the eCSGuides.
The system will request a reboot after files have been copied to yourharddisk. After this reboot, a desktop should appear. If you do not get agrahic user interface (the selective installer), but a black screen with atrap or a distorted screen please try the following:1. Reboot the machine. The moment you see the white little block in
the upper left corner on your screen with the text eCS1.00. Press thekey combination ALT-F1. Then press the button F2.
2. Wait for the command prompt. Then type setvga and press enter.After some activity the prompt should return.
3. Type exit and press enter. Your system will reboot with default VGAdrivers.
VideoWhen you arrive at the selective install screen, please check the option"Primary Display", since the IBM installer sometimes detects a wrongchipset (especially if you have an ATI video card).In most cases it is advisable to select Video Graphic Array (VGA) at thisstage of the install, not the GRADD version. Then install Scitech DisplayDoctor when the install of eComStation has completed. See Chapter 3;Video.Do not install your printer with the selective installer of IBM, but run theconversion utility afterwards (available on CD#3) which will let youselect more modern printers and uses a convenient Printer InstallationGuide. MultimediaMore modern soundcard support can be found in the MMeCS packageon CD#3. You can not use this package until you have finishedinstalling the eCS upgrade with the conversion utility.
After the selective install you will be prompted with two options selectedby default. Do not change these if you want to migrate your old desktopto your new installation!
Chapter 2: Installation 11
Network InstallationYou will now get to the network installation program.Filling in the data with your name, department and company is notrequired. (It will be used to generate some default values which can beeasily changed anyway).Click on next. You can choose four components:
1. File and Print Services. This enables you to share Printers anddirectories, files and hard disks, between OS/2 and Windowscomputers. If you do not have a local network, installing this option isnot necesarry.
2. TCP/IP. You need to install this protocol if you want to surf the web,via a networking card, modem, ISDN adapter etc. Normally youshould enable this option.
3. Netscape, keep this option marked, this is the webbrowser used ineComStation.
4. Tivoli Management Agent. You do not need this last option as aprivate home user. This is usely used in large businesses.
Click on next to configure the selected networking parts.
It is advised to configure the following screen from bottom to top.
TCP/IPThe option TCP/IP services need only to be configured if you to connectyour computer via a networkcard in your Local Network. Select DHCPserver if there is a server in your network that assigns your computerwith an IP address. If you have a small network, you usually do not havea DHCP server and you should manually assign an IP address andnetmask. Ask your network administrator if in doubt. If you connect toan internet provider via modem or ISDN card these options can beconfigured later.
12 eComStation Manual
File and Printer SharingIf you have selected to also install the file and printer sharing, you needto fill in an userid and password. Please make certain you do not loosethis information! The option at the top is important; the name given tosystem is as it shows up in your network browser. This name must beunique!
Also assure the domain name is the same as your other eComStationand/or Windows (Workgroup name) machines if you want to sharefiles and printers between all machines.
Continuing the installationAfter the network settings have been confirmed, the installer will start tocopy files. This will take some time and your computer will reboot a fewtimes. If you are migrating your previous configuration you will beprompted with a screen which contains two windows to check your oldconfig.sys and the new one. Review the proposed changes andmodify them where you think this might be required. When finsihedpress Save then Quit. In most cases all statements from the oldconfig.sys are imported correctly into the new one. After this yourautoexec.bat will be treated the same way. When you haveconfirmed the settings, the installer will continue to copy data to yourhard drive.
If your are upgrading a present installation and your computer remainshanging and you have selected the Daniela IDE driver, please checkAppendix E: Troubleshooting, installation section.
Final StepsAfter the installation has completed, you will see that on the next bootWiseMachine prompts you to register your copy of eComStation. Pleasedo so after which your system will reboot again.
Java 1.3You will then be asked if you would like to install Java 1.3 or not. It isadvisable to install Java 1.3 to a JFS volume for perfomance reasons. Ifyou do not yet have setup a JFS volume you might want to skip theinstallation at this stage and use the eCSGuide at a later moment toinstall Java 1.3.
Installation FinishedYou have now upgraded your system to eComStation code base ofversion 1.00 You will find your old desktop in a folder called PreviousDesktop. You can drag and drop applications from there to your newdesktop.
Chapter 2: Installation 13
Convert to eComStation Look and FeelTo get access to all of the bonuspak applications of eComStation, likeLotus Smartsuite, the new look and feel of the desktop, DesktopOn-Call and much more, you need to start convert.exe from CD 3. Ifyou have not received your eCS GA from Mensys, please downloadconvert.exe from http://www.ecomstation.com Insert CD#3 and open your drivesfolder, select your CD ROM drive(probably letter S:) and double click on convert.exe (located in theroot of the CD). Follow the instructions on the screen. The conversionutility requires an additional 60 MB of space on your bootdrive. Whenthe process has finished you will be asked to reboot.
WiseMachineWhen the machine has rebooted, you are once again asked to registereComStation through Wisemachine. This is an glitch in the upgradeprocess. After you succesfully registered, wait for the desktop update tobe finished.
If your registrationkey was not accepted, WiseMachine will simply exitwithout notice, this may be confusing. You can try to register again byrestarting WiseMachine.
Your system will now be at the same level as when installeddirectly from CD#1
Ready!This concludes the basic installation of eComStation. Please read on inChapter 3 about using the eCSGuides to install additional applications,supported hardware and other hints and tips!
14 eComStation Manual
Chapter 3: What's Next?
After finishing the initial installation, described in Chapter 2, you will bepresented with what are called 'eCSGuides' that are meant to easilyinstall some of the many applications included with eComStation. Selectwhich applications you wish and follow the instructions on the screen toinstall them.
If you would like to invoke the eCSGuides at a later moment, you can doso by starting WiseMachine and selecting the menu option: Utility ->Selective Install -> eCS Additional Packages.
eComStation contains some features which are not included in thenormal install process. Following are some hints on installing support forspecific hardware.
Video
If you have chosen to install VGA you may want to upgrade to a moreadvanced videodriver, which is provided by the means of "ScitechDisplay Doctor" (SDD). This driver supports almost every modern videochipset on the market today and offers excellent performance byenabling the (2D) hardware acceleration of these chipsets.It is installed onto your system already, if you selected Scitech DisplayDoctor during the eComStation installation from CD#1.To add it manually to your system, you will need to copy\SOFTWARECHOICE\ScitechSE\SDDSE705.exe from CD#3 to anempty directory on your harddrive. Execute the file, and it will selfextract there. When this is finished, from an eCS command prompt type"setup sdd" and hit enter. Now SDD will be installed on yourcomputer.
If the refreshrate of your screen is not optimal, you may have to addyour specific monitor to the SDD supported monitor list. You can do thisby importing the Windows PnP info of your monitor. To do so, yourequire the monitor 'inf' file from your manufacturer. Switch to thedirectory \SDD on your boot drive and run the utility gamon from thecommand line with the option import and then the filename of the INFfile of your monitor. For example gamon import a:\monitor.inf.
Chapter 3: What's Next? 15
Printer
To install a locally connected printer in eComStation, you can use thePrinter Installation Guide, availble in the Printers folder within theeComStation folder on your desktop. Alternatively you can use a PrinterTemplate from the templates folder and drag and drop it to the Printersfolder. When you want to install a Network Printer, you will have toinstall it via the template drag and drop method, since the Printer Guideonly supports local printers. The installed drivers contain support for over 1000 printer models andare up to date to spring 2001. Additional drivers can be found in thedirectory \DRIVERS\PRINTERDRIVERS\ on CD#3.
Multimedia
eComStation contains the MMeCS multimedia package which addssupport for some multimedia devices. For more information about MMeCS package 1 and audio drivers, open\MMECS\MANUAL\HTML\MMPAK.HTML from CD#3 with Netscape.
To add MPEG I and Video Disc playback support (not DVD filmplayback support) to Netscape and eCS, please copy the filenspip30.exe from the directory \SOFTWARECHOICE\NETSCAPE\PLUGIN of CD#1 to an emptydirectory on your HDD. Start nspip30.exe which will then selfextract.When it is finsihed extracting you should start install.exe.
USB Support
The following will describe several USB devices that are supported byeComStation and some hints to make them work.If you require more information on eComStation or OS/2 and USBplease refer to the excellent website http://www.os2world.com/usb/
If you have selected USB when installing from CD#1 (via the advancedboot menu) the following drivers will have been loaded:
BASDEV=USBUHCD.SYSBASEDEV=UBSD.SYS /REQ:USBUHCD$ /i13BASEDEV=USBUHCD.SYSBASEDEV=USBHID.SYS
16 eComStation Manual
These are the basic USB support drivers
They support motherboards with an Intel or VIA chipset.If you do not have an Intel or VIA chipset on your motherboard you mayneed to install the so called USBOHCI USB driver. You can find thisdriver on CD#1 in \Softwarechoice\USB\basic\.Install it by copying the file usbohci.exe to an empty directory onyour hard disk and start the file to begin extracting. Please read theaccompanying readme.txt on how to upgrade your USBconfiguration.
There is a chance that when you booted from CD or diskettes yourUSB mouse will not work. The USB mouse should work when youboot from the hard disk the first time after installation.
BASEDEV=USBMSD.ADD (Mass storage driver for ZIP drives, external disk drive and otherdevices that confirm to the USB mass storage standard)
BASEDEV=USBCDROM.ADD(Support for HP USB Cdwriter 8200 and Sony Spredds CDRW)
device=x:\os2\boot\usbkbd.sysdevice=x:\os2\boot\usbmouse.sys
(Support for USB keyboards and mice).device=x:\os2\boot\usbcom.sys
(Support for USB Rockwell based modems)
If you have upgraded your system via CD#2 your config.sys willcontain the following lines:
rem BASDEV=USBUHCD.SYSrem BASEDEV=UBSD.SYS /REQ:USBUHCD$ rem BASEDEV=USBHID.SYSrem BASEDEV=USBMSD.ADD rem device=x:\os2\boot\usbkbd.sysrem device=x:\os2\boot\usbmouse.sysrem device=x:\os2\boot\usbcom.sys
To enable USB support open the config.sys in the root of yourbootdrive and remove the word REM from all the lines.
USB Network AdapterseComStation has support for USB Ethernet apapters, which are basedon the Kawsaki KL5KUSB101 chipset. You can find this driver on CD#1in de directory \SoftwareChoice\USB\ether, copy the fileusbether.exe to an empty directory on your hard disk and execute it.
Chapter 3: What's Next? 17
Please read the accompanying readme.txt! The following USBethernet network cards have been tested:! 3COM USB Network Interface! D-Link Corp. USB Ethernet Adapter (DSB-650)! ADS Technologies Inc. USB Ethernet Adapter (USB-10BT)
USB AudioThe drivers to enable USB audio support can be installed by insertingCD#2. Start minstall from the folder eComStation -> System Setup ->Install Remove. Select \OPTIONS\USBAUDIO on CD#2 as sourcedirectory.
USB PrinterseComStation also supports USB printers. eCS does not support allprinters attached to an USB port. To install USB printer support insertCD#1 and read the documentation in the directory\SoftwareChoice\USB\print. Please note that besides the driverwhich needs to be installed in the config.sys also a so called PDRfile needs to be installed, which enables the USB port to be accessedby the printerspooler.
USB CD RW devicesIf you installed eComStation from CD#1 and selected USB support, youwill have Read/Write access to USB connected CDRW devices. If youhave used CD#2 to upgrade your installation and want to enable USBCDRW and USB mass storage support you should:! study the directory \SoftwareChoice\USB\stor of CD#1! install OS2CDROM.DMD from CD#3, which can be found in the
directory \DRIVERS\IBM-IDE-LATEST.
PCMCIA Support
Most laptops/notebooks nowadays have one or more slots for so calledPCMCIA card / PCCard devices. These devices should have OS/2drivers if you would like to use them with eComStation. But firstly, youneed to enable support for the PCMCIA chipset it self. eComStationships with "Play at Will" which provides that support. To install Play AtWill, insert CD#3 and switch to the directory \DRIVERS\PCCARD andcopy the file pccarden.exe to an empty directory on your harddisk.Execute this file to let it selfextract. Then run the programPCMINST2.EXE and follow the instructions on the screen.
18 eComStation Manual

Please see the readme.txt on the CD in the directory\DRIVERS\PCCARD for the a list of supported PCMCIA chipsets.
Miscellaneous
FAT32 supportIf you have FAT32 partitions on your hard drive you can enable supportunder eComStation by using the driver available on CD#3 in thedirectory \THIRDPARTY\Fat32\. Please read the document fat32.txt!You are NOT required to install partfilt.flt or replaceos2dasd.dmd. If you have rebooted your computer and the driver isloaded you will get read and write access to a FAT32 volume when thatdrive has a drive letter assigned under LVM.
Iomega ZIP drivesSupport for parallel port Iomega ZIP drives can be found on CD#3 in thedirectory \DRIVERS\IBM-IOMEGA-PP-ZIP. Copy the file ppzip.exeto an empty directory on your hard disk and start it. See theaccompanying documentation file for installation details.
Network AdaptersSupport for additional network adapters can be found on CD#3 In thedirectory \DRIVERS\NICPAK-IBM-DDPAK.
IBM TrackPointOn CD#2 you will find the directory \OPTIONS\TP4 this is theTrackPoint Support version 1.0. Run INSTALL from this directory toenable this feature.
Chapter 3: What's Next? 19
Chapter 4: Getting Connected
Internet
The Internet is a huge network of computers, itself incorporating manythousands of individual subnetworks known as intranets (LAN's). TheInternet is the largest network of computers in the world and it'simportance as a medium to communicate and interact with other usershas become very clear in recent years.
eComStation is very well capable to act as a client system to severalservices available on the Internet, such as (e)mail, webbrowsing, IRC('chatting'), ftp (downloading files), telnet (remote console access) andmuch more. eComStation by default installs Netscape Communicatorfor webbrowsing and some other tasks (mail, news, ftp). More clientsare available, either as installed application or as seperate download.(for an overview please have a look at the 'Internet' folder on youreComStation desktop).
Before you are able to access the Internet, you will have to configurehow your connection will be made. The list below gives an overview ofthe possibilities available in eComStation.
! Modem (analogue/ISDN)! Cable! ADSL! LAN
General Information RequiredBefore you start to configure your Internet Access, make sure you havethe following information at hand:
! Your ISP dial in telephone number (in case of modem/ISDN)! The username/password required to login to your ISP! Your ISP nameserver IP address (most of the time this are two IP
addresses, Primary DNS and Secondary DNS)! In case of LAN connection the IP address of the gateway PC! Additionally you may want to configure a Proxy Server (within your
browser)
Modem
20 eComStation Manual
If you use a so called 'serial modem' to access the Internet you have toconfigure one of two options, which are explained below.
Internet Dial-upFirstly, you can use the default installed 'Internet Dial-up' which can befound in the Dial-up Tools folder (within the Internet folder on thedesktop)
To be able to use it, you are required to use 'Add Entry' to define anew dialup connection.
Login Info tab: Most fields of this application are self-explanatory, and you can pressF1 at any time to get additional information. Please note that the'default' of SLIP as connection type is obsolete and almost everyprovider nowadays supports PPP, which is preferred, as it uses a moreefficient means of communication with the ISP. Connect Info tab: Most ISP's provide you with an IP address dynamically, so you wouldnot need to fill the fields in Server Details (you can leave the MTUsetting at its default of 1500). The Domain Nameserver should be filled with the IP address of thePrimary DNS of your ISP. The Domain Name can be filled in with the domain of your ISP, typicallythe part that comes after the @ sign in your email address (for exampleyour-isp.com)Your Hostname can be left empty or filled in with your userid. You should leave the remaining settings at their default value.Server Info tab: None of these fields are required and they are mainly used for obsoleteapplications that you will probably not use anyway, so you may leavethese empty. If you want to fill them out, please consult your ISPdocumentation for the proper values.Modem Info tab: This page contains the physical configuration of your modem. There isan extensive list of predefined modems and if yours isn't listed you arewell of using the 'default Hayes compatible' setting (most modems areHayes compatible).Please take note of which com-port your modem is connected to. If youuse an external modem this is most likely com1 or com2, internalmodems usually reside at com4. Most default settings can be used, the notable exception is theport-speed. Please set this to 57.600 baud. Setting it higher will not
Chapter 4: Getting Connected 21
have a positive effect, but a lower setting will seriously slow down yourconnection.
InJoyInJoy is a text-mode internet dialler with highly advanced features and isthe recommended way to connect to the Internet using eComStation.Every license of eComStation contains a full version of: InJoy Extended!
A short list of interesting features:
! Dial On Demand (InJoy will dial in to the Internet if you request adocument which is not locally available)
! NAT (Network Address Translation) supports up to five PC's on yourLAN to share one internet connection
! Autostart modules - you can configure InJoy to automatically start aprogram or sequence of programs once the internet connection isavailable.
Installing InJoyYou can install InJoy after the basic installation of eComStation hasfinished by using the eCSGuide that is called 'eCS BonusPak'
Click the Install button to start the installation. After installationcompletes, a folder InJoy has been created in your Installed Softwarefolder and a shadow of InJoy has been placed in the Dial-Up tools folderwithin the Internet folder.
Double Click the InJoy icon to start the program. (Since it is a textmodeapplication you will see a eCS commandprompt open up. You are stillable to use your mouse to make menu selections though)
Configuring InJoyTo configure InJoy for a dial-up connection to the Internet you will firsthave to create an account. You can do this by pressing 'new' in the righthalf of the main screen. Give the account a name (other than 'Default')and fill in your userid and password provided by your ISP. Pressing 'Ok' takes you to the main configuration screen. Note that mostdefault values are okay, InJoy is intelligent enough to pickup thenameserver and other IP addresses from your ISP. If you want you canstill fill the nameserver IP address out, of course. If need be, you can letInJoy 'learn' a connection by scripting the login process. Please refer tothe extensive online documentation, available in the InJoy folder onyour desktop.
22 eComStation Manual

One notable selection is 'Auto Connect' - when you enable thisfeature, the connection will be created at the moment you start InJoy,this can be very usefull for unattended login procedures when combinedwith Dial On Demand (Available at the 'Disconnect Actions'screen)The other interesting feature, as described above, is the NAT option.Select this if you would like to share your connection with other PC's inyour LAN. For information how to configure this feature properly, pleaserefer to the online documentation of InJoy, or the website at:http://www.fx.dk/injoy/
ISDN adaptersIf you use an ISDN adapter to connect to the Internet, you can also usethe above described programs when: ! you use an external adapter, connected to your serial port ! you install and configure cFos/2, which is a driver that converts your
ISDN device to a 'normal' serial modem. For more information oncFos, please consult their website: http://www.cfos.com/
Otherwise you will need to install and configure ISDNPM, which alsoships with eComStation in a limited (but useable) eCS version. The fullISDNPM features NAT (like InJoy does) and highly advanced options.The version included with eComStation has no time limit but it is limitedto one ISDN or PPPoE session via IP-Interface (slx) without NAT, Filtersand Accounting. For more information, or installation, please refer to theThirdParty eCSGuide available from: WiseMachine -> Utility ->Selective Install -> eCS Additional Packages -> Thirdparty.
Cable ConnectionsCable Internet Access is by far the easiest to use and setup ineComStation. All that is required is that you install and configure theTCP/IP stack as described in Chapter 2. You can setup your IPconfiguration in detail by opening the Internet -> TCP/IP -> TCP/IPConfiguration (local) from your desktop.
Note that some Cable Internet Service Providers use a serial modemto connect you to the Internet and use a special login-'phone'-numberyou can use. If this is the case with your provider, use Internet Dial Upfrom Internet -> Dial Up Tools or InJoy as described above, instead.
(A)DSL(A)DSL modems can be used with eComStation when your provideruses the PPPoE protocol. To enable this, you will need to install InJoy
Chapter 4: Getting Connected 23
PPoE from the WiseMachine -> Utility -> Selective Install -> eCSAdditional Packages -> eCS BonusPak eCSGuide.
Please note that InJoy PPoE installs a driver to your system which willnot work under all conditions. Refer to the online documentation tomake sure you understand the issues involved.
The InJoy PPPoE Client is designed to offer reliable PPP over Ethernet(PPPoE) connectivity. For the full description and the complete list offeatures, refer to the product homepage: http://www.fx.dk/pppoe/This version is fully functional and licensed for the use witheComStation.
Some Internet Service Providers use another protocol to give youaccess to the Internet, the main one being PPPTP. For example KPNMxStream in Holland uses this protocol. Currently the only way you canaccess the Internet through PPPTP is by purchasing InJoy FireWallProfessional and requesting special PPPTP drivers from F/Xcommunications. For more information we refer to F/X:http://www.fx.dk/firewall/
LAN
Using your Local Area Network to access the Internet is possible whenthe TCP/IP protocol is installed and configured as described in Chapter2. The main thing you need to know is whether your LAN uses DHCP toassign IP addresses to workstations, or that it uses static IP addresses.Consult your network administrator if in doubt. You can setup your IPconfiguration in detail by opening the Internet -> TCP/IP -> TCP/IPConfiguration (local) from your desktop.
Local Networking
eComStatiom has very excellent support for other networking operatingsystems (NOS) besides IBM LAN Server (or Warp Server), such asNovell and Banyan. It also supports several networking protocols.TCP/IP is the most popular these days, but eComStation offers NetBios(NetBEUI), NetBios over TCP/IP (TCPBEUI), IBM IEEE 802.2, Netwareand Banyan. The most important feature of all this networking support isthat the requester's execute concurrently. Meaning that you can runthem all at the same time!In the present eComStation architecture, this networking is referred toas Multi-Protocol Transport Services. The support is provided by drivers
24 eComStation Manual

called requester's. The requester's are specified in the config.sys fileand loaded at boot. Network communication is provided to and from therequester's and protocol's using NDIS (Network Driver InterfaceSpecification). eComStation ships with these requesters: IBM LAN,3270 Emulation, Netware (via ThirdParty eCSGuide) and IBM TCP/IP.These requester's also have their associated protocol drivers asdescribed previously (TCP/IP, 802.2, etc.). A very extensive online book"MPTS Configuration Guide" has been placed in the Online Informationfolder in the Help Center of your desktop.When properly configured, eComStation is able tocommunicate/network with: ! Windows 95/98/Me! Windows NT/2000! Linux (Samba)! Netware! and more
Networking Interoperability: Windows
You will need to install File and Printer Sharing to interoperate with aMicrosoft Network. The eComStation client is very easy to setup tointeroperate with a Microsoft Network if you know the tricks involved. The "File and Print Client Guide" is placed in the Online Informationfolder of the Help Center when you installed File and Printer Sharing. Itcontains a brief section on interoperability with Microsoft Networks. Thethree protocols generally needed to interoperate with MicrosoftNetwork's are TCP/IP, NetBios, and NetBios over TCP/IP. The NetBiosprotocol is used locally on a subnet because it contains no routinginformation. This also means that NetBios cannot see past a routerwithout help. NetBios over TCP/IP can see past a router and thisprotocol is generally used at corporate sites where large segmentednetworks are the norm.
Windows NTAn eComStation client can take advantage of Microsoft Network in oneof two ways. The eCS client can logon to the NT domain or logonlocally. However, browsing is severely limited on a Microsoft Network ifthe servers have been configured with the default settings (more on thisin a later section). Either method will achieve the desired results, to usethe resources on a Windows NT server domain. One precaution, yourlocal eCS logon must exactly match the logon ID on the NTdomaincontroller. In addition, NT server allows lower case in passwordswhereas eComStation does not.
Chapter 4: Getting Connected 25
In a segmented network architecture where the eComStation client isseparated from the NT server via a router, NT domain authentication isimpossible with the default configuration of the eCS client. IBM hasdescribed this issue in Technical Document #7775533. IBM TechnicalDocument #3724433 describes some useful NT administrator tips. Inorder for the eCS client to be authenticated by the NT domain controllerthe IP address will have to be added to the RFCBCST.LST file.Other NT resources would be added to the RFCNAMES.LST file. Thesefiles may be updated using MPTS or a text editor may be used. After theRFC files have been modified, the RFCADDR command can be run froman OS/2 window which will update the system and prevent the clientfrom having to be restarted.
Windows: Network BrowsingeComStation clients are unable to browse available resources onMicrosoft Networks due to a LAN Manager parameter calledlmannounce. This parameter defines the response to LAN Manager 2.xbrowser broadcasts. The default response is to ignore thesebroadcasts. However, the "net view" command can show resourceswhen the resource is specified as follows: "net view \\resource". Ifthe command "net view" is used, nothing will show except yourworkstation or other OS/2 Servers/Workstations on your network. TheWindow's servers and workstations will have to have their defaultsettings changed as outlined below to enable browsing from OS/2 andeComStation.
Windows for Work Groups:The parameter "lmannounce=yes" will have to be added in the [network]section of the system.ini file.
Windows 95/98/Me:The parameter "LMAnnounce" is in located in Network settings underFile and Print sharing properties.
Windows NT 4.0 Server:In Network settings, Services, Server, select the Make BrowserBroadcasts to LAN Manager 2.x clients at the bottom of the dialog page.Windows NT Workstation (possibly Windows 2000 also)Users will have to manually modify the Lmannounce entry in theregistry. The entry is as follows:\HKEY_LOCAL_MACHINES\System\CurrentControlSet\Services\LanmanServer\Parameters
26 eComStation Manual

This setting will have to be changed from the default of 0 to 1. Theregedt32.exe program will have to be used for the above procedure.It is located in \WINNT\SYSTEM32.
To enhance the performance of an eComStation workstation in aWindows NT Network you can change the default settings of MAXINand MAXOUT from 1 to 3 in eComStation, either by using MPTS ordirectly in \IBMCOM\PROTOCOL.INI
Chapter 4: Getting Connected 27
Chapter 5: Getting Involved
eComStation allows the user to get involved on several levels. Userscan adopt programs for WiseMachine, and allow them to be easilydeployed and write new programs or port programs to eComStation.This chapter will briefly discuss this and hand you the tools to getstarted.
Adopting ProgramseComStation allows you to easily install programs by deploymentthrough WiseMachine. To provide the information to enableWisemachine to deploy a program we designed the adoption process.This process takes you through the steps to gather essential informationabout a program to allow WiseMachine to deploy it. Two kinds ofinformation are gather during the process. First some generalinformation about the program and second information how to install it.Usually the following information is required for a succesful adoption ofa program:
A script that can destroy the desktop objects and deregisterany WPS classes used by the program
desktop objectremoval script
A script to create the icons for the program and register anyWPS classes it needs (see below for instructions)
desktop objectcreation script
To which files does the program need read/write accessread/write accessWhat changes have to be made to the startup.cmdstartup.cmd
What changes have to be made to config.sys (set statements,device drivers etc.)
config.sysInstallation information
Your e-mail address or information to contact youContact infoHow can you buy this programHow to buy
Why did you choose this program and not a competingprogram
WhyWhat does the program doWhatName of the company or author of the programAuthor/Companythe versionnumber of the current versionVersionthe full name of the programProgram name
General information
28 eComStation Manual

This list may sound a bit intimidating, but the process is usually easierthan it looks like at first sight. Of course if you run into trouble we areglad to help you complete the adoption process. For the process youwill need the following programs: The program you want to adopt, or afully functional demo version; Object Desktop (or its trial version);Graphical File Compare. If you don't already have Object Desktop orGraphical File Compare you can find links to download (trial) versions atthe end of the section. Before you start adopting a program you shouldverify that the program isn't already adopted by someone else, andstate your intention to adopt the program by registering the program foradoption. You can do this on the special adoption website. Theinformation for the general section of the adoption program can usuallybe extracted from the manual or readme's included with a program. Forthis section it is especially important that you verify that you use thelatest version available, and that you clearly identify the version youuse.
To complete the information about the installation process there is aspecial procedure which makes it easier to get the correct information,this procedure consists of the following steps:
1. Install Object Desktop (only Object Package is needed) andGraphical File Compare
2. Make a copy of your config.sys and startup.cmd3. Install the program you want to adopt4. Use Graphical File Compare to find the changes in your
config.sys and startup.cmd, and save these changes to a file.5. Create a Object Package of the program folder or objects on you
desktop6. Save the Object Package as a REXX script and save the resources
(icons/background bitmaps) too. 7. Zip up the REXX script and the resources
These seven steps provide you with all the information aboutconfig.sys changes, startup.cmd changes and desktop objectcreation. Usually we can extract the information to create the desktopobject removal script from the desktop object creation script, so you donot have to worry about that.To compose the list of files to which read/write access is needed isusually a bit more complicated, but normally the files to which read/writeaccess is needed are only the configuration files and data files. Toidentify them you should consult the documentation included with theprogram or have a look at the directory listings. Common filenameextensions for configuration files are .cfg, .ini, .conf, .dat. It is
Chapter 5: Getting Involved 29
important to verify is whether a program needs access to the centralOS/2 ini files, usually named os2.ini and os2sys.ini. To verify thatyou could inspect these files with the Registry Editor, which you can findin the System Setup folder. If you can not get a comprehensive list itmight be necessary to contact the author of the program or use aspecial sniffer daemon.When you have gathered all the information you bundle everything in azip file, and upload it to the adoption program ftp site. If the program youadopted is free for distribution you can include the installed version ofthe program also, if it is a commercial program, or distribution isinhibited in any other way you should only upload the information filesand the files created with Object Package.Some time after you uploaded the information you will receive apreliminary version of the WiseMachine deployment scripts for youadoption. You are kindly asked to test this script, and report back theresults. When you find everything to work properly the WiseMachinescripts are ready for release and will be placed on the eComStationwebsite, or will be included in a WiseMachine update.
Links:Register a program for adoption:http://www.ionet.net/~jimburke/ecs/3rdparty.htmAdopted programs:http://www.ionet.net/~jimburke/ecs/list.htmAdaption process documentation:http://www.touchvoicecorp.com/ecsadopt.htmlGraphical File Compare: http://hobbes.nmsu.edu/pub/os2/util/disk/os2gfc.zipObject Desktop Trial Version: http://hobbes.nmsu.edu/pub/os2/util/wps/odp-demo.zip(expires in 30 days)
NB: Eventually the adoption program will move to the eComStationwebsite at http://www.ecomstation.com/ if the links above haveexpired, please find the information at this site.
30 eComStation Manual
Development of new programs
Included with eComStation are the basic tools needed to develop newprograms. On the CD#3 you will find the Toolkits for Java (both the Java1.1.8 and Java 1.3 versions) and the OS/2 Developers Toolkit (version4.5). Also included with the system is the powerful REXX language,which can be used to make text mode applications, or with someextensions can also be used to develop PM applications (see below). Ifyou want to get started on development it is advisable to install thetoolkits, which will give you extensive information on all aspects ofprogramming for eComStation. If you are not interested in nativeapplication development, but only Java development, installation of theJava Toolkit would suffice.There are no compilers or RAD (Rapid Application Development) toolsincluded with eComStation, but several good compilers and RAD toolscan be found on the internet, we will list a few of them here:
C/C++ Compilers:! EMX GCC, the GNU Compiler Collection, including the EMX runtime
libraries that implement part of the standard UNIX functionality! OpenWatcom, work in progress, the OpenSourced version of the
famous compiler from Watcom
Pascal Compilers:! Virtual Pascal, a free highly Borland Pascal/Delphi compatible
compiler with a Borland Pascal like development environment! EMX GNU Pascal, part of the GNU Compiler Collection mentioned
above.! Free Pascal: A free, Turbo Pascal 7 compatible compiler
BASIC Interpreters:! QBasic, DOS version is included with eComStation. QBasic is an
BASIC interpreter only, you can't compile to a executable! Liberty Basic, a commercial BASIC for Windows and OS/2, which can
also produce standalone programs
REXX extensions:! VREXX: REXX extensions to develop PM applications with REXX! DrDialog, RAD development tool for REXX which allows you to
develop PM applications, available on the IBM Developers' Toolbox.
Chapter 5: Getting Involved 31
Next to these there are several commercial development tools likeVisualAge for Java, VisualAge C++, Simplicity for Java, VisPro REXX,etc, and there certainly are more free-, and shareware products outthere which we did not include in this list. A good place to start lookingfor more free-, and shareware products is the /pub/os2/dev directoryof the Hobbes archive.
When you develop your own program you can of course use theAdoption Process described earlier in this chapter to create an easymethod for installation. Otherwise you could use one of the otherInstallers available for eComStation. A popular free installer foreComStation is the "WarpIN installer", which can be found on theNetlabs pages.
Links:EDM/2 programmers magazine: http://www.edm2.com/Netlabs: http://www.netlabs.org/Hobbes ftp archive: http://hobbes.nmsu.edu/OpenWatcom: http://www.openwatcom.org/Virtual Pascal: http://www.vpascal.com/Free Pascal: http://www.freepascal.org/Liberty BASIC: http://world.std.com/~carlg/basic.htmlIBM Developers' Toolbox:http://www.developer.ibm.com/devcon/
32 eComStation Manual

Appendix A: License AgreementeComStation End User License Agreement READ THE TERMS AND CONDITIONS OF THIS LICENSE AGREEMENTCAREFULLY BEFORE INSTALLING AND USING THIS COMPUTERSOFTWARE AND THE ACCOMPANYING USER DOCUMENTATION (THE"PROGRAM"). THE PROGRAM IS COPYRIGHTED AND LICENSED (NOTSOLD). BY INSTALLING THE PACKAGE CONTAINING THE PROGRAM,YOU ARE ACCEPTING AND AGREEING TO THE TERMS OF THIS LICENSEAGREEMENT. IF YOU ARE NOT WILLING TO BE BOUND BY THE TERMSOF THIS LICENSE AGREEMENT, YOU SHOULD PROMPTLY RETURN THEPACKAGE TO YOUR DISTRIBUTOR AND YOU WILL RECEIVE A REFUNDOF YOUR MONEY. THIS LICENSE AGREEMENT REPRESENTS THE ENTIREAGREEMENT CONCERNING THE PROGRAM BETWEEN YOU ANDSERENITY SYSTEMS INTERNATIONAL, AND IT SUPERSEDES ANY PRIORPROPOSAL, REPRESENTATION, OR UNDERSTANDING BETWEEN THEPARTIES. NOTE: IF YOU ARE USING A PREVIEW 1 COPY OF THIS SOFTWARE, YOUARE REQUIRED TO INSTALL THE GENERALLY RELEASED PRODUCT. ATTHAT TIME, NO FURTHER USE OF THE PREVIEW SOFTWARE ISAUTHORIZED. USERS OF PREVIEW 2.x AND 3.x MAY REQUESTEXTENSIONS REGARDING CONTINUED USE OF THE PREVIEW PRODUCT.
1. License Grant: Licensor hereby grants to you, and you accept, a nonexclusivelicense to use the Program and the computer programs contained therein inmachine readable, object code form only (collectively referred to as the"Software", see Information About Your Software, Section 12 of thisdocument), and the accompanying User Documentation, only as authorized inthis License Agreement. A license for each copy of eComStation is required foreach computer owned, leased, or otherwise controlled by you; or in the event ofthe inoperability of that computer, on a backup computer selected by you.Neither concurrent use on two or more computers nor use in a local areanetwork or other network is permitted without separate authorization and thepayment of other license fees. In addition to your primary computer, eComStation may be stored on secondarymachine, such as a home or portable computer, provided that eComStation isnot in active use on both machines at the same time. This would expresslyprohibit running Desktop on Call to access eComStation on the primarycomputer from the secondary machine, a home or portable computer. You agree that you will not assign, sublicense, transfer, pledge, lease, rent, orshare your rights under this License Agreement without permission fromSerenity Systems International. You agree that you may not reverse assemble,reverse compile, or otherwise translate the Software. A program is considered in use when it resides in memory or is otherwisestored in the machine. A program stored on a network server, solely for the
Appendix A: License Agreement 33
purpose of being distributed to other machines is not considered to be in use.But your use may not exceed the total number of users authorized. You maytransfer all your rights and obligations under this license to another party. Totransfer such rights and obligations, you must transfer an unaltered copy of thislicense agreement. Upon loading the Software into your computer, you may retain the ProgramMedia for backup purposes. In addition, you may make one copy of theSoftware on a second set of media for the purpose of backup in the event theProgram media is damaged or destroyed. You may make one copy of the User'sManual for backup purposes. Any such copies of the Software or the User'sManual shall include Licensor's copyright and other proprietary notices. Exceptas authorized under this paragraph, no copies of the Program or any portionsthereof may be made by you or any person under your authority or control.
2. Licensor's Rights: You acknowledge and agree that the Software and theUser's Manual are proprietary products of Licensor protected under U.S.copyright law and other countries as appropriate. You further acknowledge andagree that all right, title, and interest in and to the Program, includingassociated intellectual property rights, are and shall remain with Licensor. ThisLicense Agreement does not convey to you an interest in or to the Program, butonly a limited right of use revocable in accordance with the terms of thisLicense Agreement.
3. License Fees: The license fees paid by you are paid in consideration of thelicenses granted under this License Agreement. Payments must be made toSerenity Systems International, or designated distributors and resellers fromwhom you acquired eComStation. You agree to notify Serenity Systems, or itsdistributors or resellers, and pay any applicable charges if you change thenumber of users.
4. Term: This License Agreement is effective upon your installation and use ofthis package and shall continue until terminated. You may terminate thisLicense Agreement at any time by returning the Program and all copies thereof,save one copy which may be kept for your archive, and extracts therefrom toLicensor. Licensor may terminate this License Agreement upon the breach byyou of any term hereof. Upon such termination by Licensor, you agree to returnto Licensor the Program and all copies and portions thereof.
5. Limited Warranty: Licensor warrants, for your benefit alone, for a period of90 days from the date of commencement of this License Agreement (referred toas the "Warranty Period") that the Program media in which the Software iscontained are free from defects in material and workmanship. Licensor furtherwarrants, for your benefit alone, that during the Warranty Period the Programshall operate substantially in accordance with the functional specifications inthe User's Manual. Serenity Systems does not warrant uninterrupted orerror-free operation of eComStation. If during the Warranty Period, a defect in the Program appears, you may returnthe Program to your distributor for either replacement or, if so elected bydistributor, refund of amounts paid by you under this License Agreement. You
34 eComStation Manual

agree that the foregoing constitutes your sole and exclusive remedy for breachby Licensor of any warranties made under this Agreement. EXCEPT FOR THEWARRANTIES SET FORTH ABOVE, THE PROGRAM, AND THESOFTWARE CONTAINED THEREIN, ARE LICENSED "AS IS," ANDLICENSOR DISCLAIMS ANY AND ALL OTHER WARRANTIES,WHETHER EXPRESS OR IMPLIED, INCLUDING, WITHOUTLIMITATION, ANY IMPLIED WARRANTIES OF MERCHANTABILITYOR FITNESS FOR A PARTICULAR PURPOSE.
6. Limitation of Liability: Licensor's cumulative liability to you or any otherparty for any loss or damages resulting from any claims, demands, or actionsarising out of or relating to this Agreement shall not exceed the license fee paidto Licensor for the use of the Program. In no event shall Licensor be liable forany indirect, incidental, consequential, special, or exemplary damages or lostprofits, even if Licensor has been advised of the possibility of such damages.THE LIMITATION OR EXCLUSION OF LIABILITY FOR INCIDENTALOR CONSEQUENTIAL DAMAGES, MAY BE CONTROLLED BY LOCALREGULATION, SO THE ABOVE LIMITATION OR EXCLUSION MAYNOT APPLY TO YOU.
7. Trademark: eComStation, eComServer, WiseMachine, WiseManager,WiseServer, and WiseClient are trademarks of Licensor. No right, license, orinterest to such trademark is granted hereunder, and you agree that no suchright, license, or interest shall be asserted by you with respect to suchtrademark.
8. Governing Law: This License Agreement shall be construed and governed inaccordance with the laws of the applicable jurisdiction.
9. Costs of Litigation: If any action is brought by either party to this LicenseAgreement against the other party regarding the subject matter hereof, theprevailing party shall be entitled to recover, in addition to any other reliefgranted, reasonable attorney fees and expenses of litigation, as appropriateunder applicable jurisdiction.
10. Severability: Should any term of this License Agreement be declared void orunenforceable by any court of competent jurisdiction, such declaration shallhave no effect on the remaining terms hereof.
11. No Waiver: The failure of either party to enforce any rights granted hereunderor to take action against the other party in the event of any breach hereundershall not be deemed a waiver by that party as to subsequent enforcement ofrights or subsequent actions in the event of future breaches.
Appendix A: License Agreement 35
12. Information About Your Software: eComStation includes a license to use the following products witheComStation.
" IBM OS/2 Warp V4, IBM Product Number 31L0480MNote: eCS upgrade product users are required to supply their own validlicense for OS/2 V4
" IBM OS/2 Warp Convenience Pak, IBM Product Number AS6Y5NAIBM SMP feature when purchased as an option or as part ofeComStation Professional, Product Number AS6Y9NA
" IBM Desktop on Call for OS/2, IBM Product Number AS6YBNA " IBM Lotus Smart Suite for OS/2 R1.6, IBM Product Number AS76KNA " WiseMachine from Serenity Systems International " Applause and the TWAIN Consumer Pack from Solution Technologies,
Inc." InJoy 2.3 Professional Dialer and InJoy PPPoE from F/X Communications" HOBLink X/11 for OS/2 from HOB Software
36 eComStation Manual
Appendix B: Trademarks
eComStation is packaged on CD using Info-ZIP's compression utility. Theinstallation program uses UnZip to read zip files from the CD. Info-ZIP'ssoftware (Zip,UnZip and related utilities) is free and can be obtained assource code or executables fromhttp://www.cdrom.com/pub/infozip/
The following terms, are trademarks of SSI or the TouchVoice Corporation inthe United States, or other countries, or both:! Managed Client! eComStation! eCS! WiseManager! WiseServer! WiseClient! WiseMachine! WiseTalker! Drag-n-Drop Deployment
The following terms, are registered trademarks of the IBM Corporation in theUnited States, or other countries, or both:! IBM! LAN Distance! OS/2! WebSphere! WIN-OS/2
The following terms are trademarks of other companies:! Approach, Freelance Graphics, Lotus, Lotus Notes, Lotus Organizer,
Lotus SmartSuite, and WordPro are trademarks of Lotus DevelopmentCorporation in the United States, other countries, or both.
! Tivoli is a trademark of Tivoli Systems Inc. in the United States, othercountries, or both.
! Java and all Java-based trademarks and logos are trademarks of SunMicrosystems, Inc. in the United States, other countries, or both.
Microsoft, Windows, Windows NT, and the Windows logo are trademarks ofMicrosoft Corporation in the United States, other countries, or both.
Other company, product, and service names may be trademarks or servicemarks of others.
Appendix B: Trademarks 37
Acknowledgements
Parts of this document are based on the kind contributions of the followingpeople:
Paul Jarvinen (Artwork)Peter Moylan (WiseMachine)Oliver Rick (SCSI)Alexander Taylor (LVM)Robert Thomas (Windows Network - [email protected])Jack Troughton (Preboot Documentation)
eComStation includes a number of software packages from a number ofindividuals, and companies. We are very grateful of their contributions.Check http://www.ecomstation.com/ for a complete list ofcontributors.
Abbotsbury Software has been so kind to license theirHauppage drivers so these could be included witheComStation. These drivers allow for the use ofHauppage TV boards to function under eComStation. For any commercial request regarding these driversplease contact:
Abbotsbury Software Ltd.West Yard Barn tel: (+44)-(0)1305-871543West Street fax: (+44)-(0)1305-871688Abbotsbury web: http://www.abbotsbury.comDorset DT3 4JT email: [email protected] Kingdom
MainConcept GmbH has been so so kind to license their OS/2 AVI codecsfor inclusion with eComStation.
For more info on MainConcept, please have a look onthe following webaddress:http://www.mainconcept.de
38 eComStation Manual

Appendix C: LVM
This section takes you through the LVM program and explores its userinterface.
LVM has two display modes, or 'views': the Logical View and thePhysical View. These are described in detail below. You may switchbetween views by pressing the 'F5' key on your keyboard.
The Logical View
When the LVM program is run, it starts up in what is called the LogicalView. This is a display mode which shows all of the logical volumes thatcurrently exist on your system.
Here is an example of what the Logical View looks like (the actualvolumes and partitions shown may vary):
Appendix C: Logical Volume Manager 39
As the picture shows, the Logical View is divided into two display areas:an upper area, and a lower area.
The upper area, hereafter referred to as the volume list, lists all of thelogical volumes that exist on the system. (If the system has novolumes, then this list will be empty.)
A volume is a logical drive, represented by a "drive letter".Consequently, the list of volumes includes not only hard disk volumes,but anything which currently has a drive letter assigned. This includesCD-ROM drives, Zip drives and similar devices, and even sharednetwork drives, if available.
Each volume has a number of attributes, and these are shown by thecolumns in the volume list:
Logical Volume This column indicates the volume's name and drive letter. The nameis a short text label, up to a maximum of 20 characters, which youmay choose yourself. If you decide not to give it a name of your own,then LVM will choose a default name. These names are mainly justlabels for your convenience. However, if Boot Manager is installed,then these names will also be used to display the volumes on theBoot Manager menu.
After the name, the volume's drive letter is displayed. The drive letteris very important, as it is the name that the volume will have whenyou are using eComStation. You may assign any letter to anyvolume as you choose, unless that letter is already being used.
You may change a volume's drive letter, but if you do, you shouldmake certain that any programs installed on the system which usethat drive are also updated to be aware of the new letter. Since thiscan be a painstaking process, changing a volume's drive letter onceit has been set is not generally recommended.
If the drive letter is changed, the old drive letter disappears from thedisplay, and the new letter appears slightly to the left. This is a visualcue used to indicate that the letter has been changed since LVM wasstarted.Volumes which correspond to CD-ROM drives have an asterisk andan arrow next to the drive letter (' *-> '). This is used to indicate thatthe volume does not actually have a fixed drive letter, but will simply
40 eComStation Manual
use the next letter available. The letter shown is the one currentlybeing used, which may change if that letter is assigned to a differentvolume.
Type This column indicates whether the volume is a compatibility volumeor LVM volume.
Status This indicates whether a volume is startable, bootable, installable, ornone of these.
File System Indicates the type of file system which the volume is using. LVM itselfdoes not create or alter file systems. This column simply reportswhich file systems are in use, if any.
Size (MB) This column indicates the total size of the volume, in megabytes(Mb). This size should be equal to the total size of all partitions in thevolume.
Individual volumes within the list may be selected by using the up anddown arrow keys on your keyboard. The currently-selected volume isindicated by a coloured 'selection bar'.
Throughout LVM, you may choose from a set of options relevant to thecurrently-selected item by pressing the 'Enter' key. This will cause anoption menu to appear.
In this case, selecting a volume and pressing 'Enter' will bring up thevolume options menu. (For more information, see the section onvolume options.) The lower display area, referred to as the volume partition list, lists thepartitions that correspond to the currently-selected volume. Every volume consists of either a single partition (if it is a compa- tibilityvolume), or a set of partitions (if it is an LVM volume) which may spanmultiple drives (this is one of the major advantages of LVM!)
The volume partition list displays the following attributes for eachpartition:
Disk Partition This column indicates the partition's name. Like the volume name (inthe volume list), the partition name is a short text label of up to 20characters, which you may choose yourself. If you decide not to giveit a name of your own, then LVM will choose a default name. These
Appendix C: Logical Volume Manager 41
names are only used within the actual LVM program, and are purelyfor your convenience.
Size (MB) This column indicates the size of the partition, in megabytes (Mb).
Disk NameThis column indicates the name of the physical disk on which thepartition is located.
Specific partitions within the volume partition list may be selected usingthe keyboard. To select a partition, you must first select the volume towhich it belongs. With the desired volume selected, press the 'Tab' key,and the volume partition list will become 'active'. A selection barappears in the volume partition list whenever it is active, allowing you toselect partitions within the list by using the up and down arrow keys. Toreturn focus to the volume list, press the 'Tab' key again.
Pressing 'Enter' when an item in the volume partition list is selectedwill cause the volume partition options menu to appear.
The Logical View allows you to work with logical volumes, and to viewand rename the partitions within those volume; but it does not permitany significant manipulation of partitions, or the disks on which theyreside. In order to work with disks and partitions, you will need to switchover to the Physical View.
Use the 'F5' key to switch views.
42 eComStation Manual

The Physical View
The Physical View does for physical disks what the Logical View doesfor logical volumes. It allows you to view all disks and partitions presentin the system, and to manipulate them in a number of ways.
Like the Logical View, the Physical View is divided into upper and lowerdisplay areas.
The upper area, referred to as the disk list, lists all the physical disksthat exist on the system.
The disk list displays the following attributes for each disk present:
Physical Disk This column indicates the disk's number and name. The numberrepresents the disk's physical identity within the computer.The disk name, like volume and partition names, is a short text labelof up to 20 characters. LVM gives each disk a default name, but youare free to change this name to a more descriptive one of yourchoosing. These names have no real meaning to the system, and are purely foryour convenience.
Appendix C: Logical Volume Manager 43
Size (MB)This indicates the physical disk's total size, in megabytes.
Free Space Total: This column indicates the total amount of free space (that is,space which is not part of any partition) available on the disk. Thesize is given in megabytes. Largest: This column indicates the size of the largest contiguousblock of free space on the disk. If there is only one block of freespace, then this value will be the same as that shown under the'Total' column.
As in the Logical View, the disk list has a 'selection bar' which allowsyou to select a disk from within the list, using the up and down arrowkeys. Pressing the 'Enter' key will cause the disk options menu toappear.
The lower display area, referred to as the disk partition list, lists allpartitions that exist on the currently-selected disk. It also shows blocksof free space.
The disk partition list displays the following attributes for each partitionon the current disk:
Disk PartitionThis column displays the name of each partition. As usual, the nameis a short text label of up to 20 characters. If you do not assign thepartition a name, LVM will give it a generic default name, usuallyconsisting of the letter 'A' and a number, enclosed in squarebrackets. This column also indicates blocks of free space. Free space may berecognized by the fact that only the 'Disk Partition' and 'Size' columnshave values. Free space blocks always have the name 'free space'followed by a number, enclosed in square brackets. The numberindicates the relative position of the free space block on the disk, ifthere is more than one such block.
Size (MB) This column indicates the size of the partition or free space block, inmegabytes.
Type This column indicates whether the partition is a primary or logicalpartition.
Status This column shows the current status of the partition. The possiblevalues are 'available' and 'in use'.
44 eComStation Manual

Logical Volume This column indicates the name of the volume to which the partitionbelongs, if any.
To select a partition, you must first select the disk on which it exists.With the desired disk selected, press the 'Tab' key, and a selection barwill appear in the disk partition list, allowing you to select partitionsusing the up and down arrow keys. To return focus to the disk list,press the 'Tab' key again.
Pressing 'Enter' when a partition is selected will cause the diskpartition options menu to appear.
Creating an installable volume In order to install eComStation, you need to have at least one empty,visible compatibility volume available on your hard disk.
If you do not already have a suitable volume ready to installeComStation, you will need to create one.
Creating a volume may seem like a complicated procedure. To acertain extent, it is. Managing hard disk partitions is not a trivial taskunder any circumstances, and the fact that volume management offersmany powerful features unavoidably adds to the potential complexity.
Note: If you have already created an empty volume for the purpose ofinstalling eComStation (or from a preview installation), then youshould not need to create another one.
Tip: An excellent step by step guide is available in the online helpduring installation, please consult it if you need to perform harddisk orpartition management. You can also view this document directly fromCD from the directory: \ecs\books\lvmhelp.inf
Appendix C: Logical Volume Manager 45
General Considerations
Make sure you have your harddisk layout the way you want it, beforeyou install eComStation. The use of partitioning tools, likePartitionMagic of PowerQuest, FIPS, or others should be prevented if atall possible after you have installed eComStation.
Under eComStation, instead of using standard disk partitions to arrangeyour hard disks into logical drives, you use volumes.
Note: the eComStation Preview and the IBM MCP installer use a toolto automatically "tag" all available partitions with a LVM "fingerprint". Acompatibility volume is simply a partition which has been tagged inthis way. The fingerprint is used by LVM to store extra informationspecific to volume management. This tool is called VolumeConversion Utility (VCU) and is known to cause trouble on someconfigurations. That is why the eComStation installer does not invokethis tool automatically. This requires that you create the volumesyourself with LVM.
Operating systems which do not "understand" logical volumes willsimply continue to treat compatibility volumes as partitions in thetraditional sense.
However, if non-LVM-aware software which performs partition-level diskmanagement is used, then this "fingerprint" may be inadvertentlyerased. Such programs include the "FDISK" utilities from most otheroperating systems, and also software such as Partition Magic fromPowerQuest. For this reason, it is strongly recommended that you donot use such software on your system after installing eComStation.
If you must do so, then please read the following information carefullyfirst.
If your system does not contain any special "LVM volumes" (as opposedto simple compatibility volumes), then the use of such programs is notlikely to cause permanent data loss. In all probability, however,eComStation will not be able to boot from the affected disk drive untilthe LVM "fingerprints" are recreated. To do this, it will be necessary toboot the system off the eComStation CD-ROM or recovery diskettes,run LVM, and manually convert the partitions back into volumes. Oncethis has been done, your volumes should be fully restored andfunctional, with no loss of data.
46 eComStation Manual
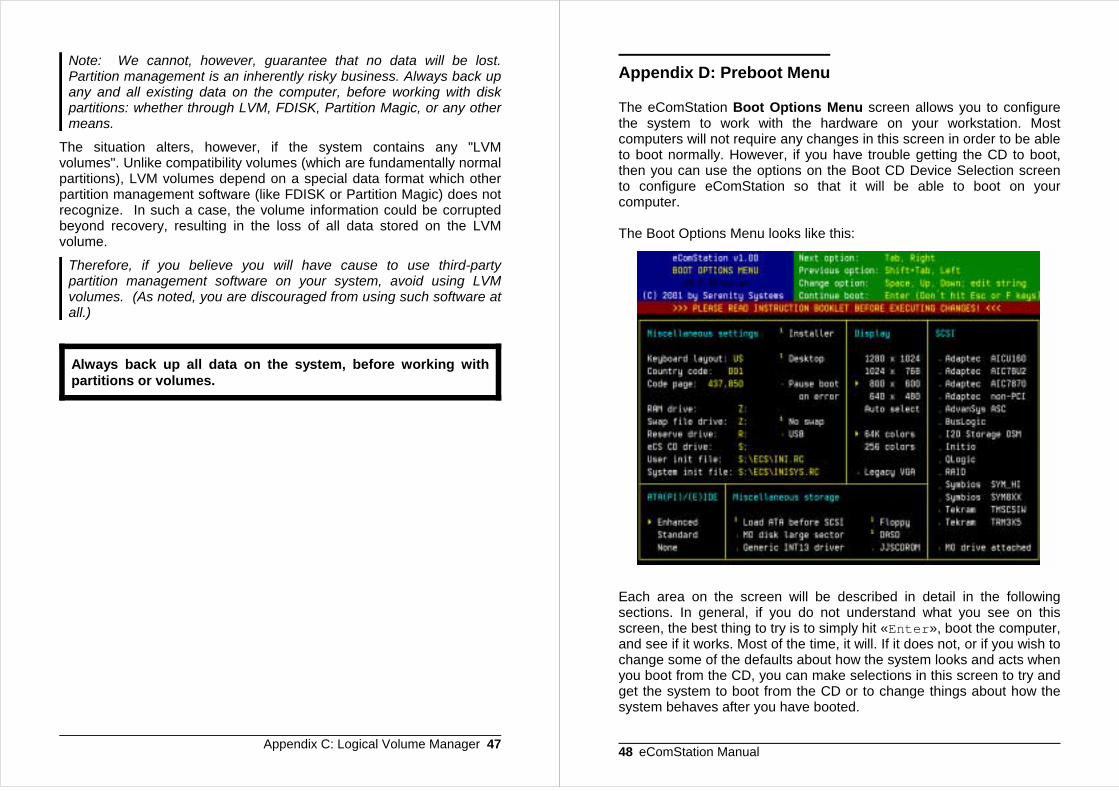
Note: We cannot, however, guarantee that no data will be lost.Partition management is an inherently risky business. Always back upany and all existing data on the computer, before working with diskpartitions: whether through LVM, FDISK, Partition Magic, or any othermeans.
The situation alters, however, if the system contains any "LVMvolumes". Unlike compatibility volumes (which are fundamentally normalpartitions), LVM volumes depend on a special data format which otherpartition management software (like FDISK or Partition Magic) does notrecognize. In such a case, the volume information could be corruptedbeyond recovery, resulting in the loss of all data stored on the LVMvolume.
Therefore, if you believe you will have cause to use third-partypartition management software on your system, avoid using LVMvolumes. (As noted, you are discouraged from using such software atall.)
Always back up all data on the system, before working withpartitions or volumes.
Appendix C: Logical Volume Manager 47
Appendix D: Preboot Menu
The eComStation Boot Options Menu screen allows you to configurethe system to work with the hardware on your workstation. Mostcomputers will not require any changes in this screen in order to be ableto boot normally. However, if you have trouble getting the CD to boot,then you can use the options on the Boot CD Device Selection screento configure eComStation so that it will be able to boot on yourcomputer.
The Boot Options Menu looks like this:
Each area on the screen will be described in detail in the followingsections. In general, if you do not understand what you see on thisscreen, the best thing to try is to simply hit «Enter», boot the computer,and see if it works. Most of the time, it will. If it does not, or if you wish tochange some of the defaults about how the system looks and acts whenyou boot from the CD, you can make selections in this screen to try andget the system to boot from the CD or to change things about how thesystem behaves after you have booted.
48 eComStation Manual

Please note that selections made in the "Boot Options Menu" will beused to configure the installation which will be created on yourharddrive.
Navigating the eComstation Boot Options Menu
The controls you use to change the various settings on the screen arethe arrow keys, the «Tab» key, and the «Spacebar». Once you haveconfigured the devices, you can use the «Enter» key to continue theboot. Here is a brief description of each of these controls:
! «Tab»: or «Right-Arrow»: Use either of these keys to move to thenext field.
! «Shift+Tab» or «Left-Arrow»: Use either of these keys to moveto the previous field.
! «Spacebar», «Up-Arrow», and «Down-Arrow»: Use these keys tomodify the value of the currently selected field. Fields that use acheckmark to select whether a particular option is on or off can betoggled by using the space bar. When there are several options thatare available in a field, you can scroll through them using the «Left»and «Right» arrows.
! Use the «Enter» key to continue booting once you have configuredthe setup to your satisfaction.
The Configuration Options Available
Miscellaneous settings
There are three groups of options in this area of the screen. The firstallows you to configure the International options of eComStation, suchas which keyboardlayout you are using, which codepage you are usingand which country you are in. The second set of options allows you toselect which drive you would like to use for your swap partition, if any,and where you would like the system initialization files to be stored. Themain reason for being able to modify these settings is to make sure yoursystem can succesfully boot from CD. If you have more than one CDdevice in your computer for example, you should change the eCS CDDrive, User init file and System init file settings all to read T: (if you putthe eCS boot CD in the second drive). Please experiment with thesesettings when you get an error 'cannot operate harddrive'during the CD bootprocess.
International SettingsAppendix D: Preboot Menu 49
There are three options in the International Settings section of theMiscellaneous area of the screen. They are as follows:! Country Code: This option lets you select the number that
represents your country of origin. There is a list available of allcountries and their country codes in the online documentation. If youdon't know your country code, select the default, and look up yourcountry code after you have reached the desktop by typing "helpcountry" at an eCS command prompt. Most of the time, the countrycode is the same three digit number as the one used for your countryin the international phone system.
! Keyboard: This option lets you select which keyboard layout you willbe using. If you do not know the code of the keyboard you are using,then boot the system and type 'help keyb' at an eCS commandprompt, and click on the 'layout' link in the command reference.You will see a complete list of all the keyboard layouts available tothe system.
! Codepage: You can use this option to select which codepage youwish the system to use. If you are not sure which codepage youwould like to use, select the default and then type 'help codepage'at an eCS command prompt to see a complete list of all thecodepages that are on the system.
System ConfigurationThe following options allow you to customise the operation ofeComStation as a system while it is booted from CD.
! Ram drive: this is the driveletter that will be assigned to the RAMdrive from which the CD will boot the eComStationInstall/Maintenance system. Obviouslym this letter should not alreadybe assigned in your computer, that is why the default value is theletter Z:
! Swap file drive: This setting controls which drive the swap file will bestored on. It defaults to the RAM disk created by the system when itboots up, so as to avoid the extremely unlikely possibility ofdamaging any existing system on the hard disk. However, if you wish,you can point the system to a disk on the hard drive. This isespecially useful on computers with 64 MB RAM or less. Note: Youneed to have your harddisk LVM enabled to use this feature.
! Reserve drive: This controls some of the drive letter assignmentseComStation will use when booted from the CD. The default is to usethe RESERVEDRIVELETTER setting to force the CD-ROM to driveR: and to use drive Z: as the ramdisk for certain parts of the system.
50 eComStation Manual
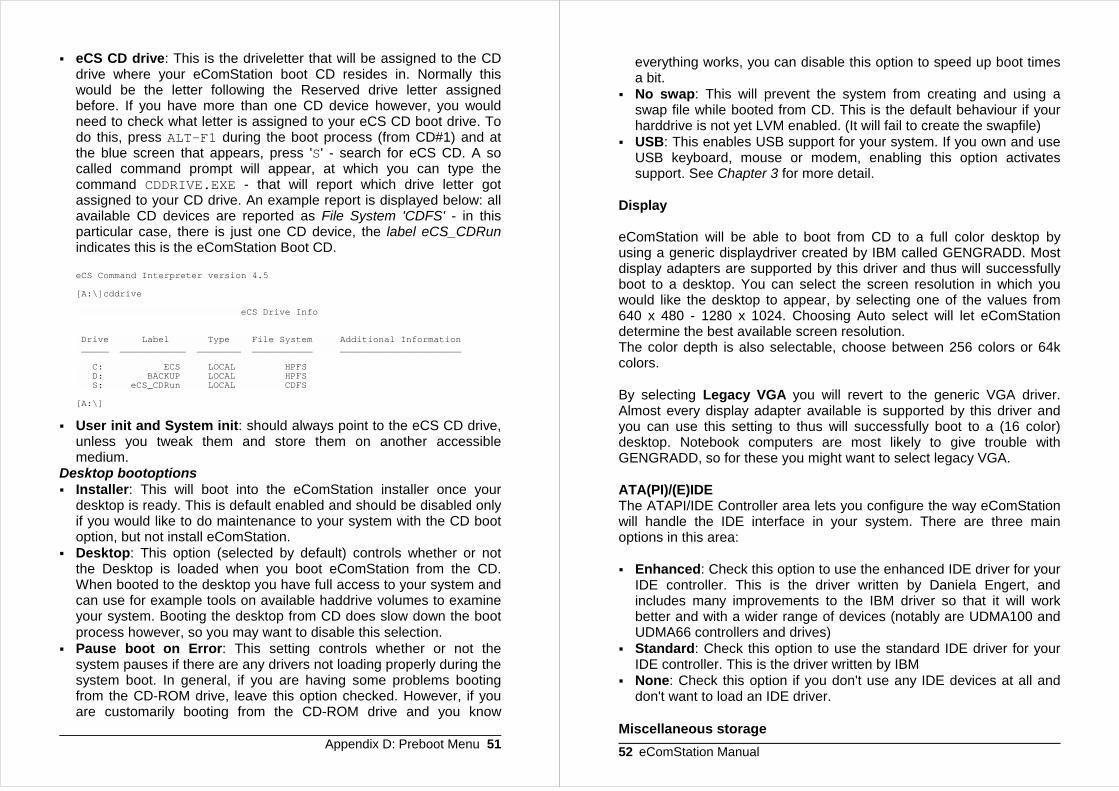
! eCS CD drive: This is the driveletter that will be assigned to the CDdrive where your eComStation boot CD resides in. Normally thiswould be the letter following the Reserved drive letter assignedbefore. If you have more than one CD device however, you wouldneed to check what letter is assigned to your eCS CD boot drive. Todo this, press ALT-F1 during the boot process (from CD#1) and atthe blue screen that appears, press 'S' - search for eCS CD. A socalled command prompt will appear, at which you can type thecommand CDDRIVE.EXE - that will report which drive letter gotassigned to your CD drive. An example report is displayed below: allavailable CD devices are reported as File System 'CDFS' - in thisparticular case, there is just one CD device, the label eCS_CDRunindicates this is the eComStation Boot CD.
eCS Command Interpreter version 4.5
[A:\]cddrive
eCS Drive Info
Drive Label Type File System Additional Information _____ ____________ ________ ___________ ______________________
C: ECS LOCAL HPFS D: BACKUP LOCAL HPFS S: eCS_CDRun LOCAL CDFS
[A:\]
! User init and System init: should always point to the eCS CD drive,unless you tweak them and store them on another accessiblemedium.
Desktop bootoptions! Installer: This will boot into the eComStation installer once your
desktop is ready. This is default enabled and should be disabled onlyif you would like to do maintenance to your system with the CD bootoption, but not install eComStation.
! Desktop: This option (selected by default) controls whether or notthe Desktop is loaded when you boot eComStation from the CD.When booted to the desktop you have full access to your system andcan use for example tools on available haddrive volumes to examineyour system. Booting the desktop from CD does slow down the bootprocess however, so you may want to disable this selection.
! Pause boot on Error: This setting controls whether or not thesystem pauses if there are any drivers not loading properly during thesystem boot. In general, if you are having some problems bootingfrom the CD-ROM drive, leave this option checked. However, if youare customarily booting from the CD-ROM drive and you know
Appendix D: Preboot Menu 51
everything works, you can disable this option to speed up boot timesa bit.
! No swap: This will prevent the system from creating and using aswap file while booted from CD. This is the default behaviour if yourharddrive is not yet LVM enabled. (It will fail to create the swapfile)
! USB: This enables USB support for your system. If you own and useUSB keyboard, mouse or modem, enabling this option activatessupport. See Chapter 3 for more detail.
Display
eComStation will be able to boot from CD to a full color desktop byusing a generic displaydriver created by IBM called GENGRADD. Mostdisplay adapters are supported by this driver and thus will successfullyboot to a desktop. You can select the screen resolution in which youwould like the desktop to appear, by selecting one of the values from640 x 480 - 1280 x 1024. Choosing Auto select will let eComStationdetermine the best available screen resolution.The color depth is also selectable, choose between 256 colors or 64kcolors.
By selecting Legacy VGA you will revert to the generic VGA driver.Almost every display adapter available is supported by this driver andyou can use this setting to thus will successfully boot to a (16 color)desktop. Notebook computers are most likely to give trouble withGENGRADD, so for these you might want to select legacy VGA.
ATA(PI)/(E)IDEThe ATAPI/IDE Controller area lets you configure the way eComStationwill handle the IDE interface in your system. There are three mainoptions in this area:
! Enhanced: Check this option to use the enhanced IDE driver for yourIDE controller. This is the driver written by Daniela Engert, andincludes many improvements to the IBM driver so that it will workbetter and with a wider range of devices (notably are UDMA100 andUDMA66 controllers and drives)
! Standard: Check this option to use the standard IDE driver for yourIDE controller. This is the driver written by IBM
! None: Check this option if you don't use any IDE devices at all anddon't want to load an IDE driver.
Miscellaneous storage52 eComStation Manual

! Load ATA before SCSI: Check this option if you have both IDE andSCSI devices in your system and are booting from an IDE CD-ROM.If you have a mixed IDE and SCSI system and are booting from aSCSI CD-ROM, then make sure this option is unchecked. If you try toboot your computer and it doesn't work, changing this option isprobably the first thing you should try.
! MO disk large sector: This setting is required for (large) MOdevices/disks with sector sizes other than 512 bytes. Refer to yourMO manual to find out if you require this.
! Generic INT13 driver: Use the BIOS to access your harddrive. Thisdriver will only make drives available that do not are not supported byany other driver in the system. It will not use harddiskspace above8.4 GB, even when you have more available. This driver is rarelyneeded.
! Floppy: Load floppy drive support for diskettedrives of 360 kB to 2.88MB
! DASD: This is a required setting. Disabling it will prohibit access toyour local drives. Obviously you should not disable this driver. (Thesetting is redundant)
! JJSCDROM: JJSCDROM is a replacement CD-ROM file systemdriver, and supports some of the more recent Microsoft Joliet formatsnot supported by the IBM driver. If you are having trouble accessingsome CDs while in eComStation, try using this driver to see if itimproves the ability to use those CD's
Appendix D: Preboot Menu 53
SCSI Support
Many SCSI controllers will work normally with default settings. However,there are some types of SCSI controllers that can create problems.Most notably, these devices tend to either be Adaptec, LSI, or Tekramcontrollers. If you have a SCSI controller in your computer and arehaving trouble getting the system to boot, find out what kind of controlleryou have and select the appropriate driver for your controller. Here is alist of the options listed, the physical driver and the hostadapters theysupport:
Advansys: ABP-3925, ABP510, ABP5140,ABP5150, ABP5142, ABP542, ABP742,ABP752, ABP842, ABP852, ABP920,
ASC.ADDAdvansys ASC
Adaptec: AHA-174x, AHA154x,APA-1460, AVA-150x, AVA-/AHA-151x,AHA-152x, AHA-153x, AVA-1825,AVA-2825, AHA-274xA/AT/W,AHA-284xA, AHA-274xTDTC: DTC-329xTekram: DC-300B, DC-320, DC-380,DC800/B, DC-820/B, DC-880/B
AIC7770.ADDAHA174X.ADDAHA154X.ADDAHA152X.ADD
Adaptecnon-PCI
Adaptec: APA-1480, AVA-2904CD,AHA-2910/B/C, AHA-2915C,AHA-2920C, AHA-2930/B/C/CU/U,AHA-2940/AU/U/U Dual/UW/UWDual/UW Pro/W,AHA-2944UW/W,AHA-3940/AU/AUW/AUWD/U/UW/UWD/W,AHA-3944AUWD/UWD,AHA-4944UW/W, AVA-2902E,AVA-2904, AVA-2906Asus: PCI-AS2940UW, PCI-SC300OEM: AIC-7850, AIC-7855, AIC-7856,AIC-7860, AIC-7870, AIC-7880, AIC-7895
AIC7870.ADDAdaptec 7870
Adaptec: AHA-2940U2B/U2W,AHA-2950U2B, AHA-3950U2B/U2D,AHA-2930U2OEM: AHA-2940U2, AIC-7890,AIC-7891, AIC-7896, AIC-7897
AIC78U2.ADDAdaptec 78U2
Adaptec: AHA-29160/LP/N,AHA-39160/DOEM: AIC-7892, AIC-7899
AICU160.ADDAdaptec U160Supported Host AdaptersDriverMenu Option
54 eComStation Manual
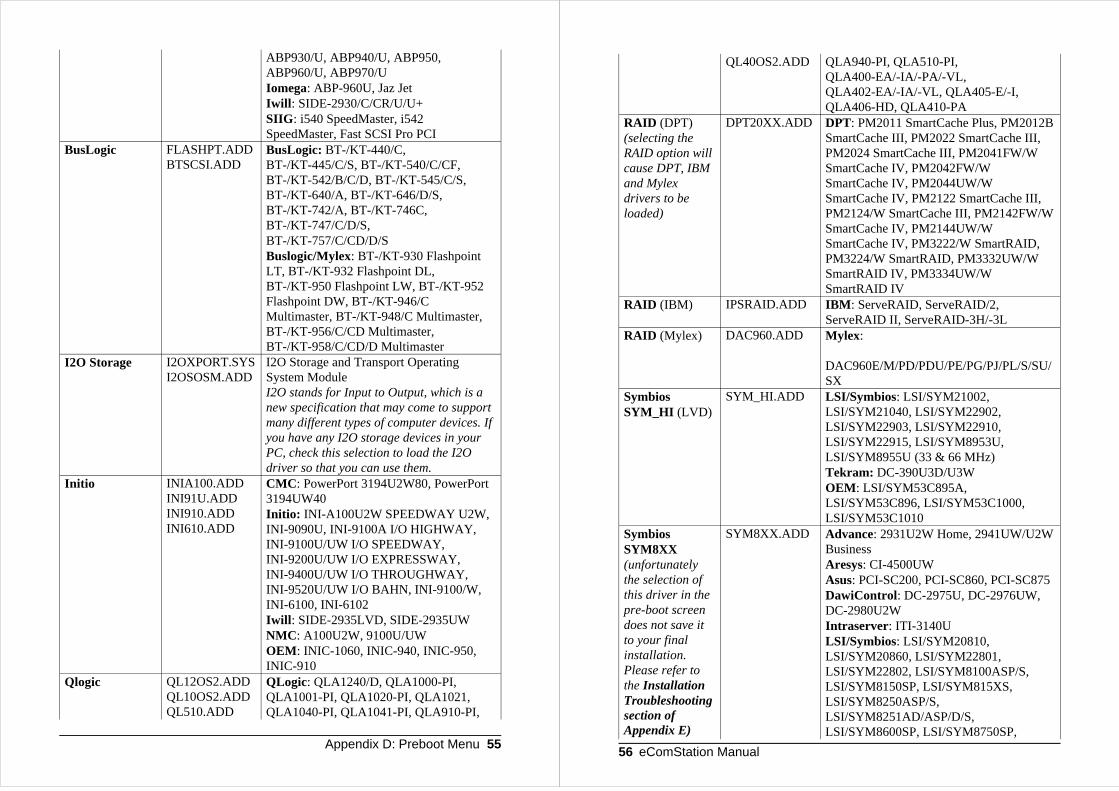
QLogic: QLA1240/D, QLA1000-PI,QLA1001-PI, QLA1020-PI, QLA1021,QLA1040-PI, QLA1041-PI, QLA910-PI,
QL12OS2.ADDQL10OS2.ADDQL510.ADD
Qlogic
CMC: PowerPort 3194U2W80, PowerPort3194UW40Initio: INI-A100U2W SPEEDWAY U2W,INI-9090U, INI-9100A I/O HIGHWAY,INI-9100U/UW I/O SPEEDWAY,INI-9200U/UW I/O EXPRESSWAY,INI-9400U/UW I/O THROUGHWAY,INI-9520U/UW I/O BAHN, INI-9100/W,INI-6100, INI-6102Iwill: SIDE-2935LVD, SIDE-2935UWNMC: A100U2W, 9100U/UWOEM: INIC-1060, INIC-940, INIC-950, INIC-910
INIA100.ADDINI91U.ADDINI910.ADDINI610.ADD
Initio
I2O Storage and Transport OperatingSystem ModuleI2O stands for Input to Output, which is anew specification that may come to supportmany different types of computer devices. Ifyou have any I2O storage devices in yourPC, check this selection to load the I2Odriver so that you can use them.
I2OXPORT.SYSI2OSOSM.ADD
I2O Storage
BusLogic: BT-/KT-440/C,BT-/KT-445/C/S, BT-/KT-540/C/CF,BT-/KT-542/B/C/D, BT-/KT-545/C/S,BT-/KT-640/A, BT-/KT-646/D/S,BT-/KT-742/A, BT-/KT-746C,BT-/KT-747/C/D/S,BT-/KT-757/C/CD/D/SBuslogic/Mylex: BT-/KT-930 FlashpointLT, BT-/KT-932 Flashpoint DL,BT-/KT-950 Flashpoint LW, BT-/KT-952Flashpoint DW, BT-/KT-946/CMultimaster, BT-/KT-948/C Multimaster,BT-/KT-956/C/CD Multimaster,BT-/KT-958/C/CD/D Multimaster
FLASHPT.ADDBTSCSI.ADD
BusLogic
ABP930/U, ABP940/U, ABP950,ABP960/U, ABP970/UIomega: ABP-960U, Jaz JetIwill: SIDE-2930/C/CR/U/U+SIIG: i540 SpeedMaster, i542SpeedMaster, Fast SCSI Pro PCI
Appendix D: Preboot Menu 55
Advance: 2931U2W Home, 2941UW/U2WBusinessAresys: CI-4500UWAsus: PCI-SC200, PCI-SC860, PCI-SC875DawiControl: DC-2975U, DC-2976UW,DC-2980U2WIntraserver: ITI-3140ULSI/Symbios: LSI/SYM20810,LSI/SYM20860, LSI/SYM22801,LSI/SYM22802, LSI/SYM8100ASP/S,LSI/SYM8150SP, LSI/SYM815XS,LSI/SYM8250ASP/S,LSI/SYM8251AD/ASP/D/S,LSI/SYM8600SP, LSI/SYM8750SP,
SYM8XX.ADDSymbiosSYM8XX(unfortunatelythe selection ofthis driver in thepre-boot screendoes not save itto your finalinstallation.Please refer tothe InstallationTroubleshootingsection ofAppendix E)
LSI/Symbios: LSI/SYM21002,LSI/SYM21040, LSI/SYM22902,LSI/SYM22903, LSI/SYM22910,LSI/SYM22915, LSI/SYM8953U,LSI/SYM8955U (33 & 66 MHz)Tekram: DC-390U3D/U3WOEM: LSI/SYM53C895A,LSI/SYM53C896, LSI/SYM53C1000,LSI/SYM53C1010
SYM_HI.ADDSymbiosSYM_HI (LVD)
Mylex:
DAC960E/M/PD/PDU/PE/PG/PJ/PL/S/SU/SX
DAC960.ADDRAID (Mylex)
IBM: ServeRAID, ServeRAID/2,ServeRAID II, ServeRAID-3H/-3L
IPSRAID.ADDRAID (IBM)
DPT: PM2011 SmartCache Plus, PM2012BSmartCache III, PM2022 SmartCache III,PM2024 SmartCache III, PM2041FW/WSmartCache IV, PM2042FW/WSmartCache IV, PM2044UW/WSmartCache IV, PM2122 SmartCache III,PM2124/W SmartCache III, PM2142FW/WSmartCache IV, PM2144UW/WSmartCache IV, PM3222/W SmartRAID,PM3224/W SmartRAID, PM3332UW/WSmartRAID IV, PM3334UW/WSmartRAID IV
DPT20XX.ADDRAID (DPT)(selecting theRAID option willcause DPT, IBMand Mylexdrivers to beloaded)
QLA940-PI, QLA510-PI,QLA400-EA/-IA/-PA/-VL,QLA402-EA/-IA/-VL, QLA405-E/-I,QLA406-HD, QLA410-PA
QL40OS2.ADD
56 eComStation Manual

Tekram: DC-305E/I, DC-315U,DC-395U/UW
TRM3X5.ADDTekramTRM3X5
Tekram: DC-310/U,DC-390F/U/U2B/U2W/W
TMSCSIW.ADDTekramTMSCSI
LSI/SYM8751D/SP/SPE, LSI/SYM8951U,LSI/SYM8952U, LSI/SYM8953UNCR: NCR8100S, NCR8150S, NCR8250S,NCR8251STyan: YorktownOEM: NCR53C810, NCR53C815,NCR53C825, LSI/SYM53C810/A/AE,LSI/SYM53C815, LSI/SYM53C825,LSI/SYM53C825A, LSI/SYM53C860/AE,LSI/SYM53C875/E, LSI/SYM53C876,LSI/SYM53C885, LSI/SYM53C895/A
This list can also be found on the eComStation CD#1 in\eCS\SCSI.LST
Appendix D: Preboot Menu 57
Appendix E: Troubleshooting
This chapter discusses some common problems you may encounterduring the installation of eComStation. It is composed of severalsources and documents, the main text however is found as theknown.issues document in the root of eCS CD#1.
For a more extensive list of problems and solutions, please see thesupport forum at: http://www.ecomstation.com/ and thenewsserver at: news://news.ecomstation.nl/
INSTALLATION
Q: The system will not boot from the bootable CD.A1: Verify that your motherboard and/or disk controller BIOS supportbooting from CD and that you selected the right boot order.A2: Watch the cd-rom ready light and the BIOS cd boot messages. Did thecd-rom become ready after the BIOS checked for a CD? If the cd-rom istaking too long to become ready, check if there is setting in the motherboardor disk controller BIOS to delay or wait longer for the cd-rom to becomeready. In some cases a newer BIOS may provide this feature. Sometimesyou can delay the boot process by pressing the Pause key.
Q: When booted to the command line, issuing the commandecsmakedisk.exe does not bring up the shell properly.A: Issue the command pmshell.exe instead. The installer will still appearcorrectly.
Q: During Phase 1 (booted from CD or diskette) the system will hang on acommand session (usually windowed) with endless looping commandprompts. For example: [S:\][S:\][S:\][S:\][S:\][S:\][S:\]A: This happens with some display adapters. Try to close the session. If youcan't close the session you will need to reboot by pressing Ctrl+Alt+Del.Try to invoke the function you were running through a different path (ie. usethe menu).
Q: I created a volume using LVM, but I cannot make it bootable, what iswrong?A: If you created the volume from the Logical View of LVM, the volume willalways be created as a logical partition. To make this type of partitionbootable, you need to install the bootmanager. If you want to create a volumeas a primary partition, use the Physical View.
58 eComStation Manual

Q: At the end of phase 1 of the installation, a command window came up withendless rolls of command prompts. Forexample:[A:\][A:\][A:\][A:\][A:\][A:\] I can not kill it. What do Ido?A: This is a result of some combinations of video adapter and the mousedriver which surface under certain conditions when booted from the CD. Ifthe installer displayed a screen indicating "eCS installation completed.", tryrebooting the machine. If the machine boots from the target volume cleanlyand continues the installation, there is nothing to worry about. If, however, it fails to boot, the last part of phase 1 did not get completed.Boot from the CD again, wait for the desktop to come up, start a full screencommand session. At the command line, issue the command: s:\ecs\instexit.cmd t: s: PHASE3where s: is your CD-ROM drive letter, and t: is the target drive letter. Whenfinished, reboot and to continue the installation Q: My machine locked up during installation how can I restart theinstallation?A: If the machine locked up after the first reboot you should bring upWiseMachine from your desktop, go to Utility -> Selective Install-> eCS Installation - phase 2. It will ask you for the eCS CD#1(since some files will have to be copied to the harddrive), and then you cancontinue with the installation process. If the machine locked up after thesecond reboot you should select phase 3 from the WiseMachine menu torestart the installation
Q: During phase 2, I invoked the Selective Install for Networking and themain window of the Network installer popped up. Before I finish, I get amessagebox that asked me if I cancelled the Networking Installer. What'sgoing on?A: We are seeing this on some machines. When that happens do you, ignorethe message box and leave it open while continuing with Selective Install forNetworking. If the message box remains after Selective Install for Networkinghas closed you can dismiss it by answering "No".
Q: I would like to invoke some commandline commands from the CD bootedeComStation desktop. Selecting the Full Screen Command Prompt doesn'tdo anything.A: The command prompt opens in the background. Please use theCTRL+ESC keys and select it from the window list.
Q: My system hangs or freezes when during startup, before I get thePresentation Manager.A: If the boot process hangs during boot you can disable hardware detection.Press Alt+F1 before the logo and select disable Hardwaredetection.
Appendix E: Troubleshooting 59
Q: After the first reboot I can not see anything on my screen and I am using aSiS videochipsetA: Your video-chipset is not supported properly by the SDD videodriver.Please press ALT+F1 before the logo appears and select F3 - resetprimary video to generic default display and reboot.
Q: LVM reports no recognizable filesystems and no freespace.A: Currently FAT32, NTFS, EXT2 and other filesystems will not berecognized by the eCS. Please use other disk tools to create space for eCSbootmanager and boot partition, then let LVM create the eCS partitions andBootManager during installation. After using LVM, do NOT use any otherFDISK programs.
Q: When trying to run the installer for networking my computer locks up /crashes. A: This is being caused by the hardware detection. Not all computers canhandle the low level hardware probing that takes place in this process, soyou should disable hardware detection and run the installer again. You can disable hardware detection by renaming the file\IBMINST\CLBSNIFF.EXE on your bootdrive. You can then manually selectyour network adapter from the presented list. Or add the following line to yourconfig.sys to disable the sniffer: SET MPTS_SNIFF=/NS
INSTALLATION - SCSI
Q: I have an Adaptec SCSI Adapter and SCSI CD-ROM and I couldn't get itto boot the eCS bootable CD. A typical message is for this problem is -- loading please wait ......A: Check the following to settings:1. In the Adaptec BIOS, for the cdrom device set disconnect "NO"2. Also some cdroms will not work properly in sync mode, try turning offinitiate sync negotiation in the BIOS.
Q: When booting from the CD I get the following message:eCS in unable to operate your hard disk or diskettedrive.The system is stopped.
A: Is your cd-rom connected to a SCSI disk controller?eCS supports more SCSI disk controllers than most other OSes. Due to thelarge number of drivers there is a high possibility for a conflict betweendrivers. If you have a SCSI controller you have to use the advanced pre-bootmenu (select boot option 2) and specify which SCSI driver you wish eCS touse. See the readme ReadME-BootMenu.TXT for more info. Also AppendixD lists all supported SCSI host adapters.
60 eComStation Manual
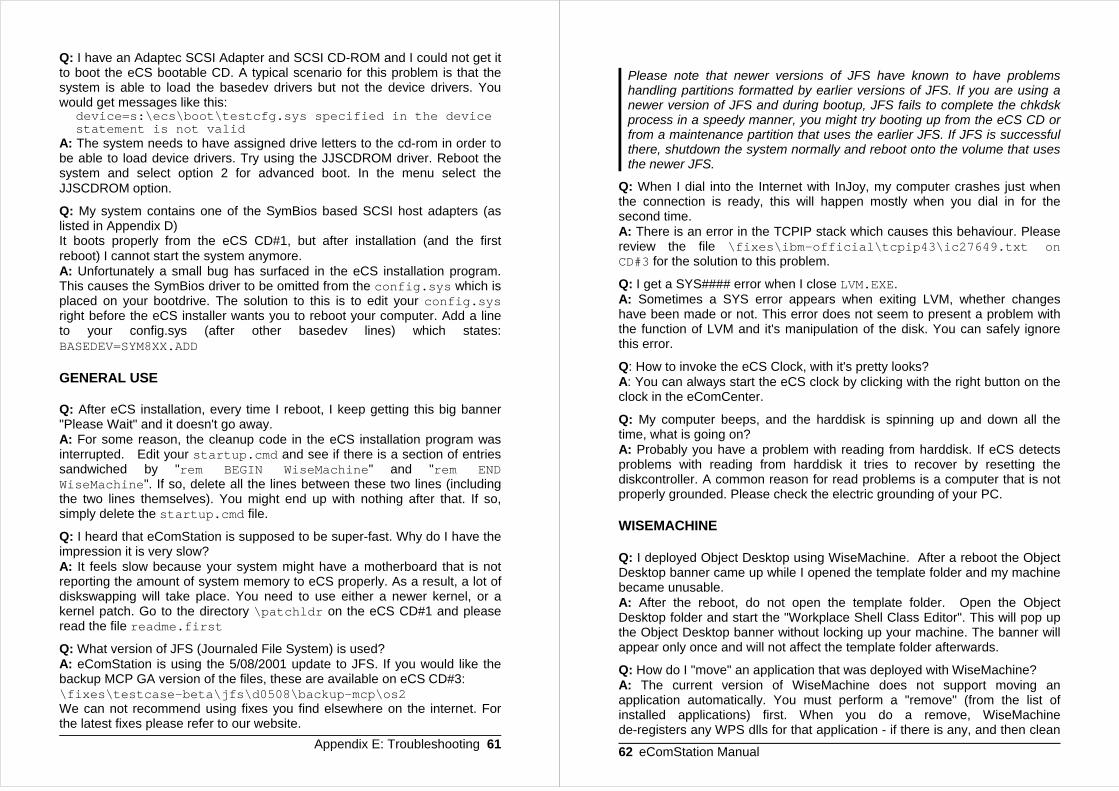
Q: I have an Adaptec SCSI Adapter and SCSI CD-ROM and I could not get itto boot the eCS bootable CD. A typical scenario for this problem is that thesystem is able to load the basedev drivers but not the device drivers. Youwould get messages like this:
device=s:\ecs\boot\testcfg.sys specified in the devicestatement is not valid
A: The system needs to have assigned drive letters to the cd-rom in order tobe able to load device drivers. Try using the JJSCDROM driver. Reboot thesystem and select option 2 for advanced boot. In the menu select theJJSCDROM option.
Q: My system contains one of the SymBios based SCSI host adapters (aslisted in Appendix D)It boots properly from the eCS CD#1, but after installation (and the firstreboot) I cannot start the system anymore. A: Unfortunately a small bug has surfaced in the eCS installation program.This causes the SymBios driver to be omitted from the config.sys which isplaced on your bootdrive. The solution to this is to edit your config.sysright before the eCS installer wants you to reboot your computer. Add a lineto your config.sys (after other basedev lines) which states:BASEDEV=SYM8XX.ADD
GENERAL USE
Q: After eCS installation, every time I reboot, I keep getting this big banner"Please Wait" and it doesn't go away.A: For some reason, the cleanup code in the eCS installation program wasinterrupted. Edit your startup.cmd and see if there is a section of entriessandwiched by "rem BEGIN WiseMachine" and "rem ENDWiseMachine". If so, delete all the lines between these two lines (includingthe two lines themselves). You might end up with nothing after that. If so,simply delete the startup.cmd file.
Q: I heard that eComStation is supposed to be super-fast. Why do I have theimpression it is very slow?A: It feels slow because your system might have a motherboard that is notreporting the amount of system memory to eCS properly. As a result, a lot ofdiskswapping will take place. You need to use either a newer kernel, or akernel patch. Go to the directory \patchldr on the eCS CD#1 and pleaseread the file readme.first
Q: What version of JFS (Journaled File System) is used?A: eComStation is using the 5/08/2001 update to JFS. If you would like thebackup MCP GA version of the files, these are available on eCS CD#3:\fixes\testcase-beta\jfs\d0508\backup-mcp\os2 We can not recommend using fixes you find elsewhere on the internet. Forthe latest fixes please refer to our website.
Appendix E: Troubleshooting 61
Please note that newer versions of JFS have known to have problemshandling partitions formatted by earlier versions of JFS. If you are using anewer version of JFS and during bootup, JFS fails to complete the chkdskprocess in a speedy manner, you might try booting up from the eCS CD orfrom a maintenance partition that uses the earlier JFS. If JFS is successfulthere, shutdown the system normally and reboot onto the volume that usesthe newer JFS.
Q: When I dial into the Internet with InJoy, my computer crashes just whenthe connection is ready, this will happen mostly when you dial in for thesecond time. A: There is an error in the TCPIP stack which causes this behaviour. Pleasereview the file \fixes\ibm-official\tcpip43\ic27649.txt onCD#3 for the solution to this problem.
Q: I get a SYS#### error when I close LVM.EXE.A: Sometimes a SYS error appears when exiting LVM, whether changeshave been made or not. This error does not seem to present a problem withthe function of LVM and it's manipulation of the disk. You can safely ignorethis error.
Q: How to invoke the eCS Clock, with it's pretty looks?A: You can always start the eCS clock by clicking with the right button on theclock in the eComCenter.
Q: My computer beeps, and the harddisk is spinning up and down all thetime, what is going on?A: Probably you have a problem with reading from harddisk. If eCS detectsproblems with reading from harddisk it tries to recover by resetting thediskcontroller. A common reason for read problems is a computer that is notproperly grounded. Please check the electric grounding of your PC.
WISEMACHINE Q: I deployed Object Desktop using WiseMachine. After a reboot the ObjectDesktop banner came up while I opened the template folder and my machinebecame unusable.A: After the reboot, do not open the template folder. Open the ObjectDesktop folder and start the "Workplace Shell Class Editor". This will pop upthe Object Desktop banner without locking up your machine. The banner willappear only once and will not affect the template folder afterwards.
Q: How do I "move" an application that was deployed with WiseMachine?A: The current version of WiseMachine does not support moving anapplication automatically. You must perform a "remove" (from the list ofinstalled applications) first. When you do a remove, WiseMachinede-registers any WPS dlls for that application - if there is any, and then clean
62 eComStation Manual

up config.sys, desktop ICONs, and any entries in systems files relating to thisparticular application. However, the actual directory containing theapplication code is NOT removed. (This is intentional. If you DO want toremove the application code, you can do so by manually deleting the files).After removal, you can re-deploy that application by pointing the "source" tothe original location, and set the "destination" to the new location.WiseMachine will then make a copy of the code and re-deploy it accordingly.You can remove the original copy after that. A move function will be added infuture versions of WiseMachine.
Q: I am trying to install a program using WiseMachine or eCSGuides and theinstall window never appears?A: Check that the install window did not appear in the background. Use theCtrl+Ecs keys to bring up the window list. Select the program and pressenter.
Q: I want to restart Phase 2 / Phase 3 of the eComStation Installationprocess using WiseMachine, but this does not affect my desktop, while Iwould like it to do just that!A: The installation process sets two values in your USER.INI file, which youcan remove to let the installer do a 'complete' Phase 2 or 3 re-install. OpenREGEDIT2.EXE (from a Command Prompt) and use the Edit -> Findoption to locate the ECOMSTATION entry. You can simply remove it.
Appendix E: Troubleshooting 63
APPENDIX F: Getting support
If you run into problems with eComStation there are several places toget support. First of all a lot of documentation is included with theproduct. Most of it are text files which you can read with an editor liketedit.exe or e.exe. The .inf files can be viewed with view.exe andthe .pdf files with acroread.exe. All these applications are included instartable form on CD. On the CD's you can find the followingdocuments:
General Documents - CD1readme.first
General info on eComStation - Last minute installation notes and a quicktroubleshooter for CD boot
readme.txtDocumentation from Merlin Convenience Pack - Information for installingfrom CD#2 (from IBM)
readme2.txtAddenda to readme.txt
ecs\books\WSeB-sg245393.pdfInformation on the new functionality since the release of WSeB - chapter 4discusses LVM and JFS
ecs\books\lvmhelp.INFLVM documentation from Serenity Systems - includes tutorial approach forsetting up your system
ecs\books\usinglvm.infLVM documentation from IBM
ecs\books\migrate.pdfDocumentation for migration - mainly targetted at WSeB - chapter 7discusses LVM and JFS
Next to these documents you can find the helpfiles in .inf format foreComStation in the following directory: \OS2\BOOK
Drivers Related - CD1SoftwareChoice\UDF\readme.txt
Documentation for the UDF Installable Filesystem (ifs)SoftwareChoice\USB\*.txt
These subdirectories contain documentation for the USB driverspatchldr\readME.FIRST
Documentation for the Bootloader patch to allow detection of >64MB onsome machines
64 eComStation Manual

Recovery and Diagnostic Tools - CD1grahamutil\graham20.inf
Documentation for the Graham Utilities - Filesystem and Recovery tools.
Please note that the Graham Utilities can be run directly from CD toprovide maintenance possibilities for your system
TVoice\WiseProg\wptool32\*.txtimportant warnings and documentation about the use of WPTools
Application documentation - CD1ecs\thememgr\readme.txt
Documentation for the ThemeManagerecs\eCSStyler\readme.txt
Documentation for eStylerLiteecs\books\wise.INF
Documentation for WiseMachineLocalTvoice\Wiseprog\WiseManager\WiseApp\index.html
explanation of WiseApp, a utility to create your own WiseMachinePackages
Drivers Related - CD3Drivers\Dani-IDE-latest\506\DaniS506.DOC
Documentation for the Daniela IDE driverDrivers\Dani-IDE-latest\ATAP\DaniATAPI.DOC
Documentation for the Daniela ATAPI driverDrivers\ibm-ide-latest\README.TXT
Documentation for the IBM IDE and ATAPI driversDrivers\ibm-print01\readme.txt
Documentation for the parallel port driver with PCI supportDrivers\ibm-raid\README.TXT
Documentation for the IBM RAID controller driversDrivers\printerdrivers\epomni-epson-readme.txt
Readme for the Epson OMNI driversDrivers\SCSI\adaptec-7800fam\Reados2.txt
Readme for the Apadaptec 7800 family driversDrivers\SCSI\lsi-symbios\INTRO.TXT
Readme for the LSI SCSI driversDrivers\SCSI\lsi-symbios\OS2.TXT
Readme for the LSI SCSI driversDrivers\SCSI\lsi-symbios\OS2faq.txt
FAQ for the LSI SCSI driversDrivers\SCSI\QLOGIC\readme.txt
Readme for the QLogic SCSI driversDrivers\pccard\README.CID
CID installation manual for PC Card Director (Play at Will)
Appendix F: Getting Support 65
Drivers\pccard\README.TXTInstallation manual for PC Card Director (Play at Will)
SoftwareChoice\ScitechSE\problems.txtDocumentation of known issues with SciTech Display Doctor
SoftwareChoice\ScitechSE\readme.txtManual, installation instructions and information on
MMeCS\readme.txtReadme for the eCS Multimedia Pack 1.0
Please note:! Some other packed drivers can also be found in the drivers directory
on CD#3, to read their documentation unpack the drivers to atemporary directory first.
! In the directory Fixes you will find supported and unsupported fixes.All fixes include a text file description and installation instructions.
Information on the internetIf the readme's do not help, you can always try to consult the supportforums on the internet, to help you forums have been created at thefollowing sites:
! http://www.ecomstation.com/! http://www.ecomstation.nl/
Other websites of interest are:
! http://www.os2ezine.com/! http://www.os2voice.org/! http://www.warpdoctor.org/
Alternatively you could have a look at the OS/2 newsgroups or mailinglists and the OS/2 and eComStation usergroups.
66 eComStation Manual
Appendix G: Coexisting with other OSes
eComStation is very well capable of coexisting with other Oses on yourcomputer. This can be convenient in some situations, where you maywant to use certain applications which are not able to run oneComStation. There are some details you should pay attention to, whichare listed below. If you want to exchange data between Oses, makesure you have a volume which is read/writeable by these systems. Mostof the time special drivers will be required to make this possible.
General Considerations
Make sure you have your harddisk layout the way you want it, beforeyou install eComStation. The use of partitioning tools, likePartitionMagic of PowerQuest, FIPS, or others should be prevented if atall possible after you have installed eComStation. If you do want tochange your harddisk layout, please consult Appendix D; LVM.
Windows NT/2000
If you are going to install Windows 2000 on your computer, pleaseinstall Windows 2000 and then apply service pack 2 first. If you alreadyhave Windows 2000 on your system and want to install eComStation,also install service pack 2. If you do not do this, every time Windows2000 starts up, it will destroy the eCS boot manager. This is a bug inWindows 2000. If your boot manager is destroyed you can restore it bybooting eCS from the installation CD#1 and run LVM, where you canreinstall the bootmanager.
If you are using Windows N.T. 4.0 there is an option that you can marka partition as not having a drive letter. Windows 2000 on the other handdoes not have this option. Because of this, Windows 2000 will list HPFSpartitions as being available in 'My Computer'. If you double click onthat drive letter it will say it can not read that partition and sometimesyou will be prompted with an option to format it. Of course you shouldnot accept this offer, since it will render your HPFS volume useless.
Appendix G: Coexisting with other OSes 67
Windows 95, 98 or Me
If you have installed eCS and you are going to install Windows 95, 98 orWindows Me you will receive a warning about a 'bootmanager beingdisabled' or that you will 'no longer be able to start OS/2'. Ignore thesewarnings. When the installation has finished you can enable thebootmanager again by starting FDISK (from DOS) and via option 2 markthe smallest available partition as active (the bootmanager partition isusely about 4 to 7 MB in size).To access FAT32 partitions on your harddisk, please refer to theMiscellaneous section of Chapter 3.VFAT partitions require the use of a VFAT driver, these are available onhttp://hobbes.nmsu.edu/ another option to access VFAT partitions is by using NetDrive:http://www.blueprintsoftwareworks.com/netdrive/
Linux
eComStation can be installed without problems alongside a Linuxinstallation on the same system. Please use the LVM Bootmanagerinstead of lilo. To read/write HPFS volumes you will need to obtain a module for Linux.To access Linux ext2fs partitions you require the driver available onCD#3: \THIRDPARTY\MoreStuff\ext2_240.zip
Please note that the OpenJFS is not compatible with eComStationJFS and as such it is not advised to access your JFS volume fromLinux. This may change in the future.
68 eComStation Manual

Cover design by "Meneer van Rooijen"Artwork by Paul Jarvinen
©2001, Mensys BV, The Netherlandshttp://www.mensys.nl/
Printed in the NetherlandsPDF Rev 1.0.1
Appendix G: Coexisting with other OSes 69


![Housekeeping manual _(1)[1]](https://static.fdocuments.in/doc/165x107/58ed60181a28abb3648b470f/housekeeping-manual-11.jpg)