MANUAL DE USUARIO CHS ES CHS - Baxtran · MANUAL DE USUARIO CHS ES 10 4. gUÍa dE USo dEL IndICador...
52
1 ES MANUAL DE USUARIO CHS V.1 ES |FR|EN GANCHO PESADOR GROCHET PESEUR HOOK WEIGHING CHS marca propiedad de | est une marque de | trade mark propiety of: Pol. Empordà Internacional Calle F. Parcela 15-16 17469 VILAMALLA - (Girona) SPAIN T. (34) 972 527 212 - F. (34) 972 527 211 El fabricante se reserva el derecho de modificar sin previo aviso las características de sus productos para introducir mejoras técnicas o cumplir con nuevas regulaciones oficiales./Le constructeur se réserve le droit de modifier les caractéristiques de ses produits en vue d’y apporter des améliorations techniques ou de respecter de nouvelles réglamentations./The manufacturer reserves the right to modify the specifications of its products in order to make technical improvements or comply with new regulations. 20151002
Transcript of MANUAL DE USUARIO CHS ES CHS - Baxtran · MANUAL DE USUARIO CHS ES 10 4. gUÍa dE USo dEL IndICador...

1
ESMANUAL DE USUARIO CHS
V.1
ES |fr|En
ganCHo pESadorgroCHET pESEUrHooK WEIgHIng
CHS
marca propiedad de | est une marque de | trade mark propiety of:
Pol. Empordà Internacional Calle F. Parcela 15-16 17469 VILAMALLA - (Girona) SPAIN T. (34) 972 527 212 - F. (34) 972 527 211
El fabricante se reserva el derecho de modificar sin previo aviso las características de sus productos para introducir mejoras técnicas o cumplir con nuevas regulaciones oficiales./Le constructeur se réserve le droit de modifier les caractéristiques de ses produits en vue d’y apporter des améliorations techniques ou de respecter de nouvelles réglamentations./The manufacturer reserves the right to modify the specifications of its products in order to make technical improvements or comply with new regulations.
20151002

ESMANUAL DE USUARIO CHS
2

3
ESMANUAL DE USUARIO CHS
1. gUÍa dE opEraCIonES SEgUraS 72. CaraCTErÍSTICaS Y ESpECIfICaCIonES 7
2.1 CaraCterístiCas 7
2.2 Datos téCniCos prinCipales 8
2.3 espeCifiCaCiones 8
2.4 aparienCia ilustraCiones 8
2.5 suplemento potenCia 9
3. panTaLLa 63.1 lCD pantalla 9
3.2 teClas 9
4. gUÍa dE opEraCIonES InaLámbrICo 105. gUÍa dE fUnCIonES 11
5.1 enCenDer / apaGar 11
5.2 apaGar 11
5.3 Cero 12
5.4 tara 12
5.5 máximo valor 12
5.6 aCumulaCiÓn 12
5.7 BÚsQueDa aCumulaCiÓn 12
5.8 Borrar aCumulaCiÓn 13
5.9 ComproBar potenCia Batería 13
5.10 ConvertiDor De uniDaDes 13
5.11 volver al estaDo De ComproBaCiÓn 13
6. ConfIgUraCIÓn parámETro & CaLIbraCIÓn 146.1 teCla funCiÓn 14
6.2 ConfiGuraCiÓn parámetro 14
6.3 CaliBraCiÓn 17
7. panTaLLa ILUSTraCIÓn 188. SoLUCIÓn dE probLEmaS 199. rS232 proToCoLo 2010. garanTÍa 20
DECLARACIÓN DE CONFORMIDAD 51
ÍndICEESPAÑOL

frMANUEL D´UTILISATION CHS
4
ÍndICEfRENch
1. gUIdE opEraTIonS SUrES 222. CaraCTÉrISTIQUES ET SpÉCIfICaTIonS 22
2.1 CaraCtéristiQues sanDarDs 22
2.2 information teChniQue prinCipale 23
2.3 spéCifiCation 23
2.4 illustration apparenCe 23
2.5 supplément puissanCe 24
3. ÉCran ET CLaVIEr 243.1 lCD éCran 24
3.2 area Clavier 24
4. gUIdE opEraTIonS SUr L’IndICaTEUr SanS-fIL 255. gUIdE dE fonCTIon 26
5.1 on 26
5.2 off 26
5.3 Zéro 26
5.4 tare 27
5.5 sommet pousser 27
5.6 aCCumulation 27
5.7 reCherChe aCCumulation 27
5.8 effaCer aCCumulation 27
5.9 voltaGe Batterie 28
5.10 Conversion unité 28
5.11 retourner à l’état normal De verifiCation 28
6. programmEr paramÈTrES & CaLIbraTIon 296.1 fonCtion Clavier 29
6.2 proGrammer Des parametres 29
6.3 CaliBration 32
7. ÉCran ILLUSTraTIon 338. gUIdE dÉTECTIon ET SoLUTIon dES probLÈmES 349. proToCoLE rS232 3510. garanTIE 35
DECLARATION DE CONFORMITÉ 51

5
EnUSER MANUAL CHS
1. SafE opEraTIon gUIdE 372. fEaTUrES and SpECIfICaTIon 37
2.1 features 37
2.2 main teChniCal Data 38
2.3 speCifiCation 38
2.4 appearanCe illustration 38
2.5 power supply 39
3. dISpLaY 393.1 lCD Display 39
3.2 Key 39
4. WIrELESS IndICaTor opEraTIon gUIdE 405. fUnCTIon gUIdE 41
5.1 turn on 41
5.2 turn off 41
5.3 Zero 41
5.4 tare 42
5.5 peaK holD 42
5.6 aCCumulation 42
5.7 aCCumulation searCh 42
5.8 Clear 42
5.9 Battery voltaGe 43
5.10 unit Convert 43
5.11 return to n ormal teCtinG status 43
6. paramETEr SETTIng & CaLIbraTIon 446.1 Key funCtion 44
6.2 proGram parameters 44
6.3 CaliBration 46
7. dISpLaY ILLUSTraTIon 478. TroUbLESHooTIng gUIdE 489. rS232 proToCoL 4910. garanTIE 49
DECLARATION OF CONFORMITY 51
IndExENgLISh


7
ESMANUAL DE USUARIO CHS
1. gUÍa dE opEraCIonES SEgUraSNo sobre cargue este calibrador de carga chS .1.
No realice pesadas por encima.2.
Mantengase apartado cuando el calibrador de carga chS esté operando.3.
No realice pesadas con viento fuerte, puede causar una lectura incorrecta.4.
No realice pesadas cuando la temperatura con cambios bruscos de temperatura, puede causar una lectura incorrecta5.
No intente abrir el calibrador de carga chS , no hay ninguna parte que pueda ser de uso para el usuario.6.
No retire el tapón de la cuerda de alambre del gancho. Por razones de seguridad, utilícelo siempre.7.
Retire todas las cargas de las cadenas o del gancho cuando no lo esté utilizando.8.
Antes de pesar, compruebe y asegúrese que todos los elementos que reciben la carga/colgados/ se encuentran en buenas condiciones 9.
compruebe el gancho, las cadenas, clavijas de seguridad, y los pestillos periódicamente. 10.
contacte con su proveedor si tiene que reemplazar algunas partes en caso de encontrar defectos , deformidades o desgaste.11.
2. CaraCTErÍSTICaS Y ESpECIfICaCIÓn2.1 CaraCterístiCas
2.2 main teChniCal Data
2.3 espeCifiCaCiones
2.4 ilustraCiÓn aparienCia
PERFILEl calibrador de carga chS es un instrumento especialmente bien construido para tener un uso industrial. Al ser un instrumento estándar ofrece las aplicaciones universales. Tanto si se utiliza como una grúa para pesar como para mesurar la fuerza, el calibrador de carga chS es un microprocesador diseñado para conseguir precisión, la calibración es más fácil utilizando su control remoto de infra rayos.
2.1 CARACTERíSTICASconstrucción resistente ▪
Precisión: 0.1% de la capacidad ▪
Todas las funciones y unidades aparecen claramente en la pantalla LcD (con luz trasera), ▪
Los dígitos son1 pulgada más grandes para facilitar su visualización a distancia, ▪
Pueden utilizarse dos Set-Point programables por el usuario para aplicaciones de seguridad y advertencia o para límite de peso. ▪
Larga vida de la batería en 3 tamaños estándar de baterías alcalinas “LR6(AA)” ▪
Todas las unidades utilizada y reconocidas internacionalmente están disponibles :kilogramos(kg), Tonas cortas(t) libras(lb), Newtons y ▪quilonewtons(kN)
El control remoto por infra rayos es más fácil de calibrar (con contraseña) ▪
El control remote por infra rayos con muchas funciones: “ZERO”( cERO), ”TARE”(TARA),”cLEAR”(BORRAR), ▪
“PEAK”(cUMBRE),”AccUMULATE”(AcUMULAR),”hOLD”(AgUANTAR),”Unit change”(cambio de unidad),”Voltage check” (compro- ▪bación potencia) y “Power Off”(Apagado)
4 teclas locales mecánicas:”ON/Off”,”ZERO”(cERO),”PEAK”(cUMBRE) y ”Unit change”(Unidad de cambio) ▪
Aviso batería baja. ▪
Indicador de palanca sin cables Rf (comunicación Bi-dirección) disponible (opcional) •

ESMANUAL DE USUARIO CHS
8
2.2 MAIN TEChNICAL DATA
Pantalla 25mm (1’’) 5 digitos LcD con retroiluminaciónEncender rango cero 20% f.S.
Rango cero manual 4% f.S.Rango Tara 20% f.S.
Tiempo estable ≤10segundosIndicador de sobrecarga 100% f.S. + 9e
Max. Seguridad de carga 125% f.S.carga última 400% f.S.
Vida de batería ≥50horasTipo de batería “LR6(AA)”baterías alcalinas. 1.5Vx3
Temperatura de funcionamiento - 10ºc~ + 40ºchumedad de funcionamiento ≤85%RHpordebajo20ºC
Distancia control remoto Min.80m(pordefecto),[200m(opcional)]frecuencia control remoto 2.4GHz(pordefecto),433MHz,860MHz(opcional)
2.3 ESPECIFICACIONES
MODELO CAPACIDAD (kg) MIN. PESO (KD) DIVISIÓN TOTAL CUENTAS PANTALLA
chS3000M 3000 10 1 3000chS5000M 5000 40 2 2500chS10000M 10000 100 5 2000chS3000W 3000 10 1 3000chS5000W 5000 40 2 2500chS10000W 10000 100 5 2000
2.4 ILUSTRACIÓN APARIENCIA
Cap: 1-5 t Cap: 10 t
CAPACIDAD A(mm) B(mm) C(mm) D(mm) Ø(mm) h(mm) MATERIAL3000 260 123 37 195 51 365 aluminio5000 285 123 57 210 58 405 aluminio10000 320 120 57 230 92 535 acero

9
ESMANUAL DE USUARIO CHS
2.5 SUPLEMENTO POTENCIA
Batería: “LR6(AA)”baterías alcalinas tamaño. 1.5Vx3
corriente: la corriente de carga chS se encuentra alrededor de los Dc 35mA, 3pcs baterías nuevas pueden utilizarse durante unas 40 horas. Lacorreintedecargadel indicadorremotoseencuentraalrededordelosDC28mA,4pcsnuevasbateríaspuedenserutlizadasduranteaproximadamente80horas.
Aviso de batería baja: Si los dígitos de la pantalla están brillando significa que la batería necesita ser reemplazada. El calibrador de carga chS se apagará automáticamente después de media hora de estar en funcionamiento.
3. panTaLLa
3.1 LCD PANTALLA
DISPLAY LCD25mm (1’’)
5 dígitos LcD
con todas las funciones y unidades
Señal inalámbrico, su aparición significa que la señal se encuentra estable, esto desaparece cuando hay falta de señal. Este señal parpadea cuando el señal es débil
Voltaje batería
llena
baja Vacía
PEAK El valor actual es el valor de aguante máximo(máximo valor)
MEMAparece una vez cuando el valor del parámetro o calibración de almacenaje es largo. La aparición del tiempo significa que el valor actual es la información de acumulación
STB Estado estable
kN “kilonewton”,N “Newton”.Estado de la Tara“N”parpadeará
t tonelada
lb libras
kg kilogramo
3.2 TECLAS
ON/OFFENCENDER & APAGARPresione “ ▪ ON/OFF” durante 3 segundos el calibrador de carga chS se encenderá.cuando se encuentre en, Presionando “ ▪ ON/OFF” durante 1 se-gundo, el calibrador de carga chS se apagará.
CEROcuando encienda el calibrador de carga chS sin ninguna carga en ▪el gancho, pero aparecen unos dígitos pequeños sobre la panta-lla, presione esta tecla para obtener la lectura de cero.
UNIDADESPresionar la tecla ▪ “U”, la unidad en el LcD circundará el cambio de secuencia: kg, t, lb, klb, N, kN, kg. ▪
MÁXIMOcuando el peso está cambiando, presionando esta tecla aparecerá ▪en pantalla la lectura máxima.Presione esta tecla otra vez, la lectura resumirá el cambio. ▪
ESMANUAL DE USUARIO CHS
10
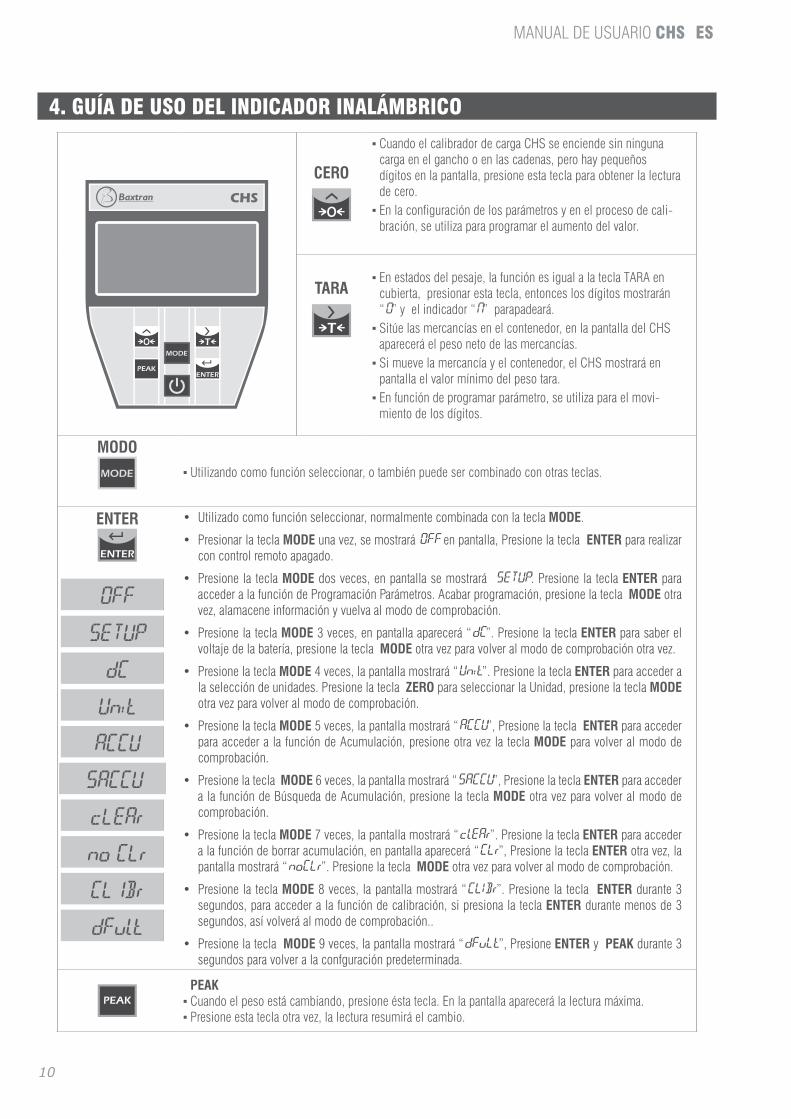
4. gUÍa dE USo dEL IndICador InaLámbrICo
CERO
cuando el calibrador de carga chS se enciende sin ninguna ▪carga en el gancho o en las cadenas, pero hay pequeños dígitos en la pantalla, presione esta tecla para obtener la lectura de cero. En la configuración de los parámetros y en el proceso de cali- ▪bración, se utiliza para programar el aumento del valor.
TARAEn estados del pesaje, la función es igual a la tecla TARA en ▪cubierta, presionar esta tecla, entonces los dígitos mostrarán “0” y el indicador “N” parapadeará.Sitúe las mercancías en el contenedor, en la pantalla del chS ▪aparecerá el peso neto de las mercancías.Si mueve la mercancía y el contenedor, el chS mostrará en ▪pantalla el valor mínimo del peso tara.En función de programar parámetro, se utiliza para el movi- ▪miento de los dígitos.
MODO
Utilizando como función seleccionar, o también puede ser combinado con otras teclas. ▪
ENTER
OFF
SETUP
dC
Unit
ACCU
SACCU
cLEAr
no CLr
CL1Br
dFult
• Utilizadocomofunciónseleccionar,normalmentecombinadaconlateclaMODE.
• PresionarlateclaMODE una vez, se mostrará OFF en pantalla, Presione la tecla ENTER para realizar con control remoto apagado.
• PresionelateclaMODE dos veces, en pantalla se mostrará SETUP. Presione la tecla ENTER para acceder a la función de Programación Parámetros. Acabar programación, presione la tecla MODE otra vez, alamacene información y vuelva al modo de comprobación.
• PresionelateclaMODE 3 veces, en pantalla aparecerá “dC”. Presione la tecla ENTER para saber el voltaje de la batería, presione la tecla MODE otra vez para volver al modo de comprobación otra vez.
• PresionelateclaMODE 4 veces, la pantalla mostrará “Unit”. Presione la tecla ENTER para acceder a la selección de unidades. Presione la tecla ZERO para seleccionar la Unidad, presione la tecla MODE otra vez para volver al modo de comprobación.
• PresionelateclaMODE 5 veces, la pantalla mostrará “ACCU”, Presione la tecla ENTER para acceder para acceder a la función de Acumulación, presione otra vez la tecla MODE para volver al modo de comprobación.
• PresionelateclaMODE 6 veces, la pantalla mostrará “SACCU”, Presione la tecla ENTER para acceder a la función de Búsqueda de Acumulación, presione la tecla MODE otra vez para volver al modo de comprobación.
• PresionelateclaMODE 7 veces, la pantalla mostrará “clEAr”. Presione la tecla ENTER para acceder a la función de borrar acumulación, en pantalla aparecerá “CLr”, Presione la tecla ENTER otra vez, la pantalla mostrará “noCLr”. Presione la tecla MODE otra vez para volver al modo de comprobación.
• PresionelateclaMODE8veces,lapantallamostrará“CLIBr”. Presione la tecla ENTER durante 3 segundos, para acceder a la función de calibración, si presiona la tecla ENTER durante menos de 3 segundos, así volverá al modo de comprobación..
• PresionelateclaMODE 9 veces, la pantalla mostrará “dFuLt”, Presione ENTER y PEAK durante 3 segundos para volver a la confguración predeterminada.
PEAKcuando el peso está cambiando, presione ésta tecla. En la pantalla aparecerá la lectura máxima. ▪Presione esta tecla otra vez, la lectura resumirá el cambio. ▪
11
ESMANUAL DE USUARIO CHS
5. gUÍa dE opEraCIonES5.1 enCenDer
5.2 apaGar
5.3 Cero
5.4 tara
5.5 máximo valor
5.6 aCumulaCiÓn
5.7 BÚsQueDa aCumulaCiÓn
5.8 Borrar aCumulaCiÓn
5.9 voltaje De Batería
5.10 ConversiÓn uniDaD
5.11 volver al estaDo normal De ComproBaCiÓn
5.1 ENCENDER
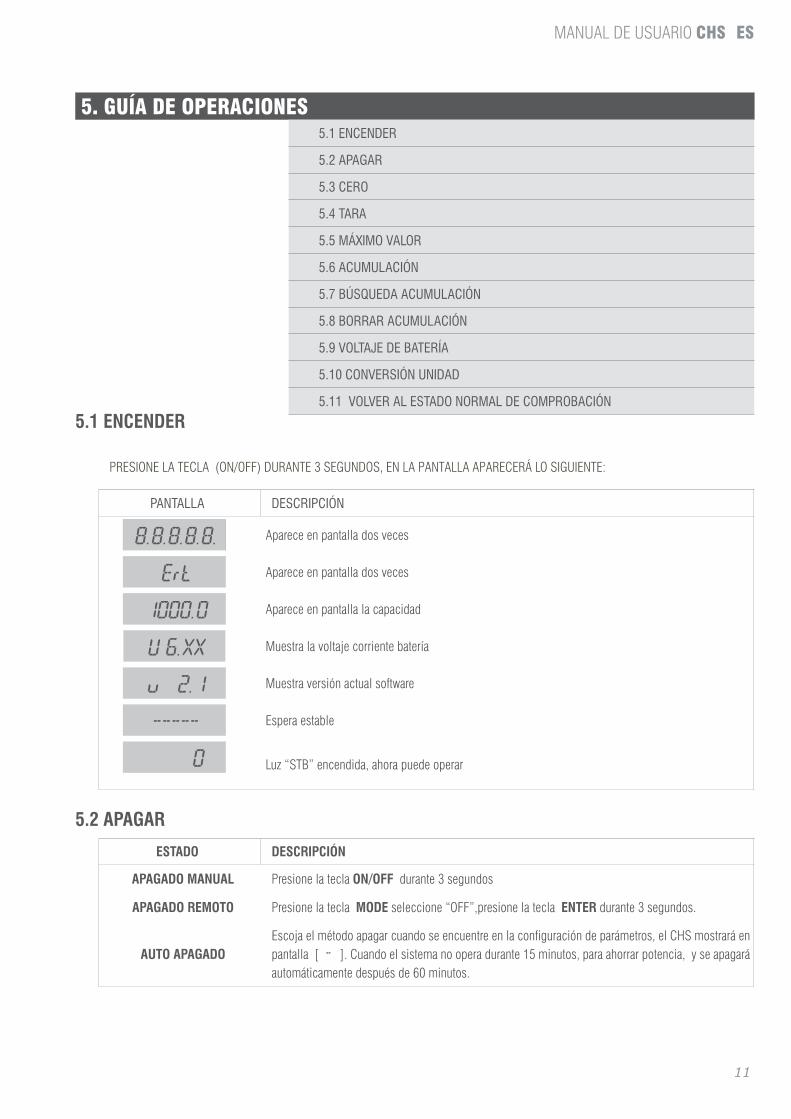
PRESIONE LA TEcLA (ON/Off) DURANTE 3 SEgUNDOS, EN LA PANTALLA APAREcERÁ LO SIgUIENTE:
pantalla DesCripCiÓn
8.8.8.8.8. Aparece en pantalla dos veces
Ert Aparece en pantalla dos veces
1000.0 Aparece en pantalla la capacidad
U 6.XX Muestra la voltaje corriente batería
u 2.1 Muestra versión actual software
----- Espera estable
0 Luz “STB” encendida, ahora puede operar
5.2 APAGAR
ESTADO DESCRIPCIÓN
APAGADO MANUAL Presione la tecla ON/OFF durante 3 segundos
APAGADO REMOTO Presione la tecla MODE seleccione “Off”,presione la tecla ENTER durante 3 segundos.
AUTO APAGADOEscoja el método apagar cuando se encuentre en la configuración de parámetros, el chS mostrará en pantalla[- ].Cuandoelsistemanooperadurante15minutos,paraahorrarpotencia,yseapagaráautomáticamente después de 60 minutos.

ESMANUAL DE USUARIO CHS
12
5.3 CERO
pantalla DesCripCiÓn
. . . .0. Presione ZEROPresione ZEROcuando chSseenciende,generalmentelapantallaaparece[0],sienlapantallaaparecedígitospequeños cuando no hay carga, presione esta tecla.
5.4 TARA
pantalla DesCripCiÓn
. . . .0. Presione TARADespués de encender, colgar el peso tara como cabestrillo,cable primero, presionar esta tecla.con la luz “TARE” ” encendida,entonces la balanzal mostrará peso neto de las mercancías.
PRESIONAR MODE 9 VEcES, LA PANTALLA MOSTRARÁ DfULT, PRESIONAR LA TEcLA ENTER Y LA TEcLA PEAK DURANTE 3 SEgUNDOS PARA VOLVER A LA PROgRAMcIÓN POR DEfEcTO.
5.5 MÁXIMO VALOR
pantalla DesCripCiÓn
Presionar PEAKEn pantalla aparece el valor máximo.Presionar PEAK otra vez.La lectura resumirá el cambio.
5.6 ACUMULACIÓN
pantalla DesCripCiÓn
No * * *Presione la tecla MODE 5 veces.Tiempo acumulación actual
H * * * *
Presionar la tecla ENTER.Lectura de loscuatro dígitos del valor total.l * * * *
DESPUéS DE MOSTRAR LOS cONTENIDOS PREcISADOS ANTERIORMENTE, LA DYNA LINK VOLVERÁ AUTOMÁTIcAMENTE A SU POSIcIÓN ANTERIOR.
5.7 BÚSQUEDA ACUMULACIÓN
pantalla DesCripCiÓn
No * * *Presione la tecla MODE 6 veces. Después presione la tecla ENTER.Tiempo acumulación actual
* * * * * Lectura peso actual

13
ESMANUAL DE USUARIO CHS
H * * * * 4 dígitos principlaes del valor total
l * * * * Lectura de los cuatro dígitos del valor total
Presione la tecla MODE otra vez.VOLVER.
PRESIONAR LA TEcLA TARE Y ZERO PUEDE cOMPROBAR DIfERENTES VEcES EL PESO Y LA AcUMULAcIÓN.
5.8 BORRAR ACUMULACIÓN
pantalla DesCripCiÓn
Clr
Presione la tecla MODE 7 veces. Despues presione la tecla ENTER.Pregunta si quiere borrar o no.
noCLr Presione la tecla MODE para cancelar borrado.
8.8.8.8.8. Presione la tecla ENTER para confirmar borrado.
5.9 VOLTAjE DE BATERíA
pantalla DesCripCiÓn
U * . * *Presione la tecla MODE 3 veces, la pantalla mostrará “dC”, presione la tecla ENTER.La pantalla mostrara el voltaje de la batería:
Presione la tecla MODE otra vez.VOLVER
NOTA: El voltaje de la batería normalmente está entre U 3.50 a U 4.70 si está por debajo U 3.10 . la pantalla parpadeará. debe cambiarse la batería.
5.10 CONVERSIÓN UNIDAD
pantalla DesCripCiÓn
Un =00
Presione MODE para seleccionar las “Unit”,
presione la tecla ENTER. La Unidad será cambiado cirularmente
Presione la tecla MODE otra vez.
VOLVER
5.11 VOLVER AL ESTADO NORMAL DE COMPROBACIÓN
pantalla DesCripCiÓn
ESCPresione la tecla MODE para “Esc”presione la tecla ENTER Volver al estado normal de comprobación
Presione la tecla MODE otra vez.VOLVER

ESMANUAL DE USUARIO CHS
14
6. ConfIgUraCIÓn dE parámETroS & CaLIbraCIÓn6.1 teClas De funCiÓn
6.2 ConfiGuraCiÓn De parámetros
6.3 CaliBraCiÓn
6.1 TELCAS DE FUNCIÓN
TECLA FUNCIÓN TECLA FUNCIÓN
Mueva los dígitos ▪ Almacenamiento y salida ▪
Programar valor al alza ▪ confirmar ▪
6.2 CONFIGURACIÓN DE PARÁMETROS
operaCiÓn pantalla DesCripCiÓn
Presione la tecla MODE dos veces SETUP confirmar, introducir parámetros programación programa.
Presionar ENTER FS=06 Nueva chS,la pantalla muestra fS=06 ,si chS está calibrada,la pantalla muestra la capacidad.
Presionar ZERO para seleccionar FS=02
Escoger capacidad, la pantalla muestra circularmente
02/03/05/06/10/15/20/30/50/60/75, escoja cap:2000kg como ejem-plo, escoja fS=02.
Presionar ENTER para confirmar Id=02Nueva chS , la pantalla muestra Id=02, si chS está calibrada, la pantalla muestra la división calibrada.
Presionar ZERO para seleccionar Id=01Escoger división,la pantalla mostrará01/02/05/10/20circularmente. 2000kg La división chS es 1kg, por tanto escoja Id=01
Pt=0Nueva chS, la pantalla muestra Pt=0, si chS está calibrada la pantalla muestra la posición decimal calibrada.
Presionar ZERO para seleccionar Pt=0Escoger posición decimal, la pantalla mostrará circularmente0/1/2/3, 0=xxxxx, 1=xxxx.x, 2=xxx.xx, 3=xx.xxx. cap.2000kg Escoja chS Pt=0
Presionar ENTER para confirmar Ab=24pantalla rango cero , A:rango cero a mano;B:rango cero automático, 0~5 total 6 opciones: 0=0%f. S; 1=2%f.S; 2=4%f.S; 3=10%f.S; 4=20%f.S; 5=50%f.S generalmente no cambia este parámetro.
15
ESMANUAL DE USUARIO CHS
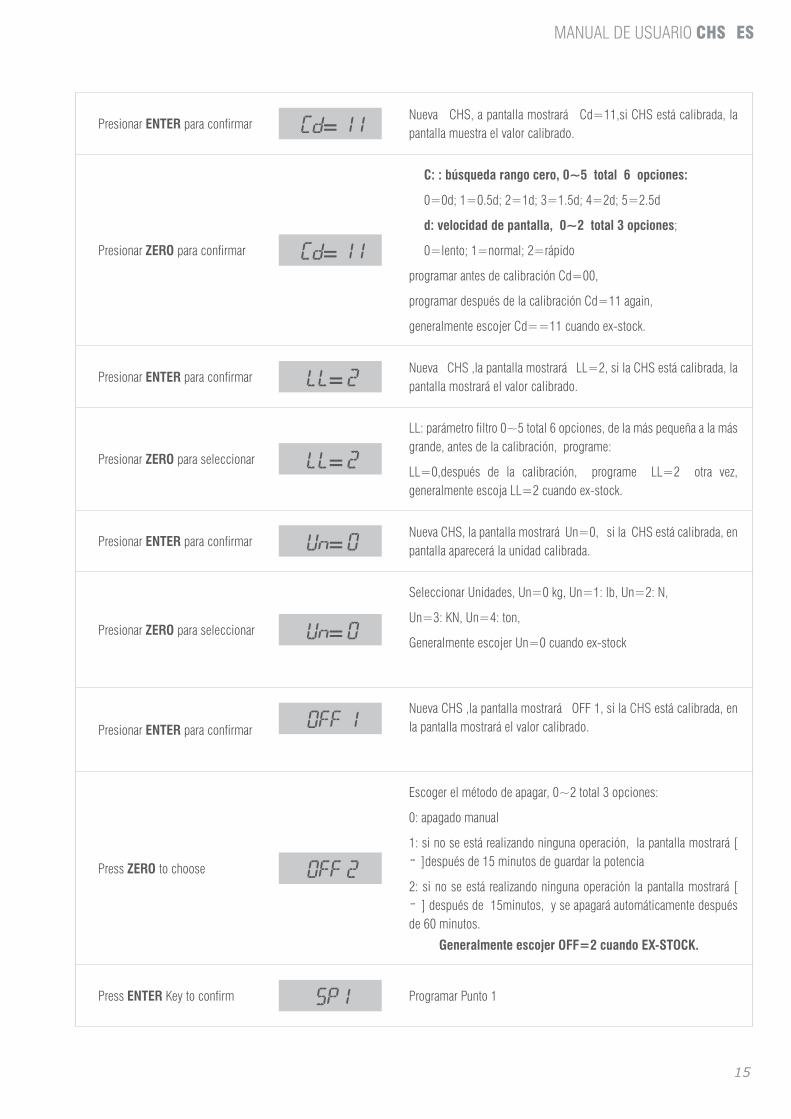
Presionar ENTER para confirmar Cd=11Nueva chS, a pantalla mostrará cd=11,si chS está calibrada, la pantalla muestra el valor calibrado.
Presionar ZERO para confirmar Cd=11
C: : búsqueda rango cero, 0~5 total 6 opciones:
0=0d; 1=0.5d; 2=1d; 3=1.5d; 4=2d; 5=2.5d
d: velocidad de pantalla, 0~2 total 3 opciones;
0=lento; 1=normal; 2=rápido
programar antes de calibración cd=00,
programar después de la calibración cd=11 again,
generalmente escojer cd==11 cuando ex-stock.
Presionar ENTER para confirmar LL=2Nueva chS ,la pantalla mostrará LL=2, si la chS está calibrada, la pantalla mostrará el valor calibrado.
Presionar ZERO para seleccionar LL=2
LL: parámetro filtro 0~5 total 6 opciones, de la más pequeña a la más grande, antes de la calibración, programe:
LL=0,después de la calibración, programe LL=2 otra vez, generalmente escoja LL=2 cuando ex-stock.
Presionar ENTER para confirmar Un=0Nueva chS, la pantalla mostrará Un=0, si la chS está calibrada, en pantalla aparecerá la unidad calibrada.
Presionar ZERO para seleccionar Un=0
Seleccionar Unidades, Un=0 kg, Un=1: lb, Un=2: N,
Un=3: KN, Un=4: ton,
generalmente escojer Un=0 cuando ex-stock
Presionar ENTER para confirmar OFF 1Nueva chS ,la pantalla mostrará Off 1, si la chS está calibrada, en la pantalla mostrará el valor calibrado.
Press ZERO to choose OFF 2
Escoger el método de apagar, 0~2 total 3 opciones:
0: apagado manual
1:sinoseestárealizandoningunaoperación,lapantallamostrará[-]despuésde15minutosdeguardarlapotencia
2:sinoseestá realizandoningunaoperación lapantallamostrará[-]despuésde15minutos,yseapagaráautomáticamentedespuésde 60 minutos.
Generalmente escojer OFF=2 cuando EX-STOCK.
Press ENTER Key to confirm SP1 Programar Punto 1

ESMANUAL DE USUARIO CHS
16
Press ENTER Key to confirm 1 OFFNueva chS, la pantalla muestra 1 apagado, si chS está calibrada, el valor calibrado de pantalla.
Press ZERO to choose 1 LO
Programar punto modo 1 ;
1 OFF• significa punto programado 1 no funciona.
1 LO• se encuentra punto programado mínimo 1.
1 HI • punto programado 1 Alto.
Press ENTER Key to confirm 02000Nueva chS, la pantalla mostrará 02000, si chS está calibrada, el valor calibrado de pantalla.
Press ZERO to set value, Press TARE to move digit 02000 Programar “1 LO ” o valor “1 HI ”.
Press ENTER Key to confirm SP 2 Programar Punto 2
Press ENTER Key to confirm 2 OFFNueva chS, la pantalla muestra 2 Off, si chS está calibrada, la pantalla muestra el valor calibrado.
Press ZERO to choose 2 LO
Programar punto modo 2;
2 OFF• significa punto programado 2 no funciona.
2 LO• se encuentra punto programado mínimo 2.
2 HI • está programado punto 2.
Press ENTER Key to confirm 02000Nueva chS, la pantalla mostrará 02000, si chS está calibrado. la pantalla mostrará el valor calibrado
Press ZERO to set value, Press TARE to move digit 02000 Programar “2 LO ” o valor “2 HI ”.
Press ENTER Key to confirm g= gravedad
Press ENTER Key to confirm 9.82
Nueva chS, la pantalla muestra el valor de gravedad 9.7930, si chS está calibrada. la pantalla muestra el valor del área de calibración. El usuario puede cambiarlo al valor local, presionando la tecla MODE para cambiar el dígito, Presione la tecla ENTER para cambiar el valor. Elvalorlimitadoes9.783-9.832
Press MODE Key Endconfirme la programación de parámetros anterior. Salga del programa de configuración de parámetros.

17
ESMANUAL DE USUARIO CHS
6.3 CALIBRACIÓN
operaCiÓn pantalla DesCripCiÓn
Para confirmar 0Escoja cap:1000kg chS como ejemplo , vigile que en la pantalla aparez-ca[0 ]despuésdecolgarelpesotara,ustedpuedecolgarelpeostaraprimero y después encender el indicador.
Presione la tecla MODE 8veces CLlbr Acceda a la función calibración
Presione la tecla ENTER CAL 1 calibración de un punto
Presione la tecla ENTER CALSP calibración punto cero
Presione la tecla ENTER loAdcolgar peso estándar 2000kg
Esperar hasta que el señal STB aparezca en pantalla
Presione la tecla ENTER 01000
La pantalla muestra la capacidad que usted ha escogido when cuando programe parámetros, y parpadee el primer dígito.
Espere hasta que aparezca el señal “STB” en pantalla.
Presione la tecla MODE para alma-cenar -------- confirmar
-oL-
End
1000.0
Presione la tecla TARE para cambiar los digitos 1000 final de la calibración.

ESMANUAL DE USUARIO CHS
18
7. panTaLLa ILUSTraCIÓn
PANTALLA SIGNIFICADO CAUSA
no519 Sin señal inalámbrico Distancia demasiado lejos
SEtUP Introducir parámetros programación
UAdL Introducir voltage calibración
loAd Punto calibración
----- Excede límite máximo a Peso Tara no puede exceder la capacidad máxima
____ Excede límite mínimo Peso Tara no puede ser negativo
Err10 Peso inferior a capacidad mínima No puede acumular el valor
Err11 Sobrepaso de tiempo acumulado No puede acumular después de 30 veces
Err12 Sobrepaso peso acumulado No puede acumular después de 99999
Err13 Error en acumulación repetida No puede acumular un peso repetidamente
no * * * Acumulación tiempo actual
H * * * * 4 dígitos acumulados más usuales Peso total= cuatro dígitos usuales + cuatro dígitos poco comunes
l * * * * 4 dígitos de acumulación poco comunes Peso total=cuatro dígitos usuales + cuatro dígitos poco comunes
CLrPreguntar si realmente quiere borrar el peso acu-mulado
En caso de suppression de errores
no CLr Abandonar borrado
88888 confirmar borrado
--- Valor introducido demasiado grande cuando introduzca tara o valor peso
____ Valor introducido demasiaso pequeño cuando introduzca tara o valor peso
noACC No hay contenido de acumulación cuando compruebe acumulación
-oL0- Aviso sobrecarga Peso Tara + Neto excede capacidad máxima + 9e
-oL1- Aviso sobrecarga Peso Tara + Neto excede capacidad máxima 125%
-Lb- Aviso bacteria baja Apagado automático un minuto más tarde
U*.* * Voltage bacteria actual
End finalcuando el programador de parámetros o la calibración sea correcta
OFF Apagar
Unstb Introducir valor antes de encenderse STB

19
ESMANUAL DE USUARIO CHS
8. SoLUCIÓn dE probLEmaS
proBlema Causa posiBle soluCiÓn
Sin pantalla
Batería defectuosa Reemplazar
Tecla defectuosa Requiere servicio autorizado
Tecla defectuosa Requiere servicio autorizado
Dígit.parpadean Batería baja cambie la nueva batería
La pantalla no respon-de a los cambios de carga
célula de carga defectuosa o PcB Requiere servicio autorizado
fuera de calibración Re- calibrar
La pantalla muestra cambios excesivos de Cero entre las diferen-tes pesadas
DYNA LINK no se estabiliza después de encenderse
Después del encendido, caliente la balanza durante un periodo de 3-5 minutos.
El peso mostrado en pantalla muestra un gran
DYNA LINK no ha realizado la puesta a cero antes de aplicar el peso
Libere el ZERO antes de aplicar el peso
Es necesario recalibrar consulte calibración
Kg/lb selección equivocada consulte operación
Distancia inalámbrica más corta
La batería del indicador inalámbrico está baja
cambie la batería
NOTA:SiustedapagaelDYNA-LIN,ylovuelveaencenderinmediatamente,algunasvecesapareceráenpantalla[ -oL1- “]aunquenohayaningún peso colgando. Si ello ocurre solo debe apagar el DYNALINK , esperar unos cuantos minutos y después volverlo a encender.

ESMANUAL DE USUARIO CHS
20
9. rS232 proToCoLo
PUERTO cOM 1VELOcIDAD BAUDIO 4800INfORMAcIÓN BITS 8
STOP BITS 1PARIDAD ninguna
AScII código y transmisión binaria híbrida
= PREÁMBULO =
BAND
ERA
(1 B
YTE)
F1 STABLE 0: NO 1: YESF2 OVERLOAD 0: NO 1: YESF3 TARE 0: NO 1: YESF4 hOLD 0: NO 1: YESF5 PEAK 0: NO 1: YESF6 BATTERY 0: LOWF7 SPALARM 0: NO 1: YESF8
UNIDAD (1 Byte)
0x30: kg0x31: Lb0x32: N0x33: kN0x34: t
señal y decimal(1Byte)
(+ y - ) señal:Máximo 4 bits
0: Positivo1: Negativo0: No Decimal1: 1 Decimal2: 2 Decimal3: 3 Decimal
Decimal:Mínimo 4 bits
TTTTT , NNNNN/PPPPP5 Byte 1 byte 5 Byte
Valor Tara Separar símbolo Peso neto y valor cumbre
0x30~0x39
Overload:
3SP+OL
0x30~0x39
Overload:
3SP+OL
EjEMPLO
67.8kG:(F1F2F3F4F5F6F7F8)30013030363738,3030363738
-68.1Lb:(F1F2F3F4F5F6F7F8)31F13030363738,3030363738
6.78kG:(F1F2F3F4F5F6F7F8)30023030363738,3030363738
10. garanTÍa
El gANchO PESADOR está garantizada contra todo defecto de fabricación y de material, por un periodo de 1 año a partir de la fecha de entrega.
Durante este periodo, gIROPÈS, se hará cargo de la reparación de la balanza.
Esta garantía no incluye los daños ocasionados por uso indebido o sobrecargas.
La garantía no cubre los gastos de envío (portes) necesarios para la reparación deL gANchO PESADOR.


frMANUEL D´UTILISATION CHS
22
1. gUIdE opEraTIonS SUrES
1. Ne surcharger pas l’indicateur de chargement chS .
2. N’effectuer pas de pesés importantes. Vous maintenir éloigné quand l’indicateur de chargement effectuera une operation.
3. N’effectuer pas des pesés dans des conditions défavorable de fort vent qui peuvent causer une lecture incorrecte.
4. N’effectuer pas des pesés dans des conditions défavorables de modifications rapides dans le changement de température puisque cela pourrait dériver dans une lecture incorrecte.
5. N’essayez pas d’ouvrir l’indicateur de chargement, il ne contient pas de paragraphes aptes pour l’utilisation de l’usager.
6. Ne retirer pas le stop de la corde de fil du crochet. Pour des raisons de sécurité, les appliquer toujours.
7. Retirer toutes les charges des manilles ou du crochet quand on ne l’utilise pas.
8.Avantdepeser,vérifieretassurerquetouslesappareilsaccrochés,récepteursdechargementetd’autresélémentssoientdansdesconditionnes correctes.
9. Vérifier crochets, manilles, aiguilles de sécurité et verrous périodiquement. contacter avec son fournisseur en trouvant des défauts ou des déformations et avoir besoin de remplacer ces éléments.
10. Lever toujours la charge de manière verticale.
2. CaraCTÉrISTIQUES ET SpÉCIfICaTIonS2.1 CaraCtéristiQues stanDarDs
2.2 information teChniQue prinCipal
2.3 spéCifiCation
2.4 illustration apparenCe
2.5 supplément puissanCe
DESCRIPTIONL’indicateur de charge sans fil est un instrument extrêmement bien construit pour une utilisation industrielle, comme outil standard sans fil, il offre des applications universelles. Tant utilisé sous une grue pour des peser ou pour mesurer la force. L’indicateur de charge sans fil est un micro processeur contrôlé d’une grande précision. Le calibrage est plus simple avec un indicateur sans câble.
2.1 CARACTÉRISTIQUES STANDARDS construction résistent. ▪
Précision: 0.1% de porté. ▪
Toutes les fonctions et unités apparaissent clairement sur l’écran en LcD (avec rétroéclairage). ▪
Les digits sont d’une hauteur de 1 pouce pour qu’ils soient faciles à distinguer a longue distance. ▪
Deux modes programmables avec point de programmation pouvant être utilisé pour une plus grande sécurité pour les situations ▪dangereuse et pour les surcharges.
Longue durée de la batterie dans 3 tailles standards LR6 (AA). Batteries alcalines. ▪
Toutes les unités reconnues et utilisés internationalement: kilogrammes (kg), Tonne courtes (t), livres (lb), Newton et kilo newton ▪(KN).
contrôle éloigné par infrarouges pour la calibration, plus simple (avec mot de passe). ▪
contrôle éloigné par infrarouges avec beaucoup de fonctions: ZERO, TARE, éffAcER, ▪
SOMMET, AccUMMULER, SOUTENIR, Unité de changement, vérification Voltage et éteindre. ▪
4 touches mécaniques locales: ON/Off, ZERO, Sommet et Unité de changement. ▪
Avertissement batterie baisse. ▪
Rf indicateur sans-fil de poche/de main. ▪

23
frMANUEL D´UTILISATION CHS
2.2 INFORMATION TEChNIQUE PRINCIPAL
écran 25mm (1’’) 5 digits LcDAllumage Rang zéro 20% f.S.
Notice Rang zéro 4% f.S.Rang Tara 20% f.S.
Temps stable ≤10secondsIndicateur surcharge 100% f.S. + 9e
Max. charge sure 125% f.S.Dernière charge 400% f.S.
Vie batterie ≥50heuresType batterie LR6 (AA) dimensions piles alcalines. 1.5Vx3
Opération Temp - 10ºc~ + 40ºcOpération humidité ≤85%RHau-dessous20ºC
Distancé sans-fil Min.80m(pardéfaut)[200m(optionnel)]fréquence sans-fil 2.4GHz(pardéfaut),433MHz,860MHz(optionnel)
2.3 SPÉCIFICATION
TYPE Max. porté
(kg)
Min. Poids
(kg)
Division Comptes
écran total (n)chS3000M 3000 10 1 3000chS5000M 5000 40 2 2500chS10000M 10000 100 5 2000chS3000W 3000 10 1 3000chS5000W 5000 40 2 2500chS10000W 10000 100 5 2000
2.4 ILLUSTRATION APPARENCE
Cap: 1-5 t Cap: 10 t
porté A(mm) B(mm) C(mm) D(mm) Ø(mm) h(mm) matériel3000 260 123 37 195 51 365 aluminium5000 285 123 57 210 58 405 aluminium10000 320 120 57 230 92 535 acier

frMANUEL D´UTILISATION CHS
24
2.5 SUPPLÉMENT PUISSANCE
Batterie: “LR6(AA)”dimensions batteries alcalines. 1.5Vx3
courant: la moyenne de courant de l’indicateur de chargement se trouve sur les Dc 35mA, 3pcs les nouvelles batteries peuvent être utiliséespendant40heures.Lamoyennedecourantdel’indicateursans-filssetrouveautourdeDC28mA,4pcsLesnouvellesbatteriespeuventêtreutiliséespendantunes80heures.
Avis batterie faible, la bascule avise l’utilisateur quand les chiffrent clignotent. cela signifie que les batteries doivent être remplacées. L’indicateur de chargement ou indicateur sans-fil s’éteindra automatiquement après une Demi heure sans être utilisé.
3. ÉCran & CLaVIEr2.1 éCran lCD
2.2 area Clavier
3.1 ÉCRAN LCD
ÉCRAN LCD25mm (1’’)
5 dígitos LcD
avec toutes les fonctions et unités.
Signal sans-fil, son apparition signifie que le signa lest
stable, ceci disparaît quand il y aura manque de signal. ce signal
clignote quand le signal sera faible.
Voltage batterie
plein
baisse, vide
PEAK La valeur actuel est la valeur de durabilité maximale (maximum value).
MEMApparait une fois quand la valeur du paramètre ou calibration de stockage est long. L’apparition du temps signifie que la valeur actuelle est l’information d’accumulation.
STB état stable
kN “kilonewton”, N: “Newton”. l’état tare “N”clignotera.
t “tonnes”.
lb “livres”.
kg “kilogrammes ”.
3.2 AREA CLAVIER
ON/OFFALLUMAGE ET ÉTEINTPousser la touche“ ▪ ON/OFF” pendant 3 seconds, l’indicateur de chargement s’allumera.En état on, pousser la touche “ ▪ ON/OFF” 1 seconde, l’indicateur de chargement s’éteindra.
ZEROQuand l’indicateur de chargement s’allume sans aucune charge ▪sur le crochet, il apparait des petits chiffres sur l’écran, pousser cette touche et vous obtiendrez le lecteur de zéro.
UNITESPousser la touche UNIT, l’unité sur l’écran LcD changera de sé- ▪quence: kg, t, lb, klb, N, kN, kg. ▪
SOMMETQuand le poids changera, en pressant cette touche l’écran mon- ▪trera la lecture maximale.Pousser cette touche une autre fois, la lecture résumera le chan- ▪gement..

25
frMANUEL D´UTILISATION CHS
4. gUIdE opEraTIonS SUr L’IndICaTEUr SanS-fIL
ZERO En fonction d’essai, s’il apparait des petits chiffres sur l’écran, ▪pousser cette touche pour obtenir la lecture du zero.
En fonction de programmation des paramètres il peut être utilisé ▪comme un écran déporté.
TARE
Accrochez un container sur le crochet, quand la lecture sera ▪stable, pousser la touche, alors les chiffres montreront “0” et l’indicateur “N” clignotera.
Placez le matériel sur le container, sur l’écran apparaitra le ▪poids net du matériel.
Si vous enlevez le matériel et le container, montrera sur l’écran ▪la valeur minimale du poids tare.
fonction de programmation des paramètres s’utilise pour le ▪déplacement des caractères.
MODE
Utilisé comme fonction sélectionner, ou aussi peut être combinée avec des autres touches. ▪
ENTER
OFF
SETUP
dC
Unit
ACCU
SACCU
cLEAr
no CLr
CL1Br
dFult
• Utilisé comme fonction choisir, normalement combinée avec la touche MODE.
• PousserlatoucheMODE une fois, se montrera OFF sur l’écran, pousser la touche ENTER pour réaliser avec télécommande.
• Pousser la toucheMODE deux fois, en écran SETUP. pousser ENTER pour accéder à la fonction de Programmation Paramétrons. finir programmation, pousser la touche MODE autre fois, stocker information et retourner au mode de vérification.
• Pousser la toucheMODE 3 fois, en écran apparaitra “dC”. Pousser la touche ENTER pour savoir le voltage de la batterie pousser la touche MODE une autre fois pour retourner au mode de vérification.
• PousserlatoucheMODE 4 fois, écran apparaitra “Unit”. Pousser la touche ENTER pour accéder à la sélection de unités. Pousser la touche ZERO pour sélectionner la unité, Pousser la touche MODE une autre fois pour retourner au mode de vérification.
• PousserlatoucheMODE 5 fois, en écran apparaitra “ACCU”. Pousser la touche ENTER pour accéder à la fonction Accumulation. Pousser la touche MODE une autre fois pour retourner au mode de verification.
• PousserlatoucheMODE 6 fois, en écran apparaitra “SACCU”. Pousser la touche ENTER pour accéder à la fonction de recherche de Accumulation. Pousser la touche MODE une autre fois pour retourner au mode de vérification.
• PousserlatoucheMODE 7 fois, en écran apparaitra “clEAr”. Pousser la touche ENTER pour accéder à la fonction de effacer Accumulation, en écran apparaitra “CLr”. Pousser la touche ENTER fois, en écran apparaitra “noCLr”. Pousser la touche MODE une autre fois pour retourner au mode de vérification.
• Pousser la toucheMODE8 fois,enécranapparaitra“CLIBr”. Pousser la touche ENTER pendant 3 seconds, pour accéder à la fonction de calibration, si on pousse la touche ENTER pendant moins de 3 seconds, ainsi on retournera au mode de vérification.
• PousserlatoucheMODE 9 fois, en écran apparaitra “dFuLt”. Pousser la touche ENTER et PEAK pendant 3 seconds pour revenir à la confguration par défaut.
PEAKLorsque le poids est en train de changer, appuyer sur cette touche. L’écran affiche la lecture maximale. ▪
Appuyer sur cette touche à nouveau, la lecture résumer le changement. ▪

frMANUEL D´UTILISATION CHS
26
5. gUÍa dE opEraCIonES5.1 allumer
5.2 éteinDre
5.3 Zero
5.4 tare
5.5 sommet pousser
5.6 aCCumulation
5.7 reCherChe aCCumulation
5.8 effaCer aCCumulation
5.9 voltaGe De Batterie
5.10 Conversion unité
5.11 retourner à l’état normal De vérifiCation
5.1 ALLUMER
POUSER (ON/Off) 3 SEcONDS, EN écRAN, cOME IL EST DéTAILé:
éCran DesCription
8.8.8.8.8. Montrer deux fois
Ert Montrer deux fois
1000.0 Montrer deux fois porté
U 6.XX Montrer voltage courant batterie
u 2.1 Montrer version actuel software
----- Attente stable
0 Lumière “STB” allumé maintenant on peut opérer
5.2 ÉTEINDRE
état DesCription
ETEINT MANUEL Pousser la touche ON/OFF pendant 3 seconds
ETEINT REMOTE Pousser la touche MODE pour choisir Off, pousser la touche ENTER pendant 3 seconds
AUTO ETEINT Choisirleméthodedeéteintaveclaprogrammationdesparamètres,montrerasurécran[- ].Aprèsde15minutes sans opérer, garder la puissance et s’éteindra automatiquement après de 60 minutes..
5.3 ZERO
éCran DesCription
. . . .0.Pousser ZEROPousser ZEROQuands’allumeenécranilapparaitgénéralement[0],sisurl’écranapparaitdespetitsdigitsquandiln’y aura pas charge pousser touché.

27
frMANUEL D´UTILISATION CHS
5.4 TARE
éCran DesCription
. . . .0. Pousser TARAApes allumer, accrocher le poids tare comme en écharpe, câble premier, pousser cette touche, avec la lumière “TARE” allumé ,alors la balance montrera poids o net du matériel.
POUSSER LA TOUchE MODE 9 fois, sur l’écran apparaître DFULT, pousser la touche ENTER et la touche PEAK pendant 3 seconds pour retourner a la programmation par défauto.
5.5 SOMMET POUSSER
éCran DesCription
Pousser PEAKEn écran apparait la valeur maximale.Pousser PEAK nouveau.Lecture résumer le changement.
5.6 ACCUMULATION
éCran DesCription
No * * *Presione la tecla MODE 5 veces.Tiempo acumulación actual
H * * * *Presionar la tecla ENTER.Lectura de loscuatro dígitos del valor total.
l * * * *
Apres montrer les contenus spécifiés précédemment, retournera automatiquement à sa position précédente.
5.7 REChERChE ACCUMULATION
éCran DesCription
No * * *Pousser touche MODE 6 fois. Apres pousser ENTER.Temps accumulation actuelv
* * * * * Lecture poids actuel
H * * * * 4 digits principaux de la valeur totale
l * * * * Lecture des quatre digits de la valeur totale
Pousser MODE une autre fois.RETOURNER
Pousser TARE et ZERO peut vérifier le poids et l’accumulation en des différents périodes.
5.8 EFFACER ACCUMULATION
éCran DesCription
ClrPousser la touché MODE 7 fois. Après pousser ENTER.Demande si on veut effacer o non.
noCLr Pousser touche MODE annuler effacement.
8.8.8.8.8. Pousser ENTER confirmer effacement borrado.

frMANUEL D´UTILISATION CHS
28
5.9 VOLTAGE BATTERIE
éCran DesCription
U * . * *Pousser la touche MODE 3 fois, En écran “dC”, pousser à ENTER.
L’écran montrera le voltage actuel de la batterie voltage
Pousser la touche MODE autre fois.
RETOURNER
NOTE: Le voltage de la batterie est normalement entre U 3.50 et U 4.70 , si est par audessous U 3.10 ., l’écran clignotera, la batterie Doit être changée.
5.10 CONVERSION UNITÉ
éCran DesCription
Un =00Pousser la touché MODE pour choisir la unite “Unit”,Pousser la touché ENTER. la unité sera changé circulairement
Pousser la touché MODE autre fois.
RETOURNER
5.11 RETOURNER À L’ÉTAT NORMAL DE VÉRIFICATION
éCran DesCription
ESCPousser la touche MODE par “ESc”Pousser ENTER Retourner à l’état normal de vérification
Pousser la touche MODE autre fois
RETOURNER

29
frMANUEL D´UTILISATION CHS
6. programmEr paramETrES & CaLIbraTIon6.1 fonCtion Clavier
6.2 proGrammer parametres
6.3 CaliBration
6.1 TELCAS DE FUNCIÓN
TECLA FUNCIÓN TECLA FUNCIÓN
Déplacer digits ▪ Stockage et sortie ▪
Programmer valeur à la hausse ▪ confirmer ▪
6.2 PROGRAMMER PARAMETRES
operation éCran DesCription
Pousser touche MODE deux fois SETUP confirmer, introduire des paramètres programmation programme
Pousser touche ENTER FS=06 L’écran montre fS=06, si est calibré, l’écran montre la porté.
Pousser la touche ZERO pour choisir FS=02
choisir porté, l’écran montre circulairement
02/03/05/06/10/15/20/30/50/60/75, prenez cap:2000kg comme exemple, choisir fS=02.
Pousser la touche ENTER pour confirmer Id=02
L’écran montre Id=02, si est calibré, l’écran montre la divisions calibré.
Pousser la touche ZERO pour choisir Id=01
choisir une division, l’écran montrera 01/02/05/10/20 circulairement. 2000kg la division est 1kg, par conséquent choisir Id=01
Pt=0L’écran montre Pt=0, si est calibré, l’écran montre la position décimal calibré.
Pousser la touche ZERO pour choisir Pt=0
choisir position décimal, l’écran montrera circularmente 0/1/2/3, 0=xxxxx, 1=xxxx.x, 2=xxx.xx, 3=xx.xxx cap.2000kg Pt=0
Pousser la touche ENTER pour confirmer Ab=24
Ëcran rang zero , A:rang zéro à main B:rang zéro automatique, 0~5 total 6 options: 0=0%f. S; 1=2%f.S; 2=4%f.S; 3=10%f.S; 4=20%f.S; 5=50%f.S généralement no change pas ce para-mètre.
Pousser la touche ENTER pour confirmer Cd=11
L’écran montre cd=11, si est calibré, l’écran montre la valeur ca-libré.

frMANUEL D´UTILISATION CHS
30
Pousser la touche ENTER pour confirmer Cd=11
C: recherche rang zéro, 0~5 total 6 options:
0=0d; 1=0.5d; 2=1d; 3=1.5d; 4=2d; 5=2.5d
d: écran vitesse, 0~2 total 3 options;
0=lento; 1=normal; 2=rápido
programmer avant de la calibration cd=00, après de la calibration, programmer cd=11 autre fois, généralement choisir cd==11 quand ex stock.
Pousser la touche ENTER pour confirmer LL=2
L’écran montrera LL=2, si est calibré, l’écran montrera la valeur ca-libré.
Pousser la touche ZERO pour choisir LL=2
LL: paramètre filter, 0~5 total 6 options, de la plus petite a la plus grand, avant de la calibration, programmer.
LL=0, après de la calibration, programmer LL=2 autre fois, généralement choisir LL=2 quand ex-stock.
Pousser la touche ENTER pour confirmer Un=0
L’écran montrera Un=0, si est calibré, l’écran montrera la valeur calibré.
Pousser la touche ZERO pour choisir Un=0
choisir la unité, Un=0 kg, Un=1: lb, Un=2: N,
Un=3: KN, Un=4: ton,
généralement, choisir Un=0 quand ex-stock
Pousser la touche ENTER pour confirmer OFF 1
L’écran montrera Off 1, si est calibré, l’écran montrera la valeur ca-libré.
Pousser la touche ZERO pour choisir OFF 2
choisir la méthode d’éteindre, 0~2 total 3 options:
0: éteindre l’indicateur à main
1:sionn’effectueaucuneopération,l’écranmontrera[-]après15minutes de garder la puissance
2:sionn’effectueaucuneopérationl’écranmontrera[-]après15minutes, et sera automatiquement éteint après 60 minutes.
Choisir généralement OFF=2 quand EX-STOCK.
Pousser la touche ENTER pour confirmer SP1 Programmer Point 1
Pousser la touche ENTER pour confirmer 1 OFF L’écran montre 1 éteint, si est calibrée, valeur calibré d’écran.
Press ZERO to choose 1 LO
Programmer point mode 1 ;
1 OFF• éTEINT” signifie point programmé 1 ne fonctionne pas.
1 LO• se trouve point programmé minime 1.
1 HI • point programmé 1 halte.
31
frMANUEL D´UTILISATION CHS
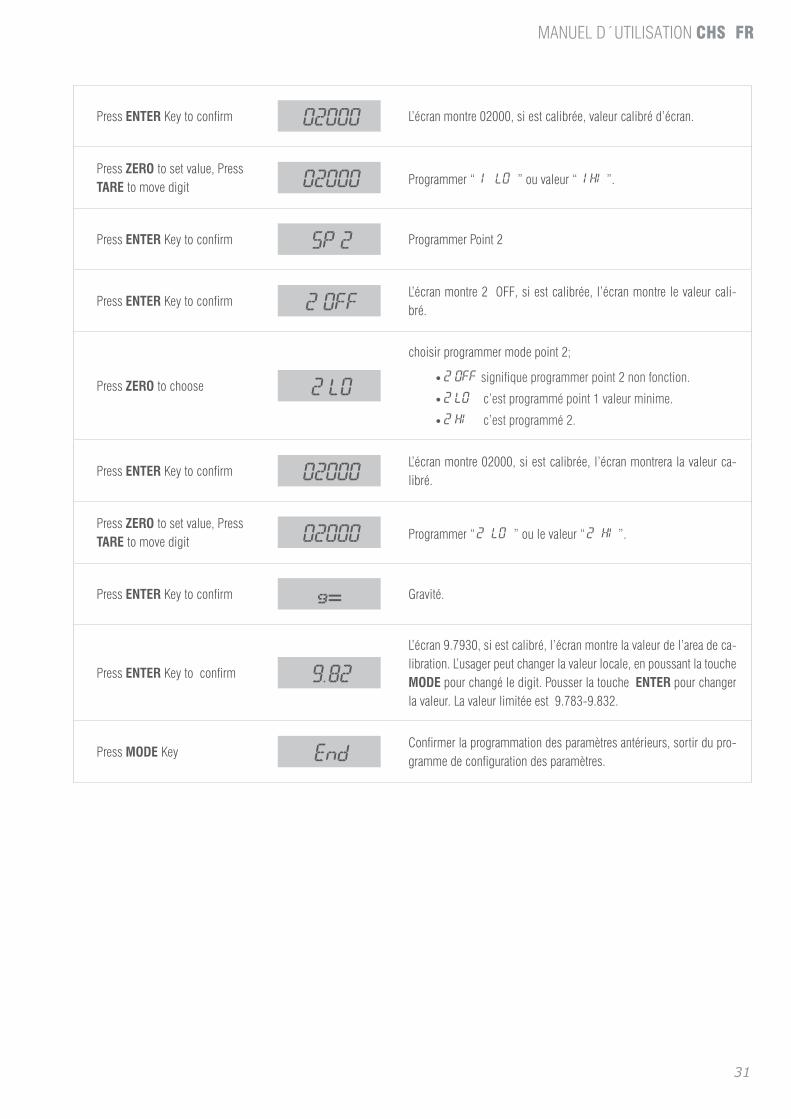
Press ENTER Key to confirm 02000 L’écran montre 02000, si est calibrée, valeur calibré d’écran.
Press ZERO to set value, Press TARE to move digit 02000 Programmer “1 LO ” ou valeur “1 HI ”.
Press ENTER Key to confirm SP 2 Programmer Point 2
Press ENTER Key to confirm 2 OFFL’écran montre 2 Off, si est calibrée, l’écran montre le valeur cali-bré.
Press ZERO to choose 2 LO
choisir programmer mode point 2;
2 OFF• signifique programmer point 2 non fonction.
2 LO• c’est programmé point 1 valeur minime.
2 HI • c’est programmé 2.
Press ENTER Key to confirm 02000L’écran montre 02000, si est calibrée, l’écran montrera la valeur ca-libré.
Press ZERO to set value, Press TARE to move digit 02000 Programmer “2 LO ” ou le valeur “2 HI ”.
Press ENTER Key to confirm g= gravité.
Press ENTER Key to confirm 9.82
L’écran 9.7930, si est calibré, l’écran montre la valeur de l’area de ca-libration. L’usager peut changer la valeur locale, en poussant la touche MODE pour changé le digit. Pousser la touche ENTER pour changer lavaleur.Lavaleurlimitéeest9.783-9.832.
Press MODE Key Endconfirmer la programmation des paramètres antérieurs, sortir du pro-gramme de configuration des paramètres.

frMANUEL D´UTILISATION CHS
32
6.3 CALIBRATION
operation éCran DesCription
Pour confirmer. 0Escoja cap:1000kg chS como ejemplo , vigile que en la pantalla apa-rezca[0 ]despuésdecolgarelpesotara,ustedpuedecolgarelpeostara primero y después encender el indicador.
Pousser la touche MODE 8fois. CLlbr Accéder a la fonction calibration
Pousser la touche ENTER CAL 1 calibration de un point
Pousser la touche ENTER CALSP calibration point zéro
Pousser la touche ENTER loAdAccrocher poids standard 2000kg.
Attendre jusqu’à ce que la signal STB apparaisse en écran.
Pousser la touche ENTER 01000L’écran montre la porté que on a choisie quand on programme des paramètres, et clignote le premier digit. Attendre jusqu’a ce qu’apparaisse la signal STB en écran“STB” display Screen.
Pousser la touche MODE
pour stocker -------- confirmer
-oL-
End
1000.0Pousser la touche TARE pourchanger les digits 1000 final de la calibration.

33
frMANUEL D´UTILISATION CHS
7. ÉCran ILLUSTraTIon
ÉCRAN ILLUSTRATION OBSERVATIONS
no519 Sans signal sans-fil Distance trop loin Distance trop loin
SEtUP Introduire paramètres programmation
UAdL Introduire voltage calibration
loAd Point calibration
----- Dépasse limite maximale a Poids Tare ne peut pas dépasser la capacité maximale
____ Dépasse limite minimale Poids Tare ne peut pas être négatif
Err10 Poids inférieur à capacité minimale Il ne peut pas accumuler la valeur
Err11 Amble de temps accumulé Il ne peut pas accumuler après de 30 fois
Err12 Amble poids accumulé Il ne peut pas accumuler après de 99999
Err13 Erreur en accumulation répété Il ne peut pas accumuler un poids maintes fois
no * * * Accumulation temps actuel
H * * * * 4 digits accumulés plus habituelsPoids total= Quatre digits habituels + Quatre digits peu communs
l * * * * 4 digits d’accumulation peu communsPoids total=quatre digits habituels+ quatre digits peu habituels
CLrDemander sil veut réellement effacer. Le poids ac-cumulé
En cas de suppression de erreurs
no CLr Abandonner effacement
88888 confirmer effacement
--- Valeur introduite trop grande Quand on introduise tare ou valeur poids
____ Valeur introduite trop petite Quand on introduise tare ou valeur poids
noACC Il n’y a pas contenu accumulation Quand on vérifie accumulation
-oL0- Avis surcharge Poids Tare + Net dépasse porté maximal + 9e
-oL1- Avis surcharge Poids Tare + Net dépasse porté maximal 125%
-Lb- Aviso batterie baisse éteint automatique un minute plus tard
U*.* * Voltage batterie actuel
End finQuand le programmateur des paramètres ou la calibra-tion était correcte
OFF éteindre
Unstb Introduire valeur avant s’allume STB

frMANUEL D´UTILISATION CHS
34
8.gUIdE dÉTECTIon ET SoLUTIon dES probLÈmES
proBlÈme Cause possiBle solution
Sans écran
Batterie défectueuse Remplacer
Touche défectueuse Requière service autorisé
La touche d’allumage n’est poussée pas correctement
Pousser la touche ON/Off
fermement pendant 3 seconds
Digit .clignotent Batterie faible changer la batterie
L´’ecran ne répond pas aux changements de la charge
capteur défectueuse PcB Requière service autorisé
hors calibration Re- calibrer
L’écran montre changes
excessives de zéro entre
les différentes pesés
n’est pas stabilise après
l’allumage
Apres l’allumage, préchauffez la balance pendant une période de 3-5 minutes.
Le poids montré sur l’écran
montre un grand
n’a pas effectué la mise à zéro
avant d’appliquer le poidsfaire le ZERO avant de mettre le poids
Re-calibrer consulter calibration
Kg/lb sélection erronée consulter opération
Distance sans-fil plus
courte
La batterie de l’indicateur sansfil est faible
changer la batterie
NOTE:SionéteintetonallumeaNouveau,quelquesfois,ilapparaitrasurl’écran[ -oL1- “]mêmes’iln’yaaucunpoidsAccROché. SI cELA SE PRODUIT ON DOIT éTEINDRE, ATTENDRE QUELQUES MINUTES ET LE RALLUMER PLUS TARD.

35
frMANUEL D´UTILISATION CHS
9. rS232 proToCoLE
PORT cOM 1VITESSE BAUDIE 4800
INfORMATION BITS 8STOP BITS 1
PARITé aucuneAScII code et transmission binaire hybride
= PRÉAMBULS =
DRAP
EAU
(1 B
YTE)
F1 STABLE 0: NO 1: YESF2 OVERLOAD 0: NO 1: YESF3 TARE 0: NO 1: YESF4 hOLD 0: NO 1: YESF5 PEAK 0: NO 1: YESF6 BATTERY 0: LOWF7 SPALARM 0: NO 1: YESF8
UNITé (1 Byte)
0x30: kg
0x31: Lb
0x32: N
0x33: kN
0x34: t
SIgNAL ET DécIMALE (1Byte)
(+ y - ) signal:
Maximale 4 bits
0: Positive
1: Négative
0: No Décimale
1: 1 Décimale
2: 2 Décimale
3: 3 Décimale
Décimale:
Minimale 4 bits
TTTTT , NNNNN/PPPPP5 Byte 1 byte 5 Byte
Valeur Tare Séparer symbole Poids Net et valeur sommet0x30~0x39
Overload:
3SP+OL
0x30~0x39
Overload:
3SP+OL
EXEMPLE 67.8kG:(F1F2F3F4F5F6F7F8)30013030363738,3030363738-68.1Lb:(F1F2F3F4F5F6F7F8)31F13030363738,30303637386.78kG:(F1F2F3F4F5F6F7F8)30023030363738,3030363738
10. garanTIEcette groCHET pESEUr est garantie contre tout défaut de fabrication et de matériel pendant 1 an à partir de la date de livraison.
Durant cette période, gIROPÈS SL. se chargera de la réparation de la balance.
cette garantie n’inclut pas les dommages causés par une utilisation impropre, surcharge ou par le non respect des recommandations décrites dans ce manuel.
La garantie ne couvre pas les frais d’envois nécessaires à la réparation de la groCHET pESEUr.


37
EnUSER MANUAL CHS
1. SafE opEraTIon gUIdE
1. Do not overload this chS load guage.
2. Do not perform overhead weighing. Stay clear when chS load guage is in operation
3. Do not perform weighing under strong wind condition which may cause incorrect reading
4. Do not perform weighing under enviorment of temperature rapid changes in which may cause incorrect reading
5. Do not attempt to open this chS load guage, no user serviceable parts inside.
6. Do not remove wire rope stopper from hook. for safety reasons, always apply it.
7. Remove all loads from shackle or hook when not in used.
8.beforeweighing,checkandmakesurethatallhanging/load-receivingelements/devicesareingoodcondition.
9. check hook, shackle, safety pins, and latches periodically. contact your dealer for parts replacement in case defect, deform or wearing is found.
10. Always lift loads vertically.
2. fEaTUrES and SpECIfICaTIon2.1 features
2.2 main teChniCal Data
2.3 speCifiCation
2.4 appearanCe illustration
2.5 power supply
PROFILEERT wireless chS load guage is an extremely well-built instrument for industry use ,as a standard wireless tool offer universal applications,Whether used as conventional crane weigher or to measure force, ERT wireless chS load guage is microprocessor controlled for precision accuracy, calibration is easier with wireless indicator.
2.1 FEATURESRugged construction. ▪
Accuracy: 0.1% of capacity ▪
All fuctions and units are clearly display on the LcD (with backlighting), ▪
Digits are 1 inch high for easy distant viewing. ▪
Two user programmable Set-Point can be used for safety and warning applications or for limit weighing. ▪
Long battery life on 3 standard “LR6(AA)”size alkaline batteries. ▪
All commonly used internationally recognized units are available:kilograms(kg), short Tons(t) pounds(lb), Newton and kilonewton(kN) ▪
Infrared Remote control easier to calibration(with password) ▪
Infrared Remote control with many fuctions: “ZERO”, ”TARE”,”cLEAR”,“PEAK”,”AccUMULATE”,”hOLD”,”Unit change”,”Voltage check” ▪and “Power Off”
4 local mechanical keys: ”ON/Off”,”ZERO”,”PEAK” and ”Unit change”. ▪
low battery warnning. ▪
Rf wireless palm indicator ▪

EnUSER MANUAL CHS
38
2.2 MAIN TEChNICAL DATA
Display 25mm (1’’) 5digits LcD with blacklightPower on zero range 20% f.S.Manual Zero Range 4% f.S.
Tare Range 20% f.S.Stable Time ≤10seconds
Overload Indication 100% f.S. + 9eMax. Safety Load 125% f.S.
Ultimate Load 400% f.S.Life battery ≥50heures
Type battery “LR6(AA)”size alkaline batteries. 1.5Vx3Operating Temp. - 10ºc~ + 40ºc
Operating humidity ≤85%RHunder20ºCWireless Distance Min.80m(default),[200m(optional)]
Wireless frequency 2.4GHz(default),433MHz,860MHz(optional)
2.3 SPECIFICATION
MODEL CAPACITY (KG) MIN. WEIGhT (KD) DIVISON TOTAL COUNTSchS3000M 3000 10 1 3000chS5000M 5000 40 2 2500chS10000M 10000 100 5 2000chS3000W 3000 10 1 3000chS5000W 5000 40 2 2500chS10000W 10000 100 5 2000
2.4 APPEARANCE ILLUSTRATION
Cap: 1-5 t Cap: 10 t
CAPACITY A(MM) B(MM) C(MM) D(MM) Ø(MM) h(MM) MATÉRIEL3000 260 123 37 195 51 365 aluminium
5000 285 123 57 210 58 405 aluminium10000 320 120 57 230 92 535 acier

39
EnUSER MANUAL CHS
2.5 POWER SUPPLY
Battery: “LR6(AA)”size alkaline batteries. 1.5Vx3
current: the chS load guage average current is about Dc 35mA, 3pcs new batteries can be used for about 40hours. Wireless indicator average currentisaboutDC28mA,4pcsnewbatteriescanbeusedforabout80hours.
Low battery warning: When the digits flashes, it means the battery needs to be replaced. The chS load guage or wireless indicator will power off automatically after half hours operation
3. dISpLaY2.1 lCD Display
2.2 Key
3.1 ÉCRAN LCD
DISPLAY LCD25mm (1’’)
5 digits LcD
with all fuctions and units
Wireless signal, It appear means signal stable, it disppear while signal miss. It flash means signal weak
Battery Voltage
full
low empty
PEAK current value is Peak hold value(maxmium value)
MEMAppear one time when Parameter or calibration value storage. Long time appearance means current value is Accumulation data
STB Stable Status
kN “kilonewton”,N “Newton”.Tare status“N”will flash
t “ton”
lb “pound”
kg “kilogram”
3.2 KEY
ON/OFFPower ON & Power OFFPress “ ▪ ON/OFF”Key 3 Seconds, the chS load guage turn ON.
In ON status, Press “ ▪ ON/OFF”Key 1 Second, the chS load guage turn Off
ZEROWhen the indicator is no load on the hook, little figures show on ▪the display, press this key and the reading will be zero.
UNITSPress UNIT key, the unit on LcD will circlely sequence ▪change:
kg, t, lb, klb, N, kN, kg. ▪ .
PEAKWhen weight is changing, press this key will display the maximum ▪reading.
Press this key again, reading will resume changing. ▪
EnUSER MANUAL CHS
40
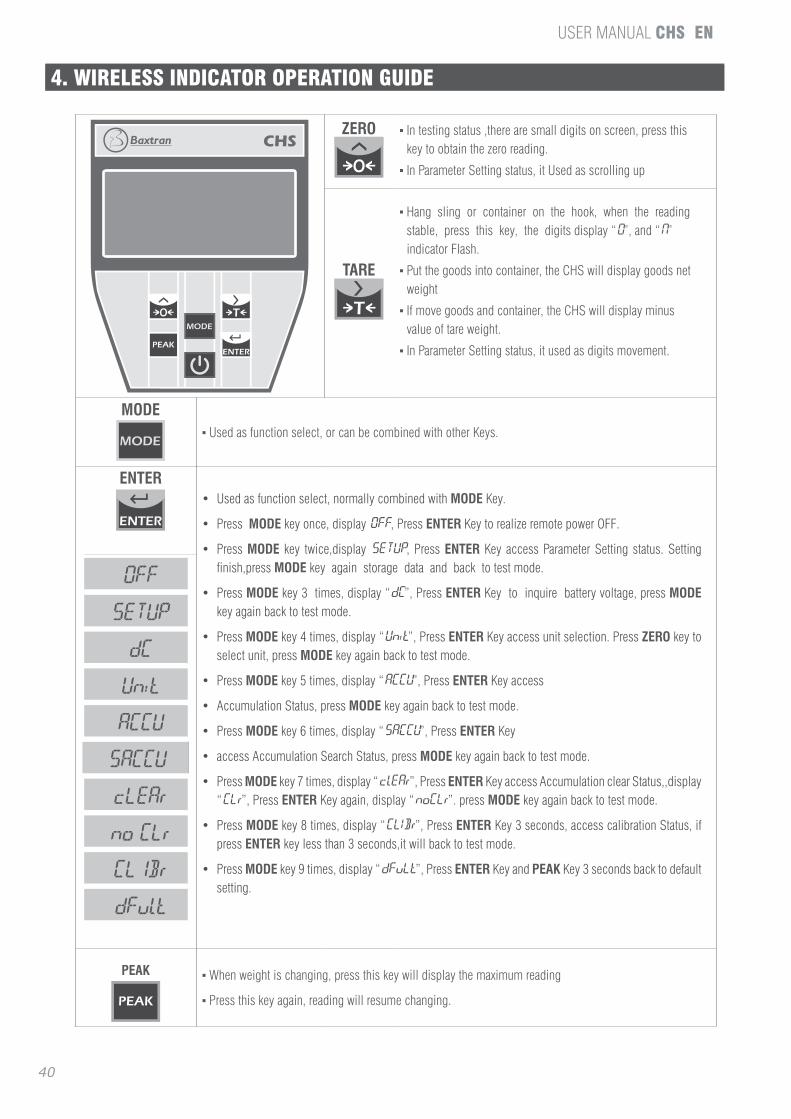
4. WIrELESS IndICaTor opEraTIon gUIdE
ZERO In testing status ,there are small digits on screen, press this ▪key to obtain the zero reading.
In Parameter Setting status, it Used as scrolling up ▪
TARE
hang sling or container on the hook, when the reading ▪stable, press this key, the digits display “0”, and “N” indicator flash.
Put the goods into container, the chS will display goods net ▪weight
If move goods and container, the chS will display minus ▪value of tare weight.
In Parameter Setting status, it used as digits movement. ▪
MODEUsed as function select, or can be combined with other Keys. ▪
ENTER
OFF
SETUP
dC
Unit
ACCU
SACCU
cLEAr
no CLr
CL1Br
dFult
• Usedasfunctionselect,normallycombinedwithMODE Key.
• PressMODE key once, display OFF, Press ENTER Key to realize remote power Off.
• PressMODE key twice,display SETUP, Press ENTER Key access Parameter Setting status. Setting finish,press MODE key again storage data and back to test mode.
• PressMODE key 3 times, display “dC”, Press ENTER Key to inquire battery voltage, press MODE key again back to test mode.
• PressMODE key 4 times, display “Unit”, Press ENTER Key access unit selection. Press ZERO key to select unit, press MODE key again back to test mode.
• PressMODE key 5 times, display “ACCU”, Press ENTER Key access
• AccumulationStatus,pressMODE key again back to test mode.
• PressMODE key 6 times, display “SACCU”, Press ENTER Key
• accessAccumulationSearchStatus,pressMODE key again back to test mode.
• PressMODE key 7 times, display “clEAr”, Press ENTER Key access Accumulation clear Status,,display “CLr”, Press ENTER Key again, display “noCLr”. press MODE key again back to test mode.
• PressMODEkey8times,display“CLIBr”, Press ENTER Key 3 seconds, access calibration Status, if press ENTER key less than 3 seconds,it will back to test mode.
• PressMODE key 9 times, display “dFuLt”, Press ENTER Key and PEAK Key 3 seconds back to default setting.
PEAK When weight is changing, press this key will display the maximum reading ▪
Press this key again, reading will resume changing. ▪

41
EnUSER MANUAL CHS
5. fUnCTIon gUIdE5.1 turn on
5.2 turn off
5.3 Zero
5.4 tare
5.5 peaK holD
5.6 aCCumulation
5.7 aCCumulation seaCh
5.8 aCCumulation Clear
5.9 Batery voltaGe
5.10 unit Convert
5.11 return to normal testinG status
5.1 TURN ON
TURN ON PRESS (ON/Off) 3 SEcONDS. DISPLAY AS BELOW
Display DesCription
8.8.8.8.8. Display twice
Ert Display twice
1000.0 Display twice capacity
U 6.XX Display current battery voltage
u 2.1 Display current software version
----- Waiting stable
0 “STB”light on, you can operate now
5.2 TURN OFF
status DesCription
MANUAL POWER OFF Press ON/OFF Key 3 Seconds
REMOTE POWER OFF Press MODE Key select “Off”,press ENTER Key 3 Seconds
AUTO POWER OFF choose turn off method when parameter setting, the chSwilldisplay[- ]afternoope-ration at 15 minutes to save power, and it will turn off automatically after 60 minutes.
5.3 ZERODisplay DesCription
. . . .0. Press ZERO
Press ZERO
When chSturnon,generallyitdisplays[0],ifdisplaysmalldigitswhennoload,pressthiskey..

EnUSER MANUAL CHS
42
5.4 TARE
Display DesCription
. . . .0.Press TARE
After turn on, hanging tare weight such as sling, cable at first, press this key, “TARE” light on, then the scale will display net weight of the goods.
Press MODE kEY 9 TIMES, on the display show DfULT, press the enter key and the peak key during 3 seconds for return to the program-mation us default.
5.5 PEAK hOLD
Display DesCription
Press PEAKDisplay Maximum value.Press PEAK againReading will resume changing.
5.6 ACCUMULATION
DISPLAY DESCRIPTION
No * * *Press MODE key 5 times
current accumulation time
H * * * * Press ENTER key
front four digits of total valuel * * * *
AfTER DISPLAY ABOVE cONTENTS TWIcE, ThE chS LINK WILL RETURN AUTOMATIcALLY
5.7 ACCUMULATION SEARCh
DISPLAY DESCRIPTION
No * * *Press MODE key 6 times. Then Press ENTER Key
current accumulation time
* * * * * current weight reading
H * * * * front four digits of total value
l * * * * Rear four digits of total value
Press MODE key again.Return
PRESS TARE AND ZERO cAN chEcK DIffERENT TIMES WEIghT AND AccUMULATION.
5.8 ACCUMULATION CLEAR
Display DesCription
ClrPress MODE key 7 times. Then Press ENTER Key
Ask if you want to clear or not
noCLr Press MODE key cancel clear
8.8.8.8.8. Press ENTER key confirm clear

43
EnUSER MANUAL CHS
5.9 BATTERY VOLTAGE Display DesCription
U * . * *Press MODE key 3 times, display“dC”, press ENTER key.
Display current battery voltagePress MODE key again
ReturnNOTE Battery voltage normally between U 3.50 to U 4.70 if below U 3.10 display will flash, Battery should be changed.
5.10 UNIT CONVERT DISPLAY DESCRIPTION
Un =00
Press MODE key select “UnIt”,
press ENTER key,Unit
will be changed circulate
Press MODE key again
Return
5.11 RETURN TO NORMAL TESTING STATUS
DISPLAY DESCRIPTION
ESCPress MODE key select “Esc”press ENTER keyReturn to normal testing status
Press MODE key again
Return

EnUSER MANUAL CHS
44
6. paramETEr SETTIng & CaLIbraTIon6.1 Key funCtion
6.2 proGram parameters
6.3 CaliBration
6.1 KEY FUNCTIONKEY FUNCTION KEY FUNCTION
Move digits ▪ Storage and exit ▪
Set value up ▪ confirm ▪
6.2 PROGRAM PARAMETERSoperation Display illustration
Press MODE key twice SETUP confirm, enter parameter setting program
Press ENTER FS=06 New chS, the screen display fS=06 , if chS calibrated, the screen display capacity.
Press ZERO to choose FS=02choose capacity ,the 02/03/05/06/10/15/20/30/50/60/75 circularly, take cap:2000kg as example, choose fS=02.
Press ENTER to confirm Id=02New chS , the screen display Id=02, if chS calibrated, the screen display calibrated division.
Press ZERO to choose Id=01choose division,the screen display 01/02/05/10/20 circularly.2000kg chS division is 1kg, so choose Id=01
Pt=0New chS, the screen display Pt=0, if chS calibrated, the screen display calibrated decimal position.
Press ZERO to choose Pt=0choose decimal position, the screen display 0/1/2/3 circularly, 0=xxxxx, 1=xxxx.x, 2=xxx.xx, 3=xx.xxx, cap.2000kg The chS choose Pt=0
Press ENTER to confirm Ab=24Display zero range , A:zero range by hand; B:zero range automatica-lly, 0~5 total 6 options: 0=0%f. S; 1=2%f.S; 2=4%f.S; 3=10%f.S; 4=20%f.S; 5=50%f.S generally Don’t change
Press ENTER to confirm Cd=11New chS, the screen display cd=11,if chS calibrated, the screen display calibrated value.
Press ZERO to confirm Cd=11
C: zero-tracking range, 0~5 total 6 options; 0=0d; 1=0.5d; 2=1d; 3=1.5d; 4=2d; 5=2.5dd: display speed, 0~2 total 3 options;0=slow; 1=average; 2=fast;
before calibration,set cd=00,after calibration, set cd=11 again, generally choose cd==11 when ex-stock.

45
EnUSER MANUAL CHS
Press ENTER to confirm LL=2New chS , the screen display LL=2, if chS calibrated, the screen display calibrated value.
Press ZERO to choose LL=2LL: filter parameter 0~5 total 6 options from smallest to biggest, before calibration, set LL=0,after calibration, set LL=2 again, generally choose LL=2 when ex-stock..
Press ENTER to confirm Un=0New chS, the screen display Un=0, if dyna-link calibrated, the screen display calibrated unit.
Press ZERO to choose Un=0
choose unit, Un=0 kg, Un=1: lb, Un=2: N,Un=3: KN, Un=4: ton,generally, choose Un=0 when ex-stock
Press ENTER to confirmOFF 1 New chS , the screen display Off 1,if
chS calibrated, the screen display calibrated value
Press ZERO to choose OFF 2
choose turn off method, 0~2 total 3 options: 0:turn off by hand, 1: if no operation, the screen display “ - “ after 15 minutes to save power. 2: if no operation, the screen display “ - “ after 15 minutes and turn automaticcaly after 60 minutes.
Generrally choose OFF=2 WhEN EX-STOCK.
Press ENTER Key to confirm SP1 Set point 1
Press ENTER Key to confirm 1 OFFNew chS, the screen display 1 Off, if dyna-link calibrated, the screen display calibrated value.
Press ZERO to choose 1 LO
choose Set point 1 mode;1 OFF• means set point 1 no function.1 LO• is set point 1 lower.1 HI • is Set point 1 high.
Press ENTER Key to confirm 02000New chS, the screen display 02000, if chS calibrated, the screen display calibrated value.
Press ZERO to set value, Press TARE to move digit 02000 Set “1 LO ” or “1 HI ” Value.
Press ENTER Key to confirm SP 2 Set point 2
Press ENTER Key to confirm 2 OFFNew chS, the screen display 2 Off, if chS calibrated, the screen display calibrated value.
Press ZERO to choose 2 LO
choose Set point 1 mode;2 OFF• means set point 2 no function.2 LO• is set point 1 low value.2 HI • is Set point 2.

EnUSER MANUAL CHS
46
Press ENTER Key to confirm 02000New chS, the screen display 02000, if chS calibrated, the screen display calibrated value
Press ZERO to set value, Press TARE to move digit 02000 Set “2 LO ” or “2 HI ” Value.
Press ENTER Key to confirm g= acceleration of gravity
Press ENTER Key to confirm 9.82
New chS, the screen display 9.7930, if chS be calibrated, the screen display calibrated area value.user can change it to local value, press MODE key to shift digit, Press ENTER key to change value. The limi-tedvalueis9.783-9.832
Press MODE Key End confirm above parameter setting, Exit parameter setting program.
6.3 CALIBRATIONoperation Display illustration
To confirm 0Take cap:1000kg chS as example , pay attention that the screen display ” 0 “ after hanging tare weight, you can hang tare weight at first, then turn on.
Press MODE key8times CLlbr Access calibration Status
Press ENTER Key CAL 1 One point calibration
Press ENTER Key CALSP Zero point calibration
Press ENTER Key loAdhanging standard weight 2000kg
Waiting until STB signal on screen
Press ENTER Key 01000Display capacity you choose when parameter setting, and first digit flash, Do wait until “STB” signal display on screen.
Press MODE Key to storage -------- confirm
-oL-
End
1000.0
Press TARE Key to shift digit 1000 calibration end.

47
EnUSER MANUAL CHS
7. dISpLaY ILLUSTraTIonDisplay illustration remarK
no519 Without wireless signal Distance too far.
SEtUP Enter parameter setting
UAdL Enter voltage calibration
loAd calibration point
----- Exceed high limit Tare weight can’t exceed full capacity
____ Exceed low limit Tare weight can’t be negative
Err10 Weight less than Min. capacity can’t accumulate the value
Err11 Accumumated times overflow can’t accumulate after 30times
Err12 Accumulated weight overflow can’t accumulate after 99999
Err13 Error in repeat accumulation can’t accumulate one weight repeatedly
no * * * current accumulation times
H * * * * front four digit of accumulated Total weight=front four digit + rare four digit
l * * * * Rare four digit of accumulated Total weight=front four digit + rare four digit
CLrAsk if you really want to delete accumulated weight
In case error deletion
no CLr give up deletion
88888 confirm deletion
--- Input value is too large When you input tare or weight value
____ Input value is too small When you input tare or weight value
noACC No any accumulated content when you check accumulation
-oL0- Overload warning Tare + Net weight exceed full capacity + 9e
-oL1- Overload warning Tare + Net weight exceed full capacity 125%
-Lb- Low battery warning Turn off automatically one minute later
U*.* * The voltage of current battery
End End when parameter setting or calibration ready
OFF Turn off
Unstb Input value before STB light on

EnUSER MANUAL CHS
48
8. TroUbLESHooTIng gUIdE
proBlem possiBle Cause solution
No display
Defective battery Replace
Defective button Requires authorized service
Power button not properly depressed
Press ON/Off key firmly in three seconds
Digits flash Low battery change new battery
Display doesn’t respond to load changes
faulty loadcell or PcB Requires authorized service
Out of calibration Re- calibration
Display experiences excessive Zero drift between weighment
chS do not stabilize after turning on After turning on, heating 3-5 minutes.
Displayed weight shows large error
chS not Zeroed before applying weight Depress ZERO before applying weight
Requires recalibration See calibration
Kg/lb wrong selecion See operation
Wireless distance shortened Wireless indicator’s battery is low Replace battery.
NOTE: If YOU TURN Off ThE chS ,IMMEDIATELY TURN ON IT , SOMETIME IT WILL DISPLY " -OL1- “ ThOUgh IT WIThOUT ANY hANgINg. jUST TURN Off chS AND WAITINg fEW MINUTES ThEN TURN ON AgAIN.

49
EnUSER MANUAL CHS
9. rS232 proToCoLPORT cOM 1BAUD RATE 4800DATA BITS 8STOP BITS 1PARTITY noneAScII code and Binary hybrid transmission
= PREAMBLE =
DRAP
EAU
(1 B
YTE)
F1 STABLE 0: NO 1: YESF2 OVERLOAD 0: NO 1: YESF3 TARE 0: NO 1: YESF4 hOLD 0: NO 1: YESF5 PEAK 0: NO 1: YESF6 BATTERY 0: LOWF7 SPALARM 0: NO 1: YESF8
UNIT (1 Byte)
0x30: kg
0x31: Lb
0x32: N
0x33: kN
0x34: t
SIgNAL and decimal
(1Byte)
(+ and -) signal:
maximum 4 bits
0: Positive
1: Negative
0: No Decimal
1: 1 Decimal
2: 2 Decimal
3: 3 Decimal
Decimal:
minimum 4 bits
TTTTT , NNNNN/PPPPP5 Byte 1 byte 5 Byte
value Tare Separate symbol Net Weight and Value top0x30~0x39
Overload:
3SP+OL
0x30~0x39
Overload:
3SP+OL
EXEMPLE
67.8kG:(F1F2F3F4F5F6F7F8)30013030363738,3030363738
-68.1Lb:(F1F2F3F4F5F6F7F8)31F13030363738,3030363738
6.78kG:(F1F2F3F4F5F6F7F8)30023030363738,3030363738
10. gUaranTEEThis WEIgHIHg HooKS has a warranty against all manufacture and material defects, for a period of a year starting with the delivery date.
During this period, gIROPES, will be in charge of the repairing of the scale.
This warranty does not include the damages done by overload or wrong use.
The warranty does not cover the delivery expenses necessary for the repair of the scale.

EnUSER MANUAL CHS
50

CHSDECLARACIÓN DE CONFORMIDAD | DÉCLARATION DE CONFORMITÉ | DECLARATION OF CONFORMITY |
DECLARACIÓN DE CONFORMIDADDécLARATION DE cONfORMITéDEcLARATION Of cONfORMITY
Nosotros:
Nous/ We
BAXTRAN S.L.Pol. Empordà Internationalc/f. Parcela 15-16E-17469 VILAMALLA (girona)- SPAIN -
Declaramos bajo nuestra responsabilidad que el producto denominado:Nous déclarons sous notre résponsabilité que le produit ci-dessous nommé: Declare under our responsibility that the denominated product:
CHS
A la cual se refiere la presente declaración, es conforme a las siguientes normas o documentos:A la quelle se refaire la présente déclaration, et conforme aux normes suivantes ou documents:To wich déclaration referes to, conform wich the followings standards or other normative documents:
Conformidad CE:
conformité cE / cE conformity
2004/108/CE Directiva sobre la compatibilidad electromagnética.2004/108/CEdirectivesurlacompatibilitéelectromagnétique.2004/108/CEdirectiveontheelectromagneticcompatibility.2006/042/CE 17 May 2006 relativa a la máquinas2006/042/cE 17 Mai 2006 relative sur la machines.2006/042/cE 17 May 2006 on machinery.
Director general
general Manager

EnUSER MANUAL CHS
52
marca propiedad de | est une marque de | trade mark propiety of:
Pol. Empordà Internacional Calle F. Parcela 15-16 17469 VILAMALLA - (Girona) SPAIN T. (34) 972 527 212 - F. (34) 972 527 211