
MANDOLIN KIT - · PDF fileMANDOLIN KIT MUSICMAKER’S KITS PO Box 2117 Stillwater MN...
14
MANDOLIN KIT MUSICMAKER’S KITS PO Box 2117 Stillwater MN 55082 651 439 9120 [email protected] www.harpkit.com
Transcript of MANDOLIN KIT - · PDF fileMANDOLIN KIT MUSICMAKER’S KITS PO Box 2117 Stillwater MN...

MANDOLIN KIT
MUSICMAKER’S KITS PO Box 2117
Stillwater MN 55082
651 439 9120 [email protected] www.harpkit.com
2/25/2010 2
MANDOLIN
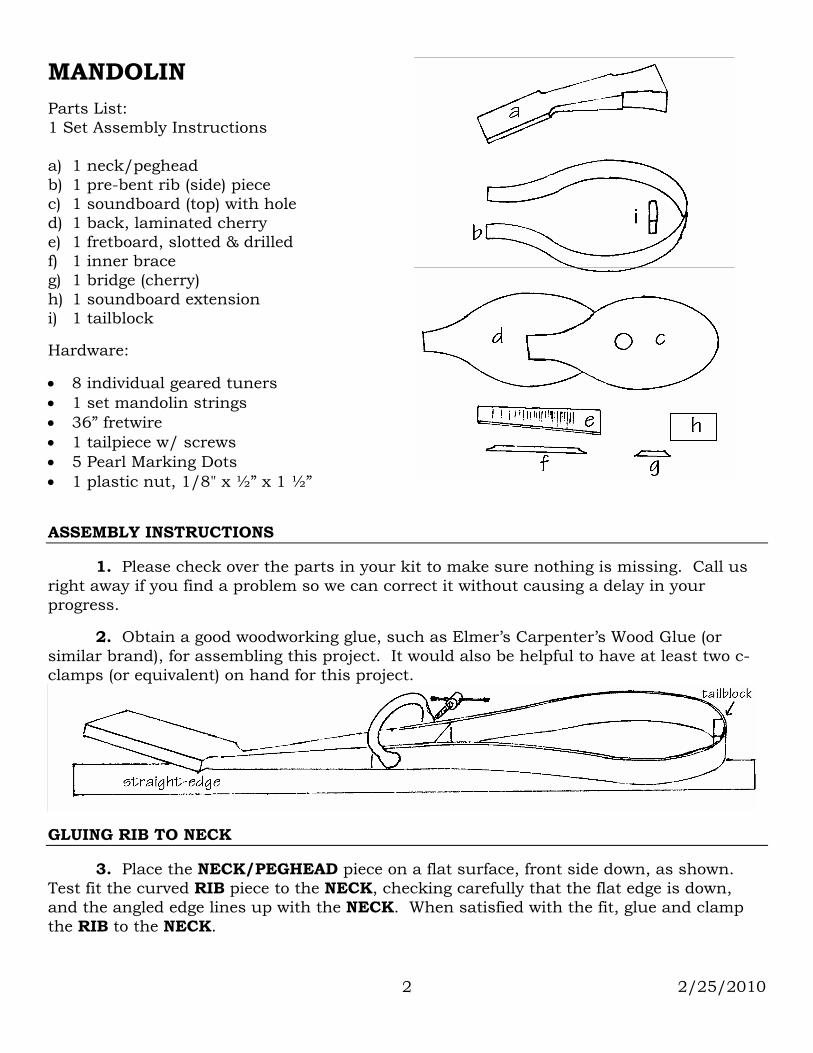
Parts List: 1 Set Assembly Instructions a) 1 neck/peghead b) 1 pre-bent rib (side) piece c) 1 soundboard (top) with hole d) 1 back, laminated cherry e) 1 fretboard, slotted & drilled f) 1 inner brace g) 1 bridge (cherry) h) 1 soundboard extension i) 1 tailblock
Hardware:
• 8 individual geared tuners • 1 set mandolin strings • 36” fretwire • 1 tailpiece w/ screws • 5 Pearl Marking Dots • 1 plastic nut, 1/8" x ½” x 1 ½”
ASSEMBLY INSTRUCTIONS
1. Please check over the parts in your kit to make sure nothing is missing. Call us right away if you find a problem so we can correct it without causing a delay in your progress.
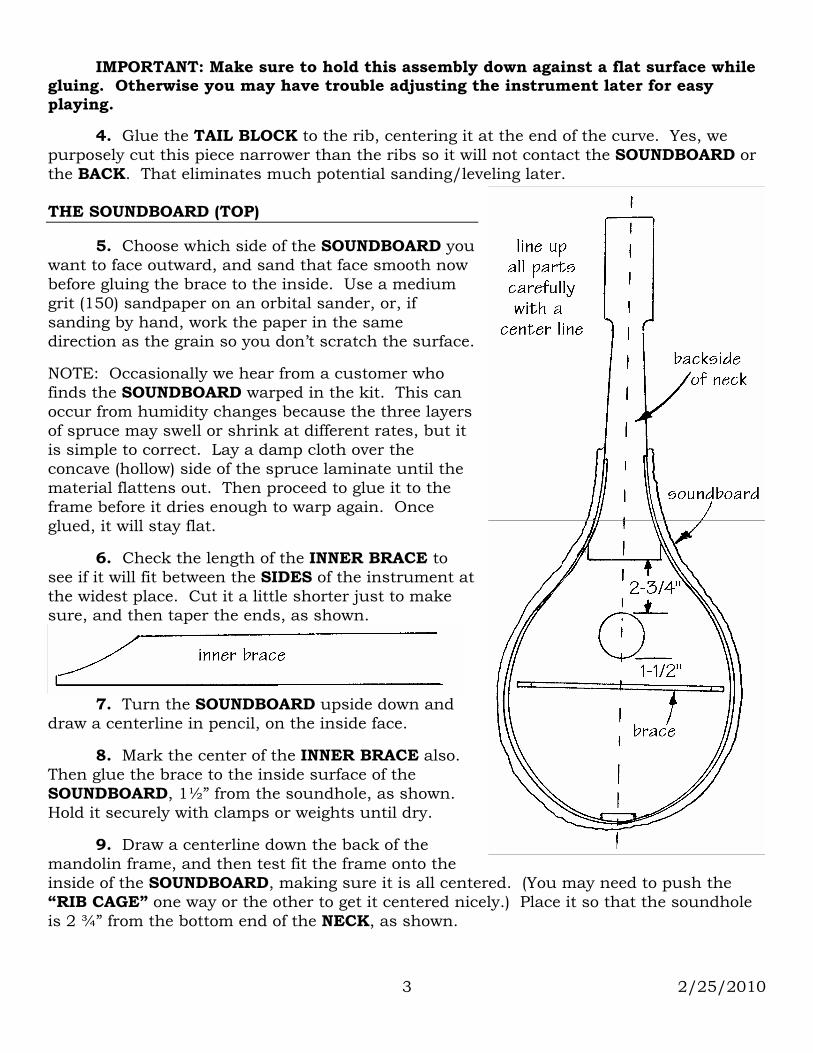
2. Obtain a good woodworking glue, such as Elmer’s Carpenter’s Wood Glue (or similar brand), for assembling this project. It would also be helpful to have at least two c-clamps (or equivalent) on hand for this project.
GLUING RIB TO NECK
3. Place the NECK/PEGHEAD piece on a flat surface, front side down, as shown. Test fit the curved RIB piece to the NECK, checking carefully that the flat edge is down, and the angled edge lines up with the NECK. When satisfied with the fit, glue and clamp the RIB to the NECK.
2/25/2010 3
IMPORTANT: Make sure to hold this assembly down against a flat surface while gluing. Otherwise you may have trouble adjusting the instrument later for easy playing. 4. Glue the TAIL BLOCK to the rib, centering it at the end of the curve. Yes, we purposely cut this piece narrower than the ribs so it will not contact the SOUNDBOARD or the BACK. That eliminates much potential sanding/leveling later. THE SOUNDBOARD (TOP)
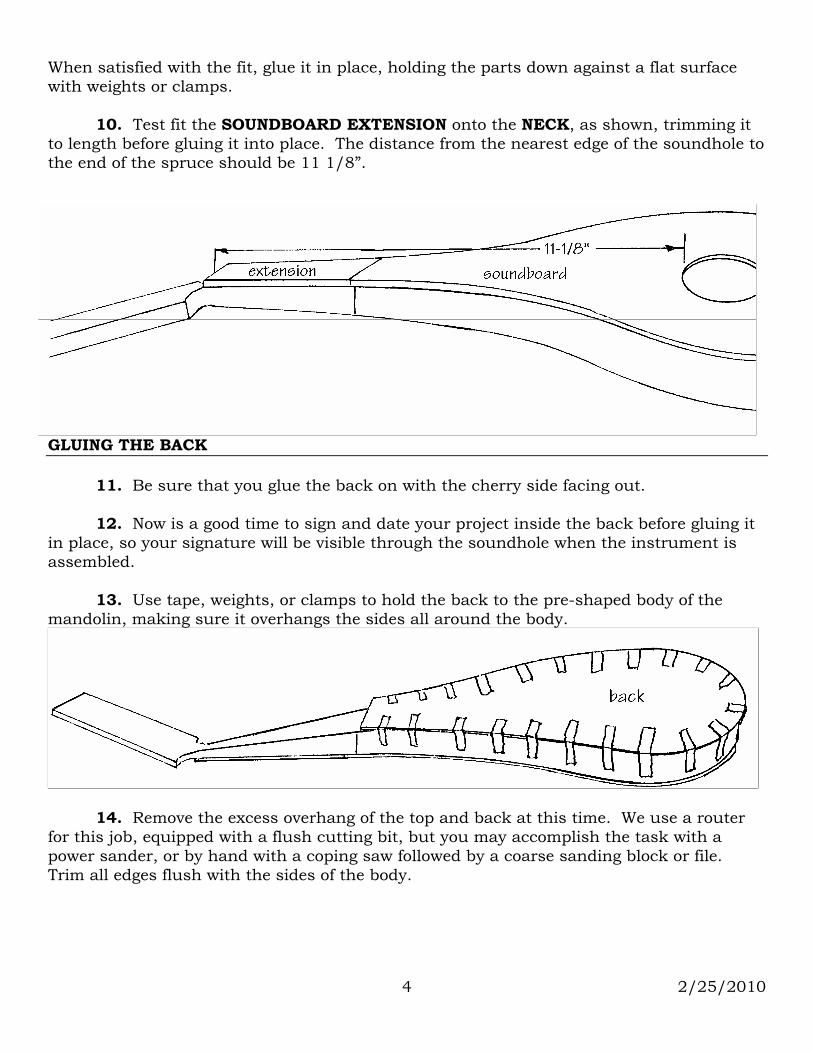
5. Choose which side of the SOUNDBOARD you want to face outward, and sand that face smooth now before gluing the brace to the inside. Use a medium grit (150) sandpaper on an orbital sander, or, if sanding by hand, work the paper in the same direction as the grain so you don’t scratch the surface.
NOTE: Occasionally we hear from a customer who finds the SOUNDBOARD warped in the kit. This can occur from humidity changes because the three layers of spruce may swell or shrink at different rates, but it is simple to correct. Lay a damp cloth over the concave (hollow) side of the spruce laminate until the material flattens out. Then proceed to glue it to the frame before it dries enough to warp again. Once glued, it will stay flat.
6. Check the length of the INNER BRACE to see if it will fit between the SIDES of the instrument at the widest place. Cut it a little shorter just to make sure, and then taper the ends, as shown.
7. Turn the SOUNDBOARD upside down and draw a centerline in pencil, on the inside face.
8. Mark the center of the INNER BRACE also. Then glue the brace to the inside surface of the SOUNDBOARD, 1½” from the soundhole, as shown. Hold it securely with clamps or weights until dry.
9. Draw a centerline down the back of the mandolin frame, and then test fit the frame onto the inside of the SOUNDBOARD, making sure it is all centered. (You may need to push the “RIB CAGE” one way or the other to get it centered nicely.) Place it so that the soundhole is 2 ¾” from the bottom end of the NECK, as shown.
2/25/2010 4
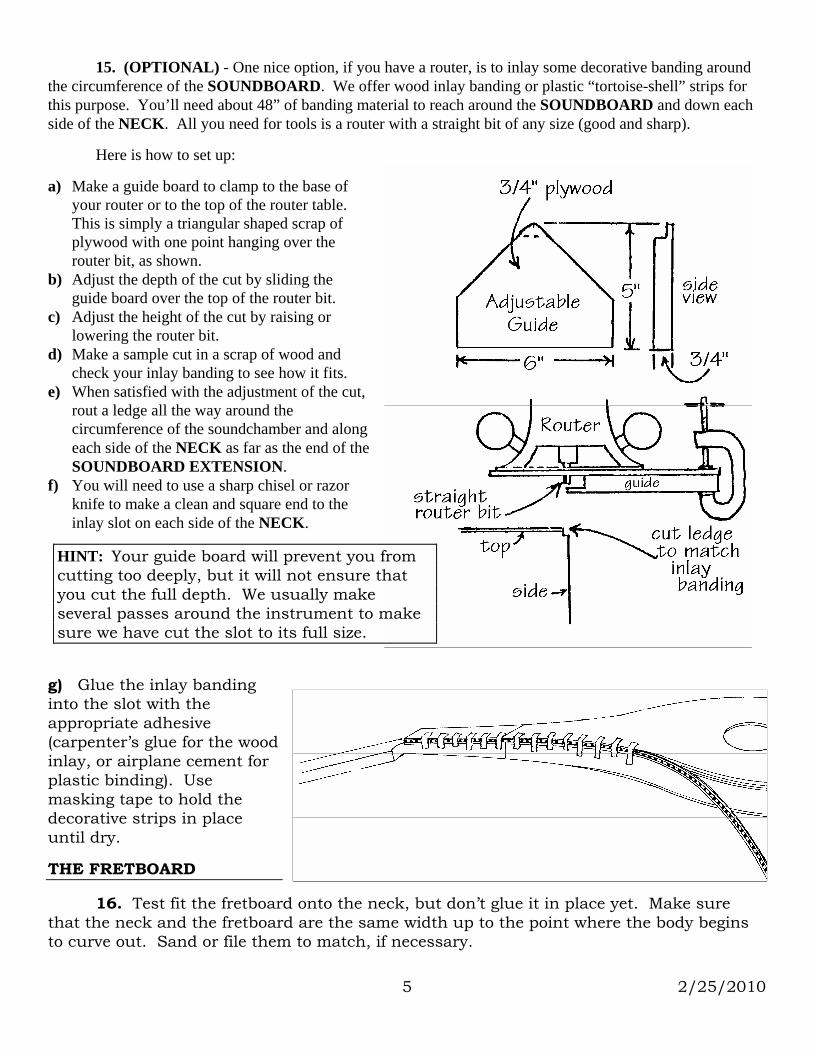
When satisfied with the fit, glue it in place, holding the parts down against a flat surface with weights or clamps. 10. Test fit the SOUNDBOARD EXTENSION onto the NECK, as shown, trimming it to length before gluing it into place. The distance from the nearest edge of the soundhole to the end of the spruce should be 11 1/8”.
GLUING THE BACK 11. Be sure that you glue the back on with the cherry side facing out. 12. Now is a good time to sign and date your project inside the back before gluing it in place, so your signature will be visible through the soundhole when the instrument is assembled. 13. Use tape, weights, or clamps to hold the back to the pre-shaped body of the mandolin, making sure it overhangs the sides all around the body.
14. Remove the excess overhang of the top and back at this time. We use a router for this job, equipped with a flush cutting bit, but you may accomplish the task with a power sander, or by hand with a coping saw followed by a coarse sanding block or file. Trim all edges flush with the sides of the body.
2/25/2010 5
15. (OPTIONAL) - One nice option, if you have a router, is to inlay some decorative banding around the circumference of the SOUNDBOARD. We offer wood inlay banding or plastic “tortoise-shell” strips for this purpose. You’ll need about 48” of banding material to reach around the SOUNDBOARD and down each side of the NECK. All you need for tools is a router with a straight bit of any size (good and sharp).
Here is how to set up:
a) Make a guide board to clamp to the base of your router or to the top of the router table. This is simply a triangular shaped scrap of plywood with one point hanging over the router bit, as shown.
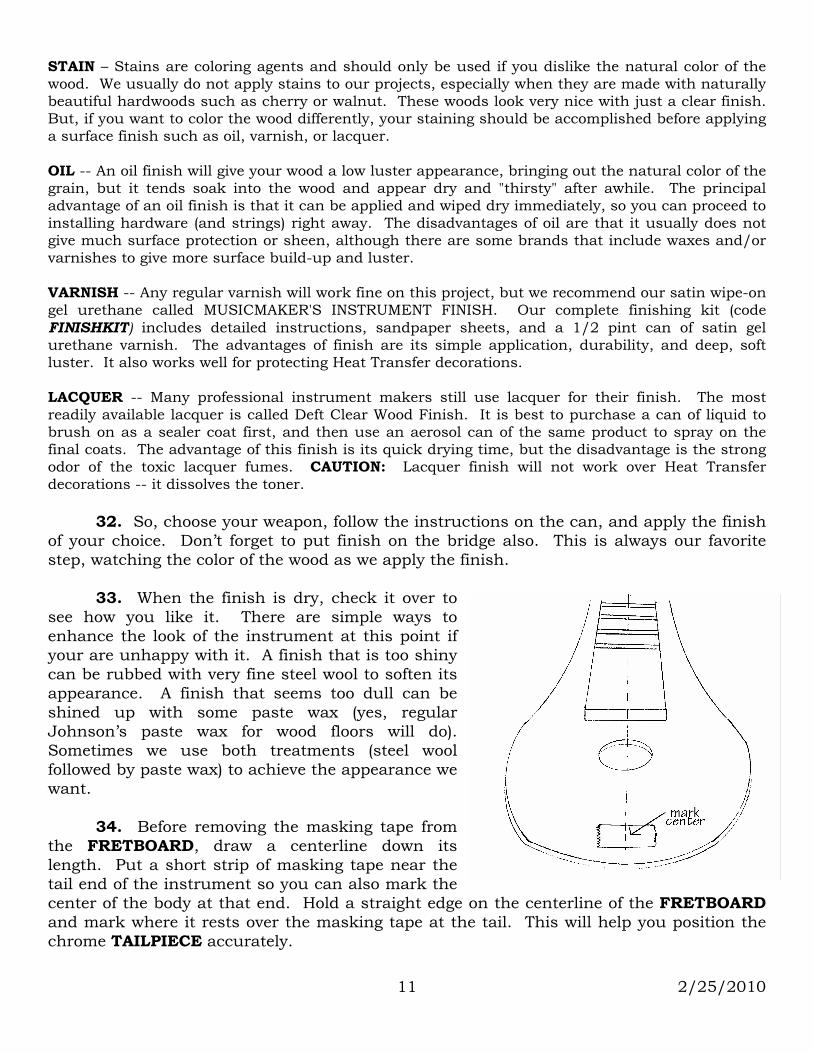
b) Adjust the depth of the cut by sliding the guide board over the top of the router bit.
c) Adjust the height of the cut by raising or lowering the router bit.
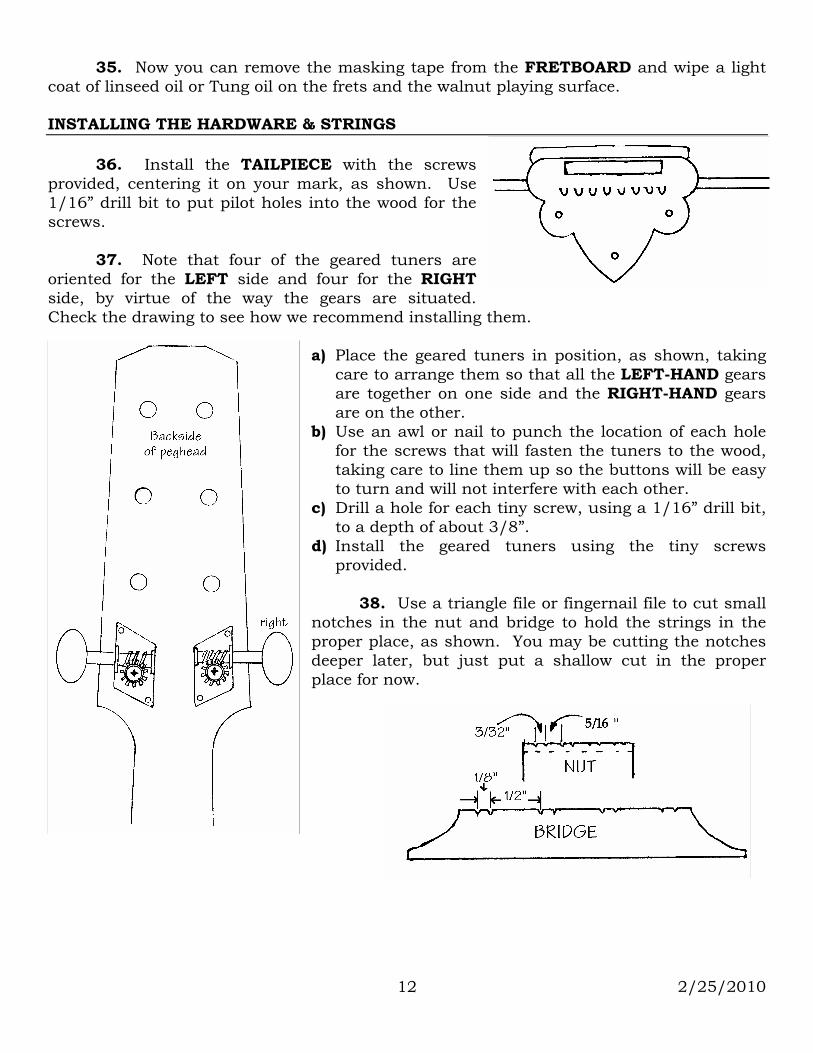
d) Make a sample cut in a scrap of wood and check your inlay banding to see how it fits.
e) When satisfied with the adjustment of the cut, rout a ledge all the way around the circumference of the soundchamber and along each side of the NECK as far as the end of the SOUNDBOARD EXTENSION.
f) You will need to use a sharp chisel or razor knife to make a clean and square end to the inlay slot on each side of the NECK.
g) Glue the inlay banding into the slot with the appropriate adhesive (carpenter’s glue for the wood inlay, or airplane cement for plastic binding). Use masking tape to hold the decorative strips in place until dry.
THE FRETBOARD
16. Test fit the fretboard onto the neck, but don’t glue it in place yet. Make sure that the neck and the fretboard are the same width up to the point where the body begins to curve out. Sand or file them to match, if necessary.
HINT: Your guide board will prevent you from cutting too deeply, but it will not ensure that you cut the full depth. We usually make several passes around the instrument to make sure we have cut the slot to its full size.
2/25/2010 6
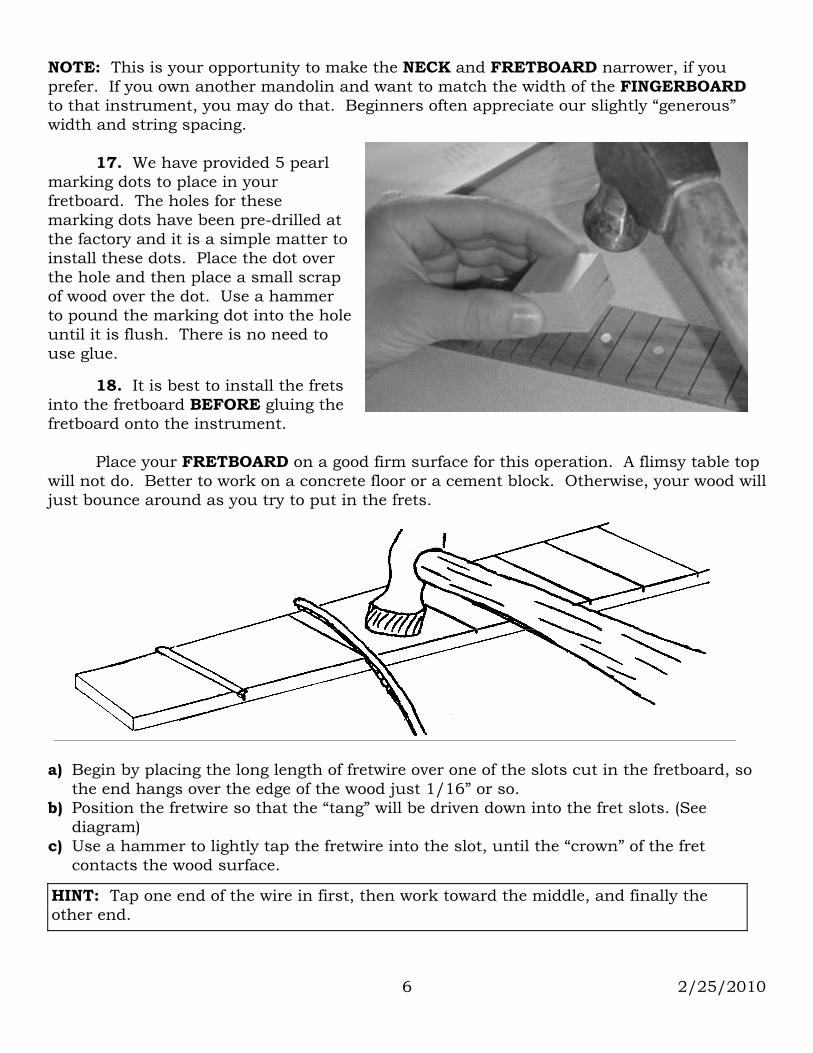
NOTE: This is your opportunity to make the NECK and FRETBOARD narrower, if you prefer. If you own another mandolin and want to match the width of the FINGERBOARD to that instrument, you may do that. Beginners often appreciate our slightly “generous” width and string spacing. 17. We have provided 5 pearl marking dots to place in your fretboard. The holes for these marking dots have been pre-drilled at the factory and it is a simple matter to install these dots. Place the dot over the hole and then place a small scrap of wood over the dot. Use a hammer to pound the marking dot into the hole until it is flush. There is no need to use glue.
18. It is best to install the frets into the fretboard BEFORE gluing the fretboard onto the instrument. Place your FRETBOARD on a good firm surface for this operation. A flimsy table top will not do. Better to work on a concrete floor or a cement block. Otherwise, your wood will just bounce around as you try to put in the frets.
a) Begin by placing the long length of fretwire over one of the slots cut in the fretboard, so
the end hangs over the edge of the wood just 1/16” or so. b) Position the fretwire so that the “tang” will be driven down into the fret slots. (See
diagram) c) Use a hammer to lightly tap the fretwire into the slot, until the “crown” of the fret
contacts the wood surface.
HINT: Tap one end of the wire in first, then work toward the middle, and finally the other end.
2/25/2010 7
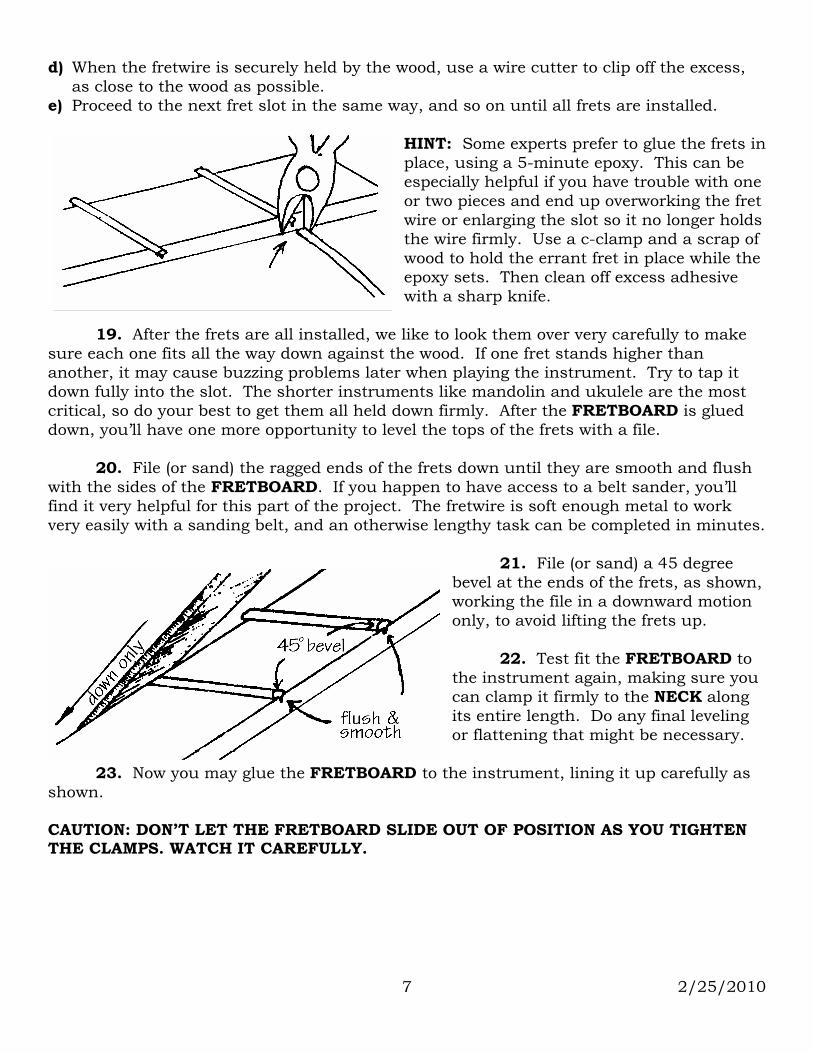
d) When the fretwire is securely held by the wood, use a wire cutter to clip off the excess, as close to the wood as possible.
e) Proceed to the next fret slot in the same way, and so on until all frets are installed.
HINT: Some experts prefer to glue the frets in place, using a 5-minute epoxy. This can be especially helpful if you have trouble with one or two pieces and end up overworking the fret wire or enlarging the slot so it no longer holds the wire firmly. Use a c-clamp and a scrap of wood to hold the errant fret in place while the epoxy sets. Then clean off excess adhesive with a sharp knife.
19. After the frets are all installed, we like to look them over very carefully to make sure each one fits all the way down against the wood. If one fret stands higher than another, it may cause buzzing problems later when playing the instrument. Try to tap it down fully into the slot. The shorter instruments like mandolin and ukulele are the most critical, so do your best to get them all held down firmly. After the FRETBOARD is glued down, you’ll have one more opportunity to level the tops of the frets with a file. 20. File (or sand) the ragged ends of the frets down until they are smooth and flush with the sides of the FRETBOARD. If you happen to have access to a belt sander, you’ll find it very helpful for this part of the project. The fretwire is soft enough metal to work very easily with a sanding belt, and an otherwise lengthy task can be completed in minutes.
21. File (or sand) a 45 degree bevel at the ends of the frets, as shown, working the file in a downward motion only, to avoid lifting the frets up. 22. Test fit the FRETBOARD to the instrument again, making sure you can clamp it firmly to the NECK along its entire length. Do any final leveling or flattening that might be necessary.
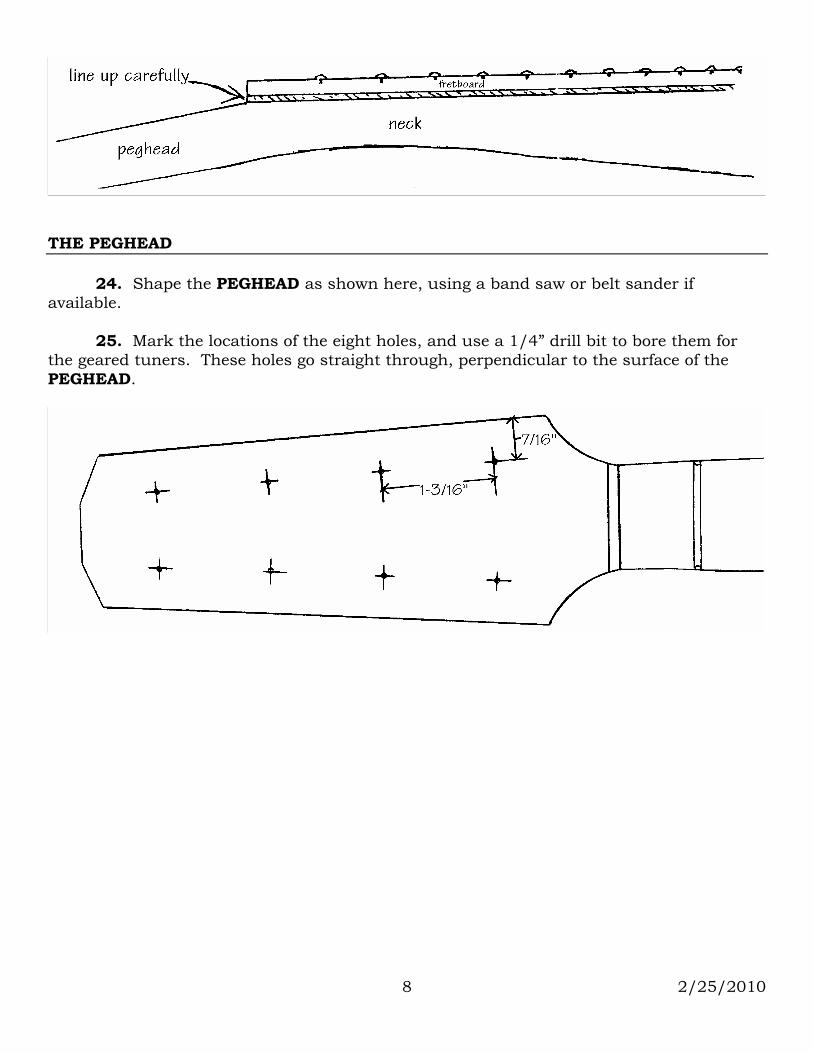
23. Now you may glue the FRETBOARD to the instrument, lining it up carefully as shown. CAUTION: DON’T LET THE FRETBOARD SLIDE OUT OF POSITION AS YOU TIGHTEN THE CLAMPS. WATCH IT CAREFULLY.
2/25/2010 8
THE PEGHEAD 24. Shape the PEGHEAD as shown here, using a band saw or belt sander if available. 25. Mark the locations of the eight holes, and use a 1/4” drill bit to bore them for the geared tuners. These holes go straight through, perpendicular to the surface of the PEGHEAD.
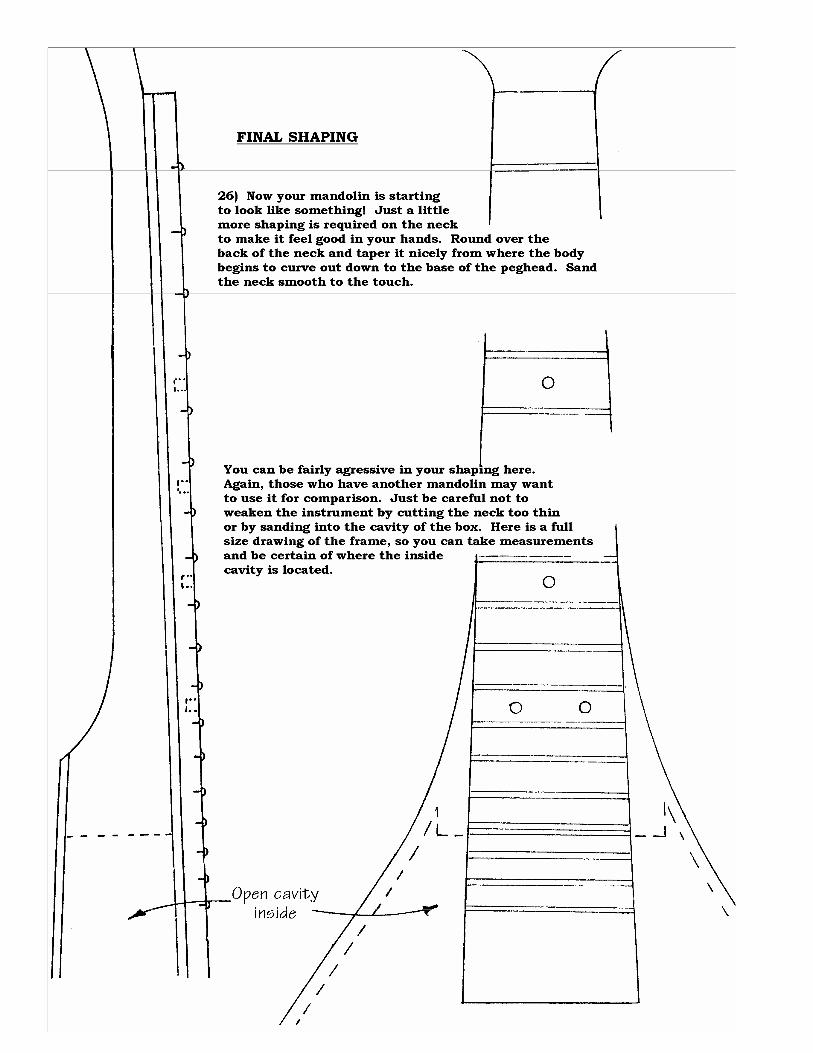

27. This is a good time to “level the frets” on the fretboard, just to make sure the mandolin will play well at each fret. If one fret stands even a small amount higher than its neighbor, you will have a buzzing problem.
The best technique is to slide a long flat metal file over the fretboard, as shown, allowing it to wear down the highest frets. This is a noisy operation, but grit your teeth and slide the file forward and back along the length of the fretboard. Look carefully to see which frets are not being affected by the file. You will need to work until each fret shows some sign of contact with the file.
If you have no flat metal file, glue some fine sandpaper to a very flat board. That will work just as well, but it may take longer.
28. Test fit the black plastic “NUT” to the end of the FRETBOARD. You’ll probably need to trim it down both in height and length. An electric sander works well for this. Round over tone corner, as shown, and fit the opposite corner to the end of the FRETBOARD. Glue the nut into place with 5 minute epoxy of Superglue, using masking tape to hold it until dry.
APPLYING THE FINISH
29. Your mandolin is now ready for final sanding and finishing. Use a medium (150 grit) sandpaper to go over the entire instrument, rounding over all sharp edges, removing any glue residue, and smoothing out all scratches and machining marks. Be sure to work the sandpaper IN THE DIRECTION OF THE GRAIN, or you will just add more scratches. Sand until the whole thing feels good in your hands.
30. In order to prevent the FRETBOARD from becoming sticky from excess finish, we recommend masking off the top surface (unless you are just planning to finish the whole instrument with oil). It is best to avoid putting varnish or lacquer on the frets.
31. Read through the following comments about finishes before you go out and purchase anything. Here are some guidelines that we find helpful:
2/25/2010 11
STAIN – Stains are coloring agents and should only be used if you dislike the natural color of the wood. We usually do not apply stains to our projects, especially when they are made with naturally beautiful hardwoods such as cherry or walnut. These woods look very nice with just a clear finish. But, if you want to color the wood differently, your staining should be accomplished before applying a surface finish such as oil, varnish, or lacquer. OIL -- An oil finish will give your wood a low luster appearance, bringing out the natural color of the grain, but it tends soak into the wood and appear dry and "thirsty" after awhile. The principal advantage of an oil finish is that it can be applied and wiped dry immediately, so you can proceed to installing hardware (and strings) right away. The disadvantages of oil are that it usually does not give much surface protection or sheen, although there are some brands that include waxes and/or varnishes to give more surface build-up and luster. VARNISH -- Any regular varnish will work fine on this project, but we recommend our satin wipe-on gel urethane called MUSICMAKER'S INSTRUMENT FINISH. Our complete finishing kit (code FINISHKIT) includes detailed instructions, sandpaper sheets, and a 1/2 pint can of satin gel urethane varnish. The advantages of finish are its simple application, durability, and deep, soft luster. It also works well for protecting Heat Transfer decorations. LACQUER -- Many professional instrument makers still use lacquer for their finish. The most readily available lacquer is called Deft Clear Wood Finish. It is best to purchase a can of liquid to brush on as a sealer coat first, and then use an aerosol can of the same product to spray on the final coats. The advantage of this finish is its quick drying time, but the disadvantage is the strong odor of the toxic lacquer fumes. CAUTION: Lacquer finish will not work over Heat Transfer decorations -- it dissolves the toner. 32. So, choose your weapon, follow the instructions on the can, and apply the finish of your choice. Don’t forget to put finish on the bridge also. This is always our favorite step, watching the color of the wood as we apply the finish. 33. When the finish is dry, check it over to see how you like it. There are simple ways to enhance the look of the instrument at this point if your are unhappy with it. A finish that is too shiny can be rubbed with very fine steel wool to soften its appearance. A finish that seems too dull can be shined up with some paste wax (yes, regular Johnson’s paste wax for wood floors will do). Sometimes we use both treatments (steel wool followed by paste wax) to achieve the appearance we want. 34. Before removing the masking tape from the FRETBOARD, draw a centerline down its length. Put a short strip of masking tape near the tail end of the instrument so you can also mark the center of the body at that end. Hold a straight edge on the centerline of the FRETBOARD and mark where it rests over the masking tape at the tail. This will help you position the chrome TAILPIECE accurately.
2/25/2010 12
35. Now you can remove the masking tape from the FRETBOARD and wipe a light coat of linseed oil or Tung oil on the frets and the walnut playing surface. INSTALLING THE HARDWARE & STRINGS 36. Install the TAILPIECE with the screws provided, centering it on your mark, as shown. Use 1/16” drill bit to put pilot holes into the wood for the screws. 37. Note that four of the geared tuners are oriented for the LEFT side and four for the RIGHT side, by virtue of the way the gears are situated. Check the drawing to see how we recommend installing them.
a) Place the geared tuners in position, as shown, taking
care to arrange them so that all the LEFT-HAND gears are together on one side and the RIGHT-HAND gears are on the other.
b) Use an awl or nail to punch the location of each hole for the screws that will fasten the tuners to the wood, taking care to line them up so the buttons will be easy to turn and will not interfere with each other.
c) Drill a hole for each tiny screw, using a 1/16” drill bit, to a depth of about 3/8”.
d) Install the geared tuners using the tiny screws provided.
38. Use a triangle file or fingernail file to cut small notches in the nut and bridge to hold the strings in the proper place, as shown. You may be cutting the notches deeper later, but just put a shallow cut in the proper place for now.
2/25/2010 13
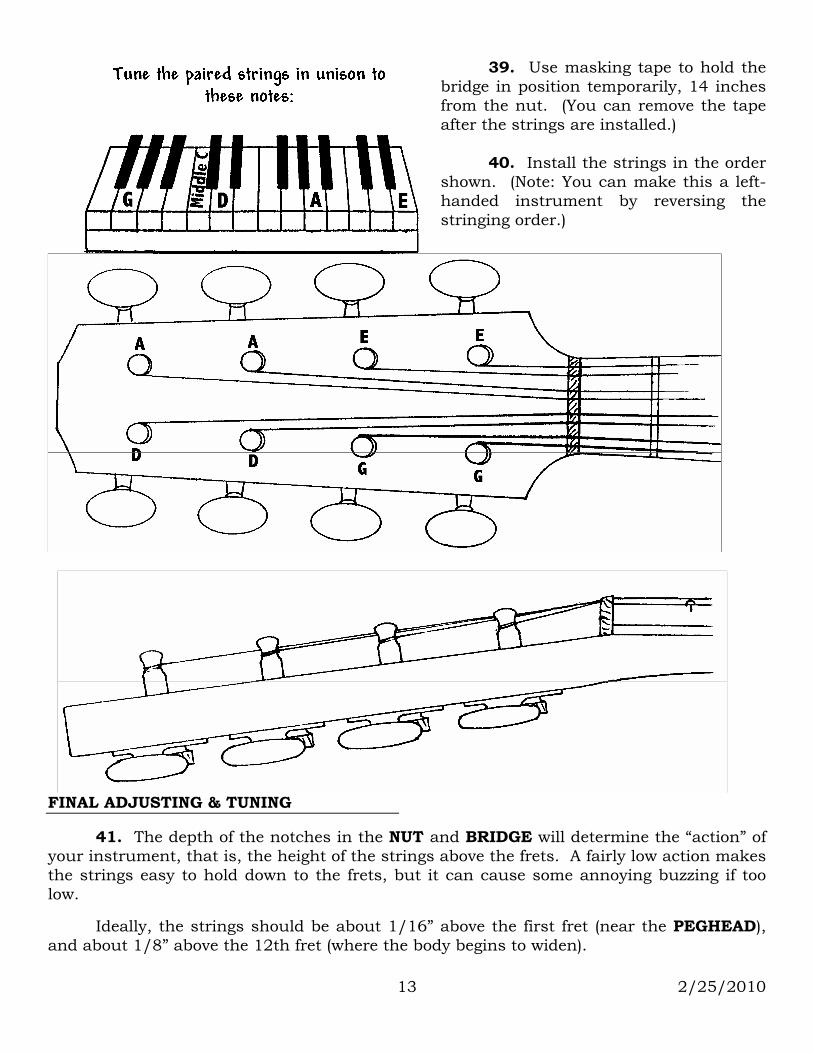
39. Use masking tape to hold the bridge in position temporarily, 14 inches from the nut. (You can remove the tape after the strings are installed.) 40. Install the strings in the order shown. (Note: You can make this a left-handed instrument by reversing the stringing order.)
FINAL ADJUSTING & TUNING
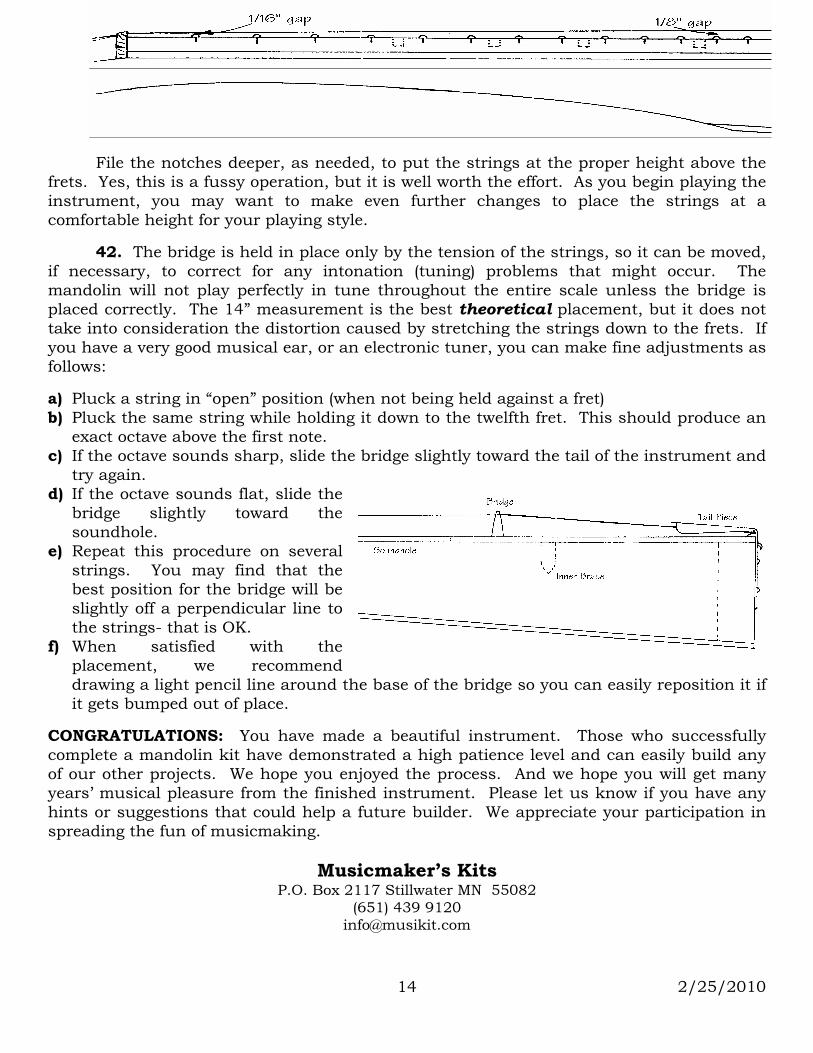
41. The depth of the notches in the NUT and BRIDGE will determine the “action” of your instrument, that is, the height of the strings above the frets. A fairly low action makes the strings easy to hold down to the frets, but it can cause some annoying buzzing if too low.
Ideally, the strings should be about 1/16” above the first fret (near the PEGHEAD), and about 1/8” above the 12th fret (where the body begins to widen).
2/25/2010 14
File the notches deeper, as needed, to put the strings at the proper height above the frets. Yes, this is a fussy operation, but it is well worth the effort. As you begin playing the instrument, you may want to make even further changes to place the strings at a comfortable height for your playing style.
42. The bridge is held in place only by the tension of the strings, so it can be moved, if necessary, to correct for any intonation (tuning) problems that might occur. The mandolin will not play perfectly in tune throughout the entire scale unless the bridge is placed correctly. The 14” measurement is the best theoretical placement, but it does not take into consideration the distortion caused by stretching the strings down to the frets. If you have a very good musical ear, or an electronic tuner, you can make fine adjustments as follows:
a) Pluck a string in “open” position (when not being held against a fret) b) Pluck the same string while holding it down to the twelfth fret. This should produce an
exact octave above the first note. c) If the octave sounds sharp, slide the bridge slightly toward the tail of the instrument and
try again. d) If the octave sounds flat, slide the
bridge slightly toward the soundhole.
e) Repeat this procedure on several strings. You may find that the best position for the bridge will be slightly off a perpendicular line to the strings- that is OK.
f) When satisfied with the placement, we recommend drawing a light pencil line around the base of the bridge so you can easily reposition it if it gets bumped out of place.
CONGRATULATIONS: You have made a beautiful instrument. Those who successfully complete a mandolin kit have demonstrated a high patience level and can easily build any of our other projects. We hope you enjoyed the process. And we hope you will get many years’ musical pleasure from the finished instrument. Please let us know if you have any hints or suggestions that could help a future builder. We appreciate your participation in spreading the fun of musicmaking.
Musicmaker’s Kits P.O. Box 2117 Stillwater MN 55082
(651) 439 9120 [email protected]


![El condor pasa [Peruvian traditional] - free · PDF filemandolin and the bass. ... palm muting Violin Flute 1 Flute 2 Clarinet in B ... El condor pasa Peruvian traditional Score arr.:](https://static.fdocuments.in/doc/165x107/5a8743b27f8b9a14748d6089/el-condor-pasa-peruvian-traditional-free-and-the-bass-palm-muting-violin.jpg)


![Ouverture [big band] - Free- · PDF filemandolin and the bass. ... Title: Overture [big band] Composer: Bergeron, Guy Arranger: ... Ouverture [big band] Author: Bergeron, Guy](https://static.fdocuments.in/doc/165x107/5a7e4ccc7f8b9a0a668e9b9a/ouverture-big-band-free-and-the-bass-title-overture-big-band-composer.jpg)


