MANAJEMEN DATA SPASIAL - Dinas Kehutanan Pemerintah …dishut.pasamankab.go.id/files/DATA...
18
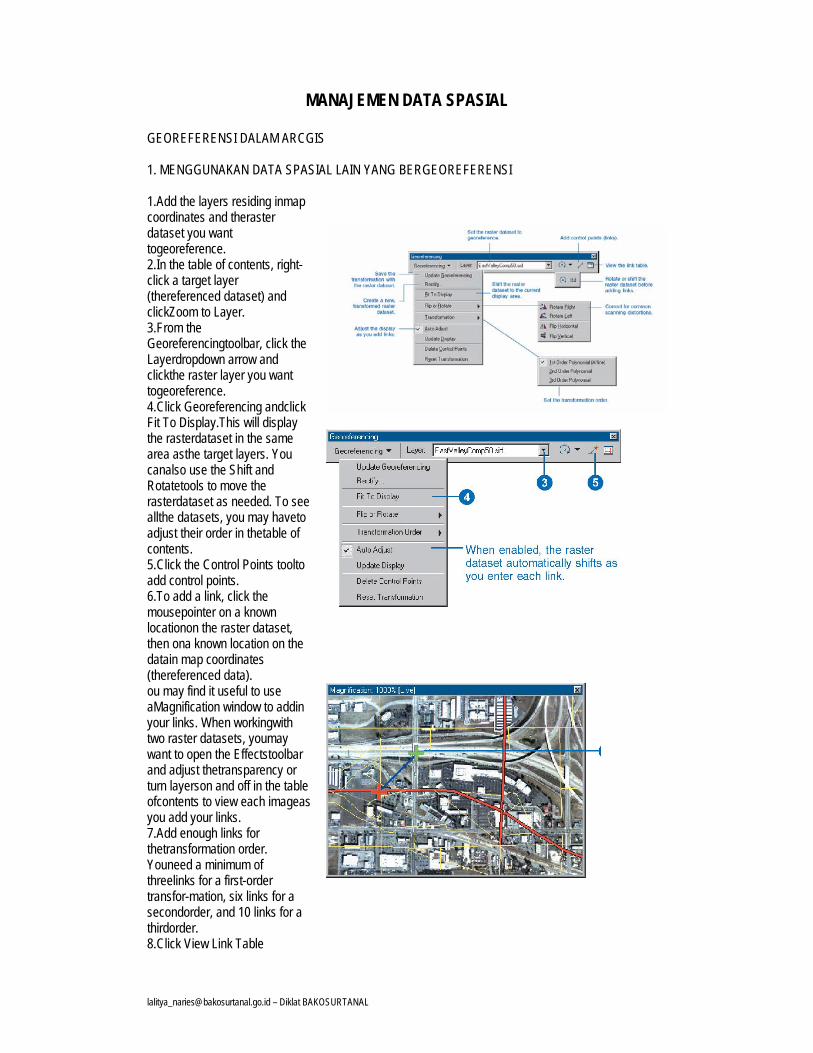
[email protected] – Diklat BAKOSURTANAL MANAJEMEN DATA SPASIAL GEOREFERENSI DALAM ARCGIS 1. MENGGUNAKAN DATA SPASIAL LAIN YANG BERGEOREFERENSI 1.Add the layers residing inmap coordinates and theraster dataset you want togeoreference. 2.In the table of contents, right- click a target layer (thereferenced dataset) and clickZoom to Layer. 3.From the Georeferencingtoolbar, click the Layerdropdown arrow and clickthe raster layer you want togeoreference. 4.Click Georeferencing andclick Fit To Display.This will display the rasterdataset in the same area asthe target layers. You canalso use the Shift and Rotatetools to move the rasterdataset as needed. To see allthe datasets, you may haveto adjust their order in thetable of contents. 5.Click the Control Points toolto add control points. 6.To add a link, click the mousepointer on a known locationon the raster dataset, then ona known location on the datain map coordinates (thereferenced data). ou may find it useful to use aMagnification window to addin your links. When workingwith two raster datasets, youmay want to open the Effectstoolbar and adjust thetransparency or turn layerson and off in the table ofcontents to view each imageas you add your links. 7.Add enough links for thetransformation order. Youneed a minimum of threelinks for a first-order transfor-mation, six links for a secondorder, and 10 links for a thirdorder. 8.Click View Link Table
Transcript of MANAJEMEN DATA SPASIAL - Dinas Kehutanan Pemerintah …dishut.pasamankab.go.id/files/DATA...
[email protected] – Diklat BAKOSURTANAL
MANAJEMEN DATA SPASIAL
GEOREFERENSI DALAM ARCGIS 1. MENGGUNAKAN DATA SPASIAL LAIN YANG BERGEOREFERENSI 1.Add the layers residing inmap coordinates and theraster dataset you want togeoreference. 2.In the table of contents, right-click a target layer (thereferenced dataset) and clickZoom to Layer. 3.From the Georeferencingtoolbar, click the Layerdropdown arrow and clickthe raster layer you want togeoreference. 4.Click Georeferencing andclick Fit To Display.This will display the rasterdataset in the same area asthe target layers. You canalso use the Shift and Rotatetools to move the rasterdataset as needed. To see allthe datasets, you may haveto adjust their order in thetable of contents. 5.Click the Control Points toolto add control points. 6.To add a link, click the mousepointer on a known locationon the raster dataset, then ona known location on the datain map coordinates (thereferenced data).
ou may find it useful to use aMagnification window to addin your links. When workingwith two raster datasets, youmay want to open the Effectstoolbar and adjust thetransparency or turn layerson and off in the table ofcontents to view each imageas you add your links. 7.Add enough links for thetransformation order. Youneed a minimum of threelinks for a first-order transfor-mation, six links for a secondorder, and 10 links for a thirdorder. 8.Click View Link Table

[email protected] – Diklat BAKOSURTANAL
toevaluate the transformation.You can examine the residualerror for each link and theRMS error. If you’re satisfiedwith the registration, you canstop entering links. 9.Click Georeferencing andclick Update Georeferencingto save the transformationinformation with the rasterdataset.This creates a new file withthe same name as the rasterdataset, but with an .aux fileextension. It also creates aworld file for .tif and .img files.
2. MENGGUNAKAN TITIK X,Y (INFORMASI GRID PADA PETA) 1.Click the View Link Tablebutton on the Georeferencingtoolbar.
2.Click the Control Points tool. 3.Click the mouse on a knownlocation in the unreferencedimage to add the firstcoordinate in the link. 4.Right-click the image andchoose Input X and Y. 5.Enter the reference coordi-nates in the Enter

[email protected] – Diklat BAKOSURTANAL
Coordi-nates dialog box. 6.Click OK
CAPTURING DATA MEMULAI DIGITASI 1. Click Editor toolbar 2. Click the Editor menu and click Start
Editing.
SETING SNAPPING 1.Click Editor and click Snapping. 2.Check the boxes for Edge and End for target new layer.This specifies that the new line you draw in new layer dataset will snap to existing lines (edges)and endpoints of existing lines.
MEMBUAT POINT,GARIS POLIGON DENGAN DIGITASI 1.Click the Target dropdown arrow and click NEW_LAYER as the feature

[email protected] – Diklat BAKOSURTANAL
class you want to create new features in. 2. Select create New Task 3.Click Tool pallete and select the Sketch tool / trace tool on the Editor toolbar. 4.The pointer changes to a crosshair with a circle. Click to start digitizing. Right-click to display the context menu. 5.Move the mouse pointer in the direction you want thenew target to go. Right-click and click Length. 6.Type “900” (map units) and press Enter. ArcMap places a vertex at the correct location.
MENAMBAH ATRIBUT PADA NEW LAYER You can also add the INFORMATION of the new LAYER.
1.Click the Attributes button on the Editor toolbar.
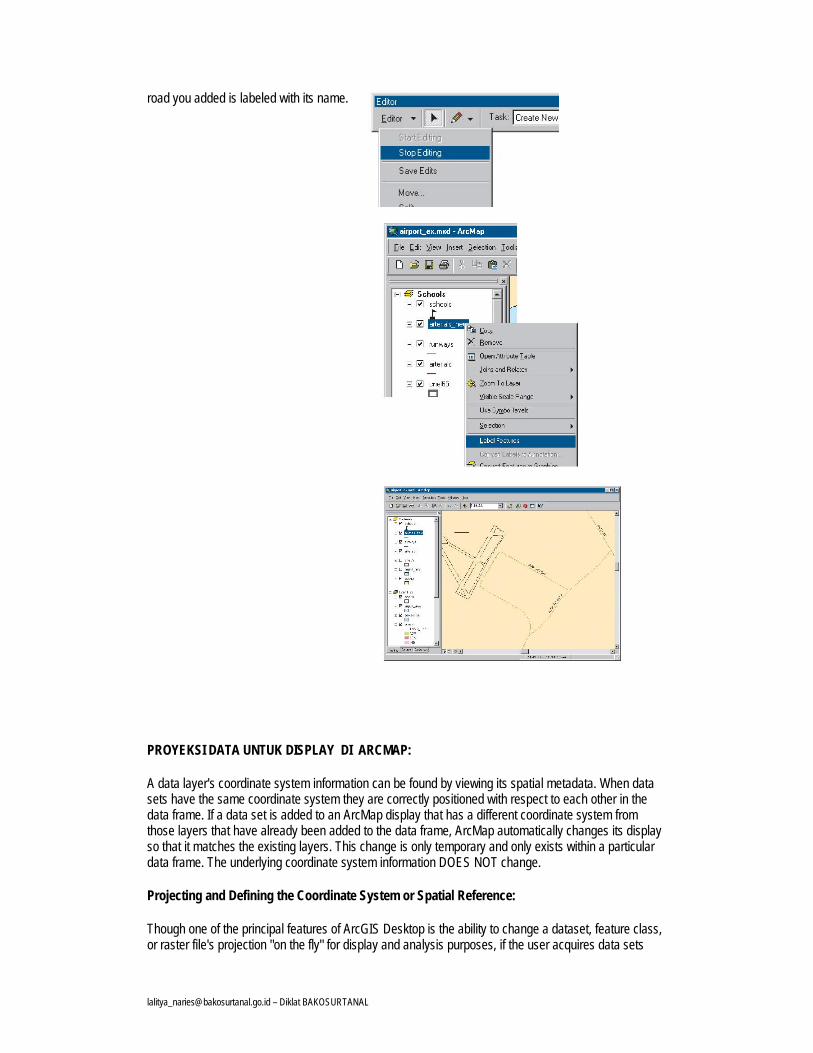
2.Click next to NAME on the list of attributes, type“AIRPORT DR”, and press Enter 3.Close the Attributes window 4.Click the Editor menu and click Stop Editing. Click Yeswhen prompted to save your edits. 5.Close the Editor toolbar. 6.Right-click arterials_new in the table of contents andclick Label Features. The
[email protected] – Diklat BAKOSURTANAL
road you added is labeled with its name.
PROYEKSI DATA UNTUK DISPLAY DI ARCMAP:
A data layer's coordinate system information can be found by viewing its spatial metadata. When data sets have the same coordinate system they are correctly positioned with respect to each other in the data frame. If a data set is added to an ArcMap display that has a different coordinate system from those layers that have already been added to the data frame, ArcMap automatically changes its display so that it matches the existing layers. This change is only temporary and only exists within a particular data frame. The underlying coordinate system information DOES NOT change.
Projecting and Defining the Coordinate System or Spatial Reference:
Though one of the principal features of ArcGIS Desktop is the ability to change a dataset, feature class, or raster file's projection "on the fly" for display and analysis purposes, if the user acquires data sets

[email protected] – Diklat BAKOSURTANAL
with different coordinate systems or projections, the user may wish to change them so that they all match. A user can project data to a new data set using ArcToolbox™ Project for features and Project Raster for raster files, or the user can define or change the projection and coordinate system of a data set using Define Projection.
To project or define a projection or project data, the user must click the plus sign next to Data Management Tools, followed by a click on the plus sign next to Projections and Transformations.
Project and Project Raster reproject input data and saves it as a new data set. Project allows the user to define or project feature classes and geodatabases. Project Raster allows the user to define or project coverages, grids, or TINs. The Define Projection tool applys coordinate system information to data sets and feature classes.
For example, if the user wishes to project a feature class the Project tool (shapefiles, geodatabases) should be opened by double-clicking on the option in ArcToolbox. Once the Project dialog box opens, the user must select the data set to define. This can be done by clicking the folder icon and navigating to the shapefile or geodatabase of interest.

[email protected] – Diklat BAKOSURTANAL
Once the data set name has been added to the dialog, the Output Coordinate System must be selected. To select a coordinate system click on the Spatial Reference Properties button highlighted by the red circle in the graphic above. The Spatial Reference Properties dialog box appears.
Within this dialog box, the user can select a predefined coordinate system, import a coordinate system from another data set, or create a new coordinate system. Once a coordinate system has been
[email protected] – Diklat BAKOSURTANAL
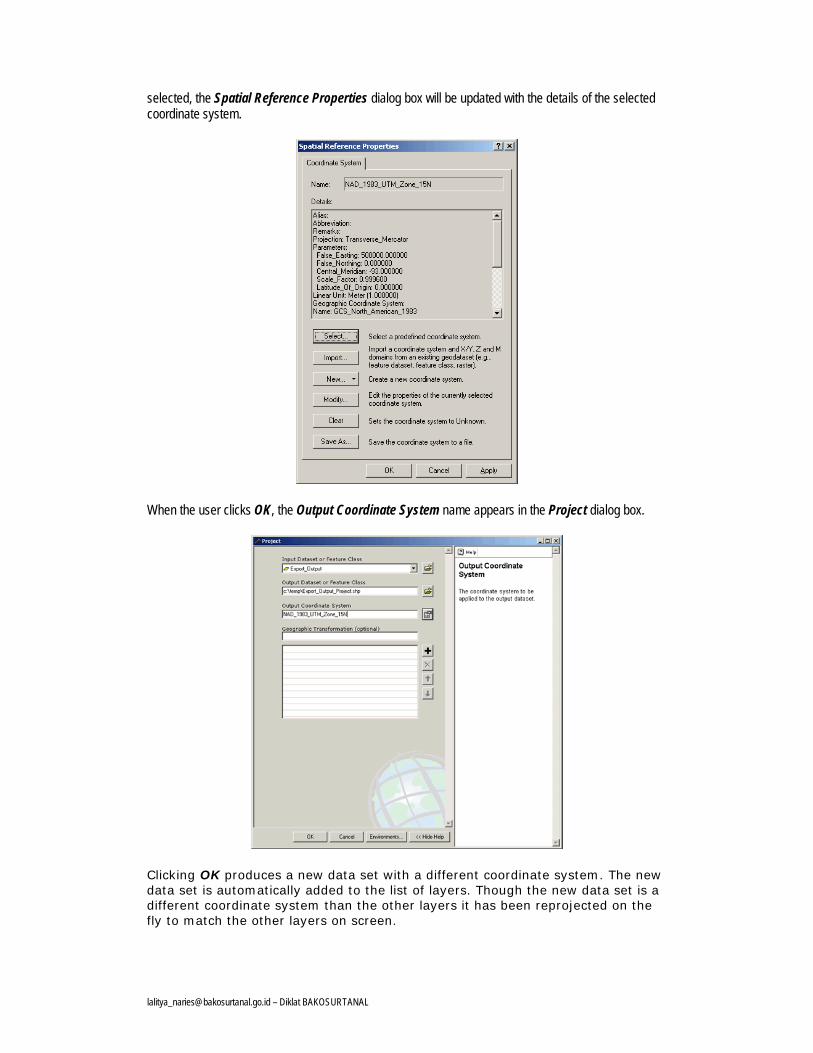
selected, the Spatial Reference Properties dialog box will be updated with the details of the selected coordinate system.
When the user clicks OK, the Output Coordinate System name appears in the Project dialog box.
Clicking OK produces a new data set with a different coordinate system. The new data set is automatically added to the list of layers. Though the new data set is a different coordinate system than the other layers it has been reprojected on the fly to match the other layers on screen.

[email protected] – Diklat BAKOSURTANAL
UPLOAD DATA MEMBUAT GEODATABASE BARU 1.Click the ArcCatalog buttonin the ArcMap Standardtoolbar to open ArcCatalog. 2.Click a folder or create a newfolder to create the geodata-base in. 3.Right-click the folder, point toNew, then click PersonalGeodatabase. 4.The folder name is already highlighted so you canchange the name to some-thing more appropriate.
MEMBUAT FEATURE CLASS 1.Right-click the geodatabasewhere you want to create thefeature class. Point to New,then click Feature Class. 2.Enter a name for the feature. 3.Choose the type of featureclass to create. 4.Click Next. 5.Specify the database storageconfiguration. ChoosingDefault is often sufficient. 6.Click Next. 7.Click Shape under FieldName. 8.Under Field Properties,choose the Geometry Type byclicking in the space beside itand clicking the option youwant from the dropdownmenu.If you do not choose aGeometry Type, the default isPolygon. 9.Click Finish.To add this layer to ArcMap,you can click and drag it aspreviously described in‘Adding a layer fromArcCatalog’.

[email protected] – Diklat BAKOSURTANAL
MENAMBAH TABLE DARI DATA KOORDINAT X,Y 1.Click Tools on the Main menuand click Add XY Data. 2.Click the table dropdownarrow and click a table thatcontains x,y coordinate data.If the table is not on the map,click the Browse button toaccess it from disk. 3.Click the X Field dropdownarrow and click the fieldcontaining x coordinatevalues. 4.Click the Y Field dropdownarrow and click the fieldcontaining y coordinatevalues. 5.Click Edit to define thecoordinate system and unitsrepresented in the x and yfields.The x,y coordinates will beautomatically transformed tomatch the coordinate systemof the data frame. 6.Click OK.
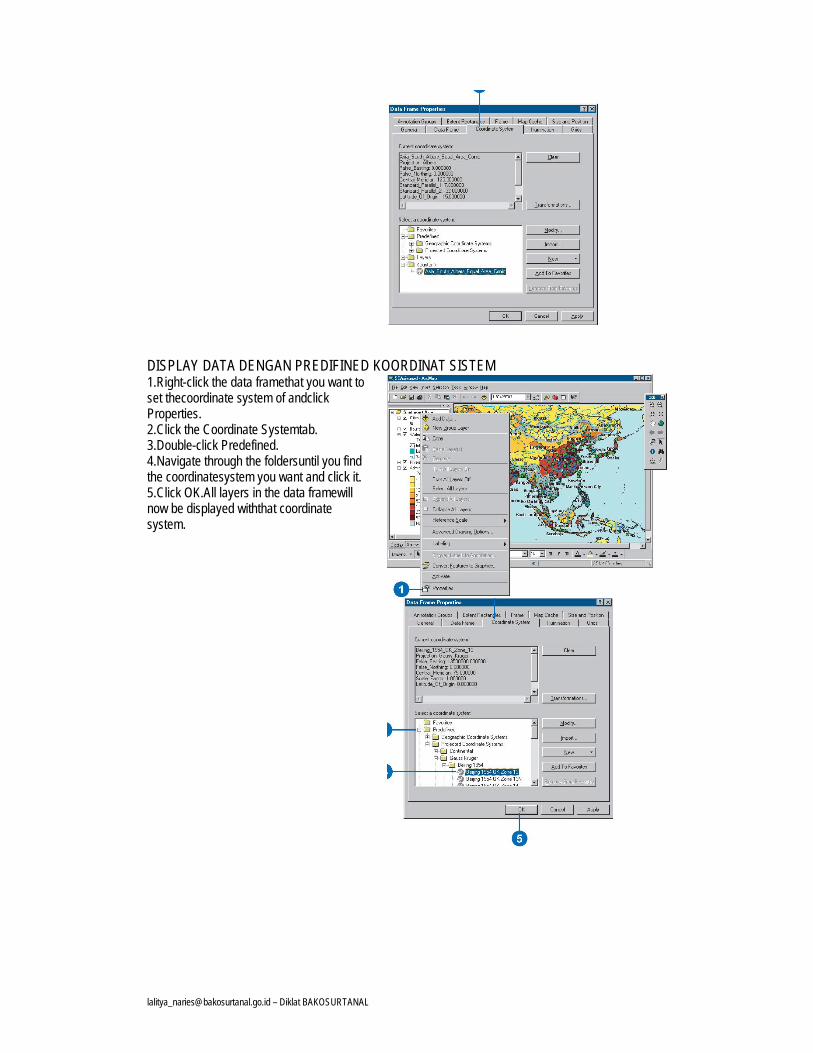
MELIHAT SISTEM COORDINAT DATA YANG SEDANG DITAMPILKAN 1.Right-click the data framethat you want to determinethe coordinate system of andclick Properties. 2.Click the Coordinate Systemtab.The details of the currentdata frame coordinate systemdisplay in the dialog box.
[email protected] – Diklat BAKOSURTANAL
DISPLAY DATA DENGAN PREDIFINED KOORDINAT SISTEM 1.Right-click the data framethat you want to set thecoordinate system of andclick Properties. 2.Click the Coordinate Systemtab. 3.Double-click Predefined. 4.Navigate through the foldersuntil you find the coordinatesystem you want and click it. 5.Click OK.All layers in the data framewill now be displayed withthat coordinate system.

[email protected] – Diklat BAKOSURTANAL
SETING UNIT UNTUK DISPLAY KOORDINAT DAN PANJANG 1.Right-click the data frameand click Properties 2.Click the General tab. 3.Click the Map dropdownarrow and click the appropri-ate units.The map units option is onlyavailable when your datahas no coordinate systeminformation associated withit. 4.Click the Display dropdownarrow and click the appropri-ate units. 5.Click OK.
BEKERJA DENGAN LAYER MENAMBAH LAYER DI ARCMAP 1.Click the File menu and clickAdd Data, or click the AddData button on the Standardtoolbar. 2.Click the Look in dropdownarrow and navigate to thefolder containing your layerfile. 3.Click the layer file. 4.Click Add.ArcMap adds the layer toyour table of contents usingthe special properties it wassaved with.
[email protected] – Diklat BAKOSURTANAL
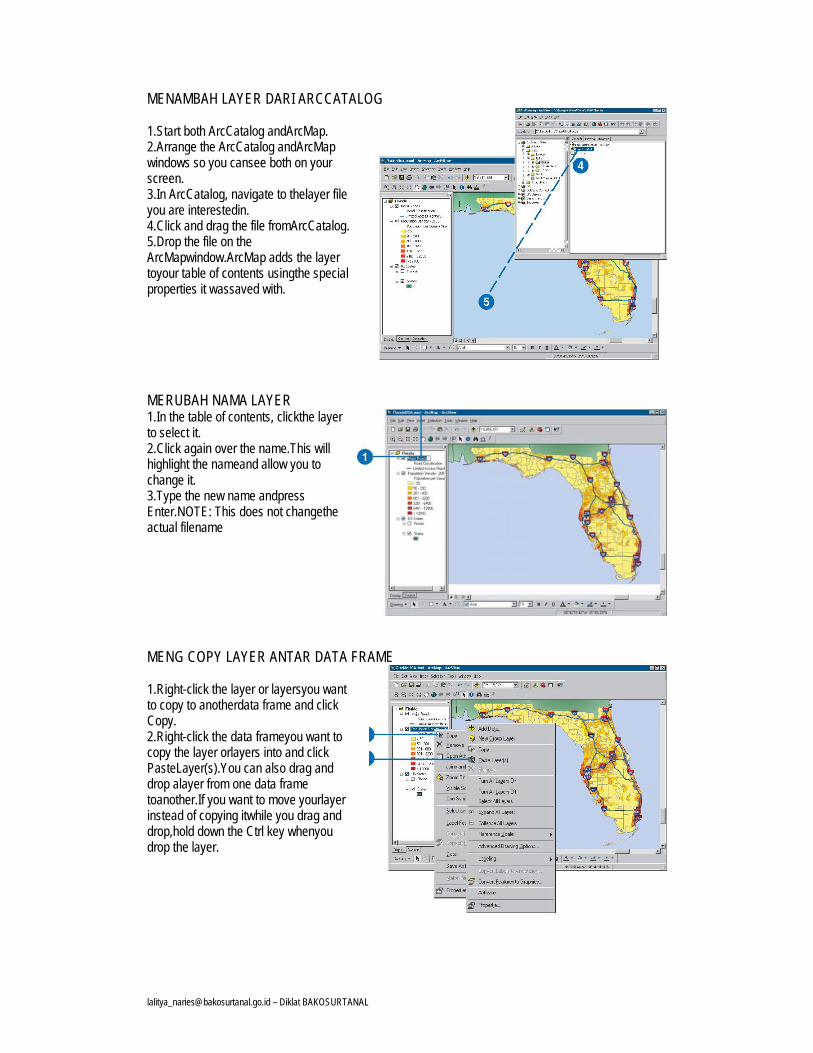
MENAMBAH LAYER DARI ARCCATALOG 1.Start both ArcCatalog andArcMap. 2.Arrange the ArcCatalog andArcMap windows so you cansee both on your screen. 3.In ArcCatalog, navigate to thelayer file you are interestedin. 4.Click and drag the file fromArcCatalog. 5.Drop the file on the ArcMapwindow.ArcMap adds the layer toyour table of contents usingthe special properties it wassaved with.
MERUBAH NAMA LAYER 1.In the table of contents, clickthe layer to select it. 2.Click again over the name.This will highlight the nameand allow you to change it. 3.Type the new name andpress Enter.NOTE: This does not changethe actual filename
MENG COPY LAYER ANTAR DATA FRAME 1.Right-click the layer or layersyou want to copy to anotherdata frame and click Copy. 2.Right-click the data frameyou want to copy the layer orlayers into and click PasteLayer(s).You can also drag and drop alayer from one data frame toanother.If you want to move yourlayer instead of copying itwhile you drag and drop,hold down the Ctrl key whenyou drop the layer.

[email protected] – Diklat BAKOSURTANAL
MENAMPILKAN PROPERTIES LAYER 1.In the table of contents, right-click the layer and clickProperties. 2.Click the tab containing theproperties you want to adjust. 3.When finished, click OK.
SETING SKALA VISIBEL MINIMUN PADA LAYER 1.Right-click the layer in thetable of contents and clickProperties. 2.Click the General tab. 3.Click Don’t show layer whenzoomed. 4.Type a minimum scale for thelayer.If you zoom out beyond thisscale, the layer will not bevisible. 5.Click OK.

[email protected] – Diklat BAKOSURTANAL
SETING SKALA VISIBEL MAKSIMUN PADA LAYER 1.Right-click the layer in thetable of contents and clickProperties. 2.Click the General tab. 3.Click Don’t show layer whenzoomed. 4.Type a maximum scale forthe layer.If you zoom in beyond thisscale, the layer will not bevisible. 5.Click OK.
SETTING TEXT FONT LAYERS 1.Click the Tools menu on theStandard toolbar and clickOptions. 2.Click the Table Of Contentstab. 3.Uncheck Use WindowsDesktop Settings. 4.Click the Font dropdownarrow and click the font youwant to use. 5.Click the Size dropdownarrow and click the font size. 6.Click OK.
MENAMPILKAN LAYER DENGAN SINGLE SIMBOL 1.In the table of contents, right-click the layer you want todraw with a single symboland click Properties 2.Click the Symbology tab. 3.Click Features.Because Single symbol is theonly option, ArcMap auto-matically selects it. 4.Click the Symbol button tochange the symbol.

[email protected] – Diklat BAKOSURTANAL
5.In the Symbol Selector dialogbox, click a new symbol orchange specific properties ofthe symbol. 6.Click OK on the SymbolSelector dialog box. 7.Type a label for the feature.The label appears next to thesymbol in the table ofcontents. 8.Click OK.
MENAMPILKAN LAYER BERDASAR UNIQUE VALUES 1.In the table of contents, right-click the layer you want todraw showing unique valuesand click Properties. 2.Click the Symbology tab. 3.Click Categories.ArcMap automatically selectsthe Unique values option. 4.Click the Value Field drop-down arrow and click thefield that contains the valuesyou want to map 5.Click the Color Schemedropdown arrow and click acolor scheme. 6.Click Add All Values.This adds all unique valuesto the list. Alternatively, clickthe Add Values button tochoose which unique valuesto display. 7.If you want to edit the defaultlabel so more descriptivelabels appear in your legendand the table of contents,click a label in the Labelcolumn and type the labelyou want. 8.Click OK.

[email protected] – Diklat BAKOSURTANAL
MENGGABUNGKAN DUA ATAU LEBIH KATEGORI 1.In the table of contents, right-click the layer drawn withunique values you want tocombine categories for andclick Properties. 2.Click the Symbology tab.If you don’t already seecategories in the scrolling list,follow the steps for ‘Drawinga layer showing uniquevalues’ earlier in this chapter. 3.Click the first of the valuesyou want to combine. Holddown the Shift or Ctrl key andclick the additional valuesthat you want to combine. 4.Right-click over the valuesand click Group Values. Theselected values will now becombined into one category. 5.If you want more descriptivelabels to appear in yourlegend and the table ofcontents, click a label in theLabel column and type thelabel you want. 6.Click OK.
UNGROUPING GABUNGAN KATEGORI 1.Right-click a combinedcategory in the scrolling list. 2.Click Ungroup Values.The symbols for each of theungrouped values are thesame as when they weregrouped.
EXPORT DATA
1. Pada TOC klik kanan pada layer yang akan di ekxport
2. Pilih DATA, arahkan ke EXPORT DATA 3. klik pada icon folder, arahkan alamat,
ketik nama dan pilih jenis data baru. 4. klik save 5. klik OK

[email protected] – Diklat BAKOSURTANAL
IMPORT DATA
1. Buka arccatalog 2. klik kanan pada data
(shp,cad) yang akan diimport ke geodatabse
3. pilih EXPORT 4. pilih geodatabase 5. Ketik alamat dan nama data
yang baru 6. klik OK